

Page 1

user guide
Domino S1310
User Guide 1
Page 2

Domino S1310 User Guide
This manual is based on the production version of the Kyocera
S1310 phone. Software changes may have occurred after this
printing. Kyocera reserves the right to make changes in
technical and product specifications without prior notice. The
products and equipment described in this documentation are
manufactured under license from QUALCOMM Incorporated
under one or more of the following U.S. patents:
4,901,307 5,109,390 5,267,262 5,416,797 5,506,865
5,544,196 5,657,420 5,101,501 5,267,261 5,414,796
5,504,773 5,535,239 5,600,754 5,778,338 5,228,054
5,337,338 5,710,784 5,056,109 5,568,483 5,659,569
5,490,165 5,511,073
The Kyocera Communications Inc. (“KCI”) products described in
this manual may include copyrighted KCI and third party
software stored in semiconductor memories or other media.
Laws in the United States and other countries preserve for KCI
and third party software providers certain exclusive rights for
copyrighted software, such as the exclusive rights to distribute or
reproduce the copyrighted software. Accordingly, any
copyrighted software contained in the KCI products may not be
modified, reverse engineered, distributed or reproduced in any
manner not permitted by law.
Furthermore, the purchase of the KCI products shall not be
deemed to grant—either directly or by implication, estoppel, or
otherwise—any license under the copyrights, patents, or patent
applications of KCI or any third party software provider, except
for the normal, non-exclusive royalty-free license to use that
arises by operation of law in the sale of a product.
Kyocera is a registered trademark of Kyocera Corporation. Brick
Attack and Race 21 are trademarks of Kyocera Wireless Corp.
QUALCOMM is a registered trademark of QUALCOMM
Incorporated.
Openwave is a trademark of Openwave Systems Incorporated.
eZiText is a registered trademark of Zi Corporation. TransFlash
is a trademark of SanDisk Corporation.
All other trademarks are the property of their respective owners.
2
Copyright © 2010 Kyocera Wireless Corp. All rights reserved.
Ringer Tones Copyright © 2000-2 010 Ky oce ra Wireless Corp.
82-L2707-1EN, Rev. 001
IC Notice
Operation is subject to the following two conditions: (1) this
device may not cause interference, and (2) this device must
accept any interference, including interference that may cause
undesired operation of the device. The term “IC” before the radio
certification number only signifies that Industry Canada technical
specifications were met.
• This Class B digital apparatus complies with Canadian
ICES-003.
• Cet appareil numérique de la classe B est confome à la
norme NMB-003 du Canada.
FCC Notice
This device complies with part 15 of the FCC rules. Operation is
subject to the following two conditions: (1) This device may not
cause harmful interference, and (2) This device must accept any
interference received, including interference that may cause
undesired operation. To maintain compliance with FCC RF
exposure guidelines, if you wear a phone on your body, use the
Kyocera Communications Inc. (KCI) supplied and approved
accessory designed for this product. Using accessories that are
not supplied or approved by KCI may violate FCC RF exposure
guidelines.
Other accessories used with this device for body-worn
operations must not contain any metallic components and must
provide at least 15 mm separation distance including the
antenna and the user’s body.
THIS MODEL PHONE MEETS THE GOVERNMENT’S
REQUIREMENTS FOR EXPOSURE TO RADIO WAVES.
Your wireless phone is a radio transmitter and receiver. It is
designed and manufactured to not exceed the emission limits for
exposure to radio frequency (RF) energy set by the Federal
Communications Commission of the U.S. Government. These
limits are part of comprehensive guidelines and establish
Page 3

permitted levels of RF energy for the general population. The
guidelines are based on standards that were developed by
independent scientific organizations through periodic and
thorough evaluation of scientific studies. The standards include
a substantial safety margin designed to assure the safety of all
persons, regardless of age and health.
The exposure standard for wireless mobile phones employs a
unit of measurement known as the Specific Absorption Rate, or
SAR. The SAR limit set by the FCC is 1.6 W/kg.*
Tests for SAR are conducted using standard operating positions
specified by the FCC with the phone transmitting at its highest
certified power level in all tested frequency bands.
Although the SAR is determined at the highest certified power
level, the actual SAR level of the phone while operating can be
well below the maximum value. This is because the phone is
designed to operate at multiple power levels so as to use only
the power required to reach the network. In general, the closer
you are to a wireless base station antenna, the lower the power
output.
Before a phone model is available for sale to the public, it must
be tested and certified by the FCC that it does not exceed the
limit established by the government-adopted requirement for
safe exposure. The tests are performed in positions and
locations (e.g., at the ear and worn on the body) as required by
the FCC for each model.
Body-worn measurements differ among phone models,
depending upon availability of accessories and FCC
requirements. While there may be differences between the SAR
levels of various phones and at various positions, they all meet
the government requirement for safe exposure.
The FCC has granted an Equipment Authorization for this model
phone with all reported SAR levels evaluated as in compliance
with the FCC RF emission guidelines. SAR information on this
model phone is on file with the FCC and can be found under the
Display Grant section
the FCC ID: OVF-K33BIC06.
www.fcc.gov/oet/ea
after searching on
Additional information on SAR can be found on the Cellular
Telecomm unications and Internet Association (CTIA) web-site at
www.ctia.org
* In the United States and Canada, the SAR limit for mobile
phones used by the public is 1.6 watts/kg (W/kg) averaged over
one gram of tissue. The standard incorporates a substantial
margin of safety to give additional protection for the public and to
account for any variations in measurements.
.
Bluetooth® Certification
For information about S1310 Bluetooth Certification, visit the
Bluetooth Qualification Program Web site at
www.bluetooth.org/tpg/listings.cfm
.
Caution
The user is cautioned that changes or modifications not
expressly approved by the party responsible for compliance
could void the warranty and user’s authority to operate the
equipment.
Optimize your Phone’s Performance
Use the instructions in this guide to learn how to optimize the
performance and life of your phone and battery.
Air Bags
If you have an air bag, DO NOT place installed or portable
phone equipment or other objects over the air bag or in the air
bag deployment area. If equipment is not properly installed, you
and your passengers risk serious injury.
Medical devices
Pacemakers
—Warning to pacemaker wearers: Wireless
phones, when in the ‘on’ position, have been shown to interfere
with pacemakers. The phone should be kept at least six (6)
inches away from the pacemaker to reduce risk.
User Guide 3
Page 4

The Health Industry Manufacturers Association and the wireless
technology research community recommend that you follow
these guidelines to minimize the potential for interference.
• Always keep the phone at least six inches (15 centimeters)
away from your pacemaker when the phone is turned on.
• Do not carry your phone near your heart.
• Use the ear opposite the pacemaker.
• If you have any reason to suspect that interference is taking
place, turn off your phone immediately.
Hearing aids
hearing aids. In the event of such interference, you may want to
call the customer service line to discuss alternatives.
Other medical devices
device, consult the manufacturer of the device to determine if it
is adequately shielded from external RF energy. Your physician
may be able to help you obtain this information.
In health care facilities
facilities when instructed. Hospitals and health care facilities
may be using equipment that is sensitive to external RF energy.
—Some digital wireless phones may interfere with
—If you use any other personal medical
—Turn your phone off in health care
Potentially unsafe areas
Posted facilities
posted notices require you to do so.
Aircraft
that is in the air. Turn your phone off or switch it to Airplane
Mode before boarding aircraft.
Vehicles
inadequately shielded electronic systems in motor vehicles.
Check with the manufacturer of the device to determine if it is
adequately shielded from external RF energy.
Blasting areas
progress. Observe restrictions, and follow any regulations or
rules.
—Turn your phone off in any facility when
—FCC regulations prohibit using your phone on a plane
—RF signals may affect improperly installed or
—Turn off your phone where blasting is in
Potentially explosive atmospheres
when you are in any area with a potentially explosive
atmosphere. Obey all signs and instructions. Sparks in such
areas could cause an explosion or fire, resulting in bodily injury
or death. Areas with a potentially explosive atmosphere are
often, but not always, clearly marked.
They include:
• fueling areas such as gas stations
• below deck on boats
• transfer or storage facilities for fuel or chemicals
• vehicles using liquefied petroleum gas, such as propane or
butane
• areas where the air contains chemicals or particles such as
grain, dust, or metal powders
• any other area where you would normally be advised to turn
off your vehicle engine
—Turn off your phone
Use with care
Use only in normal position (to ear). Avoid dropping, hitting,
bending, or sitting on the phone.
Avoid magnetic environments
Keep the phone away from magnets which can cause improper
functioning of the phone.
Keep your phone dry
Keep the phone dry. Damage can result if the phone gets wet.
Water damage is not covered under warranty.
Resetting the phone
If the screen seems frozen and the keypad does not respond to
keypresses, reset the phone by completing the following steps:
1. Remove the battery cover.
2. Remove and replace the battery.
If the problem persists, return the phone to the dealer for
service.
4
Page 5

Accessories
Use only Kyocera-approved accessories with Kyocera phones.
Use of any unauthorized accessories may be dangerous and will
void the phone warranty if said accessories cause damage or a
defect to the phone.
Radio Frequency (RF) energy
Your telephone is a radio tran smitter and re ceiver. When it is on,
it receives and sends out RF energy. Your service provider’s
network controls the power of the RF signal. This power level
can range from 0.006 to 0.6 watts.
In August 1996, the U.S. Federal Communications Commission
(FCC) adopted RF exposure guidelines with safety levels for
hand-held wireless phones. These guidelines are consistent with
the safety standards previously set by both U.S. and
international standards bodies in the following reports:
• ANSI C95.1 (American National Standards Institute, 1992)
• NCRP Report 86 (National Council on Radiation Protection
and Measurements, 1986)
• ICNIRP (International Commission on Non-Ionizing
Radiation Protection, 1996)
Your phone complies with the standards set by these reports
and the FCC guidelines.
E911 mandates
Where service is available, this phone complies with the Phase I
and Phase II E911 Mandates issued by the FCC.
Hearing Aid Compatibility (HAC) with Mobile
Phones
Some mobile phones and hearing devices (hearing aids and
cochlear implants), when used together, result in buzzing,
humming, or whining noises detected by the user.
Some hearing devices are more immune than others to this
interference noise, and phones also vary in the amount of
interference they generate.
The wireless telephone industry has developed ratings for some
of their mobile phones, to assist hearing device users in finding
phones that may be compatible with their hearing devices. Not
all phones have been rated.
Phones that are rated have the rating on their box or a label on
the box. The ratings are not guarantees and results will vary
depending on the user’s hearing device and hearing loss. If your
hearing device happens to be vulnerable to interference, you
may not be able to use a rated phone successfully. Trying out
the phone with your hearing device is the best way to evaluate it
for your personal needs.
M-Ratings
—Phones rated M3 or M4 meet FCC requirements
and are likely to generate less interference to hearing devices
than phones that are not labeled. M4 is the better/higher of the
two ratings.
T-Ratings
—Phones rated T3 or T4 meet FCC requirements and
are likely to be more usable with a hearing device’s telecoil (“T
Switch” or “Telephone Switch”) than unrated phones. T4 is the
better/higher of the two ratings. (Note that not all hearing
devices have telecoils in them.)
Hearing devices may also be measured for immunity to this type
of interference. Your hearing device manufacturer or hearing
health professional may help you choose the proper rating for
your mobile phone. The more immune your hearing aid is, the
less likely you are to experience interference noise from mobile
phones.
For more information about hearing aid compatibility, visit the
FCC’s Consumer & Governmental Affairs Bureau Web site at
www.fcc.gov/cgb/dro
.
Kyocera Communications Inc.
www.kyocera-wireless.com
To purchase accessories, visit
kyocera.superiorcommunications.com
User Guide 5
Page 6

6
Page 7

Table of Contents
1 Get Started . . . . . . . . . . . . . . . . . . . . . . . . 9
Phone Battery . . . . . . . . . . . . . . . . . . . . . . . 9
Phone Overview . . . . . . . . . . . . . . . . . . . . 11
Main Menu . . . . . . . . . . . . . . . . . . . . . . . . 13
Guide Conventions. . . . . . . . . . . . . . . . . . 14
2 Call Features . . . . . . . . . . . . . . . . . . . . . 15
Power Phone Up. . . . . . . . . . . . . . . . . . . . 15
Make Phone Calls. . . . . . . . . . . . . . . . . . . 15
Answer Phone Calls . . . . . . . . . . . . . . . . . 15
End Phone Calls . . . . . . . . . . . . . . . . . . . . 15
Volume Control . . . . . . . . . . . . . . . . . . . . 16
Use Speed Dialing . . . . . . . . . . . . . . . . . . 16
Emergency Services . . . . . . . . . . . . . . . . . 16
3 Text Entry. . . . . . . . . . . . . . . . . . . . . . . . 17
Text Entry Modes. . . . . . . . . . . . . . . . . . . 17
Text Entry Quick Reference. . . . . . . . . . . 19
4 Recent Calls. . . . . . . . . . . . . . . . . . . . . . 20
Recent Calls Menu . . . . . . . . . . . . . . . . . . 20
Work with Call Lists. . . . . . . . . . . . . . . . . 20
Erase Call List Records . . . . . . . . . . . . . . 21
Work with Call Timers. . . . . . . . . . . . . . . 21
View Data Counter. . . . . . . . . . . . . . . . . . 22
5 Contacts . . . . . . . . . . . . . . . . . . . . . . . . . 23
Contacts Menu . . . . . . . . . . . . . . . . . . . . . 23
Access Contacts . . . . . . . . . . . . . . . . . . . . 23
Add Contacts . . . . . . . . . . . . . . . . . . . . . . 24
Use Contacts. . . . . . . . . . . . . . . . . . . . . . . 24
Customize Contacts . . . . . . . . . . . . . . . . . 25
Erase Contacts . . . . . . . . . . . . . . . . . . . . . 26
Contact Groups. . . . . . . . . . . . . . . . . . . . . 27
Speed Dial List. . . . . . . . . . . . . . . . . . . . . 28
Check Contacts. . . . . . . . . . . . . . . . . . . . . 28
User Guide 7
6 Media Gallery. . . . . . . . . . . . . . . . . . . . . 29
Media Gallery Menu . . . . . . . . . . . . . . . . .29
Images . . . . . . . . . . . . . . . . . . . . . . . . . . . .29
Sounds . . . . . . . . . . . . . . . . . . . . . . . . . . . .29
Media File Options. . . . . . . . . . . . . . . . . . .30
Erase Media Files. . . . . . . . . . . . . . . . . . . .30
7 Tools & Games . . . . . . . . . . . . . . . . . . . 32
Tools & Games Menu . . . . . . . . . . . . . . . .32
Play Brick Attack. . . . . . . . . . . . . . . . . . . .32
Voice Memo. . . . . . . . . . . . . . . . . . . . . . . .33
Scheduler . . . . . . . . . . . . . . . . . . . . . . . . . .33
Alarm Clock. . . . . . . . . . . . . . . . . . . . . . . .36
Use Tip Calculator. . . . . . . . . . . . . . . . . . .36
Use Calculator . . . . . . . . . . . . . . . . . . . . . .36
Use Timer. . . . . . . . . . . . . . . . . . . . . . . . . .37
Use Stopwatch . . . . . . . . . . . . . . . . . . . . . .37
8 Messaging . . . . . . . . . . . . . . . . . . . . . . . 38
Messaging Menu . . . . . . . . . . . . . . . . . . . .38
Send Messages. . . . . . . . . . . . . . . . . . . . . .39
Manage Received Messages . . . . . . . . . . .41
Manage Voicemail . . . . . . . . . . . . . . . . . . .42
Manage Sent Messages . . . . . . . . . . . . . . .43
Manage Browser Alerts . . . . . . . . . . . . . . .44
Message Settings . . . . . . . . . . . . . . . . . . . .44
Message Groups. . . . . . . . . . . . . . . . . . . . .46
Erase Messages . . . . . . . . . . . . . . . . . . . . .47
Check Message Count . . . . . . . . . . . . . . . .47
9 Settings . . . . . . . . . . . . . . . . . . . . . . . . . 48
Settings Menu . . . . . . . . . . . . . . . . . . . . . .48
Bluetooth . . . . . . . . . . . . . . . . . . . . . . . . . .49
Convenience. . . . . . . . . . . . . . . . . . . . . . . .50
Display. . . . . . . . . . . . . . . . . . . . . . . . . . . .53
Sounds . . . . . . . . . . . . . . . . . . . . . . . . . . . .54
Page 8

Accessories . . . . . . . . . . . . . . . . . . . . . . . .55
Network. . . . . . . . . . . . . . . . . . . . . . . . . . .56
Security . . . . . . . . . . . . . . . . . . . . . . . . . . .58
10 Browser . . . . . . . . . . . . . . . . . . . . . . . . . .59
Launch Browser. . . . . . . . . . . . . . . . . . . . .59
Browse the Web. . . . . . . . . . . . . . . . . . . . .59
Add a Bookmark . . . . . . . . . . . . . . . . . . . .59
11 Downloads . . . . . . . . . . . . . . . . . . . . . . .60
How does BREW Work?. . . . . . . . . . . . . .60
Download an Application . . . . . . . . . . . . .60
Access Help for Downloads . . . . . . . . . . .60
12 Phone Info . . . . . . . . . . . . . . . . . . . . . . . .61
View Version Information. . . . . . . . . . . . .61
View Phone Icons . . . . . . . . . . . . . . . . . . .61
13 Get Help. . . . . . . . . . . . . . . . . . . . . . . . . .62
Customer Support . . . . . . . . . . . . . . . . . . .62
Qualified Service. . . . . . . . . . . . . . . . . . . .62
Phone Accessories . . . . . . . . . . . . . . . . . . .62
Consumer Limited Warranty . . . . . . . . . . . . .63
Index . . . . . . . . . . . . . . . . . . . . . . . . . . . . . . . .65
8
Page 9
1 Get Started
Phone Battery
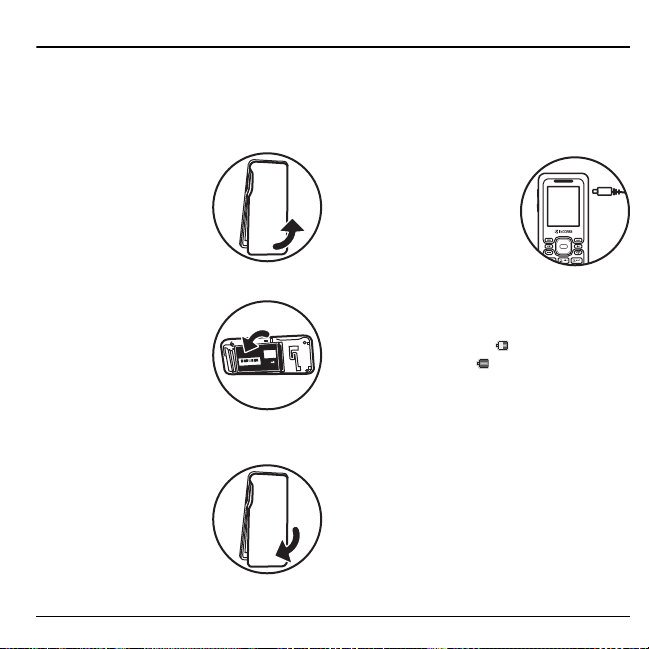
Install the Battery
To install the battery:
1. Hold the phone face
down.
2. Find the notch directly
below the back cover.
It is square. Using your
thumbnail, pry the
cover up from the
bottom to remove.
3. Place the battery in the
battery casing with the
metal contacts facing
toward the top of the
phone. The metal
contacts of the battery
must make contact
with the metal contacts of the battery
casing.
4. Replace the battery
cover by sliding the
notches into the
openings on the top of
the battery casing.
5. Snap the cover into
place.
User Guide 9
Charge the Battery
You must have at least a partial charge in the
battery to make or receive calls.
To charge the battery:
1. Connect the AC
adapter to the
microUSB jack on the
side of the phone.
2. Plug the adapter into a
wall outlet.
The battery icon in the
upper-right corner of the screen tells you
whether the phone is:
– Charging (the icon is animated)
– Partially charged
– Fully charged
Y ou can safely recharge the battery at any time,
even if it has a partial charge.
Note:
Before removing the battery, make sure
the phone is powered off.
Page 10

Battery Safety Guidelines
• Do not disassemble or open the battery.
• Do not crush, bend, deform, puncture, or
shred the battery.
• Do not attempt to insert foreign objects into
the battery.
• Do not immerse the battery or expose it to
water or other liquids. Even if a battery
appears to dry out and operate normally,
internal parts can slowly corrode and pose a
safety hazard.
• Always keep the battery between 15 °C and
25 °C (59 °F and 77 °F). Do not expose the
battery to extremes of temperature (heat or
cold), fire, or other hazards such as a
cooking surface, iron, or radiator.
• Never use any damaged battery.
• Only use the battery for its intended phone.
• Only use the battery with a qualified
charger. Use of an unqualified battery
charger may present a risk of fire,
explosion, leakage, or other hazard. If you
are unsure about whether a charger is
qualified, contact customer support.
• Do not short-circuit the battery or allow
metallic conductive objects—such as keys,
coins, or jewelry—to contact the battery’s
terminals.
• Replace the battery only with another
qualified battery. Use of an unqualified
battery may present a risk of fire,
explosion, leakage, or other hazard. If you
are unsure about whether a replacement
battery is compatible, contact customer
support.
• Promptly dispose of used batteries in
accordance with local regulations and
recycle if possible. Do not dispose as
household waste.
• Supervise all battery usage by children.
• Avoid dropping the phone or battery . If the
phone or battery is dropped, especially on a
hard surface, an internal short-circuit can
occur and pose a safety hazard. If you
suspect battery damage, take it to a service
center for inspection.
• Improper battery use may result in a fire,
explosion, or other hazard.
Common Causes of Battery Drain
• Playing games or using the Web.
• Keeping backlighting on.
• Operating when far away from a base
station or cell site.
• Using data cables or accessories.
• Operating when no service is available, or
service is available intermittently.
• High earpiece and ringer volume settings.
• Repeating sound, vibration, or lighted
alerts.
10 Phone Battery
Page 11
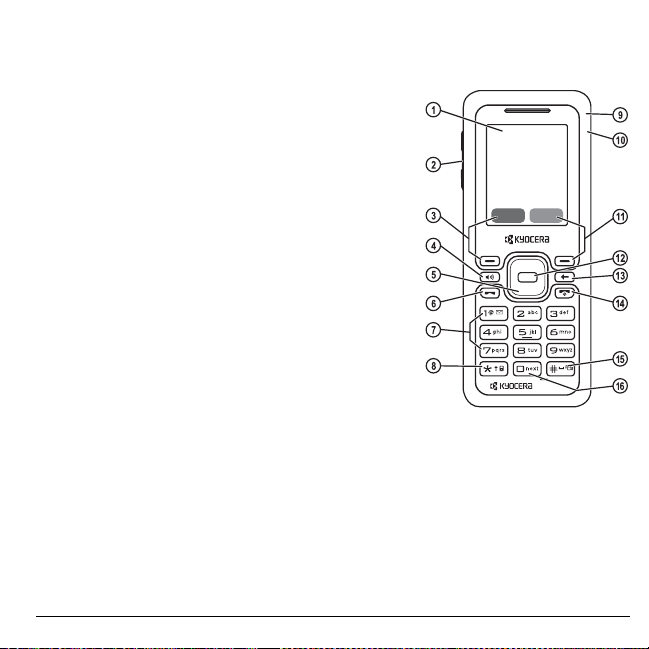
Phone Overview
Get to Know Your Phone
The phone is shown here in the open position.
1. Home screen.
2.
Volume
3.
4.
5.
6.
7. Keypad for entering numbers, letters, or symbols.
8.
9. Jack for a hands-free headset (sold separately).
10.Jack for AC adapter (included) and microUSB ca ble (sold
11.
12.
13.
14.
15.
16.
Warning:
User Guide 11
key raises or lowers ringer volume.
Left
softkey selects items that appear on the lower left of
the display. At the home screen, you can select
Speakerphone
incoming calls.
Navigation
and accesses the following shortcuts from the home screen.
– Scroll left to launch
– Scroll right to go to
– Scroll up to create a custom menu shortcut.
– Scroll down to go to
Send
key starts or answers a call. Press once to display the
All Calls list, and two times to redial the last number dialed.
* Shift
hold to activate keyguard.
separately).
Right
the display. At the home screen, you can select
OK
key selects a menu item or option. At the home screen, you go to the main menu when you
press the OK key.
Back
key erases characters in text entry and returns you to the previous screen when
navigating through menus.
End
key turns the phone on and off, ends a call or browser session, and returns you to the
home screen.
# Space
mode.
0 Next
key activates the speakerphone and answers
key scrolls through lists and text entry fields
Browser
.
Tools & Games > Voice Memo
Recent Calls > All
key changes the text mode in text entry. Press and
softkey selects items that appear on the lower right of
key enters a space during text entry. Press and hold to activate or deactivate silent
key cycles through word choices during text entry.
Inserting an accessory into the incorrect jack will damage the phone.
Menu
.
Contacts
.
.
.
Page 12
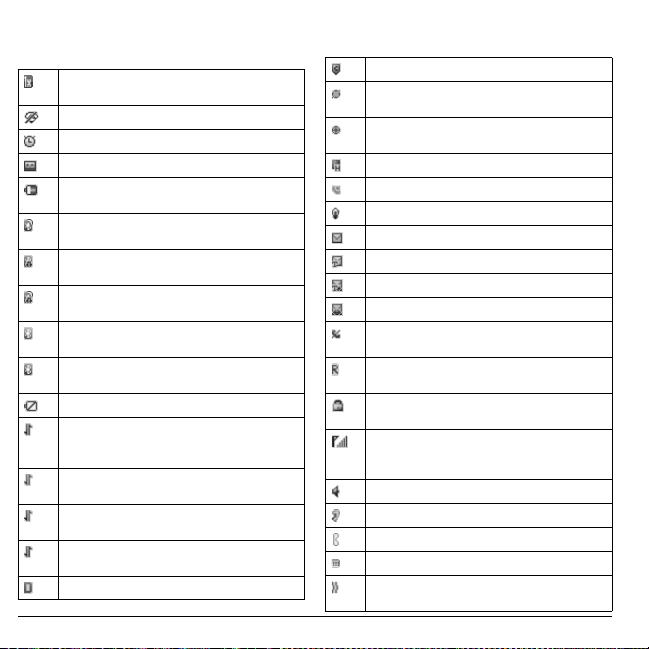
Screen Icons
These icons may appear on your phone’s screen.
The phone is operating in IS2000 (1X)
digital mode.
The phone is in airplane mode.
The alarm clock is set.
The phone is set to auto answer.
The battery is fully charged. The more black
bars, the greater the charge.
The phone is transferring data with
Bluetooth.
A headset or other hands free device is in
operation.
A headset or other hands free device is
transferring data.
Bluetooth wireless technology is disabled
(Off).
Bluetooth wireless technology is enabled
(On).
The battery will not charge.
Data service is available and active on your
phone. Check with your service provider for
availability.
Data service is available, but the phone is
dormant.
(blinking) The phone is receiving high-speed
data.
(blinking) The phone is sending high-speed
data.
The phone is operating in IS95 digital mode.
12 Phone Overview
Content is DRM protected.
Position location is set to emergency
services only.
Position location is set to your service
provider and to emergency services.
The phone is in High Speed Data mode.
A call is in progress.
The phone is set to light up instead of ring.
New message.
New text message.
New voice and text message.
New voice message.
The phone is not receiving a signal. You
cannot make or receive calls.
The phone is roaming outside of its home
service area.
The phone is in privacy mode or is accessing
a secure Web site.
The phone is receiving a signal. You can
make and receive calls. More bars indicate a
stronger signal.
The speaker phone is turned on.
A T-coil hearing aid is in operation.
A traffic channel is active.
The phone is in TTY device mode.
The phone is set to vibrate or to vibrate and
then ring.
Page 13
Main Menu
Press the OK key or select
Idle State > Level 1 > Level 2
Menu Recent Calls
Note:
The menu items on your phone can change depending on the services provided by your service provider.
Check with your service provider.
Menu
when the phone is in idle state to access the main menu.
Contacts
Media Gallery
Tools & Games
Messaging
Settings
Browser
Downloads
Phone Info
Access these options:
Erase Call List, Call Timers
Access these options:
Dial List
,
Erase Contacts
Access these options:
Access these options:
Scheduler, Alarm Clock, Tip Calculator, Calculator
Timer
, and
Access these options:
Browser Alerts, Sent Msgs, Outbox, Saved Msgs, Drafts
Msg Settings, Message Groups, Erase Msgs
Count
.
Access these options:
Sounds, Accessories, Network
Browse the web.
Download an application.
Access these options:
All, Incoming, Outgoing, Missed
, and
Kilobyte Counter
View All, Add New, Groups, Speed
, and
Contacts Count
Images, Sounds
Brick Attack, Voice Memo
Stopwatch
.
New Text Msg, Voicemail, Inbox
Bluetooth, Convenience, Display
, and
Build Info
and
, and
Security
Icon Keys
.
Delete All
,
and
Message
.
.
,
.
.
,
,
,
,
User Guide 13
Page 14

Guide Conventions
In this guide, the following conventions are
used when describing phone features.
Select
means to press the
softkey or
display. For example, “Select
to physically press the left softkey to choose
Menu
Press
example, “Press the
call” tells you to physically press the
on your phone.
Scroll
move through a list on the display. For
example, “Scroll through your contacts list to
choose a contact” means to physically press the
Navigation
the list on the display.
>
option from a menu or list. For example,
“
1. Press the left softkey to select
2. Scroll to the
3. Press the
OK
key to select an item seen on the
from the display.
means to press a phone key. For
means to use the
key up or down to scroll through
(greater than symbol) tells you to select an
Menu
>
Settings
OK
Left
Send
key to make a phone
Navigation
” means to:
Settings
option.
key to select
softkey,
Menu
key to
Menu
Settings
Right
” tells you
Send
key
.
.
14 Guide Conventions
Page 15

2 Call Features
This section describes the basic features related
to calls.
Power Phone Up
• To turn your phone on, press the
and wait until the phone display lights up.
• To turn your phone off, press and hold the
End
key until the phone plays a short
musical sound and turns off.
End
Make Phone Calls
Make sure you are in an area where a signal
can be received. Look for the signal strength
icon on the home screen. The more bars, the
stronger the signal. If there are no bars, move
to where the signal strength is better.
When the phone has been idle for a time, it
cycles into power save mode. Press any key to
return to normal operating mode.
There are several ways you can make a phone
call.
Call Using a Number
1. Enter a phone number.
2. Press the
Send
key.
Redial a Number
1. Press the
2. Highlight a phone number or contact and
key
Note:
received or missed, press the
Send
history.
press the
To redial the last number called,
key to open your call
Send
key.
Answer Phone Calls
When a call comes in, the phone rings,
vibrates, or lights up. The phone number of the
caller also appears if it is not restricted. If the
number is stored in your contacts list, the
contact’s name appears. There are several ways
you can answer a phone call.
Answer Using Earpiece
Press the
Send
key.
Answer Using Speakerphone
Press the
Speakerphone
key.
End Phone Calls
Press the
End
key.
Send
key twice.
Call Using a Contact
1. From
View All
, highlight a contact.
2. Press the
User Guide 15
Send
key.
Page 16

Volume Control
Adjust Volume during a Call
Press the
Volume
earpiece volume during a call.
key up or down to adjust the
Use the Speakerphone
Your phone has a built-in speakerphone.
• To turn on the speakerphone, press the
Speakerphone
appears on the home screen when the
speakerphone is on.
• To turn off the speakerphone, press the
Speakerphone
Note:
If you press the
during an incoming call, you will answer the
call.
key. The speakerphone icon
key again.
Speakerphone
key
Silence an Incoming Call
• To silence the phone without answering the
call, press the
Volume
• To silence the phone and answer the call,
press the
key up or down and then press the
key.
Back
key up or down.
Back
key or press the
key or press the
Volume
Send
Use Speed Dialing
Speed dialing allows you to assign a one- or
two-digit shortcut to a contact. Before you can
use speed dialing you must save a phone
number as a contact and assign a speed dial
location to it. See “Assign Speed Dials to
Contacts” on page 26.
16 Volume Control
To call a contact that has a speed dial location:
1. Enter the one- or two-digit speed dial
location.
2. Press the
Send
key.
Emergency Services
Call Emergency Services
You can call an emergency code even if your
phone is locked or your account is restricted.
When you call, your phone enters emergency
mode. This enables the emergency service
exclusive access to your phone to call you
back, if necessary. To make or receive regular
calls after dialing the code, you must exit this
mode.
To dial an emergency code:
1. Enter the 3-digit emergency code.
2. Press the
Note:
code (911, 111, 999, 000, etc.), your phone
operates as described above.
Exit Emergency Services
When you have completed the emergency call:
1. Select
2. Select
Note:
location, see “Set Location Information” on
page 57.
Send
key.
Regardless of the 3-digit emergency
Exit
.
Exit
again to confirm your choice.
To determine who has access to your
Page 17
3 Text Entry
You can enter letters, numbers, and symbols in
contacts, text messages, and your banner.
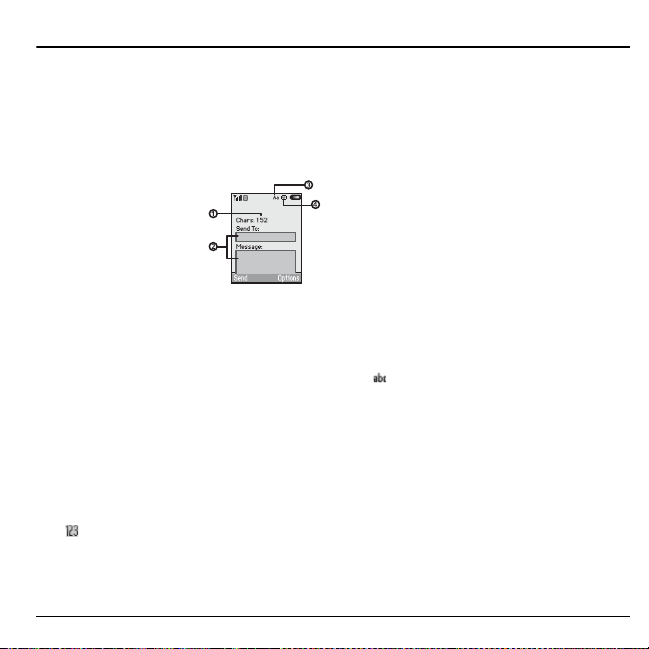
Text Entry Modes
The text entry screen has the following
features:
1. Characters remaining
that you can type.
Allowed message
length can vary
depending on your
service.
2. Text entry fields.
3. Current capitalization setting.
4. Current text entry mode.
Note:
The entry mode will default depending
on the task you are doing. For example, when
entering a phone number, you are in
Only
mode. When entering a name for a
contact, you are in
Normal Alpha
Numbers
mode.
Enter Letters with Number Keypad
From the text entry field, select
Normal Alpha
text in the following ways:
• To enter a letter, press a key once for the
first letter, twice of the second letter, and so
on. If your phone is set to Spanish,
accented letters are available. Wait for the
cursor to move right and enter the next
character. Press the
space.
• To change case mode for a single letter,
press that key until you see the letter case
you want. To change the case mode, press
the
• To enter a number , press and hold a number
key until the number appears on the screen.
The icon indicates you are in
Alpha
key to switch input modes.
to enter letters. You can enter
* Shift
key.
input mode. Press and hold the
# Space
Options >
to enter a
Normal
* Shift
Enter Numbers with Number Keypad
From the text entry field, select
Numbers Only
press a key once.
The icon indicates you are in
Only
input mode. Press and hold the
key to switch input modes.
User Guide 17
to enter a number when you
Options >
Numbers
* Shift
Page 18

Rapid Entry with Number Keypad
From the text entry field, select
Rapid Entry
spell against a dictionary of common words.
You can enter text in the following ways:
• To enter words, press a key once. For
example, to enter the word “Glow” press
the 4 > 5 > 6 keys. If the word doesn’t
match what you want, press
look at other word matches. When you see
the word you want, scroll right.
• To change case mode, press the
• To enter a number , press and hold a number
key until the number appears on the screen.
The icon indicates you are in
input mode. Press and hold the
key to switch input modes.
to check words you are trying to
Options >
0 Next
key to
* Shift
Rapid Entry
* Shift
input
key.
Enter Symbols with Number Keypad
While entering text in
you can enter symbols by pressing the
until you see the symbol you want. Using this
method, you have access to the following
symbols:
. @ ? ! - , & : ‘
To access the full set of symbols:
1. From the text entry field, select
Add Symbols
2. Scroll up or down to view the list of
symbols.
3. Press the number key corresponding to the
symbols to enter it.
18 Text Entry Modes
Normal Alpha
.
mode,
1
key
Options
>
Page 19

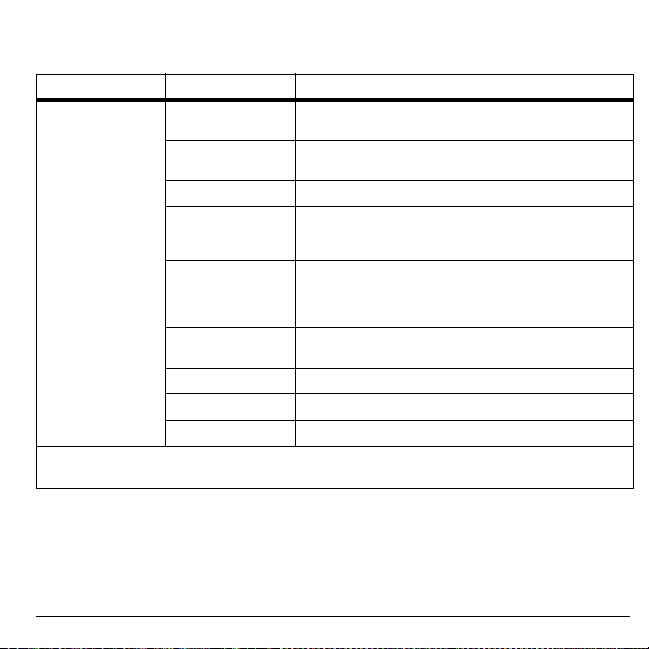
Text Entry Quick Reference
This table gives instructions for entering letters, numbers, and symbols.
To... Do this...
Use
Enter a letter
Enter a number
Enter a symbol
Enter a space
Erase a character
Erase all characters
Move the cursor right or left
Move the cursor up or down
Change input mode
Change case mode
Capitalize any letter
Lowercase any letter
Initial caps
Select options on the bottom of th e screen
Normal Alpha
the letter your want.
Use
Numbers Only
Use
Normal Alpha
see the symbol you want.
Press the
Press the
Press and hold the
Scroll left or right.
Scroll up or down.
Press and hold the
Press the
In
Normal Alpha
uppercase.
In
Normal Alpha
lowercase.
In
Normal Alpha
sentence case.
Press the appropriate left or right softkey.
mode and press a key until you see
mode and press a key.
mode and press the 1 key until you
# Space
key.
Back
key.
Back
* Shift
* Shift
key.
mode, press the
mode, press the
mode, press the
key.
key.
* Shift
* Shift
* Shift
key. Choose
key. Choose
key. Choose
User Guide 19
Page 20
4 Recent Calls
Recent Calls Menu
Select
Recent Calls
Level 1 > Level 2 > Level 3
Recent Calls All
from the main menu to access the following functions:
See a list of all voice calls.
Incoming
Outgoing
Missed
Erase Call List
Call Timers
Kilobyte Counter
See a list of all voice calls you have received.
See a list of all voice calls you have made.
See a list of voice calls you have missed.
Access these options:
Access these options:
and
See how much data you have sent and received.
Outgoing
All, Incoming, Outgoing
All, Recent, Home, Roam, Incoming
.
, and
Missed
.
,
Work with Call Lists
Return Any Call
1. From
All
, highlight a number.
2. Press the
This list contains all calls made and received.
select
Send
key to call the number or
Options
to access more features.
Return a Received Call
1. From
Incoming
2. Press the
select
, highlight a number.
Send
key to call the number or
Options
to access more features.
This list contains all calls received.
Return an Outgoing Call
1. From
Outgoing
2. Press the
select
, highlight a number.
Send
key to call the number or
Options
to access more features.
This list contains all calls you have made.
20 Recent Calls Menu
Page 21

Return a Missed Call
1. From
Missed
, highlight a number.
2. Press the
This list contains all calls you received, but did
not answer.
select
Send
key to call the number or
Options
to access more features.
Manage a Missed Call Alert
When you have missed a call, “Missed Call”
appears on your screen. You can do one of the
following:
• To clear the screen, select
• To view the call details, select
press the
OK
• To return the call, select
Send
key.
key.
OK
.
Calls
and press the
Calls
and
Call List Options
Save Number from Call List
1. At a call list, highlight a number.
2. Select
3. Select
View Contact from Call List
1. At a call list, highlight a contact.
2. Select
Options > Save
Save New Contact
contact or
to an existing contact.
details screen.
Add to Existing
Options > View
.
to create a new
to add a number
to see the contact
Send Text Message from Call List
1. At a call list, highlight a contact.
2. Select
3. Complete your text message and select
Options > Send Text Msg
Send
.
.
Erase Call List Records
Erase a Single Record
1. At a call list, highlight a contact.
2. Select
Options > Erase Record > Yes
.
Erase a Call List
From
Erase Call List
records from. For example to erase all records
from the incoming call list, select
Yes
.
, select a call list to erase
Incoming >
Erase All Call Lists
From
Erase Call List
all records from all call lists.
, select
All > Yes
to erase
Work with Call Timers
View All Calls Timer
Select
All
to view the number of calls and the
total call time. Select
This timer tracks all calls made and received
for life of the phone and cannot be reset.
Done
when finished.
User Guide 21
Page 22

View Recent Calls Timer
Select
Recent
the total call time. Select
This timer tracks all calls made and received
since you last reset the timer. To reset this
timer to zero, select
to view the number of calls and
Done
Reset > Yes
when finished.
.
View Home Calls Timer
Select
Home
the total call time. Select
This timer tracks all calls made and received in
your home network since you last reset the
timer. T o reset this timer to zero, select
Yes
to view the number of calls and
.
Done
when finished.
Reset >
View Roam Calls Timer
Select
Roam
the total call time. Select
This timer tracks all roaming calls made and
received since you last reset the timer. To reset
this timer to zero, select
Your phone can alert you with a short beep ten
seconds before each minute passes during a
call. For more information, see “Enable Minute
Alert” on page 52.
to view the number of calls and
Done
when finished.
Reset > Yes
.
View Outgoing Calls Timer
Select
Outgoing
and the total call time. Select
finished.
This timer tracks all calls made since you last
reset the timer. To reset this timer to zero,
select
Reset > Yes
to view the number of calls
.
Done
when
View Data Counter
Select
Kilobyte Counter
of kilobytes sent during data calls. Select
when finished.
This timer tracks kilobytes sent during data
calls made, data calls received, and for the life
of the phone. To reset the data counter to zero,
select
Options > Reset > Yes
to view the amount
Done
.
View Incoming Calls Timer
Select
Incoming
and the total call time. Select
finished.
This timer tracks all calls received since you
last reset the timer. To reset this timer to zero,
select
Reset > Yes
22 View Data Counter
to view the number of calls
.
Done
when
Page 23

5Contacts
Use
Contacts
to store information about a person or company.
Contacts Menu
Select
Contacts
from the main menu to access the following functions:
Level 1 > Level 2 > Level 3
Contacts View All
Add New
Groups
Speed Dial List
Erase Contacts
Contacts Count
Access your existing contacts list.
Add a new entry to your contacts list.
View your groups of contacts.
View your contacts assigned with speed dials.
Access options:
All
Check how much contact space you have used.
.
Contacts Only, Groups Only
, and
Erase
Access Contacts
Access Contacts List
1. From
View All
desired contact and scroll to highlight it.
2. Do one of the following:
–Press the
–Press the
details.
– Select
– Select
functions.
User Guide 23
, enter the first letter of your
Send
key to call the contact.
OK
key to view the contact’s
New
to create a new contact.
Options
to access more
View Contact Details
1. From
View All
, select a contact.
2. At the contact details screen, highlight a
number, address or note.
3. Select the detail you want to view. For
example, to view a phone number, select
Options > View Number
.
Use Frequent List
With
Frequent List
of your most frequently called contacts. See
“Enable Frequent List” on page 52.
enabled, you can view 15
Page 24

Use Fast Find
With
Fast Find
two keys to view closer matches in your
contacts list. See “Call Contact using Fast
Find” on page 52.
enabled, you can press one or
Add Contacts
Add Contacts from Home Screen
1. From the home screen, enter a phone
number to save (include the area code).
2. Select
3. Enter a name for the contact.
4. Enter additional phone numbers, email
5. When done, select
Add Contacts from Contacts Menu
1. From
2. Enter a primary number for the contact.
3. Enter additional phone numbers, email
4. When done, select
24 Add Contacts
Save > Save New Contact
addresses, and other contact details. (Scroll
up or down to move through the contact
fields.)
Save
Add New
contact. Scroll down to the next field when
done.
addresses, and other contact details. (Scroll
up or down to move through the contact
fields.)
, enter a name for the
Save
.
.
.
Add a Code or Extension
When saving the phone number of an
automated service, you may include a pause
for dialing an extension.
1. From the home screen, enter a phone
number.
2. Select
3. Enter the remaining numbers and select
4. Complete the contact information and
Options
–
Time Pause
dialing for two seconds.
–
Hard Pause
until you select
the call.
Save > Save New Contact
select
and a type of pause:
causes the phone to stop
causes the phone to wait
Release
Save
.
while making
.
Use Contacts
Call Contacts
1. From
View All
, select a contact.
2. At the contact details screen, highlight a
number.
3. Select
Send a Text Message to Contacts
1. From
2. At the contact details screen, highlight a
3. Select
4. Complete your text message and select
Options > Call
View All
number or email address.
Options > Send Text Msg
Send
.
.
, select a contact.
.
Page 25

Send a Contact vCard
1. From
View All
, select a contact.
2. At the contact details screen, highlight the
contact name.
3. Select
4. Complete the appropriate task to send the
Options > Send as vCard > via
Bluetooth
device.
contact information.
to send to a Bluetooth-enabled
Customize Contacts
Edit Contact Details
1. From
View All
, select a contact.
2. At the contact details screen, select
3. Enter additional phone numbers, email
addresses, and other contact details. (Scroll
up or down to move through the contact
fields.)
4. When done, select
Save
.
Assign Number Types
1. From
View All
, select a contact.
2. At the contact details screen, select
3. Press down twice to scroll to the number
type dropdown and press the
4. Select a number type. The appropriate icon
appears next to the number in your contacts
list.
5. Select
User Guide 25
Save
.
OK
Edit
Edit
key.
Assign Ringers to Contacts
1. From
View All
, select a contact.
2. At the contact details screen, highlight the
contact name.
3. Select
Options > Ringer > Assign Ringer
and a ringer from the list. (Scroll to play the
ringers.)
Assign Message Tones to Contacts
1. From
View All
, select a contact.
2. At the contact details screen, highlight the
contact name.
3. Select
.
Options > Msg T one > Assign Msg
Tone
and a ringer from the list. (Scroll to
play the ringers.)
Assign Pictures to Contacts
1. From
View All
, select a contact.
2. At the contact details screen, highlight the
contact name.
3. Select
Add a Prefix to Phone Numbers
.
Use
code, to a phone number:
1. From
2. At the contact details screen, highlight a
3. Select
4. Select
Options > Picture > Assign Picture
to assign a picture .
Prepend
to add a prefix, such as an area
View All
, select a contact.
number.
Options > Prepend
prefix at the beginning of the number.
Save
.
to enter the
Page 26

Assign Speed Dials to Contacts
1. From
View All
, select a contact.
2. At the contact details screen, highlight a
number.
3. Select
4. Select a location from the list to assign the
Options > Add Speed Dial
speed dial number.
.
Change Primary Numbers
When a contact has more than one number, the
first number becomes the primary number by
default. To change the contact’s primary
number:
1. From
View All
2. At the contact details screen, highlight a
number.
3. Select
, select a contact.
Options > Primary Number > Yes
Add Contacts to Groups
1. From
View All
2. At the contact details screen, highlight a
number or email address.
3. Select
4. Select groups from the list provided. A
checkmark appears next to each selection.
You can also remove a checkmark.
5. When finished, select
, select a contact.
Options > Add To Group
Done
.
.
Visit Web Addresses
1. From
View All
, select a contact.
2. At the contact details screen, highlight a
Web address.
3. Select
Options > Launch Web
.
Erase Contacts
Erase Contact Details
1. From
View All
2. At the contact details screen, highlight a
number, address or note.
3. Select your desired erase option and then
select
address, select
Yes
.
.
Erase an Entire Contact
1. From
2. At the contact details screen, highlight the
contact name.
3. Select
erase the entire contact.
Erase All Contacts
From
Erase Contacts
Yes > Yes
Note:
You cannot recover deleted information.
, select a contact.
Yes
. For example, to erase an email
Options > Erase Address >
View All
, select a contact.
Options > Erase Contact > Yes
, select
to erase all your contacts.
Contacts Only >
to
26 Erase Contacts
Page 27

Erase All Contacts and Groups
From
Erase Contacts
> Yes
to erase all your contacts and groups.
Note:
You cannot recover deleted information.
, select
Erase All > Yes
Contact Groups
You can assign your contacts to groups. Your
phone comes with default groups. You can also
create your own groups.
View Groups
1. Select
2. Highlight a group and do one of the
Create a New Group
1. From
2. Enter a name for the group and select
3. Select contacts from the list provided. A
4. When finished, select
Your new group appears the next time you
view your groups list.
User Guide 27
Groups
groups, followed by the custom groups you
have created.
following:
–Press the
details.
– Select
– Select
functions.
checkmark appears next to each selection.
You can also remove checkmarks.
to view your preloaded
OK
key to view the group
New
to create a new group.
Options
to access more
Groups
, select
New
Done
.
.
Send Text Messages to Groups
1. From
Groups
, highlight a group.
2. Select
3. Complete your text message and select
Options > Send Text Msg
Send
.
Add or Remove Contacts from Groups
1. From
Groups
, highlight a group.
2. Select
3. If you are modifying a group you created,
4. Select contacts from the list provided. A
5. When finished, select
Options > Edit
select
Next
. Otherwise, go to the next step.
checkmark appears next to each contact in
the group. Press the
remove checkmarks.
OK
Assign Ringers to Groups
1. From
Groups
2. At the group details screen, scroll to the
group name.
3. Select
and a ringer from the list. (Scroll to play the
Next
ringers.)
.
, select a group.
Options > Ringer > Assign Ringer
Assign Message Tones to Groups
1. From
Groups
2. At the group details screen, scroll to the
group name.
3. Select
Tone
play the ringers.)
, select a group.
Options > Msg T one > Assign Msg
and a ringer from the list. (Scroll to
.
key to add or
Done
.
.
Page 28

Assign Pictures to Groups
1. From
Groups
created.
2. At the group details screen, scroll to the
group name.
3. Select
to assign a picture.
, select a group you have
Options > Picture > Assign Picture
Create a Message Group
You can create a group specifically for
messaging, based on a contact group.
1. From
Groups
, highlight a group.
2. Select
3. Modify the name for the group and select
4. Select contacts from the list provided. A
5. When finished, select
Y our new message group appears the next time
you view your message groups list.
Options > Create Msg Group
Next
.
checkmark appears next to each contact in
the group. Press the
remove checkmarks.
OK
key to add or
Done
.
Speed Dial List
Assign Speed Dial Numbers
1. From
Speed Dial List
unassigned number (marked as empty).
2. Select
3. At the contacts list, select a contact.
4. At the contact details screen, select a phone
Assign
number.
, highlight an
.
Clear Speed Dial Numbers
1. From
Speed Dial List
.
assigned number.
2. Select
Erase > Yes
, highlight an
.
Check Contacts
Select
Contacts Count
contacts you have stored.
to check how many
Erase a Group
1. From
Groups
, highlight a group.
2. Select
Options > Erase > Yes
.
Erase All Groups
From
Erase Contacts
Yes > Yes
Note:
or erase preloaded groups.
28 Speed Dial List
to erase all your groups.
You cannot recover deleted information
, select
Groups Only >
Page 29

6 Media Gallery
Use
Media Gallery
Media Gallery Menu
Select
Media Gallery
Level 1 > Level 2 > Level 3
Media Gallery Images
to retrieve and playback media files and other downloads.
from the main menu to access the following functions:
Access these options:
Screensavers
Sounds
Delete All
Access these options:
Memos
Access these options:
Delete All
Saved Images, Wallpapers
, and
Caller IDs
.
.
.
Saved Sounds, Ringers
Images Only, Sounds Only
, and
,
Voice
, and
Images
Send an Image
1. From
Saved Images
2. Select
3. Complete the appropriate task.
Send > via Bluetooth
Bluetooth-enabled device.
Change the Default Wallpaper
1. From
Wallpapers
2. Select
Set Default
Change the Default Screensaver
1. From
Screensavers
2. Select
User Guide 29
Set Default
, select an image.
to send to a
, select a wallpaper.
.
, select a screensaver.
.
Assign a Caller ID
1. From
Caller IDs
2. Select
3. At the contacts list, select a contact.
Assign
, select an image.
.
Sounds
Send a Sound
1. From
Saved Sounds
2. Select
3. Complete the appropriate task.
Send > via Bluetooth
Bluetooth-enabled device.
, highlight a sound.
to send to a
Page 30

Assign a Ringer
1. From
Ringers
, highlight a ringer.
2. Select
3. Complete the appropriate task.
Assign
assign the ringer.
and choose how you want to
Play a Voice Memo
1. From
V oice Memos
have recorded.
2. Select
Use the
playback tools displayed.
Play
Navigation
, highlight a memo you
.
key to control the
Media File Options
Rename a File
1. From a media file list, highlight a file.
2. Select
3. Enter a new name and select
Y ou can only rename unlocked files. Preloaded
files on your phone are always locked.
Send a File
1. From a media file list, highlight a file.
2. Select
3. Complete the appropriate task.
Options > Rename
Options > Send > via Bluetooth
send to a Bluetooth-enabled device.
.
Save
.
to
Assign a File
1. From a media file list, highlight a file.
2. Select
3. Complete the appropriate task.
Options > Assign
to assign the file.
and choose how
Lock a File
1. From a media file list, highlight a file.
2. Select
Options > Lock
from being accidently erased. To unlock the
file, select
Options > Unlock
to protect a file
.
Play a File
1. From a media file list, highlight a file.
2. Select
Use the
playback tools displayed.
Options > Play
Navigation
.
key to control the
View File Details
1. From a media file list, highlight a file.
2. Select
3. Select
Options > Details
details such as file size or save date.
OK
to exit.
to view the
Erase Media Files
Erase a Single File
1. From a media file list, highlight a file.
2. Select
You can only erase unlocked files. Preloaded
files on your phone are always locked.
Options > Erase > Yes
.
30 Media File Options
Page 31

Erase All Files in a Folder
From a media file list, select
All > Yes
.
Note:
You can only erase unlocked files.
Preloaded files on your phone are always
locked.
Options > Erase
Erase All Image Files
From
Delete All
erase all files in the
Note:
You can only erase unlocked files.
Preloaded files on your phone are always
locked.
, select
Images Only > Yes
Images
folder.
Erase All Sound Files
From
Delete All
erase all files in the
Note:
You can only erase unlocked files.
Preloaded files on your phone are always
locked.
, select
Sounds Only > Yes
Sounds
folder.
Erase All Media Files
From
Delete All
erase all files in the
Note:
You can only erase unlocked files.
Preloaded files on your phone are always
locked.
, select
Delete All > Yes
Media Gallery
folder.
to
to
to
User Guide 31
Page 32

7 Tools & Games
Tools & Games Menu
Select
T ools & Games
Level 1 > Level 2 > Level 3
T ools & Games Brick Attack
Play Brick Attack
The goal of this game is to eliminate bricks
arranged in levels. You send a moving ball
upward using a paddle at the bottom of the
screen.
1. Select
2. You may see a notification, select
No
.
Brick Attack
from the main menu to access the following functions:
Play Brick Attack.
V oice Memo
Scheduler
Alarm Clock
Tip Calculator
Calculator
Timer
Stopwatch
Access these options:
Access these options:
Day
Set an alarm.
Calculate a tip.
Perform basic calculations.
Set a countdown timer.
Use a stopwatch timer.
.
Yes
or
Record New
,
Go to Date, View All Events
3. Select
Add New Event, View Month, View
New
to start the game. You have the
following options:
–Use the
Navigation
paddle.
–Press the
–Select
–Select
Back
Resume
Options
and
Recorded Memos
, and
Settings
.
key to move the
key to pause the game.
to restart the game.
>
Exit
to exit the game.
.
32 Tools & Games Menu
Page 33

Voice Memo
Use
Voice Memo
audio memos.
to record and play back
Record Voice Memos
1. From
Voice Memo
2. Record your voice memo and select
when done.
3. Select
If you receive an incoming call while recording
a memo, the memo is saved and the incoming
call screen appears.
Save
, select
Record New
.
.
Stop
Play Voice Memos
1. From
Recorded Memos
memo.
2. Select
Play
access more features.
to play the memo or
, highlight a
Options
to
Scheduler
Use
Scheduler
reminder alerts.
Create an Event
1. From
Scroll down to move to the next field when
done.
2. Press the
from the list.
3. Press the
needed.
to schedule events and set
Add New Event
OK
OK
, enter a name.
key to select an event type
key to change the date, if
– Scroll left or right to move between
month, day, and year fields.
– Scroll up or down to change month,
day, and year.
Press the
OK
next field.
4. Press the
needed.
– Scroll left or right to move between
hour, minute, and AM/PM fields.
– Scroll up or down to change hour,
minute, and AM/PM.
Press the
next field.
5. Press the
needed.
– Scroll left or right to move between
hour and minute fields.
– Scroll up or down to change hour and
minute.
Press the
next field.
6. Press the
the list.
7. Press the
the list.
8. Press the
sound from the list.
9. Press the
to enable silent mode or
sounds.
10.Press the
event from the list, if needed.
11. Select
key to save and move to the
OK
key to change the time, if
OK
key to save and move to the
OK
key to change the duration, if
OK
key to save and move to the
OK
key to select a priority from
OK
key to select a reminder from
OK
key to select a reminder
OK
key to select
OK
key to select a recurring
Save
.
During Event
Off
to have normal
User Guide 33
Page 34

View Events
View Events by Month
1. From
View Month
month view. (Days with events are
highlighted.)
2. Press the
3. Do one of the following:
– Scroll left or right to move to ano ther
date.
– Select an event.
– Scroll to a time and select
create a new event.
– Select
View Events by Date
From
View Day
• Scroll left or right to move to another date.
• Select an event.
• Scroll to a time and select
create a new event.
• Select
Options
Go to a Specific Date
1. From
Go to Date
move between month, day, and year fields.
Scroll up or down to change month, day, or
year.
2. Press the
View Events by List
From
View All Events
the list or
34 Scheduler
Options
, scroll through the
OK
key to select a date.
Options
to access more features.
, do one of the following:
Add New
to access more features.
, scroll left or right to
OK
key to select the date.
, select an event from
to access more features.
Add New
to
Return to the Current Date
From
View Day
Today
, select
to return to the current date.
Sort Events by Time
From
View All Events
by Time
to sort events by time.
Sort Events by Type
From
View All Events
by Type
to sort events by their assigned type.
to
Sort Events by Priority
From
View All Events
by Priority
priority.
to sort events by their assigned
Modify Events
Edit an Event
1. From
View Day
2. At the event details screen, select
> Edit
3. Modify the event and select
Send an Event
1. From
View Day
2. At the event details screen, select
> Send > via Bluetooth
Bluetooth-enabled device.
3. Complete the appropriate task.
, select an event.
.
, select an event.
Options > Go to
, select
Options > Sort
, select
Options > Sort
, select
Options > Sort
Options
Save
.
to send the file to a
Options
Page 35

Copy an Event
1. From
View Day
2. At the event details screen, select
> Copy
3. Enter a new name for the event.
4. Complete the event and select
, select an event.
.
Save
Erase Events
Erase an Event
1. From
View Day
2. At the event details screen, select
> Erase > Yes
Erase the Current Day’s Events
From
View Day
Today’s Events > Yes
that day.
Erase All Events
From
View All Events
Erase All Events > Yes
from the phone.
Note:
You cannot recover deleted information.
Erase All Past Events
From
View All Events
Erase All Past Events > Yes
events from the phone.
Note:
You cannot recover deleted information.
, select an event.
.
, select
Options > Erase
to erase all events on
, select
to erase all events
, select
to erase all past
Options >
Options >
Options
.
Options
Change Scheduler Settings
From
Settings
features.
Set Scheduler Hours
1. From
and end times.
– Scroll left or right to move between
– Scroll up or down to change hour,
2. Select
Erase Events Automatically
From
list to set when to automatically erase your past
events.
Set Event Priority
From
event you create with this priority type.
Set Event Reminder
From
event you create with this reminder setting.
Set Event Reminder Alert
From
every event you create with this reminder alert.
(Scroll to listen to sounds.)
, you can modify the following
Scheduler Hours
hour, minute, and AM/PM fields.
minute, and AM/PM.
Save
when done.
Auto Erase
Priority
, select an option to set every
Reminder
Reminder Sound
, select an option to set every
, modify the start
, select an option from the
, select an option to set
Set Event Silent Mode
From
Silent Mode
every event you create with this silent mode.
User Guide 35
, select an option to set
Page 36

Alarm Clock
You can set up to four alerts with your phone’s
three alarm clocks and one quick alarm.
Note:
The alert occurs only if the phone is on.
Set an Alarm
1. From
Alarm Clock
alarms and select
2. Press the
3. Press the
4. Press the
5. Press the
6. Select
When the alarm rings, select
the alarm or
another ten minutes.
36 Alarm Clock
OK
needed.
– Scroll left or right to move between
hour, minute and AM/PM fields.
– Scroll up or down to change hour,
minute and AM/PM.
Press the
OK
the next field.
OK
list.
OK
alarm from the list, if needed.
OK
Save
Snooze
, scroll to one of the
Set
.
key to change the time, if
key to save time and move to
key to select a sound from the
key to select a recurring
key to enter a note.
.
Stop
to set the alarm to ring in
to turn off
Set the Quick Alarm
1. From
Alarm Clock
alarm and select
2. Choose a time. (A notification shows the
quick alarm is on.)
When the quick alarm rings, select
off the alarm, or
again.
, scroll to the quick
Set
.
Reset
to set the quick alarm
Off
to turn
Use Tip Calculator
1. From
Tip Calculator
your bill and select
2. Scroll down to select the percentage you
want to tip.
The total bill with tip is displayed. If you
are finished, select
to the next step.
3. Scroll down to enter the number of people
sharing the bill (or enter 1 if paying the
entire bill).
4. Select
5. Select
Next
to view the final bill.
Done
, enter the amount of
Next
.
Done
. Otherwise, go on
when finished.
Use Calculator
1. From
Calculator
2. Select a mathematical operation:
– Scroll left to multiply.
– Scroll right to divide.
– Scroll up to add.
– Scroll down to subtract.
Your selection will appear highlighted.
, enter the first number.
Page 37

3. Enter the second number, and press the OK
key to view the result.
4. Select
Exit
Options
–
–
–
–
to return to the menu, or
and one of the following:
MS
replaces the value currently stored
in memory with the displayed result on
the screen.
M+
adds displayed result on the screen
to the value currently stored in memory.
MR
displays value currently stored in
memory on the screen.
MC
clears value currently stored in
memory.
Use Stopwatch
From
Stopwatch
options:
•
Start
•
Stop
•
Reset
Press the
, select from the following
begins counting.
pauses counting.
clears the stopwatch.
Back
key to exit.
Use Timer
The timer counts down for the specified time.
It beeps when that amount of time has elapsed.
1. From
Timer
, select
Set
.
2. Enter the time length.
– Scroll left or right to move between
hours, minutes, or seconds fields.
– Scroll up or down to change hours,
minutes, or seconds.
3. Select
4. To work the timer, select from the
When the countdown is complete, select
silence the alarm.
User Guide 37
Sound
modify the sound.
following options:
–
–
–
, and choose from the list to
Start
begins the countdown.
Stop
pauses the countdown.
Reset
clears the timer.
Off
to
Page 38

8 Messaging
Use
Messaging
Messaging Menu
Select
Level 1 > Level 2 > Level 3
Messaging New Text Msg
Note:
Check with your service provider.
to send, receive, and erase messages from your phone.
Messaging
The menu items on your phone can change depending on the services provided by your service provider.
from the main menu to access the following functions:
Compose a text message.
Voicemail
Inbox
Browser Alerts
Sent Msgs
Outbox
Saved Msgs
Drafts
Msg Settings
Message Groups
Erase Msgs
Message Count
Shows how many voicemails are waiting.
Shows a list of received text messages.
Shows how many alerts are waiting.
Shows a list of messages you have successfully sent.
Shows a list of messages you have sent, but are pending or
failed.
Shows a list of messages you have saved.
Shows a list of messages that have been started, but saved to
be completed at a later time.
Access these options:
QuickText, Callback Number, Save to Sent, Auto-Erase
Default Text, Text Msg Receipt, Voicemail Number
Erase Recent List
See a list of your message groups.
Access these options:
Msgs
,
Drafts
Check how many messages you have.
Alerts, Msg List View, Signature
.
Inbox, Outbox, Sent Msgs, Saved
, and
All
.
, and
,
,
38 Messaging Menu
Page 39

Send Messages
Create a Te xt Message
You can only send text messages to phone
numbers capable of receiving them or to email
addresses if supported.
1. From
New Text Msg
phone number or email address. (Select
Options
to access contacts, groups or
recently used addresses. Scroll down to
move to the next field when done.)
You can message up to ten recipients at
once. Use comma or spaces to separate
addresses.
2. Enter the message. (Select
access more features.)
3. When done, select
Receive Calls while Creating Messages
If you receive a call while creating a message a
notification appears. Do one of the following:
• Select
•Press the
Ignore
to the message screen.
Send
your phone automatically saves the
message to
Enter Message Recipients
The following describes how to add recipients
to your messages, depending on the services
provided. Check with your service provider for
availability.
, enter a recipient’s
Options
to
Send
.
to ignore the call and return
key to answer the call and
Drafts
.
Add Recipients from Contacts
1. At the compose message screen, select
Options > Contacts
number or email address.
2. Select a contact from the contacts list.
3. Select a number or address.
4. Complete your message.
when entering a phone
Add Recipients from Recent List
1. At the compose message screen, select
Options > Recent List
phone number or email address.
2. Select a number or address.
3. Complete your message.
when entering a
Add Recipients from Recent Calls
1. At the compose message screen, select
Options > Recent Calls
phone number or email address.
2. Select a number.
3. Complete your message.
when entering a
Send to Groups
1. At the compose message screen, select
Options > Message Groups
a phone number or email address.
2. Select a group.
3. Complete your message.
when entering
User Guide 39
Page 40

Save Recipients as Contacts
1. At the compose message screen, select
Options > Save Address
phone number or email address.
2. Select a number or address.
3. Select
Options > Save New Contact
create a new contact) or
Contact
(to add the number or address to
an existing contact).
when entering a
Options > Add to
Add Recipients from Message Text
1. At the compose message screen, select
Options > Add Address
text to add more recipients.
2. Enter a number or address to add.
3. Complete your message.
when entering the
Save Messages to Drafts
At the compose message screen, select
Options > Save Message
text. Your phone saves the message to
for you to complete at a later time.
when entering the
Drafts
Complete Messages in Drafts
1. From
Drafts
message.
2. Select
3. Complete your message.
, highlight your desired
Edit
or
Options > Edit
.
Use Preset Te xt
Add Preset Text
1. At the compose message screen, select
Options > Insert QuickT ext
(to
entering the text.
2. Select a preset text entry.
3. Complete your message.
Save Messages as Preset Text
1. At the compose message screen, select
Options > Save as QuickT ext
entering the text to use it later as preset text.
2. Complete your message.
Save Received Messages as Preset Text
When viewing a received message, select
Options > Save as QuickText
preset text.
Set Individual Message Settings
The following describes how to set message
settings for individual messages.
Note:
Your selection of each of the following
message settings overrides that selected for all
messages from
Msg Settings
Request a Message Receipt
1. When entering a message, select
Msg Settings > Msg Receipt > Request
request a message delivery notice.
2. Complete your message.
when
when
to use it later as
.
Options >
to
40 Send Messages
Page 41

Set Message Priority
1. When entering a message, select
Msg Settings > Set Priority
priority level.
2. Complete your message.
Options >
to set the
Change the Callback Number
1. When entering the message, select
> Msg Settings > Callback Number
2. Enter your callback number and select
3. Complete your message.
Options
Send Messages Later
1. When entering a message, select
Msg Settings > Send Later
2. Select
3. Press the
4. Select
5. Press the
6. Select
7. Complete your message. Your phone will
User Guide 41
Immediate
specific time to send the message.
– Scroll left or right to move between the
hour, minute, and AM/PM.
– Scroll up or down to change the hour,
minute, and AM/PM.
Next
– Scroll left or right to move between the
month, day, and year.
– Scroll up or down to change the mon th,
day, and year.
Done
save the message and send it later.
or
Set Time
OK
key to change the time.
.
OK
key to change the date.
.
Options >
.
to set a
Set the Validity Period
1. When entering a message, select
Msg Settings > Validity Period
2. Select
3. Press the
.
OK
.
4. Select
5. Press the
6. Select
7. Complete your message.
Set Time
your message valid before removing it
from the phone if not sent.
– Scroll left or right to move between the
hour, minute, and AM/PM.
– Scroll up or down to change the hour,
minute, and AM/PM.
– Scroll left or right to move between the
month, day, and year.
– Scroll up or down to change the month,
day, and year.
to set how long to keep
OK
key to change the time.
Next
.
OK
key to change the date.
Done
.
Manage Received Messages
Reply to Text Messages
When receiving a message, your phone
displays a notification and the message icon
appears at the top of your screen. The message
icon flashes with an urgent message alert if the
message is urgent.
1. When a message notification appears,
select
Inbox
Ignore
An icon appears at the top of your screen
when you have an unread message.
(to view the message) or
(to clear the notification).
Options >
.
Page 42

2. From
Inbox
View > Reply
or
3. Complete your message and select
, highlight a message and select
Options
(to compose your message)
(to access more features).
Send
Forward Messages
1. When viewing a received message, select
Options > Forward
2. Enter a number or address.
3. Complete your message and select
.
Send
Reply with a Copy of the Message
1. When viewing a received message, select
Options > Reply with Copy
The original message appears in your reply
message.
2. Complete your message and select
.
Send
Save Received Messages
When viewing a received message, select
Options > Save Message
Msgs
.
to save it to
Saved
View Sender Information
When viewing a received message, select
Options > Sender
add to an existing contact, or create a new
contact depending on the sender.
to view an existing contact,
Lock Messages
When viewing a received message, select
Options > Lock Msg
accidental deletion. To unlock the message,
select
Options > Unlock Msg
42 Manage Voicemail
to protect it from
.
Call a Number in a Message
When viewing a received message, press the
Send
.
key to call a valid number in the
message.
Go to Web Addresses in Messages
When viewing a received message, select
Options > Launch Browser
address included in the message.
.
to go to a web
Sort Messages in Inbox
1. From
Inbox
, select
2. Select a sort option.
Options > Sort
Manage Voicemail
.
Configure your Voicemail
Before your phone can receive voicemail
messages, you need to set up a password and
record a personal greeting with your service
provider.
When you have set up your voicemail, all
unanswered calls to your phone are
automatically transferred to voicemail, even if
your phone is in use or turned off.
1. Press and hold the 1 key.
2. Follow the system prompts to create a
password and record a greeting.
.
Page 43

Check your Voicemail
When you receive a voicemail message, a
notification with a voicemail message icon
appears at the top of your screen.
• At the voicemail notification, select
Call
call your voicemail number and follow the
system prompts to retrieve the message.
Select
Ignore
to clear the notification
without checking messages. The
notification icon remains on top of the
screen until you listen to the message.
• When only the voicemail message icon
appears on top of the screen, select
Voicemail
and follow the system prompts
to retrieve the message.
Manage Sent Messages
Check Message Status in Sent Folder
Use the following symbols to check the Sent
folder for the status of messages successfully
sent.
The scheduled message will be sent at
the scheduled time. You cannot cancel
delivery of the message.
The message was sent. You cannot
cancel delivery of the message.
The message has been received.
The message has been sent to more than
one recipient.
Check Message Status in Outbox
Use the following symbols to check your
Outbox
for the status of messages sent but still
in process.
to
The message is pending and will be sent
when possible. You can cancel delivery
of the message.
The message cannot be sent because
service is not available. An alert appears
on your phone if the message cannot be
sent.
Unable to Send Messages
You may not be able to send or receive
messages if your phone’s memory is nearly
full, or if digital service is not available at the
time. To free up memory, erase old messages.
See “Erase Messages” on page 47.
Appended Messages
If you go over the character limit for a single
message, the phone may automatically append
an empty segment to your message to make
space.
Warning:
you for each message segment.
When you start a message, the maximum
character limit appears once you are in the
message entry field. This number counts down
as you enter characters, until it reaches 0.
If you continue to enter text after this counter
reaches 0, a message segment may be
appended. When you reach the message size
Your service provider may charge
User Guide 43
Page 44

limit, you are prompted to edit the message or
alerted that the message is being appended.
Note:
Appended messages may not be
available on all phones. Check with your
service provider.
Manage Browser Alerts
1. From
2. Select
Browser Alerts
Connect
, select an alert.
to launch the browser.
Message Settings
The following message settings affect all
messages unless you change them for
individual messages.
Set Message Alerts
1. From
Alerts
, select
2. Select an alert for messages.
If you select an
notifies you once when receiving a new
message and notifies you again every five
minutes. To stop a reminder alert, select
Ignore
.
Msg Alert
& Remind
Set Page Alerts
1. From
Alerts
, select
2. Select an alert for pages.
If you select an
notifies you once when receiving a new
message and notifies you again every five
minutes. To stop a reminder alert, select
Ignore
.
Page Alert
& Remind
.
alert, the phone
.
alert, the phone
Set Voicemail Alerts
1. From
Alerts
, select
Voicemail Alert
2. Select an alert for voicemails.
If you select an
notifies you once when receiving a new
message and notifies you again every five
minutes. To stop a reminder alert, select
Ignore
.
& Remind
alert, the phone
.
Set Message List View
From
Msg List View
following to set your message list display:
•
Sender & Preview
first part of messages.
•
Sender & Date-Time
and sent time of messages.
•
Msg Preview
messages.
•
Sender
displays the message sender.
, select one of the
displays the sender and
displays the send e r
displays the first part of
Set your Signature
You can create a signature to appear at the end
of all outgoing messages.
1. From
Signature
2. Select
Note:
The signature counts towards the
character limit of your message.
, enter your signature.
OK
to save the signature.
44 Manage Browser Alerts
Page 45

From
Edit Preset Messages
Your phone comes with preset messages, such
as “Please call me,” which you can insert into
the body of a text message. You can edit or
create up to 40 preset messages.
1. From
QuickT ext
– Scroll to a preset message and select
Edit
– Select
message.
2. Enter or edit the text.
3. Select
Note:
written or received as preset messages.
Save
You can also save messages you have
, do one of the following:
.
New Msg
to create a new preset
.
Set Callback Number
1. From
Callback Number
number to change your default callback
number.
2. Select
OK
to save the number.
, enter a new
Enable Save to Sent
From
Save to Sent
automatically save outgoing messages to the
Sent Msgs
folder.
, select
Enabled
to
Enable Auto-Erase
Use
Auto-Erase
messages automatically when it needs memory
for incoming messages.
User Guide 45
to set your phone to erase
Auto-Erase
•
Disabled
•
Inbox Msgs
when memory is needed.
•
Sent Msgs
Msgs
•
Both
and
Sent Msgs
Set Default Text
You can change the default text entry mode
when creating a text message. This setting
applies only to the Message field, not the Send
To field.
From
Default Text
enter text letter by letter) or
enter text with word recognition).
Request Te xt Message Receipts
From
Text Msg Receipt
request a notification when a recipient has
received your text message.
Set your Voicemail Number
Often your service provider automatically
programs your voicemail number (the number
your phone calls to retrieve voicemail). To
change it:
1. From
2. Enter your voicemail number. (Use
Options > Time Pause
enter pauses.)
3. Select
, select one of the following:
erases no messages.
erases old messages in
erases old messages in
when memory is needed.
erases old messages in both
when memory is needed.
, select
Normal Alpha
, select
Voicemail Number
or
Save
.
Rapid Mode
Request
, select
Hard Pause
Inbox
Sent
Inbox
Edit
(to
(to
to
.
to
Page 46

Erase Recent List
From
Erase Recent List
the list of recipients you have recently sent
messages to.
, select
Yes
to clear
Message Groups
You can create groups for messaging.
View Message Groups List
1. From
Message Groups
preloaded groups, followed by the custom
groups you have created.
2. Highlight a group and do one of the
following:
–Press the
– Select
– Select
OK
details.
New
Options
functions.
Create a New Message Group
1. From
Message Groups
2. Enter a name for the group and select
3. Select contacts from the list provided. A
check mark appears next to each selection.
You can also remove checkmarks.
4. When finished, select
Your new group appears the next time you
view your groups list.
, view your
key to view the groups
to create a new group.
to access more
, select
New
Done
.
.
Next
Send Text Messages to Message
Groups
1. From
Message Groups
2. Select
3. Complete your text message and select
Options > Send Text Msg
Send
.
, highlight a group.
Add Contacts to Message Groups
1. From
Message Groups
2. Select
3. If you are modifying a group you created,
4. Select contacts from the list provided. A
5. When finished, select
Options > Edit
select
Next
. Otherwise, go to the next step.
checkmark appears next to each contact in
the group. Press the
remove checkmarks.
, highlight a group.
.
OK
key to add or
Done
.
Assign Message Tone to Message
Group
1. From
Message Groups
2. At the groups details screen, scroll to the
.
group name.
3. Select
Options > Msg T one > Assign Msg
Tone
and a ringer from the list. Scroll to
play the ringers.
, select a group.
Erase a Message Group
1. From
2. Select
Message Groups
Options > Erase > Yes
, highlight a group.
.
.
46 Message Groups
Page 47

Erase Messages
Erasing old messages frees up memory in your
phone. You can erase messages as you send or
read them, erase them one at a time, or erase
them all at once.
Erase a Single Message
When viewing a received message, select
Options > Erase > Yes
Note:
You can erase a scheduled message, but
cannot cancel its delivery.
.
Erase Messages from a Folder
From
Erase Msgs
messages from. For example, to erase received
messages, select
Note:
You cannot recover deleted information.
, select a folder to erase
Inbox > Yes
.
Erase All Messages
From
Erase Msgs
messages from all folders, except for voicemail
messages.
Note:
You cannot recover deleted information.
, select
All > Yes
to erase all
Check Message Count
From
Message Count
many messages you have stored.
screen, check how
User Guide 47
Page 48

9 Settings
Settings Menu
Select
Settings
from the main menu to access the following functions:
Level 1 > Level 2 > Level 3
Settings Bluetooth
Convenience
Display
Sounds
Accessories
Network
Security
Access these options:
Access these options:
enabled),
1-Touch Dialing, Answer Hold, Fast Find, Frequent List
Minute Alert, Missed Call Alert
Access these options:
Themes, Main Menu View, My Banner, Backlighting
Brightness, Contrast, Language
Access these options:
On/Off
Access these options:
Port Speed
Access these options:
Roam/Svc Alert, Roam Option, Set Phone Line, Location
Web Alert
Access these options:
Lock Code
On/Off, My Devices
Airplane Mode, Auto Keyguard, Auto-Hyphen
, and
Set Date/Time
Set Wallpape r, Set Screensaver
Ringers, Ringer Mode, Volume, Pwr
Keypad
.
Headset Sounds, Auto-Answer, Com
,
TTY Device
, and
.
, and
T-coil Hearing Aid
Privacy Alert, Voice Privacy
Roam Call Alert
Lock Phone, Limit Calls
, and
(with
Airplane Mode
, and
Any Key Answer
, and
Date/Time Format
.
Settings
.
, and
,
New
.
,
,
.
,
,
.
,
48 Settings Menu
Page 49

Bluetooth
The Bluetooth® wireless technology (not
available on all phones) enables wireless
connectivity with accessories such as portable
or installed hands-free car kits, phones,
handsets, computers, and so on. For details,
check with your service provider.
You must use a Bluetooth device (compatible
with Class 2 Bluetooth wireless technology,
version 1.2) in order to use this phone
wirelessly. Bluetooth accessories display a
symbol on your phone.
Enable Bluetooth
Before you can connect your phone with a
Bluetooth device, you need to enable the
Bluetooth feature on your phone.
From
On/Off
, select On.
Pair with a Device
To enable your phone to communicate with a
Bluetooth device, you need to "pair" the device
with your phone. The following instructions
describe the process. You may also need to
reference the user guide provided with your
Bluetooth device.
1. Prepare the Bluetooth device (accessory)
for pairing as described in the device’s user
guide.
2. From
My Devices
phone then searches and detects any
available Bluetooth devices in the vicinity.
You must enable the Bluetooth feature on
your phone.
User Guide 49
, select
Find New
. Your
3. At the device list, highlight a device and
select
Add
Accept the pairing if prompted.
4. If necessary, enter the password provided
with the Bluetooth device and select
With the password accepted, the device
appears in your device list.
.
OK
Use Bluetooth Devices
Connect to a Device
Before you can use Bluetooth, you must get
your phone ready to communicate with a
device. This is called “connecting.”
To connect your phone to a Bluetooth device,
from
My Devices
Connect
A notification appears confirming the
connection. You can now use the device with
your phone.
Disconnect from a Device
From
My Devices
device and select
Rename a Device
1. From
2. Select
3. Enter a new name and select
, highlight a device and select
.
, highlight a connected
Disconnect
My Devices
Options > Rename
, highlight a device.
.
.
Save
.
.
Page 50

Delete a Device
You can delete a Bluetooth device that you
have paired your phone with.
1. From
2. Select
My Devices
Options > Delete > Yes
, highlight a device.
.
View Device Services
A Bluetooth device paired with your phone
may have more than one service profile (such
as Headset, Handsfree, and so on). Do the
following to check the services available:
1. From
My Devices
2. Select
3. At the service list, highlight a profile and
Options > Services
select
Connect
, highlight a device.
.
to change the active profile.
Change Bluetooth Settings
From
Settings
Bluetooth
Change Phone’s Name
You can change the name presented for other
Bluetooth devices’ search of your phone.
From
Save
Limit V is ibi li ty
By default your phone is always visible, if set
to visible mode. You can limit the time your
phone is visible to other Bluetooth devices.
From
the phone visible for your selected time before
becoming invisible.
50 Convenience
, you can modify the following
features.
My Name
.
Visible Duration
, enter a new name and select
, select an option to set
View Supported Services
Select
Services
service profiles your phone supports.
to view a list of the Bluetooth
Enable OBEX Authentication
From
OBEX Authentication
With object exchange (OBEX) authentication
enabled, you need a user name and password to
transfer files via Bluetooth.
, select
Enabled
Convenience
Use these settings to make your phone more
convenient to use.
Set Date and Time
In Airplane mode, you can set the time and
date manually.
Note:
Y ou can only access
Airplane Mode
1. From
change the date:
– Scroll left or right to move between the
– Scroll up or down to change the month,
2. Press the
3. Do the following to change the time:
– Scroll left or right to move between the
– Scroll up or down to change the hour,
4. Press the
5. Select
enabled.
Set Date/Time
month, day, and year fields.
day, and year.
OK
key to save the date.
hour, minute, and AM/PM fields.
minute, and AM/PM.
OK
key to save the time.
Done
.
Set Date/Time
, do the following to
with
.
Page 51

Enable Airplane Mode
While in an airplane, it is normally required
that you turn off your mobile phone because it
emits RF signals that interfere with air traffic
control. In airplane mode, however, your
phone does not emit RF signals. You cannot
make or receive calls, send text messages, use
the Browser or Bluetooth, but you can play
games, use the Scheduler, set the clock, and
make emergency calls to designated
emergency numbers. Please check with
uniformed personnel before operating your
phone in Airplane mode.
From
Airplane Mode
to activate airplane mode.
With airplane mode enabled, you can also set
the time and date manually.
, select
Enabled > OK
Auto Keyguard
Enable Auto Keyguard
Use
Auto Keyguard
keypad after 30 seconds of inactivity to prevent
accidental key presses.
From
Auto Keyguard
the home screen, press and hold the
key.
Unlock Keyguard
From the home screen, select
the
* Shift
key to unlock the keypad.
to automatically lock the
, select
Enabled
or from
* Shift
Unlock
and press
Enable Auto-Hyphenation
Auto-hyphenation, when enabled,
automatically inserts hyphens into your phone
numbers to be consistent with the U.S. dialing
plan (or the North American Numbering Plan).
From
Auto-Hyphen
auto-hyphenation.
, select
Enabled
Use 1-Touch Dialing
The 1-Touch Dialing feature is the fastest way
to call a speed dial location. To call a contact
with speed dial, press and hold the speed
dialing location.
If it is a two-digit location, press the first digit
briefly, then press and hold the second digit.
Note:
To use 1-Touch dialing, you must enable
1-Touch dialing on your phone and have a
speed dial location assigned to a contact.
From
1-T ouch Dialing
on 1-touch dialing.
, select
Enabled
Answer Hold
Enable Hold Call
Use
Answer Hold
hold until you are ready to answer them.
1. From
If you have not recorded a hold message,
you need to record one, such as “Please
hold. I’ll answer in a minute.”
2. Record the message twice, as prompted.
to place incoming calls on
Answer Hold
, select
Enabled
to turn on
to turn
.
User Guide 51
Page 52

3. Select
The next time a call comes in, you can place it
on hold.
Place a Call on Hold
You can place a call on hold with
Hold
Note:
receive another call, you cannot place the
incoming call on hold. With no call waiting
enabled, the call goes to
When a call comes in, do the following:
1. Select
2. Select
Change Hold Call Message
1. From
2. Record the message twice, as prompted.
3. Select
52 Convenience
Save
or
Options
following:
–
Play
to replay your message.
–
Re-Record
again.
–
Exit
to exit.
enabled.
If you are already on a call and you
Options > Answer Hold
the caller on hold with your recorded hold
message.
Answer
hold or
End Call
speaking.
Answer Hold
Msg
.
Save
and one of the following:
–
–
–
to save the message or
Play
to replay your message.
Re-Record
again.
Exit
to exit.
and one of the
to record your message
Answer
Voicemail
to speak to the caller on
to hang up without
, select
to record your message
.
to place
Re-Record
Options
Call Contact using Fast Find
1. From
Fast Find
fast find.
2. From the home screen, press the keys
corresponding to the letters of the name
you want to find. A matching contact or
speed dial entry appears.
3. Scroll to your desired contact and press the
Send
key to call the number.
, select
Enabled
to turn on
Enable Frequent List
From
Frequent List
Frequent List
most frequently called contacts appear at the
beginning of your contacts list. Scroll past the
double line to view the entire contacts list.
, select
enabled, the last 15 of your
Enabled
Enable Minute Alert
From
Minute Alert
phone alerts you with a short beep ten seconds
before each minute passes during a call.
, select
Enabled
. Your
Set Missed Call Alert
From
Missed Call Alert
for missed calls.
If you select an
notifies you once when receiving a new
message and notifies you again every five
minutes. To stop a reminder alert, select
Ignore
.
& Remind
, select an alert type
alert, the phone
. With
Page 53

Enable Any Key Answer
From
Any Key Answer
answer calls when you press any key on the
keypad.
, select
Enabled
to
Create a Custom Menu
1. From the home screen, scroll up and hold.
2. Select
3. Select features from the list provided. A
4. Select
Your new selections appear the next time you
select your custom menu.
Edit
.
check mark appears next to each selection.
You can also remove checkmarks.
Save
after selecting all your options.
Display
Set Wallpaper
You can select a wallpaper for your phone’s
home screen.
1. From
Set Wallpaper
or
Wallpapers
2. Select a file.
To turn off wallpaper, select
Set Screensaver
Screensavers appear on the home screen,
activated ten seconds after the last keypress.
Incoming calls and alerts override the
screensavers.
1. From
Set Screensaver
Images
or
2. Select a file.
To turn off screensaver, select
User Guide 53
Screensavers
, select
.
Saved Images
None
, select
.
None
.
Saved
.
Set Theme
From
Themes
display background.
, select a color theme for the
Set Main Menu View
From
Main Menu View
following:
•
Grid
displays icons of each menu item,
with its name at the top of the screen.
•
List
displays a list of all menu items.
The next time you view the
selected menu style appears.
, select one of the
Menu
, your
Set Greeting Banner
The banner is the personal label for your
phone, appearing on the home screen above the
time and date.
1. From
My Banner
2. Press the
banner.
3. Enter your new text (up to 14 characters).
4. Select
Save
, select
Edit
Back
key to clear the current
.
.
Set Backlight Duration
Use
Backlighting
and maximize the battery life.
to minimize the bright time
Page 54

From
Backlighting
following:
•
Always Dim
dim before turning off.
•
7 Seconds, 10 Seconds, 15 Seconds
Seconds
time after your last keypress.
•
Always Bright
remain bright before turning off.
, select one of the
forces the backlight to remain
, or
turns backlighting on for the set
forces the backlight to
30
Set Brightness
1. From
Brightness
brightness level.
2. Select
Save
, scroll to change the
.
Set Contrast
1. From
Contrast
contrast level.
2. Select
, scroll to change the
Save
.
Set Language
From
Language
, select a language.
Set Time and Date Format
From
Date/Time Format
date format.
, select a time and
Sounds
Y our phone has several settings that control the
sound. Y ou can select from a variety of ringers
and adjust the volume.
Ringers
From
Ringers
settings.
, you can modify the following
Set Ringers
From
Ringer Type
down the list to play the ringers.)
, select a ringer. (Scroll
Enable Roam Ringer
From
Roam Ringer
activate a specific ringer for roaming calls.
, select
Enabled
to
Set Ringer Mode
Your phone is set to make sounds when you
receive calls, press keys, navigate through
menus, and receive alerts (such as new
messages). You can silence all sounds and set
the phone to vibrate or light up when you
receive calls and alerts.
From
Ringer Mode
following:
•
Normal Sounds
or alert (in effect, returning the phone to a
non-silent mode).
•
Vibrate Only
the incoming call or other alerts.
•
Vibe Then Ring
seconds and then rings for the remainder of
the incoming call alert.
•
Lights Only
the incoming call or other alerts.
, select one of the
rings for the incoming call
vibrates for the duration of
vibrates for the first ten
lights up for the duration of
54 Sounds
Page 55

Y ou can also press and hold the
toggle between
Normal Sounds
Note:
external power source (such as a charger), even
if all sounds have been silenced.
Vibrate Only
mode.
The phone rings when attached to an
# Space
mode and
key to
Volume
From
Volume
settings.
Set Ringer Volume
1. From
set the ringer volume.
2. Press the
Set Speakerphone Volume
1. From
left to set the speakerphone volume.
2. Press the
Set Earpiece Volume
1. From
to set the earpiece volume.
2. Press the
Set Keypad Volume
1. From
the keypad volume.
2. Press the
, you can modify the following
Ringer V olume
OK
Spkrphone Volume
OK
Earpiece Volume
OK
Key V olume
OK
, scroll right or left to
key to save.
, scroll right or
key to save.
, scroll right or left
key to save.
, scroll right or left to set
key to save.
Set Power On/Off Sounds
From
Pwr On/Off
your phone play the sound when turned on.
, select
Enabled
to have
Keypad
From
Keypad
settings.
, you can modify the following
Set Key Press Sounds
From
Key Sounds
to set the sounds you hear when pressing the
keypad.
, select
Tone, Click
, or
Off
Set Key Tone Length
From
Key Length
set the length of the keypad tone.
, select
Normal
or
Long
to
Accessories
Set Headset Sounds
With a headset attached to your phone, you can
play the ringer through the headset or phone
speaker.
From
Headset Sounds
(ringing from the phone speaker) or
headset
(ringing from the headset).
Enable Auto-Answer
From
Auto-Answer
The phone automatically answers after five
seconds with a headset attached.
, select
, select
Out of phone
Out of
After 5 seconds
.
User Guide 55
Page 56

Set Com Port Speed
From
Com Port Speed
which your phone connects to a laptop or PC.
Check with your service provider for details.
, select a data rate at
Connect to TTY Device
Y ou can connect the phone to a teletype (TTY)
device for the hearing impaired. (TTY device
sold separately.)
Note:
Enable TTY only when using the phone
with a TTY device.
1. Connect the TTY device to your phone.
2. From
TTY Device
notification.
3. Select one of the following:
–
TTY Off
–
TTY On
–
TTY On + Talk
and voice carry over.
–
TTY On + Hear
and hearing carry over.
Note:
You can also enter
keypad and select
, select OK to clear the
disables TTY.
enables TTY devices.
enables TTY devices
enables TTY devices
##889
TTY
with your
to enable TTY.
Connect to Hearing Aid Device
With a T-coil hearing aid device (sold
separately) connected, you can enable the
hearing aid feature.
1. Connect the T-coil hearing aid device to
your phone.
2. From
T -coil Hearing A id
Enabled
.
56 Network
, select
OK >
Network
Enable Privacy Alert
From
Privacy Alert
your phone to alert you when enhanced digital
CDMA privacy is lost or regained.
Enable Voice Privacy
From
Voice Privacy
enhanced digital CDMA privacy.
Enable Roaming Service Alert
Use this setting if you want the phone to alert
you when you roam outside of your home
service area.
From
Roam/Svc Alert
following:
•
Disabled
•
When no svc
decreasing in pitch when service is lost and
three tones increasing in pitch when service
is acquired again.
•
On roam change
decreasing tones when roaming service is
acquired and three increasing tones when
home area service is acquired again.
•
On any change
increasing tones if there is a change in
roaming service or three decreasing tones if
the phone loses service.
, select
Enabled
to set
, select
Enhanced
, select one of the
turns roaming service alert off.
alerts you with three tones
alerts you with two
alerts you with three
to use
Page 57

Set Roaming Restrictions
Y ou can restrict your phone from making a call
when roaming.
From
Roam Option
allow roaming) or
roaming).
, select
Automatic
No Roaming
(to
(to disallow
Set Phone Line
Your phone can have two service accounts, or
phone lines, associated with it. Each phone line
has its own phone number.
Note:
You must first establish a second phone
line with your service provider. Once
established, a second phone number becomes
available in the menu for selection.
From
Set Phone Line
OK
and one of the phone lines.
When using one line, you cannot receive calls
from the other. It would be as if the phone were
“off” for that number. Your voicemail,
however, still takes messages. All contacts and
settings are shared for both lines.
, read the note and select
Set Location Information
Use
Location
information with network services other than
emergency services (for example, 911, 111,
999 and 000) in serviced areas. This feature
works only when your phone is in digital
mode. Y ou do have the option of turning off
the locator to emergency services.
to share your location
From
Location
•
911 Only
information only with emergency services
when you call your 3-digit emergency
code.
•
Location On
information, in addition to emergency
services.
, select one of the following:
(default) shares your position
shares your position
Set Web Alerts
You can set an alert to confirm the start or end
of a browser session.
From
Web Alert
•
At Start
•
At End
•
Both
session.
•
No Prompts
, select one of the following:
prompts when you start a session.
prompts when you end a session.
prompts when you start and end a
sets for no prompts.
Enable Roaming Call Alert
You can set the phone to warn you before you
answer or place a call while roaming.
Note:
Call prompt is disabled when the phone
is in Emergency Mode.
From
Roam Call Alert
The phone emits a distinctive ring to indicate
when you are roaming during a call. To accept
or place a call while roaming, you must
press
1
.
, select
Enabled
.
User Guide 57
Page 58

Security
This section describes the security features on
your phone. You can adjust these features to
prevent access to your personal information.
All security features are shielded by a
four-digit lock code (typically 0000 or the last
4 digits of your phone number).
Lock Phone
Set Lock Phone
With your phone locked, you can call only
emergency numbers or your service provider’s
customer service number. You can still receive
incoming calls.
1. From
Security
code.
2. Select
following:
–
Now
–
On power up
time you turn it on.
Unlock the Phone
1. From the home screen, select
2. Enter your four-digit lock code.
, enter your four-digit lock
Lock Phone > OK
locks the phone immediately.
and one of the
locks the phone every
Unlock
.
Set Limit Calls
You can limit the calls that can be made from
your phone to emergency numbers, your
contacts, and your service provider’s numbers.
1. From
Security
code.
2. Select
following:
–
No Limit
–
Limit Outgoing
while incoming calls still work.
–
Limit All
outgoing calls.
, enter your four-digit lock
Limit Calls
and one of the
does not limit calls.
limits outgoing calls
limits both incoming and
Change Lock Code
Change your lock code from the default.
1. From
Security
code.
2. Select
3. Enter a new four-digit code.
4. Re-enter your new lock code.
, enter your four-digit lock
New Lock Code > Yes
.
58 Security
Page 59

10 Browser
You can use your phone to browse the Internet
if you have obtained phone Internet services
from your service provider and if over-the-air
Internet access is available in your area.
Launch Browser
Select
Browser
appears notifying of airtime fees, if you have
enabled web alerts. Select
If this is the first time you have connected to
the Internet, a message informs you that
security is not yet enabled for your browser.
Select
to launch the browser. An alert
OK
Yes
to enable security.
to continue.
Add a Bookmark
1. Surf to the Web page you want to
bookmark and select
Bookmarks
2. Edit the bookmark’s details, if needed.
3. Select
To access your saved bookmarks, select
Options > Bookmarks
Options > Save
bookmark.
Options > Add to
.
to save the
from any web page.
Browse the Web
A browser home page with a list of bookmarks
and some browser menu options appear when
you are connected to the Web. The lock icon
appears in a secure session. You can do the
following:
• To choose a site, scroll to the link and press
the
OK
• An underline and an arrow indicate that
•Press the
•Press the
• Select
User Guide 59
key.
there is more text. Scroll down to view the
rest of the text.
Back
screen.
features.
key to return to the previous
End
key to exit.
Options
to access more browser
Page 60

11 Downloads
How does BREW Work?
Your Kyocera phone has the added ability to
download and manage applications through
BREW .
You connect to the server, download
applications, and then manage them as you
like. When you choose an application, you
have the option of choosing a demo, various
limited use options, or the full version—all
varying in price. If you choose a demo, BREW
lets you know when it has expired. If you
choose a priced version, the amount is added to
your phone bill. BREW also lets you know if
you are running out of memory. At that point,
you can either disable an application or remove
it completely.
Once applications are loaded, you can update
to newer versions as they become available.
For more information about BREW
capabilities and application pricing, contact
your service provider.
2. Select an application type. A list of
applications appears. Long titles scroll left
as you highlight them.
3. Select an application. A list of usages
appears. There may be one or more usages
available. Prices are specified for each
usage.
4. Select a usage for the application. You are
prompted to confirm your purchase.
5. Select
To open the application now , select
select
you see a link to your new application.
Note:
server automatically ends after 30 seconds,
unless you connect again to download more
apps. If you want to end the connection
manually, press the
Yes
downloads to your phone. Download times
may vary.
to confirm. The application
No
, you return to
Your connection to the application
Downloads
End
key on your phone.
Yes
, where
. If you
Access Help for Downloads
From
Download an Application
1. From
Downloads
Catalog
of application types appears.
60 How does BREW Work?
, select
. When a connection is made, a list
Mobileshop >
Downloads
instructions on how to run and manage your
downloaded applications.
, select
Help
to get
Page 61

12 Phone Info
View Version Information
Select
Build Info
software and hardware information.
View Phone Icons
Select
Icon Keys
your phone.
to check your phone’s
to view the icons used in
User Guide 61
Page 62

13 Get Help
Customer Support
Your service provider’s customer support
department may be accessible directly from
your phone when you dial a number, such as
*611 (check with your service provider). They
can answer questions about your phone, phone
bill, call coverage area, and specific features
available to you, such as call forwarding or
voicemail. For questions about the phone
features, refer to the materials provided with
your phone, or visit
www.kyocera-wireless.com
For additional questions, you may contact the
Kyocera Communications Inc. Customer Care
Center in any of the following ways:
• Web site:
• Email: phone-help@kyocera-wireless.com.
• Phone (U. S. and Canada): 1-800-349-4478
or 1-858-882-2000 (press 2 for Product
Information).
Before requesting support, please try to
reproduce and isolate the problem. When you
contact the Customer Care Center, be ready to
provide the following information:
62 Customer Support
www.kyocera-wireless.com
.
• The name of your service provider.
• The actual error message or problem you
are experiencing.
• The steps you took to reproduce the
problem.
• The phone’s mobile equipment identifier
(MEID).
Note:
From
Scroll down to
the MEID number. If your phone uses an
electronic service number (ESN),
replaces
Phone Info
MEID
, select
MEID
. The 18-digit number is
.
Qualified Service
If the problem with your phone persists, return
the phone with all accessories and packaging to
.
the dealer for qualified service.
Phone Accessories
To shop for phone accessories, visit
kyocera.superiorcommunications.com
Build Info
ESN
.
.
Page 63

Consumer Limited Warranty
Kyocera Communications Inc. (“KYOCERA”)
offers you a limited warranty that the enclosed
product or products (the “Product”) will be free
from defects in material and workmanship for
a period that expires one year from the date of
sale of the Product to you, provided that you
are the original end-user purchaser of the
Product and provided that your purchase was
made from an authorized supplier. Transfer or
resale of a Product will automatically terminate
warranty coverage with respect to that Product.
This limited warranty is not transferable to any
third party, including but not limited to any
subsequent purchaser or owner of the Product.
KYOCERA shall, at its sole and absolute
discretion, either repair or replace a Product
(which unit may use refurbished parts of
similar quality and functionality) if found by
KYOCERA to be defective in material or
workmanship, or if KYOCERA determines
that it is unable to repair or replace such
Product, KYOCERA shall refund the purchase
price for such Product, provided that the
subject Product (i) is returned, with
transportation prepaid, to a KYOCERA
authorized service center within the one year
warranty period, and (ii) is accompanied by a
proof of purchase in the form of a bill of sale or
receipted invoice which evidences that the
subject Product is within the one year warranty
period (“Proof of Purchase”). After the one
year warranty period, you must pay all
shipping, parts and labor charges.
User Guide 63
This limited warranty does not cover and is
void with respect to the following: (i) any
Product which has been improperly installed,
repaired, maintained or modified; (ii) any
Product which has been subjected to misuse
(including any Product used in conjunction
with hardware electrically or mechanically
incompatible or used with accessories not
approved by KYOCERA), abuse, accident,
physical damage, abnormal operation,
improper handling, neglect, exposure to fire,
water or excessive moisture or dampness or
extreme changes in climate or temperature;
(iii) any Product operated outside published
maximum ratings; (iv) cosmetic damage; (v)
any Product on which warranty stickers or
Product serial numbers have been removed,
altered, or rendered illegible; (vi) cost of
installation, removal or reinstallation; (vii)
signal reception problems (unless caused by
defects in material and workmanship); (viii)
damage the result of fire, flood, acts of God or
other acts which are not the fault of
KYOCERA and which the Product is not
specified to tolerate, including damage caused
by mishandling, shipping and blown fuses; (ix)
consumable (such as fuses); or (x) any Product
which has been opened, repaired, modified or
altered by anyone other than KYOCERA or a
KYOCERA authorized service center.
Page 64

USE ONLY KYOCERA APPROVED
ACCESSORIES WITH KYOCERA
PHONES. USE OF ANY UNAUTHORIZED
ACCESSORIES MAY BE DANGEROUS
AND WILL INVALIDATE THE PHONE
WARRANTY IF SAID ACCESSORIES
CAUSE DAMAGE OR A DEFECT TO THE
PHONE.
KYOCERA SPECIFICALLY DISCLAIMS
LIABILITY FOR ANY AND ALL DIRECT,
INDIRECT, SPECIAL, GENERAL,
PUNITIVE, EXEMPLARY, AGGRAVATED,
INCIDENTAL OR CONSEQUENTIAL
DAMAGES, EVEN IF ADVISED OF THE
POSSIBILITY THEREOF, WHETHER
FORESEEABLE OR UNFORESEEABLE OF
ANY KIND WHA TSOEVER, INCLUDING
BUT NOT LIMITED TO LOSS OF PROFITS,
UNANTICIPATED BENEFITS OR
REVENUE, ANTICIPATED PROFITS
ARISING OUT OF USE OF OR INABILITY
TO USE ANY PRODUCT (FOR EXAMPLE,
WASTED AIRTIME CHARGES DUE TO
THE MALFUNCTION OF A PRODUCT) OR
CONTRIBUTION OR INDEMNITY IN
RESPECT OF ANY CLAIM RELATED TO A
PRODUCT.
REP AIR OR REPLACEMENT OF A
DEFECTIVE PRODUCT OR REFUND OF
THE PURCHASE PRICE RELATING TO A
DEFECTIVE PRODUCT, AS PROVIDED
UNDER THIS W ARRANTY, ARE YOUR
SOLE AND EXCLUSIVE REMEDIES FOR
BREACH OF THE LIMITED WARRANTY,
AND SUBJECT TO THIS W ARRANTY, THE
PRODUCTS ARE APPROVED AND
ACCEPTED BY YOU “AS IS”.
KYOCERA MAKES NO OTHER
WARRANTIES, REPRESENTATIONS OR
CONDITIONS OF ANY KIND, ORAL OR
VERBAL, EXPRESS OR IMPLIED,
STATUTORY OR OTHERWISE, WITH
RESPECT TO THE PRODUCTS,
INCLUDING BUT NOT LIMITED TO ANY
IMPLIED W ARRANTY OR CONDITION OF
MERCHANTABILITY OR FITNESS FOR.
A PARTICULAR PURPOSE OR AGAINST
INFRINGEMENT OR ANY IMPLIED
WARRANTY OR CONDITION ARISING
OUT OF TRADE USAGE OR OUT OF A
COURSE OF DEALING OR COURSE OF
PERFORMANCE.
NO DEALER, DISTRIBUTOR, AGENT OR
EMPLOYEE IS AUTHORIZED TO MAKE
ANY MODIFICATION OR ADDITION TO
THIS WARRANTY.
Some jurisdictions do not allow the exclusion
or limitation of incidental or consequential
damages, or allow limitations on how long an
implied warranty lasts, so the above limitations
or exclusions may not apply to you. This
limited warranty gives you specific legal
rights, and you may also have other rights
which vary from jurisdiction to jurisdiction.
For warranty service information, please call
the following telephone number from
anywhere in the continental United States and
Canada:
1-800-349-4478 or 858-882-1401.
64 Phone Accessories
Page 65

Index
Numerics
1-touch dialing
A
accessories
headsets
T-coil hearing aid
TTY device
airplane mode
set date and time
alarm clock
alerts
browser
calls
lights only
messages
minute
missed calls
pages
roaming
scheduler
vibrate
voice privacy
voicemail
applications
downloading
auto-hyphenation
B
backlighting
banner
battery
charging
drain
installing
User Guide 65
, 30, 54
, 53
, 10
, 51
, 62
, 55
, 56
, 51
, 36
, 57
, 54
, 44
, 52
, 44
, 54, 56, 57
, 35
, 54
, 44
, 54
, 9
, 9
, 52
, 60
, 51
, 56
, 50
, 56
recharging
safety guidelines
Bluetooth
activating
adding devices
changing phone name
connecting
connecting devices
deleting devices
OBEX authentication
pairing
renaming devices
visibility
bookmarks
Brick Attack
browser
alerts
bookmarks
launching
navigating
C
calculator
calendar, see scheduler
call history, see call lists
call lists
all
erasing
incoming
missed
outgoing calls
saving numbers
sending messages
viewing contacts
, 20
, 49
, 49, 50
, 50
, 59
, 32
, 44, 57
, 36
, 21
, 20
, 21
, 9
, 49
, 49
, 59
, 59
, 59
, 49
, 20
, 10
, 50
, 21
, 21
, 50
, 49
, 50
, 49
, 21
Page 66

call logs, see call lists
call timers
all
, 21
data
, 22
home
, 22
incoming
, 22
outgoing
, 22
recent
, 22
roaming
caller IDs
calls
CDMA privacy
com port speed
consumer limited warranty
contact groups
contacts
66
, 22
, 29
alerts
, 54
answering
any key answer
auto answer
call lists
emergency
ending
limiting
making
missed
placing on hold
redialing
silencing
timing
, 15
, 15
, 52
, 52
, 20
, 58
, 15
, 16
, 15
, 16
, 56
, 53
, 55
, 52
, 56
, 27
, 23
adding
, 24
adding prefixes
assigning alerts
assigning pictures
calling
changing primary number
checking memory
, 24
, 25
, 25
, 25
, 28
, 63
, 26
editing
, 25
erasing
, 26, 27
groups
, 27
number types
sending messages
sending vCard
viewing
web addresses
contacts list
conventions, using this guide
countdown timer
customer support
D
data counter
display
, 53
brightness
contrast
language
time and date
downloads
help
drafts folder
E
earpiece
emergency calls
emergency services
F
fast find
, 52
frequent list
G
games
Brick Attack
groups
adding
adding contacts
, 23
, 23
, 22
, 54
, 54
, 60
, 60
, 40
, 15
, 52
, 27, 28, 46
, 54
, 16
, 37
, 62
, 32
, 25
, 25
, 26
, 54
, 24
, 57
, 26
, 14
Page 67

assigning alerts
assigning pictures
editing
erasing
sending messages
viewing
groups list
H
headset sounds
headsets
auto answer
help, getting
hold calls
activating
changing message
I
icons
, 12
images
erasing
sending
inbox
, 41
incoming calls
Internet
, 59
K
keyguard
activating
unlocking
keypad
setting sounds
tone length
L
language
, 54
location information
lock code
, 58
User Guide 67
, 27, 46
, 28, 46
, 27, 46
, 27, 46
, 55
, 62
, 51
, 31
, 29
, 20
, 51
, 51
, 55
, 55
, 27, 46
, 55
, 57
, 28
, 27, 46
, 52
M
media files
assigning
details
, 30
erasing
, 30, 31
locking
, 30
playing
, 30
renaming
sending
media gallery
menus
message groups
messages
, 30
contacts
, 23
custom
, 53
main
, 13
media gallery
messaging
recent calls
setting main view
settings
, 48
tools
, 32
adding addresses
adding contacts
adding groups
adding preset text
alerts
, 44
appended
callback number
calling numbers
checking status
completing drafts
creating
, 39
delivery receipts
erasing
, 45, 47
forwarding
incoming calls
, 30
, 30
, 29
, 38
, 20
, 28, 46
, 43
, 42
, 29
, 39
, 39
, 43
, 39
, 53
, 40
, 40, 45
, 41, 45
, 42
, 40
, 40, 45
Page 68

list view
, 44
locking
, 42
recent calls
recent list
replying
saving
saving addresses
saving drafts
saving preset text
sending later
setting priority
signature
sorting
unable to send
validity period
viewing sender
web addresses
missed calls
multimedia
N
navigation shortcuts
notifications
messages
voicemail
number prefixes
number types
O
OBEX authentication
outbox
outgoing calls
P
pages
alerts
phone
accessories
, 43
, 41, 42
, 42, 45
, 42
, 21
, 29
, 44
, 39
, 39, 46
, 40
, 41
, 44
, 41
, 43
, 25
, 25
, 20
, 62
, 41
, 43
, 41
, 42
, 42
, 11
, 40
, 40
, 50
answering calls
build information
changing lock code
codes
, 24
extensions
icons
, 12, 61
locking
, 58
making calls
overview
, 11
service
, 62
switching numbers
turning on
power on sounds
preset text
, 40, 45
primary number
Q
quick alarm
R
ringers
roaming
S
scheduler
, 36
assigning
, 30
alerts
, 54, 56, 57
restrictions
, 33
alerts
, 35
auto erase
copying events
creating events
day view
, 34
editing events
erasing events
event priority
event reminders
finding dates
, 24
, 15
, 57
, 35
, 55
, 26
, 15
, 35
, 34
, 35
, 33
, 34
, 35
, 15
, 35
, 61
, 58
, 57
68
Page 69

finding events
month view
sending events
silent mode
sorting events
work hours
screensavers
security
, 58
sent messages folder
settings
accessories
convenience
display
network
scheduler
security
sounds
silent mode
sounds
erasing
power
sending
silence all
speakerphone
speed dial list
adding contact
editing
using
stopwatch
support, customer
symbols
, 18
T
T-coil hearing aid
teletype device
text entry
letters
User Guide 69
, 34
, 35
, 35
, 29, 53
, 55
, 50
, 53
, 56
, 35, 50, 54, 55
, 58
, 54
, 54
, 31
, 55
, 29
, 54
, 15, 16
, 28
, 16
, 37
, 56
, 17, 19
, 17
, 34
, 34
, 34
, 26
, 62
, 56
, 43, 45
modes
, 17, 45
numbers
rapid entry
symbols
text messages
themes
, 53
timer
, 37
tip calculator
tools
, 32
alarm clock
calculator
scheduler
stopwatch
timer
, 37
tip calculator
voice memos
V
vibrate mode
voice memos
playing
recording
voicemail
alerts
, 44
changing number
checking
configuring
volume
adjusting
earpiece
keypad
ringers
speakerphone
W
wallpapers
warranty
, 29, 53
, 63
web browser
, 17
, 18
, 18
, 39, 41
, 36
, 36
, 33
, 37
, 54
, 33
, 30, 33
, 33
, 43
, 16
, 55
, 55
, 55
, 59
, 36
, 42
, 36
, 33
, 55
, 45
Page 70

70
Page 71

User Guide 71
Page 72

Kyocera Communications Inc.
www.kyocera-wireless.com
82-L2707-1EN, Rev. 001
 Loading...