

Page 1

KYOCERA Rise
User Guide
© 2012 Kyocera Corporation. All rights reserved. The “Virgin” name and the Virgin signature
logo are registered trademarks of Virgin Enterprises Limited and are used under license. All
other trademarks are the property of their respective owners. KYOCERA is a registered
trademark of Kyocera Corporation.
Page 2

Table of Contents
Get Started ................................................................................................................................ 1
Your Device at a Glance ......................................................................................................... 2
Set Up Your Device ................................................................................................................ 2
Activate Your Device .............................................................................................................. 3
Create Your Account and Pick Your Plan ................................ ............................................ 4
Activate Your Device ........................................................................................................... 4
Account Management ............................................................................................................. 4
Managing Your Account ...................................................................................................... 4
Top-Up Your Account ......................................................................................................... 5
Set Up Voicemail ................................................................ .................................................... 5
Mobile ID ................................................................................................................................ 6
Installing an ID Pack ........................................................................................................... 6
Switching ID Packs ............................................................................................................. 7
Customer Support .................................................................................................................. 7
Virgin 411 ............................................................................................................................... 7
Device Basics ............................................................................................................................ 8
Your Device’s Layout .............................................................................................................. 9
Key Functions ..................................................................................................................... 9
Turn Your Device On and Off ................................................................................................10
Turn Your Device On .........................................................................................................11
Turn Your Device Off .........................................................................................................11
Turn Your Screen On and Off ................................................................................................11
Turn the Screen Off When Not in Use ................................................................................11
Turn the Screen On and Unlock It ......................................................................................11
Touchscreen Navigation ........................................................................................................12
Touch .................................................................................................................................12
Touch and Hold..................................................................................................................12
Drag ...................................................................................................................................12
Slide or Flick ......................................................................................................................12
Pinch and Spread ..............................................................................................................13
TOC i
Page 3

Rotate ................................................................................................................................13
Your Home Screens ..............................................................................................................13
Home Screen Overview .....................................................................................................13
Customize the Home Screens ............................................................................................14
Status Bar .............................................................................................................................15
Status Icons .......................................................................................................................16
Notification Icons ................................................................................................................16
Enter Text ..............................................................................................................................17
Slide-out QWERTY Keyboard ............................................................................................17
Touchscreen Keyboard ......................................................................................................19
Enter Text Using Swype .....................................................................................................19
Enter Text Using the Android Keyboard .............................................................................24
Copy and Paste Text .........................................................................................................28
Google Account .....................................................................................................................30
Create a Google Account ...................................................................................................30
Sign In to Your Google Account .........................................................................................31
Add Account ......................................................................................................................31
General Sync Settings .......................................................................................................32
Phone .......................................................................................................................................33
Make Phone Calls .................................................................................................................33
Call Using the Phone Dialpad ............................................................................................33
Call From Recent Calls ................................................................ ......................................34
Call From People ...............................................................................................................34
Call a Number in a Text Message ......................................................................................35
Call Emergency Numbers ..................................................................................................35
Call Numbers with Pauses .................................................................................................36
Call Using Plus (+) Code Dialing ........................................................................................36
Call Using the Internet Calling ............................................................................................36
Receive Phone Calls .............................................................................................................37
Voicemail ...............................................................................................................................38
Set Up Voicemail ...............................................................................................................38
Voicemail Notification .........................................................................................................39
Retrieve Your Voicemail Messages....................................................................................39
TOC ii
Page 4

Voicemail Settings .............................................................................................................39
Phone Call Options................................................................................................................40
Caller ID .............................................................................................................................40
Call Waiting ........................................................................................................................40
Other Call Settings .............................................................................................................41
In-Call Options ...................................................................................................................42
Call Log .................................................................................................................................43
View Recent Calls ..............................................................................................................43
Call Log Options ................................................................................................................43
Clear Call Logs ..................................................................................................................44
Device Settings .........................................................................................................................45
WIRELESS & NETWORKS Settings .....................................................................................45
Wi-Fi ..................................................................................................................................45
Bluetooth............................................................................................................................45
Data Usage ........................................................................................................................45
Airplane Mode ....................................................................................................................46
Mobile Networks ................................................................................................................47
DEVICE Settings ...................................................................................................................48
Sound ................................................................................................................................48
Display ...............................................................................................................................50
Storage ..............................................................................................................................52
Battery ...............................................................................................................................52
PC Connection ...................................................................................................................52
Apps ..................................................................................................................................52
PERSONAL Settings .............................................................................................................53
Accounts & Sync ................................................................................................................53
Location Services ...............................................................................................................53
Security ..............................................................................................................................54
Language & Input ...............................................................................................................58
Backup & Reset ................................................................ .................................................58
SYSTEM Settings ..................................................................................................................59
Date & Time .......................................................................................................................59
Accessibility .......................................................................................................................60
TOC iii
Page 5

Developer Options .............................................................................................................61
About Phone ......................................................................................................................61
System Update ..................................................................................................................61
People ......................................................................................................................................63
Get Started with People .........................................................................................................63
Access People ...................................................................................................................63
People List Options ............................................................................................................64
Add a New People Entry .......................................................................................................64
Save a Phone Number ..........................................................................................................66
Edit a People Entry ................................................................................................................66
Add or Edit Information for a People Entry .........................................................................67
Assign a Stored Picture to a People Entry..........................................................................67
Assign a New Picture to a People Entry .............................................................................67
Assign a Ringtone to a People Entry ..................................................................................68
Assign a Vibration to a People Entry .................................................................................. 68
Add an Entry to Favorites ...................................................................................................68
Send an Entry’s Call to Voicemail ......................................................................................68
Delete a People Entry ........................................................................................................69
Select People List ..................................................................................................................69
Customize People List ...........................................................................................................69
Synchronize People Entries ...................................................................................................69
Display Options .....................................................................................................................70
Share a People Entry ............................................................................................................70
Messaging ................................................................................................................................72
Gmail .....................................................................................................................................72
Access Gmail ................................ ..................................................................................... 72
Send a Gmail Message ......................................................................................................73
Read and Reply to Gmail Messages ................................ ..................................................73
Email .....................................................................................................................................74
Add an Email Account (POP3 or IMAP) .............................................................................74
Add a Corporate Account ...................................................................................................75
Create Another Email Account ...........................................................................................76
Compose and Send Email .................................................................................................76
TOC iv
Page 6

View and Reply to Email ....................................................................................................77
Manage Your Email Inbox ..................................................................................................77
Email General Settings ......................................................................................................78
Email Account Settings ................................................................................................ ......78
Delete an Email Account ....................................................................................................79
Text Messaging and MMS .....................................................................................................80
Compose Text Messages ..................................................................................................80
Send a Multimedia Message (MMS) ..................................................................................81
Save and Resume a Draft Message ...................................................................................82
New Messages Notification ................................................................................................83
Managing Message Conversations ....................................................................................83
Text and MMS Options ......................................................................................................85
Social Networking Accounts ..................................................................................................86
YouTube ................................ ............................................................................................ 86
Google Talk ...........................................................................................................................87
Signing In and Chatting ......................................................................................................87
Managing Your Friends ......................................................................................................89
Mobile Indicators ................................................................................................................89
Signing Out ........................................................................................................................90
Google Talk Settings ..........................................................................................................90
Applications and Entertainment .................................................................................................92
Google Play Store App ..........................................................................................................92
Find and Install an Application ...........................................................................................92
Create a Google Wallet Account ........................................................................................94
Request a Refund for a Paid Application ............................................................................94
Open an Installed Application.............................................................................................94
Uninstall an Application ......................................................................................................95
Get Help with Google Play .................................................................................................95
Navigation .............................................................................................................................95
Google Maps .....................................................................................................................96
Google Navigation .............................................................................................................98
Google Latitude..................................................................................................................98
Google Play Music App ....................................................................................................... 101
TOC v
Page 7

Open the Play Music Library ............................................................................................ 102
Play Music ....................................................................................................................... 102
Search for Music in the Play Music Library ....................................................................... 104
Use Playlists .................................................................................................................... 104
Back Up Your Downloaded Music Files ........................................................................... 105
Web and Data ......................................................................................................................... 107
Wi-Fi .................................................................................................................................... 107
Turn Wi-Fi On and Connect to a Wireless Network .......................................................... 107
Check the Wireless Network Status ................................................................................. 108
Connect to a Different Wi-Fi Network ............................................................................... 108
Data Services ...................................................................................................................... 109
Launch a Web Connection ............................................................................................... 109
Data Connection Status and Indicators ............................................................................ 109
Browser ............................................................................................................................... 110
Learn to Navigate the Browser ......................................................................................... 110
Browser Menu .................................................................................................................. 111
Select Text on a Web Page ............................................................................................. 112
Adjust Browser Settings ................................................................................................... 113
Adjust Browser Privacy and Security Settings .................................................................. 113
Adjust Browser Accessibility Settings ............................................................................... 114
Adjust Browser Advanced Settings .................................................................................. 115
Adjust Browser Bandwidth Management Settings ............................................................ 116
Adjust Browser Labs Settings .......................................................................................... 116
Set Search Engine ........................................................................................................... 116
Create Website Settings .................................................................................................. 116
Reset the Browser to Default ........................................................................................... 117
Set the Browser Home Page ............................................................................................ 117
Read Web Page Offline ................................................................................................... 117
Manage Bookmarks ......................................................................................................... 117
Camera and Video .................................................................................................................. 119
Take Pictures ...................................................................................................................... 119
Open the Camera ............................................................................................................ 119
Camera Viewfinder Screen .............................................................................................. 120
TOC vi
Page 8

Review Screen ................................................................................................................. 121
Take a Picture .................................................................................................................. 121
Close the Camera ............................................................................................................ 122
Record Videos ..................................................................................................................... 122
Video Viewfinder Screen .................................................................................................. 122
Record a Video ................................................................................................................ 123
Camera/Video Settings ........................................................................................................ 124
View Pictures and Videos Using Gallery .............................................................................. 125
Open Gallery .................................................................................................................... 125
View Photos and Videos .................................................................................................. 126
Zoom In or Out on a Photo ............................................................................................... 126
Watch a Video ................................................................................................................. 127
Close Gallery ................................................................................................................... 127
Working with Photos ............................................................................................................ 127
Photo Options Menu ........................................................................................................ 127
Edit a Photo ..................................................................................................................... 128
Rotate and Save a Photo ................................................................................................. 128
Crop a Photo .................................................................................................................... 129
Share Photos and Videos .................................................................................................... 129
Send Photos or Videos by Email/Gmail ............................................................................ 130
Send Photos or Videos by Multimedia Message .............................................................. 130
Send Photos or Videos Using Bluetooth .......................................................................... 130
Share Photos or Videos on Google+ ................................................................................ 131
Share Photos on Picasa ................................................................................................... 131
Share Videos on YouTube ............................................................................................... 132
Tools and Calendar ................................................................................................................. 133
Calendar .............................................................................................................................. 133
Add an Event to the Calendar .......................................................................................... 133
Invite Guests to Your Event.............................................................................................. 134
Event Alerts ..................................................................................................................... 135
View Events ..................................................................................................................... 136
Erase Events ................................................................................................................... 137
Show or Hide Calendars .................................................................................................. 138
TOC vii
Page 9

Synchronize Calendars with Your Device......................................................................... 138
Clock & Alarm ...................................................................................................................... 138
Open Clock ...................................................................................................................... 138
Set an Alarm .................................................................................................................... 139
Change Alarm Settings ................................................................................................ .... 140
Calculator ............................................................................................................................ 141
Voice Service ...................................................................................................................... 141
Automatic Speech Recognition (ASR) .............................................................................. 141
Text-to-speech Settings ................................................................................................... 142
Voice Search ................................................................................................................... 142
Eco Mode ............................................................................................................................ 143
Bluetooth ................................................................................................................................. 145
Turn Bluetooth On or Off ..................................................................................................... 145
The Bluetooth Menu ................................ ................................................................ ............ 145
Connect a Bluetooth Headset or Car Kit ................................ .............................................. 146
Reconnect a Headset or Car Kit .......................................................................................... 147
Disconnect or Unpair From a Bluetooth Device ................................................................... 147
Disconnect a Bluetooth Device ........................................................................................ 147
Unpair From a Bluetooth Device ...................................................................................... 147
Send and Receive Information Using Bluetooth ................................................................... 148
Send Information From Your Device to Another Device ................................................... 148
Receive Information From Another Device ....................................................................... 149
microSD Card ......................................................................................................................... 151
Remove the microSD Card .................................................................................................. 151
Insert a microSD Card ......................................................................................................... 152
View the microSD Card Memory .......................................................................................... 152
Format the microSD Card .................................................................................................... 152
Unmount the microSD Card ................................................................................................. 153
Use the Device’s microSD Card as a USB Drive ................................................................. 153
Use the Device’s microSD Card as a Media Device ............................................................ 154
Notes ...................................................................................................................................... 155
Copyrights ............................................................................................................................... 156
Index ....................................................................................................................................... 157
TOC viii
Page 10

Get Started
This section gives you all the information you need to set up your device and the service the first
time.
Your Device at a Glance
Set Up Your Device
Activate Your Device
Account Management
Set Up Voicemail
Mobile ID
Customer Support
Virgin 411
Get Started 1
Page 11
Your Device at a Glance
Set Up Your Device
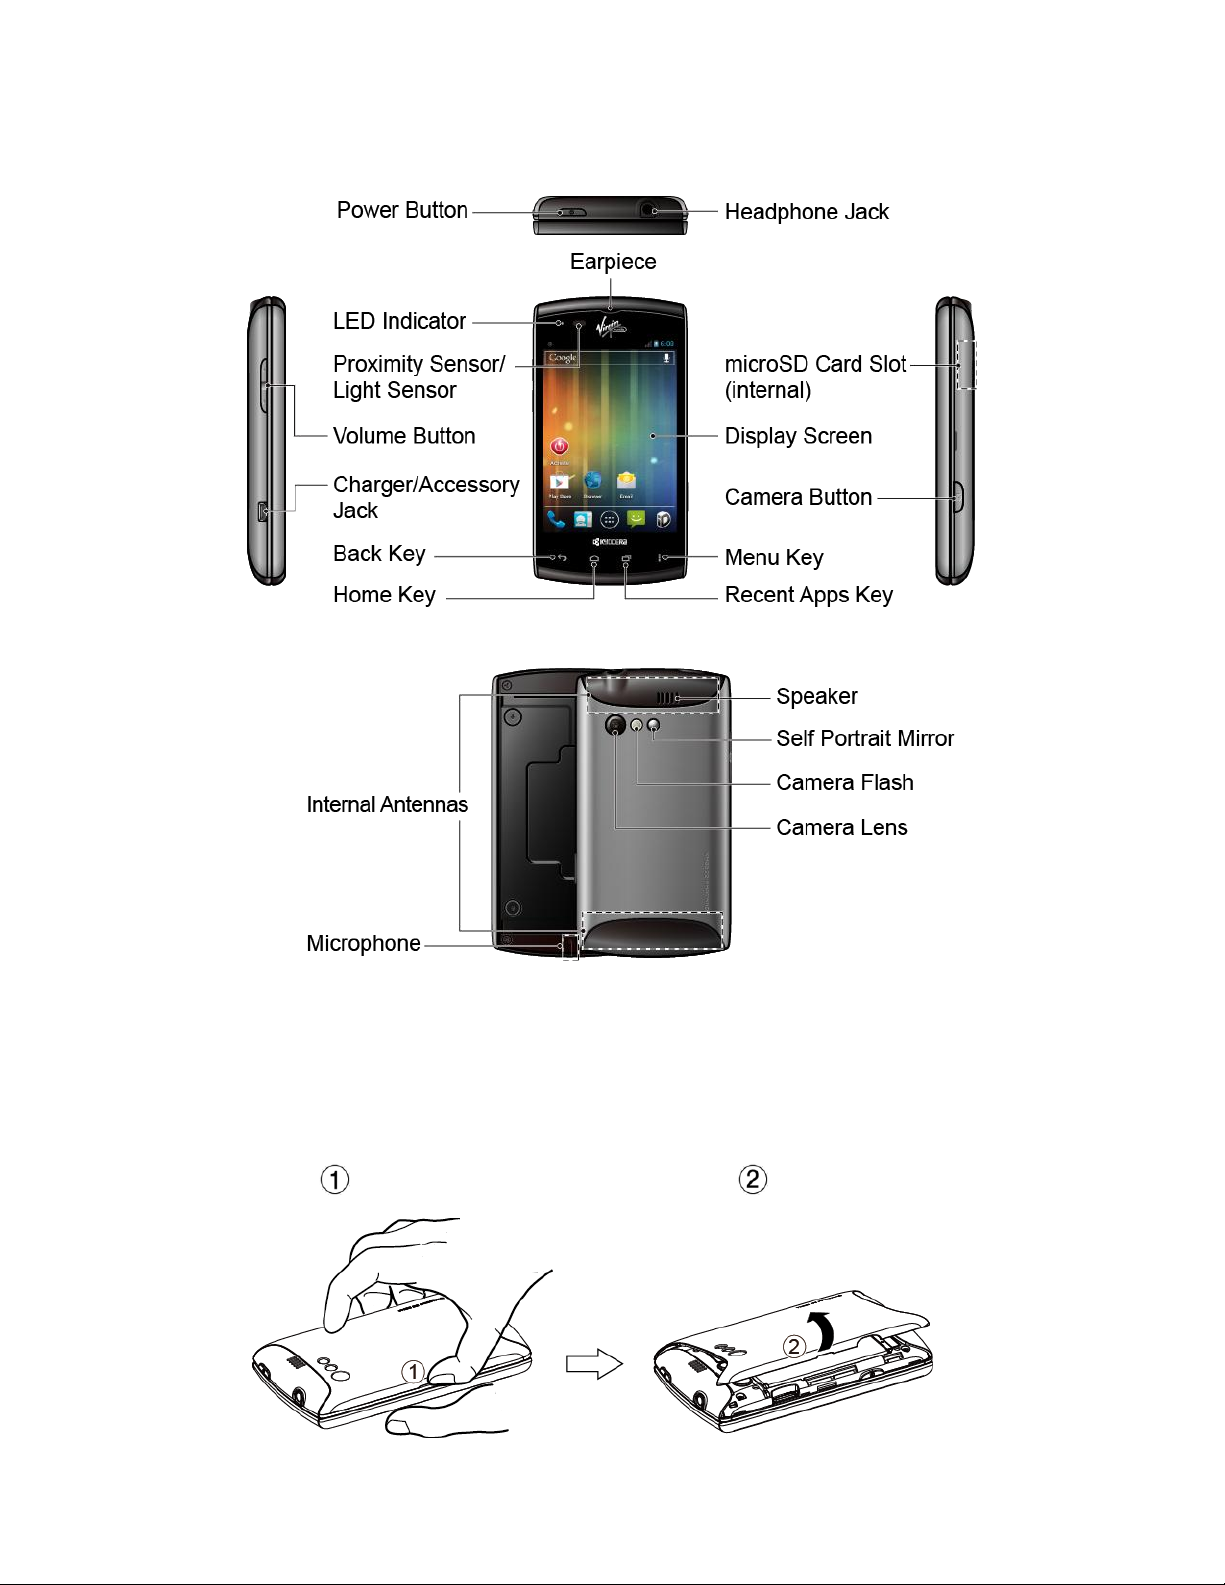
You must first install and charge the battery to begin setting up your device.
1. Install the battery.
Hook your thumb- or fingernail into the slot at the left side of the battery compartment
cover ( ) and gently lift up to remove the cover ( ).
Get Started 2
Page 12
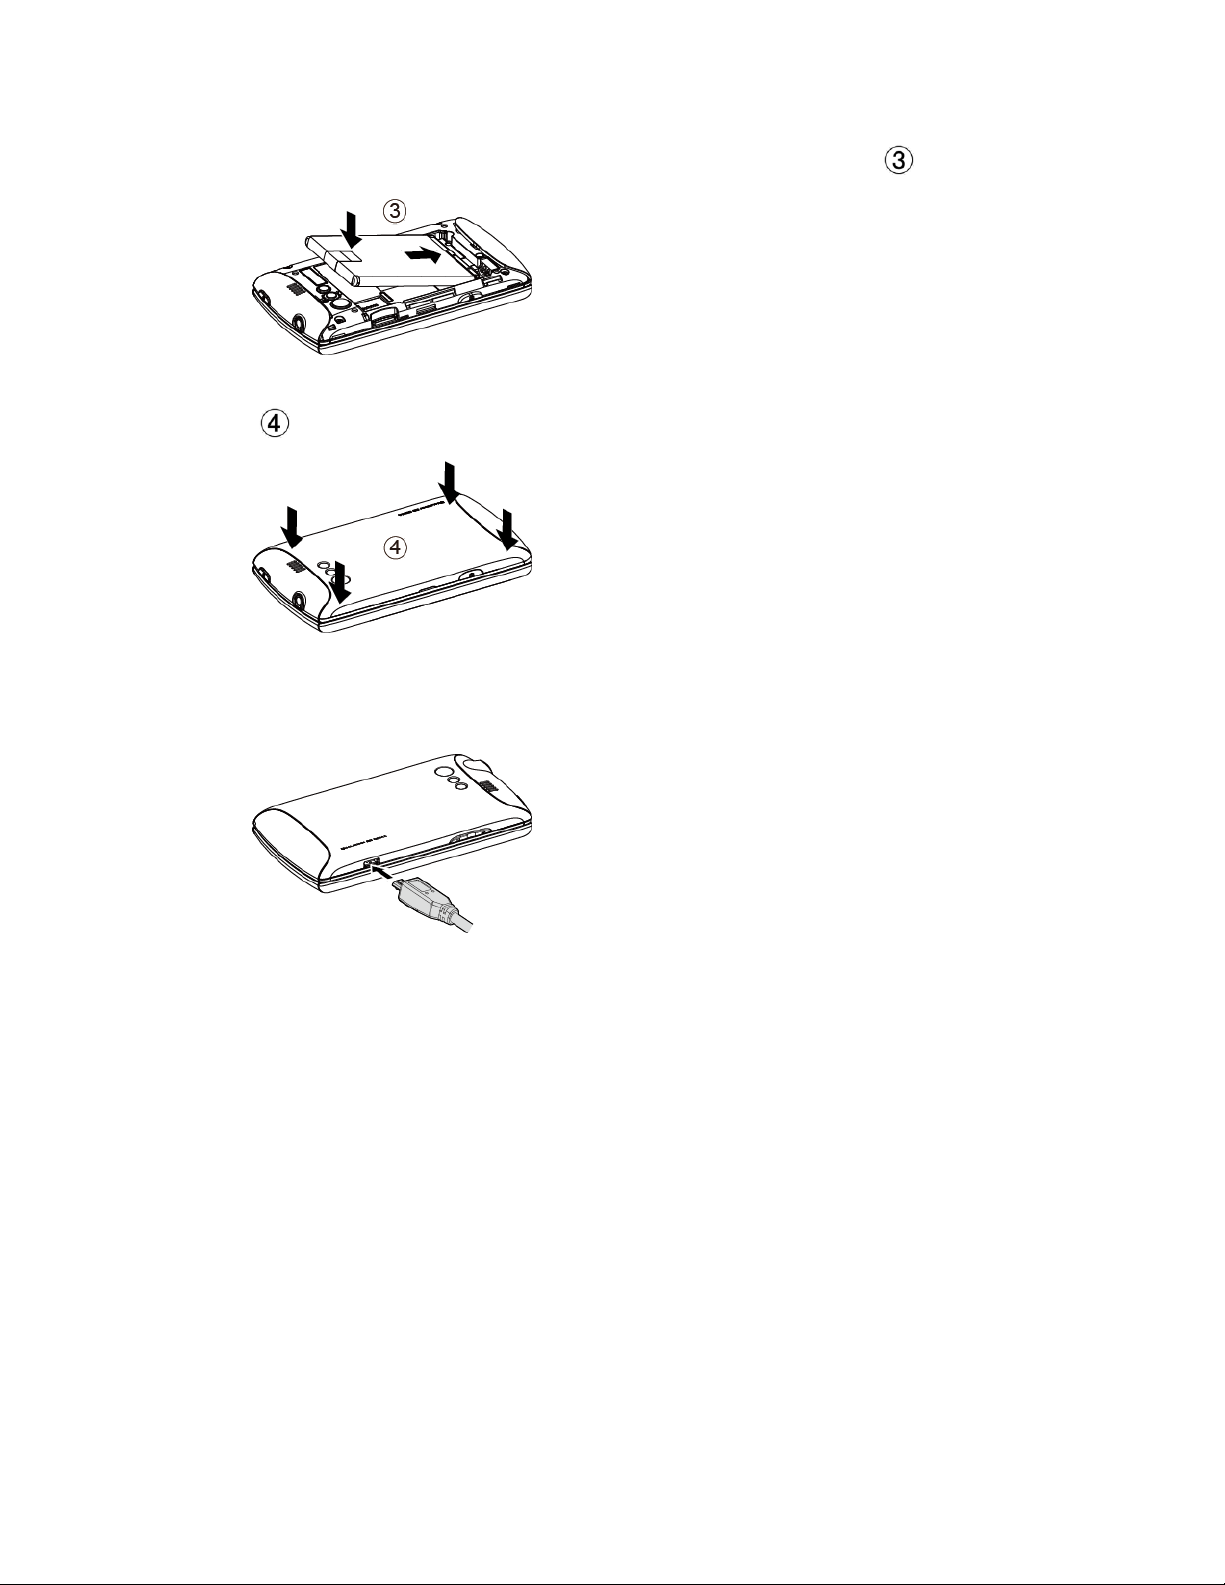
Insert the battery, contacts end first, and gently press into place ( ).
Make sure the locking tabs of the cover are seated and then gently press the cover.
( ).
2. Charge your battery.
Plug the smaller end of the micro-USB cable into the device’s charger/accessory jack.
Plug the other end of the USB cable into the charger, and then plug the charger into
an electrical outlet.
WARNING: Do not handle a damaged or leaking Li-Ion battery as you can be burned.
Note: Your device’s battery should have enough charge for the device to turn on and find a
signal, run the setup application, set up voicemail, and make a call. You should fully
charge the battery as soon as possible.
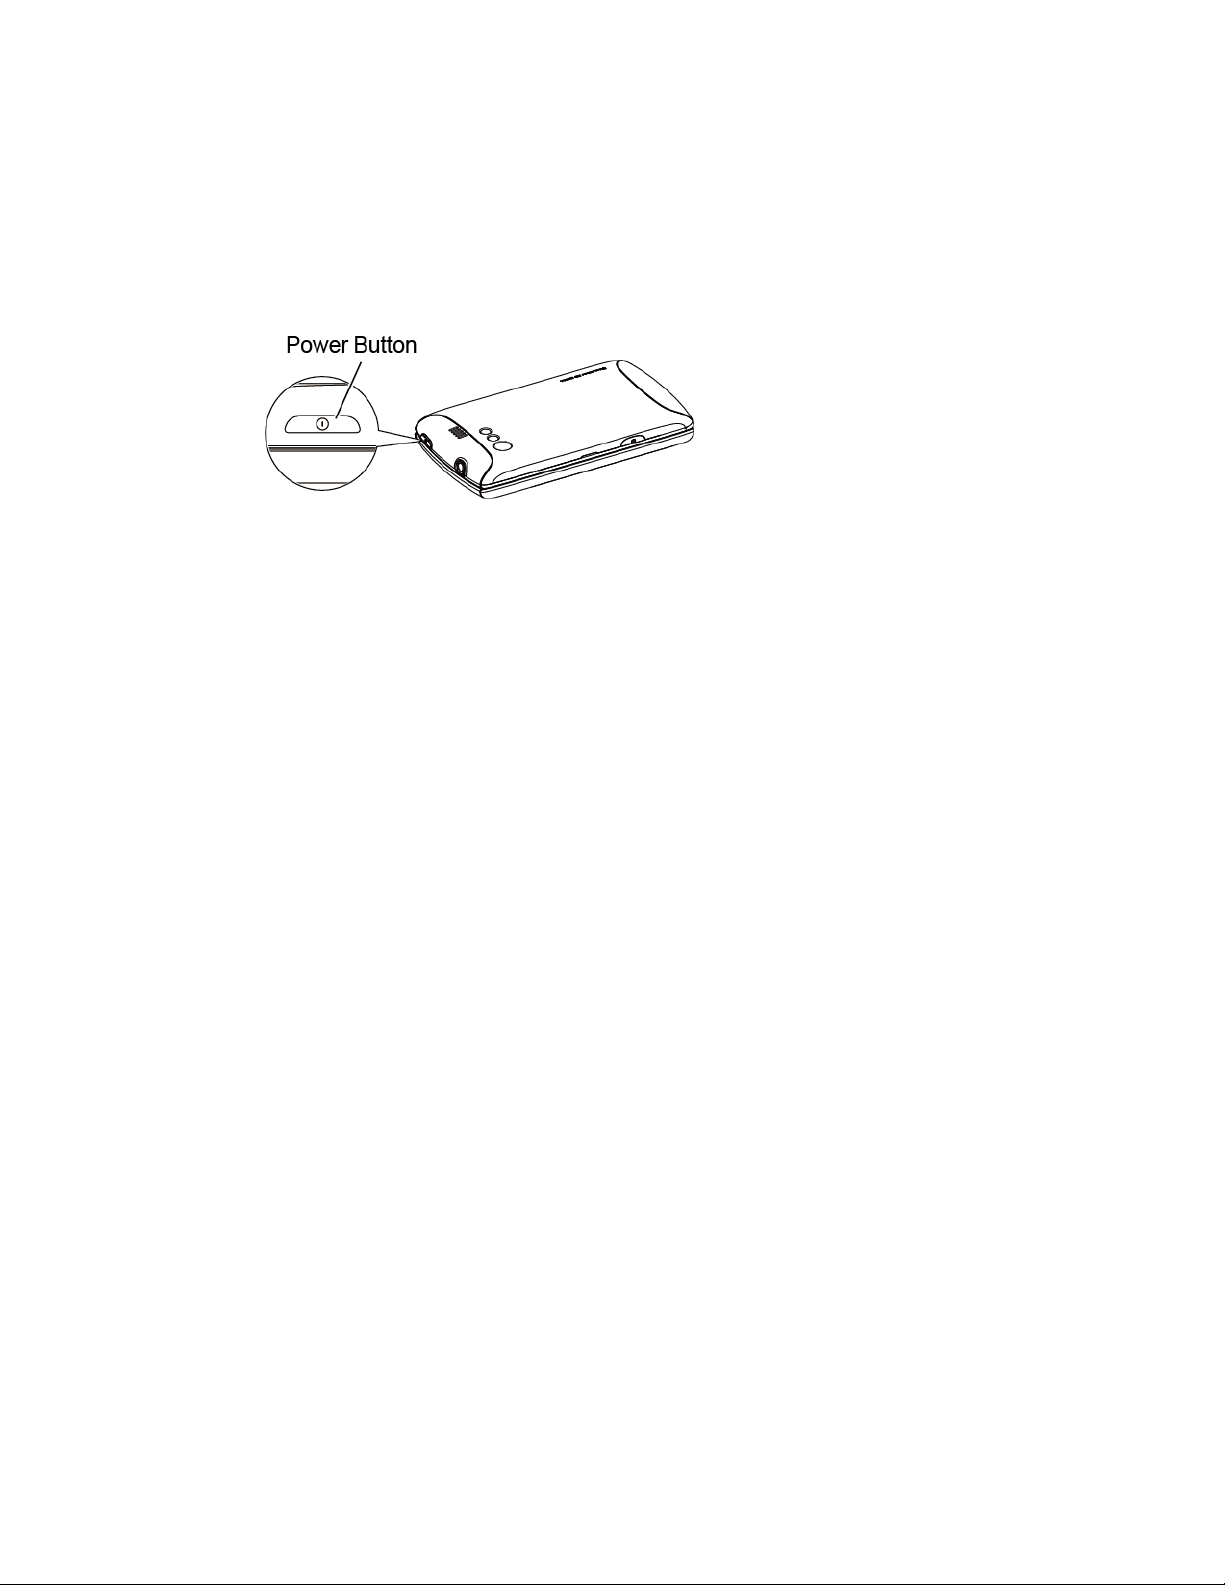
3. Press and hold the Power button to turn your device on.
To remove the battery, after removing the battery compartment cover, grasp the tab extending
from the battery pack and pull the battery out of its compartment.
Activate Your Device
Find out information about activating your device.
Get Started 3
Page 13

Create Your Account and Pick Your Plan
Activate Your Device
Create Your Account and Pick Your Plan
1. From your computer, visit virginmobileusa.com and click on Activate.
2. Choose an activation option and click Next. Then enter your zip code and click Next.
3. When prompted, enter the serial number (MEID DEC) printed on the sticker located on
the back of your device in the battery compartment and click Next.
4. Follow the remaining instructions to choose your plan and select a payment method.
5. Follow the activation instructions below after creating your account in order to be able to
start using your device.
Activate Your Device
1. Turn on your new device.
2. Touch the Activate icon on the home screen.
– or –
Touch , and then touch the Activate icon .
3. Follow the onscreen prompts to complete the activation process.
After activation, your device will automatically download “The Essentials” ID pack. This may
take several minutes or more depending on the network speed. However, you may continue to
use your device as the ID pack is being downloaded in the background.
Account Management
Find out information about managing your account.
Managing Your Account
Top-Up Your Account
Managing Your Account
Manage your account from your device or your computer.
From Your Device
Dial *86 on your device or press Home and touch > My Account to access
your Account, where you can do any of the following things:
Get Started 4
Page 14

● Check your minutes
● Add money (Top-Up)
● Change plans... and a lot more
From Your Computer
Log in with your phone number and Account PIN at virginmobileusa.com where you can do
everything above, and more.
Top-Up Your Account
Buy Top-Up cards at thousands of retailers. Or, make it real easy by registering your credit/debit
card or PayPal account.
Auto Top-Up
Auto Top-Up is the easiest way to keep your service working. Set it to Top-Up your account
once a month so you can keep emailing, IMing, Tweeting with Twitter, surfing, and talking. No
interruptions, no sweat. Activate Auto Top-Up and adjust your settings anytime by logging at
virginmobileusa.com.
One-time Top-Ups
From Your Device:
Dial *729 on your device or press Home and touch > My Account .
From Your Computer:
If you don’t want to set Auto Top-Up, you can still log in at virginmobileusa.com whenever you
need a quick Top-Up.
Set Up Voicemail
You should set up your voicemail and personal greeting as soon as your device is activated.
Always use a password to protect against unauthorized access. Your device automatically
transfers all unanswered calls to your voicemail, even if your device is in use or turned off.
1. Press Home , and touch . (If your screen is locked, press the Power button to
turn on the display, and then touch and flick it to unlock the screen.)
2. Touch and hold to dial your voicemail number.
3. Follow the system prompts to:
Create your password.
Get Started 5
Page 15

Record your name announcement.
Record your greeting.
Note: Voicemail Password – It is strongly recommended that you create a password when
setting up your voicemail to protect against unauthorized access. Without a password,
anyone who has access to your device is able to access your voicemail messages.
Mobile ID
Mobile ID is a free service from Virgin Mobile that lets you download a complete mobile
experience on demand. Customize your device to match whatever you’re into... music,
entertainment, social networking, and more.
“The Essentials” ID pack includes an entire set of apps, widgets, and more – handpicked by
Virgin Mobile.
You can install as many as five ID Packs at any one time in addition to the default “The
Essentials” ID pack. You can easily switch from one ID Pack to another without losing any
applications already installed.
Installing an ID Pack
Switching ID Packs
Installing an ID Pack
Note: Your device must be activated, your battery should be fully charged, and you should be
in a network coverage area before you install an ID Pack.
1. Press Home , and touch . (If your screen is locked, press the Power button to
turn on the display, and then touch and flick it to unlock the screen.)
2. Touch Get New ID Packs.
3. Touch All ID Packs.
4. Scroll to and touch the desired ID Pack.
5. Touch Install.
6. Read the Terms and Conditions and touch Agree.
If a Downloading message appears, read the message and touch Continue.
7. The ID Pack is now installed.
Get Started 6
Page 16

Switching ID Packs
1. Press Home , and touch .
2. Touch an ID Pack to replace your current pack.
– or –
Touch Get New ID Packs to install a new ID Pack and follow steps 3–7 of Installing an
ID Pack.
Note: Certain features of Mobile ID are subject to change. For the most up-to-date information
about using Mobile ID, please visit virginmobileusa.com.
Customer Support
Contact Virgin Mobile’s customer support department for information about your device, account
history, call coverage area, and specific features available to you.
● Visit virginmobileusa.com.
● Dial *VM from your Virgin Mobile device.
● Dial 1-888-322-1122 from any phone.
For questions about the device features, refer to the materials provided with your device, or visit
virginmobileusa.com.
Virgin 411
Virgin 411 gives you access to a variety of services and information, including residential,
business, and government listings; movie listings or show times; driving directions, restaurant
reservations, and major local event information. There is a per-call charge to use Virgin 411,
and you will be billed for airtime.
● Dial 411 from your Virgin Mobile device.
For more information or to see the latest in services, visit virginmobileusa.com.
Get Started 7
Page 17

Device Basics
The topics in this section will introduce the basic functions and features of your device.
Your Device’s Layout
Turn Your Device On and Off
Turn Your Screen On and Off
Touchscreen Navigation
Your Home Screens
Status Bar
Enter Text
Google Account
Device Basics 8
Page 18
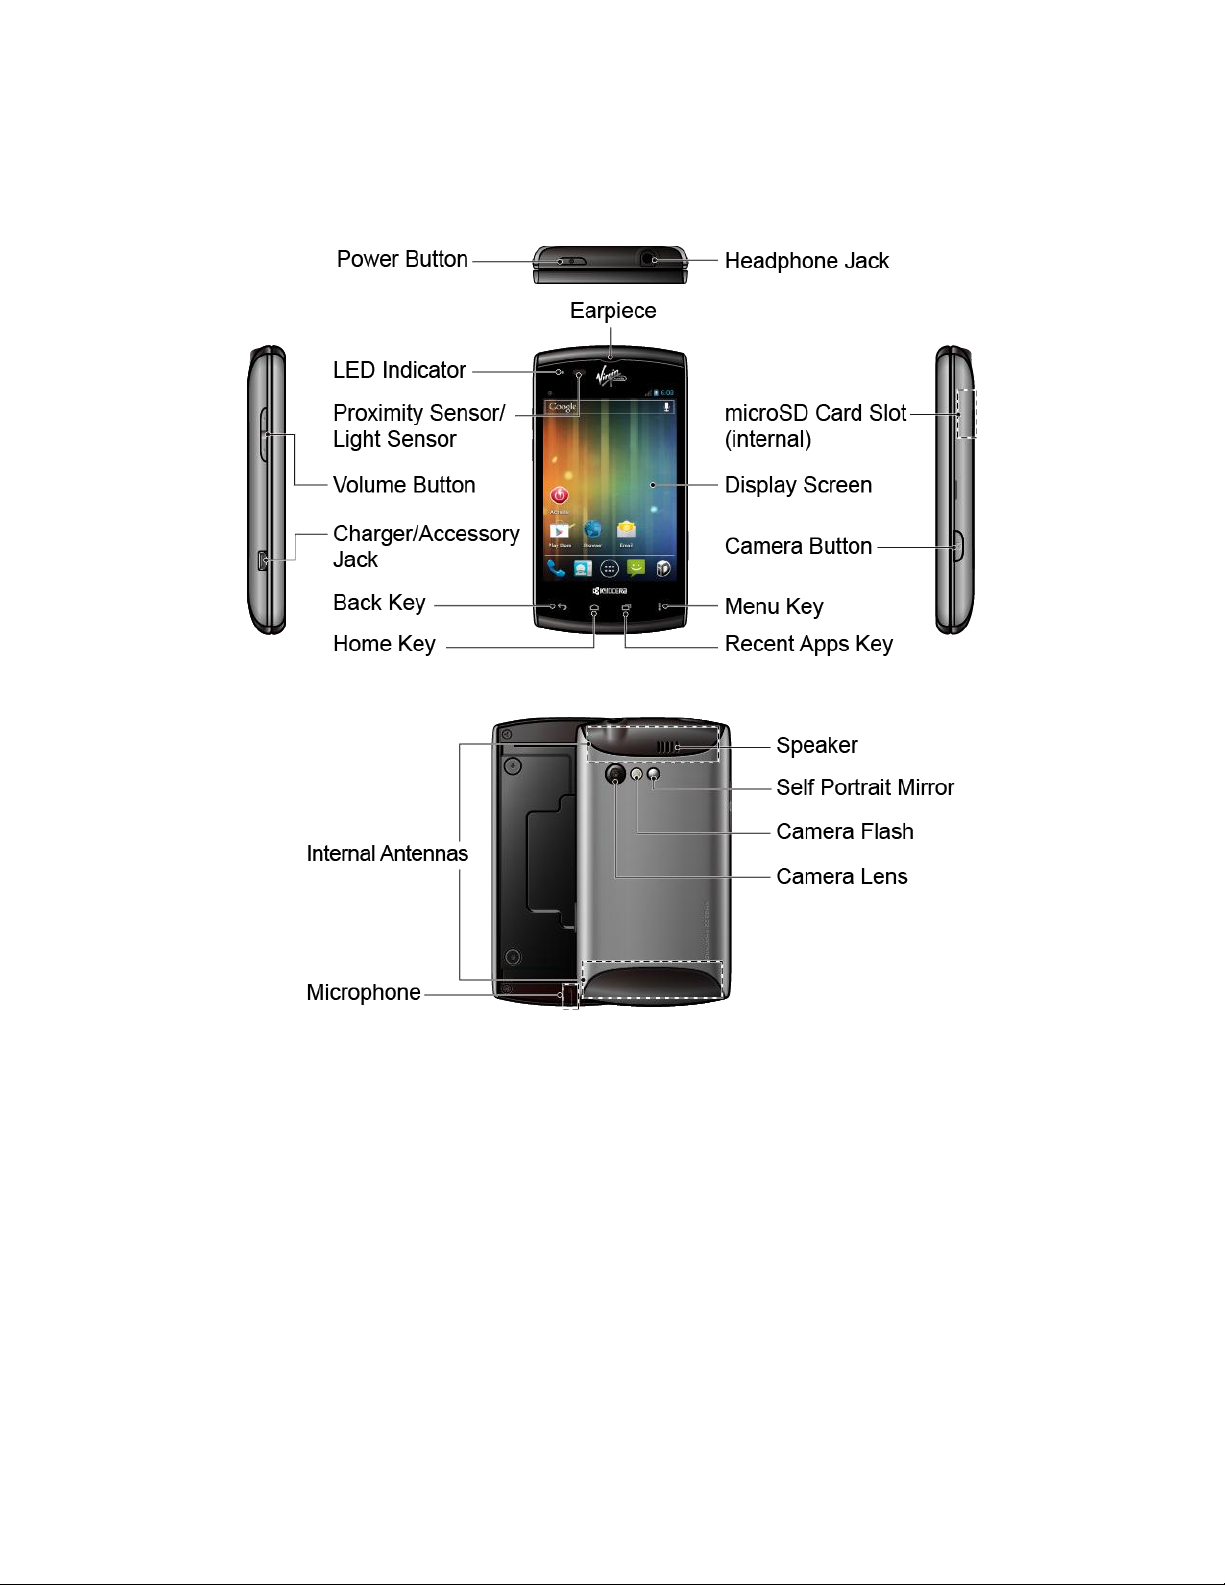
Your Device’s Layout
The illustrations and descriptions below outline your device’s basic layout.
Key Functions
● Power Button lets you turn the device on or off, or turn the screen backlight on or off. This
button can be configured to end a call.
● LED Indicator shows your device’s battery status. It also flashes for incoming calls or
pending notifications.
● Proximity Sensor/Light Sensor automatically deactivates the touchscreen when you hold
the device near your face. This prevents you from unintentionally activating device functions
during a call. It also automatically turns off the backlight and brightens the display when you
are in sunlight or a bright room, and dims the display in darker places.
● Volume Button allows you to adjust the ringtone and media volumes when you are not on a
call, or the voice volume during a call.
Device Basics 9
Page 19

● Charger/Accessory Jack allows you to connect the micro-USB cable (included) to charge
the battery or to transfer files to and from a computer.
CAUTION! Inserting an accessory into the incorrect jack may damage the device.
● Back Key ( ) returns you to the previous screen or closes the dialog box.
● Home Key ( ) returns you to the Home screen.
● Recent Apps Key ( ) allows you to show the Recent Apps screen.
● Menu Key ( ) lets you open the menus of the current screen or application.
● Camera Button lets you activate the camera and camcorder and take pictures and videos.
● Display Screen displays all the information needed to operate your device. Use finger
gestures to navigate and interact with items on the screen.
● microSD Card Slot (internal) allows you to insert a microSD card to support external
memory.
Note: Your device comes with the microSD card preinstalled.
● Earpiece lets you hear the caller and automated prompts.
● Headphone Jack allows you to plug in an optional headset for convenient, hands-free
conversations.
CAUTION! Inserting an accessory into the incorrect jack may damage the device.
● Internal Antennas facilitate reception and transmission. To maximize performance, do not
obstruct while using the device.
● Microphone allows other callers to hear you clearly when you are speaking to them.
● Camera Lens, as part of the built-in camera, lets you take pictures and videos.
● Camera Flash allows you to take pictures and videos in low light conditions.
● Self Portrait Mirror allows you to see your reflection when taking photos or videos.
● Speaker lets you hear the different ringtones and sounds. It also lets you hear the caller’s
voice in speakerphone mode.
Turn Your Device On and Off
The instructions below explain how to turn your device on and off.
Turn Your Device On
Device Basics 10
Page 20
Turn Your Device Off
Turn Your Device On
To turn your device on, follow the step below.
► Press and hold the Power button.
Turn Your Device Off
To turn your device off, follow the steps below.
► Press and hold the Power button to open the device options menu. Touch Power off >
OK to turn the device off.
Your screen remains blank while your device is off.
Turn Your Screen On and Off
Your device allows you to quickly turn the screen off when not in use and to turn it back on and
unlock it when you need it.
Turn the Screen Off When Not in Use
Turn the Screen On and Unlock It
Turn the Screen Off When Not in Use
To turn your screen off, follow the step below.
► To quickly turn the screen off, press the Power button. Pressing the Power button again
will turn on your device screen and show the lock screen.
To save battery power, the device automatically turns off the screen after a certain period of
time when you leave it idle. You will still be able to receive messages and calls while the
device’s screen is off.
Note: For information on how to adjust the time before the screen turns off, see Sleep within
the Display section.
Turn the Screen On and Unlock It
1. To turn the screen on, press the Power button.
Device Basics 11
Page 21

2. Flick until it turns to (with a blue frame) to unlock the screen.
– or –
Open the slide-out QWERTY keyboard.
You can disable the screen lock or add more secure one from the System settings
menu. See Screen lock within the Security section.
Touchscreen Navigation
Your device’s touchscreen lets you control actions through a variety of touch gestures.
Touch
Touch and Hold
Drag
Slide or Flick
Pinch and Spread
Rotate
Touch
Touch once with your finger to select or launch a menu, option, or application. A light touch
works best.
Warning: Do not touch with a pen or stylus. It may damage the touchscreen.
Warning: If the touchscreen of your device does get wet, dry it with a clean soft cloth
before touching it.
Touch and Hold
To open the available options for an item (for example, options for a contact), simply touch and
hold the item.
Drag
Touch and hold your finger before you start to move it. Do not release your finger until you have
reached the target position.
Slide or Flick
To slide, quickly move your finger vertically or horizontally across the screen. To flick, move
your finger in lighter, quicker strokes than sliding. When you’re flicking through a long list, touch
the screen to stop scrolling.
Device Basics 12
Page 22
Pinch and Spread
Pinch the screen using your thumb and forefinger to zoom out or spread the screen to zoom in
when viewing a picture or a Web page. (Move fingers inward to zoom out and outward to zoom
in.)
Rotate
For most screens, you can automatically change the screen orientation from portrait to
landscape by turning the device sideways. When entering text, you can turn the device
sideways to bring up a bigger keyboard. See Touchscreen Keyboard for more details.
Note: The Auto-rotate screen check box in Home > Menu > System settings >
Display needs to be selected for the screen orientation to automatically change.
Your Home Screens
The Home screen is the starting point for your device’s applications, functions, and menus. You
can customize your home screen by adding shortcuts, widgets, and more. Your home screen
extends beyond the initial screen. Swipe the screen left or right to display additional screens.
Home Screen Overview
Customize the Home Screens
Home Screen Overview
The below explains some examples you see on the Home screen.
Device Basics 13
Page 23

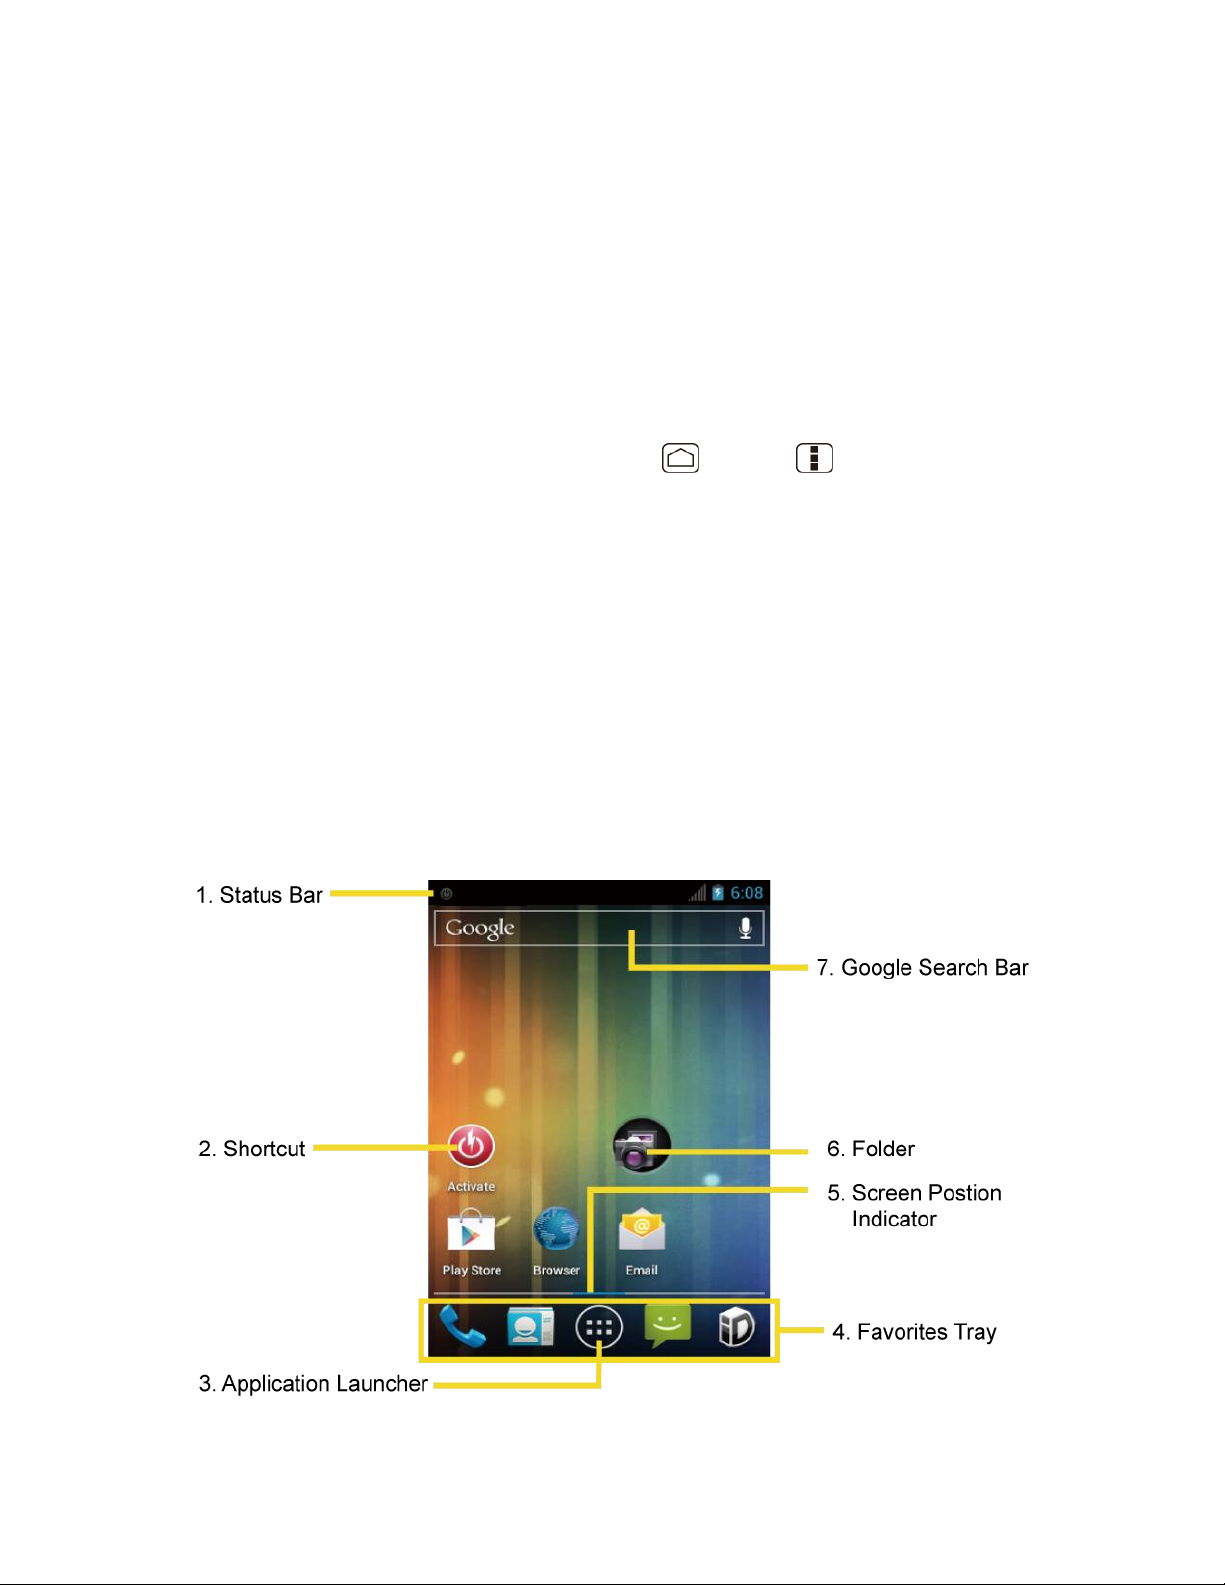
1. Status Bar: Displays the time, notification, and device status icons. Slide down to
display the Notifications panel.
2. Shortcut: Allows users to quickly launch applications.
3. Application Launcher: Touch to display available applications and widgets on the
device.
4. Favorites Tray: Keeps icons of your favorite application. The icons in the tray remain
visible on every Home screen. You can change icons except the Application launcher
icon (center).
5. Screen Position Indicator: Allows users to know where you are among five home
screens.
6. Folder: Allows users to store multiple application icons as a group.
7. Google Search Bar: Allows users to enter text or spoken keywords for a quick search
on the device or on the Internet. Touch to enter text or touch to speak your keyword.
Customize the Home Screens
Learn how to add, move, or remove items from the home screen.
Add Application Icons or Widget to the Home Screens
1. Touch on the Favorites Tray.
2. Slide the APPS and WIDGETS screens to find the item you want to add to the Home
screens.
3. Touch and hold an application or widget icon. The initial Home screen appears.
4. Pressing the application or widget icon, move your finger left or right to the place you
want to add the icon.
5. Release your finger.
Move or Remove Items on the Home Screens
► Touch and hold the item you want to move or remove from the screen.
To move the item, drag it to a new area and release it.
To remove the item, touch and hold the item until you see “X Remove” at the top of
the home screen, and then drag the item until it turns red, and then release your
finger.
Device Basics 14
Page 24

Change Wallpaper
1. Touch and hold the empty area of the Home screens.
2. Select one of the following options.
Gallery: Select to use saved or captured pictures on your device. Touch to select a
picture, and crop it before setting it as wallpaper.
ID wallpapers: Select to use ID wallpapers. Select the wallpaper and touch Set
wallpaper.
Live Wallpapers: Select to use Live wallpapers. Select the wallpaper and touch Set
wallpaper.
Wallpapers: Select to use preset wallpapers. Select the wallpaper and touch Set
wallpaper.
Favorites Tray
Favorites Tray keeps five icons you usually use. The icons in the tray remain visible on every
Home screen. You can change icons except the Application launcher icon located in the center
of the tray.
To add a new icon on the Favorites Tray:
1. Remove the current icon on the tray. See Move or Remove Items on the Home Screens.
2. Touch and hold the application icon and drag it to the Favorites Tray.
3. Release your finger.
Use folders
You can combine several app icons in a folder. Drop one app icon over another on a Home
screen, and the two icons will be combined.
1. Drag one application icon over another icon.
2. Release your finger. You can see two icons piled within a folder (a black circle).
3. Touch a circle. You can see application icons within the folder.
4. Touch Unnamed Folder. The keyboard opens and you can name this folder. To
rename it, touch the name.
Status Bar
The status bar at the top of the screen provides device and service status information on the
right side and notification alerts on the left. To view notification alerts, slide the status bar down.
Device Basics 15
Page 25
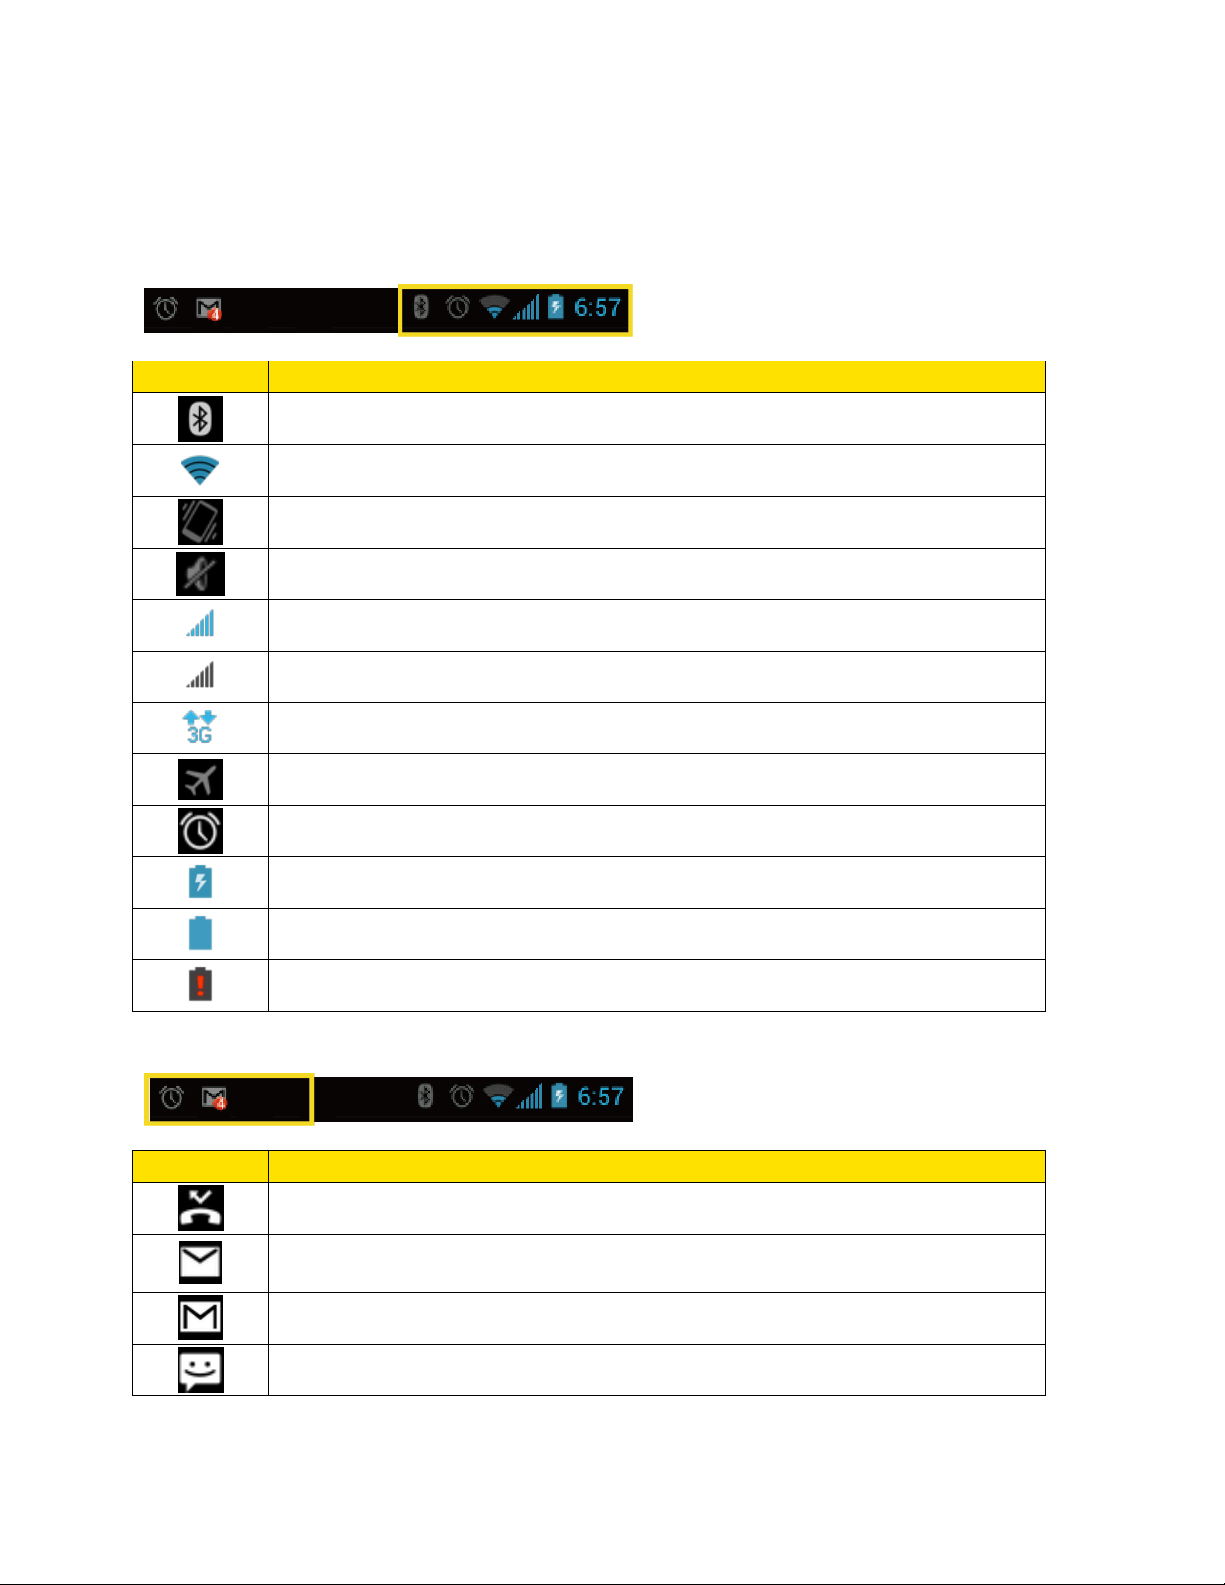
Status Icons
Icon
Description
Bluetooth® enabled
Wi-Fi® active (full signal)
Vibrate
Silent
Network (full signal)
Network (no signal)
3G (data service)
Airplane mode
Alarm set
Battery (charging)
Battery (full charge)
Battery (discharged)
Icon
Description
Missed call
New email
New Gmail
New SMS message
Notification Icons
Status Icons
Notification Icons
Device Basics 16
Page 26
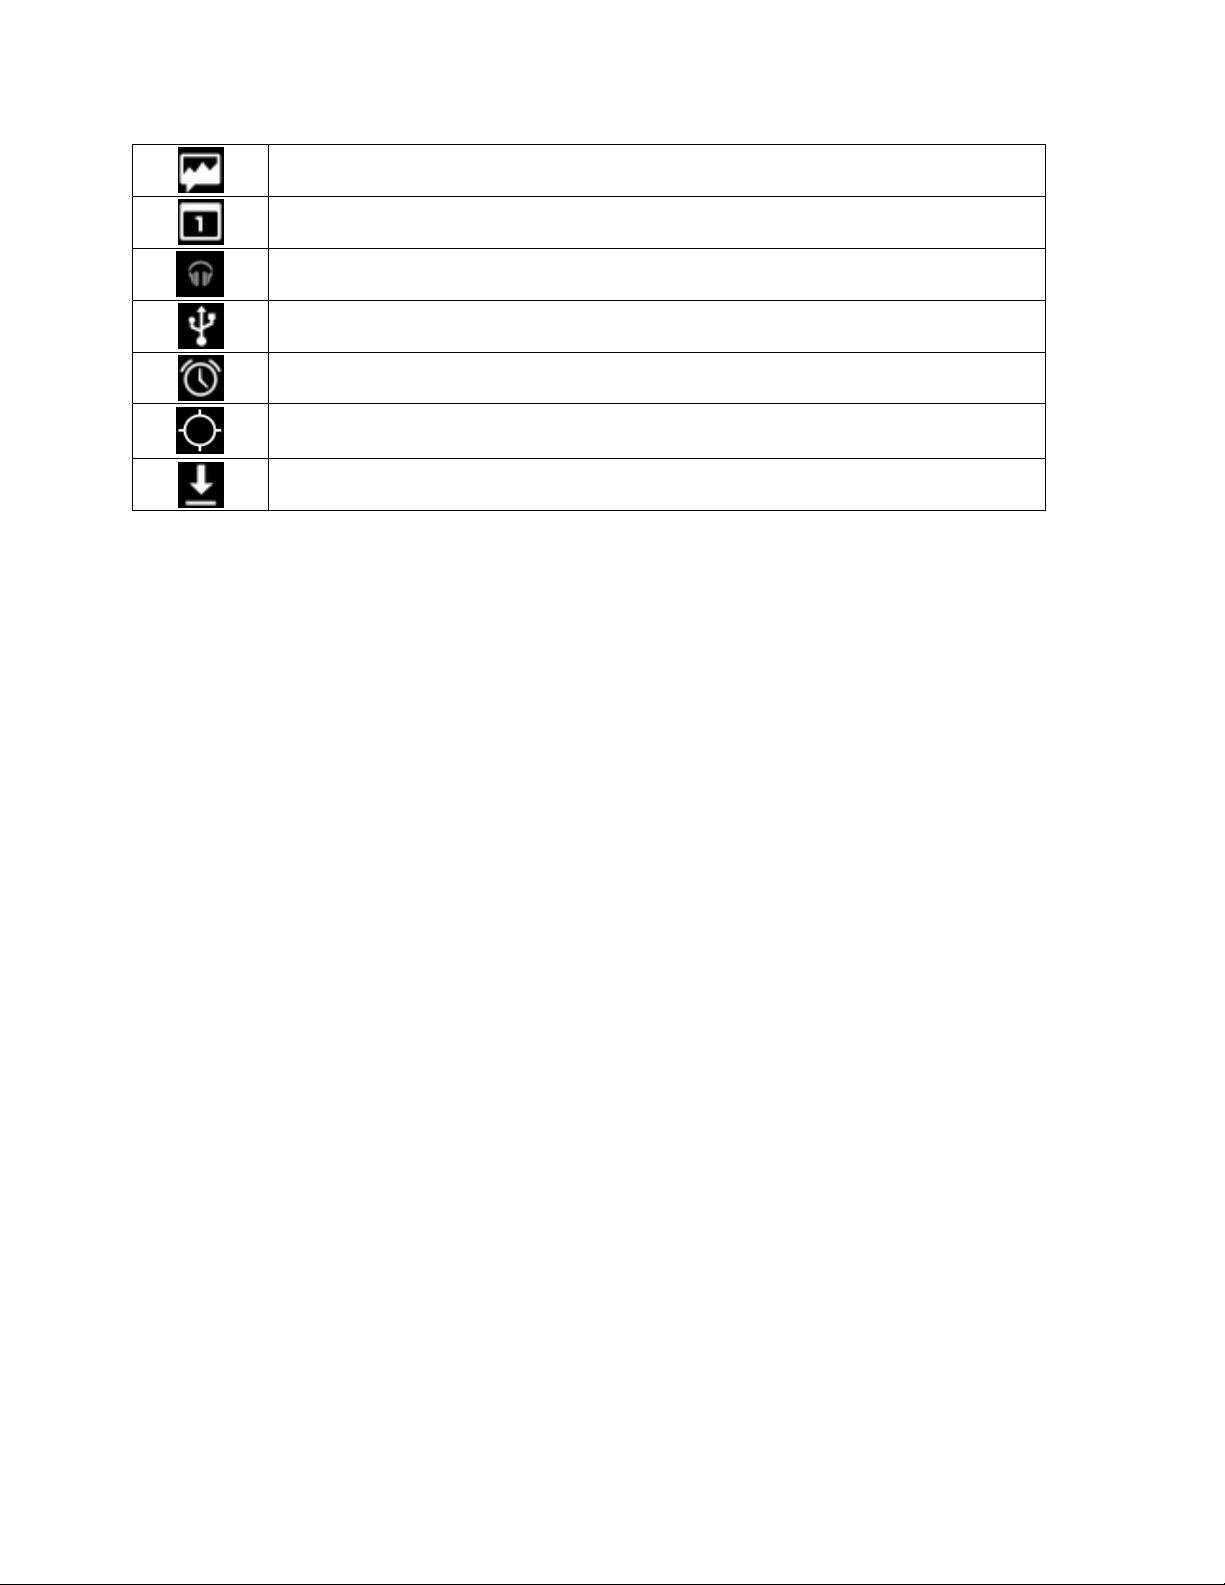
New MMS message
Event
Music application is running background
USB connection
Alarm
When animating, GPS is active
Downloading
Enter Text
You can type on your device using either the slide-out QWERTY keyboard or one of the
available touchscreen keyboards.
Slide-out QWERTY Keyboard
Touchscreen Keyboard
Enter Text Using Swype
Enter Text Using the Android Keyboard
Copy and Paste Text
Slide-out QWERTY Keyboard
Open the slide-out QWERTY keyboard to type faster using your thumbs. The slide-out keyboard
also comes with special keys that let you quickly access menus and search your device.
To open the slide-out QWERTY keyboard:
1. Hold the phone sideways, with the front panel buttons to your right.
2. Push the screen panel up with your thumbs to reveal the slide-out keyboard.
Note: When the slide-out keyboard is opened, the display stays in landscape mode and you
will not be able to use the onscreen keyboard.
Device Basics 17
Page 27

3. Start an app or select a field that requires text or number entry.
4. Press the letter keys to enter text. Press the following keys to enter uppercase letters,
numbers, special characters, or symbols:
Shift key ( )
• Press once to capitalize the next letter you select.
• Press twice to lock the shift key and type a series of uppercase letters. (This
works just like the Caps Lock key on your computer keyboard.)
• To unlock, press the shift key once again.
Function key ( )
• Press to enter the number or symbol located at the upper right corner of the key
(for example #, *, &, +, ! , .com). Press this key first and then any corresponding
key.
• Press twice to lock the function key.
• To unlock, press the function key once again.
Note: Do not confuse with the four keys at the bottom of your device when closed and in
portrait orientation. These keys can also be referred to as “function keys.”
Symbol key ( )
• Press to open the Symbols window. Touch the symbol you want to insert into
your text.
5. Press these keys to perform other actions:
Device Basics 18
Page 28

Navigation keys ( )
• Press to scroll through the phone’s menu options. On the text input screen, press
to move the cursor.
Enter key ( )
• Press to insert a line feed in text input mode, or access the phone’s menus and
select the highlighted choice when navigating through a menu.
Backspace key ( )
• Press to delete characters from the display in text input mode.
Touchscreen Keyboard
The touchscreen keyboard lets you enter text directly onscreen without opening the slide-out
QWERTY keyboard.
Your device provides convenient ways to enter letters, numbers, and symbols whenever you are
prompted to enter text. To manually display the touchscreen keyboard, simply touch a text field
where you want to enter text. There are two ways of entering text on your device: Swype and
Android keyboard.
To switch the touchscreen keyboard:
1. Press Home > Menu , and touch System settings > Language & input.
2. Touch Default under KEYBOARD & INPUT METHODS.
3. Choose Android keyboard or Swype.
– or –
1. When a touchscreen keyboard is displayed, slide the status bar down.
2. Touch Select input method.
3. Choose Android keyboard or Swype.
Enter Text Using Swype
Swype® allows you to enter text by sliding your finger from letter to letter rather than touching
each key individually. To enter text, slide your finger from one letter to the next.
Device Basics 19
Page 29
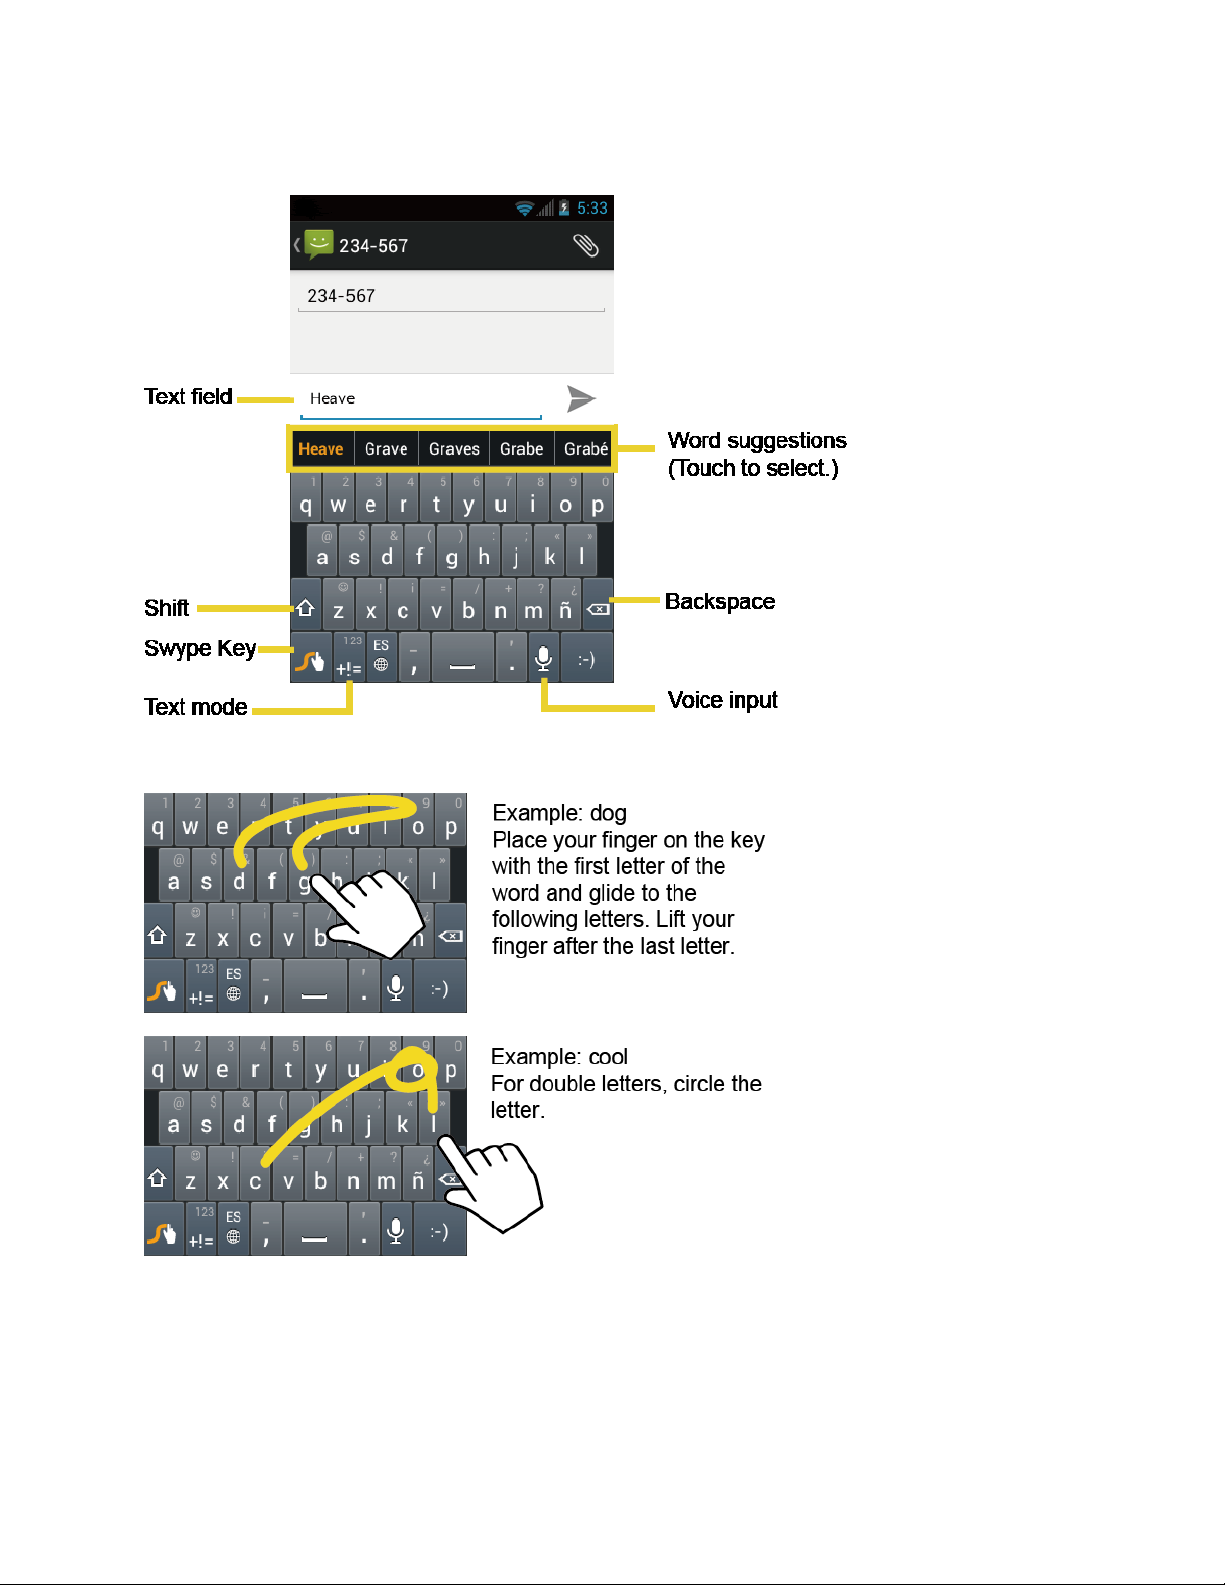
Swype Keyboard Overview
Note: Key appearance may vary depending on the selected application.
Device Basics 20
Text mode: Touch to toggle between the Alphabet keyboard and Number &
Symbol keyboard.
Page 30
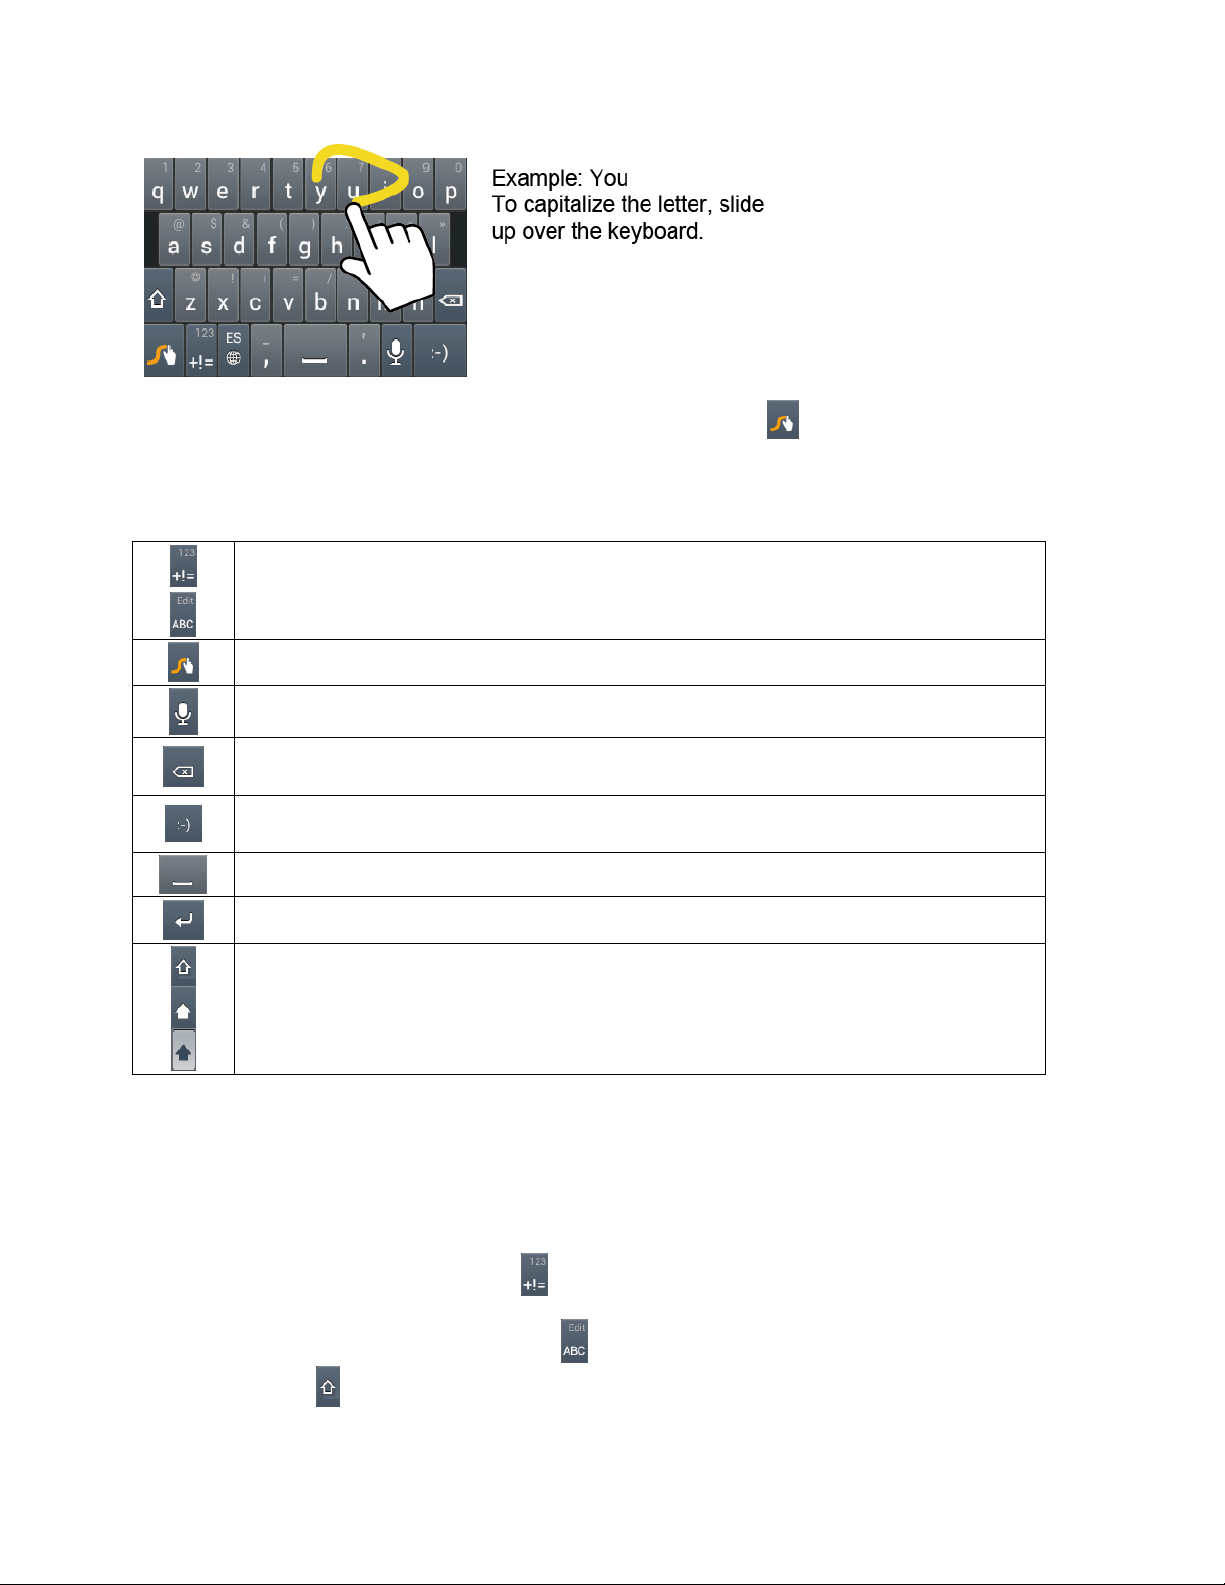
Swype Key: Touch and hold to access the tips or the settings of Swype.
Voice input mode: Touch to enter text using your voice.
Backspace: Touch to delete a character. Touch and hold to delete multiple
characters.
Smiley: Touch to insert a smiley. Touch and hold to view and select other
smileys.
Space: Touch to insert a space.
Enter: Touch to confirm your entry.
Shift: Touch to toggle between the uppercase, lowercase and caps lock text
input.
Tip: For tips on using Swype, touch and hold the Swype key and then select How to
Swype.
You can do the following with the Swype keyboard:
For more information about the Swype application, visit www.nuancemobilelife.com/apps/swype.
ABC Mode
In ABC mode, you can enter letters from the onscreen keyboard by sliding your finger. While in
this mode, the text mode key displays .
1. Select the ABC mode by touching . Capitalization in ABC mode can be altered by
touching .
Device Basics 21
Page 31

(Unshifted) to make all letters in a word lowercase.
(One-character-shifted) to capitalize only the first letter of a word.
(Caps Lock) to make all letters in a word uppercase.
2. Enter text using the keyboard.
If you make a mistake, touch to erase a single character. Touch and hold
to erase an entire word.
Touch the key for the characters you want to enter.
Touch and hold to enter the character located at the upper right corner of the key.
Confirm the character you want to enter is displayed and release your finger.
Touch and long-hold to bring up a list of all the characters available on that key.
Touch the character you want to enter from the list.
Numbers & Symbol Mode
In Number & Symbol mode, you can enter numbers and symbols from the onscreen keyboard
by sliding your finger. While in this mode, the text mode key displays .
To enter numbers and symbols in Swype mode:
1. Select the Number & Symbol mode by touching .
2. Enter numbers or symbols using the keyboard.
If you make a mistake, touch to erase a single character. Touch and hold
to erase an entire word.
Touch the key for the number or symbol you want to enter.
Touch and hold to enter the number or symbol located at the upper right corner of
the key. Confirm the number or symbol you want to enter is displayed and release
your finger.
Touch and long-hold to bring up a list of all the characters available on that key.
Touch the character you want to enter from the list.
Tip: Touch to show the keyboard with the symbol characters located at the upper right
corner of the key.
Device Basics 22
Page 32

Entering Text by Speaking
You can use voice input to enter text by speaking anywhere that you can enter text with the
touchscreen keyboard.
1. Touch on the keyboard.
2. Say the text you wish to enter into the microphone.
Adding a Word to the User Dictionary
You can use the user dictionary option to add new words into the dictionary.
1. Press Home > Menu , and touch System settings > Language & input.
2. Scroll to Swype under KEYBOARD & INPUT METHODS and touch .
3. Touch Personal dictionary.
4. Touch and type the word you want to add, and then touch . (A
list of words you have added to the dictionary is displayed.)
To edit a word, touch a word to edit it.
To delete a word, touch and touch a word to check it and then touch
> OK.
• Touch to select all the words in the dictionary.
• Touch to cancel deleting and back to the previous screen.
Swype Settings
You can customize the Swype settings as you like.
1. Press Home > Menu , and touch System settings > Language & input.
2. Scroll to Swype under KEYBOARD & INPUT METHODS and touch .
Tip: You can open the Swype settings from the Swype keyboard. Touch and hold on
the keyboard.
3. Choose from the following options.
Select Input Method: Touch to select Swype or Android keyboard.
Device Basics 23
Page 33

How to Swype: Touch to learn Swype in quick steps.
Personal dictionary: Touch to make your personal dictionary for Swype.
Preferences: Touch to show the following settings menu for Swype.
• Audio feedback: Touch to turn on sounds from Swype.
• Vibrate on keypress: Check to activate vibration when a key is touched.
• Show tips: Check to turn on a flashing indicator for quick help.
• Auto-spacing: Check to automatically insert spaces between words.
• Auto-capitalization: Check to automatically capitalize the first letter of sentence-
initial words within the specific text entry fields.
• Show complete trace: Check to display the complete Swype path.
• Word suggestion: Touch to activate word prediction when typing in Swype.
• Speed vs. accuracy: Touch to set how quickly Swype responds to input.
• Reset Swype’s dictionary: Touch to delete all the words you have added to
Swype’s dictionary.
• Version: Displays the current Swype version.
Language Options: Touch to select the language to use on Swype.
Enter Text Using the Android Keyboard
When entering text, you can choose to use the Android keyboard.
To select the Android keyboard:
1. Press Home > Menu , and touch System settings > Language & input.
2. Touch Default under KEYBOARD & INPUT METHODS.
3. Touch Android keyboard.
– or –
1. When a touchscreen keyboard is displayed, slide the status bar down.
2. Touch Select input method.
3. Touch Android keyboard.
Device Basics 24
Page 34

Android Keyboard Overview
Shift: Touch to toggle between lower case or upper case.
Capslock: Double-touch the lower case or upper case shift key.
Text mode: Touch to toggle between the Alphabet keyboard and Number &
Symbol keyboard.
Smiley: Touch to insert a smiley. Touch and hold to view and select other
smileys.
Next: Touch to go to the next text entry field.
Alternate: Touch to toggle between the default Number & Symbol
keyboard and additional Number & Symbol keyboard.
Go: Touch to go to a Web address.
Space: Touch to insert a space. Touch and hold to select the input method.
You can do the following with the Android keyboard:
Device Basics 25
Page 35

ABC Mode
In ABC mode, you can enter letters from the onscreen keyboard. While in this mode, the text
mode key displays .
1. Select the ABC mode by touching .
You can switch the capitalization style in ABC mode by touching the shift key .
(Unshifted) to make all letters in a word lowercase.
(One-character-shifted) to capitalize only the first letter of a word.
You can select the caps lock by double-touching or to make all letters
in a word uppercase.
(Caps Lock) to make all letters in a word uppercase.
2. Touch the corresponding alphabet keys to enter the word.
Tip: Some keys have alternate characters. Touch and hold a key to bring up a list of all the
characters available on that key. Touch the character you want to enter from the list.
Numbers and Symbols Mode
In Number & Symbol mode, you can enter numbers and symbols only from the onscreen
keyboard. While in this mode, the text mode key displays .
To enter numbers:
1. Select the Number & Symbol mode by touching .
2. Touch the appropriate numeric key.
To enter symbols:
1. Select the Number & Symbol mode by touching .
2. Touch the appropriate symbol key.
– or –
Device Basics 26
Page 36

Touch to select from additional symbol characters.
Tip: Some keys have alternate characters. Touch and hold a key to bring up a list of all the
characters available on that key. Touch the character you want to enter from the list.
Entering Text by Speaking
Voice input is an experimental feature that uses Google’s speech-recognition service, so you
must have a data or Wi-Fi connection to use it.
If the touchscreen keyboard does not display , voice input is not turned on.
To turn on voice input:
1. Press Home > Menu , and touch System settings > Language & input.
2. Scroll to Android keyboard under KEYBOARD & INPUT METHODS and touch .
3. Touch Voice input key and select On main keyboard or On symbols keyboard.
To enter text by speaking:
1. Touch on the keyboard.
2. Say the text you wish to enter into the microphone and touch Done.
Adding a Word to the User Dictionary
You can use the user dictionary option to add new words into the dictionary.
1. Press Home > Menu , and touch System settings > Language & input >
Personal dictionary.
2. Touch .
3. Type the word you want to add, and touch OK. (A list of words you have added to the
dictionary is displayed.)
Touch a word to edit it.
Touch to delete it.
Android Keyboard Settings
1. Press Home > Menu , and touch System settings > Language & input.
2. Scroll to Android keyboard under KEYBOARD & INPUT METHODS and touch .
Device Basics 27
Page 37

Tip: Check Show settings key to always show on the Android keyboard.
Tip: If is not displayed, touch and hold the key at the left of the space key and then
touch Android keyboard settings.
3. Choose from the following options:
Input languages: Touch to select the input language. The dictionary for the selected
language will be enabled.
Auto-capitalization: Check to automatically set the first letter of a sentence to upper
case.
Vibrate on keypress: Check to activate vibration when a key is touched.
Sound on keypress: Check to activate a clicking sound when a key is touched.
Popup on keypress: Check to display a larger image of the key above it when you
touch it.
Show settings key: Check to display the keyboard settings key on the keyboard.
Voice input key: Touch to select where the Voice Input key is displayed from On
main keyboard, On symbols keyboard, or Off.
Add-on dictionaries: Touch to select the dictionary you want to use.
Auto correction: Touch to allow the space bar and punctuation to automatically
correct mistyped words.
Show correction suggestions: Touch to select when correction suggestions are
displayed.
Advanced settings: Touch to open the settings for expert users.
Copy and Paste Text
In applications that require text entry, such as Messaging, use the copy and paste functions to
copy and paste text from one application to another.
To copy and paste the text:
1. Open the application or received message that you want to copy text from.
2. Touch and hold the text body. Selection tabs appear, and currently selected words or
characters are highlighted. Drag tabs to expand or reduce the range of selected text.
Device Basics 28
Page 38

Tip: Touch , , or SELECT ALL to select all the text on the Web page.
3. Touch or to copy.
4. Open the application that you want to paste the text to.
5. Touch and hold the text box where you want to paste the text.
6. If you want to add the selected text to the current text, drag a selection tab to the
position where you want to insert selected words or characters.
7. Touch and hold the text box, and touch PASTE.
To copy text from a Web page:
1. Scroll to the area of the Web page containing the text you want to select.
2. Touch and hold the text you want to copy. Drag tabs to expand or reduce the range of
selected text. Any selected text will appear highlighted.
Tip: Touch SELECT ALL to select all the text on the Web page.
3. Touch > Copy.
4. Open the application that you want to paste into.
5. Touch and hold the text box where you want to paste the text, and touch PASTE.
To copy a URL:
1. To copy a URL, touch and hold the URL to display the options menu.
2. Touch Copy link URL or .
Device Basics 29
Page 39

3. Open the application that you want to paste into.
4. Touch and hold the text box where you want to paste the URL, and touch PASTE.
Google Account
You will need a Google account to access several device features such as Gmail™, Google
Maps Navigation™, Google Talk™, and Google Play™ applications. Before you can access
Google applications, you must enter your account information. These applications sync between
your device and your online Google account.
Create a Google Account
Sign In to Your Google Account
Add Account
General Sync Settings
Create a Google Account
If you do not already have a Google account, you can create one online or by using your device.
Note: Although you need a Gmail account to use certain features of your device, such as
Google Play™, you do not need to use Gmail as the default account for your device.
Create a Google Account Online
1. From a computer, launch a Web browser and navigate to google.com.
2. On the main page, click Sign in > Create an account for free.
3. Follow the onscreen prompts to create your free account.
Create a Google Account Using Your Device
1. Press Home > Menu , and touch System settings > Accounts & sync.
2. Touch ADD ACCOUNT, and then touch Google.
3. Touch New.
4. Enter your First name, Last name, and touch Next.
5. Enter your email address and touch Next.
6. When prompted, enter and reenter a password and touch Next.
7. Create a security question and answer, enter a secondary email address to help you
recover your password if you ever lose it, and then touch Next.
Device Basics 30
Page 40

Note: When setting up a new Google account, either on your device or online, you will be
prompted to add a secondary email address. Enter a second Gmail address or any other
email address from which you currently send and receive email. This address is used to
authenticate your account should you ever encounter problems or forget your password.
It is strongly encouraged for Android users so you can regain access to Google services
and purchases on your device.
8. Select if you want to join Google+ or not.
9. Read and accept the Google Terms of Service, and then touch I accept.
10. Enter the characters shown, and then touch Next.
11. Select if you save your credit card number or not.
12. Select if you want to set a PIN code in Google Play or not.
13. Select items you want to sync with Google servers and touch Next.
Sign In to Your Google Account
If you already have a Google account, sign in with the account.
1. Press Home > Menu , and touch System settings > Accounts & sync.
2. Touch ADD ACCOUNT, and then touch Google.
3. Touch Existing.
4. Enter your Gmail username and password, and then touch Sign in.
5. Select if you want to join Google+ or not.
6. Select if you want to set a PIN code in Google Play if requested.
7. Select items you want to sync with Google servers and touch Next.
Add Account
You can add additional accounts to your device.
1. Press Home > Menu , and touch System settings > Accounts & sync.
2. Touch ADD ACCOUNT.
3. Touch an account type.
Corporate, Google, etc.
4. Follow the instructions on the screen to add your additional account.
Device Basics 31
Page 41

Depending on the account type, you may need to enter an email address or user
address, password, domain name, or other information. For Corporate accounts,
contact your server administrator to determine what information you will need.
General Sync Settings
Let applications synchronize data in the background, whether or not you are actively working in
them.
As default your Google accounts are automatically synced.
1. Press Home > Menu , and touch System settings > Accounts & sync.
2. If you see at the upper right corner, your accounts will automatically sync. Touch
the account with data you want to sync.
3. Touch the types of data you wish to synchronize automatically. (A check mark indicates
the feature is enabled.)
Note: If you do not want to sync your Google account automatically, touch at the upper
right corner and confirm is displayed.
Note: If you want to remove the account, press Menu > Remove account.
Device Basics 32
Page 42

Phone
With the network and your device’s calling feature, you can enjoy clear calling across the
country.
Make Phone Calls
Receive Phone Calls
Voicemail
Phone Call Options
Call Log
Make Phone Calls
There are several convenient ways to place calls from your device.
Call Using the Phone Dialpad
Call From Recent Calls
Call From People
Call a Number in a Text Message
Call Emergency Numbers
Call Numbers with Pauses
Call Using Plus (+) Code Dialing
Call Using the Internet Calling
Call Using the Phone Dialpad
The most “traditional” way to place a call is by using the phone’s dialpad.
1. Press Home , and touch to display the phone screen.
2. Touch the number keys on the dialpad to enter the phone number.
Phone 33
Page 43

3. Touch on the bottom of the screen to call the number.
4. To end the call, touch .
Call From Recent Calls
The Recent Calls list lets you quickly place calls to recent incoming, outgoing, or missed
numbers.
1. Press Home , and touch to display the phone screen.
2. Touch to display the Call log list.
3. Touch the phone icon next to a number or a People entry to place a call.
For additional options, touch the name or number.
Call From People
You can place phone calls directly from entries in your People list.
1. Press Home , and touch to display the phone screen.
2. Touch to display the People list. Your frequent People entries are displayed at the
top of the list.
Phone 34
Page 44

Touch to search your People entry.
Press Menu > Contacts to display to select a list which contains your People
entries.
3. Touch the entry you want to call and then touch the number to place a call.
Call a Number in a Text Message
While viewing a message, you can place a call to a number that is in the body of the message.
1. Press Home , and touch > Messaging.
2. Touch the message with the phone number.
3. The Phone screen then opens, with the phone number automatically filled in and ready
to be dialed. To place the call, touch .
Call Emergency Numbers
You can place calls to 911 even if the device’s screen is locked or your account is restricted.
1. Flick to unlock the screen, if the device’s screen is locked. For more information,
see Turn Your Screen On and Off.
2. Touch on the Home screen.
3. Touch .
To call the 911 emergency number when the device’s screen is locked with a pattern, PIN, or
password (see Screen Lock):
1. Touch Emergency call on the screen.
2. Touch .
Enhanced 911 (E911) Information
This device features an embedded Global Positioning System (GPS) chip necessary for utilizing
E911 emergency location services where available.
When you place an emergency 911 call, the GPS feature of your device seeks information to
calculate your approximate location. Depending on several variables, including availability and
access to satellite signals, it may take up to 30 seconds or more to determine and report your
approximate location.
Important: Always report your location to the 911 operator when placing an emergency call.
Some designated emergency call takers, known as Public Safety Answering
Phone 35
Page 45

Points (PSAPs), may not be equipped to receive GPS location information from
your device.
Call Numbers with Pauses
You can dial phone numbers with pauses for use with automated systems, such as voicemail or
credit card billing numbers.
There are two types of pauses available on your device:
● Add 2-sec pause: Automatically sends the next set of numbers after two seconds.
● Add wait: Sends the next set of numbers when you touch Yes in the pop-up window.
1. Press Home , and touch and enter all or part of a number.
2. Press Menu , and touch Add 2-sec pause or Add wait.
3. Enter additional numbers.
4. Touch to dial the number.
Call Using Plus (+) Code Dialing
When placing international calls, Plus Code Dialing automatically enters the international access
code for your location (for example, 011 for international calls made from the U.S.). See North
American Dialing.
1. Press Home , and touch to display the phone screen.
2. Touch and hold until you see a “+” on the display screen.
3. Enter the country code and phone number, and then touch . The device
automatically prepends the access code for international dialing, followed by the country
code and phone number.
Call Using the Internet Calling
When Wi-Fi network is available, you can make and receive calls through an Internet calling
account.
Important: Calling a phone number using Internet calling may incur additional charges.
Adding an Internet Calling Account
1. Press Home and touch to display the phone screen.
2. Press Menu , and touch Settings.
Phone 36
Page 46

3. Touch Accounts under INTERNET CALL SETTINGS.
4. Touch ADD ACCOUNT.
5. Enter your account details and touch SAVE.
6. To set your phone to receive Internet calls on your added account, touch the Receive
incoming calls check box.
Note: This requires the phone to maintain a connection with a Wi-Fi data network, which
reduces the life of your phone’s battery.
Making an Internet Call
1. Press Home , and touch > People.
2. Touch an entry, and then touch Internet call.
Changing Internet Calling Settings
1. Press Home and touch to display the phone screen.
2. Press Menu , and touch Settings.
3. Touch Use Internet calling under INTERNET CALL SETTINGS.
4. Select an option from the following:
For all calls when data network is available to use Internet calling for all calls
when Wi-Fi network is available.
Only for Internet calls to use Internet calling only for calls to Internet calling
addresses.
Ask for each call to ask each time you make a call.
Receive Phone Calls
The following information lets you know how to answer incoming calls, mute the ringtone on
incoming calls, reject incoming calls, and more.
When you receive a phone call from an entry stored in People, the Incoming call screen
appears and displays the caller ID icon, name, and phone number of the calling party. When
you receive a phone call from someone who is not stored in People, only the default caller ID
icon and phone number appear on the Incoming call screen.
Note: If your device is turned off, all calls automatically go to voicemail.
Phone 37
Page 47

Answer an Incoming Call
► On the Incoming call screen, flick the Answer icon .
Mute the Ringtone
To mute the ringtone without rejecting the call:
► Press the volume button up or down.
Reject an Incoming Call
► Flick the Ignore icon to send the call to your voicemail inbox.
Reject a Call and Send a Text Message
You can automatically send a text message to a caller and reject the incoming voice call.
► Flick the Ignore & Text icon to ignore the call and send a message to the caller.
Voicemail
You should set up your voicemail and personal greeting as soon as your device is activated.
Always use a password to protect against unauthorized access. Your device automatically
transfers all unanswered calls to your voicemail, even if your device is in use or turned off.
Set Up Voicemail
Voicemail Notification
Retrieve Your Voicemail Messages
Voicemail Settings
Set Up Voicemail
1. Press Home , and touch .
2. Touch and hold to dial your voicemail number.
3. Follow the system prompts to:
Create your password.
Record your name announcement.
Record your greeting.
Phone 38
Page 48

Important: Voicemail Password – It is strongly recommended that you create a password
when setting up your voicemail to protect against unauthorized access. Without a
password, anyone who has access to your device is able to access your
voicemail messages.
Voicemail Notification
There are several ways your device alerts you to a new voicemail message.
● By sounding the assigned notification sound.
● By vibrating the device.
● By displaying in the notifications area of the status bar when new unheard voicemail
message(s) is received. The figure is the number of new messages. This icon means you
have 10 unheard new messages.
Note: Your device accepts messages even when it is turned off. However, your device notifies
you of new messages only when it is turned on and you are in the service area.
Retrieve Your Voicemail Messages
You can review your messages directly from your device or from any other touch-tone phone.
Use Voicemail to Access Your Messages
1. Press Home , and touch .
2. Touch and hold . If prompted, enter your voicemail password.
3. Follow the voice prompts to listen to and manage your voicemail messages.
Note: Depending on your plan, you may be charged when you are accessing your voicemail
from your wireless device.
Use Another Phone to Access Messages
1. Dial your wireless phone number.
2. When your voicemail answers, press the asterisk key (*) on the phone.
3. Enter your password.
Voicemail Settings
Follow the steps below if you need to change the voicemail settings.
1. Press Home , and touch to display the phone screen.
2. Press Menu , and touch Settings.
Phone 39
Page 49

3. Touch Voicemail service under VOICEMAIL to select the voicemail service provider.
4. Touch Voicemail settings under VOICEMAIL to configure the voicemail number if
necessary.
Phone Call Options
Your phone application provides many useful features and options to help you make the most of
your calling experience.
Caller ID
Call Waiting
Other Call Settings
In-Call Options
Caller ID
Caller ID identifies a caller before you answer the phone by displaying the number of the
incoming call. If you do not want your number displayed when you make a call, follow these
steps.
1. Press Home , and touch .
2. Touch .
3. Enter a phone number.
4. Touch .
To permanently block your number, call Virgin Mobile Customer Support.
Call Waiting
When you’re on a call, Call Waiting alerts you to incoming calls by sounding beeps. Your
device’s screen informs you that another call is coming in and displays the caller’s phone
number (if it is available).
To respond to an incoming call while you’re on a call:
► Flick .
To switch back to the first caller:
► Touch Switch calls.
Phone 40
Page 50

Note: For those calls where you don’t want to be interrupted, you can temporarily disable Call
Waiting by pressing before placing your call. Call Waiting is
automatically reactivated once you end the call.
Other Call Settings
North American Dialing
1. Press Home and touch to display the phone screen.
2. Press Menu , and touch Settings.
3. Check North American dialing under OTHER CALL SETTINGS when placing
international calls while in the United States or Canada. See Call Using Plus (+) Code
Dialing.
TTY Mode
A TTY (teletypewriter, also known as a TDD or Text Telephone) is a telecommunications device
that allows people who are deaf, hard of hearing, or who have speech or language disabilities to
communicate by telephone.
Your device is compatible with select TTY devices. Please check with the manufacturer of your
TTY device to ensure that it supports digital wireless transmission. Your device and TTY device
will connect using a special cable that plugs into your device’s headset jack. If this cable was
not provided with your TTY device, contact your TTY device manufacturer to purchase the
connector cable.
To turn TTY mode on or off:
1. Press Home and touch to display the phone screen.
2. Press Menu , and touch Settings.
3. Touch TTY mode.
4. Touch TTY Full, TTY HCO, or TTY VCO to turn TTY mode on.
– or –
Touch TTY Off to turn TTY mode off.
Note: When enabled, TTY mode may impair the audio quality of non-TTY devices connected
to the headset jack.
Warning: 911 Emergency Calling
It is recommended that TTY users make emergency calls by other means,
including Telecommunications Relay Services (TRS), analog cellular, and
Phone 41
Page 51

landline communications. Wireless TTY calls to 911 may be corrupted when
received by public safety answering points (PSAPs), rendering some
communications unintelligible. The problem encountered appears related to TTY
equipment or software used by PSAPs. This matter has been brought to the
attention of the FCC, and the wireless industry and the PSAP community are
currently working to resolve this.
In-Call Options
While you’re on a call, you will see a number of onscreen options. Touch an option to select it.
● End: End the current call.
● Dialpad/Hide: Toggle the appearance of the onscreen dialpad to enter additional numbers,
for example, an extension or access code.
For example: When you call your bank’s 800 number, use your dialpad to enter your
account number and PIN.
● Mute: Mute the microphone ( ) during an active call, or unmute the microphone ( ).
● Speaker: Route the device’s audio through the speaker ( ) or through the earpiece
( ).
Warning: Because of higher volume levels, do not place the device near your ear during
speakerphone use.
Phone 42
Page 52

Press Menu during a call to display a list of additional in-call features. Touch an option to
select it.
● Contacts: Display your People list.
● Bluetooth: Route the device’s audio through a connected Bluetooth headset (checked) or
through the speaker (not checked).
Call Log
The Call log tab of the Phone application lists max. 500 recent incoming, outgoing, and missed
calls.
View Recent Calls
Call Log Options
Clear Call Logs
View Recent Calls
1. Press Home , and touch to display the phone screen.
2. Touch to display the Call log list.
You can determine if an entry was an incoming, outgoing, or a missed call from the
icons shown below.
= Incoming Call
= Outgoing Call
= Missed Call
Call Log Options
● To make a call from Call log, see Call From Recent Calls.
For additional options:
1. Press Home , and touch to display the phone screen.
2. Touch to display the Call log list.
3. Touch the name to display the options list.
Touch to send a text message.
Touch to view a People entry.
Phone 43
Page 53

Touch to add the number to People.
Press Menu > Remove from call log to remove the log.
Press Menu > Edit number before call to edit the number before calling.
Clear Call Logs
Use the menu option to clear the Call log list.
1. Press Home , and touch to display the phone screen.
2. Touch to display the Call log list.
3. Press Menu , and touch Clear call log > OK.
Phone 44
Page 54

Device Settings
This section provides an overview of items you can change using your device’s Settings menus.
WIRELESS & NETWORKS Settings
DEVICE Settings
PERSONAL Settings
SYSTEM Settings
WIRELESS & NETWORKS Settings
This group of settings lets you control your device’s wireless network settings, Wi-Fi settings,
Bluetooth, and more.
Wi-Fi
Bluetooth
Data Usage
Airplane Mode
Mobile Networks
Wi-Fi
Your device lets you take advantage of Wi-Fi hotspots for high-speed data access using
available computer networks. For details on your device’s Wi-Fi features and settings, see Wi-Fi.
Bluetooth
Your device’s Bluetooth capabilities let you use wireless headsets, send and receive pictures
and files, and more. For details on your device’s Bluetooth settings, see Bluetooth.
Data Usage
Your device provides a new data usage chart feature which shows current usage as well as
usages in a specific period of time.
View Data Usage by Application
You can view the amount of the data usage for the specific period of time.
1. Press Home > Menu , and touch System settings > Data usage.
2. Confirm Mobile data is set to .
Device Settings 45
Page 55

3. Touch of Data usage cycle to change the period of time for which the chart will
display the data usage.
4. Drag the bottom of the white line to set the short period of time you want to see the data
usage within that cycle.
The usage amount will be displayed just below the chart.
Set Data Usage Limit
You can also set the limit for mobile data in case you don’t have unlimited data plan which cuts
off data at a specified threshold.
Warning: The usage displayed is measured by your phone. Your carrier’s data usage
accounting may differ and the usage in excess of your data limit plan can result in
charges. Data usage limit set in this menu is not guaranteed to prevent additional
charges.
1. Press Home > Menu , and touch System settings > Data usage.
2. Touch to check Set mobile data limit. Read the message and touch OK.
3. Drag the right side of the red line at the top of the chart to set the limit you want.
When your data usage reaches the limit, mobile data will be turned off automatically.
4. Drag the right side of the orange line under the red line to set the level where you
receive the warning.
When your data usage reaches the level set with the orange line, you will see the
message.
Restrict Data Usage by Application
You can restrict the background data usage.
1. Press Home > Menu , and touch System settings > Data usage.
2. Press Menu > Restrict background data to check it.
3. Read the message and touch OK.
Tip: You can see the Wi-Fi usage. Press Menu > Show Wi-Fi usage to check it.
Airplane Mode
Airplane mode allows you to use many of your device’s features, such as Gallery, Camera, and
Music, when you are on an airplane or in any other area where making or receiving calls or data
Device Settings 46
Page 56

is prohibited. When you set your device to Airplane mode, it cannot send or receive any calls or
access online information.
To quickly turn Airplane mode on or off:
► Press and hold the Power button, and then touch Airplane mode under Phone options.
While in Airplane mode, the status bar will display .
To turn Airplane mode on or off in Settings:
1. Press Home > Menu , and touch System settings > More… under
WIRELESS & NETWORKS.
2. Touch the Airplane mode check box. While in Airplane Mode, the status bar will display
.
Mobile Networks
Mobile networks menu lets you enjoy the data connection.
Enable Data
Enable data access to enjoy the data connection.
1. Press Home > Menu , and touch System settings > More… under
WIRELESS & NETWORKS.
2. Touch Mobile networks and confirm Data enabled is checked.
Connections Optimizer
Your device can be set to automatically select the best mobile network.
1. Press Home > Menu , and touch System settings > More… under
WIRELESS & NETWORKS.
2. Touch Mobile networks > Connections Optimizer.
3. Read the message and touch I Agree.
– or –
Touch More Information for further details. Read the message and leave the check
box checked if you agree, or touch the check box to uncheck if you do not agree.
Device Settings 47
Page 57

DEVICE Settings
The DEVICE settings menu lets you control your device’s feature.
Sound
Display
Storage
Battery
PC Connection
Apps
Sound
Use the following settings for such features as silent mode, vibrate, and overall device volume.
Volumes
Adjust your device’s volume settings to suit your needs and your environment.
1. Press Home > Menu , and touch System settings > Sound > Volumes.
2. Drag the onscreen slider to adjust the volume level of Music, video, games, & other
media, Ringtone & notifications, or Alarms.
3. Touch OK.
Tip: You can adjust the ringtone volume in standby mode (or the earpiece volume during a
call) by using the volume button on the left side of your device.
Silent Mode
The Silent mode option allows you to mute all sounds or vibrate (except for media and alarm
sounds).
1. Press Home > Menu , and touch System settings > Sound > Silent mode.
2. Select your option.
Off to disable the silent mode.
Vibrate to mute all sounds but vibrate. You can select the vibrate pattern. See
Vibrate Pattern.
Mute to mute all sounds.
Device Settings 48
Page 58

Tip: Press the volume button down in standby mode until you see or on the
screen.
Phone Ringtone
You can select and assign ringtones for your incoming calls.
1. Press Home > Menu , and touch System settings > Sound > Phone
ringtone.
2. Touch a ringtone from the available list. The ringtone briefly plays when selected.
3. Touch OK to assign a ringtone.
Tip: You can assign individual ringtones to your People entries. See Assign a Ringtone to a
People Entry.
Vibrate Pattern
You can select the vibrate pattern.
1. Press Home > Menu , and touch System settings > Sound > Vibrate
Pattern.
2. Touch a vibrate pattern from the available list. Your phone briefly vibrates when
selected.
3. Touch OK to assign a vibrate pattern.
Default Notification
Use the settings menus to assign specific ringtones for notifications.
1. Press Home > Menu , and touch System settings > Sound > Default
notification.
2. Touch a notification sound from the available list. The sound briefly plays when selected.
3. Touch OK to assign a notification sound.
Vibrate and Ring
Check this option to let your device ring and vibrate simultaneously.
Persistent Alerts
This menu lets you set alerts, such as beep, vibration, or LED blinking for notification.
Device Settings 49
Page 59

1. Press Home > Menu , and touch System settings > Sound > Persistent
alerts.
2. Check the following.
Audible tone to beep when notification is on the notification bar.
Vibrate to vibrate when notification is on the notification bar.
Blink LED to blink the LED indicator when notification is on the notification bar.
SYSTEM
The SYSTEM settings menu lets you select whether you hear tones when touching numbers on
the dialpad, selecting onscreen options, and more.
● Dial pad touch tones: Check to play tones when using the dialpad.
● Touch sounds: Check to play sounds when making an onscreen selection.
● Screen lock sound: Check to play sounds when locking or unlocking the screen.
● Vibrate on touch: Check to vibrate when touching softkeys and during certain other
instances.
● Hearing aid: Check to use your hearing aid device effectively.
Display
Adjusting your device’s display settings not only helps you see what you want, it can also help
increase battery life.
Brightness
Adjust your screen’s brightness to suit your surroundings.
1. Press Home > Menu , and touch System settings > Display > Brightness.
2. Drag the Brightness slider left or right to adjust the screen brightness.
– or –
Check Automatic brightness to set the brightness automatically.
3. Touch OK.
Wallpaper
Select wallpaper using this menu.
1. Press Home > Menu , and touch System settings > Display > Wallpaper.
Device Settings 50
Page 60

2. Select the wallpaper you want to display on the screen.
Auto-rotate Screen
Your device is capable of automatically changing the orientation of some onscreen content.
With this feature, you can view the screen in either portrait or landscape orientation by turning
the device sideways. By default, the screen orientation automatically changes when the device
is rotated.
To deactivate the Auto-rotate feature:
1. Press Home > Menu , and touch System settings > Display.
2. Touch Auto-rotate screen check box to uncheck it.
If you open the device and access the slide-out keyboard, the screen automatically changes to
the landscape orientation. See Slide-out QWERTY Keyboard.
Sleep
Select the delay time before the screen automatically turns off.
1. Press Home > Menu , and touch System settings > Display > Sleep.
2. Touch a delay time to select it.
Font Size
Choose the font size of the screen as you like.
1. Press Home > Menu , and touch System settings > Display > Font size.
2. Select your desired font size.
Keyboard Timeout
Select the delay time before the key backlight automatically turns off.
1. Press Home > Menu , and touch System settings > Display > Keyboard
timeout.
2. Touch a time delay to select it.
Screen Proximity Safety
Set the distance between your device and your face that triggers your device’s proximity sensor
to work.
Note: If you disable the proximity sensor, it may cause accidental key presses during a call.
Device Settings 51
Page 61

1. Press Home > Menu , and touch System settings > Display > Screen
proximity safety.
2. Drag the slider left or right to adjust the distance between your device and your face,
and then touch OK.
Storage
The Storage settings menu lets you see the available space of the internal storage and the SD
card on your device and provides options for your microSD card. For SD card options, see
microSD Card.
Battery
The battery menu lets you see the current battery status and which applications have been
using the battery.
1. Press Home > Menu , and touch System settings > Battery.
2. Touch “… on battery” to see the history details of the battery usage.
PC Connection
Set your device’s default connection mode when connected to the USB port of a computer.
1. Press Home > Menu , and touch System settings > PC connection.
2. Touch Default connection type and select one of the following options.
Charge only: Let your PC charge your device only.
Mass Storage: Let your device function as a removable disk when connected to the
USB port of a computer.
Media Transfer: Let your device function as a media device when connected to the
USB port of a computer.
3. Check Ask me if you want to display the selection screen whenever you connect your
device to a computer.
If Ask me is checked, the selection screen is displayed whenever you connect your device to a
computer. If you want this selection set as default, check Remember this choice > Done on
the selection screen.
Apps
This menu lets you view applications on your device.
1. Press Home > Menu , and touch System settings > Apps.
2. Touch one of the following tabs to select the applications to be displayed.
Device Settings 52
Page 62

DOWNLOADED: Select to display downloaded application. You can also see the
storage status on your device at the bottom of the screen.
ON SD CARD: Select to display applications stored on the microSD card. You can
also see the storage status on your SD card at the bottom of the screen.
RUNNING: Select to display currently running applications. You can also see the
RAM status on your device at the bottom of the screen. Touch SHOW CACHED
PROCESSES to see the cached process of the application.
ALL: Select to display all applications stored on your device and the installed SD
card.
PERSONAL Settings
The PERSONAL settings menu lets you manage your personal settings of your device.
Accounts & Sync
Location Services
Security
Language & Input
Backup & Reset
Accounts & Sync
The Accounts & sync settings menu lets you add and manage your accounts and synchronizes
the calendar or People entries on your device. See General Sync Settings.
Location Services
Your device is equipped with a Location feature for use in connection with location-based
services. The Location services menu allows the network to detect your position. Turning the
Location services menu off will hide your location from everyone except 911.
Google’s Location Service
This service uses Wi-Fi and/or mobile networks to detect your location.
1. Press Home > Menu , and touch System settings > Location services.
2. Touch Google’s location service. (A check mark indicates this feature is enabled.)
3. Read the disclaimer and touch Agree.
Device Settings 53
Page 63

GPS Satellites
This service uses available GPS to pinpoint your location within certain applications such as
Google Maps Navigation™.
1. Press Home > Menu , and touch System settings > Location services.
2. Touch GPS satellites. (A check mark indicates this feature is enabled.)
Location & Google Search
This service lets Google use your location to improve search results and other services.
1. Press Home > Menu , and touch System settings > Location services.
2. Touch Location & Google search. (A check mark indicates this feature is enabled.)
3. Read the disclaimer and touch Agree.
Security
The Security settings menus let you set device security, lock codes, passwords, administrator
settings, and more.
Screen Lock
You can choose the way how your device acts when the device’s display screen is turned on.
As default, you must flick the lock button on the screen. See Turn the Screen On and Unlock It.
The security of your device can be increased by drawing the correct pattern on the screen,
entering the correct PIN, or entering the correct password to unlock the device’s control keys,
buttons, and touchscreen.
If you fail to enter the correct pattern, PIN or password after five attempts, you will have to wait
for 30 seconds before you can try again.
Use a Pattern:
1. Press Home > Menu , and touch System settings > Security > Screen lock.
2. Touch Pattern.
Device Settings 54
Page 64

3. Read the information and study the example pattern on the screen and touch Next.
4. Draw the screen unlock pattern by connecting at least four dots in a vertical, horizontal,
or diagonal direction. Lift your finger from the screen when finished.
5. The device records the pattern. Touch Continue.
6. When prompted, draw the screen unlock pattern again, and then touch Confirm.
Note: Clear the Make pattern visible check box if you do not want the pattern to be displayed
on the screen when you draw it.
Use a PIN:
1. Press Home > Menu , and touch System settings > Security > Screen lock.
2. Touch PIN.
3. Enter a PIN and touch Continue.
4. Enter your PIN again and touch OK to confirm it.
Use a Password:
1. Press Home > Menu , and touch System settings > Security > Screen lock.
2. Touch Password.
3. Enter a password and touch Continue.
4. Enter your password again and touch OK to confirm it.
Device Settings 55
Page 65

Note: Check the Vibrate on touch check box if you want the device to vibrate when you draw
the pattern or enter the PIN.
Note: Touch Automatically lock to select the time duration before the screen lock feature
activates.
Note: Check the Power button instantly lock check box if you want the screen lock feature to
activate by pressing the Power button.
Note: Touch Owner info to enter your information to be displayed on the lock screen.
Change or Disable the Screen Lock:
1. Press Home > Menu , and touch System settings > Security > Screen lock.
2. Draw your unlock screen pattern, or enter your PIN or password and touch Next.
3. Touch None to disable the screen lock or change the unlock mode. Touch Slide to
return to the default lock pattern.
Encrypt Data
You can encrypt your device and the SD card installed in your device.
Warning: To unencrypt your device, you need to reset your device to the original factory
settings, which erases all data from the device’s application storage.
Warning: To unencrypt your SD card, you need to format the card, which permanently removes
all files stored on the card.
Note: Charge the battery enough and connect the device to an electrical outlet.
Note: You cannot use other features including making or receiving phone calls during
encryption.
1. Press Home > Menu , and touch System settings > Security > Encrypt
data.
2. Select the following options.
Phone & SD card to encrypt your device and the SD card installed in your device.
Phone to encrypt your device only.
SD card to encrypt the installed SD card only.
3. Read the message and touch Next.
4. If you use the security lock with a PIN or password, enter it and touch Next.
Device Settings 56
Page 66

5. Read the message and touch Encrypt.
Warning: Do not remove the SD card during the encryption of the SD card, otherwise you will
lose some or all of your data.
Warning: If you interrupt the encryption process, you will lose some or all of your data.
Passwords
You can hide your password or PIN number as you type it.
1. Press Home > Menu , and touch System settings > Security.
2. Clear the Make passwords visible check box.
Device Administration
You can disable the authority to be a device administrator of certain applications. If disabled,
you will typically lose some functionality in those applications, such as the ability to sync new
email or calendar events to your device.
1. Press Home > Menu , and touch System settings > Security > Device
administrators.
2. Touch an application you want to disable the authority to be a device administrator.
Unknown Sources
Follow the steps below to install non-Google Play applications.
1. Press Home > Menu , and touch System settings > Security.
2. Touch Unknown sources > OK. (A check mark indicates this feature is enabled.)
Credential Storage
You can see the trusted credentials on your device’s system.
1. Press Home > Menu , and touch System settings > Security > Trusted
credentials.
2. Touch to read the information.
You can install encrypted certificates from the SD card.
1. Press Home > Menu , and touch System settings > Security > Install from
SD card.
2. Touch an available certificate.
Device Settings 57
Page 67

3. Follow the onscreen instructions.
You can remove all the credentials on your device.
1. Press Home > Menu , and touch System settings > Security > Clear
credentials.
2. Touch OK.
Language & Input
Your device’s Language & input settings let you select a language for the device’s screens and
menus, as well as manage a personal user dictionary. The Keyboard settings let you select a
preferred input method, control keyboard settings, and more. For details, see Enter Text.
This menu also provides the settings when using voice function. See Text-to-speech Settings
and Voice Search.
Backup & Reset
This menu helps you to back up and restore your data.
Back up My Data
You can back up your settings to a Google server.
1. Press Home > Menu , and touch System settings > Backup & reset.
2. Touch Back up my data. (A check mark indicates this feature is enabled.)
Automatic Restore
Check this option to restore your settings and other data when you install an application.
1. Press Home > Menu , and touch System settings > Backup & reset.
2. Touch Automatic restore. (A check mark indicates this feature is enabled.)
Factory Data Reset
Your device’s Backup & reset menu includes the Factory data reset option. This option lets you
reset your device to the original factory settings, which erases all data from the device’s
application storage, including the following options.
● Your Google account
● All other email and social networking accounts
● System and application data and settings
● Downloaded applications
Device Settings 58
Page 68

To reset your device:
1. Press Home > Menu , and touch System settings > Backup & reset >
Factory data reset. Read the Factory data reset information.
2. Touch Reset phone.
3. Touch Erase everything. Your device will power down and reset itself, which may take
up to 10 minutes.
SYSTEM Settings
The SYSTEM settings menu lets you manage the system settings of your device.
Date & Time
Accessibility
Developer Options
About Phone
System Update
Date & Time
Your device obtains its time and date information by using the network-provided date, time, and
time zone. These values can be changed manually.
1. Press Home > Menu , and touch System settings > Date & time.
2. Clear the Automatic date & time check box if necessary.
3. Clear the Automatic time zone check box if necessary.
4. Touch Set date. Adjust the date, month, and year by touching or . Touch Set
when finished.
5. Touch Set time. Adjust the hour, minute, and AM or PM by touching or . Touch
Set when finished.
6. Touch Select time zone, and then select a time zone from the onscreen list. Scroll
down the list to view additional time zones.
7. Touch Use 24-hour format to toggle between 12-hour or 24-hour format.
8. Touch Select date format to select how the date information is displayed on your
device.
Device Settings 59
Page 69

Accessibility
You can download and manage accessibility-related applications or configure the accessibility
setting of your device.
Note: You can also enable your TTY (teletypewriter, also known as a TDD or Text Telephone)
settings. See TTY mode within the Other Call Settings section.
SERVICES
This menu provides you the list of accessibility-related applications. Touch the application and
configure its settings.
1. Press Home > Menu , and touch System settings > Accessibility.
2. Touch an application to configure its settings.
TalkBack
TalkBack is an application to help blind and vision-impaired users use their devices more easily.
It adds spoken, audible, and vibration functionality services to your device.
1. Press Home > Menu , and touch System settings > Accessibility.
2. Touch TalkBack.
3. If is displayed at the right of TalkBack, touch it to turn TalkBack on.
4. Read the message and touch OK. is displayed.
5. Touch SETTINGS and configure the TalkBack settings
SYSTEM
This menu configures the accessibility settings of the system in your device.
1. Press Home > Menu , and touch System settings > Accessibility.
2. Configure the following system accessibility settings.
Large text to use large fonts on the screen.
Power button ends call to use the Power button to end a call.
Auto-rotate screen to automatically change the orientation of some onscreen
content when the device is rotated.
Speak passwords to let your device speak the password you enter.
Device Settings 60
Page 70

Explore by touch to let your device speak or write the descriptions of what’s under
your finger (when TalkBack is turned on).
Touch & hold delay to set the delay time when the screen recognizes the touch and
hold operation.
Install web scripts to install web scripts that make the web content more accessible.
Developer Options
These menus are specific for application development. Unless you have a specific reason for
changing these settings, you should leave them at the default settings.
About Phone
The About phone menu lets you access important phone information including your phone
number, and view legal information.
System Update
From time to time, updates may become available for your device. You can download and apply
updates through the System update menu.
Update Kyocera Software
This option provides you to the latest Android Operating System (OS) and the device software
on your device via an over-the-air connection.
Before Updating Your Firmware:
Updating your device firmware may erase all user data from your device. You must back up all
critical information before updating your device firmware.
To back up your account information:
1. Press Home > Menu , and touch System settings > Accounts & sync.
2. Touch the account containing data you want to back up now.
3. Press Menu , and touch Sync now.
As an added precaution, to preserve any data on your microSD card, please remove it from
your device prior to starting the update process.
Update Kyocera Firmware:
1. Press Home > Menu , and touch System settings > System update >
Update Kyocera software.
Device Settings 61
Page 71

2. Follow the onscreen instructions. (Your device automatically downloads and installs any
available updates. You may be required to power your device off and back on to
complete the software upgrade.)
Confirm Your Current Device Firmware:
1. Press Home > Menu , and touch System settings > About phone.
2. Scroll to the bottom of the page for the version number.
Reinstall Your Google Application:
Your Google™ application purchases are reloaded remotely and can be re-installed after the
update is applied.
1. Log into your Google account via the device.
2. Press Home , and touch > Play Store.
3. Press Menu , and touch My Apps.
4. Scroll through the list of previously downloaded Google applications and choose the
one you wish to reinstall.
5. Follow the onscreen instructions.
Device Settings 62
Page 72

People
The People application lets you store and manage contacts from a variety of sources, including
contacts you enter and save directly in your device as well as contacts synchronized with your
Google account or compatible email programs.
Get Started with People
Add a New People Entry
Save a Phone Number
Edit a People Entry
Select People List
Customize People List
Synchronize People Entries
Display Options
Share a People Entry
Get Started with People
Before using People, it’s best to learn a few basics.
Access People
People List Options
Access People
Follow the steps below to access People.
► Press Home , and touch > People.
There are four tabs on People:
Groups to display the Group of entries.
All to display all entries.
Favorite to display your favorite entries.
ICE to display your ICE (in case of emergency) entry.
People 63
Page 73

Scroll through the list to view all your entries. To see a specific entry, scroll to it and touch it.
People List Options
You can manage your entries from the People list.
● Touch to add an entry. See Add a New People Entry.
● Touch to search an entry.
You can also press Menu to display the People list options.
● Contacts to display: Selects the People list to be displayed. See Select People List.
● Import/export: Imports/exports entries from/to the microSD card.
● Accounts: Opens the Accounts & sync settings screen. See Accounts & Sync.
● Settings: Opens the Display options screen. You can select how your entries are displayed.
See Display Options.
Add a New People Entry
Enter details such as name, phone numbers, email addresses, mailing addresses, and more.
1. Press Home , and touch > People.
2. If this is the first time to open the People application, select where to save a new entry.
Existing to save a new entry to your existing Google account.
People 64
Page 74

New to save a new entry to your new Google account.
Not now to save a new entry in your device only.
3. Touch .
You may be prompted to select a type of the entry.
• Select your Google account to save an entry to.
• Select Add new account to save an entry to your new account. Select Google
or Corporate.
• They will be synced automatically with your Google account online.
4. Use the keyboard to enter as much information as you want.
(People icon): Touch to assign a photo to the entry. See Assign a Stored
Picture to a People Entry or Assign a New Picture to a People Entry.
Name
Add organization
PHONE
EMAIL
ADDRESS
People 65
Page 75

EVENTS
GROUPS
Add another field: Touch to include additional information such as IM (address),
Notes, Nickname, Website, Internet call, etc.
Note: To select a type (label) for a phone number, email address, or postal address (such as
Mobile, Home, Work, etc.), touch the type to the right of the field.
Note: To add more phone numbers, email addresses, etc., touch Add new under the current
numbers or addresses.
5. When you have finished adding information, touch DONE.
Save a Phone Number
You can save a phone number to People directly from the phone dialpad.
1. Press Home , and touch > .
2. Enter a phone number and press Menu , and touch Add to contacts.
3. To add the number to an existing entry, scroll through the list and touch the entry or
touch Find contacts to find the entry. To add a new entry, touch CREATE NEW
CONTACT.
4. For an existing entry, select a number type for the new number, and then touch OK.
5. For a new entry, enter the name and any additional information, and then touch DONE.
See Add a New People Entry.
Edit a People Entry
Once you’ve added an entry, you can add or edit any of the information in the entry, assign a
caller ID picture, customize it with a unique ringtone, and more.
Add or Edit Information for a People Entry
Assign a Stored Picture to a People Entry
Assign a New Picture to a People Entry
Assign a Ringtone to a People Entry
Assign a Vibration to a People Entry
Add an Entry to Favorites
Send an Entry’s Call to Voicemail
People 66
Page 76

Delete a People Entry
Add or Edit Information for a People Entry
Use the Edit menu to add or edit information for an existing entry.
1. Press Home , and touch > People.
2. Touch an entry to display it, and then press Menu , and touch Edit.
3. Touch any field you want to change or add. See Add a New People Entry.
4. Add or edit the information, and then touch DONE.
Note: To select a type (label) for a phone number, email address, or postal address (such as
Mobile, Home, Work, etc.), touch the type at the right of the field.
Assign a Stored Picture to a People Entry
The Edit menu lets you assign a picture stored in your device’s memory or SD card to an entry.
1. Press Home , and touch > People.
2. Touch an entry to display it, and then press Menu , and touch Edit.
3. Touch the entry icon at the right of the name.
4. Touch Choose photo from Gallery and select a location.
5. Touch a picture to select it.
You may be prompted to size the picture for use with entries. Touch and drag the
square to frame the portion of the picture to use. Touch and drag the side of the
square to resize the square and touch CROP.
6. Touch DONE to save the entry.
Assign a New Picture to a People Entry
Follow the instructions to take a new picture and assign it directly to an existing entry.
1. Press Home , and touch > People.
2. Touch an entry to display it, and then press Menu , and touch Edit.
3. Touch the entry icon at the right of the name.
4. Touch Take photo.
5. Touch to take the photo. If you’re satisfied with the picture, touch to continue.
People 67
Page 77

You may be prompted to size the picture for use with entries. Touch and drag the
square to frame the portion of the picture to use. Touch and drag the side of the
square to resize the square and touch CROP.
6. Touch DONE to save the entry.
Assign a Ringtone to a People Entry
Know who’s calling without looking at your device by assigning a specific ringtone to an entry.
1. Press Home , and touch > People.
2. Touch an entry to display it, and then press Menu > Set ringtone.
3. Touch an available ringtone.
When you touch a ringtone, you will hear a sample.
4. Touch OK to assign the ringtone.
Assign a Vibration to a People Entry
You can assign a specific vibration pattern to a People entry.
1. Press Home , and touch > People.
2. Touch an entry to display it, and then press Menu > Set vibrate.
3. Touch an available vibration.
When you touch a vibration, you will feel a vibration.
4. Touch OK to assign the vibration.
Add an Entry to Favorites
The Favorites tab of the Phone menu is a listing that can help you quickly access your most
used or preferred People entries.
1. Press Home , and touch > People.
2. Touch an entry.
3. Touch the star at the upper right corner. The star turns to white.
Send an Entry’s Call to Voicemail
You can transfer your entry’s voice call to voicemail anytime you receive it.
1. Press Home , and touch > People.
People 68
Page 78

2. Touch an entry to display it, and then press Menu .
3. Check All calls to voicemail.
Delete a People Entry
You can delete an entry from the entry’s details page.
1. Press Home , and touch > People.
2. Touch an entry to display it, and then press Menu > Delete.
3. Touch OK.
Select People List
Display the People list you like if you have multiple Google accounts.
1. Press Home , and touch > People.
2. Press Menu > Contacts to display.
3. If you save multiple accounts, select the account. People entries saved in the account
will be displayed.
If you select All contacts, all the entries you saved will be displayed.
Customize People List
You can customize the People list of the account.
1. Press Home , and touch > People.
2. Press Menu > Contacts to display.
3. Touch Customize and touch the account.
4. Check the types of entries to be displayed or uncheck those types you don’t wish to
display.
5. Touch OK.
Synchronize People Entries
Syncing data from your managed accounts allows you to add and manage a new or existing
entry from your online or remote accounts to your device. Prior to syncing, you must first have
an active Google or Corporate account with current People entries, and be signed into your
account via the device.
People 69
Page 79

With syncing, any entries (with phone numbers, email addresses, pictures, etc.) are updated
and synced with your device.
For more information about syncing existing managed accounts, see General Sync Settings.
1. Press Home > Menu , and touch System settings > Accounts & sync.
2. Touch the account you want to sync your People with.
3. Touch the Sync Contacts check box to select the feature. (A check mark indicates this
feature is enabled.)
Note: The process of updating your People can take several minutes. If after 10-20 minutes,
your list has not been updated, repeat steps 2 and 3.
Your People then reflects any updated entry information.
This update process works both ways. For example, any changes on the device are
updated to your Gmail contacts list after sync.
Display Options
Select how the People list is displayed.
1. Press Home , and touch > People.
2. Press Menu > Settings.
3. Set the following options.
Sort list by to choose how your entries are sorted.
View contact names as to choose how the names of your entries are displayed.
Share a People Entry
You can quickly share People entries using Bluetooth, Email, or Gmail.
1. Press Home , and touch > People.
2. Touch an entry to display it, and then press Menu , and touch Share.
3. In the Share contact via menu, select a method:
Bluetooth to send the information via Bluetooth. See Bluetooth for information on
pairing and sending via Bluetooth.
People 70
Page 80

Email to send the information as an email attachment. If prompted, select an email
account. Address the message, add a subject and a message, and then touch .
See Compose and Send Email for details on sending email.
Gmail to send the information as a Gmail attachment. Address the message, add a
subject and a message, and then touch . See Send a Gmail Message for details.
People 71
Page 81

Messaging
With the data service and your device’s messaging capabilities, you have the opportunity to
share information through many different channels and accounts.
Gmail
Email
Text Messaging and MMS
Social Networking Accounts
Google Talk
Gmail
Gmail is Google’s web-based email service. You need to setup your Google Account in advance.
Access Gmail
Send a Gmail Message
Read and Reply to Gmail Messages
Access Gmail
Your device allows you to access, read, and reply to all your Gmail messages.
1. Press Home , and touch > Gmail.
Messaging 72
Page 82

2. Do any of the following:
View more email messages: If the Inbox is full, swipe your finger up the screen to
view more messages and conversations.
Read a new email message: Touch the unread message or the conversation with an
unread message (just-arrived items display in bold).
Select messages and conversations: Touch the box before the email or conversation.
View the Inbox of your other Gmail account. Touch Inbox at the top of the screen
and select the account you want to view its inbox.
Refresh the Inbox: Touch .
Send a Gmail Message
1. Press Home , and touch > Gmail.
2. Touch .
3. Enter the message recipient’s email address in the To field. If you’re sending the email
message to several recipients, separate the email addresses with a comma. As you
enter email addresses, any matching addresses from your People list are displayed.
Touch a match to enter that address directly.
Tip: If you want to send a CC or a BCC of the email to other recipients, press Menu , and
touch Add Cc/Bcc.
4. Enter the subject, and then compose your message.
Note: If you want to attach a picture, press Menu , and then touch Attach file. Locate and
then touch the picture you want to attach.
5. After composing your message, touch .
Note: While composing the message, press Menu > Save draft if you want to send it
later. To open a draft email, in the email account Inbox, touch Inbox (top of the Gmail
screen), and then touch Drafts.
Note: To view your sent messages in the Inbox, touch Inbox, and then touch Sent.
Read and Reply to Gmail Messages
1. Press Home , and touch > Gmail.
2. Touch a message to display it.
Messaging 73
Page 83

Tip: You can also access new messages through the status bar. When a new Gmail
message arrives, you’ll see the icon in the status bar. Slide the bar down to display
notifications. Touch a message to display it.
3. To reply to or forward a message:
Touch to reply to the message.
Touch > Reply all to reply to all recipients.
Touch > Forward to forward the message.
4. After composing your message, touch .
Use the Email application to send and receive email from your webmail or other accounts, using
POP3 or IMAP. You can also access your corporate email and other features on your device.
Add an Email Account (POP3 or IMAP)
Add a Corporate Account
Create Another Email Account
Compose and Send Email
View and Reply to Email
Manage Your Email Inbox
Email General Settings
Email Account Settings
Delete an Email Account
Add an Email Account (POP3 or IMAP)
You can add several types of personal email accounts, such as POP3 and IMAP accounts, on
your device.
1. Press Home , and touch > Email.
2. Enter the Email address and Password for the email account and then touch Next.
Important: If the account type you want to set up is not in the device database, you will be
asked to enter more details. You should get all pertinent information for the email
account, such as incoming and outgoing server settings, before you proceed.
Messaging 74
Page 84

3. Confirm the Email settings and touch Next.
4. Touch Next. The inbox of the account is displayed.
Add a Corporate Account
If you synchronize your device with your corporate account, you can read, manage, and send
email in the same easy way as with a POP3/IMAP account. However, you can also access
some powerful Exchange features.
1. Press Home > Menu , and touch System settings > Accounts & sync.
2. Touch ADD ACCOUNT, and then touch Corporate.
3. Enter your Email address and Password information, and then touch Next. Consult your
network administrator for further details.
Email address: your corporate email address.
Password: typically your network access password (case-sensitive).
4. Enter a Domain\Username, Password, and Server information and touch Next.
Domain\Username: enter your network domain\login username.
Password: typically your network access password (case-sensitive).
Server: your exchange server remote email address. Typically it is in the form
mail.XXX.com. Obtain this information from your company’s network administrator.
5. If your network requires SSL encryption, touch the Use secure connection (SSL) box
to place a check mark and activate this additional level of security. If your exchange
server requires this feature, leaving this field unchecked can prevent connection.
6. If the onscreen activation disclaimer is displayed, touch Next.
7. Configure your Inbox checking frequency, Days to sync (days to synchronize between
your device and server), and activate any other email settings, then touch Next.
Note: Signal interruptions or incorrect user name or password information can cause
completion issues.
8. Identify your new account with a unique name and provide the outgoing name, then
touch Done.
Note: You can have multiple corporate email accounts active on your device.
Note: Your corporate Exchange Server must support auto-detect for the device to
automatically set up the Exchange ActiveSync account. If your corporate Exchange
Messaging 75
Page 85

Server does not support auto-detect, you will need to enter your Exchange Server
settings after you touch Next. Ask your Exchange Server administrator for details.
Create Another Email Account
While you are viewing one email account, you can access the tool to create another email
account.
1. Press Home , and touch > Email.
2. Press Menu , and touch Settings.
3. Touch ADD ACCOUNT.
4. Enter the Email address and Password for the email account and then touch Next.
5. Confirm the Email settings and touch Next.
6. Touch Next. The inbox of the account is displayed.
Compose and Send Email
Compose and send email using any account you have set up on your device. Increase your
productivity by attaching files such as pictures or videos to your email messages.
1. Press Home , and touch > Email.
2. On the email account Inbox, touch .
Tip: Touch displayed email address to select a different email account.
3. Enter email addresses directly in the To field. If you’re sending the email to several
recipients, separate the email addresses with a comma. As you enter email addresses,
any matching addresses from your People list are displayed. Touch a match to enter
that address directly.
Tip: If you want to send a CC or a BCC of the email to other recipients, press Menu , and
touch Add Cc/Bcc.
4. Enter the subject, and then compose your message.
5. To add an attachment, press Menu , and touch Attach file, and choose from the
following options:
Pictures: Select photos from Gallery.
Videos: Select videos from Gallery.
Audio: Select sound files.
Messaging 76
Page 86

6. Touch to send the message immediately, or press Menu > Save draft as
draft if you want to send it later.
Note: To open a draft email, in the email account Inbox, touch Inbox (top of the Email screen),
and then touch Drafts.
View and Reply to Email
Reading and replying to email on your device is as simple as it is on your computer.
1. Press Home , and touch > Email.
2. On the email account Inbox, touch the message you want to view.
3. Touch or > Reply all to reply to the message.
Manage Your Email Inbox
View Your Email Inbox
1. Press Home , and touch > Email.
2. Touch the account whose mails you want to view.
Touch to search an email.
Touch to display folders.
Touch to refresh your email box.
Press Menu > Settings to display the Email settings. See Email General
Settings and Email Account Settings.
Refresh an Email Account
Whatever your automatic synchronization settings are, you can also synchronize your sent and
received email messages manually at any time.
► While in the account you want to synchronize, touch .
Delete an Email Message
1. On the email account Inbox, touch the message you want to delete (the message is
checked).
2. Touch .
Messaging 77
Page 87

Delete Multiple Email Messages
1. On the email account Inbox, touch the check box of the messages you want to delete.
2. Touch .
Email General Settings
You can edit the general settings of your email.
1. Press Home , and touch > Email.
2. Press Menu > Settings > General.
Auto-advance: Choose which screen to show after you delete a message.
Message text size: Select the message text size.
Reply all: Check if you want to display “Reply all” option as default.
Ask to show pictures: Touch if you want to be asked before pictures in messages
to be displayed.
Email Account Settings
You can edit settings for your individual email accounts, such as email address and password,
name display and signature, frequency of retrieval, and more.
1. Press Home , and touch > Email.
2. Press Menu > Settings.
3. Select the account you want to edit the settings of.
4. Set the following options:
Account name: Edit your account name.
Your name: Edit your name displayed on your emails.
Signature: Create an email signature for your outgoing emails.
Quick responses: Edit the text you frequently insert when composing emails.
Default account: Check to assign this account as the default email used for
outgoing messages.
Inbox check frequency: Touch to select the time interval used by your device to
check your new emails from Automatic (Push) (corporate account only), Never,
Messaging 78
Page 88

Every 5 minutes, Every 10 minutes, Every 15 minutes, Every 30 minutes, and
Every hour.
Days to sync: Set a period of time to synchronize your account (corporate account
only).
Sync email: Check to synchronize your email (corporate account only).
Sync contacts: Check to synchronize your contacts (corporate account only).
Sync calendar: Check to synchronize your calendar (corporate account only).
Download attachments: Check if you want to automatically download attachments
via Wi-Fi.
Email notifications: Check to display the email notification icon on the status bar
when a new email is received.
• Choose ringtone: Select a ringtone for new email messages.
• Vibrate: Select a vibration pattern for new email messages.
Incoming settings: Adjust the incoming email parameters, such as username,
password, and other incoming connection parameters (ex: IMAP server).
Outgoing settings: Adjust the outgoing parameters, such as username, password,
and other outgoing connection parameters (ex: SMTP server, not for a corporate
account).
Out of office settings: Set your current status and your message to reply
automatically while you are out of the office (corporate account only).
Remove account: Touch to remove the account.
Delete an Email Account
If you no longer want an email account on your device, you can delete it through the email
settings menu.
1. Press Home , and touch > Email.
2. Press Menu > Settings.
3. Select the account you want to delete.
4. Touch Remove account > OK.
Messaging 79
Page 89

Text Messaging and MMS
With Text Messaging (SMS), you can send and receive instant text messages between your
wireless device and another messaging-ready phone.
Multimedia messages, or MMS, can contain text and pictures, recorded voice, audio or video
files, or picture slideshows.
See your service plan for applicable charges for messaging.
Compose Text Messages
Send a Multimedia Message (MMS)
Save and Resume a Draft Message
New Messages Notification
Managing Message Conversations
Text and MMS Options
Compose Text Messages
Quickly compose and send text messages on your device.
1. Press Home , and touch > Messaging.
2. On the Messaging screen, touch . The compose screen opens.
3. Fill in one or more recipients.
Enter phone numbers or email addresses in the To field. If you’re sending the
message to several recipients, separate the phone numbers or email addresses with
commas. As you enter information, any matching phone numbers or addresses from
your People list are displayed. Touch a match to enter that number or address.
Messaging 80
Page 90

4. Touch Type message and then start composing your message.
Tip: You can add a subject line by pressing Menu , and then touching Add subject.
5. When done, touch to send the text message.
Send a Multimedia Message (MMS)
When you need to add a little more to a text message, you can send a multimedia message
(MMS) with pictures, recorded voices, or audio or video files, or slideshows.
1. Press Home , and touch > Messaging.
2. On the Messaging screen, touch . The compose screen opens.
3. Fill in one or more recipients.
Enter phone numbers or email addresses in the To field. If you’re sending the
message to several recipients, separate the phone numbers or email addresses with
commas. As you enter information, any matching phone numbers or addresses from
your People list are displayed. Touch a match to enter that number or address.
4. Touch Type message and then start composing your message.
Tip: You can add a subject line by pressing Menu , and then touching Add subject.
5. Touch and select from the following file attachments.
Pictures: Open Gallery to attach a photo from your storage card.
Messaging 81
Page 91

Capture picture: Run the camera application to take a photo and attach it.
Videos: Open Gallery to attach a video from your storage card.
Capture video: Run the camcorder application to take a video and attach it.
Audio: Select a ringtone and attach it.
Record audio: Run the voice recorder application to create a recording and attach it.
Slideshow: See Create a Slideshow for details.
6. To make changes to your attachment, touch Replace or Remove.
7. Touch to send the MMS message.
Create a Slideshow
In a multimedia message, you can add slides, each containing a photo, video, or audio.
1. In the multimedia message you’re composing, Touch > Slideshow.
2. To compose your slideshow, do any of the following.
Touch Add slide to create a new slide. (This is a placeholder for new images to be
added, similar to a playlist.)
Touch the created slide (example, Slide 1), touch Add picture, and then select the
picture you want to add to the slide.
Touch the text field below the image to enter a caption for the picture.
Touch Preview (to preview the slide), Replace picture (to delete the currently
selected picture), Remove slide, press Menu , and touch Add music, Add
slide, Duration, or Layout.
When finished, touch Done to attach the slideshow to your message.
3. When you have finished composing the multimedia message, touch or Send.
Save and Resume a Draft Message
While composing a text or multimedia message, press Back > Yes to save your message
as a draft.
To resume composing the message:
Messaging 82
Page 92

1. On the Messaging screen, touch the message to resume editing it. “Draft” in red
appears at the right of the message in the list.
2. When you finish editing the message, touch , or touch if you have added
attachments to your message.
New Messages Notification
Depending on your notification settings, the device will play a ringtone, vibrate, or display the
message briefly in the status bar when you receive a new text or multimedia message. To
change the notification for new text and multimedia messages, see Text and MMS Options for
details.
A new message icon or also appears in the notifications area of the status bar to
notify you of a new text or multimedia message.
To open the message, slide the status bar down to open the Notifications panel. Touch the new
message to open and read it. For information on reading and replying to messages see
Managing Message Conversations.
Managing Message Conversations
Text and multimedia messages that are sent to and received from a contact (or a number) are
grouped into conversations or message threads in the Messaging screen. Threaded text or
multimedia messages let you see exchanged messages (similar to a chat program) with a
contact on the screen.
To read a text message:
► Do one of the following:
On the Messaging screen, touch the text message or message thread to open and
read it.
If you have a new message notification, slide the status bar down to open the
Notifications panel. Touch the new message to open and read it.
To return to the Messaging screen from a text message thread, press Back .
Note: To view the details of a particular message, in the message thread, touch the message
to open the options menu, and then touch View details.
Note: If a message contains a link to a Web page, touch the message and then touch the link
to open it in the Web browser.
Note: If a message contains a phone number, touch the message to dial the number, or touch
and hold the message to send a text message to the number or to add the number to
your People list.
Messaging 83
Page 93

To view a multimedia message (MMS):
1. Press Home , and touch > Messaging.
2. On the Messaging screen, touch a multimedia message or message thread to open it.
3. Touch the attachment to open it.
Tip: To save the attachment, touch and hold the message, and then touch Save attachment
on the options menu.
Note: When Auto-retrieve in MMS settings is disabled, only the message header is
downloaded. To download the entire message, touch the Download button at the right
side of the message. For details, see Text and MMS Options.
Note: If you are concerned about the size of your data downloads, check the multimedia
message size before you download it.
To reply with a multimedia message (MMS):
1. Press Home , and touch > Messaging.
2. On the Messaging screen, touch a text or multimedia message thread to open it.
3. Touch the text box at the bottom of the screen, enter your reply message, attach files,
and then touch .
To delete a message thread:
1. Press Home , and touch > Messaging.
2. On the Messaging screen, touch the message thread that you want to delete.
3. Press Menu , and then touch Delete thread.
4. When prompted to confirm, touch Delete.
To delete a single message:
1. While viewing a message thread, touch and hold the message that you want to delete.
2. From the options menu, touch Delete.
3. When prompted to confirm, touch Delete.
When you have received a message from someone stored in your People, you can touch the
entry’s photo or icon in the message thread to open a menu of options. Depending on the stored
Messaging 84
Page 94

entry information, you can view the entry details, phone or send an email message to the entry,
and more.
Text and MMS Options
The messaging settings menu lets you control options for your text and MMS messages
including message limits, size settings, and notifications.
1. Press Home , and touch > Messaging.
2. Press Menu , and then touch Settings. You can set the following options.
STORAGE Settings
● Delete old messages: Automatically delete older messages, when the set limits are
reached.
● Text message limit: Choose the maximum number of text messages to store in each
conversation thread.
● Multimedia message limit: Choose the maximum number of MMS messages to store in
each conversation thread.
TEXT (SMS) MESSAGES Settings
● Emergency Alerts: Sets the federally supervised cell phone alert services to send out
broadcast SMS messages for public warning.
Presidential: Receives an emergency presidential alert. (Presidential is always
grayed out [not selectable] and cannot be excluded.)
Imminent Threat - Extreme: Select this option if you want to receive emergency
alerts in an extreme emergency situation (an extraordinary threat to life or property).
Imminent Threat - Severe: Select this option if you want to receive emergency
alerts in a severe emergency situation (a significant threat to life or property).
Amber: Select this option if you want to receive alerts related to missing or
endangered children.
Emergency Alerts Test: Select this option if you want to receive a test message to
make sure that the alert messages can be successfully received.
Help: Displays the help information for Emergency Alerts.
MULTIMEDIA (MMS) MESSAGES Settings
● Auto-retrieve: Select this option to automatically retrieve all your multimedia messages
completely. When selected, the multimedia message header plus the message body and
Messaging 85
Page 95

attachments will automatically download to your device. If you clear this check box, only the
multimedia message header will be retrieved and shown in your Messaging screen.
NOTIFICATIONS Settings
● Notifications: Select this option if you want to receive a notification in the status bar when a
new text or multimedia message arrives.
Choose ringtone: Select a ringtone that is specific to new text and multimedia
messages. Note that the ringtone briefly plays when selected.
Vibrate: Select when your device to vibrate when a new text or multimedia message
arrives.
Social Networking Accounts
Stay in touch on the go with all your social networking accounts.
YouTube
YouTube
YouTube™ is a video sharing website on which users can upload and share videos. The site is
used to display a wide variety of user-generated video content, including movie clips, TV clips,
and music videos, as well as video content such as video blogging, informational shorts and
other original videos.
Opening YouTube
► Press Home , and touch > YouTube. The library screen appears.
Note: If Terms of Service appears, touch Accept if you agree to the Terms of Service.
Watching YouTube Videos
1. On the YouTube screen, touch a video.
2. Touch the screen to show the progress bar at the bottom. Touch the screen while the
bar is displayed to pause/play the video. Move the slider on the bar to the left or right to
rewind or fast-forward the video.
Searching for Videos
1. On the YouTube screen, touch at the upper right of the screen to open the search
box.
2. Enter the keyword to search. Search results appear below the status bar.
Messaging 86
Page 96

3. Touch one of the results, or touch or .
4. Scroll through the results and touch a video to watch it.
Google Talk
Google Talk™ is the instant messaging program provided by Google. Google Talk lets you chat
with other people that also have a Google account. Your Google Talk account is tied to the
Google account you used to set up your device.
Signing In and Chatting
Managing Your Friends
Mobile Indicators
Signing Out
Google Talk Settings
Signing In and Chatting
You need to sign in the Google Talk before starting chatting.
► Press Home , and touch > Talk to open Google Talk.
Adding New Friends
You can add only people who have a Google account.
1. On the friends list screen, touch .
Messaging 87
Page 97

2. Enter the Google Talk ID or the Gmail address of the person you want to add.
3. Touch DONE.
Viewing Your Invitations
On the friends list screen, the friends you invited appear offline in your Friends list until they
accept your invitation.
Accepting and Canceling Invitations
On the friends list screen, touch Chat invitation. When an invitation pop-up window appears,
touch Accept or Cancel.
Changing Your Online Status Message
1. On the friends list screen, touch your email address at the top of the list.
2. Touch the status and select the status you want from the menu.
3. Touch the text box below the online status, and then type your status message.
4. Press Back .
Starting a Chat
1. Touch a friend on the friends list.
2. Touch the text box, and then type your message.
3. Touch .
Switching Between Active Chats
You can conduct multiple chats at the same time and switch between active chats.
► On the friends list, touch the friend you want to chat with.
Closing a Chat
To close a chat, do one of the following:
► On a chat screen, press Menu > End chat.
– or –
On the friends list screen, press Menu > End all chats. All the chats will be closed.
Messaging 88
Page 98

Managing Your Friends
Friends on the friends list screen are sorted according to their online status and are listed
alphabetically.
Viewing the Friends List
You can sort your friends as you like.
► On the friends list screen, press Menu , and touch Display option.
Availability to show the friends that you frequently chat with first and now available
first.
Name to sort all your friends by name.
Recency to show the friends that you frequently chat with first.
Blocking Friends
You can block friends from sending you messages.
1. On the friends list screen, touch the name of the friend you want to block.
2. Press Menu > Friend info > Block. That friend is removed from your friends list
and is added to the blocked friends list.
Unblocking Friends
1. On the friends list screen, press Menu > Settings and touch your account.
2. Touch Blocked friends.
3. On the blocked friends list, touch the name of the friend you want to unblock.
4. Touch OK to confirm.
Mobile Indicators
Mobile indicators allow you to check your friend’s device.
Checking Friends’ Devices
You can see which devices your friends are using to chat in Google Talk.
● If “on Mobile Device” appears below your friend’s name, it indicates that your friend is using
an Android phone.
● If an email address is displayed, it indicates that your friend is using a computer.
Messaging 89
Page 99

Displaying a Mobile Indicator
You can choose to show a mobile indicator along with your name to let your friends know the
type of wireless device you are using.
1. On the friends list screen, press Menu , and touch Settings.
2. Touch your account name and check Mobile indicator.
Signing Out
Follow the steps to sign out from the Google Talk.
► On the friends list screen, press Menu , and touch Sign out to sign out from Google
Talk.
Google Talk Settings
You can manage the Google Talk settings as you like.
1. On the friends list screen, press Menu , and touch Settings.
2. Touch your account name and touch any of the following to change the settings.
Mobile indicator: Select to allow your friends to see the type of wireless device you
are using. See Mobile Indicators.
Away when screen off: Select to show your status as away when the screen is
turned off.
Invitation notifications: Select to show a notification in the status bar when
someone invites you to become a friend.
IM notifications: Select to show a new instant message icon on the status bar when
a new instant message is received.
Notification ringtone: Select if you want the device to ring when a new instant
message is received. On the ringtone menu, touch a ringtone to play the tone briefly,
and then touch OK to confirm selection. Select Silent if you do not want the device
to ring when a new instant message is received.
Vibrate: Select if you want the device to vibrate when a new instant message is
received.
Video chat notifications: Select if you want the device to open a dialog or only to
show notification when a voice or video chat invitation arrives.
Video chat ringtone: Select if you want the device to ring when a new video chat
notification arrives. On the ringtone menu, touch a ringtone to play the tone briefly,
Messaging 90
Page 100

and then touch OK to confirm selection. Select Silent if you do not want the device
to ring when a new video chat notification arrives.
Vibrate: Select if you want the device to vibrate when a new video chat notification
arrives.
Blocked friends: Select to show your blocked friends list.
Clear search history: Select to delete the Google Talk search history.
Manage account: Select to open the Accounts & sync settings menu.
Terms & privacy: Select to show the Google legal information.
Messaging 91
 Loading...