

Page 1
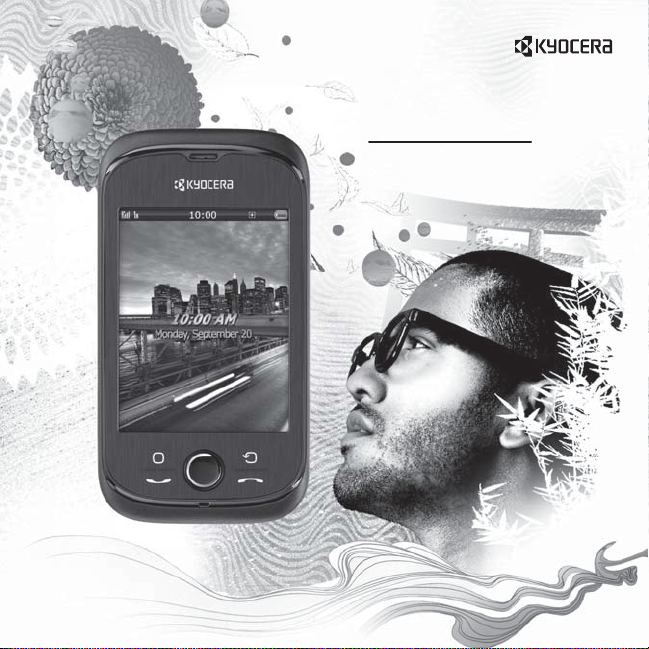
Rio™
user guide
User Guide 1
Page 2

Rio User Guide
This manual is based on the production version of the Kyocera
E3100 phone. Software changes may have occurred after this
printing. Kyocera reserves the right to make changes in
technical and product specifications without prior notice.
The Kyocera Communications Inc. (“KCI”) products described in
this manual may include copyrighted KCI and third party
software stored in semiconductor memories or other media.
Laws in the United States and other countries preserve for KCI
and third party software providers certain exclusive rights for
copyrighted software, such as the exclusive rights to distribute or
reproduce the copyrighted software. Accordingly, any
copyrighted software contained in the KCI products may not be
modified, reverse engineered, distributed or reproduced in any
manner not permitted by law.
Furthermore, the purchase of the KCI products shall not be
deemed to grant—either directly or by implication, estoppel, or
otherwise—any license under the copyrights, patents, or patent
applications of KCI or any third party software provider, except
for the normal, non-exclusive royalty-free license to use that
arises by operation of law in the sale of a product.
Kyocera is a registered trademark of Kyocera Corporation. Brick
Attack and Race 21 are trademarks of Kyocera Wireless Corp.
QUALCOMM is a registered trademark of QUALCOMM
Incorporated.
Openwave is a trademark of Openwave Systems Incorporated.
eZiText is a registered trademark of Zi Corporation. TransFlash
is a trademark of SanDisk Corporation. Bluetooth trademarks
are owned by Bluetooth SIG, Inc. and used by Kyocera
Communications Inc. under license.
All other trademarks are the property of their respective owners.
Copyright © 2010 Kyocera Corporation. All rights reserved.
Ringer Tones Copyright © 2000-2010 Kyocera Corporation.
82-A6193-1EN, Rev. 002
2
FCC Notice
This device complies with part 15 of the FCC rules. Operation is
subject to the following two conditions: (1) This device may not
cause harmful interference, and (2) This device must accept any
interference received, including interference that may cause
undesired operation. To maintain compliance with FCC RF
exposure guidelines, if you wear a phone on your body, use the
Kyocera Communications Inc. (KCI) supplied and approved
accessory designed for this product. Using accessories that are
not supplied or approved by KCI may violate FCC RF exposure
guidelines.
Other accessories used with this device for body-worn
operations must not contain any metallic components and must
provide at least 15 mm separation distance including the
antenna and the user’s body.
THIS MODEL PHONE MEETS THE GOVERNMENT’S
REQUIREMENTS FOR EXPOSURE TO RADIO WAVES.
Your wireless phone is a radio transmitter and receiver. It is
designed and manufactured to not exceed the emission limits for
exposure to radio frequency (RF) energy set by the Federal
Communications Commission of the U.S. Government. These
limits are part of comprehensive guidelines and establish
permitted levels of RF energy for the general population. The
guidelines are based on standards that were developed by
independent scientific organizations through periodic and
thorough evaluation of scientific studies. The standards include
a substantial safety margin designed to assure the safety of all
persons, regardless of age and health.
The exposure standard for wireless mobile phones employs a
unit of measurement known as the Specific Absorption Rate, or
SAR. The SAR limit set by the FCC is 1.6 W/kg.*
Tests for SAR are conducted u sing standard operating positions
specified by the FCC with the phone transmitting at its highest
certified power level in all tested frequency bands.
Although the SAR is determined at the highest certified power
level, the actual SAR level of the phone while operating can be
well below the maximum value. This is because the phone is
Page 3

designed to operate at multiple power levels so as to use only
the power required to reach the network. In general, the closer
you are to a wireless base station antenna, the lower the power
output.
Before a phone model is available for sale to the public, it must
be tested and certified to the FCC that it does not exceed the
limit established by the government-adopted requirement for
safe exposure. The tests are performed in positions and
locations (e.g., at the ear and worn on the body) as required by
the FCC for each model.
Body-worn measurements differ among phone models,
depending upon availability of accessories and FCC
requirements. While there may be differences between the SAR
levels of various phones and at various positions, they all meet
the government requirement for safe exposure.
The FCC has granted an Equipment Authorization for this model
phone with all reported SAR levels evaluated as in compliance
with the FCC RF emission guidelines.
The highest reported SAR values of this phone are:
Cellular CDMA mode (Part 22)
Head: 1.06 W/kg; Body-worn: 0.83 W/kg
PCS mode (Part 24)
Head: 1.49 W/kg; Body-worn: 0.59 W/kg
AWS mode (Part 27)
Head: 1.21 W/kg; Body-worn: 0.54 W/kg
SAR information on this model phone is on file with the FCC and
can be found under the Display Grant section
www.fcc.gov/oet/ea/fccid
OVF-K5402.
Additional information on SAR can be found on the Cellular
Telecomm unications and Internet Association (CTIA) web-site at
www.ctia.org
* In the United States and Canada, the SAR limit for mobile
phones used by the public is 1.6 watts/kg (W/kg) averaged over
one gram of tissue.
.
:
:
:
after searching on the FCC ID:
Bluetooth® Certification
For information about E3100 Bluetooth Certification, visit the
Bluetooth Qualification Program Web site at
www.bluetooth.org/tpg/listings.cfm
.
Caution
The user is cautioned that changes or modifications not
expressly approved by the party responsible for compliance
could void the warranty and user’s authority to operate the
equipment.
Optimize your Phone’s Performance
Use the instructions in this guide to learn how to optimize the
performance and life of your phone and battery.
Air Bags
If you have an air bag, DO NOT place installed or portable
phone equipment or other objects over the air bag or in the air
bag deployment area. If equipment is not properly installed, you
and your passengers risk serious injury.
Medical Devices
Pacemakers
—Warning to pacemaker wearers: Wireless
phones, when in the ‘on’ position, have been shown to interfere
with pacemakers. The phone should be kept at least six (6)
inches away from the pacemaker to reduce risk.
The Health Industry Manufacturers Association and the wireless
technology research community recommend that you follow
these guidelines to minimize the potential for interference.
• Always keep the phone at least six inches (15 centimeters)
away from your pacemaker when the phone is turned on.
• Do not carry your phone near your heart.
• Use the ear opposite the pacemaker.
• If you have any reason to suspect that interference is taking
place, turn off your phone immediately.
Hearing aids
hearing aids. In the event of such interference, you may want to
call the customer service line to discuss alternatives.
—Some digital wireless phones may interfere with
User Guide 3
Page 4

Other medical devices
device, consult the manufacturer of the device to determine if it
is adequately shielded from external RF energy. Your physician
may be able to help you obtain this information.
In health care facilities
facilities when instructed. Hospitals and health care facilities
may be using equipment that is sensitive to external RF energy.
—If you use any other personal medical
—Turn your phone off in health care
Potentially unsafe areas
Posted facilities
posted notices require you to do so.
Aircraft
that is in the air. Turn your phone off or switch it to Airplane
Mode before boarding aircraft.
Vehicles
inadequately shielded electronic systems in motor vehicles.
Check with the manufacturer of the device to determine if it is
adequately shielded from external RF energy.
Blasting areas
progress. Observe restrictions, and follow any regulations or
rules.
Potentially explosive atmospheres
when you are in any area with a potentially explosive
atmosphere. Obey all signs and instructions. Sparks in such
areas could cause an explosion or fire, resulting in bodily injury
or death. Areas with a potentially explosive atmosphere are
often, but not always, clearly marked.
They include:
• fueling areas such as gas stations
• below deck on boats
• transfer or storage facilities for fuel or chemicals
• vehicles using liquefied petroleum gas, such as propane or
• areas where the air contains chemicals or particles such as
• any other area where you would normally be advised to turn
—Turn your phone off in any facility when
—FCC regulations prohibit using your phone on a plane
—RF signals may affect improperly installed or
—Turn off your phone where blasting is in
—Turn off your phone
butane
grain, dust, or metal powders
off your vehicle engine
4
Use with Care
Use only in normal position (to ear). Avoid dropping, hitting,
bending, or sitting on the phone.
Avoid Magnetic Environments
Keep the phone away from magnets which can cause improper
functioning of the phone.
Keep Your Phone Dry
Keep the phone dry. Damage can result if the phone gets wet.
Water damage is not covered under warranty.
Resetting the Phone
If the screen seems frozen and the keypad does not respond to
key presses, reset the phone by completing the following steps:
1. Remove the battery cover.
2. Remove and replace the battery.
If the problem persists, return the phone to the dealer for
service.
Accessories
Use only Kyocera-approved accessories with Kyocera phones.
Use of any unauthorized accessories may be dangerous and will
void the phone warranty if said accessories cause damage or a
defect to the phone.
Radio Frequency (RF) Energy
Your telephone is a radio transmitter and receiver . When it is on,
it receives and sends out RF energy. Your service provider’s
network controls the power of the RF signal. This power level
can range from 0.006 to 0.6 watts.
In August 1996, the U.S. Federal Communications Commission
(FCC) adopted RF exposure guidelines with safety levels for
hand-held wireless phones. These guidelines are consistent with
the safety standards previously set by both U.S. and
international standards bodies in the following reports:
• ANSI C95.1 (American National Standards Institute, 1992)
• NCRP Report 86 (National Council on Radiation Protection
and Measurements, 1986)
Page 5

• ICNIRP (International Commission on Non-Ionizing
Radiation Protection, 1996)
Your phone complies with the standards set by these reports
and the FCC guidelines.
E911 Mandates
Where service is available, this phone complies with the Phase I
and Phase II E911 Mandates issued by the FCC.
Hearing Aid Compatibility (HAC) with Mobile
Phones
Some mobile phones and hearing devices (hearing aids and
cochlear implants), when used together, result in buzzing,
humming, or whining noises detected by the user.
Some hearing devices are more immune than others to this
interference noise, and phones also vary in the amount of
interference they generate.
The wireless telephone industry has developed ratings for some
of their mobile phones, to assist hearing device users in finding
phones that may be compatible with their hearing devices. Not
all phones have been rated.
Phones that are rated have the rating on their box or a label on
the box. The ratings are not guarantees and results will vary
depending on the user’s hearing device and hearing loss. If your
hearing device happens to be vulnerable to interference, you
may not be able to use a rated phone successfully. Trying out
the phone with your hearing device is the best way to evaluate it
for your personal needs.
M-Ratings
—Phones rated M3 or M4 meet FCC requirements
and are likely to generate less interference to hearing devices
than phones that are not labeled. M4 is the better/higher of the
two ratings.
T-Ratings
—Phones rated T3 or T4 meet FCC requirements and
are likely to be more usable with a hearing device’s telecoil (“T
Switch” or “Telephone Switch”) than unrated phones. T4 is the
better/higher of the two ratings. (Note that not all hearing
devices have telecoils in them.)
Hearing devices may also be measured for immunity to this type
of interference. Your hearing device manufacturer or hearing
health professional may help you choose the proper rating for
your mobile phone. The more immune your hearing aid is, the
less likely you are to experience interference noise from mobile
phones.
For more information about hearing aid compatibility, visit the
FCC’s Consumer & Governmental Affairs Bureau Web site at
www.fcc.gov/cgb/dro
.
Kyocera Communications Inc.
www.kyocera-wireless.com
To purchase accessories, visit
kyocera.superiorcommunications.com
User Guide 5
Page 6

6
Page 7

Table of Contents
1 Get Started . . . . . . . . . . . . . . . . . . . . . . . . 9
Phone Battery . . . . . . . . . . . . . . . . . . . . . . . 9
Memory Card . . . . . . . . . . . . . . . . . . . . . . 11
Phone Overview . . . . . . . . . . . . . . . . . . . . 12
Guide Conventions. . . . . . . . . . . . . . . . . . 19
2 Messages . . . . . . . . . . . . . . . . . . . . . . . . 20
View All Message Threads. . . . . . . . . . . . 20
Create a Message . . . . . . . . . . . . . . . . . . . 20
Reply to a Message. . . . . . . . . . . . . . . . . . 21
Compose Message Options . . . . . . . . . . . 21
Text Entry Options. . . . . . . . . . . . . . . . . . 23
Thread List Options . . . . . . . . . . . . . . . . . 24
View Thread Options . . . . . . . . . . . . . . . . 25
View Message Options. . . . . . . . . . . . . . . 25
Message Settings . . . . . . . . . . . . . . . . . . . 26
3 Phone . . . . . . . . . . . . . . . . . . . . . . . . . . . 29
Phone Menu . . . . . . . . . . . . . . . . . . . . . . . 29
Dialer . . . . . . . . . . . . . . . . . . . . . . . . . . . . 29
Call History. . . . . . . . . . . . . . . . . . . . . . . . 31
Voicemail . . . . . . . . . . . . . . . . . . . . . . . . . 34
4 Contacts . . . . . . . . . . . . . . . . . . . . . . . . . 36
Create a Contact . . . . . . . . . . . . . . . . . . . . 36
View Contacts List. . . . . . . . . . . . . . . . . . 36
View Groups List . . . . . . . . . . . . . . . . . . . 36
View Favorites List . . . . . . . . . . . . . . . . . 36
Launch MyBackup . . . . . . . . . . . . . . . . . . 37
Contact List Options. . . . . . . . . . . . . . . . . 37
Group List Options. . . . . . . . . . . . . . . . . . 38
Favorite List Options . . . . . . . . . . . . . . . . 38
Contact Detail Options . . . . . . . . . . . . . . . 38
Group Detail Options . . . . . . . . . . . . . . . . 40
5 Browser . . . . . . . . . . . . . . . . . . . . . . . . . 42
Launch Browser . . . . . . . . . . . . . . . . . . . . 42
User Guide 7
Browse the Web. . . . . . . . . . . . . . . . . . . . .42
Add a Bookmark . . . . . . . . . . . . . . . . . . . .42
6 Send Email. . . . . . . . . . . . . . . . . . . . . . . 43
7 Calendar. . . . . . . . . . . . . . . . . . . . . . . . . 44
Create an Event . . . . . . . . . . . . . . . . . . . . .44
Manage Calendar. . . . . . . . . . . . . . . . . . . .44
Calendar Settings. . . . . . . . . . . . . . . . . . . .46
8 Music Player . . . . . . . . . . . . . . . . . . . . . 47
View Artists. . . . . . . . . . . . . . . . . . . . . . . .47
View Albums. . . . . . . . . . . . . . . . . . . . . . .47
View Playlists . . . . . . . . . . . . . . . . . . . . . .47
Play a Song. . . . . . . . . . . . . . . . . . . . . . . . .47
Load a Song . . . . . . . . . . . . . . . . . . . . . . . .48
Artist / Album List Options. . . . . . . . . . . .48
Playlist Options . . . . . . . . . . . . . . . . . . . . .49
Song Options . . . . . . . . . . . . . . . . . . . . . . .50
Music Player Settings. . . . . . . . . . . . . . . . .51
9 Camera. . . . . . . . . . . . . . . . . . . . . . . . . . 52
Camera Tips. . . . . . . . . . . . . . . . . . . . . . . .52
Take a Picture. . . . . . . . . . . . . . . . . . . . . . .52
Camera Options . . . . . . . . . . . . . . . . . . . . .52
Camera Settings. . . . . . . . . . . . . . . . . . . . .53
10 Gallery . . . . . . . . . . . . . . . . . . . . . . . . . . 55
Gallery Menu. . . . . . . . . . . . . . . . . . . . . . .55
Images . . . . . . . . . . . . . . . . . . . . . . . . . . . .55
Sounds . . . . . . . . . . . . . . . . . . . . . . . . . . . .56
Manage Gallery . . . . . . . . . . . . . . . . . . . . .56
11 Alarm . . . . . . . . . . . . . . . . . . . . . . . . . . . 59
Activate an Alarm . . . . . . . . . . . . . . . . . . .59
Set an Alarm. . . . . . . . . . . . . . . . . . . . . . . .59
Set the Quick Alarm. . . . . . . . . . . . . . . . . .59
Change Alarm Settings . . . . . . . . . . . . . . .59
Page 8

12 Bluetooth. . . . . . . . . . . . . . . . . . . . . . . . .60
Enable Bluetooth. . . . . . . . . . . . . . . . . . . .60
Manage Bluetooth Devices . . . . . . . . . . . .60
Set Phone’s Name . . . . . . . . . . . . . . . . . . .61
Limit Visibility . . . . . . . . . . . . . . . . . . . . .61
Enable OBEX Authentication . . . . . . . . . .61
View Supported Services. . . . . . . . . . . . . .61
13 Settings . . . . . . . . . . . . . . . . . . . . . . . . . .62
Settings Menu . . . . . . . . . . . . . . . . . . . . . .6 2
Bluetooth . . . . . . . . . . . . . . . . . . . . . . . . . .63
Convenience . . . . . . . . . . . . . . . . . . . . . . . 63
Display. . . . . . . . . . . . . . . . . . . . . . . . . . . .64
Sound and Touch. . . . . . . . . . . . . . . . . . . . 64
Voice Features. . . . . . . . . . . . . . . . . . . . . .65
Accessories . . . . . . . . . . . . . . . . . . . . . . . .66
Network. . . . . . . . . . . . . . . . . . . . . . . . . . .68
Security . . . . . . . . . . . . . . . . . . . . . . . . . . .69
Phone Info . . . . . . . . . . . . . . . . . . . . . . . . .69
14 Use Stopwatch . . . . . . . . . . . . . . . . . . . .70
15 World Clock. . . . . . . . . . . . . . . . . . . . . . .71
View a City . . . . . . . . . . . . . . . . . . . . . . . .71
Find a City. . . . . . . . . . . . . . . . . . . . . . . . .71
16 Use Calculator . . . . . . . . . . . . . . . . . . . .72
17 Use Tip Calculator . . . . . . . . . . . . . . . . .73
18 Record a Voice Memo . . . . . . . . . . . . . .74
19 Memo Pad . . . . . . . . . . . . . . . . . . . . . . . .75
Create a Memo. . . . . . . . . . . . . . . . . . . . . .75
Edit a Memo . . . . . . . . . . . . . . . . . . . . . . .75
Send a Memo. . . . . . . . . . . . . . . . . . . . . . .75
Use a Number or Address from a Memo. .75
Lock a Memo. . . . . . . . . . . . . . . . . . . . . . .75
Delete a Memo. . . . . . . . . . . . . . . . . . . . . .75
Delete All Memos . . . . . . . . . . . . . . . . . . .75
20 Use Timer . . . . . . . . . . . . . . . . . . . . . . . .76
21 Games & Apps . . . . . . . . . . . . . . . . . . . .77
How does BREW Work? . . . . . . . . . . . . . 77
Download an Application . . . . . . . . . . . . . 77
Access Help for Games & Apps . . . . . . . . 77
22 Voice Commands. . . . . . . . . . . . . . . . . . 78
Call a Contact . . . . . . . . . . . . . . . . . . . . . . 78
Call a Number. . . . . . . . . . . . . . . . . . . . . . 78
Play a Playlist . . . . . . . . . . . . . . . . . . . . . . 78
Use a Shortcut. . . . . . . . . . . . . . . . . . . . . . 79
Find a Contact. . . . . . . . . . . . . . . . . . . . . . 79
23 Get Help . . . . . . . . . . . . . . . . . . . . . . . . . 80
User Guide . . . . . . . . . . . . . . . . . . . . . . . . 80
Customer Support . . . . . . . . . . . . . . . . . . . 80
Qualified Service. . . . . . . . . . . . . . . . . . . . 80
Phone Accessories. . . . . . . . . . . . . . . . . . . 80
Index . . . . . . . . . . . . . . . . . . . . . . . . . . . . . . . . 81
8
Page 9
1 Get Started
Qualcomm
3G CDMA
Qualcomm
3G CDMA
Phone Battery
Install Battery
1. Hold the phone face down.
2. Find the notch on the
bottom of the phone. It is
a rectangle. Using your
thumbnail, remove the
battery cover by prying it
up from the bottom.
3. Place the battery in the
battery casing. Make sure
that the metal contacts of
the battery and battery
casing touch.
4. Replace the battery cover
by sliding the notches
into the openings on the
top of the battery casing.
Charge Battery
1. The Micro-USB jack is
located on top of the
phone. Connect the AC
adapter to the Micro-USB
jack.
2. Plug the adapter into a
wall outlet.
The battery icon in the upper-right corner of
the screen tells you whether the phone is:
– Charging (the icon is animated)
– Partially charged
– Fully charged
You must have at least a partial charge in the
battery to make or receive calls. You can safely
recharge the battery at any time, even if it has a
partial charge.
Note:
Before removing the battery, make sure
the phone is powered off.
5. Snap the cover into place.
User Guide 9
Page 10

Battery Safety Guidelines
• Do not disassemble or open the battery.
• Do not crush, bend, deform, puncture, or
shred the battery.
• Do not attempt to insert foreign objects into
the battery.
• Do not immerse the battery or expose it to
water or other liquids. Even if a battery
appears to dry out and operate normally,
internal parts can slowly corrode and cause
a safety hazard.
• Always keep the battery between 15 °C and
25 °C (59 °F and 77 °F). Do not expose the
battery to extremes of temperature (heat or
cold), fire, or other hazards such as a
cooking surface, clothes iron, or radiator.
• Never use any damaged battery.
• Only use the battery for its intended phone.
• Only use the battery with a qualified
charger. Use of an unqualified battery
charger may present a risk of fire,
explosion, leakage, or other hazard. If you
are unsure about whether a charger is
qualified, contact customer support.
• Do not short-circuit the battery or allow
metallic conductive objects—such as keys,
coins, or jewelry—to contact the battery’s
terminals.
10 Phone Battery
• Replace the battery only with another
qualified battery. Use of an unqualified
battery may present a risk of fire,
explosion, leakage, or other hazard. If you
are unsure about whether a replacement
battery is compatible, contact customer
support.
• Promptly dispose of used batteries in
accordance with local regulations and
recycle if possible. Do not dispose as
household waste.
• Supervise all battery usage by children.
• Avoid dropping the phone or battery . If the
phone or battery is dropped, especially on a
hard surface, an internal short-circuit can
occur and pose a safety hazard. If you
suspect battery damage, take it to a service
center for inspection.
• Improper battery use may result in a fire,
explosion, or other hazard.
Common Causes of Battery Drain
• Playing games or using the Web.
• Using the flash when taking pictures.
• Setting the backlight to always lit.
• Operating when far away from a base
station or cell site.
• Using data cables or accessories.
• Operating when no service is available, or
service is available intermittently.
• High earpiece and ringer volume settings.
• Repeating sound, vibration, or lighted
alerts.
Page 11
Memory Card
You can extend the phone’s memory with a
MicroSD memory card.
Install the Memory Card
1. Hold the phone face down.
2. Find the notch on the bottom of the phone.
It is a rectangle. Using your thumbnail,
remove the battery cover by prying it up
from the bottom.
3. Make sure that the metal
contacts are facing down,
securely slide the memory
card into the inner part of
the slot.
4. Replace the battery cover
by sliding the notches into the openings on
the top of the battery casing.
5. Snap the cover into place.
Note:
A notification appears when the card is
ready for use. Do not use the card until you see
the notification.
Format Memory Card
From
Accessories
Format Card > Yes
card.
Note:
Formatting will erase all current
information on the memory card.
, select
Memory Card >
to format your memory
Remove Memory Card
1. Hold the phone face down.
2. Find the notch on the
bottom of the phone. It is
a rectangle. Using your
thumbnail, remove the
battery cover by prying it
up from the bottom.
3. Remove the memory card from the slot.
4. Replace the battery cover by sliding the
notches into the openings on the top of the
battery casing.
5. Snap the cover into place.
User Guide 11
Page 12

Phone Overview
Get to Know Your Phone
The following shows the front of the phone.
1. Earpiece speaker.
2. Touch screen. Your phone has a touch-activated
screen. Touch objects on the screen to select them.
The initial state of the phone is referred to as the
home screen.
Note:
To prevent damage, do not use sharp objects on
the touch screen.
3.
Menu
key accesses the
4.
Send
key starts or answers a call. Press once to
display the recent calls list or twice to redial the last
number dialed. Press and hold to activate voice
commands.
5.
Navigation
Navigation
sense your finger. To scroll, swipe your finger across the
down. Objects are highlighted as you scroll to them. You can press the
touch the screen to select an object.
6.
Power
When the phone is on, press the
accidental touches.
7.
Back
8.
End
press the
Note:
key scrolls to objects on the screen. The
key has an optical sensor that allows it to
key turns on the phone. Press and hold the
key returns you to the previous screen.
key ends a call or browser session. You can also return to the home screen, when you
End
The
End
key does not turn on the phone. Use the
key.
Menu
.
Navigation
Power
Power
key to lock or unlock the touch screen. This prevents
key to turn the phone on or off.
Power
key left, right, up or
Navigation
key to turn the phone on or off.
key or
12 Phone Overview
Page 13

The following shows the back of the phone.
1. Accessory eyelet (for optional straps and lanyards).
2. Jack for AC adapter (included) and Micro-USB cable
(sold separately).
3. Camera lens.
4.
Power
key turns on the phone. Press and hold the
Power
key to turn the phone on or off. When the phone
is on, press the
Power
key to lock or unlock the touch
screen. This prevents accidental touches.
5. Jack for a hands-free headset (sold separately).
6. External speaker.
7.
Camera
key activates camera mode. Press and hold the
Camera
8.
Warning:
key to activate camera mode.
Volume
key raises or lowers ringer volume.
Inserting an accessory into the incorrect jack
will damage the phone.
3G CDMA
Qualcomm
User Guide 13
Page 14
Home Screen
The home screen refers to the initial state of the phone. This is also called the idle state. The home
screen has the following elements:
1. Top row icons. The top row of the screen has a set of
small icons that display signal strength, battery life,
message alerts, and other information.
2. Display controls. Change the display options of the
home screen.
3. Banner area. The banner displays a greeting banner,
date, and time.
4. Shortcuts. Your phone has the following shortcuts:
–
Messages
–
Phone
–
Main Menu
–
Contacts
to view messages.
to call a number.
to access the menu screen.
to view contacts.
14 Phone Overview
Page 15
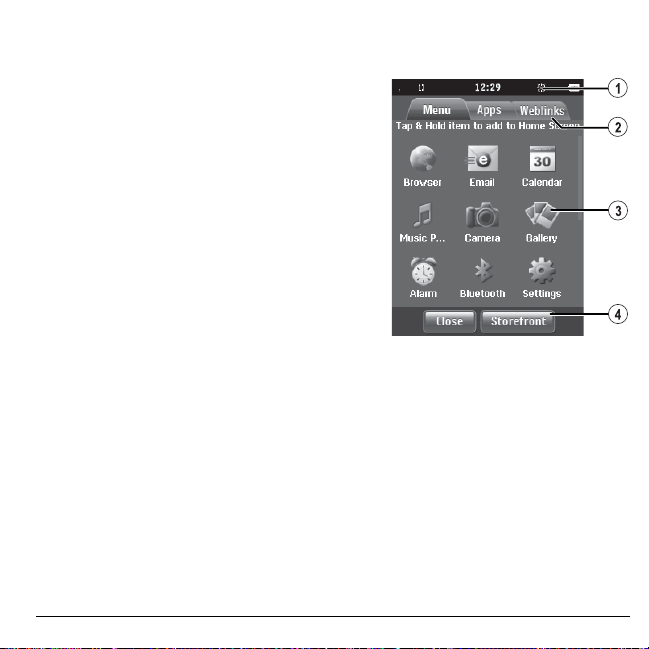
Menu Screen
From the home screen, touch
following elements:
1. Top row icons.
2. Tabs. Switch the menu that you are viewing. Choose
one of the following:
–
Menu
–
–
3. Menu area. The current menu you are viewing. To
move a menu item to the home screen, touch and
hold it.
4. Option bar. Touch
applications or
Note:
depending on the applications provided by your service
provider.
to access the phone menu.
Apps
to access applications.
Weblinks
The menu items on your phone can change
to access web sites.
Close
Main Menu
Storefront
to return to the home screen.
to access the menu screen. The menu screen has the
to buy more
User Guide 15
Page 16
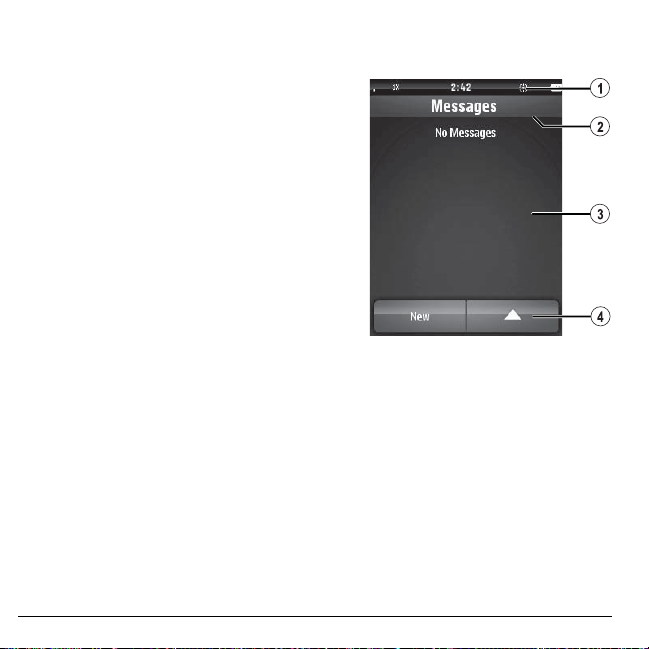
Message Screen
From
Messages
commonly used throughout your phone’s software:
1. Top row icons.
2. Title. The title displays your current location.
3. Work space. The work space is where you can
complete tasks. For example, the message screen
has a list of threads in the work space.
4. Option bar. The option bar displays the most
frequent options used. The option bar can contain
icons or words.
, you will see the following screen. This screen has the following elements that are
16 Phone Overview
Page 17
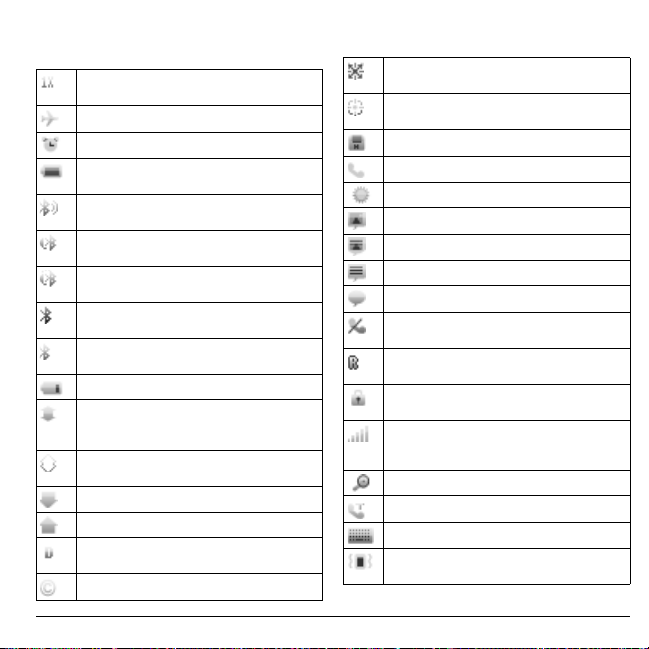
Top Row Icons
These icons may appear on the top row of your phone’s screen.
The phone is operating in IS-2000 (1X)
digital mode.
The phone is in airplane mode.
The alarm clock is set.
The battery is fully charged. The more black
bars, the greater the charge.
The phone is transferring data with
Bluetooth.
A headset or other hands free device is in
operation.
A headset or other hands free device is
transferring data.
Bluetooth wireless technology is disabled
(Off).
Bluetooth wireless technology is enabled
(On).
The battery will not charge.
Data service is available and active on your
phone. Check with your service provider for
availability.
Data service is available, but the phone is
dormant.
The phone is receiving high-speed data.
The phone is sending high-speed data.
The phone is operating in IS-95 digital
mode.
Content is DRM protected.
Position location is set to emergency
services only.
Position location is set to your service
provider and to emergency services.
The phone has a high speed data connection.
A call is in progress.
The phone is set to light up instead of ring.
New photo message.
New photo, text, and voice message.
New text message.
New voice message.
The phone is not receiving a signal. You
cannot make or receive calls.
The phone is roaming outside of its home
service area.
The phone is in privacy mode or is accessing
a secure Web site.
The phone is receiving a signal. You can
make and receive calls. Fewer bars indicate a
weaker signal.
A T-coil hearing aid is in operation.
A traffic channel is active.
The phone is in TTY device mode.
The phone is set to vibrate or to vibrate and
then ring.
User Guide 17
Page 18

Touch Icons
Y ou can touch icons to initiate actions when they appear on your screen’s working space. Icons are
referred to in the user guide as follows:
Pause icon
More icon
accesses more options.
New icon
create a new contact, message,
group or other items.
Back icon
erases characters when entering
text.
Shift icon
changes letter case when entering
text.
Call icon
calls the contact or number.
pauses playback of a sound file.
Repeat icon
current playlist.
Shuffle icon
current playlist.
Favorites icon
favorites list.
Bluetooth icon
repeats playback of files in
shuffles playback of files in
adds a contact to your
turns on Bluetooth.
Message icon
contact or number.
Add icon
messages.
Camera icon
My Photos icon
Saved Images icon
Wallpapers icon
Last Picture icon
taken.
Play Song icon
Player
Play icon
18 Phone Overview
sends a message to the
add a recipient when creating
take a picture.
view saved photos.
view saved images.
view wallpaper files.
goes to the last picture
opens the song in
.
starts playback of a sound file.
Music
Page 19

Guide Conventions
In this guide, the following conventions are
used when describing phone features.
Touch
means to touch an area on the screen.
For example, “Touch
physically touch the word
screen.
Press
means to use a phone key. For example,
“Press the
you to physically press the
phone.
Scroll
move through a list on the display. For
example, “Scroll through your contacts list to
choose a contact” means to physically swipe
the
through the list on the display.
Select
example, “Select
physically press the
highlighted
touch
>
option from a menu or list. For example,
“
1. From the main menu, touch
2. Scroll to the
3. Touch
Send
means to use the
Navigation
means to choose an option. For
Settings
(greater than symbol) tells you to select an
Settings
>
Accessories
Done
” means to
Done
on your phone
key to make a phone call” tells
key up or down to scroll
Settings
to select it.
Accessories
Accessories
Send
key on your
Navigation
Settings
” means to
Navigation
option. You can also
to select the
” means to:
Settings
option.
.
key to
.
User Guide 19
Page 20

2 Messages
Use
Messages
phone.
to manage messages on your
View All Message Threads
All messages are displayed as a list of threads.
A thread is group of messages sent between
you and a contact, number or email address.
The thread with the most recent message is
displayed first.
1. From
Messages
displayed. Threads are displayed in the
following ways:
– Unread threads are in bold text. The
number of messages in the thread is
shown in parenthesis after the address
of the sender, for example
(5)
thread, no number is displayed.
– Read threads are in plain text. Messages
with attachments or messages that are
locked are designated by applicable
icons.
– Drafts are designated by an icon.
– Browser alerts are designated by an
icon.
– Scheduled messages are designated by
an icon. These messages will be sent at
the time set by you.
– Pending mess ages are designated by an
icon. These messages will be sent when
possible.
– Failed messages are designated by an
icon. These messages cannot be sent.
20 View All Message Threads
, all message threads are
Luthor Bone
. If there is only one message in a
2. At the thread list, you can do the following:
– Touch a thread to view messages in the
thread. When viewing a thread, touch a
message to view that individual
message.
–Touch
–Touch
features.
New
to create a new message.
More icon
to access more
Create a Message
Y ou can only send messages to phone numbers
capable of receiving them or to email
addresses. If the character and file size limit for
a single message is exceeded, the message
must be edited to meet the size limitation.
1. From
Messages
2. At the compose screen, enter a recipient’s
phone number or email address. Touch
Add icon
recently used addresses.
3. If applicable, enter a subject.
4. Enter a message.
5. If applicable, touch
from your phone or to create a new file to
send with your message.
6. If applicable, touch
more features.
7. When done, touch
, touch
New
.
to access contacts, groups or
Attach
to select a file
More icon
Send
to access
.
Page 21

If you receive a call while creating a message,
a notification appears. Do one of the following:
–Touch
–Press the
Ignore
return to the compose screen.
Your message is automatically saved as
a draft.
to ignore the call and
Send
key to answer the call.
Reply to a Message
When receiving a message, your phone
displays a notification and a message icon
appears at the top of the screen. The message
icon flashes an urgent message alert if the
message is urgent.
1. When a message notification appears,
touch
View
message later, touch
icon will remain when you have an unread
message.
2. When viewing a message, touch
3. Complete your message.
. If you want to view the
Ignore
. The message
Reply
.
Compose Message Options
Save Message as a Draft
When composing a message, select
> Save as Draft
phone saves the message as a draft to complete
at a later time.
when entering the text. Your
More icon
Save Preset Text
1. When composing a message, select
icon > Save as Preset Text
the text to use it later as preset text.
2. Complete your message.
when entering
Take a Picture
1. When composing a message, select
> Camera
2. Take a picture.
3. Complete your message.
.
Record a Sound
1. When composing a message, select
> Record Sound
2. Record the sound.
3. Complete your message.
.
Attach a Media File
1. When composing a message, select
> Media Gallery
2. Select a file.
3. Complete your message.
.
Attach a Contact
1. When composing a message, select
> Contacts
2. Select a contact.
3. Complete your message.
.
More
Attach
Attach
Attach
Attach
User Guide 21
Page 22

Attach an Event
1. When composing a message, select
> Events
.
2. Select an event.
3. Complete your message.
Attach
Request a Message Receipt
1. When composing a message, select
icon > Delivery > Message Receipt > On
to request a message delivery notice.
2. Complete your message.
More
Set Message Priority
1. When composing a message, select
icon > Delivery > Priority
2. Select a priority level.
3. Complete your message.
More
.
Request a Message Read Receipt
1. When composing a message, select
icon > Message Read Receipt > On
request a message read notice.
2. Complete your message.
More
to
Set the Validity Period
1. When composing a message, select
icon > Validity Period
keep your message valid before removing it
from the phone if not sent.
2. Touch
3. Touch
4. Touch
5. Complete your message.
22 Compose Message Options
Time
to change the time.
Date
to change the date.
Set
.
to set how long to
More
Enable CC and BCC Fields
1. When composing a message, select
icon > Add CC/BCC
BCC address fields.
2. Complete your message.
to enable the CC and
Add Slides to Messages
Use slides in a message to send multiple files,
such as pictures or voice memos. The options
to add more slides can only be used once you
have attached an initial media file.
1. When composing a message, select
icon > Add New Slide
2. Select a slide and add more files or text if
needed.
To navigate through the slides, select
icon > Next Slide
erase the current slide, select
Erase Slide
3. Complete your message.
The number of slides you can attach is limited
by the available memory space and the file size
of the attachments.
.
.
or
Previous Slide
More icon >
Set the Slide Interval
1. When composing a message, select
icon > Slide Interval
2. Select a time interval for the slides.
3. Complete your message.
.
Cancel a Message
When composing a message, select
> Cancel Msg
to cancel the message.
More
More
More
. To
More
More icon
Page 23

Text Entry Options
Enter Text with Grid Keyboard
1. When composing a message, touch a text
entry field.
2. At the keyboard, you can do one of the
following:
– Touch keyboard to enter text. Press a
key once for the first letter, twice for the
second letter, and so on. If your phone
is set to Spanish, accented letters are
available. Wait for the cursor to move
right and enter the next character.
–Touch
–Touch
–Touch
–Touch
–Touch
–Touch
–Touch
Enter Text with Half QWERTY
1. When entering text, select
Half QWERTY Keyboard
half QWERTY keyboard.
2. When finished, touch
To return to the grid keyboard, select
Keyboard
User Guide 23
symbols.
case.
options.
.
Abc
to enter letters.
SYM
to enter numbers and
Back icon
Space
Shift icon
More icon
Done
to erase characters.
to enter a space.
to change the letter
to access more
to close the keyboard.
Done
More icon >
to access the
.
Grid
Enter Text with Full QWERTY
1. When entering text, select
Full QWERTY Keyboard
full QWERTY keyboard.
2. When finished, touch
To return to the grid keyboard, select
Keyboard
.
More icon >
to access the
Done
.
Grid
Enter Numbers and Symbols
1. When entering text, touch
keyboard changes to show numbers and
symbols.
2. Enter characters as needed. Go to the next
screen to see more characters.
To return to letter keyboard, touch
SYM
. The
Abc
.
Change Letter Case
Y our phone enters letters in sentence case. You
can change this to upper or lower case, if
needed.
When entering text, touch and hold
to change the letter case mode. The keyboard
will change accordingly.
To change case for next letter only, touch
icon
.
Shift icon
Shift
Add Smileys
1. When entering text, touch
Add Smiley
smileys.
2. Select a smiley. Go to the next screen to see
more smileys.
3. When finished, touch
To return to letter keyboard, touch
. The keyboard changes to
More icon >
Done
.
Abc
.
Page 24

Insert Preset Text
1. When entering text, select
Preset Text
2. Select a text message.
3. When finished, touch
to use a preset text message.
More icon >
Done
.
Use Word Recognition
When you create a message, your phone can
speed up word completion. Your phone uses a
dictionary to guess words that you are trying to
spell.
1. When entering text, select
Turn eZi On
2. Enter a series of letters, then select a word
from the choices provided. If the choices do
not fit on the screen, touch
see all the words. To add a word to the your
phone dictionary, select
For example to enter the word “Wyoming”,
touch the w > y > o keys and touch
To turn off word recogntion, select
Off
.
to activate word recognition.
More icon >
More icon
Add Word
Wyoming
Turn eZi
to
.
Enter Text in Spanish
1. When entering text, select
Spanish Writing Language
with Spanish characters.
2. When finished, touch
More icon >
Done
.
to enter text
Enter Text in English
1. When entering text, select
English Writing Language
with English characters.
2. When finished, touch
More icon >
to enter text
Done
.
Thread List Options
Complete a Draft
1. From
Messages
2. Complete your message.
View a Browser Alert
1. From
Messages
2. If applicable, touch
browser.
Delete Multiple Threads
1. From
Messages
Multiple
.
2. Select threads to delete. A mark appears
next to each selection. You can also remove
marks.
3. Touch
Note:
You cannot recover deleted information.
Delete All Threads
1. From
Messages
All
.
2. Touch
Note:
You cannot recover deleted information.
, select a draft.
, select a browser alert.
, select
.
Delete > Y es
, select
Yes
to confirm.
Connect
to launch the
More icon > Delete
to confirm.
More icon > Delete
24 Thread List Options
Page 25

View Thread Options
Reply to a Thread
1. When viewing a thread, touch
thread recipients are included in the reply.
2. Complete your message.
Call Sender
When viewing a thread, touch
sender of the most recent message in the
thread.
Lock Multiple Messages
1. When viewing a thread, select
Lock/Unlock
2. Select messages to lock. A mark appears
next to each selection. Y ou can also remove
marks.
3. Touch
Note:
Locked messages cannot be deleted.
Done
.
to confirm.
View Thread Recipients
When viewing a thread, select
Recipient
to see addressees of the thread.
Delete Multiple Messages
1. When viewing a thread, select
Delete Multiple
2. Select messages to delete. A mark appears
next to each selection. Y ou can also remove
marks.
3. Touch
Note:
User Guide 25
Delete > Yes
You cannot recover deleted information.
.
to confirm.
Reply
. All
Call
to call the
More icon >
More icon >
More icon >
Delete All Messages in a Thread
1. When viewing a thread, select
Delete All
2. Touch
Note:
.
Yes
to confirm.
You cannot recover deleted information.
More icon >
View Message Options
Reply to a Message
1. When viewing a message, touch
2. Complete your message.
Call Sender
When viewing a message, touch
the sender of the message.
Reply to All Recipients
1. When viewing a message with multiple
recipients, select
All message recipients are included in the
reply.
2. At the compose screen, complete your
message.
3. When done, touch
More icon > Reply All
Send
Forward a Message
1. When viewing a message, select
> Forward
2. Complete your message.
3. When done, touch
.
Send
.
.
Reply
Call
to call
More icon
.
.
Page 26

View Attachments
When viewing a message, touch an attachment
to view the file. If applicable, touch the screen
icons to control the playback. Touch
exit.
Done
Save Attachments
When viewing a message, select the applicable
save option to save attachments, including
graphics, sounds, contacts (vCard) or events
(vCal). For example to save a contact, select
More icon > Save Contact(s)
.
View Message with Multiple Slides
When viewing a message with multiple slides,
the slideshow automatically begins. Touch the
screen icons to control the playback.
Save Message as Preset Text
When viewing a message, select
Save as Preset Text
text.
to use it later as preset
More icon >
Lock a Message
When viewing a message, select
Lock/Unlock
deletion.
to protect it from accidental
More icon >
Call a Number in a Message
1. When viewing a message, press the
key to extract valid numbers and addresses.
2. Touch the number to you want to call.
26 Message Settings
Send
Go to a Web Address
1. When viewing a message, press the
to
key to extract valid numbers and addresses.
2. Touch a web address to launch the browser.
View Message Recipients
When viewing a message, select
Recipient
to see addressees of the message.
View Message Information
When viewing a message, select
Message Info
to see the message details.
Delete a Message
1. When viewing a message, select
> Delete
.
2. Touch
Note:
Yes
to confirm.
You cannot recover deleted information.
Message Settings
Message settings affect all messages unless
you change them for an individual message.
From
Messages
to modify the following features.
Set Message Alert
1. From
Sounds
your phone to vibrate.
2. Select a new sound for your message alerts.
If you select an
notifies you once when receiving a new alert
and notifies you again every five minutes. To
dismiss a reminder alert, touch
, select
More icon > Settings
Alerts > Message Alerts
. You can also turn off alert or set
& Remind
alert, the phone
Send
More icon >
More icon >
More icon
, touch
Close
.
Page 27

Set Page Alert
1. From
Alerts > Page Alerts
Y ou can also turn off alert or set your phone
to vibrate.
2. Select a new sound for your page alerts.
If you select an
notifies you once when receiving a new alert
and notifies you again every five minutes. To
dismiss a reminder alert, touch
& Remind
, touch
Sounds
alert, the phone
Close
.
Set Notifications
From
Alerts > Notification
following:
•
Msg & Icon
icon when you receive a notification.
•
Icon Only
receive a notication.
displays a message and an
displays only an icon when you
, select one of the
Edit Preset Messages
Your phone comes with preset messages, such
as “Please call me,” which you can insert into
the body of a text message. You can edit or
create up to 40 preset messages.
1. From
Edit Preset Text
following:
– Touch an existing message to edit it.
–Touch
2. Enter or edit the text.
3. Touch
Note:
written or received as preset messages.
User Guide 27
New
message.
Save
.
You can also save messages you have
, do one of the
to create a new preset
Set Callback Number
.
Your phone number is the default callback
number on sent messages. Do the following to
change it:
1. From
Callback Number
following:
–
MDN
sends your phone number. Touch
OK
to confirm.
–
None
sends no callback number. Touch
OK
to confirm.
–
Custom
allows you to enter a number.
2. Enter a number and touch
3. Touch
OK
to confirm.
, select one of the
Done
Enable Auto-Erase
Use
Auto-Erase
messages automatically when it needs memory
for incoming messages.
From
Auto-Erase
•
Disabled
•
Received Messages
messages when memory is needed.
•
Sent Messages
when memory is needed.
•
Both
when memory is needed.
to set your phone to erase
, select one of the following:
erases no messages.
erases old received
erases old sent messages
erases old received and sent messages
.
Page 28

Set Text Entry Mode
From
Entry Mode
following:
•
Abc
to enter text letter by letter in sentence
case.
•
ABC
to enter text letter by letter in
uppercase.
•
123
to enter numbers.
•
Rapid
, select one of the
to enter text with word recognition.
Request Delivery Receipts
From
Message Receipt
notification when a recipient has received your
message.
, select On to request a
Enable Auto View
From
Auto View
•
Off
turns off auto view and prompts you
before downloading any messages with
multimedia content.
•
On
turns on auto view to automatically
download messages with multimedia
content.
, select one of the following:
Request Read Receipts
From
Message Read Receipt
request a notification when a recipient has read
your message.
, select On to
Check Message Count
From
Message Count
messages are stored on your phone.
, check how many
28 Message Settings
Page 29
3 Phone
Use
Phone
to access your call features.
Phone Menu
Select
Phone
to access the following features:
Level 1 > Level 2 > Level 3
Phone Dialer
Call History
Voicemail
Call a phone number with the number keyboard.
View a list of calls you have made and received.
Shows how many voicemails are waiting.
Dialer
From
Dialer
, you can dial numbers.
Make Phone Calls
Make sure you are in an area where a signal
can be received. Look for the signal strength
icon on the home screen. The more bars, the
stronger the signal. If there are no bars, move
to where the signal strength is better.
There are several ways you can make a phone
call.
Dial a Number
1. From
Dialer
, enter a phone number.
2. Touch
User Guide 29
Call
to dial the number.
Call a Contact
1. From
Contacts
, touch
All
contacts.
2. Touch
wish to dial.
Call icon
to view all your
next to the contact you
Redial a Number
From
Call History
contact or number you wish to dial.
, touch
Call icon
next to the
End a Call
To end a phone call, press the
End
key.
Use Voice Commands
You can use voice commands to call a contact
from your voice dial list or to dial a phone
number. For more information, see “Voice
Commands” on page78.
Page 30

Use Fast Find
You can find contacts quickly when
is enabled.
1. From
Dialer
corresponding to the letters of the name
you want to find.
2. Touch
3. Touch a contact to make a phone call or
touch the entry field to do a new search.
To enable fast find, see “Enable Fast Find” on
page 63.
, enter the numbers
Hide
to view the results.
Fast Find
Answer Phone Calls
When a call comes in, the phone rings,
vibrates, or lights up. The phone number of the
caller also appears if it is not restricted. If the
number is stored in your contacts list, the
contact’s name appears.
There are several ways you can respond to an
incoming call.
Answer a Call
When you receive a call alert, touch
to answer the call.
Silence a Call
When you receive a call alert, touch
quiet the alert. You can either touch
to answer or let it go to voicemail (if
applicable).
Call icon
Silence
Call icon
to
Adjust Volume during a Call
During a call, press the
down to adjust the earpiece volume.
Volume
key up or
Use Speaker during a Call
This feature works as a toggle. During a call,
touch
Speaker
Touch
to activate the speakerphone.
Speaker
to turn off the speakerphone.
Mute Sound during a Call
This feature works as a toggle. During a call,
touch
Mute
Mute
to silence the microphone. Touch
to turn on the microphone.
Use Bluetooth Device during a Call
During a call, touch
to a paired Bluetooth device. Touch
icon
again to disconnect.
For more information, see “Bluetooth” on
page 60.
Bluetooth icon
Emergency Services
Call Emergency Services
You can call an emergency code even if your
phone is locked or your account is restricted.
When you call, your phone enters emergency
mode. This enables the emergency service
exclusive access to your phone to call you
back, if necessary. To make or receive regular
calls after dialing the code, you must exit this
mode.
to connect
Bluetooth
30 Dialer
Page 31

To dial an emergency code:
1. From
Dialer
code.
2. Touch
, enter the 3-digit emergency
Call
.
Exit Emergency Services
1. When you have completed an emergency
call, press the
2. Touch
Note:
To determine who has access to your
location, see “Set Location Information” on
page 68.
End
key.
Exit
again to confirm your choice.
Dialer Options
Save Number to Contacts
1. When entering a number, select
> Save Number
2. Touch
3. Complete the appropriate task.
Add to Existing Contact
New Contact
.
.
Send Message to a Number
1. When entering a number, select
> Send Message
2. Complete your message.
.
Search for a Number
1. When entering a number, select
> Find Number
among your contacts or call history.
2. Select a number and touch
User Guide 31
to search for a number
Call
More icon
or
Create
More icon
More icon
to dial.
Enter a Hard Pause
1. When enterin g a num b er, select
> Hard Pause
phone to wait until you touch
while making the call.
2. Enter the remaining numbers and touch
Call
to dial.
. A hard pause causes the
More icon
Release
Enter a Time Pause
1. When enterin g a num b er, select
> Time Pause
phone to stop dialing for two seconds.
2. Enter the remaining numbers and touch
Call
. A time pause causes the
to dial.
More icon
Call History
View Call History
1. From
Call History
log.
2. At the call log, you can do one of the
following:
– Touch a contact or number to view the
call details.
–Touch
number to dial the number.
–Touch
only.
–Touch
only.
–Touch
only.
–Touch
features.
, view your entire call
Call icon
next to contact or
Missed
to view missed calls
Outgoing
Incoming
More icon
to view outgoing calls
to view incoming calls
to access more
Page 32

View Missed Calls
1. From
Call History
2. At the
When you have missed a call, a notification
appears on your screen. Touch
View
Missed
the following:
– Touch a contact or number to view the
call details.
–Touch
number to dial the number.
–Touch
only.
–Touch
only.
–Touch
–Touch
features.
to see the missed call.
, touch
Missed
call log, you can do one of
Call icon
next to contact or
Outgoing
Incoming
All
More icon
to view outgoing calls
to view incoming calls
to view all calls.
to access more
OK
to ignore or
.
View Outgoing Calls
1. From
Call History
2. At the
32 Call History
Outgoing
the following:
– Touch a contact or number to view the
call details.
–Touch
number to dial the number.
–Touch
only.
–Touch
only.
–Touch
–Touch
features.
, touch
Outgoing
call log, you can do one of
Call icon
next to contact or
Missed
to view missed calls
Incoming
All
More icon
to view incoming calls
to view all calls.
to access more
.
View Incoming Calls
1. From
Call History
2. At the
Incoming
the following:
– Touch a contact or number to view the
call details.
–Touch
number to dial the number.
–Touch
only.
–Touch
only.
–Touch
–Touch
features.
, touch
Incoming
call log, you can do one of
Call icon
next to contact or
Missed
to view missed calls
Outgoing
All
More icon
to view outgoing calls
to view all calls.
to access more
.
Call History Options
View a Call Record
1. When viewing a call log, touch a record.
2. At the call record, you can do one of the
following:
–Touch
–Touch
–Touch
–Touch
View Life Ti mer
When viewing a call log, select
Call Timers
time.
This timer tracks all calls made and received
for the life of the phone and cannot be reset.
Call icon
number.
Msg
or number.
Save
Delete
to view the total
to dial the contact or
to send a message to contact
to save the number.
to erase the record.
More icon >
Lifetime
call
Page 33

View All Calls Timer
When viewing a call log, select
Call Timers
time.
This timer tracks all calls made and received
since you last reset the timer. To reset this
timer to zero, touch
> Yes
to view the total
All Calls
.
More icon >
All Calls
and select
call
Reset
View Home Calls Timer
When viewing a call log, select
Call Timers
time.
This timer tracks all calls made and received in
your home network since you last reset the
timer. To reset this timer to zero, touch
Calls
to view the total
and select
Reset > Yes
More icon >
Home Calls
Home
.
View Roam Calls Timer
When viewing a call log, select
Call Timers
time.
This timer tracks all roaming calls made and
received in your home network since you last
reset the timer. To reset this timer to zero,
touch
Your phone can alert you with a short beep ten
seconds before each minute passes during a
call. For more information, see “Enable Minute
Alert” on page 64.
User Guide 33
to view the total
Roam Calls
and select
More icon >
Roam Calls
Reset > Yes
View Incoming Calls Timer
When viewing a call log, select
Call Timers
call time.
This timer tracks all calls received since you
last reset the timer. To reset this timer to zero,
touch
to view the total
Incoming Calls
and select
View Outgoing Calls Timer
When viewing a call log, select
Call Timers
call time.
call
This timer tracks all calls made since you last
reset the timer. To reset this timer to zero,
touch
to view the total
Outgoing Calls
and select
View Data Counter
When viewing a call log, select
Kilobyte Counter
kilobytes sent during data calls. Select
when finished.
call
This counter tracks kilobytes for data calls
made, data calls received, and total data. To
reset the counter to zero, select
Reset > Yes
.
Delete Multiple Records
1. When viewing a call log, select
> Delete
2. Select records to delete. A mark appears
next to each selection. You can also remove
marks.
3. Select
to track the amount of
.
.
Delete > Yes
to confirm.
More icon >
Incoming Calls
Reset > Yes
More icon >
Outgoing Calls
Reset > Yes
More icon >
Done
More icon >
More icon
.
.
Page 34

Delete All Records
1. When viewing a call log, select
> Delete All
2. Touch
Note:
.
Yes
to confirm.
You cannot recover deleted information.
More icon
Voicemail
Configure your Voicemail
Before your phone can receive voicemail
messages, you need to set up a password and
record a personal greeting with your service
provider.
When you have set up your voicemail, all
unanswered calls to your phone are
automatically transferred to voicemail, even if
your phone is in use or turned off.
1. From
Phone
, touch
Call icon
Voicemail
2. Follow the system prompts to create a
password and record a greeting.
Note:
to access voicemail.
From
.
Dialer
, you can touch and hold 1
next to
Check your Voicemail
When you receive a voicemail message, a
notification with a voicemail message icon
appears at the top of your screen.
• At the voicemail notification, touch
to call your voicemail number and follow
the system prompts to retrieve the message.
Touch
Close
without checking messages. The
notification icon remains on top of the
screen until you listen to the message.
• When only the voicemail message icon
appears on top of the screen, touch and hold
1 on the
to retrieve the message.
to clear the notification
Dialer
. Follow the system prompts
Listen
Voicemail Settings
From
Voicemail
features.
Launch Visual Voicemail
From
Phone
Voicemail
your phone. For more information on the
availability of
service provider.
Note:
You need to subscribe to
Voicemail
, you can access the following
, select
Voicemail > Visual
to manage voicemail visually on
Visual Voicemail
to see the menu item on your phone.
contact your
Visual
Reset Notification Count
1. From
Voicemail Notification Count
touch
Reset
to set notifications to zero.
2. Touch
34 Voicemail
OK
to confirm.
,
Page 35

Set Voicemail Number
Often your service provider automatically
programs your voicemail number (the number
your phone calls to retrieve voicemail). Do the
following to change it:
1. From
Voicemail Number
voicemail number.
2. Touch
Done
to save.
, modify your
Set Voicemail Alert
From
Voicemail Alert
voicemail.
If you select an
notifies you once when receiving a new alert
and notifies you again every five minutes. To
dismiss a reminder alert, touch
, select an alert type for
& Remind
alert, the phone
Close
.
User Guide 35
Page 36

4Contacts
Use
Contacts
person or company.
Create a Contact
1. From
2. At the edit contact screen, touch
enter the name.
3. Touch
phone number.
4. If applicable, enter additional phone
numbers, email addresses, and other
contact details.
5. When done, touch
to store information about a
Contacts
, touch
New icon
Add Primary Number
Save
.
.
Name
to enter the
View Groups List
1. From
Contacts
your groups.
2. At the groups list, you can do one of the
to
following:
– Touch a group to view group members.
–Touch
–Touch
favorites list.
–Touch
list.
–Touch
features.
, touch
New icon
to create a new group.
Favorites icon
All
to view the entire contacts
More icon
to access more
Groups
to view the
to view
View Contacts List
1. From
Contacts
, touch
All
contacts.
2. At the contacts list, you can do one of the
following:
– Touch a contact to view details.
–Touch
–Touch
–Touch
–Touch
–Touch
36 Create a Contact
Call icon
New icon
contact.
Favorites icon
favorites list.
Groups
More icon
features.
to view all your
to dial the number.
to create a new
to view the
to view the groups list.
to access more
View Favorites List
1. From
Contacts
, touch
view all your favorites.
2. At the favorites list, you can do one of the
following:
– Touch a contact to make a call or send a
message.
–Touch
–Touch
–Touch
–Touch
New icon
contact.
Groups
All
list.
More icon
features.
Favorites icon
to create a new
to view the groups list.
to view the entire contacts
to access more
to
Page 37

Launch MyBackup
At the contacts list, select
MyBackup
You may need to download and install
MyBackup
availability of
service provider.
to back up your contacts online.
. For more information on the
MyBackup
More icon >
, contact your
Contact List Options
Find a Contact
1. At the contacts list, select
Search Contacts
2. Enter letters to search by name or numbers
to search by number.
3. Touch
Search
to view results.
Enable Voice Dial Tags
Your phone can create a voice dial tag for each
contact. The name field cannot be blank nor
can the name be more than five syllables in
length. Y ou can enable or disable the voice dial
tags associated with your contacts.
1. At the contacts list, select
Voice Dial List
2. At the voice tag list, touch boxes to add or
remove checkmarks. A checkmark appears
next to each enabled voice dial. Touch
contacts to play the voice tag.
3. When done, touch
User Guide 37
.
.
Save
More icon >
More icon >
.
Send Contacts List via Message
1. At the contacts list, select
Send Contacts as vCard > via Message
2. Choose the contacts to include in list.
3. Complete the message.
More icon >
Send Contacts List via Bluetooth
1. At the contacts list, select
Send Contacts as vCard > via Bluetooth
2. Choose the contacts to include in the list.
3. Complete the appropriate task to send list
to a Bluetooth-enabled device.
More icon >
Send Contacts List to Printer
1. At the contacts list, select
Send Contacts as vCard > to Printer
2. Choose the contacts to include in the list.
3. Complete the appropriate task to print list
on a Bluetooth-enabled printer.
More icon >
.
Delete Multiple Contacts
1. At the contacts list, select
Delete Contacts
2. Select contacts to delete. A mark appears
next to each selection. You can also remove
marks.
3. Touch
Delete > Y es
More icon >
.
to confirm.
Delete All Contacts
1. At the contacts list, select
Delete All Contacts
2. Touch
Note:
Yes
to confirm.
You cannot recover deleted information.
More icon >
.
.
.
Page 38

Group List Options
Create a Group
1. At the groups list, touch
2. Enter a name, touch
3. Touch
4. Select contacts to add. A mark appears next
5. Touch
Edit
to add members.
to each selection. You can also remove
contacts.
Done
to confirm members.
Done
New icon
.
.
Delete Groups
1. At the groups list, select
Delete Groups
2. Select groups to delete. A mark appears
next to each selection. Y ou can also remove
marks.
3. Touch
Note:
or erase preloaded groups.
Delete > Yes
You cannot recover deleted information
More icon >
.
to confirm.
Favorite List Options
Send Favorites via Message
1. At the favorites list, select
Send Favorites as vCard > via Message
to attach the list to a message.
2. Complete the message.
More icon >
Send Favorites via Bluetooth
1. At the favorites list, select
Send Favorites as vCard > via Bluetooth
to send the list to a Bluetooth-enabled
device.
2. Complete the appropriate task.
More icon >
Send Favorites to Printer
1. At the favorites list, select
Send Favorites as vCard > to Printer
print list on a Bluetooth-enabled printer.
2. Complete the appropriate task.
More icon >
Contact Detail Options
Call a Contact
When viewing a contact, touch
to the number you wish to dial.
Send Message to a Contact
1. When viewing a contact, touch
icon
next to the number or address you
wish to send a message.
2. Complete the message.
Assign Contact to Favorites
When viewing a contact, touch
to add contact to your favorites. To remove the
contact from your favorites, touch the
Favorites icon
again.
Call icon
Favorites icon
to
next
Message
38 Group List Options
Page 39

Edit Contact Name
1. When viewing a contact, touch
2. Touch
3. Touch
4. Touch
Name
to edit the name.
Done
.
Save
to save the contact.
Edit
.
Change Primary Number
When a contact has more than one number, the
first number created becomes the primary
number by default. To change the contact’s
primary number, do the following:
1. When viewing a contact, touch
2. Touch
3. Select a primary number and touch
4. Touch
Change Primary
Save
to save the contact.
Edit
.
.
Done
Change Phone Type
1. When viewing a contact, touch
2. Select the phone type next to the number.
For example, to change a mobile phone
type, touch the phone icon next to the
number.
3. Select a phone type and touch
4. Touch
Save
to save the contact.
Edit
Done
.
.
Edit Contact Details
1. When viewing a contact, touch
2. Touch a number , email, street address or
other detail to edit it.
3. Touch
4. Touch
Done
.
Save
to save the contact.
Edit
.
Add Contact Details
1. When viewing a contact, touch
2. Touch a detail to add it. For example, to
add a number, touch
3. Touch
4. Touch
Done
Save
Add Phone
.
to save the contact.
Assign Image to Contact
1. When viewing a contact, touch
2. Touch the image to modify it.
3. Select an image file.
4. Touch
Assign Ringer to Contact
.
1. When viewing a contact, touch
2. Touch
3. Select a sound file.
4. Touch
Save
Ringer
the contact.
Save
to save the contact.
to change the call alert for
to save the contact.
Assign Message Tone to Contact
1. When viewing a contact, touch
2. Touch
3. Select a sound file.
4. Touch
Message Tone
message alert for the contact.
Save
to change the
to save the contact.
Edit
.
Edit
Edit
Edit
.
.
.
.
User Guide 39
Page 40

Assign Contact to Group
1. When viewing a contact, touch
2. Touch
3. Select groups to assign and touch
4. Touch
Groups
.
mark appears next to each selection. You
can also remove marks.
Save
to save the contact.
Edit
Send Contact via Message
1. When viewing a contact, select
> Send Contact as vCard > via Message
to attach the contact to a message.
2. Complete the message.
More icon
Send Contact via Bluetooth
1. When viewing a contact, select
> Send Contact as vCard > via Bluetooth
to send the contact to a Bluetooth-enabled
device.
2. Complete the appropriate task.
More icon
Send Contact to Printer
1. When viewing a contact, select
> Send Contact as vCard > to Printer
print contact on a Bluetooth-enabled
printer.
2. Complete the appropriate task.
More icon
Delete a Contact
1. When viewing a contact, select
> Delete Contact
2. Touch
Yes
.
to confirm.
More icon
.
Done
Group Detail Options
Add Contacts to Group
1. When viewing a group, touch
. A
2. Select contacts to add. A mark appears next
to each selection. You can also remove
contacts.
3. Touch
Rename a Group
1. When viewing a group, select
2. Edit the name and touch
Assign Image to Group
1. When viewing a group, select
2. Select an image file.
Assign Ringer to Group
1. When viewing a group, select
2. Select a sound file.
to
Assign Message Tone to Group
1. When viewing a group, select
2. Select a sound file.
Done
to save.
Rename Group
Assign Photo
Assign Ringer
Assign Message Tone
.
.
.
Done
.
Edit
.
More icon >
.
More icon >
More icon >
More icon >
40 Group Detail Options
Page 41

Send Group via Message
1. When viewing a group, select
Send Group as vCard > via Message
attach the group information to a message.
2. Complete the message.
More icon >
Send Group via Bluetooth
1. When viewing a group, select
Send Group as vCard > via Bluetooth
send the group information to a
Bluetooth-enabled device.
2. Complete the appropriate task.
More icon >
Send Group to Printer
1. When viewing a group, select
Send Group as vCard > to Printer
print the group information on a
Bluetooth-enabled printer.
2. Complete the appropriate task.
More icon >
Delete a Group
1. When viewing a group, select
Delete Group
2. Touch
Note:
You cannot erase preloaded groups.
Yes
to confirm.
.
More icon >
to
to
to
User Guide 41
Page 42

5 Browser
You can use your phone to browse the Internet
if you have obtained phone Internet services
from your service provider and if over-the-air
Internet access is available in your area.
Launch Browser
Touch
Browser
appears notifying of airtime fees, if you have
enabled web alerts. Select
to launch the browser. An alert
Yes
to continue.
Add a Bookmark
1. Surf to the web page you want to bookmark
and select
Bookmarks
2. Edit the bookmark’s details, if needed.
Touch
3. Touch
To access your saved bookmarks, select
icon > Bookmarks
More icon > Add to
.
Save
.
OK
to confirm.
from any web page.
More
Browse the Web
A browser home page with browser menu
options appears when you are connected to the
web. The lock icon appears in a secure session.
You can do the following:
• To choose a site, touch a link.
•Touch
•Touch
•Touch
• An underline and an arrow indicate that
•Touch
•Press the
•Press the
42 Launch Browser
Go to URL
Stop
page.
Refresh
there is more text on the current page.
Scroll down to view the rest of the text.
More icon
features.
screen.
to go to a Web page.
to stop loading the current
to reload the current page.
to access more browser
Back
key to return to the previous
End
key to exit.
Page 43

6 Send Email
From the menu screen, touch
the email application. For more information on
this application, contact your service provider.
User Guide 43
Email
to launch
Page 44

7 Calendar
Use
Calendar
reminder alerts.
Create an Event
1. From
2. At the event edit screen, touch
modify the event name.
3. Touch
4. Touch
5. Touch
6. Touch
needed.
7. Touch
8. Touch
9. Touch
reminder sound.
10.Touch
11. Touch
weekly or other rec urring option.
12.Touch
Manage Calendar
View Events by Date
From
• Scroll left or right to move to another date.
• Scroll to a time and touch
• Scroll up or down to view or select events.
•Touch
44 Create an Event
to schedule events and set
Calendar
Today
, touch
Type
to select the event type.
Date
to change the date.
Time
to change the time.
Duration
to change the duration, if
Priority
to select a priority type.
Reminder
Reminder Sound
Silent Mode
Recurring Event
Save
More icon
to select a reminder type.
to create the new event.
, do one of the following:
to access more features.
New Event
to select a
to enable silent mode.
to make the event
.
Name
New Event
to
.
View Events by Month
1. From
Month
view. Days with events are highlighted.
2. Touch a day and do one of the following:
– Scroll left or right to move to another
– Scroll to a time and touch
– Scroll up or down to select events.
–Touch
, scroll through the month
date.
More icon
features.
New Event
to access more
View All Events
From
All Events
• Scroll up or down to select events.
•Touch
•Touch
, do one of the following.
New Event
More icon
to create an event.
to access more features.
Go to a Specific Date
1. From
2. Touch
Go To Date
Go
, enter a date.
to view that date.
Return to the Current Date
From
Today
, select
to return to the current date.
More icon > Go to Today
Edit an Event
1. At the event details screen, touch
2. At the event edit screen, modify the event
and touch
Save
.
Edit
.
.
Page 45

Send Event via Message
1. At the event details screen, select
icon > Send > via Message
event to a message.
2. Complete the message.
to attach the
Send Event via Bluetooth
1. At the event details screen, select
icon > Send > via Bluetooth
event to a Bluetooth-enabled device.
2. Complete the appropriate task.
to send the
Send Event to Printer
1. At the event details screen, select
icon > Send > to Printer
on a Bluetooth-enabled device.
2. Complete the appropriate task.
to print the event
Copy an Event
1. At the event details screen, select
icon > Copy
2. Enter a new name for the event.
3. Complete the event edits and touch
.
Sort Events by Time
From
All Events
Time
to sort events by time.
, select
More icon > Sort by
Sort Events by Type
From
All Events
Type
to sort events by their assigned type.
, select
More icon > Sort by
More
More
More
More
Save
Sort Events by Priority
From
All Events
Priority
priority.
, select
to sort events by their assigned
Delete an Event
1. At the event details screen, select
icon > Delete
2. Touch
Note:
You cannot recover deleted information.
Yes
to confirm.
.
Delete the Current Day’s Events
1. At the event day view, select
Delete All Today’s Events
events on that day.
2. Touch
Note:
Yes
to confirm.
You cannot recover deleted information.
Delete All Events
1. From
.
All Events
Delete All Events
the phone.
2. Touch
Note:
Yes
You cannot recover deleted information.
, select
to erase all events from
to confirm.
Delete All Past Events
1. From
All Events
Delete All Past Events
events from the phone.
2. Touch
Note:
Yes
You cannot recover deleted information.
, select
to confirm.
More icon > Sort by
More
More icon >
to erase all
More icon >
More icon >
to erase all past
User Guide 45
Page 46

Calendar Settings
From
Settings
features.
Set Calendar Hours
1. From
and end times of the work day.
2. Touch
Erase Events Automatically
From
automatically erase your past events.
Set Event Priority
From
every event you create.
Set Event Reminder
From
when the reminder alert goes off. This is the
default for every event you create.
Set Event Reminder Alert
From
for every event you create. To preview a sound,
touch the icon next to the name.
Set Silent Mode
From
every event you create.
, you can modify the following
Scheduler Hours
Set
to save new hours.
Auto Delete
Priority
, select a default priority type for
Reminder
Reminder Sound
Silent Mode
, select a default option for
, modify the start
, select a time frame to
, select a default sound
, select a default mode for
46 Calendar Settings
Page 47

8 Music Player
Use
Music Player
files.
to play and manage media
View Artists
1. From
Music Player
in alphabetical order. If you do not have
any media files, then the
closes.
2. At the artists list, you can do one of the
following:
– Touch an artist name to view albums by
that artist.
–Touch
highlighted song.
–Touch
list.
–Touch
–Touch
features.
, view the list of artists
Play Song icon
By Album
Playlists
More icon
to view the albums
to view your playlists.
to access more
Music Player
to play the
–Touch
–Touch
–Touch
features.
By Artist
to view the artist list.
Playlists
to view your playlists.
More icon
to access more
View Playlists
1. From
Music Player
view your playlists.
2. At the playlists list, you can do one of the
following:
– Touch a playlist to view the song list.
–Touch
playlist.
–Touch
list.
–Touch
–Touch
features.
New icon
By Album
By Artist
More icon
, touch
Playlists
to
to create a new
to view the albums
to view the artist list.
to access more
Play a Song
View Albums
1. From
Music Player
view the albums list.
2. At the albums list, you can do one of the
following:
– Touch an album to view album song
list.
–Touch
highlighted song.
User Guide 47
, touch
Play Song icon
By Album
to play the
When playing a song, you can do the
following:
to
•Press the
• Touch the arrows to move to the next or
• Touch the bar to fast forward or rewind the
Volume
volume.
previous song in the list.
current song.
key to control the
Page 48

•Touch
•Touch
•Touch
•Touch
Shuffle icon
random order.
Pause icon
continue the song, touch the
Repeat icon
More icon
to pause a song. To
to access more features.
to play song list in
Play icon
to repeat the song list.
.
7. Open the
8. Drag and drop music files to the
9. When you are done transferring files,
My_Music
card.
My_Music
disconnect your phone from your computer.
folder on the memory
folder.
Load a Song
Music files can be loaded onto your phone via
the browser or a message. Y ou can also use the
following steps to load music from your
computer via a Micro-USB cable.
Note:
The
in MP3 file format only (other file formats are
not supported).
1. Insert a memory card into your phone. You
2. Connect the Micro-USB cable to the
3. Connect the Micro-USB cable to the USB
Note:
software when using the phone in Mass
Storage mode.
4. From your phone’s main menu, select
5. On your computer, you will see your phone
6. Open the removable disk drive.
48 Load a Song
Music Player
must have a memory card to load music via
a Micro-USB cable.
Micro-USB jack on your phone.
port on your computer.
Y ou do not have to install any additional
Settings > Accessories > USB Mode >
Mass Storage
as a removable disk drive.
will read music saved
.
Artist / Album List Options
Play Songs by Artist
1. When viewing the artists list, select an
artist.
2. At the albums list, touch
songs by the artist.
Play Songs by Album
1. When viewing an albums list, select an
album.
2. At the album song list, touch
all songs on the album.
Play All Songs
1. When viewing the artists list, select
icon > All Tracks
2. At the song list, touch
songs.
Play Songs by Genre
1. When viewing the artists list, select
icon > Music by Genre
2. At the genre list, select a genre.
3. At the genre song list, touch
songs in the genre.
.
Play
Play
to play all
.
to play all
Play
to play
Play
to play all
More
More
Page 49

Search for a Song
1. When viewing the artists list, select
icon > Search
2. Enter the first letter(s) of the search criteria.
The search letters are not case sensitive.
3. At the search results, select a song to play.
.
More
Refresh Song List
1. When viewing the artists list, select
icon > Refresh Tracks
list with recently loaded songs.
2. Touch
Yes
to confirm.
to update your song
More
Delete Multiple Songs
1. At the artists list, select
Delete Tracks
2. Select songs to delete. A mark appears next
to each selection. You can also remove
marks.
3. Touch
Note:
Delete > Yes
You cannot recover deleted information.
More icon >
.
to confirm.
Delete All Songs
1. At the artists list, select
Delete All Tracks
2. Touch
Note:
Yes
to confirm.
You cannot recover deleted information.
More icon >
.
Playlist Options
Create a Playlist
1. At the playlists list, touch
2. Enter a name, touch
3. Select how you want to browse the songs.
4. Select songs to add. A mark appears next to
each selection. You can also remove marks.
5. Touch
6. Touch
Done
Yes
the playlist.
to confirm songs.
to add more songs or No to save
Play a Playlist
1. At the playlists list, select a playlist.
2. At the playlist, touch
on the playlist.
Modify a Playlist
1. When viewing a playlist, select
> Add Tracks
2. Select how you want to browse the songs.
3. Select songs to add. A mark appears next to
each selection. You can also remove marks.
4. Touch
5. Touch
the playlist.
To remove songs from a playlist, select
Remove Tracks
.
Done
to confirm songs.
Yes
to add more songs or No to save
.
New icon
Done
.
Play
to play all songs
.
More icon
User Guide 49
Page 50

Rename a Playlist
1. When viewing a playlist, select
> Rename Playlist
2. Enter a name, touch
.
Done
More icon
.
Delete a Playlist
1. When viewing a playlist, select
> Delete Playlist
2. Touch
Note:
or erase preloaded lists.
Yes
You cannot recover deleted information
.
to confirm.
More icon
Delete Multiple Playlists
1. At the playlists list, select
Delete Playlists
2. Select playlists to delete. A mark appears
next to each selection. Y ou can also remove
marks.
3. Touch
Note:
You cannot recover deleted information
or erase preloaded lists.
.
Delete > Yes
More icon >
to confirm.
Song Options
Add Song to Playlists
1. When viewing a song title, select
icon > Add Track to Playlist
2. Select playlists for the song. A mark
appears next to each selection. You can also
remove marks.
3. Touch
Done
to confirm.
More
.
Move Song to Card
1. When viewing a song title, select
icon > Move to Memory Card
the song from the phone memory to the
card memory.
2. Touch
To move a file back to the phone, select
to Phone
Yes
to confirm.
.
More
to move
Copy Song to Card
1. When viewing a song title, select
icon > Copy to Memory Card
song from phone memory to card memory.
2. Touch
To copy a song back to the phone, select
to Phone
Yes
to confirm.
.
More
to copy a
Lock a Song
When viewing a song title, select
Lock
to protect a song from being accidently
erased. To unlock the song, select
More icon >
Unlock
View Song Details
When viewing a song title, select
Track D etails
to view song infomation.
More icon >
Delete an Album
1. When viewing an album, select
> Delete Album
2. Touch
Note:
You cannot recover deleted information.
Yes
to confirm.
.
More icon
Move
Copy
.
50 Song Options
Page 51

Music Player Settings
From
Music Player
Music Settings
features.
Set the Equalizer
From
Equalizer
when you play music.
Set Auto Off Duration
From
Auto Off
be paused or stopped before automatically
turning off the
Pair with Bluetooth Device
From
Bluetooth Headset
device with the
information, see “Bluetooth” on page 60.
Reset to Factory Default
From
Reset to Factory Default
reset the
Music Player
defaults.
, select
to modify the following
, select a sound setting to use
, set how long your phone must
Music Player
Music Player
More icon >
.
, pair your Bluetooth
. For more
, touch
settings to the factory
Yes
to
User Guide 51
Page 52

9 Camera
Camera Tips
Your phone has a camera. Before using your
phone’s camera, here are some tips:
• Y ou cannot activate the camera while on an
active call or while browsing files in the
gallery.
• Once the camera is active, the screen acts
as the viewfinder.
• If you get a “Low memory” error, check
your resolution and quality compression
settings.
• If there is no activity after you turn your
camera on, the camera times out and
returns to the previous launch point.
• Menu settings and options can only be
accessed when the camera is active.
• Numbers in the bottom right corner
indicate the number of snapshots remaining
before the phone runs out of memory.
Take a Picture
1. To activate the camera, press and hold the
Camera
key. You can also select
from the main menu.
2. Focus on the image using the phone’s
display as a viewfinder.
52 Camera Tips
Camera
3. To take a picture, touch
can also press the
picture is saved to
one of the following:
–Press the
–Touch
–Touch
–Press the
Camera
picture.
Send
Delete
Back
Camera Options
Send Picture with Message
1. Take a picture.
2. Select
3. Complete the message.
Send Picture via Bluetooth
1. Take a picture.
2. Select
3. Complete the appropriate task.
Send Picture to Printer
1. Take a picture.
2. Select
3. Complete the appropriate task.
Send > Send via Message
it to a message.
Send > Send via Bluetooth
the event to a Bluetooth-enabled device.
Send > Send to Printer
file on a Bluetooth-enabled device.
Camera icon
Navigation
My Photos
to send the picture.
to erase the picture.
key to exit.
key. The
. You can do
key to take another
to print the
. You
to attach
to send
Page 53

Set Brightness Level
1. When taking a picture, select
Brightness
2. Use the slider control to adjust the
brightness.
3. Touch
Set
.
to save.
More icon >
Use Camera Zoom
When taking a picture, press the
key to scroll up or down to zoom in and out.
An indicator on the viewfinder shows the
current zoom level. Using the highest
resolution setting will disable the camera
zoom.
Navigation
Take a Picture in a Frame
1. When taking a picture, select
Frames
.
2. Scroll left or right to view the the frames
available.
3. Touch
4. Take a picture with the frame. The frame is
Set
to choose a frame.
part of the image and cannot be removed.
More icon >
Go to My Photos
When taking a picture, select
Photos
to see all the pictures you have taken.
More icon > My
Go to Last Picture Taken
When taking a picture, touch
icon
to view the last picture you took.
User Guide 53
Last Picture
Camera Settings
When taking a picture, select
Settings
to modify the following features.
Set Resolution
From
Resolution
pictures.
A higher resolution setting will increase the
size of the picture files. Using the highest
resolution setting will disable the camera
zoom.
, set the resolution for your
Set Self Timer
From
Self Timer
your next picture.
An icon on the viewfinder indicates the timer is
activated. When you take a picture, the
countdown time will pass before the shutter
snaps the picture.
, set a countdown time for
Enable Time Stamp
From
Date/Time
stamp on each picture taken.
An icon indicates when the time stamp is
activated.
, select On to place a time
Enable Multishot
From
Multishot
pictures.
An icon indicates when multishot mode is
activated. When you take a picture, press and
hold the
A single tone plays for each picture taken.
, select On to take multiple
Camera
key to take multiple pictures.
More icon >
Page 54

Your camera is set to a lower resolution during
multishot mode. The resolution setting returns
to the previous settting when you are done.
Set Shutter Sound
From
Shutter Sound
when the shutter takes a picture.
, select a sound to play
Set Color Tone
1. From
Color Tone
adjust the color tone setting. Look at the
viewfinder to see how each setting looks.
2. Touch
Set
, scroll left or right to
to save.
Set White Balance
1. From
White Balance
adjust the white balance setting. Look at the
viewfinder to see how each setting looks.
2. Touch
Set
to save.
, scroll left or right to
Set Picture Quality
From
Picture Quality
level for your pictures. A higher compression
level produces a higher picture quality.
A higher compression level will increase the
size of the picture files.
, set the compression
Set Save Location
1. From
Save Location
Memory Card
memory card.
2. Touch
To save pictures to your phone, select
Phone
pictures will be saved to your phone.
Yes
to confirm.
. If you remove your memory card,
, select
to save pictures to your
Save to
Save to
54 Camera Settings
Page 55

10 Gallery
Use
Gallery
to retrieve and playback media files and other downloads.
Gallery Menu
Select
Gallery
to access the following functions:
Level 1 > Level 2 > Level 3
Gallery Images
Sounds
Access these options:
Wallpapers
Access these options:
Memos
My Photos, My Images
.
.
Ringtones, My Sounds
, and
, and
Voice
Images
From
Images
files.
View Picture List
From
• Touch a picture to view it.
•Touch
•Touch
image list.
•Touch
wallpaper list.
•Touch
User Guide 55
, you can access the following
My Photos
, you can do the following:
Camera icon
Saved Images icon
Wallpapers icon
More icon
to take a picture.
to access more features.
to view the
to view the
Send a Picture
1. From
My Photos
2. When viewing the file, touch
attach it to a message.
3. Complete the message.
, select a picture.
Send
to
Assign an Image
1. From
My Images
2. When viewing the file, touch
3. Choose how you want to assign the image.
4. Complete the appropriate task.
, select an image.
Assign
.
Change the Wallpaper
1. From
Wallpapers
2. When viewing the file, touch
Default
.
, select a wallpaper.
Set as
Page 56

Sounds
From
Sounds
files.
, you can access the following
Assign a Ringtone
1. From
Ringtones
2. When viewing the file, touch
3. Choose how you want to assign the
ringtone.
4. Complete the appropriate task.
, select a ringtone.
Assign
.
Assign a Sound
1. From
My Sounds
2. When viewing the file, touch
3. Choose how you want to assign the sound.
4. Complete the appropriate task.
, select a sound.
Assign
.
Voice Memos
Use
Voice Memos
See “Record a Voice Memo” on page 74 for
more information.
to create voice recordings.
Manage Gallery
View a Slideshow
1. At a file list, select
View
to play the slideshow of the files
contained in the list.
2. Touch the screen prompts to control the
slideshow.
More icon > Slideshow
Set File as Wallpaper
1. When viewing a file, select
Set as Wallpaper
2. Touch
Set
to confirm.
More icon >
.
Wallpaper Shuffle
At a file list, select
Shuffle
to modify the following features.
Enable Wallpaper Shuffle
From
Set Wallpaper Shuffle
to turn on wallpaper shuffle.
Edit Wallpaper Shuffle
1. From
2. Select the files from your
include in your shuffle. Files included in
your shuffle are marked.
3. Touch
Cancel
Set Wallpaper Shuffle Interval
From
Set Shuffle Time
time. Y our wallpaper changes to another file in
the shuffle at the selected interval time.
More icon > Wallpaper
View Shuffle List
Save
to save your changes or
to exit.
, select an interval
, select
, touch
Gallery
Enabled
Edit
.
to
View File Details
When viewing a file, select
Image Details
to view file infomation.
More icon >
56 Sounds
Page 57

Modify a File
1. When viewing a file, select
Modify Image
rotate, resize, and so on.
2. When done, touch
and the applicable option to
More icon >
OK
to save the changes.
Rename a File
1. When viewing a file, select
Rename
2. Enter a new name and touch
Y ou can only rename unlocked files. Preloaded
files on your phone are always locked.
.
More icon >
Done
.
Send File via Bluetooth
1. When viewing a file, select
Send via Bluetooth
Bluetooth-enabled device.
2. Complete the appropriate task.
More icon >
to send the event to a
Send File to Printer
1. When viewing a file, select
Send to Printer
Bluetooth-enabled device.
2. Complete the appropriate task.
to print the file on a
More icon >
Move File to Card
1. When viewing a file, select
Move to Memory Card
from the phone memory to the card
memory.
2. Touch
To move a file back to the phone, select
to Phone
User Guide 57
Yes
to confirm.
.
More icon >
to move the file
Move
Copy File to Card
1. When viewing a file, select
Copy to Memory Card
phone memory to card memory.
2. Touch
To copy a file back to the phone, select
to Phone
Yes
to confirm.
.
More icon >
to copy a file from
Copy
Lock a File
When viewing a file, select
to protect a file from being accidently erased.
To unlock the file, select
More icon > Lock
Unlock
.
Browse Pictures
1. From
My Photos
2. To browse through your pictures, touch and
drag on the screen. You can also scroll left
or right with the
, select a picture.
Navigation
key.
Use the Zoom
1. When viewing a file, use the
key to zoom. Scroll up to zoom in and
down to zoom out.
2. Press the
Back
key to exit.
Navigation
Delete a File
When viewing a file, select
applicable option. For example, select
Image
to erase an image.
You can only erase unlocked files. Preloaded
files on your phone are always locked.
More icon
and the
Delete
Page 58

Delete All Pictures
From
My Photos
All Pictures > Yes
Note:
You can only erase unlocked files.
, select
More icon > Delete
to erase all pictures.
Delete All Images
From
My Images
All Saved Images > Yes
Note:
You can only erase unlocked files.
, select
to erase all images.
Delete All Sounds
From
My Sounds
All Sounds > Yes
Note:
You can only erase unlocked files.
, select
to erase all sounds.
More icon > Delete
More icon > Delete
58 Manage Gallery
Page 59

11 Alarm
Use
Alarm
to set alerts with your phone.
Note:
The alert occurs only if the phone is on.
Activate an Alarm
From
Alarm
one of the alarms.
When the alarm rings, select
the alarm or
later time.
Set an Alarm
1. From
2. Touch
3. Touch
4. Touch
5. Touch
6. Touch
You can set the other alarms with the same
steps.
, toucn the on/off toggle next to
Stop
Snooze
to set the alarm to ring at a
Alarm
, toucn
Time
to change the time.
Alarm Sound
sound.
Recurring
weekly or other recurring option.
Add Note
Save
to make the alarm
to enter a note.
.
to turn off
Alarm 1
.
to select an alarm
Set the Quick Alarm
1. From
Alarm
, touch
2. Select a time, and touch
shows the quick alarm is on.
When the quick a larm ri ngs, sel ect
off the alarm, or
again.
Quick Alarm
Reset
to set the quick alarm
.
Set
. A notification
Stop
to turn
Change Alarm Settings
From
Settings
features.
Set Snooze Duration
From
before the alarm goes off again when you use
the snooze option.
Set Snooze Limit
From
you can use the snooze option for an alarm.
, you can modify the following
Snooze Duration
Snooze Limit
, select how long
, select a number of times
User Guide 59
Page 60

12 Bluetooth
The Bluetooth® wireless technology (not
available on all phones) enables wireless
connectivity with accessories such as portable
or installed hands-free car kits, phones,
handsets, computers, and so on. For details,
check with your service provider.
You must use a Bluetooth device (compatible
with Class 2 Bluetooth wireless technology,
version 1.2) in order to use this phone
wirelessly. Bluetooth accessories display a
symbol on your phone.
From
Bluetooth
features.
, you can access the following
Enable Bluetooth
Before you can connect your phone with a
Bluetooth device, you need to enable the
Bluetooth feature on your phone.
From
Bluetooth
not automatically find a device, you will be
prompted to find one.
, touch On. If your phone does
Manage Bluetooth Devices
Pair with a Device
To enable your phone to communicate with a
Bluetooth device, you need to "pair" the device
with your phone. The following instructions
describe the process. You may also need to
reference the user guide provided with your
Bluetooth device.
60 Enable Bluetooth
1. Prepare the Bluetooth device (accessory)
for pairing as described in the device’s user
guide.
2. From
My Devices
then searches and detects any available
Bluetooth device in the vicinity. The
Bluetooth feature on your phone must be
enabled to find devices.
3. At the device list, select a device. If
prompted, accept the pairing.
4. If necessary, enter the password provided
with the Bluetooth device.
5. Touch
Note:
change the security setting to pair with it.
OK
list.
If the device is not trusted, you can
, touch
Find
. Y our phone
to add the device to your device
Connect to a Device
Before you can use Bluetooth, you must get
your phone ready to communicate with a
device. This is called “connecting”. Some
devices will attempt to automatically connect
to your phone when the Bluetooth feature is
turned on. To connect manually , do the
following:
1. From
My Devices
2. At the device detail screen, touch
3. Touch
Note:
touch
OK
now use the device with your phone.
To disconnect from a Bluetooth device,
Disconnect
, select a device.
Connect
to clear the notification. You can
.
.
Page 61

Rename a Device
1. From
My Devices
2. Touch
3. Enter a name, then touch
Rename
, select a device.
.
Done
.
Set Device Security
1. From
My Devices
2. Touch
Set Security
following:
–
Always Ask
request from this device.
–
Always Connect
connect to this device.
, select a device.
and select one of the
to confirm every Bluetooth
to automatically
View Device Services
A Bluetooth device paired with your phone
may have more than one service profile (such
as Headset, Handsfree, and so on).
1. From
2. Touch
available.
My Devices
View Services
, select a device.
to check the services
Delete a Device
1. From
2. Touch
My Devices
Delete > Yes
, select a device.
to confirm.
Set Phone’s Name
You can change the name presented for other
Bluetooth devices’ search of your phone.
From
Done
My Name
.
, enter a new name and touch
Limit Visibility
You can limit the time your phone is visible to
other Bluetooth devices.
From
Visibility
phone visible for your selected time before
becoming invisible.
, select an option to set the
Enable OBEX Authentication
From
OBEX Authentication
With object exchange (OBEX) authentication
enabled, you need a user name and password to
transfer files via Bluetooth.
, select
Enabled
View Supported Services
Select
Available Services
Bluetooth service profiles your phone
supports.
to view a list of the
.
User Guide 61
Page 62

13 Settings
Settings Menu
Select
Settings
to access the following features:
Level 1 > Level 2 > Level 3
Settings Bluetooth
Convenience
Display
Sound and Touch
V oice Featur es
Accessories
Network
Security
Phone Info
Pair a Bluetooth device.
Access these options:
(with
Fast Find, Frequent List, Minute Alert
Alert
Access these options:
Backlighting
Access these options:
Power On Sound, Power Off Sound, Touch Feedback
Key and Touch Tone, T ou ch C alibra tion
Length
Access these options:
Display Results, Digit Lengths, Voice Answer
Training
Access these options:
Mode
Access these options:
Roam Call Alert, Privacy Alert
Access these options:
Limit Calls
Access these options:
Memory
Airplane Mode
.
.
.
.
,
TTY Device
.
,
Icon Key
Airplane Mode, Set Date and Time
enabled),
Automatic Screen Lock
, and
Missed Call
Brightness, Language
Roam Ringer, Ringer Mode, Volume
Automatic Add, Expert Mode
Headset Sounds, Memory Card, USB
, and
T-coil Hearing Aid
Roam/Svc Alert, Roam Option
, and
Security Lock, New Lock Code
Phone Info, Phone Memory, Card
, and
User Guide
, and
Location
.
, and
.
DTMF
, and
.
,
Voice
,
,
,
, and
,
62 Settings Menu
Page 63

Bluetooth
Use
Bluetooth
“Bluetooth” on page 60 for more information.
to configure your devices. See
Convenience
From
Convenience
following features.
Enable Airplane Mode
While in an airplane, it is normally required
that you turn off your mobile phone because it
emits RF signals that interfere with air traffic
control. In airplane mode, however, your
phone does not emit RF signals. You cannot
make or receive calls, send text messages, use
a browser or bluetooth devices, but you can
play games, use the calendar, set the clock, and
make emergency calls to designated
emergency numbers. Please check with
uniformed personnel before operating your
phone in airplane mode.
1. From
Airplane Mode
the notification.
2. Select
With airplane mode enabled, you can set the
time and date manually.
Set Date and Time
In Airplane mode, you can set the time and
date manually.
, you can modify the
Enabled
to activate airplane mode.
, touch OK to clear
Note:
Y ou can only access
with
Airplane Mode
1. From
Set Date and Time
2. Enter the time, then touch
3. Touch
4. Enter the date, then touch
5. Touch
Date
Set
.
to save.
Set Date and Time
enabled.
, touch
Done
Done
Time
.
.
.
Enable Screen Lock
From
Automatic Screen Lock
Enabled
to activate screen lock.
With
Automatic Screen Lock
screen will automatically lock after a period of
inactivity. To unlock the phone, touch the
prompt on the phone.
, select
enabled, the
Enable Fast Find
From
Fast Find
fast find.
With
Fast Find
corresponding to the letters of the contact you
want to find when dialing a number. A
matching contact appears. Press the
to dial the number.
, select
Enabled
to activate
enabled, touch the keys
Send
key
Enable Frequent List
From
Frequent List
With
Frequent List
frequently called contacts are listed first when
contacts are accessed from the home screen.
, select
Enabled
enabled, a list of
.
User Guide 63
Page 64

Enable Minute Alert
From
Minute Alert
phone alerts you with a short beep ten seconds
before each minute passes during a call.
, select
Enabled
. Your
Set Missed Call Alert
From
Missed Call Alert
for missed calls.
If you select an
notifies you once when receiving a new alert
and notifies you again every five minutes. To
dismiss a reminder alert, touch
, select an alert type
& Remind
alert, the phone
Close
.
Display
From
Display
features.
Set Brightness
1. From
adjust the brightness.
2. Touch
Set Language
From
Set Backlight
From
backlight remains bright after the last screen
touch.
Note:
shorter duration for the backlight.
, you can modify the following
Brightness
Set
Language
Backlighting
To maximize the battery life, set a
, use the slider control to
to save.
, select a language.
, set how long the display’s
Sound and T ouch
From
Sound and Touch
following features.
Enable Roam Ringer
From
Roam Ringer
activate a specific ringer for roaming calls.
Set Ringer Mode
Your phone is set to make sounds when you
receive calls, press keys, navigate through
menus, and receive alerts (such as new
messages). You can silence all sounds and set
the phone to vibrate or to light up when you
receive calls and alerts.
From
Ringer Mode
following:
•
Normal Sounds
or alert (in effect, returning the phone to a
non-silent mode).
•
Vibrate Only
the incoming call or other alerts.
•
Vibrate And Ring
of the incoming call or other alerts.
•
Vibrate Then Ring
ten seconds and then rings for the
remainder of the incoming call alert.
•
Lights Only
the incoming call or other alerts.
You can also use the
Vibrate Only
Note:
external power source (such as a charger), even
if all sounds have been silenced.
mode.
The phone rings when attached to an
, you can modify the
, select
Enabled
to
, select one of the
rings for the incoming call
vibrates for the duration of
vibrates for the duration
vibrates for the first
lights up for the duration of
Volume
key activate
64 Display
Page 65

Volume
From
Volume
features.
, you can modify the following
Set Ringer Volume
1. From
Ringer
adjust the volume.
2. Touch
, use the slider control to
Set
to save.
Set Speakerphone Volume
1. From
Speakerphone
to adjust the volume.
2. Touch
Set
to save.
, use the slider control
Set Earpiece Volume
1. From
Earpiece
adjust the volume.
2. Touch
, use the slider control to
Set
to save.
Set Power On Sound
From
Power On Sound
when your phone powers on. To preview a
sound, touch the icon next to the name.
, select a sound to play
Set Power Off Sound
From
Power Off Sound
when your phone powers down. To preview a
sound, touch the icon next to the name.
, select a sound to play
Set Touch Feedback
From
T ouch Feedback
vibration feedback when you touch the screen.
To preview a vibration level, touch the name.
User Guide 65
, set the level of
Set Key and Touch Tone
From
Key and Touch Tone
you hear when pressing a key or touching the
screen.
, select the sound
Calibrate Touch Sensor
From
Touch Calibration
to calibrate the touch sensor on your phone.
, follow the prompts
Set DTMF Length
From
DTMF Length
dual-tone multi-frequency (DTMF) tones last
when you dial a number.
, set how long the
Voice Features
From
Voice Features
following features.
Enable Automatic Add
From
Automatic Add
automatically add a contact to your voice dial
list when you create a new contact.
Enable Expert Mode
From
Expert Mode
voice command after you hear a tone instead of
following the voice prompts.
Set Display Results
You can set the phone to display up to three
contacts when calling or searching for a
contact with a voice command.
From
Display Results
Three Best
, select
.
, you can modify the
, select
Enabled
to
Expert
to speak a
, select
Single Best
or
Page 66

Set Digit Lengths
You can set the number of digits used for a
phone number in your voice dial list.
From
Digit Lengths
following options:
•
North American
and 1 + 10 digits in a phone number.
•
Permit All
number.
, select one of the
recognizes only 7, 10,
allows 4-14 digits in a phone
Voice Answer
Enable Voice Answer
You can set your phone to answer a call with
your voice when using a hands-free accessory.
1. From
Ringer Mode
Sounds
.
2. From
Headset Sounds
Headset
.
3. From
Voice Answer
Accessory
Answer Using Voice Answer
When you receive an incoming call, the phone
prompts “Incoming call, answer?” With the
caller recognized as a contact entry in your
phone, the phone prompts “Incoming call from
(Name), answer?” Do one of the following:
• Say “Y es” or press any key except the
key to answer the call.
, select
Normal
, select
Out of
, select
.
With
Send
End
• Say “No” or press the
the call.
• Remain silent. The voice alert repeats twice
and the phone rings once before returning
to the home screen.
key to ignore
Use Voice Training
If your phone has trouble recognizing your
voice, you can train your phone to recognize
your specific voice with numbers.
1. From
V oice Training
and touch
2. Follow the prompts for each number until
training is complete.
Note:
for voice training to work.
OK > Train Numbers > OK
Y ou must read the numbers digit by digit
, read the message
Accessories
From
Accessories
following features.
Set Headset Sounds
With a headset attached to your phone, you can
play alerts through the headset or phone
speaker.
From
Headset Sounds
(ringing from the phone speaker) or
Headset
, you can modify the
, select
Out of Phone
(ringing from the headset).
Out of
.
66 Accessories
Page 67

Memory Card
From
Memory Card
following features.
, you can modify the
Choose Files to Save
1. From
Files to Save on Card
types from the list provided. A checkmark
appears next to each file type that is saved
to the memory card. Touch screen to add or
remove checkmarks.
2. Touch
Done
.
, select the file
Format Memory Card
1. Insert memory card into correct slot.
2. From
Format Card
Note:
Formatting will erase all current
information on the memory card.
, touch
Yes
.
Set USB Mode
You can set your phone to transfer files to and
from a computer.
From
USB Mode
•
Mass Storage
with a USB cable to transfer files.
•
Modem/COM
for charging only.
, select one of the following:
to use the Micro-USB jack
to use the Micro-USB jack
Connect to TTY Device
Y ou can connect the phone to a teletype (TTY)
device (sold separately) for the hearing
impaired.
Note:
Enable TTY only when using the phone
with a TTY device.
1. Connect the TTY device to your phone.
2. From
TTY Device
notification.
3. Select one of the following:
–
TTY Off
–
TTY On
–
TTY On + Talk
and voice carry over.
–
TTY On + Hear
and hearing carry over.
Note:
You can also enter
Dialer
and touch
, touch OK to clear the
disables TTY devices.
enables TTY devices.
enables TTY devices
enables TTY devices
##889
TTY
with the
to enable TTY.
Connect to Hearing Aid Device
1. Connect the T-coil hearing aid device (sold
separately) to your phone.
2. From
T -coil Hearing Aid
clear the notification.
3. Select
Enabled
feature.
to activate the hearing aid
, touch OK to
User Guide 67
Page 68

Network
From
Network
features.
Enable Roaming Service Alert
Use this setting if you want the phone to alert
you when you roam outside of your home
service area.
From
following:
•
Disabled
•
When No Svc
decreasing in pitch when service is lost and
three tones increasing in pitch when service
is acquired again.
•
On Roam Change
decreasing tones when roaming service is
acquired and three increasing tones when
home area service is acquired again.
•
On Any Change
increasing tones if there is a change in
roaming service or three decreasing tones if
the phone loses service.
Set Roaming Restrictions
Y ou can restrict your phone from making a call
when roaming.
From
allow roaming) or
roaming).
, you can modify the following
Roam/Svc Alert
turns roaming service alert off.
Roam Option
, select one of the
alerts you with three tones
alerts you with two
alerts you with three
, select
No Roaming
Automatic
(to disallow
(to
Enable Roaming Call Alert
You can set the phone to warn you before you
answer or place a call while roaming.
From
Roam Call Alert
The phone emits a distinctive ring to indicate
when you are roaming during a call. To accept
or place a call while roaming, you must touch
1
.
Note: Roam Call Alert
phone is in emergency mode.
, select
Enabled
.
is disabled when the
Enable Privacy Alert
From
Privacy Alert
you when enhanced digital CDMA privacy is
lost or regained.
, select
Enabled
to alert
Set Location Information
Use
Location
information with network services other than
emergency services (for example, 911, 111,
999 and 000) in serviced areas. This feature
works only when your phone is in digital
mode. You do have the option of turning off
the locator to emergency services.
From
•
911 Only
information only with emergency services
when you call your 3-digit emergency
code.
•
Location On
information, in addition to emergency
services.
to share your location
Location
, select one of the following:
(default) shares your position
shares your position
68 Network
Page 69

Security
From
Security
features to prevent access to your personal
information. All security features are shielded
by a four-digit lock code (typcially 0000 or the
last four digits of your phone number).
Set Security Lock
With
lock code is required to access features on your
phone. You can still receive incoming calls.
From
following:
•
Disable
•
Lock Now
•
Auto Lock
a time of inactivity. Select one of the
options to choose different times.
Change Lock Code
When you have enabled
can change your lock code at any time.
1. From
four-digit lock code.
2. Re-enter the four-digit lock code, then
touch
Set Limit Calls
You can limit the calls that can be made from
your phone to emergency numbers, your
contacts, and your service provider’ s numbers.
, you can use the following
Security Lock
Security Lock
New Lock Code
Done
activated, the four-digit
, select one of the
leaves the phone always unlocked.
locks the phone immeditately.
options. Locks your phone after
Security Lock
, enter a new
.
, you
From
Limit Calls
•
No Limit
•
Limit Outgoing
incoming calls still work.
•
Limit All
outgoing calls.
, select one of the following:
does not limit calls.
limits outgoing calls while
limits both incoming and
Phone Info
From
Phone Info
following features.
View Build Information
Touch
Phone Info
software and hardware information.
Check Phone Memory
Touch
Phone Memory
memory is being used by your phone.
Check Card Memory
Touch
Card Memory
memory is being used by your memory card.
View Phone Icons
Touch
Icon Key
phone.
Access User Guide
Touch
User Guide
your phone.
, you can modify the
to check your phone’s
to check how much
to check how much
to view the icons used in your
to access the user guide for
User Guide 69
Page 70

14 Use Stopwatch
From
Stop Watch
•Touch
•Touch
•Touch
Press the
, do one the following:
Start
to begin counting.
Stop
to pause counting.
Reset
to set to zero.
End
key to exit.
70 Phone Info
Page 71

15 World Clock
Use
World Clock
around the world in relation to your local time.
View a City
1. From
scroll through time zones.
2. Check your local time and date on the first
line, followed by your selected world city
and its time and date.
Find a City
1. From
2. Select a city from the list.
Touch
Country List
Search
to search by entering letters.
to check times in cities
World Clock
World Clock
to search by country or
, touch the arrows to
, touch
City List
.
User Guide 71
Page 72

16 Use Calculator
From
Calculator
basic mathematical operations with screen
touches. The following memory option s ar e
available:
•
MS
replaces the value currently stored in
memory with the displayed result on the
screen.
•
M+
adds displayed result on the screen to
the value currently stored in memory.
•
MR
memory on the screen.
•
MC
memory.
, you can complete many
displays value currently stored in
clears value currently stored in
72 Find a City
Page 73

17 Use Tip Calculator
1. From
Tip Calculator
to enter your bill.
2. Touch
3. Touch
4. Touch
Tip
to tip.
number of people sharing the bill (or skip if
paying the entire bill).
to select a percentage you want
Number of Guests
Calculate
, touch
Bill Amount
to enter the
to view the final bill.
User Guide 73
Page 74

18 Record a Voice Memo
1. From
Voice Memos
2. Use the
3. When you are done, touch
Start, Pause, Stop
controls to record a memo.
, touch
Record New
and other
Save
.
.
74 Find a City
Page 75

19 Memo Pad
Create a Memo
1. From
Memo Pad
2. Enter the memo and touch
3. Touch
Save
, touch
New
Done
.
Edit a Memo
1. From
Memo Pad
2. Touch
3. Edit the memo and touch
4. Touch
Edit
Save
, select a memo.
.
Done
.
Send a Memo
1. When viewing a memo, select
Send as SMS
2. Complete the message.
.
.
.
.
More icon >
Lock a Memo
When viewing a memo, select
Lock
to prevent it from being edited or erased.
To unlock a memo, touch
More icon >
Unlock
Delete a Memo
1. When viewing a memo, select
Delete
.
2. Touch
Note:
Yes
to confirm.
Locked memos cannot be deleted.
Delete All Memos
1. From
Memo Pad
2. Touch
Note:
Yes
Locked memos cannot be deleted.
, select
to confirm.
Delete All
.
More icon >
.
Use a Number or Address
from a Memo
If you have a phone number, email address or
URL in a memo, you can use it.
1. From
Memo Pad
2. Press the
one number or address in the memo, choose
which one you want to use from a list.
3. Select how you want to use the number or
address.
4. Complete the appropriate task.
User Guide 75
, select a memo.
Send
key. If there is more than
Page 76

20 Use Timer
The timer counts down for the specified time
and then plays an alert.
1. From
Timer
length.
2. Touch
the home screen.
3. Touch
alert.
4. To work the timer, do the following:
–Touch
–Touch
– Touc the timer to enter a new time
When the countdown is complete, touch
Off
to silence the alert.
, touch screen to enter a time
Display
to show or hide the timer on
Sound
to select a sound for the timer
Start
to begin the countdown.
Stop
to pause the countdown.
length.
Turn
76 Delete All Memos
Page 77

21 Games & Apps
How does BREW Work?
Your Kyocera phone has the added ability to
download and manage applications through
BREW .
You connect to the server, download
applications, and then manage them as you
like. When you choose an application, you
have the option of choosing a demo, various
limited use options, or the full version—all
varying in price. If you choose a demo, BREW
lets you know when it has expired. If you
choose a priced version, the amount is added to
your phone bill. BREW also lets you know if
you are running out of memory. At that point,
you can either disable an application or remove
it completely.
Once applications are loaded, you can update
to newer versions as they become available.
For more information about BREW
capabilities and application pricing, contact
your service provider.
2. Touch an application type. A list of
applications appears. Long titles scroll left
as you highlight them.
3. Touch an application. A list of usages
appears. There may be one or more usages
available. Prices are specified for each
usage.
4. Touch a usage for the application. You are
prompted to confirm your purchase.
5. Touch
To open the application now, touch
select
where you see your new application.
Note:
server automatically ends after 30 seconds,
unless you connect again to download more
applications. If you want to end the connection
manually, press the
Yes
downloads to your phone. Download times
may vary.
to confirm. The application
No
, you return to the applications list,
Your connection to the application
End
key on your phone.
Yes
. If you
Access Help for Games &
Download an Application
1. From
Games & Apps
> Catalog
list of application types appears.
User Guide 77
. When a connection is made, a
, select
MobileShop
Apps
From
Games & Apps
instructions on how to run and manage your
downloaded applications.
, touch
Help
to get
Page 78

22 Voice Commands
You can execute certain commands through
voice recognition. To control the settings
associated with voice commands, see “Voice
Features” on page 65.
Call a Contact
1. From the home screen, press and hold the
Send
key. The phone prompts, “Say a
command”.
2. Say “Contact” and the name of the person
you want to call.
The phone prompts, “Please repeat” or
“Say a name” if it does not recognize the
name. If the name you spoke matches a
contact in the voice dial list, the phone
prompts: “Name, correct?” Say “Yes” to
make the call, “No” to select a similar
name, or “Cancel” to cancel the call.
If the phone finds multiple voice tags that
sound like the name you said, the phone
will list the names. You will be asked to
verify which name you want to call. Say
“Y es” when you hear the correct name. Say
“No” when you hear an incorrect name.
3. Press the
To modify your voice dial list, see “Enable
Voice Dial Tags” on page 37.
78 Call a Contact
End
key to end the call.
Call a Number
1. From the home screen, press and hold the
Send
key. The phone prompts, “Say a
command”.
2. Say “Dial Number” and then speak the
digits of the number you want to call.
If you pause, the phone prompts you, “Did
you say <number>” or “Say a number” if it
does not recognize the number.
Say “Yes” to make the call, “No” to cancel
the call.
3. Press the
End
key to end the call.
Play a Playlist
1. From the home screen, press and hold the
Send
key. The phone prompts, “Say a
command”.
2. Say “Play” and then a playlist name. If you
pause, the phone prompts you to say a
playlist name.
3. Say “Yes” to confirm your choice.
Page 79

Use a Shortcut
1. From the home screen, press and hold the
Send
key. The phone prompts, “Say a
command”.
2. Say the name of the menu item you want to
access or say “Shortcuts” to view a list of
menu items. The phone prompts, “Say one
of the shortcuts”.
3. Say the name of the menu item you want to
access.
Find a Contact
1. From the home screen, press and hold the
Send
key. The phone prompts, “Say a
command”.
2. Say “Find Contact”. The phone prompts,
“Say a name”.
The phone prompts, “Please repeat” or “Say a
name” if it does not recognize the name. If the
name you spoke matches a contact in the voice
dial list, the phone prompts: “Name, correct?”
Say “Y es” to display the contact, “No” to select
a similar name, or “Cancel” to cancel the
search.
Note:
You can only search for contacts that
have a voice tag.
User Guide 79
Page 80

23 Get Help
User Guide
From
Phone Info
the user guide for your phone. You can also
find the user guide at
www.kyocera-wireless.com/support
, touch
User Guide
to access
.
Customer Support
Your service provider’s customer support
department may be accessible directly from
your phone when you dial a number, such as
*611 (check with your service provider). They
can answer questions about your phone, phone
bill, call coverage area, and specific features
available to you, such as call forwarding or
voicemail. For questions about the phone
features, refer to the materials provided with
your phone, or visit
www.kyocera-wireless.com
For additional questions, you may contact the
Kyocera Communications Inc. Customer Care
Center in any of the following ways:
• Web site:
• Email: phone-help@kyocera-wireless.com.
• Phone (U. S. and Canada): 1-800-349-4478
or 1-858-882-2000 (press 2 for Product
Information).
80 User Guide
www.kyocera-wireless.com
.
Before requesting support, please try to
reproduce and isolate the problem. When you
contact the Customer Care Center, be ready to
provide the following information:
• The name of your service provider.
• The actual error message or problem you
are experiencing.
• The steps you took to reproduce the
problem.
• The phone’s mobile equipment identifier
(MEID).
Note:
From
Scroll down to
number is the MEID number. If your phone
uses an electronic service number (ESN),
replaces
Phone Info
MEID
, touch
MEID (dec)
.
Qualified Service
If the problem with your phone persists, return
the phone with all accessories and packaging to
the dealer for qualified service.
.
Phone Accessories
To shop for phone accessories, visit
kyocera.superiorcommunications.com
Phone Info
. The 18-digit
.
ESN
.
Page 81

Index
A
accessories
airplane mode
alarm clock
alerts
applications
B
battery
Bluetooth
User Guide 81
, 80
headset sounds
T-coil hearing aid
TTY device
set date and time
snooze reminder
lights only
messages
minute
missed calls
pages
privacy
roaming call
roaming service
vibrate
voice privacy
voicemail
downloading
charging
drain
, 10
installing
recharging
safety guidelines
, 60
activating
adding devices
, 27
, 59
, 64
, 68
, 64
, 9
, 63
, 26
, 35
, 9
, 60
, 66
, 67
, 64
, 64
, 68
, 68
, 77
, 9
, 60
, 67
, 63
, 59
, 68
, 10
changing phone name
connecting devices
deleting devices
device services
OBEX authentication
pairing
renaming devices
security
services supported
visibility
bookmarks
browser
bookmarks
navigating
C
calculator
, 72
calendar, see scheduler
call history
all calls
deleting
incoming calls
missed calls
outgoing calls
call record
viewing
call timers
all calls
home
incoming
life
, 32
outgoing
recent
roam
, 33
, 42
, 33
, 33
, 60
, 61
, 31
, 32
, 61
, 42
, 42
, 33, 34
, 32
, 32
, 33
, 33
, 61
, 32
, 32
, 61
, 61
, 61
, 60
, 61
, 61
Page 82

calls
answering
bluetooth
dialer
emergency
ending
limiting
making
muting
silencing
timing
voice answer
volume
camera
, 52
bluetooth
brightness
color tone
frames
multishot
picture quality
pictures
printing pictures
resolution
save location
self timer
sending pictures
shutter sound
time stamp
white balance
zoom
contacts
back up
calling
creating
deleting
editing
favorites
82
, 30
, 30
, 29
, 30
, 29
, 69
, 29
, 30
, 30
, 64
, 30
, 52
, 53
, 54
, 53
, 53
, 53
, 53
, 53
, 53
, 53
, 37
, 29, 38
, 36
, 37, 40
, 38, 39, 40
, 36
, 66
, 54
, 54
, 54
, 54
, 52
, 52
groups
, 36
messaging
primary number
printing
searching
sending
viewing all
contacts list
printing
sending
convenience
fast find
conventions, using this guide
customer support
D
display
backlighting
brightness
contrast
language
wallpaper shuffle
downloads
help
DTMF length
E
email
launch
emergency calls
emergency services
events
sending
F
fast find
favorites
printing
, 40
, 21, 40
, 37
, 37
, 63
, 64
, 77
, 77
, 43
, 22
, 30, 63
, 36
, 38
, 37
, 64
, 65
, 38
, 36
, 64
, 80
, 64
, 30
, 39
, 56
, 68
, 19
Page 83

sending
frequent list
G
groups
H
hard pause
headset sounds
headsets
help, getting
I
icons
images
Internet
K
kilobyte counter
L
language
location information
M
mass storage
media file
media files
User Guide 83
, 38
, 63
adding members
creating
, 38
deleting
, 38, 41
editing
, 40
printing
, 41
sending
, 41
, 31
, 66
voice answer
, 66
, 80
, 17, 18
assigning
, 55
erasing
, 58
, 42
, 33
, 64
, 67
bluetooth
, 57
copy to card
details
, 56
, 57
, 40
, 68
erasing
, 57
locking
modifying
move to card
printing
renaming
sending
zoom
media gallery
media player
memopad
memory card
memory status
menus
messages
, 57
calling numbers
editing memos
erasing memos
locking memos
sending memos
formatting
installing
removing
saving files
media gallery
phone
, 29
settings
adding preset text
adding slides
addressees
attaching contacts
attaching events
attaching files
attaching pictures
attaching sounds
auto retrieve
browser
, 57
, 57
, 21
, 47
, 62
, 26
, 57
, 55
, 11
, 57
, 57
, 67
, 11
, 67
, 69
, 22
, 25, 26
, 28
, 75
, 55
, 21
, 75
, 75
, 75
, 75
, 22
, 27
, 21
, 21
, 21
Page 84

call sender
callback number
cancel
, 22
count
, 28
creating
, 20
deleting
, 24, 25, 26
delivery receipts
drafts
, 24
erasinge
, 27
forward
, 25
information
insert preset text
locking
, 25, 26
numbers
, 26
playing slides
read receipts
replying
, 21, 25
saving attachments
saving drafts
saving preset text
setting priority
slide interval
text entry
threads
, 25
validity period
view all
, 20
viewing attachments
multimedia
music
84
, 55
images
, 55
sounds
, 56
albums
, 47
artists
, 47
auto off
, 51
Bluetooth
copy to card
deleting
, 49, 50
, 28
, 51
, 25
, 26
, 26
, 22, 28
, 21
, 22
, 50
, 27
, 22, 28
, 24
, 21, 26
, 22
, 22
, 26
, 26
details
, 50
equalizer
, 51
genres
, 48
locking
, 50
move to card
playing
playlists
refresh
reset
searching
voice commands
music player
N
navigation shortcuts
network
roaming restrictions
roaming service
notifications
voicemail
number
calling
redialing
numbers
messaging
saving
searching
O
OBEX authentication
P
phone
accessories
answering calls
changing lock code
icons
locking
, 48
, 47
, 49
, 51
, 47
, 27
, 29
, 29
, 31
, 17, 18
, 69
, 50
, 49
, 34
, 31
, 31
, 80
, 78
, 12
, 68
, 68
, 61
, 30
, 69
Page 85

making calls
overview
service
user guide
picture messages, see messages
pictures
erasing
sending
slideshow
taking
playlists
changing
deleting
playing
renaming
power off sounds
power on sounds
preset text
Q
quick alarm
R
ringers
roaming
ringtones
assigning
roaming
alerts
ringer
S
scheduler
copying events
creating events
current date
day view
editing events
User Guide 85
, 80
, 58
, 55
, 21, 52
, 49, 50
, 49
, 27
, 59
, 68
, 64
, 44
, 12
, 80
, 56
, 49, 50
, 50
, 64
, 56
, 44
, 44
, 29
, 65
, 65
, 45
, 44
, 44
erasing events
finding dates
finding events
month view
sending events
silent mode
snooze duration
sorting events
screen
home
, 14
menu
, 15
message
settings
accessories
alarm clock
camera
convenience
display
memory card
messaging
music player
network
phone information
scheduler
security
sound
, 64
touch
, 64
voice features
voicemail
volume
silent mode
slideshow
songs
sounds
, 56
loading
assigning
key tone
, 53
, 64
, 69
, 65
, 64
, 48
, 16
, 68
, 65
, 46
, 34
, 56
, 46
, 66
, 59
, 26
, 44
, 63
, 51
, 44
, 45
, 67
, 65
, 45
, 44
, 45
, 59
, 60, 69
Page 86

power
, 65
recording
, 21
silence all
, 64
touch tone
speakerphone
stopwatch
, 70
, 30
, 65
support, customer
T
T-coil hearing aid
teletype device
text entry
English
full QWERTY
grid keyboard
half QWERTY
letter case
numbers
smileys
Spanish
symbols
word recognition
threads, messages
time pause
timer
tip calculator
tools
calculator
scheduler
stopwatch
timer
tip calculator
world clock
touch calibration
touch feedback
U
USB mode
86
, 76
, 31
, 76
, 67
, 24
, 23
, 23
, 24
, 23
, 73
, 67
, 23
, 72
, 44
, 70
, 65
, 71
, 65
, 80
, 67
, 23
, 20
, 73
, 23
, 23
, 24
user guide
V
vibrate mode
visual voicemail
voice commands
voice dial
voice dial list
voice memos
voicemail
volume
W
wallpaper
wallpaper shuffle
web browser
, 80
, 64
display results
expert mode
finding contacts
making calls
playing music
shortcuts
, 79
voice training
editing
, 37
automatic add
digit lengths
recording
, 74
changing number
checking
, 34
configuring
notifications
, 30
earpiece
, 65
ringers
, 65
speakerphone
setting
, 55, 56
activating
, 56
editing
, 56
time interval
, 42
, 34
, 78
, 65
, 66
, 34
, 34
, 78
, 66
, 65
, 56
, 56
, 65
, 79
, 78
, 65
, 35
Page 87

world clock
, 71
User Guide 87
Page 88

Kyocera Communications Inc.
www.kyocera-wireless.com
82-A6193-1EN, Rev. 002
Page 89

Rio™
guía del usuario
Guía del Usuario 1
Page 90

Rio Guía del Usuario
Este manual se basa en la versión de producción del teléfono
Kyocera E3100. Pueden haberse producido cambios en el
software después de su impresión. Kyocera se reserva el
derecho de hacer cambios en las especificaciones técnicas y
del producto sin previo aviso.
Los productos de Kyocera Communications Inc. (“KCI”)
descritos en este manual pueden incluir software de KCI y de
terceros protegido por derechos de autor y almacenado en la
memoria de semiconductores u otros medios. Las leyes de los
Estados Unidos y otros países conservan para KCI y otros
proveedores de software ciertos derechos exclusivos para el
software con derecho de autor, tales como los derechos
exclusivos de distribuir o reproducir el software con derecho de
autor. De igual manera, ningún software con derecho de autor
incluido en los productos KCI podrá modificarse, someterse a
ingeniería inversa,distribuirse ni reproducirse en ninguna forma
prohibida por la ley.
Además, no se considera que la compra de los productos KCI
otorgue,ya sea directa o indirectamente, por exclusión o de otro
modo, ninguna licencia bajo los derechos de autor, las patentes
o la aplicación de las patentes de KCI o de cualquier otro
proveedor de software, excepto por la licencia normal, no
exclusiva y libre de regalías para su uso que surge por la
aplicación de la ley en la venta de un producto.
Kyocera es una marca comercial registrada de Kyocera
Corporation. Brick Attack y Race 21 son marcas comerciales de
Kyocera Wireless Corp. QUALCOMM es una marca comercial
registrada de QUALCOMM Incorporated.
Openwave es una marca comercial de Openwave Systems
Incorporated. eZiText es una marca com ercial registrada de Zi
Corporation. TransFlashes es una marca comercial de SanDisk
Corporation. Las marcas comerciales Bluetooth son propiedad
de Bluetooth SIG, Inc. y Kyocera Communications Inc. las utiliza
bajo licencia.
Todas las demá s ma rcas com erciales son propiedad de sus
respectivos dueños.
2
Copyright © 2010 Kyocera Corporation. Todos los derechos
reservados. Ringer T one s Copyright © 200 0-201 0 Ky ocera
Corporation.
82-A6193-1SP, Rev. 002
Aviso de la FCC
Este dispositivo cumple con la sección 15 de las reglas de la
FCC. Su uso está sujeto a las dos condiciones siguientes: (1)
Este dispositivo no puede causar interferencia perjudicial, y (2)
este dispositivo debe aceptar toda interferencia recibida,
incluida la interferencia que pueda causar un funcionamiento no
deseado. Para garantizar el cumplimiento de las pautas
establecidas por la FCC respecto a la exposición a
radiofrecuencias, si utiliza un teléfono portátil sobre su cuerpo,
utilice los estuches (KCI) accesorio proporcionado y aprobado,
diseñado para este producto. El uso de accesorios no
proporcionados ni aprobados por KCI puede violar las pautas de
exposición contra las ondas de radiofrecuencia establecidas por
la FCC.
Otros accesorios utilizados con este dispositivo para portar en el
cuerpo no deben tener ningún componente metálico y deben
estar a por lo menos una distancia de separación de 15 mm,
incluida la antena y el cuerpo del usuario.
ESTE MODELO DE TELÉFONO CUMPLE CON LOS
REQUERIMIENTOS GUBERNAMENTALES EN LO QUE
RESPECTA A LA EXPOSICIÓN A ONDAS RADIALES.
El teléfono es un transmisor y receptor de radiofrecuencia. Se
ha diseñado y manufacturado de manera que no exceda los
límites de emisión para la exposición a la energía de
radiofrecuencia (RF) establecidos por la Comisión Federal de
Comunicaciones del Gobierno. Estos límites forman parte de un
conjunto de pautas integrales y establecen los niveles
permitidos de energía de RF para la población en general. Estas
pautas se basan en normas desarrolladas por organizaciones
científicas independientes mediante la evaluación periódica y
rigurosa de estudios científicos. Las normas incluyen un
considerable margen de seguridad diseñado para garantizar la
seguridad de todas las personas, independientemente de su
edad o estado de salud.
Page 91

La norma de exposición para teléfonos móviles inalámbricos
emplea una unidad de medida conocida como Coeficiente de
Absorción Específica o SAR, por sus siglas en inglés. El límite
SAR establecido por la FCC es de 1,6 W/kg.*
Las pruebas de SAR se llevan a cabo usando las p osiciones de
operación estándar especificadas por la FCC, donde el teléfono
transmite al nivel de potencia certificado más alto en todas las
bandas de frecuencia probadas.
Aunque el SAR se determina al nivel de potencia certificado
más alto, el nivel de SAR real del teléfono al utilizarlo puede ser
muy inferior al valor máximo. Esto se debe a que el teléfono se
ha diseñado para operar a múltiples niveles de potencia y
suficientes para sólo utilizar la potencia requerida para alcanzar
la red. En general, cuanto más cerca se esté a una antena de
estación base inalámbrica, menor será la salida de potencia.
Antes de que se pueda ofrecer un modelo de teléfono al público,
la FCC debe probarlo y certificar que su funcionamiento no
excede los límites establecidos por el gobierno en cuanto a una
exposición segura. Las pruebas se realizan en las posiciones y
los lugares (por ejemplo, en la oreja y partes del cuerpo)
indicados por la FCC para cada modelo.
Las mediciones para llevar el teléfono en el cuerpo difieren de
un modelo de teléfono a otro, dependiendo de la disponibilidad
de accesorios y los requerimientos de la FCC. Si bien pueden
haber diferencias entre los niveles de SAR de distintos teléfonos
y en varias posiciones, todos cumplen el requerimiento del
gobierno para la exposición segura.
La FCC ha otorgado una Autorización de Equipo para este
modelo de teléfono con todos los niveles de SAR que se
informan evaluados conforme a las pautas de emisión de
radiofrecuencia de la FCC.
Los valores SAR más altos que se reportaron en este teléfono
son:
Modo Celular CDMA (Parte 22)
Cabeza: 1.06 W/kg; Uso cerca del cuerpo: 0.83 W/kg
Modo PCS (Parte 24)
Cabeza: 1.49 W/kg; Uso cerca del cuerpo: 0.59 W/kg
:
:
Modo AWS (Parte 27)
Cabeza: 1.21 W/kg; Uso cerca del cuerpo: 0.54 W/kg
La información de SAR en este modelo se encuentra archivada
con la FCC y se puede encontrar en la sección “Display Grant”
www.fcc.gov/oet/ea/fccid
de
la FCC: OVF-K5402.
Encontrará información adicional sobre los índices SAR en el
sitio Web de la Asociación de Telecomunicaciones Celulares e
Internet (Cellular Telecommunications and Internet Association,
CTIA), en
* En los Estados Unidos y Canadá, el límite SAR para teléfonos
móviles de uso público es 1,6 watts/kg (W/kg) promediados
sobre un gramo de tejido.
www.ctia.org
:
después de buscar con el ID de
.
Certificación Bluetooth®
Para obtener información sobre E3100 la Certificación
Bluetooth, visite el sitio web del Programa de Calificación
Bluetooth en
www.bluetooth.org/tpg/listings.cfm
.
Precaución
Se le advierte al usuario que los cambios o modificaciones no
autorizados expresamente por la parte responsable del
cumplimiento pueden anular la garantía y la autorización del
usuario para operar el equipo.
Optimice el Desempeño de su Teléfono
Siga las recomendaciones en esta guía para saber cómo
aprovechar el rendimiento y ciclo útil del teléfono y la batería al
máximo.
Bolsas de Aire
Si su vehículo cuenta con un sistema de bolsas de aire, NO
coloque el aparato telefónico fijo o portátil (ni otros objetos)
sobre el sistema de bolsas de aire ni en el área que éste
ocuparía en caso de activarse. Si el equipo no está instalado
adecuadamente, usted y los pasajeros del vehículo corren el
riesgo de sufrir graves lesiones.
Guía del Usuario 3
Page 92

Dispositivos Médicos
Marcapasos
—Advertencia para las personas con marcapasos:
Se ha demostrado que los teléfonos inalámbricos, cuando están
encendidos interfieren con los marcapasos. El teléfono debe
mantenerse a una distancia de al menos seis (6) pulgadas del
marcapasos para reducir el riesgo.
La asociación de fabricantes de la industria de la salud (Health
Industry Manufacturers Association) y la comunidad de
investigación tecnológica de dispositivos inalámbricos
recomiendan seguir estas pautas para reducir las posibles
interferencias.
• Siempre mantenga el teléfono al menos 15 centímetros (6
pulgadas) de distancia del marcapasos cuando el teléfono
esté encendido.
• No lleve el teléfono cerca del corazón.
• Use el oído contrario al marcapasos.
• Si por algún motivo sospecha que se está produciendo una
interferencia, apague el teléfono inmediatamente.
Audífonos
— Algunos teléfonos inalámbricos digitales pueden
interferir con los audífonos. En caso de tal interferencia, puede
que le convenga llamar a la línea de atención al cliente para
evaluar las alternativas.
Otros dispositivos médicos
dispositivo médico personal, consulte al fabricante el dispositivo
para determinar si está protegido adecuadamente contra la
energía de radiofrecuencia externa. Su médico puede ayudarlo
a obtener esta información.
En instituciones médicas
instituciones médicas cuando así se indique. Los hospitales y
centros médicos pueden usar equipos sensibles a la energía de
radiofrecuencia externa.
—Si utiliza cualquier otro
—Apague el teléfono en las
Áreas Potencialmente Inseguras
Zonas con avisos de advertencia
zonas donde haya avisos de advertencia que le soliciten
hacerlo.
—Apague el teléfono en
Aeronaves
—Las normas de la FCC prohíben el uso de
teléfonos celulares cuando una aeronave está en el aire.
Apague su teléfono o póngalo en el Modo para aviones a ntes de
abordar.
Vehículos
—Las señales de radiofrecuencia pueden afectar los
sistemas electrónicos que no estén bien instalados o protegidos
indebidamente en vehículos motorizados. Consulte al fabricante
del dispositivo para determinar si está protegido
adecuadamente contra la energía de radiofrecuencia externa.
Zonas de explosión
explosiones. Respete las restricciones y siga todas las normas y
reglamentos.
Zonas con riesgo de explosión
esté en un área con zonas potencialmente explosivas. Respete
todos los anuncios e instrucciones. Las chispas en tales lugares
podrían provocar una explosión o un incendio, y ocasionar
lesiones físicas o hasta la muerte. Las áreas con entornos
potencialmente explosivos, por lo general están claramente
marcadas, aunque no siempre sea el caso.
Éstas incluyen:
• áreas de carga de combustible como las estaciones de
servicio
• bajo cubierta en los barcos
• lugares de almacenamiento o transporte de combustible o
sustancias químicas
• vehículos que usen gas de petróleo licuado, tales como el
propano o el butano
• áreas donde el aire contenga sustancias químicas o
partículas como fibras, polvo o polvo de metales
• cualquier otra área donde normalmente se le recomendaría
apagar el motor de su vehículo
—Apague el teléfono donde ocurran
—Apague el teléfono cuando
Úselo con Precaución
Úselo sólo en la posición normal (contra el oído). Evite que el
teléfono se caiga, golpee o curve, y evite sentarse sobre el
mismo.
4
Page 93

Evite los Entornos Magnéticos
Mantenga el teléfono alejado de magnetos que pueden causar
el funcionamiento inadecuado del teléfono.
No Deje que su Teléfono se Humedezca
No deje que el teléfono se humedezca. Dañará el teléfono si
éste se humedece. La garantía no cubre el daño causad o por el
agua
Restaurar los Valores del Teléfono
Si la pantalla parece bloquearse y el teclado no responde,
restaure el teléfono completando los siguientes pasos:
1. Quite la tapa de la batería.
2. Extraiga la batería y vuelva a colocarla.
Si el problema continúa, lleve el teléfono al distribuidor o técnico
para repararlo.
Accesorios
Solamente utilice accesorios aprobados por Kyocera con los
teléfonos de Kyocera. El uso de cualquier accesorio no
autorizado puede ser peligroso e invalidará la garantía del
teléfono si dichos accesorios causan daño o un defecto del
teléfono.
Energía de Radiofrecuencia (RF)
El teléfono es un transmisor y receptor de radiofrecuencia.
Cuando está encendido, recibe y emite energía de
radiofrecuencia. La red telefónica del proveedor de servicios
controla el nivel de potencia de la señal de radiofrecuencia. Este
nivel de potencia puede oscilar entre 0,006 y 0,6 watts.
En agosto de 1996, la Comisión Federal de Comunicaciones
(FCC) del Gobierno de EE.UU. adoptó pautas de exposición a la
radiofrecuencia con niveles de seguridad para los teléfonos
inalámbricos de mano. Estas pautas coinciden con las normas
de seguridad establecidas anteriormente por las entidades de
normalización tanto estadounidenses como internacionales en
los siguientes informes:
• ANSI C95.1 Instituto Nacional de Normalización
Estadounidense, 1992 (American National Standards
Institute, 1992)
• Informe 86 NCRP Consejo Nacional sobre Medidas y
Protección contra la Radiación, 1986 (National Council on
Radiation Protection and Measurements, 1986)
• ICNIRP Comisión Internacional sobre Protección contra la
Radiación no Ionizante, 1996 (International Commission on
Non-Ionizing Radiation Protection, 1996)
Su teléfono cumple con las normas establecidas en estos
informes y las pautas de la FCC.
Mandatos E911
Si hay servicio disponible, este teléfono portátil cumple con las
fases I y II de los mandatos E911 emitidos por la FCC.
Compatibilidad de los Audífonos (HAC) con los
Teléfonos Celulares
A veces el usuario puede escuchar ruidos, zumbidos o silbidos
al usar algunos teléfonos celulares junto con dispositivos para
personas con dificultades auditivas (audífonos e implantes
cocleares).
Algunos dispositivos para personas con dificultades auditivas
son más inmunes que otros a estos ruidos de interferencia,y la
interferencia generada por los teléfonos también varía.
La industria de telefonía celular ha desarrollado clasificaciones
para algunos de sus teléfonos celulares para ayudar a las
personas que usan audífonos a encontrar teléfonos que sean
compatibles con los mismos. No se han clasificado todos los
teléfonos.
Los teléfonos que han sido evaluados exhiben esa clasificación
en la caja o en una etiqueta sobre la caja. Las clasificaciones no
constituyen garantía de funcionamiento y los resultados pueden
variar según el grado de pérdida de audición de cada persona y
el dispositivo que utilice. Si su dispositivo es vulnerable a
interferencias, es posible que no pueda usar satisfactoriamente
un teléfono con clasificación. La mejor manera de evaluar si el
teléfono se ajusta a sus necesidades es probarlo con su
dispositivo.
Guía del Usuario 5
Page 94

Clasificación M
cumplen con los requisitos de la Comisión Federal de
Comunicaciones de EE.UU. (FCC, por su sigla en inglés) y es
menos probable que generen interferencias que los teléfonos
que no se han clasificado. De las dos, M4 es la mejor
calificación, la más alta.
Clasificación T
cumplen con los requisitos de la FCC y es probable que
funcionen mejor con dispositivos que posean telecoil (bobinas
telefónicas “T Switch” o “Telephone Switch”) que los teléfonos
que no han sido clasificados. De las dos, T4 es la mejor
clasificación, la más alta. (Nótese que no todos los dispositivos
para personas con dificultades auditivas poseen bobinas
telefónicas).
Tamb ién se puede m ed ir la inmunidad de los dispositivos para
personas con dificultades auditivas con respecto a este tipo de
interferencias. El fabricante de su dispositivo o un especialista
de la salud auditiva pueden ayudarle a elegir la clasificación
adecuada para su teléfono celular. Cuanto mayor sea el nivel de
inmunidad de su dispositivo, menos probabilidades habrá de
que experimente ruido de interferencia de teléfonos celulares.
Para obtener más información sobre la compatibilidad de los
audífonos, visite el sitio web del Consumer & Governmental
Affairs Bureau en
—Los teléfonos con una clasificación M3 o M4
—Los teléfonos con una clasificación T3 o T4
www.fcc.gov/cgb/dro
Kyocera Communications In c.
www.kyocera-wireless.com
Para comprar accesorios, visite
kyocera.superiorcommunications.com
.
6
Page 95

Contenido
1 Pasos Iniciales. . . . . . . . . . . . . . . . . . . . . 9
Batería del Teléfono. . . . . . . . . . . . . . . . . . 9
Tarjeta de Memoria. . . . . . . . . . . . . . . . . . 11
Datos Generales del Teléfono. . . . . . . . . . 12
Convenciones de Guía . . . . . . . . . . . . . . . 19
2 Mensajes. . . . . . . . . . . . . . . . . . . . . . . . . 20
Ver Todas las Cadenas de Mensajes. . . . . 20
Crear un Mensaje . . . . . . . . . . . . . . . . . . . 20
Responder a un Mensaje. . . . . . . . . . . . . . 21
Opciones de Redacción de Mensajes . . . . 21
Opciones de Ingreso de Texto . . . . . . . . . 23
Opciones de Listas de Cadenas. . . . . . . . . 25
Ver Opciones de Cadenas. . . . . . . . . . . . . 25
Ver Opciones de Mensaje. . . . . . . . . . . . . 26
Configuración de Mensajes . . . . . . . . . . . 27
3 Teléfono . . . . . . . . . . . . . . . . . . . . . . . . . 30
Menú Teléfono . . . . . . . . . . . . . . . . . . . . . 30
Marcador. . . . . . . . . . . . . . . . . . . . . . . . . . 30
Historia de Llamadas . . . . . . . . . . . . . . . . 33
Correo de Voz. . . . . . . . . . . . . . . . . . . . . . 35
4 Contactos. . . . . . . . . . . . . . . . . . . . . . . . 37
Crear un Contacto. . . . . . . . . . . . . . . . . . . 37
Ver Lista de Contactos . . . . . . . . . . . . . . . 37
Ver Lista de Grupos . . . . . . . . . . . . . . . . . 37
Ver Lista de Favoritos . . . . . . . . . . . . . . . 37
Iniciar MyBackup. . . . . . . . . . . . . . . . . . . 38
Opciones de la Lista de Contactos . . . . . . 38
Opciones de la Lista de Grupos . . . . . . . . 39
Opciones de la Lista de Favoritos. . . . . . . 39
Opciones de Detalles de los Contactos. . . 40
Opciones de los Detalles de Grupo. . . . . . 41
5 Navegador . . . . . . . . . . . . . . . . . . . . . . . 43
Iniciar Navegador. . . . . . . . . . . . . . . . . . . 43
Guía del Usuario 7
Navegar la Web . . . . . . . . . . . . . . . . . . . . .43
Agregar un Separador . . . . . . . . . . . . . . . .43
6 Enviar Email. . . . . . . . . . . . . . . . . . . . . . 44
7 Agenda. . . . . . . . . . . . . . . . . . . . . . . . . . 45
Crear un Evento. . . . . . . . . . . . . . . . . . . . .45
Administrar Agenda. . . . . . . . . . . . . . . . . .45
Configuración de la Agenda . . . . . . . . . . .47
8 Reproductor de Música . . . . . . . . . . . . 48
Ver Artistas . . . . . . . . . . . . . . . . . . . . . . . .48
Ver Álbumes . . . . . . . . . . . . . . . . . . . . . . .48
Ver Listas de Reproducción. . . . . . . . . . . .48
Reproducir una Canción. . . . . . . . . . . . . . .48
Cargar una Canción . . . . . . . . . . . . . . . . . .49
Opciones de la Lista de
Álbumes / Artistas . . . . . . . . . . . . . . . . . . .49
Opciones de la Lista de Reproducción. . . .50
Opciones de Canciones . . . . . . . . . . . . . . .51
Configuración del Reproductor de Música 52
9 Cámara. . . . . . . . . . . . . . . . . . . . . . . . . . 53
Sugerencias para la Cámara. . . . . . . . . . . .53
Tomar una Foto . . . . . . . . . . . . . . . . . . . . .53
Opciones de la Cámara . . . . . . . . . . . . . . .53
Configuración de la Cámara . . . . . . . . . . .54
10 Multimedia . . . . . . . . . . . . . . . . . . . . . . . 56
Menú Multimedia. . . . . . . . . . . . . . . . . . . .56
Imágenes . . . . . . . . . . . . . . . . . . . . . . . . . .56
Sonidos. . . . . . . . . . . . . . . . . . . . . . . . . . . .57
Administrar Multimedia. . . . . . . . . . . . . . .57
11 Despertador . . . . . . . . . . . . . . . . . . . . . . 60
Activar una Alarma . . . . . . . . . . . . . . . . . .60
Configurar una Alarma . . . . . . . . . . . . . . .60
Configurar la Alarma Rápida . . . . . . . . . .60
Cambiar la Configuración del Despertador60
Page 96

12 Bluetooth. . . . . . . . . . . . . . . . . . . . . . . . .61
Activar Bluetooth. . . . . . . . . . . . . . . . . . . .61
Administrar Dispositivos Bluetooth . . . . .61
Configurar el Nombre del Teléfono . . . . . 62
Limitar la Visibilidad. . . . . . . . . . . . . . . . .62
Activar Autenticación OBEX . . . . . . . . . .63
Ver Servicios Compatibles . . . . . . . . . . . .63
13 Configuración. . . . . . . . . . . . . . . . . . . . .64
Menú Configuración . . . . . . . . . . . . . . . . .64
Bluetooth . . . . . . . . . . . . . . . . . . . . . . . . . .65
Funciones Útiles . . . . . . . . . . . . . . . . . . . .65
Pantalla . . . . . . . . . . . . . . . . . . . . . . . . . . .66
Sonido y Toque . . . . . . . . . . . . . . . . . . . . .66
Funciones de Voz . . . . . . . . . . . . . . . . . . .68
Accesorios . . . . . . . . . . . . . . . . . . . . . . . . .69
Red. . . . . . . . . . . . . . . . . . . . . . . . . . . . . . .70
Seguridad. . . . . . . . . . . . . . . . . . . . . . . . . .71
Info Teléfono. . . . . . . . . . . . . . . . . . . . . . .72
14 Utilizar el Cronómetro . . . . . . . . . . . . . .73
15 Reloj Mundial . . . . . . . . . . . . . . . . . . . . .74
Ver una Ciudad . . . . . . . . . . . . . . . . . . . . .74
Buscar una Ciudad. . . . . . . . . . . . . . . . . . .74
16 Usar la Calculadora . . . . . . . . . . . . . . . .75
17 Utilizar la Calculadora de Propinas . . .76
18 Grabar una Nota de Voz. . . . . . . . . . . . .77
19 Notas . . . . . . . . . . . . . . . . . . . . . . . . . . . .78
Crear una Nota. . . . . . . . . . . . . . . . . . . . . .78
Editar una Nota . . . . . . . . . . . . . . . . . . . . .78
Enviar una Nota. . . . . . . . . . . . . . . . . . . . .78
Usar un Número o una Dirección
de una Nota . . . . . . . . . . . . . . . . . . . . . . . .78
Bloquear una Nota. . . . . . . . . . . . . . . . . . .78
Eliminar una Nota . . . . . . . . . . . . . . . . . . .78
Eliminar Todas las Notas. . . . . . . . . . . . . .78
20 Utilizar Contador. . . . . . . . . . . . . . . . . . .79
21 Descargas. . . . . . . . . . . . . . . . . . . . . . . .80
¿Cómo Funciona BREW?. . . . . . . . . . . . . 80
Descargar un Programa. . . . . . . . . . . . . . . 80
Acceder a la Ayuda para Descargas . . . . . 80
22 Comandos de Voz . . . . . . . . . . . . . . . . . 81
Llamar a un Contacto . . . . . . . . . . . . . . . . 81
Llamar a un Número. . . . . . . . . . . . . . . . . 81
Reproducir una Lista de Reproducción. . . 81
Usar un Atajo . . . . . . . . . . . . . . . . . . . . . . 82
Encontrar un Contacto. . . . . . . . . . . . . . . . 82
23 Obtener Ayuda . . . . . . . . . . . . . . . . . . . . 83
Guía del Usuario. . . . . . . . . . . . . . . . . . . . 83
Apoyo al Cliente . . . . . . . . . . . . . . . . . . . . 83
Servicio Calificado . . . . . . . . . . . . . . . . . . 83
Accesorios para el Teléfono . . . . . . . . . . . 83
Índice. . . . . . . . . . . . . . . . . . . . . . . . . . . . . . . . 85
8
Page 97

1 Pasos Iniciales
Qualcomm
3G CDMA
Qualcomm
3G CDMA
Batería del Teléfono
Instalar la Batería
1. Sostenga el teléfono boca abajo.
2. Busque la ranura en la
parte inferior del teléfono.
Es un rectángulo. Con la
uña del pulgar, retire la
cubierta de la batería
levantándola de abajo
hacia arriba.
3. Coloque la batería en el
recinto para la batería.
Asegúrese de que los
contactos de metal de la
batería toquen el recinto
para la batería.
4. Coloque de nuevo la
cubierta de la batería
deslizando las muescas en
las aberturas de la parte
superior del recinto para
la batería.
Cargar la Batería
1. El enchufe Micro-USB
está ubicado en la parte
superior del teléfono.
Conecte el adaptador de
CA al enchufe
Micro-USB.
2. Conecte el adaptador al tomacorriente de
pared.
El icono en forma de batería que aparece en la
esquina superior derecha de la pantalla le
indica si el teléfono está:
– Cargándose (el icono es animado)
– Parcialmente cargado
– Completamente cargado
La batería debe estar al menos parcialmente
cargada para hacer o recibir llamadas. Puede
recargar la batería de manera segura en
cualquier momento, incluso si está
parcialmente cargada.
Nota:
Antes de extraer la batería, asegúrese de
que el teléfono esté apagado.
5. Encaje la cubierta a presión en su lugar.
Guía del Usuario 9
Page 98

Pautas de Seguridad de la Batería
• No desacople ni abra la batería.
• No aplaste, doble, deforme, perfore ni
triture la batería.
• No trate de insertar objetos extraños en la
batería.
• No sumerja la batería ni la exponga al agua
ni a otros líquidos. Aun si la batería
pareciera estar agotada y funcionara
normalmente, las partes internas pueden
corroerse lentamente y ocasionar un riesgo
de seguridad.
• Siempre mantenga la batería a una
temperatura entre 15°C y 25°C (59°F y
77°F). No exponga la batería a
temperaturas extremas (frío o calor), fuego
u otros peligros, tales como una superficie
para cocinar, una plancha o un radiador.
• Nunca use ninguna batería dañada.
• Sólo utilice la batería para el teléfono
correspondiente.
• Sólo utilice la batería con un cargador
aprobado. El uso de un cargador de batería
no adecuado puede presentar un riesgo de
incendio, explosión, fugas u otro peligro. Si
no está seguro si tiene un cargador
adecuado, comuníquese con el servicio de
atención al cliente.
• No permita que la batería entre en
cortocircuito ni que objetos metálicos
conductores, tales como llaves, monedas o
joyería, entren en contacto con las
terminales de la batería.
• Sólo reemplace la batería con otra batería
aprobada. El uso de un cargador de batería
no adecuado puede presentar un riesgo de
10 Batería del Teléfono
incendio, explosión, fugas u otro peligro. Si
no está seguro si la batería de repuesto es
compatible, comuníquese con el servicio de
atención al cliente.
• Descarte de inmediato las baterías usadas,
de acuerdo con los reglamentos locales y
recicle, de ser posible. No arroje en el tacho
de basura doméstica.
• Supervise a los niños cuando usen las
baterías.
• Evite dejar caer el teléfono o la batería. Si
el teléfono o la batería se caen al piso,
especialmente sobre una superficie dura,
puede producirse un cortocircuito interno y
presentar un peligro de seguridad. Si
sospecha que la batería está dañada, llévela
a un centro de servicio para su inspección.
• El uso inadecuado de la batería puede resultar
en un incendio, explosión u otro peligro.
Causas Comunes de Agotamiento de
la Batería
• Usar juegos o la Web.
• Usar el flash al tomar fotos.
• Configurar la luz de fondo para que
siempre esté encendida.
• Hacer funcionar el teléfono cuando se
encuentra lejos de una estación base o de la
ubicación de la celda.
• Usar cables de datos o accesorios.
• Hacer funcionar el teléfono cuando no hay
servicio disponible o cuando el servicio
sólo está disponible a intervalos.
• Configurar el volumen del auricular y del
timbre muy alto.
• Repetir los avisos de sonido, vibración o
iluminación.
Page 99

Tarjeta de Memoria
La memoria del teléfono se puede ampliar con
una tarjeta de memoria MicroSD.
Instalar la Tarjeta de Memoria
1. Sostenga el teléfono boca abajo.
2. Busque la ranura en la parte inferior del
teléfono. Es un rectángulo. Con la uña del
pulgar, retire la cubierta de la batería
levantándola de abajo hacia arriba.
3. Asegúrese de que los
contactos de metal estén
hacia abajo, deslice bien
la tarjeta de memoria en
la parte interna de la
ranura.
4. Coloque de nuevo la cubierta de la batería
deslizando las muescas en las aberturas de
la parte superior del recinto para la batería.
5. Encaje la cubierta a presión en su lugar.
Nota:
Aparece un aviso cuando la tarjeta está
lista para el uso. No utilice la tarjeta hasta ver
el aviso.
Formatear la Tarjeta de Memoria
En
Accesorios
Formatear Tarjeta > Sí
tarjeta de memoria.
Nota:
información actual de la tarjeta de memoria.
, elija
Tarjeta de Memoria >
para formatear la
Al formatearla, se borrará toda la
Extraer la Tarjeta de Memoria
1. Sostenga el teléfono boca abajo.
2. Busque la ranura en la
parte inferior del teléfono.
Es un rectángulo. Con la
uña del pulgar, retire la
cubierta de la batería
levantándola de abajo
hacia arriba.
3. Extraiga la tarjeta de memoria de la ranura.
4. Coloque de nuevo la cubierta de la batería
deslizando las muescas en las aberturas de
la parte superior del recinto para la batería.
5. Encaje la cubierta a presión en su lugar.
Guía del Usuario 11
Page 100

Datos Generales del Teléfono
Información sobre el Teléfono
La siguiente ilustración muestra el frente del teléfono.
1. Auricular y altavoz.
2. Pantalla táctil. El teléfono tiene una pantalla que se
activa con el tacto. Toque los objetos que aparecen en
pantalla para elegirlos. El estado inicial del teléfono
se conoce como la pantalla de inicio.
Nota:
Para evitar daños, no utilice objetos filosos sobre
la pantalla táctil.
3.
Menú
accede al
4.
Enviar
vez para mostrar la lista de llamadas recientes o dos
veces para volver a marcar el último número
marcado. Oprima sin soltar para activar los comandos
de voz.
5.
Navegación
aparecen en pantalla. La tecla
dedo. Para desplazarse, ubique el dedo sobre la tecla
izquierda, hacia la derecha, hacia arriba o hacia abajo. Los objetos se resaltan a medida que se
desplaza por ellos. Puede oprimir la tecla
6.
Encendido
apagar el teléfono. Cuando el teléfono esté encendido, oprima la tecla
bloquear o desbloquear la pantalla táctil. Esto impide que la toque accidentalmente.
7.
Volver
8.
Terminar
pantalla de inicio si oprime la tecla
Nota:
La tecla
el teléfono.
Menú
.
inicia o contesta una llamada. Oprímala una
permite desplazarse por los objetos que
enciende el teléfono. Oprima la tecla
le permite regresar a la pantalla anterior.
finaliza una llamada o una sesión del navegador. También puede regresar a la
T erm inar
Navegación
no enciende el teléfono. Use la tecla
tiene un sensor óptico que le permite detectar el
Navegación
Terminar
Navegación
o tocar la pantalla para elegir un objeto.
Encendido
.
y muévalo hacia la
sin soltarla para encender o
Encendido
Encendido
para encender o apagar
para
12 Datos Generales del Teléfono
 Loading...