

Page 1

Exhibit 21
User’s Guide
Page 2
Page 3

User’s Guide for QCP™ 2008
This manual is based on the production version s of the QCP
2008 and QCP 2035 phones. Software changes may have
occurred after this printing. Kyocera reserves the right to
make changes in technical and product specifications
without prior notice. The products and equipment described
in this documentation are manufactured under license from
QUALCOMM Incorporated under one or more of the
following U.S. patents:
4,901,307 5,056,109 5,099,204 5,101,501 5,103,459
5,107,225 5,109,390 5,193,094 5,228,054 5,257,283
5,265,119 5,267,261 5,267,262 5,280,472 5,283,536
5,289,527 5,307,405 5,309,474 5,337,338 5,339,046
5,341,456 5,383,219 5,392,287 5,396,516 D356,560
5,408,697 5,414,728 5,414,796 5,416,797 5,426,392
5,437,055 D361,065 5,442,322 5,442,627 5,452,473
5,461,639 5,469,115 5,469,471 5,471,497 5,475,870
5,479,475 5,483,696 5,485,486 5,487,175 5,490,165
5,497,395 5,499,280 5,504,773 5,506,865 5,509,015
5,509,035 5,511,067 5,511,073 5,513,176 5,515,177
5,517,323 5,519,761 5,528,593 5,530,928 5,533,011
5,535,239 5,539,531 5,544,196 5,544,223 5,546,459
5,548,812 5,559,881 5,559,865 5,561,618 5,564,083
5,566,000 5,566,206 5,566,357 5,568,483 5,574,773
5,574,987 D375,740 5,576,662 5,577,022 5,577,265
D375,937 5,588,043 D376,804 5,589,756 5,590,069
5,590,406 5,590,408 5,592,548 5,594,718 5,596,570
5,600,754 5,602,834 5,602,833 5,603,096 5,604,459
5,604,730 5,608,722 5,614,806 5,617,060 5,621,752
5,621,784 5,621,853 5,625,876 5,627,857 5,629,955
5,629,975 5,638,412 5,640,414 5,642,398 5,644,591
5,644,596 5,646,991 5,652,814 5,654,979 5,655,220
5,657,420 5,659,569 5,663,807 5,666,122 5,673,259
5,675,581 5,675,644 5,680,395 5,687,229 D386,186
5,689,557 5,691,974 5,692,006 5,696,468 5,697,055
5,703,902 5,704,001 5,708,448 5,710,521 5,710,758
5,710,768 5,710,784 5,715,236 5,715,526 5,722,044
5,722,053 5,722,061 5,722,063 5,724,385 5,727,123
5,729,540 5,732,134 5,732,341 5,734,716 5,737,687
5,737,708 5,742,734 D393,856 5,748,104 5,751,725
5,751,761 5,751,901 5,754,533 5,754,542 5,754,733
and QCP™ 2035 phone s
5,757,767 5,757,858 5,758,266 5,761,204 5,764,687
5,774,496 5,777,990 5,778,024 5,778,338 5,781,543
5,781,856 5,781,867 5,784,406 5,784,532 5,790,589
5,790,632 5,793,338 D397,110 5,799,005 5,799,254
5,802,105 5,805,648 5,805,843 5,812,036 5,812,094
5,812,097 5,812,538 5,812,607 5,812,651 5,812,938
5,818,871 5,822,318 5,825,253 5,828,348 5,828,661
5,835,065 5,835,847 5,839,052 5,841,806 5,842,124
5,844,784 5,844,885 5,844,899 5,844,985 5,848,063
5,848,099 5,850,612 5,852,421 5,854,565 5,854,786
5,857,147 5,859,612 5,859,838 5,859,840 5,861,844
5,862,471 5,862,474 5,864,760 5,864,763 5,867,527
5,867,763 5,870,427 5,870,431 5,870,674 5,872,481
5,872,774 5,872,775 5,872,823 5,877,942 5,878,036
5,870,631 5,881,053 5,881,368 5,884,157 5,884,193
5,884,196 5,892,178 5,892,758 5,892,774 5,892,816
5,892,916 5,893,035 D407,701 5,898,920 5,903,554
5,903,862 D409,561 5,907,167 5,909,434 5,910,752
5,911,128 5,912,882 D410,893 5,914,950 5,915,235
5,917,708 5,917,811 5,917,812 5,917,837 5,920,284
D411,823 5,923,650 5,923,705 5,926,143 5,926,470
5,926,500 5,926,786 5,930,230 5,930,692
Other patents pending.
Kyocera is a US-registered trademark and QCP is a
trademark of Kyocera Corporation. QUALCOMM is a
registered trademark and registered service mark of
QUALCOMM Incorporated. Other product and brand names
may be trademarks or registered trademarks of their
respective owners.
Copyright © 2000 Kyocera Wireless Corp. All rights
reserved. Printed in the United States of America.
80-B6426-1EN
Page 4
Contents
1 Features of the QCP 2008 and QCP
2035 Phone 1
Menus . . . . . . . . . . . . . . . . . . . . . . . 2
2 Getting Started. . . . . . . . . . . . . . . . 3
To turn on the phone . . . . . . . . . . 3
To turn off the phone . . . . . . . . . . 3
To find your phone number . . . . 3
To make a call . . . . . . . . . . . . . . . . 3
To end a call . . . . . . . . . . . . . . . . . . 3
To answer a call . . . . . . . . . . . . . . . 3
To silence the ringer/alert . . . . . . 4
To lock the keypad . . . . . . . . . . . . 4
To unlock the keypad . . . . . . . . . . 4
To adjust the volume . . . . . . . . . . 4
Screen icons . . . . . . . . . . . . . . . . . . 5
3 Battery . . . . . . . . . . . . . . . . . . . . . . . 7
4 Using the Contacts directory. . . . 9
To save a phone number . . . . . . . 9
Speed dial and 1-Touch Dial . . . 12
Contact cards . . . . . . . . . . . . . . . . 14
To delete a contact card . . . . . . . 15
To search the Contacts directory 15
To enter letters, numbers and
punctuation marks . . . . . . . . . . . 17
8VHU¶V*XLGHIRUWKH4&3 DQG4&3 SKRQHV LLL
5 Settings . . . . . . . . . . . . . . . . . . . . . 21
Silence All . . . . . . . . . . . . . . . . . . . 23
Keyguard . . . . . . . . . . . . . . . . . . . 23
To turn keyguard off . . . . . . . . . 24
Sounds . . . . . . . . . . . . . . . . . . . . . 24
Display . . . . . . . . . . . . . . . . . . . . . 24
Security . . . . . . . . . . . . . . . . . . . . . 25
Call Information . . . . . . . . . . . . . 26
Network . . . . . . . . . . . . . . . . . . . . 27
Extras . . . . . . . . . . . . . . . . . . . . . . 29
Messaging . . . . . . . . . . . . . . . . . . 30
Accessories . . . . . . . . . . . . . . . . . . 32
6 Tools . . . . . . . . . . . . . . . . . . . . . . . 35
Web Browser . . . . . . . . . . . . . . . . 35
Alarm Clock . . . . . . . . . . . . . . . . . 37
Calculator . . . . . . . . . . . . . . . . . . . 37
Tip Calculator . . . . . . . . . . . . . . . 38
Bust Out game . . . . . . . . . . . . . . . 39
Stopwatch . . . . . . . . . . . . . . . . . . . 39
Countdown Timer . . . . . . . . . . . 39
7 Troubleshooting . . . . . . . . . . . . . 41
8 Phone care and safety. . . . . . . . . 45
Glossary . . . . . . . . . . . . . . . . . . . . . . . . 49
Page 5
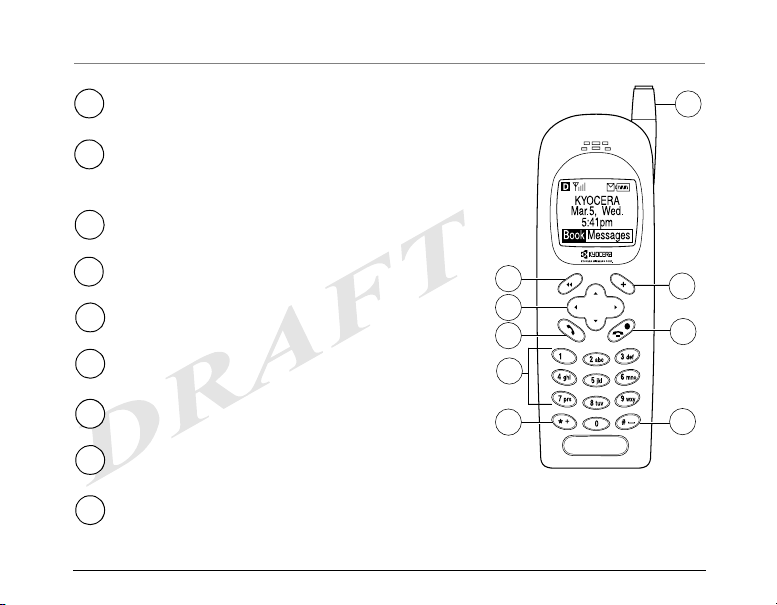
1 Features of the QCP 2008 and QCP 2035 Phone
Erases the last character in or moves to the
1
previous menu.
Adjusts volume whe n on a call, scrolls up, down,
2
left or right through lists and menus, and
positio ns the cursor during te xt entry.
Starts, answers or en d s a call.
3
Enters a number, letter, or punctuation mark.
4
Enters a capital letter.
5
Pull out the antenna to make or answer a call.
6
Push in the antenna when the phone is not in use.
Selects a menu item.
7
Turns on and turns off the phone, ends a call, or
8
returns to standby mode.
Enters a space during text entry.
9
User’s Guide for the QCP 2008 and QCP 2035 phones 1
1
2
3
4
5
6
7
8
9
Page 6

Menus
My Info Calls Settings Tools MessagesContacts
My Information View All
Add New
Find Name
Speed Dial List
Voice Dial List
Business List
Personal List
Info
Recent Calls Silence All
Keyguard
Sounds
Display
Security
Call Information
Network
Extras
Messaging
Accessories
Web Browser
Voice Memo
Scheduler
Alarm Clock
Calculator
Voicemail
In-Box
Out-Box
Filed
Settings
Tip Calculator
Bust Out
Stopwatch
Countdown Timer
Memo Pad
Quick menu reference
■ Press to scroll up, down, left or right through the menus.
■ Press to select a menu item.
■ Press to go back to the top level of the current menu.
■ Press to return to idle standby mode.
2 Menus
Page 7
2Getting Started
This section explains how to use the
basic features of two types of Kyocera
Wireless Corpo r ation (KWC) phones:
■ QCP 2008 dual-mode CDMA digital
and analog cellular service at 800
MHz
■ QCP 2035 trimode CDMA digital
service at 800 and 1900 MHz, and
analog service at 800 MHz
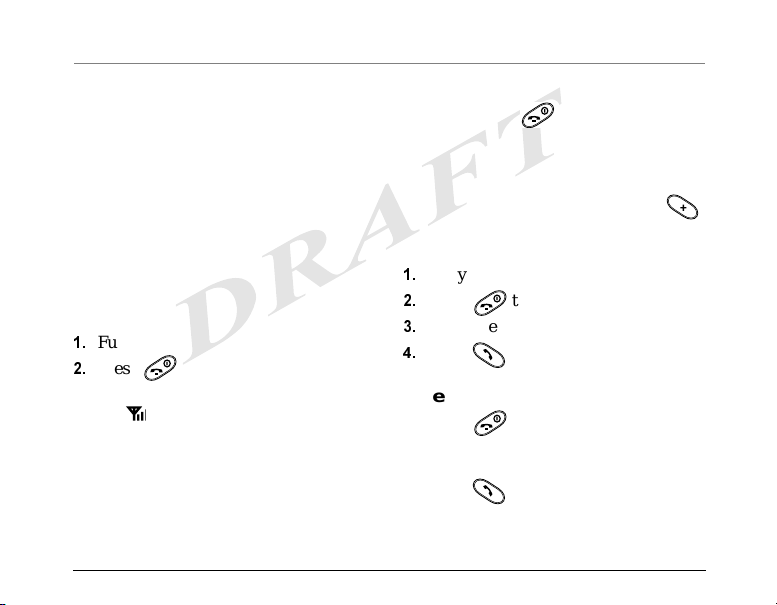
To turn on the phone
Fully extend the antenna.
Press for one to two seconds.
When the phone locates a signal,
the appears and the phone is
ready to make or receive a call. Once
the phone is on, it enters idle
standby mode when no numbers
have been entered and no call is in
To turn off the phone
➤ Hold down until “Powering
off” appears (about three seconds).
To find your phone number
➤ From idle standby mode, press .
To make a call
Fully extend the antenna.
Press to turn on the phone.
Enter the phone number.
Press .
T o end a call
➤ Press .
To answer a call
➤ Press .
progress.
User’s Guide for the QCP 2008 and QCP 2035 Phones 3
Page 8

To silence the ringer/alert
When you receive a call, you may
silence the ringer or stop the vibration
alert in one of three ways:
■ Press .
■ Press up or down.
■ Select Silence on the screen.
To silence a ll alerts (in cluding the
ringer) in idle standby mode, press and
hold , then s elect the set ting you
want.
To lock the keypad
To protect your phone from
accidental keypresses when a call is
not in progress, press up and hold
.
Press to lock the keypad. A
message appears “Keypad guard is
P
active. Press
to unlock.”
To unlock the keypad
Press up on .
4 To silence the ringer/alert
Press . A message appears
P
“Keypad guard is active. Press
to
unlock.”
Press up on , then press .
To adjust the volume
T o manually adjust t he volume dur ing a
call, press up or down.
Follow these instructions to set the
phone to automatically adjust the
earpiece volume based on the amount
of noise arou n d you or the oth er
person’s voice volume level:
Select Settings 3 Sounds 3 Smart
Sound.
Select one of the following:
■ Enabled adjusts the volume
automatically.
■ Disabled keeps the volume level
the same until you manually
adjust it using .
Press .
Page 9

Screen icons
Your phone has a five-line screen. The
following icons may appear on the top
line:
The phone is operating in
CDMA digital mode.
Current signal strength. When
this icon is visible, you can
make and receive calls.
No signal. You cannot make or
receive calls.
A call is in progress. (In idle
standby mode, this icon is not
visible.)
The alarm clock is set.
The phone is set to make no
noises for incoming calls, new
messages, or other alerts. The
backlighting or vibrator will be
used instead.
The phone is outside of its
home area.
User’s Guide for the QCP 2008 and QCP 2035 Phones 5
Page 10

6 Screen icons
Page 11

3 Battery
Your phone comes with an internal
lithium ion (LiIon) b a t t ery. Leave th is
battery in the phone at all times. The
battery is p ar tially charged when you
phone is in power-save mode, you
cannot make or receive calls, and
“Power Save Mode” and ( ) appear
on the screen.
receive the phone.
Battery performance
Before using your phone, fully charge
the battery by connecting the AC
Adapter to the phone, then connecting
it to a wall outlet. Let the phone charge
until you receive a text message stating
that charging is complete or the battery
icon is full . You can safely
recharge the battery at any time, even if
it has a part ial charge.
Power-save mode
Your phone automatically switches to
power-save mode after about 15
minutes. Power-save mode decreases
the drain on the battery. When the
User’s Guide for the QCP 2008 and QCP 2035 phones 7
Follow these guidelines to improve
battery performance.
■ Do not disassemble or short-circuit
the battery.
■ Keep the metal contacts at the base
of the battery clean.
■ If you have not used an internal or
external battery for more than a
month, recharge it before using it.
■ Avoid extreme temperatures, direct
sunlight and high humidity.
■ Never dispose of any battery in or
near a fire. It could explode.
Page 12

8
Page 13

4 Using the Contacts directory
NOTE—Some features in this section
have not been implemented, tested or
validated.
Your phone has a tool called the
Contacts directory, which works like a
set of phone index cards. Use the
Contacts directory to store information
about a person or a company on a
virtual contact card.
The Contacts directory stores a
minimum of 100 cards. On each card
you can store a name and a phone
number, as well as street addresses,
email addresses, URLs, and notes about
the person or company . You can also set
up a speed dial number. You can
Note—If you have the Q-Suite
Connectivity Kit Contacts Manager
application (sold separately) on your
computer, you can download phone
book entries from your computer to the
Contacts dir ectory on your pho ne. Refer
to the documentation that came with
that application for more inform ati o n.
Before using the Contacts directory,
refer to the following sections:
■ “To enter letters, numbers and
punctuation marks” on page 17.
■ “To enter special characters” on
page 18.
■ “To enter pauses and hyphens” on
page 19.
designate each card as personal or
business to help you find numbers by
type. Phone numbers and cards can be
set up as secret, so you can access them
only with a security code.
User’s Guide for the QCP 2008 and QCP 2035 phones 9
To save a phone number
Make sure your phone is in idle
standby mode, then enter the phone
number you want to save.
Page 14

Select Save by pressing to the
right, then press .
Select the type of number (work,
home, mobile, pager, or fax).
Select an option:
D
To add to an existing contact,
select Add and press up or
down to find the contact, or press
to select “Find Name,” then
proceed to step 5.
E
To create a ne w contact, selec t
New and enter a name for the
contact. Proceed to step 5.
Select Done by pressing twice.
D
Select an option:
■ Save & Exit saves information
and returns you to idle
standby mode.
■ Speed Dialing asks you to
choose a speed dial location
from the list. You can choose
any location except 1, which is
Note—Multiple items, such as
addresses, are indicated on the contact
card by dots next to the applicable icon.
For example, if there are two addresses,
the icon will show one dot next to it to
reserved for your voicemail
number.
■ Secrecy allows you to set
restrictions, lock or hide the
phone number.
■ Primary Number al lo w s yo u
to classify this number as the
primary number for the
contact.
■ Classify Contact allows you to
classify the contact as business
or personal.
■ View Contact allows you to
enter an email address, street
address, a URL, or notes.
Press . The message “Contact
Successfully Saved!” appears.
indicate a second address exists. A
10 To save a phone number
Page 15

maximum of six phone numbers, two
email addresses, two street addresses,
two URLs, and one note may be entered
for each cont act.
Important—Some pieces of information
can be added only after you save a card,
including speed dial number and
secrecy status.
To save a phone number
automatically
The Auto-Save setting tells the phone to
ask you to save a number in the
Contacts directory after you have called
the number three times.
From idle sta ndby mode , select
Settings 3 Extras 3 Auto-Save.
Select Enabled.
Press .
To save a phone number as a
contact card
This allows you to create a new contact
card and add necessary information.
User’s Guide for the QCP 2008 and QCP 2035 phones 11
From idle standby mode, select
3
Contacts
Add New3 phone
number.
Enter the phone number up to 50
digits.
Tip—When you save a number as a
contact card, include long distance
information so you can use the
number fr om any wher e. If i t’s a local
number, you pay only local rates.
Select Save by pressing twice.
Select the type of number (work,
home, mobile, pa g er, or fax).
The screen shows “Add to an
existing contact or create a new
contact?”
If this is a new card, select New and
follow these steps:
D
Enter a name for this card up to
50 characte rs long. ( If you need to
know how to use the keypad to
enter letters, see page 20.)
Page 16
E
Select Done by pressing
twice.
F
Select an option:
■ Save & Exit
■ Voice Dialing
■ Speed Dialing
■ Secrecy
■ Primary Number
■ Classify Contact
■ View Contact
■ Speed Dialing
■ Secrecy
■ Primary Number
■ Classify Contact
■ View Contact
For more information on contact
options, refer to page 10.
F
Press . The message
“Contact Successfully Saved!”
appears.
See page 10 for more information
on contact options.
G
Press . The message
“Contact Successfully Saved!”
appears.
If you are adding to an existing card,
select Add and follow these steps:
D
Press up or down to select a
contact from the list, or press
to select “Find Name.”
E
Select an option:
■ Save & Exit
■ Voice Dialing
12 Speed dial and 1-Touch Dial
Speed dial and 1-Touch Dial
To set a spe ed dial lo r 1-Touch Dial
location
Follow the steps below to set a speed
dial location for speed dialin g and 1T ouch dialing. Up to 98 locations can be
saved.
Note—Location 1 cannot be used; it is
reserved for your voice mail number.
Open a saved contact card.
Select Speed Dialing.
Choose a speed dial location.
Select Assign.
Page 17
Note—You can overwrite an existing
assignment.
To remove a speed dial location
From idle sta ndby mode , select
Contacts 3 Speed Dial List.
Select the speed dial location by
pressing twice.
Select Speed Dialing and c hoose t he
speed dialing location you wish to
remove by pressing .
Select Remove by pressing .
To speed dial
➤ Enter the one- or two-digit speed
dial number and press .
To enable 1-Touch Dialing
Select Settings 3 Extras 3 1-Touch
3
Dialing
Press .
Enabled.
To use 1-Touch Dialing
➤ Enter the one- or two-digit speed
dial number and hold down the last
number to dial. For example, if the
User’s Guide for the QCP 2008 and QCP 2035 phones 13
speed dial number is 15, press 1,
then press and hold 5 to dial.
To redial the last number called
➤ Press twice.
To call from the Conta cts dire ctory
or Recent Calls list
From idle standby mode, select
3
Contacts
Highlight a name or phone number
View All.
and press .
To call your voice mail number
➤ To call your voice mail number from
either idle standby mode or from a
notification, press and hold .
To change your voice mail speed
dial number
Select Settings 3 Messaging
3
Voicemail Number.
If a number exists, select Edit.
Enter or change the voice mail speed
dial number.
Select Save 3 OK.
Press .
Page 18
The Recent Calls list
The Recent Calls list shows the last 15
call entries. These entries include calls
you have received, places, missed, an d
forwarded, as well as call-waiti ng and
three-way calls.
Each type of call in the list is identified
by an icon as shown below.
Call to Forwarded
call
Call
from
Threeway
502EG_99
Call
waiting
Missed
call
call
To view details about a call, select
the entry you want, then press .
■ (Optional) What does Save do?
■ (Optional) To see the duration of
the call, select Time.
■ (Optional) To see the full number,
select Number.
■ (Optional) To go back to the calls
list, press .
To dial from the Recent Calls list
From idle standby mode, select Calls
3
Recent Calls.
Select the call in the list or display
the call detail and press .
Contact cards
This section explains how to work with
contact cards.
To view t he Recent Calls list
From idle standby mode, select Calls
3
Recent Calls, or select the Recent
Calls soft option from the missed
call alert. [VERIF Y ]
14 Contact cards
To change a contact card
You can edit information on a contact
card, including the name, phone
number, phone number type, speed dial
location, secrecy status, voice dial
Page 19

status, street address, email address,
URL, and notes.
From idle sta ndby mode , select
3
Contacts
Select the type of card (All Contacts,
Find Name.
If finished, select Done and press
. To continue making changes,
select View, and go back to step 5.
When you are finished, press to
return to idle standby mode.
Personal, Business, or Speed Dial.)
G
Enter the name on the card you
want and select Find.
Select the contact card you want to
3
edit and select View
Edit 3
Options.
From the list, select the type of
information you want t o change.
To change information, enter new
information over the old.
To delete information:
D
Select the informat ion you wan t
to delete.
E
Select Erase 3 One Item.
F
Select Yes to confirm you want to
delete this information.
To delete a contact card
From idle standby mode, select
3
Contacts
Select the card you want to delete by
View All.
pressing twice.
Select Erase.
The message “Erase just this number
or the entire contact?” Select
Number to delete just the number or
Contact to delete the entire contact
record, then Yes to delete or No to
cancel.
T o search the Contacts
directory
The Contacts directory automatically
sorts entries by speed dial location
User’s Guide for the QCP 2008 and QCP 2035 phones 15
Page 20

number, but there are several ways to
find a phone number or full card in the
Contacts directory. You can search by
name, by speed dial number, voice dial
status, or card type.
After you find the entry, you can
display the full card or call a number by
highlighting the phone number and
pressing .
To scroll through all contact cards
Select Contacts 3 View All. A list of
all contacts appears in alphabe tic al
order.
To find the entry you want, press
down to scroll through the
entries.
Press to display the full card.
To search by name
Select Contacts 3 Find Name.
Enter all or part of the name and
select Find. A li st of m atc hi ng na mes
appears.
Use to scroll through the list to
find the entry.
Press to display the full card.
To search by speed dial location
You can display a list only of numbers
assigned a speed dial number in the
Contacts directory.
Select Contacts 3 Speed Dial Lis t. A
list of names and speed dial
numbers appears.
To find the entry you want, press
down to scroll through the
entries.
Press to display the full card.
To search by card category
You can display a list of numbers based
on the category set for the card.
Select Contacts
3
Business List or
Personal List. A list of names
appears.
To find the entry you want, press
down to scroll through the
entries.
16 To search the Contacts directory
Page 21

Press to display the full card.
Dialing from the Contacts directory
Use one of the search options on
page 15 to display the phone
number in a list or on the contact
card.
Select the phone number you want.
Press .
To enter letters, numbers and
punctuation marks
You can enter any combination of
letters, numbers, and punctuation
marks in all but the number field in a
contact card.
The QCP 2008 and QCP 20 35 phones
offer severa l different methods of
entering text. When you are in a text
entry screen, start entering text if you
wish to use the default
entry mode. To change the entry mode,
press , then use to scroll to the
} rapid text
text or number entry mode you wish to
use and press .
■ To enter spaces between words,
press .
■ To move the cursor, press .
■ To delete characters, press .
To use rapid text entry
➤ T9® rapid text entry, shown on your
phone by
}, allows you to enter
text quickly and easily by storing a
database of commonly used words.
For example, to enter the word
“how,” you can spell out the word
by pressing only three keys, 4-6-9.
This is the default text entry setting.
To use normal text entry
➤ Normal alpha text entry, shown your
phone by
, allows you to enter text
in the conventional manner of one
keypress per letter. Press the key
once for the first letter, twice for the
second letter, and so on. After you
have cycled through the letters, the
User’s Guide for the QCP 2008 and QCP 2035 phones 17
Page 22

key number appears. For example, if
you press twice, the letter b
appears. Two seconds after you
choose a character, the cursor moves
one space to the right.
To switch cases
➤ Press . A graphic appears. To
change back to lower-case, press
again.[DOESN’T WORK]
To enter punctuatio n
Press .
Use to scroll to the text entry
mode you are currently using and
press again.
Press to scroll through the list of
symbols, and press to see a list.
Press to scroll through the list.
To enter numbers
➤ The number setting, shown on your
phone by
, allows you to enter
numbers using the number keys.
Press the key once for each number.
18 To enter letters, numbers and punctuation marks
There are three
screens of
characters, each
matched to a
number key.
Use to
scroll between
the screens.
With the correct
screen visible,
press the
appropriate
number to enter
each
punctuation
mark.
To exit the list without entering a
punctuation mark, press .
To enter special character s
Your phone supports English, French,
Spanish, and Portuguese character sets.
If you select En glish, the number keys
enter the letters printed on the keys. If
Page 23

you select another language, you can
also enter letters with accents, cedillas,
circumflexes, and other marks.
.H\ )UHQFK
A À Â B C Ç 2
D E Ë È É Ê F 3
G H I Ï Î 4
M N O Ô Œ 6
T U Ü Ú V 8
H
.H\ 6SDQLVK
A Á B C 2
D E É F 3
G H I Í 4
M N Ñ O Ó 6
T U Ü Ú V 8
.H\ 3RUWXJXHVH
A À Á Â B C Ç 2
D E È É Ê F 3
G H I Í 4
M N O Ò Ó Ô Õ 6
T U Ü Ú V 8
Press to the right and select
Settings
Select the language from the list,
3
Display 3 Language.
then press .
Press the keys in the chart to enter
special characters.
To enter pauses and hyphens
You can insert pauses and man ua l
hyphens along with numbers in your
Contacts directory. You may wish to
enter pauses or manual hyphens when
dialing numbers that require you to
pause and enter an option, such as
User’s Guide for the QCP 2008 and QCP 2035 phones 19
Page 24

calling yo ur company’s voice mail
system.
There are two kinds of pauses:
■ Hard pauses cause the phone to stop
dialing until you select Resu me .
■ Timed pauses are two seconds long.
■ Hyphens (need info)
By default, your phone enters hyphens
using the North American numbering
plan. Pauses and manual hyp he ns
count toward the 32-character limit.
Start entering the number.
Press one of the following key s:
to insert a hard pause
to insert a timed pause
to insert a manual hyphen
Enter the rest of the numbers and the
name as usual.
20 To enter letters, numbers and punctuation marks
Page 25

5 Settings
The Settings menu options are shown on the next two pages.
Settings Menu
Silence All Sounds
Keyguard
Call Ring/Vibe
Ringer Volume
Ringer Type
Roaming Ringer
Key Beep Volume
Earpiece Volume
Over the Air Tones
Missed Call Alert
Smart Sound
Key Beep Sound
Business Call Ring
Personal Call Ring
Display
Backlighting
My Banner
Memory Used
Auto-Hyphenation
Language
Time/Date Format
Security
Lock Phone Use
Limit Calls Out
Change Lock Code
Erase All Contacts
Erase Recent Call
Phone Reset
Call Information
Recent Calls Timer
All Calls Timer
Minute Alert
Calling Plan Timer
Rental Timer
Browser Timer
Continued on next page
User’s Guide for the QCP 2008 and QCP 2035 phones 21
Page 26

Settings menu (conti nued)
Network
Digital or Analog
Roam Option
Roam/Service Alert
Privacy Alert
Set Phone Line
Data/Fax Calls In
Extras
1-Touch Dialing
Auto-Save
Browser Prompt
Text Entry Style
Messaging
Voicemail Number
Erase Messages
Auto-Erase Text
Voicemail Alert
Page Alert
Message Alert
Internet Alert
Signatures
Email Domain
Accessories
Power Backlighting
Headset Ringing
Car Kit Power
Car Auto-Answer
User’s Guide for the QCP 2008 and QCP 2035 phones 22
Page 27

NOTE—Some features in this section
have not been implemented, tested or
validated.
Keyguard
The Keyguard locks your keypad to
protect your phone against accidental
keypresses when the phone is turned on
Silence All
This feat ure a llows you to s ilence all
phone sounds, including the ringer and
all alerts, while leaving the pho n e on.
You can have the phone alert you by
vibration or intense flashing of the
backlight.
Select Settings 3 Silence All.
Highlight and select one of the
options. (Normal returns the alert to
the ringer.) When the phone is in
silent mode, the screen shows a bell
with a slash through it. If the bell
with slash icon is flashing, that
means the Lights Only option is
active.
Press to save your selection.
and a call is not in progress.
■ You can always answer ca lls by
pressing whether the keyguard
is turned on or not. If you answer a
call, the keyguard is turned on again
at the end of the call. Also, if the
keyguard is on you can still s ilence
an incomi n g call by pressing
by pressing up or down on .
To turn keyguard on
Select Settings 3Keyguard.
Highlight o n e of the locking options
and press to save:
■ Guard Now locks the keypad
immediately.
■ 15s auto-guard locks the keypad
if no keys are pressed for fifteen
or
seconds.
User’s Guide for the QCP 2008 and QCP 2035 phones 23
Page 28

■ 30s auto- guard locks the keypad
if no keys a re pressed for th ir ty
seconds.
■ 1m auto-guard locks the keypad if
no keys are pressed for one
minute.
■ Auto-guard off unlocks the
keypad and restores it to normal.
Shortcut—To turn the keyguard on
quickly in standby mode, press up and
hold , then press to lock the
keypad.
To turn keyguard off
Press up on .
Press to unlock the keypad. A
message appears, “Keypad guard is
P
active. Press
Press up on .
to unlock.”
Select Settings 3 Sounds, then the
setting you want:
■ Call Ring/Vibe
■ Ringer Volume
■ Ringer Type
■ Roaming Ringer
■ Key Beep Volume
■ Earpiece Volume
■ Over the Air Tones
■ Missed Ca ll Alert
■ Smart Sound
■ Key Beep Sound
■ Business Call Ring
■ Personal Call Ring
Display
You may change yo ur phone’s display
from this menu option.
Select Settings 3 Display, then the
setting you want:
Sounds
You may change the alert sounds your
phone makes from this menu option.
24 To turn keyguard off
■ Backlighting
■ My Banner
■ Memory Used
Page 29

■ Auto-Hyphena tion
■ Language
■ Time/Date Format
up. To lock the phone immediately ,
select Now.
Press .
Security
You must enter your four-digit lock
code (typically 0000 or the la st 4 di gi ts
of the phone number) to set any of the
options on the Security menu. To
change your lock code , see “To change
your lock code” on page 25.)
To lock and unlock the phone
When you lock your phone, you can
only call a numb e r set up as an
emergency number, a service provider
(OTASP) number, or a priority number.
You can still receive incoming calls.
To lock the phone
Select Settings 3 Security 3 Lock
Phone Use.
To lock the phone every time you
To unlock the phone
➤ Select Unlock and enter your four-
digit lock code.
To limit calls out
➤ Select Settings
3
Security 3 Limit
Calls Out. Select No for unlimited
calls, or select Yes, to Contacts to
allow calls to contacts only.
To change your lock code
Select Settings 3 Security 3 Change
Lock Code.
You will see the message "Change
Lock Code?"
D
Select Yes and enter a new code,
then press .
E
Select Exit to leave your lock code
unchanged.
turn on the phone, select On power
User’s Guide for the QCP 2008 and QCP 2035 phones 25
Page 30

To erase all contacts
Select Settings 3 Security 3 Erase
All Contacts.
■ Select No to leave contacts
unchanged.
■ Select Yes to erase all contacts.
You will see the message, "Erase
ALL contacts? " Select No to cancel
or Yes to erase all contacts.
■ Select Yes to reset the phone. You
will see the message, "Reset ALL
phone settings?" Select No to
cancel or Yes to reset the phone.
Note—Y our four -digit lock code, Rec ent
Calls timer, Contacts directory, In- and
Out-Box contents, memos, and service
programming are not reset when you
reset your phone.
To erase recent calls
Select Settings 3 Security 3 Erase
Recent Call.
■ Select No to leave the Recent Calls
list unchang e d.
■ Select Yes to erase all recent calls.
You will see the message, "Erase
ALL recent calls list entries?"
Select No to cancel or Yes to erase
all recent calls.
To reset the phone
Select Settings 3 Security 3 Phone
Reset.
■ Select No to cancel.
26 Call Information
Call Information
This setting allows you to view
information about calls and alerts.
Recent Calls Timer
➤ This timer displays the total number
and duration of recent calls you have
made and received. Press Reset to
reset the timer to zero.
All Calls Timer
➤ This timer displays the total number
and duration of all calls you have
made and r e ce iv ed . You cannot reset
this timer.
Page 31

Minute Alert
➤ You can set an alert to beep ten
seconds before the end of every
minute during a call.
Rental Timer
(not available on al l phones)
➤ If available from your service
provider, this timer can be activated
if the phone is to be used as a rental.
Note—the timer can only be reset by
your service provider.
Browser Timer
➤ This timer displays the total number
and duration of data calls you have
made and received. Press Reset to
reset the timer to zero.
To select digital or analog mode
Select Settings 3 Network 3 Digital
or Analog.
Select an option by pressin g :
■ Automatic automaticall y switches
the phone between digital and
analog.
■ An al og only sets the phone to
work in analog mode only.
■ An al og call forces a call into
analog mode until the end of the
call.
■ Digital only sets the phone to
work in digital mode only.
Roam Option
Use this setting to determine which
signals your phone will accept.
Network
Use this setting to view or change
options such as roaming and privacy
alerts.
Select Settings 3 Network 3 Roam
Option.
Select an option by pressing :
■ Automatic (recommended
setting) accepts any system the
phone service provides.
User’s Guide for the QCP 2008 and QCP 2035 phones 27
Page 32

■ No Roaming prevents you from
making or receiving calls outside
of your home service area.
Roam/Service Alert
Use this setting to have the phone alert
you if you roam outside of your home
service area.
Select Settings 3 Network 3 Roam/
Service Alert.
Select an option by pressing :
■ Disabled will not alert you if you
roam outside your home service
area.
■ When no service alerts you with
three tones, decreasing in
intensit y, when service is lost.
When service is required, you will
hear three tones in increasing
intensity.
■ On roam change alerts you with
two tones, decreasing in intensity,
when a less preferred service is
acquired. When a more preferred
28 Network
service is acquired, you hear thr ee
tones, increasing in in t ensity.
■ On any change alerts you with
three increasing tones if there is a
change in roaming service or three
decreasing tones if the phone
loses service.
Privacy Alert
Select Settings 3 Network 3
Privacy Alert.
Select an option by pressin g :
■ Enabled plays an audible al er t
whenever enhanced privacy is
lost when a call is in progress .
■ Disabled does not play any alerts.
Note—The phone always shows a
text alert regardless of these
settings.
Set Phone Line
➤ This setting allows you to change
what number is displayed on your
phone if you have more than one
phone number (check with your
Page 33

service provider to see if your phone
supports more than one phone
number.) For example, you may
■ Data, until off forces the phone
into data mode until the phone is
turned off.
want to set the phone to use one
number when home and one
number when travelling on
business.
Data/Fax Calls In
These settingstell the phone how to
handle voice and data calls.
Select Settings 3 Network 3 Data/
Fax Calls In.
Select an option by pressing :
■ Standard a llows only voice calls.
■ Fax, next call sets the phone to fax
mode for the next incoming call or
the next ten minutes.
■ Data, next call sets the phone to
data mode for the next incoming
call or the next ten minutes.
■ Fax, until off forces the phone
into fax mode until the phone is
turned off.
User’s Guide for the QCP 2008 and QCP 2035 phones 29
Extras
These settings allow you to program
various options, such as 1-Touch
Dialing, Auto-Save and additional
prompts.
1-Touch Dialing
➤ For more information on 1-Touch
Dialing, refer to “Speed di al and 1Touch Dial” on page 12.
Auto-Save
➤ For in formation on Auto-Save , refer
to “To save a phone number
automatically” on page 11.
Browser Prompt
You will receive an additional prompt
whenever you attempt to launch the
browser.
Select Settings
Prompt.
3
Extras 3 Browser
Page 34

To leave settings unchanged, select
Disabled. For an additional prompt,
select Enabled.
Text Entry Style
You may set the text entry style you
wish to use when entering text
messages.
Select Settings
3
Extras 3 Text
Entry Style.
For basic (default) text entry, select
Basic. For advanced text entry, select
Advanced. For more information on
text entry styles, see “T o enter letters,
numbers and punctuation marks”
on page 17.
To erase messages
Select Settings 3 Messaging 3
Erase Messages.
Select an option by pressin g :
■ Entire In-box
■ Read In-box
■ Read N e t Alerts
■ Re ad P ages
■ Read M e ssages
■ Enti re Out-Box
■ Sent Out-Box
Note—Selectin g Entire In-b ox or Read
In-box deletes text messages only. It
does not affect voice mail notifications.
To delete mes sag es autom atic ally
Use this setting to have old, read
Messaging
To change your voicemail number
Select Settings 3 Messaging 3
Voicemail Number 3 Edit.
Enter a new voicemail speed dial
number and press to save.
30 Messaging
messages automatically deleted from
the phone if space is needed to store
new messages. (This setting does not
affect voice mail notifications.)
Select Settings 3Messaging 3
Auto-Era se Text.
Select an option by pressin g :
Page 35

■ Read In-box msg
■ Never
■ Only if Urgent: messages are
deleted only if the messages were
labeled “urgent” or “priority.”
Alerts
For voice mail, pages, text messages,
and Internet browser alerts, choose the
alert type as follows:
Select Settings 3 Messaging, then
the type of alert (Vo ice ma il, Page ,
Message, or Browser).
Select an option by pressing :
■ Disabled
■ Vibrate once
■ Vibe & remind
■ Low beep on ce
■ Low beep s
■ Loud beep onc e
■ Loud beeps
Select Settings 3 Messaging 3
3
Signatures
Enter signature text and press
New.
to save.
Email Domain
If your phone has the ability to send
messages as email, you may enter up to
two domain names to be saved. When
sendin g an email to a saved domain,
you only need to enter the beginning of
an email address, and the domain name
is automatically added when you send
the message.
Select Settings 3 Messaging 3
3
Email Domain
Enter the domain name and press
New.
to save.
Signatures
Y ou may create up to two signatures for
insertion into outgoing messages.
User’s Guide for the QCP 2008 and QCP 2035 phones 31
Page 36

Accessories
Y our phone comes with several features
for additional conveni ence .
Power Backlighting
This allows backlighting to remain on
when external power, such as an AC
Adapter, is used with the phone.
Select Settings 3 Accessories
Power Backlighting.
Select Normal to keep the default
setting, or Always on to keep
backlighting on.
Headset Ringing
When a headset is attached to the
phone, you may choose to have alert
sounds come out of either the phone or
the headset.
Select Settings 3 Accessories
Headset Ringing.
Select Out of phone to have the
alerts come out of the phone, or Out
of headset to have alerts come out of
the headset.
32 Accessories
3
3
Car Kit Power
When you are using car power to power
the phone, you can tell the phone how
long to leave the phone on once the car
ignition is turned off.
Select Settings 3 Accessories 3 Car
Kit Power.
Select an option by pressin g :
■ 30 s, phone on allows the phone
to receive power from the car for
30 seconds after the ignition is
turned off, and also leaves the
phone on until you turn it off.
■ 30 s, phone off allows the phone
to receive power from the car for
30 seconds after the ignition is
turned off, and also turns the
phone off after 30 seconds.
■ 30 m, phone on allows the phone
to receive power from the car for
30 minutes after the ignition is
turned off, and also leaves the
phone on until you turn it off.
Page 37

■ 30 m, phone off allows the phone
to receive power from the car for
30 minutes after the ignition is
turned off, and also turns the
phone off after 30 minutes.
■ 3 h, phone on allows the phone to
receive power from the car for 3
hours after the ignition is turned
off, and also leaves the phone on
until you turn i t off.
■ 3 h, phone off allows the phone to
receive power from the car for 3
hours after the ignition is turned
off, and also tu r n s t h e p h one off
after 3 hours.
Car Auto-Answer
If your phone is attached to a HandsFree Car Kit (sold separately), you may
set it to answer an incoming call after 5
seconds.
■ Select Settings
Auto-Answer
User’s Guide for the QCP 2008 and QCP 2035 phones 33
3
Accessories 3 Car
3
After 5 seconds.
Page 38

34 Accessories
Page 39

6Tools
The QCP 2008 and QCP 20 35 phones
offer a range of helpful tools, including:
■ Web Browser
■ Alarm Clock
■ Calculator
■ Tip Calcu lator
■ Bust Out game
■ Stopwatch
■ Countdown Timer
NOTE—Some features in this section
have not been implemented, tested or
validated.
Web Browser
This section includes information on
how to use your phone’s web browser.
Yo u can use your phone to browse the
Internet if you have obtained phone
Internet services from your service
provider and if over-the -air Internet
access is available in your area.
User’s Guide for the QCP 2008 and QCP 2035 phones 35
The QCP 2008 and QCP 2035 phones
can support Internet messages called
Net Alerts.
T o l earn mor e about the fea tur es of your
web browser, contact your service
provider . When you sign up for Internet
service, they may provide access to a
personal configuration web page. This
page allows yo u to e dit some phone
browser settings from a desktop or
laptop computer. For example, you
could format the home page on your
web browser, set up some applications
for easy access, and assign bookmarks
to favorite pages.
To start the browser
Select Tools 3 Web Browser.
To exit the browser
➤ Press .
Page 40

To make or receive calls from the
browser
➤ Press .
Note—You cannot receive incoming
calls while a d ata call is in progress.
Answering an incoming call will end
your browser session.
To bypass an incoming call
➤ If you are in the browser and do not
wish to answer an incoming call,
press . This will silence the
ringer. When you return to idle
standby mode, a missed call alert
will be displayed.
■ Goto New URL
■ Show URL
■ Phone.com
■ Encryption
■ Restart
■ Help displays on line help.
Indicators and alerts
Audible and visual alerts may be
displayed while using the browser.
Indicators
■ When you are in a secured browser
session, the will be displayed.
■ Links are identified with an
underline and an ar row, as follows:
Browser options
The main browser window has several
options:
■ Home returns you to the main
According to AP,
Gates says breakup is not being ...
MORE...
browser window, or home page.
■ Mark Site bookmarks the site
location.
■ Options contains several items:
■ Bookmarks
36 Web Browser
■ If there are several items to be
selected, the items are numbered
and the chosen item shows an arrow
Page 41

next to it. Press up or down to
scroll through the list.
■ If information is available above or
below the displayed text, a scroll bar
will be shown. Press up or
down to scroll through the list.
Net Alerts
If your service provider activated
Internet services on your phone and
you are in an area that provides overthe-air Internet access, you may receive
Net Alerts. Net Alerts are Internet
messages such as stock quote alerts,
traffic updates, or email. They are
different from pages and text messages
because the information in Net Alerts is
stored on the Web, not on your phone.
For more information, see “Alerts” on
page 31.
Alarm Clock
The Alarm Clock is used to set an alert
for a specific time. (The alert occurs
only if the phone is on.)
Select Tools 3 Alarm Clock 3
3
Enable
Enter numbers on the keypad to set
Set.
the hour and minutes. (Press to
move from hours to minutes and to
select a.m. or p.m.)
Press twice to save the setting
and exit.
When the alarm rings:
■ Select Snooze to silence the alarm
for 15 minutes.
■ Select Off to turn off the alarm.
Calculator
The Calculator tool is used to complete
basic mathematical equations. Use the
keypad to enter numbers and to
select an operation.
Select Tools 3 Calculator.
User’s Guide for the QCP 2008 and QCP 2035 phones 37
Page 42

Press to select and insert
characters to complete the following
functions:
= Inserts the equals character and
performs the “equals” function.
Tip — Pressing for a few
seconds also performs the “equals”
function.
Inserts the division character after
the last number entered.
- Inserts the subtraction character
after the last number entered.
+ Inserts the addition character after
the last number entered.
X Inserts the multiplication character
after the last number entered.
. Inserts the decimal point character
after the last number entered.
C Clears all numbers entered and
displays a zero.
38 Tip Calculator
MR Displays the value currently stored
in memory.
M+ Adds the current digit to the value
stored in memory.
MC Clears the value currently stored in
memory.
Changes the sign of the current
number.
Clears one function or one digit
from the display and returns the
calculator to digit enter mode. If
held down, it clears all of the digits
and operations and displays a zero.
Exits the calculator and returns to
standby mode.
Tip—Use the scroll bar if the equation is
too large to fit on one screen.
Tip Calculator
Select Tools 3 Tip Calculator.
Page 43

Enter the amount of your bill and
press .
Select the amount you wish to
include as a tip (15%, 18%, 20%, 10%,
5%, Other) and pres s .
Your total bill including tip is
calculated and displayed.
■ Select Done if you are finished.
■ Select Split to divide the bill
among guests. Enter the number
of guests and press . The
amount each guest owes is
displayed.
call alert is ended. The game cannot be
paused while the phone is off.
Stopwatch
The Stopwatch feature counts upwards
to a hundredth of a second until you
manually stop it.
Select Tools 3 Stopwatch.
Select Start to have the stopwatch
begin counting.
Select Stop to quit counting.
Select Reset to set the counter back
to zero and have the stopwatch
begin counti ng again.
Bust Out game
Press when finished.
The goal of this game is to eliminate
bricks arranged in levels. To do this,
you send a moving ball upwards using
to scroll a paddle left or right
along the bottom of the display.
The game is paused and exited if an
incoming call alert is rece i v e d , and can
be returned to play once the incoming
User’s Guide for the QCP 2008 and QCP 2035 phones 39
Countdown Timer
This feature counts down for a specified
amount of time, down to the second. It
beeps (using the volume set for alerts)
when that amount of time has elapsed.
Select Tools 3 Countdown Timer 3
Set.
Page 44

Scroll up or down using to set
the hours, minutes, and seconds. To
move the cursor, press to the
right.
Select Start to begin the countdown.
When the time has elapsed, the
phone beeps repeatedly. The time
00:00:00 flashes on the screen.
If you need to pause the countdown,
select Stop.
When the alarm rings, select Off to
silence the alarm.
40 Countdown Timer
Page 45

7 Troubleshooting
What is my lock code?
The default lock code is usually either
0000 or the last four digits of yo ur
phone number. If you forget your lock
code, call your service provider.
How do I lock and unlock the phone?
To lock your phone, select Settings
3
Security
your phone every time you turn it on,
select On power up. To lock your phone
immediately, select Now. To unlock the
phone, select Unlock and enter your
four-digit lock code.
My ringer is off. How do I turn it back
on?
Select Settings
Normal to return the ringer to normal.
User’s Guide for the QCP 2008 and QCP 2035 phones 41
Lock Phone Use. To lock
3
Silence All
3
3
How do I change the ringer volume?
Select Settings
Volume. Press up or down to
change the volume, then press .
How do I change the ringer type?
Select Settings
Type, then select a ringer.
How do I store phone numbers?
From idle standby mode, enter the
phone number you want to save and
press .
How do I change my banner?
Select Settings
Banner. Enter your change s and select
Save by pressing .
How do I speed dial?
Enter the one- or two-digit speed dial
number and press .
3
Sounds 3 Ringer
3
Sounds 3 Ringer
3
Display 3 My
Page 46

How do I set the time and date on the
phone?
Select Settings
3
Display 3 Time/Date
Format. Select a time/date format and
press .
How do I erase all recent ca l ls ?
Select Settings
3
Security. Enter your
lock code, then select Erase Recent
3
Yes.
Calls
What does the “D” on my phone
mean?
Your phone is operatin g in CDMA
digital mode.
What does the “R” on my phone
mean?
Your phone is roaming outside of its
home service area.
My phone displayed the message
“Reading Info. Please wait ... “ when I
turned it on. What does this mean?
42
Your phone is performing routine
maintenance. This normally takes a few
minutes.
How do I get accessori es for my
phone?
To shop online for phone accessories,
visit our Accessory Store at
www.kyocera-wireless.com/store, or
order by phone at 800-211-1537 or 510683-4004.
Where to find help
Your service provider
For questions about your phone and
phone service, contact your service
provider. Your service provider’s
customer support departme nt can
answer questions about your phone,
phone bill, call coverage area, and
specific features (such as call
forwarding or voice mail) avai lable to
you.
Page 47

Your phone documentation
If you have questions about the features
of the phone, refer to this guide and
other materials provided with your
phone. To view or download the most
current version of this user’s guide, visi t
us at www .k yocera-wireless.com.
Kyocera technical sup por t
■ The name of your service provider
■ The actual error message or problem
you are experiencing
■ The steps you take to reproduce the
problem
■ The phone’s electr onic serial number
(ESN) and part number (MCN). The
ESN usually starts with a "B" and the
MCN usually starts with a "61-."
If you have additional qu e s ti ons,
contact the Kyocera Wireless Corp.
Customer Care Center in any of these
ways:
■ Kyocera Wireless Corp. Web site:
www.kyocera-wireless.com
■ U. S. and Canada: (800) 349-4478
■ Other countries: (858) 882-1400
■ Email: phone-help@kyocera-
wireless.com
Before requesting support, please try to
reproduce and isolate the problem.
When you contact the Customer Care
Center, be ready to provide the
following information:
User’s Guide for the QCP 2008 and QCP 2035 phones 43
Page 48

44
Page 49

8 Phone care and safety
Use the following guidelines to opti mize the perfor mance
and life of your phone, antenna, and battery.
Road safety comes first
While driving a car, driving is your first responsibility. A
wireless phone can be an invaluable tool, but good
judgment must be exercised at all times while driving a
motor vehicle. Check the local laws and regulations on
the use of wireless phones in vehicles. Always obey
them, and exercise caution while driving.
The following guidelines are based on re commenda tions
of the Cellular Telecommunications Industry Association
(CTIA):
1. Get to know your wireless phone and its
features, such as speed dial and redial. Carefully
read your instruction manual and learn to take
advantage of features most phones offer, including
automatic redial and me mory. Work to memorize the
phone keypad so you can use the speed dial
function without taking your attention off the road.
2. When available, use a hands-free device. A
number of hands-free wireless phone accessories
are readily available. You can purchase accessories
online at www.kyocera-wireless.com/store.
3. Position your wireless phone within easy reach.
Make sure you can grab it without removing your
eyes from the road. If you get an incoming call at an
inconvenient time, let your voice mail answer it for
you.
4. Suspend conversations during hazardous
driving conditions or situations, and do not
engage in stressful or emotional conversations.
Let the person with whom you are speaking know
you are driving. Rain, sleet, snow, ice, and heavy
traffic can be hazardous. As a driver, your first
responsibility is to pay attention to the road.
User’s Guide for the QCP 2008 and QCP 2035 phones 45
D
R
Suspend conversations that have the potential to
divert your attention from the road.
5. Do not take notes or look up phone numbers
while driving. If you are reading or writing while
driving a car, you are not watching where you are
going. Don’t get caught in a dangerous situation
because you are reading or writing and not paying
attention to the road or nearby vehicles.
6. Dial sensibly and assess the traffic. If possible,
pull to the side of the road before placing a call. Try
T
to plan your calls before you begin your trip, or
attempt to coincide your calls with time s you may be
stopped.
7. Use your wireless phone to call for help. Your
AF
wireless phone can be used to protect yourself and
your companions in dangerous situations. Dial 91 1
or other local emergency numbers in case of a fire,
traffic accident, road hazard or other emergency.
Remember, it is a free call.
8. Use your wireless phone to help others in
emergencies. If you see a traffic accident, crime in
progress, or other serious emergency where lives
are in danger, call 911 or other local emergency
numbers, as you would want others to do for you.
9. Call roadsie assistance or a special nonemergency wireless assistance number when
necessary. Certain situations you encounter while
driving may require attention, but are not urgent
enough to merit a call for emergency services. You
can use your wireless phone to lend a hand.
Air bags
If you have an air bag, DO NOT place installed or
portable phone equipment or other objects over the air
bag or in the air bag deployment area. Air bags inflate
with great force. If equipment is carelessly placed or not
Page 50

properly installed, you or your passengers risk serious
injury.
Potentially unsafe areas
Posted facilities—Turn your phone off in any facility
when posted notices require you to do so.
Aircraft—FCC regulations prohibit using your phone on
a plane that is in the air. Turn your phone off before
boarding aircraft.
Vehicles—RF signals may affect improperly installed or
inadequately shielded electronic systems in motor
vehicles. Check with the manufacturer of the device to
determine if it is adequately shielded from external RF
energy. Your physician may be able to help you obtain
this information.
Blasting areas—Turn off your phone where blasting is
in progress. Observe restrictions, and follow any
regulations or rules.
Potentially explosive atmospheres—Turn off your
phone when you are in any area with a potentially
explosive atmosphere. Obey all signs and instructions.
Sparks in such areas could cause an explosion or fire,
resulting in bodily injury or death.
Areas with a potentially explosive atmosphere are often,
but not always, clearly marked. They include:
■ fueling areas such as gas stations
■ below deck on boats
■ transfer or storage facilities for fuel or chemicals
■ vehicles using liquefied petroleum gas, such as
propane or butane
■ areas where the air contains chemicals or particles
such as grain, dust, or metal powders
■ any other area where you would normally be
advised to turn off your vehicle engine
Use with ca re
Use only in normal position (to ear). Don’t bend the
antenna or touch it unnecessarily. Pull out the antenna
46
D
R
when on a call and push it in when the phone is not in
use. Avoid dropping, hitting, bending, or sitting on the
phone.
Keep phone dry
If the phone gets wet, turn the power off immedia tely and
return it to the dealer for service.
Resetting the phone
If the screen seems frozen and the keypad does not
respond to keypresses, return it t o the deale r for ser vice.
Qualified service
Changes or modifications not expressly approve d by the
party responsible for compliance could vo i d the warra nty
and the user’s authority to operate the equipment.
Accessories
Use only Kyocera-approved accessories with Kyocera
AF
phones. Use of any unauthorized accessories may be
dangerous and will invalidate the phone warranty if said
accessories cause damage or a defect to the phone. To
shop online for phone accessories, visit www.kyocerawireless.com/store. To order by phone, call (800) 2111537 (USA) or (510) 683-4004 (other countries).
FCC/IC Notice
This device complies with part 15 of the FCC rules.
Operation is subject to the following two conditions: (1)
This device may not cause harmful interference, and (2)
this device must accept any interference received,
including interference that may cause undesired
operation.
Radio freque ncy (RF) energy
Your tel epho ne is a rad io transm itter a nd rece iv er. When
it is on, it receives and sends out RF energy. Your
service provider’s network controls the power of the RF
signal. This power level can range from 0.006 to 0.6
watts.
In August 1996, the U.S. Federal Communications
Commission (FCC) adopted RF exposu re guidelines with
T
Page 51

safety levels for hand-held wireless phones. These
guidelines are consistent with the safety standards
previously set by both U.S. and international standards
bodies in the following reports:
■ ANSI C95.1 (American National Standards Institute,
1992)
■ NCRP Report 86 (National Council on Radiation
Protection and Measurements, 1986)
■ ICNIRP (International Commission on Non-Ionizing
Radiation Protection, 1996)
Your phone complies with the standards set by these
reports and the FCC guidelines.
T
AF
R
D
User’s Guide for the QCP 2008 and QCP 2035 phones 47
Page 52

T
AF
R
D
48
Page 53

*ORVVDU\
1-Touch
Dial
4-way
navigator
key
analog
mode
Auto-Save A feature which allows your phone to prompt you to save a phone
Automatic
Gain
Control
bookmark A Web file that lets you quickly connect to a site you have previously
CDMA Code Division Multipl e Access, a digital technology produced by
call
forwarding
User’s Guide for the QCP 2008 and QCP 2035 phones 49
The ability to dial a phon e number by pressing a single key
corresponding to the memory location of the phone number.
A button on your QCP 2008 or QCP 2035 phone which allows you to
navigate up, down, left or right depending on menu choices. This key
also controls volume while on a call.
One of two ways in which a phone communicates. The other is
digital mo d e. Dual-mode phones can switch between the two modes.
number after you have dialed it three times.
A feature which allows the phone to automatically adjust the earpiece
volume based on the amount of noise around you or on the other
person’s voice volume level.
visited and marked (like a bookmark in a book).
QUALCOMM for use in the cellular telephone industry. CDMA
digitally encodes the sound of voices and key beeps to ensure callers’
privacy.
A programmable phone option that sends incoming calls to another
number.
Page 54

call waiting A service-provider feature, which beeps if another call comes in
while you are on the phone. You can usually switch back and
forth between calls by pressing a key such as .
cellular Wireless phone service in the 800 MHz frequency range.
contacts
directory
A tool within a phone which works like a set of phone index
cards.
data cable An electrical wire capable of transmitting information between
two or more devices.
data port A connector that connects devices, such as a comp ute r, to a
phone and allows phones to act as modems or faxes.
data port
connector
A phone jack where you can connect devices such as a computer,
for the use of your phone for non-voice communications.
digital mode A state in which phones send voices and key beeps as digitally
encoded signals instead of analog sounds. See CDMA and
analog mode.
domain name The address of a network connection, written as a sequence of
words separated by dots, such as server.business.org
dual band A phone which can operate in two frequency ranges, usually the
800 MHz band and the 1900 M Hz band.
dual-mode A phone which can operate in either CDMA digital or analog
cellular service at 800 MHz, and ca n sw i tch be tw ee n di gi tal
mode and analog mode.
50
Page 55

email Electronic mail, a store-and-forward service for text and graphical
messages from one computer to another . The information is stored for
you until you log in to the system to receive the messages.
idle
standby
mode
The mode the phone is in when it is turned on, no numbers have been
entered on the display, and no ca ll is in progress.
Internet The worldwide set of interconnected networks that share the same
network address scheme and use the TCP/IP protocol.
hard pause A delay which is programmed into a stored number. The phone does
not continue dialing until you press a sp e cific key.
key beep
The level of noise that you get when you press a key on the phone.
volume
keyguard A feature which can be turned on when no call is in progress to
protect the phone from accidental keypresses.
lock code A four-digit sequence that lets you restrict access to certain phon e
numbers or all phone numbers.
memory
location
One of 99 reserved spaces for data. Each memory location can hold a
phone number of up to 50 digits and associated text, such as a name
of up to 50 characters.
menu item A command which is associated with a certain men u o n the pho ne .
missed call
alert
User’s Guide for the QCP 2008 and QCP 2035 phones 51
A display indicator that tells you when you didn’t answer an
incoming c all.
Page 56

NAM Number assignment module, which consists of a phone number and
network information that your service provider programs into your
phone. If available, this allows you to have two phone numbers that
are activated in different service areas, thus avoiding roaming fees.
OTASP Over the air service provisioning/programming, which allows you to
program a phone ov e r t h e air.
power
save mode
When you haven’t used your phone for a certain amount of time, the
phone goes into a lower-energy-consumption state, and stays here
until a call comes in or you press a key.
power off To turn off the phone by pressing . When you turn off the phone,
it is unable to send or receive calls. See idle standby mode.
power on To turn on the phone by pressing . When you turn on the phone,
it is able to send an receive calls.
recent
calls list
The last ten unique incoming or outgoing calls, when the phone
number is available.
roam alert A display icon that tells you that you are moving out of your home
service area,and phone prices, feature availability, and service may
change.
roaming Using telephone services outside of the area covered by your home
service provider.
service
An area in which a service provider’s terms of use apply u nifo rmly.
area
52
Page 57

service
provider
A company which provides certain phone services, such as basic
phone service, long distance, call waiting, three-way calling and so
on. Phones may have the ability to perform these functions, but they
cannot do so unless the infrastructure is available and you have opted
to pay for the service(s).
signal
strength
The degree of radio frequ ency energ y available to the phone. Weather
and distance both affect signal strength. If signal strength is weak, call
quality may decrease or the call may be disconnected. An icon on the
phone displays the signal strength.
Silence All
mode
A state in which all phone sounds are silenced, including ringer and
alerts. When the phone is in Silence All mode, you may still receive
vibration alerts or have the backlight flash.
speed dial The process of quickly dialing a stored phone number by entering the
memory location and pressing .
Smart
Sound
A feature which allows the phone to automatically adjust the earpiece
volume based on the amount of noise around you or on the other
person’s voice volume level.
soft
Items which can be selected from the phone’s menu.
options
standby
time
The amount of time that the phone can maintai n po w er w hen it is on
and in idle standby mode.
talk time The amount of time that you can talk on a wireless phone when the
battery is fully charged.
User’s Guide for the QCP 2008 and QCP 2035 phones 53
Page 58

three-way
calling
A service-provider feature which allows phone calls between three
people instead of two.
trimode A phone which can operate in CD M A di gi tal service at 800 and 1900
MHz, and analog cellular service at 800 MHz.
URL Universal Resource Locator, the address of an Internet location. A
URL typically uses the form http://www.locationname.com
web
A tool which allows you to browse the Internet.
browser
wireless
phone
54
A fixed or portable phone which is not connected to a power
infrastructure by physical cable.
Page 59

User’s Guide for the QCP 2008 and QCP 2035 phones 55
Page 60

56
Page 61

Index
Numerics
1-Touch Dial 12, 13
A
alarm clock 5, 37
answering calls 3
Auto-Save 11
B
battery
care and safety 7
charge icon 5
improving performance 7
Bell icon 5
C
calculator 37
calls
answering 3
ending 3
making 3
characters
French 18
international 18
Portuguese 18
Spanish 18
Clear key 1
User’s Guide for the QCP 2008 and QCP 2035 phones 57
contact
deleting 15
editing 14
Contacts book
calling from 13
countdown ti me r 39
D
data/fax setup 29
dialing
from Contacts book 17
from Recent Calls list 14
E
End/Power key 1
ending calls 3
H
hanging up 3
hard pause 20
I
Internet browser 35
K
keypad
locking 4
L
languages
Page 62

entering special characters 18
letters
entering special characters 18
international characters 18
switching cases 18
locking
keypad 4
phone 25
M
making calls 3
messages
auto-delete 30
N
Navigator key 1
numbers, entering 18
O
on call icon 5
P
performance
battery 7
phone number
finding your own 3
saving as contact 11
saving automatically 11
powering off the phone 3
powering on the phone 3
58
power-save mode 7
Q
QCP 2008 3
QCP 2035 3
R
radio frequency, see RF energy
Recent Ca lls list
descript i o n of 14
dialing from 14
viewing 14
redial, last number called 13
resetting the phone 46
RF energy 46
exposure 46
S
safety
RF energy 46
road 45
saving a phone num b er 9
screen
icons 5
searching
by card category 16
by name 16
by speed dial location 16
Select key 1
Page 63

Shift key 1
silence
alerts 4
ringer 4
Silence All Mode 23
Smart Sound (see also volume,
adjusting automatically) 4
Sounds 24
Space key 1
V
voice mail
calling 13
setting speed dial number for 13
volume
adjustin g automatically 4
automatic gain contr o l (AGC) 4
setting 4
Smart Sound 4
speed dial 12
standby time
battery charge icon 5
stopwatch 39
T
talk time
battery charge icon 5
timed pause 20
timer
countdown timer 39
stopwatch 39
turning off the phone 3
turning on the phone 3
U
unlocking
phone 25
User’s Guide for the QCP 2008 and QCP 2035 phones 59
Page 64

60
Page 65

Page 66

10300 Campus Point Drive, San Diego, California 92121-1714 USA
To purchase accessories, visit: www.kyocera-wireless.com/store
Visit us at: www.kyocera-wireless.com
80-B6426-1, Rev. -
 Loading...