

Page 1
The Kyocera 7135
Smartphone
Reference Guide
10300 Campus Point Drive
San Diego, California 92121 U.S.A.
Visit us at www.kyocera-wireless.com
For accessories, visit www.kyocera-wireless.com/store
82-K5033-4, Rev. 001
Page 2

This manual is based on the production version of the 7135 smartphone by Kyocera. Software changes may have
occurred after this printi ng. K yocera res erves the rig ht to ma ke ch anges in tec hnica l and p roduct spec ificat ions wi thout
prior notice. The products and equipment described in this documentation are manufactured under license from
QUALCOMM Incorporated under one or more of the following U.S. patents:
4,901,307 5,056,109 5,099,204 5,101,501 5,103,459 5,107,225 5,109,390 5,193,094 5,228,054
5,257,283 5,265,119 5,267,261 5,267,262 5,280,472 5,283,536 5,289,527 5,307,405 5,309,474
5,337,338 5,339,046 5,341,456 5,383,219 5,392,287 5,396,516 D356,560 5,408,697 5,414,728
5,414,796 5,416,797 5,426,392 5,437,055 D361,065 5,442,322 5,442,627 5,452,473 5,461,639
5,469,115 5,469,471 5,471,497 5,475,870 5,479,475 5,483,696 5,485,486 5,487,175 5,490,165
5,497,395 5,499,280 5,504,773 5,506,865 5,509,015 5,509,035 5,511,067 5,511,073 5,513,176
5,515,177 5,517,323 5,519,761 5,528,593 5,530,928 5,533,011 5,535,239 5,539,531 5,544,196
5,544,223 5,546,459 5,548,812 5,559,881 5,559,865 5,561,618 5,564,083 5,566,000 5,566,206
5,566,357 5,568,483 5,574,773 5,574,987 D375,740 5,576,662 5,577,022 5,577,265 D375,937
5,588,043 D376,804 5,589,756 5,590,069 5,590,406 5,590,408 5,592,548 5,594,718 5,596,570
5,600,754 5,602,834 5,602,833 5,603,096 5,604,459 5,604,730 5,608,722 5,614,806 5,617,060
5,621,752 5,621,784 5,621,853 5,625,876 5,627,857 5,629,955 5,629,975 5,638,412 5,640,414
5,642,398 5,644,591 5,644,596 5,646,991 5,652,814 5,654,979 5,655,220 5,657,420 5,659,569
5,663,807 5,666,122 5,673,259 5,675,581 5,675,644 5,680,395 5,687,229 D386,186 5,689,557
5,691,974 5,692,006 5,696,468 5,697,055 5,703,902 5,704,001 5,708,448 5,710,521 5,710,758
5,710,768 5,710,784 5,715,236 5,715,526 5,722,044 5,722,053 5,722,061 5,722,063 5,724,385
5,727,123 5,729,540 5,732,134 5,732,341 5,734,716 5,737,687 5,737,708 5,742,734 D393,856
5,748,104 5,751,725 5,751,761 5,751,901 5,754,533 5,754,542 5,754,733 5,757,767 5,757,858
5,758,266 5,761,204 5,764,687 5,774,496 5,777,990 5,778,024 5,778,338 5,781,543 5,781,856
5,781,867 5,784,406 5,784,532 5,790,589 5,790,632 5,793,338 D397,110 5,799,005 5,799,254
5,802,105 5,805,648 5,805,843 5,812,036 5,812,094 5,812,097 5,812,538 5,812,607 5,812,651
5,812,938 5,818,871 5,822,318 5,825,253 5,828,348 5,828,661 5,835,065 5,835,847 5,839,052
5,841,806 5,842,124 5,844,784 5,844,885 5,844,899 5,844,985 5,848,063 5,848,099 5,850,612
5,852,421 5,854,565 5,854,786 5,857,147 5,859,612 5,859,838 5,859,840 5,861,844 5,862,471
5,862,474 5,864,760 5,864,763 5,867,527 5,867,763 5,870,427 5,870,431 5,870,674 5,872,481
5,872,774 5,872,775 5,872,823 5,877,942 5,878,036 5,870,631 5,881,053 5,881,368 5,884,157
5,884,193 5,884,196 5,892,178 5,892,758 5,892,774 5,892,816 5,892,916 5,893,035 D407,701
5,898,920 5,903,554 5,903,862 D409,561 5,907,167 5,909,434 5,910,752 5,911,128 5,912,882
D410,893 5,914,950 5,915,235 5,917,708 5,917,811 5,917,812 5,917,837 5,920,284 5,920,834
D411,823 5,923,650 5,923,705 5,926,143 5,926,470 5,926,500 5,926,786 5,926,786 5,930,230
5,930,692 Other patents pending.
FCC/IC Notice
This device compl ies wit h p art 15 of the FC C rules . Opera tion i s subjec t to the followi ng tw o cond itions: (1 ) This d evic e
may not cause harmful interference, and (2) this device must accept any interference received, including interference
that may cause undesired operation.
The exposure standard for wireless mobile phones employs a unit of measurement known as the Specific Absorption
Rate, or SAR. The SAR limit set by the FCC is 1.6Watts per kilogram (W/kg). Tests for SAR are conducted using
standard operating positions specified by the FCC with the phone transmitting at its highest certified power level in all
tested frequency bands. Although the SAR is determined at the highest certified power level, the actual SAR level of
the phone while opera t in g c an b e wel l below the maximum value. Th is i s b ec aus e th e p hone is designed to operate at
multiple power levels so as to use only the power required to reach the network. In general, the closer you are to a
wireless base station antenna, the lower the power output.
Before a phone model is available for sale to the public, it must be tested and certified to the FCC that it does not
exceed the limit established by the government-adopted requirement for safe exposure. The tests are performed in
positions and locations (e.g., at the ear and worn on the body) as required by the FCC for each model. The highest
SAR value for this model phone when tes ted for use at the ear is 0.89 W/kg and when worn on the body at the waist is
0.34 W/kg. (Body-worn measurements differ among phone models, depending upon available accessories and FCC
requirements). While there may be differences between the SAR levels of various phones and at various positions,
they all meet the government requirement for safe exposure.
Page 3

Warning
Use only Kyocera Wi reless Corp . approve d accesso ries with Ky ocera Wi reless Cor p. phones . Use of a ny unauth orized
accessories may be dang erous an d will inv alida te the pho ne war rant y if said accesso rie s caus e damag e or a defec t to
the phone.
To comply with FCC radiation exposure requirements, use of this device for body-worn operational configurations is
limited to accessories tested and approved by Kyocera Wireless Corp. Other accessories used with this device for
body-worn operations must not contain any metallic components and must provide at least 22.75mm separation
distance includ ing the antenna an d the user’s body. Other b elt -clip s, ho lsters or s imila r acce ssorie s that h ave no t been
tested for body-worn SAR may not comply with FCC RF exposure limit and should be avoided.
Caution
The user is cautioned that changes or modifications not expressly approved by the party responsible for compliance
could void the warranty and user’s authority to operate the equipment.
Apple and Macintosh are registered trademarks, and iMac is a trademark of Apple Computer, Inc. Kyocera is a
registered trademark of Kyocera Corpor ation. QCP is a tra demark of Kyocera Wirele ss Co rp. Micros oft , Window s, an d
Windows NT are registered trademarks of Microsoft Corporation. Graffiti and HotSync are registered trademarks, and
Palm and the Palm Computing platform logo are trademarks of Palm, Inc., 3COM Corporation, or its subsidiaries.
Eudora is a regist ered tra dem ark o f the U ni ve rsi ty of I llinois Board of T rus tee s, lic en se d to Q UALC O MM Incorporated.
America Online and Compus erv e are regi ste red tradem ark s of Americ a On line, Inc. WinFax is a registered trademark
of Symantec Corporation. Other product and brand names may be trademarks or registered trademarks of their
respective owners.
Copyright © 2002 Kyocera Wireless Corp. All rights reserved. Printed in the United States of America.
Portions of this document are Copyright © 1998 3Com Corporation or its subsidiaries. Reprinted with permission.
82-K5033-4, Rev. 001
Page 4

Page 5

Contents
1 Introducing the Kyocera 7135 Smartphone . . . . . . . . . . . . . . . . . . . . . . . . . . . . . .1
What to do first . . . . . . . . . . . . . . . . . . . . . . . . . . . . . . . . . . . . . . . . . . . . . . . . . . . . . . . . . . .1
Turning the phone on and off . . . . . . . . . . . . . . . . . . . . . . . . . . . . . . . . . . . . . . . . . . . . . . .3
Phone features . . . . . . . . . . . . . . . . . . . . . . . . . . . . . . . . . . . . . . . . . . . . . . . . . . . . . . . . . . . .5
Palm applications . . . . . . . . . . . . . . . . . . . . . . . . . . . . . . . . . . . . . . . . . . . . . . . . . . . . . . . . .7
Accessories for your Kyocera 7135 Smartphone . . . . . . . . . . . . . . . . . . . . . . . . . . . . . . .8
Where to get more information . . . . . . . . . . . . . . . . . . . . . . . . . . . . . . . . . . . . . . . . . . . . .9
Where to go next . . . . . . . . . . . . . . . . . . . . . . . . . . . . . . . . . . . . . . . . . . . . . . . . . . . . . . . . . .9
2 Making and Receiving Calls . . . . . . . . . . . . . . . . . . . . . . . . . . . . . . . . . . . . . . . . .11
Dialing calls on the keypad . . . . . . . . . . . . . . . . . . . . . . . . . . . . . . . . . . . . . . . . . . . . . . . .11
Making a call from Speed Dial . . . . . . . . . . . . . . . . . . . . . . . . . . . . . . . . . . . . . . . . . . . . .12
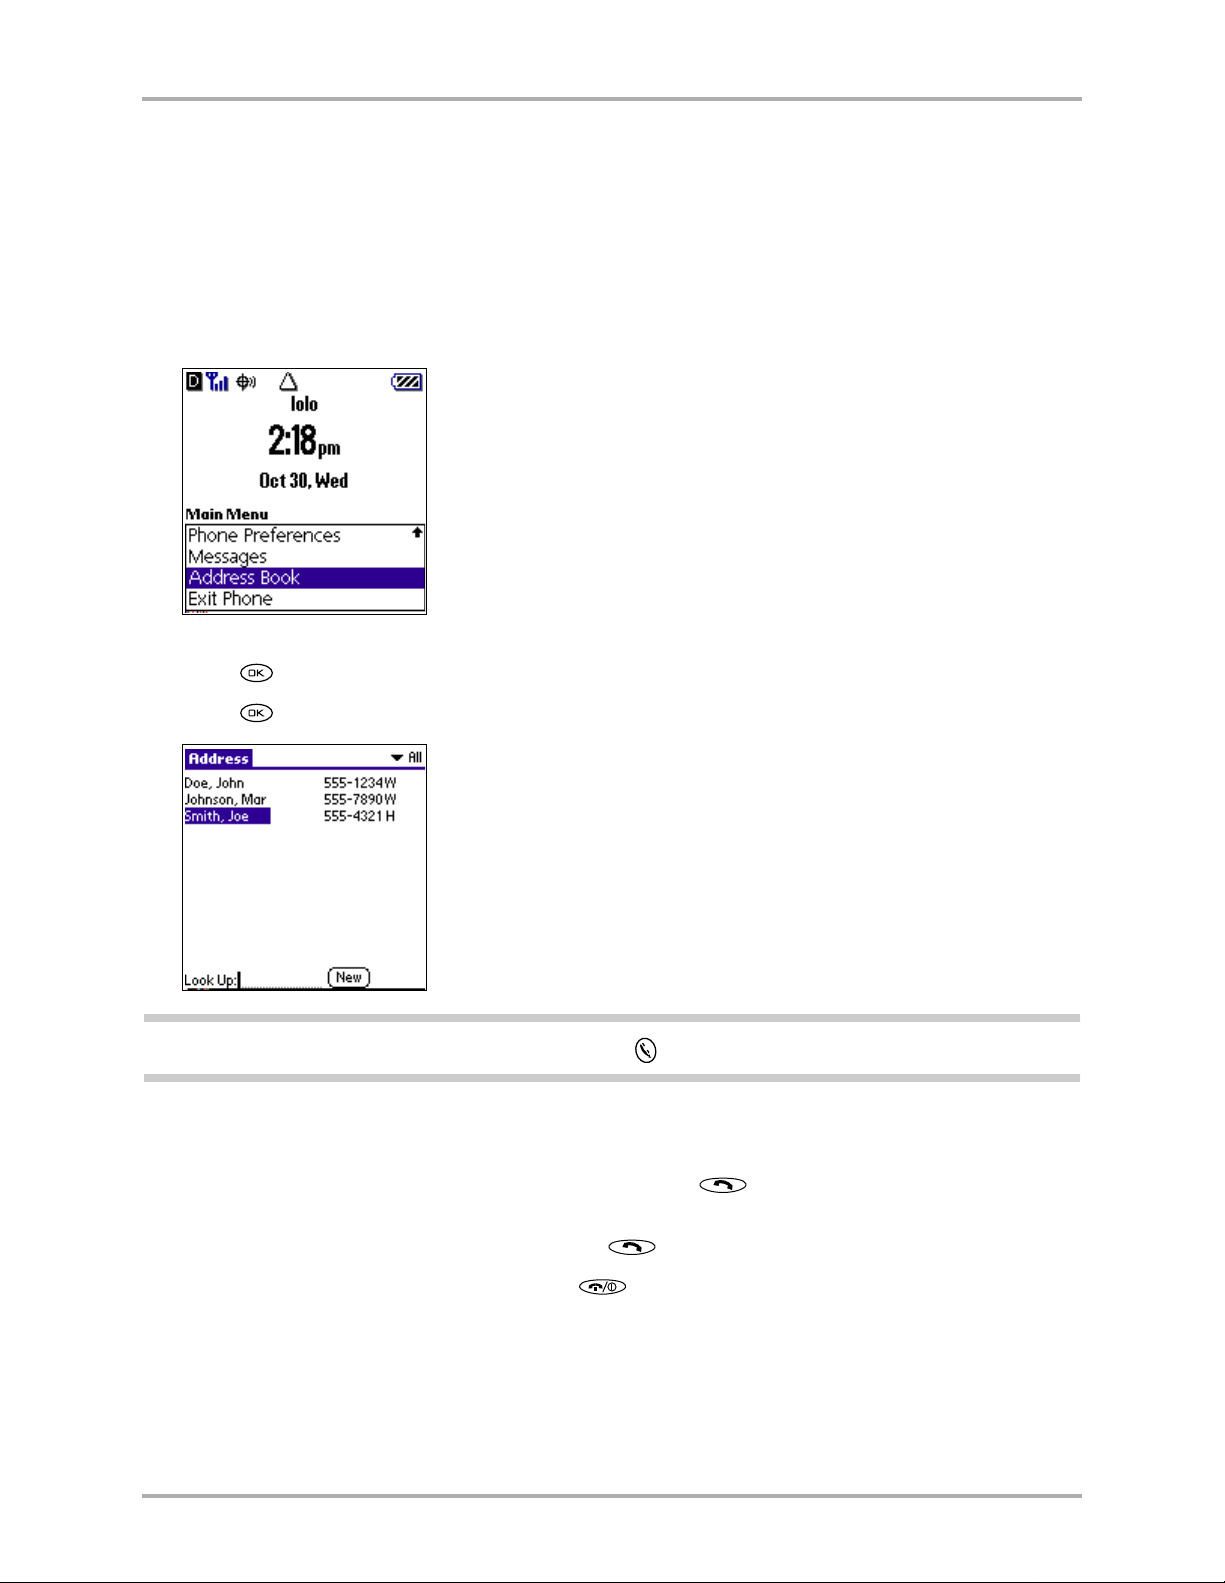
Making a call from the Address Book . . . . . . . . . . . . . . . . . . . . . . . . . . . . . . . . . . . . . . .13
Redialing recent calls . . . . . . . . . . . . . . . . . . . . . . . . . . . . . . . . . . . . . . . . . . . . . . . . . . . . .14
Checking your own phone number . . . . . . . . . . . . . . . . . . . . . . . . . . . . . . . . . . . . . . . . .16
Making a data connection . . . . . . . . . . . . . . . . . . . . . . . . . . . . . . . . . . . . . . . . . . . . . . . . .17
Answering calls . . . . . . . . . . . . . . . . . . . . . . . . . . . . . . . . . . . . . . . . . . . . . . . . . . . . . . . . . .17
Answering calls “hands-free” . . . . . . . . . . . . . . . . . . . . . . . . . . . . . . . . . . . . . . . . . . . . . .18
Ending calls . . . . . . . . . . . . . . . . . . . . . . . . . . . . . . . . . . . . . . . . . . . . . . . . . . . . . . . . . . . . .19
Adjusting sounds . . . . . . . . . . . . . . . . . . . . . . . . . . . . . . . . . . . . . . . . . . . . . . . . . . . . . . . .19
Seaching for contacts . . . . . . . . . . . . . . . . . . . . . . . . . . . . . . . . . . . . . . . . . . . . . . . . . . . . .21
Using power-save mode . . . . . . . . . . . . . . . . . . . . . . . . . . . . . . . . . . . . . . . . . . . . . . . . . .23
Viewing the phone status bar . . . . . . . . . . . . . . . . . . . . . . . . . . . . . . . . . . . . . . . . . . . . . .24
3 Using the Organizer . . . . . . . . . . . . . . . . . . . . . . . . . . . . . . . . . . . . . . . . . . . . . . . .25
Selecting applications . . . . . . . . . . . . . . . . . . . . . . . . . . . . . . . . . . . . . . . . . . . . . . . . . . . . .25
Entering information . . . . . . . . . . . . . . . . . . . . . . . . . . . . . . . . . . . . . . . . . . . . . . . . . . . . .27
Using application controls . . . . . . . . . . . . . . . . . . . . . . . . . . . . . . . . . . . . . . . . . . . . . . . . .34
Using menus . . . . . . . . . . . . . . . . . . . . . . . . . . . . . . . . . . . . . . . . . . . . . . . . . . . . . . . . . . . .34
Choosing fonts . . . . . . . . . . . . . . . . . . . . . . . . . . . . . . . . . . . . . . . . . . . . . . . . . . . . . . . . . . .36
Using categories . . . . . . . . . . . . . . . . . . . . . . . . . . . . . . . . . . . . . . . . . . . . . . . . . . . . . . . . .36
Attaching notes . . . . . . . . . . . . . . . . . . . . . . . . . . . . . . . . . . . . . . . . . . . . . . . . . . . . . . . . . .39
Marking private entries . . . . . . . . . . . . . . . . . . . . . . . . . . . . . . . . . . . . . . . . . . . . . . . . . . .40
Installing applications . . . . . . . . . . . . . . . . . . . . . . . . . . . . . . . . . . . . . . . . . . . . . . . . . . . .40
Removing applications from the phone . . . . . . . . . . . . . . . . . . . . . . . . . . . . . . . . . . . . .42
Removing the Desktop software . . . . . . . . . . . . . . . . . . . . . . . . . . . . . . . . . . . . . . . . . . .43
4 Transferring Information . . . . . . . . . . . . . . . . . . . . . . . . . . . . . . . . . . . . . . . . . . . .45
Installing Palm Desktop for the 7135 Smartphone . . . . . . . . . . . . . . . . . . . . . . . . . . . . .45
Synchronizing data using the sync cradle . . . . . . . . . . . . . . . . . . . . . . . . . . . . . . . . . . . .48
Synchronizing data remotely . . . . . . . . . . . . . . . . . . . . . . . . . . . . . . . . . . . . . . . . . . . . . .50
Synchronizing data using the infrared port . . . . . . . . . . . . . . . . . . . . . . . . . . . . . . . . . .54
v
Page 6

Creating a user profile . . . . . . . . . . . . . . . . . . . . . . . . . . . . . . . . . . . . . . . . . . . . . . . . . . . .58
Modifying synchronization options . . . . . . . . . . . . . . . . . . . . . . . . . . . . . . . . . . . . . . . . .60
Customizing a conduit . . . . . . . . . . . . . . . . . . . . . . . . . . . . . . . . . . . . . . . . . . . . . . . . . . . .61
Transferring information between Palm devices . . . . . . . . . . . . . . . . . . . . . . . . . . . . . .63
Troubleshooting HotSync operations . . . . . . . . . . . . . . . . . . . . . . . . . . . . . . . . . . . . . . .65
Beaming information . . . . . . . . . . . . . . . . . . . . . . . . . . . . . . . . . . . . . . . . . . . . . . . . . . . . .66
5 Address Book . . . . . . . . . . . . . . . . . . . . . . . . . . . . . . . . . . . . . . . . . . . . . . . . . . . . .69
Creating Address Book entries . . . . . . . . . . . . . . . . . . . . . . . . . . . . . . . . . . . . . . . . . . . . .69
Making calls from the Address Book . . . . . . . . . . . . . . . . . . . . . . . . . . . . . . . . . . . . . . . .70
Editing Address Book entries . . . . . . . . . . . . . . . . . . . . . . . . . . . . . . . . . . . . . . . . . . . . . .71
Beaming entries to other devices . . . . . . . . . . . . . . . . . . . . . . . . . . . . . . . . . . . . . . . . . . .75
Deleting entries . . . . . . . . . . . . . . . . . . . . . . . . . . . . . . . . . . . . . . . . . . . . . . . . . . . . . . . . . .77
Using Address Book menus . . . . . . . . . . . . . . . . . . . . . . . . . . . . . . . . . . . . . . . . . . . . . . .78
6 Call History
and the Recent Calls List . . . . . . . . . . . . . . . . . . . . . . . . . . . . . . . . . . . . . . . . . . . .81
Opening lists of your recent calls . . . . . . . . . . . . . . . . . . . . . . . . . . . . . . . . . . . . . . . . . . .81
Making a call from Call History . . . . . . . . . . . . . . . . . . . . . . . . . . . . . . . . . . . . . . . . . . . .82
Viewing your calls . . . . . . . . . . . . . . . . . . . . . . . . . . . . . . . . . . . . . . . . . . . . . . . . . . . . . . .83
Deleting calls . . . . . . . . . . . . . . . . . . . . . . . . . . . . . . . . . . . . . . . . . . . . . . . . . . . . . . . . . . . .85
Setting up your preferences in Call History . . . . . . . . . . . . . . . . . . . . . . . . . . . . . . . . . .85
Using the menus in Call History . . . . . . . . . . . . . . . . . . . . . . . . . . . . . . . . . . . . . . . . . . .86
7 Date Book . . . . . . . . . . . . . . . . . . . . . . . . . . . . . . . . . . . . . . . . . . . . . . . . . . . . . . . .89
Scheduling events in the Date Book . . . . . . . . . . . . . . . . . . . . . . . . . . . . . . . . . . . . . . . . .89
Scheduling repeating events . . . . . . . . . . . . . . . . . . . . . . . . . . . . . . . . . . . . . . . . . . . . . . .93
Deleting an event . . . . . . . . . . . . . . . . . . . . . . . . . . . . . . . . . . . . . . . . . . . . . . . . . . . . . . . .95
Changing the Date Book view . . . . . . . . . . . . . . . . . . . . . . . . . . . . . . . . . . . . . . . . . . . . .96
Using the Date Book menus . . . . . . . . . . . . . . . . . . . . . . . . . . . . . . . . . . . . . . . . . . . . . .100
8 Memos . . . . . . . . . . . . . . . . . . . . . . . . . . . . . . . . . . . . . . . . . . . . . . . . . . . . . . . . .103
Creating memos . . . . . . . . . . . . . . . . . . . . . . . . . . . . . . . . . . . . . . . . . . . . . . . . . . . . . . . .103
Reviewing and editing memos . . . . . . . . . . . . . . . . . . . . . . . . . . . . . . . . . . . . . . . . . . . .107
Beaming a memo . . . . . . . . . . . . . . . . . . . . . . . . . . . . . . . . . . . . . . . . . . . . . . . . . . . . . . . .109
Deleting a memo . . . . . . . . . . . . . . . . . . . . . . . . . . . . . . . . . . . . . . . . . . . . . . . . . . . . . . . .109
Using Memo menus . . . . . . . . . . . . . . . . . . . . . . . . . . . . . . . . . . . . . . . . . . . . . . . . . . . . .110
9 Messages . . . . . . . . . . . . . . . . . . . . . . . . . . . . . . . . . . . . . . . . . . . . . . . . . . . . . . .113
Setting up the Messages application . . . . . . . . . . . . . . . . . . . . . . . . . . . . . . . . . . . . . . .113
Checking your messages . . . . . . . . . . . . . . . . . . . . . . . . . . . . . . . . . . . . . . . . . . . . . . . . .114
Erasing messages . . . . . . . . . . . . . . . . . . . . . . . . . . . . . . . . . . . . . . . . . . . . . . . . . . . . . . .118
Setting preferences . . . . . . . . . . . . . . . . . . . . . . . . . . . . . . . . . . . . . . . . . . . . . . . . . . . . . .120
10 Setting Up Network Connections . . . . . . . . . . . . . . . . . . . . . . . . . . . . . . . . . . . .123
Getting started with network connections . . . . . . . . . . . . . . . . . . . . . . . . . . . . . . . . . .123
Entering network settings . . . . . . . . . . . . . . . . . . . . . . . . . . . . . . . . . . . . . . . . . . . . . . . .124
Creating and using service templates . . . . . . . . . . . . . . . . . . . . . . . . . . . . . . . . . . . . . .130
vi Kyocera Smartphone Reference Guide
Page 7

Using service template menus . . . . . . . . . . . . . . . . . . . . . . . . . . . . . . . . . . . . . . . . . . . .132
Troubleshooting network connections . . . . . . . . . . . . . . . . . . . . . . . . . . . . . . . . . . . . .133
Creating a login script . . . . . . . . . . . . . . . . . . . . . . . . . . . . . . . . . . . . . . . . . . . . . . . . . . .133
Using Fax/Modem mode with the wireless modem . . . . . . . . . . . . . . . . . . . . . . . . . .136
11 Speed Dial . . . . . . . . . . . . . . . . . . . . . . . . . . . . . . . . . . . . . . . . . . . . . . . . . . . . . .141
Adding an entry to the Speed Dial list . . . . . . . . . . . . . . . . . . . . . . . . . . . . . . . . . . . . . .141
Making calls using Speed Dial . . . . . . . . . . . . . . . . . . . . . . . . . . . . . . . . . . . . . . . . . . . .143
Editing the Speed Dial list . . . . . . . . . . . . . . . . . . . . . . . . . . . . . . . . . . . . . . . . . . . . . . . .143
Deleting entries . . . . . . . . . . . . . . . . . . . . . . . . . . . . . . . . . . . . . . . . . . . . . . . . . . . . . . . . .145
Using Speed Dial menus . . . . . . . . . . . . . . . . . . . . . . . . . . . . . . . . . . . . . . . . . . . . . . . . .146
12 Setting Phone Preferences . . . . . . . . . . . . . . . . . . . . . . . . . . . . . . . . . . . . . . . . .147
About preferences . . . . . . . . . . . . . . . . . . . . . . . . . . . . . . . . . . . . . . . . . . . . . . . . . . . . . . .147
Setting Accessory preferences . . . . . . . . . . . . . . . . . . . . . . . . . . . . . . . . . . . . . . . . . . . . .148
Setting Dialing preferences . . . . . . . . . . . . . . . . . . . . . . . . . . . . . . . . . . . . . . . . . . . . . . .149
Setting Display preferences . . . . . . . . . . . . . . . . . . . . . . . . . . . . . . . . . . . . . . . . . . . . . . .150
Setting Flip preferences . . . . . . . . . . . . . . . . . . . . . . . . . . . . . . . . . . . . . . . . . . . . . . . . . .151
Setting Incoming Call preferences . . . . . . . . . . . . . . . . . . . . . . . . . . . . . . . . . . . . . . . . .152
Setting Keypad preferences . . . . . . . . . . . . . . . . . . . . . . . . . . . . . . . . . . . . . . . . . . . . . . .153
Setting Phone Alert preferences . . . . . . . . . . . . . . . . . . . . . . . . . . . . . . . . . . . . . . . . . . .154
Setting Phone Service preferences . . . . . . . . . . . . . . . . . . . . . . . . . . . . . . . . . . . . . . . . .155
Setting Power preferences . . . . . . . . . . . . . . . . . . . . . . . . . . . . . . . . . . . . . . . . . . . . . . . .157
Setting Security preferences . . . . . . . . . . . . . . . . . . . . . . . . . . . . . . . . . . . . . . . . . . . . . .158
Setting Voice Dialing preferences . . . . . . . . . . . . . . . . . . . . . . . . . . . . . . . . . . . . . . . . . .158
13 Setting PDA Preferences . . . . . . . . . . . . . . . . . . . . . . . . . . . . . . . . . . . . . . . . . . .159
About PDA preferences . . . . . . . . . . . . . . . . . . . . . . . . . . . . . . . . . . . . . . . . . . . . . . . . . .159
Setting Button preferences . . . . . . . . . . . . . . . . . . . . . . . . . . . . . . . . . . . . . . . . . . . . . . . .160
Setting Connection preferences . . . . . . . . . . . . . . . . . . . . . . . . . . . . . . . . . . . . . . . . . . .161
Setting the Date and Time . . . . . . . . . . . . . . . . . . . . . . . . . . . . . . . . . . . . . . . . . . . . . . . .164
Using the Digitizer . . . . . . . . . . . . . . . . . . . . . . . . . . . . . . . . . . . . . . . . . . . . . . . . . . . . . .165
Setting Format preferences . . . . . . . . . . . . . . . . . . . . . . . . . . . . . . . . . . . . . . . . . . . . . . .165
Setting General preferences . . . . . . . . . . . . . . . . . . . . . . . . . . . . . . . . . . . . . . . . . . . . . . .166
Setting Network preferences . . . . . . . . . . . . . . . . . . . . . . . . . . . . . . . . . . . . . . . . . . . . . .168
Setting Owner preferences . . . . . . . . . . . . . . . . . . . . . . . . . . . . . . . . . . . . . . . . . . . . . . .172
Setting ShortCuts preferences . . . . . . . . . . . . . . . . . . . . . . . . . . . . . . . . . . . . . . . . . . . . .172
14 To Do List . . . . . . . . . . . . . . . . . . . . . . . . . . . . . . . . . . . . . . . . . . . . . . . . . . . . . . .175
Creating To Do items . . . . . . . . . . . . . . . . . . . . . . . . . . . . . . . . . . . . . . . . . . . . . . . . . . . .175
Setting Item Details . . . . . . . . . . . . . . . . . . . . . . . . . . . . . . . . . . . . . . . . . . . . . . . . . . . . . .177
Attaching a Note . . . . . . . . . . . . . . . . . . . . . . . . . . . . . . . . . . . . . . . . . . . . . . . . . . . . . . . .179
Deleting a To Do item . . . . . . . . . . . . . . . . . . . . . . . . . . . . . . . . . . . . . . . . . . . . . . . . . . . .179
Sorting and Managing your To Do list . . . . . . . . . . . . . . . . . . . . . . . . . . . . . . . . . . . . .181
Changing the To Do List Screen Font . . . . . . . . . . . . . . . . . . . . . . . . . . . . . . . . . . . . . .182
Adding Contact Information to a To Do Item . . . . . . . . . . . . . . . . . . . . . . . . . . . . . . .183
Making Items Private . . . . . . . . . . . . . . . . . . . . . . . . . . . . . . . . . . . . . . . . . . . . . . . . . . . .183
Beaming Items and Categories . . . . . . . . . . . . . . . . . . . . . . . . . . . . . . . . . . . . . . . . . . . .184
vii
Page 8

15 Voice Dial . . . . . . . . . . . . . . . . . . . . . . . . . . . . . . . . . . . . . . . . . . . . . . . . . . . . . . .185
Training Voice Dial . . . . . . . . . . . . . . . . . . . . . . . . . . . . . . . . . . . . . . . . . . . . . . . . . . . . . .185
Making and answering calls with Voice Dial . . . . . . . . . . . . . . . . . . . . . . . . . . . . . . . .186
16 Troubleshooting . . . . . . . . . . . . . . . . . . . . . . . . . . . . . . . . . . . . . . . . . . . . . . . . .187
Where to find help . . . . . . . . . . . . . . . . . . . . . . . . . . . . . . . . . . . . . . . . . . . . . . . . . . . . . .187
Resetting the phone . . . . . . . . . . . . . . . . . . . . . . . . . . . . . . . . . . . . . . . . . . . . . . . . . . . . .189
Troubleshooting tips . . . . . . . . . . . . . . . . . . . . . . . . . . . . . . . . . . . . . . . . . . . . . . . . . . . . .190
Phone care . . . . . . . . . . . . . . . . . . . . . . . . . . . . . . . . . . . . . . . . . . . . . . . . . . . . . . . . . . . . .193
Safety information . . . . . . . . . . . . . . . . . . . . . . . . . . . . . . . . . . . . . . . . . . . . . . . . . . . . . . .196
viii Kyocera Smartphone Reference Guide
Page 9
Chapter 1
Introducing the Kyocera 7135 Smartphone
Congratulations on your purchase of the Kyocera 7135 smartphone.
Your new phone combines many leading-edge technologies, giving you the convenience of a
CDMA digital phone, an electronic organizer, a media player, an MP3 player, and many other
applications in a single handset.
The Kyocera smartphone looks and works like other phones and electronic organizers you may
already have used. But it is much more, since it is both a phone and an organizer. Because these
features are completely integrated, you can use the telephone features and the organizer features
together or independently. You can use the organizer applications without turning the phone on
at all.
This chapter introduces your phone and provides an overview of its features.
What to do first
Before first use, you must install the main battery and fully charge it. You must also allow enough
time for the internal backup battery to charge completely. You will need the following:
■ Kyocera 7135 smartphone
■ battery
■ phone power cable
■ sync cradle (optional)
To install the battery
Before using the phone for the first time, you must install and fully charge the battery.
1. With the phone turned off, use the stylus or your finger to open
the battery compartment on the lower back of the phone. Lift off
the battery compartment cover.
2. Slide the battery into the compartment with the Kyocera label
facing up toward you and the arrow pointing toward the bottom
of the phone. The end of the battery with three copper-colored
depressions goes toward the bottom of the phone.
Chapter 1 Introducing the Kyocera 7135 Smartphone 1
Page 10
What to do first
3. Apply gentle pressure until the battery snaps into place. Then replace the battery cover by
inserting the top of the battery cover first. Apply gentle pressure to the bottom of the battery
cover to snap it closed.
Note: In addition to the main battery you just installed, your phone has an internal backup battery. During
shipment, this back up battery may have become di scharg ed. If so, the phone will not power up immed iatel y
after you install the mai n battery. Just connect the phone to the power cable or place it in the cradle as
explained in the next section.
To charge the batteries
Both the batteries—the main battery you just installed and the internal backup battery—are
recharged when the phone is connected to power. You can charge the batteries using either the
power cable or the sync cradle.
To charge the batteries using the power cable
1. Insert the small round plug of the power cable (a) into the
round port on the base of the phone. Plug the other end into
an AC power outlet.
The message “Phone is charging” appears on the screen. Before
your first use of the phone, wait until the message “Charging is
complete” appears. If the battery is completely drained, it may
take 2–3 hours to charge the first time.
Insert small round
plug here
2. Unplug the phone from the power cable.
To charge the batteries in the sync cradle
1. Place the sync cradle on a flat surface near your computer.
2. Insert the small round plug of the power cable (a) into the base of the sync cradle. Plug the
cable’s other end into a power outlet.
3. To attach the sync cradle to your computer:
■ Turn off the computer.
■ Plug the data cable from the sync cradle into a Universal Serial Bus serial communications
(COM) port (b) or the RS-232 serial port (c) on your computer. The sync cradle requires a
dedicated port; it cannot share a port with an internal modem, IR port, or other device.
■ Turn on the computer.
2 Kyocera 7135 Smartphone Reference Guide
Page 11
Turning the phone on and off
4. Slide the base of the phone into the sync cradle.
The message “Phone is charging” appears on the screen.
Before your first use of the phone, wait until the message
“Charging is complete” appears. If the battery is completely
drained, it may take 2-3 hours to charge the first time.
Once the main battery is charged, you can use the Kyocera
7135 Smartphone in or out the cradle for all functions.
Leaving the phone in the cradle when not being used is a
convenient way to keep the battery charged.
5. If you purchased an extra battery, i t can be recharged in the cra dle at the same time. Slide the
battery into the rear port with the Kyocera label facing up.
The light on the sync cradle shows the battery’s status in the rear port.
■ No light—No battery installed.
■ Red—Battery charging.
■ Green—Battery fully charged.
■ Slow flas hing r ed—Battery is not ma king contact or there is a charging problem. Reset the
battery. If the problem is not resolved, contact your service provider.
■ Fast fla shing r ed—An incorrect charging accessory is being used to charge the battery. Use
only the Kyocera 7135 sync cradle or the correct power cable.
Note: The first port filled is the first port charged. If you insert an extra battery into the rear port before
placing the phone in the f ront port, the extra battery is char ged first.
Turning the phone on and off
To turn on the phone for the first time
1. Flip the phone open and press and hold for a few seconds. You see the message
“Powering on”.
2. Remove the stylus from its slot on the top left side of the phone.
3. Follow the procedures i n the welcome screens t o calibrate the phone. Use the styl us to tap the
screen when instructed.
Chapter 1 Introducing the Kyocera 7135 Smartphone 3
Page 12
Turning the phone on and off
4. Follow the instructions and tap the Graffiti writing area below the screen.
5. When finished calibrating the screen, tap Done. The phone is now ready to use.
Note: To prevent scratches, never use a pen, pencil, or other sharp object to tap or write on the screen.
To turn the phone on and off anytime
1. Press and hold down for a few seconds. Status messages appear on the screen.
Phone is ON.
Phone is
searching or OFF.
Phone is OFF.
Hold To Po wer On . Powering On.
Hold To Power Off.
Powering Off.
If a signal is
found
If no signal is
found
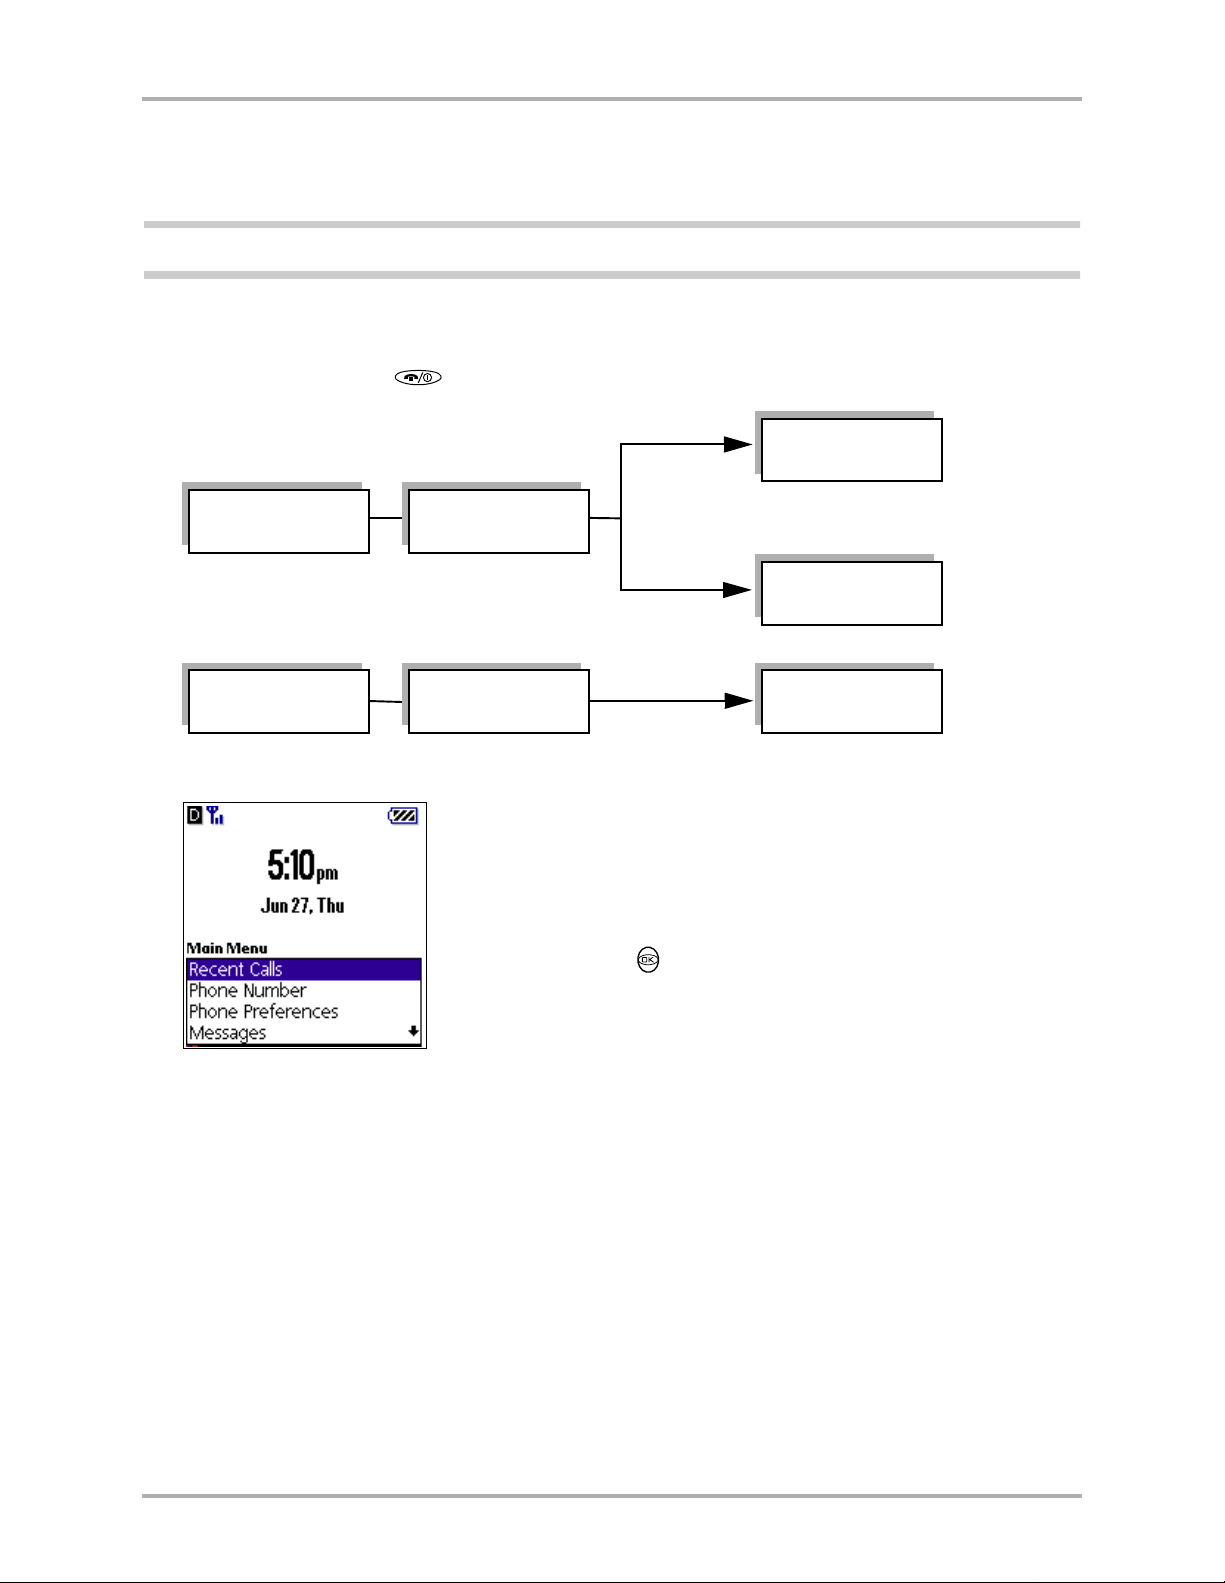
2. When the phone is on and it finds a signal, the home screen appears.
The home screen gives
information abo ut
battery power and signal
strength. From this
screen, access menus
by pressing the
navigation key
4 Kyocera 7135 Smartphone Reference Guide
Page 13
Phone features
Getting to know the function keys
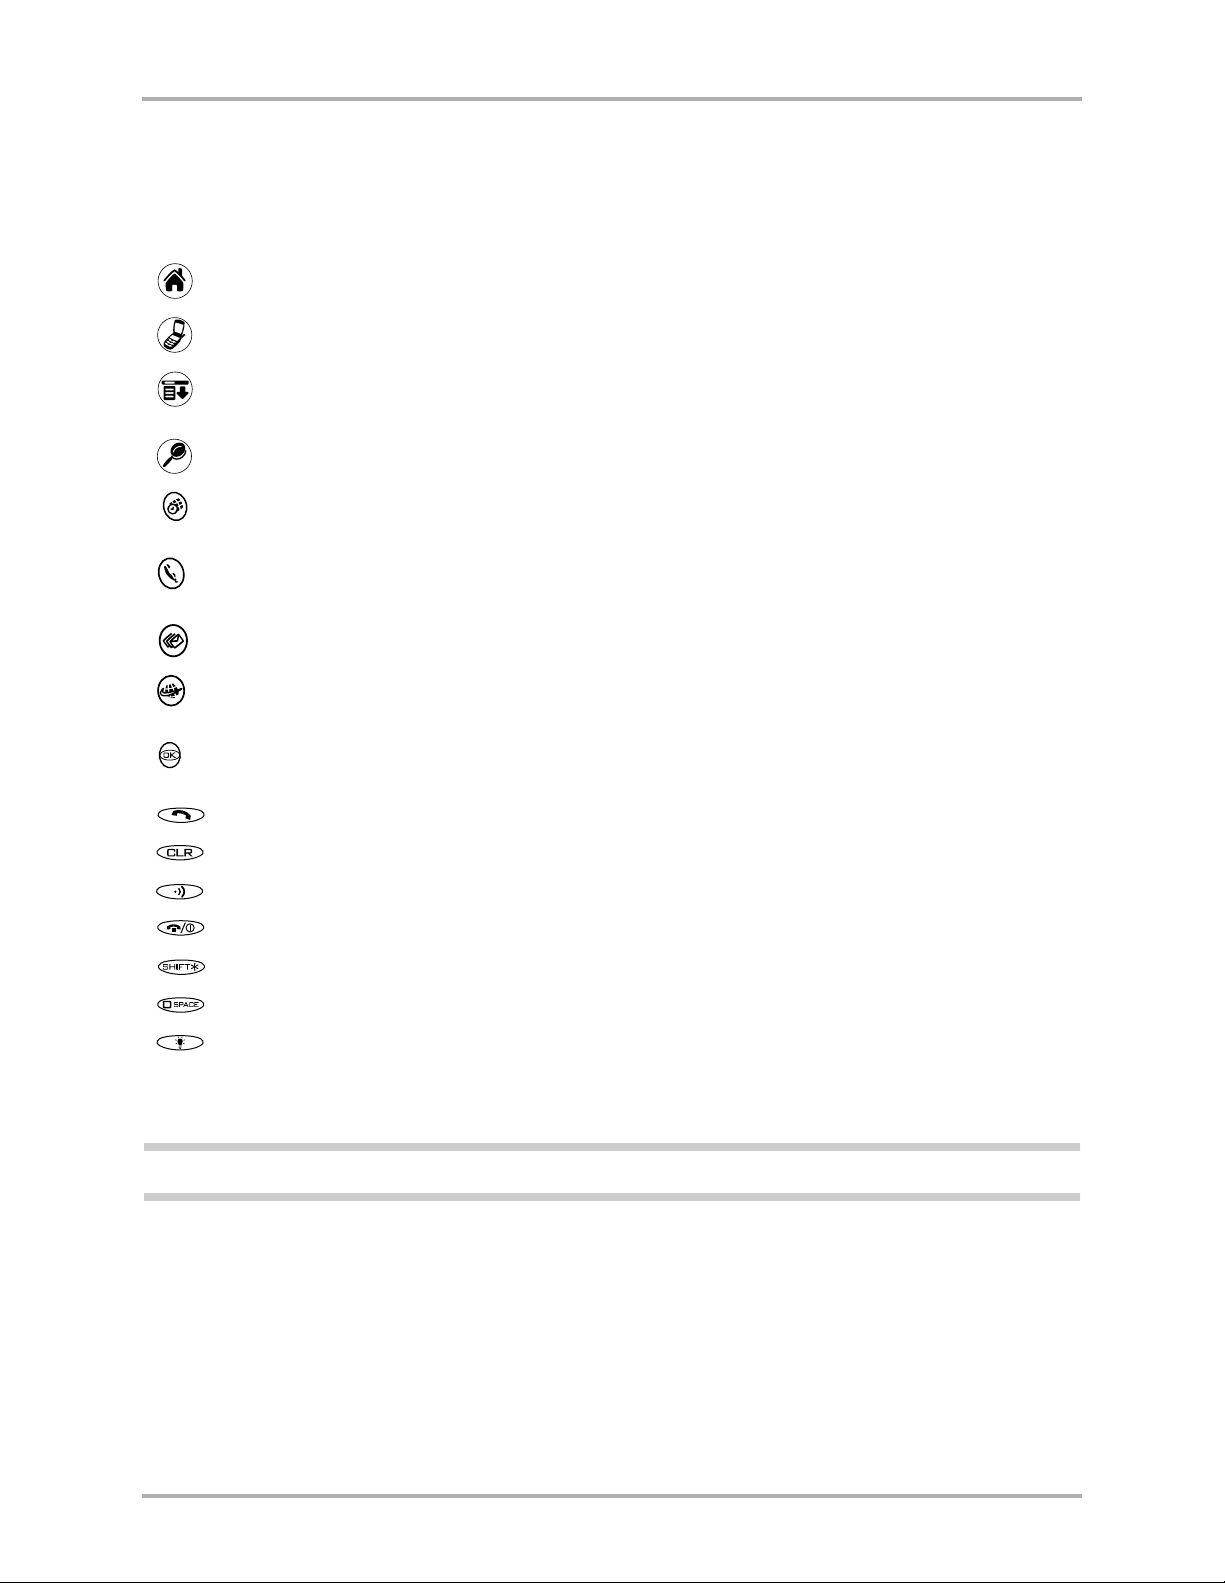
PDA key takes you to the Application Launcher screen.
Dialer key shows the main screen of the phone.
Dropdown menu key allows you to perform selected functions in the application you
are using.
Find key allows you to search for files and applications on your smartphone.
Date book key opens the date book to schedule appointments and view entries by hour,
day, or month.
Address book key opens the address book where contact names, phone numbers, email
addresses, and other information are stored.
Messages key opens your Messages In-box to view text messages and access voice mail.
Phone features
Web key opens the EIS Web application to browse the Internet. View HTML Web pages
with images, with support for downloads, Javascript, and SSL.
Navigator key scrolls through lists and menus. Press the key up or down to highlight an
item. Press the center of the key to select the item.
Send/Talk key starts or answers a call.
Clear key erases the last character entered from the keypad or an application.
Speakerphone key turns speakerphone on and off.
End/Power key turns the phone on and off, ends a call, or returns to the home screen.
Shift key changes the text mode in text entry.
Space key enters a space during text entry.
Backlight button turns the phone screen and PDA on and off. Press and hold the backlight
button to turn the backlight on and off. You can still see the screen. A press of the
backlight turns the PDA off until you press any key.
Note: The Date book, Address bo ok, me ssages, a nd Web keys can be cus tomiz ed to represent any functi on.
Chapter 1 Introducing the Kyocera 7135 Smartphone 5
Page 14
Phone features
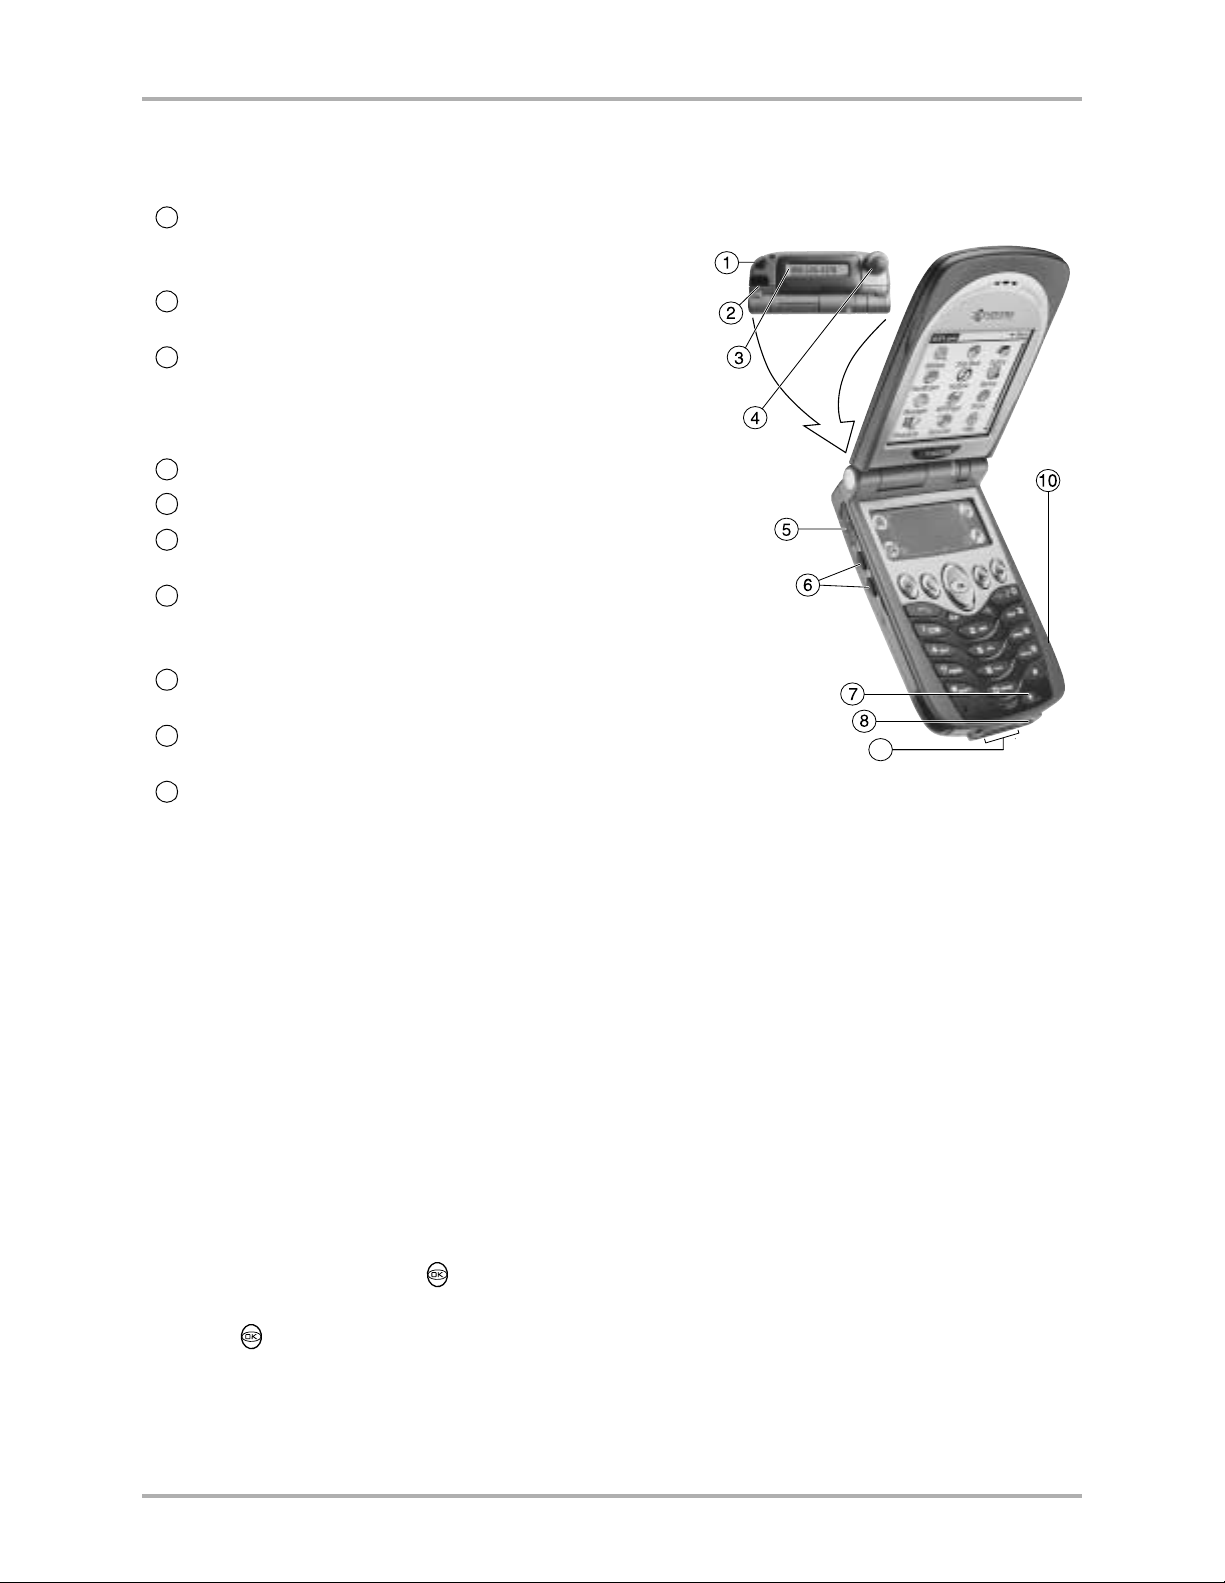
Getting to know your phone
1
—Slide the stylus out of its slot. Hold like a pen
Stylus
to write on the screen. Never use a pen, pencil, or
other sharp object on the screen.
2
Infrared port
—Point the infrared port at other devices
to beam data.
3
LED (light-emitting diode)
Green = Home area
Amber = Roaming
Red = No signal
4
Antenna
5
Headset jack
6
Volume up and down
—Extend during calls.
—Plug in the 2.5 mm headset cable here.
—Press these buttons to increase
or decrease phone volume.
7
Backlight button
—Press the button to turn the phone
screen on and off. Press and hold to turn the
backlight on and off.
8
Power port
—Plug in the power cable here to recharge
the battery.
9
Data port/MP3 Port
—Plug in the data cable here to
download data and MP3s.
10
Expansion slot
—Insert a media card here to expand
available memory on your smartphone.
9
When the phone is turned on
■ You can send and receive calls. If there is an incoming, outgoing, or active phone call,
information about the call appears on the screen.
■ If you are using another application (like Mail) when the phone rings, you can answer the call
and your smartphone saves any unfinished work automatically.
When the phone is turned off
■ You can use all the organizer features, but you cannot send or receive calls, send or receive
email, or search the Web.
Using the navigation key
The navigation key is pressed up and down. The center of the key is t he OK b utton; pressing this
selects any highlighted item.
■ Press the navigation key up or down to move through lists, text, or applications on
the screen.
■ Press in the center of the navigation key to select an item.
6 Kyocera 7135 Smartphone Reference Guide
Page 15

Status indicators
The phone screen shows the following information when the phone is on.
The phone is operating in CDMA digital mode. If this icon is not present, the phone is either
in analog mode or there is no service.
The phone is outside its home area (roaming).
This icon shows the current signal strength. The more lines, the stronger the signal.
When this icon appears, you can make and receive calls . If the sign al st re ngth is v ery low,
you may not be able to complete a call.
Geographic Positioning System (GPS) is enabled to share your location with emergency
services as well as your service provider.
Geographic Positioning System (GPS) shares your location with emergency services only.
The phone is not receiving a signal. You cannot make or receive calls.
A call is in progress.
You have a text message, voice mail, or page.
Palm applications
This icon shows how much power remains in the battery. The more black bars, the greater
the charge.
Speakerphone is enabled.
Checking LED status
The LED indicates the following states:
■ Green—Home. The phone is in its home area. The light flashes when a call is received, and
remains green during a call.
■ Amber—Roaming. The phone is in roaming mode. The light flashes when a call is received,
and remains amber during a call.
■ Red—No signal available. The phone is searching for a signal. On the top line of the screen,
the status bar displays icons that show the phone’s current status.
■ No light—The phone is off.
Palm applications
In your phone package, you find a CD-ROM containing third-party applications for sending
email, browsing the Internet, using web clipping services, downloading MP3 files, and others.
Many other applications are available on the Internet. For help with these applications, contact
their source. For example, if you need help with Eudora®, go to the Eudora web site
(www.eudora.com).
To use Palm applications
It does not matter whether the phone is turned on or off. You can use the Palm applications at
any time.
Chapter 1 Introducing the Kyocera 7135 Smartphone 7
Page 16

Accessories for your Kyocera 7135 Smart phone
Easy access to Palm applications during calls
If you’re talking on the phone and need to check information in another application (like Date
Book or Memo Pad), simply open the application you want to use. Your call is not affected by
opening any of the applications on your Kyocera 7135 Smartphone.
You can use the on-screen keyboard or stylus to add or change information (like appointments,
addresses, memos, etc.) during a call.
Note: The Kyocera 7135 Smartphone headset make s ent er ing infor mation dur i ng a phon e call ev en si mpler.
If you are already using a Palm device
If you are already familiar with Palm organizers, you’ll find the Kyocera 7135 Smartphone
operates the same way, with a few exceptions. Many applications like the Address Book are
enhanced so you can make phone calls directly from them.
■ Icons—Most icons and buttons are identical to those on your Palm organizer. Only the
Calculator icon is replaced with the Dialer icon. Tap this icon to view the phone’s main
screen. You’ll find the Calculator on the applications screen.
■ Transferring data—You can transfer all data from your existing Palm device to your new
Kyocera smartphone. Before doing so, however, be sure to read “Transferring information
between Palm devices” on page 63.
There are several ways to transfer data.
■ Synchronize the data—Follow this procedure only if you are not planning to use your Palm
device anymore. See “If you have two Palm devices with the same user name” on page 65.
■ Copy the data—Follow this procedure if you intend to use both devices on an ongoing basis.
Since every Palm handheld device must have a unique name, serious synchronization
problems may occur if you synchronize two Palm devices with the same user name.
Accessories for your Kyocera 7135 Smartphone
You can purchase a number of accessories for your phone, including:
■ Keyboard ■ Headsets
■ Adapters ■ Phone cases
■ Batteries ■ Cables
■ Chargers ■ Data products
For the full line of accessories, visit our Web site at
8 Kyocera 7135 Smartphone Reference Guide
http://www.kyocerasmartphone.com/store
Page 17

Where to get more information
Where to get more information
To learn about the many features of your Kyocera 7135 smartphone as quickly as possible, your
product package includes these documents.
■ User Guide—The 7135 User Guide gives a quick tour of the phone’s major features. It identifi es
all icons, buttons, and controls and explains how to use both phone and organizer features.
As you explore, you’ll notice there are many ways to use your phone. Each procedure begins
with a graphic telling you whether the phone should be on or not.
■ Reference Guide—This guide contains detailed information about the Kyocera 7135
smartphone and it’s applications. To view the guide, insert the CD-ROM in your computer
and select the PDF file. You can read and search through the guide on your computer or
print it out.You can also download the latest versions of all phone documentation at
www.kyocerasmartphone.com.
■ User Guide Library—This library of user guides contains detailed information about many of
the applications available for your Kyocera 7135 smartphone. To vi ew these guides, insert the
CD-ROM into your computer and click User Guides Library. Select a guide by clicing on it.
You can read and search through the guides or print selected pages. The latest versions of the
guides are available at
www.kyocerasmartphone.com.
Where to go next
Preferences
Your Kyocera 7135 smartphone can be configured to your individual taste using the phone and
PDA preferences screens. Your choices range from selecting ringer sounds to configuring the
phone for use on a network.
Network settings
Your Kyocera 7135 Smartphone is capable of connecting wireless ly to network services for email
and Internet access. To make these connections, your service provider must offer digital data
coverage in your area.
In most cases, if you have purchased data coverage, your Kyocera 7135 Smartphone has already
been configured for network services. The network settings are entered for you by your
service provider.
If your phone is not correctly configured, contact your service provider for the correct settings to
enter yourself. For details about network settings, see Chapter 10—“Setting Up Network
Connections”.
Chapter 1 Introducing the Kyocera 7135 Smartphone 9
Page 18

Where to go next
10 Kyocera 7135 Smartphone Reference Guide
Page 19

Chapter 2
Making and Receiving Calls
On your Kyocera 7135 smartphone, you can make calls in many different ways (for example, from
your Address Book or from the Call History list). You can also receive pages, check voice mail,
and make data connections to the Internet.
This chapter explains how to use your Kyocera 7135 smartphone as an integrated phone and
message manager.
Dialing calls on the keypad
To dial a call from the keypad
1. Extend the antenna and wait for the signal strength icon to appear.
2. Press the keys to enter the phone number.
As you dial, you can access information in your Speed Dial list and Address Book.
■ Speed Dial—The phone automatically checks your Speed Dial list and displays the
matching information. For example, if you set up 12 as a Speed Dial number, that entry
appears when you press 12. For details on setting up Speed Dial numbers, see “Adding an
entry to the Speed Dial list” on page 141.
■ Address Book—As you press the digit(s), the following options appear a t the bottom of the
screen: Save, Find, Time Pause, and Hard Pause. To check your Address Book, use the
navigation key to find and highlight Address Book. Then press the navigation key in.
Use the navigation key to scroll down through the options. They are View Address Book,
Add New Contact, View Speed Dial List, and View Voice Dial List. Once you have
highlighted your selection, press the navigation key. Select View Address Book. All the
phone numbers beginning with the digit(s) you have entered appear on the screen.
Press the navigation key down to until the one you want to call is highlighted.
3. When you have entered or selected the correct number, press to make the call.
4. When you have finished your call, press .
If you make an error while dialing
1. If you press the wrong key while dialing, press to remove the last digit you entered.
2. To remove all the digits you have entered, press and hold or press .
Kyocera 7135 Smartphone Reference Guide 11
Page 20
Making a call from Speed Dial
Making a call from Speed Dial
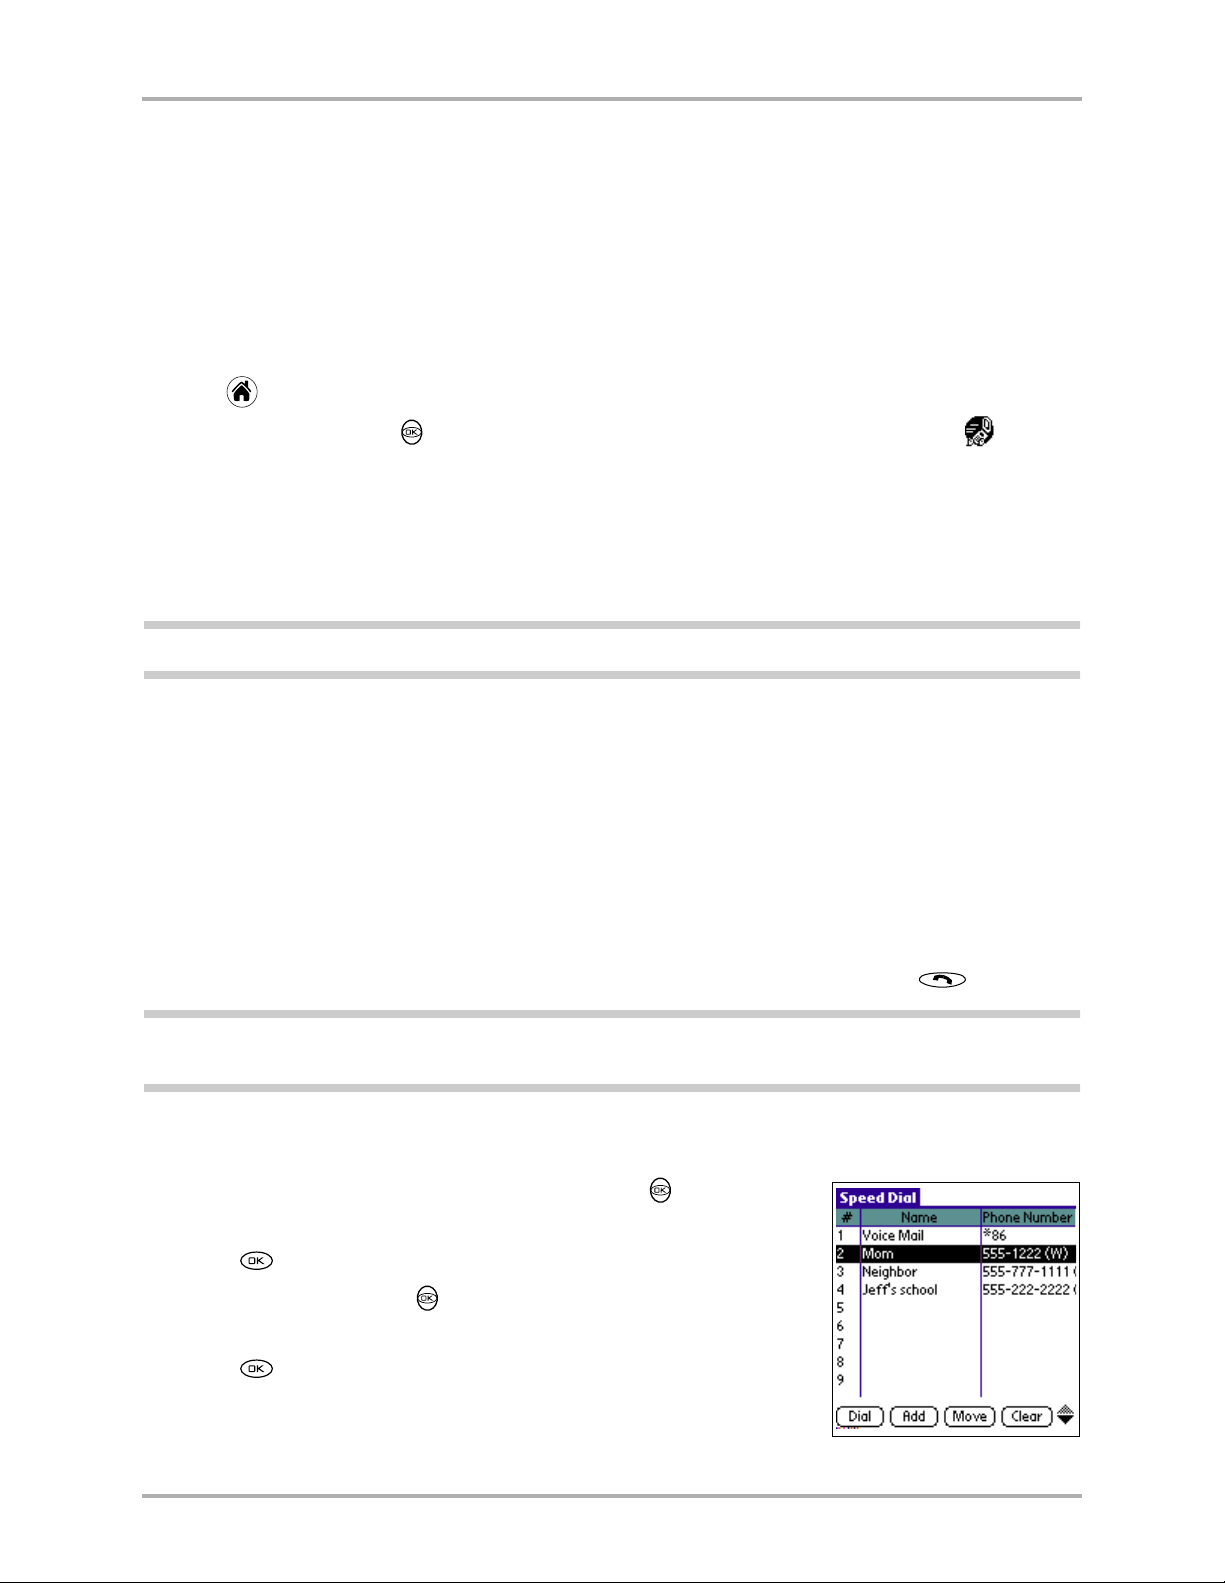
You can designate up to 99 phone numbers from your Address Book to be on your Spee d Dial list.
You can then call these numbers just by pressing the one or two-digit Speed Dial number
(1 through 99). Because Speed Dial is linked to the Address Book, when you change a phone
number in the Address Book, it automatically updates in the Speed Dial list.
To add numbers to your Speed Dial list
1. Tap to view the Applications screen.
2. Use the naviga tor key or tap the sc roll bar to mov e through applications. Tap to open
Speed Dial.
3. Tap on an empty speed dial location, then tap Add.
You are asked if you want to look up the phone number in your Address Book or create a new
entry. If the contact is not in your Address Book, tap New Entry and follow the on-screen
instructions. If the contact is listed in your Address Book, proceed with step 4.
Note: Speed Dial #1 has been assigned to voice mail. You cannot move, add, or delete this entry.
4. Tap Lookup.
5. Tap the entry you want to add to the Speed Dial list. Then tap Add. If the entry has more than
one phone number, select the one you want. The entry is added to the next available Speed
Dial number.
To make a call using Speed Dial
If you know the Speed Dial number
Press the Speed Dial number assigned to your contact on the keypad and press .
Note: Press the Speed Dial number on the keypad and hold down the final digit for a few seconds to place
the call.
If you need to look up the Speed Dial number
1. From the phone screen, press the navigator key up or down
to highlight
2. Press .
Address Book.
3. Press the navigator key up or down to select View Speed
Dial List.
4. Press .
12 Kyocera 7135 Smartphone Reference Guide
Page 21
Making a call from the Address Book
Making a call from the Address Book
You can view the names and numbers in your Address Book and place calls using the
Address book.
To make a call from the Address book
1. From the phone screen, press the navigator key down to highlight Address Book.
2. Press to select Address Book.
3. Press to select View Address Book.
Note: You may also open the address book b y pressing on the keypad.
4. Press the navigator key down to move through the list.
5. When the name you want to call is highlighted, do one of the following:
■ If there is only one number for this contact, press to make the call.
■ If there are several numbers for this contact, press the navigator key in to see them all.
Select the one you want, and then press .
6. When you have finished your call, press .
Chapter 2 Making and Receiving Calls 13
Page 22
Redialing recent calls
Alternate method for making a call from Address book
1. Scroll through the Address List using the navigator key. Locate the person or business you
want to call and do one of the following:
■ If the number you want to call appears in the list, tap the phone number (not the name) and
the call is placed.
■ To call an alternate number for an entry, tap in the right column. All additional
numbers for this person or business appear. Make your selection by tapping on the
number you want and the call is placed.
2. When you have finished your call, press .
Redialing recent calls
Your Kyocera 7135 smartphone provides several ways to redial numbers you have recent ly called
or received calls from.
Redial—Call the most recently dialed number by pressing twice.
Call History—Use the Call History application to return calls to any of the last 99 numbers you
either called or received calls from. For each call, you can see the phone number, name of caller
(if available), date and time of the call, and type of call (incoming, outgoing, or missed).
Duplicate calls are not removed from this list.
Recent Calls list—Use the Recent Calls list to return calls to any of the last 30 unique numbers you
either called or received calls from. Duplicate numbers are removed from this list. For each call,
you can see the phone number, name of caller (if available), and date and time of the call.
To redial the most recently called number
1. After the phone has acquired service, press .
A message prompts you to press again or to speak the number you want to call (if you
have set up Voice Recognition).
2. Press again.
14 Kyocera 7135 Smartphone Reference Guide
Page 23
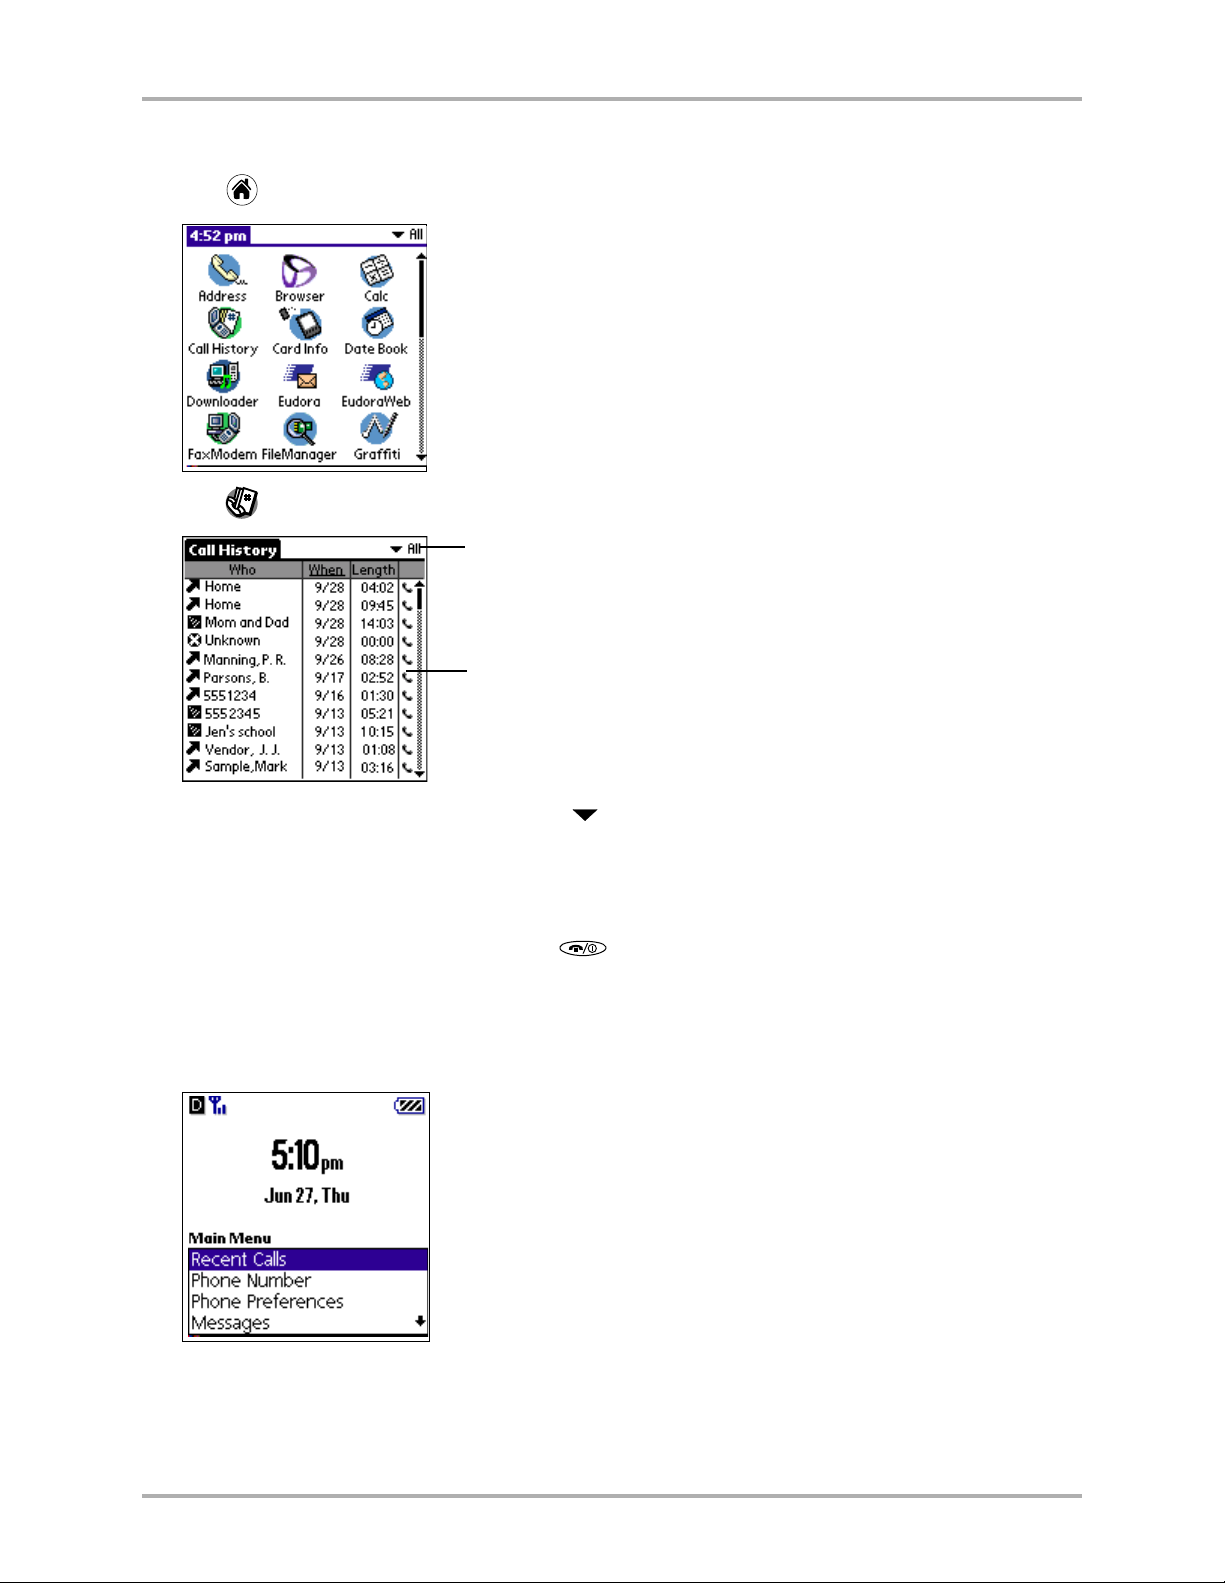
To make a call from Call History
1. Tap to view the applications screen.
2. Tap to open the Call History application.
Tap here to view all calls, incoming calls only,
outgoing calls only, or missed calls only.
Redialing recent calls
Tap the phone icon to return the call .
3. To display a speci fi c type of ca ll, tap the in the upper-right corner of the screen. From the
pick list, select
4. Scroll through the calls using the scroll bar on the right or the navigator key. When you find
Incoming, Outgoing, or Missed. To see all your calls, se lect All from the pick list.
the call you want to return, tap the phone icon beside it.
5. When you have finished your call, tap .
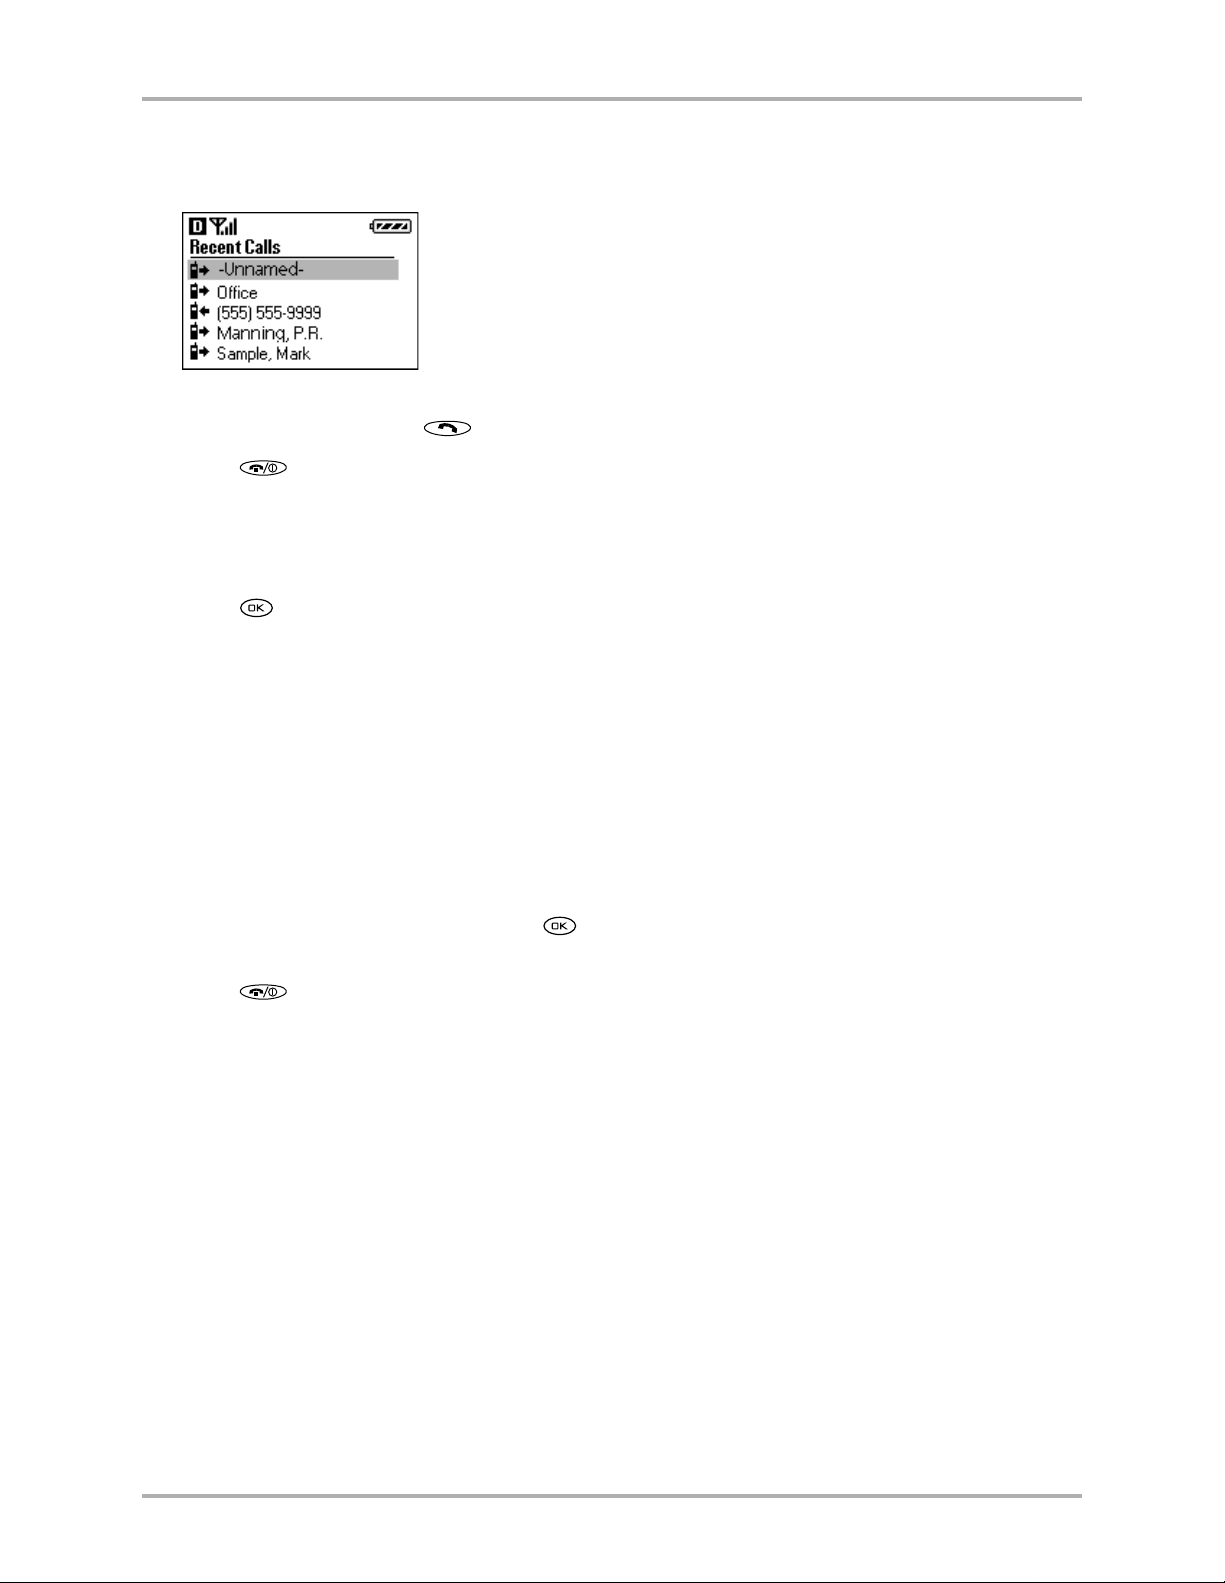
To make a call from the Recent Calls list
1. From the phone screen, use the navigator key to scroll to Recent Calls.
2. Press OK to select Recent Calls.
Chapter 2 Making and Receiving Calls 15
Page 24
Checking your own phone number
The Recent Calls list appears. This list contains the 30 most recent phone numbers for both
incoming and outgoing calls. Duplicate numbers are removed.
3. Press the navigator key up or down to move through the list. When the number you want to
call is highlighted, press once to make the call.
4. Press to end your call.
To add a number from the Recent Calls list to your address book
1. To add a number from the Recent Calls list to your Address Book, highlight the number and
press .
2. Press the navigator key up or down until Save i s highlighted. Then press the navigator key in.
You see a message confirming the number is saved in your Address Book.
Save and Exit appear at the bottom of the screen.
Checking your own phone number
To check your own phone number
1. From the phone screen, press the navigator key down.
2. Highlight Phone Number, then press to select it. The screen displays information about
your Kyocera 7135 smartphone, including your phone number.
3. Press to exit the screen.
16 Kyocera 7135 Smartphone Reference Guide
Page 25

Making a data connection
Making a data connecti on
You can use your Kyocera 7135 smartphone to connect to Internet Service Providers (ISPs)
or remote access servers. Once they have been set up, follow these procedures to make a
data connection.
To set up Network Preferences
Your phone is capable of connecting wirelessly to multiple
network services, depending on your service plan and your
carrier’s data coverage.
The connection setting is preselected for optimal speed and ease of
use; however, if you want an alternate connection, you can choose
from one of the other preprogrammed choices.
To change your network connection settings
1. Install your desired data application from the CD-ROM.
2. Tap to view the PDA Applications screen.
3. Tap to open Prefs PDA on your PDA Applications screen.
4. Use your stylus to tap in the upper-right corner. Select Network.
5. Tap next to Service and select a service option.
Note: Use caution when modifying your existing settings. You could impair your phone’s ability to connect
to a network. Consult the User Guide library for detailed instructions on using data applicat ions.
Answering calls
When you receive an incoming call, the phone rings, the backlight turns on, and the message
“Incoming Call” appears on the screen if the flip is open or on the LED on the top of the phone if
it is closed. If available, caller information from the Address Book also appears.
If you are working with an application (for example, entering addresses), your entries are not l ost
when you answer the phone. If you have set up Auto Answer or Voice Answer, you can answer
calls using your voice alone, without touching the phone.
To answer a call
1. Press .
Pressing always answers the call, even if the keypad is locked.
Note: You can customize your phone’s preferences and set it to answer a call when you open the flip.
Fromthe launcher screen, use your sty lus t o tap the s croll ba r on t he right side of t he screen t o scr oll d own.
Select Prefs Phone. In the upp er-right corner , tap the down arrow and us e your stylus to sele ct Flip Settings.
Check the box next to Answer call.
Chapter 2 Making and Receiving Calls 17
Page 26
Answering calls “hands-free”
If a call comes in while you’re on t he phone
If a call comes in while you are on the phone, the phone does not ring. A tone announces t he cal l
allowing you to either place the caller on hold, or send the caller a voicemail by ignoring the call.
The call is automatically added to the Call History list, whether you answer it or not. Call waiting
and messaging services vary depending on your service provider; contact your service provider
for information.
To put a caller on hold
1. To put a caller on hold, press .
2. To move between two callers, press again.
Answering calls “hands-free”
You can answer calls using your voice alone, without touching the phone. This capability is
particularly useful when the phone is in a hands-free car kit, but can be used at other times as well.
You can choose from the following options:
Auto Answer
(HFK only)
Voice Answer
All calls are answered automatically after about 5 seconds if the phone is in a
hands-free car kit.
After one ring, a voice prompt asks whether you want to answer the phone or not.
If you answer “Yes,” the call is answered. If you answer “No,” the call is sent to
voicemail. To use this method, the phone must be attac hed to a hands-f ree car kit ,
the sync cradle, or other powered accessory.
When you receive a call—The phone rings once and then puts the call through. If you selected On, all
calls are handled in this way. If you selected HFK only, calls are not answered automatically
unless the phone is in the hands-free car kit.
To set up and use Voice Answer
1. From the applications screen, tap to select Prefs Phone.
2. Tap in the upper-right corner of the screen and tap Voice Dialing to select it from the
dropdown list.
3. Tap the box for Voice Answer box.
Once you have selected this method, Voice Answer is in effect any time the phone is attached
to a powered accessory, such as the hands-free car kit.
When you receive a call—After one ring, a voice prompt asks you whether you want to answer the
phone or not. To accept the call, answer “Yes.” To send the call to your voice mail, answer “No.”
Note: If you have enabled both Auto Answer and Voice Answer, Auto Answer overrides t he other setting.
Calls are answered directly without the voice prompt.
18 Kyocera 7135 Smartphone Reference Guide
Page 27

Ending calls
Ending calls
To end a call
Press .
The length of the call in minutes and seconds appears on the screen for about 10 seconds.
Adjusting sounds
It is easy to adjust the spea ker volume, s et the microphone to mute, or turn off the ringe r on your
Kyocera 7135 smartphone.
You can adjust the ringer volume or set your phone to blink or vibrate instead of ringing when
you have an incoming call. For example, if you want to silence the ringer during a meeting, you
can do so using either the navigator key on the keypad or the Preferences screen.
You can make many adjustments to the sounds using the Preferences screens. You c an adjust the
phone ringer separately from alert beeps or other sounds. For example, if you have set an alert for
a Date Book event, the phone beepd at the scheduled time, even if the phone ringer is turned off.
To adjust the speaker volume
Press the volume up or volume down on the side of the phone during a call.
To mute the microphone during a call
The normal setting for your microphone is “unmute”, so your voice can be heard by the person
you are calling. But sometimes you may want to select mute (so your voice cannot be heard).
An example would be muting a phone conversation in order to speak privately to a person next
to you. You would select mute (so phone party cannot hear), have your private conversation, then
select unmute when ready to return to the phone party.
To mute the microphone:
1. During a call, the Options menu appears at the bottom of the screen. Mute is already
highlighted in the menu.
2. Press to select Mute. The phone party can no longer hear you. Unmute appears in
the menu.
3. To unmute your call, select Unmute and press . The phone party can hear your
voice again.
To put the phone in Speakerphone mode
1. Press the Speakerphone key .
2. To turn Speakerphone mode off, press the Speakerphone key .
Chapter 2 Making and Receiving Calls 19
Page 28
Adjusting sounds
To silence the ringer
1. Tap .
2. Tap to select Prefs Phone.
3. Tap in the upper-right corner and select Phone Alerts.
4. Tap next to Silence All.
5. Tap on an option to select it:
■ Normal Sounds—The phone rings when you receive a call.
■ Vibrate Only—The ringer and all alert sounds are turned off.
The phone vibrates when you receive a call.
■ Lights Only—The ringer and all alert sounds are turned off. The lights on the phone flash
when you receive a call.
To adjust the ringer volume
Press the volume up or volume down buttons on the side of the Kyocera 7135 smartphone to
adjust the volume. You hear a sample of the ringer at each level.
-orRefer to the next section to set a volume.
To set sound preferences
1. Tap to view the applications screen.
2. Tap to open Pr efs Phone.
3. Tap in the upper-right corner and select Incoming Calls.
4. Tap beside Call/Ring Vibe and select from three options:
Ring Only, Vibrate Only,
5. Tap by Ringer Volume to select from the options listed.
Your phone will demonstrate the selected volume.
6. Tap next to Ringer Type to select from a variety of ringer tones.
When you select a Ringer Type, your phone will demonstrate
that ringer.
7. Tap the box next to Ring by Category to set specific rings for assigned types of contacts.
8. Tap the box next to Roam Ringer to activate a unique ringer indicating that your phone is
located in a roam area.
or Vibrate then Ring.
20 Kyocera 7135 Smartphone Reference Guide
Page 29
Seaching for contacts
Seaching for contacts
Looking up information on your phone
After using your phone for a while, you may have a large amount of information stored on it.
There are several ways to search through this information, locate names or numbers, and place
phone calls. You can do any of the following:
■ Find and dial a number by using the keypad
■ Find text in any application and (if it includes a dialable number) place a call directly from
the application
■ Find a contact in the Address Book and paste the phone number into another application
To find and dial contacts by name using the keypad
1. Press the Address Book key .
2. Using the keypad, press the first letter of the name you are searching for. For example, the
2 key is equivalent to A, B, or C. If you press the 2 key once, the letter A appears in the
Find window. If you press the 2 key twice, the letter B appears. Press keys rapidly.
3. Wait a moment. The cursor moves one position to the right.
4. Press the key for the second letter of the name you are sea rch ing for. Enter as many lett ers as
you wish.
5. Your phone will find all entries beginning with the letters you have sel ected. Use the navigator
key to scroll up or down to highlight an entry.
6. Press to make your selection. If there are multi ple numbers for a person, use the navigator
key to highlight the one you want to call.
7. Press .
8. To end your call, press .
To find and dial contacts by number
Using this method, you can look up and dial numbers by entering the first few digits of the phone
number on the keypad.
1. From the phone screen, press the first few digit(s) of a number using the keypad.
2. Press the navigator key down to highlight Find Number, and press to select it.
All the entries in your Address Book whose phone numbers begin with those digits appear on
the screen.
3. Use the navigator key to scroll through the list and highlight the contact you want to call.
4. Press to make the call.
To cancel without making the call, press or .
Chapter 2 Making and Receiving Calls 21
Page 30
Seaching for contacts
To find text in any application
Using this method, you can search for any text in any appl ication, including the notes attac hed to
Date Book or Address Book entries. You can search f or whole words or just the begi nning letters
of a word.
1. Tap the icon from any application.
If you select text in an application before you tap , the selected text automatically appears
in the Find dialog.
2. Enter the text that you want to find. Notice that the Find command is not case-sensitive.
3. Tap OK to display a list of all instances of the text that you specified.
Note: You can stop the search at any time by tapping the Stop button (for example, if the entry you want
appears before the search has finished). To resume the search, tap the Find More button.
4. Tap the text you want to review to display the selected entry and its corresponding
application on the screen.
5. To copy the text into another application, use the Copy and Paste commands from the
Edit menu.
To look up and insert a phone number into another application
Using the Phone Lookup command, you can search for a phone number and paste it directly into
an application. For example, if you want to include a phone number in a memo, you can use
Phone Lookup to find the phone number and transfer it directly to the memo.
Note: You can use the Graffiti Command stroke /L to open Phone Look up while enteri ng text. For ex ample, to
insert the phone numb er of Joe Williams i n a memo you are writing , write Wi, followed b y /L. If you have on ly
one entry beginning wit h Wi , the phone inserts the phone number immediately. If you have more than one
name beginning with Wi, the Phone Lookup screen appears so you can select the correct one.
1. Open the entry where you want to insert a phone number.
This can be an event in th e Date Book, a To Do item, or a memo. Phone Lookup is not av ailable
in the Address Book or the Expense application.
2. Tap to open the menus for your application.
22 Kyocera 7135 Smartphone Reference Guide
Page 31

Using power-save mode
3. From the Options menu, tap Phone Lookup.
4. Tap the phone number you want to use.
Note: To find a number more qui ckly , enter t he fi rst lett er or two o f the n ame you want to find i n the L ook Up
line at the bottom of the screen. The list scrolls to the first name starting with that letter.
5. Tap Add to paste the name and number into the entry selected in step 1.
Using power-save mode
Since your Kyocera 7135 smartphone is both a phone and a connected organizer, you may want
to save power by turning off features you do not plan to use. For example, you can use
applications such as the Address Book or Date Book without turning on the phone if you don’t
plan to make or receive calls. On the other hand, you may want to turn off the orga nizer to extend
the battery life, while leaving your phone turned on to receive calls.
Normally, the organizer applications on your phone are never completely “off” even when you
are not using them. This feature allows the applications to “wake up” immediately when you
open the flip, but it draws a small amount of battery power at all times. The power-save mode
puts the connected organizer to “sleep” so it does not draw energy from the battery.
Another benefit of power-save mode is that it automatically engages Keyguard. If you leave your
phone turned on when it is inside a purse or briefca se, Keyguard prevents a cci dental keypresse s
from initiating calls.
Chapter 2 Making and Receiving Calls 23
Page 32

Viewing the phone status bar
To turn power-save mode on or off
1. Tap to view the Application Launcher screen.
2. Tap to open Prefs PDA.
3. Tap in the upper-right corner and tap on General from the pick list.
4. Tap the next to Off After: to select the length of time you would like the PDA to wait before
going into sleep mode:
30 seconds, 1 minute, 2 minutes, 3 minutes, or Never when open.
Viewing the phone status bar
Your phone screen provides a lot of information about the phone’s status, including phone power,
battery power, and signal strength, among other indicators.
To view the status
From any application, tap . Icons showing the phone’s current state appear on the screen.
The phone screen shows the following information when the phone is on.
The phone is operating in CDMA digital mode. If this icon is not present, the phone is
either in analog mode or there is no service.
The phone is outside its home area (roaming).
This icon shows the current signal strength. The more lines you see, t he stronger the signal.
When this icon appears, you can make and receive calls. If the signal strength is very low,
you may not be able to complete a call.
Geographic Positioning System is enabled to share your location with emergency servi ces
as well as your service provider.
Geographic Positioning System shares your location with emergency services only.
The phone is not receiving a signal. You cannot make or receive calls. Wait a little longer
or move to an open area.
A call is in progress.
You have a text message, voice mail, or page.
This icon shows how much power remains in the battery. The more black bars you see, the
greater the charge.
The speakerphone is enabled.
24 Kyocera 7135 Smartphone Reference Guide
Page 33

Chapter 3
Using the Organizer
Record keeping on the go challenges even the most organized person. Your Kyocera smartphone
includes the organizer to help you maintain information about the people, places, and events in
your life. All it takes is a tap to ensure that information you enter is up-to-date and available in
two places when you synchronize your Kyocera smartphone with your computer.
This chapter explains how to work with the built-in applications, enter information, install
applications, and use organizer features.
Selecting applications
The Kyocera smartphone comes with a variety of applications that you can open from the
applications screen. You can also use the buttons surrounding and below the writing area to
open applications.
To open an application
1. Tap to view the applications screen.
2. Tap the icon for the application you want to launch.
If you have more applications installed than you can see on one
screen, tap the scroll bar or press the Down button to move
between screens.
Note: As a shortcut, you can write the Graffiti handwriting character for
the first letter of an ap pli ca tion yo u want to op en. The ap pli ca tions screen
scrolls to the fir st application beginning with that letter.
Changing applications
When working in any application, tap or press a key to switch to another application.
The phone automatically saves your work when you change from one application to another, so
you don’t need to worry about losing information.
Displaying applications
By default, the applications screen displays each application as an icon. If you prefer, you can
display applications as a list of names or by category.
Categories make the applications easy to organize and see. For example, you could put all the
phone applications into a category called Phone. After assigning applications to categories, you
can choose to look at a single category or to see all your applications.
25 Kyocera 7135 Smartphone Reference Guide
Page 34

Selecting applications
To display the applications in list form
1. Tap to view the applications menu.
2. Tap Options to bring up the pick list.
3. Tap Preferences.
4. Tap List in the View By pick list.
5. Tap OK to view the applications screen in list format.
26 Kyocera 7135 Smartphone Reference Guide
Page 35

To display applications by category
1. Tap to view the applications menu.
2. Tap Category.
Entering information
3. Tap next to each application and assign a category from the list.
Note: You can create your own categories. Tap Edit Categories (found at the bottom the category list).
Inthe Edit Categories di al og, tap New and ent er the cat ego ry na me. Ta p OK to ad d the new ca tegor y to the
list. Tap OK again to close the dialog.
4. Tap Done to return to the applications screen.
5. Tap the pick lis t in the upper- right corner of the screen. From the pick list, t ap the appli cation
category you want to see.
You can also tap to scroll through the application categories.
Entering information
There are two ways to enter information into your phone. You can use the on-screen keyboard or
you can write in the Graffiti area. Both of these methods use the stylus.
Using the on-screen keyboard
You can activate the on-screen keyboard any time you need to enter text or numbers.
To enter text with the on-screen keyboard
1. Open any application.
2. Tap any record name or tap New.
Chapter 3 Using the Organizer 27
Page 36

Entering information
3. Tap abc to open the alphabetic keyboard or 123 to open the numeric keyboard.
Graffiti writing area
Tap here for the letters keyboa rd.
Tap here for the numbers keyboard .
4. Tap the characters of the on-screen keyboard to enter text and numbers.
Alpha
Tab
Caps lock
Caps shift
Tap here to display the
Alpha keyboard.
Numeric
Tap here to display the
Numeric keyboard.
Backspace
Carriage return
International
Tap here to display the
International keyboard.
Notice that the on-screen keyboard also has a screen for international characters. You can
move among the three screens at any time.
5. When you have finished, tap Done to close the on-screen keyboard.
Writing with the stylus
The Kyocera smartphone includes Graffiti power writing software as the primary system for
entering text and numbers. In Graffiti, the simple strokes you write with the stylus are instantly
recognized as letters or numbers.
The Memo Pad application is ideal for practicing Graffit i script. This section explains how to open
the Memo Pad and use it to practice Graffiti.
Writing letters with Graffiti
Graffiti includes any character you can ty pe on a standard keyboa rd. Beca use the Graffi ti strokes
closely resemble those of the regular alphabet, most people find they can enter text quickly and
accurately with only minutes of practice.
AF
4
28 Kyocera 7135 Smartphone Reference Guide
K
5
T
Page 37

Entering information
y
There are four basic concepts for success with Graffiti:
■ If you draw the character shape exactly as shown in the tables in this chapter, you can achie ve
100% accuracy.
■ The heavy dot on each shape shows where to begin the stroke. Certain characters have similar
shapes, but different beginning and end points. Always begin the stroke at the heavy dot.
■ Most characters require only a single stroke. When you lift the stylus, the text character is
displayed immediately.
■ The Graffiti writing area is divided into two parts: one f or writing letters and one for writing
numbers. The small marks at the top and bottom of the Graffiti writing area indicate the
two areas.
Letters her e Numbers her e
Division mark
To write letters of the alphabet with Graffiti
1. Tap the screen where you want your text to go.
2. Refer to the Graffiti Script table on page 30 to find the stroke shape for the letter you want to
write. For example, the stroke below creates the letter “n.”
Lift the stylus here.
Start the stroke at
the heav
You use the same shapes to create both uppercase and lowercase letters.
3. Position the stylus on the left side of the Graffiti writing area.
4. Start at the heavy dot. Draw the shape as it appears in the table.
Don’t try to draw the dot itself. The dot is there to show the starting point.
5. Lift the stylus from the screen at the end of the stroke shape.
When you lift the stylus from the screen, the letter appears at the insertion point. You can
immediately begin the stroke for the next character.
dot.
Note: You must be gin t he cha racter s tro kes i n th e Graf fi ti wri ting ar ea. I f yo u d o n ot make Gr af fiti strok es in
the Graffiti writing area, the phone does not recognize them as text characters.
Chapter 3 Using the Organizer 29
Page 38

Entering information
Graffiti tips—When writing with Graffiti, keep these tips in mind:
■ Accuracy improves when you write large characters. Draw strokes that nearly fill the Graffiti
writing area.
■ To delete characters, place the insertion point to the right of the character you want to delete
and make the backspace stroke (a line from right to left) in the Graffiti writing area.
■ Write at natural speed. Writing too slowly can cause recognition errors.
■ Do not write on a slant. Vertical strokes should be parallel to the sides of the Graffiti
writing area.
■ For some letters, there are two different stroke shapes. Use the one that’s easiest for you.
Graffiti script
To enter... Draw
A
B
C
D
E
F
G
H
I
J
K
L
M
To enter...
N
O
P
Q
R
S
T
U
V
W
X
Y
Z
Draw
To enter... Draw
0
1
2
3
4
5
6
7
8
9
Space
Back Space
Next Line
Writing capital letters with Graffiti
You make capital letters with the same stroke shapes as the basic alphabet characters. To make
capital letters, you must first “shift” to caps — just as you press the Shift key on a keyboard — and
then write the character strokes. When you start a new entry (for example, a new memo or a new
Address Book entry), Graffiti automatically capitalizes the first letter.
30 Kyocera 7135 Smartphone Reference Guide
Page 39

Entering information
To make the first letter of a word a capital letter:
Write the Caps Shift stroke.
When Caps Shift is active, an arrow appears in the lower-right corner of
the screen. Caps Shift is only active for the first character.
To enter only capital letters (Caps Lock):
Write the Caps Lock stroke.
When Caps Lock is active, an underlined arrow appears in the lower-right corner
of the screen. To return to lowercase, make the Caps Shift stroke again.
Writing numbers with Graffiti
Writing numbers with Graffiti is similar to writing the letters of the alphabet, except that you
make the character strokes on the right side of the Graffiti writing area.
Number Strokes
0
1
2
3
4
Number
5
6
7
8
9
Strokes
Writing punctuation marks wit h Graffiti
Graffiti can create any punctuation mark you can enter from a keyboard.
All punctuation marks begin with a single tap on the Graffiti writing
area. When you make this tap, a dot appears to show that Punctuation
Shift is active. The next stroke you make with the stylus creates a
punctuation mark.
_
Period
Comma Apostrophe
? !
( ) / $
@ # % ^ & * < > – + = |
\ { } [ ] ~ ` ; : "
Tab
When Punctuation Shift is active, you can make a symbol stroke anywhere in the Graffiti writing
area (the letters or numbers side).
Chapter 3 Using the Organizer 31
Page 40

Entering information
a a a a a a
Writing symbols and extended char acters
All symbols and extended characters begin with the Symbol Shift stroke.
When the Symbol Shift is active, a slanted shift symbol appears in the
lower-right corner of the screen. The next stroke you make creates the symbol
or extended character.
!
•
,
,
,
,
,
,
?
+
=
–
:
X
c
Y
=
ε
ƒ
∅
Writing accented characters
To create accented characters, draw the stroke normally used to create the letter,
followed by an accent stroke. Graffiti then adds the accent to the letter. This example
= e
shows the strokes required to draw an “e” with an acute accen t.
Accent strokes
Using these accent strokes, you can write the following accented
letters:
à á â ã ä å
è é ê ë ì í î ï ò ó ô õ ö ù ú û ü ñ ÿ
Additional non-English characters
You can write the following characters in the lowercase alphabet mode without any special
punctuation or shifting:
c
a
e
You must write these non-English characters in the left
side of the Graffiti writing area.
32 Kyocera 7135 Smartphone Reference Guide
Page 41

Entering information
Navigation strokes
In addition to character symbols, Graffiti includes special strokes that you can use to navigate
within text or fields in applications.
Command
Move cursor right
Move cursor left
Previous field (Address Book only)
Next Field (Address Book only)
Open Address Record (Address Book only)
Stroke
Graffiti ShortCuts
Graffiti ShortCuts make entering commonly used words or
phrases quick and easy. Graffiti comes
with several predefined ShortCuts, and you can also create your own. Each ShortCut can
represent up to 45 characters. For example, you might create a ShortCut for your name or for the
header of a memo. See Chapter 12—“Setting Phone Preferences” to learn about creating your own
ShortCuts.
To use a ShortCut, draw the ShortCut stroke followed by the ShortCut characters. When you
draw the ShortCut stroke, the ShortCut symbol appears at the insertion point to show that you
are in ShortCut mode.
The phone includes the following predefined Graffiti ShortCuts:
Entry ShortCut Entry ShortCut
Date stamp ds Breakfast br
Time stamp ts Lunch lu
Date / time stamp dts Dinner di
Meeting me
For example, draw these strokes to enter the date and time.
Chapter 3 Using the Organizer 33
Page 42

Using application controls
Using application controls
The applications on your Kyocera smartphone use standard controls for moving around the
screen. Once you become familiar with them, you c an ea sil y sel ect opti ons and nav igat e through
applications. The following table lists the controls and how to use them.
Check box—Tap an empty check b ox to se lect t hat opti on. Tap i t again to remove the
check mark.
Scroll arrows—Tap the up arrow to display the previous page. Tap the down arrow
to display the next page. You can also press the up and down scroll keys on the front
panel of the phone.
Pick list—Tap the arrow to display a list of c hoices. From the pick list, tap an item to
select it.
Button—Tap a button to perform a command. In most cas es, ta pping a button opens
or closes a dialog, a screen where you enter information or change settings. A dialog
always contains an OK, Cancel, or Done button for closing the dialog. The on-screen
keyboard is an example of a dialog.
Scroll bar—Drag the slider to scroll the display one line at a time. To scroll to the
previous page, tap the arrow at the top of the scroll bar. To scroll to the next page, tap
the arrow at the bottom of the scroll bar.
Using menus
A menu is a set of commands for ac tion s y ou can do, such as creating a new record or beaming a
business card. You open the menus on your phone by tapping the menu icon.
Some menu commands are common to all application s. Others are specific to t he application you
are using. (For example, menus in the Memo Pad have different options than those in the Date
Book). The common menu commands are described in this section. For details about the menus
in an application, see the chapter on that application.
Choosing a menu
After you open the menus for an application, tap the menu that contains the command you want
to use.
The menus and menu commands you can see depend not only on the application that is running,
but also on which part of the application is currently on the screen. For example, in the Memo Pad,
the menus for the Memo List screen are different from those for the Memo screen.
34 Kyocera 7135 Smartphone Reference Guide
Page 43

Using menu s
Using Graffiti Shortcut commands
Most menu commands have Graffiti “Command stroke” equivalents (like the keyb oard shortcuts
on computers). The command letters appear on the right side of the menu commands.
Menu
commands
To use the Graffiti menu commands, draw the Command stroke followed by the command
letter. The Command symbol appears just above the Graffiti writing area to indicate that you are
in Command mode. For example, to choose the Select All command, draw the Command stroke,
followed by the letter “s.”
Note: You do not need to tap before you use the Graffi ti menu commands. However, since the Command
mode is active for approximately two seconds, you must write the letter immediately after drawing the
command stroke to activate the menu command.
Command letters
Using the Edit menu
The Edit menu is available with any screen where you enter or edit text. In general, these
commands apply to text that you select in an application.
To select text in an application
1. Tap the beginning of the text that you want to select.
2. Drag the stylus over the text to highlight it (in black). Drag across the text to select additional
words, or drag down to select a group of lines.
The following commands may appear in an Edit menu:
Undo
Cut
Copy
Paste
Reverses the action of the last Edit command. For example, if you used Cut to
remove text, the Undo command replaces the text.
Removes text and stores it in memory. You can paste this text into another area
of the application or into a different application.
Copies text and stores it temporarily in memory. You can paste this text into
another area or into a different application.
Inserts text you cut or copied at the selected point. If you did not previously cut
or copy text, the Paste command does nothing.
Select All
Selects all the text on the current record or s creen. Use this c ommand t o cut or
copy all of the text and paste it elsewhere.
Keyboard
Graffiti Help
Opens the on-screen keyboard.
Shows the Graffiti character strokes. Use this command any time you forget the
stroke for a particular character.
Chapter 3 Using the Organizer 35
Page 44

Choosing fonts
Choosing fonts
In most applications, you can change the font style to make the text on the screen easier to read.
You can even choose a different font style for each application that supports this feature.
To change the font style
1. Tap to view the applications screen.
2. Open an application.
3. Tap to open the menus.
4. Tap Font from the Options menu.
Tap here for bold font.
Tap here for large font.
Tap here for small font.
5. Tap the font style you want to use.
6. Tap OK to return to the application. The font style has changed.
Small font
Bold font
Large font
Using categories
Categories can help you group Address entries, To Do items, or Memos for easy review.
You cannot, however, assign categories to Date Book events. When you first create an entry, it is
“Unfiled,” which means it does not belong to a categor y. You ca n leave it Unf iled or a ssign it to a
category at any time.
The use of categories is optional. The category you choose is used only for sorting and viewing
records. It does not affect the contents of the record.
36 Kyocera 7135 Smartphone Reference Guide
Page 45

Using categories
To assign a category to an entry
1. Open the Address Book, To Do List, or Memo Pad.
2. Tap the entry you want to place in a category. Tap Edit (if needed).
3. Tap Details.
4. From the Category pick list, tap the category you want to assign.
5. Tap OK.
Viewing lists by category
After you have assigned categories to your entries, you can easily view the entries by category.
Viewing by category is particularly useful in applications such as the Address Book where you
may have a long list of records.
To use categories in a List screen
1. Tap to view the PDA applications screen.
2. Open the application you want to view.
3. Tap the pick list in the upper-right corner of the screen.
Tap here
4. Tap the category of entries you want to view. The List screen now shows only records in
that category.
5. To return to a complete list of your entries, open the pick list in the upper-right corner of the
screen and tap
All.
Chapter 3 Using the Organizer 37
Page 46

Using categories
Creating a new category
The Kyocera smartphone comes with two default ca tegories: Business and Personal. The Address
Book also includes the QuickList category, which contains comm only used names, addresses, and
phone numbers.
You can rename the default categories or add new categories to suit your needs. You can define
up to 15 categories for each application.
To create a new Address Book category
1. Press the Address Book key .
2. Tap the in the upper-right corner of the screen. Tap Edit Categories.
Tap here
3. In the Edit Categories dialog, tap New.
4. Enter the name of the new category. Tap OK.
Your new category is added to the pick list.
5. Edit any of your records and file them in the new category as appropriate.
38 Kyocera 7135 Smartphone Reference Guide
Page 47

Renaming categories
You can change the name of any existing category.
To change the name of an Address Book category
1. Press the Address Book key .
2. Tap the pick list in the upper-right corner of the screen. Tap Edit Categories.
3. Tap the category you want to rename. Tap Rename.
Attaching notes
4. Enter the new name you want to assign to the category. Tap OK.
5. Tap OK. The new name appears in the pick list.
Note: You can “merge” two or more categories by assigning them the same name. For e xample, if you
change the name of the “Personal” ca tegory to “Business,” all entries formerly in the Personal category
appear in the Business category.
Attaching notes
You can attach notes to entries in most applications (except the Memo Pad).
A note is anything you want to write. For example, if you have entered an appointment in the
Date Book, you could attach a note with di rections to the location. A note can be several thousand
characters in length.
To attach a note to an entry
1. Open the application and display the entry where you want to add a note.
2. Tap Details.
3. Tap Note. Write the text you want to appear in the note.
4. Tap Done to close the note and return to the application screen.
Note icon
Notice that appears at the right side of any item with a note attached.
5. To review or edit a note, tap .
Chapter 3 Using the Organizer 39
Page 48

Marking private entries
Marking private entries
In applications, you can mark individual entries as Private. Private entries remain visible and
accessible in the organizer until you change the Security setting to hide all Private entries.
To mark an entry as private
1. Display the entry that you want to make private.
2. Tap Details.
3. Tap the Private check box.
Installing applications
Your phone comes with many applications installed. You can also install additi onal applications,
including games and programs that are available for downloading from the Internet. There are
many third-party applications (called .PRC files) available for Palm connected organizers.
The Palm Install Tool makes it quick and easy to install software on the phone. You install new
applications during the process of synchronizing your phone and your computer.
Considerations
■ Be aware that each application you install resides in the phone’s memory and remains there
until you delete it. If you see a message stating that the memory is full, delete some
applications to free up memory. A hard reset of the phone automatically deletes these
applications; you can also delete them manually.
■ Install o nly applications from re liable sources. It is recommended that you use only
Palm-certified or Platinum-certified applications. (Products bearing the “Designed for Palm
OS Platinum” logo have passed compatibility testing established by Palm Inc. and
administered by Product Quality Partners.)
To install software on your Kyocera 7135 smartphone
1. Decide which application you want to install on your smartphone.
2. On your computer, place a copy of the appli cation into the Add-On fol der (located i nside the
Palm folder).
3. On your computer, launch the Palm Desktop for the Kyocera smartphone.
40 Kyocera 7135 Smartphone Reference Guide
Page 49

Installing applications
You can double-click the Palm Desktop icon on your Windows desktop (or select Palm
Desktop from the Start menu) to open the Palm Desktop software.
4. Click Install, located at bottom of left column.
When you click Install,
the Install Tool opens.
Note: You can also open the Palm Instal l Tool by sele cting Insta ll Tool from the Palm Desktop pr ogram group
or by double-clicking any file with a PRC file extension.
5. Select the appropriate user name in the User drop-down list.
6. Click Add. The Add-On folder appears.
7. Find the PRC file in the Add-On folder. If you did not place the PRC file in the Add-On folder,
navigate to the location where you placed it.
Chapter 3 Using the Organizer 41
Page 50

Removing applications from the phone
8. Select the PRC file and click Open.
Use Shift- click or Ctr l-click to select multiple applicatio ns.
The PRC file you selected
appears in the list. Yo u can verify
the size of the file here.
9. Repeat steps 6–8 for each PRC file you want to install.
If you decide not to install an application, click it and then click
Remove. (This does not
remove the application from your com puter; it simply rem oves it from t he list of applica tions
to install.)
10. When you have identified all the files to be installed, click Done.
These files are installed on your phone the next time you perform a HotSync.
11. If you want to install the files immediately, turn on the phone and place it in the cradle.
Press the HotSync button.
Removing applications fro m the phone
Each application you install resides i n the phone’s memory and remains there unti l you delete i t.
If you see a “memory full” message or if you decide that you no longer need an applic ation, you
can remove it to recover the memory.
You can remove any application, patch, or extension that you have installed on your phone.
You cannot remove the applications that were installed at the factory.
42 Kyocera 7135 Smartphone Reference Guide
Page 51

Removing the Desktop software
To remove an add-on application
1. Tap to open the Applications menus.
2. From the App menu, tap Delete.
The Delete window lists all the additional applications you have loaded on the phone and
how much memory each of them takes.
3. Tap the application you want to remove. Then tap Delete.
4. Tap Yes to confirm that you want to remove the application.
5. Tap Done.
Removing the Desktop software
If you no longer want to use the Palm Desktop software, you can remove it.
To remove the Desktop software
1. From the Windows Start menu, choose Settings. Then choose Control Panel.
2. Double-click the Add/Remove Programs icon.
3. On the Install/Uninstall tab, select Palm Desktop from the list.
4. Click Add/Remove.
5. Click Yes to confirm you want to remove the application.
Chapter 3 Using the Organizer 43
Page 52

Removing the Desktop software
44 Kyocera 7135 Smartphone Reference Guide
Page 53

Chapter 4
Transferring Information
There are many ways to transfer information to and from your Kyocera smartphone. You can
synchronize data with your computer; you can beam data to other devices with infrared ports,
and you can download third-party PRC applications into the phone.
Installing Palm Desktop for the 7135 Smartphone
Desktop software extends many of the functions of your Kyocera 7135 smartphone to your
computer. Using the Palm Desktop for the 7135 Smartphone, you can easily do the following:
■ Work with applications for the Palm OS platform on your computer.
■ Back up the data on the phone and synchronize the data with the Palm Desktop for the
7135 Smartphone.
■ Import and export data, so you can easily transfer data from ot her Windows applications into
Address Book or Memo Pad.
■ Print your Date Book, Address Book, To Do List, and Memo Pad information on any
Windows-compatible printer.
About synchronizing data
Using the Palm Desktop for the 7135 Smartphone, you can synchronize the data on your phone
with the information on your computer. Changes you make on either the phone or the computer
appear in both places.
Synchronization is a simple, one-step procedure that ensures your data is always safe and
up-to-date. You can synchronize your data by connecting your smartphone directly to your
computer with the sync cradle, by synchronizing remotely over a modem or over a network, or
by “beaming” (sending data via the infrared port).
For example, if you travel with an infrared-enabled laptop, you don’t need the sync cradle or the
data cable to synchronize information on your phone and your laptop. Simply enable infrared
communication on your computer and follow the instructions giv en in “Customizing a conduit”
on page 61.
45 Kyocera 7135 Smartphone Reference Guide
Page 54

Installing Palm Desktop for the 7135 Smartphone
System requirements
Your computer system must meet the following minimum requirements.:
■ PC running Windows 98se/NT 4.0* (Service Pack 6)2000**/ME**/XP**
or Macintosh OS 8.6 to 10.x***
■ IBM-compatible 486 computer or higher for Windows operation
■ 8 MB RAM (memory) minimum; 16 MB recommended
■ 12 MB available hard disk space
■ One available serial port or USB port
■ VGA monitor or better
■ CD-ROM drive
■ Mouse
Notes:
*Windows NT does not support USB.
**Administrative rights may be required to install some software.
***Macintosh OS 8.6 to 10.x may require additional accessories, sold separately.
Before you install software
To ensure a safe and uninterrupted installation of the Palm Desktop for the 7135 Smartphone
software, please do the following before you begin:
1. Remove the phone from the cradle during software installation.
2. Exit all progr ams, including those that run automatically at startup, such as fax software, vi rus
protection software, screen-savers, and application toolbars such as Microsoft Office.
3. If you are installi ng from diskettes th at you have ordered f rom Palm Computing (rath er than
the CD provided with your phone), make sure the original Palm Desktop diskettes are
write-protected, and then make backup copies of them. Use the copi es to install the software,
and store the original diskettes in a safe place. Refer to your computer manua l for information
about locking or copying diskettes.
Note: Do not simply copy the Desktop fil es to your hard drive. You must use the instal ler to place the files in
their proper locations and to decompress the files.
To install Palm Desktop for the 7135 Smartphone on a PC
1. Exit any Windows programs and disable any virus-scanning software.
2. Insert the Palm Desktop for the 7135 Smartphone CD into the computer’s CD-ROM drive
(or insert the diskette labeled Setup into the diskette drive).
3. Wait for the introduction screen to appear.
If the introduction screen does not appear automatically, open the Start menu and choose Run.
Type the letter of your CD-ROM drive, followed by a colon and the word
if your CD-ROM drive is drive D, type
46 Kyocera 7135 Smartphone Reference Guide
D:launch.
setup. For example,
Page 55

Installing Palm Desktop for the 7135 Smartphone
4. Click the Install button. Follow the instructions on the screen.
5. After you have installed the software, refer to the Help menu for complete information about
how to use the Desktop.
To install the Palm Desktop for the 7135 Smartphone on a Macintosh
1. Insert the Kyocera 7135 CD into the computer’s CD-ROM drive.
2. Double-click on the CD-ROM drive icon. It will be labeled as Kyocera Palm Desktop.
3. Double-click on the folder labeled Palm Desktop for 7135.
4. Double-click on the Install Palm Desktop.
To connect the sync cradle
Your package includes a cradle for storing the phone, recharging its battery, and synchronizing
information with your computer. If you have purchased an extra battery, you can charge it in the
cradle as well.
To synchronize data between your phone and your computer, you must connect the cradle to the
computer. If you don’t plan to synchronize data, just plug the power ca ble into the cradle and into
a power outlet.
1. Place the sync cradle on a flat surface near your computer.
2. Insert the small round plug of the power cable (a) into the base of the sync cradle. Use only
the power cable that came with your Kyocera 7135 smartphone Using any other charger or
AC adapter will invalidate your warranty and may damage the sync cradle.
3. Plug the other end of the cable into an AC power outlet.
4. To attach the cradle to your computer, first turn off the computer.
5. Plug the data cable from the sync cradle into a Universal Serial Bus communications (COM)
port (b) or aserial communications COM port (c) on your computer. The cradle requires a
dedicated port; it cannot share a port with an internal modem, infrared port, or other device.
6. Turn on the computer.
Chapter 4 Transferring Information 47
Page 56

Synchronizing data using the sync cradle
Synchronizing data using the sync cradle
Running your first synchronization
The first time you synchronize data, you must enter user information on both the phone and the
Palm Desktop for the 7135 Smartphone.
Important considerations
■ You must perform your first synchronization with a local, direct connection using the sync
cradle, rather than using a modem or the infrared port. After the first synchronization, you
can use the other methods explained in this chapter.
■ Do not turn the phone power on or off during synchronization.
■ Do not remove the phone from the sync cradle during synchronization.
■ If you are a Palm user, read “Transferring information between Palm devices” on page 63
before you synchronize the phone.
■ If you are a System Administrator preparing several phones for a group of users,
see “Synchronizing data using the infrared port” on page 54 before performing the
following steps.
To synchronize data the first time
1. Once you hav e installed the Desktop, clic k the icon in
the Windows system tray.
If the icon does not appear in the system tray, open the
Start menu and select
7135 Smartphone
2. In the popup menu, verify that either Local Serial or Local
USB
is checked.
3. Click Setup. The Setup window appears.
4. Click the Local tab.
Programs > Palm Desktop for the
> HotSync Manager.
Make sure there is a
check mark beside
Local.
Then click Setup.
5. In the Serial Port field, select the port where you connected the cable. Click OK.
Note: USB users do not need to specify a serial port.
48 Kyocera 7135 Smartphone Reference Guide
Page 57

Synchronizing data using the sync cradle
6. Slide the Kyocera 7135 smartphone into the sync cradle.
IMPORTANT: Do not turn the phone power on or off—or remove the phone from the sync cradle—during
synchronization.
7. Press the sync button on the cradle. During your first synchronization, a message prompts you
to select a user name.
8. Highlight the correct user name and click OK.
Note: On the computer, enter a unique user name. Problems may occur if you try to synchronize more than
one handheld device with the same user name.
A message tells you when synchronization is complete.
To synchronize data using the cradle
After you have completed your first synchronization, the process is even faster and easier.
1. Slide the Kyocera 7135 smartphone into the sync cradle.
2. Make sure the icon appears in the computer’s taskbar. If it does not, open the Start menu
and select
3. Press the sync button on the cradle.
Programs > Palm Desktop for the 7135 Smartphone > HotSync Manager.
4. Wait for a message indicating that the process is complete.
Note: Do not turn the phone on or off, or remove it from the sync cradle during synchronization.
Chapter 4 Transferring Information 49
Page 58

Synchronizing data remotely
Synchronizing data remotely
You can synchronize your Kyocera 7135 smartphone with your primary computer (the c omputer
you use on a regular basis) while you are on the road and away from your office or home.
There are three methods for doing this:
■ Landline Network Synchronization: this allows you to synchronize your Kyocera 7135
smartphone using a remote computer that is on the same network as your primary computer.
Both the remote computer and your primary computer must have the Palm Desktop for the
7135 Smartphone software installed.
■ Wireless Network Synchronization: this allws you to synchronize your Kyocera 7135
smartphone with your primary computer if your primary computer is on a network and the
network has dial-up access.
■ Wireless Direct-to-modem Synchronization: this allows you to synchronize your Kyocera
7135 smartphone with your primary computer by using your smartphone to dial into your
primary computer’s modem.
Note: The primiary computer must be powered on to remove sync.
Landline network synchronization
Certain conditions must be met before you can perform your first landline network
synchronization:
■ The Kyocera 7135 smartphone already must have been synchronized with your primary
computer. (Your primary computer is the computer that stores all of your information and
that you use on a regular basis.)
■ The primary computer must have both Local and Network checked in the HotSync Manager.
■ The appropriate user(s) must be selected. (In the HotSync Manager, select Setup, then the
Network Tab.)
■ The remote computer must have the Palm Desktop for the 7135 Smartphone software
installed, and must be on the same network as your primary computer.
Synchronizing
1. Start the HotSync application on your Kyocera 7135 smartphone.
2. Tap the Menu icon and select Modem Sync Prefs.
3. Select Network. Tap OK.
50 Kyocera 7135 Smartphone Reference Guide
Page 59

Synchronizing data remotely
4. Tap the Menu icon and select LANSync Prefs.
5. Select LANSync. Tap OK.
6. Tap the Menu icon and select Primary PC Setup. This is the primary computer that you wish
to synchronize with.
7. Check the settings. These settings should already be filled in with information from initially
synchronizing your Kyocera 7135 smartphone with your primary computer.
OK.
Tap
8. Select the Local option on the main screen of the HotSync application.
9. Place your Kyocera 7135 smartphone in the cradle (or use the separate data cable accessory)
that is connected to the remote computer.
10. Tap the icon on the HotSync application screen. The remote computer will appear to
perform a normal synchronization operation.
Chapter 4 Transferring Information 51
Page 60

Synchronizing data remotely
Wireless network synchronization
Certain conditions must be met before you can perform your first wireless network
synchronization:
■ The Kyocera 7135 smartphone already must have been synchronized with your primary
computer. (Your primary computer is the computer that stores all of your information and
that you use on a regular basis.)
■ The primary computer must have both Local and Network checked in the HotSync Manager.
■ The appropriate user(s) must be selected. (In the HotSync Manager, select Setup, then the
Network Tab.)
Synchronizing
1. Start the HotSync application on your Kyocera 7135 smartphone.
2. Tap the Menu icon and select Modem Sync Prefs.
3. Select Network. Tap OK.
4. Tap the Menu icon and select LANSync Prefs.
5. Select LANSync. Tap OK.
52 Kyocera 7135 Smartphone Reference Guide
Page 61

Synchronizing data remotely
6. Tap the Menu icon and select Primary PC Setup. This is the primary computer that you wish
to synchronize with.
7. Check the settings. These settings should already be filled in with information from
initially synchronizing your Kyocera 7135 smartphone with your primary computer.
OK.
Tap
8. Select the Modem option on the main screen of the HotSync application.
9. Tap on “Select Service.” The Network Preferences screen will appear.
10. Select the network connection used to connect to the same network that your primary
computer is connected to and tap
Done.
11. Tap the HotSync icon in the center of the HotSync application screen. Your Kyocera
7135 smartphone will initiate a data call for connection to the selected service.
Network synchronization operations take additional time due to general network latency
(slowness) and overhead protocols.
Wireless direct-to-modem synchronization
Certain conditions must be met before you can perform your first modem-to-modem
synchronization.
■ The Kyocera 7135 smartphone already must have been synchronized with your primary
computer. (Your primary computer is the computer that stores all of your information and
that you use on a regular basis.)
■ The primary computer must have both Local and Network checked in the HotSync Manager.
■ The appropriate user(s) must be selected. (In the HotSync Manager, select Setup, then the
Network Tab.)
Chapter 4 Transferring Information 53
Page 62

Synchronizing data using the infrared port
Synchronizing
1. Start the HotSync application on your Kyocera 7135 smartphone.
2. Tap the Menu icon and select Modem Sync Prefs.
3. Select Direct to modem. Tap OK.
4. Select the Modem option on the main screen of the HotSync application.
5. Tap the below the HotSync icon and select Wireless Modem for the connection type.
6. Tap Enter phone #, the Phone Setup screen will appear.
7. Enter the phone number of the modem that you will be dialing into and tap OK.
8. Tap on the icon in the center of the HotSync application. A circuit-switched data call will be
made to the modem on the primary computer and the synchronization process will be begin.
Note: Make sure the conduits on the primary computer wi ll not prompt for a user response. Such a prompt
will cause the synchroni zation proces s to appear t o fail, becau se the primar y computer will wait indefi nitely
for a user to respond. This wi ll only happen with third-party con duits; please check with the respective
developers for more information.
Synchronizing data using the infrared port
Before you can synchronize data using the infrared port, the computer with which you want to
synchronize must fulfill these requirements.
■ Your computer must support the IrCOMM implementation of the IrDA standards.
■ Your computer must have either an enabled port built into the computer or an enabled
infrared device attached to the computer.
Desktop computers are likely to require an infrared device attached to a physical COMM port.
Laptops are likely to have a built-in infrared port. Your computer must also have an installed
infrared driver.
Check your computer’s documentation to learn if the computer supports infrared
communication. If your computer is a Macintosh G3 (or higher) or uses Microsoft Windows 98
(or higher), infrared c ommunication is built into the operat ing system. Some versions of the
Macintosh iMac also have built-in infrared communication.
54 Kyocera 7135 Smartphone Reference Guide
Page 63

Synchronizing data using the infrared port
To check if your Windows 95 computer supports infrared communication
1. In the Windows taskbar, click Start.
2. Choose Settings, and then choose Control Panel.
3. In the Control Panel, look for the infrared icon.
If the icon is there, your computer is enabled for infrared communication. If the icon does not
appear, you need to install an infrared driver.
To install a Windows 95 infrared driver
1. Click in the Windows taskbar to open the menu.
2. Choose Setup. Click the Local and Modem tabs. Make a note of the COM ports shown on
these panels. You need this information later.
3. Go to this Web site:
http://www.microsoft.com/windows/downloads
4. Follow the links to the Windows 95 or 98 IrDA 2.0 (infrared driver), and follow the
instructions to download the driver.
5. Find the file W95 or W98ir.exe on your computer. Be sure this file is in a folder where you want
to store the infrared driver.
6. Double-click W95 or W98ir.exe. A window displays the files that are being unzipped onto
your hard disk. When the title bar displays Finished, close this window.
7. In the same folder where you unzipped W95 or W98ir.exe, find the file Setup.exe. Double-cli ck
it to begin installation.
Chapter 4 Transferring Information 55
Page 64

Synchronizing data using the infrared port
8. Accept the defaults provided by the Add Infrared Device Wizard, except when the Wizard
asks you to select the port to which your infrared device is connected. Be sure that an
available communications port is selected. Do not select the port that the HotSync Manager
currently uses.
9. If an alert appears telling you that there is a communication port conflict, click OK and
proceed with the rest of the installation using the defaults provided.
To configure HotSync Manager for infrared communication
When your computer is prepared for infrared synchronization, you must specify the simulated
port to be used.
1. Click in the Windows system tray to open the menu.
2. Make sure that Local is checked on the menu. Then click Setup.
3. Click the Local tab.
4. In the Serial Port drop-down box, select the COM port that was given as the simulated port in
the Options tab of the Infrared Monitor (in this example, COM4).
5. Click OK.
The HotSync Manager is now communicating with the simulated port defined for infrared
communication. This means you cannot use your cradle again until you reconfigure the
HotSync Manager to communicate with the port defined for cradle synchronization.
To synchronize data using the infrared port
May be either on or off
1. Tap to view the applications screen.
2. Tap to select HotSync.
3. If Local is not already selected, tap Local.
4. Tap the below the icon and select IR to a PC/Handheld.
5. Position the infrared port of your phone within a few inches of the infrared port of
your computer.
6. Tap the HotSync icon to start the synchronization.
56 Kyocera 7135 Smartphone Reference Guide
Page 65

Synchronizing data using the infrared port
To return to synchronization by the cradle
After you have set the computer to synchronize data using the infrared port, you must change the
computer settings if you want to return to using the cradle for synchronization.
1. If necessary, connect the cradle to a serial (COM) port of your computer and plug the power
cord into an outlet.
2. Click in the Windows system tray to open the menu.
3. From the menu, choose Setup. Then click Local.
4. Select the COM port to which your cradle is connected.
5. Click OK.
You also have to reset your Kyocera 7135 smartphone for synchronizing by using the cradle.
To do this, place your Kyocera 7135 smartphone in the cradle and follow these procedures:
1. Tap to view the applications screen.
2. Tap to select HotSync.
3. If Local is not already selected, tap Local.
4. Tap below the HotSync icon and select Cradle/Cable.
You can leave the computer set to synchronize data using the infrared port and still use the cradle.
This is useful if you synchronize data from the phone to both your desktop computer and a
laptop. When you travel, you don’t have to carry a cradle or cable because your phone is set to
synchronize data via the infrared port. When you’re in the office, just return the phone to
the cradle.
Chapter 4 Transferring Information 57
Page 66

Creating a user profile
Creating a user profile
If you need to configure a number of phones with specific information (such as a company phone
list) before distributing them to their actual users, you can create a user profile to load the data
into a phone without associating that data with a user name. The user profile feature is designed
only for the first-time synchronization, before you assign a User ID to a particular phone.
See “Using File Link” on page 16 for information about loading data after you assign a User ID.
To create a user profile
1. Open the Palm Desktop for the 7135 Smartphone.
2. From the Tools menu, select Users to open the Users dialog.
3. Click Profiles to open the Profiles dialog.
4. Click New to open the New Profile dialog.
5. Enter a name for the profile and click OK.
6. Repeat steps 4 – 5 for each Profile you want to create.
7. When you have finished, click OK to return to the Palm Desktop for the 7135 Smartphone.
8. Select the Profile from the User list and create the data for the Profile (such as company
phone list).
To use a profile for the first-time synchronization
1. Place the new phone in the cradle.
2. On the phone, tap to view the applications screen. Tap .
58 Kyocera 7135 Smartphone Reference Guide
Page 67

Creating a user profile
3. On the computer, click Profiles to open the Profiles dialog. Choose the profile you want to
install on the phone. Click
OK.
4. Click Yes to transfer all the Profile data to the phone.
The next time you synchronize the phone, you will be prompted to assign a User name to
the phone.
Using File Link
Using File Link, you can synchronize the Address Book and Memo Pad information on your
phone with an external file, such as a company phone list.
The data is stored in a separate category on your Palm Desktop for the 7135 Smartphone and
your phone. You can configure the File Link feature to check for changes to the external file when
you synchronize. For information on how to set up a File Link, see the Palm Desktop for the
7135 Smartphone Software online Help.
With File Link you can synchronize data stored in any of these formats:
■ Comma-separated (*.csv) ■ Address Book archive (*.aba)
■ Memo Pad archive (*.mpa) ■ Text (*.txt)
Chapter 4 Transferring Information 59
Page 68

Modifying synchronization options
Modifying synchronization options
You can choose when you want HotSync Manager to run, and you can adjust the local and
modem HotSync settings.
To set HotSync options
1. Click in the Windows system tray to open the menu.
2. On the menu, click Setup.
3. Click the General tab and select one of the following options:
Always available
Adds HotSync Manager to the Startup folder and constantly
monitors the communication port for synchronization requests.
With this option, the HotSync Manager conducts synchronizations
even when the Palm Desktop for 7135 software is not running.
Available when Palm
Desktop for 7135
is running
Manual
Starts HotSync Manager and monitors requests automatically
when you open the Palm Desktop for 7135 Smartphone software.
Starts the HotSync Manager and monitors requests only when you
select HotSync Manager from the Start menu.
Note: If you’re not sure which option to use, select Always available.
4. Click the Local tab to display the settings for the connection between your PC and the cradle.
60 Kyocera 7135 Smartphone Reference Guide
Page 69

Customizing a conduit
5. Adjust the following options as needed. Note: USB users can omit this step.
Serial Port
Identifies which port the Palm Desktop for the 7135 Smartphone software uses
to communicate with the cradle. This selection should match the port number
where you connected the cradle.
The Kyocera 7135 smartphone cannot share this port with an internal modem or
other device.
Note: USB users can omit this step.
Speed
Determines the speed at which data is transferred between the phone and the
Palm Desktop for 7135 software. We suggest you try the As Fast As Possible rate
first, and adjust downward if you experience problems. This setting allows the
phone and the Palm Desktop for 7135 software to find a nd use the fastest speed.
6. Click OK to close the Setup dialog.
Customizing a conduit
For each application, a program called a conduit controls how the records are moved during
synchronization. There are conduits for the Date Book, Address Book, To Do List, Memo Pad, and
Expense applications, as well as System and Install conduits.
In most c ases, you won’t need to make any changes in the default conduit settings. However, in
the following cases, you must customize these settings:
■ To overwrite data on either the phone or the Palm Desktop for the 7135 Smartphone.
■ To avoid synchronizing a particular type of file because you don’t use it.
Note: Be aware that some third-pa rty applications install th eir own conduits. For detailed inf o rmation on
these conduits, see the documentation for the third-party software product.
Chapter 4 Transferring Information 61
Page 70

Customizing a conduit
To customize conduit settings
1. Click in the Windows taskbar to open the menu.
2. On the menu, click Custom.
3. Select the appropriate user name from the list at the top of the dialog.
4. Select the application in the Conduit list you want to change.
5. Click Change.
The Change HotSync Action dialog appears.
6. Click the direction in which you want to write data, or click Do Nothing to sk ip data transfer
for an application.
Note: Changing the HotSync setting from the default affects only the next HotSync operation. Thereafter,
the HotSync Actions reve rt to thei r default s ettings. To u se a new setting on an ongoing b asis, selec t the Set
As Default box. Thereafter, just click Default in the Custom dialog to revert to the default settings.
7. Repeat st eps 3–6 to change conduit settings for other applicati ons or for a di fferent user name.
8. Click OK to activate your settings.
62 Kyocera 7135 Smartphone Reference Guide
Page 71

Transferring information between Palm devices
Transferring information between Palm devices
There are three methods of exchanging information between two or more Palm devices. Do not
simply synchronize your new phone to copy the data. Some important settings on the phone will
be changed if you do so.
To synchronize using the same user name
Use this method only if you are transferring data from a Palm device you will not be using
anymore to a new device. If you intend to use both devices on an ongoing basis, do not use this
method, because it gives both devices the same user name. (If you continue to synchronize two
Palm devices with the same user name, serious synchronization problems may occur.)
Note: If you have accidently given two Palm devices the same name, see “Troubleshooting HotSync
operations” on page65 for procedures to rename one of them.
1. Synchronize the original Palm device to your computer.
2. On the computer, launch Windows Explorer.
3. Navigate to the C:\Palm directory and open your user folder
This folder has a name similar to the name of your old Palm device. For example, if the user
name for your Palm device was “Joe Smi th,” the folder might be named “smithj.”
4. Inside the user folder, open the folder called Backup.
5. Locate the file named Saved_Preferences.prc. Move this file to another folder or delete it.
Note: Mac users can use Sherlock to find and remove the saved-preferences.prc file.
The Saved_Preferences file contains the preference settings from your Palm device (for
example, your selected alert sounds) . The Kyocera 7135 smartphone has many additional
preference settings (for example, network settings and phone settings). If you do not move or
delete the existing Saved_Preferences.prc file before synchronizing, the organizer settings will
overwrite the phone settings, and you will lose the benefit of these new features.
6. Synchronize the Kyocera 7135 smartphone, choosing the same user name as that of the old
Palm device. All of your data is transferred to your phone. A new Saved_Preferences.prc file
is created, containing the new phone preferences.
7. If you intend to continue using the original device, do a hard reset on it. The hard reset
removes the user name and all assoc iate d data f rom the d evic e. It will not affect the data that
has already been synchronized with your phone.
Note: Macintosh users can use Sherlock to find and remove the Saved_Preference s.prc file.
Chapter 4 Transferring Information 63
Page 72

Transferring information between Palm devices
To copy and paste data
Use this method if you have a small number of records to move or if you are not comfortable
manipulating files and folders in Windows Explorer. This method is also recommended if you
want to merge different information between two devices.
1. Perform a HotSync operation on the new device, giving it a new user name. This user name
must be unique and different from the first device.
2. Launch the Palm Desktop for the 7135 Smartphone.
3. In the upper right-hand corner, open the drop-down list of existing user names. Use this list
to toggle between the user name of the device with t he old i nformation and the user name of
the new device.
4. In the Address Book, To Do List, or Memo List on the computer, highlight the information to
be copied.
To select a sequential group of records, hold down the Shift key while you select them.
To select a group of nonsequential rec ords, hold down the Control key while you select them.
5. Right click on any part of the highlighted item(s). Select Copy from the pop-up menu.
6. From the list of users, select the new user name. Open the appropriate application (Address
Book, To Do List, or Memo List).
7. Right click on a blank part of the application. Select Paste from the pop-up menu.
8. Repeat steps 4–7 for all of the other records and applications.
Note: You cannot copy cate gories; the categ ories must be recreat ed on the ne w device. It is a good idea to
create them ahead of time to simplify the copy and paste process. Date Book events cannot be copied by
category.
9. Perform a HotSync operation wit h the new device and new user name. All of the inf ormation
will be transferred over.
To copy data using Windows Explorer
The data transfer method is a more advanced method requiring you to move files in Windows
Explorer. Do not try this method unless you are familiar with moving files in a Windows
environment.
1. Perform a HotSync operation on the new device, giving it a new user name. This user name
must be unique and different from the first device.
2. If the Palm Desktop for the 7135 Smartphone is open, close it.
3. Open the Windows Explorer. Navigate to the Palm Desktop for the 7135 Smartphone
directory. By default, this directory is C:\Palm.
4. Locate the folder with the name of the original Palm device. Copy the contents of the folder
into another directory or onto the Desktop for safekeeping.
This step makes a duplicate of the files in case a problem occurs.
64 Kyocera 7135 Smartphone Reference Guide
Page 73

Troubleshooting HotSync operations
5. Go back to the folder with the name of the original Palm device. Copy—do not move—the
contents into the folder with the name of the new device.
6. Launch the Palm Desktop for the 7135 Smartphone. All of the data from the older device
should be located under the new user name
7. Perform a HotSync operation wit h the new device and new user name. All of the inf ormation
will be transferred to the new device.
Troubleshooting HotSync operations
The HotSync operation fails to start
■ Make sure your computer is turned on, and that it does not shut down automatically as part
of an energy-saving feature.
■ Check the cable between the cradle and the computer serial or USB port.
■ Make sure you selected the correct serial port on the Local tab in the Setup dialog. Select the
port where you connected the cradle.
■ Make sure you are not running another program—such as America Online
or WinFax
®
—that uses the same port.
®
, CompuServe®,
■ Verify th at HotSync Manager is r unning. If it is running, exit and restart it.
■ Make sure you selected Local Serial or Local USB from the HotSync Manager menu or the
Palm Desktop for the 7135 Smartphone menu.
■ Try deleting the Saved_Preferences.PRC file on your computer:
Browse to C:\Palm\<username>\Backup, where <username> is the name of your
Palm device.
Locate the Saved_Preferences.PRC file and delete it.
The HotSync operation does not run to completion
■ Do not turn the phone on or off while it is synchronizing data.
■ If you have problems using the As Fast As Possible option or a specific speed, select a lower
baud rate setting on the Local tab in the Setup dialog.
■ Read the HotSync Log for the user account you are synchronizing.
■ Try deleting the Saved_Preferences.PRC file on your computer:
Browse to C:\Palm\<username>\Backup, where <username> is the name of your
Palm device.
Locate the Saved_Preferences.PRC file and delete it.
If you have two Palm devices with the same user name
Problems occur during synchronization if two Palm devices have the same user name.
The HotSync process creates a unique user ID in addition to the user name. It is important that no
two IDs synchronize to the same user name. Follow these steps to rename one of the Palm d evices.
1. On your computer, open the Palm Desktop for the 7135 Smartphone.
2. From the Tools menu, select Users.
Chapter 4 Transferring Information 65
Page 74

Beaming information
3. Click New.
4. Create a different user name.
5. Close the Palm Desktop for the 7135 Smartphone.
6. Using Windows Explorer or the Desk top, locate the folder with the ol d user name. By default,
the folder is located in the Pilot or Palm directory.
7. Copy—do not move—the files from that folder to the folder with the new user name.
8. Perform a hard reset on the organizer that will use the new user name.
9. Perform a HotSync operation with the reset organizer. When prompted for the user name,
select the new name.
Beaming information
Your Kyocera 7135 smartphone is equipped with an infrared (IrDV) port that you can use to
“beam” information to other devices with infrared ports. These devices include other phones,
Palm devices, and some laptop computers. You can beam the following:
■ The current Address Book, Date Book, To Do List, or Memo Pad entry
■ All Address Book, To Do List, or Memo Pad entries in the current category
■ Your “business card”
■ An applic ation that you have installed (if the a pplication allows beam ing)
To turn the beam receive feature on or off
1. Tap to view the applications screen.
2. Tap to open Prefs PDA.
3. Tap the in the upper-right corner and select General.
4. Tap the beside Beam Receive and select On or Off.
Tap here.
66 Kyocera 7135 Smartphone Reference Guide
Page 75

Beaming information
To beam information
1. Locate the entry you want to beam.
2. Tap to open the menus.
3. From the Record menu, tap Beam.
4. Point the infrared port (at the top of the back panel) at the infrared port of the receiving devic e.
For best results, the devices should be from 5 to 30 centimeters (approximately 2 to 12 inches)
apart, and the path between the two devices must be clear of obstacles.
---------
5. Wait for the Beam Status dialog to indicate that the transfer is complete before you continue
working on the phone.
TIP: To quickly beam your business card, just press and hold the Address Book key for a few seconds.
To receive beamed information
Before you can receive beamed information, the beam receive feature must be turned on. See “To
turn the beam receive feature on or off” on page 66. Point the infrared port directly at the infrared
port of the transmitting device to open the Beam Status dialog.
1. Tap Yes to accept the transmission.
2. Wait for the Beam Status dialog to indicat e that the transfer is complete, then tap OK to display
the new entry.
Troubleshooting the Beam feature
Beamed data does not work
■ Verify that the Beam feature is enabled (on the General Preferences screen). See “To turn the
beam receive feature on or off” on page 66.
■ Verify that the path between the two devices is clear of obstacles.
■ Try using the Beam feature at different distances. The usual distance for beaming information
is between f ive centim eters (app roximatel y 2 inches) and one mete r (approxim ately 40 inches).
However, in some cases, you may find that greater or lesser distances work more effectively.
When data is beamed at the phone, an out -of-memory message appears
■ The Kyocera 7135 smartphone requires at least twice the amount of memory available as the
data you are receiving. For example, if you are receiving a 30K application, you must have at
least 60K free.
Chapter 4 Transferring Information 67
Page 76

Beaming information
68 Kyocera 7135 Smartphone Reference Guide
Page 77

Chapter 5
Address Book
Using the Address Book, you can easily keep track of names, addresses, phone numbers, email
addresses, URLs, and other information about your personal and business contacts.
You can make phone calls, send email, or open Web sites directly from the Address Book.
Each contact in the Address Book can have up to five phone numbers, email addresses, or Web
addresses (URLs). You can put these entries into categories so you can quickly sort and view your
entries in logical groups.
Creating Address Book entries
An Address Book entry is the name, address, and phone information you are keeping f or a person
or business. You can create these entries on the Kyocera smartphone, or you can use the Kyocera
7135 smartphone Desktop software to create them on your computer and download them to your
phone during a HotSync operation. For complete information about synchronization procedures,
see Chapter 4—“Transferring Information”.
Note: The Kyocera 7135 smartphone Desktop software also has data import capabilities that allow you to
load database files into the Address Book. Refer to the online documentation supplied with the Desktop
software for de tails.
To create a new Address Book entry
1. Press the Address Book key .
2. Tap New to display the Address Edit screen.
Tap New.
3. Enter the last name of a person you want to add to your Address Book.
You can write with the stylus or use the on-screen keyboard. The first letter is capitalized
automatically (except for numeric and email information). For details about entering text,
see “Entering information” on page 27.
4. Move to the next line either by tapping it or by writing , the Next Field Graffiti stroke.
Chapter 5 Address Bo o k 69
Page 78

Making calls from the Address Book
5. Enter the person’s first name on the First Name line.
6. Enter the rest of the information for this person or business.
Notice that you can enter email addresses or Web addresses (URLs) in any of the five phone
number fields.
7. Tap to move to the next page.
8. When you have finished, tap Done to return to the Address screen.
Making calls from the Address Book
After you create an Address Book entry, you can make a call from it direct ly. If you have entered
email addresses or URLs in the Address Book, you can also make direct connections to them if
your service provider supports over-the-air data.
Note: You cannot initiate conference calls from the Address Book. If your service provider supports
conference calls, you can initiate a three-way call by entering the numbers directly on the keypad or
the Dialer.
To make a phone call from the Address Book
1. Press the Address Book key .
Tap the phone
number to dia l it .
Tap the arrow to see
other numbers for
this entry.
2. Scroll through the entries using the navigator key. Locate the person or business you want to
call and do one of the following:
■ If the number you want to call appears in the list, tap the phone number (not the name).
■ To call one of the alternate numbers for an entry, tap the in the right column.
All additional numbers for this person or business appear. Tap the one you want to call.
That number becomes the primary number for the entry.
■ Tap the number to place the call.
3. When you have finished your call, tap .
70 Kyocera 7135 Smartphone Reference Guide
Page 79

Editing Address Book entries
Editing Address Book entries
In the Address Book, you can locate your entries quickly, edit them, display them by name or
company name, and group them by category. You can also choose the type of information you
want your entries to include and exchange Address Book information with other phones or
Palm devices.
To edit an Address Book entry
1. Press the Address Book key .
The Address screen appears.
Tap the name.
2. Tap the name of t he entry you want to change, like Mark Sample. (Be sure to tap the name in
the left column, not the phone number in the right column. Tapping the phone number
initiates a call.)
The Address View screen appears.
Tap Edit.
3. Tap Edit.
4. Tap any line (such as Last name or Company). Enter or change the information.
5. When finished editing, ta p Done.
Chapter 5 Address Bo o k 71
Page 80

Editing Address Book entries
To enter pauses in a phone number
When you call automated systems, you often have to dial a series of numbers with pauses
between them (for example, when sending a page or entering a password). You can place these
pauses in the Address Book.
1. Press the Address Book key .
2. Tap the name of the entry you want to edit.
The Address View screen appears.
3. Tap Edit.
The Address Edit screen appears.
4. Tap the appropriate phone number. Enter a percent sign for a hard pause or a comma for a
timed pause wherever necessary.
To enter these punctuation marks using the on-screen keyboard, tap
corner of the Graffiti writing area.
To write these punctuation marks using Graffiti, first tap once to enter punctuation mode.
Then write the appropriate Graffiti stroke as shown in the table below.
123 in the lower right
Hard Pause (%)
When you call this number, the Kyocera smartphone pauses at this
point. It does not continue with the next set of numbers until you
tap Resume.
Timed Pause (,)
When you call this number, the Kyocera smartphone pauses for two
seconds before continuing with the next set of numbers. You can
enter as many commas as necessary to extend the length of
the pause.
To scroll through the Address Book
Press the navigator key up or down through your list of contacts when in the Address screen.
72 Kyocera 7135 Smartphone Reference Guide
Page 81

Editing Address Book entries
To look up an entry in the Address Book
1. Press the Address Book key .
2. Enter the first letter of the name you want to find.
Write the first letter or two in the Look Up line.
The list scrolls to the first entry beginning with that letter. If you write a second letter, the list
scrolls to the first entry beginning with those two letters.
3. Tap any entry to view its contents.
To choose other phone numbers in an Address Book entry
In your Address Book, you can keep up to five phone numbers, email addresses, or URLs for each
entry. You can select the labels for these numbers individually. For example, you might want to
keep a fax number for one person and a pager number for another. You can also choose which of
these numbers you want to see in the Address Book for each entry.
1. Press the Address Book key .
2. Tap the name of the entry you want to change.
Tap the name in the left column, not the phone number in the right column.
3. Tap Edit to display the Address Edit screen.
4. Tap the beside the phone number you want to change.
Tap the arrow to
open the list.
5. From the list, tap the label (for example, Fax or Pager) you want to use.
Chapter 5 Address Bo o k 73
Page 82

Editing Address Book entries
6. If you want to select which phone number appears in the Address Book and Contact list, tap
Details to open the Address Entry Details dialog. If you don’t want to change this setting, skip
to step 9.
7. Tap the beside Show in List. Select a label to identify which phone number appears on the
Address screen and the Contacts list.
8. Tap OK.
9. Tap Done.
To assign a category to an Address Book entry
Categories can help you file your Address Book entries into groups for ea sy review. The Address
Book has two standard categories (Business and Personal). You can create your own categories up
to a total of 15 categories. For information about creating and editing categories, see “To assign a
category to an Address Book entry” on page 74.
1. Press the Address Book key .
2. Tap the name you want to assign to a category.
Tap the name in the left column, not the phone number in the right column.
3. Tap Edit in the Address View screen to display the Address Edit screen.
4. In the Address Edit screen, tap the pick list in the upper-right corner. From the list, tap the
category you want to assign to this entry.
5. Tap Done.
To mark an entry as private
You can mark any entry as private. When the security features are turned on, private entries are
not visible. You must enter a password to see them.
1. Press the Address Book key .
2. Tap the entry you want to mark as private.
Tap the name in the left column, not the phone number in the right column.
3. Tap Edit to display the Address Edit screen.
4. Tap Details to open the Address Entry Details dialog.
74 Kyocera 7135 Smartphone Reference Guide
Page 83

Beaming entries to other devices
5. Tap the Private check box.
6. Tap OK.
7. In the confirmation dialog, tap OK.
8. Tap Done.
To sort the entries
You can sort the entries in the Address Book by Company and Last Name, rather than by Last
Name and First Name. These settings do not change your Address Book data in any way; they
merely change the view.
1. Press the Address Book key .
2. Tap to open the Address Book menus.
3. Tap on Options.
4. Select Preferences from the pick list.
5. Tap the setting that you want to use.
6. Tap OK.
The Address Book is resorted based on your choice. Entries with no company name are
always sorted by last name.
Beaming entries to other devices
Using the infrared (IR) port, you can beam Address Book entries to other Kyocera smartphones
or Palm devices.
Note: To conserve power, your Kyocera smartphone is delivered with the beam receive feature turned off.
To turn it on, see “Beaming infor m at io n ” on page 66.
Once the beam feature is turned on, you can beam any of the following:
■ Your business card—The business card is a specially designated entry containing information
you want to exchange with business contacts. You can send your business card quickly with
one-touch beaming.
■ An address entry—You can select and beam any entry in your Address Book.
■ A category of address entries—You can beam all of the entries in a category. For example , you
can share a list of restaurants with a friend.
For more information on the IR port, see “Beaming information” on page 66.
Chapter 5 Address Bo o k 75
Page 84

Beaming entries to other devices
To create a business card
1. Press the Address Book key .
2. Tap New.
3. Create an entry containing the information you want on your business card.
4. Tap to open the Address Book menus.
5. From the Record menu, tap Select Business Card. Tap Yes to accept this entry as you r
business card.
6. Tap Done.
Notice that in Address View, the icon identifies this record as your business card.
To beam a business card
1. Press the Address Book key .
2. Tap the name of your business card entry to display the Address View screen.
Tap the name in the left column, not the phone number in the right column.
3. Tap to open the Address Book menus.
4. Tap Beam Business Card from the Record menu to beam your card.
You can also press and hold the Address Book key for about two seconds to beam
your card.
To beam the current entry
1. Press the Address Book key .
2. Tap the name of an entry you want to beam.
Tap the name in the left column, not the phone number in the right column.
3. Tap to open the Address Book menus.
4. Tap Beam Address from the Record menu to beam the current entry.
If you beam entries often, you can set the full-screen pen stroke to beam the current entry.
To beam the current category
1. Press the Address Book key .
2. Tap the pic k list in the upper-rig ht corner. From the lis t, select the c ategory you want to beam.
3. Tap to open the Address Book menus.
4. From the Record menu, tap Beam Category.
Note: You may choose to beam “All.” This sends the entire address book without the individual categories.
76 Kyocera 7135 Smartphone Reference Guide
Page 85

Deleting entr ie s
You can remove entries from the Address Book at any time.
To delete an entry from the Address Book
1. Press the Address Book key .
2. Tap the name of the entry you want to delete.
Be sure to tap the name in the left column, not the phone number in the right column.
Tapping the phone number initiates a call.
Deleting entries
3. Tap Edit to display the Address Edit screen.
4. Tap Details.
5. Tap Delete.
Chapter 5 Address Bo o k 77
Page 86

Using Address Book menus
6. If you want to keep a backup copy of this entry on your computer, put a check mark in the
Save archive copy on PC check box. If you don’t want to save a backup, remove the
check mark.
7. In the confirmation dialog, tap OK to delete the entry or Cancel to keep it.
If you delete the entry, it is removed from both the Address Book and the Speed Dial list.
Using Address Book menus
This section covers the menu commands specific to the Address Book.
Record menu
The commands in the Record menu vary depending on which screen is open.
If the Address screen is open If Address View is open
Delete Address
Attach Note
Delete Note
Beam Address
Beam Category
Select
Business Card
Beam
Business Card
Remove an Address Book entry. In the alert dialog, tap OK to delete the entry.
The entry is removed from the Address Book, but a copy is sent to an a rchive file
on your computer during your next HotSync operation. To delete the entry
completely, remove the check mark from the Save archive copy on PC check box.
Create a note for the current entry.
Remove a note attached to an Address Book entry. In the alert dialog, tap OK to
delete the note or
Cancel to keep the note.
Beam the current Address Book entry to another Kyocera smartphone through
the IR port.
Beam all Address Book entries in the current category to another Kyocera
smartphone through the IR port.
Select the current entry as your business card. To beam your business card, use
the Beam Business Card command.
Send the current business card to another Kyocera smartphone through the IR
port. You can also beam your business card by holding down the Address Book
button for at least two seconds.
78 Kyocera 7135 Smartphone Reference Guide
Page 87

Using Address Book menus
Options menu
The commands on the Options menu vary depending on which screen is open.
If the Address s creen is open
Font
Preferences
Choose a different font (text) style for your entries.
Set how you want the Address Book to list information.
Remember last category—If you select this check box, the Address Book
shows the last category you used when you return to it from another
application. If you clear it, the Address Book shows the entries for all
categories.
List By—Sort address entries by last name or by company.
If Address View is open
Rename
Custom Fields
Security
About Address Book
Launch Speed Dial
Launch Voice Dial
Create your own names for the four custom fields. Your changes apply to
all of your Address Book entries.
Select Show records, mask records, or hide records.
Show version information for the Address Book application.
Open the Speed Dial application.
Open the Voice Dial application.
Chapter 5 Address Bo o k 79
Page 88

Using Address Book menus
80 Kyocera 7135 Smartphone Reference Guide
Page 89

Chapter 6
Call History and the Recent Calls List
Your Kyocera 7135 smartphone keeps a record of your incoming, outgoing, and missed
phone calls. You can see exactly when someone called you and you can return the call directly.
There are two ways to view this information.
Call History—You can see your 99 most recent calls in the Call History application. You can adjust
this number as high as 999 if you choose. In Call History, duplicate calls are retained; if you
bill for your phone time, you can easily track data about your calls and export it to the
Expense application.
Recent Calls List—You can see 30 calls in the Recent Calls list. In this list, duplicate calls are removed.
Using this list, you can quickly locate recent numbers and return the calls.
Opening lists of your recent calls
You can open a list of calls you have sent, received, or missed. You can see 99 calls in the Call
History application. You can see 30 calls in the Recent Calls list.
To open Call History
1. Tap to view the applications screen.
2. Tap to open the Call History list.
The icons show what type of call w as made:
Incoming ca ll
Outgoing call
Missed call
Data call (for example, a ca ll to a Web site)
The screen shows the calls you have made or received, including the date, time, and length.
If the phone number is in your Address Book, the contact name appears in the Who column.
Otherwise, the Who column displays the phone number. If you haven’t made or received any
calls yet, the Call History screen is empty.
81 Kyocera 7135 Smartphone Reference Guide
Page 90

Making a call from Call History
If you synchronize more than one Kyocera 7135 Smartphone with the same user name, the
Call History screen displays calls from all of them.
Note: Call History does not necessarily reflect all calls made on your phone. Synchronizing the phone with
more than one user and/or res e tting the phone can both affect the history.
To open the Recent Calls list
1. From the phone’s home screen, press the navigator key in to open Recent Calls .
2. Press the navigator key up or down to move through the list of calls.
3. To return a call, highlight the entry and press the navigator key in. Press .
4. To save a phone number and put it in your Address Book, press t he navigator key up or down
Save is highlighted. Then press the navigator key in.
until
Making a call from Call History
You can quickly return a phone call directly from either of the lists that show the calls you
have received.
To make a call from Call History
1. Tap to view the applications screen.
2. Tap to open the Call History list.
3. To dial the number immediately, tap the phone icon to the right of the number you want
to call.
4. To see more information before placing the call, tap the entry to open the Details screen.
To dial the number, tap
Dial.
82 Kyocera 7135 Smartphone Reference Guide
Page 91

To make a call from the Recent Calls list
1. From the phone screen, press the navigator key in to open Recent Calls.
2. Press the navigator key up or down to move through the list of calls.
3. When the call you want to return is highlighted, press .
Viewing your calls
Viewing your calls
Call History is a valuable tool for keeping track of your incoming and outgoing calls. You can
view calls by category, sort the Call History list, copy information from it into the Address Book
or the Clipboard, and delete entries.
To view calls by category
You can quickly view the calls in Call History b y their category (for example , only calls you hav e
missed).
1. Tap to view the applications screen.
2. Tap to open the Call History list.
3. Tap the pick list in the upper-right corner.
4. From the list, select All, Incoming, Outgoing, or Missed.
The screen displays calls in that category only.
Note: The Recent category is the same as the Recent Calls list you see from the phone’s main screen. It
includes the last 30 unique phone numbers of incoming, outgoing, and missed calls. Each number is listed
only once; duplicate numbers are deleted (oldest first). For example, if you called the same number four
times, only the most recent of these calls is listed.
To sort the Call History list
With a single click, you can sort the Call History list by the name or phone number of the caller,
by date and time, or by length of call. No matter which sequence you choose, new calls
automatically appear at the top of the list.
1. Tap to view the applications screen.
Chapter 6 Call History and the Recent Calls List 83
Page 92

Viewing your calls
2. Tap to open the Call History list.
3. To list calls in alphanumeric order by name and phone number, tap Who in the column
heading. Tap
Who again to reverse the sort order.
4. To list calls by date , tap Date in the column heading. Calls are l iste d b y date, with all the calls
on a single day listed by time. For calls received or made during the current day, only the time
is displayed, not the date. For previous calls, both the date and time are listed; expand the
column to see all of the information. Tap
Date again to resort the list based on the most
recent time.
5. To list calls in order from longest to shortest, tap Length in the column heading. Tap Length
again to resort the list from shortest call to longest call.
To copy information from Call History to the Address Book
1. Tap to view the applications screen.
2. Tap to open the Call History list.
3. Tap the entry you want to add to (or modify) in the Address Book. The Call Detail
dialog appears.
4. Do one of the following:
■ To add a new entry, tap Create Address Book Entry. Tap OK in the confirmation dialog.
The Address Details screen appears where you can verify or change the entry.
■ To change an existing entry, tap Update Address Book Entry. In the confirmation mess age,
OK. The Address Book appears where you can verify or change the entry.
tap
To copy information from Call History to the Clipboard
1. Tap to view the applications screen.
2. Tap to open the Call History list.
3. Tap the entry you want to copy.
4. Tap to open the Call History menus.
5. From the Record menu, tap Copy Number to Clipboard.
84 Kyocera 7135 Smartphone Reference Guide
Page 93

Deleting calls
To delete one entry
1. Tap to view the applications screen.
2. Tap to open the Call History list.
3. Tap the entry you want to delete.
4. Tap Delete. The call is removed from the list.
To delete a group of entries
1. Tap to view the applications screen.
2. Tap to open the Call History list.
3. Drag the stylus through the entries you want to delete.
4. From the Call History list, tap to open the menus.
Deleting calls
5. From the Record menu, tap Delete Selected Calls. The highlighted calls are removed from your
Call History list.
To delete all entries
1. Tap to view the applications screen.
2. Tap to open the Call History list.
3. From the Call History list, tap to open the menus.
4. From the Record menu, tap Delete All Calls. All the call s are removed from both the Call
History list and the Recent Calls list.
Setting up your preferences in Call History
To define Call History preferences
1. Tap to view the applications screen.
2. Tap to open the Call History list.
3. In the Call History application, tap .
4. From the Options menu, tap Preferences.
Chapter 6 Call History and the Recent Calls List 85
Page 94

Using the menus in Call History
5. If you don’t want caller names to appear in the Who column even if this information is
available, tap
6. To delete calls after a specific number of days, tap Delete calls after ___ days. Enter the number
Don’t show name in summary.
of days on the line.
7. To set the maximum number of calls to be listed in Call History, enter a number between 1
and 999 on the Maximum # of Calls line.
8. Tap OK when you have finished.
Using the menus in Call History
This section outlines menu commands specific to Call History.
Record menu
The commands on the Record menu vary depending on which screen is open.
From Call Histor y From Call Details
Delete All Calls
Delete Selected
Calls
Look Up Names
Copy Number
to Clipboard
Look up Name
in Address Book
Remove all records from the Call History list and the Recent Calls list.
Remove highlighted records from the Call History list. This option does not
remove the records from the Recent Calls list.
From the Call History screen, scan the Address Book to updat e the information
in Call History. If you have made a number of changes to your Address Book,
you can select this menu option to refresh the information in Call History.
Note that if you have 250 or more names in the Address Book, you may want
to turn off this feature to increase the performance speed of Call History.
From the Call Details screen, copy information from a call to your
Address Book.
From the Call Details screen, scan the Address Book for an entry that matches
this number. The Kyocera 7135 Smartphone makes this scan automatically
after each call. However, if you have made a number of changes to your
Address Book, you can select this menu option to update information in
Call History.
86 Kyocera 7135 Smartphone Reference Guide
Page 95

Options menu
Using the menus in Call History
Preferences
About Call History
Manage the way calls are handled by Call History.
■ Display phone numbers only, without names.
■ Disable the lookup feature that updates Call History with names from
the Address Book. If you have more than 250 names in the Address Book,
it is recommended that you disable automatic lookup to improve
phone performance.
■ Delete calls after X days.
■ Set the maximum number of calls to be kept in Call History.
View version information for the Call History application.
Chapter 6 Call History and the Recent Calls List 87
Page 96

Using the menus in Call History
88 Kyocera 7135 Smartphone Reference Guide
Page 97

Chapter 7
Date Book
Using the Date Book, you can quickly and easily schedule appointments or any kind of activity
associated with a specific time and date.
Scheduling events in the Date Book
An event is any activity that you schedule for a particular day. When you create an event, its
description appears on the time line, and its duration is set to one hour. You can ea sily change the
start time and duration for any event.
You can also include events in your Date Book that have no start or end time, such as birthdays,
holidays, and anniversaries. These untimed events appear at the top of the Date Book screen and
are noted by a diamond.
To schedule an event for the current day
1. Press the Date Book key .
2. Tap the time at which you want the event to begin.
You can also select a starting time for an appointment by making sure that no event is se lected,
and then writing a number on the number side of the Graffiti writing area.
Tap a time line and enter
the event.
3. Enter information about the event.
4. To set the length of the event, do one of the following:
■ If your appointment is longer or shorter than an hour, tap the time of the event to open the
Set Time dialog.
Chapter 7 Date Book 89
Page 98

Scheduling events in the Date Book
■ If your appointment is exactly one hour long, skip to step 8. Date book events are set at
one hour by default.
Tap the time of an
event.
5. Tap the appropriate hour and minute in the time columns on the right side of the dialog to set
the Start Time.
Tap this arrow to scroll to earlier hours.
Tap in this column to change hours.
Tap in this colu m n to change minute s .
Tap this arrow to scroll to lat er hours.
6. To schedule the event for the entire day, tap All Day.
7. To schedule a specific ending time, tap the End Time box. Tap the appropriate hour and
minute in the time columns.
8. Tap OK.
To schedule an event for another day
1. Press the Date Book key.
2. Select the date you want for the event by doing one of the following:
■ Tap the day of the week you want to choose in the Date Bar at the top of the Date Book
screen. Tap the left arrow to move to the previous week or the right arrow to move to the
next week.
Next week
Previous week
■ Press the scroll up key to move to the previous day or the scrol l down key to move t o the
next day.
90 Kyocera 7135 Smartphone Reference Guide
Page 99

Scheduling events in the Date Book
■ Tap Go To to open the Go to Date dialog. Select a date by tapping a year, month, and day
in the calendar.
Previous
year
Next year
Tap the month.
Tap the day.
Tap Today to select the current date.
3. After you locate the date, follow the steps in the previous section, “To schedule an event for
the current day” on page 89.
To schedule an untimed event
1. Press the Date Book key.
2. Select the date and Tap New.
3. Tap No Time.
Tap No Time.
The cursor appears beside a diamond on the top line. The diamond indicates an untimed
event for that day.
4. Enter a description for the event.
5. Tap a blank area on the screen to deselect the untimed event.
Note: If you create an event and d ecide later that it ha s no particular st art or end time, you c an easily change
it to an untimed event. Tap the time of the event in the Date Book screen, tap No Time, and then tap OK.
To reschedule an event
1. Press the Date Book key .
2. Tap the event you want to reschedule.
3. Tap Details to open the Event Details dialog for that event.
4. Tap the Time box. Select the new time.
Chapter 7 Date Book 91
Page 100

Scheduling events in the Date Book
5. Tap the Date box. Select the new date.
6. Tap OK to return to the Date Book screen.
Setting an alarm for an event
You can set an audible alarm to remind yourself of upcoming events. The alarm sounds even if
the phone is turned off.
The default alarm setting is five minutes before an event, but you can change this time period
to any number of minutes, hours, or days. When you set an alarm, appears to the far right of
the event.
When the alarm tone sounds, a reminder message appears on the screen. If the phone is turned
on, this message (including the event date or time) appears.
To set an alarm for an event
1. Press the Date Book key .
2. Tap the event to which you want to assign an alarm.
3. Tap Details to open the Event Details dialog for that event.
Tap here to select minutes, hours, or days.
Enter the number of minutes, hours, or days.
4. To activate the alarm, tap the Alarm check box.
5. Tap to select Minutes, Hours, or Days.
6. Enter any number from 0 to 99 (inclusive) as the numeric alarm setting.
7. Tap OK to return to the Date Book screen.
The alarm icon shows that an
alarm has been set for this event.
Note: If you set an alarm f or a n unti med ev ent , the a la rm sounds a t one a t the s peci fie d numbe r o f minut es,
hours, or days before midnight of that day. A reminder message remains on the screen until you tap OK.
92 Kyocera 7135 Smartphone Reference Guide
 Loading...