


 QUICKGuide TASKalfa 3010i / TASKalfa 3510i
E-Mail operation |
ENG |
Sending
Scan settings
Further settings
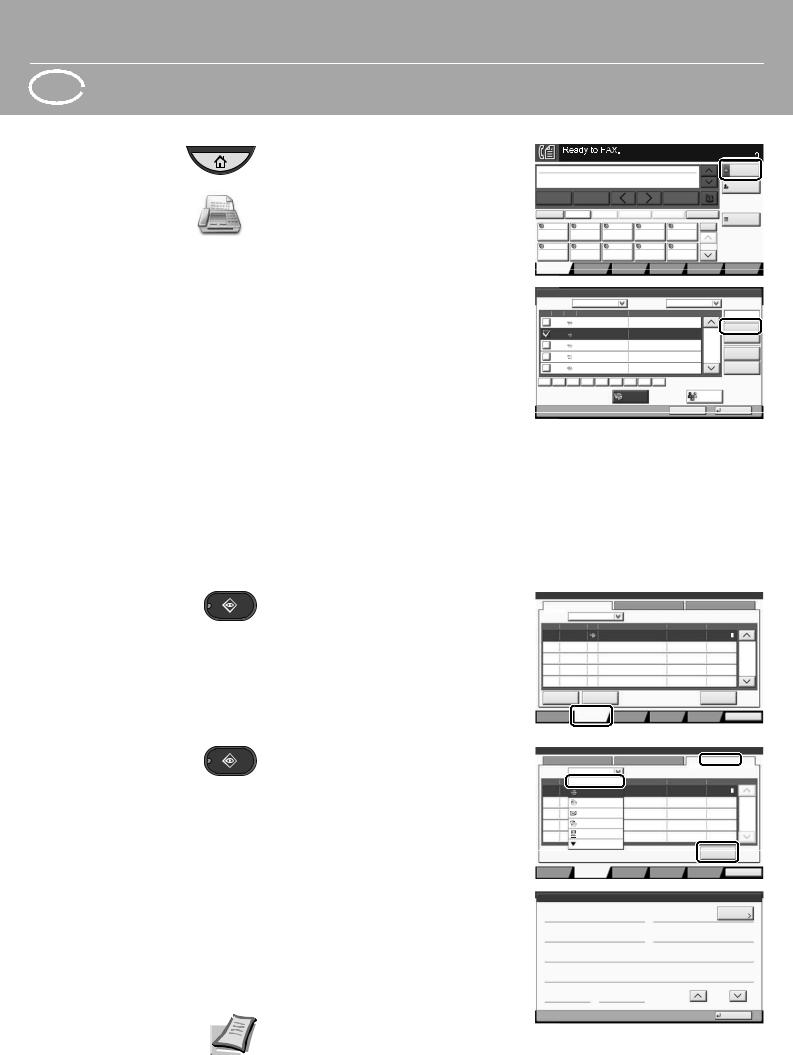
Press the [Home] key.
Press [Send].
Place the originals on the platen or in the document processor.
Enter the destination address.
From the address book:
Press [Address Book]. Press the checkbox to select the desired destination from the list. Press [Search (Name)] to find the destination. Enter the name you search for. Confirm with [OK].
You may choose multiple destinations.
Enter an e-mail address:
Press [E-mail Addr Entry] and [E-mail Address]. Enter the E-Mail address on the touch screen. After that press [OK].
If you want to send the e-mail to several destinations, go back to step 4.
To send the e-mail press the [Start] key.
|
|
|
|
|
|
|
|
Destination |
|
Enter Destination. |
|
|
|
|
|
||
|
|
Destination |
|
|
Detail |
|
|
|
|
|
|
|
|
|
|
1/1 |
|
|
|
|
|
|
|
|
|
Folder Path |
|
|
|
|
|
|
|
|
Entry |
On Hook |
Direct |
Chain |
Detail/Edit |
Delete |
|
Recall |
FAX No. |
|
|
|
|
|
|
|
|
|
|
|
0001 |
0002 |
0003 |
0004 |
0005 |
No. |
Entry |
|
|
|
|||||||
AAA |
|
BBB |
CCC |
DDD |
EEE |
|
|
i-FAX |
|
|
|
|
|
|
|
|
Addr Entry |
|
0006 |
0007 |
0008 |
0009 |
0010 |
1/100 |
WSD Scan |
|
FFF |
|
GGG |
HHH |
III |
JJJ |
|
|
|
|
|
|
/DSM Scan |
|||||
|
|
Quick Setup |
Org./Sending |
Color/ |
|
Advanced |
Program |
|
|
|
|
|
Data Format |
Image Quality |
Setup |
|
|
Address Book |
|
|
|
|
|
|
||
Addr Book |
Address Book |
Sort |
Name |
|
|
|
||
Dest. |
No. |
Type |
Name |
|
Detail |
|
|
|
|
0001 |
ABCD |
|
abcd@efg.com |
|
|
|
|
|
0002 |
TUVW |
|
tuvw@xyz.com |
|
|
Search(No.) |
|
|
|
|
|
|
|
|
|
|
|
0003 |
Group1 |
|
|
|
|
1/2 |
Add/Edit |
|
|
|
|
|
|
|
|
|
|
0004 |
Group2 |
|
|
|
|
|
Address Book |
|
0005 |
Group3 |
|
|
|
|
|
Detail |
|
|
|
|
|
|
|
||
ABC |
DEF |
GHI JKL |
MNO PQRS TUV WXYZ |
0-9 |
|
|
|
|
Folder |
FAX |
i-FAX |
|
Group |
|
|||
|
|
|
|
|
|
Cancel |
|
OK |
|
|
|
|
|
|
|
|
Destination |
|
Enter Destination. |
|
|
|
|
|
||
E-mail Address Entry |
|
|
|
|
|
|
||
|
|
|
|
|
|
|
||
|
Address |
|
|
|
|
|
|
|
|
Add a new e-mail destination. |
|
|
|
|
|||
|
Press [E-mail Address], then enter |
|
|
|
|
|||
|
the address using the keyboard screen. |
|
|
|
|
|||
|
Add to Addr Book |
|
Next Dest. |
|
Cancel |
|
OK |
|
Press the [Home] key.
Press [Send].
Press [Color/Image Quality].
Press [Color Selection].
Choose the Color to be used.
Confirm with [OK].
Press the [Home] key.
Press [Send].
Press [Quick Setup].
Choose an item to be changed. After changing confirm with [OK].
To enter a file name press [Advanced Setup]. Press [File Name Entry] and change the name. Confirm with [OK].
Press [Destination] to return.
|
|
|
|
|
|
|
|
|
|
|
Destination |
|
|
|
Destination |
|
|
|
Detail |
|
|
|
Address |
ABCD |
|
|
abcd@efg.com |
|
|
|
Book |
||||
TUVW |
|
|
192.168.188.120 |
|
|
1/1 |
|||||
|
|
|
|
Addr Entry |
|||||||
|
|
|
|
|
|
|
|
|
|
|
|
Group1 |
|
|
Group1 |
|
|
|
|
Folder Path |
|||
|
|
|
|
|
|
|
|
|
|
|
|
|
|
|
|
|
|
|
|
|
|
|
Entry |
On Hook |
|
|
Direct |
Chain |
Detail/Edit |
Delete |
|
|
Recall |
FAX No. |
|
|
|
|
|
|
|
|
|
|
|
|
|
0001 |
0002 |
|
0003 |
|
0004 |
0005 |
No. |
Entry |
|||
|
|
|
|||||||||
AAA |
|
|
BBB |
CCC |
|
DDD |
EEE |
|
|
|
i-FAX |
|
|
|
|
|
|
|
|
|
|
|
Addr Entry |
0006 |
0007 |
|
0008 |
|
0009 |
0010 |
1/100 |
WSD Scan |
|||
FFF |
|
|
GGG |
HHH |
|
III |
JJJ |
|
|
|
|
|
|
|
|
|
|
/DSM Scan |
|||||
|
|
|
|
|
|
|
|
|
|
|
|
Destination |
Quick Setup |
Org./Sending |
|
|
|
Advanced |
Program |
||||
|
|
|
|
|
Data Format |
|
|
|
Setup |
|
|
|
|
|
|
|
|
|
|
|
|
|
Destination |
Color Selection |
|
|
|
|
|
|
|
|
|||
|
|
|
|
Select scanning color. |
|
|
|
|
|||
|
|
|
|
Use [Auto Color] to automatically produce color originals |
|
||||||
|
|
|
|
in full color and black & white originals in black & white. |
|
||||||
|
|
|
|
|
Auto Color |
Auto Color |
|
|
|||
|
|
|
|
|
(Color/Gray) |
(Color/B & W) |
|
|
|||
Original |
|
: |
A4 |
|
|
|
|
|
|
|
|
Zoom |
|
: 100% |
|
|
|
|
|
|
|
|
|
Send |
|
: A4 |
|
Full Color |
Grayscale |
Black & White |
|
||||
Preview |
|
|
|||||||||
|
|
|
|
|
|
|
|
||||
|
Add Shortcut |
|
|
|
|
Cancel |
|
OK |
|||
|
|
|
|
|
|
|
|
|
|
|
Destination |
Sending Image |
|
|
Destination |
|
|
|
Shortcut 1 |
||||
|
|
|
|
ABCD |
|
|
|
|
|
|
|
|
|
|
|
TUVW |
|
|
|
|
1/1 |
Shortcut 2 |
|
|
|
|
|
|
|
|
|
|
|||
|
|
|
|
Group1 |
|
|
|
|
|
Shortcut 3 |
|
|
|
|
|
|
|
|
|
|
|
|
|
|
|
|
|
Auto Color |
300x300dpi |
Normal 0 |
Shortcut 4 |
||||
|
|
|
|
(Color/Gray) |
|
|
|
|
|
||
Original |
: |
A4 |
Color |
|
Scan |
|
Density |
|
|||
Selection |
|
Resolution |
|
|
|
Shortcut 5 |
|||||
|
|
|
|
||||||||
Zoom |
: |
100% |
1-sided |
|
Off |
|
|
||||
Send |
: |
A4 |
|
|
|
|
|||||
Preview |
2-sided/Book |
|
Continuous |
|
File Format |
Shortcut 6 |
|||||
|
|
|
|
Original |
|
Scan |
|
|
|
|
|
|
|
|
|
|
|
|
|
|
|||
|
|
|
|
|
Org./Sending |
Color/ |
|
|
|
Program |
|
|
|
|
|
|
Data Format |
Image Quality |
|
|
|
|
|
Printed in China 302NL5611001 First edition 2013.7
ENG 
Sending a fax
Canceling fax job
Check transmission result
Fax operation
Press the [Home] key.
Press [FAX].
Place the originals on the platen or in the document processor.
Enter the destination address.
Enter the destination:
Enter the fax number with the numeric keys. After that press [OK].
From the address book:
Press [Address Book]. Press the checkbox to select the desired destination from the list. Press [Search (Name)] to find the destination. Enter the name you search for. Confirm with [OK].
You may choose multiple destinations. If you want to send the fax to several destinations, go back to step 4.
To send the fax press the [Start] key.
|
|
|
|
|
|
|
|
Destination |
|
Enter Destination. |
|
|
|
|
|
||
|
|
|
|
|
|
001/001 |
|
|
|
ABCD |
|
|
abcd@efg.com |
|
|
|
|
|
|
|
|
|
|
|
|
FAX No. |
|
|
|
|
|
|
|
|
Entry |
Pause |
|
Space |
|
|
Backspace |
|
|
|
On Hook |
Direct |
Chain |
Detail |
|
Delete |
Recall |
Check |
|
|
|
|
|
|
|
|
|
|
|
0001 |
|
0002 |
0003 |
0004 |
0005 |
No. |
Destinations |
|
|
|
||||||
AAA |
|
BBB |
CCC |
DDD |
|
EEE |
|
|
|
0006 |
|
0007 |
0008 |
0009 |
0010 |
1/100 |
|
FFF |
|
GGG |
HHH |
III |
|
JJJ |
|
|
Destination |
Quick Setup |
Org./Sending |
Image Quality |
Advanced |
Program |
|||
|
|
|
|
Data Format |
|
|
Setup |
|
Address Book |
|
|
|
|
|
|
||
Addr Book |
Address Book |
Sort |
|
Name |
|
|
||
Dest. |
No. |
Type |
Name |
|
Detail |
|
|
|
|
0001 |
A OFFICE |
1234567890 |
|
|
|
||
|
0002 |
B OFFICE |
1234568907 |
|
|
Search(No.) |
||
|
|
|
|
|
|
|
|
|
|
0003 |
C OFFICE |
1234569078 |
|
1/2 |
Add/Edit |
||
|
|
|
|
|
|
|
|
|
|
0004 |
D OFFICE |
1234568790 |
|
|
Address Book |
||
|
0005 |
E OFFICE |
1234568860 |
|
|
Detail |
||
|
|
|
|
|||||
ABC |
DEF |
GHI |
JKL MNO PQRS TUV WXYZ |
0-9 |
|
|
|
|
|
|
|
|
FAX |
|
|
Group |
|
|
|
|
|
|
|
Cancel |
|
OK |
Press the [Status/Job Cancel] key.
Press [Sending Jobs].
Choose the job to be canceled and press [Cancel].
Confirm with [Yes]. Communication is canceled.
Press the [Status/Job Cancel] key.
Press [Sending Jobs].
Press [Log].
Under Job Type, select [FAX].
Select a job to be checked.
Press [Detail].
The details are displayed.
For more details refer to the Operation Guide on the co-packed DVD.
Status |
|
|
|
|
|
|
|
|
|
Status |
|
Scheduled Job |
Log |
|
|
Job Type |
All |
|
|
|
|
|
|
Job No. |
Accepted Time Type |
|
Destination |
User Name |
Status |
|
|
438 |
14:47 |
0123456789 |
|
InProcess |
|
||
|
|
|
|
|
|
|
1/1 |
Cancel |
|
Priority |
|
|
|
Detail |
|
|
|
Override |
|
|
|
|
|
Printing Jobs |
|
|
Storing Jobs |
Device/ |
Paper/ |
Close |
|
|
|
|
|
|
Communicate |
Supplies |
|
Status |
|
|
|
|
|
|
|
|
|
Status |
|
Scheduled Job |
|
|
|
Job Type |
All |
|
|
|
|
|
|
Job No. |
|
|
|
Destination |
User Name |
Result |
|
438 |
|
FAX |
|
|
|
InProcess |
|
|
|
|
|
|
|
|
|
|
|
i-FAX |
|
|
|
|
|
|
|
|
|
|
|
1/1 |
|
|
|
Folder |
|
|
|
|
|
|
|
Application |
|
|
|
|
|
|
|
Next |
|
|
|
|
|
Printing Jobs |
Sending Jobs |
Storing Jobs |
Device/ |
Paper/ |
Close |
||
|
|
|
|
|
Communicate |
Supplies |
|
Detail Job No.: 000080 |
|
|
|
|
|
||
Job No.: |
|
|
|
Result/Destination: |
Detail |
|
|
|
|
|
|
|
|
|
|
000080 |
|
|
|
Completed |
|
|
|
Job Type: |
|
|
|
Destination: |
|
|
|
Sending Job - E-mail |
|
|
1 |
|
|
||
User Name: |
|
|
|
|
|
|
|
User1 |
|
|
|
|
|
|
|
Job Name: |
|
|
|
|
|
|
|
doc20070404115151 |
|
|
|
|
|
||
Accepted Time: |
End Time: |
|
|
|
|||
08:08:08 |
|
09:09:09 |
|
1/2 |
|
||
Close
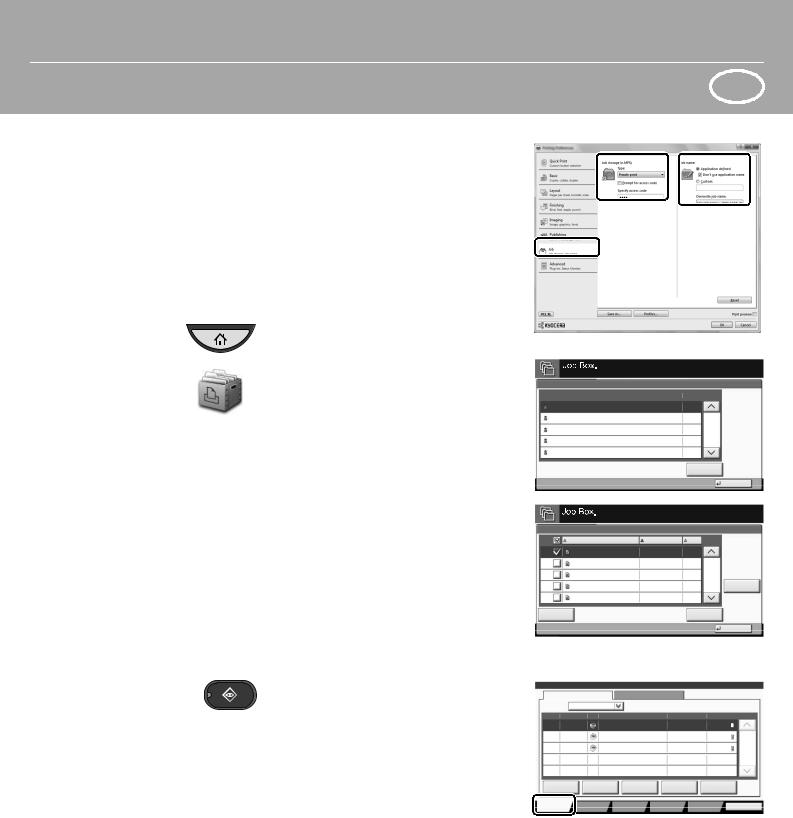
Private printing
Cancel print job
Print operation |
ENG |
Note: To activate the private printing from the PC, select the [Job] tab in the printer driver, select [Job storage (e-MPS)] checkbox, and then select [Private print] from [Type] list.
Remove the checkmark from [Prompt for access code], and enter 4 digits number in [Specify access code].
The section [Job name] allows you to type in your name directly.
Press the [Home] key.
Press [Job Box].
Select the creator of the private print job.
Select the document to be printed from the list.
Press [Print]. Type in the access code with the numeric keys.
Press [Start Print] to start printing.
Note: By pressing [Delete] jobs can be canceled.
|
|
|
|
Private Print/Stored Job |
|
|
|
|
User Name |
Files |
|
1 User |
5 |
|
|
2 User |
2 |
|
|
3 User |
1 |
1/2 |
|
4 User |
1 |
|
|
5 User |
1 |
|
|
|
|
Open |
|
|
|
|
Close |
User: |
|
|
|
|
File Name |
Date and Time |
Size |
|
|
1File |
02/02/2013 09:40 |
21 |
MB |
|
2File |
02/02/2013 09:45 |
30 |
MB |
|
3File |
02/02/2013 09:50 |
36 |
MB |
2/3 |
4File |
02/02/2013 09:55 |
21 |
MB |
Detail |
|
||||
5File |
02/02/2013 10:00 |
30 |
MB |
|
|
Delete |
|
||
Close
Press the [Status/Job Cancel] key.
Press [Printing Jobs].
Choose the job to be canceled and press [Cancel].
Confirm with [Yes]. Job is canceled.
Status |
|
|
|
|
|
|
|
|
|
Status |
|
|
Log |
|
|
Job Type |
All |
|
|
|
|
|
|
Job No. |
Accepted Time Type |
|
Job Name |
User Name |
Status |
|
|
000001 |
10/10 09:10 |
doc20081010091015 |
AAAAA |
InProcess |
|
||
000002 |
10/10 09:15 |
doc20081010091510 |
AAAAA |
Waiting |
|
||
000003 |
10/10 09:20 |
doc20081010092015 |
BBBBB |
Waiting |
1/1 |
||
Pause All |
Cancel |
|
Priority |
Move Up |
Detail |
|
|
Print Jobs |
|
|
Override |
|
|
|
|
|
|
Sending Jobs |
Storing Jobs |
Device/ |
Paper/ |
Close |
|
|
|
|
|
|
Communicate |
Supplies |
|
|
|
|
|
|
|
||
ENG |
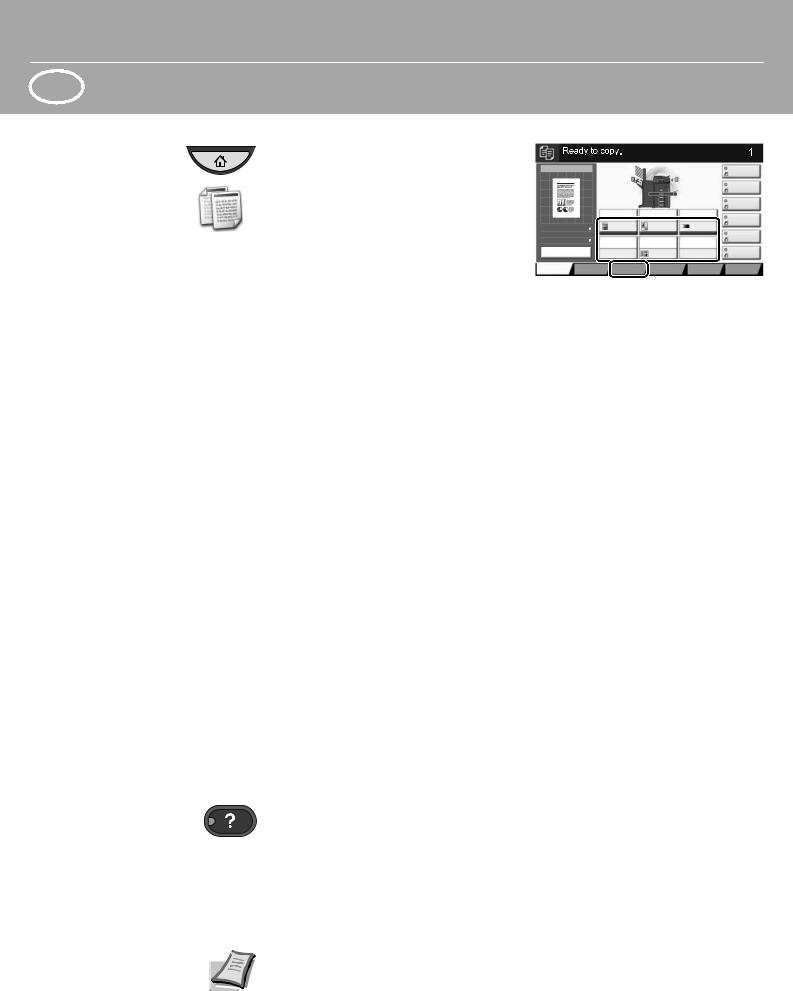
Copy operation |
Preparation |
Press the [Home] key. |
|
Press [Copy]. |
|
Place the originals on the platen or in |
|
the document processor. |
|
Choose [Paper Selection], [Duplex] |
|
[Zoom], [Combine], [Density] or |
|
[Staple/Punch] (optional) in the sub |
|
menu from the main screen. |
|
Confirm all settings with [OK]. |
|
Enter the number of copies with the |
|
numeric keys. |
|
Press the [Start] key. |
|
|
|
|
|
|
|
|
|
|
Copies |
|
Preview |
|
|
|
|
|
|
|
Shortcut 1 |
|
|
|
|
|
|
|
|
|
|
|
Shortcut 2 |
|
|
|
|
|
|
|
|
|
|
Shortcut 3 |
|
|
|
Auto |
100% |
Normal 0 |
Shortcut 4 |
||||
|
|
|
|
|
|
|
|
|
|
|
Original |
: |
A4 |
|
|
|
|
|
|
|
Shortcut 5 |
|
|
|
|
|
|
|
||||
Zoom |
: |
100% |
|
|
|
|
|
|
|
|
Paper |
: |
A4 |
|
|
|
|
|
|
|
|
|
Preview |
|
|
|
|
|
|
|
Shortcut 6 |
|
Quick Setup |
Org./Paper/ |
|
Layout/Edit |
|
Advanced |
Program |
||||
|
|
|||||||||
|
|
|
Finishing |
|
|
|
Setup |
|
||
Help
A [Help] key is provided on this machine’s operation panel. If you are unsure of how to operate the machine, would like more information on its functions or are having problems getting the machine to work properly, press the [Help] key to view a detailed explanation on the touch panel.
For more details refer to the Operation Guide on the co-packed DVD.


 QUICKGuide TASKalfa 3010i / TASKalfa 3510i
Envío
Configuración de escaneo
Configuración adicional
Uso del e-mail |
ES |
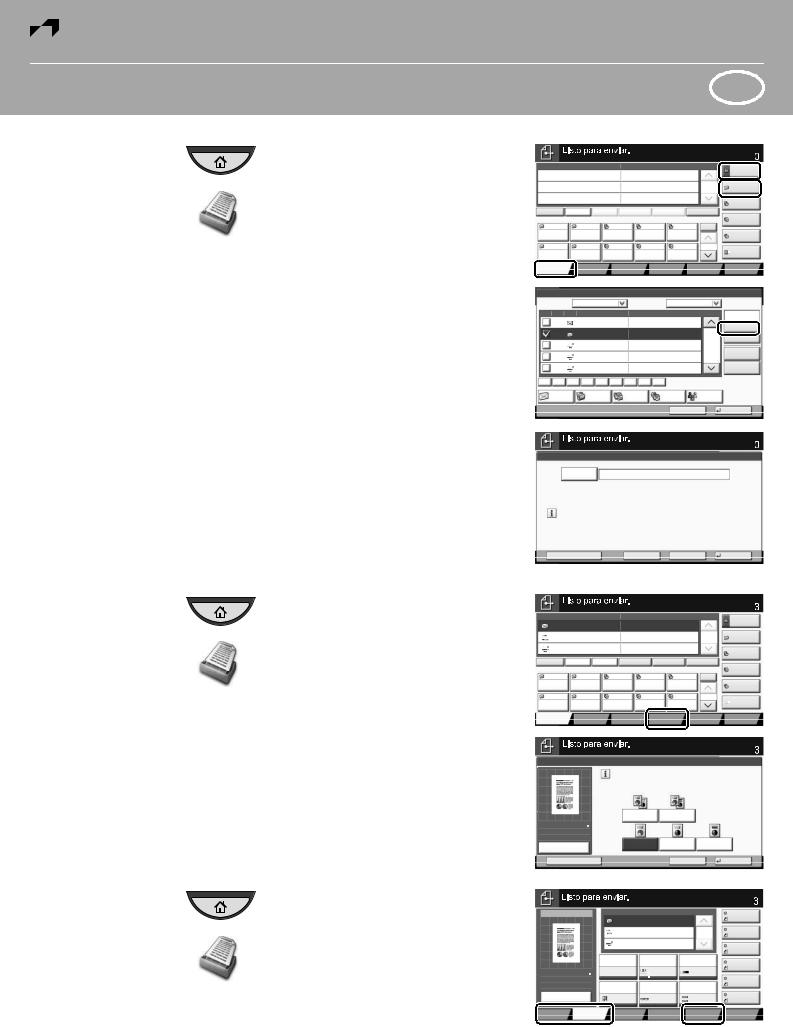
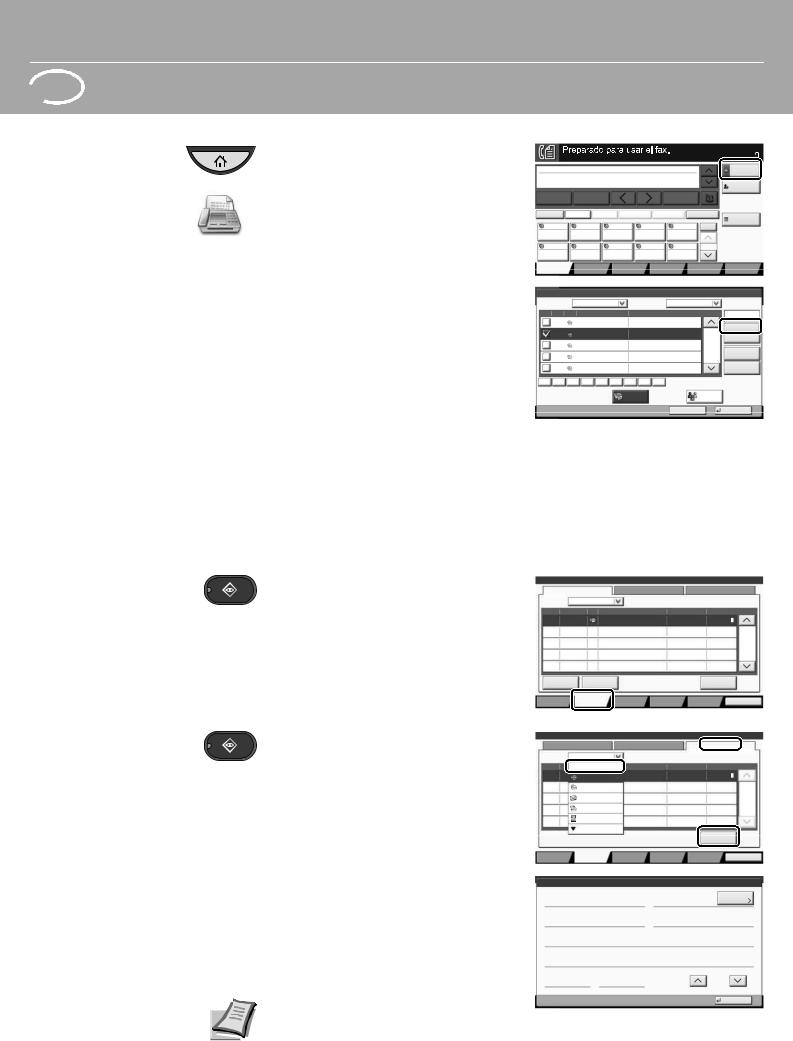
Pulse la tecla [Inicio].
Pulse [Enviar].
Coloque los originales en el cristal de exposición o en el alimentador de documentos.
Introduzca la dirección de destino.
Desde la libreta de direcciones:
Pulse [Libr. direc.]. Marque la casilla para seleccionar el destino deseado de la lista. Pulse [Buscar (Nombre)] para buscar el destino. Introduzca el nombre que desea buscar.
Confirme la configuración con [Aceptar]. Puede elegir varios destinos.
Introducción de una dirección de e- mail:
Pulse [E-mail Ingreso dir] y [Dirección de E-mail]. Introduzca la dirección de e-mail en la pantalla digital. A continuación, pulse [Aceptar].
Si desea enviar el e-mail a varios destinos, vuelva al paso 4.
Para enviar el e-mail, pulse la tecla [Inicio].
Pulse la tecla [Inicio].
Pulse [Enviar].
Pulse [Color/Calidad de imagen].
Pulse [Selección de colores].
Seleccione el color que desea usar.
Confirme la configuración con [Aceptar].
Pulse la tecla [Inicio].
Pulse [Enviar].
Pulse [Config. rápida].
Seleccione el elemento que desea cambiar. Después de cambiarlo, confirme la configuración con [Aceptar].
Para introducir un nombre de archivo, pulse [Avanzado Configuración]. Pulse [Ingreso de nom. archivo] y cambie el nombre. Confirme la configuración con [Aceptar].
Pulse [Destino] para volver.
|
|
|
|
|
|
|
|
|
|
Destino |
|
Ingresar destino. |
|
|
|
|
|
|
|
||
|
|
Destino |
|
|
Detalle |
|
|
|
|
|
|
|
|
|
|
|
|
|
|
1/1 |
|
|
|
|
|
|
|
|
|
|
|
Ingreso de |
|
|
|
|
|
|
|
|
|
|
ruta carpeta |
Colgar |
Directo |
Cadena |
Det./editar |
Eliminar |
|
Rellamar |
Ingreso de |
|||
|
|
|
|
|
|
|
|
|
|
|
|
0001 |
0002 |
0003 |
0004 |
|
|
0005 |
Nro. |
nro. de FAX |
|
|
|
|
|
|||||||
AAA |
|
BBB |
CCC |
DDD |
|
EEE |
|
|
|
Ingreso dir |
|
|
|
|
|
|
|
|
|
|
i-FAX |
|
0006 |
0007 |
0008 |
0009 |
|
|
0010 |
1/100 |
Escan WSD |
|
FFF |
|
GGG |
HHH |
III |
|
JJJ |
|
|
|
|
|
|
|
|
|
/Escan DSM |
|||||
|
|
Config. rápida |
Formato datos |
Color/Calidad |
Avanzado |
Programa |
||||
|
|
|
|
original/envío |
de imagen |
|
Configuración |
|
||
Libr. direc. |
|
|
|
|
|
|
|
|
|
|
Libr direc |
Libr. direc. |
|
Clasificar |
Nombre |
|
|
|
|||
Dest. |
Nro. |
Tipo |
Nombre |
|
Detalle |
|
|
|
|
|
|
0001 |
ABCD |
|
abcd@efg.com |
|
|
|
|
|
|
|
0002 |
TUVW |
|
tuvw@xyz.com |
|
|
|
|
Buscar(Nro.) |
|
|
|
|
|
|
|
|
|
|
|
|
|
0003 |
Group1 |
|
|
|
|
|
|
1/2 |
Agregar/editar |
|
|
|
|
|
|
|
|
|
|
|
|
0004 |
Group2 |
|
|
|
|
|
|
|
libreta direc. |
|
0005 |
Group3 |
|
|
|
|
|
|
|
Detalle |
|
|
|
|
|
|
|
|
|
||
ABC |
DEF |
GHI JKL |
MNO PQRS TUV WXYZ |
0-9 |
|
|
|
|
|
|
Carpeta |
FAX |
i-FAX |
|
|
Grupo |
|
||||
|
|
|
|
|
|
|
Cancelar |
|
Aceptar |
|
|
|
|
|
|
|
|
|
|
|
Destino |
|
Ingresar destino. |
|
|
|
|
|
|
|
||
Ingreso de dirección de E-mail |
|
|
|
|
|
|
|
|||
|
Dirección |
|
|
|
|
|
|
|
|
|
|
de E-mail |
|
|
|
|
|
|
|
|
|
|
Agregar un nuevo destino de E-mail. |
|
|
|
|
|
|
|||
|
Presionar [Dirección de E-mail], e introducir la dirección |
|
|
|
|
|||||
|
usando la pantalla del teclado. |
|
|
|
|
|
|
|||
|
Agregar a libr direc |
|
Sgte. dest. |
|
Cancelar |
|
Aceptar |
|||
|
|
|
|
|
|
|
|
|
|
Destino |
|
|
Destino |
|
|
Detalle |
|
|
|
|
Libr. direc. |
|
ABCD |
|
|
abcd@efg.com |
|
|
|
|
|
|
|
TUVW |
|
|
192.168.188.120 |
|
|
|
1/1 |
||
|
|
|
|
|
|
Ingreso dir |
||||
|
|
|
|
|
|
|
|
|
|
|
|
Group1 |
|
Group1 |
|
|
|
|
|
Ingreso de |
|
|
|
|
|
|
|
|
|
|
|
|
|
|
|
|
|
|
|
|
|
|
ruta carpeta |
Colgar |
Directo |
Cadena |
Det./editar |
Eliminar |
|
Rellamar |
Ingreso de |
|||
|
|
|
|
|
|
|
|
|
|
|
|
0001 |
0002 |
0003 |
0004 |
|
|
0005 |
Nro. |
nro. de FAX |
|
|
|
|
|
|||||||
AAA |
|
BBB |
CCC |
DDD |
|
EEE |
|
|
|
Ingreso dir |
|
|
|
|
|
|
|
|
|
|
i-FAX |
|
0006 |
0007 |
0008 |
0009 |
|
|
0010 |
1/100 |
Escan WSD |
|
FFF |
|
GGG |
HHH |
III |
|
JJJ |
|
|
|
|
|
|
|
|
|
/Escan DSM |
|||||
Destino |
Config. rápida |
Formato datos |
|
|
|
Avanzado |
Programa |
|||
|
|
|
|
original/envío |
|
|
|
Configuración |
|
|
Destino
Selección de colores
Original |
: |
A4 |
Zoom |
: 100% |
|
Enviar |
: |
A4 |
Vista previa
Crear acceso directo
Imagen de envío
Original : A4
Zoom : 100%
Enviar : A4
Vista previa
Seleccionar color de escaneo.
Seleccionar [Color auto] para hacer copias a color de orig. a color y cop. en B/N de orig. en B/N.
Color auto |
Color Auto |
|
(Color/Gris) |
(Color / B/N) |
|
A todo color |
Escala grises |
Blanco y Negro |
Cancelar Aceptar
|
|
|
|
|
Destino |
|
|
Destino |
|
|
Acc. ráp. 1 |
||
ABCD |
|
|
|
|
|
|
TUVW |
|
|
1/1 |
Acc. ráp. 2 |
||
|
|
|
||||
Group1 |
|
|
|
|
Acc. ráp. 3 |
|
|
|
|
|
|
||
Color auto |
300x300dpi |
Normal 0 |
Acc. ráp. 4 |
|||
(Color/Gris) |
|
|
|
|
||
Selección |
|
Resolución |
|
Densidad |
|
|
de colores |
|
escaneado |
|
|
Acc. ráp. 5 |
|
|
|
|
||||
1 cara |
Desactivado |
|||||
|
||||||
Orig. a |
|
Escaneo |
|
Formato |
Acc. ráp. 6 |
|
caras/lbro |
|
continuo |
|
|
|
|
Formato datos |
Color/Calidad |
|
|
Programa |
||
original/envío |
de imagen |
|
|
|
||
 ES
ES
Envío de un fax
Cancelación de un trabajo de fax
Comprobación del resultado de transmisión
Uso del fax
Pulse la tecla [Inicio].
Pulse [FAX].
Coloque los originales en el cristal de exposición o en el alimentador de documentos.
Introduzca la dirección de destino.
Introducción del destino:
Introduzca el número de fax con las teclas numéricas. A continuación, pulse [Aceptar].
Desde la libreta de direcciones:
Pulse [Libr. direc.]. Marque la casilla de verificación para seleccionar el destino deseado de la lista. Pulse [Buscar (Nombre)] para buscar el destino. Introduzca el nombre que desea buscar. Confirme la configuración con [Aceptar]. Puede elegir varios destinos.
Si desea enviar el fax a varios destinos, vuelva al paso 4.
Para enviar el fax, pulse la tecla [Inicio].
|
|
|
|
|
|
|
|
|
Destino |
|
Ingresar destino. |
|
|
|
|
|
|
||
|
|
|
|
|
|
|
001/001 |
|
|
|
ABCD |
|
|
abcd@efg.com |
|
|
|
|
|
|
|
|
|
|
|
|
|
|
Ingreso de |
|
|
|
|
|
|
|
|
|
nro. de FAX |
Pausa |
|
Espacio |
|
|
Retroceso |
|
|
||
Colgar |
Directo |
Cadena |
Detalle |
|
Eliminar |
Rellamar |
Comprobar |
||
|
|
|
|
|
|
|
|
|
|
|
0001 |
|
0002 |
0003 |
0004 |
0005 |
Nro. |
destinos |
|
|
|
|
|||||||
AAA |
|
BBB |
CCC |
DDD |
|
EEE |
|
|
|
|
0006 |
|
0007 |
0008 |
0009 |
0010 |
1/100 |
|
|
FFF |
|
GGG |
HHH |
III |
|
JJJ |
|
|
|
Destino |
Config. rápida |
Formato datos |
Calidad de |
Avanzado |
Programa |
||||
|
|
|
|
original/envío |
|
imagen |
Configuración |
|
|
Libr. direc. |
|
|
|
|
|
|
|
|
|
Libr direc |
Libr. direc. |
Clasificar |
Nombre |
|
|
||||
Dest. |
Nro. |
Tipo |
Nombre |
|
|
Detalle |
|
|
|
|
0001 |
A OFFICE |
1234567890 |
|
|
|
|
||
|
0002 |
B OFFICE |
1234568907 |
|
|
|
Buscar(Nro.) |
||
|
|
|
|
|
|
|
|
|
|
|
0003 |
C OFFICE |
1234569078 |
|
|
1/2 |
Agregar/editar |
||
|
|
|
|
|
|
|
|
|
|
|
0004 |
D OFFICE |
1234568790 |
|
|
|
libreta direc. |
||
|
0005 |
E OFFICE |
1234568860 |
|
|
|
Detalle |
||
|
|
|
|
|
|||||
ABC |
DEF |
GHI |
JKL MNO PQRS TUV WXYZ |
0-9 |
|
|
|
||
|
|
|
|
FAX |
|
|
|
Grupo |
|
|
|
|
|
|
|
|
Cancelar |
|
Aceptar |
Pulse la tecla [Est./Canc. Trab].
Prulse [Enviando trabajos].
Seleccione el trabajo que desea cancelar y pulse [Cancelar].
Confirme la configuración con [Sí]. La comunicación se cancela.
Pulse la tecla [Est./Canc. Trab].
Pulse [Enviando trabajos].
Pulse [Registrar].
En Tipo tbjo., seleccione [FAX].
Seleccione el trabajo que desea comprobar.
Pulse [Detalle].
Se muestran los detalles.
Para obtener más información, consulte el guía de uso disponible en el DVD proporcionado.
Estado |
|
|
|
|
|
|
|
|
|
Estado |
|
Trabajos programados |
Registrar |
||
Tipo tbjo. |
Todos |
|
|
|
|
|
|
Nro tbjo |
Hora aceptada Tipo |
|
Destino |
Nombre de usuario |
Estado |
||
438 |
14:47 |
0123456789 |
|
En proc. |
|||
|
|
|
|
|
|
|
1/1 |
Cancelar |
Cambiar |
|
|
|
Detalle |
||
|
|
prioridad |
|
|
|
|
|
Imprimiendo |
|
|
Almacenando |
Dispositivo/ |
Papel/ |
Cerrar |
|
trbjs |
|
|
|
trbjs |
Comunicación |
suministros |
|
Estado |
|
|
|
|
|
|
|
|
|
Estado |
|
Trabajos programados |
|
|
|
Tipo tbjo. |
Todos |
|
|
|
|
|
|
Nro tbjo |
|
|
|
Destino |
Nombre de usuario |
Resultado |
|
438 |
|
FAX |
|
|
|
En proc. |
|
|
|
|
|
|
|
|
|
|
|
i-FAX |
|
|
|
|
|
|
|
|
|
|
|
1/1 |
|
|
|
Carpeta |
|
|
|
|
|
|
|
Aplicación |
|
|
|
|
|
|
|
Siguiente |
|
|
|
|
|
Imprimiendo |
Enviando |
Almacenando |
Dispositivo/ |
Papel/ |
Cerrar |
||
trbjs |
|
trabajos |
|
trbjs |
Comunicación |
suministros |
|
Nro. de trabajo detalle:000080 |
|
|
|
|
|||
Nro. de trabajo: |
|
|
Resultado/destino: |
|
Detalle |
||
|
|
|
|
|
|
|
|
000080 |
|
|
|
Completo. |
|
|
|
Tipo de trabajo: |
|
|
Destino: |
|
|
||
Enviando trabajo - E-mail |
|
|
1 |
|
|
||
Nombre de usuario: |
|
|
|
|
|
||
User1 |
|
|
|
|
|
|
|
Nombre trabaoj: |
|
|
|
|
|
||
doc20070404115151 |
|
|
|
|
|
||
Hora aceptada: |
Hora de término: |
|
|
|
|||
08:08:08 |
|
09:09:09 |
|
|
1/2 |
||
Cerrar
Impresión privada
Cancelación de un trabajo de impresión
Uso de la impresión |
ES |
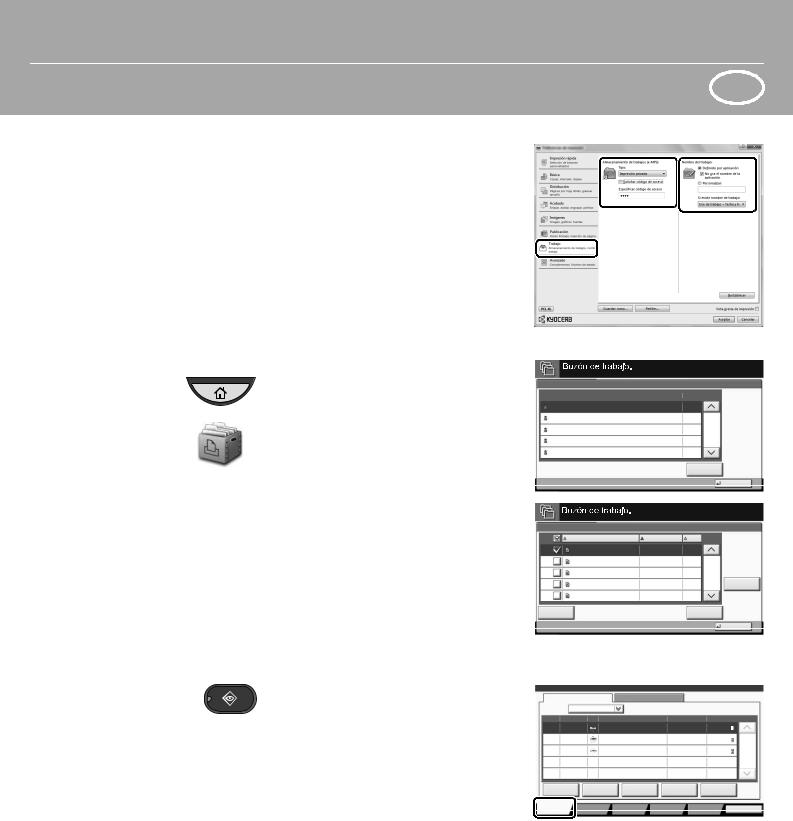
Nota: Para activar la impresión privada desde el PC, seleccione la ficha [Trabajo] en el controlador de impresora, active la casilla [Almacenamiento de trabajos (e- MPS)] y después seleccione [Impresión privada] en la lista [Tipo].
Quite la marca de verificación de Solicitar código de acceso y escriba el código de acceso con las teclas numéricas.
La sección [Nombre del trabajo] le permite escribir directamente su nombre.
Pulse la tecla [Inicio].
Pulse [Buzón de trabajo].
Seleccione el usuario que ha creado el trabajo de impresión privada.
Seleccione el documento que desea imprimir de la lista.
Pulse [Imprimir]. Escriba el código de acceso con las teclas numéricas.
Pulse [Inic impr] para iniciar la impresión.
Nota: Si se pulsa [Eliminar] se pueden cancelar los trabajos.
|
|
|
|
|
|
Impresión privada/trabajo almacenado |
|
|
|
|
|
|
Nombre de usuario |
|
Archivos |
|
|
1 Usuario |
|
5 |
|
|
|
2 Usuario |
|
2 |
|
|
|
3 Usuario |
|
1 |
|
1/2 |
|
4 Usuario |
|
1 |
|
|
|
5 Usuario |
|
1 |
|
|
|
|
|
|
Abrir |
|
|
|
|
|
|
|
Cerrar |
Usuario: |
|
|
|
|
|
Nombre de archivo |
Fecha y hora |
Tam. |
|
||
1Archivo |
02/02/2013 09:40 |
21 |
MB |
|
|
2Archivo |
02/02/2013 09:45 |
30 |
MB |
|
|
3Archivo |
02/02/2013 09:50 |
36 |
MB |
2/3 |
|
4Archivo |
02/02/2013 09:55 |
21 |
MB |
Detalle |
|
|
|||||
5Archivo |
02/02/2013 10:00 |
30 |
MB |
|
|
Imprimir |
|
Eliminar |
|
||
|
|
|
|
|
Cerrar |
Pulse la tecla [Est./Canc. Trab].
Pulse [Imprimiendo trbjs].
Seleccione el trabajo que desea cancelar y pulse [Cancelar].
Confirme la configuración con [Sí]. El trabajo se cancela.
Estado |
|
|
|
|
|
|
|
|
Estado |
Registrar |
|
|
|
Tipo tbjo. |
Todos |
|
|
|
|
|
Nro tbjo |
Hora aceptada Tipo |
Nombre de trabajo |
Nombre de usuario |
Estado |
|
|
000001 |
10/10 09:10 |
doc20081010091015 |
AAAAA |
En proc. |
|
|
000002 |
10/10 09:15 |
doc20081010091510 |
AAAAA |
Esperan. |
|
|
000003 |
10/10 09:20 |
doc20081010092015 |
BBBBB |
Esperan. |
1/1 |
|
Pausa todo |
Cancelar |
Cambiar |
Mover arriba |
Detalle |
|
Imp. tbjos. |
|
prioridad |
|
|
|
|
Enviando |
Almacenando |
Dispositivo/ |
Papel/ |
Cerrar |
|
trabajos |
trbjs |
Comunicación |
suministros |
|
|
|
ES |
Uso de la copia |
Preparativos |
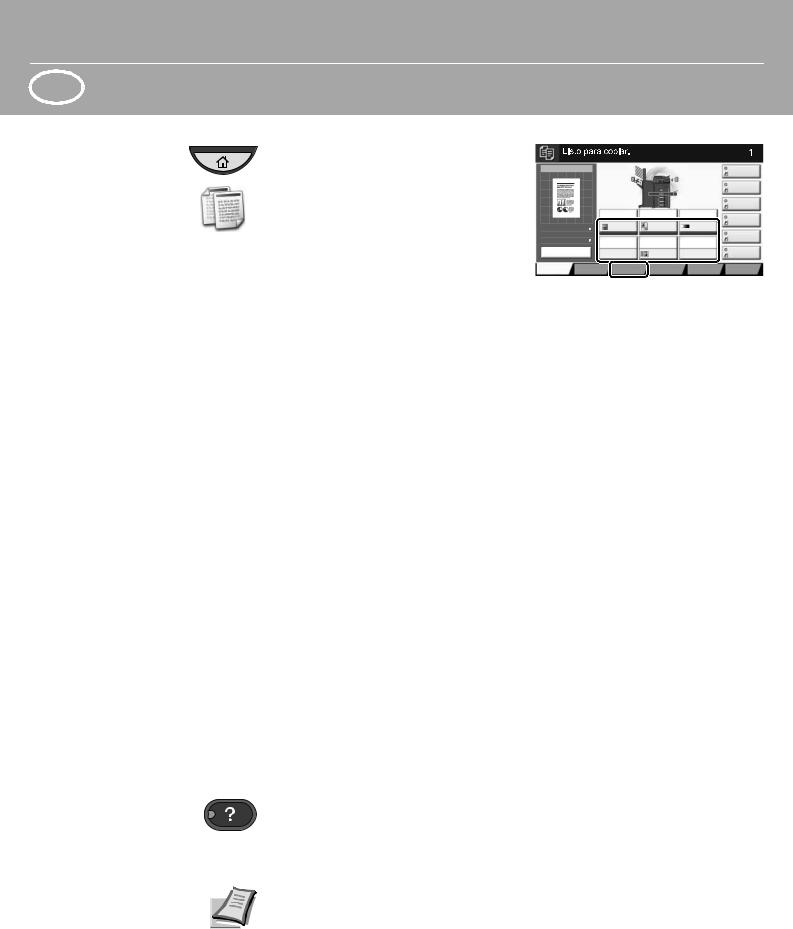
Pulse la tecla [Inicio]. |
|
Pulse [Copia]. |
|
Coloque los originales en el cristal de |
|
exposición o en el alimentador de |
|
documentos. |
|
Elija [Selección de papel], [Dúplex], |
|
[Zoom], [Combinar], [Densidad] o |
|
[Grapa/perf.] (opcional) en el |
|
submenú de la pantalla principal. |
|
Confirme la configuración con |
|
[Aceptar]. |
|
Introduzca el número de copias con |
|
las teclas numéricas. |
|
Pulse la tecla [Inicio] de color verde. |
|
|
|
|
|
|
|
|
|
|
Copias |
Vista previa |
|
|
|
|
|
|
|
Acc. ráp. 1 |
||
|
|
|
|
|
|
|
|
|
|
Acc. ráp. 2 |
|
|
|
|
|
|
|
|
|
|
Acc. ráp. 3 |
|
|
|
Auto |
100% |
Normal 0 |
Acc. ráp. 4 |
||||
|
|
|
|
|
|
|
|
|
|
|
Original |
: |
A4 |
|
|
|
|
|
|
|
Acc. ráp. 5 |
|
|
|
|
|
|
|
||||
Zoom |
: |
100% |
|
|
|
|
|
|
|
|
Papel |
: |
A4 |
|
|
|
|
|
|
|
|
Vista previa |
|
|
|
|
|
|
|
Acc. ráp. 6 |
||
Config. rápida |
Org./papel/ |
|
Distrib./editar |
|
Avanzado |
Programa |
||||
|
|
|||||||||
|
|
|
Finalizando |
|
|
|
Configuración |
|
||
Ayuda
La tecla [Ayuda] está disponible en el panel de control de esta máquina. Si no está seguro de cómo usar la máquina, desea obtener más información sobre sus funciones o tiene problemas para que la máquina funcione correctamente, pulse la tecla [Ayuda] para ver una explicación detallada del panel digital.
Para obtener más información, consulte el guía de uso disponible en el DVD proporcionado.


 QUICKGuide TASKalfa 3010i / TASKalfa 3510i
Sendung ausführen
Scanart wählen
Weitere
Einstellungen
E-Mail versenden |
DE |
Drücken Sie die Taste [Startseite].Drücken Sie die Taste [Senden].
Legen Sie die Vorlage auf das Vorlagenglas oder in den Vorlageneinzug.
Wählen Sie den E-Mailempfänger aus.
Aus dem Adressbuch:
Tippen Sie auf [Adressbuch]. Aktivieren Sie den Kontrollkasten links, um ein Ziel aus der Liste zu wählen. Tippen Sie auf [Suchen (Name)], um ein Ziel zu suchen. Geben Sie den zu suchenden Namen ein. Bestätigen Sie mit [OK].
Wiederholen Sie die Schritte zum Senden an mehrere Empfänger.
Eingabe einer E-Mail Adresse:
Tippen Sie auf [E-Mail Adresseing.] und [E- Mail Adresse]. Geben Sie die E-Mail Adresse über die angezeigte Tastatur ein. Bestätigen Sie mit [OK].
Zum Senden an mehrere Empfänger, gehen Sie zu Schritt 4.
Drücken Sie zum Versenden der E-Mail die Taste [Start].
Drücken Sie die Taste [Startseite].
Drücken Sie die Taste [Senden].Tippen Sie auf [Farbe/Bildqualität].Tippen Sie auf [Farb Auswahl].
Wählen Sie die geeignete Scanart aus.Bestätigen Sie mit [OK].
Drücken Sie die Taste [Startseite].Drücken Sie die Taste [Senden].
Tippen Sie auf [Basis].
Öffnen und ändern Sie eine Einstellung Ihrer Wahl. Bestätigen Sie mit [OK]. Zur Eingabe eines Dateinamens tippen Sie auf [Erweiterte Einstellung]. Tippen
Sie auf [Dateinamen Eingabe] und ändern Sie den Dateinamen. Bestätigen Sie mit [OK].
Tippen Sie auf [Ziel], um zum Hauptmenü zurückzukehren.
|
|
|
|
|
|
|
|
|
Ziel |
|
Ziel eingeben. |
|
|
|
|
|
|
|
|
|
|
Ziel |
|
|
Detail |
|
|
|
|
|
|
|
|
|
|
|
|
1/1 |
|
|
|
|
|
|
|
|
|
|
Ordnerpfad |
|
|
|
|
|
|
|
|
|
Eingabe |
Aufgelegt |
Direkt |
Kettenwahl |
Detail/Bearb. |
|
Löschen |
Neuaufruf |
FAX-Nr. |
||
|
|
|
|
|
|
|
|
|
|
|
0001 |
0002 |
0003 |
0004 |
0005 |
Nr. |
Eingabe |
||
|
|
||||||||
AAA |
|
BBB |
CCC |
DDD |
|
EEE |
|
|
i-FAX |
|
|
|
|
|
|
|
|
|
Adr.-Eingabe |
|
0006 |
0007 |
0008 |
0009 |
0010 |
1/100 |
WSD-Scan |
||
FFF |
|
GGG |
HHH |
III |
|
JJJ |
|
|
|
|
|
|
|
/DSM-Scan |
|||||
|
|
Basis |
Original/Sende |
Farbe/Bild- |
Erweiterte |
Programm |
|||
|
|
|
|
-datenformat |
|
qualität |
Einstellung |
|
|
Adressbuch |
|
|
|
|
|
|
|
|
|
Adressbuch |
Adressbuch |
Sortieren |
Name |
|
|
|
|||
Ziel |
Nr. |
Typ |
Name |
|
|
Detail |
|
|
|
|
0001 |
ABCD |
|
abcd@efg.com |
|
|
|
|
|
|
0002 |
TUVW |
|
tuvw@xyz.com |
|
|
|
Suchen (Nr.) |
|
|
|
|
|
|
|
|
|
|
|
|
0003 |
Group1 |
|
|
|
|
|
1/2 |
Adressbuch |
|
|
|
|
|
|
|
|
|
|
|
0004 |
Group2 |
|
|
|
|
|
|
speich./bearb. |
|
0005 |
Group3 |
|
|
|
|
|
|
Detail |
|
|
|
|
|
|
|
|
||
ABC |
DEF |
GHI JKL |
MNO PQRS TUV WXYZ |
0-9 |
|
|
|
||
|
Ordner |
FAX |
|
i-FAX |
Gruppe |
|
|||
|
|
|
|
|
|
Abbrechen |
|
OK |
|
Ziel
Ziel eingeben.
E-Mail-Adresseingabe
Adresse
Neues E-Mail-Ziel hinzufügen.
[E-mail Adresse] drücken und dann die Adresse über den Tastaturbildschirm eingeben.
In Adressbuch hinein |
|
Nächst. Ziel |
Abbrechen |
|
OK |
||||
|
|
|
|
|
|
|
|
|
Ziel |
|
Ziel |
|
|
|
Detail |
|
|
|
Adressbuch |
ABCD |
|
|
abcd@efg.com |
|
|
|
|
||
TUVW |
|
|
192.168.188.120 |
|
|
1/1 |
|||
|
|
|
|
Adresseing. |
|||||
|
|
|
|
|
|
|
|
|
|
Group1 |
|
|
Group1 |
|
|
|
|
Ordnerpfad |
|
|
|
|
|
|
|
|
|
|
|
|
|
|
|
|
|
|
|
|
Eingabe |
Aufgelegt |
Direkt |
Kettenwahl Detail/Bearb. |
Löschen |
Neuaufruf |
FAX-Nr. |
||||
|
|
|
|
|
|
|
|
|
|
0001 |
|
0002 |
0003 |
|
0004 |
|
0005 |
Nr. |
Eingabe |
|
|
|
|
||||||
AAA |
BBB |
|
CCC |
DDD |
|
EEE |
|
|
i-FAX |
|
|
|
|
|
|
|
|
|
Adr.-Eingabe |
0006 |
|
0007 |
0008 |
|
0009 |
|
0010 |
1/100 |
WSD-Scan |
FFF |
GGG |
|
HHH |
III |
|
JJJ |
|
|
|
|
|
|
|
/DSM-Scan |
|||||
|
|
|
|
|
|
|
|
|
|
Ziel |
|
Basis |
Original/Sende |
|
|
Erweiterte |
Programm |
||
|
|
|
-datenformat |
|
|
Einstellung |
|
||
Ziel
Farbauswahl
Original |
: |
A4 |
Zoom |
: 100% |
|
Senden |
: |
A4 |
Vorschau
Schnellwahl
Bild senden
Original : A4
Zoom : 100%
Senden : A4
Vorschau
Scanfarbe auswählen.
[Auto. Farbe] wählen, um automatisch farbige Originale in mehrfarbig und S/W-Originale in schwarz/weiß zu erzeugen.
Auto. Farbe |
Auto. Farbe |
|
(Farbe/Grau) |
(Farbe&S/W) |
|
Mehrfarbig |
Graustufen |
Schwarz/weiß |
Abbrechen OK
|
|
|
|
|
Ziel |
|
Ziel |
|
|
Schnellwahl1 |
|
ABCD |
|
|
|
|
|
TUVW |
|
|
1/1 |
Schnellwahl2 |
|
|
|
|
|||
Group1 |
|
|
|
|
Schnellwahl3 |
|
|
|
|
|
|
Auto. Farbe |
300x300dpi |
Normal 0 |
Schnellwahl4 |
||
(Farbe/Grau) |
|
|
|
|
|
Farb |
|
Scan |
|
Helligkeit |
|
Auswahl |
|
Auflösung |
|
|
Schnellwahl5 |
|
|
|
|||
1-seitig |
Aus |
|
|||
|
|
||||
2-seit./Buch |
|
Mehrfach |
|
Dateiformat |
Schnellwahl6 |
Original |
|
Scan |
|
|
|
Original/Sende |
Farbe/Bild- |
|
|
Programm |
|
-datenformat |
qualität |
|
|
|
|

 DE
DE
Fax senden
Sendung löschen
Sendeergebnis prüfen
Faxen
Drücken Sie die Taste [Startseite].
Drücken Sie die Taste [FAX].
Legen Sie die Vorlage auf das Vorlagenglas oder in den Vorlageneinzug.
Wählen Sie den Faxempfänger aus.
Eingabe einer Faxnummer:
Geben Sie die Faxnummer über die Zifferntasten ein. Drücken Sie dann auf [OK].
Aus dem Adressbuch:
Tippen Sie auf [Adressbuch]. Aktivieren Sie den Kontrollkasten links, um ein Ziel aus der Liste zu wählen. Tippen Sie auf [Suchen (Name)], um ein Ziel zu suchen. Geben Sie den zu suchenden Namen ein. Bestätigen Sie mit [OK].
Wiederholen Sie die Schritte zum Senden an mehrere Empfänger.
Zum Senden an mehrere Empfänger, gehen Sie zu Schritt 4.
Drücken Sie zum Versenden des Fax die Taste [Start].
|
|
|
|
|
|
|
|
|
Ziel |
|
Ziel eingeben. |
|
|
|
|
|
|
||
|
|
|
|
|
|
|
001/001 |
|
|
|
ABCD |
|
|
abcd@efg.com |
|
|
|
|
|
|
|
|
|
|
|
|
|
|
FAX-Nr. |
|
|
|
|
|
|
|
|
|
Eingabe |
Pause |
Leertaste |
|
|
Rücktaste |
|
|
|||
Aufgelegt |
Direkt |
Kettenwahl |
Detail |
Löschen |
Neuaufruf |
Ziele |
|||
|
|
|
|
|
|
|
|
|
|
|
0001 |
|
0002 |
0003 |
0004 |
|
0005 |
Nr. |
prüfen |
|
|
|
|
||||||
AAA |
|
BBB |
CCC |
DDD |
|
EEE |
|
|
|
|
0006 |
|
0007 |
0008 |
0009 |
|
0010 |
1/100 |
|
FFF |
|
GGG |
HHH |
III |
|
JJJ |
|
|
|
|
Ziel |
|
Basis |
Original/Sende |
Bildqualität |
Erweiterte |
Programm |
||
|
|
|
|
-datenformat |
|
|
Einstellung |
|
|
Adressbuch |
|
|
|
|
|
|
|
|
|
Adressbuch |
Adressbuch |
Sortieren |
Name |
|
|
|
|||
Ziel |
Nr. |
Typ |
Name |
|
Detail |
|
|
|
|
|
0001 |
A OFFICE |
1234567890 |
|
|
|
|
||
|
0002 |
B OFFICE |
1234568907 |
|
|
|
Suchen (Nr.) |
||
|
|
|
|
|
|
|
|
|
|
|
0003 |
C OFFICE |
1234569078 |
|
|
1/2 |
Adressbuch |
||
|
|
|
|
|
|
|
|
|
|
|
0004 |
D OFFICE |
1234568790 |
|
|
|
speich./bearb. |
||
|
0005 |
E OFFICE |
1234568860 |
|
|
|
Detail |
||
|
|
|
|
|
|||||
ABC |
DEF |
GHI |
JKL MNO PQRS TUV WXYZ |
0-9 |
|
|
|
|
|
|
|
|
|
FAX |
|
|
Gruppe |
|
|
|
|
|
|
|
|
Abbrechen |
|
OK |
|
Drücken Sie die Taste [Status/ Druckabbr.].
Tippen Sie auf [Sendeaufträge].
Wählen Sie die Sendung aus, die abgebrochen werden soll, indem Sie die Sendung antippen. Tippen Sie auf [Abbrechen].
Bestätigen Sie mit [Ja].
Die Sendung wird abgebrochen.
Drücken Sie die Taste [Status/ Druckabbr.].
Tippen Sie auf [Sendeaufträge].
Tippen Sie auf [Protokoll].
Unter Auftragstyp, wählen Sie [FAX].
Wählen Sie die Sendung aus, die geprüft werden soll, indem Sie die Sendung antippen.
Tippen Sie auf [Detail].
Die Details zur Sendung werden angezeigt.
Mehr Informationen in der Bedienungsanleitung der beigepackten DVD.
Status |
|
|
|
|
|
|
|
|
|
Status |
|
Geplanter Auftrag |
Protokoll |
||
Auftragstyp |
Alle |
|
|
|
|
|
|
Job-Nr. |
Annahmezeit Typ |
|
Ziel |
Benutzername |
Status |
||
438 |
14:47 |
0123456789 |
|
In Arbeit |
|||
|
|
|
|
|
|
|
1/1 |
Abbrechen |
Auftr. Prio. |
|
|
Detail |
|
||
|
|
ändern |
|
|
|
|
|
Druckaufträge |
|
|
Speicherau- |
Gerät/ |
Papier/ |
Schließen |
|
|
|
|
|
fträge |
Kommunikation |
Material |
|
Status |
|
|
|
|
|
|
|
|
|
Status |
|
Geplanter Auftrag |
|
|
|
Auftragstyp |
Alle |
|
|
|
|
|
|
Job-Nr. |
|
|
|
Ziel |
Benutzername |
Ergebnis |
|
438 |
|
FAX |
|
|
|
In Arbeit |
|
|
|
|
|
|
|
|
|
|
|
i-FAX |
|
|
|
|
|
|
|
|
|
|
|
1/1 |
|
|
|
Ordner |
|
|
|
|
|
|
|
Anwendung |
|
|
|
|
|
|
|
Weiter |
|
|
|
|
|
Druckaufträge |
Sendeaufträge |
Speicherau- |
Gerät/ |
Papier/ |
Schließen |
||
|
|
|
|
fträge |
Kommunikation |
Material |
|
Jobnummer-Details:000080 |
|
|
|
|
|
||
Job-Nr.: |
|
|
|
|
Ergebnis/Ziel: |
|
Detail |
|
|
|
|
|
|
|
|
000080 |
|
|
|
Fertig. |
|
|
|
Auftragstyp: |
|
|
|
Ziel: |
|
|
|
Sendeauftrag - E-Mail |
|
|
1 |
|
|
||
Benutzername: |
|
|
|
|
|
||
User1 |
|
|
|
|
|
|
|
Auftragsname: |
|
|
|
|
|
||
doc20070404115151 |
|
|
|
|
|
||
Annahmezeit: |
Endzeit: |
|
|
|
|
||
08:08:08 |
|
09:09:09 |
|
|
|
1/2 |
|
Schließen
Privater Druck
Druckauftrag löschen
DE |
Hinweis: Um den privaten Druck vom PC zu aktivieren, wählen Sie die Karteikarte [Auftrag] im Druckertreiber, aktivieren das Kontrollkästchen [Auftragsspeicher (e-MPS]) und wählen dann [Privater Druck] aus der Liste [Typ].
Löschen Sie den Haken in der Anzeige des Zugangscodes und geben Sie den Zugangscode mit den Zifferntasten ein. Im Feld [Auftragsname] können Sie auch direkt Ihren Benutzernamen eintragen.
Drücken Sie die Taste [Startseite].
Tippen Sie auf [Auftragsbox].
Wählen Sie den Benutzer des privaten Drucks aus.
Wählen Sie das zu druckende Dokument aus der Liste aus.
Tippen Sie auf [Drucken]. Geben Sie den Zugangscode über die Zifferntasten ein.
Tippen Sie auf [Druck starten], um den Ausdruck zu starten.
Hinweis: Durch Tippen auf [Löschen] kann der Auftrag gelöscht werden.
|
|
|
|
|
|
Privater/Gespeicherter Druckauftrag |
|
|
|
|
|
|
Benutzername |
|
Dateien |
|
|
1 Anwender |
|
5 |
|
|
|
2 Anwender |
|
2 |
|
|
|
3 Anwender |
|
1 |
|
1/2 |
|
4 Anwender |
|
1 |
|
|
|
5 Anwender |
|
1 |
|
|
|
|
|
|
Öffnen |
|
|
|
|
|
|
|
Schließen |
Benutzer: |
|
|
|
|
|
Dateiname |
Datum/Zeit |
Größe |
|
||
1Datei |
02/02/2013 09:40 |
21 |
MB |
|
|
2Datei |
02/02/2013 09:45 |
30 |
MB |
|
|
3Datei |
02/02/2013 09:50 |
36 |
MB |
2/3 |
|
4Datei |
02/02/2013 09:55 |
21 |
MB |
Detail |
|
|
|||||
5Datei |
02/02/2013 10:00 |
30 |
MB |
|
|
|
Löschen |
|
|||
|
|
|
|
|
Schließen |
Drücken Sie die Taste [Status/Druckabbr.].
Tippen Sie auf [Druckaufträge].
Wählen Sie den zu löschenden Druckauftrag aus und tippen Sie auf [Abbrechen].
Bestätigen Sie mit [Ja].
Der Druckauftrag wird gelöscht.
Status |
|
|
|
|
|
|
|
|
|
|
Status |
|
Protokoll |
|
|
|
|
Auftragstyp |
Alle |
|
|
|
|
|
|
|
Job-Nr. |
Annahmezeit Typ |
|
Auftragsname |
Benutzername |
Status |
|
||
000001 |
10/10 09:10 |
doc20081010091015 |
AAAAA |
|
In Arbeit |
|
||
000002 |
10/10 09:15 |
doc20081010091510 |
AAAAA |
|
Warten |
|
||
000003 |
10/10 09:20 |
doc20081010092015 |
BBBBB |
|
Warten |
1/1 |
||
Alle Drucke |
Abbrechen |
Auftr. Prio. |
Nach oben |
|
Detail |
|
||
anhalten |
|
|
|
ändern |
|
|
|
|
|
|
Sendeaufträge |
Speicherau- |
Gerät/ |
Papier/ |
Schließen |
||
|
|
|
|
fträge |
Kommunikation |
Material |
||
|
|
|
|
|
||||
 DE
DE
Kopie vorbereiten
Kopieren
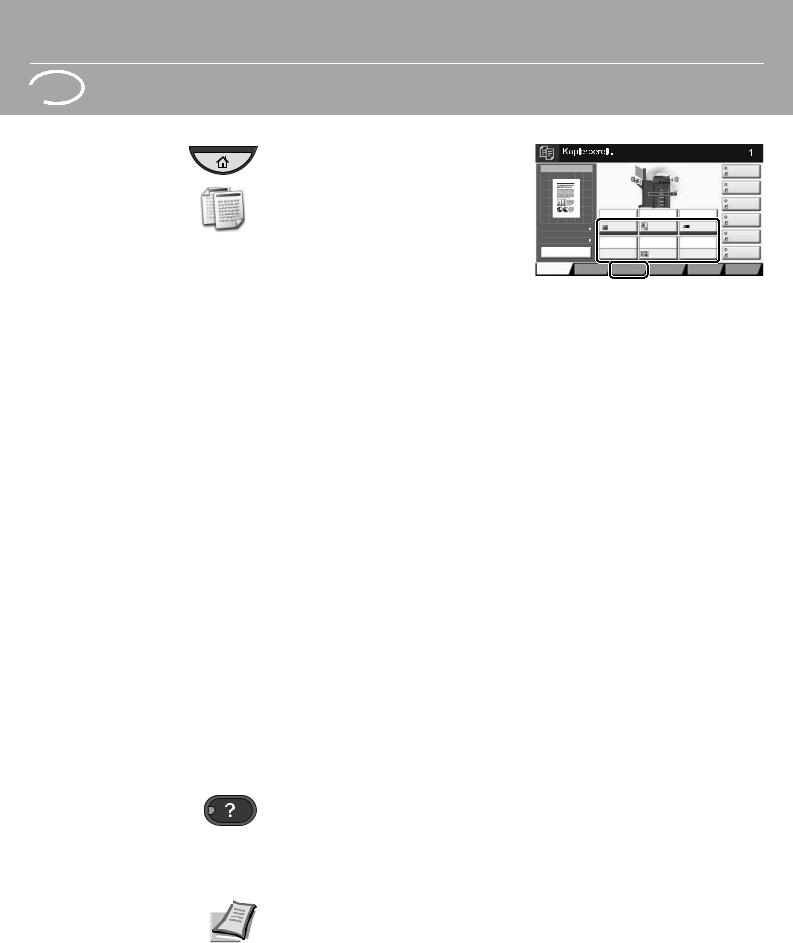
Drücken Sie die Taste [Startseite].
Drücken Sie die Taste [Kopieren].
Legen Sie die Vorlage auf das Vorlagenglas oder in den Vorlageneinzug.
Wählen Sie [Papier Auswahl], [Duplex], [Zoom], [Kombinieren], [Helligkeit] oder [Heften/Lochen] (optional) im Untermenü aus der Hauptauswahl.
Bestätigen Sie die Einstellungen mit [OK].
Geben Sie die Kopienanzahl über die Zifferntasten ein.
Drücken Sie die Taste [Start], um den Kopiervorgang zu starten.
|
|
|
|
|
|
|
|
|
Kopien |
Vorschau |
|
|
|
|
Schnellwahl1 |
||||
|
|
|
|
|
|
|
|
|
Schnellwahl2 |
|
|
|
|
|
|
|
|
|
Schnellwahl3 |
|
|
Autom. |
100% |
Normal 0 |
Schnellwahl4 |
||||
|
|
|
|
|
|
|
|
|
|
Original |
: |
A4 |
|
|
|
|
|
|
Schnellwahl5 |
|
|
|
|
|
|
||||
Zoom |
: |
100% |
|
|
|
|
|
|
|
Papier |
: |
A4 |
|
|
|
|
|
||
Vorschau |
|
|
|
|
Schnellwahl6 |
||||
Basis |
|
Orig./Papier/ |
|
Layout/ |
|
Erweiterte |
Programm |
||
|
|
|
|||||||
|
|
Endbearbeit. |
|
Bearbeiten |
|
Einstellung |
|
||
Hilfe
Eine [Hilfe] Taste befindet sich auf dem Bedienfeld. Falls Sie weitere Informationen zum Betrieb des Systems benötigen oder nicht das gewünschte Ergebnis produziert wird, drücken Sie die [Hilfe] Taste, die Ihnen weitere Informationen angezeigt.
Mehr Informationen in der Bedienungsanleitung der beigepackten DVD.
 Loading...