

Page 1

Page 2

This Operation Guide is for 1650, 2050, and 2550. This Operation Guide mentions that 1650 is a
16 ppm (prints per minute) model, 2050 is a 20 ppm (prints per minute) model, and 2550 is a
25 ppm (prints per minute) model.
Note This Operation Guide contains information that corresponds to using both the inch and metric
versions of this machine.
This Operation Guide shows messages of the inch version. When using the metric version, see
the messages of the inch version for reference. With regard to the messages in the text, if a
message has only the difference of upper- and lower-case spelling, we show only the message
of the inch version. When there is even a slight difference in the message, we have listed the
information for the inch version followed, in brackets, by the corresponding information for the
metric version.
Page 3

Guide to This Operation Guide
This operation guide has the following chapters. The content of each chapter is summarized
below for reference.
1 Copier Functions
This chapter explains various settings that can be made in relation to the copier functions of this
machine.
2 Printer Settings
This chapter explains various settings that can be made in relation to the printer functions of this
machine.
3 System Menu
This chapter explains the other general settings that can be made in this machine.
4 Job Accounting
This chapter explains the settings of the job accounting functions.
Appendix
This chapter includes a table of paper that can be used in this machine, a table of specifications,
a chart which explains the combinations of functions and settings that can be used with this
machine, and glossary of terms used in this document.
Guides Supplied with This Machine
The following guides are supplied with this machine. Refer to the guides as needed.
Basic Operation Guide
This Basic Operation Guide contains explanations on the procedures for loading paper and
connection of this product, the basic procedures of copying and printing, and troubleshooting.
Advanced Operation Guide (this guide)
The Advanced Operation Guide contains explanations on copier and printer functions as well as
default settings that can be adjusted on this machine.
KX Printer Driver Installation Guide
This guide describes the procedure to install the printer driver software.
KX Printer Driver Operation Guide
This guide describes how to install and set the printer driver software.
PRESCRIBE Commands Technical Reference
PRESCRIBE is the native language of the Kyocera Mita printers. This Technical Reference
contains the information about how the printing is performed using the PRESCRIBE commands
as well as the font and emulation description. Also included is a list of permanent parameters
and their explanation needed when customizing your printer.
PRESCRIBE Commands Command Reference
Gives a detailed explanation of the PRESCRIBE command syntax and parameters with the aid
of print examples.
i
Page 4
Conventions
This manual uses the following conventions:
3
4
1
2
1Bold indicates key names.
2 Courier indicates content of the message display.
3Note contain important information aside from the text.
4 Italic refers to another page or other guide.
ii
Page 5

CONTENTS
1 Copier Functions ........................................................................................... 1-1
Paper Source Selection ...........................................................................................................1-2
Original Size Selection .............................................................................................................1-3
Image Quality Mode .................................................................................................................1-5
Copy Exposure Adjustment ......................................................................................................1-6
Number of Copies to Be Made .................................................................................................1-7
Zoom Copying ..........................................................................................................................1-8
Auto Zoom Ratio Selection Mode .......................................................................................1-8
Zoom Mode ........................................................................................................................1-9
Preset Zoom Mode .............................................................................................................1-9
Original Orientation ................................................................................................................1-10
Interrupt Mode ........................................................................................................................1-11
Duplex Copying ......................................................................................................................1-13
Split Copying ..........................................................................................................................1-15
Sort Copying ..........................................................................................................................1-17
Offset Copying ........................................................................................................................1-18
Staple Copying .......................................................................................................................1-19
Combine Copying ...................................................................................................................1-20
Combine Copying Modes .................................................................................................1-20
Borderline Types ...............................................................................................................1-24
Setting the Combine Copying ...........................................................................................1-24
Margin Mode ..........................................................................................................................1-26
Border Erase Mode ................................................................................................................1-27
Continuous Copying ...............................................................................................................1-28
Auto Rotation .........................................................................................................................1-29
EcoPrint Mode ........................................................................................................................1-30
Auto Selection Mode ..............................................................................................................1-31
Program Function ...................................................................................................................1-32
2 Printer Settings .............................................................................................. 2-1
Using This Machine as a Network Printer ................................................................................2-2
Menu Hierarchical Diagram ......................................................................................................2-3
Status Page Printing .................................................................................................................2-7
e-MPS Function .......................................................................................................................2-8
Printing Quick Copy/Proof-and-Hold ..................................................................................2-8
Deleting Quick Copy/Proof-and-Hold .................................................................................2-9
Printing Private Print/Stored Job .........................................................................................2-9
Deleting Private Print/Stored Job ......................................................................................2-10
Printing Virtual Mailbox Accumulated Data .......................................................................2-11
Printing Virtual Mailbox List ..............................................................................................2-11
Printing Code Job List ......................................................................................................2-12
e-MPS Detail Settings ......................................................................................................2-13
Interface .................................................................................................................................2-16
Parallel Interface ...............................................................................................................2-16
Network Setting ................................................................................................................2-17
Emulation ...............................................................................................................................2-22
Emulation Mode Selection ................................................................................................2-22
Font ........................................................................................................................................2-25
Font Selection ...................................................................................................................2-25
Font Size ..........................................................................................................................2-26
Courier/Letter Gothic Font Character Pitch ......................................................................2-27
Courier/Letter Gothic Font Setting ....................................................................................2-27
Code Set Selection ...........................................................................................................2-28
Font List Printing ...............................................................................................................2-28
iii
Page 6

Print Configuration ................................................................................................................. 2-30
Number of Copies ............................................................................................................ 2-30
Reduction Printing ........................................................................................................... 2-31
Print Orientation ............................................................................................................... 2-31
Page Protect Mode .......................................................................................................... 2-32
Line Feed (LF) Action ...................................................................................................... 2-32
Carriage Return (CR) Action ............................................................................................ 2-33
Wide A4 ........................................................................................................................... 2-33
Print Quality ........................................................................................................................... 2-34
KIR Mode ......................................................................................................................... 2-34
EcoPrint Setting ...............................................................................................................2-35
Resolution Setting ............................................................................................................ 2-35
Print Density .................................................................................................................... 2-36
Memory Card Operation ........................................................................................................ 2-37
Reading Font Data ........................................................................................................... 2-37
Reading Macro Data ........................................................................................................ 2-38
Reading Data ...................................................................................................................2-38
Reading Program ............................................................................................................. 2-38
Writing Data ..................................................................................................................... 2-39
Deleting Data ................................................................................................................... 2-39
Deleting Font Data ........................................................................................................... 2-39
Deleting Program Data .................................................................................................... 2-40
Deleting Macro Data ........................................................................................................ 2-40
Deleting Language Data .................................................................................................. 2-40
Formatting Memory Card ................................................................................................. 2-40
Printing a Partition List ..................................................................................................... 2-41
Hard Disk Operation .............................................................................................................. 2-43
RAM Disk Operation .............................................................................................................. 2-44
RAM Disk Functions ........................................................................................................ 2-44
RAM Disk Operation ........................................................................................................ 2-44
RAM Disk Size ................................................................................................................. 2-45
Paper Handling ...................................................................................................................... 2-47
Multi-Bypass Tray Mode .................................................................................................. 2-47
Paper Source ...................................................................................................................2-48
Duplex Print Mode ........................................................................................................... 2-48
Output Destination ........................................................................................................... 2-49
Override A4/Letter ........................................................................................................... 2-49
Other Settings ........................................................................................................................ 2-51
Form Feed Timeout ......................................................................................................... 2-51
Received Data Dump ....................................................................................................... 2-52
Printer Function Resetting ............................................................................................... 2-52
Resource Protect Mode ................................................................................................... 2-53
Auto Continue ..................................................................................................................2-53
Duplex Printing Error Detection ....................................................................................... 2-54
Stapling Error Detection ................................................................................................... 2-55
Service Status Page Printing ........................................................................................... 2-56
3 System Menu .................................................................................................. 3-1
Default Setting Mode ............................................................................................................... 3-2
Copier Default Settings ...................................................................................................... 3-2
Machine Default Settings ................................................................................................. 3-12
Multi-Bypass Tray Settings .................................................................................................... 3-26
Paper Size ....................................................................................................................... 3-26
Paper Type ...................................................................................................................... 3-28
Browsing and Printing the Total Counter ............................................................................... 3-29
Report Output ........................................................................................................................ 3-31
Language Setting .................................................................................................................. 3-33
User Adjustment .................................................................................................................... 3-34
Drum Refresh .................................................................................................................. 3-34
iv
Page 7

4 Job Accounting .............................................................................................. 4-1
Job Accounting Mode ...............................................................................................................4-2
Managing Accounts ..................................................................................................................4-4
Registering a New Account ................................................................................................4-4
Setting Limit of Use ............................................................................................................4-5
Deleting an Account ...........................................................................................................4-8
Changing Limit of Use ........................................................................................................4-9
All Account Management .......................................................................................................4-10
Individual Account Management ............................................................................................4-11
Enabling Job Accounting ........................................................................................................4-12
Default Settings ......................................................................................................................4-13
Copier Job Accounting .....................................................................................................4-13
Printer Job Accounting .....................................................................................................4-14
Scanner Job Accounting ...................................................................................................4-14
Fax Job Accounting ..........................................................................................................4-15
Operation against Excess over Limit ................................................................................4-16
Using Job Accounting ............................................................................................................4-17
Appendix ......................................................................................................Appendix-1
Paper ...........................................................................................................................Appendix-2
Basic Specifications of Paper ................................................................................Appendix-2
Proper Paper Selection .........................................................................................Appendix-2
Special Paper ........................................................................................................Appendix-5
Specifications ..............................................................................................................Appendix-8
Main Body ..............................................................................................................Appendix-8
Copier Functions ...................................................................................................Appendix-9
Printer Functions .................................................................................................Appendix-10
Document Processor (optional) ...........................................................................Appendix-10
Paper Feeder (optional) .......................................................................................Appendix-10
Duplex Unit (optional) ..........................................................................................Appendix-11
Finisher (optional) ................................................................................................Appendix-11
Job Separator (optional) ......................................................................................Appendix-11
Environmental Specifications ...............................................................................Appendix-12
Copier Function Combination Chart ..........................................................................Appendix-13
Glossary ....................................................................................................................Appendix-16
Index ....................................................................................................................Index-1
v
Page 8

vi
Page 9

1 Copier Functions
This chapter explains the following topics.
• Paper Source Selection
• Original Size Selection
• Image Quality Mode
• Copy Exposure Adjustment
• Number of Copies to Be Made
• Zoom Copying
• Original Orientation
• Interrupt Mode
• Duplex Copying
• Split Copying
•Sort Copying
• Offset Copying
• Staple Copying
• Combine Copying
• Margin Mode
• Border Erase Mode
• Continuous Copying
• Auto Rotation
• EcoPrint Mode
• Auto Selection Mode
• Program Function
1-1
Page 10
Copier Functions
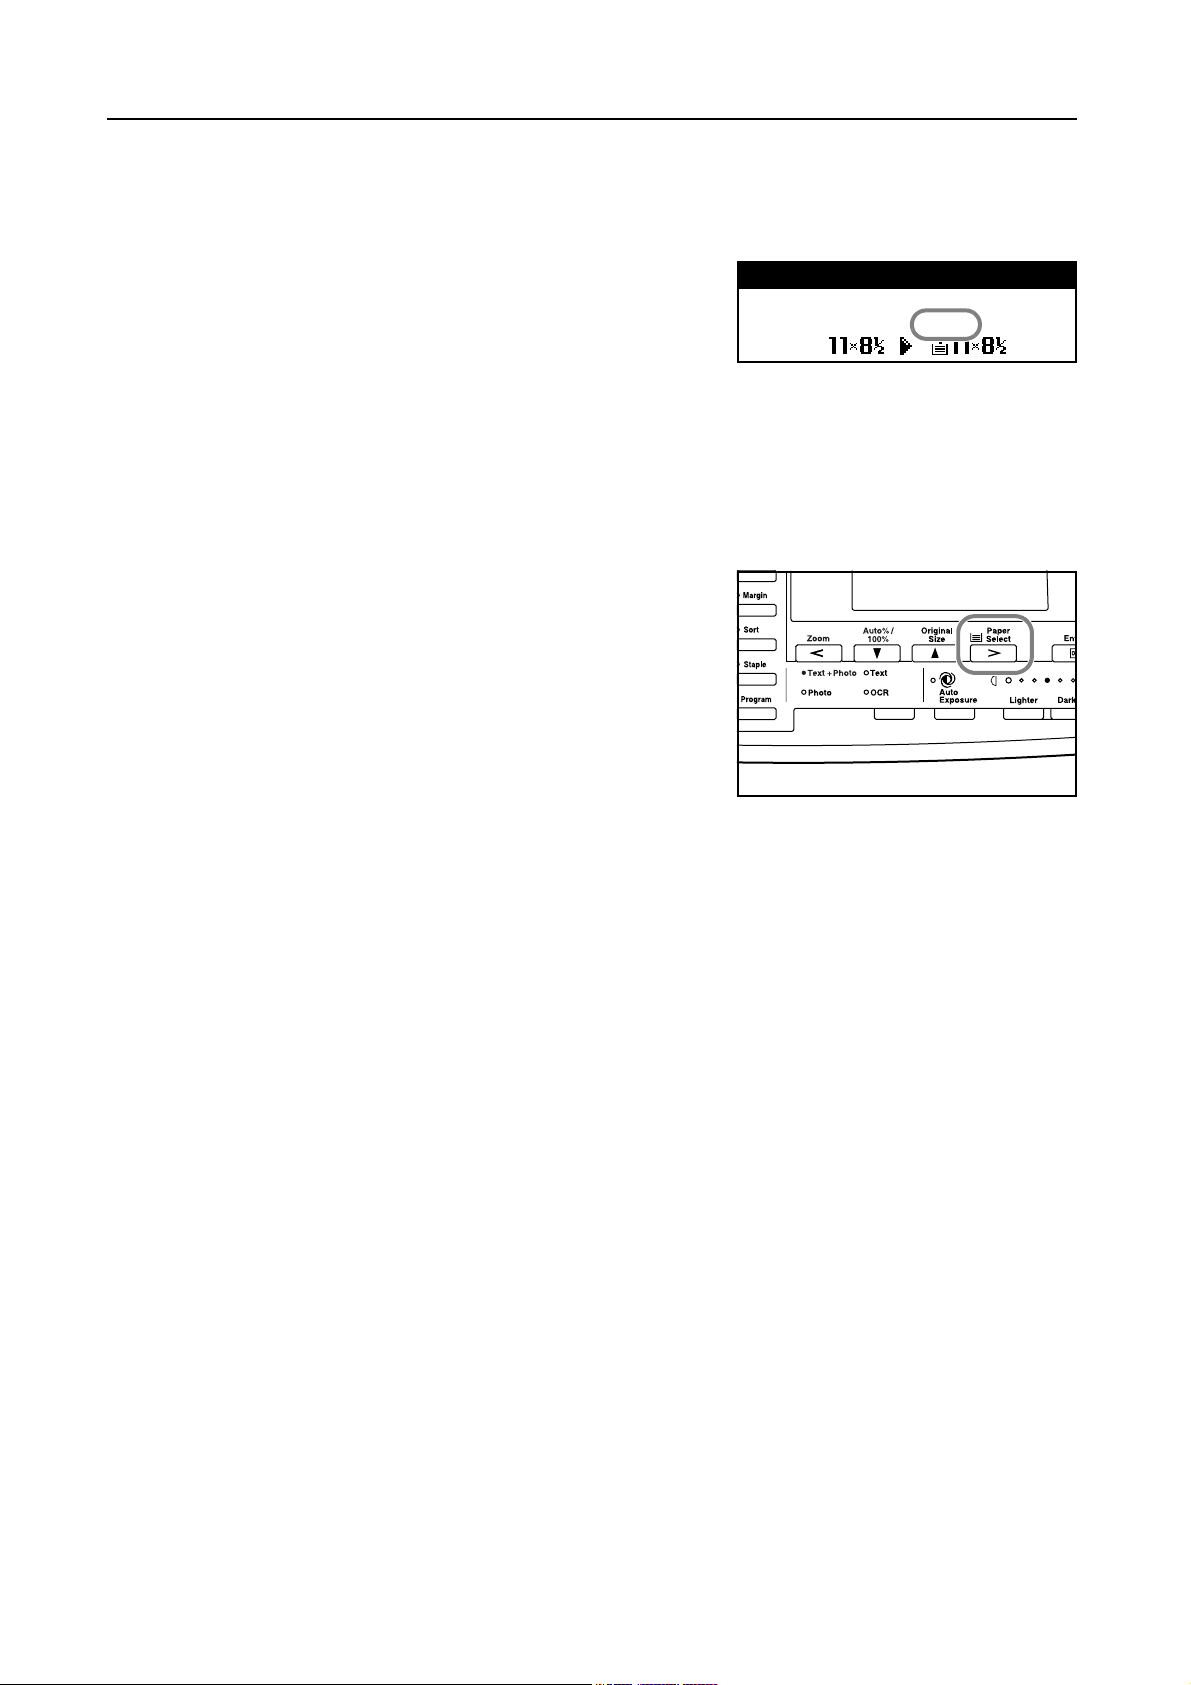
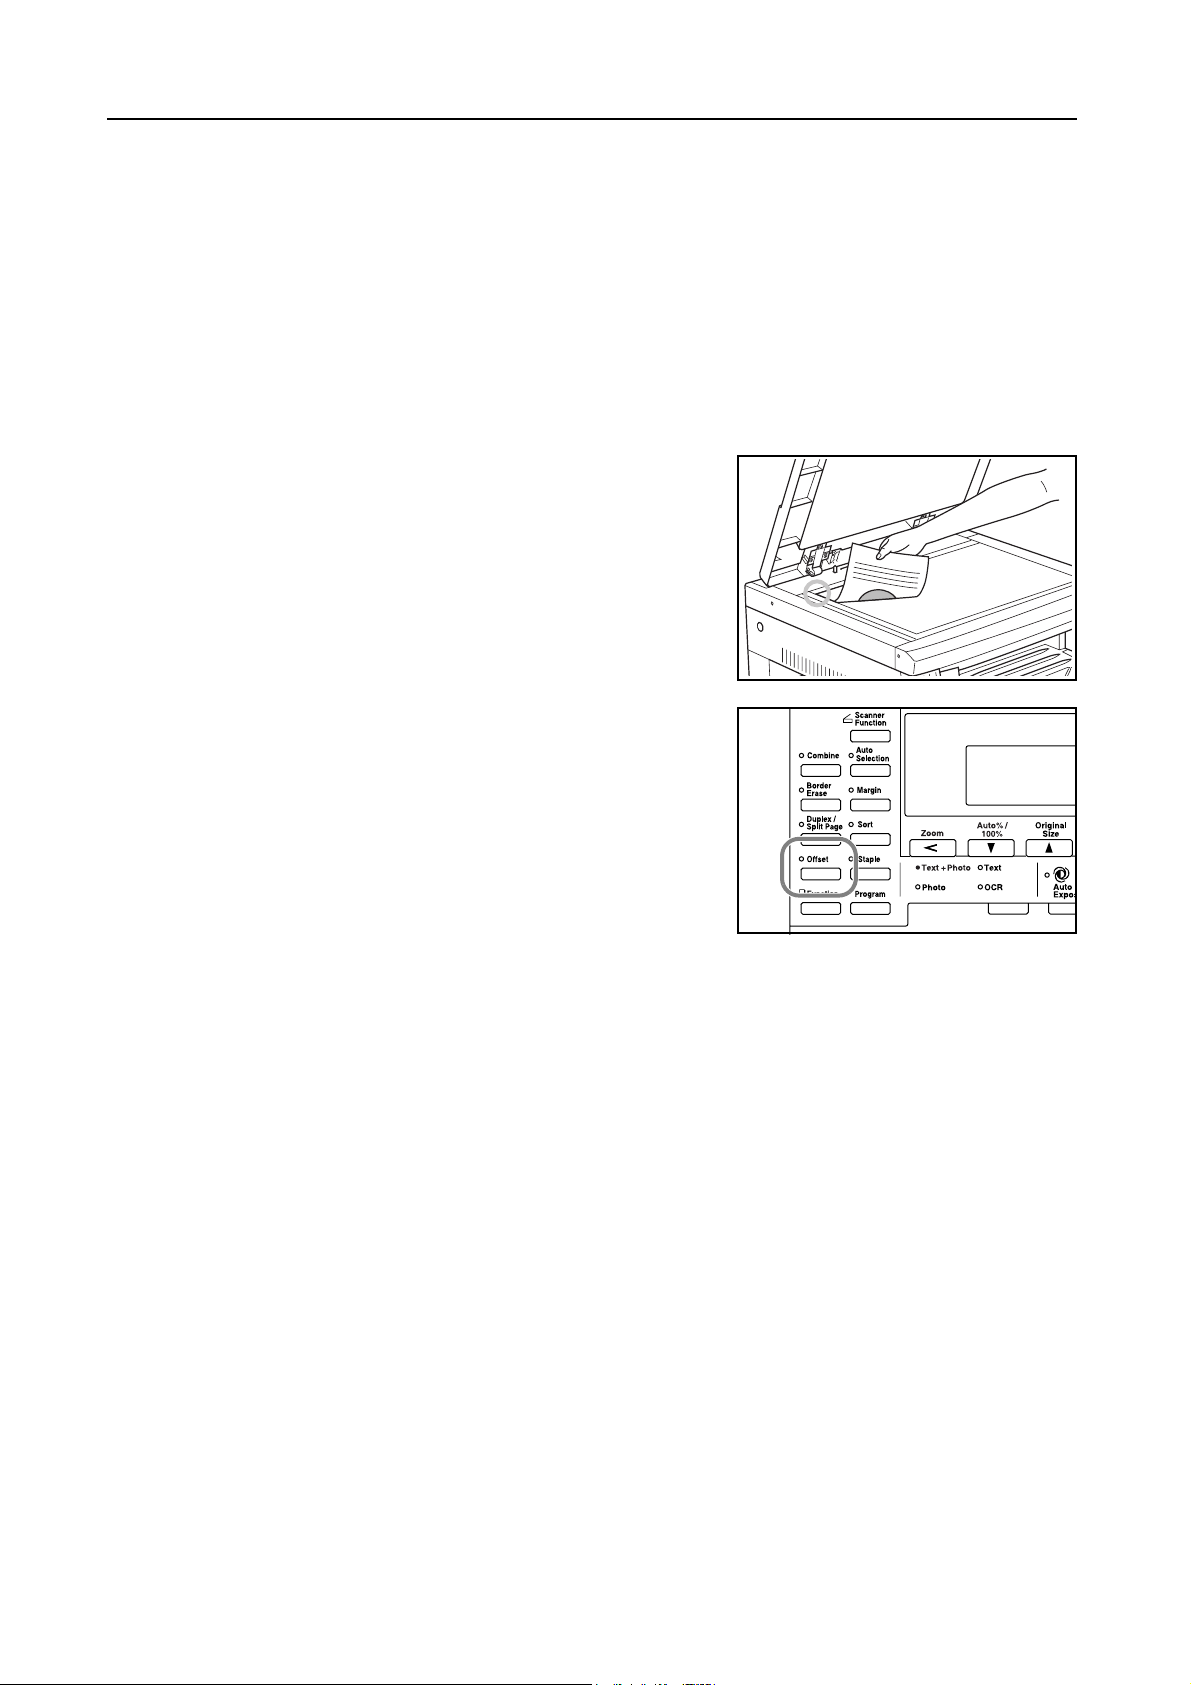
Paper Source Selection
Perform the following procedure to select a paper source (cassette or multi-bypass tray) with the
desired paper size.
Set the original.
1
If Auto is displayed on the message display, copy
paper of the same size as the original is automatically
selected.
Notes • This auto paper selection function can be disabled. (For details, see Paper Selection on
page 3-4.)
• You can set a paper size for the cassette. (For details, see Paper Size (cassettes 1 to 4) on
page 3-13.)
• You can set a paper type for the cassette. (For details, see Paper Type (cassettes 1 to 4) on
page 3-14.)
To change the paper size, press the Paper Select key
2
to select the desired paper source.
Ready to copy.
Auto
100%
Auto
1
Notes • When using the multi-bypass tray, set the paper size and the paper type referring to
Multi-Bypass Tray Settings on page 3-26.
• You can set the machine to display the Bypass Paper size screen when the multi-bypass
tray is selected. (See Multi-Bypass Tray Confirmation Display on page 3-14.)
Press the Start key. Copying starts.
3
1-2
Page 11
Original Size Selection
With manual original size selection, this machine can scan only the part of a specified size of the
original for copying.
Also you can use an irregular size original by inputting the original size.
Selecting an Original Size from Regular Size
Set the original.
1
Press the Original Size key.
2
Press the S key or the T key to select the desired
3
original size.
Original Size:
Auto
*
Input size
Copier Functions
Press the Enter key.
4
Press the Start key. Copying starts.
5
Selecting an Original Size from Other Regular Sizes
Set the original.
1
Press the Original Size key.
2
Press the S key or the T key to select Other
3
Regular Size.
Original Size:
Other Regular Size
Press the Enter key.
4
Press the S key or the T key to select the desired
5
original size.
Other Regular Size:
1-3
Page 12
Copier Functions
Press the Enter key.
6
Press the Start key. Copying starts.
7
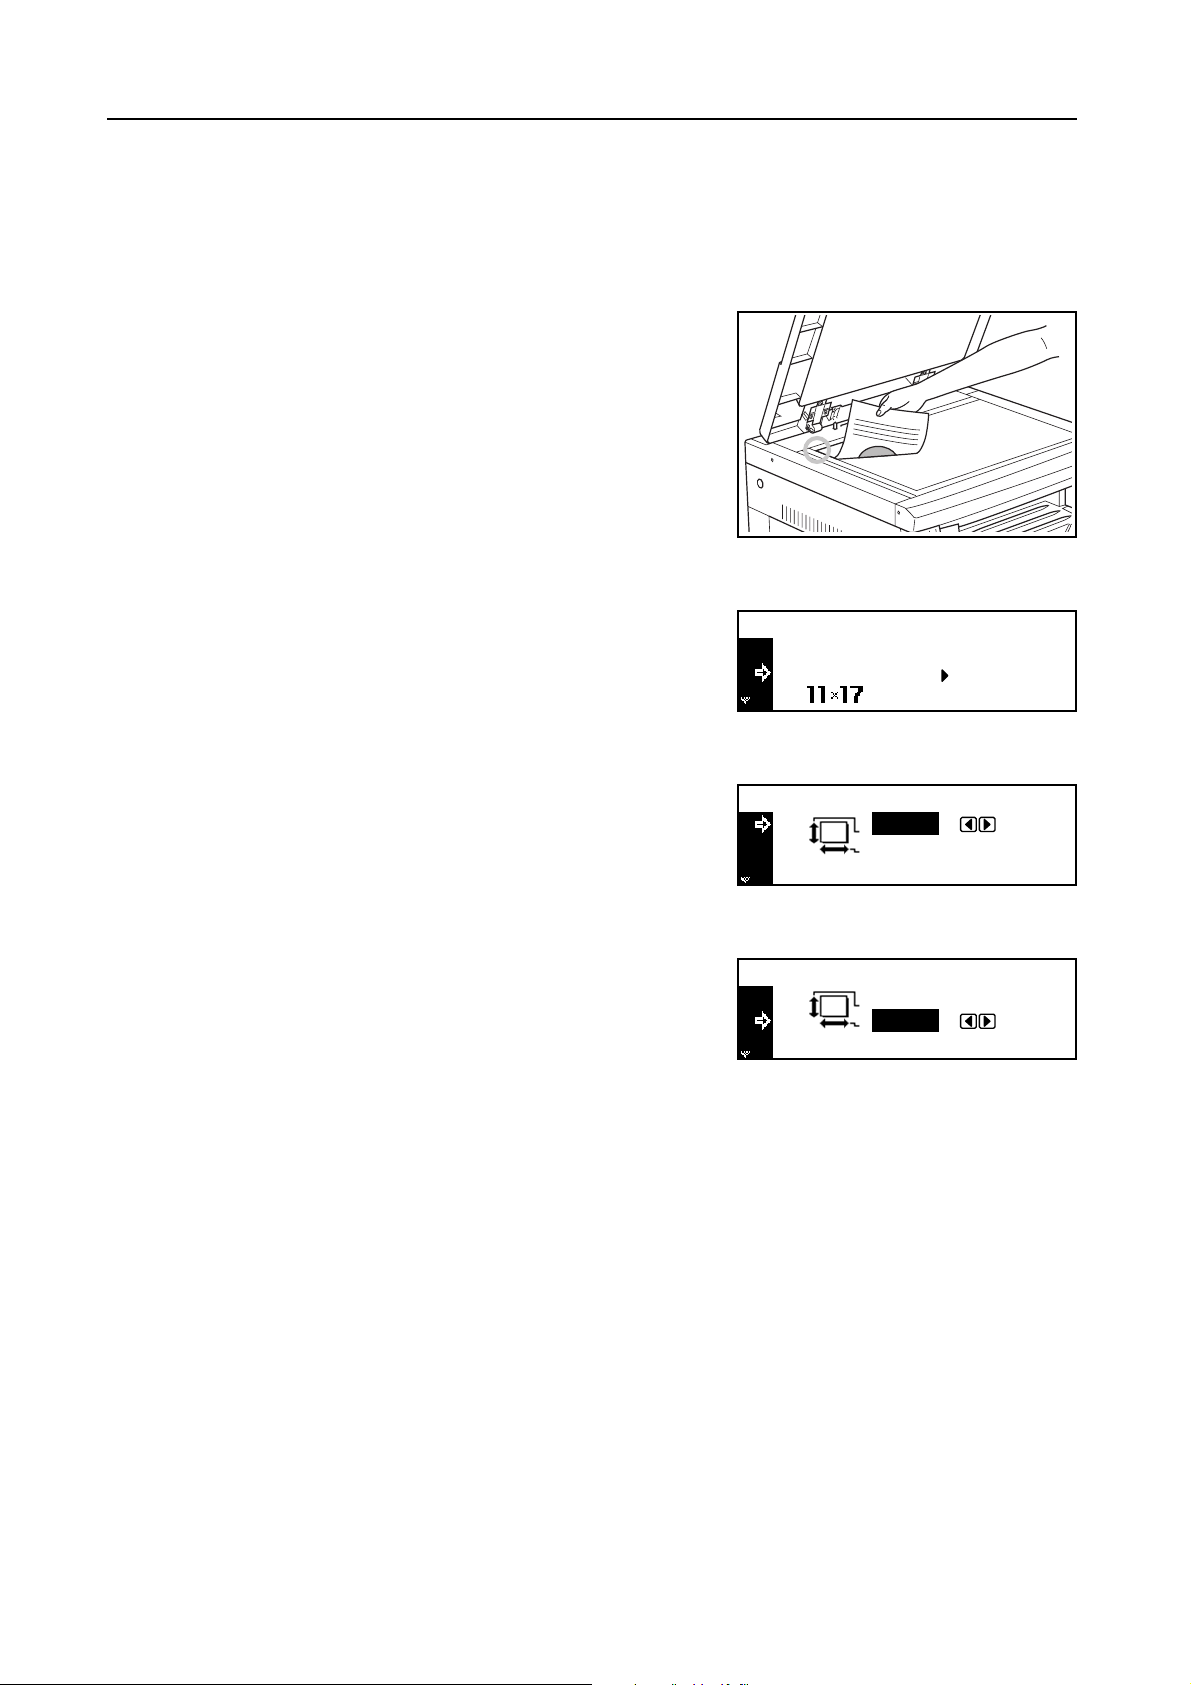
Inputting the Original Size
Set the original.
1
Press the Original Size key.
2
Press the S key or the T key to select Input size.
3
Original Size:
Auto
*
Input size
Press the Enter key.
4
Press the < key or the > key to set the vertical size.
5
You can set the vertical size to 2" to 11 5/8" in 1/8"
increments [50 to 297 mm in 1 mm increments].
Press the T key to move to the horizontal size.
6
Press the < key or the > key to set the horizontal size.
7
You can set the horizontal size to 2" to 17" in 1/8"
increments [50 to 432 mm in 1 mm increments].
Press the Enter key.
8
Press the Start key. Copying starts.
9
Input size
2"
2"
Input size
2"
2"
1-4
Page 13
Image Quality Mode
You can select the image quality mode according to the type of originals.
Image quality mode Description
Text + Photo Select to copy originals that contain a mixture of both text and
Text Select to copy originals that contain large amounts of text, such as
Photo Select to copy originals that contain photographs.
Set the original.
1
Press the image quality mode select key to select the
2
desired mode.
Copier Functions
photographs.
documents.
Press the Start key. Copying starts.
3
Note • You can adjust the copy exposure in each of the image quality modes. (See Exposure
Adjustment for Text + Photo Originals on page 3-7, Exposure Adjustment for Text
Originals on page 3-8 and Exposure Adjustment for Photo Originals on page 3-8.)
• If you select the Photo mode, the manual copy exposure mode is set. (See Copy Exposure
Adjustment on page 1-6.)
1-5
Page 14

Copier Functions
Copy Exposure Adjustment
This section explains how to adjust the copy exposure. The following modes are available for copy
exposure adjustment.
Mode Description
Auto exposure mode The machine detects the density of the original and sets the optimum
Manual exposure mode The operator presses the Lighter key or the Darker key to adjust the
Auto Exposure Mode
Press the Auto Exposure key. The machine detects
the density of the original and sets the optimum
exposure.
exposure.
exposure.
Notes • You can make adjustments to the auto exposure mode if the overall copies come out too dark
or too light. (See Auto Exposure Adjustment on page 3-6.)
• If you select Photo as the image quality mode, you cannot select the auto exposure mode.
Manual Exposure Mode
Press the Lighter key or the Darker key to adjust the
exposure. The exposure display indicates the current
exposure level.
Note You can change the default setting for the copy exposure to the auto exposure mode. (See
Exposure Mode on page 3-3.)
1-6
Page 15

Number of Copies to Be Made
Set the number of copies to be made as follows. You can set the number of copies to 999 at the
maximum.
Set the original.
1
Use the numeric keys to set the desired number of
2
copies.
Copier Functions
Ready to copy.
Auto
100%
Note To cancel the number of copies, press the Stop/Clear key. The number of copies is reset to 1.
Press the Start key. Copying starts.
3
Auto
10
1-7
Page 16

Copier Functions
Zoom Copying
The zoom ratio can be changed to reduce or enlarge the copies. The following modes are available
for zoom copying.
Mode Description
Auto zoom ratio selection mode
Zoom mode The zoom ratio can be changed from 25 % to 200 % in 1 %
Preset zoom mode A preset zoom ratio can be used to reduce or enlarge original
Original images are reduced or enlarged according to the selected
paper size.
increments.
images.
Inch Specification
200 % (5.5 × 8.5 Æ 11 × 17), 154 % (5.5 × 8.5 Æ 8.5 × 14),
129 % (8.5 × 11 Æ 11×17), 121%(8.5×14Æ 11 × 1 7),
78 % (8.5 × 14 Æ 8.5 × 11), 77 % (11 × 17 Æ 8.5 × 14),
64 % (11 × 17 Æ 8.5 × 11), 50 % (11 × 17 Æ 5.5 × 8.5)
Metric Specification
200 % (A5 Æ A3), 141 % (A4 Æ A3, A5ÆA4), 127 % (Folio Æ A3),
106 % (11 × 15" Æ A3), 90 % (Folio Æ A4), 75 % (11 × 15" Æ A4),
70 % (A3 Æ A4, A4 Æ A5), 50 % (A3 Æ A5)
Auto Zoom Ratio Selection Mode
Original images are reduced or enlarged according to the selected paper size.
Note You can set a default setting so that the auto zoom ratio selection mode is selected when you select
a cassette. (See Default Magnification on page 3-6.)
Set the original.
1
Press the AUTO%/100% key. AUTO % is displayed on
2
the message display.
Metric Specification (Asia Pacific)
200 % (A5 Æ A3), 141 % (A4 Æ A3, B5 Æ B4), 122 % (A4 Æ B4,
A5 Æ B5), 115 % (B4 Æ A3, B5 Æ A4), 86 % (A3 Æ B4, A4 Æ B5),
81 % (B4 Æ A4, B5 Æ A5), 70 % (A3 Æ A4, B4 Æ B5),
50 % (A3 Æ A5)
Ready to copy.
1-8
Press the Paper Select key to select the copy paper.
3
The zoom ratio is displayed on the message display.
AutoAuto %
100%
Ready to copy.
AutoAuto %
129%
1
1
Page 17

Zoom Mode
Press the Start key. Copying starts.
4
With this mode, the zoom ratio can be set between 25 % and 200 % in 1 % increments.
Set the original.
1
Press the Zoom key.
2
Use the numeric keys to input the zoom ratio. The
3
zoom ratio is displayed on the message display.
(The display example shows a screen displayed when
an operator enters 1, 1, and 8.)
Zoom:
118%
121%:8.5x14
100%:
78%:8.5x14
Copier Functions
11x17
8.5x11
4
5
Preset Zoom Mode
1
2
3
Press the Enter key.
Press the Start key. Copying starts.
With this mode, the zoom ratio can be set to one of the preset ratios.
Set the original.
Press the Zoom key.
Press the S key or the T key to select the desired
zoom ratio.
Zoom:
100%
121%:8.5x14
100%:
78%:8.5x14
11x17
8.5x11
Press the Enter key. The zoom ratio is displayed on
4
the message display.
Press the Start key. Copying starts.
5
Ready to copy.
Auto
121%
Auto
1
1-9
Page 18

Copier Functions
Original Orientation
You must specify the orientation of the original when using the following functions: duplex copying,
split copying (from 2-sided originals), margin mode, border erase mode, combine copying, auto
selection mode (optional), and staple copying (optional).
When the originals are set on the platen:
When the originals are set in the document processor:
Original Rear Left top
Original Rear Left top
Note You can change the default setting of the orientation of the original. (See Original Orientation on
page 3-18.)
Press the Function key.
1
Press the S key or the T key to select Orig.
2
direction.
Function:
End
Orig. direction : Rear
Press the Enter key.
3
Press the S key or the T key to select Rear [Back
4
Edge] or Left top [Left].
Continuous scan
Orig. direction:
Rear
*
: Off
Left top
Press the Enter key.
5
1-10
Page 19
Interrupt Mode
Copier Functions
The interrupt mode can be used to stop output of copying or another job temporarily and to output
urgent copy or print data or received fax data. After the interrupt processing is complete, the
interrupted job can be resumed.
The following modes are available for the interrupt function.
Mode Description
Interrupt copy • This mode can be used to stop copying and to make a copy of
a different original at different settings. After the interrupt copy
has been produced, the interrupted copying can be resumed at
the same settings in effect prior to the interruption.
• This mode can also be used to stop output of a job and to make
a copy of another job. After the interrupt copy has been
produced, the interrupted job is resumed.
Priority output This mode can be used to interrupt output of a job and to output
print data or received fax data with priority. After priority output is
complete, the interrupted job is resumed.
Note
To use the fax functions, the optional fax kit must be installed.
During a Copy Job
Press the Interrupt key. Interrupt mode OK
1
[Interrupt mode] is displayed.
Store the originals for the current copying.
2
Set the original for interrupt copying and perform copying.
3
After the interrupt copying is complete, press the Interrupt key. The settings for the interrupted job
4
are restored.
Replace the original with the originals that have been stored. Press the Start key to resume
5
copying.
During Output
Press the Interrupt key during output. Select Interrupt mode is displayed.
1
Note If the machine has neither print data nor received fax data, Interrupt mode OK [Interrupt
mode] is displayed. Proceed to step 4.
Press the S key or the T key to select the desired
2
interrupt mode.
Select Interrupt mode.
Interrupt copy
Priority:Printer
Priority:Fax
1-11
Page 20

Copier Functions
Note • Priority:Printer is displayed when the machine has print data.
• Priority:Fax is displayed when the machine has received fax data.
Press the Enter key.
3
If you have selected Interrupt copy, message Interrupt mode OK [Interrupt mode] is
displayed. Proceed to the next step.
If you have selected Priority:Printer or Priority:Fax, output of data starts. Proceed to
step 5.
Set the original for interrupt copying and perform copying.
4
After the interrupt job is complete, press the Interrupt key. The interrupted job resumes.
5
1-12
Page 21
Duplex Copying
Note The optional duplex unit must be installed.
Copier Functions
Two-sided copies can be made from a variety of originals including double-page spread or
two-sided originals.
The following modes are available for duplex copying.
Mode Description
1 sided->2 sided
[1-sided->2-sided]
(2-sided copying from 1-sided
originals)
One-sided originals are copied onto the front and back sides of the
copy paper. If the number of originals is odd, the back side of the
last copy page is blank.
Original Copy
2 sided->2 sided
[2-sided->2-sided]
(2-sided copying from 2-sided
originals)
Note
In the 1-sided to 2-sided mode, select the following setting.
• Stitch at left/right of originals Æ Finished stitch at left of copies:
The images for the back side are copied without rotation...A
• Stitch at left/right of originals Æ Finished stitch top of copies:
The images for the back side are rotated 180 degrees and
copied. Finished copies can be bound at the top so that
double-page spread pages are copied in the same
orientation...B
ghi
def
abc
AB
ghi
abc
def
ghi
abc
def
Original Copy
Front and back sides of originals are copied in the same way onto
both sides of copy paper.
Original Copy
Note
The paper sizes that can be used are A3 to A5R, Folio, 11 × 17"
(Ledger), 8
1/2 ×81/2" (Statement), 8 1/2 × 13" (Oficio II), 8K, 16K, and 16KR.
5
1/2 × 14" (Legal), 8 1/2 × 11" (Letter), 11 × 8 1/2",
1-13
Page 22

Copier Functions
Mode Description
Book->2-sided (2-sided
copying from double-page
spread originals)
Set the original.
1
A double-page spread original of magazines, books, etc. can be
copied onto both sides of copy paper by pressing the Start key one
time.
Original Copy
Note
The original sizes that can be used are A3, B4, A4R, B5R, A5R,
11 × 17" (Ledger), 8
limited to 11 × 8 1/2" and 16K in the inch specifications and A4, B5,
and 16K in the metric specifications. The paper size can be
changed and the zoom ratio adjusted to fit the size of the paper.
1/2 × 11" (Letter), and 8K. The paper sizes are
Press the Duplex/Split Page key.
2
Press the S key or the T key to select the desired
3
duplex copy mode from 1 sided->2 sided
[1-sided->2-sided], 2 sided->2 sided
[2-sided->2-sided], and Book->2-sided.
Press the Enter key.
4
If you have selected 1 sided->2 sided [1-sided->2-sided], proceed to the next step.
If you have selected 2 sided->2 sided [2-sided->2-sided], or Book->2-sided, proceed to
step 7.
Press the S key or the T key to select the desired
5
finished stitch side.
Duplex/Split Page:
1 sided 2 sided
2 sided
Book
2 sided
2-sided
Saddle Stitch Direction:
Left side
Top side
Press the Enter key.
6
Press the Start key. Scanning of the original starts.
7
If the originals have been set in the optional document processor, copying starts automatically.
If the original has been set on the platen, a message prompting replacement of the original is
displayed. In this case, proceed to the next step.
1-14
Replace the original and press the Start key. Scanning of the original is performed.
8
When all originals have been scanned, press the Enter key. Copying starts.
9
Page 23

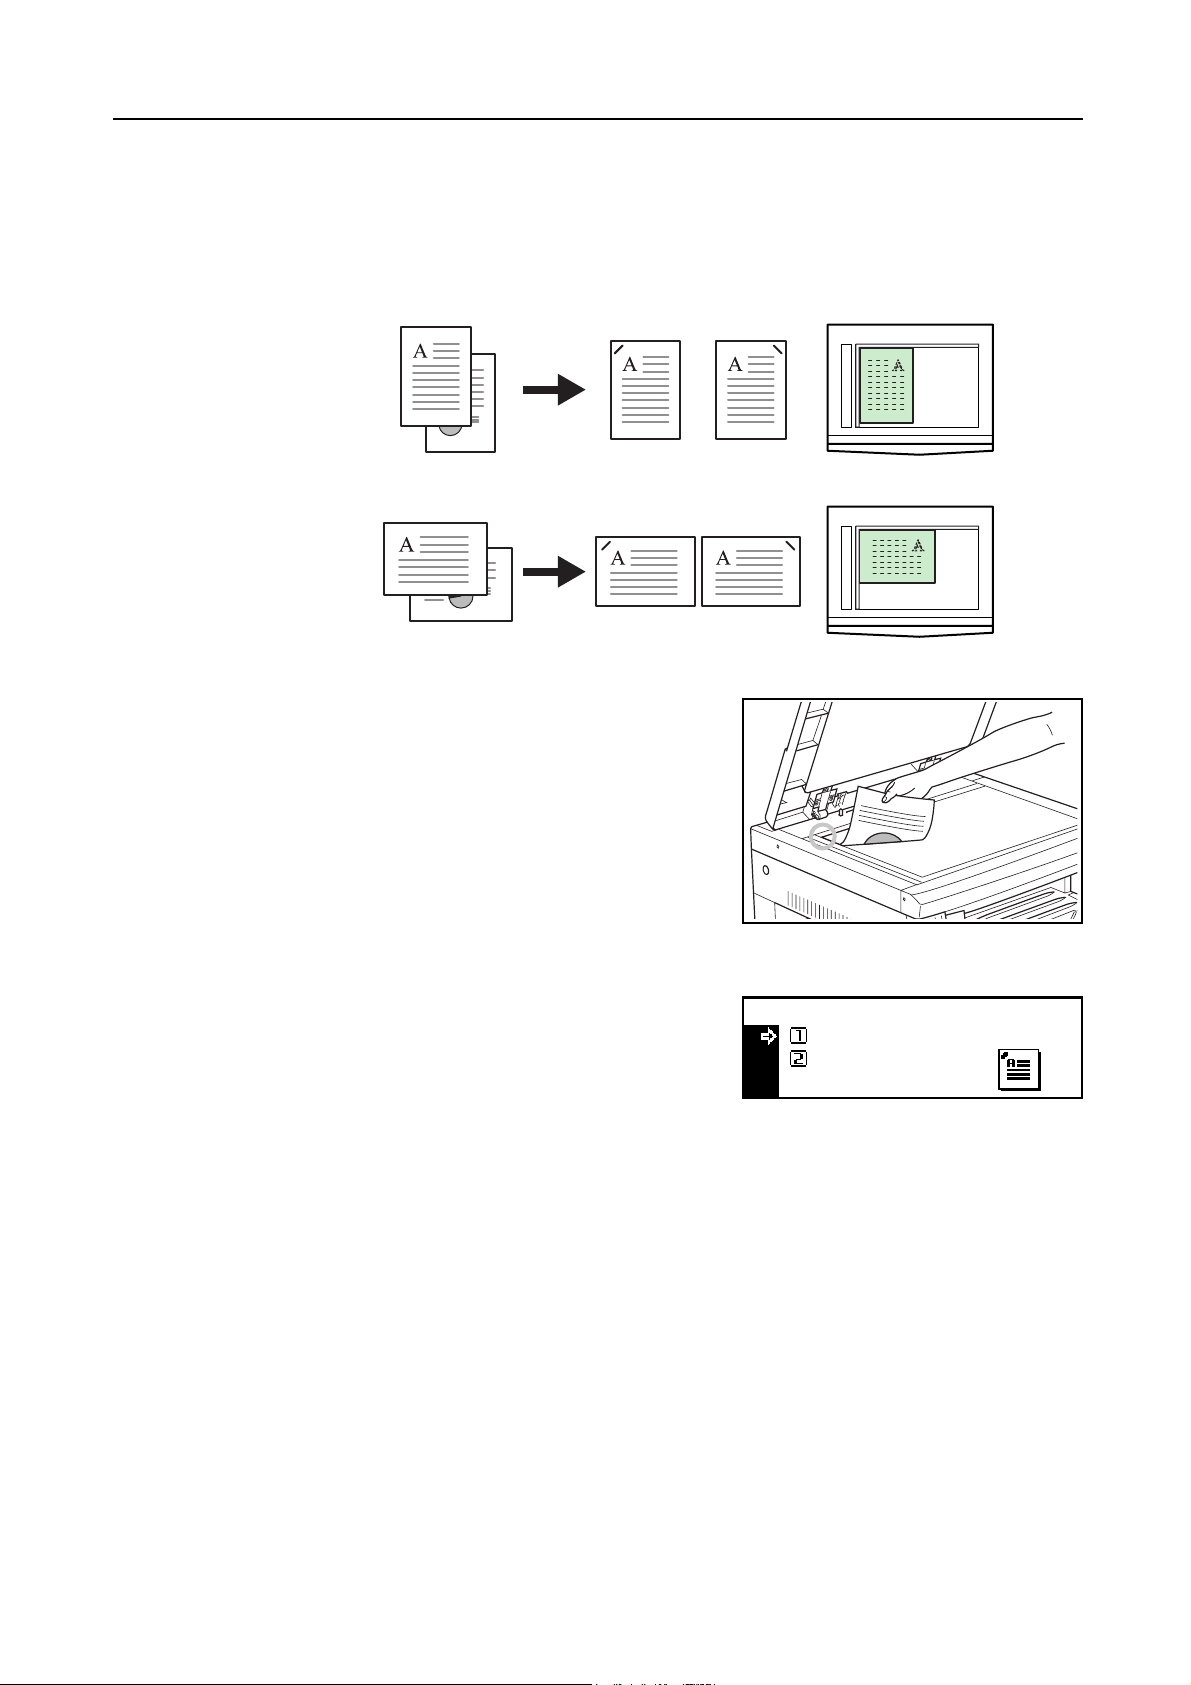
Split Copying
Each page of double-page spread or two-sided originals is copied separately.
The following modes are available for split copying.
Mode Description
2 sided->1 sided
Each page of two-sided originals is copied separately.
[2-sided->1-sided] (Split
copying from double-page
1
2
1
2
spread originals)
Original Copy
Copier Functions
Book->1-sided (Split
copying from 2-sided originals)
Set the original.
1
Each page of double-page spread originals of magazines, books,
etc. is copied separately.
21
1
2
Original Copy
Note
The original sizes that can be used are A3, B4, A4R, B5R, A5R,
11 × 17" (Ledger), 8 1/2 × 11" (Letter), and 8K. The paper sizes are
limited to 11 × 8 1/2" and 16K in the inch specifications and A4, B5,
and 16K in the metric specifications. The paper size can be
changed and the zoom ratio adjusted to fit the size of the paper.
Press the Duplex/Split Page key.
2
Press the S key or the T key to select the desired split
3
copy mode from 2 sided->1 sided
[2-sided->1-sided] and Book->1-sided.
Press the Enter key.
4
Duplex/Split Page:
Book 2-sided
2 sided
Book
1-sided
1 sided
If you have selected 2 sided->1 sided [2-sided->1-sided], proceed to the next step.
If you have selected Book->1-sided, proceed to step 7.
Press the S key or the T to select the original stitch
5
side.
Original stitch side:
Left side
Top side
Press the Enter key.
6
1-15
Page 24

Copier Functions
Press the Start key. Scanning of the original starts.
7
If the originals have been set in the optional document processor, copying starts automatically.
If the original has been set on the platen, a message prompting replacement of the original is
displayed. In this case, proceed to the next step.
Replace the original and press the Start key. Scanning of the original is performed.
8
When all originals have been scanned, press the Enter key. Copying starts.
9
1-16
Page 25
Sort Copying
Note If the optional document processor is installed, you can select whether or not to turn on the sort
Copier Functions
Since copying in this mode is performed after multiple originals have been scanned and memorized,
a required number of collated copy sets can be produced.
mode at a default setting. (See Sort Copying on page 3-8.)
Set the original.
1
Press the Sort key.
2
Input the number of copies and press the Start key. Scanning of the original starts.
3
If the originals have been set in the optional document processor, copying starts automatically.
If the original has been set on the platen, a message prompting replacement of the original is
displayed. In this case, proceed to the next step.
Replace the original and press the Start key. Scanning of the original is performed.
4
When all originals have been scanned, press the Enter key. Copying starts.
5
1-17
Page 26
Copier Functions
Offset Copying
Notes • If the optional document processor or finisher is not installed, use this function with sort
For copying of multiple sets, the orientation of the copies can be changed at the end of each set for
easy classification.
copying.
• You can select whether or not to turn on the offset mode at a default setting. (See Offset
Copying on page 3-9.)
• When setting the offset copying, turn the auto rotation on. (See Auto Rotation on page 1-29.)
• The paper sizes that can be used for offset copying are limited to A4, B5, 11 × 8
Set the original.
1
Press the Offset key.
2
Press the Sort key.
3
1/2", and 16K.
1-18
Input the number of copies and press the Start key. Scanning of the original starts.
4
If the originals have been set in the optional document processor, copying starts automatically.
If the original has been set on the platen, a message prompting replacement of the original is
displayed. In this case, proceed to the next step.
Replace the original and press the Start key. Scanning of the original is performed.
5
When all originals have been scanned, press the Enter key. Copying starts.
6
Page 27
Staple Copying
Note The optional finisher must be installed.
Copier Functions
Copies can be stapled at the upper left or upper right corner.
The relation between the orientation of originals and the stapling position is shown below.
Original Copy
Original Copy
Set the original.
1
Press the Staple key.
2
Press the S key or the T key to select the desired
3
stapling position.
Staple:
Left Top
Right Top
Press the Enter key.
4
Press the Start key. Scanning of the original starts.
5
If the originals have been set in the optional document processor, copying starts automatically.
If the original has been set on the platen, a message prompting replacement of the original is
displayed. In this case, proceed to the next step.
Replace the original and press the Start key. Scanning of the original is performed.
6
When all originals have been scanned, press the Enter key. Copying starts.
7
1-19
Page 28

Copier Functions
Combine Copying
Two or four originals can be reduced and copied onto a single sheet. Also borderlines of each
original can be marked with solid lines or dotted lines.
Note Both the original size and the copy paper size must be regular sizes.
Combine Copying Modes
The following modes are available for combine copying.
Mode Description
2 in 1 [2-UP] Use this mode to copy two originals onto one sheet. This mode can
also be used in conjunction with duplex copying in order to copy
four originals onto both sides of one sheet.
2
1
1
Original Copy
2
4 in 1 [4-UP] (horizontal
arrangement)
4 in 1 [4-UP] (vertical
arrangement)
Use this mode to copy four originals onto one sheet. This mode can
also be used in conjunction with duplex copying in order to copy
eight originals onto both sides of one sheet.
1-20
Original Copy
Page 29
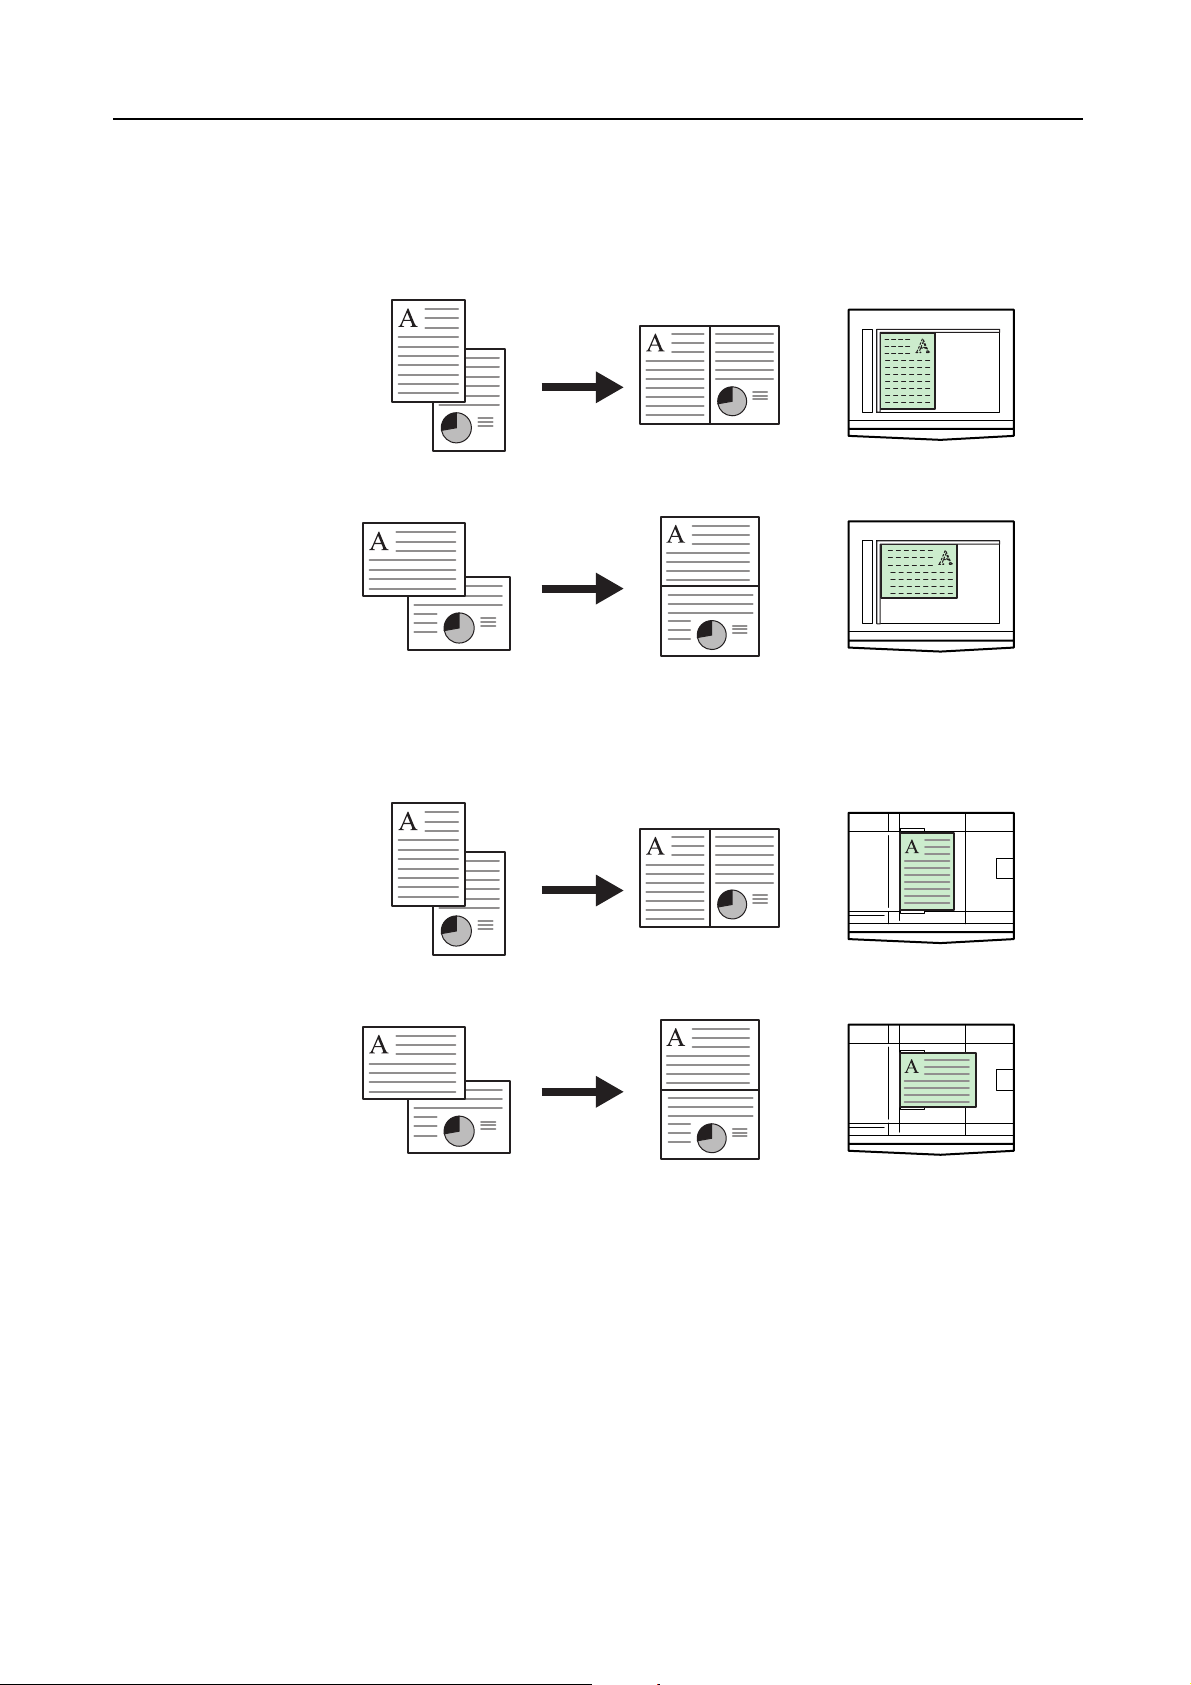
2 in 1
The orientations of the originals and the finished copy are shown below.
When the originals are set on the platen:
CopyOriginal
CopyOriginal
Copier Functions
When the originals are set in the document processor:
CopyOriginal
CopyOriginal
1-21
Page 30

Copier Functions
4 in 1 (horizontal arrangement)
The orientations of the originals and the finished copy are shown below.
When the originals are set on the platen:
CopyOriginal
CopyOriginal
When the originals are set in the document processor:
CopyOriginal
1-22
CopyOriginal
Page 31

4 in 1 (vertical arrangement)
The orientations of the originals and the finished copy are shown below.
When the originals are set on the platen:
CopyOriginal
Copier Functions
CopyOriginal
When the originals are set in the document processor:
CopyOriginal
CopyOriginal
1-23
Page 32

Copier Functions
Borderline Types
The following borderline types are available.
Borderline type Copy
2 in 1 4 in 1 (horizontal arrangement)/
4 in 1 (vertical arrangement)
None
Solid
Dotted
Mark [Cropmark]
Setting the Combine Copying
Set the original.
1
Press the Combine key.
2
Press the S key or the T key to select the desired
3
combine copying mode.
Combine:
2 in 1
4 in 1 (Z)
4 in 1 (N)
1-24
Press the Enter key.
4
Press the S key or the T key to select the desired
5
borderline type.
Border line:
None
Solid
Dotted
Page 33

Copier Functions
Press the Enter key
6
Press the Start key. Scanning of the original starts.
7
If the originals have been set in the optional document processor, copying starts automatically.
If the original has been set on the platen, a message prompting replacement of the original is
displayed. In this case, proceed to the next step.
Replace the original and press the Start key. Scanning of the original is performed.
8
When all originals have been scanned, press the Enter key. Copying starts.
9
1-25
Page 34

Copier Functions
Margin Mode
Note You can set the default value of the margin width. (See Margin Width Default Value on page 3-10.)
The image of the original can be shifted to make a margin (blank) space at the left or top side on the
copy. You can set the width of each margin to 1/8" to 3/4" in 1/8" increments [1 mm to 18 mm in
1 mm increments].
Set the original.
1
Press the Margin key.
2
Press the S key or the T key to select Left Margin
3
or Top Margin.
Margin:
Left Margin
Top Margin
Press the Enter key.
4
Press the < key or the > key to set the margin width.
5
You can set the width to 1/8" to 3/4" in 1/8" increments
[1 mm to 18 mm in 1 mm increments].
Press the Enter key.
6
Press the Start key. Copying starts.
7
Margin width:
1/4" 3/4"
1/8"
1-26
Page 35

Border Erase Mode
Shadows that may appear around the edges of copies can be erased.
The following modes are available for border erase function.
Mode Description
Sheet Erase Use this mode to erase shadows that may appear around the edges of
Book Erase Use this mode to make clean copies from a thick book. You can set the
Note You can set the default value of the border erase width. (See Border Erase Width Default Value
on page 3-10.)
Set the original.
1
Copier Functions
copies made from sheet originals. You can set the width of the border
to be erased to 1/8" to 3/4" in 1/8" increments [1 mm to 18 mm in 1 mm
increments].
width of the border to be erased to 1/8" to 3/4" in 1/8" increments
[1 mm to 18 mm in 1 mm increments].
Press the Border Erase key.
2
Press the S key or the T key to select Sheet Erase
3
or Book Erase.
Press the Enter key.
4
Press the < key or the > key to set the border erase
5
width. You can set the width to 1/8" to 3/4" in 1/8"
increments [1 mm to 18 mm in 1 mm increments].
Press the Enter key.
6
Press the Start key. Copying starts.
7
Border Erase:
Sheet Erase
Book Erase
Border Erase width:
1/4" 3/4"
1/8"
1-27
Page 36

Copier Functions
Continuous Copying
The continuous copying function allows multiple originals to be separated into some blocks, to be
scanned at more than one time, and to be copied in one batch. Since multiple originals of the same
type are scanned in multiple steps to accumulate data in memory, many originals can be copied in
one batch.
Set the originals.
1
Press the Function key.
2
Press the S key or the T key to select Continuous
3
scan.
Press the Enter key.
4
Press the S key or the T key to select On.
5
Function:
End
Orig. direction : Rear
Continuous scan
Continuous scan:
Off
*
On
: Off
Press the Enter key.
6
Press the S key or the T key to select End.
7
Press the Enter key.
8
Press the Start key. Scanning of originals starts.
9
Replace the originals and press the Start key. Scanning of originals of the next step starts.
10
When all originals have been scanned, press the Enter key. Copying starts.
11
1-28
Page 37

Auto Rotation
Notes • The paper sizes that can be used for auto rotation are A4/11 × 8 1/2" or smaller sizes. A3, B4,
1
2
Copier Functions
With the auto rotation function, the image of the original is automatically rotated counterclockwise by
90 degrees if the orientation of the original is different from that of the paper loaded in the cassette.
Folio, 11 × 17" (Ledger), 8 1/2 × 14" (Legal) or 8K cannot be used for auto rotation.
• You can select whether or not to enable auto rotation at a default setting. (See Auto Rotation
Copy on page 3-9.)
Set the original.
Press the Function key.
Press the S key or the T key to select Auto
3
Rotation.
Press the Enter key.
4
Press the S key or the T key to select On or Off.
5
Press the Enter key.
6
Function:
Orig. direction
Continuous scan
Auto Rotation
Auto Rotation:
Off
On
*
: Rear
: Off
: On
1-29
Page 38

Copier Functions
EcoPrint Mode
Notes • The copy exposure will be a little lighter.
1
2
3
The ecoprint mode can reduce toner consumption. Use this mode when high quality copies are not
necessary, for example, for trial copying.
• You can select whether or not to turn on the ecoprint mode at a default setting. (See EcoPrint
Mode on page 3-4.)
Set the original.
Press the Function key.
Press the S key or the T key to select EcoPrint.
Function:
Continuous scan
Auto Rotation
EcoPrint
:Off
: On
: Off
Press the Enter key.
4
Press the S key or the T key to select On or Off.
5
Press the Enter key.
6
EcoPrint :
Off
*
On
1-30
Page 39

Auto Selection Mode
With the auto selection mode, you need not use the Paper Select key to specify the paper size
when using the optional document processor. The original sizes are detected one by one and each
original is automatically copied to a sheet of the same size.
Notes • The maximum number of sheets that can be set in the document processor in this mode is 30.
• The original sizes that can be used for the auto selection mode:
Inch Specification — 11 × 8
(Letter)
Metric Specification — A3 and A4, folio and A4R, or B4 and B5.
The original width must be the same.
Set the originals in the document processor.
1
Press the Auto Selection key.
2
Copier Functions
1/2" and 11 × 17" (Ledger) or 8 1/2 × 14" (Legal) and 8 1/2 ×11"
Press the Start key. Copying starts.
3
1-31
Page 40

Copier Functions
Program Function
Up to eight combinations of copy modes and functions displayed on the operation panel can be
registered as a single program.
Registering a Program
Set the desired copy modes, etc., to be registered.
1
Press the Program key.
2
Press the S key or the T key to select Register
3
program.
Press the Enter key.
4
Press the S key or the T key to select the program
5
number to register (1 to 8).
Program:
Program #7
Program #8
Register program.
Register program:
Program #1
Program #2
Program #3
Note You can also select the program number using a numeric key.
Press the Enter key. The program is registered.
6
Using a Program to Make Copies
Press the Program key.
1
Press the S key or the T key to select the program
2
number to recall.
Note You can also select the program number using a numeric key.
Press the Enter key.
3
Set the originals and press the Start key. Copying starts with the settings that were registered.
4
Program:
Program #1
Program #2
Program #3
1-32
Page 41

2 Printer Settings
This chapter explains the settings required for using the printer functions. For setting operation
required for using this machine as a network printer, use the operation panel.
The principal settings that can be made are shown below.
• Using This Machine as a Network Printer
• Menu Hierarchical Diagram
• Status Page Printing
• e-MPS Function
• Interface
•Emulation
• Font
• Print Configuration
• Print Quality
• Memory Card Operation
• Hard Disk Operation
• RAM Disk Operation
• Paper Handling
• Other Settings
2-1
Page 42

Printer Settings
Using This Machine as a Network Printer
To use this machine as a network printer, use the procedure below for the setting.
Preparation of network connection environment
(Assignment of IP address, etc.)
(Refer to Chapter 2 in Basic Operation Guide, Connecting the Network Cable.)
Setting operation from the operation panel of this machine (See this chapter.)
Principal setting items
•Network
• Emulation selection
• Number of copies and print orientation
• Print quality
• Paper sizes for cassette and multi-bypass tray
È
Connection of network cable
È
È
Installation and setting operation of printer driver
(Refer to the KX Printer Driver Operation Guide.)
È
Printing from application
2-2
Page 43

Menu Hierarchical Diagram
Note > displayed on each setting screen indicates the current setting.
Printer Settings
Print Status
Page `
e-MPS ` Quick Copy ` Select User
Interface ` Parallel ` Auto, Normal, High speed, Nibble (high)
No, Print
Select JOB ` Copies: ###
Name
Private/
Stored `
Print VMB
Data `
List of VMB ` No, Print
List of code
JOB `
e-MPS
Configuration
Network ` NetWare ` On, Off
USB
Option ` NetWare ` On, Off
Select User
Name
Tray ### Enter User ID
No, Print
Quick Copy ` Number of JOB: 0 to 50
Temp Code Job
`
Size `
Perm Code Job
Size `
VMB Size ` 0 to 9999 M Byte
TCP/IP ` On, Off
EtherTalk ` On, Off
Network
Status Page `
TCP/IP ` On, Off
EtherTalk ` On, Off
Opt.
StatusPage `
`
Select JOB ` Copies: ### Enter User ID
`
0 to 9999 M Byte
0 to 9999 M Byte
Change # ` Auto, 802.3, Ethernet II,
Change # ` DHCP ` On, Off
On, Off
Change # ` Auto, 802.3, Ethernet II,
Change # ` DHCP ` On, Off
On, Off
Delete
Delete
802.2, 802.3 SNAP
IP Address ` ###.###.###.###
Subnet Mask ` ###.###.###.###
Gateway ` ###.###.###.###
802.2, 802.3 SNAP
IP Address ` ###.###.###.###
Subnet Mask ` ###.###.###.###
Gateway ` ###.###.###.###
2-3
Page 44

Printer Settings
Emulation ` PCL 6
KC-GL ` KC-GL Pen
Adjust `
KC-GL Page
Set `
KPDL ` Print KPDL
Errs `
KPDL (AUTO) ` Print KPDL
Errs `
Alt.
Emulation `
Line Printer
IBM Proprinter
Diablo 630
EPSON LQ-850
Font ` Select Font ` Internal ` I### ID ` I###
Option ` #### ID ` S###, M###, H###, O###
Code Set ` #####
List of
Inter. Fonts`
List of
Option Fonts`
Page Set ` Copies ` 1 to 999
Zoom(Reduce)` Paper size ###, Print size ###
Orientation ` Portrait, Landscape
Page Protect` Auto, On
LF Action ` LF only, CR and LF, Ignore LF
CR Action ` CR only, CR and LF, Ignore CR
Wide A4 ` On, Off
Print
Quality `
KIR Mode ` On, Off
Ecoprint
Mode `
Resolution ` Fast1200 Mode, 600 dpi, 300 dpi
Print
Density `
No, Print
No, Print
On, Off
1 to 5
Pen (1 to 8) ` 01 to 99 dot(s)
A2, A1, A0, B3, B2, B1, B0, SPSZ
On, Off
On, Off
PCL6, KC-GL, Line Printer, IBM Proprinter,
Diablo 630, EPSON LQ-850
Detail ` 4 to 999.75 Point
0.44 to 99.99 CPI
Courier ` Dark, Regular
Letter
Gothic `
Detail ` 4 to 999.75 Point
Dark, Regular
0.44 to 99.99 CPI
2-4
Page 45

HARD DISK ` Read Data
Read Program
Write Data ` OK
Delete Data
Delete Font
Delete Program
Delete Macro
Delete the language
Format ` No, OK
List of
Partitions `
RAM Disk
Mode `
Memory Card ` Read Fonts ` OK
Paper
Handling `
On, Off
Change # ` RAM Disk
Read Macro ` OK
Read Data
Read Program
Write Data ` OK
Delete Data
Delete Font
Delete Program
Delete Macro
Delete the language
Format ` OK
List of
Partitions `
Bypass Mode ` Cassette, First
Feed Select ` Bypass, Cassette 1 (to 4)
Duplex Mode ` None, Short edge bind, Long edge bind
Stack Select` Top tray, Finisher, Job Separator
Override
A4/LT `
No, Print
Size `
Read Data
Read Program
Write Data ` OK
Delete Data
Delete Font
Delete Program
Delete Macro
Delete the language
List of
Partitions `
No, Print
On, Off
Printer Settings
1 to 1024 Mbyte
No, Print
2-5
Page 46

Printer Settings
Others ` Form Feed
Time Out `
Print
HEX-DUMP `
Printer
Reset `
Resource
Prot. `
Auto
Continue `
Finishing
Error `
Service ` Print Status
0 to 495 sec.
OK
On
Off, Permanent, Perm/Temp
On, Off
Change # ` 0 to 495 sec.
Proces.
Duplex print`
Staple mode ` On, Off
Page `
Paper Feed ` Normal, Special
On, Off
No, Print
2-6
Page 47

Status Page Printing
The printer default settings, the memory capacity, and so on are printed in a list.
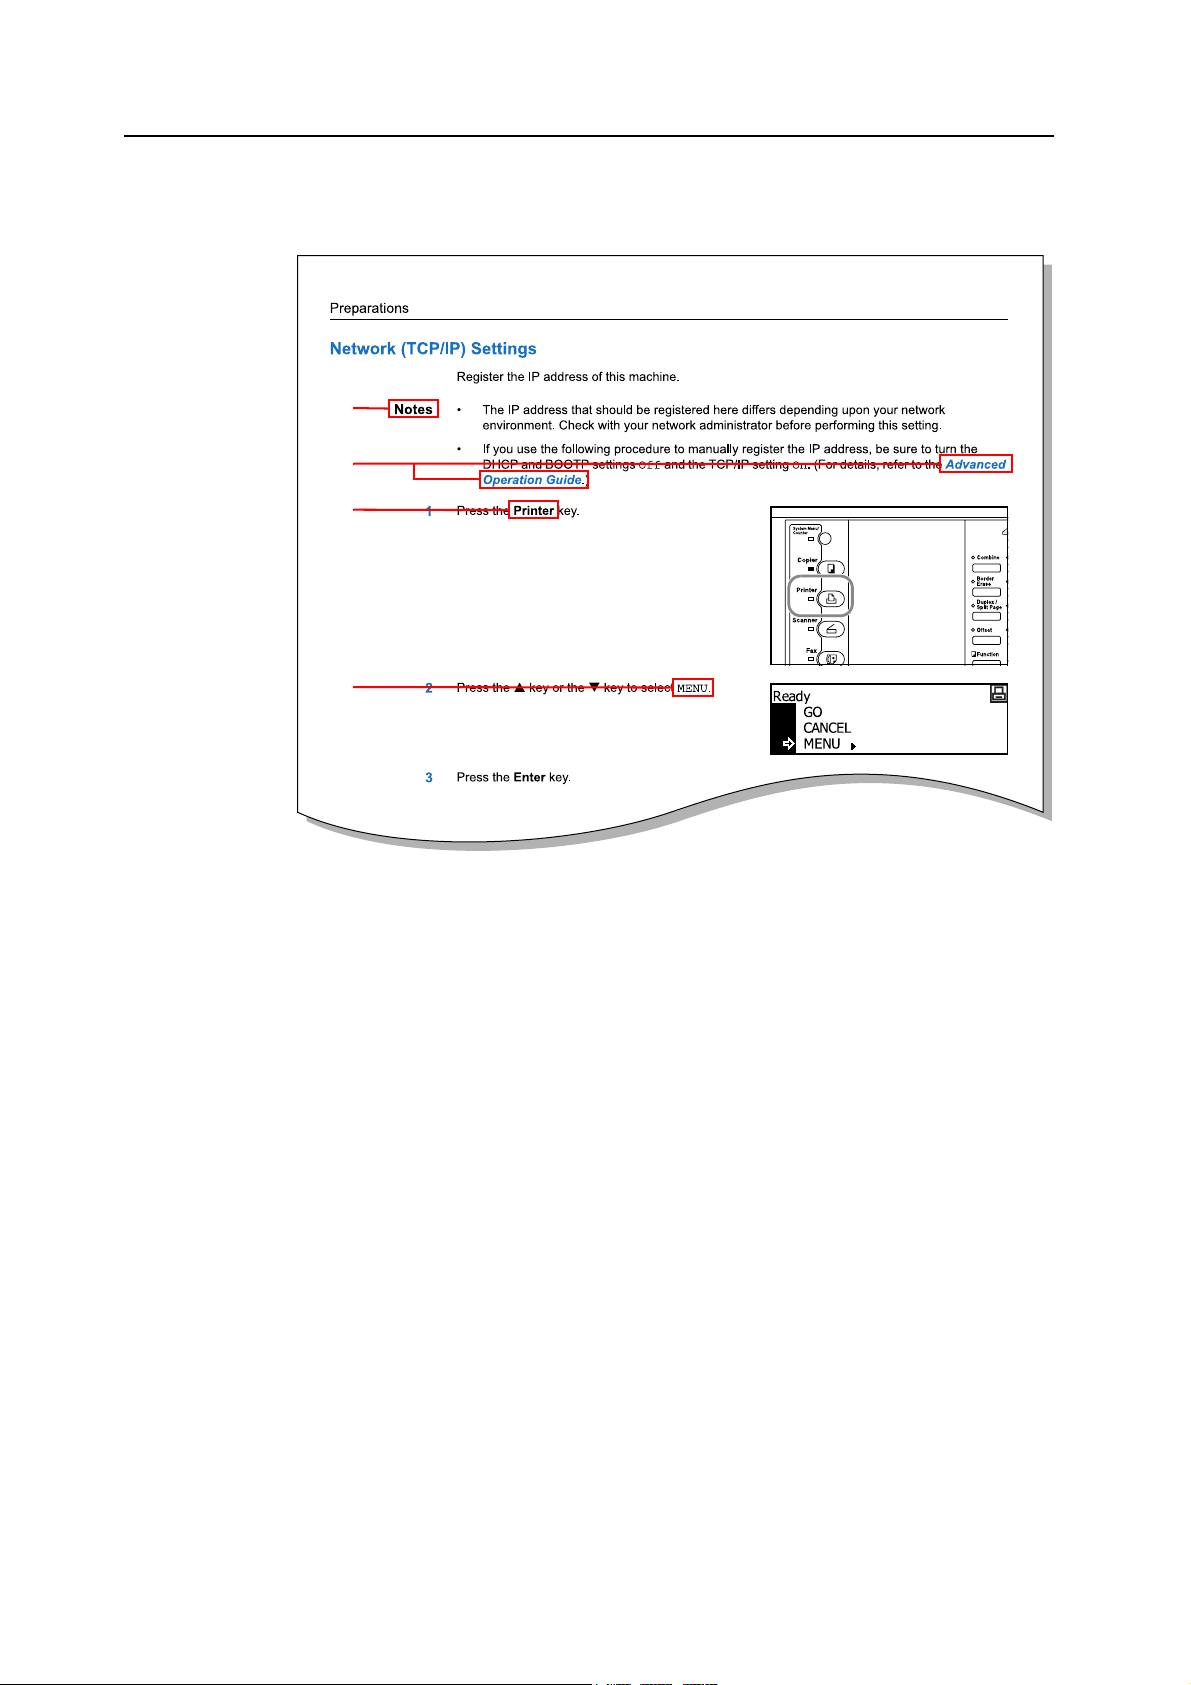
Press the Printer key.
1
Press the S key or the T key to select MENU.
2
Press the Enter key.
3
Press the S key or the T key to select Print
4
Status Page.
Press the Enter key.
5
Press the S key or the T key to select Print.
6
Printer Settings
Ready
GO
CANCEL
MENU
Menu
Back
Print Status Page
Interface
Print Status Page
No
Print
Press the Enter key. The status page is printed.
7
2-7
Page 48

Printer Settings
e-MPS Function
Notes • To use the e-MPS functions, the optional hard disk must be installed. For details on e-MPS,
The following items can be set in e-MPS function setting.
• Printing Quick Copy/Proof-and-Hold
• Deleting Quick Copy/Proof-and-Hold
• Printing Private Print/Stored Job
• Deleting Private Print/Stored Job
• Printing Virtual Mailbox Accumulated Data
• Printing Virtual Mailbox List
• Printing Code Job List
• e-MPS Detail Settings
refer to the KX Printer Driver Operation Guide.
• Even if the RAM Disk Operation (see page 2-44) is turned On, the e-MPS function can be
used. In this case, only proof-and-hold and printing private print can be used.
How to Display the e-MPS Screen
Press the Printer key.
1
Press the S key or the T key to select MENU.
2
Press the Enter key.
3
Press the S key or the T key to select e-MPS.
4
Press the Enter key. The e-MPS screen is displayed.
5
Next, perform the setting referring to the following description of each setting item.
Printing Quick Copy/Proof-and-Hold
If you set quick copy with the printer driver when printing a document, the data is printed and stored
in the hard disk. When printing is required, you can print a required number of copies from the
operation panel.
If you set proof-and-hold with the printer driver and set the required number of copies to execute
printing, only one set is output and the document data is stored in the hard disk. To print the
remaining number of copies, execute printing from the operation panel. At this time, you can change
the number of copies.
For the method of setting with the printer driver, refer to the KX Printer Driver Operation Guide.
Ready
GO
CANCEL
MENU
Menu
Back
Print Status Page
e-MPS
2-8
Display the e-MPS screen. (See How to Display the e-MPS Screen on page 2-8.)
1
Page 49

Press the S key or the T key to select Quick Copy.
2
Press the Enter key.
3
Press the S key or the T key to select the user name.
4
The user name is the name that has been set with the
printer driver.
Press the Enter key.
5
Press the S key or the T key to select the desired job
6
name. The job name is the name that has been set
with the printer driver.
Press the Enter key.
7
Use the numeric keys to input the number of copies.
8
e-MPS
Back
Quick Copy
Private/Stored
Select User Name
george
Select JOB
List
Select User Name
Copies
Delete
Printer Settings
001:
Press the Enter key. Printing starts.
9
Deleting Quick Copy/Proof-and-Hold
Jobs stored with the quick copy/proof-and-hold are deleted automatically when the power of this
machine is turned off. Each job, however, can be deleted manually as shown below.
Select the job to delete referring to steps 1 to 7 of Printing Quick Copy/Proof-and-Hold.
1
Press the S key or the T key to select Delete.
2
Press the Enter key.
3
Printing Private Print/Stored Job
In private printing, you can execute printing by using the operation panel to input the four-digit
access code that has been set with the printer driver when printing from your computer. The data is
cleared after printing is complete.
In the stored job mode, access codes are not used, and print data is stored in the hard disk after
printing is complete. For the method of setting the respective functions with the printer driver, refer
to the KX Printer Driver Operation Guide.
Select User Name
Copies
Delete
001:
Display the e-MPS screen. (See How to Display the e-MPS Screen on page 2-8.)
1
2-9
Page 50

Printer Settings
Press the S key or the T key to select
2
Private/Stored.
Press the Enter key.
3
Press the S key or the T key to select the user name.
4
The user name is the name that has been set with the
printer driver.
Press the Enter key.
5
Press the S key or the T key to select the desired job
6
name. The job name is the name that has been set
with the printer driver.
Press the Enter key.
7
Use the numeric keys to input the four-digit access
8
code. The access code has been set with the printer
driver.
e-MPS
Back
Quick Copy
Private/Stored
Select User Name
george
Select JOB
List
List
Enter User ID
Press the Enter key.
9
Use the numeric keys to input the number of copies.
10
Press the Enter key. Printing starts.
11
Deleting Private Print/Stored Job
Each stored job can be deleted manually as shown below. Jobs stored with the private print function
are deleted automatically when printing is complete or the power of this machine is turned off. Jobs
stored with the stored job function, however, are not deleted.
Select the job to delete referring to steps 1 to 7 of Printing Private Print/Stored Job.
1
Press the S key or the T key to select Delete.
2
Press the Enter key.
3
Select User Name
Copies
Delete
Select User Name
Copies
Delete
001:
001:
2-10
Page 51

Printing Virtual Mailbox Accumulated Data
With the virtual mailbox function, a job is stored in the virtual mailbox. If you use the virtual mailbox
function to print a document with the printer driver, the job is stored and is not printed until you
execute printing from the operation panel. For the method of setting with the printer driver, refer to
the KX Printer Driver Operation Guide.
Display the e-MPS screen. (See How to Display the e-MPS Screen on page 2-8.)
1
Press the S key or the T key to select Print VMB
2
Data.
Press the Enter key.
3
Press the S key or the T key to select the mailbox to
4
print.
Press the Enter key.
5
Printer Settings
e-MPS
Quick Copy
Private/Stored
Print VMB Data
Print VMB Data
001: File B
Use the numeric keys to input the five-digit access
6
code. The access code has been set with the KM-NET
Printer Disk Manager.
Press the Enter key. Printing starts. Once printing is complete, the document data in the mailbox is
7
deleted.
Printing Virtual Mailbox List
A list that includes the currently set virtual mailbox tray numbers (mailbox numbers), presence of
accumulated data, data sizes, etc. is printed.
Display the e-MPS screen. (See How to Display the e-MPS Screen on page 2-8.)
1
Press the S key or the T key to select List of VMB.
2
Press the Enter key.
3
Press the S key or the T key to select Print.
4
001:File B
Enter User ID
e-MPS
Private/Stored
Print VMB Data
List of VMB
List of VMB
No
Print
2-11
Page 52

Printer Settings
Press the Enter key. The virtual mailbox list is printed.
5
Printing Code Job List
Permanent code jobs in the hard disk can be printed.
VIRTUAL MAIL BOX LIST
Display the e-MPS screen. (See How to Display the e-MPS Screen on page 2-8.)
1
Press the S key or the T key to select List of
2
code JOB.
e-MP S
Print VMB Data
List of VMB
List of code J OB
Press the Enter key.
3
Press the S key or the T key to select Print.
4
List of code J OB
No
Print
Press the Enter key. The code job list is printed.
5
PERMANENT CODE JOB LIST
2-12
Page 53

e-MPS Detail Settings
The e-MPS settings such as the maximum number of documents that can be stored in the hard disk
and the capacity assigned to each function can be changed.
Maximum Number of Quick Copy Jobs That Can Be
Registered
Display the e-MPS screen. (See How to Display the e-MPS Screen on page 2-8.)
1
Press the S key or the T key to select e-MPS
2
Configuration.
Press the Enter key.
3
Press the S key or the T key to select Quick Copy.
4
Printer Settings
e-MPS
List of VMB
List of code JOB
e-MPS Configuration
e-MPS Configuration
Back
Quick Copy
Temp Code Job Size
Press the Enter key.
5
Press the < key or the > key to input the maximum
6
number of jobs that can be stored. You can set the
number to 0 to 50.
Press the Enter key.
7
Quick Copy
32 50)
(0
Capacity for Storage of Temporary Code Jobs
Set the total capacity (upper limit) for storage of temporary code jobs in the hard disk. The actual
maximum size, however, is the size of available hard disk space.
Display the e-MPS screen. (See How to Display the e-MPS Screen on page 2-8.)
1
Press the S key or the T key to select e-MPS
2
Configuration.
Press the Enter key.
3
Press the S key or the T key to select Temp Code
4
Job Size [Temp. code Job size].
e-MPS
List of VMB
List of code JOB
e-MPS Configuration
e-MPS Configuration
Back
Quick Copy
Temp Code Job Size
Press the Enter key.
5
2-13
Page 54

Printer Settings
Press the < key or the > key to input the capacity for
6
storage of temporary code jobs. You can set the
capacity to 0 to 9999 MB.
Press the Enter key.
7
Temporary Code Job Size
1550 Mbyte
Total Capacity for Storage of Permanent Code Jobs
Set the total capacity (upper limit) for storage of permanent code jobs in the hard disk. The actual
maximum size, however, is the size of available hard disk space.
Display the e-MPS screen. (See How to Display the e-MPS Screen on page 2-8.)
1
Press the S key or the T key to select e-MPS
2
Configuration.
Press the Enter key.
3
Press the S key or the T key to select Perm Code
4
Job Size [Perm. code Job size].
e-MPS
List of VMB
List of code JOB
e-MPS Configuration
e-MPS Configuration
Quick Copy
Temp Code Job Size
Perm Code Job Size
Press the Enter key.
5
Press the < key or the > key to input the total capacity
6
for storage of permanent code jobs. You can set the
capacity to 0 to 9999 MB.
Press the Enter key.
7
Permanent Code Job Size
1550 Mbyte
Total Capacity for Storage of Virtual Mailboxes
Set the total capacity (upper limit) for storage of virtual mailboxes in the hard disk. The actual
maximum size, however, is the size of available hard disk space.
Display the e-MPS screen. (See How to Display the e-MPS Screen on page 2-8.)
1
Press the S key or the T key to select e-MPS
2
Configuration.
Press the Enter key.
3
Press the S key or the T key to select VMB Size.
4
e-MPS
List of VMB
List of code JOB
e-MPS Configuration
e-MPS Configuration
Temp Code Job Size
Perm Code Job Size
VMB Size
2-14
Press the Enter key.
5
Page 55

Press the < key or the > key to input the capacity for
6
storage of virtual mailboxes (VMB). You can set the
capacity to 0 to 9999 MB.
Press the Enter key.
7
Printer Settings
VMB Size
1550 Mbyte
2-15
Page 56

Printer Settings
Interface
This machine is equipped with a parallel interface, USB interface, and network interface as standard
components.
How to Display the Interface Screen
Press the Printer key.
1
Press the S key or the T key to select MENU.
2
Press the Enter key.
3
Press the S key or the T key to select Interface.
4
Press the Enter key. The Interface screen is displayed.
5
Next, perform the setting referring to the following description of each setting item.
Ready
GO
CANCEL
MENU
Menu
Back
Print Status Page
Interface
Parallel Interface
Note Use a parallel interface cable that complies with the IEEE 1284 standard.
1
2
The parallel interface of this machine supports a bi-directional/high-speed mode. The
transmission/reception modes that can be set from the operation panel of this machine are shown
below.
Mode Description
Auto The printer automatically changes its communication mode according
to the connected computer. Normally, you should leave this setting
unchanged.
Normal The printer uses the standard communication method prescribed for
Centronics interfaces.
High speed This mode enables faster data transmission between the printer and
the computer. (Select this mode if printing problems occur when the
printer is connected to a workstation.)
Nibble (high) High speed data communication is used in compliance with the IEEE
1284 standard.
Display the Interface screen. (See How to Display the Interface Screen on page 2-16.)
Press the S key or the T key to select Parallel.
Interface
Back
Parallel
Network
2-16
Press the Enter key.
3
Page 57

Network Setting
Note Before setting the IP address, ask your network administrator to obtain the address and prepare it.
Printer Settings
Press the S key or the T key to select the desired
4
transmission/reception mode for the parallel interface.
Parallel
Back
Auto
Normal
Press the Enter key.
5
Press the Reset key. The message display returns to the printer basic screen.
6
To perform network printing, network setting is required. This section describes the setting required
for using the network function.
NetWare Frame
When connecting to a NetWare network, turn this setting On.
Display the Interface screen. (See How to Display the Interface Screen on page 2-16.)
1
Press the S key or the T key to select Network.
2
Press the Enter key.
3
Press the S key or the T key to select NetWare.
4
Press the Enter key.
5
Press the S key or the T key to select On or Off.
6
Press the Enter key. If you have selected On, Change # is displayed.
7
Press the S key or the T key to select Change #.
8
Interface
Back
Parallel
Network
Network Setting
Back
NetWare
TCP/IP
NetWare
Back
On
Off
NetWare
On
Off
Change #
Press the Enter key.
9
Press the S key or the T key to select the frame
10
mode.
Press the Enter key.
11
NetWare Frame
Back
Auto
802.3
2-17
Page 58

Printer Settings
Press the Reset key. The message display returns to the printer basic screen.
12
EtherTalk
When using this machine by connecting to an Apple Macintosh computer, turn EtherTalk On.
Display the Interface screen. (See How to Display the Interface Screen on page 2-16.)
1
Press the S key or the T key to select Network.
2
Press the Enter key.
3
Press the S key or the T key to select EtherTalk.
4
Press the Enter key.
5
Interface
Back
Parallel
Network
Network Setting
NetWare
TCP/IP
EtherTalk
Press the S key or the T key to select On.
6
EtherTalk
Back
On
Off
Press the Enter key.
7
Press the Reset key. The message display returns to the printer basic screen.
8
TCP/IP
When connecting to a Windows network through TCP/IP, turn TCP/IP On.
Display the Interface screen. (See How to Display the Interface Screen on page 2-16.)
1
Press the S key or the T key to select Network.
2
Press the Enter key.
3
Press the S key or the T key to select TCP/IP.
4
Interface
Back
Parallel
Network
Network Setting
Back
NetWare
TCP/IP
2-18
Press the Enter key.
5
Press the S key or the T key to select On.
6
TCP/IP
Back
On
Off
Page 59

Press the Enter key.
7
DHCP
This machine supports DHCP (Dynamic Host Configuration Protocol). When using DHCP, turn
DHCP On.
Display the TCP/IP screen referring to steps 1 to 5 of TCP/IP setting.
1
Press the S key or the T key to select Change #.
2
Press the Enter key.
3
Press the S key or the T key to select DHCP.
4
Press the Enter key.
5
TCP/IP
On
Off
Change #
TCP/IP Setting
Back
DHCP
IP Address
Printer Settings
Press the S key or the T key to select On.
6
DHCP
Back
On
Off
Press the Enter key.
7
IP Address
Register the IP address of this machine.
Notes • The IP address that should be registered here differs depending upon your network
environment. Check with your network administrator before performing this setting.
• If you use the following procedure to manually register the IP address, be sure to turn the
DHCP setting Off and the TCP/IP setting On.
Display the TCP/IP screen referring to steps 1 to 5 of TCP/IP setting.
1
Press the S key or the T key to select Change #.
2
Press the Enter key.
3
TCP/IP
On
Off
Change #
Press the S key or the T key to select IP Address.
4
Press the Enter key.
5
TCP/IP Setting
Back
DHCP
IP Address
2-19
Page 60

Printer Settings
Use the numeric keys to input the IP address. Enter the
6
first block of 3 digits of the address in the highlighted
area.
Press the > key. Enter the next block of 3 digits of the
7
address in the highlighted area.
Continue the same procedure for the other 2 blocks.
8
Press the Enter key.
9
Next, set the subnet mask.
IP Address
IP Address
Subnet Mask
To register the subnet mask, continue the procedure from step 9 above.
Press the S key or the T key to select Subnet Mask.
1
TCP/IP Setting
0 0..00.
10 0..00 .
DHCP
IP Address
Subnet Mask
Press the Enter key.
2
Use the same procedure as steps 6 to 8 of IP Address
3
setting to input the address.
Press the Enter key.
4
Next, set the default gateway.
Subnet Mask
Default Gateway
To register the default gateway, continue the procedure from step 4 above.
Press the S key or the T key to select Gateway.
1
Press the Enter key.
2
Use the same procedure as steps 6 to 8 of IP Address
3
setting to input the address.
TCP/IP Setting
Gateway
0 0..00.
IP Address
Subnet Mask
Gateway
2-20
0 0..00.
Press the Enter key.
4
When you finish making all of the setting, press the Reset key. The message display returns to the
5
printer basic screen.
Page 61

Network Status Page Printing
When printing the status page, you can also print the network status page in succession.
Display the Interface screen. (See How to Display the Interface Screen on page 2-16.)
1
Press the S key or the T key to select Network.
2
Press the Enter key.
3
Press the S key or the T key to select Network
4
Status Page.
Press the Enter key.
5
Press the S key or the T key to select On or Off.
6
Interface
Back
Parallel
Network
Network Setting
TCP/IP
EtherTalk
Network Status Page
Network Status Page Setting
Back
On
Off
Printer Settings
Press the Enter key.
7
Press the Reset key. The message display returns to the printer basic screen.
8
2-21
Page 62

Printer Settings
Emulation
Note You can set the emulation for each interface.
Emulation Mode Selection
Emulation modes that can be used with this machine: PCL6, KC-GL, KPDL, KPDL (AUTO), Line
Printer, IBM Proprinter, Diablo 630, EPSON LQ-850
If you set KC-GL, you can set the thickness of the pen and the page size.
If you set KPDL (AUTO), switching between KPDL and an alternative emulation mode will be
automatically performed according to the print data.
If you set KPDL or KPDL (AUTO), the details of any error that occurs during printing can be printed.
Press the Printer key.
1
Press the S key or the T key to select MENU.
2
Press the Enter key.
3
Ready
GO
CANCEL
MENU
Press the S key or the T key to select Emulation.
4
Menu
Print Status Page
Interface
Emulation
Press the Enter key.
5
Press the S key or the T key to select the desired
6
interface.
Interface
Back
Parallel
Network
Press the Enter key.
7
Press the S key or the T key to select the desired
8
emulation.
Emulation
Back
PCL 6
KC-GL
Press the Enter key.
9
If you have selected KC-GL, set KC-GL Pen Thickness.
If you have selected KPDL or KPDL (AUTO), set KPDL Error Printing.
If you have selected KPDL (AUTO), perform KPDL (AUTO) Alternative Emulation Selection.
2-22
Page 63

Printer Settings
KC-GL Pen Thickness
If you have selected the KC-GL emulation, you can set the thicknesses of the eight pens and the
page size. Continue the procedure from step 9 of Emulation Mode Selection to set these items as
shown below.
Press the S key or the T key to select KC-GL Pen
1
Adjust.
Press the Enter key.
2
Press the S key or the T key to select the pen to set.
3
Press the Enter key.
4
Press the < key or the > key to input the thickness
5
(number of dots).
KC-GL
Back
KC-GL Pen Adjust
KC-GL Page Set
KC-GL Pen Adjust
Back
Pen (1)
Pen (2)
Pen Width
1 99)dot(s)
(01
Press the Enter key.
6
Press the S key or the T key to select Back.
7
Press the Enter key.
8
Press the S key or the T key to select KC-GL Page
9
Set.
KC-GL
Back
KC-GL Pen Adjust
KC-GL Page Set
Press the Enter key.
10
Press the S key or the T key to select the page size.
11
KC-GL Page Set
B1
B0
SPSZ
Note SPSZ is the size specified with the PRESCRIBE SPSZ command. For details of the PRESCRIBE
commands, refer to the PRESCRIBE Command Reference Manual.
Press the Enter key.
12
Press the Reset key. The message display returns to the printer basic screen.
13
2-23
Page 64

Printer Settings
KPDL Error Printing
The details of any error that occurs during printing in the KPDL emulation mode can be printed.
Continue the procedure from step 9 of Emulation Mode Selection to set this item as shown below.
Press the S key or the T key to select Print KPDL
1
Errs.
Press the Enter key.
2
Press the S key or the T key to select On or Off. If
3
you set On, the details of any error will be printed.
Press the Enter key.
4
Press the Reset key. The message display returns to the printer basic screen.
5
KPDL
Back
Print KPDL Errs
Print KPDL Errs
Back
On
Off
KPDL (AUTO) Alternative Emulation Selection
If you set KPDL (AUTO), switching between KPDL and an alternative emulation mode will be
automatically performed according to print data. Continue the procedure from step 9 of emulation
mode selection to set this item as shown below.
Available emulation modes: PCL6, KC-GL, Line Printer, IBM Proprinter, DIABLO 630,
EPSON LQ-850
Press the S key or the T key to select Alt.
1
Emulation.
Press the Enter key.
2
Press the S key or the T key to select the desired
3
emulation mode.
Press the Enter key.
4
Press the Reset key. The message display returns to the printer basic screen.
5
KPDL (AUTO)
Back
Alt. Emulation
Print KPDL Errs
Alt. Emulation
Back
PCL 6
KC-GL
2-24
Page 65

Font
You can select the default font for the current interface. The default font can be one of the internal
fonts or a font stored in the optional memory card.
You can set the following items for fonts.
• Font Selection
• Font Size
• Courier/Letter Gothic Font Character Pitch
• Courier/Letter Gothic Font Setting
• Code Set Selection
• Font List Printing
Note You can set the font for each interface.
How to Display the Font Screen
Press the Printer key.
1
Press the S key or the T key to select MENU.
2
Printer Settings
Ready
GO
CANCEL
MENU
Font Selection
Press the Enter key.
3
Press the S key or the T key to select Font.
4
Menu
Interface
Emulation
Font
Press the Enter key.
5
Press the S key or the T key to select the interface to
6
set.
Interface
Back
Parallel
Network
Press the Enter key. The Font screen is displayed.
7
Next, perform the setting referring to the following description of each setting item.
Display the Font screen. (See How to Display the Font Screen on page 2-25.)
1
Press the S key or the T key to select Select Font.
2
Font
Back
Select Font
Code Set
Press the Enter key.
3
Note If optional fonts as well as internal fonts are stored in this machine, a screen for selecting Internal
font or Option font is displayed. Press the S key or the T key to select the font to set.
2-25
Page 66

Printer Settings
Press the S key or the T key to select the font ID.
4
Select Font
Back
I000 ID
Detail
Press the Enter key. The font number is displayed.
5
Characters displayed before font numbers indicate the
following items.
Display Description
I Internal font
S Downloaded fonts
M Fonts in memory card
H Fonts in RAM disk or optional hard disk
O Fonts in optional ROM
Press the < key or the > key to input the font number. For internal font numbers, see Font List
6
Printing on page 2-28.
Font ID
I000
Font Size
Press the Enter key.
7
Press the Reset key. The message display returns to the printer basic screen.
8
If you have selected a proportional font as the default font, you can set the font size. If you have
selected the Courier font or the Letter Gothic font as the default font, this menu is not displayed and
the character pitch setting is displayed.
Display the Font screen. (See How to Display the Font Screen on page 2-25.)
1
Press the S key or the T key to select Select Font.
2
Font
Back
Select Font
Code Set
Press the Enter key.
3
Note If optional fonts as well as internal fonts are stored in this machine, a screen for selecting Internal
font or Option font is displayed. Press the S key or the T key to select the font to set.
Press the S key or the T key to select Detail.
4
Select Font
Back
I000 ID
Detail
2-26
Press the Enter key.
5
Press the < key or the > key to input the character size.
6
You can set the character size to 4.00 to 999.75 point.
Press the Enter key.
7
Font Size Setting
8.50 999.75)Point
(4.00
Page 67

Press the Reset key. The message display returns to the printer basic screen.
8
Courier/Letter Gothic Font Character Pitch
You can set the character pitch of the Courier or Letter Gothic font.
Display the Font screen. (See How to Display the Font Screen on page 2-25.)
1
Press the S key or the T key to select Select Font.
2
Press the Enter key.
3
Note If optional fonts as well as internal fonts are stored in this machine, a screen for selecting Internal
font or Option font is displayed. Press the S key or the T key to select the font to set.
Press the S key or the T key to select Detail.
4
Printer Settings
Font
Back
Select Font
Code Set
Select Font
Back
I000 ID
Detail
Press the Enter key.
5
Press the < key or the > key to input the character
6
pitch. You can set the character pitch to 0.44 to
99.99 cpi.
Press the Enter key.
7
Press the Reset key. The message display returns to the printer basic screen.
8
Courier/Letter Gothic Font Setting
You can select the thickness of the Courier or Letter Gothic font from two types. An example of
changing the Courier font thickness is described below.
Display the Font screen. (See How to Display the Font Screen on page 2-25.)
1
Press the S key or the T key to select Select Font.
2
Press the Enter key.
3
Font Pitch Setting
10.00 99.99)CPI
Font
Back
Select Font
Code Set
(0.44
Note If optional fonts as well as internal fonts are stored in this machine, a screen for selecting Internal
font or Option font is displayed. Press the S key or the T key to select Internal font.
Press the S key or the T key to select Courier.
4
Select Font
I000 ID
Detail
Courier
Press the Enter key.
5
2-27
Page 68

Printer Settings
6
7
8
Code Set Selection
1
2
3
Press the S key or the T key to select Regular or
Dark.
Courier
Back
Regular
Dark
Press the Enter key.
Press the Reset key. The message display returns to the printer basic screen.
With the PCL6 emulation, you can select a code set.
Display the Font screen. (See How to Display the Font Screen on page 2-25.)
Press the S key or the T key to select Code Set.
Font
Back
Select Font
Code Set
Press the Enter key.
4
5
6
Font List Printing
1
2
Note If optional fonts as well as internal fonts are stored in this machine, you can also select List of
3
4
Press the S key or the T key to select the desired
code set.
Code Setting
IBM PC-8
PC-855 Serbia
ISO Cyrillic
Press the Enter key.
Press the Reset key. The message display returns to the printer basic screen.
Display the Font screen. (See How to Display the Font Screen on page 2-25.)
Press the S key or the T key to select List of
Inter. Fonts.
Font
Select Font
Code Set
List of Inter. Fonts
Option Fonts.
Press the Enter key.
Press the S key or the T key to select Print.
List of Inter. Fonts
No
Print
2-28
Page 69

Press the Enter key. Printing of the font list starts.
5
Printer Settings
Internal Scalable and Bitmapped Fonts List
Font Name Scalable/Bitmap Password Selection [FSET] Font ID
Internal Scalable and Bitmapped Fonts List
Font Name Scalable/Bitmap Password Selection [FSET] Font ID
PRESCRIBE
PRESCRIBE
2-29
Page 70

Printer Settings
Print Configuration
You can set the following items for print configuration.
• Number of Copies
• Reduction Printing
• Print Orientation
• Page Protect Mode
• Line Feed (LF) Action
• Carriage Return (CR) Action
•Wide A4
Note You can set the print configuration for each interface.
How to Display the Page Set Screen
Press the Printer key.
1
Press the S key or the T key to select MENU.
2
Ready
GO
CANCEL
MENU
3
4
5
6
7
Number of Copies
1
Press the Enter key.
Press the S key or the T key to select Page Set.
Menu
Emulation
Font
Page Set
Press the Enter key.
Press the S key or the T key to select the interface to
set.
Interface
Back
Parallel
Network
Press the Enter key. The Page Set screen is displayed.
Next, perform the setting referring to the following description of each setting item.
You can set the number of copies to be printed through the currently selected interface. You can set
any number from 1 to 999.
Display the Page Set screen. (See How to Display the Page Set Screen on page 2-30.)
2-30
Press the S key or the T key to select Copies.
2
Press the Enter key.
3
Page Set
Back
Copies
Zoom(Reduce)
Page 71

4
5
6
Reduction Printing
1
2
3
Printer Settings
Press the < key or the > key to input the number of
copies. You can set any number from 1 to 999.
Copies
1
Press the Enter key.
Press the Reset key. The message display returns to the printer basic screen.
If you specify the paper size (original size) and the output size, the machine reduces the image at a
preset magnification ratio to print onto the specified output size paper.
Display the Page Set screen. (See How to Display the Page Set Screen on page 2-30.)
Press the S key or the T key to select Zoom
(Reduce).
Page Set
Back
Copies
Zoom(Reduce)
Press the Enter key.
4
5
6
7
8
Print Orientation
1
2
Press the S key or the T key to select the desired
paper size.
Press the > key.
Press the S key or the T key to select the desired
output size. The reduction ratio is automatically set and
displayed.
Press the Enter key.
Press the Reset key. The message display returns to the printer basic screen.
You can select the print orientation from portrait and landscape.
Display the Page Set screen. (See How to Display the Page Set Screen on page 2-30.)
Press the S key or the T key to select Orientation.
Zoom(Reduce)
Paper size
Cassette
Zoom(Reduce)
Paper size
8.5x11
Page Set
Print size
Cassette 100%
Print size
8.5x11 98% 98%
Copies
Zoom(Reduce)
Orientation
Press the Enter key.
3
Press the S key or the T key to select Portrait or
4
Landscape.
Orientation
Back
Portrait
Landscape
2-31
Page 72

Printer Settings
5
6
Page Protect Mode
1
2
3
4
Press the Enter key.
Press the Reset key. The message display returns to the printer basic screen.
To maintain the printer memory efficiently, the default setting of this mode is Auto. Normally, this
menu is not displayed. If a print overrun error occurs due to insufficient printer memory, Page
Protect is forcibly set to On. After the print overrun error occurs, be sure to reset this setting to
Auto.
Display the Page Set screen. (See How to Display the Page Set Screen on page 2-30.)
Press the S key or the T key to select Page
Protect.
Page Set
Zoom(Reduce)
Orientation
Page Protect
Press the Enter key.
Press the S key or the T key to select Auto.
Page protect
Back
Auto
On
Press the Enter key.
5
Press the Reset key. The message display returns to the printer basic screen.
6
Line Feed (LF) Action
Set the action of the machine to be executed when it receives a line feed code (0AH).
Display the Page Set screen. (See How to Display the Page Set Screen on page 2-30.)
1
Press the S key or the T key to select LF Action.
2
Press the Enter key.
3
Press the S key or the T key to select the desired
4
action from LF only, CR and LF, and Ignore LF.
LF only: Performs a line feed.
CR and LF: Performs a line feed and carriage return.
Ignore LF: Does not perform a line feed.
Press the Enter key.
5
Page Set
Orientation
Page Protect
LF Action
LF Action
Back
LF only
CR and LF
2-32
Press the Reset key. The message display returns to the printer basic screen.
6
Page 73

Carriage Return (CR) Action
Set the action of the machine to be executed when it receives a carriage return code (0DH).
Display the Page Set screen. (See How to Display the Page Set Screen on page 2-30.)
1
Press the S key or the T key to select CR Action.
2
Press the Enter key.
3
Press the S key or the T key to select the desired
4
action from CR only, CR and LF, and Ignore CR.
CR only: Performs a carriage return.
CR and LF: Performs a carriage return and line feed.
Ignore CR: Does not perform a carriage return.
Press the Enter key.
5
Press the Reset key. The message display returns to the printer basic screen.
6
Printer Settings
Page Set
Page Protect
LF Action
CR Action
CR Action
Back
CR only
CR and LF
Wide A4
The print area of the A4 size can be enlarged.
Display the Page Set screen. (See How to Display the Page Set Screen on page 2-30.)
1
Press the S key or the T key to select Wide A4.
2
Page Set
LF Action
CR Action
Wide A4
Press the Enter key.
3
Press the S key or the T key to select On or Off.
4
Wide A4
Back
On
Off
Press the Enter key.
5
Press the Reset key. The message display returns to the printer basic screen.
6
2-33
Page 74

Printer Settings
Print Quality
You can set the following items for print quality.
• KIR Mode
• EcoPrint Setting
• Resolution Setting
• Print Density
How to Display the Print Quality Screen
Press the Printer key.
1
Press the S key or the T key to select MENU.
2
Press the Enter key.
3
Press the S key or the T key to select Print
4
Quality.
Ready
GO
CANCEL
MENU
Menu
Font
Page Set
Print Quality
KIR Mode
Press the Enter key. The Print Quality screen is displayed.
5
Next, perform the setting referring to the following description of each setting item.
Smoothing realizes the print quality of 2400 dpi equivalent × 600 dpi.
Display the Print Quality screen. (See How to Display the Print Quality Screen on
1
page 2-34.)
Press the S key or the T key to select KIR Mode.
2
Print Quality
Back
KIR Mode
EcoPrint Mode
Press the Enter key.
3
Press the S key or the T key to select On or Off.
4
KIR Mode
Back
On
Off
Press the Enter key.
5
Press the Reset key. The message display returns to the printer basic screen.
6
2-34
Page 75

EcoPrint Setting
1
2
3
4
5
6
Printer Settings
The ecoprint mode allows printing with less toner consumption. Use this mode when high quality
printing is not necessary, for example, for trial printing.
Display the Print Quality screen. (See How to Display the Print Quality Screen on
page 2-34.)
Press the S key or the T key to select EcoPrint
Mode.
Print Quality
Back
KIR Mode
EcoPrint Mode
Press the Enter key.
Press the S key or the T key to select On or Off.
EcoPrint Mode
Back
On
Off
Press the Enter key.
Press the Reset key. The message display returns to the printer basic screen.
Resolution Setting
1
2
3
4
5
6
With this machine, three types of resolution are available: 300 dpi, 600 dpi, and Fast 1200
Mode.
Display the Print Quality screen. (See How to Display the Print Quality Screen on
page 2-34.)
Press the S key or the T key to select Resolution.
Print Quality
KIR Mode
EcoPrint Mode
Resolution
Press the Enter key.
Press the S key or the T key to select Fast 1200
Mode, 600 dpi or 300 dpi.
Resolution
Back
Fast 1200 Mode
600 dpi
Press the Enter key.
Press the Reset key. The message display returns to the printer basic screen.
2-35
Page 76

Printer Settings
Print Density
The print density can be adjusted among five levels from 1 (light) to 5 (dark).
Display the Print Quality screen. (See How to Display the Print Quality Screen on
1
page 2-34.)
Press the S key or the T key to select Print
2
Density.
Print Quality
EcoPrint Mode
Resolution
Print Density
Press the Enter key.
3
Press the < key or the > key to set the print density.
4
Print Density
3
Press the Enter key.
5
Press the Reset key. The message display returns to the printer basic screen.
6
2-36
Page 77

Memory Card Operation
If the optional memory card is installed in this machine, the following operations are available.
• Reading Font Data
• Reading Macro Data
• Reading Data
• Reading Program
• Writing Data
• Deleting Data
• Deleting Font Data
• Deleting Program Data
• Deleting Macro Data
• Deleting Language Data
• Formatting Memory Card
• Printing a Partition List
How to Display the Memory Card Screen
Printer Settings
1
2
3
4
5
Reading Font Data
1
2
Press the Printer key.
Press the S key or the T key to select MENU.
Ready
GO
CANCEL
MENU
Press the Enter key.
Press the S key or the T key to select Memory Card.
Menu
Hard Disk
RAM Disk Mode
Memory Card
Press the Enter key. The Memory Card screen is displayed.
Next, perform the setting referring to the following description of each setting item.
Display the Memory Card screen. (See How to Display the Memory Card Screen on page 2-37.)
Press the S key or the T key to select Read Fonts.
Memory Card
Back
Read Fonts
Read Macro
Press the Enter key.
3
Press the S key or the T key to select OK.
4
Press the Enter key. Fonts are read from the memory card.
5
Press the Reset key. The message display returns to the printer basic screen.
6
2-37
Page 78

Printer Settings
Reading Macro Data
1
2
3
4
5
6
Reading Data
1
2
Display the Memory Card screen. (See How to Display the Memory Card Screen on page 2-37.)
Press the S key or the T key to select Read Macro.
Memory Card
Back
Read Fonts
Read Macro
Press the Enter key.
Press the S key or the T key to select OK.
Press the Enter key. Macros are read from the memory card.
Press the Reset key. The message display returns to the printer basic screen.
Display the Memory Card screen. (See How to Display the Memory Card Screen on page 2-37.)
Press the S key or the T key to select Read Data.
Memory Card
Read Fonts
Read Macro
Read Data
3
4
5
6
Reading Program
1
2
3
4
5
6
Press the Enter key.
Press the S key or the T key to select the data to read.
Press the Enter key. The selected data is read from the memory card.
Press the Reset key. The message display returns to the printer basic screen.
Display the Memory Card screen. (See How to Display the Memory Card Screen on page 2-37.)
Press the S key or the T key to select Read
Program.
Memory Card
Read Macro
Read Data
Read Program
Press the Enter key.
Press the S key or the T key to select the program to read.
Press the Enter key. The selected program is read from the memory card.
Press the Reset key. The message display returns to the printer basic screen.
2-38
Page 79

Writing Data
Display the Memory Card screen. (See How to Display the Memory Card Screen on page 2-37.)
1
Press the S key or the T key to select Write Data.
2
Memory Card
Read Data
Read Program
Write Data
Press the Enter key.
3
Press the S key or the T key to select OK.
4
Press the Enter key. GO and CANCEL are displayed.
5
Note If you select CANCEL and press the Enter key, data is not written.
Send data from your computer to this machine.
6
When the data is received, the message display of this machine changes to Processing data.
When reception is complete, the message display changes to Waiting.
Press the S key or the T key to select GO.
7
Printer Settings
8
Deleting Data
1
2
3
4
5
6
Deleting Font Data
1
2
Press the Enter key. The data is written to the memory card.
Display the Memory Card screen. (See How to Display the Memory Card Screen on page 2-37.)
Press the S key or the T key to select Delete Data.
Memory Card
Read Program
Write Data
Delete Data
Press the Enter key.
Press the S key or the T key to select the data to delete.
Press the Enter key. The selected data is deleted from the memory card.
Press the Reset key. The message display returns to the printer basic screen.
Display the Memory Card screen. (See How to Display the Memory Card Screen on page 2-37.)
Press the S key or the T key to select Delete Font.
Memory Card
Write Data
Delete Data
Delete Font
Press the Enter key.
3
Press the S key or the T key to select the font to delete.
4
Press the Enter key. The selected font is deleted from the memory card.
5
2-39
Page 80

Printer Settings
Press the Reset key. The message display returns to the printer basic screen.
6
Deleting Program Data
Display the Memory Card screen. (See How to Display the Memory Card Screen on page 2-37.)
1
Press the S key or the T key to select Delete
2
Program.
Press the Enter key.
3
Press the S key or the T key to select the program to delete.
4
Press the Enter key. The selected program is deleted from the memory card.
5
Press the Reset key. The message display returns to the printer basic screen.
6
Deleting Macro Data
Display the Memory Card screen. (See How to Display the Memory Card Screen on page 2-37.)
1
Memory Card
Delete Data
Delete Font
Delete Program
Press the S key or the T key to select Delete
2
Macro.
Press the Enter key.
3
Press the S key or the T key to select the macro data to delete.
4
Press the Enter key. The selected macro data is deleted from the memory card.
5
Press the Reset key. The message display returns to the printer basic screen.
6
Deleting Language Data
Display the Memory Card screen. (See How to Display the Memory Card Screen on page 2-37.)
1
Press the S key or the T key to select Delete the
2
language.
Press the Enter key.
3
Memory Card
Delete Font
Delete Program
Delete Macro
Memory Card
Delete Program
Delete Macro
Delete the language
Press theS key or the T key to select the language data to delete.
4
Press the Enter key. The selected language data is deleted from the memory card.
5
Press the Reset key. The message display returns to the printer basic screen.
6
Formatting Memory Card
Note
Be sure to format the memory card using this machine. Any memory card formatted with other
equipment cannot be used.
2-40
Page 81

Printer Settings
Display the Memory Card screen. (See How to Display the Memory Card Screen on page 2-37.)
1
Press the S key or the T key to select Format.
2
Memory Card
Back
Format
Press the Enter key.
3
Press the S key or the T key to select OK.
4
Press the Enter key. Formatting of the memory card starts. When formatting is complete, format
5
information is output.
FORMAT INFORMATION
Printing a Partition List
Display the Memory Card screen. (See How to Display the Memory Card Screen on page 2-37.)
1
Press the S key or the T key to select List of
2
Partitions.
Press the Enter key.
3
Press the S key or the T key to select Print.
4
Memory Card
Delete Macro
Delete the language
List of Partitions
List of Partitions
No
Print
2-41
Page 82

Printer Settings
Press the Enter key. The partition list is printed.
5
PARTITION LIST
2-42
Page 83

Hard Disk Operation
If the optional hard disk is installed in this machine, the following operations are available.
• Reading Data
• Reading Program
• Writing Data
• Deleting Data
• Deleting Font Data
• Deleting Program Data
• Deleting Macro Data
• Deleting Language Data
• Formatting Hard Disk
• Printing a Partition List
Press the Printer key.
1
Press the S key or the T key to select MENU.
2
Printer Settings
Ready
GO
CANCEL
MENU
Press the Enter key.
3
Press the S key or the T key to select HARD DISK.
4
Menu
Page Set
Print Quality
HARD DISK
Press the Enter key.
5
The operation procedure of each item is the same as that of the memory card operation. See
Memory Card Operation on page 2-37.
2-43
Page 84

Printer Settings
RAM Disk Operation
RAM Disk Functions
This machine is equipped with RAM disk functions. The RAM disk is a virtual disk unit that uses a
part of the memory. If you assign a certain size of the memory to the RAM disk, you can use the
RAM disk for electronic sorting (for reduction of total print time) and storage and reading of data.
Also you can use the e-MPS function (see page 2-8).
Important! • Note that data written to the RAM disk is deleted when this machine is reset or the main power
switch is turned off ({).
• The RAM disk area is assigned from the user available memory. Consequently, note that
printing speed may be lower or insufficient memory occurs depending on the RAM disk setting
value.
The RAM disk functions are disabled at the default setting. To use the RAM disk functions, set as
follows.
Press the Printer key.
1
Press the S key or the T key to select MENU.
2
Ready
GO
CANCEL
MENU
Press the Enter key.
3
Press the S key or the T key to select RAM Disk
4
Mode.
Press the Enter key.
5
Press the S key or the T key to select On.
6
Press the Enter key. Change # is displayed.
7
Press the Reset key.
8
Press the S key or the T key to select Yes.
9
Press the Enter key. This machine restarts.
10
Menu
Page Set
Print Quality
RAM Disk Mode
RAM Disk Mode
Back
On
Off
Do you want to restart?
Yes
No
RAM Disk Operation
1
2-44
Press the Printer key.
Page 85

Press the S key or the T key to select MENU.
2
Ready
GO
CANCEL
MENU
Press the Enter key.
3
Press the S key or the T key to select RAM Disk
4
Mode.
Menu
Page Set
Print Quality
RAM Disk Mode
Press the Enter key.
5
Press the S key or the T key to select Change #.
6
RAM Disk Mode
On
Off
Change #
Press the Enter key.
7
The operation procedure of each item is the same as that of the memory card operation. See
Memory Card Operation on page 2-37.
Printer Settings
RAM Disk Size
Press the Printer key.
1
Press the S key or the T key to select MENU.
2
Press the Enter key.
3
Press the S key or the T key to select RAM Disk
4
Mode.
Press the Enter key.
5
Press the S key or the T key to select Change #.
6
Press the Enter key.
7
Ready
GO
CANCEL
MENU
Menu
Page Set
Print Quality
RAM Disk Mode
RAM Disk Mode
On
Off
Change #
Press the S key or the T key to select RAM Disk
8
Size.
Press the Enter key.
9
RAM Disk Mode Setting
Back
RAM Disk Size
List of Partitions
2-45
Page 86

Printer Settings
Press the < key or the > key to input the RAM disk size.
10
You can set the size to 1 to 1024 Mbyte.
Press the Enter key.
11
Press the Reset key.
12
Press the S key or the T key to select Yes.
13
Press the Enter key. This machine restarts.
14
RAM Disk size
28 Mbyte
Do you want to restart?
Yes
No
2-46
Page 87

Paper Handling
1
2
3
You can set the following items for paper.
• Multi-Bypass Tray Mode
• Paper Source
• Duplex Print Mode
• Output Destination
• Override A4/Letter
How to Display the Paper Handling Screen
Press the Printer key.
Press the S key or the T key to select MENU.
Press the Enter key.
Ready
GO
CANCEL
MENU
Printer Settings
Press the S key or the T key to select Paper
4
Handling.
Press the Enter key. The Paper Handling screen is displayed.
5
Next, perform the setting referring to the following description of each setting item.
Multi-Bypass Tray Mode
If you select First, any paper set in the multi-bypass tray will be fed.
Display the Paper Handling screen. (See How to Display the Paper Handling Screen on
1
page 2-47.)
Press the S key or the T key to select Bypass Mode.
2
Press the Enter key.
3
Press the S key or the T key to select Cassette or
4
First.
Menu
Print Quality
RAM Disk Mode
Paper Handling
Paper Handling
Back
Bypass Mode
Feed Selec t
Bypass Mode
Back
Cassette
First
Press the Enter key.
5
Press the Reset key. The message display returns to the printer basic screen.
6
2-47
Page 88

Printer Settings
Paper Source
Set the paper source to be selected first.
Display the Paper Handling screen. (See How to Display the Paper Handling Screen on
1
page 2-47.)
Press the S key or the T key to select Feed Select.
2
Paper Handling
Back
Bypass Mode
Feed Selec t
Press the Enter key.
3
Press the S key or the T key to select the desired
4
paper source.
Feed Selec t
Back
Bypass
Cassette 1
Press the Enter key.
5
Press the Reset key. The message display returns to the printer basic screen.
6
Duplex Print Mode
Set the binding position on finished prints in duplex printing.
Setting Binding position
Short edge bind Binding at a short edge
Long edge bind Binding at a long edge
2-48
Note This setting is displayed only if the optional duplex unit is installed.
Display the Paper Handling screen. (See How to Display the Paper Handling Screen on
1
page 2-47.)
Press the S key or the T key to select Duplex Mode.
2
Paper Handling
Bypass Mode
Feed Selec t
Duplex Mode
Page 89

3
4
5
6
Output Destination
Note This item is displayed only if the optional finisher or job separator is installed.
Press the Enter key.
Press the S key or the T key to select Short edge
bind or Long edge bind.
Duplex Mode
Back
None
Short edge bind
Press the Enter key.
Press the Reset key. The message display returns to the printer basic screen.
Set the paper output destination.
Setting Output destination
Top tray Output tray of main body
Finisher Optional finisher
Job Separator Optional job separator
Printer Settings
1
2
3
4
5
6
Override A4/Letter
1
Display the Paper Handling screen. (See How to Display the Paper Handling Screen on
page 2-47.)
Press the S key or the T key to select Stack
Select [Stack Slect].
Paper Handling
Bypass Mode
Feed Selec t
Stack Select
Press the Enter key.
Press the S key or the T key to select the desired
paper output destination.
Select Output Tray
Back
Top tray
Finisher
Press the Enter key.
Press the Reset key. The message display returns to the printer basic screen.
The A4 and 8 1/2 × 11" (Letter) sizes can be regarded as a size that can be used in common.
Display the Paper Handling screen. (See How to Display the Paper Handling Screen on
page 2-47.)
Press the S key or the T key to select Override
2
A4/LT.
Press the Enter key.
3
Paper Handling
Feed Selec t
Stack Select
Override A4/LT
2-49
Page 90

Printer Settings
Press the S key or the T key to select On or Off.
4
Override A4/LT
Back
On
Off
Press the Enter key.
5
Press the Reset key. The message display returns to the printer basic screen.
6
2-50
Page 91

Other Settings
1
2
You can set the following items for other settings.
• Form Feed Timeout
• Received Data Dump
• Printer Function Resetting
• Resource Protect Mode
• Auto Continue
• Duplex Printing Error Detection
• Stapling Error Detection
• Service Status Page Printing
How to Display the Others Screen
Press the Printer key.
Press the S key or the T key to select MENU.
Printer Settings
Ready
GO
CANCEL
MENU
3
4
5
Form Feed Timeout
1
2
3
Press the Enter key.
Press the S key or the T key to select Others.
Menu
RAM Disk Mode
Paper Handling
Others
Press the Enter key. The Others screen is displayed.
Next, perform the setting referring to the following description of each setting item.
If this machine does not receive any information indicating the end of data after receiving the last
data, the machine waits for a certain time without printing the last page. When the preset time
elapses, the machine performs automatically a form feed. If you set the time to 0, the machine does
not perform a form feed until GO is manually selected.
Display the Others screen. (See How to Display the Others Screen on page 2-51.)
Press the S key or the T key to select Form Feed
Time Out.
Others
Back
Form Feed Time Out
Print HEX-DUMP
Press the Enter key.
Press the < key or the > key to set the time. You can
4
set the time to 0 to 495 seconds in 5 second
increments.
Press the Enter key.
5
Form Feed Time Out
30 495)sec.
(0
2-51
Page 92

Printer Settings
Press the Reset key. The message display returns to the printer basic screen.
6
Received Data Dump
You can print data received by this machine as hexadecimal codes for debugging programs and
files.
Display the Others screen. (See How to Display the Others Screen on page 2-51.)
1
Press the S key or the T key to select Print
2
HEX-DUMP.
Press the Enter key.
3
Press the S key or the T key to select OK.
4
Press the Enter key. Waiting is displayed and the message display returns to the printer basic
5
screen.
Others
Back
Form Feed Time Out
Print HEX-DUMP
Print HEX-DUMP
Back
OK
At this time, send data to the printer. Dump pages are printed.
6
Press the S key or the T key to select GO.
7
Press the Enter key.
8
Press the Reset key. The message display returns to the printer basic screen.
9
Printer Function Resetting
This function resets the printer’s temporary settings (such as the current page orientation and font)
to the default settings.
Display the Others screen. (See How to Display the Others Screen on page 2-51.)
1
Press the S key or the T key to select Printer
2
Reset.
Press the Enter key.
3
Waiting
GO
CANCEL
Others
Form Feed Time Out
Print HEX-DUMP
Printer Reset
2-52
Press the S key or the T key to select OK.
4
Press the Enter key. The printer functions are reset.
5
Printer Reset
Back
OK
Page 93

Resource Protect Mode
The resource protect mode protects the resource data such as downloaded fonts and macros and
memorizes the PCL resources even if the emulation mode is switched. If you select Permanent,
temporary resources are not protected. If you select Perm/Temp, however, temporary resources
are also protected.
Display the Others screen. (See How to Display the Others Screen on page 2-51.)
1
Press the S key or the T key to select Resource
2
Prot.
Press the Enter key.
3
Press the S key or the T key to select Off,
4
Permanent or Perm/Temp.
Press the Enter key.
5
Printer Settings
Others
Print HEX-DUMP
Printer Reset
Resource Prot.
Resource Prot.
Back
Off
Permanent
Auto Continue
Press the Reset key. The message display returns to the printer basic screen.
6
If any of the following error messages appears, the error can be cleared and printing can be
continued after the preset recovery time elapses (auto continue).
• Memory Overflow/Press GO
• Print overrun Press GO
• KPDL error Press GO
• File not found Press GO
• HARD DISK error Press GO
• RAM disk error Press GO
• MemoryCard err Press GO
• Illegal Account Press GO
• Exceeded Max.out Press GO
• Account error Press Go
• Duplex disabled Press GO
• Add Staples and Press GO
• e-MPS not stored Press GO
• Opt. ROM error Press GO
Also you can set the time that elapses before auto continue is activated.
Display the Others screen. (See How to Display the Others Screen on page 2-51.)
1
Press the S key or the T key to select Auto
2
Continue.
Others
Printer Reset
Resource Prot.
Auto Continue
2-53
Page 94

Printer Settings
Press the Enter key.
3
Press the S key or the T key to select On or Off.
4
Press the Enter key. If you have selected On, Change # is displayed.
5
To set the time that elapses before auto continue is
6
activated, press the S key or the T key to select
Change #.
Press the Enter key. The Auto Continue (time) screen is displayed.
7
Press the < key or the > key to input the time. You can
8
set the time to 0 to 495 seconds in 5 second
increments.
Press the Enter key.
9
Auto Continue
Auto Continue
Auto Continue (time)
Back
On
Off
On
Off
Change #
30 495)sec.
(0
Press the Reset key. The message display returns to the printer basic screen.
10
Duplex Printing Error Detection
This setting is available if the optional duplex unit is installed. You can select whether or not to
display Duplex disabled Press GO when you select duplex printing and specify a paper type
that cannot be used for duplex printing such as label.
Setting Processing
On • If you select GO, one-sided printing is performed.
Off One-sided printing is performed.
Display the Others screen. (See How to Display the Others Screen on page 2-51.)
1
Press the S key or the T key to select Finishing
2
Error.
Press the Enter key.
3
Press the S key or the T key to select Proces.
4
Duplex print.
• If you select CANCEL, printing is canceled.
Others
Resource Prot.
Auto Continue
Finishing Error
Finishing Error
Back
Proces. Duplex print
Staple Setting
2-54
Press the Enter key.
5
Page 95

Press the S key or the T key to select On or Off.
6
Press the Enter key.
7
Press the Reset key. The message display returns to the printer basic screen.
8
Stapling Error Detection
You can select whether or not to display Add Staples and Press GO when staples have run out
while stapling is performed.
Setting Processing
On • If you select GO, printing is performed without stapling.
Off Printing is performed without stapling.
Note This setting is displayed only if the optional finisher is installed.
Display the Others screen. (See How to Display the Others Screen on page 2-51.)
1
Printer Settings
Duplex Print Process
Back
On
Off
• If you select CANCEL, printing is canceled.
Press the S key or the T key to select Finishing
2
Error.
Others
Resource Prot.
Auto Continue
Finishing Error
Press the Enter key.
3
Press the S key or the T key to select Staple
4
Setting.
Finishing Error
Back
Proces. Duplex print
Staple Setting
Press the Enter key.
5
Press the S key or the T key to select On or Off.
6
Staple Setting
Back
On
Off
Press the Enter key.
7
Press the Reset key. The message display returns to the printer basic screen.
8
2-55
Page 96

Printer Settings
Service Status Page Printing
The service status page contains more detailed printer setting information than the normal status
page. This page is mainly used by the service personnel for maintenance. Use the following
procedure to print this page as needed.
Display the Others screen. (See How to Display the Others Screen on page 2-51.)
1
Press the S key or the T key to select Service.
2
Press the Enter key.
3
Press the S key or the T key to select Print
4
Status Page.
Press the Enter key.
5
Press the S key or the T key to select Print.
6
Others
Auto Continue
Finisher Error
Service
Service
Back
Print Status Page
Paper Feed
Print Status Page
No
Print
Press the Enter key. The service status page is printed.
7
Press the Reset key. The message display returns to the printer basic screen.
8
2-56
Page 97

3System Menu
This chapter explains the system settings concerning the general operation of this machine.
The principal settings that can be made are shown below.
• Default Setting Mode
• Multi-Bypass Tray Settings
• Browsing and Printing the Total Counter
• Report Output
• Language Setting
• User Adjustment
3-1
Page 98

System Menu
Default Setting Mode
For this machine, the state that the machine enters at the end of warm-up or when the Reset key is
pressed is called initial mode. The settings of this machine that are made automatically in the initial
mode are called default settings. The default settings are divided into the Copier Default Settings
and the Machine Default Settings. These settings can be changed freely according to the method
of use.
Copier Default Settings
You can set the following items as copier default settings.
• Exposure Mode
• Original Image Quality
•EcoPrint Mode
• Background Color Adjustment
• Paper Selection
• Paper Type in Auto Paper Selection
• Priority Cassette
• Default Magnification
• Auto Exposure Adjustment
• Auto OCR Exposure Adjustment
• Exposure Adjustment for Text + Photo Originals
• Exposure Adjustment for Text Originals
• Exposure Adjustment for Photo Originals
• Sort Copying
• Offset Copying
• Auto Rotation Copy
• Margin Width Default Value
• Border Erase Width Default Value
• Limit of Number of Copies
• Black Streaking Reduction Processing
How to Display the Copy Default Screen
Use the following procedure to display the Copy Default screen.
Press the System Menu/Counter key.
1
Press the S key or the T key to select Copy
2
default.
System Menu / Counter:
Print Report
Job Accounting
Copy default
3-2
Press the Enter key.
3
Use the numeric keys to input the four-digit
4
management code. The management code at the
factory default setting is 1600 for the 16 ppm model,
2000 for the 20 ppm model, and 2500 for the 25 ppm
model.
Enter pin code using # key.
Page 99

System Menu
Note The four-digit management code can be changed. (See Administrator Management Code
Change on page 3-23.)
If the management code is accepted, the Copy
5
Default screen is displayed.
Next, perform the setting referring to the following
description of each setting item.
Copy Default:
End
Exposure Mode
Orig Quality
:
Manual
:
Text+Photo
Note The * (asterisk) at an item on each setting screen indicates the current setting.
Exposure Mode
Set the Default exposure mode: auto or manual.
Display the Copy Default screen. (See How to Display the Copy Default Screen on page 3-2.)
1
Press the S key or the T key to select Exposure
2
Mode.
Press the Enter key.
3
Copy Default:
End
Exposure Mode
Orig Quality
:
Manual
:
Text+Photo
Press the S key or the T key to select Auto or
4
Manual.
Press the Enter key.
5
Press the Reset key. The message display returns to the copier basic screen.
6
Exposure mode:
Auto
Manual
*
Original Image Quality
Set the default original image quality mode.
Display the Copy Default screen. (See How to Display the Copy Default Screen on page 3-2.)
1
Press the S key or the T key to select Orig
2
Quality.
Press the Enter key.
3
Press the S key or the T key to select Text+Photo,
4
Text or Photo.
Copy Default:
End
Exposure Mode
Orig Quality
Original image quality:
Text+Photo
*
Text
Photo
:
:
Manual
Text+Photo
Press the Enter key.
5
Press the Reset key. The message display returns to the copier basic screen.
6
3-3
Page 100

System Menu
EcoPrint Mode
Select whether or not to set the ecoprint mode at the default setting.
Display the Copy Default screen. (See How to Display the Copy Default Screen on page 3-2.)
1
Press the S key or the T key to select EcoPrint.
2
Press the Enter key.
3
To set the ecoprint mode as the default setting, press
4
the S key or the T key to select On.
Press the Enter key.
5
Press the Reset key. The message display returns to the copier basic screen.
6
Copy Default:
Exposure Mode
Orig Quality
EcoPrint Off
EcoPrint:
Off
*
On
:
:
:
Manual
Text+Photo
Background Color Adjustment
If the background color is dark, use this item to lighten it.
Display the Copy Default screen. (See How to Display the Copy Default Screen on page 3-2.)
1
Press the S key or the T key to select Background
2
adjst.
Press the Enter key.
3
Press the < key or the > key to adjust the background
4
color. Moving right darkens the background color, and
moving left lightens it.
Press the Enter key.
5
Press the Reset key. The message display returns to the copier basic screen.
6
Copy Default :
Orig Quality
EcoPrint
Background adjst 3
Background adjustment:
12
*
:
:
:
453
Paper Selection
Text+Photo
Off
3-4
Set whether to select automatically the cassette that contains paper of the same size as the original
when it is set or to select the fixed cassette with priority.
Display the Copy Default screen. (See How to Display the Copy Default Screen on page 3-2.)
1
Press the S key or the T key to select Paper
2
Select.
Copy Default :
EcoPrint
Background adjst
Paper Select
: Off
: 3
: Auto
 Loading...