

Page 1
Page 2

rлЙкЫл=dмбЗЙ=Сзк=нЬЙ=hузЕЙк~=OOPR=йЬзеЙ
qЬбл=г~ем~д=бл=Д~лЙЗ=зе=нЬЙ=йкзЗмЕнбзе=оЙклбзе=зС=нЬЙ=
hузЕЙк~=OOPR=йЬзеЙK=pзСнп~кЙ=ЕЬ~еЦЙл=г~у=Ь~оЙ=
зЕЕмккЙЗ=~СнЙк=нЬбл=йкбенбеЦK=hузЕЙк~=кЙлЙкоЙл=нЬЙ=кбЦЬн=нз=
г~вЙ=ЕЬ~еЦЙл=бе=нЙЕЬебЕ~д=~еЗ=йкзЗмЕн=лйЙЕбСбЕ~нбзел=
пбнЬзмн=йкбзк=езнбЕЙK=qЬЙ=йкзЗмЕнл=~еЗ=ЙимбйгЙен=
ЗЙлЕкбДЙЗ=бе=нЬбл=ЗзЕмгЙен~нбзе=~кЙ=г~емС~ЕнмкЙЗ=меЗЙк=
дбЕЙелЙ=Скзг=nr^i`ljj=fеЕзкйзк~нЙЗ=меЗЙк=зеЙ=зк=
гзкЙ=зС=нЬЙ=СзддзпбеЦ=rKpK=й~нЙенлW
QIVMNIPMT RIMRSINMV RIMVVIOMQ RINMNIRMN RINMPIQRV
RINMTIOOR RINMVIPVM RINVPIMVQ RIOOUIMRQ RIORTIOUP
RIOSRINNV RIOSTIOSN RIOSTIOSO RIOUMIQTO RIOUPIRPS
RIOUVIROT RIPMTIQMR RIPMVIQTQ RIPPTIPPU RIPPVIMQS
RIPQNIQRS RIPUPIONV RIPVOIOUT RIPVSIRNS aPRSIRSM
RIQMUISVT RIQNQITOU RIQNQITVS RIQNSITVT RIQOSIPVO
RIQPTIMRR aPSNIMSR RIQQOIPOO RIQQOISOT RIQROIQTP
RIQSNISPV RIQSVINNR RIQSVIQTN RIQTNIQVT RIQTRIUTM
RIQTVIQTR RIQUPISVS RIQURIQUS RIQUTINTR RIQVMINSR
RIQVTIPVR RIQVVIOUM RIRMQITTP RIRMSIUSR RIRMVIMNR
RIRMVIMPR RIRNNIMST RIRNNIMTP RIRNPINTS RIRNRINTT
RIRNTIPOP RIRNVITSN RIROUIRVP RIRPMIVOU RIRPPIMNN
RIRPRIOPV RIRPVIRPN RIRQQINVS RIRQQIOOP RIRQSIQRV
RIRQUIUNO RIRRVIUUN RIRRVIUSR RIRSNISNU RIRSQIMUP
RIRSSIMMM RIRSSIOMS RIRSSIPRT RIRSUIQUP RIRTQITTP
RIRTQIVUT aPTRITQM RIRTSISSO RIRTTIMOO RIRTTIOSR
aPTRIVPT RIRUUIMQP aPTSIUMQ RIRUVITRS RIRVMIMSV
RIRVMIQMS RIRVMIQMU RIRVOIRQU RIRVQITNU RIRVSIRTM
RISMMITRQ RISMOIUPQ RISMOIUPP RISMPIMVS RISMQIQRV
RISMQITPM RISMUITOO RISNQIUMS RISNTIMSM RISONITRO
RISONITUQ RISONIURP RISORIUTS RISOTIURT RISOVIVRR
RISOVIVTR RISPUIQNO RISQMIQNQ RISQOIPVU RISQQIRVN
RISQQIRVS RISQSIVVN RISROIUNQ RISRQIVTV RISRRIOOM
RISRTIQOM RISRVIRSV RISSPIUMT RISSSINOO RISTPIORV
RISTRIRUN RISTRISQQ RISUMIPVR RISUTIOOV aPUSINUS
RISUVIRRT RISVNIVTQ RISVOIMMS RISVSIQSU RISVTIMRR
RITMPIVMO RITMQIMMN RITMUIQQU RITNMIRON RITNMITRU
RITNMITSU RITNMITUQ RITNRIOPS RITNRIROS RITOOIMQQ
RITOOIMRP RITOOIMSN RITOOIMSP RITOQIPUR RITOTINOP
RITOVIRQM RITPOINPQ RITPOIPQN RITPQITNS RITPTISUT
RITPTITMU RITQOITPQ aPVPIURS RITQUINMQ RITRNITOR
RITRNITSN RITRNIVMN RITRQIRPP RITRQIRQO RITRQITPP
RITRTITST RITRTIURU RITRUIOSS RITSNIOMQ RITSQISUT
RITTQIQVS RITTTIVVM RITTUIMOQ RITTUIPPU RITUNIRQP
RITUNIURS RITUNIUST RITUQIQMS RITUQIRPO RITVMIRUV
RITVMISPO RITVPIPPU aPVTINNM RITVVIMMR RITVVIORQ
RIUMOINMR RIUMRISQU RIUMRIUQP RIUNOIMPS RIUNOIMVQ
RIUNOIMVT RIUNOIRPU RIUNOISMT RIUNOISRN RIUNOIVPU
RIUNUIUTN RIUOOIPNU RIUORIORP RIUOUIPQU RIUOUISSN
RIUPRIMSR RIUPRIUQT RIUPVIMRO RIUQNIUMS RIUQOINOQ
RIUQQITUQ RIUQQIUUR RIUQQIUVV RIUQQIVUR RIUQUIMSP
RIUQUIMVV RIURMISNO RIUROIQON RIURQIRSR RIURQITUS
RIURTINQT RIURVISNO RIURVIUPU RIURVIUQM RIUSNIUQQ
RIUSOIQTN RIUSOIQTQ RIUSQITSM RIUSQITSP RIUSTIROT
RIUSTITSP RIUTMIQOT RIUTMIQPN RIUTMISTQ RIUTOIQUN
RIUTOITTQ RIUTOITTR RIUTOIUOP RIUTTIVQO RIUTUIMPS
RIUTMISPN RIUUNIMRP RIUUNIPSU RIUUQINRT RIUUQINVP
RIUUQINVS RIUVOINTU RIUVOITRU RIUVOITTQ RIUVOIUNS
RIUVOIVNS RIUVPIMPR aQMTITMN RIUVUIVOM RIVMPIRRQ
RIVMPIUSO aQMVIRSN RIVMTINST RIVMVIQPQ RIVNMITRO
RIVNNINOU RIVNOIUUO aQNMIUVP RIVNQIVRM RIVNRIOPR
RIVNTITMU RIVNTIUNN RIVNTIUNO RIVNTIUPT RIVOMIOUQ
aQNNIUOP RIVOPISRM RIVOPITMR RIVOSINQP RIVOSIQTM
RIVOSIRMM RIVOSITUS RIVPMIOPM RIVPMISVO=
lнЬЙк=й~нЙенл=йЙеЗбеЦK
qV=qЙсн=fеймн=бл=ЕзоЙкЙЗ=Ду=rKpK=m~нK=RIUNUIQPTI=rKpK=m~нK=
RIVRPIRQNI=rKpK=m~нK=SIMNNIRRQI=`~е~Зб~е=m~нK=NIPPNIMRT=
~еЗ=й~нЙенл=йЙеЗбеЦ=пзкдЗпбЗЙK
hузЕЙк~=бл=~=кЙЦблнЙкЙЗ=нк~ЗЙг~кв=зС=hузЕЙк~=
`зкйзк~нбзеK=nr^i`ljj=бл=~=кЙЦблнЙкЙЗ=нк~ЗЙг~кв=зС=
nr^i`ljj=fеЕзкйзк~нЙЗK=pй~ЕЙ=aмЗЙл=~еЗ=_кбЕв=^нн~Ев=
~кЙ=нк~ЗЙг~квл=зС=hузЕЙк~=tбкЙдЙлл=`зкйK=jулнбЕ=f=`ЬбеЦ=
~еЗ=`~оЙке=`к~пд=~кЙ=нк~ЗЙг~квл=зС=aк~ЦзеiзкЗ=
bенЙкйкблЙлI=fеЕK=lйЙеп~оЙ=бл=~=кЙЦблнЙкЙЗ=нк~ЗЙг~кв=зС=
lйЙеп~оЙ=pулнЙгл=fеЕзкйзк~нЙЗK=qV=бл=~=кЙЦблнЙкЙЗ=
нк~ЗЙг~кв=зС=qЙЦбЕ=`зггмебЕ~нбзелI=fеЕK=^дд=знЬЙк=
нк~ЗЙг~квл=~кЙ=нЬЙ=йкзйЙкну=зС=нЬЙбк=кЙлйЙЕнбоЙ=зпеЙклK
`зйукбЦЬн=«=OMMN=hузЕЙк~=tбкЙдЙлл=`зкйK=^дд=кбЦЬнл=
кЙлЙкоЙЗK=mкбенЙЗ=бе=нЬЙ=rебнЙЗ=pн~нЙл=зС=^гЙкбЕ~K=
UMJ_SVTQJNbpI=oÉîK=J
Page 3

c``Lf`=kзнбЕЙ
qЬбл=ЗЙобЕЙ=ЕзгйдбЙл=пбнЬ=й~кн=NR=зС=нЬЙ=c``=кмдЙлK=
lйЙк~нбзе=бл=лмДаЙЕн=нз=нЬЙ=СзддзпбеЦ=нпз=ЕзеЗбнбзелW=
ENF=qЬбл=ЗЙобЕЙ=г~у=езн=Е~млЙ=Ь~кгСмд=бенЙкСЙкЙеЕЙI=
~еЗ=EOF=нЬбл=ЗЙобЕЙ=гмлн=~ЕЕЙйн=~еу=бенЙкСЙкЙеЕЙ=
кЙЕЙбоЙЗI=беЕдмЗбеЦ=бенЙкСЙкЙеЕЙ=нЬ~н=г~у=Е~млЙ=
меЗЙлбкЙЗ=зйЙк~нбзеK=
qз=Езгйду=пбнЬ=c``=к~Зб~нбзе=ЙсйзлмкЙ=
кЙимбкЙгЙенлI=млЙ=зС=нЬбл=ЗЙобЕЙ=Сзк=ДзЗуJпзке=
зйЙк~нбзе~д=ЕзеСбЦмк~нбзел=бл=дбгбнЙЗ=нз=~ЕЕЙллзкбЙл=
нЙлнЙЗ=~еЗ=~ййкзоЙЗ=Ду=hузЕЙк~=tбкЙдЙлл=`зкйK==
lнЬЙк=~ЕЕЙллзкбЙл=млЙЗ=пбнЬ=нЬбл=ЗЙобЕЙ=Сзк=ДзЗуJ
пзке=зйЙк~нбзел=гмлн=езн=Езен~бе=~еу=гЙн~ддбЕ=
ЕзгйзеЙенл=~еЗ=гмлн=йкзобЗЙ=~н=дЙ~лн=OOKR=гг=
лЙй~к~нбзе=Зблн~еЕЙ=беЕдмЗбеЦ=нЬЙ=~енЙее~=~еЗ=нЬЙ=
млЙкЫл=ДзЗуK=lнЬЙк=~ЕЕЙллзкбЙл=нЬ~н=Ь~оЙ=езн=ДЙЙе=
нЙлнЙЗ=Сзк =ДзЗуJпзке=p^o=г~у=езн=Езгйду=пбнЬ=c``=
к~Зб~нбзе=ЙсйзлмкЙ=дбгбнл=~еЗ=лЬзмдЗ=ДЙ=~озбЗЙЗK
qefp=jlabi=melkb=jbbqp=qeb=dlsbokjbkqÛp=
obnrfobjbkqp=clo=bumlprob=ql=o^afl=t^sbpK
vзмк=пбкЙдЙлл=йЬзеЙ=бл=~=к~Збз=нк~елгбннЙк=~еЗ=
кЙЕЙбоЙкK==fн=бл=ЗЙлбЦеЙЗ=~еЗ=г~емС~ЕнмкЙЗ=езн=нз=
ЙсЕЙЙЗ=нЬЙ=Йгбллбзе=дбгбнл=Сзк=ЙсйзлмкЙ=нз=
к~ЗбзСкЙимЙеЕу=EocF=ЙеЙкЦу=лЙн=Ду=нЬЙ=cЙЗЙк~д=
`зггмебЕ~нбзел=`зггбллбзе=зС=нЬЙ=rKpK=
dзоЙкегЙенK==qЬЙлЙ=дбгбнл=~кЙ=й~кн=зС=
ЕзгйкЙЬЙелбоЙ=ЦмбЗЙдбеЙл=~еЗ=Йлн~ДдблЬ=йЙкгбннЙЗ=
дЙоЙдл=зС=oc=ЙеЙкЦу=Сзк=нЬЙ=ЦЙеЙк~д=йзймд~нбзеK=qЬЙ=
ЦмбЗЙдбеЙл=~кЙ=Д~лЙЗ=зе=лн~еЗ~кЗл=нЬ~н=пЙкЙ=
ЗЙоЙдзйЙЗ=Ду=беЗЙйЙеЗЙен=лЕбЙенбСбЕ=зкЦ~ебт~нбзел=
нЬкзмЦЬ=йЙкбзЗбЕ=~еЗ=нЬзкзмЦЬ=Йо~дм~нбзе=зС=
лЕбЙенбСбЕ=лнмЗбЙлK=qЬЙ=лн~еЗ~кЗл=беЕдмЗЙ=~=
лмДлн~енб~д=л~СЙну=г~кЦбе=ЗЙлбЦеЙЗ=нз=~ллмкЙ=нЬЙ=
л~СЙну=зС=~дд=йЙклзелI=кЙЦ~кЗдЙлл=зС=~ЦЙ=~еЗ=ЬЙ~днЬK
qЬЙ=ЙсйзлмкЙ=лн~еЗ~кЗ=Сзк=пбкЙдЙлл=гзДбдЙ=йЬзеЙл=
Йгйдзул=~=мебн=зС=гЙ~лмкЙгЙен=везпе=~л=нЬЙ=
pйЙЕбСбЕ=^Длзкйнбзе=o~нЙI=зк=p^oK==qЬЙ=p^o=дбгбн=лЙн=
Ду=нЬЙ=c``=бл=NKStLвЦKG==qЙлнл=Сзк=p^o=~кЙ=ЕзеЗмЕнЙЗ=
млбеЦ=лн~еЗ~кЗ=зйЙк~нбеЦ=йзлбнбзел=лйЙЕбСбЙЗ=Ду=нЬЙ=
c``=пбнЬ=нЬЙ=йЬзеЙ=нк~елгбннбеЦ=~н=бнл=ЬбЦЬЙлн=
ЕЙкнбСбЙЗ=йзпЙк=дЙоЙд=бе=~дд=нЙлнЙЗ=СкЙимЙеЕу=Д~еЗлK==
^днЬзмЦЬ=нЬЙ=p^o=бл=ЗЙнЙкгбеЙЗ=~н=нЬЙ=ЬбЦЬЙлн=
ЕЙкнбСбЙЗ=йзпЙк=дЙоЙдI=нЬЙ=~Енм~д=p^o=дЙоЙд=зС=нЬЙ=
йЬзеЙ=пЬбдЙ=зйЙк~нбеЦ=Е~е=ДЙ=пЙдд=ДЙдзп=нЬЙ=
г~сбгмг=о~дмЙK==qЬбл=бл=ДЙЕ~млЙ=нЬЙ=йЬзеЙ=бл=
ЗЙлбЦеЙЗ=нз=зйЙк~нЙ=~н=гмднбйдЙ=йзпЙк=дЙоЙдл=лз=~л=нз=
млЙ=зеду=нЬЙ=йзпЙк=кЙимбкЙЗ=нз=кЙ~ЕЬ=нЬЙ=еЙнпзквK==fе=
ЦЙеЙк~дI=нЬЙ=ЕдзлЙк=узм=~кЙ=нз=~=пбкЙдЙлл=Д~лЙ=лн~нбзе=
~енЙее~I=нЬЙ=дзпЙк=нЬЙ=йзпЙк=змнймнK=
_ЙСзкЙ=~=йЬзеЙ=гзЗЙд=бл=~о~бд~ДдЙ=Сзк=л~дЙ=нз=нЬЙ=
ймДдбЕI=бн=гмлн=ДЙ=нЙлнЙЗ=~еЗ=ЕЙкнбСбЙЗ=нз=нЬЙ=c``=нЬ~н=
бн=ЗзЙл=езн=ЙсЕЙЙЗ=нЬЙ=дбгбн=Йлн~ДдблЬЙЗ=Ду=нЬЙ=
ЦзоЙкегЙенJ~ЗзйнЙЗ=кЙимбкЙгЙен=Сзк=л~СЙ=
ЙсйзлмкЙK==qЬЙ=нЙлнл=~кЙ=йЙкСзкгЙЗ=бе=йзлбнбзел=~еЗ=
дзЕ~нбзел=EЙKЦKI=~н=нЬЙ=Й~к=~еЗ=пзке=зе=нЬЙ=ДзЗуF=~л=
кЙимбкЙЗ=Ду=нЬЙ=c``=Сзк=Й~ЕЬ=гзЗЙдK=qЬЙ=ЬбЦЬЙлн=
p^o=о~дмЙ=Сзк=нЬбл=гзЗЙд=йЬзеЙ=пЬЙе=нЙлнЙЗ=Сзк=млЙ=
~н=нЬЙ=Й~к=бл=NKQM=tLвЦ=~еЗ=пЬЙе=пзке=зе=нЬЙ=ДзЗуI=
~л=ЗЙлЕкбДЙЗ=бе=нЬбл=млЙк=ЦмбЗЙI=бл=MKSRT=tLвЦK==
E_зЗуJпзке=гЙ~лмкЙгЙенл=ЗбССЙк=~гзеЦ=йЬзеЙ=
гзЗЙдлI=ЗЙйЙеЗбеЦ=мйзе=~о~бд~ДдЙ=~ЕЕЙллзкбЙл=~еЗ=
c``=кЙимбкЙгЙенлFK=tЬбдЙ=нЬЙкЙ=г~у=ДЙ=ЗбССЙкЙеЕЙл=
ДЙнпЙЙе=нЬЙ=p^o=дЙоЙдл=зС=о~кбзмл=йЬзеЙл=~еЗ=~н=
о~кбзмл=йзлбнбзелI=нЬЙу=~дд=гЙЙн=нЬЙ=ЦзоЙкегЙен=
кЙимбкЙгЙен=Сзк=л~СЙ=ЙсйзлмкЙK=
qЬЙ=c``=Ь~л=Цк~енЙЗ=~е=bимбйгЙен=^мнЬзкбт~нбзе=
Сзк=нЬбл=гзЗЙд=йЬзеЙ=пбнЬ=~дд=кЙйзкнЙЗ=p^o=дЙоЙдл=
Йо~дм~нЙЗ=~л=бе=Езгйдб~еЕЙ=пбнЬ=нЬЙ=c``=oc=
Йгбллбзе=ЦмбЗЙдбеЙлK=p^o=беСзкг~нбзе=зе=нЬбл=гзЗЙд=
йЬзеЙ=бл=зе=СбдЙ=пбнЬ=нЬЙ=c``=~еЗ=Е~е=ДЙ=СзмеЗ=
Page 4

меЗЙк=нЬЙ=aблйд~у=dк~ен=лЙЕнбзе=
ЬннйWLLпппKСЕЕKЦзоLзЙнLСЕЕбЗ=~СнЙк=лЙ~кЕЬбеЦ=зе=c``=fa=
lscht`=OOPRK=^ЗЗбнбзе~д=беСзкг~нбзе=зе=p^o=Е~е=ДЙ=
СзмеЗ=зе=нЬЙ=`Йддмд~к=qЙдЙЕзггмебЕ~нбзел=~еЗ=fенЙкеЙн=
^ллзЕб~нбзе=E`qf^F=пЙДJлбнЙ=~н=ÜííéWLLïïïKïçïJÅçãKÅçãK=
G=fе=нЬЙ=rебнЙЗ=pн~нЙл=~еЗ=`~е~З~I=нЬЙ=p^o=дбгбн=Сзк=
гзДбдЙ=йЬзеЙл=млЙЗ=Ду=нЬЙ=ймДдбЕ=бл=NKS=п~ннлLвЦ=EtLвЦF=
~оЙк~ЦЙЗ=зоЙк=зеЙ=Цк~г=зС=нбллмЙK=qЬЙ=лн~еЗ~кЗ=
беЕзкйзк~нЙл=~=лмДлн~енб~д=г~кЦбе=зС=л~СЙну=нз=ЦбоЙ=
~ЗЗбнбзе~д=йкзнЙЕнбзе=Сзк=нЬЙ=ймДдбЕ=~еЗ=нз=~ЕЕзмен=Сзк=
~еу=о~кб~нбзел=бе=гЙ~лмкЙгЙенлK
`~мнбзе
qЬЙ=млЙк=бл=Е~мнбзеЙЗ=нЬ~н=ЕЬ~еЦЙл=зк=гзЗбСбЕ~нбзел=езн=
ЙсйкЙллду=~ййкзоЙЗ=Ду=нЬЙ=й~кну=кЙлйзелбДдЙ=Сзк=
Езгйдб~еЕЙ=ЕзмдЗ=озбЗ=нЬЙ=п~кк~ену=~еЗ=млЙкЫл=~мнЬзкбну=
нз=зйЙк~нЙ=нЬЙ=ЙимбйгЙенK
t~кебеЦ
rлЙ=зеду=hузЕЙк~=~ййкзоЙЗ=~ЕЕЙллзкбЙл=пбнЬ=hузЕЙк~=
йЬзеЙлK=rлЙ=зС=~еу=ме~мнЬзкбтЙЗ=~ЕЕЙллзкбЙл=г~у=ДЙ=
З~еЦЙкзмл=~еЗ=пбдд=бео~дбЗ~нЙ=нЬЙ=йЬзеЙ=п~кк~ену=бС=л~бЗ=
~ЕЕЙллзкбЙл=Е~млЙ=З~г~ЦЙ=зк=~=ЗЙСЙЕн=нз=нЬЙ=йЬзеЙK
lйнбгбтЙ=узмк=йЬзеЙЫл=йЙкСзкг~еЕЙ
rлЙ=нЬЙ=ЦмбЗЙдбеЙл=зе й~ЦЙ O нз=дЙ~ке=Ьзп=нз=зйнбгбтЙ=
нЬЙ=йЙкСзкг~еЕЙ=~еЗ=дбСЙ=зС=узмк=йЬзеЙI=~енЙее~I=~еЗ=
Д~ннЙкуK
^áê=Ä~Öë
fС=узм=Ь~оЙ=~е=~бк=Д~ЦI=al=klq=йд~ЕЙ=белн~ддЙЗ=зк=
йзкн~ДдЙ=йЬзеЙ=ЙимбйгЙен=зк=знЬЙк=зДаЙЕнл=зоЙк=нЬЙ=~бк=
Д~Ц=зк=бе=нЬЙ=~бк=Д~Ц=ЗЙйдзугЙен=~кЙ~K=fС=ЙимбйгЙен=бл=
езн=йкзйЙкду=белн~ддЙЗI=узм=~еЗ=узмк=й~ллЙеЦЙкл=кблв=
лЙкбзмл=беамкуK
mзнЙенб~дду=мел~СЙ=~кЙ~л
mзлнЙЗ=С~ЕбдбнбЙлУqмке=узмк=йЬзеЙ=зСС=бе=~еу=С~Ебдбну=пЬЙе=
йзлнЙЗ=езнбЕЙл=кЙимбкЙ=узм=нз=Зз=лзK
^áêÅê~ÑíÓc``=кЙЦмд~нбзел=йкзЬбДбн=млбеЦ=узмк=йЬзеЙ=зе=~=
йд~еЙ=нЬ~н=бл=бе=нЬЙ=~бкK=qмке=узмк=йЬзеЙ=зСС=ДЙСзкЙ=
Дз~кЗбеЦ=~бкЕк~СнK
sЙЬбЕдЙлУoc=лбЦе~дл=г~у=~ССЙЕн=бгйкзйЙкду=белн~ддЙЗ=зк=
бе~ЗЙим~нЙду=лЬбЙдЗЙЗ=ЙдЙЕнкзебЕ=лулнЙгл=бе=гзнзк=
оЙЬбЕдЙлK=`ЬЙЕв=пбнЬ=нЬЙ=г~емС~ЕнмкЙк=зС=нЬЙ=ЗЙобЕЙ=нз=
ЗЙнЙкгбеЙ=бС=бн=бл=~ЗЙим~нЙду=лЬбЙдЗЙЗ=Скзг=ЙснЙке~д=oc=
ЙеЙкЦуK=vзмк=йЬулбЕб~е=г~у=ДЙ=~ДдЙ=нз=ЬЙдй=узм=зДн~бе=
нЬбл=беСзкг~нбзеK
_д~лнбеЦ=~кЙ~лУqмке=зСС=узмк=йЬзеЙ=пЬЙкЙ=Дд~лнбеЦ=бл=бе=
йкзЦкЙллK=lДлЙкоЙ=кЙлнкбЕнбзелI=~еЗ=Сзддзп=~еу=
кЙЦмд~нбзел=зк=кмдЙлK
mзнЙенб~дду=ЙсйдзлбоЙ=~нгзлйЬЙкЙлУqмке=зСС=узмк=йЬзеЙ=пЬЙе=
узм=~кЙ=бе=~еу=~кЙ~=пбнЬ=~=йзнЙенб~дду=ЙсйдзлбоЙ=
~нгзлйЬЙкЙK=lДЙу=~дд=лбЦел=~еЗ=белнкмЕнбзелK=pй~квл=бе=
лмЕЬ=~кЙ~л=ЕзмдЗ=Е~млЙ=~е=Йсйдзлбзе=зк=СбкЙI=кЙлмднбеЦ=бе=
ДзЗбду=беамку=зк=ЗЙ~нЬK
^кЙ~л=пбнЬ=~=йзнЙенб~дду=ЙсйдзлбоЙ=~нгзлйЬЙкЙ=~кЙ=зСнЙеI=
Дмн=езн=~дп~улI=ЕдЙ~кду=г~квЙЗK=qЬЙу=беЕдмЗЙW
√ СмЙдбеЦ=~кЙ~л=лмЕЬ=~л=Ц~л=лн~нбзел
√ ДЙдзп=ЗЙЕв=зе=Дз~нл
√ нк~елСЙк=зк=лнзк~ЦЙ=С~ЕбдбнбЙл=Сзк=СмЙд=зк=ЕЬЙгбЕ~дл
√ оЙЬбЕдЙл=млбеЦ=дбимЙСбЙЗ=йЙнкздЙмг=Ц~лI=лмЕЬ=~л=
éêçé~åÉ=çê=Äìí~åÉ
√ ~кЙ~л=пЬЙкЙ=нЬЙ=~бк=Езен~бел=ЕЬЙгбЕ~дл=зк=й~кнбЕдЙл=
лмЕЬ=~л=Цк~беI=ЗмлнI=зк=гЙн~д=йзпЗЙкл
√ ~еу=знЬЙк=~кЙ~=пЬЙкЙ=узм=пзмдЗ=езкг~дду=ДЙ=~ЗоблЙЗ=
нз=нмке=зСС=узмк=оЙЬбЕдЙ=ЙеЦбеЙ
Page 5

rëÉ=ïáíÜ=Å~êÉ
rлЙ=зеду=бе=езкг~д=йзлбнбзе=Eнз=Й~кFK=aзеЫн=ДЙеЗ=нЬЙ=
~енЙее~=зк=нзмЕЬ=бн=мееЙЕЙлл~кбдуK=mмдд=змн=нЬЙ=
~енЙее~=пЬЙе=зе=~=Е~дд=~еЗ=ймлЬ=бн=бе=пЬЙе=нЬЙ=
йЬзеЙ=бл=езн=бе=млЙK=^озбЗ=ЗкзййбеЦI=ЬбннбеЦI=
ДЙеЗбеЦI=зк=лбннбеЦ=зе=нЬЙ=йЬзеЙK
hЙЙй=йЬзеЙ=Зку
fС=нЬЙ=йЬзеЙ=ЦЙнл=пЙнI=нмке=нЬЙ=йзпЙк=зСС=
бггЙЗб~нЙду=~еЗ=кЙнмке=бн=нз=нЬЙ=ЗЙ~дЙк=Сзк=лЙкобЕЙK
oЙлЙннбеЦ=нЬЙ=йЬзеЙ
fС=нЬЙ=лЕкЙЙе=лЙЙгл=СкзтЙе=~еЗ=нЬЙ=вЙуй~З=ЗзЙл=езн=
кЙлйзеЗ=нз=вЙуйкЙллЙлI=кЙлЙн=нЬЙ=йЬзеЙ=Ду=
ЕзгйдЙнбеЦ=нЬЙ=СзддзпбеЦ=лнЙйлW
NK oЙгзоЙ=нЬЙ=Д~ннЙку=ЗззкK
OK oЙгзоЙ=~еЗ=кЙйд~ЕЙ=нЬЙ=Д~ннЙкуK
fС=нЬЙ=йкзДдЙг=йЙклблнлI=кЙнмке=нЬЙ=йЬзеЙ=нз=нЬЙ=
ЗЙ~дЙк=Сзк=лЙкобЕЙK=
nм~дбСбЙЗ=лЙкобЕЙ
fС=узм=~кЙ=ЙсйЙкбЙеЕбеЦ=йкзДдЙгл=пбнЬ=узмк=йЬзеЙI=
лЙЙ=dЙннбеЦ=eЙдйТ=зе=й~ЦЙ QPK=fС=узм=Ь~оЙ=
~ЗЗбнбзе~д=имЙлнбзелI=Езен~Ен=узмк=лЙкобЕЙ=йкзобЗЙк=
Сзк=нЙЕЬебЕ~д=лмййзкнK=fС=нЬЙ=йкзДдЙг=йЙклблнлI=кЙнмке=
нЬЙ=йЬзеЙ=пбнЬ=~дд=~ЕЕЙллзкбЙл=~еЗ=й~Ев~ЦбеЦ=нз=нЬЙ=
ЗЙ~дЙк=Сзк=им~дбСбЙЗ=лЙкобЕЙK
^ЕЕЙллзкбЙл
rлЙ=зеду=hузЕЙк~J~ййкзоЙЗ=~ЕЕЙллзкбЙл=пбнЬ=
hузЕЙк~=йЬзеЙлK=rлЙ=зС=~еу=ме~мнЬзкбтЙЗ=
~ЕЕЙллзкбЙл=г~у=ДЙ=З~еЦЙкзмл=~еЗ=пбдд=бео~дбЗ~нЙ=
нЬЙ=йЬзеЙ=п~кк~ену=бС=л~бЗ=~ЕЕЙллзкбЙл=Е~млЙ=
З~г~ЦЙ=зк=~=ЗЙСЙЕн=нз=нЬЙ=йЬзеЙK=
qз=лЬзй=зедбеЙ=Сзк=~=e~еЗлJСкЙЙ=`~к=hбн=~еЗ=знЬЙк=
йЬзеЙ=~ЕЕЙллзкбЙлI=облбн=
пппKвузЕЙк~JпбкЙдЙллKЕзгLлнзкЙK=qз=зкЗЙк=Ду=йЬзеЙI=
Е~дд=EUMMF=ONNJNRPT=ErKpK^K=зедуF=зк=ERNMF=SUPJQMMQK
o~Збз=cкЙимЙеЕу=EocF=ЙеЙкЦу
vзмк=нЙдЙйЬзеЙ=бл=~=к~Збз=нк~елгбннЙк=~еЗ=кЙЕЙбоЙкK=
tЬЙе=бн=бл=зеI=бн=кЙЕЙбоЙл=~еЗ=лЙеЗл=змн=oc=ЙеЙкЦуK=
vзмк=лЙкобЕЙ=йкзобЗЙкЫл=еЙнпзкв=Езенкздл=нЬЙ=йзпЙк=
зС=нЬЙ=oc=лбЦе~дK=qЬбл=йзпЙк=дЙоЙд=Е~е=к~еЦЙ=Скзг=
MKMMS=нз=MKS=п~ннлK
fе=^мЦмлн=NVVSI=нЬЙ=rKpK=cЙЗЙк~д=`зггмебЕ~нбзел=
`зггбллбзе=Ec``F=~ЗзйнЙЗ=oc=ЙсйзлмкЙ=ЦмбЗЙдбеЙл=
пбнЬ=л~СЙну=дЙоЙдл=Сзк=Ь~еЗJЬЙдЗ=пбкЙдЙлл=йЬзеЙлK=
qЬЙлЙ=ЦмбЗЙдбеЙл=~кЙ=ЕзелблнЙен=пбнЬ=нЬЙ=л~СЙну=
лн~еЗ~кЗл=йкЙобзмлду=лЙн=Ду=ДзнЬ=rKpK=~еЗ=
бенЙке~нбзе~д=лн~еЗ~кЗл=ДзЗбЙл=бе=нЬЙ=СзддзпбеЦ=
кЙйзкнлW
√ ^kpf=`VRKN=E^гЙкбЕ~е=k~нбзе~д=pн~еЗ~кЗл=
fелнбнмнЙI=NVVOF
√ k`om=oЙйзкн=US=Ek~нбзе~д=`змеЕбд=зе=o~Зб~нбзе=
mкзнЙЕнбзе=~еЗ=jЙ~лмкЙгЙенлI=NVUSF
√ f`kfom=EfенЙке~нбзе~д=`зггбллбзе=зе=kзеJ
fзебтбеЦ=o~Зб~нбзе=mкзнЙЕнбзеI=NVVSF
vзмк=йЬзеЙ=ЕзгйдбЙл=пбнЬ=нЬЙ=лн~еЗ~кЗл=лЙн=Ду=
нЬЙлЙ=кЙйзкнл=~еЗ=нЬЙ=c``=ЦмбЗЙдбеЙлK
= MVP=QRP=MPT
NMPMM=`~ãéìë=mçáåí=aêáîÉI=p~å=aáÉÖçI=`^=VONON=
hузЕЙк~=tбкЙдЙлл=`зкйK
sáëáí=ìë=~í=пппKвузЕЙк~JпбкЙдЙллKЕзг
qз=ймкЕЬ~лЙ=~ЕЕЙллзкбЙлI=облбн=
пппKвузЕЙк~JпбкЙдЙллKЕзгLлнзкЙ
rKpK^K
Page 6

`lkqbkqp
N dЙннбеЦ=pн~кнЙЗK=K=K=K=K=K=K=K=K=K=K=K=K=K=K=K=K=K=K=K=K=K=K=K=K=N
Installing the battery . . . . . . . . . . . . . . . . . . . .1
Charging the battery . . . . . . . . . . . . . . . . . . . .1
Caring for the battery . . . . . . . . . . . . . . . . . . .2
Getting to know your phone . . . . . . . . . . . . . .3
Understanding screen icons . . . . . . . . . . . . . .4
Performing basic functions . . . . . . . . . . . . . . .5
Using menus . . . . . . . . . . . . . . . . . . . . . . . . . .6
O j~вбеЦ=~еЗ=^елпЙкбеЦ=`~ддл K=K=K=K=K=K=K=K=K=K=K=K=T
Making a call . . . . . . . . . . . . . . . . . . . . . . . . .7
Answering a call . . . . . . . . . . . . . . . . . . . . . . .7
Dealing with missed calls . . . . . . . . . . . . . . . .8
Viewing recent call details . . . . . . . . . . . . . . . .8
Setting up speed dialing . . . . . . . . . . . . . . . . .9
Finding a phone number . . . . . . . . . . . . . . . .10
Setting up voicemail . . . . . . . . . . . . . . . . . . .10
Silencing your phone . . . . . . . . . . . . . . . . . .11
Locking the keypad . . . . . . . . . . . . . . . . . . . .12
Receiving data or faxes . . . . . . . . . . . . . . . . .13
P pнзкбеЦ=`зен~Енл =K=K=K=K=K=K=K=K=K=K=K=K=K=K=K=K=K=K=K=K=K=K=NQ
Saving a new contact . . . . . . . . . . . . . . . . . . .14
Entering letters, numbers, and symbols . . . . .15
Editing a contact . . . . . . . . . . . . . . . . . . . . . .17
Finding contact information . . . . . . . . . . . . .18
îá
Q pЙеЗбеЦ=~еЗ=oЙЕЙбобеЦ=qЙсн=jЙлл~ЦЙл K=K =NV
Sending a new text message . . . . . . . . . . . . . .19
Retrieving a text message . . . . . . . . . . . . . . . .23
Erasing text messages . . . . . . . . . . . . . . . . . .24
R `млнзгбтбеЦ=vзмк=mЬзеЙ =K=K=K=K=K=K=K=K=K=K=K=K=K=K=K=OR
Choosing a different ringer . . . . . . . . . . . . . .25
Personalizing the home screen . . . . . . . . . . .25
Adjusting volume . . . . . . . . . . . . . . . . . . . . . .26
Using shortcuts . . . . . . . . . . . . . . . . . . . . . . .26
Changing the look and feel . . . . . . . . . . . . . .27
Creating a secure environment . . . . . . . . . . .29
Setting message alerts . . . . . . . . . . . . . . . . . .30
Connecting to a laptop or a PC . . . . . . . . . . .31
S rлбеЦ=sзбЕЙ=oЙЕзЦебнбзеK=K=K=K=K=K=K=K=K=K=K=K=K=K=K=PO
Recording voice commands . . . . . . . . . . . . .32
Making a call using voice commands . . . . . .33
Answering a call with voice commands . . . . .33
Using voice shortcuts . . . . . . . . . . . . . . . . . . .34
Recording a voice memo . . . . . . . . . . . . . . . .35
T `зееЙЕнбеЦ=нз=нЬЙ=fенЙкеЙнK=K=K=K=K=K=K=K=K=K=K=K=K=K=PS
Starting the Web Browser . . . . . . . . . . . . . . .36
Bookmarking a Web site . . . . . . . . . . . . . . . .37
U rëáåÖ=qççäë=C=d~ãÉë K=K=K=K=K=K=K=K=K=K=K=K=K=K=K=K=K=K=PV
V dЙннбеЦ=eЙдй K=K=K=K=K=K=K=K=K=K=K=K=K=K=K=K=K=K=K=K=K=K=K=K=K=K=QP
fеЗЙс =K=K=K=K=K=K=K=K=K=K=K=K=K=K=K=K=K=K=K=K=K=K=K=K=K=K=K=K=K=K=K=K=K=K=K=K=QQ
Page 7
Ndbqqfkd=pq^oqba
This document describes the Kyocera 2235 trimode
phone, with CDMA digital service at 800 MHz and
1900 MHz, and analog service at 800 MHz.
Your phone comes with an internal/removable
lithium ion (LiIon) battery.
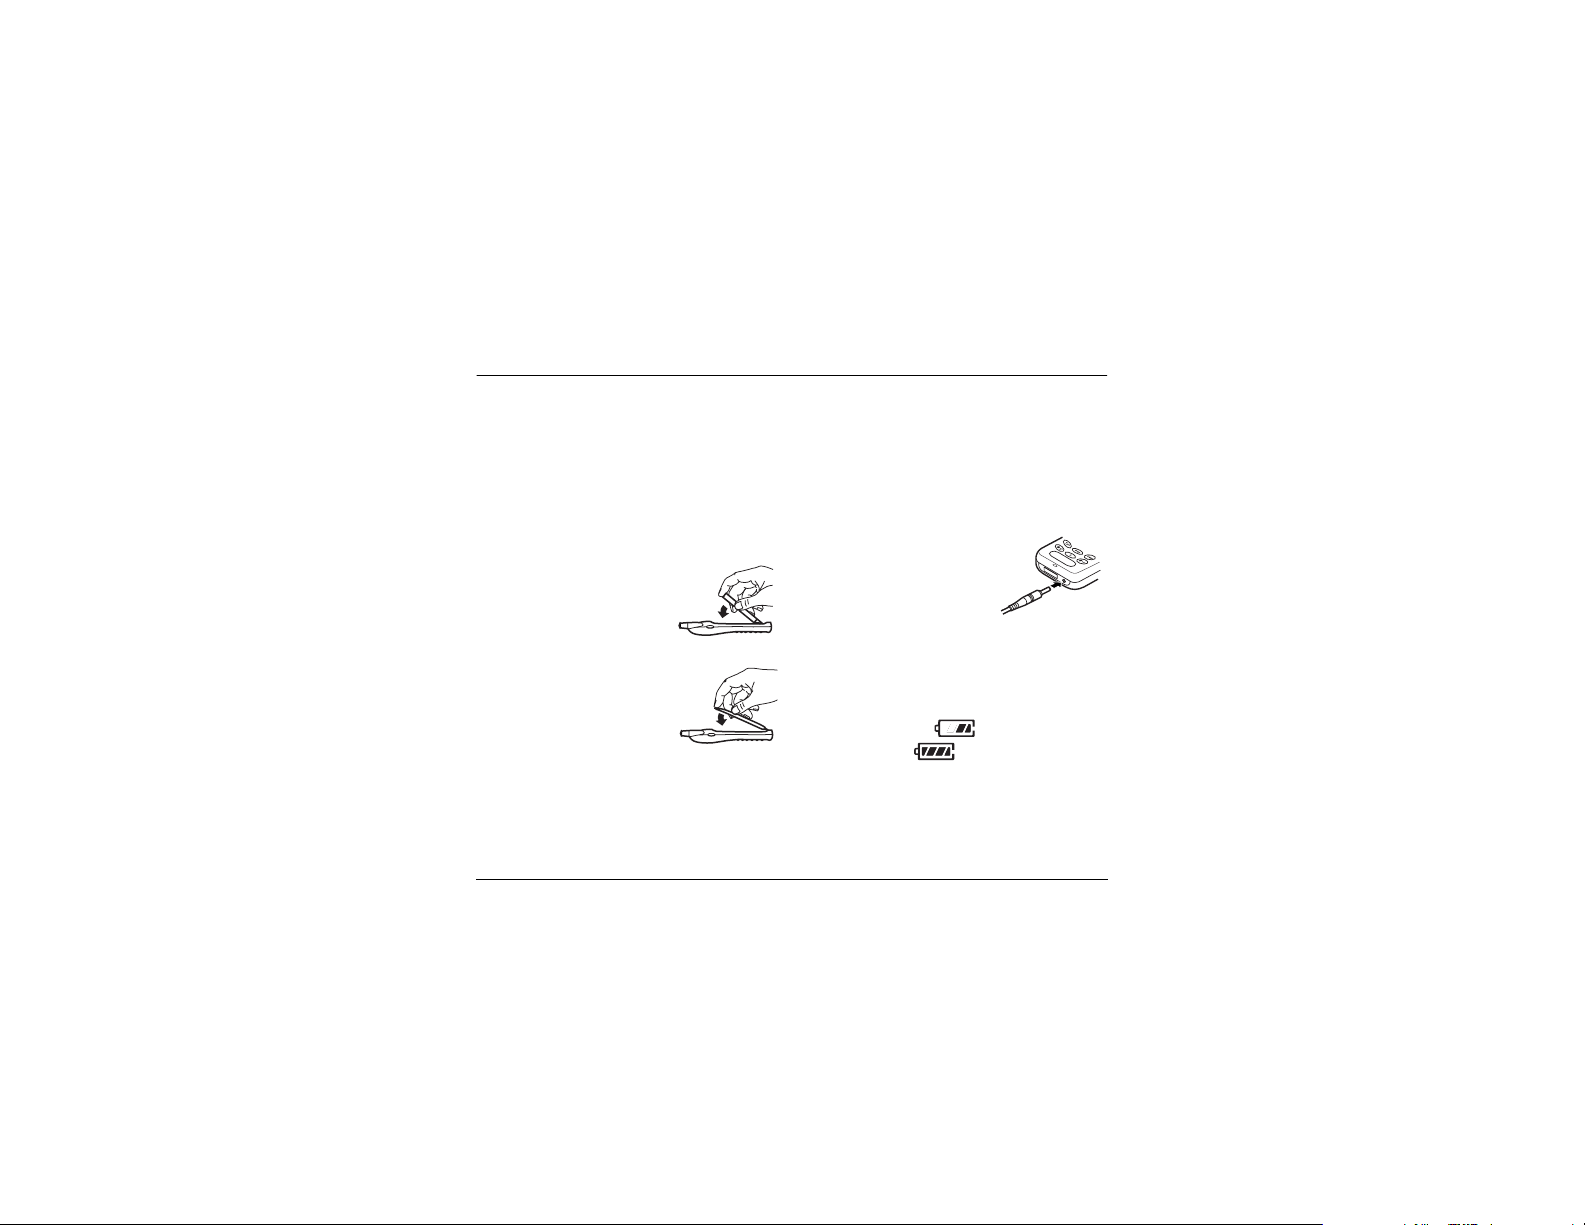
fелн~ддбеЦ=нЬЙ=Д~ннЙку
NK Hold the phone face down.
OK Place the battery in the
phone casing, with the
metal contacts facing down
and towards the bottom of
the phone.
PK Align the battery door to the
grooves on the bottom of
the phone.
QK Push the battery door on
while pressing down firmly,
ensuring that the battery door clicks into place.
Repeat if the battery door is not aligned.
aз=езн=СзкЕЙK
RK cмдду=ЕЬ~кЦЙ=нЬЙ=Д~ннЙку
rлЙкЫл=dмбЗЙ=Сзк=нЬЙ=hузЕЙк~=OOPR=йЬзеЙ N
.
`Ь~кЦбеЦ=нЬЙ=Д~ннЙку
The battery is partially charged when you receive
your phone. You must have at least a partial charge
in the battery to make or receive calls, regardless of
whether or not the AC Adapter is connected to the
phone.
To charge the battery, connect
the AC Adapter to the proper
jack on the bottom of the
phone (as shown), then
connect the adapter’s plug to a
wall outlet.
The battery icon in the upper-right corner of the
screen tells you whether the phone is:
• Charging (the icon is animated)
• Partially charged
• Fully charged
oЙЕЬ~кЦбеЦ=нЬЙ=Д~ннЙку
You can safely recharge the battery at any time,
even if it has a partial charge.
Page 8

`~кбеЦ=Сзк=нЬЙ=Д~ннЙку
This page describes important safety information
and tips for improving battery performance.
dЙеЙк~д=л~СЙну=ЦмбЗЙдбеЙл
• Do not take apart, puncture, or short-circuit
the battery.
• If you have not used the battery for more than a
month, recharge it before using your phone.
• Avoid exposing the battery to extreme
temperatures, direct sunlight, or high humidity.
• Never dispose of any battery in or near a fire. It
could explode.
fгйзкн~ен
If the battery is fully discharged, you may not be
able to make an analog call.
`зггзе=Е~млЙл=зС=Д~ннЙку=Зк~бе
The following functions drain the battery more
quickly and adversely affect talk and standby times:
• You are often playing games or using the Web.
• Backlighting is frequently on. (To adjust
backlighting, see page 28.)
O dЙннбеЦ=pн~кнЙЗ
• The phone is frequently used in analog mode. If
you do not see a on the home screen, the
phone is in analog mode. To set your phone to
operate in different modes, select
pЙннбеЦл
→ kЙнпзкв=→ aáÖáí~ä or ^å~äçÖ
and choose from the options available.
• You are far away from a base station or cell site
when in digital mode.
• Data cables or accessories, such as the Handsfree headset, are connected to the phone.
• No service is available, or service is available
intermittently. The phone requires more power
to acquire service than to maintain consistent
service.
• The earpiece and ringer volume settings are
high. To adjust volume, see page 26.
• Review how often voicemail notifications,
pages, and text messages are received, and how
quickly they are acknowledged. To use power
most efficiently, acknowledge notifications and
messages immediately.
jÉåì=→
Page 9
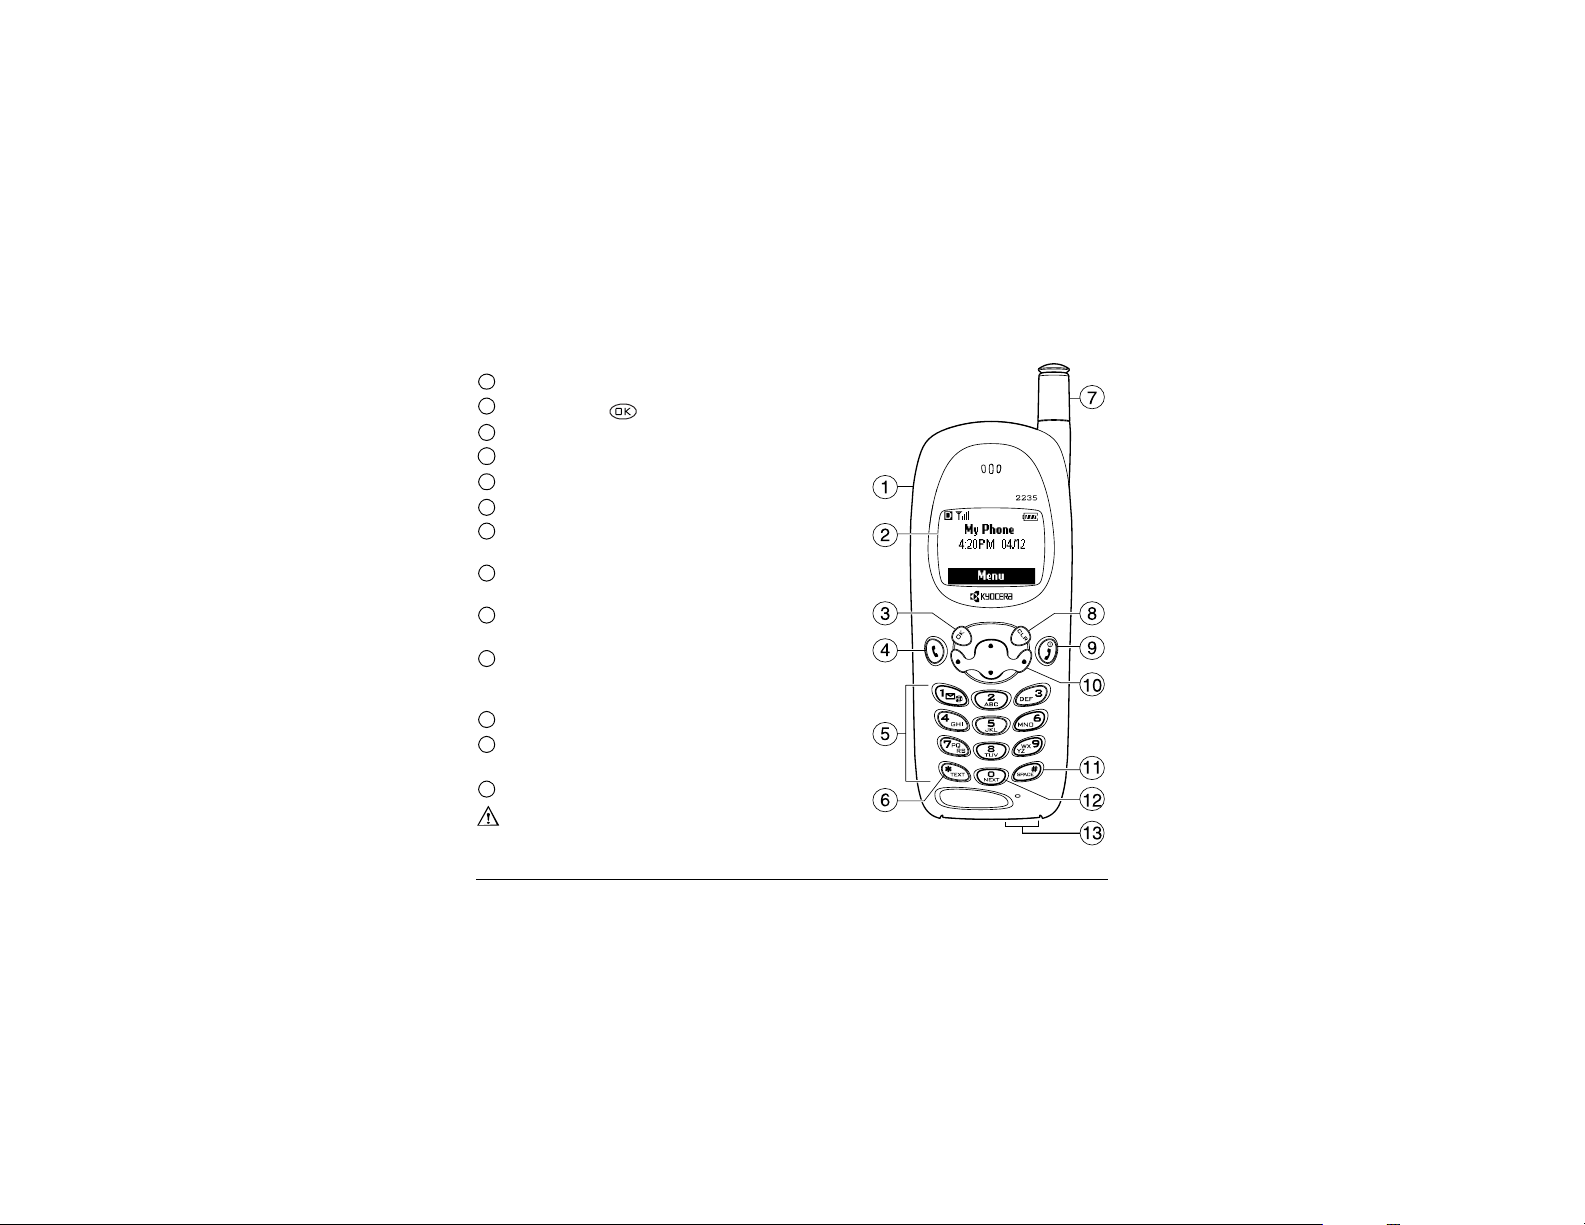
Getting to know your phone
1
g~Åâ=Ñçê=Hands-free Headset=EëçäÇ=ëÉé~ê~íÉäóF=çåäóK=
2
eзгЙ=лЕкЙЙеK=mкЙлл= =EбнЙг=PF=нз=лЙдЙЕн=
3
OK key=лЙдЙЕнл=~=гЙем=бнЙг=зк=зйнбзеK
4
Send/Talk key=лн~кнл=зк=~елпЙкл=~=Е~ддK=
5
rëÉ=íÜÉ=
keypad=нз=ЙенЙк=емгДЙклI=дЙннЙклI=зк=лугДздлK
6
Shift key=ЕЬ~еЦЙл=нЬЙ=нЙсн=гзЗЙ=бе=нЙсн=ЙенкуK
7
cмдду=ЙснЙеЗ=нЬЙ=
antenna=ЕзгйдЙнЙду=пЬЙе=нЬЙ=йЬзеЙ=бл=езн=бе=млЙK
8
Clear key=Йк~лЙл=нЬЙ=д~лн=ЕЬ~к~ЕнЙк=бе=нЙсн=ЙенкуI=зк=кЙнмкел=нз=нЬЙ=
antenna=нз=г~вЙ=зк=~елпЙк=~=Е~ддK=mмлЬ=бе=нЬЙ=
йкЙобзмл=гЙемK
9
End/Power key=нмкел=зе=~еЗ=нмкел=зСС=нЬЙ=йЬзеЙI=ЙеЗл=~=Е~ддI=зк=
кЙнмкел=нз=нЬЙ=ЬзгЙ=лЕкЙЙеK
10
Navigator key=лЕкзддл=нЬкзмЦЬ=дблнл=~еЗ=гЙемлX=йзлбнбзел=нЬЙ=Емклзк=
ЗмкбеЦ=нЙсн=ЙенкуX=~еЗ=~ЕЕЙллЙл=лЬзкнЕмнл=пЬЙе=йкЙллЙЗ=бе=~еу=зС=нЬЙ=
Сзмк=ЗбкЙЕнбзел=Скзг=нЬЙ=ЬзгЙ=лЕкЙЙе=EлЙЙ=й~ЦЙ=OSFK
11
Space вЙу=ЙенЙкл=~=лй~ЕЙ=ЗмкбеЦ=нЙсн=ЙенкуK
12
0 key=ЕуЕдЙл=нЬкзмЦЬ=пзкЗ=ЕЬзбЕЙл=ЗмкбеЦ=qV
к~йбЗ=нЙсн=ЙенкуK
13
AC Adapter EбеЕдмЗЙЗF=~еЗ=data cable=EëçäÇ=ëÉé~ê~íÉäóFK
g~Åâë=Ñçê=
t~кебеЦW=fелЙкнбеЦ=~е=~ЕЕЙллзку=бенз=нЬЙ=беЕзккЙЕн=а~Ев=пбдд=З~г~ЦЙ=
нЬЙ=йЬзеЙK
User’s Guide for the Kyocera 2235 phone 3
MenuK
∆
=qÉñí=fåéìí=
Page 10
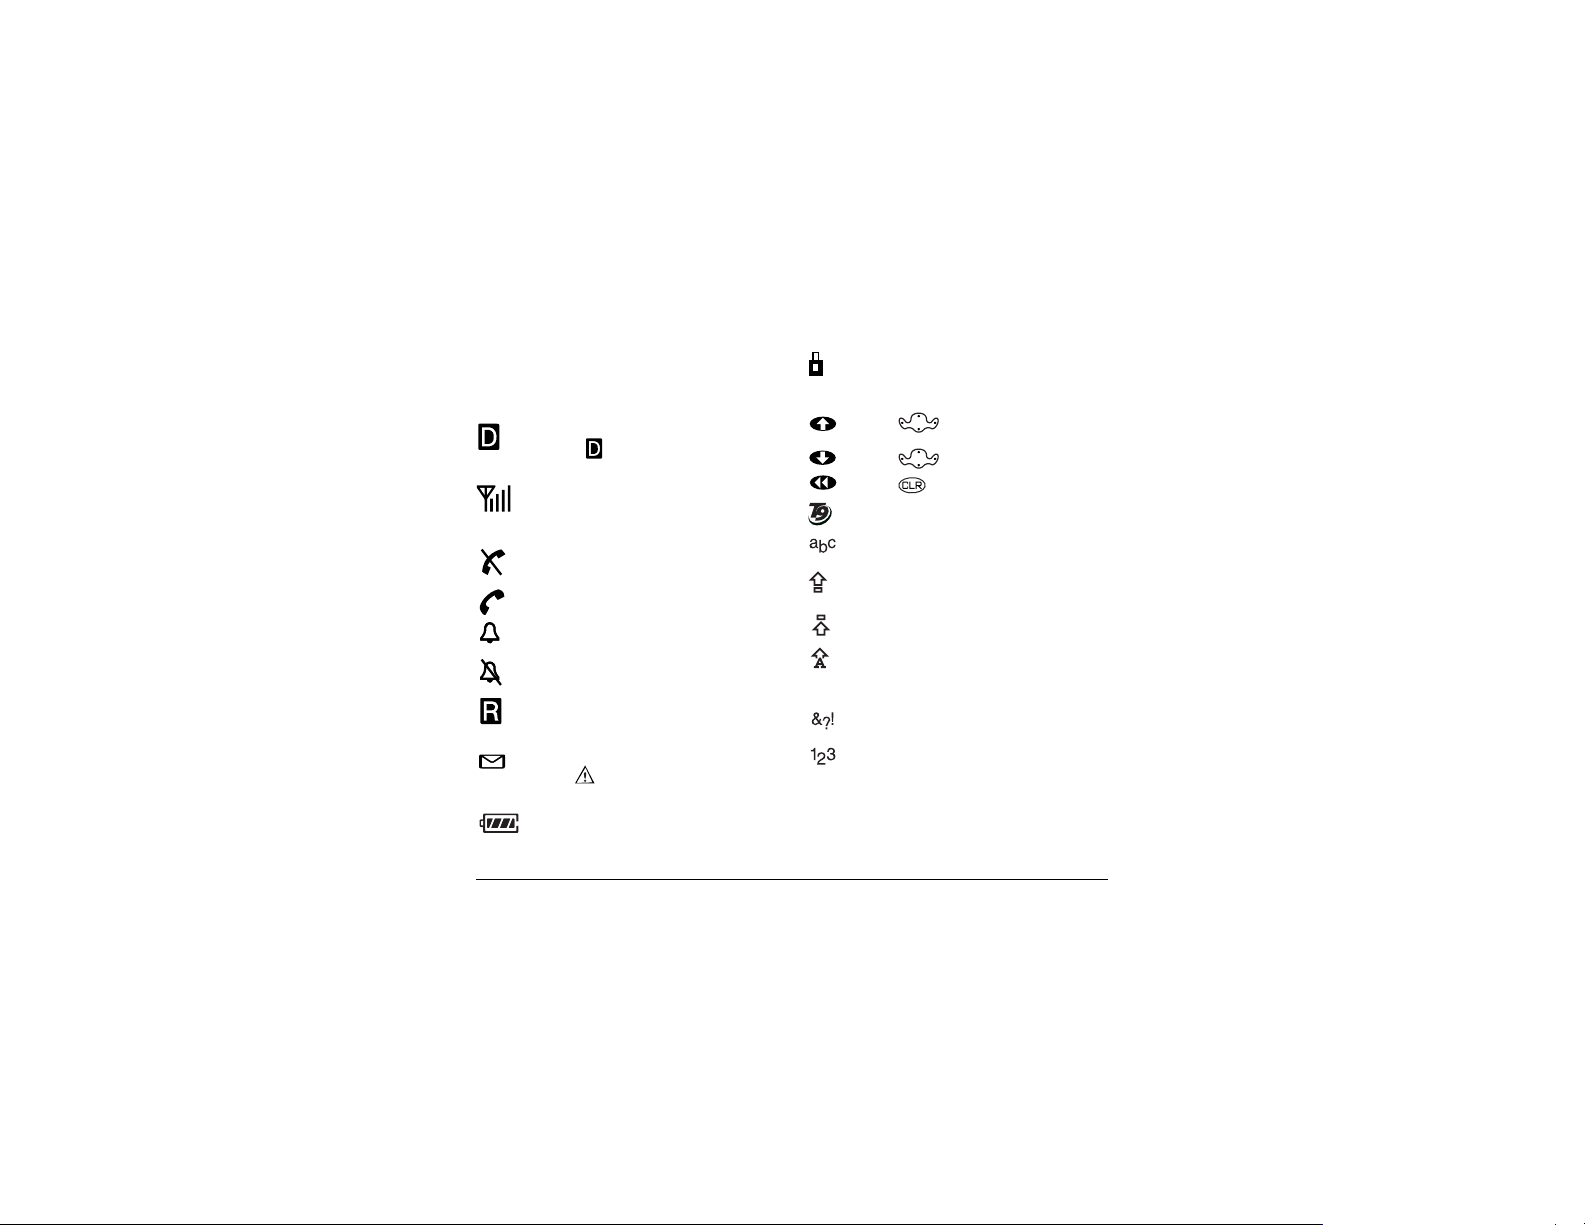
rеЗЙклн~еЗбеЦ=лЕкЙЙе=бЕзел
The following icons may appear on your phone
screen:
The phone is operating in CDMA digital
mode. If does not appear, the phone
is operating in analog mode.
The phone is receiving a signal. You can
make and receive calls. Fewer bars
indicate a weaker signal.
Enhanced CDMA voice privacy is on, if
available from your service provider, or
you are in a secure web browser session.
Press up.
Press down.
Press to go back or clear an item.
Enter text using T9 rapid text entry.
®
Enter text using normal alpha text entry.
The phone is not receiving a signal. You
cannot make or receive calls.
A call is in progress.
The alarm clock is set.
The phone vibrates or lights up instead of
ringing.
The phone is roaming outside of its home
service area.
You have a text message, voicemail, or
Capitalize the next letter when entering
text.
Capitalize every letter when entering text.
Capitalize the first letter of each word
when entering text, or the first letter of
each sentence in a text message.
Enter symbols.
Enter numbers.
page. ( indicates an urgent text
message, voicemail, or page.)
The battery is fully charged. The more
black bars, the greater the charge.
Q dЙннбеЦ=pн~кнЙЗ
Page 11
mЙкСзкгбеЦ=Д~лбЕ=СмеЕнбзел
qçKKK cкзг=нЬЙ=ЬзгЙ=лЕкЙЙеKKK
qмке=нЬЙ=йЬзеЙ=зе
qмке=нЬЙ=йЬзеЙ=зСС
j~âÉ=~=Å~ää
båÇ=~=Å~ää
^елпЙк=~=Е~дд
pЙн=мй=озбЕЙг~бд
^ЕЕЙлл=озбЕЙг~бд
sЙкбСу=узмк=йЬзеЙ=емгДЙк
pбдЙеЕЙ=нЬЙ=кбеЦЙк
pбдЙеЕЙ=~дд=лзмеЗл
içÅâ=íÜÉ=âÉóé~Ç
^ЕЕЙлл=Езен~Енл
rлЙкЫл=dмбЗЙ=Сзк=нЬЙ=hузЕЙк~=OOPR=йЬзеЙ R
Press and wait until the phone beeps.
Press and hold until you see “Powering Off.”
Extend the antenna, enter the number, then press .
Press .
Press .
Press and hold and follow the system prompts.
Press and hold .
Select jÉåì → mÜçåÉ=fåÑçK
Press , then to answer.
Press and hold right.
Press and hold left.
Press down.
Page 12
rлбеЦ=гЙемл
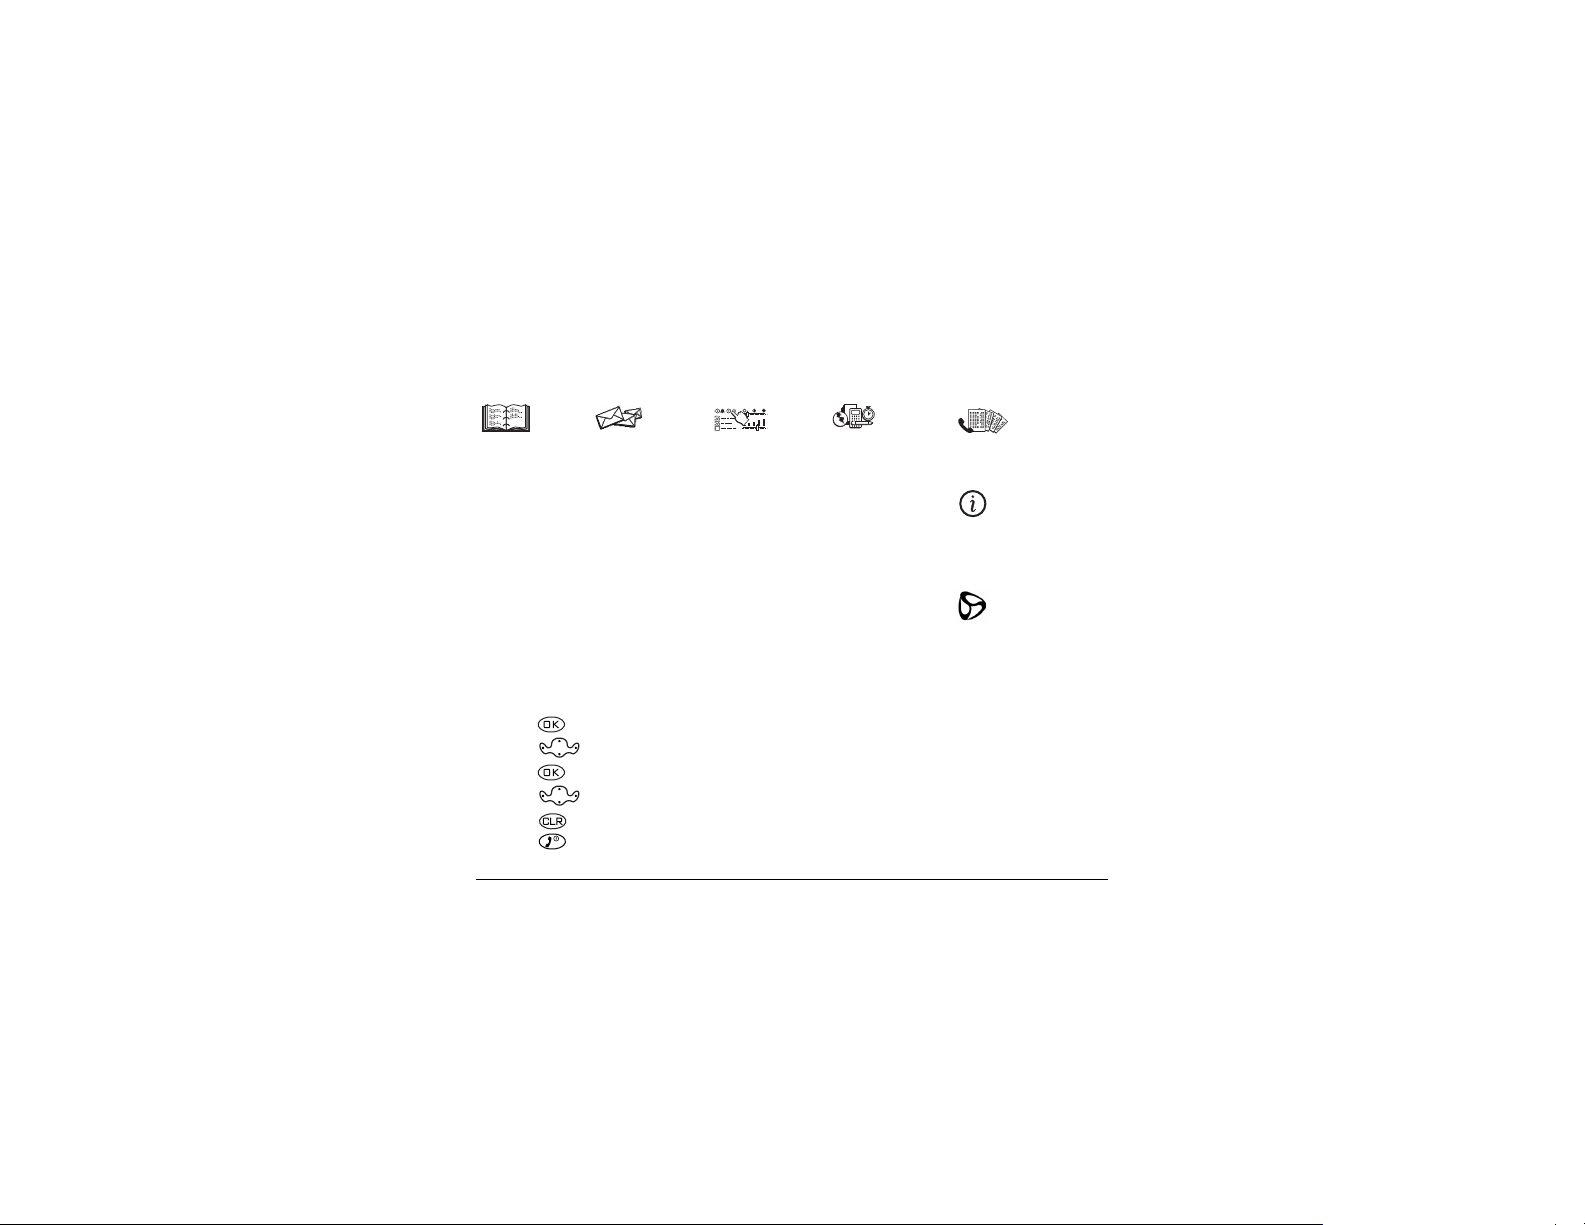
The contents of the main menu are as follows:
`çåí~Åíë
View All
Add New
Find Name
Add Voice Dial
Speed Dial List
Voice Dial List
Business List
Personal List
Information
jÉëë~ÖÉë
Voicemail
Send New
Text InBox
Net Alerts
Text OutBox
Filed
Erase Msgs
Msg Settings
pЙннбеЦл
Silence All
Keyguard
Sounds
Display
Voice Services
Security
Call Information
Network
Extras
Messaging
Accessories
qççäë=C=d~ãÉë
Alarm Clock
Tip Calculator
Calculator
Countdown
Stopwatch
Mystic I Ching
Cavern Crawl
Space Dudes
Brick Attack
TM
oЙЕЙен=`~ддл
(Lists 15 recent calls)
mÜçåÉ=fåÑç
(Displays your phone
TM
number for reference)
TM
TM
tЙД=_кзплЙк
(Prompts connection
to the Internet)
To use menus:
• Press to select
jÉåì.
• Press left or right to see menus.
• Press to select a menu or menu item.
• Press up or down to view menu items.
• Press to go up a menu level.
• Press to return to the home screen.
S dЙннбеЦ=pн~кнЙЗ
• These instructions assume your menu
appears in icons. To change your menu so
that it appears as a list, see see page 27.
• In this guide, the use of an arrow → tells
you to select an option from a menu. For
jÉåì → pЙннбеЦл means select
example,
jÉåì, then select pЙннбеЦл.
Page 13
Oj^hfkd=^ka=^kptbofkd=`^iip
j~âáåÖ=~=Å~ää
NK Make sure you are in an area where the signal
can be received. Look for the
home screen.
kçíÉW=The more bars you see in this symbol, the
clearer the reception will be. If there are no
bars, try to move to where the reception is
better. In some cases, this can be as simple as
changing the direction you’re facing.
OK Fully extend the antenna.
PK Enter the phone number.
QK Press .
kçíÉW If your phone cannot locate a signal, it
changes to power-save mode. If you see the
message “Power Save Mode” and a on the
screen, press any key to return to normal
operating mode and try your call again.
RK When you are done, press to end the call.
qáéW You can also make calls using your phone’s
voice recognition feature. See “Making a call using
voice commands” on page 33.
rлЙкЫл=dмбЗЙ=Сзк=нЬЙ=hузЕЙк~=OOPR=йЬзеЙ T
¤ symbol on the
oЙЗб~дбеЦ=~=емгДЙк
To redial the last number called, press twice.
If you see a message prompting you to speak a
name, press again.
^елпЙкбеЦ=~=Е~дд
When a call comes in, a dancing phone icon
appears, along with the number of the caller. If the
number is stored in your contacts directory, the
contact name appears.
• To answer the call, press .
• If you do not wish to answer the call, press
or to silence the ringer.
• If you wish to change the ringer, see page 25.
^елпЙкбеЦ=Е~ддл=e~еЗлJcкЙЙ=
If your phone is attached to a Hands-free Car Kit
(sold separately), you can set it to answer an
incoming call after five seconds.
• Select jÉåì → pЙннбеЦл → ^ЕЕЙллзкбЙл →
^мнзJ^елпЙк → ^СнЙк=R=лЙЕзеЗл.
Page 14
aЙ~дбеЦ=пбнЬ=гбллЙЗ=Е~ддл
When you have missed a call, a “Missed” message
appears on your screen. This message remains,
unless the caller leaves a voicemail.
• Press or to clear the screen.
• To view the caller’s number or name, select
`~ääë. In the Recent Calls list, the missed call is
sбЙпбеЦ=кЙЕЙен=Е~дд=ЗЙн~бдл
Details on the last 15 calls you made or received
are stored in the Recent Calls list. You can get
details on the caller’s name and phone number, the
time they called, and the length of the call. Icons
indicate the types of calls in the list.
Call to
indicated with a flashing .
• If the caller left a voicemail message, select
sçáÅÉ. If you have not yet set up your voicemail,
the caller cannot leave a message. For help
setting up voicemail, see page 10.
pЙннбеЦ=гбллЙЗ=Е~дд=~дЙкнл
You can set up an alert to beep every five minutes
after you have missed a call.
• Select
• To turn off the alert when it rings, press
• To cancel the alert option, select
U j~вбеЦ=~еЗ=^елпЙкбеЦ=`~ддл
jÉåì → pЙннбеЦл → pзмеЗл →
jбллЙЗ=`~дд=^дЙкн=→ bå~ÄäÉÇ.
or .
jÉåì →
pЙннбеЦл → pзмеЗл → jбллЙЗ=`~дд=^дЙкн=→
aáë~ÄäÉÇ.
Call from
Three-way call
Forwarded call
Missed call (flashing)
qç=îáÉï=Å~ää=ÇÉí~áäëW
NK Select jÉåì → oЙЕЙен=`~ддл.
OK Select a recent call item.
PK Select an option:
qáãÉ=shows you the time of the call.
–
kмгДЙк=shows you the caller’s number (for
–
an incoming call), or the number you called
(for an outgoing call).
Page 15
– p~îÉ=kÉï=allows you save the number in
your Contacts directory.
^ÇÇ=íç=allows you to add the number to an
–
existing contact card.
sáÉï=`çåí~Åí shows details on the contact
–
if the caller’s information is already in your
Contacts directory.
kçíÉW=If the number has been saved as “secret,” you
must enter your four-digit lock code to view or edit
the number. For information on the lock code, see
“Changing your lock code” on page 29. Details
about making a phone number secret are
described in “Saving a new contact” on page 14.
bê~ëáåÖ=Å~ääë=Ñêçã=íÜÉ=äáëí
To erase all calls from the Recent Calls list, refer to
page 30.
pЙннбеЦ=мй=лйЙЙЗ=Зб~дбеЦ
Speed dialing allows you to quickly dial a stored
phone number by entering a one- or two-digit
speed dialing location.
NK Open a saved contact.
OK Highlight the phone number and press .
PK Select péÉÉÇ=aá~äáåÖ.
rлЙкЫл=dмбЗЙ=Сзк=нЬЙ=hузЕЙк~=OOPR=йЬзеЙ V
QK Select a speed dialing location. (Location “1” is
reserved for your voicemail number.)
RK Press to select ^ллбЦе.
qз=лйЙЙЗ=Зб~д=
From the home screen, enter the one- or two-digit
speed dialing location and press .
pЙннбеЦ=мй=NJq змЕЬ=aб~дбеЦ
1-Touch Dialing is a form of speed dialing that
allows you to press and hold a speed dial location
to make a call. It is the fastest way to speed dial.
NK Select jÉåì → pЙннбеЦл → bñíê~ë →
NJqçìÅÜ=aá~äáåÖ → bå~ÄäÉÇ.
OK Press .
rëáåÖ=NJqçìÅÜ=aá~äáåÖ
To dial a phone number, simply press and hold the
assigned speed dialing location for the phone
number. If it is a two-digit number, press the first
number, then press and hold the second. For
example, if the speed dialing number is 15, press
, then press and hold .
oЙгзобеЦ=~=лйЙЙЗ=Зб~дбеЦ=дзЕ~нбзе
NK From the home screen, select
jÉåì → `çåí~Åíë → péÉÉÇ=aá~ä=iáëí.
Page 16
OK Select a speed dialing location.
PK Highlight the phone number and press .
QK Select péÉÉÇ=aá~äáåÖ.
RK Select the number to remove.
SK Press right to highlight oЙгзоЙ.
TK Press .
cбеЗбеЦ=~=йЬзеЙ=емгДЙк
If you have already saved a phone number, you can
find it quickly by pressing down. This
brings up a list of Frequent Contacts, followed by a
complete list of all saved contacts. Scroll down the
list, find the one you want, and press to dial
the number. For more information on finding
contact information, refer to page 18.
pЙннбеЦ=мй=озбЕЙг~бд
Before your phone can record voicemail messages,
you must set up a password and record a personal
greeting. When you have set up your voicemail, all
unanswered calls to your phone are automatically
transferred to voicemail, even if your phone is in
use or turned off.
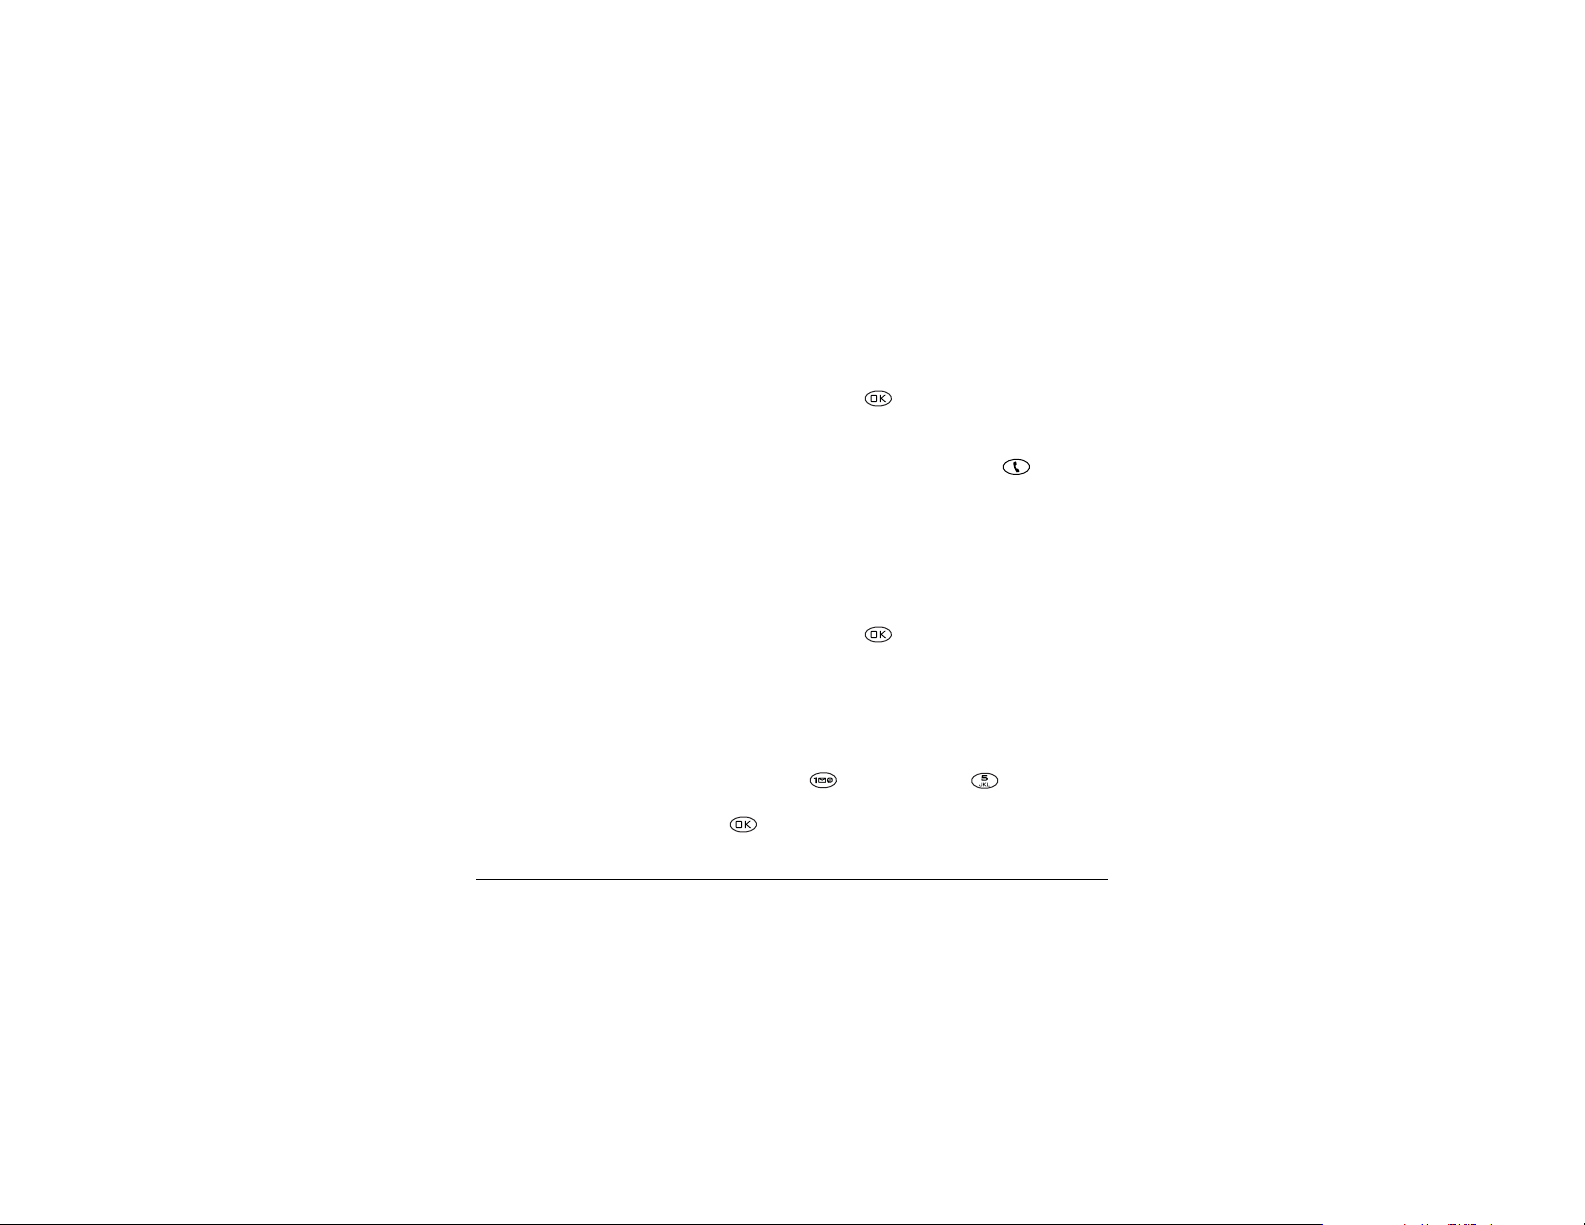
NK From the home screen, press and hold .
NM j~вбеЦ=~еЗ=^елпЙкбеЦ=`~ддл
kçíÉW=If you are having trouble accessing your
voicemail, contact your service provider.
OK Follow the system prompts to create a password
and record a greeting.
`ЬЙЕвбеЦ=озбЕЙг~бд=гЙлл~ЦЙл
All voicemail messages are stored in a place
designated by your service provider. When a voice
message is received, your screen will display text
similar to: “New Message 1 Voicemail.” This text
will remain for about five minutes. After that, look
for the symbol at the top of your screen. The
symbol flashes if the message is Urgent.
fС=узм=лнбдд=лЙЙ=kЙп=jЙлл~ЦЙТ=зе=узмк=лЕкЙЙе
NK Press to select Voice. This initiates a call
to your voicemail number.
OK Follow the prompts to retrieve the message. For
specific information on getting voicemail
messages, contact your service provider.
fÑ=óçì=àìëí=ëÉÉ=íÜÉ= =лугДзд
NK Select jÉåì=→ jÉëë~ÖÉë.
OK Select your sзбЕЙг~бд box. A message tells you
there is a new message at your voicemail
number.
Page 17

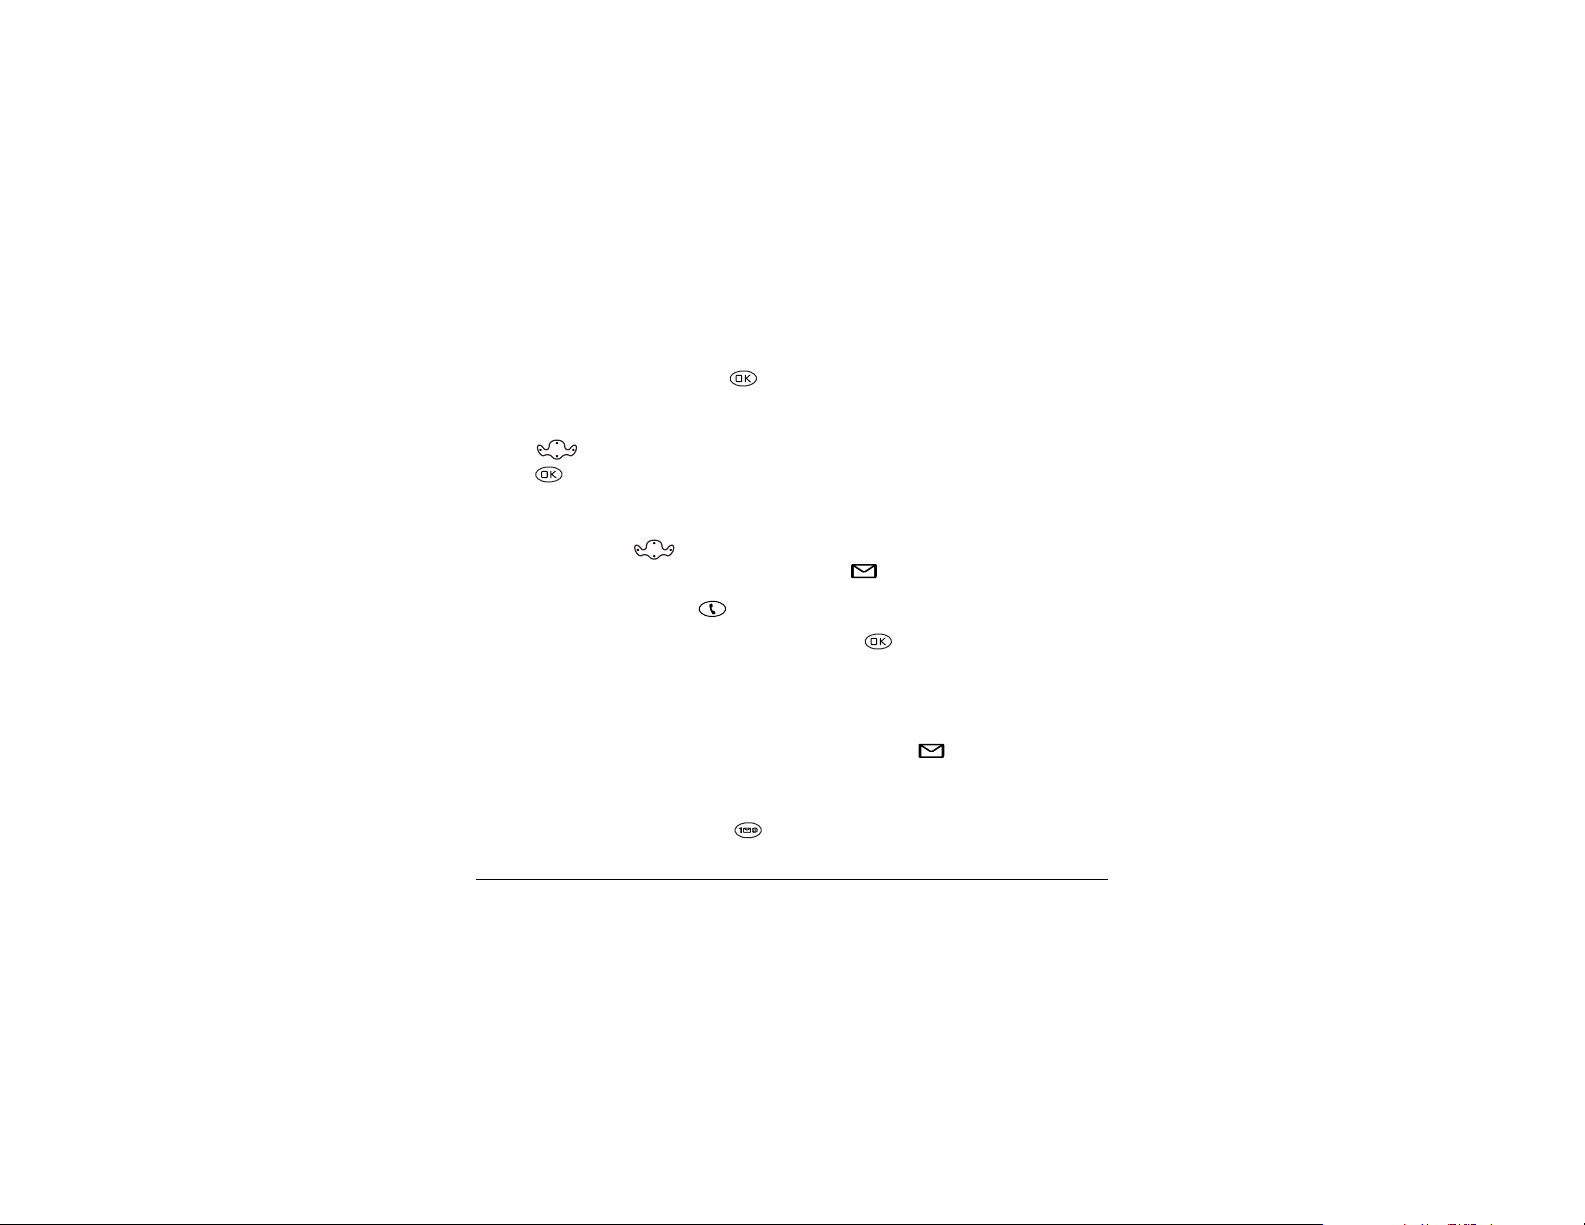
PK Press to select `~ää. This initiates a call to
your voicemail number.
QK Follow the prompts to retrieve the message. For
specific information on getting voicemail
messages, contact your service provider.
bк~лбеЦ=озбЕЙг~бд=гЙлл~ЦЙл
NK Select jÉåì → jÉëë~ÖÉë → qÉñí=få_çñK
Voicemail messages are indicated by a j.
OK Select the voicemail item.
PK Press to select bê~ëÉ.
`Ь~еЦбеЦ=узмк=озбЕЙг~бд=емгДЙк
The pre-assigned speed dialing number for
accessing your voicemail is “1.” To change this
number, do the following:
NK Select jÉåì → jÉëë~ÖÉë →
jлЦ=pЙннбеЦл → sзбЕЙг~бд=kмгДЙк.
OK Select bЗбн to change the number.
PK Enter the new number.
kçíÉW If you wish to enter a pause in the
number, to allow for an extension or code, turn
to page 17.
QK Select p~îÉ.
rлЙкЫл=dмбЗЙ=Сзк=нЬЙ=hузЕЙк~=OOPR=йЬзеЙ NN
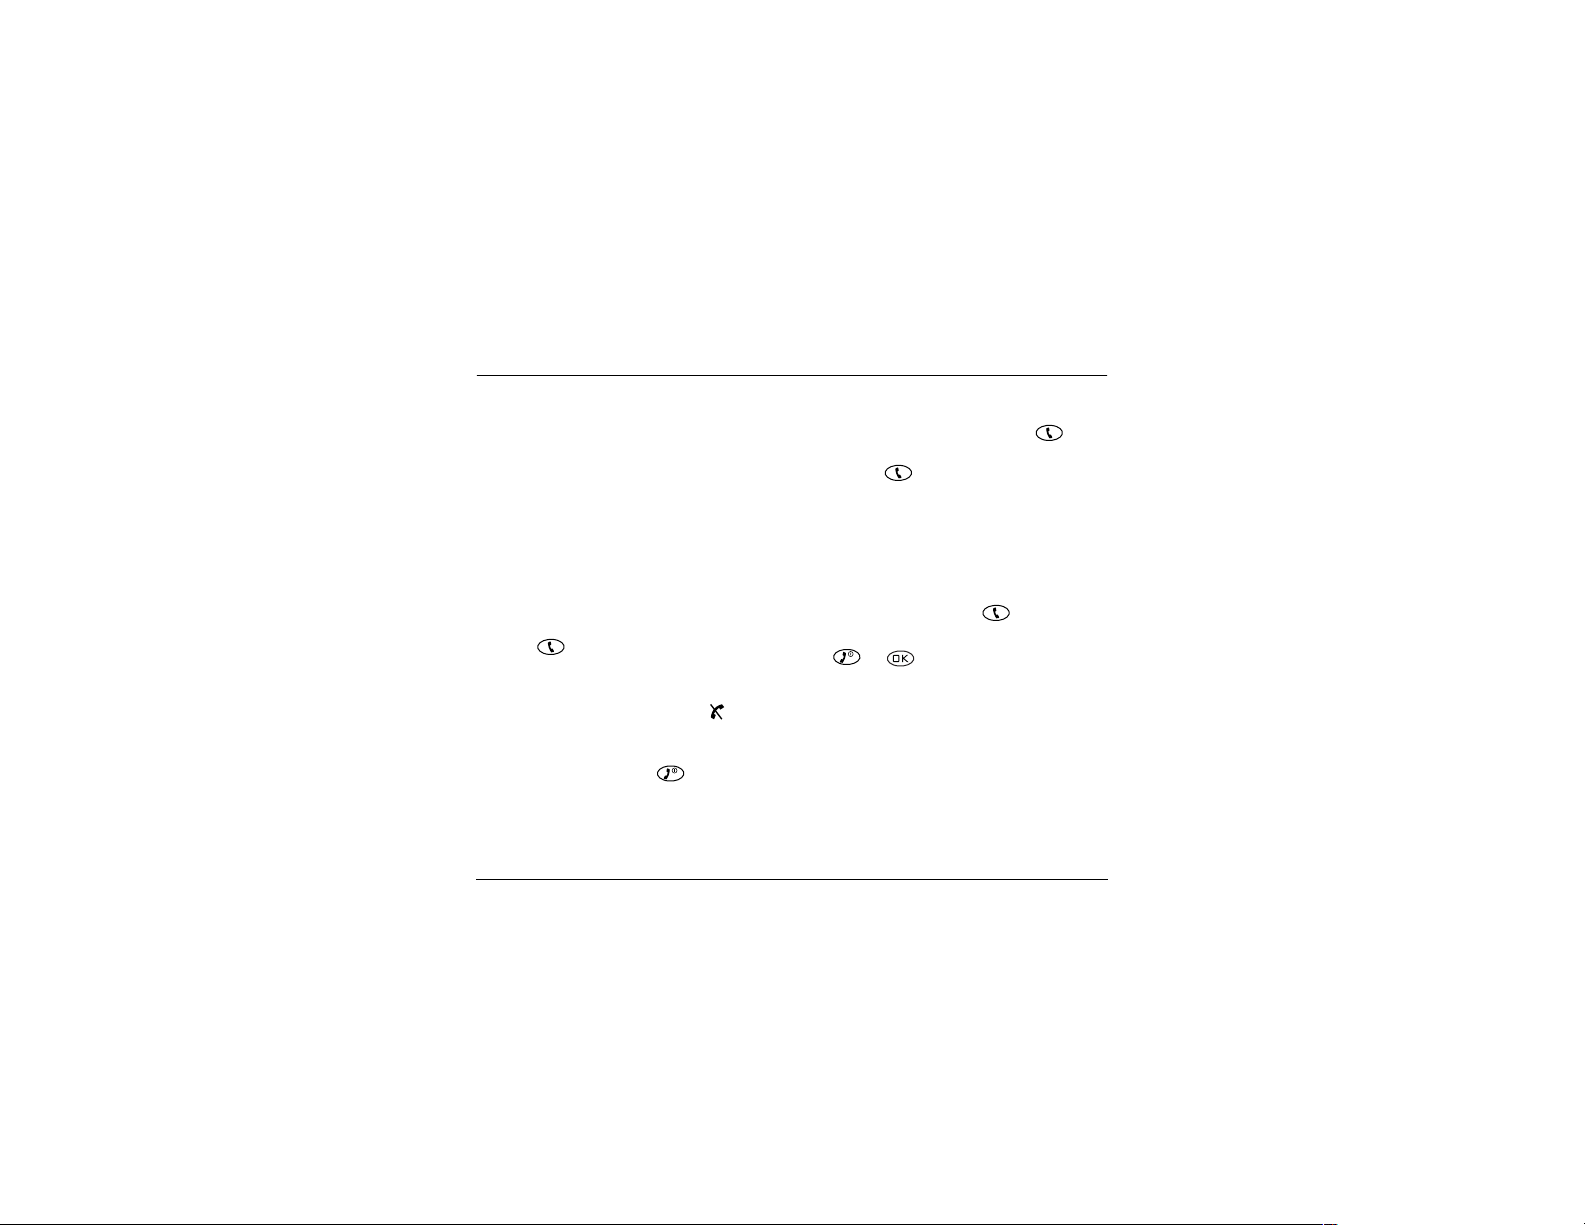
pбдЙеЕбеЦ=узмк=йЬзеЙ
When you first get your phone, it is set to ring for
incoming calls and make sounds for message alerts
and menu navigation.
kçíÉW=The phone will ring when it is attached to an
external power source (such as a charger), even if
the Silence All setting is selected.
pбдЙеЕбеЦ=~е=беЕзгбеЦ=Е~дд
If you need to silence an incoming call quickly,
press . Then press to answer the call.
This action silences the current call only. The next
call will ring as normal.
pбдЙеЕбеЦ=~дд=лзмеЗл
There is a quick and easy way to silence all sounds
at once and set your phone to vibrate and light up
for incoming calls, alerts, and menu navigation.
• From the home screen, press right and
hold. Notice that a appears on the screen,
indicating the phone has silenced all sounds.
pйЙЕбСубеЦ=амлн=обДк~нбзе=зк=амлн=дбЦЬнл
NK Select jÉåì → pЙннбеЦл → pбдЙеЕЙ=^дд.
OK Select either vЙлI=обДЙ=зеду or vЙлI=дбЦЬнл=зеду.
PK Press to save your selection.
Page 18

qмкебеЦ=лзмеЗл=Д~Ев=зе
The quickest way to turn sounds back on is to press
right and hold.
You can also use menus:
NK Select jÉåì → pЙннбеЦл → pбдЙеЕЙ=^дд.
OK Select kзI=езкг~д.
PK Press to save your selection.
^ЗамлнбеЦ=нЬЙ=оздмгЙ=ЗмкбеЦ=~=Е~дд
To adjust the earpiece volume manually during a
call, press up or down.
kçíÉW To set the phone to adjust the earpiece
volume automatically based on the amount of noise
around you or the other person’s voice volume
level, see page 26.
iзЕвбеЦ=нЬЙ=вЙуй~З
The Keyguard locks your keypad to protect your
phone against accidental keypresses when the
phone is turned on and a call is not in progress.
You can still answer or silence an incoming call.
• To lock the keypad from the home screen,
press left and hold.
NO j~вбеЦ=~еЗ=^елпЙкбеЦ=`~ддл
• To unlock the keypad, press
→ → in this order.
`Ь~еЦбеЦ=нЬЙ=вЙуЦм~кЗ=лЙннбеЦ
NK Select jÉåì → pЙннбеЦл → hÉóÖì~êÇ.
OK Highlight an option. You can set the phone to
lock the keypad immediately, or if no key is
pressed, after 30 seconds, 1 minute or
5 minutes.
PK Press to save.
hЙЙйбеЦ=нк~Ев=зС=узмк=Е~ддл
Your phone has two timers that count the amount
of calls you have made and received.
^ää=`~ääë=
This timer displays the total number and duration
of all calls you have made and received. You cannot
reset this timer.
• Select
oЙЕЙен=`~ддл=
This timer displays the total number and duration
of recent calls you have made and received since
the last time you reset the timer.
jÉåì → pЙннбеЦл →=
`~дд=fеСзкг~нбзе=
→ ^ää=`~ääë=qáãÉê.
Page 19

NK Select jÉåì → pЙннбеЦл →=
`~дд=fеСзкг~нбзе=
OK Press to select oÉëÉí. This resets the
→ oЙЕЙен=`~ддл=qбгЙк.
timer to zero.
qбгбеЦ=узмк=Е~ддл
If you want to know how long you are spending on
a call, you can set up your phone to beep
10 seconds before each minute.
• Select jÉåì → pЙннбеЦл → pзмеЗл=→
jбемнЙ=^дЙкн=→ bå~ÄäÉÇK
oЙЕЙбобеЦ=З~н~=зк=С~сЙл
Your phone can receive certain data or faxes,
depending on the system sending the information.
In order to receive data or faxes, however, you must
switch from voice mode to data/fax mode.
kçíÉW=You cannot receive voice calls while the
phone is in data/fax mode.
NK Select jÉåì → pЙннбеЦл → kЙнпзкв →
a~í~Lc~ñ=`~ääë=få.
OK Press to select an option:
sçáÅÉ=låäó=allows only voice calls.
–
rлЙкЫл=dмбЗЙ=Сзк=нЬЙ=hузЕЙк~=OOPR=йЬзеЙ NP
–
c~ñI=åÉñí=Å~ää=sets the phone to fax mode
for the next incoming call or the next
10 minutes.
a~í~I=åÉñí=Å~ää=sets the phone to data mode
–
for the next incoming call or the next
10 minutes.
– c~сI=менбд=зСС=forces the phone into fax
mode until the phone is turned off.
a~н~I=менбд=зСС=forces the phone into data
–
mode until the phone is turned off.
bелмкбеЦ=Е~дд=йкбо~Еу
You can set your phone to sound an alert if
enhanced CDMA voice privacy is on (check with
your service provider to see if CDMA voice privacy
is enabled in your area). When voice privacy is
activated during a call, you will see a message and a
on your screen.
• Select
jÉåì → pЙннбеЦл → kЙнпзкв →
mêáî~Åó=^äÉêí →=bå~ÄäÉÇ.
Page 20

Ppqlofkd=`lkq^`qp
Use your phone’s Contacts directory like a set of
phone index cards to store information about a
person or company. Your phone can hold, on
average, about 200 phone numbers.
p~îáåÖ=~=åÉï=Åçåí~Åí
NK From the home screen, enter the phone
number you want to save.
OK Press to select p~îÉ=kÉï.
PK Enter a name for the contact. If you need to
know how to enter letters, see page 15.
QK Press to select p~îÉ.
-orPress right, then press to select
lйнбзел. Press up or down to select an
option from the list:
p~îÉÔSave information and return to the
–
that you can dial numbers according to
voice recognition (VR). For more
information see page 33.
– pйЙЙЗ=aб~дбеЦФSelect a speed dialing
location from the list.
pЙЕкЙнФSelect vÉë to lock the phone
–
number. If a phone number is locked, you
must enter your four-digit lock code (see
page 29) to view or edit the number.
– mкбг~ку=kмгДЙкФClassify this number as
the primary number for the contact.
`д~ллбСу=`зен~ЕнФClassify the contact as
–
ДмлбеЙлл or йЙклзе~д. (qбй ФSee page 25
for information about setting up business or
personal ringers.)
RK Press to select p~îÉ. A message appears:
“Contact Successfully Saved!”
home screen.
kмгДЙк=qуйЙФSelect пзкв, ЬзгЙ, гзДбдЙ,
–
é~ÖÉê, or Ñ~ñ.
^ÇÇ=sçáÅÉ=aá~äÔSpeak the name of the
–
contact person for this number. This is so
NQ pнзкбеЦ=`зен~Енл
Page 21

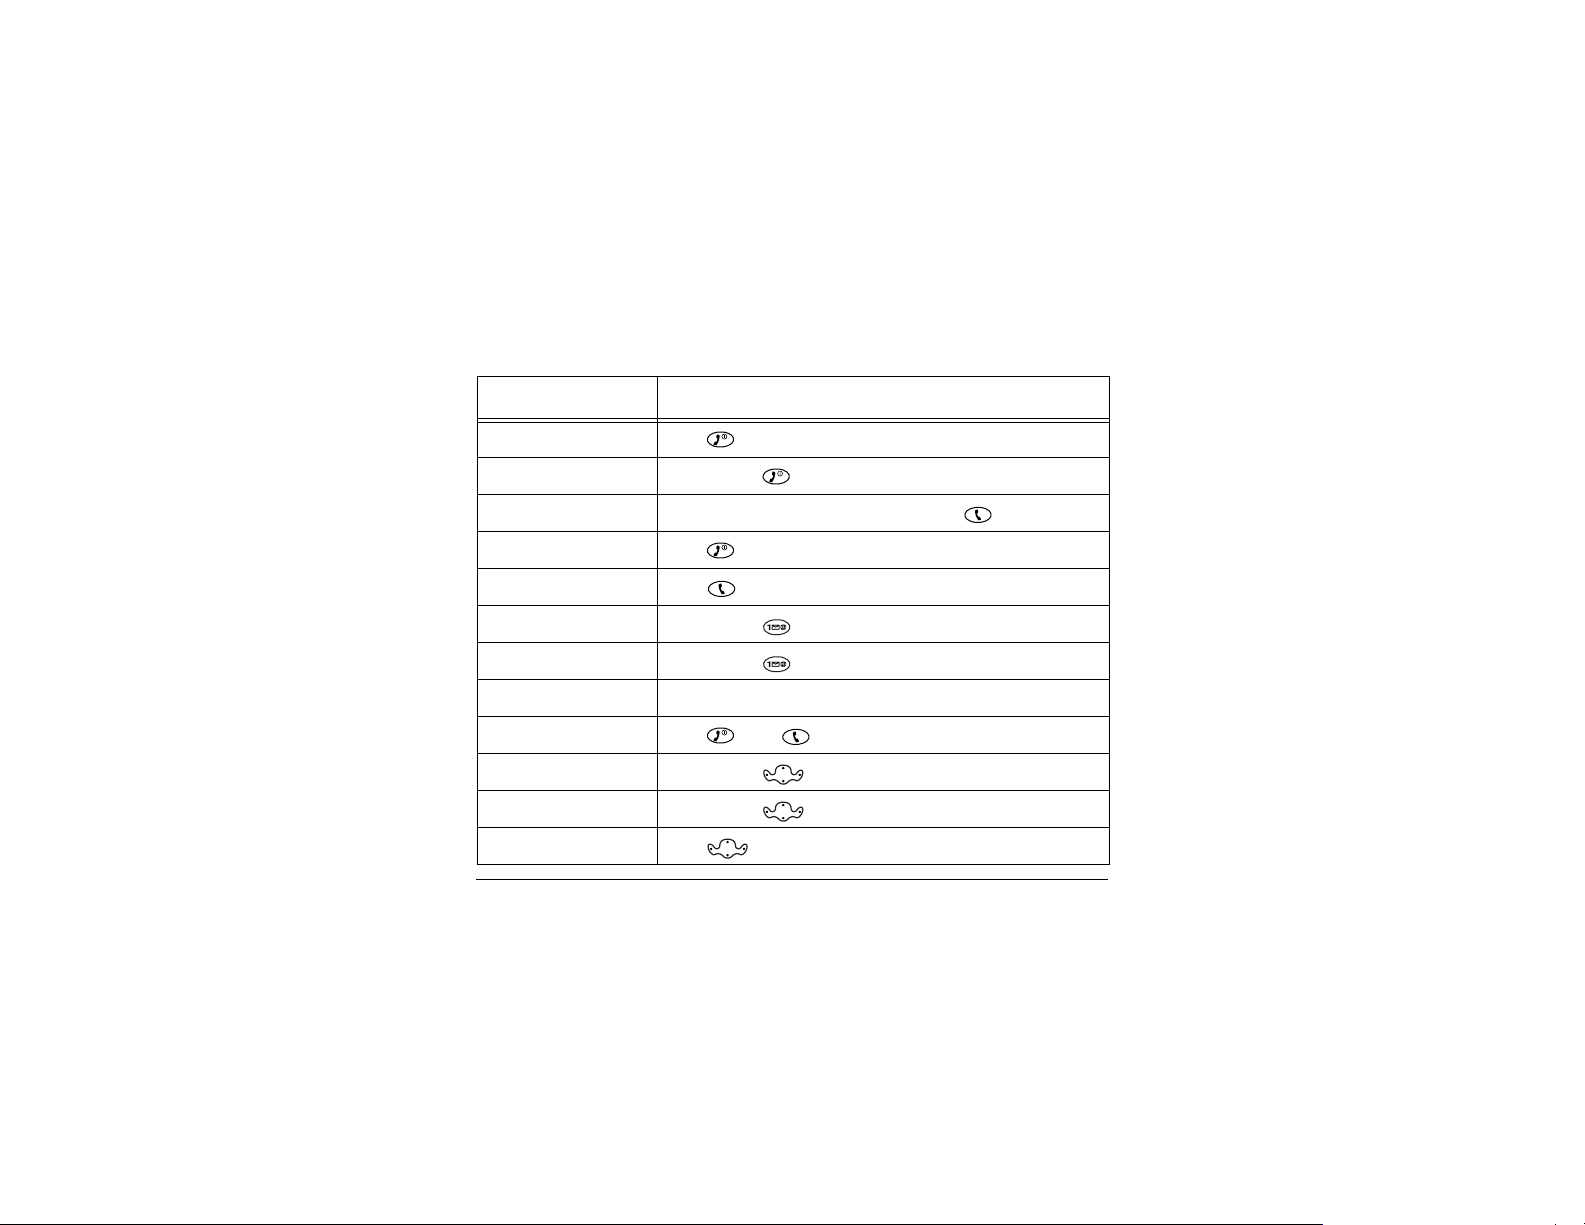
bенЙкбеЦ=дЙннЙклI=емгДЙклI=~еЗ=лугДздл
Use this table for general instructions for entering letters, numbers, and symbols in a contact card. For more
detailed information on using text entry modes, see page 16.
qçKKK aç=íÜáëKKK
Enter a letter Use mode and press a key until you see the letter
you want. For more information, see page 16.
Enter a number Use mode and press a key once to enter it’s number.
For more options, see page 16.
Enter a symbol Press until you find the symbol you want. There are
more symbols under the symbol text mode. See page 16.
Enter a space Press .
Erase a character Press .
Erase all characters Press and hold .
Move the cursor right or left Press up or down.
Change text entry modes Press .
Capitalize the next letter Press and hold . Choose .
Capitalize every letter Press and hold . Choose .
Capitalize the first letter of each word Press and hold . Choose .
Highlight an option at the bottom of the screen Press left or right.
rлЙкЫл=dмбЗЙ=Сзк=нЬЙ=hузЕЙк~=OOPR=йЬзеЙ NR
Page 22

rеЗЙклн~еЗбеЦ=нЙсн=Йенку=гзЗЙл
There are four modes:
Number mode
Normal Text
Rapid Text
®
Symbol mode
kçíÉW The mode you start in depends on the task
you are doing.
bенЙкбеЦ=емгДЙкл
• In mode, press a number key once.
• In mode, press and hold a number key
until the number appears on the screen.
• In mode, press and hold a number key
®
until the number appears on the screen.
=bенЙкбеЦ=пзкЗл=дЙннЙк=Ду=дЙннЙк
NK Press a key once for the first letter, twice for the
second letter, and so on.
OK Wait for the cursor to move right and enter the
next letter.
Enter Name:
Sav e
Current mode
Ñ
Ñ
Ñ Ñ
O...
bенЙкбеЦ=пзкЗл=имбЕвду
®
When you press a series of keys in rapid text mode,
TM
Tegic
T9® Text Input checks its dictionary of
common words and guesses at the word you are
trying to spell.
NK For each letter of the word you want, press the
key once. For example, to enter the word “any”
press: → → .
qáéW=Don’t look at the screen until you have
pressed a key for each letter of the word.
OK If the word doesn’t match what you want, press
to look at other word matches.
PK When you see the word you want, press .
bенЙкбеЦ=лугДздл
You can access a subset of symbols by pressing the
key. For a more complete list, use the symbol
text mode.
NK Press right to highlight the mode.
OK Press to enter the text entry menu.
PK Select pугДздл.
QK Press down to view the list of symbols.
RK Press the number key corresponding to the
symbol you want.
NS pнзкбеЦ=`зен~Енл
Page 23

`Ь~еЦбеЦ=нЙсн=Йенку=гзЗЙл
Change modes to enter a character from a different
mode. For example, to enter numbers in an email
address while you’re in normal text entry mode.
You can either:
• Press to switch modes.
• Press right to highlight the text entry
mode, press to enter the menu, then
select a different text entry mode.
^ЗЗбеЦ=~=ЕзЗЙ=зк=ЙснЙелбзе
When you save the phone number of an automated
service, you may include a pause where you would
select an option or enter a password. You can enter
multiple pauses in a phone number.
NK Enter the first portion of the phone number.
OK Press right to scroll through the
options at the bottom of the screen.
PK Press to select a type of pause.
нбгЙЗ=й~млЙ=causes the phone to stop
A
dialing for two seconds.
A
Ü~êÇ=é~ìëÉ causes the phone to stop
dialing until you select
rлЙкЫл=dмбЗЙ=Сзк=нЬЙ=hузЕЙк~=OOPR=йЬзеЙ NT
oÉäÉ~ëÉ.
QK Enter the remaining numbers.
bЗбнбеЦ=~=Езен~Ен
NK Select jÉåì → `çåí~Åíë.
OK To find the contact you want to edit, select
either
sáÉï=^ää or cáåÇ=k~ãÉ.
PK Press to select the contact to edit.
QK Select lйнбзел to edit the entire contact, or
select the specific information (such as the
phone number) you want to edit.
RK Enter the new information.
SK If finished, press to select p~îÉ.
bк~лбеЦ=беСзкг~нбзе=Скзг=~=Езен~Ен
NK Select jÉåì → `çåí~Åíë → sáÉï=^ää.
OK Press to select a card.
PK Select lйнбзел=→ bê~ëÉ=`çåí~Åí=to erase the
entire contact.
-orSelect the phone number, then select
kмгДЙк
to erase the phone number.
QK Select vÉë to erase.
bê~ëÉ=
Page 24

cбеЗбеЦ=Езен~Ен=беСзкг~нбзе
There are three main methods for finding a phone
number or contact details: checking the Frequent
Contacts list, searching the Contacts directory, and
using Fast Find.
`ЬЙЕвбеЦ=нЬЙ=cкЙимЙен=`зен~Енл=дблн
From the home screen, press down to see
up to 15 of the most frequently called contacts, in
order from most frequent to least frequent. You
also see the full Contacts List if you scroll down past
the double line.
qáéW You can enter the first letter of the name you
are looking for to skip down the list.
pЙ~кЕЬбеЦ=нЬЙ=`зен~Енл=ЗбкЙЕнзку
NK Select jÉåì → `çåí~Åíë.
OK Select a search method:
– To view a list of names, select
– To find a specific name, select cáåÇ=k~ãÉK
Enter part of the name and select
PK Scroll down until you find the name you want.
– To call the contact, select the number and
press .
sáÉï=^ää
cáåÇ.
pЙннбеЦ=мй=c~лн=cбеЗ
With Fast Find, you press one or two keys to view
close matches of the number you are looking for.
NK From the home screen, select
jÉåì → pЙннбеЦл=→=bñíê~ë=→=c~ëí=cáåÇ.
OK Select bå~ÄäÉÇ.
rëáåÖ=c~ëí=cáåÇ
NK Press the keys corresponding to the letters of
the name you want to find. The matching
contacts appear on the screen.
kçíÉW=Speed dial locations appear before
names if they use the same keys. For example,
to look for Abe’s contact entry, you press
for “A”. However, there is a speed dial location
associated with 2, so the speed dial contact
appears first. To find Abe’s number, you would
then press the key that corresponds to the next
letter of his name.
OK When you see the name you want, you can press
to call the number, or press to view
contact details.
PK If you do not see the name you want, press
up or down to search the possibilities.
– To display the full contact, press .
NU pнзкбеЦ=`зен~Енл
Page 25

Qpbkafkd=^ka=ob`bfsfkd=qbuq=jbpp^dbp
This chapter describes how to send, receive, and
erase text messages from your phone. If you are
looking for information on voicemail messages, see
page 10.
fгйзкн~енW The features and menus described in
this chapter may vary depending on services
available in your area. In addition, usage charges
may apply to each message. For clarification on
these issues, check with your service provider.
pЙеЗбеЦ=~=еЙп=нЙсн=гЙлл~ЦЙ
You can only send text messages to phones that are
capable of receiving them, or to email addresses.
NK Select jÉåì=→ jÉëë~ÖÉë=→ pÉåÇ=kÉï.
OK Enter the phone number or email address of
the person to whom you are sending the
message, or select
phone number or email address.
kçíÉW If you wish to enter an email address, you
need to switch text entry modes. To enter
letters, press to switch to mode. To
enter symbols, press until you find the
rлЙкЫл=dмбЗЙ=Сзк=нЬЙ=hузЕЙк~=OOPR=йЬзеЙ NV
`çåí~Åíë to choose a saved
symbol you want. See page16 for more
information on text entry modes.
PK Press to select kÉñí.
QK You now have the option of writing your own
message or sending a pre-written message.
– To send a pre-written message, see page 20.
– For help entering text, see page 15.
– For help adding an emoticon (like a “smiley
face”) to your message, see page 21.
RK When you are finished with the body of the
message, press to select kÉñí.
SK Choose one of the following options:
pÉåÇ=jÉëë~ÖÉ to send the message=
–
immediately. A copy is then saved to your
Text OutBox.
`~ддД~Ев=kмгДЙк=to=include a callback
–
number with the messageK=See page 20.
aЙдбоЙку=oЙЕЙбйн to request notification
–
when the message
mкбзкбну to label the message as “Urgent.”
–
=has been received.
Page 26

– pÉåÇ=i~íÉê to schedule when to send the
message. For help, see page 21.
p~îÉ=jÉëë~ÖÉ to save the message in your
–
Filed folder.
bñáí=to cancel the message=without saving.
–
oЙЕЙбобеЦ=беЕзгбеЦ=Е~ддл=пЬбдЙ=ЕкЙ~нбеЦ=
гЙлл~ЦЙл
• If you answer the call, you can continue working
on the message when you are finished with the
call by selecting
qÉñí=lìí_çñ=and opening the message.
jÉåì=→ jÉëë~ÖÉë →
• If you don’t wish to answer the call, select
fЦезкЙ. The call is silenced and you return to
the screen you were working in.
pЙеЗбеЦ=~=гЙлл~ЦЙ=нз=лЙоЙк~д=
кЙЕбйбЙенл
If you are sending a message to more than one
person, enter a space or a comma between each
phone number or email address. If you are sending
to more than one contact in your Contacts directory,
the phone automatically inserts a comma after each
contact. The messages are sent one at a time, once to
each addressee. You can send a message to up to
pЙеЗбеЦ=~=йкЙJпкбннЙе=гЙлл~ЦЙ
Your Kyocera 2235 phone comes with a set of
commonly used messages, such as “Call me,”
“Need directions,” or “I’m delayed.”.
NK Select jÉåì=→ jÉëë~ÖÉë=→ pÉåÇ=kÉï and
enter the phone number or email address of the
recipient.
OK Select kÉñí.
PK Press right and select ^ìíçjëÖK
QK
Press up or down to scroll through the
list of message options.
RK Press to select a message. If you wish,
enter additional text.
SK Press left and select kÉñí.
fеЕдмЗбеЦ=~=Е~ддД~Ев=емгДЙк
A callback number lets the recipient of a message
know to what number they can call you back.
After creating a message (See “Sending a new text
message” on page 19) and choosing
kмгДЙк
from the message Options screen, you
have the option of including your own phone
number or a specified number.
`~ääÄ~Åâ=
10 contacts at once.
OM pЙеЗбеЦ=~еЗ=oЙЕЙбобеЦ=qЙсн=jЙлл~ЦЙл
Page 27

fеЕдмЗбеЦ=узмк=зпе=йЬзеЙ=емгДЙк=
NK Press to select vÉë.
OK Press up and select pÉåÇ=jÉëë~ÖÉ.
The message is sent and a copy is saved to your
Text OutB ox.
fеЕдмЗбеЦ=~=лйЙЕбСбЙЗ=йЬзеЙ=емгДЙк
NK Press right and select líÜÉê.
OK Enter the phone number.
PK Press to select açåÉ. To change the text
entry mode, see page 17.
QK Press up and select pÉåÇ=jÉëë~ÖÉ.
The message is sent and a copy is saved to your
Text OutB ox.
^ЗЗбеЦ=~е=ЙгзнбЕзе
Your Kyocera 2235 phone has a special set of
emotion icons, or “emoticons” that you can add to
a text message. These emoticons are like a
sophisticated set of “smiley faces.” If the recipient’s
phone supports the same technology as your
phone, they appear as you see them. If they are not
supported, the icons appear in a more simplistic
form.
qз=~ЗЗ=~е=ЙгзнбЕзе=нз=~=гЙлл~ЦЙ
NK
From the message entry screen, place the
cursor where you would like to enter the
emoticon.
OK Press right and select bгзнбзе.
PK Press up or down to move through the
list of available icons.
QK Press the key corresponding to the emoticon
you wish to use. The emoticon is placed in the
message.
pЙеЗбеЦ=~=гЙлл~ЦЙ=~н=~=лЕЬЙЗмдЙЗ=
нбгЙ
If you do not wish to send the message immediately,
you can schedule to send it later.
NK Create the message, and choose pÉåÇ=i~íÉê
from the message Options screen. (See
“Sending a new text message” on page 19).
OK Select a time when you wish the message to be
sent (the options are
O=ЬзмклI=NO=ЬзмклI=N=З~уI=O=З~улI=
The message is scheduled for delivery and
stored in your Text OutBox.
PK When you return to the Options screen, press
PM=гбемнЙлI=N=ЬзмкI=
and P=Ç~óë).
up and select pÉåÇ=jÉëë~ÖÉ.
rлЙкЫл=dмбЗЙ=Сзк=нЬЙ=hузЕЙк~=OOPR=йЬзеЙ ON
Page 28

The message is sent from your phone
immediately, but then held by your service
provider’s network for the specified period of
time before it is sent.
pЙеЗбеЦ=~=йкЙобзмлду=л~оЙЗ=гЙлл~ЦЙ
NK Select jÉåì=→ jÉëë~ÖÉë=→ cáäÉÇ.
OK Press up or down through the list of
messages and press to select one.
PK Press to select pÉåÇ=qç.
QK Enter the phone number or email address of
the person to whom you are sending the
message, or select
`çåí~Åí to select a phone
number or email address from a contact.
RK Press to select kÉñí.
fÑ=óçì=Å~ååçí=ëÉåÇ=ãÉëë~ÖÉë
You may not be able to send or receive messages if
your phone’s memory is nearly full, or if service is
not available at that time. To free up memory, erase
old messages.
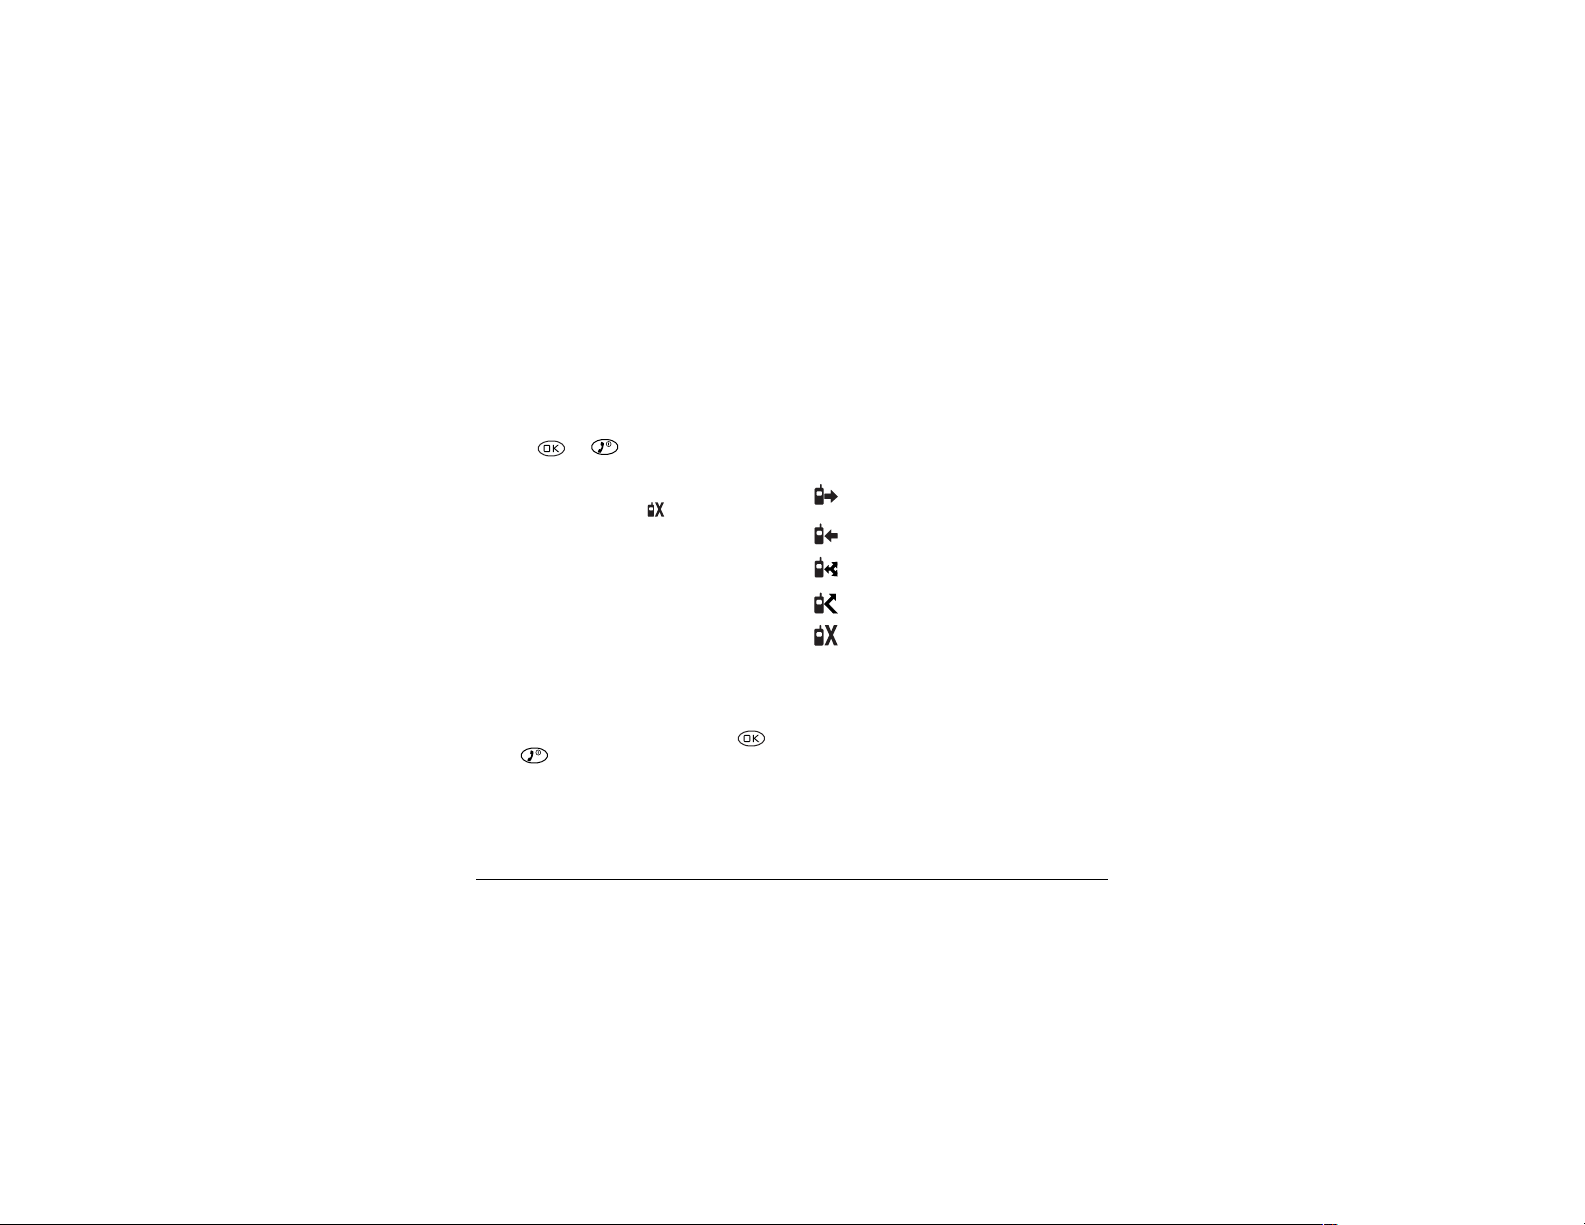
sбЙпбеЦ=нЬЙ=qЙсн=lмн_зс
NK Select jÉåì=→=jÉëë~ÖÉë=→=qÉñí=lìí_çñ.
OK Press up or down through the list of
messages. One of the following symbols
appears next to each message:
The message is pending and will be sent
when possible. You can cancel delivery of
the message.
C The message is scheduled to be sent at a
scheduled time. You cannot cancel delivery
of the message.
The message cannot be sent because
service is not available. An alert appears on
your phone if the message cannot be sent.
{ The scheduled message has been sent and
will be delivered as scheduled. You cannot
cancel delivery of the message.
| The message has been received by the
recipient you have specified.
z The message has never been sent, or has
not been sent since it was last modified. You
can cancel delivery of the message.
OO pЙеЗбеЦ=~еЗ=oЙЕЙбобеЦ=qЙсн=jЙлл~ЦЙл
Page 29

PK Press to accept the message text.
– For help including a callback number, see
page 20.
– For help scheduling an amount of time to
wait before sending the message, see
page 21.
– For help requesting delivery notification or
labeling the message as Urgent, see page 19.
QK When you are ready, select pÉåÇ=jÉëë~ÖÉK
A copy is saved to your Text OutBox.
oЙнкбЙобеЦ=~=нЙсн=гЙлл~ЦЙ
When a text message is received, two things appear
on your screen:
• A note: “New Message: 1 Text”.
• A symbol: , which flashes if the message is
urgent.
fÑ=óçì=ëÉÉ=íÜÉ=kÉï=jÉëë~ÖÉ=åçíÉ
You can choose to:
sáÉï the message by pressing .
•
• Ignore the message by pressing right
and selecting
• Clear the screen by pressing .
rлЙкЫл=dмбЗЙ=Сзк=нЬЙ=hузЕЙк~=OOPR=йЬзеЙ OP
fЦезкЙ.
fÑ=óçì=çåäó=ëÉÉ=íÜÉ= лугДзд
The message has been sent to your Text InBox.
NK Select jÉåì=→ jÉëë~ÖÉë=→ qÉñí=få_çñ.
A list of all your received messages appears.
New, unread messages appear in
ÄçäÇ.
indicates an “Urgent” message.
OK Press up or down to scroll through the
list of messages.
PK Press to read a message.
QK If the message is long, press down to
view the entire message.
RK When you are finished, select an option from
the bottom of the screen:
Ó oÉéäó to the sender.
bê~ëÉ the current message.
–
Ó p~îÉ the message to your cáäÉÇ folder.
У pЙеЗЙк=allows you to view the sender’s
information. You can select an option to
save it to the Contacts directory.
Ó cçêï~êÇ the message.
ÓaçåÉ returns you to the qÉñí=få_çñ.
SK Press to see information such as callback
number, email address, or URL. (If a callback
Page 30

number is included with the message, press
again to call the number.)
bê~ëáåÖ=íÉñí=ãÉëë~ÖÉë
You have the option of erasing messages as you
read them, erasing them one-at-a-time from the list
in the Text InBox, or erasing them all at once. It is a
good idea to erase old messages, as you have
limited memory on your phone.
bк~лбеЦ=лбеЦдЙ=гЙлл~ЦЙл=
NK Select jÉåì=→ jÉëë~ÖÉë.
OK Press down and press to select
the type of message you want to erase (qÉ ñ í=
få_çñI
qÉñí=lìí_çñI or cáäÉÇ).
PK Press to select the message to erase.
QK Select bê~ëÉ to erase the message. A notification
appears: “Erase this message?”
RK Select vÉë to erase the message.
kçíÉW=You can erase a scheduled message from the
Text OutBox, but you cannot cancel delivery of the
message.
OQ pЙеЗбеЦ=~еЗ=oЙЕЙбобеЦ=qЙсн=jЙлл~ЦЙл
bê~ëáåÖ=~ää=ãÉëë~ÖÉë=~í=çåÅÉ
NK Select jÉåì=→ jÉëë~ÖÉë=→ bê~ëÉ=jëÖë.
OK Press up or down and press to
select an option:
kç=cancels the erase request.
–
bенбкЙ=fе_зс erases all messages in your
–
Text InBox.
läÇ=få_çñ=erases all read messages in your
–
Text InBox.
bенбкЙ=lмн_зс=erases all messages in your
–
Text OutBox.
cáäÉÇ=erases all messages in the Filed folder.
–
PK A message appears: “Erase ALL?” Select vÉë to
erase messages or
kç to cancel.
e~îáåÖ=ãÉëë~ÖÉë=~ìíçã~íáÅ~ääó=
Éê~ëÉÇ=E^ìíçJbê~ëÉ=qÉñíF
Use this setting to have old messages automatically
erased when memory is low.
NK Select jÉåì=→ pЙннбеЦл=→ jÉëë~ÖáåÖ=→
^ìíçJbê~ëÉ=qÉñí.
OK Press to select läÇ=få_çñ.
Page 31

R`rpqljfwfkd=vlro=melkb
`ЬззлбеЦ=~=ЗбССЙкЙен=кбеЦЙк
Your Kyocera 2235 phone has several ringers you
can choose from for your incoming calls.
NK Select jÉåì → pЙннбеЦл → pзмеЗл →
oбеЦЙк=qуйЙ.
OK Scroll down the list to hear the different rings.
PK Press to select a ringer from the list.
pйЙЕбСубеЦ=кбеЦЙкл=Сзк=ЗбССЙкЙен=Е~ддл
You can set up your phone to ring differently
depending on the type of call you get.
NK If you have not already done so, save the contact
in your Contacts directory and specify it as
business or personal. For help, see page 14.
OK Select jÉåì → pЙннбеЦл → pзмеЗл →
_млбеЙлл=`~дд=oбеЦ=or mЙклзе~д=`~дд=oбеЦ.
PK Select a ringer from the list.
fгйзкнбеЦ=~ЗЗбнбзе~д=кбеЦЙкл
You can import additional ringers into your
this software and other accessories, visit
пппKвузЕЙк~JпбкЙдЙллKЕзгLлнзкЙK
mЙклзе~дбтбеЦ=нЬЙ=ЬзгЙ=лЕкЙЙе=
`Ь~еЦбеЦ=узмк=Д~ееЙк
The banner is the personal label for your phone. It
appears on the home screen above the time and
date. The banner can be up to 14 characters long.
NK Select jÉåì → pЙннбеЦл → aáëéä~ó=→
jó=_~ååÉê.
OK Select bÇáí.
PK Press to clear the screen.
QK Enter your new text.(For help, see page 15.)
RK Press to save.
`ЬззлбеЦ=~=ЗбССЙкЙен=нбгЙLЗ~нЙ=Сзкг~н
NK Select jÉåì → pЙннбеЦл → aáëéä~ó=→=
qáãÉLa~íÉ=cçêã~í
OK Highlight the option you want.
.
Kyocera 2235 phone using the Kyocera Phone
Desktop software (sold separately). To purchase
rлЙкЫл=dмбЗЙ=Сзк=нЬЙ=hузЕЙк~=OOPR=йЬзеЙ OR
Page 32

^ЗамлнбеЦ=оздмгЙ
^ЗамлнбеЦ=нЬЙ=Й~кйбЙЕЙ=оздмгЙ
To adjust the earpiece volume manually during a
call, press up or down to find a
comfortable level.
pЙннбеЦ=~мнзг~нбЕ=оздмгЙ=~ЗамлнгЙен
You can set your phone to automatically adjust the
earpiece volume during a call, based on the
surrounding noise level.
NK Place a call from a quiet environment and set
the volume to a comfortable level.
OK When you are finished with the call, select
jÉåì → pЙннбеЦл → pзмеЗл →
pã~êí=pçìåÇ.
PK Select bå~ÄäÉÇK=The volume you have just set is
now used as a baseline. You can still manually
adjust the volume during a call.
QK Press to save the setting.
^ЗамлнбеЦ=нЬЙ=кбеЦЙк=оздмгЙ
NK Select jÉåì → pЙннбеЦл → pзмеЗл →=
oбеЦЙк=sздмгЙ
OK Press right to increase the volume, or
left to decrease the volume.
OS `млнзгбтбеЦ=vзмк=mЬзеЙ
.
`Ь~еЦбеЦ=нЬЙ=вЙу=ДЙЙй
The key beep is the sound made when you press the
keys on the keypad. You can change the sound
(tones or clicks), length (normal or long), and
volume of the key beep.
To change the various elements of the key beep,
select
=jÉåì → pЙннбеЦл → pзмеЗл and choose
either
hЙу=_ЙЙй=sздмгЙ, hЙу=_ЙЙй=iЙеЦнЬ, or
hÉó=_ÉÉé=pçìåÇ.
rлбеЦ=лЬзкнЕмнл
From your home screen, you can access four
shortcuts, just by pressing the navigation key in any
one of the four directions:
The shortcut you define.
Press and
hold to lock/
unlock the
keypad.
' Left Right &
Access your saved Contacts.
Three shortcut keys are automatically programmed
into your phone (left, right, and down). For the
*
Up Press and
Down
+
hold to set
the phone
to vibrate.
Page 33

СзмкнЬ=EмйFI=узм=Е~е=~ллбЦе=~=лЬзкнЕмн=нз=зеЙ=зС=нЬЙ=
о~кбзмл=СЙ~нмкЙл=зС=узмк=йЬзеЙK=pЙЙ=`кЙ~нбеЦ=~=
СЙ~нмкЙ=лЬзкнЕмнIТ=ДЙдзпK
Creating a feature shortcut
1. pЙдЙЕн=Menu=→=Settings=→=Display →
Shortcut Key
2. eбЦЬдбЦЬн=нЬЙ=СЙ~нмкЙ=узм=п~ен=лЙн=~л=~=лЬзкнЕмнI=
~еЗ=йкЙлл= =нз=лЙдЙЕн=бнK
У fС=узм=ЕЬззлЙ=~еу=зС=нЬЙ=СзддзпбеЦW=
Send New Msg, Voice Shortcut, Ringer
Volume, Recent Calls, Business List,
Personal List, Web Browser,
Stopwatch, Calculator,
нЬЙбк=кЙлйЙЕнбоЙ=гЙем=зк=СЙ~нмкЙ=~ййЙ~клK
– Send New Msg йкЙй~кЙл=узм=Сзк=лЙеЗбеЦ=
~=åÉï=íÉñí=ãÉëë~ÖÉK
Voice Shortcuts Éå~ÄäÉë=óçì=íç=ë~ó=~=
Ó
лйЙЕбСбЕ=СЙ~нмкЙ=бенз=нЬЙ=йЬзеЙ=бе=зкЗЙк=нз=
~ЕЕЙлл=бнK=cзк=ЬЙдй=лЙннбеЦ=мй=~=озбЕЙ=
лЬзкнЕмнI=лЙЙ=й~ЦЙ PQK=
None Збл~ДдЙл=нЬЙ=лЬзкнЕмнK
Ó
K
InBox,
çê=Voice MemoI=
Accessing a feature shortcut
cкзг=нЬЙ=ЬзгЙ=лЕкЙЙеI=йкЙлл= =мй=~еЗ=
Сзддзп=нЬЙ=йкзгйнлK
Re-assigning a feature shortcut
qз=ЕЬ~еЦЙ=нЬЙ=лЬзкнЕмн=узм=Ь~оЙ=~ллбЦеЙЗI=йкЙлл=
=мй=Скзг=нЬЙ=ЬзгЙ=лЕкЙЙеI=лЙдЙЕн=
Setup=
~еЗ=ЕЬззлЙ=~езнЬЙк=лЬзкнЕмн=Скзг=нЬЙ=дблнK
Changing the look and feel
Choosing a different menu view
vзм=Е~е=ЕЬ~еЦЙ=нЬЙ=~ййЙ~к~еЕЙ=зС=нЬЙ=гЙемл=узм=
лЙЙ=пЬЙе=узм=лЙдЙЕн=
qç=ÅÜ~åÖÉ=íÜÉ=ãÉåì=îáÉïW
Menu=→=Settings=→=Display → Main
pЙдЙЕн=
Menu ViewI=нЬЙе=нЬЙ=зйнбзе=узм=п~енW
pã~ää=fÅçåë
\
Contacts
Note: fÑ=óçì=ÅÜ~åÖÉ=íç=List MenusI=óçì=ïáää=åÉÉÇ=
E
Menu=Скзг=нЬЙ=ЬзгЙ=лЕкЙЙеK=
Contacts
iáëí=jÉåìë
Main Menu
Contacts
Browser
Web Browser
J Messages
i~êÖÉ=fÅçåë
нз=йкЙлл= =мй=зк=Ззпе=нз=лЙЙ=гЙемлKF
User’s Guide for the Kyocera 2235 phone 27
Page 34

^ЗамлнбеЦ=нЬЙ=Д~ЕвдбЦЬнбеЦ
Your screen generally lights up while you are in a
call or when you press a key on the keypad.
However, you can change when and how
backlighting lights up.
NK Select jÉåì → pЙннбеЦл →=aáëéä~ó=→
_~ЕвдбЦЬнбеЦ.
OK Select an option from the list:
aáë~ÄäÉÇ turns backlighting off completely.
–
NM=лЙЕзеЗл=turns backlighting on for
–
10 seconds after your last keypress.
PM=лЙЕзеЗл=turns backlighting on for
–
30 seconds after your last keypress.
NM=ëÉÅK=C=áå=Å~ää=turns backlighting on
–
during a call, and for 10 seconds after your
last keypress.
– PM=ëÉÅK=C=áå=Å~ää=turns backlighting on
during a call, and for 30 seconds after your
last keypress.
kçíÉW=Keeping backlighting on during a call drains
the battery more quickly and reduces talk and
standby times.
OU `млнзгбтбеЦ=vзмк=mЬзеЙ
pЙннбеЦ=mзпЙк=_~ЕвдбЦЬнбеЦ
You can set backlighting to remain on when an
external power, such as the AC Adapter, is used with
the phone.
kçíÉW=Power Backlighting may not be available with
some accessories. Check with your service
provider.
NK Select jÉåì → pЙннбеЦл → ^ЕЕЙллзкбЙл →
mзпЙк=_~ЕвдбЦЬнбеЦ.
OK Select ^äï~óë=çå to keep backlighting on. (The
battery charges more slowly when power
backlighting is on.)
`Ь~еЦбеЦ=нЬЙ=Зблйд~у=Езенк~лн
NK Select jÉåì → pЙннбеЦл → aáëéä~ó=→=
aáëéä~ó=`çåíê~ëíK
OK Select the level of contrast you want (eбЦЬЙлнI=
eбЦЬI=jЙЗбмгI=iзпI=
and=iзпЙлн).
pЙннбеЦ=емгДЙкл=нз=~мнзJЬуйЬЙе~нЙ
Auto-hyphenation automatically inserts hyphens
into your phone numbers to be consistent with the
U.S. dialing plan. For example, 1-800-555-1111.
Page 35

NK Select jÉåì → pЙннбеЦл → aáëéä~ó=→=
^мнзJeуйЬЙе~нбзе
OK Select bå~ÄäÉÇ to turn this feature on.
.
pЙннбеЦ=~=лЕкЙЙе=л~оЙк
OK Select the language and press .
PK Press the appropriate keys to enter special
characters. For more information on special
characters, refer to the Kyocera 2235 Reference
Guide at
пппKвузЕЙк~JпбкЙдЙллKЕзг.
Several screen savers are provided with your
phone. A screen saver works only from the home
screen, and activates 10 seconds after the last
keypress. Incoming calls and alerts override screen
savers.
kçíÉW This function cannot be used with voice
services.
NK Select jÉåì → pЙннбеЦл → aáëéä~ó=→=
pЕкЙЙе=p~оЙк
OK Select one of the available examples.
PK Press to return to the home screen and
.
wait 10 seconds to view the screen saver you
chose.
`ЬззлбеЦ=~=ЗбССЙкЙен=д~еЦм~ЦЙ
Your phone supports English, Spanish, French, and
Portuguese languages.
NK Select jÉåì → pЙннбеЦл → aáëéä~ó →
i~åÖì~ÖÉ.
rлЙкЫл=dмбЗЙ=Сзк=нЬЙ=hузЕЙк~=OOPR=йЬзеЙ OV
`кЙ~нбеЦ=~=лЙЕмкЙ=ЙеобкзегЙен
This section describes all the features involved in
securing your phone and preventing access to
personal information. All security features are
shielded by a four-digit lock code.
`Ь~еЦбеЦ=узмк=дзЕв=ЕзЗЙ
The lock code is typically 0000 or the last 4 digits
of your phone number.
NK Select jÉåì → pЙннбеЦл → pЙЕмкбну.
OK Enter your lock code and select `Ь~еЦЙ=iзЕв=
`çÇÉ
. A message appears: “Change Lock
Code?”
PK Select vÉë and enter a new code, then press
. Enter your new lock code again.
iзЕвбеЦ=узмк=йЬзеЙ
When your phone is locked, you can call only your
service provider number, a priority number, or a
Page 36

number your service provider has set up as an
emergency number. You can still receive incoming
calls.
NK Select jÉåì → pЙннбеЦл → pЙЕмкбну →
içÅâ=mÜçåÉ=rëÉ.
OK Select an option:
kÉîÉê=does not lock the phone.
–
lе=йзпЙк=мй=locks the phone every time
–
you turn it on.
kçï=locks the phone immediately.
–
PK Press .
rедзЕвбеЦ=нЬЙ=йЬзеЙ
NK From the home screen, select rедзЕв.
OK Enter your four-digit lock code.
oЙлнкбЕнбеЦ=Е~ддл
You can restrict the calls that can be made from
your phone to only those that have been saved in
your Contacts Directory.
NK Select jÉåì → pЙннбеЦл → pЙЕмкбну →
iáãáí=`~ääë=lìí.
OK Select vÉëI=íç=`çåí~Åíë.
PM `млнзгбтбеЦ=vзмк=mЬзеЙ
`дЙ~кбеЦ=йЙклзе~д=беСзкг~нбзе
To clear all personal information from your phone
at once, you can erase all contacts from the
Contacts directory, and/or erase the Recent Calls
list.
bê~ëáåÖ=~ää=Åçåí~Åíë
NK Select jÉåì → pЙннбеЦл → pЙЕмкбну →
bê~ëÉ=^ää=`çåí~Åíë.
OK Select vÉë to erase all contacts. A message
appears: “Erase ALL contacts?”
PK Select vÉë to erase all contacts.
bê~ëáåÖ=íÜÉ=Å~ääë=äáëí
NK Select jÉåì → pЙннбеЦл → pЙЕмкбну →
bê~ëÉ=`~ääë=iáëí.
OK Select vÉë to erase all recent calls. A message
appears: “Erase Calls?”
PK Select vÉë to erase all recent calls.
pЙннбеЦ=гЙлл~ЦЙ=~дЙкнл
You can choose how you want be alerted of
incoming voicemail, pages, or text messages.
Page 37

NK Select jÉåì → pЙннбеЦл → jÉëë~ÖáåÖ=→ the
type of alert (
sзбЕЙг~бд
OK Press to select an option:
–
jÉëë~ÖÉ, kÉí,=m~ÖÉ,=or=
).
aáë~ÄäÉÇ=does not alert you when a
message is received.
sáÄê~íÉ=çåÅÉ=sets the phone to vibrate once
–
when a new message is received.
sбДЙ=C=кЙгбеЗ=sets the phone to vibrate
–
once when a new message is first received,
and once every five minutes. To stop the
reminder, press to select
pçÑí=ÄÉÉé=çåÅÉ=sets the phone to beep once
–
fЦезкЙ.
softly when a message is received.
pзСн=ДЙЙйл=sets the phone to beep softly
–
approximately every five minutes. To stop
this reminder, press to select
içìÇ=ÄÉÉé=çåÅÉ=sets the phone to beep
–
fЦезкЙ.
pЙннбеЦ=~дЙкнл=Сзк=узмк=ЬЙ~ЗлЙн
When a headset (sold separately) is attached to the
phone, you can set alert sounds to originate from
the headset.
NK Select jÉåì → pЙннбеЦл → ^ЕЕЙллзкбЙл →
eЙ~ЗлЙн=oбеЦбеЦ.
OK Select lìí=çÑ=ÜÉ~ÇëÉí to have alerts originate
from the headset.
`зееЙЕнбеЦ=нз=~=д~йнзй=зк=~=m`
The Com Port speed sets the data rate at which your
phone connects to a laptop or PC.
NK Select jÉåì → pЙннбеЦл → ^ЕЕЙллзкбЙл=→
`çã=mçêí=péÉÉÇK
OK
Select the speed. The options are: NVKO=âÄéë,
NNRKO=âÄéë (default),=OPMKQ=âÄéë.
once loudly when a message is received.
iзмЗ=ДЙЙйл=sets the phone to beep loudly
–
approximately every five minutes. To stop
this reminder, press to select
rлЙкЫл=dмбЗЙ=Сзк=нЬЙ=hузЕЙк~=OOPR=йЬзеЙ PN
fЦезкЙ.
Page 38

Srpfkd=slf`b=ob`ldkfqflk
Voice Recognition is a unique feature on your
Kyocera 2235 phone that allows you to activate
calls and special features by speaking commands
into the phone’s microphone.
oЙЕзкЗбеЦ=озбЕЙ=Езгг~еЗл
In order to make or receive calls using voice
recognition, contacts must be saved and have
associated voice commands, or “voice dials.”
oЙЕзкЗбеЦ=~=озбЕЙ=Езгг~еЗ=Сзк=~=
еЙп=Езен~Ен
NK From the home screen, enter the phone
number of the person you want to call.
OK Press to select p~îÉ=kÉï.
PK Enter a name for the contact and press to
save. For help entering letters, see page 15.
QK Press left and select lйнбзел.
RK Select ^ЗЗ=sзбЕЙ=aб~д.
SK At the tone or prompt, say a name, then repeat
added” or, if the name was not saved, you are
instructed to try again.
TK If finished, press to select p~îÉ. A
message appears: “Contact Successfully Saved!”
You are now ready to make a call using this
voice command. See page 33.
oЙЕзкЗбеЦ=~=озбЕЙ=Езгг~еЗ=Сзк=~е=
ЙсблнбеЦ=Езен~Ен
NK From the home screen, select jÉåì →
`çåí~Åíë=→ sáÉï=^ää.
OK Highlight the contact you want to add voice dial
to and press .
PK Highlight the phone number and press .
QK Select ^ÇÇ=sçáÅÉ=aá~ä.
RK Follow the prompts to record a name.
SK Press to select p~îÉ.
You are now ready to make a call using this
voice command.
the name as instructed. You hear “(Name)
PO rлбеЦ=sзбЕЙ=oЙЕзЦебнбзе
Page 39

j~вбеЦ=~=Е~дд=млбеЦ=озбЕЙ=
Езгг~еЗл
NK If you haven’t already done so, record a voice
command for the person you wish to call. See
“Recording voice commands” on page 32.
OK From the home screen, press .
The phone responds: “Say a name.”
PK Say the name of the person you want to call.
QK If the name you said matches a contact in the
Voice Dial List, the phone responds: “Calling
(Name).” Remain silent to make the call, or say
“No” to cancel.
kçíÉW=If there are multiple names saved in the
Voice Dial List that match the name you said,
you will be asked to verify which name you want
to call. Say “Yes” when you hear the correct
name. Say “No” when you hear an incorrect
name.
RK When you are finished, press .
You cannot end the call with a voice command.
rлЙкЫл=dмбЗЙ=Сзк=нЬЙ=hузЕЙк~=OOPR=йЬзеЙ PP
^елпЙкбеЦ=~=Е~дд=пбнЬ=озбЕЙ=
Езгг~еЗл
You can use voice commands to answer an
incoming call only if your phone is connected to an
accessory such as a Hands-free Car Kit or Headset
(both sold separately) and Auto-Answer is turned
off (see “Answering calls Hands-Free” on page 7.)
NK Select jÉåì=→=pЙннбеЦл=→=
sзбЕЙ=pЙкобЕЙл=
When you receive an incoming call, VR
responds: “Incoming call, answer?” or
“Incoming roam call, answer?” If the caller is
recognized as a contact entry in your phone,
then the phone will say “Incoming call from
(Name), answer?”
OK Say “Yes” or press any key except .
fЦезкбеЦ=~е=беЕзгбеЦ=Е~дд
To ignore an incoming call, do one of the following:
• Say “No” and press to silence the alert.
• Remain silent. The voice alert repeats twice and
the phone rings once, then returns to the home
screen.
→=sзбЕЙ=^елпЙк=→=bå~ÄäÉ.
Page 40

rлбеЦ=озбЕЙ=лЬзкнЕмнл=
You can use voice commands to quickly access
features of your phone. These features include:
• Recording a
• Writing a
• Changing the ringer volume
• Opening the Calculator
• Viewing the Recent Calls
• Starting the Web Browser
• Opening web bookmarks
`кЙ~нбеЦ=~=озбЕЙ=лЬзкнЕмн
NK Select jÉåì=→=pЙннбеЦл=→=sзбЕЙ=pЙкобЕЙл=→=
sзбЕЙ=pЬзкнЕмнл
OK Select the item for which you want to record a
voice shortcut.
The phone says: “Speak a shortcut name.”
PK Say the shortcut you want to record. You can
record any word you wish. It is recommended
you record a word you will easily remember.
The phone says: “Again.”
QK Say the shortcut again.
PQ rлбеЦ=sзбЕЙ=oЙЕзЦебнбзе
=voice memo
=new text message
=list
.
If the two words you said match, the phone
says: “Shortcut (Name) saved.” If the two words
you said do not match, the phone asks you to
record the shortcut again.
RK You must now activate the shortcut. Select
jÉåì=→=pЙннбеЦл=→=aáëéä~ó=→=pЬзкнЕмн=hЙуK
SK
Select sзбЕЙ=pЬзкнЕмн.
You can now use the shortcut you just created.
rлбеЦ=~=озбЕЙ=лЬзкнЕмн
Once you have created a voice shortcut for a feature
(see “Creating a voice shortcut”), you can access
the feature by pressing and holding up and
by speaking the shortcut when prompted.
qк~бебеЦ=sзбЕЙ=oЙЕзЦебнбзе
If your phone is having trouble recognizing your
voice, you can train it with the commands “yes,”
“no,” and “wake up.”
kçíÉW=The Wake up command is used with a
Hands-free Car Kit or Headset (both sold
separately) to turn the phone on.
NK Select jÉåì=→=pЙннбеЦл=→ sзбЕЙ=pЙкобЕЙл=→=
sзбЕЙ=qк~бебеЦ=
OK Follow the prompts to train the phone.
→ qê~áå=^ää.
Page 41

oЙЕзкЗбеЦ=~=озбЕЙ=гЙгз
You can record and play back voice recordings
using the voice memo feature.
kçíÉW=You can access voice memo quickly by setting
up a shortcut key. See “Creating a feature shortcut”
oЙпбеЗбеЦ=зк=С~лн=Сзкп~кЗбеЦ=~=озбЕЙ=
гЙгз
You can rewind or fast forward a voice memo while
the memo is playing, by pressing left to
rewind or right to fast forward.
on page 27.
oЙЕзкЗбеЦ=~=озбЕЙ=гЙгз
NK Select jÉåì=→=pЙннбеЦл=→ sзбЕЙ=pЙкобЕЙл=→=
sçáÅÉ=jÉãç=
→=oЙЕзкЗ=kЙп.
The phone says: “Please record at the tone.”
OK Say your memo and select píçé when finished.
PK To attach a name to the memo, select k~ãÉ.
mд~убеЦ=~=озбЕЙ=гЙгз
NK Select jÉåì=→=pЙннбеЦл=→ sзбЕЙ=pЙкобЕЙл=→=
sçáÅÉ=jÉãç
OK Scroll through the list of voice memos and press
PK Press to select mä~ó.
rлЙкЫл=dмбЗЙ=Сзк=нЬЙ=hузЕЙк~=OOPR=йЬзеЙ PR
.
to select the one you want.
Page 42

T`lkkb`qfkd=ql=qeb=fkqbokbq
You can use your phone to browse the Internet if
you have obtained phone Internet services from
your service provider and if over-the-air Internet
access is available in your area.
kçíÉW=You cannot receive incoming calls while you
are using the Web Browser.
pн~кнбеЦ=нЬЙ=tЙД=_кзплЙк
NK Select jÉåì 6 tЙД=_кзплЙк.
A message informs you that airtime fees apply
for browser use. For more information about
how airtime is charged, contact your service
provider.
kçíÉW=If you wish to cancel this message
prompt, see “Changing the browser prompt” on
page 38.
OK Press to continue.
If this is the first time you have connected to the
Internet, a message informs you that security is
not yet enabled for your Web Browser.
PK Press to select vÉë to enable security.
PS `зееЙЕнбеЦ=нз=нЬЙ=fенЙкеЙн
When you are connected to the Web Browser,
your home page will look something like this:
Your home page has a
1 News
2 Weather
3 Sports
OK Ma ...Home
QK You are now ready to use the Internet.
list of bookmarks, and
a number of web menu
options on the bottom
of the screen.
– A appears in a secure session.
– An underline and an arrow indicate that
there is more text. Press down to
view more text. Press to return to the
previous screen.
– For information on the menu options at the
bottom of the screen, see “Using the web
menu options” on page 37.
– For help searching for a web site, see
“Searching for a Web site” on page 37.
RK When you have finished using the Internet,
press to exit the browser.
Page 43

rлбеЦ=нЬЙ=пЙД=гЙем=зйнбзел
The following options may appear on your screen:
eçãÉ=returns you to the main Web Browser
•
window, or home page.
j~êâ=páíÉ=saves the current location as a
•
bookmark for easy access.
_ççâã~êâë=displays a list of your saved web
•
sites.
pÉíìé=gives you options for changing=how
•
information is displayed
– pÜçï=roi=displays the entire URL.
–
^Äçìí=léÉåï~îÉ»=displays information
about your Web Browser version.
–
bеЕкуйнбзе=should not be used unless you
are instructed to do so by your service
provider.
–
rmKiáåâ=selects a different browser server.
You can use this option if you have more
than one Web Browser account, such as one
for business and one for personal use.
–
oÉëí~êí=restarts the Web Browser.
K
pЙ~кЕЬбеЦ=Сзк=~=tЙД=лбнЙ
How you search for a website depends on your
service provider. However, most providers place
search engines on the home page. For more
information about searching for a Web site, contact
your service provider.
_ззвг~квбеЦ=~=tЙД=лбнЙ
When you have found a Web site that you want to
access quickly, you can bookmark it so that it will
be easily accessible from the home page.
NK Go to the site you would like to bookmark. For
help finding a Web site, see “Searching for a
Web site” on page 37.
OK Ensure that you are looking at the actual page
you would like to access.
PK Select j~êâ=páíÉ from the bottom of the screen.
dзбеЦ=нз=~=Дззвг~квЙЗ=лбнЙ
NK Select jÉåì 6 tЙД=_кзплЙк.
OK If you see a message prompt, press to
continue.
rлЙкЫл=dмбЗЙ=Сзк=нЬЙ=hузЕЙк~=OOPR=йЬзеЙ PT
Page 44

PK From your Web home page, press right
to highlight
_ççâã~êâëK
A list of bookmarks appears.
QK Enter the number corresponding to the
bookmark you want and press .
`ЬЙЕвбеЦ=млЙ=~гзменл
Your phone has a timer that counts the number and
total duration of Web calls you have made since the
last time you reset the timer.
• Select jÉåì → pЙннбеЦл →=
`~дд=fеСзкг~нбзе=
• Select
kçíÉW A single browser session may consist of
oÉëÉí to reset the timer to zero.
several browser calls.
→=_кзплЙк=qбгЙк.
`Ь~еЦбеЦ=нЬЙ=ДкзплЙк=йкзгйн
You can choose to receive a confirmation prompt
whenever you start or exit the Web Browser.
NK Select jÉåì → pЙннбеЦл →=bñíê~ë →=
_кзплЙк=mкзгйн
OK Press to select an option:
^í=pí~êí=confirms that airtime fees will be
–
.
applied when you use the browser.
^í=båÇ=verifies you want to exit the browser.
–
_çíÜ=prompts you when you start the
–
browser and exit the browser.
kз=mкзгйнл does not use any prompts.
–
cзк=гзкЙ=беСзкг~нбзе
This chapter describes the basics of connecting to
and using the Internet on your phone. For more
detailed information, refer to the Kyocera 2235
Reference Guide at
PU `зееЙЕнбеЦ=нз=нЬЙ=fенЙкеЙн
пппKвузЕЙк~JпбкЙдЙллKЕзг.
Page 45

Urpfkd=qllip=C=d^jbp
The Tools & Games menu offers a variety of helpful
items and four games.
rëáåÖ=qççäë
=^ä~êã=`äçÅâ
Use the Alarm Clock to set an alert for a specific
time. The alert occurs only if the phone is on.
NK Select jÉåì → qççäë=C=d~ãÉë →
^ä~êã=`äçÅâ → pÉí.
– Press up or down to select an hour
NK Select jÉåì → qççäë=C=d~ãÉë → qáé=
`~äÅìä~íçê
OK Enter the amount of your bill and press .
PK Select the amount you want to include as a tip
.
(15%, 18%, 20%, 10%, 5%, Other) and press
. Your total bill appears, including tip.
QK If you want to split the bill, press right
and press to select
RK
Enter the number of guests and press .
péäáíK
The amount each guest pays appears.
and minutes.
– Press left or right to switch between
hours, minutes, and a.m./p.m.
– Enter numbers using the phone keypad.
OK Press to save.
PK When the alarm rings, select pеззтЙ to silence
the alarm for 10 minutes, or select lÑÑ to turn
off the alarm.
=qáé=`~äÅìä~íçê
The Tip Calculator helps you calculate how much
tip to include on a bill.
rлЙкЫл=dмбЗЙ=Сзк=нЬЙ=hузЕЙк~=OOPR=йЬзеЙ PV
=`~äÅìä~íçê
Use the calculator for basic mathematical
equations.
NK Select jÉåì → qççäë=C=d~ãÉë → `~äÅìä~íçê.
OK Use the keypad to enter numbers.
PK Press to select mathematical operations.
Z equal H add ñ multiply
Ù divide J subtract
` Clear all numbers entered and display a zero.
jo Display the value currently stored in memory.
decimal point
K
Page 46

jH Add the displayed digit to the value stored in
memory.
j` Clear the value currently stored in memory.
œ Change the sign of the displayed number.
Clear one function or one digit from the
screen and return the calculator to digit entry
mode. Hold down to clear all of the digits and
operations and display a zero.
Exit the calculator and return to home screen.
=`зменЗзпе=qбгЙк
This timer counts down for a specified amount of
time. It beeps when that amount of time has
elapsed.
NK Select jÉåì → qççäë=C=d~ãÉë →
`зменЗзпе=qбгЙк.
OK Press to pÉí.
PK Press up or down to set the hours,
minutes, and seconds. To move the cursor,
press left or right.
QK Select pí~êí to begin the countdown.
píçé to pause the countdown.
Select
RK When the alarm rings, press to silence it.
=píçéï~íÅÜ
NK Select jÉåì → qççäë=C=d~ãÉë → píçéï~íÅÜ.
OK Select pí~êí to have the stopwatch begin
counting.
PK Select píçé to stop counting.
QK Select oÉëÉí to set the counter back to zero and
begin counting again.
RK Press when finished.
mä~óáåÖ=d~ãÉë
There are four games that come with the Kyocera
2235 phone:
aìÇÉëI
If an incoming call alert is received while playing a
game, the game is paused and exited. You can
return to play once the incoming call alert is ended.
The game will not remain paused while the phone
is off.
The I Ching is a 3,000-year-old collection of
64 fortunes written in China. Each fortune has a
number, a name, and a mystical description. This
game gives you your fortune based on the option
jулнбЕ=f=`ЬбеЦ, `~оЙке=`к~пд, pй~ЕЙ=
and _êáÅâ=^íí~Åâ.
=jулнбЕ=f=`ЬбеЦ»
you select.
QM rëáåÖ=qççäë=C=d~ãÉë
Page 47

NK Select jÉåì → qççäë=C=d~ãÉë →
jулнбЕ=f=`ЬбеЦ.
OK Select a game option:
vзмк=cзкнмеЙ—At the prompt, think of a
–
question you want answered. Your fortune
appears.
nìáÅâ=vÉëLkç—Think of a question that
–
would require a yes/no answer and then
press to have your question answered.
– fелнкмЕнбзел—Provides help on using
Mystic I Ching.
oЙСЙкЙеЕЙ=sЙклбзе—At the prompt, enter
–
your lucky 2-digit number (for numbers
lower than 10, enter 0 before the numeral,
e.g., 07). Press to see the Chinese
name and fortune associated with your
number.
`Ь~еЦбеЦ=нЬЙ=лзмеЗл=~еЗ=белнкмЕнбзел
NK Select jÉåì → qççäë=C=d~ãÉë →
jулнбЕ=f=`ЬбеЦ=→ pЙннбеЦлK
OK
Select an option:
pзмеЗл=allows you to determine when you
–
hear music with this game. Choose=pçìåÇ=
^äï~óë
,=aмкбеЦ=qбндЙ, or kç=pçìåÇK=
rлЙкЫл=dмбЗЙ=Сзк=нЬЙ=hузЕЙк~=OOPR=йЬзеЙ QN
– fелнкмЕнбзе=aблйд~у lets you choose how to
view instructions. Choose
fелнкмЕнбзел
PK
Press= to save your setting.
or eбЗЙ=fелнкмЕнбзелK=
=pÜçï=
=`~îÉêå=`ê~ïä»=
This adventure game sends the player through a
multi-layer maze inside a large cavern while
fighting monsters, gathering gold, and finding
treasure. The goal of the game is for the player to
gain as many points as possible before being killed.
To collect items or attack monsters, simply move
over them. Monsters attack you by attempting to
move over your spot.
To play the game:
NK Select jÉåì → qççäë=C=d~ãÉë →
`~îÉêå=`ê~ïä=→ kÉï=d~ãÉ.
OK Press to enter the game.
PK Press up, down, left, and right to move
through the maze.
QK Press each time you receive a prompt
announcing that you have collected an item or
killed a monster.
Page 48

RK Press to exit the game.
kçíÉW When you exit the game, you do not lose
your place. You can resume by going back to
`~îÉêå=`ê~ïä and selecting oЙлмгЙ=p~оЙЗ.
`Ь~еЦбеЦ=лзмеЗл=~еЗ=белнкмЕнбзел
NK Select jÉåì → qççäë=C=d~ãÉë →
`~îÉêå=`ê~ïä=→ pЙннбеЦлK
OK
Select an option:
pçìåÇ=allows you to determine when you
–
hear music with this game.
Choose
=pзмеЗ=^дп~ул,=aмкбеЦ=qбндЙ, or=kç=
pçìåÇK
– jÉëë~ÖÉë allows you to set status
information as
PK Press= to save your setting.
låÉ=iáåÉ=or cмдд=pЕкЙЙе.
=pé~ÅÉ=aìÇÉë»
The goal of this game is to shoot down the space
dudes before they shoot you.
• Select
jÉåì → qççäë=C=d~ãÉë=→
pé~ÅÉ=aìÇÉë.
Play begins immediately.
– Press left or right to reposition your
ship.
– Press to pause the game.
Your ship has three lives. The first two times your
ship is hit you will be prompted to either
the game or to begin a
kÉï game. The third time
oЙлмгЙ
your ship is hit, you must start a New game or exit.
Press to select all of these options.
=_êáÅâ=^íí~Åâ»
The goal of this game is to eliminate bricks
arranged in levels. To do this, you send a moving
ball upward using a paddle at the bottom of the
screen.
NK Select jÉåì → qççäë=C=d~ãÉë →
_êáÅâ=^íí~Åâ.
OK Press to select kÉï.
– To pause the game, press , then press
– To move the paddle, press left or
PK To exit the game, highlight bñáí and press .
right.
to
oЙлмгЙ.
– Press up to shoot the space dudes.
QO rëáåÖ=qççäë=C=d~ãÉë
Page 49

Vdbqqfkd=ebim
`млнзгЙк=pмййзкн
Your service provider’s customer support
department may be accessible directly from your
phone when you dial a number such as *611
(check with your service provider). They can
answer questions about your phone, phone bill,
call coverage area, and specific features available to
you, such as call forwarding or voicemail.
For questions about the phone features, refer to the
materials provided with your phone, or visit
пппKвузЕЙк~JпбкЙдЙллKЕзг.
For additional questions, you may contact the
Kyocera Wireless Corp. Customer Care Center in
any of the following ways:
• Web site:
• Email: phone-help@kyocera-wireless.com
• Phone: (800) 349-4478 (U.S.A. and Canada
Before requesting support, please try to reproduce
and isolate the problem. When you contact the
Customer Care Center, be ready to provide the
following information:
rлЙкЫл=dмбЗЙ=Сзк=нЬЙ=hузЕЙк~=OOPR=йЬзеЙ QP
пппKвузЕЙк~JпбкЙдЙллKЕзг
only) or (858) 882-1401.
• The name of your service provider.
• The actual error message or problem you are
experiencing.
• The steps you took to reproduce the problem.
• The phone’s electronic serial number (ESN).
To find the ESN:
~K Remove the battery.
ÄK Locate the white label on the back of the
phone. Your phone’s 11-digit ESN begins
with “D” and is located under the bar code
on the label.
mЬзеЙ=^ЕЕЙллзкбЙл
To shop for phone accessories, visit
пппKвузЕЙк~JпбкЙдЙллKЕзгLлнзкЙ, or call
(800) 211-1537 (U.S.A. only) or (510) 683-4004.
_ЙЕзгЙ=~=йкзЗмЕн=Йо~дм~нзк
To participate in the testing and evaluation of
Kyocera Wireless Corp. products, including cellular
or PCS phones, visit
ДЙн~KвузЕЙк~JпбкЙдЙллKЕзг.
Page 50

fkabu
kмгЙкбЕл
1-Touch dialing, 9
^
Alarm Clock, 4, 39
alerts
for headsets
for messages, 30
for missed calls, 8
for voice privacy, 13
all calls timer, 12
Auto-Answer, 7
auto-hyphenation, 28
_
backlighting, 28
banner, 25
battery
charging
icon, 1
installing, 1
safety guidelines, 2
bookmarks, 37
Brick Attack, 42
browser prompt, 38
browser timer, 38
`
Calculator, 39
QQ fåÇÉñ
, 31
, 1
callback number
including in messages
Cavern Crawl, 41
CDMA, enhanced voice privacy, 4
Com Port speed, 31
contacts
business
, 14
calling, 18
classifying, 14
editing, 17
erasing, 17
finding, 18
personal, 14
Contacts directory, 14
Countdown Timer, 40
a
data/fax setup, 13
delivery reciept
for text messages
digital mode, 4
display contrast, 28
b
emoticons, 21
enhanced CDMA voice privacy, 4
erasing
all contacts
messages, 24
, 20
, 19
, 30
recent calls list, 30
single contact entries, 17
c
Fast Find, 18
frequent contacts, 10, 18
e
hard pause, 17
f
I Ching, 40
icons, 4
h
keyguard, 12
keypad locking, 12
i
language, 29
limiting calls out, 30
lock code, 29
locking
keypad
, 5, 12
phone, 29
j
menu view, 27
messages
erasing
, 24
pre-written, 20
Page 51

retrieving, 23
troubleshooting, 22
missed call alerts, 8
Mystic I Ching, 40
k
normal text mode, 16
number mode, 16
number type, 14
m
pauses in phone numbers, 17
phone book
see Contacts directory
phone number
phone unlocking, 29
power backlighting, 28
power save mode, 7
priority of messages, 19
privacy
o
rapid text mode, 16
recent calls timer, 12
redialing a number, 7
resetting the phone, v
ringers
rлЙкЫл=dмбЗЙ=Сзк=нЬЙ=hузЕЙк~=OOPR=йЬзеЙ QR
, 14
type of
verifying your own, 5
enhanced CDMA
choosing types
for different calls, 25
, 4
, 25
importing, 25
silencing, 5
volume, 26
roaming, 4
p
screen icons, 4
screen savers, 29
secret contacts, 9, 14
security, 29
shortcuts
accessing
, 26
creating, 27
voice, 34
silencing all sounds, 5, 11
Smart Sound, 26
sounds, 29
in games, 41, 42
Space Dudes, 42
speed dialing, 9
Stopwatch, 40
symbol mode, 16
q
Text InBox, 23
text modes
changing
, 17
understanding, 16
Text OutBox, 22
time/date format, 25
timed pause, 17
timers
, 12
all calls
browser, 38
recent calls, 12
Tip Calculator, 39
r
unlocking the phone, 30
s
vibrate mode, 11
voice dial
voice memos, 35
voice privacy, enhanced CDMA, 4
Voice Recognition (VR), 32
voice shortcuts, 34
voice training, 34
voicemail
volume
t
Web Browser, 36
Web security, 36
, 14
adding
accessing
, 5, 10
changing number, 11
setting up, 5, 10
adjusting during a call
automatic adjustment, 26
earpiece, 26
key beep, 26
ringer, 26
Smart Sound, 26
, 12
Page 52

 Loading...