

Page 1

Contents V1.1
ONE TV BOX Instruction............................................................02
1.1 Functions and features
1.2 Packaged contents
1.3 Technical specifications
TWO Remote control instructions........................................04
2.1 Diagram of remote control and buttons description
THREE Hardware &installation instructions...........................06
3.1 Product picture and Front Panel Description..........................06
3.2 Rear panel description......................................................07
3.3 Connection illustration....................................................08
3.4 Installation and Channel Scan for the First Time...............09
FOUR Menu Description........................................................10
4.1 Menu Description..................................................10
4.2 Program searching.......................................................12
4.3 Operations for PIP function at PC mode................................13
...........................................02
....................................................03
...............................................03
..............04
1
FIVE Operations for game function.....................................14
SIX Troubleshooting...............................................................15
Thank you for buying KWorld’s TV Box
For better use of the product, please read this User’s Manual carefully before use.
TVBOX
Page 2

2
ONE
TVBOX Instruction
Instruction
The TVBox uses the professional progressive scanning TV (DPTV) chip, which adopts
enhanced features such as black level stretch, video noise suppression (de-noise),
and 3D motion compensation to offer clearer and brighter pictures and stronger threedimensional perception.
In addition, its specic, improved frequency-scanning technology increases the frequency
refresh rate from original 50Hz to 60Hz or 75Hz* (optional), which effectively overcomes
the large area and interline icker in picture caused by the lower refresh frequency (50Hz
only) of ordinary TV, giving the picture display higher stability, and reducing the visual
fatigue due to long TV watching.
The TVBox supports 4:3 CRT, 4:3 LCD and 16:9 widescreen LCD Monitor. It has improved
the refresh rate and the resolution. It has also solved the problem of the ordinary PC TV
receiver that is not compatible with LCD monitor. This product helps you easily connect to
LCD monitor and enjoy the wide screen and comfort of LCD technology.
The TVBox has PIP (Picture In Picture) function at PC mode, which allows you to enjoy
wonderful TV programs while operating PC, so neither work nor entertainment is held
up. Furthermore, it has multi-channel preview function, which enables you to view the
program of each channel conveniently.
In addition, the TVBox has 3D noise reduction function, which makes the picture more
exquisite, clearer and more stable.
1.1 Functions and features
• Advanced frequency scanning technology to make the refresh rate up to 60Hz or 75Hz,
which delivers stable pictures without icker.
• Compatibility with CRT monitor and traditional / wide-screen LCD monitor, see below:
SA220:800X600/1024X768/1280X1024/1440X900/1680X1050
SA230:800X600/1024X768/1280X1024/1440X900/1680X1050/1920x1200
• Support 4:3/16:9 picture aspect ratio.
• 9/16-channel preview function to facilitate the channel selection.
• Still-picture function enables you to capture wonderful moments in TV program.
• Super 3D picture noise reduction function to make picture clearer and more stable.
• Special PIP function to give size and position adjustable window. *PIP mode can’t work
on PC display resolution 1680X1050, 1920x1200 and YPbPr input.
• Full-function remote control and 3D-effect English and Chinese menu display for easy
operations.
• VGA/TV output with one click (this function needs to be customized).
© 2009 KWorld
Page 3
• TV tuner with frequency phase lock (PLL) to offer stable reception. Thus, no TV program
will be lost due to poor reception.
• AV/S-VIDEO/YPbPr input interface can be extended with MMI cable so that the TVBox
can be connected with DVD, PS2 game machine etc. The product supports standard-
denition and high-denition signal input (480i/ 480p/ 576i/ 576p/ 720p/ 1080i).
• Auxiliary functions such as automatic power up or shutdown within 24 hours, calendar,
calculator, game and etc.
• Channel functions allow you to arrange the order of programs and channels to meet your
needs.
• PC/TV changeover switch.
• TV program with composite video output (OSD is not supported in this function )
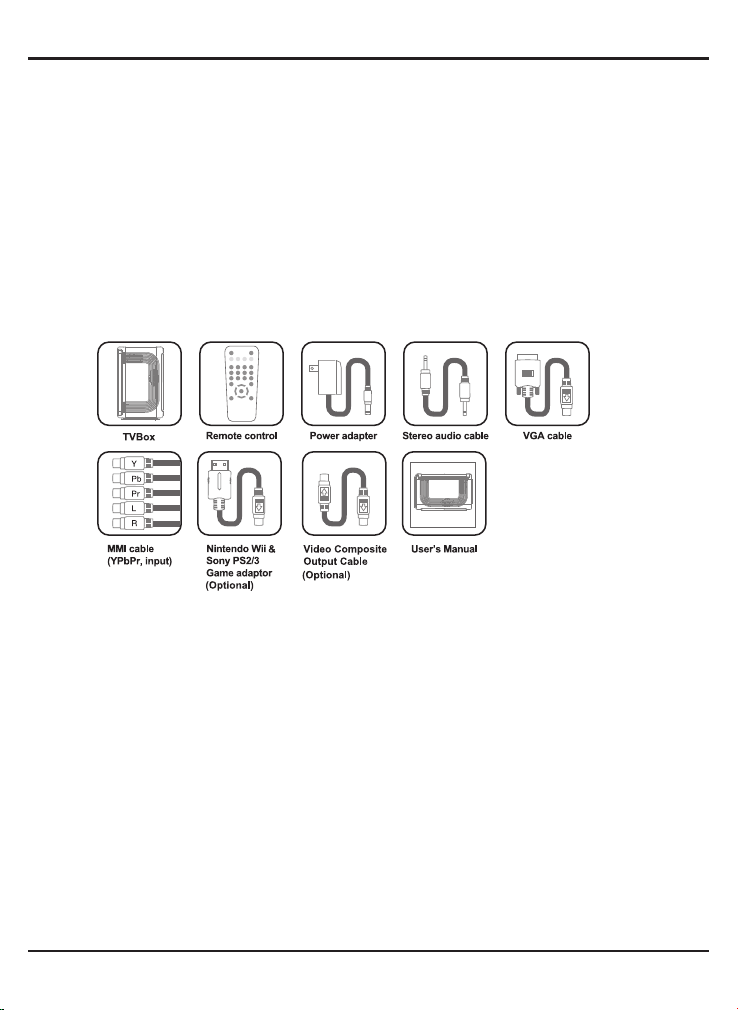
1.2 Packaged contents
1.3 Technical specications
• Power input: DC 5V, 800mA
• TV System Input: 75Ω IEC or type-F
• TV System Support: NTSC, PAL, Secam (Depend on the model)
• Video Input:
• Composite video input (RCA)
• S Video input (4PIN)
• YPbPr input (RCA)
• Wii Game adaptor input (Optional)
• PS2/3 Game adaptor input (Optional)
• VGA input
• Video Output:
• D-SUB output
• Audio input & output: Mini jack (stereo 3.5mm)
•Resolution: Models respectively, according to SA220/SA230
SA220:800X600/1024X768/1280X1024/1440X900/1680X1050
SA230:800X600/1024X768/1280X1024/1440X900/1680X1050/1920x1200
3
TVBOX
Page 4
4
Remote control instructions
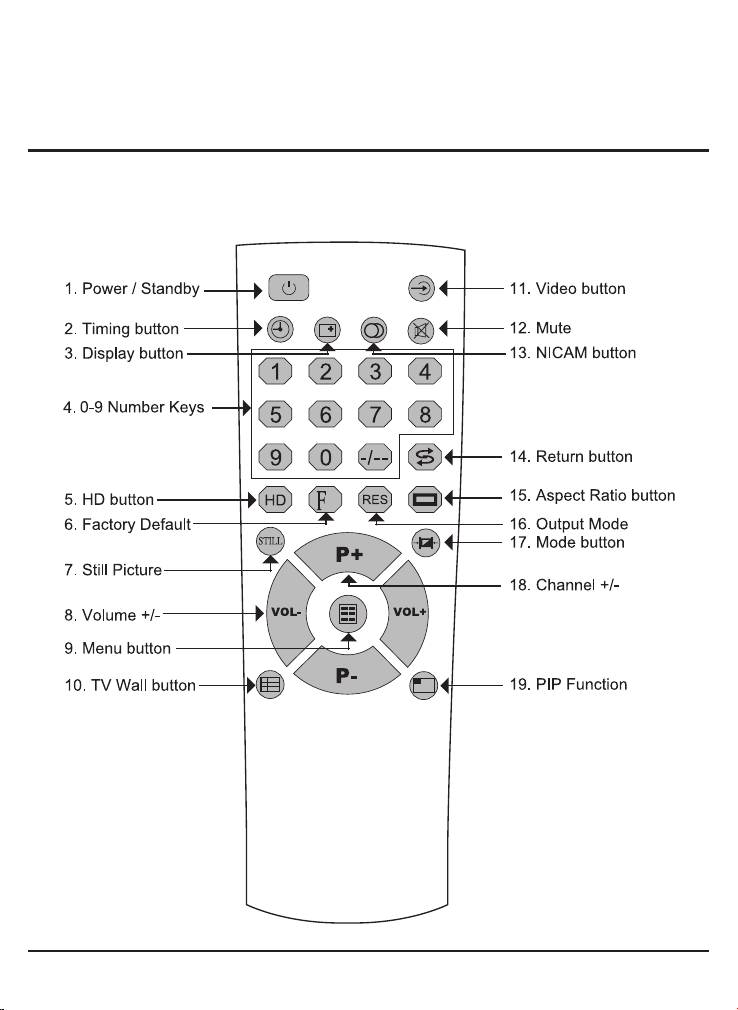
2.1 Diagram of remote control and buttons description
TWO
© 2009 KWorld
Page 5

1.Power/Standby button: Used for power up/standby. At standby mode, it is PC direct
connection state.
2.Timing button: Click this button continuously, the timing of 15-180 minutes for shutdown
and “OFF” will be displayed on the screen in turn. If you set the time for shutdown, the
product will automatically be powered off when the time you set is over.
3.Display button: If this button is clicked, the number of the program you are watching
will be displayed.
4.0-9, -/-- buttons: Used for the selection of channel number.
5.HD button: Not support in this model.
6.Factory Default button: You can click this button to resume the factory default setting.
(Note: If wrong operation by user causes no display on the monitor, you shall press this
button for a long time so as to resume the factory default setting.)
7.Still Picture button: Used to still the picture of TV or video program. At PC mode, it is
used for the left movement of PIP window.
8.Volume + and Volume - buttons: These two buttons are used to adjust volume and are
also used for adjustment in menu.
9.Menu button: Used to enter into and exit from menu.
10.TV Wall button: Used for multi-channel preview.
11.Video button: Clicking this button continuously, you can change over the mode among
TV/ Video/ S video/ YPbPr circularly.
Note: It can only receive one source of signal at the time.
12.Mute button: Clicking this button to make the sound disappear. You can click the
button again or click Volume +/Volume - button to resume the sounds.
13.NICAM button: Only supported in PAL-I Nicam model.
14.Return button: Used for the skip to the previous program.
15.Aspect Ratio button: Used to adjust picture aspect ratio, i.e. the changeover between
4:3 and 16:9.
16.Output Mode button: Used to adjust the resolution and refresh rate of output picture.
(Note: You can click this button continuously to adjust the resolution and refresh rate,
or you can click the button, use P+ and P- to select item and then use VOL+ to realize
the function.)
17.Mode button: Clicking this button continuously, you can change over the picture mode
among the four set modes, i.e. bright, standard, soft and preset. At PC mode, this
button is used for the right movement of window.
18.Program + and Program - buttons: These two buttons are used to increase and
decrease program number, and they are also used to move cursor up and down during
menu operation.
19.PIP button: When there is PC signal input, you can click this button to enter into PIP
function.
5
TVBOX
Page 6
6
Hardware &installation instructions
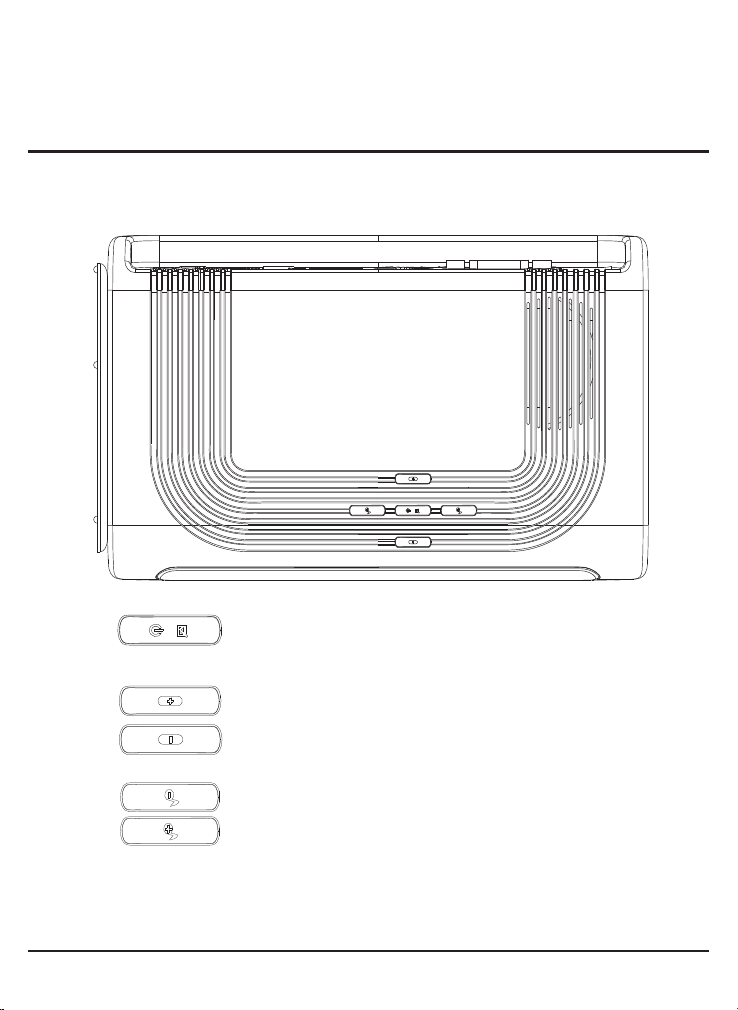
3.1 Product picture and Front Panel Description
THREE
•
© 2009 KWorld
Power/Standby, OSD menu button, i.e. Press to open OSD
•
menu. Press 3~5 seconds to switch the Power/Standby.
Program + and program - button.
•
Volume + and volume - button.
•
LED indicator: Bright for TV or PIP mode.
Dim or ashing for standby mode.
Flashing for command receiving mode.
Page 7

3.2 Rear panel description
7
VGA:The 15-pin connector end on the
attached VGA cable is connected to the
output of video card in PC and the other
end on the cable to the VGA port.
MONITOR:Connected with monitor.
AUDIO IN:Audio inp ut po rt , which is
connected to the output port of sound card
of PC with the stereo audio cable.
AUDIO OUT:Audio output port, which can
be connected with the audio input port of
active speaker or sound amplifying device.
MMI-C:For th e MMI S-vi deo/AV input,
YPbPr input, PS2/3 & Wii Game adaptor
input.
DC IN:Power input port (Please use the
5V power adapter for this product.)
ANT IN:Antenna input port for CATV or
antenna TV signal input.
TVBOX
Page 8

8
3.3 Connection illustration
© 2009 KWorld
Page 9

3.4 Installation and Channel Scan for the First Time
When you use the TVBox for the rst time, please make sure you have followed
the Hardware Installation Instruction in this manual to complete the hardware
installation. To ensure that you can watch TV and select active channels with the
TVBox, please follow the steps below to setup your TV:
1.Press the menu button on
the remote control to enter
the OSD menu.
2.Select TV Tuning on the
left of the menu and enter
the submenu of Tuning.
9
3.Select Auto to start auto
scan for TV channels.
TVBOX
Page 10

10
4.1 Menu Description
Menu I: Picture
FOUR
Menu Description
•C on tr as t, bri gh tn es s, Chroma, an d
Sharpness can be adjusted from 0 to
100 (No te: Sharpne ss opti on can be
displayed only if the video input is NTSC
system signal.)
•There are two options, ON and OFF, for
noise reduction. Select “ON” to reduce
the noise in picture.
•Pict ure. Sys : se lect you r TV pictu re
sy stem in you r are a. The de fa ult is
“AUTO”.
Menu II: System
Menu III: Display setup
© 2009 KWorld
•Source: Adjusting input source. You can
change the input mode of the product.
There are four kinds of input source: TV,
video, S-video and YPbPr.
•Blue Screen: Adjusting Blue Screen ON/
OFF. You can turn on or turn off blue
background at no signal state.
•C H Pr ev ie w: all ow s yo u to se t th e
number of pictures you want to preview,
and there are 9 and 12 available.
•Display Set: please refer to Menu III for
Display Setup
•Auxiliary: the auxiliary option includs four
sub items: see Menu IV for details.
•Output Mode: Adjusti ng Output mode.
You can cha nge the re solutio n and
refresh rate of picture output.
•Aspect Ratio: change picture aspect
ratio.
Page 11

11
Menu IV: Auxiliary
Menu V: TV Tuning
Menu VI: Tuning
•Calendar: display year/month/day/week.
You can use “P+”/“P-” and “VOL+”/”VOL-”
to adjust year and month.
•Calc ulato r: offers sim ple ca lcula tin g
function.
•Game function: see sectio n IV of this
manual for details.
•I nfo: Infor ma tion opt io n. Shows th e
mo del nu mber of th is pro duc t, the
revision number and date of the software
and hardware of this product.
•CH.No: Channel Number. Display the
current channel number.
•C H. Ski p: Cha nn el Ski p. Del ete th e
channel with no signal or poor signal.
•CH.Swap: Channel Swap. Arrange the
or de r of TV pro grams to me et yo ur
needs.
•Region: Select your region (TV system)
or common.
•Tuning: search programs. See Menu VI.
•ANT.SEL: select the antenna including
Cable and Antenna.
•CH.No: display current channel number.
•Auto: After this option is selected, click
VOL+ for auto searching.
•Ma nual: After this option is select ed,
p res s VOL + or V O L- f or m a nua l
searching.
•Fine-tuning: After this option is selected,
click VOL+ or VOL- for ne adjustment
of frequency.
TVBOX
Page 12

12
Menu VII: Timing
•Ti mer OFF: used to set the tim e for
shutdown. It shall be changed to “on”.
•Timer ON : use d to set the ti me fo r
startup. It shall be changed to “on”.
•Valid time: used to set the valid time of
your setting as once or every day.
•Startup Mode: used to set the mode for
each startup, which can be set as video,
S-video or TV.
Menu VIII: OSD
•Language: Select the language for OSD.
•Style: set the style of menu, including
classic, modern and romantic.
•Ho riz ontal: adju st the position of the
menu on screen in left or right direction.
•Vertical: adjust the position of the menu
on screen up or down.
•Display Time: adjust the display time of
the menu on screen.
4.2 Program searching
• Connect the antenna plug for CATV or antenna TV to the ANT IN port of this product.
• Enter into Tuning menu. Click VOL+ to enter into Tuning menu. Select Auto and click
VOL+ to start auto searching.
• If the noise level is too high at a certain channel and you do not want to keep it, you can
enter into TV Tuning menu to select CH. Skip and the channel will be deleted.
• You can use CH. Swap option in TV Tuning menu to arrange TV programs. For example,
CCTV-8 is now located in channel 8 and you want to change it to channel 1, you can do
the following operation:
a.select CCTV-8
b.enter into TV Tuning menu
c.select CH swap option
d.change the channel number from 8 to 1, and then click Menu button.
Similarly, you can change other channels such as CCTV-12 from channel 12 to channel 2.
© 2009 KWorld
Page 13

4.3 Operations for PIP function at PC mode
• At TV or PC mode, click PIP button on remote control and wait for 1-2 seconds, there will
be a small window in the upper left corner of the screen and a change of sound. You can
click PIP button again to switch the window to the larger one. If you click PIP button for
the third time, the window is switched to the smaller one. If you click it for the fourth time,
PIP will be cancelled.
• You can adjust the position of PIP with the Still Picture and Picture Mode buttons on
remote control.
• In addition, at PIP mode, you can use Video button to switch to video or S-video mode.
13
TVBOX
Page 14

14
FIVE
Operations for game function
A. To enter into game: Enter into the menu and select Game under the Auxiliary menu.
B. Gaming method: Box, Destination, Wall. Pull every box through up, down,
left and right movement. If all boxes are pulled to the destination, you can then access to
this function.
C. Description of function buttons:
Program + Up movement
Program - Down movement
Volume + Left movement
Volume - Right movement
Menu button Exit from game
© 2009 KWorld
Page 15

SIX
Troubleshooting
6.1 TV part
Failure Cause and action
15
No picture, no sound No power connection, or defective connection of plug. Receiver is
Pic t ur e disp l aye d
without sound
No color Chroma is not turned on. Adjust chroma option under PICTURE
Normal sound but no
picture
No picture or
unusual color of
picture from PC
Remote control can’t
be operated or has
low sensitivity.
Snow spots or
oblique line, vertical
line in picture
The default
resolution of PC
will vary with the
resolution of TVBox,
if a built-in video
card is used.
at standby mode.
Speaker for multimedia is not connected properly.
Volume is not turned on. Click Volume + button.
menu.
Program is of black and white color.
Picture system is set improperly. Set picture system correctly
under PICTURE menu.
Monitor is not connected properly.
Interference in TV signal too strong leads to protection state of
monitor.
Check if VGA cable is connected properly and if PC runs normally.
Check if batteries are installed correctly.
Check if batteries are of weak power, or signal from remote
control is obstructed or disturbed.
Signal from antenna is too weak. Add antenna amplier.
Defective connection of antenna, or the wire in antenna cable is
breaking off.
Failure of TV station.
It is suggested to use an independent video card with this product.
TVBOX
Page 16

16
6.2 PIP part
Failure Cause and action
After PIP turned on, sound
is normal but no picture
display.
PIP invalid Check if there is PC signal input.
Check if the output mode of video card in PC is standard (see
section 3) – if the LED is on.
6.3 PIP can function normally at the following PC display modes
Resolution Refresh Rate
800X600 60Hz 75Hz
1024X768 60Hz 75Hz
1280X1024 60Hz 75Hz
1440X900 60Hz
© 2009 KWorld
Page 17

WARRING
This User’s Manual is for specic product, and all its contents are processed with due care but
are not ensured fully correct.
We assume no responsibility for any loss arising from use of this manual.
The right to interpret all contents of this User’s Guide belongs to the company
The manual is subject to change without notice.
This User’s Manual is not authorized to any party and no reproduction or copy,
in part or whole, of the manual in any way is permitted.
KWorld Website: www.kworld-global.com
17
TVBOX
 Loading...