

KTM 990 Adventure R AUS/UK 2012, 990 Adventure EU 2012, 990 Adventure R USA 2012, 990 Adventure AUS/UK 2012, 990 Adventure FR 2012 Setup Instructions
...Page 1
SETUP INSTRUCTIONS 2012
990 Adventure AUS/UK
990 Adventure R EU
990 Adventure R USA
990 Adventure R AUS/UK
990 Adventure EU
990 Adventure USA
990 Adventure FR
Art. no. 3211895en
Page 2

Page 3
INTRODUCTION 1
INTRODUCTION
The work described in these setup instructions must be performed before the vehicle is delivered to the customer.
Read the setup instructions in their entirety before beginning work.
Print out the current PDI form found on the KTM DEALER.NET.
These setup instructions were written to correspond to the latest state of this series. We reserve the right to make changes in the interest of technical advancement without at the same time updating this manual.
We shall not provide a description of general workshop methods. Likewise, safety rules that apply in a workshop are not specified here.
It is assumed that the work will be performed by a fully trained mechanic.
All specifications are non-binding. KTM Sportmotorcycle AG specifically reserves the right to modify or delete technical specifications, prices, colors, forms, materials, services, designs, equipment, etc., without prior notice and without specifying reasons, to adapt
these to local conditions, as well as to stop production of a particular model without prior notice. KTM accepts no liability for delivery
options, deviations from illustrations and descriptions, as well as misprints and other errors. The models portrayed partly contain special equipment that does not belong to the regular scope of delivery.
© 2012 KTM-Sportmotorcycle AG, Mattighofen Austria
All rights reserved
Reproduction, even in part, as well as copying of all kinds, is permitted only with the express written permission of the copyright
owner.
ISO 9001(12 100 6061)
According to the international quality management standard ISO 9001, KTM uses quality assurance processes that lead
to the maximum possible quality of the products.
Issued by: TÜV Management Service
KTM-Sportmotorcycle AG
5230 Mattighofen, Austria
Page 4
1 MEANS OF REPRESENTATION 2
1.1 Symbols used
The meaning of specific symbols is described below.
Indicates an expected reaction (e.g. of a work step or a function).
Indicates an unexpected reaction (e.g. of a work step or a function).
Indicates a page reference (more information is provided on the specified page).
Indicates information with more details or tips.
Indicates the result of a testing step.
Denotes a voltage measurement.
Denotes a current measurement.
Denotes a resistance measurement.
1.2 Formats used
The typographical formats used in this document are explained below.
Proprietary name Identifies a proprietary name.
®
Name
Brand™ Identifies a trademark.
Identifies a protected name.
Page 5
2 SETUP 3
2.1 Unpacking and setting up the vehicle
Preparatory work
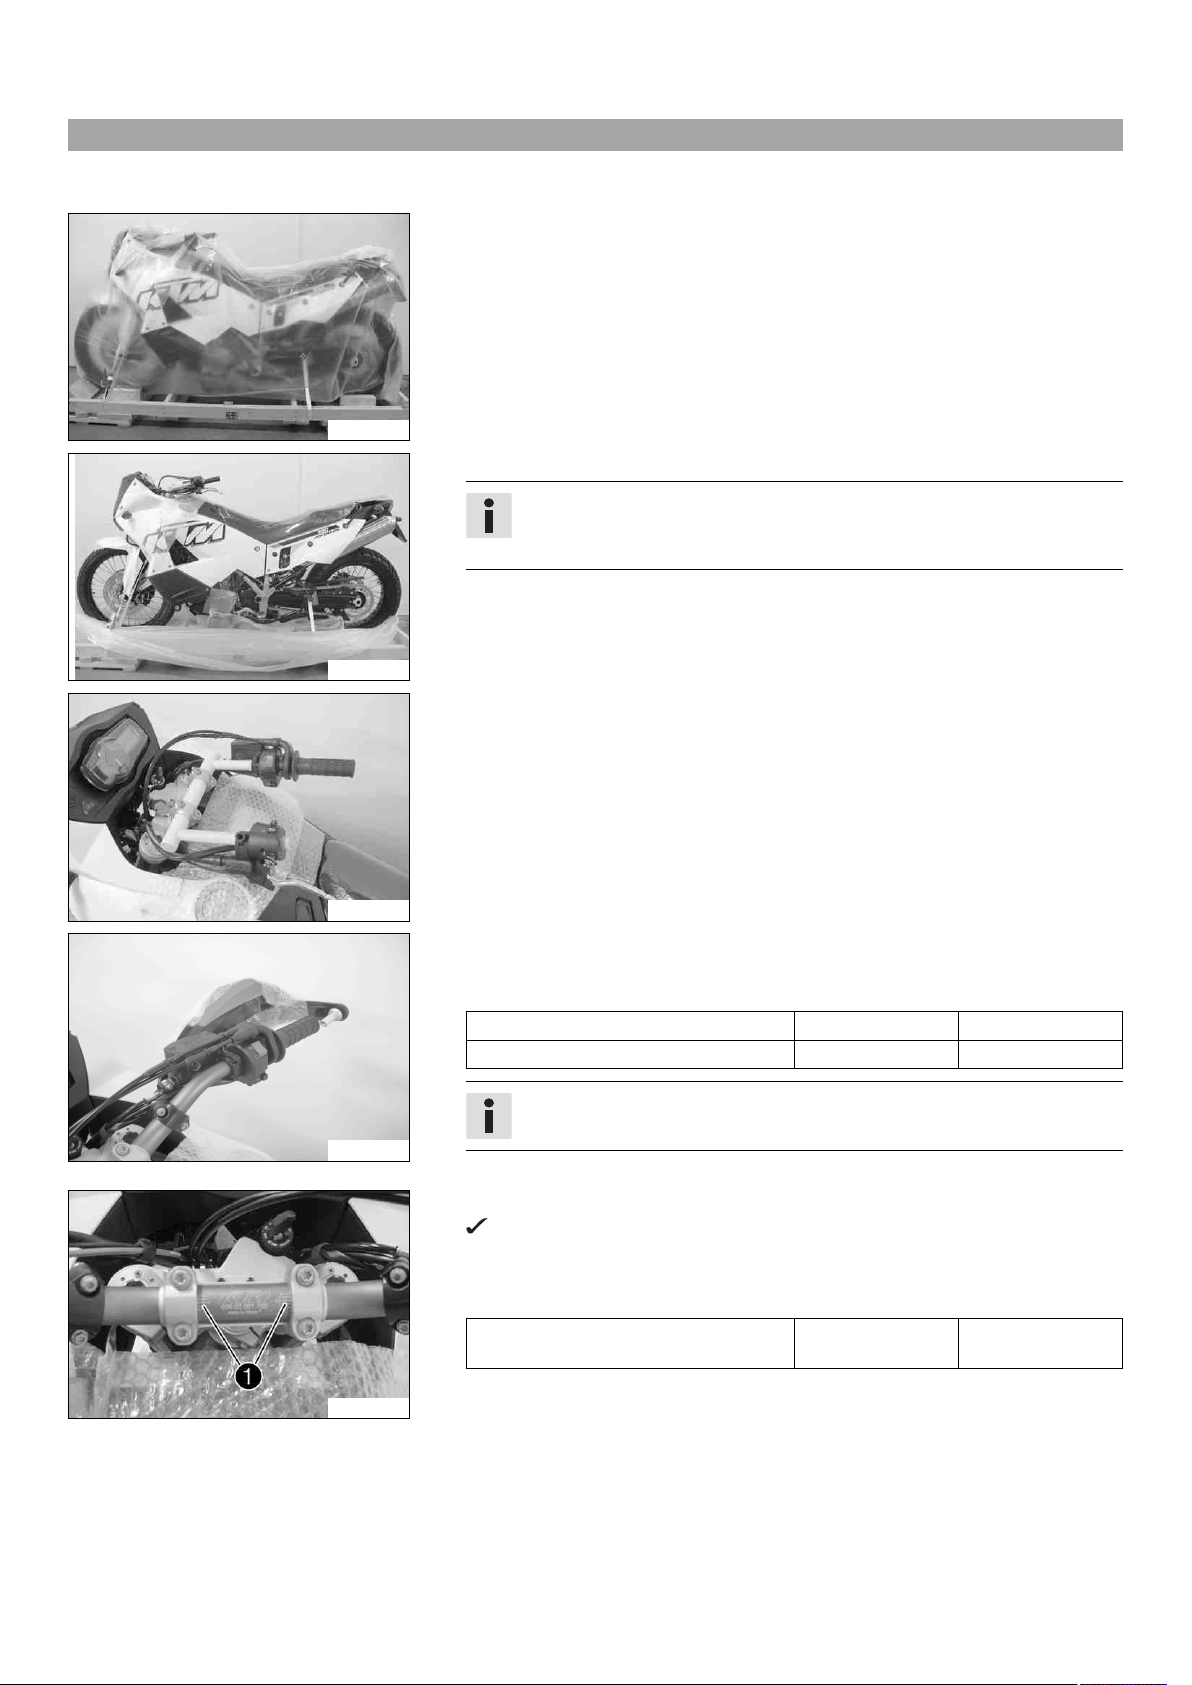
– Remove the carton.
Main work
– Remove the adhesive tape in the upper area of the motorcycle.
201911-10
– Roll down the film at the sides.
Info
To avoid damaging the motorcycle during unpacking, leave the other films
on the vehicle until you have finished work on the vehicle.
– Remove the separate enclosure and unpack it. Check the separate enclosure for
completeness.
– Check the vehicle for transport damage.
201912-10
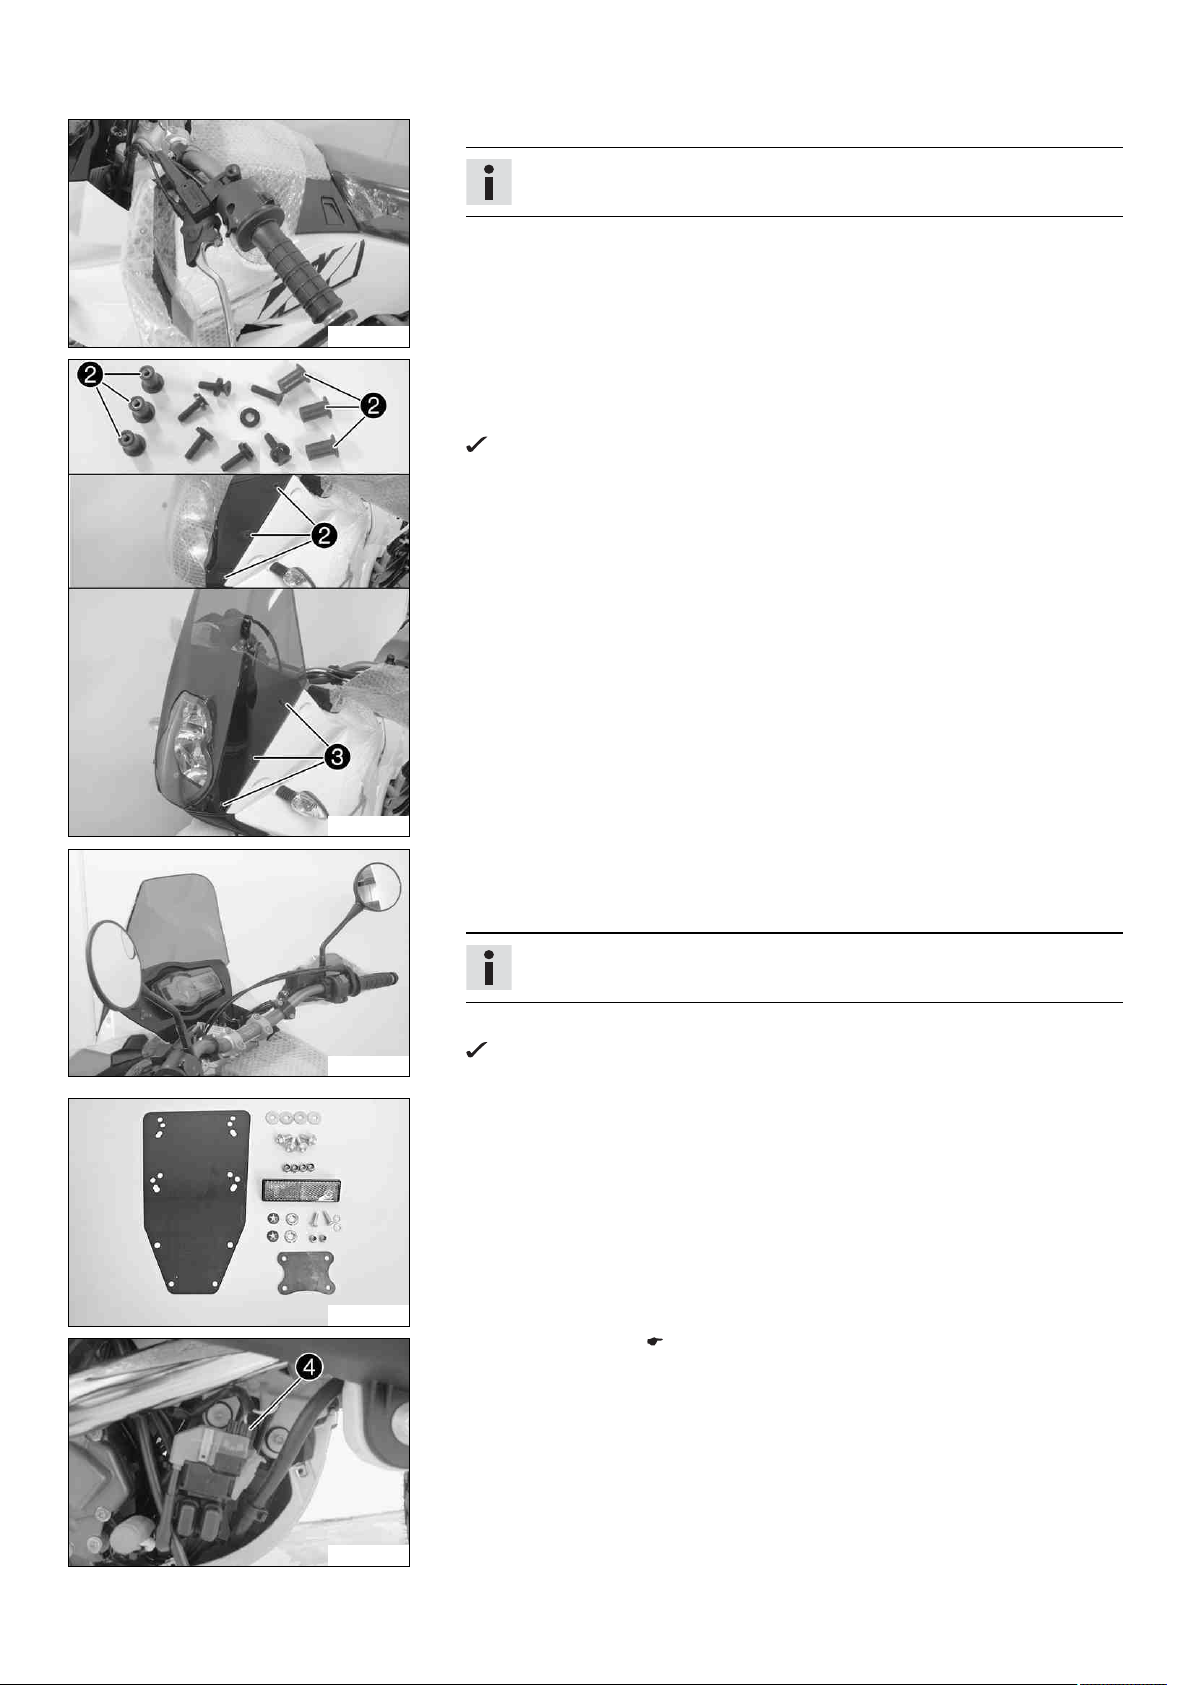
– Remove the controls from the transport holder. Remove the screws and handlebar
clamps. Remove the transport holder.
201913-10
201914-10
201915-10
– Remove the right hand guard.
– Position the controls on the right half of the handlebar. Tighten the screws.
Guideline
Remaining screws, chassis M5 6 Nm (4.4 lbf ft)
Remaining chassis screws M6 10 Nm (7.4 lbf ft)
Info
Position the holding lug of the switch unit in the drill hole of the handlebar.
– Mount the right hand guard.
– Position the handlebar.
Marking 1 on the scale on the handlebar is situated in the middle of the handlebar clamp.
– Position the handlebar clamps. Tighten the screws evenly.
Guideline
Screw, handlebar clamp M8 20 Nm
(14.8 lbf ft)
– Check the throttle grip for smooth operation.
Page 6
2 SETUP 4
– Position the controls on the left half of the handlebar.
Info
Position the holding lug of the switch unit in the drill hole of the handlebar.
– Position all controls in their exact positions on the handlebar. Tighten all screws.
201916-10
– Mount speed nuts 2.
– Remove the film from the headlight. Position the screen. Mount and tighten the
screws with washers 3.
The screw heads are countersunk in the washers.
201917-10
201918-10
201901-10
– Mount and tighten the rear mirror on both sides.
– An assistant holds the motorcycle.
– Carefully loosen and remove the tensioning belt over the swingarm.
Info
An assistant prevents the motorcycle from falling over.
– Carefully loosen and remove the tensioning belts around the lower triple clamp.
The vehicle is released at the front.
– Together with an assistant, take the vehicle off the pallet.
– Mount the reflector.
– Recharge the battery. ( p. 6)
– Plug in connector 4.
201919-10
Page 7
2 SETUP 5
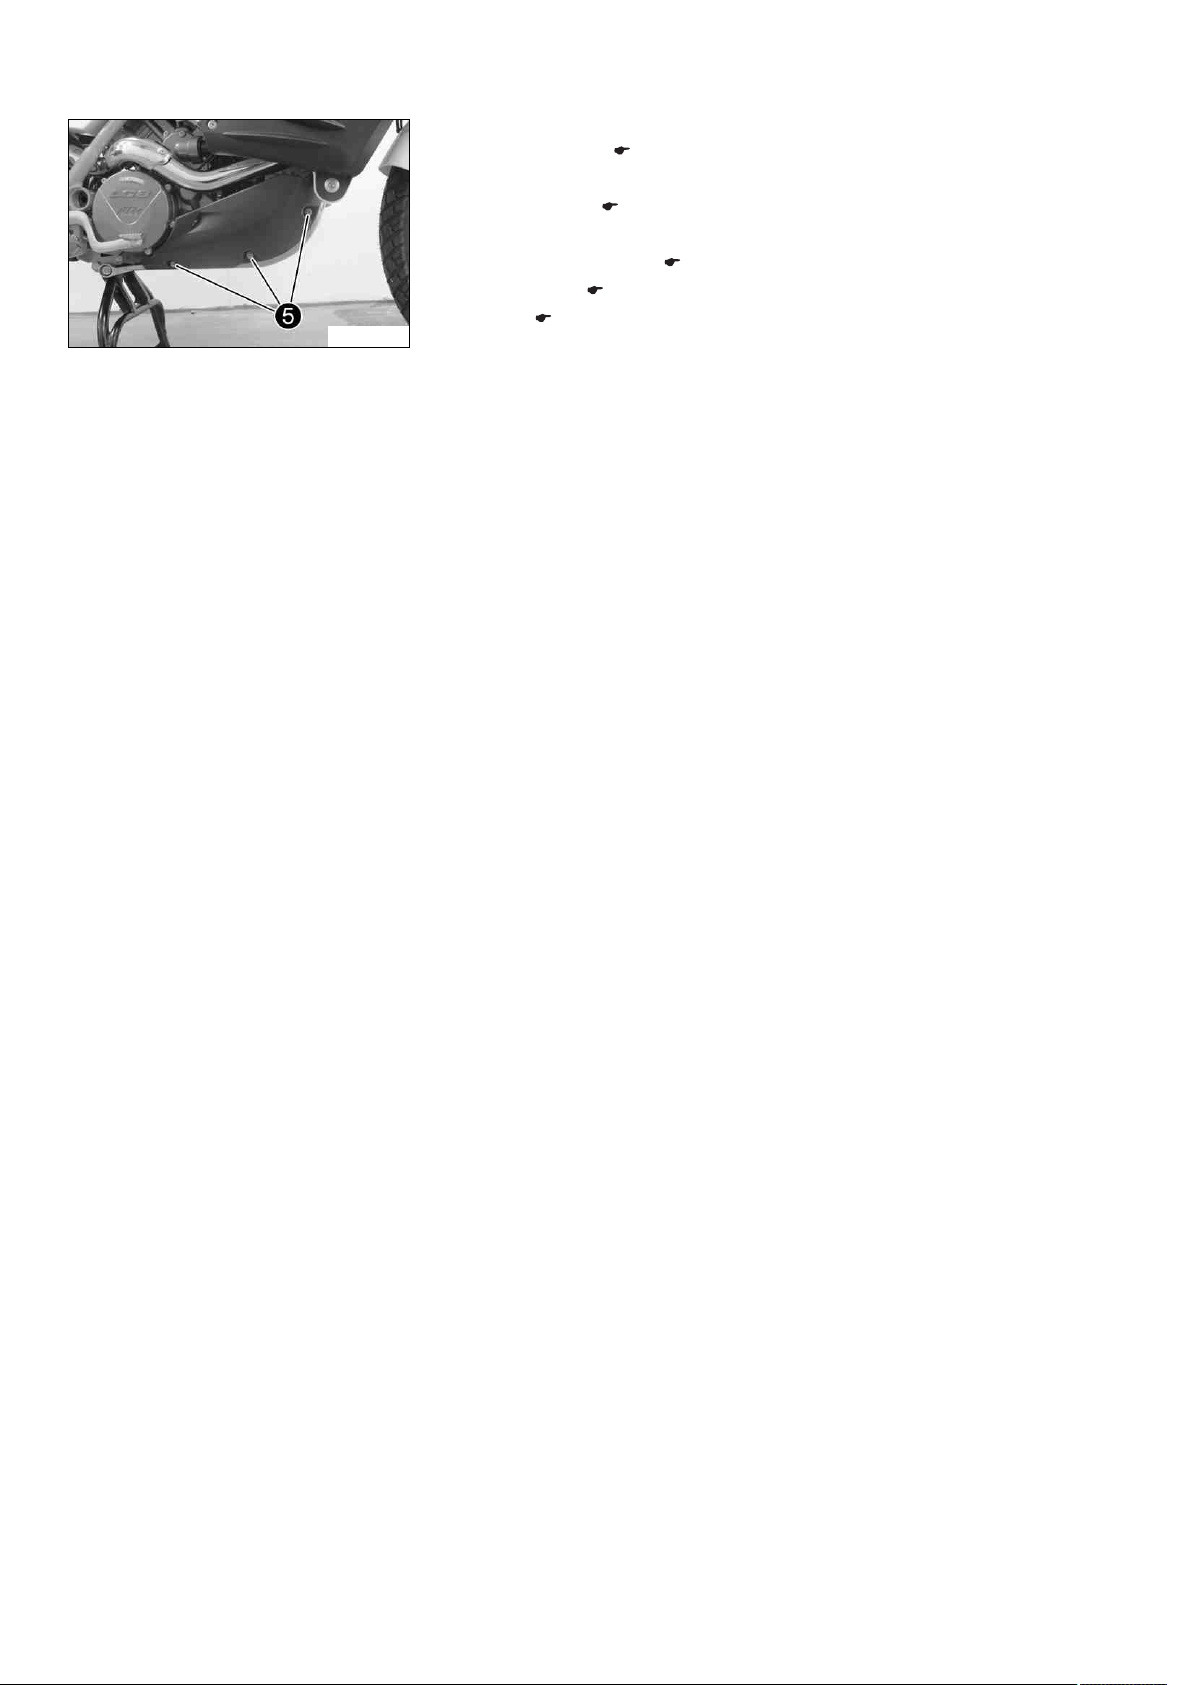
– Position the underride guard on both sides. Mount and tighten screws 5.
– Remove the seat. ( p. 6)
– Store the tool set below the seat.
– Mount the seat. ( p. 6)
– Remove the remaining films.
– Set kilometers or miles. ( p. 10)
– Set the clock. ( p. 10)
201920-10
– Refuel. ( p. 7)
– Print out the current PDI form found on KTM DEALER.NET and perform the delivery
inspection.
Page 8
3 WORK 6
00330011 0022
3.1 Removing the seat
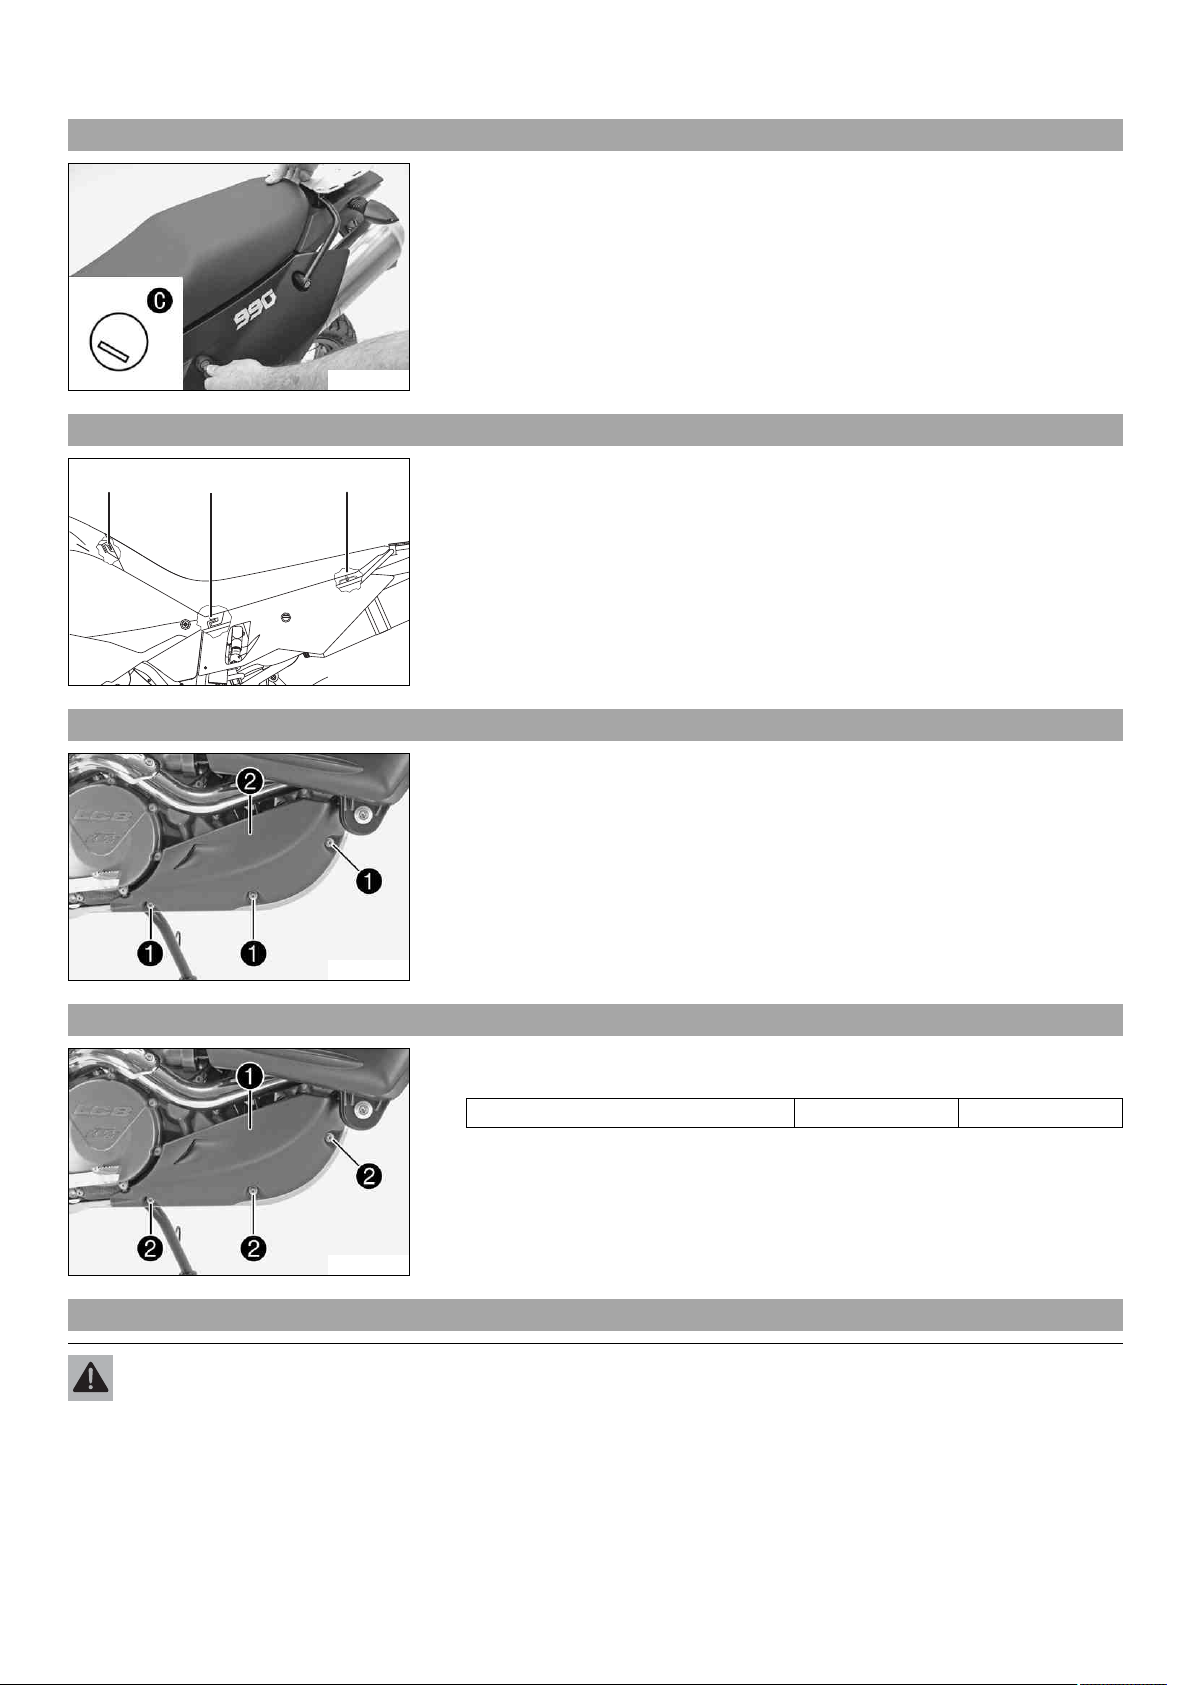
– Insert the ignition key into the seat lock.
– Turn the ignition key to position C.
– Lift up the seat at the rear, pull it back and remove from above.
– Remove the ignition key.
100516-10
3.2 Mounting the seat
– Hook projection 1 of the seat into the storage compartment, lower the seat at the
rear and push it forward at the same time. The two projections 2 must be inserted
into the frame.
– Push locking pin 3 into the lock housing and push the back of the seat down until
the locking pin locks in place with an audible click.
– Finally, check that the seat is correctly mounted.
100505-10
3.3 Removing the right underride guard
– Remove screws 1. Remove the right underride guard 2.
100581-10
3.4 Installing the right underride guard
– Position right underride guard 1. Mount and tighten screws 2.
Guideline
Remaining chassis screws M6 10 Nm (7.4 lbf ft)
100581-11
3.5 Recharging the battery
Warning
Risk of injury Battery acid and battery gases cause serious chemical burns.
– Keep batteries out of the reach of children.
– Wear suitable protective clothing and goggles.
– Avoid contact with battery acid and battery gases.
– Keep the battery away from sparks or open flames. Charge only in well-ventilated areas.
– In the event of skin contact, rinse with large amounts of water. If battery acid gets in the eyes, rinse with water for at least
15 minutes and contact a physician.
Page 9
3 WORK 7
Warning
Environmental hazard The battery contains elements that are harmful to the environment.
– Do not discard batteries with the household trash. Dispose of a defective battery in an environmentally compatible manner.
Give the battery to your KTM dealer or to a recycling center that accepts used batteries.
Warning
Environmental hazard Hazardous substances cause environmental damage.
– Oil, grease, filters, fuel, cleaners, brake fluid, etc., should be disposed of as stipulated in applicable regulations.
Info
Even when there is no load on the battery, it discharges steadily.
The charge state and the type of charge are very important for the service life of the battery.
Rapid recharging with a high charging current shortens the battery's service life.
If the charging current, charging voltage and charging time are exceeded, electrolyte escapes through the safety valves. This
reduces the battery capacity.
If the battery is depleted from starting the vehicle repeatedly, the battery must be charged immediately.
If the battery is left in a discharged state for an extended period, it will become over-discharged and sulfate, destroying the
battery.
The battery is maintenance-free, i.e., the acid level does not have to be checked.
If the battery is not charged using the KTM battery charger, the battery must be removed for charging. Otherwise, overvoltage
may damage electronic components. Charge the battery according to the instructions on the battery casing.
100582-10
Preparatory work
– Switch off all power consumers and switch off the engine.
– Remove the right underride guard. ( p. 6)
Main work
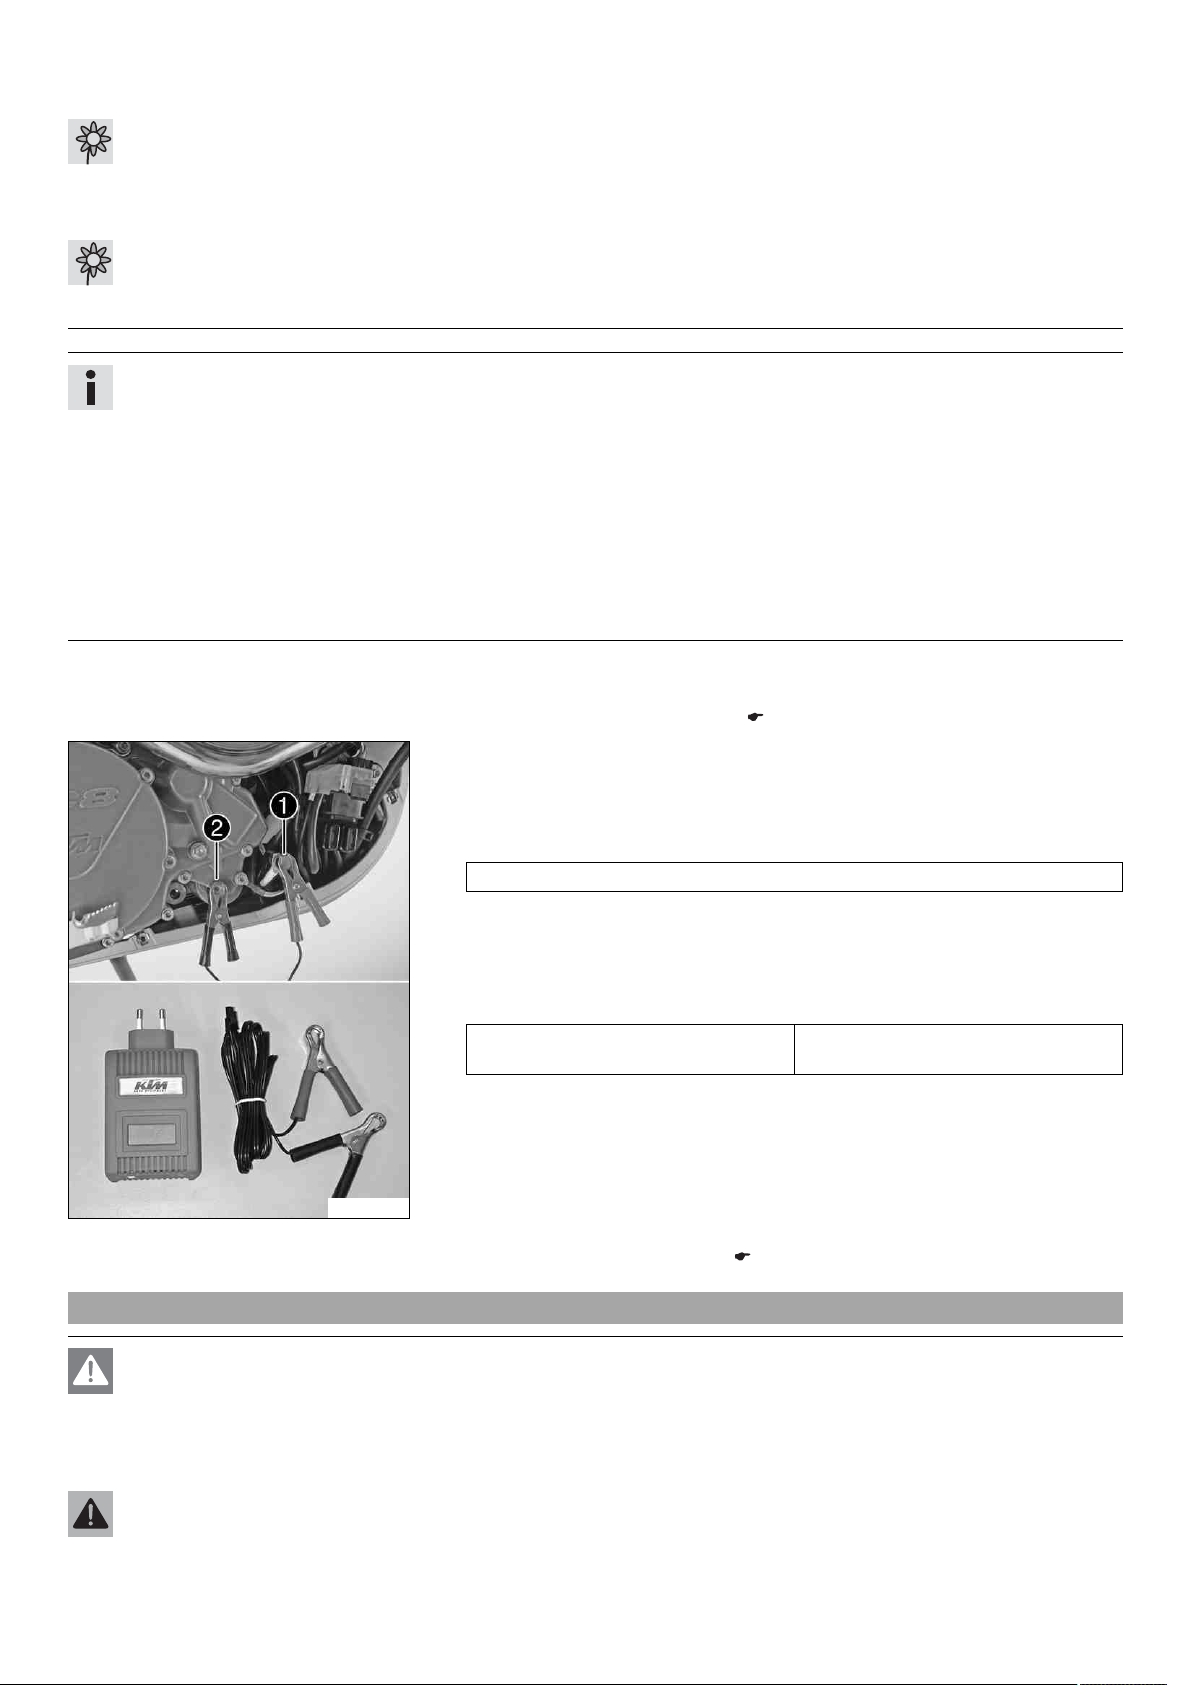
– Pull off the red protection cap of the positive terminal extension.
– Connect the positive cable of the charger to the positive terminal extension 1 and
the negative cable to an unpainted point on the engine 2. Switch on the battery
charger.
Battery charger (58429074000)
You can also use the battery charger to test the rest potential and start potential of
the battery, and to test the alternator. With this device, you cannot overcharge the
battery.
– Switch off and disconnect the battery charger after charging.
Guideline
Charge the battery regularly when the
motorcycle is not in use
– Mount the red protection cap of the positive terminal extension.
Finishing work
– Install the right underride guard. ( p. 6)
3 months
3.6 Refueling
Danger
Fire hazard Fuel is highly flammable.
– Never refuel the vehicle near open flames or burning cigarettes, and always switch off the engine first. Be careful that no
fuel is spilt, especially on hot vehicle components. Clean up spilt fuel immediately.
– Fuel in the fuel tank expands when warm and can escape if the tank is overfilled. See the notes on refueling.
Warning
Danger of poisoning Fuel is poisonous and a health hazard.
– Avoid contact of the fuel with skin, eyes and clothing. Do not inhale fuel vapors. If fuel gets into your eyes, rinse imme-
diately with water and contact a doctor. Wash affected skin areas immediately with soap and water. If fuel is swallowed,
contact a doctor immediately. Change clothing that has come into contact with fuel.
Page 10
3 WORK 8
Note
Material damage Premature clogging of the fuel filter.
– In some countries and regions, the available fuel quality and cleanliness may not be sufficient. This will result in problems with
the fuel system.
– Only refuel with clean fuel that meets the specified standards.
Warning
Environmental hazard Improper handling of fuel is a danger to the environment.
– Do not allow fuel to get into the ground water, the ground, or the sewage system.
– Switch off the engine.
– Lean the vehicle on the side stand.
– Open the filler caps. ( p. 8)
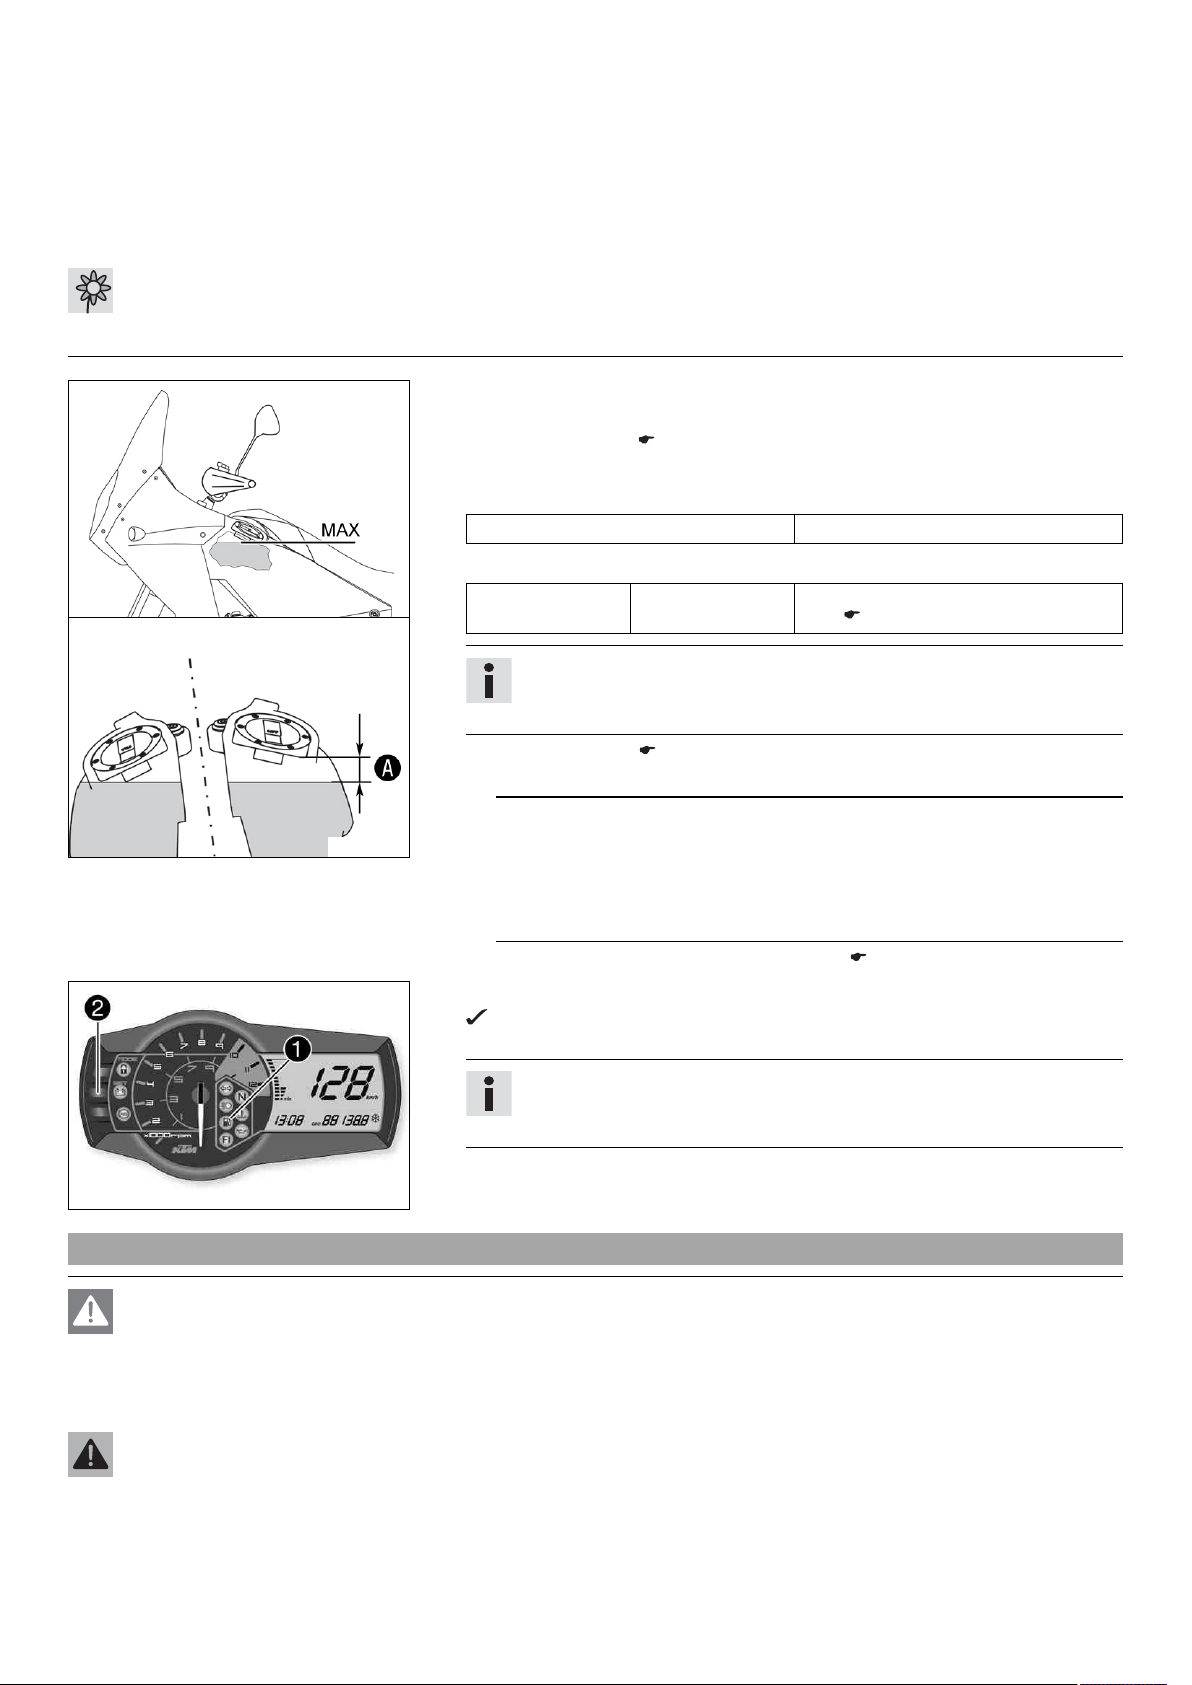
– Fill the right fuel tank with fuel no higher than level A.
Guideline
Measurement of A 75 mm (2.95 in)
– Fill the left fuel tank no higher than the lower edge of the filler neck.
800111-10
Total fuel tank
capacity, approx.
20 l (5.3 US gal) Super unleaded (ROZ 95/RON 95/PON
91) ( p. 13)
Info
If the right fuel tank is filled to the filler neck, fuel may run out of the
motorcycle if parked on the side stand and the fuel becomes warm.
– Close the filler caps. ( p. 9)
When using low octane fuel
Note
Engine failure Low-quality fuel damages the engine.
– Operate the vehicle with fuel with an octane rating below 95 (ROZ 95/RON
95/PON 91) for no more than one tank full.
– The ignition curve must be adjusted to low octane fuel.
– Adjust the ignition curve to the fuel quality. ( p. 9)
– Press the SET button 2 for two seconds.
The fuel level warning lamp 1 switches off. TRIP F is set to 0.0 and the previous display mode appears.
Info
If you do not press the SET button 2, the reset takes place automatically
after about three minutes.
400913-12
3.7 Opening the filler caps
Danger
Fire hazard Fuel is highly flammable.
– Never refuel the vehicle near open flames or burning cigarettes, and always switch off the engine first. Be careful that no
fuel is spilt, especially on hot vehicle components. Clean up spilt fuel immediately.
– Fuel in the fuel tank expands when warm and can escape if the tank is overfilled. See the notes on refueling.
Warning
Danger of poisoning Fuel is poisonous and a health hazard.
– Avoid contact between fuel and skin, eyes and clothing. Do not inhale fuel vapors. If fuel gets into your eyes, rinse immedi-
ately with water and contact a doctor. Wash affected skin areas immediately with soap and water. If fuel is swallowed, contact a doctor immediately. Change clothing that has come into contact with fuel. Store fuel in a suitable canister according
to regulations and keep it out of the reach of children.
Page 11
3 WORK 9
Warning
Environmental hazard Improper handling of fuel is a danger to the environment.
– Do not allow fuel to get into the ground water, the ground, or the sewage system.
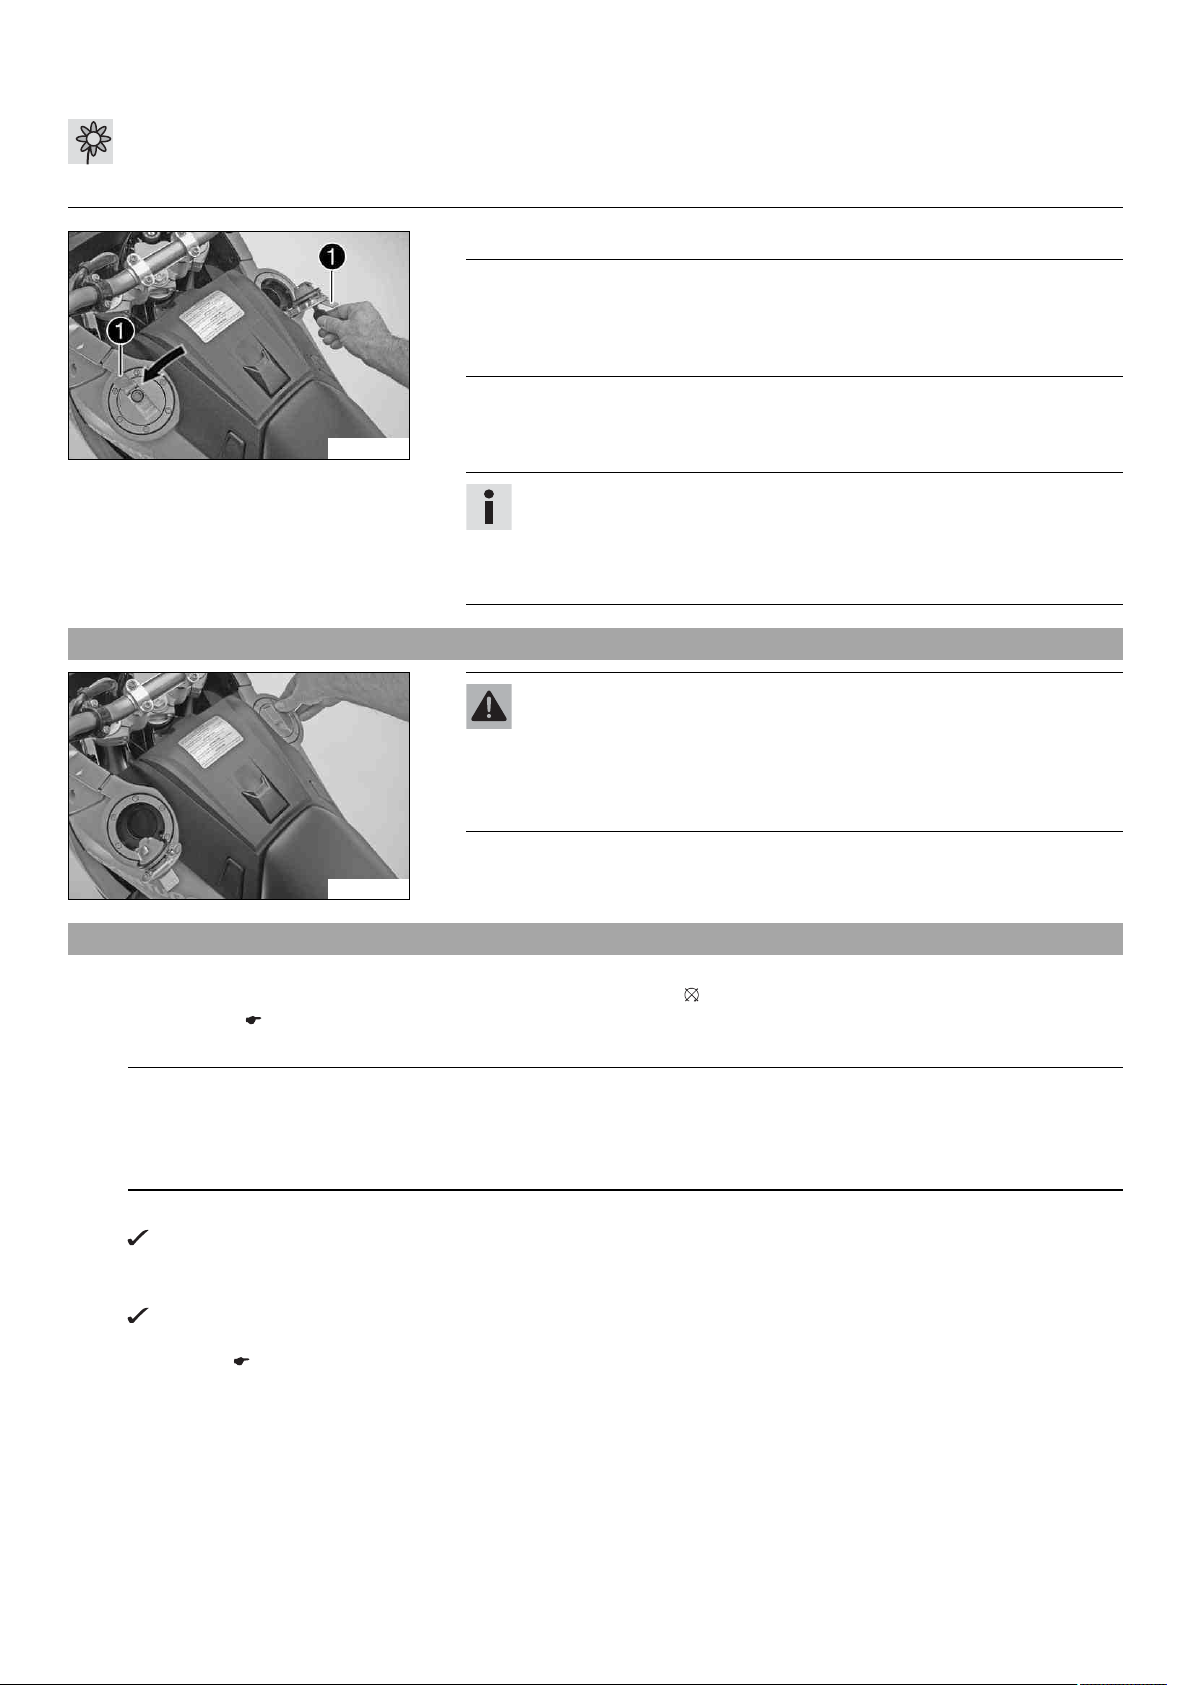
– Lift the cover 1 of the filler cap and insert the ignition key in the lock.
Note
Danger of damage Ignition key breakage.
– To take pressure off of the ignition key, push down on the filler cap. Damaged
ignition keys must be replaced.
– Turn the ignition key 90° clockwise.
– Raise the filler cap, withdraw the ignition key and open the second filler cap.
302078-10
3.8 Closing the filler caps
– Remove the ignition key.
Info
The motorcycle is equipped with two fuel tanks and two filler necks. The
fuel tanks are connected to each other with a fuel line that equalizes the
fuel level.
The two filler caps are equipped with a ventilation system.
Warning
Fire hazard Fuel is highly flammable, poisonous and harmful to your
health.
– When closing the filler cap, ensure that it is closed correctly. Change
clothing that came into contact with fuel. Immediately clean skin that
came into contact with fuel using soap and water.
– Push the filler caps closed until the locks engage.
100515-10
– Close the covers.
3.9 Adjusting the ignition curve to the fuel quality
Preparatory work
– Switch off the ignition by turning the black ignition key to the position OFF .
– Remove the seat. ( p. 6)
To activate the ignition curve for low octane fuel:
Note
Engine failure Low-quality fuel damages the engine.
– Operate the vehicle with fuel with an octane rating below 95 (ROZ 95/RON 95/PON 91) for no more than one tank full.
– The ignition curve must be adjusted to low octane fuel.
– Disconnect plug-in connector 1.
Plug-in connector disconnected – Fuel with an octane rating of 80 to 94 (RON) can be used for one tank full.
Activate the ignition curve for fuel with an octane rating of 95 or higher (ROZ 95 / RON 95 / PON 91):
– Connect plug-in connector 1.
Plug-in connector connected – Fuel with an octane rating of 95 or higher can be used.
Finishing work
– Mount the seat. ( p. 6)
Page 12
3 WORK 10
3.10 Setting kilometers or miles
Info
If you change the unit, the value ODO is retained and converted accordingly.
Making the setting according to the country.
Condition
The motorcycle is standing.
– Switch on the ignition by turning the black ignition key to the position ON .
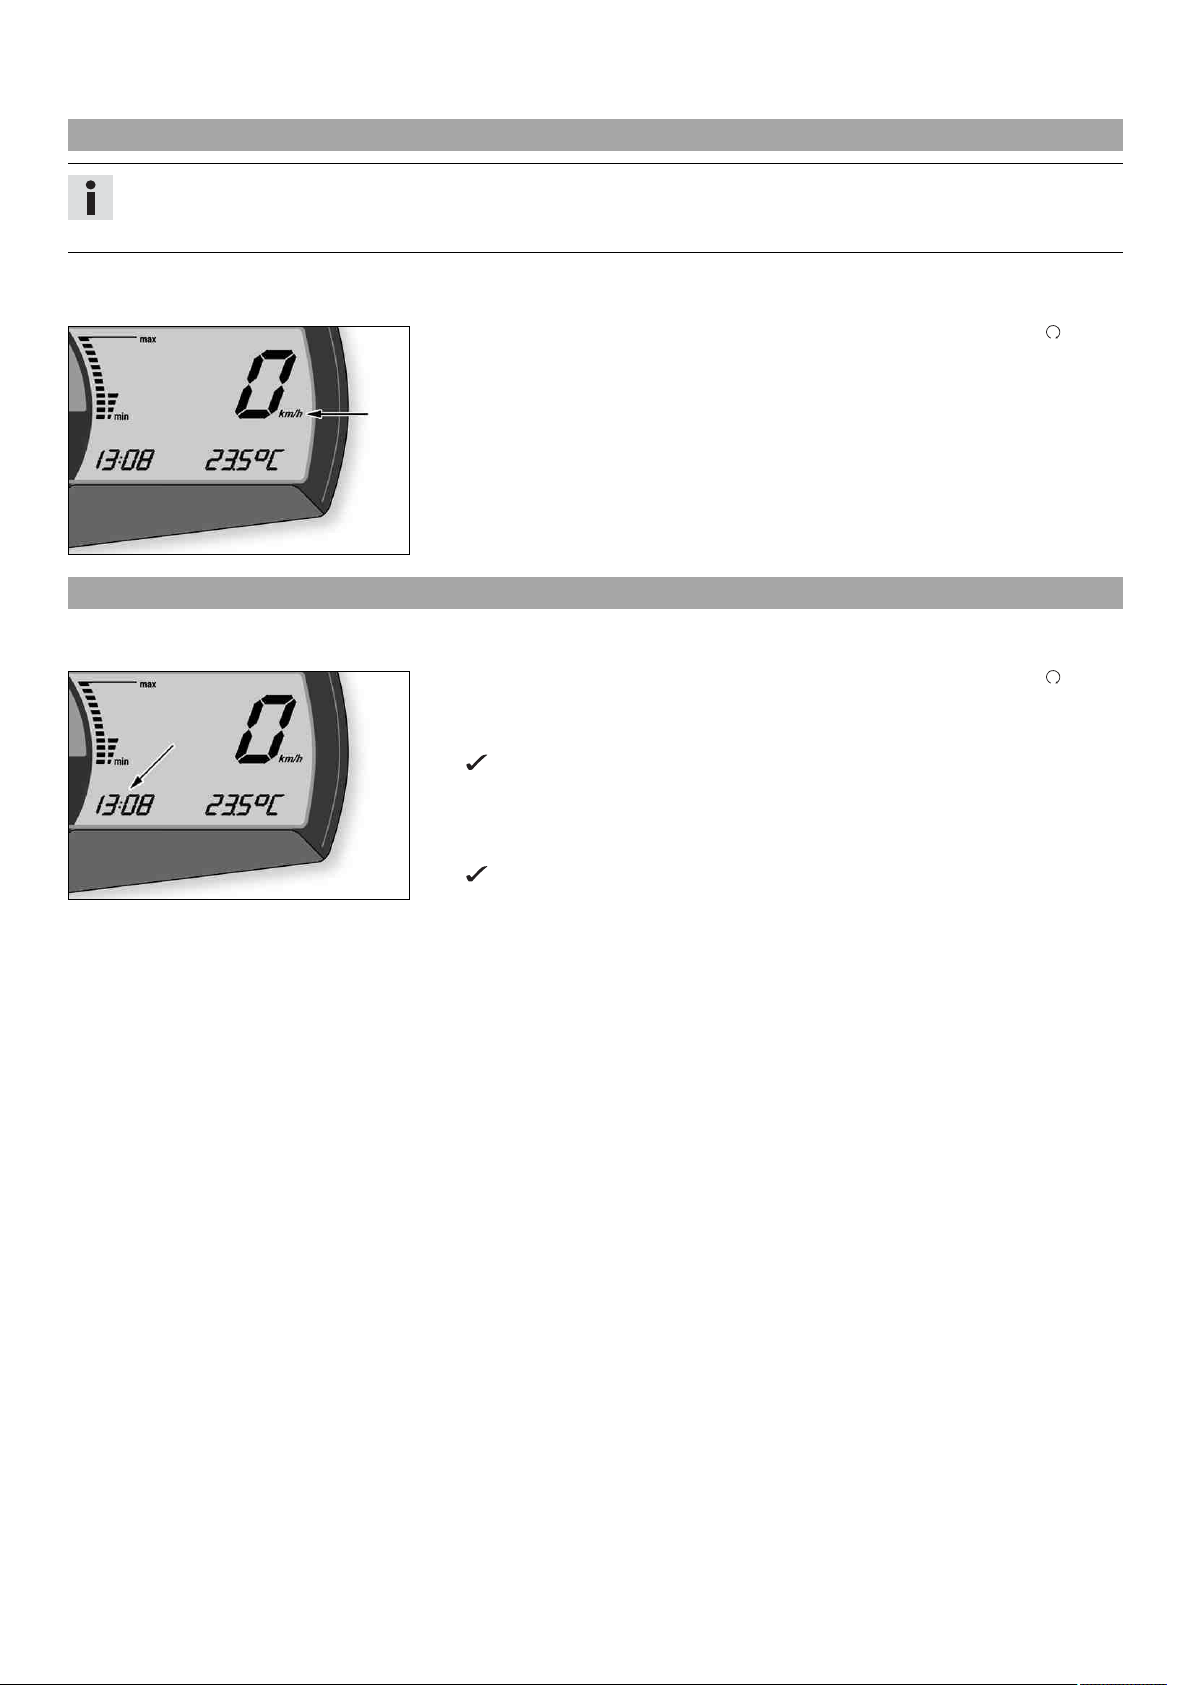
– Press the MODE button repeatedly until the ODO mode is active.
– Keep the MODE button pressed until the display mode changes from km/h to mph or
from mph to km/h.
400893-10
3.11 Setting the clock
Condition
The motorcycle is standing.
– Switch on the ignition by turning the black ignition key to the position ON .
– Press the MODE button repeatedly until the ODO mode is active.
– Keep the MODE button and the SET button pressed simultaneously.
The time display begins to flash.
– Press the MODE button to set the hour.
– Press the SET button to set the minute.
– Keep the MODE button and the SET button pressed simultaneously.
400893-12
The time is set.
Page 13

4 TECHNICAL DATA - TIGHTENING TORQUES FOR CHASSIS 11
Screw, side stand switch M4 2 Nm (1.5 lbf ft) –
Screw, cable guide, wheel speed sen-
sor, rear
Screw, filler cap M5 5 Nm (3.7 lbf ft) –
Screw, foot brake lever stub M5 6 Nm (4.4 lbf ft)
Screw, fuel level indicator M5 3 Nm (2.2 lbf ft) –
Screw, wheel speed sensor bracket,
front
Spoke nipple M5 5 Nm (3.7 lbf ft) –
Nut, ABS unit fixation M6 8 Nm (5.9 lbf ft) –
Nut, positive terminal extension M6 4 Nm (3 lbf ft) –
Nut, tail light M6 8 Nm (5.9 lbf ft) –
Remaining chassis nuts M6 10 Nm (7.4 lbf ft) –
Remaining chassis screws M6 10 Nm (7.4 lbf ft) –
Screw connection, wheel speed sensor,
front
Screw, brake line holder on bottom
triple clamp
Screw, cable/line guide at top triple
clamp
Screw, chain guide M6 6 Nm (4.4 lbf ft)
Screw, chain sliding guard M6 6 Nm (4.4 lbf ft)
Screw, exhaust pipe bracket M6 12 Nm (8.9 lbf ft)
Screw, foot brake cylinder M6 10 Nm (7.4 lbf ft)
Screw, front brake disc M6 14 Nm (10.3 lbf ft)
Screw, fuel pump M6 6 Nm (4.4 lbf ft) –
Screw, fuel tap M6 6 Nm (4.4 lbf ft) –
Screw, heat guard on manifold M6 8 Nm (5.9 lbf ft) –
Screw, magnetic holder on side stand M6 6 Nm (4.4 lbf ft)
Screw, rear brake disc M6 14 Nm (10.3 lbf ft)
Screw, wheel speed sensor, rear M6 8 Nm (5.9 lbf ft)
Nut, manifold on cylinder head M8 Tightening sequence:
Remaining chassis nuts M8 25 Nm (18.4 lbf ft) –
Remaining chassis screws M8 25 Nm (18.4 lbf ft) –
Screw, bottom triple clamp M8 15 Nm (11.1 lbf ft) –
Screw, crash bar M8 15 Nm (11.1 lbf ft) –
Screw, exhaust clamp M8 8 Nm (5.9 lbf ft) –
Screw, foot brake lever M8 20 Nm (14.8 lbf ft) –
Screw, fork stub M8 15 Nm (11.1 lbf ft) –
Screw, front brake caliper M8 25 Nm (18.4 lbf ft)
Screw, fuel tank M8 15 Nm (11.1 lbf ft) –
Screw, handlebar clamp M8 20 Nm (14.8 lbf ft) –
Screw, ignition lock (ratchet screw) M8
Screw, rear footrest bracket M8 25 Nm (18.4 lbf ft)
Screw, spring holder on side stand
bracket
Screw, steering stem M8 20 Nm (14.8 lbf ft) –
Screw, top triple clamp M8 20 Nm (14.8 lbf ft) –
Screw, underride guard M8 25 Nm (18.4 lbf ft)
Engine carrying screw M10 45 Nm (33.2 lbf ft) –
Remaining chassis nuts M10 45 Nm (33.2 lbf ft) –
Remaining chassis screws M10 45 Nm (33.2 lbf ft) –
M5 3 Nm (2.2 lbf ft) –
M5 4 Nm (3 lbf ft)
M6 6 Nm (4.4 lbf ft) –
M6 8 Nm (5.9 lbf ft)
M6 8 Nm (5.9 lbf ft)
Tighten the nuts evenly. Do
not bend the metal.
M8 25 Nm (18.4 lbf ft)
Loctite®243™
Loctite®243™
Loctite®243™
Loctite®243™
Loctite®243™
Loctite®243™
Loctite®243™
Loctite®243™
Loctite®243™
Loctite®243™
Loctite®243™
Loctite®243™
–
Loctite®243™
Loctite®243™
Loctite®243™
Loctite®243™
Loctite®243™
Page 14
4 TECHNICAL DATA - TIGHTENING TORQUES FOR CHASSIS 12
Screw, handlebar support M10 20 Nm (14.8 lbf ft) –
Screw, side stand M10 35 Nm (25.8 lbf ft)
Screw, side stand bracket M10 45 Nm (33.2 lbf ft)
Screw, side stand holding plate M10 40 Nm (29.5 lbf ft)
Nut, rear sprocket screw M10x1.25 50 Nm (36.9 lbf ft)
Screw, subframe M10x1.25 45 Nm (33.2 lbf ft)
Oil drain plug with magnet M12x1.5 25 Nm (18.4 lbf ft) –
Screw, bottom shock absorber M14x1.5 80 Nm (59 lbf ft) Thread greased
Screw, top shock absorber M14x1.5 80 Nm (59 lbf ft) Thread greased
Nut, socket M18x1 4 Nm (3 lbf ft) –
Lambda sensor M18x1.5 45 Nm (33.2 lbf ft) –
Nut, swingarm pivot M19x1.5 130 Nm (95.9 lbf ft) Thread greased
Screw, top steering head M20x1.5 12 Nm (8.9 lbf ft) –
Nut, rear wheel spindle M25x1.5 90 Nm (66.4 lbf ft) Thread greased
Screw, front wheel spindle M25x1.5 45 Nm (33.2 lbf ft) –
Loctite®243™
Loctite®243™
Loctite®243™
Loctite®243™
Loctite®243™
Page 15
5 SUBSTANCES 13
Super unleaded (ROZ 95/RON 95/PON 91)
According to
– DIN EN 228 (ROZ 95/RON 95/PON 91)
Guideline
– Only use unleaded super fuel that matches or is equivalent to the specified fuel grade.
– Fuel with an ethanol content of up to 10 % (E10 fuel) is safe to use.
Info
Do not use fuel containing methanol (e. g. M15, M85, M100) or more than 10 % ethanol (e. g. E15, E25, E85, E100).
Page 16
*3211895en*
3211895en
08/2012
KTM-Sportmotorcycle AG
5230 Mattighofen/Austria
http://www.ktm.com
Photo: Mitterbauer/KTM
 Loading...