

Page 1

Novo Compact
Model #989
Novo Compact Latte
(')
,
Model #882
Instructions
for Use
Warranty
Guarantee of
Performance
Page 2
IMPORTANT SAFEGUARDS
When uSing.electrlcal appliances, basIc safety precautions should
always be followed to reduce the rlstk of fire, electric shock, and/or
injury to persons, Including the following:
. Read all Instructions and Information Inthis Instruction book and
any other literature Included Inthis carton referring to this product
before operating or uSing this appliance.
. Do not touch hot surfaces. Use handles or knobs.
.To protect against fire, electric shock and personal injury do not
Immerse cord, plugs, or appliance In water or other liquid.
. Close supervision ISnecessary when any appliance ISused by or
near children.
. Unplug from outlet when not Inuse and before cleamng. Allowto cool
before pUtting on or taking offparts, and before cleamng the appliance.
. Do not operate any appliance with a damaged cord or plug or after
the appliance malfunctions, or has been damaged In any manner.
Return appliance to your nearest authorized KRUPSService Center
for examination, repair or adjustment, or call KRUPSConsumer Service
Department (see GUARANTEEOFPERFORMANCE)forrepair procedure.
. The use of accessory attachments not recommended or sold by
KRUPSmay result Infire,electricshock or personal Injury.
.Donot use outdoors.
. Donot let cord hang over edge of table or counter, or touch hot
surfaces.
. Donotplaceon orneara hot gas orelectricburner,orIna heatedoven.
. Alwaysattach plugto appliance first,then plug cord Intothe wall
outlet. To disconnect, turn any control to uoffu,then remove plug
from wall outlet.
. Thisappliance ISforhousehold use only.Anyservicingother than
cleaning should be performed byyour localauthorized KRUPS
ServiceCenter.
. ApplianceswithGlassContainers. ,
A.The container ISdesigned for use with this appliance.It must never
be used on a range top.
B. Do not set a hot container on a wet or cold surface.
C. Do not use a cracked container or a container having a loose or
weakened handle.
D.Do not clean container with cleansers, steel wool pads, or other
abrasive material.
'
CAUTION
This appliance ISfor household use. Any servIcing other than cleanmg
and user maintenance should be performed by the nearest authorIzed
KRUPSService Center (see Guarantee of Performance).
Do not Immerse base In water.
To reduce the risk of fire or electric shock, do not remove the base.
No user servlcable parts insIde. RepaIr should be done by an
authorized KRUPSService Center only.
SPECIAL CORD SET INSTRUCTIONS
Regarding your cord set:
A. A short power-supply cord ISprovided to reduce risks resulting
from becoming entangled In or tnpplng over a longer cord.
B.
Longer extension cords are available and may be used if care IS
exercised In their use.
C.
Ifa long extension cord ISused, (1) the marked electncal rating
of the extension cord should be at least as great as the
electrical rating of the appliance, (2)ifthe appliance ISof the
grounded type, the extension cord should be a grounding-type
3 wire cord, and ,(3)the longer cord should be arranged so that
it will not drape over the counter top or table top where it can
be pulled on by children or tripped over.
D.
This appliance has a polarized plug (one blade ISwider than the
other). As a safety feature, this plug will fit In a polarized outlet
only one way. Ifthe plug does not fully fit In the outlet, reverse
the plug. Ifit still does not fit, contact a qualified electrician.
Do not attempt to defeat this safety feature.
SAVE THESE INSTRUCTI'ONS
Page 3
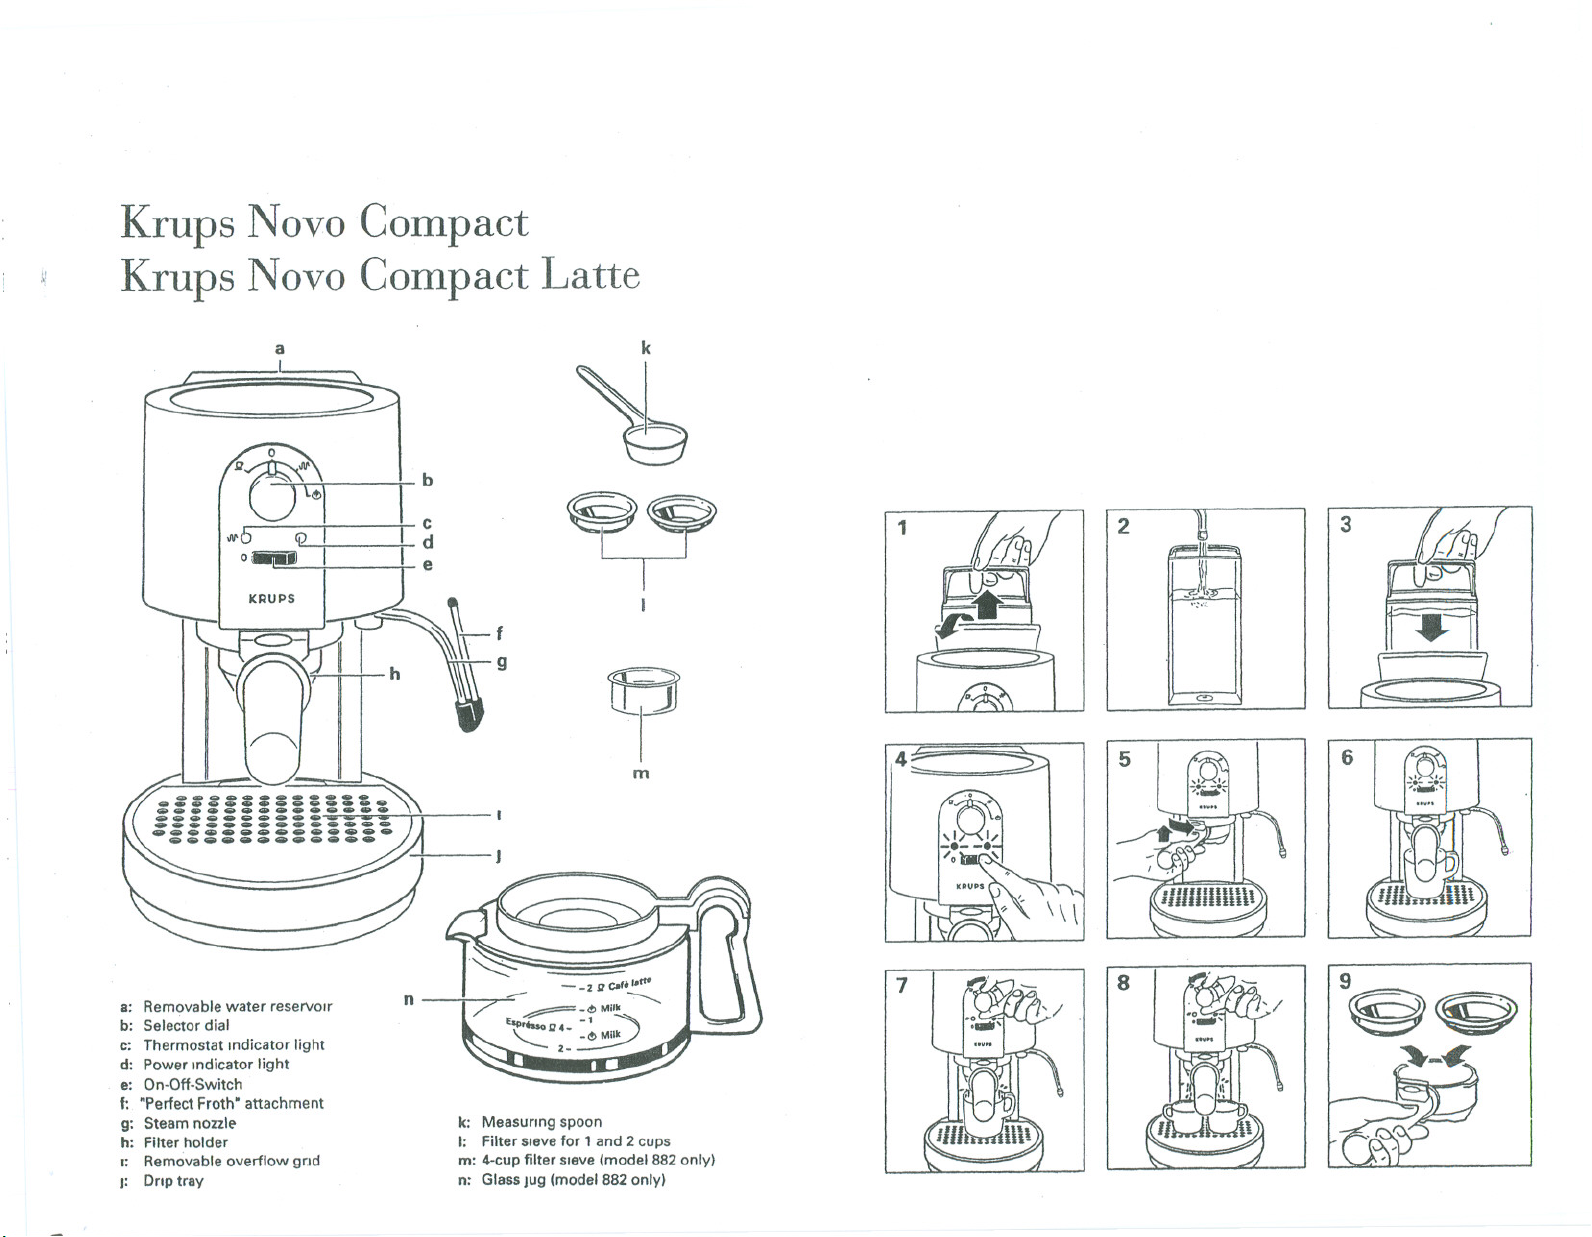
Krups Novo Compact
Krups Novo Compact Latte
a
~ ~
~
k
~
~~I~
I
~
m
1
4::::::-:- ~
2
III
_.-t~
",,".
3
=
5
a: Removable water reservoir
b: Selector dial
c: Thermostat Indicator light
d: Power Indicator light
e: On-Oft-Switch
f: 'Perfect Froth" attachment
g: Steam nozzle-
h: Filter holder
I: Removable overflow gnd
J: Drtp tray
n
k: Measuring spoon
I: Filter sIeve for 1 and 2 cups
m: 4-cup filter sieve (model 882 only)
n: Glass Jug (model 882only)
7
Page 4

...
Q
...
...
...
I\>
. -
I\>
...
()
OJ
Page 5

Features
. Pump Espresso System
features a stainless steel boiler that brews
up.to 4 cups of authentic, crema laden
espresso at a time.
. Microchip Monitored Steam Pump
delivers a constant flow of "dry" steam.
This unique dryness of steam and its
regulated pressure froth milk for perfect
cappuccinO.
. Separate 20oz. LatteCarafe (model#882
only) IS convenient to use and makes 1-step
lattes In minutes I The large capacity glass
carafe easily lets you steam milk and brew
espresso directly Into the carafe for coffee
bar quality lattes raght In your own home.
. Program Dial enables you to turn to any
of the following three positions
" Q" espresso
,/\/''' steam pre-heat
" ~" steam
" 0 "
OFF position.
. ReadyLightI Thermostat Indicator Light
Light lets you know when the machine IS
ON, and when it has reached the proper
brewing temerature.
.34 oz. Water Reservoir.
Large capacity, easy to fillwater container
makes continuous cups of espresso,
capPuccino and 1-step lattes.
."Perfect Froth Attachment" effortlessly pro-
duces froth for perfect cappuccino and latte.
. Steam Nozzle for frothing and steaming.
. Stainless Steel Filter Baskets allows you to
make 1,2 or 4 cups of espresso at a time.
. Removable Drip Tray & Grid ISeasy to
remove and easy to clean.
8
Introduction
Your new KRUPS "Novo Compact" or
"Novo Compact Latte" features the latest In
espresso technology and the most
sophisticated features.
Your new "Novo Compact" or "Novo
Compact Latte" IS another one of KRUPS
finest espresso makers that IS now available
to you for at home use.
Genuine Espresso
Espresso ISa far richer and stronger brew
than regular coffee. It should be deep, dark
and delicIous. Most people find they enJoy it
'in small quantities because of its richness
and for that reason, espresso ISusually
served 10small 2-2.5 oz. demitasse cups.
The mark of real espresso ISits wonderful
Inviting fragrance and a light brown
"Crema" found on top of the surface of the
coffee. Your "Novo Compact" or "Novo
Compact Latte" properly used, will always
produce espresso that ISdeep, dark, and
delicIous. Just follow the Instructions and
use fresh, well roasted espresso beans.
USing your
"NOVO COMPACT"
"NOVO COMPACT LATTE"
for the first time
We recommend that you get familiar with
all the parts of your "Novo Compact''l''Novo
Compact Latte" before operating the machine.
Insert the filter holder Into the machine, and
remove and replace water reservoir.
Wipe off the steam nozzle and Perfect Froth
attachment with a damp cloth to make sure
all dust particles from transport are
removed. Wash all loose parts In warm,
soapy water, nnse thoroughly and dry.
When uSing your "Novo Compact"I"Novo
Compact Latte" for the first time we
recommend running water through the
machine to remove any dust particles whIch
may have settled durang shiPPing.
Make sure before you start that the removable
overflow grad !illS properly In place and that
the drip tray IiI ISproperly Inserted.
Before plugging the appliance Into an
electrical outlet, make sure that the control
dial (bl IS 10the "0" position and the
ON/OFF switch (el IS In the "OFF" position.
Cleaning the
Internal System
Step 1
. Open the water chamber lid and remove
the water reservoir (see figure 1I. This
allows you to conveniently brang the
water reservoir to the faucet.
. Fill the water contamer with fresh, cold
water Just below the hinge of the handle
(see figure 2).
. Insert the water container back Into the,
appliance (see figure 31. Make sure that it
sits In properly so the valve on the base of
the water reservoir IS activated.
. Place a one or two cup filter sieve Into the
filter holder (see figure 91, then Insert the
filter holder mto the machine. Do this by
raising the filter holder up Into the machine
at a 45 degree angle (see figure 51. Turn
the filter holder to the raght until it IS firmly
locked Into .place. Now you are ready to
warm up your "Novo Compact"/"Novo
Compact Latte"
Step 2
. Place a cappuccinO cup that has at least a
5 oz. capacity underneath the filter holder
spout (see figure 61.
. Turn the "ON/OFF" switch (el "ON" The
two Indicator lights, both yellow and red,
will illuminate (see figure 4). As soon as
the yellow (thermostat) light goes out, the
machine ISheated up and ready to use.
. Turnthecontroldialtothe position"Q "
and allow a cup of water to run through
the machine. Repeat this process until
half the water In the water container has
been emptied(see figure7).
THIS WILL REOUIREYOU TO STAY WITH
THE MACHINETO EMPTY EACH CUP AS IT
BECOMES FULL. UPON COMPLETION OF
EACH CUP RETURN TO THE "0" POSITION.
PreparingEspresso
Step 1
. Fillthe water container with fresh, cold
water (see figure 1-3).While making
espresso, water canbe added to the reservoir
by opemng the hinged water chamber lid
and adding water to the water reservoir,
uSing another receptacle to fill the
container. Otherwise, the water reservoir
can be removed and.taken to the faucet.
&. CAUTION:
If the water reservoir ISempty and the pump
ISrunmng, you willhear a very distinct nOise,
which ISlouder than the normal operating
sound. Ifthis happens, tum the machrne "OFF"
Check water reservoir and refill as needed.
Never let the pump run when the water reser-
vOir ISempty as this can damage the pump.
9
Page 6

Step 2
. Make sure the control dial ISset to "0';
position. Then switch the appliance "ON"
uSing the "ON/OFF" switch. Both Indicator
lights will illuminate (yellow and red).
When the yellow Indicator light goes out,
the machine ISready for use.
Prewarmlng Espresso/
Cappuccino Cups
Ifthe machine ISbeing used for the first
time dUring the day, we recommend
prewarmrng your cups with hot water.
Step 3
Remove filter holder from the appliance.
Choose the desired filter basket which ISre-
QUiredfor making one or two cups of espresso
and Insert In filter holder (see figure 9).
Depending on which filter basket you have
chosen, add one measunng spoon of espresso
coffee for each cup of espresso that you are
preparing (see figure 101.
. The 1-cup filter basket only requires one
level KRUPS measuring spoon of espresso
coffee.
. The 2- cup filter basket only reqUires two
KRUPS measUring spoons of espresso
coffee.
Gently press (tamp) the coffee Into the filter
hoder uSing the bottom of the measuring
spoon (see figure 111,and ensure that any
loose coffee remaining on the outer edges
are removed (see figure 121.
Insert the filter holder back Into the machine
by raising it up at a 45 degree angle and
turmng it to the right. Turn the filter holder
to the nght, until it IS firmly locked Into'
place (see figure 131.
Place a cup which has at least a 2-2.5 oz.
capacity underneath the filter holder spout.
If you are prepanng more than' one cup of
espresso, be sure to position two Cups
underneath the brewrng spouts.
When prepanng cap.pucclno, you will need a
cup that has at least a 5 oz. capacity.
As soon as the yellow thermostat light goes
out turn the control dial to the" Q "position
(see figure 141.
When the desired amount of espresso IS,10
the cup(sl, turn the control dial back to the
"0" position.
Place the Cup aSide. To remove the coffee
from the filter basket, remove the filter
holder from the machine by grasprng the
filter holder and turmng it to the left, until it
dislodges. Dispose of used coffee In a waste
receptacle (see figure 151 usrng the thumb
guard to hold the filter sieve In place.
Rernsert the empty filter holder back rnto the
machine to help keep it warm.
If you are- prepanng more than one Cup of
espresso, disregard the yellow thermostat
light. It simply Indicates that the thermostat
IS regulating temperature.
CappuccinO
In addition to preparing espresso, your
"Novo Compact"/"Novo Compact Latte" may
be used to froth milk for cappuccino.
CapPuccino reportedly takes its name from
the chocolate hues of the robes worn by the
Capuchin monks who favored this delicIous
desert coffee. While cappuccino IS
traditionally made up of espresso and frothed
milk, it can be tailored to one's own taste with
cmnamon, sugar, chocolate flakes, or even
liquor. Its versatility makes capPuCCinO a
world-wide gourmet choice.
Preparing Steam for
Cappuccino
Since a higher temperature IS necessary for
making steam than ISneeded for making
espresso, this espresso/cappuccino maker IS
furnished with a preheating mode for
steamrng/frothmg preparation. DUring this
preheating phase, a small amount of water
may emerge from the filter holder.
Use will need to use the steam pre-heat mode
before froth 109 milk for cappuccinO. To use
the steam pre-heat mode, turn the control
dial to the" VII'" position. When the yellow
temperature Indicator light goes out, turn the
control dial to "
(see FROTHING MILKFOR CAPPUCCINO).
NOTE:
Ifyou wish to prepare espresso Immediately
after steammg/frothmg, return the control dial
to the "0" position. Place an empty cup under
the filter holder and turn the control dial
to" Q"
~ " and begrn frothmg milk
Frothing Milk
for Cappuccino
Step 1
. The first step Inmaking cappuccinO ISto
make espresso. See section "Prepanng
Espresso" When preparing cappuccino
use a cappuccino cup which has a
capacity of at least 5 oz. You should fill
the cup 1/2way with espresso.
.If your "Perfect Froth" Attachment ISnot
already attached. attach it now
(see figure 161.
.
. Make sure that the control dial ISIn the
"0" position before turning on the machine.
. Once you have made your espresso, turn
the selector dial to the" 1f\J\" steam pre-
heat mode (see figure 171.Some water
may escape through the filter holder at
this time. Wait until the yellow thermostat
Indicator light ISextinguished before
turnmg to the" ($ " position.
Step 2
. Take a stamless steel frothing pitcher and
fill it 1/3 to 112full with fresh, cold milk
and set aSide. This amount of milk will
Yieldenough froth for two cups of
cappuccinO. If you need more froth,
repeat these steps.
. We recommend uSing skIm or 2% milk if
you prefer a stiff, dense froth. Use regular
milk ifyou prefer a more liqUidtype of froth.
Step 3
. When the yellow thermostat light goes
out. Insert the steam nozzle half way IOto
the milk and turn the control dial to " <!!!>"
(see figure 181.
. Leave the steam nozzle In the milk for
approximately 45-60 seconds, depending
on how much froth you want and the type
of milk you are uSing.
NOTE:
Do not bring milk to a boil (this will happen
if large bl,lbbles start formrng at the surface
of the milk).
Do not let the "Perfect Froth" attachment
touch the bottom of the pitcher. ThIs will
prevent you from frothing the milk.
10
11
Page 7

Step 4
. After the milk ISfrothed, keep the "Perfect
Froth" 10the milk until the control dial has
been turned to the .0" position. This will.
prevent any splattering from occunng.
. After milk ISfrothed, set aSide. Ifyou like
very stiff froth, let the pitcher sit for a few
seconds.
. Now you are ready to add the frothed milk
to the already prepared espresso. Pour the
milk Into the cup by holding back the froth
with your spoon. Fillthe remamder of the
cup withthe hot milk and then spoon on the
froth. In Italy cappuccino ISnormally '/3
espresso, '/3 milk plus '/3 froth.
Attention:
The top closure of the .Perfect Froth"
attachment (see figure 28, part A) has a very
fine hole which draws air Into the milk. If
this tiny hole gets clogged, "Perfect Froth"
will not work properly. Therefore, never
Immerse the top closure In milk or froth.
USingthe GlassCarafe
1.Step lattes (model #882 only)
Lattes are fast becoming a popular beverage
choice In restaurants and coffee bars. While
cappuccino IS'/3 espresso, 1f3steamed milk
and 'f3 froth, a latte consists of ':3 espresso
and 2/3steamed milk. A latte ISalso generally
served In a large mug. Lanes are also served
In many differend flavours, usmg "syrups"
such as Vanilla, Hazelnut. Irish Creme and
Almond.
KRUPS' Novo Compact Latte (model #882)
lets you make coffee bar quality lattes right
In your own home uSing the glass carafe.
12
The 20 oz. glass carafe can also be used to
make 4 cups of espresso only, great for
entertammg! You will notice that the glass
carafe IS marked on both sides. 1 side for 2
or4 cups of espresso, the other for 1 or 2
lattes. The e!'>"Milk" lines mdicate how
much milk to add for the perfect latte. For
one latte, fill milk to the first
closest to the bottom of the carafe; For two
lattes, fill to the second ~ "Milk" line.
Before you start, remove the drip tray and
Insert the overflow grid onto the base
(see figures 19 & 201. Fill the water reservoir
and turn on the machine.
~ "Milk" line,
To make 4 cups of espresso:
. Insert 4-cup filter sieve mto filter holder
(see figure 21). Fillwith coffee to the rim
and press (tamp) gently with the bottom
of the measunng spoon. Remove any
excess coffee from around the filter
holder. Insert filter holder IOtOthe machme.
. Place the carafe lid onto the carafe (see
figure 22). Place the carafe directly under
the filter holder (see figure 231.Turn the
selector dial to the position and brew
espresso until itreaches the" 4" espresso
cup fillline ofthe carafe.Once brewingIS
completed, return the selector dial to the
"0" position.
To make lattes:
. Insert 1 or 2 cup filter sieve IOtOfilter holder
and fill with coffee (use 1 cup filter sieve if
you are making one latte, 2 cup sieve for
two lattes). Insert filter holder Into machine.
. Remove the rubber "Perfect Froth"
attachement from the steam nozzle. This
IS necessary because for lattes, the milk IS
steamed, rather than frothed.
. Turn the selector dial to the steam pre-
heat mode
. While you are waiting for the machine
temperature to regulate for steam,
remove the cover from the glass carafe.
Fillthe carafe with cold milk to the
appropnate ~ "Milk" line, depending on
whether you are making 1 or 2 lattes.
(see figure 24)
. Once the thermostat Indicator light ISout,
you may begin to steam the milk. Place
steam nozzle (without the "Perfect Froth"
attachment) directly Into the carafe.
Be sure that the bottom of the steam nozzle
does not touch the bottom of the carafe.
(see figure 25)
. Steam milk for approximately 60 seconds,
or until milk IShot, but not boiling.
Remember, you are not frothing milk so
the milk will not foam as it would when
uSing the "Perfect Froth" attachment for
cappuccino. Rather, a thin layer of creamy
foam will appear on the surface.
. Once you have steamed your milk, turn
the selector dial back to the "0" position.
Place the carafe lid on the carafe, and
position the carafe (with the steamed
milk) back under the filter holder.
(see figure 23)
. Turn the selector dial to" .Q' " and brew
the espresso nght Into the carafe. You will
see the espresso begin to blend with the
steamed milk. Brew espresso until it reaches
the appropriate fill line on the carafe (the
"1" for one latte, "2" for two lattes).
. To serve, Just pour directly from the
carafe IOtOmugs or latte cups. No stimng
IS necessary, as the brewed espresso has
already comblOed with the milk to create
a delicIous latte!
Cleamng the
"Perfect Froth" Attachment
It IS strongly advised that you wipe off the
milk residue which may have collected on
the "Perfect Froth" and steaming nozzle soon
after the frothmg process IScompleted.
For a thorough cleanmg of the" Perfect Froth"
attachment, remove the separate parts A, B,
& C (see figure 28). All parts should be
nnsed 10 warm, soapy water. If the small
section of part A IS clogged, it can be
opened usmg a fine sewing needle.
Use caution when removing the "Perfect
Froth" from the steaming nozzle as it may
still be hot. Use a damp cloth to clean the
steam nozzle. Use caution when cleamng or
removing the steaming nozzle as it may still
be hot.
Cleaning the Machine
Before cleanmg, make sure that the machme
ISturned "OFF" and unplugged. After each
use, the water container should be emptied
and the overflow gnd and drip tray should
be removed for cleamng. The dnp tray may
need to be emptied after maklOg espresso
4 or.5 times.
The brewmg head, filterholder and filtersieves
should be washed after every use. Wipe the
brewing head with a damp cloth and wash
alll005e parts 10warm soapy water. We re-
commend wash 109all loose parts by hand.
If the inside of the brewmg head becomes
extremely dirty, it can be unscrewed uSing a
cOin.The sieve of the brewmg head can be
cleaned In mild, soapy water.
13
-
Page 8

Place the sieve back Into the brewing head
and screw firmly Into place (see figure 26).
The steam nozzle must be wiped with a
mOist cloth Immediately after frothing.
This will prevent the milk from drying onto
the nozzle and clogging the steam hole.
However, should the nozzle become
clogged, the nozzle can be removed with a
COinand cleaned uSing a needle. Ensure the
rubber nng ISIn position when replacing the
steam nozzle (see figure 27).
Ifthe machine will not be used for any length
of time, we recommend not leaving the filter
holder Inside the brewing head, as this puts
'the sealing nng under unecessary pressure,
which can shorten the life ofthe sealing nng.
Decalcifymg.
Under normal conditions you do not need to
decalcify your ~Novo Compact~rNovo
Compact Latte" However, In areas where
there IShard water or ifyou use your machine
very frequently we recommend decalcifying.
"Youwill know when such a cleanrng IS
necessary by an obvIous slow down In the
brewing time. Decalcifier ISwJdely available
and can be purchased through KRUPS
Consumer Service Department.
How To Decalcify
. Before beginning, it ISnecessary to
remove the brewing sieve from the
brewing head (see figure 26). This can be
done uSing a flat head screw dnver or COin.
.Remove the water reservoir and fill it with
luke warm water. Dissolve the decalcifying
solution IOtO the water reservoir. Replace
the water reservoIr.
. Place a cup underneath the brewing spout.
. Turnthe controldialto the" .Q' " position.
Stop between eachcup and empty itas it
becomes full. Proceed with this until all of
the water has run through the machine.
Allow the appliance to cool for 10-15
minutes when done.
. To eliminate traces of the decalcifying
solution, fill the water reservoir with
fresh, cold water.
. Turn the control dial to the" .Q' " position
and clean the machine until there ISno
more water Inthe reservoir.
Problems and Causes
Problem:
Coffee leakmg from filter holder.
Cause:
. Filter holder not properly Inserted Inthe
machine.
. Filterholder not pushed In as far as itwill go.
Problem:
Pump makes. loud nOise.
Cause:
. No water 10the water reservoir.
. Old or dry coffee ISberng used, water
cannot properly flow through the coffee.
Problem:
Coffee does not come out of filter holder.
Cause:
. No water Inthe water reservoir.
. Water reservoir not Inserted correctly.
. Filter blocked because the coffee mixture
IStoo fine or has been tamped too hard.
. Machine needs to be decalcified.
Problem:
Espresso has no "Crema"
Cause:
. Old or dried out coffee being usee.
. Coffee not suitable for espresso.
. Coffee ground too coarsely.
. Too little coffee In the filter or not
properly tamped.
Problem:
Not enough froth when frothrng milk.
Cause:
. Steam nozzle IS clogged.
. Milk IS not fresh.
. The pitcher that you are using ISnot suitable.
(It IS recommended that you use a starnless
steel.frothlng pitcher.) Cold conducts
better to metal than to glass or plastic.
. The type of milk IS not suitable. We
recommend uSlOg 2% or skim milk.
Whole milk IS acceptable, but due to the
fat molecules, it will not have as dense a
froth as ifyou were to use 2% or skIm milk.
LimitedOne Year Warranty
Your KRUPS #989 or 882 IS covered by the
following warranty:
Iffrom date of purchase within one year thIs
KRUPSproduct fails to function because of
defects 10matenals or workmanship,
KRUPS North Amenca will, at its option,
repair or replace the unit with our charge,
provided the owner has a proof of date of
purchase. .
This warranty will be vOid jf malfunction
was caused by damage to the product by
accident, misuse, use on frequency or
voltage other than marked on the product
and/or described Inthe Instructions, abuse
IOcludingtampenng, damage In transit, or
use for commercial purposes. This warranty
gives you specificlegalnghts, and you may
also have other rrghts which may vary from
state to state.
14
15
..
Page 9

GUARANTEE OF PERFORMANCE
This fine KRUPSproduct ISmanufactured according to a rigId code of
quality standards, and, with minimum care, should give years of
satisfying service.
However, should the need anse for repairs or for replacement parts
within or after the warranty penod. please call our CONSUMER
SERVICEDEPARTMENT
(800) 526-5377
24-hours a day, 7 days a week
You will be provided with specific Instruction on how to get your
product repaIred, as well as the name and address of your nearest
authorized KRUPSService Center. The department will also be able
to answer any general product questions you may have.
Before calling the Consumer Service Department, please have the
type number of your KRUPSappliance available.
You must have this mformation before calling our Consumer Service
Department so that we may better answer your questions. The type
number can be located by lookmg at the bottom of your appliance.
This product ISType #989 or 882
Any general correspondance can be addressed to:
KRUPS North Amenca, Inc.
P.O. Box 3900
Peona, IL61612
0595/ I:r /989; 882
'"
.~~"- ," M- ..--
US66032
-
 Loading...