

Page 1

My
Machine
11065_UM_ARES_C_Krups.indd 1 16.05.17 14:03
Page 2
EN
Nespresso Ver tuo is an exclusive system creating a per fect coee, from the Espresso to the large A lto, time aer time.
Nespresso Ver tuo machines are equipped with the unique Centrifusion
parameter has been caref ully defined by Nespresso coee exp erts to ensure that all aromas from each Grand Cru can be extrac ted to give the coee body and create an exceptionally ri ch
and generous crema.
CONTENT
These instructions are par t of the appliance. Read all instructions and safety ins tructions before operating the appliance.
These instructions are par t of the appliance. Read all instructions and safety ins tructions before operating the appliance.
SAFETY PRECAUTIONS .............................................................................................. 3
OVERVIEW .....................................................................................................................7
PACKAGING CONTENT................................................................................................7
SPECIFICATIONS ..........................................................................................................7
MACHINE HANDLING ..................................................................................................8
FIRST USE OR AF TER A LONG PERIOD OF NONUSE.........................................10
COFFEE PREPARATION .............................................................................................12
ENERGY SAVING CONCEPT .................................................................................... 14
PROGRA MMING THE WATER VOLUME..................................................................15
SPECIAL FUNCTIONS
CLEANING ...................................................................................................................16
RESET TO FACTORY SETTINGS .............................................................................. 17
EMPTYING THE SYSTEM ..........................................................................................18
BEFORE A PERIOD OF NONUSE, FOR FROST PROTECTION
OR BEFORE A REPAIR ...............................................................................................18
DESCALING ..................................................................................................................19
BUTTON INDICATORS/BLINKING SUMMARY ......................................................22
®
technology to gently extract an Alto, Mug, Gran Lung o or Espresso at the tou ch of a buon. Each ex tracting
ASSISTANCE VID EOS ARE AVAILABLE ON WW W.NESPRESSO.COM VISIT “MACHINES” SECTION
TROUBLESHOOTING .................................................................................................24
CONTACT THE NESPRESSO CLUB .......................................................................... 26
DISPOSAL AND ENVIRONMENTAL PROTECTION ...............................................26
LIMITED GUARANTEE................................................................................................27
2
11065_UM_ARES_C_Krups.indd 2 16.05.17 14:03
Page 3
EN
SAFETY PRECAUTIONS
CAUTION:
Use of controls, adjustments or performance of
procedures other than those specified here in may result in
hazardous radiation exposure.
CAUTION: when you
see this sign, please
refer to the safety
precautions to avoid
possible harm and
damage.
INFORMATION:
when you see this sign,
please take note of the
advice for the correct
and safe usage of your
appliance.
WARNING: the
safety precautions are
part of the appliance.
Read them carefully
before using your new
appliance for the first
time. Keep them in a
place where you can
find and refer to them
later on.
• The appliance is
intended to prepare
beverages according to
these instructions.
• Do not use the
appliance for anything
other than its intended
u s e .
• This appliance has
been designed for
indoor and nonextreme temperature
conditions use only.
• Protect the appliance
from direct sunlight
eect, prolonged water
splash and humidity.
• This is a household
appliance only. It is not
intended to be used in:
sta kitchen areas in
shops, oces and other
working environments;
farm houses; by clients
in hotels, motels and
other residential type
environments; bed
and breakfast type
environments.
• This appliance may
be used by children of
at least 8 years of age,
as long as they are
supervised and have
been given instructions
about using the
appliance safely and
are fully aware of the
dangers involved.
• Cleaning and user
maintenance shall
not be carried out by
children unless they
are older than 8 years
of age and they are
supervised by an adult.
• Keep the appliance and
its cord out of reach of
children under 8 years
of age.
• This appliance may
be used by persons
with reduced physical,
sensory or mental
capabilities, or
whose experience
or knowledge is not
sucient, provided they
are supervised or have
received instruction
to use the appliance
safely and understand
the dangers.
• Children shall not use
the appliance as a toy.
• The manufacturer
accepts no
responsibility and the
guarantee will not apply
for any commercial
use, inappropriate
handling or use of the
appliance, any damage
resulting from use
for other purposes,
faulty operation, nonprofessionals repair or
failure to comply with
the instructions.
3
11065_UM_ARES_C_Krups.indd 3 16.05.17 14:03
Page 4

EN
SAFETY PRECAUTIONS
NOTE:
This appliance contains a class-1 laser product.
Avoid risk of fatal
electric shock and fire
• In case of emergency:
immediately remove
the plug from the
power outlet. Exception:
do not remove plug
in case of pinching
during machine head
movement, when
automatic reverse
mechanism will
operate.
• Only plug the appliance
into suitable, easily
accessible, earthed
mains connections.
Make sure that the
voltage of the power
source is the same as
that specified on the
rating plate. The use of
an incorrect connection
voids the guarantee.
• The appliance must
only be connected aer
installation.
• Do not pull the cord
4
over sharp edges,
clamp it or allow it to
hang down.
• Keep the cord away
from heat and damp.
• If the supply cord or
the plug are damaged,
they must be replaced
by the manufacturer,
its service agent or
similarly qualified
persons, in order to
avoid all risks.
• If the cord or the
plug are damaged,
do not operate the
appliance. Return
the appliance to the
Nespresso Club or to a
Nespresso authorised
representative.
• If an extension cord
is required, use only
an earthed cord with
a conductor crosssection of at least
1.0 mm2 or matching
input power.
• To avoid hazardous
damage, never place
the appliance on or
beside hot surfaces
such as radiators,
stoves, ovens, gas
burners, open flame, or
similar.
• Always place it on
a horizontal, stable
and even surface.
The surface must be
resistant to heat and
fluids, like water, coee,
descaler or similar
liquids.
• Disconnect the
appliance from the
mains when not in
use for a long period.
Disconnect by pulling
out the plug and not by
pulling the cord itself or
the cord may become
damaged.
• Before cleaning and
servicing, remove the
plug from the mains
socket and let the
appliance cool down.
• To disconnect the
appliance, stop any
preparation, then
remove the plug from
the power socket.
• Never touch the cord
with wet hands.
• Never immerse the
appliance or part of it in
water or other liquid.
• Never put the
appliance or part of it in
a dishwasher.
• Electricity and water
together is dangerous
and can lead to fatal
electrical shocks.
• Do not open the
appliance. Hazardous
voltage inside!
• Do not put anything
into any openings.
Doing so may cause
fire or electrical shock!
11065_UM_ARES_C_Krups.indd 4 16.05.17 14:03
Page 5

EN
Avoid possible harm
when operating the
appliance
• Never leave the
appliance unaended
during operation.
• Do not use the
appliance if it is
damaged or not
operating perfectly.
Immediately remove
the plug from the
power socket. Contact
the Nespresso Club or
Nespresso authorised
representative for
examination, repair or
adjustment.
• A damaged appliance
can cause electrical
shocks, burns and fire.
• Risk of scalding by
hot liquids. If the
machine is forced
open hot liquids and
coee grounds may
splash. Always lock the
system completely and
never open it during
operation.
• Do not put fingers
under coee outlet, risk
of scalding.
• Do not insert
fingers into capsule
compartment when
machine head is
closing. Risk of injury.
• Do not put fingers
into the capsule
compartment or
capsule sha, risk of
injury!
•
Be careful not to
injure yourself on
sharp points or trap
your fingers when
reaching inside the
machine.
• Never use a damaged
or deformed capsule.
• Always fill the water
tank with fresh drinking
water.
• Empty water tank if the
appliance will not be
used for an extended
time (holidays, etc.).
• Do not use any
other liquid (such
as cow’s milk, soya
milk, enriched milks,
flavoured liquids, etc.).
• Replace water in
water tank when
the appliance is not
operated for a weekend
or a similar period of
time.
• Do not use the
appliance without
a cup placed at the
suitable cup support
level and ensure the
cup support is in
place aer any usage,
to avoid spilling any
liquid on surrounding
surfaces.
• Do not use any strong
cleaning agent or
solvent cleaner. Use a
damp cloth and mild
cleaning agent to clean
the surface of the
appliance.
• To clean machine,
Use fresh and clean
tools (fresh and clean
cloths, fresh and clean
sponges, clean paper
towels) to execute
the cleaning of the
equipment.
• When unpacking
the machine, remove
the plastic film and
dispose.
• This appliance is
designed for Nespresso
Vertuo coee capsules
available exclusively
through the Nespresso
Club or your
Nespresso authorised
representative.
• All Nespresso
appliances pass
stringent controls.
Reliability tests under
practical conditions are
performed randomly
5
11065_UM_ARES_C_Krups.indd 5 16.05.17 14:03
Page 6

EN
SAFETY PRECAUTIONS
on selected units. This
can show traces of any
previous use.
• The use of accessory
aachments not
recommended by the
manufacturer may
result in fire, electric
shock or injury to
persons.
• Nespresso reserves
the right to change
instructions without
prior notice.
• Unplug appliance
when not in use for a
long period and before
cleaning. Allow to cool
down before puing on
or taking o parts, and
before cleaning.
Descaling
• Nespresso descaling
agent, when used
correctly, helps ensure
the proper functioning
of your machine over
6
its lifetime and that
your coee experience
is as perfect as the first
day.
• For coee and
coee&milk machines,
descale according
to user manual
recommendations or
specific alerts.
SAVE THESE
INSTRUCTIONS
Pass them on to any
subsequent user.
This Instruction Manual
is also available as a PDF
file at nespresso.com
11065_UM_ARES_C_Krups.indd 6 16.05.17 14:03
Page 7
EN
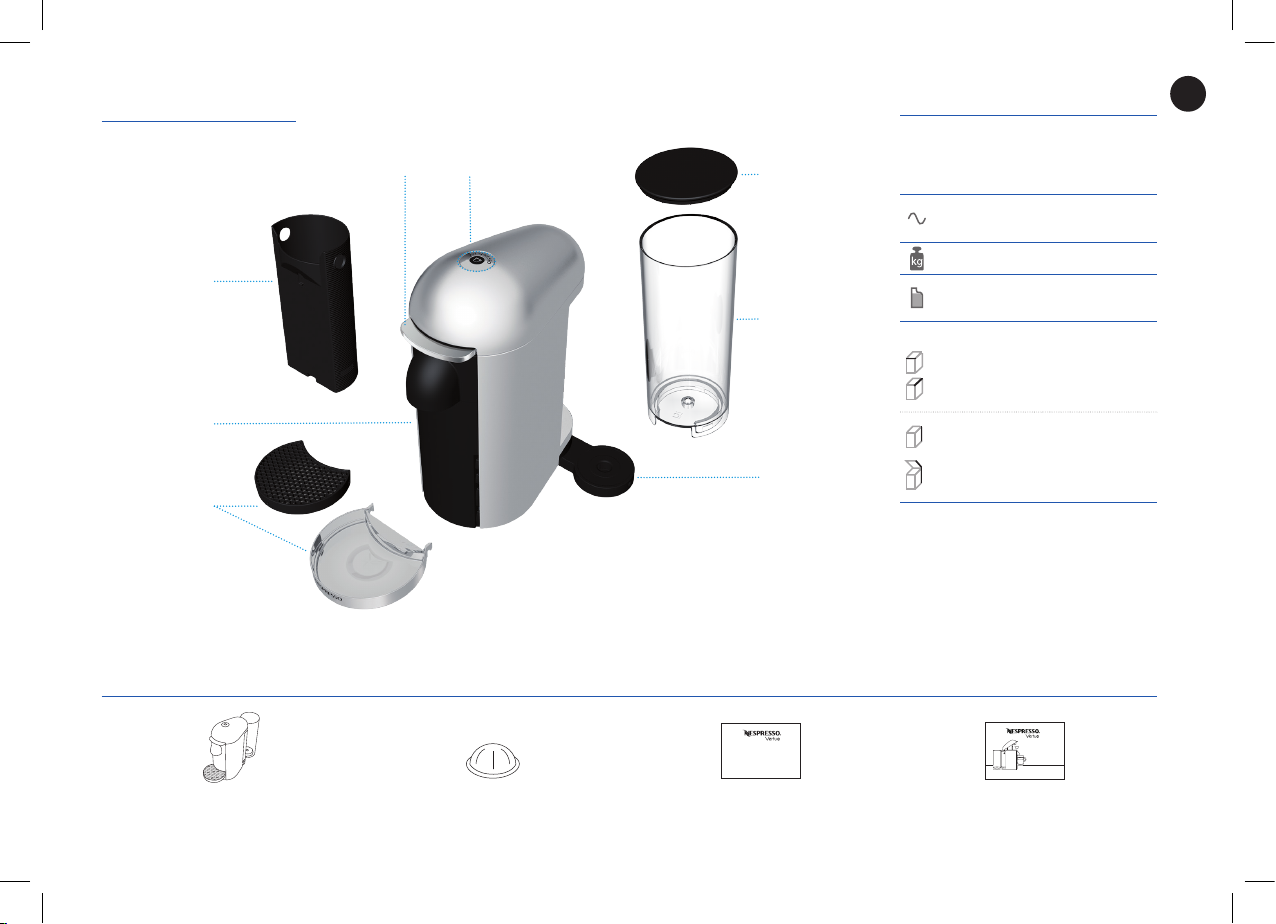
OVERVIEW
SPECIFICATIONS
Capsule Container
Coee Outlet
Adjustable Cup
Support
PACKAGING CONTENT
LidOFF/Open and Close Lever ON/Coee Buon
Water Tank
Adjustable Water
Tank Arm
XN900
220 - 24 0 V, 50Hz, 12 60 W
~ 4.6 kg
1.7 l
If water tank on
the side
232 mm
335 mm
325 mm
419 mm
411 m m
If water tank at the back
142mm
423 mm
My
Machine
Coee Machine User Manual
Nespresso Capsules Box
Nespresso Welcome Material
7
11065_UM_ARES_C_Krups.indd 7 16.05.17 14:03
Page 8
EN
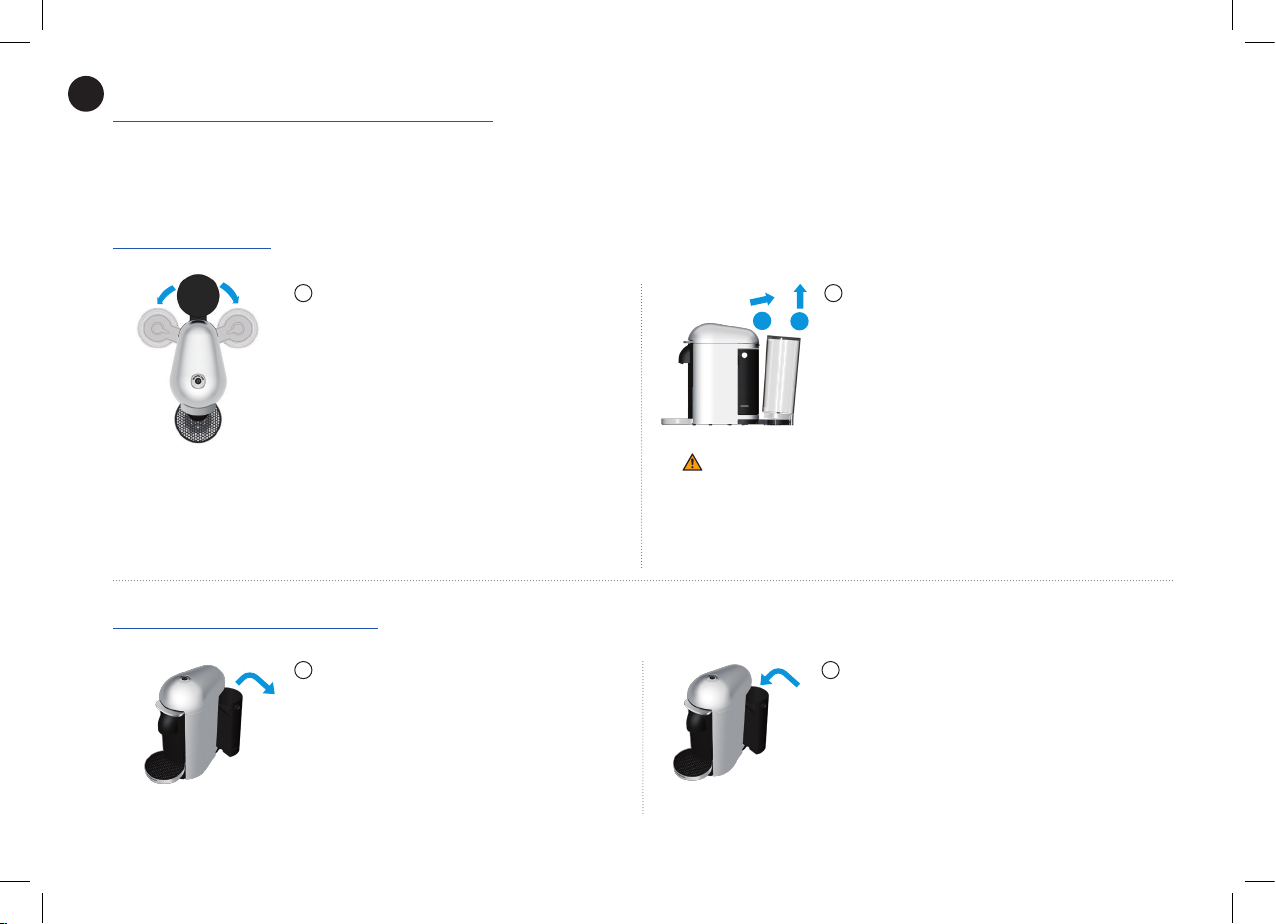
MACHINE HANDLING
WATER TANK
CAPSULE CONTAINER
8
The water tank arm can be rotated and p ositioned
1
at the back, to the le or to the right hand side of the
machine.
Remove the water tank, then remove th e capsule
1
container by sliding it sideways.
Remove the water tank by tilting i t slightly backwards,
2
then gently pulling it up.
1
WARNING:
machine may tilt during the movement.
Put the water tank in positio n by placing it ver tically onto
2
its arm, until there is a ‘click’ sound.
Be careful when remov ing the water tank since the
Place the capsule container in the back of the machine
2
by sliding it sideways into position. It is held in place by
a magnet.
Place the water tank back.
11065_UM_ARES_C_Krups.indd 8 16.05.17 14:03
Page 9
EN
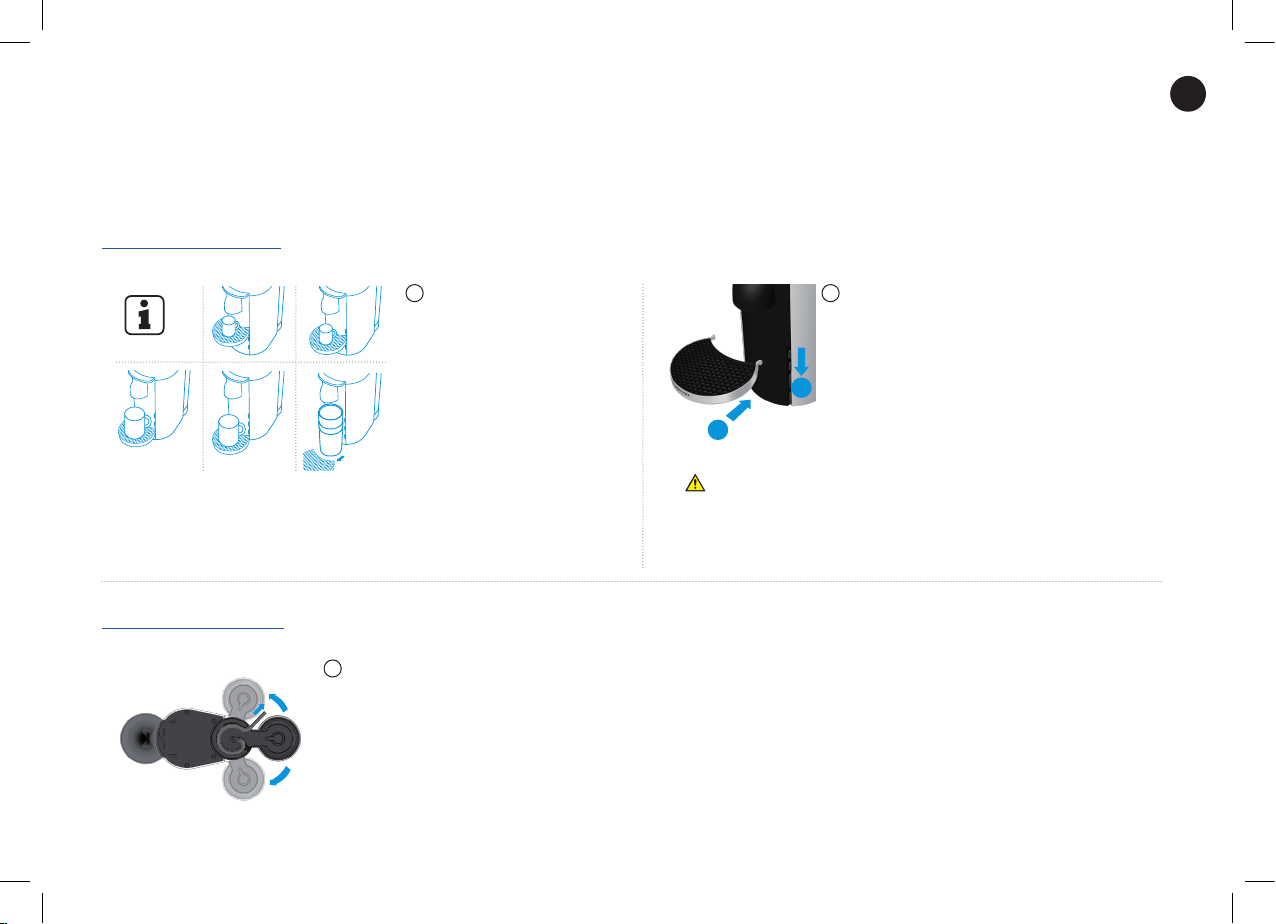
CUP SUPPORT
POWER CABLE
The cup suppor t has 4 positions
1
and can be temporar ily removed
to accommodate vari ous cup
sizes.
The power cable can be a djusted under the machine. Insert
1
the remaining cable in th e guide on the le or on the right
side socket, depending on t he position ch osen for the water
tank. Ensure machine is in the upright p osition.
To place the cup support, slide cup support st raight into
2
the holes and gently push down until the h ooks are well
in place.To rem ove it, gently li straight up an d then pull
the cup suppor t out.
2
1
CAUTION:
when removing the cup support since
it may contain warm liquid.
Make sure the cup support is properly
placed before puing the cup.
Be careful
9
11065_UM_ARES_C_Krups.indd 9 16.05.17 14:03
Page 10

EN
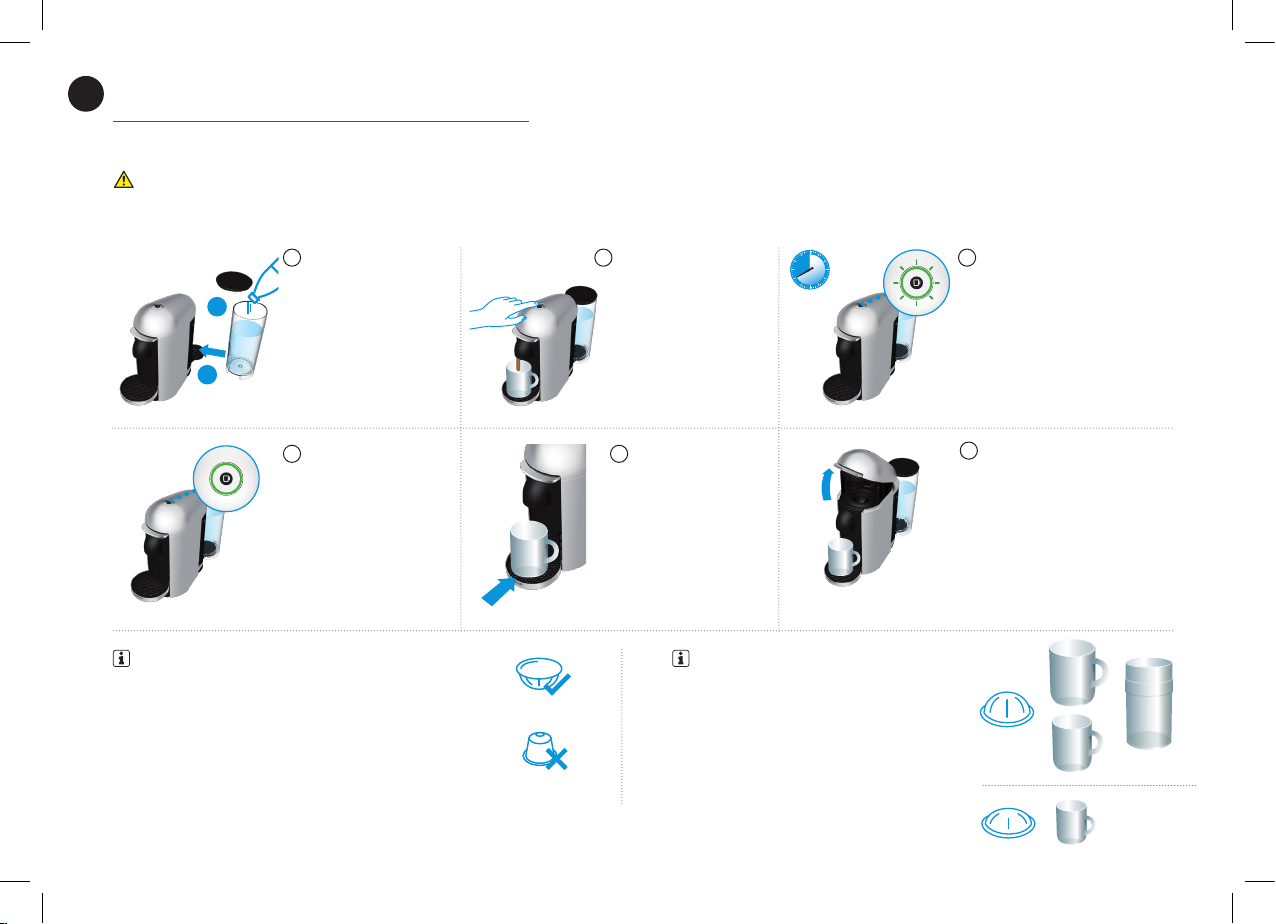
FIRST USE OR AFTER A LONG PERIOD OF NONUSE
CAUTION:
1
2
UK
First read the Safet y Precautio ns to avoid risks of fatal electrical shock and fire.
Rinse and clean the water
1
tank and lid before filling it
with only fresh drinking water.
Place the water tank in place.
2
Plug the machine into the outlet.
3
40 sec.
Ensure the capsule container and t he cup suppor t
2
are in place. For your safet y, operate the machine only
with cup suppor t and capsule container in position.
1
Turn the machine “ON” by pushing the buon. GREEN
4
light will blink while the machin e is heating up.
10
11065_UM_ARES_C_Krups.indd 10 16.05.17 14:03
Page 11

EN
Steady GREEN lights will indicate the machine
5
is ready.
Open the machine h ead by pressing the l ever up to eject
7
2
the capsule and then push the lever down to clos e it.
3 x
2 sec.
1
This procedure may take up to 5 minutes. T he procedure
9
can be stopped at any time by pushing the b uon. The
buon will go to steady GREEN. To restart the cleaning
process, follow the instructions starting at point 8. To
brew a coee, inser t a capsule, push the lever down to
close the machine an d push the buon.
Place a cup of at least 0. 8 l under the coee outlet.
6
Push the buon 3 times in 2 seconds to star t cleaning
8
and let the cleaning procedure complete automatically.
ORANGE lights will blink during th e operation. It will take
less than 2 minutes before a flow comes ou t.
The procedure consists of 3 cycles of pumping water
in, internal cleaning and water flowing from the outlet to
complete.
5 min.
11
11065_UM_ARES_C_Krups.indd 11 16.05.17 14:03
Page 12
EN
COFFEE PREPARATION
CAUTION:
Be careful not to injure yo urself on sharp points or trap your fingers when reaching inside the machin e.
Fill the water tank with
1
fresh drinking water.
1
2
Steady GREEN light
4
indicates the machine
is ready.
NOTE:
capsules. Nespresso classic capsules cannot b e used in this
machine.
This machine operates wi th Nespresso Ver tuo
Turn the machine “ON” by
2
pushing the buon.
Place a cup of
5
sucient capacity
under the coee
outlet. Risk of
scalding may occur
due to overflowing.
NOTE:
The factory seings and recommended cup
sizes are:
Alto: 414ml Gran Lungo: 150 ml
Mug: 230ml Espresso: 40ml
40 sec.
GREEN lights will blink while the
3
machine is heating up.
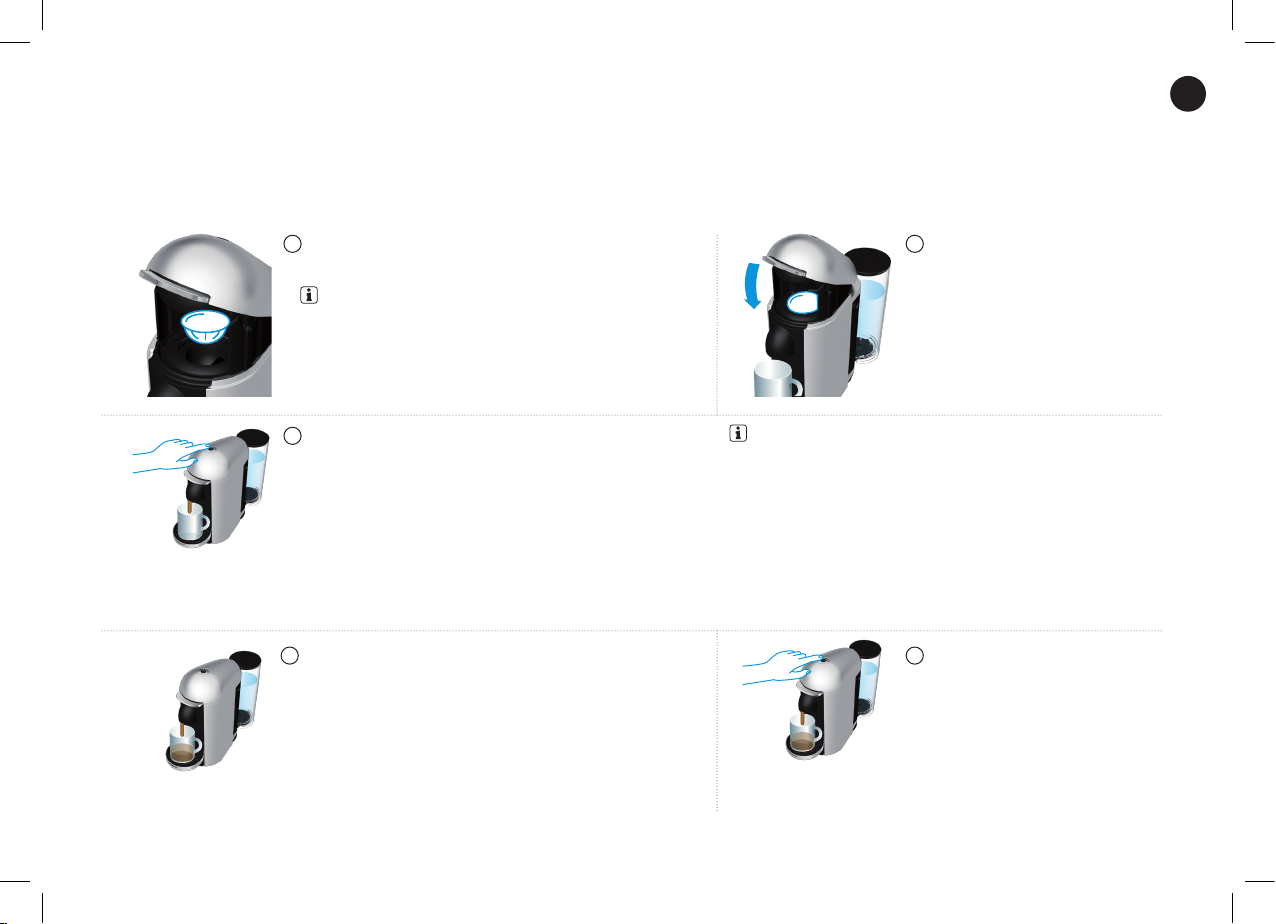
Open the machine head by
6
pushing the lever upwards.
The machine head will open
automatically, with an electrical
mechanism.
12
11065_UM_ARES_C_Krups.indd 12 16.05.17 14:03
Page 13
EN
Insert a capsule wi th the dome shap e facing downward.
7
NOTE:
unused capsules. Ensure previous capsule has been ejec ted before
inserting a fresh one.
To avoid damaging the machine, use only fresh,
Push the buon to star t the brewing pro cess. Green light will rotate
9
slowly during the barcode reading and pre-wein g phase.
During the coee preparation phase coee will start to fl ow. GREEN
10
light will rotate quickly during b rewing.
Steady GREEN light indicates t hat coee brewing is ready.
Push the lever down to close t he
8
machine head.
NOTE:
The coee will then flow automatically when the machine is read y.
The machine will automatically recognize th e inserted capsule and select
the coee preparat ion parameters and cup length defined by Nespresso
coee exper ts to extract the coee blend at its bes t.
You can do this even when the machine is still h eating up.
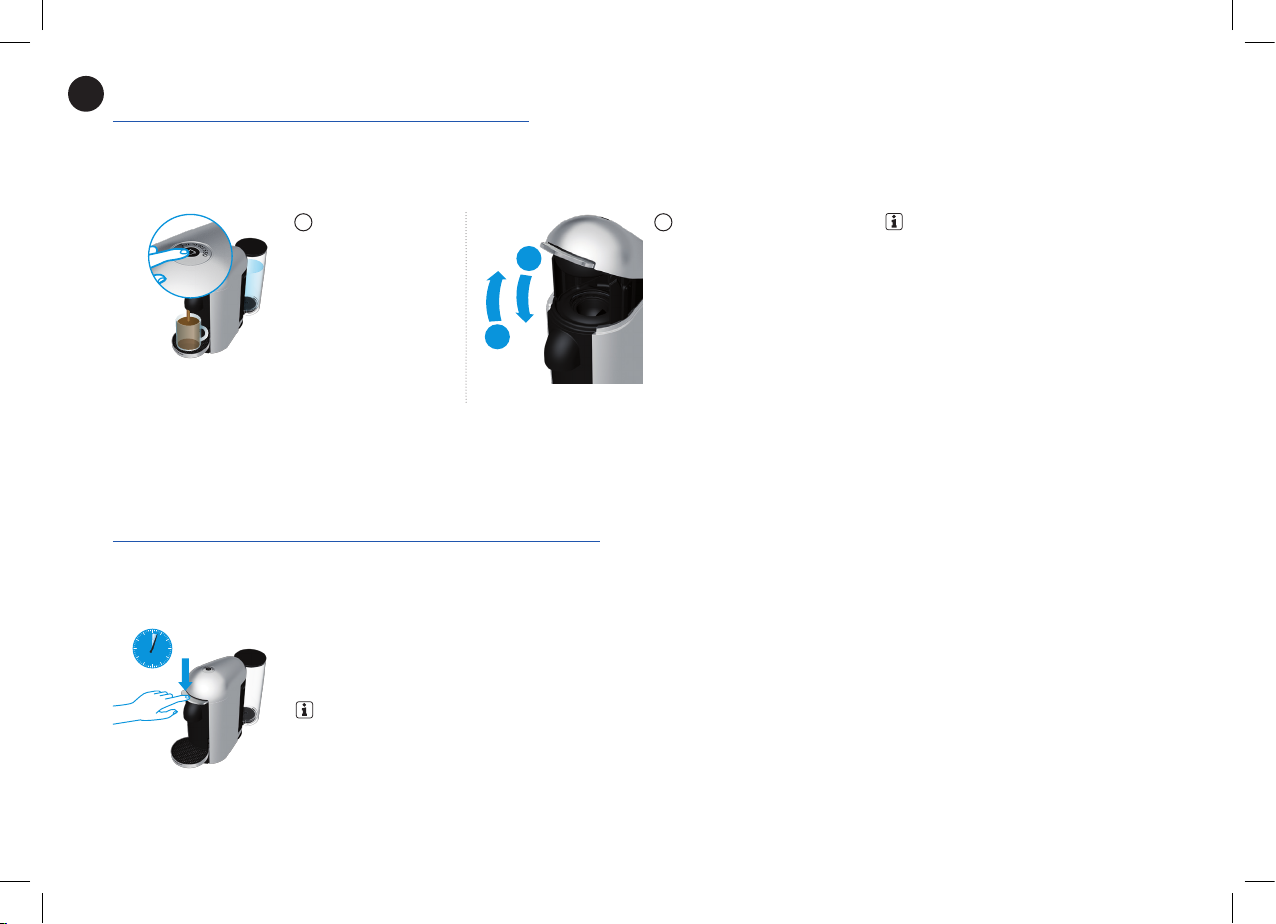
To stop the coee flow early, push the
11
buon.
Steady GREEN light indicates t hat coee
brewing is ready.
13
11065_UM_ARES_C_Krups.indd 13 16.05.17 14:03
Page 14
EN
COFFEE PREPARATION
To manually top o your
12
coee, push the buon
and push again to stop
when desired volume is
reached.
2
1
ENERGY SAVING CONCEPT
The machine can be turned 'OFF' at any time, by closing the machine head and then pushing the lever down for 3 seco nds.
Automatic”OFF” Mode: T he machine will turn o automatically aer 9 minutes of non-use.
3 sec.
NOTE:
The machine head sh ould be in closed p osition when the machine is turned o .
To eject the capsule, open the
13
machine head by pushing the
lever upwards. The machine
head will open automatically
with an electrical mechanism.
NOTE:
capsule directly at t he end of the brewin g.
It is recommended to eject the
14
11065_UM_ARES_C_Krups.indd 14 16.05.17 14:03
Page 15

EN
PROGRAMMING THE WATER VOLUME
The programming is spe cific to each capsule
1
size, Alto, Mug, Gran Lungo or Espress o. Cup
sizes can be reprogrammed f rom 10 ml to 50 0
ml.
Push and hold the
3
buon until desired
volume is reached.
Open the machine head by pressing the lever upwards; Insert the c apsule blend you
2
want to program; Close the hea d by pushing the lever down.
Water volume level is now stored for the capsule size
4
used for the programming.
NOTE:
time that capsule size is inserte d in the machine, the preparation will stop at th e userprogrammed cup size. It is possibl e to restore cup size volumes; refer to "Reset to
factory seings" section.
Once a customer-spe cific volume is pro grammed by the user, every
15
11065_UM_ARES_C_Krups.indd 15 16.05.17 14:03
Page 16

3 x
EN
SPECIAL FUNCTIONS
CLEANING
NOTE:
CAUTION:
Clean the coee o utlet regularly with a damp cloth. Please use only clean cloths for cleaning the machine.
The machine has a prede fined cleaning pro cedure that can be laun ched at user discretion.
Do not use any strong or abrasive cleaning agent or solvent cleaner. Do not pu t in a dishwasher. Never immerse the appliance or part of it in water.
Rinse and clean the water
1
tank and lid before filling it
1
with fresh drinking water.
Place the water tank in
place.
2
Push the buon 3 times in 2 seconds to star t the cleaning cycle. ORANGE light will blink
2 sec.
/
4
during the cycle. It will take less than 2 minutes before a flow comes ou t. The cleaning
procedure will run au tomatically for 5 minutes. The procedure consists of 3 cycles of
pumping water in, internal cleaning an d water flowing from the ou tlet to complete.
Rinse the cup suppor t.
2
Place a container of at
least 0.8 l under
the coee outlet.
Open the machine head
3
by pushing the lever up
2
and let the used capsul e
be ejected, th en close the
machine. Empty and rinse
the capsule container.
1
The procedure c an be stoppe d at any time by pushing
5
the buon.The buon will go to steady GREEN light wh en
ready for brewing. To restart the cleaning process, follow
the instructions starting at point 4. To brew a coee, inser t
a capsule, push the lever down to close the machine an d
push the buon.
16
11065_UM_ARES_C_Krups.indd 16 16.05.17 14:03
Page 17

3 x
EN
RESET TO FACTORY SETTINGS
NOTE:
3 sec.
3 x
/
3 sec.
Choose special function by pressing the lever down: 1 tim e for "Descaling". 2 times for "Emptying the system". 3 t imes for "Reset to facto ry seings"
Turn the machine "OFF" by pushing the lever down
1
for 3 seconds.
Choose func tion by pressing th e lever down:
3
- 3 times for "Reset to factor y seings"
NOTE:
2 seconds until the b uon will be pressed.
Push the buon to confirm.
4
ORANGE light will blink 3 times in 3 seconds to
confirm reset is don e and then go to stead y GREEN.
The machine is now read y to use.
the machine will blink 3 t imes every
3 sec.
NOTE:
Ready mode. OR ANGE light will blink 3 times ever y 2 seconds, indic ating the “Factor y
reset” func tion.
NOTE:
pushing the buon an d pressing the lever d own at the same time fo r 3 seconds.
GREEN steady light indicates the machine is ready.
Choose func tion within 2 minute s or else the machine will go b ack to
It is possible at any time to ex it the Special Func tions menu by
To enter "Factory seings" mode, push the bu on
2
and the lever down at t he same time for 3 se conds.
ORANGE steady light indic ates entry into th e Special
Functions menu.
17
11065_UM_ARES_C_Krups.indd 17 16.05.17 14:03
Page 18

EN
EMPTYING THE SYSTEM
BEFORE A PERIOD OF NONUSE, FOR FROST PROTECTION OR BEFORE A REPAIR
3 sec.
Empty the water
1
tank and put it in
place.
2
1
Place a container under the coee
4
outlet. To enter "Emptying the system"
mode push the bu on and the lever
down at the same time for 3 seconds.
ORANGE steady light indicates entry
into the Special functions menu.
Push the buon. The ORANGE
6
light will blink during th e entire
procedure. The machine turns
“OFF” automatically wh en machine
is e mp ty.
Open the machine head and let
2
the used capsule be ej ected. Close
the machine. Empty the capsule
container.
2 X
remaining liquids using heat. Small quantities of steam may emit from the machine.
pushing the buon an d pressing the lever d own at the same time fo r 3 seconds.
GREEN steady light indicates the machine is ready.
3 sec.
Choose func tion by pressing th e lever
5
down
- 2 times for “Emptying the system”
NOTE:
blink twice ever y 2 seconds until the
buon will be pressed.
CAUTION:
NOTE:
the machine will
Caution should be exercised as the machine evacuates
It is possible at any time to ex it the Special Func tions menu by
Tur n the machine "OFF" by
3
pushing the lever down for 3
seconds.
NOTE:
within 2 minutes or else th e machine
will go back to Ready mo de. ORANGE
light will blink 2 times ever y 2 seconds,
indicating the “Emptying the system”
function.
Choose function
18
11065_UM_ARES_C_Krups.indd 18 16.05.17 14:03
Page 19

EN
DESCALING
ASSISTANCE VIDEOS ARE AVAILABLE ON WWW.NESPRESSO.COM VISIT “MACHINES” SECTION
NOTE:
CAUTION:
product oth er than the Nespresso descaling kit available t hrough the Nespresso Club to avoid damage to your machine. For any additional questions you may have regarding descaling,
please contact your Nespresso Club.
Duration: Approximately 20 minutes.
Read the Safet y Precautions o n the descaling p ackage. The descaling solution can be harmful. Avoid contact with eye s, skin and surfaces. Never use any
Turn the machine
1
"ON" by pushing
the buon.
Open the machine head by
2
pushing the lever upwards
2
and let the used capsul e be
ejected. Close the machine
by pushing the lever down.
3 sec.
Turn the machine “OFF” by
3
pushing the lever down for 3
seconds.
1
Empty the cup
4
support an d the
used capsule
container.
℮
100 ml
Fill the water tank with
5
1 unit of Nespresso
descaling liquid and add
minimum 0.5 l of water.
3 sec.
To enter "Descaling" mode,
6
push the buon and t he lever
down at the same time for 3
seconds. ORANGE steady
light indicates entr y into the
Special Functi ons menu.
19
11065_UM_ARES_C_Krups.indd 19 16.05.17 14:03
Page 20

1 x
EN
DESCALING
ASSISTANCE VID EOS ARE AVAILABLE ON WW W.NESPRESSO.COM VISIT THE “MACHINES” SECTIO N
Choose func tion by pressing th e lever
7
down:
- 1 time for “Descaling”
NOTE:
blink once ever y 2 seconds until th e
buon will be pressed.
To start descaling, push the bu on.
9
The machine will stop automatically
when complete. OR ANGE light will
blink during the entire descaling
process.
the machine will
NOTE:
minutes or else the machin e will go back to
Ready mode. OR ANGE light will blink 1 time
every 2 sec onds, indicatin g the “Descaling”
function.
Choose func tion within 2
Empty, clean and rinse the
10
water tank and cup suppor t
thoroughly.
Place a recipient
8
(minimum volume:
0.8 l) under th e coee
outlet.
Fill the water tank with
11
1
fresh drinking water
and put it back in
place on the machine.
2
20
11065_UM_ARES_C_Krups.indd 20 16.05.17 14:03
Page 21

EN
When ready, push the buon to rinse the machine. Machine will stop automatically when complete.
12
ORANGE light blinking once e very 2 seconds confirms the descaling process is completed. The procedure
can be stopped at any time by pushing the b uon.
To exit descaling mode,
13
press the buon and the
lever down at the sam e
3 sec.
NOTE:
light. Machine can only be operated to make coee a few more times once the alert appears
before descaling becomes mandatory.
program may not func tion and the machine will stop and blink. Pause the program in this case
for several minutes, allowin g the descaling a gent to penetrate the scale build- up, then push the
buon again to restar t the descaling.
This machine is equipped with a descaling al ert: GREEN and RED steady
time for 3 seconds.
If the machine is completely scaled, th e descaling
GREEN steady light
14
when ready.
Descaling is completed. Allow the
15
machine to dry for 10 minutes before
using it.
The machine is now read y for use.
16
21
11065_UM_ARES_C_Krups.indd 21 16.05.17 14:03
Page 22

EN
BUTTON INDICATORS/BLINKING SUMMARY
NO LIGHT
No light on the b uon
GREEN LIGHT NORMAL USE
Steady light
Regular blinking: Once/second
Slow rotation Capsule bar code reading
Fast rotation Coee preparation
Blink three times Programming is confirmed
RED LIGHT WARNING OR ERRO R
Steady light
Pulse down: Fade to OFF th en ON
Regular blinking: Once/second
Blink two times and then back to steady GREEN
Blink two times and then back to steady OR ANGE
Ready mode
Heating up
Machine OFF ➔ s ee point 1*
Device error ➔ see point 17*
Cooling down aer overheat ing ➔ see point 18*
Error ➔ see point 14*
Water tank is empty or c apsule missing ➔ se e point 15*
Error in special f unction ➔ see point 20*
O˝
1˝ 2˝
22
11065_UM_ARES_C_Krups.indd 22 16.05.17 14:03
Page 23

EN
RED LIGHT WARNING OR ERRO R
Blink two times and then back to ORAN GE blinking
Blink three tim es every 2 seconds in bet ween a steady RED
light
Steady light, le side RED and righ t side GREEN
ORANGE LIGHT SPECIAL FUNCTIONS
Steady light Entering spec ial functi ons menu
Regular blinking: Once/second
Blink once ever y 2 seconds
Blink twice every 2 seconds
Blink three tim es every 2 seconds
Blink three tim es within 3 seco nds and then ba ck to steady
GREEN
Special func tion is runn ing
Error while spe cial function running ➔ see p oint 19*
Machine head in unknown position ➔ see po int 16*
Descaling a larm ➔ see point 13*
Descaling ➔ see poin ts 21-22*
Emptying t he system ➔ see p oints 21-22*
Reset to facto ry sein gs ➔ see points 21-22*
Reset to facto ry sein gs has been completed
O˝
1˝ 2˝
*See pages 24-25
23
11065_UM_ARES_C_Krups.indd 23 16.05.17 14:03
Page 24

EN
TROUBLESHOOTING
ASSISTANCE VIDEOS ARE AVAILABLE ON
WWW.NESPRESSO.COM VISIT THE “MACHINES” SECTION
1. No light on the bu on.
2. No coe e.
3. C oee is not hot eno ugh.
4. Unusual co ee flow.
5. Water leakage.
6. Capsule is not ejecting correctly.
7. Coe e leakage.
8. Machine turns to “OFF” mode.
9. Coee groun ds in the cup.
GREEN LIGHT
10. The machine does not start and has GREEN steady lights.
11. GREEN light blinking continuo usly and machine not
running.
➔ The machine has turned “O FF” automatically; p ush the buon to turn t he machine “ON”.
➔ Check the mains, voltage, an d fuse.
➔ Check that th e light on the buon is GREEN.
➔ Ch eck that the water tank is filled and is well p ositioned.
➔ Ch eck that a fresh capsule is inser ted in correct position, that th e machine head is close d and push the buon to s tart.
➔ D escale if necessary.
➔ O pen the machine head and let the capsul e be ejected. Th en perform a cleaning as per cleaning se ction.
➔ Preh eat cup with hot drinkin g water from the tap.
➔ D escale if necessary.
➔ Ch eck that the water tank is well posit ioned.
➔ O pen the machine head and let the capsul e be ejected. Th en perform a cleaning as per cleaning se ction.
➔ Descale if necessary.
➔ Ch eck that the water tank is well posit ioned.
➔ Emp ty and clean th e capsule container.
➔ I f problem persists, c all the Nespresso Club.
➔ Open the machine head. Remove the power cord fro m the grid. Clean the metallic
clamps with precaut ion. Be careful of th e sharp edges in the mac hine head.
➔ I f problem persists, c all the Nespresso Club.
➔ O pen the machine head and let the capsul e be ejected. Th en perform a cleaning.
➔ Emp ty and clean th e cup support.
➔ Descale if necessary.
➔ I f problem persists, c all the Nespresso Club.
➔ To save energy the machine will turn o aer 9 minu tes of non- use.
➔ See paragraph on “Energy Saving Concept”.
➔ Star t the cleaning procedure. See paragraph on “Cl eaning”.
➔ Ch eck the machine he ad is properly clos ed.
➔ I f you want to brew a Alto, Mug, Gran Lungo or Espresso, check t hat a fresh capsule is inserte d in correct posi tion, that the
machine head is prop erly closed and push th e buon to star t.
➔ T he machine is heating up an d it will take maximum one minute to b e ready.
12. GREEN light turning while ma chine is running.
➔ T his indicates the machin e is working proper ly.
24
11065_UM_ARES_C_Krups.indd 24 16.05.17 14:03
Page 25

EN
RED LIGHT
13. Half G REEN and Half RED steady light.
14. RED light blinking continuously and th e machine head
stops moving.
15. The machin e does not star t and RED light blinking 2 times
and goes back to Steady GREEN.
16. The machine d oes not star t and RED light blinking 3 times
every 2 seco nds and goes bac k to Steady RED.
17. RED steady light and th e machine is NOT running.
18. RED light fading out.
19. RED light flashing twice and go es back to ORANGE
blinking.
20. RED light flashing twice and go es back to steady O RANGE.
ORANGE LIGHT
21. O RANG E light blinking continu ously.
22. Flashing ORANGE lights.
➔ D escaling nee ded: Machine can be operated when aler t appears only a few t imes aer this aler t before descaling b ecomes
ne ce ssa r y.
➔ See paragraph on “Descaling”.
➔ Rem ove any obstacle, empt y the capsule contain er if necessar y, and then open or close th e machine head dep ending on
position.
➔ Fill t he water tank and push buon to star t.
➔ O pen the machine head to eject capsule.
➔ Ch eck that a fresh capsule is inser ted in correct position, that the ma chine head is closed an d push the buon to star t.
➔ Pre ss the lever up and wait until t he machine head sto ps, release any obstacle if ap plicable, empt y the capsule contain er if
necessar y, and then press the lever down to c lose the machine head.
➔ Turn the machine O FF, unplug the power cord, wait for 15 minutes for the ma chine to cool down.
➔ Plu g the power cord and t urn the machine ON b y pressing the lever do wn. Machine is heating up an d will go to steady
GREEN when ready.
➔ I f problem persists, c all the Nespresso Club.
➔ Machine is cooling down an d will go to steady green when ready.
➔ Sp ecial function running; open the ma chine head and let th e capsule be ejec ted. Then restar t the function by pressing the
buon.
➔ If in the "Emptying t he system" mode, remove t he water tank.
➔ Special Functions menu: Cho ose desired special f unction by pressing lever down.
➔ Sp ecial function is running.
➔ Refer to ap plicable sec tion; Descalin g/ Cleaning/ Empt ying the system/ Reset to factor y seings.
➔ Sp ecial function is in selection m ode. Refer to applicabl e paragraph; Descaling / Cleaning/ Empt ying the sys tem/ Reset to
factory seings.
25
11065_UM_ARES_C_Krups.indd 25 16.05.17 14:03
Page 26

EN
CONTACT THE NESPRESSO CLUB
Should you need any additional informat ion, in case of problems or simply to seek adv ice, call the Nespresso Club.
Contact details for your nearest Nespresso Club can be found in the welcome material in your machin e box or at nespresso.com
DISPOSAL AND ENVIRONMENTAL PROTECTION
This appliance complies also with the Dire ctive 2012/19/EU. Packaging materials and appliance contain recyclable materials.
Your appliance contains valuable materials that can be re covered or can be re cycled. Separat ion of the remaining waste materials into dierent types facilitates the recycling of valuable raw
materials. Leave the appliance at a c ollection p oint. You can obtain information on disposal from your local authorities. To know more about Nespresso sustainability st rategy,
go to www.nespresso.com/positive
26
11065_UM_ARES_C_Krups.indd 26 16.05.17 14:03
Page 27

EN
LIMITED GUARANTEE
Krups guarantees this product against defects in materials and workmanship for a period of two years from the date of purchase. During this period, Krups will either rep air or replace, at
its discretion, any defective produ ct at no charge to the owner. Replacement products or repaired parts will b e guaranteed for only th e unexpired portion of the original guarantee or six
months, whichever is greater. This limited guarantee does not appl y to any defect resultin g from accident, misuse, improper maintenan ce, or normal wear and tear. Except to the extent
allowed by applicab le law, the terms of this limited guarantee do not exclude, restri ct or modif y, and are in addition to, the mandatory statu tory rights applicable to the sale of the product to
you. If you believe yo ur product is defe ctive, contac t Krups for instructions on where to sen d or bring it for repair.
27
11065_UM_ARES_C_Krups.indd 27 16.05.17 14:03
Page 28

www.nespresso.com
8020000035
Version 1 - Released on 2017.05
11065_UM_ARES_C_Krups.indd 28 16.05.17 14:03
 Loading...