

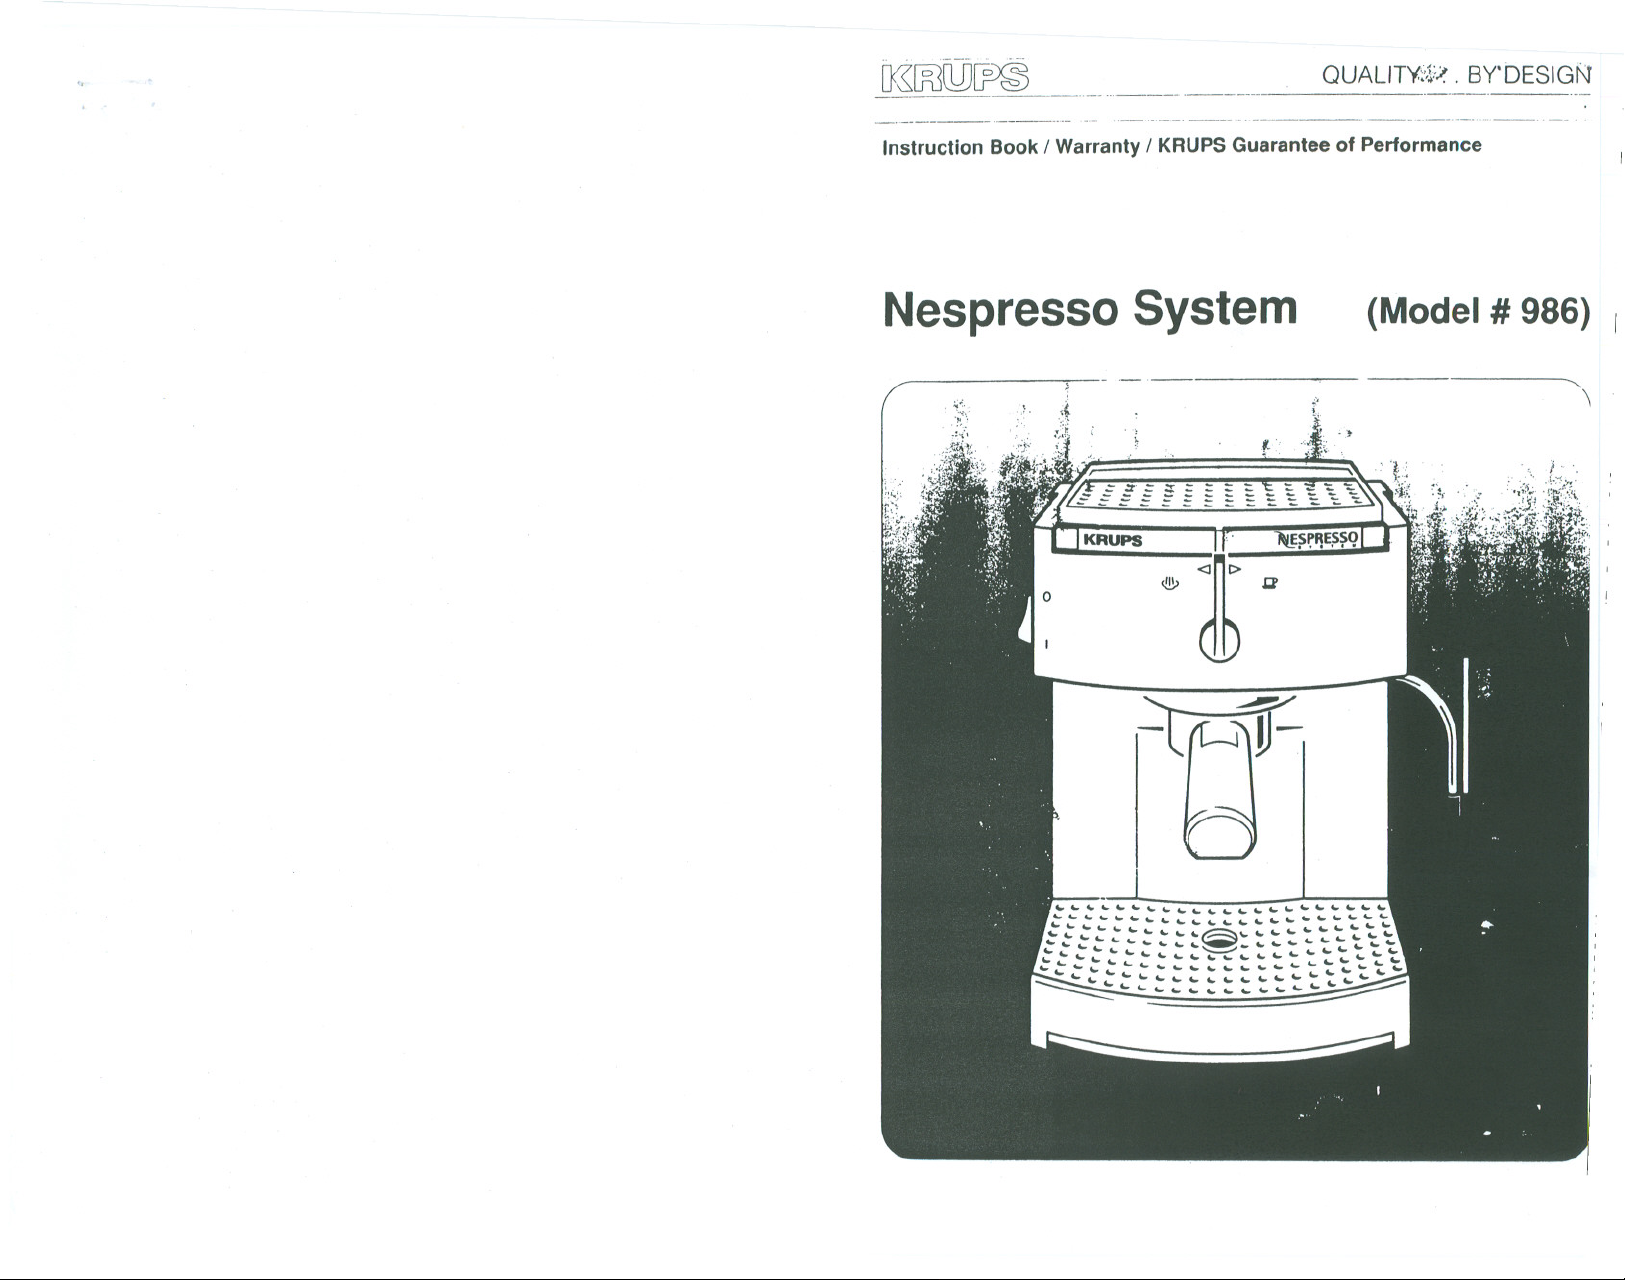
Page 1
.. ... ..
m.[K5CW~
Instruction BookI Warranty I KRUPS Guarantee of Performance
n.' '------
n..- .,.-
QUALlTY.~,f~. BY'DESIGN
,n -- .
Nespresso System
,~,.
,
t-
(Model # 986)
.,
L
-}
,
"-
\
Page 2

.. -, .-. ----
----
IMPORTANT SAFEGUARDS
Whenusing electricalappliances, basic safety precautions
should always be observed, includingthe following:
. Read all Instructions carefully.
. Donot touch hot surfaces. Usehandlesor knobs.
. Toprotect against fire,electricshock and person Injury,do
not Immersecord, plugs, or applianceInwateror anyother
liquid.
. Close slJpervlslonIs necessary whenany appliance is used
byor near children.
. Unplugfromoutlet when not in use and before cleaning.
Allowto cool before putting on or takingoffparts, and
before cleaning the appliance.
. Donot operate any appliance witha damaged cord or plug,
or after the appliance malfunctions,or is dropped or
damaged Inany manner. .
. The use ofaccessory attachments not recommended by the
appliance manufacturer mayresult Infire,electric shock or
personoJllnjury.
.Donot use outdoors.
. Donot let cord hang overedge oftable or counter, or touch
hot surfaces.
. Donot place on or near a hot gas or electric burner,or Ina
heated oven.
. Alwaysattach plugto appliance first;then plug cord Intothe
wall outlet. Todisconnect, turn any control to "off",then
remove plug fromwalloutlet.
. Donot use appliance for other than intended use.
. Use extreme caution when disposing hot steam.
. Donot put fingers Inside capsule housing, due to the sharp
needle that is there to piercethe capsule.
''''''' ......-
SPECIALCORDSET INSTRUCTIONS
Regarding your Cord Set:
A. Ashort power-supply cord (or detachable power-supply
cord) is to be provided to reduce risks resulting from
becoming entangled in or tripping over a longer cord.
B. Longer detachable power-supply cords or extension cords are
available and may be used ifcare Is exercised in their use.
C. Ifa long detachable power-supply cord or extension cord is
used, (1)the marked electrical rating of the detachable power-
supply cord or extension cord should be at least as great as
the electrical rating of the appliance, (2) Ifthe appliance Is of
the grounded type, the extension cord should be a
grounding-type 3-wlre cord, and (3)the longer cord should be
arranged so that Itwillnot drape over the counter top or table
top where Itcan be pulled on by children or tripped over.
CAUTION:
This appliance is for household use. Any servicing other, than
cleaning and user maintenance should be performed by an
authorized service representative.
. Do not immerse base in water or try to disassemble.
. To reduce the risk of fire or electric shock, do not remove the
II
base. No user serviceable parts inside. Repair should be
done by authorized service personnel only.
. Check voltage to be sure that the voltage indicated on the
name plate agrees with your voltage.
. Never use warm or hot water to fillthe water container!
Use cold water only!
. Keep your hands and the cord away from hot parts of the
appliance during operation.
SAVE THESE INSTRUCTIONS
'~)i\~~:::.:)\11~?~;.'. J%}~~~:'
.i, '.!d~~>,:,:.
..,::;~{~i';:l~;itf;t:,..: ;:.{'~Fv.:r'
. Never clean with scouring powders or hard implements.
.¥l'f~:'in~j::,;S,'~,~"":':'~
""";r:t~r~?vc~"-:" ',: ...,'
'."
,.'..::;. .;,:':,:."
::""%~\,.:: .'" : :::~,:'
".' .'.'.
":'.. ,"'!~.. "':'"''''
Page 3
....
0 . I
C +.
I
d -i 12:f~~
" .
-J
.;!;~/
e
f
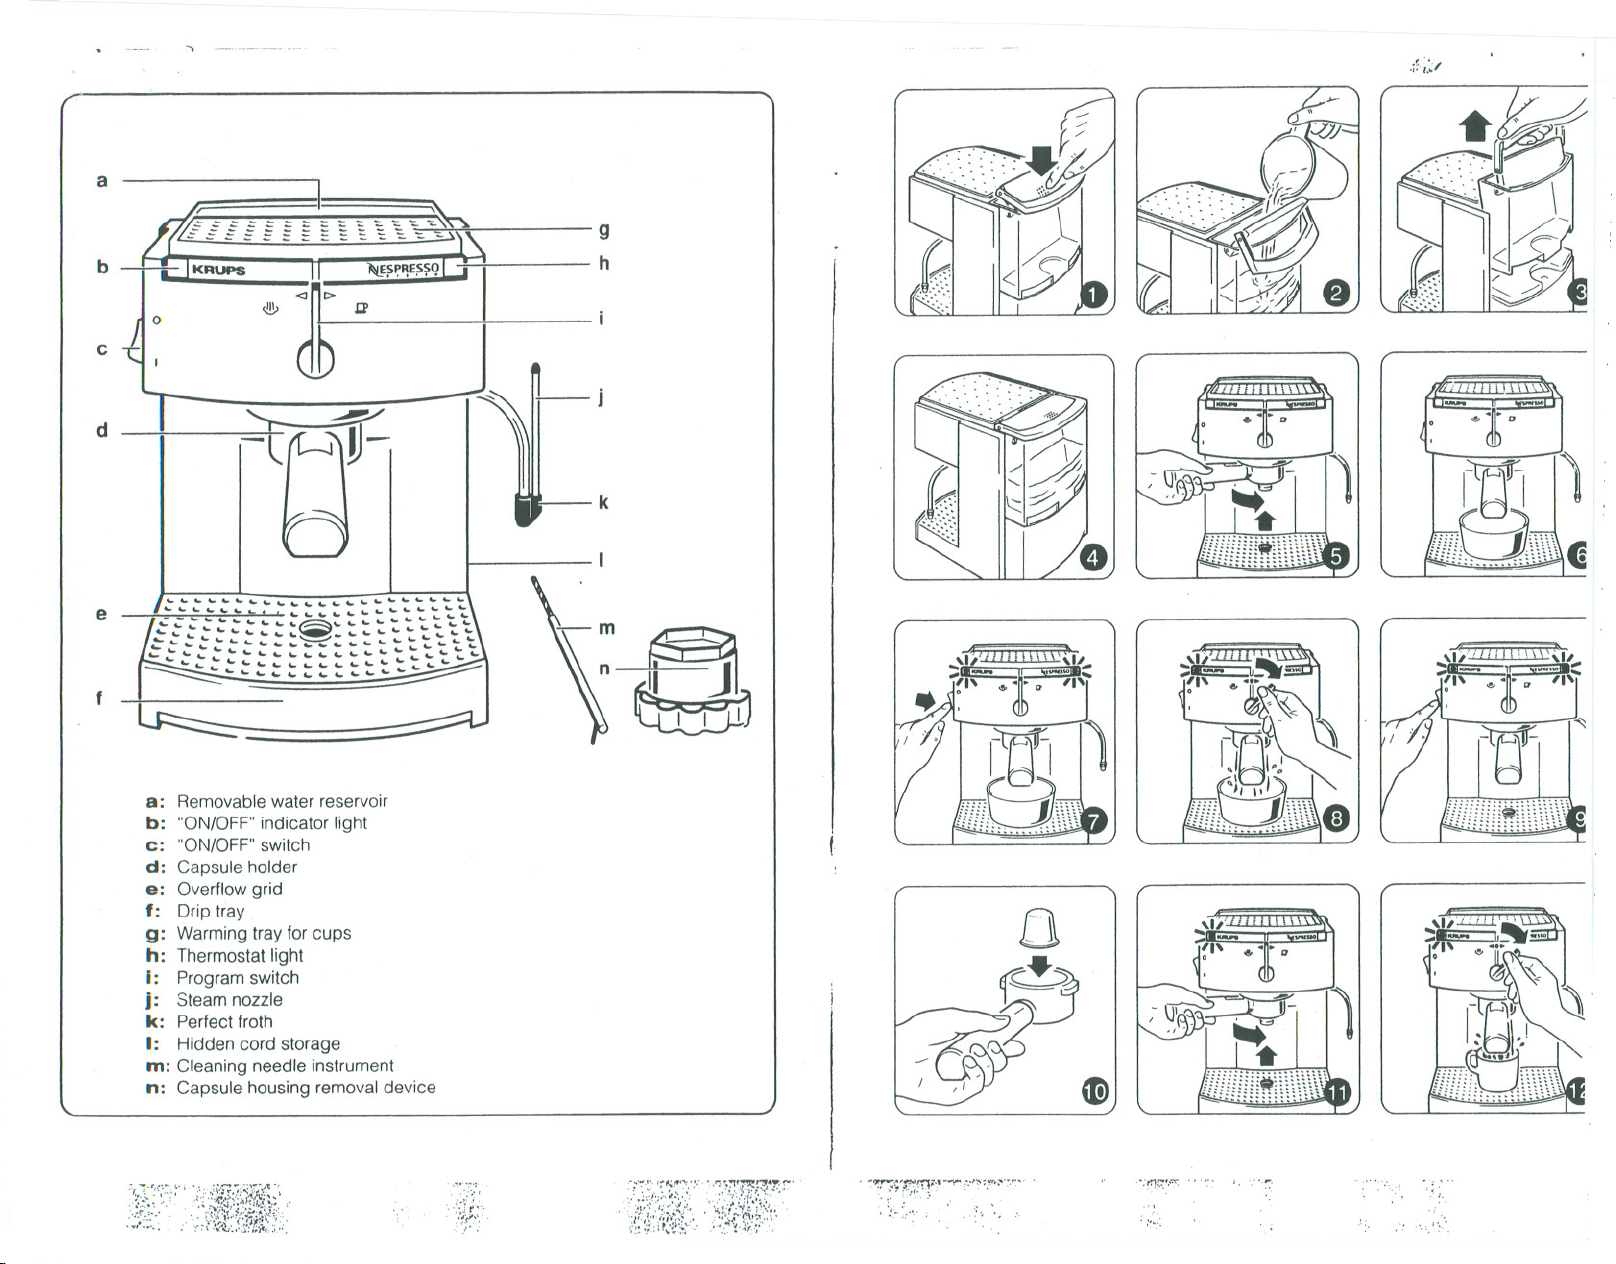
a: Removablewater reservoir
b: "ON/OFF"indicator light
c: "ON/OFF"switch
d: Capsule holder
e: Overflowgrid
f: Driptray
g: Warming tray for cups
h: Thermostat light
I: Programswitch
j: Steamnozzle
k: Perfectfroth
I: Hidden cord storage
m: Cleaning needle instrument
n: Capsule housing removal device
k
-~Q
I I I
[)
A
?1~
~
,.,:
""fa--!
"',., ...
.
:1f111
="'l - .~\l\\\\..
'<"::::.......
HIn: ~"
~
g
)hr:~:'~" '.',;:~iff£~~~~}~:::~'
.ii/;':
:'r.
.':':'
,.' ~ijhi?~r,";~~i~~'C'
. ~1:.'F~,:~~;.:,~:,~r"'
':"1,,"'" ..'...
':''':
".~.
. . ','
.<;.
" ".."."
Page 4
[ =~~J \'
~
0:-.
IJ..::"!4J
ti}
}ti}
04'
..~
~
~
m C
~@<D
~-
I I ,
,
G
~
; " ,..
-"" "
.. .
,',
",
.'
~. -.~:
_._-
~.TI
~
e
<):j~
~
......
'.
c
>
t-
~,' ','
.",
R'
f,
r~:p':
R:.,J,
f-' -
...,._"
';'!:-"~:'"
c.,'";".",,
~
/jNf?~
, '
~
r~,~?:
@}
~
Q . ".
J v ".
~t:b
'Ii.;:' ~ -,
Q
;~Ir1)=':j
~
,~I< "01;i
~
'1\'0 ' L=Jlffp
-
1
' nm\;i
[d
...::d
<t: Q) ()
Page 5
.---.--".-
,Features.
. Thermoblock Heating
System clears the ma-
chine of any excess water
in the machinc's system.
. Microchip Monitored
Steam Pump control
delivers a constant flow
of "ciry"steam. This
unique dryness of
steam and itsregulated
pressure froth milk for
cappuccino.
. ProqramSwitch
enables you to select the
brewing mode or steam
mode
. KRUPS unique "Perfect
Froth"attachment takes
allthe guesswork out of
frothing milk.
. Large Capacity
removable water
.:;;; This is achieved by pre-
"'."
...
'.'.""
cisely applying the right running water through the (d) without the Nes-
amount of pressure, which machine to remove any presso capsule into the
draws out allof the coffee' s
natural richness. With the
turn of a switch you can shipping.
enjoy the fullbodied flavor
and aroma of authentic & Attention!
espresso, or Yo:.Jrchoice of
premium Nespresso
coffees.
After unpacking your
KRUPS "Nespresso inserted (flg.18).
System", verify that all
accessories have been
included in the package.
(2) sleeves of Nespresso
(2) Nespresso demitasse
(1) Capsule holder Step 1
(2)Capsule housing
(1)Cleaning needle
..--.----...---..
Coffee
cups with saucers
removal device
instrument
reservoir.
. Warming Plate for
warming cups and
keeping beverages hot.
UsingYourKRUPS
,"." ,::.""'.,"'!;"'-;,.
..Nespm
.. ForThersf1lttle Fillthe reservoir with
. Removable Drip Tray
allows for easy cle<m up.
Introduction
_'iS
We recommend thatyou
get familiar with all the
parts of your KRUPS
"Nespresso System" before
operating the machine.
The KRUPS "Nespresso
Insert the capsule holder
System" extracts. rich, into the machine and
natural flavors from the
remove and replace water
coffee beans and brings all reservoir. Move the steam
of those flavors to a single
perfect cup of espresso.
nozzle.Wash allloose
parts inwarm soapy water,
rinse thoroughly and dry.
When using your KRUPS
"NespressoSystem" forthe
8
"-'-"-'--'--'---'"
first time we recommend
- --. ..-.... - ....- - .....-
. Insert the capsule holder
This will require you to Step 2
stay with the machine to
empty each cup as It
dust particles which may
have settled during
Before you start,make sure
that the overflow grid is in temperature continuously so
place and the removable
drip tray is properly
Before plugging appliance
into an electricaloutlet,
make sure that the program
dial isin the "0" position
and the ON/OFF switch is in
the "0" position.
1
machine.
Do not use capsule at completion of each cup
this time.
. When inserting the
capsule holder into the
machine, the handle
should be at a 90° angle
(flg.5).
Raise the capsule holder
up into the machine and
turn filterholder to the
right untilthe handle can
go no further (flg.5).
Now you are ready to
warm up the machine.
becomes full upon
return to "0" position.
Note:
Your machine has a
thermostat that controls the
that itwillbe ready for use
at any time. You may leave
your machine on for several
hours using a minimum
amount of power.
Ifyou don't intend to use the
machine for a long period of
time (overnight, for
example), itis recommen-
ded that you turn itoff.
Step 2
. Place one espresso cup For
To'cleanse internalsystem under the capsule holder
letwater run through the
machine.
.Pressdown on the
ribbed surfaced lidofthe
removable water reser-
voir (a) (flg.1). "I"position (flg.7).
The handle willemerge.
fresh,cold water (flg.l).
Or, you may choose to
remove the reservoir by
lifting the reservoir
handle up and drawing
out the reservoir tank
r.
I
J
spout (flg.6).
. Make sure that the
program dialisin "0"
position.Then turnthe
"ON/OFF" switch to the
. The two indicator lights
willilluminate, both yellow
and red.
As soon as the yellow
thermostat light (h) goes
"out", the machine is hea-
ted up and ready to use.
(flg.3).
This allows you to
conveniently bring the
water reservoir to the
faucet.
Replace the reservoir
back into the machine.
making surethat the
handle and lid are
closed (flg.4).
Step 3
. Turn the program dial to
the" ,g " position and
allowwater to run
through the machine into
the cup (fig.8).Repeat
this process one more
time.
Preheating Cups
When using the appliance.
you should preheat the
cups with hot water.
Afterwards, you can keep
the cups on the appliance (flg.1-4).
at their ideal temperature
by placing them on the
warming plate upside
down. You may also want
to place e dish cloth on top
of the cups to help keep
them warm.
Preheating cups:
Step 1
. Set the program dial to
the "0" position.
. Switch "ON" the
appliance using the
"ON/OFF" switch.
";;,,..
. Insert the capsule holde
without a capsule into
the machine.
. When the yellow
thermostat light goes
out, set the program dia
to the" $ " position an<
heat the cup with the jet
of steam. Then place th,
cups onto warming plat'
(flg.16).
Step 3
. After the preheating. tur
the program dial to the
"0" position.
Every Day Use
Preparing
Espresso
Step 1
. Fillthe water reservoir(i
with fresh,cold water
Caution:
Ifthe water reservoir is
empty and the pump is
running, you will hear a
distinct noise, which is
louder than the normal
operating sound.
Turn off the machine.
Never let the pump run
when the water reservoir i J
empty, this can damage
the pump.
Step 2
. Leave the capsule
holder in the machine
without any capsules
and allow it to heat up
I
':.'HF:::";';:.::,TrF:
'.'" . "YJ''';'-:
".
..':':?i!:,:.:;?7':.': ;!-i:
';-:"1!7.'.F "''''.7'''''''''
'.".. ".
." """"'. .
",'"
',.
.'.
Page 6
'_n_._n -----.-.---
_.
_'_-O_d_'" ..-" '
,f.:;.j.I'
Step 3
. Settheprogramdialto
the"0" position(flg.9).
Step 4
. Turn"ON" the appliance
using the "ON/OFF"
.switch (flg.9).
Step 5
. Placea Nespresso cup
under the capsule holder
spout and wait for both
indicator lights to
illuminate. As soon as the
yellow thermostat light
goes out turn the
program dial to the" ,g "
position. This will allow
plain hot water to run
through the machine.
(Do this for approximately
5 seconds). Doing this
will warm up the machine
and all key parts as well
as your cup. Dispose of
water in the cup. At this
point your machine is
heated and ready for use.
Making Espresso
Step 1
. Remove C'lpsule holder
from the machine and
place a Nespresso
capsule into the capsule
holder, make sure that
the widest part of the
capsule is positioned
facing down in the
bottom of the capsule
holder (flg.10). Insert the
capsule holder into the
10
machine (flg.11) and
turn tightly to the right.
. Each capsule contains
enough ground coffee
for one cup of espresso.
Step 2
. Positionthe warmed cup
under the capsule holder
spout.
Step 3
. Turnthe program dial to
the" ,g" position(fig.12).
When the de~.red amount
of espresso is in the cup,
turn the program dial
back to the "0"
position. Place the cup
aside, remove the
capsule holder from the
machine and dispose of
the used capsule
immediately (fig.13). This
will prevent the system
from becoming clogged
with dried coffee grinds.
. Always reinsert the
empty capsule holder
into the machine to keep
it warm.
If you are preparing more
than one cup of espresso,
disregard the yellow
thermostat light. It simply
indicates that the
thermostat Is regulating
the temperature.
Frothlng'Mn~~: ';
Forcip.p.~i1({"
In addition to preparing
espresso, you can also use
this machine to froth milk for
cappuccino. For best
results, use the "Perfect
Froth" attachment. If it is not
in place attach it at this time
(flg.14).
Step 1
. The first step in making
capPucCino is to make
espresso (See section
"Preparing espresso").
When preparing
cappuccino use a mini
mug or any cappuccino
cup and fill half the cup
with espresso.
If you are making more than
one or two cups of cap-
puccino, it is recommended
that you place the waiting
espresso on top of the war-
ming plate and cover with a
cloth to keep the espresso
hot. Once you are finished
making the required amount
of espresso, then you can
begin frothing your milk for
cappuccino.
Step 2
. Remove the empty
capsule from the
machine and reinsert the
capsule holder back into
the machine.
Step 3
. Take a stainless steel
pitcher and fill '13to '/2
full with fresh, cold milk
and set aside.
This will yield enough froth
for two cups of cappuccino.
If you need more froth,
repeat steps 4-6.
As long as your machine is
turned "ON" and the water
reservoir is properly filled
you can use the steaming
feature. There is no need to
prepare espresso before
using this steaming feature.
As soon as the yellow ther-
me,stat light goes out turn
the program dial to "$"
position.
The thumping sound which
occurs during the hot
steam preparation results
from the interval-controlled
water pump. As the
thumping sound begins a
few drops of water will
come out of the steam
nozzle before changing
entirely to steam
Note:
Before preparing the
machine to steam, any
used capsules must be
removed from the capsule
holder to prevent the coffee
from drying up and
clogging the capsule
housing needle.
& Attention!
The Perfect Froth
attachment should only be
used to froth milk.
Step 4
. Afterthe yellow
thermostat light goes
"out", insert the steam
nozzle half way into the
pitcher and turn the
program dial to the" $ "
position (fig.15). Leave
steam nozzle in the milk
for approximately 45-60
seconds, depending on
how much froth you want
and the type of milk you
are using.
. We recommend using
skim or 2% milk if you'
prefer a stiff, dense froth.
Use regular milk for a
smooth, more liquid type
froth.
& Attention!
Do not bring milk to a boil
(this will happen if large
bubbles start forming at the
surface of the milk). Do not
let the "Perfect Froth" attach-
ment touch the bottom of the
pitcher. This will prevent you
from frothing the milk.
Step 5
. After the milk is frothed,
keep the "Perfect Froth"
attachment in the milk
until program dial is in
the "0" position. This will
prevent any splattering.
. Now, you are ready to
add the frothed milk to
the waiting espresso.
The proportion between
espresso and milk is to
taste; in Italy it is
normally one part
espresso to two parts
milk plus froth.
Step 6
. After the milk is frothed
set aside. If you like ve
stiff froth, let the pitchel
stand for a few second
& Attention!
Thetopclosureofthe"Pe I
fect Froth" (flg.20;PartA:
hasavery fine holewhich I
draws air into the milk. If
this tiny hole becomes
clogged, the "Perfect Frot
will not work properly.
Never immerse the top
closure in milk or froth
.' Cleaning The
. Perfect. Froth
r:; Attachme"t
& Attention!
It is strongly advised that
you wipe off the milk
residue which may have
settled on the "Perfect
Froth" and steaming noz,
after the frothing process.
completed. .
For a thorough cleaning e .
the "Perfect Froth" attach
ment remove separate
Parts A,B,C (flg.20). .
All parts should be rinsec ,
in warm, soapy water. If t .
small section opening in I
Part A is pluyged up, it c .
be opened with a fine
needle.
."':S~':~::":j:~?:'r0~r:..
y""
."
- :':~:f:':~n~r:<;:'~:~r~'(-::-
.'~~\1 t",;"r~-'- ,...~.,";..o.. .
,:>..
.' '~'.~'" .'
Page 7
. Removethe "Perfect
Froth"attachment from
the steam nozzle and
clean itin warm, soapy
water. Use caution when
removing the "Perfect
Froth"from thesteaming
nozzleas it may still be
hot.
. Cleanthesteamnozzle
with a damp cloth. Use
caution wI;en cleaning
the steaming nozzle,the
nozzlemay still be hot.
Exercise
Caution When
Using The Steaming
Nozzle; It Is Very Hot!
Cleaning',
. Werecommend
washingthe capsule
holderin the dish-
washeronce aweek.
. Afteruse,emptythe
waterreservoiranddrip
tray.
. AfterusingyourKRUPS
"NespressoSystem"
approximatelytentimes,
thedrip tray willneedto
beemptiedandcleaned.
. Thewaterreservoir,drip
tray,grid, capsule
holder,PerfectFroth
attachmentshouldbe
washedand rinsedin
warm,soapywaterona
regularbasis.
. Werecommendwashing
thewaterreservoirinthe
dishwasheronceaweek.
Thiswilleliminateany
12
mineraldeposits from
building.
. Beforereplacing the drip
tray and grid, make sure
thatthe baffle has been
placed in the back of the
drip tray (flg.18).
. Clean thesteam/hot
water nozzle immediately
after frothing milkwith a
damp cloth.
. If the nozzle becomes
clogged for any reason,
removethescrew
holding the steam nozzle
in position (flg.19) and
removeallmilkparticles
(use a needle and rinse
under faucet).
. Replace steamnozzle
and be sure screw is
turned tightly.
Do not
place any of the
loose pieces Into the
dishwasher.
IMPORTANT
Clean the steam nozzle
each timeafter you have
immersed it in milk, other-
wise the inside of the
nozzle becomes clogged
and difficult to remove.
Allow the steam to escape
into a wet cloth for oneor
two seconds.
Any milk residuewill be
flushed out. See special
cleaning instructions for
"Perfect Froth".
Caution:
Do not try to disassemble
the mainbody of the
machine.
Ifyouwishtoprepare
espressoimmediatelyafter
usingthesteamoperation,
themachinemustcool
downtotheproper
temperature.Toaccelerate
thisprocessinsertthe
capsuleholderinto the
machinewithouta capsule,
and runwaterthroughthe
machineuntilthe yellow
light turn off.
Decalcifying
,
Under normalconditions
you do not need to
decalcify your machine.
However,in areas where
there is hard water or if
used very frequentlywe
recommend decalcifying.
Youwill knowwhen such a
cleaning
is necessaryby
an obvious slow down in
the brewing timeofyour
coffee. Pleasecontact
NespressoHousefor
furtherinformation
Cleaning The
Capsule Cage
1.Periodically, the capsule
cage should be
thoroughly cleaned.
Turn "OFF" the machine
and plug. Remove the
water reservoir and drip
tray with grid (fig.21).
2.Turn machine upside
down (fI9.22) place the
capsule cage key on the
capsule holder (flg.23).
3.To unscrew the capsule
cage, turn the capsule
cage key countp.r
clockwise (fig.24-26).
Caution:
When replacing capsule
cage do not overtighten.
4.Take the capsule housing
out of the removal device
and remove "0" ring from
capsule housing (fig.26).
Rinse housing and "0"
ring under faucet to
r.gmove any loose
particles.
S.Clean the two holes in the
shaft of the capsule
housing using the clea-
ning needle instrument
(m) (flg.27 and 28). Then
blewing to remove any
dirt.
Place "0" ring back on
capsule housing.
6.To reinsert capsule
housing, place the
capsule housing back
into the capsule housing
removal device (n).
Turn the machine to the
right position.
Insertthe capsule housing
removal device back into
the machine by turning it
clockwise by hand, making
sure it is tight (flg.29)
(do not overtighten).
The capsule holder is not
required to reinsert capsule
housing back into the
machine.
Problems And
Solutions
Problem:
Coffee temperature too low.
Solution:
. Place the cups on the
warming plate of the
appliance to preheat.
. Leave the empty capsule
holder in the machine.
Problem:
Loud pump noise.
Solution:
. Checkto make sure the
water reservoirhas been
filled and inserted
correctly.
Problem:
Notenoughfrothwhen
frothing milk.
Solution:
. Steamnozzle or Perfect
Froth clogged.
. Old milk, or previously
heated milk.
Problem:
Coffeedoesnot flowout.
Solution:
. Makesurewater
reservoiris properly
filled.
. Checkwhetherthe water
reservoirhas been
properly inserted.
. Themachinemayneed
to be decalcified (see
section "Decalcifying").
':,:!3>
. Capsule housing needs'
to be cleaned (see
section "Cleaning the
capsule cage").
If machine still does not
function properly, or if
you havefurther
questions or concems,
please direct your
inquiries to the
Nespresso House at
1-800-562-1465
"":.:'7~~"':":~i1f;;~.~'
'~~""'"
.."
.. :.:.}:\':~:?"~"1~;:2;r'
7f"'-::~T"~1~'-~~ ':-'.' .'..
. ""
Page 8

~ n.._._.-..--..
---,--
KRUPS LIMITED ONE YEAR
WARRANTY
Your KRUPS product is covered by the
following warranty:
If within one year from the date of
purchase, this KRUPS products falls to
function because of defect in materials or
workmanship, KRUPS North America,
Inc. will. at its option, repair or replace
the unit without charge, provided the
owner returns:
. the KRUPS product
(securely packed) and
. proof of date of purchase to:
KRUPS Consumer Service
KRUPS North America, Inc.
7 Reuten Drive
Closter, NJ 07624
"h '--..
To assure prompt service, please include
a letter indicating the specific cause for
returning your KRUPS product.
Do not return any loose parts or any
accessories which are not defective with
your appliances to avoid damage and
loss in transit.
This warranty will be void if malfunction
or damage was caused to the product by
accident. misuse, use on frequency or
voltage other than marked on the product
and/or described in the instructions.
abuse including tampering, damage in
transit or use for commercial purposp.s,
This warranty gives you specific legal
rights, and you also may have other
rights which vary from state to state.
_...
.';;':r>J
KRUPSGUARANTEEOF PERFORMANCE
For ordering nespresso capsules and answering technical questions please
call the "Nespresso House" AT 1-800-562-1465,
7 days a week with 24 hour service.
For service, repair, or warranty please see Instructions below.
This fine KRUPSproduct Is manufactured according to a rigid code of quality
standards, and with minimum of care, should give you years of satisfying
service. However, should the need arise for repairs or for replacement parts
(within or after the warranty period, please do as follows for the most
convenient, fastest service.
If your product needs to be repaired please send It to the address listed
below:
KRUPS Consumer Service
KRUPS North America, Inc
7 Reuten Drive
CLOSTER, New Jersey 07624
Pack up your appliance carefully to avoid damage in shipping and be sure to
provide us with the following Information:
A. Your name, address and type number of the appliance on the out 3ide
wrapping of the packaging.
B. Tape a brief note to the body of the machine Indicating:
How long you own It; and the possible defect.
IMPORTANT:ONLYSENDTHE DEFECTIVEAPPLIANCE. KEEP ALL
REMOVABLE PARTS AT HOMETO AVOID FURTHER
DAMAGE IN TRANSPORTI
.\:,'.1~~;!i:':1:f~~ t.
7r~ "
.~;<-:':'
"~~':~'{~~:."" '-"'~i:',. ~r:,;.'
OJ
''7w~~':;.'::r-'-_.:'''''': .
.,''',;,'
',;'6:,'
Wewill repair or replace your KRUPS product without delay
and send it back
to you with no charge for shipping (ifyou send us a receipt for the regular
UPS or Parcel Post charges, we will even reimburse you for shipping
charges, within or after the warranty period).
On all repair work to be done after the warranty period, our Consumer
ServiceDepartmentwill bill youformaterial and laboronly.
Donot returnyour appliance to the store. The KRUPS Guarantee of
Performance program has been designed
possibleserviceusing genuineKRUPSparts. '
All repair work and replaced parts willcarry an extended 90-day warranty.
.,',"
'"
to provide you with the best
" ';,
 Loading...