

Page 1
8080012620
Réalisation : Espace Graphique
FR . . . . . . . . p. 05
EN . . . . . . . . p. 11
DE . . . . . . . . p. 17
NL . . . . . . . . p. 23
ES . . . . . . . . p. 29
IT . . . . . . . . p. 35
PT . . . . . . . . p. 41
DA . . . . . . . . p. 47
FI . . . . . . . . p. 53
NO . . . . . . . . p. 59
SV . . . . . . . . p. 65
D7
D6
D5
D4
D1
D3
D2
D
E4
E1
E2
E
C
B
E3
A
F4
F1
F2
F
G
H
F3
www.krups.com
FR
EN
DE
NL
ES
IT
PT
DA
FI
NO
SV
PERFECT MIX 9000
MiniPro
WWW.KRUPS.COM
KR_MINI-BLENDER_PERFECT-MIX_8080012620_MISEENPAGE07/05/1315:49PageC1
Page 2
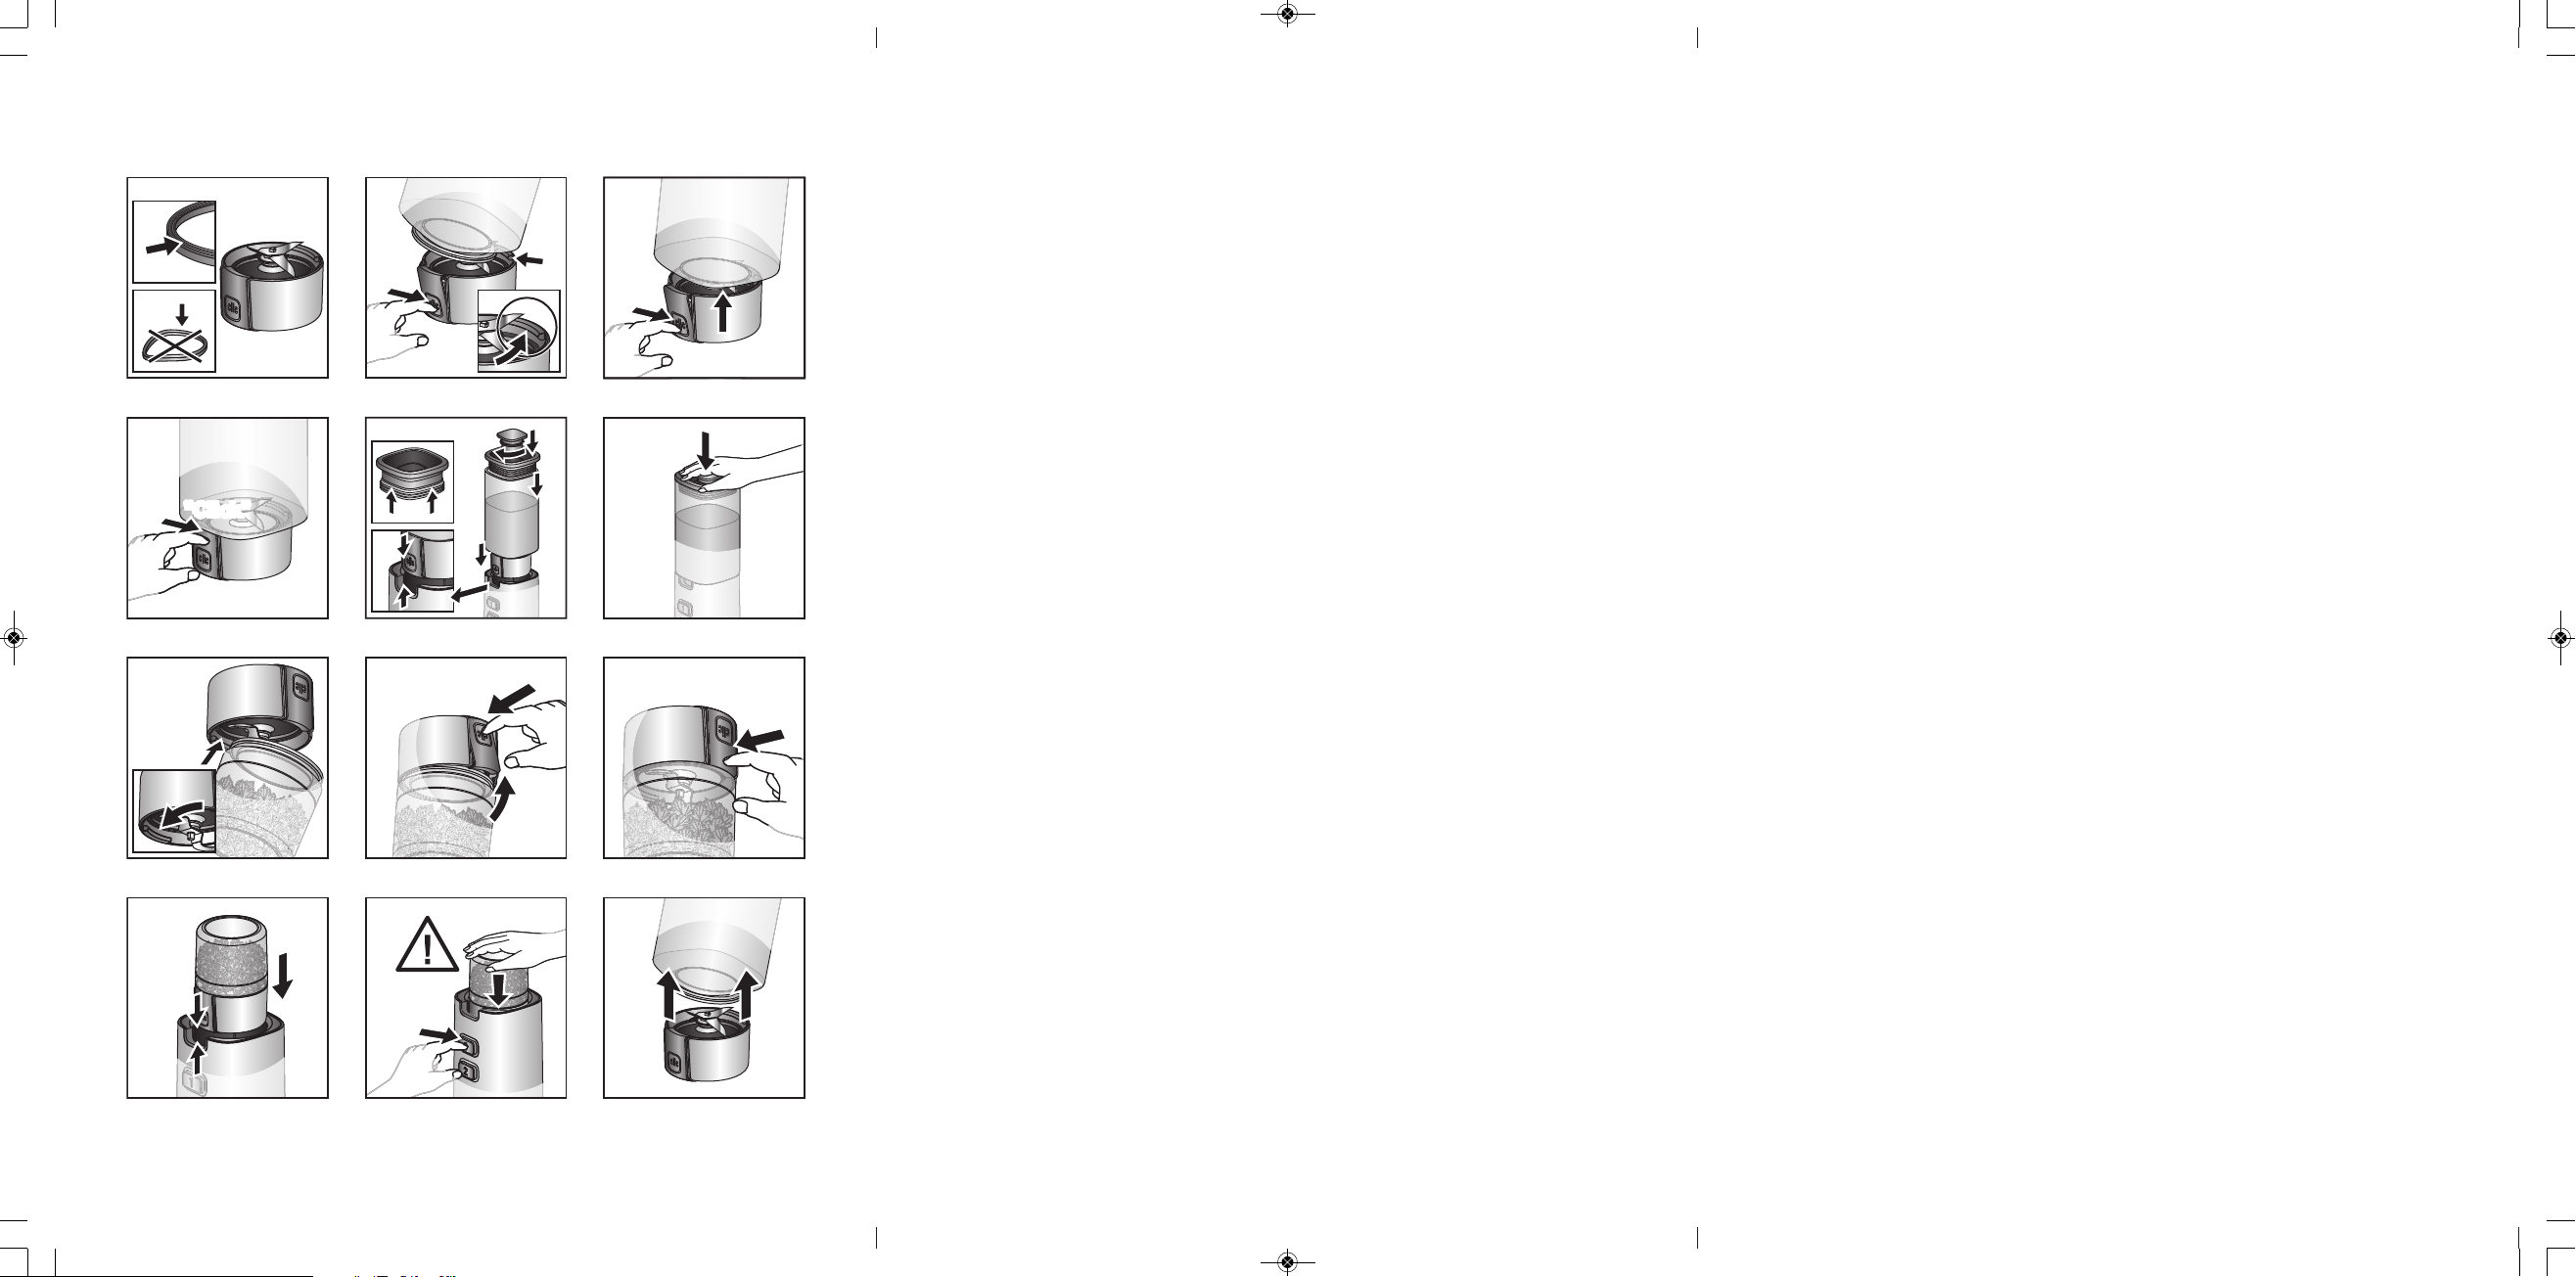
fig. 1
OK
NO
fig. 2a
D3
1
2
1
2
fig. 2b
"Click"
fig. 2c
"Click"
2
3
4
fig. 3
1
fig. 4
fig. 5a
F3
E3
fig. 5b fig. 5c
"Click""Click""Click"
fig. 6 fig. 7 fig. 8
KR_MINI-BLENDER_PERFECT-MIX_8080012620_MISEENPAGE07/05/1315:49PageC4
Page 3
DESCRIPTION
CONSIGNES DE SECURITE
:
Lisez attentivement le mode d'emploi avant une première utilisation de votre appareil, une utilisation non conforme au
mode d'emploi dégagerait le fabricant de toute responsabilité.
Cet appareil n'est pas prévu pour être utilisé par des personnes (y compris les enfants) dont les capacités physiques,
sensorielles ou mentales sont réduites, ou des personnes dénuées d'expérience ou de connaissance, sauf si elles ont
pu bénéficier, par l'intermédiaire d'une personne responsable de leur sécurité, d'une surveillance ou d'instruction préalable
concernant l'utilisation de l'appareil. Il convient de surveiller les enfants et de s'assurer qu'ils ne jouent pas avec l'appareil.
L'appareil est conçu pour fonctionner uniquement sur courant alternatif. Vérifiez que la tension d'alimentation indiquée
sur la plaque signalétique de l'appareil correspond bien à celle de votre installation électrique, toute erreur de
branchement annule la garantie.
Toujours déconnecter l’appareil de l’alimentation si on le laisse sans surveillance et avant montage, démontage
ou nettoyage. Ne pas laisser les enfants utiliser l’appareil sans surveillance.
Cet appareil est exclusivement destiné à un usage domestique, à l'intérieur de la maison. N'utilisez pas votre appareil
en plein air. Le fabricant décline toute responsabilité et se réserve le droit de résilier la garantie en cas d'utilisation
commerciale ou inadaptée, ou de non-respect des consignes.
Ne tirez jamais sur le cordon pour débrancher l'appareil.
Cet appareil peut être utilisé par des personnes dont les capacités physiques, sensorielles ou mentales sont réduites
ou dont l'expérience ou les connaissances ne sont pas suffisantes, à conditions qu'ils bénéficient d'une surveillance ou
qu'ils aient reçu des instructions quant à l'utilisation de l'appareil en toute sécurité et en comprennent bien les dangers
potentiels.
N'utilisez pas votre appareil s'il ne fonctionne pas correctement, s'il a été endommagé ou si le câble d'alimentation ou
la fiche sont endommagés.
Afin d'éviter tout danger faites obligatoirement remplacer le cordon par un centre service
agréé (voir liste dans le livret de garantie).
Cet appareil ne doit pas être utilisé par les enfants. Conserver l'appareil et son câble hors de portée des enfants.
Si le câble d’alimentation est endommagé, n'utilisez pas l’appareil. Faites obligatoirement remplacer le câble
d’alimentation par le fabricant, son service après-vente ou des personnes de qualification similaire afin d’éviter tout danger.
Toute intervention, autre que le nettoyage et l'entretien usuel par le client, doit être effectuée par un centre service agréé.
Pour votre sécurité, n’ utilisez que des accessoires et des pièces détachées adaptés à votre appareil, vendus en centres
de service après-vente agréés.
Aucun accessoire ne pourra vous être vendu sans présentation de votre notice d’utilisation ou de votre appareil.
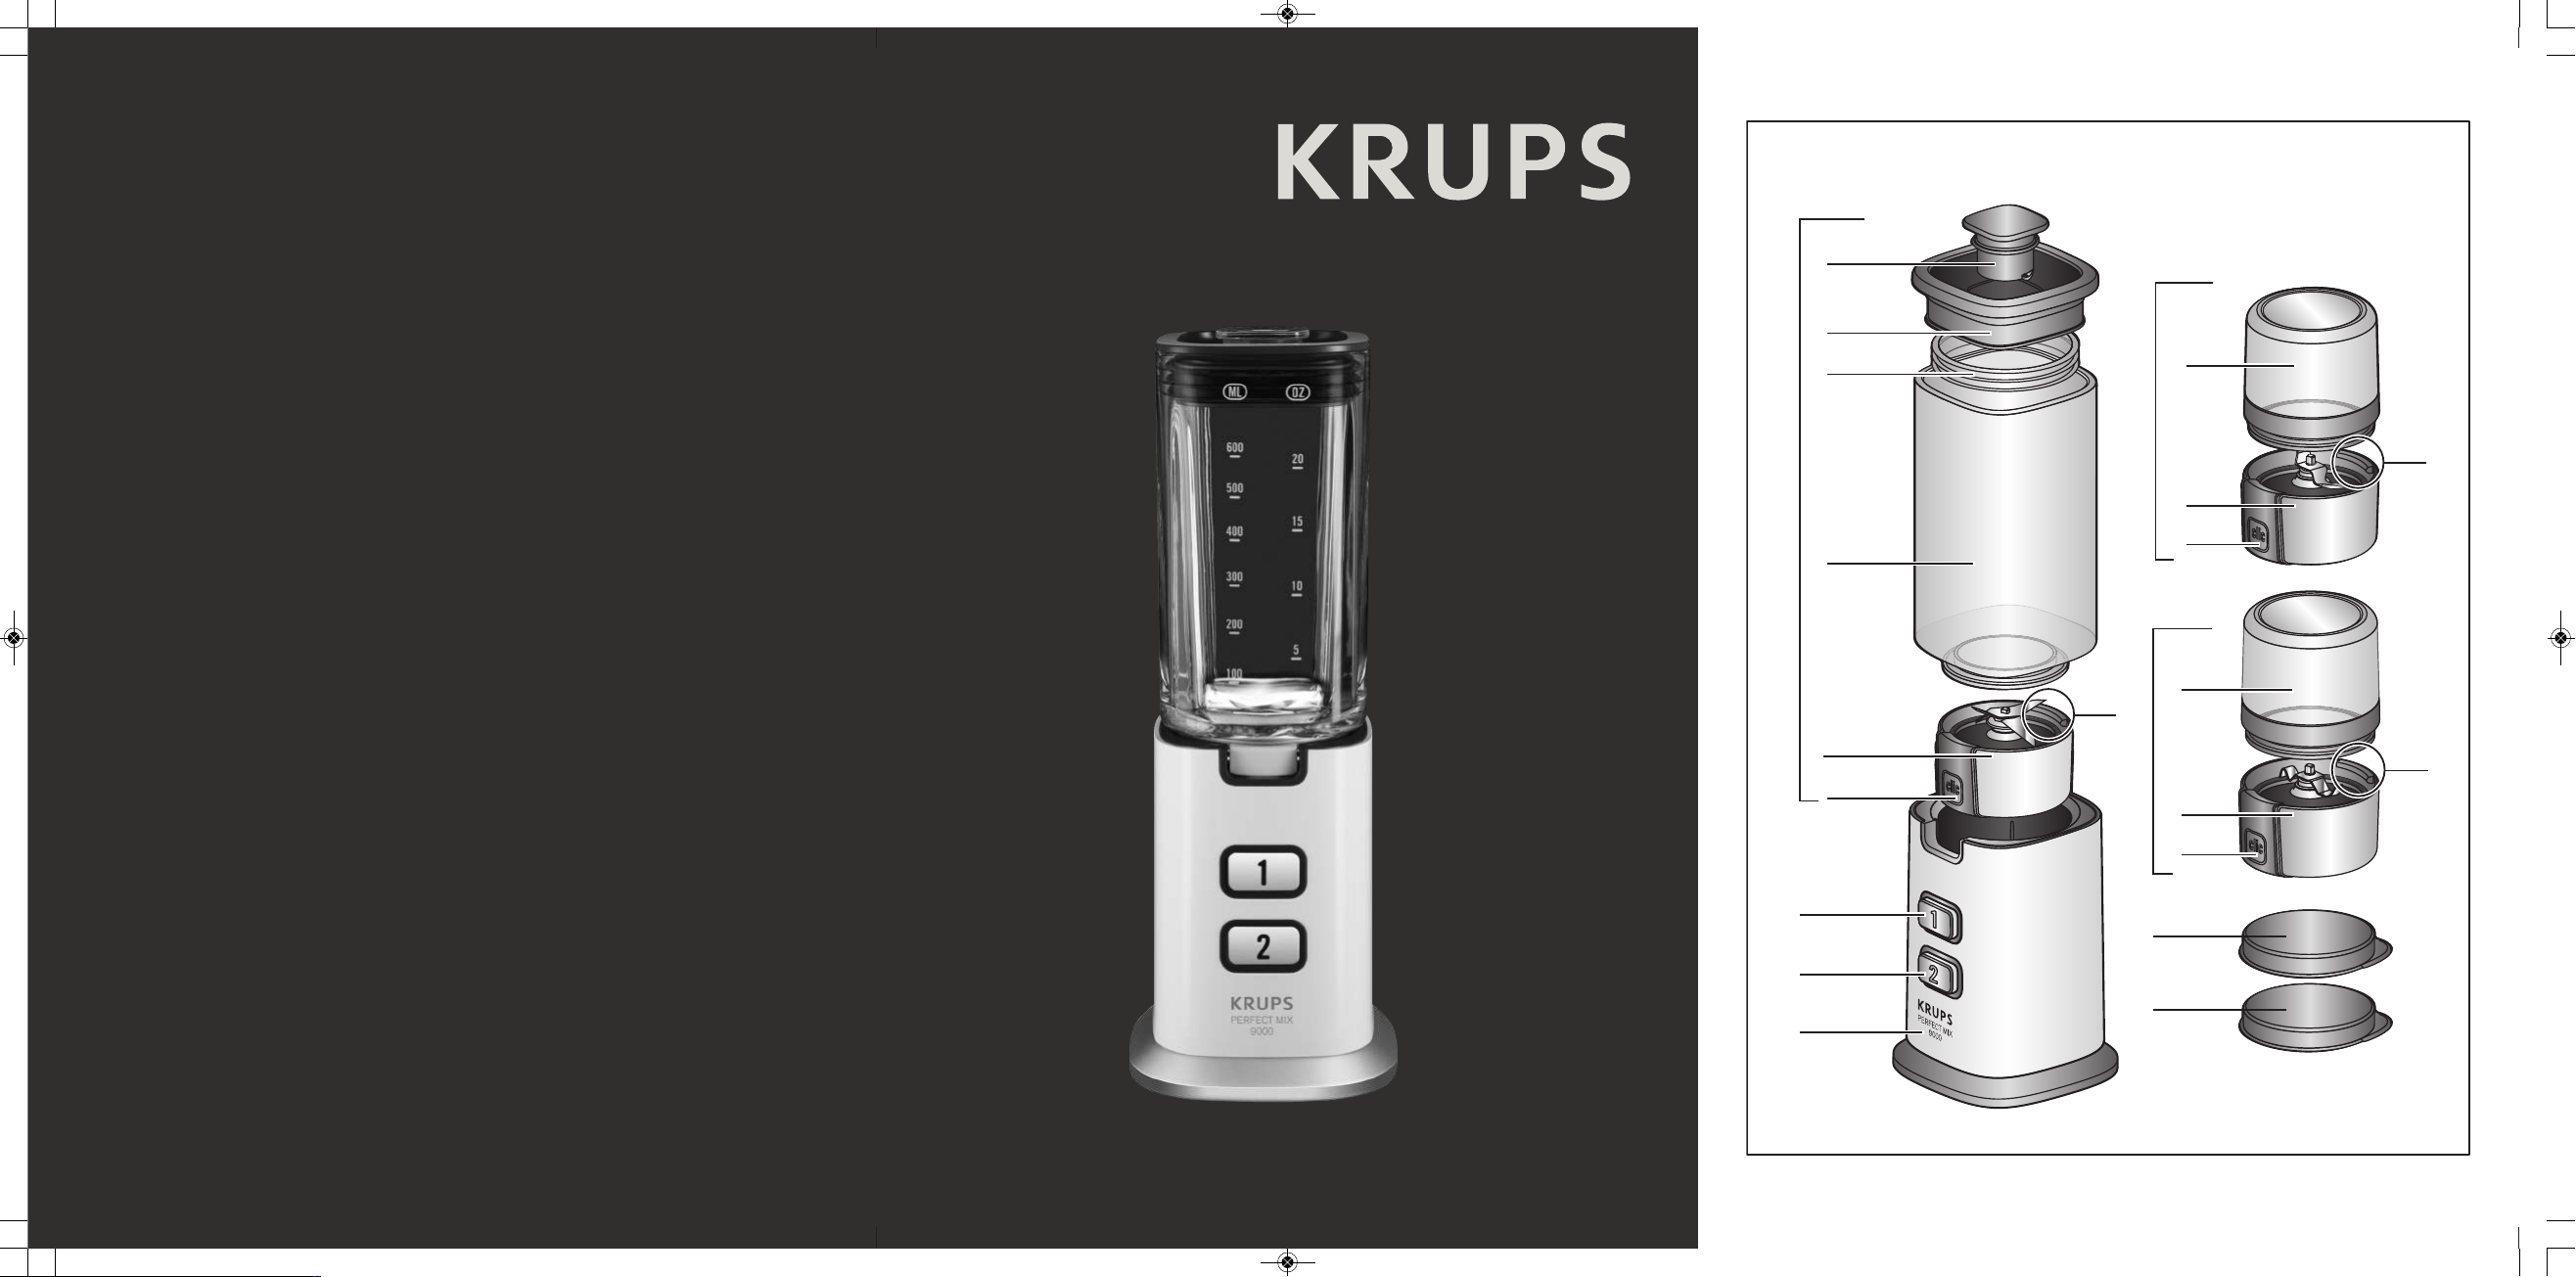
A Bloc moteur
B Touche 2 : vitesse rapide
C Touche 1 : vitesse lente
D Ensemble Bol blender
D1 Bloc lames avec joint
D2 Bouton de déverrouillage du bloc lames
D3 Nervure de positionnement
D4 Bol blender
D5 Joint de couvercle
D6 Couvercle
D7 Bouchon
E Mini hachoir
E1 Bloc lames avec joint
E2 Bouton de déverrouillage du bloc lames
E3 Nervure de positionnement
E4 Bol
F Moulin à café
F1 Bloc lames avec joint
F2 Bouton de déverrouillage du bloc lames
F3 Nervure de positionnement
F4 Bol
G - H Couvercles pour accessoire
Français
5
KR_MINI-BLENDER_PERFECT-MIX_8080012620_MISEENPAGE07/05/1315:50Page5
Page 4
Français
6
Les enfants ne doivent pas utiliser l'appareil comme un jouet.
Ne mettez pas l'appareil, le câble d'alimentation ou la fiche dans du liquide.
Ne laissez pas le câble à proximité ou en contact avec les parties chaudes de l'appareil, près d'une source de chaleur
ou sur un angle vif.
Ne passez pas les accessoires contenant du métal au micro-ondes.
Attention au risque de blessures en cas de mauvaise utilisation de l’appareil.
Les lames des couteaux et des accessoires sont coupantes, manipulez les avec précaution lorsque vous videz les bols
et lors du nettoyage.
Ne touchez jamais les pièces en mouvement lorsque l'appareil est en fonctionnement attendez l'arrêt complet de
l'appareil et des accessoires pour intervenir ou pour enlever ces accessoires.
N'introduisez jamais d'ustensiles de cuisine (cuillère, spatule…) dans le bol (D) pendant le fonctionnement.
Ne laissez jamais pendre les cheveux longs, écharpes, cravates etc.… au dessus de l'appareil ou des accessoires en
fonctionnement.
Attention : Ne versez et ne mélangez jamais de liquides ou d'ingrédients dont la température dépasse 60° C (140°F).
Si vous devez mélanger des ingrédients chauds, gardez vos mains à distance du couvercle (D6) et du doseur (D7)
pour éviter tout risque de brûlure.
Ne pas utiliser les bols comme récipients (congélation, cuisson, stérilisation).
N'utilisez pas votre appareil plus de 1 minute en marche continue.
Pour votre sécurité, cet appareil est conforme aux normes et réglementations applicables (Directives Basse Tension,
Compatibilité Electromagnétique, Matériaux en contact des aliments, Environnement,...).
Placez l'appareil sur un plan de travail stable, résistant à la chaleur, propre et sec.
N'utilisez jamais cet appareil pour mélanger ou mixer des ingrédients non alimentaires.
VERROUILLAGE DE SÉCURITÉ
n L'appareil ne peut pas fonctionner si l'ensemble bol blender (D) ou les accessoires (E) ou (F) ne sont
pas correctement assemblés et correctement positionnés sur le bloc moteur (A).
n Les bols (E4) (F4) sont repérés à leurs bases par un trait de couleur, ils doivent être assemblés avec les
blocs lames dont les boutons de déverrouillage (E2)(F2) ont la même couleur.
n Le bol blender (D4) n'est pas repéré par une couleur, il doit être assemblé avec le bloc lame qui a un
bouton de déverrouillage (D2) jaune.
AVANT UNE PREMIÈRE UTILISATION
n Avant une première utilisation nettoyez tous les accessoires (D, E, F, G, H) à l'eau savonneuse mais pas
le bloc moteur (A).
n Assurez-vous que tout emballage soit retiré avant le fonctionnement de l'appareil.
n Assurez vous que le bloc moteur soit bien à l'arrêt, les touches (B) et (C) relâchées avant de placer
l'ensemble blender ou les accessoires sur le bloc moteur.
n Ne faites jamais fonctionner l'appareil si le couvercle assemblé (D6) avec le joint (D5) n'est pas en place
sur le bol assemblé (D).
UTILISATION DE L'APPAREIL
1 - M IXER/ M ELANGER/ H OMOGE N EIS E R (bol mixer D)
Ne faites pas fonctionner le bol blender sans ingrédients, avec des produits secs uniquement ou durs (tels
que des morceaux de sucre…) ou si le couvercle (D6) avec son joint (D5) n'est pas en place sur le bol (D).
Selon la nature des ingrédients, le bol mixer (D) vous permet de réaliser jusqu'à 0.6L de mélange épais et
0.5L de préparation liquide tels que :
KR_MINI-BLENDER_PERFECT-MIX_8080012620_MISEENPAGE07/05/1315:50Page6
Page 5
Français
7
Ne mettez pas de liquide ou d'ingrédients dont la température dépasse 60° C (140°F) dans le
bol mixer (D). Il ne doit pas être mis non plus au réfrigérateur ni au congélateur.
Versez toujours les ingrédients liquides en premier dans le bol blender avant d'ajouter les ingrédients solides,
sans dépasser le niveau maximal indiqué. Les ingrédients solides doivent être découpés en morceaux de
20 mm x 20 mm.
Vous pouvez préparer :
- des potages finement mixés, des veloutés de crème, des smoothies, des milk-shakes, des cocktails.
- des pâtes légères (crêpes, beignets, clafoutis, far …).
MONTAGE DES ACCESSOIRES
n Assurez vous que le joint est présent et bien positionné sur le bloc lames (D1). Les plis du
joint doivent être visibles quand il est en place et le joint doit être bien à plat, il ne doit pas
gondoler (fig. 1).
n Appuyez sur le bouton "clic" (D2) du bloc lames (D1) face à vous. Positionnez la base du bol (D4) sous
la nervure (D3) (fig. 2a) puis ramenez le bloc lames (D1) vers le bol (fig. 2b) jusqu'au verrouillage.
Appuyez sur la partie haute du bouton clic (D2) pour vous assurez vous que le bol (D4) et le bloc lames
(D1) soient bien solidaires (fig. 2c).
n Mettez le joint de couvercle (D5) autour du couvercle (D6) placez l'ensemble sur le bol (D4), verrouillez
le bouchon (D7) dans son logement situé sur le couvercle. Installez le bol assemblé (D) sur le bloc moteur
(A) bouton clic (D2) du bloc lames aligné avec l'encoche située sur le devant du bloc moteur (A) (fig. 3).
n Le bol (D) doit être suffisamment descendu sur le bloc moteur (A) sinon l'appareil ne fonctionnera pas
(fig. 4).
n Branchez l'appareil et appuyez sur la touche 1 (C) ou 2 (B), selon la vitesse désirée par impulsions ou
en maintenant la pression pour un fonctionnement continu. Ne pas fonctionner plus de 60 secondes en
continu.
n Pour arrêter l'appareil relâchez la pression sur la touche (B) ou (C). Débranchez l'appareil. Enlevez le bol
(D) du bloc moteur (A).
2 - HACHER (mini hachoir E) ou M OU D RE (moulin à café F)
N'utilisez pas le mini hachoir ou le moulin à café pour des préparations liquides (jus de fruits…).
Le couvercle (G) à positionner sur le bol (E4) ou (F4) évite le desséchement des préparations et permet de
les conserver au réfrigérateur pour une prochaine utilisation. Le couvercle (G ou H), le bol (E4) ou (F4) ne
doivent pas être mis au congélateur.
Le mini hachoir (E) vous permet de hacher, en quelques secondes, des ingrédients tendres tels que :
Ingrédients Quantités Temps de fonctionnement
Jus de pommes : pommes + eau 300g pommes 200ml d'eau 20 secondes touche 2
Soupe de légumes : légumes + eau 300g de légumes 200ml d'eau 20 secondes touche 2
Smoothie de fruits : fruits + lait 300g de fruits 200ml de lait 15 secondes touche 2
Ingrédients Quantité (max) Temps de fonctionnement
Abricots secs 40g 4 secondes touche 2 maintenue
Chapelure 1 biscotte
10 impulsions touche 2 et
15 secondes touche 2 maintenue
Oignons/échalotes/ail 30g 10 impulsions touche 1
Ail 40g 10 impulsions touche 1
Jambon 20g (1/2 tranche roulée coupée en 4) 5 impulsions touche 1
Viande dénervée et coupée
en dés de 1 cm max
40g 10 impulsions touche 1
Persil 5g 10 impulsions touche 1
KR_MINI-BLENDER_PERFECT-MIX_8080012620_MISEENPAGE07/05/1315:50Page7
Page 6
Français
8
Le moulin à café (F) vous permet de réduire en poudre, en quelques secondes, des ingrédients durs et
secs tels que :
Le mixage de certaines épices très dures (clous de girofle, cannelle...) est déconseillé car celles-ci peuvent
altérer la couleur du bol.
Le mixage de certains ingrédients tels que le chocolat, le parmesan, les bâtons de cannelle, les clous de
girofles sont déconseillés car ils peuvent endommager l'appareil.
MONTAGE DES ACCESSOIRES
n Ces accessoires sont équipés d'un bol qui interdit l'accès aux lames pendant l'utilisation.
n Assurez vous que le joint est présent et bien positionné sur le bloc lames (E1) ou (F1) (fig. 1). Les plis
du joint doivent être visibles quand il est en place et le joint doit être bien à plat, il ne doit pas gondoler
(fig. 1).
n Mettez les ingrédients dans le bol (E4) ou (F4). Prenez le bloc lames (E1) ou (F1), lames orientées vers
le bas, le bouton "clic" (E2) ou (F2) face à vous, positionnez la nervure (E3) ou (F3) dans la collerette du
bol (E4) ou (F4) (fig. 5a).
n Appuyez sur le bouton "clic" (E2) ou (F2), ramenez le bol (E4) ou (F4) jusqu'au bloc lames (E1) ou (F1)
(fig. 5b) et clipsez-le sur le bol en appuyant sur sur la partie haute du bouton clic (E2) ou (F2). Assurezvous que le bol (E4) ou (F4) et le bloc lames (E1) ou (F1) soient solidaires (fig. 5c).
n Retournez votre accessoire, placez l'accessoire assemblé (E) ou (F) sur le bloc moteur (A) en alignant le
bouton clic (E2) ou (F2) avec l'encoche sur le devant du bloc moteur (A), les accessoires (E) ou (F)
doivent être descendus au maximum sur le bloc moteur (A) sinon l'appareil ne fonctionnera pas (fig. 6).
n Branchez l'appareil. Maintenez la main en appui sur le bol (E4) ou (F4) pendant le fonctionnement appuyez
sur la touche (B) ou (C) par impulsions ou en continu (fig. 7).
n Pour arrêter l'appareil, cessez d'appuyer sur la touche (B) ou (C). Débranchez l'appareil.
n Enlevez l'accessoire (E) ou (F) du bloc moteur (A). Retournez l'accessoire sur le plan de travail et
déverrouillez le bloc lames (E1) ou (F1) en appuyant sur le bouton "clic" (E2) ou (F2). Vous pouvez alors
récupérer votre préparation.
NETTOYAGE DE L'APPAREIL
n Débranchez l'appareil et retirez le bol ou les accessoires.
n Les lames des couteaux et des accessoires sont coupantes, manipulez les avec précaution.
n Pour faciliter le nettoyage le bloc lames (D1) se désolidarisent du bol (D4) en appuyant sur les bouton
clic (D2).
n Rincez immédiatement après utilisation, les bols et les couvercles sous l'eau courante ainsi que les
éléments amovibles à l'eau chaude savonneuse.
n Le bol (D) et l’accessoire (E) et (F) peuvent être nettoyés au lave vaisselle dans le panier supérieur avec
le programme "ECO" ou "PEU SALE".
n Pour nettoyer le bloc moteur (A) utilisez un chiffon humide et séchez-le soigneusement. Ne le mettez
jamais sous l'eau courante.
Ingrédients Quantité (max) Temps de fonctionnement
Noisettes/amandes décortiquées 70g 10 secondes en touche 2
Noix 20g 10 impulsions touche 2
Graines de coriande, poivre 40g 45 secondes en touche 2
Café 50g 45 secondes en touche 2
KR_MINI-BLENDER_PERFECT-MIX_8080012620_MISEENPAGE07/05/1315:50Page8
Page 7
Français
9
SI VOTRE APPAREIL NE FONCTIONNE PAS, QUE FAIRE?
Votre appareil ne fonctionne toujours pas ?
Contactez le service consommateur (voir les coordonnées dans le livret de garantie).
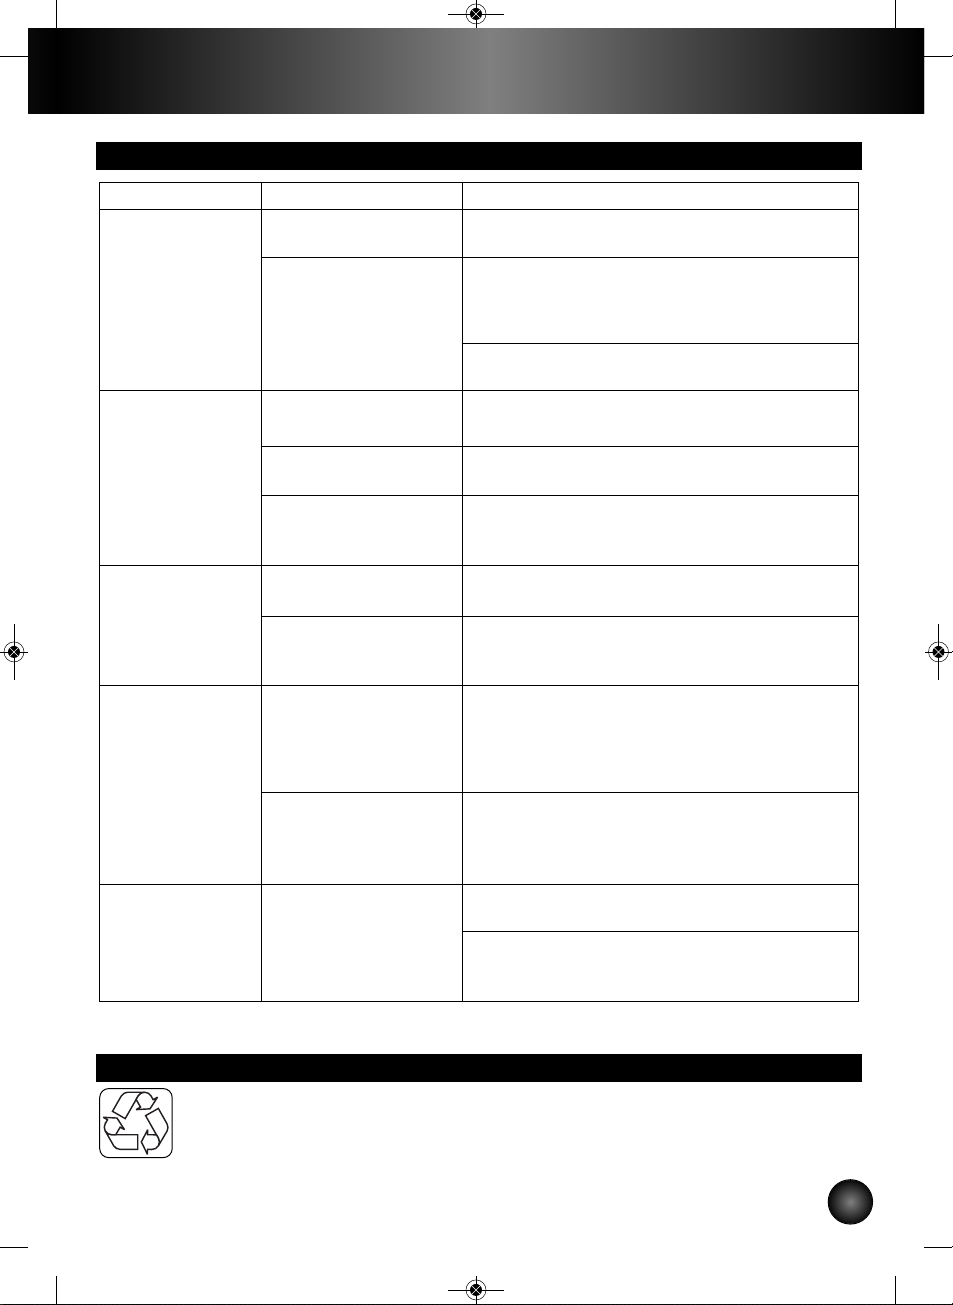
RECYCLAGE
Problèmes Causes Solutions
Le produit ne
fonctionne pas
La prise n’est pas branchée.
Branchez l’appareil sur une prise de même voltage.
Le bol (D) ou les accessoires (E) ou (F) ne sont
pas bien assemblés ou
positionnés sur le bloc
moteur (A).
Vérifiez que le bol ou les accessoires sont bien assemblés; démontez et recommencez l'assemblage (Fig.
2.a, 2.b et 2.c) et vérifiez qu'ils sont suffisamment
descendus sur le bloc moteur.
Maintenez une pression sur le couvercle des accessoires (E) ou (F) pendant le fonctionnement.
Vibrations
excessives
Le produit n'est pas posé
sur une surface plane.
Placez le produit sur une surface plane.
Volume d'ingrédients trop
important.
Réduisez la quantité d'ingrédients traités.
Erreur dans les assemblages d'accessoires .
Vérifiez que les bols (E4) (F4) sont bien assemblés
avec les blocs lames (E2) (F2) qui lui sont associés,
les repères couleur doivent être identiques.
Fuite par le
couvercle
Volume d'ingrédients trop
important.
Réduisez la quantité d'ingrédients traités.
Le couvercle n'est pas
étanche.
Vérifiez la présence du joint (D5) sur le couvercle (D6).
Positionner correctement le couvercle (D6) sur le bol
(D). Verrouillez le bouchon (D7).
Fuite par le bas
du bol ou des
accessoires
Absence ou mauvais
positionnement du joint
sur le bloc lames
(D1)(E1)(F1).
Assurez-vous que le joint est bien positionné, les lèvres du joint doivent être visibles et il ne doit pas gondoler (fig. 1). Manipulez les blocs lames (D1),
(E1), (F1), avec précautions car les lames du
couteau sont coupantes.
Le bloc lames
(D1)(E1)(F1) est insuffisamment ou mal verrouillé
sur le bol (D4)(E4)(F4).
Assurez-vous que le bloc lames et le bol sont bien solidaires en appuyant sur le haut du bouton (D2)(fig.
2c) ou sur les boutons (E2)(F2) (fig. 5c).
Le couteau ne
tourne pas
facilement
Morceaux d'aliment trop
gros ou trop durs.
Réduisez la taille ou la quantité des ingrédients traités.
Ajoutez du liquide dans le bol mixer sans dépasser le
niveau max.
Elimination des matériaux d’emballage et de l’appareil.
L'emballage comprend exclusivement des matériaux sans danger pour l'environnement, pouvant
être jetés conformément aux dispositions de recyclage en vigueur.
Pour la mise au rebut de l'appareil, se renseigner auprès du service approprié de votre
commune.
KR_MINI-BLENDER_PERFECT-MIX_8080012620_MISEENPAGE07/05/1315:50Page9
Page 8
Français
10
Produits électroniques ou produits électriques en fin de vie :
Votre appareil est prévu pour fonctionner durant de longues années. Toutefois, le jour où vous envisagez de
le remplacer, ne le jetez pas dans votre poubelle ou dans une décharge mais apportez-le au point de collecte
mis en place par votre commune (ou dans une déchetterie le cas échéant).
Participons à la protection de l’environnement !
Votre appareil contient de nombreux matériaux valorisables ou recyclables.
Confiez celui-ci dans un point de collecte ou à défaut dans un centre service agréé pour
que son traitement soit effectué.
KR_MINI-BLENDER_PERFECT-MIX_8080012620_MISEENPAGE07/05/1315:50Page10
Page 9

English
11
DESCRIPTION
SAFETY INSTRUCTIONS:
Read these instructions for use carefully before using your appliance for the first time and keep them to hand for future reference.
This appliance is designed for indoor domestic household use only. In case of professional use, inappropriate use or failure to
comply with the instructions, the manufacturer accepts no responsibility and the guarantee does not apply.
It is not intended to be used in the following cases, which are not covered by the guarantee.
- In kitchens reserved for staff use in shops, offices and other professional environments;
- On farms;
- By hotel or motel clients, or on other residential premises;
- In bed and breakfast accommodation and other similar environments.
This appliance is suitable for use by children of 8 years and above or by persons without the necessary experience or knowledge
or with impaired physical,sensory or mental capacities if they have been trained and are supervised, to ensure that they use the
appliance safely and understand the hazards that exist. Children should not be left to play with the appliance. Children should not
attempt to clean or service the appliance unless they are aged at least 8 years or older and supervised.
Please keep the appliance and its power cord out of the reach of children less than 8 years of age.
Children should be supervised to ensure they do not play with the appliance.
For your safety, this appliance meets applicable standards and regulations (Directives on Low Voltage, Electromagnetic Compatibility,
Materials in contact with food articles, Environment, etc.).
This appliance is designed to function on AC current only. Before using it for the first time, check that your mains supply voltage
matches that indicated on the appliance data plate.
Any connection error will invalidate your guarantee.
Always disconnect the food blender if left unattended and before assembly, disassembly or cleaning. Do not let children use the
blender unattended.
Given the diverse standards in effect, if the appliance is used in a country other than that in which it is purchased, have it checked
by an Approved Service Centre.
Do not use an extension lead. If you accept liability for doing so, only use an extension lead which is in good condition, has a plug
with an earth connection and is suited to the power rating of the appliance.
This appliance is not intended to function using an external time-switch or a separate remote control system.
To avoid the risk of electric shock, never use the appliance with wet hands or on a damp or wet surface. Never immerse the motor
unit, power cord or plug in water or any other liquid.
Never leave the appliance unattended whilst connected to the power supply, even if for a few moments, especially where children
are present.
Do not let the power cord hang where children may reach it.
Never disconnect the plug by pulling on the power cord.
A Motor unit
B Button 2: fast speed
C Button 1: slow speed
D Bowl blender assembly
D1 Blade unit with seal
D2 Blade unit unlocking button
D3 Positioning ridge
D4 Blender bowl
D5 Lid seal
D6 Lid
D7 Cap
E Herb mill (*accessory depending on model)
E1 Blade unit with seal
E2 Blade unit unlocking button
E3 Positioning ridge
E4 Bowl
F Coffee grinder
F1 Blade unit with seal
F2 Blade unit unlocking button
F3 Positioning ridge
F4 Bowl
G - H Accessory lids
KR_MINI-BLENDER_PERFECT-MIX_8080012620_MISEENPAGE07/05/1315:50Page11
Page 10
English
12
Do not leave the power cord close to or in contact with sources of heat or sharp edges.
Do not allow long hair, scarves, ties etc. to hang over the appliance or attachments when in use.
Do not touch any moving parts (blades etc.).
If your appliance “jams” during operation, switch off, disconnect from the power supply and check that the attachment is not
overloaded with ingredients. Carefully remove any obstructions before reconnecting.
Do not use your appliance if it does not operate correctly, if it has been damaged or if the power cord or plug is damaged. To
maintain safety, these parts must be replaced by an Approved Service Centre.
This appliance may be used by persons with reduced physical, sensory or mental capabilities, or whose experience or knowledge
is not sufficient, provided they are supervised or have received instruction to use the appliance safely and understand the dangers.
This appliance should not be used by children. Keep the appliance and its cord out of reach of children.
If the power cord is damaged, do not use the appliance. Have the power cord replaced by the manufacturer or its after sales
service in order to avoid any danger.
Any intervention other than normal cleaning and maintenance by the customer must be performed by an Approved Service Centre.
Do not put accessories containing metal in the microwave.
For your own safety, use only accessories and spare parts designed for your appliance and sold in an approved service centre.
Children should not use the appliance as a toy.
Beware risk of injury due to improper use of the appliance.
The blades and accessories are sharp, handle them with care when emptying the bowls and during cleaning.
Never touch moving parts while the appliance is in operation, wait for the appliance and accessories to come to a complete stop
before touching parts or removing these accessories.
Never introduce kitchen utensils (spoons, spatulas, etc.) into the bowl (D) while in operation.
Do not operate the blender bowl without ingredients, with dry or hard products only (such as sugar cubes) or if the lid (D6) with
its seal (D5) is not fitted to the bowl (D).
Warning: Never pour or mix liquids or ingredients with a temperature of more than 60° C (140°F).
If you have to mix hot ingredients, keep your hands at a distance from the lid (D6) and the feeder (D7) to avoid any risk of burning.
Always pour liquid ingredients into the blender bowl first before adding the solid ingredients, without exceeding the maximum level
indicated.
Do not use the bowls as containers (for freezing, cooking or sterilising).
Do not operate the appliance for more than 1 minute in continuous operation.
Place the appliance on a stable, heatproof work surface.
Never use this appliance to blend or mix non-food ingredients.
SAFETY LOCKING SYSTEM
n The appliance will not operate if the blender bowl assembly (D) or the accessories (E) or (F) are not
correctly assembled and correctly positioned on the motor unit (A).
n The bowls (E4) (F4) are marked with a coloured line on their base and should be assembled with the
blade units whose release buttons (E2)(F2) are the same colour.
n The blender bowl (D4) is not marked with a colour, it should be assembled with the blade unit that has a
yellow release button (D2).
BEFORE USING FOR THE FIRST TIME
n Before using for the first time wash all accessories (D, E, F, G, H) in warm water and a little washing-up
liquid but not the motor unit (A).
n Make sure that all packaging has been removed before operating the appliance.
n Make sure that the motor unit has come to a complete stop, with buttons (B) and (C) released before
fitting the blender assembly or accessories to the motor unit.
n Never operate the appliance if the lid fitted (D6) with the seal (D5) has not been placed on the assembled
bowl (D).
KR_MINI-BLENDER_PERFECT-MIX_8080012620_MISEENPAGE07/05/1315:50Page12
Page 11
English
13
USING YOUR APPLIANCE
1 - M I XI N G / BLEN D ING / SMOOTHI N G (mixer bowl D)
Do not operate the blender bowl without ingredients, with dry or hard products only (such as sugar
cubes) or if the lid (D6) with its seal (D5) is not fitted to the bowl (D).
Depending on the type of ingredients, the mixer bowl (D) allows you to prepare up to 0.6L of a thick mixture
or 0.5L of a liquid preparation, such as:
Do not put any liquid or ingredients whose temperature exceeds 60° C (140°F) in the mixer
bowl. The blender bowl (D) must not be put into a fridge or freezer.
Always pour liquid ingredients into the blender bowl first before adding the solid ingredients, without
exceeding the maximum level indicated. Solid ingredients should be cut into 20 mm x 20 mm pieces.
You can prepare:
- Smooth soups, creamy sauces, smoothies, milk-shakes and cocktails.
- Light batters (pancakes, doughnuts, clafoutis, far, etc.).
FITTING THE ACCESSORIES
n Make sure that the seal is fitted and correctly positioned on the blade unit (D1): the folds of
the seal should be visible when it is in place and the seal should be flat, it should not be
buckled (fig1).
n Press the "click" button (D2) on the blade unit (D1) facing you. Position the base of the bowl (D4) under
the ridge (D3) (fig. 2a) then move the blade unit (D1) towards the bowl (fig. 2b) until it clicks. Press on
the top of the click button (D2) to ensure that the bowl (D4) and the blade unit (D1) are fitted together
correctly (fig 2c).
n Fit the lid seal (D5) around the lid (D6) place the lid assembly on the bowl (D4), lock the cap (D7) in its
housing located on the lid. Fit the assembled bowl (D) to the motor unit (A) with the click button (D2) of
the blade unit lined up with the notch located in front of the motor unit (A)(fig. 3).
n Note: If the bowl (D) is not far enough down on the motor unit (A) the appliance will not work (fig. 4).
n Plug in the appliance and press button 1 (C) or 2(B), depending on the required speed, pressing several
times or holding the button down for continuous operation. Do not use for more than 60 seconds in
continuous operation.
n To stop the appliance, release the pressure on button (B) or (C). Unplug the appliance. Remove the bowl
(D) from the motor unit (A).
2 - CHOPPING (mini chopper E) or G R IND I NG (coffee grinder F)
The lid (G) is fitted on the bowl (E4) or (F4) to avoid preparations drying out and allows them
to be kept in the refrigerator for later use. The lid (G or H), the bowl (E4) or (F4) should not be put in the
freezer.
Ingredients Quantities Operating times
Apple juice: apples + water 300g apples 200ml water 20 seconds button 2
Vegetable soup: cooked vegetables + water 300g cooked vegetables 200ml water 20 seconds button 2
Fruit smoothie: soft fruit + milk 300g soft fruit 200ml milk 15 seconds button 2
KR_MINI-BLENDER_PERFECT-MIX_8080012620_MISEENPAGE07/05/1315:50Page13
Page 12
English
14
The mini chopper (E) allows you to chop soft ingredients in a few seconds, such as:
The coffee grinder (F) allows you to reduce to a power, in a few seconds, hard dry ingredients such as::
The mixing of certain very hard spices (cloves, cinnamon, etc.) is not recommended because they may
discolour the bowl. The mixing of certain ingredients such as chocolate, parmesan, cinnamon sticks, whole
cloves, etc. is not recommended because they could damage the appliance.
FITTING THE ACCESSORIES
n These accessories come with a bowl that does not allow access to the blades during use.
n Make sure that the seal is fitted and correctly positioned on the blade unit (E1) or (F1) (fig1), the folds of
the seal should be visible when it is in place and the seal should be flat, it should not be buckled (fig1).
n Put the ingredients in the bowl (E4) or (F4). Take the blade unit (E1) or (F1), with the blades facing
downwards, with the “click” button (E2) or (F2) facing you, position the ridge (E3) or (F3) in the neck of
the bowl (E4) or (F4) (fig 5a).
n Press the “click” button (E2) or (F2), bring the bowl (E4) or (F4) back to the blade unit (E1) or (F1) (fig
5b) and clip it on the bowl by pressing down on the top of the click button (E2) or (F2). Make sure that
the bowl (E4) or (F4) and the blade unit (E1) or (F1) are fitted together (fig 5c).
n Turn your accessory over, place the assembled accessory (E) or (F) on the motor unit (A), lining up the
click button (E2) or (F2) with the notch on the front of the motor unit (A), the accessories (E) or (F) should
be as far down as they can go on the motor unit (A) if not the appliance will not operate (fig6).
n Plug in the appliance. Keep your hand supporting the bowl (E4) or (F4) and during operation press the
button (B) or (C) several times or continuously (fig7).
n To stop the appliance, release the button (B) or (C). Unplug the appliance.
n Remove the accessory (E) or (F) from the motor unit (A), turn the accessory over on the work surface
and release the blade unit (E1) or (F1) by pressing on the “click” button (E2) or (F2).
n You can then take out your preparation.
Ingredients Quantity (max) Operating time
Dried apricots 40g 4 seconds button 2 held down
Breadcrumbs 1 rusk
10 pulses button 2 and
15 seconds button 2 held down
Onions/shallots 30g 10 pulses button 1
Garlic 40g 10 pulses button 1
Ham 20g (1/2 slice rolled up and quartered) 5 pulses button 1
Meat with sinew removed and
cut into cubes 1 cm max
40g 10 pulses button 1
Parsley 5g 10 pulses button 1
Ingredients Quantity (max) Operating time
Shelled hazelnuts/almonds 70g 10 seconds button 2
Nuts 20g 10 pulses button 2
Coriander seeds, peppercorns 40g 45 seconds button 2
Coffee 50g 45 seconds button 2
KR_MINI-BLENDER_PERFECT-MIX_8080012620_MISEENPAGE07/05/1315:50Page14
Page 13
English
15
CLEANING YOUR APPLIANCE
n Unplug the appliance and remove the bowl or accessories.
n The blades and accessories are sharp, handle them with care.
n To facilitate cleaning, the blade unit (D1) can be detached from the bowl (D4) by pressing on the click
button (D2) (fig 8a 8b 8c).
n The bowl (D) the accessories (E) and (F) can be washed in the top basket of the dishwasher using the
"ECO" or "LIGHT WASH" programme.
n To clean the motor unit (A), use a damp cloth and dry it carefully. Never immerse the motor unit (A)
in water or any other liquid.
WHAT TO DO IF YOUR APPLIANCE DOES NOT WORK
Problems Causes Solutions
The appliance
does not work.
It is not plugged in. Plug the appliance in using a plug with the same
voltage.
The bowl (D) or the accessories
(E) and (F) are not correctly assembled or positioned on the
motor unit (A).
Check that the bowl or accessories are correctly assembled; dismantle and start to assemble again (Fig 2.a, 2.b and 2.c) and check that
they are far down enough on the motor unit.
Maintain pressure on the accessory lid (E) or (F)
during operation.
Excessive vibration.
The appliance is not on a flat,
stable surface.
Put the appliance on a flat surface.
Volume of ingredients is too high. Reduce the quantity of ingredients processed.
Error in assembling the accesso-
ries.
Check that the bowls (E4) (F4) are correctly assembled with the blade units (E2) (F2) associated with them, the coloured markers should be
identical.
Leak through lid.
Volume of ingredients is too high. Reduce the quantity of ingredients processed.
The lid is not fitted correctly. Check that the seal is in place (D5) on the lid
(D6). Correctly position the lid (D6) on the bowl
(D). Lock the button (D7).
Leak from the
bowl or accessories
Incorrect positioning of the seal
on the blade unit (D1)(E1)(F1).
Make sure that the seal is correctly positioned,
the lips of the seal should be visible and it
should not be buckled (fig1). Handle the
blade units (D1), (E1), (F1) with care because the blades are sharp.
The blade unit (D1)(E1)(F1) is insufficiently or incorrectly locked
on the bowl (D4)(E4)(F4).
Make sure that the blade unit and the bowl are
fitted together correctly be pressing at the top
of the button (D2)(fig2c) or on the buttons
(E2)(F2) (fig5c)
The blade does
not rotate easily.
Pieces of food that are too big or
too hard.
Reduce the size or quantity of the ingredients
processed.
Add liquid to the bowl mix without exceeding
the maximum level.
KR_MINI-BLENDER_PERFECT-MIX_8080012620_MISEENPAGE07/05/1315:50Page15
Page 14
English
16
Is your appliance still not working?
Contact customer service (see contact details in the booklet).
RECYCLING
End-of-life electronic or electrical appliances:
Your appliance is designed to operate for many years. However, the day you plan to replace it, do not throw
it away with normal household rubbish or in a landfill but take it to a suitable collection point.
Environmental protection first!
Your appliance valuable materials that can be recovered or recycled.
Leave it at a local civic waste collection point.
Elimination of packaging and appliance materials.
The packaging exclusively contains materials that are not dangerous to the environment, which
can be disposed of in accordance with the recycling regulations in force.
To dispose of your appliance, consult the appropriate department of your local authority.
KR_MINI-BLENDER_PERFECT-MIX_8080012620_MISEENPAGE07/05/1315:50Page16
Page 15

Français
17
BESCHREIBUNG
SICHERHEITSHINWEISE:
Lesen Sie sich die Gebrauchsanweisung sorgfältig vor der ersten Benutzung Ihres Gerätes durch. Eine unsachgemäße
Benutzung, die nicht den Angaben der Gebrauchsanweisung entspricht, enthebt den Hersteller jeglicher Verantwortung.
Dieses Gerät ist nicht zur Benutzung durch Personen (einschließlich Kindern) mit eingeschränkten körperlichen,
sensorischen oder mentalen Fähigkeiten oder durch Personen ohne entsprechende Erfahrung oder Kenntnisse
vorgesehen, es sei denn, sie werden von einer Person, die für ihre Sicherheit verantwortlich ist, beaufsichtigt oder haben
von dieser zuvor Anweisungen zum Gebrauch des Geräts erhalten. Kinder müssen beaufsichtigt werden, um zu
gewährleisten, dass sie nicht mit dem Gerät spielen.
Das Gerät ist lediglich für den Gebrauch mit Wechselstrom konzipiert. Vergewissern Sie sich, dass die auf dem
Typenschild angegebene Versorgungsspannung der Ihrer Elektroinstallation entspricht. Jegliches Fehlverhalten
hinsichtlich des Stromanschlusses annulliert den Garantieanspruch.
Immer den Netzstecker des Küchenmixer aus der Steckdose ziehen, wenn er unbeaufsichtigt bleibt oder
beim Aufbau, Abbau oder Reinigen. Kinder den Küchenmixer nicht unbeaufsichtigt nutzen lassen.
Dieses Gerät ist nur für den Hausgebrauch im Gebäude-Innenbereich konzipiert. Benutzen Sie Ihr Gerät nicht im
Freien. Der Hersteller übernimmt im Falle einer gewerblichen oder unsachgemäßen Nutzung sowie bei Nichtbeachten
der Anweisungen keine Verantwortung und behält sich das Recht vor, den Garantievertrag aufzuheben.
Ziehen Sie niemals am Stromkabel, um den Stecker des Gerätes aus der Steckdose zu ziehen.
Dieses Gerät darf von Personen, deren körperliche oder geistige Unversehrtheit oder deren Wahrnehmungsfähigkeiten
eingeschränkt sind oder deren Kenntnissen und Erfahrungen nicht ausreichen, verwendet werden vorausgesetzt, sie
werden beaufsichtigt oder haben Anweisungen zur sicheren Nutzung des Geräts erhalten und verstehen die Gefahren.
Benutzen Sie Ihr Gerät nicht, falls es nicht einwandfrei funktioniert, falls es beschädigt wurde oder das Stromkabel oder
der Netzstecker beschädigt sind.
Um Gefahren zu vermeiden, müssen Sie das beschädigte Netzkabel unbedingt von
einem autorisierten Servicezentrum ersetzen lassen (siehe Liste im Servicehandbuch).
Dieses Gerät sollte nicht von Kindern genutzt werden. Das Gerät außerhalb der Reichweite von Kindern aufbewahren.
Wenn das Stromkabel beschädigt ist, benutzten Sie das Gerät bitte nicht. Lassen Sie das Stromkabel nur durch den
Hersteller, den durch ihn autorisierten Kundendienst oder Personen austauschen, welche über eine dementsprechende
Qualifikation verfügen, um jegliche Verletzungsgefahr auszuschließen.
Alle Arbeiten, die über die Reinigung und die Pflege durch den Kunden hinausgehen, müssen von einem autorisierten
Servicezentrum durchgeführt werden.
A Motorblock
B Druckknopf 2: hohe Geschwindigkeit
C Druckknopf 1: niedrige Geschwindigkeit
D Behälter-Mixer-Einheit
D1 Messerblock mit Dichtungsring
D2 Sicherungsknopf des Messerblocks
D3 Positionsführung
D4 Mixbehälter
D5 Dichtungsring für Deckel
D6 Deckel
D7 Verschlusskappe
E Kräutermühle
E1 Messerblock mit Dichtungsring
E2 Sicherungsknopf des Messerblocks
E3 Positionsführung
E4 Zutatenbehälter
F Kaffeemühle
F1 Messerblock mit Dichtungsring
F2 Sicherungsknopf des Messerblocks
F3 Positionsführung
F4 Zutatenbehälter
G - H Deckel für Zubehörteil
Deutsch
KR_MINI-BLENDER_PERFECT-MIX_8080012620_MISEENPAGE07/05/1315:50Page17
Page 16
Deutsch
18
Verwenden Sie zu Ihrer eigenen Sicherheit nur Zubehör und Ersatzteile passend zu Ihrem Gerät , die Sie bei einem
autorisierten Fachhändler erworben haben.
Ohne Vorlage der Gebrauchsanweisung oder das Vorzeigen Ihres Gerätes kann Ihnen kein Zubehör- oder Ersatzteil
verkauft werden.
Kinder sollten das Gerät nicht als Spielzeug verwenden.
Tauchen Sie das Gerät, das Stromversorgungskabel oder den Gerätestecker nicht in Wasser oder andere Flüssigkeiten.
Lassen Sie das Stromkabel nicht in die Reichweite von Kindern, in die Nähe oder den Kontakt mit sich drehenden
Geräteteilen, einer Hitzequelle oder einer scharfen Kante kommen.
Geben Sie die Zubehörteile, die Metallteile aufweisen, niemals in Mikrowellen.
Achtung, es besteht ein Verletzungsrisiko bei unsachgemäßer Benutzung des Geräts.
Die Klingen der Messer und der Zubehörteile sind scharf. Gehen Sie vorsichtig mit Ihnen um, während der Leerung der
Behälter oder der Reinigung.
Berühren Sie niemals die beweglichen Teile während das Gerät betrieben wird. Warten Sie bis zum kompletten Stillstand
des Geräts und der Teile, um einzugreifen oder Zubehörteile zu entfernen.
Führen Sie niemals Küchenutensilien (Löffel, Spatel,...) während des Gerätebetriebs in den Mixbehälter (D) ein.
Lassen Sie niemals lange Haare, Schals, Krawatten,.... über dem Gerät hängen, während das Gerät oder die
Zubehöraufsätze in Betrieb sind.
Achtung: Geben Sie niemals Flüssigkeiten oder Zutaten in das Gerät, mit einer Temperatur höher als 60°C (140°F).
Wenn Sie heiße Zutaten mixen müssen, halten Sie ihre Hände vom Deckel (D6) und der Dosierkappe (D7) entfernt,
um jegliche Art von Verbrennungen zu vermeiden. Geben Sie keine Flüssigen Zutaten in die Kräutermühle oder
Gewürzmühle.
Benutzen Sie die Behälter nicht als Aufbewahrungsbehälter (Tieffrieren, Kochen, Sterilisieren).
Benutzen Sie Ihr Gerät nicht länger als 1 Minute im Dauerbetrieb.
Für Ihre Sicherheit erfüllt dieses Gerät folgende Normen und vorgeschriebene Anforderungen
(Niederspannungsrichtlinie, Elektromagnetische Verträglichkeit, Lebensmittelechtheit der Materialien, die in Kontakt mit
Lebensmitteln kommen können, Umweltauflagen,...).
Stellen Sie Ihr Gerät auf eine ebene, stabile, hitzebeständige, saubere sowie trockene Arbeitsfläche.
Benutzen Sie dieses Gerät niemals, um andere Zutaten als Lebensmittel zu mischen oder zu zerkleinern.
SICHERHEITSVERRIEGELUNG
n Das Gerät kann nicht funktionieren, wenn die Behälter-Mixer-Einheit (D) oder die Zuberhöraufsätze (E)
oder (F) nicht richtig zusammengesetzt und korrekt auf dem Motorblock (A) positioniert sind.
n Die Zutatenbehälter (E4) (F4) sind an ihrer jeweiligen Basis farblich gekennzeichnet. Sie dürfen jeweils nur
mit dem Messerblock zusammengesetzt werden, dessen Sicherungsknopf (E2)(F2) dieselbe Farbe aufweist.
n Der Zutatenbehälter (D4) ist farblich nicht gekennzeichnet. Er muss mit dem Motorblock
zusammengesetzt werden, der einen gelben Sicherungsknopf (D2) hat.
VOR DER ERSTEN BENUTZUNG
n Vor der ersten Benutzung reinigen Sie alle Zubehörteile (D, E, F, G, H) mit Seifenwasser, jedoch nicht
den Motorblock (A).
n Vergewissern Sie sich, dass jegliche Verpackung entfernt wurde, bevor das Gerät in Betrieb genommen wird.
n Vergewissern Sie sich, dass der Motorblock ausgeschaltet ist und die Druckknöpfe (B) (C) nicht
eingedrückt sind, bevor Sie die Mixereinheit oder die Zubehöreinheiten auf den Motorblock setzen.
n Schalten Sie das Gerät niemals ein, wenn der Deckel (D6) mit der Dichtungsverbindung (D5) nicht auf
dem zusammengesetzten Behälter (D) platziert wurde.
KR_MINI-BLENDER_PERFECT-MIX_8080012620_MISEENPAGE07/05/1315:50Page18
Page 17
Français
19
GERÄTEBENUTZUNG
1 - M IXEN / MISCHE N / HOMOGENI S IER E N (Mischbehälter D)
Betreiben Sie den Mixer nicht ohne Zutaten im leeren Zustand, nur mit trockenen oder festen Produkten
(wie beispielsweise Zucker....), oder wenn der Deckel (D6) mit seinem Dichtungsring (D5) nicht auf dem
Mixbehälter (D4) platziert wurde.
Je nach Art der Zutaten, erlaubt Ihnen der Mischbehälter (D) die Zubereitung von bis zu 0,6 l fester Mischung
und von 0,5 l flüssiger Zubereitung wie:
Geben Sie niemals Flüssigkeiten oder Zutaten in das Gerät, mit einer Temperatur höher als
60°C (140°F). Er darf weder in den Kühlschrank noch in das Gefrierfach gestellt werden.
Fügen Sie immer zuerst die flüssigen Zutaten in den Mixbehälter, bevor Sie feste Zutaten hinzufügen, ohne
die angegebene, maximale Füllmenge zu überschreiten. Feste Zutaten müssen in Stücke von 20 mm x 20
mm geschnitten werden.
Sie können zubereiten:
- fein gemischte Suppe, cremige Mischungen, Smoothies, Milchshakes, Cocktails.
- leichte Teigmischungen (Crepes, Krapfen, Teigpanaden, Teigfladen...).
ZUSAMMENSETZEN DER ZUBEHÖRTEILE
n Stellen Sie sicher, dass der Dichtungsring vorhanden ist und richtig auf dem Messerblock
(D1) sitzt: Die Dichtungslamellen müssen sichtbar sein, der Dichtungsring muss eben sein
und darf sich nicht wellen (Abb. 1).
n Drücken Sie auf den "Clic"-Knopf (D2) des Messerblocks (D1) vor Ihnen. Setzen Sie die Basis der
Schüssel (D4) in die Führungsnut (D3) (Abb. 2a) und führen Sie dann den Messerblock (D1) bis zum
Einrasten zur Schüssel (Abb. 2b). Drücken Sie auf den Bereich oberhalb des 'Clic'-Knopfs der
Verriegelung (D2), um sicher zu stellen, dass der Behälter (D4) und der Messerblock (D1) fest miteinander
verbunden sind (Abb. 2c).
n Setzen Sie den Dichtungsring für den Deckel (D5) auf die untere Deckellasche (D6), platzieren Sie diese
Einheit auf den Behälter (D4) und setzen Sie die Verschlusskappe (D7) in die dafür vorgesehene Öffnung
im Deckel und verriegeln Sie sie. Setzen Sie den zusammengefügten Behälter (D) auf den Motorblock
(A), wobei der 'Clic'- Knopf (D2) des Messerblocks über der Ausbuchtung auf der Vorderseite des
Motorblocks (A) (Abb. 3) sitzen muss.
n Der Behälter (D) muss richtig in den Motorblock (A) eingesteckt werden, da sonst das Gerät nicht richtig
funktioniert (Abb. 4).
n Stecken Sie den Gerätestecker ein und drücken Sie kurz auf den Druckknopf 1(C) oder 2(B),
entsprechend der gewünschten Geschwindigkeit, oder halten Sie den Knopf für den durchgehenden
Betrieb andauernd gedrückt. Kein Dauerbetrieb länger als 60 Sekunden.
n Um das Gerät anzuhalten hören Sie auf, den Knopf (B) oder (C) zu drücken. Ziehen Sie den
Gerätestecker. Entfernen Sie den Behälter (D) vom Motorblock (A).
2 - HACKEN (Mini-Hackmesser E) oder MAH LE N (Kaffeemühle F)
Verwenden Sie das Mini-Hackmesser oder die Kaffeemühle nicht für flüssige Zubereitungen (Fruchtsäfte...).
Das Verschließen der Behälter (E4) oder (F4) mit dem Deckel (G) verhindert das Austrocknen der
Zubereitungen und erlaubt die Aufbewahrung im Kühlschrank bis zur nächsten Benutzung.
Der Deckel (G oder H) und die Schüssel (E4 oder F4) dürfen nicht in den Gefrierschrank gestellt werden.
Der Mini-Hacker (E) gestattet Ihnen innerhalb weniger Sekunden weiche Zutaten, wie die folgenden,
kleinzuhacken:
Zutaten Mengen Zubereitungszeit
Apfelsaft: Äpfel + Wasser 300 g Äpfel 200 ml Wasser 20 Sekunden Taste 2 drücken
Gemüsesuppe: Gemüse + Wasser 300 g Gemüse 200 ml Wasser 20 Sekunden Taste 2 drücken
Frucht-Smoothies: Früchte + Milch 300 g Früchte 200 ml Milch 15 Sekunden Taste 2 drücken
Deutsch
KR_MINI-BLENDER_PERFECT-MIX_8080012620_MISEENPAGE07/05/1315:50Page19
Page 18
Deutsch
20
Die Kaffeemühle (F) gestattet Ihnen innerhalb weniger Sekunden feste und trockene Zutaten wie folgende
zu Pulver zu mahlen:
Vom Mischen bestimmter, sehr harter Gewürzen (Gewürznelken, Zimt,...) wird abgeraten, da diese die Farbe
des Behälters verändern können.
Vom Mixen bestimmter Zutaten wie Schokolade, Parmesankäse, Zimtstangen und Gewürznelken wird
abgeraten, da sie das Gerät beschädigen können.
ZUSAMMENSETZEN DER ZUBEHÖRTEILE
n Diese Zubehöre sind mit einem Behälter ausgestattet, der den Zugriff auf die Messer während der
Benutzung verhindert.
n Vergewissern Sie sich, dass der Dichtungsring richtig auf dem Messerblock (E1) oder (F1) (Abb. 1) sitzt;
die Dichtungslamellen müssen sichtbar sein, wenn dieser platziert ist, und die Dichtung muss glatt sein
und er darf keine Wellen werfen (Abb.1).
n Geben Sie die Zutaten in den Behälter (E4) oder (F4). Nehmen Sie den Messerblock (E1 oder F1), mit
den Messern nach unten und dem 'Clic'- Knopf (E2 oder F2) Ihnen zugewandt, setzen Sie die
Positionsführung (E3 oder F3) über den Nutrand des Behälters (E4 oder F4) (Abb. 5a).
n Drücken Sie auf den 'Clic'-Knopf (E2 oder F2), ziehen Sie den Behälter (E4 oder F4) bis zum Messerblock
(E1 oder F1) (Abb. 5b) und arretieren Sie ihn auf dem Behälter indem Sie auf die Partie oberhalb des
'Clic'-Knopfs (E2 oder F2) drücken. Vergewissern Sie sich, dass der Behälter (E4 oder F4) und der
Messerblock (E1 oder F1) fest miteinander verbunden sind (Abb. 5c).
n Drehen Sie Ihr Zubehör um, platzieren Sie den zusammengefügten Zubehörsatz (E oder F) auf den
Motorblock (A), den 'Clic'-Knopf (E2 oder F2) in einer Linie mit der Ausbuchtung auf der Vorderseite des
Motorblocks (A). Die Zubehörsätze (E oder F) müssen bis zum Anschlag auf den Motorblock (A) gedrückt
werden, da sonst das Gerät nicht funktioniert (Abb. 6).
n Schließen Sie das Gerät an die Stromversorgung an. Drücken Sie mit der Hand während des gesamten Betriebs
auf den Behälter (E4 oder F4) und betätigen Sie kurz oder andauernd den Knopf (B) oder (C) (Abb. 7).
Zutaten Menge (max.) Zubereitungszeit
geschälte Nüsse/Mandeln 70g 10 Sekunden Taste 2 drücken
Nüsse 20g 10 mal kurz Druckknopf 2 drücken
Koriandersamen, Pfeffer 40g 45 Sekunden Taste 2 drücken
Kaffeebohnen 50g 45 Sekunden Taste 2 drücken
Zutaten Menge (max.) Zubereitungszeit
Getrocknete Aprikosen 40g
4 Sek. Druckknopf 2 gedrückt
halten
Paniermehl 1 Zwieback
10 mal kurz Druckknopf 2
drücken und danach 15 Sek.
Druckknopf 2 gedrückt halten
Zwiebeln/Schalotten/
Knoblauch
30g 10 mal kurz Druckknopf 1 drücken
Knoblauch 40g 10 mal kurz Druckknopf 1 drücken
Schinken
20g (1/2 gerollte Scheibe in 4 Teile
geschnitten)
5 mal kurz Druckknopf 1 drücken
Entsehntes Fleisch in max. 1
cm Stücke geschnitten
40g 10 mal kurz Druckknopf 1 drücken
Petersilie 5g 10 mal kurz Druckknopf 1 drücken
KR_MINI-BLENDER_PERFECT-MIX_8080012620_MISEENPAGE07/05/1315:50Page20
Page 19
Français
21
n Um das Gerät anzuhalten, hören Sie auf, den Knopf (B) oder (C) zu drücken. Ziehen Sie den
Gerätestecker.
n Nehmen Sie den Zubehörsatz (E) oder (F) vom Motorblock (A) drehen Sie ihn auf der Arbeitsfläche um
und entriegeln Sie den Messerblock (E1) oder (F1), indem Sie auf den 'Clic'-Knopf (E2) oder (F2) drücken.
Nun können sie Ihre Zubereitung entnehmen.
REINIGUNG DES GERÄTS
n Ziehen Sie den Gerätestecker und entfernen Sie den Behälter oder die Zubehörsätze.
n Die Klingen der Messer und der Zubehörteile sind scharf. Gehen Sie vorsichtig mit ihnen um!
n Um die Reinigung des Messerblocks (D1) zu erleichtern, entfernen Sie ihn vom Behälter (D4), indem Sie
auf den 'Clic'-Knopf (D2) drücken.
n Spülen Sie den Behälter und die Deckel unmittelbar nach der Benutzung unter fließendem Wasser ab
und reinigen Sie die abnehmbaren Teile mit heißem Spülwasser.
n Der Behälter (D) sowie die Zubehöre (E) und (F) können in der Spülmaschine im oberen Reinigungskorb
im Programm 'Eco' oder 'wenig verschmutzt' gereinigt werden.
n Benutzen Sie für die Reinigung des Motorblocks (A) ein feuchtes Tuch und trocknen Sie ihn danach
sorgfältig ab. Halten Sie den Motorblock (A) niemals unter Wasser.
WAS IST ZU TUN, FALLS IHR GERÄT NICHT FUNKTIONIERT?
Deutsch
Probleme Ursachen Lösungen
Das Gerät
funktioniert nicht.
Der Geräterstecker ist nicht
eingesteckt.
Stecken Sie den Stecker in eine Steckdose mit einer für
das Gerät zugelassenen Spannung.
Der Behälter (D) oder die
Zubehörsätze (E und F) sind
nicht richtig zusammengesetzt
oder falsch auf dem Motorblock
(A) positioniert.
Stellen Sie sicher, dass der Behälter oder die
Zubehörsätze richtig zusammengesetzt sind; nehmen
Sie sie auseinander, setzen sie wieder zusammen (Abb.
2.a, 2.b et 2.c) und überprüfen Sie, dass sie richtig bis
zum Anschlag auf den Motorblock gesetzt sind.
Drücken Sie auf den Deckel der Zubehörsätze (E) oder
(F) während des Gerätebetriebs.
Starkes Vibrieren.
Das Gerät steht auf keiner
ebenen Oberfläche.
Stellen Sie das Gerät auf eine ebene Oberfläche.
Die Menge der Zutaten ist zu
groß.
Reduzieren Sie die Menge der zu verarbeitenden
Zutaten.
Fehler beim Zusammensetzen
der Zubehörteile.
Überprüfen Sie, ob die Behälter (E4 und F4) mit den
richtigen Messerblöcken (E2 und F2) zusammengesetzt
wurden; die zur Orientierung dienenden Farben müssen
identisch sein.
Entweichen der
Zutaten über die
Deckelöffnung
Die Menge der Zutaten ist zu
groß.
Reduzieren Sie die Menge der zu verarbeitenden
Zutaten.
Der Deckel ist nicht dicht. Stellen Sie sicher, dass der Dichtungsring (D5) auf dem
Deckel sitzt (D6). Setzen Sie den Deckel (D6) richtig
auf den Behälter (D). Arretieren Sie die
Verschlusskappe (D7).
KR_MINI-BLENDER_PERFECT-MIX_8080012620_MISEENPAGE07/05/1315:50Page21
Page 20
Deutsch
22
Ihr Gerät funktioniert immer noch nicht?
Setzen Sie sich mit dem Verbraucherservice in Verbindung (für die Kontaktadressen schauen Sie bitte ins
Garantieheft).
RECYCLING
n Entsorgung der Verpackungsmaterialien und des Geräts.
n Entsorgung von Elektro- und Elektronik-Altgeräten.
Ihr Gerät ist dafür vorgesehen, viele Jahre zu funktionieren. Wenn Sie sich jedoch eines Tages
entscheiden, es zu ersetzen, entsorgen Sie es nicht über Ihren Hausmüll oder auf einer Müllhalde,
sondern bringen Sie es zu einer von Ihrer Gemeinde eingerichteten Sammelstelle (oder gegebenenfalls
auf einen Wertstoffhof).
Denken Sie an den Schutz der Umwelt!
Ihr Gerät enthält wertvolle Rohstoffe, die wieder verwertet werden können.
Geben Sie Ihr Gerät deshalb bitte bei einer Sammelstelle Ihrer Stadt oder Gemeinde ab.
Die Verpackung besteht ausschließlich aus umweltfreundlichen Materialien, die nach den gültigen
Recycling-Bestimmungen entsorgt werden können.
Informieren Sie sich bei den zuständigen Stellen Ihrer Gemeinde über die Entsorgung des Geräts.
Probleme Ursachen Lösungen
Entweichen der Zu-
taten am Boden
des Behälters oder
der Zubehörsätze.
Fehlen oder schlechte Positionierung des
Dichtungsrings auf dem Messerblock
(D1)(E1)(F1).
Stellen Sie sicher, dass der Dichtungsring
richtig positioniert ist; die Lamellen der
Dichtung müssen sichtbar sein und er darf
sich nicht wellen (Abb. 1). Handhaben
Sie die Messerblöcke (D1), (E1), (F1)
sehr vorsichtig, da die Messerklingen
sehr scharf sind.
Der Messerblock (D1)(E1)(F1) ist
unzureichend oder schlecht auf dem
Behälter arretiert (D4)(E4)(F4).
Stellen Sie sicher, dass der Messerblock
und der Behälter fest miteinander
verbunden sind, indem Sie auf den oberen
Teil des Kopfes (D2)(Abb. 2c) oder der
Knöpfe (E2)(F2) (Abb. 5c)drücken.
Das Messer dreht
sich nicht einwandfrei.
Die Zutatenstücke sind zu groß oder zu
fest.
Reduzieren Sie die Größe oder die Menge
der zu verarbeitenden Zutaten.
Geben Sie Flüssigkeit in den Mixbehälter
ohne die maximale Füllmenge zu
überschreiten.
KR_MINI-BLENDER_PERFECT-MIX_8080012620_MISEENPAGE07/05/1315:50Page22
Page 21

Nederlands
23
BESCHRIJVING
VEILIGHEIDSVOORSCHRIFTEN :
Lees de gebruiksaanwijzing aandachtig voor het eerste gebruik: Niet-naleving ontheft de fabrikant van alle
aansprakelijkheid.
Dit apparaat mag niet gebruikt worden door personen (of kinderen) met verminderde, fysieke, zintuiglijke of mentale
capaciteiten, of personen die te weinig ervaring of kennis hebben tenzij ze onder de supervisie staan van een persoon
die voor hen verantwoordelijk is of als ze genoeg richtlijnen hebben gekregen om het apparaat correct te hanteren. Er
moet toezicht op kinderen zijn, zodat zij niet met het apparaat kunnen spelen.
Het apparaat is uitsluitend geschikt om op wisselstroom te werken. Controleer of de voedingsspanning op de
gegevensplaat van het apparaat overeenkomt met de spanning van uw elektrische installatie. Als u het apparaat niet
correct aansluit, vervalt de garantie.
Trek de stekker altijd uit het stopcontact wanneer het apparaat onbeheerd is en voorafgaand aan het in
elkaar zetten, uit elkaar halen of reinigen. Laat het apparaat niet zonder toezicht door kinderen gebruiken.
Dit apparaat is uitsluitend geschikt voor huishoudelijk gebruik binnenshuis. Het apparaat niet in de open lucht gebruiken.
De fabrikant is niet verantwoordelijk en behoudt zich het recht voor de garantie te annuleren in geval van commercieel
of oneigenlijk gebruik of niet-naleving van de instructies.
Trek nooit aan het snoer om de stekker van het apparaat uit het stopcontact te trekken.
Dit apparaat mag worden gebruikt door personen met verminderde fysieke, sensorische of mentale capaciteiten, of
waarvan de ervaring of kennis niet toereikend is, met dien verstande dat ze worden begeleid of instructies hebben
gekregen om het apparaat veilig te gebruiken en de gevaren begrijpen.
Gebruik uw apparaat niet als het niet correct werkt of als het apparaat, het netsnoer of de stekker is beschadigd. Om
gevaarlijke situaties te voorkomen, dient u het netsnoer door een erkend service center te laten vervangen (zie lijst in het
garantieboekje).
Dit apparaat dient niet door kinderen te worden gebruikt. Houd het apparaat en zijn snoer buiten bereik van kinderen.
Gebruik het apparaat niet als het snoer is beschadigd. Laat het netsnoer vervangen door de fabrikant, de servicedienst
of een persoon met een gelijkwaardige vakbekwaamheid teneinde ieder gevaar te voorkomen.
Elke handeling anders dan gewone onderhouds- of schoonmaakwerkzaamheden dient door een erkend service center
uitgevoerd te worden.
A Motorblok
B Knop 2 : hoge snelheid
C Knop 1 : lage snelheid
D Blenderkom met toebehoren
D1 Messenblok met dichtingsring
D2 Ontgrendelingsknop van het messenblok
D3 Plaatsingsgleuf
D4 Blenderkom
D5 Dichtingsring deksel
D6 Deksel
D7 Dop
E Kruidenmolen
E1 Messenblok met dichtingsring
E2 Ontgrendelingsknop van het messenblok
E3 Plaatsingsgleuf
E4 Kom
F Koffiemolen
F1 Messenblok met dichtingsring
F2 Ontgrendelingsknop van het messenblok
F3 Plaatsingsgleuf
F4 Kom
G - H Deksels voor accessoire
KR_MINI-BLENDER_PERFECT-MIX_8080012620_MISEENPAGE07/05/1315:50Page23
Page 22

Nederlands
24
Gebruik omwille van uw eigen veiligheid alleen de voor uw apparaat bedoelde accessoires en reserveonderdelen die
verkrijgbaar zijn bij een erkend servicecentrum.
Om accessoires aan te kopen moet u altijd de bijsluiter of het apparaat meebrengen
Kinderen dienen het apparaat niet als speelgoed te gebruiken.
Dompel het apparaat, het snoer of de stekker nooit in vloeistof.
Laat het netsnoer niet binnen het handbereik van kinderen hangen of in aanraking komen met of in de buurt hangen van
de warme onderdelen van het apparaat, een warmtebron of scherpe randen.
Plaats de metalen accessoires nooit in de magnetron.
Let op voor verwondingen door slecht gebruik van het apparaat.
De snijvlakken van de messen en de accessoires zijn zeer scherp, wees voorzichtig wanneer u de kommen leegt en
schoonmaakt.
Raak de bewegende onderdelen nooit aan wanneer het apparaat in werking is. Wacht tot het apparaat en de
accessoires volledig tot stilstand zijn gekomen alvorens de accessoires aan te raken of te verwijderen.
Steek nooit keukengerei (lepel, spatel, ...) in de kom (D) tijdens het gebruik.
Zorg ervoor dat er nooit lang haar, sjaals, stropdassen, etc. ... boven het apparaat of de accessoires hangen wanneer
het apparaat in werking is.
Opgelet : Gebruik of meng nooit vloeistoffen of ingrediënten die warmer zijn dan 60° C (140°F).
Als u warme ingrediënten moet mengen, houdt u uw handen op veilige afstand van het deksel (D6) en de maatbeker
(D7) om risico op brandwonden te vermijden.
De kommen niet als bakjes gebruiken om ingrediënten in te vriezen, te bereiden of te steriliseren.
Laat uw apparaat nooit langer dan 1 minuut onafgebroken draaien.
Voor uw veiligheid beantwoordt dit apparaat aan de toepasselijke normen en regelgevingen (Richtlijnen Laagspanning,
Elektromagnetische Compatibiliteit, Materialen die met voedingsmiddelen in contact komen, Milieu,...).
Zet het apparaat op een stabiel, hittebestendig, schoon en droog werkvlak.
Dit apparaat nooit gebruiken om niet-eetbare ingrediënten te mengen of mixen.
VEILIGHEIDSVERGRENDELING
n Het apparaat werkt niet als de blenderkom met toebehoren (D) of de accessoires (E) of (F) niet correct
zijn gemonteerd of niet correct zijn geplaatst op het motorblok (A).
n De onderkant van de kommen (E4) (F4) is gemarkeerd met een gekleurd streepje. De kommen moeten
op de messenblokken worden gemonteerd waarvan de ontgrendelingsknoppen (E2) of (F2) dezelfde
kleur hebben.
n De blenderkom (D4) is niet gemarkeerd met een kleur. Deze kom moet worden gemonteerd op het
messenblok met de gele ontgrendelingsknop (D2).
VOOR HET EERSTE GEBRUIK
n Maak alle accessoires (D, E, F, G, H), uitgezonderd het motorblok (A), met zeepwater schoon voor het
eerste gebruik.
n Vóór het eerste gebruik controleert u of al het verpakkingsmateriaal is verwijderd.
n Controleer of het motorblok volledig is gestopt en laat de knoppen (B) en (C) los voordat u de blender
en de toebehoren of de accessoires op het motorblok plaatst.
n Gebruik het apparaat nooit als het deksel (D6) met de dichtingsring (D5) niet correct is geplaatst op de
gemonteerde kom (D).
KR_MINI-BLENDER_PERFECT-MIX_8080012620_MISEENPAGE07/05/1315:50Page24
Page 23

Nederlands
25
GEBRUIK VAN HET APPARAAT
1 - M I X E N / M E N G E N / H OM OG E N I S E R E N (mengkom D)
De blenderkom nooit gebruiken onder de volgende omstandigheden: zonder ingrediënten, enkel met droge
of harde ingrediënten (zoals suikerklontjes...) of wanneer het deksel (D6) met de dichtingsring (D5) niet correct is geplaatst op de kom (D).
Afhankelijk van de aard van de ingrediënten kunt u met de mengkom (D) tot 0,6 L dik mengsel en tot 0,5L
vloeibare bereiding maken zoals:
Gebruik of meng nooit vloeistoffen of ingrediënten die warmer zijn dan 60° C (140° F) in de kom
(D). Het apparaat mag niet in de koelkast of in de diepvriezer worden geplaatst.
Giet eerst de vloeibare ingrediënten in de blenderkom en voeg daarna de vaste ingrediënten toe. Respecteer
altijd de maximumaanduiding. De vaste ingrediënten moeten in stukjes van 20 mm x 20 mm worden
gesneden.
U kunt de volgende gerechten maken:
- fijn gemixte soepen, crèmesoepen, smoothies, milk-shakes, cocktails.
- licht beslag (pannenkoeken, beignets, clafoutis, far, ...).
MONTAGE VAN DE ACCESSOIRES
n Controleer of de dichtingsring correct is geplaatst op het messenblok (D1). De gleuven in de
dichtingsring moeten zichtbaar zijn wanneer u de ring plaatst en de ring moet volledig plat
liggen. De ring mag niet golven (fig. 1).
n Druk op de "klik"-knop (D2) van het messenblok (D1) tegenover u. Plaats de onderkant van de kom (D4)
onder de rand (D3) (fig. 2a), duw het messenblok (D1) naar de kom (fig. 2b) en vergrendel. Druk op
het bovenste deel van de "klik"-knop (D2) om te controleren of de kom (D4) en het messenblok (D1)
goed zijn verbonden (fig. 2c).
n Doe de dichtingsring (D5) rond het deksel (D6), zet het geheel op de kom (D4) en vergrendel de dop
(D7) in de houder op het deksel. Plaats de gemonteerde kom (D) op het motorblok (A) met de "klik"knop (D2) op het messenblok op dezelfde hoogte als de inkeping aan de voorkant van het motorblok (A)
(fig. 3).
n Laat de kom (D) op het motorblok zakken (A) om het apparaat te laten werken (fig. 4).
n Steek de stekker in het stopcontact en druk op knop 1 (C) of 2 (B), afhankelijk van de gewenste snelheid
of houd de knop ingedrukt voor een continue werking. Niet langer dan 60 seconden onafgebroken laten
draaien.
n Laat de knop (B) of (C) los om het apparaat stil te zetten. Trek de stekker uit het stopcontact. Verwijder
de kom (D) van het motorblok (A).
2 - HAKKEN (mini-hakker E) of MALEN (koffiemolen F)
Gebruik de mini-hakker of de koffiemolen niet om vloeibare bereidingen te maken (fruitsappen, ...).
Het deksel (G) op de kom (E4) of (F4) voorkomt de uitdroging van de bereidingen en biedt u de mogelijkheid
om uw bereidingen in de koelkast te bewaren en later te gebruiken. Het deksel (G of H), de kom (E4) of
(F4) mogen niet in de diepvriezer worden geplaatst.
De mini-hakker (E) om in enkele seconden zachte ingrediënten te hakken zoals:
Ingrediënten Hoeveelheden Bereidingstijd
Appelsap: appels + water 300g appels 200ml water 20 seconden knop 2
Groentesoep : groenten + water 300g groenten 200ml water 20 seconden knop 2
Fruitsmoothie: fruit + melk 300g fruit 200ml melk 15 seconden knop 2
KR_MINI-BLENDER_PERFECT-MIX_8080012620_MISEENPAGE07/05/1315:50Page25
Page 24

Nederlands
26
De koffiemolen (F) om in enkele seconden harde en droge ingrediënten tot poeder te malen zoals:
We raden u af harde specerijen (kruidnagel, kaneel,...) te mixen aangezien ze de kleur van de kom kunnen
aantasten.
Het mengen van bepaalde ingrediënten zoals chocolade, parmezaanse kaas, kaneelstokjes, kruidnagel, ...
is niet aanbevolen, omdat deze het apparaat kunnen beschadigen.
MONTAGE VAN DE ACCESSOIRES
n Deze accessoires zijn voorzien van een kom die de toegang tot de messen tijdens het gebruik belet.
n Controleer of de dichtingsring correct is geplaatst op het messenblok (E1) of (F1) (fig. 1): de gleuven in
de dichtingsring moeten zichtbaar zijn wanneer u de ring plaatst en de ring moet volledig plat liggen. De
ring mag niet golven (fig. 1).
n Doe de ingrediënten in de kom (E4) of (F4). Neem het messenblok (E1) of (F1) vast met de messen naar
beneden, de "klik"-knop (E2) of (F2) tegenover u, en plaats de gleuf (E3)of (F3) in de flens van de kom
(E4) of (F4) (fig. 5a).
n Druk op de "klik"-knop (E2) of (F2), breng de kom (E4) of (F4) naar het messenblok (E1) of (F1) (fig. 5b)
en druk op het bovenste deel van de "klik"-knop (E2) of (F2) om het blok op de kom vast te maken.
Controleer of de kom (E4) of (F4) en het messenblok (E1) of (F1) goed zijn verbonden (fig. 5c).
n Draai het accessoire om, plaats het gemonteerde accessoire (E) of (F) op het motorblok (A) door de
"klik"-knop (E2) of (F2) op dezelfde hoogte als de inkeping aan de voorkant van het motorblok (A) te
brengen. Laat de accessoires (E) of (F) volledig op het motorblok (A) zakken om het apparaat te laten
werken (fig. 6).
n Steek de stekker van het apparaat in het stopcontact. Druk met uw hand op de kom (E4) of (F4) tijdens het
gebruik en druk op de knop (B) of (C) om het apparaat met impulsen of continu te laten werken (fig. 7).
n Laat de knop (B) of (C) los om het apparaat stil te zetten. Trek de stekker uit het stopcontact.
n Verwijder het accessoire (E) of (F) van het motorblok (A), draai het accessoire om op het werkblad en
ontgrendel het messenblok (E1) of (F1) door op de "klik"-knop (E2) of (F2) te drukken. U kunt nu uw
bereiding uit het apparaat halen.
Ingrediënten Hoeveelheden (max.) Bereidingstijd
Gedroogde abrikozen 40g 4 seconden knop 2 ingedrukt
Paneermeel 1 beschuit
10 impulsen knop 2 en
15sec knop 2 ingedrukt
Uien/sjalotten/knoflook 30g 10 impulsen knop 1
Knoflook 40g 10 impulsen knop 1
Ham
20g (1/2 plakje, opgerold en in 4
gesneden)
5 impulsen knop 1
In blokjes van max. 1 cm
gesneden, ontnerfd vlees
40g 10 impulsen knop 1
Peterselie 5g 10 impulsen knop 1
Ingrediënten Hoeveelheden (max.) Bereidingstijd
Hazelnoten/gepelde amandelen 70g 10 seconden knop 2
Noten 20g 10 seconden knop 2
Korianderzaad, peper 40g 45 seconden knop 2
Koffie 50g 45 seconden knop 2
KR_MINI-BLENDER_PERFECT-MIX_8080012620_MISEENPAGE07/05/1315:50Page26
Page 25

Nederlands
27
HET APPARAAT SCHOONMAKEN
n Trek de stekker uit het stopcontact en verwijder de kom of de accessoires.
n De snijvlakken van de messen en de accessoires zijn zeer scherp, wees voorzichtig.
n Druk op de "klik"-knop (D2) om het messenblok (D1) van de kom (D4) los te maken en het schoonmaken
te vergemakkelijken.
n Spoel de kommen en het deksel na gebruik onmiddellijk af onder stromend water. Spoel de afneembare
onderdelen af met warm zeepwater.
n De kom (D) en de accessoires (E en F) kunnen in de vaatwasmachine gereinigd worden, in de bovenste
korf op het programma "ECO" of "LICHT VUIL".
n Gebruik een vochtige doek om het motorblok (A) schoon te maken en droog het blok zorgvuldig af. Houd
het motorblok (A) nooit onder stromend water.
UW APPARAAT WERKT NIET. WAT NU?
Problemen Oorzaken Oplossingen
Het apparaat
werkt niet.
De stekker zit niet in het stopcontact. Steek de stekker van het apparaat in
een stopcontact met dezelfde spanning.
De kom (D) of de accessoires (E) en
(F) zijn niet correct gemonteerd of zijn
niet correct geplaatst op het motorblok
(A).
Controleer of de kom of de accessoires
goed zijn gemonteerd; demonteer de
onderdelen, begin opnieuw (Fig. 2.a,
2.b en 2.c) en controleer of de
onderdelen correct op het motorblok
zijn geplaatst.
Druk op het deksel van de accessoires
(E of F) tijdens het gebruik.
Overmatige
trillingen.
Het product staat niet op een vlak
werkblad.
Zet het apparaat op een vlak werkblad.
De hoeveelheid ingrediënten is te groot. Verminder de hoeveelheid ingrediënten.
De accessoires zijn niet correct
gemonteerd.
Controleer of de kommen (E4) (F4)
goed zijn gemonteerd met de
overeenkomstige messenblokken (E2)
(F2), de gekleurde streepjes moeten
overeenkomen.
Het deksel lekt.
De hoeveelheid ingrediënten is te groot. Verminder de hoeveelheid ingrediënten.
Het deksel is niet goed gesloten. Controleer de dichtingsring (D5) van
het deksel (D6). Plaats het deksel (D6)
correct op de kom (D). Vergrendel de
dop (D7).
KR_MINI-BLENDER_PERFECT-MIX_8080012620_MISEENPAGE07/05/1315:50Page27
Page 26

Nederlands
28
Problemen Oorzaken Oplossingen
De onderkant van
de kom of de accessoires lekt.
De dichtingsring ontbreekt of is
niet correct geplaatst op het
messenblok (D1)(E1)(F1).
Zorg ervoor dat de dichtingsring correct is
geplaatst, de gleuven in de dichtingsring
moeten zichtbaar zijn en de ring mag niet
golven (fig. 1). Ga voorzichtig met de
messenblokken om (D1), (E1), (F1) want
de snijvlakken van de messen zijn
bijzonder scherp.
het messenblok (D1)(E1)(F1) is
niet voldoende of slecht
vergrendeld op de kom
(D4)(E4)(F4).
Druk op het bovenste deel van de knop
(D2)(fig. 2c) of op de knoppen (E2)(F2) om
te controleren of het messenblok en de kom
goed zijn verbonden (fig. 5c).
Het mes draait
niet goed.
De ingrediënten zijn te hard of de
stukken te groot.
Verminder de hoeveelheden of de grootte van
de stukken.
Giet vloeistof in de kom.
Respecteer de maximumaanduiding tijdens het
mixen.
Uw apparaat werkt nog steeds niet?
Neem contact op met de klantendienst (zie gegevens in het garantieboekje).
AFVALVERWERKING
Elektrisch of elektronisch product aan het eind van de levenscyclus :
Uw apparaat werd ontworpen om gedurende vele jaren dienst te doen. Wanneer u echter op een dag besluit
het te vervangen, werp het dan niet met het huisvuil weg maar breng het naar het hiervoor door de gemeente
ingerichte verzamelpunt (of een milieustraat indien van toepassing).
Bescherm het milieu!
Uw apparaat bevat verschillende, voor terugwinning of recycling geschikte materialen.
Breng het toestel naar een afvalinzamelpunt of naar een erkend service center voor een
correcte verwerking.
Vernietiging van de verpakking en het apparaat.
De verpakking bestaat voor 100% uit milieuvriendelijk materiaal dat in overeenstemming met
de bepalingen omtrent afvalverwerking kan worden vernietigd.
Breng het apparaat naar een gemeentelijk afvalinzamelpunt.
KR_MINI-BLENDER_PERFECT-MIX_8080012620_MISEENPAGE07/05/1315:50Page28
Page 27

Français
29
DESCRIPCIÓN
CONSEJOS DE SEGURIDAD:
Lea atentamente el manual de uso antes de utilizar el aparato por primera vez; un uso no conforme con las instrucciones
de uso eximiría al fabricante de cualquier responsabilidad.
Este aparato no está diseñado para ser utilizado por personas (incluidos los niños) cuyas capacidades físicas,
sensoriales o mentales sean reducidas, o por personas con falta de experiencia o de conocimientos, salvo si éstas
están supervisadas por una persona responsable de su seguridad o esta última les ha facilitado instrucciones relativas
al uso del aparato. Se recomienda vigilar a los niños para asegurarse de que no juegan con el aparato.
Este aparato está diseñado para funcionar únicamente con corriente alterna. Asegúrese de que la tensión de
alimentación del aparato se corresponde efectivamente con la de la instalación eléctrica, pues cualquier error de conexión
anularía la garantía.
Desconecte siempre el aparato si va a dejarlo sin vigilancia, antes de acoplar y retirar los accesorios y antes de
limpiarlo. No permita que los niños jueguen con el aparato.
Este aparato está diseñado exclusivamente para un uso doméstico en el interior de su hogar. No utilice el aparato al
aire libre. El fabricante declina cualquier responsabilidad y se reserva el derecho a rescindir la garantía en caso de un
uso comercial o inadaptado, o de no respetar las instrucciones de uso.
No desenchufe nunca el aparato tirando del cable.
Este aparato no está diseñado para que lo utilicen personas con alguna discapacidad física, sensorial o mental, o
con falta de experiencia o conocimientos, a no ser que alguien responsable de su seguridad las supervise o las haya
instruido previamente sobre el uso del aparato con toda seguridad y comprendan todos los posibles peligros.
No utilice el aparato si este no funciona correctamente, si está dañado o si el cable de alimentación o la toma están
dañados.
Para evitar cualquier peligro, llévelos a cambiar a un centro de servicio autorizado (consulte la lista en el
cuaderno de garantía).
Este aparato no debe ser utilizado por niños. Mantenga el aparato y su cable fuera del alcance de los niños.
En caso de que el cable de alimentación esté dañado no utilice el aparato. Deberá ser cambiado por el fabricante, un
servicio postventa autorizado o por personas con una cualificación similar con el fin de evitar cualquier peligro.
Cualquier intervención por parte del cliente diferente de la limpieza y el mantenimiento deberá llevarse a cabo en un
centro de servicio autorizado.
Para su seguridad, utilice únicamente accesorios y piezas de recambio adecuadas para el aparato, vendidas en los
centros de servicio oficiales.
A Bloque motor
B Botón 2: velocidad rápida
C Botón 1: velocidad lenta
D Conjunto del vaso de la licuadora
D1 Bloque de cuchillas con junta
D2 Botón de desbloqueo del bloque de cuchillas
D3 Mecanismo de encaje
D4 Vaso de la licuadora
D5 Junta de la tapa
D6 Tapa
D7 Tapón
E Molinillo para finas hierbas
E1 Bloque de cuchillas con junta
E2 Botón de desbloqueo del bloque de cuchillas
E3 Mecanismo de encaje
E4 Vaso
F Molinillo de café
F1 Bloque de cuchillas con junta
F2 Botón de desbloqueo del bloque de cuchillas
F3 Mecanismo de encaje
F4 Vaso
G - H Tapas para accesorio
Español
KR_MINI-BLENDER_PERFECT-MIX_8080012620_MISEENPAGE07/05/1315:50Page29
Page 28

Español
30
No se le podrá vender ningún accesorio sin que presente el manual de uso de su aparato o el propio aparato.
Los niños no deben utilizar este aparato como si fuera un juguete.
No sumerja el aparato, el cable de alimentación o la toma en líquido.
No deje el cable de alimentación colgando al alcance de los niños, ni cerca o en contacto con las partes calientes del
aparato, junto a una fuente de calor o sobre un ángulo vivo.
No introduzca accesorios con piezas metálicas en el microondas.
Existe el riesgo de una lesión por el uso indebido del aparato.
Las hojas de las cuchillas y de los accesorios son cortantes; manéjelas con precaución mientras vacíe los recipientes
y durante la limpieza.
No toque nunca las piezas en movimiento cuando el aparato esté en funcionamiento; espere a que el aparato y sus
accesorios se detengan por completo para intervenir o retirar los accesorios.
No introduzca jamás utensilios de cocina (cucharas, espátulas, etc.) en el vaso (D) mientras el aparato esté en
funcionamiento.
No permita que haya cabello largo, bufandas, corbatas, etc. que queden colgando por encima del aparato o del
accesorio que esté en funcionamiento.
Atención: No vierta ni mezcle nunca líquidos o ingredientes cuya temperatura exceda los 60° C (140°F).
Si tiene que mezclar ingredientes calientes, mantenga las manos a distancia de la tapa (D6) y del dosificador (D7)
para evitar cualquier riesgo de quemadura.
No utilice los vasos como recipientes (para congelación, cocción o esterilización).
No utilice el aparato durante más de 1 minuto en marcha continua.
Por su seguridad, este aparato cumple las normas y reglamentaciones aplicables (Directivas de Baja Tensión,
Compatibilidad Electromagnética, Materiales en contacto con los alimentos, Medio Ambiente,...).
Coloque el aparato sobre una superficie de trabajo estable, resistente al calor, limpia y seca.
No utilice nunca este aparato para mezclar o batir ingredientes no alimentarios.
BLOQUEO DE SEGURIDAD
n El aparato no puede funcionar si el conjunto del vaso de la licuadora (D) o los accesorios (E) o (F) no
están correctamente montados y debidamente colocados sobre el bloque motor (A).
n Los vasos (E4) (F4) llevan una marca de color en su base, y han de montarse con los bloques de cuchillas
cuyos botones de desbloqueo (E2) (F2) tienen el mismo color.
n El vaso de la licuadora (D4) no lleva ninguna marca de color, y tiene que montarse con el bloque de
cuchillas que lleva un botón de desbloqueo (D2) amarillo.
ANTES DEL PRIMER USO
n Antes de utilizar el aparato por primera vez, lave todos los accesorios (D, E, F, G, H) con agua caliente
jabonosa, salvo el bloque motor (A).
n Asegúrese de haber retirado todo el embalaje antes de poner en funcionamiento el aparato.
n Asegúrese de que el bloque motor se haya detenido por completo y que los botones (B) y (C) no estén
pulsados antes de colocar el conjunto de la licuadora o los accesorios sobre el bloque motor.
n No ponga en marcha el aparato si la tapa montada (D6) con la junta (D5) no está colocada sobre el vaso
montado (D).
KR_MINI-BLENDER_PERFECT-MIX_8080012620_MISEENPAGE07/05/1315:50Page30
Page 29

Français
31
USO DEL APARATO
1 - BATIDORA / MEZCLAD ORA / HOMOG ENEI ZADORA (recipiente
batidor D)
No ponga en funcionamiento el vaso de la licuadora sin utilizar ingredientes, con productos secos o duros
únicamente (como terrones de azúcar, etc.) o si la tapa (D6) con su junta correspondiente (D5) no está colocada sobre el vaso (D).
Según las características de los alimentos, el recipiente batidor (D) le permite preparar hasta 0.6 l de mezclas espesas y 0,25 l de preparados líquidos, como por ejemplo:
No introduzca líquidos o ingredientes cuya temperatura sea superior a 60° C (140°F) en el vaso
mezclador. Nunca se lo debe poner en el refrigerador ni en el congelador.
Vierta siempre los ingredientes líquidos en primer lugar dentro del vaso de la licuadora antes de añadir los
ingredientes sólidos, sin sobrepasar el nivel máximo indicado. Los ingredientes deben estar pelados y
cortados de 20 mm x 20 mm.
Puede preparar:
- sopas batidas muy finas, cremas ricas, compotas, batidos y cócteles.
- pastas ligeras (crêpes, buñuelos, clafoutis (pastel de cerezas), far (tarta de ciruelas), etc.)
MONTAJE DE LOS ACCESORIOS:
n Asegúrese de que la junta está y que está bien colocada sobre el bloque de cuchillas (D1):
los pliegues de la junta han de quedar visibles cuando esta esté en su lugar y debe quedar
bien plana, no debe doblarse (fig. 1).
n Oprima el botón “clic” (D2) del bloque de hojas (D1) frente a usted. Ubique la base del recipiente (D4)
bajo el mecanismo de encaje (D3) (fig. 2a) luego vuelva a colocar el bloque de las hojas (D1) en el
recipiente (fig. 2b) hasta el cierre. Pulse la parte superior del botón "clic" (D2) para asegurarse de que
el vaso (D4) y el bloque de cuchillas (D1) encajan correctamente (fig. 2c).
n Coloque el vaso montado (D) sobre el bloque motor (A) con el botón clic (D2) del bloque de cuchillas
alineado con la muesca situada en la parte delantera del bloque motor (A) (fig. 3).
n El vaso (D) ha de haber bajado lo suficiente sobre el bloque motor (A), pues de lo contrario el aparato
no funcionará (fig. 4).
n Enchufe el aparato y pulse el botón 1 (C) o 2 (B), en función de la velocidad deseada, por impulsos o
manteniendo pulsado el botón para que el aparato funcione de forma continuada. El aparato no puede
funcionar de forma continuada durante más de 60 segundos.
n Para detener el aparato, deje de pulsar el botón (B) o (C). Desenchufe el aparato. Retire el vaso (D) del
bloque motor (A).
2 - PICADORA (mini picadora E) o MOLEDORA (molinillo de café F)
No utilice la mini picadora ni el molinillo de café para preparados líquidos (zumos de frutas, etc.). La tapa
(G), que debe colocarse sobre el vaso (E4) o (F4), evita que se sequen los preparados y permite
conservarlos en la nevera para una próxima utilización. La tapa (G o H) y el recipiente (E4) o (F4) no deben
ser puestos en el congelador.
La mini picadora (E) le permite picar, en apenas segundos, ingredientes como los que se describen a
continuación:
Ingredientes Cantidades Tiempo de operación
Zumos de manzanas: manzanas +
agua
300 g de manzanas 200 ml de
agua
20 segundos botón 2
Sopa de verduras: verduras + agua
300 g de verduras 200 ml de
agua
20 segundos botón 2
Compota de fruta: frutas + leche 300 g de frutas 200 ml de leche 15 segundos botón 2
Español
KR_MINI-BLENDER_PERFECT-MIX_8080012620_MISEENPAGE07/05/1315:50Page31
Page 30

Español
32
El molinillo de café (F) le permite reducir a polvo, en apenas segundos, los ingredientes duros y secos
como los siguientes:
No es aconsejable mezclar determinadas especies muy duras (como clavo o canela), pues pueden alterar
el color del vaso.
No se aconseja la mezcla de algunos ingredientes como el chocolate, el queso parmesano, las ramas de
canela, los clavos porque pueden dañar al aparato.
MONTAJE DE LOS ACCESORIOS:
n Estos accesorios van equipados con un vaso que impide acceder a las cuchillas mientras el aparato está
en funcionamiento.
n Asegúrese de que la junta está y está bien colocada sobre el bloque de las cuchillas (E1) o (F1) (fig. 1),
los pliegues de la junta han de quedar visibles cuando esta esté en su lugar y debe quedar bien plana,
no debe doblarse (fig. 1).
n Introduzca los ingredientes en el vaso (E4) o (F4). Coloque el bloque de las cuchillas (E1) o (F1), con
las cuchillas orientadas hacia abajo y el botón "clic" (E2) o (F2) hacia usted y emplace el mecanismo de
encaje (E3) o (F3) en el cuello del vaso (E4) o (F4) (fig. 5a).
n Pulse el botón "clic" (E2) o (F2), desplace el vaso (E4) o (F4) hasta el bloque de cuchillas (E1) o (F1)
(fig. 5b) y encájelo en el vaso presionando sobre la parte superior del botón "clic" (E2) o (F2). Asegúrese
de que el vaso (E4) o (F4) y el bloque de cuchillas (E1) o (F1) encajen bien (fig. 5c).
n Gire el accesorio y coloque el accesorio montado (E) o (F) sobre el bloque motor (A) alineando el botón
clic (E2) o (F2) con la muesca en la parte delantera del bloque motor (A); los accesorios (E) o (F) han
de haberse bajado al máximo sobre el bloque motor (A), pues en caso contrario el aparato no funcionará
(fig. 6).
n Enchufe el aparato. Sujete el vaso con la mano (E4) o (F4) mientras esté en funcionamiento el aparato y
pulse el botón (B) o (C) por impulsos o de forma continuada (fig. 7).
n Para detener el aparato, deje de pulsar el botón (B) o (C). Desenchufe el aparato.
n Retire el accesorio (E) o (F) del bloque motor (A), dele la vuelta al accesorio sobre la superficie de trabajo
y desbloquee el bloque de las cuchillas (E1) o (F1) pulsando el botón "clic" (E2) o (F2). Entonces podrá
recuperar su preparado.
Ingredientes Cantidad (máx.) Tiempo de operación
Albaricoques secos 40 g
4 s manteniendo pulsado el
botón 2
Pan rallado 1 biscote
Pulsar 10 veces el botón 2
y mantener pulsado el botón 2
durante 15 s
Cebollas, chalotes, ajo 30 g 10 pulsos, botón 1
Ajo 40 g 10 pulsos, botón 1
Jamón 20 g (1/2 lonja arrollada cortada en 4) 5 pulsos, botón 1
Carne desnervada y cortada
en cubos de 1 cm, máximo
40 g 10 pulsos, botón 1
Perejil 5 g 10 pulsos, botón 1
Ingredientes Cantidad (máx.) Tiempo de operación
Nueces, avellanas peladas 70 g 10 segundos botón 2
Nuez 20 g 10 pulsos, botón 2
Granos de cilantro, pimienta 40 g 45 segundos botón 2
Café 50 g 45 segundos botón 2
KR_MINI-BLENDER_PERFECT-MIX_8080012620_MISEENPAGE07/05/1315:50Page32
Page 31

Français
33
LIMPIEZA DEL APARATO
n Desconecte el aparato y retire el vaso o los accesorios.
n Las hojas de las cuchillas y de los accesorios son muy cortantes, manipúlelas con precaución.
n Para facilitar la limpieza del bloque de las cuchillas (D1) se separan del vaso (D4) pulsando los botones
clic (D2).
n Después de utilizarlos, enjuague inmediatamente con agua corriente los vasos y las tapas, así como los
elementos extraíbles, que debe lavar con agua jabonosa.
n El vaso (D) y los accesorios (E) y (F) pueden limpiarse en el lavavajillas en la cesta superior con el
programa "ECO" o "POCA SUCIEDAD".
n Para limpiar el bloque motor (A) utilice el paño húmedo y séquelo con cuidado. No coloque nunca el
bloque motor (A) bajo el agua corriente.
¿QUÉ HACER SI SU APARATO NO FUNCIONA?
Español
Problemas Causas Soluciones
El producto no
funciona.
El enchufe no está conectado a la toma. Conecte el aparato a una toma de la
misma tensión.
El vaso (D) o los accesorios (E) y (F)
no están bien montados o colocados
sobre el bloque motor (A).
Compruebe que el vaso o los
accesorios están bien montados;
desmonte y proceda nuevamente al
montaje (fig. 2.a, 2.b y 2.c) y
compruebe que han descendido lo
suficiente sobre el bloque motor.
Apriete la tapa de los accesorios (E) o
(F) mientras el aparato esté en
funcionamiento.
Excesivas
vibraciones.
El producto no está colocado sobre una
superficie plana.
Coloque el producto sobre una
superficie plana.
El volumen de ingredientes es excesivo. Reduzca la cantidad de ingredientes
tratados.
Error en el montaje de los accesorios. Comprueba que los vasos (E4) (F4)
están bien montados con los bloques
de las cuchillas (E2) (F2) que les
corresponden (las marcas de colores
han de coincidir).
Se pierde
producto por la
tapa.
El volumen de ingredientes es excesivo. Reduzca la cantidad de ingredientes
tratados.
La tapa no es estanca. Compruebe que la junta está (D5)
sobre la tapa (D6). Coloque
correctamente la tapa (D6) sobre el
vaso (D). Bloquee el tapón (D7).
KR_MINI-BLENDER_PERFECT-MIX_8080012620_MISEENPAGE07/05/1315:50Page33
Page 32

Español
34
¿Su aparato sigue sin funcionar?
Póngase en contacto con el servicio al consumidor (consulte los datos en el cuaderno de garantía).
RECICLAJE
Fin de la vida útil de un producto eléctrico o electrónico:
Su aparato está diseñado para funcionar durante muchos años. Sin embargo, el día en el que lo vaya a sustituir, no lo tire a la basura o a un vertedero, llévelos al punto de recogida dispuesto a tal efecto en su comunidad (o a un centro de tratamiento de residuos, llegado el caso).
¡Colaboremos con la protección del medio ambiente!
Su aparato contiene un gran número de materiales aprovechables o reciclables.
Lleve el aparato a un punto de recogida o deséchelo en un Centro de Servicio Autorizado
para su procesamiento.
Eliminación de los materiales de embalaje y del aparato.
El embalaje incluye únicamente materiales sin riesgo para el medio ambiente, que se pueden
desechar de conformidad con las disposiciones de reciclaje vigentes.
Para desechar el aparato, infórmese en el servicio técnico autorizado de su comunidad.
Problemas Causas Soluciones
Se pierde pro-
ducto por debajo
del vaso o de los
accesorios.
La junta no está o está mal colocada
sobre el bloque de cuchillas (D1) (E1)
(F1).
Asegúrese de que la junta esté bien
colocada, los bordes de la junta han de
estar visibles y no debe doblarse (fig. 1).
Manipule los bloques de cuchillas
(D1), (E1), (F1) con precaución
porque los filos son cortantes.
El bloque de las cuchillas (D1)(E1)(F1)
no está lo bastante bloqueado o está
mal bloqueado sobre el vaso
(D4)(E4)(F4).
Asegúrese de que el bloque de
cuchillas y el vaso están bien encajados
pulsando la parte superior del botón
(D2) (fig. 2c) o los botones (E2)(F2)
(fig. 5c)
La cuchilla no gira
con facilidad
Los trozos de alimentos son demasiado
gruesos o duros
Reducir el tamaño o la cantidad de
ingredientes tratados.
Añada líquido en el vaso mezclador sin
superar el nivel máximo.
KR_MINI-BLENDER_PERFECT-MIX_8080012620_MISEENPAGE07/05/1315:50Page34
Page 33

Italiano
35
DESCRIZIONE
NORME DI SICUREZZA:
Leggere attentamente il manuale d’istruzioni prima del primo utilizzo dell’apparecchio. Un utilizzo non conforme alle
istruzioni libera il produttore da ogni responsabilità.
Questo prodotto non deve essere utilizzato da adulti o bambini affetti da disabilità fisiche, sensoriali o mentali, né da
persone che non hanno alcuna esperienza o conoscenza dell’apparecchio, a meno che non siano sorvegliati o siano
stati istruiti sul suo uso da una persona responsabile della loro sicurezza. Si consiglia di sorvegliare i bambini per
assicurarsi che non giochino con l’apparecchio.
L'apparecchio è progettato per funzionare esclusivamente a corrente alternata. Verificare che la tensione della rete
elettrica corrisponda a quella riportata sulla targa dell’apparecchio; in caso di collegamento errato la garanzia sarà annullata.
Scollegare sempre l'apparecchio dall'alimentazione se incustodito e prima di qualsiasi operazione di montaggio,
smontaggio o pulizia. Non lasciare che i bambini utilizzino l'apparecchio senza sorveglianza.
Questo apparecchio è destinato al solo uso domestico e in interni. Non utilizzare l’apparecchio all’aria aperta. Il produttore
declina ogni responsabilità e si riserva il diritto di invalidare la garanzia in caso di utilizzo commerciale o inappropriato o
del mancato rispetto delle istruzioni.
Non tirare il cavo di alimentazione per scollegare l’apparecchio dalla presa di corrente.
Questo apparecchio non è destinato all'uso da parte di persone (bambini inclusi) le cui abilità fisiche, sensoriali o mentali
risultino ridotte o che siano prive dell'esperienza e delle conoscenze necessarie, fatto salvo il caso in cui una persona
responsabile della loro sicurezza provveda alla loro sorveglianza o le abbia precedentemente istruite sulle modalità d'uso
dell'apparecchio.
Non utilizzare l’apparecchio se non funziona correttamente, se ha subito danni o se il cavo di alimentazione o la spina
sono danneggiati.
Per evitare ogni rischio, il cavo di alimentazione deve essere sostituito da un centro di assistenza
autorizzato (vedere l’elenco nel libretto di garanzia).
Questo apparecchio non deve essere utilizzato dai bambini. Tenere l'apparecchio lontano dalla portata dei bambini.
Se il cavo di alimentazione è danneggiato, non utilizzare l'apparecchio. Fare sostituire il cavo di alimentazione dal
produttore, dal suo servizio post-vendita o da personale qualificato per evitare qualsiasi pericolo.
Tutti gli interventi, ad eccezione delle operazioni di pulizia e manutenzione ordinaria, devono essere effettuati da un
centro di assistenza autorizzato.
Al fine di garantire la sicurezza, utilizzare esclusivamente accessori e ricambi adatti all'apparecchio, venduti presso centri
assistenza autorizzati.
A Blocco motore
B Pulsante 2: velocità massima
C Pulsante 1: velocità minima
D Gruppo recipiente miscelatore
D1 Gruppo lame con guarnizione
D2 Pulsante di sblocco del gruppo lame
D3 Linguetta a incastro
D4 Recipiente miscelatore
D5 Guarnizione del coperchio
D6 Coperchio
D7 Tappo del dosatore
E Trita erbe aromatiche
E1 Gruppo lame con guarnizione
E2 Pulsante di sblocco del gruppo lame
E3 Linguetta a incastro
E4 Recipiente
F Macina-caffè
F1 Gruppo lame con guarnizione
F2 Pulsante di sblocco del gruppo lame
F3 Linguetta a incastro
F4 Recipiente
G - H Coperchi accessorio
KR_MINI-BLENDER_PERFECT-MIX_8080012620_MISEENPAGE07/05/1315:50Page35
Page 34

Italiano
36
Gli accessori possono essere venduti esclusivamente dietro presentazione del manuale o dell’apparecchio.
Ibambini non devono giocare con l'apparecchio.
Non immergere l’apparecchio, il cavo di alimentazione o la spina in liquidi.
Non tenere il cavo a portata dei bambini, in prossimità o in contatto con le parti calde dell’apparecchio, vicino a una
fonte di calore o su un angolo appuntito.
Non riscaldare a microonde gli accessori contenenti metallo.
Prestare attenzione al rischio di lesioni causate dall'uso improprio dell'apparecchio.
Le lame sono molto taglienti: maneggiarle con cautela durante lo svuotamento e la pulizia dell'apparecchio.
Non toccare le parti in movimento quando l’apparecchio è in uso; attendere l’arresto completo dell’apparecchio e degli
accessori prima di intervenire o rimuovere gli accessori.
Non introdurre utensili da cucina (cucchiai, spatole ecc.) nel recipiente (D) quando è in uso.
Non far pendere capelli lunghi, sciarpe, cravatte ecc. al di sopra dell’apparecchio o degli accessori quando in uso.
Attenzione: non versare e non miscelare liquidi o ingredienti la cui temperatura è superiore a 60°C (140°F).
Se si miscelano ingredienti caldi, tenere le mani lontane dal coperchio (D6) e del dosatore (D7) per evitare il rischio di
ustioni.
Non utilizzare i recipienti come contenitori (per scongelamento, cottura, sterilizzazione).
Non utilizzare l’apparecchio continuativamente per più di 1 minuto.
Per motivi di sicurezza questo apparecchio è conforme alle leggi e alle normative applicabili (Direttiva Bassa tensione,
Direttiva Compatibilità elettromagnetica, Direttiva Materiali a contatto con prodotti alimentari, Direttiva Ambiente,...).
Installare l’apparecchio su un piano di lavoro stabile, resistente al calore, pulito e asciutto.
Non utilizzare questo apparecchio per miscelare o tritare prodotti non alimentari.
BLOCCO DI SICUREZZA
n L'apparecchio non può funzionare se il gruppo recipiente miscelatore (D) o gli accessori (E) o (F) non
sono installati e posizionati correttamente sul blocco motore (A).
n I recipienti (E4) (F4) sono contrassegnati alla base da una linea colorata: devono essere assemblati
insieme ai gruppi lame i cui pulsanti di sblocco (E2) (F2) hanno lo stesso colore.
n Il recipiente miscelatore (D4) non è contrassegnato da alcun colore: deve essere assemblato insieme al
gruppo lame con il pulsante di sblocco (D2) giallo.
PRIMA DEL PRIMO UTILIZZO
n Prima del primo utilizzo pulire tutti gli accessori (D, E, F, G, H), ad eccezione del blocco motore, con
acqua insaponata.
n Assicurarsi di aver rimosso tutti i materiali d’imballaggio prima di mettere in funzione l’apparecchio.
n Prima di installare il gruppo recipiente miscelatore o gli accessori sul blocco motore, assicurarsi che il
blocco motore sia completamente fermo e che i pulsanti (B) e (C) non siano premuti.
n Non mettere in funzione l’apparecchio se il coperchio (D6) con la guarnizione (D5) non sono posizionati
sul gruppo recipiente miscelatore assemblato (D).
UTILIZZO DELL’APPARECCHIO
1 - F R ULLAR E / M IS C E LARE / OMOG E NE IZ Z AR E (recipiente
miscelatore D)
Non mettere in funzione il recipiente miscelatore senza ingredienti, con prodotti esclusivamente secchi o
duri (ad esempio zucchero in zollette) o se il coperchio (D6) e la guarnizione (D5) non sono installati sul recipiente (D). A seconda del tipo di ingredienti, il recipiente miscelatore (D) permette di preparare fino a 0,6L
di passato spesso e 0,5L di passato più liquido, come ad esempio:
KR_MINI-BLENDER_PERFECT-MIX_8080012620_MISEENPAGE07/05/1315:50Page36
Page 35
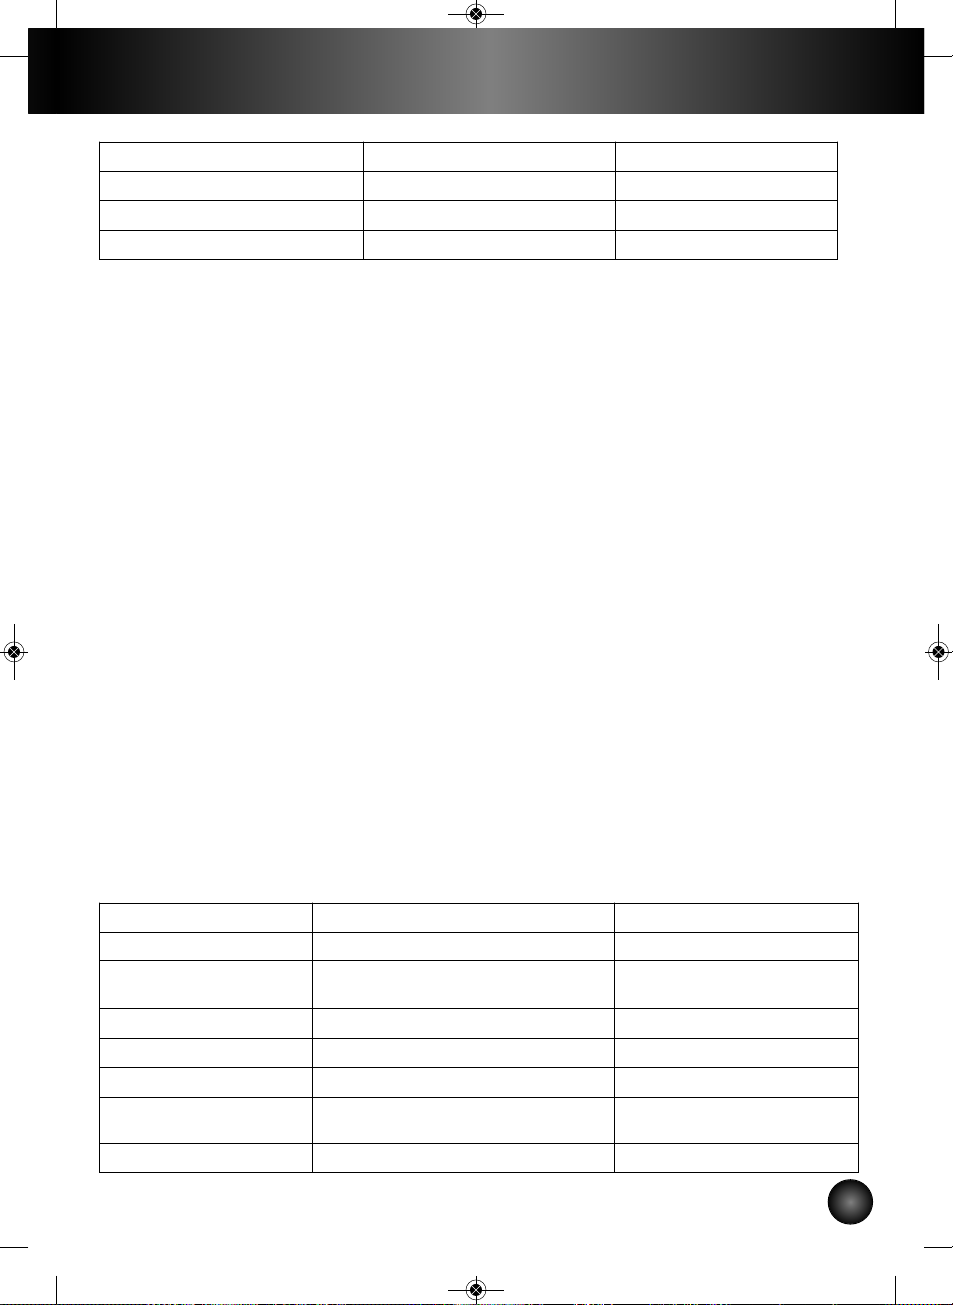
Italiano
37
Non versare e non miscelare liquidi o ingredienti la cui temperatura è superiore a 60°C (140°F).
Non collocare l'apparecchio in frigorifero né in congelatore.
Versare nel recipiente miscelatore gli ingredienti liquidi e solo successivamente gli ingredienti solidi, senza
oltrepassare il livello massimo indicato. Gli ingredienti solidi devono essere tagliati in pezzi di circa 20 mm x
20 mm.
E possibile preparare:
- minestroni passati, cremose vellutate, frullati, milkshake, cocktail.
- paste leggere (crêpes, bigné, clafoutis …).
MONTAGGIO DEGLI ACCESSORI
n Assicurarsi che la guarnizione sia presente e installata correttamente sul gruppo lame (D1):
le scanalature della guarnizione devono essere visibili quando in posizione e la guarnizione
non deve essere incurvata (fig. 1).
n Premere il pulsante "clic" (D2) del gruppo lame (D1) posizionato frontalmente sull'apparecchio.
Posizionare la base del recipiente (D4) sotto la linguetta (D3) (fig. 2a) poi spostare il gruppo lame (D1)
verso il recipiente (fig. 2b) fino al blocco. Premere la parte superiore del pulsante di sblocco (D2) per
assicurarsi che Il recipiente (D4) e il gruppo lame (D1) siano correttamente assemblati (fig. 2c).
n Collocare la guarnizione del coperchio (D5) intorno al coperchio (D6) e posizionare l’insieme sul recipiente
(D4). Installare il tappo del dosatore (D7) nel suo alloggio, situato sopra il coperchio. Installare il recipiente
miscelatore assemblato (D) sul blocco motore (A) allineando il pulsante di sblocco (D2) con la rientranza
situata sulla parte frontale del blocco motore (A) (fig. 3).
n Il recipiente (D) deve essere completamente inserito nel blocco motore (A), altrimenti l’apparecchio non
funzionerà (fig. 4).
n Collegare l’apparecchio alla presa di corrente e premere il pulsante 1 (C) o 2 (B) a seconda della velocità
desiderata, a impulsi o tenendoli premuti per un funzionamento continuato. Non mantenere in funzione
l’apparecchio per più di 60 secondi continuativi.
n Per spegnere l’apparecchio rilasciare il pulsante (B) o (C). Scollegare l’apparecchio dalla presa di
corrente. Rimuovere il recipiente miscelatore (D) dal blocco motore (A).
2 - TR ITARE (mini tritatutto E) o MACI NARE (macina-caffè F)
Non utilizzare il mini tritatutto o il macina-caffè per preparazioni liquide (succhi di frutta, …). Il coperchio (G)
da posizionare sul recipiente (E4) o (F4) evita che le preparazioni si secchino e permette di conservarle in
frigorifero per un utilizzo successivo. Il coperchio (G o H) e il recipiente (E4) o (F4) non devono essere
collocati in congelatore.
Il mini tritatutto (E) permette di tritare in pochi secondi ingredienti morbidi come:
Ingredienti Quantità Durata di funzionamento
Succo di mela: mele + acqua 300g mele 200ml d'acqua 20 secondi pulsante 2
Passato di verdura: verdura + acqua 300g di verdura 200ml d'acqua 20 secondi pulsante 2
Frullato di frutta: frutta + latte 300g di frutta 200ml di latte 15 secondi pulsante 2
Ingredienti Quantità (max) Durata di funzionamento
Albicocche essicate 40g 4sec pulsante 2
Pan grattato 1 fetta biscottata
10 impulsi pulsante 2 e
15sec pulsante 2
Cipolla/scalogno 30g 10 impulsi pulsante 1
Aglio 40g 10 impulsi pulsante 1
Prosciutto 20g (1/2 trancio arrotolato tagliato in 4) 5 impulsi pulsante 1
Carne senza nervi e tagliata
in pezzetti di 1 cm max
40g 10 impulsi pulsante 1
Prezzemolo 5g 10 impulsi pulsante 1
KR_MINI-BLENDER_PERFECT-MIX_8080012620_MISEENPAGE07/05/1315:50Page37
Page 36

Italiano
38
Il macina-caffè (F) permette di polverizzare in pochi secondi ingredienti duri e secchi come:
Si sconsiglia di miscelare alcune spezie molto dure (chiodi di garofano, cannella ecc.) poiché possono
alterare il colore del recipiente.
Si sconsiglia la miscelazione di alcuni ingredienti come cioccolato, formaggio Parmigiano, bastoncini di
cannella, chiodi di garofano, poiché potrebbero danneggiare l'apparecchio.
MONTAGGIO DEGLI ACCESSORI
n Questi accessori sono dotati di un recipiente che impedisce l’accesso alle lame durante l’uso.
n Assicurarsi che la guarnizione sia presente e correttamente installata sul gruppo lame (E1) o (F1) (fig. 1):
le scanalature della guarnizione devono essere visibili quando in posizione e la guarnizione non deve essere
incurvata (fig. 1).
n Versare gli ingredienti nel recipiente (E4) o (F4). Prendere il gruppo lame (E1) o (F1), con le lame orientate
verso il basso e guardando il pulsante di sblocco (E2) o (F2), e posizionare la linguetta (E3) o (F3) nel
collo del recipiente (E4) o (F4) (fig. 5a).
n Premere il pulsante di sblocco (E2) o (F2), portare il recipiente (E4) o (F4) fino al gruppo lame (E1) o (F1)
(fig. 5b) e fissarlo sul recipiente premendo la parte superiore del pulsante di sblocco (E2) o (F2). Assicurarsi
che il recipiente (E4) o (F4) e il gruppo lame (E1) o (F1) siano correttamente assemblati (fig. 5c).
n Capovolgere l’accessorio assemblato (E) o (F) e posizionarlo sul blocco motore (A), allineando il pulsante
di sblocco (E2) o (F2) con la rientranza situata sulla parte frontale del blocco motore (A). Gli accessori
(E) o (F) devono essere completamente inseriti nel blocco motore (A), altrimenti l’apparecchio non
funzionerà (fig. 6).
n Collegare l’apparecchio alla presa di corrente. Premere il coperchio del recipiente (E4) o (F4) con la
mano durante il funzionamento e premere il pulsante (B) o (C) a impulsi o continuativamente (fig. 7).
n Per spegnere l’apparecchio rilasciare il pulsante (B) o (C). Scollegare l’apparecchio dalla presa di
corrente.
n Rimuovere l’accessorio (E) o (F) dal blocco motore (A), posizionarlo sul piano di lavoro e sbloccare il
gruppo lame (E1) o (F1) premendo il pulsante di sblocco (E2) o (F2).E’ ora possibile prelevare la
preparazione.
PULIZIA DELL’APPARECCHIO
n Scollegare l’apparecchio dalla presa di corrente e rimuovere il recipiente o gli accessori.
n Le lame sono molto taglienti, maneggiare con cautela.
n Per facilitare la pulizia, è possibile separare il gruppo lame (D1) dal recipiente miscelatore (D4) premendo
il pulsante di sblocco (D2).
n Risciacquare immediatamente dopo l’uso i recipienti e i coperchi con acqua corrente e gli elementi
removibili con acqua calda insaponata.
n E’ possibile lavare il recipiente (D) e gli accessori (E) e (F) in lavastoviglie nel cestello superiore, con il
programma ecologico o per stoviglie poco sporche.
n Per pulire il blocco motore (A) utilizzare un panno umido e asciugarlo con cura. Non lavare il blocco
motore (A) sotto l’acqua corrente.
Ingredienti Quantità (max) Durata di funzionamento
Mandorle/nocciole sgusciate 70g 10 secondi pulsante 2
Noci 20g 10 impulsi pulsante 2
Semi di coriandolo, pepe 40g 45 secondi pulsante 2
Caffé 50g 45 secondi pulsante 2
KR_MINI-BLENDER_PERFECT-MIX_8080012620_MISEENPAGE07/05/1315:50Page38
Page 37

Italiano
39
RISOLUZIONE DEI PROBLEMI
Problema Causa Soluzione
L’apparecchio non
funziona.
La spina non è inserita nella presa di
corrente.
Collegare l’apparecchio a una presa di
corrente di identico voltaggio.
Il recipiente (D) o gli accessori (E) e (F)
non sono correttamente assemblati o
posizionati sul blocco motore (A).
Verificare che il recipiente o gli
accessori siano assemblati
correttamente; smontarli e assemblarli
nuovamente (fig 2.a, 2.b e 2.c) e
verificare che siano completamente
inseriti nel blocco motore.
Tenere premuto il coperchio degli
accessori (E) o (F) durante il
funzionamento.
Vibrazioni
eccessive.
L’apparecchio non è installato su una
superficie piana.
Installare l’apparecchio su una
superficie piana.
Volume degli ingredienti eccessivo. Ridurre la quantità di ingredienti.
Assemblaggio errato degli accessori. Verificare che i recipienti (E4) (F4)
siano correttamente assemblati insieme
al rispettivo gruppo lame (E2) (F2): le
linee colorate devono corrispondere.
Perdite dal
coperchio.
Volume degli ingredienti eccessivo. Ridurre la quantità di ingredienti.
Il coperchio non è installato
correttamente.
Verificare che sul coperchio (D6) sia
presente la guarnizione (D5).
Posizionare correttamente il coperchio
(D6) sul recipiente (D). Chiudere il
tappo del dosatore (D7).
Perdite dalla base
del recipiente o
degli accessori.
Assenza o posizionamento scorretto
della guarnizione sul gruppo lame
(D1)(E1)(F1).
Assicurarsi che la guarnizione sia
posizionata correttamente: le
scanalature della guarnizione devono
essere visibili e la guarnizione non deve
piegarsi (fig1). Manipolare i gruppi
lame (D1), (E1), (F1) con cautela
poiché le lame sono taglienti.
Il gruppo lame (D1)(E1)(F1) è installato
erroneamente o solo parzialmente sul
recipiente (D4)(E4)(F4).
Assicurarsi che il gruppo lame e il
recipiente siano assemblati
correttamente premendo la parte
superiore del pulsante (D2)(fig2c) o dei
pulsanti (E2)(F2) (fig5c)
La lama non ruota
facilmente.
Alimenti in pezzi troppo grandi o troppo
duri .
Ridurre la dimensione o la quantità degli
ingredienti.
Aggiungere del liquido nel recipiente
miscelatore senza oltrepassare il livello
massimo.
KR_MINI-BLENDER_PERFECT-MIX_8080012620_MISEENPAGE07/05/1315:50Page39
Page 38

Italiano
40
Il problema non è stato risolto?
Contattare il servizio consumatori (vedere gli indirizzi nel libretto di garanzia).
PROTEZIONE DELL’AMBIENTE
Smaltimento di apparecchi elettronici o elettrici
Questo apparecchio è stato progettato per funzionare per molti anni. Tuttavia, se si ha intenzione di sostituirlo
non gettarlo insieme ai rifiuti domestici o in una discarica, ma portarlo al punto di raccolta predisposto dal
proprio comune (o eventualmente in un’isola ecologica).
Salvaguardia dell’ambiente
Questo apparecchio contiene numerosi materiali riutilizzabili o riciclabili.
Portarlo in un punto di raccolta o, in sua mancanza, in un centro di assistenza autorizzato
affinché possa essere riciclato.
Smaltimento dell’apparecchio e dei materiali d’imballaggio
L'imballaggio comprende esclusivamente materiali non dannosi per l’ambiente che possono
essere smaltiti conformemente alle norme di riciclaggio in vigore.
Per lo smaltimento dell’apparecchio rivolgersi al dipartimento apposito del proprio comune.
KR_MINI-BLENDER_PERFECT-MIX_8080012620_MISEENPAGE07/05/1315:50Page40
Page 39

Français
41
DESCRIÇÃO
INSTRUÇÕES DE SEGURANÇA:
Leia atentamente o manual de instruções antes da primeira utilização do aparelho. Uma utilização não conforme isenta
o fabricante de qualquer responsabilidade.
Este aparelho não foi concebido para ser utilizado por pessoas (incluindo crianças) cujas capacidades físicas, sensoriais
ou mentais se encontram reduzidas, ou por pessoas com falta de experiência ou conhecimento, a não ser que tenham
sido devidamente acompanhadas e instruídas sobre a correcta utilização do aparelho, pela pessoa responsável pela
sua segurança. Éimportante vigiar as crianças por forma a garantir que as mesmas não brinquem com o aparelho.
Este aparelho foi concebido para funcionar apenas em corrente alterna. Verifique se a tensão eléctrica indicada na
placa sinalética do aparelho corresponde à da sua instalação eléctrica. Os erros de ligação anulam a garantia.
Desligar sempre o aparelho da corrente se o deixar sem vigilância e antes de proceder à sua montagem,
desmontagem ou limpeza. Não deixe as crianças utilizarem o aparelho sem vigilância.
Este aparelho foi exclusivamente concebido para um uso doméstico, dentro de casa. Não utilize o aparelho ao ar livre.
O fabricante declina qualquer responsabilidade e reserva-se o direito de anular a garantia em caso de utilização comercial
ou inadequada, ou de desrespeito pelas instruções.
Nunca desligue o aparelho puxando pelo cabo.
Este aparelho pode ser utilizado por pessoas cujas capacidades físicas, sensoriais ou mentais se encontram reduzidas,
ou por pessoas com falta de experiência ou conhecimento, desde que tenham sido devidamente acompanhadas e
instruídas sobre a correcta utilização do aparelho, pela pessoa responsável pela sua segurança e que compreendam
os potenciais riscos.
Não utilize o aparelho se este não funcionar correctamente, estiver danificado ou se o cabo de alimentação ou a ficha
estiverem danificados.
Por forma a evitar qualquer tipo de perigo, estes deverão ser obrigatoriamente substituídos por
um Serviço de Assistência Técnica autorizado (consultar lista no folheto da garantia).
Este aparelho não deve ser utilizado por crianças. Manter o aparelho e o cabo de alimentação fora do alcance das
crianças.
Se o cabo de alimentação se encontrar de alguma forma danificado, não utilize o aparelho. Por forma a evitar qualquer
situação de perigo, solicitar a substituição do cabo de alimentação junto do fabricante, de um Serviço de Assistência
Técnica autorizado ou por uma pessoa devidamente qualificada para tal.
Qualquer intervenção para além da limpeza e manutenção habituais realizadas pelo cliente deve ser efectuada por um
Serviço de Assistência Técnica autorizado.
A Bloco do motor
B Botão 2: Velocidade rápida
C Botão 1: Velocidade lenta
D Conjunto do copo liquidificador
D1 Bloco de lâminas com junta
D2 Botão de desencaixe do bloco de lâminas
D3 Ranhura de posicionamento
D4 Copo liquidificador
D5 Junta da tampa
D6 Tampa
D7 Tampa doseadora
E Moinho para ervas aromáticas
E1 Bloco de lâminas com junta
E2 Botão de desencaixe do bloco de lâminas
E3 Ranhura de posicionamento
E4 Copo
F Moinho de café
F1 Bloco de lâminas com junta
F2 Botão de desencaixe do bloco de lâminas
F3 Ranhura de posicionamento
F4 Taça
G - H Tampas para acessório
Português
KR_MINI-BLENDER_PERFECT-MIX_8080012620_MISEENPAGE07/05/1315:50Page41
Page 40

Português
42
Para sua segurança, utilize apenas acessórios e peças sobresselentes adaptadas ao seu aparelho, vendidos nos
Serviços de Assistência Técnica autorizados.
Nenhum acessório pode ser vendido sem a apresentação do manual de instruções ou do aparelho em questão.
Não permita que as crianças utilizem o aparelho como um brinquedo.
Não coloque o aparelho, o cabo de alimentação nem a ficha dentro de líquidos.
Não deixe o cabo de alimentação ao alcance das crianças, na proximidade ou em contacto com as partes quentes do
aparelho, junto a uma fonte de calor ou sobre uma aresta afiada.
Não coloque os acessórios de metal num micro-ondas.
Tenha em atenção que a utilização incorrecta do aparelho pode provocar lesões.
As lâminas dos discos de corte e dos acessórios são extremamente afiadas; manuseie-as com precaução quando
esvazia os copos e durante a limpeza.
Não toque nas peças em movimento quando o aparelho está em funcionamento. Aguarde a paragem completa do
aparelho e dos acessórios para intervir ou retirar os acessórios.
Nunca introduza utensílios de cozinha (colher, espátula…) dentro do copo (D) durante o funcionamento.
Não deixe o cabelo comprido, echarpes, gravatas, etc., pendurados por cima do aparelho ou dos acessórios em
funcionamento.
Atenção: Nunca deite nem misture líquidos ou ingredientes cuja temperatura seja superior a 60º C.
Se tiver de misturar ingredientes quentes, mantenha as mãos afastadas da tampa (D6) e da tampa doseadora (D7)
para evitar riscos de queimaduras.
Não utilize os copos como recipientes (de congelação, cozedura, esterilização).
Não utilize o aparelho durante mais de 1 minuto em funcionamento contínuo.
Para sua segurança, este aparelho está em conformidade com as normas e regulamentações aplicáveis (Directivas
sobre baixa tensão, Compatibilidade Electromagnética, Materiais em contacto com os alimentos, Ambiente,...).
Coloque o aparelho em cima de uma bancada de trabalho estável, resistente ao calor, limpa e seca.
Nunca utilize este aparelho para misturar ou triturar ingredientes não alimentares.
BLOQUEIO DE SEGURANÇA
n O aparelho não pode funcionar se o conjunto do copo liquidificador (D) ou os acessórios (E) ou (F) não
estiverem correctamente montados e posicionados sobre o bloco do motor (A).
n Os copos (E4) (F4) são assinalados na base com um risco de cor, devendo ser montados com os blocos
de lâminas cujos botões de desencaixe (E2) (F2) apresentam a mesma cor.
n O copo liquidificador (D4) não está assinalado por uma cor, devendo ser montado com o bloco de
lâminas que tem um botão de desencaixe (D2) amarelo.
ANTES DA PRIMEIRA UTILIZAÇÃO
n Antes da primeira utilização, limpe todos os acessórios (D, E, F, G, H) com água e detergente para a
loiça, à excepção do bloco do motor (A).
n Certifique-se de que retirou todo o material de embalagem antes de colocar o aparelho em
funcionamento.
n Certifique-se de que o bloco do motor está completamente parado e que os botões (B) e (C) não estão
pressionados antes de colocar o conjunto da liquidificadora ou os acessórios sobre o bloco do motor.
n Nunca coloque o aparelho em funcionamento se a tampa (D6) equipada com a junta (D5) não estiver
colocada sobre o copo montado (D).
KR_MINI-BLENDER_PERFECT-MIX_8080012620_MISEENPAGE07/05/1315:50Page42
Page 41

Français
43
UTILIZAÇÃO DO APARELHO
1 - TRITURAR / MISTU RAR/ HOMOGENIZAR (copo liquidificador D)
Não coloque o copo liquidificador em funcionamento sem ingredientes, apenas com produtos secos ou
rijos (como cubos de açúcar…) ou se a tampa (D6) equipada com a junta (D5) não estiver colocada sobre
o copo (D).
Consoante a natureza dos alimentos, o copo liquidificador (d) permite-lhe preparar até 0,6 litros de preparações espessas e 0,5 litros de preparações líquidas, como por exemplo:
Não coloque líquidos ou ingredientes no copo liquidificador cuja temperatura seja superior a
60º C. O copo liquidificador não deve ser colocado nem no frigorífico nem no congelador.
Deite sempre os ingredientes líquidos em primeiro lugar no copo liquidificador antes de adicionar os
ingredientes sólidos, sem exceder o nível máximo indicado. Os ingredientes sólidos devem ser cortados
em pedaços de 20 mm x 20 mm.
Pode preparar:
- sopas bem trituradas, cremes aveludados, , smoothies, batidos e cocktails.
- massas ligeiras (crepes, filhós, pudim de frutas, bolo pudim …)
MONTAGEM DOS ACESSÓRIOS
n Certifique-se de que a junta está presente e bem posicionada sobre o bloco de lâminas (D1)
As pregas da junta devem estar visíveis quando esta está colocada e a junta deve estar
esticada para não se danificar (fig. 1).
n Pressione o botão "clic" (D2) do bloco de lâminas (D1) virado para si. Posicione a base do copo (D4)
na ranhura (D3) (fig. 2a), depois encaixe o bloco de lâminas (D1) no copo (fig. 2b) até bloquear.
Pressione a parte superior do botão "clic" (D2) para se certificar de que o copo (D4) e o bloco de lâminas
(D1) estão bem encaixados (fig. 2c).
n Coloque a junta da tampa (D5) à volta da tampa (D6), coloque o conjunto sobre o copo (D4), encaixe a
tampa doseadora (D7) na respectiva abertura situada na tampa principal. Instale o copo montado (D)
sobre o bloco do motor (A) com o botão "clic" (D2) do bloco de lâminas alinhado com o entalhe situado
na parte da frente do bloco do motor (A) (fig. 3).
n O copo (D) deve ser suficientemente descido sobre o bloco do motor (A), caso contrário, o aparelho
não funciona (fig. 4).
n Ligue o aparelho e pressione o botão 1 (C) ou 2 (B), consoante a velocidade pretendida, através de
impulsos ou mantendo a pressão para um funcionamento contínuo. Não deixe o aparelho funcionar mais
de 60 segundos seguidos.
n Para parar o aparelho, diminua a pressão do botão (B) ou (C). Desligue o aparelho e retire a ficha da
tomada. Retire o copo (D) do bloco do motor (A).
2 - PICAR (mini picadora E) ou MOE R (moinho de café F)
Não utilize a mini picadora ou o moinho de café para preparações líquidas (p. ex., sumo de frutas). A tampa
(G) colocada sobre o copo (E4) ou (F4) evita que as preparações sequem e permite conservá-las no
frigorífico para uma próxima utilização. A tampa (G ou H) e o copo (E4) ou (F4) não devem ser colocados
no congelador.
A mini picadora (E) permite-lhe picar, em apenas alguns segundos, ingredientes tenros tais como:
Ingredientes Quantidades Tempo de funcionamento
Sumo de maçã: maçãs + água 300 g de maçãs, 200 ml de água 20 seg. botão 2
Sopa de legumes: legumes + água 300 g de legumes, 200 ml de água 20 seg. botão 2
Smoothie de frutas: frutas + leite 300 g de frutas, 200 ml de leite 15 seg. botão 2
Português
KR_MINI-BLENDER_PERFECT-MIX_8080012620_MISEENPAGE07/05/1315:50Page43
Page 42

Português
44
O moinho de café (F) permite-lhe reduzir a pó, em apenas alguns segundos, ingredientes duros e secos
como:
Desaconselha-se a trituração de algumas especiarias muito rijas (cravinho, canela, etc.) porque estas podem
alterar a cor do copo.
Desaconselha-se a trituração de determinados ingredientes como o chocolate, o queijo parmesão, os paus
de canela ou os cravos-da-índia porque estes podem danificar o aparelho.
MONTAGEM DOS ACESSÓRIOS
n Os acessórios estão equipados com um copo que impede o acesso às lâminas durante a utilização.
n Certifique-se de que a junta está presente e bem posicionada sobre o bloco de lâminas (E1) ou (F1)
(fig. 1), as pregas da junta devem estar visíveis quando esta está colocada e a junta deve estar esticada
para não se danificar (fig. 1).
n Coloque os ingredientes no copo (E4) ou (F4). Segure no bloco de lâminas (E1) ou (F1), com as lâminas
viradas para baixo e o botão "clic" (E2) ou (F2) virado para si, e posicione a ranhura (E3) ou (F3) no
gargalo do copo (E4) ou (F4) (fig. 5a).
n Pressione o botão "clic" (E2) ou (F2), enrosque o copo (E4) ou (F4) no bloco de lâminas (E1) ou (F1)
(fig. 5b) e bloqueie-o no copo pressionando a parte superior do botão "clic" (E2) ou (F2). Certifique-se
de que o copo (E4) ou (F4) o bloco de lâminas (E1) ou (F1) ficam bem encaixados (fig. 5c).
n Vire o acessório ao contrário, coloque o acessório montado (E) ou (F) sobre o bloco do motor (A)
alinhando o botão "clic" (E2) ou (F2) com o entalhe da parte da frente do bloco do motor (A); os
acessórios (E) ou (F) devem ser descidos o máximo possível sobre o bloco do motor (A), caso contrário,
o aparelho não funciona (fig. 6).
n Ligue o aparelho à corrente. Mantenha a mão a pressionar o copo (E4) ou (F4) durante o funcionamento,
pressione o botão (B) ou (C) por impulsos ou continuadamente (fig. 7).
n Para parar o aparelho, deixe de pressionar o botão (B) ou (C). Desligue o aparelho e retire a ficha da
tomada.
n Retire o acessório (E) ou (F) do bloco do motor (A), coloque o acessório em cima da bancada de trabalho
e desbloqueie o bloco de lâminas (E1) ou (F1) pressionando o botão "clic" (E2) ou (F2). Pode, então,
retirar a preparação.
Ingredientes Quantidade (máx.) Tempo de funcionamento
Damascos secos 40 g 4 seg. botão 2 contínuo
Pão ralado 1 tosta
10 impulsos botão 2 e 15 seg.
botão 2 contínuo
Cebolas/chalotas/alho 30 g 10 impulsos botão 1
Alho 40 g 10 impulsos botão 1
Fiambre 20 g (1/2 fatia enrolada cortada em 4) 5 impulsos botão 1
Carne sem nervuras e cortada
em cubos de 1 cm (máximo)
40 g 10 impulsos botão 1
Salsa 5 g 10 impulsos botão 1
Ingredientes Quantidade (máx.) Tempo de funcionamento
Avelãs/amêndoas descascadas 70 g 10 seg. botão 2
Nozes 20 g 10 impulsos botão 2
Sementes de coentros, pimenta 40 g 45 seg. botão 2
Café 50 g 45 seg. botão 2
KR_MINI-BLENDER_PERFECT-MIX_8080012620_MISEENPAGE07/05/1315:50Page44
Page 43

Français
45
LIMPEZA DO APARELHO
n Desligue o aparelho e retire o copo ou os acessórios.
n As lâminas dos discos de corte e dos acessórios são extremamente afiadas, manuseie-as com precaução.
n Para facilitar a limpeza do bloco de lâminas (D1) separe-o do copo (D4) pressionando o botão "clic"
(D2.
n Após a utilização, lave imediatamente os copos e as tampas sob água corrente, bem como os elementos
amovíveis com água quente e detergente para a loiça.
n O copo (D) e os acessórios (E) e (F) podem ser lavados na máquina de lavar loiça no cesto superior,
com o programa "ECO" ou "POUCO SUJA".
n Para limpar o bloco do motor (A) utilize um pano húmido e seque-o cuidadosamente. Não coloque o
bloco do motor (A) sob água corrente.
O QUE FAZER SE O APARELHO NÃO FUNCIONAR?
Português
Problemas Causas Soluções
O aparelho não
funciona.
A ficha não está ligada. Ligue o aparelho numa tomada com a
mesma voltagem.
O copo (D) ou os acessórios (E) e (F)
não estão bem montados ou
posicionados sobre o bloco do motor
(A).
Verifique se o copo e os acessórios
estão bem montados. Desmonte e volte
a montá-los (Fig 2.a, 2.b e 2.c) e
verifique se estão suficientemente
descidos sobre o bloco do motor.
Mantenha pressão sobre a tampa dos
acessórios (E) ou (F) durante o
funcionamento.
Vibrações
excessivas.
O aparelho não está colocado sobre
uma superfície plana.
Coloque o aparelho sobre uma
superfície plana.
Volume de ingredientes excessivo. Reduza a quantidade de ingredientes a
preparar.
Erro na montagem dos acessórios. Verifique se os copos (E4) (F4) estão
bem montados nos blocos de lâminas
(E2) (F2) associados aos mesmos; os
traços coloridos devem ser idênticos.
Fuga pela tampa.
Volume de ingredientes excessivo. Reduza a quantidade de ingredientes a
preparar.
A tampa não é estanque. Verifique se a tampa (D6) está equipada
com a junta (D5).
Posicione correctamente a tampa (D6)
sobre o copo (D). Encaixe a tampa
doseadora (D7).
KR_MINI-BLENDER_PERFECT-MIX_8080012620_MISEENPAGE07/05/1315:50Page45
Page 44

Français
46
O seu aparelho continua a não funcionar?
Contacte o serviço de apoio ao cliente (ver os dados de contacto no folheto de garantia).
RECICLAGEM
Produtos electrónicos ou eléctricos em fim de vida:
O seu aparelho está previsto para funcionar durante muitos anos. Contudo, quando o pretender substituir,
não o deite para o seu caixote do lixo ou numa lixeira, entregue-o no ponto de recolha existente para esse
efeito na sua freguesia (ou, se for o caso, numa estação de tratamento de resíduos).
Protecção do ambiente em primeiro lugar!
O seu aparelho contém inúmeros materiais que podem ser recuperados ou reciclados.
Entregue-o num ponto de recolha para possibilitar o seu tratamento.
Eliminação dos materiais de embalagem e do aparelho.
A embalagem é composta exclusivamente por materiais sem perigo para o ambiente, que
podem ser eliminados em conformidade com as disposições de reciclagem em vigor.
Para a eliminação do aparelho, informe-se junto do serviço adequado da sua freguesia.
Problemas Causas Soluções
Fuga pela parte de
baixo do copo ou
pelos acessórios.
Ausência ou colocação
incorrecta da junta sobre o
bloco de lâminas (D1) (E1)
(F1).
Certifique-se de que a junta está bem
posicionada, as pregas da junta devem ser
visíveis (fig1). Manuseie os blocos de
lâminas (D1), (E1), (F1) com precaução
porque as lâminas dos discos de corte são
muito afiadas.
O bloco de lâminas (D1) (E1)
(F1) está insuficientemente ou
mal encaixado sobre o copo
(D4) (E4) (F4).
Certifique-se de que o bloco de lâminas e o
copo estão bem ligados, pressionando a parte
superior do botão (D2) (fig2c) ou os botões
(E2) (F2) (fig5c).
O disco de corte
não roda facilmente
Pedaço de alimento demasiado
grande ou demasiado rijo.
Diminua o tamanho ou a quantidade dos
ingredientes a preparar.
Adicione líquido no copo liquidificador sem
ultrapassar o nível máximo.
KR_MINI-BLENDER_PERFECT-MIX_8080012620_MISEENPAGE07/05/1315:50Page46
Page 45
Dansk
47
BESKRIVELSE
SIKKERHEDSANVISNINGER:
Læs omhyggeligt brugsanvisningen, inden apparatet tages i brug. Producenten fralægger sig ethvert ansvar for enhver
anvendelse af apparatet, som ikke er i overensstemmelse med brugsanvisningen.
Det er ikke hensigten, at dette apparat skal benyttes af personer (herunder børn) med begrænsede fysiske,
følelsesmæssige eller mentale evner, eller med begrænset erfaring og/eller viden. De må bruge apparatet kun hvis de er
under konstant opsyn af personer, som kan være ansvarlige for deres sikkerhed, eller hvis de er blevet grundigt instrueret
i brugen af dette apparat. Børn skal altid være under opsyn, for at sikre, at de ikke leger med apparatet.
Apparatet er udelukkende beregnet til at blive anvendt med vekselstrøm. Kontroller, at den spænding, der er angivet på
apparatets mærkeplade, stemmer overens med spændingen i Deres lysnet. Enhver tilslutningsfejl ophæver garantien.
Afbryd altid apparatet fra stikkontakten, hvis det efterlades uden opsyn, og før montering, afmontering eller
rengøring. Lad ikke børn benytte apparatet uden opsyn.
Dette apparat er udelukkende beregnet til indendørs brug i hjemmet. Apparatet må ikke bruges udendørs. Producenten
fralægger sig ethvert ansvar, og forbeholder sig ret til at ophæve garantien, hvis apparatet anvendes kommercielt eller
uhensigtsmæssigt, eller hvis anvisningerne ikke overholdes.
Træk aldrig i ledningen, for at tage apparatet ud af stik-kontakten.
Dette apparat kan benyttes af personer, hvis fysiske, sensoriske eller mentale egenskaber er nedsatte, eller personer
med manglende erfaring eller kendskab, hvis de overvåges eller har fået instruktion i brugen af apparatet på forsvarlig
måde, og er klar over den forbundne risiko.
Brug ikke apparatet, hvis det ikke fungerer korrekt, hvis det er blevet beskadiget, eller hvis ledningen eller stikket er
beskadiget.
Gå til et godkendt servicecenter (se liste over servicecentre i garantihæftet), for at få ledningen udskiftet.
Således undgår De at udsætte Dem selv eller andre for fare.
Apparatet må ikke benyttes af børn. Hold apparatet og dets ledning udenfor rækkevidde af børn.
Hvis el-ledningen er beskadiget, må apparatet ikke bruges. For at undgå enhver fare, skal el-ledningen ubetinget udskiftes
af producenten, dennes eftersalgsservice eller personer med lignende kvalifikationer.
Kunden må kun rengøre og udføre almindeligt vedligeholdelsesarbejde på apparatet. Alle andre indgreb skal udføres
af et godkendt servicecenter.
Af hensyn til din sikkerhed må du kun anvende tilbehør og reservedele tilpasset til apparatet, som sælges på godkendte
servicecentre.
A Motordel
B Knap 2: Hurtig hastighed
C Knap 1: Langsom hastighed
D Skål- og blenderdel
D1 Knivdel med pakning
D2 Knap til oplåsning af knivdelen
D3 Positioneringskile
D4 Blenderskål
D5 Pakning til låg
D6 Låg
D7 Prop
E Krydderurtehakker
E1 Knivdel med pakning
E2 Knap til oplåsning af knivdelen
E3 Positioneringskile
E4 Skål
F Kaffekværn
F1 Knivdel med pakning
F2 Knap til oplåsning af knivdelen
F3 Positioneringskile
F4 Skål
G - H Tilbehørslåg
KR_MINI-BLENDER_PERFECT-MIX_8080012620_MISEENPAGE07/05/1315:50Page47
Page 46

Dansk
48
Tilbehørsdele sælges kun mod forevisning af denne brugsanvisning eller apparatet.
Lad ikke børn bruge apparatet som legetøj.
Nedsænk aldrig apparatet, ledningen eller stikket i væske.
Ledningen skal altid være uden for børns rækkevidde. Den må aldrig være i nærheden af, eller i kontakt med ydre
varmekilder, apparatets egne varme områder, eller et skarpt hjørne.
Tilbehørsdele, der indeholder metal, er ikke beregnet til brug i mikrobølgeovn.
Vær opmærksom på, at du risikerer at komme til skade ved ukorrekt anvendelse af apparatet.
Knivene på tilbehøret er skarpe, håndter dem med forsigtighed, når du tømmer skålene og under rengøring.
Rør aldrig ved delene, mens de er i bevægelse, når apparatet er i brug. Vent til apparatet og tilbehørsdelene er standset
helt, inden De rører ved dem eller fjerner tilbehørsdelene.
Stik aldrig køkkenredskaber, som f.eks. en ske eller en palet, ned i skålen (D), mens apparatet er i brug.
Lad aldrig langt hår, tørklæder, slips m.v. komme i nærheden af apparatet og tilbehørsdelene under brug.
Bemærk: Påfyld eller bland aldrig væsker eller ingredienser med en temperatur på over 60° C (140° F).
Lad være med at røre ved låget (D6) og doseringsproppen (D7), hvis De skal blande varme ingredienser, for at undgå
enhver risiko for forbrænding.
Brug ikke skålen som beholder til f.eks. nedfrysning, tilberedning eller sterilisering.
Brug ikke apparatet i mere end 1 minut med kontinuerlig kørsel.
Af hensyn til Deres sikkerhed overholder apparatet de gældende standarder og regler (Direktiverne om lavspænding,
Elektromagnetisk kompatibilitet, Materialer, der kommer i berøring med fødevarer, Miljø, osv.).
Placer apparatet på en stabil, varmebestandig, ren og tør arbejdsflade.
Brug udelukkende apparatet til at blande eller blende levnedsmidler.
SIKKERHEDSLÅS
n Apparatet virker ikke, hvis skålen og blenderen (D), eller tilbehørsdelene (E) eller (F) ikke er rigtigt samlet
og korrekt placeret på motordelen (A).
n Skålene (E4) (F4) er mærket i forhold til deres bund med en farvekode, og de skal samles med de knive,
hvor oplåsningsknapperne (E2)(F2) har den samme farve.
n Blenderskålen (D4) er ikke mærket med en farve. Den skal samles med den knivdel, der har en gul
oplåsningsknap (D2).
INDEN IBRUGTAGNING
n Før apparatet anvendes første gang, skal alle tilbehørsdele (D, E, F, G, H) vaskes i sæbevand, undtagen
motordelen (A).
n Sørg for, at al emballage er taget af, før apparatet tages i brug.
n Sørg for, at motordelen er standset helt, og knapperne (B) og (C) er løsnet, før blenderdelen eller
tilbehørsdelene anbringes på motordelen.
n Start ikke apparatet, hvis låget, der er sat sammen (D6) med pakningen (D5) , ikke er korrekt placeret på
skåldelen (D).
ANVENDELSE AF APPARATET
1 - M IKSE / BLANDE / HOMOG ENI S ERE (blenderskål D)
Lad ikke blenderkanden køre uden ingredienser, kun med tørre eller hårde produkter (som f.eks. sukkerstykker, osv.), eller hvis låget (D6) med pakningen (D5) ikke sidder på kanden (D). Alt efter arten af ingredienserne
kan blenderskålen (D) bruges til at tilberede op til 0,6 liter tyktflydende blandinger og 0,5 liter tyndtflydende
blandinger som f.eks.:
KR_MINI-BLENDER_PERFECT-MIX_8080012620_MISEENPAGE07/05/1315:50Page48
Page 47

Dansk
49
Hæld aldrig væsker eller ingredienser med en temperatur på over 60 °C (140 °F) i blenderskålen
(D). Den må heller ikke sættes i køleskabet eller fryseren.
Start altid med at komme de våde ingredienser i blenderskålen, inden de tørre ingredienser tilsættes, uden
at overskride det angivne maksimumsniveau: Faste ingredienser skal skæres i stykker på 20 mm x 20 mm.
Du kan tilberede:
- Fint blendet suppe, cremesauce, smoothies, milk-shakes, cocktails.
- Tynd dej (til pandekager, friture, clafoutis, æbleskiver, osv.)
MONTERING AF TILBEHØR
n Sørg for, at pakningen er til stede, og at den er placeret korrekt på knivdelen (D1). Læggene
i pakningen skal være synlige, når den er placeret korrekt, og pakningen skal være jævn. Den
må ikke bølge (fig. 1).
n Tryk på "klik"-knappen (D2) på knivdelen (D1) vendt mod dig selv. Anbring skålens bund (D4) under kilen
(D3) (fig. 2a), og drej derefter knivdelen (D1) hen mod skålen (fig. 2b), indtil den låser. Tryk på den
øverste del af klikknappen (D2), for at sikre, at skålen (D4) og knivdelen (D1) ikke kan skilles ad (fig. 2c).
n Sæt lågpakningen (D5) rundt om låget (D6). Anbring delen på skålen (D4) og skru proppen (D7) ned i
fordybningen på låget. Sæt skåldelen (D) på motordelen (A), således at klikknappen (D2) på knivdelen er
på linje med hakket på forsiden af motordelen (A) (fig. 3).
n Skålen (D) skal være tilstrækkeligt langt nede på motordelen (A), for at apparatet kan fungere (fig. 4).
n Tilslut apparatet og tryk på knap 1 (C) eller 2 (B), alt efter den ønskede hastighed ved gentagne tryk,
eller ved at holde knappen trykket ned for kontinuerlig kørsel. Apparatet må ikke køre mere end 60
sekunder i træk.
n Slip trykket på knap (B) eller (C), for at standse apparatet. Tag stikket ud af stikkontakten. Tag skålen (D)
af motordelen (A).
2 - HAKKE (minihakker E) eller MALE (kaffekværn F)
Brug ikke minihakkeren eller kaffekværnen til flydende blandinger (frugtjuice m.m.)
Låget (G) kan sættes på skålen (E4) eller (F4), for at undgå, at blandinger tørrer, og de kan opbevares i
køleskabet til senere brug. Låget (G eller H), skålen (E4) eller (F4) må ikke sættes i fryseren.
Med minihakkeren (E) kan du på få sekunder hakke bløde ingredienser som f.eks.:
Ingredienser Mængder Kørselstid
Æblesaft: Æbler + vand 300 g æbler, 200 ml vand 20 sekunder, tast 2
Grøntsagssuppe: Grøntsager + vand 300 g grøntsager, 200 ml vand 20 sekunder, tast 2
Frugtsmoothie: Frugt + mælk 300 g frugt, 200 ml mælk 15 sekunder, tast 2
Ingredienser Mængde (maks.) Kørselstid
Tørrede abrikoser 40 g 4 sek. vedvarende tryk på knap 2
Rasp 1 tvebak
10 gentagne tryk på knap 2, og
15 sek. vedvarende tryk på knap 2
Løg/skalotteløg/hvidløg 30 g 10 gentagne tryk på knap 1
Hvidløg 40 g 10 gentagne tryk på knap 1
Skinke
20 g (1/2 skive rullet sammen og
skåret i 4 stykker)
5 gentagne tryk på knap 1
Kød uden sener og skåret i
terninger på højst 1 cm
40 g 10 gentagne tryk på knap 1
Persille 5 g 10 gentagne tryk på knap 1
KR_MINI-BLENDER_PERFECT-MIX_8080012620_MISEENPAGE07/05/1315:50Page49
Page 48

Dansk
50
Med kaffekværnen (F) kan du på få sekunder male hårde og tørre ingredienser som f.eks.:
Det frarådes at blende visse meget hårde krydderier (kryddernellike, kanel, osv.), da de kan ændre skålens
farve.
Det frarådes at blende visse ingredienser, som f.eks. chokolade, parmesan, kanelstænger og kryddernelliker,
da de kan beskadige apparatet.
MONTERING AF TILBEHØR
n Tilbehørsdelene er forsynet med en skål, som forhindrer, at man kan komme i berøring med skærene
under anvendelsen.
n Kontroller, at pakningen er til stede, og at den er placeret korrekt på knivdelen (E1) eller (F1) (fig. 1)
Læggene i pakningen skal være synlige, når den er placeret på den. Pakningen skal være jævn, og den
må ikke bølge (fig. 1).
n Fyld ingredienserne i skålen (E4) eller (F4). Tag knivdelen (E1) eller (F1) med skærene vendt nedad og
klikknappen (E2) eller (F2) vendt mod dig selv. Anbring kilen (E3) eller (F3) i skålens krave (E4) eller (F4)
(fig. 5a).
n Tryk på klikknappen (E2) eller (F2). Drej skålen (E4) eller (F4) indtil knivdelen (E1) eller (F1) (fig. 5b), og
klik den fast på skålen ved at trykke på den øverste del af klikknappen (E2) eller (F2). Kontroller, at skålen
(E4) eller (F4) og knivdelen (E1) eller (F1) ikke kan skilles ad (fig. 5c).
n Sæt tilbehørsdelen på igen. Placer den samlede tilbehørsdel (E) eller (F) på motordelen (A), således at
klikknappen (E2) eller (F2) er på linje med hakket på forsiden af motordelen (A). Tilbehørsdelene (E) eller
(F) skal være så langt nede som muligt på motordelen (A), for at apparatet kan fungere (fig. 6).
n Tilslut apparatet. Hold på skålen (E4) eller (F4) og tryk gentagne gange på knap (B) eller (C), mens
apparatet er i brug (fig. 7).
n Hold op med at trykke på knap (B) eller (C), for at standse apparatet. Tag stikket ud af stikkontakten.
n Tag tilbehørsdelen (E) eller (F) af motordelen (A). Sæt tilbehørsdelen tilbage på arbejdsfladen og lås op
for knivdelen (E1) eller (F1) ved at trykke på klikknappen (E2) eller (F2). Du kan nu benytte blandingen.
RENGØRING AF APPARATET
n Tag stikket ud af stikkontakten og fjern skålen eller tilbehørsdelene.
n Knivene på tilbehøret er skarpe og skal håndteres med forsigtighed.
n For at gøre rengøringen lettere, kan knivdelen (D1) skilles fra skålen (D4), ved at trykke på klikknapperne
(D2).
n Efter brug, skyl straks skålene og lågene i rindende vand, samt de aftagelige dele i varmt sæbevand.
n Skålen (D) og tilbehørsdelene (E) og (F) kan vaskes i opvaskemaskinen i den øverste kurv med "ØKO"-
programmet, eller med et program til lettere snavsede ting.
n Rengør motordelen (A) med en fugtig klud, og tør den grundigt. Skyl aldrig motordelen (A) i rindende
vand.
Ingredienser Mængde (maks.) Kørselstid
Hasselnødder/mandler 70 g 10 sekunder med tast 2
Valnødder 20 g 10 gentagne tryk på knap 2
Korianderfrø, peber 40 g 45 sekunder med tast 2
Kaffe 50 g 45 sekunder med tast 2
KR_MINI-BLENDER_PERFECT-MIX_8080012620_MISEENPAGE07/05/1315:50Page50
Page 49

Dansk
51
HVAD SKAL JEG GØRE, HVIS APPARATET IKKE VIRKER?
Virker apparatet stadig ikke?
Kontakt kundeservice (se kontaktoplysningerne i garantihæftet).
Problemer Årsager Løsninger
Apparatet
fungerer ikke.
Stikket er ikke sat i stikkontakten. Tilslut apparatet til en stikkontakt med
den samme spænding.
Skålen (D), eller tilbehørsdelene (E) og
(F) er ikke samlet korrekt, eller placeret
rigtigt på motordelen (A).
Kontroller, om skålen og tilbehørsdelene
er samlet rigtigt.
Skil dem ad og saml dem igen (fig. 2.a,
2.b og 2.c). Sørg for, at de er anbragt
tilstrækkeligt langt nede på motordelen.
Bliv ved med at trykke på låget til
tilbehørsdelene (E) eller (F) mens
apparatet er i brug.
For store
vibrationer.
Apparatet er ikke placeret på en plan
flade.
Placer apparatet på en plan flade.
For stor mængde ingredienser. Reducer den mængde ingredienser, der
skal bearbejdes.
Fejl i tilbehørsdelenes samlinger. Kontroller, at skålene (E4) (F4) slutter
tæt til de tilhørende knivdele (E2) (F2).
Farvemærkningerne skal være identiske.
Udstrømning
gennem låget.
For stor mængde ingredienser. Reducer den mængde ingredienser, der
skal bearbejdes.
Låget er ikke tæt. Kontroller, at pakningen er sat (D5) på
låget (D6). Sæt låget (D6) rigtigt på
skålen (D). Skru proppen på (D7).
Udstrømning gennem skålens bund
eller tilbehørsdelene.
Pakningen mangler eller er sat forkert på
knivdelene (D1) (E1) (F1).
Sørg for, at pakningen er placeret
korrekt. Pakningens kanter skal være
synlige, og den må ikke bølge (fig. 1).
Håndter knivdelene (D1), (E1) og
(F1) med forsigtighed, da
knivskærene er skarpe.
Knivdelene (D1) (E1) (F1) er sat
utilstrækkeligt eller dårligt på skålen
(D4) (E4) (F4).
Sørg for, at knivdelen og skålen ikke kan
skilles ad ved at trykke på den øverste
del af knappen (D2) (fig. 2c), eller på
knapperne (E2) (F2) (fig. 5c).
Kniven drejer ikke
rigtigt rundt.
For store eller for hårde fødevarestykker. Reducer de bearbejdede ingrediensers
størrelse eller mængde.
Tilsæt væske i skålen.
Det blendes uden at overskride
maksimumsniveauet.
KR_MINI-BLENDER_PERFECT-MIX_8080012620_MISEENPAGE07/05/1315:50Page51
Page 50

Dansk
52
GENBRUG
Udtjente elektroniske og elektriske apparater:
Deres apparat er beregnet til at fungere i mange år. Når De overvejer at udskifte det, skal De imidlertid ikke
smide det i skraldespanden eller på en losseplads, men bringe det hen til indsamlingsstedet i Deres kommune (eller i givet fald til en genbrugsplads).
Hjælp med at skåne miljøet!
Dette apparat indeholder mange materialer, der kan genanvendes eller genbruges.
Apparatet afleveres på en godkendt genbrugsstation, eller i en serviceafdeling, for at sikre
aflevering til genbrug.
Bortskaffelse af emballage og apparatet.
Emballagen består udelukkende af materialer, som ikke er miljøfarlige, og som kan kasseres i
henhold til de gældende genbrugsbestemmelser.
Når apparatet skal bortskaffes, skal De gøre dette under hensyntagen til Deres kommunes
regler og forskrifter.
KR_MINI-BLENDER_PERFECT-MIX_8080012620_MISEENPAGE07/05/1315:50Page52
Page 51

Français
53
KUVAUS
TURVAOHJEET:
Lue käyttöohjeet huolellisesti ennen laitteen ensimmäistä käyttöä. Käyttöohjeiden vastainen käyttö vapauttaa valmistajan
kaikesta vastuusta.
Tätä laitetta ei voi käyttää henkilöt (mukaan lukien lapset), joiden fyysiset, aisteihin liittyvät tai henkiset kyvyt ovat rajoittuneet
tai joilla ei ole riittävästi tietoa ja kokemusta, paitsi jos he ovat saaneet tietoa ja opastusta laitteen turvallisesta käytöstä ja
jos he ymmärtävät laitteen käyttöön liittyvät riskit ja vaarat. Valvo lapsia laitteen käytön aikana äläkä anna lasten leikkiä
laitteella.
Laite on suunniteltu käytettäväksi ainoastaan vaihtovirralla. Tarkista, että laitteen tunnistuskorttiin merkitty jännite vastaa
kotisi sähköasennuksesi jännitettä. Kaikki liitäntävirheet kumoavat takuun.
Kytke laite aina irti sähköverkosta, jos jätät sen ilman valvontaa sekä ennen asennusta, purkamista tai puhdistamista.
Lapset eivät saa käyttää laitetta ilman valvontaa.
Laite on tarkoitettu käytettäväksi ainoastaan kotikäyttöön sisätiloissa. Älä käytä laitetta ulkona. Valmistaja vapautetaan
kaikesta vastuusta ja pidättää oikeuden purkaa takuun, jos laitetta käytetään kaupallisessa tarkoituksessa tai laitteelle
sopimattomalla tai ohjeiden vastaisella tavalla.
Älä koskaan vedä johdosta kytkeäksesi laitetta irti sähköverkosta.
Tätä laitetta voivat käyttää henkilöt, joiden fyysiset, aisteihin liittyvät tai henkiset kyvyt ovat rajoittuneet tai joilla ei ole
riittävästi tietoa ja kokemusta, mikäli he ovat saaneet tietoa ja opastusta laitteen turvallisesta käytöstä ja jos he ymmärtävät
laitteen käyttöön liittyvät riskit ja vaarat.
Älä käytä laitetta, jos laite ei toimi normaalisti, jos se on vioittunut tai jos virtajohto tai pistoke on vahingoittunut.
Kaikenlaisten vaaratilanteiden välttämiseksi anna valtuutetun huoltopalvelun vaihtaa johto (katso huoltopalvelut
takuukirjasesta).
Lapset eivät saa käyttää laitetta. Pidä laite ja sen johto kaukana lasten ulottuvilta.
Jos virtajohto on vioittunut, älä käytä laitetta. Kaikenlaisten vaaratilanteiden välttämiseksi anna valmistajan, valmistajan
huoltopalvelun tai samanlaisen pätevyyden omaavien henkilöiden vaihtaa virtajohto.
Kaikki huoltotoimenpiteet, lukuun ottamatta käyttäjän suorittamaa normaalia puhdistusta tai huoltoa, tulee antaa
valtuutetun huoltopalvelun tehtäväksi.
Älä käytä muita kuin valtuutetun huoltokeskuksen toimittamia lisätarvikkeita ja alkuperäisvaraosia oman turvallisuutesi
vuoksi.
Lisätarvikkeita ei voi ostaa ilman laitteen tai käyttöohjeiden näyttämistä.
A Moottoriosa
B Painike 2: nopea käyttö
C Painike 1: hidas käyttö
D Sekoituskulho kokonaisuudessaan
D1 Teränpidike tiivisteellä
D2 Teränpidikkeen vapautuspainike
D3 Asennusura
D4 Sekoituskulho
D5 Kannen tiiviste
D6 Kansi
D7 Korkki
E Yrttimylly
E1 Teränpidike tiivisteellä
E2 Teränpidikkeen vapautuspainike
E3 Asennusura
E4 Kulho
F Kahvimylly
F1 Teränpidike tiivisteellä
F2 Teränpidikkeen vapautuspainike
F3 Asennusura
F4 Kulho
G - H Kannet lisätarvikkeille
Suomi
KR_MINI-BLENDER_PERFECT-MIX_8080012620_MISEENPAGE07/05/1315:50Page53
Page 52

Suomi
54
Älä anna lasten leikkiä laitteella.
Älä aseta laitetta, virtajohtoa tai pistoketta nesteeseen.
Älä jätä virtajohtoa roikkumaan lasten ulottuville. Älä säilytä johtoa laitteen kuumien osien läheisyydessä tai kosketuksissa
niiden kanssa tai lämpölähteen tai terävän reunan läheisyydessä.
Älä laita metallia sisältäviä lisätarvikkeita mikroaaltouuniin.
Laitteen vääränlainen käyttö saattaa aiheuttaa loukkaantumisriskin.
Veitsien ja lisätarvikkeiden terät ovat teräviä. Käsittele niitä varoen tyhjentäessäsi kulhoja ja puhdistuksen aikana.
Älä koskaan koske liikkuvia osia laitteen ollessa käynnissä. Odota, että laite ja sen lisätarvikkeet ovat pysähtyneet ennen
lisätarvikkeisiin koskemista tai niiden poistamista.
Älä koskaan aseta keittiövälineitä (lusikka, lasta…) kulhoon (D) käytön aikana.
Älä anna pitkien hiusten, huivien, solmioiden jne. roikkua käytössä olevan laitteen tai lisätarvikkeiden yläpuolella.
Älä koskaan kaada ja sekoita nesteitä tai aineksia, joiden lämpötila on yli 60 °C.
Jos haluat sekoittaa kuumia aineksia, pidä kätesi kaukana kannesta (D6) ja annostelukorkista (D7) palovammojen
välttämiseksi.
Älä käytä kulhoja säilöntäastiana (pakastukseen, paistamiseen tai sterilointiin).
Älä käytä laitetta 1 minuuttia kauempaa tauotta.
Turvallisuussyistä laite on voimassa olevien normien ja säädösten mukainen (Alijännitedirektiivi, Elektromagneettinen
yhteensopivuus, Ruokien kanssa kosketuksissa olevat materiaalit, Ympäristö,...).
Aseta laite tasaiselle työtasolle, joka on puhdas, kuiva ja lämmönkestävä.
Älä koskaan käytä laitetta muiden ainesten kuin ruoka-ainesten sekoittamiseen.
TURVAKIINNITYS
n Laite ei toimi, jos sekoituskulho kokonaisuudessaan (D) tai lisätarvikkeet (E) tai (F) eivät ole kunnolla
asennettu ja kiinnitetty moottoriosan (A) päälle.
n Kulhot (E4) (F4) tunnistetaan niiden alustassa olevasta väriviivasta. Aseta ne teränpidikkeeseen, joiden
vapautuspainikkeet (E2)(F2) ovat samanvärisiä.
n Sekoituskulhossa (D4) ei ole väriviivaa. Sitä tulee käyttää teränpidikkeellä, jonka vapautuspainike (D2) on
keltainen.
ENNEN ENSIMMÄISTÄ KÄYTTÖÄ
n Ennen ensimmäistä käyttöä puhdista kaikki lisätarvikkeet (D, E, F, G, H) saippuavedellä, lukuun ottamatta
moottoriosaa (A).
n Varmista, että pakkausmateriaalit on poistettu laitteen ympäriltä ennen käyttöä.
n Varmista, että moottoriosa on pysähtynyt ja että nopeuspainikkeita (B) ja (C) ei paineta ennen
sekoituskulhon tai lisätarvikkeiden asettamista moottoriosaan.
n Älä koskaan käytä laitetta, jos kansi (D6) ja tiiviste (D5) eivät ole kiinni kulhossa (D).
LAITTEEN KÄYTTÖ
1 - S EKOITUS / VATKAUS / TASOITUS (sekoituskulho D)
Älä käynnistä sekoituskulhoa ilman aineksia, pelkästään kuivilla tai kovilla tuotteilla (kuten sokeripalat…) tai
jos kansi (D6) ja sen tiiviste (D5) eivät ole kunnolla paikoillaan kulhossa (D). Ruoka-aineiden tyypistä riippuen
voit valmistaa sekoituskulhossa (D) enintään 0,6 l paksua seosta ja 0,5 l kevyttä seosta, kuten:
KR_MINI-BLENDER_PERFECT-MIX_8080012620_MISEENPAGE07/05/1315:50Page54
Page 53

Français
55
Älä kaada sekoituskulhoon (D) nesteitä tai aineksia, joiden lämpötila on yli 60 °C. Älä laita kulhoa
jääkaappiin tai pakastimeen.
Kaada aina nestemäiset ainekset sekoituskulhoon ennen kiinteitä aineksia. Älä ylitä kulhoon merkittyä
enimmäisrajaa. Paloittele kiinteät ainekset 20 mm x 20 mm paloiksi.
Voit valmistaa:
- hienoksi sekoitettuja keittoja, kermakastikkeita, smoothieita, pirtelöitä, cocktaileja.
- kevyitä taikinoita (letut, munkit, piirakat, pannukakut…).
LISÄTARVIKKEIDEN ASENNUS
n Varmista, että tiiviste on kunnolla paikoillaan teränpitimessä (D1). Paikoilleen asetetun
tiivisteen taitteet tulee olla näkyvissä ja tiivisteen tulee olla litteä, se ei saa käyristyä (kuva 1).
n Paina teränpidikkeen (D1) vapautuspainiketta (D2) itseesi päin. Aseta kulhon (D4) alusta asennusuraan
(D3) (kuva 2a) ja kiinnitä sitten teränpidike (D1) kulhoon (kuva 2b). Paina vapautuspainikkeen (D2)
yläosaa varmistaaksesi, että kulho (D4) ja teränpidike (D1) ovat oikein paikoillaan (kuva 2c).
n Aseta kannen tiiviste (D5) kannen (D6) ympärille, ja aseta kokonaisuus sekoituskulhon (D4) päälle. Kiinnitä
korkki (D7) sille tarkoitettuun paikkaan kannessa. Asenna sekoituskulho (D) moottoriosaan teränpidikkeen
vapautuspainikkeen (D2) ollessa (A) samassa linjassa moottoriosan (A) edessä olevan pykälän kanssa
(kuva 3).
n Kulhon (D) tulee olla kunnolla painettuna moottoriosaan (A), muuten laite ei toimi (kuva 4).
n Käynnistä laite ja paina painiketta 1 (C) tai 2 (B) haluamasi käyttönopeuden mukaan. Paina joko monta
kertaa peräkkäin tai pidä painike pohjassa. Älä käytä laitetta tauotta yli 60 sekuntia pidempään.
n Sammuta laite lakkaamalla painamasta painiketta (B) tai (C). Kytke laite irti sähköverkosta. Poista kulho
(D) moottoriosasta (A).
2 - S ILPPUA (minisilppuri E) tai JAUHA (kahvimylly F)
Älä käytä minisilppuria tai kahvimyllyä nestemäisten seosten valmistamiseksi (hedelmämehut…).
Kulhon (E4) tai (F4) päälle asetettava kansi (G) estää seosten kuivumisen ja mahdollistaa seoksen
säilyttämisen jääkaapissa myöhempää käyttöä varten. Älä laita kantta (G tai H) tai kulhoa (E4) tai (F4)
pakastimeen.
Minisilppurilla (E) voi silputa muutamassa sekunnissa muun muassa seuraavia aineksia:
Ainekset Määrät Käyttöaika
Omenamehut: omenat + vesi 300 g omenoita 200 ml vettä 20 sekuntia painikkeella 2
Kasviskeitto: kasvikset + vesi 300 g kasviksia 200 ml vettä 20 sekuntia painikkeella 2
Hedelmäsmoothie: hedelmät + maito 300 g hedelmiä 200 ml maitoa 15 sekuntia painikkeella 2
Ainekset Määrä (enint.) Käyttöaika
Kuivat aprikoosit 40 g 4 s painike 2 painettuna
Korppujauho 1 keksi
10 nopeata painallusta painikkeella 2 ja
15 s painike 2 painettuna
Sipuli/salottisipuli/valkosipuli 30 g 10 nopeata painallusta painikkeella 1
Valkosipuli 40 g 10 nopeata painallusta painikkeella 1
Kinkku 20 g (1/2 viipale, 4 osaan leikattu) 5 nopeata painallusta painikkeella 1
Enintään 1 cm paloiksi
paloiteltu liha ilman hermoja
40 g 10 nopeata painallusta painikkeella 1
Persilja 5 g 10 nopeata painallusta painikkeella 1
Suomi
KR_MINI-BLENDER_PERFECT-MIX_8080012620_MISEENPAGE07/05/1315:50Page55
Page 54
Suomi
56
Kahvimyllyllä (F) voi jauhaa muutamassa sekunnissa kovia ja kuivia aineksia, kuten:
Tiettyjen kovien mausteiden sekoitus (mausteneilikka, kaneli...) käyttö ei ole suositeltavaa, sillä
ne voivat värjätä kulhon.
Tiettyjen ainesten, kuten suklaan, parmesaanin, kanelitankojen ja mausteneilikoiden sekoitus ei ole
suositeltavaa, sillä ne saattavat vahingoittaa laitetta.
LISÄTARVIKKEIDEN ASENNUS
n Nämä lisätarvikkeet on varustettu kulholla, joiden terät ovat piilossa käytön aikana.
n Varmista, että tiiviste on kunnolla paikoillaan teränpidikkeessä (E1) tai (F1): paikoilleen asetetun tiivisteen
taitteet tulee olla näkyvissä ja tiivisteen tulee olla litteä, se ei saa käyristyä (kuva 1).
n Aseta ainekset kulhoon (E4) tai (F4). Nosta teränpidike (E1) tai (F1) terät alaspäin ja vapautuspainike
(E2) tai (F2) itseäsi vasten, aseta asennusura (E3) tai (F3) kulhon (E4) tai (F4) kaulukseen (kuva 5a).
n Paina vapautuspainiketta (E2) tai (F2), aseta kulho (E4) tai (F4) teränpidike (E1) tai (F1) (kuva 5b) ja
kiinnitä se kulhoon painamalla vapautuspainikkeen (E2) tai (F2) yläosaa. Varmista, että kulho (E4) tai (F4)
ja teränpidike (E1) tai (F1) ovat oikein paikoillaan (kuva 5c).
n Käännä lisätarvike, aseta koottu lisätarvike (E) tai (F) moottoriosaan (A) kohdistamalla vapautuspainike
(E2) tai (F2) moottoriosan (A) edessä olevan pykälään. Lisätarvikkeen (E) tai (F) tulee olla kunnolla
painettuna moottoriosaan (A), muuten laite ei toimi (kuva 6).
n Käynnistä laite. Paina kulhoa (E4) tai (F4) kädellä käytön ajan ja paina painiketta (B) tai (C) joko monta
kertaa peräkkäin tai pidä painike pohjassa (kuva 7).
n Sammuta laite lakkaamalla painamasta painiketta (B) tai (C). Kytke laite irti sähköverkosta.
n Poista lisätarvike (E) tai (F) moottoriosasta (A) kääntämällä lisätarvike työtasolla ja vapauttamalla
teränpidike (E1) tai (F1) vapautuspainiketta (E2) tai (F2) painamalla. Sen jälkeen voit kaataa valmiin
seoksen pois kulhosta.
LAITTEEN PUHDISTUS
n Kytke laite irti sähköverkosta ja irrota kulho tai lisätarvikkeet.
n Veitsien ja lisätarvikkeiden terät ovat teräviä. Käsittele niitä varoen.
n Teränpitimen (D1) puhdistuksen helpottamiseksi ne voidaan irrottaa kulhosta (D4) painamalla
vapautuspainiketta (D2).
n Huuhtele kulhot ja kannet heti käytön jälkeen juoksevan veden alla ja pese irrotettavat osat kuumassa
saippuavedessä.
n Lisätarvikkeiden (E) ja (F) kulhot (D) voidaan pestä astianpesukoneen yläosassa taloudellisella tai vähän
likaisille astioille tarkoitetulla ohjelmalla.
n Puhdista moottoriosa (A) kostealla liinalla ja kuivaa se huolellisesti. Älä koskaan aseta moottoriosaa
(A) juoksevan veden alle.
Ainekset Määrä (enint.) Käyttöaika
Kuorittu manteli ja hasselpähkinä 70 g 10 sekuntia painikkeella 2
Saksanpähkinä 20 g 10 nopeata painallusta painikkeella 2
Korianterinsiemenet, pippuri 40 g 45 sekuntia painikkeella 2
Kahvi 50 g 45 sekuntia painikkeella 2
KR_MINI-BLENDER_PERFECT-MIX_8080012620_MISEENPAGE07/05/1315:50Page56
Page 55

Français
57
LAITTEEN VIANMÄÄRITYS
Eikö laitteesi toimi vieläkään?
Ota yhteys asiakaspalveluun (katso yhteystiedot takuukirjasesta).
Suomi
Ongelma Syy Ratkaisu
Laite ei toimi.
Pistoke ei ole kiinni pistorasiassa. Kytke laite samalla jännitteellä toimivaan
pistorasiaan.
Kulho (D) tai lisätarvikkeet (E) ja
(F) on huonosti koottu tai
kiinnitetty moottoriosaan (A).
Tarkista kulhon tai lisätarvikkeiden asennus;
pura ja kokoa uudelleen (Kuva 2.a, 2.b ja 2.c).
Tarkista, että ne on painettu tarpeeksi syvälle
moottoriosaan.
Paina lisätarvikkeen (E) tai (F) kantta kädellä
käytön aikana
Laite tärisee liikaa.
Laitetta ei käytetä vakaalla
työtasolla.
Aseta laite vakaalle työtasolle.
Laitteessa on liikaa aineksia. Vähennä ainesten määrää.
Lisätarvikkeet on koottu väärin. Tarkista, että kulhot (E4) (F4) ja teränpitimet
(E2) (F2) on koottu oikein. Osien väriviivojen
tulee täsmätä.
Kansi vuotaa.
Laitteessa on liikaa aineksia. Vähennä ainesten määrää.
Kansi ei ole tiivis. Varmista, että kannessa (D6) on tiiviste (D5).
Aseta kansi (D6) kunnolla kulhoon (D). Kiinnitä
korkki (D7).
Kulhon tai lisätarvikkeiden alaosa
vuotaa
Teränpitimien (D1)(E1)(F1) tiiviste
on huonosti asennettu tai sitä ei
ole.
Varmista, että tiiviste on kunnolla paikoillaan. Tiivisteen taitteet tulee olla näkyvissä ja se ei saa
käyristyä (Kuva 1). Käsittele teränpitimiä
(D1), (E1), (F1) varoen, sillä terät ovat terävät.
Teränpitimet (D1)(E1)(F1) ovat
huonosti kiinni kulhossa
(D4)(E4)(F4).
Tarkista, että teränpitimet ja kulho ovat kunnolla
paikoillaan painamalla painikkeen (D2)(kuva 2c)
tai painikkeiden (E2)(F2) (kuva 5c) yläosaa.
Terä ei pyöri kunnolla
Ainespalat ovat liian suuria tai liian
kovia
Pienennä ainesten kokoa tai vähennä ainesten
määrää.
Lisää sekoituskulhoon nestettä ylittämättä enimmäisrajaa.
KR_MINI-BLENDER_PERFECT-MIX_8080012620_MISEENPAGE07/05/1315:50Page57
Page 56
Suomi
58
KIERRÄTYS
Käytöstä poistetut sähköiset ja elektroniset laitteet:
Laite on suunniteltu olemaan käyttökunnossa useamman vuoden ajan. Jos kuitenkin haluat vaihtaa laitteen
toiseen, älä heitä laitetta kotitalousjätteen mukana roskakoriin tai kaatopaikalle, vaan vie se kotikuntasi jätteidenkeräyspisteeseen (tai muuhun ongelmajätteiden keräyspisteeseen).
Pidä huolta ympäristöstäsi!
Laitteesi sisältää useita arvokkaita ja kierrätettäviä materiaaleja.
Vie laite jätteidenkeräyspisteeseen sen asianmukaista käsittelyä varten.
Laitteen ja pakkausmateriaalin hävittäminen.
Pakkausmateriaali sisältää vain ympäristölle vaarattomia materiaaleja, jotka voidaan hävittää
voimassa olevien kierrätysnormien mukaisesti.
Ota selvää laitteen hävittämisestä kotikuntasi asianmukaisesta palvelusta.
KR_MINI-BLENDER_PERFECT-MIX_8080012620_MISEENPAGE07/05/1315:50Page58
Page 57

Norsk
59
BESKRIVELSE
RÅD OM SIKKERHET:
Les bruksanvisningen nøye før første gangs bruk av apparatet. En bruk som ikke er i samsvar med denne fritar
produsenten for ethvert ansvar.
Dette apparatet er ikke beregnet for bruk av personer (inkludert barn) med reduserte fysiske, sensoriske eller mentale
evner, eller av personer uten erfaring eller kunnskap, med mindre de har fått opplæring i bruken av det eller er under
tilsyn av en person som er ansvarlig for sikkerheten. Pass på at barn ikke leker med apparatet.
Apparatet skal kun brukes med vekselstrøm. Kontroller at nettspenningen samsvarer med spenningen som er angitt
på apparatet. Enhver tilkoblingsfeil opphever garantien.
Alltid koble fra apparatet før montering, demontering, rengjøring og hvis apparatet blir stående uten tilsyn.
Barn skal ikke bruke apparatet uten oppsyn.
Dette apparatet er utelukkende ment for bruk i hjemmet. Apparatet skal ikke brukes ute. Produsenten påtar seg intet
ansvar og forbeholder seg retten til å oppheve garantien i tilfeller av kommersiell eller upassende bruk. Dette gjelder
også når forholdsreglene ikke respekteres.
Ikke trekk i strømledningen for å koble fra apparatet.
Dette apparatet kan brukes av personer med reduserte fysiske, sensoriske eller mentale evner, eller av personer uten
erfaring eller kunnskap, hvis de er under oppsyn eller har fått opplæring i bruken av det og er innforstått med farene ved
apparatet.
Apparatet må ikke brukes hvis det ikke fungerer slik det skal, eller hvis apparatet, strømledningen eller støpselet har blitt
skadet.
For å unngå fare skal strømledningen bare skiftes ut av et godkjent servicesenter (se liste i garantiheftet).
Dette apparatet skal ikke brukes av barn. Oppbevar apparatet og ledningen utenfor rekkevidde for barn.
Apparatet må ikke brukes hvis strømledningen er skadet. For å unngå enhver risiko, må strømledningen skiftes ut av
produsenten, deres servicesenter eller av personer med tilsvarende kvalifikasjoner.
All intervensjon utenom rengjøring og dagligdags vedlikehold utført av kunden skal utføres av et godkjent servicesenter.
Av sikkerhetsgrunner må du utelukkende bruke tilbehørsdeler og reservedeler som passer til apparatet og som kan fås
fra et autorisert serviceverksted.
Du vil ikke kunne kjøpe noe tilbehør uten å fremvise bruksanvisningen eller apparatet.
Pass på at barn ikke leker med apparatet.
Ikke senk apparatet, strømledningen eller støpselet i væske.
A Motorenhet
B Knapp 2: høy hastighet
C Knapp 1: lav hastighet
D Blenderbolle
D1 Knivenhet med pakning
D2 Utløserknapp for knivenheten
D3 Plasseringsspor
D4 Blenderbolle
D5 Pakning for lokket
D6 Lokk
D7 Propp
E Urtekvern
E1 Knivenhet med pakning
E2 Utløserknapp for knivenheten
E3 Plasseringsspor
E4 Bolle
F Kaffekvern
F1 Knivenhet med pakning
F2 Utløserknapp for knivenheten
F3 Plasseringsspor
F4 Bolle
G - H Lokk til tilbehør
KR_MINI-BLENDER_PERFECT-MIX_8080012620_MISEENPAGE07/05/1315:50Page59
Page 58

Norsk
60
Strømledningen må holdes utenfor barns rekkevidde. Den må heller ikke være i nærheten av eller i kontakt med de
varme delene på apparatet, nær en varmekilde eller en skarp kant.
Deler som inneholder metall må ikke brukes i mikroovn.
Vi advarer mot at skader kan oppstå ved feilaktig bruk av apparatet.
Knivbladene og tilbehørsdelene er meget skarpe. Håndteres med forsiktighet når bollene tømmes og ved rengjøring.
De bevegelige delene må ikke berøres mens apparatet er i drift. Vent til apparatet og tilbehøret har stoppet helt før du
griper inn eller tar av tilbehøret.
Kjøkkenredskaper (skje, stekespade etc.) må aldri brukes i bollen (D) når apparatet er i drift.
Unngå at langt hår, sjal, slips og lignende henger over apparatet eller tilbehøret mens det er i drift.
Advarsel: Væsker eller ingredienser som er varmere enn 60 °C (140 °F) må aldri helles i eller blandes i apparatet.
Hvis du behøver å blande varme ingredienser, hold hendene vekk fra lokket (D6) og proppen (D7) for å unngå
brannskader.
Bollene må ikke brukes til oppbevaring (frysing, steking, sterilisering).
Apparatet skal ikke brukes sammenhengende i mer enn 1 minutt.
For din egen sikkerhet er dette apparatet i samsvar med gjeldende standarder og forskrifter (Lavspenningsdirektivet,
Elektromagnetisk kompatibilitet, Materialer i kontakt med mat, Miljø,...).
Plasser apparatet på en stabil, varmebestandig, ren og tørr arbeidsbenk.
Apparatet må aldri brukes til å blande ingredienser som ikke er matvarer.
SIKKERHETSMEKANISMER
n Apparatet vil ikke fungere hvis blenderbollen (D) eller tilbehøret (E) eller (F) ikke er satt riktig sammen
eller riktig plassert på motorenheten (A).
n Bollene (E4) (F4) er merket på bunnen med en farge. Denne skal være den samme som fargen på
utløserknappene (E2) (F2) på knivenhetene når disse settes sammen.
n Blenderbollen (D4) har ingen farge, men skal monteres sammen med knivenheten som har en
utløserknapp (D2) i gult.
FØR FØRSTE GANGS BRUK
n Rengjør alle delene (D, E, F, G, H) i såpevann før første gangs bruk. Motorenheten (A) skal ikke rengjøres.
n Sørg for at all emballasje er fjernet før du starter apparatet.
n Kontroller at motorenheten er riktig slått av. Knappene (B) og (C) skal være utløst før blenderbollen eller
tilbehøret settes på motorenheten.
n Apparatet må ikke startes hvis ikke lokket (D6) er satt sammen med pakningen (D5) og plassert på
blenderbollen (D).
BRUK AV APPARATET
1 - B LAN DE/ E LTE / RØR E (blenderbolle D)
Blenderbollen må aldri brukes uten innhold eller utelukkende med tørre eller harde ingredienser
(f.eks. sukkerbiter osv.). Ikke start apparatet hvis lokket (D6) med pakningen (D5) ikke er satt
på plass på bollen (D). Avhengig av type ingredienser, kan du lage 6 dl tykke blandinger og 5 dl flytende
blandinger i blandebollen (D), f.eks.:
KR_MINI-BLENDER_PERFECT-MIX_8080012620_MISEENPAGE07/05/1315:50Page60
Page 59

Norsk
61
Væsker eller ingredienser som er varmere enn 60 °C (140 °F) må aldri helles i eller blandes i
apparatet. Bør ikke settes i kjøleskapet eller i fryseren.
Flytende ingredienser skal alltid helles i blenderbollen før tørre ingredienser. Pass på ikke å overskride
maksimumsnivået. Faste ingredienser bør skjæres i biter på 20 x 20 mm.
Du kan lage:
- fine supper, kremer, smoothie, milkshake og drinker.
- flytende deiger (pannekaker, smultringer, clafoutis osv.)
MONTERING AV TILBEHØRSDELENE
n Kontroller at pakningen er til stede og riktig plassert på knivenheten (D1): yttersidene på
pakningen bør være synlige og flate (ikke bøyd) når den er riktig plassert (fig. 1).
n Hold "klikk"-knappen (D2) på knivenheten (D1) mot deg, og sett bunnen på bollen (D4) i sporet (D3)
(fig. 2a). Sett deretter knivenheten (D1) på plass i bollen og skru fast (fig. 2b). Trykk på den øverste
delen av klikk-knappen (D2) for å kontrollere at bollen (D4) og knivenheten (D1) er riktig satt sammen
(fig. 2c).
n Plasser pakningen (D5) rundt lokket (D6), og plasser det på bollen (D4). Skru proppen (D7) på plass på
lokket. Sett blenderbollen (D) på motorenheten (A) med knivenhetens klikk-knapp (D2) på linje med hakket
foran på motorenheten (A) (fig. 3).
n Bollen (D) må være riktig plassert ned på motorenheten (A), ellers vil ikke apparatet fungere (fig. 4).
n Koble til apparatet og trykk på knappen 1 (C) eller 2 (B) i forhold til ønsket hastighet på pulsene, eller
hold inne knappen for en kontinuerlig funksjon. Apparatet må ikke fungere i mer enn 60 sekunder
sammenhengende.
n For å stoppe apparatet, slippes trykket på knappene (B) eller (C). Koble fra apparatet. Ta bollen (D) av
motorenheten (A).
2 - HAKKER (minihakker E) eller MØLLE (kaffekvern F)
Minihakkeren eller kaffekvernen må ikke brukes med flytende ingredienser (fruktjuice osv.).
Når lokket (G) er plassert på bollen (E4) eller (F4), unngår du at ingrediensene tørker ut. De kan oppbevares
i kjøleskapet til neste gang du skal bruke dem. Lokket (G eller H), bollen (E4) eller (F4) kan ikke settes i
fryseren.
Med minihakkeren (E) kan du hakke myke ingredienser på få sekunder, f.eks.:
Ingredienser Mengde (maks) Brukstid
Tørkede aprikoser 40 g Hold inne knapp 2 i 4 sek
Griljermel Kavring
10 pulser med knapp 2 og deretter
hold inne knapp 2 i 15 sek
Løk/sjalottløk/hvitløk 30 g 10 pulser med knapp 1
Hvitløk 40 g 10 pulser med knapp 1
Skinke 20 g (1/2 rullet stykke, skjært i 4) 5 pulser med knapp 1
Kjøtt uten sener og skjært i
biter på maks 1 cm.
40 g 10 pulser med knapp 1
Persille 5 g 10 pulser med knapp 1
Ingredienser Mengder Brukstid
Eplejuice: epler + vann 300 g epler, 200 ml vann 20 sekunder med knapp 2
Grønnsakssuppe: grønnsaker + vann 300 g grønnsaker, 200 ml vann 20 sekunder med knapp 2
Fruktsmoothie: frukt + melk 300 g frukt, 200 ml melk 15 sekunder med knapp 2
KR_MINI-BLENDER_PERFECT-MIX_8080012620_MISEENPAGE07/05/1315:50Page61
Page 60

Norsk
62
Bruk kaffekvernen (F) til å male harde og tørre ingredienser til pulver på bare noen få sekunder, f.eks.:
Maling av noen spesielle typer krydder slik som nellik, kanel osv. anbefales ikke da de kan endre fargen på
bollen.
Bruk av noen ingredienser slik som sjokolade, parmesan, kanelstenger og nellik frarådes fordi de kan skade
apparatet.
MONTERING AV TILBEHØRSDELENE
n Dette tilbehøret er utstyrt med en bolle som ikke gir tilgang til knivbladene under bruk.
n Kontroller at pakningen er riktig plassert på knivenheten (E1) eller (F1) (fig. 1). Yttersiden på pakningen
bør være synlig, og pakningen må være flat, ikke bøyd (fig. 1).
n Ha ingrediensene i bollen (E4) eller (F4). Ta knivenheten (E1) eller (F1) med knivene vendt nedover, «klikk»-
knappen (E2) eller (F2) mot deg og plasser sporet (E3) eller (F3) i hakket på bollen (E4) eller (F4) (fig. 5a).
n Mens du trykker på «klikk»-knappen (E2) eller (F2) settes bollen (E4) eller (F4) og knivenhetene (E1) eller
(F1) (fig. 5b) sammen ved å trykke på den øverste delen av klikk-knappen (E2) eller (F2). Kontroller at
bollen (E4) eller (F4) og knivenhetene (E1) eller (F1) er riktig satt sammen (fig. 5c).
n Snu tilbehøret og plasser det (E) eller (F) samlet på motorenheten (A). Klikk-knappen (E2) eller (F2) skal
plasseres på linje med sporet på motorenheten (A). Tilbehøret (E) eller (F) plasseres helt ned på
motorenheten (A), ellers vil ikke apparatet fungere (fig. 6).
n Koble til apparatet. Trykk med hånden på bollen (E4) eller (F4) under bruk, og trykk på knappen (B) eller
(C) for pulser eller kontinuerlig drift (fig. 7).
n For å stoppe apparatet, slutter du å trykke på knappene (B) eller (C). Koble fra apparatet.
n Fjern tilbehøret (E) eller (F) fra motorenheten (A), og sett det på arbeidsbenken. Skru av knivenheten (E1)
eller (F1) ved å trykke på «klikk»-knappen (E2) eller (F2). Ta deretter ut ingrediensene.
RENGJØRING AV APPARATET
n Koble fra apparatet og ta av bollen eller tilbehøret.
n Knivbladene og tilbehørsdelene er meget skarpe. Håndteres med forsiktighet.
n Koble knivenheten (D1) fra bollen (D4) ved å klikke på knappen (D2) for å gjøre rengjøringen enklere.
n Skyll bollen og lokkene under rennende vann like etter bruk og de bevegelige delene i varmt såpevann.
n Bollen (D) og tilbehøret (E) og (F) kan vaskes i oppvaskmaskin i øverste skuff på "ECO"-program eller
programmet "LITE SKITTENT".
n Bruk en fuktig klut for å vaske motorenheten (A) og tørk grundig. Motorenheten (A) må aldri holdes
under rennende vann.
Ingredienser Mengde (maks) Brukstid
Hasselnøtter/mandler uten skall 70 g 10 sekunder med knapp 2
Nøtter 20 g 10 pulser med knapp 2
Korianderfrø, pepper 40 g 45 sekunder med knapp 2
Kaffe 50 g 45 sekunder med knapp 2
KR_MINI-BLENDER_PERFECT-MIX_8080012620_MISEENPAGE07/05/1315:50Page62
Page 61

Norsk
63
HVA GJØR DU HVIS IKKE APPARATET FUNGERER?
Fungerer apparatet ditt fremdeles ikke?
Kontakt kundeservice (se kontaktinformasjon i garantiheftet).
Problemer Årsaker Løsninger
Apparatet
fungerer ikke
Støpselet er ikke i
stikkontakten.
Koble apparatet til en stikkontakt med samme
spenning.
Bollen (D) eller tilbehøret (E)
og (F) er ikke satt riktig
sammen eller riktig plassert på
motorenheten (A).
Kontroller at bollen og/eller tilbehøret er satt riktig
sammen: ta dem fra hverandre og sett dem
sammen på nytt (Fig. 2a, 2b og 2c). Sørg for at
de er godt satt ned på motorenheten.
Trykk ned lokket på tilbehøret (E) eller (F) mens
apparatet er i bruk.
Overdrevne
vibrasjoner.
Apparatet er ikke plassert på
en rett overflate.
Plasser apparatet på en rett overflate.
Mengden av ingredienser er for
stor.
Reduser mengden av tilberedte ingredienser.
Feil i monteringen av tilbehøret. Sørg for at bollene (E4) (F4) er riktig satt
sammen med knivenhetene (E2) (F2) de hører
sammen med - merkene må være i samme farge.
Lokket lekker.
Mengden av ingredienser er for
stor.
Reduser mengden av tilberedte ingredienser.
Lokket er ikke vanntett. Kontroller at pakningen (D5) er plassert på lokket
(D6). Lokket (D6) må plasseres riktig på bollen
(D). Skru på proppen (D7).
Lekkasje fra bunnen av bollen eller
tilbehøret.
Pakningen mangler eller er
uriktig plassert på
knivenhetene (D1) (E1) (F1).
Kontroller at pakningen er riktig plassert,
yttersidene bør være synlige og den må ikke være
bøyd (fig1). Knivenhetene (D1), (E1) og (F1)
må håndteres med forsiktighet da knivene
er meget skarpe.
Knivenheten (D1) (E1) (F1) er
ikke godt nok eller feil skrudd
på bollen (D4) (E4) (F4).
Kontroller at knivenheten og bollen er riktig satt
sammen ved å trykke på den øverste knappen (D2)
(fig. 2c) eller på knappene (E2) (F2) (fig. 5c)
Kniven har vanskeligheter for å rotere.
Matbitene er for store eller for
harde.
Reduser størrelsen eller mengden av matvarer
som skal tilberedes.
Tilsett væske i bollen uten å passere
maksimumsnivået.
KR_MINI-BLENDER_PERFECT-MIX_8080012620_MISEENPAGE07/05/1315:50Page63
Page 62

Norsk
64
RESIRKULERING
Elektriske eller elektroniske produkter ved endt levetid:
Apparatet er laget for å vare i mange år. Men den dagen du bestemmer deg for å kvitte deg med det, må du
ikke kaste det i søppelet eller på en avfallsplass. Ta det heller med til et returpunkt for elektriske og elektroniske produkter i kommunen din).
Tenk miljø!
Apparatet inneholder mange materialer som kan gjenvinnes eller resirkuleres.
Ta det med til et returpunkt for å sikre riktig behandling.
Avhending av materialene i apparatets emballasje.
Emballasjen er utelukkende laget av miljøvennlige materialer og kan kastes i henhold til
gjeldende resirkuleringsordninger.
Ta kontakt med den aktuelle avdelingen i kommunen din for riktig avhending av apparatet.
KR_MINI-BLENDER_PERFECT-MIX_8080012620_MISEENPAGE07/05/1315:50Page64
Page 63

Français
65
BESKRIVNING
SÄKERHETSANVISNINGAR:
Läs bruksanvisningen noggrant innan du använder apparaten första gången, användning som apparaten inte är avsedd
för friskriver tillverkaren från allt ansvar.
Den här apparaten är inte avsedd att användas av personer (inklusive barn) med nedsatt fysisk, sensorisk eller mental
förmåga, eller av personer som saknar lämplig erfarenhet eller kunskap, om de inte står under uppsikt av eller har hjälp
av en kompetent person som ansvarar för deras säkerhet, eller tidigare fått de instruktioner som krävs för att kunna
använda apparaten. Barn bör hållas under uppsikt. De får inte handskas med apparaten.
Apparaten är endast avsedd för växelström. Kontrollera att spänningen i ditt elnät stämmer överens med den som är
angiven på apparatens märkplåt. Felaktig inkoppling innebär att garantin upphör att gälla.
Dra alltid ur strömsladden till apparaten om den lämnas oövervakad samt före hopsättning, isärtagning eller
rengöring. Låt inte barn använda apparaten utan tillsyn.
Apparaten är enbart avsedd för hushållsbruk inomhus. Använd inte apparaten utomhus. Tillverkaren frånsäger sig allt
ansvar och förbehåller sig rätten att upphäva rätten till garanti om apparaten används kommersiellt eller olämpligt, samt
om anvisningarna inte följs.
Dra inte i sladden för att dra ur kontakten ur vägguttaget.
Den här apparaten får användas av personer med fysiskt, sensoriskt eller mentalt nedsatt kapacitet eller med bristande
kunskaper, förutsatt att personen övervakas eller har fått instruktioner när det gäller hur apparaten kan användas på ett
säkert sätt och förstår eventuella risker den medför.
Använd inte apparaten om den inte fungerar korrekt, om den har skadats eller om nätsladden eller stickproppen har
skadats.
För att undvika alla risker bör sladd och kontakt alltid bytas ut av auktoriserad servicepersonal (se lista i
servicehäftet).
Den här apparaten får inte användas av barn. Håll apparat och strömsladd utom räckhåll för barn.
Använd inte apparaten om strömsladden är skadad. För att undvika alla risker bör sladden alltid bytas ut av tillverkaren,
dennes serviceagent eller likvärdigt kvalificerad person.
Allt underhåll, utöver rengöring och vanlig skötsel, måste utföras av ett godkänt servicecenter.
Av säkerhetsskäl, ska endast tillbehör och reservdelar avsedda för den här apparaten användas (sålda av ett auktoriserat
servicecenter).
Inga tillbehör går att köpa utan att visa upp bruksanvisningen för apparaten eller själva apparaten.
Barn får inte använda apparaten som leksak.
A Motorenhet
B Knapp 2: hög hastighet
C Knapp 1: låg hastighet
D Blender med bägare
D1 Knivdel med packning
D2 Låsknapp för knivdelen
D3 Positioneringsskåra
D4 Bägare
D5 Packning till lock
D6 Lock
D7 Kork
E Kvarn för färska kryddor
E1 Knivdel med packning
E2 Låsknapp för knivdelen
E3 Positioneringsskåra
E4 Bägare
F Kaffekvarn
F1 Knivdel med packning
F2 Låsknapp för knivdelen
F3 Positioneringsskåra
F4 Bägare
G - H Lock för tillbehör
Svenska
KR_MINI-BLENDER_PERFECT-MIX_8080012620_MISEENPAGE07/05/1315:50Page65
Page 64

Svenska
66
Lägg aldrig apparaten, nätsladden eller stickkontakten i vatten eller andra vätskor.
Nätsladden får inte vara i kontakt med, eller nära apparatens varma delar, nära en värmekälla eller böjas i skarp vinkel.
Använd aldrig tillbehören i mikrovågsugn.
Se upp, vid felanvändning av apparaten finns risk för skada.
Knivarna och tillbehören är mycket vassa. Hantera dem med försiktighet när du tömmer skålarna och vid rengöring.
Vidrör aldrig delar som rör sig under drift. Vänta tills apparaten och tillbehören stannat helt innan du hanterar apparaten
eller tar bort tillbehör.
Stoppa aldrig ner köksredskap (sked, slickepott …) i bägaren (D) under drift.
Låt inte långt hår, scarfs eller slipsar hänga ned ovanför apparat och tillbehör under bruk.
Obs! Häll inte i eller blanda vätska eller ingredienser som är varmare än 60°C.
Om du behöver mixa varma ingredienser måste du hålla händerna på avstånd från locket (D6) och korken (D7) för att
undvika att bränna dig.
Använd inte bägarna som förvaringskärl (frys, tillagning, sterilisering).
Använd inte apparaten mer än 1 minut i taget.
För att garantera din säkerhet överensstämmer apparaten med gällande tekniska regler och standarder (Direktiv för
lågspänning, Direktiv för elektromagnetisk kompatibilitet, Direktiv för material som kommer i kontakt med livsmedel, Direktiv
för miljö,...).
Ställ apparaten på en stabil och värmetålig arbetsyta som är ren och torr.
Använd aldrig apparaten för att blanda eller mixa ingredienser som inte är livsmedel.
SÄKERHETSSPÄRR
n Apparaten fungerar inte om blender och bägare (D) eller tillbehören (E) eller (F) inte sitter korrekt
monterade och placerade på motorenheten (A).
n Bägarna (E4) (F4) är färgmarkerade på basen och de får bara användas med knivdelarna som har
motsvarande färg på låsknapparna (E2)(F2).
n Bägaren (D4) är inte färgmarkerad, den får bara monteras på den knivdel som har en gul låsknapp (D2).
INNAN DU ANVÄNDER APPARATEN FÖRSTA GÅNGEN
n Diska alla tillbehör (D, E, F, G, H) med vatten och diskmedel innan du använder dem första gången, men
inte motorenheten (A).
n Kontrollera att det inte finns något emballage kvar i eller runt apparat och tillbehör.
n Kontrollera att motorenheten är i stoppläge och att knapparna (B) och (C) inte är intryckta innan du
monterar blender eller tillbehör på motorenheten.
n Starta aldrig apparaten om locket (D6) med packning (D5) inte sitter på plats på blendern (D).
ANVÄNDA APPARATEN
1 - M I X A / B L A N D A / H O M O G E N I S E R A (mixerskål D)
Kör inte blendern tom eller med enbart torra eller hårda ingredienser (som t.ex. sockerbitar) eller om locket
(D6) och dess packning (D5) inte sitter på ordentligt på mixerskålen (D).
Beroende på ingrediensernas konsistensen, ger mixerskålen (D) möjlighet att bereda upptill 0,6 l tjock beredning och 0,5 l flytande beredning, t.ex.:
KR_MINI-BLENDER_PERFECT-MIX_8080012620_MISEENPAGE07/05/1315:50Page66
Page 65

Français
67
Häll inte i vätska eller ingredienser med temperaturer på över 60°C i bägaren (D). Den får inte
ställas i kylskåpet eller i frysen.
Börja med att hälla i flytande ingredienser i bägaren och därefter fasta ingredienser, utan att överskrida
angiven maxnivå. Fasta ingredienser ska skäras i bitar om 20 mm x 20 mm.
Det går att bereda:
- finmixade soppor, redda soppor, smoothies, milkshakes, cocktails.
- smeter (t.ex. pannkakor, munkar, sockerkaka).
MONTERING AV TILLBEHÖREN
n Kontrollera att packningen sitter ordentligt på plats på knivdelen (D1): vecken på packningen
måste synas när den sitter på plats och packningen måste vara plan, den får inte bukta sig
(fig. 1).
n Tryck på "klick"-knappen (D2) på knivbladen (D1) mot dig. Sätt bägarens bas (D4) under skåran (D3)
(fig. 2a) för sedan tillbaka delen med knivbladen (D1) mot bägaren (fig. 2b) tills den sitter fast. Tryck på
den övre delen av klickknappen (D2) för att kontrollera att bägaren (D4) och knivdelen (D1) sitter ihop
ordentligt (fig 2c).
n Sätt på lockets packning (D5) runt locket (D6) och sätt på det på bägaren (D4), lås korken (D7) på dess
plats på locket. Sätt bägaren och monterade delar (D) på motorenheten (A) med klickknappen (D2) på
knivdelen i linje med skåran framtill på motorenheten (A) (fig. 3), bägaren (D) måste sitta ordentligt på
motorenheten (A) annars startar apparaten inte (fig. 4).
n Sätt i kontakten i vägguttaget och tryck på knapp 1 (C) eller 2 (B), beroende på vilken hastighet du vill
ha, tryck stötvis om du vill ha pulserande gång, eller håll in knappen om du vill mixa under en lite längre
stund. Kör inte mer än 60 sekunder i taget.
n Stoppa apparaten genom att trycka på knappen (B) eller (C). Dra ur kontakten ur vägguttaget. Ta av
bägaren (D) från motorenheten (A).
2 - HACKA (minihackare E) eller MALA (kaffekvarn F)
Använd inte minihackaren eller kaffekvarnen för flytande beredningar (t.ex. fruktjuice).
Locket (G) som man sätter på bägaren (E4) eller (F4) förhindrar att beredningarna torkar ut och därmed
kan sparas i kylen till nästa användning. Locket (G eller H) och skålen (E4 eller F4) och får inte ställas i
frysen.
Med minihackaren (E) kan du på några sekunder hacka ingredienser som:
Ingredienser Mängd Driftstid
Torkade aprikoser 40 g 4 sek med knapp 2 intryckt
Ströbröd 1 skorpa
10 pulstryck med knapp 2 och
15 sek med knapp 2 intryckt
Lök/schalottenlök/viktlök 30 g 10 pulstryck med knapp 1
Vitlök 40 g 10 pulstryck med knapp 1
Skinka 20 g (1/2 rullad skiva, skuren i 4 delar) 5 pulstryck med knapp 1
Kött utan senor skuret i max
1 cm stora tärningar
40 g 10 pulstryck med knapp 1
Persilja 5 g 10 pulstryck med knapp 1
Ingredienser Mängd Driftstid
Äppeljuice: äpple + vatten 300 g äpplen, 200 ml vatten 20 sekunder med knapp 2
Grönsakssoppa: grönsaker + vatten 300 g grönsaker, 200 ml vatten 20 sekunder med knapp 2
Fruktsmoothie: frukt + mjölk 300 g frukt, 200 ml mjölk 15 sekunder med knapp 2
Svenska
KR_MINI-BLENDER_PERFECT-MIX_8080012620_MISEENPAGE07/05/1315:50Page67
Page 66

Svenska
68
Med kaffekvarnen (F) kan du på några sekunder mala pulver av hårda ingredienser som:
Vissa hårda kryddor, t.ex. kryddnejlika och kanel, är inte bra att mixa, eftersom de kan färga av sig på bägaren.
Vissa ingredienser som choklad, parmesanost, kanelstänger och kryddnejlikor rekommenderas inte att mixa
eftersom de kan skada apparaten.
MONTERING AV TILLBEHÖR
n De här tillbehören är utrustade med en bägare som gör att man inte kommer åt knivarna under drift.
n Kontrollera att packningen sitter ordentligt på plats på knivdelen (E1) eller (F1) (fig. 1). Vecken på
packningen måste synas när den sitter på plats och packningen måste vara plan, den får inte bukta sig
(fig. 1).
n Lägg i ingredienserna i bägaren (E4) eller (F4). Ta knivdelen (E1) eller (F1), med knivbladen riktade neråt,
med "klick"-knappen (E2) eller (F2) mot dig, placera skåran (E3) eller (F3) i kanten på bägaren (E4) eller
(F4) (fig. 5a).
n Tryck på "klick"-knappen (E2) eller (F2), tryck bägaren (E4) eller (F4) mot knivdelen (E1) eller (F1) (fig. 5b)
och fäst den på bägaren genom att trycka på den övre delen av "klick"-knappen (E2) eller (F2). Kontrollera
att bägaren (E4) eller (F4) och knivdelen (E1) eller (F1) sitter ihop ordentligt (fig. 5c).
n Vänd på tillbehöret, sätt enheten (E) eller (F) på motorenheten (A) med "klick"-knappen (E2) eller (F2) i
linje med skåran framtill på motorenheten (A). Tillbehören (E) eller (F) måste sitta så långt ned på
motorenheten (A) som möjligt, annars startar apparaten inte (fig. 6).
n Sätt i nätsladden i vägguttaget. Tryck med handen på bägaren (E4) eller (F4) under drift, och tryck på
knappen (B) eller (C) om du vill ha pulserande gång eller mixa en längre stund i taget (fig. 7).
n Stoppa apparaten genom att trycka på knappen (B) eller (C). Dra ur kontakten ur vägguttaget
n Ta av tillbehöret (E) eller (F) från motorenheten (A) och vänd på tillbehöret på arbetsbänken och lås upp
knivdelen (E1) eller (F1) genom att trycka på "klick"-knappen (E2) eller (F2). Nu kan du ta ut det du mixat.
RENGÖRA APPARATEN
n Dra ut väggkontakten och ta av bägare eller tillbehör.
n Knivbladen och tillbehören är vassa. Hantera dem med försiktighet.
n För att förenkla rengöringen kan knivdelen (D1) tas av från bägaren (D4) genom att man trycker på "klick"-
knappen (D2).
n Diska bägare och lock omedelbart efter användning samt rörliga delar i varmt vatten med diskmedel.
n Bägaren (D), tillbehören (E) och (F) går att diska i maskin i den övre korgen med det skonsamma
programmet.
n Motorenheten (A) kan du torka av med en fuktig trasa och sedan torka noga. Håll aldrig motorenheten
(A) under rinnande vatten.
Ingredienser Mängd Driftstid
Skalade nötter/mandlar 70 g 10 sekunder med knapp 2
Valnötter 20 g 10 sekunder med knapp 2
Korianderfrön, peppar 40 g 45 sekunder med knapp 2
Kaffe 50 g 45 sekunder med knapp 2
KR_MINI-BLENDER_PERFECT-MIX_8080012620_MISEENPAGE07/05/1315:50Page68
Page 67

Français
69
OM APPARATEN INTE FUNGERAR
Fungerar apparaten ändå inte?
Kontakta kundservice (se garantihäftet).
Svenska
Problem Orsak Lösning
Apparaten
fungerar inte
Kontakten sitter inte i
vägguttaget.
Sätt i kontakten i ett uttag med rätt spänning
Bägare (D), tillbehör (E)
eller (F) sitter inte korrekt
monterade eller placerade
på motorenheten (A).
Kontrollera att bägare och tillbehör sitter korrekt
monterade; montera av och montera på nytt (Fig
2.a, 2.b och 2.c) och kontrollera att de sitter
ordentligt på motorenheten.
Tryck på lock och tillbehör (E) eller (F) under drift
Kraftiga
vibrationer.
Apparaten står inte på en
plan arbetsbänk.
Ställ apparaten på en plan arbetsyta.
För stor mängd
ingredienser.
Minska mängden ingredienser i bägaren.
Fel vid montering av
tillbehör.
Kontrollera att bägarna (E4) (F4) sitter korrekt på
knivdelarna (E2) (F2) som de hör ihop med, med
identiska färgmarkeringar.
Det läcker vid
locket.
För stor mängd
ingredienser.
Minska mängden ingredienser i bägaren.
Locket är inte tätt. Kontrollera att packningen är monterad (D5) på
locket (D6). Placera locket korrekt (D6) på bägaren
(D). Lås fast korken (D7).
Det läcker nedtill
på bägaren eller
från tillbehören
Packningen saknas eller är
fel monterad på knivdelen
(D1)(E1)(F1).
Kontrollera att packningen sitter korrekt, vecken på
packningen måste synas och den får inte bukta
(fig1). Handskas försiktigt med knivdelarna
(D1), (E1), (F1) eftersom bladen är mycket
vassa.
Knivdelarna (D1)(E1)(F1)
sitter felaktigt eller inte är
låsta på bägaren
(D4)(E4)(F4).
Kontrollera att knivdelarna och bägaren sitter ihop
ordentligt genom att trycka upptill på knappen
(D2)(fig2c) eller knapparna (E2)(F2) (fig5c)
Kniven snurrar
inte korrekt
För stora eller för hårda
ingredienser
Gör mindre bitar eller ha i mindre mängd.
Tillsätt vätska i bägaren
utan att överskrida maxnivån.
KR_MINI-BLENDER_PERFECT-MIX_8080012620_MISEENPAGE07/05/1315:50Page69
Page 68

Svenska
70
ÅTERVINNING
Hantering av elektriskt avfall eller elektronikavfall:
Den här apparaten är framtagen för användning i många år. Den dag du ändå vill byta ut den mot en annan
ber vi att du lämnar in den på kommunens återvinningsstation.
Skydda vår miljö!
Apparaten innehåller material som går att återvinna.
Lämna den på en återvinningsstation eller till ett godkänt servicecenter.
Kassering av förpackningsmaterial och apparat.
Förpackningen består enbart av material som inte är skadligt för miljön. Kassera den enligt
gällande återvinningsregler.
Följ gällande regler i din kommun för kassering av apparaten.
KR_MINI-BLENDER_PERFECT-MIX_8080012620_MISEENPAGE07/05/1315:50Page70
Page 69

KR_MINI-BLENDER_PERFECT-MIX_8080012620_MISEENPAGE07/05/1315:50Page71
Page 70

KR_MINI-BLENDER_PERFECT-MIX_8080012620_MISEENPAGE07/05/1315:50Page72
 Loading...