

Page 1
SMOOTHIE BLENDER
FRENDEIT
www.krups.com
Page 2
C
C2
C1
B3
D
6
0
Z
O
B
0
2
0
m
l
B2
B1
A
Page 3
1 2 3
4
5 6
3
Page 4

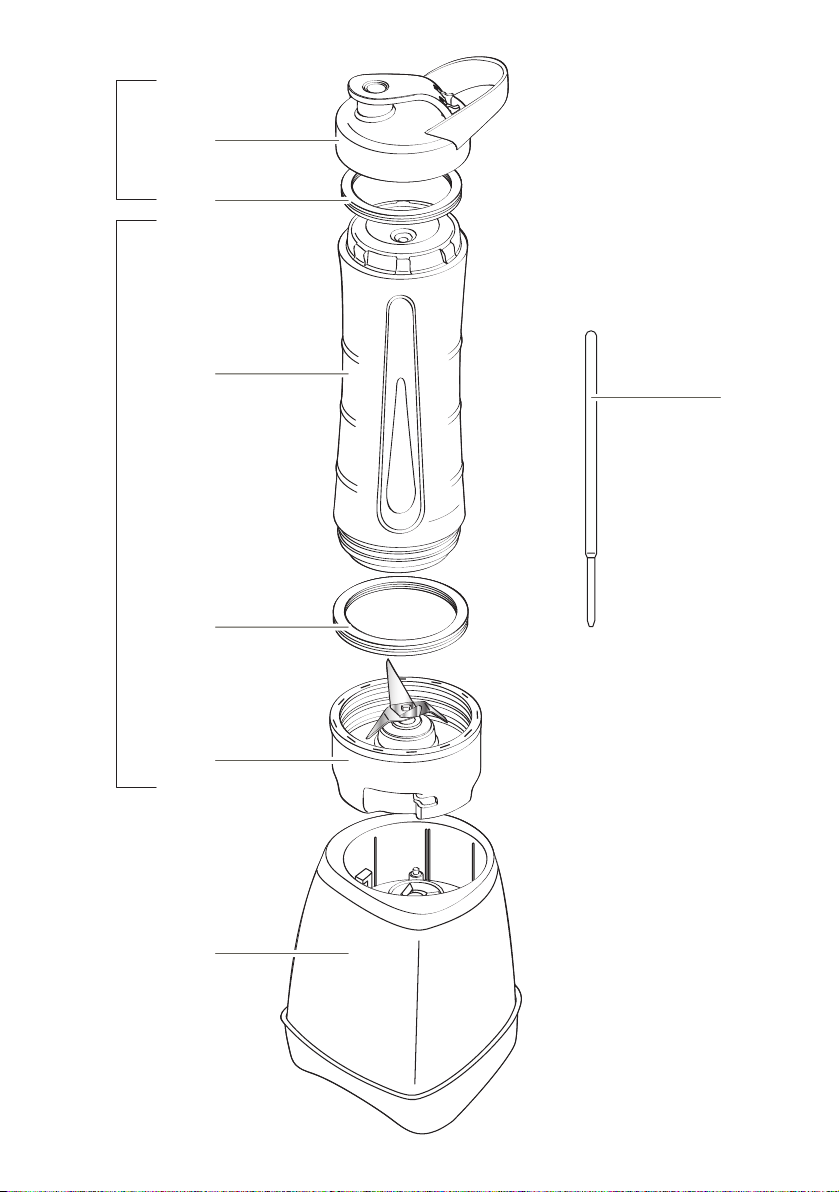
DESCRIPTION
A Bloc moteur
B Bouteille Blender
B1 Couteau
B2 Joint
B3 Bouteille en plastique
C Bouchon type gourde
C1 Joint de bouchon
C2 Bouchon
D Bâtonnet en plastique
ATTENTION
Les consignes de sécurité font partie de
l’appareil. Lisez cette notice d’utilisation
attentivement avant d’utiliser votre
nouvel appareil pour la première fois.
Conservez-la dans un endroit accessible
pour pouvoir la consulter ultérieurement.
SYSTÈME DE VERROUILLAGE DE SÉCURITÉ
L’appareil ne fonctionnera pas si la bouteille (B1 + B2 + B3) n’est pas correctement
assemblée et correctement positionnée sur le bloc moteur (A).
AVANT LA PREMIÈRE UTILISATION
Avant la première utilisation, lavez toutes les pièces de la bouteille (B) et du couvercle (C)
avec de l’eau chaude et un peu de liquide vaisselle, mais ne lavez pas le bloc moteur (A).
AVERTISSEMENT : Les lames du couteau sont extrêmement tranchantes,
manipulez- les avec précaution pendant l’utilisation, le nettoyage et le vidage des
bols.
Retirez tous les éléments d’emballage avant d’utiliser l’appareil.
INTRODUCTION
Ce blender vous permettra de découvrir une grande variété de textures : liquides, fruits
hachés et poudres nement moulues, qui vous permettront de préparer de merveilleuses
recettes culinaires. Son utilisation vous permet de mixer des ingrédients simples pour
réaliser des recettes sophistiquées.
4
Page 5

UTILISER VOTRE APPAREIL
Placez le bloc moteur (A) sur une surface plane et stable et branchez-le dans une prise
murale.
Mettez les ingrédients dans la bouteille du blender (B3). Le niveau maximal de 600 ml
(voir le marquage sur la bouteille) ne doit pas être dépassé. Pour de meilleurs résultats,
nous vous recommandons de remplir la bouteille d’abord avec les ingrédients liquides,
puis avec les ingrédients frais ou congelés (coupez les ingrédients en morceaux de 2 cm
au maximum). Ne remplissez pas excessivement la bouteille.
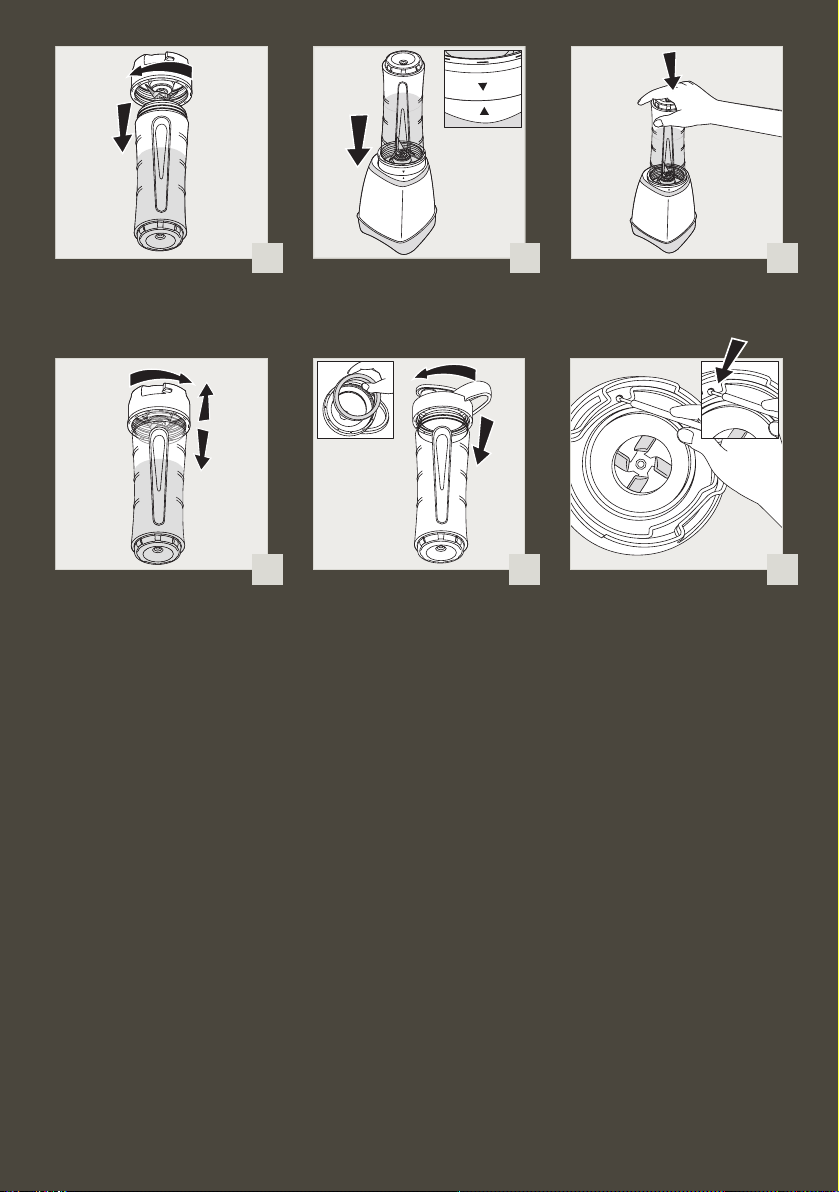
Vissez solidement le couteau avec le joint (B1 + B2) sur l’ouverture inférieure de la bouteille du
blender (B3) (Image 1). Puis placez la bouteille avec le couteau sur le bloc moteur en alignant
la èche sur l’extérieur du couteau avec la èche sur le bord du bloc moteur (Image 2).
Le mixage commence dès que la bouteille (B) est appuyée dans le bloc moteur (A)
(Image3). Appuyez jusqu’à ce que le mixage soit terminé. Le mixage s’arrête dès que la
bouteille est relâchée. La durée de fonctionnement continu maximale est de 30 secondes
et doit être suivie d’une pause de 10 minutes.
Cet appareil ne convient pas pour mixer des pommes de terre, de la crème, des blancs
d’oeuf, de la pâte, etc.
L’appareil ne doit pas être utilisé avec des liquides chauds, car la pression au niveau de
la base sera trop importante.
Si le moteur s’arrête pendant l’utilisation, débranchez l’appareil et retirez la bouteille (B) du
bloc moteur (A). Laissez l’appareil reposer 10 minutes au minimum avant de le réutiliser.
Quand vous avez terminé le mixage, retournez la bouteille pour placer le couteau (B1)
en haut et dévissez-le de la bouteille (B3) (Image 4). Puis placez le joint en caoutchouc
dans le bouchon et vissez-le (C1 + C2) (Image 5). Vous pouvez boire directement dans la
bouteille du blender ou l’emporter avec vous.
FRANÇAIS
RECETTES
Smoothie ananas mangue citron vert
125g d’ananas frais
½ mangue (125g)
½ citron vert
80 ml de jus d’orange
1. Retirez la peau et le coeur dur de l’ananas et coupez sa chair en petits cubes.
2. Pelez, retirez le noyau et coupez la mangue en dés.
3. Ajoutez l’ananas, la mangue et le jus d’orange.
4. Coupez le citron vert en deux, et pressez le jus de½ citron vert dans le bol du
blender.
5. Positionnez le couteau. Mixez 30sec et dégustez bien frais.
Smoothie fraise menthe
200g de fraises
3 feuilles de menthe
2 pots 0% de yaourt nature
10g de miel
5
Page 6

1. Lavez et équeutez les fraises.
2. Nettoyez les feuilles de menthe.
3. Mettez les fraises, la menthe, le miel et les yaourts dans le bol du blender.
Positionnez le couteau.
4. Mixez pendant 30sec en restant appuyer sur le bol du blender. Servez
immédiatement.
Smoothie banane ananas lait d’amandes
240ml de lait d’amandes
½ banane (50g)
80g d’ananas frais
1. Retirez la peau et le coeur dur de l’ananas et coupez sa chair en petits cubes.
2. Retirez la peau de la banane et coupez la en rondelles.
3. Mettez le lait de soja, la banane et l’ananas dans le bol du blender. Positionnez
le couteau.
4. Mettez en marche le blender en faisant 8 impulsions puis 30sec en restant
appuyer.
5. Servez frais.
Vous pouvez remplacer le lait d’amandes par du lait de soja, lait d’avoine ….
NETTOYER VOTRE APPAREIL
Débranchez l’appareil et enlevez la bouteille (B).
Manipulez-le délicatement, car les lames sont tranchantes.
Rincez la bouteille (B3) et le couteau (B1 + B2) immédiatement après utilisation à l’eau
courante, ainsi que les pièces détachables avec de l’eau chaude et un peu de liquide
vaisselle.
Pour faciliter le nettoyage, le couteau (B1) peut être dévissé de la bouteille (B3). La
bouteille (B3), le couteau (B1) et le bouchon (C2) peuvent être lavés dans le panier
supérieur d’un lave-vaisselle avec le programme « ECO » ou « LAVAGE DOUX ».
Nettoyez le bloc moteur (A) avec un chiffon humide, puis séchez-le soigneusement.
N’immergez jamais le bloc moteur (A) dans de l’eau ni dans aucun autre liquide.
Nettoyer le joint en caoutchouc :
Lors du nettoyage du couteau, le joint en caoutchouc doit être retiré du couteau pour
pouvoir enlever les résidus alimentaires.
1. Dévissez le couteau (B1) de la bouteille (B3). (Le couteau est très coupant.) Retournez
le couteau (B1) et enfoncez le bâtonnet en plastique (D) fourni dans le petit trou sous
le couteau. Image 6
2. Cela permet de décoller le joint sur le dessus du couteau pour le retirer et le nettoyer
avec de l’eau et du détergent.
3. Nettoyez soigneusement le joint et le couteau (le couteau peut être lavé au lavevaisselle), puis réinsérez le joint dans le logement du couteau. Veillez à ce que le joint
assure une bonne étanchéité tout autour de la base du couteau en appuyant dessus
avec le bout non pointu du bâtonnet en plastique. Il y a un risque de fuite si le joint n’est
pas correctement positionné.
6
Page 7

QUE FAIRE SI L’APPAREIL NE FONCTIONNE PLUS
PROBLEM CAUSE SOLUTION
L’appareil ne
fonctionne pas.
Vibrations excessives. L’appareil n’est pas
La bouteille Blender
fuit.
Les lames doivent
pouvoir tourner
facilement.
Il n’est pas branché. Branchez l’appareil dans une prise
électrique fournissant la même tension
électrique que celle spéciée sur
l’appareil.
La bouteille (B) n’est
pas correctement
assemblée ou
positionnée sur le
bloc moteur (A).
posé sur une surface
stable et plane.
Le volume d’ingrédients
est trop élevé.
Les accessoires ont été
mal assemblés.
Le joint n’est pas
correctement positionné
(B2) sur le couteau (B1).
Le couteau (B1 + B2)
n’est pas assez ou
incorrectement vissé sur
la bouteille (B3).
Les morceaux d’aliment
sont trop gros ou trop
durs.
Vériez que la bouteille est
correctement assemblée. Démontezla, puis réassemblez-la Image 1
et Image 2 et vériez qu’elle est
sufsamment enfoncée sur le
bloc moteur.
Appuyez en continu sur la bouteille(B)
pendant l’utilisation Image 3.
Placez l’appareil sur une surface plane
et stable.
Réduisez la quantité d’ingrédients
dans l’appareil.
Vériez que la bouteille (B3) est
correctement assemblée avec le
couteau (B1 + B2).
Vériez que le joint est correctement
positionné, ses lèvres doivent être
visibles et il ne doit pas être déformé
Manipulez le couteau (B1) avec
précaution, car ses lames sont très
coupantes.
Vériez que le couteau et la bouteille
sont correctement assemblés.
Réduisez la quantité ou la taille des
ingrédients mixés.
Ajoutez du liquide dans la bouteille
sans dépasser le niveau maximal.
FRANÇAIS
Votre appareil ne fonctionne toujours pas ?
Contactez le service client (voir les coordonnées dans la notice)
7
Page 8

DESCRIPTION
A Motor Unit
B Blender bottle assembly
B1 Blade unit
B2 Seal
B3 Plastic bottle
C Lid Assembly
C1 Lid Seal
C2 Lid
D Plastic stick (for removing the lid seal)
CAUTION
The safety precautions are part of the
appliance. Read them carefully before
using your new appliance for the rst
time. Keep them in a place where you
can nd and refer to them later on.
SAFETY LOCKING SYSTEM
The appliance will not operate if the blender bottle assembly (B1 + B2 + B3) is not correctly
assembled and correctly positioned on the motor unit (A).
BEFORE USING FOR THE FIRST TIME
Before using for the rst time wash the blender assembly (B) and lid assembly (C), in warm
water and a little washing-up liquid. ATTENTION: DO NOT IMMERSE THE MOTOR UNIT(A)
OR PUT IT UNDER WATER OR ANY OTHER LIQUID. Clean with a damp cloth then dry it
carefully.
WARNING: The cutter blades are extremely sharp, handle them with caution during
use, cleaning or on emptying the bottle. Do not fit the blade unit onto the motor unit
by itself.
Make sure that all packaging has been removed before operating the appliance.
INTRODUCTION
This blender will allow you to discover a new world of textures: liquids, chopped fruits and
nely ground powders for culinary use. Using it, you can blend some simple ingredients to
obtain delicious recipes.
8
Page 9

USING YOUR APPLIANCE
Place the motor unit (A) on a at, stable, heat-resistant surface away from sources of heat
or water splashes, and plug into a wall socket.
Fill the blender bottle (B3) with ingredients. The maximum level is 600 ml (see marking on
bottle) and must not be exceeded. For best results, we recommend lling the bottle with
liquid ingredients rst and then fresh/frozen ingredients (cut the ingredients into pieces no
larger than 2 cm). Do not overll the bottle.
Screw the blade unit with seal (B1+B2) securely on to the open end of the blender
bottle(B3) Fig.1. Turn the bottle upside down so that the blade unit is at the bottom, then
align the arrow on the exterior of the blade unit with the arrow on the edge of the motor
unit Fig.2.
Mixing starts as soon as the blender bottle (B) is pressed down into the motor unit (A)
Fig.3. Press down until mixing is complete. Mixing stops once the bottle is released. The
maximum continuous operating time is 30 seconds, followed by a break of 10 minutes.
This appliance is not suitable for mixing potatoes, cream, egg whites, dough, etc.
The appliance must not be used with hot liquids, as the pressure at the base will be too
great.
The appliance must not be used with ice cubes.
If the motor stops during use, unplug the appliance and remove the blender bottle (B)
from the motor unit (A). Let the appliance rest for at least 10 minutes before starting it
again.
Once you have nished mixing, turn the blender bottle upright so that the blade unit (B1)
is at the top and then unscrew it from the blender bottle (B3) Fig.4. Then place the rubber
seal in the lid, and screw on the lid (C1+C2) provided Fig.5. The blender bottle is ready to
drink from or take with you.
ENGLISH
RECIPES
Pineapple, mango and lime smoothie
125g fresh pineapple
½ mango (125g)
½ lime
80 ml orange juice, chilled
1. Remove the skin and the hard core of the pineapple and cut its esh into small
cubes.
2. Peel and remove the stone and dice the mango.
3. Add the pineapple, mango and orange juice.
4. Cut the lime in half and squeeze the juice of half a lime into the blender bottle.
5. Fit the blade in position. Mix for 30 seconds and serve chilled.
Strawberry and mint smoothie
200g strawberries
3 mint leaves
2 pots (150 g each) 0% fat free natural yogurts
10g honey
9
Page 10

1. Wash and hull the strawberries.
2. Wash the mint leaves.
3. Put the strawberries, mint, honey and yoghurts in the blender bottle. Fit the
blade into position.
4. Mix for 30 seconds, by continuously pressing down on the blender bottle.
Serve immediately.
Banana, pineapple and almond milk smoothie
240ml almond milk, chilled
½ banana (50g)
80g fresh pineapple
1. Remove the skin and the hard core of the pineapple and cut its esh into small
cubes.
2. Remove the skin from the banana and cut into slices.
3. Put the soya milk, the banana and the pineapple into the blender bottle. Fit the
blade into position.
4. Turn the blender on, do 8 pulses and then hold down for 30 seconds.
5. Serve chilled.
You can replace the almond milk with soy milk, oat milk, etc.
CLEANING YOUR APPLIANCE
Unplug the appliance and remove the blender bottle (B).
Handle the blender unit with care because the blade is sharp.
Rinse the blender bottle (B3) and blade unit (B1+B2) immediately after use
under running water and also the detachable parts in warm water and a little
washing-up liquid.
For easier cleaning, the blade unit (B1) can be detached from the bottle (B3) by
unscrewing.
The blender bottle (B3), blade unit (B1), without the seal (B2), and lid (C2) can
be washed in the top basket of the dishwasher using the “ECO” or “LIGHT
WASH” programme.
To clean the motor unit (A), use a damp cloth and dry it carefully.
Never immerse the motor unit (A) in water or any other liquid.
Cleaning the rubber seal:
When cleaning the blade unit, the rubber seal must be removed from the blade unit to
remove any food residues.
1. Unscrew the blade unit (B1) from the bottle (B3). (Note that the blades are very sharp.)
Turn the blade unit (B1) upside down and press the plastic stick (D) provided into the
small hole on the underside of the blade unit. Fig.6.
2. The seal will then loosen from the top of the blade unit and can now be cleaned
with water and a little washing up liquid.
10
Page 11

3. Clean the seal and blade unit carefully (the blade unit only, without the seal, is
dishwasher safe) and replace the seal in the slot on the blade unit. Make sure
that the seal forms a tight seal around the base of the blade unit by pressing
it down with the blunt end of the plastic stick. There is a risk of leakage if the
seal is not correctly replaced.
WHAT TO DO IF YOUR APPLIANCE DOES NOT WORK
PROBLEMS CAUSE SOLUTIONS
The appliance does
not work.
Excessive vibration. The appliance is not on
Leak from the bottle Incorrect positioning
The blade does not
rotate easily.
It is not plugged in. Plug the appliance in using a plug with
the same voltage.
The bottle (B) is not
correctly assembled or
positioned on the motor
unit (A).
a at, stable surface.
Volume of ingredients is
too high.
Error in assembling the
accessories.
of the seal (B2) on the
blade unit (B1).
The blade unit (B1+B2)
is insufciently or
incorrectly locked on the
bottle (B3).
Pieces of food are too
big or too hard.
Check that the bottle is correctly
assembled; dismantle and assemble
again Fig.1 and Fig.2 and check that it
is far down enough on the motor unit.
Maintain pressure on the blender
bottle assembly (B) during operation
Fig.3.
Put the appliance on a at stable
surface.
Reduce the quantity of ingredients
processed.
Check that the bottle (B3) is
correctly assembled with the blade
unit(B1+B2).
Make sure that the seal is correctly
positioned, the lips of the seal should
be visible and it should not be buckled
Handle the blade units (B1) with
care because the blades are sharp.
Make sure that the blade unit and the
bottle are tted together correctly.
Reduce the size or quantity of the
ingredients processed.
Add liquid to the bottle without
exceeding the maximum level.
ENGLISH
Is your appliance still not working?
Contact customer service (see contact details in the separate booklet).
11
Page 12

BESCHREIBUNG
A Motorblock
B Mixbehältereinheit
B1 Messereinheit
B2 Dichtung
B3 Kunststoffbehälter
C Deckeleinheit
C1 Deckeldichtung
C2 Deckel
D Kunststoffstab
ACHTUNG
Die Sicherheitshinweise gehören zu dem
Gerät. Lesen Sie diese aufmerksam, bevor
Sie Ihr neues Gerät zum ersten Mal benutzen.
Bewahren Sie die Sicherheitshinweise zum
Nachlesen griffbereit auf.
SICHERHEITSVERSCHLUSS
Das Gerät funktioniert nur, wenn die Mixbehältereinheit (B1 + B2 + B3) korrekt
zusammengesetzt und korrekt auf den Motorblock (A) gesetzt ist.
VOR DEM ERSTEN GEBRAUCH
Waschen Sie vor dem ersten Gebrauch die Mixbehältereinheit (B) und Deckeleinheit (C) in
warmem Wasser und etwas Geschirrspülmittel ab, jedoch nicht den Motorblock (A).
WARNUNG: Die Messer sind äußerst scharf. Seien Sie vorsichtig, wenn Sie die Messer
während des Gebrauchs, der Reinigung oder beim Entleeren des Behälters anfassen.
Stellen Sie sicher, dass sämtliches Verpackungsmaterial entfernt wurde, bevor Sie das
Gerät in Betrieb nehmen.
EINLEITUNG
Mit diesem Standmixer können Sie eine neue Welt von Konsistenzen entdecken: Flüssigkeiten,
püriertes Obst und fein gemahlenes Puder für den kulinarischen Erfolg. Mithilfe dieses Gerätes
können Sie ein paar einfache Zutaten vermischen, um rafnierte Rezepte zuzubereiten.
BENUTZUNG IHRES GERÄTES
Stellen Sie den Motorblock (A) auf eine ebene, stabile Fläche und verbinden Sie das
Gerät mit einer Wandsteckdose.
12
Page 13

Füllen Sie die Mixerasche (B3) mit Zutaten. Die maximale Füllmenge beträgt 600 ml
(siehe Markierung an der Flasche) und darf nicht überschritten werden. Um das beste
Ergebnis zu erzielen, empfehlen wir erst die üssigen Zutaten in die Flasche zu geben und
dann die frischen/gefrorenen Zutaten (schneiden Sie die Zutaten in Stücke von maximal
2cm). Überfüllen Sie die Flasche nicht.
Schrauben Sie die Messereinheit mit der Dichtung (B1+B2) fest auf das offene Ende der
Mixerasche (B3), Abb. 1. Setzen Sie dann die Flasche mit der Messereinheit auf den
Motorblock, indem Sie den Pfeil an der Außenseite der Messereinheit am Pfeil an der
Kante des Motorblocks ausrichten, Abb. 2.
Der Mixvorgang beginnt, sobald die Mixerasche (B) auf den Motorblock (A)
heruntergedrückt wird, Abb. 3. Halten Sie die Mixerasche heruntergedrückt, bis der
Mixvorgang abgeschlossen ist. Der Vorgang stoppt, sobald die Flasche losgelassen wird.
Die maximale ununterbrochene Betriebszeit beträgt 30 Sekunden. Anschließend sollte
eine Pause von 10 Minuten folgen.
Dieses Gerät eignet sich nicht zum Mixen und Rühren von Kartoffeln, Sahne, Eiweiß, Teig
usw.
Das Gerät darf nicht mit heißen Flüssigkeiten benutzt werden, da der Druck an der Basis
zu groß ist.
Das Gerät darf nicht mit Eiswürfel benutzt werden.
Falls der Motor während des Gebrauchs stoppt, ziehen Sie den Netzstecker des Gerätes
und entfernen Sie die Mixerasche (B) vom Motorblock (A). Lassen Sie das Gerät
mindestens 10 Minuten lang still stehen, bevor Sie es erneut starten.
Sobald Sie die Zutaten verarbeitet haben, drehen Sie die Mixerasche, sodass die
Messereinheit (B1) nach oben zeigt und drehen sie dann aus der Mixerasche (B3)
heraus, Abb. 4. Legen Sie danach die Gummidichtung in den Deckel und drehen Sie die
Deckeleinheit (C1+C2) zu, Abb. 5. Sie können direkt aus der Mixerasche trinken oder
diese mitnehmen.
DEUTSCH
REZEPTE
Mango, Ananas Limonen Smoothie
125 g frische Ananas
½ Mango (125 g)
½ Limone
80 ml Orangensaft
1. Schale und Strunk der Ananas entfernen, dann das Fruchteisch in kleine
Würfel schneiden.
2. Mango schälen, Kern entfernen und in Würfel schneiden.
3. Ananas, Mango und Orangensaft dazugeben. Das Messer aufsetzen.
4. Limone halbieren und den Saft einer Limonenhälfte in den Behälter des Mixers
auspressen.
5. Auf das Messer setzen. 30 Sekunden lang mixen und gut gekühlt genießen.
Erdbeeren Minze Smoothie
200 g Erdbeeren
3 Minzblätter
2 Naturjoghurt 0%
10 g Honig
13
Page 14

1. Erdbeeren waschen und Stiele entfernen.
2. Minzblätter säubern.
3. Erdbeeren, Minzblätter, Honig und Naturjoghurt in den Mixer geben.
Das Messer aufsetzen.
4. Zum Mixen 30 Sekunden lang auf den Behälter des Mixers drücken. Sofort
servieren.
Bananen Ananas Mandelmilch Smoothie
240 ml Mandelmilch
½ Banane (50 g)
80 g frische Ananas
1. Schale und Strunk der Ananas entfernen, dann das Fruchteisch in kleine
Würfel schneiden.
2. Bananenschale entfernen und Banane in Scheiben schneiden.
3. Mandelmilch, Banane und Ananas in den Behälter des Mixers geben.
Das Messer aufsetzen.
4. 8-mal kurz auf den Mixer drücken, dann 30 Sekunden lang gedrückt halten.
5. Kühl servieren.
Anstatt Mandelmilch können Sie auch Sojamilch, Hafermilch usw verwenden.
REINIGUNG IHRES GERÄTES
Ziehen Sie den Netzstecker des Gerätes und entfernen Sie die Mixerasche (B).
Seien Sie vorsichtig, denn das Messer ist scharf.
Spülen Sie die Mixerasche (B3) und Messereinheit (B1+B2) sofort nach dem Gebrauch
unter laufendem Wasser ab und waschen Sie alle abnehmbaren Teilen in warmem Wasser
und etwas Geschirrspülmittel ab.
Um die Reinigung zu erleichtern, kann die Messereinheit (B1) aus dem Behälter (B3)
herausgedreht werden.
Mixerasche (B3), Messereinheit (B1) und Deckel (C2) können im oberen Korb der
Geschirrspülmaschine im „SPAR“- oder „SCHON“-Programm gereinigt werden.
Benutzen Sie zum Reinigen des Motorblocks (A) ein feuchtes Tuch und trocknen Sie ihn
gründlich ab.
Tauchen Sie den Motorblock (A) auf keinen Fall in Wasser oder eine andere Flüssigkeit.
Reinigung der Gummidichtung:
Zum Reinigen der Messereinheit muss die Gummidichtung von der Messereinheit
abgenommen werden, um Speisereste zu entfernen.
1. Lösen Sie die Messereinheit (B1) von der Flasche (B3). (Beachten Sie, dass die
Messer sehr scharf sind.) Drehen Sie die Messereinheit (B1) um und schieben Sie
den mitgelieferten Kunststoffstab (D) in die kleine Öffnung an der Unterseite der
Messereinheit, Abb. 6.
2. Die Dichtung wird sich daraufhin von der Oberseite der Messereinheit lösen und kann
nun mit Wasser und Geschirrspülmittel gereinigt werden.
3. Reinigen Sie die Dichtung und Messereinheit sorgfältig (die Messereinheit ist
geschirrspülmaschinenfest) und setzen Sie die Dichtung wieder in die Rille an
der Messereinheit ein. Achten Sie darauf, dass die Dichtung fest an der Basis der
Messereinheit anliegt, indem Sie diese mit dem stumpfen Ende des Kunststoffstabs
14
Page 15

herunterdrücken. Es besteht die Gefahr, dass Flüssigkeit ausläuft, wenn die Dichtung
nicht wieder korrekt eingesetzt wird.
WAS KÖNNEN SIE TUN, WENN IHR GERÄT NICHT
FUNKTIONIERT?
PROBLEME URSACHEN LÖSUNGEN
Das Gerät funktioniert
nicht.
Extreme Vibrationen Das Gerät steht nicht
Der Behälter ist
undicht.
Das Messer rotiert nur
mühsam.
Das Gerät ist nicht
mit einer Steckdose
verbunden.
Der Behälter (B)
ist nicht korrekt
zusammengesetzt
oder nicht korrekt auf
dem Motorblock (A)
positioniert.
auf einer ebenen,
stabilen Fläche.
Zu viele Zutaten
eingefüllt.
Fehler beim
Zusammensetzen des
Zubehörs.
Die Dichtung (B2) ist
nicht korrekt auf die
Messereinheit (B1)
gesetzt.
Die Messereinheit
(B1+B2) ist nicht
ausreichend oder
nicht korrekt auf dem
Behälter(B3) befestigt.
Zu große oder zu harte
Lebensmittelstücke.
Verbinden Sie das Gerät mit einer
Steckdose mit gleicher Spannung.
Prüfen Sie, ob der Behälter korrekt
zusammengesetzt ist. Nehmen Sie ihn
auseinander und setzen Sie ihn erneut
zusammen, Abb.1 und Abb.2, und
prüfen Sie, ob er tief genug auf dem
Motorblock sitzt.
Üben Sie während des Betriebs
Druck auf die Mixbehältereinheit (B)
aus,Abb. 3.
Stellen Sie das Gerät auf eine ebene,
stabile Fläche.
Reduzieren Sie die Menge der zu
verarbeitenden Zutaten.
Prüfen Sie, ob der Behälter (B3)
korrekt mit der Messereinheit (B1+B2)
verbunden ist.
Stellen Sie sicher, dass die Dichtung
korrekt positioniert ist. Die Dichtlippen
sollten zu sehen und nicht geknickt
sein.
Handhaben Sie die Messereinheit
(B1) mit Vorsicht, denn die Messer
sind scharf.
Achten Sie darauf, dass
Messereinheit und Behälter korrekt
zusammengesetzt sind.
Reduzieren Sie die Größe oder Menge
der zu verarbeitenden Zutaten.
Geben Sie Flüssigkeit zu der Mischung
im Behälter, ohne die maximale
Füllmenge zu überschreiten.
DEUTSCH
Ihr Gerät funktioniert immer noch nicht?
Kontaktieren Sie den Kundendienst (siehe Kontaktinformationen im Handbuch)
15
Page 16

DESCRIZIONE
A Unità motore
B Gruppo recipiente
B1 Unità lama
B2 Guarnizione
B3 Recipiente in plastica
C Gruppo coperchio
C1 Guarnizione del coperchio
C2 Coperchio
D Asticella in plastica
ATTENZIONE!
Le precauzioni di sicurezza fanno parte
dell’apparecchio. Leggerle attentamente
prima di usare l’apparecchio per la prima
volta. Conservarle a portata di mano per
poterle consultare in futuro.
DISPOSITIVO DI BLOCCAGGIO DI SICUREZZA
L’apparecchio non funziona se il gruppo recipiente del frullatore (B1 + B2 + B3) non è
assemblato e posizionato correttamente sull’unità motore (A).
PRIMA DEL PRIMO UTILIZZO
Prima del primo utilizzo, lavare il gruppo recipiente (B) e il gruppo coperchio (C) con acqua
calda e detersivo per piatti. Non lavare l’unità motore (A).
AVVERTENZA! Le lame sono estremamente affilate; manipolarle con attenzione
durante l’uso, la pulizia o lo svuotamento del recipiente.
Accertarsi di aver rimosso tutti i materiali di imballaggio prima di usare l’apparecchio.
INTRODUZIONE
Questo frullatore vi farà scoprire un nuovo mondo di consistenze: liquidi, frutta a pezzetti e
polveri macinate nemente per ottimi risultati culinari. Grazie ad esso è possibile miscelare
ingredienti semplici per ottenere ricette sosticate.
FUNZIONAMENTO DELL’APPARECCHIO
Posizionare l’unità motore (A) su una supercie piana e stabile e collegarla a una presa
di corrente.
16
Page 17

Versare gli ingredienti nel recipiente di miscelazione (B3). Il livello massimo è 600 ml (come
indicato sul recipiente) e non deve essere superato. Per risultati migliori, si raccomanda
di riempire il recipiente iniziando con gli ingredienti liquidi, successivamente versare gli
ingredienti freschi/surgelati (tagliare gli ingredienti a pezzi non più larghi di 2 cm). Non
riempire eccessivamente il recipiente.
Avvitare saldamente l’unità lama con la guarnizione (B1+B2) sull’estremità aperta del
recipiente di miscelazione (B3) (Fig.1). Posizionare il recipiente con l’unità lama sull’unità
motore, allineando la freccia sull’esterno dell’unità lama con la freccia sul bordo dell’unità
motore (Fig. 2).
Per miscelare gli ingredienti, premere il recipiente (B) sull’unità motore (A) (Fig. 3). Tenerlo
premuto no al termine della miscelazione. Per arrestare la miscelazione, rilasciare la
pressione sul recipiente. Il tempo di funzionamento continuativo non deve superare i 30
secondi. Attendere 10 minuti prima di iniziare una nuova miscelazione.
L’apparecchio non è adatto alla miscelazione di patate, panna, albumi, impasti, ecc.
L’apparecchio non deve essere usato con liquidi caldi, per evitare un’eccessiva pressione
sulla base.
Se il motore si arresta durante l’uso, scollegare l’apparecchio dalla presa di corrente e
rimuovere il recipiente (B) dall’unità motore. Lasciare che l’apparecchio si raffreddi per
circa 10 minuti prima di riavviarlo.
Al termine della miscelazione, capovolgere il recipiente afnché l’unità lama (B1) sia
rivolta verso l’alto e svitarla dal recipiente (B3) (Fig. 4). Posizionare la guarnizione nel
coperchio e avvitare il coperchio (C1+C2) (Fig.5). Il recipiente è pronto all’uso: è possibile
portarlo sempre con sé.
RICETTE
ITALIANO
Frullato di ananas, mango e lime
125 g di ananas fresco
½ mango (125 g)
½ lime
80 ml di succo d’arancia
1. Rimuovere la scorza e il torsolo dell’ananas e tagliare la polpa a dadini.
2. Sbucciare il mango, rimuovere il nocciolo e tagliarlo a dadini.
3. Aggiungere l’ananas, il mango e il succo d’arancia.
4. Tagliare il lime in due e spremere il succo di ½ lime nel recipiente del frullatore.
5. Posizionare la lama. Miscelare per 30 secondi e servire freddo.
Frullato di fragola e menta
200 g di fragole
3 foglie di menta
2 yogurt bianchi 0%
10 g di miele
1. Lavare e depicciolare le fragole.
2. Lavare le foglie di menta.
3. Versare le fragole, la menta, il miele e gli yogurt nel recipiente del frullatore.
Posizionare le lame.
4. Miscelare per 30 secondi continuando a premere il recipiente del frullatore.
Servire immediatamente.
17
Page 18

Frullato di banana, ananas e latte di mandorla
240 ml di latte di mandorla
½ banana (50 g)
80 g di ananas fresco
1. Rimuovere la scorza e il torsolo dell’ananas e tagliare la polpa a dadini.
2. Sbucciare la banana e tagliarla a rondelle.
3. Versare il latte, la banana e l’ananas nel recipiente del frullatore. Posizionare
la lama.
4. Avviare il frullatore a 8 impulsi, poi per 30 secondi continuando a premere.
5. Servire fresco.
È possibile sostituire il latte di mandorla con latte di soia, latte di avena, ecc.
PULIZIA DELL’APPARECCHIO
Scollegare l’apparecchio dalla presa di corrente e rimuovere il recipiente.
Maneggiare le lame con attenzione perché sono affilate.
Risciacquare il recipiente (B3) e l’unità lama (B1+B2) immediatamente dopo l’uso sotto
l’acqua corrente, e lavare le parti separabili con acqua calda e detersivo per piatti.
Per facilitare la pulizia, è possibile separare l’unità lama (B1) dal recipiente (B3) svitandola.
Il recipiente (B3), l’unità lama (B1) e il coperchio (C2) possono essere lavati nel cestello
superiore della lavastoviglie usando il programma “ECO” o “DELICATO”.
Per pulire l’unità motore (A), usare un panno umido e asciugarla accuratamente.
Non immergere l’unità motore (A) in acqua o altri liquidi.
Pulizia della guarnizione
Durante la pulizia dell’unità lama è necessario rimuovere la guarnizione in gomma dall’unità
lama per eliminare eventuali residui alimentari.
1. Svitare l’unità lama (B1) dal recipiente (B3). Prestare attenzione perché le lame sono
molto aflate. Capovolgere l’unità lama (B1) e inserire l’asticella in plastica (D) inclusa
nel piccolo foro sulla parte inferiore dell’unità lama (Fig. 6).
2. La guarnizione uscirà dalla parte superiore dell’unità lama; pulirla con acqua e
detergente.
3. Pulire attentamente la guarnizione e l’unità lama (l’unità lama è lavabile in lavastoviglie)
e riposizionare la guarnizione nell’unità lama. Assicurarsi che la guarnizione sia ssata
saldamente intorno alla base dell’unità lama premendola con l’estremità arrotondata
dell’asticella in plastica. Se la guarnizione non viene riposizionata correttamente
sussiste il rischio di perdite.
18
Page 19

RISOLUZIONE DEI PROBLEMI
PROBLEMA CAUSA SOLUZIONE
L’apparecchio non
funziona.
Vibrazioni eccessive. L’apparecchio non è
Perdite dal recipiente Posizionamento
La lama non ruota
facilmente.
Non è collegato
all’alimentazione.
Il recipiente (B)
non è assemblato
o posizionato
correttamente sull’unità
motore (A).
posizionato su una
supercie piana e
stabile.
Eccessiva quantità di
ingredienti.
Assemblaggio scorretto
degli accessori.
scorretto della
guarnizione (B2)
sull’unità lama (B1).
L’unità lama (B1 +B2)
è bloccata in modo
scorretto sul recipiente
(B3).
Gli alimenti sono troppo
duri o a pezzi troppo
grandi.
Collegare l’apparecchio a una presa di
corrente con lo stesso voltaggio.
Vericare che il recipiente sia
assemblato correttamente; smontarlo
e riassemblarlo (Fig.1 e Fig.2) e
controllare che sia inlato a fondo
dell’unità motore.
Tenere premuto il recipiente (B)
durante l’uso (Fig.3).
Collocare l’apparecchio su una
supercie piana e stabile.
Ridurre la quantità di ingredienti
utilizzati.
Controllare che il recipiente (B3) sia
assemblato correttamente sull’unità
lama (B1+B2).
Accertarsi che la guarnizione sia
posizionata correttamente: i bordi
della guarnizione devono essere
visibili e non devono essere piegati.
Manipolare l’unità lama (B1) con
attenzione perché le lame sono
affilate.
Accertarsi che l’unità lama e il
recipiente siano avvitati correttamente.
Ridurre la quantità o le dimensioni
degli ingredienti.
Aggiungere del liquido agli ingredienti
nel recipiente senza superare il livello
massimo.
ITALIANO
L’apparecchio continua a non funzionare?
Contattare il servizio clienti (vedere i dettagli di contatto nel libretto).
19
Page 20

FR ................. P. 4 – 7
EN ................. P. 8 – 11
DE ................. P. 12 – 15
IT ................... P. 16 – 19
8080016067
 Loading...