

Page 1

Beyond reason
Beyond reason
KRUPS PREP EXPERTKRUPS PREP EXPERT
KA950 Kitchen Machine
INSTRUCTION &
RECIPE BOOK
HELPLINE
If you have any product problems or queries, please contact our
Customer Relations Team first for expert help and advice:
0845 602 1454 - UK
(01) 4018448 - Ireland
or consult our website:
www.krups.co.uk
Engineered to prepare and perform
KA950 Kitchen Machine
0827887
Page 2
DESCRIPTION OF ACCESSORIES
03
CONTENTS
00
00
02
Thank you for choosing an appliance
from the KRUPS range, which is intended
exclusively for the preparation of food
and is only for indoor, domestic use.
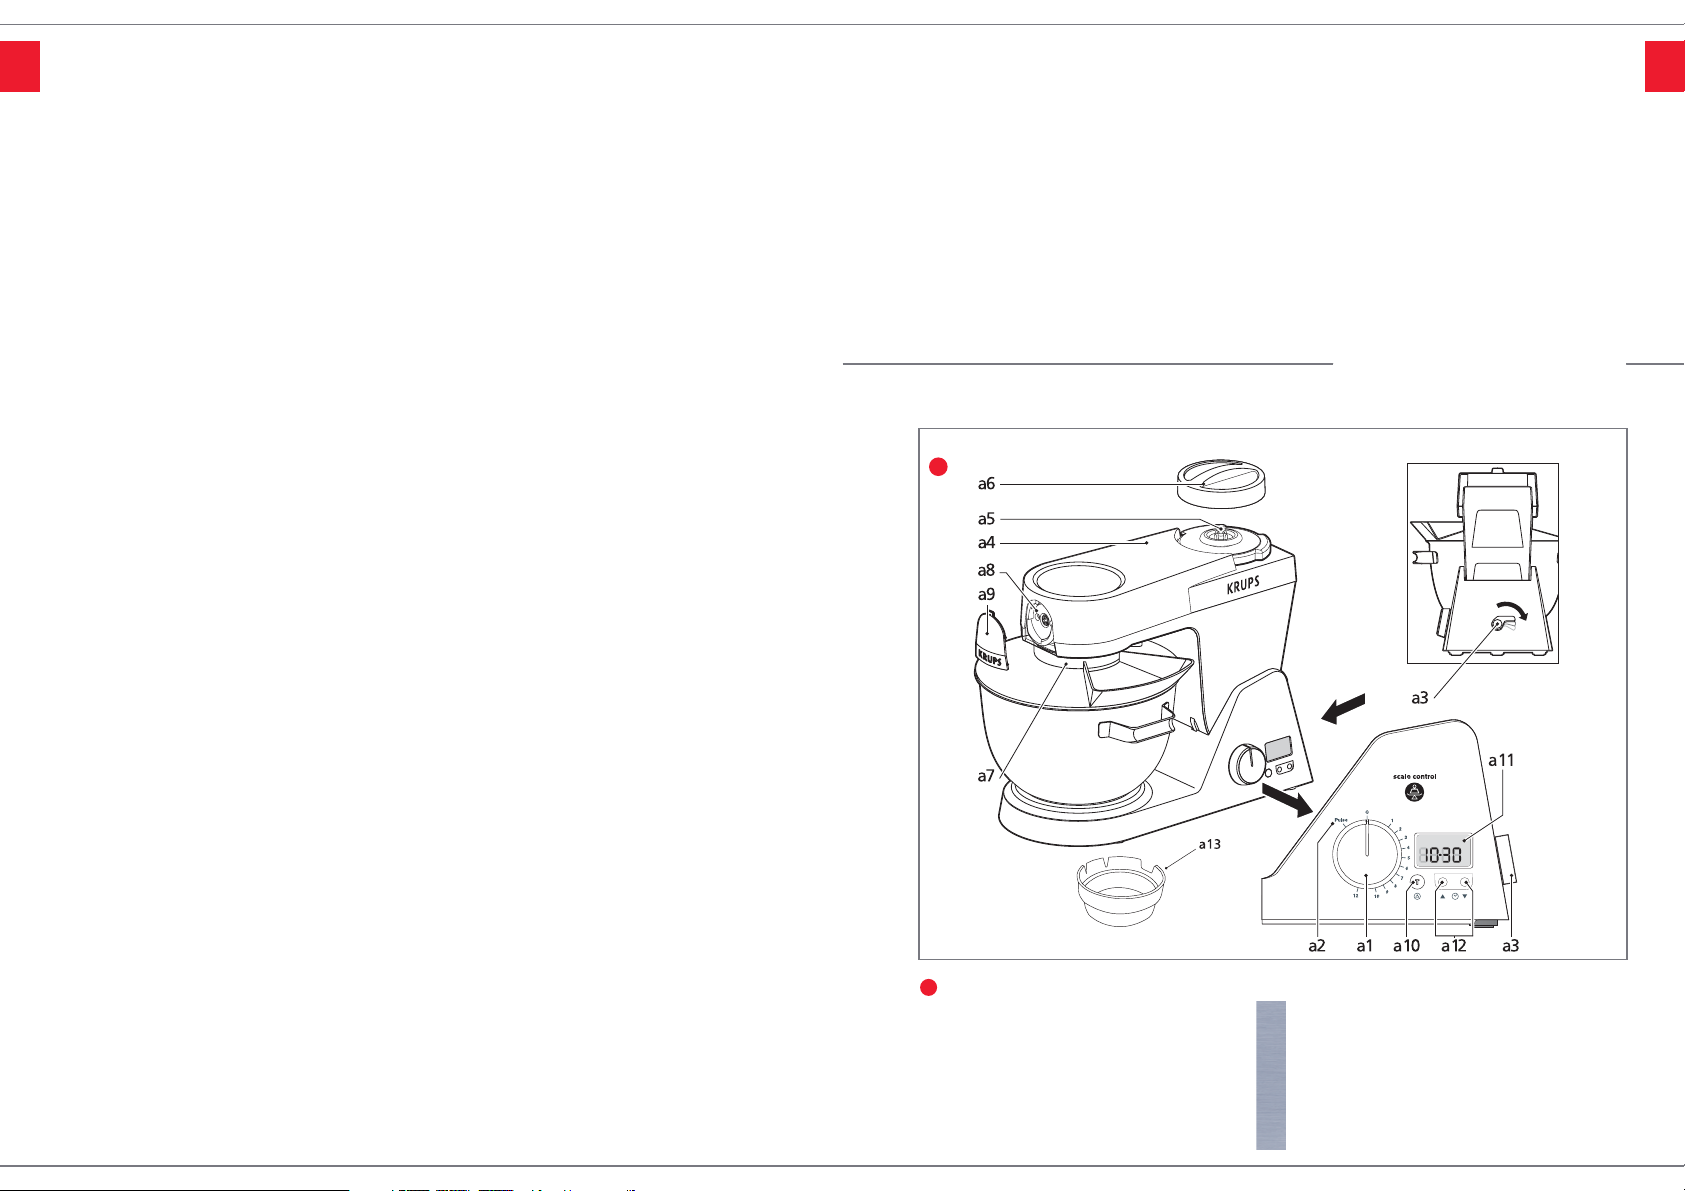
Motor Unit & Control Panel
a1 Electronic speed control
a2 ‘Pulse’ setting (intermittent operation)
a3 Release lever for multifunction head (a4)
a4 Multifunction head
a5 Power outlet for blender/minichopper/grinder
a6 Cover for outlet a5
a7 Power outlet for mixing accessories
(kneading hook, whisk, mixer blade)
a
a
a8 Power outlet for mincer
a9 Removable cover for mincer power outlet
a10 Set zero button for weighing
a11 Display for weight (in grams only) for weighing function and
time (in seconds and minutes) for timer function
a12 Adjustment buttons for operating time and of TIMER
a13 Power outlet cover for a7
INSTRUCTIONS AND INFORMATION
ACCESSORIES .................................................................................. page 3 - 5
DESCRIPTION OF ACCESSORIES .......................................................... page 6
SAFETY INSTRUCTIONS.......................................................................... page 7
USING YOUR APPLIANCE ...................................................................... page 8
SPEED SETTINGS AND MAXIMUM CAPACITIES .................................... page 9
YOUR FOOD PROCESSOR’S FUNCTIONS .................................... page 10 - 15
CLEANING, TROUBLESHOOTING .................................................. page 16-17
IMPERIAL TO METRIC CONVERSION TABLE ........................................ page 18
DISPOSAL OF PACKAGING ....................................................................page 18
RECIPES
SOUPS AND STARTERS ................................................................ page 20 - 21
MAIN COURSES ............................................................................ page 22 - 25
DESSERTS...................................................................................... page 26 - 29
BREADS AND BAKERY .................................................................. page 30 - 33
CAKES .......................................................................................... page 34 - 37
BASIC RECIPES ............................................................................ page 38 - 39
Page 3
ACCESSORIES (According to model)
05
ACCESSORIES (According to model)
04
Spatula
Dough cutter
h
i
h
i
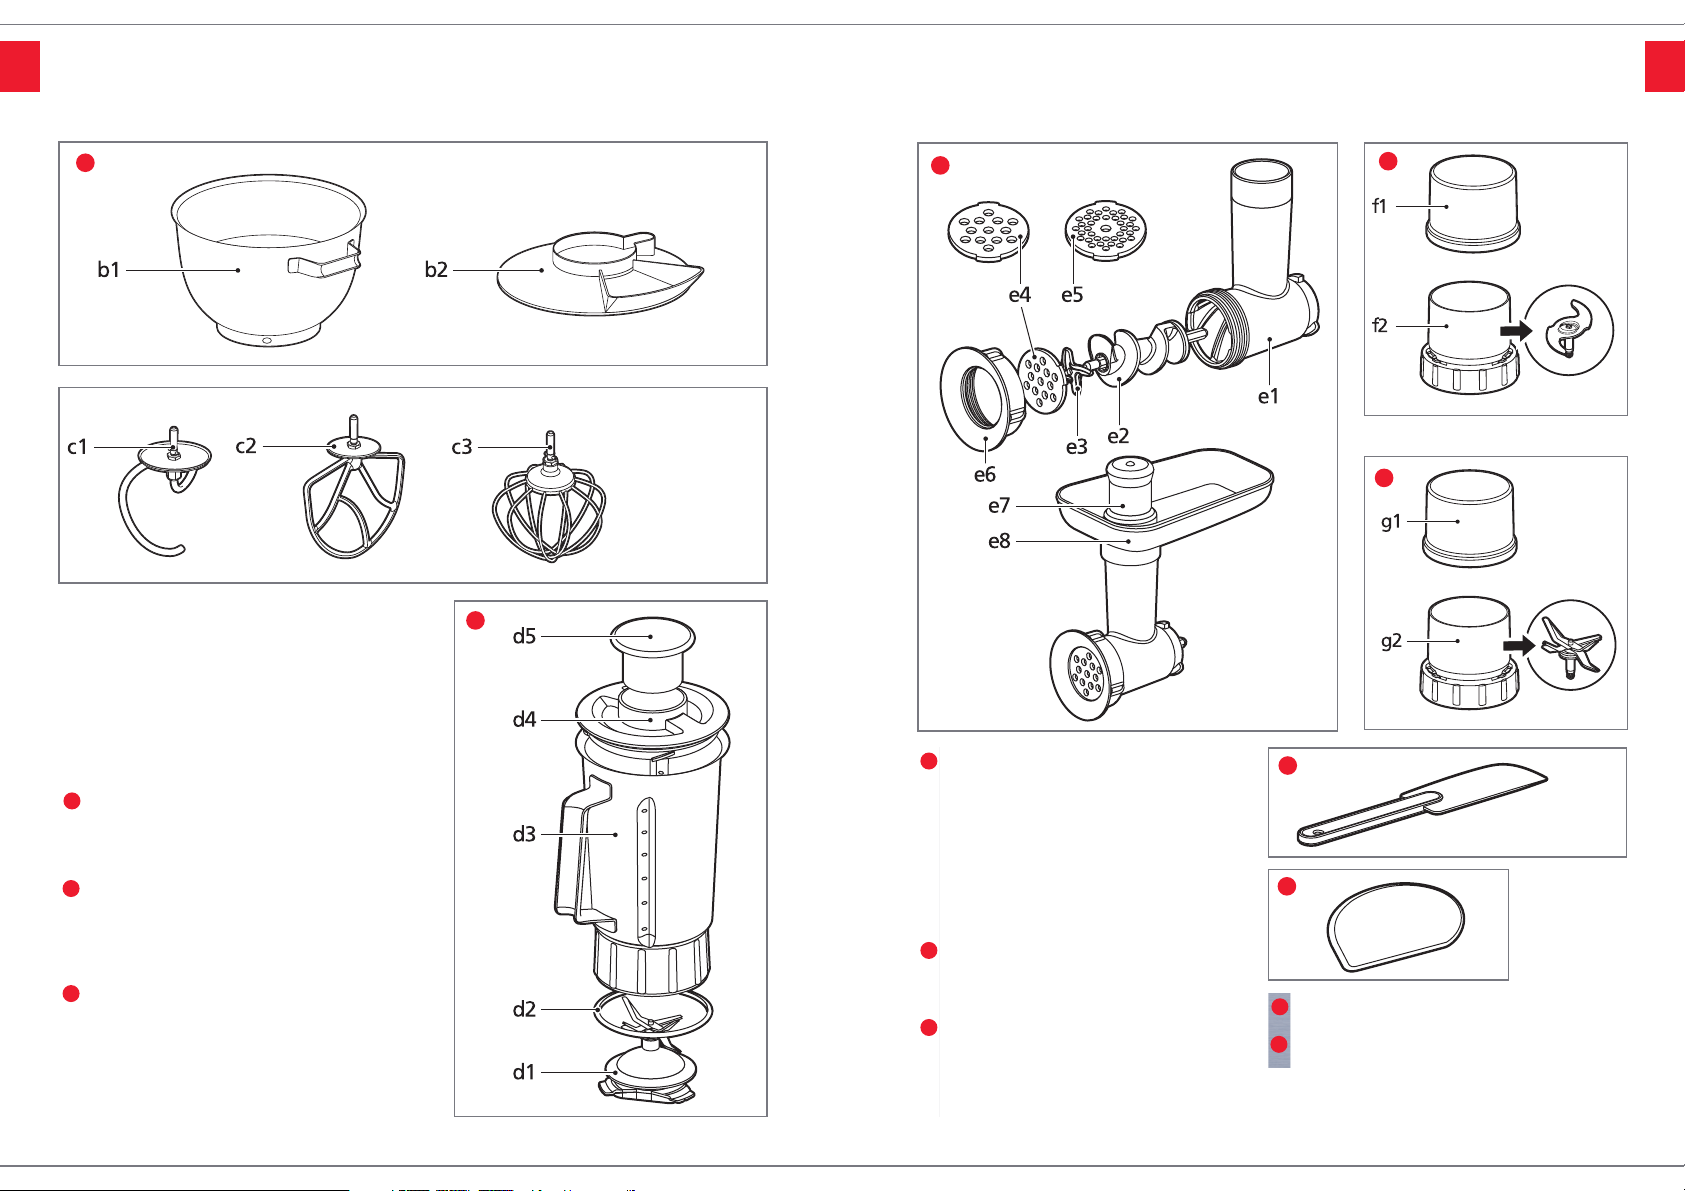
Bowl assembly
b1 Stainless steel bowl
b2 Splashguard
Mixer accessories
c1 Kneading hook
c2 Mixer blade
c3 Whisk
Blender (according to model)
d1 Removable blade/nut assembly
d2 Reversible seal
d3 Stainless steel jug
d4 Lid
d5 Measuring cap
b
c
d
b
c
d
e
f
g
Mincer (according to model)
e1 Metal body
e2 Feed screw
e3 Blade
e4 Coarse mincing screen
e5 Medium mincing screen
e6 Cap nut
e7 Pusher
e8 Metal tray
Mini-chopper (according to model)
f1 Cover
f2 Bowl
Grinder (according to model)
g1 Cover
g2 Bowl
e
f
g
The accessories included with the model that you
have just purchased are shown on the flap found at
the top of the box.
Page 4

SAFETY INSTRUCTIONS
07
DESCRIPTION OF ACCESSORIES
06
• Carefully read the instructions before using
your appliance; any use which does not
conform to the instructions for use will
release KRUPS from all responsibility.
• Never leave the appliance to run
unsupervised, especially when young
children or disabled persons are present.
• Check that the voltage rating of the
appliance matches that of your electrical
system. Any error in connections will
negate the guarantee.
• This product has been designed for
domestic use only. Any commercial
use, inappropriate use or failure to
comply with the instructions, the
manufacturer accepts no responsibility
and the guarantee will not apply.
• Unplug the appliance as soon as you have
finished using it and when you clean it.
• Do not use your appliance if it is not
working correctly or if it has been
damaged. If this is the case, contact the
Krups Helpline - see back cover.
• Any work on the appliance other than
normal care and cleaning by the customer
must be carried out by a KRUPS approved
service centre.
• Do not immerse the appliance, the power
cord or the plug in water or in any other
liquid.
• Do not allow the power cord to hang within
the reach of children.
• Do not allow the power cord to come close
to or in contact with the hot parts of your
appliance, any other heat source or any
sharp edge.
• If the power cord or the plug is damaged
do not use the appliance. To avoid any risk
these must be replaced by an approved
KRUPS service centre Please call our
Helpline (see back page).
• Do not store the accessories; mixer blade,
dough hook and whisk inside the bowl as
their weight could damage the weighing
system.
• Do not put any accessories containing
metal into a microwave oven.
• For your safety, only use KRUPS
accessories and spare parts that
correspond to your appliance.
• Always remove the blender (d) before
activating the release button (a3) for the
multifunction head (a4).
• Always use the pusher (e7) to feed food
items down the feed tube of the mincer (e);
never use fingers or cutlery or any other
implement. Do not touch moving parts.
• Handle the blades of accessories (d), (e), (f),
(g) with great care; they are extremely sharp.
• Do not touch the whisk, mixer blade or
kneading hook while the appliance is in
operation.
• Do not use the spatula while the
appliance is in operation.
• Only remove the accessories when the
appliance has come to a complete stop.
• Do not let long hair, scarves, ties, etc. hang
over the appliance when in operation.
• Never insert utensils (spoon, spatula etc.)
through the feed tube of the splash guard
(b2) or lid (d4).
• Do not operate the blender without its lid.
• Only use one accessory at a time.
• The appliance must not be used in
proximity to a microwave appliance or
mobile phone because of radio frequency
interference.
• Always use the appliance on a flat, stable,
heat-resistant work surface away from
water splashes and sources of heat.
Kneading Hook (c1)
The hook is used when making all types of
bread or yeast dough and takes all the hard
work out kneading. The planetary action
ensures a smooth, elastic dough. Use it for
bread, rolls, buns, pizza, pasta dough and
sweet dough including yeast batter doughs for
savarin, kugelhopf and rum babas.
Mixer blade (c2)
This is the attachment that is most frequently used.
You can use it for mixing cake mixtures either by
the creamed or all-in-one method, making pastry,
for rubbed-in mixtures such as crumbles and rock
cakes, mashed potatoes, biscuit dough, choux
pastry, icing and crumbing biscuits for
cheesecakes and biscuit crumb flan cases.
Whisk (c3)
The shape of the whisk is designed to
incorporate the maximum amount of air into
the food. Use for whisking egg whites,
meringues, whipping cream, batters mixtures,
mayonnaise, whipped desserts such as
soufflés and mousses, cheesecakes, and
whisked sponges. Do not use the whisk for
heavy mixtures, such as creaming fat and
sugar, as you could damage it.
Blender (d)
Ideal for blending and puréeing soups and
sauces, making frothy milkshakes, smoothies
and cocktails, puréeing soft fruits or cooked
vegetables and fruit, making batters and
mayonnaise. The stainless steel jug, apart
from being stylish, has the advantage of
keeping the ingredients cool which is ideal
when making smoothies, cocktails and
milkshakes. It can blend up to 1.5 litres.
Mincer (e) (Available as an additional accessory)
This accessory enables you to mince your
own meat, game, poultry and fish to make
burgers, fish cakes, pâtés, terrines and minced
meat for chilli-con-carne, bolonnaise sauce,
Shepherds pie, meatballs, etc. There are two
different sizes of mincing screens – medium
and coarse.
Mini-chopper (f) (Available as an
additional accessory)
Useful for chopping cloves of garlic, herbs,
parsley, cooked ham, small amounts of bread
for breadcrumbs and baby food.
Note: the mini-chopper is not designed to grind
coffee beans or hard spices.
Grinder (g) (Available as an additional accessory)
Grinds spices, pepper, dried figs and dried
fruit in seconds.
Note: the grinder is not designed to grind coffee
beans. A separate coffee grinder is available to
purchase.
Stainless steel bowl (b1)
The large capacity bowl is made of stainless
steel which has the advantage of staying cool
when whipping cream, making pastry and
whisking egg whites. The bowl has handles to
assist when scraping out food and is
dishwasher safe for easy cleaning.
Splash guard (b2)
The splashguard stops powdery food like flour
from producing a cloud of powder when mixing.
It also prevents any splashes from liquid being
mixed in the bowl. There is an opening at the
front so that additional ingredients can be
spooned directly into the bowl during mixing. The
accessory can easily be changed without having
to remove the splashguard.
Spatula (h)
The flexible spatula is designed to fit the
contours of the bowl and scrape every last
bit of mixture out.
Dough cutter (i)
An extremely useful tool, for cutting bread and
biscuit dough. Make up a batch of dough and
divide it into portions using the dough cutter.
Accessories included are:
Stainless steel bowl
Splash guard
Blender
Kneading hook
Mixer blade
Whisk
Spatula
Dough Cutter
Page 5

Function Type of Food Accessory Speed Minimum Max Capacity
capacity
(total weight of
ingredients)
kneading White bread dough Kneading 1-4 only 250g flour 2 kg
& pizza dough hook
Yeast batter doughs Kneading 1 to 4 only 250 g flour 2 kg
(for savarin, rum hook
babas, kugelhopf)
Bread dough made Kneading
with wholemeal, rye or hook 1 to 4 only 250 g flour 1.3 kg
bran bread
(maximum of 750g
of flour at a time)
Mixing Sponge cake mix Mixer blade 1 to 12 2 egg sponge 2 kg
(Victoria sponge cake)
or cake mix
All-in-one method sponge Mixer blade 1 to 12 2 egg sponge 2 kg
cake mixture
Biscuit dough Mixer blade 1 to 12 250 g flour 2 kg
Shortcrust pastry, Mixer blade 1 to 4 only 200 g flour 2 kg
Crumble & Rock cake mix
Mashed potatoes Mixer blade 3 to 5 500 g 1.5 kg
and mashed vegetables
Choux pastry Mixer blade 4 to 8 3 egg mixture 2 kg
Shortbread dough Mixer blade 1 to 8 only 200g flour 2 kg
Beating Mayonnaise Whisk 1 to 12 2 egg yolk 2 kg
quantity
mayonnaise
Batters Whisk 1 to 12 250 ml liquid 2 kg
Whisking Whisked egg whites Whisk 1 to 12 2 medium size Up to 10 egg
egg whites whites
Whisked sponges, Genoese . Whisk 8 to 10 2 eggs 6 eggs
sponge. Roulades, Swiss roll
Whipping Whipped cream Whisk 6 to 10 284 ml tub cream Up to 500 ml
Blending Soups, stewed fruit, Blender jug Pulse or any 0.5 litre 1.25 litre for
milkshakes, smoothies speed setting (500 ml) thin preparations,
cocktails, batters 1.5 litre for thick
thick preparations.
Chopping small Herbs, garlic, bread, rusks, Mini Chopper Pulse or any Sufficient food to 100 g
small quantities ham, nuts and baby food or Grinder speed setting cover blades
very fine
Mincing Raw & cooked meat, poultry, Mincer head 12 Not applicable Not applicable
game and fish.
SPEED SETTINGS AND MAXIMUM CAPACITIES
09
USING YOUR APPLIANCE
08
Weighing mode
• This function enables you to dispense with
separate scales and weigh your ingredients
up to a total of 4kg in grams only. The
scales weigh in 5g increments.
• Place the machine on a clean, horizontal
work surface.
• Place the stainless steel bowl (b1) or either
the assembled blender (d) or the
assembled mini-chopper (f) or the
assembled grinder (g) into position.
• Press the zero ‘T’ button (a10); Initially the
display shows 8888 but after a delay of a
few seconds a ‘0’ will appear on the
display (a11). Fill the bowl to the desired
amount. Allow a few seconds for the
weight to stabilise to avoid adding too
much of the ingredients.
• Make sure all ingredients you use are
evenly distributed in the bottom of the bowl
to get an accurate weight reading.
• To weigh additional ingredients press the
zero ‘T’ button (a10) each time to reset
to zero.
• You can weigh additional ingredients
directly in the stainless steel bowl (b1) or
place a separate bowl or plate on top of
the multifunction head. Press the ‘T’ button
to reset the weighing scale to zero.
Timer mode
This function enables you to:
• Measure the processing time: once the
ingredients are weighed and the accessory
cover in place, the seconds counter will
start to run as soon as you turn the speed
control (a1), enabling you to measure the
processing time.
• Program an operating time up to 16
minutes: Once the ingredients are weighed
and the accessory cover in place, press the
button or the button (a12) of the
timer; the display (a11) will show 0. Time is
shown in 10sec increments.
To set an operating time, press the button
to increase the setting or the button to
reduce it (a12).
- For longer times press and hold the
button and the setting will change more
quickly.
- For shorter times or fine adjustment, press
the button or the button briefly
several times.
- To set a time more quickly, press and hold
down the button or the button
pressed until the desired time is shown.
- To jump directly from the maximum time of
16 minutes to zero, press the button for
2 seconds.
- To jump directly from zero to the maximum
time of 16 minutes, press the button for
2 seconds.
- To cancel a time setting, press the
button and the button together for one
second.
As soon as you turn the speed control knob
(a1), the display will show the time counting
down and the appliance will stop at the end of
the programmed time. Once STOP is
displayed, to clear this the speed control knob
should be turned back to 0.
For speed 1 you may need to turn the control
knob (a1) slightly past speed 1 setting and
back again to the number 1.
The appliance can also be stopped at any
time by turning the speed control knob (a1)
back to ‘0’.
Page 6
Adjusting the height of your accessories
Your accessories are equipped with a system
for adjusting the height above the bottom of
the bowl for optimum results.
• Unplug the appliance.
• Loosen the nut on the whisk, mixing blade
and kneading hook using a 14mm spanner
(not included with the product).
• Press the release lever (a3), lift the
multifunction head and insert the whisk,
mixing blade or kneading hook by pushing
upwards and at the same time turn it a
quarter turn anti-clockwise to lock it in
position (fig 1.1)
• Lower the head of the appliance (a4) with
the lever (a3) and press down until a click
is heard.
• Adjust the height by turning the shaft (fig
1.2) Adjust the accessories to the ideal
position, i.e. as close as possible to the
sides of the bowl without touching it. If the
accessory is too far away from the bottom
of the bowl it may not mix all the
ingredients properly.
• Lift the head (a4) of the appliance again,
holding the whisk, mixing blade or
kneading hook in position, and retighten
the nut.
Before using for the first time
• Clean all parts of the accessories with
warm water and washing up liquid. Rinse
and dry.
• Place the appliance on a flat, stable, heat-
resistant, clean and dry work surface and
then plug in your appliance.
Operating your appliance
• It can be started in a number of ways:
Intermittent (pulse) operation: turn the
speed control knob (a1) to the pulse
position (a2) repeatedly for better control of
the preparation process.
Continuous operation: turn the speed
control knob (a1) to the desired setting
from 1 to 12 according to the food being
prepared.
You can change the setting during use.
Stop: return the knob (a1) to the 0 setting.
N.B When selecting speed 1, you may find that
to start the machine you may need to turn the
control knob (a1) slightly past the speed 1
setting and back again to the number1.
Important: the appliance will not start if the
cover (a6) is not properly closed and clicked
into place.
YOUR FOOD PROCESSOR’S FUNCTIONS
11
USING YOUR APPLIANCE
10
2: USING THE MIXER
Depending on the type of recipe, the bowl (b1) with the splash
guard can be used to prepare up to 2 kg of mixture.
ACCESSORIES USED
Bowl (b1), Splash guard (b2), Kneading hook (c1), Mixing blade (c2) , or Whisk (c3)
2
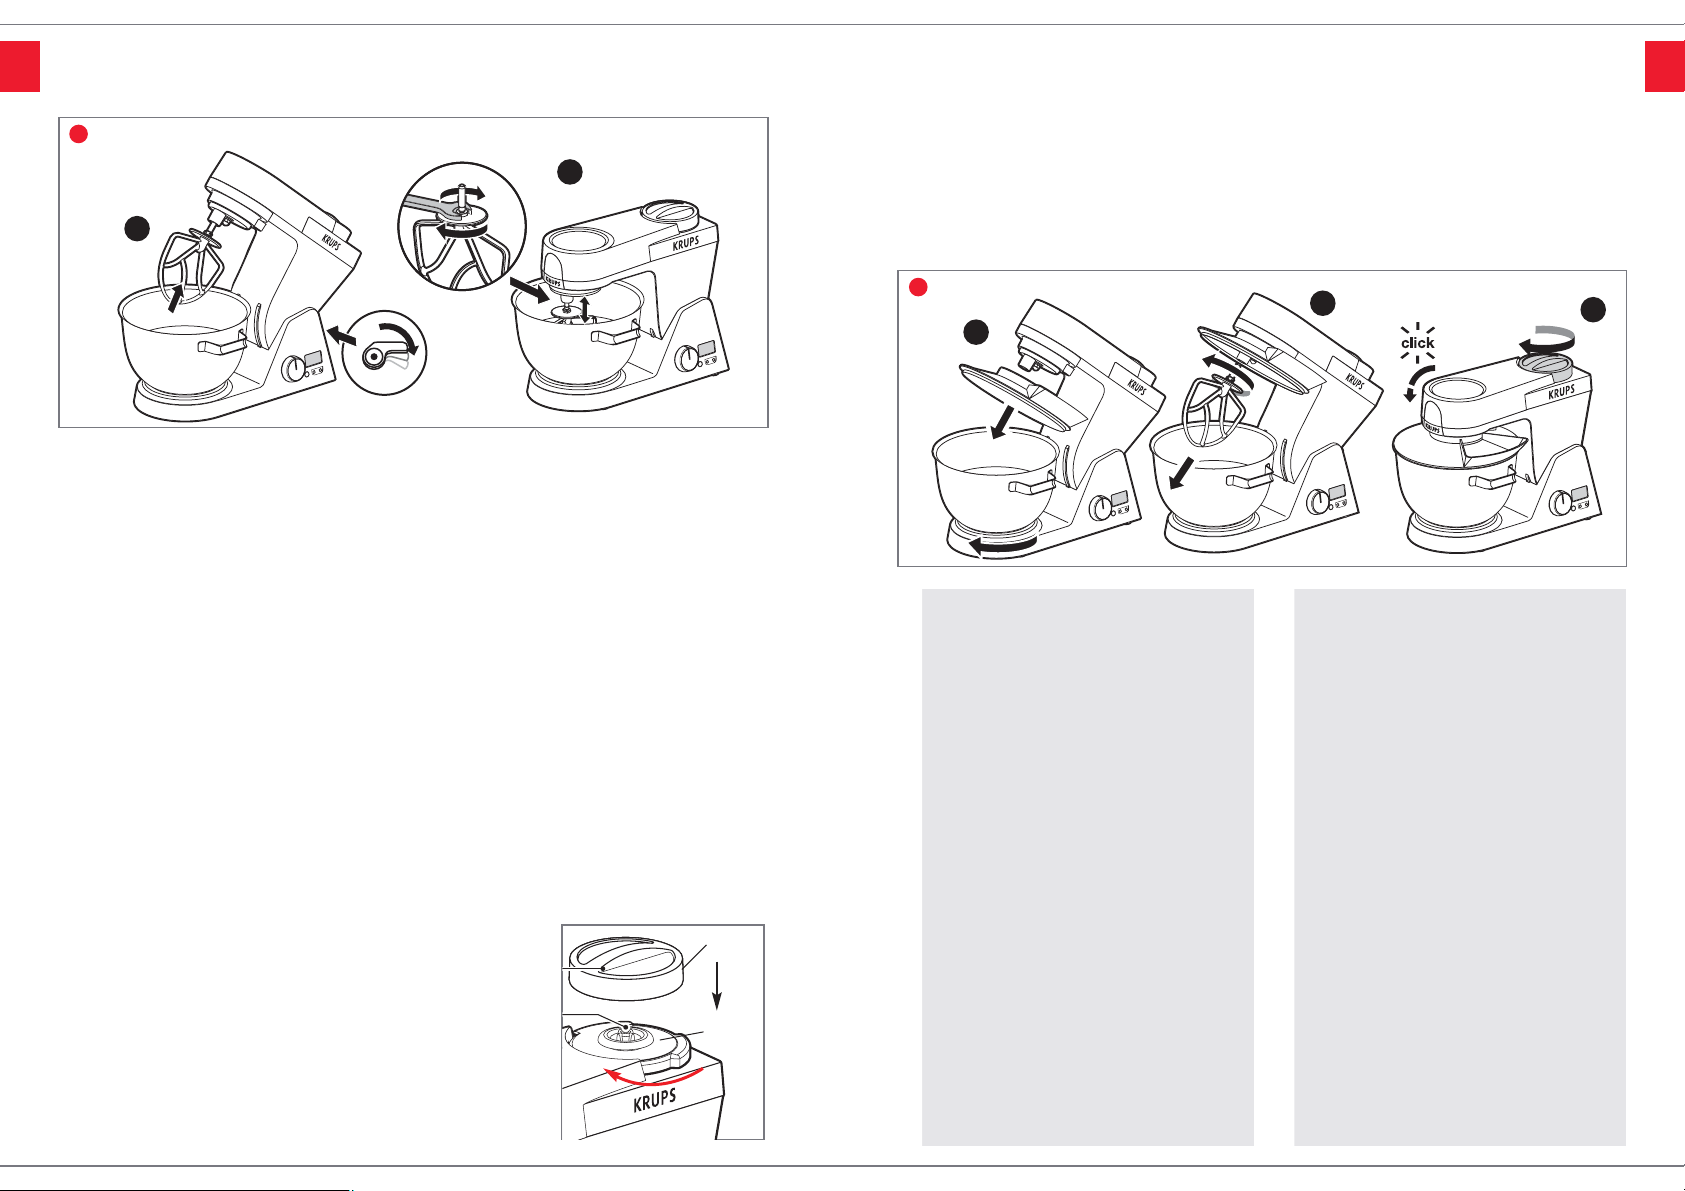
Fitting the accessories
1 Fit the bowl (b1) onto the appliance by
positioning the handle on the bowl as
shown in figure 2.1 and turning it clockwise
until it locks into position. Place the
ingredients in the bowl, weighing them as
indicated under the WEIGHING function
(see figure 2.1).
2 Position the splash guard (b2) on the head
(a4) with the filling opening at the front of
the appliance (see figure 2.1) and push
upwards until it clicks into place.
3 Fit the desired accessory (c1, c2 or c3) in
the power outlet (a7), pushing the shaft of
the accessory home and then push
upwards and at the same time turn it a
quarter turn anti-clockwise to lock it into
position (see figure 2.2).
4 Press button (a3) again. Lower the
multifunction head of the appliance (a4) to a
horizontal position until you hear a click.
5 Check that the cover (a6) is properly
positioned over the blender outlet (a5) by
turning it clockwise (see figure 2.3) as far as
it will go.
Starting
Program an operating time as indicated
under the TIMER function or start at once
by turning the speed control (a1) to the
position required
for the recipe.
1 The appliance will start at once. During
preparation, you can add ingredients
through the opening in the Splash guard
(b2).
2 To stop the appliance, turn the knob (a1)
back to 0 or wait for the appliance to stop
automatically if under control of the
programmed TIMER. (Once STOP is
displayed, to clear this the speed control
knob should be turned back to 0).
a6
a5
1
1.1
1.2
Adjusting the height of your accessories
2.1
2.2
2.3
Fitting the accessories
Page 7
YOUR FOOD PROCESSOR’S FUNCTIONS
13
YOUR FOOD PROCESSOR’S FUNCTIONS
12
2: USING THE MIXER 3: USING THE BLENDER
ACCESSORIES USED
Blender assembly (d)
a3
a4
b2
Kneading Mixing Whisking, whipping and emulsifying
Usage and practical tips
Kneading (bread dough & pastry) use the
kneading hook (c1) at speed 1 to 4 only.
You can knead:
• up to 2kg of heavy pastry or dough (pizza
and pasta dough, bread)
• up to 1.3kg of dough for wholemeal, rye or
bran bread (maximum of 750g of flour at a
time).
Mixing (cake & biscuit dough)
• Use the mixing blade (c2) at speed 1 to 12.
You can mix up to 2 kg of light cake mixture
(biscuits, sponge cake, etc) or short-crust
pastry.
• Never use the mixing blade (c2) to knead
heavy doughs.
Whisking, whipping and emulsifying
• Use the whisk (c3) at speed 1 to 12.
• You can prepare: mayonnaise, aioli, sauces,
whisked egg whites (up to 10 egg whites),
whipped cream (up to 0.5L), meringues,
whisked sponges.
• Never use the whisk (c3) to knead heavy
dough or to mix sponge cake mixture.
Removing the Accessories
1 Wait until the appliance comes to a
standstill.
2 Press lever (a3) to release the multifunction
head (a4) and raise it to a vertical position.
3 Release the accessory (c1, c2 or c3) from
the multifunction head by tur
ning it a
quarter turn anticlockwise. (Fig 2.4)
4 To remove the bowl turn it anti-clockwise.
5 Remove the splash guard (b2). (Fig 2.5)
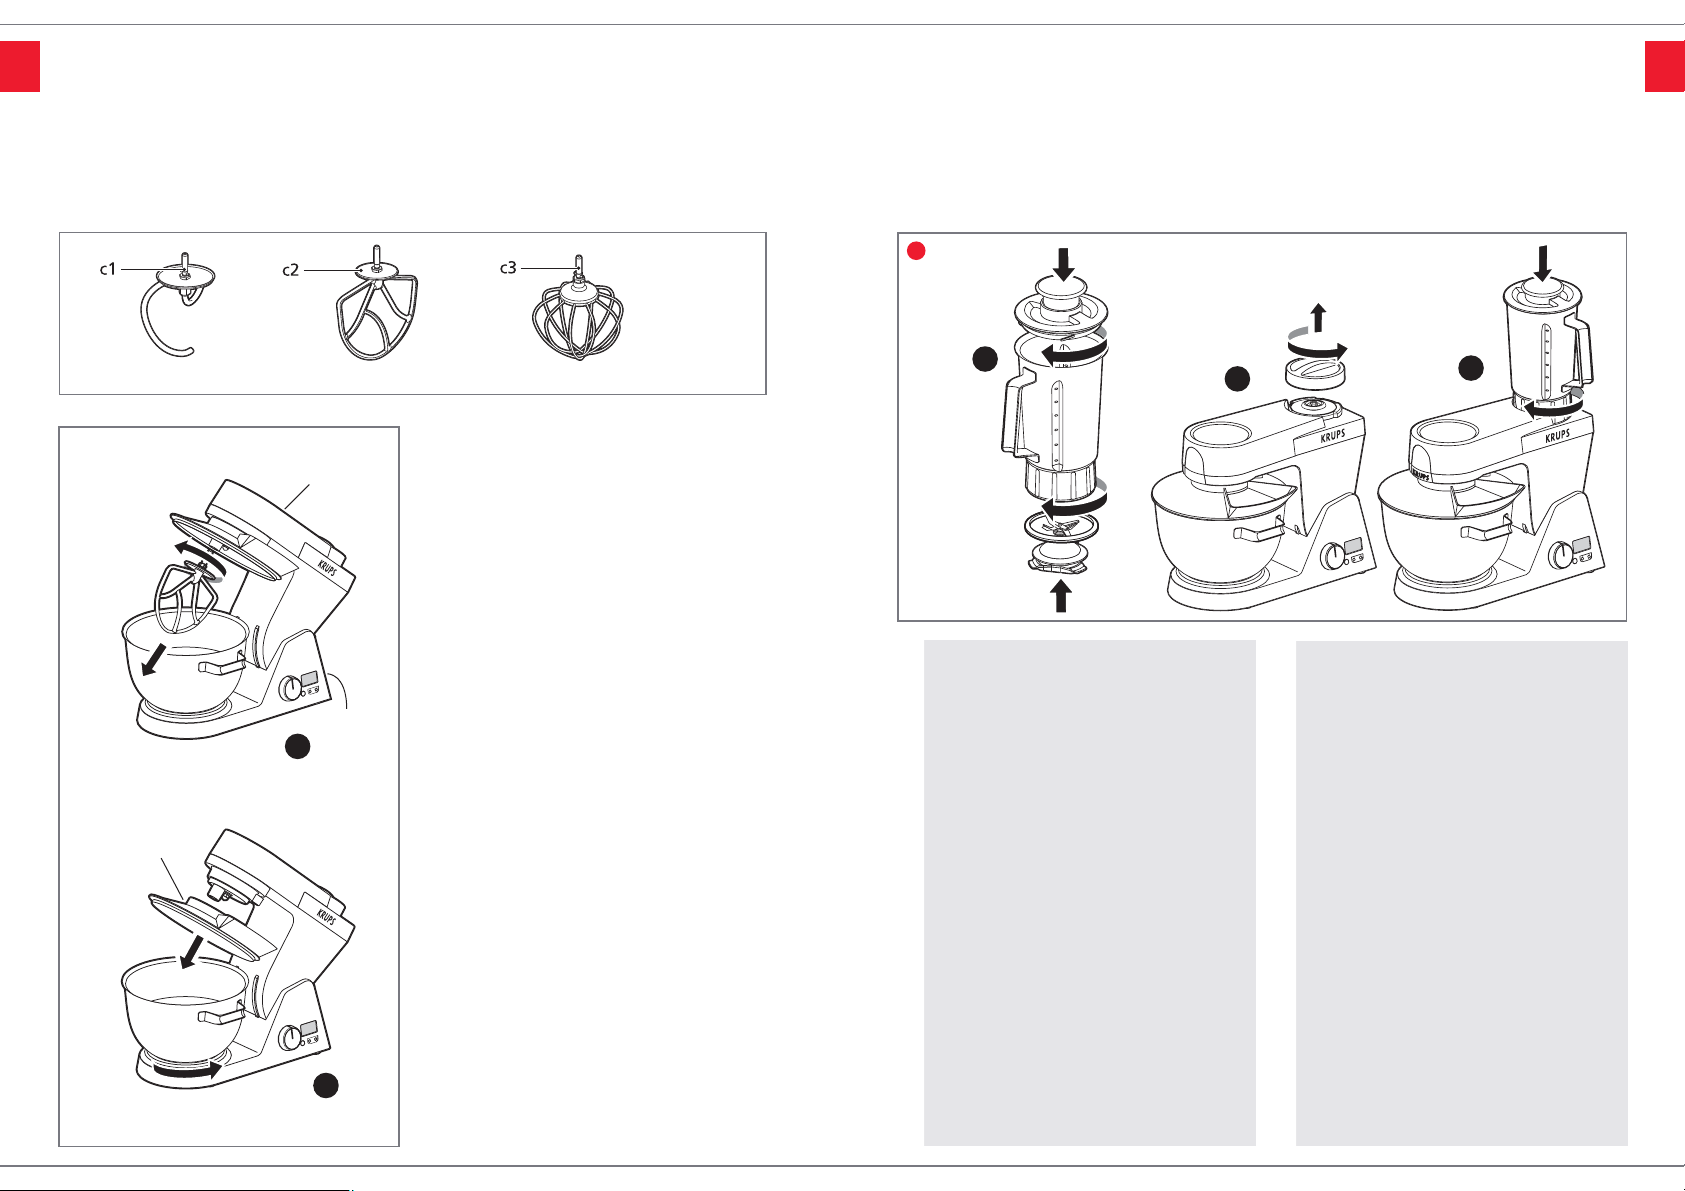
Fitting the blender
Assemble the blade assembly (d1) to the
seal (d2) and lock it with a quarter turn
clockwise into the bottom of the jug (d3) the
jug must be upright. (Fig 3.1)
1 Lower the multifunction head of the
appliance (a4) to a horizontal position by
pressing lever (a3) to release then push down
until you hear a click.
2 Release and remove the cover (a6) from the
outlet (a5) by turning it anti-clockwise. (Fig 3.2)
3 Ensure that the appliance is at a standstill
before fitting on the assembled blender (d).
4 Fit the assembled bender (d) on to (a5).
Position the blender jug handle in the
position shown (Fig 3.3) and lock it in
position by turning it clockwise.
5 Place the ingredients in the blender jug,
weighing them as indicated under the
WEIGHING function and then fit the lid (d4) by
turning clockwise with the measuring cap (d5).
6 The power outlet (a7) will rotate while the
blender operates. If preferred, detach the
splashguard (b2) and fit the power outlet
cover (a13).
Starting
Program an operating time as indicated
under the TIMER function or start at once by
turning the speed control (a1) to the position
required for the recipe.
Use the Pulse position (a2) for better control
of blending.
During preparation, you can add ingredients
through the measuring cap (d5) hole.
• Do not run the blender empty for more than
1 minute.
Usage and practical tips
You can prepare:
- finely blended soups, cream soups, stewed
fruit, milkshakes and cocktails.
- all types of batter (pancakes, waffles,
yorkshire puddings, fritters and custard flan).
• Never fill the blender with boiling liquid. Only
use liquids or foods at simmering
temperatur
es or below.
Removing the Accessories
Wait for the appliance to come to a standstill
before removing the blender by turning it
anti-clockwise and replace the cover (a6) by
locking in place over the outlet (a5).
Removing the accessories
3.1
3.2
3.3
Fitting the
blender
2
2.4
2.5
Page 8

YOUR FOOD PROCESSOR’S FUNCTIONS
15
YOUR FOOD PROCESSOR’S FUNCTIONS
14
4: MINCING
(according to model)
ACCESSORIES USED
Chopping bowl assembly (b),
Metal whisk assembly (g)
5: CHOPPING SMALL QUANTITIES VERY FINELY
(according to model)
ACCESSORIES USED
Assembled mini-chopper (f) or grinder (g).
Fitting the mincer
The attachment:
1 Take the body (e1) by the feed tube with the
largest opening upwards.
2 Insert the feed screw (e2) (drive pins first) in
the body (e1) (see figure 4.1).
3 Fit the blades (e3) on the shaft with the
cutting edges upwards.
4 Place the selected hole-plate (e4 or e5) over
the blades ensuring that the two lugs fit in the
two cut-outs in the body (e1) (see figure 4.2).
5 Screw the cap nut (e6) fully home on the
body (e1).
6 Check the assembly. The shaft should have
no play nor be able to turn on itself.
7 Place the multifunction head (a4) in the
horizontal position (a click should be heard).
8 Remove the cover (a9) from the outlet (a8)
(see figure 4.3).
9 Offer up the assembled mincer attachment
(e), tilted towards you, to the outlet (a8) and
engage it fully. Return the feed tube to a
vertical position by turning to the rear until it
stops (see figure 4.4).
10 Place the removable tray (e8) on the feed
tube (see figure 4.5).
Starting and removing the attachment
Place a bowl in front of the appliance to
collect the minced product.
• Start by turning the speed control (a1) to
speed 12.
• Insert the pieces of meat in the feed tube
piece by piece using the pusher (e7). Never
push the meat with the fingers or any other
utensil.
• To stop the appliance, turn the speed control
to 0 and wait until it comes to a stand still.
• Release the mincer attachment by turning in
the opposite dir
ection to that for fitting it.
Usage and practical tips
• Prepare the full quantity of food to be
minced (for meat, r
emove bones cartilage
and tendons and cut it into small pieces).
• When mincing is finished, any residual
fragments can be clear
ed by putting a few
pieces of bread through the mincer.
Fitting the accessories
1 Lower the multifunction head of the
appliance (a4) to a horizontal position.
2 Release and remove the cover (a6) from the
outlet (a5) by turning it anti-clockwise (see
figure 5.1).
3 Place your ingredients in the bowl (f2 or g2),
fit and lock the lid (f1 and g1) on the bowl
by turning it clockwise.
4 Ensure that the appliance is at a standstill
before fitting the assembled bender
accessory (f or g) on the outlet (a5). Turn it
clockwise to lock it in place (see figure 5.2).
If the cover is not correctly fitted, the
appliance will not start.
Starting and removing
the accessories
• Turn the speed control knob (a1) to the
desired setting.
• The appliance will start at once.
• Use the Pulse position (a2) for better control
of chopping.
With the mini-chopper (f) you can:
- in a few seconds, chop cloves of garlic,
mixed herbs, parsley, dried fruit, bread, rusk
for breadcrumbs, ham etc.
- Prepare baby purées,
- Maximum quantity of nuts
(hazelnuts, almonds, etc) 100g.
This mini-chopper is not designed for hard
products such as coffee beans.
With the grinder (g) you can:
- in a few seconds, chop coriander, pepper,
figs, dried apricots etc.
You can, for example, chop 100 g of dried
apricots in 5 seconds.
This grinder is not designed for hard
products such as coffee beans.
• To stop the appliance, turn the speed
contr
ol knob (a1) to 0.
• Wait for the appliance to come to a
standstill before removing the accessory by
turning it anti-clockwise and replace the
cover (a6) over the outlet (a5), turning it
clockwise to lock.
4
5
4.1
Fitting the mincer
4.3
4.4
4.5
4.2
Fitting the mini-chopper or grinder
5.1
5.2
Page 9

TROUBLESHOOTING AND CLEANING
17
TROUBLESHOOTING
16
The appliance does not work
Impossible to mix or process
small quantities
When preparing foods some
ingredients are unmixed at the
base of the bowl.
When weighing food I keep
adding too much ingredients.
When weighing food the scale
gave me an inaccurate reading.
The WEIGHING function does
not work.
The TIMER function
programming does not work.
The SPEED setting has been set
but the appliance is not working
Clouds of flour or spots of liquid
spill out from the bowl when
mixing.
The plug is not inserted correctly.
The cover (a6) or the accessory
is not correctly fitted on the
multifunction head (a4).
The accessory is too far from the
walls of the bowl.
The quantity of food is too small.
The mixer beater, whisk or
kneading hook isn’t reaching the
bottom of the bowl
The weighing scale takes a few
seconds to stabilise and display
the weight.
The appliance is on an uneven
surface or is resting on the cord.
The ingredients are unevenly
distributed in the bottom of the
bowl.
Your appliance is running.
Your appliance is running.
The speed setting is on number 1
position.
The splash guard (b2) is not in
place.
Speed setting too high.
Connect the appliance to a
socket with the correct voltage.
Check it is switched on.
Check that the cover (a6)
or accessories are correctly
assembled and positioned.
Adjust the height of the
accessory using a 14mm
spanner.
Increase the quantity of food used.
Check the minimum quantities in
the table on page 9.
Adjust the height of the
accessory using a 14mm
spanner.
Wait a few seconds for the
weight to stabilise when nearing
the quantity required.
Add the food a spoonful at a
time rather than pouring it
directly in.
Rather than weighing additional
ingredients directly into the
mixing bowl, place a separate
bowl on top of the multifunctional
head and weigh the ingredients
in it.
Place on a flat, stable, level
surface. Check the appliance
is not resting on the cord.
Use a spoon to distribute the
ingredients evenly around the
bowl.
To weigh, the appliance must be
stopped.
To program, the appliance must
be stopped.
To start the machine you will
need to turn the control knob (a1)
slightly past the speed 1 setting
and back again to the number 1
position.
The kitchen machine should
always be used with the splash
guard (b2) in position.
Start mixing on a lower speed
and then increase to the required
setting.
PROBLEM CAUSE SOLUTIONPROBLEM CAUSE SOLUTION
The rubber seal on the splash
guard (b2) keeps
falling off.
The blender blades do not rotate
freely
Leak at the bottom of the
blender.
Abnormal noise
The appliance stops when
running.
Your appliance is equipped with
a protective cutout that trips if
the load is too high or the
running time too long.
When drying with a tea towel the
seal gets pulled off.
Pieces of food too large or too
hard.
The seal is not correctly
positioned. The blade/nut
assembly is not correctly fitted.
The cover (a6) or accessory is
not correctly positioned on the
multifunction head (a4).
The accessory is touching the
bottom of the bowl.
Quantity is too large.
You have allowed the appliance
to run too long (more than 16
minutes).
Leave to dry on the draining
board if possible or avoid drying
the seal. Do not wash the seal in
a dishwasher.
Reduce the size of the pieces or
quantity of food.
Reposition the seal (d2) on the
blade/nut assembly (d1) and fit it
in the bottom of the jug.
Check that the cover (a6) or
accessories are correctly
assembled and positioned.
Adjust the height of the
accessory (see page 10 of
instructions).
Return the speed control knob
(a1) to 0. Leave the appliance to
cool down for a few minutes.
Remove some of the food being
processed. Restart the
appliance.
Return the speed control knob
(a1) to 0. Leave the appliance to
cool down for a few minutes.
Restart the appliance.
Cleaning
• Unplug the appliance.
• Never immerse the motor unit (a) in water or
put it under running water
. Wipe it with a
dry or slightly damp cloth.
• For easier cleaning, quickly rinse the
accessories after use. Completely dismantle
the mixer attachment. Handle the blades
with car
e, as some have sharp cutting
edges.
• Wash, rinse and wipe the accessories in
warm water and washing up liquid.
Alter
natively they can be put in the
dishwasher (except for the splash guard
(b2), reversible seal (d2), the metal
components of the mincer attachment
(body (e1), feed screw (e2), blade (e3),
course and medium mincing screens (e4
and e5) and nut (e6)).
• The mincing screens (e4) and (e5) and the
blade (e3) of the mincer must be kept
lubricated. Wipe them over with cooking oil
after each use.
• Never use wire wool, abrasive pads or
bleach to clean the stainless steel bowl.
• Do not use the stainless steel bowl on the
hob, in the oven or micr
owave.
• If your accessories are discoloured by food
(carr
ots, oranges etc.), rub them gently with
kitchen towel dipped in cooking oil and then
clean in the usual way.
• Blender assembly (d): pour hot water with a
few dr
ops of washing up liquid into the
blender jug. Close the lid. Fit it on the
appliance and give a few pulses. Remove
the blender, rinse the jug under running
water and leave it upside down to dry. For
cleaning more difficult residues, especially
with thicker preparations, the blade nut
assembly can be detached from the bottom
of the jug. To do this, place the empty
blender upside down on a flat surface,
release the blade/nut assembly with a
quarter turn clockwise and lift out the
mounting/blade and seal with care as the
blade can be sharp. Re-fit the
mounting/blade and seal with a quarter turn
anti-clockwise.
Page 10

IMPERIAL TO METRIC CONVERSION TABLE
18
The weighing facility on your Krups Kitchen Machine only weighs in grams. To convert your existing recipes with
measurements in imperial measures use the guide below. The following weights are only approximate.
Weights
Imperial Metric
1
/
4 oz 7 g
1
/
2 oz 15 g
3
/
4 oz 20 g
1 oz 25 g
1
1
/
2 oz 40 g
2 oz 50 g
2
1
/
2 oz 65 g
3 oz 75 g
3
1
/
2 oz 90 g
4 oz 100 g
5 oz 150 g
6 oz 175 g
7 oz 200 g
8 oz 225 g
9 oz 250 g
10 oz 275 g
11 oz 300 g
12 oz 350 g
13 oz 375 g
14 oz 400 g
15 oz 425 g
1 lb 450 g
1
1
/
4
lb 575 g
1
1
/
2
lb 675 g
1
3
/
4
lb 800 g
2 lb 900 g
2
1
/
4 lb 1 kg
Liquids
Imperial Metric
1
/
2 teaspoon 2.5 ml
1 teaspoon 5 ml
1 tablespoon 15 ml
2 tablespoons (1 fl oz) 30 ml
3 tablespoons 45 ml
4 tablespoons (2 fl oz) 60 ml
5 tablespoons 75 ml
6 tablespoons (3 fl oz) 90 ml
7 tablespoons 105 ml
1
/
4 pint 150 ml
6 fl oz 175 ml
7 fl oz 200 ml
9 fl oz 250 ml
1
/
2 pint 300 ml
12 fl oz 350 ml
14 fl oz 400 ml
3
/
4 pint 450 ml
18 fl oz 500 ml
1 pint (20 fl oz) 600 ml
1
1
/
4
pint 750 ml
1
1
/
2
pint 900 ml
1
3
/
4
pint 1 litre
2 pint 1.2 litre
RECIPES
19
Disposal of packaging materials & the appliance
The packaging contains only ecologically
sound materials that can be disposed of
according to your local recycling facilities.
To find out how to dispose of the appliance
itself, contact the relevant department of
your local administrative body.
Environment protection first!
Your appliance contains valuable materials
which can be recovered or recycled.
Leave it at a civic waste collection point.
• Processing times are for the quantities stated in the recipes.
For larger or smaller quantities the time may need adjustment.
• All spoon measures are level, unless stated otherwise.
• Eggs used in recipes are medium size, unless stated otherwise.
• The cooking times and temperatures stated in the recipes are only a
guide. If using a fan oven the times and temperature may need adjusting
as advised in the manufacturer's instructions. If you have adapted the
recipe in any way, you may also need to adjust the cooking time.
• The recipes in this book have been devised specifically for use in your
Krups Kitchen Machine. If the recipes are prepared in an appliance other
than this, the processing times and results may vary considerably.
Page 11

SOUPS AND STARTERS
Serves: 4
Preparation time: 20 minutes
Cooking time: 30 minutes
You will need:
25 g butter
450 g celery sticks, roughly chopped
1 small onion, chopped
1 small potato (about 175 g), peeled & diced
150 ml dry white wine
300 ml chicken stock
300 ml milk
150 ml single cream
75 g blue Stilton, crumbled into pieces
salt and freshly ground black pepper
To serve: Single cream and celery leaves.
Instructions:
1 Melt the butter in a large saucepan. Add all the
vegetables, mix well to coat all the vegetables
with butter
. Cover with a lid and cook on a low
heat for 10 to 15 minutes to soften them.
2 Add the wine, increase the heat and reduce the
liquid by half in an open pan.
3 Add the stock, milk and seasoning. Simmer for
30 minutes. Remove the pan fr
om the heat and
stir in the cream.
4 Fit the blender attachment. Add the soup and
Stilton, pr
ocess the soup in batches using pulse.
5 Return the soup to the rinsed out pan and reheat
gently
, taking care not to boil the soup. Taste and
adjust seasoning. Serve with a swirl of cream
and garnish with celery leaves .
Variation: Instead of Stilton try using Blue
Wensleydale or Danish Blue
Serves: 4
Preparation time: 20 minutes + 30 minutes
standing time for the batter
Cooking time: 20 minutes
You will need:
For the pancakes:
120 g plain flour
pinch of salt
1 egg, medium size
250 ml milk (or half milk and half water)
sunflower oil for frying
For the filling:
4 tablespoon double cream
200 g Philadelphia style
“Light “ soft cheese with chives
100 g cooked ham, diced
25 g mature cheddar cheese, grated
salt and freshly ground black pepper
For the topping:
25 g melted butter
25 g mature cheddar cheese, grated
1 small packet ready salted crisps, crushed
Instructions:
To make the batter using the whisk:
1 Fit the bowl and the whisk. Add the egg, milk and salt to
the bowl. T
urn the machine on to speed 6 for 15
seconds, and gradually add the flour a tablespoonful at
time through the hole in the splashguard. Once all the
flour has been added, stop the machine scrape down
any unmixed flour from the sides and mix in briefly. Turn
the speed up to 10 and keep the machine running for
about 1 minutes until the mixture is completely smooth.
Cover and leave the batter to stand for 30 minutes.
To make the batter using the blender:
2 Set up the blender. Add all the ingr
edients, except the
flour, and lock the lid. Remove the cap. Start the
appliance on speed 12, and gradually add the flour a
spoonful at time through the hole in the lid. Once all the
flour has been added, stop the machine scrape down
any unmixed flour from the sides. Blend until completely
smooth. Leave the batter to stand for 30 minutes.
3 In a bowl mix together all the filling ingredients & season.
4 First preheat the oven to 190°C/Fan oven 180°C, Gas
mark 5. Then heat a little oil in a heavy based frying pan
and cook over a medium high heat to make 8 thin
pancakes. Remove fr
om the pan and set aside, layering
them with greaseproof paper.
5 Place a spoonful of mixture in the centre of each
cooked pancake. Fold each side of the pancake into
the centr
e. Fold over both ends to make a square
parcel. Place on a baking tray with the join underneath.
6 Brush the pancakes with melted butter. Sprinkle over the
remaining cheese and crushed crisps. Bake for about 20
minutes or until the filling is hot. Serve immediately.
Variation: Instead of soft cheese with chives you can
use ordinary soft cheese and add 1 tablespoon finely
chopped fresh chives.
Cream of Celery Soup with Stilton Ham and Cheese Pancake Parcels
21
Cream of Celery Soup with Stilton
SOUPS AND STARTERS
20
Page 12

MAIN COURSES
Serves: 8
Preparation time: 30 minutes
Cooking time: 35 minutes
You will need:
For the shortcrust pastry:
280 g plain flour
1
/
2
teaspoon salt
70 g lard, straight from the fridge
70 g block margarine, straight from the fridge
about 3 – 4 tablespoons cold water
For the filling:
1 small onion, peeled and chopped
1 tablespoon oil
200 g smoked back bacon, rind removed and cut
into pieces
3 eggs
150 ml milk
200 g low fat crème fraiche
100 g gruyere cheese, grated
salt and freshly ground black pepper
For decoration;
2 tomatoes, sliced (optional)
Instructions:
1 Place the flour and salt in the bowl. Fit the mixer
blade. Cut the mar
garine and lard into 1.5 cm
cubes and add to the bowl. Mix on speed 2 for
about 2 to 3 minutes until the mixture resembles
fine breadcrumbs.
2 Whilst the machine is running add the water
thr
ough the opening in the splashguard, until the
mixture just begins to form a dough. Bring
together by hand to form a ball of dough. Do not
overhandle the dough or it will become tough.
Wrap in cling film and chill in the fridge for 30
minutes before rolling out.
3 On a lightly floured board roll out the pastry and
line a 26 cm fluted flan dish or loose bottom flan
dish. If possible, chill for 20 minutes.
4 Preheat the oven to 200°C/Fan oven 190°C, Gas
mark 6. Prick the base of the pastry case and
line with gr
easeproof paper and baking beans.
Bake blind for 15 minutes, remove the beans and
cook for another 5 minutes without them.
5 Meanwhile prepare the filling. In a frying pan,
lightly fry the onion in the oil. Remove fr
om the
pan and set aside. Fry the bacon. Mix the eggs,
milk, crème fraiche and seasoning together.
6 Sprinkle the onion, bacon and cheese over the
base of the pastry case. Pour over the egg
mixtur
e. Decorate the top with the tomato slices.
7 Reduce the oven to 180°C/Fan oven 170°C, Gas
mark 4 and bake for 30 to 35 minutes or until set.
Serve warm or cold.
Variation: For a less crumbly pastry use 140 g block
margarine instead of margarine and lard.
Smoked Bacon and Onion Quiche
23
Smoked Bacon and Onion Quiche
MAIN COURSES
22
Serves: 4
Preparation time: 20 minutes
Cooking time: 15 minutes
You will need:
4 x middle cut salmon fillets, skinned
salt and freshly ground black pepper
For the sauce:
110 g cup mushrooms, thinly sliced
50 ml white wine
200 ml double cream
For the topping:
25 g ciabiatta bread or dry white bread
25 g coarsely grated Parmesan cheese
1 tablespoon chopped fresh parsley
grated rind of
1
/
2 lemon
Instructions:
1 Preheat the oven to 220°C/Fan oven 200°C, Gas
mark 7. Season the salmon fillets on both sides
and place in a non-stick coated r
oasting tin.
2 Cut the bread into 2.5 cm (1 in) pieces and place
in the blender. Pr
ocess on speed 12 to make into
breadcrumbs. If any pieces remain unprocessed
stop the blender, shake the jug and then process
again. Add the Parmesan, chopped parsley and
lemon rind, and process briefly to mix.
3 Put the wine and mushrooms in a pan and boil
for 1 minute on a high heat. Lift out the
mushr
ooms and set aside. Reduce the wine on a
medium high heat by half. Add the cream, and
return the mushrooms to the pan. Season. Bring
to the boil and reduce to a sauce consistency.
4 Spoon about 2 tablespoons of sauce on the
centr
e of each salmon fillet. Sprinkle the topping
over the complete surface of the salmon fillet
and press down so it sticks to the salmon.
Retain the rest of the sauce to heat and
serve separately.
5 Bake in the preheated oven for about 15
minutes. T
ake care not to overcook the salmon; it
should be an opaque pink. Serve immediately
with the warmed sauce.
Salmon with Parmesan Crust with
Creamy Mushroom Sauce
Page 13

Serves: 6
Preparation time: 30 minutes
Cooking time: 30 minutes
You will need:
For the potato topping:
1 kg peeled floury potatoes,
such as Maris Piper or King Edwards
40 g butter
2 tablespoons milk
For the fish layer:
450 g skinned cod fillet
250 g skinned salmon fillet
1 small onion, thickly sliced
1 clove
1 bayleaf
450 ml milk
150 ml double cream
100 g fresh broccoli florets
40 g butter
40 g plain flour
50 g mature cheddar cheese, grated
2 tablespoon chopped fresh parsley
salt and freshly ground white pepper
Instructions:
1 Stud an onion slice with the clove. Put in a large
pan with the bay leaf, 450 ml milk, cr
eam, cod
and salmon. Bring just to the boil, cover with a
lid and simmer for 8 minutes. Lift the fish out
onto a plate and strain the cooking liquor into a
jug. When the fish is cool enough to handle,
break it into large flakes, discarding the skin and
bones. Sprinkle it over the base of a shallow
1.75 litre ovenproof dish.
2 Boil the potatoes for 20 minutes or until tender
and then drain. Place the potatoes with the milk
and butter in the bowl. Using the mixer beater
on speed 3 mash the potatoes and season to
taste. Add enough additional milk to make a soft,
spr
eadable mash.
3 While the potatoes are cooking, cut the broccoli
into small florets. Cook for 3 minutes in salted
boiled water.
4 Melt the butter in pan, stir in the flour and cook
for 1 minute. T
ake the pan off the heat and
gradually stir in the hot reserved cooking liquor.
Return the pan to the heat and slowly bring to
the boil, stirring continuously. Remove from the
heat and stir in the grated cheese and parsley.
Season. Pour the sauce over the fish and leave
to cool.
5 Spoon the potato over the fish and smooth down
and mark the surface with a fork. Bake in a
pr
eheated oven at 190°C/Fan oven 180°C, Gas
mark 4 for 30 – 35 minutes until piping hot and
golden brown.
Variation: Make the potato topping using 500 g old
potatoes and 500 g peeled parsnips cut into chunks
and boiled together with the potatoes for 20 minutes.
Salmon and Broccoli Fish Pie
MAIN COURSES
25
Pepperoni Pizza Dough
MAIN COURSES
24
Serves: 6
Preparation time: 15 minutes + 30 minutes
proving time
Cooking time: 20 minutes
You will need:
300g strong white bread flour
1 teaspoon salt
1 teaspoon Easy bake or
Fast action dried yeast
170 ml warm water
(1 part boiling water and 2 parts cold water)
1
/
2
teaspoon granulated sugar
1 tablespoon Extra Virgin olive oil
For the topping:
1
/
2 x 300g jar tomato pizza topping
125 g grated mozzarella cheese
125 g grated mature cheddar cheese
8 slices salami or pepperoni
1 tomato, sliced
8 pitted black olives (optional)
1
/
2 teaspoon dried oregano
Instructions:
1 Fit the kneading hook and splashguard. In the
bowl add the flour
, salt, and dried yeast and
start at speed 4 for 15 sec, so that all the
ingredients are well mixed. In a jug mix the
water, sugar and olive oil together. Turn to speed
1, then slowly add the water and oil through the
hole in the splashguard, and knead for 5 minutes
or until the dough is smooth and elastic.
Remove the bowl from the stand, cover with
cling film and leave to rest in a warm place for
about 30 minutes.
2 Preheat the oven to 200°C/Fan oven 190°, Gas
mark 6. Place the dough on a lightly flour
ed
board and using a floured hand, punch the risen
dough to knock out any air bubbles. Roll out
into a circle 28 cm and place in pizza tray or on
a large baking sheet.
3 Spread the pizza topping over the base and
cover with the cheese. T
op with the salami or
pepperoni, sliced tomato and olives. Drizzle with
a little olive oil and sprinkle over the oregano
4 Bake for about 20 minutes or until the crust is
crisp and golden. Serve immediately with a
crisp gr
een salad.
Variation: Instead of olives you can use blanched,
sliced green peppers instead.
Pepperoni Pizza
Page 14

Serves: 6
Preparation time: 20 mins
Pastry resting time: 1 hr
Chilling time: 1 hr
Cooking time: 15 minutes
You will need:
For the pastry:
200 g plain flour
150 g cold butter, straight from the fridge
50 g cocoa powder, sieved
100 g icing sugar
1 or 2 eggs yolks
1 tablespoon cold water
For the filling:
250 g good quality plain chocolate (with about 50%
cocoa solids content)
200 ml double cream
25 g softened butter
Instructions:
1 Cut the butter into 1.5 cm cubes. Fit the bowl
with the mixer blade. Add the flour and sieved
cocoa powder
. Mix on speed 2 for about 10
seconds or until evenly mixed.
2 Add the butter and the icing sugar. Mix on
speed 3 for about 2 to 3 minutes until the
mixtur
e resembles fine breadcrumbs. Reduce to
speed 1, add one egg yolk and 1 tablespoon of
cold water through the hole in the lid. Stop the
machine as soon as the dough has become
smooth and formed a ball. If the dough is not
sticking together properly, add another egg yolk.
Wrap the dough ball in cling film and leave it in
the refrigerator for 1 hour.
3 Preheat the oven to 180°C/Fan oven 170°C, Gas
mark 4. On a lightly flour
ed surface roll out the
pastry and line a shallow sided 28 cm loose
bottom tart tin, or 6 mini-tart tins. Cover with a
circle of greaseproof paper and fill with baking
beans. Cook in the oven for 10 minutes, then
remove the beans and the paper. Cook for a
further 5 minutes, remove from the oven and
leave to cool completely.
4 Roughly chop up the chocolate using a big knife
or grate it and then tip it into a lar
ge bowl.
Slowly bring the cream to simmering point,
then pour it over the chocolate and whisk gently
until the mixture becomes smooth. Add the
butter and carry on whisking.
5 Pour this mixture into the tart case and leave
it to set in the r
efrigerator for 1 hour.
If you wish, just before serving you can
decorate the tart with chocolate curls or
rosettes of whipped cream.
Serves: 6
Preparation time: 15 min
Cooking time: 1
1
/
2 hr
You will need:
4 egg whites
pinch of salt
230 g caster sugar
1
/
2
teaspoon vanilla extract
1
/
2
teaspoon vinegar
1
1
/
2
teaspoon cornflour
284 ml carton double cream
1 teaspoon caster sugar
450 g strawberries or raspberries
Instructions:
1 Preheat the oven 150°C/Fan oven 140°C, Gas
mark 1. Line a baking sheet with non-stick baking
par
chment and draw a 20cm (8 in) circle on the
paper and turn over.
2 Fit the bowl and the whisk. Add the egg whites
and salt. Whisk on speed 10 for 1 minute 30
seconds until they form soft peaks. With the
machine still running, add the sugar a tablespoon
at a time and beat until the mixtur
e holds stiff
peaks. Beat in the vanilla extract, vinegar and
cornflour using speed 10 until mixed in.
3 Spread the meringue mixture over the circle and
use the back of spoon to make peaks ar
ound the
edge to form a rim.
4 Bake for about 1
1
/
2 hour or until crisp on the
outside but still soft in the centre. Switch off the
oven and leave the meringue to cool in the oven
for a few hours. Cool on a wire rack and remove
the baking parchment.
5 Clean the bowl and whisk. Whip the cream
together with the sugar on speed 8 for about 2
minutes, checking the pr
ogress once the cream
starts to stiffen. Chill the cream until required.
Place the meringue on a serving dish, spread
over the cream and top with soft fruit.
Chocolate Shortcrust Tart Summer Fruits Pavlova
DESSERTS
27
Chocolate Shortcrust Tart
DESSERTS
26
Page 15

Serves: 6-8
Preparation time: 30 minutes,
Pastry resting time: 1 hr
Cooking time: 40-45 minutes
You will need:
For the butter crust pastry:
250 g plain flour
100 g icing sugar
a pinch of salt
125 g softened butter
1 egg yolk
2 tablespoons of milk
For the filling:
2 eggs
150 g soft light brown sugar
150 g melted butter
175 g ground almonds
50 g green pistachios (shells removed)
2 ripe pears
juice of 1 lemon
Instructions:
1 To prepare the pastry: Fit the bowl and mixer
blade. Add the flour
, icing sugar, salt and the
butter cut into 2 cm pieces. Set to speed 2.
After a few seconds, add the egg yolk via the
hole in the splashguard. Add the milk if
necessary to help it form a dough. Stop the
machine as soon as the dough starts to cling
together. Bring together by hand to form a ball of
dough. Do not over handle the dough or it will
become tough and shrink when baking. Wrap in
cling film and chill in the fridge for 1 hour before
rolling out.
2 To prepare the filling: clean the bowl and fit the
mixer blade. Put the eggs, br
own sugar, melted
butter, ground almonds and pistachios into the
bowl. Mix on speed 10 and until the mixture has
combined. Chill in the refrigerator for 30 minutes
to stiffen.
3 Preheat the oven to 180°C/Fan oven 170°C, Gas
mark 4. Roll the pastry out on a lightly flour
ed
work surface and line a 26 cm loose bottom tart
tin. Cover with a circle of greaseproof paper and
fill with baking beans. Bake in the oven for 10
minutes, then remove the beans and the paper
and leave to cool.
4 Peel the pears, remove the core and the pips and
cut them into slices. Dip them into lemon juice to
pr
event them from going black.
5 Pour the almond filling into the cooled pastry
case. Arrange the pear slices in an attractive
patter
n on top. Return to the oven and cook for
about 40 - 45 minutes. Serve lukewarm.
Serves: 6-8
Preparation time: 35 minutes
Cooking time: 45-50 minutes
You will need:
1 teaspoon cornflour
1 teaspoon vanilla extract
1 teaspoon malt vinegar
1 tablespoon cocoa powder
4 teaspoon cold water
4 egg whites, at room temperature
225 g golden caster sugar
For the filling:
about 150 g good quality chocolate spread
284 ml double cream, whipped
200 g fresh raspberries
Instructions:
1 Line a 33 cm x 23 cm Swiss roll tin with non-
stick silicone baking par
chment. In a cup mix
together the cornflour, vanilla extract, and
vinegar. In a separate bowl mix the cocoa
powder and water together until smooth. Preheat
the oven to 150°C/Fan oven 140°C, Gas mark 2.
2 Fit the whisk and whip the egg whites into soft
peaks on speed 12 for 1
1
/
2 minutes. With the
machine still running, add the sugar a
tablespoonful at a time, and a little of the cornflour
mixture. Continue adding the sugar and cornflour
until the mixture forms soft peaks. Remove the
bowl from the machine and gently fold in the
chocolate mixture using a metal spoon.
3 Spoon the mixture into the tin and spread over
evenly
. Bake for about 45 to 50 minutes until
crisp on the outside but still soft inside. Remove
from the oven and cover loosely with foil and
leave 15 minutes. Turn out onto a large sheet of
greaseproof paper and carefully peel off the lining
paper. Leave until cold.
4 If the chocolate spread is to stiff to spread on the
delicate meringue mix it with a little milk. Spr
ead
the chocolate spread evenly over the meringue.
Cover with a layer of whipped cream and
sprinkle the raspberries on top leaving a 2.5 cm
(1 in) gap at each short end.
5 Carefully roll up the roulade like a swiss roll and
transfer to a serving plate. Chill and serve within
2 hours. Dr
edge generously with icing sugar.
Variation: If preferred you can omit the raspberries
and serve them separately.
Cook’s note: This roulade is ideal at Christmas as it
looks like a Yule Log. Don’t worry about it cracking
when you roll it up, this is all part of its charm
.
Pear and Almond Tart Chocolate Meringue Roulade
DESSERTS
29
Pear and Almond Tart
DESSERTS
28
Page 16

Makes: 2 fougasses
Preparation time: 30 mins
Dough resting time: 1 hr
Cooking time: 25 minutes
You will need:
350 strong white bread flour
1 level teaspoon salt
2 teaspoons of Easy Bake or
Fast Action type yeast
150 ml warm water
(1 part boiling water to 2 parts cold water)
2 tablespoons olive oil
60 g black olives with stones removed
5 sprigs of thyme
200 g fresh goat's cheese
1 egg
Instructions:
1 Chop the olives up with a knife. Strip the leaves
fr
om the sprigs of thyme.
2 Fit the bowl and the kneading hook. Mix the
water and oil together
. Put the flour, salt and
yeast into the bowl. Switch the appliance to
speed 1 and mix for a few seconds, then pour
warm water oil mixture through the hole in the
splashguard. Knead the dough on speed 1 for 5
minutes until it is smooth and elastic. Add the
thyme leaves just before the end of the
kneading time.
3 Place the dough on a lightly floured board.
Knead the olives into the dough by hand. Cut the
dough in half and knead each half into a ball.
Roll it each piece into a r
ectangle 1 cm thick.
Place each fougasse on a baking tray.
4 Cut gashes in them using a sharp knife and pull
the gashes open with your fingers. In each of the
slits, place small lumps of the cheese, and push
them down into the dough. Loosely cover the
shaped dough with oiled polythene. Leave the
fougasse to rise in a warm place for about 1 hour
until double in size.
5 Preheat the oven to 230°C/Fan oven 220°C, Gas
mark 8. Beat 1 egg with 1 teaspoon of water
.
Brush the beaten egg over the fougasse.
6 Bake for about 25 minutes. Halfway through the
baking pr
ocess, lower the temperature of the
oven to 200°C/190°C, Gas mark 6. Bake until
golden brown and the bread sounds hollow when
tapped on the base. Leave to cool on a
wire rack.
Makes: About 24
Preparation time: 5 minutes
Mixture resting time: 1 hr
Cooking time: 8-10 minutes
You will need:
200 g plain flour
75 g finely grated parmesan
a pinch of pepper
125 g lightly salted softened butter
1 egg, beaten
1 tablespoon cold water
Instructions:
1 Fit the bowl and the mixer blade. Add the flour
,
parmesan, pepper and butter, cut into small 1.5
cm cubes. Process on speed 2 for 3 to 4
minutes until the mixture resembles fine
breadcrumbs.
2 Add the egg and water through the hole in the
splashguar
d and stop the machine as soon as
the dough starts to cling together. Bring together
by hand to form a ball of dough. Do not over
handle the dough or it will become tough after
baking. Wrap in cling film and chill in the fridge
for 1 hour before rolling out.
3 Preheat the oven to 200°/Fan oven 190°C, Gas
mark 6. Roll out the dough on a lightly flour
ed
work surface into a rough square about 5 mm
thick. With a sharp knife, cut the square into
narrow fingers 2cm x 10cm. Gently lift them on
to baking sheets lined with baking parchment,
leaving a little space between each one.
4 Bake for about 8 minutes, but check after five or
six minutes, as oven temperatur
es vary. The
cheese straws should be a pale golden brown.
They are fragile when they come out of the oven,
so leave them to rest for five minutes before you
try to move them. Transfer to a wire rack to cool
for a few more minutes.
Olive and Goat's
Cheese Fougasse
Parmesan Cheese Straws
BREAD AND BAKERY
31
Olive and Goat's Cheese Fougasse
BREAD AND BAKERY
30
Page 17

Makes: 1 loaf
Preparation time: 6 minutes
Dough resting time: 1 hr
Cooking time: 30 minutes
You will need:
400 g strong white bread flour
1 teaspoon salt
1
/
2 teaspoon sugar
2 teaspoons of Easy Bake or Fast Action dried yeast
1 egg yolk
280 ml warm water
(1 part boiling water to 2 parts cold water)
70 g chopped walnuts
Instructions:
1 Fit the bowl and the kneading hook. Put the
flour
, salt, sugar and yeast into the bowl and mix
on speed 3 for 30 seconds.
2 Add the egg yolk and water through the hole in
the splashguar
d. Set to speed 1 and knead for 5
minutes until the dough is smooth and elastic.
3 Place the dough on a lightly floured board.
Knead the walnuts into the dough by hand.
4 Shape the dough into a ball for a round loaf and
place it on a baking sheet. Loosely cover the
shaped dough with oiled polythene. Leave in a
warm place for about 1 hour until doubled in
size, wher
e there is no draught.
5 Preheat the oven to 230°C/Fan oven 220°C, Gas
mark 8. Cut slits into the loaf and cook for about
30 minutes until golden br
own and the bread
sounds hollow when tapped on the base.
Makes: 8 – 10 rolls or 1 loaf
Preparation time: 20 minutes plus rising time
Dough resting time: about 1 hr
Cooking time: 20 minutes for rolls and
35 minutes for a loaf
You will need:
For 800 g of white bread dough:
500 g strong white bread flour
2 teaspoons Easybake or Fast Action dried yeast
1 teaspoon salt
1
/
2 teaspoon sugar
2 teaspoons vegetable oil
300 ml warm water
(1 part boiling water to
2 parts cold)
milk, to glaze
poppy seeds, sesame seeds or
coarse oatmeal (optional)
Instructions:
1 Grease and warm sufficient baking sheets. Fit the
bowl and the kneading hook. Place the flour
,
yeast, salt, sugar and oil in the bowl.
2 Mix on speed 2 and for 15 seconds to combine
the ingr
edients. With the machine running, add
the warm water through the hole in the
splashguard, and then knead for 5 minutes on
speed 1 until the dough is smooth and elastic.
On a lightly floured surface, knead by hand until
smooth.
3 To make a loaf: shape into a ball and place on a
gr
eased baking tray or use a 900 g (2 lb) loaf tin.
To make rolls: cut the dough into 8 - 10 pieces,
knead each piece and shape into balls. Place on
the greased baking sheets, leaving space
between the rolls for them to expand.
4 Loosely cover the shaped dough with oiled
polythene. Leave to rise in a warm place, such as
an airing cupboar
d, for about 1 hour or until
doubled in size. For a crisp crust, brush with a
little milk and scatter with seeds.
5 Bake in a preheated oven at 220°C/Fan oven
210°C, Gas mark 7 for 15 - 20 minutes for r
olls.
For the loaf, bake for 20 minutes and then
reduce to 180°C/Fan oven 170°C, Gas mark 4
and bake for a further 15 minutes. To test, tap
the base of the bread and it should sound
hollow. Remove from the trays and cool on a
wire rack.
Variation: For a Wholemeal Loaf replace the 500g
strong white with 250 g strong wholemeal bread flour
and 250g strong white bread flour and increase the
quantity of warm water to 325 ml. Prepare the same
as the instructions for the white bread.
Walnut Bread Rustic White Bread
BREAD AND BAKERY
33
Walnut Bread
BREAD AND BAKERY
32
Page 18

Serves: 8-12
Preparation time: 30 minutes
Cooking time: 20-25 minutes
You will need:
250 g good quality plain chocolate
(with at least 70% cocoa solids)
250 g softened unsalted butter
6 eggs
250 g caster sugar
80 g plain flour, sieved
a pinch of salt
Instructions:
1 Preheat the oven to 180°C/Fan oven 170°C, Gas
mark 4. Butter a 24 cm diameter deep sided
cake tin.
2 Break the chocolate into pieces, place it in a
heat-pr
oof dish, add the chopped butter and
melt it all by placing it over a saucepan of hot,
but not boiling, water. Leave to cool slightly.
3 Take the eggs and separate the yolks from the
whites. Place the yolks and the sugar in the bowl
and fit the whisk. Pr
ocess on speed 12 for
about 1 minute until the mixture whitens.
4 Add the flour and chocolate mixture to the bowl.
Remove the whisk and fix the mixer blade. T
urn
the appliance on to speed 10. Empty the
contents of the mixer bowl into a large bowl.
5 Wash and dry the bowl thoroughly, put it back on
the base. Add the egg whites and a pinch of salt.
Fit the whisk and pr
ocess them on speed 12 for
about 2 minutes until the egg whites become
stiff. Gently fold the egg whites into the
chocolate mixture using a metal spoon.
6 Pour the mixture into the tin and bake for 20 to
25 minutes. Leave the cake to cool befor
e
removing it from its tin.
7 To check that the cake is ready, stick the tip of a
knife into it close to the edge: it should be dry
when it comes out. However
, when inserted in
the centre of the cake: it should come out wet,
so that the cake is nice and soft in the middle
and undercooked.
Cook’s note: When cooking the cake, don’t worry that
the centre is too liquid as the mixture will solidify on
cooling. If preferred you can cook the cake longer for
about 40 minutes so that it is nearly set in the middle.
Serves: 6-8
Preparation time: 35 minutes
Cooking time: 1 - 1
1
/
4 hours
You will need:
150 g (5 oz) butter
225 g (8oz) self-raising flour
1 level teaspoon baking powder
1 level teaspoon ground cinnamon
225 g (8oz) caster sugar
1
/
2
level teaspoon almond extract
2 eggs
350 g (12 oz) cooking apples, peeled and cored
25 g (1 oz) flaked almonds
Instructions:
1 Preheat oven to 160°/Fan oven 140°C, Gas mark
3. Lightly gr
ease a 20 cm (8 in) loose bottom
non-stick cake tin.
2 Melt the butter and leave to cool.
3 Fit the mixer blade and measur
e the flour, baking
powder, cinnamon, caster sugar and almond
extract into the bowl. Add the eggs and melted
butter. Mix on speed 4 for 45 seconds or until
smooth and evenly mixed.
4 Spread half the mixture into the prepared tin.
Thickly slice the apples and lay on top of the
mixtur
e. Roughly spoon the remaining mixture
over the apples piling it onto the centre. It
doesn’t matter too much if it doesn’t fully cover
the top as it will spread out in the oven.
5 Bake in the oven for 5 minutes so the mixture
spr
eads out over the top, then sprinkle with the
almonds. Return the cake to the oven and bake
for a further 1 - 1
1
/
4 hours or until golden brown
and coming away from the sides of the tin.
Serve warm dusted with icing sugar or as a
dessert with ice cream or crème fraiche. Warm in
the oven or microwave. Eat on the day making
or use within 1 day.
Moist Rich Chocolate Cake Apple and Cinnamon
Dessert Cake
CAKES
35
Moist Rich Chocolate Cake
CAKES
34
Page 19

This recipe uses one basic cake mix to make 3
different types of cake, which really saves time if you
are batch baking for the freezer, a special event or
cake stall. Bake the cakes in batches or all in one
go if your oven is large enough. Cover the prepared
tins with cling film and keep in a cool place but not
the refrigerator, then bake within an hour or so.
Makes: 26 pieces of cake (Victoria Sponge Cake
cuts into 8, the Orange Drizzle Loaf into 6 and
makes 12 fruit buns)
You will need:
350 g softened butter or soft margarine
350 g caster sugar
6 eggs
350 g self-raising flour
3 level teaspoons baking powder
Instructions:
1 Sieve the flour and baking powder together.
Place the fat and sugar in the bowl. Fit the mixer
blade. Beat the fat and sugar on speed 4 until
light and fluf
fy. The time will depend on the type
of fat used and degree of softness. Usually it
takes about 5 to 7 minutes.
2 With the machine running on speed 4 add the
eggs one at a time together with a tablespoonful
of flour thr
ough the opening in the splashguard.
Then add the rest of the flour.
3 Spoon a quarter of the mixture into a large bowl,
and then spoon another quarter of the mixtur
e
into a second mixing bowl. Leave the remaining
half of the mixture in the bowl to make the Coffee
and Walnut Cake.
Preheat the oven to 180°C/Fan oven 170°C, Gas
mark 4 for all the cakes.
Use half the basic cake mixture:
Instructions:
1 Lightly grease two lined 18cm (7in) sandwich
tins, spoon in the mixtur
e and smooth the top.
Bake in the preheated oven for about 30 minutes
or until the sponge is firm to touch.
2 Turn out and cool on a wire rack. Fill with jam
and butter
cream icing.
Coffee and Walnut Sponge:
Add 3 level teaspoons instant coffee granules
dissolved in 1 tablespoon boiling water and 75 g
finely chopped shelled walnuts to half the basic
cake mixture. To make the icing, dissolve 3
teaspoons instant coffee granules in 1
tablespoon boiling water and leave to cool. Beat
together 75 g softened butter and half of 250g
icing sugar. Mix in the coffee liquid then
gradually beat in the remaining icing sugar until
you have achieved a texture and taste that you
like. Sandwich the cake with half the icing and
spread the remaining icing over the top, and
decorate with halved walnuts.
Afternoon Tea Selection
Basic Cake mixture
Victoria Sponge Cake
CAKES
37
Victoria Sponge Cake
CAKES
36
Use a quarter of the basic mixture plus the
following ingredients:
You will need:
finely grated rind of
1
/
2 orange
For the crunchy orange topping:
50 g granulated sugar
juice of
1
/
2 orange
Instructions:
1 Add the orange rind to the basic cake mixture
and mix in using a wooden spoon. Line the base
of a 450 g (1 lb) non-stick loaf tin.
2 Bake in the preheated oven for about 35 minutes
or until golden br
own and springy to the touch.
3 Leave the cake in the tin and while it is still
warm, mix together the sugar and orange juice
and pour over the warm cake.
4 Loosen the sides of the cake and remove the
cake fr
om the tin. Leave to cool on a wire rack.
Orange Drizzle Loaf Cake
Use a quarter of the original mixture plus the
following ingredients:
You will need:
25 g ground almonds
50 g raisins or sultanas
50 g glacé cherries , quartered
about 3 tablespoons milk
12 paper cases
Topping: about 40 g flaked almonds (optional)
Instructions:
1 Reduce the oven to 170°C/Fan oven 160°C, Gas
mark 4.
2 Add the ground almonds, dried fruit, glacé
cherries and milk to the cake mixtur
e and mix in
using a wooden spoon. Line 1 x 12 hole bun tins
with paper cases. Fill the cases and sprinkle the
tops with the flaked almonds.
3 Bake for about 20 to 25 minutes until golden brown
and springy to the touch. Cool on a wir
e rack.
Fruity Almond Buns
Page 20

For crumbly UK style pastry use the following
recipe.
You will need:
Sufficient for a 20-23cm flan case:
175 g plain flour
pinch of salt
85 g block margarine or 45 g block margarine and
40 g lard (straight from the fridge)
2 – 3 tablespoon cold water
Instructions:
1 In the bowl add the flour, salt and fat cut into 1cm
pieces.
1 Fit the mixer blade and mix on speed 2 until the
mixtur
e resembles fine breadcrumbs (takes about 3
to 4 minutes). While the mixer blade is turning,
add the water through the opening in the lid, until it
forms a dough.
1 Shape into a ball but do not overwork the dough.
W
rap in cling film and leave in the refrigerator for
30 min before rolling out.
You will need:
75 g butter
225 ml water
110 g plain flour
3 eggs, medium size
Instructions:
1 Melt the butter and water in a saucepan. When
the mixtur
e is boiling, remove from the heat and
add the flour in one go. Beat with a wooden
spoon until smooth and comes away from the
sides of the pan. Leave to cool slightly.
2 Fit the bowl and the mixer blade. Add the paste
and with the machine running on speed 4 add the
eggs one at a time thr
ough the feed tube. Increase
to speed 8 and beat for another 1 minute.
3 Use the choux pastry to make profiteroles or
éclairs. Bake in batches in a pr
eheated oven at
200°C/Fan oven 190°C. Gas mark 6 for about 15
- 20 minutes or until crisp, well puffed and
golden brown. Lift onto a wire rack and make a
small hole in the base to release any steam.
Leave to cool.
4 Fill the cooled choux puffs with the
whipped cr
eam.
Shortcrust Pastry Choux pastry
BASIC RECIPES
39
BASIC RECIPES
38
Suitable for pancakes, crepes and Yorkshire
pudding
You will need:
120 g plain flour
Pinch of salt
1 egg, medium size
250 ml milk (or half milk and half water)
sunflower oil for frying
Instructions:
Follow the method detailed on page 21 for the
Ham and Cheese Pancake Parcels.
Pouring batter
Pouring Batter
 Loading...