

Page 1
Instruction BooklWarranty/KRUPS Guarantee of Performance
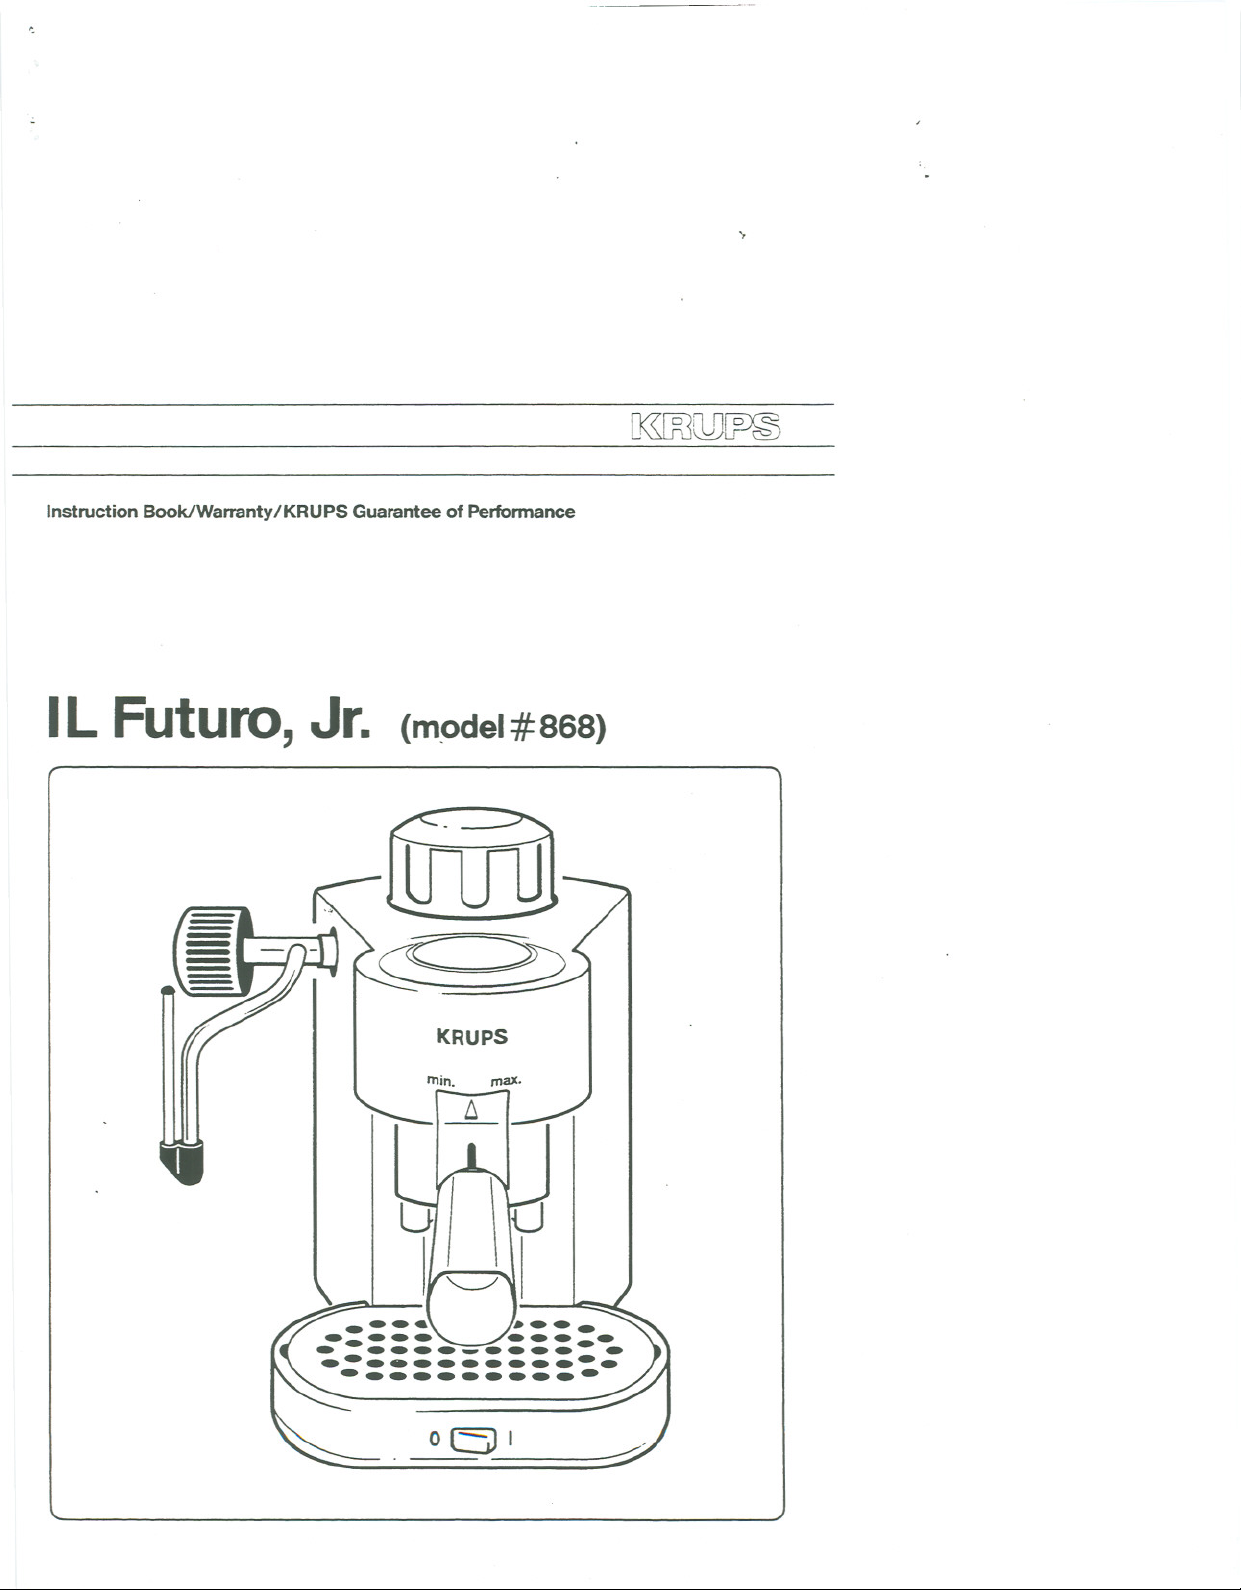
IL Futuro,Jr. (m~del#868)
.,
CI«OOl1D~
WID
~
~ ~
kRUPS
lTIin. rnaJC.
0 l:-J I
Page 2
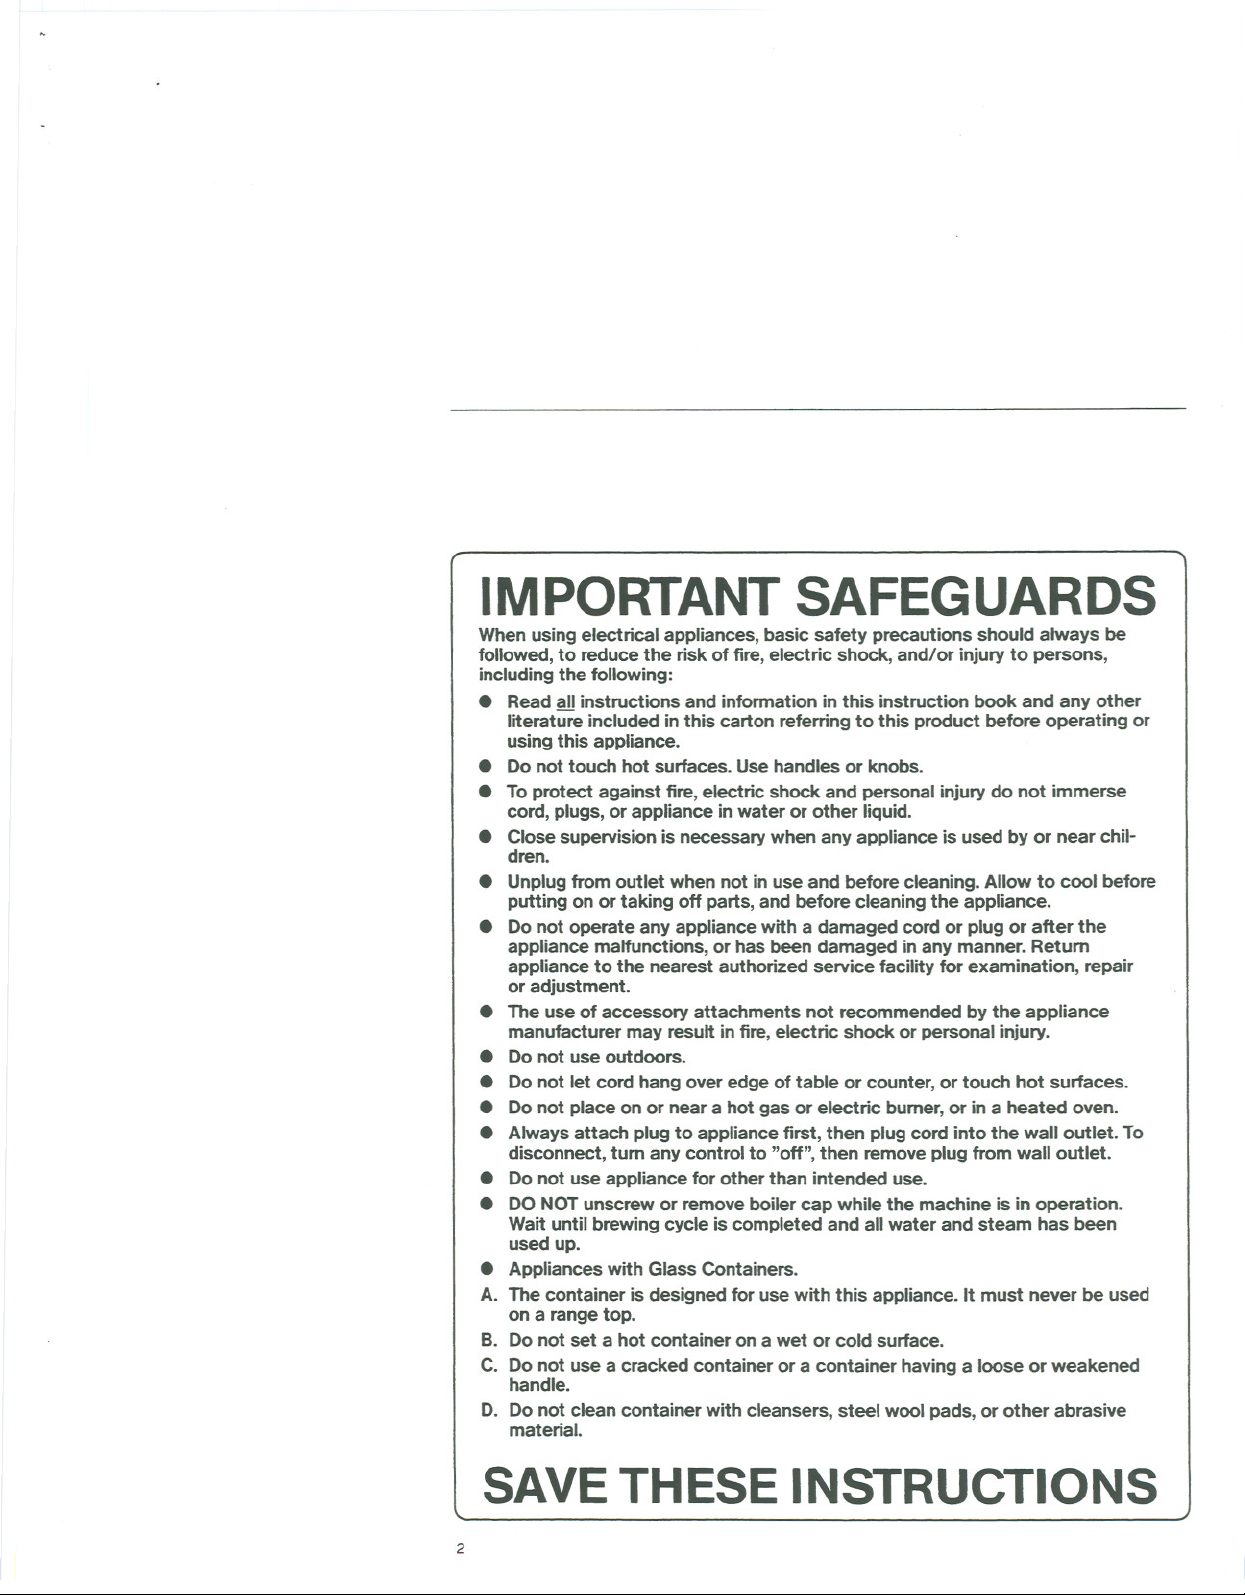
IMPORTANT SAFEGUARDS
When using electrical appliances, basic safety precautions should always be
followed,to reduce the risk of fire,electric shock, and/or injuryto persons,
including the following:
. Read all instructions and information inthis instruction book and any other
literature included inthis carton referring to this product before operating or
using this appliance.
. Do not touch hot surfaces. Use handles or knobs.
. To protect against fire, electric shock and personal injury do not immerse
cord, plugs, or appliance inwater or other liquid.
. Close supervision is necessary when any appliance is used by or near chil-
dren.
. Unplug from outlet when not in use and before cleaning. Allowto cool before
putting on or taking off parts, and before cleaning the appliance.
. Do not operate any appliance with a damaged cord or plug or after the
appliance malfunctions, or has been damaged inany manner. Return
appliance to the nearest authorized service facility for examination, repair
or adjustment.
. The use of accessory attachments not recommended by the appliance
manufacturer may result infire, electric shock or personal injury.
. Do not use outdoors.
. Donot let cord hang over edge of table or counter, or touch hot surfaces.
. Do not place on or near a hot gas or electric burner, or in a heated oven.
. Always attach plug to appliance first, then plug cord into the wall outlet. To
disconnect, tum any control to "off",then remove plug from wall outlet.
. Do not use appliance for other than intended use.
. DONOTunscrew or remove boiler cap while the machine is in operation.
Wait until brewing cycle is completed and all water and steam has been
used up.
. Appliances with Glass Containers.
A. The container is designed for use with this appliance. It must never be used
on a range top.
B. Donot set a hot container on a wet or cold surface.
C. Do not use a cracked container or a container having a loose or weakened
handle.
D. Do not clean container with cleansers, steel wool pads, or other abrasive
material.
SAVETHESE INSTRUCTIONS
2
Page 3
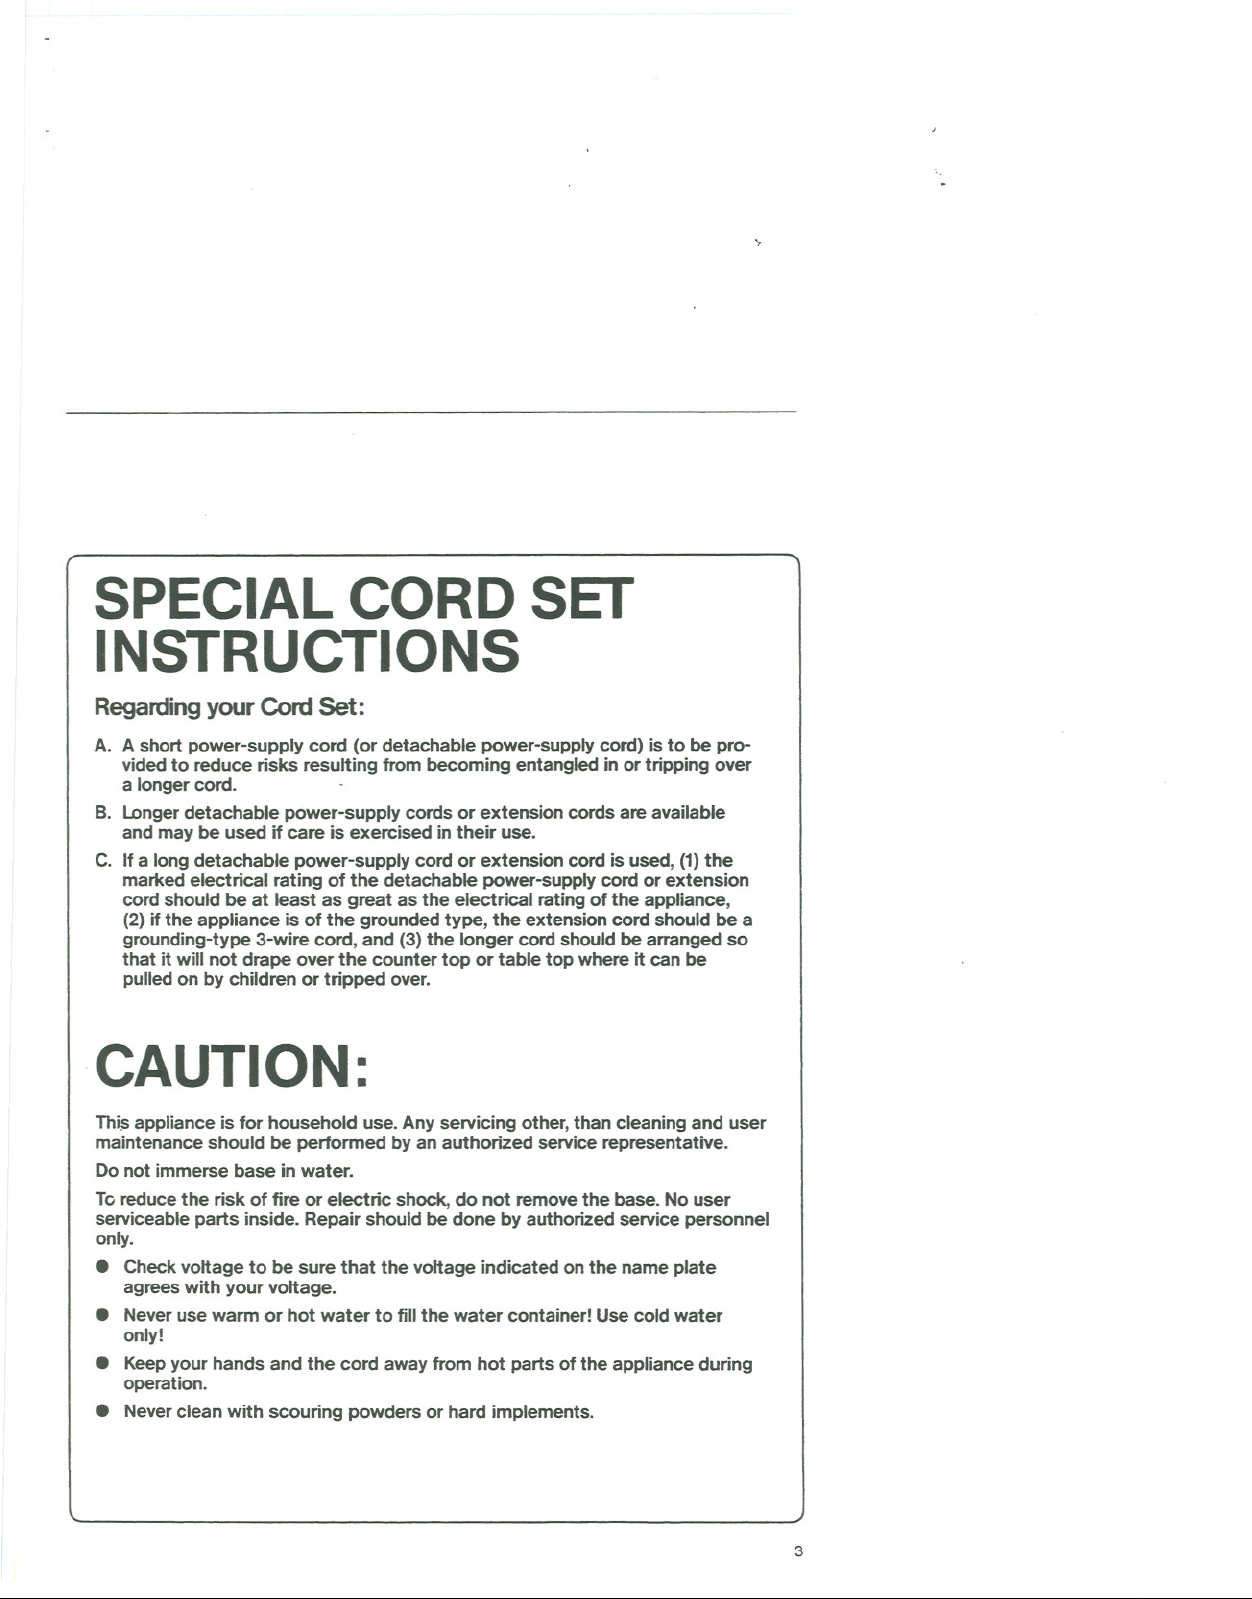
SPECIAL CORD SET
INSTRUCTIONS
Regarding your Cord Set:
A. A short power-supply cord (or detachable power-supply cord) is to be pro-
vided to reduce risks resulting from becoming entangled in or tripping over
a longer cord.
B. LDngerdetachable power-supply cords or extension cords are available
and may be used ifcare is exercised in their use.
C. Ifa long detachable power-supply cord or extension cord is used, (1)the
marked electrical rating of the detachable power-supply cord or extension
cord should be at least as great as the electrical rating of the appliance,
(2)ifthe appliance is of the grounded type, the extension cord should be a
grounding-type 3-wire cord, and (3) the longer cord should be arranged so
that it willnot drape over the counter top or table top where it can be
pulled on by children or tripped over.
"
.CAUTION:
Thi$appliance is for household use. Anyservicing other, than cleaning and user
maintenance should be performed by an authorized service representative.
Donot immerse base in water.
To reduce the risk of fire or electric shock, do not remove the base. No user
serviceable parts inside. Repair should be done by authorized service personnel
only.
. Check voltage to be sure that the voltage indicated on the name plate
agrees with your voltage.
. Never use warm or hot water to fillthe water container! Use cold water
only!
. Keep your hands and the cord away from hot parts of the appliance during
operation.
. Never clean with scouring powders or hard implements.
3
Page 4
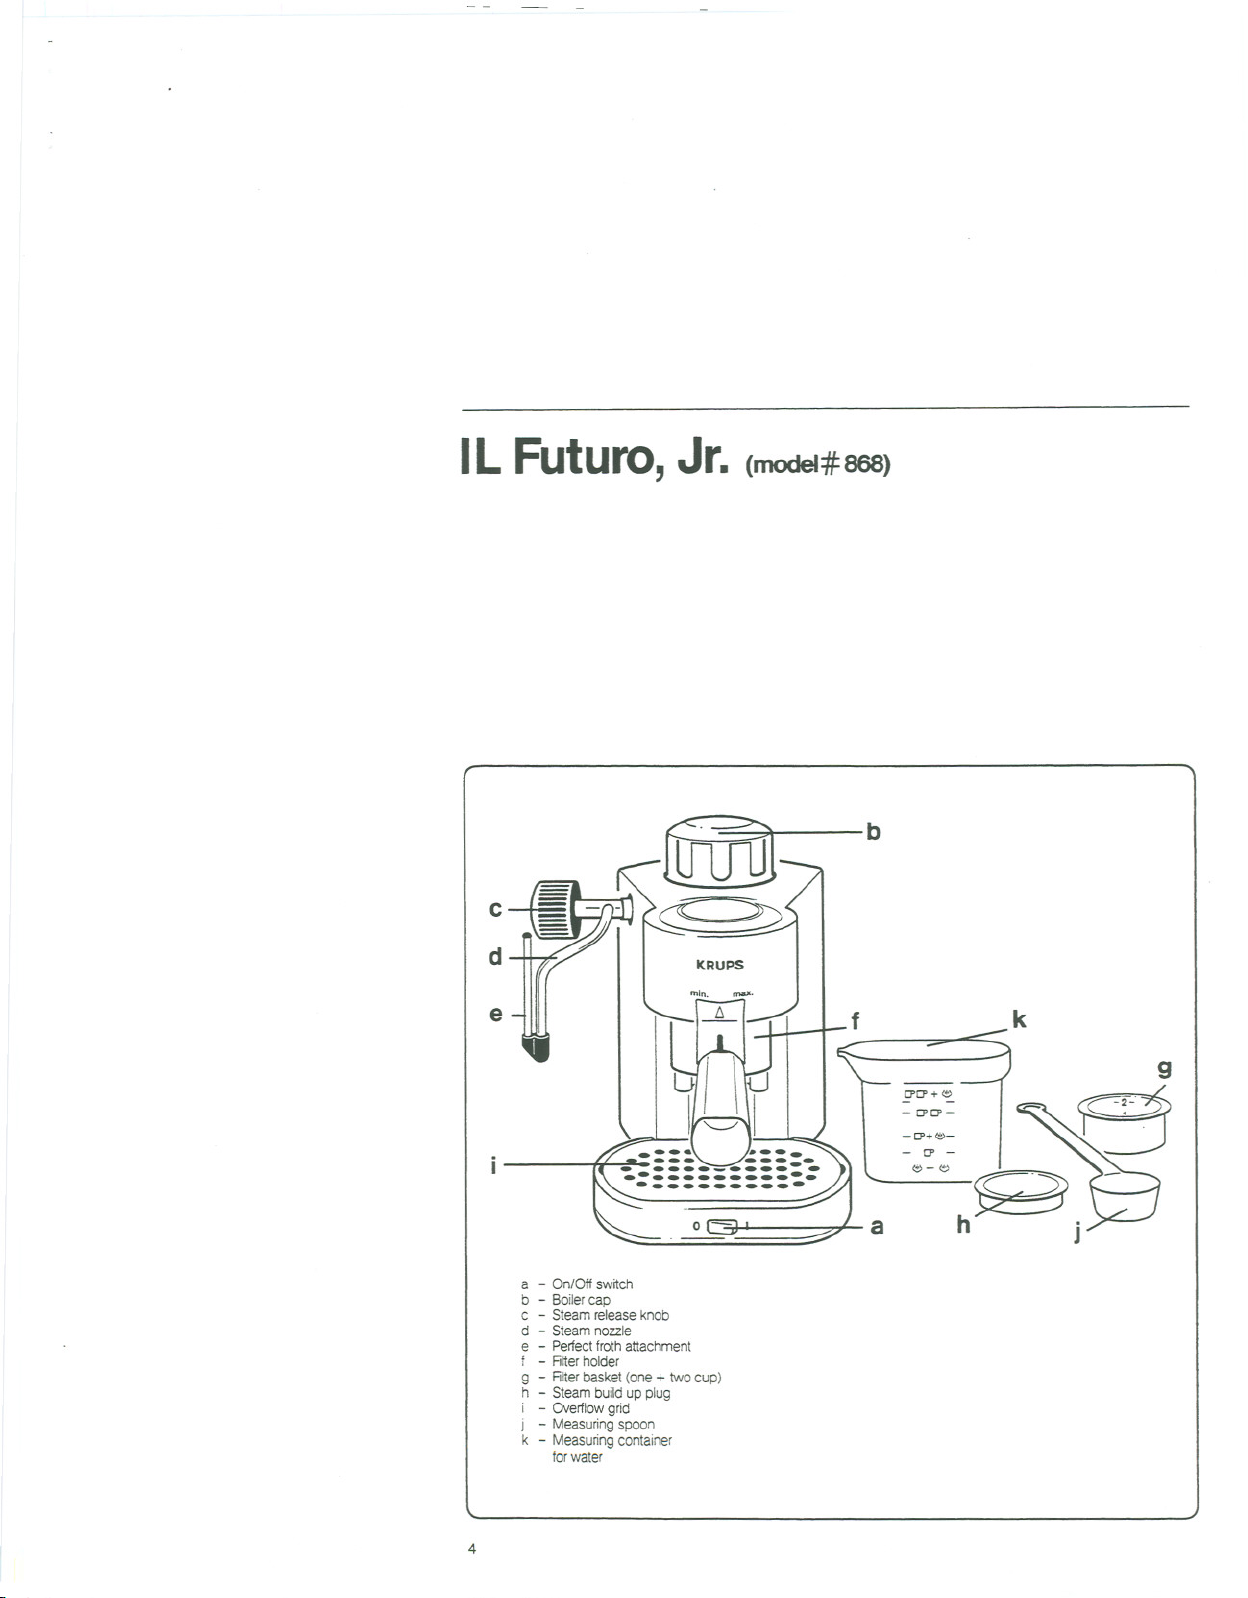
IL Futuro,Jr. (modeI#868)
b
c
d
e
a - On/Offswitch
b - Boilercap
c - Steamreleaseknob
d - Steamnozzle
e - Pertectfrothattachment
f
- Fiiterholder
- Fiiterbasket(one+ twocup)
g
h
- Steambuild up plug
i
- Overtlowgrid
j
- Measuringspoon
k - Measuringcontainer
forwater
kRUPS
""n,
"""',
0'0'+1<>
-0'0'-
-0'+1<>-
- [J' -
a
k
"'-<t>_~.
h J
4
Page 5
"
5
Page 6

-. ,~
A if
B
cl'
lffi.
M
~
I,.,
c~
I 1.1 I
::::--
-..
I
13
6
Page 7

.,
Before you make espresso.. .
Preparingespresso orcappuccinois different than brewing regular drip coffee. Technically, one
main difference is that the water will come to a boil and will then be forced through the ground cof-
fee. This means that an espresso machine works under pressure and needs special attention. We,
therefore, ask you to read ALL the instructions, CAUTIONS,NOTESAND ATTENTIONS.
We recommend that you get familiar with all the parts of your "IL Futuro, Jr." before operating the
machine. Begin by inserting the filter basket into the filter holder and into the brewing head.
Turn the stain knob "ON" and "OFF" andwash/dry all parts in warm, soapy water.
CAUTION -PRESSURE
NEVER open boiler cap (b) or remove the filter holder (f) while your "IL Futuro, Jr." is turned "ON"
or as long as there ispressure in the boiler container.
Please follow the instructions listed below to see if the machine is still under pressure. Follow
these safety precautions while your machine is in use and ten to fifteen minutes after last use.
1. Tum the On/Off switch to the "OFF" position and unplug the appliance.
2. Carefully open the steam release knob (c) by slowly tuming it counter clockwise. If steam comes
out of the nozzle,then the boiler container is still under pressure. Close steam knob and proceed
with instructions listed below.
3. Take a pitcher filled with cold water and hold it undemeath the steam nozzle with nozzle in-
serted into the water. Then open the steam release knob (c) by tuming it counter clockwise.
Leave steam release knob open until no more steam comes out of nozzle. When finished tum
steam knob clockwise to close.
4. Now you can carefully remove the boiler cap and filter holder.
'.
GENUINE ESPRESSO
Espresso is a far richer and stronger brew than regular coffee. It should be deep, dark and delicious.
Most people find that they enjoy it in small quantities because of its richness, and for that reason,
espresso is usually served in small (2-2112 Oz.) demitasse cups.
The mark of real espresso is its wonderful inviting fragrance and its rich frothed topping: a light
brown, cream foam called "crema". Your "IL Futuro, Jr'-, properly used, will always produce espresso
that is deep, dark and delicious. Just follow the instructions and use fresh, well roasted, pre-ground
espresso or espresso beans you grind yourself.
GRINDING ESPESSOBEANS
If you grind your own beans and use the
KRUPS "FAST-TOUCH" (model
or"TOUCH TOP" (model =# 208), the
approximate grindling time for 4 cups
of espresso is 8-10 seconds. Remember
espresso requires a fine grind.
# 203)
KRUPS
"FASHOUCH"
CoffeeMill( =# 203)
7
Page 8

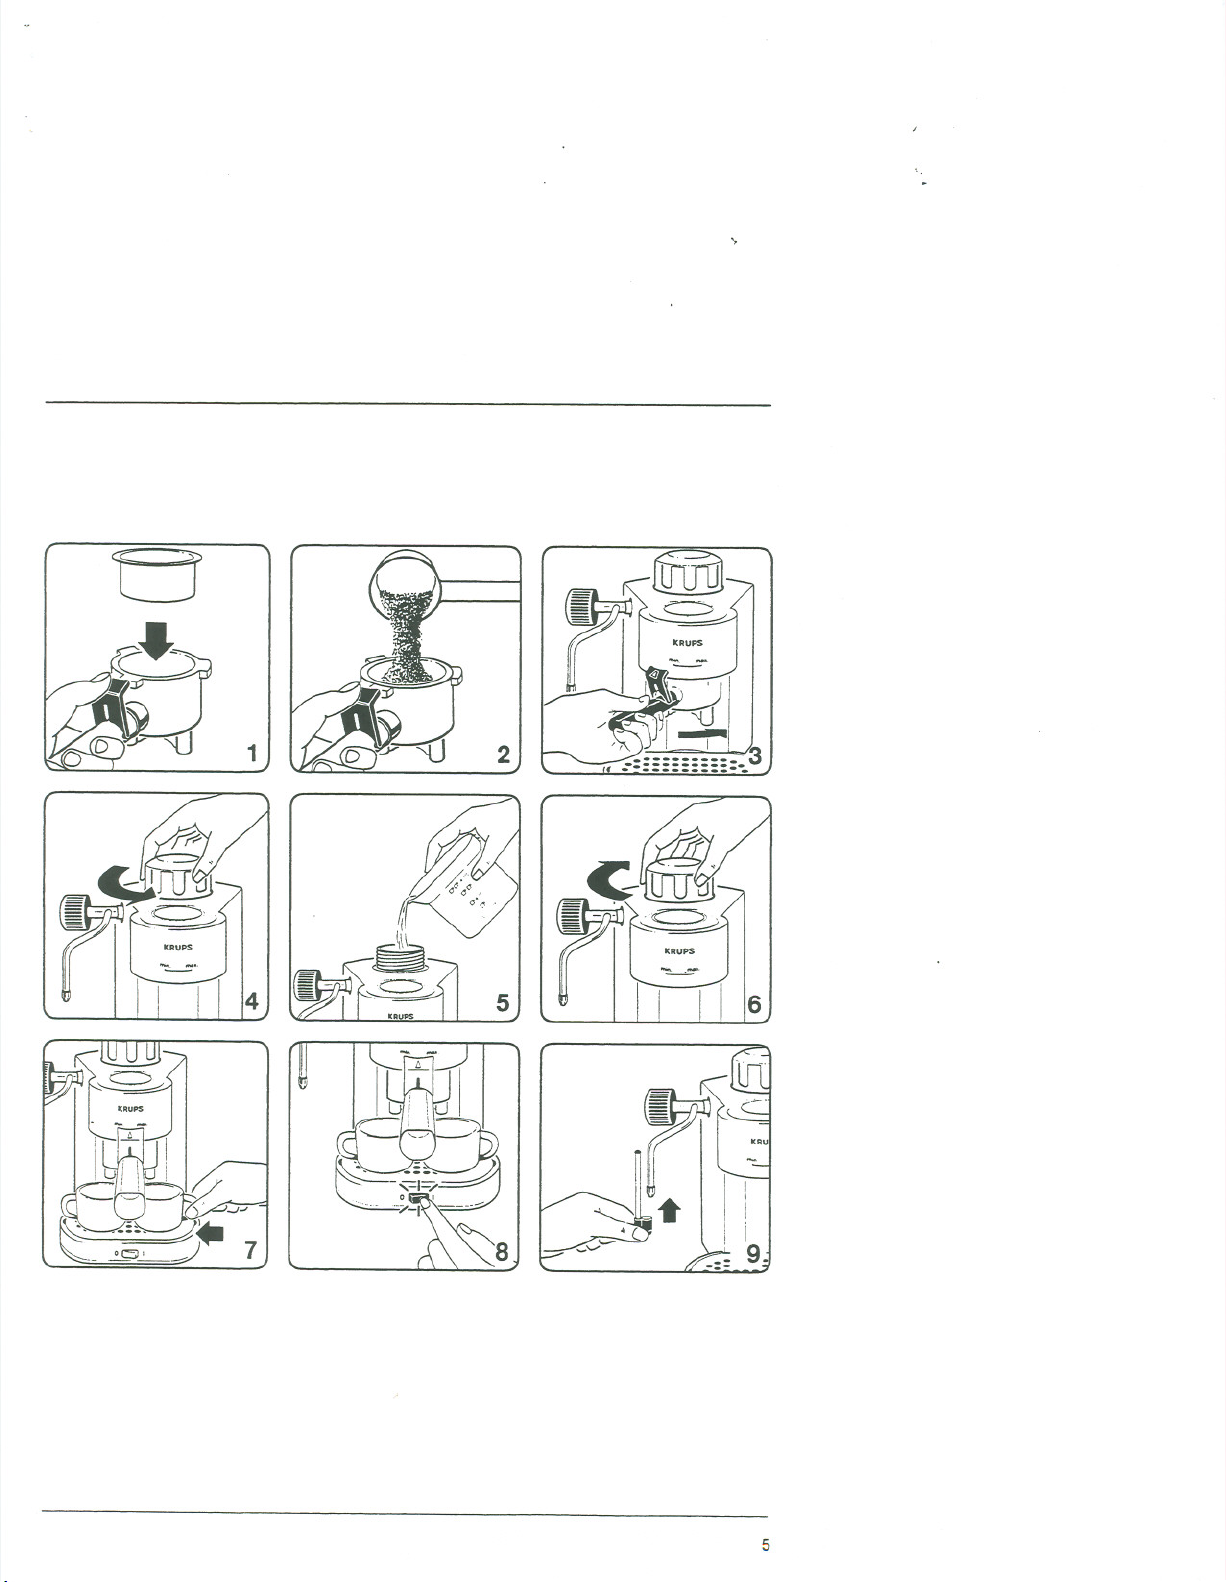
MAKING ESPRESSO
1. Place your "ILFuturo,Jr." near an electrical outlet, then plugmachine into outlet. Make sure the
On/Offswitch is inthe "OFP' position.
2. Place your filter basket (g) into the filterholder (1)(see figure1).The basket is marked on the in-
side indicating and 1 and 2 cups. Do not press coffee down tightlyor overfillthe basket.
3. Fillthe filterbasket with ground espresso coffee. Spoon the coffee into the filterbasket and clear
any excess coffee from the rimof the filterholder.Thiswillensure a proper fit intothe brewing
head (see figure 2).
AlTENTION
. Do not pack coffee tightly.
. Donotfillmore coffee than indicated bythe 2-cup marking.Thismight cause clogging or over-
flow(see under section "Problems and Causes").
4. Replace filter holder (1)containing the filterbasket and coffee. The filterholder must be inserted
so that the arrow on the filterholder isinlinewiththe arrowon the frontof the machine. Insert
the filterholder upwards intothe machine and turn firmlytothe rightas far rightto the "max"
(maximum) setting as possible (see figure3).
The min and max markings have nothing to do with the strength of the coffee.
Followingthis procedure this willprevent the filterholder from being dislodged as pressure builds
up during the brewing process.
5. Unscrewthe boiler cap (b) bytuming itcounter clockwise (see figure 4).
6. Usingthe measuring container (k),fillthe boilercontainer withfresh, cold water (see figure5).
NOTE
(8-(8
=the quantity of water required to steam/froth milk for cappuccino
- D' - =the quantity of water required to make 1 cup of espresso
-0'+ (8- = the quantity of water required to make 1cup of espresso and steam/froth milkfor
cappuccino
-0'0' - =the quantity of water required to make 2 cups of espresso
~ 0' + C8 = the quantity of water required to make 2 cups of espresso and steam/froth milkfor
CAUTION
. Neverfilltheboilerwhileyour "ILFuturo, Jr." is switched "ON".
. Neverfillmorethan 6 oz. of water into the boiler. Follow the measurements on the measuring
container.
8
cappuccino
Page 9

"
,
;.
NOTE:
You may want to add a little extra water (approx. 1/4 cup) to compensate for evaporation and
absorption during the brewing process. (DO NOTEXCEEDMORETHAN 6 OZ. OF WATER.)
The measuring container (k) has markings on it to 'meet all your measuring needs.
7. Place the boiler cap (b) on the machine and turn it clockwise until it is secure (see figure 6).
ATTENTION
Make sure that the overflow grid (i) is in place.
8. Tomake espresso place either an espresso cup or a cappuccino cup directly underneath filter
holder (t). Make sure the cups are positioned directly under the spouts (see figure 7). If you are
making only one cup make sure you center the cup under the spouts.
9. Make sure that the steam release knob (c) is in the "closed" position (turn knob clockwise).
10. Plug in the machine and turn the "On/Off' switch (a) to the "On" position (see figure 8)
11. After approximately two minutes the water will have reached the proper temperature. The water
at this time will pass through the coffee grinds, producing espresso in the cups, whichever size
cup you have chosen.
12. Once the coffee has stopped brewing, turn "OFP' the machine with the "On/Off' switch and the
light will go out.
13. Before you remove the filter holder for cleaning, make sure that the boiler is no longer under
pressure (see section "Caution - Pressure").
CAUTION
Use caution when removing the filter holder and filter basket,parts may still be hot.
To remove filter holder, turn the filter holder to the left,past the "min" (minimum) markings until the
filter holder dislodges from the machine.
ATTENTION
The filter holder/filter basket parts might still be very hot, they can be cooled down by running water
over them.
To make more espresso, proceed as follows:
. Check to see if the boiler is empty and not under pressure (see section "Caution - Pressure").
. Repeatsteps1-12 of this section.
CAPPUCCINO
Cappuccino takes its name from the chocolate hues of the robes worn by the Capuchin monks who
favored this delicious dessert coffee. While cappuccino is traditionally made up of espresso and
frothed milk,it can be tailored to one's own taste with cinnamon, sugar,chocolate flakes or.even
liquor. Its versatility makes cappuccino aworld-wide gourmet choice.
1. The first step in making cappuccino isto make espresso.Therefore,fill the measuring container
with the amount of water which is required to make the amount of espresso plus additional water
for frothing milk(see markings on container). Traditionally,when making cappuccino you use a
cup with at least a 5 oz. capacity.
2. Fill a small pitcher 113to 1/2full with fresh. cold milk and set aside. If the "Perfect Froth" attachment
is not in place at this time, attach "Perfect Froth" now (see figure 9).
9
Page 10

3. a) Before turning "On" your "IL Futuro, Jr." open the steam release knob (c). Do this by tuming
the knob counter clockwise. Then tum "On" your "IL Futuro, Jr." using the "On/Ofr' switch.
Make sure you place the proper cup size that is required for the quantity of espresso that
you are preparing. Place a cup under the brewing spout.
As soon as steam starts coming out of the steam release knob, you are now ready to start
frothing milk. Before you begin, close the steam knob by tuming it clockwise until no more
steam comes out of the nozzle. This will prevent any milk from splattering when you place
your pitcher under the nozzle. Once the steam knob has been closed you can begin frothing
the milk.
Start frothing milk immediately so that the proper pressure is maintained to froth your milkfor
cappuccino.
b) Hold the pitcher under the steam nozzle. Insert the steam nozzle with the "Perfect Froth"
attachment half way into the milk. Turn the steam control knob almost a fullturn counter
clockwise (see figure 10). Hold the pitcher steady as you froth the milk.Leave steam nozzle
in pitcher for approximately 45-60 seconds, depending on how much froth you want and the
type of milk you are using.
ATTENTION
Do not bring milk to a boil (this will happen if large bubbles start forming at the surface of the milk).
4. Close the steam release knob (c) after the milk is frothed by tuming it clockwise while the nozzle
is still immersed in the milk. This will prevent splattering of hot milk and foam. If you prefer "stiff"
foam, let the frothed milk stand for a minute. Ifyou prefer "creamy" foam, use immediately.
5. Add the steamed milk to the espresso and spoon on the frothed milk. The proportion between
espresso and milk is to taste; in Italy it is normally one part espresso to two parts milk plus froth.
ATTENTION
The top closure of the Perfect Froth attachment (see figure 11Part A) has a very fine hole in it which
draws air into the milk. Ifthis tiny hole becomes clogged, "Perfect Froth" willnot work properly.
Therefore, never immerse the top closure in milk or froth.
STEAMING WITHOUT MAKING ESPRESSO
1. Insert the steam build-upplug (h) into the filter holder.Then proceed with steps 4 and 5 in
section "Making Espresso".
2. Fillthe boiler container with cold water.
CAUTION: For steam only fillthe measuring container to the "@" marking. This will give you
enough steam.
3. Open the Steam Release Knob (c) immediately after turningthe machine on. Stand bywith your
frothing pitcher.
CAUTION: Do not leave the machine unattended at this time.
It willtake approximately 30 seconds after turning the machine "On" for the steam to come out
of the steam nozzle. Proceed with steps 3b to 5 in section "Making Cappuccino".
4. When all steam is released close the Steam Release Knob and tum "Ofr' machine.
CAUTION: In case you do not need all the water for steaming, proceed as follows:
a) tum off the machine,
b) release the remaining steam pressure into a pitcher.
DO NOT CLOSE THE STEAMRELEASEKNOB BEFORE ALL STEAMIS RELEASED!
(see also the section "CAUTION - PRESSURE").
10
Page 11

CLEANING
Before cleaning, turn "Off" unplug, and allow machine to cool
down.
The filter holder, filter basket and the overflow grid can be put
in the dishwasher. Be sure to place all parts inthe upper rack
away from the heating/drying element.
The machine can be cleaned with a damp cloth. Never immerse
the body of your "IL Futuro, Jr." in water or any other liquid.
Clean the filter ring with a damp cloth and remove ground cof-
fee. If there is water left in the boiler container, let the machine
cool down, remove all loose parts and empty through the top
opening.
"
Cleaning The Steam Nozzle
Clean the steam nozzle each time after you have immersed
it in the milk, otherwise the inside of the nozzle can become
clogged with milk particles. Ifthis does occur, unscrew the
nozzle tip (see figure 12)and use a sewing needle to remove
milk particles. Rinse under faucet to flush out any debrec.
Replace nozzle tip and screw on tightly.
Cleaning The Perfect Froth Attachment
For a thorough cleaning of the "Perfect Froth" attachment
remove part C (see figure 11).All parts should be rinsed in
warm water. Ifthe small suction opening in part A is clogged it
can be opened with a fine, sewing needle.
CAUTlON
DO NOT try to open or disassemble the main body of the machine.
DECALCIFYING
Under normal conditions you do not need to decalcify your "IL Futuro, Jr.". However, in areas where
there is hard water or if used very frequently we recommend decalcifying. If you can see white
deposits in the boiler container, this is a good indication that your machine should be decalcified.
Decalcifier is widely available or can be purchased from the KRUPS Consumer Department.
How To Decalcify
. Remove stainless steel water screen and gasket from the machine (seefigure 13)by using a
Phillipsscrewdriver.
. Insert the filter holder without the filter basket into the machine.
. Place a cup underneath the filter holder. Turn the machine "On" so that the solution can pass
through the water heating system into the cup.
. Repeat the above process using clean, cold water to remove allthe remaining solution in the
machine. If necessary clean twice. Allow machine to cool down between each time when
cleansing.
11
Page 12

PROBLEMS AND CAUSES
(Always check if machine is plugged in and if machine is in the proper "On" position.)
Problem:
1. Coffee leaking from filter holder
Cause:
. Filter holder not properly inserted
. Filter holder not pushed in far enough
. Internal gasket is dirty, clean gasket
. Gasket without elasticity, replace
. Coffee powder not cleaned off the edge ofthe filter holder
Problem:
2. Coffee does not come out
Cause:
. No water in boiler container
. No coffee in filter holder
. Riter clogged up because coffee mixture is too fine or pressed down too hard.
Problem:
3. Steamdoesnot comeoutof steam nozzle
Cause:
. No water or not enough water in the boiler container
. Steam nozzle is clogged (see section "Cleaning")
. Perfect Froth attachment isclogged (see section "Cleaning the Perfect Froth")
Problem:
4. Not enough froth when frothing the milk
Cause:
. Perfect Froth attachment touches the bottom of the pitcher
. Perfect Froth tip (see figure 11)is clogged (part A) (see section "Cleaning the Perfect Froth")
. Steam nozzle is clogged (see section "Cleaning")
. Not enough water left in boiler to steam for 45-60 seconds
12
Page 13

'1
UMITEDone-year warranty
Your KRUPSproduct is covered by
the following warranty: If,within one
year from date of purchase, this
KRUPS product fails to function
because of defects in material or
workmanship, KRUPSNorth America,
Inc. will, at its option, repair or
replace the unit without charge,
provided the owner returns:
. The KRUPSproduct (securely
packed) and
. Proof of date of purchase to:
KRUPS Customer Service
KRUPS NORTHAMERICA, Inc.
7 Reuten Drive
CLOSTER,New Jersey 07624
Toassurepromptservice,includea
letterindicatingthe specificcause
for returningyourKRUPSproduct.
Do not return any loose parts or any
accessories which are not defective
with your appliances to avoid
damage and loss in transit.
This warranty will be void if malfunc-
tion was caused by damage to the
product by accident, misuse, use on
frequency or voltage other than
marked on the product and/or de-
scribed in the instructions, abuse
including tampering, damage intran-
sit, or use for commercial purposes.
This warranty gives you specific legal
rights, and you may also have other
rights which vary from state to state.
13
Page 14

GUARANTEE OF PERFORMANCE
Thisfine KRUPSproduct is manufactured according to a rigid code of quality standards, and,
with a minimumof care, should give years of satisfying service. However, should the need
arise for repairs or for replacement parts (withinor after the warranty period) please do as
followsfor the most convenient, fastest service.
Note the Type Number # 868 of your KRUPS appliance. You will need this information
when calling our Customer Service Department.
Forparts orders or any other questions on how to operate yourKRUPSproduct, call our
CUSTOMERSERVICEDEPARTMENTtollfree (Monday through Friday [except holidays]
from 9AMuntil4PM Eastern Standard Time) 1-800-526-5377 (in New Jersey call
[201]767-5600).
KRUPSCustomer Service
Robert KRUPS,North America
7 Reuten Drive
CLOSTER,New Jersey 07624
Pack up your appliance carefully to avoid damage in shipping and be sure to provide us
with the following information:
A.Yourname and address and type number of the appliance on the outside wrapping of
the packaging.
B.Tape a brief note to the body of the machine indicating:
1. Howlong you have owned it.
2. The nature of the problem.
IMPORTANT: ONLY SEND THE DEFECTIVE APPLIANCE. KEEP ALL REMOVABLE PARTS
AT HOME TO AVOID FURTHER DAMAGE IN TRANSPORT!
Wewillrepair or replace your KRUPSproduct without delay and send it back to you with
nochargeforshiPP!!:!9. .
Ifyou send us a receipt for the regular UPS or Parcel Post charges, we willeven
reimburse you for the shipping charges, within or after the warranty period.
On allrepair work to be done after the warranty period, our Customer Service Depart-
ment willbillyou for material and labor only.
Donot retum your appliance to the store. The KRUPSGuarantee of Performance pro-
gram has been designed to provide you with the best possible service using genuine
KRUPSparts.
Allrepair work and replaced parts willcarry an extended 90-day-warranty.
KRUPSNorthAmerica, Inc.
7 Reuten Drive, CLOSTER, New Jersey 07624
0692/810/868
us "5413 ~
0
0
0
0
""
N
OJ
<!:J
e
""
....
I'-
N
'"
~
 Loading...