

Page 1
Instruction bookIWaiTanty/KRUPS Guarantee of Performance
-
"
~CVJ[¥@
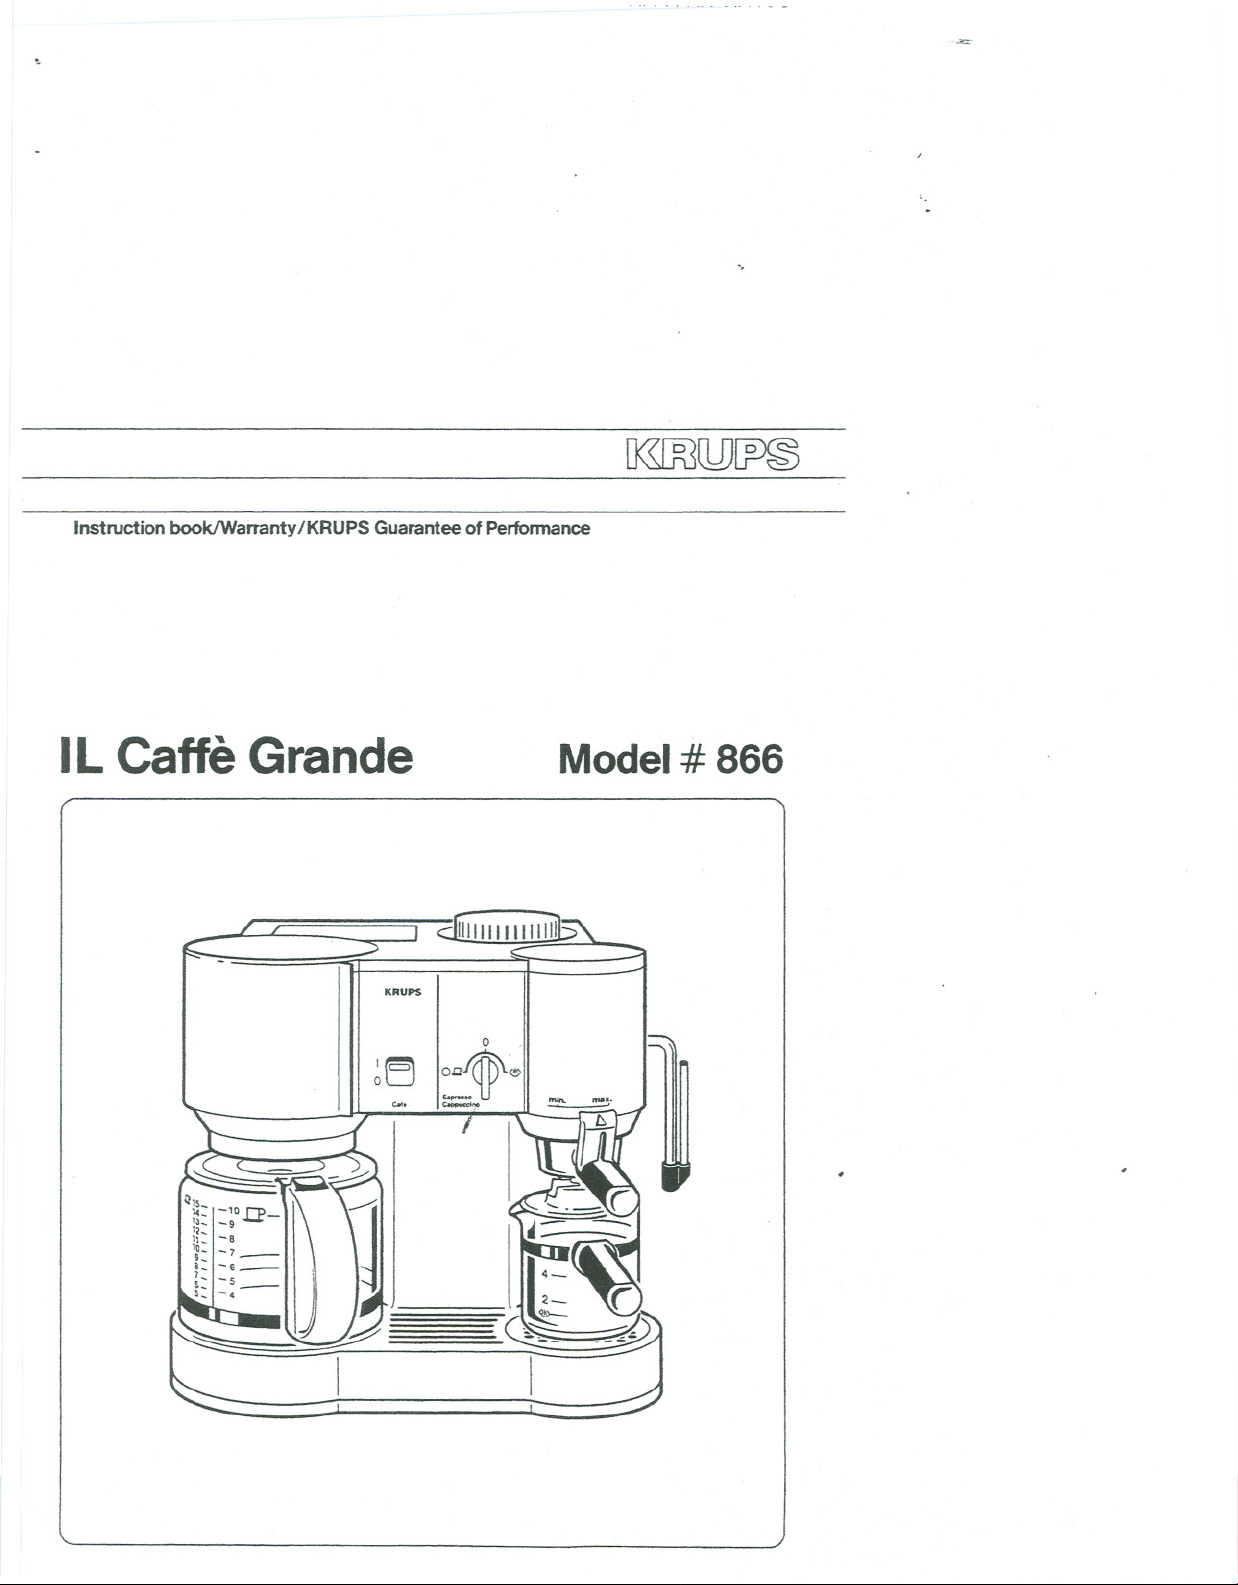
IL Caffe Grande
~E) I:~~
Model# 866
KRUPS
0
"-<,,,
Page 2
IMPORTANT SAFEGUARDS
When using electrical appliances, basic safety precautions should always be
followed, to reduce the risk of fire, electric shock, and/or injury to persons,
including the following:
. Read all instructions and information in this instruction book and any other
literature included inthis carton referring to this product before operating or
using this appliance. -
. Do not touch hot surfaces. Use handles or knobs.
. To protect against electric shock, do not place cord, plugs, or appliance in
water or other liquid.
. Close supervision is necessary when any appliance is used by or near chil-
dren.
. Unplug from outlet when not in use arid before cleaning. Allowto cool before
putting on or taking off parts, and before cleaning the appliance.
. Donot operate any appliance with a damaged cord or plugor after the appli-
ance malfunctions, or has been damaged inany manner. Return appliance to
an authorized service facility for examination, repair or adjustment.
. "t:heuse of an accessory not evaluated for use withthis appliance may cause
-injuries.
. Do not use outdoors.
/. Donot let cord hang overedge oftable or counter,or touch hot surfaces.
. Do not place on or near a hot gas or electric burner, or in a heated oven.
. Todisconnect, turn any control to "OFP', then remove plugfrom \yalloutlet.
.' Donotuse applianceforotherthan intendeduse.
. Do not unscrew or remove boiler cap while the machine is in operation. Wait
until brewing cycle is completed and allwater and steam has been used up.
. Appliances with Glass Containers.
A. The container is designed for use with this appliance. It must never be
used on a range top.
B. Do not set a hot container on a wet or cold surface.
C. Do not use a cracked container or a container having a loose or weak-
ened handle.
D. Do not clean container with cleansers, steel wool pads, or other abra-
sive material.
SAVE THESE INSTRUCTIONS
Page 3

SPECIAL CORD SET INSTRUCTIONS
Regarding your Cord Set:
A. A short power-supply cord is to be provided to reduce risks resulting
from becoming entangled in or tripping over a longer cord.
B. Longer extension cords are available and may be used ifcare is exer-
cised in their use.
C. If a long extension cord is used, (1)the marked electrical rating of the
extension cord should be at least as great as the electrical rating of
the appliance, (2) ifthe appliance is of the grounded type, the extension
cord should be a grounding type 3-wire cord, and (3) the longer cord
should be arranged so that it willnot drape over the counter top or table
top where it can be pulled on by children or tripped over.
D. This appliance has a polarized plug (one blade is wider than the other).
As a safety feature, this plug will fit in a polarized outlet only one way.
Ifthe plug does not fit fullyin the outlet, reverse the plug. Ifit still does
not fit, contact a qualified electrician. Do not attempt to defeat this
safety feature.
"
CAUTION:
This appliance is for household use. Anyservicing other than cleaning
and user maintenance should be performed by an authorized service re-
presentative.
Do not immerse this coffeemaker in water or any other liquid.
To ~educe the risk of fire or electric shock, do not remove the base. No
user serviceable parts inside. Repair shoulcVbe done by authorized ser-
vice personnel only.
. Check voltage to be sure that the voltage indicated on the name plate #
agrees with your voltage. #
. Never use warm or hot water to fillthe water container! Use cold water
only!
. Never refillthe water chamber while this coffeemaker is inthe "on-posi-
tion".
Turnthe coffeemaker offand let itcool down for ten minutes before refil-
ling with water.
. Do not place carafe on a hot surface or in a heated oven.
. Before turning your KRUPScoffeemaker on, please make sure that
carafe sits flat on inside circle of heating plate.
. Never remove carafe before brewing is comletely finished (this is the
case when dripping from the filter holder into the carafe has stopped
completely).
. Keepyourhands andthe cord awayfromhot partsofthe appliance
duringoperation.
. Neverclean with scouring powders or hard implements.
Page 4
C
D
I
B
A
KO-
a
b
c
e
d
9
h
E
J
f
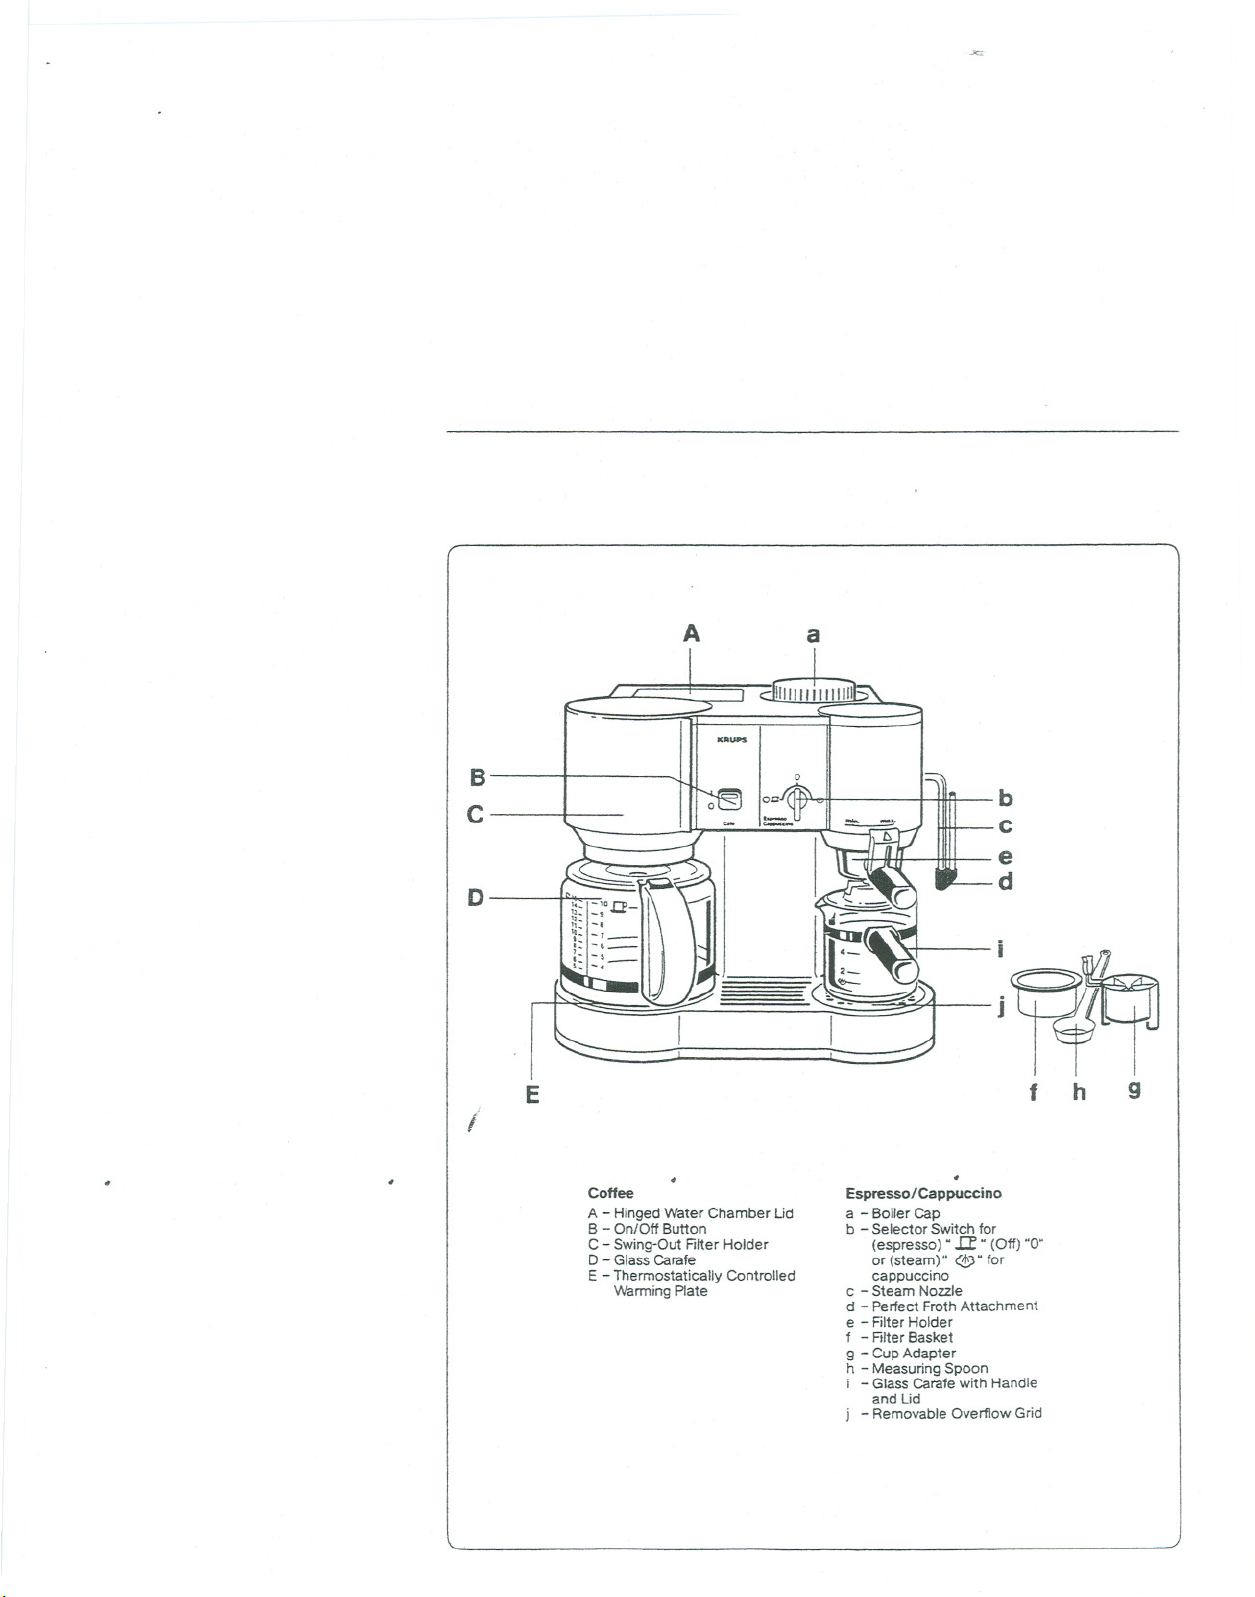
Coffee
-Hinged Water Chamber Ud
A
B - On/Off Button
C - Swing-Out Filter Holder
D - Glass Carafe
E - Thermostatically Controlled
WarmingPlate
Espresso/Cappuccino
a -Boiler Cap
b
-Selector Switch for
(espresso) ".a N(Off) "0.
or (steam)" ($" for
cappuccino
-Steam Nozzle
c
d
-Perfect Froth Attachment
e
-Filter Holder
f
- Filter Basket
g -Cup Adapter
h - Measuring Spoon
i-Glass Carafewith Handle
andUd
j -Removable Overflow Grid
Page 5
Espresso/Cappuccino
Ef
"
1 2 3
~.
n I)
7
9
5.
0I
o,,~''!.- -
10
Page 6

Espresso/Cappuccino
A i
a ~
cl
14
.-'--=
Qnu\~
- ~
I
16
/
17
Page 7

Coffee
.
"
~
\).1
tJf-
EIJ- ;~ 3
'''",PS
5 6
Page 8

The KRUPS IlCaffe Grande
is a state of the art pro-
grammable combination
coffee, espresso, and cap-
puccino maker that incor-
porates all of these func-
tions in an all in one space
saving coffee/espresso
making system.
BEFORE YOU START...
We recommend that you
get familiar with all the parts
of your "IL Caffe Grande"
before operating the
machine. With the unit
unplugged, begin by insert-
ing the filter basket (f) into
the filter holder (e), fit the
filter holder (e) into the
brewing head, and remove
and replace the boiler cap
(a). Tu.rnthe selector switch
(b) to the three different
Rositions, and check out all
~arts of the coffee maker as
well. Wash all loose parts in
warm, soapy water, r;inse
thoroughly and dry.
It is also recommended that
you operate your "IL Caffe
Grande" once without cof-
fee using the instruction
provided for espresso and
coffee making.
CAUTION - PRESSURE
It is important to remember
to NEVER open the filter
holder (e) or boiler cap (a)
while your "IL Caffe Grande"
is turned "On", or as long as
there is pressure in the boi-
ler.
Pleasefollow the instruc-
tions listed below to see if
the machine is still under
pressure.These safety pre-
cautions should be followed
while your machine is in use
and ten to fifteen minutes
after last use of the
machine.
1. Tum the selector switch
to the "0" position.
2. Unplug the machine.
3. Hold a pitcher with cold
water undemeath the
steam nozzle and insert
nozzle into the pitcher.
4. Once the steam nozzle
is immersed in the pit-
cher of water, tum the
selector switch to the
"@" position. Continue
this procedure until no
more steam comes out
of the steam nozzle.
5. Tumthe selector switch
to the "0" position.
6. Now you can remove
the boiler cap and fil~r
holder.
In case there is still water in
the boiler chamber, remove
the glass carafe, drip tray,
and tum the machine
upside down to empty any
remaining water in the
chamber.
GENUINE ESPRESSO
Espresso is a far richer and
stronger brew than regular
coffee. It should be deep,
dark, and delicious. Most
people find that they enjoy
it in small quantities
because of its richness, and
for that reason, espresso is
usually served in small
(2-2112 oz.) demitasse cups.
The mark of real espresso is
its wonderful inviting fra-
grance and its rich frothed
topping, a light brown
"crema". Your "IL Caffe
Grande", properly used, will
always produce espresso
that is deep, dark, and deli-
cious. Just follow the
instructions and use fresh,
well-roasted, pre-ground
espresso or espresso
beans you grind yourself.
Grinding Espresso Beans
If you use the KRUPS "Fast
Touch" (model # 203), or
"Touch Top" (model # 208)
coffee mills, the grinding
time for 4 cups of espresso
is approximately 16-18
seconds.
Remember: Espresso re-
quires a fine grind.
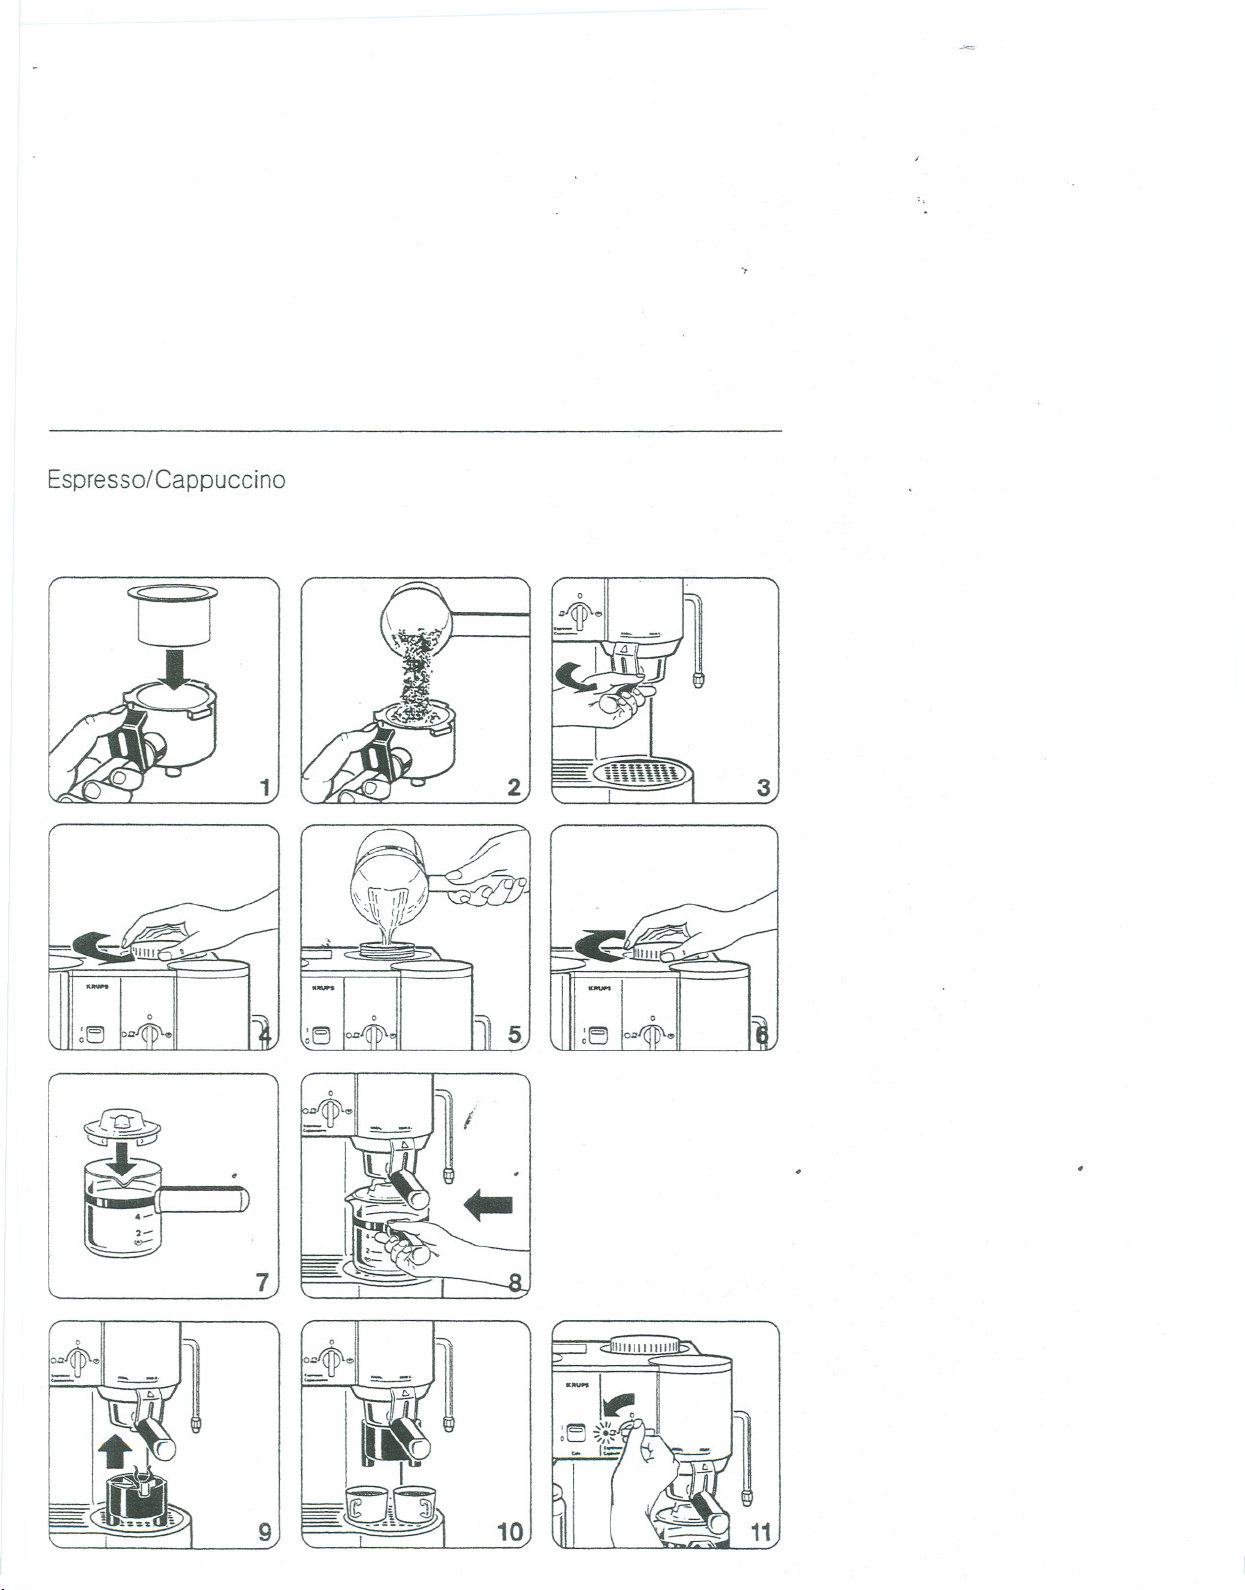
Making Espresso
1. Place your "IL Caffe
Grande" near an electri-
cal outlet, then plug in
the machine.
Make sure the selector
switch (b) is in the "0"
(off) position.
2. Place
your filter basket
(f) into the filter holder
(e) (see figure 1).The
basket is marked on the
inside indicating 2 or 4
cups. RIIto the desired
level.
Page 9

"
3. Fill the filter basket with
ground espresso coffee
(see figure 2). Pack the
coffee lightly and clear
any excess coffee from
the rim of the filter hol-
der. This will ensure the
filter holder will fit pro-
perly into the brewing
head.
ATTENTION
Do Not Pack Coffee Tightly.
Do Not Fill More Coffee
Than Indicated By The
4-Cup Marking.
This might cause clogging
or overflow (see section
Problems & Causes).
4. Insert filter holder (e)
containing the filter bas-
ket and coffee into the
brewing head. The filter
holder must be inserted
so that the arrow on the
filter holder is in line with
the beginning of the line
on the machine. Press
the filter hoider upwards
and tum firmly to the
right until it can go no
further. The arrow on the
filter holder should be as
far right between the
"min" (minimum) -
"max" maximum range
as possible. If the arrow
is not at least in the
middle of the "min" -
"max" range, do ot ope-
rate the machine.
Rather, remove filter hol-
der and reinsert as
described above until
the arrow is within the
"min" - "max" range (see
figure 3). The "min" and
"max" markings have
nothing to do with the
strength of the coffee.
Following this procedure
will prevent the filter hol-
der from being dislodg-
ed as pressure builds up
during the brewing pro-
cess.
5. Unscrew the boiler cap
(a) by turning it counter
clockwise (see figure 4).
6. Using the glass carafe,
fill the boiler chamber
with fresh, cold water
(see figure 5).
Measuring Guidelines
The glass carafe (i) has
markings for 2 cups and
4 cups and steaming. .
2 cups of water yields
2 cups of espresso,
3 cups of water yie'lds
2 cups espresso, plus
steam for frothing l"I'Iilkfor
cappuccino.
4 cups of water yields
4 cups espresso.
5-51/2 cups of water yields
4 cups of espresso, plus
steam for frothing milk for
cappuccino. 5-51/2 cups of
water is the upper rim of
the metal band surrounding
the carafe.
CAUTION
Never fill the boiler cham-
ber while your "IL Caffe
Grande" is in the "..a" or
"@" position.
It should be in the "0" (off)
position.
Never pour more than 12
oz. of water into the boiler
chamber.
7. Placethe boiler cap (a)
on the machine and turn
it clockwise until it is
secure (see figure 6).
8. Next, place the carafe
lid on the carafe (i) so
that the opening points
towards the pouring
spout on the carafe (see
figure 7).
9. Position the carafe
under the filter hoider.
Make sure that the
nozzle in the filter holder
points through the open-
ing of the carafe lid (see
figure 8).
ATTENTION
Make sure that the overflow
grid G)is in place.
10.Tomake espresso
directly into the cups,
clip the cup adapter (g)
onto the filter holder
(see figure 9). Place
cups directly under the
two spouts (see figure
10).
11.Now you are ready to
make espresso. Simply
tum the selector switch
to the left "..a" (see
figure 11).The on/off indi-
cator light will illuminate.
12.After approximately
2 minutes the water will
have reached the proper
temperature. The water
Page 10

--
at this time willpass
through the ground cof-
fee, producing espresso
inthe glass carafe or in
the cups, whichever
you choose.
section CAUTION-
PRESSURE).
Removefilter holder(e).
Emptyfilterbasket (t).
Repeat steps 1-4 ofthis
section.
13.Once the espresso has
stopped brewing,tum
"off"the machine by
movingthe switchto the
"0"position. The control
lightwillgo out, indicat-
ingthat the machine is
off.
14. Before you remove the
filterholder for cleaning,
or to make more
espresso, make sure
that the boiler isno lon-
ger under pressure (see
section CAUTION-
PRE~SURE).
CAPPUCCINO
Cappuccino reportedly
takes its name from the
chocolate hues of the
robes worn by the Capu-
chin monks who favored
this delicious dessert cof-
fee. While cappuccino is
traditionally made up of
espresso and frothed milk,
it can be tailored to one's
own taste with cinnamon,
sugar, chocolate flakes, or
even liquor. Its versatility
makes cappuccino a world-
wide gourmet choice.
CAUTION
U1ecaution when removing Preparationof Cappuccino
ttle filter holder as the Note: Ifthe Perfect Froth
metal parts may stillbe hot attachment is not inplace,
Toremove the filterholder, .attach itnow (see figure12).
tum the filterto the left, 1. The firststep inmaking
past the white "min"mark- cappuccino is to make
ing,untilthe holder dis- espresso. Therefore,fill
lodges from the machine. the glass carafe withthe
amount ofwater which
ATTENTION
The metal parts mightstill
be hot and can be cooled
down by running cold water
over them.
Tomake more espresso,
proceed as follows:
Check to see ifthe boiler
chamber is empty and
not under pressure (see
is required to make the
desired amount of
espresso, plusadditional
water forfrothing milk
(see section Making
Espresso).
2. RIIa small pitcher 1/3to
1/2fullwith fresh, cold
milkand set aside.
3. Tomake espresso, tum
the machine to the ".a"
position. As soon as half
the required amount of
espresso is produced,
turn the selector switch
to the "0"position. At
this time the boiler has
created enough pres-
sure and steam to start
frothing milk.Frothing
milkbefore finishingthe
espresso prevents you
from runningout of
steam. Thiswillhappen
ifyou froth milktowards
the end of the brewing
process.
4. Tofroth milk,take your
pitcher with fresh, cold
milkand insert steam
nozzle with perfect froth
attachment halfway into
the milk.Then tum the
selector switch to the
"@" position. Leave in
for approximately 45-60
seconds depending on
how much froth you
want and the type of
'milk you are using.
ATTENTION
Do not bring milkto a boil
(this willhappen iflarge
bubbles start formingat the
surface ofthe milk).
Do not let the Perfect Froth
attachment touch the bot-
tom of the pitcher as this
willprevent you from froth-
ingthe milk.
5. Afterthe milkis frothed,
set aside and allowitto
settle.
Page 11

"
6. Tumthe three way
selector switch back to
the "..a" position to
finishmaking the
espresso.
7. Pour the espresso intoa
cup which has a capa-
cityof at least 5 ounces.
Add the steamed milkto
the espresso and spoon
on the frothed milk The
proportion between
espresso and milkis to
taste; in Italyit is nor-
mally1part espresso to
2 parts milkplus froth.
Steam Only
Ifyou onlywant to froth
milk,fillthe glass carafe
withwaterupto the "«!;)"
mark This willgive you
approximately one minute
ofsteaming.
1. Pourthe water into the
water chamber and tum
the selector switch to
the" «!;)" position.
~ Place a cup under the
steam nozzle to collect
any water which may
escape. Assoon as you
start seeing steam,
move the selector
switch to the "0" posi-
tion.
3. Nowfollowsteps 2-7
and when finished froth-
ingthe milkreturn to "0"
position.
AlTENTION
The top closure of the Per-
fect Froth attachment (see
figure 14,part A)has a very
fine hole which draws air
into the milk Ifthis tiny hole
gets clogged, "Perfect
Froth" willnot work pro-
perly. Therefore, never
immerse the top closure in
milk
or froth.
CLEANING
Before cleaning, turn "off'
the machine, unplug it, and
allow it to cool down.
The filter holder, filter bas-
ket, carafe, carafe lid, and
overflow grid can be put in
the dishwashers upper
rack, away from the heat-
ing/drying element.
The machine can be wiped
clean by using a damp
cloth. Never immerse the
body of your "ILGaffe.
Grande" in water or any
other liquid. Clean the
brewing head with }idamp
cloth and remove ~round
coffee. If there is water left
in the boiler chamber, let
the machine cool down,
remove all loose parts and
empty through the top
opening by tuming upside
down.
Cleaning The Steam
Nozzle
Clean the steam nozzle
each time after you have
immersed it inthe milk,
otherwise the inside of the
nozzlebecomes clogged
and the milk deposits on
the outside harden and
become difficult
to remove.
Ifclogging does occur,
unscrew the tip' of the
steam nozzle (see figure
15). Remove all milk par-
ticles using a sewing
needle and rinse under the
faucet. Replace nozzle tip
making sure to screw it on
tightly.
Wipe offthe outside of the
nozzle with a wet cloth.
Holdthe wet cloth very
close to the tip of the
nozzle and turn
switch to the"@". Let the
steam escape into the wet
the selector
cloth for one or two
seconds. Any milk residue
will then be flushed
Then return to the "0" posi-
tion.
out.
Cleaning The Perfect Froth
Attachment
Fora thorough cleaning of
the "Perfect Froth" attach-
ment, remove part C (see
figure 14).All parts should
be rinsed'in warm water. If
the small suction opening in
part A is clogged up, it can
be opened with afine
needle.
Cleaning The Drip Tray
The overflow grid can be
cleaned by removing the
grid (see figure 16).
CAUTION
DO NOT try to open or
disassemble the main body
of the machine.
Page 12

DECALCIFYING
Under normal conditions
you do not need to decal-
cify your
However, in areas where
there is hard water or if
used very frequently, we
recommend decalcifying,
especially if white deposits
can be seen in boiler cham-
ber. Decalcifier iswidely
available and can be
purchased from KRUPS
Consumer Service Depart-
ment.
How To Decalcify
Please follow the procedure
listed below to decalcify
your machine:
. Turn machine "off' and
. Remove filter holder,
"ILCafre Grande".
unplug the appliance.
Allow it to cool before
decalcifying.
glass carafe,and over-
,flowgrid from the
machine.
. Turn machine,comple-
tely upside down. With a
flat blade screw driver,
remove the brewing
head sieve by turning it
clockwise until the sieve
can be removed from the
machine (see figure 17).
. Turn machine upright
again and reinsert over-
flow grid into place.
. Dissolve the decalcifying
agent into 4 cups of
water. Pourthis solution
into the boiler container
and secure the boiler
cap.
. Place the glass carafe
without the lid under-
neath the brewing head.
. Turnthe machine to the
" lr positionsothat
the solution will pass
through the water heat-
ing system into the glass
carafe.
. Allow the machine to
cool down after each
application.
. Repeat the above pro-
cess using clean, cold
water to remove all the
remaining solution inthe
machine. Cleantwice if
necessary.
PROBLEMSANDCAUSES
MAKINGESPRESSOOR
CAPPUCCINO
(Always check ifthe appli-
ance is plugged in and is in
the proper "On" position).
Problem:
1. Espresso leaking from
filter holder '
Cause:
. Filterholder not properly
inserted
. Filterholder not pushed
infarenough
. Internal gasket isdirty
and needs to be clean-
ed
. Gasket withoutelasti-
city,replace itwitha
new one
. Coffeepowdernot
cleaned off the edge of
the filter holder
Problem:
2. Espressodoes not
come out
Cause:
. Nowaterin boiler con-
tainer
. Nocoffeeinfilter holder
. Filterclogged because
coffee is ground too fine
and or pressed down to
hard
Problem:
3. Steam does not come
out of steam nozzle
Cause:
. Nowateror not enough
water inthe boiler
chamber
. Steamnozzleisclogged
(see"Cleaning"section)
. Perfect Froth attach-
mentisclogged (see
"Cleaning
Froth")
Problem:
4. Not enough froth when
frothingthe milk
Cause:
. Perfect Froth attach-
ment touches the bot-
tom of the pitcher
. PerfectFrothtip is clog-
ged (see figure 14, part
A). See also section
"Cleaning the Perfect
FrothAttachment"
. Steam nozzle is clogged
(see"Cleaning")
the Perfect
Page 13

"
. Notenoughwaterleftin
the boilerto steam 45-
60seconds
PREPARINGCOFFEE
Beforemakingyourfirstpot
of delicious coffee, we
recommend rinsingthe cof-
fee maker once ortwice
with water only,without
ground coffee inthe filter
basket Thiswillremove any
possible dust which may
have settled duringship-
ping.
Be sure that the water
chamber isempty. Remove
anyliterature,etc. iffound
inthe waterchamber.
. Thelidofthe glass
carafemust be properly
positioned during the
brewingprocess.The
front hooks have to be
inside the carafe and
the rectangular part of
the lid has to be pushed
down so that itengages
with the handle of the
glasscarafe.
. Toreleasethe lidpush
the rectangularpart of
the lid upwards.
. Makesurethat the swi-
vel filter is closed pro-
perly
during the brewing
process. When closing
the swivel filter you will
feel a noticeable resist-
ance when the handle
of the swivel filter is
approximately 112inch
away from the non-
removable side piece.
Push in firmly until the
handle touches the side
of the coffee maker.
. Caution: If the swivel fil-
ter is not pushed in pro-
perly the "Stop'N Serve"
trigger can not function.
This may cause hot
water or hot coffee to
overflow.
. The "Stop'N Serve"
mechanism isopened
as long as the glass
carafe is inserted into
the machine and sits
properly on the warming
plate and the swivel filter
is closed properly. When
brewing
sure the glass carafe is
in place (see Stop'N
Serve section).
Putting in The Ground
Coffee
1. Swing out the spivel fil-
ter (C) (see figure 1)and
insert a paper filter. We
recomme~d using
KRUPS size 4. When
inserting a paper filter
make sure the seam is
pointing towards the
base of the filter holder
(see figure 2).
. Use your hands to con-
form the filter to the
contours of the filter
holder. This will enable
you to achieve better
results.
. If you prefer a more per-
manent filter, the
KRUPS "Gold Tone" fil-
ter # 053 is available as
coffee make
an accessory. This can
be purchased from your
local retailer or call the
KRUPS Consumer Ser-
vice department.
2. Put ground coffee into
the filter holder (see
figure 3). We suggest
one level KRUPS
using
measuring spoon of
ground coffee for each
cup of robust brewed
coffee. After using your
KRUPS coffee maker
several times, you can
adjust the quantity to
suit your own taste.
. We do not recommend
using coffee that is
ground to a powder-like
consistency, as this will
prevent water from pas.
sing through the coffee.
3. Close the swivel filter
and make sure that it is
completely closed (see
figure4).
ATTENTION
. Make sure that the filter
paper does not fold over
when closing the swivel
filter, otherwise the
water might run be-
tween the filter paper
and the filter holder pro-
ducing a very weak cup
of coffee.
Filling
The Water Chamber
1. Open the hinged water
chamber lid (see figure
5). Pour in the desired
quantity of water (see
figure 6).
Page 14

. The amount of freshly
brewed coffee deliver-
ed after the brewing pro-
cess willalways be
slightlyless than the
amount put into the
water chamber. This is
due to the minimal
absorption of the water
by the ground coffee.
Therefore,put in a little
more water to begin
withso that you will
have the number of
cups that you desire.
2. Place the glass carafe
with lidin position on
the warmingplate.
3. Tum"on"your "ILCaffe
Grande" using the "Onl
Off' button. The indica-
tor lightwillilluminate
indicatingthat the brew-
ing process has begun
/see figure7).
4. As longas the red indi-
cator lightis illuminated
the coffee willbe k:ept
warm.
Stop'N Serve Feature
The Stop'N Serve feature is
KRUPS'answer to the
impatient coffee drinker's
clamor fora quick cup of
coffee! Thisdevice automa-
ticallystops the flow of
brewed coffee through the
tiltercone ifthe glass carafe
is removed from the warm-
ing plate duringthe brewing
cycle. Youhave about
20 seconds between the
removalofthe carafe and it
being reinserted back onto
the warmingplate.
The Stop'N Serve device
closes offthe tilter cone so
effectivelythat there is vir-
tuallyno coffee-drip onto
the warmingplate. Once
the carafe is replaced, the
brewing process and the
flowofcoffee intothe
carafe can be resumed.
CAUTION
Ifthe coffee DOESdrip
onto the warming plate
after the removal ofthe
carafe, it isusually an indi-
cation that the seal in the
filterholder is missing or
defective. Inthis case call
the KRUPSConsumer
Service Department at
1-800-526-5377and they
can assist you.
Itis also possible that too
much ground coffee has
been placed inthe filter
paper. Thiscauses the
water that jets into the tilter
cone to overflow between
the filterand the sides of
the filtercone.
Ifthis blockage and subse-
quent dripping does occur,
put the glass carafe imme-
diately back onto the warm-
ingplate, and allow the full
brewingcycle to run its
course. Do not swing out
the swiveltilter untilthe bre-
wingprocess is completed.
CLEANING
. Alwaysunplugthis appli-
ance before cleaning.
Clean the filterbasket,
carafe, and lidina solu-
tion ofwarm water and
mildliquidsoap. These
parts can also be placed
inthe upper levelof
your dishwasher away
from the heating and
dryingelement for safe
effective cleaning.
. Never use scouring
agents.
. Never immerse the
appliance itself inwater.
Toclean, simplywipe off
witha soft, damp cloth.
. Never use a cloth to
clean inside of the water
chamber, as this might
leave fuzzydeposits in
the chamber. Just rinse
with cold water periodi-
cally.
DeCALCIFYING
Although your KRUPS cof-
fee maker has the most
advanced water heating
and pumping system, it will
periodically need cleaning
with a decalcifying agent.
. Thisis due to the cal-
cium (limestone) found
in drinking water.
. Insomeareaswherethe
water is hard, you will
need to decalcify more
frequently than in areas
with soft water.
Page 15

,
. Itwillalsodepend upon
how often you use your
coffee maker.
When To Decalcify
Youwill know when such a
cleaning is necessary by an
obvious slowdown in the
brewing time of your coffee.
This extended time indi-
cates that there is a cal-
cium deposit in your coffee
maker. Decalcifier is widely
available and can be
purchased from the KRUPS
Consumer Service Depart-
ment.
UMITED one-year warranty
Your KRUPS product is covered by the following war-
ranty: If, within one year from date of purchase, this
KRUPS product fails to function because of defects in
material or workmanship, KRUPS North America, Inc.
will, at its option, repair or replace the unit without
charge, provided the owner returns:
. The KRUPSproduct (securely packed)
and
. Proof of date of purchase to:
KRUPSCustomer Service
KRUPSNorth America, Inc.
7 Reuten Drive
CLOSTER,New Jersey 07624
To assure prompt service, include a letter indicating
the specific cause for returning your KRUPS product.
Do not return any loose parts or any accessories
which are not defective with your appliances to avoid
damage and loss in transit.
This warranty will,be void if malfunction was caused by
damage to the Iroduct by accident, misuse, use on
frequency or voltage other than marked on the pro-
duct and/or described in the instructions, abuse.
including tampering, damage in transit, or use for com-
mercial purposes. This warranty gives you specific
legal rights, and you may also have other rights which
vary from state to state.
Page 16

KRUPS GUARANTEE OF PERFORMANCE
For service, repair or warranty please see instructions below.
Ifyou have any other questions concerning your "IL Caffe Grande" machine
# 866 call the KRUPS Consumer Service Department toll free (Monday
through Friday [exept holidays] from 9 AMto 4 PM Eastern Standard (Time)
1-800-526-5377.
This fine KRUPS product is manufactured according to a rigid code of quali-
ty standards, and, with a minimum of care, should give years of satisfying
service. However, should the need arise for repairs or for replacement parts
(within or after the warranty period), please do as follows for the most con-
venient, fastest service.
Ifyour product needs to be repaired please send it to the address listed
below:
KRUPS Consumer Service
KRUPS North America, Inc.
7 Reuten Drive
CLOSTER,New Jersey 0'7624
Pack up your appliance carefully to avoid damage in shipping and be sure to
provide us with the following information:
A.Yourname and address and type number of the appliance on the outside
wrapping of the packaging.
B.Tape a brief note to the body of the machine indicating:
. How long you own it.
~' . Possibleproblem.
IMPORTANT: ONLYSEND THE DEFECTIVEAPPLIANCE. KEEP ALLREMOVABLE
We'will repair or replace your KRUP'Sproduct without delay and se~d it back
to you with no charge for shipping.
Ifyou send us a receipt for the regular UPS or Parcel Post charges, we will
even reimburse you for your shipping charges, within or after the warranty
period.
On all repair work to be done after the warranty period, our Consumer Ser-
vice Department willbillyou for material and labor only.
Do not return your appliance to the store. The KRUPS Guarantee of Perform-
ance program has been designed to provide you with the best possible ser-
vice using genuine KRUPS parts.
Allrepair work and replaced parts will carry an extended 90-day-warranty.
KRUPS North America, Inc.
7 Reuten Drive, CLOSTER, New Jersey 07624
1092/StD/866
PARTS AT HOME TO AVOIDFURTHER DAMAGE INTRANSPORT!
us
57729
 Loading...