

Page 1

y
www.krups.com
Page 2

2
FBC 2/3/4
Español
35
Características del aparato p 39
Características p 39
Antes de la primera utilización p 40
Ajuste del reloj p 41
Utilizando el Panel de Control p 41
Sistema de calentamiento p 42
Función BAKE/
Horno
p 42
Función CONV. BAKE/
Horno de convección
p 43
Función BROIL/
Asar
p 43
Función Tostar p 44
Función DEFROST/
descongelación
p 45
Función Expert Controlled Cooking p 46
Limpieza y mantenimiento p 49
Expert Heat reflector p 49
English
3
Features p 7
Advantages p 7
Before using for the first time p 8
Setting the clock p 9
Using the control panel p 9
Heating performance p 10
Bake function p 10
Convection Bake function p 11
Broil/Grill function p 11
Toast function p 12
Defrost function p 12
Expert Controlled Cooking function p 13
Cleaning and care p 16
Expert Heat reflector p 17
Français
19
Caractéristiques de l’appareil p 23
Avantages p 23
Avant la première utilisation p 24
Réglage de l’horloge p 25
Utilisation du tableau de commandes p 25
Puissance de chauffage p 26
Fonction BAKE
(CUISSON)
p 26
Fonction CONV. BAKE /
cuisson à convection
p 27
Fonction BROIL /
grillage
p 27
Fonction TOAST /
grille-pain
p 28
Fonction DEFROST /
décongélation
p 29
Fonction Expert Controlled Cooking p 30
Nettoyage et entretien p 33
Expert Heat reflector p 34
Page 3

3
English
IMPORTANT SAFEGUARDS
When using electrical appliances, there are certain basic rules that should always be adhered to,
especially the following:
• Read all the instructions for use and follow them carefully.
• The appliance must not be used by young children or by the infirm without supervision.
• Young children must be supervised to ensure that they do not play with the appliance.
• Do not leave the appliance within the reach of children.
• Never leave the appliance operating unattended; remain nearby when it is in use.
• Do not use the appliance for any purpose other than that for which it was designed.
• Do not touch the metal or hot parts of the appliance while in use; use the knobs and the handle.
Use oven gloves if necessary.
• To avoid electric shock, never immerse the electric cord, the plug or the appliance in water or in any
other liquid.
• To disconnect the appliance, press stop and then pull the plug from the wall outlet.
• Disconnect the appliance when not in use and before cleaning it. Wait for it to cool before cleaning
or putting it away.
• Never use the appliance if:
- the power cord is damaged,
- the appliance has fallen to the floor and shows visible signs of damage or does not function
correctly.
In either case, the appliance must be sent to the nearest KRUPS approved service center to
eliminate any risk.
• Do not allow the power cord to hang down or to touch the hot parts of the appliance.
• Do not place the appliance on or close to a source of heat (hot plate, oven etc.).
• Do not cover the appliance while in operation.
• In order to avoid any risk of fire, do not operate the appliance under a wall cupboard, a shelf or
near inflammable materials such as: blinds, curtains, drapes etc.
• Do not place objects on the appliance while in operation.
Should any part of the appliance catch fire, do not attempt to extinguish it with water.
Smother external flames with a damp cloth. Never attempt to open the oven door if the oven should
catch fire.
• Do not store flammable materials in the vicinity of the appliance.
• Never place large items of food or metal utensils in the appliance as they may catch fire or cause a
short circuit.
• Take extreme care if you use containers made of materials other than metal or glass compatible
with the oven.
• Disconnect the appliance if it does not work correctly, after each use, before changing its position
and before cleaning.
• Do not use metal pads or abrasive cleaning products. These could shed metal particles, which might
touch the electrical parts of the appliance and cause a short circuit.
• Do not use the appliance outdoors.
• While in operation, do not store any accessories in the appliance other than those recommended
by KRUPS.
• Do not place any of the following materials in the oven: paper, cardboard or plastic.
• Do not use it as a source of heat or for drying.
• The appliance must only be used in an upright position, never lying down, tilted or upside down.
• Do not insert anything in the ventilation slots and do not obstruct them.
Page 4

4
English
• Empty the crumb tray regularly. Do not cover the crumb tray with aluminum foil, as this will cause
the appliance to overheat.
• This appliance is designed solely for household use; any professional or inappropriate use or use
not in accordance with these instructions renders the warranty null and void.
• Use extreme caution when removing tray or disposing of hot grease.
• Any work other than cleaning and care must be entrusted to the nearest KRUPS authorized
service center.
There are no user repairable parts. In order to avoid any risk fire or electrocution, repairs may only
be carried out by the qualified personnel of a KRUPS approved service center.
SAVE THESE INSTRUCTIONS
CAUTION
• Check that the supply voltage matches that indicated on the appliance.
• Given the diversity of applicable standards, if this appliance is to be used in a country other than
that in which it was purchased, you should have it checked by an approved service center.
• Use a solid work surface away from any water splashes.
• Do not carry or move the appliance during use.
• Do not pull on the supply cord to unplug the appliance.
SPECIAL CORD INSTRUCTIONS
A. A short power-supply cord is provided to reduce the risk of becoming entangled in or tripping
over a longer cord. Extension cords are available and may be used if care is exercised in their
use.
B. If an extension cord is used,
(1) the marked electrical rating of the extension cord should be at least as great as the electricalrating of the appliance,
(2) the cord should be arranged so that it will not drape over the counter top or table top
where it can be pulled on by children or tripped over unintentionally.
C. This appliance has a polarized plug (one blade is wider than the other). To reduce the risk of
electric shock, this plug is intended to fit into a polarized outlet only one way. If the plug does
not fit, contact a qualified electrician. Do not attempt to modify the plug in any way.
In the interest of improving products, Krups reserves the right to change specifications without
prior notice.
Page 5

5
English
LIMITED WARRANTY
This Krups product is warranted for 1 year from the date of purchase against defects
in material and workmanship. During this period, the Krups product that, upon
inspection by Krups, is proved defective, will be repaired or replaced, at Krups's
option, without charge to the customer. If a replacement product is sent, it will carry
the remaining warranty of the original product. This warranty does not apply to any
defect arising from a buyer's or user's misuse of the product, negligence, failure to
follow Krups' instructions, use on current or voltage other than that stamped on the
product, wear and tear, alteration or repair not authorized by Krups, or use for
commercial purposes.
THE WARRANTIES SET FORTH HEREIN ARE EXCLUSIVE AND NO OTHER WARRANTIES,
EXPRESS OR IMPLIED, INCLUDING BUT NOT LIMITED TO ANY WARRANTY OF
MERCHANTABILITY OR FITNESS FOR A PARTICULAR PURPOSE OR USE, ARE MADE BY
KRUPS OR ARE AUTHORIZED TO BE MADE WITH RESPECT TO THE PRODUCT.
Some states do not allow limitation on how long an implied warranty lasts or do not
allow the exclusion of incidental or consequential damages, so the above limitations may
not apply to you. This warranty gives you specific legal rights, and you may also have
other rights which vary from state to state.
If you believe your product is defective, bring the product (or send it, postage prepaid)
along with a copy of the proof of purchase to the nearest authorized Krups Service
Center.
(Please contact your respective countrys customer service department, indicated
below for the address of the nearest authorized Krups Service Center.)
If you send the product, please include a letter explaining the nature of the claimed
defect.
If you have additional questions, please call our Consumer Service Department at :
United States : 1-800-526-5377 ; Canada : 1-800-418-3325 ;
Mon - Fri 8:30 a.m. - 7:00 pm (EST). Mon – Fri 8:30 a.m. – 4:30 p.m. (EST)
www
.krupsUSA.com www.Krups.ca
Please note hours are subject to change.
Before calling the Consumer Service Department, please have the type number of
your Krups appliance available. This will assist in answering your questions. The type
number is generally found on the bottom of the machine. It would be helpful if you
had the appliance available at the time of your call.
General correspondance can be addressed to:
Krups USA Groupe SEB Canada Inc
196 Boston Avenue 455 Finchdene Square
Medford, MA 02155 Scarborough, Ontario MIX 1 B 7
Only letters can be accepted at this address. Shipments and packages
that do not have a return authorization number will be refused.
ENVIRONMENTAL PROTECTION
The packaging of your product is made of recyclable materials. Do not throw it in your usual
trash can; take it to a nearby separated waste collection center.
The approved after-sales service centers will accept your used appliance in order to dispose
of it in an environmentally friendly manner or you can take it to a specialized collection
center provided for this purpose.
Page 6

6
* Depending on model, selon modèle, según modelo
y
2
1
3
6
9
*
10
*
11
*
7
8
5
4
*
12
*
a
b
c
d
e
f
h
i
j
k
*
g
Page 7

English
7
Features
1 Door handle
2 Control panel
a) Display
b) Temperature setting
c) Cooking time setting
d) “+” or “-” adjustment button
e) BAKE function, cooking
f) BROIL function, grilling
g) CONVECTION BAKE cooking
h) DEFROST function
i) TOAST function, toasting
j) START/STOP button
k) Expert Controlled Cooking*
selector switch: (thin pizza, thick pizza, cookies, brownies, bagels, pastry)
3 Ventilation slots
4 Non stick side-walls*
5 Quartz top elements
6 Crumb tray / Expert Heat Reflector
7 Quartz bottom elements
8 Shelf supports
9 Non-stick broil pan*
10 Non-stick bake sheet*
11 2 reversible shelves*
12 Bread tongs*
Advantages:
• Large capacity allows toasting of up to 6 slices of bread, and provides space to heat more of
your favorite foods.
• Versatility to bake, reheat, toast, broil and defrost.
• Convection Bake cooking function uses a fan to distribute hot air throughout the oven for fast
results.
• Patented “Expert Quartz Cycling Technology” cooks faster, and toasts better than other ovens.
• 4 shelf positions allow you to vary the distance of the food from the top or bottom heating
elements to customize your results.
• Electronic thermostat can be precisely adjusted from 100°F to 450°F (in 25°F increments).
• Electronic browning control for toast to your taste.
• Six pre-programmed recipes*.
• Stainless steel crumb tray reflects heat during cooking and pulls out for easy cleaning.
• User-friendly electronic display with digital clock and easy-to-use soft touch controls.
*
Depending on model
Page 8
8
English
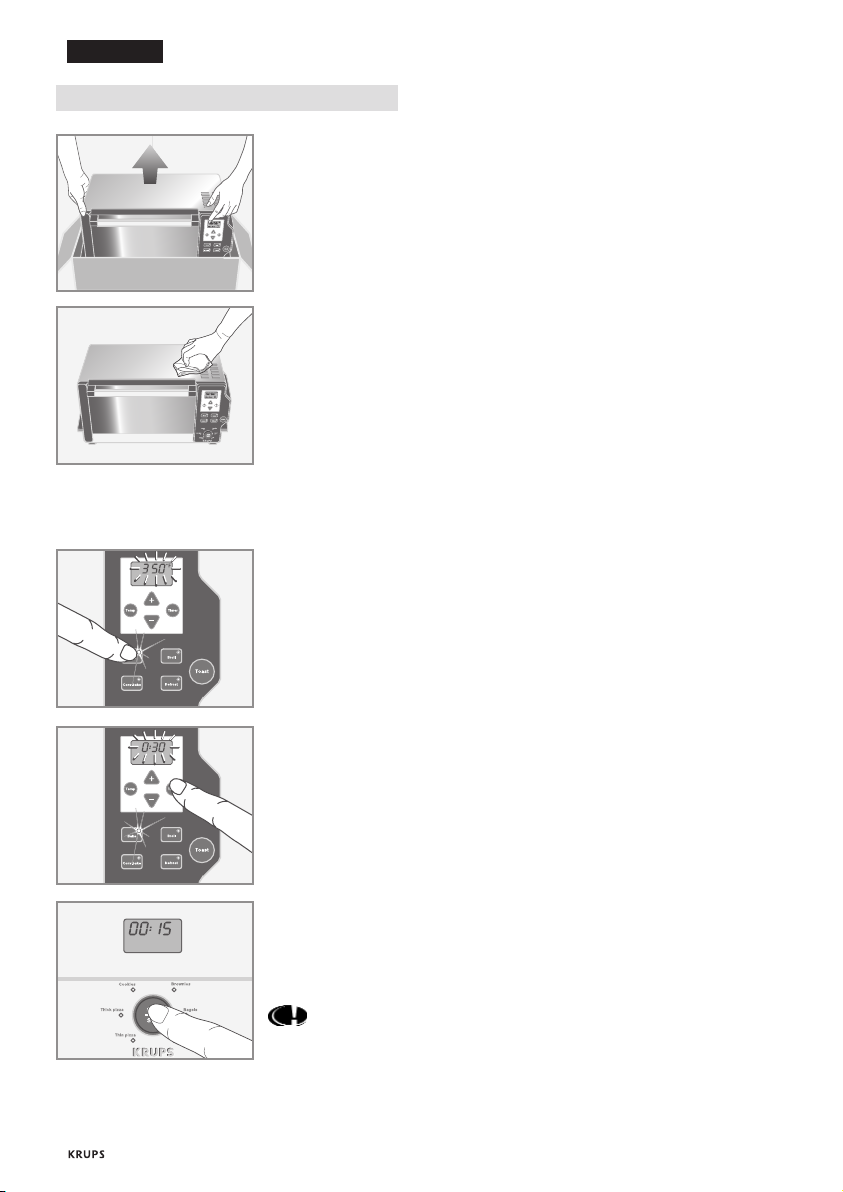
Before using for the first time
• Unpack the appliance and remove packaging including the selfadhesive display sticker on the LCD screen and product information
tags from door handle (not on all models).
• Read all the instructions for use and the important safeguards and
follow them carefully.
• Remove all accessories and wash them in warm, soapy water.
Rinse and dry carefully.
• Unroll the power cord completely.
• Wipe the outside of the appliance with a damp cloth and dry.
• Plug in the toaster oven. It will beep.
In order to remove any possible residues from manufacturing,
run the appliance empty for 15 minutes.
Select the temperature:
• Press the “Bake” button. The “Bake” indicator lamp will light.
• The default temperature of 350°F will be shown blinking on the
display.
• Press on “+” to select a temperature of 450°F.
Select the cooking time:
• Press the “Timer” button.
• The default cooking time of “0:30” (30 minutes) will be shown
blinking on the display.
• Set the cooking time to 15 minutes by pressing the “-” button.
• Press “Start”. The appliance will beep and the oven will start.
• The time will be counted down in one-minute intervals.
• At the end of the cooking time, the appliance will beep five times and
the oven will turn off.
You may observe smoke escaping from the oven. This is
normal and will gradually disappear with use.
Page 9
9
English
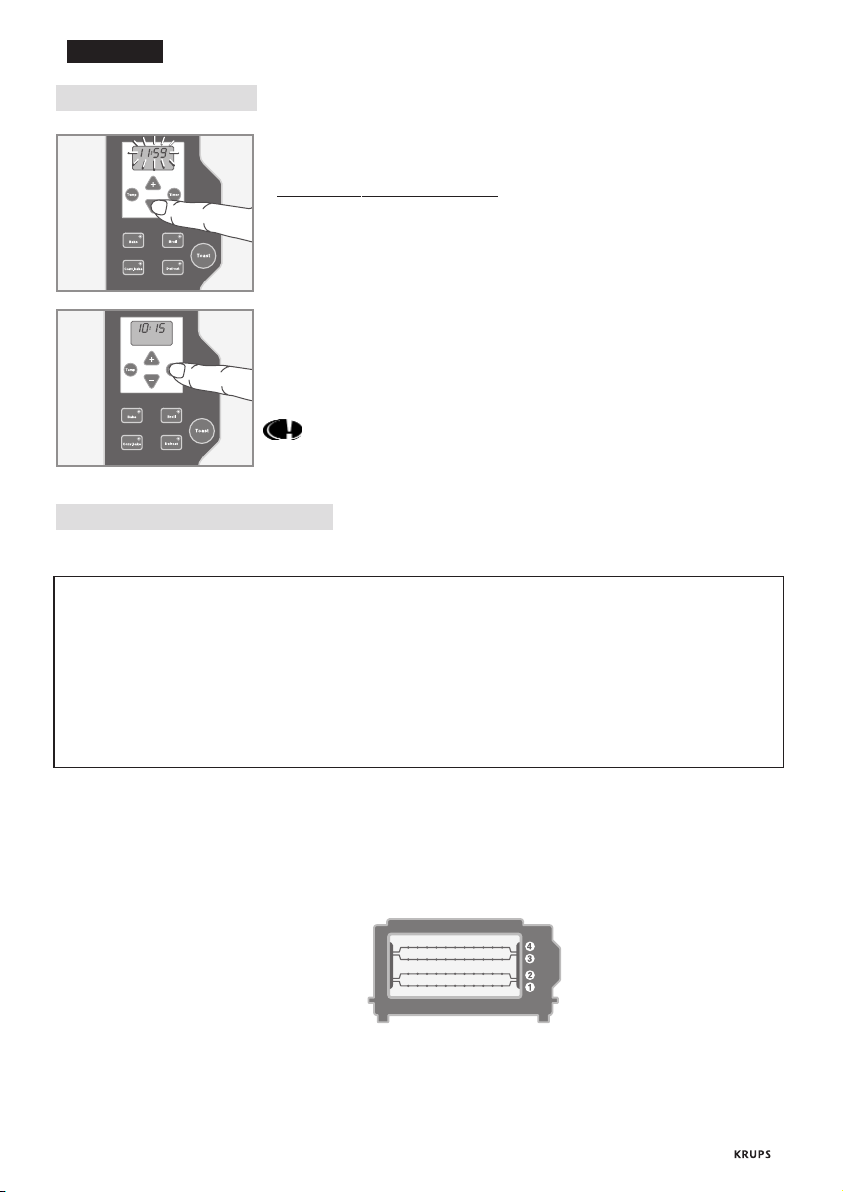
Setting the clock:
• When the oven is first plugged in “12:00” appears on the display.
• Pr
ess the “Timer” button twice. The display will begin to blink “12:00”.
• Adjust the time in steps of one minute by pressing the “+” or “-”
buttons.
• If you hold the button pressed down for more than 6 seconds, the
time will change quicker.
• Press the “Timer” button to enter the time in the system.
If you do not press the “Timer” button, the time will be
entered automatically after 30 seconds.
Using the control panel:
Cooking time and temperature can be adjusted before or during the cooking cycle.
To adjust cooking times: Press « Timer » button once. Time remaining will be displayed,
blinking. Cooking time can be adjusted in 1 minute increments up to a maximum of
1 hour 30 minutes, using the « + » and « - » buttons.
Press « Timer » again to set new time.
To adjust temperature: Press « Temp ». Current temperature setting will be displayed,
blinking. Temperature can be adjusted in 25 increments up to a maximum of 450° using
the « + » and « - » buttons.
Press « Temp » again to set new temperature.
SHELF POSITIONS:
• For all functions the position of the cooking shelf will play an important role in the
final result.
• Note that there are 4 separate positions for the cooking shelf.
• Place your food in the center of the tray or on the shelf at the desired height.
Shelf position #1: best for frozen pizza, and many baking and reheating uses.
Shelf position #2: best for cookies, brownies, toasting bread, and many baking and reheating uses.
Shelf position #3: best for toasting bagels, and broiling meats, or bacon.
Shelf position :
Page 10
10
English
Heating performance
This toaster oven employs Krups patented Expert Quartz Cycling Technology™. The top 3 heating
elements and bottom 3 heating elements are powered alternately at full power to heat food more
quickly and provide ultra precise temperature control. Monitor results carefully as cooking time can
be reduced by as much as 30%.
It is normal for one set of elements to turn off while the other set is heating at full
power.
The ends of each heating element will glow more brightly than the middle of the
element. This is normal. The elements are specially designed to produce a balanced
level of heat throughout the chamber.
During baking, quartz elements heat even if they are not lighting up.
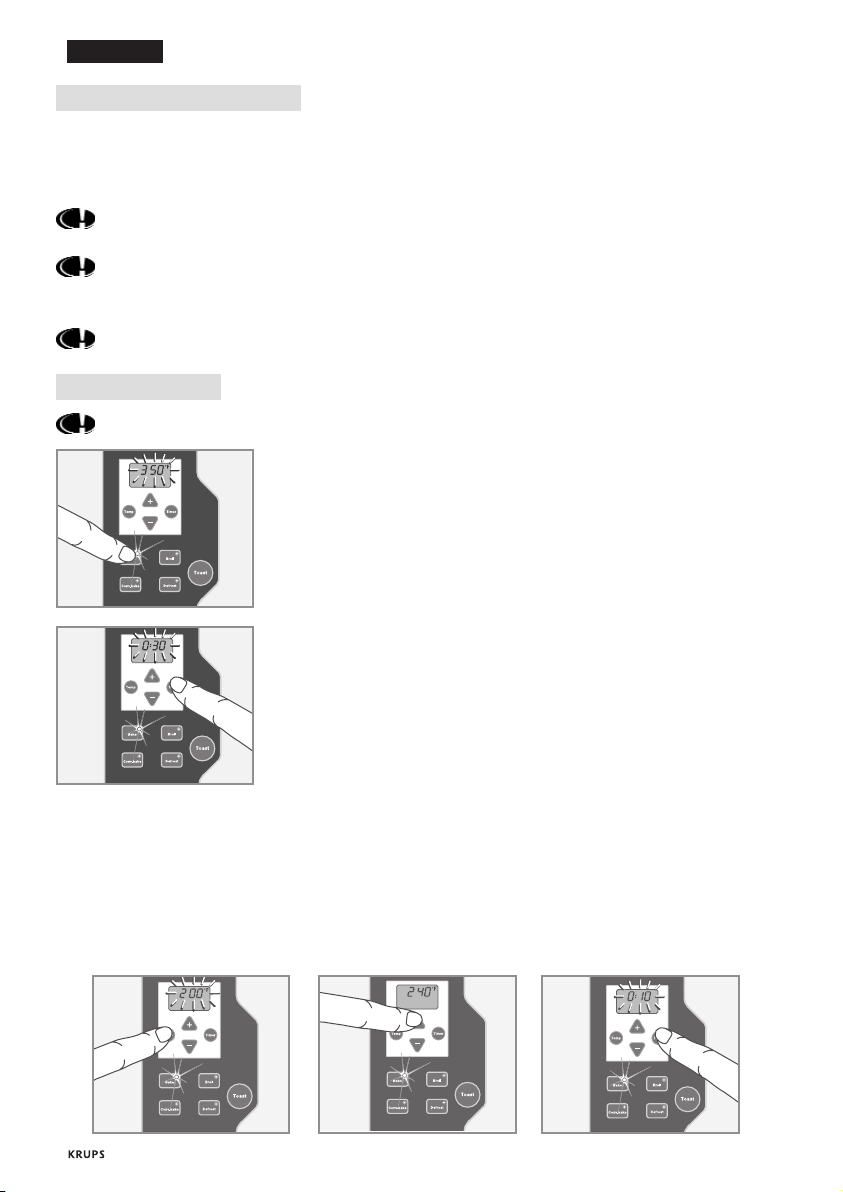
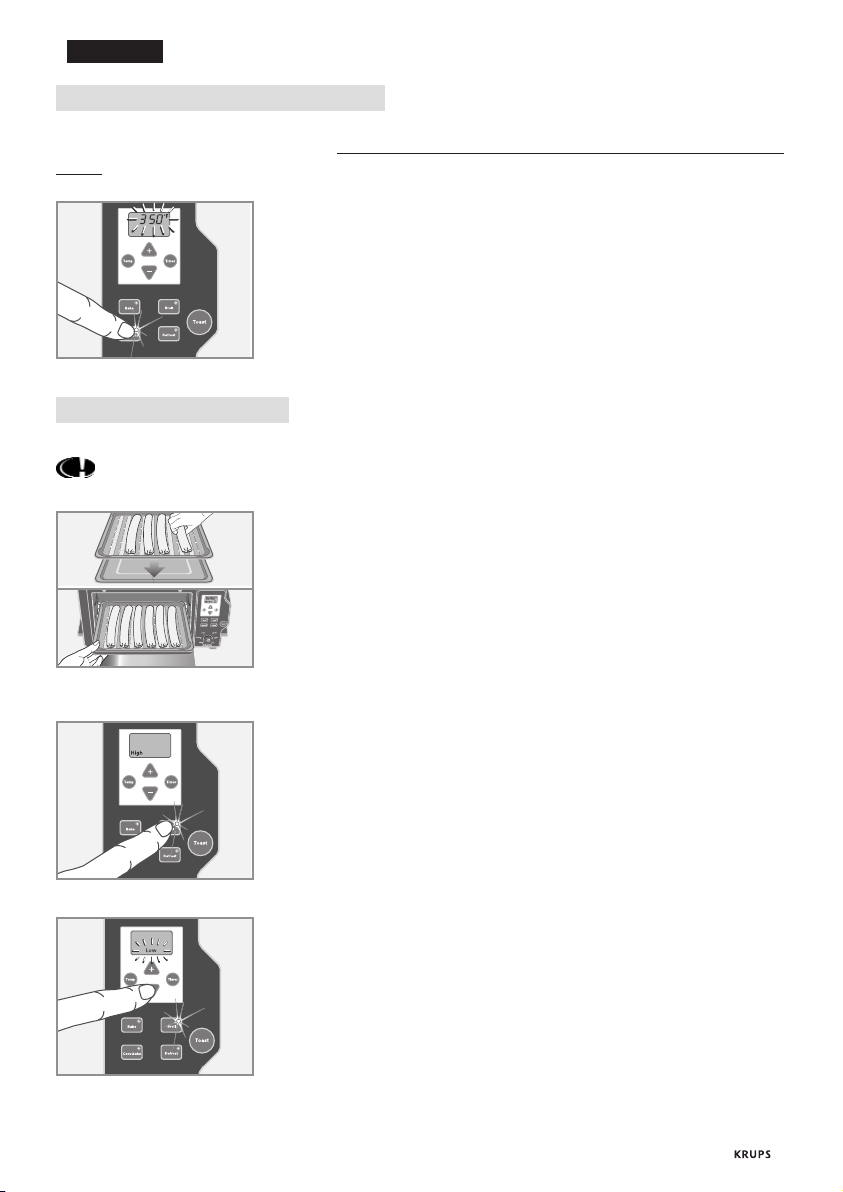
BAKE function
Never leave unattended during use.
Select the temperature:
• Press the “Bake” button. The “Bake” indicator lamp will light.
• The default temperature of 350°F will be shown blinking on the
display.
• Press the “+” and “-” buttons to select the desired temperature.
The temperature can be changed in steps of 25°F.
• The display will continue to blink.
Select the cooking time:
• Press the “Timer” button.
• The default cooking time of “0:30” (30 minutes) will be shown
blinking on the display.
• Set the cooking time according to your recipe by pressing the “+” and
“-” buttons, up to a maximum of 1 hour 30 minutes.
• Press “Start”. The appliance will beep and cooking will start.
• The time will be counted down in one-minute intervals.
• At the end of the cooking time, the appliance will beep five times
and cooking will stop.
• You can stop the cooking at any time by pressing the “Stop”
button.
Changing the temperature or cooking time:
• You can change the cooking time or temperature at any time during a baking cycle.
• Press « Timer » or « Temp » and use the « + » and « - » buttons to change settings.
• Press « Timer » or « Temp » again to confirm the new setting.
Page 11
11
English
CONVECTION BAKE function
Convection bake uses an internal fan to circulate heated air around the food. This function
produces fast, even cooking results. Please note: convection function will reduce cooking
times. Some foods may not be ideal for convection bake.
• The “Conv. Bake” indicator lamp will light.
• Select a temperature using the « + » and « - » buttons.
• Select a cooking time by pressing « Timer » then use
the « + » and « - » buttons.
• Press Start.
BROIL/Grill function
(Only the top heating elements are used. There are two broil settings: “High” and “Low”).
Never leave oven unattended when in use.
The Broil tray is designed to drain grease and fats away from meats
for healthier cooking.
• Place the broil tray on the bake sheet.
• Use shelf position #3.
• There must be a minimum space of 1 inch (2 cm) between the food
and the top element.
• Close the door.
Choosing the grill setting:
• Press the “Broil” button. The “Broil” indicator lamp will light.
• The default setting of “High” (fast broiling), will appear on the
display.
• If you wish to reduce the broiling temperature, press the “-” button
and “Low” will appear on the display.
• The display will blink.
• The default “broil” time is set at 10 minutes.
• You can adjust the cooking time by pressing « Timer », then the
« + » and « - » buttons.
• To change broil temperature at any time press the « Temp »
button and use « + » and « - » buttons to choose high or low.
For best results turn the food once during broiling.
For example try broiling meats for 10 minutes on HIGH, turning the
food over after 7 minutes, and then broiling for another 3 minutes.
Page 12

12
English
TOAST function
(the top and bottom heating elements operate alternately).
Never leave oven unattended when in use.
Shelf position for toasting bread and bagels:
For toasting bread:
• Use shelf position #2. The shelf is inverted and placed in the lower
guides. This centers the bread in the chamber.
For toasting bagels:
• Use shelf position #3. The shelf is placed in the upper guides.
• The bagels should be arranged with cut side facing up. This causes
the cut side to be toasted while the crust is warmed.
• For best results on bagels use a higher browning setting.
Try browning settings between 6 – 9.
Results of toasting will vary depending on the bread type,
freshness and browning level selected.
Browning level:
• Press the “Toast” button. The “Toast” indicator lamp will light.
• The default setting, “4” will appear on the display. Press the “+”
and “-” buttons to select the desired toasting setting.
• There are 9 possible toasting settings. Adjust the browning level to
your preference and considering the type, thickness and freshness of
bread.
• Browning levels increase between setting 1, which is warmed, and
setting 9, which is very toasted. The toast setting 1-9 do not refer
to the number of minutes for each setting. The oven will adjust the
time for each setting depending on heat already present in the
chamber.
• Press “Start”; the appliance will beep and toasting will start.
• The remaining time will be counted down in one-second intervals.
• At the end of the cooking time, the appliance will beep five times
and cooking will stop.
• You can stop the toasting at any time by pressing the “Stop” button.
DEFROST function
The defrost function uses the convection fan and minimal heat to thaw frozen foods gently and
evenly without cooking.
• Use shelf position #1.
• Use the broil tray together with the bake pan to catch water as the
food is defrosted.
• Press the “Defrost” button.
• The default defrost time of 45 minutes will be shown blinking on
the display.
Shelf position :
Page 13
13
English
• You can adjust the defrosting time required by pressing the “+”
and “- ” buttons.
The time needed to defrost is dependant on the thickness and the
quantitiy of the frozen food. Examples:
Frozen food item Defrost time
2 chicken cutlets 45-50 minutes
1
1
/2 lbs. steak tips 60-65 minutes
4-6 slice of bread 5 minutes
• Press “Start”. The appliance will beep and defrosting will begin.
• The time will be counted down in one-minute intervals.
• At the end of the defrosting time, the appliance will beep five
times and defrosting will stop.
• You can stop defrosting at any time by pressing the “Stop” button.
Changing the time during defrosting:
• The defrosting time is counting down.
• Press the “Timer” button; the time display will start to blink.
• Set the new defrosting time as desired by pressing the “+” and
“-” buttons.
• Press the “Timer” button again to enter the time in the system.
• The display will show the new remaining defrosting time.
Expert Controlled Cooking function (FBC3 - FBC4 models only)*
6 different programmed cooking cycles, each with preset cooking times and temperatures.
When first using each preset function monitor the cooking carefully to ensure good result.
Changes to the preset cooking times and temperatures may be necessary depending
on the recipe, the amount of food and your personal taste.
Cooking results are significantly affected by the position of the cooking shelf.
We highly recommend using the shelf position proposed for each type of food listed.
Turn the Expert Controlled Cooking dial to one of 6 food selections:
Thin Pizza, Thick Pizza, Cookies, Brownies, Bagels, or Pastries.
To adjust any preset recipe cooking times and temperatures:
• Press « Timer », and use the « + » and « - » buttons to adjust
cooking time in one-minute increments.
• Press « Timer » again to confirm again to confirm the new time.
*Depending on model
Page 14

14
English
• Press « Temp » and use the « + » and « -» buttons to adjust
cooking temperature in increments of 25°.
• Press « Temp » again to confirm the new temperature.
You can stop the cooking at any time by pressing the
“Start/Stop” button.
Thin pizza
• Preset: 450°F - 10 minutes – Use shelf position #1.
• The Thin Pizza program is for cooking frozen pizza, approximately
10 ‘’ diameter.
• We recommend you to adjust the time and/or temperature
according to the size of your pizza and your taste.
For 8 ‘’ frozen pizza substract 1 minute.
For 12’’ frozen pizza, add 1 minute.
• For best results always rotate the pizza 180º halfway through the
cooking cycle.
Thick pizza
• Preset: 450°F - 15 minutes – Use shelf position #1.
• The Thick pizza program is for a cooking frozen pizza, (or deep
dish) approximately 8 ‘’ diameter.
• Due to the variety of fresh and frozen pizza on the market we
recommend you to adjust the time and/or temperature according
to the size of your pizza and to your taste.
• For best results always rotate the pizza 180º halfway through the
cooking cycle.
Cookies
• Preset: 300° - 10 minutes – Use shelf position #2.
• Cookies can be made using the non-stick bake pan included in
your toaster oven. If you choose to use an aluminium pan you will
need to decrease the cooking time.
• Cooking times vary depending on:
- The starting temperature of the dough (refrigerated or fresh).
- The amount of dough per cookie.
- The thickness of each portion of dough.
• We recommend you to adjust the time and/or temperature
according to the type of cookies and the browning you prefer.
1
Page 15

Brownies
• Preset: 300° - 30 minutes – shelf position #2.
• The brownies program is based on typical packaged brownie mix,
baked in a nonstick 8” x 8” pan. Aluminium pans will require less
cooking time.
• Adjustments to time and temperature will be necessary when
using a larger bake pan (ie. 9’’ x 9’’) or for larger amounts of mix.
Bagels
• Use shelf position #3.
• Arrange bagels directly on the shelf with cut side facing up. Do not
use the bake pan.
• There are 9 possible browning settings.
• The default browning level is 4, but you can adjust it to your taste
by pressing “+” or “-“.
• For best results use a browning level between 6 – 9.
Pastry
• Preset: 450°F - 20 minutes. Use shelf position #1 (for the Apple
tart recipe below).
• The pastry function alternates quickly between heating with top
and bottom heating elements. The function can be used for baking
breads, pies and pastries, with your customized adjustments to time
and temperature. Try this Apple Tart recipe listed below.
APPLE TART
- Put flour and salt in food processor and pulse until mixed,
about 2 seconds.
- Add chunks of butter and pulse 3 – 4 times until crumbly.
- Sprinkle minimum amount of water evenly over mixture and
pulse 2 – 4 times until dough forms a ball and pulls away from
bowl.
- Add slightly more water as needed.
- On lightly floured surface, roll ball into a circle 2 inches larger
than pie plate or tart pan. Line pan with pastry.
- Combine cream with well beaten egg. Pour evenly over pastry.
- Arrange apple slices over cream mixture.
- Combine sugar and cinnamon and sprinkle liberally over
apples.
- Choose the Pastry function and press start.
15
English
Ingredients:
•
1 cup all purpose flour
•
1
/4 tsp. salt
•
5 TBS. cold butter,
cut into chunks
•
2 - 4 TBS. ice cold water
•
1
/2 cup heavy cream
•
1 egg
•
2 apples, cored and
thinly sliced
•
1
/4 cup sugar
•
1 tsp. cinnamon
Page 16

Expert Controlled Cooking Function (model FBC412)
Preselected recipe table - You may have to adjust time + temperature to your taste.
Cleaning and care
Never touch or clean the quartz heating elements.
Do not allow grease to accumulate in the appliance.
• Before cleaning, care or storage disconnect the appliance and
leave it to cool.
• A quick wipe with a sponge is sufficient to clean the outside of the
appliance.
• Do not use cleaning products intended for metals (for stainless
steel, copper etc.).
• Clean the door, enameled or lacquered surfaces and translucent
parts with a damp sponge and a mild detergent.
Do not use aggressive cleaning products (especially
oven cleaners or metal or abrasive pads).
• The inside walls of the oven are non-stick and will clean easily with
water and detergent.
• All accessories* (shelf, bake sheet, broiling pan) can be cleaned with
water and detergent.
16
English
*
Depending on model
Function Temperature Shelf position Time
Thin pizza 450°F 1 10 min
Thick pizza 450°F 1 15 min
Cookies 300°F 2 10 min
Brownies 300°F 2 30 min
Bagels 1 to 9 3 varies
Pastry 450°F 1 20 min
Page 17

*Depending on model
17
English
Expert Heat ReflectorTm- The stainless steel crumb tray
Do not wash the crumb tray in the dishwasher.
• Leave the crumb tray in place while the appliance is in operation.
• Do not touch the metal part of the crumb tray during or immediately
after operation. Allow to cool completely.
• The crumb tray should be cleaned in warm soapy water.
• Do not use abrasive scouring pads to avoid damaging the highly
polished surface.
Page 18

18
Page 19

19
Français
PRECAUTIONS IMPORTANTES
Lors d'utilisation d'appareils électriques, un certain nombre de règles élémentaires doivent être
respectées, en particulier les suivantes :
• Lisez entièrement le mode d'emploi et suivez-le attentivement.
• L'appareil ne doit pas être utilisé sans assistance et supervision par de jeunes enfants ou d'autre
personnes si leurs capacités physiques, sensorielles ou mentales les empêchent d'utiliser l'appareil
en toute sécurité.
• Les jeunes enfants doivent être surveillés de façon à ce qu'ils ne jouent pas avec l'appareil.
• Ne laissez pas l’appareil à la portée des enfants.
• Ne laissez jamais l'appareil fonctionner sans surveillance; restez à proximité de l'appareil pendant
son utilisation.
• N’utilisez pas l'appareil pour tout autre usage que celui pour lequel il a été conçu.
• Ne touchez pas les parties métalliques ou chaudes de l'appareil en cours d'utilisation; utilisez les
boutons et la poignée. Utilisez des gants de cuisine si nécessaire.
• Afin d'éviter les chocs électriques, ne plongez pas le fil électrique, la prise de courant ou l'appareil
dans l'eau ou tout autre liquide.
• Pour mettre l’appareil hors tension, appuyez sur « Stop » et débranchez la prise du mur.
• Débranchez l'appareil quand il n’est pas utilisé et avant de le nettoyer. Attendez qu'il refroidisse
pour le nettoyer ou avant de le ranger.
• N’utilisez pas l'appareil si :
- celui-ci a un cordon défectueux,
- l’appareil est tombé et présente des détériorations visibles ou des anomalies de fonctionnement.
Dans chacun de ces cas, l'appareil doit être envoyé au centre de service KRUPS agréé le plus près, afin
d'éviter tout danger.
• Ne laissez pas le cordon pendre ou toucher les parties chaudes de l'appareil.
• Ne placez pas l'appareil sur ou à proximité d'une source de chaleur (plaque de cuisson, four,...).
• Ne couvrez pas l'appareil pendant son fonctionnement.
• Afin d’éviter les risques d’incendie, ne faites pas fonctionner l'appareil sous un meuble mural, une
étagère, ou à proximité de matériaux inflammables tels que : stores, rideaux, tentures...
• Ne stockez pas d’objets sur l’appareil pendant son fonctionnement.
S'il arrivait que certaines parties de l’appareil s'enflamment, ne tentez jamais d’éteindre les flammes
avec de l'eau.
Etouffez les flammes externes au produit avec un linge humide. Ne tentez jamais d’ouvrir la porte
du four en cas d’incendie à l’intérieur de l’appareil.
• Ne rangez pas de produits inflammables à proximité ou sous le meuble où est placé l'appareil.
• Ne mettez pas d’aliments de trop grande taille ni d’ustensiles en métal dans l’appareil car ils
pourraient s’enflammer ou créer un court circuit.
• Prenez d’extrêmes précautions si vous utilisez des plats faits d’autres matériaux que le métal ou le
verre compatible au four.
• Débranchez l'appareil si une anomalie de fonctionnement se produit, après chaque utilisation,
avant de le changer de place et avant de le nettoyer.
• N’utilisez pas de tampons métalliques ni de nettoyants abrasifs. Des particules métalliques
pourraient se détacher et toucher des parties électriques de l’appareil ce qui pourrait provoquer
un court-circuit.
• N'utilisez pas l'appareil à l’extérieur.
• Lorsqu’il n’est pas en fonctionnement, ne stockez pas dans l’appareil des accessoires autres que
ceux recommandés par le fabricant KRUPS.
• Ne placez aucun des matériaux suivants dans le four : papier, carton ou plastique.
• Ne l'utilisez pas comme source de chaleur ou pour sécher.
• L'appareil doit être exclusivement en position debout, jamais couché ni incliné ou à l'envers.
• N’introduisez rien dans les fentes de ventilation et ne les obstruez pas.
Page 20

20
Français
• Enlevez régulièrement les miettes du plateau ramasse-miettes. Ne couvrez pas le ramasse-miettes
avec une feuille d'aluminium; cela causerait une surchauffe de l'appareil.
• Cet appareil a été conçu pour un usage domestique uniquement; toute utilisation professionnelle,
non appropriée ou non conforme au mode d'emploi annule la garantie.
• Faites attention lorsque vous retirez un plat ou de la graisse chaude.
• Toutes les interventions autres que le nettoyage et l'entretien doivent être confiées au centre de
service agréé KRUPS le plus près.
Afin d'éviter tout risque d'accident domestique, d'incendie ou d'électrocution, aucune pièce ne
peut être réparée par l'utilisateur. La réparation doit être effectuée uniquement par le personnel
qualifié d'un centre de service agréé KRUPS.
GARDEZ CES INSTRUCTIONS
ATTENTION
• Vérifiez que la tension du réseau correspond bien à celle indiquée sur l’appareil.
• Compte tenu de la diversité des normes en vigueur, si l’appareil est utilisé dans un pays différent
de celui où il a été acheté, faites-le vérifier par un centre de service agréé.
• Utilisez un plan de travail stable à l’abri des projections d’eau.
• Ne portez ni ne déplacez l’appareil pendant l’utilisation.
• Ne pas déconnectez l’appareil en tirant sur le cordon.
INSTRUCTIONS SUR LE CORDON D'ALIMENTATION
A. Le fil électrique est court, de façon à réduire les risques de blessures qui pourraient survenir si
l’on s’emmêle ou si l’on trébuche sur un cordon plus long.
B.
Si une rallonge est utilisée, faites preuve de prudence.
C.
Si vous utilisez une rallonge, certaines précautions s’imposent :
Le calibre de la rallonge doit être au minimum le même que celui de l’appareil.
La rallonge doit être placée hors de la portée des enfants et de façon à ne pas faire trébucher
quelqu’un.
La rallonge doit être mise à la terre si la fiche du cordon de votre appareil est équipée d’une
prise de terre.
D. Cet appareil est doté d’une fiche polarisée (une lame est plus large que l’autre). Afin de réduire
le risque de choc électrique, cette fiche ne peut être branchée sur la prise que d’une seule
manière. Si elle ne rentre pas au complet dans la prise de courant, retournez-la. Si elle ne rentre
toujours pas, appelez un électricien qualifié. N’essayez pas de modifier la prise d’aucune façon.
PROTECTION DE L’ENVIRONNEMENT
L’emballage du produit est fabriqué de matières recyclables : ne le jetez pas à la
poubelle, mais rapportez-le plutôt au centre local de tri des matières recyclables.
Vous pouvez apportez vos appareils usagés au Centre de service agréé, qui en
disposera de façon à respecter l’environnement, ou vous pouvez l’apporter à un centre
spécialisé dans la collecte de tels appareils.
Page 21

21
Français
GARANTIE LIMITÉE
Ce produit Krups est garanti contre les défauts de fabrication un an à compter de la date
d’achat. Au cours de cette période, un produit Krups présumé défectueux sera examiné
et s’il est reconnu comme tel par Krups, il sera réparé ou remplacé, à la discrétion de
Krups, sans aucuns frais pour le client. Si un produit de remplacement est envoyé, la durée
de la garantie reste celle fournie avec le produit original. Cette garantie ne s’applique pas
si le défaut est dû à une mauvaise utilisation du produit par l’acheteur, à une négligence,
à un mauvais suivi des instructions de Krups, ou encore à l’utilisation du produit avec un
courant ou un voltage différents de ceux indiqués sur le produit. Elle ne s’applique pas
non plus en cas de modification ou de réparation non autorisée par Krups, ni en cas
d’utilisation commerciale.
LES GARANTIES EXPOSÉES DANS CE LIVRET SONT EXCLUSIVES À CE PRODUIT ET
EXHAUSTIVES, ET AUCUNE AUTRE GARANTIE, EXPLICITE OU IMPLICITE, Y COMPRIS
TOUTE GARANTIE DE QUALITÉ MARCHANDE OU AUTRE POUR UNE UTILISATION
SPÉCIFIQUE, N’EST DÉLIVRÉE NI AUTORISÉE PAR KRUPS.
Puisque certains États ou certaines provinces ne permettent pas de restreindre la durée
d’une garantie ni de stipuler des exclusions quant aux dommages directs ou indirects, les
restrictions ci-dessus peuvent ne pas s’appliquer. Cette garantie vous donne des droits
précis reconnus par la loi et les droits supplémentaires peuvent varier d’un État à l’autre
ou d’une province à l’autre.
Si vous pensez que votre produit est défectueux, apportez-le (ou envoyez-le port
payé) avec votre preuve d’achat au Centre de service Krups le plus près. (Veuillez
contacter le Centre de service à la clientèle de votre pays - voir la liste ci-dessous- pour
obtenir l’adresse du Centre de service Krups agréé le plus près.)
Si vous envoyez le produit, veuillez y joindre une lettre nous expliquant la nature de
votre réclamation et du défaut revendiqué.
Si vous avez des questions supplémentaires, veuillez appeler notre Centre de service à
la clientèle :
É.-U. : 1-800-526-5377; Canada : 1-800-418-3325;
Du lundi au vendredi, Du lundi au vendredi,
de 8 h 30 à 19 h 00 (HNE). de 8 h 30 à 16 h 30 (HNE)
www
.krupsUSA.com www.Krups.ca
Veuillez noter que ces heures sont sujettes à modifications.
Lorsque vous communiquez avec notre Centre de service à la clientèle, assurez-vous
d’avoir avec vous le numéro correspondant au type de produit de votre appareil
KRUPS. Il est essentiel d’avoir ce renseignement lorsque vous communiquez avec l’un
des représentants de notre Centre de service à la clientèle, qui sera ainsi davantage en
mesure de répondre adéquatement à vos questions. Le numéro correspondant au type
de produit est inscrit au bas de l’appareil.
Toute correspondance générale peut être adressée à :
É.-U. : Canada :
Krups Groupe SEB Canada Inc.
196 Boston Avenue 455 Finchdene Square
Medford, MA 02155 Scarborough, Ontario MIX 1 B 7
Nous n’acceptons que des lettres à cette adresse. Les envois et les colis
qui ne possèdent pas de code d’autorisation seront refusés.
Page 22

22
* Depending on model, selon modèle, según modelo
y
2
1
3
6
9
*
10
*
11
*
7
8
5
4
*
12
*
a
b
c
d
e
f
h
i
j
k
*
g
Page 23

23
Français
Caractéristiques de l’appareil :
1 Poignée d’ouverture
2 Tableau de commandes
a) Ecran
b) Réglage de la température
c) Réglage du temps de cuisson
d) Touches de réglage « + » ou « - »
e) Fonction BAKE (cuisson)
f) Fonction BROIL (grillage)
g) Fonction CONVECTION BAKE (cuisson à convection)
h) Fonction DEFROST (décongélation)
i) Fonction TOAST (grille-pain)
j) Touche START / STOP (marche / arrêt)
k) Sélecteur de recettes programmées - Expert Control Cooking
MD
*
(thin pizza, thick pizza, cookies, brownies, bagels, pastry)
(pizza mince ou épaisse, biscuits, brownies, bagels, pâtisseries)
3 Fentes de ventilation
4 Parois antiadhésives*
5 Éléments supérieurs en quartz
6 Plateau ramasse-miettes / réflecteur de chaleur Expert
7 Éléments inférieurs en quartz
8 Supports pour la grille
9 Grilloir antiadhésif*
10 Plaque antiadhésive*
11 2 grilles réversibles*
12 Pince à pain*
Avantages :
• Sa grande capacité permet de griller 6 tranches de pain à la fois et une plus grande quantité
d’aliments.
• Il permet de cuire, de réchauffer, de griller ou de décongeler.
• Le système de cuisson à convection utilise un ventilateur qui distribue l’air chaud, pour des
résultats rapides.
• La technologie brevetée « Expert Quartz Cycling Technology » permet une cuisson plus rapide
et un grillage plus efficace que les autres fours.
• La grille se place en 4 positions différentes et vous permet de varier la distance entre les
aliments et l’élément du haut et du bas, pour personnaliser les résultats.
• Le thermostat électronique s’ajuste avec précision entre 100°F et 450°F (par intervalles
de 25°F).
• La commande électronique de grillage vous permet de griller les aliments à votre goût.
• Six recettes sont préprogrammées*.
• Le plateau ramasse-miettes en acier inoxydable réfléchit la chaleur pendant la cuisson et
s’enlève pour faciliter le nettoyage.
• L’affichage électronique convivial inclut une horloge numérique et des touches de commandes à effleurement faciles à utiliser.
*
selon modèle
Page 24

24
Français
Avant la première utilisation :
• Déballez l’appareil et retirez tous les éléments de l’emballage, y
compris l’autocollant de l’écran LCD et les étiquettes d’information
sur le produit attachées à la poignée du four grille-pain (selon
modèle).
• Lisez le mode d’emploi et les précautions importantes au complet et
suivez-les attentivement.
• Retirez tous les accessoires et lavez-les à l’eau tiède savonneuse.
Rincez et séchez soigneusement.
• Déroulez complètement le cordon d’alimentation.
• Avec un linge humide, essuyez l’extérieur de l’appareil et séchez-le.
• Branchez le four grille-pain. L’appareil émet un signal sonore.
Pour éliminer les résidus possibles de fabrication, faites
fonctionner votre appareil à vide pendant 15 minutes.
Pour sélectionner la température :
• Appuyez sur la touche « Bake ». Le voyant de la touche « Bake »
s’allume.
• La température par défaut de 350°F s’affiche et clignote à l’écran.
• Appuyez sur « + » pour choisir une température de 450°F.
Pour sélectionner le temps de cuisson :
• Appuyez sur la touche « Timer ».
• Le temps de cuisson par défaut de « 0:30 » (30 minutes) s’affiche
et clignote à l’écran.
• Réglez le temps de cuisson à 15 minutes en appuyant sur la touche
« - ».
• Appuyez sur « Start ». L’appareil émet un signal sonore et se met
en marche.
• Le décompte se fait par minute.
• À la fin du temps de cuisson, l’appareil émet 5 signaux sonores et il
s'arrête.
Il est possible que de la fumée s’échappe du four. Ceci est
normal et disparaîtra progressivement en cours
d’utilisation.
Page 25

25
Français
Réglage de l’horloge :
• Lorsque vous branchez l’appareil pour la première fois, « 12:00 »
s’affiche à l’écran.
• Appuyez 2 fois sur la touche « T
imer » : « 12:00 » clignote.
• Réglez l’heure en appuyant sur la touche « + » ou « - »; l’heure
s’ajuste minute par minute.
• Si vous appuyez plus de 6 secondes sur la touche, les chiffres
défilent plus rapidement.
• Appuyez sur la touche « Timer » pour enregistrer l’heure.
Si vous n'appuyez pas sur « Timer », l'heure s’enregistrera
automatiquement après 30 secondes.
Utilisation du tableau de commandes :
Le temps de cuisson et la température peuvent être ajustés avant ou pendant le cycle
de cuisson.
Pour ajuster le temps de cuisson : Appuyez une fois sur la touche « Timer ». Le temps
restant s’affiche et clignote. Le temps de cuisson peut être ajusté par intervalles de 1
minute jusqu’à un maximum de 90 minutes, au moyen de la touche « + » ou « - ».
Appuyez de nouveau sur la touche « Timer » pour enregistrer le nouveau temps.
Pour ajuster la température : Appuyez sur la touche « Temp »; la température courante
s’affiche et clignote. La température peut être ajustée par intervalles de 25 degrés au
moyen de la touche « + » ou « - », pour un maximum de 450 °F.
Appuyez de nouveau sur la touche « Temp » pour enregistrer la nouvelle température.
POSITIONS DE LA GRILLE :
• Pour toutes les fonctions de l’appareil, la position de la grille a un impact important
sur les résultats.
• Prenez note qu’il y a 4 positions différentes de grille.
• Placez vos aliments au centre de la plaque ou de la grille, à la hauteur désirée.
Position 1 : idéale pour les pizza congelées et pour cuire ou réchauffer.
Position 2 : idéale pour les biscuits, pour les brownies, pour griller le pain et pour cuire ou
réchauffer.
Position 3 : idéale pour griller les bagels et pour griller les viandes ou le bacon.
Positions de la grille :
Page 26

26
Français
Puissance de chauffage :
Ce four grille-pain utilise le système exclusif Krups « Expert Quartz Cycling TechnologyMD». Les
3 éléments du haut ainsi que les 3 du bas fonctionnent alternativement à puissance maximale
pour chauffer plus rapidement et pour obtenir un contrôle très précis de la température.
Surveillez les résultats de près car le temps de cuisson est presque 30 % plus rapide.
Il est normal que 3 éléments soient éteints quand les 3 autres chauffent.
Il est normal que le milieu des éléments ne soit pas aussi rouge que leurs extrémités. Les éléments sont spécialement conçus pour fournir un niveau de chaleur équilibré à l’intérieur de l’appareil.
Durant la cuisson, les éléments en quartz chauffent même s’ils ne deviennent pas
rouges.
Fonction BAKE (CUISSON)
Ne laissez jamais l’appareil sans surveillance lorsqu’il fonctionne.
Pour sélectionner la température :
• Appuyez sur la touche « Bake ». Le voyant de la touche « Bake »
s’allume.
• La température par défaut de « 350°F » s’affiche et clignote à
l’écran.
• Appuyez sur la touche « + » ou « - » pour sélectionner la température désirée. Elle défile par intervalles de 25°F.
• L’affichage continue à clignoter.
Pour sélectionner le temps de cuisson :
• Appuyez sur la touche « Timer ».
• Le temps de cuisson par défaut de « 0:30 » (30 minutes) s’affiche
et clignote à l’écran.
• Réglez le temps de cuisson en appuyant sur la touche « + » ou « - »,
selon la recette choisie (maximum 1h30).
• Appuyez sur « Start ». L’appareil émet un signal sonore et la
cuisson commence.
• Le décompte se fait par minute.
• À la fin du temps de cuisson, l’appareil émet 5 signaux sonores,
indiquant que la cuisson est terminée.
• Vous pouvez arrêter à tout moment la cuisson, en appuyant sur la
touche « Stop ».
Page 27

27
Français
Changement de la température ou du temps de cuisson :
• Vous pouvez modifier le temps de cuisson ou la température à tout moment pendant le cycle
de cuisson.
• Appuyez sur la touche « Timer » ou « Temp » et utilisez la touche « + » ou « - » pour modifier
les paramètres.
• Appuyez de nouveau sur la touche « Timer » ou « Temp » pour confirmer le nouveau paramètre.
Fonction CONV. BAKE / cuisson à convection
La cuisson à convection utilise le ventilateur à l’intérieur de l’appareil pour faire circuler l’air
autour des aliments. Cette fonction permet une cuisson rapide et uniforme.
Veuillez noter que la fonction convection réduit le temps de cuisson.
Certains aliments peuvent ne pas convenir à la cuisson à convection.
• Le voyant de la touche « Conv. Bake » s’allume.
• Réglez la température au moyen de la touche « + » ou « - ».
• Réglez le temps de cuisson en appuyant sur la touche « Timer »
puis en utilisant la touche « + » ou « - ».
• Appuyez sur « Start ».
Fonction BROIL / grillage
(Seuls les éléments du haut sont utilisés. Il y a deux réglages, soit « High » (max.) et « Low » (min.).)
Ne laissez jamais l’appareil sans surveillance lorsqu’il fonctionne.
Le grilloir est conçu pour drainer le gras de la viande, pour une
cuisson plus saine.
• Placez le grilloir sur la plaque.
• Utilisez la position de grille no 3.
• Il doit y avoir un espace d’au minimum 1 pouce (2 cm) entre les
aliments et l’élément supérieur.
• Refermez la porte.
Page 28

28
Français
Pour choisir les paramètres de grillage :
• Appuyez sur la touche « Broil ». Le voyant de la touche « Broil »
s’allume.
• Le paramètre par défaut « High » (grillage rapide) s’affiche.
• Si vous voulez réduire la température de grillage, appuyez sur la
touche « - » et « Low » s’affiche.
• L’affichage clignote.
• Le temps de grillage par défaut est de 10 minutes.
• Vous pouvez ajuster le temps de cuisson en appuyant sur la touche
« Timer », puis sur la touche « + » ou « - ».
• Pour changer la température en tout temps, appuyez sur la touche
« Temp » puis sur la touche « + » ou « - » pour sélectionner « High »
ou « Low ».
Pour de meilleurs résultats, retournez les aliments une fois
pendant le grillage.
Par exemple, essayez de griller les viandes 10 minutes à « High », en
les retournant après 7 minutes, puis grillez-les 3 autres minutes.
Fonction TOAST / grille-pain
(Les éléments supérieurs et inférieurs fonctionnent en alternance).
Ne laissez jamais l’appareil sans surveillance lorsqu’il fonctionne.
Position de la grille pour griller du pain et des bagels :
Pour griller du pain :
• Utilisez la position de grille n° 2. Retournez la grille et insérez-la
dans les fentes les plus basses. Cela permet de centrer le pain dans
l’appareil.
Pour griller des bagels :
• Utilisez la position de grille n° 3. Placez la grille dans les fentes
supérieures.
• Les bagels devraient être placés la face coupée vers le haut.
Cela permet de griller la face coupée pendant que la croûte est
réchauffée.
• Pour de meilleurs résultats avec les bagels, utilisez un grillage
plus fort. Essayez de régler le niveau de grillage entre 6 et 9.
Les résultats varient en fonction du type de pain, de sa fraîcheur et du niveau de grillage sélectionné.
Niveau de grillage :
• Appuyez sur la touche « Toast ». Le voyant de la touche « Toast »
s’allume.
• Le paramètre par défaut « 4 » s’affiche. Appuyez sur la touche
« + » ou « - » pour choisir le niveau de grillage.
Position de la grille :
Page 29

29
Français
• Il y a 9 positions de grillage possibles. Ajustez le niveau de grillage
selon vos préférences et tenez comte du type de pain, de son
épaisseur et de sa fraîcheur.
• Le niveau de grillage augmente de 1 (réchauffé) à 9 (très grillé).
Les chiffres 1 à 9 ne représentent pas le nombre de minutes de
grillage. Le four grille-pain ajustera le temps de grillage en fonction
de la chaleur déjà présente à l’intérieur de l’appareil.
• Appuyez sur la touche « Start »; l’appareil émet un signal sonore
et le grillage commence.
• Le décompte se fait par seconde.
• À la fin du cycle de grillage, l’appareil émet 5 signaux sonores et il
s’éteint.
• Vous pouvez arrêter le cycle de grillage en tout temps en appuyant
sur la touche « Stop ».
Fonction DEFROST / décongélation
La fonction de décongélation utilise le ventilateur à convection et un minimum de chaleur pour
décongeler les aliments en douceur, sans les cuire.
• Utilisez la position de grille n° 1.
• Utilisez le grilloir et la plaque pour recueillir l’eau qui s’écoule pendant la décongélation.
• Appuyez sur la touche « Defrost ».
• Le temps de décongélation par défaut de 45 minutes s’affiche et
clignote.
• Vous pouvez ajuster le temps de décongélation en appuyant sur la
touche « + » ou « - ».
Le temps de décongélation requis varie en fonction de l’épaisseur et
de la quantité d’aliments à décongeler. Voici quelques exemples :
Aliment congelé Temps de décongélation
2 escalopes de poulet 45-50 minutes
1
1
/2 lb steak 60-65 minutes
4 à 6 tranches de pain 5 minutes
• Appuyez sur la touche « Start ». L’appareil émet un signal sonore
et la décongélation commence.
• Le décompte se fait par minutes.
• À la fin de la décongélation, l’appareil émet 5 signaux sonores et
il s’éteint.
• Vous pouvez arrêter le cycle de décongélation en tout temps en
appuyant sur la touche « Stop ».
Page 30

30
Français
Changement du temps en cours de décongélation :
• Le décompte du temps de décongélation est en cours.
• Appuyez sur la touche « Timer », l’affichage du temps clignote.
• Réglez le nouveau temps en appuyant sur les touches « + » ou
« - », tel que désiré.
• Appuyez à nouveau sur la touche « Timer » pour enregistrer le
nouveau temps de décongélation.
• Le nouveau temps de décongélation restant apparaît à l'écran.
Fonction Expert Controlled CookingMD/ Recettes préprogrammées
(FBC3 - FBC4 uniquement)*
Il y a 6 différents cycles de cuisson programmés, chacun avec son propre temps de cuisson et sa
propre température.
Lorsque vous utilisez les fonctions préprogrammées pour la première fois, surveillez la cuisson pour
assurer un bon résultat.
Il est possible que les temps de cuisson et les températures doivent être ajustés selon
la recette, la quantité d’aliments et vos propres goûts.
La position de la grille a une grande influence sur les résultats de cuisson.
Il est fortement recommandé d’utiliser la position de grille proposée pour chaque type
d’aliment listé.
Placez le sélecteur Expert Controlled Cooking à une des 6 positions :
Thin Pizza, Thick Pizza, Cookies, Brownies, Bagels, or Pastries.
(pizza mince, pizza épaisse, biscuits, brownies, bagels, pâtisseries).
Pour ajuster le temps de cuisson ou la température d’une
recette préprogrammée :
• Appuyez sur la touche « Timer » et utilisez la touche « + » ou « - »
pour ajuster le temps de cuisson par intervalles de 1 minute.
• Appuyez de nouveau sur la touche « Timer » pour enregistrer le
nouveau paramètre.
• Appuyez sur la touche « Temp » et utilisez la touche « + » ou « - »
pour ajuster la température par intervalles de 25°.
• Appuyez de nouveau sur la touche « Temp » pour enregistrer le
nouveau paramètre.
Vous pouvez arrêter le cycle de cuisson en tout temps en
appuyant sur la touche « Start/Stop ».
*selon modèle
Page 31

31
Pizza mince
• Paramètres par défaut : 450°F - 10 minutes – Utilisez la position de
grille n° 1.
• Le programme pour la pizza mince est conçu pour cuire une pizza
congelée d’environ 10 pouces de diamètre.
• Il est recommandé d’ajuster le temps de cuisson et la température
selon le diamètre de la pizza et selon vos goûts.
Pour une pizza congelée de 8 pouces, enlevez 1 minute.
Pour une pizza congelée de 12 pouces, ajoutez 1 minute.
• Pour de meilleurs résultats, tournez toujours votre pizza de 180º à
mi-cuisson.
Pizza épaisse
• Paramètres par défaut : 450°F - 15 minutes – Utilisez la position de
grille n° 1.
• Le programme pour la pizza épaisse est conçu pour cuire une pizza
congelée (ou une pizza dans un plat profond) d’environ 8 pouces
de diamètre.
• En raison de la variété de pizzas congelées offertes sur le marché,
il est recommandé d’ajuster le temps de cuisson et la température selon le diamètre de la pizza et selon vos goûts.
• Pour de meilleurs résultats, tournez toujours votre pizza de 180º à
mi-cuisson.
Biscuits
• Paramètres par défaut : 300° - 10 minutes – Utilisez la position de
grille n° 2.
• Les biscuits peuvent être cuits dans la plaque antiadhésive fournie
avec votre four grille-pain. Si vous préférez utiliser une plaque en
aluminium, vous devrez réduire le temps de cuisson.
• Les temps de cuisson varient en fonction de :
- La température de départ de la pâte (réfrigérée ou à la température de la pièce).
- La quantité de pâte par biscuit.
- L’épaisseur de chaque biscuit.
• Il est recommandé d’ajuster le temps de cuisson et la température
selon le type de biscuits et le degré de grillage que vous préférez.
Brownies
• Paramètres par défaut : 300° 30 minutes – Utilisez la position de
grille n° 2.
• Le programme pour les brownies est basé sur un mélange à brownies
type, cuit dans un moule antiadhésif de 8 po x 8 po. Les moules
en aluminium exigent moins de temps de cuisson.
• Il est nécessaire d’ajuster le temps de cuisson et la température si
vous utilisez un moule plus grand (c.-à-d. 9 po x 9 po) ou une plus
grande quantité de pâte.
Français
1
Page 32

32
Français
Bagels
• Utilisez la position de grille n° 3.
• Placez directement les bagels sur la grille, la face coupée vers le
haut. Ne placez pas les bagels sur la plaque de cuisson.
• y a 9 positions de grillage possibles.
• Le niveau de grillage par défaut est de 4, mais vous pouvez l’ajuster
en fonction de vos goûts en appuyant sur la touche « + » ou « - ».
• Pour de meilleurs résultats, utilisez les niveaux 6 à 9.
Pâtisserie
• Paramètres par défaut : 450°F - 20 minutes. Utilisez la position de
grille n° 1 (pour la tarte aux pommes ci-dessous).
• Avec la fonction pâtisserie, les éléments du haut et du bas chauffent
rapidement en alternance. Cette fonction peut être utilisée pour
cuire du pain, des tartes et des pâtisseries, grâce aux ajustements
personnalisés de temps de cuisson et de température. Essayez la
recette de tarte aux pommes ci-dessous.
TARTE AUX POMMES
- Versez la farine et le sel dans le robot culinaire et mélangez par
pulsations environ 2 secondes.
- Ajoutez les morceaux de beurre et mélangez par pulsations 3 à
4 fois, jusqu’à ce que le mélange soit granulé.
- Versez uniformément une très petite quantité d’eau sur le
mélange et mélangez par pulsations 2 à 4 fois, jusqu’à ce que
la pâte forme une boule.
- Ajoutez un peu d’eau, au besoin.
- Sur une surface légèrement enfarinée, roulez la pâte pour
obtenir un cercle d’environ 2 pouces de plus de diamètre que
l’assiette à tarte. Placez la pâte dans l’assiette et coupez le
surplus.
- Combinez la crème et les œufs bien battus. Versez dans la
croûte.
- Placez les tranches de pommes sur le mélange de crème.
- Combinez le sucre et la cannelle et saupoudrer généreusement
sur les pommes.
- Sélectionnez la fonction pâtisserie et appuyez sur « Start ».
Ingrédients :
•
1 tasse de farine tout
usage
•
1
/4 c. à thé de sel
•
5 c. à table de beurre
froid, coupé en morceaux
•
2 - 4 c. à table d’eau très
froide
•
1
/2 tasse de crème 35 %
•
1 œuf
•
2 pommes, sans le cœur,
coupées en tranches
minces
•
1
/4 tasse de sucre
•
1 c. à thé de cannelle
Page 33

EXPERT CONTROLED COOKING FUNCTION (modèle FBC4 12)
Tableau des recettes préprogrammées – vous pouvez devoir ajuster les temps de cuisson
et les températures selon vos goûts.
33
Français
Fonction Température
Position de la
grille
Temps
Pizza mince 450°F 1 10 min
Pizza épaisse 450°F 1 15 min
Biscuits 300°F 2 10 min
Brownies 300°F 2 30 min
Bagels 1 to 9 3 variable
Pâtisserie 450°F 1 20 min
Nettoyage et entretien
Ne touchez jamais les éléments en quartz et ne les
nettoyez jamais.
Ne laissez pas la graisse s’accumuler dans l’appareil.
• Avant tout entretien, nettoyage ou entreposage, débranchez et
laissez refroidir l’appareil.
• Un simple coup d’éponge suffit pour nettoyer l’extérieur de
l’appareil.
• N’utilisez pas de produits d’entretien destinés aux métaux (pour
l’acier inoxydable, le cuivre, etc.).
• Nettoyez la porte, les surfaces émaillées ou laquées et les pièces
translucides avec une éponge humide additionnée de savon doux.
N’utilisez aucun produit d’entretien agressif (notamment
les produits de nettoyage pour le four et les tampons
métalliques ou abrasifs).
• Les parois de votre four sont antiadhésives et se nettoient facilement
avec de l’eau savonneuse.
• Tous les accessoires* (grille, plaque, grilloir) se nettoient à l’eau
savonneuse.
*selon modèle
Page 34

34
Expert Heat ReflectorMD(réflecteur de chaleur Expert)
Plateau ramasse-miettes
Ne lavez pas le plateau ramasse-miettes au lave-vaisselle.
• Laissez le plateau ramasse-miettes en place pendant que l’appareil
est en marche.
• Ne touchez pas à la partie métallique du plateau ramasse-miettes
pendant l’utilisation ou immédiatement après. Laissez-lui toujours
le temps de refroidir.
• Le plateau ramasse-miettes se nettoie avec de l’eau tiède savonneuse.
• N’utilisez pas de tampons à récurer abrasifs qui pourraient endommager la surface polie.
*selon modèle
Page 35

35
Español
PRECAUCIONES IMPORTANTES
Durante la utilización de aparatos eléctricos, debemos respetar algunas normas elementales, en
especial, las siguientes:
• Lea por completo el modo de empleo y siga atentamente las instrucciones de utilización.
• Los niños o personas discapacitadas no deben utilizar el aparato sin supervisión.
• Este aparato no esta diseñado para el uso de niños u otras personas que requieran ayuda o
supervisión, si sus capacidades físicas, sensoriales o mentales evitan que lo usen con seguridad.
• Los niños deben estar vigilados para asegurarnos de que no jueguen con el aparato.
• No dejar el aparato al alcance de los niños.
• No dejar nunca el aparato funcionando sin supervisión, permanezca cerca del aparato durante su
utilización.
• No utilizar el aparato para otra función que no sea para la que se ha diseñado.
• No tocar las partes metálicas o calientes del aparato durante su utilización, utilice los botones y el
asa. Utilice guantes de cocina si fuera necesario.
• Para evitar choques eléctricos, no sumerja el cable eléctrico, la toma de corriente o el aparato en
agua o cualquier otro líquido.
• Para desconectar el aparato, presione en stop y desenchúfelo de la toma eléctrica.
• Desconecte el aparato cuando no lo utilice y antes de limpiarlo. Espere a que se enfríe para
limpiarlo o antes de guardarlo.
• No utilizar el aparato si:
- tiene un cable defectuoso,
- el aparato se ha caído y presenta daños visibles o anomalías de funcionamiento.
En cada uno de estos casos, el aparato deberá enviarse al servicio técnico postventa autorizado
KRUPS más cercano, para evitar cualquier peligro. Consulte la garantía.
• La utilización de accesorios que no estén recomendados por el fabricante puede ser peligrosa.
• No dejar el cable colgando en vacío o tocando las partes calientes del aparato.
• No colocar el aparato encima o cerca de una fuente de calor (Hornillas de la estufa, horno,...).
• No tapar el aparato mientras esté funcionando.
• Para evitar riesgos de incendio, no poner el aparato a funcionar bajo un mueble mural, una
estantería o cerca de materiales inflamables tales como: persianas, cortinas, papel tapiz...
• No almacenar objetos en el aparato durante su funcionamiento.
Si algunas partes del aparato se inflamaran, no intente nunca apagar las llamas con agua.
Apague las llamas externas del aparato con un paño húmedo. No intente nunca abrir la puerta del
horno en caso de que se incendiara.
• No guardar productos inflamables cerca o bajo el mueble donde esté colocado el aparato.
• No introducir alimentos demasiado grandes ni utensilios de metal en el aparato porque podrían
inflamarse o producir un cortocircuito.
• Extreme las precauciones si utiliza fuentes que no sean de metal o cristal compatibles con el horno.
• Desconecte el aparato si se produjera una anomalía de funcionamiento, después de cada utilización, antes de cambiarlo de lugar y antes de limpiarlo.
• No utilizar estropajos metálicos ni limpiadores abrasivos. Podrían desprenderse partículas metálicas
y provocar un cortocircuito.
• No utilice el aparato en el exterior.
• Cuando no esté funcionando, almacenar únicamente en el aparato los accesorios recomendados
por el fabricante KRUPS.
• No introducir ninguno de los siguientes materiales en el horno: papel, cartón o plástico.
• No utilizar como fuente de calor o de secado.
• El aparato debe permanecer exclusivamente en posición vertical, nunca en horizontal, inclinado o
al revés.
• No introduzca nada en las ranuras de ventilación, ni las obstruya.
Page 36

36
Español
• Retire con regularidad las migas de la bandeja recoge-migas. No tape el recoge-migas con papel de
aluminio, esto podría causar un sobrecalentamiento del aparato.
• Este aparato se ha diseñado únicamente para uso doméstico, cualquier utilización profesional no
apropiada o no conforme con el modo de empleo no comprometerá la responsabilidad, ni la
garantía del fabricante.
• Use con mucha precaución quitando la bandeja o eliminando la grasa caliente.
• Todas las intervenciones que no sean la limpieza y el mantenimiento deberá realizarlas el servicio
técnico autorizado KRUPS más próximo.
• Para evitar cualquier riesgo de accidente doméstico, incendio o electrocución, el usuario no podrá
reparar ninguna pieza. La reparación debe realizarse únicamente por el personal calificado de un
servicio técnico autorizado KRUPS.
GUARDE ESTAS INSTRUCCIONES
CONSEJOS DE SEGURIDAD
• Compruebe que el voltaje corresponde al indicado en el aparato.
• Tenga en cuenta la diversidad de normas en vigor, si utiliza el aparato en un país diferente al que
lo compró, llévelo a revisar a un servicio técnico autorizado.
• Utilice una superficie de trabajo estable protegida de las salpicaduras de agua.
• No mueva o desplace el aparato mientras lo esté utilizando.
• No desconecte el aparato tirando del cable.
INSTRUCCIONES PARA EL CABLE DE ALIMENTACIÓN
A. El cable eléctrico es corto: para reducir los riegos de heridas que pudiera provocarnos si nos
enredáramos o tropezáramos con un cable más largo. Sea prudente si utiliza una extensión.
B.
Si utiliza una extensión, debe tener en cuenta algunas precauciones:
(1) La potencia eléctrica de su extensión debe ser al menos igual a la del horno.
(2) La extensión debe estar fuera del alcance de los niños y colocado de tal modo que ninguna
persona pueda tropezarse o hacerse daño. La extensión debe estar provista de una conexión a
tierra si el enchufe del cable del aparato estuviera equipado con una toma de tierra.
C. Este aparato tiene un enchufe polarizado (una de las clavijas es más larga que la otra). Para
reducir el riesgo de choque eléctrico, este enchufe se ha diseñado para conectarse a una toma
de corriente en una sola posición. Si el enchufe no se introduce correctamente en la toma de
corriente, invierta las clavijas, si el problema persistiera, avise a un electricista cualificado.
No intente de ninguna manera modificar la toma.
En el interés de mejorar el producto, Krups se reserva la derecho de cambiar especificaciones sin
previo aviso.
Page 37

37
Español
GARANTÍA RESTRINGIDA
Este producto Krups está garantizado contra los defectos de fabricación durante un año
a partir de la fecha de compra. Si durante este periodo, algún producto Krups
mostrara defectos, se examinará y revisará por Krups, se reparará o reemplazará, según
el criterio de Krups, sin gastos para el cliente. Si se enviara un producto de
sustitución, la duración de la garantía será la suministrada con el producto original. Esta
garantía no se aplicará si el defecto es resultado de una utilización incorrecta del
producto por parte del comprador, de una negligencia, de un seguimiento incorrecto de
las instrucciones de Krups, o incluso de la utilización del producto con una corriente o
un voltaje diferente a los indicados en el producto. Tampoco se aplicará en caso de
modificación o reparación no autorizada por Krups, ni en caso de utilización comercial.
LAS GARANTÍAS EXPUESTAS EN ESTE MANUAL SON EXCLUSIVAS Y EXHAUSTIVAS
PARA ESTE PRODUCTO, Y KRUPS NO ENTREGARÁ NI AUTORIZARÁ NINGUNA OTRA
GARANTIA EXPLÍCITA O IMPLÍCITA QUE INCLUYA CUALQUIER GARANTIA DE CALIDAD
DE MERCADO U OTRAS PARA UNA UTILIZACION ESPECÍFICA.
Debido a que algunos Estados [algunas provincias] no permiten restringir la duración
de garantía ni estipular exclusiones en cuanto a los daños directos o indirectos, las
restricciones anteriormente mencionadas pueden no aplicarse. Esta garantía le da
derechos precisos reconocidos por la ley y los derechos adicionales pueden variar de
un Estado a otro (de una provincia a otra).
Si piensa que su producto está defectuoso, llévelo (o envíelo con a portes debidos) con la
prueba de compra al Centro de Atención al Cliente Krups más cercano.
Rogamos contacte con el Centro de Atención al Cliente Krups autorizado más cercano.
Si envía el producto, rogamos adjunte una carta explicándonos el tipo de su reclamación
y el defecto detectado.
Si tiene más preguntas porfavor llame al Departamento de Servicio al Cliente:
United States : 1-800-526-5377 ; Canada : 1-800-418-3325 ;
Mon - Fri 8:30 a.m. - 7:00 pm (EST). Mon – Fri 8:30 a.m. – 4:30 p.m. (EST)
www
.krupsUSA.com www.Krups.ca
Tome nota que las horas de apertura están sujetas a cambios.
Antes de llamar al Centro de Atención al Cliente, tenga a mano el número de serie del
producto KRUPS; esto nos permitirá responder mejor a sus preguntas.
Encontrará este número debajo del aparato.
Rogamos envíe cualquier comentario de orden general a:
Krups USA Groupe SEB Canada Inc
196 Boston Avenue 455 Finchdene Square
Medford, MA 02155 Scarborough, Ontario MIX 1 B 7
Dirección postal únicamente para cartas. Todos los envíos o paquetes
que no tengan número de autorización para su reexpedición serán
rechazados.
PROTECCIÓN DEL MEDIO AMBIENTE
El embalaje del producto está compuesto por materiales reciclables, no lo tire en su
papelera habitual, y llévelo a un centro de reciclaje próximo a su domicilio.
Los centros de servicios postventa autorizados le recogerán el aparato utilizado para
proceder a su destrucción respectando las reglas del medio ambiente o llévelo a un
punto de recolección especializada previsto para este fin.
Page 38

38
* Depending on model, selon modèle, según modelo
y
2
1
3
6
9
*
10
*
11
*
7
8
5
4
*
12
*
a
b
c
d
e
f
h
i
j
k
*
g
Page 39

Español
39
Funciones del aparato
1 Asa de apertura
2 Panel de control
a) Pantalla
b) Selector de temperatura
c) Selector del tiempo de cocción
d) Botón de selección "+" o "-"
e) Función BAKE, Hornear
f) Función BROIL, Asar
g) Función CONVECTION . Convección. Hornear, cocción con calor giratorio,
h) Función DEFROST, Descongelar
i) Función TOAST, tostador
j) Botón START/STOP, on/off encendido/apagado
k) Selector de recetas programadas / Expert Control CookingTm *
(thin pizza, thick pizza, cookies, brownies, bagels, pastry)
(pizza gruesa,pizza delgada, galletas, brownies, bagels, pasteles).
3 Ranuras de ventilación
4 Paredes con recubrimiento antiadherente*
5 Resistencias superiores de cuarzo
6 Charola recoge-migas
7 Resistencias inferiores de cuarzo
8 Soportes para la parrilla
9 Charola antiadherente para asar*
10 Charola antiadherente para hornear*
11 2 parrillas reversibles*
12 Pinza de pan*
Características:
• Gran capacidad que le permite tostar hasta 6 rebanadas de pan, brindando mayor espacio
para preparar sus platillos favoritos.
• Versatilidad: hornear, recalentar, tostar, asar y descongelar.
• Horneado con convección asistida(con calor giratorio): el aire caliente se distribuye por la
cavidad para una cocción perfectamente homogénea.
• 4 posiciones para la parrilla que permiten variar la distancia del alimento de las resistencias de
la parte superior o inferior para obtener resultados óptimos.
• Termostato electrónico regulable de modo preciso de 100°F a 450°F (por intervalos de 25°F).
• Control electrónico del grado de tostado para tostar según sus preferencias.
• 6 recetas preprogramadas que le permitirán cocinar fácilmente sus preparaciones más
comunes *.
• La charola recoge-migas de acero inoxidable refleja el calor durante la cocción además de
retirarse fácilmente gracias a su práctica asa en el exterior.
• Una charola* de cocción con antiadherente, para cualquier tipo de plato. Fácil limpieza.
• Una charola-parrilla* antiadherente, para una cocción más sana de las carnes y los alimentos
dorados.
• Pantalla electrónica de fácil manejo con reloj digital, además controles de toque suave fáciles
de utilizar.
• Fácil mantenimiento gracias a sus paredes interiores con antiadherente.
*Según modelo
Page 40

40
Español
Antes de la primera utilización
• Desempaque el aparato y retire todas las etiquetas.
• Lea el modo de empleo y siga atentamente las instrucciones de
utilización.
• Retire todos los accesorios* (charolas, bandeja-parrilla) y lávelos
con agua caliente y jabón líquido. Enjuáguelos y séquelos cuidadosamente.
• Desenrosque por completo el cable de alimentación.
• Con un paño húmedo, limpie el exterior del aparato y séquelo.
• Conecte el horno-tostador. Sonará un “bip”.
Para eliminar cualquier residuo de manufactura, ponga a
funcionar el aparato en vacío durante 15 minutos.
Seleccione la temperatura:
• Presione la tecla "Bake". El indicador luminoso de la tecla "Bake"
se encenderá.
• La temperatura por default que aparecerá parpadeando en la
pantalla es de "350°F.
• Presione el botón "+" para elegir la temperatura de 450°F.
Seleccione tiempo de cocción:
• Presione el botón "Timer".
• El tiempo por default que aparecerá parpadeando en la pantalla es
de "0:30" (30 minutos).
• Ajuste el tiempo de cocción a 15 minutos presionando el botón "-".
• Presione "Start". Sonará un “bip” y el horno se pondrá en marcha.
• El tiempo se ira contando hacia abajo en intervalos de un minuto.
• Al final del tiempo de cocción, sonarán 5 bips y el horno se
apagará.
Podrá observar que sale humo del horno. Esto es normal
y desaparecerá progresivamente durante la utilización.
Page 41

41
Español
Posiciones de la parrilla :
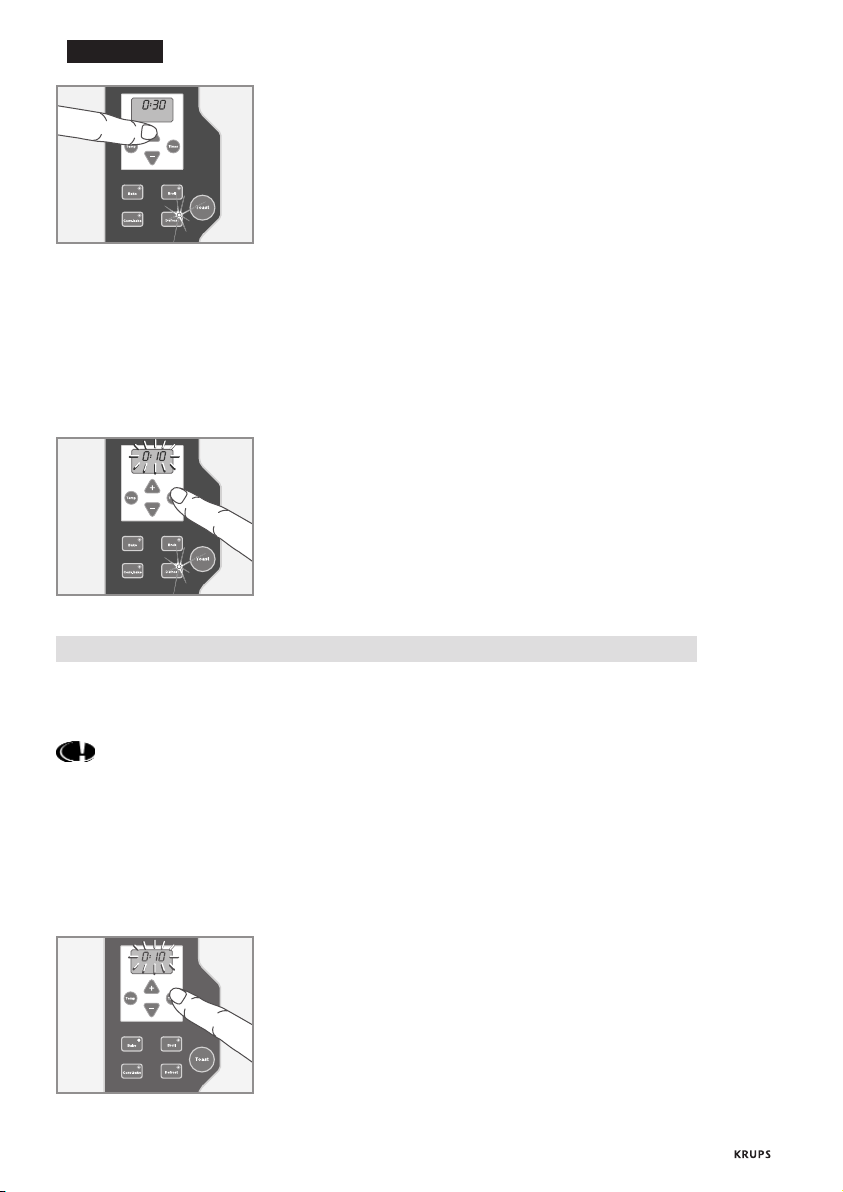
Ajuste del reloj:
• Cuando el horno se conecta la primera vez aparece "12:00" en la
pantalla.
• Pr
esione 2 veces el botón "Timer": la imagen "12:00" comenzará a
parpadear.
• Ajuste la hora presionando los botones "+" o "-", minuto a minuto.
• Si presiona la tecla más de 6 segundos, los números correrán
rápidamente.
• Presione la tecla "Timer" para grabar.
Si no presiona en "Timer", la hora se grabará automáticamente después de 30 segundos.
Utilizando el Panel de Control:
El tiempo de cocción y la temperatura pueden seleccionarse antes o durante el ciclo de
cocimiento.
Ajustar Tiempo de Cocción: Presione el botón de “Timer” una vez. El tiempo ajustado
previamente aparecerá parpadeando. El tiempo de cocción puede seleccionarse desde
1 minuto hasta 1 hora con 30 minutos, utilizando los botones " + " y " - ".
Presione “Timer” de nuevo para dejar ajustada la nueva selección de tiempo.
Ajustar Temperatura: Presione el botón “Temp.” La temperatura seleccionada actualmente aparecerá parpadeando. La temperatura puede ajustarse en intervalos de 25°
hasta un máximo de 450° utilizando los botones " + " y " - ".
Presione “Temp” de nuevo para dejar ajustada la nueva temperatura.
Posiciones de la Parrilla
• Para todas la funciones la posición de la parrilla jugará un papel importante en el
resultado final.
• Observe que existen 4 posiciones para colocar la parrilla.
• Coloque el alimento en la posición central o en la posición de la altura deseada.
Posición #1: lo mejor para pizzas congeladas, varios tipos de horneado y recalentar.
Posición #2: lo mejor para galletas, brownies, tostar pan varios tipos de horneado y recalentar.
Posición #3: lo mejor para tostar bagels, asar carnes o tocino.
Page 42

42
Español
Sistema de calentamiento
Éste horno tostador de pan utiliza el sistema patentado exclusivo de Krups "Expert Quartz
Cycling Technology". Los tres elementos calentadores (resistencias) de la parte superior, así
como los tres de la parte inferior, funcionan alternadamente a toda potencia, para calentar
rápidamente y para obtener un control más preciso de la temperatura. El monitoreo resulta
cuidadoso ya que el tiempo de cocción se reduce hasta un 30%.
Es normal que 3 resistencias estén apagadas, mientras que las otras 3 calientan a
toda potencia.
Para cada grupo de 3 resistencias (superior e inferior), es normal que la parte central
de los cuarzos no esté tan roja como los extremos. Las resistencias están especialmente diseñadas para producir un nivel de calor balanceado.
Durante la cocción, las resistencias de cuarzo calientan aunque no estén al rojo vivo.
Función BAKE/Horno
Nunca deje su horno sin supervisión durante el funcionamiento.
Selecciones la Temperatura:
• Presione el botón "Bake". El indicador luminoso del botón se
encenderá.
• La temperatura por default que aparecerá parpadeando en la pantalla es de 350°F.
• Presione la tecla "+" o "-" para seleccionar la temperatura deseada.
Aparecerá por intervalos de 25°F.
• La pantalla continuará parpadeando.
• Introducir las preparaciones en el horno a la altura deseada.
• Cierre la puerta.
Selección del Tiempo de cocción:
• Presione el botón de "Timer".
• El tiempo de cocción que por default aparecerá parpadeando en la
pantalla es de "0:30" (30 minutos).
• Seleccione el tiempo de cocción de acuerdo con su receta presionando los botones " + " y " -", hasta un máximo de 1 hora y 30
minutos.
• Presione en "Start". Sonará un bip y la cocción comenzará.
• La regresión de tiempo se realizará en intervalos de un minuto.
• Al finalizar el tiempo de cocción, sonarán 5 bips, indicando que la
cocción ha terminado.
• Puede parar la cocción en cualquier momento, presionando el
botón "Stop".
Page 43

43
Español
Cambiando la temperatura o el tiempo de cocción.
• Usted puede cambiar la temperatura ó el tiempo de cocción en cualquier momento durante el
ciclo de horneado.
• Presione el botón “Timer” o “Temp” y use los botones “ +” y “-“.
• Presione el botón “Timer” o “Temp” para confirmar la nueva selección.
Función CONV. BAKE/Horno de convección
La Función de horneado con convección utiliza un ventilador en la parte interna para hacer que
el aire caliente circule alrededor de los alimentos, lo que hace que la cocción sea más rápida y
homogénea. Por favor tome en cuenta que la función de convección reducirá los tiempos
de cocción, por lo que es posible que algunos alimentos no necesiten utilizar esta función.
• La luz indicadora de “Conv bake” se encenderá.
• Seleccione la temperatura usando los botones "+" o "-".
• Selección el tiempo de cocción presionando el botón “timer” y
usando los botones "+" o "-".
• Presione el botón “Start”.
Función BROIL/Asar
(Para esta función solo se usan las resistencias superiores Existen 2 niveles para Asar: "High" y
"Low" “Alto y Bajo”).
Nunca deje su horno sin supervisión durante el funcionamiento.
La charola para asar esta diseñada para una cocción más sana ya que
permite que la grasa se escurra durante el asado de carnes, salchichas,
etc
• Ponga la charola escurridora sobre la charola para hornear.
• Ponga la charola en la posición # 3.
• Introduzca las charolas al horno. La distancia entre los alimentos y la
resistencia superior debe ser al menos de 2 cm (1 pulgada).
• Cierre la puerta.
Page 44

44
Español
Ajuste de la potencia para Asar:
• Seleccione el botón "Broil". El indicador luminoso del botón
"Broil" se encenderá.
• El ajuste por default que se visualizará en la pantalla es
"High" (asado rápido).
• Si desea disminuir la temperatura, presione la tecla "-" y "Low" aparecerá en la pantalla.
• La imagen parpadeará.
• Por Default el tiempo establecido es de 10 minutos.
• Usted puede ajustar el tiempo presionando “Timer” y después los
botones “+” y “-“.
• Para cambiar la temperatura en cualquier momento presione el
botón “Temp” y utilice las teclas “+” o “-“ para escoger “High” o
“Low”.
Para mejores resultados voltee los alimentos una vez durante
la cocción.
Por ejemplo intente asar las carnes por 10 minutos en ALTO, dar la
vuelta al alimento después de 7 minutos, y después asar por otros 3
minutos.
Función Tostar
(Las resistencias superiores e inferioes funcionan alternadamente).
Nunca deje su horno sin supervisión durante el funcionamiento.
Posición de la parrilla para tostar pan y bagels
Para tostar pan
• Utilice la posición #2. La parilla se pone invertida y se coloca en las
guias inferiores. Esto centra el pan dentro del horno.
Para Tostar Bagels
• Utilice la posición #3. La parilla se coloca en las guías superiores.
• Los bagels deben acomodarse con la parte cortada hacia arriba,
para que ésta se tueste mientras que se calienta la corteza.
• Para mejores resultados con bagels, utilice un nivel de tostado
Alto. Trate en un nivel entre 6-9.
Los resultados pueden variar dependiendo del tipo de pan,
frescura y el nivel de tostado seleccionado.
Nivel de Tostado
• Presione el botón “Toast”. La luz indicadora del botón se encenderá.
• Por default el nivel “4” aparecerá parpadeando en la pantalla.
Presione los botones de “+” o “-“ para seleccionar el nivel de
tostado deseado.
• Existen 9 niveles de Tostado. Ajuste el nivel de su preferencia considerando el tipo, grosor y frescura del pan.
Posiciones de la parrilla :
Page 45

45
Español
• Los niveles de tostado van desde el número 1, el cual es ligero, hasta
9, que es muy tostado. Los niveles 1-9 no se refieren al tiempo en
minutos de cada nivel. El horno ajustará el tiempo de cada nivel de
acuerdo al calor que haya dentro del horno.
• Al presionar el botón “Start” sonará un “bip” indicando que el
tostado comenzará.
• La regresión del tiempo se hace por segundos.
• Al final del tiempo de cocción, sonarán 5 bips, indicando que el
tostado ha terminado.
• Puede parar el tostado en cualquier momento, presionando el
botón "Stop".
Función DEFROST/descongelación
Esta función utiliza la función de convección, lo que permite descongelar los alimentos de forma
más rápida que al aire libre y con mejores resultados que en el microondas: los alimentos se
descongelan suavemente y de manera homogénea sin cocerse.
• Utilice la posición #1.
• Utilice la charola para asar junto con la charola para hornear, para
recolectar el agua de los alimentos que se están descongelando.
• Presione la tecla "Defrost".
• Por Default el tiempo de descongelación que aparecerá parpadeando en la pantalla será de 45 minutos.
• Usted puede ajustar el tiempo de descongelación presionando los
botones “+” o “-“.
El tiempo requerido para descongelar dependerá del grosor y la cantidad de alimento congelado. Ejemplos:
Alimento Tiempo de descongelación
2 chuletas de pollo 45-50 minutos
1
1
/2 lbs. puntas de filete 60-65 minutos
4-6 rebanadas de pan 5 minutos
• Presione "Start". Sonará un bip y el proceso de descongelado
comenzará.
• La regresión de tiempo se hace por minutos.
• Al finalizar el proceso, sonarán 5 bips, indicando que la descongelación ha terminado.
• Puede parar en cualquier momento presionando el botón "Stop".
Page 46

46
Español
Cambio del tiempo en curso del proceso de descongelación:
• El descuento del tiempo de descongelación está en curso.
• Presione el botón "Timer", el tiempo se visualizará parpadeando.
• El proceso de descongelado continua.
• Ajuste el nuevo tiempo presionando los botones"+" o "-", a su
gusto.
• Presione de nuevo el botón la tecla "Timer" para grabar.
• El nuevo tiempo restante aparecerá en la pantalla.
Función Expert Controlled Cooking
Tmv
Recetas programadas (Modelos FBC3 - FBC4 únicamente)*
6 diferentes ciclos de cocción programados, cada uno con tiempos y temperaturas establecidos
(pizza gruesa y delgada, galletas, brownies, bagels y pasteles).
Cambios a los tiempos y temperaturas de cocción pueden ser necesarios dependiendo de la receta, la cantidad de alimento y el gusto personal.
Los resultados de la cocción se ven afectados significativamente por la posición de la
parrilla. Le recomendamos ampliamente utilizar la posición indicada para cada tipo de
alimento que se encuentra en la lista.
Gire la perilla de “Expert Controlled Cooking” a una de las 6 selecciones
Pizza delgada, Pizza gruesa, galletas, brownies, bagels o pasteles.
Para ajustar la temperatura o el tiempo de alguna receta
establecida:
• Presione el botón “Timer” y use los botones “+” y “-“ para
ajustar el tiempo, en intervalos de un minuto.
• Presione “Timer” de nuevo para confirmar el nuevo tiempo.
• Presione el botón “Temp” y use los botones “+” y “-“ para
ajustar la temperatura, en rangos de 25°.
• Presione “Temp” de nuevo para confirmar la nueva temperatura.
Usted puede detener la cocción en cualquier momento,
oprimiendo el botón “Star/Stop”.
Pizza delgada
• Pre-selección: 450°F, 10 minutos, use la parrilla en la posición #1.
• El programa para pizza delgada es para cocinar una pizza congelada de aproximadamente 25 cm de diámetro.
• Le recomendamos ajustar el tiempo y/o la temperatura de acuerdo
al tamaño de su pizza y su gusto personal.
Para una pizza congelada de 20 cm disminuya 1 minuto.
Para una pizza congelada de 30 cm agregue 1 minuto.
• Para mejores resultados rote siempre la pizza 180º a la mitad del
ciclo de cocción.
*Según modelo
1
Page 47

47
Español
Pizza Gruesa
• Pre-selección: 450°F, 15 minutos, use la parrilla en la posición #1.
• El programa para pizza gruesa es para cocinar una pizza
congelada (o un plato profundo) de aproximadamente 20 cm de
diámetro.
• Debido a la variedad en la frescura y nivel de congelado de las
pizzas del mercado, le recomendamos ajustar el tiempo y/o la
temperatura de acuerdo al tamaño de su pizza y su gusto
personal.
• Para mejores resultados rote siempre la pizza 180º a la mitad del
ciclo de cocción.
Galletas
• Pre-selección: 300°F, 10 minutos, use la parrilla en la posición #2.
• Las galletas pueden hacerse en la charola antiadherente para hornear, incluida en su horno tostador. Si utiliza una charola de aluminio necesita reducir el tiempo de cocción.
• Los tiempos de cocción varían dependiendo de:
- La temperatura de la masa al iniciar la cocción (refrigerada o
recién hecha).
- La cantidad de masa por galleta.
- El grosor de cada porción de masa.
• Le recomendamos ajustar el tiempo y/o la temperatura de acuerdo
al tipo de galletas y el dorado de su preferencia.
Brownies
• Pre-selección: 300°F, 30 minutos, use la parrilla en la posición #2.
• El programa de brownies esta basado en el típico empaque de
mezcla para brownie, para hornearse en un molde antiadherente
de 20 x 20 cm. Los moldes de aluminio requieren menos tiempo
de cocción.
• Los ajustes en el tiempo y la temperatura son necesarios cuando
se utiliza un molde mas largo (ejemplo: 23 x 23 cm) o con mayores
cantidades de mezcla.
Bagels
• Use la parrilla en la posición #3.
• Los bagels deben acomodarse con la parte cortada hacia arriba.
No utilice la charola para hornear.
• Existen 9 selecciones de tostado.
• Por defult el nivel de tostado es 4, usted puede ajustarlo de acuerdo a su gusto, presionando los botones “+” o “-“.
• Para mejores resultados utilice niveles de tostado entre 6-9.
Page 48

Pasteles
• Pre-selección: 450°F, 20 minutos, use la parrilla en la posición #1
(para la receta de Tarta de Manzana de la parte inferior).
• La función de los pasteles alterna rápidamente el calor entre las
resistencias de la parte superior e inferior. La función puede ser
usada para hornear pan, pies y pasteles. Pruebe la receta de Tarta
de Manzana presentada a continuación.
TARTA DE MANZANA
- Ponga la harina y la sal en el procesador de alimentos y pulse
hasta mezclarlas, aprox. 2 segundos.
- Agregue los trozos de matequilla y pulse 3-4 segundos hasta
desbaratarla.
- Asparza una mínima cantidad de agua uniformemente sobre
la mezcla y pulse 2 - 4 veces hasta que la pasta forme una
bola y se pueda despegar del tazón.
- Agregue cuidadosamente agua si es necesario.
- Sobre una superficie plana y limpia extienda la masa con
un rodillo 5 cm más larga del molde para tarta que va a
utilizar.
- Combine la crema con el huevo batido. Coloque la mezcla
sobre el molde con la pasta.
- Acomode las rebanadas de manzana sobre la mezcla de
crema.
- Combine el azúcar y la canela y espolvoreé sobre las manzanas.
- Seleccione la Función de Pasteles “Pastry” y presione “Start”.
Función “Expert Controlled Cooking” (modelo FBC412)
Tabla de recetas pre-seleccionadas. Usted tienen que ajustar tiempo y temperatura de
acuerdo a su gusto personal.
48
Español
*Según modelo
Función Temperatura
Posición de la
parrilla
Tiempo
Pizza delgada 450°F 1 10 min
Pizza gruesa 450°F 1 15 min
Galletas 300°F 2 10 min
Brownies 300°F 2 30 min
Bagels 1 a 9 3 varios
Pasteles 450°F 1 20 min
Ingredientes:
•
1 taza de harina
•
1
/4 de cucharadita de sal
•
5 cucharadas de mantequilla
fría cortada en trozos
•
2-4 cucharadas de agua
fría
•
1
/2 taza de crema entera
•
1 huevo
•
2 manzanas sin corazón,
cortada en rebanadas
delgadas
•
1
/4 de taza de azúcar
•
1 cucharadita de canela
Page 49

*Según modelo
49
Español
Limpieza y mantenimiento
Nunca toque o limpie las resistencias de quarzo.
No deja que la grasa se acumule en el aparato.
• Antes de realizar cualquier operación de mantenimiento o limpieza,
desconecte el aparato y déjelo enfriar.
• Una simple pasada con la esponja, es suficiente para limpiar el
exterior del aparato.
• No utilice productos de limpieza destinados a los metales (para
acero inoxidable, cobre, etc.).
• Limpie la puerta, las superficies esmaltadas o lacadas y las piezas
translúcidas con una esponja húmeda con detergente suave. No
utilice ni productos de mantenimiento agresivos(sobre todos los
productos de limpieza para el horno a base de bicarbonato o de
sosa), ni estropajos metálicos o abrasivos.
No utilice productos de limpieza agresivos (especialmente limpiadores para horno, metal o esponjas abrasivas)
• Como el horno dispone de paredes con recubrimiento antiadherente, sólo tiene que limpiarlas con un paño húmedo y detergente
líquido.
• Todos los accesorios* (rejilla, charolas bandeja-parrilla) se limpian con
agua y detergente líquido o pueden ir al lavavajillas.
Expert Heat ReflectorTm- charola recoge-migas
No lave charola recoge-migas en el lavavajillas.
• Deje la charola recoge-migas en su lugar mientras el aparato
estéfuncionando.
• No toque la parte metálica de la charola recoge-migas durante la
utilización o inmediatamente después. Deje que se enfríe totalmente.
• La charola recoge-migas se limpia con agua caliente y jabón.
• No utilice estropajos abrasivos que pudieran dañar la superficie
pulida. Las propiedades reflectantes de la charola recoge-migas
mejoran la difusión del calor para un tostado más eficaz.
 Loading...