

Page 1

KRU PS
Espresso
NOVO
2000
PIUS
Model#984
--
Hi
--
-l
Instruction
Book
Warranty
Guarantee of
Performance
Page 2

IMPORTANT SAFEGUARDS
When using electrical appliances, basic safety precautions
should always be followed to reduce the risk of fire, electric
shock, and/or injury to persons, including the following:
0
Read all instructions and information in this instruction book
and any other literature included in this carton referring to
this product before operating or using this appliance.
0
Do not touch hot surfaces. Use handles or knobs.
0
To protect against fire, electric shock and personal injury do
not immerse cord, plugs, or appliance in water or other liquid.
0
Close supervision is necessary when any appliance is used
by or near children.
0
Unplug from outlet when not in use and before cleaning. Allow
to cool before putting on or taking off parts, and before cleaning
the appliance.
0
Do not operate any appliance with a damaged cord or plug
or after the appliance malfunctions, or has been damaged in
any manner. Return appliance to your nearest authorized
KRUPS Service Center for examination, repair or adjustment, or
call KRUPS Consumer Service Department (see GUARANTEE OF
PERFORMANCE) for repair procedure.
0
The use of accessory attachments not recommended or sold
by KRUPS may result in fire, electric shock or personal injury.
0
Do not use outdoors.
l .Do not let cord hang over edge of table or counter, or touch
hot surfaces.
0
Do not place on or near a hot gas or electric burner, or in a
heated oven.
0
Always attach plug to appliance first, then plug cord into the
wall outlet. To disconnect, turn any control to “off”, then
remove plug from wall outlet.
0
This appliance is for household use only. Any servicing other
than cleaning should be performed by your local authorized
KRUPS Service Center.
0
Use extreme caution when disposing hot steam.
SAVE THESE INSTRUCTIONS
Page 3

CAUTION
This appliance is for household use. Any servicing other, than
cleaning and user maintenance should be performed by an
authorized service representative.
0
Do not immerse appliance in water or try to disassemble.
0
To reduce the risk of fire or electric shock, do not remove the
base. No user serviceable parts inside. Repair should be done
by authorized service personnel only.
l
Check voltage to be sure that the voltage indicated on the
name plate agrees with your voltage.
0
Never use warm or hot water to fill the water container!
Use cold water only!
0
Keep your hands and the cord away from hot parts of the
appliance during operation.
0
Never clean with scouring powders or hard implements.
SPECIAL CORD SET INSTRUCTIONS
Regarding your Cord Set:
A. A short power-supply cord (or detachable power-supply
cord) is to be provided to reduce risks resulting from
becoming entangled in or tripping over a longer cord.
B. Longer detachable power-supply cords or extension cords are
available and may be used if care is exercised in their use.
C. If a long detachable power-supply cord or extension cord is
used,
(I)
the marked electrical rating of the detachable
power-supply cord or extension cord should be at least as
great as the electrical rating of the appliance, (2) if the
appliance is of the grounded type, the extension cord should
be a grounding-type 3-wire cord, and
(3)
the longer cord
should be arranged so that it will not drape over the counter
top or table top where it can be pulled on by children or
tripped over.
D. This appliance has a polarized plug (one blade is wider than
the other). To reduce the risk of electric shock, this plug is
intended to fit into a polarized outlet only one way. If the
plug does not fit fully into the outlet, reverse the plug. If it
still does not fit, contact a qualified electrician. Do not
attempt to modify the plug in any way.
Page 4
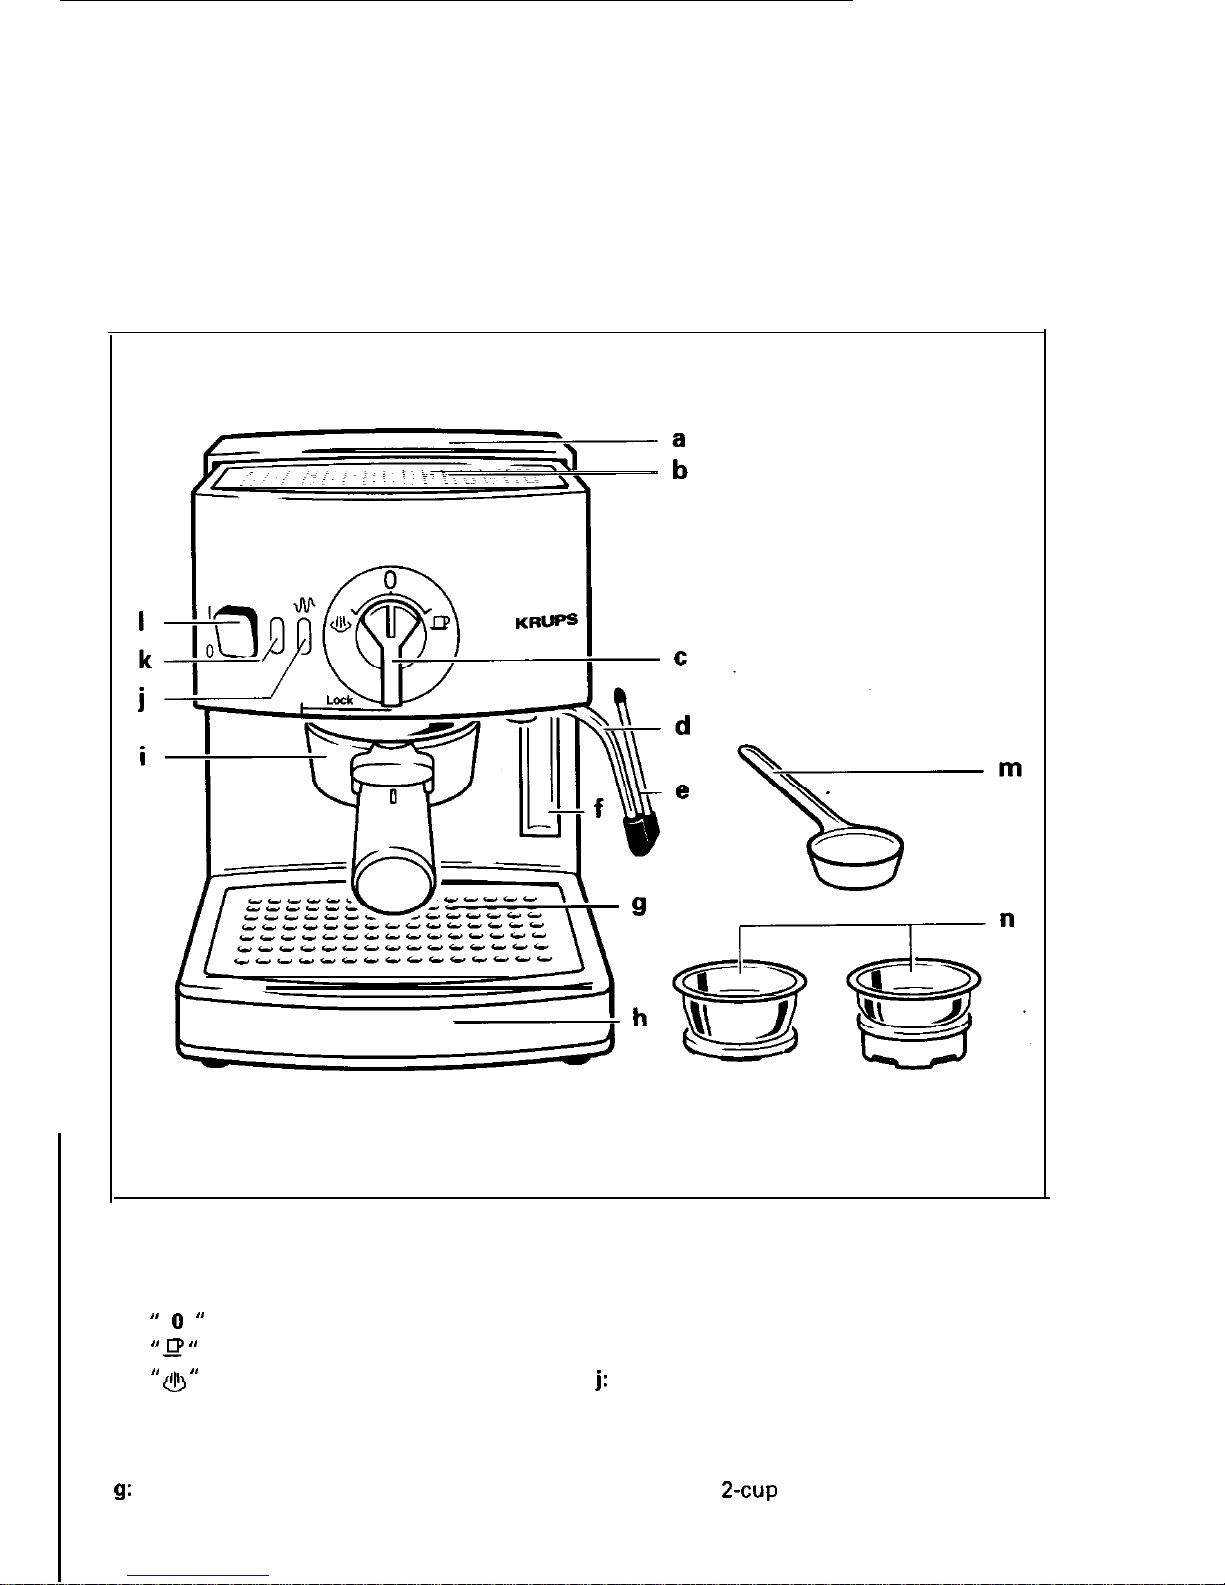
Krups Espresso Novo 2000 Plus
a: Removable water reservoir
b: Warming plate for cups
c: Control dial
” 0 ”
OFF position
” rP ”
Espresso position
” & ”
Steam position
d: Swiveling steam nozzle
e: Perfect Froth attachment
f: Water level indicator
g:
Removable overflow grid
h: Removable drip tray
i: Filter holder
j:
Thermostat light (yellow)
k: ON/OFF indicator light (red)
I: ON/OFF-Switch
m: Measuring spoon
n:
l-cup or
~-CUP
filter basket with
“Crematic System”
Page 5

r
L
Page 6

%
L!!
;#pn -
’
2\-
_
/
-0
.*
ar
b
‘II
I:
Ll
-
iLzrL?l
____
fEE_fi
-_:::
____
_____
tt==
______
_____
__------______-
Page 7

24
A
B
C
c
Page 8

l Warming Plate enables you to preheat You
espresso and cappucino cups.
l
Thermoblock Heating System
features a 47” tube which heats up water
to the precise temperature for brewing
espresso which is then pumped onto the
espresso. When espresso making is done,
excess water is flushed from the system
into the drip tray. No stale water remains
in the system and there is no bacteria
build-up, ensuring a fresher, tasting cup of
espresso.
l One + Two Cup ‘Crematic System” Filter
Baskets deliver flawless crema-laden
espresso every time. One and two cup
baskets allow you to choose the desired
amount of espresso you wish to brew.
l Microchip Monitored Steam Pump delivers
a constant flow of “dry” steam. This
unique dryness of steam and its regulated pressure froth milk for perfect
l Perfect Froth Attachment effortlessly
produces froth for perfect cappuccino.
l Water Level Indicator lets you see how
much water is in the water reservoir.
l Removable Drip Tray & Grid is easy to
remove and clean.
Your new Espresso Novo 2000 Plus is a
machine that has been constructed like no
other espresso maker in the world. This
machine features a highly sophisticated
pump technology called Thermo-Block. Your
Espresso Novo 2000 Plus is another one of
KRUPS fine espresso makers that
.is
now
available to You for at home use.
l
Program Dial
enables you to turn to any of the
following three positions
‘I rp ‘I
espresso,
” @ ” for steaming and
” 0 “= OFF position.
l
Ready Light Indicator
alerts user when machine has reached the
proper temperature.
l
37
02.
Water Reservoir.
Large capacity, easy to fill water
container, produces a continous number
of cups of espresso and cappucino.
15 demitasse cups
(2.5 oz.)
7 cappucino cups
(5.0
oz.)
Genuine Espresso
Espresso is a far richer and stronger brew
than regular coffee. It should be deep, dark
and delicious. Most people find they enjoy it
in small quantities because of its richness
and for that reason, espresso is usually
served in small 2-2.5 oz. demitassse cups.
The mark of real espresso is its wonderful
inviting fragrance and a light brown
“Crema”, found on top of the surface of the
coffee. Your Espressso Novo 2000 Plus,
properly used, will always produce espresso
that is deep, dark, and delicious. Just follow
the instructions and use fresh, well roasted
espresso beans.
8
Page 9

Grinding spresso Beans
If you choose to grind your own beans we
recommend using the KRUPS II Barista
#220
grinder. Remember, espresso requires a much
finer grind than regular coffee.
We recommend that you get familiar with all
the parts of your “Espresso Novo 2000 Plus”
before operating the machine. Insert the filter
holder into the machine, and remove and
replace water reservoir. Wipe off the steam
nozzle and Perfect Froth attachment with a
damp cloth to make sure all dust particles
from transport are removed. Wash all loose
parts in warm, soapy water, rinse thoroughly
and dry.
When using your “Espresso Novo 2000 Plus”
for the first time we recommend running
water through the machine to remove any
dust particles which may have settled during
shipping.
Make sure before you start that the
removable overflow grid
(g)
is properly in
place and that the drip tray
(h)
is properly
inserted.
Before plugging the appliance into an
electrical outlet, make sure that the control
dial
(c)
is in the “0” position and the
“ON/OFF” switch (I) is in the “OFF” position.
Step 1
l
Open the water chamber lid and remove
the water reservoir (see figure
1).
This
allows you to conveniently bring the
water reservoir to the faucet.
l
Fill the water container with fresh, cold
water just below the hinge of the handle
(see figure
2).
l
Insert the water container back into the
appliance (see figure 3). Make sure that it
sits in properly so the valve on the base
of the water reservoir is activated. The
front view water level indicator tells you
how much water you have added
(see
figure 4).
l
Insert filter holder with either the one or
two cup filter basket inserted. Raise the
filter holder up into the
mach’ine
at a 45
degree angle (see figure 5). Turn the filter
holder to the right until the marking
located on the center of the filter holder
handle is within the “lock-range” indicated
on the lower edge of the front panel. This
will lock the filter holder into place. Now
you are ready to warm up your Espresso
Novo 2000 Plus.
Step 2
l
Place a large cup that has at least a 5 oz.
capacity underneath the filter holder spout
(see figure 6).
l
Turn the “ON/OFF” switch to
“I”
ON. The
two indicator lights, both yellow and red,
will illuminate. As soon as the yellow
(thermostat) light goes out, the machine
is heated up and ready to use.
l
Turn the control dial to the
I rp 11
position
and allow cup of water to run through the
machine. Repeat this process until half
the water in the water container has been
9
Page 10

emptied (see figure 7).
THIS WILL REQUIRE YOU TO STAY WITH
THE MACHINE TO EMPTY EACH CUP AS IT
BECOMES FULL. UPON COMPLETION OF
EACH CUP RETURN TO THE “0” POSITION!
Step 1
l
Fill the water container with fresh, cold
water (see figure I-3).
While making espresso, water can be
added to the reservoir by opening the
hinged water chamber lid and adding
water to the water reservoir, using
another receptacle to fill the container,
Otherwise, the water reservoir can be
removed and taken to the faucet.
L”rl
CAUTION:
IF THE WATER RESERVOIR IS EMPTY AND
THE PUMP IS RUNNING, YOU WILL HEAR A
VERY DISTINCT NOISE, WHICH IS LOUDER
THAN THE NORMAL OPERATING SOUND. IF
THIS HAPPENS, TURN THE MACHINE
“OFF”. CHECK WATER RESERVOIR AND
REFILL AS NEEDED.
NEVER LET THE PUMP RUN WHEN THE
WATER RESERVOIR IS EMPTY AS THIS
CAN DAMAGE THE PUMP.
Prewarming Espresso/
Cappuccino Cups
If the machine is being used for the first
time during the day, we recommend
prewarming your cups with hot water (see
figure 8). After you have made several
cups of espresso, the cups can be
prewarmed on the warming plate
(b)
of
your Espresso Novo 2000 Plus.
J
Step 2
l
Make sure the control dial is set to
“0”
position. Then switch the appliance “ON”
using the “ON/OFF” switch. Both
indicator lights will illuminate (yellow and’
red). When the yellow indicator light goes
out, the machine is ready for use.
Step 3
Remove filter holder from the appliance.
Choose the desired filter basket which is
required for making one or two cups of
espresso and insert filter holder
(see figure 9).
Depending upon which filter basket you have
chosen, add one measuring spoon of
espresso coffee for each cup of espresso
that you are preparing
(see
figure 10).
l
The one cup filter basket only requires
one
lecel
KRUPS measuring spoon of
espresso coffee.
l
The two cup filter basket only requires
two KRUPS measuring spoons of espresso
coffee.
Make sure that you do not overfill the filter
basket, and that you use the measuring
spoon
Im)
to press your coffee to the proper
consistency for brewing
(see
figure 11).
It is also very important that you remove any
coffee that might have fallen onto the rim of
the filter holder, while you were filling or
tamping the coffee
(see
figure 12).
Insert filter holder back into the machine by
raising it up at a 45 degree angle and turning
it to the right. Turn the filter holder to the
right, until it is firmly locked into place. The
marking located on the center of the filter
holder handle must be within the
“lock-
range” indicated on the lower edge of the
front panel (see figure 13).
Place a cup which has at least a
2-2,5
oz.
capacity underneath the filter holder spout. If
you are preparing more than one cup of
IO
Page 11

.
espresso, be sure to position two cups
underneath the brewing spouts.
When preparing cappucino, you will need a
cup that has at least a 5 oz. capacity.
As soon as the yellow
thermosF,aGight
goes
out turn the control dial to the
“
position
(
see figure 14).
When the desired amount of espresso is in
the
cup(s),
turn the control dial back to the
“0” position.
Place the cup aside. To remove the coffee
from the filter basket, remove the filter
holder from the machine by grasping the
filter holder and turning it to the left, until it
dislodges.
Dispose of used coffee in a waste receptacle
(see figure 15).
Reinsert the empty filter holder back into the
machine to help keep it warm.
If you are preparing more than one cup of
espresso, disregard the yellow thermostat
light. It simply indicates that the thermostat
is regulating temperature.
‘In addition to preparing espresso, you can
also use your Espresso Novo 2000 Plus to
froth milk for cappuccino. Cappuccino
reportedly takes its name from the chocolate
hues of the robes worn by the Capuchin
monks who favored this delicious desert
coffee. While cappuccino is traditionally
made up of espresso and frothed milk, it can
be tailored to one’s own taste with
cinnamon, sugar, chocolate flakes, or even
liquor. Its versatility makes cappucino a
world-wide gourmet choice.
As long as your Espresso Novo 2000 Plus is
turned on and the water reservoir is properly
filled, you can use the steaming feature.
There is no need to prepare espresso before
using this steaming feature.
For best results, you should use the “Perfect
Froth” attachment
fe).
If it is not in place,
attach it now
(see
figure 16). KRUPS
“Perfect Froth” attachment lets you froth
milk perfectly for making cappuccino.
Step 1
l
The first step in making cappucino is to
make espresso. See section “Preparing
Espresso”. When preparing cappuccino
use a cappuccino cup which has a
capacity of at least 5 oz. You should fill
the cup
l/3
way with espresso.
l
Make sure that the control dial is in the
“0” position before turning on the
machine.
Step 2
l
Take a stainless steel frothing pitcher and
fill it
113
to
l/2
full with fresh, cold milk
and set aside. This amount of milk will
yield enough froth for two cups of
cappuccino. If you need more froth,
repeat these steps.
l
We recommend using skim or 2% milk if
you prefer a stiff, dense froth. Use regular
milk if you prefer a more creamy type of
froth.
NOTE:
When you start frothing milk, there will be a
thumping sound which occurs during the
steam preparation. This results from the
interval controlled water pump condensing
water into steam.
11
Page 12

As the thumping sound begins a few drops
of water will come out of the steam nozzle
before entirely changing over to steam.
Step 3
l
When the yellow thermostat light goes
out, insert the steam nozzle half way i to
the milk and turn the control dial to
I
G ‘1
(see
figure 17).
l
Leave the steam nozzle in the milk for
approximately 45-60 seconds, depending
on how much froth you want and the
type of milk you are using.
NOTE:
l
Do not bring milk to a boil (this will
happen if large bubbles start forming at
the surface of the milk).
l
Do not let the “Perfect Froth” attachment
touch the bottom of the pitcher. This will
prevent you from frothing the milk.
Step 4
l
After the milk is frothed, keep the
“Perfect Froth” in the milk until the
control dial has been turned to the “0”
position. This will prevent any splattering
from
occuring.
l
After milk is frothed, set aside. If you like
very stiff froth, let the pitcher set for a
few seconds.
l
Now you are ready to add the frothed
milk to the already prepared espresso.
Pour the milk into the cup by holding back
the froth with your spoon. Fill the
remainder of the cup with the hot milk
and then spoon on the froth. In Italy
cappuccino is normally one part espresso
to two parts milk plus froth.
If you are making more than one or two cups
of cappuccino, it is recommended that you
place the finished espresso on top of the
12
warming plate with a cloth or saucer
covering the cups. This will help to keep the
espresso hot.
Attention:
The top closure of the “Perfect Froth”
attachment (see figure 24, part A) has a very
fine hole which draws air into the milk. If
this tiny hole gets clogged, “Perfect Froth”
will not work properly. Therefore, never
immerse the top closure in milk or froth.
If you wish to prepare espresso immediately
after using the steam nozzle, the machine
must be cooled down to the proper brewing
temperature. (When frothing milk, the
temperature of the water is much hotter than
when you are brewing espresso.)
In order that you do not burn your next
batch of espresso, insert the clean filter
holder into the machine and turn the control
dial to ” p
“.
Allow
l/2
cup of water to run
through the machine.
This process cools the machine sufficiently
to prepare additional cups of espresso.
It is strongly advised that you wipe off the
milk residue which may have collected on
the “Perfect Froth” and steaming nozzle after
the frothing process is completed.
For a thorough cleaning of the “Perfect
Froth” attachment, remove the separate
parts A, B, & C (see figure 24).
All parts should be rinsed in warm, soapy
water. If the small section of part A is
clogged, it can be opened using a fine
sewing needle.
Page 13

Use caution when removing the “Perfect
Froth” from the steaming nozzle as it may
still be hot.
Use a damp cloth to clean the steam nozzle.
Use caution when cleaning or removing the
steaming nozzle as it may still be hot.
l
After preparing espresso five times, the
drip tray and grid may need to be emptied
and cleaned
(see
figures 18 and 19).
l
The water reservoir, drip tray, baffle grid,
filter holder, and Perfect Froth attachment
should be washed and rinsed in warm,
soapy water on a regular basis.
l
Before replacing the drip tray and grid,
make sure the baffle has been placed in
the drip tray properly (see figure 20).
l
If the steam nozzle becomes clogged for
any reason, remove the screw that is
holding it in position
(see
figure 21).
Rinse it under the faucet with warm water. If
it is still clogged, take a sewing needle and
insert it into the tip of the steam nozzle to
free any milk particles.
l
The warming tray can be removed and
wiped with a damp cloth for easy cleaning
(see
figure 25).
00
NOT PLACE ANY LOOSE
PfECES
IN THE
DISHWASHER.
IMPORTANT
Clean the steam nozzle each time you have
immersed it in milk, otherwise the inside of
the nozzle becomes clogged with milk
particles. Allow the steam to escape into a
wet cloth for one or two seconds after
frothing milk. This will flush out any milk
residue.
A
CAUTION
:
DO NOT TRY TO DISASSEMBLE THE MAIN
BODY OF THE MACHINE.
13
Page 14
Fill the water container with fresh water.
Rinse the appliance by allowing one to two
water containers full of fresh water to run
through the system.
Turn off the appliance and let the appliance
cool down for 30 min.
Replace the sieve with the seal in the
brewing head and screw them back on
tightly.
Replace the “Perfect Froth” attachment.
Attention:
Appliance can be still warm.
Lime-scale should be removed from the
appliance regularly. With hard water and an
average daily use of 4 cups of espresso, we
recommend descaling every three months.
Before descaling, the brewing sieve with seal
must be unscrewed from the brewing head.
Remove all lime and remnants of coffee from
the sieve and the brewing head.
Pull off the “Perfect Froth” attachment.
Dissolve 2 tablespoons of tartaric acid or
citric acid (obtainable at drugstores) in 17
ounces of lukewarm water and pour the
mixture into the water container.
Beware: Never leave machine unattended in
the presence of children.
Place one receptacle under the brewing head
and another under the steam nozzle.
Turn on
the
appliance and set the control dial
to the u
cp“
position.
Allow about one third of the descaling
solution to run through immediately.
Leave the control dial on position ” cp I and
turn off the appliance.
Now let the remainder of the descaling
solution work internally for 1 O-l 5 minutes.
Put a receptacle under the brewing head and
turn on the appliance again.
Allow the second third of the descaling
solution to run through.
Turn the control dial to the “0” position.
Put a receptacle under the steam nozzle.
Turn the control dial to the
“6 I#
position to
allow the last third of the descaling solution
to run out of the nozzle.
Turn the control dial back to the “0”
position.
14
Problem:
Coffee leaking from filter holder.
Cause:
l
Filter holder not properly inserted in the
machine.
l Filter holder not pushed in as far as it will go.
l
No
elasticjty
in the brewing head seal.
(This may happen after a long period of
use). This part can be ordered through
KRUPS Consumer Service Department.
l
If the seal has lost its
elasticity, it must be replaced with a new
one. Allow the appliance to cool down and
then unscrew the sieve from the brewing
head. Re-move the seal carefully from the
brewing head using a screw driver.
l
Place the new seal onto the machine and
then place the flattened side of the sieve
back into brewing head.
Page 15

Problem:
Pump makes loud noise.
Cause:
l
No water in the water reservoir.
l
Old or dry coffee is being used, water
cannot properly flow through the coffee.
Problem:
Coffee does not come out of filter holder.
Cause:
l
No water in the water reservoir.
l
Water reservoir not inserted correctly.
l
Filter blocked because the coffee mixture
is too fine or has been tamped too hard.
l
Machine needs to be decalcified.
Problem:
Espresso has no “Crema”.
Cause:
l
Old or dried out coffee being used.
l
Coffee not suitable for espresso.
l Coffee ground too
coarsely.
l
Too little coffee in the
filter or not properly
tamped.
Problem:
Not enough froth when
frothing milk.
Cause:
l Steam nozzle is clogged.
l Milk is not fresh.
l
The pitcher that you are using is not
suitable.
(It is recommended that you use a
’
stainless steel frothing pitcher.) Cold
conducts better to metal than to glass or
plastic.
l
The type of milk is not suitable.
We recommend using 2% or skim milk.
Whole milk is acceptable, but due to the
fat molecules, it will not have as dense a
froth, as if you were to use 2% or skim
milk.
Your KRUPS
#984
is covered by the
following warranty:
If from date of purchase within one year this
KRUPS product fails to function because of
defects in materials or workmanship, KRUPS
North America will, at its option, repair or
replace the unit without charge, provided the
owner has a proof of date of purchase.
This warranty will be void if malfunction was
caused by damage to the product by
accident, misuse, use on frequency or
voltage other than marked on the product
and/or described in the instructions, abuse
including tampering, damage in transit, or
use for commercial purposes. This warranty
gives you specific legal rights, and you may
also have other rights which may vary from
state to state.
15
Page 16

GUARANTEE OF PERFORMANCE
This fine KRUPS product is manufactured according to a rigid code of
quality standards, and, with minimum care, should give years of
satisfying service.
However, should the need arise for repairs or for replacement parts
within or after the warrantv period, please call our CONSUMER
SERVICE DEPARTMENT:
(800) 526-5377
24-hours
a day, 7 days a week
You will be provided with specific instruction on how to get your
product repaired, as well as the name and address of your nearest
authorized KRUPS Service Center. The department will also be able to
answer any general product questions you may have.
Before calling the Consumer Service Department, please have the type
number of your KRUPS appliance available.
You must have this information before calling our Consumer Service
Department so that we may better answer your questions. The type
number can be located by looking at the bottom of your appliance.
This product is Type
#984
Any general
correspondance
can be addressed to:
KRUPS North America, Inc.
P.O. Box 3900
Peoria, IL 61612
-
1097/F
I
984
 Loading...