

Kraus KHU10233165041CH, KHU10032164042CH, KHU10030164042CH, KHU10032165041CH, KHF20033165041CH Installation manual
...Page 1

INSTALLATION MANUAL
Soap Dispensers
KSD-30
KSD-33
KSD-35
KSD-41
KSD-42
SD-20
SD-25
www.kraususa.com I Toll Free: 1.800.775.0703 I © 2014-2015 Kraus USA Inc. I REV. August 16, 2016
Page 2

Thank you for your purchase
We would like to take this opportunity to thank you for choosing Kraus.
We hope that you are completely satised with your purchase, and enjoy it for
years to come. If you have any questions, or require technical assistance, please
contact
us at 800.775.0703 and one of our representatives will be happy to help.
For more information about Kraus products, please visit:
www.kraususa.com
In order to activate your warranty and get faster access to customer support,
please register your new Kraus product at:
www.kraususa.com/registration
Sincerely,
Kraus USA Customer Service
Page 3

PRIOR TO INSTALLATION
• Make sure you have all necessary parts by checking the diagram and parts
list. If any part is missing or damaged, please contact Kraus Customer
Service at 800-775-0703 for a replacement
• Pre-drilled hole size requirement: 1-1/4”
• Max countertop thickness without deck plate: 1-3/8”
For technical assistance or replacement parts, please contact Kraus
Customer Service and one of our representatives will be happy to help:
Toll-Free: 800.775.0703 or Customerservice@kraususa.com
The step-by-step guidelines in the installation instructions are a general reference for installing
a Kraus Sink. Should there be any discrepancies, Kraus cannot be held liable. It is recommended
to install all Kraus products by hiring a licensed professional.
Page 4
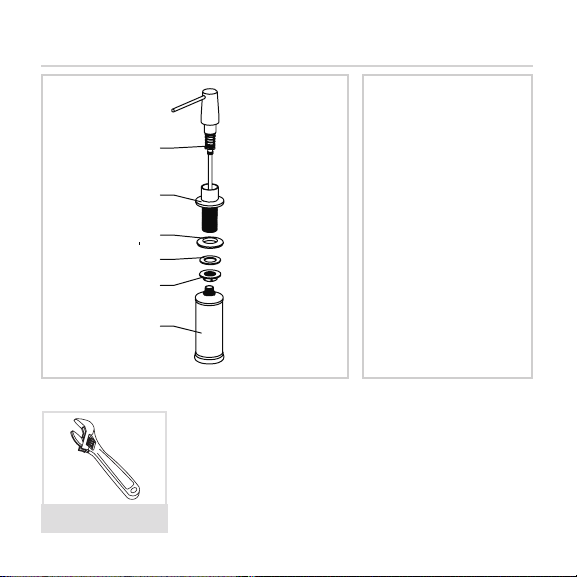
GDA-1 Diagram and Parts List:
a
b
c
d
e
f
TOOLS REQUIRED:
*Adjustable Wrench
a. Pump
b. Dispenser Base
c. Rubber Washer A
d. Rubber Washer B
e. Mounting Nut
f. Dispenser Bottle
Page 5

Step 1
Disassemble soap dispenser
a
b
c
d
e
f
Page 6

Step 2
Install dispenser base (b) with rubber washer A (c) attached into the hole in the
countertop. Re-install rubber washer B (d) and mounting nut (e) on the dispenser
base (b) from underneath the countertop. Tighten mounting nut (e) with adjustable
wrench until snug
b
c
d
e
Page 7

Step 3
Screw the dispenser bottle (f) to the dispenser base (b) from underneath the
countertop. Tighten as required. Fill the dispenser bottle (f) from the top with 12
ounces of soap
b
f
Page 8

Step 4
Insert pump (a) into dispenser base (b) from the top. Press the pump several times to
make sure soap is evenly distributed
a
b
Page 9

HELP LINE
Our customer service hours are Monday – Friday, 9am – 8pm EST.
Be sure to visit our website at www.kraususa.com
If you are a HOMEOWNER please contact a Kraus Customer Service Representative at:
Kraus USA, Inc.
12 Harbor Park Drive
Port Washington, NY 11050
Toll-free 800-775-0703
Customerservice@kraususa.com
If you are a PLUMBING CONTRACTOR OR TRADE PROFESSIONAL please contact a Kraus Pro
Representative at:
Kraus USA, Inc.
12 Harbor Park Drive
Port Washington, NY 11050
516-801-8955
Proservice@kraususa.com
If you are an AUTHORIZED PARTNER please contact a Partner Support Representative at:
Kraus USA, Inc.
12 Harbor Park Drive
Port Washington, NY 11050
516-801-8954
Partnersupport@kraususa.com
In requesting warranty service, please be ready to provide:
1. Proof of purchase.
2. A description of the problem.
Page 10

Page 11

www.kraususa.com
Page 12

REGISTER YOUR PRODUCT TODAY
Scan to Register Online or visit
http://www.kraususa.com/registration
We’re always looking for ways to improve.
Visit http://www.kraususa.com/review to let us know what you think
1.800.775.0703 / www.kraususa.com / customerservice@kraususa.com
Please take a moment to share your experience.
about your new Kraus product.
Contact Us to Learn More
Like & Follow KrausUSA
Download the Kraus Care & Maintenance Guide at:
http://www.kraususa.com/maintenance
www.kraususa.com
 Loading...