

Page 1

KRAMER ELECTRONIC S LTD.
USER MANUAL
MODEL:
VP-7 90
Genlock Presentation
Switcher/Scaler
P/N: 2900-300093 Rev 4
Page 2
Page 3
Page 4

VP-790 – Contents
i
Contents
1 Introduction 1
2 Getting Started 2
2.1 Achieving the Best Performance 2
2.2 Safety Instructions 2
2.3 Recycling Kramer Products 3
3 Overview 4
3.1 Using the IR Transmitter 6
3.2 Defining the VP-790 Genlock Presentation Switcher/Scaler 6
4 Installing in a Rack 9
5 Connecting the VP-790 10
6 Configuring the VP-790 via the OSD MENU Screens 12
6.1 The Input Screen 13
6.2 The Picture Screen 15
6.3 The Output Screen 16
6.4 The PIP Screen 19
6.5 The Multi-unit Screen 21
6.6 The Geometry Screen 24
6.7 The Setup Screen 25
6.8 The Info Screen 27
7 Controlling the VP-790 28
7.1 Controlling via the Front Panel Buttons 28
7.2 Connecting to the Product via RS-232 28
7.3 Controlling via the Ethernet 28
7.4 Controlling via the Infrared Remote Control Transmitter 32
8 Firmware Upgrade 33
8.1 Installing the VP-790 Updater Tool 33
8.2 Saving User Settings 36
8.3 Updating the Firmware 36
9 Technical Specifications 38
9.1 Input Resolutions 38
9.2 Output Resolutions 39
9.3 RS-232 Communication Protocol 40
Page 5

ii
VP-790 - Contents
Figures
Figure 1: VP-790 Genlock Presentation Switcher/Scaler Front Panel 7
Figure 2: VP-790 Genlock Presentation Switcher/Scaler Rear Panel 8
Figure 3: Connecting the VP-790 Genlock Presentation Switcher/Scaler 11
Figure 4: MENU Items 12
Figure 5: Input Screen 13
Figure 6: Picture Screen 15
Figure 7: Output Screen 16
Figure 8: PIP Screen 19
Figure 9: Audio Screen 22
Figure 10: Geometry Screen 24
Figure 11: Setup Screen 25
Figure 12: Information Screen 27
Figure 13: Local Area Connection Properties Window 29
Figure 14: Internet Protocol (TCP/IP) Properties Window 30
Figure 15: Web Browser Address Bar 30
Figure 16: Web Browser Address Bar 31
Figure 17: Infrared Remote Control Transmitter 32
Figure 18: Welcome Window 33
Figure 19: Choose Destination Location Window 34
Figure 20: Confirm Installation 34
Figure 21: Installation Progress Window 35
Figure 22: Installation Complete Window 35
Figure 23: Updater Tool Window 36
Page 6

VP-790 – Introduction
1
1 Introduction
Welcome to Kramer Electronics! Since 1981, Kramer Electronics has been
providing a world of unique, creative, and affordable solutions to the vast range of
problems that confront the video, audio, presentation, and broadcasting
professional on a daily basis. In recent years, we have redesigned and upgraded
most of our line, making the best even better!
Our 1,000-plus different models now appear in 11 groups that are clearly defined by
function: GROUP 1: Distribution Amplifiers; GROUP 2: Switchers and Routers;
GROUP 3: Control Systems; GROUP 4: Format/Standards Converters; GROUP 5:
Range Extenders and Repeaters; GROUP 6: Specialty AV Products; GROUP 7:
Scan Converters and Scalers; GROUP 8: Cables and Connectors; GROUP 9:
Room Connectivity; GROUP 10: Accessories and Rack Adapters and GROUP 11:
Sierra Video Products.
Congratulations on purchasing your Kramer VP-790 Genlock Presentation
Switcher/Scaler. This product, which incorporates HDMI™ technology, is ideal for:
Projection systems in conference rooms, boardrooms, auditoriums, hotels and
churches, production studios, rental and staging
Any application where high quality conversion and switching of multiple and
different video signals to graphical data signals is required for projection
purposes
Large screen displays and multiple screen applications from video or graphic
sources
In addition to this user manual these online guides are available for download from
our Web site:
Warp Generator online guide
Blending Guides
RS-232 Protocol online guide
These software programs are available for download from our Web site:
VP-790 Updater Tool
Warp Generator
Page 7

2
VP-790 - Getting Started
Go to http://www.kramerelectronics.com/support/product_downloads.asp
to check for up-to-date user manuals, application programs, and to check if
firmware upgrades are available (where appropriate).
This equipment is to be used only inside a building. It may only be
connected to other equipment that is installed inside a building.
Caution:
There are no operator serviceable parts inside the unit
Warning:
Use only the power cord that is supplied with the unit
Warning:
Do not open the unit. High voltages can cause electrical
shock! Servicing by qualified personnel only
Warning:
Disconnect the power and unplug the unit from the wall
before installing
i
!
!
2 Getting Started
We recommend that you:
Unpack the equipment carefully and save the original box and packaging
materials for possible future shipment
Review the contents of this user manual
2.1 Achieving the Best Performance
To achieve the best performance:
Use only good quality connection cables (we recommend Kramer high-
performance, high-resolution cables) to avoid interference, deterioration in
signal quality due to poor matching, and elevated noise levels (often
associated with low quality cables)
Avoid interference from neighboring electrical appliances that may adversely
influence signal quality
Position your Kramer VP-790 away from moisture, excessive sunlight and
dust
2.2 Safety Instructions
Page 8

VP-790 – Getting Started
3
2.3 Recycling Kramer Products
The Waste Electrical and Electronic Equipment (WEEE) Directive 2002/96/EC aims
to reduce the amount of WEEE sent for disposal to landfill or incineration by
requiring it to be collected and recycled. To comply with the WEEE Directive,
Kramer Electronics has made arrangements with the European Advanced
Recycling Network (EARN) and will cover any costs of treatment, recycling and
recovery of waste Kramer Electronics branded equipment on arrival at the EARN
facility. For details of Kramer’s recycling arrangements in your particular country go
to our recycling pages at http://www.kramerelectronics.com/support/recycling/.
Page 9

4
VP-790 - Overview
3 Overview
The VP-790 is a proscale genlock presentation scaler/switcher with edge blending,
warping and genlocking. The unit includes a powerful software tool to generate
custom warp maps to fit any projection surface.
The unit takes one of the input signals (RGB component, computer graphics,
composite, s-Video, HDMI, DVI or 3G HD-SDI), scales the video, embeds the audio
and outputs the signal to the computer graphics, DVI/HDMI and 3G-SDI outputs
simultaneously.
The VP-790 features:
HQV® Video Processing - HQV (Hollywood Quality Video) processing
represents the state-of-the-art in video processing technology, with the
highest quality de-interlacing (with 3:2 and 2:2 pull down), noise reduction,
and scaling performance for both standard-definition and high-definition
signals
Flexible warp mapping for curved screen projection, simulation and 3D
alignment
Edge Blending – facilitates building large images using multiple projectors by
feathering the overlapped edges
A maximum data rate of 3Gbps
3G-SDI, HDMI, DVI, VGA Analog, Component YPbPr, RGsB/RGBS,
Composite and s-Video inputs with signal compatibility up to 1080p and
WUXGA
HDTV Compatibility
Genlock Input - ideal for use in broadcast video applications
HDCP Compliance. The HDCP (High Definition Content Protection) license
agreement allows copy-protected data on the HDMI input to pass only to the
HDMI output.
Three output connectors are provided which can be used simultaneously,
provided that the input signal is not HDCP encrypted. When the input signal
has HDCP encryption, the DVI-D output connector will carry a similarly HDCP
encrypted signal and the VGA and 3G-SDI connector will be disabled
Page 10

VP-790 – Overview
5
K-Storm™ Scaling Technology - Kramer’s extremely high performance scaling
technology. High quality 3:2 and 2:2 pull down de-interlacing and full up and
down scaling of computer graphics video input signals
4D Motion, Noise Adaptive HQV noise reduction for spatial and temporal noise
Genlock and frame lock options, making the unit ideal for broadcast
applications
DVI/HDMI, 3G HD-SDI and computer graphics video (15-pin HD) scaled
outputs
DVI/HDMI supports HDMI with 36-bit video and multi-channel audio (DTS6.1, Dolby5.1
and PCM Multichannel (8x) at 48kHz)
SD-SDI, HD-SDI and 3G-SDI that support SMPTE 259M, SMPTE 292M and
SMPTE 424M compliancy
Standard Definition (SD-SDI) means an NTSC or PAL compatible video format,
consisting of 480 (for NTSC) or 576 (for PAL) lines of interlaced video
High Definition (HD-SDI) means a video format, consisting of 720 active lines of
progressive video or 1080 lines of progressive or interlaced video
3G-SDI means a video format, consisting of 1080 lines of progressive video
An S/PDIF audio output, de-embedded from HDMI
Multiple aspect ratio selections: standard, full screen, crop and anamorphic
4-field full resolution SD and HD processing
A USB port for in-field firmware updates
Built-in ProcAmp - Color, hue, sharpness, noise, contrast, and brightness
Front panel buttons, including menu, test pattern, PIP and Reset to XGA/720p
buttons
Scales and zooms (to up to 400% of the original size)
Non-volatile memory that retains the last settings used
Front panel lockout, as well as input lock and save lock features via the OSD
Control your VP-790 directly via the front panel push buttons, or:
By RS-232 serial commands transmitted by a touch screen system, PC, or
other serial controller
Remotely, from the infrared remote control transmitter (with on-screen menus)
Via the Ethernet
Page 11

6
VP-790 - Overview
The VP-790 is housed in a 19” 1U rack mountable enclosure, with rack “ears”
included and is fed from a 100-240 VAC universal switching power supply.
3.1 Using the IR Transmitter
You can use the IR transmitter to control the machine via the built-in IR receiver on
the front panel or, instead, via an optional external IR receiver (Model: C-A35M/IRR-
50). The external IR receiver can be located up to 15 meters away from the
machine. This distance can be extended to up to 60 meters when used with three
extension cables (Model: C-A35M/A35F-50).
Before using the external IR receiver, be sure to arrange for your Kramer dealer to
insert the internal IR connection cable (P/N: 505-70434010-S) with the 3.5mm
connector that fits into the REMOTE IR opening on the rear panel. Connect the
external IR receiver to the REMOTE IR 3.5mm connector.
3.2 Defining the VP-790 Genlock Presentation Switcher/Scaler
This section defines the VP-790.
Page 12
VP-790 – Overview
7
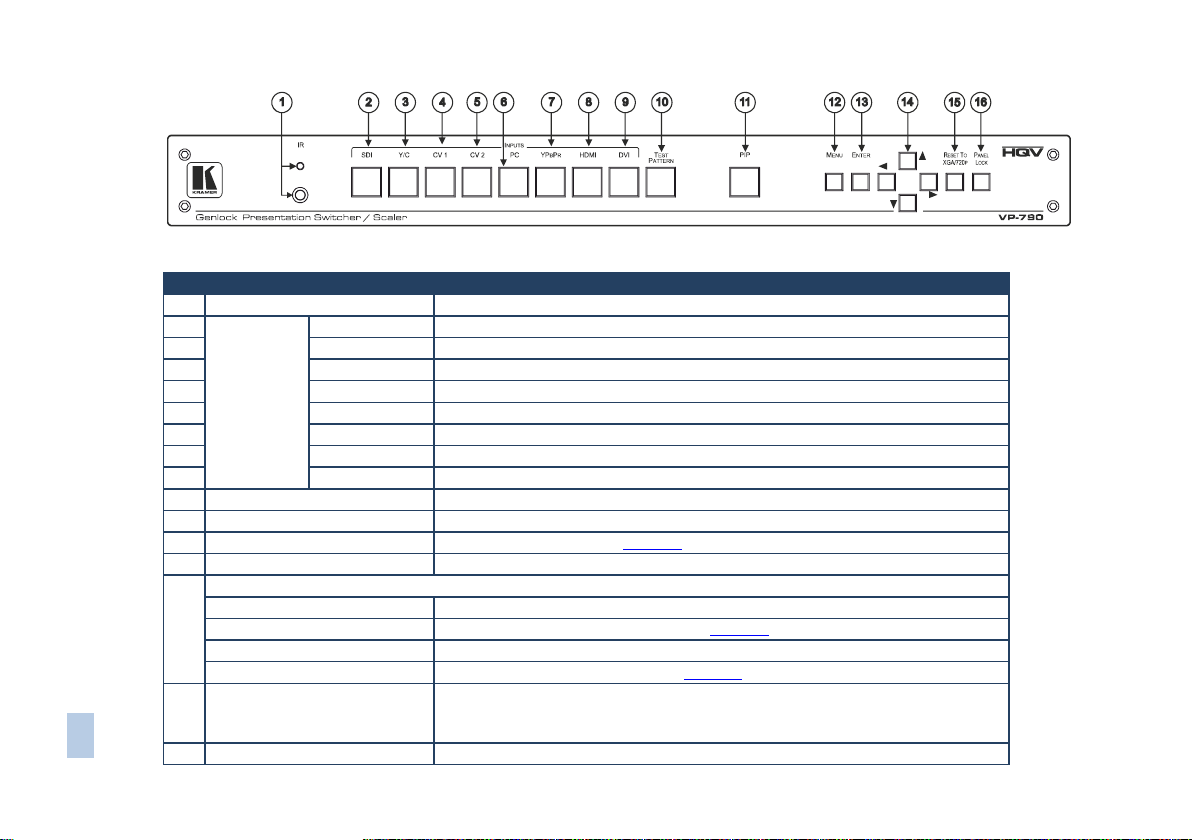
#
Feature
Function
1
IR Receiver
Receives signals from the remote control transmitter
2
INPUT
Selector
Buttons
SDI
Press to select the SDI input
3
Y/C
Press to select the s-Video input
4
CV 1
Press to select the composite video 1 input
5
CV 2
Press to select the composite video 2 input
6
PC
Press to select the computer graphics input
7
YPbPr
Press to select the component video input
8
HDMI
Press to select the HDMI input
9
DVI
Press to select the DVI input
10
TEST PATTERN Button
Press to toggle between a blank screen (blue or black screen) and the display
11
PIP Button
Press to toggle between muting (blocking out the sound) and enabling the audio output
12
MENU Button
Displays the OSD menu (see Section 6)
13
ENTER Button
Press to move to the next level in the OSD screen or to accept a new parameter
14
Navigation Buttons:
Button
Press to decrease numerical values or select from several definitions
Button
Press to move up the menu list values (see Section 6)
Button
Press to increase numerical values or select from several definitions
Button
Press to move down the menu list (see Section 6)
15
RESET TO XGA/720p Button
Press to reset the video resolution to XGA or 720p
Press and hold for about 2 seconds to reset to XGA; or press and hold for about 5
seconds to reset to 720p
16
PANEL LOCK Button
Press and hold (for about 2 seconds) to lock/unlock the front panel buttons
Figure 1: VP-790 Genlock Presentation Switcher/Scaler Front Panel
Page 13
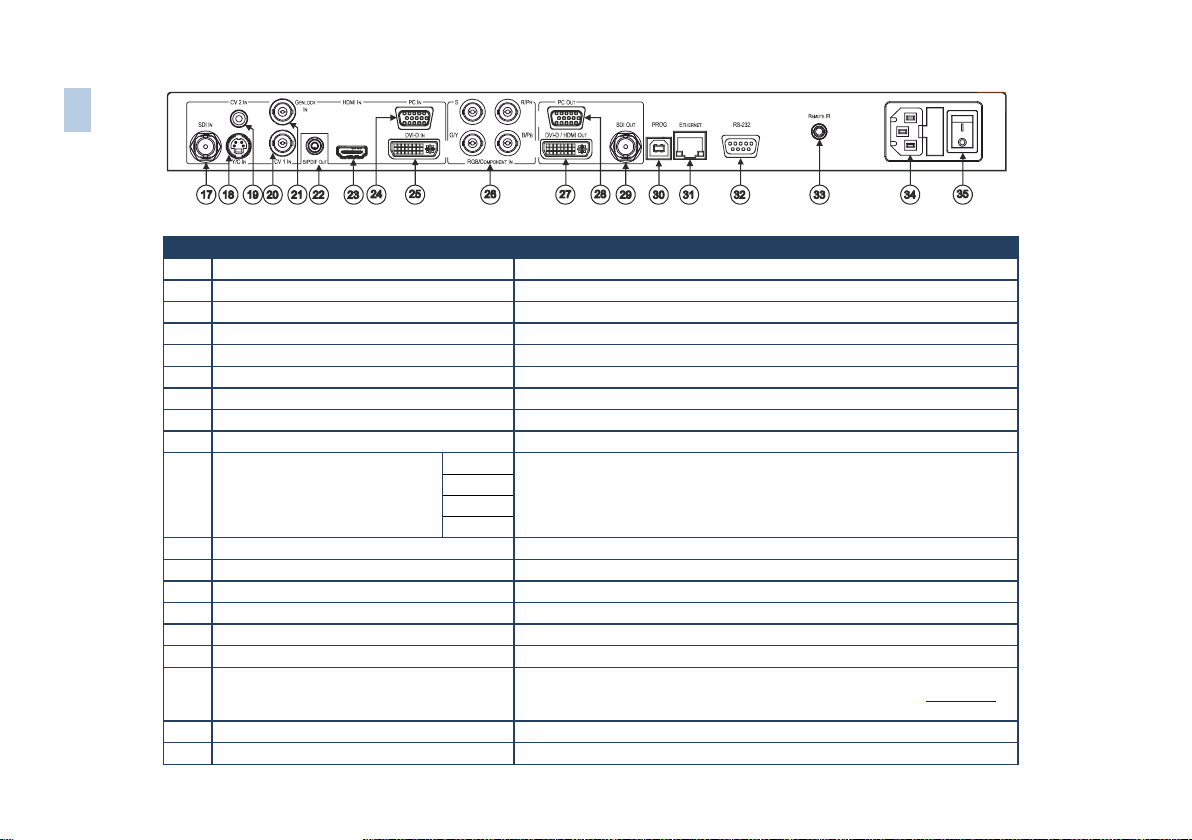
#
Feature
Function
17
SDI IN BNC Connector
Connect to the SDI source
18
Y/C IN 4-pin Connector
Connect to the s-Video source
19
CV 2 IN RCA Connector
Connect to the composite video 2 source
20
CV 1 IN BNC Connector
Connect to the composite video 1 source
21
GENLOCK IN BNC Connector
Connect to an external genlock input
22
S/PDIF OUT RCA Connector
Connect to a digital audio acceptor
23
HDMI Connector
Connect to the HDMI source
24
PC IN 15-pin HD Connector
Connect to the computer graphics source
25
DVI IN DVI-I Connector
Connect to the DVI source
26
RGB/COMPONENT IN BNC
Connectors
S
Connect to the RGBS/component video source
R/Pr G/Y B/Pb
27
DVI-D/HDMI OUT DVI Connector
Connect to the DVI/HDMI acceptor
28
PC OUT 15-pin HD Connector
Connect to a VGA acceptor
29
SDI OUT BNC Connector
Connect to an SDI acceptor
30
PROG USB Connector
Connect to a PC for firmware upgrade
31
ETHERNET Connector
Connects to the PC or other Serial Controller through computer networking
32
RS-232 9-pin D-sub Port
Connect to the PC or the remote controller
33
REMOTE IR Opening (Covered by a cap. The
3.5mm connector at the end of the internal IR
connection cable fits through this opening)
Connects to an external IR receiver unit for controlling the machine via an IR
remote controller instead of using the front panel IR receiver (see Section 3.1)
34
Power Connector with Fuse
AC connector, enabling power supply to the unit
35
POWER Switch
Illuminated switch for turning the unit ON or OFF
8
VP-790 – Overview
Figure 2: VP-790 Genlock Presentation Switcher/Scaler Rear Panel
Page 14
VP-790 - Installing in a Rack
9
9
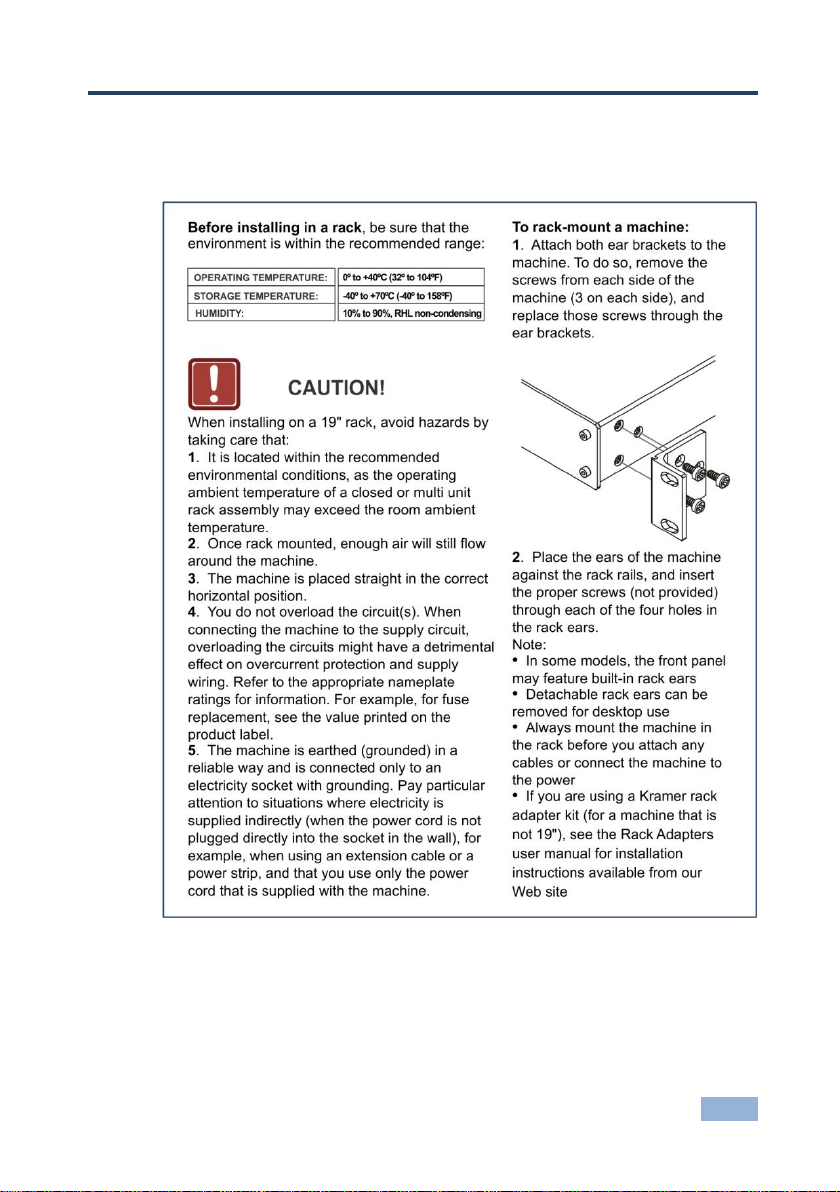
4 Installing in a Rack
This section provides instructions for rack mounting the unit.
Page 15

10
VP-790 - Connecting the VP-790
Always switch off the power to each device before connecting it to
your VP-790. After connecting your VP-790, connect its power and
then switch on the power to each device.
You do not have to connect all the inputs and outputs, connect only
those that are required.
!
i
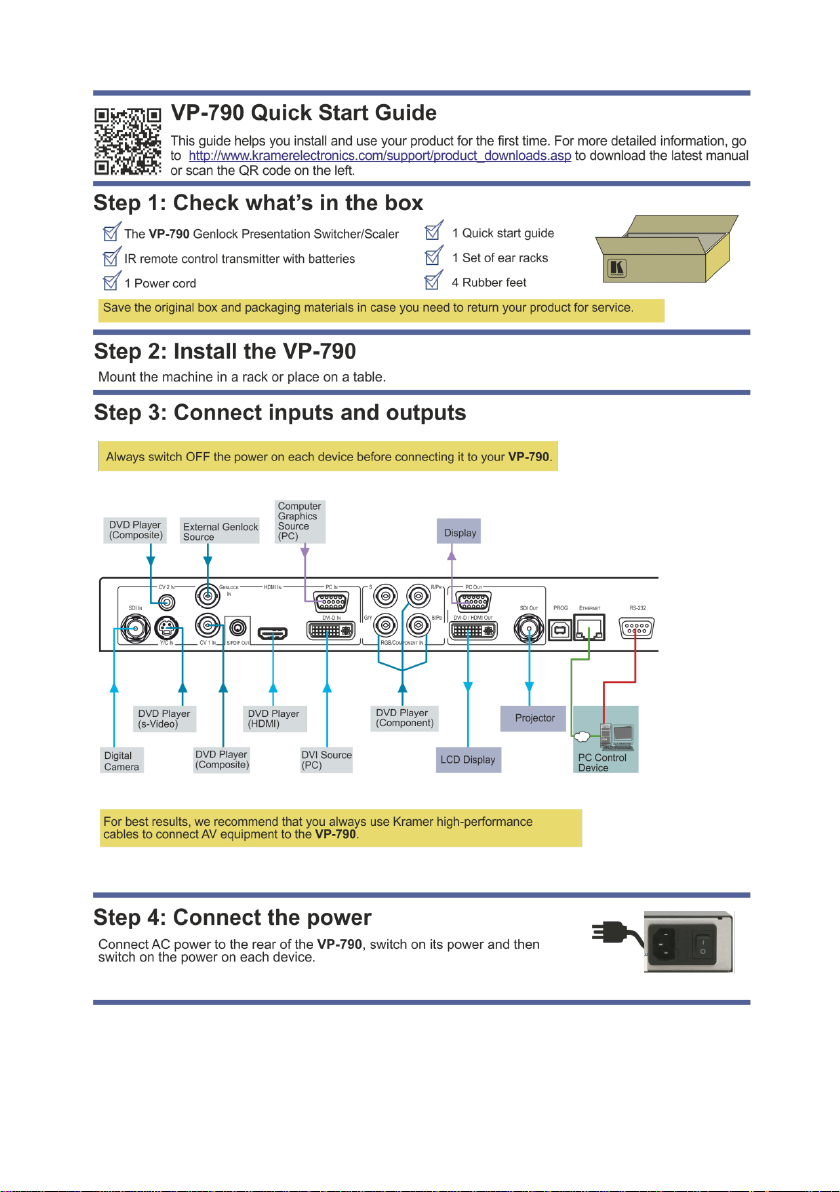
5 Connecting the VP-790
To connect the VP-790, as illustrated in the example in Figure 3, do the following:
1. Connect an SDI source (for example, an SDI digital camera) to the SDI IN
BNC connector.
2. Connect an s-Video source (for example, an s-Video player) to the Y/C IN
4-pin VIDEO INPUT connector.
3. Connect a component video source (for example, a component video player)
to the COMP/RGB IN PR, PB and Y, RCA connectors.
4. Connect an HDMI source (for example, a DVD player) to the HDMI IN
connector.
5. Connect a computer graphics source to the PC IN 15-pin HD VIDEO INPUT
connector.
6. Connect a DVI source (for example, a computer) to the DVI-D IN DVI
connector.
7. Connect a composite video source (for example, a composite video player)
to the CV 1 IN BNC connector.
8. Connect a composite video source (for example, a composite video player)
to the CV 2 IN RCA connector (not shown in Figure 3).
9. Connect an external sync source to the GENLOCK IN BNC connector (not
shown in Figure 3).
Page 16

VP-790 - Connecting the VP-790
11
11
10. Connect the SDI OUT BNC connector to an SDI acceptor (for example, a
projector).
11. Connect the DVD-D/HDMI VIDEO OUT connector to an HDMI acceptor (for
example, an LCD display).
12. Connect the PC OUT 15-pin HD connector to a VGA acceptor (for example,
a display).
13. Connect the audio output signal to the S/PDIF OUT digital audio acceptor,
as required (not shown in Figure 3).
14. Connect the power cord (not shown in Figure 3).
Figure 3: Connecting the VP-790 Genlock Presentation Switcher/Scaler
Page 17

12
VP-790 - Configuring the VP-790 via the OSD MENU Screens
6 Configuring the VP-790 via the OSD MENU
Screens
The VP-790 uses an on-screen display (OSD) menu for system configuration. The
menu appears as an overlay over any images that are output from the VP-790.
There are seven sub-menus (the PIP and Multiunit menus automatically replace
each other in the Single Unit mode and the Multi-unit mode, respectively) that are
used to configure the VP-790. You can activate and navigate these menus from the
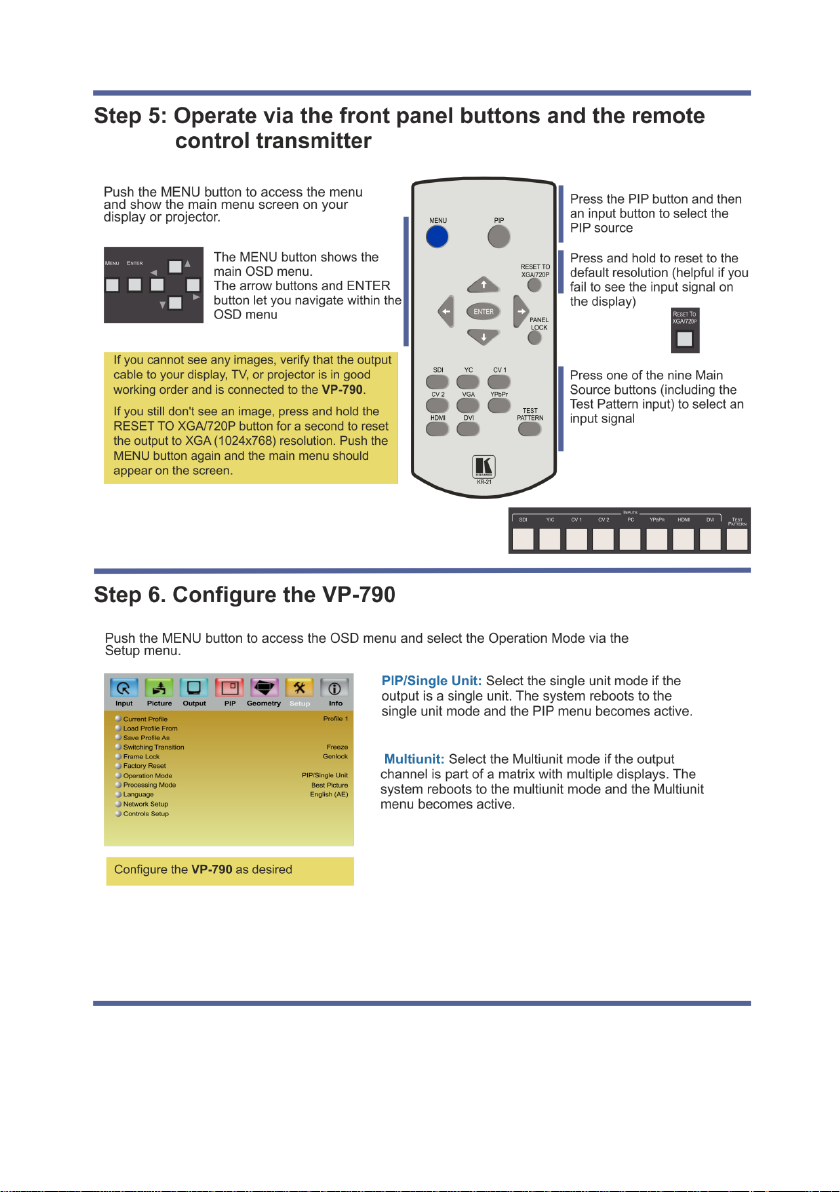
front panel buttons or from the IR remote control.
Single Unit Mode Menu Items:
Multi-Unit Mode Menu Items:
Figure 4: MENU Items
To access and use the OSD menus, push the button for the desired input signal
(alternatively, you can select the desired input via the Input OSD menu), then press
the MENU front panel OSD button or the MENU key on the infrared remote control
transmitter to display the main MENU screen which shows the seven interactive
icons.
Press the or buttons to select the desired sub-menu, and then press
ENTER
Press the or buttons to select the menu item to be adjusted, and then
press ENTER
Press the or buttons to make the adjustment and then press ENTER
Press the or buttons to increase or decrease the (numerical) value as
needed
Page 18

VP-790 - Configuring the VP-790 via the OSD MENU Screens
13
13
The values defined in the different menus may change according to the
firmware version (you can download the up-to-date firmware version
from our Web site at http://www.kramerelectronics.com).
Setting
Function
Source
Select the source: CVBS 1, CVBS 2, S-VIDEO, COMPONENT, VGA,
3G-SDI, DVI, HDMI or Test Pattern
When switching sources, the image fades through black
When selecting the Test Pattern input, you can select one of the 11
built-in test patterns available (for example, gray bars, color bars and so
on)
The source is automatically updated when pressing an input front panel
button on the machine
DVI Color Format
Select the DVI input color format: RGB, YUV or Auto
HDMI Color
Format
Select the HDMI input color format: RGB, YUV or Auto
Component Color
Format
Select the Component Video input color format: RGB, YUV or Auto
i
To return to the previous menu level, press the front panel MENU button or the
MENU key on the remote control. All settings and adjustments are automatically
saved in non-volatile memory for each of the inputs (except USB).
6.1 The Input Screen
Figure 5: Input Screen
Page 19

14
VP-790 - Configuring the VP-790 via the OSD MENU Screens
Setting
Function
Component Sync
Select the component sync: 3 Wire, 4 Wire, Auto
3 Wire: The sync signal is stripped from the green or Y channel (typical
for YUV)
4 Wire: The sync signal is derived from a separate sync line (typical for
RGB)
Auto: Automatically detects a sync signal
The Auto setting will automatically detect a sync signal and set-up the
VP-790 accordingly
SDI to HDMI Audio
Map
Select the channels through which the SDI audio signal will be routed to
the HDMI output: Stereo ch(1,2), Stereo ch(3,4), Stereo ch(5,6), Stereo
ch(7,8) or multichannel
The SDI audio input is routed to the HDMI and 3G-SDI output
connectors by default. Two consecutive SDI audio channels can be
output on the HDMI/3GSDI output interface. The group can be chosen.
Or all eight SDI audio channels can be transmitted.
SDI Audio Routing
Select HDMI & SDI or S/PDIF
H-Position
Set the horizontal position according to the input resolution
For UXGA and component video inputs
V-Position
Set the vertical position according to the input resolution
Frequency
Adjust the frequency
For UXGA inputs
Phase
Adjust the phase: 0 to 31
Auto image
Assesses the image and improves the quality accordingly, by
automatically adjusting the phase, frequency and position
Page 20

VP-790 - Configuring the VP-790 via the OSD MENU Screens
15
15
Setting
Function
Brightness
Adjust the brightness
Contrast
Adjust the contrast
Color
Adjust the color
Hue
Adjust the hue
Sharpness
Adjust the sharpness
Temporal NR
Set the temporal noise reduction level: Off, Low, Medium,
High
Mosquito NR
Set the Mosquito noise reduction level: Off, Low, Medium,
High
Block NR
Set the block noise reduction level: Off, On
Detail Enhancement
Set the detail enhancement: Off, Low, Medium, High
If the USB input is selected, Detail Enhancement is set to Off
Luma Transition Enhance
Set the luminance transition enhance level: Off, Low, High
Chroma Transition Enhance
Set the chrominance transition enhance level: Off, Low, High
Cross Color Suppression
Select On to reduce luminance to chrominance crosstalk
which appears as a coarse rainbow pattern or random colors
in regions of fine details
For composite video signals only (CVBS1 or CVBS2).
6.2 The Picture Screen
The Brightness, Contrast, Color, Hue and sharpness settings are saved individually
for each input (except USB).
Figure 6: Picture Screen
Page 21

16
VP-790 - Configuring the VP-790 via the OSD MENU Screens
Setting
Function
Resolution
Set the resolution: 640x480, 800x600, 1024x768, 1280x768, 1280x800,
1280x1024, 1360x768, 1366x768, 1400x1050, 1440x900, 1600x1200,
1680x1050, 1920x1200, 480i, 480p, 576p, 720p, 1080i, 1080p
Note that any change in the resolution must be confirmed via the count-down
message that appears on the screen
The 3G-SDI output supports 480i, 480p, 576i, 576p, 720p, 1080i and 1080p
resolutions only
Frame Rate
Select 60Hz, 50Hz or Auto
When Auto is selected, the output frame rate follows the input frame rate as
configured in the Output Config menu
HDMI Type
Set the HDMI type: DVI/HDMI, Native, DVI Forced
DVI/HDMI: the output is set to the capability of the attached monitor and is
determined by the information provided through DDC and EDID by the monitor
Native: the output resolution is automatically set to the native screen
resolution of the connected display
DVI Forced: outputs with 24 bit color depth irrespective of the supported
standard of the display
6.3 The Output Screen
Figure 7: Output Screen
Page 22

VP-790 - Configuring the VP-790 via the OSD MENU Screens
17
17
Setting
Function
Aspect Ratio
Set the aspect ratio to: Standard, Full Screen, Crop or Anamorphic (also see
Section 6.3.1):
Standard: Maintains the aspect ratio of the input and scales the image to fit
the display size. The background remains black
Full Screen: Fits the image to the size of the display without maintaining the
aspect ratio
Crop: Maintains the aspect ratio of the input and crops the image so it fits the
display
Anamorphic: scales the input image to 16:9 and fits the 16:9 scaled image to
the display
Note that some aspect ratios may not be applicable to all signal types, in
which case selecting a non-applicable aspect ratio conversion will have no
effect on the displayed image. For example, when a 16:9 image is displayed
on a 16:9 panel all settings give an identical full screen image
Output
Gamma
Set the output gamma: 1.0 to 2.2
Output gamma allows to re-gamma video signals with pre-configured gamma
values to match the display.
If, for example, an adjustment to reduce the level of red in the image is
required, select a higher number for the (input) Color Temp in the Color
menu, or a lower number for the Native Color Temp in the Output menu
Zoom Enable
Off or On
Zoom
Set the Zoom
Zoom H-Pan
Set the Zoom H-Pan
Zoom V-Pan
Set the Zoom V-Pan
Flicker Filter
Strength
Set to control the filter weighting of prior field versus current field
Flicker Filter
Recursion
Recursion chooses between vertical filtering of current and prior input fields, or
current field and recursive data output from filter during prior field
Flicker filter is available in the PIP/Single unit mode but not in the
multiple unit mode.
i
6.3.1 The Flicker Filter
The Flicker Filter reduces interlace horizontal line edge bounce or flicker when scan
converting from a computer progressive input format to an interlaced output signal.
By choosing the filter strength and recursion mode it is possible to choose between
higher levels of flicker reduction or better motion reproduction.
The flicker filter applies to the DVI and HDMI computer input ports. It does not apply
to the composite, s-Video, component and 3G-SDI video inputs or to interlaced
modes on DVI and HDMI. The filter strength slider is always available and the
strength can be changed but it has no effect to a currently displayed interlace mode
or video input port.
Page 23

18
VP-790 - Configuring the VP-790 via the OSD MENU Screens
STANDARD – This setting re-sizes the video or graphics
input signal to best fit the output resolution while
maintaining the aspect ratio of the input signal. For
example, a composite video signal (4:3 aspect ratio) will
“best fit” to the top and bottom of a widescreen output
image, resulting in black areas on either side or top and
bottom edges.
FULL SCREEN – The aspect ratio and resolution of
the input signal is re-sized to precisely fit the size of
the display. This may result in some distortion to the
input signal images
CROP – The aspect ratio and resolution of the input
video or graphics signal are both preserved.
ANAMORPHIC – scales the input image so that it is
displayed with a 16:9 aspect ratio when on the
screen.
The Flicker Filter reduces interlace horizontal line edge bounce or flicker when scan
converting from a computer progressive input format to an interlaced output signal.
By choosing the filter strength and recursion mode it is possible to choose between
higher levels of flicker reduction or better motion reproduction.
6.3.2 Selecting the Correct Aspect Ratio
You can configure the aspect ratio of any output image to fit your application. The
VP-790 offers six different aspect ratio settings: Best Fit, Letterbox, Follow Output,
Virtual Wide, Follow Input, and Custom. Here is how each of these settings works.
Page 24

VP-790 - Configuring the VP-790 via the OSD MENU Screens
19
19
Setting
Function
Type
Select the PIP type: Picture-in-Picture, Split, Picture + Picture or Off
Picture in Picture: Displays a second input channel over the main one
Split: displays two inputs side by side scaled to the size of the display
Picture + Picture: Displays two inputs side by side while maintaining the
aspect ratio of each input
Source
Select the PIP source: CVBS1, CVBS2, S-VIDEO, COMPONENT, VGA, 3GSDI, DVI or HDMI
If the main input channel is HDMI, DVI, DVI-A, VGA or COMPONENT, the
PIP source can be selected from CVBS1, CVBS2, S-VIDEO or HD-SDI
If the main input channel is CVBS1, CVBS2, S-VIDEO or HD-SDI, the PIP
source can be selected from HDMI, DVI, DVI-A, VGA or COMPONENT
PIP Size
Select the PIP size: 1/16, 1/9, 1/4, or Custom
PIP Position
Set the position of the PIP on the display: Free H/V, Top Left, Top Right,
Bottom Left, Bottom Right
H-Position
Set the horizontal position of the PIP on the display
Is available only if Free H/V is selected for PIP Position
V-Position
Set the vertical position of the PIP on the displays available only if Free H/V
is selected for PIP Position
6.4 The PIP Screen
Figure 8: PIP Screen
Page 25

20
VP-790 - Configuring the VP-790 via the OSD MENU Screens
Picture-in-Picture, with a smaller PiP
window superimposed over a full main
window image
Picture + Picture, where both images
appear side-by-side and the aspect
ratios of both images are maintained
6.4.1 The PIP Feature
The VP-790 PIP feature lets you show two images on one screen: the main window
and the PIP window.
If the main input channel is HDMI, DVI, DVI-A, VGA or COMPONENT, the PIP
source can be selected from CVBS1, CVBS2, S-VIDEO or HD-SDI If the main input
channel is CVBS1, CVBS2, S-VIDEO or HD-SDI, the PIP source can be selected
from HDMI, DVI, DVI-A, VGA or COMPONENT
For example, you can show a live video window on top of a graphic background, or
a graphic picture side by side with a video window.
The PIP window mode appears in the following preset PiP configurations:
The PIP window size feature lets you select one of three preset sizes or customize
the PIP window to any size.
If the HDMI signal is HDCP protected, it can appear on HDMI and digital outputs that
support HDCP compliant displays. However, it cannot appear on a display that is not
HDCP compliant and the VP-790 will not output a picture on the VGA and SDI
outputs.
Page 26

VP-790 - Configuring the VP-790 via the OSD MENU Screens
21
21
PIP functionality is not supported in the Multi-unit operation mode
due to the higher bandwidth requirements of the video processing.
When using multiple VP-790 units to drive a matrix display, it is
essential that all VP-790 units are frame locked, otherwise motion
tear will be observed at the boundaries of the image processed by
each VP-790. The processing mode should be identical for all the
units as well (see Section 6.7).
i
!
6.4.1.1 Activating the PIP
You can the PIP feature (indicated by an illuminated PIP front panel button) in any
of the following ways:
Press and hold (for about 2 seconds) the front panel PIP button
Press the PIP button on the IR remote control transmitter (see Section 7.4)
Access the OSD menu, select SETUP>Operation Mode>PIP/Single Mode
and then in the PIP menu select the PIP type
Via the Web pages (see Section 7.3.3)
6.4.1.2 Selecting the PIP Source
To select a PiP source you have to set the VP-790 to any of the PiP display mode
configurations. From the PIP menu, select the PIP source.
6.5 The Multi-unit Screen
Multiple screens can be set in a matrix to provide a larger display that provides a
resolution that is higher than that of a single display. Each display is controlled by
one VP-790 unit. Each VP-790 unit gets the same graphics or video input signal via
a distribution amplifier and outputs the part of the image to its corresponding
display (defined in the Multi-unit OSD screen). In the matrix display the individual
projections usually overlap to give a uniform intersection. The overlapping regions
are illuminated by multiple projectors and are brighter than non-overlapping
regions. For a uniform brightness over the total display, the brightness in the
overlapping regions has to be reduced electronically.
Page 27

22
VP-790 - Configuring the VP-790 via the OSD MENU Screens
Setting
Function
Auto Zoom
Select to automatically crop and zoom the input video image so it
outputs the appropriate part in the matrix
Units Wide
Set the number of screens comprising the width of the wall display
matrix (1 to 4)
Units High
Set the number of screens comprising the height of the wall display
matrix (1 to 4)
H-Position
Define the horizontal position of the display in the matrix
The unit will cut and resize the output signal according to the display’s
location in the matrix
V-Position
Define the vertical position of the display in the matrix
The unit will cut and resize the output signal according to the display’s
location in the matrix
Blend Width
Set the overlap region for the left, right, top and bottom blend regions
In the overlap region, the image intensity gradually fades towards the
edge of the blend area (the fading curve can be controlled via the SCurve item below)
The blend width is set in output pixels with a range of up to a quarter of
the output resolution.
For a configuration with two projectors, for example, in the horizontal
direction, the overlap can be higher to allow 16:9 images to fit on two
combined projectors with an aspect ratio of 4:3 or 5:4
Set the blend width offset for the left, right, top and bottom blend regions
The area between the edge and the start of the blend area is black. The
total number of pixels of the blend area and the offset region is limited by
the same amount of pixels as for an offset of zero
Figure 9: Audio Screen
Page 28

VP-790 - Configuring the VP-790 via the OSD MENU Screens
23
23
Setting
Function
Blend Width
(Contd.)
Each display in the matrix needs to be set to the same blend
width and offset value for its left and right sides. The top and
bottom blend width and offset values also need to be identical
(though they don’t have to be identical to the left and right
settings). This is necessary for the calculating the Auto Zoom
for the matrix.
Blend Curve Type
Select the blend curve type to Off, S-Curve or Align Pattern
Off: the blend area is displayed without applying any gain factor (align
pattern or S-curve)
Align Pattern: Reduce the image intensity of each pixel in the blend
area by 50%
S-Curve: Select S-Curve when the blend region (defined in the Blend
Width menu item above) and the physical blend match. The S-Curve
reduces the image intensity along the blend width.
Use the S-Curve Value slider to control the image intensity change rate
along the blend area. Use the Output Gamma slider to set the output
gamma to match the gray scale of the images
Black Level Uplift
Set the uplift black level: Non Blend Region, Top Left, Top Middle, Top
Right, Middle Left, Middle Right, Bottom Left, Bottom Middle and Bottom
Right
Setting the black levels for the display edges compensate for additional
light leakage from multiple projectors in the overlapping areas.
The adjustable areas are available according to the position of the
display in the matrix.
Setting the middle regions automatically sets the adjacent left and right
regions, but you can still set the left and right separately.
Reduce Black Level
Uplift Width
Adjust the black level uplift width in case the projection is performed
under non-rectangular conditions.
The black level uplift may be used for bright projectors in dark
environments.
The Black Level Uplift field may need to be adjusted to achieve a perfect
result. There may be an area of light leakage beyond the edge of the
active image from the projector. With these controls the edges of the
black uplift region can be moved so they can be aligned with the edges
of the area of light leakage. In the case of projection under nonrectangular conditions the projection fields of adjacent projectors are not
aligned with the blend region.
The corners of the non-blend region can be moved to allow tracking of
the edge of the projection field of adjacent projectors
i
Page 29

24
VP-790 - Configuring the VP-790 via the OSD MENU Screens
Setting
Function
Default
Application
Select the output application: Off, Keystone, Anyplace, Rotation
or PC
Location
Select the location of the display: Front Tabletop, Front Ceiling,
Rear Tabletop or Rear ceiling
Horizontal Keystone
Adjust the horizontal keystone
If the projector is located at an angle to the left or right of the
screen
Vertical Keystone
Adjust the vertical keystone.
If the projector is located at an angle above or below the screen
Diagonal Projection
Move the location of each corner of the display separately
(horizontal and vertical): Top Left, Top Right, Bottom Left,
Bottom Right or Reset All (to reset diagonal projections settings)
When selecting a corner, for example the Top Left corner, the
following message appears:
Use the keys to drag the top left corner of the screen.
Hit Enter to go back
Pincushion/Barrel
Adjust the pincushion or barrel appearance of the screen: -20 to
20
Rotation
Rotate the display by 180 degrees clockwise or
counterclockwise: -180 to 180
Discrete Warp Map
Set to a preset warp configuration: Off, 1 to 8
Warp maps created with the “Warp Generator” PC application
can be uploaded into VP-790 and processed accordingly
Reset All
Resets to default view
6.6 The Geometry Screen
Figure 10: Geometry Screen
Page 30

VP-790 - Configuring the VP-790 via the OSD MENU Screens
25
25
Application
Available Settings
Keystone
Location, Horizontal Keystone, Vertical Keystone,
Pincushion/Barrel and Reset All
Anyplace
Location, Diagonal Projection and Reset All
Rotation
Location, Pincushion/Barrel, Rotation and Reset All
PC
Location, Discrete Warp Map and Reset All
Setting
Function
Current
Profile
Select one of up to four profiles from 1 to 4
The profile includes settings such as the output resolution, filter and color
settings, warp maps, and so on
Load Profile
From
Recalls a profile from 1 to 4
Save Profile
As
Save up to four profiles 1 to 4
Switching
Transition
Set the switching transition mode: Freeze, Blank, Fast Fade or Slow Fade
The settings available for each application are defined in the following table:
6.7 The Setup Screen
Figure 11: Setup Screen
Page 31

26
VP-790 - Configuring the VP-790 via the OSD MENU Screens
Setting
Function
Frame Lock
Set the frame lock mode: Off, Source, Genlock or Auto
Off: the output is set to a fixed refresh rate defined by the frame rate setting (in
the Output menu, Section 6.3), which deviates from the input refresh rate,
even if both are nominally at the same rate. This causes occasional frame
dropping or repeat
Source: the output refresh rate follows the input refresh rate if locking is
possible
Genlock: the output refresh rate follows the vertical sync of an external signal
via the GENLOCK BNC connector, if locking is possible
Auto: Default setup
Locking is achieved by modulating the output clock and works if input and
output refresh rate are nominally at the same rate, e.g. when frame rate is set
to 60Hz and the video input is also 60Hz. If e.g. the video input rate is 50 Hz
and the Frame rate is set to 60Hz, the output will enter free run mode. When
Frame Rate is set to Auto, the matching frame rate is chosen.
When I/O lock is set to Auto and a Genlock source is present to the
GENLOCK BNC. If genlocking is not achievable, locking to the video source
frame rate is tried. If that is not possible the output is running in free-run mode.
When operating in the Multi-unit mode, the same frame lock should
be defined in all the units in the matrix.
Factory Reset
Select Yes to reset your VP-790 to its preset default settings
Operation
Mode
Set the Operation Mode: PIP/Single or Multiunit
When selecting Multiunit, the Multiunit menu (see Section 6.5) replaces the
PIP Menu (see Section 6.4)
Processing
Mode
Set the processing mode: Gaming Mode, Medium Latency or Best Picture
Gaming Mode: provides lower quality processing but a speedy response
For applications that require a quick response such as simulations, medical
imaging or gaming applications
Medium Latency: provides medium quality picture processing
Best Picture: provides optimum picture processing resulting in a high quality
image
When operating in the Multi-unit mode, the same processing mode
should be defined in all the units in the matrix.
Language
Select the language: English (AE), English (BE) or Deutsch (German)
Network
Setup
Network settings configuration:
IP Address Type: Static or DHCP
IP Address: 192.168.001.039
Net Mask: 255.255.000.000
Controls
Setup
Controls configuration:
Menu Position: Center, top Left, Top Right, Bottom Left or Bottom right
Menu Timeout: 5 sec, 10 sec, 15 sec, 20 sec, 25 sec, 30 sec or Infinite
Input Lock: On or Off
Set to OFF so you can still use the SOURCE buttons on the front panel even
when the lock button is on
Save Lock: On or Off
Set to ON to save the lock status when the machine is powered down
i
i
Page 32

VP-790 - Configuring the VP-790 via the OSD MENU Screens
27
27
6.8 The Info Screen
From the Information screen (see Figure 12) you can verify the input resolution, the
output resolution, the SYNC mode, as well as the firmware revision, DHCP status
and IP address:
Figure 12: Information Screen
Page 33

28
VP-790 - Controlling the VP-790
7 Controlling the VP-790
The VP-790 can be controlled via:
The front panel buttons (see Section 7.1)
RS-232 serial commands transmitted by a touch screen system, PC, or other
serial controller (see Section 7.2)
The ETHERNET (see Section 7.3)
The infrared remote control transmitter (see Section 7.4)
7.1 Controlling via the Front Panel Buttons
The VP-790 includes the following front panel buttons:
Input selector buttons for selecting the required input: SDI, s-Video (YC), CV
(1 and 2), COMPONENT (YPbPr), PC, HDMI, or DVD-D
The PIP button
MENU, ENTER, and arrow buttons (up, down, left and right)
RESET TO XGA/720p and PANEL LOCK buttons
7.2 Connecting to the Product via RS-232
You can connect to the VP-790 via an RS-232 connection using, for example, a PC.
Note that a null-modem adapter/connection is not required.
To connect to the VP-790 via RS-232, connect the RS-232 9-pin D-sub rear panel
port on the VP-790 unit via a 9-wire straight cable (only pin 2 to pin 2, pin 3 to pin 3,
and pin 5 to pin 5 need to be connected) to the RS-232 9-pin D-sub port on your
PC.
7.3 Controlling via the Ethernet
You can connect the VP-790 via the Ethernet, using a crossover cable (see Section
7.3.1) for direct connection to the PC or a straight through cable (see Section 7.3.2)
for connection via a network hub or network router.
Page 34

VP-790 - Controlling the VP-790
29
29
This type of connection is recommended for identification of the
factory default IP Address of the VP-790 during the initial
configuration.
i
7.3.1 Connecting the ETHERNET Port Directly to a PC (Crossover Cable)
You can connect the Ethernet port of the VP-790 to the Ethernet port on your PC,
via a crossover cable with RJ-45 connectors.
After connecting the Ethernet port, configure your PC as follows:
1. Right-click the My Network Places icon on your desktop.
2. Select Properties.
3. Right-click Local Area Connection Properties.
4. Select Properties.
The Local Area Connection Properties window appears.
5. Select the Internet Protocol (TCP/IP) and click the Properties Button (see
Figure 13).
Figure 13: Local Area Connection Properties Window
6. Select Use the following IP Address, and fill in the details as shown in
Figure 14. You can use any IP address in the range 192.168.1.1 to
192.168.1.255 (excluding 192.168.1.39) that is provided by your IT
department.
Page 35

30
VP-790 - Controlling the VP-790
7. Click OK.
Figure 14: Internet Protocol (TCP/IP) Properties Window
7.3.2 Connecting the ETHERNET Port via a Network Hub (StraightThrough Cable)
You can connect the Ethernet port of the VP-790 to the Ethernet port on a network
hub or network router, via a straight-through cable with RJ-45 connectors.
7.3.3 Operating Remotely via the Web Pages
To access the VP-790 Web pages:
1. Open your Internet browser.
2. Enter the IP address of the device (in the address bar of your browser (see
Figure 15).
Figure 15: Web Browser Address Bar
Page 36

VP-790 - Controlling the VP-790
31
31
The Menu
Description
Input
(see Section 6.1)
Select the: Source, DVI Color Format, HDMI Color Format, HDMI Color
Format, Component Setup, Test Pattern, SDI to HDMI Audio Map and
SDI Audio Routing;
Set the: Overscan, H-Position, V-Position, Frequency, Phase and
perform Auto Image
Picture
(see Section 6.2)
Set the: Brightness, Contrast, Color, Hue and Sharpness
Select the: Temporal NR, Mosquito NR, Block NR, Detail Enhancement,
Luma Transition Enhance, Chroma Transition Enhance, Cross Color
Suppression
Output
(see Section 6.3)
Select the: Resolution, Frame Rate, Allowed Frame Rates, HDMI Type,
Aspect Ratio, Zoom Enable and Flicker Filter Recursion
Set the: Output Gamma, Zoom, Zoom H-Pan, Zoom V-Pan and Flicker
Filter Strength
PIP
(see Section 6.4)
Select the: Type, Source, PIP Size and PIP Position
Set the: H-Position and V-Position
Multi-unit
(see Section 6.5)
Select the Auto Zoom
Set the unit width, unit height, H-Position and V-Position
Access the Blendwidth, Blend Curve Type and Black-Level Uplift
submenus
Geometry
(see Section 6.6)
Select the: Application, Location and Discrete Warp Map
Set the Horizontal Keystone, Vertical Keystone, Pincushion/Barrel
distortion and Rotation
Access the Diagonal Projection submenu
Reset to default values
The main menu appears:
Figure 16: Web Browser Address Bar
The main menu lets you access the different menu items. The menu items are
similar to the OSD menu (see Section 6)
Page 37

32
VP-790 - Controlling the VP-790
The Menu
Description
Setup
(see Section 6.7)
Set the: Current Profile, Load Profile, Save Profile, Switching Transition,
Frame Lock, Operation Mode, Processing Mode or Language
Access the Network Setup and Controls Setup submenus
Perform Factory Reset
File Upload
Lets you upload up to 5 custom test patterns
Backup / Restore
Lets you back up settings to a file and restore settings from a file
The File Upload and Backup/Restore menus appear only on the Web pages
Figure 17: Infrared Remote Control Transmitter
Keys
Function
MENU
Enter the OSD menu. Press
again to exit the menu
PIP
Toggle the PIP on or off
RESET TO
XGA/720P
Press and hold to reset to
the default resolution
(toggles between RESET
TO XGA and 720p)
Four navigation keys
Press to accept changes
PANEL LOCK
Lock the front panel lock
SDI
Select the SDI input
YC
Select the S-VIDEO input
CV1
Select the composite video
1 input
CV2
Select the composite video
2 input
VGA
Select the computer
graphics input
YPbPr
Select the component video
input
HDMI
Select the HDMI input
DVI
Select the DVI input
TEST
PATTERN
Select the test pattern
inputs. Cycles between
different patterns with each
press of the button
7.4 Controlling via the Infrared Remote Control Transmitter
Page 38

VP-790 - Firmware Upgrade
33
33
The latest version of firmware can be downloaded from the Kramer Web
site at www.kramerelectronics.com.
i
8 Firmware Upgrade
You can upgrade the VP-790 via the Kramer VP-790 Updater Tool software.
8.1 Installing the VP-790 Updater Tool
Download the VP-790 Updater Tool software from
http://www.kramerelectronics.com.
The VP-790 Updater Tool requires the following:
Windows™ XP, Vista or Windows™ 7
Microsoft .Net Framework version 3.5
To install the VP-790 Updater Tool:
1. Double click the Windows Installer Package file.
The Welcome window appears:
Figure 18: Welcome Window
Page 39

34
VP-790 - Firmware Upgrade
2. Click Next.
The Select Installation Folder window appears:
Figure 19: Choose Destination Location Window
3. Click Browse to select the destination folder.
4. When finished, click Next.
The Confirm Installation window appears:
Figure 20: Confirm Installation
Page 40

VP-790 - Firmware Upgrade
35
35
5. Click Next. The Installation Progress window appears:
Figure 21: Installation Progress Window
Then the Installation Complete window appears:
Figure 22: Installation Complete Window
6. Click Close.
An icon appears on the desktop and a shortcut appears in the Start Menu
Programs folder in the Kramer sub-folder.
Page 41

36
VP-790 - Firmware Upgrade
8.2 Saving User Settings
If you want to backup the user settings before upgrading the machine, you can do it
through the VP-790 Web pages. To do so, type the local IP address for the VP-790
in the Web browser’s address bar and press the ENTER button.
You can obtain/set the IP address via the OSD menu by entering the Network
Setup submenu within the Setup Menu or by connecting the VP-790 to an Ethernet
based network with the default DHCP setting to allow the VP-790 to obtain a valid
IP address from the network server.
Following firmware upgrade you may find that the VP-790 user settings have been
reset to their factory default values. If you wish to restore the user settings, you can
do it via the VP-790 Web pages.
8.3 Updating the Firmware
To upgrade the firmware:
1. Power down the VP-790.
2. Press and hold the menu button and turn the power On again. After a few
seconds, you can release the MENU button.
The VP-790 enters the firmware update mode.
3. Start the VP-790 Updater Tool application.
Figure 23: Updater Tool Window
Page 42

VP-790 - Firmware Upgrade
37
37
4. Plug in a USB cable between the VP-790 and the PC.
5. Using the VP-790 Updater Tool application, click Browse and select the
location of the desired BREC file to be programmed into the Unit.
6. Click Update Firmware.
When the VP-790 has finished programming you will see a “Firmware update complete”,
dialog box (this will take a minute or two).
7. After firmware update is complete, click OK.
8. Unplug the USB cable from the VP-790 unit.
9. Exit the VP-790 Updater application.
Do this only after disconnection,
10. Power cycle the VP-790 for the firmware update to take effect.
11. If you wish to restore the user settings go to Section 8.2
Page 43

38
VP-790 - Technical Specifications
INPUTS:
1 3G-HD-SDI on a BNC connector
1 HDMI connector (HDCP version 1.1)
1 VGA on a 15-pin HD connector
1 composite video on an RCA connector
1 composite video on a BNC connector
1 component video/RGBS on 3/4 RCA connectors
1 DVI on a DVD-I connector
1 s-Video on a 4-pin connector
OUTPUTS:
1 3G-HD-SDI on a BNC connector
1 DVI/HDMI on a DVI-D connector (HDCP version 1.1)
1 VGA on a 15-pin HD connector
1 S/PDIF on an RCA connector
OUTPUT RESOLUTIONS:
640x480, 800x600, 1024x768, 1280x768, 1280x800, 1280x1024,
1360x768, 1366x768, 1400x1050, 1440x900, 1600x1200, 1680x1050,
1920x1200, 480i, 480p, 576p, 720p, 1080i, 1080p
CONTROLS
Input selector buttons: Blank, mute, freeze, reset to XGA/720p, panel lock.
Menu functions: menu, enter, menu arrows. RS-232, Ethernet, IR
OPERATING
TEMPERATURE:
0° to +40°C (32° to 104°F)
STORAGE
TEMPERATURE:
-40° to +70°C (-40° to 158°F)
HUMIDITY:
10% to 90%, RHL non-condensing
POWER SOURCE:
100-240VAC, 50-60Hz; 35VA (500mA maximum)
DIMENSIONS:
19-inch (W), 7-inch (D) 1U (H) rack mountable
WEIGHT:
2.7kg (6lbs) approx.
ACCESSORIES:
Power cord, rack ears, IR remote control transmitter
Specifications are subject to change without notice at http://www.kramerelectronics.com/
HDMI Input Resolutions (Video)
480i
576p (ED)
1080i @59.94
1080p @25
1080p @59.94
576i
720p
1080i @60
1080p @30
1080p @60
480p
1080i @50
1080p @24
1080p @50
9 Technical Specifications
9.1 Input Resolutions
This section defines the input resolutions for each input.
9.1.1 HDMI Input Resolutions
HDMI Input Resolutions (Computer):
DOS, VGA to WUXGA up to 165 MHz pixel clock.
9.1.2 PC Input Resolutions
From VGA to WUXGA.
Page 44

VP-790 - Technical Specifications
39
39
YUV, RGB and RGBS Input Resolutions
484i (480i)
576p (ED)
1080i @59.94
1080p @24
1080p @30
576i (SD)
720p
1080i @60
1080p @25
480p
1080i @50
1080p @23.98
1080p @29.97
Note that this input does not support computer SVGA signals. SVGA
signals should be passed via the PC IN 15-pin HD connector. The PC
input supports the separate H and V syncs.
Technical Specifications of the HDMI Output Signal
640x480@60
1280x1024@50
1680x1050@60
1080p25
640x480@75
1280x1024@60
1920x1200@60
1080p29.97
800x600@50
1280x1024@75
480i60
1080p30
800x600@60
1360x768@60
480p60
1080p50
800x600@75
1366x768@50
576i50
1080p59.94
1024x768@50
1366x768@60
576p50
1080p60
1024x768@60
1400x1050@50
720p50
2K50
1024x768@75
1400x1050@60
720p59.94
2K60
1280x768@50
1600x900@60
720p60
1280x768@60
1600x1200@50
1080p23.976
1280x800@60
1600x1200@60
1080p24
i
9.1.3 SDI Input Resolutions
SMPTE 292M, SMPTE 259M-C and SMPTE 424M compliant, accepts 484i (480i),
576i, 720p, 1080i and 1080p single link formats at 270Mb, 1.485Gb or 2.97Gb
rates.
9.1.1 YUV, RGB and RGBS Input Resolutions
9.1.2 CV and s-Video Input Resolutions
NTSC, PAL and SECAM.
9.2 Output Resolutions
This section defines the output resolutions.
9.2.1 HDMI Output Resolutions
9.2.1 SDI Output Resolutions
SMPTE 292M, SMPTE 259M-C and SMPTE 424M compliant, accepts (484i) 480i,
576i, 720, 1080i and 1080p single link formats at 270Mb, 1.485Gb or 2.97Gb rates.
Page 45

40
VP-790 - Technical Specifications
9.2.2 PC Output Resolutions
From VGA to WUXGA, up to 165 MHz pixel clock.
9.3 RS-232 Communication Protocol
You can download the VP-790 RS-232 communication protocol online guide from
the VP-790 Web page.
Page 46

Page 47

For the latest information on our products and a list of Kramer distributors,
visit our Web site where updates to this user manual may be found.
We welcome your questions, comments, and feedback.
Web site: www.kramerelectronics.com
E-mail: info@kramerel.com
P/N:
2900-300093
Rev:
4
!
SAFETY WARNIN G
Disconnect the unit from the power
supply before opening and servicing
 Loading...