

Page 1
FrançaisDeutsch EnglishVoice Name
Owner’s Manual
Manuel d’utilisation
Bedienungsanleitung
1
GFE
Page 2

2
Page 3

FrançaisDeutsch
EnglishVoice Name
Table Of Contents
Precautions ........................................................4
Cautions for use ..................................................5
Introduction .................................................5
Main features .....................................................5
Getting to know the WAVEDRUM Mini .........6
Getting ready to play ....................................7
Connecting the clip to the WAVEDRUM Mini ......7
Connecting the power ........................................7
Turning the power on ........................................7
Adjusting the volume .........................................8
Turning the power off ........................................8
Switching the output destination ......................8
Using batteries ...................................................8
Location .............................................................9
Performing .................................................11
Performance techniques ..................................11
Selecting sounds ..............................................11
Using effects ....................................................12
Playing and overdubbing rhythm patterns ...... 12
Overdubbing phrases (Looper) ........................ 13
Editing the settings .................................... 14
Editing procedure ............................................ 14
Parameter list .................................................. 14
Effect type list .................................................. 15
Appendix ....................................................17
Restoring the factory settings .......................... 17
Error messages ................................................ 17
Troubleshooting .............................................. 17
Specifications .................................................. 18
Voice Name List .......................................... 68
Sounds .................................................................... 68
Effects ..................................................................... 69
Rhythm Patterns .................................................... 69
3
Page 4
Thank you for purchasing the Korg
DRUM Mini
Tohelpyougetthemostoutofyournew
instrument,pleasereadthismanualcarefully.
dynamic percussion synthesizer.
WAV E -
Precautions
Location
Using the unit in the following locations can
result in a malfunction.
• In direct sunlight
• Locations of extreme temperature or humidity
• Excessively dusty or dirty locations
• Locations of excessive vibration
• Close to magnetic fields
Power supply
Please connect the designated AC adapter to an
AC outlet of the correct voltage. Do not connect it
to an AC outlet of voltage other than that for
which your unit is intended.
Interference with other electrical devices
Radios and televisions placed nearby may experience reception interference. Operate this unit at a
suitable distance from radios and televisions.
Handling
To avoid breakage, do not apply excessive force
to the switches or controls.
Care
If the exterior becomes dirty, wipe it with a clean,
dry cloth. Do not use liquid cleaners such as benzene or thinner, or cleaning compounds or flammable polishes.
Keep this manual
After reading this manual, please keep it for later
reference.
Keeping foreign matter out of your equipment
Never set any container with liquid in it near this
equipment. If liquid gets into the equipment, it
could cause a breakdown, fire, or electrical shock.
Be careful not to let metal objects get into the
equipment. If something does slip into the equipment, unplug the AC adapter from the wall outlet.
Then contact your nearest Korg dealer or the store
where the equipment was purchased.
THE FCC REGULATION WARNING (for USA)
This equipment has been tested and found to
comply with the limits for a Class B digital
device, pursuant to Part 15 of the FCC Rules.
These limits are designed to provide reasonable protection against harmful interference in
a residential installation. This equipment generates, uses, and can radiate radio frequency
energy and, if not installed and used in accordance with the instructions, may cause harmful interference to radio communications.
However, there is no guarantee that interference will not occur in a particular installation.
If this equipment does cause harmful interference to radio or television reception, which can
be determined by turning the equipment off
and on, the user is encouraged to try to correct
the interference by one or more of the following measures:
• Reorient or relocate the receiving antenna.
• Increase the separation between the equipment and receiver.
• Connect the equipment into an outlet on a
circuit different from that to which the
receiver is connected.
• Consult the dealer or an experienced radio/
TV technician for help.
Unauthorized changes or modification to this
system can void the user’s authority to operate
this equipment.
Notice regarding disposal (EU only)
When this “crossed-out wheeled bin”
symbol is displayed on the product,
owner’s manual, battery, or battery
package, it signifies that when you wish
to dispose of this product, manual,
package or battery you must do so in an
approved manner. Do not discard this product,
manual, package or battery along with ordinary
household waste. Disposing in the correct
manner will prevent harm to human health and
potential damage to the environment. Since the
correct method of disposal will depend on the
applicable laws and regulations in your locality, please contact your local administrative
body for details. If the battery contains heavy
metals in excess of the regulated amount, a
chemical symbol is displayed below the
“crossed-out wheeled bin” symbol on the battery or battery package.
4
Page 5

FrançaisDeutsch
EnglishVoice Name
Cautions for use
The speaker contains a magnet
This speaker that's built into this instrument contains a magnet. Do not place it near cards or medical
devices that might be affected by magnetism.
Do not allow heavy objects to rest on the pad for an
extended time
Do not leave the clip attached for an extended time
If a heavy object is left on the WAVEDRUM Mini's
pad surface for an extended time, a mark may be
left both on the pad surface and on the object touching it. Do not leave heavy objects on the pad surface, or leave the WAVEDRUM Mini face down for
an extended time. Similarly, leaving the clip
attached for an extended time may cause a mark.
Changes due to aging or the state of the surface may
also cause such marks to occur regardless of how
long the WAVEDRUM Mini is in contact with the
other object.
About feedback
The WAVEDRUM Mini uses a sensor to detect the
vibrations that occur in the pad or clip when you
strike it. In some cases, the sensor will respond not
only to this direct impact but also to the sound from
a high-volume speaker, picking it up as though the
signal was coming through a microphone. In partic-
Introduction
ular, when you're playing the WAVEDRUM Mini
while monitoring the sound through a large PA system, the WAVEDRUM Mini's sound that's being
output from the speakers may be conveyed directly
from the speakers or as vibration from the floor
transmitted through a stand, and detected by the
WAVEDRUM Mini's sensor, producing acoustic
feedback (a whine or howl) that can cause an
uncontrollable sustained sound to be produced.
Feedback places an excessive load on the amps and
speakers, and may damage them seriously. When
using the WAVEDRUM Mini with a large monitor
system, please use the PA system's equalizers and
limiters to prevent feedback and protect the speakers just as you would do for a microphone used by
an acoustic instrument or vocalist.
Recording with the Looper function will make feedback more likely. Please be careful with the volume.
Data handling
Unexpected malfunctions can result in the loss of
memory contents. Korg cannot accept any responsibility for any loss or damage which you may incur
as a result of data loss.
* This product was developed under license of physical model-
ing tone generator patents (http://www.sondius-xg.com)
owned by Stanford University USA and the Yamaha Corporation.
* All product names and company names are the trademarks or
registered trademarks of their respective owners.
Introduction
The WAVEDRUM Mini is a completely new concept in percussion synthesizers, with the following
three major features:
• It can be played anywhere
• It can turn anything into a Wavedrum
• It's easy to transport
Main features
Revolutionary synthesis technology
The pad and clip sensors capture the sound of the
musician's strikes, and a variety of Wavedrum-based
synthesis technologies are used to generate unique
sounds. Since the output is based on the sounds that
you perform, the sound will change sensitively and
diversely in response to your playing technique and
the subtle movements of your fingers and palm,
allowing a high degree of performance freedom
with endless variation.
Turn anything into WAVEDRUM
The clip with the built-in sensor can be attached to
any object, transforming it into a Wavedrum.
This lets you turn a nearby object into a Wavedrum,
and the tonal character will change depending on
the material of the object—wood, metal, or glass
etc.
5
Page 6
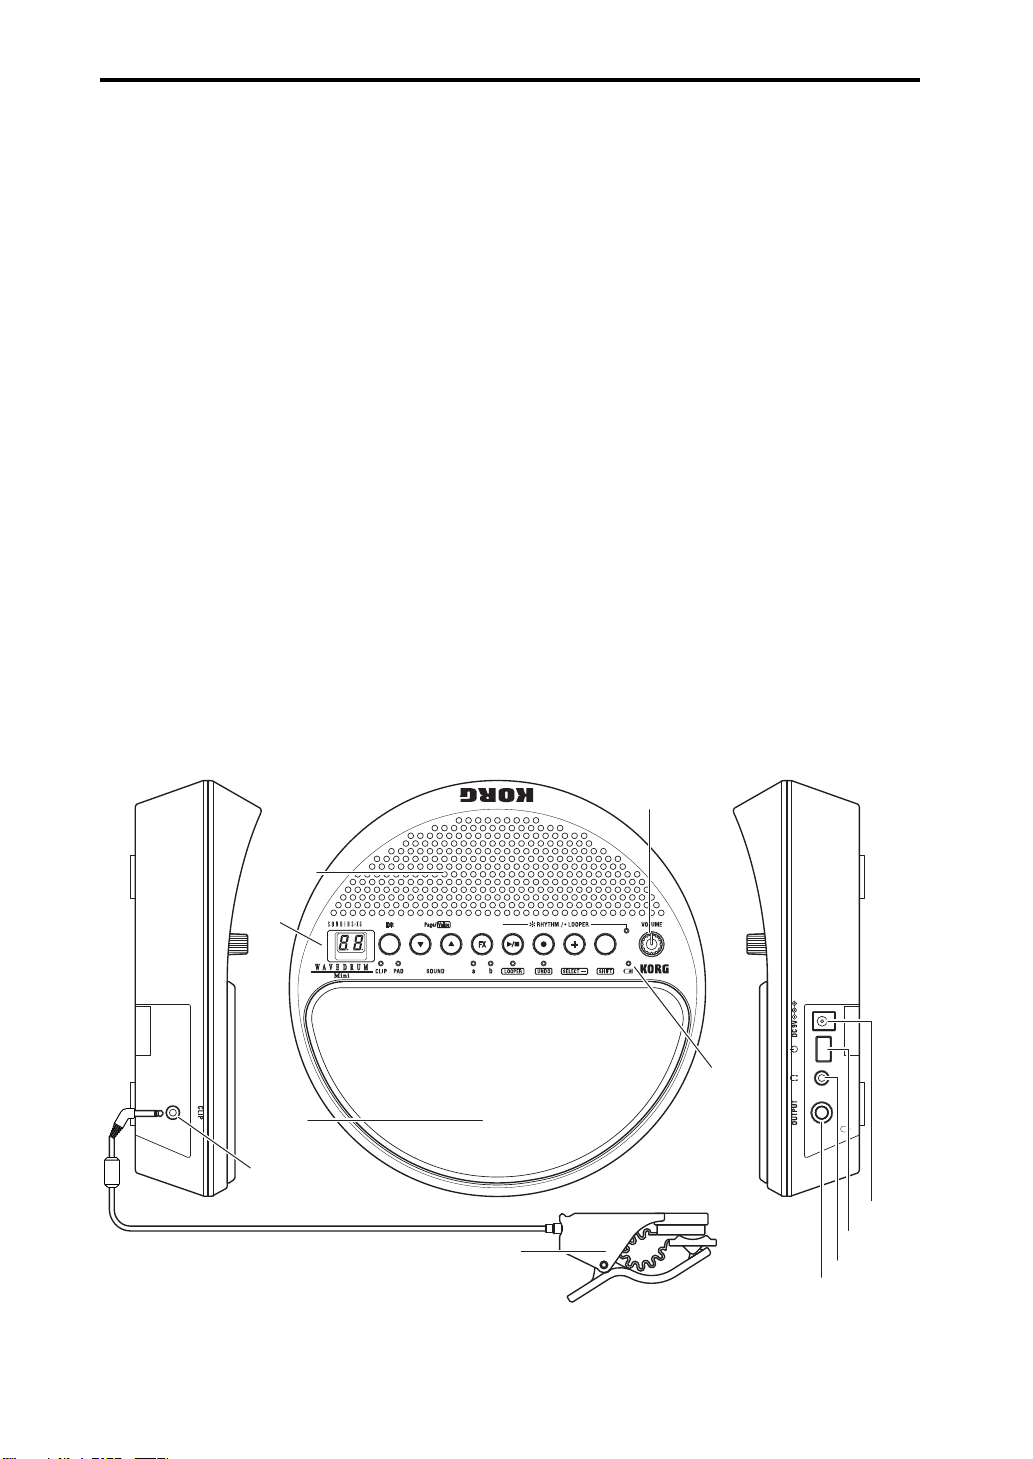
Getting to know the WAVEDRUM Mini
Operating
panel
Clip connection
jack
VOLUME knob
Remaining
battery
indicator
Speaker
TopLeft side Right side
Pad
Sensor clip (Clip)
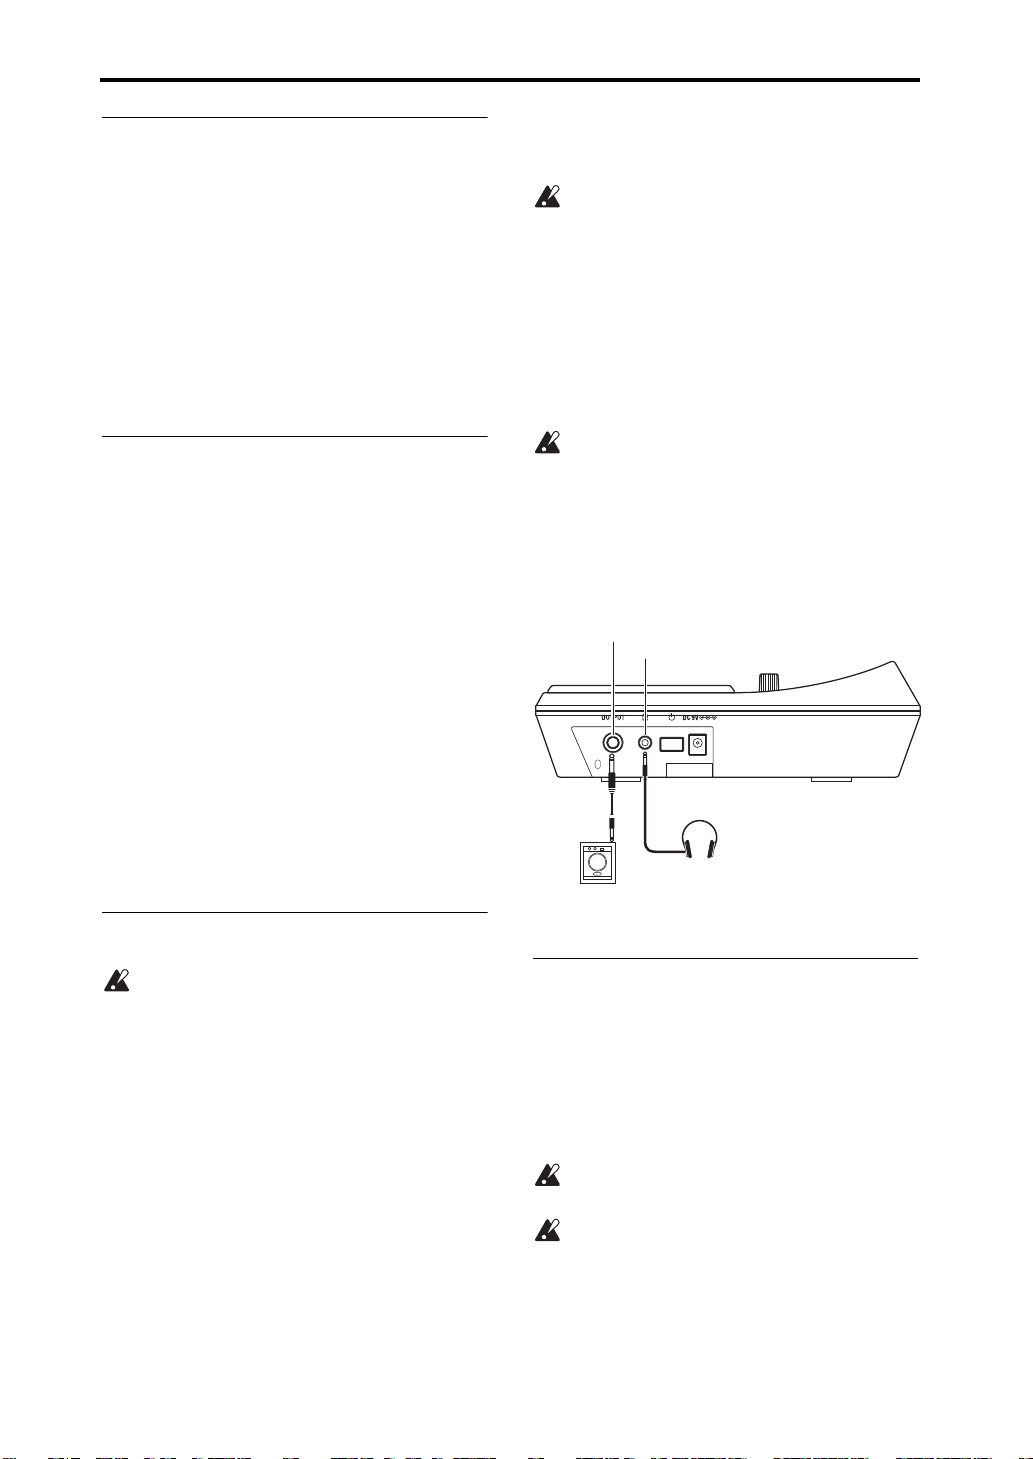
OUTPUT jack
Headphone jack
Power switch
DC9V jack
100 sounds, 10 effects
The 100 sounds cover all styles from percussion to
sound effects. The sounds produce totally different
tones depending on your playing style. Different
sounds can be independently assigned to the pad
and the clip.
There are also 10 dedicated effects that are optimized for percussion.
Rhythm patterns
You can enjoy jam sessions by playing along with
100 rhythm patterns that range across many genres
and tempo settings.
There's also a recording function that lets you layer
your own performances onto these rhythm patterns.
Looper
The Looper function lets you create grooves from
scratch.
It's a great way to create your very own original
grooves.
Internal speaker and battery operation for
portability
The lightweight and compact design make it easy to
carry the WAVEDRUM Mini anywhere. With a
built-in speaker and battery operation, you'll be able
to play it anywhere and anytime.
You can use the included strap to attach the WAVEDRUM Mini to your foot or another part of your
body.
Getting to know the WAVEDRUM Mini
6
Page 7
FrançaisDeutsch
EnglishVoice Name
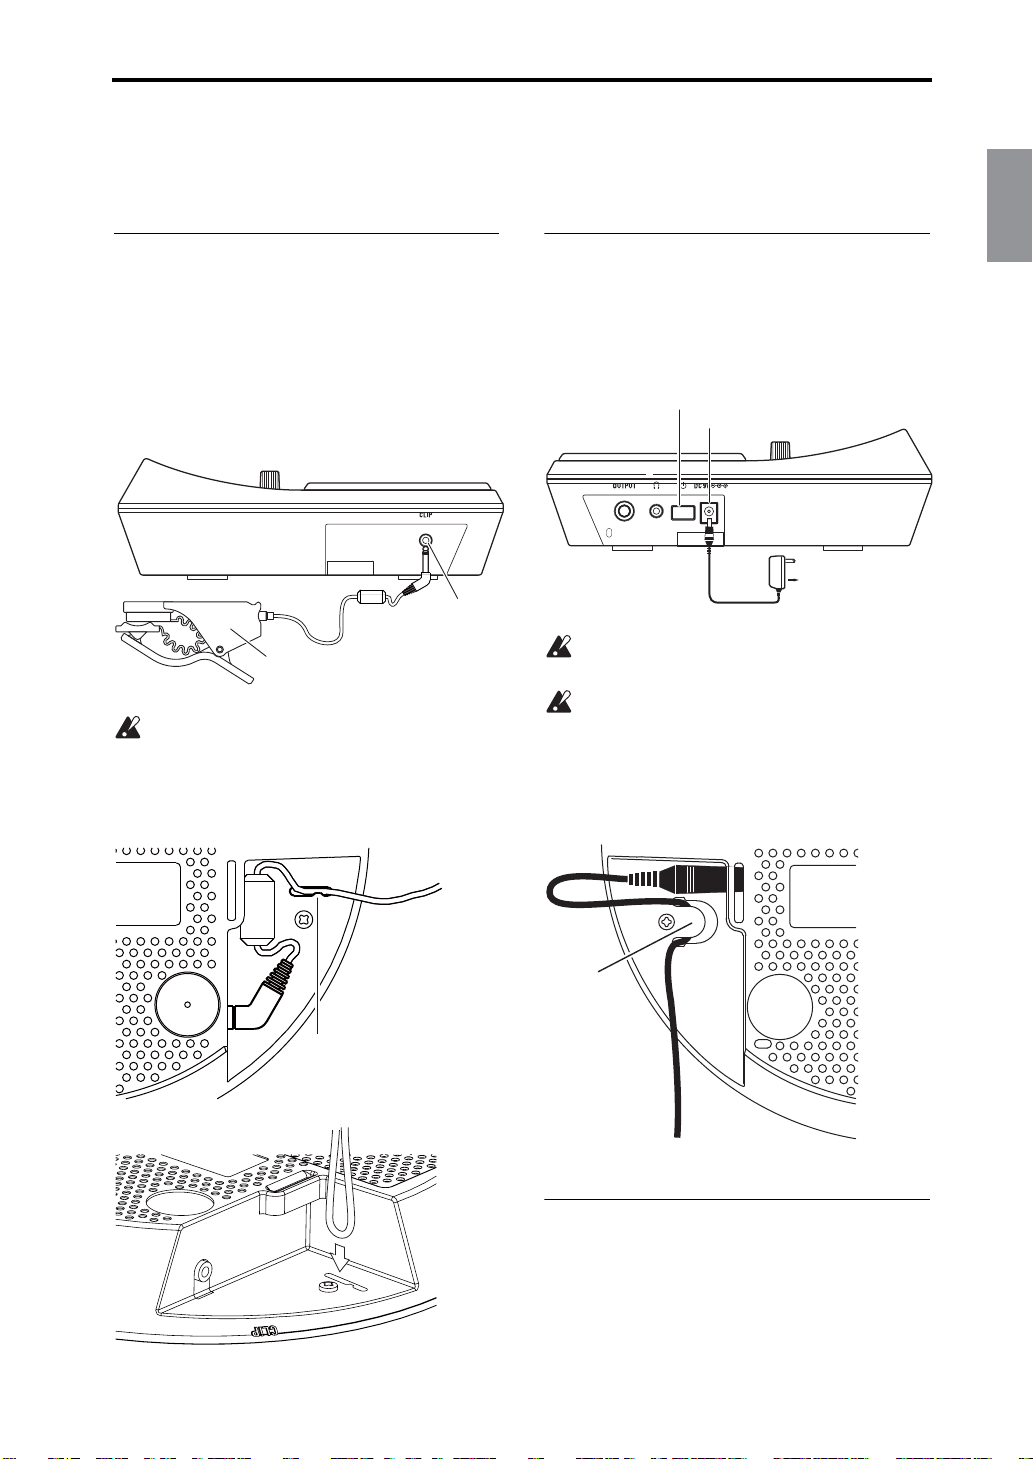
Sensor clip (Clip)
CLIP jack
Cable hook
DC9V jack
Power switch
to an electrical outlet
AC adapter (included)
Cable hook
Getting ready to play
Getting ready to play
Connecting the clip to the WAVEDRUM Mini
1.
Make sure that the WAVEDRUM Mini's power
switch is turned off. (The display and indicators
should be unlit.)
2.
Connect the clip to the CLIP jack located on the
left side of the WAVEDRUM Mini.
Do not connect anything other than the
included clip to the CLIP jack.
3.
To prevent the clip cable from being unplugged,
use the cable hook located on the bottom of the
WAVEDRUM Mini to secure the cable in place.
Connecting the power
1.
Connect the DC plug of the included AC Adapter
to the DC9V jack located on the right side of the
WAVEDRUM Mini.
2.
Plug the AC Adapter into an electrical outlet.
Use only the included AC Adapter. Using any
other AC Adapter may cause malfunctions.
Use an AC outlet of the correct voltage for the
included AC Adapter.
3.
To prevent the AC Adapter cable from being
unplugged, use the cable hook located on the bottom of the WAVEDRUM Mini to secure the
cable in place.
Turning the power on
1.
Lower the volume by turning the VOLUME
knob all the way to the left.
2.
Press the power switch to turn the power on.
7
Page 8
Getting ready to play
Adjusting the volume
• Turn the VOLUME knob toward right to
increase the volume, or toward the left to lower
the volume.
The VOLUME knob controls the output of the
built-in speaker, the headphone jack, and the OUTPUT jack.
After you've adjusted the volume to an appropriate
level, try playing the WAVEDRUM Mini. For
details, refer to “Performing” (See page 11).
Turning the power off
When you've finished performing, turn the power
off.
1.
Lower the volume by turning the WAVEDRUM
Mini's VOLUME knob all the way to the left.
2.
Hold down the power switch for approximately
one second; the power will turn off.
Auto power-off function
The WAVEDRUM Mini's auto power-off function
will automatically turn off the power approximately
four hours after the last panel operation was performed.
If desired, you can disable the auto power-off function. See
By default, the auto power-off function is enabled.
page 14
for details.
If you're using headphones with a 1/4" mini adapter
plug, be sure to grasp the adapter when inserting or
removing the plug.
To protect your hearing, avoid listening at high
volume for extended periods of time when
using headphones.
Connecting to an audio device
Connect the WAVEDRUM Mini's OUTPUT jack to
the input jack of your mixer or powered monitor.
The output signal is monaural. If a cable is connected to the OUTPUT jack, the built-in speaker
will be muted.
Before plugging anything in, be sure to poweroff the WAVEDRUM Mini and the device
that's being connected. If you connect the
WAVEDRUM mini to other devices while it's
powered-on, you might damage the WAVEDRUM Mini, the other device or malfunctions
might occur. In addition, be sure that the volume is lowered on all connected equipment.
OUTPUT jack
Headphone jack
INPUT
Headphones
Powered monitor, etc.
Switching the output destination
Your monitor equipment might be damaged if
high volume sound is suddenly output from the
WAVEDRUM Mini. This could also damage
your hearing if you're listening through headphones. Please use caution when setting the
volume.
Using headphones
If you're using headphones, connect them to the
headphone jack. If headphones are connected,
sound won't be output from the built-in speaker.
You can use headphones when you don't want to
disturb others around you, such as at night. Insert
the plug of your stereo headphones into the headphone jack located on the right side of the WAVEDRUM Mini.
8
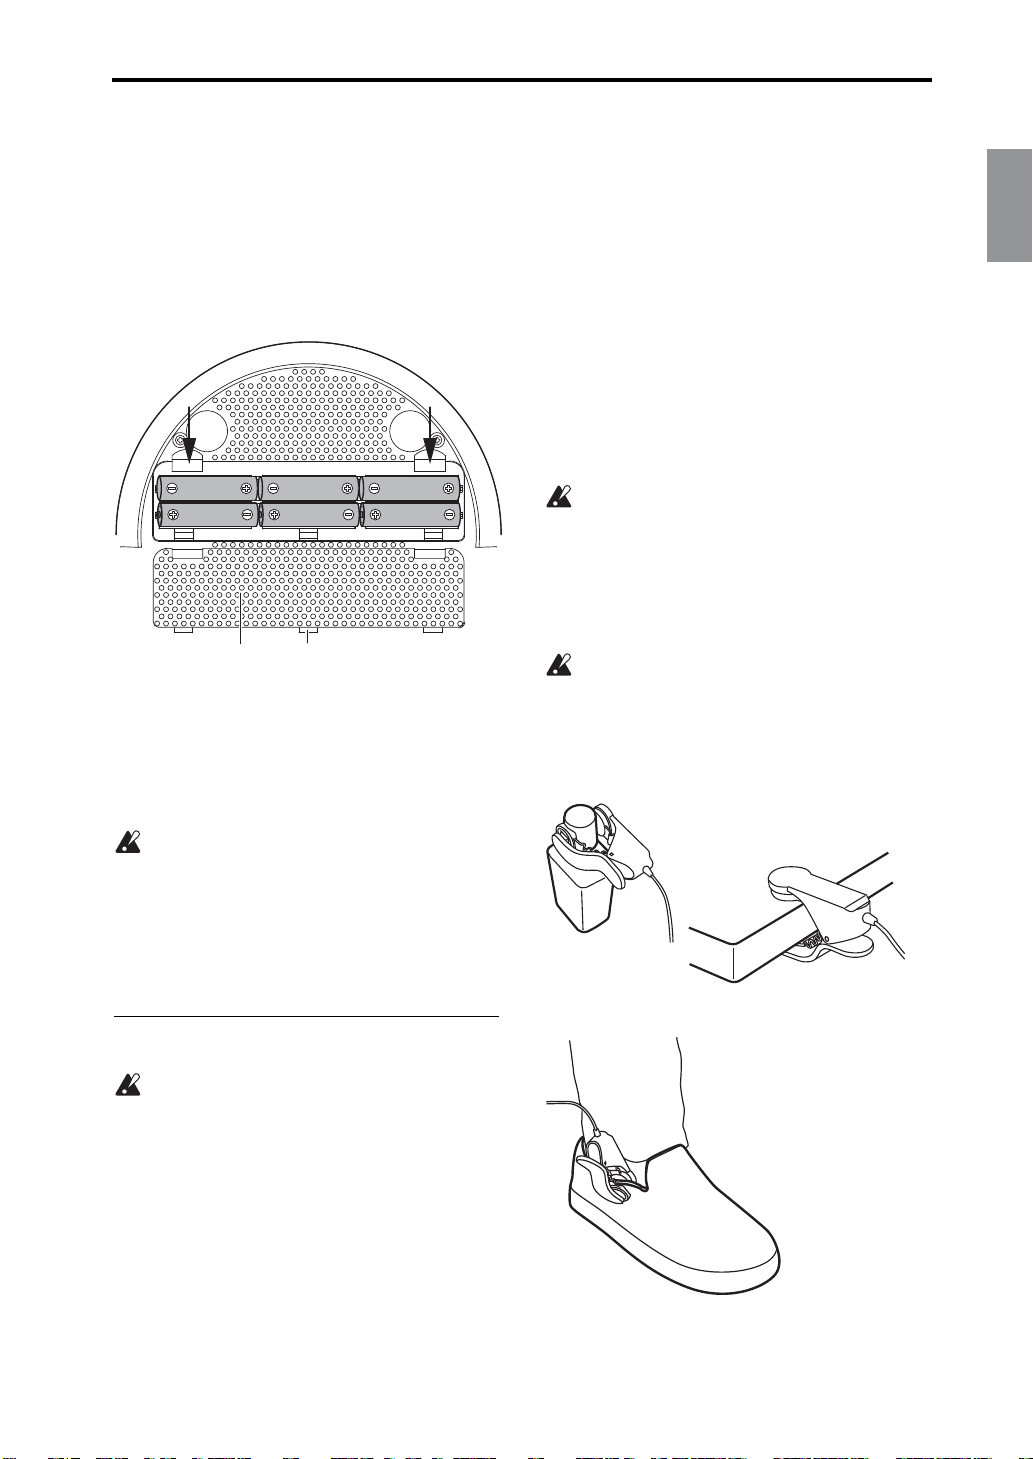
Using batteries
Detach the battery cover located on the bottom of
the WAVEDRUM Mini, and install six nickel-metal
hydride batteries, making sure that they are oriented in the correct polarity.
note:
Batteries are not included. You'll need to
obtain them separately.
Disconnect the AC Adapter's DC plug before
you install or replace the batteries.
Do not mix charged batteries with exhausted
batteries, and do not mix batteries of different
types.
Page 9
FrançaisDeutsch
EnglishVoice Name
1.
To open the battery cover, lightly press and lift up
the latches indicated by the arrows in the illustration.
2.
Insert six AA nickel-metal hydride batteries.
Take care that the polarity (+ and - indication) of
each battery is correct.
3.
Align the tabs of the battery cover, and close it.
Press down on the latches indicated by the
arrows until the cover clicks securely closed.
Battery cover
Tab
Replacing the batteries
When the batteries run low, the battery indicator
will blink. The WAVEDRUM Mini will continue
functioning for a time, but you should replace the
batteries as soon as possible.
Batteries that have become unusable should be
removed immediately. Leaving dead batteries
in the unit may cause malfunctions (e.g., electrolyte leakage from the batteries). You should
also remove the batteries if you won't be using
the unit for an extended period of time.
Getting ready to play
Attaching the included clip to an object, or
detaching it
By attaching the WAVEDRUM Mini's clip to a
nearby object that emits sound when you strike it,
you can transform that object into a Wavedrum. The
tonal character will vary depending on the object, so
we suggest that you try out various types of objects.
• Lower the VOLUME knob before you attach or
detach the clip.
• Secure the clip to the object so that it does not
come off while you perform.
• Do not pull on the jaws of the clip when detaching it from the object. Doing so may damage the
clip or the object. Be sure to open the clip when
detaching it.
Although the clip can be attached to a wide
variety of objects, you should be aware of your
surroundings, and refrain from attaching it in
ways that would inconvenience others. Since it
is possible for the clip to deform or scratch the
object where it's attached, please use caution
when attaching it.
If the clip is left attached to an object for an
extended period of time, it may leave a mark
on the object when removed. Depending on
aging or the state of the object's surface finish,
damage may occur regardless of the length of
time.
Location
Place the WAVEDRUM Mini on a flat and stable location. If you're performing in a seated
position, you can use the included strap to fasten it to your leg. When using the clip, fasten it
securely to the object, ensuring that it's in a stable location like the WAVEDRUM Mini itself.
You should neatly bundle the power cable and
audio cable so that they don't catch on anything.
9
Page 10

Getting ready to play
Slits Strap
A
B
B
Attaching and detaching the included strap
You can use the included strap to attach the WAVEDRUM Mini to your leg for performances.
Pass the strap through the slits on the bottom of
the WAVEDRUM Mini as shown in the illustration below. If you fail to do this correctly,
the strap may slip off or come loose.
The buckle is made of plastic, and should be
inspected before use to make sure that it is not
cracked or damaged. Accidents may occur if
you use the strap with a cracked or damaged
buckle.
1.
Pass the strap through the slits as shown in the
illustration below.
3.
Place the WAVEDRUM Mini on your leg as
shown in the illustration, and secure it with the
strap. Pass the strap around your leg and latch the
buckle. Pull end 'B' of the strap (shown in the
previous illustration) to securely fasten the
WAVEDRUM Mini to your leg.
2.
Pass the strap through the buckle as shown in the
illustration.
To tighten, pull end 'B' of the strap in parallel with
the buckle.
To loosen, push portion 'A' of the buckle upward
in the direction of the arrow.
10
Page 11
FrançaisDeutsch
EnglishVoice Name
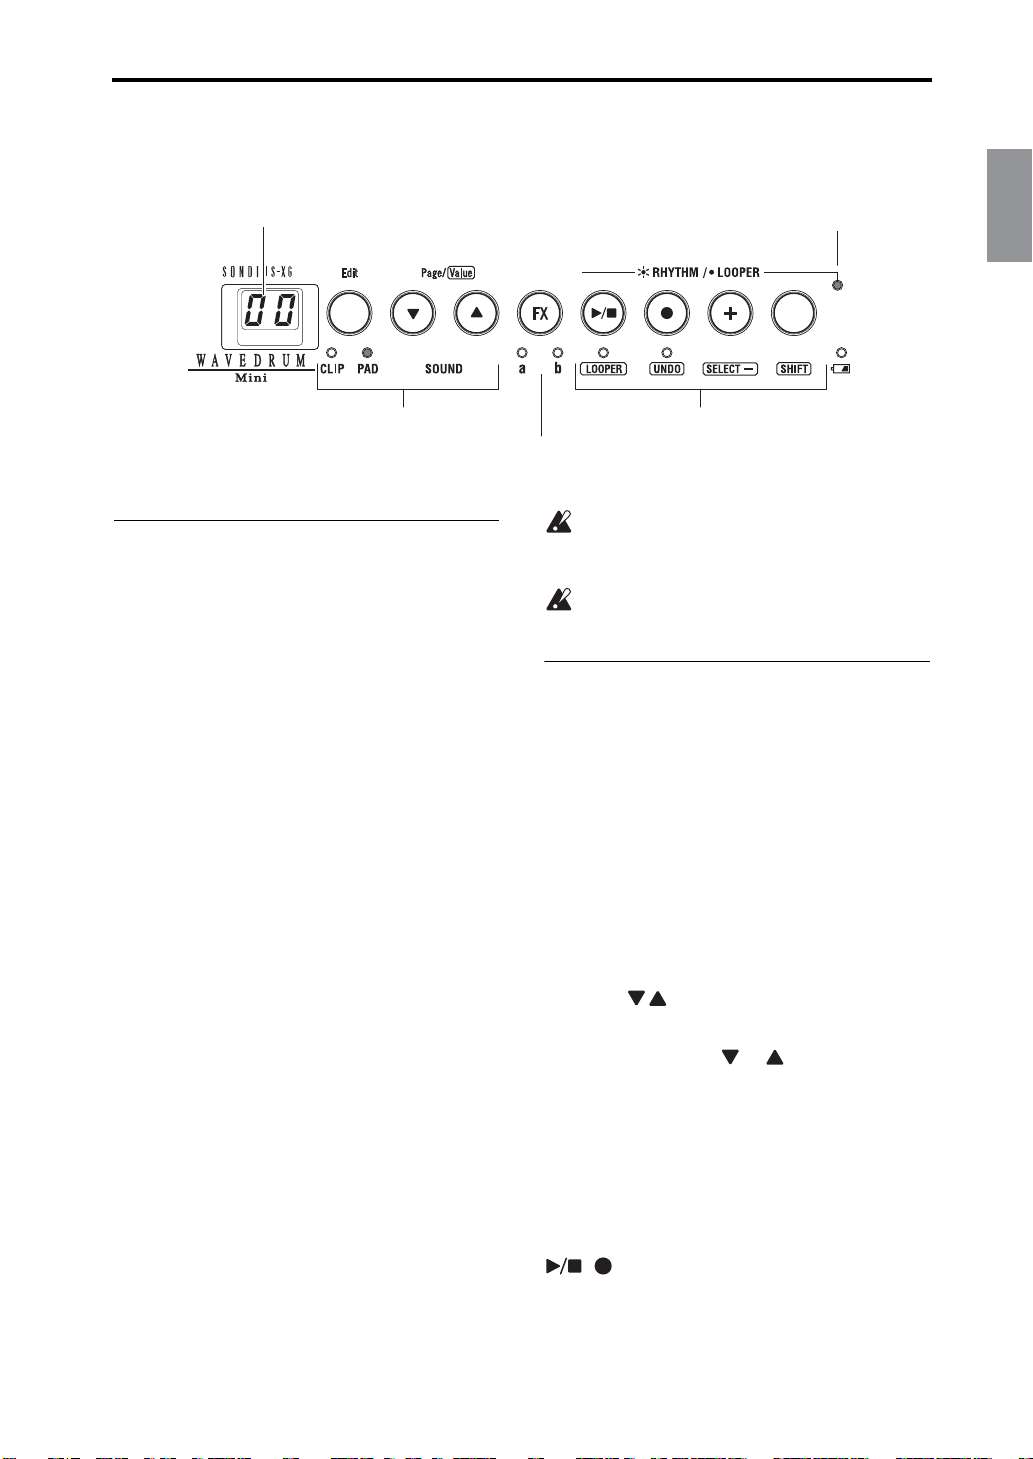
Performing
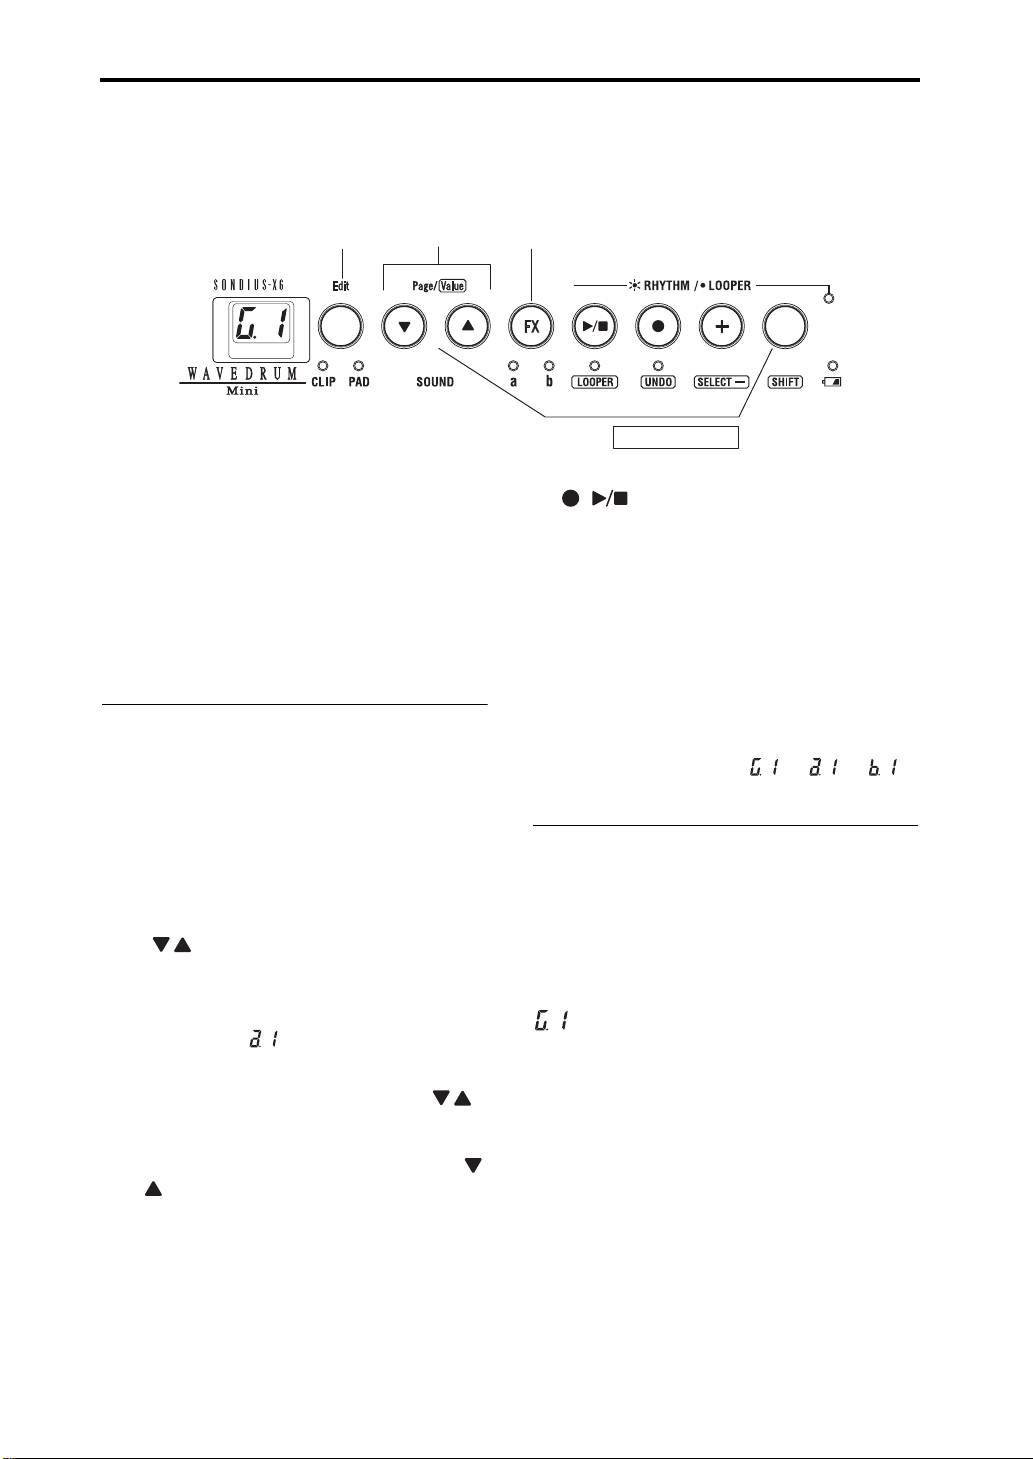
Display Rhythm pattern / Looper
selection indicator
Sound select
Rhythm pattern /
Looper transport
Effect select
Performance techniques
The WAVEDRUM Mini lets you independently
assign different sounds to the pad and the clip for
performances.
Since the tone will change sensitively and diversely
in response to your playing technique and to subtle
movements of your fingers and palm, you'll have a
high degree of performance freedom with a wide
range of sonic variation.
The sounds range from simulations of typical percussion instruments to sounds in where the pitch
will differ for each strike, and you can even use
scale settings to perform phrases. In addition to the
output volume being controlled by the force of your
strike, the output of some sounds will also be
affected by the tone of your strike, whether it's a soft
(warm) tone or a hard (sharp) tone. Although different materials will produce different results, striking
near the center of the surface will tend to produce a
softer tone, while striking near the edge will produce a harder tone. Again, although there will be
differences between users, striking the surface with
the pad of your fingertip as though you were pressing it will produce a softer sound, while slapping the
surface with all your fingers will tend to produce a
harder sound. The open and slap performance techniques used on a conga or djembe will produce similar tonal changes.
For the clip, you can try attaching it to different
materials, and enjoy the resulting differences in
strike responses and tonal changes.
For details on the sounds, refer to “Sounds” (See
page 68).
Performing
Do not strike any part of the WAVEDRUM
Mini other than its pad; e.g., do not strike the
control panel or speaker.
Do not strike the clip itself.
Selecting sounds
Here's how to select from the 100 different sounds.
1.
To choose whether you'll be selecting a sound for
the clip or pad, press the CLIP/PAD button that's
located to the left side of the control panel. This
selection will alternate each time you press the
button. The indicator of the selected side (clip or
pad) will light.
You won't be able to switch sounds if the CLIP,
PAD, 'a', or 'b' indicators are blinking (Edit mode).
In this case, press the CLIP/PAD button to make
the indicator light up.
2.
Use the buttons to select the desired sound.
The display will indicate the sound number.
If you hold down the or button, the number
will change consecutively.
Strike the pad or the object to where the clip is
attached, and listen to the sound you've selected.
note:
Immediately after the power is turned on,
sound 00 will be selected for both the pad and the
clip.
note:
You can also exit Edit mode by pressing the
, , or + buttons as well as the CLIP/PAD
button.
11
Page 12
Performing
Using effects
Here's how to apply an effect to the sound. You can
use either effect 'a' or b', but not both.
• Press the FX button. Each time you press it, the
effect setting will cycle through effect 'a' (the 'a'
indicator lit), effect 'b' (the 'b' indicator lit), and
off (both indicators 'a' and 'b' unlit).
You won't be able to switch effects if the CLIP,
PAD, 'a', or 'b' indicators are blinking (Edit mode).
In this case, press the CLIP/PAD button to make the
indicator light up.
note:
You can assign different effect types to effects
'a' and 'b'. You can also adjust settings such as the
amount of effect that will be applied. For details on
these settings, refer to “Editing the settings” (See
page 14).
note:
Immediately after the power is turned on, the
effect will be off. 'a' and 'b' will remember the settings that you had last specified before turning the
power off.
note:
You can also exit Edit mode by pressing the
, , or + buttons as well as the CLIP/PAD
button.
Playing and overdubbing rhythm patterns
You can enjoy jamming along with rhythm patterns
in a variety of genres. You can also overdub your
own performance onto these rhythm patterns.
Playing back a rhythm pattern
1.
While holding down the SHIFT button, press the
button to make the rhythm pattern / looper
select indication (located in the upper right of the
operating panel) light up.
This selects the rhythm pattern function.
2.
Press the button to start playback (the indicator will light).
3.
Press the button to stop playback (the indicator will go dark).
4.
You can choose from 100 different rhythm patterns. To switch rhythm patterns, press the + button. The next rhythm pattern (i.e., the pattern of
the following number) will be selected. If you
hold down the SHIFT button and press the + button, the previous rhythm pattern will be selected.
By holding down the + button, you can step
through the rhythm patterns.
The pattern number in the display will blink while
the rhythm pattern is switching. Once the change
has occurred, the display will revert to indicating
the sound number.
For details on each rhythm pattern, refer to
“Rhythm Patterns” (See page 69).
note:
You can adjust the volume of the rhythm pat-
tern. Refer to “Editing the settings” (See page 14).
note:
You can't change the playback speed of the
rhythm pattern.
Overdubbing your own performance onto a
rhythm pattern
1.
Select a rhythm pattern, and play it back. See
“Playing back a rhythm pattern.”
2.
Select the sound that you want to overdub. See
“Selecting sounds.”
3.
Press the button to start recording (the indicator will light up).
4.
Strike the pad or the object where the clip is
attached; your performance will be recorded.
5.
Press the button or the button to stop
recording.
If you press the button, recording will end and
playback will continue. If you press the button, recording will end and playback will stop.
6.
You can repeat the above steps to overdub your
performance as many times as you wish.
note:
If you want to erase your recorded performance and re-record, you can use the Undo/Redo
function. Refer to “Undo and Redo” (See page 13).
note:
If you press the button from the stopped
condition, playback and recording will start simultaneously.
The recorded performance will disappear when
you select another rhythm pattern, switch to the
Looper function, or turn off the power. Immediately after the power is turned on, the original
rhythm pattern 00 will be selected.
During playback and recording, the pad sensitivity will automatically be lowered to prevent
acoustic feedback.
7.
You can mute (or unmute) the sound of the
rhythm pattern if desired. If you mute the rhythm
pattern, you'll hear only the performance that you
overdubbed.
Hold down the SHIFT button and press the FX
button. Each time you do so, muting will turn on/
12
Page 13
Performing
FrançaisDeutsch
EnglishVoice Name
off. When muted, the rhythm pattern / looper
select indicator will blink.
note:
If you select another rhythm pattern (or switch
to the Looper) while muted, muting will automatically be cancelled.
Overdubbing phrases (Looper)
You can create phrases by overdubbing the sound of
your own performance. The maximum length of the
phrase is 25 seconds.
First recording pass
1.
Hold down the SHIFT button and press the
button to make the rhythm pattern / looper select
indicator (at the upper right of the operating
panel) go dark.
The Looper function is now selected.
2.
Press the button. The WAVEDRUM Mini will
be in record-ready mode (the and buttons will blink).
3.
Start performing by striking the pad or the object
to where the clip is attached. Recording will start
the instant the first sound is input to the pad or
clip.
Alternatively, you can press the button to
start recording.
The display will indicate the remaining number of
seconds available for recording.
4.
To stop recording, press one of the four buttons
to the right ( – SHIFT); recording will stop,
and the recorded phrase will play back repeatedly.
The location where you stopped recording on this
first pass will be the end of the loop; i.e., this
determines the length of the phrase.
4.
When you've finished performing, press the
or button.
If you press the button, recording will end and
playback will continue. If you press the button, recording will end and playback will stop.
note:
If you decide to cancel the recorded performance and re-record, you can use Undo/Redo. Refer
to “Undo and Redo.”
note:
If you press the button from the stopped
status, playback and recording will start simultaneously.
The recorded performance will disappear when
you switch to the Rhythm Pattern function, or
when you turn off the power.
During playback and recording, the pad sensitivity will automatically be lowered to prevent
acoustic feedback.
Undo and Redo
Undo
takes you back to the state of the previous
recording.
• During playback, while stopped, or during
recording, hold down the SHIFT button and
press the button.
note:
If you Undo while recording, you won't be
able to Redo. You can't Undo while recording the
first pass of the Looper.
Redo
takes you from the state following Undo back
to the last-recorded state.
• During playback or while stopped, hold down the
SHIFT button and press the button.
Second and subsequent recording passes
1.
Press the button to play back the Looper
(the indicator will light up).
As desired, select the sound that you want to overdub.
2.
Press the button. Recording will start (the
indicator will light up).
3.
Strike the pad or the object where the clip is
attached; your performance will be recorded
(overdubbed).
13
Page 14
Editing the settings
Edit page
select
Edit select (press for
two seconds)
Numeric input
Edit select (press for two
seconds) / Page select
Editing the settings
The WAVEDRUM Mini lets you adjust the volume
of the pad, clip, and rhythm pattern.
For some sounds, you can change the pitch or transposition.
You can also change the effect type for effects 'a'
and 'b', and adjust the effect.
These types of adjustments are referred to as “editing.”
Editing procedure
1.
Hold down the Edit (CLIP/PAD) button for
approximately two seconds.
The two indicators below the button will blink,
and the display will indicate an edit page. If you're
editing an effect, the indicators below the FX button will also blink.
2.
To select the parameter that you want to edit, use
the buttons to switch between edit pages.
For more about the edit pages and their parameters, refer to “Parameter list.”
For example if you want to edit the effect type for
effect 'a', choose (effect 'a': Type select).
3.
Edit the value.
Hold down the SHIFT button, and use the
buttons to change the value. The value will appear
in the display when you press the SHIFT button;
you'll see this value change when you press the
or button. If you hold down a button, the value
will change successively.
4.
When you've finished editing, press the Edit
(CLIP/PAD) button to exit the edit pages.
note:
The edited content is automatically saved
when you exit the edit pages.
note:
You can also exit the edit pages by pressing
the , , or + button instead of the Edit (CLIP/
PAD) button.
note:
If you want to edit the Transpose or Scale setting, you must first select a sound where those
parameters are available, and then enter the edit
pages. Refer to “Sounds” (See page 68).
note:
You can't enter the edit pages while the Rhythm
Pattern or the Looper is playing or recording.
note:
You can also enter the edit pages by holding
down the FX button for two seconds or longer. Each
time you press the FX button, you'll step through
the edit pages in the order of → → .
Parameter list
The WAVEDRUM Mini lets you edit the following
parameters.
Global parameters
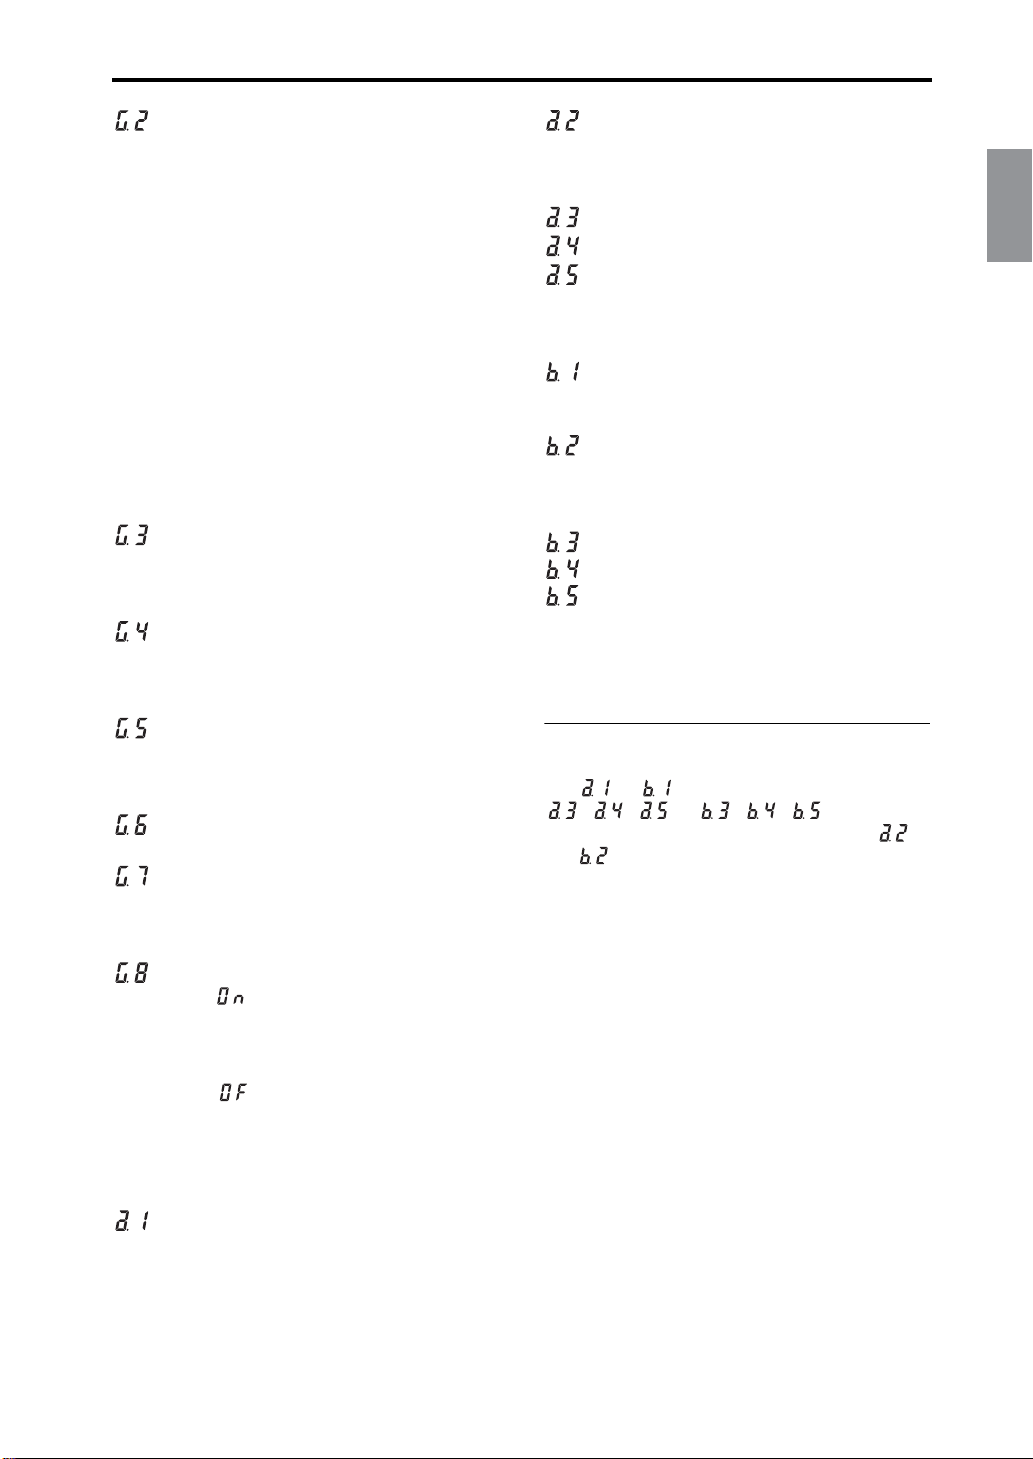
Edit page no.: Parameter name [Default value]
: Transpose [0...12]
Specifies the key in semitone steps.
Transpose can be edited only for some of the
sounds. A value of 0 corresponds to C. Increasing
the value will raise the pitch in semitone steps.
However in some cases, incrementing this value
will make the pitch “wrap around” to the octave
below; for example at the value 6 (F#), the pitch
might be the F# an octave below, with subsequent
increments once again raising the pitch. This will
differ for each sound.
The right column of the table in “Sounds” (See page
68) indicates the value where the pitch of a transposable sound will wrap around.
14
Page 15
Editing the settings
FrançaisDeutsch
EnglishVoice Name
: Scale (temperament) [0...6]
Some sounds allow you to play phrases in a scale.
Some phrases will sound randomly with a different
pitch of the scale being heard each time you strike,
while for other phrases the pitch is determined by
the force of your strike. The scale can be specified
only for some of the sounds.
The right column of the table in “Sounds” (See page
68) contains a “O” for sounds that let you specify
the scale.
You can choose from the following scales.
0. Major, 1. Major Pentatonic, 2. Minor Pentatonic,
3. Minor, 4. India (Hanuma Todi), 5. Gamelan,
6. Tonic
With the 6. Tonic setting, the sound will be at the
pitch specified by the “Transpose” setting. For other
settings, refer to “Scale” (See page 69).
: Pad level [0...99]
Adjusts the volume of the sound output by the pad.
Use this to adjust the volume balance between the
pad and the clip.
: Clip level [0...99]
Adjusts the volume of the sound output by the clip.
Use this to adjust the volume balance between the
pad and the clip.
: Clip gain [0...99]
Adjusts the level of the input signal from the clip.
Adjust this as appropriate for the volume produced
by the object where the clip is attached.
: Rhythm level [0...99]
Adjusts the volume of the rhythm pattern.
: Speaker level [0...99]
Adjusts the output volume of the speaker. This setting does not affect the OUTPUT or headphone
jacks.
: Auto power-off [Off, On]
With the On ( ) setting, the auto power-off function is enabled; the WAVEDRUM Mini will automatically turn off the power approximately four
hours after the last panel operation was performed.
With the Off ( ) setting, the auto power-off function is disabled.
Effect parameters
Edit page no.: Parameter name [Default value]
: Effect 'a': Type select [0...9]
Selects the effect type for effect 'a'. For the available
effect types, refer to “Effect type list” below.
: Effect 'a': Dry/wet [0...99]
Adjusts the balance between the effect sound and
direct sound. With a setting of 0, only the direct
sound will be heard.
: Effect 'a': Parameter 1 [min...max]
: Effect 'a': Parameter 2 [min...max]
: Effect 'a': Parameter 3 [min...max]
These parameters edit the effect. The three parameters will differ depending on the effect type. Refer
to “Effect type list” below.
: Effect 'b': Type select [0...9]
Selects the effect type for effect 'b'. For the available
effect types, refer to “Effect type list” below.
: Effect 'b': Dry/wet [0...99]
Adjusts the balance between the effect sound and
direct sound. With a setting of 0, only the direct
sound will be heard.
: Effect 'b': Parameter 1 [min...max]
: Effect 'b': Parameter 2 [min...max]
: Effect 'b': Parameter 3 [min...max]
These parameters edit the effect. The three parameters will differ depending on the effect type. Refer
to “Effect type list” below.
Effect type list
Use or to select an effect type, and use
, , or , , respectively
to edit the parameters. For every effect type,
and adjust the “dry/wet” balance.
Effect type 0: Reverb
This adds reverberation to the sound.
Parameter 1: Type [0...10]
Selects the type of reverb.
0: Off, 1: Slap, 2: Spring1, 3: Spring2, 4: Plate,
5: Garage, 6: Chamber, 7: Canyon, 8: Room,
9: Studio, 10: Hall
Parameter 2: Mix [0...99]
Adjusts the mix amount of the reverb sound.
Parameter 3: Depth [0...99]
Adjusts the duration of the reverb.
Effect type 1: Multi Tap Delay
This provides a multi-tap delay with three taps.
Delay creates an “echo-like” effect.
Parameter 1: Mode [0...4]
This specifies the combination of heads to use.
15
Page 16

Editing the settings
0: Conventional echo.
1: Plays delayed sound in the rhythm “ta ta ta (rest)”
2: Plays delayed sound in the rhythm “ta (rest) ta ta”
3: Plays delayed sound in the rhythm “ta ta (rest) ta”
4: Plays delayed sound in the rhythm “ta ta ta ta”
Parameter 2: Time [0...99]
Adjusts the delay time.
Parameter 3: Feedback [0...99]
Adjusts the amount of feedback.
Effect type 2: Delay + Reverb
This is a combination of delay and reverb.
Parameter 1: Time [0...99]
Adjusts the delay time of the delay.
Parameter 2: Feedback [0...99]
Adjusts the amount of feedback for the delay.
Parameter 3: Mix [0...99]
Adjusts the mix amount of the reverb.
Effect type 3: Reverb + Phaser
This is a combination of reverb and phaser, which
produces a twisting sound like that of a rotary
speaker.
Parameter 1: Mix [0...99]
Adjusts the mix amount of the reverb.
Parameter 2: Depth [0...99]
Adjusts the phaser's modulation depth.
Parameter 3: Speed [0...99]
Adjusts the phaser's modulation speed.
Effect type 4: Reverb + Flanger
This is a combination of reverb and flanger, which
produces a swooshing sound reminiscent of a jet
airplane taking off and landing.
Parameter 1: Mix [0...99]
Adjusts the mix amount of the reverb.
Parameter 2: Depth [0...99]
Adjusts the flanger's modulation depth.
Parameter 3: Speed [0...99]
Adjusts the flanger's modulation speed.
Effect type 5: Pitch Shifter
This effect generates harmony by adding a pitchshifted sound.
Parameter 1: Pitch [0...48]
Adjusts the pitch in semitone steps.
Parameter 2: Tracking [0...99]
Adjusts the tracking characteristics of the pitch
shifter. A shorter setting is appropriate when the
Pitch is set near 24, and a longer setting is appropriate when the Pitch is set at a more distant value.
Parameter 3: Delay Time [0...99]
Adjusts the delay time of the mixed sound.
Effect type 6: Random Step Filter
This effect applies a filter with a randomly changing
frequency.
Parameter 1: Speed [0...99]
Adjusts the speed.
Parameter 2: Depth [0...99]
Adjusts the depth of modulation.
Parameter 3: Resonance [0...99]
Adjusts the depth of resonance.
Effect type 7: Sweep Modulation Delay +
Flanger
This is a combination of a sweep modulation delay
that applies modulation according to the dynamics
of the input sound, and a flanger.
Parameter 1: Time [0...99]
Adjusts the sweep time of the sweep modulation
delay.
Parameter 2: Type [0...1]
Specifies the sweep direction of the sweep modulation delay.
Parameter 3: Mix [0...99]
Adjusts the mix amount of the flanger.
Effect type 8: Tube OD + Flanger
This is a combination of an overdrive that distorts
the sound, and a flanger.
Parameter 1: Drive [0...99]
Adjusts the distortion (boost) of the overdrive.
Parameter 2: Speed [0...99]
Adjusts the flanger's modulation speed.
Parameter 3: Mix [0...99]
Adjusts the mix amount of the flanger.
Effect type 9: Random Step Filter + Delay
This is a combination of a random step filter and a
delay.
Parameter 1: Speed [0...99]
Adjusts the speed of the random step filter.
Parameter 2: Depth [0...99]
Adjusts the modulation depth of the random step filter.
Parameter 3: Time [0...99]
Adjusts the delay time.
16
Page 17

FrançaisDeutsch
EnglishVoice Name
Appendix
Appendix
Restoring the factory settings
Here's how to return the WAVEDRUM Mini's
global settings and effect settings to their factory-set
condition.
1.
While holding down the button, press the
power switch to turn on the power.
The display will blink “PL” and the button
indicator will blink.
2.
Hold down the button for approximately two
seconds to execute the factory reset.
If you decide to cancel without executing, press
the power switch to turn off the power.
Never turn off the power while data is being
loaded. Doing so may damage the data.
3.
When you execute this operation, the WAVEDRUM Mini will be returned to its factory-set
condition, and will be in the same state as after a
normal power-on.
Error messages
The WAVEDRUM Mini automatically performs an
internal check when its power is turned on. If a
problem is detected, one of the following error messages will be displayed. Take the appropriate action
described below.
E. 0
: The user data has been lost. Initialize the data
as described in “Restoring the factory settings”
above.
E. 1
: A system error has occurred. Immediately stop
using the WAVEDRUM Mini, and contact your
nearby Korg dealer.
Troubleshooting
If you suspect a malfunction, check the following
points first. If this does not resolve the problem,
contact your nearby Korg dealer.
Power won't turn on
• Make sure that the AC Adapter is correctly connected to the WAVEDRUM Mini and to an AC
outlet.
• If you're using batteries, make sure that they are
inserted correctly.
No sound from the speaker
• Turn the VOLUME knob toward the right.
• No sound will be output from the speaker if a
cable is connected to the headphone jack or the
OUTPUT jack.
G. 7
• Could the global parameter
set to 0?
Can't select sounds or effects
Could the CLIP or PAD indicators of the buttons on
the left of the control panel be blinking?
Press one of the CLIP/PAD, , , or + buttons
to make the indicator change from blinking to
steadily lit.
Rhythm pattern doesn't sound
• Could the rhythm pattern / looper select indicator
(on the upper right side of the panel) be blinking?
If it's blinking, the rhythm pattern is muted. To
cancel muting, hold down the SHIFT button and
press the FX button.
• Could the global parameter
level be set to 0?
Speaker Level be
G. 6
rhythm pattern
Can't operate the buttons
The pattern number on the display will blink while
the rhythm pattern is being switched. During this
time, you won't be able to switch sounds or start/
stop the rhythm pattern.
17
Page 18

Appendix
The sound is different than another WAVEDRUM Mini
As with many other instruments, each WAVEDRUM Mini will sound slightly different. This is
due to many factors, such as the environment where
it's being played and how it has been maintained.
This means that even if multiple WAVEDRUM
Mini units are set to the same program and the same
settings, they might not produce the identical sound
when played. This is an example of how although
the WAVEDRUM Mini is an electronic instrument,
it also has some characteristics of an acoustic instrument.
Feedback occurs
Consider using the equalizer and limiter of your PA
system to suppress feedback and protect your amps
and speakers.
See page 5
No response when you press the pad
Unlike the Wavedrum, the WAVEDRUM Mini does
not provide the Pressure functionality that lets you
modify the sound by pressing the pad.
Specifications
Dynamic Percussion Synthesizer
Sounds:
Effects:
Rhythm patterns:
patterns)
Loop:
of phrase)
Output jacks:
Headphones (stereo mini-phone jack)
Input jack:
Amp output / speaker:
Display:
Sampling frequency:
A/D, D/A conversion:
Power supply:
AA nickel-metal hydride batteries
Battery life:
nickel-metal hydride batteries (1900 mAh)
* Battery life will vary depending on the batteries
used and the conditions of use.
Power consumption:
Wei ght:
Dimensions (W x D x H):
8.50
Operating temperature:
condensing)
Included items:
(DC9V, ), Sensor clip, Strap
100
10
100 (user can overdub onto the
Maximum 25 seconds (from beginning to end
OUTPUT (monaural phone jack)
CLIP connection jack
2 character, 7-segment LED
Included DC9V AC Adapter, or six
Approximately 4 hours when using
1.0 kg / 2.20 Ibs. (without batteries)
" x
8.50
" x
2.64
"
Owner's manual, AC Adapter
1.3 W
48 kHz
24-bit
7.5 W
216 x 216 x 67 mm /
0 – +40 degrees C (non-
18
* Specifications and appearance are subject to
change without notice for improvement.
Page 19

FrançaisDeutsch
EnglishVoice Name
Sommaire
Précautions ......................................................20
Précautions lors de l’utilisation ........................20
Introduction ...............................................21
Caractéristiques principales ..............................21
Présentation du WAVEDRUM Mini ..............22
Préparations ...............................................23
Connexion de la pince au WAVEDRUM Mini .....23
Connexion à une prise électrique .....................23
Mise sous tension .............................................23
Réglage du volume ..........................................24
Mise hors tension .............................................24
Sélectionner le dispositif de sortie audio ..........24
Alimentation par piles ......................................24
Emplacement ...................................................25
Jeu ..............................................................27
Techniques de jeu ............................................27
Sélection de sons ..............................................27
Utilisation des effets ........................................ 28
Ecouter et accompagner des motifs rythmiques
Enregistrement de plusieurs parties (Looper) .. 29
.28
Changer les réglages .................................. 30
Procédure d’édition .........................................30
Liste de paramètres ......................................... 30
Liste des types d’effet ...................................... 31
Appendice ..................................................33
Rétablissement des réglages d’usine ...............33
Messages d’erreur ........................................... 33
Dépannage ...................................................... 33
Fiche technique ...............................................34
Voice Name List .......................................... 68
Sounds ............................................................. 68
Effects .............................................................. 69
Rhythm Patterns ............................................. 69
19
Page 20

0
Nous vous remercions d’avoir choisi le synthétiseur
dynamique de percussion Korg WAVEDRUM Mini.
Afin de pouvoir exploiter au mieux toutes les possibilités offertes par l’instrument, veuillez lire attentivement ce manuel.
Précautions
Emplacement
L’utilisation de cet instrument dans les endroits suivants peut en entraîner le mauvais fonctionnement.
• En plein soleil
• Endroits très chauds ou très humides
• Endroits sales ou fort poussiéreux
• Endroits soumis à de fortes vibrations
• A proximité de champs magnétiques
Alimentation
Branchez l’adaptateur secteur mentionné à une prise
secteur de tension appropriée. Evitez de brancher
l’adaptateur à une prise de courant dont la tension ne
correspond pas à celle pour laquelle l’appareil est
conçu.
Veillez à ne pas laisser tomber des objets métalliques dans le boîtier (trombones, par ex.). Si cela
se produit, débranchez l’alimentation de la prise de
courant et contactez votre revendeur korg le plus
proche ou la surface où vous avez acheté l’instrument.
Note concernant les dispositions
(Seulement EU)
Quand un symbole avec une poubelle barrée d’une croix apparait sur le produit, le
mode d’emploi, les piles ou le pack de
piles, cela signifie que ce produit, manuel
ou piles doit être déposé chez un représent-
ant compétent, et non pas dans une
poubelle ou toute autre déchetterie conventionnelle. Disposer de cette manière, de prévenir les
dommages pour la santé humaine et les dommages
potentiels pour l'environnement. La bonne méthode
d'élimination dépendra des lois et règlements applicables dans votre localité, s’il vous plaît, contactez
votre organisme administratif pour plus de détails.
Si la pile contient des métaux lourds au-delà du
seuil réglementé, un symbole chimique est affiché
en dessous du symbole de la poubelle barrée d’une
croix sur la pile ou le pack de piles.
Interférences avec d’autres appareils électriques
Les postes de radio et de télévision situés à proximité
peuvent par conséquent souffrir d’interférences à la
réception. Veuillez dès lors faire fonctionner cet appareil à une distance raisonnable de postes de radio et de
télévision.
Maniement
Pour éviter de les endommager, manipulez les commandes et les boutons de cet instrument avec soin.
Entretien
Lorsque l’instrument se salit, nettoyez-le avec un
chiffon propre et sec. Ne vous servez pas d’agents de
nettoyage liquides tels que du benzène ou du diluant,
voire des produits inflammables.
Conservez ce manuel
Après avoir lu ce manuel, veuillez le conserver soigneusement pour toute référence ultérieure.
Evitez toute intrusion d’objets ou de liquide
Ne placez jamais de récipient contenant du liquide
près de l’instrument. Si le liquide se renverse ou
coule, il risque de provoquer des dommages, un
court-circuit ou une électrocution.
Précautions lors de l’utilisation
Le haut-parleur contient un aimant
Le haut-parleur intégré dans cet instrument contient
un aimant. Ne le placez pas à proximité de cartes ou
de matériel médical pouvant être affecté par le champ
magnétique.
Evitez de poser et de laisser des objets lourds
sur le pad.
Détachez toujours la pince immédiatement
après son utilisation.
Si vous laissez un objet lourd sur le pad du WAVEDRUM Mini, cela risque de laisser une marque sur la
surface du pad et sur l’objet. Evitez de laisser des
objets lourds sur le pad ou de laisser le WAVEDRUM Mini à l’envers durant une période prolongée.
De même, si vous ne détachez pas la pince immédiatement après son utilisation, elle risque de laisser une
marque.
Des changements dus au vieillissement ou à l’état de
la surface peuvent également entraîner l’apparition de
20
Page 21

Introduction
FrançaisDeutsch
EnglishVoice Name
traces, quelle que soit la durée pendant laquelle le
WAVEDRUM Mini est en contact avec l’objet.
Effet larsen
Le WAVEDRUM Mini utilise un capteur pour détecter les vibrations d’une frappe au niveau du pad ou de
la pince. Il peut arriver que le capteur réagisse non
seulement aux frappes mais aussi aux vibrations
générées par le volume élevé d’un haut-parleur et les
capte comme si ces signaux passaient par un micro.
Quand vous jouez sur le WAVEDRUM Mini en écoutant le son à travers un grand système de sonorisation,
le signal du WAVEDRUM Mini produit par les
enceintes peut être capté directement depuis les
enceintes ou sous forme de vibrations du sol transmises par un pied. Ces vibrations sont détectées par le
capteur du WAVEDRUM Mini, ce qui produit un
effet de boucle de réinjection du signal (effet larsen)
pouvant générer un son soutenu et incontrôlable.
L’effet larsen peut endommager sérieusement les
amplificateurs et les haut-parleurs. Si vous utilisez le
WAVEDRUM Mini avec un grand système de sonori-
sation, utilisez les égaliseurs et limiteurs de la sono
pour éviter tout larsen et protéger les haut-parleurs
comme vous le feriez pour un microphone utilisé avec
un instrument acoustique ou un chanteur.
L’enregistrement avec la fonction “Looper” augmente
encore la probabilité d’un effet larsen. Réglez donc le
volume avec prudence.
Gestion des données
Des dysfonctionnements imprévisibles peuvent
entraîner une perte de données. Korg décline toute
responsabilité pour toute perte ou dommage résultant
de la perte de données.
* Ce circuit utilise des technologies de modélisation physique
brevetés par la Stanford University USA et Yamaha Corporation (http://www.sondius-xg.com).
* Tous les noms de produits et de sociétés sont des marques
commerciales ou déposées de leur détenteur respectif.
Introduction
Le WAVEDRUM Mini renouvelle entièrement le synthétiseur de percussion grâce, notamment, aux trois
caractéristiques majeures suivantes:
• Il peut être utilisé n’importe où.
• Il peut transformer n’importe quoi en Wavedrum.
• Il est facile à transporter.
Caractéristiques principales
Technologie de synthèse révolutionnaire
Les capteurs du pad et de la pince détectent le son des
frappes du musicien tandis que diverses technologies
de synthèse Wavedrum produisent des sons inégalés.
Comme le signal de sortie dépend des sons que vous
choisissez et réagit de façon extrêmement sensible et
différenciée à vos techniques de jeu et aux nuances
des mouvements de vos doigts ou de votre paume,
vous bénéficiez d’une incroyable liberté de jeu et
d’une palette illimitée de variations.
Transformez n’importe quoi en WAVEDRUM
La pince dotée d’un capteur peut être fixée à
n’importe quel objet pour le transformer en Wavedrum.
Cela vous permet d’exploiter les propriétés de différents objets et de différent matériaux comme le bois,
le métal, le verre etc. pour diversifier le timbre des
sons.
100 sons, 10 effets
Les 100 sons couvrent tous les styles, de la percussion
aux effets spéciaux. Le son final produit dépend principalement de votre technique de jeu. Vous pouvez
assigner différents sons au pad et à la pince.
A cela s’ajoutent 10 effets optimisés pour la percussion.
21
Page 22

Présentation du WAVEDRUM Mini
Panneau de
commandes
Prise de la pince
Commande VOLUME
Charge
résiduelle
des piles
Haut-parleur
Face supérieure Côté gauche Côté droit
Pad
Pince à capteur (Clip)
Prise OUTPUT
Prise casque
Interrupteur
d’alimentation
Prise DC9V
Accompagnements rythmiques
Vous pouvez vous lancer dans des sessions d’impro
en accompagnant un des 100 motifs rythmiques couvrant un large éventail de genres et de tempos.
La fonction d’enregistrement vous permet en plus de
superposer votre propre jeu à ces motifs.
Looper
La fonction “Looper” vous permet de créer des
grooves en partant de zéro.
C’est une façon idéale de réaliser vos propres motifs
et grooves.
Présentation du WAVEDRUM Mini
Haut-parleur interne et fonctionnement sur
piles
Poids plume et compact, le WAVEDRUM Mini peut
vous accompagner n’importe où. Doté d’un hautparleur interne et fonctionnant sur piles, il vous permet littéralement de larguer les amarres.
Vous pouvez utiliser la lanière fournie pour attacher le
WAVEDRUM Mini à votre pied ou à n’importe
quelle autre partie de votre corps.
22
Page 23

FrançaisDeutsch
EnglishVoice Name
Pince à capteur (Clip)
Prise CLIP
Crochet pour câble
Prise DC9V
Interrupteur d’alimentation
A une prise de courant
Adaptateur secteur (fourni)
Crochet pour câble
Préparations
Préparations
Connexion de la pince au WAVEDRUM Mini
1.
Assurez-vous que le WAVEDRUM Mini est hors
tension. (L’écran et les témoins doivent être éteints.)
2.
Branchez la pince à la prise CLIP située sur le côté
gauche du WAVEDRUM Mini.
Ne branchez rien d’autre que la pince fournie à
la prise CLIP.
3.
Pour empêcher tout débranchement accidentel de
la pince, faites passer le câble par le crochet prévu
à cet effet sur la face inférieure du WAVEDRUM
Mini.
Connexion à une prise électrique
1.
Connectez la fiche de courant continu de l’adaptateur secteur à la prise DC9V située sur le côté droit
du WAVEDRUM Mini.
2.
Branchez l’adaptateur secteur à une prise de courant.
Utilisez exclusivement l’adaptateur secteur
fourni. L’utilisation de tout autre adaptateur peut
provoquer des dysfonctionnements.
Choisissez une prise secteur de tension appropriée pour l’adaptateur.
3.
Pour empêcher tout débranchement accidentel de
l’adaptateur secteur, faites passer le câble par le
crochet prévu à cet effet sur la face inférieure du
WAVEDRUM Mini.
Mise sous tension
1.
Réglez le volume au minimum en tournant la commande VOLUME à bout de course vers la gauche.
2.
Appuyez sur l’interrupteur pour mettre l’appareil
sous tension.
23
Page 24

Préparations
Prise OUTPUT
Prise casque
Enceinte active etc.
Casque
INPUT
Réglage du volume
• Tournez la commande VOLUME vers la droite
pour augmenter le volume ou vers la gauche pour
le diminuer.
La commande VOLUME règle le volume du hautparleur interne, de la prise pour casque et de la prise
OUTPUT.
Après avoir réglé le volume à un niveau approprié,
jouez sur le WAVEDRUM Mini. Pour en savoir plus,
voyez la section “Jeu” (page 27).
Mise hors tension
Quand vous avez fini de jouer, coupez l’alimentation.
1.
Réglez le volume au minimum en tournant la commande WAVEDRUM Mini à bout de course vers la
gauche.
2.
Maintenez l’interrupteur d’alimentation enfoncé
environ une seconde: l’instrument s’éteint.
Coupure automatique d’alimentation
L’alimentation du WAVEDRUM Mini est automatiquement coupée si l’appareil reste inutilisé durant
environ 4 heures.
Si vous le souhaitez, vous pouvez désactiver cette
fonction de coupure automatique d’alimentation.
Voyez
page 30
pour en savoir plus.
Par défaut, la coupure automatique d’alimentation est
activée.
tard le soir. Insérez la fiche de votre casque dans la
prise pour casque située sur le côté droit du WAVEDRUM Mini.
Si vous utilisez un casque doté d’une fiche adaptatrice
jack 1/4
"
–mini-jack, veillez à prendre la fiche adapta-
trice en main pour la brancher ou la débrancher.
Pour protéger votre ouïe, évitez d’écouter longtemps des signaux à volume élevé quand vous
utilisez un casque.
Connexion d’un appareil audio
Branchez la prise OUTPUT du WAVEDRUM Mini à
l’entrée d’une console de mixage ou d’une enceinte
active. Le signal de sortie est mono. Quand un câble
est branché à la sortie OUTPUT, le haut-parleur
interne est coupé.
Avant de brancher quoi que ce soit, coupez l’alimentation du WAVEDRUM Mini et de l’appareil à brancher. Si vous branchez le
WAVEDRUM Mini à d’autres appareils alors
qu’il est sous tension, vous risquez d’endommager le WAVEDRUM Mini et/ou l’autre appareil,
et de provoquer des dysfonctionnements. De
plus, réglez le volume au minimum sur tous les
appareils branchés.
Sélectionner le dispositif de sortie audio
Votre matériel d’écoute peut être endommagé si
le WAVEDRUM Mini émet brutalement un
signal de sortie élevé. Cela peut également
endommager votre ouïe si vous utilisez un
casque. Soyez donc très prudent lors du réglage
du volume.
Utilisation de casque
Pour utiliser un casque, branchez-le à la prise prévue
à cet effet. Quand vous utilisez un casque, le hautparleur interne est coupé.
Vous pouvez utiliser un casque pour éviter de déranger votre entourage, notamment quand vous jouez
24
Alimentation par piles
Ouvrez le couvercle du compartiment à piles situé
sous le WAVEDRUM Mini et installez six piles au
nickel-hydrure métallique en les orientant correctement.
Remarque:
acquérir séparément.
Les piles ne sont pas fournies. Il faut les
Débranchez la fiche de l’adaptateur avant d’installer ou de remplacer les piles.
Page 25

Préparations
FrançaisDeutsch
EnglishVoice Name
Ne mélangez pas des piles partiellement utilisées
avec des piles neuves et ne mélangez pas différents types de piles.
1.
Pour ouvrir le couvercle du compartiment à piles,
appuyez légèrement sur les languettes indiquées
dans l’illustration et soulevez-les.
2.
Insérez six piles AA au nickel-hydrure métallique.
Veillez à respecter la polarité (l’orientation + et –)
des piles.
3.
Alignez les onglets du couvercle du compartiment
à piles et fermez-le. Appuyez sur les languettes
indiquées par des flèches jusqu’à ce qu’un déclic
confirme la fermeture du couvercle.
Couvercle
du compartiment à pile
Onglet
câble audio pour qu’ils ne restent accrochés
nulle part.
Attacher/détacher la pince d’un objet
En attachant la pince du WAVEDRUM Mini à un
objet proche qui émet du son quand vous le frappez,
vous pouvez transformer cet objet en Wavedrum. Le
timbre du son dépend de l’objet choisi. Nous vous
conseillons donc de faire des essais.
• Réglez la commande VOLUME au minimum
avant d’attacher ou de détacher la pince.
• Fixez la pince à l’objet de sorte qu’elle ne puisse
pas se détacher durant le jeu.
• Pour la détacher de l’objet, ne tirez pas sur les
mâchoires. Vous risqueriez d’endommager la pince
ou l’objet. Ouvrez convenablement la pince pour
la détacher.
Bien que la pince puisse être attachée à une vaste
palette d’objets, tenez compte de votre entourage
et évitez de l’attacher à des objets susceptibles
de déranger autrui. Comme il est possible que la
pince déforme ou griffe l’objet auquel vous
l’attachez, soyez prudent dans vos choix.
Si vous laissez la pince fixée longtemps à un
objet, elle risque de laisser une marque quand
vous la retirez. Selon l’âge ou l’état de la finition
de l’objet, il peut y avoir des traces quelle que
soit la durée d’utilisation de la pince.
Remplacer les piles
Quand les piles s’épuisent, le témoin de charge des
piles clignote. Le WAVEDRUM Mini continue à
fonctionner un moment mais remplacez les piles aussi
vite que possible.
Les piles épuisées doivent être retirées immédiatement. Si vous laissez des piles épuisées dans
l’appareil, vous risquez des fuites de liquide de
piles. Retirez également les piles si vous n’avez
pas l’intention d’utiliser l’instrument pendant
une période prolongée.
Emplacement
Placez le WAVEDRUM Mini sur une surface
plane et stable. Si vous jouez assis, vous pouvez
utiliser la lanière fournie pour fixer l’instrument
à votre jambe. Si vous utilisez la pince, fixez-la
convenablement à l’objet en veillant à le placer
sur un endroit stable, comme le WAVEDRUM
Mini même. Placez le câble de l’adaptateur et le
25
Page 26

Préparations
Fentes Lanière
A
B
B
Attacher/détacher la lanière
Vous pouvez utiliser la lanière fournie pour attacher le
WAVEDRUM Mini à votre jambe.
Passez la lanière par les fentes pratiquées dans la
surface inférieure du WAVEDRUM Mini,
comme le montre l’illustration ci-dessous. Si
vous n’insérez pas correctement la lanière, elle
risque de glisser ou de se défaire.
La boucle est en plastique et doit donc être examinée avant toute utilisation pour s’assurer
qu’elle n’est pas fendue ou endommagée. Si
vous utilisez la lanière avec une boucle fendue
ou endommagée, vous risquez des accidents.
1.
Passez la lanière par les fentes comme le montre
l’illustration ci-dessous.
3.
Placez le WAVEDRUM Mini sur votre jambe de la
façon illustrée et fixez-le avec la lanière. Passez la
lanière autour de votre jambe et fermez la boucle.
tirez sur l’extrémité “B” de la lanière (voyez
l’illustration précédente) pour fixer convenablement le WAVEDRUM Mini à votre jambe.
2.
Passez la lanière dans la boucle de la façon illustrée.
Pour serrer, tirez sur l’extrémité “B” de la lanière
parallèlement à la boucle.
Pour ouvrir la lanière, poussez la partie “A” de la
boucle vers le haut, dans le sens de la flèche.
26
Page 27

FrançaisDeutsch
EnglishVoice Name
Ecran Témoin RHYTHTMUS/LOOPER
Sélection de sons
Transport pour motif
rythmique/Looper
Sélection d’eets
Jeu
Jeu
Techniques de jeu
Le WAVEDRUM Mini vous permet d’assigner différents sons au pad et à la pince.
Comme le son change de façon subtile et extrêmement différenciée selon vos techniques de jeu et les
nuances des mouvements de vos doigts ou de votre
paume, vous bénéficiez d’une incroyable liberté de
jeu et d’une palette illimitée de variations sonores.
Les sons vont de simulations d’instruments de percussion typiques à des sons dont la hauteur change à
chaque frappe, vous permettant même d’utiliser des
réglages de gamme pour jouer des mélodies. Outre le
contrôle du volume par la force de la frappe, le timbre
de certains sons change également en fonction du
type de frappe: une frappe douce produit un son
chaud et une frappe forte un son tranchant. Bien que
cela dépende également du matériel, une frappe au
centre de la surface a tendance à produire un son plus
doux et une frappe au bord un son plus dur. Des
frappes du bout des doigts, comme si vous appuyiez
sur la surface produisent également un son plus doux
tandis qu’une “gifle” sur la surface avec l’ensemble
des doigts produit un son plus dur. Les techniques de
jeu utilisées sur un conga ou un djembé produisent
des changements de timbres similaires.
Attachez la pince à l’objet de votre choix et écoutez le
timbre du son et la réponse à vos frappes.
Pour en savoir plus sur les sons, voyez la section
“Sounds” (page 68).
Ne frappez pas d’autres parties que le pad du
WAVEDRUM Mini: ne frappez pas le panneau
de commandes ni le haut-parleur.
Ne frappez pas la pince même.
Sélection de sons
Vous avez le choix parmi 100 sons différents.
1.
2.
Remarque:
sélectionné pour le pad et la pince.
Remarque:
tion en appuyant sur le bouton , ou + ainsi
que sur le bouton CLIP/PAD.
Pour déterminer si le son sélectionné est destiné à
la pince ou au pad, appuyez d’abord sur le bouton
CLIP/PAD situé du côté gauche du panneau de
commandes. La destination du son change à
chaque pression. Le témoin de la destination sélectionnée (“clip” ou “pad”) s’allume.
Il est impossible de changer de son si le témoin
CLIP, PAD, [a] ou [b] clignote (mode d’édition).
Dans ce cas, appuyez sur le bouton CLIP/PAD
pour allumer le témoin.
Utilisez les boutons pour choisir le son.
L’écran affiche le numéro du son.
Si vous maintenez le bouton ou enfoncé, le
numéro change de façon continue.
Frappez sur le pad ou sur l’objet auquel la pince est
attachée pour écouter le son choisi.
A la mise sous tension, le son “00” est
Vous pouvez aussi quitter le mode d’édi-
27
Page 28

Jeu
Utilisation des effets
Vous pouvez traiter le son avec un effet. Vous avez le
choix entre l’effet [a] ou [b] mais pas les deux.
• Appuyez sur le bouton FX. Chaque pression sur ce
bouton sélectionne successivement l’effet [a]
(témoin [a] allumé), l’effet [b] (témoin [b] allumé)
et pas d’effet (témoins [a] et [b] éteints).
Il est impossible de changer d’effet si le témoin CLIP,
PAD, [a] ou [b] clignote (mode d’édition).
Dans ce cas, appuyez sur le bouton CLIP/PAD pour
allumer le témoin.
Remarque:
aux effets [a] et [b]. Vous pouvez également régler
certains paramètres comme l’intensité de l’effet appliqué. Pour en savoir plus, voyez la section “Changer
les réglages” (page 30).
Remarque:
sion, l’effet est coupé. [a] et [b] mémorisent les derniers réglages effectués avant la mise hors tension.
Remarque:
tion en appuyant sur le bouton , ou + ainsi
que sur le bouton CLIP/PAD.
Vous pouvez assigner un type différent
Immédiatement après la mise sous ten-
Vous pouvez aussi quitter le mode d’édi-
Ecouter et accompagner des motifs rythmiques
Vous pouvez accompagner des motifs rythmiques de
genres très différents. Vous pouvez même enregistrer
votre jeu et le superposer à ces motifs.
Reproduction d’un motif rythmique
1.
Maintenez le bouton SHIFT enfoncé et appuyez
sur le bouton pour allumer le témoin de
sélection RHYTHM/LOOPER (situé dans le coin
supérieur droit du panneau de commandes).
Vous sélectionnez ainsi la fonction “Rhythm”.
2.
Appuyez sur le bouton pour lancer la reproduction (le témoin s’allume).
3.
Appuyez sur le bouton pour arrêter la reproduction (le témoin s’éteint).
4.
Vous avez le choix entre 100 motifs rythmiques
différents. Pour changer de motif, appuyez sur le
bouton +. Le motif rythmique suivant (portant le
numéro suivant) est sélectionné. Si vous appuyez
sur ce bouton + en maintenant le bouton SHIFT
enfoncé, vous sélectionnez le motif précédent.
Maintenez le bouton + enfoncé pour faire défiler
les motifs rythmiques.
Le numéro de motif clignote à l’écran quand vous
changez de motif. Quand le changement est effectué, l’écran affiche à nouveau le numéro du son.
Pour en savoir plus sur les différents motifs rythmiques, voyez “Rhythm Patterns” (page 69).
Remarque:
rythmique. Pour en savoir plus, voyez la section
“Changer les réglages” (page 30).
Remarque:
reproduction du motif rythmique.
Vous pouvez régler le volume du motif
Il est impossible de changer la vitesse de
Enregistrer votre jeu superposé à un motif
rythmique
1.
Choisissez un motif rythmique et lancez la reproduction. Voyez “Reproduction d’un motif rythmique”.
2.
Choisissez le son pour votre enregistrement. Voyez
“Sélection de sons”.
3.
Appuyez sur le bouton pour lancer l’enregistrement (le témoin s’allume).
4.
Frappez le pad ou l’objet auquel la pince est fixée.
Votre jeu est enregistré.
5.
Appuyez sur le bouton ou pour arrêter
l’enregistrement.
Si vous appuyez sur le bouton , l’enregistrement
cesse et la reproduction se poursuit. Si vous
appuyez sur le bouton , l’enregistrement
cesse et la reproduction s’arrête.
6.
Vous pouvez recommencer les opérations ci-dessus pour enregistrer votre jeu autant de fois que
vous le voulez.
Remarque:
et le recommencer, vous pouvez utiliser la fonction
“Undo/Redo”. Voyez “‘Undo’ et ‘Redo’” (page 29).
Remarque:
l’arrêt, la reproduction et l’enregistrement démarrent
simultanément.
7.
Vous pouvez couper (ou réactiver) le motif rythmique. Si vous coupez le motif rythmique, vous
n’entendez plus que votre jeu enregistré.
Maintenez le bouton SHIFT enfoncé et appuyez
sur le bouton FX. Chaque pression active/désactive
Si vous voulez effacer l’enregistrement
Si vous appuyez sur le bouton à
L’enregistrement effectué est perdu quand vous
sélectionnez un autre motif rythmique, activez la
fonction “Looper” ou coupez l’alimentation. A
la mise sous tension, le motif rythmique “00” est
sélectionné.
Durant la reproduction et l’enregistrement, la
sensibilité du pad diminue automatiquement
pour éviter tout effet larsen.
28
Page 29

Jeu
FrançaisDeutsch
EnglishVoice Name
la coupure du son. Quand vous coupez le son du
motif rythmique, le témoin RHYTHM/LOOPER
clignote.
Remarque:
activez la fonction “Looper”) alors que le motif est
coupé, la coupure du son est automatiquement annulée.
Si vous changez de motif rythmique (ou
Enregistrement de plusieurs parties (Looper)
Vous pouvez également enregistrer successivement
plusieurs parties. La longueur maximum de la phrase
est de 25 secondes.
Premier enregistrement
1.
Maintenez le bouton SHIFT enfoncé et appuyez
sur le bouton pour éteindre le témoin
RHYTHM/LOOPER (coin supérieur droit du panneau de commandes).
La fonction “Looper” est active .
2.
Appuyez sur le bouton . Le WAVEDRUM Mini
est en mode d’attente d’enregistrement (les boutons et clignotent).
3.
Commencez à jouer en frappant le pad ou l’objet
auquel la pince est fixée. L’enregistrement démarre
au moment où vous frappez le pad ou l’objet.
Vous pouvez aussi appuyer sur le bouton
pour lancer l’enregistrement.
L’écran indique le nombre de secondes disponibles
pour l’enregistrement.
4.
Pour arrêter l’enregistrement, appuyez sur un des
quatre boutons à droite ( ~SHIFT). L’enregistrement s’arrête et la phrase est reproduite en
boucle.
La position où vous avez arrêté l’enregistrement
lors du premier passage constitue la fin de la
boucle et détermine la longueur de la phrase.
Enregistrement de la deuxième partie et des
suivantes
1.
Appuyez sur le bouton pour lancer la reproduction du “Looper” (le témoin s’allume).
Choisissez le son pour votre enregistrement.
2.
Appuyez sur le bouton . L’enregistrement
démarre (le témoin cesse de clignoter et reste
allumé).
3.
Frappez le pad ou l’objet auquel la pince est fixée.
Votre jeu est enregistré (et ajouté au premier enregistrement).
4.
Quand vous avez terminé, appuyez sur le bouton
ou .
Si vous appuyez sur le bouton , l’enregistrement
cesse et la reproduction se poursuit. Si vous
appuyez sur le bouton , l’enregistrement
cesse et la reproduction s’arrête.
Remarque:
et le recommencer, vous pouvez utiliser la fonction
“Undo/Redo”. Voyez “Undo et Redo”.
Remarque:
l’arrêt, la reproduction et l’enregistrement démarrent
simultanément.
Si vous voulez effacer l’enregistrement
Si vous appuyez sur le bouton à
L’enregistrement effectué est perdu quand vous
activez la fonction “Rhythm Pattern” ou coupez
l’alimentation.
Durant la reproduction et l’enregistrement, la
sensibilité du pad diminue automatiquement
pour éviter tout effet larsen.
‘Undo’ et ‘Redo’
“Undo”
ment.
• A l’arrêt ou durant la reproduction ou l’enregistre-
Remarque:
durant l’enregistrement, il est impossible de rétablir le
dernier enregistrement annulé. Vous ne pouvez pas
utiliser “Undo” lors du premier enregistrement avec
le “Looper”.
“Redo”
lée avec “Undo”.
• Durant la reproduction ou à l’arrêt, maintenez le
rétablit l’état en vigueur avant l’enregistre-
ment, maintenez le bouton SHIFT enfoncé et
appuyez sur le bouton .
Si vous utilisez la fonction “Undo”
vous permet de rétablir une opération annu-
bouton SHIFT enfoncé et appuyez sur le bouton
.
29
Page 30

Changer les réglages
Sélection de la page
d’édition
Edit (maintenez enfoncé
2 secondes)
Entrée numérique
Sélection du mode d’édition (maintenez enfoncé
2 secondes)/Sélection de page
Changer les réglages
Le WAVEDRUM Mini vous permet de régler le
volume du pad, de la pince et du motif rythmique.
Certains sons permettent d’effectuer des réglages de
hauteur ou de transposition.
Vous pouvez aussi changer le type des effets [a] et [b]
et régler l’effet.
Ces opérations sont appelées “édition”.
Procédure d’édition
1.
Maintenez le bouton Edit (CLIP/PAD) enfoncé
environ 2 secondes.
Les deux témoins sous le bouton clignotent et
l’écran affiche une page d’édition. Si vous éditez
un effet, les témoins situés sous le bouton FX clignotent également.
2.
Pour sélectionner le paramètre à éditer, utilisez les
boutons pour changer de page d’édition.
Pour en savoir plus sur les pages d’édition et leurs
paramètres, voyez la section “Liste de paramètres”.
Si, par exemple, vous voulez changer le type de
l’effet [a], sélectionnez “ ” (sélection du type
de l’effet a).
3.
Changez le réglage.
Maintenez le bouton SHIFT enfoncé et utilisez les
boutons pour changer le réglage.
La valeur apparaît à l’écran quand vous appuyez
sur le bouton SHIFT; cette valeur change quand
vous appuyez sur le bouton ou . Si vous
maintenez un des boutons enfoncé, la valeur
change de façon continue.
4.
Quand vous avez fini vos réglages, appuyez sur le
bouton Edit (CLIP/PAD) pour quitter les pages
d’édition.
Remarque:
sauvegardés quand vous quittez les pages d’édition.
Remarque:
d’édition en appuyant sur le bouton , ou + au
lieu du bouton Edit (CLIP/PAD).
Remarque:
transposition ou de gamme, il faut d’abord sélectionner
un son disposant de ces paramètres puis afficher les
pages d’édition. Voyez la section “Sounds” (page 68).
Remarque:
d’édition durant la reproduction ou l’enregistrement
en mode “Rhythm” ou “Looper”.
Remarque:
d’édition en maintenant le bouton FX enfoncé au
moins 2 secondes. Chaque pression sur le bouton FX
fait défiler les pages d’édition dans l’ordre suivant:
Vos changements sont automatiquement
Vous pouvez aussi quitter les pages
Si vous voulez changer le réglage de
Il est impossible d’accéder aux pages
Vous pouvez aussi afficher les pages
→ → .
Liste de paramètres
Le WAVEDRUM Mini vous permet d’éditer les paramètres suivants.
Paramètres généraux
Page d’édition: Paramètre [Réglage par défaut]
: Transposition [0...12]
Règle la tonalité par demi-tons.
La transposition est disponible pour certains sons. La
valeur “0” correspond à la note Do. Augmentez la
valeur pour augmenter la hauteur par demi-tons. Dans
certains cas, cependant, l’augmentation de cette valeur
peut entraîner un “repli” de la hauteur à l’octave inférieure. Ainsi, le réglage “6” (Fa#) peut produire un Fa#
une octave plus bas; des valeurs plus élevées augmentent à nouveau la hauteur. Ce repli varie selon le son.
La colonne droite du tableau de la section “Sounds”
30
Page 31

Changer les réglages
FrançaisDeutsch
EnglishVoice Name
(page 68) indique la valeur à laquelle la hauteur d’un
son transposable se replie.
: Gamme (tempérament) [0...6]
Certains sons vous permettent de jouer des phrases
mélodiques. Certaines phrases sélectionnent les notes
d’une gamme de façon aléatoire pour chaque frappe.
Pour d’autres, par contre, la hauteur est déterminée
par la force de frappe. Ce paramètre n’est disponible
que pour certains sons.
La colonne droite du tableau de la section “Sounds”
(page 68) contient un “O” pour les sons permettant de
spécifier la gamme.
Vous avez le choix parmi les gammes suivantes:
0: Majeure, 1: Majeure pentatonique,
2: Mineure pentatonique, 3: Mineure, 4: Indienne
(Hanuma Todi), 5: Gamelan, 6: Tonique
Avec le paramètre “6.Tonique”, le son dépend de
l’intervalle de transposition choisi. Pour en savoir
plus, voyez la section “Scale” (page 69).
: Niveau du pad [0...99]
Ce paramètre détermine le volume du son produit par
le pad. Utilisez ce paramètre pour régler la balance
entre le pad et la pince.
: Niveau de la pince [0...99]
Ce paramètre détermine le volume du son produit par
la pince. Utilisez ce paramètre pour régler la balance
entre le pad et la pince.
: Accentuation de la pince [0...99]
Règle le niveau du signal d’entrée de la pince. Réglez
ce paramètre en fonction du volume produit par
l’objet auquel la pince est fixée.
: Niveau du rythme [0...99]
Détermine le volume du motif rythmique.
: Niveau du haut-parleur [0...99]
Règle le niveau de sortie du haut-parleur. Ce réglage
n’affecte pas le signal de sortie à la prise OUTPUT ou
casque.
: Coupure d’alimentation automatique [Off, On]
Avec le réglage “On ( )”, la mise hors tension
automatique est activée et l’alimentation du WAVEDRUM Mini est automatiquement coupée si l’appareil reste inutilisé durant environ 4 heures.
Avec le réglage “Off ( )”, la mise hors tension
automatique est désactivée.
Paramètres d’effet
Page d’édition: Nom du paramètre [Réglage par défaut]
: Effet a: Sélection du type [0...9]
Sélectionne le type de l’effet [a]. Les types et paramètres disponibles sont décrits dans la “Liste des
types d’effet” plus loin.
: Effet a: Dry/Wet [0...99]
Détermine la balance entre le signal d’effet et le
signal sec. Avec un réglage “0”, seul le signal direct
est audible.
: Effet a: Paramètre 1 [min...max]
: Effet a: Paramètre 2 [min...max]
: Effet a: Paramètre 3 [min...max]
Ces paramètres modifient l’effet. Les trois effets disponibles varient selon le type d’effet choisi. Voyez la
“Liste des types d’effet” plus loin.
: Effet b: Sélection du type [0...9]
Sélectionne le type de l’effet [b]. Les types et paramètres disponibles sont décrits dans la “Liste des
types d’effet” plus loin.
: Effet b: Dry/wet [0...99]
Détermine la balance entre le signal d’effet et le
signal sec. Avec un réglage “0”, seul le signal direct
est audible.
: Effet b: Paramètre 1 [min...max]
: Effet b: Paramètre 2 [min...max]
: Effet b: Paramètre 3 [min...max]
Ces paramètres modifient l’effet. Les trois effets disponibles varient selon le type d’effet choisi. Voyez la
“Liste des types d’effet” plus loin.
Liste des types d’effet
Utilisez ou pour sélectionner un type
d’effet et utilisez , , ou , ,
pour modifier les paramètres. Pour chaque type
d’effet, et règlent la balance “Dry/Wet”.
Type d’effet 0: Reverb
Cet effet ajoute de la réverbération.
Paramètre 1: Type [0...10]
Sélectionne le type de réverbération.
0: Off, 1: Slap, 2: Spring1, 3: Spring2, 4: Plate,
5: Garage, 6: Chamber, 7: Canyon, 8: Room,
9: Studio, 10: Hall
Paramètre 2: Mix [0...99]
Règle la balance entre le signal de réverb et le signal sec.
Paramètre 3: Depth [0...99]
Règle la durée de la réverbération.
Type d’effet 1: Multi Tap Delay
Delay multi-tap à trois lignes de répétitions.
Le delay crée un effet d’écho.
31
Page 32

Changer les réglages
Paramètre 1: Mode [0...4]
Définit la combinaison de têtes utilisée (écho à
bande).
0: Echo conventionnel.
1: Le delay produit le rythme “ta ta ta (pause)”.
2: Le delay produit le rythme “ta (pause) ta ta”.
3: Le delay produit le rythme “ta ta (pause) ta”.
4: Le delay produit le rythme “ta ta ta ta”.
Paramètre 2: Time [0...99]
Règle le temps de retard.
Paramètre 3: Feedback [0...99]
Règle l’intensité de la réinjection.
Type d’effet 2: Delay + Reverb
Cet effet combine delay et réverbération.
Paramètre 1: Time [0...99]
Règle le retard du delay.
Paramètre 2: Feedback [0...99]
Règle l’intensité de la réinjection du signal dans le
delay.
Paramètre 3: Mix [0...99]
Règle la balance du signal de réverbération.
Type d’effet 3: Reverb + Phaser
Combinaison de réverbération et de phaser, produisant un son tourbillonnant émulant une cabine à hautparleurs rotatifs.
Paramètre 1: Mix [0...99]
Règle la balance du signal de réverbération.
Paramètre 2: Depth [0...99]
Règle l’intensité de modulation du phaser.
Paramètre 3: Speed [0...99]
Règle la vitesse de modulation du phaser.
Type d’effet 4: Reverb + Flanger
Combinaison de réverbération et de flanger, produisant un son sifflant évoquant l’atterrissage ou le
décollage d’un jet.
Paramètre 1: Mix [0...99]
Règle la balance du signal de réverbération.
Paramètre 2: Depth [0...99]
Règle l’intensité de modulation du flanger.
Paramètre 3: Speed [0...99]
Règle la vitesse de modulation du flanger.
Type d’effet 5: Pitch Shifter
Cet effet ajoute une copie transposée du signal original.
Paramètre 1: Pitch [0...48]
Règle le décalage de hauteur par demi-tons.
Paramètre 2: Tracking [0...99]
Règle la vitesse de l’effet Pitch Shift. Pour des
valeurs “Pitch” allant jusqu’à “24”, sélectionnez une
valeur relativement basse. Quand l’intervalle “Pitch”
est plus important, optez pour une valeur plus élevée.
Paramètre 3: Delay Time [0...99]
Règle le retard du signal mélangé.
Type d’effet 6: Random Step Filter
Cet effet applique un filtre dont la fréquence change
aléatoirement.
Paramètre 1: Speed [0...99]
Règle la vitesse.
Paramètre 2: Depth [0...99]
Règle l’intensité de modulation.
Paramètre 3: Resonance [0...99]
Détermine l’intensité de la résonance.
Type d’effet 7: Sweep Modulation Delay +
Flanger
Combinaison d’un delay à modulation dont le comportement varie en fonction de la dynamique du
signal d’entrée et d’un flanger.
Paramètre 1: Time [0...99]
Temps de balayage du delay à modulation.
Paramètre 2: Type [0...1]
Sens du balayage du delay à modulation.
Paramètre 3: Mix [0...99]
Règle la balance du signal de flanger.
Type d’effet 8: Tube OD + Flanger
Combinaison d’un effet overdrive saturant le son et
d’un flanger.
Paramètre 1: Drive [0...99]
Règle la distorsion (accentuation) de l’overdrive.
Paramètre 2: Speed [0...99]
Règle la vitesse de modulation du flanger.
Paramètre 3: Mix [0...99]
Règle la balance du signal de flanger.
Type d’effet 9: Random Step Filter + Delay
Combinaison d’un filtre à changement de fréquence
aléatoire et d’un delay.
Paramètre 1: Speed [0...99]
Détermine la vitesse du filtre à fréquence aléatoire.
Paramètre 2: Depth [0...99]
Détermine l’intensité de modulation du filtre aléatoire.
Paramètre 3: Time [0...99]
Règle le temps de retard.
32
Page 33

FrançaisDeutsch
EnglishVoice Name
Appendice
Appendice
Rétablissement des réglages d’usine
Vous pouvez rétablir les réglages d’usine des paramètres généraux et d’effets du WAVEDRUM Mini.
1.
Maintenez le bouton enfoncé et appuyez sur
l’interrupteur pour mettre l’instrument sous tension.
La mention “
bouton clignote.
2.
Maintenez le bouton enfoncé durant environ
deux secondes pour rétablir les réglages d’usine.
Pour renoncer à cette opération, appuyez sur
l’interrupteur pour mettre l’instrument hors tension.
Ne mettez jamais l’instrument hors tension
quand il charge des données. Cela risque de corrompre les données.
3.
Après cette opération, le WAVEDRUM Mini se
retrouve dans l’état dans lequel il se trouvait à sa
sortie d’usine, comme s’il avait été mis sous tension normalement.
PL
” clignote à l’écran et le témoin du
Messages d’erreur
Le WAVEDRUM Mini effectue automatiquement un
contrôle interne lors de la mise sous tension. S’il
détecte un problème, il affiche un des messages
d’erreur suivants. Prenez les mesures décrites ci-dessous.
E. 0
: Les données utilisateur sont perdues. Initialisez
les réglages comme décrit sous “Rétablissement des
réglages d’usine” ci-dessus.
E. 1
: Une erreur système a eu lieu. Mettez immédiatement le WAVEDRUM Mini hors tension et contactez
votre revendeur Korg.
Dépannage
En cas de problème, vérifiez les points suivants. Si
cela ne résout pas votre problème, contactez votre
revendeur Korg.
L’appareil ne s’allume pas
• Vérifiez que l’adaptateur secteur est correctement
branché au WAVEDRUM Mini et à une prise secteur.
• Si vous utilisez des piles, vérifiez si elles sont correctement installées.
Le haut-parleur ne produit pas de son
• Tournez la commande du VOLUME vers la droite.
• Si un câble est branché à la prise OUTPUT ou à la
prise pour casque, le haut-parleur ne produit aucun
son.
• Le paramètre général
est-il réglé sur “0”?
Impossible de sélectionner des sons ou des
effets
Le témoin CLIP ou PAD à gauche du panneau de
commandes clignote-t-il?
Appuyez sur un des boutons CLIP/PAD, , ou
+ pour que le témoin cesse de clignoter et reste
allumé.
Le motif rythmique est inaudible
• Le témoin RHYTHM/LOOPER (coin supérieur
droit du panneau de commandes) clignote-t-il?
Si oui, le son du motif rythmique est coupé. Pour
rétablir le son du motif, maintenez le bouton
SHIFT enfoncé et appuyez sur le bouton FX.
• Le paramètre général
mique) est-il réglé sur “0”?
G. 7
(niveau du haut-parleur)
G. 6
(niveau du motif ryth-
Impossible d’utiliser les boutons
Le numéro de motif clignote à l’écran quand vous
changez de motif rythmique. Il est alors impossible de
changer de son ou de lancer/arrêter le motif rythmique.
33
Page 34

Appendice
Le son est différent de celui d’un autre
WAVEDRUM Mini
Comme de nombreux autres instruments, chaque
WAVEDRUM Mini a un son qui lui est propre. C’est
dû à de nombreux facteurs tels que l’environnement
dans lequel il est utilisé et la façon dont il est entretenu.
Quand plusieurs WAVEDRUM Mini utilisent des
réglages identiques, le son produit peut ne pas être
tout à fait pareil. En d’autres termes, le WAVEDRUM
Mini est un instrument de musique électronique qui
présente des caractéristiques propres aux instruments
acoustiques.
Effet larsen
Vous pouvez utiliser un égaliseur ou un limiteur du
système de sonorisation pour éviter cet effet larsen et
protéger l’ampli et les enceintes.
Voyez page 21
.
Pas de réaction lorsque vous appuyez sur le
pad
A la différence du Wavedrum, le WAVEDRUM Mini
n’a pas de fonction permettant de changer le son en
appuyant sur le pad.
Fiche technique
Synthétiseur dynamique de percussion
Sons:
100
Effets:
10
Motifs rythmiques:
son jeu)
Boucle:
la phrase)
Sorties:
Casque (mini-jack stéréo)
Entrées:
Sortie ampli/haut-parleur:
Ecran:
Fréquence d’échantillonnage:
Conversion A/N, N/A:
Alimentation:
au nickel-hydrure métallique
Autonomie des piles:
piles au nickel-hydrure métallique (1900 mAh)
* La durée de vie des piles dépend des piles utilisées
Consommation:
Poids:
Dimensions (L x P x H):
Température de fonctionnement:
condensation)
Accessoires fournis:
teur secteur (DV9V, ), Pince à capteur,
Lanière
Maximum 25 secondes (du début à la fin de
OUTPUT (jack mono)
Prise CLIP
LED, 2 caractères de 7 segments
et des conditions d’utilisation.
1,0 kg (sans piles)
100 (l’utilisateur peut y ajouter
1,3 W
48 kHz
24 bits
Adaptateur secteur DC9V ou six piles
Environ 4 heures avec des
7,5 W
216 x 216 x 67 mm
0~+40°C (sans
Manuel d’utilisation, Adapta-
34
* Les caractéristiques et l’aspect du produit sont sus-
ceptibles d’être modifiés sans avis préalable pour y
apporter des améliorations.
Page 35

FrançaisDeutsch
EnglishVoice Name
Inhaltsübersicht
Vorsichtsmaßnahmen ......................................36
Vorsicht bei der Handhabung ...........................37
Vorweg .......................................................37
Die wichtigsten Funktionen .............................37
Vorstellung der WAVEDRUM Mini ...............38
Vor dem ersten Einsatz ...............................39
Anschließen des Clips an die WAVEDRUM Mini 39
Anschließen ans Stromnetz ..............................39
Einschalten .......................................................39
Einstellen der Lautstärke ..................................40
Ausschalten ......................................................40
Wahl des Ausgabeverfahrens ...........................40
Batteriebetrieb .................................................40
Aufstellungsort ................................................41
Spielen .......................................................43
Spieltechniken .................................................43
Klanganwahl ....................................................43
Verwendung der Effekte .................................. 44
Anwahl und Wiedergabe eines
Rhythmus-Pattern ........................................... 44
Aufnahme mehrerer Parts (Looper) ................. 45
Editieren der Einstellungen ........................ 46
Arbeitsweise zum Editieren ............................. 46
Parameterübersicht ......................................... 46
Übersicht der Effekttypen ................................ 47
Anhang ......................................................49
Laden der Werkseinstellungen ........................49
Fehlermeldungen ............................................ 49
Fehlersuche ..................................................... 49
Technische Daten ............................................ 50
Voice Name List ............................................... 68
Sounds .................................................................... 68
Effects ..................................................................... 69
Rhythm Patterns .................................................... 69
35
Page 36

Vielen Dank für Ihre Entscheidung zum dynamischen Percussion-Synthesizer Korg WAVEDRUM Mini.
Bitte lesen Sie sich diese Anleitung vollständig
durch, um bei der Bedienung alles richtig zu
machen.
Vorsichtsmaßnahmen
Aufstellungsort
Vermeiden Sie das Aufstellen des Geräts an Orten, an
denen
• esdirekter Sonneneinstrahlung ausgesetzt ist;
• hohe Feuchtigkeit oder Extremtemperaturen auftreten können;
• Staub oder Schmutz in großen Mengen vorhanden
sind;
• das Gerät Erschütterungen ausgesetzt sein kann.
• in der Nähe eines Magnetfeldes.
Stromversorgung
Schließen Sie das optionale Netzteil nur an eine
geeignete Steckdose an. Verbinden Sie es niemals mit
einer Steckdose einer anderen Spannung.
Störeinflüsse auf andere Elektrogeräte
Dieser kann bei in der Nähe aufgestellten Rundfunkempfängern oder Fernsehgeräten Empfangsstörungen hervorrufen. Betreiben Sie solche Geräte nur
in einem geeigneten Abstand von diesem Erzeugnis.
Bedienung
Vermeiden Sie bei der Bedienung von Schaltern und
Reglern unangemessenen Kraftaufwand.
Reinigung
Bei auftretender Verschmutzung können Sie das
Gehäuse mit einem trockenen, sauberen Tuch abwischen. Verwenden Sie keinerlei Flüssigreiniger wie
beispielsweise Reinigungsbenzin, Verdünnungs- oder
Spülmittel. Verwenden Sie niemals brennbare
Reiniger.
Bedienungsanleitung
Bewahren Sie diese Bedienungsanleitung gut auf,
falls Sie sie später noch einmal benötigen.
Flüssigkeiten und Fremdkörper
Stellen Sie niemals Behältnisse mit Flüssigkeiten in
der Nähe des Geräts auf. Wenn Flüssigkeit in das
Gerät gelangt, können Beschädigung des Geräts,
Feuer oder ein elek-trischer Schlag die Folge sein.
Beachten Sie, daß keinerlei Fremdkörper in das Gerät
gelangen. Sollte ein Fremdkörper in das Gerät gelangt
sein, so trennen Sie es sofort vom Netz. Wenden Sie
sich dann an Ihren KORG-Fachhändler.
Hinweis zur Entsorgung (Nur EU)
Wenn Sie das Symbol mit der „durchgekreuzten Mülltonne“ auf Ihrem Produkt, der
dazugehörigen Bedienungsanleitung, der
Batterie oder dem Batteriefach sehen, müssen Sie das Produkt in der vorgeschriebenen Art und Weise entsorgen. Dies
bedeutet, dass dieses Produkt mit elektrischen und elektronischen Komponenten nicht mit
dem normalen Hausmüll entsorgt werden darf. Für
Produkte dieser Art existiert ein separates, gesetzlich festgelegtes Entsorgungssystem. Gebrauchte
elektrische und elektronische Geräte müssen
separat entsorgt werden, um ein umweltgerechtes
Recycling sicherzustellen. Diese Produkte müssen
bei benannten Sammelstellen abgegeben werden.
Die Entsorgung ist für den Endverbraucher kostenfrei! Bitte erkundigen sie sich bei ihrer
zuständigen Behörde, wo sie diese Produkte zur
fachgerechten Entsorgung abgeben können. Falls
ihr Produkt mit Batterien oder Akkumulatoren ausgerüstet ist, müssen sie diese vor Abgabe des Produktes entfernen und separat entsorgen (siehe
oben). Die Abgabe dieses Produktes bei einer
zuständigen Stelle hilft ihnen, dass das Produkt
umweltgerecht entsorgt wird. Damit leisten sie persönlich einen nicht unerheblichen Beitrag zum
Schutz der Umwelt und der menschlichen
Gesundheit vor möglichen negativen Effekten
durch unsachgemäße Entsorgung von Müll. Batterien oder Akkus, die Schadstoffe enthalten, sind
auch mit dem Symbol einer durchgekreuzten Mülltonne gekennzeichnet. In der Nähe zum Mülltonnensymbol befindet sich die chemische
Bezeichnung des Schadstoffes.
Cd oder NiCd steht für Cadmium, Pb für Blei und
Hg für Quecksilber.
36
Page 37

FrançaisDeutsch
EnglishVoice Name
Vorsicht bei der Handhabung
Der Lautsprecher enthält einen Magneten
Der Lautsprecher in diesem Instrument enthält einen
Magneten. Legen Sie niemals Datenkarten oder medizinische Geräte, die durch Magnetfelder gestört werden könnten, in seine Nähe.
Legen Sie niemals schwere Gegenstände auf
das Pad
Der Clip muss nach der Verwendung sofort
wieder entfernt werden
Wenn Sie einen schweren Gegenstand längere Zeit
auf der Pad-Oberfläche des WAVEDRUM Mini
liegen lassen, bekommen sowohl das Pad als auch der
Gegenstand eventuell Flecke oder Druckspuren. Lassen Sie also niemals schwere Gegenstände auf dem
Pad liegen und legen Sie die WAVEDRUM Mini
niemals mit dem Pad nach unten auf eine Oberfläche.
Auch der Clip könnte das Gehäuse verunzieren und
muss daher so schnell wie möglich wieder entfernt
werden.
Auch Alterungserscheinungen können zu Verfärbungen führen – und nach einer Weile spielt es kaum
noch eine Rolle, wie lange die WAVEDRUM Mini
den betreffenden Gegenstand berührt hat.
Rückkopplung
Die WAVEDRUM Mini enthält einen Sensor, der die
Schwingungen des Pads oder Clips registriert, wenn
Sie darauf schlagen. In bestimmten Fällen reagiert der
Vorweg
Sensor auch auf Schwingungen eines Lautsprechers,
was an einer so hohen Lautstärke liegt, dass sich der
Sensor wie ein Mikrofon verhält. Wenn Sie die
WAVEDRUM Mini während eines Konzerts mit
lauten Monitorboxen verwenden, kann es vorkommen, dass die von der WAVEDRUM Mini ausgegebenen Signale so starke Schwingungen erzeugen,
dass der Ständer zu zittern beginnt. Das kann dazu
führen, dass der Sensor erneut ausgelöst wird – und
das führt zu Rückkopplung (Heulton), die sich nur
noch schwer kontrollieren lässt.
Rückkopplung stellt eine überhöhte Last für die Verstärker und Lautsprecher dar und kann diese schwer
beschädigen. Wenn Sie die WAVEDRUM Mini mit
einem großen Monitorsystem verwenden, müssen Sie
dessen Klangregelung unbedingt so einstellen, dass
Rückkopplung vermieden wird. Das Prinzip ist
ungefähr das gleiche wie bei einem Mikrofon.
Zumal bei Verwendung der „Looper“-Funktion ist
Rückkopplung relativ wahrscheinlich. Bitte stellen
Sie die Lautstärke mit Bedacht ein.
Handhabung von Daten
Bei unvorhergesehenen Funktionsstörungen könnte
der Speicherinhalt gelöscht werden. Korg haftet nicht
für Schäden oder Verdienstausfälle, die auf einen
solchen Datenverlust zurückzuführen sind.
* Dieses Produkt wurde unter Lizenz der Patente zur Klanger-
zeugung auf der Basis des Physical Modeling entwickelt
(http://www.sondius-xg.com). Patentnehmer sind die Stanford
University, USA, und die Yamaha Corporation.
* Alle Produkt- und Firmennamen. sind Warenzeichen oder
eingetragene Warenzeichen der betreffenden Eigentümer.
Die WAVEDRUM Mini beruht auf einem völlig
neuen Percussion-Konzept im Synthesizersegment
und bietet drei wichtige Vorzüge:
• Sie kann überall verwendet werden
• Sie kann aus allem eine Wavedrum machen
• Sie lässt sich leicht transportieren
Die wichtigsten Funktionen
Revolutionäre Synthesetechnologie
Der Pad- und Clip-Sensor registrieren die Schläge des
Musikers, die Dank der Wavedrum-basierten Synthese
einzigartige Sounds auslösen. Das Ausgangssignal
Vorweg
richtet sich nach den Klängen, die Sie wählen und
reagiert sehr empfindlich, variiert und eminent expressiv auf die Finger- und Ballenbewegungen. So können
Sie ungemein musikalisch und nuanciert spielen.
Machen Sie aus allem eine WAVEDRUM
Der Clip mit dem eingebauten Sensor kann an jedem
beliebigen Gegenstand angebracht werden und verwandelt diesen daher in eine Wavedrum.
Sie können buchstäblich jeden Gegenstand als
Schlagfläche benutzen und die Eigenschaften seines
Materials (Holz, Metall, Glass usw.) für expressive
Zwecke nutzen.
37
Page 38

Vorstellung der WAVEDRUM Mini
100 Klänge, 10 Effekte
Die 100 Klänge decken alles zwischen PercussionKlangfarben bis hin zu Klangeffekten ab. Der
erzeugte Klang richtet sich hauptsächlich nach Ihrer
Spieltechnik. Wenn Sie möchten, können Sie dem
Pad und dem Clip unterschiedliche Klänge zuordnen.
Außerdem stehen 10 Effekte speziell für perkussive
Signale zur Verfügung.
Rhythmus-Pattern
Es stehen 100 Rhythmus-Pattern unterschiedlichster
Musikgenres zur Verfügung, zu denen Sie „jammen“
können.
Zusätzlich steht eine Aufnahmefunktion zur Verfügung, die Sie zum Aufzeichnen Ihres Spiel mitsamt
der gewählten Begleitung verwenden können.
Vorstellung der WAVEDRUM Mini
Looper
Mit der „Looper“-Funktion können Sie Part für Part
neue Grooves aufzeichnen.
So können Sie also auch eigene Grooves und Rhythmusfiguren entwickeln.
Interner Lautsprecher und Batteriespeisung
Die WAVEDRUM Mini ist so leicht und kompakt,
dass man sie überall mit hinnehmen kann. Der Lautsprecher und die Batteriespeisung erlauben den
Einsatz dieses Instruments an jedem beliebigen Ort.
Mit dem beiliegenden Gurt können Sie die WAVEDRUM Mini an einem Bein oder anderen Körperteil
befestigen.
Lautsprecher
Bedienfeld
Pad
Anschluss für den Clip
OberseiteLinke Seite Rechte Seite
VOLUME-Regler
Batterielaufzeitanzeige
Sensorclip (Clip)
DC9V-Buchse
Netzschalter
Kopfhörerbuchse
OUTPUT-Buchse
38
Page 39

FrançaisDeutsch
EnglishVoice Name
Kabelhaken
DC9V-Buchse
Netzschalter
Zu einer Steckdose
Netzteil (liegt bei)
Kabelhaken
Vor dem ersten Einsatz
Vor dem ersten Einsatz
Anschließen des Clips an die WAVEDRUM Mini
1.
Schalten Sie die WAVEDRUM Mini zunächst aus.
(Das Display und die Dioden dürfen nicht leuchten.)
2.
Verbinden Sie den Clip mit der CLIP-Buchse auf
der linken Seite der WAVEDRUM Mini.
Sensorclip (Clip)
An die CLIP-Buchse darf nur der beiliegende
Clip angeschlossen werden.
3.
Um zu verhindern, dass sich die Clip-Verbindung
aus Versehen löst, sollten Sie das Clipkabel um
den Haken an der Unterseite der WAVEDRUM
Mini drehen.
CLIP-Buchse
Anschließen ans Stromnetz
1.
Verbinden Sie den Gleichstromstecker des Netzteils mit der DC9V-Buchse auf der rechten Seite
der WAVEDRUM Mini.
2.
Verbinden Sie das Netzteil mit einer Steckdose.
Verwenden Sie nur das beiliegende Netzteil. Die
Verwendung anderer Netzteile könnte zu
Schäden führen.
Wählen Sie immer eine Steckdose mit einer für
das Netzteil geeigneten Spannung.
3.
Um zu verhindern, dass sich die Netzteilverbindung aus Versehen löst, sollten Sie das Clipkabel um den Haken an der Unterseite der
WAVEDRUM Mini drehen.
Einschalten
1.
Drehen Sie den VOLUME-Regler ganz nach links.
2.
Drücken Sie den Netzschalter, um das Gerät einzuschalten.
39
Page 40

Vor dem ersten Einsatz
OUTPUT-Buchse
Kopfhörerbuchse
Aktivboxen usw.
Kopfhörer
INPUT
Einstellen der Lautstärke
• Drehen Sie den VOLUME-Regler nach links, um
die Lautstärke zu verringern bzw. nach rechts, um
sie zu erhöhen.
Der VOLUME-Regler bestimmt den Pegel des internen Lautsprechers, der Kopfhörerbuchse und der
OUTPUT-Buchse.
Stellen Sie die Lautstärke auf einen geeigneten Wert
und spielen Sie auf der WAVEDRUM Mini. Siehe
auch „Spielen“ auf S. 43.
Ausschalten
Schalten Sie das Instrument nach dem Spielen wieder
aus.
1.
Drehen Sie den VOLUME-Regler der WAVEDRUM Mini ganz nach links.
2.
Halten Sie den Netzschalter ±1 Sekunde gedrückt,
um das Instrument auszuschalten.
Verbindung niemals am Kabel, sondern nur am Stekker ziehen.
Um sich keinen Hörschaden zuzuziehen, sollten
Sie niemals über einen längeren Zeitraum hinweg einen hohen Kopfhörerpegel verwenden.
Anschließen an ein Audiogerät
Verbinden Sie die OUTPUT-Buchse der WAVEDRUM Mini mit einem Eingang Ihres Mischpults oder
einer Aktivbox.
Das Ausgangssignal ist mono. Wenn Sie einen Stekker an die OUTPUT-Buchse anschließen, wird der
Lautsprecher stummgeschaltet.
Vor Herstellen dieser Verbindung müssen Sie
sowohl die WAVEDRUM Mini als auch das
externe Audiogerät ausschalten. Wenn Sie die
WAVEDRUM Mini an andere Geräte anschließen, während sie eingeschaltet ist, könnten
sowohl die WAVEDRUM Mini als auch das
externe Audiogerät beschädigt werden.
Außerdem müssen Sie die Lautstärke des externen Geräts auf den Mindestwert stellen.
Energiesparfunktion
Ungefähr 4 Stunden nach dem letzten Bedienvorgang
schaltet sich die WAVEDRUM Mini automatisch aus.
Bei Bedarf können Sie diese Energiesparfunktion
deaktivieren. Alles Weitere hierzu finden sie auf
Seite 46
.
Laut Vorgabe ist die Energiesparfunktion aktiv.
Wahl des Ausgabeverfahrens
Ein hoher Anfangspegel der WAVEDRUM Mini
könnte Ihr Lautsprecher -/Verstärkersystem
beschädigen. Wenn Sie einen Kopfhörer verwenden, kann ein hoher Pegel zu einem Hörschaden führen. Stellen Sie die Lautstärke immer
mit Bedacht ein.
Kopfhörerbetrieb
An die Kopfhörerbuchse kann ein optionaler Kopfhörer angeschlossen werden. Bei Anschließen eines
Kopfhörers wird der interne Lautsprecher stummgeschaltet.
Die Verwendung eines Kopfhörers empfiehlt sich,
wenn Sie niemanden stören dürfen. Verbinden Sie den
Stekker des Kopfhörers mit der Kopfhörerbuchse auf
der linken Seite der WAVEDRUM Mini.
Wenn Ihr Kopfhörer mit einem Adapterstecker (1/4
auf Miniklinke) versehen ist, dürfen Sie bei Lösen der
Batteriebetrieb
Entfernen Sie den Deckel des Batteriefachs an der
Unterseite der WAVEDRUM Mini und legen Sie
sechs Ni-MH-Batterien ein. Achten Sie dabei auf die
richtige Polarität.
Anmerkung:
daher separat gekauft werden.
Vor der Entnahme bzw. dem Einlegen von Batterien müssen Sie das Netzteilkabel lösen.
Wechseln Sie immer alle Batterien aus und verwenden Sie nur jeweils Batterien desselben Typs.
"
Batterien liegen nicht bei und müssen
40
Page 41

FrançaisDeutsch
EnglishVoice Name
1.
Um das Batteriefach zu öffnen, müssen Sie die mit
Pfeilen markierten Klemmen drücken und anheben.
2.
Legen Sie 6 Ni-MH-Batterien (AA) ein. Achten
Sie beim Einlegen der Batterien auf die richtige
Polarität („+“ und „–“).
3.
Ordnen Sie die Laschen über dem Batteriefach an
und schließen Sie den Deckel. Drücken Sie die mit
Pfeilen markierten Klemmen so weit hinunter, bis
der Deckel festsitzt.
Batteriefachblende
Lasche
Auswechseln der Batterien
Wenn die Batterien fast erschöpft sind, blinkt die
Diode. Die WAVEDRUM Mini kann dann zwar noch
eine Weile verwendet werden, allerdings sollten Sie
die Batterien so schnell wie möglich auswechseln.
Batterien mit einer schwankenden Spannung
sollten sofort entfernt werden. Erschöpfte Batterien können auslaufen und das Gerät
beschädigen. Entnehmen Sie sie daher so schnell
wie möglich. Entfernen Sie die Batterien
außerdem, wenn Sie das Instrument längere Zeit
nicht verwenden möchten.
Vor dem ersten Einsatz
Befestigen und Entfernen des Clips an/von
einem Gegenstand
Wenn Sie den Clip der WAVEDRUM Mini an einem
Gegenstand in der Nähe anbringen und auf jenen
Gegenstand schlagen, kann er als Wavedrum genutzt
werden. Der dabei erzeugte Klangcharakter richtet
sich entscheidend nach dem gewählten Gegenstand.
Probieren Sie also mehrere Oberflächen aus.
• Vor Anbringen und Entfernen des Clips müssen Sie
den VOLUME-Regler auf den Mindestwert stellen.
• Befestigen Sie den Clip an einem Gegenstand so,
dass er sich beim Trommeln nicht lösen kann.
• Ziehen Sie beim Entfernen des Clips vom Gegenstand niemals an seinen beiden Klemmen. Sonst
werden nämlich sowohl der Clip als auch der
Gegenstand beschädigt. Öffnen Sie den Clip, bevor
Sie ihn entfernen.
Obwohl man den Clip an einer Vielzahl von
Gegenständen befestigen kann, sollten Sie nach
Möglichkeit nichts wählen, was so viel Lärm
erzeugt, dass die Nachbarn usw. gestört werden.
Bedenken Sie außerdem, dass der Clip den
Gegenstand, an dem Sie ihn befestigen, verkratzen oder beschädigen könnte.
Wenn Sie den Clip längere Zeit an derselben
Stelle belassen, hinterlässt er eventuell Spuren
oder Kratzer. Je nach dem Zustand der Oberfläche, an der Sie den Clip befestigen, kann es vorkommen, dass diese schon viel früher beschädigt
wird.
Aufstellungsort
Stellen Sie die WAVEDRUM Mini auf eine
flache und stabile Oberfläche. Wenn Sie sich
hinsetzen möchten, können Sie das Instrument
mit dem Gurt an einem Bein befestigen. Wenn
Sie den Clip verwenden möchten, müssen Sie
ihn an einem stabilen Ort anbringen (ungefähr so
stabil wie der Aufstellungsort der WAVEDRUM
Mini selbst). Verlegen Sie das Netzteil- und
Audiokabel so, dass sie nirgends hängen bleiben
bzw. sich verheddern.
41
Page 42

Vor dem ersten Einsatz
Schlitze Gurt
A
B
B
Anbringen und Entfernen des Gurts
Mit dem beiliegenden Gurt können Sie die WAVEDRUM Mini an einem Bein oder anderen Körperteil
befestigen.
Schieben Sie den Gurt durch die Schlitze an der
Unterseite der WAVEDRUM Mini (siehe die
Abbildung unten). Wenn Sie das vergessen, löst
sich der Gurt beim Spielen eventuell.
Der Gurt ist aus Plastik und sollte vor der Verwendung auf Risse und Schäden überprüft werden. Wenn der Gurt beschädigt ist, könnte das
Instrument beim Spielen fallen und Schäden verursachen.
1.
Schieben Sie den Gurt durch die Schlitze an der
Unterseite (siehe die Abbildung unten).
3.
Legen Sie die WAVEDRUM Mini wie in der
Abbildung gezeigt auf ein Bein und schließen Sie
den Gurt. Winden Sie den Gurt um Ihr Bein und
verschließen Sie den Gurt. Ziehen Sie bei Bedarf
am Ende „B“ (siehe die vorige Abbildung), um die
WAVEDRUM Mini an Ihrem Bein zu befestigen.
2.
Schließen Sie den Gurt wie in der Abbildung
gezeigt.
Wenn der Gurt zu schlaff hängt, können Sie die
Partie „B“ weiter herausziehen.
Wenn der Gurt zu straff ist, können Sie ihn etwas
lösen, indem Sie den Verschluss in Richtung „A“
ziehen.
42
Page 43

FrançaisDeutsch
EnglishVoice Name
Spielen
Display RHYTHTMUS/LOOPER-Anzeige
Klanganwahl Rhythmus-Pattern/Transportfunktionen
des Loopers
Effektanwahl
Spieltechniken
Die WAVEDRUM Mini erlaubt die Anwahl unterschiedlicher Klänge für das Pad und den Clip.
Das Ausgangssignal richtet sich nach den Klängen,
die Sie wählen und reagiert sehr empfindlich, variiert
und eminent expressiv auf subtilste Finger- und
Ballenbewegungen. So können Sie ungemein
musikalisch und nuanciert spielen.
Die internen Klangfarben enthalten Simulationen
typischer Percussion-Instrumente, aber auch Effekte,
deren Tonhöhe sich bei jedem weiteren Schlag ändert.
Bei Bedarf können Sie sogar Melodien spielen. Übrigens beeinflusst nicht nur die Schlagkraft die
Klangfarbe – auch der beim Schlagen entstehende
Klang (warm/sanft oder hart/scharf) hat einen
Einfluss auf das Ausgangssignal. Das Ergebnis richtet
sich zwar immer auch nach dem gewählten Klang,
allerdings ist der Klang in der Pad-Mitte runder und
sanfter als wenn man auf den Rand schlägt. Im Prinzip sind die erzeugten Klangfarben von Spieler zu
Spieler verschieden. Allerdings gilt allgemein: Wenn
Sie mit einem Finger fast nur auf das Pad drücken, ist
der Klang runder als wenn Sie mit den Fingerunterseiten darauf schlagen. Mit den Schlagtechniken einer
Conga oder Djembe erzielen Sie ähnliche Klangvariationen.
Der Clip kann an einem beliebigen Gegenstand befestigt werden, auf den Sie schlagen. Dessen Oberfläche
beeinflusst die Klangfarbe ebenfalls.
Siehe auch „Sounds“ auf S. 68.
Schlagen Sie ausschließlich auf das Pad der
WAVEDRUM Mini: Die Bedienelemente und
der Lautsprecher sind nicht als Schlagflächen
gedacht.
Spielen
Schlagen Sie niemals auf den Clip selbst.
Klanganwahl
Mit folgendem Verfahren kann jeweils einer von 100
Klängen gewählt werden:
1.
Drücken Sie zuerst den CLIP/PAD-Taster links im
Bedienfeld, um anzugeben, ob Sie für das Pad oder
den Clip einen Klang wählen möchten. Bei wiederholtem Drücken des Tasters ändert sich die Zuordnung. Die betreffende Diode (CLIP oder PAD)
leuchtet.
Wenn die CLIP-, PAD-, [a]- oder [b]-Diode blinkt
(Editiermodus), können keine Klangfarben
gewählt werden. Drücken Sie dann den CLIP/
PAD-Taster, damit die gewünschte Diode leuchtet.
2.
Wählen Sie mit den -Tastern den
gewünschten Klang.
Das Display zeigt die Nummer des gewählten
Klangs an.
Wenn Sie oder gedrückt halten, ändert sich
die Nummer kontinuierlich.
Schlagen Sie auf das Pad oder die Oberfläche, an
welcher der Clip befestigt ist.
Anmerkung:
wird sowohl für das Pad als auch für den Clip Klang
00 gewählt.
Anmerkung:
Taster und den CLIP/PAD-Taster.
Unmittelbar nach dem Einschalten
Drücken Sie den -, - oder +-
43
Page 44

Spielen
Verwendung der Effekte
Bei Bedarf können Sie die Klangfarben mit Effekt
versehen. Sie können entweder Effekt [a] oder [b]
wählen, aber nicht beide.
• Drücken Sie den FX-Taster. Drücken Sie den Taster wiederholt, um Effekt [a] (Diode [a] leuchtet),
Effekt [b] (Diode [b] leuchtet) oder keinen Effekt
(beide Diode aus) zu wählen.
Wenn die CLIP-, PAD-, [a]- oder [b]-Diode blinkt
(Editiermodus), können keine Effekte gewählt werden. Drücken Sie dann den CLIP/PAD-Taster, damit
die gewünschte Diode leuchtet.
Anmerkung:
schiedliche Algorithmen zugeordnet werden.
Außerdem können Sie einstellen, wie stark die
Klänge mit dem Effekt bearbeitet werden sollen.
Siehe auch „Editieren der Einstellungen“ auf S. 46.
Anmerkung:
wird kein Effekt verwendet. Allerdings werden die
zuletzt für [a] und [b] verwendeten Einstellungen
gespeichert.
Anmerkung:
Taster und den CLIP/PAD-Taster.
Effekt [a] und [b] können unter-
Unmittelbar nach dem Einschalten
Drücken Sie den -, - oder +-
Anwahl und Wiedergabe eines Rhythmus-Pattern
Das Instrument enthält zahlreiche Rhythmus-Pattern,
die Sie als Begleitung verwenden können. Wenn Sie
möchten, können Sie Ihr Spiel mitsamt einer solchen
Begleitung aufnehmen.
Abspielen eines Pattern
1.
Halten Sie den SHIFT-Taster gedrückt, während
Sie den -Taster betätigen, damit die
RHYTHM/LOOPER-Diode (oben rechts) leuchtet.
Damit wählen Sie die „Rhythm“-Funktion.
2.
Drücken Sie den -Taster (er leuchtet), um die
Wiedergabe zu starten.
3.
Drücken Sie den -Taster, um die Wiedergabe
anzuhalten (die Diode erlischt).
4.
Es stehen 100 verschiedene Pattern zur Verfügung.
Drücken Sie den +-Taster, um ein anderes Pattern
zu wählen. Damit wählen Sie das jeweils nächste
Pattern (d.h. das Pattern mit der nächsten
Nummer). Wenn Sie den SHIFT-Taster gedrückt
halten, während Sie den +-Taster betätigen, wird
das vorangehende Pattern gewählt.
Halten Sie den +-Taster gedrückt, um ein weiter
entferntes Pattern zu wählen.
Während der Anwahl blinkt die Pattern-Nummer
im Display. Sobald das Pattern einsatzbereit ist,
zeigt das Display wieder die Klangnummer an.
Alles Weitere zu den Pattern finden Sie unter
„Rhythm Patterns“ auf S. 69.
Anmerkung:
der Rhythmusbegleitung ändern. Siehe „Editieren der
Einstellungen“ auf S. 46.
Anmerkung:
Rhythmus-Pattern kann geändert werden.
Bei Bedarf können Sie die Lautstärke
Die Wiedergabegeschwindigkeit der
Aufnahme Ihres Spiels mit Rhythmusbegleitung
1.
Wählen Sie ein Rhythmus-Pattern und starten Sie
die Wiedergabe. Siehe „Abspielen eines Pattern“.
2.
Wählen Sie den Klang, den Sie zum Spielen verwenden möchten. Siehe „Klanganwahl“.
3.
Drücken Sie den -Taster, um die Aufnahme zu
starten (die Diode leuchtet).
4.
Schlagen Sie auf das Pad oder den Gegenstand, an
dem der Clip befestigt ist. Alles, was Sie spielen,
wird aufgenommen.
5.
Drücken Sie den - oder -Taster, um die
Aufnahme zu beenden.
Wenn Sie den -Taster drücken, wird die
Aufnahme deaktiviert. Die Wiedergabe läuft aber
weiter. Wenn Sie den -Taster drücken, halten
sowohl die Aufnahme als auch die Wiedergabe an.
6.
Mit den obigen Schritten können Sie so viele Parts
hinzufügen wie Sie möchten.
Anmerkung:
und erneut einzuspielen, müssen Sie die „Undo/
Redo“-Funktion verwenden. Siehe „‘Undo’ und
‘Redo’“ auf S. 45.
Anmerkung:
gabe den -Taster drücken, beginnen die Aufnahme
und Wiedergabe gleichzeitig.
Bei Anwahl eines anderen Rhythmus-Pattern,
bei Aufrufen der „Looper“-Funktion oder bei
Ausschalten des Instruments wird Ihre
Aufnahme wieder gelöscht. Unmittelbar nach
dem Einschalten wird Rhythmus-Pattern 00
gewählt.
Während der Wiedergabe und Aufnahme wird
die Empfindlichkeit des Instruments reduziert,
um Rückkopplung zu vermeiden.
Um eine Aufnahme wieder zu löschen
Wenn Sie bei angehaltener Wieder-
44
Page 45

FrançaisDeutsch
EnglishVoice Name
7.
Bei Bedarf können Sie die Rhythmus-Begleitung
stummschalten (oder wieder aktivieren). Wenn Sie
das Rhythmus-Pattern stummschalten, hören Sie
nur noch die von Ihnen gespielten Parts.
Halten Sie den SHIFT-Taster gedrückt, während
Sie FX betätigen. Damit schalten Sie die Stummschaltung abwechselnd ein und aus. Solange die
Rhythmusbegleitung stummgeschaltet ist, blinkt
die RHYTHM/LOOPER-Diode.
Anmerkung:
tern wählen (oder den Looper aktivieren), wird die
Stummschaltung automatisch deaktiviert.
Wenn Sie ein anderes Rhythmus-Pat-
Aufnahme mehrerer Parts (Looper)
Wenn Sie möchten, können Sie der Reihe nach mehrere Parts aufnehmen. Die maximale Phrasenlänge
beträgt 25 Sekunden.
Erste Aufnahme
1.
Halten Sie den SHIFT-Taster gedrückt, während
Sie den -Taster betätigen, um die RHYTHM/
LOOPER-Diode (oben rechts) auszuschalten.
Jetzt ist die „Looper“-Funktion aktiv.
2.
Drücken Sie den -Taster. Die WAVEDRUM
Mini ist jetzt aufnahmebereit (der - und Taster blinken).
3.
Starten Sie die Aufnahme, indem Sie auf das Pad
oder den Gegenstand schlagen, an welchem der
Clip befestigt ist. Die Aufnahme wird zeitgleich
mit dem ersten Schlag gestartet.
Sie können die Aufnahme aber auch durch Drükken des -Tasters starten.
Das Display zeigt die verbleibende
Aufnahmedauer an.
4.
Um die Aufnahme anzuhalten, müssen Sie einen
der vier Taster rechts ( – SHIFT) drücken.
Die aufgezeichnete Phrase wird dann sofort in
einer Schleife abgespielt.
Die Stelle, an der Sie die erste Aufnahme beenden,
gilt als Endpunkt der Schleife. Damit legen Sie
folglich die Schleifenlänge fest.
Spielen
Zweiter und nachfolgende Parts
1.
Drücken Sie den -Taster, um die LooperWiedergabe zu starten (die Diode leuchtet).
Wählen Sie den Klang, den Sie zum Spielen verwenden möchten.
2.
Drücken Sie den -Taster. Die Aufnahme beginnt
(die Diode leuchtet).
3.
Schlagen Sie auf das Pad oder den Gegenstand, an
dem der Clip befestigt ist. Alles, was Sie spielen,
wird zum ersten Part hinzugefügt.
4.
Drücken Sie den - oder -Taster, um die
Aufnahme zu deaktivieren.
Wenn Sie den -Taster drücken, wird die
Aufnahme deaktiviert. Die Wiedergabe läuft aber
weiter. Wenn Sie den -Taster drücken, halten
sowohl die Aufnahme als auch die Wiedergabe an.
Anmerkung:
Aufnahme eines Parts rückgängig machen (und
wiederherstellen) kann. Siehe „Undo und Redo“.
Anmerkung:
gabe den -Taster drücken, beginnen die Aufnahme
und Wiedergabe zeitgleich.
Bei Aufrufen der „Rhythm Pattern“-Funktion
oder Ausschalten der Instruments wird Ihre
Aufnahme wieder gelöscht.
Während der Wiedergabe und Aufnahme wird
die Empfindlichkeit des Instruments reduziert,
um Rückkopplung zu vermeiden.
Es gibt eine Funktion, mit der man die
Wenn Sie bei angehaltener Wieder-
‘Undo’ und ‘Redo’
Mit
„Undo“
Aufnahme wiederhergestellt werden.
•
Halten Sie bei laufender oder angehaltener
Wiedergabe bzw. während der Aufnahme den
SHIFT-Taster gedrückt, während Sie den
ter betätigen.
Anmerkung:
man den letzten Part zwar rückgängig machen, aber
danach nicht wiederherstellen. Den ersten LooperPart kann man nicht rückgängig machen.
„Redo “
Mit
wiederherstellen.
• Halten Sie bei laufender oder angehaltener
Wiedergabe den SHIFT-Taster gedrückt, während
Sie den -Taster betätigen.
kann der Zustand vor der letzten
-Tas-
Wenn die Aufnahme noch läuft, kann
kann man etwas rückgängig Gemachtes
45
Page 46

Editieren der Einstellungen
Anwahl der EditierseiteEdit (2 Sekunden
gedrückt halten)
Numerische Eingabe
Wahl des Editmodus’ (2 Sekunden
gedrückt halten)/Seitenanwahl
Editieren der Einstellungen
Die WAVEDRUM Mini erlaubt das Einstellen der
Lautstärke für das Pad, den Clip und das RhythmusPattern. Bei bestimmten Klängen können Sie auch die
Tonhöhe oder Transposition einstellen. Den Effekten
[a] und [b] kann man andere Typen zuordnen und
außerdem bestimmte Parameter einstellen. Das
Ändern von Einstellungen nennt man „editieren“.
Arbeitsweise zum Editieren
1.
Halten Sie den Edit (CLIP/PAD)-Taster ±2 Sekunden lang gedrückt.
Beide Dioden darunter blinken und das Display
zeigt eine Editierseite an. Wenn Sie gerade eine
Effekt editieren, blinken auch die Dioden unter
dem FX-Taster.
2.
Wählen Sie mit den -Tastern den Parameter,
der editiert werden soll. Alles Weitere zu den Editierseiten und Parametern finden Sie in der
„Parameterübersicht“.
Um z.B. Effekt [a] einen anderen Effekt zuzuordnen, müssen Sie „ “ wählen (Algorithmusanwahl für Effekt „a“).
3.
Ändern Sie den Wert.
Halten Sie den SHIFT-Taster gedrückt, während
Sie mit den -Tastern den gewünschten Wert
einstellen. Wenn Sie den SHIFT-Taster drücken,
wird der Wert angezeigt. Bei Drücken des - oder
-Tasters ändert er sich. Wenn Sie einen Taster
gedrückt halten, ändert sich der Wert schneller.
4.
Drücken Sie den Edit (CLIP/PAD)-Taster, um die
Editierseite wieder zu verlassen.
Anmerkung:
sen der Editierseite automatisch gespeichert.
Anmerkung:
dem -, - oder +-Taster statt mit Edit (CLIP/
PAD) verlassen.
Alle Änderungen werden bei Verlas-
Die Editierseite kann man auch mit
Anmerkung:
nur ändern, wenn man vor Aufrufen der Editierseite
einen Klang wählt, der diese Funktionen unterstützt.
Siehe „Sounds“ auf S. 68.
Anmerkung:
Aufnahme mit der „Rhythm“- oder „Looper“-Funktion kann man die Editierseite nicht aufrufen.
Anmerkung:
fen, indem man den FX-Taster mindestens 2 Sekunden gedrückt hält. Bei wiederholtem Drücken des FXTasters rufen Sie die Seiten in folgender Reihenfolge
auf: → → .
Die Transposition oder Skala kann man
Bei laufender Wiedergabe oder
Die Editierseite kann man auch aufru-
Parameterübersicht
Die WAVEDRUM Mini bietet folgende editierbare
Parameter.
Global-Parameter
Editierseite: Parametername [Vorgabe]
: Transposition [0...12]
Hiermit können Sie die Tonhöhe in Halbtonschritten
ändern.
Dieser Parameter ist nur für bestimmte Klänge belegt.
Der Wert „0“ entspricht der Note „C“. Mit einem
höheren Wert heben Sie die Tonhöhe in Halbtonschritten an. In bestimmten Fällen ändert sich die
Tonhöhe zwar im gewünschten Halbtonintervall, aber
ab einer bestimmten Note plötzlich eine Oktave tiefer.
Beispiel: Mit dem Wert „6“ (F#) wählen Sie z.B. das
„F#“ – aber eine Oktave tiefer. Alle nachfolgenden
Erhöhungen heben die Tonhöhe von jener Position aus
an. Wann das passiert, richtet sich nach dem Klang.
In der rechten Spalte der „Sounds“-Tabelle (siehe
Seite 68) wird angezeigt, ab welchem Transpositionsintervall die Abwärtstransposition stattfindet.
46
Page 47

Editieren der Einstellungen
FrançaisDeutsch
EnglishVoice Name
: Skala (Stimmungssystem) [0...6]
Bestimmte Klänge erlauben das Spielen von Melodien.
Bestimmte Phrasen wählen die Noten einer Skala
nach einem Zufallsmuster bei jedem Schlag. Bei
anderen Klängen richtet sich die Tonhöhe dagegen
nach der Schlagstärke. Dieser Parameter ist nur für
bestimmte Klänge belegt.
Klänge, deren Skala geändert werden kann, sind in
der „Sounds“-Tabelle (siehe Seite 68) mit einem „O“
markiert.
Es stehen folgende Skalen zur Verfügung:
0: Dur, 1: Dur-pentatonisch, 2: Moll-pentatonisch,
3: Moll, 4: Indisch (Hanuma Todi), 5: Gamelan,
6: Tonika
Bei der Einstellung „6. Tonika“ richtet sich die Tonhöhe
nach dem gewählten Transpositionsintervall. Für alle
anderen Einstellungen, siehe „Scale“ (Seite 69).
: Pad-Pegel [0...99]
Bestimmt die Lautstärke des Klangs, den Sie dem Pad
zugeordnet haben. Hiermit können Sie die Balance
zwischen dem Pad- und Clip-Klang einstellen.
: Clip-Pegel [0...99]
Bestimmt die Lautstärke des Klang, den Sie dem Clip
zugeordnet haben. Hiermit können Sie die Balance
zwischen dem Pad- und Clip-Klang einstellen.
: Clip-Verstärkung [0...99]
Hiermit kann der Eingangspegel des Clip-Sensorsignals eingestellt werden. Wählen Sie diese Einstellung in Abhängigkeit der vom als Trommel
missbrauchten Gegenstand produzierten Lautstärke.
: Rhythmuspegel [0...99]
Hiermit regeln Sie die Lautstärke der Rhythmusbegleitung.
: Lautsprecherpegel [0...99]
Hiermit regeln Sie den Ausgangspegel des Lautsprechers. Dieser Parameter hat keinen Einfluss auf
die OUTPUT- oder Kopfhörerbuchse.
: Energiesparfunktion [Off, On]
Die „ “-Einstellung bedeutet, dass die Energiesparfunktion aktiv ist, d.h. die WAVEDRUM Mini
schaltet sich ca. 4 Stunden nach dem letzten
Tastendruck automatisch aus.
Die „ “-Einstellung bedeutet, dass die Energiesparfunktion nicht aktiv ist.
Effektparameter
Editierseite: Parametername [Vorgabe]
: Effekt ‘a’: Anwahl des Typs [0...9]
Hiermit wählen Sie den Effekttyp für Effekt [a]. Die
Parameter finden Sie in der „Übersicht der Effekttypen“ weiter unten.
: Effekt ‘a’: Dry/Wet [0...99]
Hiermit regeln Sie die Balance zwischen dem Effektund Original-Signal. Der Wert „0“ bedeutet, dass Sie
nur das Direktsignal hören.
: Effekt ‘a’: Parameter 1 [min...max]
: Effekt ‘a’: Parameter 2 [min...max]
: Effekt ‘a’: Parameter 3 [min...max]
Dies sind die editierbaren Effektparameter. Um
welche Parameter es sich handelt, richtet sich nach
dem gewählten Effekttyp. Siehe die „Übersicht der
Effekttypen“ weiter unten.
: Effekt ‘b’: Anwahl des Typs [0...9]
Hiermit wählen Sie den Effekttyp für Effekt [b]. Die
Parameter finden Sie in der „Übersicht der Effekttypen“ weiter unten.
: Effekt ‘b’: Dry/wet [0...99]
Hiermit regeln Sie die Balance zwischen dem Effektund Original-Signal. Der Wert „0“ bedeutet, dass Sie
nur das Direktsignal hören.
: Effekt ‘b’: Parameter 1 [min...max]
: Effekt ‘b’: Parameter 2 [min...max]
: Effekt ‘b’: Parameter 3 [min...max]
Dies sind die editierbaren Effektparameter. Um
welche Parameter es sich handelt, richtet sich nach
dem gewählten Effekttyp. Siehe die „Übersicht der
Effekttypen“ weiter unten.
Übersicht der Effekttypen
Den Effekttyp wählen Sie mit oder . Mit
, , oder , , können
diese Parameter editiert werden. Mit und
können Sie die „Dry/Wet“-Balance einstellen.
Effekttyp 0: Reverb
Verleiht dem Klang mehr Tiefe (Rauminformationen).
Parameter 1: Type [0...10]
Hier kann der Halltyp gewählt werden.
0: Off, 1: Slap, 2: Spring1, 3: Spring2, 4: Plate,
5: Garage, 6: Chamber, 7: Canyon, 8: Room,
9: Studio, 10: Hall
Parameter 2: Mix [0...99]
Regelt die Balance des Hallsignals im Verhältnis zum
Originalsignal.
Parameter 3: Depth [0...99]
Regelt die Halldauer.
Effekttyp 1: Multi Tap Delay
Ein Multitap-Delay mit drei Wiederholungslinien.
Hiermit erzielen Sie einen Echoeffekt.
47
Page 48

Editieren der Einstellungen
Parameter 1: Mode [0...4]
Hiermit wählen Sie die Anzahl der simulierten Tonköpfe (des Bandechos).
0:
Herkömmlicher Echoeffekt.
1: Das Delay-Signal verwendet den Rhythmus „ta ta ta (Pause)“.
2: Das Delay-Signal verwendet den Rhythmus „ta (Pause) ta ta“.
3: Das Delay-Signal verwendet den Rhythmus „ta ta (Pause) ta“.
4: Das Delay-Signal verwendet den Rhythmus „ta ta ta ta“.
Parameter 2: Time [0...99]
Hiermit regeln Sie die Verzögerungszeit.
Parameter 3: Feedback [0...99]
Hiermit wird die Rückkopplungsintensität eingestellt.
Effekttyp 2: Delay + Reverb
Dies ist eine Kombination von Delay und Reverb.
Parameter 1: Time [0...99]
Hiermit regeln Sie die Delay-Verzögerungszeit.
Parameter 2: Feedback [0...99]
Hiermit kann die Rückkopplungsintensität eingestellt
werden.
Parameter 3: Mix [0...99]
Regelt die Balance des Hallsignals.
Effekttyp 3: Reverb + Phaser
Eine Kombination von einem Reverb- mit einem Phaser-Effekt. Letzterer erzeugt einen Wirbeleffekt wie
bei einem sich drehenden Lautsprecher.
Parameter 1: Mix [0...99]
Regelt die Balance des Hallsignals.
Parameter 2: Depth [0...99]
Regelt die Modulationsintensität des Phasers.
Parameter 3: Speed [0...99]
Regelt die Modulationsgeschwindigkeit des Phasers.
Effekttyp 4: Reverb + Flanger
Eine Kombination von einem Hall- mit einem
Flanger-Effekt. Letzterer ähnelt einem aufsteigenden
Düsenjäger.
Parameter 1: Mix [0...99]
Regelt die Balance des Hallsignals.
Parameter 2: Depth [0...99]
Regelt die Modulationsintensität des Flangers.
Parameter 3: Speed [0...99]
Regelt die Modulationsgeschwindigkeit des Flangers.
Effekttyp 5: Pitch Shifter
Dieser Effekt versieht das Eingangssignal mit einer
transponierten Kopie.
Parameter 1: Pitch [0...48]
Anwahl des Tonhöhenversatzes in Halbtonschritten.
Parameter 2: Tracking [0...99]
Regelt die Geschwindigkeit des Pitch Shifter-Effekts
(seine Ansprache). Für „Pitch“-Werte bis „24“ sollten
Sie einen relativ niedrigen Wert wählen. Bei größeren „Pitch“-Intervallen empfehlen wir jedoch einen
höheren Wert.
Parameter 3: Delay Time [0...99]
Hiermit regeln Sie die Verzögerungszeit des
gemischten Signals.
Effekttyp 6: Random Step Filter
Dieser Effekt versieht das Eingangssignal mit einem
zufallsbasierten Filtereffekt.
Parameter 1: Speed [0...99]
Hiermit regeln Sie die Geschwindigkeit.
Parameter 2: Depth [0...99]
Bestimmt die Modulationsintensität.
Parameter 3: Resonance [0...99]
Hiermit regeln Sie die Resonanzintensität.
Effekttyp 7: Sweep Modulation Delay + Flanger
Dies ist eine Kombination von einem modulierten
Delay, dessen Verhalten sich nach dem Eingangssignal richtet, mit einem Flanger.
Parameter 1: Time [0...99]
Die Bewegungsgeschwindigkeit des ModulationsDelays.
Parameter 2: Type [0...1]
Die Bewegungsrichtung des Modulations-Delays.
Parameter 3: Mix [0...99]
Lautstärke des hinzugefügten Flanger-Effekts.
Effekttyp 8: Tube OD + Flanger
Dies ist eine Kombination eines Overdrive-Effekts
(Verzerrung) mit einem Flanger.
Parameter 1: Drive [0...99]
Hiermit regeln Sie die Verzerrungsintensität.
Parameter 2: Speed [0...99]
Regelt die Modulationsgeschwindigkeit des Flangers.
Parameter 3: Mix [0...99]
Lautstärke des hinzugefügten Flanger-Effekts.
Effekttyp 9: Random Step Filter + Delay
Dies ist die Kombination eines zufallsbasierten Filtereffekts mit einem Delay.
Parameter 1: Speed [0...99]
Bestimmt die Geschwindigkeit der Filterschritte.
Parameter 2: Depth [0...99]
Bestimmt die Modulationsintensität des Filters.
Parameter 3: Time [0...99]
Hiermit regeln Sie die Verzögerungszeit.
48
Page 49

FrançaisDeutsch
EnglishVoice Name
Anhang
Anhang
Laden der Werkseinstellungen
Zum Laden der Werkseinstellungen Ihrer WAVEDRUM Mini verfahren Sie bitte folgendermaßen.
1.
Halten Sie den -Taster gedrückt, während Sie
den Netzschalter aktivieren.
PL
Im Display blinkt die Meldung „
des -Tasters blinkt ebenfalls.
2.
Halten Sie den -Taster ±2 Sekunden gedrückt,
um die Werkseinstellungen zu laden.
Wenn Sie die Werksvorgaben doch nicht laden
möchten, müssen Sie das Instrument mit seinem
Netzschalter ausschalten.
Schalten Sie das Instrument niemals aus, solange
Daten geladen werden. Sonst könnten Sie
nämlich die Daten beschädigen.
3.
Bei Ausführen dieses Befehls ruft die WAVEDRUM Mini wieder die Werkseinstellungen auf und
wechselt danach in den nach dem Einschalten normalen Modus.
“. Die Diode
Fehlermeldungen
Beim Einschalten überprüft die WAVEDRUM Mini
automatisch die internen Schaltkreise. Falls dabei ein
Fehler festgestellt wird, erscheint eine der folgenden
Fehlermeldungen. Nachstehend erfahren Sie, wie man
die Störung beheben kann.
E. 0
: Die Anwenderdaten sind verloren gegangen.
Siehe „Laden der Werkseinstellungen“ oben.
E. 1
: Es ist ein Systemfehler aufgetreten. Schalten Sie
die WAVEDRUM Mini sofort aus und wenden Sie
sich an Ihren Korg-Händler.
Fehlersuche
Wenn Sie den Eindruck haben, dass etwas nicht nach
Plan läuft, sollten Sie zuerst folgende Punkte überprüfen. Wenn das nichts hilft, wenden Sie sich bitte
an Ihren Korg-Händler.
Das Gerät kann nicht eingeschaltet werden
• Schließen Sie das Netzteil ordnungsgemäß an die
WAVEDRUM Mini und die Steckdose an.
• Wenn Sie Batterien verwenden, müssen Sie überprüfen, ob sie richtig herum eingelegt wurden.
Der Lautsprecher bleibt stumm
• Drehen Sie den VOLUME-Regler nach rechts.
• Wenn Sie einen Stecker an die Kopfhörer- oder
OUTPUT- Buchse anschließen, wird der Lautsprecher deaktiviert.
G. 7
• Haben Sie Parameter
„0“ gestellt?
Es können weder Klänge, noch Effekte
gewählt werden
Blinkt die CLIP- oder PAD-Diode links im
Bedienfeld?
Drücken Sie einen der Taster CLIP/PAD, ,
oder +, damit die betreffende Diode wieder konstant
leuchtet.
Das Rhythmus-Pattern wird nicht abgespielt
• Blinkt die RHYTHM/LOOPER-Diode (oben
rechts)?
Wenn sie blinkt, ist die Rhythmusfunktion
stummgeschaltet. Um die Stummschaltung zu deaktivieren, müssen Sie den SHIFT-Taster gedrückt
halten, während Sie den FX-Taster betätigen.
• Haben Sie Parameter
gestellt?
(Lautsprecherpegel) auf
G. 6
(Rhythmuspegel) auf „0“
Die Taster scheinen gesperrt zu sein
Während der Anwahl eines Rhythmus-Pattern blinkt
die Pattern-Nummer im Display. Solange das der Fall
ist, können Sie weder Klangfarben wählen, noch die
Pattern-Wiedergabe starten/anhalten.
49
Page 50

Anhang
Die Klänge sind nicht dieselben wie auf einer
anderen WAVEDRUM Mini
Wie bei den meisten Instrumenten gleicht keine
WAVEDRUM Mini exakt der anderen. Die wichtigsten Gründe hierfür sind die Stimmung, wie man
darauf spielt und wie gut man sie pflegt.
Das bedeutet im Klartext, dass zwei oder mehr
WAVEDRUM Mini bei exakt denselben Einstellungen niemals absolut gleich klingen. Die
WAVEDRUM Mini mag zwar ein elektronisches Instrument sein, aber ihre Seele gleicht der eines akustischen Instruments.
Es kommt zu Rückkopplung
Am besten verwenden Sie die Klangregelung der
Beschallungsanlage und einen Limiter, um zu verhindern, dass der Verstärker und/oder die Box
beschädigt wird. Siehe Seite 37.
Bei Drücken des Pads passiert nichts
Im Gegensatz zur Wavedrum bietet die WAVEDRUM
Mini keinen Drucksensor, der das Beeinflussen des
Klangs durch das Drücken auf das Pad erlaubt.
Technische Daten
Dynamischer Percussion-Synthesizer
Klangfarben:
Effekte:
Rhythmus-Pattern:
des eigenen Spiels zur Begleitung)
Loop:
Maximal 25 Sekunden (zwischen dem Anfang
und Ende der Phrase)
Ausgangsbuchsen:
Klinkenbuchse), Kopfhörer (Stereo-Miniklinke)
Eingangsbuchse:
Ausgangleistung des Lautsprechers:
Display:
Sampling-Frequenz:
A/D-, D/A-Wandlung:
Stromversorgung:
oder 6 Ni-MH-Batterien (AA)
Battery life:
MH-Batterien (1900 mAh)
* Die Batterielaufzeit richtet sich nach den ver-
wendeten Batterien und den Einsatzbedingungen.
Leistungsaufnahme:
Gewicht:
Abmessungen (B x T x H):
Betriebstemperatur:
bildung)
Lieferumfang:
(DC9V, ), Sensorclip,Gurt
100
10
100 (Aufnahmemöglichkeit
OUTPUT (Mono-
CLIP-Buchse
1,3 W
2 Zeichen, 7 Segmente, LED
48 kHz
24 Bit
Beiliegendes DC9V-Netzteil
±4 Stunden bei Verwendung von Ni-
7,5 W
1,0 kg (ohne Batterien)
216 x 216 x 67 mm
0 – +40°C (ohne Kondens-
Bedienungsanleitung, Netzteil
50
* Änderungen der technischen Daten und des Designs
ohne vorherige Ankündigung vorbehalten.
Page 51

Français EnglishVoice Name
Page 52

Voice Name List
Sounds
Voice Name List
No. Name Category
00 Club Kit Drum Kit
01 Big Tom Drum/Perc. Instrument
02 Katim Drum/Perc. Instrument
03 SD & HH Drum Kit
04 Analog Bass Drum Drum/Perc. Instrument
05 Synth Bass 1 Synth Bass 6 (F#) Ran.
06 Hand Clap (w/Jingle) Drum/Perc. Instrument
07 Wah Hit Other Tuned Instrument 6 (F#) Vel.
08 1970 Space Tom Drum/Perc. Instrument
09 Ethnic Guitar Slide Other Tuned Instrument 8 (Ab) Vel.
10 BD/SD/HH Kit 1 Drum Kit
11 Marimba Duo Tuned Percussion 6 (F#)
12 Jingle (Light) Drum/Perc. Instrument
13 Techno Voice Drum/Perc. Instrument
14 BD/SD/HH Kit 2 Drum Kit
15 BD/SD/HH Kit 3 Drum Kit
16 Dance Drum Kit Drum Kit
17 BD/SD/HH & OHH Drum Kit
18 Dance Jam Kit Drum Kit
19 Human Drum Kit Drum Kit 6 (F#) Sec.
20 Analog Kit Session Drum Kit 6 (F#)
21 Analog Kit Drum Kit
22 Human Beatbox Drum Kit 6 (F#)
23 Voice Tom Drum Kit
24 Dance Bass Drum Drum/Perc. Instrument
25 Messy Tekno Kick Drum/Perc. Instrument
26 Boomy Rap Kick Drum/Perc. Instrument
27 Toy Snare Drum/Perc. Instrument
28 Ring Snare Drum/Perc. Instrument
29 Tribal Ambi Tom Drum/Perc. Instrument
30 Ce le bra tio n Tom Tom Drum/Perc. Instrument
31 Techno Clapper Drum/Perc. Instrument
32 Jingle (Ethnic) Drum/Perc. Instrument
33 Sagat Close Drum/Perc. Instrument
34 Riq Drum/Perc. Instrument
35 Big Riq Drum/Perc. Instrument
36 Electric Tambourine Drum/Perc. Instrument
37 Shaker Drum Drum/Perc. Instrument
38 Dance HH Drum/Perc. Instrument
39 Triarimba Drum/Perc. Instrument
40 Random Perc Drum/Perc. Instrument
41 Bonga Drum/Perc. Instrument
42 Conga Drum/Perc. Instrument
43 Tabil Drum/Perc. Instrument
44 Water Drum Drum/Perc. Instrument
45 Tar Drum/Perc. Instrument
46 Agogo Set Drum/Perc. Instrument
47 Udu & Tambourine Drum/Perc. Instrument
48 Cajon Drum/Perc. Instrument
49 Timbale Drum/Perc. Instrument
Scale
Tra nspo se
○
Ran./Vel.
○
Ran.
Pitch change: Ran. (Random pitch change), Vel. (Pitch change by velocit y), Seq. (Sequenced pitch change)
Pitch
No. Name Category
change
50 Tabla Drum/Perc. Instrument 9 (A)
51 Djembe Drum/Perc. Instrument
52 Elektro Slider Drum/Perc. Instrument
53 Chord Hit Synth Bass 6 (F#)
54 Piko Piko Synth Bass 6 (F#)○Ran.
55 Synth Bass 2 Synth Bass 6 (F#)
56 Kicked Bassline Synth Bass 6 (F#) Sec.
57 Hand Clap (w/Bass) Synth Bass 6 (F#) Ran.
58 Bass SEQ Synth Bass 6 (F#) Sec.
59 Slap Bass Synth Bass 6 (F#) Vel .
60 Space Triangle Synth Bass 6 (F#) Sec.
61 Industrial Kit 1 Industrial
62 Industrial Kit 2 Industrial
63 Industrial Kit 3 Industrial
64 Metal Game Industrial
65 Steel Drum Bluesy Tuned Percussion 6 (F#) Ve l.
66 Exotic Vibraphone Tuned Percussion 8 (Ab) Vel.
67 Gamelan Hard Tuned Percussion 6 (F#) Ve l.
68 Gamelan Soft Tuned Percussion 6 (F#)○Ran.
69 Kalimba Tuned Percussion 6 (F#) Ve l.
70 Celesta Tuned Percussion 8 (Ab) Vel.
71 Reso Tubular Bell Tuned Percussion 6 (F#) Ve l.
72 Air Bamboo Tuned Percussion 6 (F#)○Ran.
73 Balafon Tuned Percussion 6 (F#)○Ran.
74 Log's Club Tuned Percussion 6 (F#)○Ran.
75 Toy Wind Drum Tuned Percussion 6 (F#)○Ran.
76 Arabic Marimba Tuned Percussion 6 (F#)○Ran.
77 Metal Delay Bell Other Tuned Instrument 6 (F#) Vel.
78 Chord Sequence Other Tuned Instrument 6 (F#)
79 Synth Chord Hit Other Tuned Instrument 6 (F#)
80 Splash Cymbal Log Other Tuned Instrument 6 (F#)○Ran.
81 Sitar Other Tuned Instrument 8 (Ab)○Ran.
82
Belly Dancing Jam Drum
83 Tambura Other Tuned Instrument 8 (Ab)
84 Choir Other Tuned Instrument 6 (F#) Vel .
85 Pizz. Ensemble Other Tuned Instrument 6 (F#) Vel .
86 Piano Concert Other Tuned Instrument 6 (F#) Vel.
87 Telephone SFX SFX
88 Scratch SFX 6 (F#)
89 Computer Robot SFX 6 (F#)
90 Synthy Short Kit SFX
91 Game Hit SFX 6 (F#)
92 One for time SFX
93 Breath Drum SFX
94 Cosmos SFX 6 (F#) Vel.
95 Yamiuchi SFX 8 (Ab)
96 Space Frog SFX
97 Gun Explosion SFX
98 Noise Up SFX
99 Harp Bell SFX
Other Tuned Instrument 8 (Ab)○Ran.
Pitch
Scale
Tran spos e
change
Ran./Vel.
Vel. /S ec.
Vel. /S ec.
Ran./Vel.
Ran./Vel.
Ran./Vel.
68
Page 53

FrançaisDeutsch EnglishVoice Name
Voice Name List
6 Tonic only…. each note will sound at the pitch specied
by the Transpose parameter.
1 Major Pentatonic
2 Minor Pentatonic
4 Indian-type scale
0 Major
3 Minor
5 Gamelan-type scale
Scale
Pitch change
Ran. : Random pitch change.
Vel. : Pitch change by velocity.
Seq. : Sequenced pitch change. When you play repeated notes with a
certain force and tempo, each strike will repeat phrases of a certain
pattern.
Effects
No. Name Default
0 Reverb a
1Multi Tap Delay
2Delay + Reverb
3 Reverb + Phaser
4 Reverb + Flanger b
5 Pitch Shifter
6 Random Step Filter
7 Sweep Modulation Delay + Flanger
8Tube OD + Flanger
9 Random Step Filter + Delay
Rhythm Patterns
No.
00 Dreamy Planets [104] 50 Waterphone [102]
01 Techno Kick&Hat [128] 51 Tragedy [82]
02 Submarine [100] 52 Spacey [80]
03 Ambi Windy [97] 53 Orgel [84]
04 AquaCity 1 [120] 54 Murk [128]
05 Hip Hop Windy [90] 55 Afrikana [105]
06 Wavesequence Beat [130] 56 DubStep Drama [145]
07 Arp Techno [128] 57 Suspects [90]
08 DubStep Drama [145] 58 Arpeggio [76]
09 Machine Gun [120] 59 Dark Hop Beat [90]
10 Opening [80] 60 Hip Hop Thinker [90]
11 Jupiter Highs [90] 61 Granular Hip Hop [78]
12 Flying Saucer [137] 62 Heavy Marching [75]
13 Simple Shakers [85] 63 Doubt [85]
14 Simple Shakers [115] 64 Slow Dance Pop [96]
15 Simple Shakers [128] 65 Warehouse Rock [80]
16 Swing Hop Percussion [100] 66 Wah Ho p [89 ]
17 Swing Hop Tambo [100] 67 Sweep Whistle [70]
18 West Coast Rapper [66] 68 Beat Vocode [80]
19 Slow R&B [77] 69 Marching Rock [94]
20 Hip Pop [80] 70 Rock 1 [110]
21 New Cool 1 [80] 71 Rock 2 [112]
22 New Cool 2 [80] 72 Rock 3 [Swing, 95]
23 Skittles [80] 73 Rock 4 [Triplet, 130]
24 Pop Camel [85] 74 Pop 1 [ 130]
25 Pregnant Pause [85] 75 Pop 2 [1 10]
26 Mellow Pop [87] 76 Pop 3 [Swing, 104]
27 Hip Vox Hop [88] 77 Pop 4 [1 00]
28 Hip Hop Icy [90] 78 Ballad 1 [100]
29 R&B Gold Digger [90] 79 Ballad 2 [75]
30 Tek Pop [110] 80 Funk 1 [84]
31 R&B Grenade [111] 81 Funk 2 [95]
32 AquaCity 2 [120] 82 Soul [80]
33 AquaCity 3 [120] 83 16beat [120]
34 Jakarta 1 [120] 84 Jazz Samba [Swing, 120]
35 Jakarta 2 [120] 85 Latin 1 [108]
36 Jakarta 3 [120] 86 Latin 2 [130]
37 Jakarta 4 [120] 87 Bossa [65]
38 SuperTek [128] 88 Fast Bossa [106]
39 Progressive [128] 89 Andean [110]
40 Hard Techno [128] 90 Brazilian Samba [102]
41 Didgeridoo [122] 91 ChaCha [124]
42 Dance Beat [124] 92 Reggae [130]
43 Trancy [132] 93 S ambalegre [112]
44 Techno Sequence [128] 94 Turkish Pop [127]
45 DubStepper [170] 95 2/4 Oyun [112]
46 Atmosphere [80] 96 Arabic Rumba [96]
47 Conga Hop [100] 97 Baladi [112]
48 Sweeper [120] 98 Nobi [95]
49 Choir [105] 99 Rumba [138]
Name [bpm]
No.
Name [bpm]
69
Page 54

GFE
1
4015-2 Yanokuchi, Inagi-city, Tokyo 206-0812 Japan
© 2011 KORG INC.
IMPORTANT NOTICE TO CONSUMERS
This product has been manufactured according to strict specifications and voltage
requirements that are applicable in the country in which it is intended that this product
should be used. If you have purchased this product via the internet, through mail order,
and/or via a telephone sale, you must verify that this product is intended to be used in
the country in which you reside.
WARNING: Use of this product in any country other than that for which it is intended
could be dangerous and could invalidate the manufacturer’s or distributor’s warranty.
Please also retain your receipt as proof of purchase otherwise your product may be
disqualified from the manufacturer’s or distributor’s warranty.
REMARQUE IMPORTANTE POUR LES CLIENTS
Ce produit a été fabriqué suivant des spécifications sévères et des besoins en tension
applicables dans le pays où ce produit doit être utilisé. Si vous avez acheté ce produit
via l’internet, par vente par correspondance ou/et vente par téléphone, vous devez
vérifier que ce produit est bien utilisable dans le pays où vous résidez.
ATTENTION: L’utilisation de ce produit dans un pays autre que celui pour lequel il a
été conçu peut être dangereuse et annulera la garantie du fabricant ou du distributeur.
Conservez bien votre récépissé qui est la preuve de votre achat, faute de quoi votre
produit ne risque de ne plus être couvert par la garantie du fabricant ou du distributeur.
WICHTIGER HINWEIS FÜR KUNDEN
Dieses Produkt wurde unter strenger Beachtung von Spezifikationen und
Spannungsanforderungen hergestellt, die im Bestimmungsland gelten. Wenn Sie
dieses Produkt über das Internet, per Postversand und/oder mit telefonischer
Bestellung gekauft haben, müssen Sie bestätigen, dass dieses Produkt für Ihr
Wohngebiet ausgelegt ist.
WARNUNG: Verwendung dieses Produkts in einem anderen Land als dem, für das es
bestimmt ist, verwendet wird, kann gefährlich sein und die Garantie des Herstellers
oder Importeurs hinfällig lassen werden. Bitte bewahren Sie diese Quittung als
Kaufbeleg auf, da andernfalls das Produkt von der Garantie des Herstellers oder
Importeurs ausgeschlossen werden kann.
 Loading...