

Page 1
ENGLISH
Quick Start Guide
Precautions ................................................................ 2
Cautions for use ......................................................... 3
About the documentation ......................................... 3
Introduction ........................................... 4
Main features ............................................................ 4
Parts of the WAVEDRUM ............................................ 5
Preparations .......................................... 6
Connecting audio devices .......................................... 6
Turning the power on ................................................ 6
Attaching the WAVEDRUM to a stand ........................ 6
Performing ............................................ 7
Performance techniques ............................................ 7
Selecting programs .................................................... 7
Assigning programs to buttons 1–4 .......................... 7
Editing ................................................... 8
Basic editing procedure ..............................................8
Saving your edited settings ........................................9
Important editing parameters ....................................9
Appendix ............................................. 11
Restoring the factory settings ..................................11
Troubleshooting .......................................................11
Specifications ...........................................................11
Voice Name List .......................................i
Programs .....................................................................i
Live mode ...................................................................ii
Algorithms ................................................................iii
PCM Instruments .......................................................iii
Loop Phrases .............................................................iv
Program structure for Single-size/Double-size
Algorithms ............................................. v
1
Page 2
EnglishFrançaisDeutschVoice Name
Precautions
Thank you for purchasing the Korg
Global Edition
This owner’s manual contains a great deal of information that will help you understand the
and play it to its fullest potential. In order- to ensure
that you are taking complete advantage of your
WAVEDRUM
use the product as directed.
dynamic percussion synthesizer.
, please read this manual carefully and
WAVEDRUM
WAVEDRUM
Precautions
Location
Using the unit in the following locations can result in a
malfunction.
• In direct sunlight
• Locations of extreme temperature or humidity
• Excessively dusty or dirty locations
• Locations of excessive vibration
• Close to magnetic fields
Power supply
Please connect the designated AC adapter to an AC outlet
of the correct voltage. Do not connect it to an AC outlet
of voltage other than that for which your unit is intended.
THE FCC REGULATION WARNING (for USA)
NOTE:Thisequipmenthasbeentestedand
foundtocomplywiththelimitsforaClassB
digitaldevice,pursuanttoPart15oftheFCC
Rules.Theselimitsaredesignedtoproviderea‐
sonableprotectionagainstharmfulinterference
inaresidentialinstallation.Thisequipmentgen‐
erates,uses,andcanradiateradiofr
energyand,ifnotinstalledandusedinaccor‐
dancewiththeinstructions,maycauseharmful
interferencetoradiocommunications.However,
thereisnoguaranteethatinterferencewillnot
occurinaparticularinstallation.Ifthisequip‐
mentdoescauseharmfulinterferencetoradioor
televisionreception,whichcanbedete
turning
by
encouragedtotrytocorrecttheinterferenceby
oneormoreofthefollowingmeasures:
• Reorient or relocate the receiving antenna.
• Increase the separation between the equipment
and receiver.
• Connect the equipment into an outlet on a circuit
different from that to which the receiver is connected.
• Consult the dealer or an experienced radio/TV
technician for help.
eequipmentoffandon,theuseris
th
equency
rmined
Interference with other electrical devices
Radios and televisions placed nearby may experience
reception interference. Operate this unit at a suitable distance from radios and televisions.
Handling
To avoid breakage, do not apply excessive force to the
switches or controls.
Care
If the exterior becomes dirty, wipe it with a clean, dry
cloth. Do not use liquid cleaners such as benzene or thinner, or cleaning compounds or flammable polishes.
Keep this manual
After reading this manual, please keep it for later reference.
Keeping foreign matter out of your equipment
Never set any container with liquid in it near this equipment. If liquid gets into the equipment, it could cause a
breakdown, fire, or electrical shock.
Be careful not to let metal objects get into the equipment.
If something does slip into the equipment, unplug the AC
adapter from the wall outlet. Then contact your nearest
Korg dealer or the store where the equipment was purchased.
If items such as cables are included with this equipment, you must use those included items.
Unauthorized changes or modification to this system
can void the user’s authority to operate this equipment.
Notice regarding disposal (EU only)
When this “crossed-out wheeled bin” symbol
is displayed on the product, owner’s manual,
battery, or battery package, it signifies that
when you wish to dispose of this product,
manual, package or battery you must do so in
an approved manner. Do not discard this product, manual, package or battery along with ordinary
household waste. Disposing in the correct manner
will prevent harm to human health and potential damage to the environment. Since the correct method of
disposal will depend on the applicable laws and regulations in your locality, please contact your local
administrative body for details. If the battery contains heavy metals in excess of the regulated amount,
a chemical symbol is displayed below the “crossedout wheeled bin” symbol on the battery or battery
package.
En-2
Page 3

Cautions for use
About the documentation
Each individual
depending on the type of head used, how it is tuned or
played, and how it has been maintained. Please take note
of the following points as well as the preceding “Cautions
for safety.”
WAVEDRUM
unit will differ slightly
Do not place heavy objects on the head for long periods
If pressure is applied to the surface of the head for a long
period, the rubber cushion and sensor under the head will
become deformed, and this can harm the playability of
the instrument.
Avoid placing heavy objects on the head or placing the
WAVEDRUM
upside down for long periods.
Feedback
The sensors in the
occur in the head and body when you strike the
DRUM
with your hand or a drum stick. In some situations, the
pick up loud sounds from nearby high output speakers in
addition to vibrations produced by directly striking the
WAVEDRUM
Especially when monitoring the
large PA setup, the
speakers can be transmitted through the floor or stand (or
directly through the air) and be picked up once again by
the
When such vibrations are detected by the
and sent back through the speakers, feedback will occur,
and an uncontrollable and continuous sound will result.
Feedback places severe stress on amps and speakers, and
can cause serious damage to equipment. Thus, when a
powerful monitoring system is used, the equalizers and
limiters of the PA system should be adjusted to prevent
the
preventing feedback for vocal and acoustic instrument
mics.
WAVEDRUM
WAVEDRUM
WAVEDRUM
WAVEDRUM
may also act as a microphone and
.
WAVEDRUM
.
from producing feedback, similar to
detect the vibrations that
WAVEDRUM
sounds emitted by the
WAVEDRUM
WAV E-
with a
How the documentation is organized
The WAVEDRUM Global Edition comes with the following documentation.
• Quick Start Guide (printed, PDF) (this document)
• Parameter Guide (PDF)
The Quick Start Guide provides a concise explanation of
the WAVEDRUM’s main functions. Read this first.
The Parameter Guide explains all of the WAVEDRUM’s
parameters and algorithms. Refer to this guide when you
want to learn more about a specific parameter.
These guides are provided as PDF files on the included
accessory disc.
Abbreviations for the manuals
In the documentation, references to the manuals are
abbreviated as follows.
QS: Quick Start Guide
PG: Parameter Guide
Data handling
Unexpected malfunctions can result in the loss of memory contents. Korg cannot accept any responsibility for
any loss or damage which you may incur as a result of
data loss.
En-3
* This product was developed under license of physical
modeling tone generator patents (http://www.sondiusxg.com) owned by Stanford University USA and
Yamaha Corporation.
* All product names and company names are the trade-
marks or registered trademarks of their respective owners.
Page 4

Introduction Main features
EnglishFrançaisDeutschVoice Name
Introduction
Main features
Revolutionary synthesis technology
The
WAVEDRUM
sound of your strike via the head and rim sensors, and
processing this audio source by DSP (Digital Signal Processing) sound synthesis technology to create unique
sounds. At the same time, a PCM sound source is also
played using your strike as the trigger.
Using this combination of methods, the
produces a rich variety of percussion sounds that give
you an extremely wide range of freedom for performance expression. By using subtle motions of your fingers or hand to strike, rub, or scratch the
or by playing it using sticks, mallets, or brushes, you can
obtain a high degree of expressive and dynamic range
that rivals that of acoustic drums or percussion instruments.
Unique sounds generated by 60 different algorithms
The
WAVEDRUM
variety of software synthesis methods including analog,
additive, non-linear, and physical modeling, and combines these sounds to create the final output sound. Such
combinations are called “algorithms,” and the
DRUM
contains 60 different single-size and double-size
algorithms. The WAVEDRUM Global Edition gives you
the 36 algorithms of the WAVEDRUM (WD-X) as well
as the 9 algorithms for Middle Eastern percussion instruments from the WAVEDRUM ORIENTAL, plus 15
highly versatile drum/percussion algorithms such as
Snare, Conga, Djembe, and Cajon. By specifying different algorithms you can create completely new sounds
that can be produced only by the
as a variety of instrumental sounds or sounds of nature.
generates sound by detecting the
WAVEDRUM
WAVEDRUM
uses DSP technology to carry out a
WAV E -
WAVEDRUM
, as well
,
Live mode
You can register twelve frequently-used programs (four
programs x three banks) in buttons 1–4 for immediate
recall. This is convenient for live performances.
140 loop phrases
The built-in 140 loop phrases cover a broad range of
genres and tempos, allowing you to play along for a oneperson jam session.
AUX IN connector
The AUX IN connector lets you connect another WAVEDRUM unit, an audio device, or an external sound module,
and play along with that audio source.
Lightweight and compact design
The
WAVEDRUM
design for comfortable playing on your lap as well as
easy portability. You can also perform with it attached to
a stand (sold separately) for stand-up performance (Percussion Stand ST-WD) or a commercially-available
snare stand.
features a lightweight and compact
400 different PCM instruments for the head and rim
The PCM instruments (PCM sound sources produce a
rich variety of sounds in addition to the algorithms. Programs that use a single-size algorithm allow you to freely
assign a different algorithm and PCM instrument to the
head and the rim, giving you a very broad array of
sounds. Programs that use a double-size algorithm are
optimized for simulating acoustic instruments such as a
snare, djembe, or cajon; within the algorithm, these programs analyze your performance in realtime, and based
on this analysis, they control the PCM instrument to create natural response that cannot be obtained from a conventional PCM sound generator.
200 preset programs, 200 user programs
There are 200 built-in preset programs that combine percussion, drums, and sound effects in complex ways that
can produce completely different sounds according to
your playing technique. Programs that you edit can be
saved in the 200 user programs.
En-4
Page 5
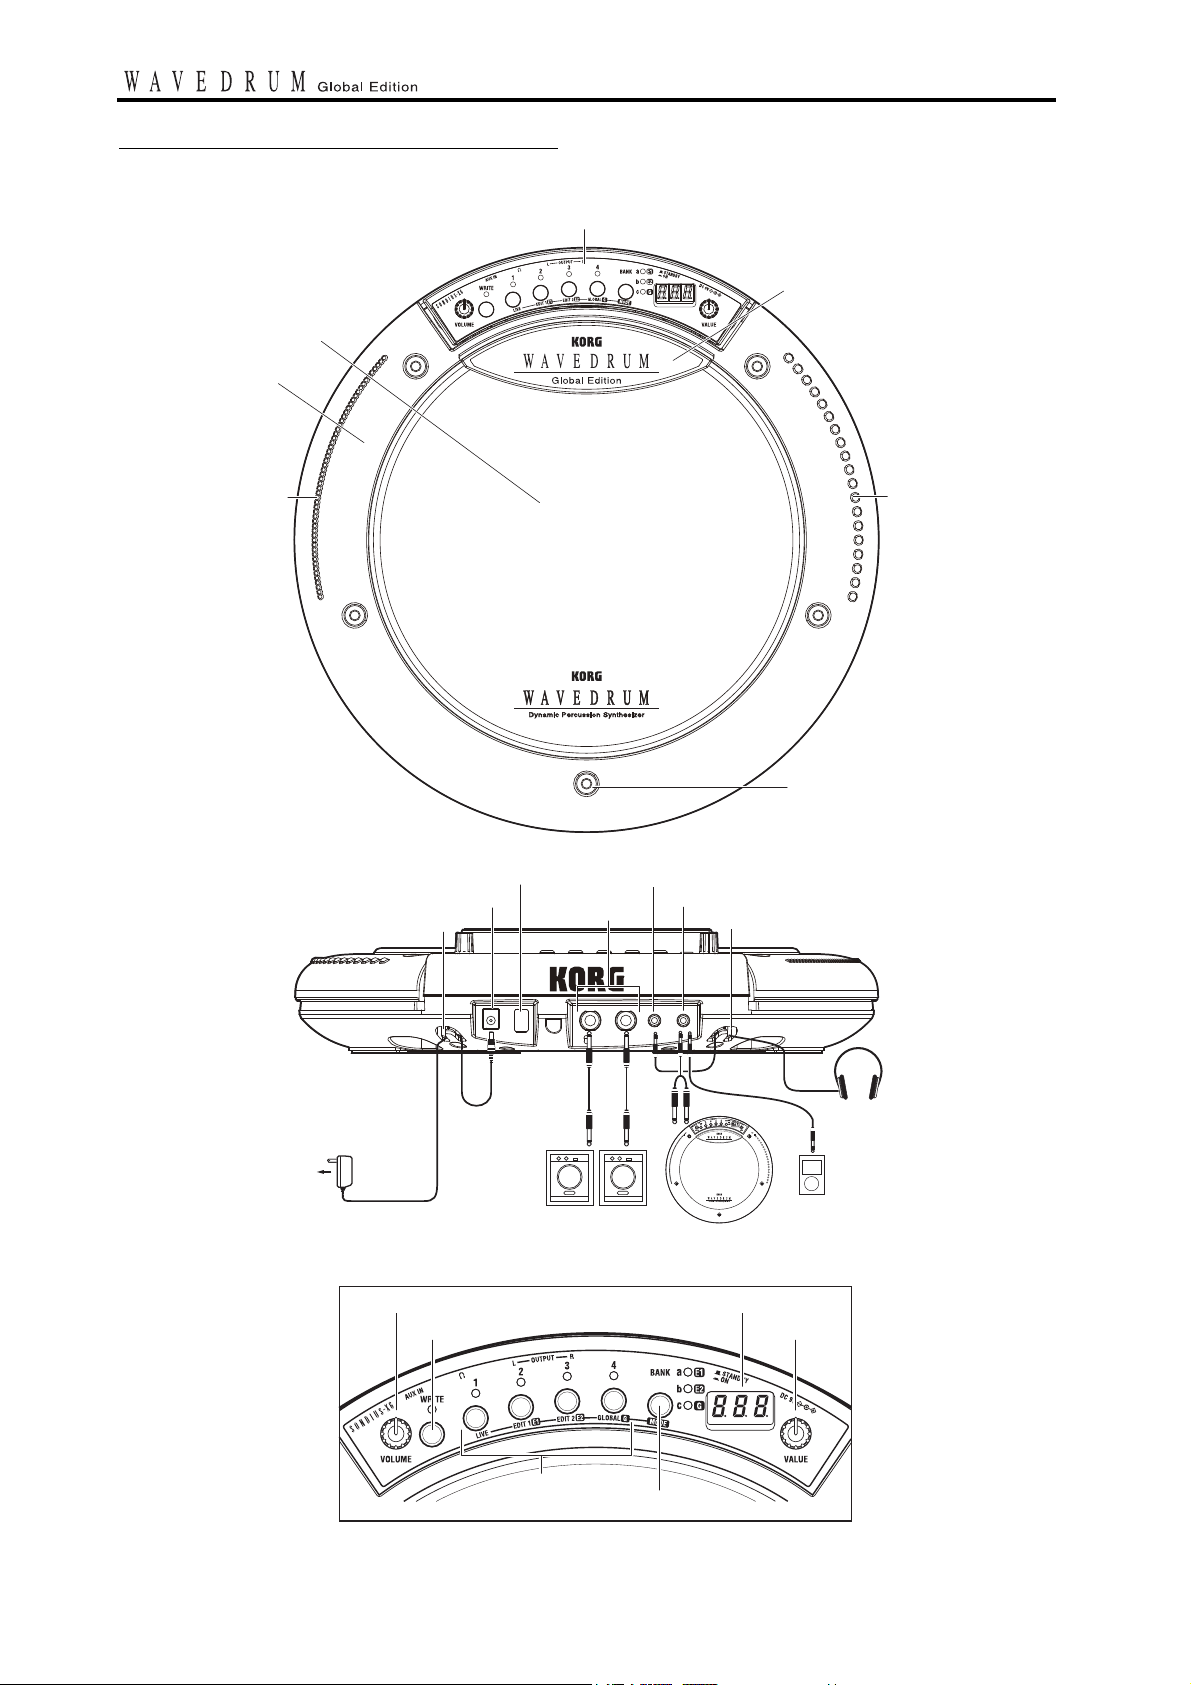
Parts of the WAVEDRUM
Notch
Tension bolt
(x 5)
Notch
Sensor cover
Front panel
Head
Rim
DC IN connector
Cable hook Cable hook
OUTPUT
L,R jacks
Power button Headphone jack
AUX IN jack
another WAVEDRUMPowered monitors, etc.
Audio player
or
Headphones
INPUT
OUTPUT
to AC outlet
AC adaptor
(included)
VOLUME knob
Front panel
WRITE button
Display
VALUE knob
Buttons 1-4
BANK/MODE button
En-5
Page 6
Preparations Connecting audio devices
EnglishFrançaisDeutschVoice Name
Preparations
Connecting audio devices
Before you connect the Wavedrum Global to other
equipment, you must turn down the volume of all
equipment and turn off the power. Careless operation may damage your speaker system or cause malfunctions.
Please refer to the preceding page for a diagram of connections.
Connecting the output jacks to powered monitors or
a mixer
• Connect the
the input jacks of your powered monitors or mixer.
If you’re monitoring through headphones, connect
your headphones to the
jack. The VOLUME knob adjusts the L & R OUTPUT as well as the headphone volume.
Connecting an audio device to the input jack
• You can connect the OUTPUT L, R jacks of a second
WAVEDRUM
devices or to the
sound that is input via this jack will be output from
the OUTPUT L, R jacks and the headphone jack.
note: To input sound from a device that’s connected
to the AUX IN jack, you must go to Global mode and
raise the AUX IN jack mix level appropriately. The
mix level is 0 by default (See PG page 7).
Sudden transient peaks in volume produced by the
WAVEDRUM can damage your monitoring equipment,
or your hearing if you’re monitoring through headphones. Please be sure to set the volume appropriately.
Turning the power on
Connecting the AC adapter
1. Connect the included AC adapter to the
DRU
Use only the included AC adapter. Using any other
AC adapter may cause malfunctions.
2. Plug the AC adapter into an AC outlet.
Be sure to use an AC outlet that is the correct voltage for the adapter.
3. To prevent the plug from being accidentally dis-
connected, secure the power cable by wrapping it
around the
Turning the power on
1. Make sure that the
nected equipment is powered off, and that all volume controls are set to 0.
WAVEDRUM
unit or the output jacks of other audio
WAVEDRUM
M’s rear panel DC IN jack.
WAVEDRUM
’s OUTPUT L, R jacks to
WAVEDRUM’
’s AUX IN jack. The
’s cable hook.
WAVEDRUM
s headphone
WAV E -
and any con-
2. Power-on the equipment that’s connected to the
AUX IN jack.
3.
Press the
When powering-on the
your hand or any other object on the head. The
WAVEDRUM
WAVEDRUM
may malfunction if this is the case.
’s power button to turn it on.
WAVEDRUM
, do not rest
4. Turn on your powered monitors or other equip-
ment connected to the OUTPUT L, R jacks.
5.
Adjust the volume of each device. Adjust the
WAVEDRUM
knob. If you’re using the AUX IN jack, use the mix
level setting to adjust its volume
’s volume by turning its VOLUME
(
See PG page 7).
Turning the power off
When you’ve completed any necessary steps such as saving a program that you were editing, turn off the power
by following the procedure below (
Never turn off the power while data is being saved.
Internal data may be destroyed if you do so.
See QS page 9
).
1. Minimize the volume and then power off your
powered monitors or other equipment that is connected to the OUTPUT L, R jacks.
2. Turn the
way to the left, and hold down the power button
until the display goes blank (approximately one
second).
WAVEDRUM
’s VOLUME knob all the
3. Power off the power to any equipment connected
to the AUX IN jack.
Auto-Off function
The WAVEDRUM Global Edition provides an auto
power-off function.
The auto power-off function will automatically turn off
the power when there has been no user input (except for
the Volume control) for approximately four hours. If
desired, you can disable the auto power-off function. See
PG page 6 for the procedure. By default, auto power-off
is enabled.
Attaching the WAVEDRUM to a stand
The
WAVEDRUM
available 14-inch three-arm snare stand.
If you want to play the
tion, like a conga, you can use the optional Percussion
Stand ST-WD (sold separately).
Place the stand on a flat and stable location. Bundle
the power adapter and all connection cables neatly
so that no one trips over them.
For details on attaching the WAVEDRUM to your stand,
carefully read the owner’s manual included with the
stand that and as described.
can be used with any commercially-
WAVEDRUM
in a standing posi-
En-6
Page 7

Performing
1
VALUE
3
Dot
2
Performance techniques
The sound of the
tle nuances in the way that you strike, rub, or scratch it
with your fingers or hand, or the way that you strike it
with a stick, mallet, or brush. It will also respond differently depending on whether you strike the center of the
head, the edge, or the rim. The
expressive and dynamic range that rivals that of an
acoustic drum or percussion instrument, covering the full
spectrum of performance gestures from a light brush
across the head to a hard rimshot.
Some of the programs simulate conventional percussion
instruments, while others produce a different pitch each
time you strike; some allow you to play a phrase in a
specified scale. You can use a variety of techniques; after
striking the surface of the head with your hand or mallet,
you can apply additional pressure to control the pitch or
tone of the decay, or you can produce sustaining sounds
simply by applying pressure without striking the drum.
For details on each program, refer to the “Voice Name
List” and to PG page 8 and following of this manual.
Do not strike below the sensor cover or on the front
panel area.
WAVEDRUM
will respond to the sub-
WAVEDRUM
produces
Selecting programs
1. Hold down the BANK/MODE button and press
button 1.
This selects Live mode, which is the mode you’ll use
when playing the
indicate
number (
note: Immediately after you turn on the power, the
program stored in button 1 of bank a will be selected.
LIU, and will then indicate the program
000–199, P . 00– P . 99– q . 00– q . 99).
2. Press the BANK/MODE button to switch banks.
Each time you press the button, you’ll switch banks
in the order of a
of the button will light up consecutively. The display
will indicate the bank name, or the program number
for the bank of the program that is currently selected.
3. Press a button 1–4 to select the program that you
want to play.
The indicator above the selected button will light up,
and the display will indicate the program number.
Strike the head or rim to hear the selected program.
4. If you want to select a program from a different
bank, repeat steps 2 and 3 to select the desired
program.
WAVEDRUM
bc
a... The indicators at the right
. The display will
note: The
drum phrases. You can play along with these loop
phrases (See PG page 7).
WAVEDRUM
contains loop phrases, such as
Playing all programs consecutively
• When the display shows the program number, turning
the VALUE knob will cycle through the programs
consecutively (
q . 99).
If a program number has been changed, the decimal
point to the right of the program number in the display will light up. If you want to return to the original
program that was assigned, press the button whose
indicator is lit.
000–199 , P . 00– P . 99– q . 00–
About the programs
The
WAVEDRUM
(
000–199) and two hundred preset programs (P . 00–
P . 99– q . 00– q . 99). User programs, on the other
hand, can be used to save a program that you’ve edited.
You cannot rewrite preset programs. By default the user
programs contain the same programs as the preset programs.
contains two hundred user programs
Assigning programs to buttons 1–4
You can assign your favorite programs to buttons 1–4,
which are assignable locations. You can assign a total of
12 programs (1–4 for banks a, b and c) for quick access.
1. Select the bank and button that you want to
assign.
As an example, here’s how to assign bank a button 1.
Press the BANK/MODE button to select bank a, and
then press button 1.
2. Turn the VALUE knob to select the program that
you want to assign.
3. Press the WRITE button. The indicator above the
button will blink, and the display will blink to
indicate the newly assigned bank and button number
a-1 and the program number.
4. Press the WRITE button once again to complete
the assignment.
If you decide not to assign the program, press any
button other than the WRITE button.
En-7
Page 8

Editing Basic editing procedure
EnglishFrançaisDeutschVoice Name
Editing
By editing a program you can adjust it to suit your playing style, or transform it into a completely new sound.
For example, you can adjust the pitch or the decay time
to match your song or your playing method, or you can
select the way that different strikes will affect the volume
or tone. You can also adjust reverb and delay effects.
By adjusting the algorithm parameters you can make
more detailed changes to the sound or even transform the
sound radically. For example, even with the same algorithm, it’s possible to create a range of variation not possible with a typical percussion instrument, such as
changing the head of a drum from skin to metal.
You can also switch the algorithm itself or choose a different PCM instrument, and create sounds from scratch.
The process of making these changes is called “editing.”
On the
WAVEDRUM
described below.
Basic editing procedure
note: In order to edit a program, you must first select the
program that you want to edit in Live mode (See
QS page 7).
1. Select the desired Edit mode.
Edit 1: Hold down the BANK/MODE button and
press button 2. The display will indicate
eral seconds.
In Edit 1 mode you can adjust parameters such as
Tune, Decay, Level, Curve, and Effect (reverb,
delay), and select the algorithm and PCM instrument
(See PG page 3).
Edit 2: Hold down the BANK/MODE button and
press button 3. The display will indicate
eral seconds.
In Edit 2 mode you can adjust the algorithm (See
PG page 5).
Global: Hold down the BANK/MODE button and
press button 4. The display will indicate
eral seconds.
In Global mode you can adjust the final panning, play
back looped phrases, and adjust the
calibration (See PG page 6).
note: In Edit 1 and 2 modes you’ll be editing the
sound of an individual program. In contrast, the settings in Global mode are common to the entire
WAVEDRUM
program.
, you can edit using the Edit modes
Ed1 for sev-
Ed2 for sev-
GLb for sev-
WAV E D RU
; they are not specific to an individual
M’s
1
2
2, 4
WRITE
For details on each mode, please refer to the respective reference pages.
The [E1], [E2], or [G] indicator at the right of the
BANK/MODE button will blink.
If you select Edit mode 1 or 2, the display will indicate
Ed1 or Ed2, and will then indicate the current
page.
In Global mode, the display will indicate
will then indicate the parameter that was last selected.
(The unit will be in this state following step 3. Immediately after you turn on the power, Pan will be
selected.)
2. Select the page that you want to edit. Press the
BANK/MODE button. Press the button until the
desired page appears. Alternatively, you can turn
the VALUE knob to select a page.
For example if you press the BANK/MODE button in
Edit 1 mode, the page will change in the order of
Tune (
tun)
Decay ( dcY) Level ( LEU) ...
(See PG page 3).
3. Press one of the buttons 1–4 to select the parame-
ter that you want to edit.
The indicator above the button will light up. The display will indicate the parameter name, and then the
value.
note: If a button other than the selected button (1–4)
is blinking, this indicates that the corresponding
parameter value has been edited.
4. Turn the VALUE knob to edit the value.
The value indicated in the display will change, and
the decimal point to the right of the value will light
up. (The decimal point will go dark if you return the
value to its original setting.)
5. If you want to edit a parameter located on another
page, press the BANK/MODE button to switch
pages (see step 2). Then edit the value as described
in steps 3 and 4.
6. If you want to keep the changes that you’ve made,
you must save them. Please see next page.
note: If you return to Live mode without saving the
program that you’ve edited (See “Selecting programs” on QS page 7), the indicator of the selected
button (1–4) will blink, and the decimal point at the
right edge of the display will light up. This indicates
that the program has not been saved.
3
GLb, and
En-8
Page 9

Saving your edited settings
Important editing parameters
If you would like to use your edited program again later,
you’ll need to save it. If you’ve edited a program and
then power-off or switch to a different program without
saving it, the changes that you made will be lost.
Changes you make to the settings of Global mode will
also be lost if you power-off without saving. After editing, be sure to save your changes if you want to keep
them.
Never turn off the power while data is being saved.
Doing so may harm the memory.
Saving a program
This operation will save all of the Edit 1 and Edit 2 mode
parameters of the program that is currently selected.
1. In Edit 1 or Edit 2 mode, press the WRITE but-
ton.
The WRITE button will blink, and the save-destination program number
q . 00– q . 99 will blink in the display. You can’t
save to
P . 00– P . 99– q . 00– q. 99.
000–199, P . 00– P . 99–
2. Turn the VALUE knob to select the program num-
ber for the desired save location.
note: When you save a program, the contents of the
destination program will be lost.
3. Press the WRITE button once again; the program
will be saved, and you’ll return to Live mode.
If you decide not to save, press any button other than
the WRITE button.
When you save, the button where the edited program
had been assigned will be reassigned to the newly
saved program (number).
Saving global settings
This operation will save all Global mode parameters
other than the loop phrase start/stop setting. When you
turn on the power, the loop phrase will be stopped.
1. In Global mode, press the WRITE button. The
WRITE button will blink, and the display will
blink
GLb.
2. Press the WRITE button once again; the settings
will be saved.
If you decide not to save, press any button other than
the WRITE button.
Tune and decay
Edit 1 – Tune ( tun): This adjusts the pitch.
Depending on the algorithm, the pitch may change
smoothly or in semitone steps. Also depending on the
pitch, this may affect the vibration of the skin, or the
body resonances.
For algorithms where the Tune parameter has a special
role, its specific function is described separately for each
algorithm (See PG pages 8, 18).
For PCM instruments, you can adjust the pitch in semitone steps in a range of four octaves up or down.
Edit 1 – Decay (dcY): This adjusts the time it takes for
the sound to decay.
Like the Tune parameter, there are cases where the
Decay parameter will affect only the vibration of the
skin, or the body resonance.
For algorithms where the Decay parameter has a special
role, its specific function is described separately for each
algorithm (See PG pages 8, 18).
Head and rim volume and pan
Edit 1 – Level ( LEU): This adjusts the volume balance
between the head and rim.
Edit 1 – Pan ( Pan): This adjusts the panning of the
head and rim.
Edit 2 – Pre EQ ( Eq): Use this to select the EQ/amp
type that will be most appropriate, depending on whether
you’re using your hand or a stick to strike the drum.
Reverb and delay
Edit 1 – Reverb ( rEb): This adjusts the reverberation
added to the sound. You can adjust the reverb type and
depth.
Edit 1 – Delay ( dLy): This adjusts the delay that is
added to the sound. You can adjust the delay time and
depth.
Algorithm
The
WAVEDRUM
methods in software, including analog, additive, non-linear, and physical modeling. These methods are then
combined, and the result is processed. These combinations are called “algorithms ,” and the
tains 36 different algorithms. An algorithm collects the
elements that determine the sound of an instrument or
other sound-producing object, and combines these elements in a wide variety of ways. This means that when a
source sound (such as the sound of a drum head being
struck) is passed through an algorithm, it will be output
as a sound that is uniquely transformed by the characteristics of that algorithm, for example becoming the sound
of a snare drum, the ringing of a bell, or the sound of a
metal pipe being struck.
Each algorithm consists of different elements that determine the sound in various ways, and each element is
expressed as an “amount” (large/small, long/short, positive/negative) such as the size of a guitar’s body, the
implements a variety of synthesis
WAVEDRUM
con-
En-9
Page 10

Editing Important editing parameters
EnglishFrançaisDeutschVoice Name
depth of a snare’s shell, the length of a pipe, or the density of a metal object. These amounts can be varied to
synthesize the sound of instruments or other sound-producing objects that could not exist in reality.
The WAVEDRUM’s algorithms differ in structure
depending on whether they are “single-size” or “doublesize.”
Program structure for single-size algorithms
(See QS page v)
Single-size algorithms use two algorithms for each program. These algorithms are used for the head and the
rim.
Programs that use a single-size algorithm also allow you
to use PCM instruments (PCM sound sources) for the
head and the rim.
You can freely assign these four sound sources and edit
their parameters to create an extremely broad range of
sounds ranging from traditional percussion instruments
to non-conventional ones; even non-percussive sounds.
The signal flow starts when you strike the head; the
audio signal of this strike is input to the head algorithm,
processed by DSP, and sent to the mixer section. At the
same time, the strike’s audio signal is also used to trigger
the PCM instrument, and is itself also sent to the mixer
section. An EQ is located immediately before this audio
signal is input to the algorithm, allowing you to select
the most appropriate setting depending on whether
you’re using your hand or a stick to strike the
DRUM
. You can adjust the velocity curve immediately
before the signal is input to the PCM instrument, allowing you to choose the way that the force of your strike
will vary the volume or tone. For example, you might set
this so that a soft strike will produce only the sound processed by the DSP, and the sound of the PCM instrument
will be added as you gradually increase the force of your
strike.
When you strike the rim, the signal flow is similar to
when you strike the head; the audio signal is processed
by the rim algorithm and the PCM instrument, and sent
to the mixer section.
In addition, you can control the head and rim algorithms
and PCM instruments by applying pressure to the head.
The curve can be adjusted for this pressure as well,
allowing you to specify how the pressure will affect the
volume and tone. This can be used to make the instrument behave differently depending on whether pressure
is being applied. For example, you might set this so that
pressure on the head will mute the DSP-processed sound
while allowing the PCM instrument sound to be produced.
The level and pan of the various audio signals sent to the
mixer section are adjusted, sent through reverb and
delay, and then sent out of the instrument.
WAV E -
Program structure for double-size algorithms
(See QS page v)
Double-size algorithms are more highly specialized for
simulating acoustic instruments.
For this reason, two separate PCM instruments for the
head and rim are combined into one, allowing a larger
amount of PCM data to be handled.
Within the algorithm, your performance is analyzed in
realtime, and the result of this analysis is used to control
the PCM instrument, allowing a natural response that
reflects your performance in a way that is impossible for
a conventional PCM sound module.
Programs that use a double-size algorithm contain only
one algorithm.
This algorithm contains inputs for both the head and rim,
but this does not mean that they have separate sound
sources for each; rather, the head and rim input signals
are mixed and input to the single algorithm.
Since the PCM instrument is linked with the algorithm, it
cannot be specified independently.
The signal flow starts when you strike the head or rim;
these audio signals are input to the algorithm.
The signal that is input to the algorithm is DSP-processed and sent to the mixer. At the same time, the signal
is analyzed to generate a trigger that sounds the appropriate PCM instrument.
The PCM instrument produces sound in response to this
trigger, and the sound is sent to the mixer section.
For the head, you can use an EQ to adjust the signal
immediately before it is input to the algorithm. You can
also use pressure on the head to control the volume or
tone of the algorithm and the PCM instrument. The pressure curve can also be adjusted.
The level and pan of the audio signals sent to the mixer
section are adjusted, sent through reverb and delay, and
then sent out of the instrument.
Edit 1 – Algorithm Select ( ALG): This selects the
algorithm.
Edit 2 – Head Algorithm 1, 2 ( H . I4, H . 58),
Edit 2 – Rim Algorithm 1, 2 ( r . I4, r . 58): Adjusts
the parameters of the algorithm.
Audio input and loop phrase playback
The stereo audio signal of the program, the stereo audio
signal from the AUX IN jack, and the loop phrase audio
are finally combined and sent out of the
Global – Common ( Co ): Here you can set the pan
following the delay effect, and the volume for the AUX
IN jack. You can also select the loop phrase, start and
stop it, and control its level.
WAVEDRUM
.
En-10
Page 11

Appendix
Restoring the factory settings
Here’s how to return the WAVEDRUM’s programs (preset and user), Live mode, and Global mode settings to
their factory default state. You can choose to restore
either of the following two types of data.
a) Program and Live mode data
b) All data (Programs, Live mode, Global mode)
When you execute these operations, all of the corresponding data will be rewritten to the factory default
settings. Be aware that all the settings you’ve made
will be lost.
If you execute b), you will also need to perform the
calibration operation once again (See PG page 22).
This operation will not change the sensor height.
1. While holding down the WRITE button, press the
power button to turn on the power. When the display
blinks
PLd, release the buttons.
2. If you want to return the data a) listed above to the
factory settings, hold down the blinking WRITE button for approximately one second.
If you want to return the data b) listed above to the factory settings, hold down the BANK/MODE button and
then hold down the blinking WRITE button for approximately one second. The display will blink
The factory settings will start being loaded. When loading is complete, the display will blink
Never turn off the power while data is being loaded.
Doing so may destroy the data.
3. Turn off the power, and then turn it on again.
Troubleshooting
Sound is different than another WAVEDRUM
As is the case for many other instruments, each individual
WAVEDRUM
is tuned, the conditions how it is played, and how it has
been maintained.
This means that even if the same heads are installed on
several
WAVEDRUM
used, they may not necessarily produce identical sounds
when played.
In other words, the
instrument that also has some characteristics of an acoustic instrument.
The sound of another instrument causes the WAVEDRUM to resonate and be triggered unintentionally
You may be able to prevent this by calibrating the head.
See PG page 22
En-11
will differ slightly depending on how it
s and the same program settings are
WAVEDRUM
is an electronic musical
PLA.
End.
Feedback occurs
Consider using an equalizer or limiter of your PA system to prevent feedback and protect the amp and speaker
system. See QS page 3
You may be able to prevent this by calibrating the head.
See PG page 22
Does not respond to pressure applied to the head
Could the drum head be stretched too tightly? If the head
is too tight, the pressure sensor will not work correctly.
You may be able to fix this by tuning the head appropriately. See PG page 21
Performing the pressure calibration may make the sensor respond correctly. See PG page 22
No sound from the device connected to the AUX IN jack
Have you appropriately raised the AUX IN jack’s mix
level in Global mode? See PG page 7
Is the volume of the connected device turned up?
See QS page 6
Are the connections correct? Is the power turned on?
See QS page 6
Specifications
Dynamic Percussion Synthesizer
Algorithms: Single-size 26, Double-size 34
PCM instruments: Head 200, Rim 200
Programs: 400 (User 200, Preset 200)
Loop phrase: 140
Effect: Reverb, Delay
Controls: VOLUME knob, WRITE button, Buttons 1–4,
BANK/MODE button, VALUE knob
Input/Output jacks: Output L, R (Monaural phone
jack), Phones (Stereo mini phone jack), AUX IN (Stereo
mini phone jack)
Display: 3-character 7-segment LED
Sampling frequency: 48 kHz
A/D, D/A conversion: 24 bit
Power supply: DC9V 1.7A
Dimensions (WxDxH): 344×349×75 mm /
13.54"x13.74"x2.95"
Wei ght: 2.0 kg / 4.41 lbs.
Included items: AC Adapter, Tuning key, Allen wrench,
Accessory Disc including PDF manuals (Quick Start
Guide, Parameter Guide)
Options: Percussion Stand ST-WD
Hard cases HC-WD
Soft cases SC-WD
Mobile Monitor Amplifier (supports power supply)
MMA130
* Specifications and appearance are subject to change
without notice for improvement.
Page 12

Voice Name List
51 Balafon 7 51 25 81
52 Gamelan 9 76 18 63
53 EthnoOpera 7 61 15 72
Programs
No.
Real Instrument
0 Snare 1 (Double-size) 29 - - 1 Snare 2 (Double-size) 30 - - 2 Snare 3 (Double-size) 31 - - 3 Velo Ambi Snare 19 17 2 12
4 Multi Powerful Tom 5 22 24 21
5 Krupa Abroad 2 26 7 10
6 Pitched Toms w/Cowbell 19 24 4 22
7 Ambi Taiko 9 23 19 12
8 Viking War Machine 12 34 9 20
9 Vintage Electronic Toms 26 31 2 14
10 Okonkolo
11 Iya Boca/Slap Dynamics 10 58 14 29
12 Itotele Boca 10 59 18 29
13 Talk Drum 17 29 24 31
14 Apocalypse Now 25 28 7 26
15 Djembe (Double-size) 34 - - 16 Djembe 19 52 2 34
17 BigHand Cowbell 10 7 2 41
18 Bongo (Double-size) 28 - - 19 Conga (Double-size) 27 - - 20 Tricky Lo Conga / Shaker 3 44 18 54
21 Conga Circle 19 42 22 25
22 Congo Bells & Rattle 19 43 18 35
23 Timbales Lo/Hi + Paila (Rim) 19 66 10 38
24 Timbale +Paila (Double-size) 32 - - 25 Samba Snare & Agogo (Rim) 22 18 18 36
26 Guiro, Mambo Set 19 68 18 53
27 Reco Reco, Mambo Set 19 69 18 39
28Hot Salsa Combo 22391927
29 Shaker & Triangle 8 41 18 55
30 Surdo 3 70 17 62
31 Pandeiro 22 71 18 76
32Rek 10732259
33 Metal Dumbek 10 74 6 30
34 Darabuka WD Dynamics 17 63 22 61
35 Tabla Drone 14 77 13 75
36 Shaken Udus 1 75 1 52
37 Udu Udu 1 7 1 51
38 Cajon (Double-size) 33 - - 39 Flamenco Castanet & Tap 22 67 18 67
40 Taiko & Tsuzumi (Pressure) 10 78 6 68
41 Wa-Daiko 12 80 2 64
42 Eastern Velo Cym Drum 9 82 21 12
43 Timpani Lo/Hi Orch Cymbal 17 81 18 71
44 China/Splash Set for Drummer 15 83 18 69
45 Mini TamTam/Gong for Drummer 9 84 15 73
Pitched Instrument
46 Jews Harp 16 100 9 65
47 Berimbau 18 40 11 83
48 Pressure Wah Drum 24 32 16 87
49 Steel Drum (F-A-B
50 Broken Kalimba 7 50 22 32
Program
Iya Dynamics 10 60 18 21
-C-F) 10361050
Head Rim
Algo. Inst. Algo. Inst.
54Koto Suite 20792066
55 Compton Kalling 20 5 22 15
56 Wind Bonga 7 8 19 28
57 Personality Split 7 10 16 78
Bass Drum/Snare Drum split
58 Snare/Kick 1 (Double-size) 35 - - 59 Snare/Kick 2 (Double-size) 36 - - 60 Kick The Synth 4 11 4 1
61 D&B Synth 4 16 23 85
62 Voice Perc. BD/SD/HH 7 13 18 74
63 Harmonic Kikudus 1 9 1 16
64 Powerful Udu & Snare 1 38 10 6
65 Kick & Snare Combo: Orchestral 26 14 22 9
66 Orky Perky Duet 7 19 7 84
67 Kenya Street Rap 9 5 22 8
68 Drum Whistler 25 3 16 2
69 Kick & Snare Combo: Pop 26 15 22 5
70 Movin'Air Club Beat 11 2 11 17
71 AlienCommunication 4 12 4 79
72 Drums and Keys 2 10 4 78
Synth
73 The Thinking Man 25 98 5 7
74 Club India 120bpm 13 92 21 60
75 Dance Hit Drone (Key of F) 2 37 14 86
76 The Serengeti 5 53 10 11
Original Wavedrum Taste
77 Water SE 9 45 15 94
78 Angry Gods 17 62 25 82
79 Dancing with Tigers 3 4 14 13
80 Yoga Breathing Drum 17 35 21 40
81 Bass Canyon 19 1 10 17
82 DDL Mystic Jam 10 30 3 23
83 Epic Film Toms 9 33 10 19
84 DonHya And 23 7 23 93
85 Suikin '09 23 85 2 95
86 3624 26 6 1 90
SE
87Cold Wind 47277
88 Always a Mystery 4 99 3 26
89 Aliens in the Basement 15 91 23 24
90 When the Clock Strikes 12 15 97 23 4
91 Tom the Robot 19 25 9 37
92 Night Market 10 96 15 36
93 Industrial Perc 10 93 18 91
94 Industrial BD/SD/HH/Cym 10 94 18 92
95 Vinyl Drummer 7 89 23 18
96Creepin' 17882458
97 Rainy Day Drum (Rim Velo SW) 10 90 18 80
98 The Forest Drum 10 27 19 48
99 MAYA 13 95 23 3
Real Simulation of Middle East Instrument
100
101 Darabuka (Double-size) 37 - - 102 Darabuka Ta rkish (Double-size) 39 - - 103 Daf (Double-size) 41 - - 104 Daf Iranian (Double-size) 44 - - 105 Daf Egyptian 22 110 18 119
106 Iranian Hard Daf - Lo 10 109 18 121
No.
Darabuka Ensemble (Double-size)
Program
Head Rim
Algo. Inst. Algo. Inst.
38 - - -
i
Page 13

EnglishFrançaisDeutschVoice Name
Voice Name List Live mode
No.
107 Tar (Double-size) 40 - - 108 Bendir (Double-size) 45 - - 109 Dark Bendir 12 112 10 106
110 Big Bendir 1 111 15 124
111 Doyra (Double-size) 42 - - 112 Req (Double-size) 43 - - 113 Req-Clap Set 19 130 18 133
114 Big Req 10 129 1 120
115 Sagat Egyptian 18 131 8 125
116 Bells and Sagat 18 132 8 128
117 Tabil 12 108 2 111
118 Katim 10 117 10 110
119 Nakrazan 19 118 1 113
120 Bongos Hi/Lo 19 114 19 136
121 Zeer & Tweasat 19 115 18 129
122 Zeer Pitched 19 116 18 121
123 Khishbah 25 123 19 115
124 Sagool Combination 22 120 5 118
Creative Sound of Middle East Instrument
125 Katim Gated 10 107 7 108
126 Tantan-Katim 10 128 19 109
127 Group Percussion 12 127 19 135
128 Asma Davul Electronic 26 121 15 116
129 Mix Doholla-Drum 26 106 22 104
130 Daf Pitched 7 119 10 105
131 Ceramic Mini Dbk 1 101 1 124
132 Egyptian String 13 135 13 132
133 Egyptian Playground 13 126 19 112
Real Simulation of Non Middle East Instrument
134 Ghatam 1 125 1 117
135 Shekele 22 136 18 137
Synthy Simulation of Middle East Instrument
136 Voice Percussion 25 148 18 150
137 White Blocks 22 143 22 130
138 Minimal Logs 23 137 17 131
139 Tar Drum Kit 12 146 19 107
140 Unhappy Camels 14 124 10 127
141 Suspicious Eyes 19 122 18 122
142 Darabuka Roll 10 104 7 102
143 World DnB K/H/S 6 134 19 122
144 The Price of Oil 10 113 5 114
SFX
145 Breathe in the Amber 4 141 2 141
146 Wind Chimes 23 144 18 140
147 Bottle Synth 5 142 1 142
148 Rain Stick 18 140 18 134
149 Border Crossing 10 105 21 123
Real Instrument
150 Snare 4 Piccolo (Double-size) 50 - - 151 Snare 5 12" (Double-size) 49 - - 152 Snare 6 Acryl (Double-size) 47 - - 153 Snare 7 Z (Double-size) 46 - - 154 Snare 8 Deep Shell (Double-size) 48 - - 155 Djembe Cowskin Hi (Double-size) 55 - - 156 Djembe Cowskin Lo (Double-size) 56 - - 157 Djembe Fiber (Double-size) 54 - - 158 Dundunba 12 176 2 190
159 Bata Drums 19 174 19 174
160 Shekere 2 7 156 19 157
161 Quinto Wood (Double-size) 51 - - 162 Conga Wood (Double-size) 52 - - -
Program
Head Rim
Algo. Inst. Algo. Inst.
No.
163 Tumba Wood (Double-size) 53 - - 164 Timbale 2 Hi 10 177 2 177
165 Timbale 2 Lo 12 178 2 188
166 Pandeiro 2 17 164 18 165
167 Samba Suite 26 163 19 189
168 Surdo 2 12 160 2 161
169 Hiradaiko 12 180 10 179
170 Okedaiko 17 182 10 181
171 Shimedaiko 19 181 19 180
172 Taiko & Chappa 12 183 8 191
173 Snake Drum 26 184 22 166
174 Octave'n Tom 17 154 2 184
175 Wild Rotate Tom 7 155 22 151
176 Cajon 2 (Double-size) 57 - - 177 Acoustic Kit (Double-size) 58 - - 178 Djembe Lo-Fi 10 173 10 173
179 Flange Hi Timbal 19 179 9 178
180 Portamento Tambourine 9 162 9 187
181 Talking Frame Drum 12 161 12 156
Pitched Instrument
182 Mill-Tn Finger Random 5 168 9 171
183 Clicket Log Drum 10 170 23 160
184 Balafon 2 21 167 21 158
185 Jegog 21 166 24 167
186 Berimbau 2 11 172 18 159
187 Thunder Theater 7 193 18 192
188 Sneaky Pursuit 21 171 21 200
Bass Drum/Snare Drum split
189 Dub Step Kit 15 151 7 199
190 Angry Man (K+S Dub) 18 199 18 153
191 World Party (K+S Moombahton) 14 152 19 154
192 Piggy (DubStep K/S/Hats) 21 153 10 155
Bass
193 Bass 1 (Reso Bass) 5 197 10 183
194 Bass 2 (Analog Bass) 10 198 10 183
SFX
195 Spacy SFX 10 195 14 196
196 The Night of the Storm 2 191 2 193
197 Praying for Rain 17 192 18 195
198 Meditation Ball 2 187 2 186
199 Terminator 2048 10 196 15 198
Program
Head Rim
Algo. Inst. Algo. Inst.
Live mode
Button Program
Bank-a
1 157 Djembe Fiber (Double-size)
2 152 Snare 6 Acryl (Double-size)
3 182 Mill-Tn Finger Random
190 Angry Man (K+S Dub)
4
Bank-b
1 100 Darabuka Ensemble (Double-size)
175 Wild Rotate Tom
2
3 197 Praying for Rain
4 164 Timbale 2 Hi
Bank-c
74 Club India 120bpm
1
2 162 Conga Wood (Double-size)
3 106 Iranian Hard Daf - Lo
4 199 Terminator 2048
ii
Page 14

No.
Algorithms PCM Instruments
No.
1Udu
2Temple
3 WoodDrum
4Analog
5 Arimbao
6Sawari-A
7WindDrum
8 Triangle
9Water
10 BigHand
11 Steel ST
12 Mo'Daiko
13 Sawari-B
14 Tabla
15 Gong
16 Wah Harp
17 TalkDrum
18 Jingle
19 Bonga
20 Koto
21 Bamboo
22 JingDrum
23 Don-Hya
24 Mariko
25 Upo
26 1812
27 Cong a
28 Bongo
29 Snare Drum 1
30 Snare Drum 2
31 Snare Drum 3
32 Timbales
33 Cajon
34 Djembe
35 BassDrum+SnareDrum 1
36 BassDrum+SnareDrum 2
37 Darabuka
38 Darabuka ensemble
39 Darabuka Turkish
40 Ta r
41 Daf
42 Doyra
43 Req
44 Daf Iranian
45 Bendir
46 Snare (Z) 14"x6.5"
47 Snare (Acrylic) 14"x6.5"
48 Snare (Wood) 14"x7.5"
49 Snare (Wood) 12"x6"
50
51 Quinto (Wood)
52 Conga (Wood)
53 Tumba (Wood)
54 Djembe (Fiber)
55 Djembe (CowSkin Hi)
56 Djembe (CowSkin Lo)
57 Cajon 2
58 Bass Drum+Snare Drum 3
59 Bass Drum+Snare Drum 4
60 Bass Drum+Snare Drum 5
1–26: Single-size, 27–60: Double-size
Algorithm
Piccolo Snare (Brass) 13"x4"
No.
Head PCM Instrument
1 Multi Tubb Kick
2 Dance Kicks w/reverse
3Whistle Kick
4 Tubby Kick /TOM
5 88 Hat/Kick
6Kick 99
7BD Ambi
8 BD Dry
9 Kick & Snare
10 Dance Kick & Snare 2
11 Kick, Snare & Hat
12 Dance BD & 99 SD
13 Voice BD/SD/HH
14 Orch SD to Orchestra BD
15 SD to BD
16 Dance BD & SD
17 Velo Ambi Snare
18 Samba Snare
19 Orch Snare w/ Cym
20 Hand Claps
21 Kompton Klaps
22 Multi Powerful Tom
23 Ambi Drum
24 Two Pitched Tom
25 Rock Toms
26 Brushes 3 Toms
27 Low Tom/ velo Forest
28 Tom Vintage Hi
29 Tom Soul
30 Mark Tree Chord w/Thump
31 E.Tom Velo Set
32 Tiki Tiki Tom Tom
33 Epic Hi-Toms Head
34 Low War Tom Rim
35 Guitar and Ghost
36 Steel Drum (F-A-Bb-C-F)
37 Mouth Harp C Drone
38 Shaker/Kick
39 Shaker to Clave
40 Caxixi
41 Triangle
42 Conga Clap
43 Conga Hi-Close/Open
44 Bassish Lo Conga
45 Conga Lo-Basstone
46 Conga Gliss
47 Low Conga
48 Super Conga
49 Tumba Open
50 Broken Kalimba
51 Balafon
52 Djembe
53 Dynamic Djembe
54 Djembe Closed Slap
55 Iya Boca Choke
56 Boca Open
57 Iya Chacha UP
58 Iya Boca Open+Slap
59 Itotele Boca Open
60 Okonkolo -> Iya (Open)
Head PCM Instrument
61 Tom/Iya Drum Corps
62 Itotele/Iya Mix
63 Darbuka Head
64 Paila Lo
65 Paila Hi
66 Lo Hi Timbales
67 Castanet
68 Guiro
69 RecoReco 4 Velo
70 Surdo Open
71 Pandeiro
72 Tambourine
73 Rek Head
74 Rek
75 Udus/ Shaker
76 Gamelan
77 Tabla"Tele"
78 Japanese Tsuzumi
79 Tsuzumi 2
80 Oodaiko
81 Timpani Lo/Hi
82 Velo Splash Cym
83 New China Cymbal
84 Mini TamTam
85 Bells
86 Jingle
87 Metal tree
88 Fly in Jungle
89 Vinyl Crash
90 Rainy Day Bird
91 Low Bull Roar Loop
92 Synth Stab (Key of C)
93 Industry
94 Industrial BD/SD/HH
95 Industs
96 Industry Hit
97 Shaker & Church Bell
98 Synthy G Melo dy
99 Velo Vocoder
100
Berimbau Attack
101
Tiny Darabuka
102
Darabuka Bend
103
Darabuka Grace Hit
104
Egypt Drb Roll Center
105
Darabuka Tek to Vox Kick
106
Doholla Center
107
Katim Center
108
Tabil Open
109
Daf 21" Hard Bak
110
Daf Tek Egypt
111
Big Bendir 14"
112
Bendir Dum
113
Low Pitch ADDum 3VS
114
Bongos Low
115
Zeer
116
Zeer Pitch Head
117
Katim
118
Nakrazan
119
Tar Sni p
120
Sagool Head
121
Asma Davul Head
122
Gulf Jam Set 3VS
123
Khishbah
No.
Head PCM Instrument
124
Wacky 3VS Khishbah
125
Yah al Dum
126
World DnB 2A
127
Group Drums
128
Tan ta n
129
Req Center
130
Req Egypt
131
Sagat Egypt
132
Sagat Bells
133
Sagat Dynamic Head
134
World DnB 1A
135
Ghost Note
136
Rattle Maracas
137
Caxixi Off Beat
138
Angklung
139
Steel Drum 2
140
Rain Stick 1
141
Heart Beat Breath
142
Synth Perc
143
Noise Scale
144
Bell Tree
145
SD-HH
146
Two Brushed Toms
147
Tom Mid
148
Tuunn
149
Hey! Zil
150
SFX - Rim
151
Dub Step Kit
152
Moombah Snare&Hits
153
Dub Step Snare&Bass
154
Octave'n Tom
155
Rotate Tom
156
Shekere 2
157
Shekere 2
158
Shaker2
159
Caxixi2
160
Surdo
161
Frame Drum Tek
162
Frame Drum/ w jingle
163
Pand e-Tambo -Surd o
164
Pandeiro 2 Open
165
Wood blocks
166
Log dru m
167
Balafon 2
168
Mill-Tn Finger Random
169
Mill-Tn Rute
170
Clicket Log Drum
171
VibraMarimba VS Chordplay
172
Berimbau 2
173
Djembe Lo-Fi
174
Bata Left
175
Bata Right
176
Dundunba
177
Timbale 2 Hi
178
Timbale 2 Lo
179
Natural Hi Timbal
180
Hiradaiko
181
Shimedaiko
182
Okedaiko
183
Nagadoudaiko
184
H-Eccs Crash
185
HH for Basses
186
Stacked Cymbal
No.
Head PCM Instrument
187
Finger Cymbal
188
Wind Chime
189
Jingle Roll
190
Chappa
191
Ocean Wave
192
Thunder
193
Rain&Thunder Drum VS
194
Rain
195
Spacy SFX
196
Seq Computer 7xVS
197
Bass 1 (Reso Bass)
198
Bass 2 (Analog Bass)
199
Dub Step Snare&Hits
200
Synth Hit +S D
No.
Rim PCM Instrument
1 Multi Pitched BDs
2 2 Tone Dance Kick
3Kick 99
4Snare 3 Velo
5 SD Dance
6 Velo 99 SD
7 Hat/Dance Snare
8 Cybernetik SD
9 Orchestra SD
10 Brush Swirls
11 Deep Tom Tom (Key of C)
12 Ambi Rim
13 Dance Clap
14 Hand Claps
15 Kompton Klaps
16 Kick & Snare
17 Dance Kick & Snare 1
18 Dance Kick & Snare 2
19 Epic Lo-Toms Rim
20 War Toms Head
21 Jazz Tom
22 Cowbell
23 Bongoish
24 Hi Bongoish
25 Conga Gliss
26 Low Conga
27 Super Conga
28 Tumba Open
29 Iya Boca Choke
30 Boca Open
31 Iya Chacha UP
32 Broken Kalimba
33 Log drum
34 Djembe Closed Slap
35 Agogo/Cuica
36 Agogo
37 Tambourine
38 Paila Lo
39 Paila Hi
40 Timbale Attack
41 Timbales Lo-Paila
42 Lo Hi Timbales
43 Castanet
44 Guiro
45 RecoReco 4 Velo
46 Pandeiro
iii
Page 15

EnglishFrançaisDeutschVoice Name
No.
Rim PCM Instrument
47 Rek Head
48 Rek
49 Gamelan
50 Steel Drum (Low F)
51 Udu
52 Udus/ Shaker Accent
53 Shaker 1
54 Shaker 2
55 Velo Accent Shaker
56 Shaker/Kick
57 Shaker to Clave
58 Caxixi
59 Rek Rim
60 Multi-Tabla
61 Darbuka Rim
62 Surdo Hand&Rim
63 Gamelan Celesta
64 Taiko Rim
65 Tsuzumi 1
66 Tsuzumi 2
67 Foot Step
68 Short Finger Cymbal
69 Velo Splash Cym
70 New China Cymbal
71 Orchestra Cymbal
72 Deep Orch Crash
73 Chinese Gong
74 Voice HH/Cym
75 Bells
76 Jingle
77 Metal tree
78 Synth Hits
79 PC Voice
80 Rain -> Thunder Velo SW
81 Gop Pitch Up
82 Angry Gods RIM
83 Berimbau Attack
84 Timpani w/Orch Hits
85 Code
86 Synth Switch
87 WaveDrum Splat
88 Industry
89 Industs
90 Industrial 1
91 Industrial 2
92 Industrial Cym
93 Industry Hit
94 Bubble
95 Rain Stick
96 Fly in Jungle
97 Vinyl Crash
98 Rainy Day Bird
99 Low Bull Roar Loop
100
Synth Stab (Key of C)
101
Darabuka Bend
102
Egybt Drb Grace Edge
103
Darabuka Grace Hit
104
Doholla Edge
105
Daf Tek Mute
106
Bendir Tek Mute
107
Tar Tek M ute
108
Katim Edge
109
Katim Tak
110
Katim Mute
No.
Rim PCM Instrument
111
Tabil Rim
112
World DnB 2B
113
Nakrazan Mute
114
Tri cky Tek M ix 6VS
115
Kasur Rim
116
Asma Davul Tek Rim
117
Yah al Tek
118
Sagool Rim
119
TD Jingle
120
Req Edge
121
Req - Tik
122
World DnB 1B
123
Ragaf Riqq to Vox Snare
124
Lo Pitch Req Open
125
Sagat Egypt Open
126
Sagat Dynamic Head
127
Sagat Silver Cl->Opn 5VS
128
Sagat Roll
129
Twe asa t
130
Splash Jingle
131
Snake Drum
132
Ghost Note
133
Clap
134
Rain Stick 2
135
Chacha OpenSlap
136
Bongos High Open
137
Caxixi 2
138
Angklung
139
Steel Drum 2
140
Wind Chi me
141
Whistle
142
Synth Perc
143
Guitar Chord
144
Tom Mid
145
Hi Toms Pitch
146
Stick Cymbal
147
SD-HH
148
SFX - Rim
149
Hey! Zil
150
Uuh
151
BD + Splash
152
Hat->Kick 3xVS
153
Dub Step Hats->Kick 4xVS
154
Moombah Pandier/Kik
155
Dub Step Kick&Hats
156
Sidestick
157
Shekere 2
158
Shaker2
159
Caxixi
160
African Shaker
161
Surdo Rim
162
Frame Dru m/w jingle
163
Pande -Tambo -Surdo
164
Pandeiro 2 Open
165
Pandeiro 2 Jingle
166
Doyra Edge
167
Wood blocks
168
Log drum
169
Balafon 2
170
Mill-Tn Finger Random
171
Mill-Tn Rute
172
Clicket Log Drum
173
Djembe Lo-Fi Mute
174
Bata Right
No.
Rim PCM Instrument
175
Timbale 2 Hi
176
Timbale 2 Lo
177
Pail a Hi
178
Natural Hi Timbal Paila
179
Hiradaiko Fuchi
180
Shimedaiko Fuchi
181
Okedaiko Fuchi
182
H-Eccs Crash
183
HH for Basses
184
Stacked Cymbal
185
Finger Cymbal
186
Wind Chime
187
Jingle Roll
188
Cowbe ll 2
189
Samba Rim
190
Dundunba Metal
191
Chappa
192
Orch SD->Timp 6x VS
193
Wave Attac k
194
Thunder
195
Rain
196
Piano Harp SFX
197
Spacy SFX
198
Bass Computer 4xVS
199
Dub Step Bass Velo SW
200
Voco der Vox 9xVS
Loop Phrases
No.
Loop Phrase [bpm]
1ClubLatin [120]
2 Andean [110]
3 Bachata [123]
4 Beguine [112]
5 Brazilian Samba1 [102]
6 Brazilian Samba2 [101]
7 Calypso [84]
8 ChaCha 1 [122]
9 ChaCha 2 [142]
10 Ciftetelli [154]
11 Cool Bossa 1 [148]
12 Cool Bossa 2 [148]
13 Cuban ChaCha [140]
14 DiscoSamba [118]
15 Fast Bossa 1 [105]
16 Fast Bossa 2 [105]
17 Fast Bossa 3 [105]
18 Gipsy Dance [114]
19 Groove Bossa [95]
20 Halay 1 [115]
21 Halay 2 [115]
22 Lambada 1 [109]
23 Lambada 2 [109]
24 LatinBigBand 1 [111]
25 LatinBigBand 2 [124]
26 LatinBigBand 3 [102]
27 Macarena [108]
28 Mambo Party [105]
29 Mariachi [106]
30 Meditation Bossa [120]
31 Merengue [131]
32 Orch.Bossa [136]
No.
Loop Phrase [bpm]
33 Reggae [129]
34 Rhumba [109]
35 Salsa 1 [97]
36 Salsa 2 [97]
37 SambaDeSol [113]
38 Sambalegre. [112]
39 Turkish Pop 1 [128]
40 Turkish Pop 2 [128]
41 Vahde [80]
42 2/4 Oyun 1 [113]
43 2/4 Oyun 2 [113]
44 5/8 [91]
45 9/8 [136]
46 Rock 1 [105]
47 Rock 2 [110]
48 Rock 3 [112]
49 Rock 4 [112]
50 Rock 5 [150]
51 Rock 6 [Swing, 95]
52 Rock 7 [Swing, 95]
53 Rock 8 [Swing, 90]
54 Rock 9 [Triplet, 130]
55 Heavy Rock 1 [75]
56 Heavy Rock 2 [85]
57 Heavy Rock 3 [115]
58 Pop 1 [130]
59 Pop 2 [110]
60 Pop 3 [125]
61 Pop 4 [128]
62 Pop 5 [Swing, 104]
63 Pop 6 [124]
64 Pop 7 [100]
65 Pop 8 [100]
66 Pop 10 [124]
67 Pop 11 [120]
68 Pop 12 [Triplet, 120]
69 Pop 13 [90]
70 Ballad 1 [77]
71 Ballad 2 [100]
72 Ballad 3 [70]
73 Ballad 4 [123]
74 Ballad 5 [75]
75 Ballad 6 [3beat, 128]
76 Ballad 7 [Swing, 75]
77 Funk 1 [120]
78 Funk 2 [84]
79 Funk 3 [Swing, 90]
80 Funk 4 [Swing, 100]
81 Funk 5 [100]
82 Funk 6 [100]
83 Funk 7 [95]
84 Soul 1 [Triplet, 124]
85 Soul 2 [80]
86 16beat 1 [90]
87 16beat 2 [120]
88 16beat 3 [104]
89 16beat 4 [120]
90 16beat 5 [92]
91 16beat 6 [122]
92 Jazz 1 [Swing, 120]
93 Jazz 2 [Swing, 92]
94 Jazz 3 [Swing, 92]
95 Latin 1 [108]
96 Latin 2 [130]
Voice Name List Loop Phrases
No.
Loop Phrase [bpm]
97 Bossa 1 [65]
98 Bossa 2 [168]
99 Percussion 1 [90]
100
Percussion 2 [90]
101
7/8 [96]
102
Arabic Rumba [96]
103
Ayoub [94]
104
Baladi 1 [112]
105
Baladi 2 [130]
106
Baladi 3 [130]
107
Benderi [174]
108
Eskandarani [140]
109
Fallahi [220]
110
Gorgina 10/8 [170]
111
Hajaa Soudasi 6/8 [124]
112
Karatchi [110]
113
Katakofti 1 [113]
114
Katakofti 2 [110]
115
Katakofti Modern [113]
116
Khbeti 6/8 [152]
117
Laf 1 [112]
118
Laf 2 [110]
119
Maksoum 1 [127]
120
Maksoum 2 [130]
121
Maksoum Sarih [160]
122
Mallaya [220]
123
Masmoudi [126]
124
Nobi [95]
125
Rumba [138]
126
Saidi 1 [109]
127
Saidi 2 [120]
128
Saidi 3 [120]
129
Saidi 4 [120 ]
130
Saidi 5 [120 ]
131
Saidi 6 [120]
132
Saidi 7 [120]
133
Saidi Modern [130]
134
Samai [120]
135
Shabi [160]
136
Soudasi 6/8 [122]
137
Wehda 1 [120]
138
Wehda 2 [120]
139
Wehda 3 [120]
140
Zaffa [96]
iv
Page 16

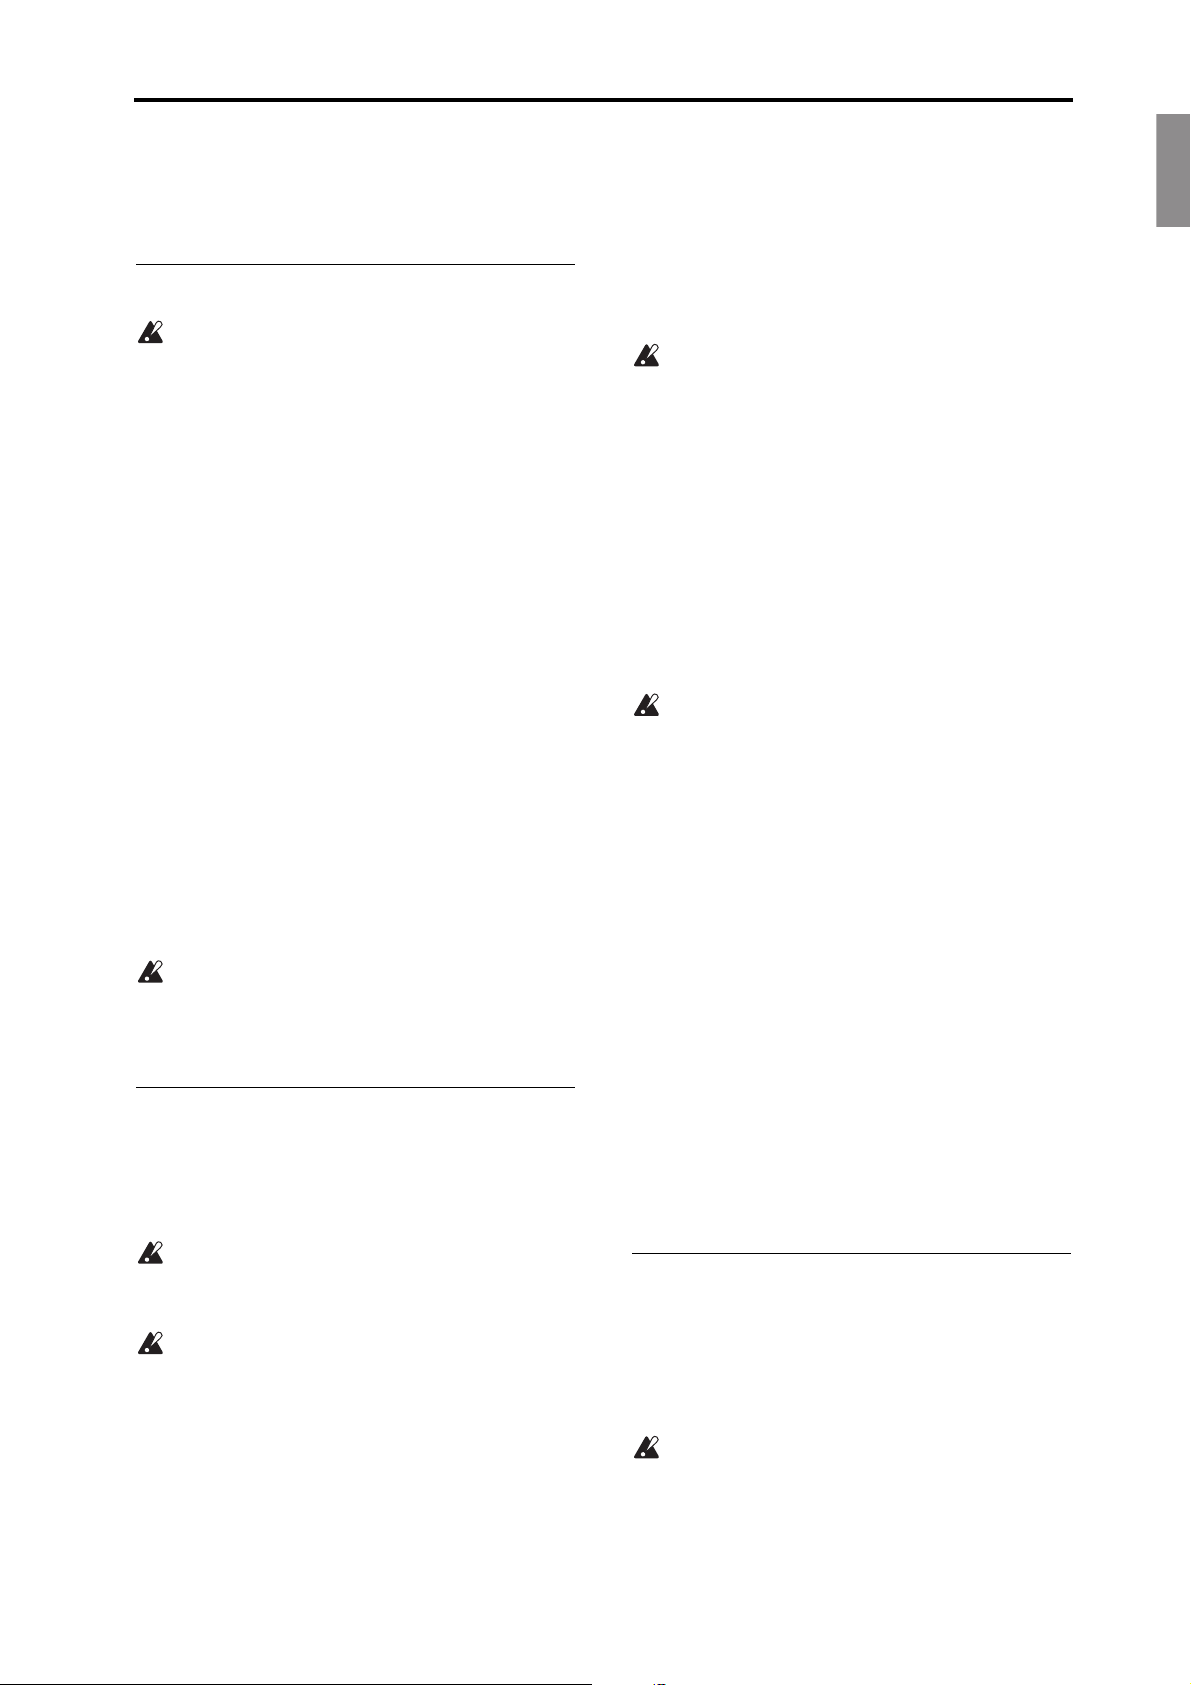
Program structure for Single-size/
Single-size Algorithm Type
Program
Pre EQ
- Type Select
- Head
sensitivity
- Rim
sensitivity
Reverb
- Pressure Curve
- Tune
- Decay
- Algorithm Select
- Algorithm Parameter 1-8
- Tune
- Decay
- Algorithm Select
- Algorithm Parameter 1-8
Control Line
- Tune
- Decay
- Instruments Select
- Sample Type Select
- Start/Stop
- Type Select
- Level
- Depth
- High Damp
- Master Level
- Delay Time
- Level
- Feedback
- High Damp
- Level
- Pan
- Level
- Pan
- Head
Velocity
Curve
Head Single-size
Algorithm
Amp
Audio Line (Stereo)Audio Line (Mono)
- Pan - Volume
Trigger
Head PCM
Instruments
Output L, R
Phones L, R
- Tune
- Decay
- Instruments Select
- Level
- Pan
- Level
- Pan
- Rim
Velocity
Curve
Rim Single-size
Algorithm
AUX IN
Phrase Looper
Trigger
Rim PCM
Instruments
- Level
- Level
Pressure Sensor
Rim Sensor
Head Sensor
Delay
Double-size Algorithm Type
Program
Reverb
- Pressure Curve
- Tune
- Decay
- Algorithm Select
- Algorithm Parameter 1-8
Control Line
- Sample Type Select
- Start/Stop
- Type Select
- Level
- Depth
- High Damp
- Delay Time
- Level
- Feedback
- High Damp
- Level
- Pan
Audio Line (Stereo)Audio Line (Mono)
- Pan
Trigger
PCM
Instruments
AUX IN
Phrase Looper
- Level
Pressure Sensor
Rim Sensor
Head Sensor
Delay
Double-size
Algorithm
- Master Level
Output L, R
Phones L, R
- Level
Pre EQ
- Type Select
Amp
- Volume
- Head
sensitivity
- Rim
sensitivity
Double-size Algorithms
v
Page 17

4015-2 Yanokuchi, Inagi-city, Tokyo 206-0812 Japan
© 2012 KORG INC.
IMPORTANT NOTICE TO CONSUMERS
Thisproducthasbeenmanufacturedaccordingtostrictspecificationsandvoltagerequirements
thatareapplicableinthecountryinwhichitisintendedthatthisproductshouldbeused.Ifyou
havepurchasedthisproductviatheinternet,throughmailorder,and/orviaatelephonesale,
youmustverifythatthisproductisintendedtobeusedinthecoun
WARNING:Useofthisproductinanycountryotherthanthatforwhichitisintendedcouldbe
dangerousandcouldinvalidatethemanufacturer’sordistributor’swarranty.
Pleasealsoretainyourreceiptasproofofpurchaseotherwiseyourproductmaybedisqualifie
fromthemanufacturer’sordistributor’swarranty.
tryinwhichyoureside.
d
 Loading...