

Page 1
EFGSCJ2
Precautions
Location
Using the unit in the following locations can result in a malfunction.
• In direct sunlight
• Locations of extreme temperature or humidity
• Excessively dusty or dirty locations
• Locations of excessive vibration
• Close to magnetic fields
Power supply
Please connect the designated AC adapter to an AC outlet of the correct voltage. Do
not connect it to an AC outlet of voltage other than that for which your unit is
intended.
Interference with other electrical devices
Radios and televisions placed nearby may experience reception interference.
Operate this unit at a suitable distance from radios and televisions.
Handling
To avoid breakage, do not apply excessive force to the switches or controls.
保証規定(必ずお読みください)
本保証書は、保証期間中に本製品を保証するもので、付属品類(ヘッドホンなど)は保
証の対象になりません。保証期間内に本製品が故障した場合は、保証規定によって無
償修理いたします。
1. 本保証書の有効期間はお買い上げ日より1か年です。
2. 次の修理等は保証期間内であっても有償となります。
・消耗部品(電池、スピーカー、真空管、フェーダーなど)の交換。
・お取扱い方法が不適当のために生じた故障。
・天災(火災、浸水等)によって生じた故障。
・故障の原因が本製品以外の他の機器にある場合。
・不当な改造、調整、部品交換などにより生じた故障または損傷。
・保証書にお買い上げ日、販売店名が未記入の場合、または字句が書き替えられて
いる場合。
・本保証書の提示がない場合。
尚、当社が修理した部分が再度故障した場合は、保証期間外であっても、修理した日
より3か月以内に限り無償修理いたします。
3. 本保証書は日本国内においてのみ有効です。
ThiswarrantyisvalidonlyinJapan.
4. お客様が保証期間中に移転された場合でも、保証は引き続きお使いいただけます。
詳しくは、お客様相談窓口までお問い合わせください。
5. 修理、運送費用が製品の価格より高くなることがありますので、あらかじめお客様
相談窓口へご相談ください。発送にかかる費用は、お客様の負担とさせていただき
ます。
6. 修理中の代替品、商品の貸し出し等は、いかなる場合においても一切行っておりま
せん。
本製品の故障、または使用上生じたお客様の直接、間接の損害につきましては、弊社は
一切の責任を負いかねますのでご了承ください。
本保証書は、保証規定により無償修理をお約束するためのもので、これよりお客様の
法律上の権利を制限するものではありません。
■お願い
1. 保証書に販売年月日等の記入がない場合は無効となります。記入できないときは、
お買い上げ年月日を証明できる領収書等と一緒に保管してください。
2. 保証書は再発行致しませんので、紛失しないように大切に保管してください。
Care
If the exterior becomes dirty, wipe it with a clean, dry cloth. Do not use liquid
cleaners such as benzene or thinner, or cleaning compounds or flammable polishes.
Keep this manual
After reading this manual, please keep it for later reference.
Keeping foreign matter out of your equipment
Never set any container with liquid in it near this equipment. If liquid gets into the
equipment, it could cause a breakdown, fire, or electrical shock.
Be careful not to let metal objects get into the equipment. If something does slip
into the equipment, unplug the AC adapter from the wall outlet. Then contact
your nearest Korg dealer or the store where the equipment was purchased.
NOTE: This equipment has been tested and found to comply with the limits for a Class B
digital device, pursuant to Part 15 of the FCC Rules. These limits are designed to provide
reasonable protection against harmful interference in a residential installation. This
equipment generates, uses, and can radiate radio frequency energy and, if not installed
and used in accordance with the instructions, may cause harmful interference to radio
communications. However, there is no guarantee that interference will not occur in a
particular installation. If this equipment does cause harmful interference to radio or
television reception, which can be determined by turning the equipment off and on, the
user is encouraged to try to correct the interference by one or more of the following
measures:
• Reorient or relocate the receiving antenna.
• Increase the separation between the equipment and receiver.
• Connect the equipment into an outlet on a circuit different from that to which the
receiver is connected.
• Consult the dealer or an experienced radio/TV technician for help.
If items such as cables are included with this equipment, you must use those included
items.
Unauthorized changes or modification to this system can void the user’s authority to
operate this equipment.
If this symbol is shown on the product, manual, battery, or package, you must
dispose of it in the correct manner to avoid harm to human health or damage to
the environment. Contact your local administrative body for details on the correct
disposal method. If the battery contains heavy metals in excess of the regulated
amount, a chemical symbol is displayed below the symbol on the battery or
battery package.
コルグ
THE FCC REGULATION WARNING (for USA)
Notice regarding disposal (EU only)
volca kick
保証書
本保証書は、保証規定により無償修理をお約束するものです。
お買い上げ日 年 月 日
販売店名
アフターサービス
修理または商品のお取り扱いについてのご質問、ご相談は、お客様相談窓口へお問い
合わせください。
お客様相談窓口
PH S等一部の電話ではご利用できません。固定電話または携帯電話から
おか けくだ さい 。
受付時間月曜~金曜10:00 ~ 17:00(祝祭日、窓口休業日を除く)
●サービス・センター: 〒168-0073東京都杉並区下高井戸 1-18-162F
This product has been manufactured according to strict specifications and voltage
IMPORTANT NOTICE TO CONSUMERS
requirements that are applicable in the country in which it is intended that this product
should be used. If you have purchased this product via the internet, through mail order,
and/or via a telephone sale, you must verify that this product is intended to be used in
the country in which you reside.
WARNING: Use of this product in any country other than that for which it is intended
could be dangerous and could invalidate the manufacturer’s or distributor’s warranty.
Please also retain your receipt as proof of purchase otherwise your product may be
disqualified from the manufacturer’s or distributor’s warranty. Company names,
product names, and names of formats etc. are the trademarks or registered trademarks
of their respective owners.
* All product names and company names are the trademarks or registered
trademarks of their respective owners.
Précautions
Emplacement
L’utilisation de cet instrument dans les endroits suivants peut en entraîner le
mauvais fonctionnement.
• En plein soleil
• Endroits très chauds ou très humides
• Endroits sales ou fort poussiéreux
• Endroits soumis à de fortes vibrations
• A proximité de champs magnétiques
Alimentation
Branchez l’adaptateur secteur mentionné à une prise secteur de tension
appropriée. Evitez de brancher l’adaptateur à une prise de courant dont la
tension ne correspond pas à celle pour laquelle l’appareil est conçu.
Interférences avec d’autres appareils électriques
Les postes de radio et de télévision situés à proximité peuvent par conséquent
sourir d’interférences à la réception. Veuillez dès lors faire fonctionner cet
appareil à une distance raisonnable de postes de radio et de télévision.
Maniement
Pour éviter de les endommager, manipulez les commandes et les boutons de
cet instrument avec soin.
Entretien
Lorsque l’instrument se salit, neoyez-le avec un chion propre et sec. Ne vous
servez pas d’agents de neoyage liquides tels que du benzène ou du diluant,
voire des produits inammables.
Conservez ce manuel
Après avoir lu ce manuel, veuillez le conserver soigneusement pour toute
référence ultérieure.
Evitez toute intrusion d’objets ou de liquide
Ne placez jamais de récipient contenant du liquide près de l’instrument. Si
le liquide se renverse ou coule, il risque de provoquer des dommages, un
court-circuit ou une électrocution. Veillez à ne pas laisser tomber des objets
métalliques dans le boîtier (trombones, par ex.). Si cela se produit, débranchez
l’alimentation de la prise de courant et contactez votre revendeur Korg le plus
proche ou la surface où vous avez acheté l’instrument.
Note concernant les dispositions (Seulement EU)
Si ce symbole apparait sur le produit, le manuel, les piles ou les packs de piles,
cela signifie que vous devez le recycler d’une manière correcte afin de prévenir
les dommages pour la santé humaine et les dommages potentiels pour
l’environnement. Contactez votre administration locale pour de plus amples
renseignements concernant la bonne méthode de recyclage. Si la pile contient
des métaux lourds au-delà du seuil réglementé, un symbole chimique est affiché
en dessous du symbole de la poubelle barrée d’une croix sur la pile ou le pack de piles.
REMARQUE IMPORTANTE POUR LES CLIENTS
Ce produit a été fabriqué suivant des spécifications sévères et des besoins en tension
applicables dans le pays où ce produit doit être utilisé. Si vous avez acheté ce produit via
l’internet, par vente par correspondance ou/et vente par téléphone, vous devez vérifier
que ce produit est bien utilisable dans le pays où vous résidez.
ATTENTION: L’utilisation de ce produit dans un pays autre que celui pour lequel il a
été conçu peut être dangereuse et annulera la garantie du fabricant ou du distributeur.
Conservez bien votre récépissé qui est la preuve de votre achat, faute de quoi votre
produit ne risque de ne plus être couvert par la garantie du fabricant ou du distributeur.
* Tous les noms de produits et de sociétés sont des marques commerciales ou
déposées de leur détenteur respectif.
Vorsichtsmaßnahmen
Aufstellungsort
Vermeiden Sie das Aufstellen des Geräts an Orten, an denen.
• es direkter Sonneneinstrahlung ausgesetzt ist;
• hohe Feuchtigkeit oder Extremtemperaturen auftreten können;
• Staub oder Schmutz in großen Mengen vorhanden sind;
• das Gerät Erschütterungen ausgesetzt sein kann.
• in der Nähe eines Magnetfeldes.
Stromversorgung
Schließen Sie das optionale Netzteil nur an eine geeignete Steckdose an. Verbinden Sie
es niemals mit einer Steckdose einer anderen Spannung.
Störeinüsse auf andere Elektrogeräte
Dieser kann bei in der Nähe aufgestellten Rundfunkempfänger oder Fernsehgeräten
Empfangsstörungen hervorrufen. Betreiben Sie solche Geräte nur in einem geeigneten
Abstand von diesem Erzeugnis.
Bedienung
Vermeiden Sie bei der Bedienung von Schaltern und Reglern unangemessenen
Kraftaufwand.
Reinigung
Bei auftretender Verschmutzung können Sie das Gehäuse mit einem trockenen,
sauberen Tuch abwischen. Verwenden Sie keinerlei Flüssigreiniger wie beispielsweise
Reinigungsbenzin, Verdünner oder Spülmittel. Verwenden Sie niemals brennbare
Reiniger.
Bedienungsanleitung
Bewahren Sie diese Bedienungsanleitung gut auf, falls Sie sie später noch einmal
benötigen.
Flüssigkeiten und Fremdkörper
Stellen Sie niemals Behältnisse mit Flüssigkeiten in der Nähe des Geräts auf. Wenn
Flüssigkeit in das Gerät gelangt, können Beschädigung des Geräts, Feuer oder ein
elektrischer Schlag die Folge sein.
Beachten Sie, dass keinerlei Fremdkörper in das Gerät gelangen. Sollte ein
Fremdkörper in das Gerät gelangt sein, so trennen Sie es sofort vom Netz. Wenden Sie
sich dann an Ihren Korg-Fachhändler.
Wenn Sie das Symbol mit der „durchgekreuzten Mülltonne“ auf Ihrem Produkt, der
dazugehörigen Bedienungsanleitung, der Batterie oder der Verpackung sehen, müssen Sie das
Produkt in der vorgeschriebenen Art und Weise entsorgen um Schäden an der menschlichen
Gesundheit und der Umwelt zu vermeiden. Batterien oder Akkus, die Schadstoffe enthalten,
sind auch mit dem Symbol einer durchgekreuzten Mülltonne gekennzeichnet. In der Nähe zum
Mülltonnensymbol befindet sich die chemische Bezeichnung des Schadstoffes.
Dieses Produkt wurde unter strenger Beachtung von Spezifikationen und Spannungsanforderungen
hergestellt, die im Bestimmungsland gelten. Wenn Sie dieses Produkt über das Internet, per Postversand
und/oder mit telefonischer Bestellung gekauft haben, müssen Sie bestätigen, dass dieses Produkt für Ihr
Wohngebiet ausgelegt ist.
WARNUNG: Verwendung dieses Produkts in einem anderen Land als dem, für das es bestimmt ist,
verwendet wird, kann gefährlich sein und die Garantie des Herstellers oder Importeurs hinfällig lassen
werden. Bitte bewahren Sie diese Quittung als Kaufbeleg auf, da andernfalls das Produkt von der
Garantie des Herstellers oder Importeurs ausgeschlossen werden kann.
* Alle Produkt- und Firmennamen sind Warenzeichen oder eingetragene Warenzei-
chen der betreffenden Eigentümer.
Main Specications
Keyboard: Multi-touch controller Sound generators:
Rev1 filter as resonator), Pulse Generator, VCA, analogue DRIVE, analogue TONE
Connectors: (Headphone) jack (ø3.5mm stereo mini-phone jack), SYNC IN
jack (ø3.5mm monaural mini-phone jack, 20V maximum input level), SYNC OUT
jack (ø3.5mm monaural mini-phone jack, 5V output level)
Power supply: AA/LR6 alkaline battery ×6 or AA nickel-metal hydride battery
×6, DC 9V AC adapter (
using alkaline batteries) Current consumption: 300mA
Dimensions (W×D×H): 193 × 115 × 46 mm/7.60" × 4.53"× 1.81"
Weight: 370g/13.05oz. (excluding batteries)
Included items: Six AA alkaline batteries, Cable, Owner´s Manual
Options: AC adapter (DC 9V )
* Specifications and appearance are subject to change without notice for
improvement.
Hinweis zur Entsorgung (Nur EU)
WICHTIGER HINWEIS FÜR KUNDEN
VCF (no input MS-20
) Battery life: Approximately 10 hours (when
Page 2
Precauciones
Ubicación
El uso de la unidad en las siguientes ubicaciones puede dar como resultado un mal
funcionamiento:
• Expuesto a la luz directa del sol
• Zonas de extremada temperatura o humedad
• Zonas con exceso de suciedad o polvo
• Zonas con excesiva vibración
• Cercano a campos magnéticos
Fuente de alimentación
Por favor, conecte el adaptador de corriente designado a una toma de corriente con el voltaje
adecuado. No lo conecte a una toma de corriente con voltaje diferente al indicado.
Interferencias con otros aparatos
Las radios y televisores situados cerca pueden experimentar interferencias en la recepción.
Opere este dispositivo a una distancia prudencial de radios y televisores.
Manejo
Para evitar una rotura, no aplique excesiva fuerza a los conmutadores o controles.
Cuidado
Si exterior se ensucia, límpiese con un trapo seco. No use líquidos limpiadores como disolvente,
ni compuestos inamables.
Guarde este manual
Después de leer este manual, guárdelo para futuras consultas.
Mantenga los elementos externos alejados del equipo
Nunca coloque ningún recipiente con líquido cerca de este equipo, podría causar un cortocircuito,
fuero o descarga eléctrica. Cuide de que no caiga ningún objeto metálico dentro del equipo.
Si aparece el símbolo del cubo de basura tachado sobre un producto, su manual de
usuario, la batería, o el embalaje de cualquiera de éstos, signica que cuando tire
dichos artículos a la basura, ha de hacerlo en acuerdo con la normativa vigente de
la Unión Europea para prevenir daños a la salud pública y al medioambiente. Le
rogamos que se ponga en contacto con su ocina o ministerio de medioambiente
para más detalles. Si la batería contiene metales pesados por encima del límite
permitido, habrá un símbolo de un material químico, debajo del símbolo del cubo
de basura tachado.
Este producto ha sido fabricado de acuerdo a estrictas especicaciones y requerimientos
de voltaje aplicables en el país para el cual está destinado. Si ha comprado este producto
por internet, a través de correo, y/o venta telefónica, debe usted vericar que el uso de este
producto está destinado al país en el cual reside.
AVISO: El uso de este producto en un país distinto al cual está destinado podría resultar
peligroso y podría invalidar la garantía del fabricante o distribuidor. Por favor guarde su
recibo como prueba de compra ya que de otro modo el producto puede verse privado de
la garantía del fabricante o distribuidor.
* Todos los nombres de productos y compañías son marcas comerciales o marcas registradas
de sus respectivos propietarios.
Nota respecto a residuos y deshechos (solo UE)
NOTA IMPORTANTE PARA EL CONSUMIDOR
注意事项
位置
在以下位置使 用本设备可能会导 致设备故障。
• 阳光直晒的位置
具有极端温度或湿度的位置
•
• 灰 尘过多或非常肮 脏的位置
• 过度震动的位置
• 靠近磁场的位置
电源
请将指定的交流适配器连接到具有正确电压的交流电源插座。请勿将本设备连接到
所带电压 不适用于本设备的交流电源插座。
其他电气设备 干扰
在附近放置的收音机和电视可能会受到信号干扰。请在适当远离收音机和电视保持
的位 置使 用此设备。
操作
为避免损坏,请勿对开关或控制部件用力过猛。
维护设备
如果设备外部变得很 脏,请使用干净的干布擦 拭设备。请勿使用苯或稀 释剂等液体
清洁剂,也不要使用洗涤剂或易燃抛光剂。
保留本手册
阅读完本手册后,请保留本手册供将来参考。
不要 在设备上 放置 异物
切勿将装有液体的任何容器放置在此设备附近。如果液体进入设备,则可能会导致设
备 故 障 、火 灾 或 电 击 。
请注意不 要使金属物体掉入该设备。如有异物进入该设备,请拔下壁式插座上的交流
适配器。然后联系您附近的 Korg 经销商或向您销售该设备的商店。
用户重要提示
本产品严格按照产品使用国家的生产标准和电压要求制造。
如果您通过网路、邮件或者电话销售购买本产品,您必须核实本产品是否适于在您所在
的国家使用。
警告 :在本产品适用国家之外的其他国家使用本产品极其危险,同时制造商和经销商
将不再履行质量担保。
请妥善保存您的购买收据作为购买凭证,否则您的产品将不能享有制造商或经销商的
质量担保。
* 本手册内使用的所有产品名称和公司名称均为所属公司或所有者的注册商。
有毒有害物质或元素
部件名称
电路板 × ○ ○ ○ ○ ○
外壳、按键 ○ ○ ○ ○ ○ ○
其他(橡胶按钮等) ○ ○ ○ ○ ○ ○
其他附属品(电池,电缆 )
○:表示该有毒有害物质或元素在该部件所有均质材料中的含量均在 GB/T 26572 标准规定的
限量要求以下。
×:表示该有毒有害物质或元素至少在该部件的某一均质材料中的含量超出 GB/T 26572 标准
规定的限量要求。
此标记适用于中华人民共和国销售的电子信息产品,标记中央的数字表示环境保护使用
期限的年数。
自制造日算起的此年月内,产品中的指定6物质不会向外部泄漏或发生突变,不会产生
环境污染或者对人体或财产带来深刻的影响。此环境保护使用期限并不表示产品保证
期限。
铅
(Pb)汞 (Hg)镉 (Cd)
× ○ ○ ○ ○ ○
六价铬
(Cr(VI))
多溴联苯
(PBB)
多溴二苯醚
(PBDE)
安全上のご注意
ご使用になる前に必ずお読みください
ここに記載した注意事項は、製品を安全に正しくご使用いただき、あなたや他の方々への危害や
損害を未然に防ぐためのものです。
注意事項は誤った取り扱いで生じる危害や損害の大きさ、または切迫の程度によって、内容を 「警
告」、「注意」 の 2 つに分けています。これらは、あなたや他の方々の安全や機器の保全に関わる
重要な内容ですので、よく理解した上で必ずお守りください。
火災・感電・人身障害の危険を防止するには
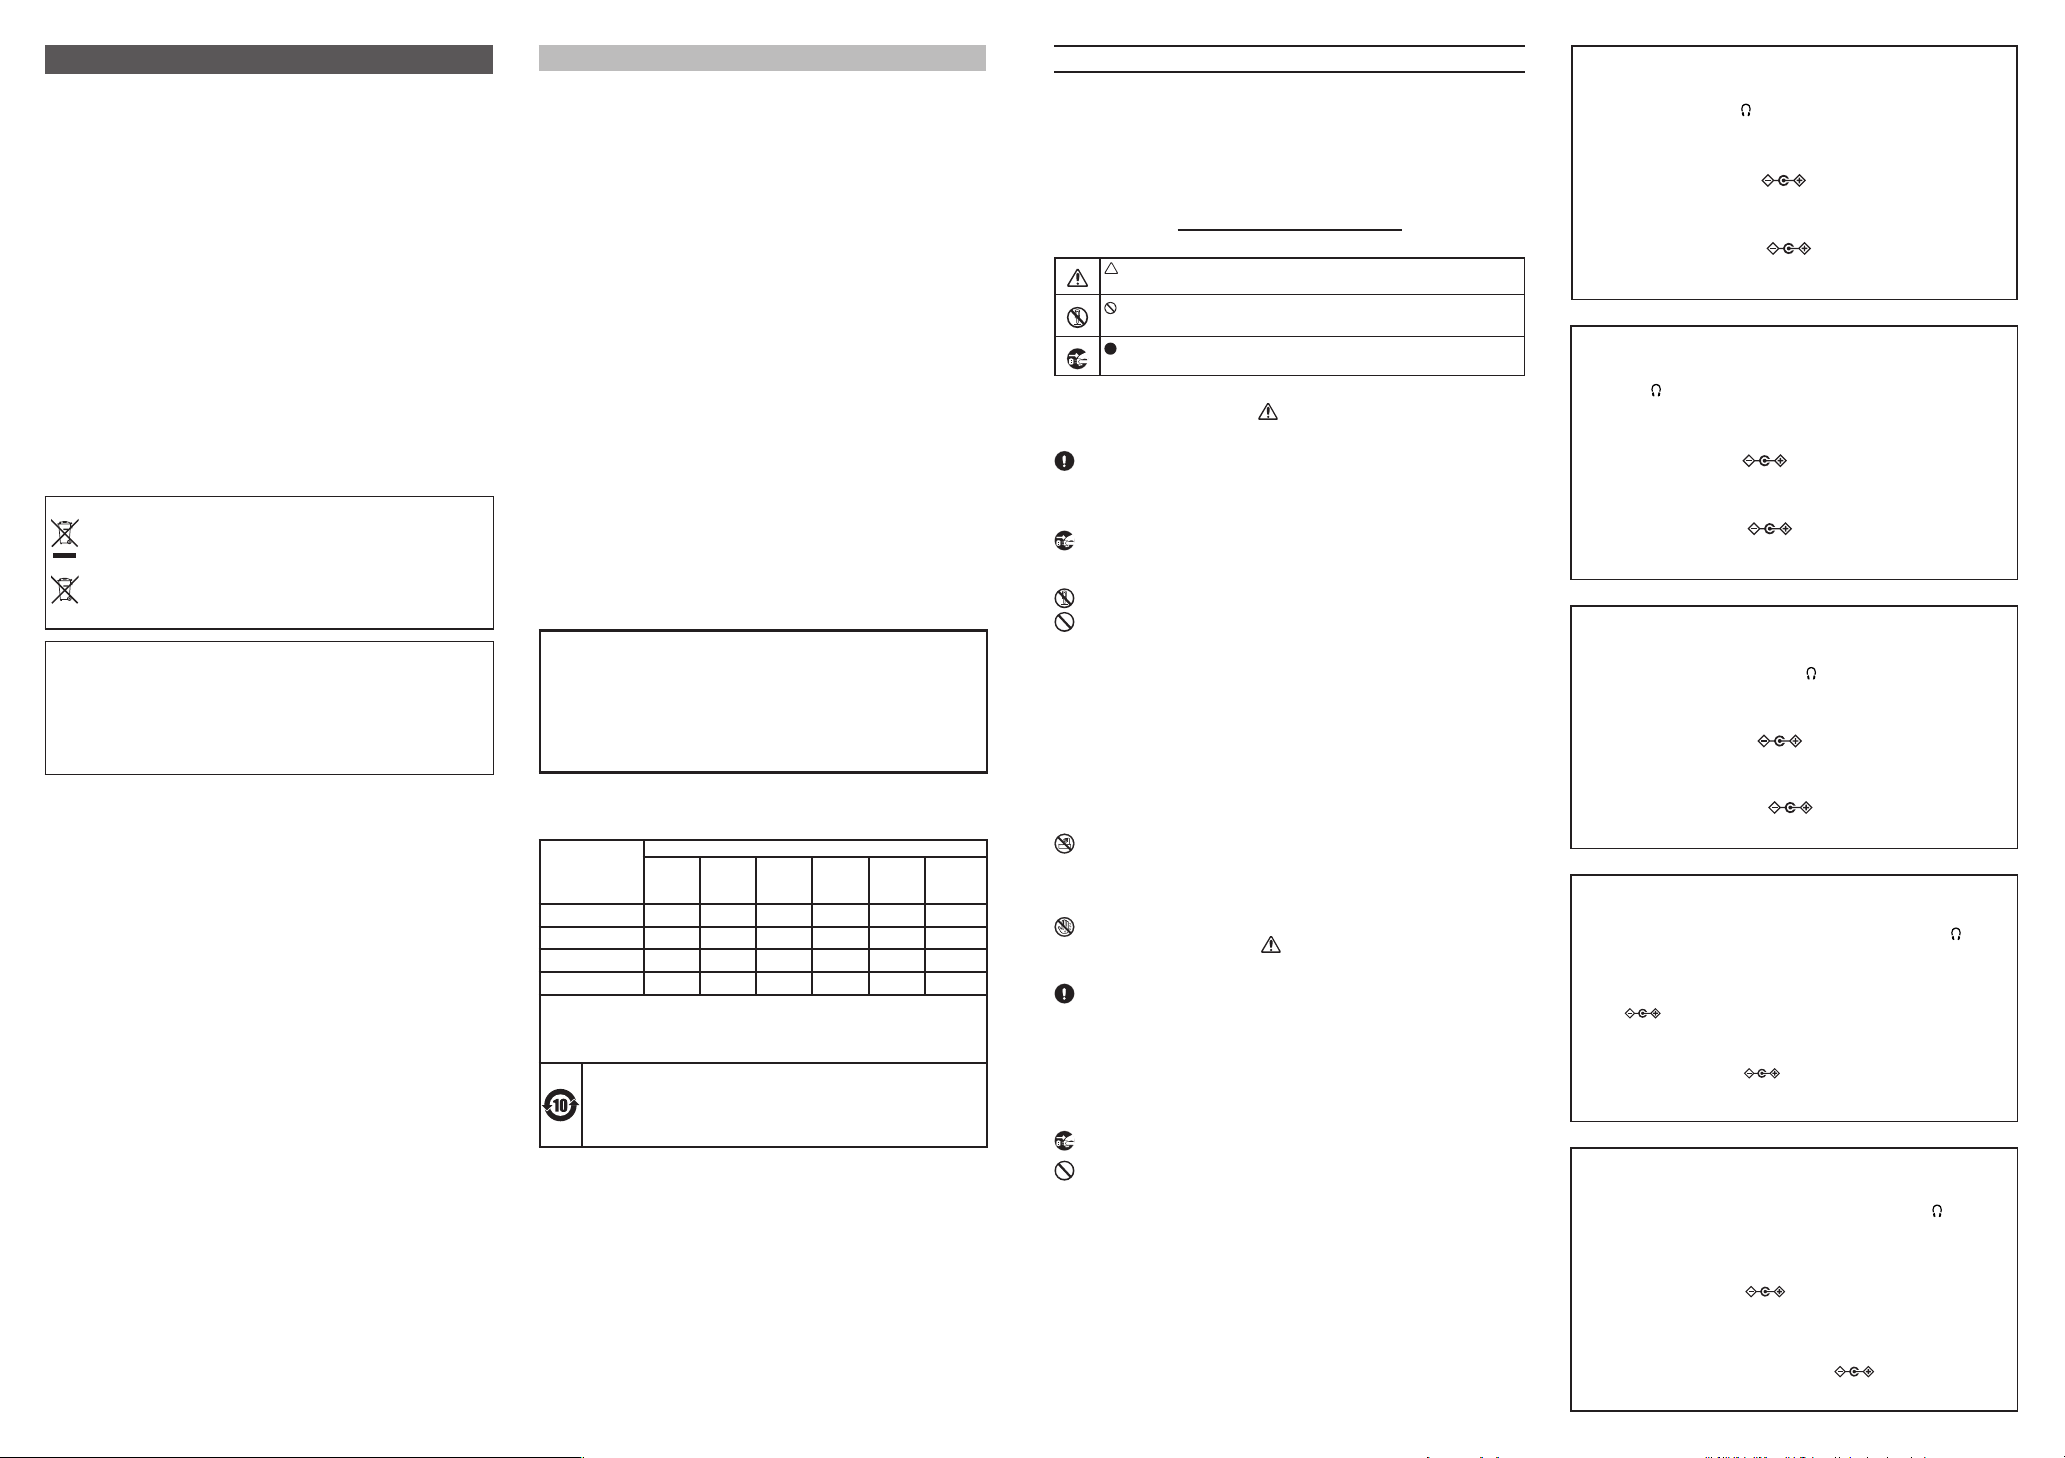
図記号の例
記号は、注意(危険、警告を含む)を示しています。記号の中には、具体的な注意内容が描かれ
ています。左の図は「一般的な注意、警告、危険」を表しています。
記号は、禁止(してはいけないこと)を示しています。記号の中には、具体的な注意内容が描か
れることが あります。左 の 図 は「 分 解 禁 止 」を 表して います 。
記号は、強制(必ず行うこと)を示しています。記号の中には、具体的な注意内容が描かれること
があります。左 の図 は「 電源 プラグをコンセントから抜くこと」を表してい ます。
以下の指示を守ってください
警 告
この注意事項を無視した取り扱いをすると、死亡や重傷を負う可能性があります
・ ACアダプターのプラグは、必ずAC100Vの電源コンセントに差し込む。
・
ACアダプターのプラグにほこりが付着している場合は、ほこりを拭き取る。
感電やショートの恐れがあります。
・ 本製品はコンセントの近くに設置し、ACアダプターのプラグへ容易に手が届くようにする。
・ 次のような場合には、直ちに電源を切ってACアダプターのプラグをコンセントから抜く。
○ACアダプターが破損したとき○異物が内部に入ったとき○製品に異常や故障が生じたとき
修理が必要なときは、お客様相談窓口へ依頼してください。
・ 本製品を分解したり改造したりしない。
・ 修理、部品の交換などで、取扱説明書に書かれていること以外は絶対にしない。
・ ACアダプターのコードを無理に曲げたり、発熱する機器に近づけない。また、ACアダプター
のコードの上に重いものをのせない。
コードが破損し、感電や火災の原因になります。
・ 大音量や不快な程度の音量で長時間使用しない。
大音量で長時間使用すると、難聴になる可能性があります。万一、聴力低下や耳鳴りを感じた
ら、専門の医師に相談してください。
・ 本製品に異物(燃えやすいもの、硬貨、針金など)を入れない。
・ 温度が極端に高い場所(直射日光の当たる場所、暖房機器の近く、発熱する機器の上など)で
使用や保管をしない。
・ 振動の多い場所で使用や保管をしない。
・ ホコリの多い場所で使用や保管をしない。
・ 風呂場、シャワー室で使用や保管をしない。
・ 雨天時の野外のように、湿気の多い場所や水滴のかかる場所で、使用や保管はしない。
・ 本製品の上に、花瓶のような液体が入ったものを置かない。
・ 本製品に液体をこぼさない。
・ 濡れた手で本製品を使用しない。
注意
この注意事項を無視した取り扱いをすると、傷害を負う可能性、または物理的損害が発生する可能性があります
・ 正常な通気が妨げられない所に設置して使用する。
・ ラジオ、テレビ、電子機器などから十分に離して使用する。
ラジオやテレビ等に接近して使用すると、本製品が雑音を受けて誤動作する場合があります。
また、ラジオ、テレビ等に雑音が入ることがあります。
・ 外装のお手入れは、乾いた柔らかい布を使って軽く拭く。
・ ACアダプターをコンセントから抜き差しするときは、必ずプラグを持つ。
・ 長時間使用しないときは、電池の液漏れを防ぐために電池を抜く。
・ 電池は幼児の手の届かないところへ保管する。
・ 長時間使用しないときは、ACアダプターをコンセントから抜く。
・ 指定のACアダプター以外は使用しない。
・ 他の電気機器の電源コードと一緒にタコ足配線をしない。
本製品の定格消費電力に合ったコンセントに接続してください。
・ 電池を過度の熱源(日光、火など)にさらさない。
・ スイッチやツマミなどに必要以上の力を加えない。
故障の原因になります。
・ 外装のお手入れに、ベンジンやシンナー系の液体、コンパウンド質、強燃性のポリッシャーを使
用しない。
・ 不安定な場所に置かない。
本製品が落下してお客様がけがをしたり、本製品が破損する恐れがあります。
・ 本製品の上に乗ったり、重いものをのせたりしない。
本製品が落下または損傷してお客様がけがをしたり、本製品が破損する恐れがあります。
*すべての製品名および会社名は、各社の商標または登録商標です。
Fiche technique
● Clavier: contrôleur multi-tactile ● Générateurs de sons: VCF (filtre du MS-20 Rev1
sans entrée comme résonateur), générateur de pulsations, VCA, DRIVE analogique,
TONE analogique ● Prises: prise
(casque) (minijack stéréo de 3,5mm de diamètre),
prise SYNC IN (minijack mono de 3,5mm de diamètre, niveau d’entrée maximum de
20V), prise SYNC OUT (minijack mono de 3,5mm de diamètre, niveau de sortie de 5V)
● Alimentation: piles AA/LR6 alcalines ×6 ou piles AA au nickel-hydrure métallique ×6,
adaptateur secteur en option DC 9V(
heures (avec des piles alcalines) ● Consommation électrique: 300mA
) ● Autonomie des piles: environ 10
● Dimensions (L x P x H): 193 × 115 × 46mm ● Poids: 370g (sans les piles)
● Accessoires fournis:
six piles alcalines AA, Câble, Manuel d’utilisation
● Options: adaptateur secteur (DC 9V )
* Les caractéristiques et l’aspect du produit sont susceptibles d’être modifiés sans avis
préalable en vue d’une amélioration.
Technische Daten
● Tastatur: Multi-Touch Controller ● Klangerzeugung: VCF (kein Eingang MS-20
Rev1 Filter als Resonator), Impuls-Generator, VCA, analog-DRIVE, analog-TONE
● Anschlüsse: (Kopfhörerbuchse)-Buchse (ø3,5 mm Stereo-Miniklinkenbuchse),
SYNC IN-Buchse (ø3,5 mm Mono-Miniklinkenbuchse; maximaler Eingangspegel: 20
V), SYNC OUT-Buchse (ø3,5 mm Mono-Miniklinkenbuchse; Ausgangpegel: 5 V)
● Stromversorgung: 6 Alkali-Batterien (AA/LR6) oder 6 NiMH-Batterien (AA),
optionales AC-Netzteil (DC 9 V ) ● Batterielaufzeit: Ca. 10 Stunden (bei
Verwendung von Alkali-Batterien) ● Stromverbrauch: 300 mA
● Abmessungen (B x T x H): 193×115×46 mm ● Gewicht: 370 g (ohne Batterien)
● Lieferumfang: 6 Alkali-Batterien, Kabel, Bedienungsanleitung
● Optional: AC-Netzteil (DC 9 V )
* Änderungen der technischen Daten und des Designs ohne vorherige Ankündi
-
gung vorbehalten.
Especicaciones principales
● Teclado: controlador con tecnología Multi-touch ● Generadores de sonido: VCF (sin
filtro MS-20 Rev1 de entrada como resonador), Generador de pulsos, VCA, DRIVE
analófica, TONE analógico
● Conectores: jack (jack mini phone estéreo de ø3,5 mm),
jack SYNC IN (jack mini phone monaural de ø3,5 mm, nivel máximo de entrada de 20
V), jack SYNC OUT (jack mini phone monaural de ø3,5 mm, nivel de salida de 5 V)
● Alimentación: batería alcalina AA/LR6 ×6 o batería de níquel-hidruro metálico AA ×6,
adaptador de CA (CC 9 V opcional
) ● Duración de la batería: unas 10 horas
(si se utilizan baterías alcalinas) ● Consumo de corriente: 300 mA
● Dimensiones (ancho x profundo x alto): 193×115×46 mm ● Peso: 370 g (sin baterías)
● Elementos incluidos: seis baterías alcalinas AA, Cable, Manual del usuario
● Opciones: adaptador de CA (CC 9 V )
* Las especicaciones y el aspecto están sujetas a cambios sin previo aviso por mejora.
主要规格
● 键盘:多触摸控制器 ● 声音发生器:VCF(没有作为谐振器的输入 MS-20
Rev1 滤波器)、脉冲发生器、VCA、模拟 DRIVE、模拟 TONE ● 插孔:
(耳机)
插孔(ø3.5mm 立体声迷你耳机插孔)、SYNC IN 插孔(ø3.5mm 单声道迷你耳机
插孔、20V 最大输入电平)、SYNC OUT 插孔(ø3.5m m 单声道迷你耳机插孔、5V
输出电平)● 电源:AA/LR6 碱性电池 ×6 或 AA 镍氢电池 ×6,直流 9V 交流
适 配 器(
● 功效:300mA ● 尺寸规格(长x宽x高):193×115×46m m ●
(不包括电池)
● 选件:交流适配器(直流 9V
) ● 电池寿命:大约10个小时(使用碱性电池时)
重 量 :3 7 0 g
● 随附物品:六个 AA 碱性电池、线缆、
用户手册
)
* 规格和外观如有更改,恕不另行通知。
おもな仕様
●鍵盤部:マルチタッチ鍵盤●音源システム:VCF(MS-20 前期フィルター発振音)、
パルス音、VCA、アナログ DRIVE、アナログTONE●接続端子:
端 子 ( ス テレ オ・ミニ・フォーン・ジャック)、 S Y N C I N 端 子 ( モ ノラ ル・ミニ・フォー
ン・ジャック、最大入力レベル 20V)、SYNCOUT 端子(モノラル・ミニ・フォーン・
ジャック、出力レベル 5V)●電源:単 3 形電池×6 本(アルカリ乾電池、またはニッ
ケル水素電池)、または DC9V
ACアダプター KA-350(別売)
●電池寿命:約 10 時間( アルカリ乾電池使用時 )●消費電流:300mA
●外形寸法(幅×奥行×高さ):193×115×46mm●質量:370g(電池含まず)
●付属品:動作確認用単 3 形アルカリ乾電池×6、ケーブル、取扱説明書
●オプション:ACアダプター KA-350(DC9V )
*仕様および外観は、改良のため予告無く変更することがあります。
ヘ ッド ホ ン )
(
Page 3
En
Introduction
o
o
SUSTAIN: OFF SUSTAIN: ON
o
o
SUSTAIN: OFF SUSTAIN: ON
Thank you for purchasing the Korg volca kick analogue kick generator.
This unit seeks to create the sound of a kick drum centered around the powerful
resonant filter of the original Korg MS-20.
By controlling the self oscillation of the VCF with the PITCH, BEND and TIME
knobs, not just a kick drum, but a pitched bass drum is created by adding a scale.
The analog drive produces a deeper and warmer sound.
As this is the first volca equipped with the TOUCH FX function, you can now add
changes in real time, in addition to the standard sequence effects (such as slide and
swing). This volca specializes in providing a more dynamic kick drum to live
performances.
(Power) button
Press this button to turn the volca kick on. To turn the volca kick off, hold this button
for approximately one second.
Auto power-o
The power-off function will automatically turn the volca kick off after roughly four
hours have passed with no sound being produced. The auto power-off function can
be disabled using the global parameters. (See global parameters.)
DC 9V Jack
Connect the plug end of the optional AC adapter to this jack.
Only use the specified AC adapter. Using any AC adapter other than the specified
model could damage the volca kick.
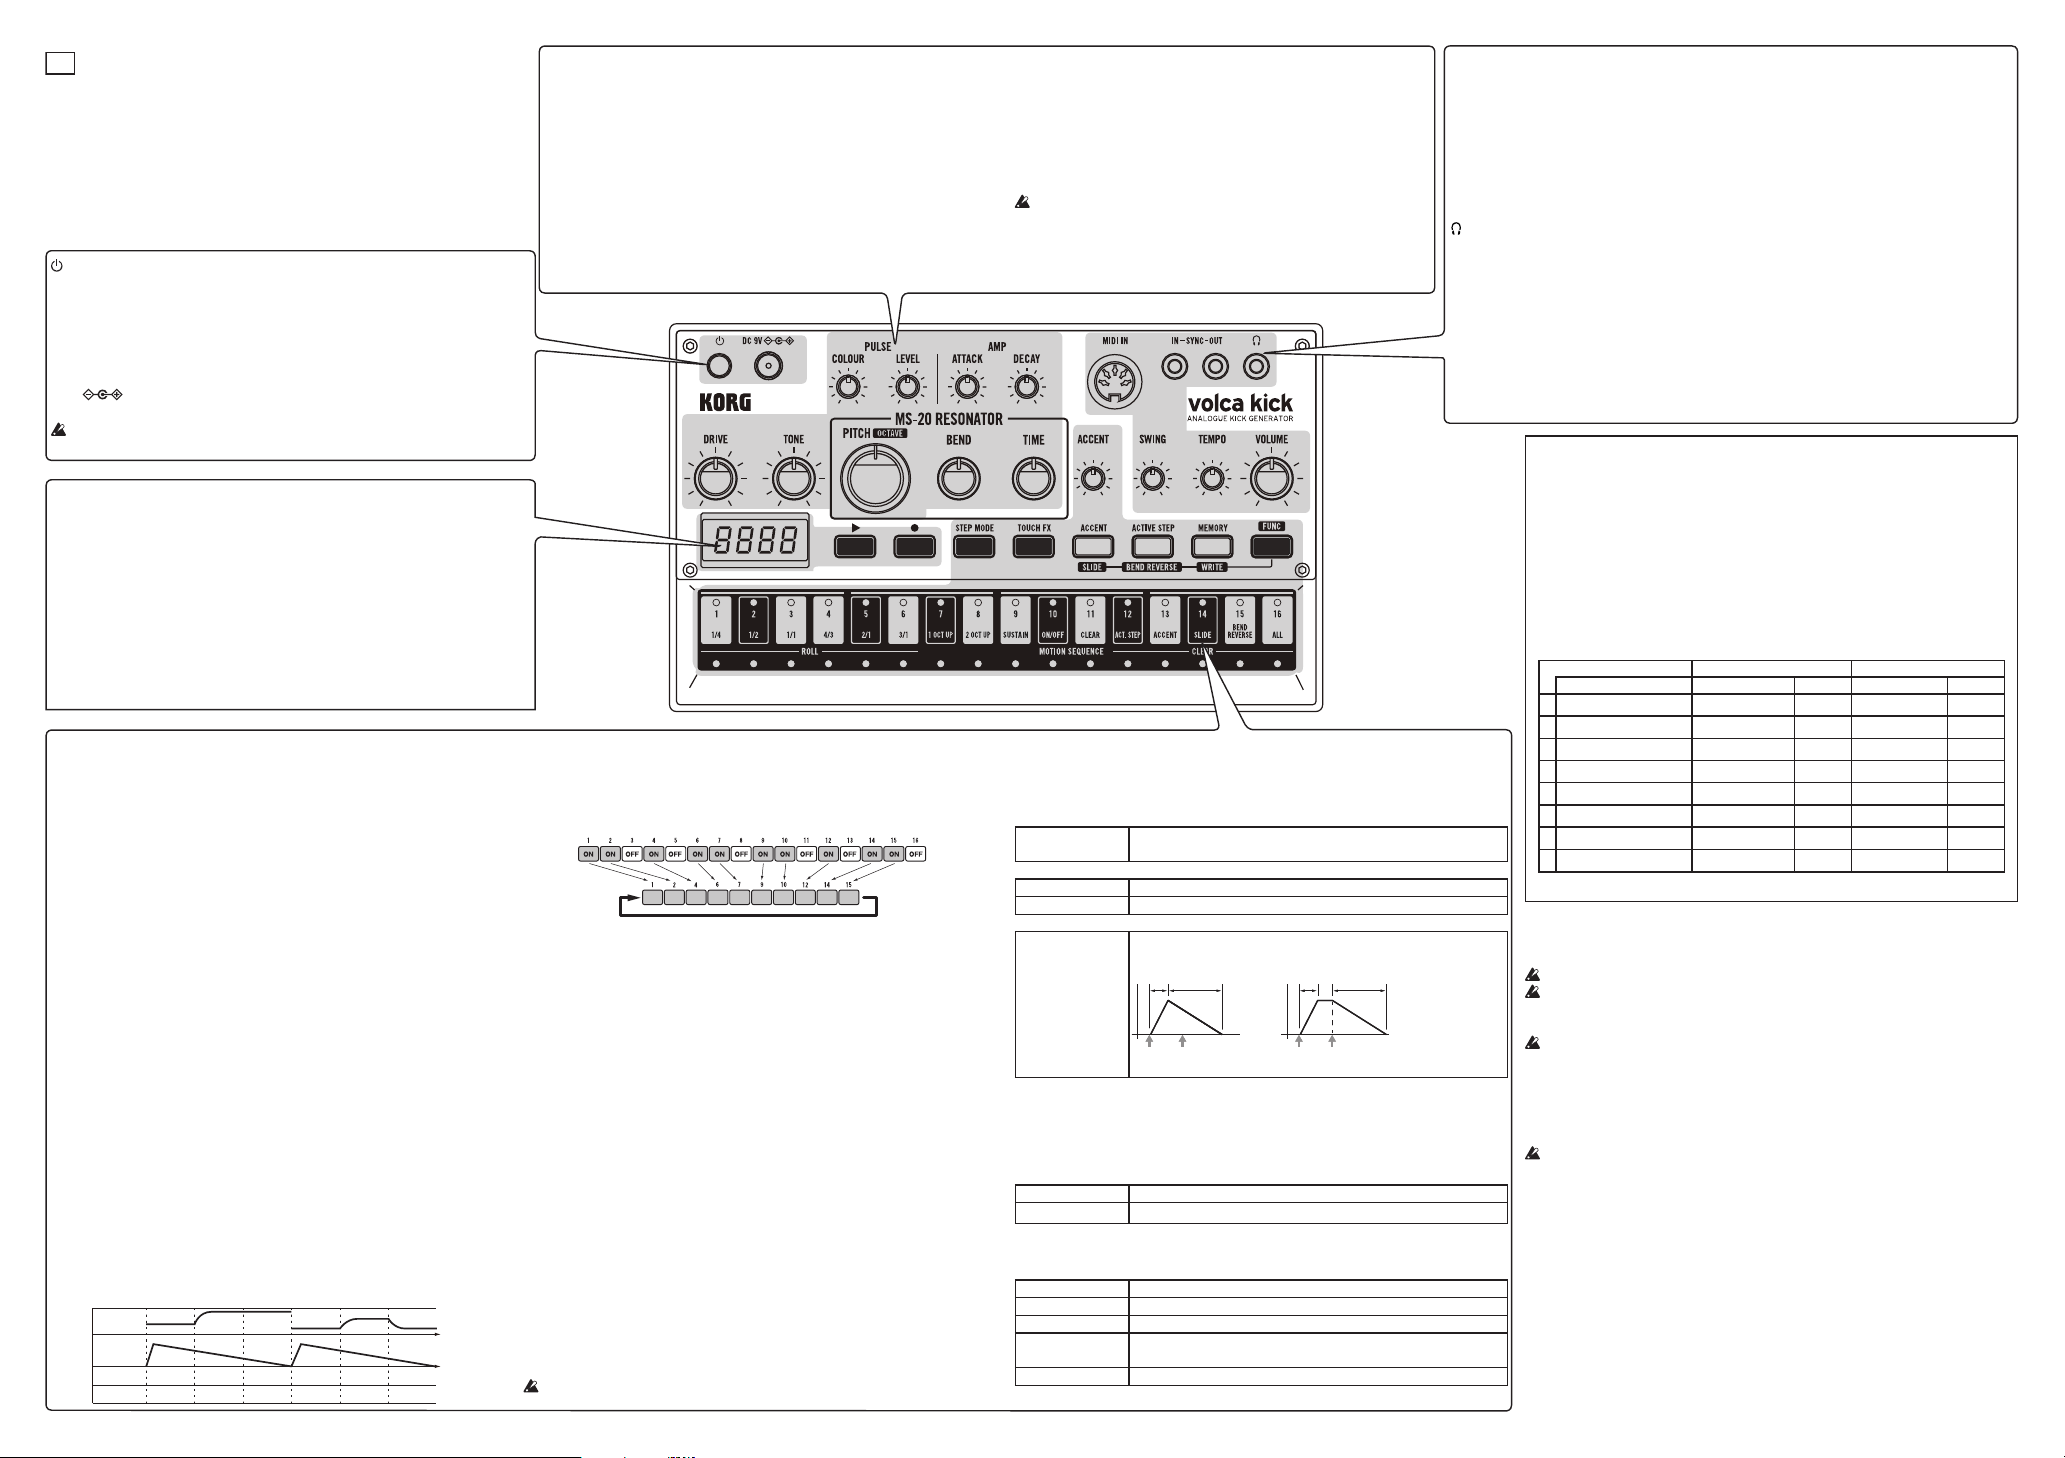
DISPLAY
The value of the selected knob, button, or function is shown in the screen.
(PLAY) button
Pressing this button will cause the current sequence to begin playing. The
button will light up during playback. Press this button a second time to stop playback.
(REC) button
This records your performance on the step buttons as a sequence. If you press this
button while stopped, you’ll enter record-ready mode (the button will blink); when
you then press the
(PLAY) button, recording will start (the button will light). You
can also start recording by playing the keyboard when in record-ready mode. If you
press the
(REC) button during playback, recording will start from the point at
which you pressed the button.
Step buttons 1 to 16
These function as step buttons for the sequencer and the keyboard.
STEP MODE button
Press this button so that step buttons 1 to 16 will function as step buttons for the
sequence (STEP MODE button lights up). Pressing a step button between 1 and 16
turns the step on or off. Steps that have been turned on will be played. However,
steps with nothing recorded cannot be turned on. When a step with nothing
recorded is turned on, the pitch for step 1 on the keyboard (the lowest note) will
automatically be recorded.
TOUCH FX button
Press this button to turn on the touch effect function (TOUCH FX button lights up).
Pressing the step buttons 1 to 16 when TOUCH FX is set to ON will cause the
sequence being played back to temporarily act as follows.
ROLL: The ROLL function will activate at the selected timing.
1 OCT UP, 2 OCT UP: The OCT UP setting that is pressed will turn on.
SUSTAIN: Turns the SUSTAIN settings on.
MOTION SEQUENCE ON/OFF:
This makes the PITCH, BEND and TIME move at random.
MOTION SEQUENCE CLEAR: The motion sequence that is set will be disabled.
CLEAR ACT.STEP: Makes the four steps following the step pushed replay in a loop.
CLEAR ACCENT: Turns the ACCENT setting on.
CLEAR SLIDE: Turns the SLIDE setting on.
CLEAR BEND REVERSE: Turns the BEND REVERSE setting on.
CLEAR ALL: Mutes the output.
ACCENT button, knob
Press this button to select whether or not to increase the sound in each step to
emphasize it. Use the ACCENT knob to specify the volume change of the accent
applied to the selected step.
SLIDE
While holding down the FUNC button, press the ACCENT button (SLIDE) to turn
on or off sliding for each step (ACCENT lights up). EG will not be triggered with
the step after the one where sliding has been turned on. This further achieves the
effect of connecting steps for a smooth change of the pitch.
PITCH
AMP EG
SLIDE
STEP
on o o
on on o
onon o
onon on
(PLAY)
DRIVE knob
Analog drive can be applied. This knob controls the amount of drive.
TONE knob
This knob controls the high frequency of a tone.
PULSE
This sets the pulse sound in order to add clickiness to the attack.
COLOUR: This knob adjusts the cutoff frequency and the tone of the pulse.
LEVEL: This sets the pulse volume.
AMP
The envelope of the oscillator level can be set.
ATTACK: This knob sets the speed of the volume attack.
DECAY: This knob sets the speed of the volume decay. The start time for the
MS-20 RESONATOR
The MS-20 filter oscillates to generate a waveform that recreates the “body
resonance” of a kick drum in a musical interval sense. The EG (BEND) can be
used to change the oscillator pitch over time.
PITCH: This knob controls the pitch. When this knob is fully turned to the
left, the volca kick can be played using the step buttons 1 to 16 as a keyboard
in chromatic scale starting with A. While holding down the FUNC button,
turn the PITCH knob to change the pitch in steps of an octave.
If you feel the pitch has drifted, please stop the sound for about 10
BEND: This knob sets the depth of the EG applied to the pitch.
TIME: This knob sets the speed of the pitch fall.
decay of the sound is changed using the SUSTAIN setting (FUNC+Step 9).
ACTIVE STEP button
Press this button to turn on or off each step of the current sequence (ACTIVE STEP
button lights up). Steps that are turned off are disabled and will be skipped during
playback and recording. The LEDs on each button for steps that have been turned on
will light up.
FUNC (function) button
To access various volca kick functions, hold down the FUNC button and press the
appropriate step button. The LED below the button will light to confirm your selection.
ROLL
This function produces a drum roll.
FNC+1/4, 1/2, 1/1,
4/3, 2/1, 3/1
Octave
FUNC + 1OCT UP This raises the pitch by one octave.
FUNC + 2OCT UP This raises the pitch by two octaves.
SUSTAIN
BEND REVERSE
FUNC + SUSTAIN Changes the start timing for the AMP DECAY.
While holding down the FUNC button, press the ACTIVE STEP button to enter BEND
REVERSE mode (ACTIVE STEP button blinks). The bend direction for each step can
be set to its opposite.
MEMORY button
The volca kick is equipped with 16 memory locations that are used to save sequences.
While holding down the MEMORY button, press a step button between 1 and 16 to
load the saved sequence and the parameters of each knob (except for the SWING,
TEMPO and VOLUME knobs).
CHAIN function
This function links multiple saved sequences.
While holding down the MEMORY button, press the step buttons between 1 and 16
(where sequences have been saved) to specify the range of sequences that you want to
play. The sequences in that range will play back consecutively.
WRITE (saving)
While holding down the FUNC button, press the MEMORY button to enter the
save-ready condition (MEMORY button blinks). In this condition, press a step button
between 1 and 16 to save the currently selected sequence and the setting of each knob
(except the SWING, TEMPO and VOLUME knobs) as sequence data with the step
button that was pressed.
Returning all sequence data to the factory defaults
1. While holding down the FUNC and MEMORY buttons, turn the volca kick on.
The
(REC) and (PLAY) buttons will blink.
2. Press the
the
(REC) button to restore the factory defaults and start volca kick. Press
(PLAY) button to cancel the reset operation and simply start volca kick.
Restoring the factory defaults will erase any saved sequence data.
MOTION SEQUENCE
This function records adjustments made to knobs while a sequence is being recorded.
Once the sequence has made a full cycle from the step where an operation was performed,
record is automatically deactivated.
TIP Motion sequencing will record adjustments to the knobs other than TEMPO, SWING
FUNC + ON/OFF This turns motion sequencing on/off.
FUNC + CLEAR All recorded knob adjustments will be erased.
CLEAR (erasing data)
The settings for various functions can be cleared. If the setting is not changed after it has
been cleared, perform the clear operation again to undo it.
FUNC + ACT.STEP All values in the active step will be deleted
FUNC + ACCENT The accent setting for all steps will be turned off.
FUNC + SLIDE The slide setting for all steps will be turned off.
FUNC +
BEND REVERSE
FUNC + ALL All sequence data will be erased
seconds. volca’s auto-tuning function will correct itself automatically.
This knob sets the hit timing interval from one of six combinations.
ATTACK
ATTACK
NoteonNote
NoteonNote
DECAY
ATTACK
ATTACK
NoteonNote
NoteonNote
DECAY
and VOLUME.
The BEND REVERSE setting for all steps will be turned off.
MIDI IN jack
By connecting a MIDI cable to this input, the volca kick can be played and controlled by the MIDI output
of an external device.
SYNC (IN, OUT) jacks
These jacks allow you to synchronize your volca kick to Korg volca, monotribe or other equipment—including an analog sequencer or a DAW. The polarity of the SYNC jacks can be set using the global parameters.
• SYNC OUT: a 5 V pulse of 15 ms is sent at the beginning of each step.
• SYNC IN: If this jack is connected, the internal step-clock will be ignored, and the volca kick sequencer
will advance according to the pulses received here.
(Headphone) jack
Connecting your headphones to this 1/8”stereo mini jack will mute the volca kick’s internal speaker and
allow you to create music in private.
SWING knob
This knob moves even-numbered steps a maximum of 75% backward. Hold down the FUNC button
while turning this knob to move the steps in the opposite direction.
TEMPO
The Tempo knob controls the speed of the onboard sequencer and arpeggiator.
VOLUME
This is the master volume knob; use this to set the output level of volca kick.
Specifying global parameter settings
Setting the MIDI channel
1. While holding down the MEMORY button,turn the volca kick on.
2. Step buttons 1 to 16 correspond to the MIDI channels 1 to 16. Press the button that
corresponds to the desired channel, and the LED below the step button will light up.
Other parameters
1. While holding down FUNC button, turn on the volca kick.
2. Use the step buttons 1–8 to set your preferences for any or all of the global parameters.
(Refer to the table.)
3. When you have finished, press the (REC) button. Your settings will be saved, and the
volca kick will restart. To cancel without making changes, press the
Button LED lit up LED unlit
Parameter
1
Auto power-off function *Enabled AP.on Disabled AP.oF
2
Battery type selection
3
Sync Out polarity Fall So.Lo *Rise So.HI
4
Sync In polarity Fall SI.Lo *Rise SI.HI
5
Tempo range settings Full (10-600) tP.FL *Narrow (56-240) tP.nr
6
MIDI Clock Src *Auto CL.At Internal CL.In
7
MIDI RX ShortMessage
8
Sync input/output unit Once a step StP1
Status
Nickel-metal hydride
*On St.on Off St.oF
Display indication
bt.nH *Alkaline bt.AL
(PLAY) button.
Status
*Once every 2 steps
Display indication
StP2
*: Factory default setting
Installing the batteries
On the back panel, locate the battery compartment and slide off the cover. Insert the
batteries—being sure to observe the correct polarity—and then replace the battery cover.
Turn the volca kick off before replacing the batteries.
Remove depleted batteries at once. Depleted batteries left in the battery compartment
may leak over time, and may cause malfunctions. Also, remove the batteries if you will
not be using the volca kick for an extended period of time.
Do not mix partially used batteries with new ones, and do not mix batteries of differing
types.
Battery level indicator
When the volca kick is turned on, the LEDs below the step buttons indicate the remaining
amount of battery power. If all LEDs are lit up, the batteries are completely full. Fewer lit
LEDs mean that the battery level is correspondingly lower.
When using the AC adapter, the remaining battery level will not be indicated correctly.
TIP Either alkaline or nickel-metal hydride batteries can be used. In order for the remaining
battery level to be detected and indicated correctly, the type of batteries being used must
be specified in the global parameters of the volca kick.
TIP If the batteries are running low during usage of the volca kick, the low battery warning
“bt.Lo” will appear in the display. If the batteries run down completely, the volca kick
automatically turns off.
TIP It’s not possible to turn off the low battery warning; however, you will be able to
continue using the volca kick until the batteries have run down completely.
About the MIDI implementation chart
The volca kick can be controlled via MIDI; simply connect the MIDI output of an external
MIDI device to the MIDI IN jack of the volca kick. The MIDI messages that can be received
by the volca kick are listed in its MIDI implementation chart. You can download the MIDI
implementation chart for the volca kick from the Korg Web site.
Page 4

Fr
activée
coupée
activée
coupée
SUSTAIN: COUPÉ (OFF) SUSTAIN: ACTIF (ON)
Introduction
Merci d’avoir choisi le générateur de son de grosse caisse analogique volca kick de Korg.
Cet instrument vise à recréer le son d’une grosse caisse en se basant sur le puissant filtre à
résonance équipant le synthétiseur MS-20 de Korg.
Grâce au contrôle de l’auto-oscillation du VCF via les commandes PITCH, BEND et TIME, il est
possible de créer non seulement un son de grosse caisse, mais aussi de modifier la hauteur du son
de grosse caisse via l’ajout d’une gamme. La distorsion analogique produit un son plus profond et
plus chaleureux. Vu que ce modèle est le premier de la gamme volca à offrir la fonction TOUCH
FX, vous pouvez à présent ajouter des changements en temps réel, en plus des effets de séquence
standard (comme le glissé et le swing). L’atout de ce volca est sa capacité de gonfler la dynamique
du son de grosse caisse pour les performances en public.
Interrupteur d’alimentation ( )
Appuyez sur cet interrupteur pour mettre le volca kick sous tension. Pour mettre le volca kick hors
tension, maintenez cet interrupteur enfoncé pendant environ une seconde.
Fonction de coupure automatique de l’alimentation
La fonction de coupure automatique de l’alimentation met le volca kick hors tension quand 4 heures
environ se sont écoulées sans aucune manipulation ni production de son sur l’instrument. Vous pouvez
désactiver la fonction de coupure automatique de l’alimentation avec les paramètres globaux de
l’instrument. (Voyez la description des paramètres globaux.)
Prise DC 9V
Branchez à cette prise la fiche de l’adaptateur secteur en option.
Utilisez uniquement le type d’adaptateur secteur spécifié. L’utilisation de tout autre
adaptateur secteur pourrait endommager le volca kick.
ÉCRAN
Affiche les valeurs sélectionnées avec les commandes, boutons et fonctions de l'instrument.
Bouton (lecture)
Appuyez sur ce bouton pour lancer la lecture de la séquence sélectionnée. Le bouton
(lecture) s’allume pendant la lecture. Une nouvelle pression sur ce bouton arrête la lecture.
Bouton (enregistrement)
Appuyez sur ce bouton pour enregistrer votre jeu sur les boutons de pas et vos manipulations
des commandes sous forme de séquence. Quand le séquenceur est à l’arrêt, une pression sur ce
bouton active le mode paré à enregistrer (le bouton clignote alors). Vous pouvez alors démarrer
l’enregistrement en appuyant sur le bouton (lecture) (le bouton s’allume). Vous pouvez aussi
lancer l’enregistrement en jouant avec les boutons de pas quand le volca kick est en mode paré
à enregistrer. Quand vous appuyez sur le bouton
l’enregistrement commence au point où vous avez enfoncé le bouton.
(enregistrement) pendant la lecture,
Boutons de pas 1 à 16
Il s´agit des boutons de pas du séquenceur et du clavier.
Bouton STEP MODE
Appuyez sur ce bouton pour activer la fonction de pas de séquence des boutons de pas 1 à 16
(le bouton STEP MODE s’allume). Appuyez sur un bouton de pas 1~16 pour activer ou
couper le pas en question. Les pas activés sont joués dans la séquence. Cependant, les pas
vides (où rien n´est enregistré) ne peuvent pas être activés. Quand un pas vide est activé, la
hauteur du pas 1 du clavier (c.-à-d. la note la plus basse) est automatiquement enregistrée.
Bouton TOUCH FX
Appuyez sur ce bouton pour activer la fonction d’effet de toucher (le bouton TOUCH FX
s’allume). Enfoncer les boutons de pas 1 à 16 quand la fonction TOUCH FX est active change
temporairement le comportement de la séquence en cours de reproduction comme suit.
ROLL: La fonction ROLL est activée conformément au timing sélectionné.
1 OCT UP, 2 OCT UP: Le réglage OCT UP correspondant au bouton enfoncé est activé.
SUSTAIN: Active les paramètres SUSTAIN.
MOTION SEQUENCE ON/OFF: Modifie les paramètres PITCH, BEND et TIME de façon
aléatoire.
MOTION SEQUENCE CLEAR: La séquence de manipulations définie est désactivée.
CLEAR ACT.STEP: Les quatre pas suivant le pas enfoncé sont lus en boucle.
CLEAR ACCENT: Active la fonction ACCENT.
CLEAR SLIDE: Active la fonction SLIDE.
CLEAR BEND REVERSE: Active la fonction BEND REVERSE.
CLEAR ALL: Coupe le signal de sortie.
Bouton et commande ACCENT
Appuyez sur ce bouton pour déterminer si le volume du son augmente ou non pour chaque
pas (pour produire un accent). Définissez avec la commande ACCENT le changement de
volume de l’accent appliqué au pas sélectionné.
SLIDE
Tout en maintenant enfoncé le bouton FUNC, appuyez sur le bouton ACCENT (SLIDE) pour
activer ou désactiver le glissé pour chaque pas (le bouton ACCENT s’allume). Dans le cas
d´un pas suivant un pas pour lequel le glissé a été activé, le générateur d´enveloppe n’est pas
déclenché. Cela permet de produire un changement de hauteur naturel entre les pas.
PITCH
AMP EG
SLIDE
STEP
on o o
on on o
onon o
onon on
Commande DRIVE
Permet d’appliquer un effet de distorsion analogique. Règle le niveau de distorsion.
Commande TONE
Accentue ou atténue l’aigu du timbre.
PULSE
Règle le son de pulsation permettant d’ajouter le clic caractéristique de l’attaque.
COLOUR: Règle la fréquence de coupure et le timbre de la pulsation.
LEVEL: Règle le volume de la pulsation.
AMP
Permet de régler l’enveloppe du niveau de l’oscillateur.
ATTACK: Règle la vitesse de l’attaque de volume.
DECAY: Règle la vitesse de la chute de volume. Le point de départ pour la chute du
son est ajusté avec le réglage SUSTAIN (FUNC+Pas 9).
Bouton ACTIVE STEP
Appuyez sur ce bouton pour activer ou désactiver chaque pas de la séquence actuelle (le
bouton ACTIVE STEP s ‘allume). Les pas coupés sont ignorés durant la reproduction et
l’enregistrement. Pour chaque pas actif, le témoin du bouton correspondant s’allume.
MS-20 RESONATOR
Le filtre du MS-20 produit une oscillation pour générer une forme d’onde recréant
la “résonance de fût” d’une grosse caisse sous forme d’intervalle musical. EG
(BEND) permet de changer la hauteur de l’oscillateur dans le temps.
PITCH: Règle la hauteur. Quand cette commande est tournée à fond à gauche, les
boutons de pas 1 à 16 du volca kick peuvent servir de clavier pour jouer une gamme
chromatique démarrant sur un La. Maintenez enfoncé le bouton FUNC et tournez la
commande PITCH pour changer la hauteur par pas d’une octave.
Si l’instrument semble désaccordé, arrêtez de produire du son pendant
environ 10 secondes. La fonction d’accordage automatique du volca corrigera
alors automatiquement la hauteur.
BEND: Règle la profondeur de l’enveloppe appliquée à la hauteur.
TIME: Règle la vitesse de la chute de hauteur.
Bouton FUNC (fonction)
Pour accéder aux diverses fonctions du volca kick, maintenez enfoncé le bouton FUNC et
appuyez sur le bouton de clavier correspondant à la fonction voulue. La diode en dessous de
chaque bouton s’allume et offre une confirmation visuelle de votre sélection.
ROLL
Cette fonction produit un roulement de batterie.
FNC+1/4, 1/2, 1/1, 4/3, 2/1,
BEND REVERSE
Maintenez enfoncé le bouton FUNC et appuyez sur le bouton ACTIVE STEP pour activer le
mode BEND REVERSE (le bouton ACTIVE STEP clignote). La direction du bend peut être
inversée pour chaque pas.
Bouton MEMORY
Le volca kick comporte 16 emplacements de mémoire utilisés pour sauvegarder les
séquences. Tout en appuyant sur le bouton MEMORY, enfoncez un des boutons de pas 1 à 16
pour charger la séquence sauvegardée et les paramètres de chaque commande (sauf les
commandes SWING, TEMPO et VOLUME).
3/1
Octave
FUNC + 1OCT UP Transpose la hauteur d’une octave vers le haut.
FUNC + 2OCT UP Transpose la hauteur de deux octaves vers le haut.
SUSTAIN
FUNC + SUSTAIN
Fonction CHAIN
Cette fonction permet d’enchaîner plusieurs séquences sauvegardées.
Tout en maintenant enfoncé le bouton MEMORY, utilisez les boutons de pas 1 à 16 (où des
séquences sont sauvegardées) pour délimiter la série de séquences à reproduire. Les
séquences comprises dans cette série sont lues en boucle.
WRITE (sauvegarde)
Tout en maintenant enfoncé le bouton FUNC, appuyez sur le bouton MEMORY pour parer
l’instrument à la sauvegarde (le bouton MEMORY clignote). Quand l’instrument est paré à la
sauvegarde, appuyez sur un bouton de pas 1 à 16 pour sauvegarder la séquence actuelle et le
réglage de chaque commande (sauf les commandes SWING, TEMPO et VOLUME) sous
forme de données de séquence dans la mémoire du bouton de pas enfoncé.
Initialisation de toutes les données de séquence
1. Mettez le volca kick sous tension en maintenant ses boutons FUNC et MEMORY enfoncés.
Les boutons
2. Appuyez sur le bouton (enregistrement) pour initialiser les réglages et redémarrer le volca
kick.
simplement le volca kick.
(enregistrement) et (lecture) clignotent.
Appuyez sur le bouton (lecture) pour annuler l’initialisation et redémarrer
L’initialisation des réglages entraîne la perte de toutes les données de séquence
sauvegardées par l’utilisateur.
MOTION SEQUENCE
Cette fonction enregistre les manipulations des commandes dans une séquence.
Quand la séquence a effectué un cycle complet depuis le pas où la manipulation initiale a été
effectuée, l’enregistrement est automatiquement désactivé.
ASTUCE L’enregistrement de manipulations capture les manipulations des commandes (sauf
FUNC + ON/OFF Active/désactive l’enregistrement de manipulations.
FUNC + CLEAR Efface toutes les manipulations de commandes et boutons
CLEAR (suppression de données)
Supprime les réglages de diverses fonctions. Si vous n’avez effectué aucun réglage après avoir
exécuté l’opération Clear, vous pouvez annuler la fonction Clear et retrouver les réglages
“pré-Clear” en exécutant à nouveau l’opération Clear.
FUNC + ACT.STP Efface toutes les valeurs du pas actif.
FUNC + ACCENT Le réglage d’accent est désactivé pour tous les pas.
FUNC + SLIDE Le réglage de glissé est désactivé pour tous les pas.
FUNC +
FUNC + ALL Efface toutes les données de la séquence.
Cette commande règle l’intervalle temporel de frappe parmi six
combinaisons.
Modifie le point de départ de la chute d’amplificateur (AMP DECAY).
ATTAQUE
Note
Note
TEMPO, SWING et VOLUME).
enregistrées dans la séquence.
BEND REVERSE
La fonction BEND REVERSE est désactivée pour tous les pas.
CHUTE
ATTAQUE
Note
Note
CHUTE
Prise MIDI IN
La connexion d’un dispositif MIDI à cette prise via un
câble MIDI permet de jouer et de piloter le volca kick
depuis le dispositif externe.
Prises SYNC (IN, OUT)
Ces prises permettent de synchroniser le volca kick
avec un Korg volca, monotribe ou un autre
instrument—y compris un séquenceur analogique ou
une station de travail audio numérique (DAW). La
polarité des prises SYNC peut être réglée avec les
paramètres globaux du volca kick.
SYNC OUT: Transmet une impulsion de 5 V durant 15
ms au début de chaque pas.
SYNC IN: Quand cette prise est reliée à un dispositif,
le séquenceur du volca kick ignore son horloge interne
et aligne ses pas sur les impulsions reçues à cette prise.
Réglage des paramètres globaux
Réglage du canal MIDI
1. Mettez le volca kick sous tension en maintenant son bouton MEMORY enfoncé.
2. Les boutons de pas 1 à 16 correspondent aux canaux MIDI 1 à 16. Appuyez sur le bouton de
clavier correspondant au canal MIDI voulu. La diode s'allume alors sous ce bouton.
Autres paramètres
1. Mettez le volca kick sous tension en maintenant son bouton FUNC enfoncé.
2. Réglez le ou les paramètres globaux voulus de l'instrument selon vos préférences avec les
boutons de pas 1 à 8. (Voyez le tableau pour plus de détails.)
3. Quand vous avez fini les réglages globaux, appuyez sur le bouton
kick sauvegarde vos réglages avant de redémarrer. Vous pouvez annuler les réglages globaux
avant la sauvegarde en appuyant sur le bouton (lecture).
Bouton Témoin allumé Témoin éteint
Paramètre
1 Mise hors tension automatique *Activée AP.on Désactivée AP.oF
2 Sélection du type de piles Au nickel-hydrure métallique bt.nH *Alcalines bt.AL
3 Polarité ‘Sync Out’ Diminue So.Lo *Augmente So.HI
4 Polarité ‘Sync In’ Diminue SI.Lo *Augmente SI.HI
5
Réglages de plage de tempo
6 Source d’horloge MIDI *Automatique CL.At Interne CL.In
7 Réception MIDI ShortMessage *Active St.on Coupée St.oF
8 Synchro du dispositif d’entrée/de sortie Une fois par pas StP1 *Une fois tous les 2 pas StP2
Statut
Intégrale (10...600) tP.FL *Réduite (56...240) tP.nr
Installation des piles
Localisez le couvercle du compartiment des piles sur la face arrière et ouvrez le couvercle en le
glissant. Insérez les piles en veillant à respecter les indications de polarité, puis remettez en place le
couvercle du compartiment des piles.
Mettez le volca kick hors tension avant de remplacer les piles.
Retirez toujours immédiatement les piles usées du volca kick. La présence de piles usées dans
l’instrument peut provoquer des dysfonctionnements (dus à une fuite du liquide des piles).
Retirez également les piles si vous n’avez pas l’intention d’utiliser le volca kick pendant une
période prolongée.
Ne mélangez pas des piles partiellement utilisées avec des piles neuves et ne mélangez pas
différents types de piles.
Indication d’autonomie restante des piles
À la mise sous tension, le volca kick indique l’autonomie restante des piles avec les témoins sous ses
boutons de pas. Avec des piles neuves en place, tous les témoins sont allumés. Au fil de l’utilisation,
les témoins s’éteignent un à un, indiquant l’autonomie restante.
Quand un adaptateur secteur est branché, l’ indication de charge des piles ne reflète pas la charge réelle.
ASTUCE
Vous pouvez alimenter l’instrument avec des piles alcalines ou au nickel-hydrure métallique. Pour
que l’instrument détecte et indique correctement l’autonomie restante des piles, il est primordial
de définir le type de piles en place avec les paramètres globaux du volca kick.
ASTUCE Quand les piles s’épuisent durant l’utilisation du volca kick, le message d’avertissement de bas
se tension des piles “bt.Lo“ s’affiche sur l’écran. Le volca kick est automatiquement mis hors
tension quand les piles sont plates.
ASTUCE
L’affichage du message d’avertissement de basse tension des piles ne peut pas être désactivé.
Toutefois, vous pouvez continuer à utiliser le volca kick jusqu’à ce que les piles soient
complètement plates.
À propos du tableau d’implémentation MIDI
Pour piloter le volca kick via MIDI, raccordez simplement la prise de sortie MIDI du dispositif MIDI
externe voulu à la prise MIDI IN du volca kick. Les types de messages MIDI qui peuvent être reçus
par le volca kick figurent dans son tableau d’implémentation MIDI. Vous pouvez télécharger le
tableau d’implémentation MIDI du volca kick sur le site web de Korg.
Prise casque
Vous pouvez brancher un casque d’écoute à cette
fiche minijack stéréo de 3,5mm pour couper le son
du haut-parleur interne et jouer sans déranger
votre entourage.
Commande SWING
Recule les pas pairs jusqu’à 75% pour produire du
swing. Maintenez le bouton FUNC enfoncé tout en
tournant cette commande pour avancer les pas.
Commande TEMPO
Cette commande règle la vitesse du séquenceur et
de l’arpégiateur intégrés.
Commande VOLUME
Cette commande de volume général règle le niveau
de sortie du volca kick.
(enregistrement). Le volca
Indication à l’écran
Statut
*: réglage d’usine
Indication à l’écran
Page 5

De
Vorweg
aus
aus
SUSTAIN: AUS SUSTAIN: EIN
Danke dass Sie sich für den analogen Kick-Generator Korg volca kick entschieden haben.
Mithilfe des leistungsfähigen Resonanzfilters aus dem Korg MS-20 können Sie mit diesem
Gerät eindrucksvolle Bassdrum-Sounds erzeugen.
Durch Steuern der Selbstoszillation des VCF mit den Reglern PITCH, BEND und TIME
können Sie neben dem Anschlag auch das Klangverhalten und die Stimmung einer
Bassdrum emulieren. Der analoge Drive erzeugt einen volleren und wärmeren Klang.
Als neues Feature verfügt dieser volca erstmals über die TOUCH TX-Funktion, die Ihnen
neben den Standard-Sequenzeffekten (wie Slide und Swing) eine Echtzeitbearbeitung
ermöglicht. Dieses Gerät der volca-Reihe ist speziell zur Erzeugung dynamischer,
realistisch wirkender Bassdrumsounds geeignet.
Ein-/Ausschalttaste
Drücken Sie diese Taste, um den volca kick einzuschalten. Um den volca kick auszuschalten,
halten Sie die Taste etwa eine Sekunde lang gedrückt.
Energiesparfunktion
Die Energiesparfunktion schaltet den volca kick automatisch aus, wenn nach etwa vier
Stunden keine Klänge erzeugt wurden. Die Energiesparfunktion kann über die globalen
Parameter deaktiviert werden. (Siehe globale Parameter.)
DC 9V -Buchse
Schließen Sie hier ein als Zubehör erhältliches Netzgerät an.
Verwenden Sie ausschließlich das hierfür vorgesehene Netzgerät. Der Anschluss nicht
für dieses Modell vorgesehener Netzgeräte kann zu Schäden am volca kick führen.
ANZEIGE
Hier wird der Wert des/der gewählten Reglers, Taste oder Funktion angezeigt.
(PLAY)-Taste
Mit dieser Taste starten Sie die Wiedergabe der aktuellen Sequenz. Die (PLAY)-Taste
leuchtet während der Wiedergabe. Drücken Sie die Taste erneut, um die Wiedergabe zu
stoppen.
(REC)-Taste
Zur Aufnahme Ihres Spiels auf der Tastatur als Sequenz. Drücken Sie bei gestoppter Wiedergabe
diese Taste, um den volca kick aufnahmebereit zu schalten (Taste blinkt) – die Aufnahme startet,
sobald Sie die (PLAY)-Taste drücken (Taste leuchtet). Sie können bei aufnahmebereitem Gerät
die Aufnahme auch durch Spielen auf der Tastatur starten. Wenn Sie die (REC)-Taste während
der Wiedergabe drücken, beginnt die Aufnahme ab genau diesem Zeitpunkt.
Schritt-Taster 1 bis 16
Diese Taster dienen als Schritt-Taster für den Sequenzer und das Keyboard.
STEP MODE-Taste
Drücken Sie diese Taste, dienen die Tasten 1–16 als Schritt-Tasten für die Sequenz (STEP
MODE-Taste leuchtet). Drücken Sie eine Schritt-Taste zwischen 1 und 16, wird der
entsprechende Schritt aktiviert oder deaktiviert. Aktivierte Schritte werden wiedergeben.
Schritte, für die nichts aufgezeichnet wurde, werden nicht wiedergegeben. Falls ein
Schritt aktiviert ist, für den nichts aufgezeichnet wurde, wird automatisch die Tonhöhe
von Schritt 1 auf der Tastatur (die tiefste Note) aufgezeichnet.
TOUCH FX-Taste
Taste zur Aktivierung der Touch-Effekt-Funktion (TOUCH FX-Taste leuchtet). Mit die
Tasten 1–16 als Schritt-Tasten können Sie bei aktivierter TOUCH FX-Funktion (ON)
während der Wiedergabe einer Sequenz temporär folgende Effekte zuweisen:
ROLL: Die ROLL-Funktion wird im aktuellen Timing aktiviert.
1 OCT UP, 2 OCT UP: Die Oktave erhöht sich je nach Taste um den Faktor 1 bzw. 2.
SUSTAIN: Aktiviert die SUSTAIN-Einstellungen.
MOTION SEQUENCE ON/OFF: Hiermit ändern sich PITCH, BEND und TIME zufällig.
MOTION SEQUENCE CLEAR: Die aktuelle Motion-Sequenz wird deaktiviert.
CLEAR ACT.STEP: Die vier Schritte nach dem gedrückten Schritt werden als Loop
wiedergegeben.
CLEAR ACCENT: Aktiviert die ACCENT-Einstellung.
CLEAR SLIDE: Aktiviert die SLIDE-Einstellung.
CLEAR BEND REVERSE: Aktiviert die BEND REVERSE-Einstellung.
CLEAR ALL: Schaltet den Ausgang stumm.
ACCENT-Taste und -Regler
Diese Taste aktiviert oder deaktiviert die Akzentfunktion zur Betonung der einzelnen
Schritte. Mit dem ACCENT-Regler bestimmen Sie die Lautstärke des Akzents des
betreffenden Schritts.
SLIDE
Wenn Sie bei gedrückter FUNC-Taste die ACCENT (SLIDE)-Taste drücken, aktivieren oder
deaktivieren Sie damit das Glissando des jeweiligen Schritts (ACCENT leuchtet) Ist für
einen Schritt Glissando aktiviert, wird im folgenden Schritt der Hüllkurvengenerator (EG)
nicht getriggert. Dies sorgt für sanfte Übergänge der Tonhöhe zwischen den Schritten.
PITCH
AMP EG
SLIDE
STEP
on o o
on on o
onon o
onon on
DRIVE-Regler
Mit diesem Regler können Sie bei Bedarf den Anteil der Übersteuerung einstellen.
TONE-Regler
Hiermit regeln Sie den Hochtonanteil des Klangs.
PULSE
Hiermit bestimmen Sie den Impulsanteil für einen deutlicheren Anschlag.
COLOUR: Dieser Regler regelt Cutoff-Frequenz und Klang des Impulses.
LEVEL: Hiermit regeln Sie den Pegel des Impulses.
MS-20 RESONATOR
Der MS-20 Filter generiert eine Wellenform, die die Kesselresonanz einer Bassdrum
möglichst realistisch emuliert und in verschiedenen Tonhöhen aufrufbar ist. Mit dem
Hüllkurvengenerator (BEND) kann die Oszillatortonhöhe im Zeitverlauf geändert werden.
PITCH: Dieser Regler steuert die Tonhöhe Ist dieser Regler ganz herunter gedreht,
funktionieren die Tasten 1–16 als Schritt-Tasten einer chromatisch gestimmten
Tastatur, die mit der Note A beginnt. Bei gedrückt gehaltener FUNC-Taste ändern
Sie mit dem PITCH-Regler die Tonhöhe in Schritten von einer Oktave.
AMP
Hiermit können Sie die Hüllkurve des Oszillatorpegels einstellen.
ATTACK: Dieser Regler verändert die Anstiegszeit.
DECAY: Dieser Regler verändert die Abfallzeit. Die Anfangszeit für das
Abschwellen des Sounds wird mit der SUSTAIN-Einstellung geändert
(FUNC+Schritt 9).
BEND: Mit diesem Regler bestimmen Sie, wie stark die Hüllkurve die Tonhöhe
beeinflusst.
TIME: Mit diesem Regler bestimmen Sie die Abfallzeit der Tonhöhe.
ACTIVE STEP-Taste
Diese Taste aktiviert oder deaktiviert die Schritte der aktuellen Sequenz (ACTIVE
STEP-Taste leuchtet) Deaktivierte Schritte werden während der Wiedergabe und
Aufzeichnung übersprungen. Die LEDs der aktivierten Schritt-Tasten leuchten auf.
BEND REVERSE
Drücken Sie bei gedrückter FUNC-Taste die ACTIVE STEP-Taste, um in den BEND
REVERSE-Modus zu gelangen (ACTIVE STEP-Taste blinkt). Sie können die
Bend-Richtung jeden Schrittes umdrehen.
MEMORY-Taste
Der volca kick verfügt über 16 Speicherplätze für Sequenzen. Drücken Sie erst die
MEMORY-Taste und laden Sie dann mit einer der Schritt-Tasten 1–16 die
gespeicherte Sequenz und die Parameter sämtlicher Regler (bis auf SWING, TEMPO
und VOLUME).
CHAIN-Funktion
Diese Funktion verkettet mehrere gespeicherte Sequenzen.
Halten Sie die MEMORY-Taste gedrückt und wählen Sie mit den Schritt-Tasten 1 bis 16
(unter denen die Sequenzen gespeichert sind) die zur Wiedergabe vorgesehenen Sequenzen
aus. Diese werden hintereinander in der Reihenfolge Ihrer Auswahl wiedergegeben.
WRITE (Speichern)
Halten Sie die FUNC-Taste gedrückt und drücken die MEMORY-Taste, um das
Gerät speicherbereit zu schalten (MEMORY-Taste blinkt). Drücken Sie nun eine der
16 Schritt-Tasten, um auf diesem Speicherplatz die aktuelle Sequenz samt
Einstellungen aller Regler (bis auf SWING, TEMPO und VOLUME) zu speichern.
Alle Sequenzdaten auf die Werkseinstellungen zurücksetzen
1. Halten Sie die FUNC- und MEMORY-Tasten gedrückt und schalten Sie den volca
kick ein.
Die (REC)- und (PLAY)-Taste blinken.
2. Drücken Sie die
zurückzusetzen und einzuschalten.
Drücken Sie die (PLAY)-Taste, um das Rücksetzen abzubrechen und den volca
kick normal einzuschalten.
Das Rücksetzen auf die Werkseinstellungen löscht sämtliche gespeicherten
Sequenzdaten.
(REC)-Taste, um den volca kick auf die Werkseinstellungen
MIDI IN-Buchse
Verbinden Sie diesen Eingang mithilfe eines
MIDI-Kabels mit dem MIDI-Ausgang eines
externen Geräts, um den volca kick damit
anzusteuern.
SYNC (IN, OUT)-Buchsen
Über diese Buchsen können Sie Ihren volca kick
Falls die Stimmung sich verschoben haben sollte, stoppen Sie die
Wiedergabe etwa 10 Sekunden lang, damit die Auto-Tuning-Funktion des
volca automatisch die Stimmung korrigieren kann.
mit einem Korg volca monotribe oder anderen
Geräten wie analogen Sequenzern oder DAW
synchronisieren. Die Polarität der SYNC-Buchsen
kann über die globalen Parameter eingestellt
werden.
SYNC OUT: Sendet einen 5 V-Impuls vom 15 ms
Länge zu Beginn jedes Schrittes.
SYNC IN: Ist an dieser Buchse ein entsprechendes
Gerät angeschlossen, wird die interne Uhr
ignoriert und der volca kick Sequenzer wird über
die hier empfangenen Impulse gesteuert.
Globale Parameter einstellen
Auswahl des MIDI-Kanals
1. Halten Sie die MEMORY-Taste gedrückt und schalten Sie den volca kick ein.
2. Die Schritt-Taster 1 bis 16 entsprechen den MIDI-Kanälen 1 bis 16. Drücken Sie die gewünschte Taste
– nun zeigt die leuchtende LED unterhalb der Taste den gewählten MIDI-Kanal an.
Weitere Parameter
1. Halten Sie die FUNC-Taste gedrückt und schalten Sie den volca kick ein.
2. Wählen Sie mit den Schritt-Taster 1 bis 8 den/die globalen Parameter aus, die Sie ändern wollen. (Siehe Tabelle.)
3. Sind Sie damit fertig, drücken Sie die (REC)-Taste. Ihre Einstellungen werden gespeichert und der
volca kick fährt hoch. Zum Abbrechen ohne Speichern drücken Sie die (PLAY)-Taste.
1
Energiesparfunktion
2 Auswahl des Batterietyps
3 SYNC OUT-Polarität
FUNC(Funktion)-Taste
Zum Aufrufen der diversen Funktionen des volca kick halten Sie die
FUNC-Taste gedrückt und drücken Sie die entsprechende Taste der Tastatur.
Die LED unterhalb der Taste leuchtet und bestätigt Ihre Auswahl.
ROLL
Funktion zur Erzeugung eines Trommelwirbels
FNC+1/4, 1/2, 1/1,
4/3, 2/1, 3/1
Octave
FUNC + 1OCT UP Erhöht die Tonhöhe um eine Oktave.
FUNC + 2OCT UP Erhöht die Tonhöhe um zwei Oktaven.
SUSTAIN
FUNC + SUSTAIN Ändert die Anfangszeit des AMP DECAY.
MOTION SEQUENCE (MOTION-SEQUENZ)
Mit dieser Funktion können Sie Einstellungen an den Reglern aufzeichnen, während
eine Sequenz aufgezeichnet wird. Sobald die Sequenz ab dem Schritt der ersten
Bearbeitung komplett durchgelaufen ist, wird die Aufnahme automatisch beendet.
TIPP Beim Motion Sequencing werden die Bedienungen aller Regler bis auf
TEMPO, SWING und VOLUME aufgezeichnet.
FUNC + ON/OFF Aktiviert oder deaktiviert das Motion-Sequencing.
FUNC + CLEAR Alle aufgenommenen Bedienschritte werden gelöscht.
CLEAR (Daten löschen)
Sie können die Einstellungen diverser Funktionen löschen. Werden nach
dem Löschen keine Einstellungen verändert, können Sie durch erneutes
Durchführen der Löschfunktion das Löschen widerrufen.
FUNC + ACT.STP Alle Werte des aktiven Schrittes werden gelöscht.
FUNC + ACCENT Die Akzenteinstellungen aller Schritte werden gelöscht.
FUNC + SLIDE Die Slideeinstellungen aller Schritte werden gelöscht.
FUNC + BEND
REVERSE
FUNC + ALL Alle Sequenzdaten werden gelöscht.
Dieser Regler wählt einen von sechs möglichen
Notenwerten für den Trommelwirbel aus.
DECAY
ATTACK
NoteanNote
DECAY
ATTACK
Note anNote
Die BEND REVERSE-Einstellungen aller Schritte werden
gelöscht.
4 SYNC IN-Polarität
5 Tempobereichseinstellungen
6 MIDI Clock-Quelle
7 MIDI RX-Kurznachrichten
8 Sync Eingang/Ausgang Gerät
Einlegen der Batterien
Das Batteriefach befindet sich auf der Rückseite. Schieben Sie den Deckel auf, legen Sie die Batterien
ein – achten Sie hierbei auf die richtige Polarität – und schließen Sie den Batteriefachdeckel wieder.
Vor dem Auswechseln der Batterien müssen Sie den volca kick ausschalten.
Verbrauchte Batterien müssen umgehend aus dem volca kick entfernt werden, da es sonst zu
Betriebsstörungen (z. B. durch auslaufende Batterien) kommen kann. Entfernen Sie die Batterien
außerdem, wenn Sie den volca kick für längere Zeit nicht verwenden möchten.
Wechseln Sie immer alle Batterien aus und verwenden Sie nur jeweils Batterien desselben Typs.
Batterieladezustandsanzeige
Wird der volca kick eingeschaltet, zeigen die LEDs unterhalb der Schritt-Taster die verbleibende
Batterieleistung an. Leuchten alle LEDs, sind die Batterien voll. Je weniger LEDs leuchten, desto geringer
die Batterieleistung.
Solange ein Netzteil angeschlossen ist, wird die verbleibende Batteriespannung nicht korrekt
angezeigt.
TIPP Sie können Alkalibatterien oder Nickel-Metallhydrid-Akkus verwenden. Damit der Batterieladezu-
stand korrekt erkannt und angezeigt wird, müssen Sie den Typ der verwendeten Batterien in den
globalen Parametern des volca kick angeben.
TIPP Wenn die Batterieleistung während der Bedienung des volca kick nachlässt, erscheint im Display
die Warnung „bt.Lo“. Wenn die Batterien komplett erschöpft sind, schaltet sich der volca kick
automatisch aus.
TIPP Sie können die Warnung vor nachlassender Batterieleistung nicht abschalten, jedoch den volca kick
noch so lange benutzen, bis die Batterien komplett erschöpft sind.
Über die MIDI-Implementation
Sie können den volca kick über MIDI ansteuern: verbinden Sie hierzu den MIDI-Ausgang eines
externen MIDI-Geräts mit der MIDI IN-Buchse des volca kick. Die MIDI-Nachrichten, die vom volca
kick empfangen werden können, sind in der MIDI-Implementationstabelle aufgelistet. Die
MIDI-Implementationstabelle für den volca kick können Sie von der Korg-Webseite herunterladen.
(Kopfhörer)-Buchse
Wenn Sie einen Kopfhörer an diese 1/8"
Stereo-Miniklinkenbuchse anschließen, wird der
interne Lautsprecher des volca kick stumm
geschaltet und Sie können Musik machen, ohne
andere zu stören.
SWING-Regler
Mit diesem Regler können Sie geradzahlige
Schritte bis zu 75 % nach hinten verschieben.
Wenn Sie die FUNC-Taste gedrückt halten,
können Sie die Schritte in die entgegengesetzte
Richtung verschieben.
TEMPO-Regler
Regler zur Steuerung der Geschwindigkeit des
eingebauten Sequenzers und Arpeggiators.
VOLUME-Regler
Mit dem Lautstärkeregler regeln Sie den
Ausgangspegel des volca kick.
Taste LED leuchtet LED aus
Parameter
Status
*Aktiviert AP.on Deaktiviert AP.oF
NiMH-Batterien
Fällt So.Lo *Steigt So.HI
Fällt SI.Lo *Steigt SI.HI
Voll (10…600) tP.FL *Eng (56…240) tP.nr
*Auto CL.At Intern CL.In
*Ein St.on Aus St.oF
Jeden Schritt StP1
Display anzeige
bt.nH *Alkali-Batterien bt.AL
Status
* Jeden zweiten
Schritt
Display anzeige
StP2
*: Werkseinstellung
Page 6

Es
Introducción
nota
nota
nota
nota
SUSTAIN: DESACTIVADO SUSTAIN: ACTIVADO
Gracias por adquirir el generador de bombo analógico volca kick de Korg.
La función de esta unidad es crear el sonido de un bombo a partir del potente filtro resonante
del Korg MS-20 original.
Controlando la oscilación automática del VCF con los mandos PITCH BEND y TIME, se puede
crear no solo un bombo, sino que se puede crear un bombo con afinación añadiendo una escala.
La saturación (drive) analógica produce un sonido más profundo y cálido.
Este es el primer volca equipado con la función TOUCH FX, gracias a la cual se pueden añadir
cambios en tiempo real además de los efectos de secuencia estándares (como “slide” –desliza
miento– y “swing” –movimiento–). Este volca es especialista en proporcionar un sonido de
bombo más dinámico para las actuaciones en directo.
Botón (encendido)
Pulse este botón para encender el volca kick. Para apagar el volca kick, mantenga pulsado
este botón durante aproximadamente un segundo.
Apagado automático
La función de apagado automático apagará automáticamente el volca kick después de que
hayan transcurrido aproximadamente cuatro horas sin que se haya producido ningún sonido.
La función de apagado automático puede desactivarse utilizando los parámetros globales
(consulte los parámetros globales).
Entrada de corriente continua DC 9V
Conecte aquí el conector del adaptador de corriente alterna (opcional).
Utilice solo el adaptador de corriente alterna especificado. El uso de otro adaptador que
no sea el modelo especificado puede dañar el volca kick.
PANTALLA
En ella se muestra el valor de la función, mando o botón seleccionado.
Botón (REPRODUCCIÓN)
Al pulsar este botón, la secuencia actual empezará a reproducirse. El botón
CIÓN) se iluminará durante la reproducción. Pulse este botón una segunda vez para detener
la reproducción.
Botón (GRABACIÓN)
Su función es grabar su interpretación en los botones de paso a modo de secuencia. Si pulsa
este botón con el secuenciador parado, entrará en el estado “listo para grabar” (el botón
parpadeará); cuando después pulse el botón
(el botón se iluminará fijo). También se puede comenzar la grabación tocando en el paso
cuando ya se está en estado “listo para grabar”. Si pulsa el botón
la reproducción, la grabación comenzará desde el punto en el que se pulse el botón.
(REPRODUCCIÓN), comenzará la grabación
Botones de paso 1 al 16
Funcionan como botones de paso para el secuenciador y el teclado.
Botón STEP MODE
Pulse este botón para que los botones de paso 1 a 16 funcionen como botones de paso para la
secuencia (se iluminará el botón STEP MODE). Al pulsar un botón de paso entre 1 y 16 se activará
o se desactivará dicho paso. Los pasos que se han activado se reproducirán. Sin embargo, los pasos
que no tienen nada grabado no se activarán. Cuando se activa un paso que no tiene nada grabado,
se grabará automáticamente el tono de afinación del paso 1 del teclado (la nota más grave).
Botón TOUCH FX
Pulse este botón para activar la función de efectos táctiles (se iluminará el botón TOUCH FX).
Si se pulsan los botones de paso 1-16 cuando la función TOUCH FX está activada (ON), la
secuencia que se esté reproduciendo actuará temporalmente como se indica a continuación.
ROLL: se activa la función ROLL al intervalo de tiempo seleccionado.
1 OCT UP, 2 OCT UP: se activa el ajuste de OCT UP pulsado.
SUSTAIN: se activan los ajustes de SUSTAIN.
ON/OFF de la sección MOTION SEQUENCE: esto hace que PITCH, BEND y TIME se
muevan aleatoriamente.
CLEAR de la sección MOTION SEQUENCE:
ACT.STEP de la sección CLEAR: hace que los cuatro pasos siguientes al paso pulsado se
repitan en bucle.
ACCENT de la sección CLEAR: se activa el ajuste de ACCENT.
SLIDE de la sección CLEAR: se activa el ajuste de SLIDE.
BEND REVERSE de la sección CLEAR: se activa el ajuste de BEND REVERSE.
ALL de la sección CLEAR: se silencia la salida.
se desactiva la secuencia de movimiento ajustada.
Botón, mando ACCENT
Pulse este botón para seleccionar si se incrementa o no el sonido en cada paso para
enfatizarlo. Utilice el mando ACCENT para especificar el cambio de volumen del acento
aplicado en el paso seleccionado.
SLIDE
Mientras mantiene pulsado el botón FUNC, pulse el botón ACCENT (SLIDE) para activar o
desactivar el deslizamiento para cada paso (se encenderá ACCENT). El EG no se
desencadenará en el paso siguiente al paso en el que se ha activado el deslizamiento. Esto
mejora aún más el efecto de conexión de pasos para un cambio suave de de la afinación.
PITCH
AMP EG
SLIDE
STEP
on o o
on on o
(REPRODUC-
(GRABACIÓN) durante
onon o
onon on
Mando DRIVE
Se puede aplicar saturación analógica. Este mando
controla la cantidad de saturación.
Mando TONE
Este mando controla las altas frecuencias del tono.
PULSE
En esta sección se ajusta el sonido del impulso para
añadir “clic” al ataque.
COLOUR: este mando ajusta la frecuencia de corte y
el tono del impulso.
LEVEL: este mando ajusta el volumen del impulso.
AMP
Se puede ajustar la envolvente del nivel del
oscilador.
ATTACK: este mando ajusta la velocidad del ataque
del volumen.
DECAY: este mando ajusta la velocidad de la
extinción del volumen. El tiempo de comienzo de la
extinción del volumen se cambia mediante el ajuste
de SUSTAIN (FUNC + botón de paso 9).
MS-20 RESONATOR
El filtro MS-20 oscila para generar una forma de
onda que recrea la “resonancia del cuerpo” de un
bombo en sentido de intervalos musicales. El mando
BEND del EG se puede utilizar para cambiar el tono
de afinación del oscilador en el tiempo.
PITCH: este mando controla la afinación. Cuando
Botón ACTIVE STEP
Pulse este botón para activar o desactivar cada paso de la secuencia actual (se iluminará el
botón ACTIVE STEP). Los pasos desactivados se omitirán durante la reproducción y la
grabación. Se iluminarán los LED correspondientes a los pasos que hayan sido activados.
BEND REVERSE
Con el botón FUNC pulsado, pulse el botón ACTIVE STEP para acceder al modo BEND
REVERSE (el botón ACTIVE STEP parpadeará). La dirección de modulación de cada
paso se ajustará a la inversa.
Botón MEMORY
El volca kick está equipado con 16 ubicaciones de memoria que se utilizan para guardar
secuencias. Con el botón MEMORY pulsado, pulse un botón de paso entre 1 y 16 para
cargar la secuencia guardada y los parámetros de cada mando (excepto los de los
mandos SWING, TEMPO y VOLUME).
Función CHAIN
Esta función enlaza varias secuencias guardadas.
Mientras mantiene pulsado el botón MEMORY, pulse los botones de paso entre 1 y 16
(donde hayan sido guardadas las secuencias) para especificar la cadena de secuencias que
desee reproducir. Las secuencias de dicha cadena se reproducirán consecutivamente.
WRITE (guardar)
Mientras mantiene pulsado el botón FUNC, pulse el botón MEMORY para entrar en
estado “listo para guardar” (parpadeará el botón MEMORY). En este estado, pulse un
botón de paso entre 1 y 16 para guardar en él la secuencia seleccionada actualmente y y
el ajuste de cada mando (excepto el de los mandos SWING, TEMPO y VOLUME) como
datos de secuencia.
Recuperación de los valores predeterminados de fábrica de todos los datos de secuencia
1. Mientras mantiene pulsados los botones FUNC y MEMORY, encienda el volca kick.
Los botones
2. Pulse el botón
fábrica e iniciar el volca kick.
Pulse el botón
simplemente iniciar el volca kick.
(GRABACIÓN) y (REPRODUCCIÓN) parpadearán.
(GRABACIÓN) para restablecer los valores predeterminados de
(REPRODUCCIÓN) para cancelar la operación de reinicialización y
Al restablecer los valores predeterminados de fábrica, se borrarán todos los datos de
secuencia guardados.
este mando está completamente girado hacia la
izquierda, el volca kick puede reproducirse
utilizando los botones de paso 1 a 16 como un
teclado en escala cromática empezando en La.
Mientras mantiene pulsado el botón FUNC, gire el
mando PITCH para cambiar la afinación en pasos de
una octava.
Si cree que la afinación no es correcta, detenga
el sonido durante 10 segundos aproximadamen
te. La función de afinación automática del volca
lo corregirá automáticamente.
BEND: este mando ajusta la profundidad del EG
aplicado a la afinación.
TIME: este mando ajusta la velocidad de la caída de
la afinación.
Conector MIDI IN
Conectando un cable MIDI a esta entrada, el volca
kick se puede tocar y controlar mediante la salida
MIDI de un dispositivo externo.
Jacks SYNC (IN, OUT)
Estos jacks permiten sincronizar el volca kick con
otro volca, monotribe u otro equipo Korg, incluido
un secuenciador analógico o una estación de trabajo
-
de audio digital (DAW). La polaridad de los jacks
SYNC se puede configurar utilizando los parámetros
globales.
SYNC OUT: se envía un pulso de 15 ms y 5 V al
principio de cada paso.
SYNC IN: si este jack está conectado, se ignorará el
reloj de pasos interno y el secuenciador del volca
kick avanzará de acuerdo a los pulsos recibidos aquí.
Botón FUNC (función)
Para acceder a varias funciones del volca kick, mantenga pulsado el botón FUNC y pulse
el botón de paso que corresponda. El LED situado debajo de la tecla se iluminará para
confirmar la selección.
ROLL
Esta función produce un redoble.
FNC+1/4, 1/2, 1/1, 4/3,
2/1, 3/1
Octava
FUNC + 1OCT UP Eleva el tono en una octava.
FUNC + 2OCT UP Eleva el tono en dos octavas.
SUSTAIN
FUNC + SUSTAIN Cambia el tiempo de comienzo de la extinción del amplificador.
MOTION SEQUENCE (secuenciador de movimientos)
Esta función graba ajustes realizados en los mandos mientras se está grabando una
secuencia.
Una vez que la secuencia ha efectuado un ciclo entero desde el paso en el que se
ejecutó una operación, la grabación se desactiva automáticamente.
NOTA La secuenciación de movimiento grabará los ajustes de todos los mandos excepto
TEMPO, SWING y VOLUME.
FUNC + ON/OFF Activa o desactiva la secuenciación de movimientos.
FUNC + CLEAR Se borrarán todos los ajustes grabados que se hayan efectuado
CLEAR (borrar datos)
Se pueden borrar los ajustes de diversas funciones. Si el ajuste no se ha cambiado después
de haber sido borrado, ejecute la operación de borrado otra vez para deshacer la acción.
FUNC + ACT.STP Se borrarán todos los valores de los pasos activos.
FUNC + ACCENT Se desactivará el ajuste de acento de todos los pasos.
FUNC + SLIDE Se desactivará el ajuste de deslizamiento de todos los pasos.
FUNC + BEND
REVERSE
FUNC + ALL Se borrarán todos los datos de secuencia.
Este mando selecciona el intervalo de tiempo de los golpes entre
seis combinaciones posibles.
DECAY
ATTACK
Inicio de
DECAY
Final de
ATTACK
Inicio de
Final de
con los mandos.
Se desactivará el ajuste de inversión de modulación (BEND
REVERSE) de todos los pasos.
Minijack (auriculares)
Si conecta unos auriculares a este minijack de 1/8 de
pulgada (3,5 mm), se silenciará el altavoz interno del
volca kick y podrá crear música en privado.
Mando SWING
Este mando permite desplazar pasos impares un
máximo del 75 % hacia atrás. Mantenga pulsado el
botón FUNC mientras gira este mando para desplazar
los pasos en sentido opuesto.
Mando TEMPO
Con el mando TEMPO se controla la velocidad del
secuenciador interno y del arpegiador.
Mando VOLUME
Este es el mando del volumen general; se utiliza para
establecer el nivel de salida del volca kick.
Especicar los ajustes de los parámetros globales
Ajustar el canal MIDI
1. Mientras mantiene pulsado el botón MEMORY, encienda el volca kick.
2. Los botones de paso 1 a 16 corresponden a los canales MIDI 1 a 16. Pulse el botón que
corresponda al canal deseado y se encenderá el LED situado debajo de dicho botón.
Otros parámetros
1. Mientas mantiene pulsado el botón FUNC, encienda el volca kick.
2. Utilice los botones de paso 1-8 para configurar las preferencias de cualquiera o de todos los
parámetros globales (remítase a la tabla).
3. Cuando haya terminado, pulse el botón (GRABACIÓN). Los ajustes realizados se guardarán y
el volca kick se reiniciará. Para cancelar si hacer cambios, pulse el botón
Botón LED iluminado LED apagado
Parámetro Estado
1 Función de desactivación automática *Activado AP.on Desactivado AP.oF
2 Selección del tipo de batería
3 Polaridad de salida de sincronización Bajada So.Lo *Subida So.HI
4 Polaridad de entrada de sincronización Bajada SI.Lo *Subida SI.HI
5 Ajustes de intervalo de tempo Completo (10...600) tP.FL *Reducido (56...240) tP.nr
6 SRC de reloj MIDI *Auto CL.At Interno CL.In
7 Mensaje breve RX MIDI *Activado St.on Desactivado St.oF
Sincronización de unidad de entrada/salida
8
Baterías de
níquel-hidruro metálico
Una vez por paso StP1 *
Indicación en pantalla
bt.nH *Baterías alcalinas bt.AL
Instalación de las baterías
En el panel posterior, localice el compartimento de las pilas y quite la tapa deslizándola. Introduzca
las pilas observando la polaridad correcta y después vuelva a poner la tapa del compartimento.
Desactive el volca kick antes de sustituir las baterías.
Las baterías gastadas deben retirarse inmediatamente del volca kick. Si no retira las baterías
gastadas de su compartimento puede provocar un funcionamiento incorrecto (las baterías
pueden tener pérdidas). Retire también las baterías si no tiene previsto utilizar el volca kick
durante un periodo de tiempo prolongado.
No combine baterías parcialmente utilizadas con otras nuevas y tampoco combine baterías de
distintos tipos.
Indicador del nivel de las baterias
Cuando se enciende el volca kick, los LED situados debajo de los botones de paso indican la
cantidad de carga que queda en las pilas. Si todos los LED si iluminan, las pilas están completamen
te cargadas. Cuantos menos LED se iluminen, menor será la carga de las pilas.
Si ha conectado un adaptador de CA, no se indicará correctamente el nivel de batería restante.
NOTA Se pueden utilizar tanto pilas alcalinas como híbridas de níquel-metal. Con objeto de poder
detectar e indicar correctamente el nivel de carga que queda en las pilas, se debe especificar el
tipo de pilas que se están usando en los parámetros globales del volca kick.
NOTA Si durante el uso del volca kick la carga de las pilas se sitúa en un nivel bajo, aparecerá en la
pantalla el aviso de pilas bajas: “bt.Lo”. Si las pilas se gastan por completo, el volca kick se
apagará automáticamente.
NOTA No es posible apagar el aviso de pilas bajas; sin embargo, podrá seguir utilizando el volca
kick hasta que las pilas se agoten del todo.
Acerca del cuadro de implementación de MIDI
El volca kick puede controlarse por MIDI: simplemente conecte la salida MIDI de un dispositivo
MIDI externo al conector MIDI IN del volca kick. Los mensajes MIDI que puede recibir el volca kick
se enumeran en su cuadro de implementación de MIDI.
Puede descargar el cuadro de implementación de MIDI para el volca kick del sitio web de Korg.
(REPRODUCCIÓN).
Estado
Una vez cada 2 pasos
Indicación en pantalla
*: Factory default setting
StP2
-
Page 7

Zh
音符开
SUSTAIN:关 SUSTAIN:开
音符关 音符开 音符关
简介
感谢您购买 Korg volca kick 模拟鼓生成器。
本机可以在原 Korg MS-20 强大的谐振滤波器周围生成集中的大鼓声音。
通过使用 PITCH、BEND 和 TIME 旋钮控制 VCF 的自身振动,不仅仅能够生成大鼓,也
能通过 添加音阶生成定调的低音鼓。模拟驱动将产生更深沉、更温暖的声音。
这是第一款配备了 TOUCH FX 功能的 volca,除了更改标准音序效果器(例如滑动和
Swing 摇摆)之外,您现在可以实时添加更改。该 volca 特长于为现场演出增添更具活
力的大鼓 效果。
( 电 源 )按 钮
按该按钮可打开 volca kick。若要关闭 volca kick,则按住该按钮大约一秒钟。
自动关机
自动关机功能将在不生成声音大约四小时后自动关闭 volca kick。可以使用全局
参数禁用自动关机功能。(请查阅全局参数。)
DC 9V 插孔
将可选 AC 适配器的终端插入该插孔。
请仅使用指定的 AC 适配器。使用任何非指定型号的 AC 适配器可能会损坏本
volca kick。
DISPL AY
选 定 旋 钮 、按 钮 或 功 能 的 值 将 显 示 在 该 屏 幕 中 。
(PLAY) 按钮
按该按钮可使当前音序开始播放。(PLAY) 按钮将在播放期间亮起。再次按该按钮可
停止播 放。
(REC) 按钮
这可以将您在键盘上的演奏录制为音序。如果在已停止时按该按钮,您将进入录音就
绪模式(该按钮将闪烁);当您按
也可以在录音就绪模式中按下键盘开始录音。如果您在播放期间按下了 ● (REC) 按
钮,录音将从您按下该按钮的点开始。
(PLAY) 按钮时,录音将开始(该按钮将亮起)。您
DRIVE 旋钮
可以应用模拟驱动。该旋钮可控制驱动的量。
TONE 旋钮
该旋钮可控制音调的高频。
PULSE
这将设置脉冲声音以便将咔嚓声添加到起音。
COLOUR:该旋钮可调节脉冲的截止频率和脉冲声音。
LE VEL:这 将设置 脉冲音量。
AMP
可以设置振荡器电平包 络。
ATTACK: 该旋钮可设置音量起音速度。
DECAY: 该旋钮可设置音量衰减速度。可以使用 SUSTAIN 设置 (FUNC+步进
9) 更改声音开始衰减的时间。
MS-20 RESONATOR
该 MS-20 滤波器震荡以生成某种波形,以带有音乐节奏感的方式重新生成大
鼓的“鼓体共鸣”。可将 EG (BEND) 用于随时间更改振荡器音调。
PITCH: 该旋钮控制音高。将该旋钮完全转向左侧时,可以将步进按钮 1 至
16 用作以 A 开始的半音音阶键盘播放 volca kick。同时按住 FUNC 按钮
时,旋转 PITCH 旋钮可以以八度步进更改音高。
如果您发现音高漂移,请停止声音大约 10 秒钟时间,volca 的调谐功能
将自动自我 纠正。
BEND: 该旋钮可设置应用到音高的 EG 的深度。
TIME: 该旋钮可设置音高回落速度。
MIDI IN 插孔
通过将 MIDI 线缆连接至该输入端,可以使用外
部设备的 MIDI 输出控制和播放 volca kick。
SYNC (IN, OUT) 插孔
这些插孔允许您将 volca kick 同步至 Korg
Volca、节拍器或其他设备,包 括模拟音序器或
DAW。可以使用全局参数设置 SYNC 插孔的极性。
SYNC OUT:每个步进的开始将发送 15 毫秒的 5
伏脉冲。
SYNC IN:如果连接了该插孔,内部步进时钟将被
忽略,volca kick 音序器将根据接收的脉冲开始
运行。
静音 volca kick 的内部扬声器并允许您个人创
建音乐。
SWING 旋钮
该旋钮可向后调整最多 75% 的偶数编号的步进。
旋转该旋钮的同时按下 FUNC 按钮可反向移动步
进。
TEMPO 旋钮
节奏旋钮可以控制板载音序器和琶音器的速 度。
VOLUME 旋钮
这是主音量旋钮,使用它可以设置 volca kick
的输出音量。
( 耳 机 )插 孔
将您的耳机连接至这个 1/8" 立体声迷你插孔将
指定全局参数设置
指定 MIDI 渠道
1. 按住 MEMORY 按钮时,打开 volca kick。
2. 步进按钮 1 至 16 对应于MIDI 通道 1 至 16。按对应相应渠道的按钮,该步进按钮下方的 LED
将亮起。
其他参数
1. 按住 FUNC 按钮时打开 volca kick。
2. 使用步进按钮 1-8 即可为任意或所有全局参数设置使用偏好。(请参阅该表。)
3. 当 您 完 成 时 ,按 (REC) 按钮。您的设置将被保存,volca kick 将重新开始。若要取消且不做任
何 更 改 ,按
按
参数
钮
1
自动关闭电源功能 *已启用 A P.o n 已禁用 A P.o F
(PLAY) 按钮。
LED 亮起 LED 熄灭
状态
显示屏指示状态
显示屏指示
步进按钮 1 到 16
这些按钮可用作音序器和键盘的步进按钮。
STEP MODE 按钮
按该按钮时,步进按钮 1 至 16 将作为音序的步进按钮工作(STEP MODE 按钮亮起)
。按 1 和 16 之间的步进按钮将打开或关闭步进。已打开的步进将会演奏出来。但
是,未录制任何内容的步进无法播放。打开没有录制任何内容的步进时,键盘上步进 1
(最低音符)的音调将自动被录制。
TOUCH FX 按钮
按该按钮将打开触摸效果器功能(TOUCH FX 按钮亮起)。TOUCH FX 设置为 ON 开启
时按 步进按钮 1 至 16将导致要播放的音序临时按以下方式播放。
ROLL:ROLL 功能将激活选定的节拍。
1 OCT UP、2 OCT UP:按下的 OCT UP 设置将开启。
SUSTAIN:打开 SUSTAIN 设置。
MOTION SEQUENCE ON/OFF:随机移动 PITCH、BEND 和 TIME。
MOTION SEQUENCE CLEAR:设置的动作序列将被禁用。
CLEAR ACT.STEP:将该步进后的四个步进设定为循环播放。
CLEAR ACCENT:打开 ACCENT 设置。
CLEAR SLIDE:打开 SLIDE 设置。
CLEAR BEND REVERSE:打开 BEND REVERSE 设置。
CLEAR ALL:静音输出。
ACCENT 按钮,旋钮
按该按钮可以选择是否在每个步进提高声音以进行强调。使用 ACCENT 旋钮指定应用
到选定步进的重音的音量变化。
SLID E
按下 FUNC 按钮的同时,按 ACCENT 按钮(SLIDE)可打开或关闭每个步进的滑音
(ACCENT 亮起)。在打开了滑音模式的步进之后的步进将无法触发 EG。并且,音高变
得平滑会更好地实现串联步进的效果。
PITCH
AMP EG
SLIDE
STEP
on o o
on on o
onon o
onon on
ACTIVE STEP 按钮
按该按钮将打开或关闭当前音序的每个步进(ACTIVE STEP 按钮亮起)。播放和
录音期间被关闭的步进将被禁用并被忽略。已打开步进所对应按钮上的 LED 将
亮起。
BEND REVERSE
按住 FUNC 按钮的同时,按 ACTIVE STEP 按钮可进入 BEND REVERSE 模式
(ACTIVE STEP 按钮闪烁)。每个步进的弯曲方向可设置为反向。
MEMORY 按钮
本 volca kick 拥有 16 个可以保存音序的内存位置。按住 MEMORY 按钮,然后
按 1 至 16 之间的步进按钮可以加载已保存的音序和每个旋钮的设置
(SWING、TEMPO 和 VOLUME 旋钮除外)。
CHAIN 功能
该功能将链接多个保存的音序。
按住 MEMORY 按钮的同时,按 1 和 16 之间的步进按钮(保存音序的位置)可指
定您要播放的音序范围。该范围内的音序将连续播放。
W R I T E( 保 存 )
按住 FUNC 按钮并按下 MEMORY 按钮进入保存就绪状态(MEMORY 按钮闪烁)。在
这种情况下,按 1 和 16 之间的步进按钮会将当前选定的音序和每个旋钮的设置
(SWING、TEMPO 和 VOLUME 旋钮除外)保存为所按下步进按钮的音序数据。
将所有序列数据返回到出厂默认值
1. 按住 FUNC 和 MEMORY 按钮时,打开 volca kick。
● (REC) 和
2. 按 ● (REC) 按钮恢复出厂默认值并启动 volca kick。
按
恢复出厂默认值将擦除所有保存的音序数据。
(PLAY) 按钮将闪烁。
(PLAY) 按钮取消重置操作并直接打开 volca kick。
F U N C( 功 能 )按 钮
若要访问各种 volca kick 功能,请按住 FUNC 按钮并按适当的步进按钮。
键下方的 LED 将亮起以确认您的选择。
ROLL
该功能将生成击鼓声。
FNC+1/4, 1/2, 1/1, 4/3,
2/1, 3/1
Octave
FUNC + 1OCT UP 这 将 提高一个八 度的 音高 。
FUNC + 2OCT UP
SU STAIN
FUNC + SUSTAIN 更改 AM P DECAY 的开始节拍。
MOTION SEQUENCE
此功能可在录制音序时,记录对旋钮进行的调整量。
一旦执行完步进中的操作完成完整音序循环后,录音功能将自动被取消激
活。
动作序列将记录除 TEMPO、SWING 和 VOLUME 之外的其他旋钮的调节。
提示
FUNC + ON/OFF 这可打开/关闭运 动序列。
FUNC + CLEAR 所有录制的旋钮调整都将被 擦除。
C L E A R( 擦 除 数 据 )
可以清除各种功能的设置。如果清除设置后并未更改设置,则再次执行清除
操作即可撤销操作。
FUNC + ACT.STP 活动步进中的所有值都将被删除。
FUNC + ACCENT 将关闭所有步进的重音设置。
FUNC + SLIDE 将关闭所有步进的滑音设置。
FUNC + BEND REVERSE 所有步进的 BEND REVERSE 设置将被关闭。
FUNC + ALL
该旋钮可以设置六个组合击打节拍间隔中的
一个。
这将提 高两 个八度的音高。
ATTACK
DECAY
所有音序数据都将被擦除。
ATTACK
DECAY
2 电池类型选择 镍氢电池 b t.nH *碱性电池 bt.A L
3 同步输出极 性 回落 S o .Lo *升高
4 同步输入极性 回落 SI.Lo *升高 SI .HI
5 节奏范围设置
6 MIDI 时钟源 *自动 CL.At
MIDI RX ShortMessage
7
8 同步输入/输出单元 一个步 进一次 S t P.1 *2个步进一次
完 整 ( 10 ...600 )
*开 St .o n 关 St .o F
tP.FL * 窄 (5 6...24 0) tP.nr
内部 C L .In
So.H I
St P.2
*: 出厂默认设置
安装电池
在后面板上,查找电池仓并关上滑盖。插入电池 - 请确保极性正确 - 然后按上电池盖。
更 换 电 池 之 前 ,请 首 先 关 闭 电 源 。
请立即取出已耗尽的电池。将耗 尽的电池遗留在电池盒中可能会导致设备故障(电池可能会漏液)。此
外,如果长时间不使用 volca kick,也应移除电池。
请勿将已使用一段时间的电池与新电池或者不同类型的电池混合使用。
电池电量指示灯
打开 volca kick 时,步进按钮下方的 LED 将指示剩余电池电量。如果所有 LED 亮起则说明电池电量
全满。LED 灯亮起的越少说明电池电量越低。
如果连接了交流适配器,则无法正确指示剩余的电池电量。
提示 可以使用碱性电池或镍氢电池。为了确保正确检测和显示剩余电池电量,必须使用符合 volca kick
的全局参数所指定类型的电池。
提示 如果使用电池使用 volca kick ,则显示屏上将显示“bt.Lo”。如果电池电量完全耗尽,volca kick
将自动关 闭。
无法关闭低电池电量警告,但是您可以在电池完全耗尽之前继续使用 volca kick。
提示
关于 MIDI 执行表
可以通过 MIDI 控制 volca kick;只需将外部 MIDI 设备的 MIDI 输出连接至 volca kick 的 MIDI IN
插孔即可。volca kick 可以接收的 MIDI 信号列出在其 MIDI 执行表中。您可以从 Korg 网站下载
volca kick 适用的 MIDI 执行表。
Page 8

Ja
・オン
・オフ
SUSTAIN: OFF SUSTAIN: ON
・オン
・オフ
イント ロ ダ ク ション
このたびは、コルグ・アナログ・キック・ジェネレーター v olca k ick をお買い上げいた
だきまして 、まことにありがとうございます。
本機は MS-20 前期フィルターの強烈な発振音を軸にしてキックの音作りを追求します。
PITCH、BEND、TIMEによってVCFの発振音をコントロールし、キックだけでなく、
音階を付けることでキック・ベースが作れます。アナログ・ドライブによって太く、厚み
のあるシーケン スが 作れ ます。
スライド、スイングなどの定番シーケンス・エフェクトに加え、volca シリーズ初搭載の
チ ・エ フェ クト 機 能
により、リアルタイムに様々な変化を加えることも可能になりました。
ライブでのパフォーマンス性がより高いキック専用 volca です。
(電源)ボタン
電源 をオン、またはオフにします。 オフにするときは約 1 秒間押したままにします。
オート・パワー・オフ
volcakick にはオート・パワー・オフ機能がついています。オート・パワー・オフとは、
本体の操作や発音がない状態が約4 時間続くと、自動的に電源が切れる機能です。オー
ト・パワー・オフ機能は解除することができます(→グローバル・パラメーターの設定)。
DC 9V 端子
別売のコルグ KA-350AC アダプター(DC9V ) を接続します。
A Cアダプターは、必ず指定のものを 使用してください。指定 以外 のA Cアダプ
ターを使用した場合、故障の原因となります。
ディスプレ イ
ノブやボタンを操 作したときに値 などを表示します。
(PLAY) ボタン
シーケンスを再生します。シーケンスは、必ず先頭から再生を開始します。再生中
▶
(PLAY )ボタンが点灯します。もう一度ボタンを押すと停止します。
は
● (R EC)ボタン
ステップ 1 ~ 16 ボタンでの 演奏 をシーケンスとして録 音します。 停止 中に●(RE C)
ボタンを押すと録音待機状態になり(ボタン点滅)、▶ (P L AY)ボタンを押すと録
音を 開始します (ボタン点 灯)。 再生 中に ● (R EC) ボタン 押すと、押したところか
ら録音を開始します。 録音 中に● (REC) ボタン押すと、録音が停止します。
ステップ1~16ボタン
鍵盤またはシーケンサーのステップ・ボタンとして機能します。
STEP MODE ボタン
このボ タン を 押すと 、ステップ 1 ~ 1 6 ボ タン がシ ー ケンス の ステッ
プ・ボタンとして機能します(STEPMODE ボタン点灯)。ステッ
プ 1 ~ 16 ボタンを押すと、ステップのオン、オフが切り替わりま
す。オンに設定されたステップが発音します。また、録音情報の
な いステップ をオン にす ると 、 鍵 盤 動 作時のス テップ 1 ボ タン の
音程が自動的に記録されます。
TOUCH FX ボタン
このボタンを押すと、タッチ・エフェクト機能がオ
ンになります(TOUCHFX ボタン点灯)。
TOUCHFX をオンに設定して、ステップ1~16 ボタンを押す
と再生中のシーケンスが一時的に下記の動作になります。
ROLL:R OLL 機 能が選択したタイミングで動作します。
1 OCT UP、2 OCT UP: 押しているOCTUP の設定がオン
になります。
SUSTAIN:SUSTAIN の設定がオンになります。
MOTION SEQUENCE ON/OFF: PITCH、BEND、TIME
がランダムに 動きます。
MOTION SEQUENCE CLEAR: 設定されているモーション・
シーケンスが無 効 になりま す。
CLEAR ACT.STEP: 押したタイミング以降の 4 ステップが繰り
返し再生されます。
CLEAR ACCENT:ACCENT の設定がオンになります。
CLEAR SLIDE:SLIDE の設定がオンになります。
CLEAR BEND REVERSE: BEND REVERSE の設定がオン
になります。
CLEAR ALL: 出 力 を ミュートします 。
ACCENT ボタン、ノブ
ACC EN T ボタンを押すと、各ステップに対して、 強調するかど
うかを設 定することができます。選択したステップに A CC ENT
ノブで設定したアクセントの音量差が反映されます。
スライド (FUNC+AC CEN T)
FUNC ボタンを押しながら ACCENT ボタン (SLIDE)を押す
と、各ステップのスライドのオン、オフを設 定できます( ACC ENT
ボタン 点滅)。 オンに 設 定 された ス テップの次のス テップ で E G
はトリガーされません。また、音程も滑らかにに変わるため、ス
テップ間がつながったような効果が得られます。
PITCH
AMP EG
SLIDE
STEP
ACTIVE STEP ボタン
このボタンを押すと、現在のシ ーケンスの各ステップのオン、オ
フを設定することができます(ACTIVESTEP ボタン点灯)。
オフにしたステップは再生、録音ともに無効となりシーケンスか
ら除外さ れ ます 。 ス テップ がオ ン の 状 態では ス テップ・ボ タン の
LED が点灯します。
ベンド・リバース(FUNC+ACTIVE STEP)
FUNC ボタンを押しながらACTIVESTEP ボタンを押すと
BENDREVERSE モードに入ります(ACTIVESTEP ボタン
点滅)。各ステップの BE ND の方向を逆に設定することができ
ます。
タッ
on o o
on on o
DRIVE ノブ
アナログ回路により歪みの効果を加えます。歪みの
量を調整します。
TONE ノブ
高域を調整して音色を変化させます。
PULSE
アタックにクリック感を加える た め の パ ル ス 音 を 設 定
します。
COLOUR:カットオフ周波数を調節し、パルス音の
音色を変化させます。
LEVEL:パルス音の音量を設定します。
MEMORY ボタン
volca kick にはシーケンスを保存できる 16 個のメモリーが
内蔵されています。MEMORY ボタンを押しながらステップ
1 ~ 16 ボタン を押 すと、 保存され たシーケン スと SWI NG、
TEMPO、VOLUME を除いたノブのパラメーターの設定を
読み込みます。
CHAIN 機能
複数のシーケンス・データを続けて読み出す機能です。
ME MO RY ボタンを押しながらシーケンスが保存されている
ステップ 1 ~ 16 ボタンで、演奏したいシーケンスの 区間を
指定すると、その区間のシーケンスが 連続して再 生されます。
保存(WRITE)
onon o
onon on
FUNC ボタンを押しながら MEMORY ボタンを押すと保存
待機状態(MEMORY ボタン点滅)になります。その状態
で保存したいステップ 1 ~ 16 ボタンを押すと、現在設定あ
るシーケンス情報と、SWING、TEMPO、VOLUME 以外
のノブのパラメーターの設定をシーケンス・データとして、
各 ステップ ・ボタ ンご とに 保 存 す ることが で きま す 。
シーケンス・データを工場出荷時に戻す
1.FUNC ボタンとMEMORY ボタンを押しながら電源を
入れます 。
●
●
2.
してから起動します。
ンセ ル動作 になり何 もせずに起 動します。
工場出荷状態に戻すとシーケンス・データが消去されます。
FUNC ボタン (ファンクション・ボタン )
F U N C ボタンを押しながらス テップ 1 ~ 16 ボタンを押すこと
によって、さまざまな機能を設 定することができます 。ステップ・
ボタンの下にある LED の点灯または消灯で設定を表示します。
AMP
オシレーターのレベルに時間的な変化を与えます。
ATTACK:音量変化の立ち上がりの早さを設定しま
す。
D E C A Y: 音量変化の立ち下がりの早さを設定し
ます。立下りが開始するタイミングは SUSTAIN
(FUNC+ステップ 9)の設定によって変わります。
MS-20 RESONATOR
MS -20 フィルターを発振させて、音程のあるキック
の「胴鳴り」を再現する波形を生成します。発振音
の音程に EG(BEND)をかけることによって、時
間的な変化を加えられます。
(REC) ボタンと▶(PLAY)ボタンが点滅します。
(RE C)ボタンを押すと、本機を工場出荷状態に戻
▶
(PLAY)ボタンを押すと、キャ
P I T C H:音の高 さを設定します。左に回し切ると、
A ( ラ) から 始 まる 半 音 階 の 鍵 盤として 、 ステップ 1
~ 16 ボタンを使った演奏ができます。また、FUNC
ボタンを押しながら P I T C H ノブを回すと、オクター
ブ単位で音高が変化します。
ピッチがズレたと感じた場 合、発音しないで1 0秒
程度放 置してくだ さい 。オ ートチューニ ングで補
正します。
B E N D:ピッチにかかる EG の効果の深さを設定し
ます。
TIME:ピッチの立ち下がりの早さを設定します。
MIDI IN端子
外部 MIDI 機器と接続して vo lcak ick の音源をコントロールします。
IN–SYNC–OUT (SYNC IN、SYNC OUT) 端子
付属のケーブルを使用して volcakickとその他の volca シリーズ、monotribeなどの機器を接続し、両方
の機器を同期させます。SYNC OUT 端子はステップのはじめに15ms のパルスを 5V で出力します。SYNC
IN 端子に接続すると、内部のステップ・クロックが無効になり、volc akick のシーケンサーは入力されたパ
ルスに応じてステップが進みます。mo notribe 等の S YN C OU T 端子やその他のアナログ・シーケンサー、
DAW などのオーディオ・アウトから出力されるパルスにステップを同期する場合に使用します。
( ヘ ッド ホ ン ) 端 子
ヘッドホン(ステレオ・ミニ・プラグ)を接続します。接続していないときは、内蔵のスピーカーで出力します。
SWING ノブ
偶数ステップの位置を、後ろに最大 75 % まで移動します。F U NC ボタンを押しながら回すと逆方向に移動
することができます。
TEMPO ノブ
シーケンサーの再 生テンポを設定します 。
VOLUME ノブ
出力 の音量を設 定します。
ROLL (ロール)
連打で発音する機能です。
FUNC + 1/4、1/2、1/1、
4/3、2/1、3/1
オクターブ
FUNC + 1 OCT UP 1 オクター ブ上 げます。
FUNC + 2 OCT UP 2 オクターブ上 げます。
サ ス ティン
FUNC + SUSTAIN
MOTION SEQUENCE(モーション・シーケンス)
シーケンス録音中に操作したノブの動作を記録します。操作したステップから
シーケンスが一周すると、この機能は自動的に解除されます。
TIP
TEMPO、SWING、VOLUME 以外のノブの設定がモーション・シーケ
ンスの記録対象です。
FUNC + ON/OFF モ ーション・シーケンスのオンとオフを切り替 えます。
FUNC + CLEAR 記録されているノブの動作を削除します。
CLEAR(削除)
各機能の設定をクリアします。クリア後に設定変更せずに再度クリア操作をす
るとUNDO します。
FUNC +ACT.STEP 全 ス テップ のアクティブ・ス テップ・モ ードをオンに
FUNC + ACCENT 全 ス テップ の ア クセント の 設 定 を オ フにし ま す 。
FUNC + SLIDE 全 ス テッ プ の ス ラ イド の 設 定 を オ フにし ま す 。
BEND REVERSE
FUNC+
FUNC + ALL すべてのシーケンス・データを削除します。
連打するタイミングの間隔を 6 種類の組み合わせで設
定します。
AMP のDECAYを開始するタイミングを変更します。
ノート
ATTACK
DECAY
ノート
ATTACK
ノート
DECAY
ノート
設定します 。
全 ス テ ッ プ の ベ ン ド・リ バ ー ス の 設 定 を オ フ に し ま す 。
グローバル・パラメーターの設定
MIDI チャンネルの設定
1.MEMORY ボタンを押しながら、電源をオンにします。
2.ステップ 1 ~ 1 6 ボタン が M I D I チャン ネ ル 1 ~ 1 6 に 対 応しま す。チャンネル に 対 応
するボタンを押してボタンの LED を 点灯させ ます。
その他の設定
1. F U N C ボ タ ン を 押 し な が ら 、 電 源 を オ ン に し ま す 。
2.ステップ 1 ~ 8 ボタンを押してグローバル・パラメーターを設定します。(表参照)
●
3. 設定を終了したら
キャン セルする 場 合 は
ステップ ・ボタ ン LED 点灯 LED 消灯
機能
1
オ ート・パ ワ ー・ オフ 機 能 * 有効
2
使用電池の選択 ニッケ ル水素
3
SyncOut 極性 立下り
4
SyncIn 極性 立下り
5
Tempo レンジ設定 Full(10 ~ 600)
6
MIDIClockSrc *Auto
MIDIRX
7
ShortMessage
8
Sync 入出力単位 1 ス テップに 1 回
(REC)ボタンを押します。設定が保存され本機が再起動します。
▶
(PLAY)ボタンを押します。
状態 表示 状態 表示
*On
AP.on
bt.nH
So.Lo
SI.Lo
tP. FL
CL.At
St.on
St P.1
無効
* アルカリ
* 立上り
* 立上り
*Narrow(56 ~ 240)
Internal
O
* 2 ステップに 1 回
AP.oF
bt.AL
So.HI
SI.HI
tP.nr
CL.In
St.oF
St P.2
*:工場出荷時の設定です。
電池の入れ方
本体裏面の電池カバーをスライドさせて取り外し、電池の極性に注意して電池を入れます。
そして、電池カバーを取り付けます。
電 池 の交 換 は電源 を切った状 態 で行ってくださ い。
使 えな くなった電 池 は、すぐに本 機 から取り出してくださ い。そのままにして おくと、故障
の原因(電池の液漏れなど)となります。また、長期間ご使用にならない場合も、電池を
外しておいてください。
新しい電池と1度使用した電池や、違う種類の電池を混ぜて使用しないでください。
付属の電池は動作確認用のため、通常より寿命が短いときがあります。
バッテリー残量表示
電源を入れたときにステップ・ボタンの下の LE D に電池の残量値が表示されます。全点灯
で最大値、残量が少なくなるにつれて点灯する数が少なくなります。
ACアダプター(別売)を接続している場合、残量は正しく表示されません。
TIP
単 3 形アルカリ乾電池、またはニッケル水素電池の両方が使用できます。残量の検出、
表示を正確におこなうためにグローバル設定でお使いの電池の種類を設定してください。
TIP
使用時にバッテリー残量が少なくなると警告動作がはじまり、ディスプレイに「bt.Lo」
が点滅 で 表示さ れま す。バッテリー残 量がなくなると、電 源が自動 的にオフになります。
TIP
警告 動作を止めることはできませんが、バッテリーがなくなるまで引き続き使用するこ
とは可能です。
MIDI インプリメンテーション・チャートについて
volcakick の MIDIIN 端子と外部 MIDI 機器の MIDI OUT 端子を接続して、volcakick
の音源をコントロールすることができます。volcakick が受信できる MIDI メッセージにつ
いてはMIDIインプリメンテーション・チャートに記載されています。volcakickの MIDI
インプリメン テ ー ション・ チャートは コ ルグ・ウェブサイトから ダウン ロ ードして くだ さ い 。
 Loading...