

Page 1
Page 2

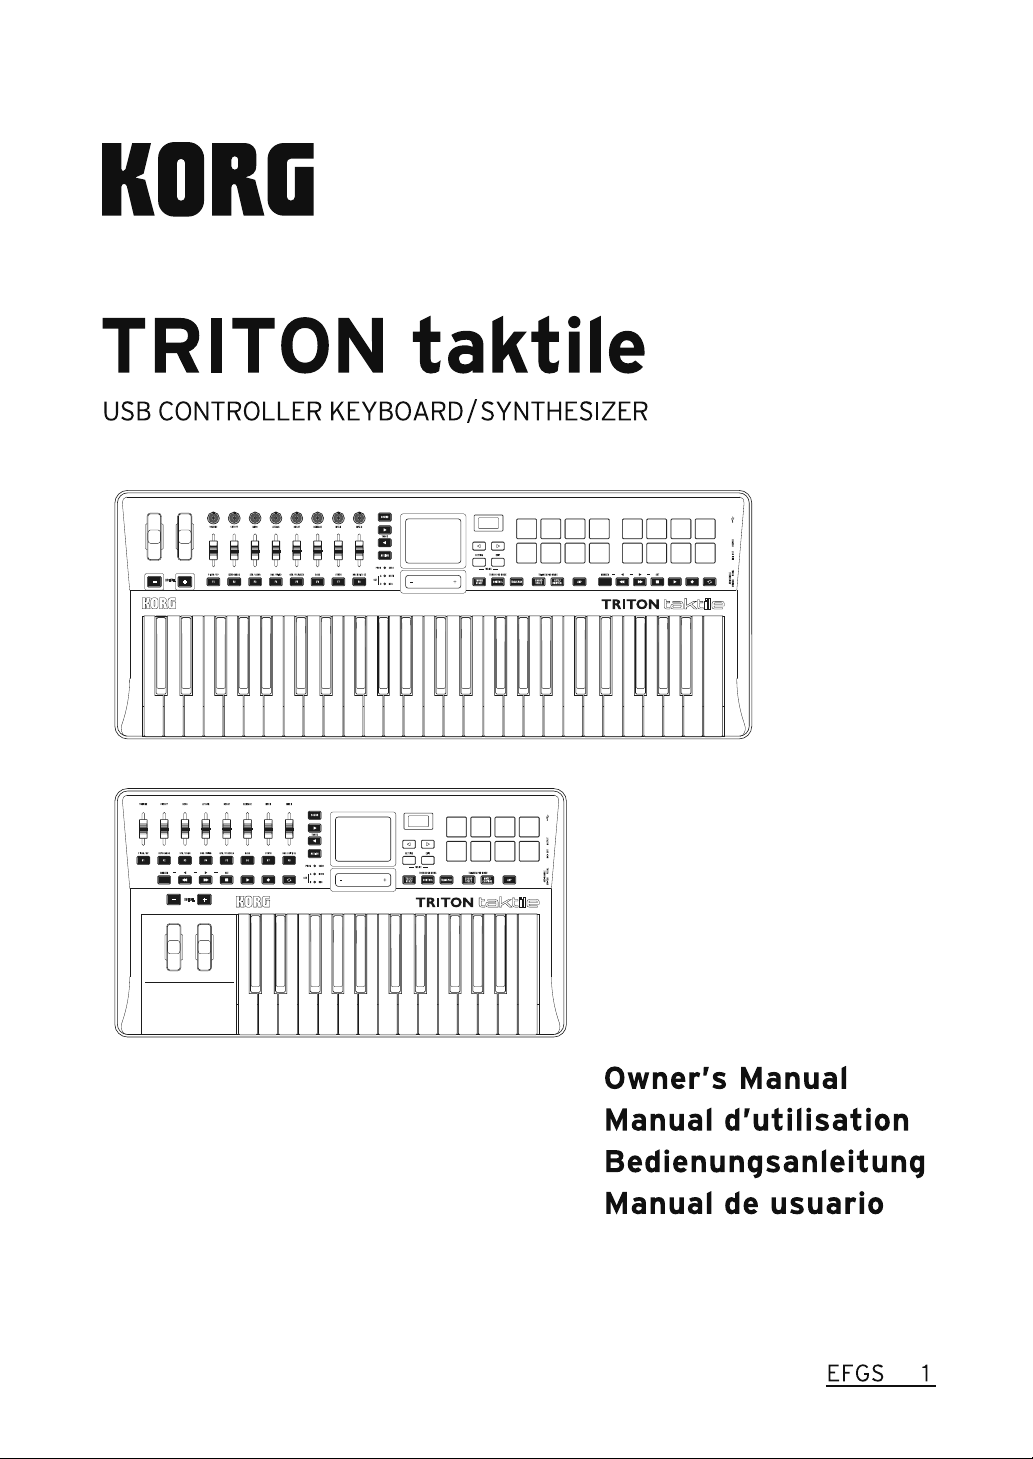
TRITON taktile
Precautions
Location
Using the unit in the following locations can result in a malfunction.
• In direct sunlight
• Locations of extreme temperature or humidity
• Excessively dusty or dirty locations
• Locations of excessive vibration
• Close to magnetic elds
Power supply
Please connect the designated AC adapter to an AC outlet of the correct voltage.
Do not connect it to an AC outlet of voltage other than that for which your unit is
intended.
Interference with other electrical devices
Radios and televisions placed nearby may experience reception interference.
Operate this unit at a suitable distance from radios and televisions.
Handling
To avoid breakage, do not apply excessive force to the switches or controls.
Care
If the exterior becomes dirty, wipe it with a clean, dry cloth. Do not use liquid
cleaners such as benzene or thinner, or cleaning compounds or ammable polishes.
Keep this manual
After reading this manual, please keep it for later reference.
Keeping foreign matter out of your equipment
Never set any container with liquid in it near this equipment. If liquid gets into the
equipment, it could cause a breakdown, re, or electrical shock.
Be careful not to let metal objects get into the equipment. If something does slip
into the equipment, unplug the AC adapter from the wall outlet. Then contact your
nearest Korg dealer or the store where the equipment was purchased.
THE FCC REGULATION WARNING (for USA)
NOTE: This equipment has been tested and found to comply with the limits for
a Class B digital device, pursuant to Part 15 of the FCC Rules. These limits are
designed to provide reasonable protection against harmful interference in a
residential installation. This equipment generates, uses, and can radiate radio
frequency energy and, if not installed and used in accordance with the instructions, may cause harmful interference to radio communications. However,
there is no guarantee that interference will not occur in a particular installation.
If this equipment does cause harmful interference to radio or television reception, which can be determined by turning the equipment off and on, the user is
encouraged to try to correct the interference by one or more of the following
measures:
• Reorient or relocate the receiving antenna.
• Increase the separation between the equipment and receiver.
• Connect the equipment into an outlet on a circuit different from that to which
the receiver is connected.
• Consult the dealer or an experienced radio/TV technician for help.
If items such as cables are included with this equipment, you must use those
included items.
Unauthorized changes or modication to this system can void the user’s authority to operate this equipment.
Responsible Party : KORG USA INC.
Address :
Telephone : 1-631-390-6500
Equipment Type : USB CONTROLLER KEYBOARD/SYNTHESIZER
Model : TRITON taktile-25 / TRITON taktile-49
This device complies with Part 15 of FCC Rules. Operation is subject to the
following two conditions:
(1) This device may not cause harmful interference,and (2) this device must
accept any interference received, including interference that may cause undesired operation.
method of disposal will depend on the applicable laws and regulations in your
locality, please contact your local administrative body for details. If the battery
contains heavy metals in excess of the regulated amount, a chemical symbol
is displayed below the “crossed-out wheeled bin” symbol on the battery or
battery package.
* All product names and company names are the trademarks or
registered trademarks of their respective owners.
DECLARATION OF CONFORMITY (for USA)
316 SOUTH SERVICE ROAD, MELVILLE, NY
Notice regarding disposal (for EU)
When this “crossed-out wheeled bin” symbol is displayed on the
product, owner’s manual, battery, or battery package, it signies that
when you wish to dispose of this product, manual, package or battery you must do so in an approved manner. Do not discard this
product, manual, package or battery along with ordinary household
waste. Disposing in the correct manner will prevent harm to human
health and potential damage to the environment. Since the correct
2
Page 3
Introduction
Thank you for purchasing the Korg TRITON taktile USB
Controller Keyboard/Synthesizer.
In order to take full advantage of your new instrument,
please read this instruction manual carefully and use the
product as directed. You should also keep the instruction
manual for future reference.
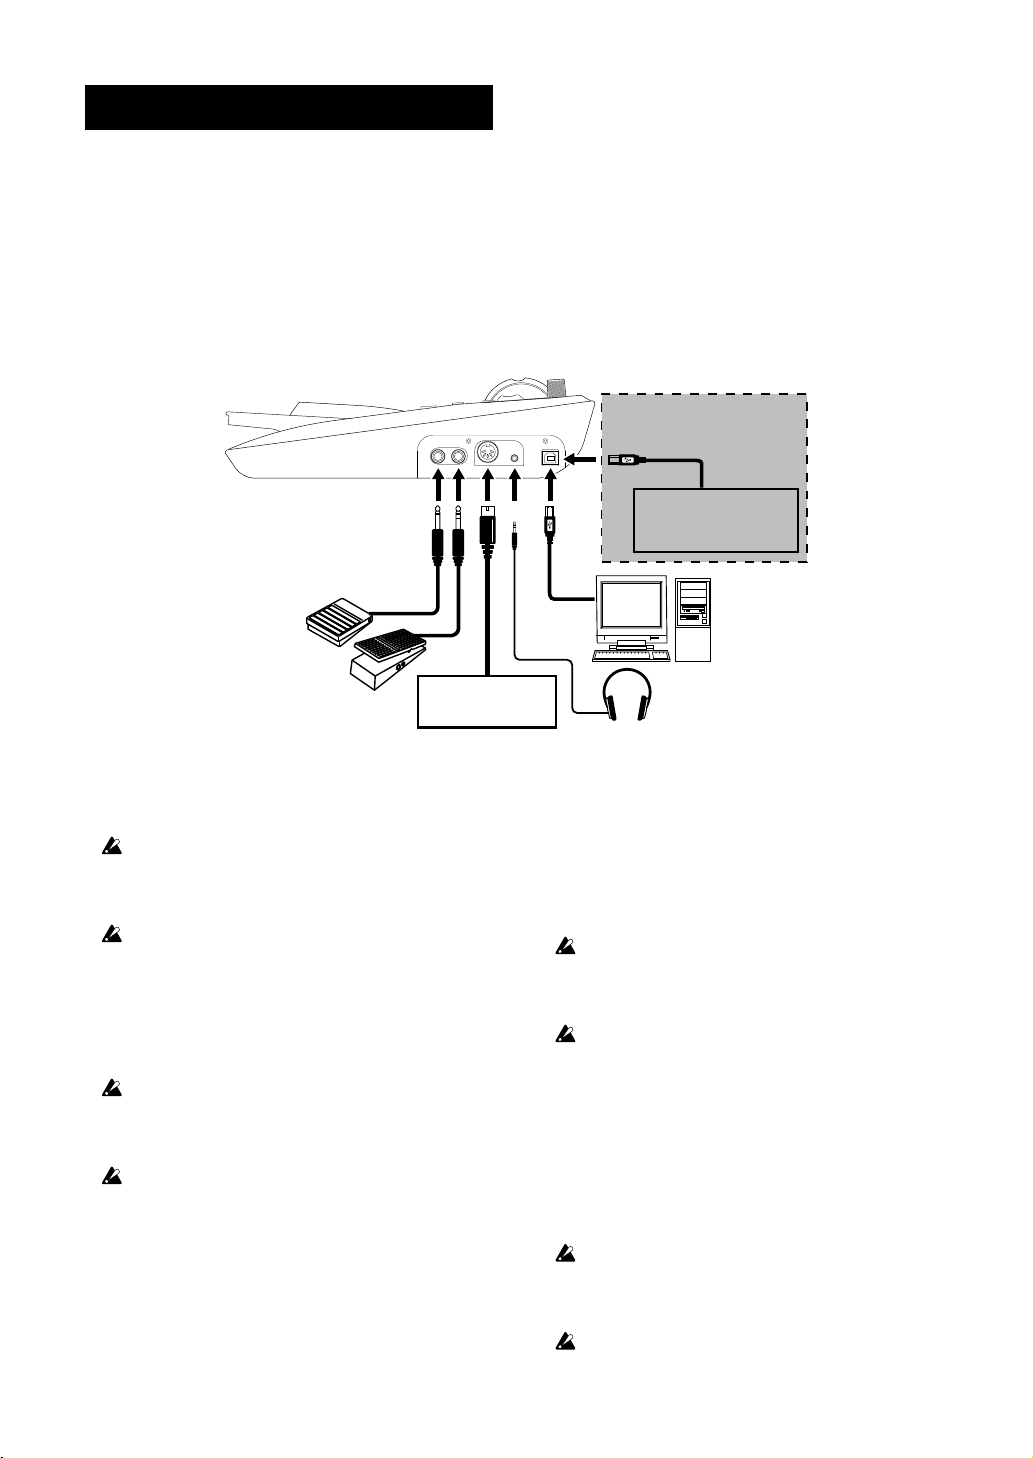
1. Connections
Pedal switch
(PS-1 pedal switch, DS-1H
damper pedal, etc.)
TIP For additional details about that functions and parameters
of this unit, please refer to The TRITON taktile Parameter
Guide. You can download The TRITON taktile Parameter
Guide from the Korg website.
Standalone
Commercial USB AC adapter
(USB 2.0 compatible)
Expression pedal
(EXP-2 foot controller, XVP-10
expression pedal, etc.)
TIP When you connect the unit to your Windows computer for
the first time, the driver included in the OS will be installed
automatically.
When the unit is turned on, the polarity of a pedal switch (sepa-
rately sold) is detected automatically. If you’re using the pedal
switch, it should be connected before the power is turned on. At
power-on, you should not touch the pedal switch.
The standard USB-MIDI driver included in the Windows OS will
not allow The TRITON taktile to be used by two or more applications simultaneously. To allow The TRITON taktile25/49 to be
used by two or more applications simultaneously, you need to
install the KORG USB-MIDI driver. Please download the KORG
USB-MIDI driver from the Korg website, and install it following
the instructions in the supplied document.
If you connect The TRITON taktile via a USB hub, it may not
turn due to insufficient power. In that case, you should directly
connect The TRITON taktile to the USB connector on the computer.
Use only the included USB cable.
MIDI IN
MIDI equipment
Computer
Headphones
Connect the AC Adapter
This unit uses a commercial AC adapter conforming to
USB standards (DC5V 550 mA or higher), making it possible to use it as a standalone unit, without using a computer.
When using the controllers on this unit, a MIDI message is
output from the MIDI OUT jack.
Be sure to use an AC adapter that conforms to USB2.0 stan-
dards. However, there may be cases where, depending on the
USB AC adapter used, it will not function normally even when
compatible with the standards.
When using an AC adapter, The TRITON taktile cannot be used
for controlling the DAW software.
Connecting with headphones and audio equipment
Headphones, powered monitors or mixers should be connected to the OUTPUT jack on the right side of the main
unit.
TIP When using a cable equipped with an adapter for conver-
sion between standard and mini, hold the adapter when
inserting or removing the plug.
When connecting a cable, do so with the device power OFF.
Connecting with the power ON could cause damage to the connected equipment or cause it to malfunction. Also, be sure to
turn down the volume on all devices that you want to connect.
You should avoid wearing headphones for extended periods of
time at loud volume.
3
Page 4
TRITON taktile
2. Basic Operations
Turning the power ON
This unit has no power switch. The power is turned ON by
connecting the USB cable from unit to the computer USB
terminal or USB AC adapter.
Turning the power OFF
The power is turned OFF when the USB cable that connects this unit to the computer or USB AC adapter is removed.
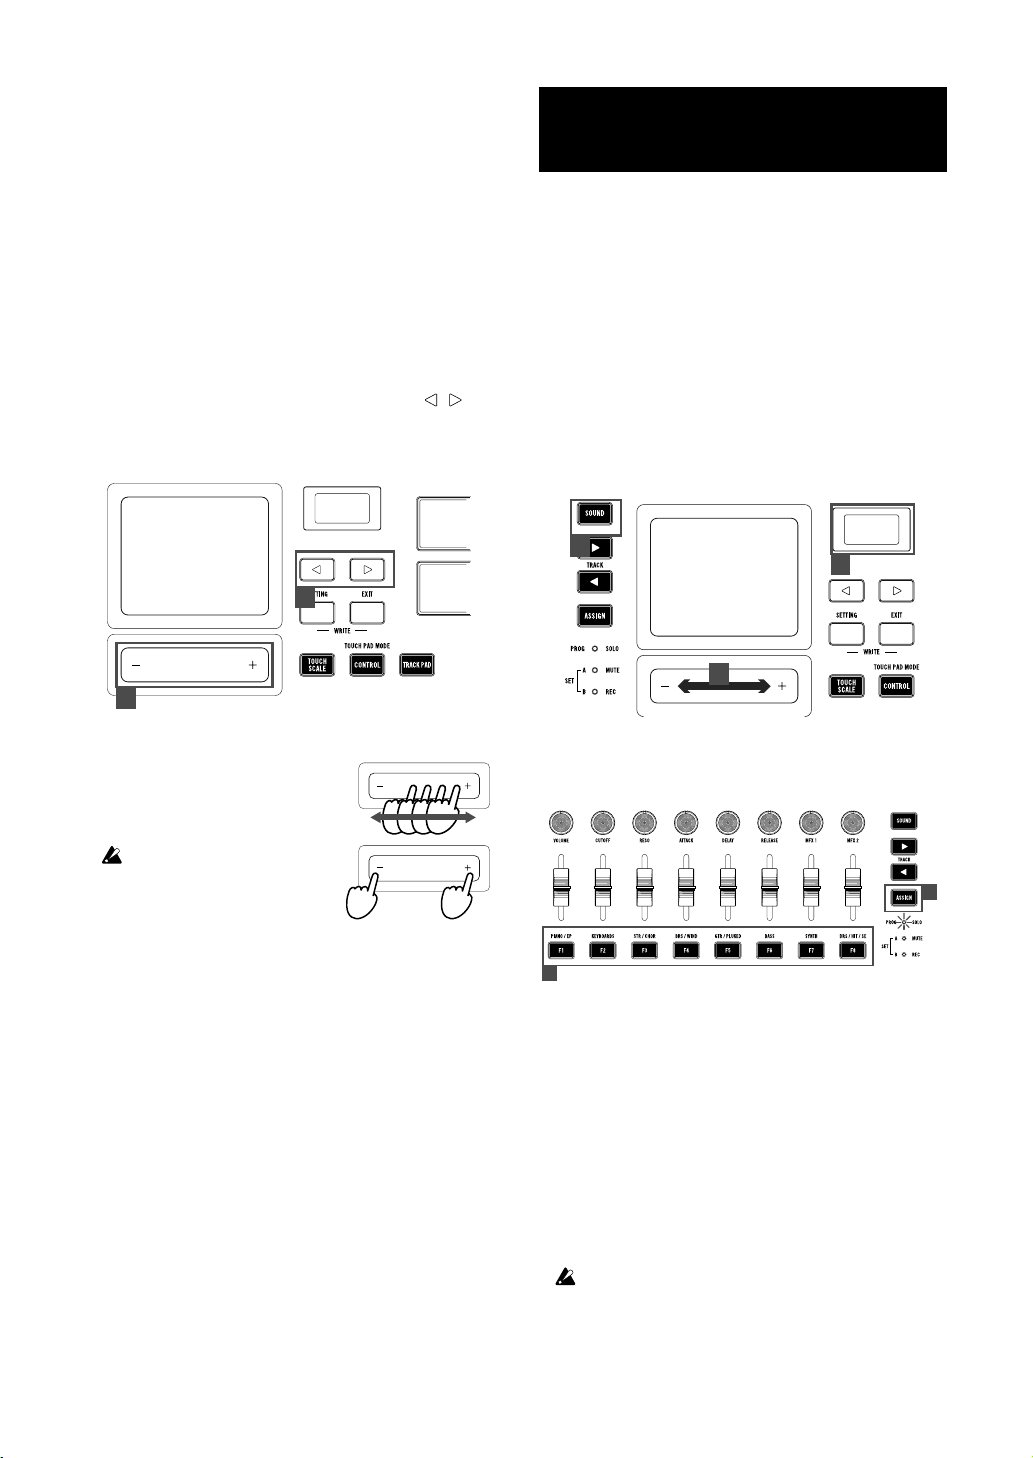
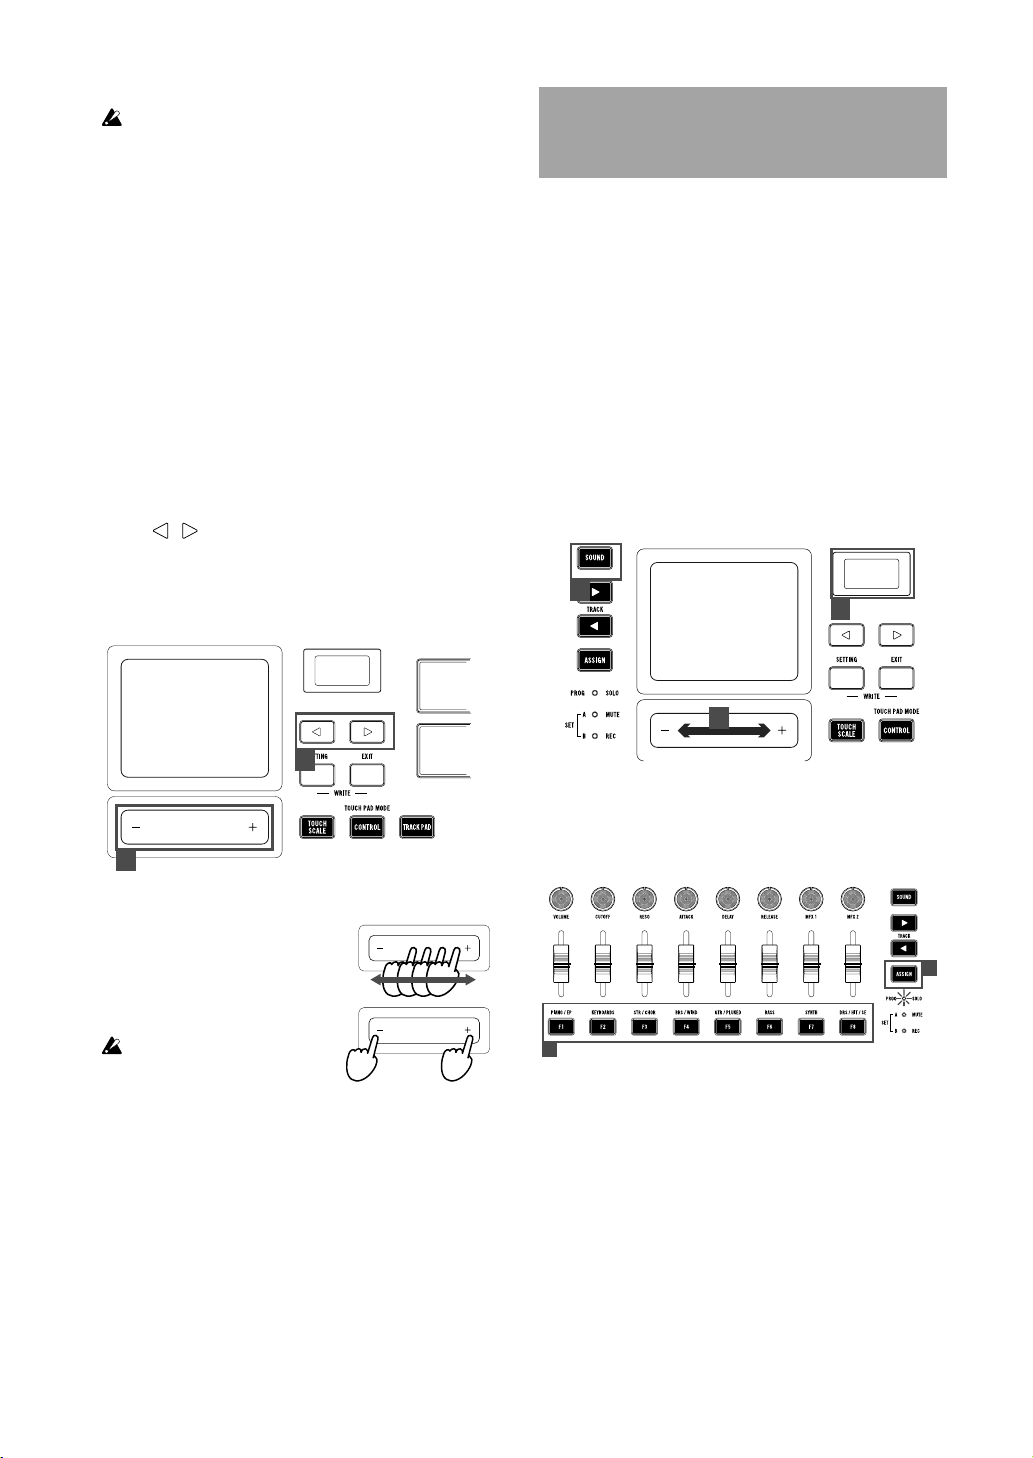
How to use the screen
1. Select a desired parameter with the page / buttons.
2. Specify a value for the parameter with the value slider.
TIP Press the EXIT button to return to the original screen.
1
2
Using the built-in sound source
for your performance
TRITON taktile includes 512 sounds created by tuning the
program sounds mounted in the legendary KORG TRITON. You can easily perform with this unit without connecting to a computer.
TIP While the SOUND mode is ON, all MIDI messages will be
transmitted on the Global MIDI channel regardless of
which MIDI channel is specified for each controller.
1. Choosing the program
1. Press the SOUND button to switch to the SOUND
mode (SOUND button lights up). The program/category names are shown in the display.
2. Change the program with the value slider.
1
1
2
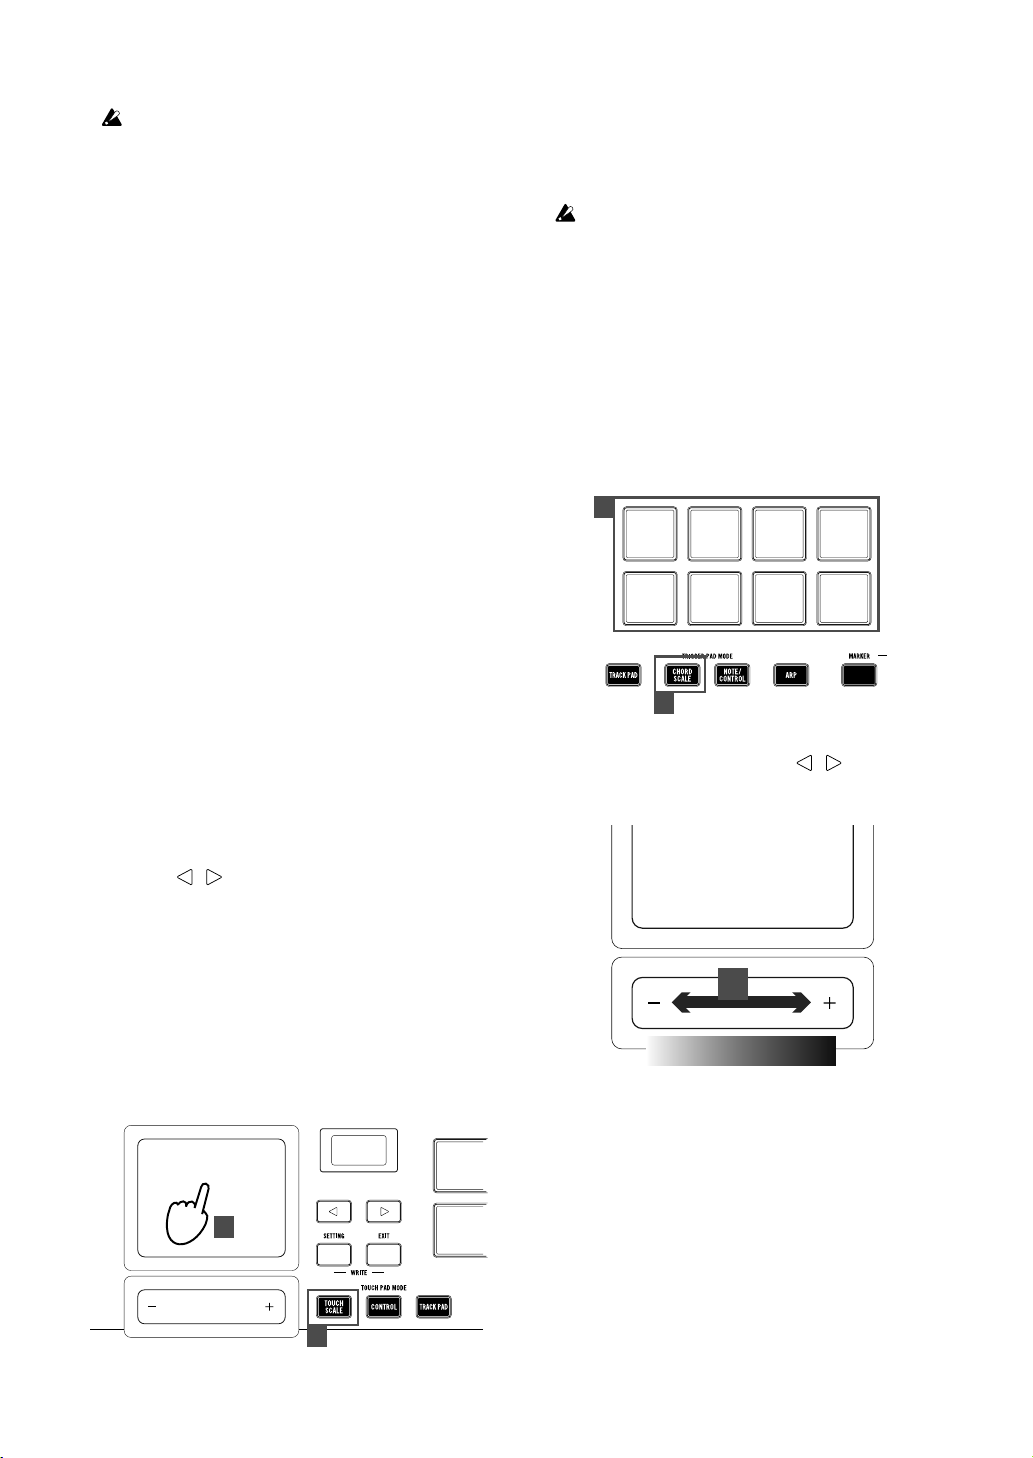
How to use the value slider
When you move a finger along the
slider, a value will change continuously. To change the value one by
one, press the end of the slider.
Only a fingertip should be used to
con trol the value sli der. You
shouldn’t use anything hard or
pointed and you shouldn’t be wearing gloves.
3. Press the ASSIGN button to choose the category (LED
lights up) and then press the F1-F8 buttons to select
the lead program for the individual categories.
3
3
4. You can perform with the keyboard, touchpad and trigger pad. You can also modify the sounds in your performance by using the pitch bend wheel or modulation
wheel to alter the notes that are played.
Changing the sound of program
You can change and modulate the sound of the program
you’ve chosen.
You can use eight sliders to adjust the parameters that are
assigned to individual programs.
TIP Refer to the Parameter Guide for the contents of the pa-
rameters.
It is not possible to store the settings of changed parameters to
the memory. If a program is changed, the unit will return to the
initial settings that are set to each program.
4
Page 5
Registering to favorites
You can use the F1–F8 buttons to register and easily recall
your favorite programs.
1. Select the program that you wish to register.
2. Press the ASSIGN button and select SET A or SET B
(LED lights up).
3. While pressing the EXIT button, press the buttons from
F1–F8 that you wish to use for registering, and register
your favorites.
4. If you press the F1–F8 buttons with SET A or SET B
selected, it is possible to instantly select the registered
programs.
2. Performing along a scale
The TRITON taktile has a function that allows you to perform along a specified scale using the touchpad or the trigger pad.
This function simplifies procedures like triggering a sound
with the trigger pad (chord scale) and playing a melody or
a bass line with the touchpad (touch scale).
Specifying a scale and a key
Specify a scale and a key to be assigned to the touchpad
or the trigger pad.
1. Choose the “Scale” or the “Key” parameter with the
page / buttons, and specify a desired scale or key
using the value slider.
Performing with the touchpad (touch scale)
The touch scale is a function that allows you to perform
with the touchpad using the scale and key that you’ve
specified.
1. Press the TOUCH SCALE button to enter touch scale
mode.
2. Perform by rubbing your finger over the touchpad or
tapping it.
2
Playing chords with the trigger pad (chord scale)
The chord scale is a function that allows you to play chords
with the trigger pad using a specified key and scale.
1. Press the CHORD SCALE button to place the trigger
pad into chord scale mode.
2. Perform by tapping the trigger pad.
2
1
3. When choosing the “Chord Variation” parameter with
the page / buttons, you can control the richness of
the chords with the value slider.
3
Low High
You can make your performance more expressive by
controlling the Variation parameter while you play.
3. Playing a drum with the trig-
ger pad
Press the NOTE/CONTROL button to place the trigger
pad into note/control mode.
Select the drum sound program and tap the trigger pad to
perform (→ 1. Choosing the program).
TIP With the DRS/HIT/SE category (F8 button), you can se-
lect the drum sound program.
TIP At the factory prior to shipment, optimum note messages
for the general GM-compatible drum kit are assigned to
the trigger pad. When using the software synthesizer, the
software may not be compliant with the GM standard.
Please change the assignment referring to The TRITON
taktile Parameter Guide.
1
TIP You can control parameters that were set by moving your
finger on the touchpad in the longitudinal direction. For
information on how to set up parameters, please refer to
the Parameter Guide.
Only a fingertip should be used to control the value slider. You
shouldn’t use anything hard or pointed and you shouldn’t be
wearing gloves.
Selecting a trigger pad bank
The trigger pad of The TRITON taktile has two banks: A
and B. For example, you can assign drum sounds to bank
A and percussion sounds to bank B, or use both A and B
for up to 32 (for the TRITON taktile-25, up to 16) sample
triggers.
Choose the “Pad Bank” with the page / buttons, and
select a bank with the value slider.
TIP An LED for the trigger pad lights up in red for bank A, and
in blue for the bank B.
TIP To select between banks A and B, you can also press the
NOTE/CONTROL button again.
5
Page 6
TRITON taktile
4. Using the arpeggiator
The arpeggiator is a function that automatically plays a
broken chord (arpeggio) when you play a chord.
1. Press the ARP button to turn on the arpeggiator.
2. Notes played on the keyboard, the touchpad, or the
trigger pad will be played by the arpeggiator.
TIP When choosing the arpeggiator parameter with the
/ button
with the value slider. For parameters that can be set up,
please refer to The TRITON taktile Parameter Guide.
s, you can change the arpeggiator setup
page
5. Useful functions
Octave shift
Specify the range of the keyboard, the touch scale, and
the chord scale in octave steps.
1. Whenever you press the OCTAVE +/- buttons, the
range will shift in increments of one octave up and
down.
TIP When pressing the OCTAVE + button and the OCTAVE -
button simultaneously, you can return the octave shift
state to zero, where there is no shifting.
TIP Each program has an upper limit, and may not produce
sound when played above that limit.
Transpose
Transpose the keyboard in semitone steps.
1. Choose the “Transpose” parameter with the page /
buttons, and set it up using the value slider.
Use as MIDI Controller
You can connect this unit to a computer with a USB cable
and use it with a software synthesizer or DAW/MIDI synthesizer, etc.
1. About a scene
Meaning of a scene
A group of settings in The TRITON taktile that suits software such as a DAW is called a scene. Up to 16 scenes
can be stored in the main unit of The TRITON taktile. Settings that support representative software are incorporated in The TRITON taktile beforehand.
TIP You can also customize scene settings. For information
on how to customize them, please refer to the Parameter
Guide of The TRITON taktile.
How to select a scene
Choose the “Scene” parameter with the page / buttons, and select a desired scene with the value slider.
2. MIDI port
KEYBOARD/CTRL, SOUND/ CTRL
MIDI messages from each controller, such as the keyboard and trigger pad of The TRITON taktile will be input.
In addition, they are used when you control the built-in
sound source.
DAW IN, DAW OUT
These ports are used for controlling DAW software.
MIDI I/F OUT
These ports are used as MIDI interfaces. They are used
when you input MIDI messages into your computer from
external MIDI equipment or when you control external
MIDI equipment from your computer.
In the Windows environment, a port name, such as “TRITON
taktile-49” and “MIDIIN2(TRITON taktile-49),” will not be displayed. Since it is usually displayed in the above order, please
specify the corresponding port on the software. When you install the KORG USB-MIDI driver, a MIDI port name will be displayed.
3. How to Set Up DAW Software
For detailed setup and use of third party DAW software, please
refer to the instruction manual of that came with your DAW
software.
If the scene settings in The TRITON taktile have changed from
the factory settings, it may not function as follows.
Cubase
1. Display the “Scene” parameter with the page / buttons, and choose “Cubase” with the value slider.
2. Open the “Device Setup” window in Cubase, and add
6
Page 7
Mackie Control to “Devices.”
3. Open the added Mackie Control page, and specify the
DAW IN/OUT ports of The TRITON taktile in the MIDI
input/output section that you want to be used by Mackie Control.
4. Open the “MIDI Port Setup” page, and uncheck “In ‘All
MIDI Inputs’” for the DAW IN/OUT ports of The TRITON
taktile.
Digital Performer
1. Display the “Scene” parameter with the page /
buttons, and choose the scene for “DP” with the value
slider.
Settings at “Audio MIDI Setup”
• Start “Applications”→“Utilities”→“Audio
MIDI Setup” to open “MIDI Studio,” and execute “Add Device.”
• Name the added device appropriately. (e.g.,
TRITON taktile DP)
• Connect the added device to The TRITON
taktile as shown on the left.
TIP
When using the KORG USB-MIDI driver, connect the INPUT/OUTPUT port of the added
device to the “DAW IN” and “DAW OUT.”
2. Open the “Control Surface” window in Digital Performer, and choose Mackie Control in “Driver” and “Unit.”
3. Choose the “DAW IN/OUT” ports of The TRITON taktile
in the “MIDI” section.
TIP For Digital Performer, the CYCLE button on the transport
buttons functions as an on/off button for the Memory Cycle. However, even if you turn on the Memory Cycle, the
CYCLE button will not light up.
TIP For Digital Performer, the SET MARKER button does not
function.
Live
1. Display the “Scene” parameter with the page / buttons, and choose “Live” with the value slider.
2. Open the “Preferences” window, and choose Mackie
Control in the “Control Surface” section.
3.
Specify the
the MIDI input/output section that you want to be used
by Mackie Control.
DAW IN/OUT
ports of The TRITON taktile in
GarageBand/Logic
Please download The TRITON taktile Control Surface
plug-in for GarageBand/Logic from the Korg website, and
set it up according to the supplied document.
SONAR
1. Display the “Scene” parameter with the page / buttons, and choose “SONAR” with the value slider.
2. Open the “Preferences” window in SONAR, check off
the KEYBOARD/CTRL, SOUND/CTRL port and DAW
IN/OUT port of The TRITON taktile in both “Inputs” and
“Outputs” on the “Devices” page, and press the Apply
button.
3. On the “Control Surfaces” page, open the “Control
Surface Settings” dialog with the button to add a control surface, and specify “Mackie Control” in “Control
Surface,” and the DAW IN/OUT ports of The TRITON
taktile in the “Input Port” and “Output Port” sections.
Other software
1. Display the “Scene” parameter with the page / buttons, and choose “Generic CC” with the value slider.
2. Set up your application so that it can be controlled
through the control change messages that are output
by the “KEYBOARD/CTRL, SOUND/CTRL” port of The
TRITON taktile.
TIP For information on how to set up your application, please
refer to the instruction manual of the application.
4. Performing with the software
synthesizer
While creating sounds, you may be required to connect
the computer and load the software synthesizer beforehand on the DAW software or in order to set the track recording condition, etc. For details, refer to the User’s Manual of the software you are using.
Using the keyboard for your performance
Use the keyboard to confirm that the software synthesizer
is emitting sounds.
In the same way as the control operations explained in
“using the sound source for your performance,” use the
pitch-bend wheel and modulation wheel to try changing
the sound.
You can also carry out operations such as “playing according to the scale,” “playing the drum with the trigger pad,” or
“using the arpeggiator.”
Pro Tools
1. Display the “Scene” parameter with the page / buttons, and choose “Pro Tools” with the value slider.
2. Open the “Peripherals” window in Pro Tools, and
choose HUI in “Type.”
3. Specify the DAW IN/OUT ports of The TRITON taktile
in the source and destination sections that you want to
be used by the HUI.
7
Page 8
TRITON taktile
5. Controlling software
1. If the SOUND button is lit up, press the SOUND button
to turn off its light.
1
2. You can use knobs, sliders and F1–F8 buttons to control your software synthesizer, etc.
TIP For parameters that can be controlled using knobs, slid-
ers, and F1–F8 buttons, please refer to the Parameter
Guide.
TIP For information on how to set up your application, please
refer to the instruction manual of your software.
Using the touchpad for control
1. Press the CONTROL button to place the touchpad into
control mode.
2. Since control change messages are transmitted when
you touch the touchpad, release your finger, and move
it, assign the control change messages at your software synthesizer.
2
3. When you choose the “TRACK PAD” page with the
page / buttons, the left and right sides on the value
slider will function as a left click and a right click respectively.
3
Left click
Right click
1
Specifications
Connectors: MIDI OUT connector, ASSIGNABLE PEDAL
jack, ASSIGNABLE SWITCH jack, OUTPUT jack, USB
connector (B type)
Power supply: USB bus power mode
Current consumption: 500 mA or less
Dimensions (W x D x H):
20.91" x 11.42" x 2.83" / 531 x 290 x 72 mm(TRITON taktile-25)
29.53" x 11.42" x 3.27" / 750 x 290 x 83 mm(TRITOR taktile-49)
Weight:
5.51 lbs. / 2.5 kg (TRITON taktile-25)
8.38 lbs. / 3.8 kg (TRITON taktile-49)
Operating temperature:
0–+40 ˚C (non-condensing)
Included items: USB cable, Owner’s manual
* Specifications and appearance are subject to change without no-
tice for improvement.
1
6. Using the Unit as the Mouse
for Your Computer
1. Press the TRACK PAD button to place the touchpad
into trackpad mode.
2. Control the mouse cursor of your computer by rubbing
your finger over the touchpad.
When you tap the touchpad, it will function as a left click.
Additionally, by rubbing y our two fingers over the touchpad up and down, you can use it for scrolling the screen
up and down.
8
Page 9
Précautions
Emplacement
L’utilisation de cet instrument dans les endroits suivants peut en entraîner le mauvais fonctionnement.
• En plein soleil
• Endroits très chauds ou très humides
• Endroits sales ou fort poussiéreux
• Endroits soumis à de fortes vibrations
• A proximité de champs magnétiques
Alimentation
Branchez l’adaptateur secteur mentionné à une prise secteur de tension appropriée. Evitez de brancher l’adaptateur à une prise de courant
dont la tension ne correspond pas à celle pour laquelle l’appareil est
conçu.
Interférences avec d’autres appareils électriques
Les postes de radio et de télévision situés à proximité peuvent par
conséquent souffrir d’interférences à la réception. Veuillez dès lors
faire fonctionner cet appareil à une distance raisonnable de postes de
radio et de télévision.
Maniement
Pour éviter de les endommager, manipulez les commandes et les boutons de cet instrument avec soin.
Entretien
Lorsque l’instrument se salit, nettoyez-le avec un chiffon propre et sec.
Ne vous servez pas d’agents de nettoyage liquides tels que du benzène ou du diluant, voire des produits inammables.
Conservez ce manuel
Après avoir lu ce manuel, veuillez le conserver soigneusement pour
toute référence ultérieure.
Note concernant les dispositions (Seulement EU)
Quand un symbole avec une poubelle barrée d’une croix
apparait sur le produit, le mode d’emploi, les piles ou le pack
de piles, cela signie que ce produit, manuel ou piles doit
être déposé chez un représentant compétent, et non pas
dans une poubelle ou toute autre déchetterie conventionnelle. Disposer de cette manière, de prévenir les dommages
pour la santé humaine et les dommages potentiels pour
l’environnement. La bonne méthode d’élimination dépendra des lois
et règlements applicables dans votre localité, s’il vous plaît, contactez votre organisme administratif pour plus de détails. Si la pile
contient des métaux lourds au-delà du seuil réglementé, un symbole
chimique est afché en dessous du symbole de la poubelle barrée
d’une croix sur la pile ou le pack de piles.
REMARQUE IMPORTANTE POUR LES CLIENTS
Ce produit a été fabriqué suivant des spécications sévères et des
besoins en tension applicables dans le pays où ce produit doit être
utilisé. Si vous avez acheté ce produit via l’internet, par vente par
correspondance ou/et vente par téléphone, vous devez vérier que
ce produit est bien utilisable dans le pays où vous résidez.
ATTENTION: L’utilisation de ce produit dans un pays autre que celui
pour lequel il a été conçu peut être dangereuse et annulera la garantie du fabricant ou du distributeur. Conservez bien votre récépissé
qui est la preuve de votre achat, faute de quoi votre produit ne risque
de ne plus être couvert par la garantie du fabricant ou du distributeur.
* Tous les noms de produits et de sociétés sont des marques
commerciales ou déposées de leur détenteur respectif.
Evitez toute intrusion d’objets ou de liquide
Ne placez jamais de récipient contenant du liquide près de l’instrument.
Si le liquide se renverse ou coule, il risque de provoquer des dommages, un court-circuit ou une électrocution.
Veillez à ne pas laisser tomber des objets métalliques dans le boîtier
(trombones, par ex.). Si cela se produit, débranchez l’alimentation de la
prise de courant et contactez votre revendeur korg le plus proche ou la
surface où vous avez acheté l’instrument.
9
Page 10

TRITON taktile
Introduction
Nous vous remercions de votre achat du clavier de
contrôle/synthétiseur USB TRITON taktile de Korg.
Afin de profiter pleinement de votre nouvel instrument,
veuillez lire ce manuel d’instructions attentivement et utiliser le produit comme indiqué. Vous devez également
conserver le manuel d’instructions pour toute référence
future.
1. Connexions
Interrupteur à pédale
(interrupteur à pédale PS-1,
pédale forte DS-1H etc.)
ASTUCE Pour les détails des fonctions et des paramètres,
veuillez vous référer au Guide de paramètres du TRITON taktile. Vous pouvez télécharger le Guide de paramètres du TRITON taktile à partir du site Internet
Korg. (http://www.korg.co.jp/English/Distributors/ or
http://www.korg.com/)
Autonome
Adaptateur secteur USB commercial
(compatible USB 2.0)
Pédale d’ expression
(commande au pied EXP-2, pédale
d’ expression XVP-10 etc.)
Lorsque vous connectez votre appareil à votre ordina-
ASTUCE
teur Windows pour la première fois, le pilote inclus
dans le système d’exploitation sera installé automatiquement.
Lors de l’allumage, la polarité de l’interrupteur à pédale (vendu
séparément) est détectée automatiquement. Lorsque vous utilisez l’interrupteur à pédale, vous devez le connecter avant
d’allumer l’appareil. Lors de l’allumage, ne touchez pas l’interrupteur à pédale.
Le pilote USB-MIDI standard inclus dans le système d’exploita-
tion Windows ne permettra pas au TRITON taktile d’être utilisé
par deux applications ou plus à la fois. Pour permettre au TRITON taktile25/49 d’être utilisé par deux applications ou plus à
la fois, vous devez installer le pilote USB-MIDI KORG. Veuillez
télécharger le pilote USB-MIDI KORG sur le site Web de Korg
et l’installer en suivant les instructions du document fourni.
Si vous connectez le TRITON taktile via un hub USB, il pourrait
ne pas s’allumer en raison de coupures d’alimentation. Dans ce
cas, vous devez connecter directement le TRITON taktile au
connecteur USB de l’ordinateur.
Utilice únicamente el cable USB incluido.
Équipement MIDI
MIDI IN
Ordinateur
casque
Brancher l’adaptateur secteur
Cet appareil utilise un adaptateur secteur conforme aux
normes USB (5 V c.c. 550 mA ou plus), ce qui permet de
l’utiliser comme appareil autonome, sans ordinateur.
Lorsque vous utilisez les contrôleurs de cet appareil, un
message MIDI est émis depuis la prise MIDI OUT.
Assurez-vous d’utiliser un adaptateur secteur compatible USB
2.0. Cependant, selon l’adaptateur secteur USB utilisé, il peut y
avoir des cas dans lesquels il ne fonctionnera pas normalement, même s’il est compatible avec les normes.
Si vous utilisez un adaptateur secteur USB, vous ne pouvez
pas utiliser l’appareil pour contrôler le logiciel DAW.
Branchement à un casque ou à de l’équipement
audio
Les casques, moniteurs alimentés ou appareils de mixage
doivent être branchés à la prise OUTPUT sur le côté droit
de l’unité principale.
ASTUCE Si vous utilisez un câble équipé d’un adaptateur pour
conversion entre les tailles standard et mini, tenez
l’adaptateur lorsque vous insérez ou retirez la prise.
Lorsque vous branchez un câble, faites-le pendant
que l’appareil est éteint. Un branchement alors que
l’appareil est allumé pourrait endommager l’équipement ou causer des dysfonctionnements. Veillez
également à diminuer le volume sur tous les appa-
10
Page 11
reils que vous souhaitez brancher.
Évitez de porter un casque fonctionnant avec un
volume élevé pendant une période prolongée.
Utiliser la source sonore intégrée pour votre séance
2. Fonctionnement de base
Allumer l’appareil
L’appareil n’a pas d’interrupteur d’alimentation. L’appareil
s’allume automatiquement lors de la connexion du câble
USB relié de cette unité au port USB de l’ordinateur ou à
l’adaptateur secteur USB.
Éteindre l’appareil
L’appareil est éteint automatiquement lorsque le câble
USB reliant cet appareil à l’ordinateur ou à l’adaptateur
secteur USB est retiré.
Comment utiliser l’écran
1. Sélectionnez un paramètre souhaité avec les boutons
page / .
2. Indiquez une valeur pour le paramètre avec le curseur
de valeur.
ASTUCE Appuyez sur le bouton EXIT pour revenir à l’écran
d’origine.
1
Le TRITON taktile comprend 512 sons créés pour reproduire les sons de programme intégrés au légendaire
KORG TRITON. Vous pouvez utiliser cet appareil facilement pour vos séances, sans vous connecter à un ordinateur.
ASTUCES Lorsque le mode SOUND est activé, tous les mes-
sages MIDI seront transmis au canal MIDI global, peu
importe le canal MIDI spécifié pour chaque contrôleur.
1. Choisir le programme
1. Appuyez sur le bouton SOUND pour basculer sur le
mode SOUND (le bouton SOUND s’éclaire). Les noms
de programme/catégorie s’affichent à l’écran.
2. Modifiez le programme avec le curseur de valeur.
1
1
2
2
Comment utiliser le curseur de valeur
Lorsque vous déplacez le curseur
avec votre doigt, la valeur va changer de façon continue. Pour changer la valeur de un à un, appuyez
sur l’extrémité du curseur.
N’utilisez qu’un doigt pour contrôler
le curseur de valeur. N’utilisez rien
de dur ou de pointu et ne portez pas
de gants.
3. Appuyez sur le bouton ASSIGN pour choisir la catégorie (la DEL s’éclaire) puis appuyez sur les boutons
F1~F8 pour sélectionner le programme principal pour
les catégories individuelles.
3
3
4. Vous pouvez effectuer votre séance au clavier, au pavé
tactile ou au pad déclencheur. Vous pouvez également
modifier les sons de votre séance en utilisant la molette
de pitch bend ou de modulation pour altérer les notes
qui sont jouées.
Modifier le son du programme
Vous pouvez modifier et moduler le son du programme
que vous avez choisi.
Vous pouvez utiliser huit curseurs pour ajuster les paramètres qui sont affectés à des programmes individuels.
ASTUCES Reportez-vous au Guide de paramètres pour en sa-
11
Page 12
TRITON taktile
voir plus sur le contenu des paramètres.
Il n’est pas possible de stocker les réglages des paramètres
modifiés dans la mémoire. Si un programme est modifié, l’appareil reviendra aux réglages d’origine définis pour chaque
programme.
Enregistrer dans les favoris
Vous pouvez utiliser les boutons F1~F8 pour enregistrer et
rappeler facilement vos programmes préférés.
1. Sélectionnez le programme que vous souhaitez enregistrer.
2. Appuyez sur le bouton ASSIGN et sélectionnez SET A
ou SET B (la DEL s’éclaire).
3. Tout en maintenant le bouton EXIT enfoncé, appuyez
sur les boutons F1~F8 que vous souhaitez utiliser pour
l’enregistrement, et enregistrez dans vos favoris.
4.
Si vous appuyez sur les boutons F1~F8 alors que vous
avez sélectionné SET A ou SET B, il est possible de sélectionner instantanément les programmes enregistrés.
2. Jouer en suivant une échelle
Le TRITON taktile propose une fonction qui vous permet
de jouer en suivant l’échelle que vous avez spécifiée avec
le pavé tactile ou le pad déclencheur.
Cette fonction simplifie des procédures comme le déclenchement d’un accompagnement avec le pad déclencheur
(échelle d’accord) et de jouer une mélodie ou une ligne
grave avec le pavé tactile (échelle tactile).
Spécifier une échelle et une touche
Spécifiez une échelle et une touche à affecter au pavé
tactile ou au pad déclencheur.
1. Choisissez le paramètre «Scale» ou «Key» avec les
boutons / , et spécifiez une échelle ou touche
souhaitée avec le curseur de valeur.
ASTUCE Vous pouvez contrôler les paramètres définis en dé-
plaçant votre doigt sur le pavé tactile dans une direction longitudinale. Pour plus d’informations sur la configuration des paramètres, veuillez vous reporter au
Guide de paramètres.
N’utilisez qu’un doigt pour contrôler le curseur de valeur. N’uti-
lisez rien de dur ou de pointu et ne portez pas de gants.
Jouer des accords avec le pad déclencheur (échelle
d’accord)
L’échelle d’accord est une fonction qui vous permet de
jouer des accords avec le pad déclencheur ainsi qu’avec
l’échelle et la touche que vous avez spécifiées.
1. Appuyez sur le bouton CHORD SCALE pour placer le
pad déclencheur en mode échelle d’accord.
2. Jouez en appuyant sur le pad déclencheur.
2
1
3. Lorsque vous choisissez le paramètre «Chord Variation» avec les boutons de page / , vous pouvez
contrôler la richesse des accords avec le curseur de
valeur.
Jouer avec le pavé tactile (échelle tactile)
L’échelle tactile est une fonction qui vous permet de jouer
avec le pavé tactile ainsi qu’avec l’échelle et la touche que
vous avez spécifiées.
1. Appuyez sur le bouton TOUCH SCALE pour entrer en
mode échelle tactile.
2. Jouez en glissant votre doigt sur le pavé ou en appuyant dessus.
2
1
12
3
Faible Élevé
Vous pouvez rendre votre séance plus expressive en
contrôlant le paramètre Variation lorsque vous jouez.
3. Jouer du tambour avec le pad
déclencheur
Appuyez sur le bouton NOTE/CONTROL pour placer le
pad déclencheur en mode note/contrôle.
Sélectionnez le programme de son de tambour et appuyez
sur le pad déclencheur pour commencer votre séance (→
1. Choisir le programme).
Page 13

ASTUCE Avec la catégorie DRS/HIT/SE (bouton F8), vous pou-
vez sélectionner le programme de son de tambour.
ASTUCE En usine, avant l’envoi, les messages de note opti-
maux pour le kit de tambour compatible GM général
sont affectés au pad déclencheur. Lorsque vous utilisez le synthétiseur logiciel, il est possible que le logiciel
ne soit pas conforme à la norme GM. Veuillez modifier
l’affectation en vous reportant au Guide de paramètres
du TRITON taktile.
Sélectionner une banque de pad déclencheur
Le pad déclencheur du TRITON taktile possède deux
banques : A et B. Par exemple, vous pouvez affecter les
sons de tambour à la banque A et les percussions à la
banque B, ou utiliser A et B pour jusqu’à 32 échantillons de
déclencheurs (16 pour le TRITON taktile-25).
Choisissez le «Pad Bank» avec les boutons de page /
, et sélectionnez une banque avec le curseur de valeur.
ASTUC E Une DEL du pad déclencheur s’éclaire en rouge pour
la banque A et en bleu pour la banque B.
ASTUC E Pour choisir entre les banques A et B, vous pouvez
également appuyer à nouveau sur le bouton NOTE/
CONTROL.
1. Choisissez le paramètre «Transpose» avec les boutons de page / , et configurez-le avec le curseur
de valeur.
Utiliser comme contrôleur MIDI
Vous pouvez connecter cet appareil à un ordinateur avec
un câble USB et l’utiliser avec un synthétiseur logiciel, un
synthétiseur DAW/MIDI, etc.
1. À propos des scènes
Signification d’une scène
Un ensemble de paramètres du TRITON taktile convenant
à un logiciel comme DAW est appelé une scène. Vous
pouvez stocker jusqu’à 16 scènes sur l’unité principale du
TRITON taktile. Des paramètres prenant en charge le logiciel de l’appareil sont intégrés au TRITON taktile à
l’avance.
ASTUCE Vous pouvez aussi personnaliser les paramètres de
scène. Pour plus d’informations à ce sujet, veuillez
vous reporter au Guide de paramètres du TRITON taktile.
4. Utiliser l’arpégiateur
L’arpégiateur est une fonction qui joue automatiquement un
accord brisé (arpégiateur) lorsque vous jouez un accord.
1. Appuyez sur le bouton ARP pour activer l’arpégiateur.
2. Les notes jouées sur le clavier, le pavé tactile ou le pad
déclencheur seront jouées par l’arpégiateur.
ASTUCE Lors du choix des paramètres de l’arpégiateur avec les
boutons de page / , vous pouvez modifier la
configuration de l’arpégiateur avec le curseur de valeur. Pour la liste des paramètres configurables,
veuillez vous reporter au Guide de paramètres du TRITON taktile.
5. Fonctions utiles
Transposition par octave
Spécifiez la plage du clavier, l’échelle tactile et l’échelle
d’accord en octaves.
1. Lorsque vous appuyez sur les boutons OCTAVE +/-, la
plage sera transposée par incréments d’une octave en
plus ou en moins.
ASTUCE Lorsque vous appuyez simultanément sur OCTAVE +
et OCTAVE -, vous pouvez remettre l’état de transposition par octave à zéro, c’est-à-dire sans transposition.
ASTUCE Chaque programme dispose d’une limite supérieure, et
pourrait ne pas produire de son quand cette limite est
dépassée lors de la lecture.
Comment sélectionner une scène
Choisissez le paramètre «Scene» avec les boutons de
page / , et sélectionnez la scène souhaitée avec le
curseur de valeur.
2. Port MIDI
KEYBOARD/CTRL, SOUND/CTRL
Les messages MIDI pour chaque contrôleur, comme le
clavier et le pad déclencheur du TRITON taktile, entrent
ici. De plus, vous pouvez vous en servir pour contrôler la
source sonore intégrée.
DAW IN, DAW OUT
Ces ports servent à contrôler le logiciel DAW.
MIDI I/F OUT
Ces ports sont utilisés en tant qu’interfaces MIDI. Il sont
utilisés lorsque vous envoyez des messages MIDI sur
votre ordinateur à partir d’un équipement MIDI externe ou
que vous contrôlez un équipement MIDI externe depuis
votre ordinateur.
Dans les environnements Windows, les noms de ports, par
exemple «TRITON taktile-49» et «MIDIIN2(TRITON taktile-49)» ne s’afficheront pas. Comme ils sont en général affichés dans l’ordre ci-dessus, veuillez spécifier le port correspondant dans le logiciel. Lorsque vous installez le pilote
USB-MIDI KORG, un nom de port MIDI s’affichera.
Transposer
Transposez le clavier en demi-tons.
13
Page 14

TRITON taktile
3.Comment configurer le logiciel
DAW
Pour plus de détails sur les méthodes de configuration et de
fonctionnement du logiciel DAW, veuillez vous reporter au manuel d’instructions du logiciel DAW.
Si les paramètres de scène du TRITON taktile ont changé par
rapport aux paramètres d’usine, il pourrait fonctionner différemment de ce qui suit.
Cubase
1. Affichez le paramètre «Scene» avec les boutons de
page / , et sélectionnez «Cubase» avec le curseur de valeur.
2. Ouvrez la fenêtre «Device Setup» sur Cubase, et ajoutez Mackie Control aux «Devices».
3. Ouvrez la page du Mackie Control et indiquez les ports
DAW IN/OUT du TRITON taktile pour les ports d’entrée/sortie MIDI à utiliser.
4. Ouvrez la page «MIDI Port Setup» et décochez «All
MIDI Inputs» pour les ports DAW IN/OUT du TRITON
taktile.
Digital Performer
1. Affichez le paramètre «Scene» avec les boutons de
page / , et sélectionnez la scène pour «DP»
avec le curseur de valeur.
Paramètres pour «Audio MIDI Setup»
• Démarrez «Applications» → «Utilitaires» →
«Audio MIDI Setup» pour ouvrir «MIDI Studio», puis exécutez «Add Device».
• Donnez à l’appareil ajouté un nom adéquat.
(par exemple DP TRITON taktile)
• Connectez le périphérique ajouté au TRITON
taktile comme illustré à gauche.
ASTUCE
Lors de l’utilisation du pilote USBMIDI KORG, connectez le port
d’entrée/sortie de l’appareil ajouté
sur “DAW IN” et “DAW OUT”.
2. Ouvrez la fenêtre «Control Surface» dans Digital Performer, et choisissez Mackie Control dans «Driver» et
«Unit».
3. Choisissez les ports «DAW IN/OUT» du TRITON taktile dans «MIDI».
ASTUCE Pour Digital Performer, le bouton CYCLE des boutons
de transport fonctionne comme un interrupteur pour
Memory Cycle. Cependant, même si vous activez Memory Cycle, le bouton CYCLE ne s’allumera pas.
ASTUCE Pour Digital Performer, le bouton SET MARKER ne
fonctionne pas.
2. Ouvrez la fenêtre «Preferences» et choisissez Mackie
Control dans le menu «Control Surface».
3. Spécifiez les ports DAW IN/OUT du TRITON taktile que
vous voulez que Mackie Control utilise dans la section
entrée/sortie MIDI.
GarageBand/Logic
Veuillez télécharger le plug-in Control Surface du TRITON
taktile pour GarageBand/Logic sur le site Web de Korg et
configurez-le d’après le document fourni.
Pro Tools
1. Affichez le paramètre «Scene» avec les boutons de
page / , et sélectionnez «Pro Tools» avec le curseur de valeur.
2. Ouvrez la fenêtre «Peripherals» de Pro Tools, et choisissez HUI dans «Type».
3. Spécifiez les ports DAW IN/OUT du TRITON taktile que
vous voulez que HUI utilise dans la section source et
destination.
SONAR
1. Affichez le paramètre «Scene» avec les boutons de
page / , et sélectionnez «SONAR» avec le curseur de valeur.
2. Ouvrez la fenêtre «Preferences» dans SONAR, décochez le port KEYBOARD/CTRL, SOUND/CTRL et le
port DAW IN/OUT du TRITON taktile dans «Inputs»
et «Outputs» sur la page «Devices» et appuyez sur le
bouton Apply.
3. Sur la page «Control Surfaces», ouvrez le dialogue
«Control Surface Settings» avec le bouton pour ajouter
une surface de contrôle, et spécifiez «Mackie Control»
dans «Control Surface» et les ports DAW IN/OUT du
TRITON taktile dans les sections «Input Port» et «Output Port».
Autres logiciels
1. Affichez le paramètre «Scene» avec les boutons de
page / , et sélectionnez «Generic CC» avec le
curseur de valeur.
2. Configuez votre application afin qu’elle puisse être
contrôlée via les messages de changement de contrôle
émis par le port «KEYBOARD/CTRL, SOUND/CTRL»
du TRITON taktile.
ASTUCE Pour plus d’informations sur la configuration de votre
application, veuillez vous reporter au manuel d’instructions de l’application.
Live
1. Affichez le paramètre «Scene» avec les boutons de
page / , et sélectionnez «Live» avec le curseur
de valeur.
14
Page 15

4. Effectuer une séance avec le
synthétiseur logiciel
Lorsque vous créez des sons, il peut être nécessaire de
vous connecter à un ordinateur et de charger le synthétiseur logiciel à l’avance sur le logiciel DAW ou afin de définir les conditions d’enregistrement de la piste, etc. Pour
plus de détails, reportez-vous au Manuel de l’utilisateur du
logiciel que vous utilisez.
Utiliser le clavier pour votre séance
Utilisez le clavier pour confirmer que le synthétiseur logiciel émet des sons.
Comme pour les opérations de contrôle expliquées dans
“Utiliser la source sonore pour votre séance”, utilisez la
molette de pitch bend et celle de modulation pour essayer
de modifier le son.
Vous pouvez aussi effectuer des opérations comme
“Jouer en suivant l’échelle”, “Jouer du tambour avec le
pad déclencheur” ou “Utiliser l’arpégiateur”.
5. Contrôler le logiciel
1. Si le bouton SOUND est éclairé, appuyez sur le bouton
SOUND pour éteindre sa lumière.
1
2
1
6. Utiliser l’appareil en tant que
souris d’ordinateur
1. Appuyez sur le bouton TRACK PAD pour placer la
zone tactile en mode pavé tactile.
2. Contrôlez le curseur de la souris de votre ordinateur en
glissant votre doigt sur le pavé tactile.
Lorsque vous touchez le pavé tactile, il fonctionnera
comme un clic gauche. De plus, en glissant vos deux
doigts vers le haut ou le bas du pavé tactile, vous pouvez
l’utiliser pour faire défiler l’écran vers le haut ou le bas.
3. Lorsque vous choisissez la page «TRACK PAD» avec
les boutons de page / , les côtés gauche et droit
du curseur de valeur fonctionneront respectivement
comme un clic gauche et comme un clic droit.
2. Vous pouvez utiliser des commandes, des curseurs et
les boutons F1~F8 pour contrôler votre synthétiseur logiciel ou autre.
ASTUCE Pour en savoir plus sur les paramètres pouvant être
contrôlés avec des commandes, des curseurs ou les
boutons F1~F8, veuillez vous reporter au Guide de paramètres.
ASTUCE
Pour plus d’informations sur la configuration de votre
application, veuillez vous reporter au manuel d’instructions du logiciel.
Utiliser le pavé tactile pour le contrôle
1. Appuyez sur le bouton CONTROL pour placer le pavé
tactile en mode contrôle.
2. Les messages de changement de contrôle étant transmis lorsque vous touchez le pavé tactile, relâchez votre
doigt et déplacez-le pour affecter les messages de
changement de contrôle à votre synthétiseur logiciel.
3
Clic gauche
Clic droit
1
Fiche technique
Prises:
Prise MIDI OUT, Prise ASSIGNABLE PEDAL, Prise
ASSIGNABLE SWITCH, Prise OUTPUT, Prise USB-B
Alimentation: Alimentation par le bus USB
Consommation électrique: 500mA ou moins
Dimensions (L x P x H):
531 × 290 × 72 mm (TRITON taktile-25)
750 × 290 × 83 mm (TRITON taktile-49)
Poids:
2,5 kg (TRITON taktile-25) / 3,8 kg (TRITON taktile-49)
Temperature de fonctionnement:
0~+40 °C (sans condensation)
Accessoires inclus: Câble USB, Manuel d’utilisation
* Les caractéristiques et l’aspect du produit sont susceptibles
d’êtremodi és sans avis préalable en vue d’une amélioration.
15
Page 16

TRITON taktile
Vorsichtsmaßnahmen
Aufstellungsort
Vermeiden Sie das Aufstellen des Geräts an Orten, an denen.
• es direkter Sonneneinstrahlung ausgesetzt ist;
• hohe Feuchtigkeit oder Extremtemp eraturen auftreten können;
• Staub oder Schmutz in großen Mengen vorhanden sind;
• das Gerät Erschütterungen ausgesetzt sein kann.
• in der Nähe eines Magnetfeldes.
Stromversorgung
Schließen Sie das optionale Netzteil nur an eine geeignete Steckdose an. Verbinden Sie
es niemals mit einer Steckdose einer anderen Spannung.
Störeinflüsse auf andere Elektrogeräte
Dieser kann bei in der Nähe aufgestellten Rund-funkempfängern oder Fernsehgeräten
Empfangsstörungen hervorrufen. Betreiben Sie solche Geräte nur in einem geeigneten
Abstand von diesem Erzeugnis.
Bedienung
Vermeiden Sie bei der Bedienung von Schaltern und Reglern unangemessenen Kraftaufwand.
Reinigung
Bei auftretender Verschmutzung können Sie das Gehäuse mit einem trockenen, sauberen
Tuch abwischen. Verwenden Sie keinerlei Flüssigreiniger wie beispielsweise Reinigungsbenzin, Verdünnungs- oder Spülmittel. Verwenden Sie niemals brennbare Reiniger.
Bedienungsanleitung
Bewahren Sie diese Bedienungsanleitung gut auf, falls Sie sie später noch einmal benötigen.
Flüssigkeiten und Fremdkörper
Stellen Sie niemals Behältnisse mit Flüssigkeiten in der Nähe des Geräts auf. Wenn Flüssigkeit in das Gerät gelangt, können Beschädigung des Geräts, Feuer oder ein elek-trischer Schlag die Folge sein.
Beachten Sie, daß keinerlei Fremdkörper in das Gerät gelangen. Sollte ein Fremdkörper
in das Gerät gelangt sein, so trennen Sie es sofort vom Netz. Wenden Sie sich dann an Ihren KORG-Fachhändler.
WICHTIGER HINWEIS FÜR KUNDEN
Dieses Produkt wurde unter strenger Beachtung von Spezikationen und Spannungsanforderungen hergestellt, die im Bestimmungsland gelten. Wenn Sie dieses Produkt
über das Internet, per Postversand und/oder mit telefonischer Bestellung gekauft haben, müssen Sie bestätigen, dass dieses Produkt für Ihr Wohngebiet ausgelegt ist.
WARNUNG: Verwendung dieses Produkts in einem anderen Land als dem, für das es
bestimmt ist, verwendet wird, kann gefährlich sein und die Garantie des Herstellers
oder Importeurs hinfällig lassen werden. Bitte bewahren Sie diese Quittung als Kaufbeleg auf, da andernfalls das Produkt von der Garantie des Herstellers oder Importeurs
ausgeschlossen werden kann.
* Alle Produkt- und Firmennamen sind Warenzeichen oder eingetragene
Warenzeichen der betreffenden Eigentümer.
Hinweis zur Entsorgung (Nur EU)
Wenn Sie das Symbol mit der „durchgekreuzten Mülltonne“ auf Ihrem Produkt, der dazugehörigen Bedienungsanleitung, der Batterie oder dem Batteriefach sehen, müssen Sie das Produkt in der vorgeschriebenen Art und
Weise entsorgen. Dies bedeutet, dass dieses Produkt mit elektrischen und
elektronischen Komponenten nicht mit dem normalen Hausmüll entsorgt
werden darf. Für Produkte dieser Art existiert ein separates, gesetzlich festgelegtes Entsorgungssystem. Gebrauchte elektrische und elektronische
Geräte müssen separat entsorgt werden, um ein umweltgerechtes Recycling sicherzustellen. Diese Produkte müssen bei benannten Sammelstellen abgegeben
werden. Die Entsorgung ist für den Endverbraucher kostenfrei! Bitte erkundigen sie
sich bei ihrer zuständigen Behörde, wo sie diese Produkte zur fachgerechten Entsorgung abgeben können. Falls ihr Produkt mit Batterien oder Akkumulatoren ausgerüstet
ist, müssen sie diese vor Abgabe des Produktes entfernen und separat entsorgen (siehe oben). Die Abgabe dieses Produktes bei einer zuständigen Stelle hilft ihnen, dass
das Produkt umweltgerecht entsorgt wird. Damit leisten sie persönlich einen nicht unerheblichen Beitrag zum Schutz der Umwelt und der menschlichen Gesundheit vor möglichen negativen Effekten durch unsachgemäße Entsorgung von Müll. Batterien oder
Akkus, die Schadstoffe enthalten, sind auch mit dem Symbol einer durchgekreuzten
Mülltonne gekennzeichnet. In der Nähe zum Mülltonnensymbol bendet sich die chemische Bezeichnung des Schadstoffes. Cd oder NiCd steht für Cadmium, Pb für Blei
und Hg für Quecksilber.
16
Page 17

Vorweg
Vielen Dank, dass Sie sich für den Kauf eines Korg TRITON taktile USB-Controller Keyboards/Synthesizers entschieden haben.
Lesen Sie bitte sorgfältig diese Bedienungsanleitung, um eine
Fehlbedienung zu vermeiden und das Beste aus Ihrem Instrument herauszuholen. Bewahren Sie die Anleitung auf, damit Sie
auch später noch darin nachschlagen können.
1. Anschlüsse
Pedalschalter
(PS-1 Pedalschalter, DS-1H
Dämpferpedal etc.)
TIPP Genaue Beschreibungen der Funktionen und Parameter finden sie im
Parameter-Leitfaden des TRITON taktile. Dieser Leitfaden steht auf
der Korg-Webseite zum Download bereit. (http://www.korg.co.jp/English/Distributors/ or http://www.korg.com/)
Standalone-Betrieb
Handelsübliches
USB-Wechselstromnetzgerät (USB 2.0
kompatibel)
Expression-Pedal
(EXP-2 Pedal, XVP-10
Expression Pedal etc.)
TIPP Beim erstmaligen Anschluss des Geräts an Ihren Windows-Computer
wird der Treiber vom Betriebssystem automatisch installiert.
Beim Einschalten wird die Polung des separat erhältlichen Pedal-
schalters automatisch erkannt. Falls Sie einen Pedalschalter verwenden, sollte dieser vor dem Einschalten angeschlossen werden. Lassen Sie beim Einschalten den Pedalschalter unangetastet.
Der Standard-USB-MIDI-Treiber des Microsoft Betriebssystems er-
laubt keine gleichzeitige Benutzung des TRITON taktile durch zwei
oder mehr Anwendungen. Damit der TRITON taktile 25/49 vom zwei
oder mehr Anwendungen gleichzeitig verwendet werden kann, müssen sie den KORG USB-MIDI-Treiber installieren. Laden Sie dazu den
KORG USB-MIDI-Treiber von der Korg-Website herunter und installieren Sie ihn gemäß der Anleitung.
Falls Sie den TRITON taktile über einen USB-Hub anschließen, lässt
er sich eventuell aufgrund ungenügender Stromversorgung nicht einschalten. Verbinden Sie in diesem Fall den TRITON taktile direkt mit
dem USB-Anschluss Ihres Computers.
Verwenden Sie nur das beigelegte USB-Kabel.
MIDI IN
MIDI Geräte
Computer
Kopfhörer
Anschluss des Netzteils
Das Gerät kann mit einem handelsüblichen USB-Netzteil betrieben werden (5 V Gleichstrom, 550 mA oder höher). Dies ermöglicht Ihnen, das Gerät im Standalone-Betrieb ohne Computer zu
verwenden.
Wenn Sie die Regler des Geräts bedienen, wird eine MIDI-Nachricht am MIDI OUT-Ausgang ausgegeben.
Bitte verwenden Sie ein USB 2.0 kompatibles Netzgerät. Es ist durchaus möglich, dass das Gerät trotz eines USB-kompatiblen Netzgeräts
nicht richtig funktioniert. Verwenden Sie in diesem Fall ein Netzgerät
eines anderen Herstellers.
Falls Sie ein USB-Netzgerät nutzen, können Sie das Gerät nicht zur
Steuerung der DAW-Software verwenden.
Anschluss von Kopfhörern und Audiogeräten
Kopfhörer, Aktivmonitore oder Mischpulte sollten an der OUTPUT-Buchse an der rechten Seite des Geräts angeschlossen
werden.
TIPP Falls Sie ein Standardkabel mit Adapter auf Mini verwenden, halten
Sie den Adapter beim Ein- oder Ausstecken fest.
Achten Sie beim Anschließen von Kabeln darauf, dass das Gerät aus-
geschaltet ist (power OFF). Anschließen bei eingeschaltetem Gerät
(power ON) kann zu Schäden oder Fehlfunktionen der angeschlossenen Geräte führen. Drehen Sie zudem bei allen Geräten, die Sie anschließen wollen, die Lautstärke herunter.
Vermeiden Sie es, Kopfhörer mit hoher Lautstärke über längere Zeit
zu tragen.
17
Page 18

TRITON taktile
2.Grundlegende Bedienung
Einschalten (power ON)
Das Gerät hat keinen Netzschalter. Es wird eingeschaltet, sobald
das Gerät mit einem USB-Kabel an einen Computer oder an ein
USB-Netzgerät angeschlossen wird.
Ausschalten (power OFF)
Sobald das USB-Kabel des Geräts vom Computer oder dem
Netzgerät getrennt wird, schaltet sich das Gerät aus.
Die Anzeige im Display
1. Wählen Sie den gewünschten Parameter mit den page
-Tasten aus.
2. Ändern Sie den Parameterwert mit dem Value-Slider.
TIPP Durch Drücken der EXIT-Taste gelangen Sie zur Originalanzeige zu-
rück.
1
2
Nutzung der geräteinternen Sounds
für Ihre Darbietung
Der TRITON taktile enthält 512 Sounds, die den internen Programmsounds des legendären KORG TRITON entsprechen. Dadurch können Sie dieses Gerät spielen, ohne es an einen Computer anzuschließen.
TIPP Wenn der SOUND-Modus aktiviert ist (ON), werden alle MIDI-Nach-
richten über den globalen MIDI-Kanal übertragen, ungeachtet des
/
dem jeweiligen Controller zugewiesenen MIDI-Kanals.
1. Ein Programm wählen
1. Drücken Sie die SOUND-Taste, um den Sound-Modus umzuschalten (SOUND-Taste leuchtet). Die Programm-/Kategorienamen werden im Display angezeigt.
2. Wählen Sie mit dem Value-Slider ein anderes Programm
1
2
1
Der Value-Slider
Wischen Sie mit dem Finger über die
Fläche des Sliders, um den Wert des aktuellen Parameters stufenlos zu ändern.
Um den Wert schrittweise zu ändern,
drücken Sie auf die Enden des Sliders.
Bedienen Sie den Value-Slider nur mit
der Spitze eines Fingers. Verwenden
Sie keine spitzen oder harten Gegenstände und tragen Sie keine Handschuhe.
3.
Drücken Sie die ASSIGN-Taste zur Auswahl der Kategorie
(LED leuchtet) und drücken Sie eine der F1–F8 Tasten, um das
Hauptprogramm für die einzelnen Kategorien auszuwählen.
3
3
4. Sie können auf der Tastatur, dem Touchpad und dem Triggerpad spielen. Sie können Ihr Spiel ausdrucksreicher gestalten,
indem Sie mit dem Pitchbend- oder Modulationsrad Tonhöhe
und Klangfarbe der gespielten Noten verändern.
Den Klang eines Programms ändern
Sie können den Klang des ausgewählten Programms ändern
und modulieren.
Sie können mit acht Schiebereglern die den einzelnen Programmen zugewiesenen Parameter einstellen.
TIPP Hinweise zu den Parametern finden Sie im Parameter-Leitfaden.
Sie können die vorgenommenen Änderungen der Parametereinstel-
lungen nicht abspeichern. Wenn Sie ein anderes Programm wählen,
setzt das Gerät die Parameter der einzelnen Programme auf die Fabrikeinstellungen zurück.
18
Page 19

Als Favoriten registrieren
Sie können mit den Tasten F1–F8 ihre Lieblingsprogramme zum
einfachen Abrufen eintragen.
1. Wählen Sie das Programm aus, das Sie registirieren wollen.
2. Drücken Sie die ASSIGN-Taste und wählen Sie SET A oder
SET B (LED leuchtet).
3. Drücken Sie gleichzeitig die EXIT-Taste und diejenige der
Tasten F1–F8, der Sie das Programm zuweisen wollen – dieses ist nun dort als Favorit registriert.
4. Sie können nun durch Drücken der F1–F8-Tasten bei ausgewähltem SET A oder SET B die registrierten Programm direkt
abrufen.
2. Töne einer Tonleiter spielen
Der TRITON taktile erlaubt Ihnen auch, mit dem Touchpad oder
dem Triggerpad Töne einer zuvor bestimmten Tonleiter zu spielen.
Diese Funktion vereinfacht beispielsweise das Triggern von Backings mit dem Triggerpad (Akkordleiter) und das Spielen von
Melodien oder Basslinien mit dem Touchpad (Notenleiter).
Tonleiter und Tonart bestimmen
Bestimmen Sie Tonleiter und Tonart, die dem Touchpad oder
Triggerpad zugewiesen werden.
1. Wählen Sie hierzu mit den page
meter „Scale“ oder „Key“ aus und wählen Sie die gewünschte
Tonleiter oder Tonart mit dem Value-Slider.
Spielen mit dem Touchpad (Notenleiter)
Die Notenleiter-Funktion erlaubt Ihnen, mit dem Touchpad Noten
einer vorab bestimmten Tonart zu spielen.
1. Drücken Sie zum Aufrufen des Notenleiter-Modus die
TOUCH SCALE-Taste.
2. Sie können nun durch Reiben oder Tippen Ihres Fingers auf
dem Touchpad spielen.
2
TIPP Sie können die eingestellten Parameter durch Bewegen Ihres Fingers
auf dem Touchpad in Längsrichtung steuern. Informationen zum Einstellen der Parameter finden Sie im Parameter-Leitfaden.
Bedienen Sie den Value-Slider nur mit der Spitze eines Fingers. Ver-
wenden Sie keine spitzen oder harten Gegenstände und tragen Sie
keine Handschuhe.
Akkorde mit dem Triggerpad spielen (Akkordleiter)
Die Akkordleiter-Funktion erlaubt Ihnen, mit dem Touchpad Akkorde einer vorab bestimmten Tonart zu spielen.
1. Drücken Sie die CHORD SCALE-Taste, um das Triggerpad
in den Akkordleiter-Modus zu versetzen.
/ -Tasten
1
den Para-
2. Sie können nun durch Tippen des Triggerpads Akkorde spielen.
2
3. Durch Auswahl des Parameters „Variation“ über die page
/ -Tasten können Sie mit dem Value-Slider die Fülle der
Akkorde bestimmen.
3
Gering Hoch
Sie können durch Wischen den Parameter „Chord Variation“
steuern und so ihr Spiel ausdrucksreicher gestalten.
3. Drums mit dem Triggerpad spielen
Drücken Sie die NOTE/CONTROL-Taste, um das Triggerpad in
den Notensteuerungsmodus zu versetzen.
Wählen Sie das Drumsound-Programm aus, um es mithilfe des
Triggerpads zu spielen (→ 1. Ein Programm wählen).
TIPP Sie können das Drumsound-Programm mit der Kategorie DRS/HIT/
SE (F8-Taste) auswählen.
TIPP Als Fabrikeinstellung sind dem Triggerpad optimale Noten-Nachrich-
ten für ein allgemeines GM-kompatibles Drumkit zugewiesen. Falls
Sie einen Software-Synthesizer verwenden, könnte die Software
eventuell nicht mit dem GM-Standard kompatibel sein. Ändern Sie in
diesem Fall bitte die Zuweisung wie im Parameter-Leitfaden des TRITON taktile beschrieben.
Auswahl einer Triggerpad-Bank
Das Triggerpad des TRITON taktile hat zwei Bänke: A und B. Sie
können beispielsweise Drumsounds der Bank A und Percussionsounds der Bank B zuweisen oder beide Bänke zum Triggern von bis zu 32 Samples nutzen (bis zu 16 beim TRITON taktile 25).
Wählen Sie „Pad Bank“ mit den page
len Sie die gewünschte Szene mit dem Value-Slider aus.
TIPP Bei Bank A leuchtet eine LED des Triggerpads rot, bei Bank B blau.
TIPP Sie können auch durch wiederholtes Drücken der NOTE/CONTROL-
Taste Wechseln zwischen den Bänken A und B wechseln.
/ -Tasten
und wäh-
19
Page 20

TRITON taktile
4. Der Arpeggiator
Die Arpeggiator-Funktion wandelt einen von Ihnen gespielten Akkord automatisch in einen gebrochenen Akkord (Arpeggio) um.
1. Drücken Sie die ARP-Taste, um den Arpeggiator zu aktivieren.
2. Nun werden alle auf der Tastatur, dem Touchpad und dem
Triggerpad gespielten Noten vom Arpeggiator bearbeitet.
TIPP Sie können bei der Auswahl der Arpeggiator-Parameter mit den page
/ -Tasten die Arpeggiator-Einstellungen mit dem Value-Slider
ändern. Beschreibungen zu den einzelnen Parametern finden sie im
Parameter Leitfaden des TRITON taktile.
5. Nützliche Funktionen
Oktave wechseln
Sie können den Bereich der Tastatur, der Notenleiter und der Akkordleiter in Oktavenschritten festlegen.
1. Mit jedem Drücken der OCTAVE +/- -Tasten ändert sich der
Bereich um eine Oktave nach oben bzw. nach unten.
TIPP Indem Sie die OCTAVE + und OCTAVE – -Tastengleichzeitig drücken,
kehren Sie zum ursprünglichen Oktavenbereich zurück.
TIPP Jedes Programm hat eine obere Grenze und produziert möglicherwei-
se keinen Klang, falls diese Grenze beim Spielen überschritten wird.
Transposition
Sie können die Tastatur in Halbtonschritten transponieren
1. Wählen Sie den Parameter „Transpose“ mit den page
-Tasten
und stellen Sie die Transposition mit dem Va-
lue-Slider ein.
Verwendung als MIDI-Controller
Sie können das Gerät mit einem USB-Kabel an einen Computer
anschließen und damit einen Software-Synthesizer oder einen
DAE/MIDI-Synthesizer etc. ansteuern.
1. Szenen
Was ist eine Szene?
Ein Satz Einstellungen des TRITON taktile zum Steuern von
Software wie DAW wird Szene genannt. Sie können bis zu 16
Szenen im Hauptspeicher des TRITON taktile speichern. Im TRITON taktile sind Einstellungen für bestimmte Software werksseitig abgespeichert.
TIPP Sie können die Einstellungen einer Szene individuell anpassen. Infor-
mationen zur Vorgehensweise finden Sie im Parameter-Leitfaden des
TRITON taktile.
Eine Szene auswählen
Wählen Sie den Parameter „Scene“ mit den page
ten
und wählen Sie die gewünschte Szene mit dem Value-Slider
aus.
2. MIDI-Port
KEYBOARD/CTRL, SOUND/CTRL
Zur Übertragung von MIDI-Nachrichten von Controllern wie der
/
Tastatur und dem Trigger-Pad des TRITON taktile. Diese dienen
zusätzlich auch zum Steuern der geräteinternen Sounds.
DAW IN, DAW OUT
Ports zur Steuerung der DAW Software.
MIDI I/F OUT
Diese Ports dienen als MIDI-Schnittstelle. So können Sie auf Ihrem Computer MIDI-Nachrichten externer MIDI-Geräte empfangen oder mit dem Computer externe MIDI-Geräte ansteuern.
In einer Windows-Umgebung wird ein Portname, beispielsweise „TRI-
TON taktile-49“ oder „MIDIIN2(TRITON taktile-49)“, nicht angezeigt.
Da die Ports üblicherweise in der oben genannten Reihenfolge angezeigt werden, müssen Sie in diesem Fall den entsprechenden Port in
Ihrer Software angeben. Wenn Sie den KORG USB MIDI-Treiber installieren, wird ein MIDI-Portname angezeigt.
/ -Tas-
20
3.DAW Software Einstellungen vornehmen
Detaillierte Hinweise zum Einstellen und zur Arbeitsweise der DAW
Software finden Sie in der Bedienungsanleitung der DAW Software.
Falls die Werkseinstellungen der Szenen Ihres TRITON taktile geän-
dert wurden, können folgende Schritte eventuell nicht funktionieren.
Cubase
1. Wählen Sie den Parameter „Scene“ mit den page
-
Tasten und wählen Sie mit dem Value-Slider „Cubase“ aus.
2. Öffnen Sie in Cubase das Fenster „Device Setup“ und fügen
Sie Mackie Control zur Geräteliste hinzu.
3. Öffnen Sie den neu hinzugefügten Mackie Control Dialog und
geben Sie als MIDI Ein-/Ausgänge die DAW IN/OUT Ports
des TRITON taktile an.
/
Page 21

4. Öffnen Sie den Eintrag „MIDI Port Setup“ und entfernen Sie
für die DAW IN/OUT Ports des TRITON taktile das Häkchen
bei „All MIDI Inputs
Digital Performer
1. Wählen Sie den Parameter „Scene“ mit den page
-Tasten und wählen Sie mit dem Value-Slider „DP“ aus.
Einstellungen unter „Audi MIDI Setup“
•
Starten Sie „Applications“→„Utilities“→„A
udio MIDI Setup“ um „MIDI Studio“ zu öffnen und führen Sie dort „Add Device“ aus.
• Benennen Sie das hinzugefügte Gerät.
(z. B. TRITON taktile DP).
• Schließen Sie das Gerät wie links angegeben an Ihren TRITON taktile an.
TIPP Wenn Sie den KORG USB-MIDI-Treiber verwen-
den, verbinden Sie den Ein-/Ausgangs-Port des
externen Geräts mit „DAW IN“ und „DAW OUT“.
2.
Öffnen Sie in Digital Performer das Fenster „Control Surface“
und wählen Sie in „Driver“ und „Unit“ jeweils Mackie Control aus.
3. Wählen Sie in „MIDI“ die „DAW IN/OUT“ Ports des TRITON
taktile aus.
TIPP Bei Digital Performer funktioniert die CYCLE-Taste der Transporttas-
ten als Ein-/Ausschalter für den Memory Cycle. Jedoch leuchtet die
CYCLE-Taste nicht, wenn der Memory Cycle eingeschaltet wird.
TIPP Bei Digital Performer hat die SET MARKER-Taste keine Funktion.
/
Live
1. Wählen Sie den Parameter „Scene“ mit den page
-
Tasten und wählen Sie mit dem Value-Slider „Live“ aus.
2. Öffnen Sie das Fenster „Preferences“ und wählen Sie unter
„Control Surface“ Mackie Control aus.
3. Geben Sie als MIDI Ein-/Ausgänge die DAW IN/OUT Ports
des TRITON taktile an, die Sie mit Mackie Control verwenden
wollen.
/
GarageBand/Logic
Bitte laden Sie zuerst von der Korg Webseite das TRITON taktile
Control Surface Plugin für GarageBand/Logic herunter und installieren Sie es gemäß Anleitung.
Pro Tools
1. Wählen Sie den Parameter „Scene“ mit den page
-
Tasten und wählen Sie mit dem Value-Slider „Pro Tools“ aus.
2. Öffnen Sie in Pro Tools das Fenster „Peripherals“ und wählen
Sie in „Type“ HUI aus.
3. Geben Sie als MIDI Ein-/Ausgänge die DAW IN/OUT Ports
des TRITON taktile an, die Sie mit HUI verwenden wollen.
/
SONAR
1. Wählen Sie den Parameter „Scene“ mit den page
-Tasten und wählen Sie mit dem Value-Slider „SONAR“ aus.
2. Öffnen Sie in SONAR das Fenster „Preferences“, wählen Sie
in der Option „Devices“ unter „Inputs“ und „Outputs“ jeweils
den
KEYBOARD/CTRL, SOUND/CTRL Ports
IN/OUT Ports des TRITON taktile aus und bestätigen Sie mit
dem Button Apply.
/
und DAW
3. Öffnen Sie auf der Seite „Cotrol Surfaces“ den Dialog „Control Surface Settings“ und geben Sie dort als Bedienoberfläche „Mackie Control“ sowie unter „Input Port“ und „Output
Port“ die DAW IN/OUT Ports Ihres TRITON taktile an.
Andere Software
1.
Wählen Sie den Parameter „Scene“ mit den page /
-Tasten und wählen Sie mit dem Value-Slider „Basic MIDI“ aus.
2. Stellen Sie Ihre Software so ein, dass Sie von des am Ports
„KEYBOARD/CTRL, SOUND/CTRL“ des TRITON taktile
ausgegeben Control Change Nachrichten angesteuert werden kann.
TIPP Hinweise zum Einrichten Ihrer Software entnehmen Sie bitte der ent-
sprechenden Bedienungsanleitung.
4. Einen Software-Synthesizer spielen
Sie werden beim Erstellen neuer Klänge eventuell dazu aufgefordert, den Computer anzuschließen und den Software-Synthesizer vorher in die DAW-Software zu laden, um Aufnahmespuren
festzulegen etc. Hinweise zur genauen Vorgehensweise finden
Sie in der Bedienungsanleitung der jeweiligen Software.
Die Tastatur spielen
Überprüfen Sie durch Antippen einiger Tasten, ob der SoftwareSynthesizer Klänge wiedergibt.
Wie unter Punkt „Nutzung der geräteinternen Sounds für Ihre
Darbietung“ beschrieben, können Sie Tonhöhe und Klangfarbe
mit dem Pitchbend- und dem Modulationsrad variieren.
Sie können natürlich auch die unter „Töne einer Tonleiter spielen“, „Drums mit dem Triggerpad spielen“ oder „Der Arpeggiator“
beschriebenen Schritte vornehmen.
5. Softwaresteuerung
1. Falls die SOUND-Taste leuchten sollte, drücken Sie diese,
um deren Beleuchtung auszuschalten.
1
2. Mit den Reglern, Schiebereglern und den
nen Sie nun Ihren Software-Synthesizer etc. steuern.
Tipp Welche Parameter Sie mit den Reglern, Schiebereglern und den F1–
F8 Tasten steuern können, erfahren Sie im Parameter-Leitfaden.
TIPP Informationen zu den Einstellungen Ihrer Anwendung finden Sie im
Handbuch Ihrer jeweiligen Software.
F1–F8 Tasten
kön-
21
Page 22

TRITON taktile
Steuern mit dem Touchpad
1. Drücken Sie die Taste CONTROL, um das Touchpad in den
Steuerungsmodus zu versetzen.
2. Mit jeder Berührung Ihres Touchpads wird eine Control
Change Nachricht übermittelt. Indem Sie mit dem Finger unterschiedliche Koordinaten auf dem Touchpad berühren, können Sie diesen Control Change Nachrichten für Ihren Software-Synthesizer zuweisen.
2
1
6. Das Touchpad des Geräts als Computermaus
verwenden
1. Drücken Sie die TRACK PAD-Taste, um das Touchpad in den
Trackpad-Modus zu versetzen.
2. Sie können nun den Cursor Ihres Computers steuern, indem
Sie mit dem Finger übers Touchpad wischen.
Tippen aufs Touchpad entspricht einem Linksklick auf der
Maus Sie können auch den Bildschirm hinauf oder hinab scrollen, indem Sie zwei Finger auf dem Touchpad nach oben
oder unten wischen.
3. Wenn Sie „TRACK PAD“ mit den page
wählen, entsprechen die linke und rechte Seite des Value-Sliders einem Links- bzw. Rechtsklick mit der Maus.
/ -Tasten
aus-
Technische Daten
Ansch lüsse:
Buchse, ASSIGNABLE SWITCH-Buchse, OUTPUT-Buchse,
Stromversorgung: Speisung über den USB-Bus
Stromverbrauch: 500mA oder weniger
Abmessungen: (BxTxH):
tile-25)
750 × 290 × 83 mm (TRITON taktile-49)
Gewicht:
tile-49)
Betriebstemperatur: 0 – +40 °C (ohne Kondensbildung)
Lieferumfang: USB-Kabel, Bedienungsanleitung
* Änderungen der tech nisch en Daten und des Designs ohne vorherige
Ankündigung vorbehalten.
MIDI OUT
USB-B-Anschluss
2,5 kg (TRITON taktile-25) / 3,8 kg (TRITON tak-
-Anschluss
531 × 290 × 72 mm (TRITON tak-
, ASSIGNABLE PEDAL-
22
3
RechtsklickLinksklick
1
Page 23

Precauciones
Ubicación
El uso de la unidad en las siguientes ubicaciones puede dar como
resultado un mal funcionamiento:
• Expuesto a la luz directa del sol
• Zonas de extremada temperatura o humedad
• Zonas con exceso de suciedad o polvo
• Zonas con excesiva vibración
• Cercano a campos magnéticos
Fuente de alimentación
Por favor, conecte el adaptador de corriente designado a una toma de
corriente con el voltaje adecuado. No lo conecte a una toma de corriente con voltaje diferente al indicado.
Interferencias con otros aparatos
Las radios y televisores situados cerca pueden experimentar interferencias
en la recepción. Opere este dispositivo a una distancia prudencial de radios y televisores.
Manejo
Para evitar una rotura, no aplique excesiva fuerza a los conmutadores o
controles.
Cuidado
Si exterior se ensucia, límpiese con un trapo seco. No use líquidos
limpiadores como disolvente, ni compuestos inflamables.
Guarde este manual
Después de leer este manual, guárdelo para futuras consultas.
Mantenga los elementos externos alejados del equipo
Nunca coloque ningún recipiente con líquido cerca de este equipo,
podría causar un cortocircuito, fuero o descarga eléctrica. Cuide de
que no caiga ningún objeto metálico dentro del equipo.
Nota respecto a residuos y deshechos (solo UE)
Cuando aparezca el símbolo del cubo de basura tachado
sobre un producto, su manual de usuario, la batería, o el
embalaje de cualquiera de éstos, significa que cuando
quiere tire dichos artículos a la basura, ha de hacerlo en
acuerdo con la normativa vigente de la Unión Europea. No
debe verter dichos artículos junto con la basura de casa.
Verter este producto de manera adecuada ayudará a evitar
daños a su salud pública y posibles daños al medioambiente. Cada país tiene una normativa específica acerca de cómo
verter productos potencialmente tóxicos, por tanto le rogamos que
se ponga en contacto con su oficina o ministerio de medioambiente
para más detalles. Si la batería contiene metales pesados por encima del límite permitido, habrá un símbolo de un material químico,
debajo del símbolo del cubo de basura tachado.
NOTA IMPORTANTE PARA EL CONSUMIDOR
Este producto ha sido fabricado de acuerdo a estrictas especificaciones y requerimientos de voltaje aplicables en el país para el cual
está destinado. Si ha comprado este producto por internet, a través
de correo, y/o venta telefónica, debe usted verificar que el uso de
este producto está destinado al país en el cual reside.
AVISO: El uso de este producto en un país distinto al cual está
destinado podría resultar peligroso y podría invalidar la garantía del
fabricante o distribuidor.
Por favor guarde su recibo como prueba de compra ya que de otro
modo el producto puede verse privado de la garantía del fabricante
o distribuidor.
*Todos los nombres de productos y compañías son marcas comerciales o marcas
registradas de sus respectivos propietarios.Instalar la baterí.
23
Page 24

TRITON taktile
Introducción
Gracias por la adquisición del teclado controlador/sintetizador USB TRITON taktile de Korg.
Para sacar todo el provecho de su nuevo instrumento, lea
detenidamente este manual de instrucciones y utilice el producto de acuerdo con las indicaciones. También deberá guardar el manual de instrucciones para referencia futura.
1. Conexiones
Conmutador de pedal
(conmutador de pedal PS-1,
pedal de resonancia DS-1H, etc.)
SUGERENCIA Con respecto a los detalles sobre las funciones y
los parámetros, consulte la Guía de parámetros del TRITON
taktile. Puede descargar la Guía de parámetros del TRITON
taktile de la página web de Korg. (http://www.korg.co.jp/English/Distributors/ or http://www.korg.com/)
Autónomo
Adaptador de CA USB
disponible en el mercado
(compatible con USB 2.0)
Pedal de expresión
(controlador de pie EXP-2, pedal
de expresión XVP-10, etc.)
SUGERENCIA Cuando conecte por primera vez la unidad a su
ordenador Windows, se instalará automáticamente el controlador incluido el sistema operativo.
Al conectar la alimentación, la polaridad de un conmutador de pedal (vendido aparte) se detectará automáticamente. Para utilizar el
pedal conmutador, deberá conectarlo antes de conectar la alimentación. Al conectar la alimentación, no deberá tocar el conmutador
de pedal.
El controlador USB-MIDI estándar incluido en el sistema operativo
Windows no permitirá utilizar el TRITON taktile con dos o más
aplicaciones a la vez. Para poder utilizar el TRITON taktile25/49
con dos o más aplicaciones a la vez, tendrá que instalar el controlador KORG USB-MIDI. Descargue el controlador KORG USBMIDI de la página web de Korg e instálelo siguiendo las instrucciones del documento suministrado.
Si conecta el TRITON taktile a través de un concentrador USB, es
posible que no se active por escasez de energía. En tal caso, deberá conectar el TRITON taktile directamente a un conector USB
del ordenador.
Utilice únicamente el cable USB incluido.
MIDI IN
Equipo MIDI
Conexión del adaptador de CA
Esta unidad utiliza un adaptador de CA comercial conforme a
las normas USB (5 V CC, 550 mA o superior), lo que permite
usarla como unidad autónoma, sin necesidad de utilizar un
ordenador.
Cuando utilice los controladores de esta unidad, a través de
la toma MIDI OUT saldrá un mensaje MIDI.
Ordenador
Auriculares
Asegúrese de utilizar un adaptador de CA compatible con USB
USB 2.0. Sin embargo, puede haber casos en los que, dependiendo del adaptador de CA USB utilizado, no funcione normalmente
incluso aunque sea compatible con las normas.
Si utiliza un adaptador de CA USB, no podrá utilizar la unidad para
controlar el software de DAW.
Conexión de auriculares y equipos de audio
Los auriculares, monitores o mezcladores activos deberán
conectarse a la jack OUTPUT de la parte derecha de la unidad principal.
SUGERENCIA Cuando utilice un cable equipado con un adaptador para conversión entre estándar y mini, sujete el adaptador al insertar o extraer la clavija.
Cuando conecte un cable, hágalo con la alimentación del dispositivo desconectada. La conexión con la alimentación conectada
podría causar daños en el equipo conectado o su mal funcionamiento. Además, cerciórese de reducir el volumen de todos los
dispositivos que desee conectar.
Deberá evitar utilizar auriculares durante largos períodos de tiempo a volumen alto.
24
Page 25

2. Operaciones básicas
Conexión de la alimentación
Esta unidad no posee interruptor de alimentación. La alimentación se conectará al conectar el cable USB conectado a
esta unidad al terminal USB de un ordenador o al adaptador
de CA USB.
Desconexión de la alimentación
La alimentación se desconectará al desconectar el cable
USB que conecta esta unidad con el ordenador o el adaptador de CA USB.
Cómo utilizar la pantalla
1. Seleccione el parámetro deseado con los botones de página
/ .
2. Especifique un valor para el parámetro deseado con la
barra deslizante de valor.
SUGERENCIA Para volver a la pantalla original, pulse el botón
EXIT.
Utilización de la fuente de sonido incorporada para su interpretación
TRITON taktile incluye 512 sonidos creados afinando los sonidos de los programas montados en el legendario KORG
TRITON. Podrá interpretar fácilmente con esta unidad sin conexión a un ordenador.
SUGERENCIA Mientras el modo SOUND esté activado, todos
los mensajes MIDI se transmitirán a través del canal Global
MIDI independientemente del canal MIDI que se haya especificado para cada controlador.
1. Elección del programa
1. Pulse el botón SOUND para cambiar al modo SOUND (el
botón SOUND se encenderá). Los nombres de programas/categorías se mostrarán en la visualización.
2. Cambie el programa con la barra deslizante de valor.
1
2
Cómo utilizar la barra deslizante de valor
Al mover un dedo a lo largo de la barra deslizante, el valor cambiará continuamente. Para cambiar el valor de
uno en uno, pulse el extremo de la barra deslizante.
Para controlar la barra deslizante de
valor solamente deberá utilizarse la
punta de un dedo. No deberá utilizar
nada duro ni puntiagudo, ni tampoco llevar guantes.
1
2
3. Pulse el botón ASSIGN para elegir la categoría (el LED se
encenderá) y después pulse los botones F1-F8 para seleccionar el programa principal para las categorías individuales.
3
4. Podrá interpretar con el teclado, el panel táctil, y el pad de
disparo. También podrá modificar los sonidos de su interpretación utilizando la rueda de inflexión de tono o la rueda de modulación para alterar las notas que esté tocando.
1
3
Cambio del sonido del programa
Podrá cambiar y modular el sonido del programa que haya
elegido.
Podrá utilizar ocho barras deslizantes para ajustar los parámetros que están asignados a programas individuales.
SUGERENCIA Con respecto al contenido de los parámetros,
consulte la Guía de parámetros.
No es posible almacenar en la memoria los ajustes de los parámetros cambiados. Si cambia un programa, la unidad volverá a los
ajustes iniciales que están establecidos para programa.
25
Page 26

TRITON taktile
Registro en favoritos
Puede utilizar los botones F1–F8 para registrar y activar fácilmente sus programas favoritos.
1. Seleccione el programa que desee registrar.
2. Pulse el botón ASSIGN y seleccione SET A o SET B (el
LED se encenderá).
3. Manteniendo pulsado el botón EXIT, pulse los botones
F1–F8 que desee utilizar para registrar, y registre sus favoritos.
4. Si pulsa los botones F1–F8 con SET A o SET B seleccionado, será posible seleccionar instantáneamente los programas registrados.
2. Interpretación a lo largo de una escala
El TRITON taktile tiene una función que le permite interpretar
a lo largo de la escala, que haya especificado, con el panel
táctil o el pad de disparo.
Esta función simplifica procedimientos como el disparo de un
respaldo con el pad de disparo (escala de acordes) y tocar
una melodía o una línea de bajo con el panel táctil (escala de
toque).
Especificación de una escala y una clave
Especifique la escala y la clave que desee asignar al panel
táctil o al pad de disparo.
1. Elija el parámetro «Scale» o «Key» con los botones de
página
da con la barra deslizante de valor.
Interpretación con el panel táctil (escala de toque)
La escala de toque es una función que le permite interpretar
con el panel táctil a lo largo de la escala y la clave, que haya
especificado.
1. Pulse el botón TOUCH SCALE para entrar en el modo de
escala de toque.
2. Interprete frotando su dedo sobre el panel táctil o golpeándolo.
SUGERENCIA Puede controlar los parámetros que se hayan
establecido moviendo su dedo sobre el panel táctil en dirección longitudinal. Para obtener información sobre cómo configurar los parámetros, consulte la Guía de Parámetros.
/ , y especifique la escala o la clave desea-
2
1
Para controlar la barra deslizante de valor solamente deberá utilizarse la punta de un dedo. No deberá utilizar nada duro ni puntiagudo, ni tampoco llevar guantes.
Toque de acordes con el pad de disparo (escala de acordes)
La escala de acordes es una función que le permite tocar
acordes con el pad de disparo a lo largo de la escala y la
clave, que haya especificado.
1. Pulse el botón CHORD SCALE para poner el pad de disparo en el modo de escala de acordes.
2. Interprete golpeando el pad de disparo.
2
1
3. Si elije el parámetro «Chord Variation» con los botones de
página
con la barra deslizante de valor.
/ , podrá controlar la riqueza de acordes
3
Baja Alta
Puede hacer que su interpretación resulte más expresiva
controlando el parámetro Variation mientras toque.
3. Toque de batería con el pad de disparo
Pulse el botón NOTE/CONTROL para poner el pad de disparo en el modo de nota/control.
Seleccione un programa de sonido de batería y golpee el pad
de disparo para realizar su interpretación (→ 1. Elección del
programa).
SUGERENCIA Con la categoría DRS/HIT/SE (botón F8), podrá
seleccionar el programa de sonido de batería.
SUGERENCIA En la fábrica, antes del envío, al pad de disparo
se le han asignado mensajes de nota óptimos para batería
general compatible con GM. Cuando utilice el sintetizador de
software, el software puede no ser compatible con la norma
GM. Cambie la asignación consultando la Guía de parámetros de TRITON taktile.
Selección de un banco de pad de disparo
El pad de disparo del TRITON taktile posee dos bancos: A y
B. Por ejemplo, puede asignar sonidos de batería al banco A
y sonidos de percusión al banco B, o utilizar ambos, A y B,
para hasta 32 (para el TRITON taktile-25, hasta 16) disparadores de muestra.
Elija «Pad Bank» con los botones de página
leccione un banco con la barra deslizante de valor.
/
, y se-
26
Page 27

SUGERENCIA El LED del pad de disparo se enciende en rojo
para el banco A, y en azul para el banco B.
SUGERENCIA Para seleccionar entre los bancos A y B, también
puede pulsar de nuevo el botón NOTE/CONTROL.
4. Utilización del arpegiador
El arpegiador es una función que reproduce automáticamente un acorde fragmentado (arpegio) cuando se toca un acorde.
1. Pulse el botón ARP para activar el arpegiador.
2. Las nota tocadas en el teclado, el panel táctil, o el pad de
disparo se reproducirán mediante el arpegiador.
SUGERENCIA Cuando elija el parámetro de arpegiador con los
botones de página
del arpegiador con la barra deslizante de valor. Con respecto
a los parámetros que pueden configurarse, consulte la Guía
de parámetros del TRITON taktile.
/
, podrá cambiar la configuración
5. Funciones útiles
Desplazamiento de octava
Especifique la gama del teclado, la escala de toque, y la escala de acordes en pasos de octava.
1. Cada vez que pulse los botones OCTAVE +/-, la gama se
desplazará en incrementos de una hacia arriba y hacia
abajo.
SUGERENCIA Si pulsa simultáneamente el botón OCTAVE + y el
botón OCTAVE -, podrá devolver el estado de desplazamiento de octava a cero, en el que no hay desplazamiento.
SUGERENCIA Cada programa tiene un límite superior, y es posible que no se produzca sonido cuando se toque por encina
de tal límite.
Transposición
Transpone el teclado en pasos de semitono.
1. Elija el parámetro «Transpose» con los botones de página
/ , y configúrelo con la barra deslizante de valor.
Utilización como controlador MIDI
Puede conectar esta unidad a un ordenador con un cable
USB y utilizarla con un sintetizador de software, un sintetizador DAW/MIDI, etc.
1. Acerca de una escena
Significado de una escena
Un juego de ajustes en el TRITON taktile que se adapte a
software como el de un DAW se denomina escena. En la
unidad principal del TRITON taktile podrán almacenarse hasta 16 escenas. Los ajustes que apoyan software representativo se han incorporado con antelación en el TRITON taktile.
SUGERENCIA También puede personalizar los ajustes de escenas. Con respecto a la información sobre cómo personalizarlos, consulte la Guía de parámetros del TRITON taktile.
Cómo seleccionar una escena
Elija el parámetro «Scene» con los botones de página
, y seleccione la escena deseada con la barra deslizante
de valor.
2. Puertos MIDI
KEYBOARD/CTRL, SOUND/CTRL
Estos puertos se utilizan para dar entrada a mensajes MIDI
procedentes de cada controlador y pad de disparo del TRITON taktile. Además, se utilizarán cuando controle la fuente
de sonido incorporada.
DAW IN, DAW OUT
Estos puertos se utilizan para controlar software de DAW.
MIDI I/F OUT
Estos puertos se utilizan como interfaces MIDI. Se utilizan
para dar entrada a mensajes MIDI a su ordenador desde
equipos MIDI externos, o para controlar equipos MIDI externos desde su ordenador.
En el entorno de Windows, no se visualizará un nombre de puerto,
como «TRITON taktile-49» y «MIDIIN2(TRITON taktile-49)».
Como normalmente se visualiza en el orden de arriba, especifique
el puerto correspondiente en el software. Cuando instale el controlador KORG USB–MIDI, se visualizará un nombre de puerto MIDI.
/
3. Cómo configurar el software de DAW
Con respecto a la configuración detallada y el método de operación del software de DAW, consulte el manual de instrucciones del
software de DAW.
Si los ajustes de una escena del TRITON taktile se han cambiado
de los de fábrica, puede que no funcione como se indica a continuación.
Cubase
1. Haga que se visualice el parámetro «Scene» con los botones de página
deslizante de valor.
2. Abra la ventana «Device Setup» en Cubase, y añada
Mackie Control a «Devices».
/ , y elija «Cubase» con la barra
27
Page 28

TRITON taktile
3. Abra la página Mackie Control añadida, y especifique los
puertos de DAW IN/OUT para el TRITON taktile en los
puertos de entrada/salida MIDI que vaya a utilizar.
4. Abra la página «MIDI Port Setup», y desmarque «In ‘All
MIDI Inputs’» para los puertos de DAW IN/OUT del TRITON taktile.
Digital Performer
1. Haga que se visualice el parámetro «Scene» con los botones de página
la barra deslizante de valor.
Ajustes en «Audio MIDI Setup»
2. Abra la ventana «Control Surface» en Digital Performer, y
elija Mackie Control en «Driver» y «Unit».
3.
Elija los puertos de «DAW IN/OUT» del TRITON taktile en
«MIDI».
SUGERENCIA Para Digital Performer, el botón CYCLE de los
botones de transporte funciona como botón de activación/
desactivación para Memory Cycle. Sin embargo, aunque
active Memory Cycle, el botón CYCLE no se iluminará.
SUGERENCIA Para Digital Performer, el botón SET MARKER no
funciona.
/ , y elija la escena para «DP» con
•
Inicie «Applications» → «Utilities» → «Audio MIDI Setup» para abrir «MIDI Studio», y
ejecute «Add Device».
•Asigne un nombre apropiado al dispositivo
añadido. (por ejemplo, TRITON taktile DP)
•Conecte el dispositivo añadido con el TRITON taktile como se muestra a la izquierda.
SUGERENCIA Cuando utilice el controlador KORG USB-MIDI, conecte el puerto INPUT/OUTPUT del dispositivo
añadido a “DAW IN” y “DAW OUT”.
Live
1. Haga que se visualice el parámetro «Scene» con los botones de página
zante de valor.
2. Abra la ventana «Preferences», y elija Mackie Control en
la sección «Control Surface».
3. Especifique los puertos de DAW IN/OUT para el TRITON
taktile en la sección de entrada/salida MIDI que vaya a
utilizar con Mackie Control.
/ , y elija «Live» con la barra desli-
GarageBand/Logic
Descargue el plug-in Control Surface del TRITON taktile para
GarageBand/Logic de la página web de Korg, y configúrelo
de acuerdo con el documento suministrado.
Pro Tools
1. Haga que se visualice el parámetro «Scene» con los botones de página
deslizante de valor.
2. Abra la ventana «Peripherals» en Pro Tools, y elija HUI en
«Type».
3. Especifique los puertos de DAW IN/OUT para el TRITON taktile
en las secciones de origen y destino que vaya a utilizar con HUI.
/ , y elija «Pro Tools» con la barra
SONAR
1. Haga que se visualice el parámetro «Scene» con los botones de página
deslizante de valor.
2. Abra la página «Preferences» en SONAR, desmarque el
puerto
KEYBOARD/CTRL, SOUND/CTRL
de DAW IN/OUT del TRITON taktile tanto en «Inputs»
como en «Outputs» de la página «Device», y pulse el botón Apply.
3. En la página «Control Surfaces», abra el diálogo «Control
Surface Settings» con el botón para añadir una superficie
de control, y especifique «Mackie Control» en «Control
Surface», y los puertos de DAW IN/OUT del TRITON taktile en las secciones «Input Port» y «Output Port».
/ , y elija «SONAR» con la barra
y el puerto
Otro software
1. Haga que se visualice el parámetro «Scene» con los botones de página
deslizante de valor.
2. Configure su aplicación de forma que pueda controlarse a
través de los mensajes de cambio de control que salen
del puerto «KEYBOARD/CTRL,SOUND/CTRL» del TRITON taktile.
SUGERENCIA Con respecto a la información sobre cómo configurar su aplicación, consulte el manual de instrucciones de la
aplicación.
/ , y elija «Basic MIDI» con la barra
4. Interpretación con el sintetizador de soft-
ware
Para la creación de sonidos, puede ser necesario conectar el
ordenador y cargar el sintetizador de software de antemano
en el software DAW, o para establecer la condición de la pista de grabación, etc. Con respecto a los detalles, consulte el
Manual del usuario del software que esté utilizando.
Utilización del teclado para su interpretación
Utilice el teclado para confirmar que el sintetizador de software esté emitiendo sonidos.
De la misma forma que en las operaciones de control explicadas en “utilización de la fuente de sonido incorporada para
su interpretación”, utilice la rueda de inflexión de tono y la
rueda de modulación para intentar cambiar el sonido.
También podrá realizar operaciones tales como “interpretación a lo largo de una escala,” “toque de batería con el pad de
disparo,” o “utilización del arpegiador.”
28
Page 29

5. Control de software
1. Si el botón SOUND está encendido, pulse el botón
SOUND para hacer que se apague.
1
2. Puede utilizar mandos, barras deslizantes, y los botones
F1–F8 para controlar su sintetizador de software, etc.
SUGERENCIA Con respecto a los parámetros que pueden controlarse utilizando mandos, barras deslizantes, y los botones
F1–F8, consulte la Guía de parámetros.
SUGERENCIA Con respecto a la información sobre cómo configurar su aplicación, consulte el manual de instrucciones de
su software.
Utilización del panel táctil para control
1. Pulse el botón CONTROL para poner el panel táctil en el
modo de control.
2. Como los mensajes de cambio de control se transmiten
cuando toque el panel táctil, levante su dedo, y lo mueva,
asignará los mensajes de cambio de control en su sintetizador de software.
2
1
6. Utilización de la unidad como ratón de su
ordenador
1. Pulse el botón TRACK PAD para poner el panel táctil en
el modo de trackpad.
2. Controle el cursor del ratón de su ordenador frotando su
dedo sobre el panel táctil.
Al tocar el panel táctil, funcionará como clic del botón iz-
quierdo. Además, frotando dos dedos sobre el panel táctil
hacia arriba y hacia abajo, podrá utilizarlo para desplazar
la pantalla hacia arriba y hacia abajo.
3. Cuando elija la página «TRACK PAD» con los botones de
página
deslizante de valor funcionarán como clic con el botón izquierdo y clic con el botón derecho, respectivamente.
/ , los lados izquierdo y derecho de la barra
Left click
Right click
3
1
Especifi caciones
Conectores: Conector MIDI OUT, Jack ASSIGNABLE PEDAL, Jack ASSIGNABLE SWITCH, Jack OUTPUT, Conector
USB-B (para conexión al ordenador)
Alimentación: Modo de alimentación por bus USB
Consumo actual: 500mA o menos
Dimensiones (Anch.xProf.xAlt.)
531 × 290 × 72 mm (TRITON taktile-25)
750 × 290 × 83 mm ( TRITON taktile-49)
Peso: 2,5 kg (TRITON taktile-25) / 3,8 kg (TRITON taktile-49)
Temperatura de funcionamiento:
0–+40 °C (sin condensación)
Elementos incluidos: USB cable, Manual de usuario
* Las especificaciones y el aspecto están sujetas a cambios sin
previo aviso por mejora.
:
29
Page 30

Appendix
Scale list
Display Scale Name Scale [Key C]
1 Chromatic Chromatic C, C, D, D, E, F, F, G, G, A, A, B
2 lonian Ionian C, D, E, F, G, A, B
3 Dorian Dorian C, D, D, F, G, A, A
4 Phrygian Phrygian C, C, D, F, G, G, A
5 Lydian Lydian C, D, E, F, G, A, B
6 Mixolydian Mixolydian C, D, E, F, G, A, A
7 Aeolian Aeolian C, D, D, F, G, G, A
8 Locrian Locrian C, C, D, F, F, G, A
9 Harm minor Harmonic minor C, D, D, F, G, G, B
10 Melo minor Melodic minor C, D, D, F, G, A, B
11 Major Blues Major Blues C, D, D, E, G, A
12 minor Blues minor Blues C, D, F, F, G, A
13 Diminished Diminished C, D, D, F, F, G, A, B
14 Com.Dim Combination Diminished C, C, D, E, F, G, A, A
15 Major Penta Major Pentatonic C, D, E, G, A
16 minor Penta minor Pentatonic C, D, F, G, A
17 Raga1 Raga Bhairav C, C, E, F, G, G, B
18 Raga2 Raga Gamanasrama C, C, E, F, G, A, B
19 Raga3 Raga Todi C, C, D, F, G, G, B
20 Arabian Arabian C, D, E, F, F, G, A
21 Spanish Spanish C, C, D, E, F, G, G, A
22 Gypsy Gypsy C, D, D, F, G, G, B
23 Egyptian Egyptian C, D, F, G, A
24 Hawaiian Hawaiian C, D, D, G, A
25 Pelog Bali Island Pelog C, C, D, G, G
26 Japanese Japanese Miyakobushi C, C, F, G, G
yukyu Ryukyu C, E
27 R
28 Chinese Chinese C, E, F, G, B
29 Bass Line Bass Line C, G, A
30 Whole Tone Whole Tone C, D, E, F, G, A
31 minor 3rd minor 3rd Interval C, D, F, A
32 Major 3rd Major 3rd Interval C, E, G
33 4th Interval 4th Interval C, F, A
34 5th Interval 5th Interval C, G
35 Octave Octave C
, F, G, B
43
Page 31

TRITON taktile
1
3 4
897
Parts of the TRITON taktile
19
18
13
17
15
16
19 20
15
16
17
18
2 10
6
5
1 3
8
7
2
9
5
4
6
10 11
14
11
12
f
a b c d e
14
13
12
44
Page 32

1. Touchpad
2. Value slider
3. Display
4. page / buttons
5. SETTING button
6. EXIT button
7. SOUND button
8. TRACK ◄/►buttons
9. ASSIGN button, LED
10. TOUCH PAD MODE buttons
11. TRIGGER PAD MODE buttons
12. ARP button
13. Transport buttons
14. Trigger pad
15. Pitch wheel
16. Modulation wheel
17. OCTAVE +/- buttons
18. F1–F8 bottons
19. Sliders
20. Knobs (TRITON taktile49 only)
a. ASSIGNABLE SWITCH jack
b. ASSIGNABLE PEDAL jack
c. MIDI OUT connector
d. OUTPUT jack
e. USB connector (B type)
f.
Functional ground terminal
1. Pavé tactile
2. Curseur de valeur
3. Affichage
4. Boutons de page /
5. Bouton SETTING
6. Bouton EXIT
7. Bouton SOUND
8. Boutons TRACK ◄/►
9.
Bouton ASSIGN, témoin d’alimentation
10. Boutons de TOUCH PAD MODE
11. Boutons de TRIGGER PAD MODE
12. Bouton ARP
13. Boutons de transport
14. Pad déclencheur
15. Molette de pitch bend
16. Molette de modulation
17. Boutons OCTAVE +/-
18. Boutons F1~F8
19. Curseurs
20.
Commandes (TRITON taktile49 uniquement)
a. Prise ASSIGNABLE SWITCH
b. Prise ASSIGNABLE PEDAL
c. Prise MIDI OUT
d. Prise OUTPUT
e. Prise USB-B
f. Terminal de mise à la terre
1. Touchpad
2. Value-Slider
3. Display
4. page / Tasten
5. SETTING-Taste
6. EXIT-Taste
7. SOUND-Taste
8. TRACK ◄/►Tasten
9. ASSIGN-Taste, LED
10. TOUCH PAD MODE-Tasten
11. TRIGGER PAD MODE-Tasten
12. ARP-Taste
13. Transporttasten
14. Triggerpad
15. Pitch-Bend-Rad
16. Modulationsrad
17. OCTAVE +/- Tasten
18. F1–F8 Tasten
19. Schieberegler
20. Regler (nur TRITON taktile 49)
a. ASSIGNABLE SWITCH-Buchse
b. ASSIGNABLE PEDAL-Buchse
c. MIDI OUT-Anschluss
d. OUTPUT-Buchse
e. USB-B-Anschluss
f. Funktionale Masseklemme
1. Panel táctil
2. Barra deslizante de valor
3. Visualización
4. Botones de página
5. Botón SETTING
6. Botón EXIT
7. Botón SOUND
8. Botones TRACK ◄/►
9. Botón ASSIGN, LED
10. Botones TOUCH PAD MODE
11. Botones TRIGGER PAD MODE
12. Botón ARP
13. Botones de transporte
14. Pad de disparo
15. Rueda de inflexión de tono
16. Rueda de modulación
17. Botones OCTAVE +/-
18. Botones F1–F8
19. Barras deslizantes
20. Mandos (TRITON taktile49 solamente)
a. Jack ASSIGNABLE SWITCH
b. Jack ASSIGNABLE PEDAL
c. Conector MIDI OUT
d. Jack OUTPUT
e. Conector USB-B
f. Terminal de tierra funcional
/
45
Page 33

TRITON taktile
Functional ground terminal
This is the terminal (screw) for connecting this machine to a
ground. When connecting a ground, loosen this terminal (screw),
and then use a ground wire to ground the machine.
After loosening the terminal (screw), be sure to tighten it. In addition, do not use the machine with this terminal (screw) removed.
TIP If this machine is connected to an audio interface, noise may be
generated due to the potential difference of the ground depending
on the connections of peripheral devices. The noise may be reduced by connecting a ground wire to the functional ground terminal of the audio interface.
Terminal de mise à la terre
Il s’agit du terminal (vis) reliant cette machine à la terre. Lors de la
mise à la terre, desserrez ce terminal (vis), puis utilisez un câble de
mise à la terre pour relier cette machine à la terre.
N'oubliez pas de serrer à nouveau le terminal (vis) après l’avoir
desserré. De plus, n’utilisez pas la machine si ce terminal (vis) est
retiré.
ASTUCE Si cette machine est branchée à une interface audio,
du bruit peut être généré par la différence potentielle
de la terre en fonction des branchements d'appareils
périphériques. Le bruit peut être réduit en branchant
un câble de mise à la terre au terminal de mise à la terre fonctionnel de
l’interface audio.
Terminal de tierra funcional
Este es el terminal (tornillo) para conectar esta máquina a tierra. Para
conectar a tierra, afloje este terminal (tornillo), y después utilice un
conductor de tierra para poner esta máquina a tierra.
Después de haber aflojado el terminal (tornillo), asegúrese de apretarlo. Además, no utilice esta máquina con este terminal (tornillo) quitado.
SUGERENCIA Si esta máquina se conecta a una interfaz de audio, se
puede generar ruido debido a la diferencia de potencial de la tierra
dependiendo de las conexiones de dispositivos periféricos. El ruido
puede reducirse conectando un conductor de tierra al terminal de
tierra funcional de la interfaz de audio.
Funktionale Masseklemme
Klemme (Schraube) zum Anschluss des Geräts an Masse/Erde. Um das
Gerät zu erden, lösen Sie die Klemme (Schraube) und bringen Sie einen
Masseleiter an.
Ziehen Sie anschließend die Schraube fest, um den Leiter sicher zu klemmen. Verwenden Sie dieses Gerät nicht, wenn diese Klemme (Schraube)
entfernt wurde.
TIPP Falls dieses Gerät an einer Audioschnittstelle angeschlossen ist, kann durch Po-
tentialunterschiede zwischen der Erdung des Geräts und der Erdanschlüsse der
peripheren Geräte ein Rauschen auftreten. Das Rauschen kann reduziert werden,
indem ein Masseleiter an die funktionale Masseklemme der Audioschnittstelle angeschlossen wird.
46
Page 34

PROGRAM LIST
Number
Name Category Sub Category
1 A.Piano PIANO/EP A.Piano
2 Chorus Pf PIANO/EP A.Piano
3 90's Piano PIANO/EP A.Piano
4 Piano & Str PIANO/EP A.Piano
5 Stage EP 1 PIANO/EP Real E.P
6 Dyno EP 1 PIANO/EP Real E.P
7 Wurly EP 1 PIANO/EP Real E.P
8 R&B E.Piano PIANO/EP Syn E.P
9 DWGS EP PIANO/EP Syn E.P
10 Deluxe EP PIANO/EP Syn E.P
11 Attack Pf PIANO/EP A.Piano
12 L/R Piano PIANO/EP A.Piano
13 Classic Pf PIANO/EP A.Piano
14 Elec Grand PIANO/EP A.Piano
15 Romance Pf PIANO/EP A.Piano
16 Layers Pf PIANO/EP A.Piano
17 SuperGrand PIANO/EP A.Piano
18 Piano Pad 1 PIANO/EP A.Piano
19 Piano Pad 2 PIANO/EP A.Piano
20 Stage EP 2 PIANO/EP Real E.P
21 Vintage EP PIANO/EP Real E.P
22 Dyno EP 2 PIANO/EP Real E.P
23 Club EP PIANO/EP Real E.P
24 Wurly EP 2 PIANO/EP Real E.P
25 Phantom EP PIANO/EP Syn E.P
26 Layer Keys PIANO/EP Syn E.P
27 Warm Layer PIANO/EP Syn E.P
28 SynPiano X PIANO/EP Syn E.P
29 Pad EP PIANO/EP Syn E.P
30 Reson Piano PIANO/EP Syn E.P
31 Syn Pianoid PIANO/EP Syn E.P
32 Digi EP 1 PIANO/EP Syn E.P
33 Digi EP 2
34 Silky EP PIANO/EP Syn E.P
35 Hybrid EP PIANO/EP Syn E.P
36 Night EP PIANO/EP Syn E.P
37 Sweep EP PIANO/EP Syn E.P
38 Flutter EP PIANO/EP Syn E.P
39 M1 Organ KEYBOARDS E.Organ
40 Full Organ KEYBOARDS E.Organ
41 Perc Short KEYBOARDS E.Organ
42 VOX Organ KEYBOARDS E.Organ
43 Clav KEYBOARDS Clav
44 Pipe Full KEYBOARDS P.Organ
45 Musette KEYBOARDS Reed
46 Jazz Organ1 KEYBOARDS E.Organ
47 Jazz Organ2 KEYBOARDS E.Organ
48 Dirt y Organ KEYBOARDS E.Organ
49 Gospel Org KE YBOARDS E.Organ
50 Dark Organ1 KEYBOARDS E.Organ
51 DWGS Org KEYBOARDS E.Organ
52 Dark Organ2 KEYBOARDS E.Organ
53 Perc.BX3 KEYBOARDS E.Organ
54 Rotary Org KEYBOARDS E.Organ
55 Old "B"Org KEYBOARDS E.Organ
56 Click Organ KEYBOARDS E.Organ
57 Killer BX-3 KEYBOARDS E.Organ
58 Super BX3 KEYBOARDS E.Organ
59 Killer B KEYBOARDS E.Organ
60 Dirt y "B" KEYBOARDS E.Organ
PIANO/EP Syn E.P
Number
Name Category Sub Category
61 2ndPercOrg KEYBOARDS E.Organ
62 Short BX3 KEYBOARDS E.Organ
63 Tone-Wheel KEYBOARDS E.O rgan
64 PerkyOrgan KEYBOARDS E.Organ
65 VeloSW BX3 KEYBOARDS E.Organ
66 Dist Organ KE YBOARDS E.Organ
67 BX-3 OD KEYBOARDS E.Organ
68 MutantClav KEYBOARDS Clav
69 Clav Snap KEYBOARDS Clav
70 Rez Clav KEYBOARDS Clav
71 Harpsi 8'+4' KEYBOARDS Harpsi
72 Pipe Tutti KEYBOARDS P.Organ
73 Mixture KEYBOARDS P.Organ
74 Positive KEYBOARDS P.Organ
75 Church KEYBOARDS P.Organ
76 FlautoPipe KEYBOARDS P.Organ
77 Fisa 1 KEYBOARDS Reed
78 Fisa 2 KEYBOARDS Reed
79 Fisa 3 KEYBOARDS Reed
80 Legato Str STR/CHOR Strings
81 Camera Str STR/CHOR Strings
82 Str Quartet STR/CHOR Strings
83 LightChoir STR/CHOR Vocal
84 Ooh/AahVox STR/CHOR Vocal
85 Cinema Pad STR/CHOR Airy
86 Stereo Str1 STR/CHOR Strings
87 Stereo Str2 STR/CHOR Strings
88 Arco Str STR/CHOR Strings
89 Oct Strings STR/CHOR Strings
90 Rosin Str STR/CHOR Strings
91 SymphoStr STR/CHOR Strings
92 Str World STR/CHOR Strings
93 Compo Str
94 Sky Strings STR/CHOR Strings
95 Str/Choir STR/CHOR Strings
96 Ens & Solo STR/CHOR Strings
97 FewBowsStr STR/CHOR Strings
98 Solo Violin STR/CHOR Strings
99 Solo Viola STR/CHOR Strings
100 2 Strings STR/CHOR Strings
101 Pizz Ens 1 STR/CHOR Strings
102 Pizz Ens 2 STR/CHOR Strings
103 Aaah Voice STR/CHOR Vocal
104 Aah Choir STR/CHOR Vocal
105 Slow Choir STR/CHOR Vocal
106 Grand Choir STR/CHOR Vocal
107 Take Voices STR/CHOR Vocal
108 Oooh Voice STR/CHOR Vocal
109 Ooh Slow STR/CHOR Vocal
110 Oooh Choir STR/CHOR Vocal
111 Choir Mmh STR/CHOR Vocal
112 Cyber Choir STR/CHOR Vocal
113 Digi Voice1 STR/CHOR Vocal
114 Digi Voice2 STR/CHOR Vocal
115 Fresh Vox STR/CHOR Airy
116 FullVox Pad STR/CHOR Airy
117 Vocalesque STR/CHOR Airy
118 Vocalscap STR/CHOR Air y
119 Ether Voice STR/CHOR Airy
120 Dream Vox STR/CHOR Airy
STR/CHOR Strings
Number
Name Category Sub Category
121 Classic Vox STR/CHOR Airy
122 Arctic Vox STR/CHOR Airy
123 TightBrass1 BRS/WIND Brass
124 Power Brs BRS/WIND Brass
125 Fanfare BRS/WIND Brass
126 Big Band BRS/WIND Brass
127 F.Horn Ens BRS/WIND Brass
128 Flute BRS/WIND W.wind
129 Sax Ens BRS/WIND Reed
130 Oboe BRS/WIND Reed
131 Fat Brass BRS/WIND Brass
132 Movie Brs BRS/WIND Brass
133 EXP Brass BRS/WIND Brass
134 Attack Brs BRS/WIND Brass
135 SFZ Brass BRS/WIND Brass
136 Slow Brass BRS/WIND Brass
137 Burnin Brs BRS/WIND Brass
138 Dyna Brass1 BRS/WIND Brass
139 TightBrass2 BRS/WIND Brass
140 Dyna Brass2 BRS/WIND Brass
141 Oct Brass BRS/WIND Brass
142 TrumpetEns BRS/WIND Brass
143 Film Brass BRS/WIND Brass
144 Brs&Reed BRS/WIND Brass
145 Bari Blaster BRS/WIND Brass
146 FrenchHorn BRS/WIND Brass
147 Horns & Ens BRS/WIND Brass
148 Trumpet BRS/WIND Brass
149 Muted Tp BRS/WIND Brass
150 Flugel Horn BRS/WIND Brass
151 Cornet BRS/WIND Brass
152 Trombone 1 BRS/WIND Brass
153 Trombone 2
154 Trombones BRS/WIND Brass
155 Trb. Ens BRS/WIND Brass
156 Tubas Gold BRS/WIND Brass
157 Classic FL BRS/WIND W.wind
158 SilverFlute BRS/WIND W.wind
159 Wooden FL BRS/WIND W.wind
160 PanFlute BRS/WIND W.wind
161 SharpBottle BRS/WIND W.wind
162 Spitz Bottle BRS/WIND W.wind
163 Shakuhachi1 BRS/WIND W.wind
164 Shakuhachi2 BRS/WIND W.wind
165 Recorder BRS/WIND W.wind
166 SopranoSax BRS/WIND Reed
167 Alto Sax 1 BRS/WIND Reed
168 Alto Sax 2 BRS/WIND Reed
169 BreathyAlto BRS/WIND Reed
170 Tenor Sax 1 BRS/WIND Reed
171 Tenor Sax 2 BRS/WIND Reed
172 Soft Tenor BRS/WIND Reed
173 BaritonSax1 BRS/WIND Reed
174 BaritonSax2 BRS/WIND Reed
175 Harmonica BRS/WIND Reed
176 WarPipes BRS/WIND Reed
177 DoubleReed BRS/WIND Reed
178 EnglishHorn BRS/WIND Reed
179 Clarinet BRS/WIND Reed
180 Bassoon BRS/WIND Reed
BRS/WIND Brass
Page 35

Number
Name Category Sub Category
181 NylonGuitar GTR/PLUCKED A.Gtr
182 Finger Gtr GTR/PLUCKED A.Gtr
183 Chorus Gtr GTR/PLUCKED E.Gtr
184 VintageGtr GTR/PLUCKED E.Gtr
185 Jazz Guitar GTR/PLUCKED E.Gtr
186 Mute D.Gtr GTR/PLUCKED E.Gtr
187 Dist Guitar GTR/PLUCKED E.Gtr
188 Harp GTR/PLUCKED Plucked
189 Spanish Gtr GTR/PLUCKED A.Gtr
190 A.Guitar GTR/PLUCKED A.Gtr
191 12 String 1 GTR/PLUCKED A.Gtr
192 12 String 2 GTR/PLUCKED A.Gtr
193 Piezo Gtr GTR/PLUCKED A.Gtr
194 Indian Frets GTR/PLUCKED A.Gtr
195 Nu Strat GTR/PLUCKED E.Gtr
196 Single Coil GTR/PLUCKED E.Gtr
197 ChimeStrat GTR/PLUCKED E.Gtr
198 Dyno E.Gtr GTR/PLUCKED E.Gtr
199 ArpeggioGt GTR/PLUCKED E.Gtr
200 ProcessGtr GTR/PLUCKED E.Gtr
201 Funkin' Gtr GTR/PLUCKED E.Gtr
202 RhythmGtr GTR/PLUCKED E.Gtr
203 Mute Gtr GTR/PLUCKED E.Gtr
204 Clean Gtr GTR/PLUCKED E.Gtr
205 CountryStr GTR/PLUCKED E.Gtr
206 PedalSteel GTR/PLUCKED E.Gtr
207 E.G. Harmo. GTR/PLUCKED E.Gtr
208 VoxWahGtr GTR/PLUCKED E.Gtr
209 WetDist.Gtr GTR/PLUCKED E .Gtr
210 FeedbackGt GTR/PLUCKED E.Gtr
211 Amp D. Gtr GTR/PLUCKED E.Gtr
212 PowerCrd&Fx GTR/PLUCKED E.Gtr
213 Sitar 1
214 Sitar 2 GTR/PLUCKED Plucked
215 Sitar 3 GTR/PLUCKED Plucked
216 Santur GTR/PLUCKED Plucked
217 Small Harp GTR/PLUCKED Plucked
218 Koto GTR/PLUCKED Plucked
219 Mandolin GTR/PLUCKED Plucked
220 Guitarish GTR/PLUCKED Plucked
221 Dirt yWounds GTR/PLUCKED Plucked
222 Finger Bass1 BASS E.Bass
223 Pick Bass1 BASS E.Bass
224 Splat Slap BASS E.Bass
225 FretlessBs1 BASS E.Bass
226 A.Bass 1 BASS A.Bass
227 Phat Bass BASS Syn Bass
228 R&B Bass BASS Syn Bass
229 Finger Bass2 BASS E.Bass
230 Finger Bass3 BASS E.Bass
231 Stein Bass BASS E.Bass
232 Pick Bass2 BASS E.Bass
233 Switch Bs1 BASS E.Bass
234 Switch Bs2 BASS E.Bass
235 Thumb Bs1 BASS E.Bass
236 Thumb Bs2 BASS E.Bass
237 Slap Bass BASS E.Bass
238 FretlessBs2 BASS E.Bass
239 FretlessBs3 BASS E.Bass
240 FretlessBs4 BASS E.Bass
241 FretlessBs5 BASS E.Bass
242 A.Bass 2 BASS A.Bass
243 Wacky A.Bs BASS A.Bass
244 Poinker Bs BASS Syn Bass
GTR/PLUCKED Plucked
Number
Name Category Sub Category
245 Nasty Bass BASS Syn Bass
246 30303 Bass BASS Syn Bass
247 Euro8va Bs BASS Syn Bass
248 Jungle Bs1 BASS Syn Bass
249 30303SquBs BASS Syn Bass
250 Decayed Bs BASS Syn Bass
251 Jungle Bs2 BASS Syn Bass
252 Organ Bass BASS Syn Bass
253 Digi Bass 1 BASS Syn Bass
254 Digi Syn Bs BASS Syn Bass
255 Hybrid Bass BASS Syn Bass
256 Blind Bass BASS Syn Bass
257 Reso Bass BASS Syn Bass
258 Dirt y Bass BASS Syn Bass
259 Digi Bass 2 BASS Syn Bass
260 SynBassRes BASS Syn Bass
261 Stabber Pad SYNTH Fast
262 Power Saw SYNTH Fast
263 SynthBrass SYNTH Fast
264 Future Pad SYNTH Fast
265 Rezbo SYNTH Fast
266 Analog Str SYNTH Slow
267 Glass Vox SYNTH Slow
268 Sweep Pad SYNTH Slow
269 DolphinRide SYNTH Motion
270 AquaPhonics SYNTH Motion
271 WaveSweep SYNTH Motion
272 SymphoWaves SYNTH Motion
273 EspressLead SYNTH Syn Lead
274 A leadload SYNTH Syn Lead
275 Sine Lead 2 SYNTH Syn Lead
276 TechPhonic SYNTH Fast
277 RaverSynth
278 Thunderlog SYNTH Fast
279 Power Snap SYNTH Fast
280 Mega Pad SYNTH Fast
281 Snap Pad SYNTH Fast
282 Syn Sweep SYNTH Fast
283 Analog Pad SYNTH Fast
284 Saw Brass SYNTH Fast
285 RaunchyBrs SYNTH Fast
286 Electrik Brs SYNTH Fast
287 Rez. Sweep SYNTH Fast
288 Digi Poly-6 SYNTH Fast
289 Cosmic Pad SYNTH Fast
290 Pop SynPad SYNTH Fast
291 BandSynPad SYNTH Fast
292 Volutionary SYNTH Fast
293 Rave SYNTH Fast
294 AutoGroove SYNTH Fast
295 Grain Board SYNTH Fast
296 Metalic Rez SYNTH Fast
297 Square Rez SYNTH Fast
298 SquareSnaps SYNTH Fast
299 Element Pad SYNTH Fast
300 Flute Pad SYNTH Fast
301 Velvet Pad SYNTH Slow
302 Money Pad SYNTH Slow
303 The Pad SYNTH Slow
304 Mellow Pad SYNTH Slow
305 Brass Pad SYNTH Slow
306 Alloy Synth SYNTH Slow
307 Sine Pad SYNTH Slow
308 SmoothyPad SYNTH Slow
SYNTH Fast
Number
Name Category Sub Category
309 Rez. Down SYNTH Slow
310 FreedomPad SYNTH Slow
311 Noble Pad SYNTH Slow
312 Ultra Sweep SYNTH Slow
313 Power Rez SYNTH Slow
314 Cyclic Pad SYNTH Slow
315 Pads Waves SYNTH Slow
316 Digi Ice Pad SYNTH Slow
317 AntarticPad SYNTH Slow
318 Harmo Pad SYNTH Slow
319 HeavenVibe SYNTH Slow
320 Metal Pad SYNTH Slow
321 Lonley Pad SYNTH Slow
322 RavelianPad SYNTH Slow
323 Air Pad SYNTH Slow
324 Lava Lakes SYNTH Slow
325 Waves Pad SYNTH Slow
326 {(Meditate}) SYNTH Slow
327 Time Warp SYNTH Slow
328 Ghostly Str SYNTH Slow
329 Syn Ghostly SYNTH Slow
330 Cloud Pad SYNTH Slow
331 Pods Pad SYNTH Slow
332 Wheel Pad SYNTH Slow
333 SwirlingPad SYNTH Motion
334 Tinklin' Pad SYNTH Motion
335 SinistarPad SYNTH Motion
336 Crimson5ths SYNTH Motion
337 Rezzo Pad SYNTH Motion
338 GoliathPad SYNTH Motion
339 Water Pad SYNTH Motion
340 Virtual Pad SYNTH Motion
341 Flying Pad
342 OXYGEN SYNTH Motion
343 Transform SYNTH Motion
344 MoonCycles SYNTH Motion
345 Hubble Pad SYNTH Motion
346 Astral Pad SYNTH Motion
347 Rez Sweep SYNTH Motion
348 Sweeper Str SYNTH Motion
349 OneNotePad SYNTH Motion
350 X Sweeper SYNTH Motion
351 Dual Filterz SYNTH Motion
352 FilterSweep SYNTH Motion
353 Mallet Pad SYNTH Motion
354 Rhythm Pad SYNTH Motion
355 Random Pad SYNTH Motion
356 Moon Talker SYNTH Motion
357 Tomorrow's SYNTH Motion
358 Motion Pad SYNTH Motion
359 RhythmPad SYNTH Motion
360 Avenger SYNTH Motion
361 Fugue L.F.O. SYNTH Motion
362 Rezonator SYNTH Motion
363 Space Pod SYNTH Motion
364 Filter Gate SYNTH Motion
365 Saw Lead SYNTH Syn Lead
366 R&B Lead SYNTH Syn Lead
367 ResRes One SYNTH Syn Lead
368 ElectroLead SYNTH Syn Lead
369 Pulse Lead SYNTH Syn Lead
370 Mini Lead SYNTH Syn Lead
371 Slow Lead SYNTH Syn Lead
372 SquareLead SYNTH Syn Lead
SYNTH Motion
Page 36

Number
Name Category Sub Category
373 Old&Analog SYNTH Syn Lead
374 Old Porta SYNTH Syn Lead
375 Gliding Squ SYNTH Syn Lead
376 TrancerLead SYNTH Syn Lead
377 Rich Lead SYNTH Syn Lead
378 HipHopLead SYNTH Syn Lead
379 ThinAnaLead SYNTH Syn Lead
380 Cat Lead SYNTH Syn Lead
381 Sine Lead 1 SYNTH Syn Lead
382 Dance Lead SYNTH Syn Lead
383 Brass/Lead SYNTH Syn Lead
384 PWM Lead SYNTH Syn Lead
385 Glide Lead SYNTH Syn Lead
386 Octo Lead SYNTH Syn Lead
387 SupperLead SYNTH Syn Lead
388 Techno Stat SYNTH Syn Lead
389 Rave Stabz SYNTH Syn Lead
390 Syn Pipes SYNTH Syn Lead
391 Syncro City SYNTH Syn Lead
392 Fat Sync SYNTH Syn Lead
393 Brian'sSync SYNTH Syn Lead
394 Sync Kronic SYNTH Syn Lead
395 Busy Sync SYNTH Syn Lead
396 X-Synced SYNTH Syn Lead
397 Fire Wave SYNTH Syn Lead
398 XModRaver SYNTH Syn Lead
399 Std Kit 1 DRS/HIT/SE Natural
400 House Kit DRS/HIT/SE Dance
401 Psycho Kit DRS/HIT/SE Dance
402 Orch&Ethno DRS/HIT/SE Perc
403 Velo Hit DRS/HIT/SE Hits
404 Gtr Hit DRS/HIT/SE Hits
405 ChipperHit
406 Wild Arp DRS/HIT/SE S.decay
407 Ens Bell DRS/HIT/SE Bell
408 Future Bell DRS/HIT/SE Bell
409 Digi Bells 1 DRS/HIT/SE Bell
410 VS Bell Boy DRS/HIT/SE Bell
411 MalletSkulls DRS/HIT/SE Mallet
412 Just Do It!!! DRS/HIT/SE Hits
413 Loop-Iteria DRS/HIT/SE SFX
414 Techno Vox DRS/HIT/SE SFX
415 Monster DRS/HIT/SE SFX
416 Std Kit 2 DRS/HIT/SE Natural
417 Brush Kit DRS/HIT/SE Natural
418 Power Kit DRS/HIT/SE Natural
419 HipHop Kit DRS/HIT/SE Dance
420 D'n'B Kit DRS/HIT/SE Dance
421 Tricky Kit DRS/HIT/SE Dance
422 KING Kit DRS/HIT/SE Natural
423 JazPitchKit DRS/HIT/SE Natural
424 UGLY Kit DRS/HIT/SE Dance
425 WAcKy Kit DRS/HIT/SE Dance
426 DnBGateKit DRS/HIT/SE Dance
427 Nasty Kit DRS/HIT/SE Dance
428 PsyPitchKit DRS/HIT/SE Dance
429 Perc Kit DRS/HIT/SE Perc
430 BD&SD Kit1 DRS/HIT/SE Perc
431 BD&SD Kit2 DRS/HIT/SE Perc
432 Cymbals Kit DRS/HIT/SE Perc
433 TinyPercKit DRS/HIT/SE Perc
434 MIX Perc DRS/HIT/SE Perc
435 Marc Tree DRS/HIT/SE Perc
436 Gong DRS/HIT/SE Perc
DRS/HIT/SE Hits
Number
Name Category Sub Category
437 Pizz Hit DRS/HIT/SE Hits
438 Brass Hit DRS/HIT/SE Hits
439 Organ Hit DRS/HIT/SE Hits
440 RecordHit 1 DRS/HIT/SE Hits
441 RecordHit 2 DRS/HIT/SE Hits
442 TechOrgHit DRS/HIT/SE Hits
443 Stab Hit DRS/HIT/SE Hits
444 Raggae Hit DRS/HIT/SE Hits
445 PopGtr Hit DRS/HIT/SE Hits
446 Angele Hit DRS/HIT/SE Hits
447 Jungle Hit DRS/HIT/SE Hits
448 Crazy Wah DRS/HIT/SE Hits
449 GoaMessage DRS/HIT/SE Hits
450 Shirk Hit DRS/HIT/SE Hits
451 KarmaSutra DRS/HIT/SE Hits
452 India Hit DRS/HIT/SE Hits
453 Mega Drum DRS/HIT/SE Hits
454 Blaster DRS/HIT/SE Hits
455 Flip Blip DRS/HIT/SE S.decay
456 Goa Lover DRS/HIT/SE S.decay
457 Arp Twins DRS/HIT/SE S.decay
458 Auto Pilot DRS/HIT/SE S.decay
459 Tropico Bells DRS/HIT/SE Bell
460 Finger Cym DRS/HIT/SE Bell
461 BreathyBells DRS/HIT/SE Bell
462 Digi Bells 2 DRS/HIT/SE Bell
463 Krystal B ells DRS/HIT/SE Bell
464 Glass Bell DRS/HIT/SE Bell
465 Bottle Bell DRS/HIT/SE Bell
466 Moving Bellz DRS/HIT/SE Bell
467 Thin Bell DRS/HIT/SE Bell
468 Digi-Bell DRS/HIT/SE Bell
469 MagicalBells
470 Tinkle Bells DRS/HIT/SE Bell
471 Hybrid Bell DRS/HIT/SE Bell
472 Kalimba 1 DRS/HIT/SE Mallet
473 Kalimba 2 DRS/HIT/SE Mallet
474 Marimba DRS/HIT/SE Mallet
475 5th Rimba DRS/HIT/SE Mallet
476 Log Drum DRS/HIT/SE Mallet
477 Log Dr&Bell DRS/HIT/SE Mallet
478 BaliGamelon DRS/HIT/SE Mallet
479 Gam-Gong DRS/HIT/SE Mallet
480 Gamelan DRS/HIT/SE Mallet
481 Steel Drum DRS/HIT/SE Mallet
482 Cow/Agogo DRS/HIT/SE Mallet
483 Vibraphone DRS/HIT/SE Mallet
484 Cyborg Hit DRS/HIT/SE SFX
485 Black Box DRS/HIT/SE SFX
486 Tambo-FX DRS/HIT/SE SFX
487 *SpaceShip* DRS/HIT/SE SFX
488 Orbiting DRS/HIT/SE SFX
489 CompuShift DRS/HIT/SE SFX
490 VanishingFX DRS/HIT/SE SFX
491 DistantLight DRS/HIT/SE SFX
492 NewVoyage DRS/HIT/SE SFX
493 CosmicToys DRS/HIT/SE SFX
494 Motion FX DRS/HIT/SE SFX
495 Hemispheres DRS/HIT/SE SFX
496 Soundscapes DRS/HIT/SE SFX
497 Sonic Blast DRS/HIT/SE SFX
498 SteamSweep DRS/HIT/SE SFX
499 Great Wall DRS/HIT/SE SFX
500 Cosmic FX DRS/HIT/SE SFX
DRS/HIT/SE Bell
Number
Name Category Sub Category
501 Water FX DRS/HIT/SE SFX
502 SolarSur ng DRS/HIT/SE SFX
503 Dark Night DRS/HIT/SE SFX
504 Frozen DRS/HIT/SE SFX
505 Cript-on DRS/HIT/SE SFX
506 Venusian DRS/HIT/SE SFX
507 ReverseVox DRS/HIT/SE SFX
508 Loonie Bin DRS/HIT/SE SFX
509 DJ Touch DRS/HIT/SE SFX
510 Birds&Bugs DRS/HIT/SE SFX
511 BadWeather DRS/HIT/SE SFX
512 WispyWind DRS/HIT/SE SFX
Page 37

TRITON taktile
50
Page 38

 Loading...