

About this manual
This manual explains the new features and functions that
have been added in the new TRITON-Rack operating system version 1.5, and how this new system has been
improved relative to the previous system.
Multi mode, Disk mode, and Sampling mode are each covered in separate chapters, and the functions that apply to
more than one mode are covered in the chapter entitled
“Other new functions.”
In this manual, the explanations of the additions and
changes are organized to correspond with the appropriate
sections of the “Basic Guide” and “Parameter Guide” that
are included with the TRITON-Rack.
Conventions in this manual
: Indicates an addition or change to the “Parameter
Guide,” and shows the corresponding page.
: Indicates an addition or change to the “Basic Guide,”
BG
and shows the corresponding page.
PG: The “Parameter Guide” is abbreviated as PG.
BG: The “Basic Guide” is abbreviated as BG.
Other conventions are the same as used in the “Parameter
Guide” or “Basic Guide.”
Major new functions of version 1.5
TRITON-Rack operating system version 1.5 adds a variety
of new functions.
Multi mode
“Copy from Combination” utility menu command
An “Auto adjust Arp for Multi REC” option has been added
to the “Copy from Combination” utility menu command.
When you are using an external sequencer to record a performance that uses the TRITON-Rack’s arpeggiator, this
option will automatically optimize the settings by adjusting
the MIDI channel of certain tracks and by adding tracks as
necessary. This will ensure that the playback performance
will be identical to the one recorded. In addition, only the
timbres that are actually used by the combination will be
copied into the multi when this command is executed.
Disk mode
Loading .PCG/.SNG files from the KARMA Music Workstation or TRITON Le
Sound data (.PCG files) and song data (.SNG files) from the
KARMA Music Workstation (version 1.0 and version 2.0)
and from Triton Le can now be loaded into the TRITONRack.
“Load PCG(RAM) and Samples” utility menu command
A “Load PCG (RAM) and Samples” utility menu command
has been added. This command loads only the programs
and drum kits from a given .PCG that use RAM samples,
and the combinations and multis that use these programs.
This command is useful when you want to edit programs or
combinations that use RAM samples. This also provides an
efficient way to load data from TRITON format sample CDs
available from third party vendors.
Sampling mode
Individual output for the metronome
The “Count Down REC Metronome” can be routed to one of
the individual outputs, so that the metronome will continue
to sound while you are sampling. This is useful when you
are sampling a phrase or other sound that must be matched
to the tempo of your song.
Other new functions
Tap tempo control
You can use the front panel [ENTER] key as a tap tempo
control. Lightly press the key at the desired tempo to make
realtime adjustments to the arpeggiator tempo, to any BPM
or tempo based effects, or to the pattern playback tempo of a
multi.
* Company names, product names, and names of formats
etc. are the trademarks or registered trademarks of their
respective owners.

Updating the system
You can update your TRITON-Rack to version 1.5 via the
internal floppy drive, by loading TRITON-Rack version 1.5
operating system files from DOS-formatted floppy disks.
If your TRITON-Rack is currently using an operating system
earlier than version 1.5.0, use the following procedure to
update your unit.
* The current operating system is displayed in the lower
right of the TRITON-Rack LCD screen when you turn the
power on.
To obtain the “TRITON-Rack Operating System Version
1.5,” please contact the KORG distributor in your country or
download the latest version from:
“http://www.korg.com/”
To find your local Distributor go to:
“http://www.korg.co.jp/English/Distributors/index.html”
Updating the TRITON-Rack operating system
You will need to have the “TRITON-Rack Operating System
Version 1.5” system files saved on three 2HD MS-DOS
floppy disks.
1 While holding down the TRITON-Rack’s [ENTER] key
and [WRITE] key, turn on the power.
2 The LCD screen will indicate “Please insert System 1
disk.” Insert the “O.S. Version 1.5 - Disk #1” disk into the
floppy disk drive.
3 The system will automatically begin loading, and the fol-
lowing messages will appear in the LCD screen.
“Now loading ...”
“Now erasing ROM”
“Checking the system’s check sum”
4 The LCD screen will indicate “Please change to System 2
disk.” Remove the first disk, and insert the “O.S. Version
1.5 - Disk #2”
5 The same messages as in step 3 will appear , and then the
screen will indicate “Please change to System 3 disk.”
Remove the second disk, and insert the “O.S. Version 1.5
- Disk #3”
6 After the Operating System has been updated, the fol-
lowing messages will appear in the LCD screen:
“Checking system’s check sum”
“System load was completed”
After the update has been successfully completed, the
TRITON-Rack will re-start using the new operating system.
If a disk error is displayed during this process,
remove the disk and turn off the power of the TRITON-Rack. Then perform the system update procedure once again from step
Do not touch the switches or other controls of the TRITON-Rack while the system is being loaded, and
never turn off the power of the TRITON-Rack during
this process.
1.
Multi mode
Copy from Combination
The explanation for the “Copy From Combi” utility menu
command has changed as follows.
In system version 1.5, “Copy From Combi” now has an
“Auto adjust Arp for Multi REC” option. When you execute
the command, only the timbres that are actually used by the
combination will be copied into the multi. Tracks corresponding to timbres not being used in the combi will be
turned off.
The explanation in “Parameter Guide” Copy From Combi
(1.1-1d
☞PG p.51) will change as follows.
Copy From Combi (Copy from Combination)
This command copies the parameter data from a specific
combination to the settings of the currently selected multi.
When you execute “Copy From Combi,” only the timbres
that are used by the combination will be copied.
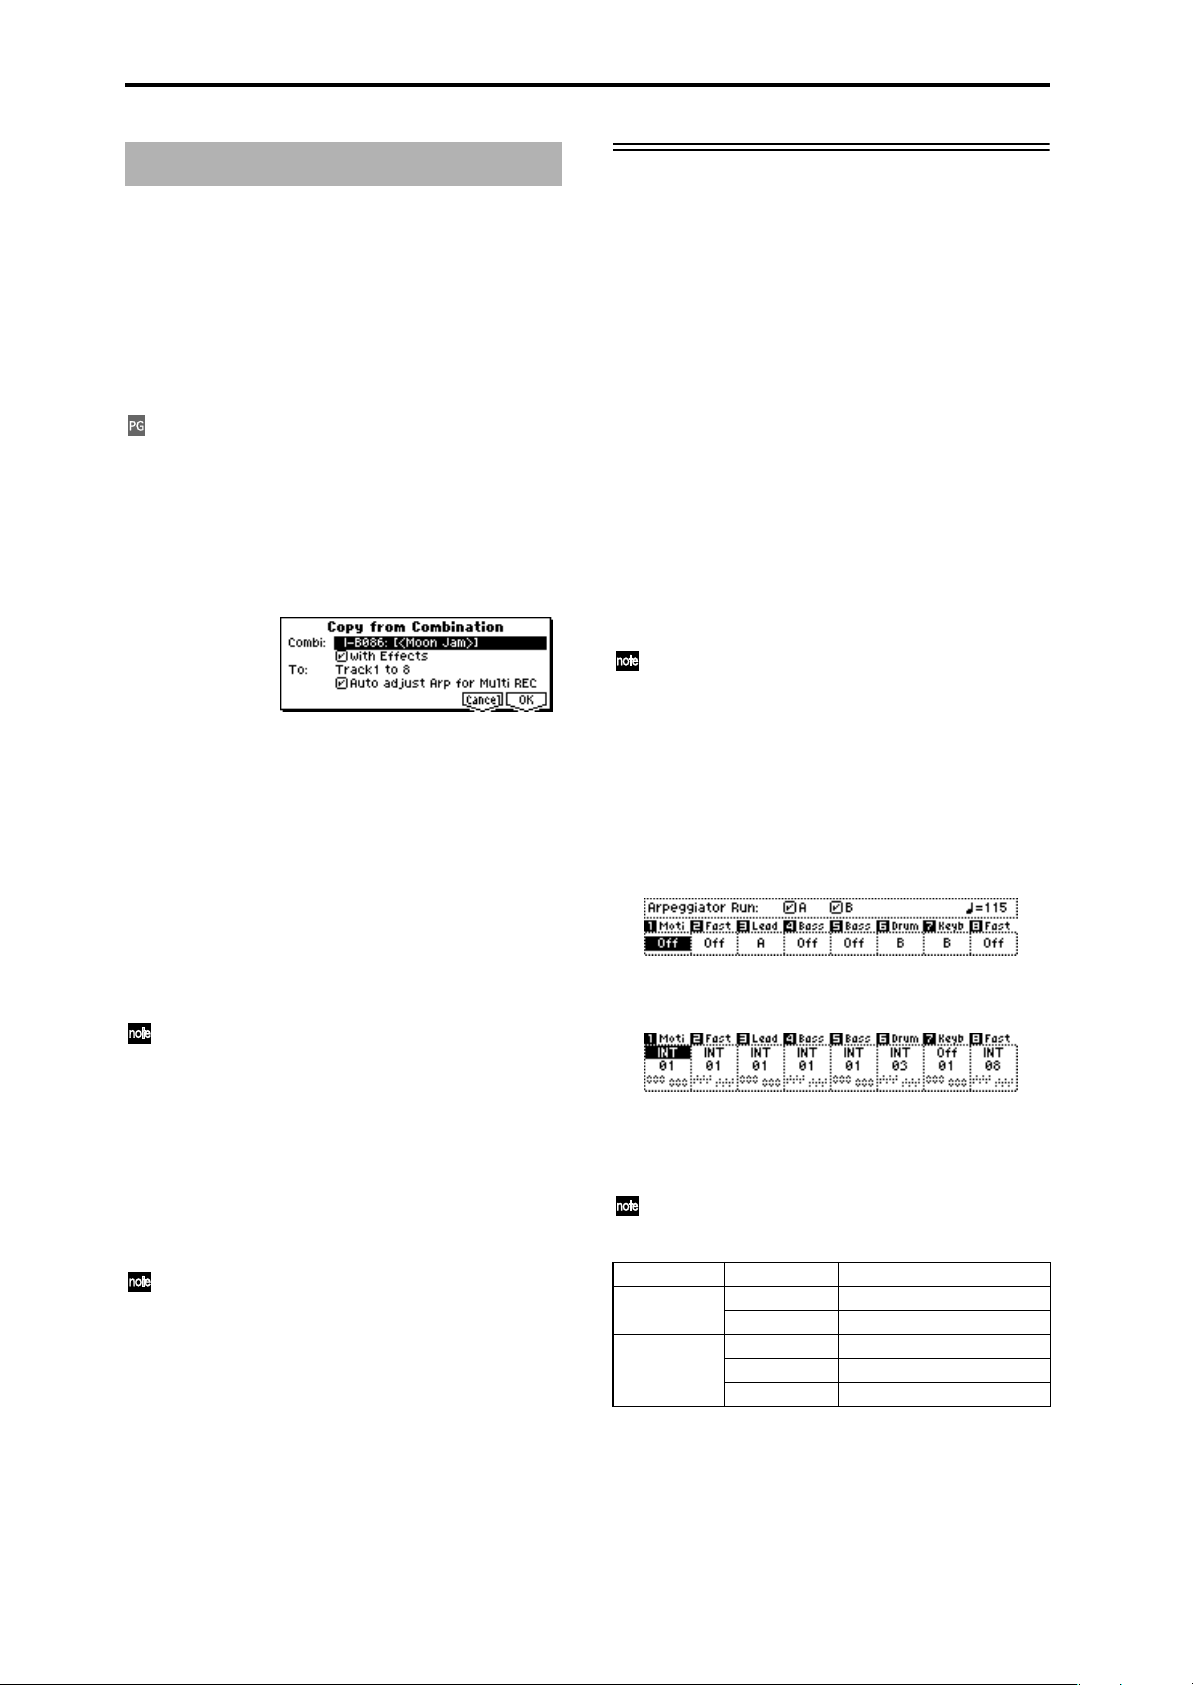
1 Choose “Copy From Combi” to access the dialog box.
2 In “Combi,” select the copy-source combination.
3 If you check “with Effects,” the insert effect, master
effect, and master EQ settings will also be copied.
4 In “To,” select the copy-destination tracks (1–8 or 9–16).
5 If you selected “Track 1 to 8” in the “To” field in step 4,
you can choose the “Auto adjust Arp for Multi REC”
option. This option automatically adjusts the MIDI channel of certain tracks and adds tracks as necessary to
ensure that when a performance using the TRITONRack’s arpeggiator is recorded onto an external
sequencer, the performance r eproduced during playback
will sound the same as when it was recorded.
These settings are applied according to the ARPEGGIATOR [ON/OFF] state of the combination. If you
copy from a combination that was written to memory
with the arpeggiator turned off, this command will
assume that the arpeggiator will be turned off for the
multi as well. If you want the arpeggiator to be turned
on in the multi, you must write the combination to
memory with the arpeggiator turned on before using
the “Copy from Combi” command.
If this option is checked, the MIDI channels etc. of the
tracks will be adjusted automatically as necessary.
For details on the settings that will be adjusted, refer
to “About the settings that are adjusted by ‘Auto
adjust Arp for Multi REC’.” Depending on the settings of the combination, you may also need to make
further adjustments to the track settings.
6 Press the [F8] (“OK”) key to execute the copy. If you
decide not to copy the data, press the [F7] (“Cancel”) key.
When you execute this command, the settings of the current multi will be erased, and replaced by the settings of
the combination.
About the settings that are adjusted by “Auto
adjust Arp for Multi REC”
If you execute the “Copy From Combi” utility menu command without checking the “Auto adjust Arp for Multi
REC” option, turn on the TRITON Rack’s arpeggiator, and
perform multi-track recording on a connected external
sequencer, it may not be possible to play back the performance the same way it was recorded.
Multiple tracks that are set to the same MIDI channel will be
combined into a single stream of performance data during
recording. If you are recording on a track assigned to the
same MIDI channel as another track that is being played by
the arpeggiator, the data being played by the arpeggiator
will be combined with the data you are playing manually,
and will be played by every track that is assigned to that
channel (if “Status” is INT).
To avoid this situation, you can change the MIDI channel of
the track that is being played by the arpeggiator, and then
create a track that will trigger the arpeggiator.
If your performance is not reproduced accurately during
playback, please check the following points.
If you have checked the “Auto adjust Arp setting for
Multi REC” option in the “Copy From Combi” utility
menu command, (and the combi being copied was
saved to memory with the arpeggiator turned on)
these changes will be executed automatically. Normally you should check this option when using this
command. In this case, the adjustments described
below will not be necessary, but you can verify the
content of the automatic changes here.
•MULTI 6.1: Arp., Set..8 page “Assign” and “Arpeggiator
Run” A and B settings
•MULTI 3.1: Param1, MID..8 page “MIDI Channel”
settings
If “Arpeggiator Run” A and B are checked and the
arpeggiator is assigned to a track, check whether “MIDI
Channel” is set to other than 01.
This shows the case when the global MIDI channel
(GLOBAL 2.1: MIDI, MIDI page “MIDI Channel”) is
01.
Arpeggiator Run MIDI Channel *1 Adjustment
If either “A” or “B”
is checked
If both “A” and
“B” are checked
*1 If every one of the multiple tracks operating the
arpeggiator is set to “MIDI Channel” 01, refer to the “01
only” row. If “MIDI Channel” is set to 01 and some other
channel (e.g., 01 and 02, or 01 and 03), then refer to the
“01 02, 01 03, etc. row. If “MIDI Channel” is set to 01 and
multiple other MIDI channels, then refer to the “01 02 03
etc.” row.
01 only adjustment needed
01 02, 01 03, etc. adjustment not needed
01 only adjustment needed
01 02, 01 03, etc. adjustment needed for only one
01 02 03, etc. adjustment not needed / needed*2

*2 Adjustment is needed if the tracks assigned to an
arpeggiator use “MIDI Channel” 01 only. Adjustment
may also be needed if both arpeggiators use the same
MIDI channel.
The preceding screen shot is an example where the combination I-B086: [<Moon Jam>] was copied using “Copy From
Combi” without checking “Auto adjust Arp setting for
Multi REC.” Using the above steps
1–6 as aguide, you can
actually perform the copy and check the result. For details
on the arpeggiator settings of this combination, refer to BG
p.88.
Using these settings as an example, we can determine if any
adjustments are required, and if so, which parameters need
to be adjusted.
In this example, “Arpeggiator Run” A and B are checked,
and “MIDI Channel” 01 and 03 are specified as the channels
assigned to the arpeggiator. Here we need to adjust one of
the arpeggiator assignments. If you perform multi-track
recording with these settings, tracks 01, 02, 03, 04, and 05
will use the same MIDI channel, meaning that the performance data for the lower bass (T04 and T05), the high
motion synth/pad (T01 and T02), and the lead synth played
by arpeggiator A (T03) will all be combined, and the performance will not playback the same as it was played. (T07 is a
dummy track for triggering arpeggiator B.)
1 In order for the lead synth performance data generated
by arpeggiator A to be recorded separately, we can select
a new MIDI channel for T03. Access the MULTI 3.1:
Param1, MID..8 page, and change Track 03 “MIDI Channel” to 02.
2 Next, we need to adjust the settings to trigger
arpeggiator A. Access the MULTI 3.1: Param1, MID..8
page, and turn the track 8 “Status” Off and the “MIDI
Channel” to 01. (T08 is a dummy track for triggering
arpeggiator A.)
3 Access the MULTI 6.1: Arp., Set..8 page “Assign”. Set the
track 8 Assign to A.
You should end up with the following settings.
Track T01 T02 T03 T04 T05 T06 T07 T08
Assign Off Off A Off Off B B A
Status INT INT INT INT INT INT Off Off
MIDI Ch. 01 01 02 01 01 03 01 01
If you will be using an external sequencer to record a
multitrack performance generated by the TRITONRack’s arpeggiator, set “Status” (3.1-1 (2) a) to BTH.
For other settings, refer to PG p.229 “Recording the
MIDI output of the TRITON-Rack’s controllers,
arpeggiator, and RPPR on an external sequencer/
computer.”
From this example, you can see what a powerful and timesaving feature this “Auto adjust Arp setting for Multi REC.”
really is. Again, this example is only to show manually what
the “Auto adjust Arp setting for Multi REC” is doing automatically.

Disk mode
Loading .PCG/.SNG files from the
Music Workstation or TRITON Le
With version 1.5, both .PCG and .SNG files created on the
Karma Music W orkstation (system version 1.0 and 2.0) or on
the TRITON Le can be converted as they are loaded into the
TRITON-Rack. However, please be aware of the following
points discussed below.
The combination or program categories may not be
appropriate.
The TRITON-Rack is completely compatible with the
Karma Music Workstation’s .MID and .EXL files and
the TRITON Le’s .KSC, .KMP, .KSF, .MID, .EXL, .AIF,
and .WAV files. These files can be loaded/saved via
external media.
.KGE files saved by Karma Music W orkstation system
version 2.0 are recognized by the TRITON-Rack as
undefined DOS files. These files cannot be loaded
Karma Music Workstation parameters that are
ignored on the TRITON-Rack
1. KARMA function
The TRITON-Rack does not possess KARMA functionality,
so the KARMA function parameters within programs, combinations, and songs will not be loaded when you load a
Karma Music Workstation .PCG file or .SNG file. Also,
arpeggiator-related parameters will be set to their default
value after the data is loaded.
2. Combination and Sequencer modes MIDI Filter
“FootPedal/Switch” parameters
These parameter settings are held as internal data, but will
be ignored.
3. Sequencer mode parameters and data
Sequencer mode data from the Karma Music Workstation
can be transferred to the TRITON-Rack as Multi mode data
by loading a .SNG file. However, you must be aware of the
following cautions.
• The following parameter settings are held as internal
data, but will be ignored.
· “Meter”
· “Tempo Mode”
· “PLAY/MUTE/REC”
· “Loop On”
· “Loop Start Meas (Loop Start Measure)”
· “Loop End Meas (Loop End Measure)”
· “Play Intro”
• Cue List data (settings for the cue list) will not be loaded.
• Track data (events of all tracks in the song)
If “Load Track events?” (
16” 1.1-1d) is checked, this data will be loaded. It will be
saved as internal data, but cannot be used in Multi mode.
• The “Tone Adjust” parameter of Karma Music
Workstation system version 2.0 will not be loaded.
☞PG p.128 “Load selected 15,
Karma
4. Global mode parameters
• The following parameter settings are held as internal
data, but will be ignored.
· “Convert Position” (the TRITON-Rack operates as Post
MIDI)
· “Foot SW Assign”
· “Foot Pedal Assign”
· “Damper Polarity”
· “Foot SW Polarity”
· “ S/S out P/C” (Karma Music Workstation system ver-
sion 2.0 only)
· “RT (Realtime Command)” (Karma Music Workstation
system version 2.0 only)
• The Karma Music Workstation operating system 2.0
“MIDI Clock” setting Auto will be set to External.
• The “Auto KARMA Program” setting will be used as the
“Program (Auto Arpeggiator Program)” parameter.
• The “Auto KARMA Combi” setting will be used as the
“Combi (Auto Arpeggiator Combi)” parameter.
• The various Audio Input parameters will preserve their
state prior to loading.
How TRITON Le data is handled by the TRITONRack
1. Insert effect (IFX)
Insert effect (IFX) parameters in Combination, Program, and
Sequencer modes will be loaded as IFX1 parameters.
IFX2...IFX5 parameters will be set to their default values.
2. Drum kits
When loading a TRITON Le .PCG file into the TRITONRack, a dialog box will appear in the display, asking where
you would like to load the drum kits. By default, 00-15
(INT) drum kits will be loaded into 00-15 (I-A/B), and 16-23
(User) drum kits will be loaded into 16-23 (E-A). However,
you can select a new bank destination by highlighting the
destination and using the VALUE dial.
3. Arpeggiator patterns
When loading a TRITON Le .PCG file into the TRITONRack, a dialog box will appear in the display, asking where
you would like to load the arpeggiator patterns. By default,
U000-199 (INT) arpeggio patterns will be loaded into U000199 (I-A/B), and U200-215 (User) arpeggio patterns will be
loaded into U200-215 (E-A). However, you can select a new
bank destination by highlighting the destination and using
the VALUE dial.
TRITON Le parameters that are ignored by the
TRITON-Rack
1. Program mode Audition Riff parameter setting
Since the TRITON-Rack does not have the “383: Kit-Trance/
Garag” audition riff, this will not sound/operate correctly.
However, the parameter setting will be held as part of the
TRITON-Rack’s internal data, and when saving, will be output with the same setting as when loaded.
2. Combination and Sequencer modes MIDI Filter
“FootPedal/Switch” parameters
These parameter settings are held as internal data, but will
be ignored.

3. Sequencer mode parameters and data
Sequencer mode data from the TRITON Le can be transferred to the TRITON-Rack as Multi mode data by loading a
.SNG file. However, you must be aware of the following
cautions.
• The following parameter settings are held as internal
data, but will be ignored.
· “Meter”
· “Tempo Mode”
· “PLAY/MUTE/REC”
· “Loop On”
· “Loop Start Meas (Loop Start Measure)”
· “Loop End Meas (Loop End Measure)”
· “Play Intro”
• Cue List data (settings for the cue list) will not be loaded.
• Track data (events of all tracks in the song)
If “Load Track events?” (
16” 1.1-1d) is checked, this data will be loaded. It will be
saved as internal data, but cannot be used in Multi mode.
☞PG p.128 “Load selected 15,
4. Global mode parameters
• The following parameter settings are held as internal
data, but will be ignored.
· “Convert Position” (the TRITON-Rack operates as Post
MIDI)
· “Foot SW Assign”
· “Foot Pedal Assign”
· “Damper Polarity”
· “Foot SW Polarity”
· “RT (Realtime Command)” (TRITON Le system version
1.5 only)
Load PCG(RAM) and Samples
The “Load PCG(RAM) and Samples” utility menu command has been added to 1.1-1: Load.
The “Load PCG(RAM) and Samples” command loads only
the programs, drum kits, combinations, and multi that use
RAM samples in the .PCG file. This is useful when you want
to edit the programs or combinations etc. that use RAM
samples.
This also provides an efficient way to load Korg TRITON
format sample CD libraries available from third party vendors.
Utility menu
“Load PCG(RAM) and Samples” has been added to the 1.11: Load utility menu.
Load PCG(RAM) and Samples
Loads only the programs, drum kits, combinations, and
multi that use RAM samples from a .PCG file.
You can select this when loading a .PCG file. In the dialog
box when loading, simply specify the bank and the number
of first program location, and only the valid items will be
loaded together. As the data is loaded, it will be adjusted
automatically so that the programs and corresponding samples will be matched correctly.
1 Select a .PCG file in the directory window.
Data compatibility
For each type of data format, system version 1.5 preserves
data compatibility with the previous operating systems (version 1.1 and earlier).
For each type of data format, the TRITON-Rack maintain data compatibility with the TRITON / TRITON
pro / TRITON proX and TRITON STUDIO. Data can
be loaded/saved via external media such as floppy
disk, or exchanged via MIDI exclusive data dump or
parameter change. However, you should be aware of
differences in the bank structure or parameter structure. For details, refer to the owner’s manual of the
TRITON / TRITON pro / TRITON proX or TRITON
STUDIO.
2 Select this command to access the dialog box.
This command will be displayed and can be selected
only if you have selected a .PCG file.
A divided .PCG file cannot be loaded. After you select
the command, a message of “Can’t load divided PCG
file” will appear, and loading will be halted.
3 If you want to load the identically-named .SNG file along
with the .PCG file, check the “Load ********.SNG too”
check box. The .SNG file that has the same name as the
.PCG file will be loaded together with the .PCG file.
Any .KSC file having same name as the .PCG file
being loaded will also be loaded at the same time. If
this file does not exist in the current or lower directory, load it using the procedure described in “If the
file to load cannot be found, or when loading a file
that was saved in parts” (
☞PG p.125).

Contents loaded from a .PCG file:
1. Drum Kit: Any drum kit in which at least one KEY of
“High/Low Drumsample Bank” (GLOBAL 5.1-1b/5.12a
☞PG p.116) is set to RAM.
2. Program: Any program whose “Mode (Oscillator
Mode)” (PROG 2.1-1a
whose “Drum Kit” (PROG 2.1-1d
drum kit described in paragraph 1, above.
3. Program: Any program whose “Mode (Oscillator
Mode)” (PROG 2.1-1a
ble and in which at least one “OSC1/2 Multisample
High/Low Bank” (PROG 2.1-2b/2.1-3b
set to RAM.
4. Combination: Any combination that uses a program
described in paragraphs 2 or 3, above.
Contents loaded from a .SNG file:
1. Multi: Multi in which “Program select” (MULTI 1.12(3)b
☞PG p.54) is set to a program described in para-
graphs 2 or 3 of “Contents loaded from a .PCG file”
(above) will be loaded consecutively into the multi numbers that follow the last multi currently existing in the
internal memory. (
“.SNG Allocation”)
The following settings will be automatically adjusted so that
the data will correspond correctly after it has been loaded.
•RAM sample numbers used by multisamples
•RAM sample numbers used by drum kits
•RAM multisample numbers used by programs
• Drum kit numbers used by programs
• Program banks/numbers used by combinations
• Program banks/numbers used by multi (if pattern
events exist, the program banks/numbers within the
events)
4 Set “Load ROM-Program in Combi/Multi too.”
On (Checked): In the combinations of a .PCG file or the
multi of a .SNG file, programs that use ROM data will be
loaded along with the programs that use RAM samples.
Use this setting if you are loading combinations or multi
that make use of user programs you created as well as
preloaded programs.
All programs (used by the combinations and multi
being loaded) that use ROM will be loaded.
Bank INT-F program data will not be loaded.
Off (Unchecked): Of the programs used by the combinations in the .PCG file or the multi in the .SNG file, only
the programs that use RAM samples will be loaded. If
you are using preset programs as well as programs that
use RAM samples, you will normally uncheck this setting.
5 In the “To Combi” field, specify the loading-destination
bank and number for the combinations in the .PCG file.
When you execute, only the valid combinations will be
loaded consecutively, starting at the bank and number
you specify here.
If the loading-destination bank and number exceed
EXB-H127, loading will end automatically.
6 In the “To Prog” field, specify the loading-destination
bank and the first location number for the programs in
the .PCG file. When you execute, only the valid programs
☞PG p.5) is set to Drums and
☞PG p.8) is set to a
☞PG p.5) is set to Single or Dou-
☞PG p.7) item is
☞ PG p.126, 1) Load .PCG step 3
will be loaded consecutively, starting at the bank and
number you specify here.
If the loading-destination bank and number exceed
EXB-H127, loading will end automatically.
7 In the “To DKit” field, specify the loading-destination
bank and number for the drum kits in the .PCG file.
When you execute, only the valid drum kits will be
loaded consecutively, starting at the bank and number
you specify here.
If the loading-destination bank and number exceed
143(E-H), loading will end automatically.
The specified bank/number and following will be
overwritten by the Load operation. If you want to
keep this data, use “Save All” or “Save PCG” to save
it.
8 Press the [F8] (“OK”) key to execute loading, or press the
[F7] (“Cancel”) key if you decide not to load.
Other updates
The following improvement has been made to the operation
of Disk mode.
•When you use the [F6] (“OPEN”) key to move to a
lower-level directory or file, and then use the [F5] (“UP”)
key to move back to the higher level, you will return to
the same directory or file that you had been previously
viewing.
Sampling mode
Individual output for the metronome (Count Down REC Metronome)
In 1.1-3d: Metro (Count Down REC Metronome), if you are
set up for manual sampling, you can set the count down
record metronome to provide a count-off before sampling
begins. This feature has been enhanced in version 1.5 so that
you can assign the count down metronome to one of the TRITON-Rack’s individual outputs (“BUS (Metronome BUS) ”).
If “Count Down (Count Down REC)” (1.1-2b ☞PG p.78) is
set to 4, 8, 3, or 6, setting the metronome output destination
(“BUS (Metronome BUS) ”)to one of the individual out (1, 2,
3, 4) will allow the metronome sound to continue even after
you begin sampling. This is effective when you want to sample a phrase at a tempo that matches your song.
Add the above explanation to “Parameter Guide” Sampling
mode 1.1-3d: Metro (Count Down REC Metronome) “BUS
(Metronome BUS) ” (
☞PG p.79).

Other new functions
Various messages
The following message has been added.
Tap tempo control
A Tap Tempo Control function has been added to Program,
Combination, and Multi modes.
While using the arpeggiator in these modes, or while playing a pattern or RPPR in Multi mode, you can control the
tempo in realtime by lightly pressing the [ENTER] key several times at the desired tempo. This is a convenient way to
match the tempo to a different beat. Tap tempo can also be
used for realtime control over any BPM or tempo based
effects.
Example
The following example shows the procedure in Program
mode.
1 In Program mode, select I-A004: !{Tricky} Kit!.
2 In the PROG 1.1: Play, select the Arp. Play page and
check the “Latch” check box.
Can’t load divided PCG file
Meaning: This message will appear if you attempt to load a
divided .PCG file using the Disk mode “Load
PCG (RAM) and Samples” command.
Action: Execute the Disk mode “Load Selected” command
to load the divided .PCG file, re-save the .PCG file
in undivided form, and then execute “Load PCG
(RAM) and Samples” once again.
This is an addition to “Parameter Guide” 9. Appendix —
Various messages (
☞PG p.237).
3 Turn on the front panel ARPEGGIATOR [ON/OFF] key.
4 Lightly press the [ENTER] key several times at the
desired beat. The tempo “ =” display in the upper right
of the LCD will change according to the playback tempo.
When you play the keyboard, the arpeggiator will play a
drum pattern at the specified tempo.
5 Lightly press the [ENTER] key on the beat, and slightly
shorten the intervals at which you press the key.
The playback tempo of the drum pattern will speed up
slightly.
Other updates
When the Program mode PROG 2.1: Ed-Basic “Mode (Voice
Assign Mode)” (2.1-1b
tion will be different in the following way.
In system version 1.1 and earlier, up to three note-on’s were
remembered internally.
C on → D on → E on → F on → F off → E off → D off
C sounds D sounds E sounds F sounds E sounds D sounds No sound
In system version 1.5, up to ten note-on’s are remembered.
This is effective for performance in mono mode.
C on → D on → E on → F on → F off → E off → D off
C sounds D sounds E sounds F sounds E sounds D sounds C sounds
☞PG p.5) is set to Mono, the opera-
© 2003 KORG INC. Pinted in Japan
 Loading...