

Page 1
y
Eas
Start
• Famous TRITON sound engine,
hundreds of sound locations, plus dual
polyphonic arpeggiators.
• New Programs and Combinations
voiced especially for the TRITON Le.
• Four-part effects section for studio-
quality sound
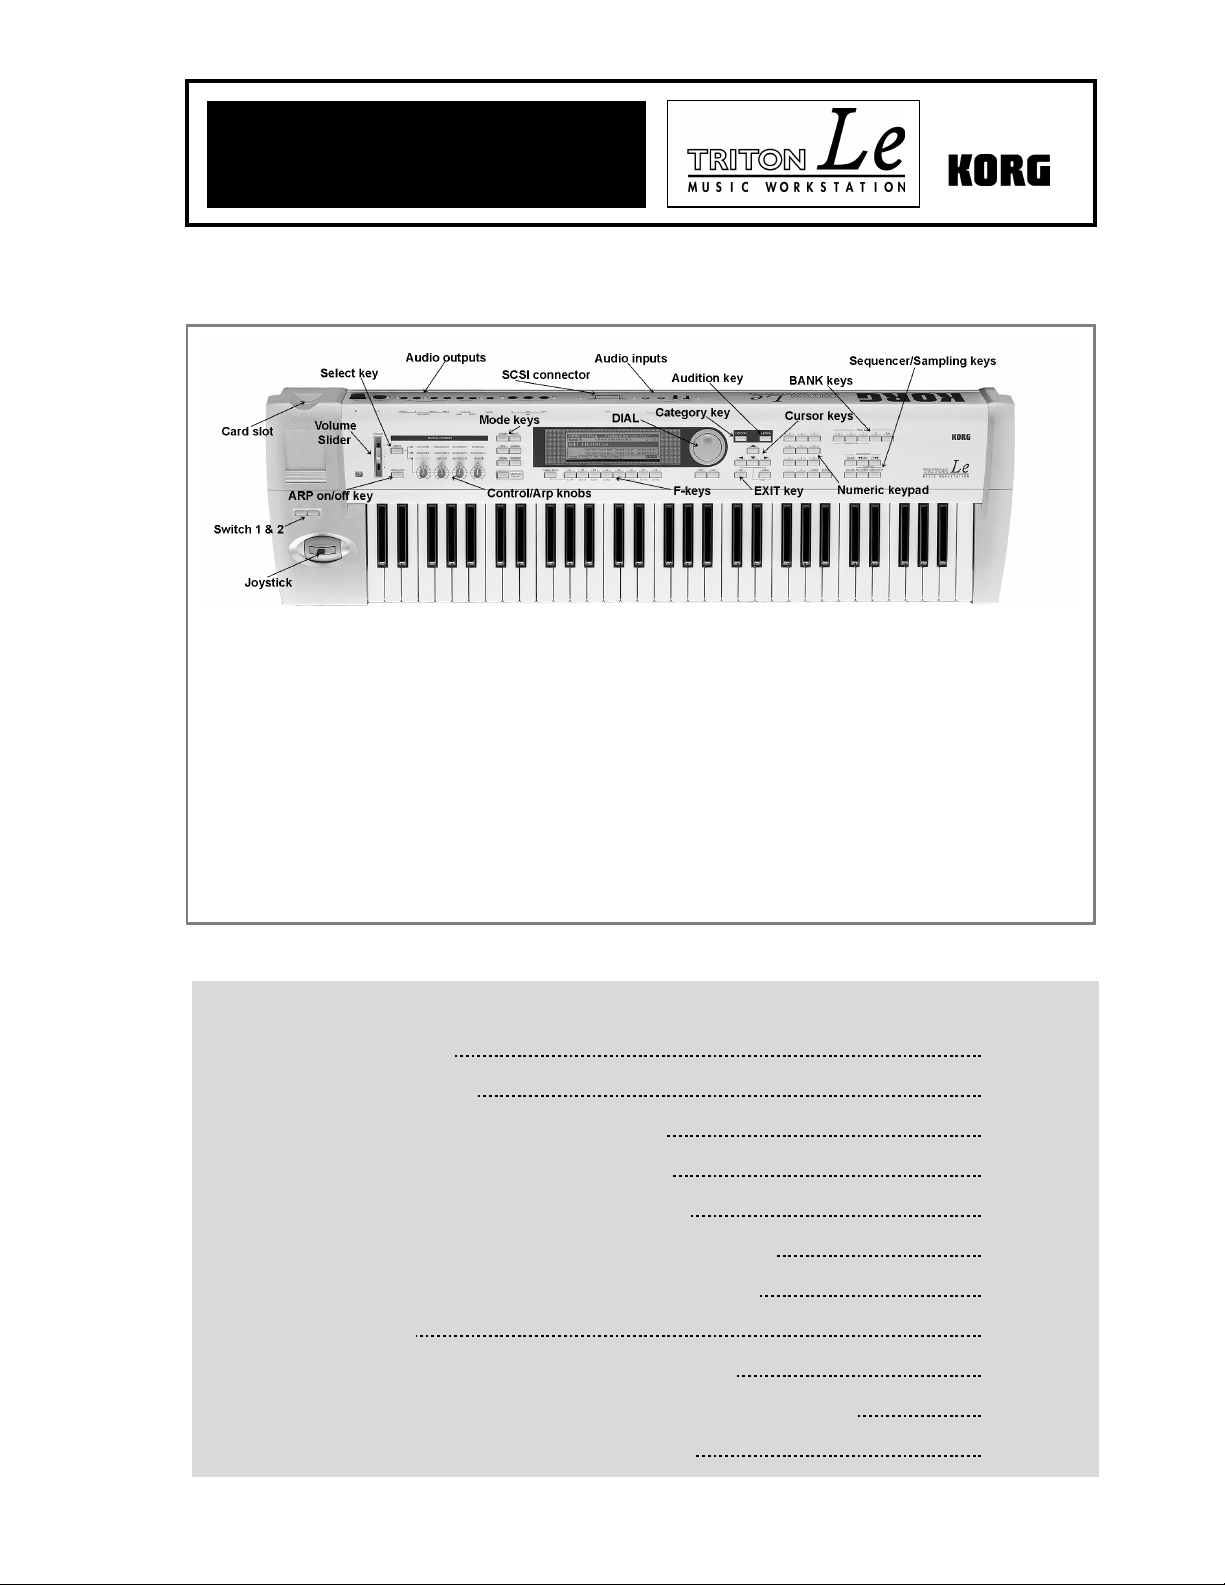
TRITON Le MAIN FEATURES
• Onboard 16-track sequencer with
extensive editing, Song Templates,
RPPR and more!
• Optional Sampling board (EXB-SMPL)
• SmartMedia™ storage lets you load
and save sounds, songs and sample
data quickly and economically.
• Easy-to-use interface
EasyStart CONTENTS
Loading the factory data 2
Listening to the demo song
Selecting and playing Programs and Combinations
Selecting Programs and Combinations by Category
Using the AUDITION function as you select Programs
Work with these great TRITON Le Programs and Combinations
Sequence mode: Creating songs quickly with Song Templates
Automating the mix
Using the Compare function as “UNDO” in Sequence mode
Sampling with the EXB-SMPL option / Recording “one-shot” vocal samples
“QuickTips” and important Owner’s Manual references
2
2
2
3
3
3
4
4
4
6
Page 2

TRITON Le EasyStart
Loading the Factory Data
! Make sure to backup any of your own internal songs/sounds to SmartMedia™ before proceeding!
1. Press the [GLOBAL] key.
2. Press the [F8] [UTILITY] key.
3. Press the [F7] key and CURSOR ▼ to select “Load Preload/Demo Data”.
a. To load all
and Demo Songs)
b. To load just the factory demo songs: Use the DIAL or the [INC]/[DEC] keys to select “All Demo Songs”
Press [F8] (“OK”), and once again to confirm.
c. To load just the factory sounds: Use the DIAL or the [INC]/[DEC] keys to select “All Preload PCG”
[F8] (“OK”), and once again to confirm.
of the factory data at once: Use the DIAL or the [INC]/[DEC] keys to select “All” (Preload PCG
Ä Press [F8] (“OK”), and once again to confirm.
Ä
Ä Press
In-Store Note: When you power off the TRITON Le, loaded demo songs will be erased from memory. For sales presentations,
make sure to reload the demos each morning using the above procedure!
Listening to the Demo Songs
1. After the preload demo songs have been loaded, press the [SEQ] key.
2. CURSOR ▼ to highlight the “song name edit cell”.
3. Select a song (“Midnight Sun” or “DEEP ENDZ”) with the DIAL or the [INC]/[DEC] keys.
4. Press the [START/STOP] key to begin playback. Press the [START/STOP] key again to stop playback.
Selecting and playing Programs and Combinations
1. To select Programs, press the [PROG] key. To select Combinations, press the [COMBI] key.
2. Then press a BANK key to select one of the sound banks, followed by using the DIAL, [INC]/[DEC] keys, or numeric
keypad to select sounds from within a bank.
! Programs are located in BANKS A-D (and GM for General MIDI). Combinations are in BANKS A-C.
Selecting Programs and Combinations by Category
1. Press the [CATEGORY] key Ä Select the category in the display, via the four Category-direction “tabs” accessed from
keys [F1]-[F4]
scrolling through the categorized list, or finalize your choice by pressing [F8] (“OK”).
ÄTo select and then play sounds from the category chosen, use the DIAL or [INC]/[DEC] keys Ä Continue
2
Page 3

TRITON Le EasyStart
Using the AUDITION function as you select Programs
Whenever you select a new Program, in normal play mode or when using the Select by Category function, press the [AUDITION]
key to playback a pre-programmed musical phrase. This is a great way for you to see how the sound you’ve selected will work in
your performance or sequencing applications! Try it!
Work with these great TRITON Le Programs and Combinations:
PROGRAM Name Performance Tips
A005 Bass4DaPhunk SW1: Pitch; SW2: Portamento, Try with ARP on!
A015 Xpanded Voice SW1: Modulate pitch; Knob1: LFO depth; Knob2: LFO speed
A031 Joystick Machine JS-X: Modulate RingMod freq; SW2: RingMod Wet/Dry balance
B025 Reactor Pad Knob2: Modulate filter LFO; SW1: Pitch from 5th to unison
C084 D’n’B Gate Kit SW2: JS-X lock, pitch of kit; Knob2: Lo and Hi Gain of EQ
COMBINATION Name Performance Tips
A007 Real Steppers JS-Y: zero output of Drum Arp; Knob2: zero output of organ timbre
A020 Fantasmagoria ARP on: # of notes played = # of drum parts (up to 8)
B016 Damper Wah Clav Damper: Wah; JS-Y: Clav mute; SW2: JS-Y lock; Play over ARP
C007 Strumin’ 2step SW2: zero output Drum ARP; Knob3: Volume of guitar ARP
C050 isabellacoola Knob2: LFO; Knob3: Doppler effect
C099 StreetCatScratch Knob1: scratch; SW1: Portamento; JS-Y: Pitch, up a 5th
Sequence Mode: Creating songs quickly with Song Templates
1. Press the [SEQ] key ÄType in a “Song #” not yet in use (if you’ve loaded the Preload Songs, type #2) on the numeric
keypad, then press [ENTER]
2. Press [F8] (“UTILITY”) and CURSOR ► to “Load Template Song”
of Song Templates: “P00-P16”. Each song selection will load programs and effects to tracks.
3. CURSOR ▼ to “Copy Pattern to Track too?” and “check” the box with the DIAL or by pressing the [INC] key.
[F8] to confirm: make sure that the pattern field highlighted is set to “Preset”
use the DIAL to select a Pattern in the same style as your Song Template choice
pattern into the track for a number of measures, and then press [F7] to exit.
the copied drum pattern
! When you press [F6] to copy the pattern, you can first select a new pattern to create a series of patterns in the track.
4. Press the [LOCATE] key to return to the beginning of the Song
page, and press the [INC] key to select Track 2 (except for the Orchestral Template, Track 2 is always Bass)
[REC/WRITE] key, and then the [START/STOP] key, and record 2 to 4 measures
to stop recording.
Ä Confirm “Create New Song?” by pressing [F8] (“OK”).
ÄPress [F8] to confirm ÄUse the DIAL to choose one
ÄPress
Ä CURSOR ▼ to the Pattern number and
Ä Press [F6] 4 to 8 times, to copy the
Ä Press the [START/STOP] key to audition
Ä Press the [START/STOP] key again to stop.
ÄCURSOR ▼ to the Track edit cell on the main sequence
Ä Press the
Ä When finished, press [START/STOP]
3
Page 4

TRITON Le EasyStart
5. Press the [MENU] key, and then press [F1] to highlight “Loop”
[TIMBRE/TRACK] key and press [F2] (or CURSOR ►) to select Track 2
ÄCURSOR ▼and leave the “loop start value” at “measure 001” Ä CURSOR ▼ and set the “loop end value” to
box”
the last measure you played on Track 2
Ä Press [LOCATE] to move to the song beginning, and then press the
[START/STOP] key to playback the song and looped bass track
ÄPress [F8] to open the Loop Page ÄHold down the
Ä Press the [INC] key to “check” Track 2’s “loop
Ä Press the [START/STOP] key again to stop.
6. Repeat previous steps 4 and 5 as you record additional tracks and set desired Play Loops.
…Continue by Automating the Mix:
7. CURSOR to the “Track edit cell” and select a track from the previous steps for mixing.
8. Press [F6] (“Pref”), and then press the [INC] key to select “Over Dub” for “REC setup.”
9. Press [F4] to view the Mix for tracks 1-8.
highlight one of the tracks.
ÄCURSOR ▼ once to highlight the volume parameter for the selected track.
ÄWhile holding down the [TIMBRE/TRACK] key, press the [F1] - [F8] keys to
10. Press the [REC/WRITE] key, then the [START/STOP] key, and record volume changes on the track by using the
DIAL
ÄPress [START/STOP] when finished.
11. Press [START/STOP] to audition the results - the volume parameter and value will update as the song plays back. Note
that track pan messages may be recorded in similar fashion.
Using the Compare function as ‘UNDO’ in Sequence mode
If you are dissatisfied with a ‘take’ or a recorded mix, press the [COMPARE] key once so it is lit: it serves as “one level of Undo”.
Simply Record again while the [COMPARE] key is lit, and you’ll record new data in the current track. “Toggle” the COMPARE key to
listen to both “takes”. Note that moving to, and recording/editing another track (or leaving sequence mode) will clear the Compare
buffer. Before you begin work on a new track, make sure that the currently selected state of Compare contains the data that you
want to keep!
Sampling with the EXB-SMPL Option
The user-installable EXB-SMPL sampling option provides the user with everything needed for serious sampling: a pair of audio
inputs with Level control and Mic/Line level switching, a SCSI connector, and 16 MB of Sampling RAM.
The Triton LE samples at 48kHz, 16-bit, in mono or stereo. With the provided 16 MB, the Triton LE is capable of recording
samples of 174 seconds @ mono, or 87 seconds @ stereo. Fully expanded with SIMM modules to 64 MB, it allows about 11 ½
mono minutes or 5.8 stereo minutes of sampling! The correct SIMMS are 72-pin, non-parity, EDO or Fast Page (FPM) DRAM
SIMM, 60 ns (nanoseconds) or faster, 11 Bit Addressing.
Recording “one-shot” vocal samples
1. Connect a microphone to the [AUDIO INPUT 1] jack on the rear panel, set the MIC/LINE switch to MIC, and set the
LEVEL control to the 12 o’clock position.
2. Press the [SAMPLING] key
MS____000”
Ä CURSOR to, and set both the “Orig K” and “Top K” (original and top key) fields to a value of “C2”. The
easiest way to set this is by holding down the [ENTER] key and pressing the [C2] key on the keyboard.
Ä Press [F1] (“Sample” tab) and make sure that “MS” (Multisample) is set to “000:new
3. Press [F3] (“In/Pref”)
(Enter 6 > 4, followed by pressing the [ENTER] key).
Ä CURSOR ► to “Input 1 Pan”, and set this value to “C064” with the DIAL or numeric keypad
4
Page 5

TRITON Le EasyStart
4. CURSOR ► to “Input 1 BUS”
Ä Set this value to “L/R” Ä CURSOR to the “Create” edit cell and set the “Range” value
to “001”.
5. Press [F2] (“Rec”), and in “Sample Setup”, CURSOR ► to “Mode” and set to “L-Mono”.
6. CURSOR ▼to “REC Setup”, and highlight “Mode”, and set to “Auto”
of “-30dB”
Ä CURSOR ▼to “Pre Trigger” and set to “5ms”.
Ä CURSOR ► to “Threshold” and set to a value
7. Press the [REC/WRITE] key to “arm” the sampler, and then speak into the microphone. If “ADC Overload” flashes above
the “level indicators”, lower the rear panel LEVEL control until this message no longer flashes
Ä CURSOR ►to the
“Recording Level” “Fader” and adjust with the DIAL while speaking into the mic. Set this for a “hot” signal level, but watch
and adjust if the display indicates, “CLIP”.
8. Press [F1] (“Sample”)
Ä Press the [START/STOP] key and say the word, “Sampling” Ä press [START/STOP] again to
stop sampling, and then press [F6] (“CREATE”). Note that the “keyboard” display moves to the next key after you press
“CREATE”.
9. Press the [REC/WRITE] key
Ä Press the [START/STOP] key and say, “is easy” Ä press [START/STOP] again to stop
sampling, and then press [F6] (“CREATE”).
10. Press the [REC/WRITE] key
Ä Press the [START/STOP] key and say, “with” Ä press [START/STOP] again to stop
sampling, and then press [F6] (“CREATE”).
11. Press the [REC/WRITE] key
Ä Press the [START/STOP] key and say, “TRITON Le” Ä press [START/STOP] again to
stop sampling, and then press [F6] (“CREATE”).
12. That’s it! Now play the keyboard: play each note (half-step) from C2 to D#2, and you’ll hear the sampled words, “Sampling
is easy with TRITON Le”.
…Continue by sampling through one of TRITON Le’s 89 Insert Effects:
13. Press [F3] (“In/Pref”) Ä CURSOR to Input 1’s “BUS:” and select “IFX” Ä Press the [MENU] key, and then press [F7] to
select “IFX”
Ä Press [F8] to “Open” this page.
14. CURSOR to “OFF” and set to “ON”
enter 5 > 2, then press the [ENTER] key (“52: Reverb Hall”)
Ä Press [F4] (“IFX ”) to view and edit the effect parameters.
15. Press the [MENU] key
Ä Press [F1] (“Rec”) Ä Press [F8] to “Open” this page Ä Press [F1] (“Sample”).
Ä CURSOR to highlight the “00 No Effect” edit cell Ä Use the numeric keypad, to
Ä Speak into the microphone to hear the effect being applied
16. Press [F6] (“CREATE”) to make a new index in the multisamples
“arm” the sampler
[START/STOP] key, speak to sample
Ä Speak into the mic and adjust the recording level as needed (see step 7 above) Ä Press the
Ä Press [START/STOP] again to stop sampling. The new sample will playback on
key E2 – the next available index.
Ä Press [F2] (“Rec”) Ä Press the [REC/WRITE] key to
5
Page 6

TRITON Le EasyStart
TRITON Le “QuickTips”
Discovering “hidden” arpeggio patterns in Program and Combi modes:
When selecting some sounds, the ARP ON/OFF key is unlit, and with other sounds, the key automatically lights, and the arpeggio pattern(s) trigger
as soon as you play the keyboard. Note that there are patterns pre-assigned to every Program and Combination in the TRITON Le. Simply press to
turn the ARP key ON (lit), and then play the keyboard to trigger the assigned patterns.
Trying out new arpeggio patterns in Programs and Combis:
After selecting a Program and triggering the assigned arpeggio pattern: Press the [F3] key (“Arp”) Ä CURSOR ▼to highlight the “Pattern” name
assigned
After selecting a Combination and triggering the assigned arpeggio pattern(s): Press the [F4] key, and the “check boxes” in the display will indicate
which patterns are set to trigger (A, B or both)
assigned
Checking the current ROM version # and installed EXB-SMPL option in the TRITON Le:
On Power-up, the display will indicate the current software version and all installed options. To download the newest operating systems as they
become available, visit www.korg.com
A few words on user- installation of the EXB-SMPL Sampling option:
The Sampling option includes the EXB-SMPL board/SCSI connector, a 16 Mbyte DRAM SIMM module and screws. You can add another 16 Mbyte
or 32 Mbyte SIMM module for a total of 32 or 48 Mbyte sample ram, or reach the maximum sample memory capacity of 64 Mbytes by removing the
16 Mbyte SIMM module, and installing 2- 32 Mbyte SIMM modules. (Specific instructions on how to easily- install this option can be found in the
Parameter Guide, page 254)
To adjust the display contrast:
Press the [GLOBAL] key Ä Press [F2] (“Pref”) Ä CURSOR to “LCD Contrast” and use the DIAL to set as needed.
Save your valuable data!
Any edits you make to Programs, Combinations, Drumkits or Global parameters can be written to internal memory and retained on power-you’re
your songs and samples will not be retained on power-off, however. Make sure that you back up all of your valuable data to SmartMedia™ or via
SCSI, if the EXB-SMPL option is installed! For more information, see the Basic Guide, page 41.
Ä Press the [INC] key or rotate the DIAL to select new patterns. (Basic Guide, page 27)
Ä Select either with the [F4] or [F5] keys, then Ä CURSOR ▼to highlight the “Pattern” name
Ä Press the [INC] key or rotate the DIAL to select new patterns. (Basic Guide, page 28)
Important Owner’s Manual References
Basic Program and Combination editing Basic Guide, pages 48 and 56
Copying a Combination to the Sequencer
Creating and recording RPPR (Realtime Pattern Play/Record)
Sampling: Converting a Multisample to a Program
Sample Looping, Time Slicing and advanced sample editing Basic Guide, pg 91-Param Guide, pgs 98-117
Creating a user arpeggio pattern
Effect Guide
Alternate Modulation
Dynamic Modulation
Routing Individual Outputs
6
Basic Guide, page 75
Basic Guide, page 73
Basic Guide, page 91
Basic Guide, pg 103
Param Guide, pg 155
Param Guide, pg 211
Param Guide, pg 217
Param Guide, pg 162
 Loading...