

Page 1
E F D J 3
Page 2
2
To ensure long, trouble-free operation, please read this manual carefully.
Precautions
Location
Using the unit in the following locations can result in a malfunction.
• In direct sunlight
• Locations of extreme temperature or humidity
• Excessively dusty or dirty locations
• Locations of excessive vibration
Power supply
Please connect the designated AC adaptor to an AC outlet of the correct voltage. Do not connect it to an AC outlet of voltage
other than that for which your unit is intended.
Interference with other electrical devices
This product contains a microcomputer. Radios and televisions placed nearb y may experience reception interference . Operate
this unit at a suitable distance from radios and televisions.
Handling
To avoid breakage, do not apply excessive force to the switches or controls.
Care
If the exterior becomes dirty, wipe it with a clean, dry cloth. Do not use liquid cleaners such as benzene or thinner, or cleaning
compounds or flammable polishes.
Keep this manual
After reading this manual, please keep it for later reference.
Keeping foreign matter out of your equipment
• Never set any container with liquid in it near this equipment. If liquid gets into the equipment, it could cause a breakdown, fire,
or electrical shock.
• Be careful not to let metal objects get into the equipment. If something does slip into the equipment, unplug the AC adaptor
from the wall outlet. Then contact your nearest Korg dealer or the store where the equipment was purchased.
Précautions à prendre
Emplacement
L’utilisation de l’appareil dans les endroits suivants risquerait d’être la cause d’un mauvais fonctionnement:
• Sous les rayons directs du soleil
• Dans des endroits de températures extrêmes ou d’une humidité excessive.
• Dans des endroits excessivement sales ou poussiéreux.
• Dans des lieux sujets à des vibrations excessives.
Alimentation DC9V
Veuillez raccorder l’adaptateur secteur fourni à une prise de courant fournissant la tension adéquate. Ne jamais le raccorder à
une prise d’un autre voltage que celui prévu pour l’appareil.
Interférences avec d’autres appareils électriques
Cet instrument contient un micro-ordinateur. Les postes de radio et de télévision situés à proximité peuvent par conséquent
souffrir d’interférences à la réception. Veuillez dès lors faire fonctionner cet appareil à une distance raisonnable de postes de
radio et de télévision.
CE mark for European Harmonized Standards
CE mark which is attached to our company’s products of AC mains operated apparatus until December 31, 1996 means it conforms to EMC
Directive (89/336/EEC) and CE mark Directive (93/68/EEC). And, CE mark which is attached after January 1, 1997 means it conforms to EMC
Directive (89/336/EEC), CE mark Directive (93/68/EEC) and Low Voltage Directive (73/23/EEC).
Also, CE mark which is attached to our company’s products of Battery operated apparatus means it conforms to EMC Directive (89/336/EEC)
and CE mark Directive (93/68/EEC).
THE FCC REGULATION WARNING
This equipment has been tested and found to comply with the limits for a Class B digital de vice , pursuant to Part 15 of the FCC Rules. These
limits are designed to provide reasonable protection against harmful interference in a residential installation. This equipment generates, uses,
and can radiate radio frequency energy and, if not installed and used in accordance with the instructions, may cause harmful interference to
radio communications. Ho w ever, there is no guarantee that interference will not occur in a particular installation. If this equipment does cause
harmful interference to radio or television reception, which can be determined by turning the equipment off and on, the user is encouraged to
try to correct the interference by one or more of the following measures:
• Reorient or relocate the receiving antenna.
• Increase the separation between the equipment and receiver.
• Connect the equipment into an outlet on a circuit different from that to which the receiver is connected.
• Consult the dealer or an experienced radio/TV technician for help.
Unauthorized changes or modification to this system can void the user’s authority to operate this equipment.
Page 3

3
Um einen langfristigen, einwandfreien Betrieb zu gewährleisten, lesen Sie bitte diese Bedienungsanleitung
sorgfältig durch.
Vorsichtsmaßnahmen
Aufstellung
Betreiben Sie das Gerät nicht in folgenden Umgebungen, da dies zu Fehlfunktionen führen könnte:
• in direktem Sonnenlicht
• bei extremer Temperatur oder Luftfeuchtigkeit
• in extrem staubigen oder schmutzigen Umgebungen
• unter dem Einfluß starker Vibrationen
Stromversorgung
Schließen Sie den mitgelieferten Wechselstromadapter bitte nur an eine Steckdose mit korrekter Netzspannung an. Schließen
Sie den Adapter nicht an eine Netzsteckdose an, die eine Spannung liefert, für die Ihr Gerät nicht vorgesehen ist.
Interferenzen bei anderen Elektrogeräten
Dieses Produkt ist mit einem Mikrocomputer ausgerüstet. Bei der A ufstellung in direkter Nähe von Rundfunk-und F ernsehgeräten
kann deren Empfang durch Interferenz en gestört werden. Betreiben Sie dieses Ger ät deshalb in ausreichender Entf ernung v on
Rundfunk- und Fernsehempfängern.
Handhabung
Bedienen Sie die Schalter und Regler nicht mit übermäßiger Kraft, um Beschädigungen zu vermeiden.
Reinigung
Wenn das Gehäuse verschmutzt ist, reinigen Sie es mit einem trockenen, weichen Tuch. Verwenden Sie keine flüssigen
Reinigungsmittel, zum Beispiel Leichtbenzin, Verdünner, Lösungsmittel oder brennbare Polituren.
Bedienungsanleitung
Nachdem Sie die Bedienungsanleitung gelesen haben, sollten Sie sie für den späteren Gebrauch gut aufbewahren.
Fremdgegenstände
• Stellen Sie keine Behälter mit Flüssigkeit in die Nähe dieses Geräts. Wenn Flüssigkeiten in das Gerät gelangen, könnte dies einen Systemausfall, Brand oder Stromschlag zur Folge haben.
• Achten Sie darauf, daß keine Metallgegenstände in das Gerät gelangen. Sollte dies dennoch geschehen, ziehen Sie den Wechselstromadapter aus der Netzsteckdose. Setzen Sie sich anschließend mit dem nächstgelegenen Korg-Fachhändler oder dem Geschäft in Verbindung, in dem Sie das Gerät gekauft haben.
Manipulations
Pour éviter tout dommage, ne jamais exercer une force excessive sur les interrupteurs ou les commandes.
Entretien
Essuyer l’extérieur avec un chiffon propre et sec. Ne jamais utiliser de détergents liquides comme du benzène ou du thinner ni
des composants de nettoyage ou des cires inflammables.
Conserver le manuel
Après avoir lu attentivement le présent manuel, veuillez le conserver pour pouvoir le consulter ultérieurement.
Tenir tout corps étranger à l’écart de l’instrument:
• Ne jamais poser de récipient contenant du liquide à proximité de l’instrument. La pénétration de liquide dans l’instrument
risquerait de provoquer une panne, un incendie ou un court-circuit.
• Veiller à ce qu’aucun objet métallique ne tombe dans l’instrument. Si un corps étranger a pénétré dans l’équipement,
débrancher l’adaptateur de la prise secteur puis contacter le représentant Korg le plus proche ou le magasin où l’équipement a été acheté.
* CE-Marke der EG-Norm
Die CE-Marke auf unseren netzgespeisten Geräten deutet auf deren Übereinstimmung mit den EMC- und CE-Richtilinien
der EG (respektive 89/336/EWG und 93/68/EWG) hin. Diese Abzeichen ist bis zum 3. Dezember 1996 gültig.
Die CE-Marke ab 1. Januar 1997 deutet auf Übereinstimmung mit den EMC-, CE- und Niederspannungsstrom-Richtilinien
der EG (respektive 89/336/EWG, 93/68/EWG und 93/68/EWG) hin.
Die CE-Marke auf unseren batteriegespeisten Geräten deutet auf deren Übereinstimmung mit den EMC- und CE-Richtilinien
der EG (respektive 89/336/EWG und 93/68/EWG) hin.
* Marque CE de conformité aux normes de sécurité européennes
La marque CE attachée à nos produits alimentés par secteur indique que ces produits sont conformes à la directive EMC (89/336/
CEE) ainsi qu'à la directive relative à la marque CE (93/68/CEE).Cette marque est valable jusqu'au 31 décembre 1996.
La marque CE attachée après le 1 janvier 1997 indique que ces produits sont conformes à la directive EMC (89/336/CEE), à la
directive relative à la marque CE (93/68/CEE) ainsi qu'à la directive relative au courant de guitare tension (73/23/CEE).
Enfin, la marque CE attachée à nos produits alimentés par batterie indique que ces produits sont conformes à la directive EMC (89/
336/CEE) ainsi qu'à la directive relative à la marque CE (93/68/EEC).
Page 4
4
以下の指示を守ってください
警告
●本製品を使用する前に、以下の指示をよく読んでください。
●ACアダプターを使用する場合は、必ずA C100Vの電源コンセ
ントにACアダプター を差し込んでく だ さい。
●次のような場合には直ちに電源を切り、ACアダプター使用時は
コンセントから抜きます。 そして、コルグ営業所またはお買い上げ
になった販売店に修理を依頼してください。
○ A C アダプターの電源コー ドやプラグが破損した と き
○異物が内部に入ったり、液体がこぼれたとき
○製品が( 雨などで) 濡れたとき
○製品に異常や故障が生じたとき
●次のような場所での使用や保存はしないでください。
○温度が極端に高い場所(直射日光のあたる場所、暖房機器
の近く、発熱する機器の上など)
○水気の近く(風呂場、洗面台、濡れた床な ど)や湿度の高い
場所
○ホコリの多い場所
●修理/部品の交換などで、取扱 説明書に書かれている以外の
ことは、 絶対にしないで ください。必ず最寄りのコルグ営 業 所また
はコルグ営業技術課に相談してください。
●ACアダプターのコードを無 理 に曲 げ たり、 上に重い もの を乗せ
たり しないで く ださい。コー ドに傷がつき危険です。
●本製品をヘッドホン、アンプ、スピーカ ーと組み合わせて使用した
場合、設定によ っては永久的な難聴にな る程度の音量になりま
す。大音量や不快な程度の音量で長時間使用しないでくださ
い。万一、聴力低下や耳鳴りを感じた ら 、専門の医師に相談して
ください 。
●本製品に、異物(燃えやすいもの、硬貨、針金など)や液体(水
やジュー スな ど)を絶対にいれないで く だ さ い。
●本製品およびACアダプターを分解した り、改造したりしないでく
ださい。
注意
●本製品は 正常な通気が妨 げられること の ない所に設置して 、使
用してく ださい。
●本製品はマイクロコンピュータを使用した機器です。このため
他の電気機器 を接近して同時にご使用に なりますと、 それらに雑
音が入る ことが あり ます。 逆に他の 電気機器から本製 品が雑音
を受けて誤動作する場合があります。
●ACアダプター をご使用になる場合は、必ず指定のも のを ご使
用ください。 他のアダプターをご使用になりますと故障の原因と
なります。 また、 使用後はACアダプターをコンセントから抜いてく
ださい。
●ACアダプタ ーは他の電気機器の電源コードといっしょにタコ足
配線することは危険です。
●長期間使用しない場合は、電池の液漏れを防ぐ ために電池を
抜いておいてくださ い。
●ス イッチやツマ ミ に必要以上の力を加え ます と故障の原因とな り
ますので注 意してく ださい。
●外装のお手入れは、必ず乾いた柔らか い布で軽く 拭い てくださ
い。ベン ジ ンや シ ンナー系の液体は絶対にご使用にな らないで
ください 。(コ ンパウ ンド質、強燃性のポリッシャーも不可 ) 。
●製品をお買い上げいただいた日より一年間は、保証期間となり、
修理は無償とな りますが 、 保証書に購入店での手続きが ない場
合は無効となり ま す。保証書は必ずお求めになった販売店で所
定の手続きを行った後、大 切 に 保 管してください。
●今後の参照の ために、この 取扱説明書はお読 みになっ た後も 大
切に保管してください。
●ACアダプター をコ ンセントから抜くときは、 絶 対にコー ドを引っぱ
らない でください 。故障の原因となります。
安全上のご注意
火災・感電・人身傷害の危険を防止するには
Page 5

Table of contents Table des matière
5
NOTICE D’
EMPLOI
BEDIENUNGSANLEITUNG
取扱説明書
OWNER’S MANUAL
Appendices Appendices
Anhänge
付録
Table of contents
■ Introduction ............................................ 7
1. Main features .............................................. 7
2. Installing the batteries .................................. 7
3. Front and rear panel .................................... 7
●Front panel.......................................................... 7
●Rear Panel .......................................................... 8
●LCD display .........................................................8
4. Making connections ..................................... 9
■ Play mode ............................................ 10
1. Let's play the AX1G ................................... 10
●Turn on the power ............................................. 10
●Adjusting the master level (overall volume) .........10
●Select a program and play................................. 10
2. Bypass and mute ....................................... 10
●Bypass ..............................................................10
●Mute .................................................................10
3. Tuner......................................................... 11
●Tuning your guitar .............................................11
●Changing the calibration.................................... 11
4. Metronome ................................................ 11
●Start the metronome, and adjust the tempo and out-
put level (volume) .............................................. 11
5. Using the expression pedal ........................ 12
●Play using the expression pedal .........................12
●Using the Sample & Play effect........................... 12
●Calibrating (adjusting) the expression pedal ....... 13
■ Edit mode............................................. 14
1. Selecting the parameter to edit ................... 14
2. Editing effect parameters ........................... 14
●DRIVE................................................................14
●TONE ................................................................14
●MOD................................................................. 14
●PEDAL ...............................................................15
●AMB ................................................................. 15
●CR ....................................................................15
●NR ....................................................................15
3. Editing other parameters ............................ 15
●LEVEL ................................................................15
●RENAME ........................................................... 15
●WRITE ...............................................................16
4. Restoring the preset programs (factory setting
programs) ................................................. 16
■ Appendices .......................................... 50
1. Effect Parameter list ................................... 50
2. Preset program parameter list .................... 55
3. Troubleshooting ......................................... 55
4. Specifications ............................................ 58
■ Introduction ............................................... 17
1. Caractéristiques principales......................... 17
2. Mise en place des piles ................................. 17
3. Panneaux avant et arrière ............................. 17
●Panneau avant ......................................................... 17
●Panneau arrière ....................................................... 18
● Affichage LCD ........................................................ 18
4. Raccordements ................................................. 19
■ Mode de jeu ............................................... 20
1. Comme nt jouer sur le AX1G ....................... 20
● Mettre l’appareil sous tension ............................. 20
●Réglage du niveau principal (niveau global) .... 20
●Sélectionner un programme et jouer .................. 20
2. Contournement et suppression du son ...... 20
● Contournemen ........................................................ 20
● Assourdissement (Mute) ...................................... 21
3. Accordeur......................................................... 21
● Accordage de la guitare ......................................... 21
● Modification du calibrage .................................... 21
4. Métronome ...................................................... 21
● Démarrer le métronome et régler le tempo ainsi
que le niveau de sortie (le volume) ..................... 21
5. Utilisation de la pédale d’expression ......... 22
● Interprétation en utilisant la pédale d’expression
22
●Utilisation de l’effet Echantillonnage et Jeu
(Sample & Play) ...................................................... 22
●Calibrage (réglage) de la pédale d’expression .. 24
■ Mode d’édition (EDIT) ............................ 25
1. Sélection d’un paramètre à éditer ............... 25
2. Edition des paramètres d’effets ................... 25
●DRIVE ....................................................................... 25
●TONE ........................................................................ 25
●MOD ......................................................................... 26
●PEDAL ...................................................................... 26
●AMB .......................................................................... 26
●CR .............................................................................. 26
●NR .............................................................................. 26
3. Edition d’autres paramètres ......................... 27
●LEVEL ....................................................................... 27
●RENAME .................................................................. 27
●WRITE....................................................................... 27
4. Rappel des programmes prédéfinis (program-
mes préenregistrés à l’usine) ....................... 28
■ Appendices .......................................... 50
1. Liste des paramètres des effets ................... 50
2. Liste de paramètre des programmers prédéfinis
................................................................. 55
3. Guide de dépannage ................................. 55
4. Spécifications techniques ............................ 58
Page 6

Inhalt
目次
6
■ Einleitung ............................................. 29
1. Hauptfunktionsmerkmale ........................... 29
2. Batterien einbauen ..................................... 29
3. Vorder-und Rückseite ................................. 29
●Vorderseite........................................................ 29
●Rückseite ........................................................... 30
lLC-Display ...........................................................30
4. Anschlüsse herstellen.................................. 31
■ Play-Modus .......................................... 32
1. AX1G spielen ............................................ 32
●Gerät einschalten ..............................................32
●Master Level (Gesamtlautstärke) einstellen ..........32
●Programm wählen und spielen ........................... 32
2. Bypass und Mute ....................................... 32
●Bypass ..............................................................32
●Mute .................................................................33
3. Tuner......................................................... 33
●Gitarre stimmen ................................................33
●Kalibrierung ändern .......................................... 33
4. Metronome ................................................ 33
●Starten Sie das Metronom, und stellen Sie das Tempo
und den Ausgangspegel (Lautstärke) ein ............. 33
5. Einsatz des Expressionpedals ..................... 34
●Spielen und Expressionpedal einsetzen ............... 34
●Sample & Play-Effekt einsetzen .......................... 34
●Expressionpedal kalibrieren (einstellen) ..............36
■ Edit-Modus ........................................... 37
1. Den zu editierenden Parameter wählen ...... 37
2. Effektparameter editieren ........................... 37
●DRIVE................................................................37
●TONE ................................................................37
●MOD................................................................. 37
●PEDAL ...............................................................38
●AMB ................................................................. 38
●CR ....................................................................38
●NR ....................................................................38
3. Weitere Parameter editieren....................... 38
●LEVEL ................................................................38
●RENAME ........................................................... 39
●WRITE ...............................................................39
4. Preset-Programme (Werksprogramme) wieder-
herstellen .................................................. 39
■ Anhänge .............................................. 50
1. Effektparameterliste ................................... 50
2. Parameterliste der Preset-Programme ......... 55
3. Fehlersuche ............................................... 55
4. Technische Daten ....................................... 58
■はじめに ....................................................... 40
1. 主な特長 ............................................................. 40
2. 電池の入れ方 ...................................................... 40
3. 各部の名称とはたらき .......................................... 40
● フロント・パネル ............................................................40
● リア・パネル ..................................................................41
● 液晶ディスプレイ............................................................ 41
4.接続してみよう .................................................... 42
■プレイ・モード ................................................ 43
1. AX1Gを演奏してみましょう................................. 43
● 電源をオンにします ........................................................ 43
lマスター・レベル(全体の音量)を調整します ....................... 43
● プログラムを選んで演奏してみよう ..................................43
2. バイパス、ミュート ............................................... 43
● バイパスにします ........................................................... 43
● ミュートにします ............................................................43
3. チューナー .......................................................... 44
● ギターをチューニングします ............................................44
● キャリブレーションを変更します ....................................... 44
4. メトロノーム........................................................44
● メトロノームをスタートして、テンポと出力レベル(音量)
を調節します ....................................................... 44
5. エクスプレッショ ン ・ ペダルを使ってみましょう......... 45
● エクスプレッション ・ペダルを使って演奏します .................. 45
● サンプル&プレイ・ エ フェクトの操作方法 ...........................45
● エクスプレッション・ペダルの調整(キャリブレ ーション) について
46
■エディット・モード .......................................... 47
1. エディット・パラメータの選択 ................................ 47
2. エフェクト・パラメータのエディット ........................ 47
● DRIVE .........................................................................47
● TONE ..........................................................................47
● MOD ...........................................................................47
● PEDAL .......................................................................48
● AMB ........................................................................... 48
● CR ............................................................................... 48
● NR ...............................................................................48
3.その他のパラメータのエディット ............................. 48
● LEVEL ........................................................................48
● RENAME .................................................................... 48
● WRITE ........................................................................49
4. プリセット ・プログラム(工場出荷時のプログ ラ ム)に戻すに
は ...................................................................... 49
■付録 .............................................................50
1. エフェクト・パラメータ・リスト ............................... 50
2.プリセット・プログラム・パラメータ・リスト .............. 55
3. 故障かな?と思ったら ........................................... 55
4. 主な仕様 ............................................................. 58
Page 7
7
Introduction
Introduction
■ Introduction
Thank you for purchasing the ToneWorks AX1G High
Performance Pr ocessor. In order to enjoy long and
trouble-free use, please read this owner’s manual and
use the product correctly. Keep this manual in a safe
place for future reference.
1. Main features
●69 types of effect variation are provided, and
a maximum of seven effects can be used si-
multaneously.
● 30 (10 x three banks) user programs are pro-
vided in internal memory.
● The expression pedal lets you control effects
in realtime.
● The sample & pla y function lets you record a phrase
that you play (up to 1.8 seconds long), and use the
pedal to play it back.
● The IPE (Integrated Parameter Edit) system
makes editing easy, so you don’t have to deal
with large numbers of confusing parameters.
● A metronome is built-in for convenience when
practicing alone.
● The auto chr omatic tuner helps you tune when
the unit is bypassed or muted.
● The friendly user interface features a liquid
crystal display.
●LCD backlit by luminous material -easy view-
ing in dark locations without wearing down the
batteries.
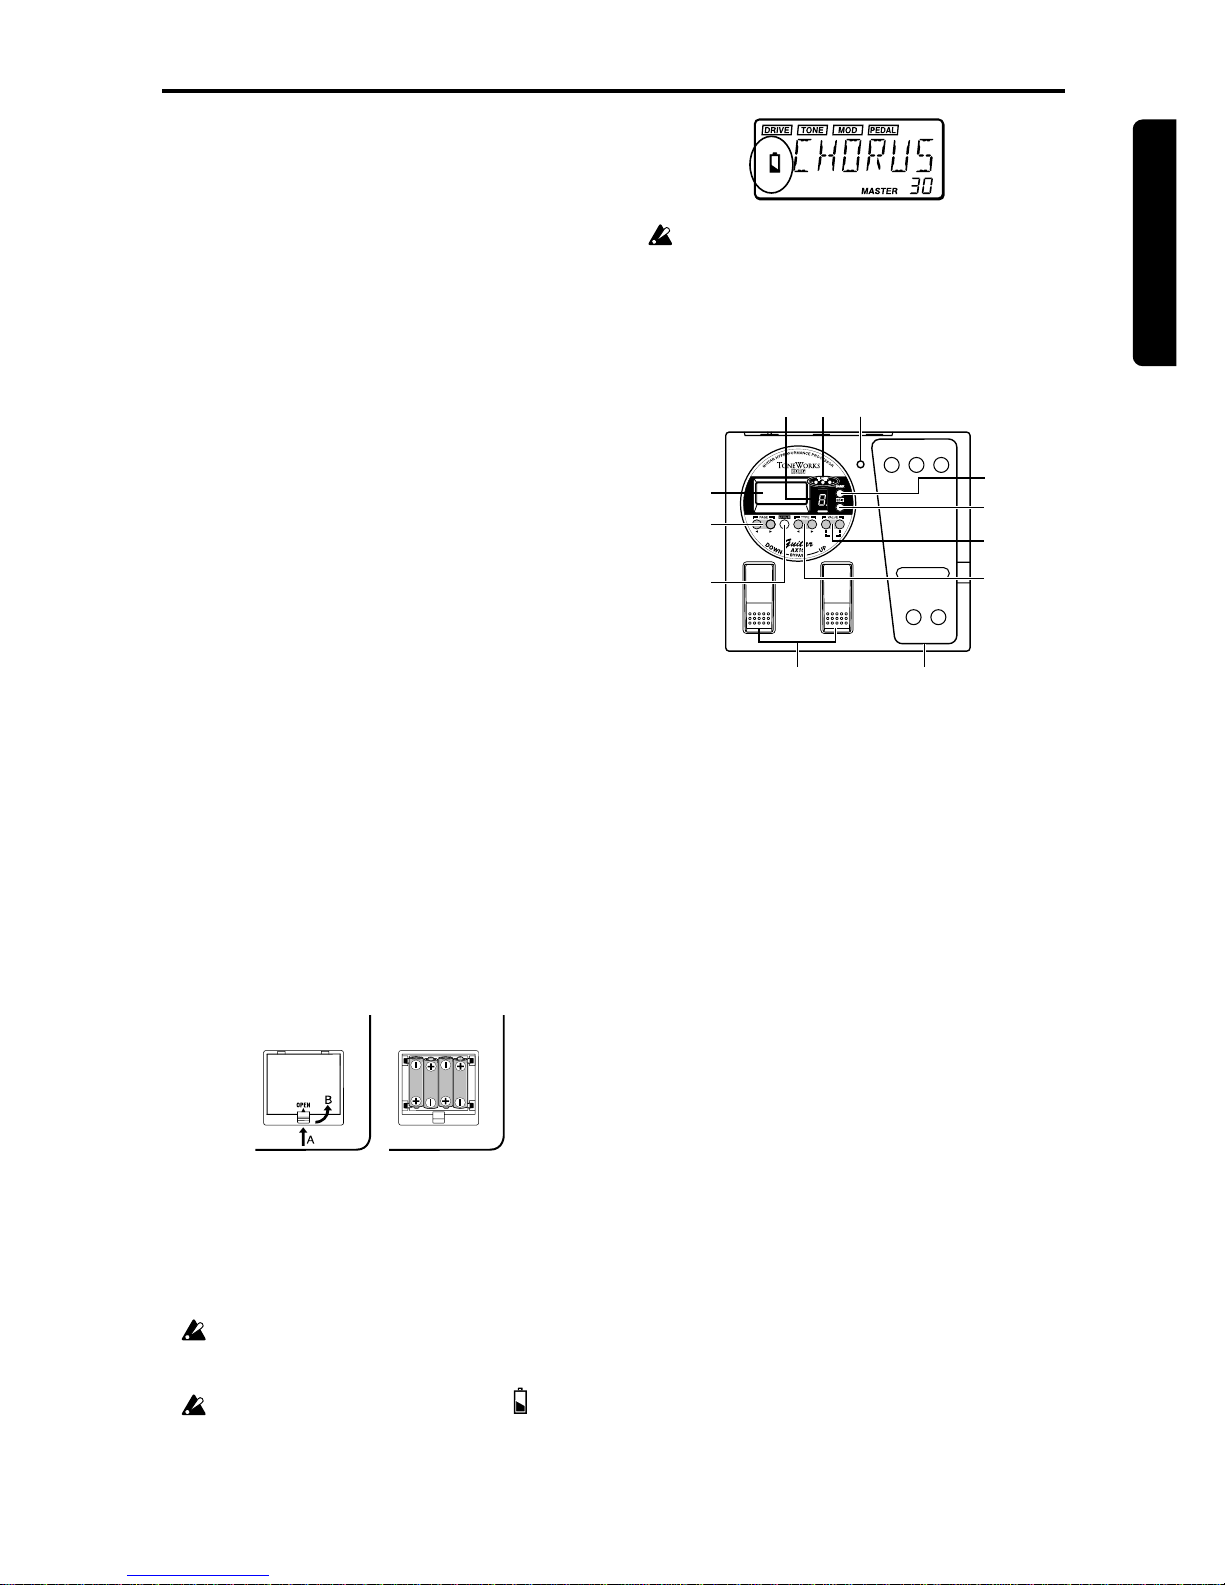
2. Installing the batteries
1 Lightly press on arrow A of the battery case,
and slide the lid upward in the direction of
the arrow to open the case.
2 Insert four AA alkaline batteries (sold sepa-
rately) as shown in the diagram. Be careful
to observe the correct polarity (+ and -) of
the batteries.
3 Close the lid of the battery case.
If you will not be using the unit for an e xtended
period of time, remove the batteries to prev ent
them from leaking.
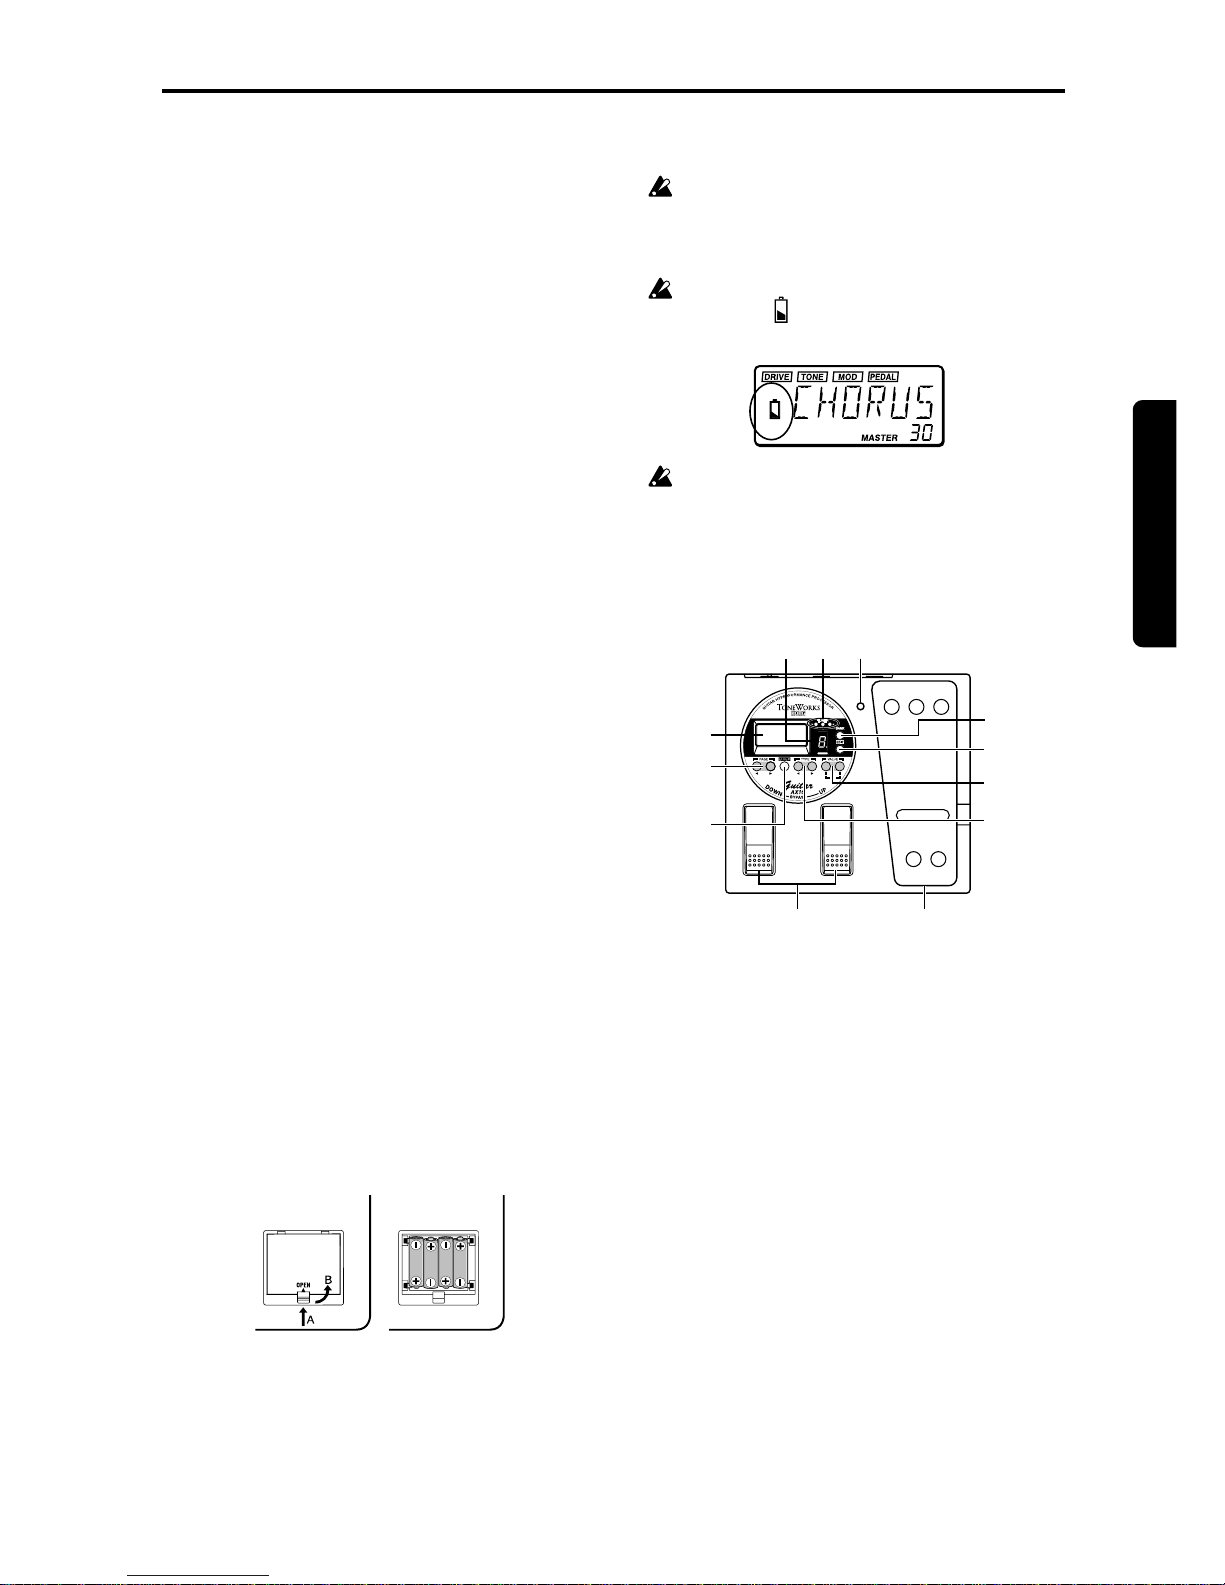
When the battery empty indicator ( symbol)
appears in the LCD, it is time to replace the
batteries. Replace the batteries as soon as
possible.
Batteries and an AC adapter are not included
with this product. They must be purchased
separately.
3. Front and rear panel
●Front panel
1
2
3
4
5
6
7
89
A
0
B
1 DOWN/UP switches
Use these switches to select programs, or to bypass or mute the unit.
2 Expression pedal
This controls the effect that you selected as the
pedal effect.
3 TYPE [√]/[®] keys
In Edit mode, these keys are used to select the
type of effect that you wish to edit.
4 VALUE [-]/[+] keys
Use these keys to edit parameters and to turn the
metronome on/off.
5 EDIT/EXIT key
Use this key to enter Edit mode and to return to
Play mode.
6 BANK SELECT key
Use this key to select banks.
7 Pedal indicator
This indicates the on/off status of the pedal effect,
or the recording condition when the sampler effect
is used.
8 BANK/TUNER LED
These LEDs indicate the bank of the selected program. When the tuner is operating, these LEDs
function as a tuning meter.
9 PROGRAM/NOTE display
This indicates the program number . When the unit
is bypassed or muted and the tuner is operating, it
indicates the note name.
0 LCD with luminous backlight
Before using the unit in a dark location, expose the
LCD to sunlight or fluorescent light.
Page 8

8
Introduction
A PAGE [√]/[®] keys
In Edit mode or when the metronome is on, these
keys are used to select the parameter that y ou wish
to modify.
B ENTER key
In Edit mode, this key is used to switch the effect
on/off, or to write a program.
●Rear Panel
1
23
4
5
1 INPUT jack
If you are using batteries, this jack acts as a power
switch. When a cable is connected, the power will
be turned on.
Before turning the power on or off, be sure to
turn down the volume of any equipment that is
connected.
2 Input level switch
Set this switch according to the output of your instrument.
H:Suitable for a pickup with a high output le v el,
such as a humbucking pickup
L: Suitable for a pickup with a low output level,
such as a single coil pickup
3 OUTPUT/PHONES jack
4 DC9V
The separately sold AC adapter (DC9V
)
can be connected here. When this is connected,
the power will be turned on automatically.
5 Cable hook
If the separately sold AC adapter is connected,
hook the cable of the AC adapter around this hook
as shown below. When removing the cable from
the hook, do not apply excessive tension to the
cable.
●LCD display
1
2
3
45
6
7
1 Effect on/off indicators
These indicate the effects (drive, tone, modulation,
pedal, ambiance) which are turned on.
2 Edit mode indicator
3 Battery empty indicator
4 Cabinet resonator on/off indicator
5 Metronome on/off indicator
6 This indicates effect parameter values or the mas-
ter level.
7 This indicates the program name or effect type, etc.
Page 9

9
Introduction
Introduction
4. Making connections
Before you make connections , be sure to turn off the pow er of your other equipment, or turn the volume do wn to
zero. Connecting cables are sold separately.
INPUT
OUTPUT/PHONES
DC9V
Hard disk recorder etc.
Audio system
Guitar amp / powered monitor (*1)
Mono 1/4" jack - mono 1/4" jack
Headphones (*1)
AC adapter (*2) to AC outlet
Mono 1/4" jack - mono 1/4" jack
Mono output - mono 1/4" jack/stereo
output - two mono 1/4" jacks
Stereo 1/4" jack - stereo RCA
(phone) jack
Guitar
*1: The OUTPUT/PHONES jack is a stereo output. If you use a mono phone cable to connect the AX1G to a
guitar amp, only the L (left) sound will be output.
*2: If you use batteries, the AC adapter is not necessary. If you use an AC adapter, be sure to use only the
specified model (DC9V
).
Page 10
10
Play mode
■ Play mode
1. Let's play the AX1G
●Turn on the power
The AX1G does not have a power switch. The power
will be turned on when one of the following occurs.
• If you are using batteries, the power will be
turned on when you connect a mono phone
plug cable to the INPUT jack.
If you connect a stereo phone plug cable, the
power will not be turned on.
When the power is turned on, the AX1G will automatically be in Play mode.
The program selected at power-on will be the
program which had been selected when the
power was last turned off.
To maximize the battery life, disconnect the cable
from the INPUT jack when you are not using the
AX1G.
• If you are using the separately sold AC
adapter , the power will be turned on when y ou
connect the AC adapter to an AC outlet.
Before you turn off the power of the AX1G, turn
off the power of the other connected equipment.
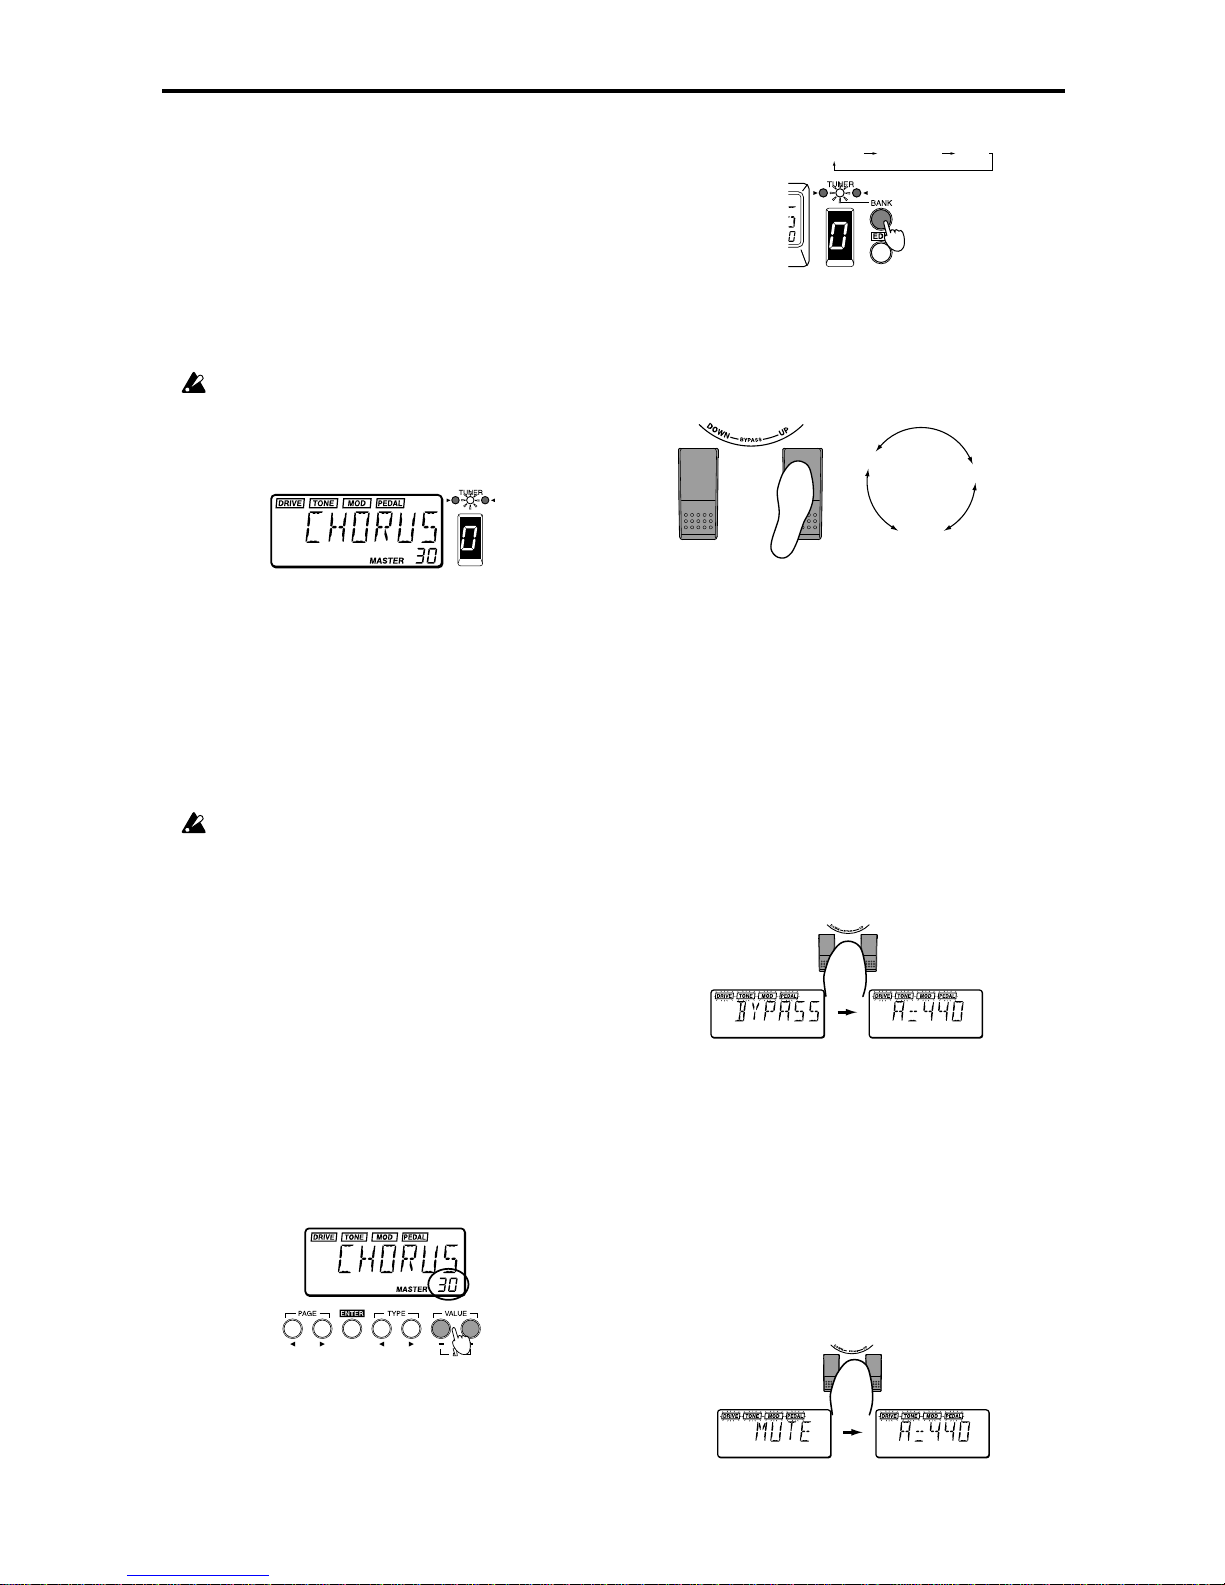
●Adjusting the master level (overall volume)
The master level adjusts the final output v olume of the
AX1G. The master level setting is displayed in Play
mode in the lower right of the LCD.
• Use the VALUE [+] or [-] keys to adjust the
master level. If you continue holding a key,
the value will change rapidly.
Normally you will leave the master level at 30
(maximum). The output of the AX1G will be optimal when the master level is set at 30. If the output sound is distorted when the master level is
30 and you play with the AX1G bypassed, reduce the master level so that the sound does
not distort.
●Select a program and play
Here's how to select a user program.
1 Press the BANK SELECT key to switch the
bank between green, orange, and red.
The bank will change each time you press
the key, and the BANK/TUNER LEDs will
change from “
green orange red
”.
1
2 Press the UP or DOWN switch to select a pro-
gram number.
The program number is shown in the PROGRAM/
NOTE display, and the program name is shown in
the LCD.
2
red0~9
green0~9
orange0~9
UP
UP
DOWN
UP
DOWN
DOWN
2. Bypass and mute
When the AX1G is bypassed, no effects will be applied, and the tuner will function. When the AX1G is
muted, no sound will be output from the AX1G, and
the tuner will function.
●Bypass
1 Simultaneously press the UP and DOWN
switches and immediately release them to
select Bypass.
The LCD effect on/off indicators will blink, and
after displaying “BYPASS” for approximately one
second, the tuner calibration will appear.
1
2 Press the UP or DOWN switch to defeat By-
pass.
●Mute
1 Simultaneously press the UP and DOWN
switches and continue holding them down to
mute the output.
While you press the switches, the LCD will indicate “MUTE”. When you release the switches,
the tuner calibration will appear. The effect on/
off indicators will blink in the same way as for
Bypass.
1
press and hold
2 Press the UP or DOWN switch to defeat Mute.
Page 11
11
Play mode
Play mode
Calibration is not displayed in Edit mode.
4. Metronome
The AX1G provides a metronome that is especially
convenient when you are practicing alone.
●Start the metronome, and adjust the tempo
and output level (volume)
1 Simultaneously press the VALUE [+] and [-]
keys to start the metronome.
The LCD will indicate the metronome tempo.
Even when the metronome is on, you can still
change programs or bypass the AX1G.
11
2
It is not possible to turn on the metronome in
Edit mode. Return to Pla y mode and turn it on.
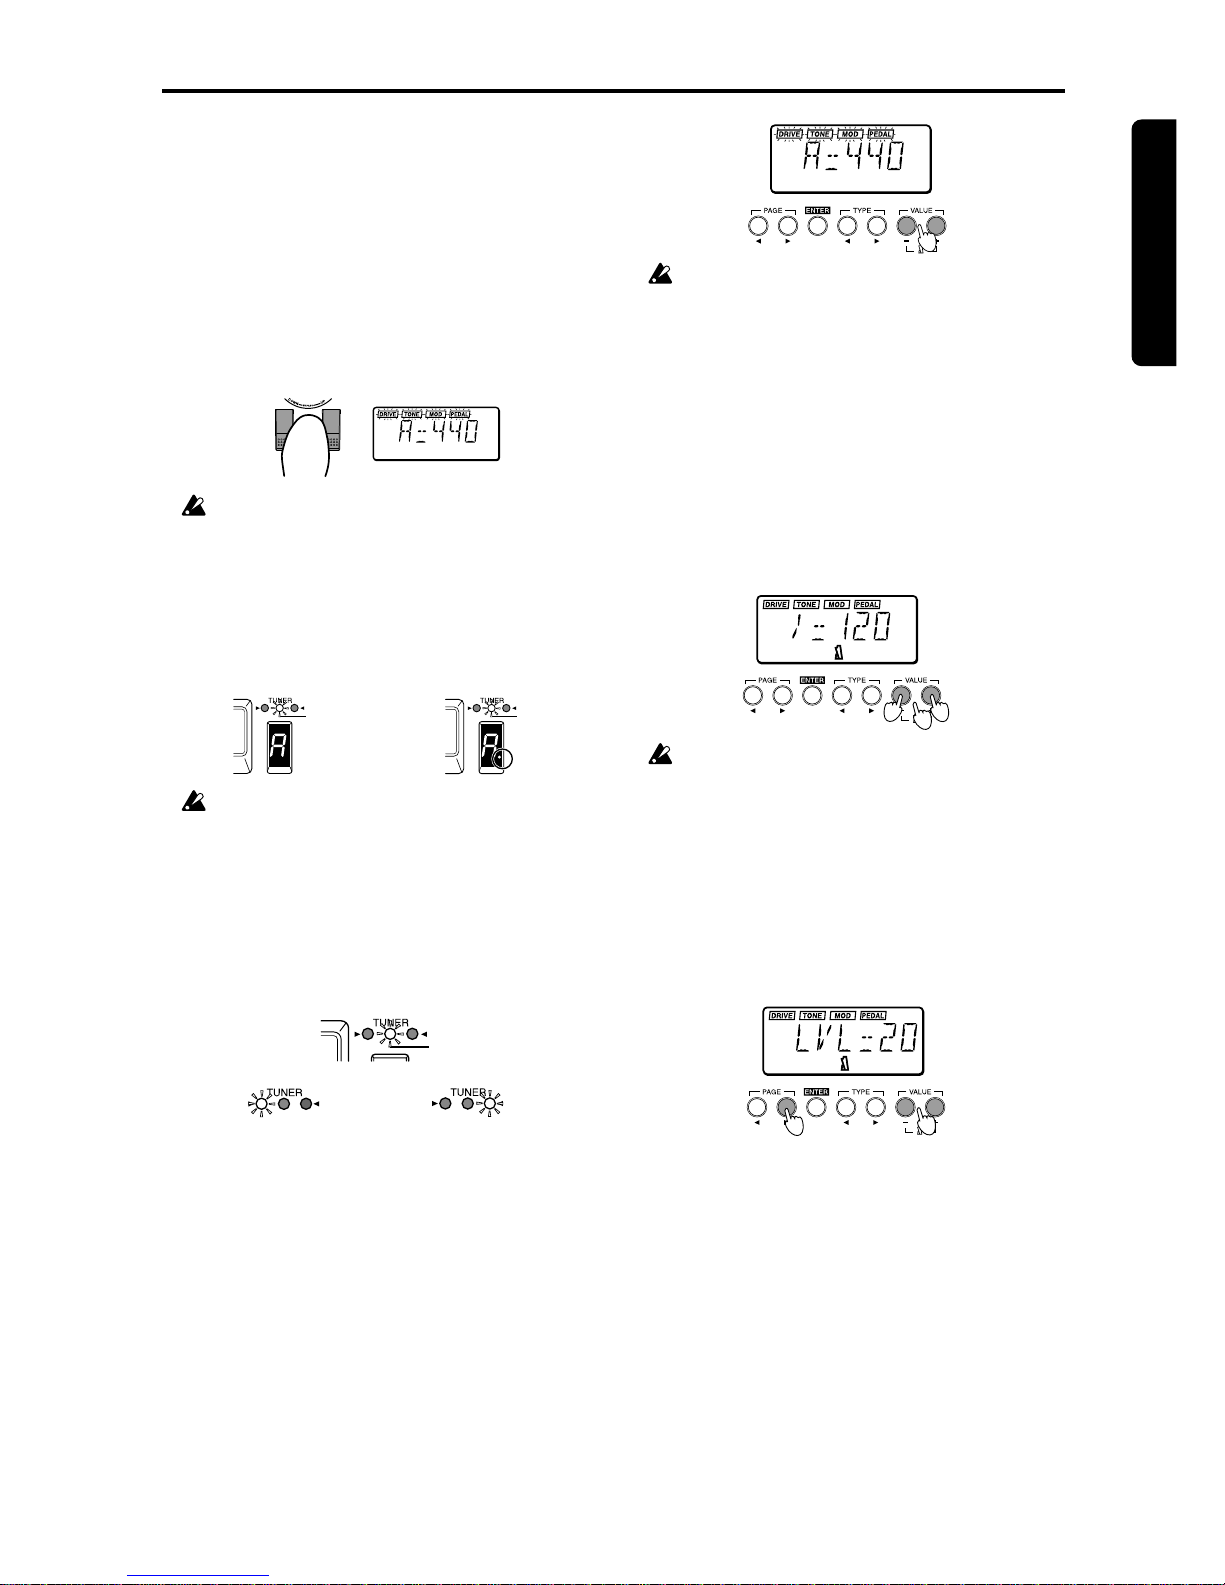
2 Press the VALUE [+] or [-] key to adjust the
tempo of the metronome.
The metronome tempo can be adjusted in the
range of = 40–208.
3 Press the PAGE [®] key once to display the
metronome output level.
Pressing the PAGE [√] key will take y ou back to
the tempo display.
3
4
4 Press the VALUE [+] or [-] key to adjust the
metronome output level.
The output level of the metronome can be adjusted from 0 to 30.
5 Once again, press the VALUE [+] and [-] keys
simultaneously. The metronome will stop.
The metronome tempo and output level setting
will be remembered even if the power is turned
off.
3. Tuner
When the AX1G is bypassed or muted, the tuner will
automatically operate. If you mute the AX1G, you will
be able to tune without outputting any sound from
your amp system etc., which is conv enient during an
on-stage performance.
●Tuning your guitar
1 Bypass (or mute) the AX1G.
The AX1G will enter bypass or mute mode, and
the tuner will operate.
1
If the metronome is on, the tuner will not operate.
2 Play the string that you wish to tune.
The note name will appear in the PROGRAM/
NOTE display. If the note you input is higher (#)
than the note name, the decimal point “.” of the
PROGRAM/NOTE display will light.
When the note name is A.
When the note name is A#.
When tuning, be careful to play only one string
at a time.
3 Adjust the tuning head of your guitar to the
desired pitch desired, so that the PR OGRAM/
NOTE display shows the correct note name.
4 Make fine adjustments to the tuning of your
guitar so that only the center LED (green) of
the BANK/TUNER LEDs is lit.
pitch is too low pitch is too high
5 When you are finished tuning, turn off By-
pass (or Mute).
●Changing the calibration
The tuner calibration (the frequency of the standard
pitch A) can be adjusted in the range of 438 to 445 Hz.
You can adjust the calibration when the tuner is operating.
Press the VALUE [+] or [-] keys to change the
calibration.
Changes you make to the calibration will be lost
when the power is turned off. The next time the
power is turned on, the calibration will automatically be reset to 440 Hz.
Page 12

12
Play mode
5. Using the expression pedal
You can use the expression pedal to control volume,
wah, chorus effect, and delay time etc. in realtime.
Using the expression pedal, you can control 18 different MOD (modulation) type effects and 13 different AMB (ambiance) type effects. The volume can
also be controlled. You can select one of these for
use (refer to p.50 “Effect parameter list”).
●Play using the expression pedal
1 In Play mode, select a program that allows
you to use the expression pedal.
The “
” indicator at the top of the LCD will
light to indicate programs which allow you to use
the expression pedal.
For this example, let's select G (green)-3
“SATCH”.
2 Make sure that the pedal indicator is lit.
If it is not lit, press down on the expression pedal
once to make the pedal indicator light.
2
3
If the pedal indicator is dark, press
down on the pedal
Operate the pedal
Pedal indicator
When controlling the volume, it is not possible
to turn the expression pedal on/off. it will remain on (the pedal indicator lit).
The pedal indicator (i.e., the on/off state of the
expression pedal) is not remembered when you
write the program in Edit mode.
3 Operate the expression pedal while you play
your guitar.
When you raise and lower the pedal, the output
sound will change accordingly.
Do not apply excessive f orce to the e xpression
pedal. Bef ore you operate the e xpression pedal,
check whether the pedal indicator is lit, and the
amount of force actually required for the eff ect.
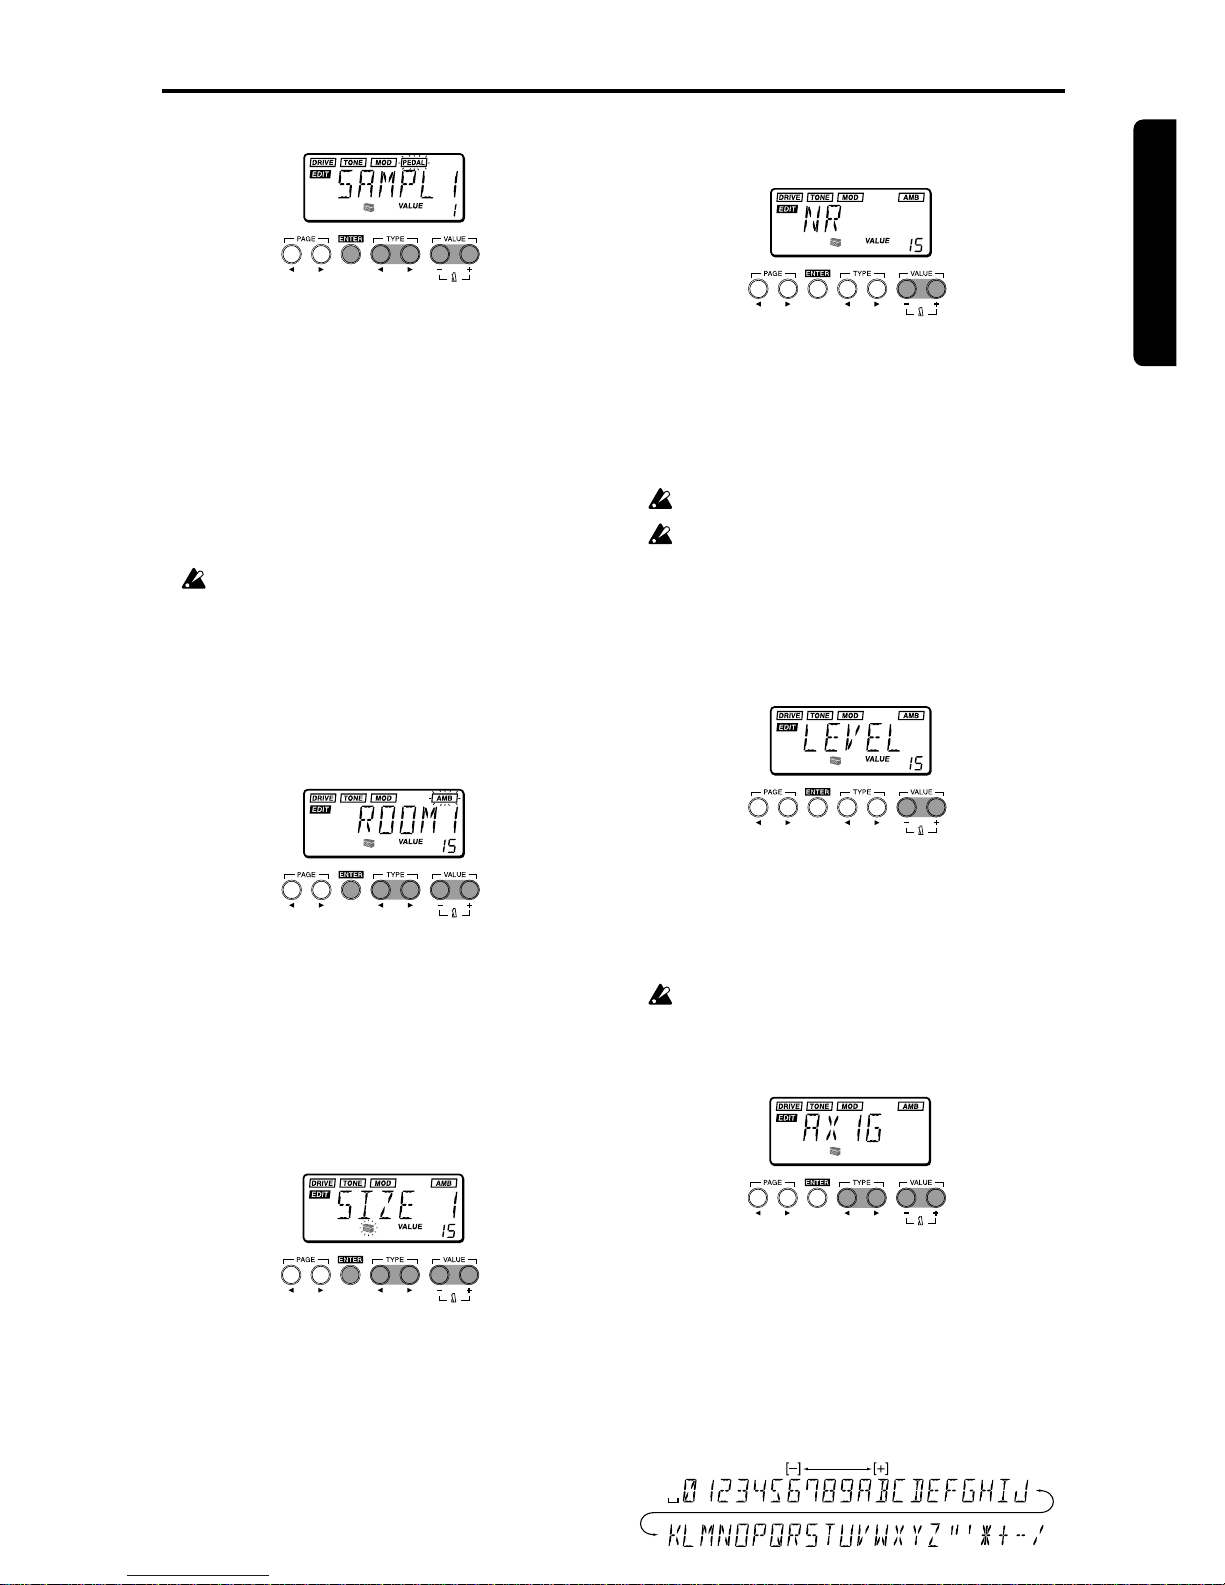
●Using the Sample & Play effect
1. SAMPL1/2, SCRAT1/2
The SAMPL1/2 effect types let you use the pedal to
playback a recorded phrase.
The SCRAT1/2 effect types let you use the pedal to
playback a scratch sound based on a recorded
phrase.
1 Select a program which uses the Sample &
Play effect.
For this example , let's select SAMPL2 R (red)-5
“FWD/BK ”.
2 Press down on the expression pedal to se-
lect record-ready mode.
The pedal indicator will light.
press down
2
blinking
3 Play a phrase on your guitar.
When you start playing your guitar , recording will
begin automatically, and the pedal indicator will
light.
When recording ends, the pedal indicator will go
dark.
Recording will not begin until your guitar exceeds a minimum volume level.
4 Operate the expression pedal.
operate the pedal
4
SAMPL1: The recorded phrase will playback
when you press the pedal.
SAMPL2: The recorded phrase will playback
when you press the pedal, and will
playback in reverse when you return
the pedal.
SCRAT1: A scratch sound will playback when
you move the pedal. Pedal movement
alone will cause the scratch sound to
playback.
SCRAT2: A scratch sound will playback when you
move the pedal while playing your guitar. Pedal movement alone will not produce playback.
The recorded sound will be cleared (erased)
when the program is changed, when the AX1G
is bypassed or muted, when the effect type is
changed or when the power is turned off.
Page 13
13
Play mode
Play mode
2. LOOP1/2
The LOOP1/2 effect types let you record a phrase
while you playback a loop. This allows you to layer
your own playing onto the playback.
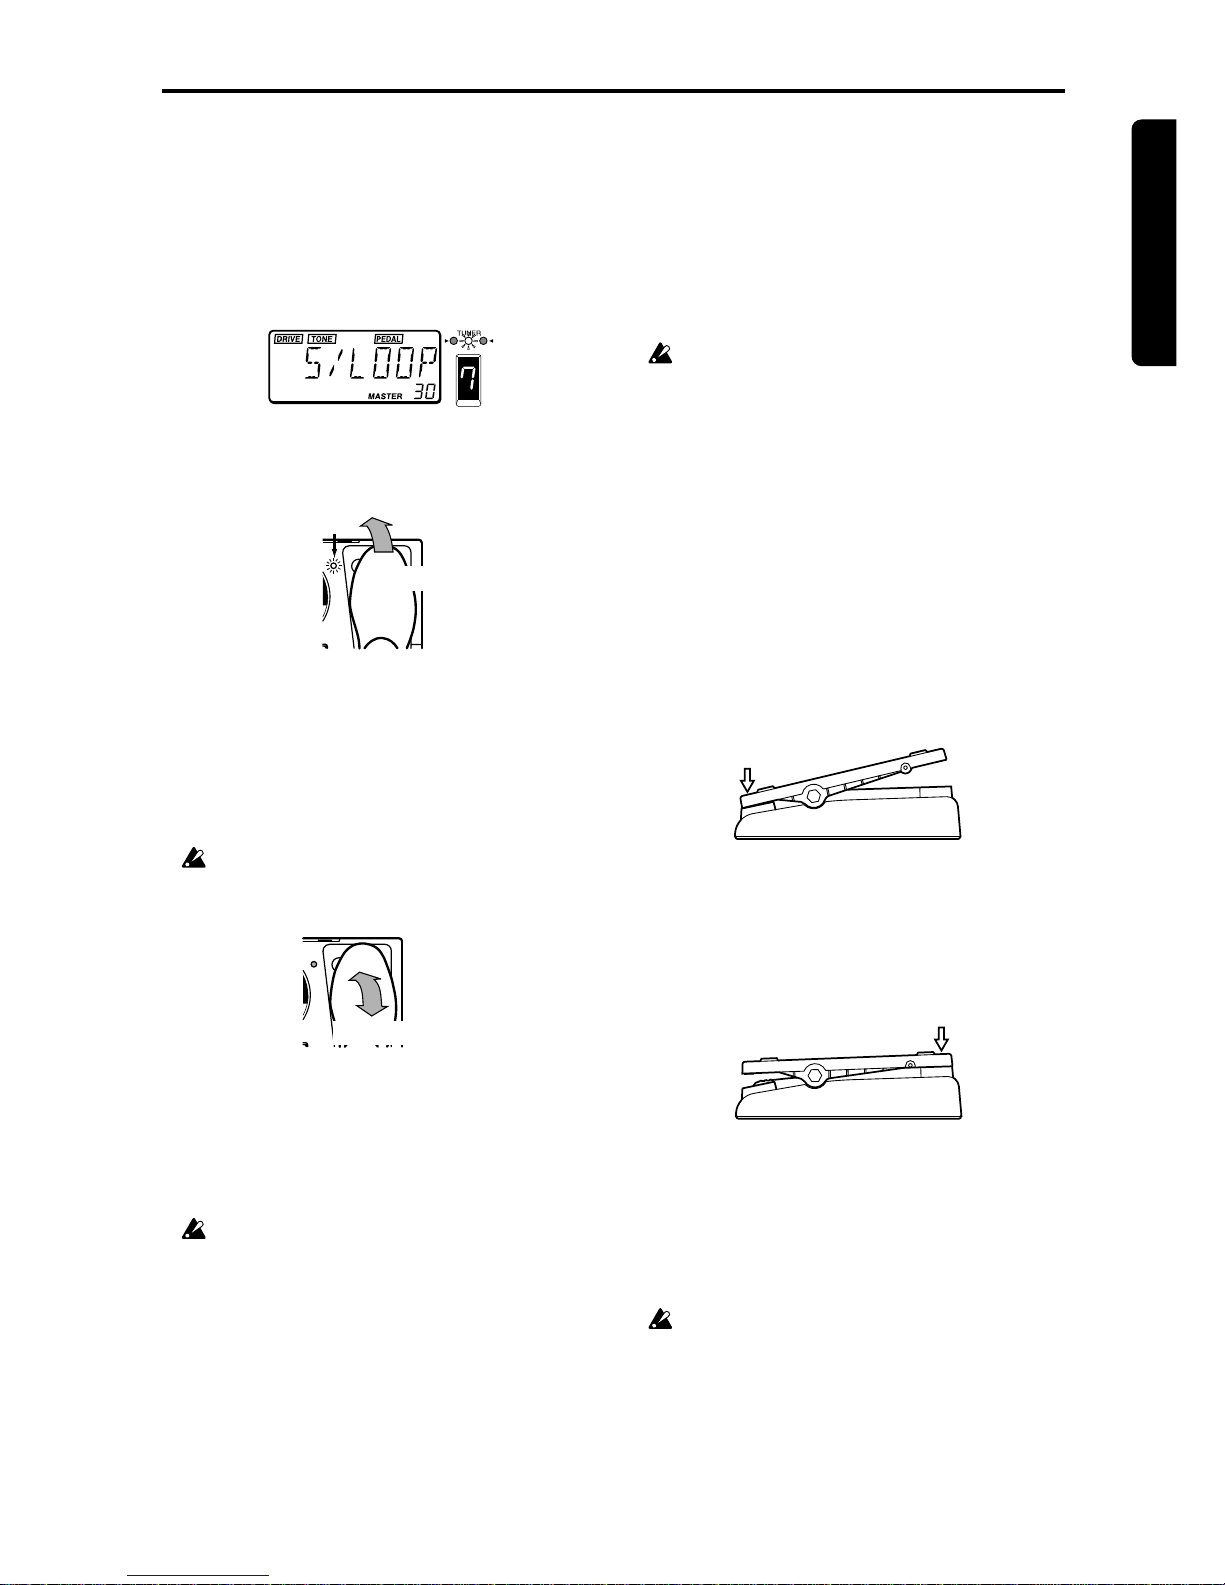
1 Select a program whic h uses a Sample & Play
effect.
For this example , let's select LOOP 1O (orange)7 “S/LOOP”.
2 Press down on the expression pedal deeply
to select record-ready mode.
The pedal indicator will light.
press down
2
blinking
3 Play a phrase on your guitar.
When you start playing your guitar , recording will
begin automatically, and the pedal indicator will
light.
When recording ends, the pedal indicator will go
dark, and the recorded sound will begin playing
back as a loop.
Recording will not begin until your guitar exceeds a minimum volume level.
4 Operate the expression pedal.
operate the pedal
4
LOOP1: The pedal will control the playback vol-
ume.
LOOP2: The pedal will control the length of the
loop. The loop will become shorter as you
return the pedal, and at the minimum
length the loop will not playback at all.
The recorded sound will be cleared (erased)
when the program is changed, when the AX1G
is bypassed or muted, when the effect type is
changed or when the power is turned off.
For SAMPL1/2, the recording time is 0.9 seconds for
hi-fi sound or 1.8 seconds for lo-fi sound. F or LOOP1/
2, the recording time is 0.26–1.8 seconds (in approximately 0.05 second steps). (☞ p.50, “Effect parameters”)
The effect type and recording time can be modified in
Edit mode. F or details ref er to p.15, “PEDAL (Expression Pedal)”.
●Calibrating (adjusting) the expression pedal
The operating range of the expression pedal can be
adjusted. If you find that the sensitivity of the expression pedal is not to your liking, you can perform this
adjustment so that the pedal operates ideally. You
should perform the adjustment described below if fully
advancing the pedal does not produce the maximum
effect, or conversely, if it is not possible to turn off the
effect fully.
When calibrating the pedal, use your hand to
operate the pedal. Accurate adjustment may
not be possible if you use your foot to operate
the pedal.
1 While simultaneously holding down the P A GE
[√] key and VALUE [-] key, turn on the po wer .
The LCD will indicate “PEDAL” for appro ximately
one second, and then indicate “MIN”.
2 Slowly move the pedal back. When it stops,
take your hand off the pedal and press the
VALUE [+] key.
The LCD will change from “MIN” to “MAX”.
If you press the VALUE [-] key during the calibration operation, calibration will be halted. The
power-on display will appear, and you will be in
Play mode.
2
press slowly
3 Slowly move the pedal forward. When it stops,
take your hand off the pedal and press the
VALUE [+] key.
The LCD will display “COMPLT” for approximately
one second. Then the initial po wer-on screen will
appear, and you will be in Play mode.
3
press slowly
After the calibration has been set, check the operation of the pedal at the MIN and MAX positions.
Check the operation by selecting an effect type
that has a clearly audible result, such as the effect type VOLUME, and verify that the MIN level
is produced for a value of 0.
If the calibration operation fails, the LCD will
indicate “ERROR”, and you will return to the
display before calibration (“MIN”). If repeated
attempts are unsuccessful, it is possible that
the AX1G has malfunctioned. Contact a Korg
service center or your dealer.
Page 14
14
Edit mode
■ Edit mode
In Edit mode you can make detailed settings for each
effect, and modify the program name.
Press the EDIT/EXIT key and the LCD will indicate “
” showing that the AX1G is in Edit mode.
Press the EDIT/EXIT key once again and you will return to Play mode. You can edit the on/off setting of
each effect, and its parameters. When you edit a program, the “.” (decimal point) of the PROGRAM/NOTE
display will light.
lit in Edit mode
lit when you edit a Program
Edited programs will be lost if you change programs
or turn the power off before writing the edited program. While editing, be sure to write your changes
frequently. For the Write procedure, refer to p.16
“WRITE”.
It is not possible to switch modes when the unit
is bypassed (or muted). Defeat bypass (or
mute), and then switch the mode.
If you bypass (or mute) the AX1G in Edit mode,
it is not possible to perform editing operations.
Defeat bypass (or mute) before you continue
editing.
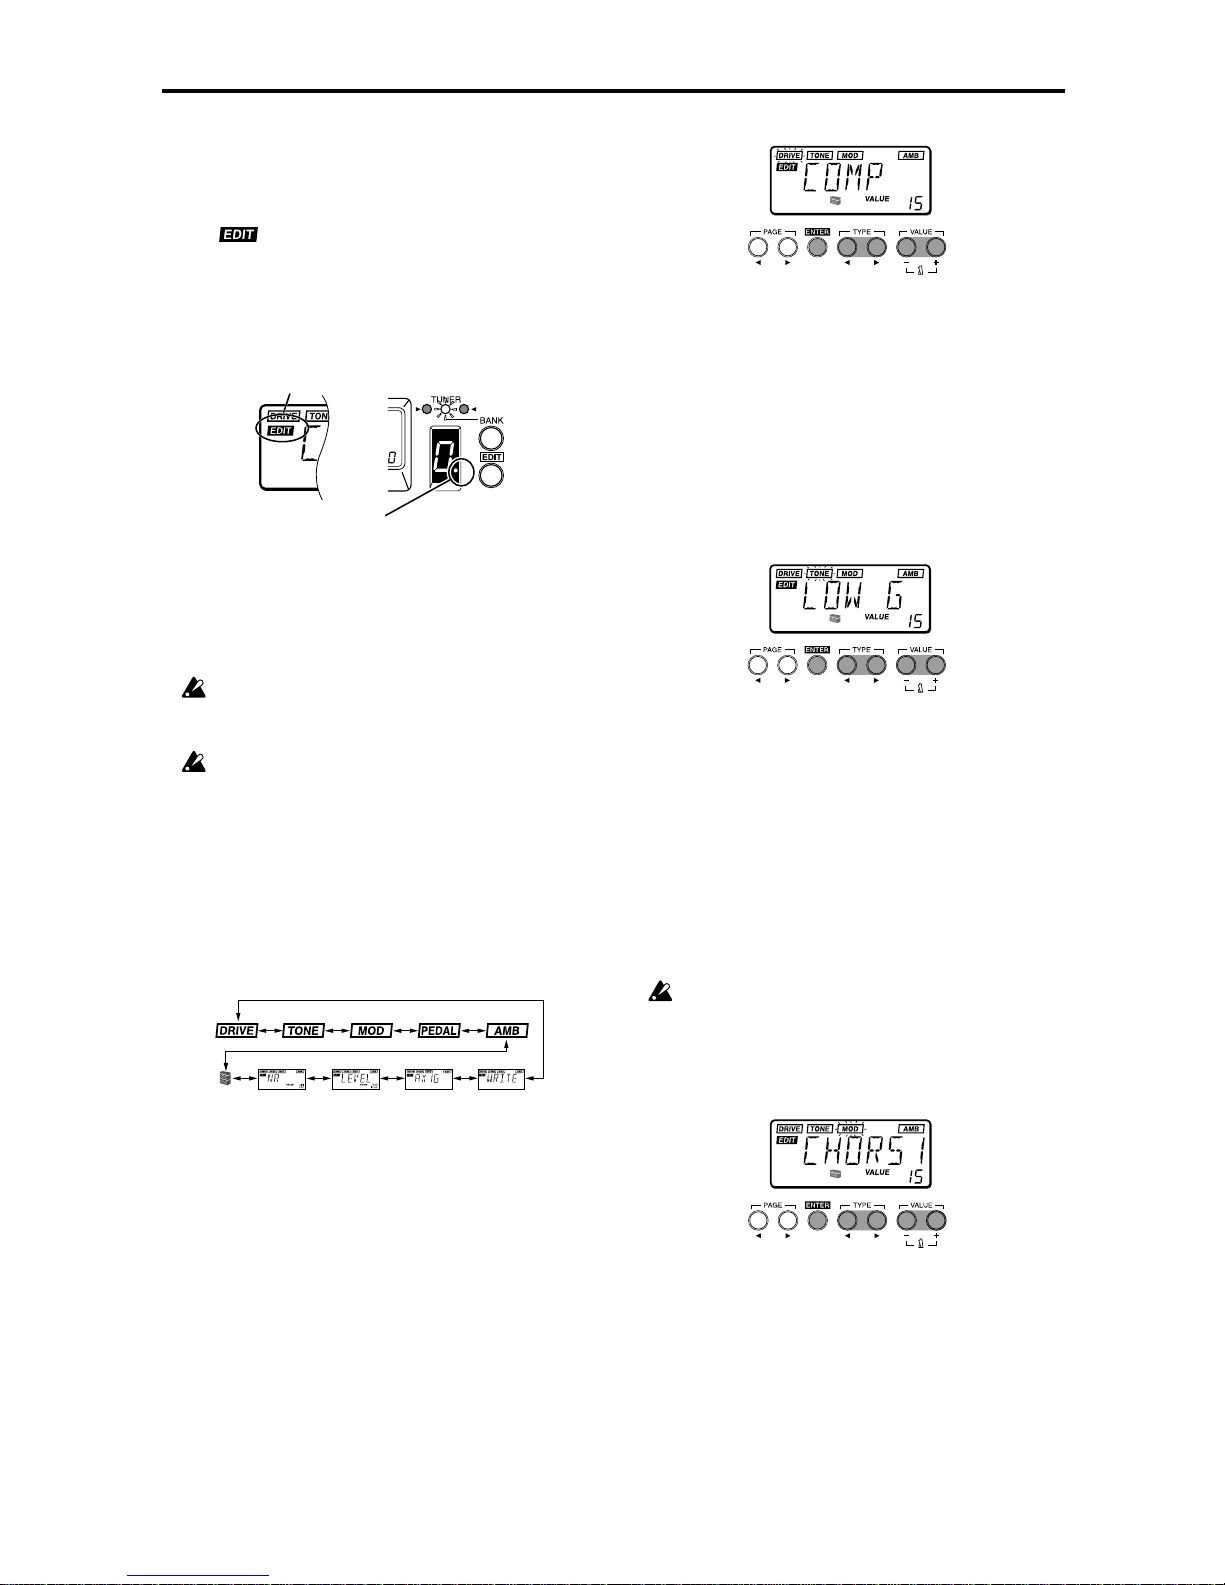
1. Selecting the parameter to edit
• Use the PAGE [√] or [®] key to select the
parameter that you wish to edit.
You can select effects and other parameter in
the order shown by the diagram below.
The currently selected effect display will blink.
Effects which are turned off cannot be edited. T o
edit an effect which is turned off, use the PAGE
[√] or [®] ke y to select the effect, and then press
the ENTER key to turn on the effect.
2. Editing effect parameters
To edit a program, you can select an effect type Drive,
Tone, Modulation, Pedal, or Ambiance, and modify
the value of the parameter assigned to each effect
type.
For the type of effects which can be selected and the
available values of the parameters, refer to the Effect
Parameter table (☞ p.50).
●DRIVE
This provides effects which process the tonal character, such as compressor, overdrive, and distortion.
❍ENTER key: Turn the effect on/off (the type name
is displayed when on, and “OFF” when
off)
❍TYPE [√]/[®] keys: Select the effect type
❍VALUE [-]/[+] keys: Specify the value of the param-
eter assigned to each effect
type (☞ p.50)
●TONE
This provides effects which adjust the tonal character.
❍ENTER key: Turn the effect on/off (the type name
is displayed when on, and “OFF” when
off)
❍TYPE[√]/[®] keys: Switch between LOW G (low
range gain), MID FC (mid
range frequency), MID G
(mid range gain), and HIGH
G (high range gain)
❍VALUE[-]/[+] keys: Set the frequency or gain (☞p.
50)
Depending on the settings, the output sound
may distort (clip). If this occurs, adjust the level
(☞ p.15 “LEVEL”) so that the sound does not
distort.
●MOD
This provides modulation-type effects such as chorus, flanger, and phaser.
❍ENTER key: Turn the effect on/off (the type name
is displayed when on, and “OFF” when
off)
❍TYPE [√]/[®] keys: Select the effect type
❍VALUE [-]/[+] keys: Specify the value of the param-
eter assigned to each effect
type (☞ p.51–52)
Page 15
15
Edit mode
Edit mode
●PEDAL
This provides effects which can be controlled using
the expression pedal. PED AL pro vides v olume pedal,
PEDAL-mod (modulation-type effects), and PEDALamb (ambiance-type effects).
❍ENTER key: Turn the effect on/off (the type name
is displayed when on, and “OFF” when
off)
❍TYPE [√]/[®] keys: Select the effect type
❍VALUE [-]/[+] keys: Specify the value of the param-
eter assigned to each effect
type (☞ p.52–54)
PEDAL-mod cannot be used simultaneously
with MOD effects. One or the other effect will
be turned off. Also, if the MOD effect is automatically turned off, turning PEDAL off or selecting an effect other than PED AL-mod will automatically turn it on once again. Similarly,
PEDAL-amb and AMB eff ects cannot be used
simultaneously.
●AMB
This provides spatial effects such as re verb and delay.
❍ENTER key: Turn the effect on/off (the type name
is displayed when on, and “OFF” when
off)
❍TYPE [√]/[®] keys: Select the effect type
❍VALUE [-]/[+] keys: Specify the value of the param-
eter assigned to each effect
type(☞ p.54)
●CR
The cabinet resonator (CR) simulates the acoustical
characteristics of the cabinet of a guitar amplifier. It is
particularly effective when you are not using an amp
(e.g., when headphones, mixer, hard disk recorder,
or an audio system is connected).
❍ENTER key: Turn the effect on/off (the type name
is displayed when on, and “OFF” when
off)
❍TYPE [√]/[®] keys: Select the cabinet size
❍VALUE [-]/[+] keys:Specify the depth of the effect
●NR
Adjust the depth of noise reduction. Raising this v alue
will produce more noise reduction. Normally you will
adjust this so that you do not hear obtrusive noise
when the strings are lightly muted.
❍VALUE [-]/[+] keys: Adjust the depth of noise re-
duction
It is not possible to turn noise reduction off.
If this value is raised excessively, the sound
may be cut off prematurely, depending on the
device that is connected. If this occurs, reduce
the value.
3. Editing other parameters
●LEVEL
Adjust the level for each program.
Depending on the DRIVE or TONE settings, the output sound may be distorted (clipped), so adjust this
parameter so that the sound is not distorted.
❍VALUE [-]/[+] keys: Set the level accordingly
The volume of each program (each tone) will
change depending on the guitar you use. Adjust the level as appropriate for your guitar.
●RENAME
Here you can specify a name for each program.
❍TYPE [√]/[®] key: Select the character location
(the selected character will
blink)
❍VALUE [-]/[+] keys: Select the character
Simultaneously pressing [+] and [-] will insert a space
(blank).
The following characters and symbols are available.
Page 16
16
Edit mode
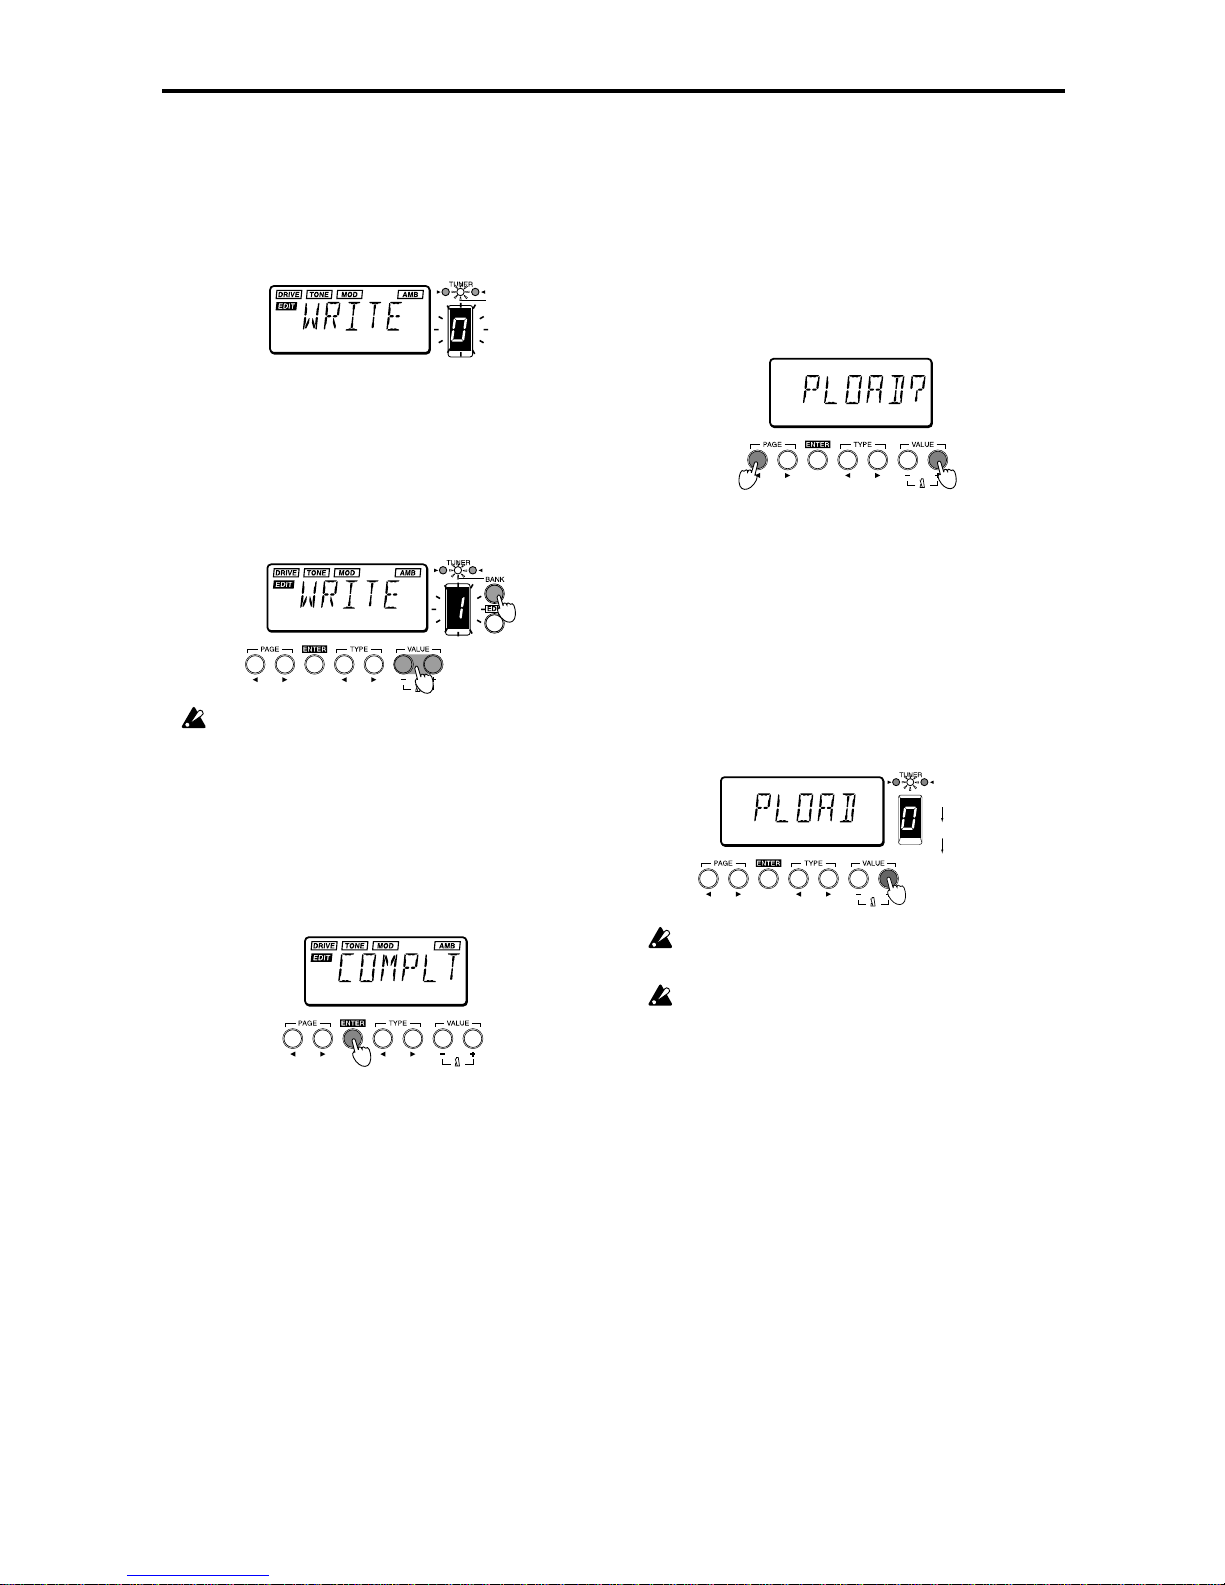
●WRITE
A program you edited or created can be written
(stored) into memory.
When the Write operation is selected, the LCD will
indicate “WRITE”, and the program number will blink
in the PROGRAM/NOTE display.
1 Use the B ANK SELECT ke y or the V ALUE [+]
[-] keys to select the bank and program number into which you wish to write the settings.
When you select the writing destination, the program name of that writing destination will be displayed briefly.
1
1
Before you write an edited program onto another program number , mak e sure that it is OK
to overwrite that program.
2 Press the ENTER key to write the program.
When you write the program, the LCD will indicate “COMPLT” for approximately one second. If
you decide not to write, press the PAGE [√] or
[®] keys to select another displa y, and the Write
operation will be canceled.
2
❍ENTER key: Execute the Write operation
❍BANK SELECT key: Select the bank
❍VALUE [-]/[+] keys: Select the program number
4. Restoring the preset programs (factory
setting programs)
1 While simultaneously pressing the P A GE [√]
and VALUE [+] keys, turn on the power.
The LCD will indicate “PLOAD?”.
If you press the VALUE [-] key, you will jump to
the initial power-on display without loading the
preset programs, and the AX1G will enter Play
mode.
1
1
2 Press the VALUE [+] key.
The LCD will change to “PLOAD,” and the preset
programs will be loaded. While the data is being
loaded, the bank and program number of the program currently being loaded will be shown by
the BANK/TUNER LEDs and in the PROGRAM/
NOTE display.
When loading is complete, the LCD will indicate
“COMPLT” for approximately one second. Then
the initial power-on display will appear, and the
AX1G will enter Play mode.
2
red 0–9
green 0–9
orange 0–9
Never turn off the power while this operation is
in progress.
Be aware that if you reload the preset programs ,
all previously written programs will be overwritten.
Page 17
17
Introduction
Introduction
■ Introduction
Merci d’avoir fait l’acquisition du Processeur
haute performance Toneworks AX1G. Pour lui
assurer une longue vie sans incidents, veuillez lire
attentivement le présent manuel et toujours veiller
à utiliser l’appareil correctement. Conserver le
manuel dans un endroit sûr afin de pouvoir s’y
reporter ultérieurement.
1. Caractéristiques principales
●69 types de variations d’effets fournies avec
un maximum de sept effets pouvant être utilisés simultanément.
● 30 programmes utilisateur, répartis dans 3
banques de 10 programmes, sont prévus dans
la mémoire interne.
● La pédale d’expression permet de contrôler
les effets en temps réel.
● La fonction d’échantillonnage et de jeu per-
met d’enregistrer une phrase jouée (qui peut
durer jusqu’à 1,8 secondes) et d’utiliser la pé-
dale pour la rejouer.
● Le système IPE (édition des paramètres in-
tégrés) facilite l’édition et vous évite de devoir
faire face à un nombre confus de paramètres.
● Un métronome incorporé s’avère extrême-
ment pratique pour les répétitions en solitaire.
● L’accordeur chromatique automatique per-
met d’accorder l’appareil lorsqu’il est contourné ou que le son est coupé.
● L’interface pratique pour l’utilisateur est pour-
vue d’un écran à cristaux liquides.
●Ecran à cristaux liquides rétroéclairé - facilite
la visualisation dans des endroits obscurs sans
épuiser les batteries.
2. Mise en place des piles
1 Appuyer légèrement sur la flèche A du lo-
gement des piles puis glisser le couvercle
vers le haut, dans le sens de la flèche, pour
ouvrir le logement.
2 Insérer quatre piles alcalines de format AA
(vendues séparément) comme indiqué sur le
diagramme. Toujours veiller à bien respecter la polarité (+ et -) des piles.
3 Refermer le couvercle du logement des pi-
les.
Si vous ne comptez pas utiliser l’appareil
pendant une période prolongée, retirer les
piles pour éviter tout dégât dû à des fuites
de produit.
Lorsque le témoin d’épuisement des piles
(symbole
) apparaît sur l’écran LCD, rem-
placer les piles dès que possible.
Les piles et l’adaptateur AC ne sont pas inclus avec cet appareil. Veuillez les acheter
séparément.
3. Panneaux avant et arrière
●Panneau avant
1
2
3
4
5
6
7
89
A
0
B
1 Commutateurs UP/DOWN (haut/bas)
Ces commutateurs servent à sélectionner des
programmes, à contourner ou à couper le son
de l’appareil.
2 Pédale d’expression
Elle contrôle l’effet sélectionné comme effet de
pédale.
3 Touches TYPE [√]/[®]
En mode d’édition, ces touches servent à sélectionner le type d’effet à éditer.
4 Touches VALUE [-]/[+]
Ces touches servent à éditer les paramètres et à
activer ou à désactiver le métronome.
5 Touche EDIT/EXIT
Sert à accéder au mode d’édition ou à revenir
au mode de jeu.
6 Touche BANK/SELECT (sélection de banque)
Sert à sélectionner les différentes banques.
7 Voyant de la pédale
Celui-ci indique l’état activé ou désactivé de l’effet de pédale ou la condition d’enregistrement
lorsque l’effet d’échantillonneur est utilisé.
Page 18

18
Introduction
8 Voyant BANK/TUNER (banque/accordeur)
Ces voyants indiquent la banque du programme sélectionné. Lorsque l’accordeur est
opérationnel, ils servent à évaluer l’accordage.
9 Affichage de PROGRAMME/NOTE
Cet affichage indique le numéro du programme.
Lorsque l’appareil est contourné ou que le son
est coupé alors que l’accordeur est opérationnel, il indique le nom de la note.
0 Affichage à cristaux liquides rétroéclairé
Avant d’utiliser l’appareil dans un endroit sombre, exposer l’affichage à la lumière solaire ou à
une lumière fluorescente.
A Touches PAGE [√]/[®]
En mode d’édition ou lorsque le métronome est
actif, ces touches servent à sélectionner le paramètre à modifie.
B Touche ENTER
En mode d’édition, cette touche sert à activer
ou à désactiver les effets ou à mémoriser un programme.
●Panneau arrière
1
23
4
5
1 Borne INPUT (entrée)
Si l’appareil fonctionne sur piles, cette borne sert
d’interrupteur d’alimentation. Le raccordement
d’un câble à celle-ci met l’appareil sous tension.
Avant de mettre l’appareil sous ou hors tension, toujours diminuer au minimum le volume de tout équipement qui pourrait y être
raccordé.
2 Commutateur du niveau d’entrée
Régler cet interrupteur en fonction du niveau
de sortie de votre instrument.
H: Convient pour un micro avec un niveau
de sortie élevé, comme un micro antibourdonnements.
L: Convient pour un micro avec un niveau
de sortie faible, comme un micro à une
seule bobine.
3 Borne OUTPUT/PHONES (sortie/casque
d’écoute)
4 DC9V
Sert à raccorder l’adaptateur secteur vendu sé-
parément (DC9V
). Dans ce cas, l’appa-
reil se met automatiquement sous tension.
5 Crochet pour câble
Si vous raccordez l’adaptateur secteur vendu
séparément, accrocher le câble de l’adaptateur
autour de ce crochet comme indiqué ci-dessous.
Lors du retrait du câble du crochet, veiller à ne
pas appliquer une tension excessive au câble.
● Affichage LCD
1
2
3
45
6
7
1 Témoins d’activation/de désactivation des
effets
Ces témoins indiquent les effets (drive, tone,
modulation, pédale, ambiance) qui sont activés.
2 Témoin du mode d’édition
3 Témoin d’épuisement des piles
4 Témoin d’activation/de désactivation du
simulateur d’ampli
5 Témoin d’activation/de désactivation du
métronome
6 Ce voyant indique les valeurs des paramètres
des effets ou le niveau principal.
7 Ce voyant indique le nom du programme ou le
type d’effet, etc.
Page 19

19
Introduction
Introduction
4. Raccordements
Avant d’effectuer les raccordements, toujours vérifier si les autres équipements sont hors tension ou si
leur volume est réduit à zéro. Les câbles de raccordement sont vendus séparément.
INPUT
OUTPUT/PHONES
DC9V
Enregistreur de disque dur, etc.
Système audio
Ampli pour guitare/moniteur sous tension (*1)
Borne mono d'1/4" - borne mono d'1/4"
Casque d'écoute (*1)
Adaptateur secteur (*2) vers prise de courant
Borne mono d'1/4" - borne mono d'1/4"
Sortie mono - borne mono d'1/4" /Sortie
stéréo - deux bornes mono d'1/4".
Borne stéréo d'1/4" - borne stéréo RCA (téléphonique).
Guitare
*1: La borne OUTPUT/PHONES est une borne de sortie stéréo. Si vous utilisez un câble té lé phonique
mono pour raccorder l’AX1G à un ampli pour guitare, seul le son L (gauche) sera émis.
*2: Si l’appareil doit fonctionner sur piles, l’adaptateur secteur n’est pas nécessaire. Néanmoins, en cas
d’utilisation d’un adaptateur, toujours employer uniquement le modèle spécifié (DC9V
).
Page 20

20
Mode de jeu
■ Mode de jeu
1. Comme nt jouer sur le AX1G
●Mettre l’appareil sous tension
Le AX1G n’est pas muni d’un interrupteur d’alimentation. Il se met automatiquement sous tension
dans chacune des circonstances suivantes:
• Lors du fonctionnement sur piles, l’appareil
se met sous tension dès que la fiche d’un câ-
ble téléphonique mono est introduite dans
la borne INPUT.
Si vous raccordez la fiche d’un câble télé-
phonique stéréo, l’appareil ne se mettra pas
sous tension.
A la mise sous tension, le AX1G se met automatiquement en mode de jeu.
L’écran affiche le nom du programme. Le pro-
gramme sélectionné à la mise sous tension
sera le programme sélectionné en dernier
avant la mise hors tension.
Pour préserver la durée de vie des piles, dé-
brancher le câble de la borne d’entrée INPUT
dès que vous cessez d’utiliser le AX1G.
• Si vous utilisez l’adaptateur secteur vendu
séparément, l’appareil se met automatiquement sous tension dès que vous raccordez
l’adaptateur secteur à une prise de courant.
Mettre les autres équipements hors tension
avant de mettre le AX1G hors tension.
●Réglage du niveau principal (niveau
global)
Le niveau principal permet de régler le volume de
sortie final du AX1G. Le réglage de volume principal s’affiche en mode jeu dans la partie inférieure
droite de l’écran.
• Utiliser les touches VALUE [+] ou [-] pour
régler le volume principal. Maintenir la touche enfoncée pour changer de valeur plus
rapidement.
Normalement, il convient de laisser le niveau
principal sur 30 (maximum).
Le niveau de sortie du AX1G est en effet le
plus performant lorsque le volume principal
est réglé sur 30. Si le son de sortie est déformé
lorsque le niveau principal est mis sur 30 et
que vous jouez en contournant le AX1G, ré-
duire le niveau principal de sorte à supprimer cette distorsion.
●Sélectionner un programme et jouer
Voici comment sélectionner un programme utilisateu.
1 Appuyer sur la touche de sélection de ban-
que BANK SELECT pour commuter entre les
banques verte, orange et rouge.
La banque change à chaque pression de la
touche et les voyants BANK/TUNER passent
de "
vert orange rouge
" et ainsi de suite.
1
2 Appuyer sur les commutateurs UP ou DOWN
pour sélectionner un numéro de programme.
Le numéro de programme apparaît sur l’affichage PROGRAMME/NOTE et le nom du
programme s’inscrit à l’écran.
2
rouge 0 à 9
vert 0 à 9
orange 0 à 9
UP
UP
DOWN
UP
DOWN
DOWN
2. Contournement et suppression du
son
Lorsque le AX1G est contourné, aucun effet n’est
appliqué et l’accordeur est opérationnel. Lorsque
le son du AX1G est coupé, il n’émet aucun son et
l’accordeur est opérationnel.
●Contournemen
1 Appuyer simultanément sur les commuta-
teurs UP et DOWN et les relâcher immédiatement pour sélectionner le contournement
BYPASS.
Les voyants d’activation/de désactivation des
effets clignotent et après l’affichage de
“BYPASS” pendant environ une seconde, le
calibrage de l’accordeur apparaît.
1
2 Appuyer sur le commutateur UP ou DOWN
pour annuler le contournement.
Page 21

21
Mode de jeu
Mode de jeu
4 Accorder finement la guitare pour que le
voyant central (vert) des voyants BANK/
TUNER s’allume.
La note est trop grave La note est trop aiguë
5 Lorsque l’accordage est terminé, annuler le
contournement (ou réactiver le son).
●Modification du calibrage
Le calibrage de l’accordeur (la fréquence de la hauteur standard du La) peut être réglé sur une plage
allant de 438 à 445 Hz.
Le réglage du calibrage peut s’effectuer lorsque
l’accordeur est opérationnel.
Appuyer sur les touches VALUE [+] ou [-]
pour modifier le calibrage.
Les modifications apportées au calibrage sont
perdues à la mise hors tension. Lorsque vous
remettez l’appareil sous tension, le calibrage
revient automatiquement à 440 Hz.
Le calibrage ne s’affiche pas en mode d’édi-
tion.
4. Métronome
Le AX1G dispose d’un métronome qui s’avère particulièrement pratique pour s’exercer en solitaire.
●Démarrer le métronome et régler le
tempo ainsi que le niveau de sortie (le
volume)
1 Appuyer simultanément sur les touches
VALUE [+] et [-] pour démarrer le métronome.
L’écran affiche le tempo du métronome.
Lorsque le métronome est activé, vous pouvez toujours changer de programmes ou contourner le AX1G.
11
2
Il n’est pas possible d’activer le métronome
en mode d’édition. Il faut revenir en mode
de jeu pour l’activer.
●Assourdissement (Mute)
1 Appuyer simultanément sur les commuta-
teurs UP et DOWN et continuer à les maintenir enfoncés pour couper le son de la sortie.
Pendant que vous appuyez sur ces commutateurs, l’écran indique "MUTE". Lorsque
vous relâchez les commutateurs, le calibrage
de l’accordeur apparaît. Les voyants d’activation/de désactivation des effets clignotent
de la même manière que pour le contournement.
1
Appuyer et maintenir enfoncé
2 Appuyer sur l’interrupteur UP ou DOWN
pour annuler l’assourdissement.
3. Accordeur
Lorsque le son de le AX1G est coupé ou contourné,
l’accordeur est automatiquement opérationnel. Si
vous coupez le son du AX1G, vous pouvez accorder votre instrument sans émettre de son par votre système d’ampli, etc. ce qui s’avère particuliè-
rement pratique lors de représentations sur scène.
●Accordage de la guitare
1 Contourner (ou couper le son) du AX1G.
Le AX1G se met en mode de contournement
ou d’assourdissement et l’accordeur devient
opérationnel.
1
Si le métronome est activé, l’accordeur ne
fonctionne pas.
2 Gratter la corde à accorder.
Le nom de la note apparaît sur l’affichage
BANK/NOTE. Si la note entrée est trop aiguë
(#) par rapport au nom de la note, le point
décimal “.” de l’affichage BANK/NOTE
s’éclaire.
Lorsque la note est
le La (A).
Lorsque la note est
le La dièse (A#).
Lors de l’accordage, veiller à ne jouer qu’une
seule corde à la fois.
3 Accorder la guitare à la hauteur souhaitée,
afin que l’affichage PROGRAMME/NOTE
indique le nom de note correct.
Page 22

22
Mode de jeu
2 Appuyer sur la touche VALUE [+] ou [-] pour
régler le tempo du métronome.
Le tempo peut être réglé sur une plage allant
de = 40 à 208.
3 Appuyer une fois sur la touche PAGE [®]
pour afficher le niveau de sortie du métronome.
Appuyer sur la touche PAGE [√] pour revenir à l’affichage du tempo.
3
4
4 Appuyer sur la touche VALUE [+] ou [-] pour
régler le niveau de sortie du métronome.
Vous pouvez régler le niveau de sortie du mé-
tronome de 0 à 30.
5 Appuyer de nouveau simultanément sur les
touches VALUE [+] et [-] pour arrêter le mé-
tronome.
Les réglages de tempo et de niveau de sortie
du métronome seront conservés même après
la mise hors tension.
5. Utilisation de la pédale d’expression
La pédale d’expression permet de contrôler le volume, le wah, l’effet de chorus, le temps de retard,
etc. en temps réel.
Grâce à cette pédale, vous pouvez contrôler 18 effets de type MOD (modulation) différents et 13
effets de type AMB (ambiance). Vous pouvez également contrôler le volume. Pour ce faire, vous
pouvez sélectionner un de ces paramètres pour les
utiliser. (se reporter à la p.50 “Liste des paramè-
tres d’effets”)
●Interprétation en utilisant la pédale
d’expression
1 En mode Jeu, sélectionner un programme
qui permet d’utiliser la pédale d’expression.
Le témoin “ ” s’éclaire dans le haut de
l’écran pour indiquer les programmes qui per-
mettent l’utilisation de la pédale d’expression.
Dans notre exemple, nous sélectionnerons
G(vert)-3 “SATCH”.
2 S’assurer que le voyant de la pédale est al-
lumé.
Si ce n’est pas le cas, appuyer sur la pédale
d’expression pour l’allumer.
2
3
Si le voyant de la
pédale est éteint,
appuyer sur la pédale.
Actionner la pédale
Voyant de la pédale
Lorsque vous contrôlez le volume, il n’est
pas possible d’activer/de dés activer la pé-
dale d’expression. Elle restera activée (le té-
moin de la pédale sera allumé).
L’état du voyant de la pédale (c’est-à-dire
l’état d’activation ou de désactivation de la
pédale d’expression) n’est pas mémorisé lors
de la sauvegarde du programme en mode
d’édition.
3 Actionner la pédale d’expression tout en
jouant sur la guitare.
Lorsque vous relevez et que vous abaissez la
pédale, le son de sortie change conformément.
Ne pas appliquer de force excessive à la pé-
dale expression. Avant d’actionner celle-ci,
vérifier si son voyant est allumé et la force
véritablement requise pour l’effet.
●Utilisation de l’effet Echantillonnage et
Jeu (Sample & Play)
1. SAMPL1/2, SCRAT1/2
Les types d’effets SAMPL1/2 permettent d’utiliser
la pédale pour reproduire une phrase enregistrée.
Les types d’effets SCRAT1/2 permettent d’utiliser la pédale pour reproduire une ébauche de son
basée sur une phrase enregistrée.
1 Sélectionner un programme qui utilise l’ef-
fet Echantillonnage et Jeu.
Dans notre exemple, nous allons sélectionner
SAMPL2R (rouge)-5 “FWD/BK”.
Page 23

23
Mode de jeu
Mode de jeu
2 Appuyer sur la pédale d’expression pour
sélectionner le mode prêt pour l’enregistrement.
Le voyant de la pédale s’allume.
Appuyer
2
Clignotan
3 Jouer une phrase sur la guitare.
Lorsque vous commencez à jouer sur la guitare, l’enregistrement commence automatiquement et le voyant de la pédale s’allume.
Lorsque l’enregistrement est terminé, le
voyant de la pédale s’éteint.
L’enregistrement ne commence pas tant que
la guitare ne dépasse pas le niveau de volume minimum.
4 Actionner la pédale d’expression.
Actionner la pédale
4
SAMPL1:La phrase enregistrée se reproduit
lorsque vous appuyez sur la pédale.
SAMPL2:La phrase enregistrée se reproduit
lorsque vous appuyez sur la pédale
et elle joue en sens inverse lorsque
la pédale revient à sa position normale.
SCRAT1: Une ébauche de son se reproduit
lorsque vous déplacez la pédale. Le
mouvement de la pédale seul cause
la reproduction de l’ébauche du
son.
SCRAT2: Une ébauche de son se reproduit
lorsque vous déplacez la pédale
tout en jouant sur la guitare. Le
mouvement de la pédale seul n’entraîne aucune reproduction.
Le son enregistré est supprimé (effacé) lors
du changement de programme, du contournement du AX1G ou de son assourdissement, lorsque le type d’effet est modifié ou
à la mise hors tension.
2. LOOP1/2
Les types d’effets LOOP1/2 permettent d’enregistrer une phrase tout en reproduisant une boucle.
Cela permet de superposer votre propre interpré-
tation à un enregistrement.
1 Sélectionner un programme qui utilise l’ef-
fet d’échantillonnage et de jeu (Sample &
Play)
Dans notre exemple, nous allons sélectionner
LOOP 1 O (orange)-7 “S/LOOP”.
2 Appuyer sur la pédale d’expression pour
sélectionner le mode prêt pour l’enregistrement.
Le voyant de la pédale s’allume.
Appuyer
2
Clignotan
3 Jouer une phrase sur la guitare.
Lorsque vous commencez à jouer sur la guitare, l’enregistrement commence automatiquement et le voyant de la pédale s’allume.
Lorsque l’enregistrement est terminé, le
voyant de la pédale s’éteint et le son enregistré se met à jouer en boucle.
L’enregistrement ne commence pas tant que
la guitare ne dépasse pas le niveau de volume minimum.
4 Actionner la pédale d’expression.
Actionner la pédale
4
LOOP1: La pédale contrôle le volume de la re-
production.
LOOP2:La pédale contrôle la longueur de la
boucle. La boucle raccourcit à mesure
que la pédale revient à sa position normale et à la longueur minimum, elle
n’est plus du tout audible.
Le son enregistré est supprimé (effacé) lors
du changement de programme, du contournement du AX1G ou de son assourdissement, lorsque le type d’effet est modifié ou
à la mise hors tension.
Page 24

24
Mode de jeu
Pour SAMPL1/2, le temps d’enregistrement est de
0,9 secondes pour le son hi-fi ou de 1,8 secondes
pour le son lo-fi. Pour LOOP1/2, le temps d’enregistrement est de 0,26 à 1,8 secondes (environ par
pas de 0,05 secondes) (☞ p.50 “Liste des paramè-
tres d’effets”).
Le type d’effet et le temps d’enregistrement peuvent être modifiés en mode d’édition. Pour plus
de détails à ce sujet, se reporter à la p.26 “Mode
d’édition, PEDALE (pédale d’expression)”.
●Calibrage (réglage) de la pédale
d’expression
La plage de fonctionnement de la pédale d’expression peut être réglée. Si vous estimez que la sensibilité de la pédale d’expression ne correspond pas
à ce que vous recherchez, vous pouvez effectuer
ce réglage pour que la pédale fonctionne idéalement à votre convenance. Vous devez effectuer le
réglage décrit ci-dessous lorsque l’enfoncement à
fond de la pédale ne produit pas l’effet maximum
ou, inversement, s’il n’est pas possible de couper
complètement l’effet.
Lors du calibrage de la pédale, l’actionner à
la main. Un réglage précis n’est en effet pas
possible lors de l’actionnement avec le pied.
1 Maintenir simultanément les touches PAGE
[√] et VALUE [-] enfoncées tout en mettant
l’appareil sous tension.
L’écran indique “PEDAL” pendant environ
une seconde puis il affiche la mention “MIN”.
2 Laisser la pédale revenir lentement à sa posi-
tion. Lorsqu’elle s’arrête, retirer sa main de la
pédale et appuyer sur la touche VALUE [+].
L’écran passe de “MIN” à “MAX”.
Si vous appuyez sur la touche VALUE [-] pendant le calibrage, celui-ci est interrompu.
L’écran initial apparaît et vous passerez en
mode de jeu.
2
Appuyerlentement
3 Déplacer lentement la pédale vers l’avant.
Lorsqu’elle s’arrête, retirer sa main et appuyer sur la touche VALUE [+].
L’écran affiche “COMPLT” pendant environ
une seconde. Ensuite, l’écran initial à la mise
sous tension apparaît pour signaler que vous
êtes repassé en mode de jeu.
Lorsque le calibrage est terminé, vérifier le
fonctionnement de la pédale aux positions
MIN et MAX.
3
Appuyer lentement
Vérifier le fonctionnement en sélectionnant un
type d’effet qui donne un résultat clairement
audible, comme un type d’effet VOLUME
puis vérifier si le niveau MIN correspond à
une valeur 0.
Si l’opération de calibrage échoue, l’écran
indique “ERROR” et vous reviendrez à l’affichage précédant le calibrage (“MIN”). Si
des tentatives répétées restent vaines, il se
peut qu’il s’agisse d’un mauvais fonctionnement du AX1G. Dans ce cas, contacter un
centre technique Korg ou votre revendeur.
Page 25

25
Mode d’édition (Edit)
Mode d’édition
■ Mode d’édition (EDIT)
Le mode d’édition permet d’effectuer des réglages précis pour chaque effet et de modifier le nom
d’un programme.
Appuyer sur la touche EDIT/EXIT et lécran affichera “
” pour signaler que le AX1G se trouve
en mode d’édition. Appuyer de nouveau sur la
touche EDIT/EXIT pour revenir au mode de jeu.
Vous pouvez éditer les réglages d’activation/de
désactivation de chaque effet et ses paramètres.
Lors de l’édition d’un programme, le “.” (point
décimal) de l’affichage PROGRAMME/NOTE
s’allume.
Allumé en mode d’éditio
Allumé lors de l’édition d’un programme
Les programmes édités sont perdus si vous changez de programmes ou si vous mettez l’appareil
hors tension avant de les sauvegarder. Pendant
l’édition, toujours sauvegarder régulièrement les
changements effectués. Pour la procédure de sauvegarde, voir p.27 “WRITE”.
Il n’est pas possible de changer de mode lorsque l’appareil est contourné (ou assourdi).
Désactivez le mode de contournement (ou
d’assourdissement) et changez de mode.
Si vous contournez (ou assourdissez) le
AX1G en mode d’édition, il n’est pas possi-
ble de réaliser des opérations d’édition. Annuler le contournement (ou l’assourdissement) avant de continuer l’édition.
1. Sélection d’un paramètre à éditer
• Utiliser la touche PAGE [√] ou [®] pour sélectionner le paramètre à éditer.
Vous pouvez sélectionner les effets et d’autres
paramètres dans l’ordre indiqué sur le diagramme illustré ci-dessous.
L’affichage de l’effet sélectionné clignote. Les
effets qui sont désactivés ne peuvent pas être
édités. Pour éditer un effet désactivé, utiliser
la touche PAGE [√] ou [®] pour sélectionner l’effet puis appuyer sur la touche ENTER
pour l’activer.
2. Edition des paramètres d’effets
Pour éditer un programme, vous pouvez sélectionner un type d’effets parmi Drive, Tone, Modulation, Pédale ou Ambiance et modifier la valeur du
paramètre assigné à chaque type d’effet.
En ce qui concerne les types d’effets pouvant être
sélectionnés et les valeurs disponibles pour les
paramètres, se reporter au Tableau des paramè-
tres d’effets (☞ p.50).
●DRIVE
Ce type fournit des effets qui traitent le caractère
tonal, comme le compresseur, la surmultiplication
et la distorsion.
❍Touche ENTER: Active ou désactive l’effet (le nom
du type d’effet s’affiche lorsqu’il
est activé et “OFF” apparaît lorsqu’il n’est pas activé.
❍Touches TYPE [√]/[®]: Sélectionnent le type
d’effet.
❍Touches VALUE [-]/[+]: Permettent de définir la
valeur du paramètre assigné à chaque type d’effet
(☞ p.50).
●TONE
Ce paramètre fournit des effets qui permettent de
régler le caractère tonal.
❍Touche ENTER: Active ou désactive l’effet (le nom
du type d’effet s’affiche lorsqu’il
est activé et “OFF” apparaît lorsqu’il n’est pas activé.
❍Touches TYPE [√]/[®]: Permettent de commuter
entre LOW G (gain de la
plage inférieure), MID
FC (fréquence de la plage
moyenne) et HIGH G
(gain de la plage supé-
rieure).
❍Touches VALUE [+]/[-]: Permettent de définir la
fréquence ou le gain (☞
p.50).
En fonction des réglages, le son de sortie risque d’être déformé (arrondi). Dans ce cas,
régler le niveau (voir p.27 “LEVEL”) de sorte
que le son ne soit plus déformé.
Page 26

26
Mode d’édition (Edit)
●MOD
Cette fonction fournit des effets de type modulation comme le chorus, le flanger et le phaser.
❍Touche ENTER: Active ou désactive l’effet (le nom
du type d’effet s’affiche lorsqu’il
est activé et “OFF” apparaît lorsqu’il n’est pas activé.
❍Touches TYPE [√]/[®]: Sélectionnent le type
d’effet.
❍Touches VALUE [-]/[+]:Permettent de définir la
valeur du paramètre assigné à chaque type d’effets
(☞ p.51 á 52).
●PEDAL
Cette fonction fournit des effets qui peuvent être
contrôlés à partir de la pédale d’expression.
PEDAL fournit une pédale de volume alors que
PEDAL-mod fournit des effets de type modulation et PEDAL-amb des effets de type ambiance.
❍Touche ENTER: Active ou désactive l’effet (le nom
du type d’effet s’affiche lorsqu’il
est activé et “OFF” apparaît lorsqu’il n’est pas activé.
❍Touches TYPE [√]/[®]: Sélectionnent le type
d’effet.
❍Touches VALUE [-]/[+]:Permettent de définir la
valeur du paramètre assigné à chaque type d’effets
(☞ p.52 à 54).
PEDAL-mod ne peut pas être utilisé simultanément avec les effets MOD. L’un ou l’autre
des effets sera désactivé. De même, si l’effet
MOD est automatiquement désactivé, le fait
de désactiver la fonction PEDAL ou de sélectionner un autre effet que PEDAL-mod le
réactive automatiquement. De même, les effets PEDAL-amb et AMB ne peuvent pas être
utilisés simultanément non plus.
●AMB
Cette fonction fournit des effets spatiaux comme
la réverbération et le retard.
❍Touche ENTER: Active ou désactive l’effet (le nom
du type d’effet s’affiche lorsqu’il
est activé et “OFF” apparaît lorsqu’il n’est pas activé).
❍Touches TYPE [√]/[®]: Sélectionnent le type
d’effet.
❍Touches VALUE [-]/[+]:Permettent de définir la
valeur du paramètre assigné à chaque type d’effets
(☞ p.54).
●CR
L’effet de résonateur de coffret (CR) simule les ca-
ractéristiques acoustiques du boîtier d’un amplificateur pour guitare. Il s’avère particulièrement
efficace lorsque vous n’utilisez pas d’ampli (par
exemple, lorsque le casque d’écoute, le mélangeur,
l’enregistreur de disque dur ou un système audio
sont raccordés.).
❍Touche ENTER: Active ou désactive l’effet (le nom
du type d’effet s’affiche lorsqu’il
est activé et “OFF” apparaît lorsqu’il n’est pas activé).
❍Touches TYPE [√]/[®]: Sélectionnent le taille du
coffret.
❍Touches VALUE [+]/[-]: Permettent de définir l’in-
tensité de l’effet.
●NR
Permet de régler la profondeur de la réduction du
bruit. L’augmentation de cette valeur produit da-
vantage de réduction du bruit. Normalement, il
convient de la régler de manière à ne pas entendre
les bruits perturbants lorsque les cordes sont légè-
rement assourdies.
Page 27

27
Mode d’édition (Edit)
Mode d’édition
❍Touches VALUE [-]/[+]:Permettent de régler l’in-
tensité de la réduction du
bruit.
Il n’est pas possible de désactiver la réduction du bruit.
Si vous augmentez cette valeur de manière
excessive, le son risque d’être coupé prématurément, en fonction de l’équipement raccordé. Pour éviter ce problème, diminuer la
valeur de réduction du bruit.
3. Edition d’autres paramètres
●LEVEL
Permet de régler le niveau de chaque programme.
En fonction des réglages DRIVE et TONE, le son
de sortie risque d’être déformé (arrondi); il convient donc de régler ce paramètre de sorte à éviter
toute distorsion.
❍Touches VALUE [+]/[-]: Règlent le niveau.
Le volume de chaque programme (chaque
tonalité) change en fonction de la guitare
utilisée. Il faut donc régler le volume en fonction de votre guitare.
●RENAME
Cette fonction permet de donner un nom à chaque programme.
❍Touches TYPE [√]/[®]: Sélectionnent l’emplace-
ment du caractère (le caractère sélectionné clignote).
❍Touches VALUE [-]/[+]: Sélectionnent le caractère.
Appuyer simultanément sur [+] et [-] pour insérer
un espace (un blanc).
Vous pouvez sélectionner les caractères et les symboles suivants.
●WRITE
Un programme édité ou créé peut être sauvegardé
dans la mémoire (mémorisé).
Lorsque vous sélectionnez l’opération de sauvegarde, l’écran indique la mention “WRITE” et le
numéro de programme clignote sur l’affichage
PROGRAMME/NOTE.
1 Utilisez la touche BANK SELECT (sélection
banque) ou les touches VALUE [+] [-] afin
de sélectionner la banque et le numéro de
programme dans lesquels vous voulez sauvegarder les réglages.
Lors de la sélection de la destination de sauvegarde, le nom du programme de destination
s’affiche brièvement.
1
1
Avant de sauvegarder un programme édité
sous un autre numéro de destination, vérifier s’il n’existe aucun inconvénient à remplacer le programme qui s’y trouvait déjà.
2 Appuyer sur la touche ENTER pour sauve-
garder le programme.
Lors de la sauvegarde du programme, l’écran
indique “COMPLT” pendant environ une seconde. Si vous décidez de ne pas le sauvegarder, appuyer sur les touches PAGE [√] ou [®]
pour sélectionner un autre affichage et annuler ainsi l’opération de sauvegarde.
2
❍Touche ENTER: Exécute l’opération de sauvegarde.
❍Touches VALUE [-]/[+]: Sélectionne le numéro de
programme.
❍Touche BANK SELECT: Sélectionne la banque.
Page 28

28
Mode d’édition (Edit)
4. Rappel des programmes prédéfinis
(programmes préenregistrés à
l’usine)
1 Appuyer simultanément sur les touches
PAGE [√] et VALUE [+] et mettre l’appareil
sous tension.
L’écran affiche “PLOAD?”.
Si vous appuyez sur la touche VALUE [-],
vous passerez directement à la page d’écran
initiale de la mise sous tension sans charger
les programmes prédéfinis d’usine et le AX1G
se mettra en mode de jeu.
1
1
2 Appuyer sur la touche VALUE [+]
L’écran indique alors “PLOAD“ et l’appareil
charge les programmes prédéfinis d’usine.
Pendant le chargement des données, la banque et le numéro du programme chargé sont
indiqués par les voyants BANK/TUNER et
par l’affichage PROGRAM/NOTE.
Lorsque le chargement est terminé, l’écran
indique “COMPLT” pendant environ une seconde. Ensuite, la page d’écran initiale qui
apparaît à la mise sous tension s’affiche et le
AX1G se met en mode de jeu.
2
rouge 0 à 9
vert 0 à 9
orange 0 à 9
Ne jamais mettre l’appareil hors tension pendant que cette opération est en cours.
Ne pas oublier que, si vous rechargez les
programmes prédéfinis, tous les programmes mémorisés précédemment seront remplacés.
Page 29

29
Einleitung
Einleitung
■ Einleitung
Für den Kauf des ToneWorks AX1G High Performance Processor möchten wir uns recht herzlich
bedanken. Um einen langjährigen problemlosen Betrieb des Gerätes sicherzustellen, sollten Sie dieses
Bedienungshandbuch lesen und das Produkt korr ekt
verwenden. Bewahren Sie das Handbuch für den
späteren Gebrauch sicher auf.
1. Hauptfunktionsmerkmale
●69 Effektvariationstypen, von denen bis zu
sieben Effekte gleichzeitig einsetzbar sind.
● 30 (10 x 3 Banken) Anwenderprogramme sind
im internen Speicher verfügbar.
● Expressionpedal zur Echtzeitsteuerung von
Effekten.
● Sample & Play-Funktion zum Aufnehmen ei-
ner gespielten Phrase (bis zu 1,8 sec lang) und
anschließendem Abspielen mittels Pedal.
● IPE (Integrated Parameter Edit) System ver-
einfacht das Editieren, damit Sie sich nicht mit
vielen verwirr enden Parametern befassen müssen.
● Integriertes Metronom unterstützt Sie, wenn
Sie allein üben.
● Autochromatisc her Tuner zum Stimmen des
Instruments, wenn der AX1G auf Bypass oder
stummgeschaltet ist.
● Bedienungsfreundliche Benutzerschnittstelle mit
LCD (Flüssigkristallanzeige).
●Hintergrundbeleuchtetes LCD erleichtert das
Ablesen von Werten in dunklen Umgebungen,
ohne die Batterien zu belasten.
2. Batterien einbauen
1 Drücken Sie leicht auf Pfeil A des Batterie-
faches, und schieben Sie den Dec kel in Pfeilrichtung nach oben, um das Fach zu öffnen.
2 Legen Sie wie in der Abbildung vier Mignon-
zellen (separat erhältlich) ein. Ac hten Sie hierbei auf die korrekte Polarität (+ und -) der Bat-
terien.
3 Schließen Sie den Dec kel des Batteriefaches.
Wenn Sie das Gerät über einen längeren Zeitraum nicht benutzen, sollten Sie die Batterien
herausnehmen, um zu verhindern, daß diese
auslaufen und das Gerät beschädigen.
Wenn auf dem LCD die Anzeige für leere Batterien (
Symbol) erscheint, ist es Zeit, die
Batterien zu ersetzen. Tauschen Sie die Batterien so bald als möglich aus.
Batterien und Wechselstromadapter gehören
nicht zum Liefer umfang. Sie sind separat erhältlich.
3. Vorder-und Rückseite
●Vorderseite
1
2
3
4
5
6
7
89
A
0
B
1 DOWN/UP-Schalter
Mit diesen Schaltern können Sie Programme wählen und das Gerät auf Bypass oder stummschalten.
2 Expressionpedal
Damit steuern Sie den als Pedaleffekt gewählten
Effekt.
3 TYPE [√]/[®]-Tasten
Im Edit-Modus wählen Sie mit diesen Tasten den
zu editierenden Effekttyp.
4 VALUE [-]/[+]-Tasten
Mit diesen Tasten editieren Sie Parameter und
schalten das Metronom ein/aus.
5 EDIT/EXIT-Taste
Mit dieser Taste können Sie in den Edit-Modus
schalten und in den Play-Modus zur ückkehren.
6 BANK SELECT-Taste
Mit dieser Taste wählen Sie die Banken.
7 Pedalanzeige
Zeigt entweder den Ein/Aus-Status des Pedaleffekts oder bei Einsatz des Samplereffekts den
Aufnahmezustand an.
8 BANK/TUNER LED
Diese LEDs zeigen die Bank des gewählten Programms an. Wenn der Tuner in Betrieb ist, zeigen
diese LEDs die Stimmung an.
9 PROGRAM/NOTE-Anzeige
Zeigt die Programmnummer an. Wenn das Gerät
auf Bypass oder stummgeschaltet ist und der Tuner in Betrieb ist, wird der Notenname angezeigt.
Page 30

30
Einleitung
0 LCD mit Hintergrundbeleuchtung.
Bevor Sie den AX1G in einer dunklen Umgebung
benutzen, sollten Sie das LCD dem Sonnenlicht
oder dem Licht einer Leuchtstoffröhre aussetzen.
A PAGE [√]/[®]-Tasten
Im Edit-Modus oder bei eingeschaltetem Metronom
wählen Sie mit diesen Tasten den zu modifizier enden Parameter.
B ENTER-Taste
Im Edit-Modus können Sie mit dieser Taste den
Effekt ein/ausschalten oder ein Programm in den
Speicher schreiben.
●Rückseite
1
23
4
5
1 INPUT-Buchse
Wenn Sie Batterien für das Gerät verwenden, fungiert diese Buchse als Netzschalter. Sobald Sie ein
Kabel anschließen, ist der Strom eingeschaltet.
Bevor Sie den Strom ein- oder ausschalten,
sollten Sie die Lautstärke aller angeschlossenen Geräte zurückdr ehen.
2 Eingangspegelschalte
Stellen Sie diesen Schalter dem Ausgangssignal
Ihres Instruments entsprechend ein.
H:Geeignet für Tonabnehmer mit hohem Aus-
gangspegel, z. B. Humbucking Pickups.
L: Geeignet für Tonabnehmer mit niedrigem
Ausgangspegel, z. B. Single Coil Pickups.
3 OUTPUT/PHONES-Buchse
4 DC9V
Hier können Sie den separat erhältlichen
Wechselstromadapter (DC9V
) anschließen. Sobald Sie den Anschluß hergestellt haben,
ist der Strom automatisch eingeschaltet.
5 Kabelhalterung
Wenn Sie den separat erhältlichen Wechselstromadapter anschließen, sollten Sie dessen Kabel wie
in der Abbildung unten in der Halter ung befestigen. Wenn Sie das Kabel aus der Halterung nehmen, sollten Sie es nicht zu stark ziehen oder anspannen.
●LC-Display
1
2
3
45
6
7
1 Effekt Ein/Aus-Anzeigen
Zeigen die eingeschalteten Effekte (Drive, Tone,
Modulation, Pedal, Ambience) an.
2 Edit-Modus-Anzeige
3 “Batterie leer”-Anzeige
4 Cabinet Resonator Ein/Aus-Anzeige
5 Metronom Ein/Aus-Anzeige
6 Zeigt Effektparameterwerte oder den Gesamtpegel
an.
7 Zeigt den Programmnamen oder Effekttyp usw. an.
Page 31

31
Einleitung
Einleitung
4. Anschlüsse herstellen
Bevor Sie Anschlüsse herstellen, sollten Sie unbedingt Ihre anderen Geräte ausschalten oder deren Lautstärke
auf 0 zurückdrehen. Die Anschlußkabel sind separat erhältlich.
INPUT
OUTPUT/PHONES
DC9V
Hard Disk Recorder usw.
Audiosystem
Gitarrenverstärker/Powered Monitor-System (*1)
Mono1/4"-Stecker – Mono 1/4"-Stecker
Kopfhörer (*1)
Wechselstromadapter (*2) zur Netzsteckdose
Mono 1/4"-Stecker - Mono 1/4"-Stecker
Mono-Ausgabe – Mono 1/4"-Stecker/Stereo-Ausgabe – zwei Mono 1/4"-Stecker
Stereo 1/4"-Stecker – Stereo
Cinch-Stecker
Gitarre
*1: Die OUTPUT/PHONES-Buchse ist ein Stereo-Ausgang. Wenn Sie den AX1G über ein Mono-Klinkenkabel
an einen Gitarrenverstärker anschließen, wird nur der Klang des linken Kanals (L) ausgegeben.
*2: Wenn Sie Batterien verwenden, benötigen Sie keinen Wechselstromadapter. Beim Einsatz eines
Wechselstromadapters sollten Sie nur das angegebene Modell (DC9V
) verwenden.
Page 32

32
Play-Modus
■ Play-Modus
1. AX1G spielen
●Gerät einschalten
Der AX1G besitzt keinen Netzschalter. Das Gerät wird
eingeschaltet, wenn eine der folgenden Bedingungen
erfüllt ist.
• Bei der Verwendung von Batterien wird der
Strom eingeschaltet, wenn Sie ein Kabel mit
einem Mono-Klinkenstecker an die INPUTBuchse anschließen.
Wenn Sie ein Kabel mit einem Stereo-Klinkenstecker anschließen, wird der Strom nicht eingeschaltet.
Nach dem Einschalten befindet sich der AX1G
automatisch im Play-Modus.
Das LCD gibt den Programmnamen an. Beim Einschalten wird das Programm gewählt, das beim
Ausschalten des Geräts zuletzt gewählt war .
Um die Lebensdauer der Batterien zu verlängern, sollten Sie das Kabel aus der INPUT-Buchse ziehen, wenn Sie den AX1G nicht benutzen.
• Bei Verwendung des separat erhältlichen
Wechselstromadapters wird der Strom eingeschaltet, wenn Sie den Wechselstromadapter an eine Netzsteckdose anschließen.
Sie den AX1G ausschalten, sollten Sie alle an-
deren angeschlossenen Geräte ausschalten.
●Master Level (Gesamtlautstärke) einstellen
Der Master Level-Wert regelt die endgültige Ausgangslautstärke des AX1G. Die Master Level-Einstellung
wir d im Play-Modus unten r echts auf dem LCD angezeigt.
• Stellen Sie die Gesamtlautstärke mit der
VALUE [+] oder [–]-Taste ein. Wenn Sie eine
Taste gedrückt halten, ändert sich der Wert
im Schnellauf.
Normalerweise sollten Sie den Master LevelWert auf 30 (Maximum) eingestellt lassen.
Die Signalausgabe des AX1G ist optimal, wenn
Master Level auf 30 eingestellt ist. Falls das Ausgangssignal verzerrt, wenn der Master LevelWert auf 30 eingestellt und der AX1G beim Spielen auf Bypass geschaltet ist, verringern Sie die
Gesamtlautstärke, bis der Klang nicht mehr verzerrt.
●Programm wählen und spielen
Gehen Sie beim Wählen eines Anwenderpr ogramms
wie folgt vor .
1 Drücken Sie die BANK SELECT-Taste, um die
Bank zwischen Grün, Orange und Rot umzuschalten.
Die Bank wird mit jedem Tastendruck umgeschaltet, und die BANK/TUNER LEDs wechseln zyklisch von „
Grün Orange Rot
“.
1
2 Drücken Sie den UP- oder DOWN-Schalter,
um eine Programmnummer zu wählen.
Die Programmnummer wir d in der PROGRAM/
NOTE-Anzeige und der Programmname auf dem
LCD angezeigt.
Rot 0–9
Grün0–9
Orange0–9
UP
UP
DOWN
UP
DOWN
DOWN
2
2. Bypass und Mute
Wenn der AX1G auf Bypass geschaltet ist, werden
keine Effekte angewandt und der Tuner ist betriebsbereit. Wenn der AX1G stummgeschaltet ist, gibt er
keine Klänge aus und der Tuner ist betriebsbereit.
●Bypass
1 Um die Bypass-Funktion zu wählen, drücken
Sie gleichzeitig die UP- und DOWN-Schalter
und lassen sie sofort wieder los.
Die Effekt Ein/Aus-Anzeigen des LCD blinken,
und nachdem etwa eine Sekunde lang die Meldung „BYPASS“ angezeigt wurde, erscheint die
T uner-Kalibrier ung.
1
2 Drücken Sie den UP- oder DOWN-Schalter,
um die Bypass-Funktion auszuschalten.
Page 33

33
Play-Modus
Play-Modus
4 Nehmen Sie Feineinstellung en an der Stim-
mung Ihrer Gitarre vor, damit nur die mittlere
LED (grün) der BANK/TUNER LEDs leuchtet.
Tonhöhe zu tief Tonhöhe zu hoch
5 Wenn Sie mit dem Stimmen fertig sind, schal-
ten Sie die Bypass- (oder Mute-) Funktion
aus.
●Kalibrierung ändern
Die Tuner-Kalibrier ung (die Frequenz des Kammertons A) läßt sich im Bereich von 438 bis 445Hz einstellen.
Sie können die Kalibrierung einstellen, wenn der Tuner in Betrieb ist.
Drücken Sie die Tasten VALUE [+] oder [–],
um die Kalibrierung zu ändern.
Die an der Kalibrierung vorgenommenen Ände-
rungen gehen beim Ausschalten des Geräts verlor en. Beim nächsten Einschalten des Geräts
wir d die Kalibrier ung automatisch auf 440Hz zurückgesetzt.
Die Kalibrier ung wir d im Edit-Modus nicht angezeigt.
4. Metronome
Das vom AX1G bereitgestellte Metronom ist besonders praktisch, wenn Sie allein üben.
●Starten Sie das Metronom, und stellen Sie
das Tempo und den Ausgangspegel
(Lautstärke) ein
1 Drücken Sie gleichzeitig die Tasten VALUE [+]
und [-], um das Metronom zu starten.
Das LCD zeigt das Metronomtempo an.
Sogar bei eingeschaltetem Metronom können
Sie noch Programme wechseln oder den AX1G
auf Bypass schalten.
11
2
Sie können das Metronom nicht im Edit-Modus einschalten. Kehr en Sie hierzu in den PlayModus zurück.
●Mute
1 Drüc ken Sie gleichzeitig die UP- und DOWN-
Schalter, und halten Sie diese gedrückt, um
das Ausgangssignal stummzuschalten.
Während Sie die Schalter drücken, wir d auf dem
LCD die Meldung „MUTE “ angezeigt. Wenn Sie
die Schalter loslassen, erscheint die Tuner-Kalibrierung. Die Effekt Ein/Aus-Anzeigen blinken
wie beim Einschalten der Bypass-Funktion.
1
gedrückt halten
2 Drücken Sie den UP- oder DOWN-Schalter,
um die Mute-Funktion auszuschalten.
3. Tuner
Wenn der AX1G auf Bypass oder stummgeschaltet
ist, wir d der Tuner automatisch aktiviert. Wenn Sie
den AX1G stummschalten, können Sie Ihr Instrument
stimmen, ohne daß Klänge über Ihr Verstärkersystem
usw. ausgegeben werden, was bei einer Live-Darbietung besonders praktisch ist.
●Gitarre stimmen
1 Schalten Sie den AX1G auf Bypass (oder
stumm).
Der AX1G schaltet in den Bypass- oder MuteModus, und der Tuner ist betriebsbereit.
1
Bei eingeschaltetem Metronom ist der Tuner
nicht betriebsbereit.
2 Schlagen Sie die Saite an, die Sie stimmen
möchten.
Der Notenname erscheint in der PROGRAM/
NOTE-Anzeige. Wenn die eingespeiste Note einen Halbton höher (#) als der angezeigte Notenname ist, leuchtet der Dezimalpunkt „.“ der PROGRAM/NOTE-Anzeige.
Bei dem Notennamen A Bei dem Notennamen A#
Schlagen Sie beim Stimmen immer nur jeweils
eine Saite an.
3 Stellen Sie die Stimm ung Ihrer Gitarre auf die
gewünschte T onhöhe ein, damit in der PROGRAM/NOTE-Anzeige der korrekte Notenname angegeben wird.
Page 34

34
Play-Modus
2 Drücken Sie die Taste VALUE [+] oder [-], um
das Tempo des Metronoms einzustellen.
Das Metronomtempo ist im Bereich = 40–208
einstellbar.
3 Drücken Sie einmal die PAGE [®]-Taste, um
den Metronom-Ausgangspegel anzuzeigen.
Durch Drücken der PAGE [√]-Taste kehren Sie
zur Tempo-Anzeige zurück.
3
4
4 Drücken Sie die Taste VALUE [+] oder [-], um
den Metronom-Ausgangspegel einzustellen.
Der Ausgangspegel des Metronoms ist im Bereich von 0 bis 30 einstellbar.
5 Drücken Sie noc hmals gleichzeitig die Tasten
VALUE [+] und [-]. Das Metronom hält an.
Das Metronomtempo und die Ausgangspegeleinstellung bleiben auch nach Ausschalten des
Geräts gespeichert.
5. Einsatz des Expressionpedals
Mit dem Expr essionpedal können Sie die Lautstärke,
den Wah- und Chorus-Effekt sowie die Delay-Zeit usw.
in Echtzeit steuern.
Mit dem Expr essionpedal lassen sich 18 verschiedene MOD (Modulations-) Ef fekte und 13 verschiedene
AMB (Ambience/Raum-) Ef fekte steuern. Auch die
Lautstärke ist steuerbar. Sie können einen davon für
die Steuer ung wählen (☞ „Effektparameterliste“ S.50).
●Spielen und Expressionpedal einsetzen
1 Wählen Sie im Play-Modus ein Programm, bei
dem Sie das Expressionpedal verwenden
können.
Bei Programmen, bei denen Sie das
Expressionpedal verwenden können, leuchtet die
„
“-Anzeige am oberen Rand des LCD.
Wählen Sie für dieses Beispiel einmal G (grün)-
3 „SATCH“.
2 Stellen Sie sicher, daß die Pedalanzeige
leuchtet.
Falls die Pedalanzeige dunkel ist, drücken Sie
einmal das Expressionpedal nach unten, damit
sie leuchtet.
2
3
Falls die Pedalanzeige
dunkel ist, drücken Sie
das Pedal nach unten.
Bedienen Sie das Pedal
Pedalanzeige
Während Sie die Lautstärke steuern, können
Sie das Expressionpedal nicht ein-/ausschalten. Es bleibt eingeschaltet (Pedalanzeige
leuchtet).
Wenn Sie das Programm im Edit-Modus in den
Speicher schreiben, wird die Pedalanzeige (d.
h., der Ein/Aus-Status des Expressionpedals)
nicht gespeichert.
3 Bedienen Sie das Expressionpedal, während
Sie Gitarre spielen.
Wenn Sie das Pedal nach oben und unten bewegen, ändert sich der ausgegebene Klang entsprechend.
Wenden Sie nicht zu viel Kraft auf das
Expressionpedal an. Bevor Sie das
Expressionpedal bedienen, prüfen Sie, ob die
Pedalanzeige leuchtet und wieviel Kraft tatsächlich für den Effekt benötigt wir d.
●Sample & Play-Effekt einsetzen
1. SAMPL1/2, SCRAT1/2
Bei den SAMPL1/2-Effekttypen können Sie das Pedal verwenden, um eine aufgenommene Phrase abzuspielen.
Bei den SCRAT1/2-Ef fekttypen können Sie das Pedal verwenden, um einen Scratchsound abzuspielen,
der auf einer aufgenommenen Phrase basiert.
1 Wählen Sie ein Programm, das den Sample
& Play-Effekt verwendet.
Wählen Sie für dieses Beispiel einmal SAMPL2
R (Rot)-5 „FWD/BK“.
Page 35

35
Play-Modus
Play-Modus
2 Drücken Sie das Expressionpedal nach un-
ten, um den RecordRead y-Modus zu wählen.
Die Pedalanzeige leuchtet.
nach unten drücken
2
blinkt
3 Spielen Sie eine Phrase auf der Gitarre.
Wenn Sie Gitarre zu spielen beginnen, wird die
Aufnahme automatisch gestartet und die Pedalanzeige leuchtet.
Wenn die Aufnahme endet, erlischt die Pedalanzeige.
Die Aufnahme beginnt erst, wenn Ihr Gitarr ensignal eine Mindestlautstärke überschreitet.
4 Bedienen Sie das Expressionpedal.
Bedienen Sie das Pedal
4
SAMPL1: Die aufgenommene Phrase wird wie-
dergegeben, wenn Sie das Pedal
nach unten drücken.
SAMPL2: Die aufgenommene Phrase wird wie-
dergegeben, wenn Sie das Pedal nach
unten drücken, und rückwärts abgespielt, wenn Sie das Pedal zurück-
bewegen.
SCRAT1: Es wird ein Scratchsound wiederge-
geben, wenn Sie das Pedal bewegen.
Bereits eine Pedalbewegung bewirkt,
daß der Scratchsound abgespielt
wird.
SCRAT2: Es wird ein Scratchsound wiederge-
geben, wenn Sie das Pedal bewegen
und Gitarr e spielen. Die Pedalbewegung allein bewirkt noch keine
Wiedergabe.
Der aufgenommene Klang wird gelöscht,
wenn Sie das Programm wechseln, den AX1G
auf Bypass oder stummschalten, den Effekttyp wechseln oder den AX1G ausschalten.
2. LOOP1/2
Bei den LOOP1/2-Effekttypen können Sie eine Phrase aufnehmen, während Sie einen Loop abspielen.
Auf diese Weise können Sie weitere Darbietungen
über die bestehenden Wiedergabesignale schichten.
1 Wählen Sie ein Programm, das einen Sample
& Play-Effekt benutzt.
Wählen Sie für dieses Beispiel einmal LOOP 1
O (orange)-7 „S/LOOP“.
2 Drücken Sie das Expressionpedal nach un-
ten, um den RecordRead y-Modus zu wählen.
Die Pedalanzeige leuchtet.
nach unten drücken
2
blinkt
3 Spielen Sie eine Phrase auf Ihrer Gitarre.
Wenn Sie Gitarre zu spielen beginnen, wird die
Aufnahme automatisch gestartet und die Pedalanzeige leuchtet.
Wenn die Aufnahme endet, erlischt die Pedalanzeige und der aufgenommene Klang wird als
Loop abgespielt.
Die Aufnahme beginnt erst, wenn Ihr Gitarr ensignal eine Mindestlautstärke überschreitet.
4 Bedienen Sie das Expressionpedal.
Bedienen Sie das Pedal
4
LOOP1: Das Pedal steuert die Wiedergabe-
lautstärke.
LOOP2: Das Pedal steuert die Länge des Loops.
Der Loop wir d um so kürzer , je weiter
Sie das Pedal zurückbewegen. Bei der
Minimallänge wird der Loop überhaupt
nicht abgespielt.
Der aufgenommene Klang wir d gelöscht, wenn
Sie das Programm wechseln, den AX1G auf
Bypass oder stummschalten, den Effekttyp
wechseln oder den AX1G ausschalten.
Bei SAMPL1/2 beträgt die Aufnahmezeit 0,9 sec für
HiFi-Klänge oder 1,8 sec für LoFi-Klänge. Bei LOOP1/
2 beträgt die Aufnahmez eit 0,26–1,8 sec (in Schritten
von ungefähr 0,05 sec) (☞ „Effektpar ameterliste“ S.50).
Sie können den Eff ekttyp und die Aufnahmezeit im EditModus modifizieren. Wegen näherer Einzelheiten ☞
„Edit-Modus, PEDAL (Expressionpedal) “ S.38.
Page 36

36
Play-Modus
●Expressionpedal kalibrieren (einstellen)
Der Betriebsbereich des Expressionpedals ist einstellbar. Wenn Sie feststellen, daß Ihnen die Empfindlichkeit des Expressionpedals nicht gefällt, k önnen Sie diese Einstellung vornehmen, damit sich das Pedal anschließend optimal bedienen läßt. Sie sollten die im
folgenden beschriebene Einstellung vornehmen, wenn
eine Pedalbewegung ganz nach unten nicht den maximalen Effekt erzeugt, oder umgekehrt sich der Effekt
nicht ganz ausschalten läßt.
Beim Kalibrieren des Pedals sollten Sie dieses mit der Hand bewegen. Bei der Bedienung
des Pedals mit dem Fuß lassen sich möglicherweise keine exakten Einstellungen vornehmen.
1 Halten Sie beim Einschalten des Geräts
gleichzeitig die Tasten PAGE [√] und VALUE
[-] gedrückt.
Das LCD zeigt etwa eine Sekunde lang die Meldung „PEDAL “ und anschließend die Meldung
„MIN “ an.
2 Bewegen Sie das Pedal langsam zurück.
Wenn es anhält, nehmen Sie die Hand vom
Pedal und drücken Sie die Taste VALUE [+].
Das LCD wechselt von „MIN“ zu „MAX“.
Wenn Sie während des Kalibrierverfahr ens die
Taste VALUE [-] dr ücken, wird die Kalibrier ung
angehalten. Es erscheint das Einschaltdisplay,
und Sie befinden sich im Play-Modus.
2
langsam drücken
3 Bewegen Sie das P edal langsam nach v orne.
Wenn es anhält, nehmen Sie die Hand vom
Pedal und drücken Sie die Taste VALUE [+].
Das LCD zeigt etwa eine Sekunde lang die Meldung „COMPL T“ an. Dann erscheint das anfängliche Einschaltdisplay, und Sie befinden sich im
Play-Modus.
3 langsam drücken
Nachdem Sie die Kalibrierung eingestellt haben,
überprüfen Sie die Pedalbedienung an den MINund MAX-Positionen. Prüfen Sie die Bedienung,
indem Sie einen Effekttyp mit klar hörbar en Ergebnissen, z. B. den Effekttyp VOLUME, wählen
und sicherstellen, daß für den Wert 0 der MINPegel erzeugt wird.
Wenn das Kalibrierverfahren mißlingt, wird auf
dem LCD die Meldung „ERROR“ angez eigt und
Sie kehren zum Display vor der Kalibrierung ( „MIN“ ) zurück. Falls wiederholte Versuche erfolglos bleiben, liegt möglicherweise eine
Fehlfunktion des AX1G vor. Setzen Sie sich mit
Ihrem Korg Kundendienst oder Ihrem F achhänd-
ler in Verbindung.
Page 37

37
Edit-Modus
Edit-Modus
■ Edit-Modus
Im Edit-Modus können Sie detaillierte Einstellungen
für jeden Effekt vornehmen und den Programmnamen
modifizieren.
Drücken Sie die EDIT/EXIT-Taste, damit auf dem LCD
die Meldung „
“ angezeigt und der AX1G in den
Edit-Modus geschaltet wir d. Drücken Sie nochmals
die EDIT/EXIT -T aste, um in den Play-Modus zurückzukehren. Sie können die Ein/Aus-Einstellung jedes
Effekts und dessen Parameter editieren. Wenn Sie
ein Programm editieren, leuchtet der „.“ (Dezimalpunkt) der PROGRAM/NOTE-Anzeige.
Leuchtet im Edit-Modus
Leuchtet, wenn Sie ein Programm editieren
Editierte Programme gehen verloren, wenn Sie das
Programm wechseln oder das Gerät ausschalten,
ohne zuvor das editierte Programm zu speichern.
Beim Editieren sollten Sie Ihre Änderungen häufig
speichern. Wegen näherer Einzelheiten über das
Write-Verfahren ☞ „WRITE“ S.39.
Wenn das Gerät auf Bypass oder stummgeschaltet ist, können Sie keine Modi wechseln. Heben Sie die Bypass- oder Stummschaltung auf, und wechseln Sie dann den
Modus.
Wenn Sie den AX1G im Edit-Modus auf By-
pass oder stummschalten, können Sie keine
Editierverfahr en durchführen. Deaktivieren Sie
die Bypass- oder Stummschaltung, bevor Sie
mit dem Editier en fortfahren.
1. Den zu editierenden Parameter wählen
• Wählen Sie den zu editierenden Parameter
mit der PAGE [√] oder [®]-Taste.
Sie können Effekte und andere Parameter in der
Reihenfolge wählen, die im Diagramm unten
dargestellt ist.
Die momentan gewählte Effektanzeige blinkt.
Ausgeschaltete Effekte lassen sich nicht editieren. Um einen ausgeschalteten Effekt zu editieren, wählen Sie diesen mit der PAGE [√] oder
[®]-Taste und drücken Sie die ENTER-Taste, um
ihn einzuschalten.
2. Effektparameter editieren
Um ein Programm zu editier en, können Sie einen der
Effekttypen Drive, Tone, Modulation, Pedal oder
Ambience wählen und den Wert des jedem Effekttyp
zugeordneten Parameters editieren.
Wegen näherer Einzelheiten über die wählbaren
Effekttypen und die für die Parameter verfügbar en
Werte siehe Effektparametertabelle (S.50).
●DRIVE
Diese Rubrik bietet Effekte, die den Klangcharakter
bearbeiten, z. B. Kompressor, Overdrive und
Distortion.
❍ENTER-Taste:Schaltet den Effekt ein/aus (Ein: An-
zeige des Typennamens, Aus: OFF)
❍TYPE [ √]/[ ®]-Tasten:Wählen den Ef fekttyp
❍V ALUE [-]/[+]-T asten: Bestimmen den Wert des
jedem Ef fekttyp zugeordneten Parameters (S.50)
●TONE
Diese Rubrik bietet Effekte, die den Klangcharakter
regeln.
❍ENTER-Taste:Schaltet den Effekt ein/aus (Ein:
Anzeige des Typennamens, Aus:
OFF).
❍TYPE [ √]/[ ®]-Tasten:Schalten um zwischen
LOW G (Bässe v erstärkung),
MID FC (Mittenfrequenz),
MID G (Mittenverstärkung)
und HIGH G (Höhenverstärkung).
❍V ALUE [+]/[–]-T asten:Stellen die Frequenz oder
Verstärkung ein (S. 50).
Abhängig von den Einstellungen, ist die Klangausgabe möglicherweise verzerrt (Clipping).
Stellen Sie in diesem Fall den Pegel so ein (☞
„LEVEL“ S. 38 ), daß der Klang nicht verzerrt.
●MOD
Page 38

38
Edit-Modus
Diese Rubrik bietet Modulationsef fekte wie Chorus,
Flanger und Phaser.
❍ENTER-Taste:Schaltet den Effekt ein/aus (Ein:
Anzeige des Typennamens, Aus:
OFF).
❍TYPE [ √]/[ ®]-Tasten:Wählen den Effekttyp.
❍V ALUE [-]/[+]-T asten: Bestimmen den Wert des je-
dem Effekttyp zugeordneten
Parameters (S.51–52).
●PEDAL
Diese Rubrik bietet Effekte, die mit dem
Expressionpedal gesteuert werden können.
PEDAL bietet die Optionen Volumenpedal, PEDALmod (Modulationsef fekte) und PEDAL-amb (Raum-
effekte).
❍ENTER-Taste:Schaltet den Effekt ein/aus (Ein:
Anzeige des Typennamens, Aus:
OFF).
❍TYPE [√] /[ ®]-Tasten:Wählen den Effekttyp.
❍V ALUE [-]/[+]-T asten: Bestimmen den Wert des je-
dem Effekttyp zugeordneten
Parameters (S.52–54).
PEDAL-mod ist nicht gleichzeitig mit MOD-Effekten einsetzbar. Einer der Effekte wir d ausgeschaltet. Wenn der MOD-Effekt automatisch
ausgeschaltet wird und Sie dann PEDAL ausschalten oder einen anderen Effekt als PEDALmod wählen, wir d der MOD-Ef fekt automatisch
wieder eingeschaltet. Analog hierzu können
auch PEDAL-amb und AMB-Effekte nicht
gleichzeitig eingesetzt werden.
●AMB
Diese Rubrik bietet Raumeffekte, z. B. Reverb und
Delay.
❍ENTER-Taste:Schaltet den Effekt ein/aus (Ein:
Anzeige des Typennamens, Aus:
OFF).
❍TYPE [ √]/[ ®]-Tasten:Wählen den Effekttyp.
❍V ALUE [-]/[+]-T asten: Bestimmen den Wert des je-
dem Effekttyp zugeordneten
Parameters (S.54).
●CR
Cabinet Resonator (CR) simuliert die akustischen Eigenschaften einer Gitarrenverstärkerbox. Dieser Effekt ist besonders wirkungsvoll, wenn Sie keinen Verstärker verwenden (z. B. wenn ein Kopfhörer, Mischer ,
Har d Disk Recorder oder ein Audiosystem ange-
schlossen ist).
❍ENTER-Taste: Schaltet den Effekt ein/aus (Ein: An-
zeige des Typennamens, Aus: OFF).
❍TYPE [ √]/[ ®]-Tasten:Wählen die Boxengröße.
❍V ALUE [+]/[–]-T asten: Bestimmen die Effekt-
stärke.
●NR
Damit regeln Sie die Stärke der Rauschunterdrückung. Je höher der Wert, desto stärker die
Rauschunterdrückung. Normalerweise sollten Sie
eine Einstellung wählen, bei der Sie bei leicht ab-
gedämpften Saiten kein störendes Rauschen hören.
❍V ALUE [-]/[+]-T asten: Bestimmen die Stärke der
Rauschunterdrückung.
Die Noise Reduction-Funktion läßt sich nicht
ausschalten.
Wenn Sie diesen Wert übermäßig hoch einstellen, wird der Klang – abhängig vom angeschlossenen Gerät – möglicherweise vorzeitig
abgeschnitten. In diesem Fall sollten Sie den
Wert verringern.
3. Weitere Parameter editieren
●LEVEL
Damit regeln Sie den Pegel jedes Programms.
Abhängig von den DRIVE- oder TONE-Einstellungen,
ist der Klang möglicherweise verzerrt (Clipping). Stellen Sie in diesem Fall diesen Parameter so ein, daß
keine Klangverzerrungen auftreten.
❍V ALUE [-]/[+]-T asten: Zum Einstellen des geeigne-
ten Pegels.
Page 39

39
Edit-Modus
Edit-Modus
Die Lautstärke der einzelnen Programme (die
Klangfarbe) ändert sich abhängig von der benutzten Gitarr e. Stellen Sie den für Ihre Gitarre
geeigneten Pegel ein.
●RENAME
Hier können Sie für jedes Programm einen Namen
festlegen.
❍TYPE [ √]/[ ®]-Tasten: Wählen die Zeichen-
position (das gewählte Zeichen blinkt).
❍V ALUE [-]/[+]-T asten: Wählen das Zeichen
Durch gleichzeitiges Drücken von [+] und [-] können
Sie ein Leerzeichen einfügen.
Es sind folgende Buchstaben und Symbole verfügbar.
●WRITE
Das editierte oder kr eierte Programm kann in den
Speicher geschrieben werden.
Wenn das Write-Verfahren gewählt ist, wir d auf dem
LCD die Meldung „WRITE“ angezeigt und die
Programmnummer blinkt in der PROGRAM/NOTEAnzeige.
1 Wählen Sie mit der BANK SELECT -Taste oder
den V ALUE [+]/[–]-Tasten die Bank- und Program-Nummer, unter der Sie die Einstellungen speichern möchten.
Wenn Sie das Schreibziel wählen, wir d kurz der
Programmname dieses Schreibziels angezeigt.
1
1
Bevor Sie ein editiertes Programm unter der
Nummer eines anderen Programms speichern,
sollten Sie sicherstellen, daß Sie dieses Programm nicht mehr benötigen.
2 Drücken Sie die ENTER-Taste, um das Pro-
gramm zu speichern.
Wenn Sie das Programm speichern, wird ungefähr eine Sekunde lang die Meldung „COMPL T“
auf dem LCD angezeigt. Falls Sie nicht speichern
möchten, wählen Sie durch Drücken der PAGE
[3] oder [4]-Taste ein anderes Display und das
Write-Verfahren wird abgebrochen.
2
❍ENTER-Taste:Führt das Write-Verfahren durch.
❍V ALUE [-]/[+]-T asten: Wählen die Programm-
nummer.
❍BANK SELECT-Taste:Wählt die Bank.
4. Preset-Programme (Werksprogramme)
wiederherstellen
1 Drücken Sie beim Einschalten des Geräts
gleichzeitig die Tasten PAGE [√] und VALUE
[+].
Auf dem LCD wir d die Meldung „PLOAD?“ angezeigt.
Wenn Sie die Taste VALUE [–] dr ücken, gelangen Sie dir ekt zum anfänglichen Einschaltdisplay,
ohne die Preset-Programme zu laden, und der
AX1G wechselt in den Play-Modus.
1
1
2 Drücken Sie die Taste VALUE [+].
Das LCD zeigt jetzt „PLOAD“ an, und die PresetProgramme werden geladen. W ährend die Daten
geladen werden, wird die Bank- und Programmnummer des momentan geladenen Programms
von den BANK/TUNER LEDs und in der PROGRAM/NOTE-Anzeige angezeigt.
Wenn das Ladeverfahren abgeschlossen ist,
zeigt das LCD ungefähr eine Sekunde lang die
Meldung „COMPL T“ an. Anschließend erscheint
das anfängliche Einschaltdisplay , und der AX1G
schaltet in den Play-Modus.
2
Rot 0–9
Grün 0–9
orange 0–9
Schalten Sie unter keinen Umständen das
Gerät aus, während dieses Verfahren läuft.
Beachten Sie, daß durch das Laden der PresetProgramme alle zuvor gespeicherten Programme überschrieben werden.
Page 40

40
はじめに
■ はじめに
このたびはトーンワークス・ギターハイパフォーマンス・プロセッ
サーAX1G をお買い上げいただきまして、誠にありがとうございま
す。AX1Gを末永くご愛用いただくためにも、取扱説明書をよくお読
みになって正しい方法でご使用ください。また、取扱説明書は大切に
保存してください。
1. 主な特長
● 69種類のエフェクト・バリエーションを内蔵し、最大7種類の
エフェクトを同時に使用できます。
● 30(10×3バンク)ユーザー・プログラムを内蔵しています。
●エクスプレッション・ペダルでエフェクトをリアルタイムにコン
トロールすること ができます。
●自分で弾いたフレーズを録音(最大 1.8秒間)し、ペダル操作
により再生させるサンプル&プレイ機能を内蔵しています。
● 多く のパラメ ータに わずらわされることな く 、簡単にエフェクトの
エデ ィットができるIPE(IntegratedParameterEdit)システ
ムを採用し ています。
●一人で練習するときに便利なメトロノームを内蔵しています。
●バイパス、ミュー ト時にオ ート・ク ロ マ チック・チューナ ー で
チューニングができます。
●液晶ディスプレイを用いたわかり やすいインターフェースを採
用しています。
● 蓄光材によるLCDバックライトを採用、暗い所でも表示を見る
ことができます。
2. 電池の入れ方
1 バッテリーケースの矢印A部分を軽く押し、矢印Bの方向へ引
き上げてふたをあけてくださ い。
2 単3アルカリ乾電池(別売)4 本を図のように入れてくださ
い。電池の+と−を間違えないように注意してください。
3 バッテリーケースのふたをしめてください。
長期間ご使用にな らないと きは、電池の液漏れを防ぐために
電池をはずしておいて ください。
液晶ディスプレイにバッテリー・エンプティ表示( のマー
ク)が表示されたら電池の交換時期です。なるべく早く新し
い電池に交換して ください。
電池とACアダプターは付属されていません。別途にお買い
求めください。
3. 各部の名称とはたらき
● フロント・パネ ル
1
2
3
4
5
6
7
89
A
0
B
1 DOWN/UPスイッチ
プログ ラ ムを選んだ りバイパス、ミュートするときに使います。
2 エクスプレッション ・ ペダル
ペダル・エフェ クトで選んだ、エフェク トをコントロールします。
3 TYPE[√]/[®]キー
エデ ィット・モードで、エディットするエフ ェ クトのタイ プ を選ぶと きに
使います。
4 VALUE[−]/[+]キー
パラメータのエディットやメトロノームのオン/オフに使います。
5 EDIT/EXITキー
エデ ィット・モードに入るときとプレイ・モー ド に戻る と きに使いま
す。
6 BANKSELECTキー
バンクを選ぶときに使います。
7 ペダル・インジケータ ー
ペダル・エフェ クトのオン/オフ表示やサンプラー・エフェ クトにし
たときの録音状態を表示します。
8 BANK/TUNERLED
選んでいるプログラムのバンクをLEDの色で表示します。また、
チューナー動作時にメータ ーとして動作します。
9 PROGRAM/NOTEディスプレイ
プログ ラ ム・ナンバーを表示します。また、バイパスやミュートで
のチューナー動作時に音名を表示します。
0 蓄光バックライト付LCD
暗いところで使用す る 前 に蛍光灯や太陽の光を当ててください。
A PAGE[√]/[® ]キー
エデ ィット・モードやメトロノ ームオン時に、変更したいパラメータ
を選ぶときに使います。
B ENTERキー
エデ ィット・モードで、エフェクトのオン/オフやプログラムをライト
するときに使います。
Page 41

41
はじめに
はじめに
● リア・パネル
1
23
4
5
1 INPUTジャック
電池で使うときには、電源スイッチとなります 。ケーブルを接続す
ると電源がオンになります。
電源をオン ま たは オフにするときは、接続してある 機器のボ
リュームを必ず下げておいてください。
2 入力レベルスイッチ
接続する楽器の出力に合わせて切り換えてください。
H:ハムバッキング等出力 レベルの大きいピックアップ向き
L:シン グル コ イル等出力レベルの小さいピ ックアップ向き
3 OUTPUT/PHONESジャック
4 DC9V
別売のACアダプター(コルグA30960JDC9V )
を接続しま す。接続すると、電源が自動的にオンになります。
5 コード・フック
別売のACアダプターを接続したと きは、下図のようにACアダプ
ターのコードを引っ かけておきま す。コー ドをフ ッ クから外すとき
は、コードを無理に引っ張らないでください。
● 液晶ディスプレイ
1
2
3
45
6
7
1 エフェク トのオン / オフ表示
エフェクト(ド ライブ、トーン、モジュレー ション、 ペ ダル、アンビエン
ス)のオン/オフ を表示します。
2 エディット・モ ード 表 示
3 バッテリー ・エンプテ ィー表示
4 アンプ ・シミュレーターのオン/オフ表示
5 メトロノームのオン/オフ表示
6 エフェ クト・パラメータのバリュー、マスター・レベルを表示しま
す。
7 プログラム名やエフェク ト・タイプ等を表示します。
Page 42

42
はじめに
4.接続してみよう
接続するときは、各機器の電源はオフに、またはボリュームを0に下げておいてください。
接続ケーブルは別売です。
INPUT
OUTPUT/PHONES
DC9V
ハードディスクレコーダー等
オーディ オ機器
ギターアンプ/パワー ドモニター(*1)
モノラル標準ーモノラル標準
ヘッドホン(*1)
ACアダプター(*2 ) コンセン トへ
モノラル標準ーモノラル標準
モノラル標準ーモノラル標準/ステレオ標準ーモノラル標準X2
ステレオ標準ーステレオ・ピン
ギター
*1OUTPUT/PHONESはステレオ出力です。ギターアンプでモノラル標準ケーブルを使用するときは、L(左)側の音が出力されます。
*2電池で使用するときは、ACアダプターは不要です。A Cアダプターを使用するときは必ず指定のもの(コルグA30960J極性:DC9V
)使用してください。
Page 43

43
プレイ ・ モード
プレイ・ モー ド
■ プレイ・ モード
1. AX1Gを演奏してみましょう
● 電源をオンにします
AX1Gには電源 スイッチはあ りません。次のいずれかの操作で電源が
オンになります。
・ 電池を使う ときは、INPUTジャックにモノラル標準プラグの
ケーブルを接続すると電源がオンになります。
ステレオ標準プラグのケーブルを接続しても電源はオンに
なりません。
電源をオンにすると、自動的にプレイ・モードになります。
液晶デ ィスプレ イにプログラム名が表示されます。
電源オン時のプログラムは、以前に電源をオフにしたときに、
選ばれていたプログラムです。
電池を長持ちさせるため、AX1Gを使わないときはINPUT
ジャックからケーブルを抜いてください。
・ 別売のAC アダプターを使う ときは、ACアダプターをAC
ジャックに接続すると電源がオンになります。
AX1Gの電源をオフ にするときは、接続している機器の電
源を先にオフにしてく ださい。
●マスター・レベル(全体の音量)を調整します
マスター・レベルで、AX1Gの最終的な出力レ ベルを調整 し ま す。マス
ター・レベルの値は、プレイ ・モードで液晶ディスプ レイの右下に表示 さ
れます。
・ VALUE[+]または[−]キーを押して、マスター・レベルを調
整します。キーを長く押すと、数値が早く送られていきます。
通常、マスター・レベルは30(最大)にしてください。AX1G
の出力は、マスター・レベルが30のときに一番よい状態が得
られます。マスター・レベルが30で、AX1Gをバイパスにして
演奏したときに、出力音が歪むようであ れば、マスター・レベル
を下げて、音が歪まないように調整してください。
● プログラムを選んで演奏してみよう
プログラ ムを選んでみましょう。
1 BANKSELECTキーを押し て、バンクを緑、橙、赤から選びま
す。
キーを押すたびにバンクが切り換わり、BANK/TUNER
LED が
緑 橙 赤
に換わります。
1
2 UPまたはDOWNスイッチを押して、プログラム・ナンバーを
選びます。
プログラム・ナンバーは PROGRAM/NOTEデ ィスプレイに表
示され、プログラム名が液晶ディスプレイに表示されます。
2
UP
UP
DOWN
UP
DOWN
DOWN
赤0〜9
橙0〜9
緑0〜9
2. バイパス、ミュー ト
バイ パス にすると、すべてのエフ ェクトがかから ないバイ パス状態に な
りチューナーが動作します。ミュートにすると、AX1Gか ら音が出なく
なりチューナーが動作します。
● バイパスにしま す
1 UPとDOWNスイッチを同時に押 し てすぐ離すと 、バイパスに
なります。
液晶ディスプレイのエフェクト・オン/オフ表示が点滅し、約1秒
間BYPASSと表示されてからチ ューナーのキャリブ レー
ションが表示されます。
1
2 UPまたは DOWNスイッチを押すと、バイパスが解除されま
す。
● ミュートにします
1 UPとDOWNスイッチを同時に長く押すと、出力がミュートさ
れます。
スイッチを押している間、液晶デ ィスプレイ にMUTEと表示
されます。スイ ッチを離すとチューナーのキ ャリブレーションが
表示されます。また、バイパスと同様にエフェクトのオン/オフ
表示が点滅します。
1
長く押す
2 UPまたはDOWNス イッ チを 押すと、ミュートが解除されます。
Page 44

44
プレイ ・ モード
4. メトロノーム
AX1Gでは、一人で練習するときに便 利な、メトロノ ームを内蔵して
います。
● メトロノームをスタートして、テンポと出力レベル(音
量)を調節します
1 VALUE[+]と[−]キ ーを同時に押して、メト ロ ノ ー ム を ス
タートさせます。
液晶デ ィスプレイ にメトロノームのテンポが表示されます。
メトロノームがオンにな っ ているときでも、プログラムを切り 換
えることができ、バイパス にすることもでき ます。
11
2
エデ ィット・モードでは、メトロノームはオンにな りません。プ
レイ・モードに戻ってオンに してください。
2 VALUE[+]または[−]キーを押して、メトロノームのテンポ
を調節します。
メトロノームのテンポは、=40〜208の範囲で調節できま
す。
3 PAGE[®]キーを1回押して、メトロノームの出力レベルを
表示させます。
PAGE[√]キーを押すと、テンポ表示に戻 ります。
3
4
4 VALUE[+]または[−]キーを押して、メトロノー ムの出力レ
ベルを調節します。
メトロノームの出力レベルは、0か ら30の範囲で調節できま
す。
5 も う一度VALUE[+]と[−]キーを同時に押すと、メトロノー
ムがストップします。
メトロノームのテンポや出力レベルの設定は、電源をオフ にし
ても記憶されます。
3. チューナー
バイパス、ミュートにすると、自動的にチューナーが動作します。
ミュートにしておくと、接続機器から音を出さずにチューニングがで
きるので、ステージ等ではミュートにする ことをお勧めし ます。
● ギターをチューニングします
1 バイパス(またはミュート)にします。
バイパス(またはミュート)になり、チューナが動作します。
1
メトロノームがオンのときは、チューナーは動作しません。
2 チューニ ングしたい弦を弾きます。
音名がPROGRAM/NOTEディスプレイに表示されます。入
力した音が音名よりも高い(#)ときは、・ が点灯し ま す。
音名がA#のとき
音名がAのとき
チュ ーニングするときは、同時に2つ以上の弦を弾かないよ
うにしてく ださい。
3 チューニングしたい音名がPROGRAM/NOTEディスプレイ
に表示されるよ うにギターをおおまかに調整します。
4 BANK/TUNERLEDの中央のLED(緑)だけが点灯するよ
うにギターを微調整します。
ピッ チが低い方にズレている と きピ ッ チが高い方にズレていると
き
5 チューニ ングが終了し た ら 、バイパス(またはミュート)を解除
します。
● キャ リブレーシ ョ ンを変更します
チューナーのキャリブレーション(基準ピッチAの周波数)を438〜
445Hzの範囲で設定できま す。
キャリブレーションは、チューナーが動作 したときに変更します。
VALUE[+]または[−]キーを押して、キャリ ブレーショ ンを
変更します。
変更したキ ャリブレーシ ョンは、電源をオフ に す ると無効となり 、
ふたたび電源をオンにすると、自動的に440Hzとなります。
エディット・モードでは、キャリブレーションは表示されませ
ん。
Page 45

45
プレイ ・ モード
プレイ・ モー ド
5. エクスプレ ッ ション・ペダルを使ってみましょう
エクスプレッション・ペダルでボリューム、ワウ、コーラスの効果、ディ
レイのディレイタイ ムな ど をリ アルタ イムにコントロールすること がで
きます。
コントロールできるエフ ェ クト・タイプはMOD(モジュレーション)系
が18種類、AMB(アンビエンス)系が13種類あります。そのほかボ
リューム もコントロールできます。これらの中から1つを選んで使 う
ことができます(☞P.50「エフェクト・パラメータ・リス ト」 参照)。
● エクスプレ ッシ ョン・ペダルを使って演奏します
1 プレイ・モ ード で エクス プレッション・ペ ダ ル が 使 えるプロ グラ
ムを選びます。
エクスプレッション・ペダルが使えるプログラムでは、液晶ディ
スプレイの上側に が表示されます。
ここでは、G(緑)-3SATCHを選んでみましょう。
2 ペダル・インジケーターが点灯していることを確認します。
点灯していなければ、エクスプレッション・ペダルを1回深く 踏
み込んで、ペダル・インジケーターを点灯(ペダルをオン)させ
てください。
2
3
ペダル ・インジケー ターが点灯し
ていないと き は、深 く踏み込む
ペダルを 操作
ペダル ・インジケーター
ボリュームをコントロールするときは、エクスプレッション・ペ
ダルのオン/オフはできません。オンのまま(ペダル・インジ
ケーターが点灯)になり ます。
エクスプレ ッ シ ョン ・ペダルのオン/オフは、エデ ィット・モード
でのライトで記憶さ れません。
3 ギターを演奏しながらエクスプレッショ ン・ペダルを操作しま
す。
ペダルを上下させると、それに応じて出力音が変化します。
エクスプレッショ ン・ペダルには 必要以上の力を加えないよ
うにしてください。 あらかじめペダル ・インジケーターの点灯
やエフェクトのかかり具合に必要な力を確認 してから、エク
スプレッション・ペダルを操作してください。
● サンプル&プ レイ・エフェクトの操作方法
1. SAMPL1/2,SCRAT1/2
エフェ クト・タイプのSAMPL1/2は、ペダル操作で、録音したフ レー
ズ等を再生するエフェクトです。
エフェ クト・タイプのSCRAT1/2は、ペダル操作で、録音したフレー
ズを元にしたスクラッチ音を再生するエフェクトです。
1 サンプル&プレイ・エフェクトが使われているプログラムを選
びます。
ここでは例としてSAMPL2のR(赤)-5FWD/BKを選ん
でみましょう。
2 エクスプレッション・ペダルを深く 踏み込んで、録音待機状態に
します。
ペダル・インジケーターが点滅 します。
深 く踏み込む
2
点滅
3 接続したギターでフレーズ等を弾きます。
ギターを弾いた時点で自動的に録音が開始され、ペダル・イン
ジケーターが点灯します 。
録音が終了すると、ペダル・イ ン ジケーターが消灯します。
ギターをある一定レベル以上の音量で弾かないと録音は開
始されません。
4 エクスプ レッション・ペダルを操作します。
ペダルを操作
4
SAMPL1: ペダルを踏んだときに、録音したフレーズが再生さ
れます。
SAMPL2: ペダルを踏んだときに、録音したフレーズが再生、
戻したときに逆再生されます。
SCRAT1: ペダルを動かしたときにスクラッチ音が再生され
ます。ペダルの操作だけでスクラッチ音が再生さ
れます。
SCRAT2: ギターを弾きながらペダルを動かしたときにスク
ラッチ音が再生されます。ペダルの操作だけでは
再生されません。
録音した音は、プログラムの変更、バイパス、ミュート、エフェ
クト・タイプの変更、電源オフによりクリアされ(消え)ます。
Page 46

46
プレイ ・ モード
2. LOOP1/2
エフェクト・タイプのLOOP1/2 は、フレーズを録音すると同時に
ループ(繰り返し)再生するエフェク トです。
再生中に自分のプレイを重ねることができます。
1 サンプル&プレ イ・エフェク トが使われているプログラムを選
びます。
ここでは例としてLOOP1のO(橙)-7S/LOOP を選ん
でみましょう。
2 エクスプレッ ション・ペダルを深く踏み込んで録音待機状態 に
します。
ペダル・インジケーターが点滅 します。
深 く踏み込む
2
点滅
3 接続したギターでフ レーズ等を弾きます。
ギター を弾 いた時点 で自動的に 録音が開始され、ペダル・イン
ジケーターが点灯します 。
録音が終了すると、ペダル・インジケーターが消灯し、録音し
た音がループ再生されます。
ギターをある 一定 レベル以上の音量で弾かないと録音は開
始されません。
4 エクスプ レッション・ペダルを操作します。
ペダルを操作
4
LOOP1: ペダルで再生音量をコントロールできま す。
LOOP2: ペダルでループの長さをコントロールできます。
ペダルを戻すほどループの長さが短 くなり、最小の
ときにループ再生されなくなります。
録音した音は、プログラムの変更、バイパス、ミュート、エ
フェク ト・タイプの変更、電源オフによりク リアされ(消え)ま
す。
各エフェクト・タイプの録音時間は、SAMPL1/2では0.9秒(ハイ
ファイ ・サウンド)か1.8秒(ローファイ・サウンド)。LOOP1/2 では
0.26 〜1.8秒(約0.05秒刻み)です(☞P.50「エフェクト・パラ
メータ」)。
エフェクト・タイプと録音時間は、エディット・モー ドで変更できます。
変更の しかたは、P.48の「PEDAL(エクスプ レ ッ シ ョン・ペダル)」を
参照してください。
● エクスプレッション・ペダルの調整(キャリブレーショ
ン)について
エクスプレ ッ シ ョン ・ペダルが使用しにくい場合に、この操作を行って
最適に動作するように調整します。例えば、踏み込んだときにエフェ
クトが最大にならなかった り、逆にエフ ェクトが完全に切れなかったり
する場合は、以下の操作で調整をしてください。
調整をするときは 、手でペダルを操作してください。足で操
作すると、正確に調整できないことがあります。
1 PAGE[√]キーと VALUE[−]キーを同時に押し ながら、電
源をオンに し ま す。
液晶ディスプレイに約 1 秒間 PEDAL と表示されてから
MINと表示されます。
2 ペダルをゆっくりと戻し、止まったら手を離し、VALUE[+]
キーを押します。
液晶ディスプレイの表示がMINからMAXに変わります。
調整を中止したいときは、VALUE[−]キーを押してくださ
い。電源オン時の画面になり、プレイモードに入ります。
2ゆっくり押す
3 ペダルをゆっくりと押し、止まったら手を離し、VALUE[+]
キーを押します。
液晶ディスプレイに約1秒間COMPLTと表示されてから電
源オン時の画面になり 、プレイ・モードに入り ます。
3ゆっくり押す
調整後、ペダルの状態を確認してください。
例えば、ペダルのエフェクトタイプをVOLUMEに、バリューを
0に設定したとき、戻したときのM IN時のレベルを確認する
等、わかりやすいエフェクトタイプを割り当て確認してくださ
い。
調整に失敗すると、液晶ディスプレイにERRORと表示さ
れ、調整前の画面(MINと表示)に戻りま す。何回調整して
もERRORと表示される と きは故障の可能性があります。
そのときは、(株)コルグ営業技術課または、お買い上げ店に
お問い合わせく ださい。
Page 47

47
エディット・ モード
エディット・モ ード
■ エディット・モード
エデ ィット・モー ド では、各エフェ クトの細かな設定やプログラム・ネー
ムを設定します。EDIT/EXIT キーを押すと、液晶ディスプレイ
に が表 示され 、エディット・モ ード に 入りま す 。もう一度
EDIT/EXITキーを押すと、プレイ・モードに戻り ます。各エフ ェクトの
オン/オフやパラメータをエディットする ことができます。プログラム
をエディットすると、PROGRAM/NOTEディスプレイの・が点灯し
ます。
エディット・モー ドで点灯
プログラムをエディ ットすると点灯
エデ ィット したプログラムは、ライトせずにプログ ラム・チェ ンジをした
り、電源をオフにすると消えてしまいます。プログラムをエデ ィットし
たら、こまめにライトをしてください。ライトのしかたは、P.49
「WRITE」を参照してください。
バイパス(またはミュート)にすると、モードの切り 換え がで
きません。バイパス(またはミ ュート)を解除し て、モードを切
り 換えてください。
エディット・モードでバイパス(またはミュート)にすると、エ
ディ ットすること ができません。バイパス(またはミ ュート)を
解除してからエディットをして ください。
1. エディット・パラメータの選択
・ PAGE[√ ]または[® ]キーを押して、エデ ィットするパラ
メータを選びます。
押す ごとに下の図の順でエフ ェクトやその他のパラメータを選
ぶことができます。
現在選ばれているエフェクトの表示が点滅しま す。オフになっ
ているエフェクトはエディットすることができません。オフに
なっているエフェクトをエディットするときは、PAGE[√]また
は[®]キーでエフェクトを選んでからENTERキーを押して、
エフェクトをオンにして ください。
2. エフェクト・パラメータのエディット
ドライ ブ、トーン、モジュ レーション、ペダル、アンビエンスのエフェク
ト・タイプ(エフェクトの種類)を選び、各エフェクト・タイプに割り当て
られたパラメータ のバリューを変更するこ とによって、プログラムの
エディットができます。
選べるエフェクトのタイ プや変更できるパラメータのバリューは、エ
フェクト・パラメータ・リス ト(☞P.50)を参照してください。
● DRIVE
コンプレ ッ サー、オーバードライブ、ディス トーションなどの主に音色
を加工するエフェクトです。
○ENTERキー:エフェクトのオン/オフ(オン時はタイプ名、オフ
時はOFFと表示)
○TYPE[√]/[®]キー: エフェク ト・タイプを選択
○VALUE[−]/[+]キー:各エフェクト・タイプに割り当てられた
パラメータのバリューを設定
(☞P.50)
● TONE
音質を調整するエフェクトです。
○ENTERキー:エフェクトのオン/オフ(オン時はタイプ名、オフ
時はOFFと表示)
○TYPE[√]/[®]キー: LOWG(低域のゲイン)、MIDFC(中
域の周波数)、MIDG(中域ゲイン )、
HIGHG(高域のゲイン)の切り換え
○VALUE[−]/[+]キー: 周波数またはゲインを設定
設定によっては出力音が歪んで(ク リップ)しまう ことがあり
ます。このときは、歪まない程度にレベル(☞P.48の
「LEVEL」を参照)を設定してください。
● MOD
コーラス 、フランジャー、フェイザー等のモ ジュレーション(変調)系の
エフェクトです。
○ENTERキー:エフェクトのオン/オフ(オン時はタイプ名、オフ
時はOFFと表示)
○TYPE[√]/[®]キー: エフェクト・タイプを選択
○VALUE[−]/[+]キー:各エフェクト・タイプに割り当てられた
パラメータのバリ ューを設定(☞P.51
〜52)
Page 48

48
エディット・ モード
● PEDAL
エクスプレッション・ペダルでリアルタイムにコントロールできるエ
フェク トです。PEDALには 、ボリューム ・ペダルと モジュレーショ ン系
エフェ クトのPEDAL-mod、アンビエンス系エフェクトのPEDALambがあります。
○ENTERキー:エフェクトのオン/オフ(オン時はタイプ名、オフ
時はOFFと表示)
○TYPE[√]/[®]キー: エフェクト・タイプを選択
○VALUE[−]/[+]キー:各エフェクト・タイプに割り当てられた
パラメータのバリ ューを設定(☞P.52
〜54)
PEDAL-modは MODのエフ ェクトと同時には使うことがで
きません。どちらかのエフェク トがオフになります。また、自
動的にオフになったMODエフ ェクトは、PEDALをオフに
するかPEDAL-mod以外を選ぶと、ふたたびオンになりま
す。また同様に、PEDAL-ambとAMBのエフェクトも同時
には使うことができません。
● AMB
リバーブ、ディ レイ等の残響系のエフェクトです。
○ENTERキー:エフェクトのオン/オフ(オン時はタイプ名、オフ
時はOFFと表示)
○TYPE[√]/[®]キー: エフェクト・タイプを選択
○VALUE[−]/[+]キー:
各エフェクト・タイプに割り当てられ
たパラメータのバリューを 設定
(☞P.54)
● CR
キャビネットレゾネーター(CR)は、アンプのキャビネットの音響特性
をシミュレー ト します。特にアンプを使わない(ヘッドホン、ミキサー、
HDR、オーディオ機器等を接続)時に効果的です。
○ENTERキー:エフェクトのオン/オフ(オン時はタイプ名、オフ
時はOFFと表示)
○TYPE[√]/[®]キー:キャビネット・サイズ(大きさ)を選択
○VALUE[−]/[+]キー: 効果の深さを設定
● NR
ノイズ ・リ ダクションのかかり具合を調整します。バリューを上げるほ
ど ノイズを押さえ る 効果は強くなりま す。通常は弦を軽くミ ュ ート し た
とき、ノイズが気にならない程度に調整します。
○VALUE[−]/[+]キー: ノイズ ・リダクションのかかり具合の調
整
ノイズ ・リダ クションはオフになりません。
バ リューを上げすぎる と 、接続する機器によっては音が途切
れることがあります。そのようなときはバリューを下げてく
ださい。
3.その他のパラメータのエディット
● LEVEL
プログラ ムごとのレベルを設定します。
DRIVE、TONEの設定によっては、出力音が歪んで(ク リップ)しまう
ことがありますので、歪まない程度に調整 し てください。
○VALUE[−]/[+]キー: レベルを設定
使用するギターによって各プログラ ムの音量が変化します
ので、ギターに合わせてレベルを調整してください。
● RENAME
プログラ ムごとに名前が設定できます。
○TYPE[√]/[®]キー: 文字の位置を選択(選ばれている文字
が点滅)
○VALUE[−]/[+]キー: 文字の種類を選択
[+]と[−]を同時に押すと、スペース(空白)にな ります。
扱える文字、記号
Page 49

49
エディット・ モード
エディット・モ ード
● WRITE
エデ ィットしたプログ ラ ムや自分で作ったプログラムをライト(記憶)
する ことができます。
ライトでは、液晶デ ィ スプ レイにWRITEと表示され、PROGRAM/
NOTEディスプレイのプログラム・ナンバーが点滅します。
1 BANKSELECTキ ー、VALUE[+]または[−]キーを押し
て、ライト先のバンクと プログラム・ナンバーを選びます。
ライト先を選ぶと 、そのラ イト先のプログラ ム名が、一瞬表示され
ます。
1
1
エディットしたプログラムを他のプログラ ム・ナンバーにライ
トすると きは、上書きしてもよいかどう かをあらかじめ確認し
てください。
2 ENTERキーを押して、プログラムをライトします。
ライトすると、液晶ディスプレイに約1秒間COMPLTと表示
されます。ライ トしないときは、PAGE[√]または[®]キーを
押して、他の画面を選ぶと、ライトがキャ ンセルされます。
2
○ENTERキー:ライトを実行
○VALUE[−]/[+]キー:プログラム・ナンバーを選択
○BANKSELECTキー:バンクを選択
4. プリセッ ト・プロ グラム (工場出荷時のプログラ
ム)に戻すには
1 PAGE[
√
]キーとVALUE[+]キーを同時に押しながら、電
源をオンに し ま す。
液晶デ ィスプレイ にPLOAD?と表示されます。
VALUE[−]キーを押すと、再ロードされずに電源オン時の画
面にな り、プレイ・モードに入ります。
1
1
2 VALUE[+]キーを押します。
液晶ディ スプレイの表示がPLOADに換わり、プリセット・プ
ログラムがロードされます。ロード中は、現在ロードされて いる
プログラムのバンクがBANK/TUNERLEDに、プログラム・
ナンバーがPROGRAM/NOTEディスプレイに順番に表示さ
れます。
ロードが完了すると、液晶ディスプレイに約1 秒間
COMPLTと表示され、電源オン時の画面になり、プレイ・
モードに入りま す。
2
赤0〜
9
緑0〜
9
橙0〜
9
再ロード中は、絶対に電源をオフにしないでく ださい。
プリセット・プログラムを再ロードすると、それまでのプログ
ラムはすべて書き換わりますのでご注意ください。
Page 50

50
Appendices Appendices Anhänge 付録
■ Appendices Appendices Anhänge 付録
1. Effect Parameter list Liste des paramètres des effets Effektparameterliste
エフェクト・パラメータ・リスト
Effect type: Effect type (use TYPE [√]/[®] keys to select)
Type d’effet (utiliser les touches TYPE [√]/[®] pour les sélectionner)
Effekttyp (mit TYPE [√]/[®]-Tasten wählen)
Effecttype(TYPE[√]/[®]キーで選択)
VALUE: Value (use VALUE [-]/[+] keys to specify)
Valeur (utiliser les touches VALUE [-]/[+] pour spécifier lavaleur)
Wert (mit VALUE [-]/[+]-Tasten bestimmen)
Value(VALUE[−]/[+]キーで設定)
Effect type VALUE
compressor
COMP
Compresseur
Kompressor
コンプレ ッ サー
overdrive
OVDRV
Surmultiplication
Overdrive
オーバードライブ
Overdrive suitable for line output (when connecting headphones, audio equipment, or HDR).
LINEOD
Surmultiplication convenant pour sortie de ligne (lors du raccordement d'un casque d’écoute, d’équi-
pement audio, ou d’un enregistreur de disque dur).
Overdrive für die Line-Ausgabe geeignet (beim Anschluß von Kopfhörern, Audiogeräten oder HDR).
ライン(ヘッドホン、オーディオ機器、HDR等を接続)向きのオーバー ドライ ブ
High gain type distortion
DIST 1
Distorsion de type à haut gain
hochverstärkte Distortion
ハイゲインタイプのディストーション
Crunch-type distortion
DIST 2
Distorsion de type crunch
Crunch-Distortion
ドンシ ャリ風のディストーション
Distortion suitable for line output (when connecting headphones, audio equipment, or HDR).
LINEDS
Distorsion convenant pour sortie de ligne (lors du raccordement d’un casque d’écoute, d’équipe-
ment audio, ou d’un enregistreur de disque dur).
Distortion für die Line-Ausgabe geeignet (beim Anschluß von Kopfhörern, Audiogeräten oder HDR).
ライン(ヘッドホン、オーディオ機器、HDR等を接続)向 きのディストーション
fuzz
FUZZ
Fuzz
Fuzz
ファズ
DRIVE
Sensitivity (1...30)
Sensibilité (1...30)
Empfindlichkeit (1...30)
感度を設定(1...30)
Gain (1...30)
Gain (1...30)
Verstärkung (1...30)
ゲインを設定(1...30)
TONE
Effect type VALUE
Low range gain
LOW G
Gain de la plage inférieure
Bässeverstärkung
低域のゲイン
Mid range frequency
MID FC
Fréquence de la plage moyenne
Mittenfrequenz
中域の周波数
Mid range gain
MID G
Gain de la plage moyenne
Mittenverstärkung
中域のゲイン
High frequency gain
HIGH G
Gain de la fréquence supérieure
Höhenverstärkung
高域のゲイン
Gain (-15...15)
Gain (-15...15)
Verstärkung (-15...15)
ゲインを設定(-15...15)
Gain (-15...15)
Gain (-15...15)
Verstärkung (-15...15)
ゲインを設定(-15...15)
Frequency (1...3)
Fréquence (1...3)
Frequenz (1...3)
周波数を設定(1...3)
Page 51

51
Appendices Appendices Anhänge 付録
Effect type VALUE
Chorus with adjustable depth
CHORS1
Chorus avec intensité réglable
Chorus mit regelbarer Stärke
深さを調整できるコーラス
Chorus with adjustable speed
CHORS2
Chorus avec vitesse réglable
Chorus mit regelbarer Geschwindigkeit
スピードを調整できるコーラス
Chorus with effect sound output to left and direct sound to right.
CHORS 3
Chorus avec sortie du son avec effet à gauche et sortie du son direct à droite.
Chorus mit Effektsignal auf linkem und Direktsignal auf rechtem Kanal.
エフ ェクト音が左に、ダイレクト音が右に出力されるコーラス
Doubling chorus
CHORS 4
Double chorus
Dopplungs-Chorus
ダブリング ・コーラス
Vibrato
VIB
Vibrato
Vibrato
ビブラー ト
Flanger (FLANG1, 2, 3 differ in feedback amount)
FLANG
Flanger (Les effets FLANG 1, 2, 3 diffèrent dans l’importance du feedback)
1, 2, 3
Flanger (FLANG1, 2, 3 unterscheiden sich in der Feedbackstärke)
フランジャ ー(FLANG1,2,3ではフィードバック量が異なる)
Flanger with inverted feedback
FLANG 4
Flanger avec feedback inversé
Flanger mit umgekehrtem Feedback
フィードバックが逆相のフランジャー
Vintage-type phaser
PHASE 1
Phaser de type ancien
Vintage-Phaser
ビンテージタイプのフェーザー
Phaser with strong peaks
PHASE 2
Phaser avec des pointes fortes
Phaser mit starken Wellenspitzen
ピークが強めのフェ ーザー
PHASE1 with inverted feedback
PHASE 3
PHASE1 avec feedback inversé
PHASE1 mit umgekehrtem Feedback
PHASE1のフィードバックを逆相にしたもの
PHASE2 with inverted feedback
PHASE 4
PHASE2 avec feedback inversé
PHASE2 mit umgekehrtem Feedback
PHASE2のフィードバックを逆相にしたもの
Tremolo (LFO: sine wave )
TREM 1
Trémolo (LFO: onde sinusoïdale
)
Tremolo (LFO: Sinuswelle )
トレモロ(LFO:サイン波 )
Tremolo (LFO: square wave )
TREM 2
Trémolo (LFO: onde carrée
)
Tremolo (LFO: Rechteckwelle )
トレモロ(LFO:矩形波 )
Auto pan (LFO: sine wave )
PAN 1
Positionnement panoramique automatique (LFO: onde sinusoïdale
)
Auto-Pan (LFO: Sinuswelle )
オート・パン(LFO:サイン波 )
Auto pan (LFO: square wave )
PAN 2
Positionnement panoramique automatique (LFO: onde carrée
)
Auto-Pan (LFO: Rechteckwelle )
オート・パン(LFO:矩形波 )
Auto wah
AWAH 1
Wah automatique
Auto-Wah
オート・ワウ
Auto wah in opposite direction from AWAH1
AWAH 2
Wah automatique dans le sens opposé à AWAH1
Auto-Wah in entgegengesetzter Richtung von AWAH1
AWAH1とは逆方向に動くオート・ワウ
Fixed wah
FIXWAH
Wah fixe
Fest eingestelltes Wah
固定されたワウ
MOD
Modulation speed (1...30)
Vitesse de modulation (1...30)
Modulationsgeschwindigkeit (1...30)
変調スピードを設定(1...30)
Effect depth (1...30)
Intensité de l’effet (1...30)
Effektstärke (1...30)
効果の深さを設定(1...30)
Sensitivity (1...30)
Sensibilité (1....30)
Empfindlichkeit (1...30)
感度を設定(1...30)
Frequency (1...30)
Fréquence (1...30)
Frequenz (1...30)
周波数を設定(1...30)
Page 52

52
Appendices Appendices Anhänge 付録
Effect type VALUE
Random step filter which moves randomly (RANDOM1, 2, 3 differ in speed)
RANDM
Filtre à pas aléatoire qui se déplace de manière aléatoire (Les effets RANDOM1, 2, 3 diffèrent dans
les bandes de fréquences)
1, 2, 3 Ramdom Step Filter, das sich zufallsgesteuert bewegt (RANDOM1, 2, 3 unterscheiden sich in den Frequenz-
bändern).
フ ィルタがランダムに動くランダムステップ・フィルタ(RANDM1,2,3では周波数帯域が変わる)
Pitch shifter (PITCH1, 2, 3 differ in the level of the effect sound)
PITCH Pitch shifter (PITCH1, 2, 3 diffèrent dans le niveau du son de l’effet)
1, 2, 3 Pitch Shifter (PITCH1, 2, 3 unterscheiden sich im Pegel des Effektklangs)
ピッチ・ シフター(PITCH1,2,3でそれぞれエフェクト音のレ ベルが変わる)
Pitch shifter with effect sound and dry sound split left, right.
PITCH4
Pitch shifter avec son de l’effet et son direct partagés entre la gauche et la droite.
Pitch Shifter mit Effektsignal auf linkem und Direktsignal auf rechtem Kanal.
エフェク ト音とドライ音が左右に分かれるピッチ・シフター
Effect that creates a sound one octave lower *Playing chords may cause malfunction
OCTAVE
Effet qui crée un son d’une octave plus bas *Le jeu d’accords risque de causer une perte de netteté
Erzeugt einen 1 Oktave tieferen Klang *Bei Akkorden geht vielleicht etwas Klarheit verloren
1オクターブ低い音を作り出すエフェクト *和音を弾いた場合、誤動作することがあります
Effect level (1...30)
Niveau de l’effet (1...30)
Effektpegel (1...30)
エフェク ト・レベルを設定(1...30)
Amount of pitch shift
Importance du changement de
hauteur
Stärke der Tonhöhenverschiebung
ピッチ・シフト量を設定
(-24, -17, -12...-1, -d, +d, +1...
+12, +19, +24)
Modulation speed (1...30)
Vitesse de modulation (1...30)
Modulationsgeschwindigkeit (1...30)
変調スピードを設定(1...30)
PEDAL
Effect type VALUE
Volume pedal
VOLUME
Pédale de volume
Volumenpedal
ボリュームペダル
Minimum level (0...30)
Niveau minimum (0...30)
Minimalpegel (0...30)
最小レベルを設定(0...30)
PEDAL-mod (MOD will be off MOD ist ausgeschaltet MOD est désactié
MODがオフになります
)
Effect type VALUE
Chorus with speed controlled by pedal
CHORS 1
Chorus dont la vitesse est contrôlée par la pédale
Chorusgeschwindigkeit von Pedal gesteuert
ペダルで速さをコントロールできるコーラス
Chorus with depth controlled by pedal
CHORS 2
Chorus dont la profondeur est contrôlée par la pédale
Chorusstärke von Pedal gesteuert
ペダルで深さをコントロールできるコーラス
Vibrato with speed controlled by pedal
VIB
Vibrato dont la vitesse est contrôlée par la pédal
Vibratogeschwindigkeit von Pedal gesteuert
ペダルで速さをコントロールできるビブ ラート
Flanger with modulation controlled by pedal
FLANG
Flanger dont la modulation est contrôlée par la pédale
Flangermodulation von Pedal gesteuert
ペダルでうねりをコントロールできるフ ラ ン ジャー
Phaser with speed controlled by pedal
PHASE 1
Phaser dont la vitesse est contrôlée par la pédale
Phasergeschwindigkeit von Pedal gesteuert
ペダルで速さをコントロールできるフェーザー
PHASE1 with feedback inverted
PHASE 2
PHASE1 avec feedback inversé
PHASE1 mit umgekehrtem Feedback
PHASE1のフィードバックを逆相にしたもの
Tremolo with speed controlled by pedal (LFO: sine wave )
TREM 1
Trémolo dont la vitesse est contrôlée par la pédale (LFO: onde sinusoïdale
)
Tremologeschwindigkeit von Pedal gesteuert (LFO: Sinuswelle )
ペダルで速さをコントロールできるトレモロ(LFO:サイン波 )
Tremolo with speed controlled by pedal (LFO: square wave )
TREM 2
Trémolo dont la vitesse est contrôlée par la pédale (LFO: onde carrée
)
Tremologeschwindigkeit von Pedal gesteuert (LFO: Rechteckwelle )
ペダルで速さをコントロールできるトレモロ(LFO:矩形波 )
Auto pan with speed controlled by pedal (LFO: sine wave )
PAN 1
Positionnement panoramique automatique dont la vitesse est contrôlée par la pédale (LFO: onde
sinusoïdale
)
Auto-Pan-Geschwindigkeit von Pedal gesteuert (LFO: Sinuswelle )
ペダルで速さをコントロールできるオート・パン(LFO:サイン波 )
Auto pan with speed controlled by pedal (LFO: square wave )
PAN 2
Positionnement panoramique automatique dont la vitesse est contrôlée par la pédale (LFO: onde
carrée
)
Auto-Pan-Geschwindigkeit von Pedal gesteuert (LFO: Rechteckwelle )
ペダルで速さをコントロールできるオート・パン(LFO:矩形波 )
Ring modulator with frequency controlled by pedal
RING
Modulateur Ring dont la fréquence est contrôlée par la pédale
Ringmodulatorfrequenz von Pedal gesteuert
ペダルで周波数をコントロールできるリング モジュレーター
Effect depth (1...30)
Intensité de l’effet (1...30)
Effektstärke (1...30)
効果の深さを設定(1...30)
Modulation speed (1...30)
Vitesse de modulation (1...30)
Modulationsgeschwindigkeit (1...30)
変調スピードを設定(1...30)
Modulation depth (1...30)
Intensité de la modulation (1...30)
Modulationsstärke (1...30)
効果の深さを設定(1...30)
Peak (tonal emphasis) (1...30)
Pointe (emphase tonale) (1...30)
Peak (Klangbetonung) (1...30)
ピーク(くせの強さ)を設定(1...30)
Effect depth (1...30)
Intensité de l’effet (1...30)
Effektstärke (1...30)
効果の深さを設定(1...30)
Maximum frequency value (1...30)
Valeur de fréquence maximum (1...30)
maximaler Frequenzwert (1...30)
周波数の最大値を設定(1...30)
Page 53

53
Appendices Appendices Anhänge 付録
Effect type VALUE
Pedal wah
WA H
Wah de la pédale
Pedal-Wah
ペダル・ワウ
Resonance filter with frequency controlled by pedal
FILTER
Filtre de résonance dont la fréquence est contrôlée par la pédale
Resonanzfilter-Frequenz von Pedal gesteuert
ペダルで周波数をコントロールできるレゾ ナンスフィルター
Voice effect where moving the pedal produces a speech-like effect (VOICE 1, 2 produce different sounds)
VOICE
Effet de sonorité dans lequel le déplacement de la pédale produit un effet de voix (VOICE1, 2 produisent des sons différents)
1, 2 Stimmeneffekt, bei der die Pedalbe wegung eine Art Spracheff ekt erzeugt (VOICE 1, 2 erzeugen unterschied-
liche Klänge)
ペダルを動かすと、しゃべっ ているような効果が得られるボイス・エフェクト(VOICE1,2でそれぞれ発声が異なる)
Random step filter with effect level controlled by pedal
RANDM Filtre à pas aléatoire dont le niveau de l’effet est contrôlé par la pédale
1, 2 Random Step Filter, bei dem der Effektpegel vom Pedal gesteuert wird
ペダルでエフェクト・レベルをコ ントロールできるランダムステップ・フィルタ
Pitch shifter with controllable pitch (PITCH 1, 2, 3 differ in the level of effect sound)
PITCH
Pitch shifter dont la hauteur peut être contrôlée (Les effets PITCH1, 2, 3 diffèrent dans le niveau du
son de l'effet)
1, 2, 3 Pitch Shifter mit steuerbarer Tonhöhe (PITCH 1, 2, 3 unterscheiden sich im Pegel des Effektklangs)
ピッチをコントロールできるピッチ・シフター(PITCH1,2,3でそれぞれエフェクト音のレベルが変わる)
Moving the pedal produces an effect similar to using a tremolo arm.
BENDER
Le déplacement de la pédale produit un effet similaire à l’utilisation d'un bras trémolo.
Die Pedalbewegungen erzeugen einen Effekt, der mit dem Einsatz eines Vibratohebels vergleichbar ist.
ペダルを動かすと、トレモロ アームを使ったよう な効果が得られるエフェクト
An effect which simulates the resonance of Indian music. The pedal controls the effect level. Effective when
you play in a key corresponding to the pitch specified by the VALUE keys.
DRONE
Effet qui simule la résonance de la musique indienne La pédale contrôle le niveau de l’effet. Cet effet est
efficace lorsque vous jouez une note dont la hauteur correspond à celle spécifiée par les touches VALUE.
Simuliert die Resonanzen der indischen Musik. Das Pedal steuert den Effektpegel. Sehr wirkungsvoll, wenn
Sie in einer Tonart spielen, die der mit den VALUE-Tasten festgelegten Tonhöhe entspricht.
イン ド風音楽の響きを再現するエフェクト。ペダルでエフェクトのレベルをコン トロール。 VALUEキーで設定した音程に沿ったキー
(調)で演奏すると効果的
Peak (tonal emphasis) (1...30)
Pointe (emphase tonale) (1...30)
Peak (Klangbetonung) (1...30)
ピーク(くせの強さ)を設定(1...30)
Modulation speed (1...30)
Vitesse de modulation (1...30)
Modulationsgeschwindigkeit (1...30)
変調スピードを設定(1...30)
Amount of pitch shift
Importance du changement de
hauteur
Stärke der Tonhöhenverschiebung
ピッチ・シフト量を設定
(-24, -17, -12...-1, -d, +d, +1...+12,
+19, +24)
Specify pitch in the range of A (1),
A# (2)...G# (12)
Définit la hauteur sur une plage al-
lant de La (1), La# (2)....à Sol# (12)
Bestimmt die Tonhöhe im Bereich
A (1), A# (2)... G# (12)
音程をA(1)、A#(2)〜G#(12)の範
囲で設定
Effect type VALUE
Delay with effect level controlled by pedal
DELAY
Retard avec niveau de l’effet contrôlé par la pédale
Delay-Effektpegel wird vom Pedal gesteuert.
ペダルでエフェクト・レベルをコントロールできるディレイ
Normally operates as a conventional delay, but when pedal is pressed deeply to make the pedal indicator
light, the delay sound will be held. Press the pedal deeply once again to cancel the hold.
Normalement, fonctionne comme un retard traditionnel mais, lorsque la pédale est enfoncée pour
allumer son voyant, le son de retard est maintenu.
HOLD Funktioniert nor malerweise wie ein herkömmliches Delay. Aber wenn das Pedal nach unten gedrückt wird
und die Pedal anzeige leuchtet, wird der Delay-Klang ausgehalten. Drücken Sie das Pedal nochmals nach
unten, um die Haltefunktion auszuschalten.
通常はふつうのディレイ として働き、ペダルを深く踏み込んでペダル・インジケーターを点灯させるとディレイ音が
ホール ドされる。もう一度ペダルを深く踏み込むとホールドが解除される
Delay with delay time controlled by pedal, as if the speed of a tape echo were being changed.
ECHO
Enfoncer à nouveau la pédale pour annuler le maintien. Retard avec temps de retard contrôlé par la
pédale, comme si la vitesse d’un écho de bande était modifiée.
Delay-Zeit wird vom Pedal gesteuert, als ob die Geschwindigkeit eines Bandechos geändert würde.
テープエコーの速さを変えるようにペダルでディレイ・タイムをコン トロールできるディレイ
Deep room reverb with effect level controlled by pedal.
ROOM 1
Réverbération de pièce intense avec niveau d’effet contrôlé par la pédale.
Der Effektpegel dieses tiefen Room Reverb wird vom Pedal gesteuert.
ペダルでエフェクト・レベルをコ ントロールできる厚みのあるルームリバーブ
Bright room reverb with effect level controlled by pedal.
ROOM 2
Réverbération de pièce claire avec niveau d’effet contrôlé par la pédale.
Der Effektpegel dieses hellen Room Reverb wird vom Pedal gesteuert.
ペダルでエフェクト・レベルをコントロールできる明るめのルームリバーブ
Deep hall reverb with effect level controlled by pedal.
HALL 1
Réverbération de salle intense avec niveau d’effet contrôlé par la pédale.
Der Effektpegel dieses tiefen Hall Reverb wird vom Pedal gesteuert.
ペダルでエフェクト・レベルをコントロールできる厚みのあるホールリバーブ
Bright hall reverb with effect level controlled by pedal.
HALL 2
Réverbération de salle claire avec niveau d’effet contrôlé par la péda.
Der Effektpegel dieses hellen Hall Reverb wird vom Pedal gesteuert.
ペダルでエフェクト・レベルをコ ントロールできる明るめのホールリバーブ
Delay time (1...21)
Temps de retard (1...21)
Delay-Zeit (1...21)
ディレイ ・タイムを設定(1...21)
Effect level (1...30)
Niveau de l’effet (1...30)
Effektpegel (1...30)
エフェク ト・レベルを設定(1...30)
Specify maximum effect level
(1...30)
Définir le niveau maximum de
l’effet (1...30)
Bestimmt den maximalen Effektpegel (1...30)
エフェクト・レベル の最大値を設定
(1...30)
PEDAL-amb (AMB will be off AMB ist ausgeschaltet AMB est désactié
AMBがオフになります
)
Page 54

54
Appendices Appendices Anhänge 付録
Effect type VALUE
Sample and Play effect. Press pedal to playback.
SAMPL 1
Effet d’échantillonnage et de jeu. Appuyer sur la pédale pour la reproduction.
Sample & Play-Effekt. Zur Wiedergabe das Pedal nach unten drücken.
ペダルを踏むと再生されるサンプル&プレー・エフェクト
Sample and Play effect. Press pedal to playback, return pedal to playback in
reverse.
SAMPL 2
Effet d’échantillonnage et de jeu. Appuyer sur la pédale pour la reproduction, laisser revenir la pédale pour une reproduction inverse.
Sample & Play-Effekt. Zur Wiedergabe das Pedal nach unten drücken. Zur
Rückwärtswiedergabe das Pedal zurückbewegen.
ペダルを踏むと再生され、戻すと逆再生されるサンプル&プレー・エフェク ト
Sample and Play loop with playback volume controlled by pedal.
LOOP 1
Boucle d’échantillonnage et de jeu avec le volume de la reproduction
contrôlée par la pédale.
Sample & Play Loop, dessen Wiedergabe-Lautstärke v om P edal gesteuert wird.
ペダルで再生音量をコントロールできるサンプル&プレイ・ル ー プ
Sample and Play loop with loop length controlled by pedal.
LOOP 2
Boucle d’échantillonnage et de jeu avec longueur de la boucle contrôlée par la
pédale.
Sample & Play Loop, dessen Loop-Länge vom Pedal gesteuert wird.
ペダルでループの長さをコントロールできるサンプル& プレイ・ル ー プ
Scratch effect. Press pedal to playback scratch sound.
SCRAT 1
Effet scratch. Appuyer sur la pédale pour reproduire une ébauche de son.
Scratch-Effekt. Zur Wiedergabe des Scratchsounds das Pedal drücken.
ペダルを踏むとスクラッチ音が再生されるスクラッ チ・エフェクト
Scratch effect. Play your instrument and press pedal to playback scratch sound.
SCRAT 2
Effet scratch. Jouer sur l’instrument et appuyer sur la pédale pour reproduire un effet d’ébauche de son.
Scratch-Effekt. Zur Wiedergabe des Scratchsounds das Instrument spielen und
das Pedal drücken.
楽器を弾いてペダルを踏むとスクラッチ音が再生されるスクラ ッチ ・エフェ クト
Specify the sample time (1, 2)
1: 0.9 seconds (hi-fi sound), 2: 1.8seconds (lo-fi sound)
Définir le temps d'échantillonnage (1, 2)
1: 0,9 secondes (son hi-fi), 2: 1,8secondes (son lo-fi)
Bestimmt die Sample-Zeit (1, 2).
1: 0,9 sec (HiFi-Klang), 2: 1,8 sec (LoFi-Klang)
サンプルタイ ムを設定(1,2)
1:0.9秒( ハ イファイ ・サウンド)、2:1.8秒( ロ ーファイ ・サウンド)
Specify the sample time (1...30) 1 is 0.26 seconds, 30 is 1.8
seconds.
1...15: hi-fi sound, 16...30: lo-fi sound
Définir le temps d’échantillonnage (1...30). 1 égale 0,26 secondes, 30 =1,8 secondes 1...15: son hi-fi, 16-30: son lo-fi.
Bestimmt die Sample-Zeit (1...30). 1 sind 0,26 sec, 30 sind 1,8
sec. 1...15: HiFi-Klang, 16...30: LoFi-Klang
サンプル・タイムを設定(1...30)、1で0.26秒、30で1.8秒(約0.05
秒刻み)
1..15: ハイファイ ・サウンド、16...30:ローファイ ・サウン ド
Effect level (1...30)
Niveau de l’effet (1...30)
Effektpegel (1...30)
エフェク ト・レベルを設定(1...30)
Effect type VALUE
Deep room type reverb
ROOM1
Réverbération de type pièce intense.
Tiefer Room Reverb
厚みのあるルームタイプのリバーブ
Bright room type reverb
ROOM 2
Réverbération de type pièce claire.
Heller Room Reverb
明るめのルームタイプのリバーブ
Deep hall type reverb
HALL 1
Réverbération de type salle intense.
Tiefer Hall Reverb
厚みのあるホールタイプのリバーブ
Bright hall type reverb
HALL 2
Réverbération de type salle clair.
Heller Hall Reverb
明るめのホールタイ プのリバーブ
Stereo delay 40...1000 [ms]
.DLY 40... Retard stéréo 40...1000 (ms)
DL1000 Stereo Delay 40...1000 [ms]
ステレオディレイ40...1000[ms]
AMB
Effect level (1...30)
Niveau de l’effet (1...30)
Effektpegel (1...30)
エフェク ト・レベルを設定(1...30)
Effect type VALUE
Specify the cabinet size
SIZE Définit la taille du coffret
1...30 Bestimmt die Boxengröße
キャビネットサイズを設定
CR
Effect depth (1...30)
Intensité de l’effet (1...30)
Effektstärke (1...30)
効果の深さを設定(1...30)
Effect type VALUE
Noise reduction
NR
Réduction du bruit
Rauschunterdrückung
ノイズ ・リダクション
NR
Effect depth (1...30)
Intensité de l’effet (1...30)
Effektstärke (1...30)
効果の深さを設定(1...30)
Page 55

55
Appendices Appendices Anhänge 付録
3. Troubleshooting Guide de dépannage Fehlersuche 故障かな?と思ったら
If the AX1G does not operate as you e xpect, please check the following points first. If this does not resolve the
problem, contact your dealer or a Korg service center.
Si le AX1G ne fonctionne pas comme vous l’espérez, commencer par vérifier les points suivants. Si, malgré
cela, vous ne parvenez pas à résoudre le problème, veuillez prendre contact avec votre revendeur ou avec un
centre technique Korg.
Wenn der AX1G nicht wie erwartet funktioniert, überprüfen Sie bitte zuerst die folgenden Punkte. Falls sich
damit das Problem nicht lösen läßt, setzen Sie sich mit Ihrem Fachhändler oder einem Korg Kundendienst in
Verbindung.
故障かな?と思 ったら、まず以下のことを確認してください。症状が改善されない場合は、お近くの販売店またはコルグ営業技術課までお問い
合わせください。
1. Power does not turn on.
* Are batteries installed? Alternatively, is the AC adapter connected to an AC outlet? (☞ p.9, 10)
* Is a mono phone plug cable connected to the INPUT jack? (☞ p.9, 10)
L’appareil ne se met pas sous tension.
* Les piles sont-elles mises en place? Ou, l’adaptateur secteur est-il raccordé à une prise de cou-
rant? (☞ p.19, 20)
* Un câble équipé d’une fiche téléphonique mono est-il raccordé à la borne d’entrée INPUT? (☞
p.19, 20).
Das Gerät läßt sich nicht einschalten
* Sind Batterien eingelegt? Oder ist der Wechselstromadapter mit einer Netzsteckdose verbunden? (
S.31, 32)
* Ist ein Mono-Klinkenkabel an die INPUT-Buchse angeschlossen? (S.31, 32)
2. Preset program parameter list Liste de paramètre des programmers prédéfinis
Parameterliste der Preset-Programme
プリセット・プロ グラム・パラメ ータ・リスト
TONE
BANK-Prog No. NAME DRIVE-VALUE
LOW G MID FC MID G HIGH G
MOD-VALUE PEDAL-VALUE AMB-VALUE CR-VALUE NR
LEVEL
G - 0 CHORUS COMP 20 5 1 2 5 CHORS1 15 DELAY 11 OFF OFF 5 20
G - 1 FOO DIST2 10 3 2 4 2 OFF VOLUME 0 ROOM2 11 OFF 10 22
G - 2 PHASED COMP 18 10 1 1 8 OFF PHASE1 15 DLY100 12 OFF 5 20
G - 3 SA TCH DIST1 16 4 2 2 4 OFF WAH DLY260 16 OFF 20 21
G - 4 TEXAS COMP 8 5 3 5 6 OFF TREM2 17 HALL1 8 OFF 5 20
G - 5 C'F'H' DIST2 22 2 2 1 4 OFF VOLUME 0 DLY40 20 OFF 15 21
G - 6 AQUA COMP 20 8 1 1 8 OFF RANDM2 20 DLY520 23 OFF 5 20
G - 7 ZOSO OVDRV 20 5 3 2 4 OFF DELAY 10 OFF OFF 10 23
G - 8 TALK COMP 16 5 1 3 1 OFF VOICE1 23 ROOM2 8 OFF 5 20
G - 9 H'DLY OVDRV 15 6 1 6 7 OFF HOLD 21 OFF OFF 10 21
O - 0 12✻STR COMP 15 5 3 0 7 CHORS1 25 VOLUME 0 HALL2 11 OFF 5 20
O - 1 ZOMBIE DIST2 25 7 2 -7 5 CHORS1 10 VOLUME 0 DL Y60 22 OFF 15 22
O - 2 FUNKY COMP 25 5 3 3 10 OFF WAH DLY220 20 OFF 5 20
O - 3 CUDA DIST1 19 3 2 0 2 FLANG1 2 VOLUME 0 DL Y180 15 OFF 15 22
O - 4 NASHVL COMP 14 3 3 11 12 OFF BENDER -2 DL Y60 15 OFF 5 20
O - 5 BUSH DIST2 12 3 2 3 4 CHORS4 1 VOLUME 0 DLY140 5 OFF 10 21
O - 6 EDGE COMP 15 3 3 3 10 OFF VIB 15 DLY460 30 OFF 5 22
O - 7 S/LOOP OVDRV 30 7 3 4 6 OFF LOOP1 30 OFF OFF 10 19
O - 8 SPACED OFF 5 3 5 5 OFF FILTER 22 DLY520 30 OFF 5 25
O - 9 RELOAD DIST2 21 5 2 -3 8 OFF DELA Y 3 OFF OFF 15 21
R - 0 RUSH COMP 10 8 3 5 7 OFF CHORS2 10 DLY100 30 OFF 5 20
R - 1 JIMI FUZZ 10 8 2 2 4 OFF WAH HALL2 8 OFF 10 21
R - 2 TWANG COMP 12 2 3 8 9 OFF VOLUME 0 ROOM1 17 OFF 5 20
R - 3 SHIFT OVDRV 25 5 3 3 5 OFF PITCH2 7 DL Y100 15 OFF 10 20
R - 4 STEVIE FUZZ 1 7 1 2 5 OFF VIB 30 ROOM1 13 OFF 10 20
R - 5 FWD/BK DIST1 10 6 3 5 5 CHORS2 1 SAMPL2 2 OFF OFF 10 17
R - 6 VIOLIN DIST1 8 5 1 1 2 OFF VOLUME 0 DLY460 30 OFF 10 21
R - 7 OCTA VE DIST2 14 9 1 2 4 OCTA VE 15 VOLUME 0 OFF OFF 10 20
R - 8 MADMAN LINEDS 23 7 3 3 7 OFF VOLUME 0 ROOM1 12 SIZE15 30 20 18
R - 9 REDHOS LINEOD 30 6 1 3 6 OFF VOLUME 0 DL Y140 30 SIZE4 30 10 18
G: green vert grün
緑
O: orange orange orange
橙
R: red rouge rot
赤
Page 56

56
Appendices Appendices Anhänge 付録
電源が入らない
* 電池が入 っていますか?または、コンセントにACアダプターが接続されていますか?(☞P.42、43)
* INPUTジャックにモノラル標準ケーブルが接続され ています か?(☞P.42、43)
2. No sound
* Are your guitar, amp and/or headphones connected to the correct jacks? (☞ p.9)
* Is your amp turned on and set correctly?
* Are any cables broken?
* Is the master level of the AX1G set to “1” or to a low level? (☞ p.10)
* Is the program level of the AX1G set to “1” or to a low level? (☞ p.15)
* Is the volume of your instrument turned down?
* Is the AX1G muted?
Pas de son
* Votre guitare, l’ampli ou le casque d’écoute sont-ils raccordés aux bornes adéquates? (☞ p.19)
* L'ampli est-il allumé et réglé correctement?
* Les câbles sont-ils abîmés?
* Le niveau principal du AX1G est-il mis sur “1” ou sur un faible niveau? (☞ p.20)
* Le niveau de programme du AX1G est-il mis sur “1” ou sur un faible niveau? (☞ p.27)
* Le volume de votre instrument est-il réduit au minimum?
* Le AX1G est-il assourdi (le son est-il coupé)?
Keine Klänge hörbar
* Sind Ihre Gitarre, Ihr Verstärker und/oder Ihre Kopfhörer an die richtigen Buchsen angeschlossen? (S.31)
* Ist Ihr Verstärker eingeschaltet und richtig eingestellt?
* Ist ein Kabel defekt?
* Ist Master Level des AX1G auf „1“ oder einen niedrigen Pegel eingestellt? (S.32)
* Ist der Programmpegel des AX1G auf „1“ oder einen niedrigen Pegel eingestellt? (S.38)
* Ist die Lautstärke Ihres Instruments zurückgedreht?
* Ist der AX1G stummgeschaltet?
音が出ない
*ギター、アンプ、ヘッドホンはそれぞれの端子に正しく接続されていますか?(☞P.42)
* アンプの電源がオンにな っていて正 しく設定されていますか?
* 接続コードが断線していませんか?
* AX1Gのマスター・レベルが1または小さい値になっ ていませんか?(☞P.43)
* AX1Gのプログラ ムごとのレベルが1または小さい値になっていませんか?(☞P.48)
* ギター側のボリュームを絞っていませんか?
* AX1Gがミュートになっ ていませんか?
3. No effect is applied
* Is the AX1G bypassed? (☞ p.10)
* Are the effects used in the program turned on?
Pas d’effet audible
* Le AX1G est-il contourné? (☞ p.20)
* Les effets utilisés dans le programme sont-ils activés?
Es werden keine Effekte angewandt
* Ist der AX1G auf Bypass geschaltet? (S.32)
* Sind die vom Programm benutzten Effekte eingeschaltet?
エフェクトがかからない
* バイパスになっていませんか?(☞P.43)
* プログラムで使うエフェクトがオンになっていますか ?
Page 57

57
Appendices Appendices Anhänge 付録
4. Metronome does not work
* Is the AX1G in Play mode? The metronome does not function in Edit mode.
* Is the metronome output level set to “0”?(☞ p.11)
Le métronome ne fonctionne pas
* Le AX1G est-il en mode de jeu? Le métronome ne fonctionne pas en mode d’édition.
* Le niveau de sortie du métronome est-il réglé sur “0”? (☞ p.21)
Das Metronom funktioniert nicht
* Befindet sich der AX1G im Play-Modus? Im Edit-Modus funktioniert das Metronom nicht.
* Ist der Ausgangspegel des Metronoms auf „0“ eingestellt? (S .33)
メトロノームが動作しない
*プレイ・モードになっていますか ?
エディット・モードでは、メトロノームは動作しません。
*メトロノームの出力レベルが0になっていませんか?(☞P.44)
5. Pedal does not work
* Have you selected a program which uses an expression pedal effect? (☞ p.12)
Check whether the “
” icon in the LCD is lit.
* Is the pedal indicator lit?
La pédale ne fonctionne pas.
* Avez-vous sélectionné un programme qui permet d'utiliser un effet de pédale d’expression? (☞ p.22)
Vérifier si l’icône “
” est allumée à l’écran.
* Le voyant de la pédale est-il éclairé?
Das Pedal funktioniert nicht
* Haben Sie ein Programm gewählt, das einen Expressionpedal-Effekt benutzt? (S.34)
Prüfen Sie, ob das „
“ Icon im LCD leuchtet.
* Leuchtet die Pedalanzeige?
ペダルが動作しない
* エクスプレッ ション・ペダルのエフェクトが使われているプログラムを選んでいますか?(☞P.45)
LCDディスプレイに のアイ コンが点灯し ている か確認 し てください。
* ペダル・イン ジケーターが点灯していますか?
6. Cannot write (LCD indicates “ERROR”)
* Did you turn the power off while the preset programs were being loaded?
Reload the preset programs. (☞ p.16)
Impossible de sauvegarder des données (l'écran marque “ERROR”)
* Avez-vous mis l’appareil hors tension pendant le chargement des programmes prédéfinis d’usine?
Recharger les programmes prédéfinis d’usine. (☞ p.28)
Daten lassen sich nicht speichern (LCD meldet „ERROR“)
* Haben Sie den Strom ausgeschaltet, während die Preset-Programmegeladen wurden?
Laden Sie nochmals die Preset-Programme. (S.39)
ライトができない(液晶ディ スプレイにERRORと表示される)
*プリセット・プログラムのロード中に電源をオフにしませんでしたか?
プリセット・プログラムを再ロードして く ださい。(☞P.49)
Page 58

58
Appendices Appendices Anhänge 付録
4. Specifications Spécifications techniques Technische Daten 主な仕様
• Effects: 69 types (Simultaneous effects: Up to 7)
• Number of programs: 30
• Input: phone jack
• Output: line/headphone dual-purpose output (stereo phone jack)
• Tuner section
detection range: 27.5Hz–2,093Hz (A0...C7)
calibration: A=438–445Hz
• Metronome section tempo: = 40–208
• Power supply: four AA size (LR6) alkaline batteries (battery life is 12hours of continuous use) or separately
sold AC adapter (DC9V
)
• Dimensions: 8.3” (212mm) x 7.5” (190mm) x 2.3” (58mm) [WxDxH]
• Weight: 715g (not including batteries)
• Effets: 69 types (Effets simultanés: jusqu’à sept effets)
• Nombre de programmes: 30
• Entrée: borne d’1/4"
• Sortie: sortie à deux fonctions ligne/casque d’écoute (borne stéréo d’1/4")
• Section accordeur
Plage de détection: 27,5 Hz à 2.093 Hz (La0 à Do7)
Calibrage: A = 438 à 445 Hz
• Tempo de la section métronome: = 40 à 208
• Alimentation: quatre piles alcalines de format AA (LR6) (durée de vie des piles: 12 heures d’utilisa-
tion continue) ou adaptateur secteur (DC9V
) vendu séparément
• Dimensions: 212mm x 190mm x 58mm (LxPxH)
• Poids: 715 g (piles non comprises)
• Effektvariation: 69 Effektvariationstypen (Gleichzeitige Effekte: bis zu 7)
• Programmanzahl: 30
• Eingang: 1/4“-Buchse
• Ausgang: Line/Kopfhörer Mehrzwec k-Ausgang (1/4" Stereo-Buchse)
• Tuner-Sektion
Erkennungsbereich: 27,5Hz–2.093Hz (A0...C7)
Kalibrierung: A = 438–445Hz
• Metronomtempo: = 40–208
• Stromversorgung: vier Mignon (LR6) Batterien (Lebensdauer bei Dauereinsatz: 12 Stunden) oder se-
parat erhältlichen Wechselstromadapter (DC9V
)
• Abmessungen: 212mm x 190mm x 58mm (BxTxH)
• Gewicht: 715g (ohne Batterien)
• エフェク ト数:69タイプ(最大同時使用エフェクト数:7)
• プログラム数:30(10×3バンク)
• 入力:標準ジャ ックインプッ ト
• 出力:ライン/ヘッドホン兼用(ステレオ標準ジャック)
• チューナー部
測定範囲:27.5Hz〜2,093Hz(A0〜C7)
キャリブレーション :A=438〜445Hz
• メトロノーム部テンポ:=40〜208
• 電源:アルカリ単3乾電池4本(連続約12時間使用可能)またはACアダプター(コルグA30960J)
• 外形寸法:212(W)×190(D)×58(H)mm
• 重量:715g(電池を含まず)
• 付属品:取扱説明書
• オプション:ACアダプターA30960J(DC9V )
Page 59

59
アフターサービス
上記の保証規定によりアフターサービスをいたします。アフターサービスについてご不明の点は下記へお問い合わせください。
▼▲▼ 株式会社コルグ ▼▲▼
インフォメーション 〒168-0073 東京都杉並区下高井戸1-11-17 ☎(03)5376-5022
東京営業所 〒168-0073 東京都杉並区下高井戸1-11-17 ☎(03)3323-5241
名古屋営業所 〒466-0825 名古屋市昭和区八事本町100-51 ☎(052)832-1419
大阪営業所 〒531-0072 大阪市北区豊崎3-2-1淀川5番館7F ☎(06)6374-0691
福岡営業所 〒810-0012 福岡市中央区白金1-3-25第2池田ビル1F ☎(092)531-0166
修理等のお問い合わせは最寄りの各営業所、または下記までお問い合わせください。
営業技術課 〒143-0001 東京都大田区東海5-4-1明正大井5号営業所コルグ物流センター内 ☎(03)3799-9085
保証規定
ご注意(必ずお読みください)
この製品は、当社の厳密な製品検査に合格したものです。万一保証期間内に製造上の不備に起因する故障の生じた場合は下記の保証規定により無償修
理いたします。
保証条件
1. 本保証書の有効期間はお買い上げ日より1ケ年です。
2. 次の場合の修理は保証期間内であっても有料修理となります。
●消耗部品(電池など)を交換する場合。
● お取扱い方法が不適当のために生じた故障の場合。
●天災(火災、浸水等)によって生じた故障。
● 故障の原因が本製品以外の、他の機器にある場合。
● コルグサービスステーション及び、コルグ指定者以外の手により修理、改造された部分の処理が不適当であった場合。
● 保証書に販売店名、お買い上げ日などが記入されていない場合あるいは、字句を書き替えられた場合。
● 本保証書の提示がない場合。
● 日本国外で使用される場合。
尚、当社が修理した部分が再度故障した場合は保証期間外であっても、修理した日より3ケ月以内に限り無償修理となります。
3. 修理や運送費用が、製品の価格より高くなることもありますので、あらかじめコルグ・サービスステーションまたはインフォメーションへご相談
ください。運送にかかる往復の費用は、お客様のご負担とさせていただきます。
4. 保証期間が切れますと修理は有料になりますが、引き続き、製品の修理は責任を持ってさせていただきます。修理用性能部品(電子回路など)は通
常8年間を基準に保有しております。ただし外装部品(パネルなど)の修理は類似の代替品を使用することもありますのでご了承ください。
5. お客様が保証期間中に移転された場合でも、保証は引き続きお使いいただけます。移転先のコルグ製品お取り扱い楽器店、またはコルグ営業技術
課までお問い合わせください。
お願い
本保証書に販売年月日の記入がない場合は無効となります。
※修理は、お買い上げの販売店に必ず本保証書を提示の上、ご依頼ください。記入不可能な場合はお買い上げ年月日を証明できる領収書等と一緒に
保管してください。
※ 本書は再発行致しませんので、紛失しないよう大切に保管して下さい。
本書は上記の保証規定により無料修理を行うことをお約束するものです。お買い上げの日
から満1年の間に万一故障が発生した場合は製品と共に本書をお買い上げの販売店にご持
参の上、修理をご依頼ください。
保証書
お買上げ日 年 月 日
販売店名
コルグギター・ハイパフォーマ
ンス・プロセッサーAX1G
(日本国内有効)
 Loading...