

Page 1
2
Page 2

Precautions
Location
Using the unit in the following locations can result
in a malfunction.
• In direct sunlight
• Locations of extreme temperature or humidity
• Excessively dusty or dirty locations
• Locations of excessive vibration
• Close to magnetic elds
Power supply
Be sure to turn the power switch to OFF when the
unit is not in use. Remove the battery in order to
prevent it from leaking when the unit is not in use
for extended periods.
Interference with other electrical devices
Rad ios and televisions place d n earby may
experience reception interference. Operate this unit
at a suitable distance from radios and televisions.
2
Handling
To avoid breakage, do not apply excessive force to
the switches or controls.
Care
If the exterior becomes dirty, wipe it with a clean,
dry cloth. Do not use liquid cleaners such as
benzene or thinner, or cleaning compounds or
ammable polishes.
Keep this manual
After reading this manual, please keep it for later
reference.
Keeping foreign matter out of your
equipment
Never set any container with liquid in it near this
equipment. If liquid gets into the equipment, it
could cause a breakdown, re, or electrical shock.
Be careful not to let metal objects get into the
equipment.
Page 3

DECLARATION OF CONFORMITY (for USA)
Responsible Party : KORG USA INC.
Address : 316 SOUTH SERVICE ROAD, MELVILLE
Telephone : 1-631-390-6500
Equipment Type : Tuner Metronome Recorder
Model : TMR-50
This device com plies with Part 15 of FCC Ru les.
Operation is subject to the following two conditions:
(1) This device may not cause harmful interference,and
(2) this device must accept any interference received,
including interference that may cause undesired
operation.
THE FCC REGULATION WARNING (for USA)
NOTE: This equipment has been tested and found to comply with the
limits for a Class B digital device, pursuant to Part 15 of the FCC Rules.
These limits are designed to provide reasonable protection against
harmful interference in a residential installation. This equipment
generates, uses, and can radiate radio frequency energy and, if not
installed and used in accordance with the instructions, may cause
harmful interference to radio communications. However, there is no
guarantee that interference will not occur in a particular installation. If
this equipment does cause harmful interference to radio or television
reception, which can be determined by turning the equipment o
and on, the user is encouraged to try to correct the interference by
one or more of the following measures:
• Reorient or relocate the receiving antenna.
•
Increase the separation between the equipment and receiver.
• Connect the equipment into an outlet on a circuit dierent
from that to which the receiver is connected.
•
Consult the dealer or an experienced radio/TV technician
for help.
If items such as cables are included with this equipment, you
must use those included items.
Unauthorized changes or modication to this system can void
the user’s authority to operate this equipment.
3
Page 4

Notice regarding disposal (EU only)
When this “crossed- out whee led bin”
symbol is display ed on the produc t,
owner ’s ma nual, batter y, or bat tery
package, it signies that when you wish
to dispo se o f th is p roduct, man ual,
package or battery you must do so in an
approved man ner. Do not discard this
product, manual, package or battery along with
ordinary household waste. Disposing in the correct
manner will prevent harm to human health and
potential damage to the environment. Since the
correct method of disposal will depend on the
applicable laws and regulations in your locality,
please contact your local administrative body for
details. If the battery contains heavy metals in excess
of the regulated amount, a chemical symbol is
displayed below the “crossed-out wheeled bin”
symbol on the battery or battery package.
4
IMPORTANT NOTICE TO CONSUMERS
This product has been manufactured according to
strict specications and voltage requirements that
are applicable in the country in which it is intended
that this prod uct should be used. If you have
purchased this product via the internet, through
mail order, and/or via a telephone sale, you must
verify that this product is intended to be used in
the country in which you reside.
WARNING: Use of this product in any country
other than that for which it is intended could be
dangerous and could invalidate the manufacturer’s
or distributor’s warranty. Please also retain your
receipt as proof of purchase otherwise your product
may be disqualied from the manufacturer’s or
distributor’s warranty.
*All product names and company names are
the trademarks or registered trademarks of
their respective owners.
Page 5

Table of Contents
Main features .................................................6
Installing batteries ........................................6
Using the stand .............................................8
Parts of the TMR-50 .......................................8
Quick start....................................................11
Turning the power on/o ...........................14
Backlight ......................................................15
Connections .................................................15
Using the tuner ............................................16
Using the metronome .................................19
Using the tuner and metronome
simultaneously ............................................21
Using the recorder ......................................22
Using the recorder and tuner
simultaneously ............................................27
Using the recorder and metronome
simultaneously ............................................28
Using the tuner, metronome and recorder
simultaneously ............................................32
Connecting a computer ..............................34
Formatting ...................................................37
Troubleshooting .........................................38
Specications ..............................................39
5
Page 6
Thank you for purchasing the Korg Tuner
Metronome Recorder TMR-50.
Main features
The TMR-50 allows you to record and tune
using the internal mic or a mic connected to
the INPUT jack. Additionally, you can use
the recorder, tuner and metronome either
separately or simultaneously.
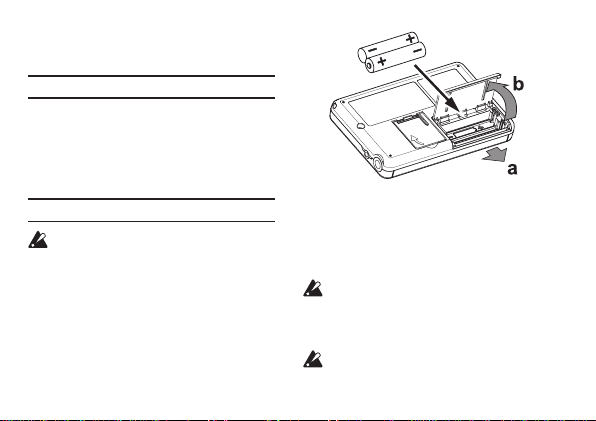
Installing batteries
Before replacing the baeries, make sure
that the recorder has been turned o.
1. Slide the baery compartment cover on
the back of the TMR-50 in direction “a”
as shown in the illustration and li up
the cover in direction “b.”
2.
Insert the batteries, making sure to
observe the correct polarity.
6
3. In order to get accurate readings of the
remaining baery power, please refer
to the “Seing the baery type” section
on page 7 and select the type of baery
that’s being used.
Depleted baeries should be immediately
removed from the unit. In addition, remove
the baeries if you do not expect to use the
unit for an extended period of time.
If the unit malfunctions try removing and
then reinstalling the baeries.
Page 7
Do not mix partially used baeries with
new ones, and do not mix baeries of
diering types.
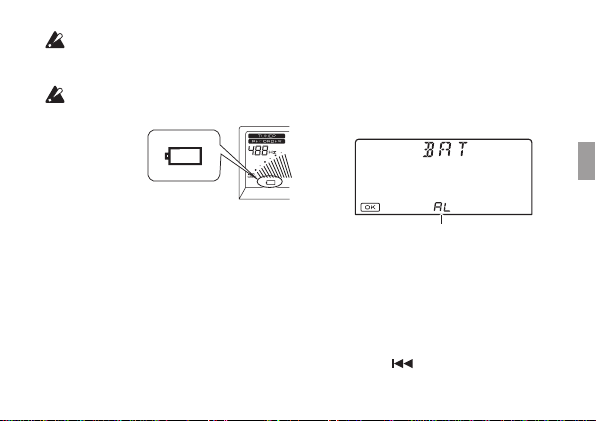
When the baeries run down, a baery symbol
will appear on the le side of the display.
When the baeries run down even further,
the baery symbol will blink. At this time, it
will no longer be possible to use the recorder
function to record. Although you will still be
able to play back recorded data and use the
tuner and metronome functions, you should
replace the baeries as soon as possible.
Setting the battery type
In order to get accurate readings of the
remaining baery power, select the type of
baery that’s being used.
1. When you replace the baeries and turn
on the power, the display will show a
screen allowing you to specify the type
of baeries you’re using.
Battery type
2. Press the TAP TEMPO buon to select
the baery type.
AL: When using alkaline or zinc-carbon
baeries
nH: When using nickel-metal hydride
baeries
3. Press the buon.
7
Page 8
The seing will be completed, and the
11
10
12
TMR-50 will start up.
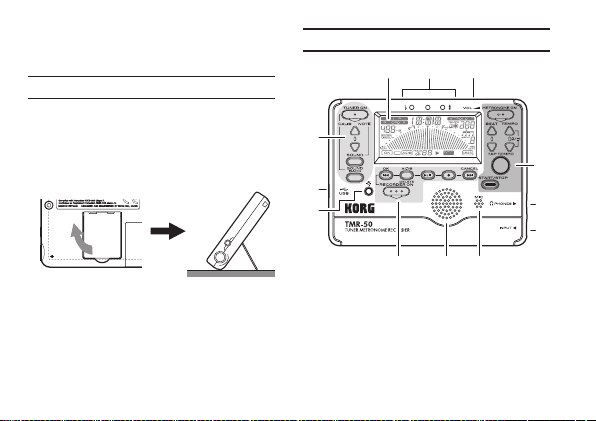
Using the stand
You can use the stand provided on the back
of the TMR-50 to tilt it back at an angle for
easy viewing.
8
Parts of the TMR-50
1
2
3
1. TUNER section
2. USB connector
3. Backlight button
4. Recorder section
5. Speaker
6. Mic
9
8
7
54 6
Page 9
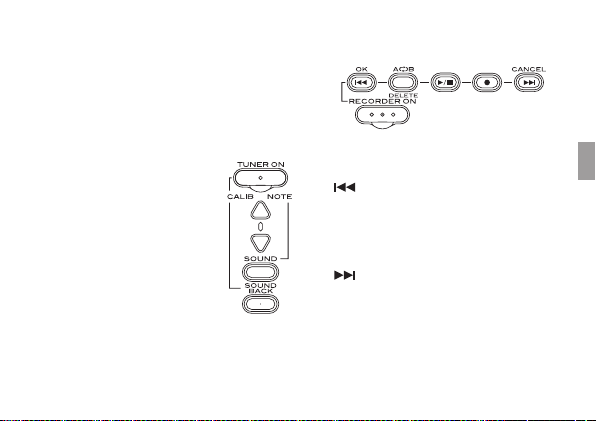
7. INPUT jack
d
8. PHONES jack
9. Metronome section
10.Volume
11.Tuning guide
12.Display
Tuner section
a. TUNER ON button
b. CALIB/NOTE
c. SOUND button
d. SOUND BACK button
p, q buttons
Recorder section
c
b
e
f
a
a
b
c
a. RECORDER ON button
button
b.
c. A-B/DELETE button
d. PLAY/STOP button
e. REC/PAUSE button
button
f.
d
9
Page 10
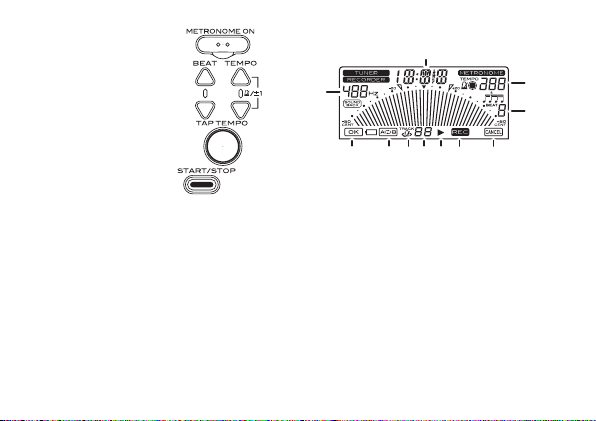
Metronome section
b
a. METRONOME ON
button
p, q buttons
b. BEAT
p, q buttons
c. TEMPO
d. TAP TEMPO button
e. START/STOP button
10
a
b
d
e
Display
a
c
e f
a. Reference pitch display
c
d
g
ji k
h
b. Note/Time display
c. Tempo display
d. Beat display
e. OK icon
f. A-B icon
g. Tempo Sync Track icon
h. Track number
i. PLAY icon
J. REC icon
k. CANCEL icon
Page 11

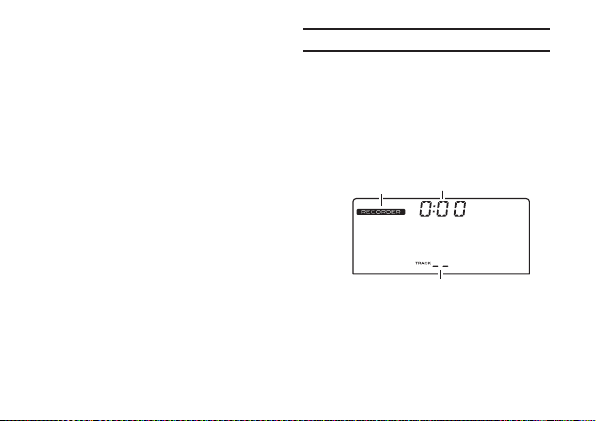
Quick start
RECORDER indicator
Recording time
The TMR-50 allows you to record using the
internal mic or an external mic that’s connected
to the INPUT jack.
It is unnecessary to specify complex seings,
such as the recording level rst. You can
simply record your performance.
In addition, you can immediately play
back your recorded performance in order
to check it.
In this section, we will explain the basic
procedures, from turning on the recorder
and recording to playing back and deleting
recorded data. Follow these procedures
while referring to the “Parts of the TMR-50”
section on page 8.
Recording a performance
1. Prepare your musical instrument.
With acoustic string instruments or wind
instruments, use the internal mic.
2.
Press the RECORDER ON buon to turn
on the recorder.
After the recorder is turned on, the
RECORDER indicator, track number and
recording time will appear on the display.
If it is the rst time a recording is being
made or if there are no recorded tracks,
“– –” will appear on the track indicator
of the display.
Track number
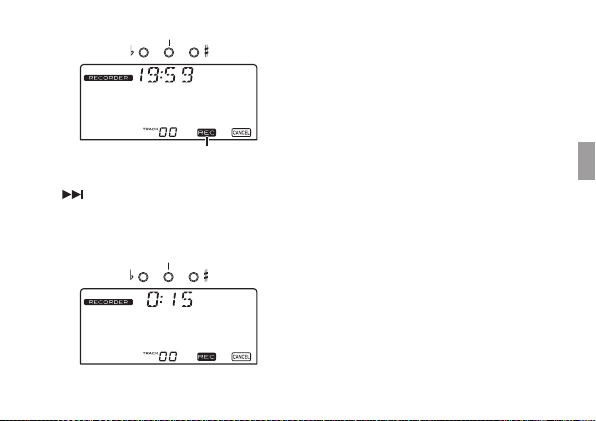
3. Press the REC buon.
The recorder will enter standby mode, and the
recording time indication will blink to show
the amount of time available for recording.
11
Page 12

The center indicator of the tuning guide will
Lite red
blink in red. In addition, the track number
and REC icon will blink on the display,
and the track number will change to “0”.
Blinking red
REC icon
With the TMR-50, the recording level is
automatically adjusted. It is unnecessary
to specify seings in advance.
4.
Press the PLAY/STOP button or the
REC buon to start recording. Play your
instrument.
While recording, the center indicator of the
tuning guide will light up in red.
12
5.
When the performance is complete, press
the PLAY/STOP buon to stop recording.
Playing back the recorded performance
Next, let’s play back the data for the recorded
performance.
1.
Aer recording was stopped, press the
PLAY/STOP buon.
The performance that was recorded is
played back.
The center indicator of the tuning guide
will blink in green, and the PLAY icon will
appear on the display.
Page 13
Playback time
Blinking green
PLAY icon
Use the volume control to adjust the
playback sound.
Aer playing to the end of the recording,
playback will automatically stop.
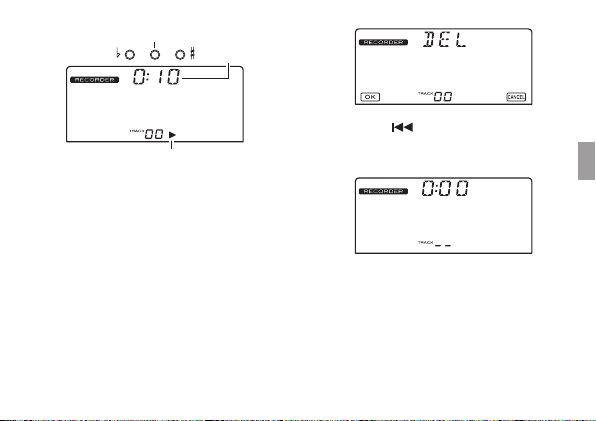
Deleting the recorded performance
Finally, let’s delete the data for the recorded
performance.
1.
With the recorder stopped, press the A-B/
DELETE buon.
The delete screen will appear on the
display, and the track number will blink.
2. Press the buon to delete the track.
Once the track has been deleted, “– –” will
appear on the track indicator of the display.
This completes the basic procedures for
recording, playing back and deleting with
the TMR-50.
The recorder of the TMR-50 can be
used simultaneously with the tuner and
metronome.
13
Page 14

For more details on recorder operation,
please refer to the “Using the recorder”
section on page 22.
Turning the power on/o
The TUNER ON buon, the METRONOME
ON buon, and the RECORDER ON buon
are the TMR-50’s power buon.
The power button is designed lower
than other buons so that the power is
not turned on involuntarily when the
TMR-50 is placed in your pocket or in a
bag. To turn the device on or o, slightly
push in the power buon.
To turn the power on
Press either the TUNER ON button, the
METRONOME ON buon, or the RECORDER
buon and the power will turn on.
When the TUNER ON buon is pressed,
14
the tuner starts in the Meter mode and “
” will appear on the display.
When the METRONOME ON button
is pressed, the metronome starts and “
” will appear on the display.
When the RECORDER ON buon is pressed,
the recorder starts and “ ” will
appear on the display.
The TMR-50 can run the tuner, metronome,
and recorder simultaneously.
To turn the power o
The power for the TMR-50 will turn o when
the tuner, metronome and recorder are all
turned o.
Turning the tuner o
When the tuner is in use, press the TUNER
ON buon to turn o the tuner. The tuner
will also turn o automatically if no sound
has been input nor any operation performed
for 20 minutes.
Page 15
Turning o the metronome
When the metronome is in use, press the
METRONOME ON buon to turn o the
metronome. The metronome will also turn o
automatically if it has remained stopped and no
operation has been performed for 20 minutes.
Turning o the recorder
When the recorder is in use, press the
RECORDER ON button to turn off the
recorder. The recorder will also turn off
automatically if not in use for 20 minutes.
Backlight
When necessary, press the Backlight buon
“ ” to set the backlight.
Each time the Backlight buon is pressed, you
can switch to So Auto O So…
So: Low-intensity lighting to prevent baery
consumption.
Auto: The backlight will light brightly when
sound is input while the tuner is on, and when
buons are operated.
If a sound is not input or a buon is not pressed
for 10 seconds, the backlight will automatically
light up to the so seing brightness.
O: The backlight does not light up.
Connections
If you want to connect an instrument or
contact mic etc.
If you want to tune an instrument with a
pickup, such as an electric guitar, connect a
cable to your instrument, and plug the cable
into the TMR-50’s INPUT jack.
The INPUT jack is only for a 1/4" mono
cable. Stereo (TRS) cables cannot be used.
If you want to tune your instrument using
a separately sold Korg contact mic, plug the
15
Page 16
contact mic into the TMR-50’s INPUT jack.
If a device is not connected to the INPUT
jack, tuning will be performed by the
internal mic.
Connecting headphone
You can connect headphones with a 1/8"
mini-plug to the PHONES jack.
When plugged in, no sound will be heard
from the speaker. Use the volume control to
adjust the volume of the headphone output.
Using the tuner
Tuning while watching the meter (Meter mode)
1.
Connect your instrument cable or contact
mic to the TMR-50’s INPUT jack.
If a device is not connected to the INPUT
jack, tuning will be performed by the
internal mic
16
2. Press the TUNER ON buon.
“ ” will appear at the top of
the display and the calibration (reference
pitch) will be displayed below that.
3.
To change the calibration, press the
CALIB/NOTE p or q buon.
The calibration value increases and
decreases in units of 1 Hz. By pressing and
holding these buons, you can increase
or decrease the value continuously. This
seing is stored even when the power is o.
4. Play a single note on your instrument.
The closest note to the input sound will
appear in the center of the display. Tune
your instrument to the correct pitch, so that
the desired note name appears.
If you’re using the internal mic, place your
instrument as close as possible to the mic
so that extraneous sound is not picked up
while tuning.
Page 17

5.
While playing a single note on your
instrument, tune your instrument so that
the tip of the meter indicates “
center indicator of the tuning guide is lit up.
The le tuning guide indicator will light
up if the pitch of your instrument is at,
and the right indicator if the pitch is sharp.
If you want to tune a just major third above
or a minor third above a certain note, use the
“ ” (-13.7 cent) or “ ” (+15.6 cent) marks
on the meter.
Tuning to a just major third above or a
minor third above
If you want to tune to a just major third
above A (0 cent), tune your instrument so
that the note name indicator shows C and
the meter is at “
If you want to tune to a minor third above
A (0 cent), tune your instrument so that
the note name indicator shows C and the
meter is at “ ”.
”.
q” and the
Tuning to a reference tone (Sound Out mode)
1. Press the TUNER ON buon.
You will enter the Meter mode.
2.
Press the SOUND buon to select Sound
Out mode.
The reference tone is output from the
PHONES jack or speakers. Use the volume
control to adjust the output volume.
3. Press the CALIB/NOTE p or q buon to
select the note.
The output reference tone changes as
follows.
C (C3) n C♯ n D n E♭ n E n F n F♯ n G n G♯
n
A n B♭ n B n C (C4) ... C (C6) n C (C3)...
This setting is stored even when the
power is o.
4.
Tune the instrument according to the
reference tone.
17
Page 18

5. Press the SOUND buon again to return
to the Meter mode.
If connected to either the INPUT jack or
PHONES jack, the Meter mode will start
simultaneously and you can tune your
instrument while viewing the meter.
Tuning using the reference tone and meter
(Sound Back mode)
This function can be used when you are
connected to either the INPUT jack or
PHONES jack (or both).
1. Press the TUNER ON buon.
You will enter the Meter mode.
2. Press the SOUND BACK buon to enter
the Sound Back mode.
In the Sound Back mode, the reference tone
closest to the tone of the input instrument
is output. Use the volume control to adjust
the volume.
18
“
” will appear on the display.
If headphones are connected to the
PHONES jack, the input sound from the
internal mic or INPUT jack will be received
and the reference tone is output from the
headphones.
If there is nothing connected to the
PHONES jack, the input sound from the
INPUT jack is received and the reference
tone is output from speakers.
If both the PHONES jack and the INPUT
jack are not connected, the Sound Back
mode will not function.
3. Tune the instrument using the reference
tone and meter.
4. If the SOUND BACK buon is pressed
again, you will return to the Meter mode.
Page 19

Using the metronome
Setting the tempo and time signature
1. Press the METRONOME ON buon.
The pendulum of the metronome will appear
on the display and “ ” will
appear above.
2. Press the TEMPO p or q buon to set
the tempo.
Press and hold the TEMPO p and q
buons simultaneously for 1 second to
switch between Pendulum Step (pendulum
of a mechanical metronome) and Full Step.
If Pendulum Step is selected, “ ” will
appear on the display.
Aer selecting “PENDULUM STEP” or
“FULL STEP”, press the TEMPO p, q
buons to set the tempo. This seing is
remembered even when the power is o.
If you’ve selected “PENDULUM STEP”
Pressing the TEMPO p, q buons will switch
the tempo successively through the following
values. The value will change continuously if
you hold down the buon.
30, 32, 34, 36, 38, 40, 42, 44, 46, 48, 50, 52,
54, 56, 58, 60, 63, 66, 69, 72, 76, 80, 84, 88,
92, 96, 100, 104, 108, 112, 116, 120, 126, 132,
138, 144, 152, 160, 168, 176, 184, 192, 200,
208, 216, 224, 232, 240, 252
If you’ve selected “FULL STEP ”
Pressing the TEMPO p, q buons will
increment or decrement the tempo through
the range of 30–252 in steps of one. The
value will change continuously if you hold
down the buon.
3.
Press the START/STOP buon to start
the metronome.
The metronome pendulum will swing from
le to right according to the tempo and the
TAP TEMPO buon will blink according
19
Page 20
to the tempo also.
4.
If you want to change the time signature,
press the BEAT p, q buons to make
your selection.
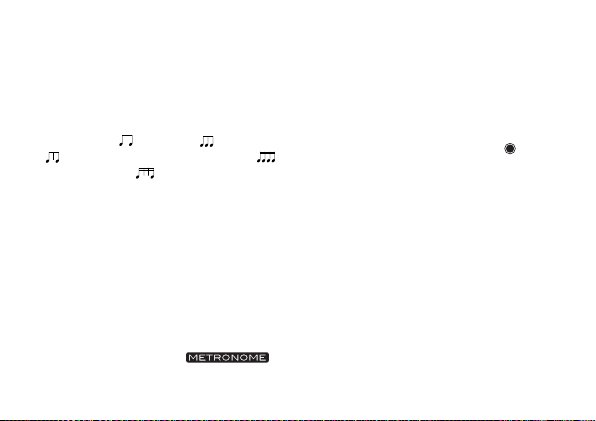
The time signature will change as follows.
Press the BEAT p, q buons: n 0 n1 ...
9 (9 beats) n (Duplet) n (Triplet)
(Triplet without the center beat) n
(Quadruplet) n (Quadruplet without
the center beat)
n 0 ...
5. Play along with the metronome tempo.
6.
To stop the metronome, press the START/
STOP buon.
Using tap tempo
The tap tempo that you input will be displayed
as a BPM (Beats Per Minute) value.
1. Press the METRONOME ON buon.
The pendulum of the metronome will appear on the display and “ ”
will appear above.
20
2.
Press the TAP TEMPO buon several
times at regular intervals at the tempo
that you want.
The TMR-50 detects the interval used when
pressing the buon and displays it as a
BPM (Beats Per Minute) value, and sets
it as the tempo.
n
While the tempo is detected, “ ” will
appear on the display.
When the BPM detected by the tap tempo
is less than 30, “Lo” will appear on the
display and the tempo will be set at “30.”
If the BPM detected by the tap tempo
exceeds 252, “Hi” will appear on the
display and the tempo will be set at “252.”
3.
Press the START/STOP buon to start
the metronome.
The metronome pendulum will swing from
le to right according to the tempo and the
TAP TEMPO buon will blink accordingly.
Page 21

The tap tempo can also be input while
the metronome is in use.
4. Play according to the tempo.
5.
To stop the metronome, press the START/
STOP buon.
Using the tuner and metronome
simultaneously
The TMR-50 lets you use the tuner and
metronome simultaneously.
For more details on tuner and metronome
operation, please refer to the “Using the
tuner” and “Using the metronome” section.
Using the tuner and metronome simultaneously
For example, if you’re playing along with the
metronome and notice that your instrument
is not tuned correctly, you can leave the
metronome running while you tune.
Proceed as follows.
1. Press the METRONOME ON buon.
2.
Press the START/STOP buon to start
the metronome.
If necessary, specify the tempo and time
signature etc.
To set the tempo: TEMPO p, q buons
or TAP TEMPO buon
To set the time signature: BEAT p, q buons
When using the tuner and metronome
simultaneously, you can’t select “triplets,”
“triplets without the center beat,”
“quadruplets” or “quadruplets without
the center beats” as the time signature.
3.
Press the TUNER ON buon to enter
Meter mode.
The display will show the tuning meter.
The tempo of the metronome tempo
is indicated by the blinking of the TAP
TEMPO buon.
21
Page 22
If you want to tune in Sound Out mode,
RECORDER indicator
Recording time
you should then press the SOUND buon.
To tune in the Sound Back mode, press the
SOUND BACK buon.
Tuning in Meter mode
When you play a single note on your
instrument, the display will show the
name of the note that is closest to the pitch
you played. Tune your instrument while
watching the meter and the tuning guide.
Tuning in Sound Out mode
Tune your instrument to the pitch you hear.
Tuning in Sound Back mode
Using the tone, tuning meter and tuning
guide, adjust the instrument.
4.
After tuning is complete, press the
TUNER ON buon and METRONOME
ON buon respectively to turn o the
tuner and metronome.
22
Using the recorder
Recording
For more details on the information that will
appear on the display, please refer to the
“Quick start” section on page 11.
1.
Press the RECORDER ON buon to turn
on the recorder.
Track number
2.
Press the REC buon to enter recordstandby mode.
Page 23
REC icon
Blinking red
Lite red
To cancel record-standby mode, press the
buon.
3.
Press the PLAY/STOP buon to start
recording.
A total of 100 tracks can be created with the
TMR-50. However, a total of approximately
23 minutes can be recorded.
When the recording time of one track
reaches 20 minutes, recording will
automatically stop. At this time, the
recording time indication will continue
alternating between “19:59” and “End.”
4.
To pause recording, press the REC buon.
The center indicator of the tuning guide
will blink in red.
The REC icon will blink on the display.
5.
To continue recording, press the REC
buon again.
6.
Press the PLAY/STOP button to stop
recording.
The recording time will blink on the display
three times.
To record again, press the REC buon. The
track number will increase by one, and the
23
Page 24
unit will enter record-standby mode for
the next track.
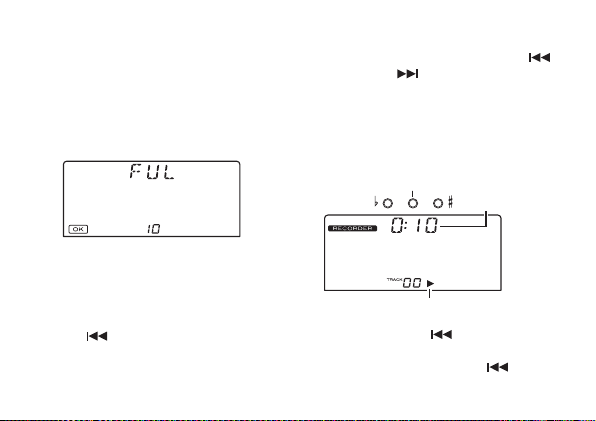
If the memory becomes full
If the unit’s memory becomes full while
recording, the current recording time and
“FUL” will alternately appear on the display
, and recording will stop.
If you try to record aer 100 tracks have
already been recorded, “FL” will blink on
the track indicator of the display, and the
available recording time will appear on the
time indicator.
Press the buon, and then delete unnecessary tracks.
Page 26 “Deleting a track”
24
Playing back a recorded track
1. With the recorder stopped, press the
buon or the buon, and then select
the track to play back.
2.
Press the PLAY/STOP buon to start
playback.
Use the volume control to adjust the
playback sound.
Blinking green
Playback time
PLAY icon
3.
If you press the button during
playback, you’ll move to the beginning
of the track. If you press the buon
Page 25

near the beginning of the track (within
approximately 3 seconds from the beginning), the preceding track will play. If you
press the buon during playback,
the next track will play.
4. To fast rewind through the track during
playback, press and hold down the
buon. To fast forward through the track,
press and hold down the buon.
5. To stop playback, press the PLAY/STOP
buon.
6.
To continue playback from the point
where it was stopped, press the PLAY/
STOP buon again.
Aer playing to the end of the recording,
playback will automatically stop.
Loop playback
This function allows you to loop playback
between two specied points.
1. Select the track, and then play it back.
2.
At the start point for loop playback, press
the A-B/DELETE buon.
Point A is specied, and the A-B icon will
blink on the display.
A-B icon
To cancel the specied point A, press the
buon.
3.
At the end point for loop playback, press
the A-B/DELETE buon.
Point B is specied, and loop playback will
start between points A and B.
The center indicator of the tuning guide
will blink in orange.
The A-B icon on the display changes from
25
Page 26

blinking to steadily lit up.
Blinking orange
4. To stop loop playback, press the PLAY/
STOP buon.
To continue loop playback, press the PLAY/
STOP buon again.
To cancel points A and B, press the A-B/
DELETE buon during loop playback or
while loop playback is stopped.
To loop (repeat) an entire track
While the track plays back, press and hold
the A-B/DELETE buon for approximately
one second; the entire track will be specied
as the region for loop playback.
26
Deleting a track
1. With the recorder stopped, press the
buon or the buon, and then select
the track to be deleted.
2. Press the A-B/DELETE buon.
The delete screen will appear on the
display, and the track number will blink.
3. Press the buon to delete the track.
To cancel the delete operation, press the
buon.
The following screen will appear on the
display during the delete operation.
Page 27

When the delete operation is complete, the
recorded track that’s located either before or
aer the deleted track will be selected.
If no recorded tracks remain aer the track is
deleted, “– –” will appear on the track indicator
of the display.
Using the recorder and tuner
simultaneously
The TMR-50 lets you use the recorder and
tuner simultaneously.
When the recorder is stopped or while
recording, tuning is performed on the input
from the INPUT jack or the internal mic.
When the recorder is being used for playback
(including loop playback), tuning is performed
on the playback sound for the track.
1.
Press the RECORDER ON buon and
TUNER ON buon to turn on the recorder
and tuner, respectively.
The RECORDER indicator, track number,
TUNER indicator, reference pitch and the
meter will appear on the display.
When using the recorder and tuner
simultaneously, the tuner only run in Meter
mode. The Sound Out mode and Sound
Back mode cannot be used.
The indicators above the display will be
used as a tuning guide.
27
Page 28

While recording, the center indicator will
light up in red. However, if the indicators
are being used as a tuning guide, the
center indicator will light up in orange
while recording.
For more details on tuner, please refer to
the “Using the tuner” section on page 16.
For details on recorder operation, please
refer to the “Using the recorder” section
on page 22.
Note: When the tuner is turned on, the
recording time and playback time do
not appear.
Deleting a track
A track can be deleted by using the same
procedure as when the recorder is used
individually. (Page 26 “Deleting a track”)
The tuner does not function while a track
is being deleted.
28
Using the recorder and metronome
simultaneously
The TMR-50 lets you use the recorder and
metronome simultaneously.
By turning on the metronome before
re cord ing, the m etr onom e wi ll be
synchronized with the track during playback.
This allows you to check if the recorded
performance is at the specied tempo.
A recorded track that can be played back in
synchronization with the metronome is called
a “tempo-synchronized track.”
When a tempo-synchronized track is selected,
the tempo-synchronized track icon ( ) will
appear on the display.
Page 29
Recording with the recorder and
Blinking red
metronome synchronized
1.
Press the RECORDER ON buon and
METRONOME ON buon to turn on
the recorder and metronome, respectively.
The METRONOME indicator, recording/
playback time, tempo, BEAT seing, temposynchronized track icon, metronome
pendulum and track number will appear
on the display.
2.
Press the REC buon to enter recordstandby mode.
The center indicator of the tuning guide
will blink in red.
The REC icon, tempo-synchronized track
icon and track number will blink on the
display.
The metronome pendulum will start to
swing, and the TAP TEMPO buon will
blink in time with this motion.
The time indication in the display will
alternate between the precount number and
the available recording time. The precount
can be specied with tempo-synchronized
recording (step 4).
The metronome will sound from the
speakers. With the START/STOP buon,
you can select whether or not the
29
Page 30

metronome will sound. Regardless of
whether or not the metronome sounds,
the metronome is running.
3.
Specify the metronome tempo, beats and
other seings.
For more details on the seing procedures,
please refer to the “Using the metronome”
section on page 19.
Note: When the recorder and metronome
are being used together, the available
range for the metronome’s BEAT seing
is 0 through 9.
4.
Press the buon to select the precount.
The precount switches each time the buon
is pressed. The available precount seings
will differ depending on the selected
BEAT seing.
30
BEAT Precount
0
...n-4n-8n-2n-1n-4...
1
...n-4n-8n-2n-1n-4...
2
...n-4n-8n-2n-1n-4...
3
...n-3n-6n-3...
4
...n-4n-8n-2n-1n-4...
5
...n-5n-10n-5...
6
...n-6n-12n-6...
7
...n-7n-14n-7...
8
...n-8n-16n-8...
9
...n-9n-18n-9...9
5.
Press the PLAY/STOP button or the
REC buon.
Aer the precount, recording will start.
During the precount, the center indicator
of the tuning guide will light up in orange.
To cancel recording, press the buon.
Note: When the recorder and metronome
are being used simultaneously, recording
Page 31

will start when precount “–1” (1 beat
before) is displayed.
The metronome sound from the speaker
will stop shortly before recording will start.
To hear the metronome while recording, use
headphones connected to the PHONES jack.
Playing back the tempo-synchronized track
1.
With the recorder stopped, press the
buon or the buon, and then
select the tempo-synchronized track to
play back.
When a tempo-synchronized track is
selected, the tempo-synchronized track
icon will appear on the display.
The tempo and beat will be set to the tempo
and beat values that are stored as track data.
Note: The tempo and beat seings will
not change if you select a track that is not
tempo-synchronized.
After selecting a tempo-synchronized
track, you can use the TEMPO UP/DOWN
buons, the TAP buon, and the BEAT UP/
DOWN buons to change the tempo or
beat seings. If you want to return these
seings to the values that are stored as
track data, temporarily select a dierent
track number, and then re-select the temposynchronized track.
2.
Press the PLAY/STOP buon to play back
the tempo-synchronized track.
Playback will start 1 beat aer the buon
is pressed. “0:00” will continue to blink
on the time indicator of the display until
playback starts.
When playback of the tempo-synchronized
track starts, the metronome pendulum will
swing. In addition, the TAP TEMPO buon
will blink in time with the tempo.
31
Page 32

3. You can mute or un-mute the metronome
Tuner calibration
Metronome tempo
by pressing the START/STOP buon while
a tempo-synchronized track is playing.
Loop playback of a tempo-synchronized trac
Loop playback of a tempo-synchronized
track is done by using the same procedure
as loop playback of a normal track when
the recorder is used individually. (Page 25
“Loop playback”)
Playing back a normal track
A normal track can also be played back when
the metronome and recorder are being used
simultaneously. When a normal track is
selected, the tempo-synchronized track icon
will not appear on the display.
Deleting a track
A track can be deleted by using the same
procedure as when the recorder is used
individually. (Page 26 “Deleting a track”)
32
Using the tuner, metronome and
recorder simultaneously
The tuner, metronome and recorder can be
k
used simultaneously.
Press the TUNER ON buon, METRONOME
ON
buon and RECORDER ON buon to
turn on the tuner, metronome and recorder,
respectively.
Recorder track number
About tuner operations
The tuner will only function in Meter mode.
The Sound Out mode and Sound Back mode
cannot be used.
Metronome beat
Page 33

When the recorder is stopped or while
recording, tuning is performed on the input
from the INPUT jack or the internal mic.
When the recorder is being used for playback
(including loop playback), tuning is performed
on the playback sound for the track.
Tuning is not performed when the recorder is
in record-standby mode, during the precount
or while a track is being deleted.
The tuner procedures are the same as when
it is used individually. Please refer to the
“Using the tuner” section on page 16
“Using the recorder and tuner simultaneously”
section on page 27
.
and the
About metronome operations
The metronome pendulum will not appear
on the display since the tuning meter will
appear on the display.
All other operations and procedures are
the same as when the metronome is used
simultaneously with the recorder. Please refer
to the “Using the metronome” section on page
19 and the “Using the recorder and metronome
simultaneously” section on page 28.
About recorder operations
With the recorder, a tempo-synchronized track
can be recorded by using the same procedure
as when it is used simultaneously with the
metronome.
For more details on the operations and
procedures, please refer to the “Using the
recorder and metronome simultaneously”
section on page 28.
Deleting a track
A track can be deleted by using the same
procedure as when the recorder is used
individually. (Page 26 “Deleting a track”)
33
Page 34

Connecting a computer
By using the included USB cable to connect
the TMR-50 to a computer, the TMR-50 can
be used like a regular USB device.
Recorded data can be transferred to the
computer, or music data saved on the
computer can be transferred to the TMR-50.
When the TMR-50 is connected to a
computer, the tuner, metronome and
recorder do not run.
Computer system requirements
Windows
Computer with a USB port that runs Microso
Windows XP/Vista/7
Macintosh
Mac OS X 10.5 or later
34
Connecting the TMR-50 to the computer
Be sure to use the included USB cable to
connect the TMR-50 to a computer.
1. Turn o the power to the TMR-50.
2. Turn on the power to the computer.
3.
Use the USB cable to connect the TMR-50
to the computer.
Aer the connections are complete, the
following screen will appear on the display.
Note: When the TMR-50 is connected to a
computer via the USB cable, the power to the
device is supplied by the computer.
Page 35

Transferring data
Data recorded by the TMR-50 can be copied
to the computer, or music data saved on the
computer can be copied to the TMR-50.
The TMR-50 is able to play back stereo or
monaural PCM audio data that is in 44.1
kHz 16-bit WAV format.
Windows
1. From “My Computer,” double-click to
open “Removable Disk *.”
Note: “*” and “**” that follow “Removable
Disk” vary depending on the computer
environment.
2.
To copy data, drag and drop the recorded
data to any location on the computer.
Mac OS X
1. Double-click to open the drive icon (NO
NAME) on the desktop.
2.
To copy data, drag and drop recorded data
to any location on the computer.
Adding data from the computer
You can copy WAV format les from your
computer, and play them back on the TMR-50.
1. Copy the les into the EXTRA folder of
the TMR-50.
Up to ten les can be detected.
When playing back les, the track numbers
will be “E0”–”E9”.
Disconnecting the TMR-50 from the computer
Windows
1.
Click the icon that appears on the
right side of the task bar of the computer.
35
Page 36

2.
From the pop-up menu, click “Remove
USB Mass Storage Device [drive leer]
safely.”
The following screen will appear on the
display of the TMR-50.
Appearing alternately
With Windows Vista and Windows 7,
the screen shown above will not appear
automatically aer the disconnection
operation is performed from the
computer. After performing a safe
disconnection operation from the
computer, hold down the RECORDER
ON buon for approximately 3 seconds.
Then, the screen shown above will appear.
36
Before disconnecting the USB cable, make
sure that the screen shown above appears
on the display.
Aer performing a safe disconnection
operation from the computer, be sure to
hold down the RECORDER ON buon
for approximately 3 seconds.
3. Remove the TMR-50 from the computer.
Mac OS X
1. Drag the drive icon on the desktop into
the Trash. Alternatively, select “Eject
TMR-50” from File menu.
2.
Remove the TMR-50 from the computer.
Page 37

Formatting
If recording or playing back a recorded le
is not possible, an error message will appear.
If this occurs, use a USB cable to connect the
TMR-50 to a computer, and then try running
Chkdsk (Windows) or Disk Utility (Mac OS
X) from the computer. If the issue is still not
improved, follow the procedure below to
format the unit.
Be sure to format using the TMR-50.
Formatting while using batteries
We recommend using USB power when
formaing the unit. (Page 38 “Formaing
while using USB power”)
1. Turn o the power to the TMR-50.
2.
While pressing and holding down the
A-B/DELETE buon and the REC buon,
press the RECORDER ON buon.
The TMR-50 enters format mode. The
following screen will appear on the display,
and the three indicators of the tuning guide
will light up in red.
Lit red
To cancel the formaing procedure, press
the buon.
3. Press the buon to format.
While formaing, the following screen
will appear on the display, and the three
37
Page 38

indicators of the tuning guide will blink
Blinking red
sequentially in red.
When the formatting procedure is
complete, the power is turned o.
Formatting while using USB power
1. Turn o the power to the TMR-50.
2. Press and hold down the A-B/DELETE
buon and the REC buon while using
a USB cable to connect the TMR-50 to
a computer.
3.
Follow the same procedure as that for
38
formaing while using the baeries.
Page 37 “Formatting while using
baeries”
4.
When the formatting procedure is
complete, a screen instructing you to
disconnect the unit from the computer
will appear on the display.
Page 35 “Disconnecting the TMR-50 from
the computer”
5.
Disconnect the TMR-50 from the computer.
Troubleshooting
Power does not turn on.
•
Could the battery symbol be blinking?
Replace the batteries. Recording is not
possible if the baery symbol is blinking.
• Make sure the baeries are inserted with
the polarities (+, -) in the correct orientation.
Page 39

Nothing appears on the display.
• Is the power to the TMR-50 turned on?
No sound is heard.
• Are the headphones connected correctly?
• Make sure that the volume is not set to “0.”
Make sure that the battery power is
•
sucient.
Cannot record.
Make sure that sucient memory space
•
is available. Check the available recording
time.
•
Make sure that the battery power is
sucient.
• If the error message has appeared, format
the TMR-50.
Cannot play back.
• Has the error message appeared?
If it has appeared oen, format the
TMR-50.
If you try to play music data transferred
•
from a computer, make sure that the le
format is compatible with the TMR-50.
The computer does not recognize the
TMR-50.
• Make sure that the TMR-50 is connected to
the computer correctly via the USB cable.
• Make sure that the power to the computer
is turned on.
Specications
Recorder section
Recording format: PCM audio format WAV
Available recording time: Approx. 20 minutes
Total number of tracks: Up to 100 tracks
Tuner section
Scale: 12 note equal temperament
format (extension: .wav), 44.1
kHz@16-bit
(Internal memory: 120 MB)
39
Page 40

Detection range*: C1 (32.70 Hz)–C8 (4186.01 Hz)
Reference tone: C3 (130.81 Hz)–C6 (1046.50
Tuning modes: Meter mode (AUTO), Sound
Calibration range:
Detection accuracy:
Sound accuracy: C3 (130.81 Hz)–C6 (1046.50
for a sine wave
Hz) 3 octave
Out mode (MANUAL), Sound
Back mode (AUTO)
A4 = 410 Hz–480 Hz (1 Hz step)
Beer than ±1 cent
Hz) Beer than ±1 cent
Metronome section
Tempo range: 30–252 beats per minute (bpm)
Tempo setting: PENDULUM STEP, FULL
Time signatures: 0–9 beats, duplets, triplets,
Tempo accuracy: ±0.3%
STEP, TAP TEMPO
triplets without the center
beat, quadruplets, quadruplets without the center beats
40
Main standard
Connectors: INPUT jack (1/4"mono),
Speaker: Dynamic speaker (ø23 mm)
Power supply: Two AAA batteries (zinc-
Baery life: Recorder ...
Metronome ... Approximately
PHONES jack (1/8" mini)
carbon, alkaline or nickelmetal hydride baeries)
16/13/11 hours
playback (
Auto
approximately 20 minutes for
a single recording/playback
when using alkaline baeries)
Tuner ... Approximately 24/22/20
hours (backlight: Off/Soft/
Auto, A4 continuous input,
when using alkaline baeries)
18/16/14 hours (backlight: O/
So/Auto, tempo 120, four
Approximately
of recording/
backlight: O/So/
, maximum length of
,
Page 41

beats, maximum volume,
Dimensions:
Weight: 119g/4.20oz (including the
Included items: Owner’s manual, two AAA
when using alkaline baeries)
111 (W) x 82 (D) x 18 (H) mm /
4.37" (W) x 3.23" (D) x 0.71" (H)
included baeries)
baeries, USB cable
The calibration and reference tone of the tuner
as well as the tempo, beat, Pendulum Step, Full
Step and backlight seings of the metronome
are stored even when the power is o.
However when you exchange the baeries,
these seings will return to the following
default values.
Default values:
Calibration = 440 Hz, Detection range = A4,
Tempo = 120,
Time signature = four beats
Tempo seing type = PENDULUM STEP,
Backlight seing = o
* Even if the pitch is within the range of
detection, the TMR-50 may be unable
to detect the pitch if the sound contains
numerous overtones (such as the low and
high notes on an acoustic piano) or if the
instrument has a rapid decay.
Specications and appearance are subject
to change without notice for improvement.
,
41
Page 42

Précautions
Emplacement
L’uti lis ati on d e ce t in str ume nt d ans les
endroits suivants peut en entraîner le mauvais
fonctionnement.
• En plein soleil
• Endroits très chauds ou très humides
• Endroits sales ou fort poussiéreux
• Endroits soumis à de fortes vibrations
• A proximité de champs magnétiques
Alimentation
Alimentation
Lorsque vous n’utilisez pas l’appareil, n’oubliez pas
de le mettre hors tension. Retirez les piles pour éviter
toute fuite lorsque l’appareil ne sera pas utilisé
pendant de longues périodes de temps.
Interférences avec d’autres appareils
électriques
Les postes de radio et de télévision situés à proximité
peuvent par conséquent sourir d’interférences à
la réception. Veuillez dès lors faire fonctionner cet
42
appareil à une distance raisonnable de postes de
radio et de télévision.
Maniement
Pour éviter de les endomma ger, ma nipulez les
commandes et les boutons de cet instrument avec soin.
Entretien
Lorsque l’instrument se salit, nettoyez-le avec un chion
propre et sec. Ne vous servez pas d’agents de nettoyage
liquides tels que du benzène ou du diluant, voire des
produits inammables.
Conservez ce manuel
Après avoir lu ce manuel, veuillez le conserver
soigneusement pour toute référence ultérieure.
Evitez toute intrusion d’objets ou de
liquide
Ne placez jamais de récipient contenant du liquide
près de l’instrument. Si le liquide se renverse ou coule,
il risque de provoquer des dommages, un court-circuit
ou une électrocution.Veillez à ne pas laisser tomber des
objets métalliques dans le boîtier (trombones, par ex.).
Page 43

Note concernant les dispositions
(Seulement EU)
Quand un symbole avec une poubelle
barrée d’une croix apparait sur le produit,
le mode d’emploi, les piles ou le pack de
piles, cela signie que ce produit, manuel
ou piles doit être déposé chez un
représentant compétent, et non pas dans
une po ubell e o u t oute autr e d échet terie
conventionnelle. Disposer de cette manière, de
prévenir les dommages pour la santé humaine et
les dommages potentiels pour l’environnement.
La bonne méthode d’élimination dépendra des
lois et règlements applicables dans votre localité,
s’il vou s pl aît, cont actez vot re organi sme
administratif pour plus de détails. Si la pile contient
des métaux lourds au-delà du seuil réglementé,
un symbole chimique est aché en dessous du
symbole de la poubelle barrée d’une croix sur la
pile ou le pack de piles.
REMARQUE IMPORTANTE POUR LES
Ce produit a été fabriqué suivant des spécications
sévères et des besoins en tension applicables dans le
pays où ce produit doit être utilisé. Si vous avez acheté
ce produit via l’internet, par vente par correspondance
ou/et vente par téléphone, vous devez vérier que ce
produit est bien utilisable dans le pays où vous résidez.
ATTENTION: L’utilisation de ce produit dans un pays
autre que celui pour lequel il a été conçu peut être
dangereuse et annulera la garantie du fabricant ou
du distributeur. Conservez bien votre récépissé qui
est la preuve de votre achat, faute de quoi
votre produit ne risque de ne plus être couvert par
la garantie du fabricant ou du
distributeur.
* Tous les noms de produits et de sociétés sont
des marques commerciales ou déposées de leur
détenteur respectif.
CLIENTS
43
Page 44

Table des matière
Caractéristiques principales ......................45
Mise en place des piles ...............................45
Utiliser le pied..............................................47
Parties du TMR-50 .......................................47
Démarrage rapide .......................................50
Mise sous/hors tension ...............................53
Rétro-éclairage ............................................54
Raccordements ............................................55
Utilisation de l’accordeur ...........................55
Utilisation du métronome ..........................58
Utilisation simultanée de l’accordeur et du
métronome ..................................................60
44
Utilisation de l’enregistreur .......................62
Utilisation simultanée de l’enregistreur et de
l’accordeur ...................................................67
Utilisation simultanée de l’enregistreur et du
métronome ..................................................69
Utilisation simultanée de l’accordeu r, du
métronome et l’enregistreur .....................73
Connexion à un ordinateur ........................74
Formatage....................................................77
Dépannage ..................................................79
Fiche technique ...........................................80
Page 45

Merci d’avoir fait l’acquisition du Korg
Accordeur Métronome Enregistreur TMR-50.
Caractéristiques principales
Grâce au modèle TMR-50, vous pourrez
enregistrer votre interprétation et accorder
vos instruments à l’aide du micro interne
ou d’un micro connecté à la prise INPUT.
Vous pouvez en outre utiliser l’enregistreur,
l’accordeur et le métronome individuellement
ou simultanément.
Mise en place des piles
Avant de remplacer les piles, assurez-vous
que l’enregistreur est hors tension.
1.
Fa it es cou li sser l e c ou ver cl e du
compartiment des piles à l’arrière de
l’accordeur TMR-50 dans le sens “a”
comme indiqué sur l’image et soulevez
le couvercle dans le sens “b”.
2.
Insérez les piles, en respectant leur
polarité.
3.
Pour obtenir des informations précises sur
la puissance restante des piles, reportezvous à la section “Régler le type de pile” en
page 46 et sélectionnez le type de pile utilisé.
Retirez immédiatement les piles épuisées
de l’appareil. Retirez-les également si vous
ne comptez pas utiliser l’appareil pendant
une durée prolongée.
Si l’appareil ne fonctionne pas et si vous
ne parvenez pas à résoudre le problème
45
Page 46

en le meant plusieurs fois sous et hors
tension, retirez les piles puis réinsérez-les.
Ne mélangez pas des piles partiellement
épuisées avec des piles neuves, et ne
mélangez pas les diérents types de pile.
Quand les piles sont usées, un symbole de
pile apparaît à gauche à l’écran. Remplacez
alors les piles aussi vite que possible.
Si vous continuez d’utiliser l’appareil avec des
piles usées, le symbole de la pile clignotera. A
ce moment-là, il ne sera plus possible d’utiliser
la fonction enregistreur pour enregistrer. Bien
que vous puissiez toujours reproduire des
données enregistrées et utiliser les fonctions
accordeur et métronome, vous devriez
46
remplacer les piles dès que possible.
Régler le type de pile
Pour obtenir des informations précises sur la
puissance restante des piles, sélectionnez le
type de pile utilisé.
1.
Quand vous remplacez les piles et meez
l’appareil sous tension, un écran s’ache
pour que vous puissiez dénir le type de
piles utilisées.
Type de pile
2.
Appuyez sur le bouton TAP TEMPO pour
sélectionner le type de pile.
AL :
Pour les piles alcalines ou zinc-carbone.
Page 47

nH : Pour les piles au nickel-métal-hydrure.
11
10
12
3. Appuyez sur le bouton .
La procédure de réglage est terminée et le
TMR-50 démarrera.
Parties du TMR-50
Utiliser le pied
Vous pouvez placer le TMR-50 en position
verticale en déployant le pied situé à l’arrière
de l’appareil.
1
2
3
1. Section ACCORDEUR
2. Connecteur USB
3. Bouton rétro-éclairage
4. Section Enregistreur
5. Haut-parleur
6. Micro
9
8
7
54 6
47
Page 48

7. Prise INPUT
d
8. Prise PHONES
9. Section Métronome
10.Volume
11.Diode de contrôle
12.Acheur
Section Accordeur
a. Bouton TUNER ON
b. Boutons CALIB/NOTE p, q
c. Bouton SOUND
d. Bouton SOUND BACK
48
Section Enregistreur
c
b
e
f
a
a
b
c
a. Bouton RECORDER ON
b. Bouton
c. Bouton A-B/DELETE
d. Bouton PLAY/STOP
e. Bouton REC/PAUSE
f. Bouton
d
Page 49

Section Métronome
b
a. Bouton METRONOME
ON
b. Boutons BEAT p, q
b. Boutons TEMPO p, q
d. Bouton TAP TEMPO
e. Bouton START/STOP
a
b
d
e
Acheur
a
c
g
e f
a. Achage de la note de référence
b. Achage de la note/temps
c. Achage du tempo
d. Achage du rythme
e. Icône OK
f. Icône A-B
g. Icône piste synchronisée avec le tempo
h. Numéro de piste
i. Icône PLAY (lecture)
J. Icône REC (enregistrement)
k. Icône CANCEL (d’annulation)
h
c
d
ji k
49
Page 50

Démarrage rapide
Grâce au modèle TMR-50, vous pourrez
enregistrer votre prestation à l’aide du micro
interne ou d’un micro externe connecté à la
prise INPUT.
Il est dans un premier temps inutile de dénir
des paramètres complexes, comme le niveau
d’enregistrement. Vous n’avez qu’à enregistrer
votre interprétation.
Vous pouvez en outre lire immédiatement
l’interprétation enregistrée pour la vérier.
Nous développerons dans cette section
les procédures de fonctionnement de base
comme la mise sous tension de l’enregistreur,
l’enregistrement, la lecture et la suppression
des données enregistrées. Veuillez suivre ces
procédures, tout en vous référant à la section
“Parties du TMR-50” en page 47.
Enregistrer une interprétation
1. Préparer votre instrument de musique.
50
Avec les instruments acoustiques à cordes
ou les instruments à vent, utilisez le micro
interne.
2. Appuyez sur le bouton RECORDER ON
pour mere l’enregistreur sous tension.
Une fois l’enregistreur sous tension,
l’indicateur RECORDER, le numéro
de piste et le temps d’enregistrement
s’acheront à l’écran.
S’il s’agit du premier enregistrement
ou s’il n’y a aucunes pistes d’ores et
déjà enregistrées, “– –” s’affichera sur
l’indicateur de piste de l’écran.
Indicateur de l’ENREGISTREUR
Temps d'enregistrement
Numéro de piste
Page 51

3. Appuyez sur le bouton REC.
Rouge clignotant
L’enregistreur entrera en mode d’aente
et le temps d’enregistrement clignotera
pour indiquer le temps disponible pour
l’enregistrement. L’indicateur central de
la diode de contrôle clignotera en rouge.
En outre, le numéro de piste et l’icône REC
clignoteront sur l’écran et le numéro de
piste indiquera “0”.
Avec le TMR-50, le niveau d’enregistrement
est automatiquement ajusté. Il est donc
inutile de dénir les paramètres à l’avance.
Icône REC
4.
Appuyez sur le bouton PLAY/STOP ou le
bouton REC pour démarrer l’enregistrement. Jouez de votre instrument.
Pendant l’enregistrement, l’indicateur central
de la diode de contrôle s'allumera en rouge.
5.
Une fois votre interprétation terminée,
appuyez sur le bouton PLAY/STOP pour
arrêter l’enregistrement.
Rouge constant
Lire l’interprétation enregistrée
Puis, diusez les données de l’interprétation
enregistrée.
1. A la n de l’enregistrement, appuyez sur
le bouton PLAY/STOP.
51
Page 52

L’interprétation enregistrée est diusée.
L’indicateur central de la diode de contrôle
clignotera en vert et l’icône PLAY s’achera
à l’écran.
Vert clignotant
Durée de lecture
Icône Play
Utilisez la commande Volume pour ajuster
le son de la lecture.
A la n de l’enregistrement diusé, la
lecture s’arrêtera automatiquement.
Supprimer l’interprétation enregistrée
Enn, supprimez les données de l’interprétation enregistrée.
1.
Après avoir arrêté l’enregistreur, appuyez
52
sur le bouton A-B/DELETE.
L’écran de suppression s’achera, et le
numéro de piste clignotera.
2. Appuyez sur le bouton pour suppri-
mer la piste.
Une fois la piste supprimée, “– –” s’achera
sur l’indicateur de piste de l’écran.
Nous avons développé les procédures
de base d’enregistrement, de lecture et
de suppression des données du TMR-50.
Vous pouvez simultanément utiliser
Page 53

l’enregistreur du TMR-50 avec l’accordeur
et le métronome.
Pour de plus amples informations sur
le fonctionnement de l’enregistreur,
reporter-vous à la section “Utilisation de
l’enregistreur” en page 62.
Mise sous/hors tension
Le bouto n TUN ER ON, le bout on
METRONOME ON et le bouton RECORDER
ON sont les boutons qui vous permeront de
mere sous/hors tension le TMR-50.
De manière à ne pas mere involontairement l’appareil sous tension, une fois
l’accordeur TMR-50 dans votre poche ou
un sac, le bouton TUNER ON et bouton
METRONOME ON est plus petit que les
autres boutons. Pour allumer ou éteindre,
appuyez sur le bouton d’alimentation.
Pour mettre l’appareil sous tension
Appuyez soit sur le bouton TUNER ON, soit
le bouton METRONOME ON ou le bouton
RECORDER ON, et l’appareil se mettra
sous tension.
Après avoir appuyé sur le bouton TUNER ON,
l’accordeur démarre en mode Compteur et “
” s’ache à l’écran.
Après avoir appuyé sur le bouton METRONOME ON, le métronome démarre et “
” s’ache à l’écran.
Après avoir appuyé sur le bouton RECORDER
ON, l’enregistreur démarre “ ”
s’ache à l’écran.
Le TMR-50 vous permet d’utiliser simultanément
l’accordeur, le métronome et l’enregistreur.
Pour mettre l’appareil hors tension
Le TMR-50 sera hors tension si vous désactivez
l’accordeur, le métronome et l’enregistreur.
53
Page 54

Pour mere l’accordeur hors tension
Pendant le fonctionnement de l’accordeur,
appuyez sur la bouton TUNER ON pour le
mere hors tension. L’accordeur se mera
automatiquement hors tension si aucun son
n’est détecté ou si aucune action n’est eectuée
en l’espace de 20 minutes.
Pour mere le métronome hors tension
Pendant le fonctionnement du métronome,
appuyez sur la bouton METRONOME ON
pour le mere hors tension. Le métronome
se mera automatiquement hors tension, s’il
est toujours arrêté et si aucune action n’est
eectuée en l’espace de 20 minutes.
Mise hors tension de l’enregistreur
Si l’enregistreur est en cours d’utilisation,
appuyez sur le bouton RECORDER ON
pour le mere hors tension. L’enregistreur
sera également mis hors tension si vous ne
l’utilisez pas pendant 20 minutes.
54
Rétro-éclairage
Si nécessaire, appuyez sur le bouton “ ” du
rétro-éclairage pour régler le rétro-éclairage.
A chaque fois que vous appuyez sur ce bouton,
le rétro-éclairage sera déni de la manière
suivante Léger Auto O Léger…
Léger: Faible intensité d’éclairage par soucis
d’économie d’énergie.
Auto: Le rétro-éclairage s’allumera une fois
le son diusé, si l’accordeur est sous tension
et si vous utilisez les boutons.
Si aucune note n’est diusée ou aucun bouton
n’est utilisé en l’espace de 10 secondes, le
rétro-éclairage passera automatiquement au
réglage léger.
O: Le rétro-éclairage est désactivé.
Page 55

Raccordements
Si vous souhaitez raccorder un instrument
ou un microphone de contact, etc
Si vous souhaitez accorder un instrument
avec micro, comme une guitare électrique,
raccordez un câble à votre instrument et
branchez le câble sur la prise INPUT du
TMR-50.
La prise INPUT est seulement conçue pour
un câble monophonique 1/4". Les câbles
stéréo (TRS) ne peuvent pas être utilisés.
Si vous souhaitez accorder votre instrument
à l’aide du Contact Microphone Korg vendu
séparément, branchez le microphone de
contact sur la prise INPUT du TMR-50.
Si un périphérique n’est pas connecté à la
prise INPUT, l’accordage s’eectuera par
le biais du micro interne.
Connexion du casque
Vous pouvez raccorder un casque avec
minack 1/8" à la prise PHONES. Lorsque le
casque est branché le son du haut-parleur est
coupé. Utilisez la commande de volume pour
régler le volume du casque.
Utilisation de l’accordeur
Accord tout en regardant le compteur
(mode Compteur)
1.
Branchez le câble de votre instrument
ou le microphone de contact sur la prise
INPUT du TMR-50.
Si un périphérique n’est pas connecté à la
prise INPUT, l’accordage s’eectuera par
le biais du micro interne.
2. Appuyez sur le bouton TUNER ON.
“ ” s’affichera en haut de
l’écran et le calibrage (note de référence)
s’achera en dessous.
55
Page 56

3. Pour changer le calibrage, appuyez sur le
bouton CALIB/NOTE p ou q.
La valeur de calibrage augmente et diminue
par unité de 1 Hz. En appuyant et en
maintenant ces boutons, vous augmenterez
ou diminuerez de façon ininterrompue les
valeurs. Ce réglage sera enregistré même
si l’appareil est mis hors tension.
4.
Jouez une note unique sur votre instrument.
La note se rapprochant le plus du son d’entrée
s’achera au centre de l’écran. Accordez
correctement votre instrument de telle
manière que la note souhaitée apparaisse.
Si vous utilisez le microphone interne,
disposez votre instrument aussi près que
possible du microphone an que les sons
extérieurs ne puissent pas être captés
pendant l’accord.
5. Tout en jouant une note unique sur votre
56
instrument, accordez celui-ci de telle
manière que la pointe de l’aiguille du
compteur indique “q” et que la diode
de contrôle centrale s’allume.
La diode à gauche s’allumera si votre
instrument produit un bémol et celle de
droite s’il produit un dièse.
Si vous souhaitez accorder une tierce
majeure pure ou une tierce mineure pure
au-dessus d’une certaine note, utilisez les
repères “ ” (-13.7 cents) ou “ ” (+15.6
cents) du compteur.
Accord sur une tierce majeure pure ou
une tierce mineure pure au-dessus
Si vous souhaitez eectuer l’accord sur
une tierce majeure pure au-dessus de A
(0 cent), accordez votre instrument de telle
façon que l’indicateur de note ache C et
le compteur indique “
Si vous souhaitez eectuer l’accord sur
une tierce mineure audessus de A (0
”.
Page 57

cent), accordez votre instrument de telle
façon que l’indicateur de note ache C le
compteur indique “
Accord sur une note de référence (mode Son)
”.
1. Appuyez sur la bouton TUNER ON.
Vous passerez en mode Compteur.
2.
Appuyez sur le bouton SOUND pour
sélectionner le mode Son.
La note de référence est diusée par les
haut-parleurs ou via la prise PHONES.
Utilisez la commande Volume pour régler
le volume de sortie.
3. Appuyez sur le bouton CALIB/NOTE p
ou q pour sélectionner la note.
La note de référence diusée est ainsi
modiée.
C (C3) n C # n D n E n E n F n F# n
G n G# n A n B n B n C (C4) ... C(C6)
n C (C3)...
Ce réglage sera enregistré même si
l’appareil est mis hors tension.
4.
Accordez votre instrument en fonction de
la note de référence.
5.
Appuyez de nouveau sur le bouton
SOUND pour revenir au mode Compteur.
Si vous connectez un instrument soit à
la prise INPUT soit à la prise PHONES,
le mode Compteur s’achera automatiquement et vous pourrez accorder votre
instrument tout en visualisant le compteur.
Accorder votre instrument avec la note
de référence et le compteur (mode
retour son).
Vous pouvez utiliser cette fonction en
connectant votre instrument à la prise INPUT
ou la prise PHONES (ou les deux).
1. Appuyez sur le bouton TUNER ON.
Vous passerez en mode Compteur.
57
Page 58

2. Appuyez sur le bouton SOUND BACK
pour entrer dans le mode Retour son.
Dans ce mode, la note de référence se
rapprochant le plus de la note provenant
de l’instrument est diusée. Utilisez la
commande Volume pour régler le volume.
“ ”
s’achera à l’écran.
Si un casque est connecté à la prise
PHONES, le son d’entrée du micro interne
ou de la prise INPUT sera reçu et la note
de référence diusée à partir du casque.
Si aucun périphérique n’est connecté à la
prise PHONES, le son d’entrée de la prise
INPUT sera reçu et la note de référence
diusée dans les haut-parleurs.
Si aucun périphérique n’est connecté à la
prise PHONES et à la prise INPUT, le mode
Retour son (Sound back) ne fonctionnera pas.
3. Accordez votre instrument à l’aide de la
note de référence et du compteur.
58
4. Si vous appuyez une nouvelle fois sur le
bouton SOUND BACK, vous reviendrez
au mode Compteur.
Utilisation du métronome
Réglage du tempo et de la signature
rythmique
1.
Appuyez sur le bouton METRONOME ON.
Le pendule du métronome s’achera à
l’écran et la mention “ ” au
dessus du pendule.
2. Appuyez sur la touche TEMPO p ou q
pour régler le tempo.
Appuyez et maintenez simultanément les
boutons p et q du TEMPO pendant 1
seconde pour alterner entre le Pas pendulaire
(pendule d’un métronome mécanique)
et le Pas complet. Si le Pas pendulaire est
sélectionné, “ ” s’achera à l’écran.
Page 59

Après avoir sélectionné “PAS PENDULAIRE” ou “PAS COMPLET”, appuyez
sur la bouton TEMPO p ou q pour régler
le tempo. Ce réglage reste mémorisé même
après la mise hors tension de l’appareil.
Si vous avez sé lectionné “PAS PENDULAIRE”
Appuyez sur les boutons TEMPO p ,
qpour dénir le tempo successivement
sur les valeurs suivantes.
continuellement si vous maintenez la touche.
30, 32, 34, 36, 38, 40, 42, 44, 46, 48, 50, 52,
54, 56, 58, 60, 63, 66, 69, 72, 76, 80, 84, 88,
92, 96, 100, 104, 108, 112, 116, 120, 126, 132,
138, 144, 152, 160, 168, 176, 184, 192, 200,
208, 216, 224, 232, 240, 252
La valeur changera
Si vous avez sélectionné “PAS COMPLET”
Appuyez sur les boutons TEMPO p ,
qpour augmenter ou réduire le tempo
dans une plage de 30 à 252 par pas de un.
La valeur changera continuellement si vous
maintenez la touche.
3.
Appuyez sur le bouton START/STOP pour
lancer le métronome.
Le pendule du métronome se balancera
de gauche à droite selon le tempo et le
bouton TAP TEMPO (Réglage du tempo)
clignotera selon le rythme.
4.
Si vous souhaitez changer la signature
rythmique, appuyez sur la bouton BEAT/
TAP p ou q.
La signature rythmique changera comme suit.
Appuyez sur le bouton BEAT p ou q:
0 n 1 ... 9 (9 temps) n (duolet) n
(triolet) n (triolet sans temps
du milieu) n (quadriolet) n
(quadriolet sans temps du milieu) n 0 ...
5.
Jouez en suivant le tempo du métronome.
6. Pour arrêter le métronome, appuyez sur
le bouton START/STOP.
59
Page 60

Entrée du tempo tap
Le tempo tap entré sera aché sous la forme
d’un nombre de BPM (baements par minute).
1.
Appuyez sur la bouton METRONOME ON.
Le pendule du métronome s’achera à
l’écran et la mention “ ” au
dessus du pendule.
2.
Appuyez plusieurs fois sur le Bouton TAP
TEMPO à intervalles réguliers.
Le TMR-50 détecte l’intervalle utilisé quand
vous appuyez sur le bouton et l’ache sous
forme de temps par minute (BPM) qui sera
déni comme le tempo.
Une fois le tempo détecté, “ ” s’achera
à l’écran.
Si le temps détecté par le réglage du tempo est
inférieur à 30 temps par minute, “Lo” s’achera
à l’écran et le tempo sera déni sur “30”.
Si le temps détecté par le réglage du tempo
est supérieur à 252 temps par minute,
“Hi” s’achera à l’écran et le tempo sera
60
déni sur “252”.
3.
Appuyez sur le bouton START/STOP pour
démarrer le métronome.
Le pendule du métronome se balancera
de gauche à droite selon le tempo et le
bouton TAP TEMPO (Réglage du tempo)
clignotera selon le rythme.
Vous pouvez également utiliser le réglage
du tempo si le métronome est en cours
d’utilisation.
4. Jouez une note conformément au tempo.
5. Pour arrêter le métronome, appuyez sur
le bouton START/ STOP.
Utilisation simultanée de l’accordeur
et du métronome
Le TMR-50 vous permet d’utiliser simultanément l’accordeur et le métronome.
Pour les détails sur le fonctionnement de l’ac-
Page 61

cordeur et celui du métronome, reportez-vous
à “Utilisation de l’accordeur” et “Utilisation
du métronome”.
Utilisation simultanée de l’accordeur et
du métronome
Par exemple, si vous jouez en vous
accompagnant du métronome et remarquez
que votre instrument n’est pas accordé
correctement, vous pourrez laisser le
métronome fonctionner pendant l’accord.
Procédez de la manière suivante.
1. Appuyez sur le bouton METRONOME
ON.
2.
Appuyez sur le bouton START/STOP pour
lancer le métronome.
Si nécessaire, spécifiez le tempo et la
signature rythmique, etc.
Pour régler le tempo: Bouton TEMPO p,
q ou Bouton TAP TEMPO
Pour régler la signature rythmique:
Bouton BEAT p ou q.
Lorsque vous utilisez simultanément
l’accordeur et le métronome, vous ne
pouvez pas sélectionner “triolets”,
“triolets avec omission du battement
du milieu”, “quartolets” ou “quartolets
avec omission des baements du milieu”
comme signature rythmique.
3. Appuyez sur la bouton TUNER ON pour
passer en mode Compteur.
L’acheur indiquera le compteur d’accord.
Le tempo du métronome est indiqué par la
diode clignotante du bouton TAP TEMPO.
Si vous souhaitez eectuer l’accord en
mode Son, vous devrez ensuite appuyer
sur la bouton SOUND. Pour accorder votre
instrument en mode Retour son, appuyez
sur le bouton SOUND BACK.
61
Page 62

Accord en mode Compteur
Jouez une seule note sur l’instrument
à accorder. Le Accordeur ache alors
le nom de la note dont la hauteur se
rapproche le plus de celle de la note jouée.
Accordez votre instrument jusqu’à ce que le
Accordeur ache la note voulue.
Accord en mode Son
Accordez votre instrument sur la hauteur
de la note entendue.
Accord en mode retour son
Avec cee note, le compteur et la diode,
accordez votre instrument en conséquence.
4. Une fois l’instrument accordé, appuyez
sur la touc he TUNER ON et sur la
touche METRONOME ON pour éteindre
l’accordeur et le métronome.
62
Utilisation de l’enregistreur
Enregistrement
Pour de plus amples informations sur les
éléments achés à l’écran, reportez-vous à la
section refer to “Démarrage rapide” on page 50.
1. Appuyez sur le bouton RECORDER ON
pour mere l’enregistreur sous tension.
Indicateur de l’ENREGISTREUR
2.
Appuyez sur le bouton REC pour passer en
mode d’aente d’enregistrement.
Temps d'enregistrement
Numéro de piste
Page 63

Icône REC
Rouge clignotant
Rouge constant
Pour annuler le mode d’aente d’enregistrement,
appuyez sur le bouton .
3.
Appuyez sur le bouton PLAY/STOP pour
démarrer l’enregistrement.
Vous pouvez créer 100 pistes avec le TMR-50.
Vous ne disposez néanmoins que d’une durée
d’enregistrement de 23 minutes au total.
Si la durée d’enregistrement d’une piste
atteint 20 minutes, l’enregistrement sera
automatiquement interrompu. A ce moment-là,
le temps d’enregistrement aché continuera
d’alterner entre “19:59” et “End.” (Fin).
4.
Pour mere en pause l’enregistrement,
appuyez sur le bouton REC.
L’indicateur central de la diode de contrôle
clignotera en rouge.
L’icône REC clignotera sur l’écran.
5.
Pour poursuivre l’enregistrement, appuyez
une nouvelle fois sur le bouton REC.
6.
Appuyez sur le bouton PLAY/STOP pour
arrêter l’enregistrement.
Le temps d’enregistrement clignotera trois
fois à l’écran.
Pour faire un nouvel enregistrement,
appuyez sur le bouton REC. Le numéro
63
Page 64

de piste augmentera de un, et l’appareil
Vert clignotant
passera en mode d’aente d’enregistrement
pour la piste suivante.
Si la mémoire est pleine
Si la mémo ire est plein e pendant un
enregistrement, le temps d’enregistrement actuel
et la mention “FUL” (mémoire pleine) alterneront
sur l’écran, l’enregistrement s’arrêtera.
Appuyez sur le bouton
et supprimez les
pistes inutiles.
Page 66 “Supprimer une piste”
Lire une piste enregistrée
1.
Après l’enregistrement, appuyez sur le
bouton ou , puis sélectionnez la
piste à lire.
2.
Appuyez sur le bouton PLAY/STOP pour
démarrer la lecture.
Utilisez la commande Volume pour ajuster
le son de la lecture.
Si vous tentez d’eectuer un enregistrement
après avoir déjà enregistré 100 pistes,
“FL” clignotera sur l’indicateur de piste
de l’achage et le temps d’enregistrement
disponible s’affichera sur l’indicateur de
temps.
64
Durée de lecture
Icône Play
Page 65

3.
Si vous appuyez sur le bouton pendant
la reproduction, vous reviendrez au début
de la piste. Si vous appuyez sur le bouton
en début de piste (dans les 3 secondes
suivant le début), vous reviendrez à la
piste précédente. Si vous appuyez sur
pendant la reproduction, la piste suivante
sera diusée.
4.
Pour rembobiner la piste pendant la
lecture, appuyez et maintenez le bouton
. Pour faire avance rapide pendant la
lecture d’une piste, appuyez et maintenez
le bouton .
5. Après avoir arrêté la lecture, appuyez sur
le bouton PLAY/STOP.
6.
Pour reprendre la lecture du point où vous
l’avez arrêtée, appuyez une nouvelle fois
sur le bouton PLAY/STOP.
A la n de l’enregistrement diusé, la
lecture s’arrêtera automatiquement.
Lecture en boucle
Cee fonction vous permet d’eectuer une
lecture en boucle entre deux points dénis.
1. Sélectionnez la piste puis lisez-la.
2.
Au point de départ de la lecture en boucle,
appuyez sur le bouton A-B/DELETE.
Le point A est défini, et l’icône A-B
clignotera à l’écran.
Icône A-B
Pour annuler le point déni A, appuyez
sur le bouton .
3. A la n de la lecture en boucle, appuyez
sur le bouton A-B/DELETE.
Le point B est déni et la lecture en boucle
commencera entre les points A et B.
65
Page 66

L’indicateur central de la diode de contrôle
Orange clignotant
clignotera en orange.
L’icône A-B de l’écran s’arrêtera de clignoter
pour rester xe.
4.
Pour arrêter la lecture en boucle, appuyez
sur le bouton PLAY/STOP.
Pour reprendre la lecture en boucle,
appuyez sur le bouton PLAY/STOP.
Pour annuler les points A et B, appuyez sur
le bouton A-B/DELETE pendant la lecture en
boucle ou une fois la lecture en boucle arrêtée.
66
Lire une piste en boucle dans son
intégralité (répéter)
Pendant la lecture de la piste, appuyez et
maintenez le bouton A-B/DELETE pendant
environ une seconde ; la piste dans son
intégralité sera dénie comme la zone de
lecture en boucle.
Supprimer une piste
1.
L’enregistreur à l’arrêt, appuyez sur le
bouton ou , puis sélectionnez la
piste à supprimer.
2. Appuyez sur le bouton A-B/DELETE.
L’écran de suppression s’achera, et le
numéro de piste clignotera.
Page 67

3.
Appu ye z sur le bo uton po ur
supprimer la piste.
Pour annuler la suppression, appuyez sur
le bouton .
L’écran suivant s’affichera pendant la
suppression.
Une fois la suppression eectuée, la piste
enregistrée située avant ou après la piste
en cours sera sélectionnée.
S’il n’y a plus de pistes enregistrées après
la suppression, “– –” s’achera sur l’indicateur de piste de l’écran.
Utilisation simultanée de
l’enregistreur et de l’accordeur
Le TMR-50 vous permet d’utiliser simultanément
l’enregistreur et l’accordeur.
Une fois l’enregistreur à l’arrêt ou pendant
l’enregistrement, l’accordage s’eectue au niveau
de l’entrée de la prise INPUT ou au niveau du
micro interne.
Si vous utilisez l’enregistreur pour la lecture
(y compris la lecture en boucle), l’accordage
s’effectue au niveau du son de la piste
enregistrée.
1. Appuyez sur le bouton RECORDER ON
et le bouton TUNER ON pour mere
sous tension l’enregistreur et l’accordeur.
L’indicateur RECORDER, le numéro de
piste, l’indicateur TUNER, la note de
référence et le compteur s’acheront à
l’écran.
67
Page 68

Si vo us utili sez s imult anéme nt
l’enregistreur et l’accordeur, l’accordeur
ne fonctionnera qu’en mode compteur.
Le mode son (Sound out) et retour son
(sound back) seront indisponibles.
Les indicateurs au dessus de l’achage
seront utilisés en tant que diodes de
contrôle. Ils ne seront pas disponibles si
un indicateur passe au rouge, par exemple,
quand vous utilisez l’enregistreur pour
enregistrer un morceau.
Pendant l’enregistrement, l’indicateur
central s’allumera en rouge. Néanmoins
si les indicateurs sont utilisés en tant
que diode de contrôle, l’indicateur
68
central s’allumera en orange pendant
l’enregistrement.
Pour de plus amples informations sur
l’accordeur, reporter-vous à la section refer
to “Utilisation de l’accordeur” on page 55.
Pour obtenir des informations sur
le fonctionnement de l’enregistreur,
reporter-vous à la section “Utilisation de
l’enregistreur” en page 62.
Remarque: Une fois l’accordeur sous
tension, le temps d’enregistrement et de
lecture ne s’acheront pas.
Supprimer une piste
Vous pouvez supprimer une piste avec la
même procédure que lorsque vous utilisez
l’enregistreur individuellement. (Page 66
“Supprimer une piste”)
L’accordeur ne fonctionnera pas quand
une piste est en cours de suppression.
Page 69

Utilisation simultanée de l’enregistreur et du métronome
Le TMR-50 vous permet d’utiliser simultanément l’enregistreur et le métronome.
Si vous activez le métronom e avant
l’enregistrement, il se synchronisera avec la
piste pendant la lecture. Vous pourrez ainsi
vérier si la piste enregistrée est au tempo déni.
Une piste enregistrée que l’on peut lire en
synchronisation avec le métronome est
appelée «piste synchronisée avec le tempo.
Si une piste synchronisée avec le tempo est
sélectionnée, l’icône de piste synchronisée
avec le tempo ( ) s’achera.
Enregistrement avec l’enregistreur et le
métronome synchronisés
1.
Appuyez sur le bouton RECORDER ON et
le bouton METRONOME ON pour mere
sous tension l’enregistreur et le métronome.
L’indicateur METRONOME, le temps
d’enregistrement/lecture, le tempo, le réglage
du temps, l’icône de piste synchronisée
avec le tempo, le pendule du métronome
et le numéro de piste s’acheront à l’écran.
2.
Appuyez sur le bouton REC pour passer en
mode d’aente d’enregistrement.
L’indicateur central de la diode de contrôle
clignotera en rouge.
L’icône REC, l’icône de piste synchronisée
avec le tempo et le numéro de piste
s’acheront à l’écran.
69
Page 70

Vert clignotant
Le pendule du métronome commencera
à se balancer et le bouton TAP TEMPO
clignotera en rythme avec le mouvement.
Le temps aché alternera entre le chire
du décompte et le temps d’enregistrement
disponible. Vous pouvez spécifier
le décompte avec l’enregistrement
synchronisé avec le temps ( étape 4).
Le métronome produira un décompte
diffusé dans le haut-parleur. Avec le
bouton START/STOP, vous pouvez
choisir d’utiliser ou non le décompte
du métronome. Que le décompte du
métronome soit diffusé ou non, le
70
métronome fonctionnera toujours.
3.
Spéciez le tempo, le temps du métronome
et autres réglages.
Pour de plus amples informations sur les
procédures de réglage, reportez-vous à
la section “Utilisation du métronome”
en page 58.
Remarque: Si vous utilisez l’enregistreur
et le métronome ensemble, la plage
disponible pour le réglage du temps du
métronome est comprise entre 0 et 9.
4. Appuyez sur le bouton pour sélec-
tionner le décompte.
Le nombre de décomptes change à chaque
pression sur ce bouton. Les réglages
disponibles du décompte dièreront en
fonction du réglage du temps sélectionné.
Page 71

TEMPS Décompte
0
...n-4n-8n-2n-1n-4...
1
...n-4n-8n-2n-1n-4...
2
...n-4n-8n-2n-1n-4...
3
...n-3n-6n-3...
4
...n-4n-8n-2n-1n-4...
5
...n-5n-10n-5...
6
...n-6n-12n-6...
7
...n-7n-14n-7...
8
...n-8n-16n-8...
9
...n-9n-18n-9...9
5. Appuyez sur le bouton PLAY/STOP ou
le bouton REC.
Après le décompte, l’enregistrement
commencera.
Pendant le décompte, l’indicateur central de
la diode de contrôle s’allumera en orange.
Pour annuler l’enregistrement pendant
le décompte, appuyez sur le bouton .
Remarque:
l’en regist reur e t l e m étr onome,
l’enregistrement commencera une fois le
décompte “–1” (1 temps avant) aché.
Le son du métronome diusé dans le hautparleur s’arrêtera brièvement avant le début
de l’enregistrement.
Pour entendre le métronome pendant
l’enregistrement, utilisez un casque connecté
à la prise PHONES.
Si vous utilisez simultanément
Lecture d’une piste synchronisée avec le tempo
1. Après l’enregistrement, appuyez sur le
bouton ou , puis sélectionnez la
piste synchronisée avec le tempo que
vous désirez lire.
Une fois une piste synchronisée avec
le tempo sélectionnée, l’icône de piste
synchronisée avec le tempo s’achera.
Le tempo et le temps seront dénis selon les
valeurs enregistrées dans les données de piste.
71
Page 72

Remarque: Les réglages du tempo et
du temps ne seront pas modiés si vous
sélectionnez une piste qui n’est pas
synchronisée avec le tempo.
Après avoir sélectionné une piste
synchronisée avec le tempo, vous
pouvez utiliser les boutons TEMPO UP/
DOWN, le bouton TAP et les boutons
BEAT UP/DOWN pour modifier les
réglages du tempo et du temps. Si vous
désirez réinitialiser ces réglages aux
valeurs dénis dans les données de piste,
sélectionnez temporairement un chire de
piste diérent et resélectionnez la piste
synchronisée avec le tempo.
2.
Appuyez sur le bouton PLAY/STOP pour
lire la piste synchronisée avec le tempo.
La lecture commencera 1 temps après avoir
appuyé sur le bouton. “0:00” continuera de
clignoter sur l’indicateur de temps jusqu’à
ce que la lecture démarre.
72
Au démarrage de la lecture de la piste
synchronisée avec le tempo, le pendule
du métronome se balancera.
bouton TAP TEMPO clignotera en rythme
avec le tempo.
En outre, le
3. Vous pouvez activer ou couper le son du
métronome en appuyant sur le bouton
START/STOP pendant la lecture de la
piste synchronisée avec le tempo.
Lecture en boucle d’une piste
synchronisée avec le tempo
Vous pouvez lire une piste synchronisée avec
le tempo avec la même procédure que la
lecture en boucle d’une piste normale quand
vous utilisez l’enregistreur individuellement.
(Page 65 “Lecture en boucle”)
Lire une piste normale
Vous pouvez également lire une piste normale
si vous utilisez le métronome et l’enregistreur
Page 73

simultanément. Après avoir sélectionné une
Calibrage de l’accordeur
piste normale, l’icône de piste synchronisée
avec le tempo ne s’achera pas à l’écran.
Supprimer une piste
Vous pouvez supprimer une piste avec la
même procédure que lorsque vous utilisez
l’enregistreur individuellement. (Page 66
“Supprimer une piste”)
Utilisation simultanée de
l’accordeur, du métronome et
l’enregistreur
Vous pouvez utiliser simultanément
l’accordeur, le métronome et l’enregistreur.
Appuyez sur le bouton TUNER ON, le bouton
METRONOME ON et le bouton RECORDER
ON pour mere simultanément sous tension
l’accordeur, le métronome et l’enregistreur.
Tempo du métronome
Numéro de piste de l’enregistreur
Temps du métronome
Fonctionnement de l’accordeur
L’accordeur ne fonctionnera qu’en mode
compteur.
Le mode son (Sound out) et retour son (sound
back) seront indisponibles.
Une fois l’enregistreur à l’arrêt ou pendant
l’enregistrement, l’accordage s’eectue au
niveau de l’entrée de la prise INPUT ou au
niveau du micro interne.
Si vous utilisez l’enregistreur pour la lecture
(y compris la lecture en boucle), l’accordage
s’effectue au niveau du son de la piste
enregistrée.
L’accordage n’est pas eectué si l’enregistreur
73
Page 74

est en mode d’attente d’enregistrement,
pendant le décompte ou si une piste est en
cours de suppression.
Les procédures de fonctionnement de
l’accordeur sont les mêmes que si vous
l’utilisiez individuellement. Veuillez
vous reporter à la section “Utilisation
de l’accordeur” en page 55, et “Utilisation
simultanée de l’enregistreur et de l’accordeur”
en page 67.
Fonctionnement du métronome
Le pendule du métronome ne s’achera pas
puisque l’indicateur de l’accordeur est aché
sur l’écran.
Toutes les autres procédures de fonctionnement
sont les mêmes que si vous utilisiez simultanément le métronome avec l’enregistreur. Veuillez
vous reporter à la section “Utilisation du métronome” en page 58, et “Utilisation simultanée
de l’enregistreur et du métronome” en page 69.
74
Fonctionnement de l’enregistreur
Avec l’enregistreur, vous pouvez enregistrer
une piste synchronisée avec le tempo comme
si vous utilisiez simultanément l’enregistreur
et le métronome.
Pour de plus amples informations sur les
procédures de fonctionnement, reportezvous à la section “Utilisation simultanée de
l’enregistreur et du métronome” en page 69
Supprimer une piste
Vous pouvez supprimer une piste avec la
même procédure que lorsque vous utilisez
l’enregistreur individuellement. (Page 66
“Supprimer une piste”)
Connexion à un ordinateur
En connectant le câble USB fourni à votre
ordinateur, utilisez le TMR-50 comme un
périphérique USB standard.
Vous pourrez transférer les données
Page 75

enregistrées sur votre ordinateur, ou les
données musicales de votre ordinateur au
TMR-50.
Une fois le TMR-50 connecté à votre
ordinateur, l’accordeur, le métronome et
l’enregistreur ne fonctionneront pas.
Système requis
Windows
Ordinateur avec prise USB tournant sous
Microso Windows XP/Vista/7
Macintosh
Mac OS X 10.5 ou plus récent
Connexion du TMR-50 à votre ordinateurr
Veillez à utiliser le câble USB fourni pour
brancher le TMR-50 à l’ordinateur.
1. Meez le TMR-50 hors tension.
2. Allumez votre ordinateur.
3. Utilisez le câble USB pour connecter le
TMR-50 à l’ordinateur.
Une fois les connexions eectuées, l’écran
suivant s’achera.
Remarque: Si le TMR-50 est branché à
l’ordinateur avec le câble USB, il est alimenté
par l’ordinateur.
Transfert de données
Vous pourrez copier les données enregistrées par
le TMR-50 sur votre ordinateur, ou les données
musicales de votre ordinateur au TMR-50.
Le TMR-50 est en mesure de lire les
données audio PCM mono et stéréo au
format WAV 16 bits 44,1 kHz.
75
Page 76

Windows
1.
Dans le “Poste de travail”, double-cliquez
pour ouvrir le “Disque amovible *”.
Remarque: Les indications “*” et “**”
suivant le “Disque amovible” varient selon
l’environnement de l’ordinateur.
2.
Pour copier les données, glissez et déposez
les données enregistrées à l’emplacement
de votre choix sur votre ordinateur.
Mac OS X
1.
Double-cliquez pour ouvrir l’icône de
disque (SANS TITRE) sur le bureau.
2.
Pour copier les données, glissez et déposez
les données enregistrées à l’emplacement
de votre choix sur votre ordinateur.
Ajouter des données de l’ordinateur
Vous pouvez copier des chiers au format WAV
de votre ordinateur et les diuser sur le TMR-50.
76
1.
Copiez les chiers dans le dossier EXTRA
du TMR-50.
Le système peut détecter jusqu’à dix
chiers. Lors de la lecture des chiers,
les numéros de piste affichés seront
“E0”–”E9”.
Déconnexion du TMR-50 et de l’ordinateur
Windows
1.
Cliquez sur l’icô ne affichée du
côté droit dans la barre des tâches de
l’ordinateur.
2.
Dans le menu déroulant, cliquez sur
“Retirer Périphérique de stockage de
masse USB [lere du lecteur] en toute
sécurité”.
L’écran suivant s’achera sur le TMR-50.
Page 77

S’achent par alternance
Avec Windows Vista et Windows 7,
l’écran aché ci-dessus n’apparaîtra pas
automatiquement après avoir déconnecté le
TMR-50 de l’ordinateur. Après avoir l’avoir
déconnecté de l’ordinateur, maintenez le
bouton RECORDER ON pendant environ 3
secondes. L’écran aché ci-dessus apparaîtra.
Avant de débrancher le câble USB, assurez-
vous que l’écran ci-dessus apparaisse.
Après l’avoir correctement déconnecté de
l’ordinateur, assurez-vous de maintenir le
bouton RECORDER ON pendant environ
3 secondes.
3. Débranchez le TMR-50 de l’ordinateur.
Mac OS X
1.
Glissez l’icône de disque achée dans la
corbeille. Vous pouvez aussi sélectionner
l’option “Ejecter TMR-50” sous le menu
Fichier.
2. Débranchez le TMR-50 de l’ordinateur.
Formatage
Si l’enregistrement ou la lecture d’un chier
enregistré est impossible, un message d’erreur
s’achera.
Dans ce cas, utilisez le câble USB pour
connecter le TMR-50 à un ordinateur, puis
tentez d’exécuter Chkdsk (Windows) ou Disk
Utility (Mac OS X) sur cet ordinateur. Si le
77
Page 78

problème n’est toujours pas résolu, veuillez
Rouge constant
suivre la procédure ci-dessous pour formater
l’appareil.
Assurez-vous de procéder au formatage
à l’aide du TMR-50.
Formatage avec les piles
Nous vous recommandons d’utiliser
l’alimentation USB pendant le formatage
de l’appareil. (Page 79 “Formatage avec
alimentation USB”)
1. Meez le TMR-50 hors tension.
2.
Tout en appuyant et en maintenant le
bouton A-B/DELETE et le bouton REC,
appuyez sur le bouton RECORDER ON.
Le TMR-50 entre dans le mode formatage.
L’écran suivant s’affichera, et les trois
indicateurs de la diode de contrôle
s’allumeront en rouge.
78
Pour annuler la procédure de formatage,
appuyez sur le bouton .
3.
Appuyez sur le bouton pour commencer le formatage.
Pendant le formatage, l’écran suivant
s’affichera, et les trois indicateurs
de la diode de contrôle clignoteront
successivement en rouge.
Vert clignotant
Page 79

Une fois la procédure de formatage
terminée, l’appareil est mis hors tension.
Formatage avec alimentation USB
1. Meez le TMR-50 hors tension.
2.
Appuyez et maintenez le bouton A-B/
DELETE et le bouton REC tout en utilisant
le câble USB pour connecter le TMR-50
à l’ordinateur.
3. Suivez la même procédure que pour le
formatage avec les piles.
Page 78 “Formatage avec les piles”
4.
Une fois la procédure de formatage
terminée, un message vous demandant
de déconnecter l’appareil de l’ordinateur
s’achera à l’écran.
Page 76 “Déconnexion du TMR-50 et de
l’ordinateur”
5. Déconnectez le TMR-50 de l’ordinateur.
Dépannage
Le dispositif ne s’allume pas.
• Le symbole de la pile clignote-il ?
Remplacez les piles. L’enregistrement est
impossible si le symbole de la pile clignote.
•
Veillez à ce que les pôles (+, –) des piles
soient correctement orientés.
Rien n’apparaît à l’écran.
• Le TMR-50 est-il allumé ?
Aucun son n’est audible.
• Le casque est-il bien branché?
• Vériez si le volume n’est pas réglé sur “0”.
• Vériez si la pile n’est pas épuisée.
Impossible d’enregistrer.
•
Vériez si la mémoire disponible est susante.
Vériez la durée d’enregistrement disponible.
• Vériez si la pile n’est pas épuisée.
•
Si le message d’erreur s’ache, formatez
le TMR-50.
79
Page 80

Lecture impossible.
• Le message d’erreur s’est-il aché ?
S’il s’ache souvent, formatez le TMR-50.
Si vous tentez de lire des données musicales
•
transférées d’un ordinateur, vériez que
le format de chier est compatible avec
le TMR-50.
L’ordinateur ne reconnaît pas le TMR-50.
Vérifiez si le TMR-50 est correctement
•
branché à l’ordinateur, avec le câble USB
fourni.
•
Assurez-vous que l’ordinateur est sous
tension.
80
Fiche technique
Section Enregistreur
Format d’enregistrement : Format audio PCM
format WAV (extension :
.wav), 44,1 kHz à 16 bits
Temps d’enregistrement disponible :
Approximativement 20
minutes (Mémoire interne
: 120 Mo)
Nombre totale de pistes : 100 pistes maximum
Section accordeur
Gamme: 12 notes tempérament égal
Plage de détection*: C1 (32,70 Hz) à C8 (4186,01
Hz) onde sinusoïde
Note de référence: C3 (130,81 Hz) à C6 (1046,50
Hz) Une octave ou AB
Page 81

Modes d’accord: Mode Compteur (AUTO),
Mode Son (MANUEL),
Mode Retour Son (AUTO)
Plage de calibrage: A4 = 410 Hz à 480 Hz (per pas
Précision de la détection:
Supérieure à ±1 centième
Précision du son: Supérieure à ±1 centième
de 1 Hz)
Section métronome
Échelle de tempo: 40 à 208 baements par minute
Réglage du tempo: PAS PENDULAIRE, PAS
Signatures rythmiques:
Précision du tempo:
(bpm)
COMPLET, TEMPO TAP
0 à 9 battements, Duolets,
Triolets, Triolets avec omission
du baement du milieu, Quartolets, Quartolets avec omission
des baements du milieu
±0,3%
Normes principales
Prises : Prise INPUT (mono 1/4’’),
Haut-parleur : Haut-parleur dynamique (23
Alimentation : Deux piles AAA (piles zinc-
Durée de vie des piles : Enregistreur… Environ
prise PHONES (mini 1/8’’)
mm de diamètre)
carbone, alcalines ou nickelmétal-hydrure)
16/13/11
heures d’enregistrement/lecture (Régler le
rétro-éclairage: O/Léger/
Auto, du rée ma ximale
d’environ 20 minutes pour
un enregistrement/lecture
unique, en cas d’utilisation
de piles alcalines)
81
Page 82

Dimensions: 111 (W) x 82 (D) x 18 (H) mm
Poids: 119g (avec piles)
Accessoires fournis :
Accordeur...Environ 24/22/20
heures (Régler le rétroéclairage: O/Léger/Auto,
Note A4 en fonctionnement
continu, avec des piles
alcalines)
Métronome… Environ
18/16/14 heures (Régler le
rétro-éclairage: O/Léger/
Auto, tempo 120, 4 baements, volume maximal,
avec des piles alcalines)
Manuel d’utilisation
AAA, Câble USB
, deux piles
La note de calibrage et de référence de
l’accordeur, ainsi que les réglages de tempo,
de temps, de pas du pendule, de pas complet
et de rétro-éclairage du métronome seront
82
enregistrés même si l’appareil est mis hors
tension. Néanmoins, les réglages seront
réinitialisés aux valeurs suivantes si vous
remplacez les piles.
Valeurs par défaut:
Calibrage = 440 Hz,
note de référence
A4, tempo = 120, signature rythmique =
quatre battements, type de tempo = PAS
PENDULAIRE, réglage du rétro-éclairage = o
*
Même si la hauteur du son se trouve à
l’intérieur de la plage de détection, il
est possible que le TMR-50 n’arrive pas
à détecter la note si de nombreux sons
harmoniques sont présents (comme des
notes basses ou élevées sur un piano
acoustique) ou si le decay de votre
instrument est important.
Les caractéristiques et l’aspect du produit sont
susceptibles d’être modiés sans avis préalable
en vue d’une amélioration.
=
Page 83

83
Page 84

Vorsichtsmaßnahmen
Aufstellungsort
Vermeiden Sie das Aufstellen des Geräts an Orten,
an denen.
• es direkter Sonneneinstrahlung ausgesetzt ist;
• hohe Feuchtigkeit oder Extremtemperaturen
auftreten können;
• Staub oder Sch mutz in groß en Men gen
vorhanden sind;
• das Gerät Erschütterungen ausgesetzt sein kann.
• in der Nähe eines Magnetfeldes.
Stromversorgung
Stellen Sie den Netzschalter auf OFF, wenn das
Gerät nicht benutzt wird. Wenn Sie das Gerät über
einen längeren Zeitraum nicht benutzen, nehmen
Sie die Batterien heraus, damit sie nicht auslaufen.
Störeinüsse auf andere Elektrogeräte
Dieser kann bei in de r N ähe aufge stellt en
Rund-funkempfängern oder Fernsehgeräten
Empfangsstörungen hervorrufen. Betreiben Sie
solche Geräte nur in einem geeigneten Abstand
84
von diesem Erzeugnis.
Bedienung
Vermeiden Sie bei der Bedienung von Schaltern und
Reglern unangemessenen Kraftaufwand.
Reinigung
Bei auftretender Verschmutzung können Sie das
Gehäuse mit einem trockenen, sauberen Tuch
abwischen. Verwenden Sie keinerlei Flüssigreiniger
wie beispielsweise Reinigungsbenzin, Verdünnungsoder Spülmittel. Verwenden Sie niemals brennbare
Reiniger.
Bedienungsanleitung
Bewahren Sie diese Bedienungsanleitung gut auf,
falls Sie sie später noch einmal benötigen.
Flüssigkeiten und Fremdkörper
Stellen Sie niemals Behältnisse mit Flüssigkeiten in
der Nähe des Geräts auf. Wenn Flüssigkeit in das
Gerät gelangt, können Beschädigung des Geräts,
Feuer oder ein elek-trischer Schlag die Folge sein.
Beachten Sie, daß keinerlei Fremdkörper in das
Gerät gelangen.
Page 85

Hinweis zur Entsorgung (Nur EU)
Wen n Si e das Sym bol m it d er
„durchgekreuzten Mülltonne“ auf Ihrem
Pr od uk t, d er d az ug eh ör ig en
Bedienungsanleitung, der Batterie oder
der Verpackung sehen, müssen Sie das
Produkt in der vorgeschriebenen Art
und Weise entsorgen um Schäden an
der menschlichen Gesundheit und der Umwelt
zu ver meide n. Batt erien od er Akku s, die
Schadstoe enthalten, sind auch mit dem Symbol
einer durchgekreuzten Mülltonne gekennzeichnet.
In der Nähe zum Mülltonnensymbol bendet sich
die chemische Bezeichnung des Schadstoes.
WICHTIGER HINWEIS FÜR KUNDEN
Dieses Produkt wurde unter strenger Beachtung
von Spezikationen und Spannungsanforderungen
hergestellt, die im Bestimmungsland gelten. Wenn
Sie dieses Produkt über das Internet, per Postversand
und/oder mit telefonischer Bestellung gekauft haben,
müssen Sie bestätigen, dass dieses Produkt für Ihr
Wohngebiet ausgelegt ist.
WARNUNG: Verwendung dieses Produkts in einem
anderen Land als dem, für das es bestimmt ist,
verwendet wird, kann gefä hrlich sein und die
Garantie des Herstellers oder Importeurs hinfällig
lassen werden. Bitte bewahren Sie diese Quittung als
Kaufbeleg auf, da andernfalls das Produkt von
der Garantie des Herstellers oder Importeur s
ausgeschlossen werden kann.
*
Alle Produkt- und Firmennamen sind Warenzeichen
oder eingetragene Warenzeichen der betreenden
Eigentümer.
85
Page 86

Inhalt
Die wichtigsten Funktionen ........................87
Einsetzen der Batterien ...............................87
Verwendung des Ständers ..........................89
Teile des TMR-50...........................................89
Schnellstartanleitung .................................. 92
Ein-/Ausschalten des Geräts .......................95
Hintergrundbeleuchtung ............................96
Anschlüsse .................................................... 97
Verwendung des Stimmgeräts ................... 97
Verwenden des Metronoms ......................101
Gleichzeitige Verwendung des Stimmgeräts
und Metronoms ..........................................103
86
Verwenden des Recorders ........................105
Gleichzeitiges Verwenden von Recorder und
Stimmgerät .................................................110
Gleichzeitiges Verwenden von Recorder und
Metronom ...................................................111
Gleichzeitiges Verwenden von Stimmgerät,
Metronom und Recorder ...........................115
Anschluss an einen Computer ..................117
Formatierung .............................................120
Fehlersuche ................................................122
Technische Daten .......................................123
Page 87

Vielen Dank für den Kauf des Korg Stimmgerät
Metronom Recorder TMR-50.
Die wichtigsten Funktionen
Mit dem TMR-50 können Sie über das integrierte
Mikrofon oder über ein angeschlossenes
Mikrofon Ihr Instrument stimmen und das
Gespielte aufnehmen. Außerdem erlaubt Ihnen
das TMR-50, den Recorder, das Stimmgerät und
das Metronom sowohl getrennt voneinander
als au gleizeitig zu verwenden.
Einsetzen der Batterien
Stellen Sie sicher, dass der Recorder
ausgesaltet ist, bevor Sie die Baerien
austausen.
1. Sieben Sie den Baeriefadael auf
der Rüseite des TMR-50 in Ritung „a“
und önen Sie die Abdeung in Ritung
„b“ (siehe nebenstehende Abbildung).
2. Setzen Sie Baerien unter Beatung der
ritigen Polung ein.
3.
Um eine korrekte Anzeige der verbleibenden Baerieladung zu gewährleisten, befolgen Sie die Anweisungen im Absni
„Einstellen des Baerietyps“ auf Seite 88 und
wählen Sie den verwendeten Baerietyp.
Leere Baerien sind unverzügli aus dem
Gerät zu entfernen. Außerdem sollten Sie
die Baerien entnehmen, wenn Sie das
Gerät über einen längeren Zeitraum nit
verwenden werden.
87
Page 88

Bei Fehlfunktionen entnehmen Sie die
Baerien einmal und setzen sie dann neu ein.
Verwenden Sie bereits benutzte Baerien
nit zusammen mit neuen Baerien und
setzen Sie stets identise Baerietypen ein.
Wenn die Batterien schwach werden,
erseint ein Baeriesymbol links im Display.
Einstellen des Batterietyps
Um eine korrekte Anzeige der verbleibenden
Baerieladung zu gewährleisten, müssen Sie
den verwendeten Baerietyp festlegen.
1. Nadem Sie die Baerien ausgetaust
haben und das Gerät einsalten, können
Sie auf dem Display den verwendeten
Baerietyp festlegen.
Wenn si die Baerien weiter entleeren,
blinkt das Baeriesymbol. In diesem Fall
kann die Aufzeinungsfunktion nit mehr
verwendet werden. Obwohl Sie weiterhin
die aufgenommenen Daten wiedergeben
sowie das Stimmgerät und das Metronom
verwenden können, sollten Sie die Baerien
so bald wie mögli austausen.
88
Batterietyp
2. Drüen Sie die TAP TEMPO-Taste, um
den verwendeten Baerietyp auszuwählen.
AL: Alkali-Baerien oder Zink-Kohle-Baerien
nH: Niel-Metallhydrid-Baerien
3. Drüen Sie die -Taste.
Die Einstellung ist abgeslossen und das
Page 89

TMR-50 wird eingesaltet.
11
10
12
Verwendung des Ständers
Sie können den an der Rüseite des TMR-50
vorhandenen Ständer verwenden, um das Gerät
zur leiten Betratung zurüzuklappen.
Teile des TMR-50
1
9
2
3
8
7
1. Stimmgerät-Sektion
2. USB-Anschluss
3. Beleuchtungstaste
4. Recorder-Sektion
5. Lautsprecher
6. Mikrofon
54 6
89
Page 90

7. INPUT-Buchse
d
8. PHONES-Buchse
9. Metronom-Sek tion
10.Lautstärke
11.Stimmhilfe
12.Display
Stimmgerät-Sektion
a. TUNER ON-Taste
b. Tasten CALIB/NOTE p, q
c. SOUND-Taste
d. SOUND BACK-Taste
90
Recorder-Sektion
c
b
e
f
a
a
b
c
a. RECORDER ON-Taste
-Taste
b.
c. A-B/DELETE-Taste
d. PLAY/STOP-Taste
e. REC/PAUSE-Taste
-Taste
f.
d
Page 91

Metronom-Sektion
b
a. METRONOME ON-Taste
b. Tasten BEAT p, q
c. Tasten TEMPO p, q
d. TAP TEMPO-Taste
e. START/STOP-Taste
a
b
d
e
Display
a
c
g
e f
a. Referenztonanzeige
b. Noten-/Zeitanzeige
c. Tempoanzeige
d. Taktanzeige
e. OK-Symbol
f. A-B-Symbol
g. Symbol für temposynchronen Track
h. Track-Nummer
i. PLAY-Symbol
J. REC-Symbol
k. CANCEL-Symbol
c
d
ji k
h
91
Page 92

Schnellstartanleitung
RECORDER-Anzeige
Aufnahmezeit
Mit dem TMR-50 können Sie über das integrierte
Mikrofon oder über ein angeschlossenes
Mikrofon das Gespielte aufnehmen.
Dafür müssen Sie keine komplexen Einstellungen
(wie etwa den Aufnahmepegel) festlegen, sondern
können das Gespielte ganz einfa aufnahmen.
Außerdem können Sie Ihre Aufnahme glei
dana abspielen, um sie zu überprüfen.
Im folgenden Abschnitt werden vom
Einsalten des Recorders über die Aufnahme
bis hin zur Wiedergabe und zum Lösen des
aufgenommenen Materials alle grundlegenden
Funktionen des Recorders erklärt. Befolgen
Sie die Anweisungen unter Berüsitigung
des Absnis „Teile des TMR-50“ auf Seite 89.
Aufnahme
1. Bereiten Sie Ihr Musikinstrument vor.
Verwenden Sie bei akustisen Saiteninstrumenten und Blasinstrumenten das
92
integrierte Mikrofon.
2. Drüen Sie die RECORDER ON-Taste,
um den Recorder einzusalten.
Bei eingesaltetem Recorder werden die
RECORDER-Anzeige, die Tra-Nummer und
die Aufnahmezeit auf dem Display angezeigt.
Wenn Sie zum ersten Mal aufnehmen
bzw. wenn keine aufgenommenen Tras
vorliegen, erseint „– –“ auf der TraAnzeige des Displays.
Track-Nummer
3. Drüen Sie die REC-Taste.
Der Recorder geht in den Bereitsasmodus
über und die blinkende Aufnahmezeitanzeige
Page 93

gibt die verfügbare Aufnahmezeit an. Die
Blinkt rot
Leuchtet rot
milere Anzeige der Stimmhilfe blinkt rot.
Zusätzli blinken die Tra-Nummer „0“
und das REC-Symbol auf dem Display.
REC-Symbol
Das TMR-50 stellt den Aufnahmepegel automatis ein, sodass Sie vor der Aufnahme
keine Einstellungen vornehmen müssen.
4. Drüen Sie die PLAY/STOP-Taste oder
die REC-Taste, um die Aufnahme zu
starten. Spielen Sie Ihr Instrument.
Während der Aufnahme leuchtet die
milere Anzeige der Stimmhilfe rot.
5.
Wenn Sie die Aufnahme beenden wollen,
drüen Sie die PLAY/STOP-Taste.
Wiedergabe des aufgenommenen Materials
Befolgen Sie diese Anweisungen, um das
aufgenommene Material wiederzugeben.
1.
Drü cken Sie die PLAY/ST OP-Taste,
nadem Sie die Aufnahme beendet haben.
Das aufgenommene Material wird
wiedergegeben.
Die milere Anzeige der Stimmhilfe blinkt
grün und das PLAY-Symbol wird auf dem
Display angezeigt.
93
Page 94

Wiedergabezeit
Blinkt grün
PLAY-Symbol
Verwenden Sie den Lautstärkeregler, um
die Wiedergabelautstärke einzustellen.
Die Wiedergabe wird am Ende der
Aufnahme automatis gestoppt.
Löschen des aufgenommenen Materials
Befolgen Sie diese Anweisungen, um das
aufgenommene Material zu lösen.
1.
Drüen Sie bei gestopptem Recorder die
A-B/DELETE-Taste.
Der Lösbildsirm wird auf dem Display
angezeigt und die Tra-Nummer blinkt.
94
2. Drüen Sie die -Taste, um den Tra
zu lösen.
Wenn der Tra gelöst wurde, erseint
„– –“ auf der Tra-Anzeige des Displays.
Das waren die grundlegenden Verfahren
zum Aufnehmen, Wiedergeben und
Lösen von Tras mit dem TMR-50.
Der Recorder des TMR-50 kann gleizeitig
mit dem Stimmgerät und dem Metronom
verwendet werden.
Weitere Informationen zum Recorder
Page 95

nden Sie im Absni „Verwenden des
Recorders“ auf Seite 105.
Ein-/Ausschalten des Geräts
Mi thilfe der TUNER ON-Taste, d er
METRONOME ON-Taste und der RECORDER
ON-Taste können Sie das TMR-50 einsalten.
Der TUNER ON-Taster und der METRO-
NOME ON-Taster stehen weniger hervor
als die anderen Tasten, damit das TMR-50
nit unabsitli eingesaltet wird.
Drüen Sie zum Ein- und Aussalten
des Geräts die Einsalaste.
Einschalten des Geräts
Drücken Sie entweder die TUNER ONTaste, die METRONOME ON-Taste oder
die RECORDER ON-Taste, um das Gerät
einzusalten.
Dur Drüen der TUNER ON-Taste aktivieren
Sie den Messmodus des Stimmgeräts, und auf
dem Display wird „ “ angezeigt.
Dur Drüen der METRONOME OM-Taste
salten Sie das Metronom ein, und auf dem
Display wird „ “ angezeigt.
Dur Drüen der RECORDER ON-Taste
salten Sie den Recorder ein und auf dem
Display wird „ “ angezeigt.
Das TMR-50 erlaubt Ihnen, das Stimmgerät,
das Metronom und den Recorder gleizeitig
zu verwenden.
Ausschalten des Geräts
Das TMR-50 wird ausgesaltet, wenn Sie
das Stimmgerät, das Metronom und/oder den
Recorder aussalten.
Aussalten des Stimmgeräts
Wenn das Stimmgerät arbeitet, drüen Sie
den TUNER ON-Taster, um das Stimmgerät
auszuschalten. Das Stimmgerät schaltet
sich außerdem automatisch aus, wenn
95
Page 96

innerhalb von 20 Minuten kein Eingangssignal
empfangen und das Gerät nit bedient wird.
Aussalten des Metronoms
Wenn das Metronom arbeitet, drüen Sie den
METRONOME ON-Taster, um das Metronom
auszusalten. Das Metronom saltet si
außerdem automatis aus, wenn es länger als
20 Minuten angehalten und nit bedient wird.
Aussalten des Recorders
Drüen Sie bei eingesaltetem Recorder
die RECORDER ON-Taste, um den Recorder
auszuschalten. Der Recorder schaltet sich
außerdem automatisch aus, wenn er 20
Minuten lang nit verwendet wird.
96
Hintergrundbeleuchtung
Drüen Sie bei Bedarf die Beleutungstaste „ “, um die Hintergrundbeleutung
einzustellen.
Mit jedem Tastendru verändert si die
Hintergrundbeleutung gemäß folgendem
Sema: So Auto Aus So …
Soft: Geringe Leuchtstärke zum Schonen
der Baerie.
Auto: Die Hintergrundbeleutung leutet
hell, wenn bei eingesaltetem Stimmgerät ein
Eingangssignal empfangen wird und wenn die
Tasten gedrüt werden.
Wenn 10 Sekunden lang kein Ton gespielt oder
keine Taste gedrüt wird, verringert si die
Beleutungsstärke automatis.
Aus : Die Hintergrundbeleuchtung ist
deaktiviert.
Page 97

Anschlüsse
Wenn Sie eine Verbindung mit einem
Instrument oder Kontaktmikrofon usw.
herstellen wollen
Wenn Sie ein Instrument mit einem Piup, wie eine
elektrise Gitarre, stimmen wollen dann sließen
Sie ein Kabel an Ihr Instrument an und steen das
Kabel in die INPUT-Buse des TMR-50.
Die INPUT-Buse ist nur für 1/4-Zoll-
Monokabel geeignet. Stereokabel (TRS)
können nit verwendet werden.
Wenn Sie ein Instrument mit getrennt
erhältlien Korg Kontaktmikrofon stimmen
wollen, steen Sie das Kontaktmikrofon in
die INPUT-Buse des TMR-50.
Wenn das Instrument nicht an die
INPUT-Buse angeslossen wird, kann
es mithilfe des integrierten Mikrofons
gestimmt werden.
Anschluss von Kopfhörern
Sie können 1/8-Zoll-Ministeer-Ohrhörer
an die PHONES-Buse ansließen. Wenn
eingestet, kommt kein Ton vom Lautspreer.
Verwenden Sie den Lautstärkeregler zum
Einstellen der Lautstärke der Kopörern.
Verwendung des Stimmgeräts
Stimmen unter Beobachtung der
Messanzeige (Messmodus)
1.
Sließen Sie Ihr Instrumentenkabel oder
Kontaktmikrofon an die INPUT-Buse
des TMR-50 an.
Wenn das Instrument nicht an die
INPUT-Buse angeslossen wird, kann
es mithilfe des integrierten Mikrofons
gestimmt werden.
2. Drüen Sie die TUNER ON-Taste.
Im oberen Teil des Displays erseint „
97
Page 98

Kalibrierung (Referenzton) angezeigt.
“, und darunter wird die
3. Um die Kalibrierung zu ändern, drüen
Sie die Taste CALIB/NOTE p oder q.
Der Kalibrierungswert erhöht oder
verringert sich um jeweils 1 Hz. Sie
können den Wert fortlaufend erhöhen oder
verringern, indem Sie diese Tasten gedrüt
halten. Diese Einstellung bleibt gespeiert,
au wenn das Gerät ausgesaltet wird.
4. Spielen Sie eine einzelne Note auf Ihrem
Instrument.
Die Note, die der gespielten Note am
nächsten ist, wird in der Mie des Displays
angezeigt. Stimmen Sie das Instrument
auf die korrekte Tonhöhe, so dass der
gewünschte Notenname erscheint.
Wenn Sie das interne Mikrofon verwenden,
bringen Sie das Instrument so nahe wie
mögli zum Mikrofon, so dass keine
98
Außengeräusche beim Stimmvorgang
eingefangen werden.
5.
Während Sie eine einzelne Note auf Ihrem
Instrument spielen, stimmen Sie Ihr Instrument so, dass die Spitze der Messanzeige
„q“ anzeigt, und die Mienanzeige an der
Stimmführung leutet.
Die linke Stimmanzeige leutet auf, wenn
die Tonlage des Instruments Moll ist, und
die rete Anzeige leutet auf, wenn die
Tonlage Dur ist.
Wenn Sie eine genaue große Terz oder
eine kleine Terz über einer bestimmten
Note stimmen wollen, verwenden Sie die
Markierungen „
(+15,6 Cent) in der Messanzeige.
“ (-13,7 Cent) oder „ “
Stimmen zu einer genauen großen
Terz oder einer kleinen Terz nach oben
Wenn Sie eine reine große Terz über A (0
Cent) abstimmen wollen, stimmen Sie Ihr
Page 99

Instrument so, dass die Notennamen-Anzeige
C anzeigt und die Messanzeige bei „ “ ist.
Wenn Sie eine kleine Terz über A (0 Cent)
abstimmen wollen, stimmen Sie Ihr
Instrument so, dass die Notennamen-Anzeige
C anzeigt und die Messanzeige bei „ “ ist.
Stimmen auf einen Referenzton (TonAusgabe-Modus)
1. Drüen Sie die TUNER ON-Taste.
Sie schalte n den M essmo dus de s
Stimmgeräts ein.
2. Drüen Sie die SOUND-Taste, um den
Ton-Ausgabe-Modus zu wählen.
Der Referenzton wird entweder über
die Kopörer (wenn an die PHONESBuchse angeschlossen) oder über die
Lautspreer wiedergegeben. Stellen Sie
die Wiedergabelautstärke mithilfe des
Lautstärkereglers ein.
3.
Wählen Sie die gewünste Note mithilfe
der Taste CALIB/NOTE p oder q.
Der wiedergegebene Referenzton ändert
si na folgendem Sema:
C(C3) n C♯ n D n E♭ n E n F n F♯ n G n G♯ n
A n B♭ n B n C(C4) ... C(C6) n C(C3)...
Diese Einstellung bleibt gespeiert, au
wenn das Gerät ausgesaltet wird.
4. Stimmen Sie Ihr Instrument gemäß dem
Referenzton.
5.
Drüen Sie die SOUND-Taste erneut,
um zum Messmodus zurüzukehren.
Wenn Sie das Instrument an die INPUTBuse oder die Kopörer an die PHONESBuse ansließen, wird der Messmodus
gestartet, und Sie können Ihr Instrument
mithilfe der Messskala stimmen.
99
Page 100

Stimmen mithilfe des Referenztons und
der Messanzeige (Sound Back-Modus)
Mithilfe dieser Funktion können Sie Ihr
Instrument stimmen, wenn entweder das
Instrument an die INPUT-Buse oder die
Kopörer an die PHONES-Buse (oder
beide) angeslossen sind.
1. Drüen Sie die TUNER ON-Taste.
Damit salten Sie den Messmodus des
Stimmgeräts ein.
2.
Drüen Sie die SOUND BACK-Taste,
um den Sound Ba-Modus zu aktivieren.
Beim Sound Ba-Modus wird der Referenzton
wiedergegeben, der dem gespielten Ton am
nästen kommt. Stellen Sie die Lautstärke
mithilfe des Lautstärkereglers ein.
Auf dem Display wird „ “ angezeigt.
Wenn Kopörer an die PHONES-Buse
angeslossen sind, wird der gespielte
Ton über das integrierte Mikrofon oder
100
über die INPUT-Buse empfangen und
der Referenzton über die Kopfhörer
wiedergegeben.
Wenn keine Kopörer an die PHONESBuchse angeschlossen sind, wird der
gespielte Ton über die INPUT-Buchse
empfangen und der Referenzton über die
Lautspreer wiedergegeben.
Wenn weder die Kopfhörer an die
PHONES-Buse no das Instrument
an die INPUT-Buchse angeschlossen
sind, kann der Sound Ba-Modus nit
durgeführt werden.
3. Stimmen Sie Ihr Instrument mithilfe des
Referenztons und der Messanzeige.
4.
Wenn Sie die SOUND BACK-Taste erneut
drüen, kehren Sie in den Messmodus
zurü.
 Loading...