

Page 1

Owner's Manual (¬p.2)
Manuel d'utilisation (¬p.8)
Bedienungsanleitung (¬s.15)
Manual de usuario (¬p.22)
取扱説明書
Thank you for purchasing the Korg TM-60/TM-60C COMBO
TUNER METRONOME. To help you get the most out of your
new instrument, please read this manual carefully.
Merci d’avoir choisi la Combo Accordeur Métronome TM60/TM-60C de Korg. Afin de pouvoir exploiter au mieux
toutes les possibilités oertes par l’instrument, veuillez lire
attentivement ce manuel.
Vielen Dank, dass Sie sich für einen TM-60/TM-60C
Kombination aus Stimmgerät und Metronom von Korg
entschieden haben. Bitte lesen Sie sich diese Anleitung
vollstädig durch, um bei der Bedienung alles richtig zu
machen.
Gracias por comprar el anador para enchufar TM-60/TM60C Combo Afinador Metrónomo de Korg. Por favor, lea
este manual atentamente y guárdelo para futuras consultas.
このたびは、コルグ COMBO TUNER METRONOME TM60/TM-60C をお買い上げいただきまして、まことにありがと
うございます。本製品を末永くご愛用いただくためにも、取扱
説明書をよくお読みになって、正しい方法でご使用ください。
(¬p.29)
Page 2
Main Features
With the TM-60/TM-60C you can tune instruments using the
internal mic or by connecting them to the INPUT jack.
You can use the tuner and metronome individually or simultaneously.
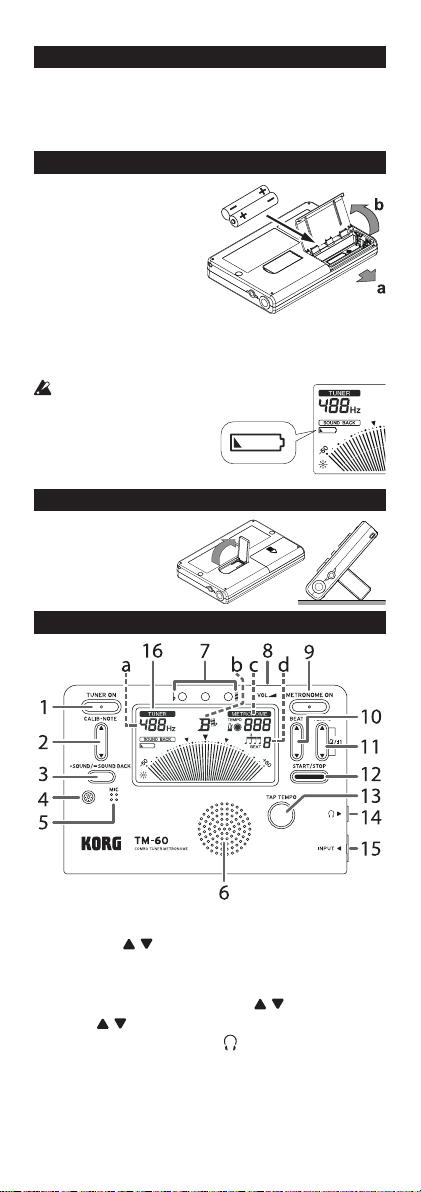
Installing batteries
Slide the battery compart-
1.
ment cover on the back
of the TM-60/TM-60C in
direction “a” as shown in
the illustration and lift up
the cover in direction “b.”
Insert the batteries, making
2.
sure to observe the correct
polarity, and then close the cover.
If the unit malfunctions try removing and then reinstalling the
batteries.
When the batteries become
depleted, a battery symbol
will appear on the left side
of the display. When this occurs, it’s time to replace the
batteries.
Using the stand
You can use the stand
provided on the back of
the TM-60/TM-60C to tilt
it back at an angle for
easy viewing.
Parts of the TM-60/TM-60C
TUNER ON button
1.
CALIB·NOTE , buttons
3.
MIC
5.
Tuning guide
7.
METRONOME ON button
9.
TEMPO , buttons
11.
TAP TEMPO button
13.
INPUT jack
15.
a. Reference pitch b. Note name
c. TEMPO (metronome tempo) d. BEAT (metronome beat)
SOUND/SOUND BACK button
2.
Backlight button
4.
Speaker
6.
VOL (Volume control)
8.
BEAT , buttons
10.
START/STOP button
12.
(Headphones) jack
14.
Display
16.
Page 3
Turning the power on/o
Turning the power on
Press either the TUNER ON button or the METRONOME ON
button and the power will turn on. Press the button for the
function that you want to use.
When the TUNER ON button is pressed, the tuner starts in the
Meter mode and “
When the METRONOME ON button is pressed, the metronome
starts and “
The TM-60/TM-60C can use the tuner and metronome simultaneously.
The TUNER ON button and the METRONOME ON button are
designed lower than other buttons so that the power is not
turned on involuntarily when the TM-60/TM-60C is placed
in your pocket or in a bag. To turn the device on or o, push
in the power button.
” will appear on the display.
” will appear on the display.
Turning the tuner o
When the tuner is in use, press the TUNER ON button to turn o
the power. The tuner will also turn o automatically if it’s not in
use for twenty minutes.
Turning o the metronome
When the metronome is in use, press the METRONOME ON
button to turn o the power. The metronome will also turn o
automatically if not in use for twenty minutes.
Connections
If you want to connect an instrument, contact mic, etc.
If you want to tune an instrument with a pickup, such as an
electric guitar, connect a cable to your instrument, and plug the
cable into the TM-60/TM-60C’s INPUT jack.
The INPUT jack is only for a 1/4” mono cable. Stereo (TRS)
cables cannot be used.
If you want to tune your instrument using the Korg CONTACT
MICROPHONE, plug the contact mic into the TM-60/TM-60C’s
INPUT jack.
If a device is not connected to the INPUT jack, tuning will
be performed by the internal mic.
Connecting headphones
You can connect commercially available headphones with
a 1/8” stereo mini-plug to the
plugged in, no sound will be heard from the speaker. Use the
volume control to adjust the volume of the headphones output.
(headphones) jack. When
Using the tuner
Tuning using the meter (Meter mode)
Connect your instrument cable or contact mic to the TM-60/
1.
TM-60C’s INPUT jack.
If a device is not connected to the INPUT jack, tuning will
be performed by the internal mic.
Press the TUNER ON button.
2.
“
pitch (calibration) will be displayed below that.
To change the reference pitch, press the CALIB·NOTE or
3.
button.
The reference pitch increases or decreases in steps of 1 Hz.
By pressing and holding these buttons, you can increase or
decrease the reference pitch continuously. This setting is
stored even when the power is o.
Play a single note on your instrument.
4.
” will appear on the display and the reference
Page 4

The closest note to the input sound will appear in the center
of the display. Tune your instrument to the correct pitch, so
that the desired note name appears.
If you’re using the internal mic, place your instrument as
close as possible to the mic so that extraneous sound is not
picked up while tuning.
While playing a single note on your instrument, tune it so
5.
that the meter indication is at “
green indicator in the center of the tuning guide lights up.
The red indicator on the left side of the tuning guide will
light up if the pitch of your instrument is at, and the red
indicator on the right side will light up if the pitch is sharp.
” at the center and the
Tuning to a just major third above or a minor third above
If you want to tune to a just major third above A (0 cent),
tune your instrument so that the note name indicator displays C# and the meter indication is at “
If you want to tune to a just minor third above A (0 cent),
tune your instrument so that the note name indicator displays C and the meter indication is at “
” on the left side.
” on the right side.
Tuning using the tone (Sound Out mode)
Press the TUNER ON button.
1.
You will enter the Meter mode.
Press the SOUND/SOUND BACK button to select Sound Out
2.
mode.
The reference tone is output from the
or speakers. Use the volume control to adjust the output
volume.
Press the CALIB·NOTE or button to select the note.
3.
The output reference tone changes as follows.
♯
C (C3) µ C
C (C4) ... C (C6) µ C (C3)...
This setting is stored even when the power is o.
Tune the instrument according to the reference tone.
4.
If connected to either the INPUT jack or the
jack (or both), the Meter mode will start simultaneously and
you can tune your instrument while viewing the meter.
If the SOUND/SOUND BACK button is pressed again, output
5.
of the reference tone stops, and the device returns to Meter
mode.
µ D µ E♭ µ E µ F µ F♯ µ G µ G♯ µ A µ B♭ µ B µ
(headphones) jack
(headphones)
Tuning using the tone and meter
(Sound Back mode)
In Sound Back mode, the tone of the input instrument is detected, and the closest reference tone is output. This can be used to
check the pitch deviation of the tone that you output.
This function can be used when you are connected to either the
INPUT jack or the
Press the TUNER ON button.
1.
You will enter the Meter mode.
Hold down the SOUND/SOUND BACK button to enter Sound
2.
Back mode.
“
control to adjust the volume.
If headphones are connected to the
the input sound from the internal mic or INPUT jack will be
received and the reference tone will be output from the
headphones.
If nothing is connected to the
put sound from the INPUT jack is received and the reference
tone is output from the speakers.
If both the (headphones) jack and the INPUT jack are not
connected, the Sound Back mode will not function.
(headphones) jack (or both).
” will appear on the display. Use the volume
(headphones) jack,
(headphones) jack, the in-
Page 5
Tune the instrument using the reference tone and meter.
3.
If the SOUND/SOUND BACK button is pressed again, you will
4.
return to the Meter mode.
Using the metronome
Setting the tempo and time signature
Press the METRONOME ON button.
1.
“
Press the TEMPO or button to set the tempo.
2.
Press and hold the TEMPO and buttons simultaneously
for 1 second to switch between Pendulum Step (pendulum
of a mechanical metronome) and Full Step. If Pendulum Step
is selec ted, “
After selecting “PENDULUM STEP” or “FULL STEP”, press the
TEMPO
membered even when the power is o.
If you’ve selected “PENDULUM STEP”
Pressing the TEMPO or button will increase or decrease
the tempo by 1 step. The value will change continuously if
you hold down the button.
30 µ 32 µ 34 ... 88 µ 92 µ 96 ... 232 µ 240 µ 252 µ 30 ...
If you’ve selected “FULL STEP”
Pressing the TEMPO or button will increase or decrease
the tempo through the range of 30–252 in steps of one. The
value will change continuously if you hold down the button.
Press the START/STOP button to start the metronome.
3.
The metronome pendulum will swing from left to right according to the tempo and the TAP TEMPO button will blink
according to the tempo also.
If you want to change the time signature, press the BEAT
4.
or buttons to make your selection.
The time signature will change as follows.
... µ 0 µ 1 ... 9 (9 beats) µ
center beat) µ (Quadruplet) µ (Triplet without the
center beat) µ (Triplet) µ (Duplet) µ 0 ...
Play along with the metronome tempo.
5.
To stop the metronome, press the START/STOP button.
6.
Using tap tempo
The tap tempo that you input will be displayed as a BPM (Beats
Per Minute) value.
Press the METRONOME ON button.
1.
“
Press the TAP TEMPO button several times at regular inter-
2.
vals at the tempo that you want.
The TM-60/TM-60C detects the interval used when pressing
the button and displays it as a BPM (Beats Per Minute) value,
and it will be set as the tempo.
While the tempo is detected, “
When the BPM that has been detected by the tap tempo is
less than 30, “Lo” will appear on the display and the tempo
will be set at “30.”
If the BPM detected by the tap tempo exceeds 252, “Hi” will
appear on the display and the tempo will be set at “252.”
Press the START/STOP button to start the metronome.
3.
The metronome pendulum will swing from left to right according to the tempo and the TAP TEMPO button will blink
accordingly.
The tap tempo can also be input while the metronome is in
use.
Play according to the tempo.
4.
To stop the metronome, press the START/STOP button.
5.
” will appear on the display.
” will appear on the display.
, buttons to set the tempo. This setting is re-
(Quadruplet without the
” will appear on the display.
” will appear on the display.
Page 6

Using the tuner and metronome
simultaneously
The TM-60/TM-60C lets you use the tuner and metronome simultaneously.
For more details on tuner and metronome operation, please
refer to the “Using the tuner” and “Using the metronome” sections.
Using the tuner and metronome simultaneously
For example, if you’re playing along with the metronome and
you notice that your instrument is not tuned correctly, you can
leave the metronome running while you tune.
Proceed as follows.
Press the METRONOME ON button.
1.
Press the START/STOP button to start the metronome.
2.
If necessary, specify the tempo and time signature etc.
To set the tempo: use the TEMPO
TEMPO button.
To set the time signature: use the BEAT
When using the tuner and metronome simultaneously, you
can’t select “triplets”, “triplets without the center beat”, “quadruplets” or “quadruplets without the center beats” as the
time signature.
Press the TUNER ON button to enter Meter mode.
3.
The tuning meter appears in the upper part of the meter on
the display, and the metronome pendulum appears in the
lower part of the meter. The metronome tempo is also indicated by the blinking of the TAP TEMPO button.
If you want to tune in Sound Out mode, you should then
press the SOUND/SOUND BACK button.
To tune in Sound Back mode, hold down the SOUND/SOUND
BACK button.
Tuning in Meter mode
When you play a single note on your instrument, the display
will show the name of the note that is closest to the pitch
that you played. Tune your instrument while watching the
meter and the tuning guide.
Tuning in Sound Out mode
Tune your instrument by listening to the reference tone.
Tuning in Sound Back mode
Tune your instrument by using the reference tone, tuning
meter and tuning guide.
After tuning is complete, press the TUNER ON button and
4.
METRONOME ON button respectively to turn o the tuner
and metronome.
, buttons or the TAP
, buttons.
Backlight
When necessary, press the Backlight button “ ” to set the backlight.
Each time the Backlight button is pressed, you can switch to
Soft ¬ Auto ¬ O ¬ Soft…. When the backlight is lit, the backlight indicator “
Soft: The backlight will light less brightly in order to prevent
the batteries from being depleted.
Auto:
The backlight will light brightly when sound is inputted
or when a button is operated. When there has been no
sound input or button operation for approximately ten
seconds, the backlight will light less brightly automatically.
O:
The backlight does not light up.
” appears on the display.
Page 7

Specications
Tuner section
Scale: 12 note equal temperament
Detection range*: C1 (32.70 Hz)–C8 (4186.01 Hz) for a sine-
Reference tone: C3 (130.81 Hz)–C6 (1046.50 Hz) 3 octaves
Tuning modes: Meter mode, Sound Out mode, Sound Back
Calibration range: A4 = 410 Hz–480 Hz (1 Hz step)
Detection accuracy: Better than ±1 cent
Sound accuracy: Better than ±1 cent
Metronome section
Tempo range: 30–252 beats per minute (bpm)
Tempo setting: PENDULUM STEP, FULL STEP, TAP TEMPO
Time signatures: 0–9 beats, duplets, triplets, triplets without
Tempo accuracy: ±0.3%
Main Specications
Connectors: INPUT jack (1/4” monaural phone jack,
Speaker: Dynamic speaker (ø23 mm)
Power supply: Two AAA batteries (3V)
Battery life: Tuner ...
Approximately 130/55/36 hours (Back-
Metronome ...
Approximately 130/55/36 hours (Back-
Dimensions ( W x D x H): 111 x 74 x 18 mm / 4.37” x 2.91” x 0.71”
Weight: 100 g / 3.53 oz. (including the provided
Included items: Quick Start Guide, two AAA batteries, Con-
The calibration (reference pitch) and reference tone settings
of the tuner, the tempo, beat and Pendulum Step/Full Step
settings of the metronome as well as the backlight setting are
stored, even after the device is turned o. However when you
exchange the batteries, these settings will return to the following default values.
Default values:
Calibration = 440 Hz, Reference tone = A4, Tempo = 120, Time
signature = four beats, Tempo setting type = PENDULUM STEP,
Backlight = O
* Even if the pitch is within the range of detection, the TM-60/
TM-60C may be unable to detect the pitch if the sound contains numerous overtones (such as the low and high notes on
an acoustic piano) or if the instrument has a rapid decay.
·
Specications and appearance are subject to change without
notice for improvement.
wave
mode
the center beat, quadruplets, quadruplets
without the center beats
unbalanced), (headphones) jack (1/8”
stereo phone jack)
light:Off/Soft/Auto, A4 continuous input,
when using zinc-carbon batteries)
light:O/Soft/Auto, tempo 120, four beats,
maximum volume, when using zinc-carbon
batteries)
batteries)
tact mic (TM-60C only)
Page 8
Caractéristiques principales
Grâce au modèle TM-60/TM-60C, vous pourrez accorder vos
instruments à l’aide du micro interne ou en les connectant à la
prise INPUT.
Vous pouvez utiliser l’accordeur et le métronome individuellement ou simultanément.
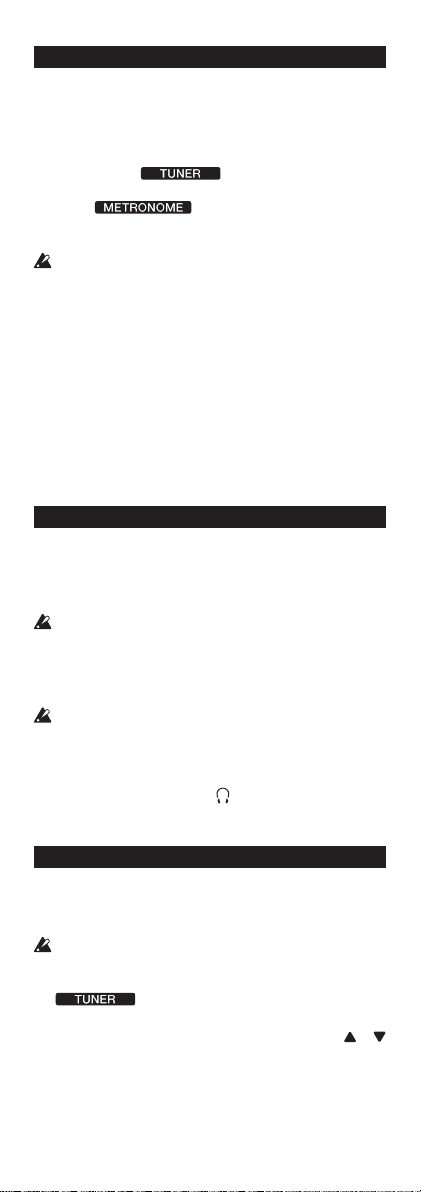
Mise en place des piles
Faites coulisser le couvercle
1.
du compartiment des piles
à l’arrière du TM-60/TM60C dans le sens “a” comme
indiqué sur l’image et soulevez le couvercle dans le
sens “b”.
Insérez les piles, en respec-
2.
tant leur polarité, puis refermez le couvercle.
Si l’appareil ne fonctionne pas et si vous ne parvenez pas à résoudre le problème en le mettant plusieurs fois sous et hors
tension, retirez les piles puis réinsérez-les.
Quand les piles sont usées,
un symbole de pile apparaît
à gauche à l’écran. Remplacez alors les piles aussi vite
que possible.
Utiliser le pied
Vous pouvez placer
le TM-60/TM-60C en
position verticale en
déployant le pied situé à
l’arrière de l’appareil.
Parties du TM-60/TM-60C
Bouton TUNER ON
1.
Boutons CALIB·NOTE ,
3.
Microphone interne
5.
Guide d’accordage
7.
Bouton METRONOME ON
9.
Boutons TEMPO ,
11.
Bouton TAP TEMPO
13.
Prise INPUT
15.
a Hauteur de référence b Nom de la note
c
TEMPO (tempo du métronome)d BEAT (battement du métronome)
Bouton SOUND/SOUND BACK
2.
Bouton du rétroéclairage
4.
Haut-Parleur
6.
VOL (Commande de volume)
8.
Boutons BEAT ,
10.
Bouton START/STOP
12.
Prise (casque)
14.
Acheur
16.
Page 9
Mise sous/hors tension
Mise sous tension
Appuyez sur la bouton TUNER ON ou METRONOME ON et l’appareil se mettra automatiquement sous tension. Appuyez sur le
bouton correspondant à la fonction voulue.
Après avoir appuyé sur le bouton TUNER ON, l’accordeur démarre en mode Compteur et “
Après avoir appuyé sur le bouton METRONOME ON, le métronome démarre et “
Le TM-60/TM-60C vous permet d’utiliser simultanément l’accordeur et le métronome.
De manière à ne pas mettre involontairement l’appareil
sous tension, une fois l’accordeur TM-60/TM-60C dans votre
poche ou un sac, le bouton TUNER ON et bouton METRONOME ON est plus petit que les autres boutons. Pour allumer ou éteindre, appuyez sur le bouton d’alimentation.
” s’ache à l’écran.
” s’ache à l’écran.
Pour mettre l’accordeur hors tension
Pendant le fonctionnement de l’accordeur, appuyez sur la
bouton TUNER ON pour le mettre hors tension. L’accordeur se
mettra aussi automatiquement hors tension si vous ne l’utilisez
pas pendant vingt minutes.
Pour mettre le métronome hors tension
Pendant le fonctionnement du métronome, appuyez sur la
bouton METRONOME ON pour le mettre hors tension. Le métronome se mettra aussi automatiquement hors tension si vous
ne l’utilisez pas pendant vingt minutes..
Raccordements
Pour connecter un instrument, un microphone
de contact, etc.
Si vous souhaitez accorder un instrument avec micro, comme
une guitare électrique, raccordez un câble à votre instrument et
branchez le câble sur la prise INPUT du TM-60/TM-60C.
La prise INPUT est seulement conçue pour un câble mono-
phonique de 6,3mm. Les câbles stéréo (TRS) ne peuvent
pas être utilisés.
Si vous souhaitez accorder votre instrument avec le MICROPHONE DE CONTACT de Korg, branchez le micro à la prise INPUT
du TM-60/TM-60C.
Si un périphérique n’est pas connecté à la prise INPUT, l’ac-
cordage s’eectuera par le biais du micro interne.
Connexion du casque
Vous pouvez brancher un casque à fiche stéréo de 3,5mm
disponible dans le commerce à la prise
casque est branché le son du haut-parleur est coupé. Utilisez la
commande de volume pour régler le volume du casque.
(casque). Lorsque le
Utilisation de l’accordeur
Accord avec le compteur (mode Compteur)
Branchez le câble de votre instrument ou le microphone de
1.
contact sur la prise INPUT du TM-60/TM-60C.
Si un périphérique n’est pas connecté à la prise INPUT, l’ac-
cordage s’eectuera par le biais du micro interne.
Appuyez sur le bouton TUNER ON.
2.
“
rence (calibrage) s’ache en dessous.
Pour changer la hauteur de référence, appuyez sur le bouton
3.
CALIB·NOTE
La hauteur de référence augmente ou diminue par pas de 1
” s’affiche sur l’écran et la hauteur de réfé-
ou .
Page 10

Hz. En maintenant ces boutons enfoncés, vous augmentez
ou diminuez la hauteur de référence de façon continue. Ce
réglage sera enregistré même si l’appareil est mis hors tension.
Jouez une note unique sur votre instrument.
4.
La note se rapprochant le plus du son d’entrée s’achera au
centre de l’écran. Accordez correctement votre instrument
de telle manière que la note souhaitée apparaisse.
Si vous utilisez le microphone interne, disposez votre ins-
trument aussi près que possible du microphone an que les
sons extérieurs ne puissent pas être captés pendant l’accord.
Tout en jouant une seule note sur votre instrument, accor-
5.
dez-le de sorte que l’aiguille du compteur indique “
centre et que la diode verte centrale du guide d’accordage
s’allume.
La diode rouge du côté gauche du guide d’accordage s’allume si la hauteur de l’instrument est trop basse. Si la hauteur est trop élevée, la diode rouge du côté droit du guide
d’accordage s’allume.
” au
Accord sur une tierce majeure pure ou une tierce mineure
pure au-dessus
Si vous souhaitez eectuer l’accord sur une tierce majeure
pure au-dessus de A (0 cent), accordez votre instrument de
telle façon que l’indicateur de note ache C
compteur indique “
Si vous souhaitez eectuer l’accord sur une tierce mineure
pure au-dessus de A (0 cent), accordez votre instrument de
telle façon que l’indicateur de note ache C et l’aiguille du
compteur indique “
” à gauche.
” à droite.
♯
et l’aiguille du
Accord avec la note (mode Son)
Appuyez sur le bouton TUNER ON.
1.
Vous passerez en mode Compteur.
Appuyez sur le bouton SOUND/SOUND BACK pour sélec-
2.
tionner le mode Son.
La note de référence est diffusée par les haut-parleurs ou
via la prise
régler le volume de sortie.
Appuyez sur le bouton CALIB·NOTE ou pour sélection-
3.
ner la note.
La note de référence diusée est ainsi modiée.
C (C3) µ C
C (C4) ... C (C6) µ C (C3)...
Ce réglage sera enregistré même si l’appareil est mis hors
tension.
Accordez votre instrument en fonction de la note de réfé-
4.
rence.
Si vous connectez un instrument soit à la prise INPUT soit
à la prise
fichera automatiquement et vous pourrez accorder votre
instrument tout en visualisant le compteur.
Si vous appuyez à nouveau sur le bouton SOUND/SOUND
5.
BACK, l’accordeur arrête de produire la note de référence et
retourne en mode Compteur.
Accord avec la note et le compteur
(casque). Utilisez la commande Volume pour
♯
µ D µ E♭ µ E µ F µ F♯ µ G µ G♯ µ A µ B♭ µ B µ
(casque)(ou les deux), le mode Compteur s’af-
(mode Retour Son)
En mode Retour Son, l’accordeur détecte la hauteur du son de
l’instrument et produit la note de référence la plus proche. Cela
permet de mesurer la diérence de hauteur avec le son produit
par l’accordeur.
Vous pouvez utiliser cette fonction en connectant votre instrument à la prise INPUT ou la prise
(casque) (ou les deux).
Page 11

Appuyez sur le bouton TUNER ON.
1.
Vous passerez en mode Compteur.
Maintenez enfoncé le bouton SOUND/SOUND BACK pour
2.
activer le mode Retour son.
“
Volume pour régler le volume.
Si un casque est connecté à la prise
trée du micro interne ou de la prise INPUT sera reçu et la
note de référence diusée à partir du casque.
Si aucun périphérique n’est connecté à la prise
le son d’entrée de la prise INPUT sera reçu et la note de référence diusée dans les haut-parleurs.
Si aucun périphérique n’est connecté à la prise (casque)
et à la prise INPUT, le mode Retour son (Sound back) ne
fonctionnera pas.
Accordez votre instrument à l’aide de la note de référence et
3.
du compteur.
Si vous appuyez une nouvelle fois sur le bouton SOUND/
4.
SOUND BACK, vous reviendrez au mode Compteur.
” s’affichera à l’écran. Utilisez la commande
(casque), le son d’en-
(casque),
Utilisation du métronome
Réglage du tempo et de la signature rythmique
Appuyez sur le bouton METRONOME ON.
1.
“
Appuyez sur la touche TEMPO ou pour régler le tempo.
2.
Appuyez et maintenez simultanément les boutons et
du TEMPO pendant 1 seconde pour alterner entre le Pas
pendulaire (pendule d’un métronome mécanique) et le Pas
complet. Si le Pas pendulaire est sélectionné, “
à l’écran.
Après avoir sélectionné “PAS PENDULAIRE” ou “PAS COMPLET”, appuyez sur la bouton TEMPO
tempo. Ce réglage reste mémorisé même après la mise hors
tension de l’appareil.
Si vous avez sélectionné “PAS PENDULAIRE”
Appuyez sur la bouton TEMPO ou pour augmenter ou
diminuer la valeur du tempo d’un pas. La valeur changera
continuellement si vous maintenez la touche.
30 µ 32 µ 34 ... 88 µ 92 µ 96 ... 232 µ 240 µ 252 µ 30 ...
Si vous avez sélectionné “PAS COMPLET”
Appuyez sur le bouton TEMPO ou pour augmenter ou
réduire le tempo dans une plage de 30 à 252 par pas de un.
La valeur changera continuellement si vous maintenez la
touche.
Appuyez sur le bouton START/STOP pour lancer le métro-
3.
nome.
Le pendule du métronome se balancera de gauche à droite
selon le tempo et le bouton TAP TEMPO (Réglage du tempo)
clignotera selon le rythme.
Si vous souhaitez changer la signature rythmique, appuyez
4.
sur la bouton BEAT
ra comme suit.
... µ 0 µ 1 ... 9 (9 temps) µ
milieu) µ (quadriolet)) µ (triolet sans temps du
milieu) µ (triolet) µ (duolet) µ 0 ...
Jouez en suivant le tempo du métronome.
5.
Pour arrêter le métronome, appuyez sur le bouton START/
6.
STOP.
Entrée du tempo tap
Le tempo tap entré sera aché sous la forme d’un nombre de
BPM (battements par minute).
” s’achera à l’écran.
” s’achera
ou pour régler le
ou . La signature rythmique change-
(quadriolet sans temps du
Page 12

Appuyez sur la bouton METRONOME ON.
1.
“
Appuyez plusieurs fois sur le Bouton TAP TEMPO à intervalles
2.
réguliers.
Le TM-60/TM-60C détecte l’intervalle utilisé quand vous
appuyez sur le bouton et l’ache sous forme de temps par
minute (BPM) qui sera déni comme le tempo.
Une fois le tempo détecté, “
Si le temps détecté par le réglage du tempo est inférieur à 30
temps par minute, “Lo” s’achera à l’écran et le tempo sera
déni sur “30.”
Si le temps détecté par le réglage du tempo est supérieur à
252 temps par minute, “Hi” s’achera à l’écran et le tempo
sera déni sur “252.”
Appuyez sur le bouton START/STOP pour démarrer le métro-
3.
nome.
Le pendule du métronome se balancera de gauche à droite
selon le tempo et le bouton TAP TEMPO (Réglage du tempo)
clignotera selon le rythme.
Vous pouvez également utiliser le réglage du tempo si le
métronome est en cours d’utilisation.
Jouez une note conformément au tempo.
4.
Pour arrêter le métronome, appuyez sur le bouton START/
5.
STOP.
” s’achera à l’écran.
” s’achera à l’écran.
Utilisation simultanée de l’accordeur
et du métronome
Le TM-60/TM-60C vous permet d’utiliser simultanément l’accordeur et le métronome.
Pour les détails sur le fonctionnement de l’accordeur et celui du
métronome, reportezvous à “Utilisation de l’accordeur” et “Utilisation du métronome”.
Utilisation simultanée de l’accordeur et du métronome
Par exemple, si vous jouez en vous accompagnant du métronome et remarquez que votre instrument n’est pas accordé
correctement, vous pourrez laisser le métronome fonctionner
pendant l’accord.
Procédez de la manière suivante.
Appuyez sur le bouton METRONOME ON.
1.
Appuyez sur le bouton START/STOP pour lancer le métro-
2.
nome.
Si nécessaire, spéciez le tempo et la signature rythmique,
etc.
Pour régler le tempo: Bouton TEMPO
TAP TEMPO.
Pour régler la signature rythmique: Bouton BEAT
Lorsque vous utilisez simultanément l’accordeur et le
métronome, vous ne pouvez pas sélectionner “triolets”,
“triolets avec omission du battement du milieu”, “quartolets”
ou “quartolets avec omission des battements du milieu”
comme signature rythmique.
Appuyez sur la bouton TUNER ON pour passer en mode
3.
Compteur.
L’achage d’accordage apparaît dans le dessus du compteur
à l’écran et le balancier du métronome dans le dessous du
compteur. Le tempo du métronome est aussi indiqué par le
clignotement du bouton TAP TEMPO.
Si vous souhaitez effectuer l’accord en mode Son, vous
devrez ensuite appuyer sur la bouton SOUND/SOUND BACK.
Pour accorder votre instrument en mode Retour son, main-
ou ou bouton
ou .
Page 13

tenez enfoncé le bouton SOUND/SOUND BACK.
Accord en mode Compteur
Jouez une seule note sur l’instrument à accorder. Le Accordeur ache alors le nom de la note dont la hauteur se
rapproche le plus de celle de la note jouée. Accordez votre
instrument jusqu’à ce que le Accordeur ache la note voulue.
Accord en mode Son
Accordez votre instrument en écoutant la note de référence.
Accord en mode retour son
Accordez votre instrument en vous aidant de la note de référence, du compteur et du guide d’accordage.
Une fois l’instrument accordé, appuyez sur la touche TUNER
4.
ON et sur la touche METRONOME ON pour éteindre l’accordeur et le métronome.
Rétroéclairage
Si nécessaire, appuyez sur le bouton “ ” du rétroéclairage pour
régler le rétroéclairage.
A chaque fois que vous appuyez sur ce bouton, le rétroéclairage
sera déni de la manière suivante ¬ Léger ¬ Auto ¬ O ¬ Léger…
Quand le rétroéclairage est allumé, l’indicateur de rétroéclairage “
” s’ache à l’écran.
Doux: La luminosité de rétroéclairage est moins forte pour
économiser les piles.
Automatique: Le rétroéclairage s’allume de façon vive quand
l’accordeur reçoit un signal ou quand vous actionnez
un bouton. S’il n’y a aucun signal d’entrée et si aucun
bouton n’est actionné durant environ 10 secondes, la
luminosité du rétroéclairage diminue automatiquement.
O:
Le rétroéclairage est désactivé.
Spécications
Section accordeur
Gamme: 12 notes tempérament égal
Plage de détection*: C1 (32,70 Hz) à C8 (4186,01Hz) onde sinu-
Note de référence: C3 (130,81 Hz) à C6 (1046,50Hz) Une oc-
Modes d’accord: Mode Compteur, Mode Son, Mode Retour
Plage de calibrage: A4 = 410 Hz à 480 Hz (per pas de 1 Hz)
Précision de la détection: Supérieure à ±1 centième
Précision du son: Supérieure à ±1 centième
Section métronome
Échelle de tempo: 30 à 252 battements par minute (bpm)
Réglage du tempo: PAS PENDULAIRE, PAS COMPLET, TEMPO
Signatures rythmiques:
0 à 9 battements, Duolets, Triolets, Triolets
Précision du tempo: ±0,3%
Principales spécications
Prises: Prise INPUT (jack mono 6,3 mm asymé-
prise (casque) (minijack stéréo de 3,5
Haut-parleur: Haut-parleur dynamique (23 mm de dia-
Alimentation: Deux piles de format AAA (3V)
soïde
tave ou AB
Son
TAP
avec omission du battement du milieu,
Quartolets, Quartolets avec omission des
battements du milieu
trique)
mm)
mètre)
Page 14

Durée de vie des piles:
Accordeur...
Environ 130/55/36 heures (Régler le ré-
Métronome...
Environ 130/55/36 heures (Régler le ré-
Dimensions: 111 (L) x 74 (P) x 18 (H) mm
Poids: 100 g (piles comprises)
Accessoires fournis: Guide de prise en main, deux piles AAA,
Les réglages de calibrage (hauteur de référence) et de note de
référence de l’accordeur ainsi que les paramètres de tempo, de
mesure, de pas pendulaire/pas complet et de rétro-éclairage du
métronome sont conservés même après la mise hors tension
de l’appareil. Néanmoins, les réglages seront réinitialisés aux
valeurs suivantes si vous remplacez les piles.
tro-éclairage: O/Léger/Auto, Note A4 en
fonctionnement continu, avec des piles
zinc-carbone)
tro-éclairage: O/Léger/Auto, tempo 120,
4 battements, volume maximal, avec des
piles zinc-carbone)
Microphone de contact (TM-60C uniquement)
Valeurs par défaut:
Calibrage = 440 Hz, note de référence = A4, tempo = 120, signature rythmique = quatre battements, type de tempo = PAS
PENDULAIRE, réglage du rétroéclairage = o
* Même si la hauteur du son se trouve à l’intérieur de la plage
de détection, il est possible que le TM-60/TM-60C n’arrive pas
à détecter la note si de nombreux sons harmoniques sont
présents (comme des notes basses ou élevées sur un piano
acoustique) ou si le decay de votre instrument est important.
·
Les caractéristiques et l’aspect du produit sont susceptibles
d’être modiés sans avis préalable en vue d’une amélioration.
Page 15

Die wichtigsten Funktionen
Mit dem TM-60/TM-60C können Sie Ihre Instrumente mithilfe
des integrierten Mikrofons oder durch Anschluss an die INPUT-Buchse stimmen.
Sie können das Stimmgerät und das Metronom sowohl separat
als auch gleichzeitig verwenden.
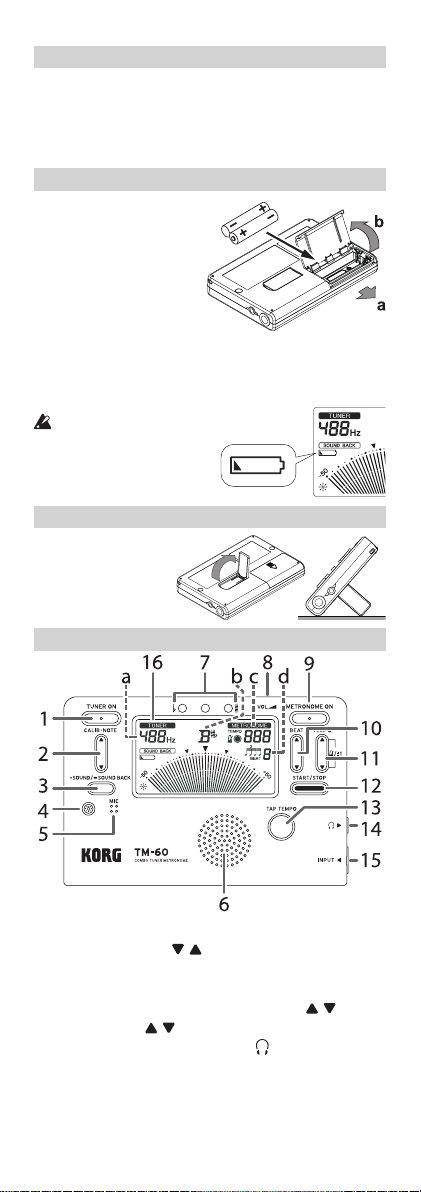
Einsetzen der Batterien
Schieben Sie den Batterie-
1.
fachdackel auf der Rückseite des TM-60/TM-60C in
Richtung „a“ und önen Sie
die Abdeckung in Richtung
„b“ (siehe nebenstehende
Abbildung).
Setzen Sie Batterien unter
2.
Beachtung der richtigen Polung ein. Schließen Sie den Deckel.
Bei Fehlfunktionen entnehmen Sie die Batterien einmal und
setzen sie dann neu ein.
Wenn die Batterien schwach
werden, erscheint ein Batte-
riesymbol links im Display. In
diesem Fall ersetzen Sie die
Batterien.
Verwendung des Ständers
Sie können den an der
Rückseite des TM-60/
TM-60C vorhandenen
Ständer verwenden, um
das Gerät zur leichten
Betrachtung zurückzuklappen.
Teile des TM-60/TM-60C
TUNER ON-Taste
1.
CALIB·NOTE , -Tasten
3.
Internes Mikrofon
5.
Stimmhilfe
7.
METRONOME ON-Taste
9.
TEMPO , -Tasten
11.
TAP TEMPO-Taste
13.
INPUT-Buchse
15.
a. Referenztonhöhe b. Notenname
c. TEMPO (Metronom Tempo) d. BEAT (Metronomtakt)
SOUND/SOUND BACK-taste
2.
Beleuchtungstaste
4.
Lautsprecher
6.
VOL (Lautstärke)
8.
BEAT , -Tasten
10.
START/STOP-Taste
12.
(Kopfhörern)-Buchse
14.
Display
16.
Page 16

Ein- und Ausschalten
Einschalten des Geräts
Drücken Sie entweder den TUNER ON-Taste oder den METRONOME ON-Taste, und das Gerät wird eingeschaltet. Aktivieren
Sie die gewünschte Funktion durch Drücken der entsprechenden Taste.
Durch Drücken der TUNER ON-Taste aktivieren Sie den Messmodus des Stimmgeräts, und im Display wird „
angezeigt. Durch Drücken der METRONOME OM-Taste schalten
Sie das Metronom ein, und im Display wird „
angezeigt.
Das TM-60/TM-60C erlaubt es Ihnen, Stimmgerät und Metronom gleichzeitig zu verwenden.
Der TUNER ON-Taste und der METRONOME ON-Taste ste-
hen weniger hervor als die anderen Tasten, damit das TM-
60/TM-60C nicht unabsichtlich eingeschaltet wird. Drücken
Sie zum Ein- und Ausschalten des Geräts die Einschalttaste.
Ausschalten des Stimmgeräts
Wenn das Stimmgerät arbeitet, drücken Sie den TUNER ON-Taste, um das Stimmgerät auszuschalten. Das Stimmgerät schaltet
auch automatisch aus, wenn es zwanzig Minuten lang nicht
verwendet wird.
Ausschalten des Metronoms
Wenn das Metronom arbeitet, drücken Sie den METRONOME
ON-Taste, um das Metronom auszuschalten. Das Metronom
schaltet auch automatisch aus, wenn es zwanzig Minuten lang
nicht verwendet wird.
Anschlüsse
Falls Sie ein Instrument, Kontaktmikrofon usw.
anschließen möchten.
Wenn Sie ein Instrument mit einem Pickup, wie eine elektrische
Gitarre, stimmen wollen dann schließen Sie ein Kabel an Ihr Instrument an und stecken das Kabel in die INPUT-Buchse des TM60/TM-60C.
Die INPUT-Buchse ist nur für 6,3 mm Monokabel geeignet.
Stereokabel (TRS) können nicht verwendet werden.
Wenn Sie Ihr Instrument mit einem Korg CONTACT MICROPHONE stimmen wollen, schließen Sie es an der INPUT-Buchse des
TM-60/TM-60C an.
Wenn das Instrument nicht an die INPUT-Buchse ange-
schlossen wird, kann es mithilfe des integrierten Mikrofons
gestimmt werden.
Anschluss von Kopfhörern
An die (Kopfhörern)-Buchse können Sie handelsübliche Kopfhörer mit 3,5 mm Stereo-Miniklinkenbuchse anschließen. Wenn
eingesteckt, kommt kein Ton vom Lautsprecher. Verwenden Sie
den Lautstärkeregler zum Einstellen der Lautstärke der Kopfhörern.
Verwendung des Stimmgeräts
Stimmen nach Messanzeige (Messmodus)
Schließen Sie Ihr Instrumentenkabel oder Kontaktmikrofon
1.
an die INPUT-Buchse des TM-60/TM-60C an.
Wenn das Instrument nicht an die INPUT-Buchse ange-
schlossen wird, kann es mithilfe des integrierten Mikrofons
gestimmt werden.
Drücken Sie die TUNER ON-Taste.
2.
Im Display erscheint „
“, darunter wird die Refe-
“
“
Page 17

renztonhöhe (Kalibrierung) angezeigt.
Um die Referenztonhöhe zu ändern, drücken Sie die Taste
3.
CALIB·NOTE
Diese erhöht oder verringert sich um jeweils 1 Hz. Sie können die Referenztonhöhe laufend erhöhen oder verringern,
indem Sie diese Tasten gedrückt halten. Diese Einstellung
bleibt gespeichert, auch wenn das Gerät ausgeschaltet wird.
Spielen Sie eine einzelne Note auf Ihrem Instrument.
4.
Die Note, die der gespielten Note am nächsten ist, wird in
der Mitte des Displays angezeigt. Stimmen Sie das Instrument auf die korrekte Tonhöhe, so dass der gewünschte
Notenname erscheint.
Wenn Sie das interne Mikrofon verwenden, bringen Sie das
Instrument so nahe wie möglich zum Mikrofon, so dass
keine Außengeräusche beim Stimmvorgang eingefangen
werden.
Spielen Sie eine einzelne Note und stimmen Sie Ihr Instru-
5.
ment so, dass die Stimmanzeige zentral auf „
grüne Anzeige der Mitte der Stimmhilfe leuchtet.
Die linke rote Anzeige der Stimmhilfe leuchtet, wenn Ihr Instrument zu tief gestimmt ist, die rechte entsprechend bei zu
hoher Stimmung.
oder .
“ steht und die
Stimmen zu einer genauen großen Terz oder einer kleinen
Terz nach oben
Um auf eine reine große Terz über A (0 Cent) zu stimmen,
stimmen Sie Ihr Instrument so, dass die Notennamen-Anzei-
♯
ge C
anzeigt und die Stimmanzeige auf „ “ links steht.
Um auf eine reine kleine Terz über A (0 Cent) zu stimmen,
stimmen Sie Ihr Instrument so, dass die Notennamen-Anzeige C anzeigt und die Stimmanzeige auf „
“ links steht.
Stimmen nach Ton (Ton-Ausgabe-Modus)
Drücken Sie die TUNER ON-Taste.
1.
Sie schalten den Messmodus des Stimmgeräts ein.
Drücken Sie die SOUND-Taste, um den Ton-Ausgabe-Modus
2.
zu wählen.
Der Referenzton wird entweder über die Kopfhörer (wenn
an die
(Kopfhörern)-Buchse angeschlossen) oder über die
Lautsprecher wiedergegeben. Stellen Sie die Wiedergabelautstärke mithilfe des Lautstärkereglers ein.
Wählen Sie die gewünschte Note mithilfe der Taste CA-
3.
LIB·NOTE
Der wiedergegebene Referenzton ändert sich nach folgendem Schema:
C (C3) µ C
C (C4) ... C (C6) µ C (C3)...
Diese Einstellung bleibt gespeichert, auch wenn das Gerät
ausgeschaltet wird.
Stimmen Sie Ihr Instrument gemäß dem Referenzton.
4.
Wenn Sie das Instrument an die INPUT-Buchse oder die
Kopfhörer an die
beide), wird der Messmodus gestartet, und Sie können Ihr
Instrument mithilfe der Messskala stimmen.
Wird die SOUND/SOUND BACK-Taste erneut gedrückt, endet
5.
die Wiedergabe des Referenztons und das Gerät fährt in den
Messmodus.
oder .
♯
µ D µ E♭ µ E µ F µ F♯ µ G µ G♯ µ A µ B♭ µ B µ
(Kopfhörern)-Buchse anschließen (oder
Stimmen nach Ton und Messanzeige
(Sound Back-Modus)
Im Sound Back-Modus wird die Höhe des auf dem Instrument
gespielten Tons ermittelt und der nächstliegende Referenzton
wiedergegeben. Somit können Sie prüfen, ob die Höhe des von
Ihnen gespielten Tons davon abweicht.
Page 18

Mithilfe dieser Funktion können Sie Ihr Instrument stimmen,
wenn entweder das Instrument an die INPUT-Buchse oder die
Kopfhörer an die
schlossen sind.
Drücken Sie die TUNER ON-Taste.
1.
Damit schalten Sie den Messmodus des Stimmgeräts ein.
Halten Sie die SOUND BACK-Taste gedrückt, um den Sound
2.
Back-Modus aufzurufen.
Im Display wird „
Lautstärke mithilfe des Lautstärkereglers ein.
Wenn Kopfhörer an die
schlossen sind, wird der gespielte Ton über das integrierte
Mikrofon oder über die INPUT-Buchse empfangen und der
Referenzton über die Kopfhörer wiedergegeben.
Wenn keine Kopfhörer an die
schlossen sind, wird der gespielte Ton über die INPUT-Buchse empfangen und der Referenzton über die Lautsprecher
wiedergegeben.
Wenn weder die Kopfhörer an die (Kopfhörern)-Buchse
noch das Instrument an die INPUT-Buchse angeschlossen
sind, kann der Sound Back-Modus nicht durchgeführt werden.
Stimmen Sie Ihr Instrument mithilfe des Referenztons und
3.
der Stimmanzeige.
Wenn Sie die SOUND/SOUND BACK-Taste erneut drücken,
4.
kehren Sie in den Messmodus zurück.
(Kopfhörern)-Buchse (oder beide) ange-
“ angezeigt. Stellen Sie die
(Kopfhörern)-Buchse ange-
(Kopfhörern)-Buchse ange-
Verwenden des Metronoms
Einstellen von Tempo und Taktar t
Drücken Sie die METRONOME ON-Taste.
1.
Im Display wird „
Drücken Sie zum Einstellen des Tempos die Taste TEMPO
2.
oder .
Halten Sie die Tasten TEMPO und gleichzeitig 1 Sekunde lang gedrückt, um zwischen Pendel-Metronom-Schritt
(Pendel wie bei einem mechanischen Metronom) und ganzem Schritt umzuschalten.
Wenn Sie Pendel-Metronom-Schritt gewählt haben, erscheint “
” im Display.
Nachdem Sie „PENDEL-METRONOM SCHRITT“ oder „GANZER
SCHRITT“ gewählt haben, drücken Sie die Taste TEMPO
oder zum Einstellen des Tempos. Diese Einstellung wird
auch bewahrt, wenn das Gerät ausgeschaltet ist.
Wenn Sie „PENDEL-METRONOM SCHRITT“ gewählt haben
Durch Drücken der Taste TEMPO oder wird der Tempowert um einen Schritt erhöht oder verringert. Sie können
den Wert fortlaufend erhöhen oder verringern, indem Sie
die entsprechende Taste gedrückt halten.
30 µ 32 µ 34 ... 88 µ 92 µ 96 ... 232 µ 240 µ 252 µ 30 ...
Wenn Sie „GANZER SCHRITT“ gewählt haben
Durch Drücken der Taste TEMPO oder wird das Tempo
im Bereich von 30-252 in Einerschritten erhöht oder verringert. Sie können den Wert fortlaufend erhöhen oder verringern, indem Sie die entsprechende Taste gedrückt halten.
Drücken Sie die START/STOP-Taste zum Starten des Metro-
3.
noms.
Das Metronompendel schwingt im festgelegten Tempo von
links nach rechts, und die TAP TEMPO-Taste blinkt gemäß
dem Takt.
Wenn Sie die Taktart ändern wollen, drücken Sie die Taste
4.
BEAT
oder , um die Wahl vorzunehmen.
Die Taktart ändert sich wie folgt.
“ angezeigt.
Page 19

... µ 0 µ 1 ... 9 (9 Takte) µ (Quartole ohne die beiden
mittleren Taktschläge) µ (Quartole) µ (Triole ohne
den mittleren Taktschlag) µ (Triole) µ (Duole) µ 0 ...
Spielen Sie zusammen mit dem Metronomtempo.
5.
Zum Stoppen des Metronoms drücken Sie die START/
6.
STOP-Taste.
Eingabe des Tap-Tempos
Das eingegebene Tap-Tempo wird als BPM (Taktschläge/Minute) angezeigt.
Drücken Sie die METRONOME ON-Taste.
1.
Im Display wird „
Drücken Sie die TAP TEMPO-Taste mehrmals in regelmäßigen
2.
Abständen.
Das TM-60/TM-60C erkennt das beim Drücken der Taste verwendete Intervall und stellt es als Tempo ein. Das Intervall
wird als BPM (Taktschläge pro Minute) angezeigt.
Wenn das Tempo ermittelt wird, erscheint “
play.
Wenn der von der Tap Tempo-Funktion ermittelte BPM-Wert
weniger als 30 beträgt, wird „Lo“ im Display angezeigt und
das Tempo auf „30“ eingestellt.
Wenn der von der Tap Tempo-Funktion ermittelte BPM-Wert
mehr als 252 beträgt, wird „Hi“ im Display angezeigt und das
Tempo auf „252“ eingestellt.
Drücken Sie die START/STOP-Taste, zum Starten des Metro-
3.
noms.
Das Metronompendel schwingt im festgelegten Tempo von
links nach rechts, und die TAP TEMPO-Taste blinkt gemäß
dem Takt.
Das Tap-Tempo kann eingegeben werden, wenn das Metro-
nom verwendet wird.
Spielen Sie Ihr Instrument gemäß dem Tempo.
4.
Zum Stoppen des Metronoms drücken Sie die START/
5.
STOP-Taste.
“ angezeigt.
” auf dem Dis-
Gleichzeitige Verwendung des
Stimmgeräts und Metronoms
Das TM-60/TM-60C erlaubt es Ihnen, Stimmgerät und Metronom gleichzeitig zu verwenden.
Einzelheiten zum Stimmgerät-Betrieb und Metronom-Betrieb
siehe „Verwendung des Stimmgeräts“ und „Verwendung des
Metronoms“.
Gleichzeitige Verwendung des Stimmgeräts und Metronoms
Wenn Sie zum Beispiel zum Metronom spielen und feststellen,
dass Ihr Instrument nicht richtig gestimmt ist, können Sie das
Metronom weiter laufen lassen, während Sie das Instrument
stimmen.
Verfahren Sie wie folgt.
Drücken Sie die METRONOME ONTaste.
1.
Drücken Sie die START/STOP-Taste zum Starten des Metro-
2.
noms.
Wenn erforderlich, legen Sie Tempo und Taktbezeichnung
usw. fest.
So legen Sie das Tempo fest: Tasten TEMPO
TAP TEMPO-Taste.
So legen Sie die Taktart fest: Tasten BEAT
Bei gleichzeitiger Verwendung von Stimmgerät und Met-
ronom können Sie nicht „Triole“, „Triole ohne den mittleren
Taktschlag“, „Quartole“, „Quartole ohne die beiden mittleren
oder , oder
oder .
Page 20

Taktschläge“ als Taktart wählen.
Drücken Sie die Taste TUNER ON zum Einschalten des Mess-
3.
modus.
Die Messanzeige erscheint im oberen Teil der Stimmanzeige
im Display, das Metronompendel in deren unterem Teil. Das
Tempo des Metronoms wird zudem durch Blinken der TAP
TEMPO-Taste angezeigt.
Wenn Sie den Ton-Ausgabe-Modus einschalten wollen, müssen Sie die Taste SOUND/SOUND BACK drücken.
Um im Sound Back-Modus zu stimmen, halten Sie die
SOUND BACK-Taste gedrückt.
Stimmen im Messmodus
Wenn Sie eine einzelne Note auf Ihrem Instrument spielen,
zeigt das Display den Namen der Note, die der gespielten
Tonlage am nächsten liegt. Stimmen Sie Ihr Instrument unter
Beobachtung des Messgeräts und der Stimmhilfe.
Stimmen im Ton-Ausgabe-Modus
Stimmen Sie Ihr Instrument passend zum Referenzton.
Sound-Back-Modus
Stimmen nach Referenzton, Messanzeige und Stimmhilfe.
Drücken Sie nach dem Stimmen Ihres Instruments die
4.
TUNER ON-Taste bzw. die METRONOME ON-Taste, um das
Stimmgerät bzw. das Metronom auszuschalten.
Hintergrundbeleuchtung
Drücken Sie bei Bedarf die Beleuchtungstaste „ “, um die Hintergrundbeleuchtung einzustellen.
Mit jedem Tastendruck verändert sich die Hintergrundbeleuchtung gemäß folgendem Schema: Soft ¬ Auto ¬ Aus ¬ Soft …
Bei leuchtender Hintergrundbeleuchtung erscheint „
Display.
Schwach:
Die Hintergrundbeleuchtung leuchtet schwächer, um
die Batterie zu schonen.
Automatisch:
Aus:
Die Hintergrundbeleuchtung leuchtet hell,
wenn ein Eingangssignal anliegt oder eine Taste bedient wird. Ungefähr zehn Sekunden danach wird die
Hintergrundbeleuchtung automatisch gedimmt.
Die Hintergrundbeleuchtung ist deaktiviert.
“ im
Technische Daten
Stimmgerät-Sektion
Skala: 12 Noten gleichschwebende Stimmung
Erkennungsbereich*: C1 (32,70 Hz) ~ C8 (4186,01 Hz) für eine
Referenzton: C3 (130,81 Hz) ~ C6 (1046,50 Hz) 3 Oktave
Stimmen-Modi: Messmodus, Ton-Ausgabe-Modus, Sound-
Kalibrierungsbereich: A4 = 410 Hz ~ 480 Hz (in 1 Hz-Schritten)
Messgenauigkeit: Besser als ±1 Cent
Klanggenauigkeit: Besser als ±1 Cent
Metronom-Sektion
Tempo-Bereich: 30 ~ 252 Taktschläge/Minute (bpm)
Tempo-Einstellung: PENDEL-METRONOM SCHRITT, GANZER
Taktbezeichnungen: 0 ~ 9 Takte, Duole, Triole, Triole ohne Mit-
Tempogenauigkeit: ±0,3%
Wichtigste technische Daten
Anschlüsse: INPUT-Buchse (6,3 mm Mono-Klinken-
Sinuswelle
Back-Modus
SCHRITT, TAP-TEMPOS
tentaktschlag, Quartole, Quartole ohne
Mittentaktschlag
buchse, unsymmetrisch),
rern)-Buchse (3,5 mm Stereo-Miniklinkenbuchse)
(Kopfhö-
Page 21

Lautsprecher: Dynamischer Lautsprecher (ø 23 mm)
Stromversorgung: Zwei AAA-Batterien (3 V)
Batterielebensdauer: Stimmgerät ...
Ca. 130/55/36 Stunden (Hintergrundbe-
Metronom ...
Ca. 130/55/36 Stunden
(Hintergrundbeleuchtung: Aus/Soft/
Abmessungen: 111 (T) x 74 (B) x 18 (H) mm
Gewicht: 100 g (einschließlich Batterien)
Lieferumfang: Blitzstart, zwei AAA-Batterien, Kontaktmi-
Kalibrierung (Referenztonhöhe) und Referenzton des Stimmgeräts, Tempo, Takt sowie die Einstellungen des Metronoms
(Pendel/ganzer Schritt) und der Hintergrundbeleuchtung werden beim Ausschalten gespeichert. Wenn Sie aber die Batterien
ersetzen, werden diese Einstellungen auf die folgenden Vorgabewerte zurückgesetzt.
leuchtung: Aus/Soft/Auto, A4 kontinuierlicher Eingang, bei Verwendung von
Zink-Kohle-Batterien)
Auto, Tempo 120, vier Taktschläge, maximale Lautstärke, bei Verwendung von
Zink-Kohle-Batterien)
krofon (nur TM-60C)
Vorgabewerte:
Kalibrierung = 440 Hz, Referenzton = A4, Die Einstellungen für
Tempo, Taktbezeichnung und Tempoeinstellungstyp, Hintergrundbeleuchtung einzustellen = aus
* Auch wenn die Tonhöhe innerhalb des Erkennungsbereichs
ist, kann das TM-60/TM-60C nicht in der Lage sein, die Tonhöhe
zu erkennen, wenn der Klang zahlreiche Obertöne (z.B. die
niedrigen oder hohen Noten auf einem akustischen Klavier) hat
oder das Instrument sehr schnelles Abklingen aufweist.
·
Änderungen der technischen Daten und des Designs ohne
vorherige Ankündigung vorbehalten.
Page 22

Características generales
Con el TM-60/TM-60C puede anar instrumentos utilizando el
micrófono interno o conectándolos al jack INPUT.
Puede utilizar el afinador y el metrónomo individualmente o
simultáneamente.
Instalar las pilas
Deslice la tapa del compar-
1.
timento de las pilas en la
parte posterior del TM-60/
TM-60C en la dirección “a”,
tal como se muestra en la
ilustración, y eleve la tapa
en la dirección “b.”
Inserte las pilas y asegúre-
2.
se de respetar la polaridad correcta y después cierre la tapa.
Si la unidad presenta un mal funcionamiento y no se puede
corregir el problema apagándolo y volviéndolo a encender varias veces, retire las pilas y después vuelva a instalarlas.
Si las pilas se han gastado, el
símbolo de pila aparecerá en
la parte izquierda de la pantalla. Cuando se produzca
este supuesto, por favor instale nuevas pilas tan pronto
como sea posible.
Uso del soporte
Puede usar el TM-60/TM60C en posición vertical
abriendo el soporte situado en la parte posterior
de la unidad.
Partes del TM-60/TM-60C
Botón TUNER ON
1.
Botones CALIB·NOTE ,
3.
Micrófono integrado
5.
Guía de anación
7.
Botón METRONOME ON
9.
Botones TEMPO ,
11.
Botón TAP TEMPO
13.
Jack INPUT
15.
a. Tono de anación de referencia b. Nombre de la nota
c. TEMPO (tempo del metrónomo)
d. BEAT (tiempo de compás del metrónomo)
Boutón SOUND/SOUND BACK
2.
Botón de luz de fondo
4.
Altavoz (Speaker)
6.
VOL (Volumen)
8.
Botones BEAT ,
10.
Botón START/STOP
12.
Jack (auriculares)
14.
Pantalla (Display)
16.
Page 23

Activación/desactivación de la ali-
mentación
Para activar la alimentación
Pulse el botón TUNER ON o el botón METRONOME ON y se
activará la alimentación. Pulse el botón correspondiente a la
función que desee utilizar.
Al pulsar el botón TUNER ON, el afinador se inicia en el
modo Medidor y “
pulsar el botón METRONOME ON, el metrónomo se inicia y
“
El TM-60/TM-60C puede utilizar el afinador y el metrónomo
simultáneamente.
El botón TUNER ON y el botón METRONOME ON se ha
diseñado más bajo que el resto de botones para que la
alimentación no se active involuntariamente al colocar el
TM-60/TM-60C en el bolsillo o en una bolsa. Para activar o
desactivar el dispositivo, presione el botón de alimentación.
” aparecerá en la pantalla.
” aparecerá en la pantalla. Al
Desactivación del anador
Con el afinador encendido, pulse el botón TUNER ON para
desactivar la alimentación. El anador también se desactivará
automáticamente si no se utiliza durante veinte minutos.
Desactivación del metrónomo
Con el metrónomo encendido, pulse el botón METRONOME
ON para desactivar la alimentación. El metrónomo también se
desactivará automáticamente si no se utiliza durante veinte
minutos.
Conexiones
Si desea conectar un instrumento o un micrófono de contacto, etc.
Si desea afinar un instrumento con una pastilla, como una
guitarra eléctrica, conecte un cable al instrumento y enchufe el
cable al jack INPUT del TM-60/TM-60C.
El jack INPUT solo se utiliza para un cable mono de 6,3 mm.
Los cables estéreo (TRS) no se pueden utilizar.
Si desea afinar el instrumento utilizando un MICRÓFONO DE
CONTACTO de Korg, enchufe el micrófono de contacto en el
jack INPUT del TM-60/TM-60C.
Si no hay ningún dispositivo conectado al jack INPUT, la
anación se realizará mediante el micrófono interno.
Conexión de auriculares
Puede conectar al jack (auriculares) unos auriculares de los
disponibles en el mercado que tengan un minijack estéreo de
3,5 mm. Una vez enchufado, no se emitirá ningún sonido por el
altavoz. Utilice el control de volumen para ajustar el volumen
de los auriculares.
Uso del anador
Anación utilizando el medidor
(Modo Medidor)
Conecte el cable del instrumento o el micrófono de contacto
1.
al jack INPUT del TM-60/TM-60C.
Si no hay ningún dispositivo conectado al jack INPUT, la
anación se realizará mediante el micrófono interno.
Pulse el botón TUNER ON.
2.
“
ción de referencia (calibración) se mostrará debajo.
Para cambiar la tono de anación de referencia, pulse el bo-
3.
” aparecerá en la pantalla y el tono de ana-
Page 24

tón CALIB·NOTE o .
El tono de anación de referencia aumenta y disminuye en
pasos de 1 Hz.
Al pulsar y mantener pulsados estos botones, puede aumentar o reducir el tono de anación de referencia de forma
continua. Este ajuste se almacena aunque la alimentación
esté desactivada.
Toque una nota única en su instrumento.
4.
La nota más cercana al sonido de entrada aparecerá en el
centro de la pantalla. Ane el instrumento con el tono correcto, para que aparezca el nombre de la nota deseada.
Si está usando el micro interno, coloque su instrumento
tan cerca como sea posible de dicho micro, para evitar que
ruidos extraños o de fondo sean captados durante la ana-
ción.
Mientras toca una sola nota en el instrumento, afínelo de
5.
forma que la indicación del medidor esté en “
y se ilumine el indicador verde del centro de la guía de anación.
El indicador rojo del lado izquierdo de la guía de anación se
iluminará si el tono del instrumento está bajo, y el indicador
rojo del lado derecho del medidor se iluminará si el tono
está alto.
” en el centro
Anación a una tercera mayor justa ascendente o a una
tercera menor ascendente
Si desea anar a una tercera mayor justa ascendente de A (La)
(0 cent), ane el instrumento de forma que el indicador de
nombre de nota muestre C
dor esté en “
Si desea anar a una tercera menor justa ascendente de A (La)
(0 cent), ane el instrumento de forma que el indicador de
nombre de nota muestre C (Do) y la indicación del medidor
esté en “
” en el lado izquierdo.
” en el lado derecho.
♯
(Do♯) y la indicación del medi-
Anación utilizando el tono acústico
(modo Salida de sonido)
Pulse el botón TUNER ON.
1.
Accederá al modo Medidor.
Pulse el botón SOUND/SOUND BACK para seleccionar el
2.
modo Salida de sonido.
El tono de referencia se emite desde el jack
o los altavoces. Utilice el control de volumen para ajustar el
volumen de salida.
Pulse el botón CALIB·NOTE o para seleccionar la nota.
3.
El tono de referencia de salida cambia de la siguiente forma.
♯
C (C3) µ C
C (C4) ... C (C6) µ C (C3)...
Este ajuste se almacena aunque la alimentación esté desactivada.
Ane el instrumento según el tono acústico de referencia.
4.
Si está conectado al jack INPUT o al jack
a ambos), el modo Medidor se iniciará simultáneamente y
podrá anar el instrumento mientras visualiza el medidor.
Si se pulsa el botón SOUND/SOUND BACK de nuevo, se de-
5.
tiene la salida del tono acústico de referencia y el dispositivo
vuelve al modo Medidor.
µ D µ E♭ µ E µ F µ F♯ µ G µ G♯ µ A µ B♭ µ B µ
(auriculares)
(auriculares) (o
Anación utilizando el tono acústico y el medidor
(modo Regreso de sonido)
En el modo de Regreso de sonido, se detecta el tono del instrumento de entrada y se emite el tono acústico de referencia más
cercano. Esto se puede utilizar para comprobar la desviación de
anación del tono que se está emitiendo.
Page 25

Esta función se puede utilizar cuando está conectado al jack
INPUT o al jack (auriculares) (o a ambos).
Pulse el botón TUNER ON.
1.
Accederá al modo Medidor.
Mantenga pulsado el botón SOUND/SOUND BACK para ac-
2.
ceder al modo Regreso de sonido.
“
volumen para ajustar el volumen.
Si los auriculares están conectados al jack
el sonido de entrada procedente del micrófono interno o
del jack INPUT se recibirá y el tono acústico de referencia se
emitirá desde los auriculares.
Si no hay nada conectado al jack
de entrada procedente del jack INPUT se recibe y el tono
acústico de referencia se emite desde los altavoces.
Si ni el jack (auriculares) ni el jack INPUT no están conec-
tados, el modo Regreso de sonido no funcionará.
Ane el instrumento utilizando el medidor y el tono acústico
3.
de referencia.
Si se vuelve a pulsar el botón SOUND/SOUND BACK, regresa-
4.
rá al modo Medidor.
” aparecerá en la pantalla. Utilice el control de
(auriculares),
(auriculares), el sonido
Uso del metrónomo
Ajuste del tempo y de la marca de tiempo
Pulse el botón METRONOME ON.
1.
“
Pulse el botón TEMPO o para denir el tempo.
2.
Pulse y mantenga pulsados los botones TEMPO y simultáneamente durante 1 segundo para cambiar entre Paso
de péndulo (péndulo de un metrónomo mecánico) o Paso
completo. Si se selecciona Paso de péndulo, “
en la pantalla.
Tras seleccionar “PASO DE PÉNDULO” o “PASO COMPLETO”,
pulse los botones TEMPO
ajuste se recuerda aunque la alimentación esté desactivada.
Si ha seleccionado “PASO DE PÉNDULO”
Al pulsar el botón TEMPO o aumentará o se reducirá el
valor de tempo en 1 paso. El valor cambiará continuamente
si mantiene pulsado el botón.
30 µ 32 µ 34 ... 88 µ 92 µ 96 ... 232 µ 240 µ 252 µ 30 ...
Si ha seleccionado “PASO COMPLETO”
Al pulsar el botón TEMPO o , aumentará o se reducirá
el tempo en un rango de 30–252 en pasos de uno. El valor
cambiará continuamente si mantiene pulsado el botón.
Pulse el botón START/STOP para iniciar el metrónomo.
3.
El péndulo del metrónomo oscilará de izquierda a derecha
según el tempo y el botón TAP TEMPO parpadeará en función del tiempo.
Si desea cambiar la marca de tiempo, pulse los botones BEAT
4.
o para realizar la selección.
La marca de tiempo cambiará de la siguiente forma.
... µ 0 µ 1 ... 9 (9 tiempos) µ
central) µ (Cuatrillo) µ (Tresillo sin el tiempo central) µ
Toque al ritmo del tempo del metrónomo.
5.
Para detener el metrónomo, pulse el botón START/STOP.
6.
IIntroducción de la marcación del tempo
La marcación del tempo que introduzca se mostrará como un
valor BPM (Tiempos por minuto).
Pulse el botón METRONOME ON.
1.
“
” aparecerá en la pantalla.
” aparecerá
, para denir el tempo. Este
(Cuatrillo sin el tiempo
(Tresillo) µ (Dosillo) µ 0 ...
” aparecerá en la pantalla.
Page 26

Pulse el botón TAP TEMPO varias veces a intervalos regulares.
2.
El TM-60/TM-60C detecta el intervalo utilizado al pulsar el
botón, lo muestra como un valor BPM (Tiempos por minuto)
y lo denirá como el tempo.
Cuando se detecta el tempo, “
Cuando el BPM que ha detectado la marcación del tempo
es menor que 30, “Lo” aparecerá en la pantalla y el tempo se
denirá en “30”.
Si el BPM detectado por la marcación del tempo supera 252,
“Hi” aparecerá en la pantalla y el tempo se denirá en “252”.
Pulse el botón START/STOP para iniciar el metrónomo.
3.
El péndulo del metrónomo oscilará de izquierda a derecha
según el tempo y el botón TAP TEMPO parpadeará en consecuencia.
La marcación del tempo también se puede introducir con
el metrónomo en uso.
Toque siguiendo el tempo.
4.
Para detener el metrónomo, pulse el botón START/STOP.
5.
” aparecerá en la pantalla.
Uso del anador y del
metrónomo simultáneamente
El TM-60/TM-60C le permite utilizar el anador y el metrónomo
simultáneamente.
Para obtener detalles sobre el funcionamiento del afinador y
del metrónomo, consulte las secciones “Uso del anador” y “Uso
del metrónomo”.
Uso del anador y del metrónomo simultáneamente
Por ejemplo, si toca siguiendo el ritmo del metrónomo y nota
que el instrumento no está anado correctamente, puede dejar
el metrónomo funcionando mientras realiza la anación.
Realice los pasos siguientes.
Pulse el botón METRONOME ON.
1.
Pulse el botón START/STOP para iniciar el metrónomo.
2.
En caso necesario, especique el tempo, la marca de tiempo,
etc.
Para denir el tempo: utilice los botones TEMPO
botón TAP TEMPO.
Para denir la marca de tiempo: utilice los botones BEAT , .
Si utiliza el anador y el metrónomo simultáneamente, no
puede seleccionar “tresillos”, “tresillos sin el tiempo central”,
“cuatrillos” o “cuatrillos sin los tiempos centrales” como la
marca de tiempo.
Pulse el botón TUNER ON para acceder al modo Medidor.
3.
El medidor de anación aparece en la parte superior del medidor en la pantalla, y el péndulo del metrónomo aparece en
la parte inferior del medidor. El tempo del metrónomo también se indica mediante el parpadeo del botón TAP TEMPO.
Si desea anar en modo Salida de sonido, debería pulsar el
botón SOUND/SOUND BACK.
Para anar en el modo Regreso de sonido, mantenga pulsado el botón SOUND/SOUND BACK.
Anación en el modo Medidor
Cuando toca una sola nota en el instrumento, en la pantalla
se muestra el nombre de la nota más cercana al tono que ha
tocado. Ane el instrumento mientras observa el medidor y
la guía de anación.
Anación en el modo Salida de sonido
Ane el instrumento escuchando el tono acústico de referencia.
Anación en el modo Regreso de sonido
Ane el instrumento utilizando el tono acústico de referen-
, o el
Page 27

cia, el medidor de anación y la guía de anación.
Una vez nalizada la anación, pulse el botón TUNER ON y el
4.
botón METRONOME ON, respectivamente, para desactivar el
anador y el metrónomo.
Luz de fondo
En caso necesario, pulse el botón de luz de fondo “ ” para denir la luz de fondo.
Cada vez que pulse el botón de luz de fondo, podrá alternar
entre Suave ¬ Auto ¬ Desactivada ¬ Suave…
Cuando la retroiluminación está encendida, en la pantalla aparece el indicador de retroiluminación “
Suave: La retroiluminación tiene menor intensidad para evitar
que las baterías se gasten.
Auto:
La retroiluminación aumentará de intensidad cuando
se introduzca sonido o se utilice un botón. Si no hay
sonido de entrada ni se utiliza ningún botón durante
aproximadamente diez segundos, la retroiluminación
bajará de intensidad automáticamente.
Desactivada:
La luz de fondo no se ilumina.
” .
Especicaciones
Sección del anador
Temperamento: 12-notas, temperamento igual
Rango de detección*: C1 (32,70 Hz)–C8 (4186,01 Hz) para una
Tono acústico de Referencia:
Modos de anación: Modo Medidor, modo Salida de sonido,
Intervalo de calibración: A4 = 410 Hz–480 Hz (1 Hz step)
Precisión de medición: Dentro de ±1centésima
Precisión del sonido: Dentro de ±1centésima
Sección del metrónomo
Intervalo de tempo: 30–252 tiempos por minuto (bpm)
Ajuste de tempo: PASO D E PÉNDULO, PASO COMPLETO,
Marcas de tiempo: 0–9 tiempos, dosillos, tresillos, tresillos
Precisión de tempo: ±0,3%
Especicaciones principales
Conectores: Jack INPUT (jack monoaural de 6,3 mm,
Altavoz: Altavoz dinámico (23 mm de diámetro)
Alimentación: Dos pilas AAA (3V)
Vida útil de las pilas:
Anador...
Aproximadamente 130/55/36 horas (luz de
Metrónomo...
Aproximadamente 130/55/36 horas (luz de
Dimensiones (Anch. x Prof. x Alt.): 111 x 74 x 18 mm
Peso: 100 g incluidas las pilas suministradas
Elementos incluidos: Guía de inicio rápido, pilas AAA (x2), Mi-
onda sunisoidal
C3 (130,81 Hz)–C6 (1046,50 Hz) 3 de octava
modo Regreso de sonido
MARCACIÓN DEL TEMPO
sin el tiempo central, cuatrillos, cuatrillos
sin los tiempos centrales
sin balancear), jack PHONES (minijack
estéreo de 3,5 mm)
fondo: Desactivada/Auto/Suave, entrada continua de A4, si se utilizan pilas de carbón-zinc)
fondo: Desactivada/Auto/Suave, tempo: 120,
cuatro tiempos, volumen máximo, si se utilizan
pilas de carbón-zinc)
cro de contacto (solo TM-60C)
Page 28

Los ajustes de calibración (tono de afinación de referencia) y
del tono acústico de referencia del afinador, y los ajustes de
tempo, tiempo de compás y Paso de péndulo/Paso completo
del metrónomo, así como el ajuste de retroiluminación, quedan
almacenados incluso después de apagar el dispositivo. Sin embargo, cuando se cambian las pilas, estos ajustes regresarán a
los valores por defecto siguientes.
Valores por defecto:
Calibración = 440 Hz, tono acústico de referencia = A4, tempo =
120, marca de tiempo = cuatro tiempos, tipo de ajuste de tempo = PENDULUM STEP, ajuste de luz de fondo = desactivada
* Aunque el tono se encuentre dentro del intervalo de detec-
ción, puede que el TM-60/TM-60C no sea capaz de detectar el
tono si el sonido contiene numerosos armónicos superiores
(como las notas bajas y altas de un piano acústico) o si el instrumento tiene una desactivación rápida.
·
Las especicaciones y el aspecto están sujetas a cambios sin
previo aviso por mejora.
Page 29

おもな特長
本機は、内蔵マイクや、I NP UT端子に楽器を接続し、チューニングする
ことができます。
チューナー、メトロノームを別々に、または同時に動作させることがで
きます。
電池の入れ方
本機の裏側にある電池の蓋を、
1.
スライドして(図中 a方向)、引
き上げます(同 b方向)。
極性に注意して電池を入れ、蓋
2.
を閉めます。
付属の電池は動作確認用
ですので、通常より寿命が
短い場合があります。
誤動作が発生して、電源のオン、オフを何度か行っても直らない場合は、
電池をいったんはずして、再度入れ直してください。
電池の残量が少なくなると、
ディスプレイに電池マークが表
示されます。そのときは、早め
に新しい電池と交換してくださ
い。
スタンドの使い方
本機の裏側にあるスタン
ドを使って、本体を立てる
ことができます。
各部の名称
1. TUNER ON(チューナー電源)ボタン
2. CALIB・NOTE 、 (キャリブレーション/ノート 、 )ボタン
3. SOUND/SOUND BACK(サウンド/サウンドバック)ボタン
4. バックライト・ボタン 5. MIC(内蔵マイク)
6. スピーカー 7. チューニング・ガイド
8. VOL(ボリューム)
9. METRONOME ON(メトロノーム電源)ボタン
10. BEAT 、 (ビート 、 )ボタン
11. TEMPO 、 (テンポ 、 )ボタン
12. START/STOP(スタート/ストップ)ボタン
13. TAP TEMPO(タップ・テンポ)ボタン
14. (ヘッドホン)端子 15. INPUT(インプット)端子
16. ディスプレイ(液晶表示)
基準ピッチ表示
a.
TEMPO(テンポ表示)
c.
音名表示
b.
BEAT(メトロノーム拍子)
d.
Page 30

電源のオンとオフ
電源をオンにする
TUNER ONボタンまたはMETRONOME ONボタンを押すと、電源が
オンになります。使用する機能のボタンを押してください。
TUNER ONボタンを押すと、チューナーのメーター・モードが起動しま
す。ディスプレイには“
METRONOME ONボタンを押すと、メトロノームが起動します。ディ
スプレイには“
本機は、チューナーとメトロノームを同時に動作させることができます。
TUNER ONボタンとMETRONOME ONボタンは、ポケットや
バッグなどに収納したとき、意図せずに電源が入らないように、他
のボタンより背を低く設計してあります。オンまたはオフにする場
合は、ボタンを少し押し込むように操作してください。
”が表示されます。
”が表示されます。
チューナーをオフにする
チューナーが動作しているときにTU NE R ONボタンを押すと、チュー
ナーがオフになります。また、音が20分間入力されなかったときにも、
自動的にオフになります。
メトロノームをオフにする
メトロノームが動作しているときにMETRO NO ME ONボタンを押す
と、メトロノームがオフになります。また、20分間停止状態が続いたと
きにも、自動的にオフになります。
接続
楽器、コンタクト・マイクなどを接続するとき
エレキ・ギターのようにピックアップ付きの楽器をチューニングすると
きは、楽器に市販のケーブルを接続し、ケーブルのもう一方のプラグを
本機のINPUT端子に接続します。
接続時はモノラル・プラグを使用してください。IN P UT端子はモノ
ラル専用ですので、ステレオ・プラグは使用できません。
コルグ・コンタクト・マイクを使用して楽器をチューニングするときは、本
機のINPUT端子にコンタクト・マイクのプラグを接続します。
INPUT端子に何も接続されていないと、内蔵マイクによるチューニ
ングになります。
ヘッドホンを接続するとき
市販のミニプラグ(φ3.5mm ステレオ)のヘッドホンを、 (ヘッドホ
ン)端子に接続します。このときスピーカーからは音が出ません。
ヘッドホンの音量は、ボリュームで調整します。
チューナーの操作
メーターを見てチューニングする
(メーター・モード)
必要に応じて、楽器やコンタクト・マイクなどをINPU T端子に接続
1.
します。
INPUT端子に何も接続されていないと、内蔵マイクによる
チューニングになります。
TUNER ONボタンを押します。
2.
デ ィ ス プ レ イ に“
チ(キャリブレーション)が表示されます。
基準ピッチを変更するときは、CALIB・NOTE 、 ボタンを押します。
3.
基準ピッチが1Hz単位で上下します。このボタンを長く押すと、基準
ピッチが連続的に上下します。この設定は、電源をオフにしても記憶
されます。
楽器を単音で鳴らします。
4.
入力した音に最も近い音名が、ディスプレイの中央に表示されます。合
わせたい音名が表示されるように、楽器を大まかにチューニングします。
内蔵マイク使用時は、内蔵マイクに楽器をできるだけ近づけ、
チューニング中に余計な音が入らないようにしてください。
楽器を単音で鳴らしながら、メーターが中央の“ ”を指し、チュー
5.
ニング・ガイドの中央の緑のランプが点灯するようにチューニング
します。
チューニング・ガイドは、楽器の音が低いときは左の赤いランプが、音
が高いときは右の赤いランプが点灯します。
”が表示され、その下には基準ピッ
Page 31

純正の長3度上、短3度上にチューニングする方法
A(0 cent)の音に対し、純正の長3度上の音にチューニングするとき
は、音名表示をC♯にし、メーターを左側の“
A(0 cent)の音に対し、純正の短3度上の音にチューニングするとき
は、音名表示をCにし、メーターを右側の“
”に合わせます。
”に合わせます。
音を聴いてチューニングする
(サウンドアウト・モード)
TUNER ONボタンを押します。
1.
メーター・モードに入ります。
SOU ND /SO UND BAC Kボタンを押して、サウンドアウト・モー
2.
ドに入ります。
(ヘッドホン)端子またはスピーカーから基準音が出力されます。
音量はボリュームで調整します。
CALIB・NOTE 、 ボタンを押して、合わせたい音名を選びます。
3.
出力される基準音が以下のように変わります。
C( C 3 )n C♯ n D n E♭ n E n F n F♯ n G n G♯ n A n B♭
n
B n C(C4) ... C(C6) n C(C3)...
この設定は電源をオフにしても記憶されます。
基準音に合わせて、楽器をチューニングします。
4.
IN PU T端子または
続している場合は、メーター・モードが同時に起動しているので、メー
ターを見ながらのチューニングも可能です。
もう一度SO UND/S OU ND BACKボタンを押すと基準音が止ま
5.
り、メーター・モードに戻ります。
音とメーターを使って、チューニングする
(ヘッドホ ン)端子いずれか( または両方)に接
(サウンドバック・モード)
サウンドバック・モードは、入力した楽器の音を感知して、最も近い基準
音を出力します。自分が出した音のピッチのズレを確認するときなど
に使用します。
IN PU T端子または
がある場合に使用できる機能です。
TUNER ONボタンを押します。
1.
メーター・モードに入ります。
SOU ND /SO UND BAC Kボタンを長く押して、サウンドバック・
2.
モードに入ります。
デ ィ ス プ レ イ に“
ムで調整します。
(ヘッドホン)端子にヘッドホンが接続されている場合は、内蔵マ
イクもしくはINPUT端子からの入力音を受け、ヘッドホンから基準音
を出力します。
(ヘッドホ ン)端子に接続されていない場合は、IN PUT端子からの
入力音を受け、スピーカーから基準音を出力します。
(ヘッドホン)端子、IN PU T端子共に接続されていない場合
は、サウンドバック・モードは機能しません。
基準音とメーターを使って、楽器をチューニングします。
3.
もう一度SOUND/SOUND BACKボタンを押すと、メーター・モー
4.
ドに戻ります。
(ヘッドホン)端子いずれか(または両方)に接続
”が表示されます。音量はボリュー
メトロノームの操作
テンポ、拍子を設定する
METRONOME ONボタンを押します。
1.
デ ィ ス プ レ イ に“
TEMPO 、 ボタンを押して、テンポを設定します。
2.
TEMPO と ボタンを2つ同時に約1秒間押し続けると、ペンデュラ
ム(機械式メトロノームの振り子)・ステップとフル・ステップが交互
に替わります。ペンデュラム・ステップのときはディスプレイに“
”が表示されます。
ペンデュラム・ステップまたはフル・ステップを選んだ後に、
、 ボタンを押すと、テンポを設定することができます。
TEMPO
この設定は、電源をオフにしても記憶されます。
”が表示されます。
Page 32

ペンデュラム・ステップのとき
TEMPO 、 ボタンを押すと、テンポの値は1ステップずつ増減しま
す。このボタンを長く押すと連続的に値が増減します。
n32n
34 ... 88n92n96 ... 232n240n252
30
フル・ステップのとき
TEMPO 、 ボタンを押すと、テンポの値は30 ~ 252まで1ずつ増
減します。このボタンを長く押すと連続的に値が増減します。
START/STOPボタンを押し、メトロノームをスタートさせます。
3.
テンポに合わせてメトロノームの振り子が左右に動き、その動きに合
わせてTAP TEMPOボタンが点滅します。
拍子を変更するときは、BEAT 、 ボタンを押して選択します。
4.
拍子は以下のように変わります。
0 n 1 ... 9( 9拍子) n ( 4連中抜き)
3連中抜き)n ( 3 連 符 )
テンポに合わせて演奏します。
5.
メトロノームを停止するときは、START/STOPボタンを押します。
6.
n
( 2連符)
n
30 ...
n
n
0 ...
( 4連符)
n
(
タップ・テンポを入力する
入力したタップ・テンポがBPM(拍/分)で表示されます。
METRONOME ONボタンを押します。
1.
デ ィ ス プ レ イ に“
TAP TEMPOボタンを一定の間隔で数回押します。
2.
本機では、ボタンが押された間隔をBPMで検知し、テンポとして設定
し、ディスプレイのテンポ表示に、その数値が表示されます。
テンポを検知している間は、ディスプレイに“
タ ッ プ・テ ン ポ で 検 知 し た BPMが30未満のときは 、デ ィ ス プ レ イ に
“Lo”と表示され、テンポは“30”に設定されます。
タ ッ プ・テ ン ポ で 検 知 し た BPMが252を超えるときは 、デ ィ ス プ レ イ
に“Hi”と表示され、 テンポは“252”に設定されます。
START/STOPボタンを押し、メトロノームをスタートさせます。
3.
テンポに合わせてメトロノームの振り子が左右に動き、その動きに合
わせて、TAP TEMPOボタンが点滅します。
タップ・テンポ入力は、メトロノーム動作中も可能です。
テンポに合わせて演奏します。
4.
メトロノームを停止するときは、START/STOPボタンを押します。
5.
”が表示されます。
”が表示されます。
チューナーとメトロノームの同時操作
本機では、チューナーとメトロノームを同時に使用することができま
す。
チューナー、メトロノームの詳しい操作方法は、「チューナーの操作」、
「メトロノームの操作」をそれぞれ参照してください。
チューナーとメトロノームを同時に使う方法
例えば、メトロノームの音に合わせ、リズム・トレーニングをしていると
きに、楽器のチューニングがずれていると感じたときは、メトロノーム
はそのまま動かしながら、チューニングすることができます。
以下のように本機を操作します。
METRONOME ONボタンを押します。
1.
START/STOPボタンを押して、メトロノームをスタートさせます。
2.
必要に応じてテンポ、拍子などを設定します。
テンポの設定:TEMPO
拍子の設定:BEAT
チューナーとメトロノームを同時に使用する場合、メトロノー
ムの拍子に3連符、3連中抜き、4連符、4連中抜きを設定できま
せん。
TUNER ONボタンを押してメーター・モードに入ります。
3.
ディスプレイのメーターが2段になり、上段にチューニング・メー
ターが、下段にメトロノームの振り子が表示されます。メトロノーム
のテンポは、TAP TEMPOボタンの点滅でも示します。
サウンドアウト・モードでチューニングするときは、SOUND/
SOUND BACKボタンを押します。
サウンドバック・モードでチューニングす るときは、SOUND/
SOUND BACKボタンを長く押します。
メーター・モードのチューニング
楽器を単音で鳴らすと、ディスプレイには入力した音に最も近い音名
、 ボタン、またはTAP TEMPOボタン
、 ボタン
Page 33

が表示されます。チューニング・メーター、チューニング・ガイドを見
ながら楽器をチューニングします。
サウンドアウト・モードのチューニング
基準音を聞きながら楽器をチューニングします。
サウンドバック・モードのチューニング
基準音とチューニング・メーター、チューニング・ガイドを使って、楽
器をチューニングします。
チューニングを終えたら、TU NE R ONボタンとMETRONOME
4.
ONボタンをそれぞれ押してチューナーとメトロノームをオフにし
ます。
バックライト
必要に応じてバックライト・ボタン“ ”を押して、バックライトを設定
します。バックライト・ボタンを押すたびに、ソフト→オート→オフ→
ソフト... と切り替わります。バックライト点灯時はディスプレイにバッ
クライトマーク“
ソフト: 電池の消耗を抑えるため、常に低輝度の点灯になります。
オート: 音を入力した場合とボタン操作時に、明るく点灯します。約
点灯しません。
オ フ:
”が表示されます。
10秒間、音の入力やボタン操作が無いときは、自動的に低輝度
の点灯になります。
仕様
チューナー部
音律: 12平均律
測定範囲*: C1(32.70Hz)~ C8(4186.01Hz)サイン波時
基準発振音: C3(130.81Hz)~ C6(1046.50Hz)3オクターブ
チューニング・モード:
キャリブレーション範囲: A4=410Hz ~ 480Hz(1Hz単位)
測定精度: ±1セント以内
サウンド精度:±1セント以内
メトロノーム部
テンポ範囲: 𝅘𝅥 =30 ~ 252回/分
テンポ設定方法:
拍子範囲: 0 ~ 9拍子、2連符、3連符、3連符中抜き、4連符、4連符中
テンポ精度: ±0.3%
主要規格
接続端子: INPUT端子(6.3mmモノラル・フォーン・ジャック、不平
スピーカー: ダイナミック・スピーカー(φ23mm)
電源: 単4形乾電池2本(3V)
電池寿命: チューナー ...
約130/55/36時 間(バッ クライ ト:オフ/ソフト/オ ート、
メトロノーム...
約130/55/36時 間(バッ クライ ト:オフ/ソフト/オ ート、
外形寸法(W×D×H): 111 x 74 x 18mm
質 量: 100 g(電池含む)
付 属 品: クイック・スタート・ガイド、動作確認用単4形乾電池( 2
チューナー部のキャリブレーション、基準発振音、メトロノーム部のテ
ンポ、拍子、ペンデュラム/フル・ステップ、バックライトの設定は、電源
をオフにしても記憶されています。ただし、電池を交換した場合は以下
の初期値に戻ります。
初期値:
キャリブレーション=440H z、基準発振音= A4、テンポ=120、拍子=4
拍子、テンポ設定=ペンデュラム・ステップ、バックライト設定=オフ
* 測定範囲内の音であっても、倍音を多く含む音色や、減衰の速い楽器
仕様および外観は、改良のため予告無く変更する場合があります。
メーター・モード、サウンドアウト・モード、サウンドバッ
ク・モ ー ド
ペンデュラム・ステップ、フル・ステップ、タップ・テンポ
抜き
衡 )、 (ヘッドホン)端子(3.5mmステレオ・ミニ・フォー
ン・ジャック)
A4連続入力、マンガン乾電池使用時)
テンポ120、4拍子、音量最大、マンガン乾電池使用時)
本)、コンタクト・マイク(TM-60Cのみ)
音は、測定できない場合があります。
 Loading...