

Page 1
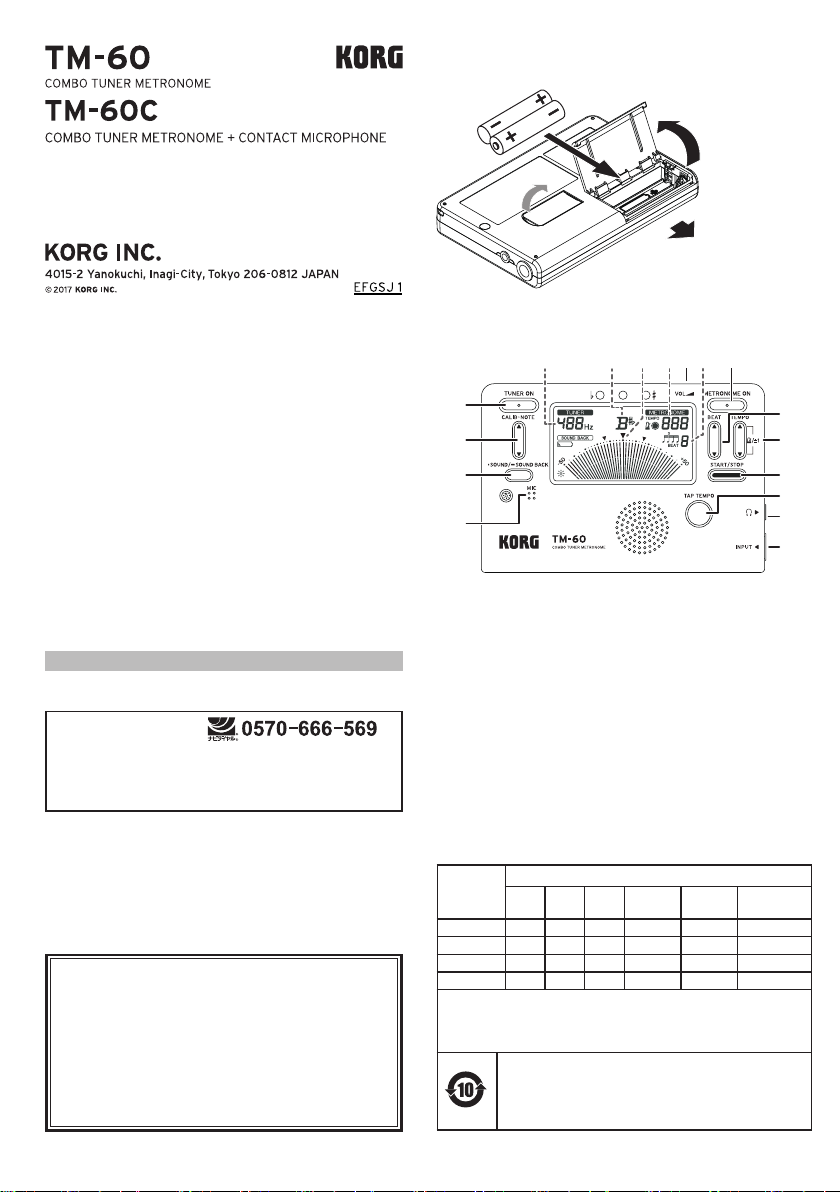
Fig.1
A
C
e
10
12
78acbd
4
5
6
1
Published 7/2017 Printed in Vietnam
B
Quick Start Guide
Guide de prise en main
Blitzstart
Guía de inicio rápido
ク イック・ス ター ト・ ガ イド
Thank you for purchasing the Korg TM-60/TM-60C COMBO
TUNER METRONOME. To help you get the most out of your new
instrument, please read this manual carefully.
Merci d’avoir choisi la Combo Accordeur Métronome TM-60/
TM-60C de Korg. An de pouvoir exploiter au mieux toutes les
possibilités oertes par l’instrument, veuillez lire attentivement
ce manuel.
Vielen Dank, dass Sie sich für einen TM-60/TM-60C Kombination
aus Stimmgerät und Metronom von Korg entschieden haben.
Bitte lesen Sie sich diese Anleitung vollstädig durch, um bei der
Bedienung alles richtig zu machen.
Gracias por comprar el afinador para enchufar TM-60/TM-60C
Combo Anador Metrónomo de Korg. Por favor, lea este manual
atentamente y guárdelo para futuras consultas.
このたびは、コルグCOMBO TUNER METRONOME TM-60/
TM -60Cをお買い上げいただきまして、まことにありがとうござ
います。本製品を末永くご愛用いただくためにも、取扱説明書を
よくお読みになって、正しい方法でご使用ください。
アフターサービス
修理または商品のお取り扱いについてのご質問、ご相談は、お客
様相談窓口へお問い合わせください。
お客様相談窓口
PHS等一部の電話ではご利用できません。固定電話または携
帯電話からおかけください。
受付時 間 月曜~金曜 10:00 ~ 17:00 (祝祭日、窓口休 業
日を除く)
●サービス・センター:
〒168-0073 東京都杉並区下高井戸1-18-16 2F
■ お願い
1. 保証書に販売年月日等の記入がない場合は無効となります。
記入できないときは、お買い上げ年月日を証明できる領収書と一
緒に保管してください。
2. 保証書は再発行致しませんので、紛失しないように大切に保
管してください。
コルグ
TM-60 / TM-60C
本保証書は、保証規定により無償修理をお約束するものです。
お買い上げ日 年 月 日
保証書
販売店名
(¬p.2)
(¬p.5)
(¬s.6)
(¬p.7)
(¬p.8)
D
Fig.2
部件名称
电路板 × ○ ○ ○ ○ ○
扬声器 ○ ○ ○ ○ ○ ○
液晶显示器 × ○ ○ ○ ○ ○
○ : 表示该有毒有害物质或元素在该部件所有均质材料中的含量均在
× : 表示该有毒有害物质或元素至少在该部件的某一均质材料中的含量
铅
(pb)汞(Hg)镉(Cd)
壳体 ○ ○ ○ ○ ○ ○
GB/T26572标准规定的限量要求以下。
超出GB/T 26572标准规定的限量 要求。
此标记适 用于中华人民共和国销售的电子信息产品,标记中
央的数字表示环境保护使用期限的年数。
自制造日算起 的此年月内,产品中的指定6 物质不会向外 部泄
漏或发生突变,不会产生环境污染或者对人体或财产带来深
刻的影响。此环境保护使用期限并不表示产品保证期限。
- 1 -
有毒有害物质或元素
六价铬
多溴联苯
(C r( VI ))
(PB B)
9
11
3
2
多溴二苯醚
(PBD E)
Page 2
En
The following documents are available for the TM-60/TM-60C.
• TM-60/TM-60C Quick Start Guide (this document)
• TM-60/TM-60C Owner's Manual (PDF)
Read this manual first. In order to make full use of this device’s
functions and ensure trouble-free operation, also read the Owner’s
Manual, which can be downloaded from the Korg website.
www.korg.com
Preparations
Installing the batteries
• Slide the battery compartment cover on the back of the TM-60/
TM-60C (A) and lift up the cover (B). Insert the batteries, making
sure to observe the correct polarity (C), and then close the cover.
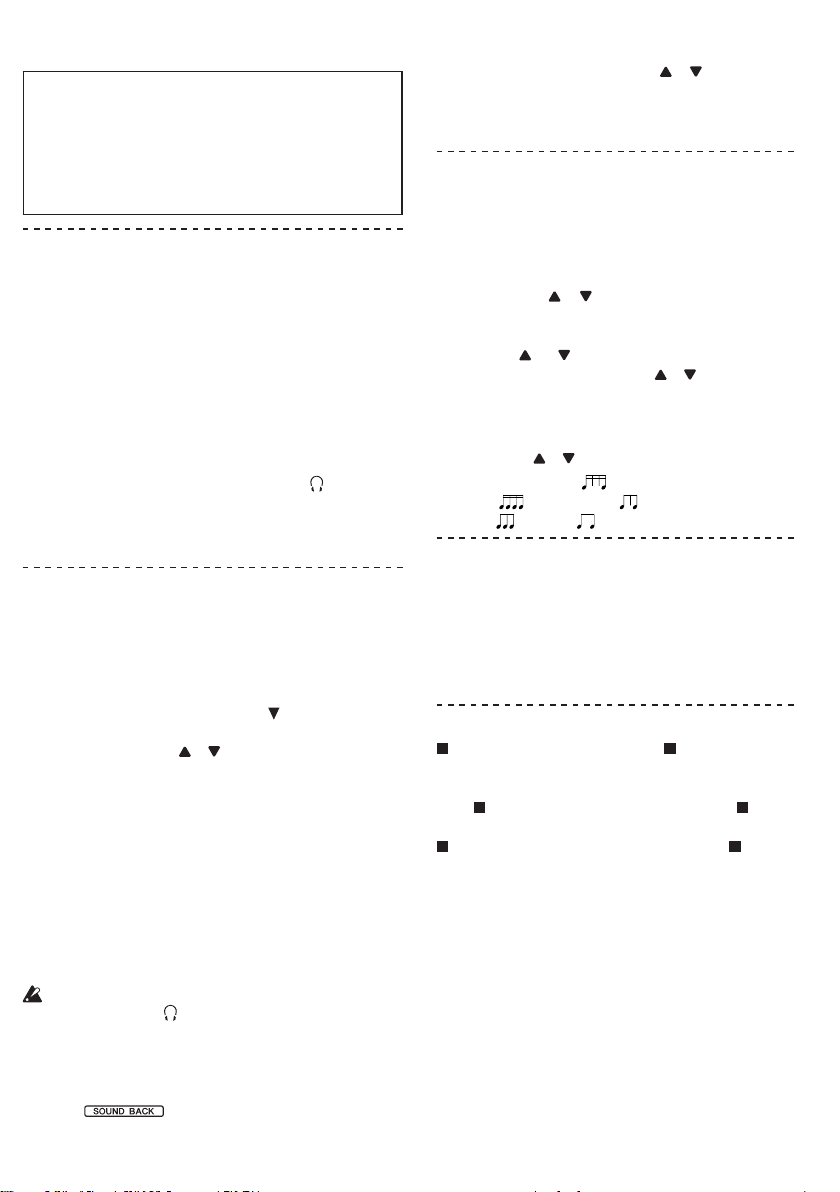
Using the internal mic or contact mic
• In order to use the internal mic (1), make sure nothing is connected to the INPUT jack (2).
• In order to use the contact mic (included with TM-60C), plug it
into the INPUT jack.
Using headphones
• Plug commercially available headphones into the (headphones)
jack (3).
Using the stand
• Pull out the stand (D) in order to prop up the TM-60/TM-60C.
(Fig. 1)
(Fig. 2)
(Fig.1)
Tuning
Tuning using the meter
1. Press the TUNER ON button (4) (Meter mode).
This button turns the TM-60/TM-60C on or o.
2. Play a single note on your instrument and tune it.
Tune your instrument until the correct note name (a) appears on
the display and the meter indication is at “ ” (b) at the center.
• To change the reference pitch (c) from the default setting A4=440
Hz, press the CALIB·NOTE or button (5).
You can use pure temperament tuning to a major third or minor
Tip:
third above a certain note. (Refer to the Owner’s Manual.)
Tuning using the tone
Instead of using the procedure described above, you can tune your
instrument as described below.
• Tune your instrument to match the reference tone that is output
by this device (Sound Out mode).
• This device detects the tone that you play on your instrument and
outputs the closest reference tone. Compare it with the pitch of
the tone that you output and tune your instrument (Sound Back
mode).
Sound Back mode can be used if a device is connected to either
the INPUT jack or the (headphones) jack (or both).
1. Press the TUNER ON button.
2. To use Sound Out mode, press the SOUND/SOUND BACK button
(6).
To use Sound Back mode, hold down the SOUND/SOUND BACK
button. “ ” appears on the display.
• Use the VOL (volume control) (7) to adjust the output volume.
(Fig. 2)
3. If the TM-60/TM-60C is in Sound Out mode, it outputs the
reference tone. Press the CALIB·NOTE
a note in semitone steps between C3 and C6 (a).
If the device is in Sound Back mode, playing a single note on
your instrument will output the closest reference tone.
or button to select
Using the metronome
1. Press the METRONOME ON button (8).
This button turns the TM-60/TM-60C on or o.
2. Press the START/STOP button (9).
The metronome starts.
Setting the tempo
• Press the TEMPO or button (10) (30–252 beats per minute (bpm)).
To change the tempo (d) in steps of 1, hold down the
Tip:
TEMPO and buttons simultaneously to switch to Full
Step, and then press the TEMPO or button.
• Otherwise, press the TAP TEMPO button (11) several times at
the tempo that you want.
Setting the time signature
• Press the BEAT or button (12).
0 µ 1 ... 9 (9 beats) µ (Quadruplet without the center
beat) µ (Quadruplet)
beat) µ (Triplet)
µ
(Triplet without the center
µ
(Duplet)
0 ... (e)
µ
Using the tuner and metronome simultaneously
• Press the TUNER ON and METRONOME ON buttons to turn on
both.
The tuning meter appears in the upper part of the meter on
the display, and the metronome pendulum appears in the
lower part of the meter.
Specications (Overview)
Power supply: two AAA batteries 3V. Battery life: Approximately 130 hours (tuner operating), Approximately 130 hours
(metronome operating), backlight:Off, using zinc-carbon batteries. Auto power-o: Approximately 20 minutes. Dimensions: 111 mm(W) x 74 mm(D) x 18 mm(H) / 4.37" x 2.91" x 0.71".
Weight: 100 g / 3.53 oz (including the batteries). Included
items: Quick Start Guide, two AAA batteries, Contact mic (TM-60C
only).
* Specications and appearance are subject to change without
notice for improvement.
- 2 -
Page 3
安全上のご注意
火災・感電・人身傷害の危険を防止するには
以下の指示を守ってください
この注意事項を無視した取り扱いをすると、死亡
警告
や重傷を負う可能性があります。
・ 次のような場合には、直ちに電源を切る。
○ 異物が内部に入ったとき ○ 製品に異常や故障が生じたとき
修理が必要なときは、お客様相談窓口へ依頼してください。
・ 本製品を分解したり改造したりしない。
・ 修理、部品の交換などで、取扱説明書に書かれていること以外は
絶対にしない。
・ 大音量や不快な程度の音量で長時間使用しない。
大音量で長時間使用すると、難聴になる可能性があります。
万一、聴力低下や耳鳴りを感じたら、専門の医師に相談してくだ
さい。
・ 本製品に異物(燃えやすいもの、硬貨、針金など)を入れない。
・ 温度が極端に高い場所(直射日光の当たる場所、暖房機器の近く、
発熱する機器の上など)での使用や保管をしない。
・ 振動の多い場所で使用や保管をしない。
・ ホコリの多い場所で使用や保管をしない。
・ 風呂場、シャワー室で使用や保管をしない。
・ 雨天時の野外のように、湿気の多い場所や水滴のかかる場所で、
使用や保管をしない。
・ 本製品の上に、花瓶のような液体が入ったものを置かない。
・ 本製品に液体をこぼさない。
・ 濡れた手で本製品を使用しない。
この注意事項を無視した取り扱いをすると、傷害を負
注意
う、または物理的損害が発生する可能性があります。
・ 正常な通気が妨げられない所に設置して使用する。
・ ラジオ、テレビ、電子機器などから十分に離して使用する。
ラジオやテレビ等に接近して使用すると、本製品が雑音を受けて
誤動作する場合があります。また、ラジオ、テレビ等に雑音が入
ることがあります。
本製品をテレビ等の横に設置すると、本製品の磁場によってテレ
ビ等の故障の原因になることがあります。
・ 外装のお手入れは、乾いた柔らかい布を使って軽く拭く。
・
長時間使用しないときは、電池の液漏れを防ぐために電池を抜く。
・ 電池や本体は幼児の手の届かないところへ保管する。
・ 電池を過度の熱源(日光、火など)にさらさない。
・ ボタンやツマミなどに必要以上の力を加えない。
故障の原因になります。
・ 外装のお手入れに、ベンジンやシンナー系の液体、コンパウンド
質、強燃性のポリッシャーを使用しない。
・ 不安定な場所に置かない。
※ すべての製品名および会社名は、各社の商標または登録商標です。
保証規定 (必ずお読みください)
本保証書は、保証期間中に本製品を保証するもので、付属品類(ヘッド
ホンなど)は保証の対象になりません。保証期間内に本製品が故障し
た場合は、保証規定によって無償修理いたします。
1. 本保証書の有効期間はお買い上げ日より1か年です。
2. 次の修理等は保証期間内であっても有償となります。
• 消耗部品(電池、スピーカー、真空管、フェーダーなど)の交換。
• お取扱い方法が不適当のために生じた故障。
• 天災(火災、浸水等)によって生じた故障。
• 故障の原因が本製品以外の他の機器にある場合。
• 不当な改造、調整、部品交換などにより生じた故障または損傷。
• 保証書にお買い上げ日、販売店名が未記入の場合、または字句が
書き替えられている場合。
• 本保証書の提示がない場合。
尚、当社が修理した部分が再度故障した場合は、保証期間外であっ
ても、修理した日より3か月以内に限り無償修理いたします。
3. 本保証書は日本国内においてのみ有効です。
This warranty is valid only in Japan.
4. お客様が保証期間中に移転された場合でも、保証は引き続きお使いい
ただけます。詳しくは、お客様相談窓口までお問い合わせください。
5. 修理、運送費用が製品の価格より高くなることがありますので、あ
らかじめお客様相談窓口へご相談ください。発送にかかる費用は、
お客様の負担とさせていただきます。
6. 修理中の代替品、商品の貸し出し等は、いかなる場合においても一
切行っておりません。
本製品の故障、または使用上生じたお客様の直接、間接の損害につき
ましては、弊社は一切の責任を負いかねますのでご了承ください。
本保証書は、保証規定により無償修理をお約束するためのもので、こ
れによりお客様の法律上の権利を制限するものではありません。
Precautions
Location
Using the unit in the following locations can result in a malfunction.
•In direct sunlight
•Locations of extreme temperature or humidity
•Excessively dusty or dirty locations
•Locations of excessive vibration
•Close to magnetic elds
Power supply
Be sure to turn o the power when the unit is not in use. Remove the battery in
order to prevent it from leaking when the unit is not in use for extended periods.
Interference with other electrical devices
Radios and televisions placed nearby may experience reception interference.
Operate this unit at a suitable distance from radios and televisions.
Handling
To avoid breakage, do not apply excessive force to the switches or controls.
Care
If the exterior becomes dirty, wipe it with a clean, dry cloth. Do not use liquid cleaners such as benzene or thinner, or cleaning compounds or ammable polishes.
Keep this manual
After reading this manual, please keep it for later reference.
Keeping foreign matter out of your equipment
Never set any container with liquid in it near this equipment. If liquid gets into
the equipment, it could cause a breakdown, re, or electrical shock. Be careful
not to let metal objects get into the equipment.
THE FCC REGULATION WARNING (for USA)
NOTE: This equipment has been tested and found to comply with the limits
for a Class B digital device, pursuant to Part 15 of the FCC Rules. These limits
are designed to provide reasonable protection against harmful interference
in a residential installation. This equipment generates, uses, and can radiate
radio frequency energy and, if not installed and used in accordance with
the instructions, may cause harmful interference to radio communications.
However, there is no guarantee that interference will not occur in a particular
installation. If this equipment does cause harmful interference to radio or
television reception, which can be determined by turning the equipment o
and on, the user is encouraged to try to correct the interference by one or
more of the following measures:
•Reorient or relocate the receiving antenna.
•Increase the separation between the equipment and receiver.
•Connect the equipment into an outlet on a circuit different from that to
which the receiver is connected.
•Consult the dealer or an experienced radio/TV technician for help.
If items such as cables are included with this equipment, you must use those
included items.
Unauthorized changes or modication to this system can void the user’s authority to operate this equipment.
Notice regarding disposal (EU only)
If this symbol is shown on the product, manual, battery, or package,
you must dispose of it in the correct manner to avoid harm to human
health or damage to the environment. Contact your local administrative body for details on the correct disposal method. If the battery
contains heavy metals in excess of the regulated amount, a chemical
symbol is displayed below the symbol on the battery or battery package.
This product has been manufactured according to strict specications and
voltage requirements that are applicable in the country in which it is intended that this product should be used. If you have purchased this product via
the internet, through mail order, and/or via a telephone sale, you must verify
that this product is intended to be used in the country in which you reside.
WARNING: Use of this product in any country other than that for which it is
intended could be dangerous and could invalidate the manufacturer’s or distributor’s warranty.
Please also retain your receipt as proof of purchase otherwise your product
may be disqualied from the manufacturer’s or distributor’s warranty.
* All product names and company names are the trademarks or
registered trademarks of their respective owners.
IMPORTANT NOTICE TO CONSUMERS
- 3 -
Page 4

Précautions
Emplacement
L’utilisation de cet instrument dans les endroits suivants peut en entraîner le mauvais fonctionnement.
•En plein soleil.
•Endroits très chauds ou très humides.
•Endroits sales ou fort poussiéreux.
•Endroits soumis à de fortes vibrations.
•A proximité de champs magnétiques.
Alimentation
Lorsque vous n’utilisez pas l’appareil, n’oubliez pas
de le mettre hors tension. Retirez les piles pour éviter toute fuite lorsque l’appareil ne sera pas utilisé
pendant de longues périodes de temps.
Interférences avec d’autres appareils
électriques
Les postes de radio et de télévision situés à proximité peuvent par conséquent sourir d’interférences
à la réception. Veuillez dès lors faire fonctionner cet
appareil à une distance raisonnable de postes de
radio et de télévision.
Maniement
Pour éviter de les endommager, manipulez les commandes et les boutons de cet instrument avec soin.
Entretien
Lorsque l’instrument se salit, nettoyez-le avec un
chion propre et sec. Ne vous servez pas d’agents
de nettoyage liquides tels que du benzène ou du
diluant, voire des produits inammables.
Conservez ce manuel
Après avoir lu ce manuel, veuillez le conserver soigneusement pour toute référence ultérieure.
Evitez toute intrusion d’objets ou de liquide
Ne placez jamais de récipient contenant du liquide
près de l’instrument. Si le liquide se renverse ou
coule, il risque de provoquer des dommages, un
court-circuit ou une électrocution. Veillez à ne pas
laisser tomber des objets métalliques dans le boîtier (trombones, par ex.).
Note concernant les dispositions
(Seulement EU)
Si ce symbole apparait sur le produit, le
manuel, les piles ou les packs de piles, cela
signi e que vous devez le recycler d’une
manière correcte a n de prévenir les dommages pour la santé humaine et les dommages potentiels pour l’environnement.
Contactez votre administration locale pour
de plus amples renseignements concernant la
bonne méthode de recyclage. Si la pile contient
des métaux lourds au-delà du seuil réglementé,
un symbole chimique est a ché en dessous du
symbole de la poubelle barrée d’une croix sur la
pile ou le pack de piles.
REMARQUE IMPORTANTE POUR LES
Ce produit a été fabriqué suivant des spécifi
cations sévères et des besoins en tension applicables dans le pays où ce produit doit être utilisé.
Si vous avez acheté ce produit via l’internet, par
vente par correspondance ou/et vente par téléphone, vous devez véri er que ce produit est
bien utilisable dans le pays où vous résidez.
ATTENTION: L’utilisation de ce produit dans un
pays autre que celui pour lequel il a été conçu
peut être dangereuse et annulera la garantie
du fabricant ou du distributeur. Conservez bien
votre récépissé qui est la preuve de votre achat,
faute de quoi votre produit risque de ne plus
être couvert par la garantie du fabricant ou du
distributeur.
* Tous les noms de produits et de sociétés sont
des marques commerciales ou déposées de leur
détenteur respectif.
CLIENTS
Vorsichtsmaßnahmen
Aufstellungsort
Vermeiden Sie das Aufstellen des Geräts an Orten, an
denen.
•es direkter Sonneneinstrahlung ausgesetzt ist;
•hohe Feuchtigkeit oder Extremtemperaturen auf-
treten können;
•Staub oder Schmutz in großen Mengen vorhanden
sind;
•das Gerät Erschütterungen ausgesetzt sein kann.
•in der Nähe eines Magnetfeldes.
Stromversorgung
Stellen Sie den Netzschalter auf OFF, wenn das Gerät
nicht benutzt wird. Wenn Sie das Gerät über einen
längeren Zeitraum nicht benutzen, nehmen Sie die
Batterien heraus, damit sie nicht auslaufen.
Störeinüsse auf andere Elektrogeräte
Dieser kann bei in der Nähe aufgestellten Rundfunkemp-fänger oder Fernsehgeräten Empfangsstörungen hervorrufen. Betreiben Sie solche Geräte nur in
einem geeigneten Abstand von diesem Erzeugnis.
Bedienung
Vermeiden Sie bei der Bedienung von Schaltern und
Reglern unangemessenen Kraftaufwand.
Reinigung
Bei auftretender Verschmutzung können Sie das
Gehäuse mit einem trockenen, sauberen Tuch abwischen. Verwenden Sie keinerlei Flüssigreiniger wie
beispielsweise Reinigungsbenzin, Verdünner- oder
Spülmittel. Verwenden Sie niemals brennbare Reiniger.
Bedienungsanleitung
Bewahren Sie diese Bedienungsanleitung gut auf,
falls Sie sie später noch einmal benötigen.
Flüssigkeiten und Fremdkörper
Stellen Sie niemals Behältnisse mit Flüssigkeiten in
der Nähe des Geräts auf. Wenn Flüssigkeit in das Gerät gelangt, können Beschädigung des Geräts, Feuer
oder ein elektrischer Schlag die Folge sein. Beachten
Sie, dass keinerlei Fremdkörper in das Gerät gelangen.
Hinweis zur Entsorgung (Nur EU)
Wenn Sie das Symbol mit der „durchgekreuzten Mülltonne“ auf Ihrem Produkt,
der dazugehörigen Bedienungsanleitung,
der Batterie oder der Verpackung sehen,
müssen Sie das Produkt in der vorgeschriebenen Art und Weise entsorgen um Schä-
den an der menschlichen Gesundheit und
der Umwelt zu vermeiden.
Batterien oder Akkus, die Schadstoe enthalten,
sind auch mit dem Symbol einer durchgekreuzten
Mülltonne gekennzeichnet. In der Nähe zum
Mülltonnensymbol be ndet sich die chemische
Bezeichnung des Schadstoes.
WICHTIGER HINWEIS FÜR KUNDEN
Dieses Produkt wurde unter strenger Beachtung
von Spezikationen und Spannungsanforderungen hergestellt, die im Bestimmungsland gelten.
Wenn Sie dieses Produkt über das Internet, per
Postversand und/oder mit telefonischer Bestellung gekauft haben, müssen Sie bestätigen, dass
dieses Produkt für Ihr Wohngebiet ausgelegt ist.
WARNUNG: Verwendung dieses Produkts in einem anderen Land als dem, für das es bestimmt
ist, verwendet wird, kann gefährlich sein und die
Garantie des Herstellers oder Importeurs hinfällig
lassen werden. Bitte bewahren Sie diese Quittung
als Kaufbeleg auf, da andernfalls das Produkt von
der Garantie des Herstellers oder Importeurs ausgeschlossen werden kann.
* Alle Produkt- und Firmennamen sind Warenzei-
chen oder eingetragene Warenzeichen der betreffenden Eigentümer.
- 4 -
Precauciones
Ubicación
El uso de la unidad en las siguientes ubicaciones puede dar como resultado un mal funcionamiento:
•Expuesto a la luz directa del sol.
•Zonas de extremada temperatura o humedad.
•Zonas con exceso de suciedad o polvo.
•Zonas con excesiva vibración.
•Cercano a campos magnéticos.
Fuente de alimentación
Apague la unidad cuando no la use la batería.
Retire las baterías si no va a usar la unidad
durante un tiempo largo.
Interferencias con otros aparatos
Las radios y televisores situados cerca pueden
experimentar interferencias en la recepción.
Opere este dispositivo a una distancia prudencial de radios y televisores.
Manejo
Para evitar una rotura, no aplique excesiva
fuerza a los conmutadores o controles.
Cuidado
Si exterior se ensucia, límpiese con un trapo
seco. No use líquidos limpiadores como disolvente, ni compuestos inamables.
Guarde este manual
Después de leer este manual, guárdelo para
futuras consultas.
Mantenga los elementos externos
alejados del equipo
Nunca coloque ningún recipiente con líquido
cerca de este equipo, podría causar un cortocircuito, fuero o descarga eléctrica. Cuide de
que no caiga ningún objeto metálico dentro
del equipo.
Nota respecto a residuos y deshechos
la Unión Europea para prevenir daños a la salud pública y al medioambiente. Le rogamos
que se ponga en contacto con su o cina o
ministerio de medioambiente para más detalles. Si la batería contiene metales pesados
por encima del límite permitido, habrá un
símbolo de un material químico, debajo del
símbolo del cubo de basura tachado.
NOTA IMPORTANTE PARA EL CON-
Este producto ha sido fabricado de acuerdo
a estrictas especi caciones y requerimientos de voltaje aplicables en el país para el
cual está destinado. Si ha comprado este
producto por internet, a través de correo, y/
o venta telefónica, debe usted veri car que
el uso de este producto está destinado al
país en el cual reside.
AVISO: El uso de este producto en un país
distinto al cual está destinado podría resultar peligroso y podría invalidar la garantía
del fabricante o distribuidor. Por favor
guarde su recibo como prueba de compra
ya que de otro modo el producto puede
verse privado de la garantía del fabricante o
distribuidor.
* Todos los nombres de productos y com-
pañías son marcas comerciales o marcas
registradas de sus respectivos propietarios.
(solo UE)
Si aparece el símbolo del cubo de basura tachado sobre un producto, su
manual de usuario, la batería, o el
embalaje de cualquiera de éstos, signi ca que cuando tire dichos artículos a la basura, ha de hacerlo en
acuerdo con la normativa vigente de
SUMIDOR
Page 5

Fr
Les documents suivants sont disponibles pour le TM-60/TM-60C.
• TM-60/TM-60C Guide de prise en main (le présent guide)
• TM-60/TM-60C Manuel d’utilisation (PDF)
Lisez d’abord ce manuel. Pour exploiter pleinement toutes les
fonctions de cet appareil et assurer une utilisation sans problème, lisez aussi le Mode d’emploi téléchargeable sur le site
internet de Korg.
www.korg.com
Préparations
Mise en place des piles
• Faites coulisser le couvercle du compartiment des piles à l’arrière
du TM-60/TM-60C (A) et soulevez le couvercle (B). Insérez les
piles, en respectant leur polarité (C), puis refermez le couvercle.
Utilisation du micro interne ou d’un microphone de
contact (Fig. 2)
• Pour pouvoir utiliser le micro interne (1), il faut qu’aucun instrument ne soit connecté à la prise INPUT (2).
• Pour utiliser le microphone de contact (fourni avec le TM-60C),
branchez-le à la prise INPUT.
Utiliser un casque
• Branchez un casque disponible dans le commerce à la prise
(casque) (3).
Utiliser le pied
• Déployez le support (D) pour placer le TM-60/TM-60C en position verticale.
(Fig 1)
(Fig .1)
Accord
Accord avec le compteur
1. Appuyez sur le bouton TUNER ON (4) (mode Compteur).
Ce bouton met le TM-60/TM-60C sous et hors tension.
2. Jouez une seule note sur votre instrument et accordez-le.
Accordez votre instrument jusqu’à ce que le nom de la note
correcte (a) apparaisse sur l’affichage et que l’aiguille du
compteur indique “ ” (b) au centre.
• Pour changer le réglage par défaut (A4=440 Hz) de hauteur de
référence (c) , appuyez sur le bouton CALIB·NOTE ou (5).
Vous pouvez accorder une note de gamme naturelle une
Astuce:
tierce majeure ou une tierce mineure au-dessus d’une
note donnée. (Voyez le Manuel d’utilisation.)
Accord avec la note
Au lieu de suivre la procédure décrite ci-dessus, vous pouvez
accorder votre instrument avec la méthode suivante.
• Accordez votre instrument en utilisant la note de référence
produit par l’appareil comme référence. (mode Son)
• Cet appareil détecte la hauteur du son que vous jouez sur
votre instrument et produit la note de référence de la hauteur
la plus proche du son joué. Servez-vous du son produit par
l’appareil comme point de comparaison avec le son que vous
jouez pour accorder votre instrument. (mode Retour Son)
Vous pouvez utiliser le mode Retour son en connectant
un dispositif à la prise INPUT ou la prise (casque) (ou les
deux).
(Fig.2)
1. Appuyez sur le bouton TUNER ON.
2. Pour utiliser le mode Son, appuyez sur le bouton SOUND/
SOUND BACK (6).
Pour utiliser le mode Retour son, maintenez enfoncé le bouton SOUND/SOUND BACK. “
• Utilisez la commande VOL (de volume) [7] pour régler le volume de sortie.
3. Si le TM-60/TM-60C est en mode Retour son, il produit la note
de référence. Appuyez sur le bouton CALIB·NOTE ou
pour sélectionner une note par pas de demi-ton entre C3 et
C6 (a).
Quand l’accordeur est en mode Retour son, il produit la note
de référence le plus proche de la hauteur de la note jouée sur
votre instrument.
” apparaît à l’écran.
Utilisation du métronome
1. Appuyez sur le bouton METRONOME ON (8).
Ce bouton met le TM-60/TM-60C sous et hors tension.
2. Appuyez sur le bouton START/STOP (9).
Le métronome démarre.
Réglage du tempo
Appuyez sur le bouton TEMPO ou (10)(30 à 252 battements
par minute (bpm)).
Pour changer le tempo (d) par pas de 1, maintenez
Astuce:
simultanément enfoncés les boutons TEMPO et
pour passer en pas complet, puis appuyez sur le bouton TEMPO ou .
• Sinon, appuyez plusieurs fois sur le bouton TAP TEMPO (11) au
tempo voulu.
Réglage de la signature rythmique
• Appuyez sur le bouton BEAT ou (12).
0 µ 1 ... 9 (9 temps) µ (quartolet sans temps du milieu)
(quartolet) µ (triolet sans temps du milieu) µ
µ
(Triolet) µ (duolet) µ 0 ... (e)
Utilisation simultanée de l’accordeur et du
métronome
• Appuyez sur les boutons TUNER ON et METRONOME ON pour
les activer les deux fonctions.
L’achage d’accordage apparaît dans le dessus du compteur
à l’écran et le balancier du métronome dans le dessous du
compteur.
Fiche techniques (Aperçu)
Alimentation: 2 piles AAA (3V) Durée des piles: Environ 130
heures (quand l’accordeur est utilisé), Environ 130 heures (quand
le métronome est utilisé), Rétroéclairage:O, pour des piles au
zinc-carbone. Mise hors tension automatique: Environ 20
minutes.
Poids: 100 g (piles comprises).
prose en main, deux piles AAA, Microphone de contact (TM-60C
uniquement).
* Les caractéristiques et l’aspect du produit sont susceptibles
d’être modiés sans avis préalable en vue d’une amélioration.
Dimensions: 111 mm (L) x 74 mm (P) x 18 mm (H).
Accessoires fournis: Guide de
- 5 -
Page 6

De
Folgende Dokumente zum TM-60/TM-60C sind erhältlich.
• TM-60/TM-60C Blitzstart (dieses Dokument)
• TM-60/TM-60C Bedienungsanleitung (PDF)
Lesen Sie diese Anleitung zuerst. Um sich mit allen Funktionen
des Geräts vertraut zu machen, lesen Sie bitte die Bedienungsanleitung, die als Download auf der Korg-Website zur Verfügung steht.
www.korg.com
Vorbereitungen
Batterien einlegen
Schieben Sie den Batteriefachdeckel auf der Rückseite des TM60/TM-60C nach außen (A) und önen Sie ihn (B). Setzen Sie Batterien unter Beachtung der richtigen Polung ein (C). Schließen
Sie den Deckel.
Verwendung des integrierten Mikrofons oder Kontaktmikrofons.
• Das integrierte Mikrofon (1) funktioniert nur, wenn die INPUT-Buchse (2) nicht belegt ist.
• Das Kontaktmikrophon (Zubehör des TM-60C) stecken Sie in
die INPUT-Buchse.
Kopfhörer verwenden
Schließen Sie einen handelsüblichen Kopfhörer an die (Kopfhörer)-Buchse (3) an.
Ständer verwenden
Ziehen Sie den Ständer (D) aus, um das TM-60/TM-60C aufzustellen.
(Fig.1)
(Fig.2)
(Fig.1)
Stimmen
Stimmen nach Messanzeige
1. Drücken Sie die TUNER ON-Taste (4) (Messmodus).
Diese Taste schaltet den TM-60/TM-60C ein oder aus.
2. Spielen Sie eine Einzelnote auf dem Instrument und stimmen
Sie es.
Stimmen Sie, bis der korrekte Notenname (a) im Display erscheint und die Stimmanzeige zentral auf „ “ steht.
• Zum Ändern die Referenztonhöhe (c) von A4=440 Hz, drücken
Sie die Taste CALIBNOTE oder (5).
Sie können auch auf eine reine große oder kleine Terz
Tipp:
oberhalb einer bestimmten Note stimmen. (Siehe Bedienungsanleitung.)
Stimmen nach Ton
Statt wie oben beschrieben, können Sie Ihr Instrument auch wie
folgt stimmen.
• Stimmen Sie Ihr Instrument auf einen vom Gerät ausgegebenen Referenzton. (Ton-Ausgabe-Modus)
• Das Gerät erkennt die von Ihnen gespielte Note und gibt den
nächstgelegenen Referenzton aus. So können Sie durch Vergleich der beiden Tonhöhen Ihr Instrument stimmen (Sound
Back-Modus).
Der Sound-Back-Modus funktioniert, wenn ein Instrument
an die INPUT-Buchse und/oder an die (Kopfhörer)-Buchse
angeschlossen ist.
(Fig.2)
1. Drücken Sie die TUNER ON-Taste.
2. Für den Ton-Ausgabe-Modus drücken Sie die SOUND/SOUND
BACK-Taste (6).
Für den Sound Back-Modus halten Sie die SOUND/SOUND
BACK-Taste gedrückt. Im Display erscheint „
• Die Wiedergabelautstärke regeln Sie mit dem Lautstärkeregler
(VOL) (7).
3. Im Ton-Ausgabe-Modus gibt das TM-60/TM-60C den Referenz-
ton wieder. Mit der Taste CALIBNOTE oder wählen Sie in
Halbtonschritten eine Note zwischen C3 und C6 (a).
Im Sound-Back-Modus erklingt der nächstliegende Referenzton, wenn Sie eine einzelne Note auf Ihrem Instrument spielen.
Verwenden des Metronoms
1. Drücken Sie die METRONOME ON-Taste (8).
Diese Taste schaltet den TM-60/TM-60C ein oder aus.
2. Drücken Sie die START/STOP-Taste (9).
Das Metronom startet.
Einstellen von Tempo
• Drücken Sie die Taste TEMPO oder (10) (30 ~ 252 Taktschläge/Minute (bpm)).
Um das Tempo (d) in Einerschritten zu ändern, halten
Tipp:
Sie gleichzeitig die Tasten TEMPO
um auf ganzer Schritt umzuschalten und drücken dann
die Taste TEMPO
• Oder drücken Sie die TAP TEMPO-Taste (11) mehrmals im gewünschten Tempo.
oder .
und gedrückt,
Einstellen von Taktart
• Drücken Sie die Taste BEAT oder
0 µ 1 ... 9 (9 Takte) µ (Quartole ohne die beiden mittleren
Taktschläge) µ (Quartole)
ren Taktschlag) µ
(Triole)
(12).
(Triole ohne den mittle-
µ
(Duole)
µ
0 ... (e)
µ
Gleichzeitige Verwendung des Stimmgeräts und Metronoms
• Drücken Sie die Tasten TUNER ON und METRONOME ON, um
beides einzuschalten.
Die Messanzeige erscheint im oberen Teil der Stimmanzeige
im Display, das Metronompendel in deren unterem Teil.
Technische Daten (Übersicht)
Stromversorgung : Zwei AAA-Batterien (3V). Lebensdauer
der Batterien : Ca. 130 Stunden (Stimmgerätbetrieb), Ca. 130
Stunden (Metronombetrieb), Hintergrundbeleuchtung : Aus,
Zink-Kohlenstoffbatterien. Energiesparfunktion : Ca. 20 Minuten.
Abmessungen : 111 mm(T) x 74 mm(B) x 18 mm(H)
Gewicht : 100 g (mit Batterien)
AAA-Batterien, Kontaktmikrofon (nur TM-60C)
* Änderungen der technischen Daten und des Designs ohne
vorherige Ankündigung vorbehalten.
Lieferumfang : Blitzstart, Zwei
- 6 -
“.
Page 7

Es
Para el TM-60/TM-60C existen los siguientes documentos disponibles:
• TM-60/TM-60C Guía de inicio rápido (este documento)
• TM-60/TM-60C Manual de usuario (PDF)
Lea este manual lo primero de todo. Para conocer todas las
funciones de este dispositivo y que funcione correctamente,
lea también el Manual del usuario, que puede descargarse
desde el sitio web de Korg.
www.korg.com
Preparativos
Instalación de las pilas
• Deslice la tapa del compartimento de las pilas en la parte
posterior del TM-60/TM-60C (A) y levántela (B). Inserte las pilas
y asegúrese de respetar la polaridad correcta (C) y después
cierre la tapa.
Uso del micro interno o del micro de contacto
• Para utilizar el micro interno (1), asegúrese de que no hay
nada conectado al jack INPUT (2).
• Para utilizar el micro de contacto (incluido con el TM-60C),
conéctelo al jack INPUT.
Uso de auriculares
• Conecte unos auriculares adquiridos aparte en el jack (auriculares) (3).
Uso del soporte
• Saque el soporte (D) para apoyar en vertical el TM-60/TM-60C.
(Fig.1)
(Fig.2)
(Fig.1)
Anación
Anación utilizando el medidor
1. Pulse el botón TUNER ON (4) (Modo de Aguja).
Este botón enciende o apaga el TM-60/TM-60C.
2. Toque una sola nota en el instrumento y afínelo.
Afine el instrumento hasta que aparezca en la pantalla el
nombre de nota correcto (a) y la indicación del medidor esté
en “ ” (b) en el centro.
• Para cambiar el tono de anación de referencia (c) por defecto
A4=440 Hz, pulse el botón CALIB·NOTE o (5).
Puede afinar en temperamento mesotónico a una
Consejo:
tercera mayor ascendente o una tercera menor ascendente de una nota determinada. (Consulte el Manual
del usuario).
Anación utilizando el tono acústico
En vez de utilizar el procedimiento descrito anteriormente, puede anar el instrumento como se describe a continuación.
• Ane el instrumento para que iguale el tono acústico de referencia emitido por este dispositivo. (modo Salida de sonido)
• Este dispositivo detecta el tono que está tocando en el instrumento y emite el tono acústico de referencia más cercano.
Compárelo con la anación del tono que está emitiendo con el
instrumento y ane el instrumento. (modo Regreso de sonido)
El modo Regreso de sonido se puede utilizar si hay un dispo-
sitivo conectado al jack INPUT o al jack
ambos).
(Fig.2)
(auriculares) (o a
1. Pulse el botón TUNER ON.
2. Para utilizar el modo Salida de sonido, pulse el botón SOUND/
SOUND BACK (6).
Para utilizar el modo Regreso de sonido, mantenga pulsado
el botón SOUND/SOUND BACK. “
pantalla.
• Utilice VOL (control de volumen) (7) para ajustar el volumen
de salida.
3. Si está en modo Salida de sonido, el TM-60/TM-60C emite el
tono acústico de referencia. Pulse el botón CALIB·NOTE o
para seleccionar una nota en pasos de semitonos entre C3
(Do3) y C6 (Do6) (a).
Si el dispositivo está en modo Regreso de sonido, al tocar una
sola nota en el instrumento se emitirá el tono acústico de referencia más cercano.
Uso del metrónomo
1. Pulse el botón METRONOME ON (8).
Este botón enciende o apaga el TM-60/TM-60C.
2. Pulse el botón START/STOP (9).
El metrónomo comienza.
Ajuste del tempo
• Pulse el botón TEMPO o (10) (30–252 tiempos por minuto (bpm)).
Para cambiar el tempo (d) en pasos de 1, mantenga
Consejo:
pulsados los botones TEMPO
mente para cambiar a Paso completo, y a continuación pulse el botón TEMPO
• Si lo preere, pulse el botón TAP TEMPO (11) varias veces al
tempo que desee.
y simultánea-
o .
Ajuste de la marca de tiempo
• Pulse el botón BEAT o (12).
0 µ 1 ... 9 (9 tiempos) µ (Cuatrillo sin el tiempo central)
(Cuatrillo)
µ
(Tresillo) µ (Dosillo)
(Tresillo sin el tiempo central)
µ
0 ... (e)
µ
Uso del afinador y del metrónomo simultáneamente
• Pulse los botones TUNER ON y METRONOME ON para activar
ambos.
El medidor de anación aparece en la parte superior del medidor en la pantalla, y el péndulo del metrónomo aparece en la
parte inferior del medidor.
Especicaciones (Resumen)
Alimentación : Dos pilas AAA (3V). Duración de la pila :
Aproximadamente 130 horas (funcionamiento como anador),
Aproximadamente 130 horas (funcionamiento como metrónomo), Retroiluminación : Desactivada, Pilas zinc-carbono.
Apagado automático: Aproximadamente 20 minutos.
siones: 111 mm (Anch.) x 74 mm (Prof.) x 18 mm (Alt.). Peso:
100g (incluyendo las pilas).
inicio rápido, pilas AAA (x2), Micro de contacto (solo TM-60C)
* Las especicaciones y el aspecto están sujetas a cambios sin
previo aviso por mejora.
Elementos incluidos: Guía de
- 7 -
” aparece en la
µ
Dimen-
Page 8

A
C
e
10
12
78acbd
4
5
6
1
Fig.1 Fig.2
B
D
Ja
TM-60/TM-60Cには以下の取扱説明書があります。
• TM-60/TM-60Cクイック・スタート・ガイド(本書)
• TM-60/TM-60C取扱説明書(PDF)
最初は本書をお読みください。さらに本機の機能を最大限に活
用し、末永くご愛用いただくためにも、「取扱説明書」をコルグ・
ウェブサイトからダウンロードして、お読みください。
準備する
電池を入れる
• 本機の裏側にある電池の蓋をスライドして(A)、 引 き 上 げ ま す
(B)。極性に注意して電池を入れ(C)、蓋を閉めます。
付属の電池は動作確認用のため、通常より寿命が短い場合が
あります。
内蔵マイク、コンタクト・マイクを使用する
• 内 蔵 マ イ ク(1)を使用するときは、INPUT端子(2)に何も接続
しないでください。
• コンタクト・マイク(TM-60C付属)を使用するときは、INPUT端
子にコンタクト・マイクを接続します。
ヘッドホンを使用する
• 市販のへッドホンを ( ヘ ッ ド ホ ン )端 子(3)に 接 続 し ま す 。
本機を立てて使用する (
• ス タ ン ド(D)を起こして、本機を立てて使用できます。
(Fig.1)
Fig.1
)
チューニングする
メーターでチューニングする
1. TUNER ONボタン(4)を 押 し ま す( メータ ー ・モー ド )。
オン/オフが切り替わります。
2. 楽器を単音で鳴らして、チューニングします。
合わせたい音名(a)が表示され、メーターが中央の“ ”(b)を
指すようにします。
• 基準ピッチ(c)を「 A4=440Hz」か ら 変 更 す る と き は、
CALIB·NOTEボタン 、 (5)を押して設定します。
Tip:
長3度上または短3度上の音を純正律でチューニングできま
す(→「取扱説明書」参照)。
音を聞いてチューニングする
上記以外に、以下のチューニングが行えます。
• 本機が出力する基準音に合わせてチューニングします(サウン
ド アウ ト・モ ード )。
• 本機が、楽器で鳴らした音を感知して、最も近い音名の基準
音を出力します。楽器と本機からの音のピッチを聞き比べて
チューニングします(サ ウンド バ ック・モ ー ド)
サウンドバック・モードは、INPU T端子または (ヘッドホ
ン)端子のいずれか(または両方)に接続している場合に使用
(Fig.2)
www.korg.com
(Fig.2)
。
できます。
1. TUNER ONボタンを押します。
2. サウンドアウト・モードは、SOUND/SOUND BACKボ
タ ン(6)を 押します。
サウンドバック・モードは、SOUND/SOUND BACKボ
タンを長押しします。 が表示されます。
• 音量はVOL(ボリューム)(7)で 調 節 し ま す 。
3. サウンドアウト・モード選択時は、本機から基準音が出力
されます。CALIB·NOTE 、 ボタンで合わせたい音名
(a)を半音単位で選びます。
C3からC6
サウンド バック・モード選択時は、楽器を単音で鳴らすと、
本機からその音に最も近い基準音が出力されます。
メトロノームを使用する
1. METRONOME ONボタン(8)を 押 し ま す 。
オン/オフが切り替わります。
2. START/STOPボタン(9)を 押 し ま す 。
メトロノームがスタートします。
テンポを設定する
• TEMPO 、 ボ タ ン(10)を 押 し ま す(𝅘𝅥 =30 ~ 252)。
Tip:
テンポの値(d)を1ずつ切り替えたいときは、TE MPO
と ボタンを同時に長押ししてフ ル・ス テッ プ に切り
替えてから、TEMPO 、 ボタンを押してください。
• または、設定したいタイミングでTAP TEMPOボタン(11)
を数回タップします。
拍子を設定する
• BEAT 、 ボ タ ン(12)を 押 し ま す 。
0 n 1 ... 9(9拍子) n (4連中抜き)
(3連中抜き)
n
( 3 連 符 )
n
(2連符)
n
(4連符)
n
0 ...
チューナーとメトロノームを同時に使用する
• TUNER ONボタンと、METRONOME ONボタンを、そ
れぞれ押して、オンにします。
ディスプレイの上段にチューニング・メーターが、下段に
メトロノームの振り子が表示されます。
仕 様( 概 略 )
■電源:単4形乾電池2本■電池寿命:約130時間*(チューナー動
作時)、約130時間*(メトロノーム動作時)*バックライト・オフ、マ
ンガン乾電池使用時 ■オート・パワー・オフ:約20分■外形寸法:
111 mm(W) x 74 mm(D) x 18 mm(H)■質量:100 g(電池含
む)■付属品:クイック・スタート・ガイド、動作確認用単4形乾電
池(2本)、コンタクト・マイク(TM-60Cのみ)
仕様および外観は改良のため予告なく変更する場合があります。
*
- 8 -
(e)
9
11
3
2
n
 Loading...