

Page 1

User Guide
Mode d’Emploi
Anleitung
Manuale di istruzioni
E F G I 1
Page 2

Page 3

Important safety instructions
• Read these instructions.
• Keep these instructions.
• Heed all warnings.
• Follow all instructions.
• Do not use this apparatus near water.
• Clean only with dry cloth.
• Do not block any ventilation openings, install in accordance with the manufacturer’s
instructions.
• Do not install near any heat sources such as radiators, heat registers, stoves, or other
apparatus (including amplifiers) that produce heat.
• Do not defeat the safety purpose of the polarized or grounding-type plug. A polarized
plug has two blades with one wider than the other. A grounding type plug has two
blades and a third grounding prong. The wide blade or the third prong are provided for
your safety. If the provided plug does not fit into your outlet, consult an electrician for
replacement of the obsolete outlet. (for U.S.A. and Canada)
• Protect the power cord from being walked on or pinched particularly at plugs, convenience receptacles, and the point where they exit from the apparatus.
• Only use attachments/accessories specified by the manufacturer.
• Unplug this apparatus during lightning storms or when unused for long periods of time.
• Refer all servicing to qualified service personnel. Servicing is required when the apparatus has been damaged in any way, such as power-supply cord or plug is damaged, liquid
has been spilled or objects have fallen into the apparatus, the apparatus has been
exposed to rain or moisture, does not operate normally, or has been dropped.
• Install this product near the wall socket and keep the power plug easily accessible.
• WARNING—This apparatus shall be connected to a mains socket outlet with a protective
earthing connection.
• Do not install this equipment on the far position from wall outlet and/or convenience
receptacle.
• Do not install this equipment in a confined space such as a box for the conveyance or
similar unit.
• Excessive sound pressure from earphones and headphones can cause hearing loss.
• When a cart is used, use caution when moving the cart/apparatus combination to avoid
injury from tip-over.
i
Page 4

ii
• Mains powered apparatus shall not be exposed to dripping or splashing and that no
objects filled with liquids, such as vases, shall be placed on the apparatus.
• Turning off the power switch does not completely isolate this product from the power
line so remove the plug from the socket if not using it for extended periods of time, or
before cleaning. Please ensure that the mains plug or appliance coupler remain readily
accessible.
The lightning flash with arrowhead symbol within an equilateral triangle,
is intended to alert the user to the presence of uninsulated “dangerous
voltage” within the product’s enclosure that may be of sufficient magnitude to constitute a risk of electric shock to persons.
The exclamation point within an equilateral triangle is intended to alert
the user to the presence of important operating and maintenance (servicing) instructions in the literature accompanying the product.
Page 5
THE FCC REGULATION WARNING (for U.S.A.)
This equipment has been tested and found to comply with the limits for a Class B digital device,
pursuant to Part 15 of the FCC Rules. These limits are designed to provide reasonable
protection against harmful interference in a residential installation. This equipment generates,
uses, and can radiate radio frequency energy and, if not installed and used in accordance with
the instructions, may cause harmful interference to radio communications. However, there is
no guarantee that interference will not occur in a particular installation. If this equipment does
cause harmful interference to radio or television reception, which can be determined by
turning the equipment off and on, the user is encouraged to try to correct the interference by
one or more of the following measures:
• Reorient or relocate the receiving antenna.
• Increase the separation between the equipment and receiver.
• Connect the equipment into an outlet on a circuit different from that to which the receiver is
connected.
• Consult the dealer or an experienced radio/TV technician for help.
Unauthorized changes or modification to this system can void the user’s authority to operate
this equipment.
IMPORTANT NOTICE TO CONSUMERS
This product has been manufactured according to strict specifications and voltage
requirements that are applicable in the country in which it is intended that this product should
be used. If you have purchased this product via the internet, through mail order, and/or via a
telephone sale, you must verify that this product is intended to be used in the country in which
you reside.
WARNING: Use of this product in any country other than that for which it is intended could be
dangerous and could invalidate the manufacturer's or distributor's warranty.
Please also retain your receipt as proof of purchase otherwise your product may be disqualified
from the manufacturer's or distributor's warranty.
iii
NOTICE REGARDING DISPOSAL (for EU only)
When this “crossed-out wheeled bin” symbol is displayed on the product, owner’s
manual, battery, or battery package, it signifies that when you wish to dispose of
this product, manual, package or battery you must do so in an approved manner. Do
not discard this product, manual, package or battery along with ordinary household
waste. Disposing in the correct manner will prevent harm to human health and
potential damage to the environment. Since the correct method of disposal will
depend on the applicable laws and regulations in your locality, please contact your
the regulated amount, a chemical symbol is displayed below the “crossed-out wheeled bin”
symbol on the battery or battery package.
local administrative body for details. If the battery contains heavy metals in excess of
Page 6

iv
Consignes importantes de sécurité
• Veuillez lire ces consignes.
• Conservez ces consignes.
• Tenez compte de tous les avertissements.
• Suivez toutes les instructions.
• N’utilisez pas ce produit à proximité d’eau.
• Nettoyez le produit avec un chiffon sec uniquement.
• Ne bloquez aucun orifice d’aération et installez le produit conformément aux consignes
du fabricant.
• Ne l’installez pas à proximité de sources de chaleur comme des radiateurs, des bouches
d’air chaud, des poêles ou d’autres appareils générateurs de chaleur (amplificateurs compris).
• Ne supprimez pas la sécurité offerte par la fiche polarisée ou dotée d’une broche de
terre. Une fiche polarisée dispose de deux lames dont une plus large que l’autre. Une
fiche avec broche de terre dispose de deux lames (ou broches) et d’une broche de terre.
La lame plus large ou la troisième broche est conçue pour votre sécurité. Si la fiche fournie ne s’adapte pas à votre prise de courant, consultez un électricien pour faire remplacer cette ancienne prise. (Pour les États-Unis et le Canada)
• Protégez le cordon d’alimentation pour éviter qu’il ne soit piétiné ou abîmé notamment
à la hauteur des fiches, des rallonges et au point de connexion du produit.
• Utilisez exclusivement des fixations ou accessoires spécifiés par le fabricant.
• Débranchez cet appareil en cas d’orage ou s’il doit rester inutilisé durant une période
assez longue.
• Pour tout dépannage ou entretien, veuillez consulter un service ou un technicien qualifié. Il est impératif de faire appel à un technicien qualifié si l’appareil a été endommagé
d’une quelconque façon, notamment, si le cordon d’alimentation ou la fiche est endommagée, si du liquide s’est renversé ou si des objets sont tombés dans l’appareil, si l’appareil a été exposé à la pluie ou à l’humidité, s’il ne fonctionne plus normalement ou s’il est
tombé.
• Installez ce produit à proximité de la prise de courant en laissant un accès facile à la prise
d’alimentation.
• AVERTISSEMENT—Ce produit doit être branché à une prise secteur disposant d’une connexion de sécurité à la terre.
• N’installez pas ce produit loin de la prise secteur.
• N’installez pas ce produit dans un espace confiné comme un flightcase ou autre meuble
de ce type.
• Une pression sonore excessive en provenance d’oreillettes ou d’un casque peut entraîner
une perte auditive.
Page 7

• Si vous utilisez un chariot, soyez prudent lors de son déplacement afin d’éviter que le
produit ne bascule et ne blesse quelqu’un.
• Un produit branché au secteur ne peut pas être exposé à des gouttes ou des éclaboussures. Ne placez aucun conteneur de liquide (vase, verre) sur le produit.
• Le fait de couper l’interrupteur n’isole pas complètement le produit de la source de courant. Débranchez donc la fiche de la prise secteur si le produit doit rester inutilisé durant
un certain temps ou pour nettoyer. Veillez à laisser un accès facile à la prise secteur.
Le symbole d’éclair dans un triangle équilatéral est destiné à avertir l’utilisateur de la présence d’une tension dangereuse non isolée au sein du produit. Cette tension est suffisante pour constituer un risque d’électrocution.
v
Le point d’exclamation dans un triangle équilatéral avertit l’utilisateur de
la présence d’importantes consignes de manipulation ou d’entretien dans
la documentation accompagnant ce produit.
Page 8
vi
THE FCC REGULATION WARNING (for U.S.A.)
This equipment has been tested and found to comply with the limits for a Class B digital device,
pursuant to Part 15 of the FCC Rules. These limits are designed to provide reasonable protection against harmful interference in a residential installation. This equipment generates, uses,
and can radiate radio frequency energy and, if not installed and used in accordance with the
instructions, may cause harmful interference to radio communications. However, there is no
guarantee that interference will not occur in a particular installation. If this equipment does
cause harmful interference to radio or television reception, which can be determined by turning the equipment off and on, the user is encouraged to try to correct the interference by
one or more of the following measures:
• Reorient or relocate the receiving antenna.
• Increase the separation between the equipment and receiver.
• Connect the equipment into an outlet on a circuit different from that to which the receiver is
connected.
• Consult the dealer or an experienced radio/TV technician for help.
Unauthorized changes or modification to this system can void the user’s authority to operate
this equipment.
REMARQUE IMPORTANTE À L’ATTENTION DES CONSOMMATEURS
Ce produit a été fabriqué selon des spécifications et des caractéristiques de tension strictes en
vigueur dans le pays dans lequel l’appareil est censé être utilisé. Si vous avez acheté ce produit
par internet, par vente par correspondance et/ou par vente téléphonique, assurez-vous que ce
produit est conçu pour fonctionner dans le pays où vous résidez.
AVERTISSEMENT: L’utilisation de ce produit dans tout autre pays que celui pour lequel il est
conçu peut être dangereuse et peut entraîner l’annulation de la garantie du fabricant ou du
distributeur.
Conservez également votre reçu comme preuve d’achat pour pouvoir bénéficier de la garantie
du fabricant ou du distributeur.
REMARQUE CONCERNANT LA MISE AU REBUT (pour l’UE)
Quand ce pictogramme représentant une poubelle à roulettes barrée figure sur le
produit, le mode d’emploi, la batterie ou son emballage, il signifie que la mise au
rebut de ce produit, du mode d’emploi, de la batterie ou de son emballage doit être
effectuée selon une procédure agréée. Ne jetez pas ce produit, ce manuel, cet
emballage ou cette batterie avec des déchets ménagers ordinaires. Une mise au
rebut correcte évite tout préjudice à la santé humaine et à l’environnement. La procédure de mise au rebut varie en fonction des lois et des réglementations en vigueur
tage. Si la teneur en métaux lourds de la batterie excède la limite autorisée, un symbole chimique est ajouté sous le pictogramme représentant une poubelle à roulettes barrée figurant sur
la batterie ou son emballage.
dans chaque pays. Veuillez donc contacter les autorités locales pour en savoir davan-
Page 9

vii
Wichtige Sicherheitshinweise
• Bitte lesen Sie sich die Hinweise durch.
• Bewahren Sie diese Hinweise auf.
• Befolgen Sie alle Warnungen.
• Führen Sie alle Anweisungen aus.
• Verwenden Sie das Gerät niemals in der Nähe von Wasser.
• Reinigen Sie es nur mit einem trockenen Tuch.
• Versperren Sie niemals die Lüftungsschlitze und stellen Sie das Gerät nur den Herstelleranweisungen entsprechend auf.
• Stellen Sie das Gerät niemals in die Nähe von Wärmequellen wie Heizkörper, Öfen bzw.
Geräte (darunter auch Verstärker), die ausgesprochen heiß werden.
• Versuchen Sie niemals, die Erdung des Netzkabels zu umgehen. Ein polarisierter (englischer) Stecker weist zwei unterschiedlich breite Stifte auf. Ein geerdeter Stecker ist hingegen mit drei Stiften versehen. Der Erdungsstift dient Ihrer Sicherheit. Wenn der beiliegende Stecker nicht in Ihre Steckdose passt, bitten Sie einen Elektriker, diese zu ersetzen.
(Für die USA und Kanada.)
• Sorgen Sie dafür, dass das Netzkabel nicht gequetscht wird und dass man nicht darüber
stolpern kann.
• Verwenden Sie nur Halter und Ständer, die ausdrücklich vom Hersteller empfohlen werden.
• Lösen Sie im Falle eines Gewitters oder wenn das Gerät längere Zeit nicht verwendet
werden soll, den Netzanschluss.
• Überlassen Sie alle Wartungsarbeiten einem qualifizierten und befugten Techniker. Das
ist z.B. notwendig, wenn das Produkt Schäden aufweist (z.B. beschädigtes Netzkabel,
Eintritt von Flüssigkeit oder Fremdkörpern, wenn das Gerät im Regen gestanden hat),
sich nicht erwartungsgemäß verhält oder hingefallen ist.
• Stellen Sie das Gerät nach Möglichkeit in die Nähe der Steckdose und sorgen Sie dafür,
dass man letztere problemlos erreicht.
• WARNUNG—Dieses Gerät darf nur an eine geerdete Steckdose angeschlossen werden.
• Stellen Sie das Gerät niemals weit von der Steckdose/Anschlussleiste entfernt auf.
• Während des Betriebs darf sich das Gerät niemals in einem teilweise oder vollständig
geschlossenen Flightcase, Rack o.ä. befinden.
• Ein hoher Schalldruck kann bei Verwendung von Ohrhörern bzw. eines Kopfhörers zu
einem bleibenden Hörschaden führen.
Page 10

viii
• Bei Verwendung eines Wagens ist darauf zu achten, dass er während des Transports
nicht umkippt.
• Ein netzgespeistes Gerät darf niemals Regen- oder Wassertropfen ausgesetzt werden.
Außerdem darf man keine Flüssigkeitsbehälter wie Vasen usw. auf das Gerät stellen.
• Wenn Sie das Instrument ausschalten, ist es weiterhin mit dem Stromnetz verbunden. Es
kann nie schaden, den Netzanschluss zu lösen, wenn Sie es über einen längeren Zeitraum
nicht verwenden bzw. es reinigen möchten. Wählen Sie daher eine Steckdose, die Sie
problemlos erreichen können.
Der Blitz in einem gleichwinkligen Dreieck bedeutet, dass das Gerät nicht
isolierte Spannungen erzeugt, die einen Stromschlag verursachen können.
Das Ausrufezeichen in einem gleichwinkligen Dreieck soll den Anwender
auf wichtige Bedienhinweise aufmerksam machen, die in der beiliegenden
Dokumentation enthalten sind.
Page 11
WICHTIGER HINWEIS FÜR ANWENDER
Dieses Produkt wurde unter strenger Beachtung der Vorgaben und Spannungsanforderungen
im jeweiligen Auslieferungsland hergestellt. Wenn Sie das Produkt über das Internet, per Postversand und/oder telefonischer Bestellung erworben haben, müssen Sie überprüfen, ob es für
Verwendung am Einsatzort geeignet ist.
WARNUNG: Die Verwendung dieses Produkts in einem anderen Land als dem, für das es
bestimmt ist, kann gefährlich sein und die Garantie des Herstellers oder Vertriebs hinfällig werden lassen.
Bitte bewahren Sie die Quittung als Kaufbeleg auf, da das Produkt sonst von der Garantie des
Herstellers oder Vertriebs ausgeschlossen werden kann.
HINWEIS ZUR ENTSORGUNG (nur für die EU)
Wenn die Bedienungsanleitung, die Verpackung, das Gerät, die Batterie und/oder
ihre Verpackung ein durchgestrichenes Mülltonnensymbol enthält, muss das Gerät,
die Bedienungsanleitung, die Verpackung oder die Batterie den örtlichen Umweltbestimmungen entsprechend entsorgt werden. Entsorgen Sie das Produkt, die
Bedienungsanleitung, die Verpackung oder die Batterie niemals mit dem Hausmüll.
Mit einer sachgerechten Entsorgung vermeiden Sie Gesundheitsschäden und eine
Schädigung der Umwelt. Da sich das Entsorgungsverfahren nach den örtlichen
Bestimmungen richtet, wenden Sie sich im Zweifelsfall bitte an die zuständige Stelle.
Wenn die Batterie mehr Schwermetall enthält als erlaubt, befindet sich unter der durchgestrichenen Mülltonne auf der Batterie oder ihrer Verpackung ein Chemiesymbol.
ix
Page 12

x
Importanti istruzioni di sicurezza
• Leggete queste istruzioni.
• Conservate queste istruzioni.
• Tenete conto di tutti gli avvertimenti.
• Seguite tutte le istruzioni.
• Non utilizzate l’apparecchio vicino ad acqua.
• Pulitelo utilizzando unicamente un panno asciutto.
• Non ostruite i fori di ventilazione, installatelo seguendo le istruzioni del produttore.
• Non installatelo in prossimità di fonti di calore come caloriferi, diffusori di aria calda,
stufe o altri dispositivi (tra cui amplificatori) che producono calore.
• Non tentate di rimuovere il sistema di sicurezza della spina polarizzata o con messa a
terra. La spina polarizzata ha due poli di cui uno è più grande dell’altro. La spina con
messa a terra ha due poli più uno per la messa a terra. Il polo più grande o il terzo polo è
fornito a scopo di sicurezza. Se la spina in dotazione non etra nella presa, consultate un
elettricista per sostituire la presa obsoleta. (per gli Stati Uniti e il Canada)
• Adottate misure adeguate per impedire che il cavo dell’alimentazione venga calpestato,
specialmente in prossimità di spine, prese multiple e punti di uscita.
• Utilizzate solo gli accessori specificati dal produttore.
• Scollegate l'apparecchio in caso di temporale o quando rimane inutilizzato per un lungo
periodo di tempo.
• Per assistenza rivolgetevi a personale qualificato. L’assistenza è necessaria quando
l’apparecchio è stato danneggiato, per esempio se il cavo o la spina dell’alimentazione è
danneggiata, se all’interno dell’apparecchio è entrato del liquido o un oggetto, se
l’apparecchio è stato esposto alla pioggia o all’umidità, se non funziona correttamente o
è caduto.
• Installate questo prodotto vicino a una presa a muro e fate in modo che la spina dell’alimentazione sia facilmente accessibile.
• ATTENZIONE — Questo apparecchio deve essere collegato a una presa con sistema di
messa a terra di protezione.
• Non installatelo lontano dalla presa a muro e/o a una presa multipla.
• Non installate l’apparecchio in uno spazio angusto quale una scatola per il trasporto o
simili.
• Un’eccessiva pressione sonora proveniente da auricolari e cuffie può provocare perdite
dell'udito.
Page 13

xi
• Se utilizzate un carrello, fate attenzione quando lo muovete insieme all’apparecchio in
modo da evitare di farlo cadere.
• L’apparecchio non deve essere esposto a gocce o schizzi e su di esso non deve essere collocato alcun oggetto contenente liquidi come vasi.
• Spegnendo l’apparecchio non lo si isola completamente dall’alimentazione, quindi
rimuovete la presa se non lo usate per lunghi periodo di tempo o prima di pulirlo. Fate in
modo che la spina o l’accoppiatore sia facilmente accessibile.
Il simbolo del lampo con la punta a freccia all’interno di un triangolo equilatero avverte l’utente della presenza di una “tensione pericolosa” non
isolata all’interno del prodotto, sufficientemente alta da costituire un
rischio di scossa elettrica per le persone.
Il punto esclamativo all’interno di un triangolo equilatero avverte l’utente
della presenza di importanti istruzioni di funzionamento e manutenzione
(di assistenza) nella documentazione che accompagna il prodotto.
Page 14
xii
IMPORTANTE AVVISO PER I CONSUMATORI
Il presente apparecchio è stato prodotto secondo severe specifiche e requisiti di tensione che si
applicano nel paese in cui l’apparecchio va utilizzato. Se avete acquistato questo apparecchio
via Internet, attraverso un ordine postale e/o per telefono, dovete verificare che il prodotto
possa essere utilizzato nel vostro paese.
ATTENZIONE: L’utilizzo di questo prodotto in paesi diversi da quello in cui dovrebbe essere utilizzato può essere pericoloso e invalidare la garanzia del produttore o del distributore.
Vi preghiamo inoltre di conservare la ricevuta quale prova dell’acquisto, altrimenti il prodotto
non sarà coperto dalla garanzia del produttore o del distributore.
AVVISO SULLO SMALTIMENTO (solo per l’UE)
Se il prodotto, il manuale di istruzioni, la batteria o il pacco batteria presenta il simbolo del “bidone della spazzatura con ruote barrato”, dovete smaltire il prodotto, il
manuale, la batteria o il pacco batteria in modo appropriato. Non smaltite questo
prodotto, il manuale, il pacco o la batteria insieme ai normali rifiuti domestici. Effettuando un corretto smaltimento si prevengono danni alla salute umana e potenziali
danni all’ambiente. Poiché il corretto metodo di smaltimento dipende dalle leggi e
dalle norme del luogo, contattate le autorità locali per maggiori dettagli. Se la bat-
sul pacco batteria è presente un simbolo chimico sotto al simbolo del “bidone della spazzatura
con ruote barrato”.
teria presenta metalli pesanti eccedenti i limiti definiti dalla legge, sulla batteria o
Page 15

ENGLISH
Page 16

2 – |
Data Handling
Data in memory may sometimes be lost due to improper use. Be sure to save important data
to the supplied Editor/Librarian software.
Trademarks
Mac is a registered trademark of Apple, Inc. Windows is a registered trademarks of
Microsoft Corporation. All other product names and company names are the trademarks or
registered trademarks of their respective owners.
Disclaimer
The information contained in this manual have been carefully revised and checked through.
Due to our constant efforts to improve our products, the specifications might differ to those
in the manual. Korg is not responsible for any eventual differences found between the specifications and the contents of the instruction manual. Specifications are subject to change
without prior notice.
Liability
Korg products are manufactured under strict specifications and voltages required by each
country. These products are warranted by the Korg distributor only in each country. Any
Korg product not sold with a warranty card or carrying a serial number disqualifies the
product sold from the manufacturer's/distributor's warranty and liability. This requirement
is for your own protection and safety.
Service and User’s Assistance
For service, please contact your nearest Authorized Korg Service Center. For more information on Korg products, and to find software and accessories for your keyboard, please contact your local Authorized Korg distributor. For up-to-date information, please point your
web browser to our web site.
Keep your keyboard up-to-date
Your instrument can be updated as new versions of the operating system are released by
Korg. You can download the operating system from our web site (www
read the instructions supplied with the operating system.
Saving energy and the life of the valve
Switch your SV-1 off whenever you are not using it. This will save power (and the planet), as
well as extend the life of the valve.
Replacing the valve
Valves, like light bulbs, have a indeterminate lifespan. When the valve fails, please contact
an Authorized Korg Service Center to replace it. DO NOT TRY TO REPLACE THE VALVE
YOURSELF, as you risk seriously damaging the instrument and risk receiving an electric
shock. In addition, this action will void the warranty.
.korg.com). Please,
Copyright © 2009 KORG Italy Spa. Printed in China.
Page 17

Table Of Contents | – 3
Table Of Contents
Introduction . . . . . . . . . . . . . . . . . . . . . . . . . . . . . . . . . . . . . . . . . . . . . 4
Welcome aboard! . . . . . . . . . . . . . . . . . . . . . . . . . . . . . . . . . . . . . . . . . . . . . . . . . . . . . . 4
What’s in the box . . . . . . . . . . . . . . . . . . . . . . . . . . . . . . . . . . . . . . . . . . . . . . . . . . . . . . 4
Main Features . . . . . . . . . . . . . . . . . . . . . . . . . . . . . . . . . . . . . . . . . . . . . . . . . . . . . . . . . 4
Real eXperience . . . . . . . . . . . . . . . . . . . . . . . . . . . . . . . . . . . . . . . . . . . . . . . . . . . . . . . . 6
Valve Reactor Technology . . . . . . . . . . . . . . . . . . . . . . . . . . . . . . . . . . . . . . . . . . . . . . . 7
Listening to the demos . . . . . . . . . . . . . . . . . . . . . . . . . . . . . . . . . . . . . . . . . . . . . . . . . . 8
Controls and connections . . . . . . . . . . . . . . . . . . . . . . . . . . . . . . . . . . 9
Front panel . . . . . . . . . . . . . . . . . . . . . . . . . . . . . . . . . . . . . . . . . . . . . . . . . . . . . . . . . . . 9
Rear panel . . . . . . . . . . . . . . . . . . . . . . . . . . . . . . . . . . . . . . . . . . . . . . . . . . . . . . . . . . . 15
Connections . . . . . . . . . . . . . . . . . . . . . . . . . . . . . . . . . . . . . . . . . . . . . . . . . . . . . . . . . 17
Using the SV-1 . . . . . . . . . . . . . . . . . . . . . . . . . . . . . . . . . . . . . . . . . .19
Selecting the sounds . . . . . . . . . . . . . . . . . . . . . . . . . . . . . . . . . . . . . . . . . . . . . . . . . . . 19
Selecting and editing the effects . . . . . . . . . . . . . . . . . . . . . . . . . . . . . . . . . . . . . . . . . . 23
Restoring settings to their default value . . . . . . . . . . . . . . . . . . . . . . . . . . . . . . . . . . . 26
Switching to a different sound or effect while editing . . . . . . . . . . . . . . . . . . . . . . . . 26
Advanced settings . . . . . . . . . . . . . . . . . . . . . . . . . . . . . . . . . . . . . . . 27
Transposing . . . . . . . . . . . . . . . . . . . . . . . . . . . . . . . . . . . . . . . . . . . . . . . . . . . . . . . . . . 27
Fine tuning the instrument . . . . . . . . . . . . . . . . . . . . . . . . . . . . . . . . . . . . . . . . . . . . . 28
Choosing a tuning curve . . . . . . . . . . . . . . . . . . . . . . . . . . . . . . . . . . . . . . . . . . . . . . . 29
Changing the touch sensitivity . . . . . . . . . . . . . . . . . . . . . . . . . . . . . . . . . . . . . . . . . . 30
Calibrating the pedals . . . . . . . . . . . . . . . . . . . . . . . . . . . . . . . . . . . . . . . . . . . . . . . . . . 31
Adjusting the RX Noise level . . . . . . . . . . . . . . . . . . . . . . . . . . . . . . . . . . . . . . . . . . . . 32
Choosing a MIDI channel . . . . . . . . . . . . . . . . . . . . . . . . . . . . . . . . . . . . . . . . . . . . . . 32
Don’t panic! . . . . . . . . . . . . . . . . . . . . . . . . . . . . . . . . . . . . . . . . . . . . . . . . . . . . . . . . . . 33
Checking the operating system version . . . . . . . . . . . . . . . . . . . . . . . . . . . . . . . . . . . 33
Saving your sounds . . . . . . . . . . . . . . . . . . . . . . . . . . . . . . . . . . . . . . 34
Save a sound that you like . . . . . . . . . . . . . . . . . . . . . . . . . . . . . . . . . . . . . . . . . . . . . . 34
Restoring all settings . . . . . . . . . . . . . . . . . . . . . . . . . . . . . . . . . . . . . . . . . . . . . . . . . . . 34
Troubleshooting . . . . . . . . . . . . . . . . . . . . . . . . . . . . . . . . . . . . . . . . . 35
Specifications . . . . . . . . . . . . . . . . . . . . . . . . . . . . . . . . . . . . . . . . . . . 36
English
Page 18

4 – Introduction | Welcome aboard!
Introduction
WELCOME ABOARD!
Many thanks, and congratulation on purchasing the Korg SV-1 Stage Vintage
Piano. We’re sure it’ll give you countless hours of great vintage piano and key-
board tones that will feel as good as they sound!
To maximize your chances of enjoying a long and happy relationship with your
SV-1, please read this manual at least once, and (as they say), “use the product as
directed”. Keep the manual for future reference after you’ve read it; you’ll want to
re-read it later at some point to pick up cool tips you may have missed the first
time around.
Please keep in mind this guide refers to both the 88- and 73-keys versions of the
SV-1. There is no other difference between the two instruments, apart for the
keybed length (and the weight!).
WHAT’S IN THE BOX
After you buy your SV-1, please check all the following items are included in the
package. If some of them are missing, immediately contact your Korg dealer.
• SV-1 Stage Vintage Piano
• User Manual (the one you are reading now)
• Accessory Disk (containing the software and related manuals)
• Music stand
• Korg DS-2H damper pedal (supporting half-pedalling)
• Standard IEC AC power cable
MAIN FEATURES
Wide range of vintage sounds
• SV-1 is a grand piano and vintage keyboard instrument, mixed with a vintage instrument amplifier, stompbox and studio effects simulator.
• SV-1 has a wide range of sounds, including two Stereo Concert Grand
Pianos. Sounds can be modified and saved into the eight “Favorite” memories.
Page 19

Introduction | Main Features – 5
Ease of use, pleasure to play
• Selecting sounds is as easy as using a knob to select the base sound, and one
for a variation of the base sound. And editing sounds (in realtime!) is just a
matter of turning a couple of knobs.
• The high-quality, realistic Korg RH3 keyboard features four zones with dif-
ferent weights. This gives you the same realism and feeling as a grand piano
keyboard. You can choose from eight different touch curves to adjust how
the sound will respond to your keyboard playing dynamics.
• Eight alternative tuning curves allows for precise tuning of vintage instru-
ments and grand piano alike.
• The transpose function lets you change the pitch of the instrument, and the
master tune function allows you to make fine tune adjustments.
The same pedals of a grand piano, and more
• The SV-1 provides connections for the same three pedals as a grand piano.
Also, you can use the pedals to control volume, rotary slow/fast change, or
the wah effect. Pedals are automatically assigned to controlling the right
effect without any additional programming.
• The damper pedal simulates the natural string resonance and noises of an
acoustic piano; it also lets you vary the amount of the effect by how far you
press down on it (“half-pedal” function).
English
Valve Reactor and modeling technologies
• The SV-1 features Valve Reactor technology that uses an actual valve to cre-
ate the sound of an authentic tube power amp, delivering the response and
tone of classic amps.
• The SV-1 uses sophisticated modeling technology to create classic amp, cabi-
net, and effect sounds. By mixing them, you can create an amazing range of
sounds, many of which have never been heard before.
High-quality vintage effects
• Since high-quality effects are built in, the SV-1 is all you need to create a
completely finished sound. You can choose one type for each pedal, amp
model, modulation and reverb/echo/delay effect, and use these sections
simultaneously.
• The SV-1 provides control switches that let you do things like set the delay
time via TAP TEMPO, switch effects on/off, or switch the speed of a rotary
speaker… again, must-have features for live performance.
Page 20

6 – Introduction | Real eXperience
Easy connection
• Featuring an USB digital interface and MIDI IN and OUT connectors, the
SV-1 offers you plenty of potential and numerous options to expand your
system. The USB port also carries MIDI data, so that you can connect the SV1 directly to your personal computer with a single cable and without the need
of a dedicated MIDI interface. A dedicated KORG USB MIDI Driver is freely
available for full use of the SV-1’s MIDI features, and can be found in the
included Accessory Disk or downloaded from our web site.
• The Local Off button immediately configures your
for working with a sequencer.
Enhanced editing
• While integrated editing is kept to a minimum for maximum ease of use,
sophisticated editing is available by using the SV-1 Editor. By using this soft-
ware, you can store all of your own sound, amp settings and effect model settings as a “preset” in one of 36 preset sounds and 8 favorite memories. Huge
libraries can be created, and collections of presets exchanged with other
users. The SV-1 Editor can be found in the included Accessory Disk or downloaded from our web site.
SV-1 as a master keyboard
REAL EXPERIENCE
ARE YOU EXPERIENCED?
The SV-1 sounds feature Korg’s Real eXperience technology, giving unprecedented realism and detail to sounds. While existing sampling techniques have resembled an audio snapshot, our technology is more of a hologram, accurately reproducing every dimensional detail of the sound. Grand piano, electric piano and clavi’s are all sampled with the hammer and natural release sound, to preserve the natural imaging of the sound. Different dynamic levels are captured to extend the instrument’s expressive vocabulary.
Take for example the grand piano. The SV-1 uses the sound of the key being
released and the hammer returning, as well as the damper resonance of the strings
to create all of the subtle shadings that create a superior instrument sound. This
attention to detail defines the sound of the new SV-1, providing an instrument that
can interpret every nuance of touch into a meaningful musical gesture.
This technique applies to all other sounds as well. For example, electric pianos,
clavi’s and organs are for the first time reproduced in complete realism, and do
not sound synthetic and deprived of any life-like quality. These sounds react
under your fingers exactly as the real instrument, and results in a more impressive performance when playing on stage.
Page 21

Introduction | Valve Reactor Technology – 7
VALVE REACTOR TECHNOLOGY
THE POWER (AMP) AND THE GLORY!
The Valve Reactor circuitry in the SV-1 has been tuned-up especially for live per-
formance. Since conventional modeling effects for line recording are not used
directly with a speaker, they do not include a power amp circuit, output transformer, or speaker. In other words, they only have a preamp circuit.
A real valve amp sound, however, is produced not just by the preamp, but also by
the tone and distortion of the power amp, and by the constant changes in
impedance that are created by the power amp driving the speakers. The SV-1
contains an actual low-wattage valve power amp circuit, a virtual output transformer that uses solid-state components to simulate an output transformer, and
a dummy speaker circuit that simulates the varying impedance of a real speaker.
This means that although it’s low-power, the SV-1 has the same circuit structure
of an actual all-valve amp.
This is great when playing live, because the sound arriving to the main mixer is
the same of a real analogue amp captured by high-quality mics.
English
Page 22
8 – Introduction | Listening to the demos
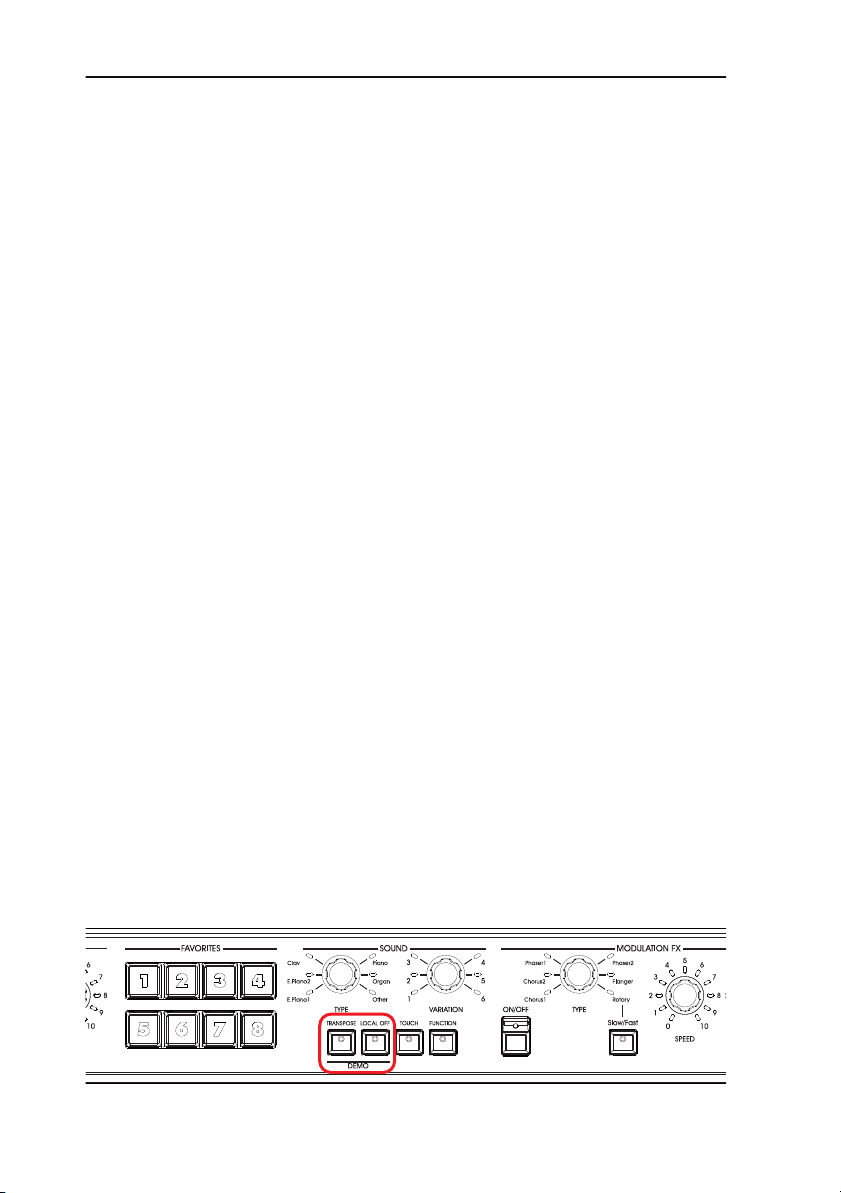
LISTENING TO THE DEMOS
Listen to the built-in demo songs to appreciate the power of the SV-1. There are
several demo songs to choose from.
1. Press the TRANSPOSE and LOCAL OFF buttons together.
Their LEDs will start blinking.
2. At this point, if you don’t press any other buttons, all the thirty-six demo
songs will be played back.
3. Select one of the available demo song by using the TYPE and VARIATION
knobs in the SOUND section.
4. Stop the demo by pressing the TRANSPOSE and LOCAL OFF buttons again.
Page 23

Controls and connections | Front panel – 9
Controls and connections
FRONT PANEL
Here we’re going to learn about the buttons and other controls on the SV-1’s
front panel.
1 VALVE
The SV-1 contains a 12AX7 (ECC83) valve (“vacuum tube”).
WARNING: The valve cover or the valve may break if either is subjected to impact. If
the valve cover breaks, please have it replaced. Failure to replace a damaged valve
cover may lead to the valve itself becoming damaged.
2
MASTER VOLUME section
Here you can set the overall volume of the
increase the volume, counter-clockwise to decrease it. This knob controls the
overall volume of the instrument, both of the Left and Right outputs, and the
Headphones output.
WARNING: Always keep the volume at a comfortable level. Excessive volume may
cause permanent hearing damage.
EQUALIZER section
3
Here you can set the equalization. Use the three knobs of the EQUALIZER section to access the three-band equalizer and adjust the overall tonal characteristics
of the sound coming from
press the corresponding knob.
the SV-1
. To reset an EQ band to the default value,
SV-1
. Turn this knob clockwise to
English
1
23
Page 24
10 – Controls and connections | Front panel
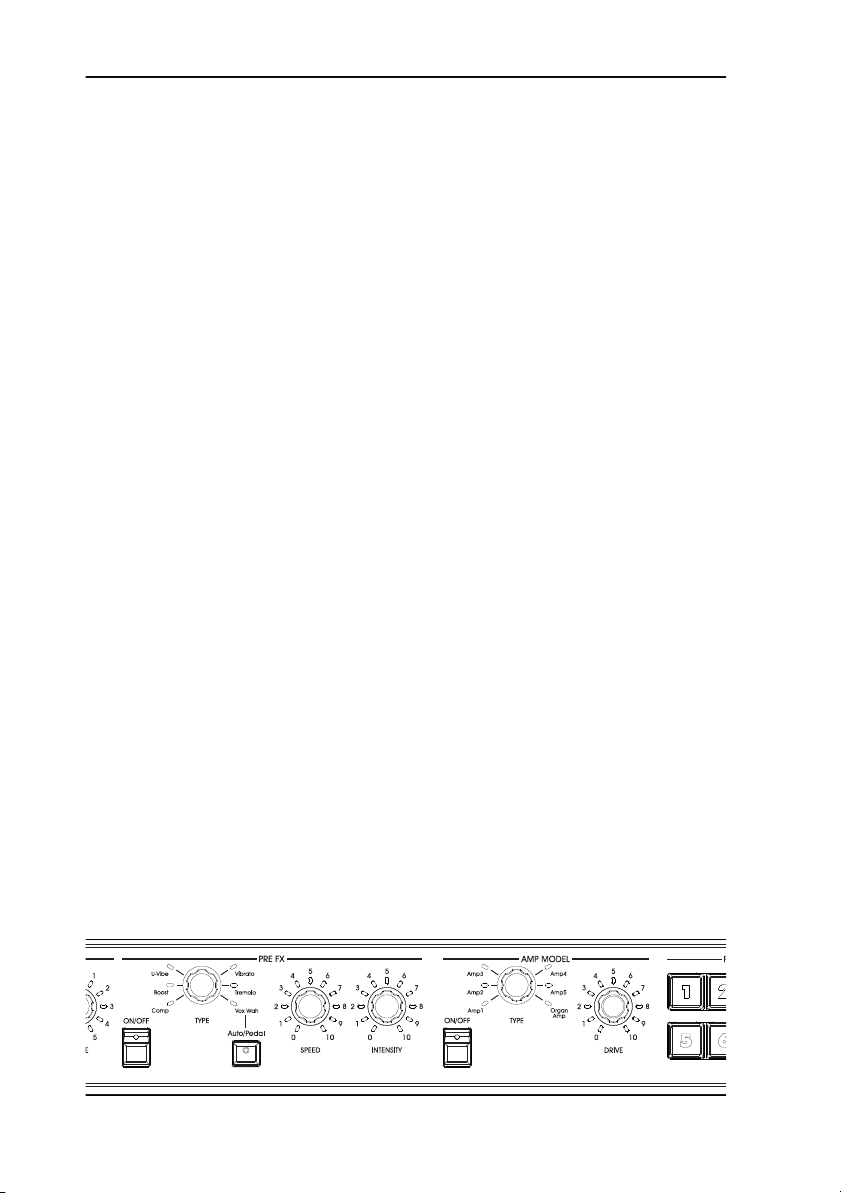
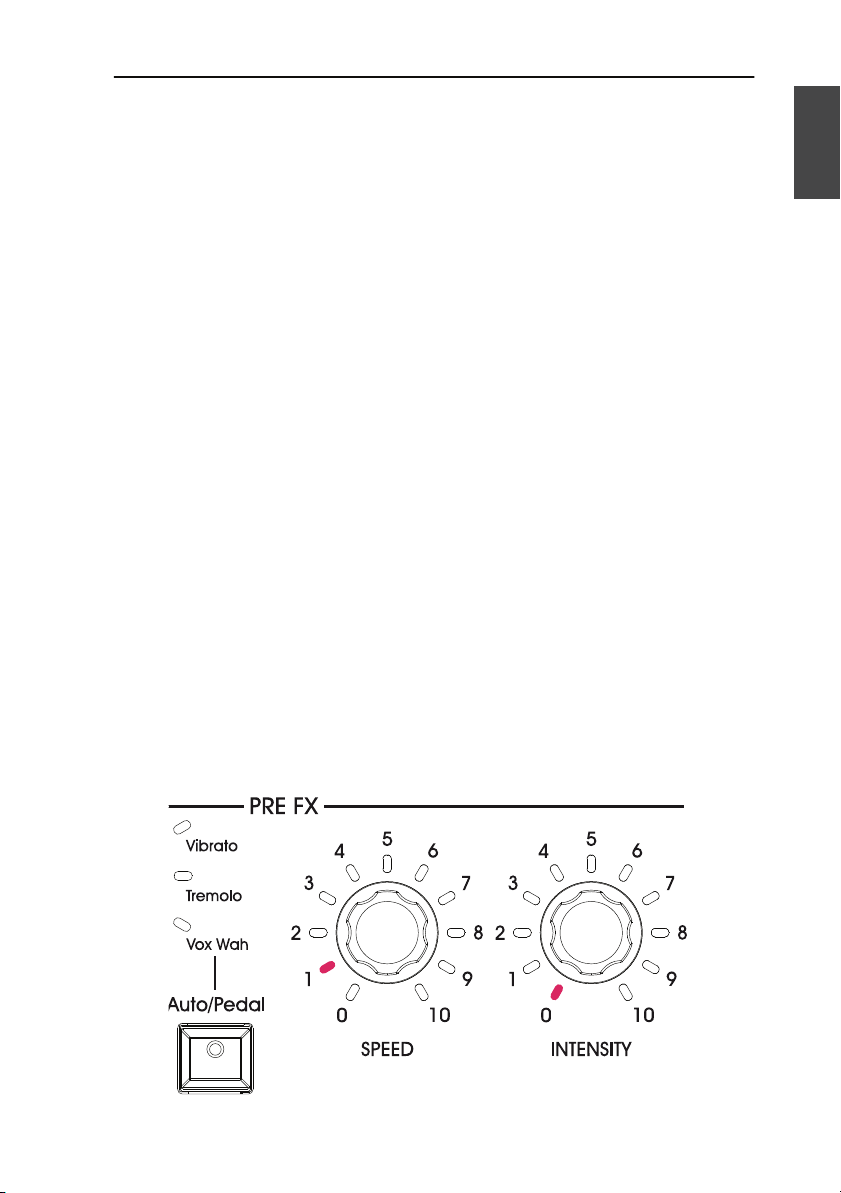
PRE FX section
4
Here you can select the model of a stompbox (pedal effect). This lets you select
one of the six pedal effect models the SV-1 offers. After selecting a pedal with the
TYPE knob, you can use the SPEED and INTENSITY knobs to adjust the pedal
effect parameters. To reset a parameter to the default value, press the corresponding knob. Pedal effects are connected before the amp.
The AUTO/PEDAL can be used when the wah effect is selected. When the button’s LED is off (Auto mode), the wah effect’s filter is set automatically depending on the sound and playing dynamics. When on (Pedal mode), you can control
the filter with an expression pedal connected to the PEDAL 2 connector; if no
pedal is connected, the wah is set to a fixed frequency. Calibrating the pedal is
warmly suggested (see “Calibrating the pedals” on page 31).
NOTE: The parameters will be initialized when you select a different preset.
AMP MODEL section
5
Here you can select the model of amp (including cabinet). This lets you select
from six types of classic amp models, including the legendary VOX AC30TBX.
Each amp model also include a cabinet simulator that can be edited with the
SV-1 Editor.
After selecting an amp with the TYPE knob, you can use the DRIVE knob to
adjust the preamp volume (therefore, the overdrive saturation). To reset the
drive to the default value, press the DRIVE knob.
The operating mode of the preamp and power amp, the response of the tone
controls, and their placement within the circuit will change depending on the
type of amp you select here, precisely replicating the exact gain and tonal character of the original amp. The all-important power amp stage (class A or AB) and
negative-feedback circuit (or lack thereof) are also carefully simulated.
NOTE: The parameters will be initialized when you select a different preset.
45
Page 25
Controls and connections | Front panel – 11
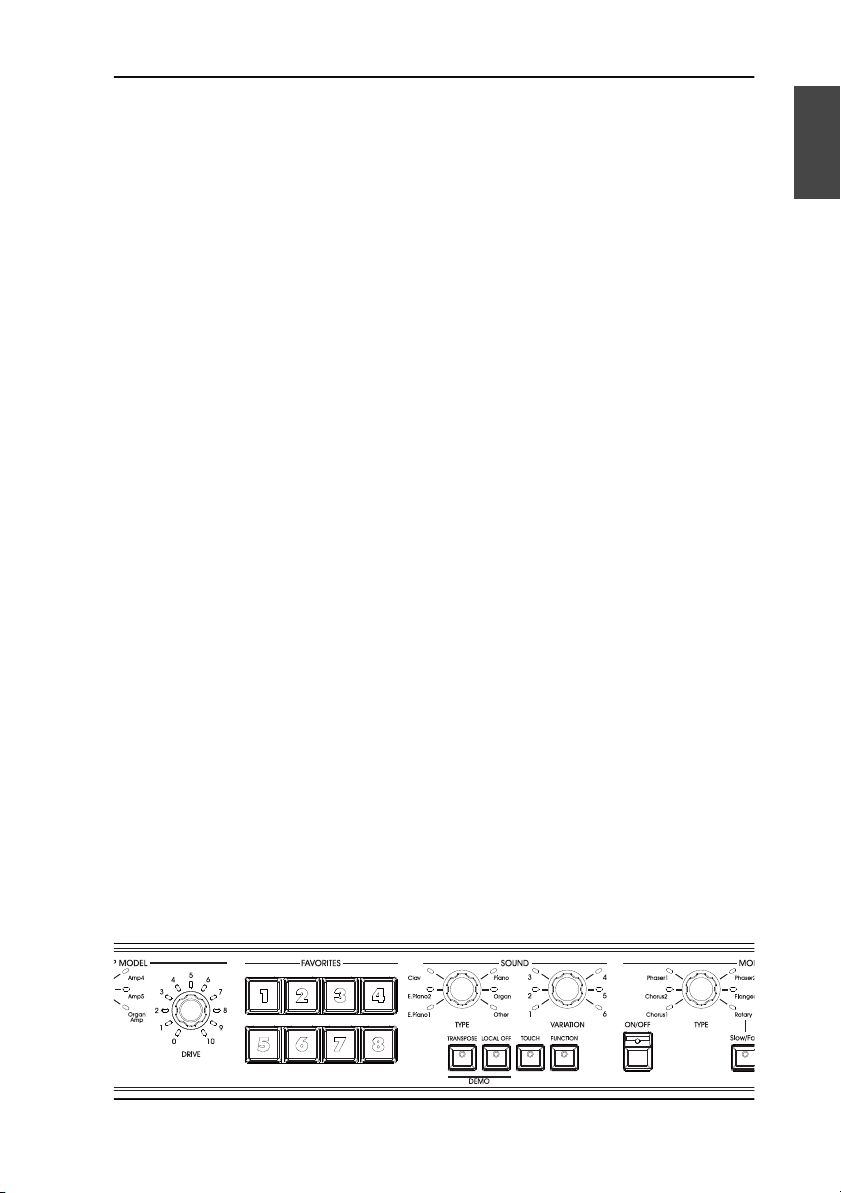
6 FAVORITES section
Here you can select one of eight favorite sounds, containing your own custom
sounds that can be saved without having to use the SV-1 Editor software.
Use these to save up to eight presets of edited sounds and effects. To store your
current settings, simply hold down one of the eight FAVORITES buttons, and
press it again when its LED starts blinking.
7 SOUND section
Here you can select a preset sound. Use the TYPE knob to selects one of six base
sounds, and the VARIATION knob to select one of six variations for each of
them (for a total of thirty-six sounds). A detailed description of the preset
sounds can be found on page 19.
NOTE: The sounds can be modified and stored through the SV-1 Editor. See the relevant manual in the Accessory Disk.
English
567
Page 26
12 – Controls and connections | Front panel
890A
TRANSPOSE button
8
Use this button to transpose your keyboard. See “Transposing” on page 27.
9 LOCAL OFF button
Here you can turn the Local Off function on or off. When you turn the LED of
this button on, the keyboard is disconnected from the internal sounds. By playing the keyboard, you cannot hear any sound from the internal tone generator.
However, notes continue to be sent to the MIDI OUT port (or the USB port),
and can be received by a computer. The computer sends them back again to the
SV-1’s MIDI IN port (or the USB port), and then to the internal tone generator.
This routing allows you to record and play at the same time, without duplicate
notes.
0 TOUCH button
Use this button to adjust the sensitivity of your keyboard. See “Changing the
touch sensitivity” on page 30.
A FUNCTION button
Use this button to make MIDI and tuning settings, to adjust the RX Noise component volume, or to restore the instrument to the default configuration. When
pressing it, a LED around the TREBLE and BASS knobs, and the FUNCTION #1
button, may start blinking.
FUNCTION, then … Does this
EQ - TREBLE Adjust fine tuning. See “Fine tuning the instrument” on page 28.
EQ - BASS Adjust the volume of the RX Noise component of the sound. See
FAVORITES 1 – 8 Selects the corresponding tuning curve (out of 8). See “Choosing a tun-
NOTES C6 – D#7 Select the corresponding MIDI channel (out of 16). See “Choosing a
“Adjusting the RX Noise level” on page 32.
ing curve” on page 29.
MIDI channel” on page 32.
Page 27

Controls and connections | Front panel – 13
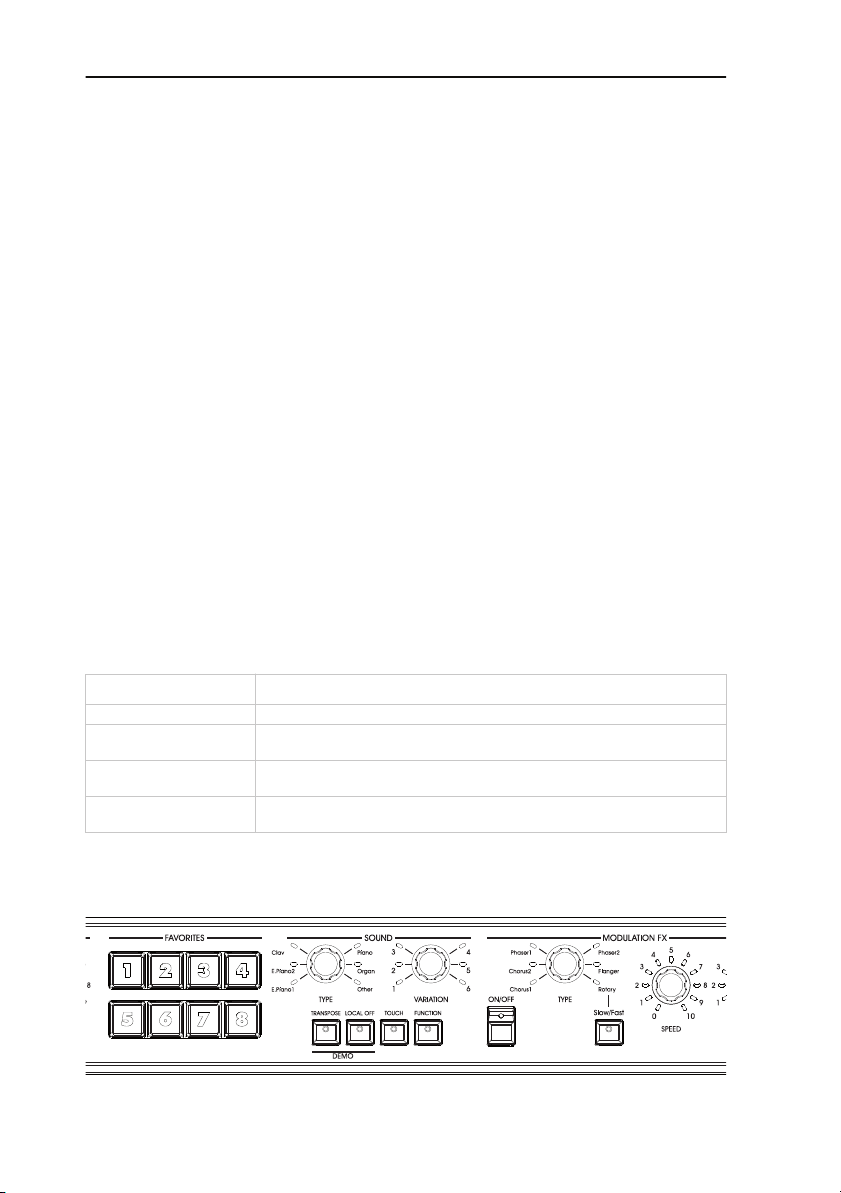
B MODULATION FX section
Here you can select a modulation effect. This selects one of six modulation effect
models. After selecting an effect with the TYPE knob, you can use the SPEED
and INTENSITY knobs to adjust the effect parameters. To reset a parameter to
the default value, press the corresponding knob. Effects are placed after the amp
and cabinet model.
The SLOW/FAST button switches the speed of the rotary effect.
NOTE: The parameters will be initialized when you select a different preset.
REVERB/DELAY section
C
Here you can select a reverb, delay or echo effect. This selects one of four reverb,
one echo, or one delay effect models. After selecting an effect with the TYPE
knob, you can use the DEPTH knob to adjust the effect’s intensity. To reset it to
the default value, press the DEPTH knob. Effects are placed after the amp and
cabinet model, and after the modulation effect.
In case the stereo delay effect is selected, you can ‘tap’ its time on the TAP button.
NOTE: The parameters will be initialized when you select a different preset.
POWER switch
D
Use this switch to turn the power on/off.
English
BCD
Page 28
14 – Controls and connections | Front panel
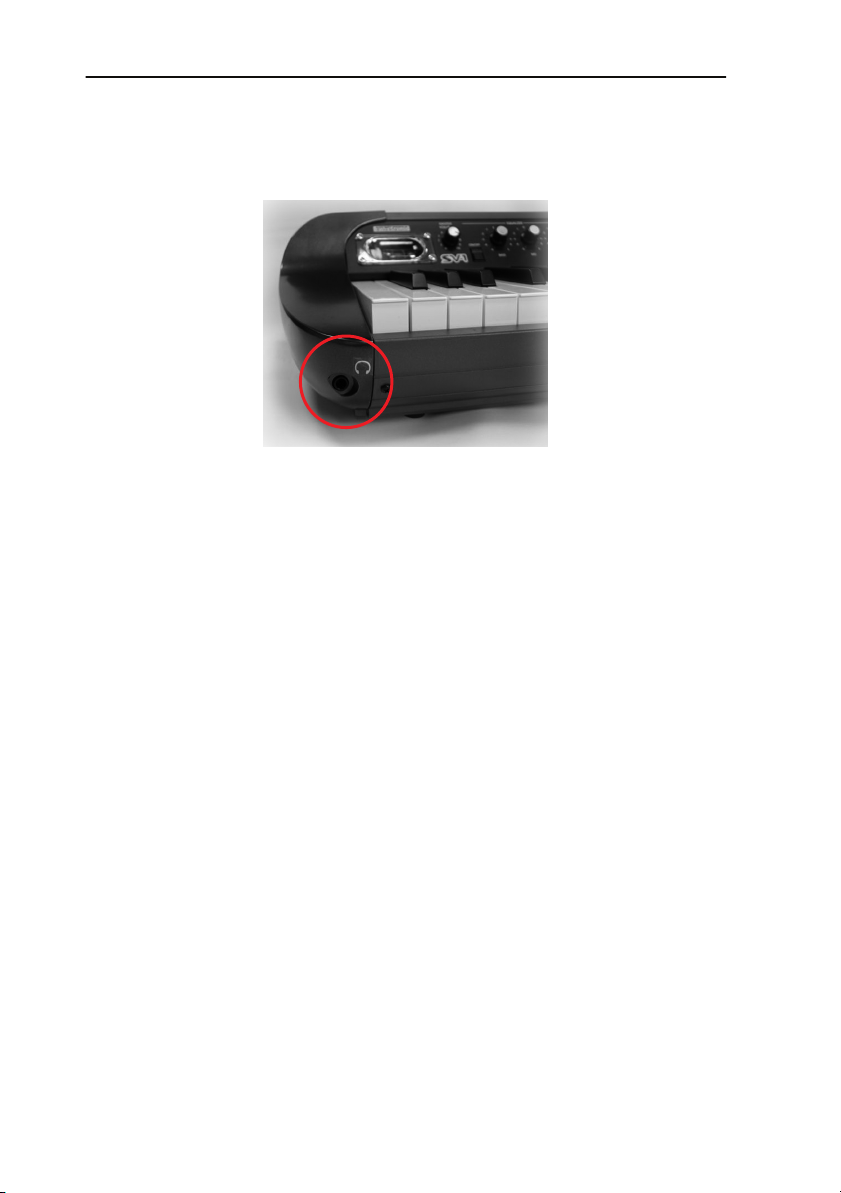
HEADPHONES jack (stereo)
E
Connect your headphones to this jack, located under the left end of the keyboard. Use a headphone splitter to connect more than one pair of headphones.
Page 29
Controls and connections | Rear panel – 15
34 5 6 7
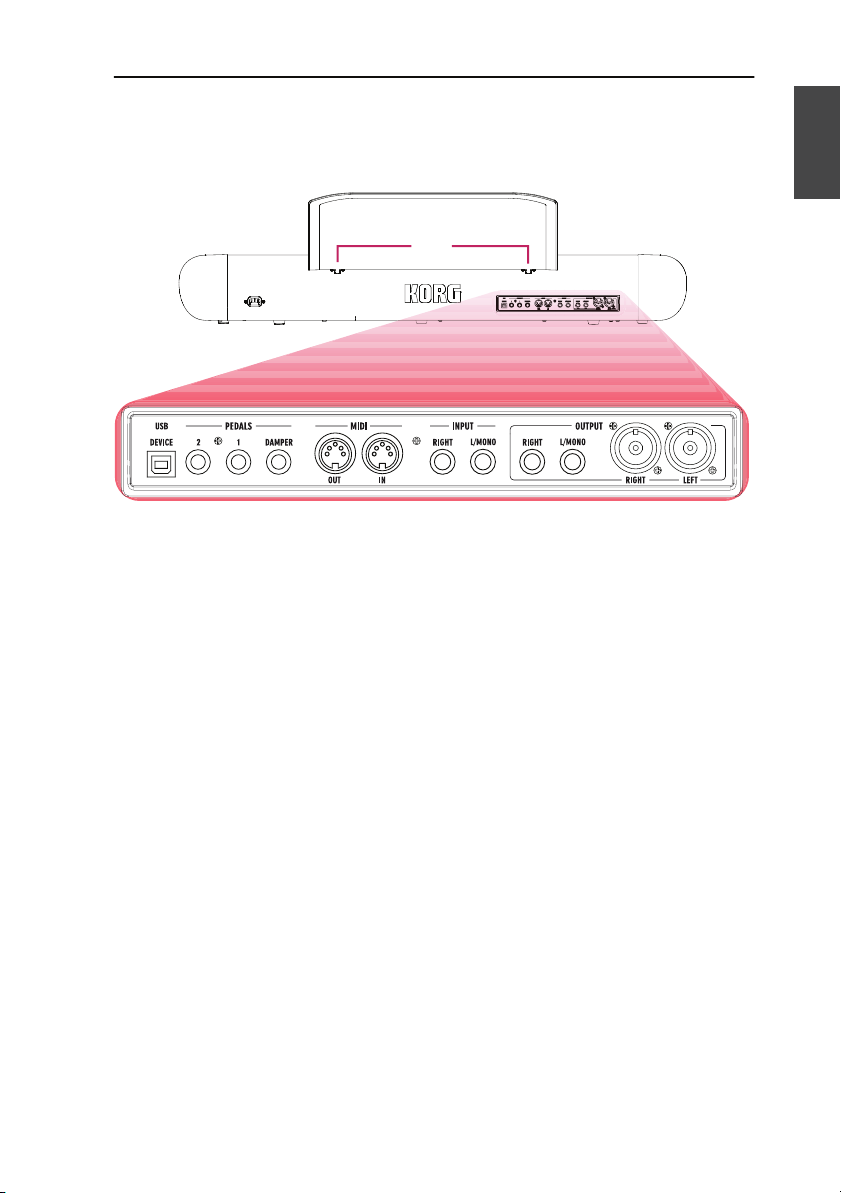
REAR PANEL
The back panel is where you can find most of the connections.
2
1
0.771°
1 POWER connector
Connect the included IEC power cable here.
English
2 MUSIC STAND holes
A music stand comes standard with your SV-1. Insert its legs into these two dedicated holes.
3 USB DEVICE connector
Use this connector to connect a computer for sequencing (this doubles the MIDI
ports), or for using the SV-1 Editor software for fine editing. Before using this
connector, please install the KORG USB-MIDI Driver (the relevant instructions
are provided together with the MIDI Driver on the Accessory Disk, or can be
downloaded from our web site).
4 PEDAL jacks (DAMPER, 1, 2)
Connect the supplied Korg DS2H pedal to the DAMPER jack. Connect a footswitch to PEDAL 1 and either a footswitch or an expression pedal to PEDAL 2.
DAMPER always operates as a damper pedal. Use it to connect the supplied Korg
DS-2H damper pedal.
Page 30

16 – Controls and connections | Rear panel
PEDAL 1 is used to connect a footswitch pedal only (like the optional Korg
PS-1), and can operate as a sostenuto pedal, or as a rotary slow/fast switch (when
the rotary effect is selected).
PEDAL 2 is used to connect a volume/expression pedal (like the optional Korg
XVP-10 or EXP-2) or a footswitch pedal (like the optional Korg PS-1). The volume/expression pedal operates as a volume control (this is the default setting). The
footswitch pedal operates as a soft pedal (this requires calibration, see page 31).
When a volume/expression pedal is connected to this connector, you can also
control the wah effect’s filter. To control the wah effect with the volume/expression pedal, select the wah effect and turn the AUTO/PEDAL LED on in the PREFX section (Pedal mode).
To calibrate the pedals (and set their polarity), see “Calibrating the pedals” on
page 31.
5 MIDI connectors
By using MIDI you can control the SV-1 from a sequencer, or control an external
MIDI device from the SV-1. When using the SV-1 to control an external MIDI
device, or to record into a sequencer, press the LOCAL OFF button to turn its LED
on; this disconnects the keyboard from the internal sounds (but not from MIDI).
MIDI OUT transmits MIDI data. Use it when you want to control a connected
external MIDI device or computer. Use a standard MIDI cable to connect it to
the MIDI IN connector of the other device.
MIDI IN receives MIDI data. Use it when you want to control the SV-1 from a
connected external MIDI device or computer. Use a standard MIDI cable to connect it to the MIDI OUT connector of the other device.
6 INPUT jacks (L/MONO, RIGHT)
Connect a line-level source, like a keyboard/synthesizer, a CD or MP3 player, to
these jacks.
7 OUTPUT jacks (L/MONO, R)
These are analog output jacks, available either in 1/4” unbalanced jacks, or XLR
balanced jacks. Either use the unbalanced 1/4” jacks for shorter run, or the XLR
balanced jacks for longer runs, like when playing on stage. In any case, they are
perfect replica the one of the other.
If you need mono output, connect only the L/MONO 1/4” jack. XLR jacks cannot be used for mono output.
HINT: XLR balanced outputs are always cleaner and louder, so they are recommended whenever possible.
Page 31

Controls and connections | Connections – 17
CONNECTIONS
In this chapter you will learn how to connect your SV-1 to an audio amplification system, to the pedals and to MIDI devices.
1. Turn both your SV-1 and all connected devices off.
NOTE: You must turn off the power of all your equipment before you make
connections. If you ignore this warning, you may damage your speaker system!
If you’re connecting the SV-1 to a mixer or speaker system, connect the OUT-
2.
PUT jack(s) to the line input jack(s) of your mixer/recorder or speaker system.
HINT: If you’re making connections in mono, use the OUTPUT L/MONO jack.
However to take the fullest advantage of the SV-1’s sound, we strongly recommend that you use stereo connections.
If you’re listening through headphones, connect your headphones to the
HEADPHONES jack.
NOTE: Signal from the OUTPUT jack(s) will still be heard even if headphones are
plugged in. If you only want to hear signal from headphones you should turn off
or lower down any equipment the SV-1 is connected to.
3.
Turn the MASTER LEVEL knob on the front panel of the SV-1 all the way to
the left, setting the volume to ‘0’.
4. Plug the supplied IEC AC power cable into the SV-1’s rear panel AC power
inlet, and plug the other end into an AC wall socket.
5. Connect the pedals to the relevant connectors on the rear panel.
6. Connect the MIDI or USB cable to your SV-1 and to the other device.
7. Plug any external CD/MP3 player or synthesizer into the rear panel INPUT
jacks.
8. Turn on the POWER switch to power up the SV-1.
9. Turn on the power switch of your mixer or speaker system.
10. To adjust the volume, turn up the volume controls on your mixer or speak-
ers, and use the SV-1’s front panel MASTER VOLUME knob to adjust the
volume to a desired level.
English
Page 32

18 – Controls and connections | Connections
Computer
Synthesizer, etc.
CD/MP3 player, etc.
Amplifier
Powered monitors
Audio system
USB cable
USB
INPUT
OUTPUT
VOX
Headphones
PHONES
Mixer, recorder, etc.
Page 33

Using the SV-1 | Selecting the sounds – 19
Using the SV-1
SELECTING THE SOUNDS
SV-1 has 36 sound (6 base sounds × 6 variations), and every one of these sounds
can be “custom tweaked” using just the knobs on the front panel. You can then
save the changes into the eight FAVORITES locations. (More detailed editing can
be performed using the SV-1 Editor software).
Use the TYPE knob of the SOUND section to select a base type of sound. Use the
VARIATION knob of the SOUND section to select one of the variation of the
base sound. Notice that the LED next to the knobs lights up to show the selected
sound and variation.
As an example, here’s how to select the sound PIANO/STRINGS.
1. Make sure that neither the LOCAL OFF, nor the FUNCTION LEDs are
turned on.
If they are, press the corresponding buttons to turn them off.
2. Use the TYPE knob in the SOUND section to select the PIANO base sound.
The corresponding LED around the TYPE knob will turn on.
3. Use the VARIATION knob in the SOUND section to select variation 5, corre-
sponding to the PIANO/STRINGS sound.
The corresponding LED around the VARIATION knob will turn on.
The preset sounds cover an amazing range of sounds; vintage electric pianos,
classic grand pianos, aggressive modern metallic-sounding pianos for active
comping, rich-sounding organs, and much more. Here is a brief description of
each of them.
English
Page 34

20 – Using the SV-1 | Selecting the sounds
Sounds
# Name Type Var. RX Notes
1 Tine EP/Amp E.Piano 1 1 √ The tine-based electric piano “par excellence”,
2 Tine EP/Phaser 2 √ The same tine-based piano, with a classic phaser
3 Tremolo EP 3 √ This is another essential setup, characterized by
4 Dyno EP 4 √ This is a custom version of the original timbre,
5 VPM Piano 5 An essential digital instrument of the mid-’80s
6 VPM Tine 6 A more cutting and strong variation of the pre-
7 Reed EP 1 E.Piano 2 1 √ Perhaps the original electric piano, first released
8 Reed EP 2 2 √ The same reed-based electric piano, with effects
9 Electric Grand 3 √ Released in the mid-’70s, this was the very first
10 SG-1D Piano 4 √ One of the first truly acoustic sounding sampled
11 80's Synth Piano 5 An innovative, accurate and expressive piano
12 MIDI Grand 6 This is a layered sound, famously used on so
13 Clav AC Clav 1 √ Born as a portable harpsichord, this instrument
14 Clav BC 2 √ “BC” configuration of the original register
15 Clav BD 3 √ “BD” configuration of the original register
16 Clav AD 4 √ “AD” configuration of the original register
17 ElectroPno 5 √ Electro-mechanical piano produced in the 60’s,
18 ElectraPno 6 A popular electronic piano from the ‘70s, used
in one of its most typical ’70s settings, played
through a guitar amp.
setting, as made famous on countless classic rock
and soul recordings.
the unmistakable stereo tremolo effect.
much brighter and sharply outlined than the
original. A very popular modification made to
these instruments in the late ’70s and early ’80s.
and beyond, this classic synthesizer made a wide
range of electric piano sounds.
vious sound.
in the late-’50s, used by countless famous musicians.
settings emulating the classic “logical” sound.
portable piano really close to the real thing.
piano, produced by Korg. Deep bass, and bright
trebles, with natural dynamics.
sound, created in the late ’80s with a popular
digital keyboard/synthesizer.
many pop hits of the ’80s and ’90s. It blends
acoustic and electric pianos with some extra
“helpers” for a powerful ballad sound.
became one of the most popular and distinctive
timbers ever.
switches. A more “edgy” presentation of the
clav, modeled after a really “super” funk song
from the ’70s.
switches.
switches.
with a unique mellow sound very popular
within gigging musicians.
by many famous classic rock and prog-rock musicians.
Page 35

Using the SV-1 | Selecting the sounds – 21
# Name Type Var. RX Notes
19 Grand Piano1 Piano 1 √ This is a very accurate sampling of a Japanese
grand piano, suitable for pop and jazz.
20 Grand Piano2 2 √ This is a very accurate sampling of a famous Ger-
man grand piano, perfect for jazz and classical
music.
21 Mono Grand 3 √ This is the mono version of a German grand
piano, mostly suitable for rock and pop music
when you need to play through a small amplifier.
22 Upright 4 √ This is the distinctive sound of a German upright
piano.
23 Piano/Strings 5 An essential blend of piano & strings, perfect for
ballads.
24 Piano/Pad 6 This is a classic layered piano sound, adding
some warm and dark sawtooth wave.
25 Click Tonewheel Organ 1 √ The best known organ sound ever! A “must-
have” for rock and jazz music.
26 Jazz Tonewheel 2 √ This setting is particularly suitable for jazz and
funky stuff.
27 Full Tonewheel 3 √ This the classic full-drawbars tonewheel organ
sound.
28 Console Organ 4 √ This is the sound of an American-made tube
organ, as heard in rock legend Garth Hudson's
most famous performances.
29 Italian Combo 5 √ An electronic organ manufactured in Italy dur-
ing the late ‘60s. Its very distinctive sound made
it very popular among rock bands.
30 Vox Combo 6 √ A perfect emulation of the VOX Continental,
the most famous transistor organs of the early
‘60s.
31 Full Strings Other 1 A warm and sophisticated texture of orchestral
strings.
32 Tape Strings 2 This tape-playback string sound became a trade-
mark of all the late ‘60s and ‘70s prog-rock
bands, and it is still used nowadays for its
unique timbre.
33 70s Strings 3 This is a “classic” string sound, extensively used
in countless records of the mid-to-late '70s.
34 Choir 4 Classic male/female mixture choir sound.
35 Synth Brass 5 A warm and dynamic classic synth brass sound.
36 Sharp Brass 6 A classic synth sound from the ‘80s. Don't you
feel an urge to jump?
English
# – The number corresponds to the Program Change number (numbering starting from 1; if your
sequencer starts from 0, please lower each number by 1).
RX – This column shows the sounds including RX Noises.
Page 36

22 – Using the SV-1 | Selecting the sounds
Favorites
# PC Name Type RX # PC Name Type RX
137Grand Piano1 Piano √ 5 41 Clav AC Clav √
238Grand Piano2 Piano √ 6 42 Click Tonewheel Organ √
3 39 Tine EP/Amp E.Piano 1 √ 7 43 Full Strings Other
4 40 Reed EP 1 E.Piano 2 √ 8 44 Sharp Brass Other
PC – The number corresponds to the Program Change number (numbering starting from 1; if your
sequencer starts from 0, please lower each number by 1).
RX – This column shows the sounds including RX Noises.
Page 37

Using the SV-1 | Selecting and editing the effects – 23
SELECTING AND EDITING THE EFFECTS
You can select the various effects and amp models by turning the corresponding
TYPE knobs. You can change the effect main setting by using the DEPTH,
INTENSITY, SPEED, DRIVE knobs. Deeper editing can be done through the
SV-1 Editor software.
Effects and the amp simulation can also be turned on or off by pressing the corresponding ON/OFF button. Changes can be saved, together with a sound, into
one of the eight FAVORITES locations.
We will experiment with the effects, by going from the beginning of the effect
chain, where the most mind-boggling preamp effects are located, to the end,
with the creamiest, most reassuring touch-up effects are contained. Just consider
this effect chain as the effect chain of a classic instrument amplifier.
English
Stereo Limiter
Stereo Mastering Limiter
NOTE: With some of the effects, the name of the actual parameter you will be editing may differ from what is printed on the piano panel. The name that appears in
the SV-1 Editor is the real name, as reported in the following tables. E.g., with the
Pre FX Compressor, the SPEED and INTENSITY knobs control the Sensitivity and Level
parameters respectively.
1.
To turn each section on, press the corresponding ON/OFF button to turn its
LED on. To turn the section off again, press the ON/OFF button again to
turn the LED off.
Page 38

24 – Using the SV-1 | Selecting and editing the effects
Use the three EQUALIZER knobs to adjust the low, mid and high frequen-
2.
cies. After having changed a knob position, you can return to the default settings by pressing the corresponding knob.
WARNING: Extreme EQ settings may produce a very loud signal.
The SV-1 includes a stompbox simulator, that recreates the sound of a pedal
3.
effect inserted before the amplifier’s input. Use the TYPE knob of the PRE FX
section to select a different stompbox effect (compressor, booster, U-Vibe,
vibrato, tremolo or wah).
If the wah effect is selected, use the AUTO/PEDAL button to change between
Auto-Wah (LED off, filter changing automatically depending on the sound
and the playing dynamics) and Pedal-Wah (LED on, filter controlled by an
expression pedal connected to PEDAL input 2; if no pedal is connected, the
filter will be fixed).
NOTE: Before using an expression pedal to control the wah, it is advisable to
calibrate it. See “Calibrating the pedals” on page 31.
You can change the speed of the modulation of the U-Vibe or tremolo effects
by using the SPEED knob, and the intensity of the modulation by using the
INTENSITY knob. To return to the default settings, press the SPEED or
INTENSITY knob.
NOTE: The booster stompbox may produce a very loud signal.
PRE-FX type SPEED knob INTENSITY knob
Comp Sens Level
Boost Drive Level
U-Vibe Speed Depth
Vibrato Type Mix
Tremolo Speed Depth
Vox Wah Manual Wah Type (V-847, V-848)
NOTE: The Manual Wah control only works when the AUTO/PEDAL button is in Pedal mode.
The SV-1 includes an amp simulator, to choose among a series of vintage and
4.
modern instrument amplifiers. Use the TYPE knob of the AMP MODEL section to select a different amplifier. You can change the preamp’s volume
(therefore, its overdrive saturation) by using the DRIVE knob. To return to
the default setting, press the DRIVE knob.
Page 39

Using the SV-1 | Selecting and editing the effects – 25
NOTE: Extreme DRIVE settings may cause unwanted distortion. If this happens,
lower its setting.
AMP MODEL type DRIVE knob
Amp1 (Clean Combo) PreVol
Amp2 (California) PreVol
Amp3 (Tweed) PreVol
Amp4 (AC30) PreVol
Amp5 (Modded OD) PreVol
Organ Amp (Korg OD/HG) Drive
Use the TYPE knob of the MODULATION FX section to select a different
5.
modulating effect (chorus, phaser, flanger or rotary speaker). If the rotary
effect is selected, use the SLOW/FAST button to change the rotor’s speed.
You can change the speed of the modulation (or horn rotation) by using the
SPEED knob, and the intensity (or horn acceleration) by using the INTENSITY
knob. To return to the default settings, press the SPEED or INTENSITY knob.
HINT: If you select the rotary effect, and a footswitch pedal is connected to the
PEDAL 1 jack on the back of the instrument, you can use the pedal to switch the
rotor speed between the SLOW and FAST settings.
MODULATION FX type SPEED knob INTENSITY knob
Chorus 1 Speed Depth
Chorus 2 Speed Intensity
Phaser 1 Speed Depth
Phaser 2 Speed Color (type 1, 2)
Flanger Speed Depth
Rotary Horn Speed Horn Accel
English
6.
Use the TYPE knob of the REVERB/DELAY section to select a different
reverb, echo or delay effect.
If the stereo delay effect is selected, input its time by “tapping” it four times on the
TAP button. The LED flashes at tempo, so that you can understand visually if the
tempo is right. If the tempo was not entered correctly, the LED does not flash.
You can change the intensity of the effect by using the DEPTH knob. To
return to the default setting, press the DEPTH knob.
REVERB/DELAY type DEPTH knob
Room Mix
Plate Mix
Hall Mix
Spring Mix
Tape Echo Mix
St. Delay Mix
Page 40

26 – Using the SV-1 | Restoring settings to their default value
RESTORING SETTINGS TO THEIR DEFAULT VALUE
Each time you move a knob, the original value is changed. Press the same knob
to recall the default value for the corresponding parameter.
SWITCHING TO A DIFFERENT SOUND OR EFFECT
WHILE EDITING
When selecting a different effect in a section, all changes to the previous effect
are preserved. You can return to the edited effect, and all changes will still be
there. (In case you want to return to the default value, press the corresponding
parameter’s knob).
On the contrary, when you select a different sound or favorite, all parameters are
reset and changes are lost.
Page 41

Advanced settings | Transposing – 27
Advanced settings
TRANSPOSING
In some cases, a song may be written in a difficult key (e.g., many black keys), or
you may wish to shift the pitch to match another instrument or vocalist. In such
cases, you can transpose (shift the pitch) so that you can use an easier fingering,
or use the same familiar fingering to play at a different pitch. This is called the
Transpose function.
For example if you transpose upward by one semitone, playing the notes shown
at the lower left will produce the pitches shown at the right.
1. Press the TRANSPOSE button. If the keyboard is already transposed, its LED
will be on, otherwise it will remain dark.
2. Keep the TRANSPOSE button pressed for three seconds, until its LED starts
blinking.
3. Press the note corresponding to the desired transposition:
-12
0 +12
English
C3
Key Effect
C3 – B3 12 – 1 semitones below
C4 (Middle C) Standard pitch
C#4 – C5 1 – 12 semitones higher
NOTE: If no note is played after four seconds, the transpose function will turn off.
Press the TRANSPOSE button again to turn transposition off. The LED will
4.
C5
turn off.
NOTE: When the instrument is turned off, transposing is reset.
Page 42

28 – Advanced settings | Fine tuning the instrument
FINE TUNING THE INSTRUMENT
You can fine tune the instrument, to adapt to another instrument that cannot be
tuned.
1. Press the FUNCTION button.
After you press the FUNCTION button, its LED starts blinking. Also, one of
the LEDs around the TREBLE knob in the EQUALIZER section starts blinking.
2. Use the TREBLE knob to edit master tuning. By default, the SV-1 is tuned to
the standard Western tuning (A = 440Hz). Use the TREBLE knob to change
this, by lowering or raising the pitch of 0.25Hz per each click of the knob.
The LEDs around the knob show the nearest value of the pitch detuning.
3. To restore tuning to the original A = 440Hz, press the TREBLE knob.
NOTE: When the instrument is turned off, the fine tuning is reset.
HINT: You can edit the fine tuning by using the Master Tune function in the
SV-1 Editor, and memorize it by choosing the Write Global command.
Page 43

Advanced settings | Choosing a tuning curve – 29
CHOOSING A TUNING CURVE
You can choose a tuning curve, to adapt it to the vintage instrument sounds.
1. Press the FUNCTION button.
2. After you press the FUNCTION button, its LED starts blinking. Also, the
LED of one of the eight FAVORITES button starts blinking.
Use the FAVORITES buttons to select a different tuning curve:
Favorite # Tuning Curve
1 Equal
2 Grand Piano 1 Stretch
3 Grand Piano 2 Stretch
4 Electric Piano Stretch
5 Electric Grand Stretch
6 Upright Stretch
7 User #1: Detuned
8 User #2
NOTE: Curves User #1 and User #2 can be programmed by using the SV-1 Editor.
NOTE: The tuning curve is memorized when saving a favorite sound. Also, it is
memorized by each preset or favorite sound you can edit with the SV-1 Editor,
after you choose the Write Current Preset command.
English
Page 44

30 – Advanced settings | Changing the touch sensitivity
CHANGING THE TOUCH SENSITIVITY
The keyboard sensitivity, or touch, can be programmed.
1. Press the TOUCH button.
After you press the TOUCH button, its LED starts blinking. Also, the
FAVORITE button corresponding to the selected touch curve is turned on.
2. Press the FAVORITE button corresponding to the desired touch curve.
3. Press the TOUCH button to confirm and return to the normal operations.
Favorite # Touch curve Note
1 Normal Normal piano touch.
2 Soft 1 Loud notes can be produced even by playing lightly.
3 Soft 2
4 Medium 1 Loud notes can be produced by playing normally.
5 Medium 2
6 Hard 1 Loud notes can be produced only by playing very hard.
7 Hard 2
8 Fixed Fixed dynamic. To program the desired dynamic, you must use
This is the diagram of the touch curves:
the SV-1 Editor.
Strong
( )
Note
loudness
Soft
Normal/Medium
Hard
Playing strength
Strong
Soft
NOTE: Touch sensitivity is memorized when saving a favorite sound. Also, it is
memorized by each preset or favorite sound you can edit with the SV-1 Editor,
after you choose the Write Current Preset command.
Page 45

Advanced settings | Calibrating the pedals – 31
CALIBRATING THE PEDALS
You can calibrate the pedals connected to the DAMPER, PEDAL 1 and PEDAL 2
connectors in the back panel. By calibrating a pedal, you let the SV-1 understand
its polarity and the full range of values sent.
1. Connect all pedals to be calibrated to the SV-1. Remember that DAMPER
expects the included Korg DS-2H damper pedal, PEDAL 1 expect a footswitch-type pedal, and PEDAL 2 can be used to connect either a footswitch or
expression-type pedal.
2. Set any expression-type pedal to its lowest setting.
3. Turn the SV-1 off.
4. Keep the AUTO/PEDAL button pressed, and turn the SV-1 on.
5. When the AUTO/PEDAL LED starts to flash, release the button.
If you do nothing in the next few seconds, the AUTO/PEDAL LED will turn
off, and the SV-1 will complete the start-up sequence.
6. While the AUTO/PEDAL LED is flashing, press the button again. SV-1 enters
calibration mode.
7. Now calibrate PEDAL 1 (a footswitch). Completely depress the pedal, then
release it. When you have finished calibrating the pedal connected to the
PEDAL 1 jack, FAVORITE button #1 will turn on.
8. Then, calibrate PEDAL 2. The procedure is different, depending on the use of
a footswitch or an expression pedal:
• If you connected a footswitch, completely depress it, then release it.
• If you connected an expression pedal, push it all the way forward to its maximum position, then return the pedal to its minimum or lowest position.
When you have finished calibrating the pedal connected to the PEDAL 2 jack,
FAVORITE button #2 will turn on.
9. Finally calibrate the DAMPER pedal. Completely depress the pedal, then
release it. When you have finished calibrating the pedal connected to the
DAMPER jack, FAVORITE button #3 will turn on.
10. When finished calibrating:
• If you calibrated all three pedals connected, SV-1 automatically exits calibration mode and continue the start-up sequence.
• If you calibrated only one or two pedals, press the AUTO/PEDAL button
again to exit calibration mode and continue the start-up sequence.
English
Page 46
32 – Advanced settings | Adjusting the RX Noise level
ADJUSTING THE RX NOISE LEVEL
The RX Noise component of the sounds can be perceived as a series of ‘noises’,
like the mechanics of the keyboard, hammer-slap, etc. You can adjust the RX
Noise level to suit your taste and playing style.
NOTE: Not all sounds include RX Noises. See table on page 19.
Press the FUNCTION button.
1.
If the sound does include RX Noises, after you press the FUNCTION button
one of the LEDs around the BASS knob in the EQUALIZER section starts
blinking. If the sound does not include RX Noises, no LED around the BASS
knob starts blinking.
2. Use the BASS knob to edit the RX Noise level. Each click of the knob corre-
sponds to a single value. The LEDs around the knob show the nearest value
of the RX Noises volume.
3. By pressing the BASS knob, the center value will be recalled. If you want to
recall the original value, select the same preset or favorite sound again.
NOTE: RX Noise level is memorized when saving a favorite sound. Also, it is
memorized by each preset or favorite sound you can edit with the SV-1 Editor,
after you choose the Write Current Preset command.
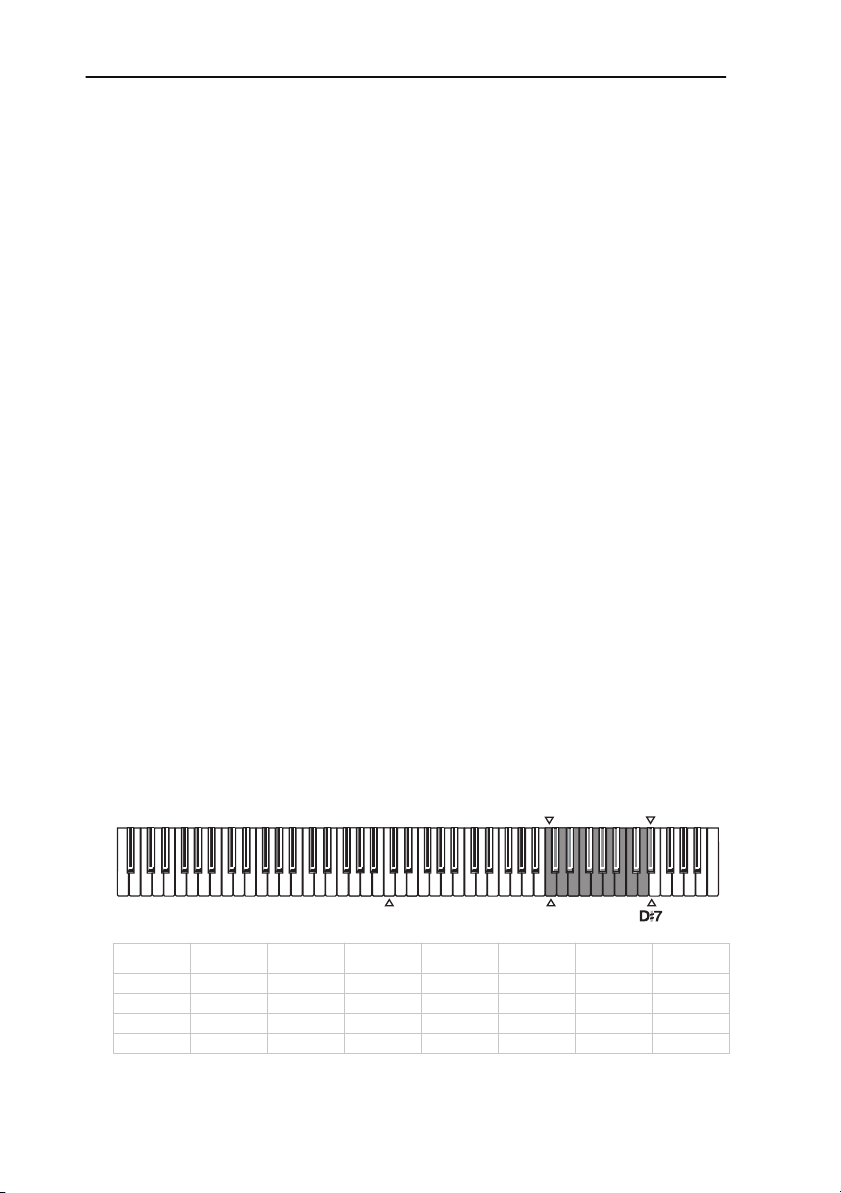
CHOOSING A MIDI CHANNEL
Choose a MIDI channel over which the SV-1 can transmit and receive data to
another instrument or a computer.
1. Press the FUNCTION button.
2. After you press the FUNCTION button, its LED starts blinking. Press one of
the notes from C6 and D#7 to choose a transmit/receive MIDI channel:
116
C4
Note Channel Note Channel Note Channel Note Channel
C61E65G#6 9 C7 13
C#6 2 F6 6 A6 10 C#7 14
D6 3 F#6 7 A#6 11 D7 15
D#6 4 G6 8 B6 12 D#7 16
C6
Page 47
Advanced settings | Don’t panic! – 33
3. When you are done editing the above settings, press the FUNCTION button
to exit.
NOTE: When the instrument is turned off, the MIDI channel is reset to channel 1.
HINT: You can memorize a different MIDI channel by choosing the Write Global
command in the SV-1 Editor.
DON’T PANIC!
In case MIDI notes remain stuck for problems in MIDI communication, keep
the EQUALIZER’s section ON/OFF button pressed until the stuck notes are
silenced. This is commonly called the MIDI Panic function.
CHECKING THE OPERATING SYSTEM VERSION
You may want to check the operating system version, to see if you have the latest
version installed.
1. Turn the SV-1 on.
2. When the instrument is on, press the SPEED and INTENSITY knobs in the
PRE-FX section.
The operating system version is always given in the format “n1.n2”, for exam-
ple “1.0” for major release 1, minor revision 0.
The number shown around the SPEED knob gives you the first part (n1),
while the number shown around the INTENSITY knob gives you the second
part of the operating system version number (n2).
English
Page 48

34 – Saving your sounds | Save a sound that you like
Saving your sounds
SAVE A SOUND THAT YOU LIKE
If you like the sound you just created by exploring through the knob positions,
save it as a favorite sound.
1. Keep one of the FAVORITE buttons pressed, until its LED starts blinking.
2. Press the same button again, to confirm saving.
HINT: If you do not want to save the changes, just wait a few seconds until the
button’s LED turns off, without pressing any button.
NOTE: The favorite sound is written over the previous contents of that location.
The favorite sound that previously occupied the number you selected in step 1
will be erased.
NOTE: If you switch to a different sound or turn off the power without storing
the sound and effects you edited, your changes will be lost.
RESTORING ALL SETTINGS
After doing several changes, you might want to restore the original, factory status
of the SV-1 (including original sounds, favorites and global settings):
1. Turn the instrument off.
2. Keep the FUNCTION button pressed.
3. Without releasing the FUNCTION button, turn the instrument on.
4. When its LED starts flashing, release the FUNCTION button.
5. Press the FUNCTION button again to confirm the restore operation.
6. At the end, all settings will be reset.
Page 49

Troubleshooting | Problems and solutions – 35
Troubleshooting
If you suspect a malfunction, please check the following points first. If this does
not resolve the problem, please contact your dealer or Korg Authorized Service
Center.
Problem Possible remedy Page
The instrument
will not turn on
No sound Make sure that the volume is not set on 0. If it is, bring it up to an
Something missing If you are using the XLR outputs, make sure you have connected
Weak sound The valve may be exhausted. Please refer to the nearest Korg Autho-
Noisy audio Cables may be too long, or get interference from other devices on
Check that the AC cable is not damaged, and it is correctly connected to the piano and the outlet.
adequate level.
Make sure that the Local Off function is not turned on. If it is, turn it
off.
If you are listening in headphones, make sure the jack is correctly
plugged into the HEADPHONES connector.
Make sure there isn’t one of the following control settings:
• Pre-FX Comp: Intensity = 0
• Pre-FX Boost: Intensity = 0
• Amp Models: Drive = 0
The valve might still be “warming up”. Please wait some seconds.
This isn’t a malfunction – it’s a real analogue valve!
both outputs. Mono output is not possible with the XLR jacks.
rized Service Center for replacement.
the stage. Use the XLR connectors instead.
If the AMP MODEL is turned on, you might be listening to the natu-
ral noise of the amp’s valve circuitry.
15
9
12
14
23
9
16
9
16
10
English
PROBLEMS AND SOLUTIONS
Page 50

36 – Specifications | Technical data
Specifications
TECHN
Specifications SV-1 (73/88)
Keyboard SV-1 73: 73 keys. SV-1 88: 88 keys. Velocity sensitive Korg RH3 (Real
Touch selection Eight curves
Tuning Transpose, Fine tuning, Tuning curves
Sound generation EDS (Enhanced Definition Synthesis)
Polyphony 80 notes (max)
Sounds 36 sounds (6 banks × 6 variations)
Bank 1: E. Piano 1 Tine EP/Amp, Tine EP/Phaser, Tremolo EP, Dyno EP, VPM Piano, VPM
Bank 2: E.Piano 2 Reed EP 1, Reed EP 2, Electric Grand, SG-1D Piano, 80's Synth Piano,
Bank 3: Clav Clav AC, Clav BC, Clav BD, Clav AD, ElectroPno, ElectraPno
Bank 4: Piano Grand Piano1, Grand Piano2, Mono Grand, Upright, Piano/Strings,
Bank 5: Organ Click Tonewheel, Jazz Tonewheel, Full Tonewheel, Console Organ,
Bank 6: Other Full Strings, Tape Strings, 70s Strings, Choir, Synth Brass, Sharp Brass
Favorites 8 favorite switches for quick control panel registration
Effects 5 insert effects + 1 total effect
Equalizer Bass, Mid, Treble
Amp Models Amp1/2/3/4/5/Organ Amp + Cabinet Models
Modulation FX Chorus1, Chorus2, Phaser1, Phaser2, Flanger, Rotary
Reverb/Delay Room, Plate, Hall, Spring, Tape Echo, Stereo Delay
Total FX Stereo Mastering Limiter, Stereo Limiter
Effect Controllers
Equalizer On/Off – 3 encoders: Bass, Mid, Treble
Amp Models On/Off – 2 encoders: Type select, Drive
Modulation FX 2 switches: On/Off, Rotary Slow/Fast
Reverb/Delay 2 switches: On/Off, Tap Tempo
Other Controls 4 switches
Panel Switches Transpose, Local Off, Touch, Function
Connections Audio output, Audio input, Headphones, MIDI, Computer, Damper
Headphones 1 (on the front panel)
Audio outputs L, R (2 × XLR, Balanced)
Computer USB Type B connector (doubles the MIDI interface)
Weighted Hammer Action 3)
Tine
MIDI Grand
Piano/Pad
Italian Combo, Vox Combo
Pre FX Compressor, Boost, U-Vibe, Vibrato, Tremolo, VoxWah
Valve Reactor Technology – 12AX7 (ECC83) valve
Pre FX 2 switches: On/Off, Auto/Pedal switch for Wah
3 encoders: Type select, Speed, Intensity
3 encoders: Type select, Speed, Intensity
2 encoders: Type select, Depth
Demo = Transpose + Local Off
Volume Master Volume Knob
MIDI In / Out
L/Mono, R (2 × 1/4” Jack, Unbalanced)
Inputs L/Mono, R
USB 1.1 Supported
Page 51

Specifications | Technical data – 37
Specifications SV-1 (73/88)
Damper pedal Korg DS-2H, supplied
Pedal 1 Footswitch (like Korg PS-1)
Pedal 2 Volume/expression (like Korg XVP-10 or EXP-2) or footswitch (like
Korg PS-1)
Demo 36 × incorporated demos
Power supply Internal switching adapter, AC100~240V, 50/60Hz
Power consumption 15 Watt
Dimensions (W x D x H) SV-1 73: 45.0 × 13.66 × 6.1 inch (1143 × 347 × 157 mm)
SV-1 88: 53.3 × 13.66 × 6.1 inch (1356 × 347 × 157 mm)
excluding music stand
Weight SV-1 73: 38.5 lbs (17.5 kg)
SV-1 88: 45.3 lbs (20.55 kg)
excluding music stand
Included accessories Power cable, User Guide, Accessory Disk, music stand, damper pedal
(Korg DS-2H)
Optional accessories XVP-10 volume/expression pedal, EXP-2 volume/expression pedal,
PS-1 footswitch pedal
Korg reserves the right to change the specifications without notice.
English
Page 52

38 – Specifications | Technical data
Page 53

FRANÇAIS
Page 54

40 – |
Gestion des données
Les données de la mémoire peuvent parfois être perdues suite à une utilisation incorrecte.
Veillez à sauvegarder les données auxquelles vous tenez avec le logiciel d’édition et d’archivage.
Marques commerciales
Mac est une marque déposée de Apple, Inc. Windows est une marque déposée de Microsoft
Corporation. Tous les autres noms de produits et de sociétés sont des marques commerciales
ou déposées de leur détenteur respectif.
Rejet de responsabilité
Les informations fournies dans ce mode d’emploi ont été soigneusement relues et vérifiées.
Notre quête permanente d’amélioration de nos produits peut cependant entraîner des différences entre les caractéristiques du produit et celles figurant dans le mode d’emploi. Korg
décline toute responsabilité pour toute différence entre les caractéristiques du produit et le
contenu du mode d’emploi. Les caractéristiques sont susceptibles d’être modifiées sans avis
préalable.
Responsabilité
Les produits Korg sont fabriqués conformément aux caractéristiques strictes et aux tension
en vigueur dans chaque pays. Ces produits ne sont garantis par le distributeur Korg que
dans le pays pour lequel ils sont fabriqués. Tout produit Korg vendu sans carte de garantie
ou sans numéro de série ne bénéficie pas de la garantie et n’engage pas la responsabilité du
fabricant/du distributeur. Cette clause est mise en œuvre pour votre propre protection et
sécurité.
Entretien et service après-vente
Pour tout entretien, veuillez contacter le service après-vente Korg agréé le plus proche. Si
vous souhaitez plus d’informations sur les produits Korg ou pour savoir où trouver les logiciels et accessoires pour votre instrument, adressez-vous à votre distributeur Korg agréé.
Pour obtenir les informations les plus récentes, veuillez vous rendre sur notre site web.
Mise à jour de votre clavier
Votre instrument peut être mis à jour avec les nouvelles versions du système d’exploitation
proposées par Korg. Vous pouvez télécharger le système d’exploitation de notre site web
.korg.com). Veuillez lire les instructions accompagnant le système d’exploitation.
(www
Economies d’énergie et préservation de la lampe
Mettez votre SV-1 hors tension quand vous ne l’utilisez pas. Vous économisez ainsi de l’énergie, préservez la planète et augmentez la durée de vie de la lampe.
Remplacer la lampe
Les lampes, comme les ampoules d’éclairage, ont une durée de vie limitée. Quand la lampe
fait défaut, contactez un centre de service après-vente agréé Korg pour la remplacer.
N’ESSAYEZ PAS DE REMPLACER LA LAMPE VOUS-MEME car vous risquez d’endommager
sérieusement l’instrument et de vous électrocuter. De plus, cette opération annule la garantie.
Copyright ©2009 KORG Italy Spa. Imprimé en Chine.
Page 55

Sommaire | – 41
Sommaire
Introduction . . . . . . . . . . . . . . . . . . . . . . . . . . . . . . . . . . . . . . . . . . . . 42
Bienvenue à bord! . . . . . . . . . . . . . . . . . . . . . . . . . . . . . . . . . . . . . . . . . . . . . . . . . . . . . 42
Contenu de l’emballage . . . . . . . . . . . . . . . . . . . . . . . . . . . . . . . . . . . . . . . . . . . . . . . . 42
Caractéristiques principales . . . . . . . . . . . . . . . . . . . . . . . . . . . . . . . . . . . . . . . . . . . . . 42
Real eXperience . . . . . . . . . . . . . . . . . . . . . . . . . . . . . . . . . . . . . . . . . . . . . . . . . . . . . . . 45
Technologie ‘Valve Reactor’ . . . . . . . . . . . . . . . . . . . . . . . . . . . . . . . . . . . . . . . . . . . . 46
Ecouter les démonstrations . . . . . . . . . . . . . . . . . . . . . . . . . . . . . . . . . . . . . . . . . . . . . 47
Contrôle et connexion . . . . . . . . . . . . . . . . . . . . . . . . . . . . . . . . . . . . 48
Face avant . . . . . . . . . . . . . . . . . . . . . . . . . . . . . . . . . . . . . . . . . . . . . . . . . . . . . . . . . . . 48
Face arrière . . . . . . . . . . . . . . . . . . . . . . . . . . . . . . . . . . . . . . . . . . . . . . . . . . . . . . . . . . 54
Connexions . . . . . . . . . . . . . . . . . . . . . . . . . . . . . . . . . . . . . . . . . . . . . . . . . . . . . . . . . . 56
Utiliser le SV-1 . . . . . . . . . . . . . . . . . . . . . . . . . . . . . . . . . . . . . . . . . . 58
Sélection des sons . . . . . . . . . . . . . . . . . . . . . . . . . . . . . . . . . . . . . . . . . . . . . . . . . . . . . 58
Sélection et édition des effets . . . . . . . . . . . . . . . . . . . . . . . . . . . . . . . . . . . . . . . . . . . . 62
Rétablir les réglages par défaut . . . . . . . . . . . . . . . . . . . . . . . . . . . . . . . . . . . . . . . . . . 65
Changer de son ou d’effet en cours d’édition . . . . . . . . . . . . . . . . . . . . . . . . . . . . . . . 65
Réglages avancés . . . . . . . . . . . . . . . . . . . . . . . . . . . . . . . . . . . . . . . . 66
Transposition . . . . . . . . . . . . . . . . . . . . . . . . . . . . . . . . . . . . . . . . . . . . . . . . . . . . . . . . 66
Régler le diapason . . . . . . . . . . . . . . . . . . . . . . . . . . . . . . . . . . . . . . . . . . . . . . . . . . . . . 67
Sélectionner une courbe d’accordage . . . . . . . . . . . . . . . . . . . . . . . . . . . . . . . . . . . . . 68
Régler la sensibilité du clavier au toucher . . . . . . . . . . . . . . . . . . . . . . . . . . . . . . . . . . 69
Calibrer les pédales . . . . . . . . . . . . . . . . . . . . . . . . . . . . . . . . . . . . . . . . . . . . . . . . . . . . 70
Régler le niveau de bruit RX . . . . . . . . . . . . . . . . . . . . . . . . . . . . . . . . . . . . . . . . . . . . 71
Choisir un canal MIDI . . . . . . . . . . . . . . . . . . . . . . . . . . . . . . . . . . . . . . . . . . . . . . . . . 72
Pas de panique! . . . . . . . . . . . . . . . . . . . . . . . . . . . . . . . . . . . . . . . . . . . . . . . . . . . . . . . 72
Vérifier la version du système d’exploitation . . . . . . . . . . . . . . . . . . . . . . . . . . . . . . . 73
Sauvegarder vos sons . . . . . . . . . . . . . . . . . . . . . . . . . . . . . . . . . . . .74
Sauvegarder un son que vous aimez . . . . . . . . . . . . . . . . . . . . . . . . . . . . . . . . . . . . . . 74
Initialiser tous les réglages . . . . . . . . . . . . . . . . . . . . . . . . . . . . . . . . . . . . . . . . . . . . . . 74
Dépannage . . . . . . . . . . . . . . . . . . . . . . . . . . . . . . . . . . . . . . . . . . . . . 75
Fiche technique . . . . . . . . . . . . . . . . . . . . . . . . . . . . . . . . . . . . . . . . . . 76
Français
Page 56

42 – Introduction | Bienvenue à bord!
Introduction
BIENVENUE À BORD!
Merci et félicitations pour votre acquisition du Korg SV-1 Stage Vintage Piano.
Nous sommes certains qu’il vous procurera d’innombrables heures de plaisir et
des sons de piano vintage inégalés!
Pour profiter au mieux de votre SV-1, veuillez lire ce manuel au moins une fois
et (comme il est coutume de le dire) “suivre les recommandations qui y sont faites…” Après l’avoir lu, conservez ce manuel pour toute référence ultérieure; en le
relisant, vous (re)découvrirez des trucs et astuces que vous aviez oubliés depuis
la première lecture.
Ce mode d’emploi s’applique aux versions à 88 et 73 touches du SV-1. La seule
différence entre ces deux instruments est la longueur du clavier (et leur poids!).
CONTENU DE L’EMBALLAGE
Après avoir acheté votre SV-1, veuillez vérifier si tous les éléments suivants se
trouvent dans l’emballage. Si l’un d’entre eux devait manquer, contactez immédiatement votre revendeur Korg.
• SV-1 Stage Vintage Piano
• Mode d’emploi (le manuel que vous avez entre les mains)
• CD accessoire (contenant les logiciels et les modes d’emploi s’y rapportant)
• Pupitre
• Pédale de maintien Korg DS-2H (progressive)
• Câble d’alimentation CA IEC standard
CARACTÉRISTIQUES PRINCIPALES
Vaste palette de sons vintage
• Le SV-1 est un instrument tenant à la fois du piano à queue et du clavier vin-
tage tout en offrant également les avantages de la modélisation d’amplificateurs classiques, de pédales d’effet et d’effets de studio.
• Le SV-1 propose une vaste palette de sons dont deux sons de pianos à queue
stéréo. Les sons peuvent être modifiés et sauvegardés dans huit mémoires
“Favorite”.
Page 57

Introduction | Caractéristiques principales – 43
Facilité d’emploi et plaisir de jeu
• La sélection de son est extrêmement simple: actionnez une commande pour
sélectionner un son de base et une autre pour choisir une variation du son de
base. Pour éditer le son (en temps réel!), il suffit de jouer avec des commandes.
• Le clavier de qualité supérieure RH3 de Korg dispose de quatre zones de pon-
dération différente des touches. Il en ressort un réalisme et une sensation de
jeu identiques à ceux d’un clavier de piano à queue. La réponse au toucher
est sélectionnable parmi huit courbes de toucher différentes: elle permet
d’ajuster la réponse du clavier à la force que vous exercez sur les touches.
• Huit courbes d’accordage permettent d’accorder avec précision des instru-
ments vintage ou un piano à queue.
• La fonction de transposition vous permet de changer la hauteur de l’instru-
ment tandis que le réglage du diapason permet d’affiner l’accordage.
Les pédales d’un piano à queue et bien plus
• Le SV-1 dispose de connexions pour émuler les trois pédales d’un piano à
queue. Vous pouvez aussi utiliser les pédales pour piloter le volume, le changement de vitesse du haut-parleur rotatif (“Rotary”) ou l’effet wah. Les pédales sont automatiquement programmées pour piloter l’effet adéquat et ne
nécessitent aucun réglage supplémentaire.
• La pédale Damper (de maintien) simule la résonance sympathique des cor-
des ainsi que les bruits concomitants d’un piano acoustique. Elle vous permet aussi de déterminer l’intensité de l’effet en fonction de son degré
d’enfoncement (pédale progressive).
Français
Technologies ‘Valve Reactor’ et de modélisation
• Le SV-1 est équipé de la technologie Valve Reactor qui utilise une lampe
pour recréer la sonorité d’un véritable ampli de puissance à lampe, offrant la
réponse et le son d’amplis classiques.
• Le SV-1 fait appel à une technologie de modélisation sophistiquée pour
recréer des sons d’amplis, d’enceintes et d’effets. En combinant ces modèles,
vous pouvez produire une gamme de sons extraordinaires, inédits pour la
plupart.
Page 58

44 – Introduction | Caractéristiques principales
Effets vintage d’une qualité sans pareille
• Comme le SV-1 contient aussi des effets de qualité exceptionnelle, vous disposez avec lui de tous les outils nécessaires pour forger intégralement votre
son. Choisissez un modèle de pédale, d’ampli, d’effet de modulation, de
réverbération, d’écho et de delay puis combinez ces sections.
• Le SV-1 dispose de boutons de contrôle permettant de déterminer le temps
de retard avec la fonction TAP TEMPO, d’activer et de couper des effets ou de
changer la vitesse d’un haut-parleur rotatif… Autant de fonctions indispensables sur scène.
Connexion simple
• Grâce à sa prise numérique USB et aux prises MIDI IN et OUT, le SV-1 permet aussi d’étendre votre installation de diverses façons. La prise USB peut
aussi transférer des données MIDI, ce qui vous permet de brancher le SV-1
directement à votre ordinateur avec un seul câble, sans interface MIDI
dédiée. Un pilote KORG USB MIDI dédié est disponible gratuitement afin
d’exploiter au mieux les fonctions MIDI du SV-1. Vous le trouverez sur le CD
accessoire et sur notre site web.
• Le bouton Local Off transforme immédiatement votre
SV-1 en clavier maître
pour travailler avec un séquenceur.
Edition de pointe
• Comme les fonctions d’édition de l’instrument sont réduites au strict minimum pour garantir une simplicité d’emploi maximale, vous pouvez éditer
vos sons de façon extrêmement pointue avec le logiciel SV-1 Editor. Ce logi-
ciel vous permet en outre de sauvegarder tous vos sons personnels, vos réglages d’amplis et d’effets sous forme de “presets” dans une des 36 mémoires de
sons et des 8 mémoires de sons favoris. Vous pouvez créer d’immenses bibliothèques de sons personnels et les échanger avec d’autres utilisateurs. Le logiciel “SV-1 Editor” est disponible sur le CD accessoire ou téléchargeable de
notre site web.
Page 59

Introduction | Real eXperience – 45
REAL EXPERIENCE
RIEN NE VAUT L’EXPERIENCE!
Les sons du SV-1 exploitent la technologie Korg Real eXperience qui leur confère un réalisme et une finition extraordinaires. Alors que les techniques d’échantillonnage en vigueur délivrent un “instantané” audio, notre technologie tient de l’hologramme en reproduisant avec exactitude le moindre détail sonore dans toutes ses dimensions. Les pianos à queue, les pianos électriques et les clavis sont tous échantillonnés avec le son des marteaux et l’estompement naturel du son afin de restituer le son dans son intégralité. Différents niveaux de dynamique sont saisis afin d’étendre le vocabulaire expressif de l’instrument.
Prenons le piano à queue, par exemple. Le SV-1 exploite le bruit de relâchement
des touches et du retour des marteaux ainsi que la résonance sympathique des
cordes pour recréer les plus subtiles nuances contribuant à générer un son d’instrument extraordinaire. Cette attention portée aux moindres détails est caractéristique du nouveau SV-1: cet instrument est en mesure d’interpréter et de restituer la moindre nuance de toucher sous forme de geste musical particulier.
Cette technique est également appliquée à tous les autres sons. Ainsi, les pianos
électriques, les clavis et les orgues sont restitués pour la première fois avec un
réalisme absolument inédit: finis les sons synthétiques et sans vie! Ces sons réagissent sous vos doigts exactement comme le ferait l’instrument simulé et produisent un effet impressionnant lorsque vous jouez sur scène.
Français
Page 60
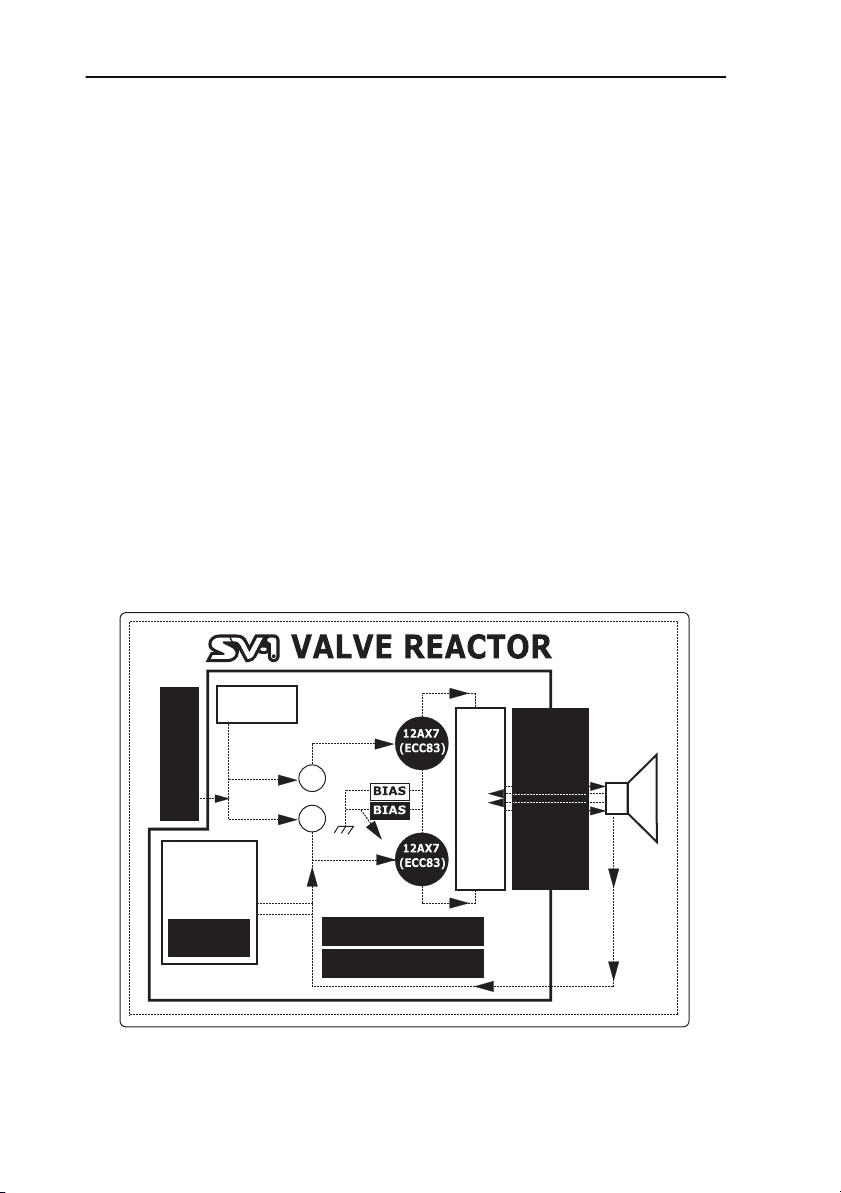
46 – Introduction | Technologie ‘Valve Reactor’
TECHNOLOGIE ‘VALVE REACTOR’
LA PUISSANCE (DE L’AMPLI) ET LA GLOIRE!
Les circuits Valve Reactor du SV-1 ont été spécialement étudiés pour la scène.
Comme les effets de modélisation conventionnels pour l’enregistrement direct
ne sont pas utilisés directement avec un haut-parleur, ils ne comprennent pas de
circuit d’amplification de puissance, de transformateur de sortie ni de hautparleur. Bref, ils n’ont qu’un circuit de préamplification.
Un vrai son d’ampli à lampes n’est pas produit uniquement par le préamplificateur. Le son et la saturation de l’ampli de puissance ainsi que les changements
constants d’impédance générés par l’ampli de puissance excitant les hautparleurs jouent aussi un rôle. Le SV-1 inclut un véritable circuit d’ampli de puissance à lampe de faible puissance, un transformateur de sortie virtuel exploitant
des composants à transistors pour simuler son homologue physique et un circuit
de haut-parleur factice qui simule les variations d’impédance d’un vrai hautparleur. Cela signifie que le SV-1 a la même structure de circuits qu’un véritable
ampli à lampes bien qu’il soit de faible puissance.
Quand vous jouez sur scène, le son qui arrive à la console principale est le même
que celui d’un véritable ampli analogique enregistré avec des micros de qualité.
Inverseur
de phase
Préampli
Circuit
feedback
(avec/sans
Presence &
Resonance)
Selon le
modèle
12AX7 (double triode)
Sortie Push-Pull
Classe A ou AB
Selon le modèle
Ampli
Reactor
Avec
virtuel
courant
constant &
feedback
réactif
Transformateur de sortie
Haut-
parleur
factice
Page 61
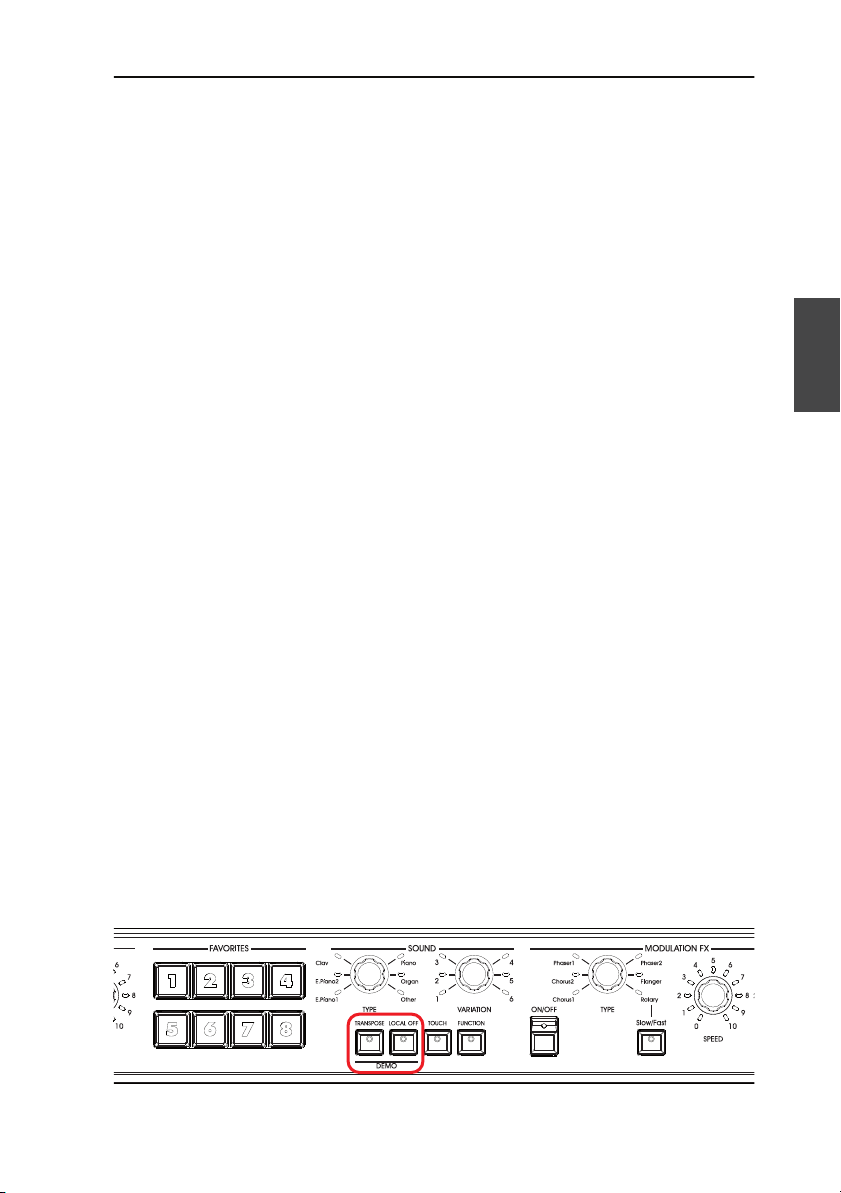
Introduction | Ecouter les démonstrations – 47
ECOUTER LES DÉMONSTRATIONS
Ecoutez les morceaux de démonstration internes pour apprécier la puissance du
SV-1. Vous avez le choix entre plusieurs morceaux de démonstration.
1. Appuyez simultanément sur les boutons TRANSPOSE et LOCAL OFF.
Leur témoin se met à clignoter.
2. Si vous n’actionnez plus aucun bouton, les 36 morceaux de démonstration
sont reproduits successivement.
3. Choisissez un des morceaux de démonstration avec les commandes TYPE et
VARIATION de la section SOUND.
4. Arrêtez la démonstration en appuyant à nouveau sur les boutons
TRANSPOSE et LOCAL OFF.
Français
Page 62

48 – Contrôle et connexion | Face avant
Contrôle et connexion
FACE AVANT
Cette section décrit les boutons et commandes situés en façade du SV-1.
1 LAMPE
Le SV-1 contient une lampe (“valve”) 12AX7 (ECC83).
AVERTISSEMENT: Evitez tout impact sur le hublot ou la lampe pour éviter de
l’endommager. Si le hublot de la lampe est cassé, faites-le immédiatement réparer
pour ne pas endommager la lampe.
2
Section MASTER VOLUME
Cette section règle le volume global du
sens des aiguilles d’une montre pour augmenter le volume et dans le sens inverse
pour le diminuer. Cette commande règle le volume global de l’instrument pour
les sorties gauche et droite ainsi que pour la sortie casque.
AVERTISSEMENT: Maintenez toujours le volume à un niveau confortable. Un
volume excessif peut entraîner une perte auditive irrémédiable.
SV-1
. Tournez cette commande dans le
Section EQUALIZER
3
Cette section permet de régler l’égalisation. Utilisez les trois commandes de la
section EQUALIZER pour régler l’égaliseur à trois bandes et ajuster le timbre du
son envoyé aux sorties du
l’égaliseur, appuyez sur la commande correspondante.
SV-1
. Pour rétablir la valeur par défaut d’une bande de
23
1
Page 63

Contrôle et connexion | Face avant – 49
4 Section PRE FX
Cette section permet de sélectionner un modèle de pédale d’effet. Il vous permet de
choisir un des 6 modèles de pédales d’effet proposés par le SV-1. Après avoir sélectionné une pédale d’effet avec la commande TYPE, vous pouvez utiliser les commandes
SPEED et INTENSITY pour régler les paramètres de la pédale d’effet. Pour rétablir la
valeur par défaut d’un paramètre, appuyez sur la commande correspondante. Les
pédales d’effet se trouvent avant l’ampli.
Le bouton AUTO/PEDAL sert quand vous sélectionnez l’effet wah. Quand son témoin
est éteint (mode “Auto”), le filtre de l’effet wah est automatiquement réglé en fonction
du son sélectionné et de la dynamique du jeu. Quand le témoin est allumé (mode
“Pedal”), vous pouvez piloter le filtre avec une pédale d’expression branchée à la prise
PEDAL 2; si aucune pédale n’est branchée le wah est réglé sur une fréquence fixe. Nous
recommandons vivement de calibrer la pédale (voyez “Calibrer les pédales” à la
page 70).
REMARQUE: Les paramètres sont initialisés lorsque vous changez de preset.
Section AMP MODEL
5
Cette section permet de sélectionner le modèle d’ampli (et d’enceinte). Vous avez le
choix entre 6 types de modèles d’amplis classiques dont le légendaire VOX AC30TBX.
Chaque modèle d’ampli comprend également un simulateur d’enceinte qui peut être
édité avec le logiciel “SV-1 Editor”.
Après avoir sélectionné un ampli avec la commande TYPE, vous pouvez utiliser la
commande DRIVE pour régler le volume du préampli (et donc la distorsion). Pour
rétablir le réglage de distorsion par défaut, appuyez sur la commande DRIVE.
Le mode de fonctionnement du préampli et de l’ampli de puissance, la réponse des
commandes de timbre et leur emplacement au sein du circuit changent en fonction du
type d’ampli sélectionné ici, restituant avec précision le gain et le timbre exacts de
l’ampli original. L’étage vital d’ampli de puissance (classe A ou AB) ainsi que la boucle
de réinjection (feedback) négative (ou son absence) sont aussi soigneusement restitués.
REMARQUE: Les paramètres sont initialisés lorsque vous changez de preset.
Français
45
Page 64

50 – Contrôle et connexion | Face avant
Section FAVORITES
6
Cette section permet de sélectionner un de vos huit sons personnels favoris; vous
pouvez les sauvegarder sans passer par le logiciel “SV-1 Editor”.
Utilisez ces boutons pour sauvegarder jusqu’à 8 presets contenant vos réglages de
sons et d’effets. Pour sauvegarder les réglages en vigueur, maintenez simple-
ment un des huit boutons FAVORITES enfoncés et actionnez-le de nouveau
quand son témoin se met à clignoter.
7 Section SOUND
Cette section permet de sélectionner un son préprogrammé (“preset”). Utilisez
la commande TYPE pour sélectionner un des six sons de base et la commande
VARIATION pour choisir une des six variations de chaque son de base (soit 36
sons en tout). Vous trouverez une description détaillée des sons préprogrammés
à la page 58.
REMARQUE: Les sons peuvent être modifiés et sauvegardés avec le logiciel “SV-1
Editor”. Consultez le mode d’emploi adéquat sur le CD accessoire.
567
Page 65

Contrôle et connexion | Face avant – 51
890A
8 Bouton TRANSPOSE
Ce bouton permet de transposer le clavier. Voyez “Transposition” à la page 66.
9 Bouton LOCAL OFF
Ce bouton permet d’activer et de couper la fonction “Local Off”. Quand le
témoin de ce bouton est allumé, le clavier est débranché du générateur de sons
internes. En jouant sur le clavier, vous n’entendez plus les sons du générateur de
sons interne. Cependant, les données de notes continuent à être transmises à la
prise MIDI OUT (ou USB) et peuvent être reçues par un ordinateur. L’ordinateur les renvoie à la prise MIDI IN du SV-1 (ou à sa prise USB) puis au générateur de sons interne. Ce routage vous permet d’enregistrer et de jouer simultanément sans produire de notes doubles.
0 Bouton TOUCH
Ce bouton permet de régler la sensibilité du clavier. Voyez “Régler la sensibilité
du clavier au toucher” à la page 69.
A Bouton FUNCTION
Utilisez ce bouton pour effectuer des réglages MIDI et d’accordage, pour régler
le volume des bruits RX concomitants ou pour rétablir la configuration par
défaut de l’instrument.
Français
FUNCTION puis… donne le résultat suivant
EQ - TREBLE Affine l’accordage. Voyez “Régler le diapason” à la page 67.
EQ - BASS Règle le volume des bruits accompagnant le son (“RX Noise”). Voyez
FAVORITES 1~8 Sélectionne une courbe d’accordage (parmi 8). Voyez “Sélectionner
Touches C6~D#7 Sélectionne un canal MIDI (parmi 16) Voyez “Choisir un canal MIDI” à
“Régler le niveau de bruit RX” à la page 71.
une courbe d’accordage” à la page 68.
la page 72.
Page 66

52 – Contrôle et connexion | Face avant
Section MODULATION FX
B
Cette section permet de choisir un effet de modulation. Vous avez le choix parmi
six modèles d’effets de modulation. Après avoir sélectionné un effet avec la commande TYPE, vous pouvez utiliser les commandes SPEED et INTENSITY pour
régler les paramètres de l’effet. Pour rétablir la valeur par défaut d’un paramètre,
appuyez sur la commande correspondante. Les effets de modulation se trouvent
après le modèle d’ampli et d’enceinte.
Le bouton SLOW/FAST change la vitesse de rotation de l’effet “Rotary”.
REMARQUE: Les paramètres sont initialisés lorsque vous changez de preset.
Section REVERB/DELAY
C
Cette section permet de sélectionner un effet de réverbération, de delay ou
d’écho. Vous avez le choix entre quatre modèles de réverbération, un modèle
d’écho et un modèle de delay. Après avoir sélectionné un effet avec la commande
TYPE, vous pouvez utiliser la commande DEPTH pour régler l’intensité de
l’effet. Pour rétablir son réglage par défaut, appuyez sur la commande DEPTH.
Ces effets sont placés après les modèles d’ampli et d’enceinte et après l’effet de
modulation.
Si vous sélectionnez l’effet de delay stéréo, vous pouvez entrer le temps de retard
en tapant sur le bouton TAP selon l’intervalle voulu.
REMARQUE: Les paramètres sont initialisés lorsque vous changez de preset.
Commutateur POWER
D
Ce commutateur met l’instrument sous/hors tension.
BCD
Page 67

Contrôle et connexion | Face avant – 53
E Prise pour casque (stéréo)
Branchez votre casque à cette prise située sous l’extrémité gauche du clavier.
Vous pouvez utiliser un répartiteur pour brancher plusieurs casques.
Français
Page 68

54 – Contrôle et connexion | Face arrière
34 5 6 7
FACE ARRIÈRE
La face arrière rassemble la plupart des prises.
2
1
0.771°
1 Prise POWER
Branchez ici le câble d’alimentation IEC fourni.
2 Orifices pour PUPITRE
Votre SV-1 est livré avec un pupitre. Insérez ses pieds dans ces deux orifices.
3 Prise USB DEVICE
Cette prise permet de brancher un ordinateur pouvant servir de séquenceur (la
prise a alors le même rôle que les prises MIDI) ou permettant d’utiliser le logiciel
“SV-1 Editor” afin d’approfondir l’édition des sons. Avant d’utiliser cette prise,
installez le pilote “KORG USB-MIDI Driver” (vous trouverez les instructions
nécessaires avec le pilote MIDI sur le CD accessoire; vous pouvez aussi les télécharger de notre site web).
4 Prises PEDAL (DAMPER, 1, 2)
Branchez la pédale de maintien fournie Korg DS2H à la prise DAMPER. Branchez un commutateur au pied à la prise PEDAL 1 et un commutateur au pied ou
une pédale d’expression à la prise PEDAL 2.
La prise DAMPER est réservée à la fonction de pédale forte (“damper”). Branchez-y la pédale de maintien Korg DS-2H.
Page 69

Contrôle et connexion | Face arrière – 55
La prise PEDAL 1 n’accepte qu’un commutateur au pied (comme le Korg PS-1,
en option). Il peut servir de pédale sostenuto (tonale) ou de commutateur alternant les vitesses lente et rapide de l’effet “Rotary” (quand il est sélectionné).
PEDAL 2 peut accueillir une pédale de volume/expression (comme la Korg
XVP-10 ou EXP-2 en option) ou un commutateur au pied (comme le Korg
PS-1). La pédale de volume/expression sert de pédale de volume (réglage par
défaut). Le commutateur au pied sert de pédale douce (pour cela, il doit être calibré; voyez page 70).
Si vous branchez une pédale de volume/expression à cette prise, elle peut aussi
contrôler le filtre de l’effet wah. Pour piloter l’effet wah avec la pédale de volume/
expression, sélectionnez l’effet wah et allumez le témoin du bouton AUTO/
PEDAL dans la section PRE FX (mode “Pedal”).
Pour calibrer les pédales (et régler leur polarité), voyez “Calibrer les pédales” à la
page 70.
5 Prises MIDI
Via MIDI, vous pouvez piloter le SV-1 à partir d’un séquenceur ou piloter un
dispositif MIDI externe à partir du SV-1. Quand vous utilisez le SV-1 pour piloter un dispositif MIDI externe ou pour enregistrer sur séquenceur, appuyez sur
le bouton LOCAL OFF afin d’allumer son témoin. Vous débranchez ainsi le clavier du générateur de sons interne (mais pas des prises MIDI).
MIDI OUT transmet des données MIDI. Servez-vous de cette prise pour brancher un appareil MIDI ou un ordinateur. Branchez un câble MIDI standard pour
relier cette prise à la prise MIDI IN de l’autre appareil.
MIDI IN reçoit des données MIDI. Servez-vous de cette prise pour piloter le
SV-1 à partir d’un appareil MIDI externe ou un ordinateur. Branchez un câble
MIDI standard pour relier cette prise à la prise MIDI OUT de l’autre appareil.
Français
6 Prises INPUT (L/MONO, RIGHT)
Branchez une source de niveau ligne à ces prises (un clavier, un synthétiseur, un
lecteur CD ou MP3, par exemple).
7 Prises OUTPUT (L/MONO, R)
Ces sorties analogiques sont disponibles sous forme de prises asymétriques jacks
1/4” ou de prises symétriques XLR. Utilisez soit les prises asymétriques jacks 1/
4” pour des connexions courtes ou les prises symétriques XLR pour des connexions plus longues (sur scène, par exemple). Pour le reste, elles ont exactement
le même rôle.
Page 70

56 – Contrôle et connexion | Connexions
S’il vous faut une sortie mono, utilisez uniquement la prise pour jack 1/4” L/
MONO. Les prises XLR ne peuvent pas être utilisées pour une sortie mono.
ASTUCE: Les sorties symétriques XLR sont toujours plus propres et plus puissantes.
Utilisez-les donc chaque fois que possible.
CONNEXIONS
Ce chapitre explique comment brancher le SV-1 à un système d’amplification
audio, aux pédales et à des dispositifs MIDI.
1. Mettez le SV-1 et tous les autres périphériques hors tension.
REMARQUE: Avant d’établir ou de supprimer des connexions, mettez tous les
appareils hors tension. Si vous ignorez cet avertissement, vous risquez d’endommager vos enceintes!
2.
Si vous branchez le SV-1 à une console de mixage ou un système d’amplification, branchez les prises OUTPUT aux entrées lignes de votre console/enregistreur ou système d’amplification.
ASTUCE: Pour une connexion mono, utilisez la prise OUTPUT L/MONO. Toutefois, pour profiter au mieux du son du SV-1, nous recommandons vivement
d’établir des connexions stéréo.
Pour écouter au casque, branchez le casque à la prise prévue à cet effet.
REMARQUE: Lorsque vous branchez un casque, le signal de sortie des prises
OUTPUT n’est pas coupé. Pour que le signal ne soit audible qu’avec le casque,
coupez l’alimentation ou diminuez le volume du matériel auquel le SV-1 est connecté.
3.
Tournez la commande MASTER LEVEL en façade du SV-1 à bout de course à
gauche pour régler le volume sur ‘0’.
4. Branchez le câble secteur IEC fourni à la prise d’alimentation en face arrière
du SV-1 et branchez l’autre extrémité à une prise de courant.
5. Branchez les pédales aux prises adéquates en face arrière.
6. Branchez le câble MIDI ou USB au SV-1 et à l’autre appareil.
7. Branchez n’importe quel lecteur CD/MP3 ou synthétiseur aux prises INPUT
en face arrière.
8. Appuyez ensuite sur l’interrupteur POWER pour mettre le SV-1 sous ten-
sion.
9. Mettez la console de mixage ou le système d’amplification sous tension.
10. Réglez le volume avec la commande de volume de la console de mixage ou
des enceintes actives ainsi qu’avec la commande MASTER VOLUME en
façade du SV-1.
Page 71
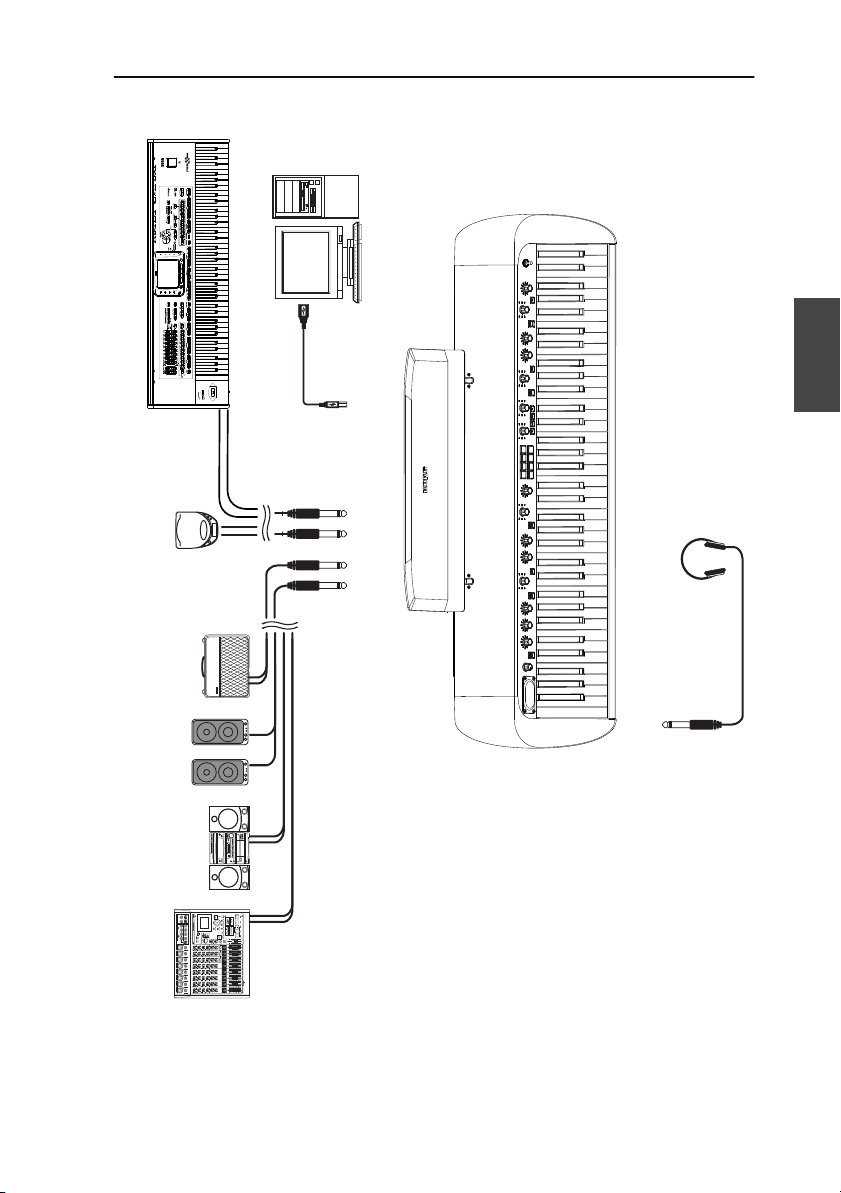
Computer
Contrôle et connexion | Connexions – 57
Synthesizer, etc.
CD/MP3 player, etc.
Amplifier
Powered monitors
Audio system
USB cable
Français
USB
INPUT
OUTPUT
VOX
Headphones
PHONES
Mixer, recorder, etc.
Page 72

58 – Utiliser le SV-1 | Sélection des sons
Utiliser le SV-1
SÉLECTION DES SONS
Le SV-1 dispose de 36 sons (6 sons de base × 6 variations) et chacun de ces sons
peut être personnalisé avec les commandes en façade. Vous pouvez ensuite sauvegarder votre nouveau son dans une des huit mémoires FAVORITES. (Vous
pouvez modifier votre son de façon plus approfondie avec le logiciel “SV-1 Editor”).
Utilisez la commande TYPE de la section SOUND pour sélectionner un son de
base. Utilisez la commande VARIATION de la section SOUND pour sélectionner
une variation du son de base. Les témoins correspondant au son et à la variation
choisis, situés à côté des commandes, s’allument.
Voyons à titre d’exemple comment sélectionner le son PIANO/STRINGS.
1. Vérifiez que les témoins LOCAL OFF et FUNCTION sont éteints.
S’ils sont allumés, appuyez sur ces boutons pour les éteindre.
2. Utilisez la commande TYPE de la section SOUND pour sélectionner le son
de base PIANO.
Le témoin correspondant de la commande TYPE s’allume.
3. Utilisez la commande VARIATION de la section SOUND pour sélectionner
la variation 5, correspondant au son “PIANO/STRINGS”.
Le témoin correspondant de la commande VARIATION s’allume.
Les sons préprogrammés couvrent une très vaste palette de sonorités: pianos
électriques vintage, pianos à queue classiques, pianos modernes au son métallique agressif pouvant générer des sons monumentaux, des orgues d’une richesse
incroyable etc. Vous trouverez ci-dessous une brève description de chacun
d’entre eux.
Page 73

Utiliser le SV-1 | Sélection des sons – 59
Sons
# Nom Type Var. RX Description
1 Tine EP/Amp E.Piano 1 1 √ L’incontournable piano électrique à barres
2 Tine EP/Phaser 2 √ Le même piano à barres métalliques traité par
3 Tremolo EP 3 √ Voici un autre son incontournable, cette fois
4 Dyno EP 4 √ Version modifiée de l’original, ce son est bien
5 VPM Piano 5 Champion des premiers synthés numériques du
6 VPM Tine 6 Une version plus musclée du son précédent.
7 Reed EP 1 E.Piano 2 1 √ Sans doute le premier vrai piano électrique qui
8 Reed EP 2 2 √ Le même piano électrique dont le son provenait
9 Electric Grand 3 √ Sorti au milieu des années 1970, ce piano était
10 SG-1D Piano 4 √ L’un des premiers pianos Korg basés sur des
11 80’s Synth Piano 5 Un son aussi innovateur qu’expressif qui vit le
12 MIDI Grand 6 Ce son combiné a fait les beaux jours de la musi-
métalliques capté dans son biotope quasi naturel des années 1970: avec un ampli de guitare.
un effet “phaser” que vous connaissez des tubes
rock et soul ultra “classiques”.
avec un trémolo stéréo.
plus clair et mieux défini que le son “classique”.
Loin d’être inventée par nous, cette modif s’est
imposée entre la fin des années 1970 et le début
des années 1980.
milieu des années 1980, cet instrument produisait aussi un son de piano électrique très prisé.
vit le jour à la fin des années 1950 et qui faisait
partie de l’équipement de base d’une kyrielle de
claviéristes.
de lames en métal au son très “Logical”.
étonnamment portable et sonnait presque
“vrai”.
échantillons Les graves puissants et les aigus
brillants sont exploités à merveille par la dynamique très réaliste.
jour à la fin des années 1980 avec un clavier/synthétiseur numérique très populaire.
que pop des années 1980 et 90. Il repose sur des
sons de piano acoustique et électrique avec
quelques “agréments” pour souligner le côté
émotionnel des ballades.
Français
Page 74

60 – Utiliser le SV-1 | Sélection des sons
# Nom Type Var. RX Description
13 Clav AC Clav 1 √ Conçu comme clavecin électrique portable, cet
14 Clav BC 2 √ Configuration “BC” des boutons de registre sur
15 Clav BD 3 √ Configuration “BD” des boutons de registre sur
16 Clav AD 4 √ Configuration “AD” des boutons de registre sur
17 ElectroPno 5 √ Piano électro-mécanique de la fin des années
18 ElectraPno 6 Piano électronique très populaire dans les
19 Grand Piano1 Piano 1 √ Son échantillonné d’une grande authenticité
20 Grand Piano2 2 √ Son échantillonné tout aussi authentique d’un
21 Mono Grand 3 √ Version mono du piano à queue allemand, cette
22 Upright 4 √ Son très reconnaissable d’un piano droit alle-
23 Piano/Strings 5 Combinaison de piano et de cordes très deman-
24 Piano/Pad 6 Autre son combinant un piano avec une forme
25 Click Tonewheel Organ 1 √ L’orgue le plus connu du monde sans lequel vous
26 Jazz Tonewheel 2 √ Ce réglage convient particulièrement pour la
27 Full Tonewheel 3 √ Son d’orgue classique avec toutes les tirettes
28 Console Organ 4 √ Son de l’orgue à lampes américain de Garth
29 Italian Combo 5 √ Orgue électronique fabriqué en Italie à la fin
30 Vox Combo 6 √ Emulation parfaite du VOX Continental, sans
instrument avait un son tellement spécifique
qu’il est devenu incontournable.
l’original. Version plus mordante du fameux
clavi, ce modèle recrée le son d’un tube “super”
funk des années 1970.
l’original.
l’original.
1960 au son très moelleux qui plaisait beaucoup
aux musiciens de scène.
années 1970 et utilisé par tous les grands musiciens rock et rock progressif.
d’un piano à queue japonais convenant pour la
musique pop et jazz.
piano à queue allemand extrêmement célèbre,
convenant pour la musique jazz et classique.
fois pour la musique rock et pop. Choisissez-la
lorsque vous utilisez un amplificateur relativement petit.
mand.
dée pour les ballades.
d’onde en dent scie plutôt “ronde”.
ne serez jamais musicien rock ou jazz.
musique jazz et funk.
actives.
Hudson, caractérisant ses pièces les plus célèbres.
des années 1960. Son timbre très reconnaissable
l’a rendu incontournable dans les milieux du
rock.
doute l’orgue à transistors le plus connu (il date
du début des années 1960).
Page 75

Utiliser le SV-1 | Sélection des sons – 61
# Nom Type Var. RX Description
31 Full Strings Other 1 Une nappe aussi chaleureuse que sophistiquée
de cordes orchestrales.
32 Tape Strings 2 Ce son de cordes provient d’un instrument qui
contenait des bandes magnétiques. A la fin des
années 1960 et dans les années ‘70, tous les
groupes expérimentaux et autres s’en servaient.
33 70s Strings 3 Son de cordes “classique” très en vogue dans la
deuxième moitié des années 1970.
34 Choir 4 Autre grand classique: le son de chorale mixte.
35 Synth Brass 5 Des cuivres synthétiques plutôt ronds mais néan-
moins dynamiques.
36 Sharp Brass 6 Un son de synthé légendaire des années 1980.
Comment dit-on “sauter” en anglais?
# – Numéro de programme transmis via MIDI (la numérotation commence à partir de “1”; si votre
séquenceur démarre à partir de “0”, diminuez chaque numéro d’une unité).
RX – Cette colonne indique les sons contenant des bruits “RX Noise”.
Favorites
No. PC Nom Type RX # PC Nom Type RX
137Grand Piano1 Piano √ 5 41 Clav AC Clav √
238Grand Piano2 Piano √ 6 42 Click Tonewheel Organ √
3 39 Tine EP/Amp E.Piano 1 √ 7 43 Full Strings Other
4 40 Reed EP 1 E.Piano 2 √ 8 44 Sharp Brass Other
PC – Numéro de programme transmis via MIDI (la numérotation commence à partir de “1”; si votre
séquenceur démarre à partir de “0”, diminuez chaque numéro d’une unité).
RX – Cette colonne indique les sons contenant de bruits “RX Noise”.
Français
Page 76

62 – Utiliser le SV-1 | Sélection et édition des effets
SÉLECTION ET ÉDITION DES EFFETS
Vous pouvez sélectionner divers effets et modèles d’amplis avec les commandes
TYPE. Vous pouvez modifier le paramètre principal de l’effet avec les commandes DEPTH, INTENSITY, SPEED, DRIVE. Pour une édition plus pointue, utilisez le logiciel “SV-1 Editor”.
Les effets et le modèle d’ampli peuvent être activés/coupés d’une pression sur le
bouton ON/OFF correspondant. Vous pouvez ensuite sauvegarder vos changements et le nouveau son dans une des huit mémoires FAVORITES.
Nous allons essayer les effets en commençant par le début de la chaîne d’effets où
se trouvent les effets les plus dingues, placés avant l’ampli, jusqu’à la fin où se
trouvent les effets de finition les plus suaves. Cette chaîne d’effets correspond à
celle accompagnant un amplificateur dans un système classique.
FLUX DU SIGNAL
Effet 1 Effet 2
SON EQUALIZER PRE FX
Effet 3Effet 3
Préampli Ampli de
VOLUME VOLUME
Effet 4 Effet 5 Effet 6
MODULATION REVERB/DELAY
puissance
Lampe
POWER
ATT.
Enceinte
PROG LVL
Effet ‘Total’
Limiteur stéréo
Limiteur stéréo de
mastérisation
NR
Sorties
REMARQUE: Pour certains effets, le nom du paramètre édité peut différer du nom
imprimé sur le panneau du piano. Le nom affiché par le logiciel “SV-1 Editor” correspond au nom réel, comme le montrent les tableaux des pages suivantes. Exemple: Pour le compresseur de la section Pre FX, les commandes SPEED et INTENSITY
règlent en fait la sensibilité et le niveau.
1.
Pour activer chaque section, appuyez sur le bouton ON/OFF correspondant
afin d’allumer son témoin. Pour couper la section, appuyez de nouveau sur
son bouton ON/OFF afin d’éteindre le témoin.
Page 77

Utiliser le SV-1 | Sélection et édition des effets – 63
2. Utilisez les trois commandes EQUALIZER pour régler le grave, le médium et
l’aigu. Après avoir changé la position d’une commande, vous pouvez rétablir
son réglage par défaut en appuyant sur la commande.
AVERTISSEMENT: Des réglages d’égalisation extrêmes peuvent engendrer un
signal très fort.
Le SV-1 dispose d’un simulateur de pédales d’effets restituant l’effet d’une
3.
pédale placée avant l’entrée de l’amplificateur. Utilisez la commande TYPE
de la section PRE FX pour sélectionner une pédale d’effet (Compressor,
Boost, U-Vibe, Vibrato, Tremolo ou Vox Wah).
Si vous avez choisi l’effet wah, utilisez le bouton AUTO/PEDAL pour alterner
entre le wah automatique (le témoin est éteint et le filtre change automatiquement selon le son et la dynamique du jeu) et le wah par pédale (le témoin
est allumé et le filtre est piloté par une pédale d’expression branchée à la prise
PEDAL 2; si aucune pédale n’est branchée, le filtre ne varie pas).
REMARQUE: Avant d’utiliser une pédale d’expression pour piloter l’effet wah, il
est conseillé de la calibrer. Voyez “Calibrer les pédales” à la page 70.
Vous pouvez changer la vitesse de modulation des effets U-Vibe ou trémolo
avec la commande SPEED. Réglez l’intensité de la modulation avec la commande INTENSITY. Pour rétablir le réglage par défaut, appuyez sur la commande SPEED ou INTENSITY.
REMARQUE: La simulation de l’effet booster peut générer un signal très fort.
Français
Type de PRE FX Commande SPEED Commande INTENSITY
Comp Sens Level
Boost Drive Level
U-Vibe Speed Depth
Vibrato Type Mix
Tremolo Speed Depth
Vox Wah Manual Wah Type (V-847, V-848)
Remarque: L’icône de commande MANUAL ne fonctionne que lorsque le bouton AUTO/
PEDAL est réglé sur “Pedal”.
Le SV-1 comprend un simulateur d’ampli vous permettant de sélectionner
4.
un modèle parmi des amplificateurs vintage et modernes. Utilisez la commande TYPE de la section AMP MODEL pour sélectionner un modèle
d’ampli. Vous pouvez changer le volume du préampli (et donc la distorsion)
en actionnant la commande DRIVE. Pour rétablir le réglage par défaut,
appuyez sur la commande DRIVE.
Page 78

64 – Utiliser le SV-1 | Sélection et édition des effets
REMARQUE: Un réglage DRIVE excessif peut entraîner une distorsion indésirable. Dans ce cas, diminuez le réglage.
Type de modèle d’ampli Commande DRIVE
Amp1 (Clean Combo) PreVol
Amp2 (California) PreVol
Amp3 (Tweed) PreVol
Amp4 (AC30) PreVol
Amp5 (Modded OD) PreVol
Organ Amp (Korg OD/HG) Drive
Utilisez la commande TYPE de la section MODULATION FX pour sélection-
5.
ner un effet de modulation (chorus, phaser, flanger ou haut-parleur rotatif).
Si vous avez choisi ce dernier effet (“Rotary”), utilisez le bouton SLOW/FAST
pour changer la vitesse de rotation.
Vous pouvez changer la vitesse de modulation (ou de rotation de la trompe)
avec la commande SPEED et l’intensité de l’effet (ou l’accélération de la
trompe) avec la commande INTENSITY. Pour rétablir les réglages par défaut,
appuyez sur la commande SPEED ou INTENSITY.
ASTUCE: Si vous sélectionnez l’effet Rotary alors qu’une pédale est branchée à
la prise PEDAL 1 à l’arrière de l’instrument, vous pouvez utiliser la pédale pour
alterner entre les vitesses de rotation SLOW/FAST.
Type d’effet de modulation Commande SPEED
Chorus 1 Speed Depth
Chorus 2 Speed Intensity
Phaser 1 Speed Depth
Phaser 2 Speed Color (type 1, 2)
Flanger Speed Depth
Rotary Horn Speed Horn Accel.
6.
Utilisez la commande TYPE de la section REVERB/DELAY pour sélectionner
Commande
INTENSITY
une effet de réverbération, d’écho ou de delay.
Si vous avez sélectionné l’effet de delay stéréo, vous pouvez régler le temps de
retard en tapant quatre fois sur le bouton TAP dans l’intervalle voulu. Le
témoin clignote en suivant le tempo entré et vous permet de vérifier de visu si
le tempo est correct. Si le tempo n’a pas pu être déterminé correctement, le
témoin ne clignote pas.
Page 79

Utiliser le SV-1 | Rétablir les réglages par défaut – 65
Vous pouvez changer l’intensité de l’effet avec la commande DEPTH. Pour
rétablir le réglage par défaut, appuyez sur la commande DEPTH.
Type de REVERB/DELAY Commande DEPTH
Room Mix
Plate Mix
Hall Mix
Spring Mix
Tape Echo Mix
St. Delay Mix
RÉTABLIR LES RÉGLAGES PAR DÉFAUT
Quand vous actionnez une commande, vous modifiez le réglage original.
Appuyez sur cette même commande pour rétablir le réglage par défaut du paramètre correspondant.
C
HANGER DE SON OU D’EFFET EN COURS D’ÉDITION
Quand vous changez d’effet dans une section, tous les réglages des effets précédents sont conservés. Vous pouvez resélectionner l’effet modifié et vous retrouverez tous les changements effectués. (Pour rétablir un réglage par défaut,
appuyez sur la commande du paramètre correspondant).
Par contre, si vous sélectionnez un autre son ou une autre mémoire “Favorite”,
tous les paramètres sont initialisés et vous perdez les réglages que vous aviez
effectués.
Français
Page 80

66 – Réglages avancés | Transposition
Réglages avancés
TRANSPOSITION
Il peut arriver qu’un morceau soit écrit dans une tonalité difficile (impliquant de
nombreuses altérations) ou que vous souhaitiez adapter la hauteur à celle d’un
autre instrument ou d’un chanteur. Dans ce cas, vous pouvez transposer le clavier afin de pouvoir jouer comme vous en avez l’habitude mais à une hauteur
différente. C’est ce que nous appelons la fonction “Transpose”.
Après une transposition d’un demi-ton, le fait de jouer les notes illustrées à gauche produit les notes illustrées à droite.
1. Appuyez sur le bouton TRANSPOSE. Si le clavier est déjà transposé, son
témoin est allumé. S’il est éteint, le clavier n’est pas transposé.
2. Maintenez le bouton TRANSPOSE enfoncé durant 3 secondes jusqu’à ce que
son témoin se mette à clignoter.
3. Appuyez sur la note correspondant à la transposition voulue:
-12
C3
Touche Effet
C3~B3 Transposition de 12~1 demi-tons vers le bas
C4 (Do central) Hauteur de référence (diapason)
C#4~C5 Transposition de 1~12 demi-tons vers le haut
REMARQUE: Si vous n’actionnez aucune touche dans les 4 secondes, la fonction
de transposition est coupée.
Appuyez de nouveau sur le bouton TRANSPOSE pour désactiver la transpo-
4.
0 +12
C5
sition. Le témoin s’éteint.
REMARQUE: Quand vous mettez l’instrument hors tension, la transposition est
coupée.
Page 81

Réglages avancés | Régler le diapason – 67
RÉGLER LE DIAPASON
Vous pouvez affiner l’accordage de l’instrument afin de l’adapter à un autre instrument qui ne peut pas être accordé.
1. Appuyez sur le bouton FUNCTION.
Le témoin du bouton FUNCTION se met à clignoter. Un témoins autour de
la commande TREBLE de la section EQUALIZER commence aussi à clignoter.
2. Utilisez la commande TREBLE pour régler l’accord global. Par défaut, le SV-
1 utilise le diapason occidental de référence (La= 440Hz). La commande
TREBLE permet de changer le diapason par pas de 0.25Hz pour chaque cran
de la commande. Les témoins entourant la commande donnent une indication grossière du désaccordage.
3. Pour retrouver le diapason par défaut (La= 440Hz), appuyez sur la com-
mande TREBLE.
REMARQUE: Quand vous mettez l’instrument hors tension, le réglage de diapason est annulé.
ASTUCE: Vous pouvez modifier le réglage du diapason avec la fonction “Master
Tune” du logiciel “SV-1 Editor” et le mémoriser en sélectionnant la commande
“Write Global”.
Français
Page 82

68 – Réglages avancés | Sélectionner une courbe d’accordage
SÉLECTIONNER UNE COURBE D’ACCORDAGE
Vous pouvez sélectionner une courbe d’accordage pour l’adapter aux sons d’instruments vintage.
1. Appuyez sur le bouton FUNCTION.
2. Le témoin du bouton FUNCTION se met à clignoter. Le témoin d’un des
huit boutons FAVORITES se met aussi à clignoter.
Vous pouvez sélectionner une courbe d’accordage différente avec les boutons
FAVORITES:
Bouton
FAVORITE
Courbe d’accordage
1 Tempérament égal
2 Accord étiré de piano à queue 1
3 Accord étiré de piano à queue 2
4 Accord étiré de piano électrique
5 Accord étiré de piano à queue électrique
6 Accord étiré de piano droit
7 Accord utilisateur 1: Désaccordé
8 Accord utilisateur 2
REMARQUE: Les courbes d’accordage utilisateur 1 et 2 peuvent être programmées avec le logiciel “SV-1 Editor”.
REMARQUE: La courbe d’accordage est mémorisée quand vous sauvegardez
un son dans une mémoire “Favorite”. Elle est également mémorisée avec chaque son preset ou favori que vous modifiez avec le logiciel “SV-1 Editor” quand
vous sélectionnez la commande “Write Current Preset”.
Page 83

Réglages avancés | Régler la sensibilité du clavier au toucher – 69
R
ÉGLER LA SENSIBILITÉ DU CLAVIER AU TOUCHER
Vous pouvez régler la sensibilité du clavier (la courbe de réponse à votre jeu).
1. Appuyez sur le bouton TOUCH.
Le témoin du bouton TOUCH se met à clignoter. Le témoin du bouton
FAVORITE correspondant à la courbe de réponse au toucher en vigueur
s’allume aussi.
2. Appuyez sur le bouton FAVORITE correspondant à la courbe de réponse au
toucher souhaitée.
3. Appuyez sur le bouton TOUCH pour confirmer votre choix et retrouver le
mode de fonctionnement normal.
Français
Bouton
FAVORITE
Toucher Remarque
1 Normal Réponse normale d’un clavier de piano.
2 Doux 1 Un toucher doux suffit pour produire des notes fortes.
3 Doux 2
4 Moyen 1 Un toucher normal permet de produire des notes fortes.
5 Moyen 2
6 Fort 1 Il faut jouer très fort pour produire des notes fortes.
7 Fort 2
8 Fixe Dynamique fixe. Pour programmer la dynamique, utilisez le
logiciel “SV-1 Editor”.
Le schéma ci-dessous indique les courbes de réponse au toucher:
Forte
Douce
( )
Volume
de la note
REMARQUE: La sensibilité au toucher est mémorisée quand vous sauvegardez
un son dans une mémoire “Favorite”. Elle est également mémorisée avec chaque son preset ou favori que vous modifiez avec le logiciel “SV-1 Editor” quand
vous sélectionnez la commande “Write Current Preset”.
Douce
Douce Forte
Force du jeu (toucher)
Normale/moyenne
Forte
Page 84

70 – Réglages avancés | Calibrer les pédales
CALIBRER LES PÉDALES
Vous pouvez calibrer les pédales branchées aux prises DAMPER, PEDAL 1 et
PEDAL 2 en face arrière. En calibrant une pédale, vous permettez au SV-1 de
détecter sa polarité et la plage complète des valeurs transmises.
1. Branchez toutes les pédales à calibrer au SV-1. N’oubliez pas ceci: la prise
DAMPER attend la pédale de maintien Korg DS-2H fournie, la prise
PEDAL 1 attend un commutateur au pied et la prise PEDAL 2 peut servir à
brancher un commutateur au pied ou une pédale d’expression.
2. Amenez la pédale d’expression sur son réglage le plus bas.
3. Mettez le SV-1 hors tension.
4. Maintenez le bouton AUTO/PEDAL enfoncé et mettez le SV-1 sous tension.
5. Quand le témoin du bouton AUTO/PEDAL se met à clignoter, relâchez le
bouton.
Si vous ne faites rien dans les secondes qui suivent, le témoin AUTO/PEDAL
s’éteint et le SV-1 poursuit la séquence de démarrage.
6. Tant que le témoin AUTO/PEDAL clignote, appuyez de nouveau sur le bou-
ton. Le SV-1 passe en mode de calibrage.
7. Calibrez la pédale branchée à la prise PEDAL 1 (un commutateur au pied).
Enfoncez complètement la pédale puis relâchez-la. Quand la pédale branchée
à la prise PEDAL 1 est calibrée, le bouton FAVORITE 1 s’allume.
8. Calibrez ensuite la pédale branchée à la prise PEDAL 2. La procédure dépend
du type de pédale: commutateur au pied ou pédale d’expression:
• Si c’est un commutateur au pied, enfoncez-le complètement puis relâchezle.
• Si c’est une pédale d’expression, enfoncez-la à bout de course vers l’avant
(position maximum) puis ramenez la pédale à bout de course vers l’arrière
(position minimum).
Quand la pédale branchée à la prise PEDAL 2 est calibrée, le bouton
FAVORITE 2 s’allume.
9. Calibrez enfin la pédale DAMPER. Enfoncez complètement la pédale puis
relâchez-la. Quand la pédale branchée à la prise DAMPER est calibrée, le
bouton FAVORITE 3 s’allume.
10. Quand le calibrage est terminé:
• Si vous avez calibré les trois pédales branchées, le SV-1 quitte automatiquement le mode de calibrage et poursuit la procédure de démarrage.
Page 85

Réglages avancés | Régler le niveau de bruit RX – 71
• Si vous n’avez calibré qu’une ou deux pédales, appuyez de nouveau sur le
bouton AUTO/PEDAL pour quitter le mode de calibrage et poursuivre la
procédure de démarrage.
RÉGLER LE NIVEAU DE BRUIT RX
Les bruits concomitants (“RX Noise”) des sons incluent les bruits mécaniques du
clavier, la frappe des marteaux etc. Vous pouvez régler le niveau de ces bruits RX
selon vos goûts et votre style de jeu.
REMARQUE: Certains sons ne sont pas accompagnés de bruits RX. Voyez le tableau
à la page 58.
Appuyez sur le bouton FUNCTION.
1.
Si le son choisi contient des bruits RX, une pression sur le bouton
FUNCTION fait clignoter son témoin. De plus, un témoin autour de la commande BASS dans la section EQUALIZER commence aussi à clignoter.
Si le son ne contient pas de bruits RX, ces témoins ne s’allument pas.
2. Utilisez la commande BASS pour régler le niveau des bruits “RX Noise”. Cha-
que cran de la commande correspond à une unité. Les témoins entourant la
commande donnent une indication grossière du volume des bruits “RX
Noise”.
3. Appuyez sur la commande BASS pour rétablir la valeur centrale. Si vous vou-
lez retrouver le réglage original, resélectionnez le même son (preset ou
favori).
REMARQUE: Le niveau de bruit RX est mémorisé quand vous sauvegardez un
son dans une mémoire “Favorite”. Il est également mémorisé avec chaque son
preset ou favori que vous modifiez avec le logiciel “SV-1 Editor” quand vous
sélectionnez la commande “Write Current Preset”.
Français
Page 86

72 – Réglages avancés | Choisir un canal MIDI
CHOISIR UN CANAL MIDI
Sélectionnez le canal MIDI via lequel le SV-1 échange des données avec un autre
instrument ou un ordinateur.
1. Appuyez sur le bouton FUNCTION.
2. Le témoin du bouton FUNCTION se met à clignoter. Appuyez sur une des
touches comprise entre C6 et D#7 pour sélectionner un canal MIDI de transmission/réception:
116
C4
Note Canal Note Canal Note Canal Note Canal
C61E65G#6 9 C7 13
C#6 2 F6 6 A6 10 C#7 14
D6 3 F#6 7 A#6 11 D7 15
D#6 4 G6 8 B6 12 D#7 16
3. Quand vous avez terminé l’édition des paramètres ci-dessus, appuyez sur le
C6
bouton FUNCTION pour quitter le mode d’édition.
REMARQUE: Quand vous mettez l’instrument hors tension, le canal MIDI par
défaut redevient le canal 1.
ASTUCE: Vous pouvez mémoriser un autre canal MIDI en sélectionnant la commande “Write Global” dans le logiciel “SV-1 Editor”.
PAS DE PANIQUE!
Si des notes MIDI sont produites en continu suite à des problèmes de communication MIDI, gardez le bouton ON/OFF de la section EQUALIZER enfoncé
jusqu’à ce que les notes “coincées” soient coupées. C’est ce que nous appelons la
fonction Panique MIDI.
Page 87

Réglages avancés | Vérifier la version du système d’exploitation – 73
V
ÉRIFIER LA VERSION DU SYSTÈME D’EXPLOITATION
Vous pouvez être amené à vérifier la version du système d’exploitation pour voir
si vous avez la version la plus récente.
1. Mettez le SV-1 sous tension.
2. Appuyez ensuite sur les commandes SPEED et INTENSITY de la section
PRE-FX.
La version du système d’exploitation est toujours exprimée en format
“n1.n2”. “1.0”, par exemple, désigne la version majeure 1, révision mineure 0.
Le numéro indiqué par la commande SPEED donne la première partie de la
version (n1) et le numéro indiqué par la commande INTENSITY donne la
deuxième partie du numéro de la version du système (n2).
Français
Page 88

74 – Sauvegarder vos sons | Sauvegarder un son que vous aimez
Sauvegarder vos sons
SAUVEGARDER UN SON QUE VOUS AIMEZ
Si vous aimez le son que vous venez de créer en jouant avec les commandes,
sauvegardez-le comme son favori.
1. Maintenez un des huit boutons FAVORITE enfoncé jusqu’à ce que son
témoin se mette à clignoter.
2. Appuyez de nouveau sur le même bouton pour confirmer la sauvegarde.
ASTUCE: Pour renoncer à sauvegarder vos réglages, attendez quelques secondes que le témoin s’éteigne sans appuyer sur le moindre bouton.
REMARQUE: Le nouveau son remplace le son qui occupait cette mémoire. Le
son qui occupait la mémoire sélectionnée à l’étape 1 est donc effacé.
REMARQUE: Si vous sélectionnez un autre son ou si vous mettez l’appareil hors
tension sans sauvegarder vos réglages de son et d’effets, ceux-ci sont perdus.
INITIALISER TOUS LES RÉGLAGES
Après avoir effectué divers changements, vous souhaitez peut-être retrouver les
réglages d’usine du SV-1 (y compris les sons originaux, les sons favoris d’usine et
les réglages globaux):
1. Mettez l’instrument hors tension.
2. Maintenez le bouton FUNCTION enfoncé.
3. Sans relâcher le bouton FUNCTION, mettez l’instrument sous tension.
4. Quand le témoin du bouton FUNCTION se met à clignoter, relâchez le bou-
ton.
5. Appuyez de nouveau sur le bouton FUNCTION pour confirmer l’initialisa-
tion des réglages.
6. Tous les réglages sont initialisés.
Page 89

Dépannage | Problèmes et solutions – 75
Dépannage
Avant de conclure que l’appareil est en panne, vérifiez les points suivants. Si cela
ne résout pas votre problème, veuillez contacter votre revendeur ou un service
après-vente agréé Korg.
Problème Solution éventuelle Page
L’instrument ne se
met pas sous tension
Pas de son Assurez-vous que le volume n’est pas réglé au minimum (“0”). Si
Il manque quelque chose
Son faible La lampe peut être en fin de vie. Veuillez vous adresser au centre de
Le signal audio est
parasité
Vérifiez que le câble d’alimentation n’est pas endommagé et qu’il
est correctement branché au piano et à la prise secteur.
c’est le cas, réglez-le à un niveau adéquat.
Vérifiez si la fonction “Local Off” est activée. Si c’est le cas, coupez-
la.
Si vous écoutez au casque, vérifiez si la fiche est correctement bran-
chée à la prise pour casque.
Vérifiez qu’un des réglages suivants n’est pas en vigueur:
• Pre FX Comp: Intensity= 0
• Pre FX Boost: Intensity= 0
• Amp Models: Drive= 0
La lampe est peut-être toujours en train de chauffer. Attendez quel-
ques secondes. C’est parfaitement normal: c’est une véritable lampe
analogique!
Si vous utilisez les sorties XLR, vérifiez que vous avez bien branché
les deux sorties. Une sortie mono est impossible avec les prises XLR.
service après-vente agréé Korg le plus proche pour la faire remplacer.
Les câbles sont peut-être trop longs ou reçoivent des interférences
d’autres appareils sur scène. Utilisez plutôt les prises XLR.
Si la section AMP MODEl est active, le bruit provient éventuellement
du circuit à lampes, ce qui est tout à fait naturel.
54
48
51
53
62
48
55
48
55
49
Français
PROBLÈMES ET SOLUTIONS
Page 90

76 – Fiche technique | Données techniques
DON-
Fiche technique
Fiche technique SV-1 (73/88)
Clavier SV-1 73: 73 touches. SV-1 88: 88 touches. Clavier sensible au toucher
Réponse au toucher 8 courbes
Accordage Transposition, diapason, courbes d’accordage
Générateur de sons EDS (Enhanced Definition Synthesis)
Polyphonie 80 notes (max.)
Sons 36 sons (6 banques × 6 variations)
Banque 1: E. Piano 1 Tine EP/Amp, Tine EP/Phaser, Tremolo EP, Dyno EP, VPM Piano, VPM
Banque 2: E.Piano 2 Reed EP 1, Reed EP 2, Electric Grand, SG-1D Piano, 80's Synth Piano,
Banque 3: Clav Clav AC, Clav BC, Clav BD, Clav AD, ElectroPno, ElectraPno
Banque 4: Piano Grand Piano1, Grand Piano2, Mono Grand, Upright, Piano/Strings,
Banque 5: Organ Click Tonewheel, Jazz Tonewheel, Full Tonewheel, Console Organ,
Banque 6: Other Full Strings, Tape Strings, 70s Strings, Choir, Synth Brass, Sharp Brass
Mémoires ‘Favorites’ 8 boutons FAVORITE pour sauvegarde rapide des réglages en
Effets 5 effets d’insertion + 1 effet total
Egalisation Bass, Mid, Treble
Modèles d’amplis Modèles Amp1/2/3/4/5/Organ Amp + modèles d’enceintes
Modulation FX Chorus1, Chorus2, Phaser1, Phaser2, Flanger, Rotary
Reverb/Delay Room, Plate, Hall, Spring, Tape Echo, Stereo Delay
Effet final Limiteur de mastérisation stéréo, limiteur stéréo
Contrôleurs d’effets
Equalizer On/Off – 3 commandes: Bass, Mid, Treble
Amp Models On/Off – 2 commandes: Type, Drive
Modulation FX 2 commutateurs: On/Off, Rotary Slow/Fast
Reverb/Delay 2 commutateurs: On/Off, Tap Tempo
Autres contrôleurs 4 commutateurs
Commutateurs en façade Transpose, Local Off, Touch, Function
Connexions Sortie audio, Entrée audio,Casque, MIDI, Ordinateur, Damper
Sorties audio L, R (2 × XLR, symétriques)
Korg RH3 (“Real Weighted Hammer Action 3”)
Tine
MIDI Grand
Piano/Pad
Italian Combo, Vox Combo
façade
Pre FX Comp, Boost, U-Vibe, Vibrato, Tremolo, VoxWah
Technologie ‘Valve Reactor’ – Lampe 12AX7 (ECC83)
Pre FX 2 commutateurs: On/Off, Commutateur Auto/Pedal pour l’effet
Wah
3 commandes: Type, Speed, Intensity
3 commandes: Type, Speed, Intensity
2 commandes: Type, Depth
Demo = Transpose + Local Off
Volume Commande Master Volume
MIDI In / Out
Casque 1 (en face avant)
L/Mono, R (2 × jacks 1/4”, asymétriques)
Entrées L/Mono, R
Page 91

Fiche technique | Données techniques – 77
Fiche technique SV-1 (73/88)
Ordinateur Prise USB de type B (joue aussi le rôle d’interface MIDI)
Compatible USB 1.1
Pédale forte Korg DS-2H, fournie
Pedal 1 Commutateur au pied (Korg PS-1 p.ex.)
Pedal 2 Pédale de volume/expression (Korg XVP-10 ou EXP-2 p.ex.) ou
commutateur au pied (Korg PS-1 p.ex.)
Démonstration 36 × morceaux de démonstration internes
Alimentation Adaptateur à commutation interne, CA100~240V, 50/60Hz
Consommation 15 W
Dimensions (L x P x H) SV-1 73: 1143 × 347 × 157 mm
SV-1 88: 1356 × 347 × 157 mm
sans pupitre
Poids SV-1 73: 17,5 kg
SV-1 88: 20,55 kg
sans pupitre
Accessoires fournis Câble d’alimentation, Mode d’emploi, CD accessoire , Pupitre,
Pédale de maintien (Korg DS-2H)
Options Pédale de volume/expression XVP-10, Pédale de volume/expression
EXP-2, Pédale commutateur PS-1
Korg se réserve le droit de modifier les caractéristiques techniques du produit sans
avis préalable.
Français
Page 92

78 – Fiche technique | Données techniques
Page 93

DEUTSCH
Page 94

80 – |
Handhabung von Daten
Die gespeicherten Daten können bei falscher Bedienung gelöscht werden. Daten, die Sie
nicht verlieren möchten, müssen Sie unbedingt mit dem beiliegenden Editor/Archivierungsprogramm extern sichern.
Warenzeichen
Mac ist ein eingetragenes Warenzeichen der Apple, Inc. Windows ist ein eingetragenes
Warenzeichen der Microsoft Corporation. Alle anderen Produkt- und Firmennamen sind
Warenzeichen oder eingetragene Warenzeichen der betreffenden Eigentümer.
Haftungsausschluss
Die in dieser Bedienungsanleitung erwähnten Informationen wurden mehrmals überprüft.
Da wir unsere Produkte aber fortwährend weiterentwickeln, stimmen eventuell nicht alle
technischen Daten mit den hier erwähnten Angaben überein. Korg haftet nicht für eventuelle Unterschiede zwischen der tatsächlichen Produktausführung und dem Inhalt der Bedienungsanleitung. Änderungen der technischen Daten bleiben ohne vorherige Ankündigung
vorbehalten.
Haftung
Korg-Produkte werden unter strengen Auflagen für die Netzspannung im Auslieferungsland hergestellt. Eine Garantie auf diese Produkte wird daher nur vom Korg-Vertrieb des
jeweiligen Landes gewährt. Korg-Produkte, die ohne eine solche Garantie verkauft werden
bzw. keine Seriennummer aufweisen, sind von der Hersteller- und Vertriebsgarantie ausgeschlossen. Diese Auflage dient Ihrer eigenen Sicherheit.
Wartung und Kundendienst
Überlassen Sie alle Reparaturarbeiten grundsätzlich einer von Korg anerkannten Kundendienststelle. Ausführliche Informationen über Korg-Produkte sowie Software und Zubehör
für Ihr Instrument bekommen Sie beim Korg-Händler in Ihrer Nähe. Aktuelle Informationen
finden Sie auf unserer Webpage.
Halten Sie Ihr Instrument auf dem neuesten Stand
Das Betriebssystem dieses Instruments kann mit neueren (von Korg freigegebenen) Versionen aktualisiert werden. Neue Systemversionen finden Sie auf unserer Webpage
.korg.com). Hinweise zum Laden des neuen Betriebssystems werden gemeinsam mit
(www
den Daten in Netz gestellt.
Energie sparen und Röhre schonen
Schalten Sie das SV-1 jeweils aus, wenn Sie es nicht brauchen. Damit sparen Sie einerseits
Energie (und schonen unseren Planeten) und verhindern andererseits, dass sich die Röhre zu
schnell abnutzt.
Auswechseln der Röhre
Die Lebensdauer einer Röhre lässt sich (wie bei einer Glühbirne) nicht vorhersagen. Eine
defekte Röhre darf nur von einer anerkannten Korg-Kundendienststelle ausgewechselt
werden. ERSETZEN SIE DIE RÖHRE NIEMALS SELBST, weil Sie das Instrument dadurch einerseits beschädigen und andererseits einen Stromschlag erleiden können. Außerdem wird
dann der Garantieanspruch hinfällig.
Copyright ©2009 KORG Italy Spa. Gedruckt in China.
Page 95

Inhaltsübersicht | – 81
Inhaltsübersicht
Vorweg . . . . . . . . . . . . . . . . . . . . . . . . . . . . . . . . . . . . . . . . . . . . . . . . 82
Willkommen an Bord! . . . . . . . . . . . . . . . . . . . . . . . . . . . . . . . . . . . . . . . . . . . . . . . . . 82
Lieferumfang . . . . . . . . . . . . . . . . . . . . . . . . . . . . . . . . . . . . . . . . . . . . . . . . . . . . . . . . . 82
Die wichtigsten Funktionen . . . . . . . . . . . . . . . . . . . . . . . . . . . . . . . . . . . . . . . . . . . . . 82
Real eXperience . . . . . . . . . . . . . . . . . . . . . . . . . . . . . . . . . . . . . . . . . . . . . . . . . . . . . . . 85
Valve Reactor-Technologie . . . . . . . . . . . . . . . . . . . . . . . . . . . . . . . . . . . . . . . . . . . . . 86
Anhören der Demosongs . . . . . . . . . . . . . . . . . . . . . . . . . . . . . . . . . . . . . . . . . . . . . . . 87
Bedienelemente und Anschlüsse . . . . . . . . . . . . . . . . . . . . . . . . . . . . 88
Bedienfeld . . . . . . . . . . . . . . . . . . . . . . . . . . . . . . . . . . . . . . . . . . . . . . . . . . . . . . . . . . . 88
Rückseite . . . . . . . . . . . . . . . . . . . . . . . . . . . . . . . . . . . . . . . . . . . . . . . . . . . . . . . . . . . . 94
Anschlüsse . . . . . . . . . . . . . . . . . . . . . . . . . . . . . . . . . . . . . . . . . . . . . . . . . . . . . . . . . . . 96
Verwendung des SV-1 . . . . . . . . . . . . . . . . . . . . . . . . . . . . . . . . . . . . 98
Anwahl von Klangfarben . . . . . . . . . . . . . . . . . . . . . . . . . . . . . . . . . . . . . . . . . . . . . . . 98
Anwählen und Einstellen der Effekte . . . . . . . . . . . . . . . . . . . . . . . . . . . . . . . . . . . . 102
Aufrufen der Vorgaben . . . . . . . . . . . . . . . . . . . . . . . . . . . . . . . . . . . . . . . . . . . . . . . 105
Aufrufen eines anderen Klangs oder Effekts beim Editieren . . . . . . . . . . . . . . . . . 105
Weiter führende Einstellungen . . . . . . . . . . . . . . . . . . . . . . . . . . . . 106
Transposition . . . . . . . . . . . . . . . . . . . . . . . . . . . . . . . . . . . . . . . . . . . . . . . . . . . . . . . 106
Gesamtstimmung . . . . . . . . . . . . . . . . . . . . . . . . . . . . . . . . . . . . . . . . . . . . . . . . . . . . 107
Wahl einer Stimmungskurve . . . . . . . . . . . . . . . . . . . . . . . . . . . . . . . . . . . . . . . . . . . 108
Ändern des Anschlagverhaltens . . . . . . . . . . . . . . . . . . . . . . . . . . . . . . . . . . . . . . . . . 109
Kalibrieren der Pedale . . . . . . . . . . . . . . . . . . . . . . . . . . . . . . . . . . . . . . . . . . . . . . . . 110
Einstellen des ‘RX Noise’-Pegels . . . . . . . . . . . . . . . . . . . . . . . . . . . . . . . . . . . . . . . . 111
Wahl eines MIDI-Kanals . . . . . . . . . . . . . . . . . . . . . . . . . . . . . . . . . . . . . . . . . . . . . . 112
Keine Panik! . . . . . . . . . . . . . . . . . . . . . . . . . . . . . . . . . . . . . . . . . . . . . . . . . . . . . . . . 112
Überprüfen der Betriebssystemversion . . . . . . . . . . . . . . . . . . . . . . . . . . . . . . . . . . . 113
Speichern Ihrer Sounds . . . . . . . . . . . . . . . . . . . . . . . . . . . . . . . . . . 114
Speichern später benötigter Sounds . . . . . . . . . . . . . . . . . . . . . . . . . . . . . . . . . . . . . 114
Laden der Werkseinstellungen . . . . . . . . . . . . . . . . . . . . . . . . . . . . . . . . . . . . . . . . . 114
Fehlersuche . . . . . . . . . . . . . . . . . . . . . . . . . . . . . . . . . . . . . . . . . . . . 115
Technische Daten . . . . . . . . . . . . . . . . . . . . . . . . . . . . . . . . . . . . . . . 116
Deutsch
Page 96

82 – Vorweg | Willkommen an Bord!
Vorweg
WILLKOMMEN AN BORD!
Vielen Dank für Ihre Entscheidung zu einem Korg SV-1 Stage Vintage Piano.
Wir sind uns ziemlich sicher, dass Sie hiermit über alle legendären Piano- und
Keyboard-Sounds verfügen, die nicht nur fantastisch klingen, sondern sich auch
authentisch verhalten!
Da Sie bestimmt längerfristig mit dem SV-1 arbeiten möchten, sollten Sie sich
diese Anleitung vollständig durchlesen, um bei der Bedienung alles richtig zu
machen. Nach der Lektüre heben Sie sie für die spätere Bezugnahme am besten
auf.
An dieser Stelle möchten wir darauf hinweisen, dass sich diese Anleitung auf das
SV-1 mit 88er- und 73er-Tastatur bezieht. Mit Ausnahme der längeren Tastatur
(und des höheren Gewichts) gibt es keine Unterschiede zwischen den beiden
Ausführungen.
LIEFERUMFANG
Zum Lieferumfang des SV-1 gehören folgende Dinge. Bitte überprüfen Sie
zunächst, ob Sie alles bekommen haben. Falls etwas fehlt, wenden Sie sich bitte
umgehend an Ihren Korg-Händler.
• SV-1 Stage Vintage Piano
• Anleitung (das Dokument, das Sie gerade lesen)
• „Accessory Disk” mit Software und den zugehörigen Anleitungen
• Notenpult
• Korg DS-2H Dämpferpedal (stufenlos)
• Standard IEC-Netzkabel
DIE WICHTIGSTEN FUNKTIONEN
Breit gefächertes ‘Vintage’-Klangangebot
• Das SV-1 ist ein Instrument mit Flügel- und „Vintage”-Klangfarben, die mit
einem ebenfalls „Vintage”-Instrumentenverstärker, Effektpedal- und
Studio-Effektsimulationen angereichert werden können.
Page 97

Vorweg | Die wichtigsten Funktionen – 83
• Das SV-1 enthält eine Vielzahl unterschiedlicher Klänge, darunter auch
hochwertige Stereoklangfarben eines Konzertflügels. Die Sounds können
abgewandelt und in acht Speichern gesichert werden.
Bedienkomfort und authentische Ansprache
• Die Klanganwahl ist erfreulich übersichtlich: Mit einem Regler wählen Sie
den gewünschten Basisklang und mit einem zweiten eine Variation. Außerdem können die Klangfarben mit zwei Reglern in Echtzeit editiert werden.
• Die hochwertige RH3-Tastatur von Korg ist in vier Gebiete mit unterschiedli-
chen Gewichtungen unterteilt und zieht in punkto Ansprache mit der Tasta-
tur eines Flügels gleich. Anhand von 8 Kurven können Sie einstellen, wie die
Tastatur Ihren Anschlag auswerten soll.
• Acht Stimmungskurven erlauben die Anwahl des für den verwendeten Klang
geeigneten Stimmungssystems.
• Mit der Transpositionsfunktion können Sie bei gleichem Fingersatz die Ton-
art der gespielten Noten ändern. Außerdem lässt sich die Gesamtstimmung
des Pianos sehr leicht an die Stimmung anderer Instrumente angleichen.
Die gleichen Pedale wie auf einem Flügel – und mehr…
• Das SV-1 erlaubt die Verwendung von drei Pedalen wie auf einem Flügel.
Diese Pedale können ferner zum Ändern der Lautstärke, zum Umschalten
der „Rotary”-Geschwindigkeit oder zum Steuern des Wah-Effekts genutzt
werden. Die Zuordnung der Pedale erfolgt automatisch in Abhängigkeit des
gewählten Klangs, was eine separate Programmierung überflüssig macht.
• Das Dämpferpedal kann die gleiche Funktion haben wie das Fortepedal eines
Klaviers: Dank unserer innovativen Technologie simuliert es die reichhalti-
geren Saitenschwingungen bei gehaltenem Pedal. Dieser Effekt lässt sich
sogar stufenlos dosieren.
Deutsch
‘Valve Reactor’- und Modeling-Technologie
• Das SV-1 enthält unsere Valve Reactor-Technologie, welche die Ansprache
eines Vollröhrenverstärkers erzeugt, die für viele „Vintage”-Sounds unabdingbar ist.
• Das SV-1 verwendet eine fortschrittliche Modeling-Technologie für eine
authentische Simulation von bekannten Verstärkern, Boxen und Effekten.
Mit unterschiedlichen Amp- und Boxenkombinationen kann man die
Sound-Palette noch entscheidend erweitern.
Page 98

84 – Vorweg | Die wichtigsten Funktionen
Hochwertige ‘Vintage’-Effekte
• Da auch hochwertige Effekte vorhanden sind, brauchen Sie außer dem SV-1
nur noch ein wenig Fingerspitzengefühl, um überzeugende Sounds zu erstellen. Für folgende Blöcke kann jeweils ein Typ gewählt werden: Pedaleffekt,
Verstärkermodell, Modulations- und Reverb/Echo/Delay-Effekt.
• Außerdem enthält das SV-1 Taster, mit denen man z.B. die Delay-Verzöge-
rungszeit (TAP TEMPO) einstellen, Effekte ein-/ausschalten, die Geschwindigkeit des „Rotary”-Effekts ändern kann usw. Auch das ist auf der Bühne
einfach Pflicht.
Problemlose Verbindung
• Dank des USB-Ports für die Datenübertragung sowie seiner MIDI IN- und
OUT-Buchse kann das SV-1 problemlos in größere Anlagen eingebunden
werden. Der USB-Port kann ebenfalls MIDI-Daten senden und empfangen.
Somit benötigen Sie für die Verbindung des SV-1 mit Ihrem Computer keine
zusätzliche MIDI-Schnittstelle. Diese Kommunikation setzt die Verwendung
des KORG USB–MIDI-Treibers voraus. Diesen finden Sie auf der „Accessory
Disk” sowie auf unserer Webpage.
• Mit dem LOCAL OFF-Taster lässt sich das SV-1 als Master-Keyboard konfi-
gurieren, was bei Verwendung eines Sequenzers wichtig sein kann.
Weiter führende Änderungen
• Obwohl sich die Anzahl der Parameter für die Editierung auf dem Instrument selbst ganz klar auf das Wesentliche konzentriert, können Sie mit dem
„SV-1 Editor”-Programm eine Vielzahl von Aspekten einstellen. Diese Software erlaubt außerdem das Speichern Ihrer Sounds, Verstärker- und Effektmodelleinstellungen als „Presets”. Hierfür können die 36 Werksprogramme
und die 8 „Favorite”-Speicher genutzt werden. Auf Ihrem Computer können
Sie sich eine riesige Sound-Bibliothek vorbereiten und bei Bedarf mit anderen Anwender austauschen. Das „SV-1 Editor”-Programm finden Sie auf der
beiliegenden „Accessory Disk”. Sie können es sich aber auch von unserer
Webpage herunterladen.
Page 99

Vorweg | Real eXperience – 85
REAL EXPERIENCE
EINE SUPERERFAHRUNG
Die Klangfarben des SV-1 beruhen auf der von Korg entwickelten Real eXperience-Technologie, die einen ausgesprochen realistischen Klangeindruck ermöglicht. Während sich die Sample-Verfahren anderer Hersteller auf „Schnappschüsse” der Original-Klänge beschränken, ähnelt unsere Technologie eher einem Hologramm mit einer geradezu dreidimensionalen Abbildung der Klänge. Die Flügel, E-Pianos und Clavis enthalten sogar Samples für die Tastenfreigabe bzw. von Hammergeräuschen und wirken dementsprechend authentisch. Außerdem stehen jeweils Samples unterschiedlicher Dynamikstufen bereit, die Ihnen ein Höchstmaß an expressiver Freiheit garantieren.
Schauen wir uns als Beispiel die Flügelklänge an. Das SV-1 enthält auch die typischen Nebengeräusche, die bei der Tastenfreigabe, der Rückkehr eines Hammers
in seine Ausgangsposition und bei Betätigen des Dämpferpedals auftreten. Der
Klangrealismus ist verblüffend. Das SV-1 kann wirklich jede auch noch so feine
Nuance Ihres Spiels akkurat wiedergeben.
Diesen Ansatz verwenden wir übrigens für alle Klangfarben. Das führt dazu, dass
auch E-Piano-, Clavi- und Orgelklänge erstmals atemberaubend echt daherkommen und endlich nicht mehr nach Retorte klingen. Diese Klänge können außerdem so realistisch und facettenreich gespielt werden, dass Sie die modellierten
Original-Instrumente nie mehr vermissen werden.
Deutsch
Page 100

86 – Vorweg | Valve Reactor-Technologie
VALVE REACTOR-TECHNOLOGIE
DIE POWER (DER VERSTÄRKER) UND DER RUHM!
Die Valve Reactor-Technologie des SV-1 ist von Kopf bis Fuß auf den Live-Ein-
satz eingestellt. Da herkömmliche Modeling-Effekte für Studioanwendungen
keinen Lautsprecher enthalten, bieten sie in der Regel weder eine Endstufe, noch
einen Ausgangswandler. Im Grunde sind es also nur Vorverstärker.
Ein amtlicher Röhren-Sound beruht aber nicht nur auf dem Vorverstärker. Vielmehr hat auch die Endstufe noch einen gewaltigen Einfluss auf den Sound. Die
Impedanz schwankt fortwährend, weil es ja die Lautsprecher auf Trab zu halten
gilt. Wir haben dem SV-1 eine Niederspannungsröhre im Endstufenbereich
spendiert, einen virtuellen Ausgangswandler hinzugefügt und noch einen
Boxensimulanten drangehängt, der die Impedanzschwankungen einer echten
Box erzeugt. Die Ausgangsleistung des SV-1 mag zwar weitaus geringer sein,
jedoch verhält sich dieses Teil genau wie ein Vollröhren-Verstärker.
Das ist zumal im Live-Einsatz von Vorteil, weil das beim Saalpult ankommende
Signal genau so „analog” klingt wie bei der fachgerechten Mikrofonabnahme
eines Röhrenverstärkers.
umkehrung
Vorverstärker
Rückkopplung
(mit/ohne
Presence &
Resonance)
Je nach
Modell
Phasen-
12AX7 (Doppeltriode)
„Push-Pull”-Ausgang
„Class A” oder „AB”
Je nach Modell
Reactor-
Verstärker
Konstante
Spannung
& reaktive
Rück-
kopplung
Virt. Ausgangswandler
Boxen-
simulation
 Loading...