

Page 1

Page 2

Page 3

Owner’s manual
English
Contents
Main Features . . . . . . . . . . . . . . . . . . . . . . . . . . . . . . . . . . . . . . . . . . . . . . . . . . . . . . . . . . . . . . 5
Sophisticated sound . . . . . . . . . . . . . . . . . . . . . . . . . . . . . . . . . . . . . . . . . . . . . . . . . . . . . . . . . . . . . . . . . . . . . . . . . . . . . . . .5
Intuitive operation. . . . . . . . . . . . . . . . . . . . . . . . . . . . . . . . . . . . . . . . . . . . . . . . . . . . . . . . . . . . . . . . . . . . . . . . . . . . . . . . . .5
Controllers and functions that support your playing . . . . . . . . . . . . . . . . . . . . . . . . . . . . . . . . . . . . . . . . . . . . . . . . .5
Panel description and functions . . . . . . . . . . . . . . . . . . . . . . . . . . . . . . . . . . . . . . . . . . . . . 6
Front panel (Joystick/Audio/Tube/FX) . . . . . . . . . . . . . . . . . . . . . . . . . . . . . . . . . . . . . . . . . . . . . . . . . . . . . . . . . . . . . . .6
Front panel (Main Control) . . . . . . . . . . . . . . . . . . . . . . . . . . . . . . . . . . . . . . . . . . . . . . . . . . . . . . . . . . . . . . . . . . . . . . . . . .7
Front panel (Oscillator/Filter). . . . . . . . . . . . . . . . . . . . . . . . . . . . . . . . . . . . . . . . . . . . . . . . . . . . . . . . . . . . . . . . . . . . . . . .8
Front panel (AMP/LFO/EG) . . . . . . . . . . . . . . . . . . . . . . . . . . . . . . . . . . . . . . . . . . . . . . . . . . . . . . . . . . . . . . . . . . . . . . . . . .9
Rear panel. . . . . . . . . . . . . . . . . . . . . . . . . . . . . . . . . . . . . . . . . . . . . . . . . . . . . . . . . . . . . . . . . . . . . . . . . . . . . . . . . . . . . . . . 10
Making connections and turning on the power . . . . . . . . . . . . . . . . . . . . . . . . . . . . . . 11
Connections. . . . . . . . . . . . . . . . . . . . . . . . . . . . . . . . . . . . . . . . . . . . . . . . . . . . . . . . . . . . . . . . . . . . . . . . . . . . . . . . . . . . . . 11
Turning the power on/off . . . . . . . . . . . . . . . . . . . . . . . . . . . . . . . . . . . . . . . . . . . . . . . . . . . . . . . . . . . . . . . . . . . . . . . . . 12
Auto power-off . . . . . . . . . . . . . . . . . . . . . . . . . . . . . . . . . . . . . . . . . . . . . . . . . . . . . . . . . . . . . . . . . . . . . . . . . . . . . . . . . . . 12
Playing the KingKORG. . . . . . . . . . . . . . . . . . . . . . . . . . . . . . . . . . . . . . . . . . . . . . . . . . . . . . 12
Listening to the demo songs . . . . . . . . . . . . . . . . . . . . . . . . . . . . . . . . . . . . . . . . . . . . . . . . . . . . . . . . . . . . . . . . . . . . . . 12
Selecting and playing a program . . . . . . . . . . . . . . . . . . . . . . . . . . . . . . . . . . . . . . . . . . . . . . . . . . . . . . . . . . . . . . . . . . 13
Selecting a program . . . . . . . . . . . . . . . . . . . . . . . . . . . . . . . . . . . . . . . . . . . . . . . . . . . . . . . . . . . . . . . . . . . . . . . . . . . . . . 13
Adding variety to the sound . . . . . . . . . . . . . . . . . . . . . . . . . . . . . . . . . . . . . . . . . . . . . . . . . . . . . . . . . . . . . . . . . . . . . . 14
Editing the sound . . . . . . . . . . . . . . . . . . . . . . . . . . . . . . . . . . . . . . . . . . . . . . . . . . . . . . . . . . 15
How a program is organized . . . . . . . . . . . . . . . . . . . . . . . . . . . . . . . . . . . . . . . . . . . . . . . . . . . . . . . . . . . . . . . . . . . . . . 15
Basic program editing . . . . . . . . . . . . . . . . . . . . . . . . . . . . . . . . . . . . . . . . . . . . . . . . . . . . . . . . . . . . . . . . . . . . . . . . . . . . 17
About global settings . . . . . . . . . . . . . . . . . . . . . . . . . . . . . . . . . . . . . . . . . . . . . . . . . . . . . . . . . . . . . . . . . . . . . . . . . . . . . 20
Other functions. . . . . . . . . . . . . . . . . . . . . . . . . . . . . . . . . . . . . . . . . . . . . . . . . . . . . . . . . . . . . . . . . . . . . . . . . . . . . . . . . . . 20
Saving . . . . . . . . . . . . . . . . . . . . . . . . . . . . . . . . . . . . . . . . . . . . . . . . . . . . . . . . . . . . . . . . . . . . 21
Saving your settings . . . . . . . . . . . . . . . . . . . . . . . . . . . . . . . . . . . . . . . . . . . . . . . . . . . . . . . . . . . . . . . . . . . . . . . . . . . . . . 21
Trouble shooting . . . . . . . . . . . . . . . . . . . . . . . . . . . . . . . . . . . . . . . . . . . . . . . . . . . . . . . . . . 22
Specifications . . . . . . . . . . . . . . . . . . . . . . . . . . . . . . . . . . . . . . . . . . . . . . . . . . . . . . . . . . . . . 23
Page 4

KingKORG Owner’s manual
Thank you for purchasing the Korg KingKORG Synthesizer. To help you get the most out of your new
instrument, please read this manual carefully.
Precautions
Location
Using the unit in the following locations can result in a malfunction.
• In direct sunlight
• Locations of extreme temperature or humidity
• Excessively dusty or dirty locations
• Locations of excessive vibration
• Close to magnetic fields
Power supply
Please connect the designated AC adapter to an AC outlet of the correct
voltage. Do not connect it to an AC outlet of voltage other than that for
which your unit is intended.
Interference with other electrical devices
Radios and televisions placed nearby may experience reception interference.
Operate this unit at a suitable distance from radios and televisions.
Handling
To avoid breakage, do not apply excessive force to the switches or controls.
Care
If the exterior becomes dirty, wipe it with a clean, dry cloth. Do not use
liquid cleaners such as benzene or thinner, or cleaning compounds or
flammable polishes.
Keep this manual
After reading this manual, please keep it for later reference.
Keeping foreign matter out of your equipment
Never set any container with liquid in it near this equipment. If liquid gets
into the equipment, it could cause a breakdown, fire, or electrical shock.
Be careful not to let metal objects get into the equipment. If something does slip
into the equipment, unplug the AC adapter from the wall outlet. Then contact
your nearest Korg dealer or the store where the equipment was purchased.
DECLARATION OF CONFORMITY (for USA)
Responsible Party : KORG USA INC.
Address : 316 SOUTH SERVICE ROAD, MELVILLE, NY
Telephone : 1‐631‐390‐6500
Equipment Type : Synthesizer
Model : KingKORG
This device complies with Part 15 of FCC Rules.
Operation is subject to the following two conditions:
(1) This device may not cause harmful interference,and
(2) this device must accept any interference received,
including interference that may cause undesired operation.
THE FCC REGULATION WARNING (for USA)
NOTE: This equipment has been tested and found to comply with the
limits for a Class B digital device, pursuant to Part 15 of the FCC
Rules. These limits are designed to provide reasonable protection
against harmful interference in a residential installation. This
equipment generates, uses, and can radiate radio frequency energy
and, if not installed and used in accordance with the instructions,
may cause harmful interference to radio communications. However,
there is no guarantee that interference will not occur in a particular
installation. If this equipment does cause harmful interference to
radio or television reception, which can be determined by turning the
equipment off and on, the user is encouraged to try to correct the
interference by one or more of the following measures:
• Reorient or relocate the receiving antenna.
• Increase the separation between the equipment and receiver.
• Connect the equipment into an outlet on a circuit different from
that to which the receiver is connected.
• Consult the dealer or an experienced radio/TV technician for help.
If items such as cables are included with this equipment, you must
use those included items.
Unauthorized changes or modification to this system can void the
user’s authority to operate this equipment.
Notice regarding disposal (EU only)
When this “crossed‐out wheeled bin” symbol is displayed on
the product, owner’s manual, battery, or battery package, it
signifies that when you wish to dispose of this product,
manual, package or battery you must do so in an approved
manner. Do not discard this product, manual, package or
battery along with ordinary household waste. Disposing in
the correct manner will prevent harm to human health and
potential damage to the environment. Since the correct method of
disposal will depend on the applicable laws and regulations in your
locality, please contact your local administrative body for details. If
the battery contains heavy metals in excess of the regulated amount, a
chemical symbol is displayed below the “crossed‐out wheeled bin”
symbol on the battery or battery package.
About data
The contents of memory can be lost due to an unexpected malfunction
caused by incorrect operation or some other reason. Be sure that you have
saved important data on other media. Please be aware that Korg will accept
no responsibility for any damages which may result from loss of data.
About the vacuum tube
The lifespan of a vacuum tube is not uniform. If the vacuum tube should
burn out, please contact a Korg service center.
All adjustments and servicing, including replacement of the vacuum tube,
must be performed by a professional.
About the owner’s manual
The documentation for this product consists of the following:
‐ Owner’s manual (what you’re reading)
‐ Parameter guide (you can download it from the Korg website).
http://www.korg.co.jp/English/Distributors/ or http://www.korg.com/
Owner’s manual
This provides a simple explanation of the KingKORG’s main
functionality. Read this first.
Parameter guide
This provides information about all of the KingKORG’s parameters.
Read this guide when you want to find out what specific parameters do.
The parameter guide is structured as follows.
‐ Parameter guide
‐ Effect guide
‐ MIDI guide
You can read the parameter guide on your computer.
Abbreviations for the manuals
OM: Owner’s Manual
PG: Parameter Guide
Display indications
The values of various parameters shown in the manual are only examples;
they might not match what you see on the KingKORG’s display.
Example of notation on the main display page
GLOBAL “g15: Power Off” page
In Global mode, the page name will be displayed on the top of the main
display.
* All product names and company names are the trademarks or regis‐
tered trademarks of their respective owners.
4
Page 5

Main Features
Main Features
Sophisticated sound
1.Synthesizer functionality with newly-developed
XMT modeling sound engine
XMT (eXpanded Modeling Technology) is proprietary Korg
technology that allows a wide range of sonic variation to be
created with simple operations. The KingKORG provides an
extremely diverse variety of oscillator algorithms, such as the
sawtooth and square waveforms typically found on an analog
synthesizer, but also including noise and PCM/DWGS.
2.A filter with personality
The filter is one of the most important elements that determine
the character of an analog synthesizer. The KingKORG provides
not only a high‐quality digital filter but also faithful modeling of
the analog filters found on classic synthesizers of the past,
allowing aggressive shaping of the sound.
3.Full-analog vacuum tube driver circuit
In a distillation of Korg’s years of experience and know‐how in
analog circuit design, a full‐analog vacuum tube driver is
provided as a mastering effect. It not only delivers warmth and
loudness, but also a powerful sense of drive.
4.Vocoder
The KingKORG features a vocoder function that can use your
voice input via a microphone to modify the sound of the
oscillator, producing an effect as though the synthesizer were
talking.
5.Virtual patching
Six sets of virtual patching allow control signals such as EG,
LFO, and joystick functions to be virtually connected to sound
parameters such as pitch or cutoff, letting you modulate the
parameters for even greater sound‐creating flexibility.
6.200 built-in programs
The KingKORG contains 200 programs organized into eight
categories such as synth, lead, and bass. You’ll be able to
immediately start playing a broad range of sounds. There’s also
a user area with 100 vacant spaces for you to store your own
original sounds.
Intuitive operation
7. Front panel
You can edit sounds intuitively by directly using the knobs and
buttons that are organized into sections on the panel.
The display also provides edit pages that allow you to edit all of
the KingKORG’s parameters.
8.Favorites
There’s a Favorites function that lets you recall your favorite
programs at one touch. You can register a total of 40 programs
in the eight category/favorites buttons and recall them instantly.
Controllers and functions that support your playing
9.Step arpeggiator
The step arpeggiator automatically generates an arpeggiated
phrase (broken chord) when you hold down a chord on the
keyboard. You can choose from six arpeggio types and specify
the duration and spacing of the notes. You can also turn each
step on/off to enjoy even more variety.
10.Joystick
The KingKORG provides the joystick that’s a favorite feature on
Korg music workstations. By moving the joystick up/down/left/
right you can freely control pitch bend and program parameters.
You can also connect a foot switch and play while holding the
joystick effect.
11.Librarian software
If you connect the KingKORG to your computer via USB, you’ll
be able to use librarian software to manage the KingKORG’s
programs on your computer. The library software can be
downloaded from the Korg website ( http://www.korg.co.jp/
English/Distributors/ or http://www.korg.com/ ) free of charge.
5
Page 6

KingKORG Owner’s manual
Panel description and functions
Front panel (Joystick/Audio/Tube/FX)
VOLUME knob
This adjusts the volume of the AUDIO OUTPUT
jacks (L/MONO, R) and headphone jack.
MIC LEVEL PEAK LED
This will light up when the input signal from the
mic jack is distorting because of excessive level.
MIC LEVEL knob
This knob adjusts the input level from the mic
jack.
OCTAVE UP/DOWN buttons
These buons shi the pitch range that’s
assigned to the keyboard in one-octave
steps over a range of +/-2 octaves.
(OM: p.14 “Switching octaves”)
Global Effects
(GLOBAL FX)
Timbre LEDs
The LED of the timbre where you’re
applying an effect will light up.
Master effects
(MASTER FX)
TUBE controls
DRIVE knob
This adjusts the amount of drive of
the vacuum tube circuit.
BOOST button
This buon booststhe vacuum
tube distortion.
ON button
This turns the vacuum tube circuit
on/off.
Headphone jack
Joystick (JS)
The joystick controls pitch and the
depth of modulation (expression).
Moving the joystick in the le/right
direction will control pitch bend,
and moving it in the up/down
direction will control modulation.
You can assign separate types of
modulation to the upward and
downward directions.
Here you can connect a set of
headphones equipped with a
mini-plug. This jack will output the
same signals as the AUDIO OUTPUT
jacks (L/MONO, R). Use the VOLUME
knob to adjust the headphone volume.
TUBE (vacuum tube)
The vacuum tube may break if it is subject to physical shock.
If the vacuum tube breaks, be sure to have it replaced.
FX control knobs
These knobs adjust the PRE FX,
MOD FX, and REV/DELAY
parameters.
FX type select dials (with push
function)
These dials select the effect types for
PRE FX, MOD FX, and REV/DELAY.
By pressing a dial you can switch the
timbre where the effect will be
applied.
EQ controls
These adjust the high and low
frequency regions of the KingKORG’s
audio output.
HIGH knob
This knob adjusts the tone of the
high-frequency region. By operating
this knob while holding down the
SHIFT/EXIT buon, you can adjust
the HIGH cutoff frequency.
LOW knob
This knob adjusts the tone of the
low-frequency region. By operating
this knob while holding down the
SHIFT/EXIT buon, you can adjust
the LOW cutoff frequency.
6
Page 7

Front panel (Main Control)
Panel description and functions
PROGRAM (GLOBAL) button
This buon has two functions.
[PROGRAM]
When you want to play programs,
press this buon to select Program
mode. The buon will light, and the
program play screen will appear in
the main display.
[GLOBAL]
When you want to make overall
seings that apply to the entire
KingKORG, hold down the
SHIFT/EXIT buon and press this
buon to select Global mode. The
buon will blink, and the main
display will show the global seing
screen.
PAGE +/- buttons
Use these to access the desired edit page.
Use the +/- buons to move between
pages.
Main display
This shows various information such as
program data and parameter values.
Value dial (with push function)
Use this dial to edit program or parameter
values, or push the dial to execute seings.
Pages where the push function is available
will show a
symbol in the main display.
“”
TIMBRE A/B select buttons
These buons select the timbre that will be
controlled by the front panel (OSCILLATOR
/FILTER, AMP/LFO/EG). By pressing both
A and B buons simultaneously, you can
select both timbres.
ORIGINAL VALUE LED
This will light up when the value you’re
editing with the front panel knobs and
buons matches the internally saved
value.
SHIFT/EXIT button
Use this buon to access the extended
functions (SHIFT) of a knob or buon,
or to return to the program select screen
(EXIT).
WRITE button
Use this buon to save a program or
global seing that you’ve edited, or to
register a desired program as a Favorite.
(OM: p.21 “Saving”)
Category/Favorites buttons
If the PROGRAM (GLOBAL) buon is lit
up, pressing one of these buons will jump
to the first program in the corresponding
category. If the FAVORITES buon is lit
up, pressing one of these buons will
directly recall a program. You can register
your favorite programs so that they can be
recalled by a single press.
FAVORITES button
Use this buon to turn on the Favorites function that makes it easy to select
a sound, or to switch Favorite Sets.
Each time you press this buon, you’ll cycle through A B C D E A….
By pressing this buon while holding down the SHIFT/EXIT buon, you can step
through the banks in the order of E →D →C →B →A →E….
To turn off the Favorites function, press the PROGRAM (GLOBAL) buon.
ARP (TEMPO) button
Use this buon to turn the
arpeggiator on/off, and to set the
tempo. A tap tempo function is also
provided. (OM: p.14 “3. Playing
arpeggios”)
TEMPO LED
This will blink in time with the tempo.
SPLIT (POSITION) button
Use this to turn the Split function on/off,
or to specify the split position.
The Split function will turn on/off each
time you press the buon. You’ll also use
this buon to specify the split position.
(PG: “1. Timbre parameters”)
7
Page 8

KingKORG Owner’s manual
Front panel (Oscillator/Filter)
OSCILLATOR select button
Use this to select the oscillator number that
you want to control. The LED of the currently
selected oscillator will light up.
OSCILLATOR sub display
This shows information about the oscillator
that’s currently selected.
OSCILLATOR TYPE select dial
(with push function)
This selects the oscillator type. By pressing the
dial you can jump to the beginning of the
categories Off, ANALOG, DWGS, PCM, or
MIC IN.
FILTER CUTOFF knob
This knob adjusts the filter cutoff
frequency.
FILTER sub display
This shows information about the
filter that’s currently selected.
OSCILLATOR controls
These knobs edit the parameters of each oscillator.
TUNE (SEMI) knob
This adjusts the amount of detune relative to the basic
pitch. By holding down the SHIFT/EXIT buon and
turning this knob, you can make adjustments in semitone
steps.
CONTROL knob
This adjusts the oscillator’s CONTROL 1 parameter.
The parameter will depend on the oscillator type you’ve
selected. By holding down the SHIFT/EXIT buon and
turning this knob, you can adjust the CONTROL 2
parameter. (PG: “1. Timbre parameters”)
FILTER controls
These knobs edit the filter parameters.
RESONANCE knob
This adjusts the amount of filter resonance.
EG INT (KEY TRK) knob
This adjusts the depth that the EG will vary
the cutoff frequency over time.
By holding down the SHIFT/EXIT buon
and turning this knob, you can adjust the
depth that the the cutoff frequency will be
affected by your keyboard playing position
(i.e., high to low notes).
FILTER TYPE (-)-select button
PORTA. TIME knob
This adjusts the portament time.
PORTAMENTO button
This is an on/off buon for the portamento effect, which
creates a smooth transition to a note of a different pitch.
This buon allows you to select the filter type.
By holding down the SHIFT/EXIT buon and
pressing this buon, you can step backward
through the choices (05 04 03 02 01...).
8
Page 9

Front panel (AMP/LFO/EG)
AMP LEVEL knob
This adjusts the volume of the timbre.
Panel description and functions
LFO select button
This buon selects the LFO that will be edited by the LFO
controls. The LED of the currently selected LFO will light
up. The LED will blink in time with the LFO frequency.
LFO controls
Use these to edit the LFO parameters.
FREQ knob
This knob adjusts the frequency of the LFO.
INTENSITY knob
This knob adjusts the depth to which the LFO will affect
the filter or pitch.
VOCODER button
This turns the vocoder on/off.
This turns the vocoder function
on/off. By pressing this buon while
holding down the SHIFT/EXIT
buon, you can turn Mic Thru on/off.
UNISON button
This turns the timbre’s Voice Unison
function on/off.
By pressing this buon while holding
down the SHIFT/EXIT buon, you can
jump to the unison voice seing screen.
EG select button
This selects the EG that will be
edited by the EG controls. The
LED of the currently selected
EG will light up.
The LED will blink in
synchronization with the EG’s effect.
VELOCITY button
This turns on/off velocity sensitivity
for the EG, which allows the EG
seings to vary according to the
amount of force you use when
playing the keyboard.
EG controls
These adjust the EG parameters.
ATTACK knob
This adjusts the time from note-on (the
moment you play a key) until the aack
level (the maximum value of the envelope)
is reached.
DECAY knob
This adjusts the time from when the aack
level is reached until the sustain level is
reached.
SUSTAIN knob
This adjusts the level where the volume
will be held aer the decay time has elapsed.
RELEASE knob
This adjusts the amount of time from
note-off (the moment you release the key)
until the volume has completely decayed
to silence.
9
Page 10

KingKORG Owner’s manual
Rear panel
DAMPER jack
You can connect a damper pedal here.
MIDI IN/OUT connectors
These connectors allow
the KingKORG to exchange
MIDI messages with an
external MIDI device.
USB B connector
This connector allows the KingKORG
to exchange MIDI messages with your
computer.
CV/GATE OUT jack
This outputs a control voltage and gate.
By connecting this to an analog synthesizer
you can control it in various ways.
SWITCH/PEDAL jack
You can connect a pedal switch or foot
controller here.
AUDIO OUTPUT jacks
You can connect powered monitors, a stereo
amp, mixer, or multi-track recorder to these
jacks. If you’ re using a monaural connection,
connect the L/MONO jack.
Mic jack
You can connect a mic here.
Vocoder-type programs use this mic
as the modulator audio.
Power switch
This turns the power on/off.
DC12V jack
Connect the included AC adapter
here. Connect the AC adapter to the
KingKORG before you plug it into
an AC outlet.
Cable hook
To prevent the power cord from being
accidentally pulled out of the DC12V jack,
fasten the cable around this hook.
Note regarding power (the Auto Power-Off function)
This instrument is equipped with an auto power-off function.
The power will turn off automatically if a certain length of time
elapses without any user input. (With the factory seings, the
power will turn off when four hours have elapsed without any
user input.)
To disable this, change the seings of the GLOBAL “g15: Power Off”
page.
10
Page 11
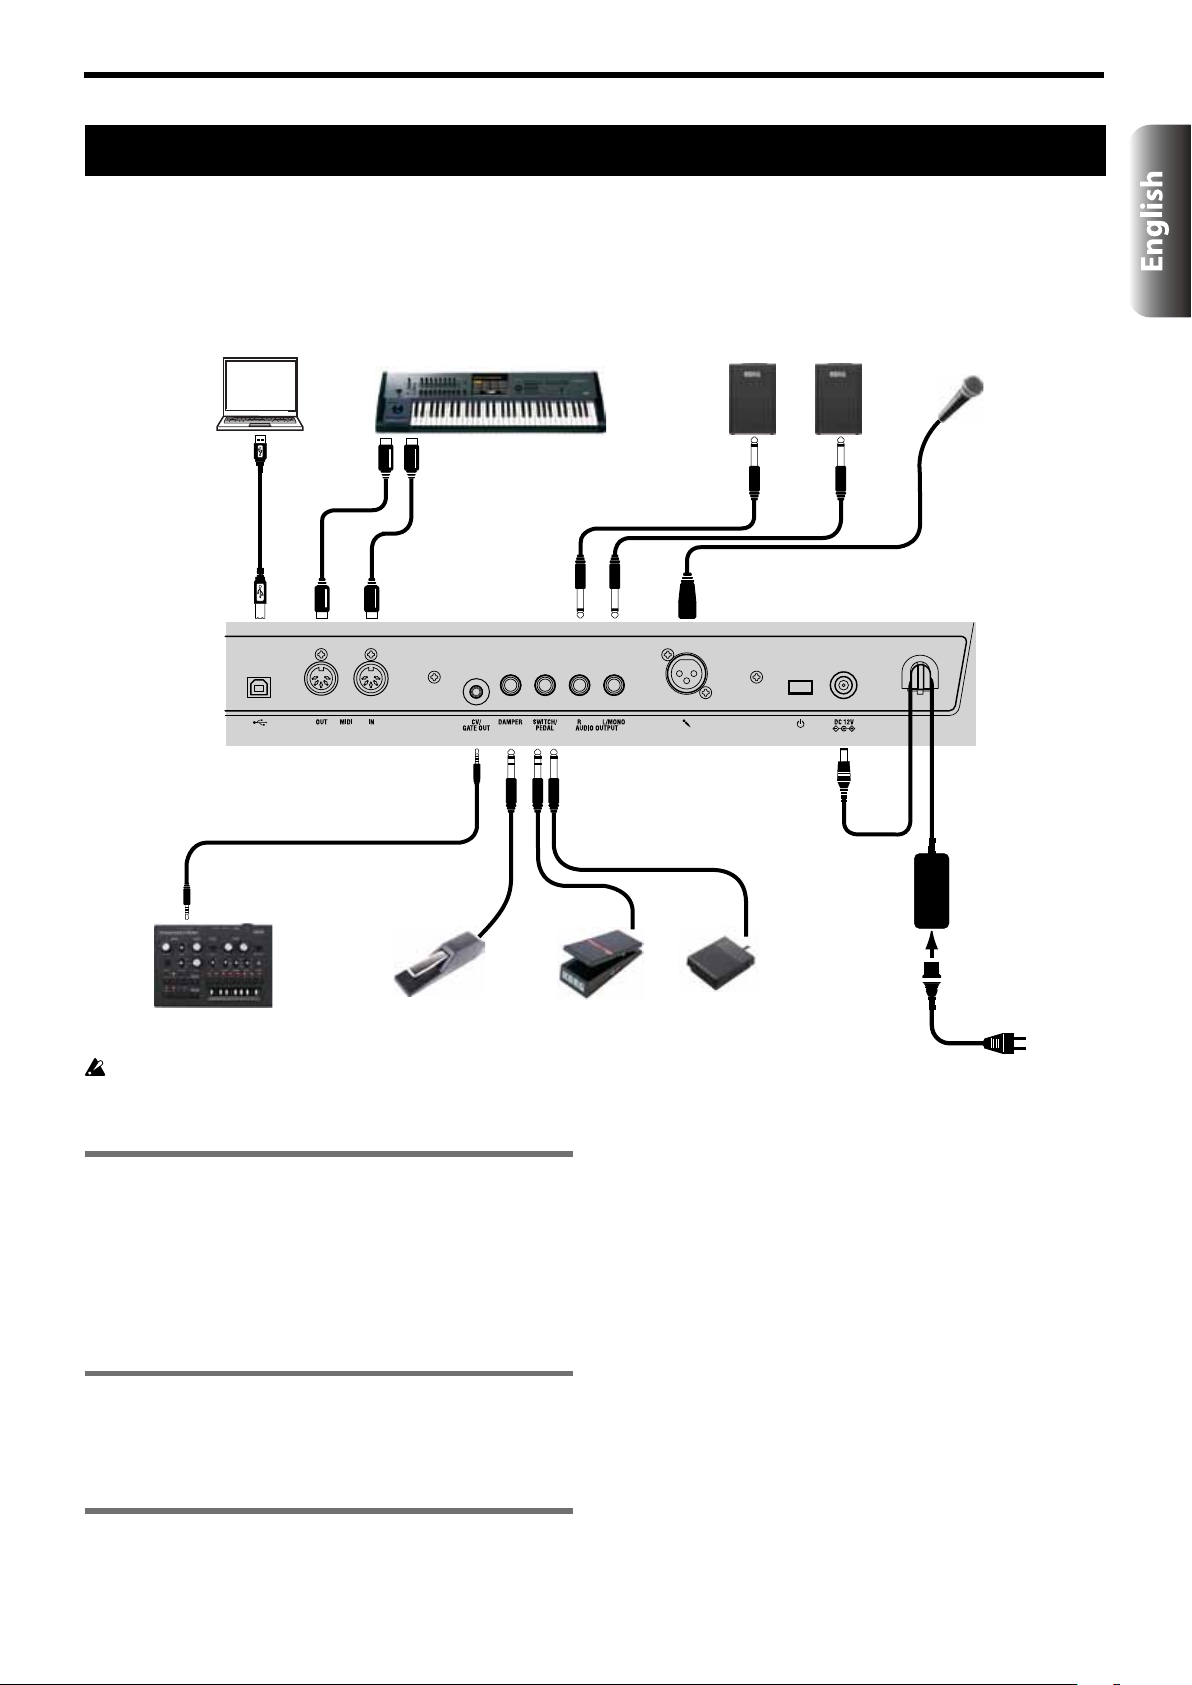
Making connections and turning on the power
MIDI keyboard, sound module,
Making connections and turning on the power
Connections
The illustration below shows a typical example of connections for the KingKORG. Connect your equipment as appropriate for your needs.
Computer
USB cable
CV/GATE cable (included)
rhythm machine, etc.
MIDI OUTMIDI IN INPUT INPUT
MIDI cable
Monitor speakers (with internal amp) Mic
DC12V
AC adaptor
(included)
to electrical
with CV/GATE IN
You must power‐off all your equipment before making connections. If you make connections while the power is on, you might damage
your speaker system or cause your equipment to malfunction or be damaged.
Damper pedalAnalog synthesizer compatible
1. Connecting your monitor amp or
speakers
Connect the KingKORG’s AUDIO OUTPUT jacks to the input jacks
of your mixer or powered monitor speakers. If you make
connections in monaural, use the L/MONO jack.
We recommend that you use the stereo outputs to take full
TIP:
advantage of the KingKORG’s sound.
2. Connecting your mic
If you’ll be using the KingKORG as a vocoder, connect your mic to
the rear panel mic input so that the audio from the mic input can be
used as the modulator. (OM: p.15 “4. Playing vocoder sounds”)
Foot controller Pedal switch
SWITCH/PEDAL jack
Here you can connect an optional pedal switch (PS‐1/PS‐3), foot
controller (EXP‐2), or expression/volume pedal (XPV‐10).
Before you use these, you must adjust the settings in Global mode to
specify the type of device (switch or pedal) that you’ve connected.
With the factory settings, this jack is set to use a switch‐type device,
and is assigned to the “program up” (Prog. Up) function.
Different functions are available for switches and pedals.
If you’ve specified a switch (Switch), you’ll be able to change
programs, switch the octave, or turn portamento on/off. Normally
the function will remain on only while you continue holding down
the pedal, but if desired, you can change this so that the function
will toggle on/off each time you press the pedal. If you’ve specified a
pedal (Pedal), you’ll be able to control parameters such as volume,
expression, and pan. (PG: “8. Foot parameters“)
outlet
DAMPER jack
3. Connecting pedals and switches
Connect a foot controller and pedal switch as desired.
Here you can connect an optional DS‐1H damper pedal or PS‐1
pedal switch, allowing you to turn the damper effect on/off.
11
Page 12

KingKORG Owner’s manual
4. Connecting a MIDI device or computer
You’ll need to make these connections if you want to use the
KingKORG’s keyboard or controllers to control an external MIDI
sound module or to use a different MIDI keyboard or a sequencer to
control the KingKORG’s sound generator. (PG: “6. MIDI parameters)
5. Connecting the AC adaptor
You must use the included AC adaptor. Using a different AC
adaptor may cause malfunctions.
Be sure that the AC outlet provides the correct voltage for your
AC adaptor.
1. Connect the included AC adapter to the DC12V jack located on
the rear panel.
2. To prevent the plug from being pulled out accidentally, wrap
the power cord around the hook on the rear panel. Be careful
not to apply excessive force to the collar of the DC plug.
Powerswitch
When fastening the cable to
the cable hook, be careful not
to bend this area more than
necessary.
DC12Vjack
Cablehook
Powercord
forACadaptor
(included)
ACadapter(included)
Connect the plug
to an AC outlet.
Auto power-off
The KingKORG has an auto power‐off function. When a certain duration
of time has elapsed without user input on the front panel buttons or
knobs, or without the keyboard being played, the power will turn off
automatically. With the factory settings, this is set to four hours.
If desired, you can disable this function as follows.
1. Disabling the auto power-off function
1. Hold down the SHIFT/EXIT button and press the PROGRAM
(GLOBAL) button to enter Global mode.
2. Use the PAGE +/- buttons to access the GLOBAL “g15: Power
Off” page.
3. Turn the value dial to choose “Disable.”
4. To save the change you’ve made, press the WRITE button to
save the global settings. (OM: p.21 “1. Saving global settings”)
If you turn off the power without saving, the changes you’ve
made to the global settings will be discarded. If you want to
use your edited settings in the future, be sure to save them.
Playing the KingKORG
Listening to the demo songs
The KingKORG contains distinctive demo songs in a variety of
styles. Before you start playing, take a moment to experience the
KingKORG’s sounds. (OM: p.112 “Demo song list”)
Turning the power on/off
1. Turning the power on
Before you power‐on the KingKORG, you must power‐off any
external output device such as your powered monitor speakers.
1. Turn the KingKORG’s VOLUME knob all the way toward the
left to minimize unwanted audio artifacts during startup.
2. Press and hold the power switch until the main display
appears; then release the power switch.
When the KingKORG starts up, the main display will show
information such as the program number and program name.
3. With the volume lowered on your monitor speakers or other
external output system, turn on the power of your output system.
4. Slowly raise the KingKORG’s VOLUME knob while you
adjust the volume of your output system.
2. Turning the power off
Never turn off the power while data is being saved. Doing so
may cause the KingKORG’s data to be damaged.
1. Lower the volume of your monitor speakers or other external
output system, and turn off the power of your output system.
2. Turn the KingKORG’s VOLUME knob all the way toward the
left, and press and hold the power switch until the main
display goes blank.
1. Selecting and playing a demo song
The demo songs are assigned to the category/favorites buttons.
1. Hold down the SHIFT/EXIT button and press a category/
favorites button to select a demo song.
The demo will begin playing automatically, and will continue
playing consecutively until the last song. When the last demo
song has finished playing, playback will continue from the first
demo song.
The button corresponding to the demo song that’s playing will
blink. To select a different demo song, press an illuminated
button.
2. During demo song playback, press the SHIFT/EXIT button.
Demo song playback will stop, and you will return to Program mode.
12
Page 13

Selecting and playing a
When the PROGRAM (GLOBAL) button is lit
When the FAVORITES button is lit up
program
1. Display screen
Main display (when playing a program)
When the PROGRAM (GLOBAL) button is lit up, the main display
will show the program number and program name.
When the FAVORITES button is lit up, the display will show the
bank, program number and program name.
Program
number
Program
name
Playing the KingKORG
Programs for which the SPLIT (POSITION) buon is lit up
TIP:
have their voice mode set to split. (PG: “1. Timbre param‐
eters”)
3. Play the keyboard to hear the sound.
You can use the OCTAVE UP/DOWN buttons to shift the range
of pitches that can be played from the keyboard. (OM: p.14
“Switching octaves”)
Program
number
Bank
Program
name
Main display (when editing a program)
The display will show the page number, page name, parameter
name, and value. The same contents will also be shown in the
display when editing global settings (when the PROGRAM
(GLOBAL) button is blinking).
Page number
Parameter valueParameter name
Page name
OSCILLATOR sub display
The display will show information about the currently selected
oscillator.
Oscillator type number
Oscillator type name
FILTER sub display
The display will show information about the currently selected filter.
Filter type number
Filter type name
Selecting programs by category
1. Press the category/favorites button that most closely matches
the program (sound) you want.
The first program in the selected category will be selected, and
that category/favorites button will light up.
2. Turn the value dial to select the desired program (sound).
3. Play the keyboard to hear the sound.
2. Selecting programs with the
FAVORITES button
In order to select programs using the FAVORITES button, you
must first have stored your favorite programs in the category/
favorites buttons. (OM: p.21 “3. Registering programs in the
category/favorites buttons”)
1. Press the FAVORITES button to make it light up; then select a
bank (A–E).
The bank will change each time you press the FAVORITES
button, and the main display will show the selected bank.
Selecting a program
The KingKORG contains 200 distinctive programs that you can start
playing immediately. So that you can select them intuitively, the
programs are organized by categories of sound. Try selecting and
playing various programs to experience the KingKORG’s sound.
1. Selecting programs by their number
1. Press the PROGRAM (GLOBAL)button to make it light up.
The main display will indicate the program number and program
name.
2. Turn the value dial to select the desired program.
By holding down the SHIFT/EXIT buon and pressing the
TIP:
FAVORITES buon you can move backward through the
banks (E D C B A E...).
2. Press the category/favorites button (1–8) in which you stored
the program that you want to select.
The program will be recalled, and the selected FAVORITES
screen will light up.
3. Play the keyboard to hear the sound.
13
Page 14

KingKORG Owner’s manual
+Y
Vary the vibrato depth or the speed
Adding variety to the sound
In addition to its keyboard, the KingKORG provides numerous
controllers such as the joystick, knobs, and buttons. You can vary the
sound by using these controllers to control the filter, LFO, and EG in
real time while you play.
1. Using the controllers
Joystick (JS)
You can control various parameters and effects by moving the
joystick in four directions (up/down/left/right). The result will be
different for each program; try each controller to hear what it
does for the program you’ve selected.
“Joystick” is abbreviated as JS.
TIP:
of the rotary speaker, etc.
Pitch down, etc. Pitch up, etc.
TIP:
TIP:
-X +X
-Y
When you release the joystick, it will automatically return
to the center position. However if you want to hold the
joystick eect so that it will continue even aer you take
your hand o the joystick, you can assign the joystick lock
function to a foot switch. (PG: “8. Foot parameters”)
You can use the joystick as a virtual patch source. This
lets you obtain even richer and more complex eects than
those listed above. (PG: “1. Timbre parameters”)
Wah, effect depth, etc.
2. Playing the keyboard
The KingKORG’s keyboard lets you control the sound in the
following ways.
Velocity
This allows the force (speed or velocity) of how you play a key
to affect the sound. Normally, key velocity is used to control the
tone or volume.
The KingKORG’s keyboard does not support aftertouch.
Some sounds will produce little or no tonal variation in
response to key velocity, or are set not to detect velocity.
Keyboard tracking
This allows the sound to be affected by the note’s position on the
keyboard. Normally, keyboard tracking is used to make the tone
become brighter as you play higher on the keyboard, or to create
a difference in volume between low and high regions of the
keyboard.
Velocity and keyboard tracking can be used as a virtual
TIP:
patch source. (PG: “1. Timbre parameters”)
Switching octaves
You can use the OCTAVE UP/DOWN buttons to shift the region
of pitches assigned to the keyboard in one‐octave steps over a
range of +/‐2 octaves.
Keyboard range Button LED
C4 – C9 UP button blinking
C3 – C8 UP button lit
C2 – C7 UP/DOWN buttons unlit
C1 – C6 DOWN button lit
C0 – C5 DOWN button blinking
Octave -1
Octave -2
3. Playing arpeggios
The arpeggiator is a function that automatically plays a broken
chord (arpeggio) when you hold down a chord on the keyboard. The
KingKORG’s arpeggiator provides six arpeggio types, and allows
you to change various aspects of the arpeggio, such as the duration
(gate time) of the notes. It also provides a “step arpeggiator” that lets
you specify the on/off status for up to eight steps, giving you a wide
range of performance possibilities.
1. Select a program. (OM: p.13 “Selecting a program”)
As an example, let’s select a piano sound to try out this function.
2. Press the ARP (TEMPO) button to make it light up.
The arpeggiator will turn on.
Octave +2
Octave +1
Octave ±0
Numbers in parentheses ( ) are MIDI note numbers.
3. Hold down a chord on the keyboard; an arpeggio will start
playing.
If you hold down the chord shown in the illustration below, the
notes will be sounded as depicted by the notation at the right.
(Arpeggio type: UP)
To change the tempo, hold down the SHIFT/EXIT button and
press the ARP (TEMPO) button to access the PROGRAM “a02:
Arp” page. Use the value dial to adjust the tempo.
The KingKORG provides a tap tempo function. Hold down
TIP:
the SHIFT/EXIT buon and repeatedly press the ARP (TEM‐
PO) buon at the desired timing interval to set the tempo.
4. The arpeggio will stop sounding when you take your hand off
the keys.
If desired, you can make the arpeggio continue sounding
TIP:
even aer you release the keys. (PG: “3. Arpeggio param‐
eters”)
14
Page 15

4. Playing vocoder sounds
The vocoder is a function that lets you vocalize into a mic while
holding down notes on the keyboard to create the impression that
the synthesizer is talking. As an alternative to inputting a human
voice, you can create many interesting effects by inputting rhythm
sounds or various waveforms.
Connecting a mic and playing the vocoder
1. Turn the front panel MIC LEVEL knob all the way toward the
left. Connect the mic to the rear panel mic jack.
2. Press the PROGRAM (GLOBAL) button to make it light.
3. Press the category/favorites SE/VOC button to make it light
up, and then turn the value dial to select a program (sound) for
which the VOCODER button is lit up.
Editing the sound
Editing the sound
4. Turn the MIC LEVEL knob to adjust the mic input level.
Adjust the level so that the MIC LEVEL PEAK LED does
TIP:
not light up.
5. While vocalizing into the mic, play the keyboard.
Try vocalizing different words and holding down different notes
on the keyboard, and notice the effect that this has on the
vocoder sound.
How a program is organized
Before you start editing, you’ll need to understand the basics of how
the sounds are created. Once you understand how the KingKORG’s
sounds are structured, you’ll be able to freely create the sounds you
want.
PROGRAM
MIC IN
TIMBRE
Arpeggiator
Keyboard
JoyStick
MIDI IN
TIMBRE A
TIMBRE B
ON
OFF
Keyboard Tracking
Keyboard Velocity
Pitch Bend (JS X)
Modulation (JS+Y/-Y)
MIDI 1〜3
Vocoder PRE FX MOD FX
Other Source
VIRTUAL PATCH
1. Synthesizer
As shown in the illustration, a synth program consists of timbres
A/B, arpeggiator, vocoder and the master effects.
MASTER FX
REV/DELAY
Free Assign
GLOBAL
TUBE EQ
Modulation to Effect
OUTPUT
L/MONO, R
MIC IN
Pitch
OSC1
OSC2
OSC3
LFO1 LFO2 EG1 EG2
Cutoff Level PAN
MIXER FILTER AMP
Modulation to Synth
L
Audio to Effect
R
15
Page 16

KingKORG Owner’s manual
The three elements of sound: pitch, tone, and
volume
Sound has three basic elements: pitch, tone, and volume. Just like the
analog synthesizers of the past, the KingKORG analog modeling
synthesizer provides “oscillator,” “filter,” and “amp” (amplifier)
sections that control these three elements. Edit the oscillator settings
to change the pitch, the filter settings to change the tone, and the
amp settings to change the volume.
The KingKORG’s oscillators, filter, and amp
On the KingKORG, the oscillator settings are in the PROGRAM
“s05–s12: Pitch” pages and the PROGRAM “s13:OSC1–s27: OSC3)”
pages. Use the Pitch pages to specify the pitch of the basic
waveform, and use the OSCILLATOR pages to select the waveform.
The waveforms generated by these oscillators are mixed in the Mixer
page. The filter settings are in the PROGRAM “s31–38: Filter” pages.
On these pages, you can modify the tonal character by applying a
filter to the sound being generated by the oscillators. Finally, the
amp settings are in the PROGRAM “s39–42: Amp” pages, allowing
you to adjust the volume. By editing in these pages, you’ll create the
basic sound of the program.
EG, LFO, keyboard tracking, virtual patches, and
controllers
In addition to the oscillator, filter, and amp settings, the sound can
be affected by change over time, by its pitch range, or by
performance expressions. Such changes can be controlled by
modulators and controllers such as the EG (Envelope Generator),
LFO (Low Frequency Oscillator), keyboard tracking, virtual patches,
and the joystick. By using these modulators and controllers you can
apply complex changes to the sound.
Take a look at the illustration above. Observe the signal flow from
OSC FILTER AMP, and notice how the EGs and LFOs can
affect each section.
Timbres (TIMBRE A/B)
Each timbre consists of an oscillator, filter, amp, EG, LFO, virtual
patches, and equalizer. The KingKORG has two timbres, and you
can combine these two timbres to create a richer‐sounding program.
Oscillator (OSC1, OSC2, OSC3)
The oscillators give you a choice of 127 types of oscillator
algorithms, including the sawtooth wave and square wave typically
found on an analog synthesizer, as well as noise, PCM/DWGS, and
the waveform being input from the mic jack. You can also make the
waveform richer and thicker by applying the unison setting.
Mixer (MIXER)
This section adjusts the volume levels of oscillator 1 (OSC1),
oscillator 2 (OSC2), and oscillator 3 (OSC3), and outputs the
combined signal to the filter (FILTER).
the time‐variant change using four parameters: attack time, decay
time, sustain level, and release time. EG1 is assigned to control the
filter cutoff frequency, and EG2 is assigned to control the amp volume.
You are also free to use an envelope generator in conjunction with a
virtual patch as an envelope source for another parameter.
LFOs (LFO1, LFO2)
An LFO (Low Frequency Oscillator) applies cyclic change to
parameters that make up the sound. Each timbre has two LFOs, each
giving you a choice of five waveforms. LFO2 is assigned as the
source of the pitch modulation controlled by the joystick. You are
also free to use an LFO in conjunction with a virtual patch as a
modulation source for another parameter.
Virtual patch (VIRTUAL PATCH)
The virtual patch functionality lets you use not only EG or LFO but
also sources such as velocity (keyboard playing strength) and
keyboard tracking (the keyboard region that you play) as
modulation sources to control the parameters that make up the
sound. This gives you a great deal of freedom in creating original
sounds. For each timbre, you can create virtual patch settings for six
parameters. (PG: “1. Timbre parameters”)
Master effects (MASTER FX)
Each program contains three types of master effect. By applying an
effect to each timbre, you can add finishing touches to the overall
sound of the program.
Arpeggiator (ARPEGGIATOR)
The arpeggiator automatically generates an arpeggio (broken chord)
when you hold down a chord on the keyboard. For programs that
use two timbres, you can apply the arpeggiator to either or both
timbres. This is a step arpeggiator with six arpeggio types.
2. Vocoder (VOCODER)
A vocoder analyzes the frequency characteristics of one signal called
the “modulator” (such as a human voice input via a mic) and applies
these characteristics to a filter that is processing a different signal
called the “carrier” (such as an oscillator waveform), thus producing
distinctive effects such as an instrument that appears to be talking.
The KingKORG contains a sixteen‐band vocoder that can not only
simulate not the classic vocoder sounds of the past but it can also
create original vocoder sounds where the tonal character or the level
of each band can be controlled. As shown in the illustration below,
the vocoder consists of the carrier (the signal being modified), the
modulator (the signal that controls the modifying), and the vocoder
section (VOCODER) itself.
Filter (FILTER)
The filter varies the brightness of the sound by removing or boosting
certain portions of the frequency spectrum of the sound generated by
the oscillator. Filter settings will have a large impact on the character
of the sound. In addition, you can use envelope generator 1 (EG1) to
vary the cutoff frequency of each filter over time.
Amp (AMP)
This section consists of the amp (AMP) and pan (PAN) settings. The
amp specifies the volume, and the pan specifies the stereo position
of the sound. You can also use envelope generator 2 (EG2) to vary
the volume over time.
Envelope generators (EG1, EG2)
An envelope generator applies time‐variant change to parameters that
make up the sound. Each envelope generator defines the “shape” of
16
Page 17

Editing the sound
MIC IN
VOCODER
MIC IN
TIMBRE B
TIMBRE A
TIMBRE B
TIMBRE A
TIMBRE B
MIC IN
TIMBRE B
TIMBRE A Level
TIMBRE B Level
Threshold
GATE
OFF
ON
MIC IN
TIMBRE B
Modulator Audio Src
Modulator
Sens
Carrier
MIC IN
TIMBRE B
TIMBRE A Level
TIMBRE B Level
Vocoder
Band 1–16
Resonance
Carrier
Modulator
Analysis
Filter
Cuto (Fc MOD)
Formant Shift
Synthesis
Filter
Vocoder
HPF
HPF Level
E.F.Sens
Envelope
Follower
Direct Level
Band
Level
Envelope
Band
PAN
OFF
ON
TIMBRE A / Vocoder
TIMBRE B
ON
OFF
to EFFECTs
HPF
HPF Gate &
Note On
Wet
Level
Wet
Spread
L
R
Output
Vocoder
Level
L
Vocoder
R
Output
Carrier (CARRIER)
This is the basic sound (signal). The best choice for the carrier
waveform is a waveform that contains large numbers of overtones,
such as a sawtooth wave or a pulse wave with a fixed pulse width.
The outputs of the two sources timbre A and timbre B are mixed and
used as the carrier.
Modulator (MODULATOR)
This is the sound (signal) whose character is imposed on the carrier.
Typically, a human voice is used as the modulator input. On the
KingKORG, you can select either the mic input (Input) or timbre B
(Timbre B) as the modulator. If you select timbre B, the output of
timbre B will be input to the vocoder’s modulator.
Vocoder section (VOCODER)
This consists of two sets of sixteen bandpass filters (the analysis
filter, the synthesis filter and an envelope follower). The audio signal
input to the modulator is sent to sixteen filters (the analysis filter),
and an envelope follower will detect the volume envelope (time‐
variant change) of each frequency band. The carrier signal is sent to
a separate set of sixteen filters (the synthesis filter), and the envelope
detected from the analysis filter is used to control the
volume of each band in the synthesis filter, thus varying the tonal
character of the carrier signal and producing the impression that the
carrier signal is talking. It is also possible to shift the frequencies of
the carrier bandpass filter. This allows you to raise or lower the
frequency response while preserving the character of the modulator,
creating dramatic changes in the sound.
Basic program editing
1. How to create sounds
There are two ways to edit sounds on the KingKORG.
₋ You can select a program that’s close to the sound you want, and
create the desired program by making the necessary changes.
₋ You can start editing the program from scratch (an initialized state).
Choose a method, and get started creating and playing your own
sounds!
Editing from a saved program
1. Select the program that you want to edit. (OM: p.13 “Selecting a
program”)
2. Operate the front panel knobs and dial.
Consider how the sound you’re imagining differs from the
original program, and select the parameter that you need to edit.
If you select another program or turn off the power before
you’ve written your edited program, the changes you made
will be lost. (OM: p.21 “2. Saving a program”)
If you want to create a program from scratch
If you want to create a program from scratch, start by initializing to
enter program. (OM: p.20 “1. Initializing a program”)
This results in a set of simple and easily understandable settings,
which will help you understand how each section works, and will be
convenient when creating a sound from scratch.
17
Page 18

KingKORG Owner’s manual
EG2
2. Editing two timbres
In each program, you can use two timbres: TIMBRE A and TIMBRE B.
You can’t select TIMBRE B if the PROGRAM “p03: Common”
TIP:
page Voice Mode parameter is set to “Single.” If “Layer” or
“Split” is selected, the TIMBRE A/B select buons will light to
indicate the timbre that you’re editing.
The voice mode parameter in the PROGRAM “p03: Common”
TIP:
page is common to the entire program.
Using two timbres (Layer)
When using two timbres, you have a choice of two modes that
determine how the timbres will work. In this example, we’ll set the
PROGRAM “p03: Common” page Voice Mode parameter to “Layer.”
When you set this parameter to “Layer,” the two timbres will be
heard simultaneously when you play the keyboard.
1. Use the PAGE +/- buttons to access the PROGRAM “p03
Common” page.
2. Turn the value dial to set the voice mode to “Layer.”
The TIMBRE A select button and the master effect timbre LEDs
will light up.
Decay (DECAY1, DECAY2)
This adjusts the decay time of EG1 (filter EG) and EG2 (amp EG). The
decay specifies the time from when the attack level is reached until the
sustain level is reached. Turning the knob toward the left will shorten
the decay time; turning it toward the right will lengthen the decay time.
Sustain (SUSTAIN1, SUSTAIN2)
This adjusts the sustain level of EG1 (filter EG) and EG2 (amp
EG). The sustain specifies the level that is reached after the decay
time has elapsed and is sustained as long as you hold down the
key. Turning the knob toward the left will lower the sustain level;
turning it toward the right will raise the sustain level.
Release (RELEASE1, RELEASE2)
This adjusts the release time of EG1 (filter EG) and EG2 (amp
EG). The release specifies the time from note‐off (the moment
you release the key) until the sound has decayed to silence. It
will vary the release time of EG1 and EG2. Turning the knob
toward the left will shorten the release time; turning it toward
the right will lengthen the release time.
Level
Note on
Attack Level
0
Note off
3
Time
Selecting a timbre to edit
When editing a program that uses two timbres, you’ll need to select
a timbre to edit.
Use the TIMBRE A/B select buttons to select the timbre that you
want to edit. The timbre select button you selected will light up,
allowing you to edit that timbre.
Editing the filter and EG
On the KingKORG you can use the front panel knobs and buttons to
control the filter and EG in real time.
You can choose one of three ways in which the knobs will work
when you turn them. (PG: “5. GLOBAL parameters”)
FILTER
Cutoff (CUTOFF)
This adjusts the cutoff frequency of the filter. The brightness of
the sound will change. Turning the knob toward the left will
darken the sound; turning it toward the right will brighten the
sound.
Resonance (RESONANCE)
This adjusts the amount of resonance for the filter. Resonance
adds a distinctive tonal character.
EG (Envelope Generator)
Attack (ATTACK1, ATTACK2)
This adjusts the attack time of EG1 (filter EG) and EG2 (amp
EG). The attack specifies the time from note‐on (the moment you
press the key) until the attack level is reached. It changes the
way in which the EG1 and EG2 will start. Turning the knob
toward the left will shorten the attack time; turning it toward the
right will lengthen the attack time.
2
1
1: Attack Time 3: Sustain Level
2: Decay Time 4: Release Time
4
Adjusting effect settings
The KingKORG provides master effects that let you apply a variety
of effects to the sound, such as distorting it, modulating it, or adding
reverberation. The master effects are applied to the overall sound of
the two timbres.
The master effects consist of three sections (PRE FX, MOD FX, REV/
DELAY), and you can choose one type of effect for each section.
For example you might choose “EP.AMP” for the PRE FX section,
“TREMOLO” for the MOD FX section, and “HALL” for the REV/
DELAY section. For each section, you can also specify the timbre(s)
where that effect will apply.
1. Press an FX type select dial to select the timbre(s) where that
effect will apply.
The selected timbre LED(s) will light up. If both timbre LEDs A
and B are unlit, that effect will not be applied.
The timbre LED B will not light if the program’s voice
mode is “Single.”
2. Select an effect.
The LED of the selected effect will light.
18
Page 19

Editing the sound
3. Use the FX control knobs to adjust the parameter values.
3. Editing the vocoder
Selecting the vocoder for editing
The procedure for editing the vocoder is essentially the same as
when editing a timbre, but you’ll first need to turn the vocoder on
and select the vocoder as the target for editing.
The “v02:Voc.Carrier–v18:Voc.Amp” pages won’t appear
unless you’ve pressed the VOCODER button to turn on the
vocoder switch.
The parameters of the 16 band‐pass filters (analysis filter and
synthesis filter) and the envelope follower can be edited in the
PROGRAM “v09:Voc.Filter–v18:Voc.Amp” pages.
1. Select a synth program. (OM: p.13 “Selecting a program”)
2. Press the VOCODER button to make it light up.
The vocoder will turn on, and will be selected as the target for
editing.
3. Use the PAGE +/- buttons to access the vocoder parameter
editing pages.
Tonal effects synchronized with the arpeggio
Synchronizing the LFO frequency or delay time to the
arpeggiator tempo
You can synchronize the frequency of LFO1 or LFO2 to the arpeggio
tempo. This lets you apply modulation that’s synchronized with the
tempo. This also gives you the ability to specify an effect’s delay
time as a multiple of the tempo so that the delay time will follow
even if you change the tempo of the arpeggio. You can also
synchronize the KingKORG’s arpeggiator to an external MIDI
sequencer, so that the LFO1/2 frequency or the delay time will be
controlled from your external sequencer.
Modifying the arpeggio
You can modify the arpeggio by turning each arpeggio step on/off.
This is called the “step arpeggiator” function.
Using the step arpeggiator to modify the arpeggio
1. Press the PROGRAM (GLOBAL) button to make it light.
2. Use the PAGE +/- buttons to access the PROGRAM “a12:Arp”
page.
3. Press the value dial.
The step setting screen will appear.
If you raise the direct level in the PROGRAM “v15:Voc.Amp”
TIP:
page, the audio input will be output directly. Adjust this value
while checking the audio input.
If you are unable to notice the eect, press the VOCODER
TIP:
buon to make it light up, and then adjust the timbre A level in
the PROGRAM “v02:Voc.Carrier” page or the vocoder level in
the PROGRAM “v18:Voc.Amp” page.
Carrier (CARRIER)
The most suitable waveform for the carrier is a waveform that
contains a large number of overtones, such as a sawtooth wave
or a pulse wave with a fixed pulse width. These parameters can
be edited in the PROGRAM “v02–v03:Voc.Carrier” pages.
To input a sawtooth wave to the carrier, edit timbre A
TIP:
so that its PROGRAM “s13:OSC1” page Type seing is
“SAW,” and edit the vocoder seing in the PROGRAM
“v02:Voc.Carrier” page to specify the timbre A input level.
Modulator (MODULATOR)
A human voice is typically input as the modulator. On the
KingKORG, you can choose either the mic input (Input) or
timbre B (Timbre B) as the modulator. You can edit these
parameters in the PROGRAM “v04:Voc.Modultr” page.
4. Editing the arpeggiator
Selecting the timbre(s) to arpeggiate
For a program that uses two timbres, you can select the timbre(s)
that will be played by the arpeggiator.
In the PROGRAM “a05:Arp” page you can specify the timbre(s) that
will be sounded by the arpeggiator. You can make both timbres A/B
be arpeggiated, or arpeggiate just one timbre.
4. Use the PAGE +/- buttons to move the “ ” cursor, selecting
the step that you want to edit.
5. Turn the value dial to turn the step on or off.
In the main display, set the indication to “O” (on) for steps that
you want to enable. If you select “_” (off), the note for that step
will be a rest.
Repeat steps 4 and 5 to specify other steps.
6. Press the value dial to confirm the on/off settings of the steps.
The number of available steps can be specied in the PRO‐
TIP:
GRAM “a10: Arp” page. (PG: “3. Arpeggio parameters”)
5. Restoring an edited program value to
its original setting
When you set a value to the same value stored in the original preset
program or saved program, the ORIGINAL VALUE LED will light up.
After editing a value, you can restore that value to its original setting
by turning knob to the value that makes the ORIGINAL VALUE
LED light up.
If you want to discard all the edits you’ve been making, and recall
the content that’s stored in internal memory, simply select another
program without saving the current edits, and then recall the
desired program once again.
19
Page 20

KingKORG Owner’s manual
About global settings
Switch to Global mode when you want to change settings that apply to
the entire KingKORG or when you want to make MIDI‐related settings.
Global mode contains various settings such as master tune,
transpose, and global MIDI channel. (PG: “5. GLOBAL parameters”)
Changes you make to these settings will be lost if you turn off
the power without saving. Be sure to save your settings if you
want to keep them. (OM: p.21 “1. Saving global settings”)
Other functions
1. Initializing a program
Here’s how to initialize the settings of the selected program.
This procedure will initialize the settings of the that’s being
edited program. It will not change the contents stored in
internal memory.
If you want to save the initialized state, save the program.
(OM: p.21 “2. Saving a program”)
1. Select the program that you want to initialize. (OM: p.13
“Selecting a program”)
2. Use the PAGE +/- buttons to access the PROGRAM “u01:
Utility” page, and press the value dial.
A screen will ask you to confirm that you want to initialize the
program.
The TIMBRE A or B select buttons will not respond if you
press them at this time.
4. Confirm the copy-source timbre.
If the copy‐source program uses two timbres, the copy‐source
timbre button will blink. Select the desired timbre if necessary,
and press the value dial to confirm your selection.
While the TIMBRE A or B select buon is blinking, you can
TIP:
also make your choice by pressing a buon.
5. Confirm the copy-destination timbre.
If the copy‐destination program uses two timbres, the TIMBRE
A or B select button will blink. As necessary, turn the value dial
to select the copy‐destination timbre, and press the value dial to
confirm your selection.
If you decide not to initialize, press the SHIFT/EXIT buon.
TIP:
3. Press the value dial once again.
When initialization is finished, the display will indicate
“Complete!” and you will automatically return to the top screen.
2. Copying a timbre
Here’s how you can copy the settings of another program’s timbre to
a timbre (either A or B) of the currently selected program.
This operation recalls settings to a timbre of the program that’s
being edited . It will not change the contents stored in internal
memory.
Only one timbre can be copied at a time.
1. First select the program that includes the copy-destination
timbre. (OM: p.13 “Selecting a program”)
2. Use the PAGE +/- buttons to access the PROGRAM “u02:
Utility” page, and press the value dial.
3. Turn the value dial to select the program that contains the
copy-source timbre, and press the dial to confirm your selection.
When selecting a program, the TIMBRE A or B select button will
light depending on the timbres used by the copy‐source
program.
6. A confirmation screen will appear in the main display; verify
the settings, and press the value dial.
When the copy is completed, the display will indicate
“Complete!” and you will return to the top screen of the “u02:
Utility” page.
If you want to save the copied state, save the program. (OM:
TIP:
p.21 “2. Saving a program”)
You can press the SHIFT/EXIT buon to return to the previous
TIP:
step. If you decide not to copy a timbre, press the SHIFT/EXIT
buon several times.
3. Restoring the factory settings
Here’s how to restore the KingKORG’s programs and global data
settings to their factory‐set condition. The factory settings are called
the “preload data.” To return to the factory‐set state, execute the
Load Preload operation.
When you execute Load Preload, the factory set data will
overwrite the data you’ve saved in internal memory. Make
sure that you don’t mind losing this data.
Do not touch the KingKORG’s knobs or keyboard while the
Preload operation is in progress. Never turn off the power
during this process.
Of factory‐set programs 1–300, programs 201–300 (programs
containing no preset data) will not return to their factory‐set
state. If programs are saved in these locations, they will remain
in that state.
You can’t execute the Load Preload operation if memory
protect is turned on. Turn off memory protect before you
20
Page 21

Saving
continue. (PG: “5. GLOBAL parameters”)
1. Hold down the SHIFT/EXIT button and press the PROGRAM
(GLOBAL) button.
You’ll enter Global mode, and the PROGRAM (GLOBAL) button
will blink.
2. Use the PAGE +/- buttons to select the GLOBAL “u01: Utility”
page item Load Preload, and press the value dial.
3. Turn the value dial to select the type of data that will be
restored to its factory-set condition.
1Program: Data of the currently selected program
ALL Program: Data for programs 1–200
Global: Global data
All Data: Programs 1–200 and global data
4. Press the value dial; a confirmation screen will appear.
If you decide not to load the data, press the SHIFT/EXIT
TIP:
buon or the PROGRAM (GLOBAL) buon.
5. Press the value dial once again.
When the selected data has been loaded, the display will
indicate “Completed!” and you will automatically return to the
top screen.
Saving
Saving your settings
If you want to keep the global settings or programs that you’ve
edited, you must save them to internal memory.
If you turn off the power without saving, any changes that
you’ve made to the global settings will be lost. Be sure to save
your edited settings if you want to use them in the future.
If you’ve edited a program, the changes you’ve made will be
lost if you select another program or turn off the power
without saving. Be sure to save your edited settings if you
want to use them in the future.
You can’t save your settings if memory protect is turned on.
Turn off memory protect before you proceed. (PG: “5.
GLOBAL parameters”)
1. Saving global settings
Which settings are saved?
When you save global data, the following settings are saved.
₋ All parameters in the GLOBAL “g01–g44” pages
The state of the OCTAVE UP/DOWN buttons is not saved. The
TUBE BOOST buon and TUBE ON buon seings are saved
as global parameters.
To save the global settings, proceed as follows in Global mode.
1. Hold down the SHIFT/EXIT button and press the PROGRAM
(GLOBAL) button to enter Global mode.
The main display will show the global parameter edit screen,
and the PROGRAM (GLOBAL) button will blink.
2. Press the WRITE button.
The main display will show a confirmation screen, and the
WRITE button will blink.
If you decide not to save, press the SHIFT/EXIT buon at
TIP:
this point.
3. Press the WRITE button once again.
When the data has been saved, the display will indicate
“Complete!” and you will return to the previous screen.
Never turn off the power while data is being saved. The
data may be destroyed if you do so.
2. Saving a program
Which settings are saved?
When you save a program, the following settings are saved.
₋ All parameters in PROGRAM “p01–06 (Program), s01–80 (Synth),
v01–18 (Vocoder), a01–12 (Arp)”
₋ Master effect settings (PRE FX, MOD FX, REV/DELAY)
The status of some of the front panel settings will not be saved
(the selected state of the TIMBRE A/B select buttons,
OSCILLATOR select button, LFO select button)
The state of the OCTAVE UP/DOWN buttons will not be
saved.
Since TUBE and EQ are global effects that apply to all
programs in common, their settings are not saved for each
program.
To save a program, proceed as follows in Program mode.
1. Press the WRITE button.
The main display will show a screen allowing you to specify the
save‐destination, and the WRITE button will blink.
2. Turn the value dial to select the storage location (program
number).
If you decide not to save the program, press the SHIFT/
TIP:
EXIT buon at this point.
3. Press the WRITE button once again.
When the data has been saved, the display will indicate
“Complete!” and you will return to the previous screen.
Never turn off the power while data is being saved. The
data may be destroyed if you do so.
3. Registering programs in the category/
favorites buttons
The KingKORG provides a convenient Favorites function that lets you
recall a program by pressing a single button. This can be very convenient
when you’re playing live. In order to use this function, you’ll need to
register your favorite programs in the category/favorites buttons.
1. Select a program that you want to register. (OM: p.13 “Selecting
a program”)
2. Hold down the WRITE button and press the FAVORITES
button.
The FAVORITES button and all of the category/favorites buttons
will blink.
21
Page 22

KingKORG Owner’s manual
3. Press the FAVORITES button to select the bank (A–E) where
you want to register the program.
The FAVORITES button will light up, and the bank will change
each time you press the button.
4. Press the category/favorites button where you want to register
the program.
The category/favorites button that you pressed will blink; when
registration is complete, the button will be steadily illuminated.
Can’t input sound
Is the mic connected correctly to the mic jack?
Could the MIC LEVEL knob be turned all the way to the le?
In a vocoder program, have you specied “Input” for the
audio you’re using as the modulator?
Can’t edit
If turning a knob does not change the parameter:
In the GLOBAL “g11: Common>Knob” page, could the setting
be “Catch”?
If when you turn a knob, the position indicated by the knob
does not match the value shown in the display:
If the GLOBAL “g11: Common>Knob”page setting is set to
“ValueScale,” the actual parameter value may differ from the
position indicated by the knob.
If the sound does not change when you use a knob:
Have you used the TIMBRE A/B select buttons to correctly
select the timbre that you want to edit?
If you can’t select timbre B:
In the PROGRAM “p03: Common” page, could the voice
mode be set to “Single”?
If you can’t select vocoder parameters in Edit mode:
Is the VOCODER button on (lit)?
If the changes you made to a program or to the global seings
have not been remembered, did you turn the power o before
executing the Write operation? In the case of a program, your
edits will also be lost if you select a dierent program. Per‐
form the Write operation to save your edits before you switch
programs or turn o the power.
Never turn off the power while registration is in progress. The
data may be destroyed if you do so.
You are free to change a program that’s registered in Favorites.
TIP:
Select Favorites, turn the dial to select the desired program,
and then press the WRITE buon.
Trouble shooting
If the KingKORG does not function as you expect, check the
following points.
Power does not turn on
Is the AC adapter connected to an AC outlet? (OM: p.11 “Con‐
nections”)
Are you holding down (long‐pressing) the power switch
when turning the power on? (OM: p.12 “Turning the power on/
o”)
No sound when you play the keyboard
Is your powered monitor system or headphones connected to
the correct jack(s)? (OM: p.11 “Connections”)
Is the connected monitor system powered‐on, and is the
volume raised?
Is the VOLUME knob set to a position where sound will be out‐
put?
In the GLOBAL “g17: MIDI Basic” page, is the local control set‐
ting “On”?
Were any volume‐related parameters set to a value of “0”?
In the PROGRAM “s32: Filter” page, could the cuto value be
“0”?
Can’t save program settings
In the GLOBAL “g12: Common” page, could the protect seing
be “On”?
If the program you edited is not saved, have you used the
value dial to correctly specify the save‐destination (program
number)?
Arpeggiator will not start
Is the arpeggiator on (ARP (TEMPO) buon lit up)?
Is the arpeggiator assigned to a timbre?
In the GLOBAL “g19: MIDI Basic” page, is the clock seing
correct?
No response to MIDI messages sent from an external device
Is the MIDI cable or USB cable connected correctly?
Does the MIDI channel of the data transmied from the exter‐
nal MIDI device match the MIDI channel of the KingKORG?
In the GLOBAL “g23–g27: MIDI Filter” page, is the seing “En‐
able”?
Transpose, velocity curve, and arpeggiator data is not
recognized correctly
In the GLOBAL “g03: Common” page, is the position seing
correct?
Can’t control timbres on separate MIDI channels
If the PROGRAM “p03: Common” page’s voice mode is set to
“Single,” the KingKORG will receive only one MIDI channel.
Volume is too soft when the TUBE control is turned on
It may be that the vacuum tube is worn out. Please contact a
Korg service center.
22
Page 23

Specifications
Specifications
Sound generation system XMT (eXpanded Modeling Technology)
Programs
Number of programs 300 programs (200 preset / 100 user)
Number of categories 8 categories
Timbres Max 2 timbres (Layer / Split)
Maximum Polyphony 24 voices max
Synth
Oscillator
Structure 3 oscillators (choose from analog, noise, DWGS, PCM, and MIC IN types)
Number of types 127 types (32 analog and noise, 64 DWGS, 30 PCM, MIC IN)
Filter
Structure 1 filter (choose from LPF, HPF, BPF)
Number of types 18 types (7 LPF, 5 HPF, 6 BPF)
Modulation
Structure EG: 2 units, LFO: 2 units
Routing Virtual patches: 6 sets
Effects
Sections Program effects x 3 (PRE FX, MOD FX, REV/DELAY) + EQ (2Band) + TUBE (Stereo)
Types PRE FX: 6 types (DISTORTION, DECIMATOR, RING MOD, GT.AMP, EP.AMP, TONE)
MOD FX: 6 types (FLANGER, CHORUS, U‐VIBE, TREMOLO, PHASER, ROTARY)
REV/DELAY: 6 types (HALL, ROOM, PLATE, TAPE ECHO, MOD DELAY, BPM DELAY)
Vocoder 16‐band vocoder, formant shift function, formant hold function
Arpeggiator Up to 8 steps (number of steps can be changed), 6 types (UP/DOWN/ALT1/ALT2/RANDOM/
TRIGGER)
Audio
Input
Micjack
Connector XLR‐3‐31 type (balanced)
Input impedance 6.8 kΩ
Maximum level ‐12 dBu
Output
AUDIOOUTPUT(L/MONO,R)jacks
Connectors 6.3 mm TS phone jacks (unbalanced) L/MONO, R
Load impedance 10 kΩ or higher
Maximum level +8.2 dBu
Headphonejack
Connector 3.5 mm stereo mini‐phone jack
Maximum level 60 mW + 60 mW @ 33 Ω
Displays
Main 16 x 2 character OLED display
OSCILLATOR, FILTER 128 x 64 pixel OLED display
Keyboard 61‐note semi‐weighted keyboard (velocity sensitive)
Controllers
Internal Joystick, OCTAVE UP/DOWN buttons, category/favorites buttons
Inputs DAMPER jack (half‐damper not supported), SWITCH/PEDAL jack
Output CV/GATE OUT jack
External connections MIDI IN, OUT, USB B connector
Power supply AC adapter jack (DC 12 V,
Power consumption 10 W
Dimensions (width x depth x height) 1,027 mm x 313 mm x 96 mm /40.43 " x 12.32 " x 3.78 "
Weight 7.0 kg / 15.43 lbs
Operating temperature range 0 – +40 °C (non‐condensing)
Included items Owner’s manual, AC Adapter, CV/GATE cable
Options XVP‐10: Expression/volume pedal, EXP‐2: Foot controller, DS‐1H: Damper pedal, PS‐1, PS‐3:
Pedal switch
)
* Specifications and appearance are subject to change without notice for mprovement.
23
Page 24
Manuel d’utilisation
Français
Sommaire
Caractéristiques principales . . . . . . . . . . . . . . . . . . . . . . . . . . . . . . . . . . . . . . . . . . . . . . . . 26
Un son sophistiqué . . . . . . . . . . . . . . . . . . . . . . . . . . . . . . . . . . . . . . . . . . . . . . . . . . . . . . . . . . . . . . . . . . . . . . . . . . . . . . . 26
Utilisation intuitive . . . . . . . . . . . . . . . . . . . . . . . . . . . . . . . . . . . . . . . . . . . . . . . . . . . . . . . . . . . . . . . . . . . . . . . . . . . . . . . 26
Contrôleurs et fonctions épaulant votre jeu. . . . . . . . . . . . . . . . . . . . . . . . . . . . . . . . . . . . . . . . . . . . . . . . . . . . . . . . 26
Description des panneaux et fonctions . . . . . . . . . . . . . . . . . . . . . . . . . . . . . . . . . . . . . . 27
Panneau avant (joystick/son/distorsion/effets) . . . . . . . . . . . . . . . . . . . . . . . . . . . . . . . . . . . . . . . . . . . . . . . . . . . . 27
Panneau avant (commandes principales) . . . . . . . . . . . . . . . . . . . . . . . . . . . . . . . . . . . . . . . . . . . . . . . . . . . . . . . . . . 28
Panneau avant (oscillateur/filtre) . . . . . . . . . . . . . . . . . . . . . . . . . . . . . . . . . . . . . . . . . . . . . . . . . . . . . . . . . . . . . . . . . . 29
Panneau avant (AMP/LFO/EG). . . . . . . . . . . . . . . . . . . . . . . . . . . . . . . . . . . . . . . . . . . . . . . . . . . . . . . . . . . . . . . . . . . . . 30
Panneau arrière. . . . . . . . . . . . . . . . . . . . . . . . . . . . . . . . . . . . . . . . . . . . . . . . . . . . . . . . . . . . . . . . . . . . . . . . . . . . . . . . . . . 31
Connexions et mise sous tension. . . . . . . . . . . . . . . . . . . . . . . . . . . . . . . . . . . . . . . . . . . . 32
Connexions . . . . . . . . . . . . . . . . . . . . . . . . . . . . . . . . . . . . . . . . . . . . . . . . . . . . . . . . . . . . . . . . . . . . . . . . . . . . . . . . . . . . . . 32
Mise sous tension/hors tension de l’instrument . . . . . . . . . . . . . . . . . . . . . . . . . . . . . . . . . . . . . . . . . . . . . . . . . . . . 33
Coupure automatique d’alimentation . . . . . . . . . . . . . . . . . . . . . . . . . . . . . . . . . . . . . . . . . . . . . . . . . . . . . . . . . . . . . 33
Jeu sur le KingKORG . . . . . . . . . . . . . . . . . . . . . . . . . . . . . . . . . . . . . . . . . . . . . . . . . . . . . . . 33
Ecouter la demonstration . . . . . . . . . . . . . . . . . . . . . . . . . . . . . . . . . . . . . . . . . . . . . . . . . . . . . . . . . . . . . . . . . . . . . . . . . 33
Selection et utilisation d’un Program . . . . . . . . . . . . . . . . . . . . . . . . . . . . . . . . . . . . . . . . . . . . . . . . . . . . . . . . . . . . . . 34
Choix d’un Program . . . . . . . . . . . . . . . . . . . . . . . . . . . . . . . . . . . . . . . . . . . . . . . . . . . . . . . . . . . . . . . . . . . . . . . . . . . . . . 34
Varier le son . . . . . . . . . . . . . . . . . . . . . . . . . . . . . . . . . . . . . . . . . . . . . . . . . . . . . . . . . . . . . . . . . . . . . . . . . . . . . . . . . . . . . . 35
Edition du son . . . . . . . . . . . . . . . . . . . . . . . . . . . . . . . . . . . . . . . . . . . . . . . . . . . . . . . . . . . . . 36
Structure d’un Program . . . . . . . . . . . . . . . . . . . . . . . . . . . . . . . . . . . . . . . . . . . . . . . . . . . . . . . . . . . . . . . . . . . . . . . . . . . 36
Édition de base de Program. . . . . . . . . . . . . . . . . . . . . . . . . . . . . . . . . . . . . . . . . . . . . . . . . . . . . . . . . . . . . . . . . . . . . . . 39
À propos des paramètres globaux. . . . . . . . . . . . . . . . . . . . . . . . . . . . . . . . . . . . . . . . . . . . . . . . . . . . . . . . . . . . . . . . . 41
Autres fonctions . . . . . . . . . . . . . . . . . . . . . . . . . . . . . . . . . . . . . . . . . . . . . . . . . . . . . . . . . . . . . . . . . . . . . . . . . . . . . . . . . . 41
Sauvegarde . . . . . . . . . . . . . . . . . . . . . . . . . . . . . . . . . . . . . . . . . . . . . . . . . . . . . . . . . . . . . . . 43
Sauvegarder vos réglages. . . . . . . . . . . . . . . . . . . . . . . . . . . . . . . . . . . . . . . . . . . . . . . . . . . . . . . . . . . . . . . . . . . . . . . . . 43
Dépannage. . . . . . . . . . . . . . . . . . . . . . . . . . . . . . . . . . . . . . . . . . . . . . . . . . . . . . . . . . . . . . . . 44
Fiche technique. . . . . . . . . . . . . . . . . . . . . . . . . . . . . . . . . . . . . . . . . . . . . . . . . . . . . . . . . . . . 45
Page 25

Nous vous remercions d’avoir choisi le synthétiseur KingKORG de Korg. Pour profiter au mieux de votre
nouvel instrument, veuillez lire attentivement ce manuel et suivre ses consignes.
Précautions
Emplacement
L’utilisation de cet instrument dans les endroits suivants peut en
entraîner le mauvais fonctionnement.
• En plein soleil
• Endroits très chauds ou très humides
• Endroits sales ou fort poussiéreux
• Endroits soumis à de fortes vibrations
• A proximité de champs magnétiques
Alimentation
Branchez l’adaptateur secteur mentionné à une prise secteur de tension
appropriée. Evitez de brancher l’adaptateur à une prise de courant dont
la tension ne correspond pas à celle pour laquelle l’appareil est conçu.
Interférences avec d’autres appareils électriques
Les postes de radio et de télévision situés à proximité peuvent par
conséquent souffrir d’interférences à la réception. Veuillez dès lors faire
fonctionner cet appareil à une distance raisonnable de postes de radio et
de télévision.
Maniement
Pour éviter de les endommager, manipulez les commandes et les boutons
de cet instrument avec soin.
Entretien
Lorsque l’instrument se salit, nettoyez-le avec un chiffon propre et sec.
Ne vous servez pas d’agents de nettoyage liquides tels que du benzène
ou du diluant, voire des produits inflammables.
Conservez ce manuel
Après avoir lu ce manuel, veuillez le conserver soigneusement pour
toute référence ultérieure.
Evitez toute intrusion d’objets ou de liquide
Ne placez jamais de récipient contenant du liquide près de l’instrument.
Si le liquide se renverse ou coule, il risque de provoquer des dommages,
un court-circuit ou une électrocution.
Veillez à ne pas laisser tomber des objets métalliques dans le boîtier
(trombones, par ex.). Si cela se produit, débranchez l’alimentation de la
prise de courant et contactez votre revendeur korg le plus proche ou la
surface où vous avez acheté l’instrument.
Note concernant les dispositions (Seulement EU)
Quand un symbole avec une poubelle barrée d’une croix
apparait sur le produit, le mode d’emploi, les piles ou le pack
de piles, cela signifie que ce produit, manuel ou piles doit être
déposé chez un représentant compétent, et non pas dans une
poubelle ou toute autre déchetterie conventionnelle. Disposer
de cette manière, de prévenir les dommages pour la santé
humaine et les dommages potentiels pour l’environnement.
La bonne méthode d’élimination dépendra des lois et règlements
applicables dans votre localité, s’il vous plaît, contactez votre
organisme administratif pour plus de détails. Si la pile contient des
métaux lourds au-delà du seuil réglementé, un symbole chimique est
affiché en dessous du symbole de la poubelle barrée d’une croix sur
la pile ou le pack de piles.
Gestion des donnees
Une erreur de manipulation ou un dysfonctionnement peut provoquer la
perte du contenu de la mémoire. Veuillez utiliser le logiciel “Editor”
fourni pour archiver vos données
importantes sur ordinateur ou sur un support de mémoire amovible.
Korg décline toute responsabilité pour tout dommage résultant de la
perte de données.
À propos de la lampe
La durée de vie d’une lampe n’est pas uniforme. Si la lampe est grillée,
adressez-vous à un centre de SAV de Korg.
Toute opération de réglage et toute réparation, y compris le
remplacement de la lampe, doivent être confiées à un technicien qualifié.
À propos du manuel d’utilisation
La documentation pour ce produit comprend les manuels suivants.
- Manuel d’utilisation (ce que vous lisez)
- Guide des paramètres (que vous pouvez télécharger sur le site internet
de Korg).
korg.com/
Manuel d’utilisation
Ce guide propose une introduction simple aux fonctions principales du
KingKORG. Lisez d’abord ce manuel.
Guide des paramètres
Ce guide fournit des informations sur tous les paramètres du
KingKORG.
Consultez ce guide chaque fois que vous souhaitez des informations sur
le rôle de paramètres spécifiques.
Le Guide des paramètres comprend les sections suivantes.
- Guide des paramètres
- Guide des effets
- Guide MIDI
Ouvrez et consultez le Guide des paramètres sur votre ordinateur.
Abréviations désignant les manuels
MU: Manuel d’utilisation
GP: Guide des paramètres
Saisies d’écran du manuel
Les valeurs des paramètres figurant dans les illustrations de ce manuel
sont uniquement fournies à titre d’exemple; elles ne correspondent pas
nécessairement aux réglages qui apparaissent sur l’écran du KingKORG.
Exemple de notation dans la page d’affichage principale
page GLOBAL “g15: Power Off”
En mode Global, le nom de la page est affiché en haut de l’écran
principal.
* Tous les noms de produits et de sociétés sont des marques ommerciales
http://www.korg.co.jp/English/Distributors/ or http://www.
ou déposées de leur détenteur respectif.
25
Page 26

KingKORG Manuel d’utilisation
Caractéristiques principales
Un son sophistiqué
1.Fonction de synthétiseur bénéficiant du nouveau
moteur sonore XMT
La technologie XMT (‘eXpanded Modeling Technology’, c.-à-d. à
plusieurs modélisations) de Korg permet de créer une vaste
palette de sons via des manipulations simples. Le KingKORG
offre une grande variété d’algorithmes d’oscillateur, dont des
ondes en dents de scie et des ondes carrées, typiques des synthés
analogiques, mais aussi des formes d’onde de bruit et PCM/
DWGS.
2.Un filtre qui a du caractère
Le filtre est l’un des éléments essentiels déterminant le caractère
sonore d’un synthétiseur analogique. Outre un filtre numérique
de haute qualité, le KingKORG propose une modélisation fidèle
des filtres analogiques équipant les bons vieux synthétiseurs
classiques, bref tout ce qu’il faut pour créer des sons pleins
d’impact.
3.Circuit de distorsion à lampe 100% analogique
Fruit des années d’expérience et de savoir-faire de Korg dans le
domaine de la conception de circuits analogiques, un circuit de
distorsion à lampe entièrement analogique a été incorporé à
l’instrument comme effet de mastérisation. Outre chaleur et
dynamique, ce circuit génère une puissante distorsion.
4.Fonction ‘Vocoder’
Le KingKORG est doté d’une fonction Vocodeur vous permettant
de traiter le signal de l’oscillateur avec votre voix (via un micro)
afin de donner l’impression que le synthétiseur «parle».
5.Connexions virtuelles
Six jeux de connexions virtuelles permettent de connecter des
contrôleurs tels que l’enveloppe, le LFO et les fonctions du
joystick à des paramètres comme la hauteur ou la fréquence du
filtre afin de moduler ces paramètres et d’obtenir un degré inédit
de création sonore.
6.200 Programs internes
Le KingKORG dispose de 200 Programs organisés en huit
catégories telles que synthétiseur, son lead et basse. Vous êtes
donc paré pour démarrer avec un incroyable éventail de sons
prêts à l’emploi. En outre, l’instrument comporte une mémoire
utilisateur avec 100 emplacements disponibles pour recueillir
vos sons «perso».
Utilisation intuitive
7. Panneau avant
Vous pouvez éditer les sons de manière intuitive en manipulant
directement les commandes et boutons organisés en sections sur
le panneau avant.
L’écran propose aussi des pages d’édition qui permettent de
modifier tous les paramètres du KingKORG.
8.Fonction ‘Favorites’
La fonction Favorites vous permet de rappeler vos Programs
favoris d’une pression sur un seul bouton. Vous pouvez
mémoriser un total de 40 Programs sous les huit boutons de
catégories/Programs favoris et rappeler instantanément ces
Programs préférés.
Contrôleurs et fonctions épaulant votre jeu
9.Arpégiateur à pas
L’arpégiateur à pas génère automatiquement un arpège quand
vous maintenez un accord sur le clavier. Vous avez le choix
entre six types d’arpèges et vous pouvez définir la durée et
l’intervalle des notes arpégées. Pour plus de possibilités, vous
pouvez aussi activer/désactiver chaque pas.
10.Joystick
Le KingKORG comporte un joystick, ce contrôleur très apprécié
des stations de travail de Korg. Vous pouvez contrôler librement
la variation de hauteur et les paramètres des Programs en
déplaçant le joystick vers le haut/le bas/la gauche/la droite. Vous
pouvez aussi connecter une pédale commutateur et l’utiliser
pour maintenir l’effet du joystick pendant votre jeu.
11.Librarian software
En reliant le KingKORG à votre ordinateur via USB, vous
pouvez utiliser le logiciel de bibliothèque pour gérer les
Programs du KingKORG sur votre ordinateur. Le logiciel de
bibliothèque peut être téléchargé gratuitement sur le site internet
de Korg ( http://www.korg.co.jp/English/Distributors/ or http://www.
korg.com/ ).
26
Page 27

Description des panneaux et fonctions
Description des panneaux et fonctions
Panneau avant (joystick/son/distorsion/effets)
Commande VOLUME
Cee commande règle le volume du signal transmis
aux prises AUDIO OUTPUT (L/MONO, R) et à la prise
casque.
Témoin MIC LEVEL PEAK
Ce témoin s’allume quand le signal d’entrée de la
prise micro est saturé en raison d’un niveau
excessif.
Commande MIC LEVEL
Cee commande règle le niveau d’entrée de la
prise micro.
Boutons OCTAVE UP/DOWN
Ces boutons transposent la plage de
hauteur assignée au clavier par pas d’une
octave sur une plage de +/-2 octaves.
(MU: p.35 «Transposition par octaves»)
Effets Global
(GLOBAL FX)
Témoins de Timbre
Le témoin du Timbre auquel vous
appliquez un effet s’allume.
Effets maîtres
(MASTER FX)
Commandes de distorsion
(TUBE)
Commande DRIVE
Règle la quantité de distorsion du
circuit à lampe.
Bouton BOOST
Ce bouton accentue la distorsion à
lampe.
Bouton ON
Permet d’activer/de couper le circuit
à lampe.
Joystick (JS)
Le joystick contrôle la hauteur et
l'intensité de modulation (expression).
Déplacez le joystick vers la gauche/
droite pour contrôler la hauteur, et
vers le haut/bas pour contrôler la
modulation.
Vous pouvez assigner des types de
modulation différents aux directions
haut et bas du joystick.
Prise casque
Branchez-y un casque doté d’une
fiche minijack. Cee prise produit le
même signal que les prises OUTPUT
(L/MONO, R). Réglez le niveau du
casque avec la commande VOLUME.
TUBE (lampe)
La lampe risque de se briser si elle est soumise à un choc.
Si la lampe est brisée, veillez à la faire remplacer sans tarder.
Commandes de contrôle
d’effets
Ces commandes contrôlent les
paramètres des effets PRE FX,
MOD FX et REV/DELAY.
Commandes de choix du type
d’effet (avec fonction de bouton)
Ces commandes sélectionnent les
types d’effets des sections PRE FX,
MOD FX et REV/DELAY.
Vous pouvez changer de Timbre en
enfonçant la commande: l’effet est
alors appliqué à l’autre Timbre.
Commandes d’égalisation (EQ)
Ces commandes permeent de régler le
grave et l’aigu du signal du KingKORG.
Commande HIGH
Cee commande agit sur la plage de l’aigu.
Vous pouvez manipuler cee commande en
maintenant enfoncé le bouton SHIFT/EXIT
afin d'ajuster la fréquence de coupure de
l'aigu (HIGH).
Commande LOW
Cee commande agit sur la plage du grave.
Vous pouvez manipuler cee commande en
maintenant enfoncé le bouton SHIFT/EXIT
afin d'ajuster la fréquence de coupure du
grave (LOW).
27
Page 28

KingKORG Manuel d’utilisation
Panneau avant (commandes principales)
Bouton PROGRAM (GLOBAL)
Ce bouton a deux fonctions.
[PROGRAM]
Quand vous voulez jouer des
Programs, appuyez sur ce bouton
pour sélectionner le mode Program.
Le bouton s’allume et l’écran principal
affiche l’écran de jeu de Program.
[GLOBAL]
Pour effectuer des réglages globaux
affectant le KingKORG tout entier,
maintenez enfoncé le bouton
SHIFT/EXIT et appuyez sur ce bouton
pour sélectionner le mode Global.
Le bouton se met alors à clignoter et
l’écran principal affiche la page des
réglages globaux.
Boutons PAGE +/-
Ces boutons permeent d’accéder à la
page d’édition voulue. Servez-vous
des boutons +/- pour passer en revue
les pages d’écran.
Écran principal
Cet écran affiche diverses informations
comme les données de Programs et les
valeurs de paramètres.
Molette de valeur
(avec fonction de bouton)
Tournez cee molee pour éditer les
valeurs des Programs ou paramètres
et enfoncez-la pour confirmer vos
réglages. Les pages d’écran pour
lesquelles la fonction de bouton est
disponible affichent le symbole “ ”
sur l’écran principal.
Boutons TIMBRE A/B de sélection
Ces boutons permeent de choisir le Timbre
piloté avec les commandes en face avant
(OSCILLATOR/FILTER, AMP/LFO/EG).
Vous pouvez sélectionner les deux Timbres
en appuyant simultanément sur les boutons
A et B.
Témoin ORIGINAL VALUE
Ce témoin s’allume quand la valeur que
vous éditez avec les commandes et
boutons en face avant correspond à la
valeur sauvegardée dans l'instrument.
28
Bouton SHIFT/EXIT
Ce bouton permet d’accéder aux
fonctions additionnelles (SHIFT) d’une
commande ou d'un bouton, ou de
retourner à l’écran de sélection de
Program (EXIT).
Bouton WRITE
Ce bouton permet de sauvegarder un
Program ou paramètre global que vous
avez édité, ou de mémoriser un
Program comme favori.
(MU: p.43 «Sauvegarde»)
Boutons de catégories de
Programs/de Programs favoris
Quand le bouton PROGRAM (GLOBAL)
est allumé, ces boutons permeent d’activer
le premier Program de la catégorie
correspondante. Quand le bouton
FAVORITES est allumé, ces boutons
rappellent directement le Program favori
correspondant. La fonction Favorites vous
permet de mémoriser vos Programs préférés
afin de les rappeler en appuyant simplement
sur un bouton.
Bouton FAVORITES
Ce bouton active la fonction Favorites, qui permet de sélectionner facilement un
son ou de changer de jeu de Programs favoris.
Chaque pression sur ce bouton sélectionne le jeu suivant dans cet ordre: A B C
D E A….
Vous pouvez enfoncer ce bouton tout en maintenant le bouton SHIFT/EXIT enfoncé
pour passer en revue les banques dans l'ordre suivant: E →D →C →B →A →E….
Pour couper la fonction Favorites, appuyez sur le bouton PROGRAM (GLOBAL).
Bouton ARP (TEMPO)
Ce bouton permet d'activer/de couper
l’arpégiateur et de régler son tempo.
Vous disposez aussi d’une fonction
Tap Tempo pour ‘taper’ le tempo.
(MU: p.36 «4. Jouer des arpèges»)
Témoin TEMPO
Ce témoin clignote sur le tempo choisi.
Bouton SPLIT (POSITION)
Ce bouton permet d’activer/de couper la
fonction de partage (Split) et de définir
le point de partage. Chaque pression sur
ce bouton active/coupe alternativement
la fonction de partage. Ce bouton est aussi
utilisé pour définir le point de partage.
(GP: «1. Paramètres de Timbre»)
Page 29

Panneau avant (oscillateur/filtre)
Bouton de sélection d’oscillateur (OSCILLATOR)
Choisissez avec ce bouton le numéro de l’oscillateur que
vous voulez piloter. Le témoin de l’oscillateur actif
s’allume sur le panneau avant.
Écran auxiliaire d’oscillateur
Cet écran affiche des informations sur
l’oscillateur actif.
Commande OSCILLATOR TYPE de
choix d’oscillateur (avec fonction
de bouton)
Cee commande sélectionne le type d’oscillateur.
Vous pouvez appuyer sur cee commande pour
choisir la première forme d’onde des catégories
Off, ANALOG, DWGS, PCM ou MIC IN.
Description des panneaux et fonctions
Commande FILTER CUTOFF
Cee commande règle la fréquence
de coupure du filtre.
Écran auxiliaire de filtre
Cet écran affiche des informations
sur le filtre actif.
Commandes d’oscillateur (OSCILLATOR)
Ces commandes agissent sur les paramètres de chaque
oscillateur.
Commande TUNE (SEMI)
Règle l’écart de hauteur (ʻDetune’) par rapport à la
hauteur de base. Vous pouvez maintenir le bouton
SHIFT/EXIT enfoncé et tourner cee commande pour
effectuer le réglage par pas de demi-ton.
Commande CONTROL
Cee commande règle le paramètre CONTROL 1 de
l’oscillateur. Le paramètre en question dépend du type
d’oscillateur que vous avez sélectionné. Vous pouvez
maintenir le bouton SHIFT/EXIT enfoncé et tourner cee
commande pour régler le paramètre CONTROL 2.
(GP: «1. Paramètres de Timbre»)
Commande PORTA. TIME
Détermine la vitesse du portamento.
Bouton PORTAMENTO
Il fait office d’interrupteur pour l’effet de portamento;
ce dernier produit une transition de hauteur fluide
d’une note à l’autre.
Commandes de filtre (FILTER)
Ces commandes règlent les paramètres de
filtre.
Commande RESONANCE
Cee commande règle l'intensité de
résonance du filtre.
Commande EG INT (KEY TRK)
Cee commande règle l'intensité à laquelle
l’enveloppe varie la fréquence de coupure
dans le temps. Vous pouvez maintenir le
bouton SHIFT/EXIT enfoncé et tourner cee
commande pour régler l’intensité avec
laquelle la fréquence de coupure change en
fonction de la zone du clavier où vous jouez
(c.-à-d. des notes hautes aux notes basses).
Bouton FILTER TYPE (-) de choix
du type de filtre
Ce bouton permet de choisir le type de filtre.
Vous pouvez maintenir le bouton SHIFT/EXIT
enfoncé et appuyer sur ce bouton pour passer
les types de filtre en revue dans l’ordre
décroissant (05 04 03 02 01...).
29
Page 30

KingKORG Manuel d’utilisation
Panneau avant (AMP/LFO/EG)
Commande AMP LEVEL
Cee commande règle le volume du Timbre.
Bouton de sélection du LFO
Ce bouton permet de choisir le LFO affecté par les
commandes de LFO. Le témoin du LFO actif s’allume
sur le panneau avant. Le témoin clignote à la fréquence
du LFO.
Commandes de LFO
Ces commandes agissent sur les paramètres de LFO.
Commande FREQ
Cee commande règle la fréquence du LFO.
Commande INTENSITY
Cee commande définit l'intensité avec laquelle le LFO
agit sur le filtre ou la hauteur.
30
Bouton VOCODER
Ce bouton active/coupe la fonction
Vocoder.
Ce bouton active/coupe la fonction
Vocoder.
Vous pouvez enfoncer ce bouton
tout en maintenant le bouton
SHIFT/EXIT enfoncé pour
activer/couper la fonction Mic Thru.
Bouton UNISON
Ce bouton active/coupe la fonction
Voice Unison du Timbre.
Vous pouvez enfoncer ce bouton
tout en maintenant le bouton
SHIFT/EXIT enfoncé pour afficher
l’écran des réglages de la voix
d’unisson.
Bouton de sélection
d’enveloppe
Ce bouton choisit l’enveloppe affectée
par les commandes d’enveloppe (EG).
Le témoin de l’enveloppe active
s’allume sur le panneau avant.
Ce témoin clignote en synchronisation
avec l’effet de l’enveloppe.
Bouton VELOCITY
Ce bouton active/coupe la fonction de
sensibilité à la vélocité de l’enveloppe;
cee fonction permet d’agir sur les
paramètres de l’enveloppe en fonction
de la force avec laquelle vous enfoncez
les touches du clavier.
Commandes d'enveloppe (EG)
Ces commandes agissent sur les paramètres
d’enveloppe.
Commande ATTACK
Cee commande règle la durée s’écoulant
entre le déclenchement de la note
(le moment où vous enfoncez une touche)
et le moment où le niveau de l’aaque
(la valeur maximum de l’enveloppe) est
aeint.
Commande DECAY
Cee commande définit la durée entre le
franchissement du niveau d’aaque et celui
du niveau de maintien.
Commande SUSTAIN
Cee commande définit le niveau auquel
le volume est maintenu après l’écoulement
de la durée de chute.
Commande RELEASE
Cee commande définit la durée entre la
coupure de note (le moment où vous
relâchez la touche) et le moment où plus
aucun son n’est audible.
Page 31

Panneau arrière
Description des panneaux et fonctions
Prise DAMPER
Cee prise permet de brancher une
pédale de maintien (Damper).
Prise MIDI IN/OUT
Ces prises permeent au
KingKORG d’échanger des
messages MIDI avec un appareil
MIDI externe.
Prise USB B
Cee prise permet au KingKORG d’échanger
des messages MIDI avec un ordinateur.
Prises AUDIO OUTPUT
Ces prises permeent de brancher des enceintes
actives, un ampli stéréo, une console de mixage
ou un enregistreur multipiste. Pour une connexion
mono, servez-vous de la prise L/MONO.
Prise pour micro
Branchez un micro à cee prise.
Les Programs de type Vocoder utilisent le
signal du micro comme modulateur sonore.
Interrupteur
Il met l’appareil sous/hors
tension.
Prise CV/GATE OUT
Cee prise produit un signal CV/Gate (de tension
de contrôle ou 'Control Voltage’ et de gate).
Vous pouvez relier cee prise à un synthétiseur
analogique afin de le piloter de différentes façons.
Prise SWITCH/PEDAL
Cee prise permet de brancher une pédale ou
pédale commutateur.
Prise DC 12V
Branchez l’adaptateur secteur fourni
à cee prise. Branchez l’adaptateur
secteur au KingKORG avant de le
brancher à une prise secteur.
Crochet pour câble
Enroulez le câble de l’adaptateur secteur autour
de ce crochet pour éviter que le câble ne soit
accidentellement débranché de la prise DC12V.
Remarque à propos de la fonction de coupure automatique
de l'alimentation (Auto Power-Off)
Cet instrument est doté d’ une fonction de coupure automatique de
l’ alimentation. L’ alimentation est automatiquement coupée quand
l’ instrument est resté inutilisé pendant un certain temps.
(À l’ usine, l’ instrument a été réglé de sorte que son alimentation soit
automatiquement coupée après quatre heures sans aucune manipulation.)
Vous pouvez désactiver cee fonction avec les paramètres de la page
GLOBAL “g15: Power Off” .
31
Page 32

KingKORG Manuel d’utilisation
Clavier MIDI, module de sons MIDI,
Connexions et mise sous tension
Connexions
L’illustration ci-dessous donne des exemples de connexions pour le KingKORG. Branchez le matériel répondant à vos besoins.
Ordinateu
Câble USB
boîte à rythmes MIDI, etc.
Câble CV/GATE (fourni)
Enceintes (amplifiées) Micro
MIDI OUTMIDI IN Entrée Entrée
Câble MIDI
DC12V
Adaptateur
secteur (fourni)
brancher à une
Synthétiseur analogique permettant
le pilotage via signal CV/GATE
Veillez à mettre tout votre matériel hors tension avant d’effectuer la moindre connexion. Effectuer des branchements quand un appareil
est sous tension pourrait endommager les enceintes ou causer un dysfonctionnement, voire un endommagement de votre matériel.
1. Connexion d’un ampli ou d’enceintes
Branchez les prises AUDIO OUTPUT du KingKORG aux entrées de
votre console de mixage ou de vos enceintes actives. Pour une
connexion mono, utilisez la prise L/MONO.
ASTUCE:
Pour proter au mieux du son du KingKORG, nous
recommandons toutefois une sortie stéréo.
2. Connexion d’un micro
Si vous comptez utiliser le KingKORG comme Vocoder, branchez un
micro à la prise pour micro du panneau arrière; l’instrument utilise
alors le signal du micro comme modulateur. (MU: p.36 «4. Jouer des
sons de Vocoder»)
3. Connexion de pédales et
commutateurs
Branchez une pédale ou une pédale commutateur selon vos besoins.
Pédale de sustain
(Damper)
Pédale commutateur Pédale
Prise SWITCH/PEDAL
Cette prise permet de brancher une pédale (PS-1/PS-3), une pédale
commutateur (EXP-2) ou une pédale d’expression/de volume
(XPV-10) en option. Avant d’utiliser une de ces pédales, veillez à
régler les paramètres du mode Global conformément au type de
contrôleur (pédale commutateur ou pédale) que vous avez branché.
À la sortie d’usine, le réglage défini pour cette prise permet la
connexion d’une pédale commutateur, et la fonction “Prog. Up”
(sélection du Program suivant) lui est attribuée. Diverses fonctions
sont disponibles pour les pédales et pédales commutateurs. Si le
contrôleur est défini comme pédale commutateur (Switch), il permet
de changer de Program, de changer d’octave ou d’activer/couper la
fonction de portamento. En principe, la fonction reste active
uniquement tant que vous enfoncez la pédale, mais vous pouvez
modifier ce réglage de sorte que chaque pression sur la pédale active
et coupe alternativement la fonction (comme un interrupteur). Si le
contrôleur est défini comme pédale (Pedal), il permet de piloter des
paramètres comme le volume, l’expression et la position dans
l’image stéréo (Pan). (GP: «8. Paramètres de Pédale»)
prise de courant
32
Page 33

Jeu sur le KingKORG
Prise DAMPER
Cette prise permet de brancher une pédale de maintien (Damper)
DS-1H ou une pédale commutateur PS-1 en option, et d’activer/
couper l’effet de maintien.
4. Connexion d’un appareil MIDI ou d’un
ordinateur
Si vous voulez utiliser le clavier et les contrôleurs du KingKORG
pour piloter un module de sons MIDI externe ou, inversement, si
vous souhaitez utiliser un autre clavier MIDI ou un séquenceur pour
piloter le générateur de sons du KingKORG, vous devez effectuer
certaines connexions. (GP: «6. Paramètres MIDI»)
5. Connexion de l’adaptateur secteur
Utilisez impérativement l’adaptateur secteur fourni.
L’utilisation de tout autre adaptateur secteur pourrait causer
des dysfonctionnements.
Veillez à ce que la prise de courant que vous comptez utiliser
fournisse la tension correcte pour l’adaptateur secteur.
1. Branchez l’adaptateur secteur à la prise DC12V en face arrière.
2. Enroulez le câble de l’adaptateur secteur autour du crochet sur
le panneau arrière pour éviter toute déconnexion accidentelle.
Veillez à conserver assez de jeu pour ne pas forcer sur la fiche
de l’adaptateur secteur.
Interrupteur
d’alimentation
Quand vous amarrez le câble
au crochet, veillez à ne pas
plier excessivement cee
partie du câble.
Prise DC12V
pour adaptateur
Crochet pour câble
Cordon d’alimentation
de l’adaptateur secteur
(fourni)
Adaptateur secteur
(fourni)
Branchez la fiche à
une prise de courant.
4. Augmentez doucement le niveau avec la commande VOLUME
du KingKORG tout en réglant le niveau sur votre système
d’amplification.
2. Mise hors tension de l’instrument
Ne mettez jamais l’instrument hors tension quand il
sauvegarde des données. Cela risquerait d’endommager les
données du KingKORG.
1. Abaissez le volume de vos enceintes ou autre dispositif
d’amplification externe sur le minimum, puis mettez votre
système hors tension.
2. Tournez la commande VOLUME du KingKORG à fond à
gauche et maintenez son interrupteur d’alimentation enfoncé
jusqu’à ce que l’écran principal s’éteigne.
Coupure automatique d’alimentation
Le KingKORG est doté d’une fonction de coupure automatique
d’alimentation. Quand une certaine durée s’écoule sans que l’utilisateur
ne manipule les commandes de l’instrument ou ne joue sur son clavier,
cette fonction coupe automatiquement l’alimentation de l’instrument. À
la sortie d’usine, cette durée est de quatre heures.
Si vous le voulez, vous pouvez désactiver cette fonction comme suit.
1. Désactiver la fonction de coupure
automatique d’alimentation
1. Maintenez enfoncé le bouton SHIFT/EXIT et appuyez sur le
bouton PROGRAM (GLOBAL) pour activer le mode Global.
2. Choisissez la page GLOBAL “g15:Power Off” avec les boutons
PAGE +/-.
3. Choisissez “Disable” avec la molette de valeur.
4. Afin de conserver votre changement, appuyez sur le bouton
WRITE pour sauvegarder les réglages globaux. (MU: p.43 «1.
Sauvegarde de réglages ‘Global’»)
Si vous mettez l’instrument hors tension sans effectuer la
sauvegarde, les changements effectués sur les réglages
globaux sont perdus. Si vous souhaitez utiliser à nouveau
ces réglages personnels dans le futur, veillez donc à les
sauvegarder.
Mise sous tension/hors tension de l’instrument
1. Mise sous tension
Avant de mettre le KingKORG sous tension, coupez
l’alimentation de tout périphérique branché, comme des
enceintes actives, par exemple.
1. Tournez la commande VOLUME du KingKORG à fond à
gauche pour éviter tout bruit pendant le démarrage.
2. Maintenez enfoncé l’interrupteur d’alimentation jusqu’à ce
que l’écran principal s’affiche; relâchez alors l’interrupteur
d’alimentation.
Quand le KingKORG démarre, son écran principal affiche des
informations comme le numéro du Program et le nom du
Program.
3. Vérifiez que le volume de vos enceintes ou autre dispositif
d’amplification externe est réglé sur le minimum, puis mettez
votre système sous tension.
Jeu sur le KingKORG
Ecouter la demonstration
Le KingKORG propose des morceaux de démonstration d’une
variété de styles différents. Avant de commencer à jouer de
l’instrument, prenez le temps de découvrir les sons du KingKORG.
(MU: p.112 «Demo song list»)
1. Choix et écoute d’un morceau de
démonstration
Les morceaux de démonstration sont assignés aux boutons de
catégories/Programs favoris.
1. Maintenez enfoncé le bouton SHIFT/EXIT et appuyez sur un
bouton de catégorie/Program favori pour choisir un morceau
de démonstration.
Le morceau de démonstration démarre automatiquement et la
33
Page 34

KingKORG Manuel d’utilisation
Quand le bouton PROGRAM (GLOBAL) est allumé
Quand le bouton FAVORITES est allumé
démo continue avec le morceau suivant, cela jusqu’au dernier
morceau. Quand la lecture du dernier morceau de
démonstration est terminée, l’instrument continue la démo
depuis le premier morceau. Le bouton correspondant au
morceau de démonstration en cours de lecture clignote. Pour
choisir un autre morceau de démonstration, appuyez sur un
bouton allumé.
2. Pendant la lecture d’un morceau de démonstration, appuyez
sur le bouton SHIFT/EXIT.
La lecture du morceau de démonstration s’arrête et l’instrument
retourne au mode Program.
Selection et utilisation d’un Program
1. Écran
Écran auxiliaire de filtre
Cet écran affiche des informations sur le filtre sélectionné.
Numéro du type de filtre
Nom du type de filtre
Choix d’un Program
Le KingKORG propose 200 Programs différents prêts à l’emploi.
Pour une plus grande facilité, les Programs sont organisés en
catégories de sons. Essayez les Programs de l’instrument pour vous
faire une idée de la diversité sonore du KingKORG.
1. Choix des Programs via leur numéro
1. Appuyez sur le bouton PROGRAM (GLOBAL) de sorte qu’il
s’allume.
L’écran principal affiche le numéro du Program et le nom du
Program.
2. Choisissez le Program voulu avec la molette de valeur.
ASTUCE:
Le mode de voix des Programs pour lesquels le bouton SPLIT (POSITION) est allumé est réglé sur partage
(Split). (GP: «1. Paramètres de Timbre»)
Écran principal (pendant le jeu d’un Program)
Quand le bouton PROGRAM (GLOBAL) est allumé, l’écran
principal affiche le numéro du Program et le nom du Program.
Quand le bouton FAVORITES est allumé, l’écran principal affiche le
banque,numéro du Program et le nom du Program.
Numéro
de Program
Nom de
Program
Banque
Numéro
de Program
Nom de
Program
Écran principal (pendant l’édition d’un Program)
L’écran affiche le numéro de la page, le nom de la page, le nom du
paramètre et la valeur. L’écran affiche aussi ces informations quand
vous éditez les réglages globaux (quand le bouton PROGRAM
(GLOBAL) clignote).
Numéro de
page
Nom de pag
3. Jouez sur le clavier pour écouter le son.
Vous pouvez utiliser les boutons OCTAVE UP/DOWN pour
changer la plage de notes du clavier. (MU: p.35 «Transposition par
octaves»)
Choix des Programs via leur catégorie
1. Appuyez sur le bouton de catégorie/Program favori offrant le
son (Program) le plus proche de ce que vous recherchez.
L’instrument sélectionne le premier Program dans la catégorie choisie
et le bouton de catégorie/Program favori correspondant s’allume.
2. Choisissez le Program (son) voulu avec la molette de valeur.
3. Jouez sur le clavier pour écouter le son.
Écran auxiliaire d’oscillateur
Cet écran affiche des informations sur l’oscillateur sélectionné.
Numéro du type d’oscillateur
Nom du type d’oscillateur
34
Valeur de paramètreNom de paramètre
2. Choix des Programs via le bouton
FAVORITES
Pour pouvoir sélectionner des Programs avec le bouton
FAVORITES, vous devez auparavant enregistrer vos Programs
favoris sous les boutons de catégorie/Programs favoris. (MU:
p.43 «3. Enregistrement de Programs sous les boutons de
catégorie/Programs favoris»)
1. Appuyez sur le bouton FAVORITES de sorte qu’il s’allume;
choisissez ensuite une banque (A~E).
La banque change à chaque pression du bouton FAVORITES et
Page 35

Jeu sur le KingKORG
+Y
Modifie l’intensité de vibrato ou
l’écran principal affiche la banque sélectionnée.
ASTUCE:
Vous pouvez maintenir enfoncé le bouton SHIFT/
EXIT et appuyer sur le bouton FAVORITES pour passer les banques en revue dans l’ordre décroissant (E
D C B A E ...).
2. Appuyez sur le bouton de catégorie/de Program favori (1–8)
sous lequel vous avez enregistré le Program voulu.
Le Program en question est rappelé et l’écran FAVORITES
correspondant s’affiche.
3. Jouez sur le clavier pour écouter le son.
Varier le son
Outre son clavier, le KingKORG offre de nombreux contrôleurs tels
que le joystick, les commandes et les boutons. Ces contrôleurs vous
permettent de varier le son pendant le jeu en pilotant le filtre, le LFO
et l’enveloppe.
1. Utilisation des controleurs
Joystick (JS)
Vous pouvez piloter divers paramètres et effets en déplaçant le
joystick dans quatre directions (vers le haut/vers le bas/vers la
gauche/vers la droite). Le résultat varie pour chaque Program;
manipulez donc les fonctions de jeu et écoutez leur effet sur le
Program en question.
ASTUCE:
L’abréviation «JS» est utilisée pour désigner le Joystick.
la vitesse de l’enceinte
Diminue la
-X +X
hauteur, etc.
Augmente la
hauteur, etc
rotative, etc.
ASTUCE:
ASTUCE:
Quand vous relâchez le joystick, il retourne automatiquement en position centrale. Toutefois, si vous
souhaitez maintenir l’eet du joystick après son retour
en position centrale, vous pouvez assigner la fonction
de verrouillage du joystick à une pédale commutateur.
(GP: «8. Paramètres de Pédale»)
Vous pouvez utiliser le joystick comme source de
connexion virtuelle. Cela permet d’obtenir des eets
encore plus riches et sophistiqués que ceux mentionnés ci-dessus. (GP: «1. Paramètres de Timbre»)
2. Jouer sur le clavier
Le clavier du KingKORG vous permet de contrôler le son de
différentes manières.
Dynamique du jeu
Cela permet d’influencer le son en fonction de la force (vitesse
ou dynamique) à laquelle vous enfoncez une touche. En général,
la dynamique de votre jeu sert à contrôler le timbre ou le
volume.
Le clavier du KingKORG ne produit pas de message
d’aftertouch. Certains sons produisent peu de, voire
aucune variation de timbre en réponse à la dynamique, ou
sont réglés de sorte à ignorer la dynamique.
Pondération du clavier (Keyboard Tracking)
Cela permet d’influencer le son en fonction de la position de la
note jouée sur le clavier. En général, la pondération du clavier
est utilisée pour rendre le son plus éclatant quand vous jouez
dans l’aigu ou pour produire des différences de volume entre la
zone aiguë et la zone grave du clavier.
ASTUCE:
Transposition par octaves
Les boutons OCTAVE UP/DOWN vous permettent de
transposer la hauteur du clavier par pas d’une octave sur une
plage de +/-2 octaves.
Vous pouvez utiliser la dynamique du jeu et la
pondération du clavier comme source de connexion
virtuelle. (GP: «1. Paramètres de Timbre»)
Plage du clavier Témoin du bouton
C4 ~ C9 Bouton UP clignotant
C3 ~ C8 Bouton UP allumé
C2 ~ C7 Boutons UP/DOWN
C1 ~ C6 Bouton DOWN allumé
C0 ~ C5 Bouton DOWN clignotant
Wah, intensité de l’effet, etc.
-Y
+2 octaves
+1octave
±0 octave
-1 octave
-2 octaves
Les chiffres entre parenthèses sont les numéros de note MIDI.
35
Page 36

KingKORG Manuel d’utilisation
3. Jouer des arpeges
La fonction arpégiateur génère automatiquement des arpèges quand
vous maintenez un accord sur le clavier.
L’arpégiateur du KingKORG propose six motifs ou types d’arpèges
et vous permet de changer divers aspects de l’arpège comme la
durée des notes (“Gate Time”). Sa fonction “Step Arpeggiator” ou
arpégiateur à pas vous permet d’activer ou de couper jusqu’à huit
pas et vous offre ainsi une vaste palette de possibilités.
1. Choisissez un Program. (MU: p.34 «Choix d’un Program»)
Choisissons par exemple un son de piano pour essayer cette
fonction.
2. Appuyez sur le bouton ARP (TEMPO) de sorte qu’il s’allume.
L’arpégiateur est activé.
4. Tournez la commande MIC LEVEL pour régler le niveau
d’entrée du micro.
ASTUCE:
Réglez le niveau d’entrée de sorte que le témoin MIC
LEVEL PEAK ne s’allume pas.
5. Chantez dans le micro et jouez sur le clavier.
Essayez de chanter des mots différents en maintenant des
accords différents sur le clavier, et voyez l’effet produit sur le
son de Vocoder.
3. Maintenez un accord sur le clavier. Un arpège se fait entendre.
Quand vous maintenez un accord comme illustré ci-dessous, les
notes sont jouées comme indiqué à droite. (Type d’arpège: UP)
Pour changer le tempo, maintenez enfoncé le bouton SHIFT/
EXIT et appuyez sur le bouton ARP (TEMPO) pour accéder à la
page PROGRAM “a02:Arp”. Réglez le tempo avec la molette de
valeur.
ASTUCE:
Le KingKORG est doté d’une fonction Tap Tempo.
Maintenez enfoncé le bouton SHIFT/EXIT et réglez
le tempo en ‘tapant’ quelques fois sur le bouton ARP
(TEMPO) à la cadence voulue.
4. Le son de l’arpège s’arrête quand vous relâchez les touches du
clavier.
ASTUCE:
Une fonction permet de continuer le jeu de l’arpègemême après le relâchement des touches du clavier.
(GP: «3. Paramètres d’arpège»)
4. Jouer des sons de Vocoder
Le Vocoder est une fonction qui vous permet de parler ou chanter
dans un micro tout en jouant un accord sur le clavier et de créer
l’impression que le synthétiseur «parle». Vous pouvez aussi obtenir
des effets intéressants en utilisant d’autres sources que la voix
humaine, comme des rythmes ou diverses formes d’onde.
Edition du son
Structure d’un Program
Avant de commencer l’édition, il est bon de connaître les bases de la
création sonore. Une fois que vous savez comment les sons du
KingKORG sont structurés, vous pouvez créer facilement les sons
que vous avez en tête.
1. Synthetiseur
Comme le montre l’illustration, un Program de synthé est constitué
des Timbres A/B, l’arpégiateur, vocoder et effets maîtres.
Brancher un micro et utiliser le Vocoder
1. Tournez la commande MIC LEVEL en face avant à fond à
gauche. Branchez un micro à la prise pour micro du panneau
arrière.
2. Appuyez sur le bouton PROGRAM (GLOBAL) de sorte qu’il
s’allume.
3. Appuyez sur le bouton de catégorie/de Program favori SE/
VOC de sorte qu’il s’allume et tournez la molette de valeur
pour choisir un Program (son) pour lequel le bouton
VOCODER est allumé.
36
Page 37

PROGRAM
Edition du son
MIC IN
MIC IN
TIMBRE
Keyboard
JoyStick
MIDI IN
Pitch
TIMBRE A
Arpeggiator
TIMBRE B
ON
OFF
Keyboard Tracking
Keyboard Velocity
Pitch Bend (JS X)
Modulation (JS+Y/-Y)
MIDI 1〜3
OSC1
OSC2
OSC3
MASTER FX
Vocoder PRE FX MOD FX
Other Source
VIRTUAL PATCH
LFO1 LFO2 EG1 EG2
Cutoff Level PAN
MIXER FILTER AMP
REV/DELAY
Free Assign
Modulation to Synth
GLOBAL
TUBE EQ
OUTPUT
L/MONO, R
Modulation to Effect
L
Audio to Effect
R
Les trois elements du son: hauteur, timbre et
volume
Le son compte trois éléments fondamentaux: la hauteur, le timbre et
le volume. Comme les synthés analogiques d’antan, le synthétiseur à
modélisation analogique du KingKORG propose des sections
“oscillateur”, “filtre” et “amp” (amplificateur) déterminant ces trois
éléments. Editez les réglages d’oscillateur pour changer la hauteur,
les réglages de filtre pour changer le timbre et les réglages
d’amplification pour changer le volume.
Oscillateurs, filtre et amplificateur du KingKORG
Les réglages d’oscillateurs du KingKORG se trouvent aux pages
PROGRAM “s05~s12:Pitch” et PROGRAM “s13:OSC1~s27:OSC3”.
Les pages «Pitch» permettent de définir la hauteur de la forme
d’onde de base et les pages «OSC» de choisir la forme d’onde. Le
mélange des formes d’ondes générées par ces oscillateurs se fait à la
page Mixer. Les réglages de filtre s’effectuent aux pages PROGRAM
“s31~38:Filter”. Ces pages permettent de modifier le timbre en
appliquant un filtre au son généré par les oscillateurs. Enfin, les
paramètres d’amplification se trouvent aux pages PROGRAM
“s39~42:Amp”; ils permettent de régler le volume (l’amplitude).
Vous pouvez créer le son de base d’un Program en modifiant les
réglages de ces pages.
Enveloppe, LFO, pondération du clavier,
connexions virtuelles et contrôleurs
Outre les réglages d’oscillateurs, de filtre et d’amplificateur, d’autres
facteurs affectent le son:
changement dans le temps, plage de hauteur ou expressions de jeu.
Ces changements du son peuvent être pilotés par des modulateurs et
des contrôleurs tels que le générateur d’enveloppe (ou
«l’enveloppe»), le LFO (l’oscillateur basse fréquence), la pondération
du clavier, les connexions virtuelles et le joystick. Ces modulateurs
et contrôleurs permettent de modifier le son en profondeur.
Voyez l’illustration ci-dessus. Comme vous pouvez le voir, le flux
du signal suit la séquence OSC FILTER AMP; notez également
comme les enveloppes et LFO peuvent affecter chaque section.
Timbres (TIMBRE A/B)
Chaque Timbre est constitué d’un oscillateur, d’un filtre, d’un
amplificateur, d’enveloppes, de LFO, de connexions virtuelles et
d’un égaliseur. Le KingKORG propose deux Timbres que vous
pouvez combiner pour créer un Program au son plus riche.
Oscillateur (OSC1, OSC2, OSC3)
Les oscillateurs vous permettent de choisir parmi 127 types
d’algorithmes, notamment une onde en dents de scie et une onde
carrée, typiques des synthétiseurs analogiques, ainsi que des ondes
de bruit, PCM/DWGS et la forme d’onde reçue à l’entrée micro.
Vous pouvez aussi enrichir et épaissir la forme d’onde en
appliquant le réglage Unison.
Mixeur (MIXER)
Cette section règle les niveaux de volume de l’oscillateur 1 (OSC1),
de l’oscillateur 2 (OSC2) et de l’oscillateur 3 (OSC3), et transmet le
signal mixé au filtre (FILTER)
Filtre (FILTER)
Le filtre modifie le timbre du son en atténuant ou en accentuant
certaines parties du spectre de fréquences du son généré par
l’oscillateur. Les réglages de filtres ont un impact très important sur
les caractéristiques du son. Vous disposez de deux filtres par Timbre:
vous pouvez créer un large éventail de sons en sélectionnant des
37
Page 38

KingKORG Manuel d’utilisation
routages différents (quatre types de connexion) pour ces filtres. De
plus, vous pouvez utiliser le générateur d’enveloppe 1 (EG1) pour
faire varier la fréquence de coupure des filtres dans le temps.
Amp (AMP)
Cette section détermine les réglages d’ampli (AMP) et de
panoramique (PAN). L’ampli détermine le volume et le panoramique
la position stéréo du son. Vous pouvez aussi utiliser le générateur
d’enveloppe 2 (EG2) pour changer le volume dans le temps.
Generateurs d’enveloppe (EG1, EG2)
Un générateur d’enveloppe applique des changements dans le temps à
des paramètres constitutifs du sons. Chaque générateur d’enveloppe
détermine la “forme” (l’enveloppe) du changement dans le temps avec
4 paramètres: durée de l’attaque, durée de la chute, niveau de maintien
et durée du relâchement. L’enveloppe EG1 est assignée à la fréquence
de coupure du filtre et EG2 au volume de la section d’ amplification.
Vous pouvez aussi utiliser un générateur d’ enveloppe en conjonction
avec une connexion virtuelle comme enveloppe pour un autre
paramètre .
LFOs (LFO1, LFO2)
Un LFO (“Low Frequency Oscillator”) applique des changements
cycliques à des paramètres constitutifs du sons. Chaque Timbre a
deux LFO, proposant chacun cinq formes d’onde. Pour certaines
formes d’onde disponibles pour l’oscillateur 1 (OSC1), le LFO1 fait
fonction de “contrôleur 2” (“OSC1 Control 2”) et le LFO2 fait
fonction de source de modulation de hauteur via la molette de
modulation. Vous pouvez aussi utiliser une connexion virtuelle pour
utiliser un LFO comme source de modulation pour d’autres
paramètres. LFO2 est défini comme source de modulation de
hauteur contrôlée par le joystick. Vous pouvez aussi utiliser un LFO
avec une connexion virtuelle comme source de modulation pour un
autre paramètre.
Connexions virtuelles (VIRTUAL PATCH)
Les connexions virtuelles vous permettent d’utiliser non seulement
les enveloppes ou LFO comme sources de modulation de paramètres
constitutifs du son mais aussi des sources telles que la force exercée
sur les touches (“Velocity”) ou la pondération du clavier (la position
des notes jouées sur le clavier). Ces possibilités vous laissent une
grande liberté pour la création de sons originaux. Par Timbre, vous
pouvez effectuer des connexions virtuelles pour six paramètres. (GP:
«1. Paramètres de Timbre»)
Effets maîtres (MASTER FX)
Chaque Program contient trois types d’effets maîtres. En appliquant
un effet à chaque Timbre, vous conférez la touche finale au son du
Program.
Arpégiateur (ARPEGGIATOR)
L’arpégiateur génère automatiquement un arpège quand vous
maintenez un accord sur le clavier. Pour les Programs qui utilisent deux
Timbres, vous pouvez appliquer l’arpégiateur à l’un ou l’autre Timbre,
voire aux deux. Cet arpégiateur à pas propose six types d’arpèges.
2. Vocodeur (VOCODER)
Un vocodeur analyse les caractéristiques fréquentielles d’un signal
appelé “modulateur” (une voix captée par micro, par exemple) et
applique ces caractéristiques à un filtre qui traite un autre signal
appelé “porteur” ou “carrier” (une forme d’onde d’oscillateur, par
exemple). Il crée ainsi des effets particuliers et peut notamment
donner l’impression qu’un instrument “parle”. Le vocodeur 16
bandes du KingKORG peut non seulement simuler les sons d’un
vocodeur vintage mais aussi créer des sons de vocodeur inédits grâce
au réglage individuel du timbre ou du niveau de chaque bande.
Comme le montre l’illustration ci-dessous, le vocodeur est constitué
du porteur (“carrier”) (le signal subissant les modifications), du
modulateur (le signal déterminant les modifications) et de la section
vocodeur (VOCODER) proprement dite.
MIC IN
VOCODER
MIC IN
TIMBRE B
TIMBRE A
TIMBRE B
TIMBRE A
TIMBRE B
MIC IN
TIMBRE B
TIMBRE A Level
TIMBRE B Level
Threshold
GATE
OFF
ON
MIC IN
TIMBRE B
Modulator Audio Src
Modulator
Sens
Carrier
MIC IN
TIMBRE B
TIMBRE A Level
TIMBRE B Level
Vocoder
Band 1–16
Resonance
Carrier
Vocoder
Modulator
Analysis
Filter
Cuto (Fc MOD)
Formant Shift
Synthesis
Filter
HPF
HPF Level
E.F.Sens
Envelope
Follower
Direct Level
Band
Level
Envelope
Band
PAN
OFF
ON
TIMBRE A / Vocoder
TIMBRE B
ON
OFF
to EFFECTs
HPF
HPF Gate &
Note On
Wet
Level
Wet
Spread
L
R
Output
Vocoder
Level
L
Vocoder
R
Output
38
Page 39

Edition du son
Porteur (CARRIER)
Il s’agit du son (signal) de base. Le meilleur choix pour un porteur
est une forme d’onde contenant de nombreuses harmoniques,
comme une onde en dents de scie ou une onde carrée à largeur
d’impulsion fixe. Les signaux des Timbres A et B de source sont
mixés et utilisés comme porteur.
Modulateur (MODULATOR)
Il s’agit du son (signal) dont le caractère affecte (module) le porteur .
Une voix humaine est généralement utilisée comme source de
modulateur. Le KingKORG permet de choisir le signal reçu à l’entrée
micro (Input) ou le Timbre B comme modulateur. Si vous avez choisi
le Timbre B, le signal de sortie du Timbre B sert de modulateur pour
le Vocoder.
Section vocodeur (VOCODER)
Elle est constituée de deux séries de 16 filtres passe-bandes
(“analysis filter”, “synthesis filter” et “envelope follower”). Le signal
audio du modulateur est envoyé aux seize bandes du filtre d’analyse
et le capteur d’enveloppe détecte l’évolution du volume dans le
temps (l’enveloppe) pour chacune de ces bandes de fréquence. Le
signal du porteur est envoyé à l’autre série de seize filtres passebandes (constituant le filtre de synthèse) et l’enveloppe détectée par
le filtre d’analyse est appliquée aux différentes bandes du filtre de
synthèse pour moduler les caractéristiques tonales du porteur et
donner l’impression que le son du porteur “parle”. Vous pouvez
aussi décaler les fréquences des filtres passe-bandes du porteur. Cela
vous permet d’augmenter ou de diminuer la réponse en fréquence
tout en préservant les caractéristiques du modulateur afin de créer
des changements sonores impressionnants.
2. Edition des deux Timbres
Vous pouvez utiliser deux Timbres dans chaque Program: le
TIMBRE A et le TIMBRE B.
ASTUCE:
ASTUCE:
Superposition des deux Timbres (Layer)
Quand vous utilisez deux Timbres, vous pouvez choisir entre deux
modes de fonctionnement des Timbres. Pour cet exemple, nous
règlerons le paramètre “Voice Mode” de la page PROGRAM
“p03:Common” sur “Layer”.
Quand ce paramètre est réglé sur “Layer”, les deux Timbres sont
audibles simultanément lorsque vous jouez sur le clavier.
1. Choisissez la page PROGRAM “p03:Common” avec les
2. Choisissez le mode de voix “Layer” (superposition) avec la
Vous ne pouvez pas sélectionner le TIMBRE B si
le paramètre “Voice Mode” de la page PROGRAM
“p03:Common” est réglé sur “Single”. Si ce paramètre
est sur “Layer” ou “Split”, les boutons A/B de sélection
de Timbre s’allument pour indiquer le Timbre en cours
d’édition.
Le paramètre de mode de voix à la page PROGRAM
“p03:Common” est commun au Program entier.
boutons PAGE +/-.
molette de valeur.
Le bouton A de sélection de Timbre et les témoins de Timbre
d’effets maîtres s’allument.
Édition de base de Program
1. Création de sons
Il y a deux façons d’éditer des sons sur le KingKORG.
₋ Vous pouvez sélectionner un Program proche du son voulu et
créer un nouveau Program en y apportant les changements
nécessaires.
₋ Vous pouvez créer un Program intégralement à partir d’une
version initialisée.
Choisissez une méthode et créez puis jouez avec vos propres sons!
Édition sur base d’un Program sauvegardé
1. Choisissez le Program à éditer. (MU: p.34 «Selection et
utilisation d’un Program»)
2. Manipulez les commandes et la molette en face avant.
Considérez les différences entre le son visé et le Program
existant, et déterminez les paramètres à éditer.
Les changements apportés à un Program sont perdus si vous
sélectionnez un autre Program ou mettez l’instrument hors
tension sans les sauvegarder. (MU: p.43 «2. Sauvegarder un
Program»)
Création intégrale d’un Program
Pour créer intégralement un Program, commencez par initialiser un
Program. (MU: p.41 «1. Initialiser un Program»)
Cela permet de produire un jeu de paramètres simples et faciles à
comprendre, et d’éclairer le fonctionnement de chacune des sections
de l’instrument. La meilleure méthode pour créer un son de A à Z.
Choix du Timbre à éditer
Pour éditer un Program utilisant deux Timbres, vous devez choisir
le Timbre sur lequel porteront vos changements.
Choisissez le Timbre à éditer avec les boutons A/B de sélection de
Timbre. Le bouton de sélection de Timbre que vous avez enfoncé
s’allume et vous pouvez éditer le Timbre.
Édition du filtre et de l’enveloppe
Vous pouvez utiliser les commandes et boutons en face avant du
KingKORG pour piloter le filtre et l’enveloppe en temps réel.
Vous pouvez choisir parmi 3 modes d’action pour les commandes.
(GP: «5. Paramètres ‘Global’»)
Filtre (FILTER)
Fréquence de coupure (CUTOFF)
Cette commande règle la fréquence de coupure du filtre. Elle
influence la brillance du son. Tournez la commande à gauche
pour produire un son plus mat et tournez-la à droite pour
obtenir un son plus brillant.
Résonance (RESONANCE)
Cette commande règle l’intensité de résonance du filtre. La
résonance confère un caractère particulier au son.
39
Page 40
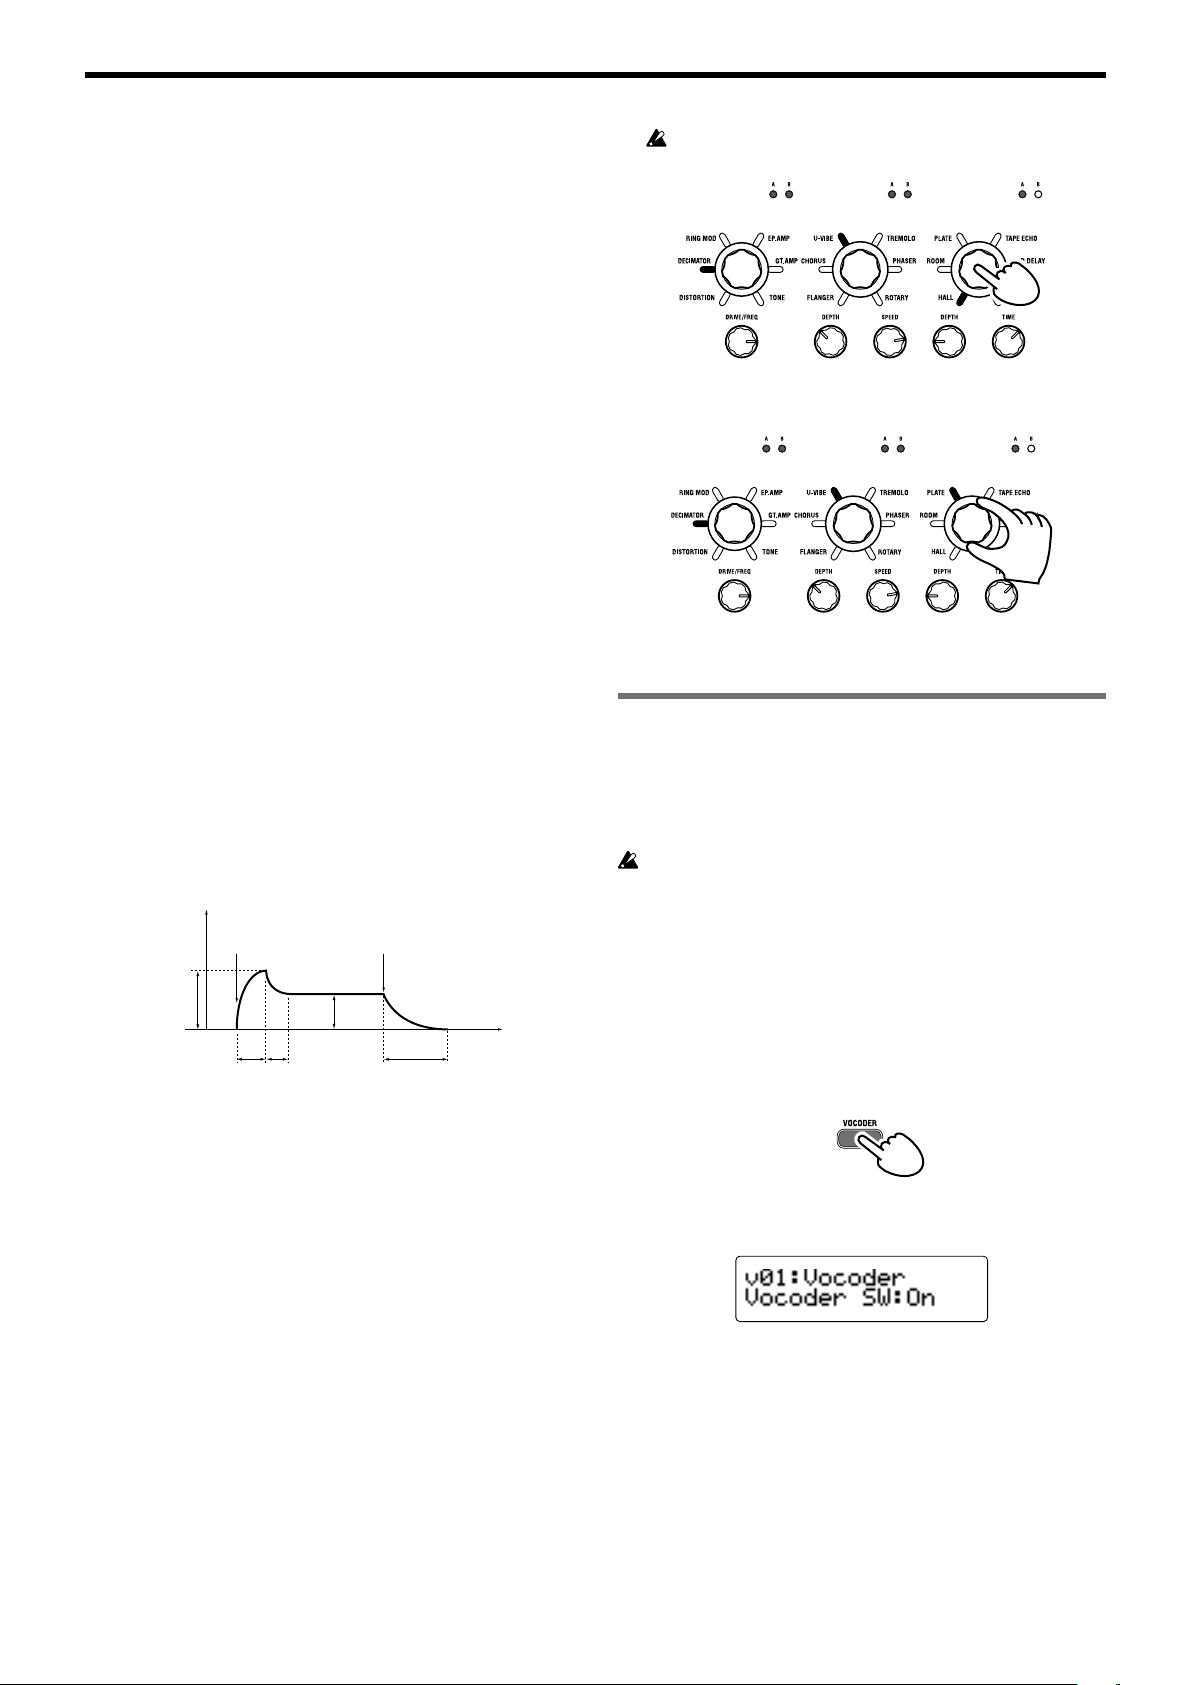
KingKORG Manuel d’utilisation
EG2
Enveloppe (EG)
Attaque (ATTACK1, ATTACK2)
Cette commande règle la durée de l’attaque de l’enveloppe EG1
(enveloppe de filtre) et EG2 (enveloppe d’amplitude). L’attaque
détermine la vitesse à laquelle le niveau de l’attaque est atteint
après le déclenchement de la note (quand vous enfoncez une
touche). Ce paramètre modifie la manière dont le son des
enveloppes EG1 et EG2 est produit. Tournez cette commande à
gauche pour raccourcir la durée de l’attaque ou tournez-la à
droite pour l’allonger.
Chute (DECAY1, DECAY2)
Cette commande règle la durée de chute de l’enveloppe EG1
(enveloppe de filtre) et EG2 (enveloppe d’amplitude). La chute
détermine la durée entre le franchissement du niveau d’attaque
et celui du niveau de maintien. Tournez cette commande à
gauche pour raccourcir la durée de chute ou tournez-la à droite
pour l’allonger.
Maintien (SUSTAIN1, SUSTAIN2)
Cette commande règle le niveau de maintien de l’enveloppe EG1
(enveloppe de filtre) et EG2 (enveloppe d’amplitude). Le maintien
correspond au niveau atteint après l’écoulement de la durée de
chute. Ce niveau est maintenu tant que vous gardez une touche
enfoncée. Tournez cette commande à gauche pour diminuer le
niveau de maintien ou tournez-la à droite pour l’augmenter.
Relâchement (RELEASE1, RELEASE2)
Cette commande règle la durée de relâchement de l’enveloppe
EG1 (enveloppe de filtre) et EG2 (enveloppe d’amplitude). Le
relâchement correspond à la durée s’écoulant entre la coupure
de note (quand vous relâchez une touche) et la disparition
complète du son. Cette commande affecte la durée de
relâchement des enveloppes EG1 et EG2. Tournez cette
commande à gauche pour raccourcir la durée de relâchement ou
tournez-la à droite pour l’allonger.
Niveau
Activation
de note
Niveau de
l’attaque
0
2
1
1: Durée de l’attaque 3: Niveau de maintien
2: Temps de chute 4: Durée de relâchement
Coupure
de note
3
Temp
4
Le témoin de Timbre B ne s’allume pas si le mode de voix
du Program est sur “Single”.
2. Sélectionnez un effet.
Le témoin de l’effet choisi s’allume.
3. Réglez les valeurs des paramètres avec les commandes de
contrôle d’effets.
3. Edition du Vocoder
Sélection du Vocoder pour l’édition
La procédure d’édition du Vocoder est identique à celle d’un Timbre
mais vous devez d’abord activer le Vocoder et le sélectionner pour
l’édition.
Les pages “v02:Voc.Carrier–v18:Voc.Amp” n’apparaissent que
si vous avez appuyé sur le bouton VOCODER pour activer la
fonction Vocoder.
Utilisez les pages PROGRAM “v09:Voc.Filter–v18:Voc.Amp” pour
éditer les paramètres des 16 filtres passe-bandes (“analysis filter”,
“synthesis filter”) et “envelope follower”.
1. Sélectionnez un Program de synthé. (MU: p.34 «Choix d’un
Program»)
2. Appuyez sur le bouton VOCODER de sorte qu’il s’allume.
Le Vocoder est activé et sélectionné pour l’édition.
Réglages d’effets
Le KingKORG propose des effets maîtres qui vous permettent
d’appliquer une série d’effets sur le son, comme par exemple de la
distorsion, de la modulation ou de la réverbération. Ces effets
maîtres sont appliqués au son mixé des deux Timbres.
Les effets maîtres sont composés de trois sections (PRE FX, MOD FX,
REV/ DELAY) et vous pouvez choisir un type d’effet pour chaque
section.
Vous pouvez par exemple assigner l’effet “EP.AMP” à la section
PRE FX, l’effet “TREMOLO” à la section MOD FX et l’effet “HALL”
à la section REV/ DELAY.
Chaque section vous permet en outre de définir le ou les Timbres
auxquels l’effet est appliqué.
1. Appuyez sur une commande de choix du type d’effet pour
sélectionner le ou les Timbres auxquels cet effet s’appliquera.
Le ou les témoins du ou des Timbres choisis s’allument. Si les
témoins de Timbre A et B sont éteints, l’effet en question n’est
pas appliqué.
40
3. Utilisez les boutons PAGE +/- pour accéder aux pages d’édition
des paramètres du Vocoder.
ASTUCE:
ASTUCE:
Si vous augmentez le niveau direct à la page PROGRAM
“v15:Voc.Amp” , le signal d’entrée est envoyé directement
à la sortie. Réglez cee valeur tout en écoutant le signal
d’entrée.
Si l’eet n’est pas audible, appuyez sur le bouton VOCODER de sorte qu’il s’allume et réglez le niveau du Timbre
A à la page PROGRAM “v02:Voc.Carrier” ou le niveau du
Vocoder à la page PROGRAM “v18:Voc.Amp”.
Page 41

Porteur (CARRIER)
Le meilleur choix pour un porteur est une forme d’onde
contenant de nombreuses harmoniques, comme une onde en
dents de scie ou une onde carrée à largeur d’impulsion fixe.
Vous pouvez éditer ces paramètres aux pages PROGRAM
“v02~03:Voc.Carrier”.
ASTUCE:
Pour utiliser une onde en dents de scie comme
porteur, éditez d’abord le Timbre A de sorte quele
paramètre ‘Type» à la page PROGRAM “s13:OSC1”
soit réglé sur “SAW”, puis éditez le réglage Vocoder
à la page PROGRAM “v02:Voc.Carrier” pour régler le
niveau d’entrée du Timbre A.
Modulateur (MODULATOR)
Une voix humaine est généralement utilisée comme source de
modulateur. Le KingKORG permet de choisir le signal reçu à
l’entrée micro (Input) ou le Timbre B comme modulateur. Vous
pouvez éditer ces paramètres à la page PROGRAM “v04:Voc.
Modultr”.
Edition du son
5. Tournez la molette de valeur pour activer ou désactiver le pas.
À l’écran principal, réglez les pas souhaités sur “O” (actif). Si
vous choisissez “_” (coupé), ce pas correspondra à un silence.
Répétez les étapes 4 et 5 pour définir les autres pas.
6. Appuyez sur la molette de valeur pour confirmer vos réglages
de pas actifs/coupés.
ASTUCE:
Le nombre de pas disponibles peut être déni à la page
PROGRAM “a10:Arp”. (GP: «3. Paramètres d’arpège»)
4. Editer l’arpegiateur
Selection du ou des Timbres pour arpege
Pour un Program de deux Timbres, vous pouvez choisir le ou les
Timbres pilotés par l’arpégiateur.
Choisissez le ou les Timbres pilotés par l’arpégiateur à la page
PROGRAM “a05:Arp”. L’arpégiateur peut utiliser un Timbre seul ou
les deux Timbres A/B.
Synchronisation des effets sonores avec l’arpège
Synchronisation de la fréquence du LFO ou du temps de retard
avec le tempo de l’arpégiateur
Vous pouvez synchroniser la fréquence du LFO1 ou du LFO2 avec le
tempo de l’arpège. Cela vous permet d’obtenir une modulation
synchronisée avec le tempo. Vous pouvez aussi sélectionner un
multiple du tempo comme temps de retard d’un effet delay pour
que l’effet suive le tempo de l’arpège même si vous le changez.
Vous pouvez aussi synchroniser l’arpégiateur du KingKORG avec
un séquenceur MIDI externe pour que la fréquence du LFO1/2 ou le
temps de retard soit déterminé par le séquenceur externe.
Modifier l’arpege
Vous pouvez modifier l’arpège en changeant le statut activé/coupé
de chaque pas. C’est ce que nous appelons la fonction “Step
Arpeggiator”.
Utiliser l’arpégiateur à pas pour modifier l’arpège
1. Appuyez sur le bouton PROGRAM(GLOBAL) de sorte qu’il
s’allume.
2. Choisissez la page PROGRAM “a12:Arp” avec les boutons
PAGE +/-.
3. Appuyez sur la molette de valeur.
L’écran de réglage de pas s’affiche.
4. Utilisez les boutons PAGE +/- pour déplacer le curseur “ ”
jusqu’au pas à éditer.
5. Retablir la valeur originale d’un
parametre de Program
Quand vous sélectionnez la valeur originale du paramètre, telle
qu’elle est sauvegardée dans le Program d’usine ou le Program
mémorisé, le témoin ORIGINAL VALUE s’allume
Après avoir modifié un réglage, vous pouvez rétablir le réglage
original en tournant les commandes afin de sélectionner le réglage
qui allume le témoin ORIGINAL VALUE.
Si vous voulez supprimer tous vos réglages et rappeler les réglages
originaux du Program, choisissez simplement un autre Program
sans sauvegarder vos éditions, puis rappelez à nouveau le Program
voulu.
À propos des paramètres globaux
Activez le mode Global pour effectuer des réglages portant sur
l’entièreté du KingKORG ou des réglages MIDI.
Le mode Global propose de nombreux paramètres comme le réglage
du diapason, de transposition et du canal MIDI global.
Pour en savoir plus, voyez. (GP: «5. Paramètres ‘Global’»)
Les changements effectués sur ces paramètres sont perdus si
vous mettez l’instrument hors tension sans les sauvegarder.
Veillez à sauvegarder vos réglages si vous souhaitez les
conserver. (MU: p.43 «1. Sauvegarde de réglages ‘Global’»)
Autres fonctions
1. Initialiser un Program
Voici comment initialiser les réglages du Program sélectionné.
Cette procédure initialise les réglages du Program en cours
d’édition. Elle ne modifie pas le contenu de la mémoire interne.
Si vous voulez sauvegarder l’état initialisé du Program,
sauvegardez ce dernier. (MU: p.43 «2. Sauvegarder un
Program»)
1. Sélectionnez le Program à initialiser. (MU: p.34 «Selection et
utilisation d’un Program»)
2. Choisissez la page PROGRAM “u01:Utility” avec les boutons
PAGE +/- et appuyez sur la molette de valeur.
Un écran vous demande de confirmer l’initialisation du
Program.
41
Page 42

KingKORG Manuel d’utilisation
ASTUCE:
Pour ne pas exécuter l’initialisation, appuyez sur le
bouton SHIFT/EXIT.
3. Appuyez à nouveau sur la molette de valeur.
Quand l’initialisation est terminée, l’écran affiche
“Complete!” et retourne automatiquement à l’écran principal.
2. Copier un Timbre
Cette opération permet de copier les réglages du Timbre d’un autre
Program dans un Timbre (A ou B) du Program sélectionné.
Cette opération rappelle les réglages dans un Timbre du
Program en cours d’édition. Elle ne modifie pas le contenu de
la mémoire interne.
Un seul Timbre peut être copié à la fois.
1. Sélectionnez d’abord le Program incluant le Timbre de
destination pour la copie. (MU: p.34 «Choix d’un Program»)
2. Choisissez la page PROGRAM “u02:Utility” avec les boutons
PAGE +/- et appuyez sur la molette de valeur.
3. Tournez la molette de valeur pour choisir le Program
contenant le Timbre de source dont vous voulez copier les
réglages, puis appuyez sur la molette de valeur pour confirmer
votre choix.
Quand vous sélectionnez un Program, le boutons TIMBRE A/B
de sélection s’allume selon les timbres utilisés par le Program de
source pour la copie.
Les boutons TIMBRE A et B de sélection ne répondent pas
si vous les enfoncez à ce moment.
4. Confirmez le Timbre de source pour la copie.
Si le Program de source pour la copie utilise deux Timbres, le
bouton du Timbre de source pour la copie clignote. Sélectionnez
le Timbre souhaité si nécessaire, puis appuyez sur la molette de
valeur pour confirmer votre choix.
ASTUCE:
5. Confirmez le Timbre de destination pour la copie.
Si le Program de destination pour la copie utilise deux Timbres,
le boutons TIMBRE A ou B de sélection clignote. Si nécessaire,
tournez la molette de valeur pour sélectionner le Timbre de
destination pour la copie, puis appuyez sur la molette de valeur
pour confirmer votre choix.
Quand le boutons TIMBRE A ou B de sélection clignote, vous pouvez également eectuer votre choix en
appuyant sur le bouton.
6. Un écran de confirmation s’affiche sur l’écran principal;
vérifiez les réglages et appuyez sur la molette de valeur.
Quand la copie est terminée, l’écran affiche “Complete!” et
retourne à l’écran principal de la page “u02:Utility”.
ASTUCE:
ASTUCE:
Si vous voulez sauvegarder l’état copié du Program,
sauvegardez ce dernier. (MU: p.43 «2. Sauvegarder un
Program»)
Vous pouvez appuyer sur le bouton SHIFT/EXIT pour
retourner à l’étape précédente. Pour annuler la copie du
Timbre, appuyez plusieurs fois sur le bouton SHIFT/EXIT.
3. Retablir les reglages d’usine
Vous pouvez rétablir les réglages d’usine de Programs ou “Global”
du KingKORG. Les réglages d’usine de l’instrument sont appelés
données “Preload”. Pour retrouver les réglages originaux définis à
l’usine, vous disposez de la fonction “Load Preload”.
Quand vous exécutez la fonction «Load Preload», les données
d’usine remplacent les données que vous avez sauvegardées
en mémoire interne. Vérifiez donc bien que la mémoire ne
contient pas de données à conserver avant d’effectuer cette
opération.
Ne touchez pas les commandes ou le clavier du KingKORG
durant cette opération Ne coupez jamais l’alimentation durant
cette opération.
Parmi les Programs d’usine 1–300, les Programs 201–300
(Programs ne contenant pas de données préprogrammées) ne
sont pas initialisés. Les Programs sauvegardés dans la
mémoire utilisateur sont donc conservés tels quels.
L’opération «Load Preload» ne peut pas être exécutée si la
mémoire est verrouillée. Vous devez d’abord désactiver le
verrouillage de la mémoire. (GP: «5. Paramètres ‘Global’»)
1. Maintenez enfoncé le bouton SHIFT/EXIT et appuyez sur le
bouton PROGRAM (GLOBAL).
Le mode Global est actif et le bouton PROGRAM (GLOBAL)
clignote.
2. Choisissez la fonction «Load Preload» à la page GLOBAL
“u01:Utility” avec les boutons PAGE +/- et appuyez sur la
molette de valeur.
3. Tournez la molette de valeur pour choisir le type de données à
initialiser.
1Program: Données du Program sélectionné
ALL Program: Données des Programs 1~200
Global: Données «Global»
All Data: Données des Programs 1~200 et données
«Global»
42
Page 43

Sauvegarde
4. Appuyez sur la molette de valeur; un écran de confirmation
s’affiche.
ASTUCE:
Si vous décidez de ne pas charger les données, appuyez sur le bouton SHIFT/EXIT ou sur le bouton
PROGRAM (GLOBAL).
5. Appuyez à nouveau sur la molette de valeur.
Quand les données choisies sont chargées, l’écran
affiche “Complete!” et retourne automatiquement à l’écran
principal.
Sauvegarde
Sauvegarder vos réglages
Si vous voulez conserver les réglages globaux ou les Programs que
vous avez édités, vous devez les sauvegarder en mémoire interne.
Si vous mettez l’instrument hors tension sans effectuer la
sauvegarde, tout changement effectué sur les réglages globaux
est perdu. Veillez donc bien à sauvegarder vos réglages si vous
souhaitez les utiliser à nouveau dans le futur.
Si vous éditez un Program puis choisissez un autre Program
ou mettez l’instrument hors tension sans sauvegarder au
préalable vos changements, ceux-ci sont perdus. Veillez donc
bien à sauvegarder vos réglages si vous souhaitez les utiliser à
nouveau dans le futur.
Vous ne pouvez pas sauvegarder vos changements si la
mémoire est verrouillée. Vous devez d’abord désactiver le
verrouillage de la mémoire. (GP: «5. Paramètres ‘Global’»)
1. Sauvegarde de réglages ‘Global’
Quels sont les réglages sauvegardés?
La sauvegarde des données Global sauvegarde les réglages suivants.
₋ Tous les paramètres des pages GLOBAL “g01~g44”
L’état des boutons OCTAVE UP/DOWN n’est pas sauvegardé.
Les réglages bouton TUBE BOOST (distorsion) et bouton TUBE
ON sont sauvegardés avec les paramètres Global.
Pour sauvegarder les réglages Global, effectuez les étapes suivantes
en mode Global.
1. Maintenez enfoncé le bouton SHIFT/EXIT et appuyez sur le
bouton PROGRAM (GLOBAL) pour activer le mode Global.
L’écran principal affiche la page d’édition des paramètres Global
et le bouton PROGRAM (GLOBAL) clignote.
2. Appuyez sur le bouton WRITE.
L’écran principal affiche un message de confirmation et le
bouton WRITE clignote.
ASTUCE:
3. Appuyez à nouveau sur le bouton WRITE.
Quand les données sont sauvegardées, l’écran affiche
“Complete!” et retourne automatiquement à l’écran précédent.
Pour annuler la sauvegarde, appuyez sur le bouton
SHIFT/EXIT à cee étape.
Ne mettez jamais l’instrument hors tension quand il
sauvegarde des données. Cela risquerait de détruire les
données.
2. Sauvegarder un Program
Quels sont les réglages sauvegardés?
La sauvegarde d’un Program sauvegarde les réglages suivants.
₋ Tous les paramètres des pages PROGRAM “p01~06 (Program),
s01~80 (Synth), v01~18 (Vocoder), a01~12 (Arp)”
₋ Les réglages des effets maîtres (PRE FX, MOD FX, REV/DELAY)
Le statut de certains contrôleurs en face avant n’est pas
sauvegardé (le statut de sélection des boutons A/B de sélection
de Timbre, du bouton de sélection OSCILLATOR et du bouton
de sélection LFO).
L’état des boutons OCTAVE UP/DOWN n’est pas sauvegardé.
Vu que TUBE et EQ sont des effets globaux appliqués
communément à tous les Programs, leurs réglages ne sont pas
sauvegardés au niveau des Programs individuels.
Pour sauvegarder un Program, effectuez les étapes suivantes en
mode Program.
1. Appuyez sur le bouton WRITE.
L’écran principal affiche une boîte de dialogue permettant de
choisir l’emplacement de sauvegarde, et le bouton WRITE
clignote.
2. Choisissez la destination de sauvegarde (numéro de Program)
avec la molette de valeur.
ASTUCE:
Pour annuler la sauvegarde du Program, appuyez sur
le bouton SHIFT/ EXIT à cee étape.
3. Appuyez à nouveau sur le bouton WRITE.
Quand les données sont sauvegardées, l’écran affiche
“Complete!” et retourne à l’écran précédent.
Ne mettez jamais l’instrument hors tension quand il
sauvegarde des données. Cela risquerait de détruire les
données.
3. Enregistrement de Programs sous les
boutons de catégorie/Programs
favoris
Le KingKORG comporte une fonction Favorites bien pratique qui vous
permet de rappeler un Program en appuyant sur un seul bouton. Une
fonction que vous apprécierez particulièrement quand vous jouez sur
scène. Pour pouvoir utiliser cette fonction , vous devez au préalable
enregistrer vos Programs favoris sous les boutons de catégorie/Programs
favoris.
1. Sélectionnez un Program que vous voulez enregistrer. (MU: p.34
«Choix d’un Program»)
2. Maintenez enfoncé le bouton WRITE et appuyez sur le bouton
FAVORITES.
Le bouton FAVORITES et tous les de catégories de Programs/de
Programs favoris clignotent.
3. Appuyez sur le bouton FAVORITES pour choisir la banque
(A~E) de destination pour l’enregistrement du Program.
Le bouton FAVORITES s’allume et chaque pression sur ce
bouton choisit la banque suivante.
43
Page 44

KingKORG Manuel d’utilisation
4. Appuyez sur le bouton de catégorie/Program favori sous
lequel vous voulez enregistrer le Program.
Le bouton de catégorie/Program favori que vous avez enfoncé
clignote ; quand l’enregistrement est terminé, le bouton cesse de
clignoter et reste allumé.
Ne mettez jamais l’instrument hors tension quand il enregistre
un Program. Cela risquerait de détruire les données.
ASTUCE:
Vous pouvez changer un Program mémorisé dans les
Programs favoris. Sélectionnez les Programs favoris, puis
choisissez le Program voulu avec la molee et appuyez
sur le bouton WRITE.
Dépannage
Si le KingKORG ne fonctionne pas selon vos attentes, vérifiez les
points suivants.
L’instrument ne s’allume pas
Le câble de l’adaptateur secteur est-il branché à une prise
secteur? (MU: p.32 «Connexions»)
Avez-vous maintenu l’interrupteur d’alimentation enfoncé
(longue pression) lors de la mise sous tension? (MU: p.33 «Mise
sous tension/hors tension de l’instrument»)
Aucun son quand vous jouez sur le clavier
Votre système d’enceintes actives ou votre casque est-il cor-
rectement branché? (MU: p.32 «Connexions»)
Avez-vous mis le système d’écoute sous tension et ajusté le
volume?
La commande VOLUME se trouve-t-elle en position zéro?
À la page GLOBAL “g17:MIDI Basic” , le paramètre de pilotage
local «Local» est-ilsur “On”?
Avez-vous réglé un paramètre ayant trait au volume sur “0”?
À la page PROGRAM “s32:Filter”, la valeur de coupure est-
elle de “0”?
Impossible d’éditer
Si l’action d’une commande ne permet pas d’agir sur un
paramètre:
À la page GLOBAL “g11:Common>Knob”, avez-vous choisi le
réglage “Catch”?
Si, quand vous tournez une commande, la position de la com-
mande ne correspond pas à la valeur achée sur l’écran:
Si, à la page GLOBAL “g11:Common>Knob”, le réglage
“ValueScale” est choisi, la valeur de paramètre réelle pourrait
différer de la position indiquée par la commande.
Si le son ne change pas quand vous utilisez une commande:
Avez-vous choisi le bon Timbre à modifier avec les boutons
TIMBRE A/B de sélection?
Si vous ne pouvez pas sélectionner le Timbre B:
À la page PROGRAM “p03:Common”, le mode de voix est-il
réglé sur “Single”?
Si vous ne pouvez pas sélectionner les paramètres de Vocoder
en mode d’édition:
Le bouton VOCODER est-il allumé?
Si les changements apportés à un Program ou aux réglages
“Global” n’ont pas été mémorisés, avez-vous coupé l’alimentation avant de sauvegarder vos changements avec “Write”?
Dans le cas d’un Program, vous perdez également vos changements si vous changez de Program sans les sauvegarder.
Sauvegardez vos éditions avec “Write” avant de changer de
Program ou de couper l’alimentation.
Impossible de sauvegarder le Program les réglages
À la page GLOBAL “g12:Common” , le paramètre “Protect”
est-il sur “On”?
Si le Program édité n’est pas sauvegardé, avez-vous choisi un
emplacement de sauvegarde (numéro de Program) correct
avec la molee de valeur?
L’arpegiateur ne demarre pas
L’arpégiateur est-il activé (bouton ARP (TEMPO) allumé)?
L’arpégiateur est-il aecté à un Timbre?
À la page GLOBAL “g19:MIDI Basic” , le réglage d’horloge
(“Clock”) est-il correct?
Pas de reaction aux messages MIDI provenant d’un appareil
externe
Etes-vous certain d’avoir connecté les câbles MIDI ou le câble
USB correctement?
L’appareil émeeur utilise-t-il le même canal MIDI que le
KingKORG?
À la page GLOBAL “g23~27:MIDI Filter” , le réglage “Enable”
est-il choisi?
Les données de transposition, de courbe de dynamique et
d’arpégiateur ne sont pas prises en compte
À la page GLOBAL “g03:Common” , le réglage de position est-il
correct?
Le volume est trop faible quand la fonction TUBE est activée
Il se peut que la lampe soit hors service . Veuillez contacter un
centre de SAV de Korg.
Pas de son à l’entrée
Le micro est-il correctement branché à la prise pour micro?
La commande MIC LEVEL est-elle à bout de course vers la
gauche?
Pour un Program Vocoder, avez-vous choisi “Input” comme
source pour le signal que vous utilisez comme modulateur?
44
Impossible de piloter les Timbres sur des canaux MIDI
distincts
Si le mode de voix de la page PROGRAM “p03:Common” est
réglé sur “Single”, le KingKORG ne reçoit que sur un seul canal
MIDI.
Les réglages “Layer” et “Split” permeent de piloter les deux
Timbres via deux canaux MIDI distincts.
Page 45
Fiche technique
Fiche technique
Système de génération de son XMT (‘eXpanded Modeling Technology’, c.-à-d. à plusieurs modélisations)
Programs
Nombre de Programs 300 Programs (200 préprogrammés / 100 utilisateur)
Nombre de catégories 8 catégories
Timbres 2 Timbres maximum (Layer / Split)
Polyphonie maximum Max. 24 voix
Synthé
Oscillateur
Structure 3 oscillateurs (choix entre les types analogique, bruit, DWGS, PCM et MIC IN)
Nombre de types 127 types (32 analogiques et bruit, 64 DWGS, 30 PCM, MIC IN)
Filtre
Structure 1 filtre (choix entre LPF, HPF, BPF)
Nombre de types 18 types (7 LPF, 5 HPF, 6 BPF)
Modulation
Structure Enveloppe: 2 unités, LFO: 2 unités
Routage Connexions virtuelles: 6 jeux
Effets
Sections Effets de Program x 3 (PRE FX, MOD FX, REV/DELAY) + EQ (2 bandes) + types TUBE (stéréo)
Types PRE FX: 6 types (DISTORTION, DECIMATOR, RING MOD, GT.AMP, EP.AMP, TONE)
MOD FX: 6 types (FLANGER, CHORUS, U-VIBE, TREMOLO, PHASER, ROTARY) REV/
DELAY: 6 types (HALL, ROOM, PLATE, TAPE ECHO, MOD DELAY, BPM DELAY)
Vocoder Vocoder à 16 bandes, avec fonctions «Formant Shift» et «Formant Hold»
Arpégiateur Jusqu’à 8 pas (le nombre de pas peut être changé), 6 types (UP/DOWN/ALT1/ALT2/RANDOM/
TRIGGER)
Audio
Entrée
Prisepourmicro
Connecteur Prise de type XLR-3-31 (symétrique)
Impédance de source d’entrée 6.8 kΩ
Niveau maximum -12 dBu
Sortie
PrisesAUDIOOUTPUT(L/MONO,R)
Connecteurs Prises jack L/MONO, R TS (asymétrique) de 6,3 mm
Impédance de charge 10 kΩ ou plus
Niveau maximum +8,2 dBu
Prisecasque
Connecteur Prise minijack stéréo de 3,5 mm
Niveau maximum 60 mW + 60 mW @ 33 Ω
Écrans
Principal À cristaux liquides et 16 x 2 caractères
OSCILLATOR, FILTER À cristaux liquides et 128 x 64 pixels
Clavier 61 clavier semi-pondéré (sensibles au toucher)
Contrôleurs
Internes Joystick, boutons OCTAVE UP/DOWN, boutons de catégorie/Programs favoris
Entrées Prise DAMPER (pédale progressive pas prise en charge), prise SWITCH/PEDAL
Sortie Prise CV/GATE OUT
Connexions externes Prise MIDI IN, OUT, USB B
Alimentation Prise pour adaptateur secteur (DC 12V,
Consommation 10 W
Dimensions (largeur x profondeur x hauteur) 1.027 x 313 x 96 mm
Poids 7,0 kg
Temperature de fonctionnement 0 ~ +40 °C (sans condensation)
Accessoires fournis Manuel d’utilisation, Adaptateur secteur, Câble CV/GATE
Options XVP-10: Pédale d’expression/volume, EXP-2: Pédale de contrôle, DS-1H: Pédale de sustain
(Damper), PS-1, PS-3: Pédale commutateur
)
* Les caractéristiques et l’aspect du produit sont susceptibles d’être modifiés sans avis préalable pour y apporter des améliorations.
45
Page 46

Bedienungsanleitung
Deutsch
Inhaltsübersicht
Die wichtigsten Funktionen . . . . . . . . . . . . . . . . . . . . . . . . . . . . . . . . . . . . . . . . . . . . . . . . 48
Kultivierter Klang . . . . . . . . . . . . . . . . . . . . . . . . . . . . . . . . . . . . . . . . . . . . . . . . . . . . . . . . . . . . . . . . . . . . . . . . . . . . . . . . . 48
Intuitive Bedienung. . . . . . . . . . . . . . . . . . . . . . . . . . . . . . . . . . . . . . . . . . . . . . . . . . . . . . . . . . . . . . . . . . . . . . . . . . . . . . . 48
Spielhilfen und hilfreiche Funktionen. . . . . . . . . . . . . . . . . . . . . . . . . . . . . . . . . . . . . . . . . . . . . . . . . . . . . . . . . . . . . . 48
Funktionen und Regler . . . . . . . . . . . . . . . . . . . . . . . . . . . . . . . . . . . . . . . . . . . . . . . . . . . . . 49
Oberseite (Joystick/Audio/Tube/FX) . . . . . . . . . . . . . . . . . . . . . . . . . . . . . . . . . . . . . . . . . . . . . . . . . . . . . . . . . . . . . . . 49
Oberseite (Hauptregler). . . . . . . . . . . . . . . . . . . . . . . . . . . . . . . . . . . . . . . . . . . . . . . . . . . . . . . . . . . . . . . . . . . . . . . . . . . 50
Oberseite (Oszillator/Filter). . . . . . . . . . . . . . . . . . . . . . . . . . . . . . . . . . . . . . . . . . . . . . . . . . . . . . . . . . . . . . . . . . . . . . . . 51
Oberseite (AMP/LFO/EG). . . . . . . . . . . . . . . . . . . . . . . . . . . . . . . . . . . . . . . . . . . . . . . . . . . . . . . . . . . . . . . . . . . . . . . . . . 52
Rückseite. . . . . . . . . . . . . . . . . . . . . . . . . . . . . . . . . . . . . . . . . . . . . . . . . . . . . . . . . . . . . . . . . . . . . . . . . . . . . . . . . . . . . . . . . 53
Anschlüsse vornehmen und Gerät einschalten . . . . . . . . . . . . . . . . . . . . . . . . . . . . . . . 54
Anschlusse . . . . . . . . . . . . . . . . . . . . . . . . . . . . . . . . . . . . . . . . . . . . . . . . . . . . . . . . . . . . . . . . . . . . . . . . . . . . . . . . . . . . . . . 54
Ein-/Ausschalten. . . . . . . . . . . . . . . . . . . . . . . . . . . . . . . . . . . . . . . . . . . . . . . . . . . . . . . . . . . . . . . . . . . . . . . . . . . . . . . . . . 55
Energiesparfunktion . . . . . . . . . . . . . . . . . . . . . . . . . . . . . . . . . . . . . . . . . . . . . . . . . . . . . . . . . . . . . . . . . . . . . . . . . . . . . . 55
Den KingKORG spielen . . . . . . . . . . . . . . . . . . . . . . . . . . . . . . . . . . . . . . . . . . . . . . . . . . . . . 55
Anhoren der Demosongs . . . . . . . . . . . . . . . . . . . . . . . . . . . . . . . . . . . . . . . . . . . . . . . . . . . . . . . . . . . . . . . . . . . . . . . . . 55
Anwahl und Einsatz der Programs. . . . . . . . . . . . . . . . . . . . . . . . . . . . . . . . . . . . . . . . . . . . . . . . . . . . . . . . . . . . . . . . . 56
Ein Programm auswählen . . . . . . . . . . . . . . . . . . . . . . . . . . . . . . . . . . . . . . . . . . . . . . . . . . . . . . . . . . . . . . . . . . . . . . . . . 56
Einen Sound variieren. . . . . . . . . . . . . . . . . . . . . . . . . . . . . . . . . . . . . . . . . . . . . . . . . . . . . . . . . . . . . . . . . . . . . . . . . . . . . 57
Editieren des Klangs . . . . . . . . . . . . . . . . . . . . . . . . . . . . . . . . . . . . . . . . . . . . . . . . . . . . . . . 58
Aufbau eines Programs . . . . . . . . . . . . . . . . . . . . . . . . . . . . . . . . . . . . . . . . . . . . . . . . . . . . . . . . . . . . . . . . . . . . . . . . . . . 58
Grundlegendes Editieren eines Programms. . . . . . . . . . . . . . . . . . . . . . . . . . . . . . . . . . . . . . . . . . . . . . . . . . . . . . . . 61
Hinweise zu globalen Einstellungen . . . . . . . . . . . . . . . . . . . . . . . . . . . . . . . . . . . . . . . . . . . . . . . . . . . . . . . . . . . . . . . 63
Andere Funktionen . . . . . . . . . . . . . . . . . . . . . . . . . . . . . . . . . . . . . . . . . . . . . . . . . . . . . . . . . . . . . . . . . . . . . . . . . . . . . . . 63
Speichern . . . . . . . . . . . . . . . . . . . . . . . . . . . . . . . . . . . . . . . . . . . . . . . . . . . . . . . . . . . . . . . . . 65
Ihre Einstellungen speichern . . . . . . . . . . . . . . . . . . . . . . . . . . . . . . . . . . . . . . . . . . . . . . . . . . . . . . . . . . . . . . . . . . . . . . 65
Fehlersuche . . . . . . . . . . . . . . . . . . . . . . . . . . . . . . . . . . . . . . . . . . . . . . . . . . . . . . . . . . . . . . . 66
Technische Daten . . . . . . . . . . . . . . . . . . . . . . . . . . . . . . . . . . . . . . . . . . . . . . . . . . . . . . . . . . 67
Page 47

Vielen Dank, dass Sie sich für einen KingKORG synthesizer von Korg ntschieden haben. Bitte lesen Sie sich
diese Anleitung vollstädig durch, um bei der Bedienung alles richtig zu machen.
Vorsichtsmaßnahmen
Aufstellungsort
Vermeiden Sie das Aufstellen des Geräts an Orten, an denen.
• es direkter Sonneneinstrahlung ausgesetzt ist;
• hohe Feuchtigkeit oder Extremtemperaturen auftreten können;
• Staub oder Schmutz in großen Mengen vorhanden sind;
• das Gerät Erschütterungen ausgesetzt sein kann.
• in der Nähe eines Magnetfeldes.
Stromversorgung
Schließen Sie das optionale Netzteil nur an eine geeignete Steckdose an.
Verbinden Sie es niemals mit einer Steckdose einer anderen Spannung.
Störeinflüsse auf andere Elektrogeräte
Dieser kann bei in der Nähe aufgestellten Rund-funkempfängern oder
Fernsehgeräten Empfangsstörungen hervorrufen. Betreiben Sie solche
Geräte nur in einem geeigneten Abstand von diesem Erzeugnis.
Bedienung
Vermeiden Sie bei der Bedienung von Schaltern und Reglern
unangemessenen Kraftaufwand.
Reinigung
Bei auftretender Verschmutzung können Sie das Gehäuse mit einem
trockenen, sauberen Tuch abwischen. Verwenden Sie keinerlei
Flüssigreiniger wie beispielsweise Reinigungsbenzin, Verdünnungsoder Spülmittel. Verwenden Sie niemals brennbare Reiniger.
Bedienungsanleitung
Bewahren Sie diese Bedienungsanleitung gut auf, falls Sie sie später noch
einmal benötigen.
Flüssigkeiten und Fremdkörper
Stellen Sie niemals Behältnisse mit Flüssigkeiten in der Nähe des Geräts
auf. Wenn Flüssigkeit in das Gerät gelangt, können Beschädigung des
Geräts, Feuer oder ein elek-trischer Schlag die Folge sein.
Beachten Sie, daß keinerlei Fremdkörper in das Gerät gelangen. Sollte ein
Fremdkörper in das Gerät gelangt sein, so trennen Sie es sofort vom
Netz. Wenden Sie sich dann an Ihren KORG-Fachhändler.
Hinweis zur Entsorgung (Nur EU)
Wenn Sie das Symbol mit der „durchgekreuzten Mülltonne“
auf Ihrem Produkt, der dazugehörigen Bedienungsanleitung,
der Batterie oder dem Batteriefach sehen, müssen Sie das
Produkt in der vorgeschriebenen Art und Weise entsorgen.
Dies bedeutet, dass dieses Produkt mit elektrischen und
elektronischen Komponenten nicht mit dem normalen
Hausmüll entsorgt werden darf. Für Produkte dieser Art
existiert ein separates, gesetzlich festgelegtes Entsorgungssystem.
Gebrauchte elektrische und elektronische Geräte müssen separat
entsorgt werden, um ein umweltgerechtes Recycling sicherzustellen.
Diese Produkte müssen bei benannten Sammelstellen abgegeben
werden. Die Entsorgung ist für den Endverbraucher kostenfrei! Bitte
erkundigen sie sich bei ihrer zuständigen Behörde, wo sie diese
Produkte zur fachgerechten Entsorgung abgeben können. Falls ihr
Produkt mit Batterien oder Akkumulatoren ausgerüstet ist, müssen
sie diese vor Abgabe des Produktes entfernen und separat entsorgen
(siehe oben). Die Abgabe dieses Produktes bei einer zuständigen
Stelle hilft ihnen, dass das Produkt umweltgerecht entsorgt wird.
Damit leisten sie persönlich einen nicht unerheblichen Beitrag zum
Schutz der Umwelt und der menschlichen Gesundheit vor möglichen
negativen Effekten durch unsachgemäße Entsorgung von Müll.
Batterien oder Akkus, die Schadstoffe enthalten, sind auch mit dem
Symbol einer durchgekreuzten Mülltonne gekennzeichnet. In der
Nähe zum Mülltonnensymbol befindet sich die chemische
Bezeichnung des Schadstoffes. Cd oder NiCd steht für Cadmium, Pb
für Blei und Hg für Quecksilber.
Handhabung von Daten
Bei falschen oder unsachgemäßen Bedienvorgängen könnte der interne
Speicherinhalt gelöscht werden. Archivieren Sie alle wichtigen Daten mit
dem beiliegenden Editor und sichern Sie sie auf dem Computer oder
einem anderen Datenträger. Korg haftet nicht für Schäden, die sich aus
dem Verlust irgendwelcher Daten ergeben.
Hinweise zur Vakuumröhre
Vakuumröhren besitzen unterschiedliche Lebensdauern. Sollte die
Vakuumröhre einmal durchbrennen, kontaktieren Sie bitte ein Korg
Servicecenter.
Alle Wartungen und Reparaturen inklusive des Austauschs der
Vakuumröhre dürfen nur von Fachleuten durchgeführt werden.
Hinweise zur Bedienungsanleitung
Für dieses Produkt existieren folgende Dokumente:
- Bedienungsanleitung (die halten Sie gerade in der Hand)
- Parameter-Leitfaden (als Download von der Korg-Website erhältlich).
http://www.korg.co.jp/English/Distributors/ or http://www.korg.com/
Bedienungsanleitung
Hier werden die grundlegenden Aspekte des KingKORG vorgestellt.
Bitte lesen Sie diese zuerst.
Parameter-Leitfaden
Hier finden Sie Informationen zu sämtlichen Parametern des KingKORG.
Lesen Sie diesen Leitfaden, wenn Sie wissen möchten, welche
Funktionen bestimmte Parameter haben.
Der Parameter-Leitfaden ist wie folgt aufgebaut:
- Parameter-Leitfaden
- Effekt-Leitfaden
- MIDI-Leitfaden
Den Parameter-Leitfaden können Sie auf Ihrem Computer lesen.
Abkürzungen der Dokumentationen
BDA: Bedienungsanleitung
PL: Parameter-Leitfaden
Displayanzeigen
Die Werte der Parameter auf den Abbildungen im Handbuch dienen nur
als Beispiele und können von den Anzeigen im Display Ihres KingKORG
abweichen.
Beispiel der Notation in der Haupt-Display-Seite
GLOBAL Seite „g15: Power Off“
Im Global-Modus, wird der Name der Seite auf der Oberseite des
Haupt-Displays angezeigt werden.
* Alle Produkt- und Firmennamen sind Warenzeien oder eingetragene
Warenzeien der betreenden Eigentümer.
47
Page 48
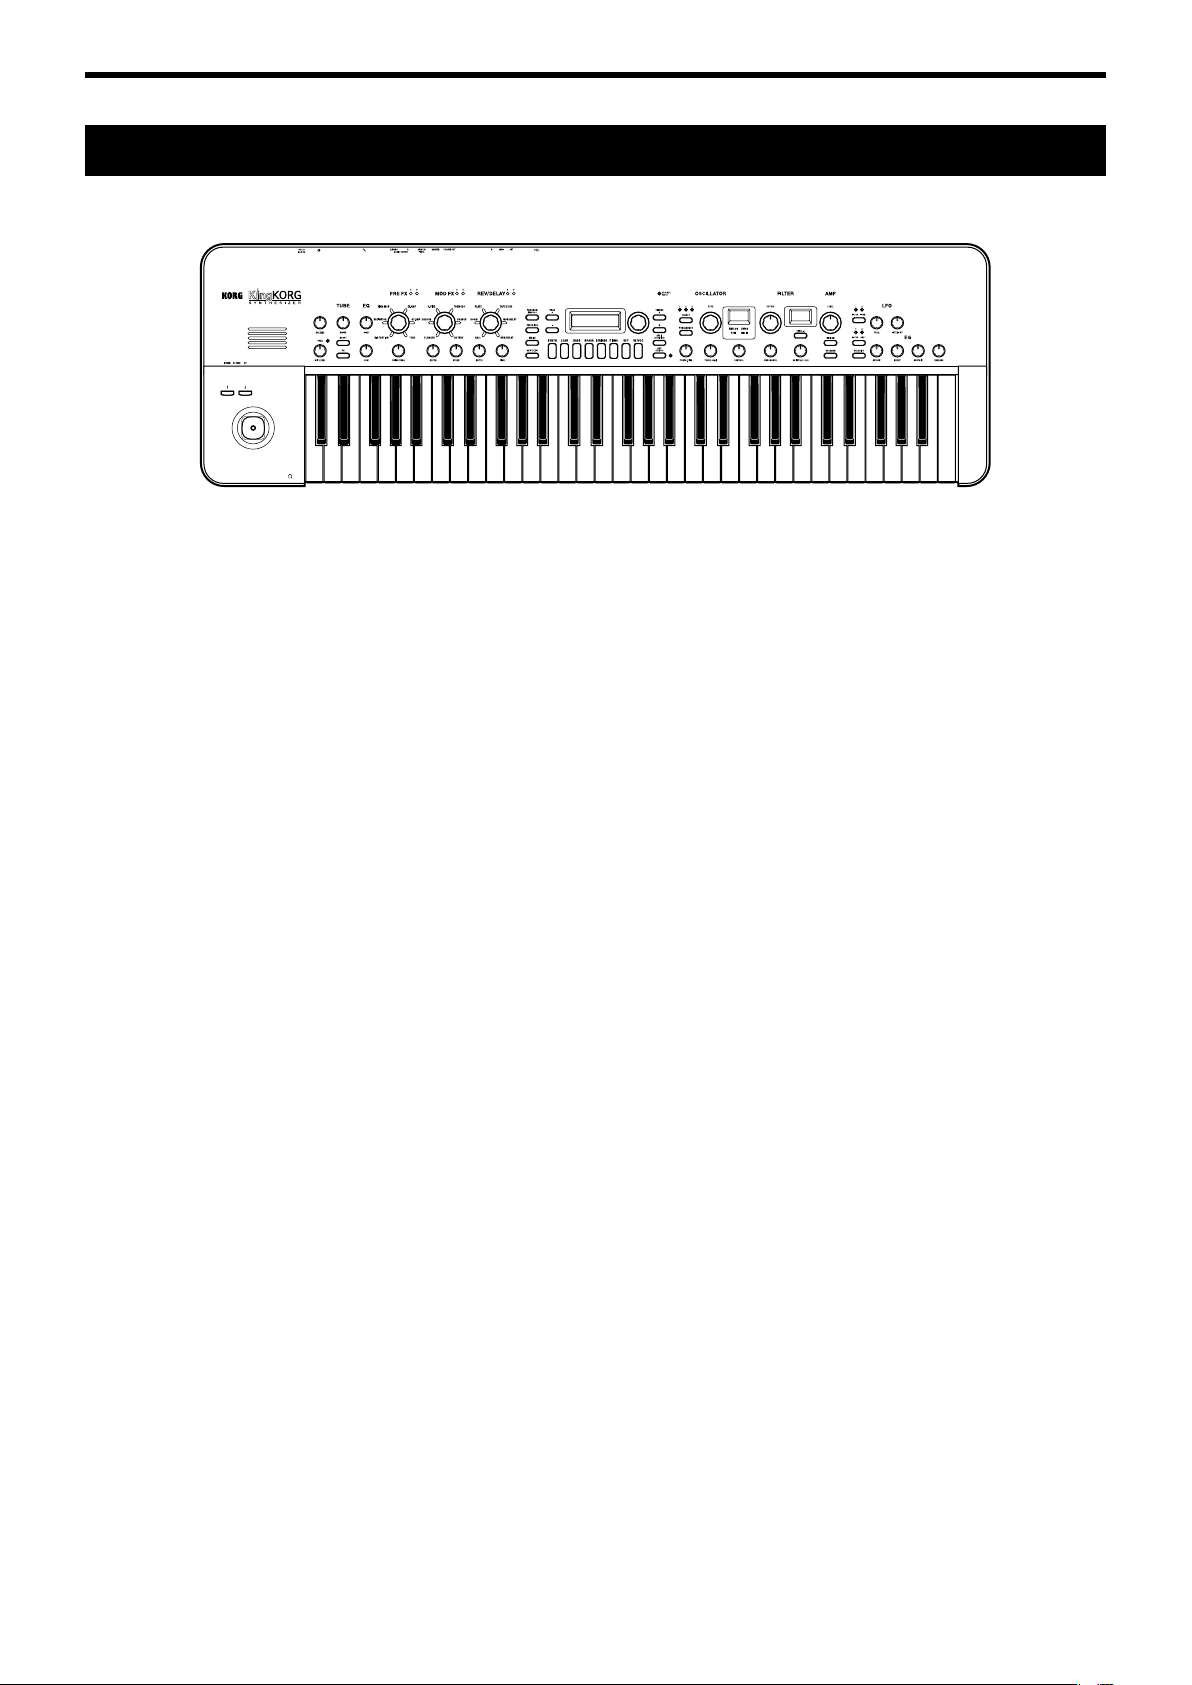
KingKORG Bedienungsanleitung
Die wichtigsten Funktionen
Kultivierter Klang
1.Synthesizerfunktion mit neu entwickelter XMT-
Modeling Klangerzeugung.
XMT (eXpanded Modeling Technology) ist eine von Korg
entwickelte Technologie zur Erzeugung einer großen Vielfalt
unterschiedlichster Klänge mit simplen Bedienungsschritten.
Der KingKORG verfügt über eine sehr große Vielfalt
unterschiedlichster Oszillatoralgorithmen, zum Beispiel die für
Analogsynthesizer typischen Sägezahn- oder
Rechteckwellenformen ebenso wie Rauschen und PCM/DWGS.
2.Ein Filter mit Charakter
Filter gehören zu den wichtigsten Elementen, die den Charakter
eines Analogsynthesizers definieren. Der KingKORG verfügt
nicht nur über ein hochwertiges digitales Filter, sondern auch
über originalgetreue Emulationen von analogen Filtern
klassischer Synthesizermodelle, die Ihnen ein aggressives
Soundshaping ermöglichen.
3.Rein analoge Vakuumröhren-Treiberschaltung
Korg hat all seine Erfahrung im Analogschaltungsdesign in die
Waagschale gelegt, um Ihnen eine rein analoge VakuumröhrenTreiberschaltung als Master-Effekt zu bieten, die nicht nur einen
warmen und vollen Klang liefert, sondern auch mächtig Druck macht.
4.Vocoder
Der KingKORG verfügt über eine Vocoder-Funktion, die Ihnen
erlaubt, mit Ihrer Stimme über ein Mikrofon den Klang des
Oszillators zu ändern. So können Sie gewissermaßen Ihren
Synthie sprechen lassen.
5.Virtuelles Patching
Sechs virtuelle Patching-Gruppen erlauben Ihnen, Steuersignale
von Hüllkurvengeneratoren oder LFOs sowie JoystickFunktionen virtuell mit Klangparametern wie Pitch oder Cutoff
zu verbinden, was Ihnen eine noch flexiblere Soundgestaltung
ermöglicht.
6.200 interne Programme
Der KingKORG verfügt über 200 Programmen, die in acht
Kategorien (z. B. synth, lead und bass) unterteilt sind. So steht
Ihnen gleich zu Beginn eine breite Auswahl an Klängen zur
Verfügung. Zusätzlich finden Sie im Nutzerbereich 100 freie
Speicherplätze für Ihre eigenen Sounds.
Intuitive Bedienung
7. Vorderseite
Die in Sektionen unterteilten Regler und Schalter auf der
Vorderseite erlauben Ihnen ein intuitives Editieren von Klängen.
Mithilfe der Editierseiten des Displays können Sie sämtliche
Parameter des KingKORG bearbeiten.
8.Favoriten
Die Favoritenfunktion erlaubt Ihnen, Ihre Lieblingsprogramme
im Handumdrehen aufzurufen. Mit den acht Kategorie/
Favoriten-Tasten können Sie bis zu 40 Programme speichern
und wieder abrufen.
Spielhilfen und hilfreiche Funktionen
9.Step-Arpeggiator
Der Step-Arpeggiator erzeugt automatisch eine Arpeggiophrase
(gebrochener Akkord), wenn Sie auf der Tastatur einen Akkord
spielen. Sie können unter sechs Arpeggioarten auswählen und
Dauer sowie Abstand der Noten einstellen. Für eine noch
größere Vielfalt können Sie jeden einzelnen Schritt ein- oder
ausschalten.
10.Joystick
Auch der KingKORG bietet Ihnen das beliebteste Feature der
Korg Music-Workstations: den Joystick. Durch Bewegen des
Joysticks (vor/zurück/links/rechts) können Sie den Pitch Bend
sowie die Programmparameter steuern. Sie können auch einen
Fußschalter anschließen und damit den Joystickeffekt beim
Spielen halten.
11.Librarian Software
Sie können den KingKORG über USB mit Ihrem Computer
verbinden und mit unserer Librarian Software die Programme
Ihres KingKORG auf Ihrem Computer verwalten. Sie können die
Librarian Software kostenlos von der Korg Website
herunterladen ( http://www.korg.co.jp/English/Distributors/ or
http://www.korg.com/ ).
48
Page 49

Funktionen und Regler
Oberseite (Joystick/Audio/Tube/FX)
VOLUME-Regler
Hiermit bestimmen Sie die Lautstärke des über die
AUDIO OUTPUT-Busen (L/MONO, R) und an die
Kopörerbuse ausgegebenen Signals.
MIC LEVE PEAK LED
Leutet, wenn das Eingangssignal der
Mikrofonbuse übersteuert ist.
Funktionen und Regler
MIC LEVEL-Regler
Zur Einstellung des Eingangspegels der
Mikrofonbuse.
OCTAVE UP/DOWN-Tasten
Zur Auswahl des der Tastatur
zugewiesenen Tonumfangs in Ein-Oktave
-Srien über einen Berei von +/-2
Oktaven. (BDA: S.57 „Zwisen Oktaven
weseln“)
Joystick (JS)
Steuert Höhe und Anteil der
Modulation (Ausdru).
Dur Bewegen des Joystis na
links und rets steuern Sie den
Pit Bend, dur Vorsieben und
Zurüziehen die Modulation.
Sie können dem oberen und unteren
Berei jeweils untersiedlie
Modulationsarten zuweisen.
TUBE (Vakuumröhre)
Die Vakuumröhre ist empfindli und kann bei Stößen zerbreen.
Sorgen Sie dafür, dass eine defekte Vakuumröhre unverzügli ausgetaust wird.
Globale Effekte
(GLOBAL FX)
TUBE-Sektion
DRIVE-Regler
Regelt den Anteil des Drives der
Vakuumröhrensaltung.
BOOST-Taste
Taste zum Verstärken der
Vakuumröhren-Verzerrung.
ON-Taste
Zum Ein-/Aussalten der
Vakuumröhrensaltung.
Kopfhörerbuchse
Zum Ansluss eines Kopörers
mit Miniklinkensteer. Diese
Buse liefert dasselbe Signal wie
die OUTPUT Busen (L/MONO/R).
Mit dem VOLUME-Regler stellen Sie
die Lautstärke des Kopörers ein.
Timbre-LEDs
Die LED des Timbres, dem Sie einen
Effekt zuweisen, leutet auf.
Master-Effekte
(MASTER FX)
FX-Regler
Zum Einstellen der PRE FX, MOD
FX und REV/DELAY Parameter.
FX-Typ-Wählräder (mit PushFunktion)
Zur Auswahl der Effekypen für
PRE FX, MOD FX und REV/DELAY.
Dur Drüen des Wählrads können
Sie das Timbre ändern, dem der
Effekt zugewiesen wird.
EQ-Sektion
Zur Einstellung der Frequenzanteile
für Höhen und Tiefen des
Audioausgangs Ihres KingKORG.
HIGH-Regler
Zum Einstellen der Höhen.
Wenn sie gleizeitig die SHIFT/EXIT
-Taste gedrüt halten, können Sie
mit diesem Regler die obere Cutoff
-Frequenz (HIGH) einstellen.
LOW-Regler
Zum Einstellen der Tiefen.
Wenn sie gleizeitig die SHIFT/EXIT
-Taste gedrüt halten, können Sie
mit diesem Regler die untere Cutoff
-Frequenz (LOW) einstellen.
49
Page 50

KingKORG Bedienungsanleitung
Oberseite (Hauptregler)
PROGRAM (GLOBAL)-Taste
Diese Taste besitzt zwei Funktionen.
[PROGRAM]
Wenn Sie Programme spielen möten,
wählen Sie dur Drüen dieser Taste
den Programm-Modus. Die Taste
leutet, und die Programmwahlanzeige
erseint im Hauptdisplay.
[GLOBAL]
Wenn Sie Einstellungen vornehmen
wollen, die si auf das gesamte Gerät
beziehen, halten Sie die SHIFT/EXITTaste gedrüt und drüen Sie diese
Taste, um den Global-Modus
auszuwählen. Die Taste leutet, und
im Hauptdisplay erseint die
Globale-Einstellungen-Anzeige.
PAGE +/- Tasten
Damit gelangen Sie zur gewünsten
Editierseite. Mit den +/-Tasten können
Sie si zwisen den Seiten bewegen.
Hauptdisplay
Zeigt diverse Informationen wie
Programmdaten und Parameterwerte
an.
Value-Wählrad (mit Push-Funktion)
Hiermit können Sie Programme oder
Parameterwerte editieren. Dur Drüen
werden die Einstellungen ausgeführt. Seiten,
die die Push-Funktion unterstützen werden
dur das Symbol „ “ im Hauptdisplay
angezeigt.
TIMBRE A/B-Wähltasten
Damit wählen Sie das Timbre aus, das Sie
steuern bzw. bearbeiten wollen
(OSCILLATOR /FILTER, AMP/LFO/EG).
Dur gleizeitiges Drüen der Tasten A
und B können Sie beide Timbres auswählen.
ORIGINAL VALUE-Diode
Leutet, wenn der Wert, den Sie mit den
Tasten und Reglern der Oberseite
editieren, mit dem gespeierten Wert
übereinstimmt.
50
SHIFT/EXIT-Taste
Hiermit gelangen Sie zu den erweiterten
Funktionen (SHIFT) einer Taste oder
eines Reglers oder zurü zur
Programmwahlanzeige (EXIT).
WRITE-Taste
Hiermit speiern Sie ein von Ihnen
editiertes Programm oder eine
vorgenommene globale Einstellung
oder legen ein gewünstes Programm
unter Favoriten ab.
(BDA: S.65 „Speiern“)
Kategorie/Favoriten-Tasten
Wenn die PROGRAM (GLOBAL)-Taste
leutet, gelangen Sie mit diesen Tasten
zum ersten Programm der entspreenden
Kategorie. Wenn die FAVORITES-Taste
leutet, rufen Sie mit diesen Tasten direkt
ein Programm auf. Sie können Ihre
Lieblingsprogramme als Favoriten ablegen
und dur einmaliges Drüen aufrufen.
FAVORITES-Taste
Zur Aktivierung der Favoriten-Funktion und zum Umsalten der Favoritengruppen.
Dur mehrmaliges Drüen dieser Taste bewegen Sie si dur A
E
A….
Wenn sie gleizeitig die SHIFT/EXIT-Taste gedrüt halten, können Sie si mit dieser
Taste rüwärts dur die Bänke bewegen: E →D →C →B →A →E….
Zum Absalten der Favoriten-Funktion drüen Sie die PROGRAM (GLOBAL)-Taste.
BC
D
ARP (TEMPO)-Taste
Zum Ein- und Aussalten des
Arpeggiators und zum Einstellen
des Tempos. Ihnen steht zudem eine
Tap-Tempo-Funktion zur Verfügung.
(BDA: S.57 „3. Spielen von Arpeggien“)
TEMPO-Diode
Blinkt synron zum Tempo
SPLIT (POSITION)-Taste
Zum Ein-/Aussalten der Split-Funktion
oder zur Bestimmung der Split-Position.
Dur einmaliges Drüen salten Sie
die Split-Funktion ein bzw. aus. Mit dieser
Taste können Sie au die Split-Position
bestimmen. (PL: „1. Timbre-Parameter“)
Page 51

Oberseite (Oszillator/Filter)
OSCILLATOR-Wähltaste
Damit wählen Sie den Oszillator aus, den Sie
bearbeiten wollen. Die LED des aktuell
gewählten Oszillators leutet.
OSCILLATOR-Nebendisplay
Zeigt Informationen zum aktuell gewählten
Oszillator an.
OSCILLATOR TYPE-Wählrad
(mit Push- Funktion)
Zur Auswahl des Oszillatortyps. Dur
Drüen des Wählrads gelangen Sie zum
Anfang der Kategorien Off, ANALOG, DWGS,
PCM oder MIC IN.
Funktionen und Regler
FILTER CUTOFF-Regler
Regelt die Cutoff-Frequenz des Filters.
FILTER-Nebendisplay
Zeigt Informationen zum aktuell
gewählten Filter an.
OSCILLATOR-Steuerung
Zum Editieren der Parameter jedes einzelnen Oszillators.
TUNE (SEMI)-Regler
Zum Einstellen des Anteils der Verstimmung in Bezug
zum Grundton. Halten Sie die SHIFT/EXIT-Taste gedrüt
und drehen Sie diesen Regler, um die Verstimmung in
Halbtonsrien einzustellen.
CONTROL-Regler
Zum Einstellen der CONTROL 1 Parameter des Oszillators.
Diese Parameter variieren je na gewähltem Oszillatortyp.
Halten Sie die SHIFT/EXIT-Taste gedrüt und drehen Sie
diesen Regler, um die CONTROL 2 Parameter einzustellen.
(PL: „1. Timbre-Parameter“)
PORTA. TIME-Regler
Hiermit stellen Sie die Portamentogeswindigkeit ein.
PORTAMENTO Schalter
Ein-/Aussalter für den Portamento-Effekt, der einen
sanen Übergang zu einer Note anderer Tonhöhe sa.
FILTER-Steuerung
Zum Editieren der Filterparameter.
RESONANCE-Regler
Zum Einstellen des Filterresonanzanteils.
EG INT (KEY TRK)-Regler
Zum Einstellen des Einflusses der
Filterhüllkurve auf die Cutoff-Frequenz mit
der Zeit. Wenn Sie die SHIFT/EXIT-Taste
gedrüt halten, können Sie mit diesem
Regler die Beeinflussung der CutoffFrequenz dur die Position der gespielten
Tasten einstellen (d. h. von hohen zu tiefen
Noten).
FILTER TYPE (-)-Wähltaste
Zur Auswahl des Filtertyps. Dur Drüen
und Halten der SHIFT/EXIT-Taste können
Sie si mit dieser Taste sriweise rüwärts
dur die Auswahl bewegen (05
02
01...).
04
03
51
Page 52

KingKORG Bedienungsanleitung
Oberseite (AMP/LFO/EG)
AMP LEVEL-Regler
Zur Einstellung der Lautstärke des Timbres.
LFO-Wähltaste
Zur Auswahl des LFOs, der miels der LFO-Steuerung
editiert werden soll. Die LED des aktuell gewählten LFOs
leutet. Die LED blinkt synron zur LFO-Frequenz.
LFO-Steuerung
Zum Editieren der LFO Parameter.
FREQ-Regle
Regelt die Frequenz des LFOs.
INTENSITY-Regler
Regelt die Intensität, mit der der LFO den Filter oder
Ton beeinflusst.
52
VOCODER-Taste
Zum Ein-/Aussalten des Vocoders.
Zum Ein-/Aussalten der
Vocoderfunktion.
Wenn Sie gleizeitig die SHIFT/EXIT
-Taste gedrüt halten, können Sie
mit dieser Taste Mic Thru
ein-/aussalten.
UNISON-Taste
Zum Ein-/Aussalten der
Unisonofunktion der Stimmen des
Timbres.
Wenn Sie gleizeitig die SHIFT/EXIT
-Taste gedrüt halten, gelangen Sie
mit dieser Taste zur Einstellanzeige
der Unisono-Funktion.
EG-Wähltaste
Zur Auswahl der Hüllkurve, die
miels der EG-Steuerung editiert
werden soll. Die LED der aktuell
gewählten Hüllkurve leutet.
Die LED blinkt synron zum
Hüllkurveneffekt.
VELOCITY-Taste
Zum Ein-/Aussalten der VelocityEmpfindlikeit der Hüllkurve, die
es ermöglit, der Hüllkurve abhängig
von der Stärke des Drus auf die
Tastatur untersiedlie Einstellungen
zuzuweisen.
EG-Steuerung
Zum Einstellen der Hüllkurvenparameter
ATTACK-Regler
Zum Einstellen der Zeitspanne von note-on
(Zeitpunkt, zu dem Sie eine Taste drüen)
bis zum Erreien des Aa-Pegels
(Maximalwert der Hüllkurve).
DECAY-Regler
Zum Einstellen der Zeitspanne zwisen
Aa-Pegel und Sustain-Pegel.
SUSTAIN-Regler
Zum Einstellen des Lautstärkepegels, der
na Ablauf der Decay-Zeit gehalten wird.
RELEASE-Regler
Zum Einstellen der Zeitspanne ab note-off
(Zeitpunkt, zu dem Sie die Taste loslassen)
bis zum vollständigen Ausklingen des Tons.
Page 53

Rückseite
Funktionen und Regler
DAMPER-Buchse
Zum Ansluss eines Dämpferpedals.
MIDI IN/OUT-Buchsen
Über diese Busen können Sie
den KingKORG mit externen
MIDIGeräten verbinden.
USB B-Anschluss
Dieser Port erlaubt den MIDI-Datenaustaus
zwisen dem KingKORG und Ihrem Computer.
CV/GATE OUT-Buchse
Ausgang für Steuerspannung und Torspannung.
Zum Ansluss und zur Steuerung eines analogen
Synthesizers.
SWITCH/PEDAL-Buchse
Zum Ansluss eines Fußsalters oder eines Pedals.
AUDIO OUTPUT L/MONO, R-Buchsen
Diese Busen müssen Sie mit Aktivboxen, einem
Stereoverstärker, Mispult oder Recorder verbinden.
Im Falle einer Mono-Verbindung braut nur die
L/MONO-Buse angeslossen zu werden.
Mikrofonbuchse
Zum Ansluss eines Mikrofons, das als
Audiomodulator für Vocoderprogramme dient.
Netzschalter
Hiermit salten Sie das Gerät
ein und aus.
DC 12V-Anschluss
Sließen Sie hier das beiliegende
AC-Netzteil an.Verbinden Sie das
Netzteil immer zuerst mit dem
KingKORG und dana mit einer
Stedose.
Kabelsicherung
Klemmen Sie das Stromkabel an diesen Haken,
um zu verhindern, dass das Kabel unbeabsitigt
aus der 12V Gleistrombuse gezogen wird.
Hinweis zur Stromversorgung (Energiesparfunktion)
Dieses Instrument ist mit einer Energiesparfunktion ausgerüstet.
Na einer gewissen Zeit, in der keinerlei Eingaben erfolgen,
saltet si das Gerät automatis aus. (Im Auslieferungszustand
saltet si das Gerät vier Stunden nadem keinerlei Eingaben
erfolgten aus.
Um dies zu deaktivieren, müssen sie die globalen Einstellungen
ändern, GLOBAL Seite „g15: Power Off “.
53
Page 54

KingKORG Bedienungsanleitung
MIDI Keyboard, Soundmodul,
Monitorlautsprecher
Anschlüsse vornehmen und Gerät einschalten
Anschlusse
Die Abbildung unten zeigt die wohl am häufigsten verwendeten Verbindungen des KingKORG. Selbstverständlich können Sie sich auf die für
Sie zutreffenden Geräte und Anschlüsse beschränken.
Computer
USB-Kabel
CV/GATE-Kabel (Lieferumfang)
Drumcomputer etc.
MIDI OUTMIDI IN INPUT INPUT
MIDI-Kabel
(aktiv, d. h. mit internem Verstärker)
12 V Gleichstrom
Netzgerät
(Lieferumfang)
Mikrofon
analoger Synthesizer
Schalten Sie sämtliche Geräte aus, bevor Sie Anschlüsse vornehmen. Der Anschluss eingeschalteter Geräte kann zu Schäden an
Lautsprechern sowie zu Störungen und Schäden an den Geräten selbst führen.
DämpferpedalMit CV/GATE IN kompatibler
1. Anschluss eines Monitorverstärkers
oder -Lautsprechers
Verbinden Sie die Buchsen AUDIO OUTPUT L/MONO, R des
KingKORG mit den Eingängen eines Verstärkers oder Mischpults.
Im Falle einer Mono-Verbindung braucht nur die L/MONO-Buchse
angeschlossen zu werden.
Eine optimale Qualität kann nur erzielt werden, wenn man
TIPP:
den KingKORG in Stereo ansließt.
2. Anschluss eines Mikrofons
Wenn Sie Ihren KingKORG als Vocoder verwenden möchten,
schließen Sie Ihr Mikrofon an den Mikrofoneingang auf der
Geräterückseite an, damit das Eingangssignal des Mikrofons als
Modulator verwendet werden kann. (BDA S.58 „4. Vocodersounds
spielen“)
Pedal Fußschalter
Zur Steckdose
3. Anschluss von Pedalen und Schaltern
Sie können nach Belieben Pedale oder Fußschalter anschließen.
SWITCH/PEDAL Buchse
Zum Anschluss eines als Zubehör erhältlichen Fußschalters (PS-1/
PS-3), Steuerpedals (EXP-2) oder Expression/Volumen- Pedals
(XPV-10).
Bevor Sie Ihren Fußschalter oder Ihr Pedal verwenden, müssen Sie
im Global-Modus erst den Typ des Geräts angeben, welches Sie
anschließen. Werksseitig ist diese Buchse für einen Fußschalter
konfiguriert und der „program up“ (Prog. Up) Funktion
zugewiesen.
Sie können mit Fußschaltern und Pedalen diverse andere
Funktionen steuern.
Mit der Spezifizierung für Schalter (Switch) können Sie entweder
zwischen Programmen wechseln, die Oktave ändern oder das
Portamento ein-/ausschalten. Normalerweise ist die Funktion nur
aktiviert, solange Sie den Fußschalter gedrückt halten. Sie können
dies jedoch ändern, um die Funktion mit jedem Drücken des
54
Page 55

Den KingKORG spielen
Schalters ein-/auszuschalten. Mit der Spezifizierung für Pedale
(Pedal) können Sie Parameter wie Lautstärke, Expression oder Pan
steuern. (PL: „8. Pedal-Parameter“)
DAMPER Buchse
Zum Anschluss eines als Zubehör erhältlichen DS-1H
Dämpferpedals oder eines PS-1 Fußschalters, mit dem Sie den
Dämpfungseffekt ein-/ausschalten können.
4. Anschluss eines MIDI-Geräts oder
Computers
Mittels dieser Anschlüsse können Sie Tastatur und Spielhilfen Ihres
KingKORG zur Steuerung externer MIDI-Klangquellen verwenden
oder umgekehrt mit einem MIDI-Keyboard oder Sequenzer den
Tongenerator Ihres KingKORG steuern. (PL: „6. MIDI-Parameter“)
5. Anschließen des Netzteils
Verwenden Sie unbedingt das beiliegende Netzteil. Die
Verwendung eines anderen Netzteils kann Störungen oder
Schäden verursachen.
Achten Sie darauf, Ihr Netzteil nur an Steckdosen mit
geeigneter Spannung anzuschließen.
1. Verbinden Sie das beiliegende Netzteil mit der DC
12V-Anschluss auf der Rückseite.
2. Um ein unbeabsichtigtes Herausziehen des Steckers zu
verhindern, sollten Sie das Kabel an die Kabelsicherung an
der Rückseite klemmen. Greifen Sie die Stecker immer direkt
an und achten Sie darauf, dass das Kabel am Übergang zum
Stecker nicht verbogen oder gar verdrillt wird.
Netzschalter
DC12V-Anschluss
Kabelsicherung
Netzkabel
fürNetzteil
(Lieferumfang)
4. Drehen Sie nun den VOLUME-Regler Ihres KingKORG
langsam auf, und stellen Sie gleichzeitig die gewünschte
Lautstärke Ihres Audiosystems ein.
2. Ausschalten
Schalten Sie das Gerät niemals aus, solange noch Daten
gespeichert werden. Sonst droht Ihnen der Verlust der zuvor
mit dem KingKORG editierten Daten.
1. Senken Sie die Lautstärke Ihres Monitorsystems oder Ihrer
Audioanlage und schalten Sie das System aus.
2. Drehen Sie den VOLUME-Regler des KingKORG ganz nach
links und halten Sie den Netzschalter gedrückt, bis das
Hauptdisplay erlischt.
Energiesparfunktion
Der KingKORG besitzt eine Energiesparfunktion. Nach einer gewissen
Zeitspanne, in der keine Schalter oder Regler bedient wurden oder in der
kein Ton auf der Tastatur gespielt wurde, schaltet sich das Gerät
automatisch aus. Werksseitig beträgt diese Zeitspanne vier Stunden.
Sie können diese Funktion wie folgt deaktivieren.
1. Deaktivieren der Energiesparfunktion
1. Halten Sie die SHIFT/EXIT-Taste gedrückt und drücken Sie
die PROGRAM (GLOBAL)-Taste, um in den Global-Modus zu
gelangen.
2. Bewegen Sie sich mit den PAGE +/-Tasten zur GLOBAL Seite
„g15: Power Off“.
3. Wählen Sie mit dem Value-Wählrad „Disable“ aus.
4. Zum Speichern der vorgenommenen Änderung die WRITE-
Taste drücken. (BDA S.65 „1. Globale Einstellungen speichern“)
Falls Sie das Gerät ausschalten ohne zuvor zu speichern,
gehen die an den globalen Einstellungen vorgenommenen
Änderungen verloren. Falls Sie ihre editierten Einstellungen
also später nutzen wollen, sollten Sie diese speichern.
Achten Sie beim Klemmen
des Kabels an die
Kabelsicherung darauf, es
nicht zu stark zu verbiegen
oder zu verdrehen
Netzgerät
(Lieferumfang)
Stecken Sie den Stecker
in eine Steckdose.
Ein-/Ausschalten
1. Einschalten
Schalten Sie die Aktivboxen, den Verstärker usw. immer erst
nach dem KingKORG ein.
1. Drehen Sie vor dem Einschalten den VOLUME-Regler Ihres
KingKORG ganz nach links, um ungewünschte
Einschaltgeräusche zu vermeiden.
2. Halten Sie den Netzschalter solange gedrückt, bis das
Hauptdisplay erscheint.
Beim Hochfahren des KingKORG zeigt das Hauptdisplay
Informationen wie Programmnummer und -Name an.
3. Schalten Sie nun Ihr Monitorsystem oder Ihr Audiosystem ein,
wobei sie auch zuerst hier die Lautstärke senken sollten.
Den KingKORG spielen
Anhoren der Demosongs
Der KingKORG beinhaltet charakteristische Demosongs
unterschiedlicher Musikstile. Nehmen Sie sich ein wenig Zeit, mit
diesen Songs die Klangvielfalt des KingKORG kennenzulernen.
(BDA S.112 „Demo song list“)
1. Auswahl und Abspielen eines
Demosongs
Die Demosongs sind den Kategorie/Favoriten-Tasten zugewiesen.
1. Halten Sie die SHIFT/EXIT-Taste gedrückt und wählen Sie
mit der Kategorie/Favoriten-Taste einen Demosong aus.
Die Demosongwiedergabe startet automatisch und läuft bis zum
letzten Song weiter. Nach dem letzten Song wird die
Wiedergabe beim ersten Demosong fortgesetzt. Bei der
Wiedergabe blinkt die dem Demosong zugewiesene Taste.
Drücken Sie eine leuchtende Taste, um einen anderen Demosong
auszuwählen.
55
Page 56

KingKORG Bedienungsanleitung
Bei leuchtender PROGRAM (GLOBAL)-Taste
Bei leuchtender FAVORITES-Taste
2. Drücken Sie während der Wiedergabe eines Demosongs die
SHIFT/EXIT-Taste.
Die Wiedergabe endet und Sie gelangen in den Programm-Modus
zurück.
Anwahl und Einsatz der Programs
1. Displays
1. Programme über Nummer auswählen
1. Drücken Sie die GLOBAL (PROGRAM)-Taste, damit diese
aufleuchtet.
Im Hauptdisplay werden Programmnummer und -Name
angezeigt.
2. Wählen Sie mit dem Wählrad ein Programm aus.
Programme, bei denen die SPLIT (POSITION)-Taste
TIPP:
aueutet, haben gespliete Stimmen. (PL: „1. TimbreParameter“)
Hauptdisplay (beim Abspielen eines Programms)
Bei leuchtender PROGRAM (GLOBAL)-Taste zeigt das
Hauptdisplay Programmnummer und -Name.
Bei leuchtender FAVORITES-Taste zeigt das Hauptdisplay Bank,
Programmnummer und -Name.
Program
mnummer
Program
mname
Program
mnummer
Bank
Program
mname
Hauptdisplay (beim Editieren eines Programms)
Das Display zeigt Seitennummer und -Name sowie Parametername
und -Wert an, auch beim Editieren globaler Einstellungen (wenn die
PROGRAM (GLOBAL)-Taste blinkt)
Seitennummer
ParameterwertParametername
Seitenname
OSCILLATOR Nebendisplay
Das Display zeigt Informationen über den aktuell gewählten Oszillator.
Oszillator Typnummer
Oszillator Typname
FILTER Nebendisplay
Das Display zeigt Informationen über den aktuell gewählten Filter.
3. Spielen Sie die Tastatur, um den Sound zu hören.
Mit den OCTAVE UP/DOWN-Tasten können Sie die der
Tastatur zugewiesenen Oktaven ändern. (BDA S.57 „Zwischen
Oktaven wechseln“)
Programme über Kategorie auswählen
1. Drücken Sie die Kategorien/Favoriten-Taste, die am ehesten
dem gewünschten Sound entspricht.
Das erste Programm der entsprechenden Kategorie wird
ausgewählt und die Kategorie/Favoriten-Tasten leuchten auf.
2. Wählen Sie mit dem Wählrad ein Programm (Sound) aus.
3. Spielen Sie die Tastatur, um den Sound zu hören.
2. Programme mit der FAVORITES-Taste
auswählen
Sie können nur dann Programme mit der FAVORITES-Taste
auswählen, die sie zuvor mit den Kategorie/Favoriten-Tasten
als Favoriten gespeichert haben. (BDA S.65 „3. Programme als
Favoriten speichern“)
1. Drücken Sie die FAVORITES-Taste, damit sie aufleuchtet und
wählen Sie anschließend eine Bank (A–E)
Mit jedem Drücken der FAVORITES-Taste wählen Sie eine
andere Bank, die im Hauptdisplay angezeigt wird.
Ein Programm auswählen
Der KingKORG hat 200 unterschiedliche interne Programme, mit
denen Sie sofort loslegen können. Um Ihnen eine intuitive Auswahl
zu ermöglichen, sind die Programme in Soundkategorien sortiert.
Wählen und Spielen Sie einige dieser Programme, um die
Klangvielfalt Ihres KingKORG kennenzulernen.
56
Filter Typnummer
Filter Typname
Sie können si rüwärts dur die Bänke bewegen,
TIPP:
indem Sie die FAVORITES-Taste bei gehaltener SHIFT/
EXIT-Taste drüen. (E D C B A E...)
2. Drücken Sie die Kategorie/Favoriten-Taste (1-8), unter der Sie
das gewünschte Programm gespeichert haben.
Das Programm wird aufgerufen und im FAVORITESNebendisplay angezeigt.
Page 57

3. Spielen Sie die Tastatur, um den Sound zu hören.
Was dann geschieht, ist von Program
Einen Sound variieren
Neben dem Keyboard bietet Ihnen der KingKORG Spielhilfen wie
den Joystick sowie diverse Regler und Tasten zur Klangsteuerung.
Damit können Sie mithilfe von Filtern, LFOs und Hüllkurven in
Echtzeit den Sound beim Spielen variieren.
1. Verwendung der Spielhilfen
Joystick (JS)
Durch Bewegen in vier Richtungen (vor/zurück/links/rechts)
steuern Sie diverse Parameter und Effekte. Was dann geschieht,
ist von Program zu Program verschieden – probieren Sie’s
einfach aus.
„Joysti“ wird als JS abgekürzt.
TIPP:
Absenken der
Tonhöhe usw.
Beim Loslassen kehrt der Joysti automatis in die Mit-
TIPP:
telposition zurü. Wenn Sie einen Joystieekt länger
halten möten, Ihre Hand jedo zum Spielen frei haben
wollen, können Sie einem Fußsalter eine Lofunktion
für den Joysti zuweisen. (PL: „8. Pedal-Parameter“)
+Y
-X +X
-Y
zu Program verschieden – probieren
Sie’ s einfach aus.
Anheben der
Tonhöhe usw.
Wah, Effektanteil usw.
Den KingKORG spielen
Sie können den Joysti als virtuelle Patquelle verwen-
TIPP:
den. Somit erhalten Sie no vielfältigere und komplexere
Eekte als oben angebeben. (PL: „1. Timbre-Parameter“)
2. Spielen der Tastatur
Mit der Tastatur des KingKORG können Sie den Klang wie folgt
steuern.
Velocity
Dadurch können Sie mittels Variieren des Tastenanschlags einen
Sound steuern. Üblicherweise wird mit Velocity Ton oder die
Lautstärke gesteuert.
Die Tastatur des KingKORG unterstützt keinen Aftertouch.
Manche Sounds reagieren auf Velocity nur mit geringen
oder keinen klanglichen Veränderungen, andere sind so
eingestellt, dass sie Velocity nicht erkennen.
Tastaturskalierung
Damit kann der Klang je nach Position auf dem Keyboard
unterschiedlich beeinflusst werden. Üblicherweise dient die
Tastaturskalierung dazu, hohe Töne brillanter klingen zu lassen
oder tiefen und hohen Tönen unterschiedliche Lautstärken
zuzuweisen.
Velocity und Tastaturskalierung können als virtuelle
TIPP:
Patquelle genutzt werden. (PL: „1. Timbre-Parameter“)
Zwischen Oktaven wechseln
Mit den OCTAVE UP/DOWN-Tasten können Sie die der
Tastatur zugewiesenen Tonbereiche in Ein-Oktaven-Schritten
über einen Bereich von +/-2 Oktaven ändern.
Tastaturbereiech Teste LED
C4 – C9 UP-Taste blinkt
C3 – C8 Up-Taste leuchetet
C2 – C7 UP/DOWN-Tasten aus
C1 – C6 DOWN-Taste leuchtet
C0 – C5 DOWN-Taste blinkt
Oktave -1
Oktave -2
3. Spielen von Arpeggien
Ein „Arpeggiator“ spielt die Noten von gehaltenen Akkorden der
Reihe nach ab und erzeugt so rhythmische Läufe.
Der Arpeggiator des KingKORG bietet 6 Arpeggiator-Typen und
erlaubt sogar das Abwandeln der Notendauer („Gate Time“) usw.
der Noten. Außerdem ist ein „Step-Arpeggiator“ am Start, mit dem
Sie selbst bestimmen können, welche der 8 Schritte tatsächlich Noten
spielen sollen. So erzeugen Sie im Nu eigene Läufe.
1. Ein Programm auswählen. (BDA S.56 „Ein Programm
auswählen“)
Wählen wir als Beispiel für diese Funktion einen Pianosound aus.
Oktave +2
Oktave +1
Oktave ±0
Zahlen in Klammern ( ) sind MIDI-Notennummern.
2. Drücken Sie die ARP (TEMPO)-Taste, damit diese aufleuchtet.
Der Arpeggiator wird eingeschaltet.
57
Page 58

KingKORG Bedienungsanleitung
3. Spielen Sie einen Akkord und halten Sie die betreffenden
Tasten gedrückt. Der Arpeggiator beginnt zu spielen.
Wenn Sie den in der Abbildung gezeigten Akkord spielen, wird
er wie folgt notiert wiedergegeben. (Arpeggiotyp: UP)
Um das Tempo zu ändern, halten Sie die SHIFT/EXIT-Taste
gedrückt und drücken Sie die ARP (TEMPO)-Taste, um zur
PROGRAM Seite „a02: Arp“ zu gelangen. Stellen Sie das Tempo
mit dem Wählrad ein.
Der KingKORG verfügt über eine Tap-Tempofunktion.
TIPP:
Zum Einstellen des gewünsten Tempos halten Sie die
SHIFT/EXIT-Taste gedrüt und drüen Sie rhythmis
die ARP (TEMPO)-Taste.
4. Das Arpeggio bricht ab, wenn Sie die Hände von der Tastatur
nehmen.
Sie können das Arpeggio au weiterklingen lassen, na-
TIPP:
dem Sie die Tasten losgelassen haben. (PL: „3. Arpeggioparameter “)
Editieren des Klangs
Aufbau eines Programs
Bevor Sie sich an das Editieren der Klänge machen, müssen Sie
begreifen, wie die Klangerzeugung aufgebaut ist. Wenn Sie nämlich
wissen, wie der KingKORG seine Klänge erzeugt, erzielen Sie viel
schneller das gewünschte Ergebnis.
1. Synthesizer
Aus der Abbildung geht hervor, dass ein Synthesizer-Program die
Timbres A/B, einen Arpeggiator, Vocoder und die Master-Effekte
und enthält.
4. Vocodersounds spielen
Ein Vocoder erlaubt Ihnen, durch Sprechen in ein Mikrofon bei
gleichzeitigem Spielen der Tasten einen Effekt zu generieren, der
den Synthesizer „sprechen“ lässt. Als Alternative zur Eingabe einer
menschlichen Stimme können Sie durch Eingabe rhythmischer
Geräusche oder diverser Wellenformen interessante Effekte
generieren.
Anschluss eines Mikrofons und Spielen des
Vocoders
1. Drehen Sie den MIC LEVEL-Regler auf der Oberseite
komplett nach links. Schließen Sie ein Mikrofon an die
Mikrofonbuchse auf der Rückseite an.
2. Drücken Sie die GLOBAL (PROGRAM)-Taste, damit diese
aufleuchtet.
3. Drücken Sie die die SE/VOC Kategorie/Favoriten-Taste, damit
diese aufleuchtet und wählen Sie anschließend mit dem
Wählrad ein Programm, bei dem die VOCODER-Taste
leuchtet.
4. Stellen Sie mit dem MIC LEVEL-Regler einen geeigneten
Eingangspegel ein.
Aten Sie darauf, dass die MIC LEVEL-PEAK-LED nit
TIPP:
aueutet.
5. Spielen Sie die Tastatur und sprechen oder singen Sie
gleichzeitig in Ihr Mikrofon.
Experimentieren Sie ruhig ein wenig mit Wörtern und Tönen,
um die Effekte auf den Vocodersound kennenzulernen.
58
Page 59

PROGRAM
Editieren des Klangs
MIC IN
MIC IN
TIMBRE
Keyboard
JoyStick
MIDI IN
Pitch
TIMBRE A
Arpeggiator
TIMBRE B
ON
OFF
Keyboard Tracking
Keyboard Velocity
Pitch Bend (JS X)
Modulation (JS+Y/-Y)
MIDI 1〜3
OSC1
OSC2
OSC3
MASTER FX
Vocoder PRE FX MOD FX
Other Source
VIRTUAL PATCH
LFO1 LFO2 EG1 EG2
Cutoff Level PAN
MIXER FILTER AMP
REV/DELAY
Free Assign
Modulation to Synth
GLOBAL
TUBE EQ
OUTPUT
L/MONO, R
Modulation to Effect
L
Audio to Effect
R
Die drei grundlegenden Klangaspekte: Tonhohe,
Klangfarbe und Lautstarke
Alle Klänge beruhen auf drei Basisaspekten: Tonhöhe, Klangfarbe und
Lautstärke. Wie seine analogen Vorfahren bietet der KingKORG (als
Analog-Modeling-Variante) einen Oszillator, ein Filter und einen
Verstärker („Amp“), mit denen sich diese Aspekte beeinflussen lassen.
Mit den Oszillator-Parametern ändern Sie die Tonhöhe, mit dem Filter
die Klangfarbe und mit dem Verstärker die Lautstärke einstellen.
Oszillatoren, Filter und Verstärker des KingKORG
Sie finden die Oszillatoreneinstellungen des KingKORG in den
PROGRAM Seiten „s05–s12:Pitch“ sowie „s13:OSC1–s27: OSC3“ Mit
den Pitch Seiten spezifizieren Sie die Tonhöhe der Grundwellenform,
mit den OSCILLATOR Seiten wählen Sie die Wellenform aus. Die
von den Oszillatoren erzeugten Wellenformen werden in der Mixer
Seite gemischt. Filtereinstellungen erfolgen in den PROGRAM Seiten
“s31–38: Filter”. In diesen Seiten können Sie die Klangeigenschaften
eines von den Oszillatoren erzeugten Sounds durch Zuweisen eines
Filters ändern. Die Verstärkereinstellungen finden Sie in den
PROGRAM Seiten „s39–42: Amp“, wo Sie die Lautstärke ändern
können. Durch Editieren in diesen Seiten generieren Sie den
grundlegenden Sound eines Programms.
Hüllkurvengenerator, LFO, Tastaturskalierung,
virtuelle Patches und Spielhilfen
Neben den Einstellungen von Oszillator, Filter und Verstärker kann
ein Klang auch durch zeitliche Änderungen, Änderungen in der
Tonhöhe oder andere Ausdruckselemente beeinflusst werden. Dazu
stehen Ihnen Modulatoren und Spielhilfen wie
Hüllkurvengeneratoren, LFOs (Low Frequency Oscillator), eine
Tastaturskalierung, virtuelle Patches sowie ein Joystick zur
Verfügung. So können Sie faszinierend komplexe Sounds generieren.
In der Abbildung oben sehen Sie den Signalweg von OSC über
FILTER zu AMP und wie Hüllkurven und LFOs jeden Abschnitt
beeinflussen.
Timbres (TIMBRE A/B)
Jedes Timbre besteht aus einem Oszillator, einem Filter, einer
Verstärkersektion, einer Hüllkurve, einem LFO, virtuellen PatchVerbindungen und einem Equalizer. Der KingKORG bietet zwei
Timbres, die man simultan verwenden kann, um einen volleren
Sound zu erzielen.
Oszillatoren (OSC1, OSC2, OSC3)
Sie haben die Auswahl unter 127 verschiedenen
Oszillatoralgorithmen, darunter die für Analogsynthesizer typischen
Sägezahn und Rechteckwellen, aber auch Rauschen, PCM/DWGS,
sowie die über den Mikrofoneingang eingespeiste Wellenform. Die
Unisono-Einstellung erlaubt Ihnen, die Wellenform noch mächtiger
und prägnanter zu gestalten.
Mixer (MIXER)
Regelt das Lautstärkeverhältnis zwischen den drei Oszillatoren
(OSC1, OSC2 und OSC3), bevor das Summensignal zum Filter
(FILTER) weitergeleitet wird.
Filter (FILTER)
Mit einem Filter kann die Klangfarbe heller oder dunkler gemacht
werden. Eine weitere Möglichkeit ist jedoch das Hervorheben oder
Unterdrücken bestimmter Frequenzbereiche. Die Wahl der
Filtercharakteristik hat einen großen Einfluss auf den
schlussendlichen Sound. Pro Timbre stehen zwei Filter zur
Verfügung, die auf vier verschiedene Arten miteinander kombiniert
59
Page 60
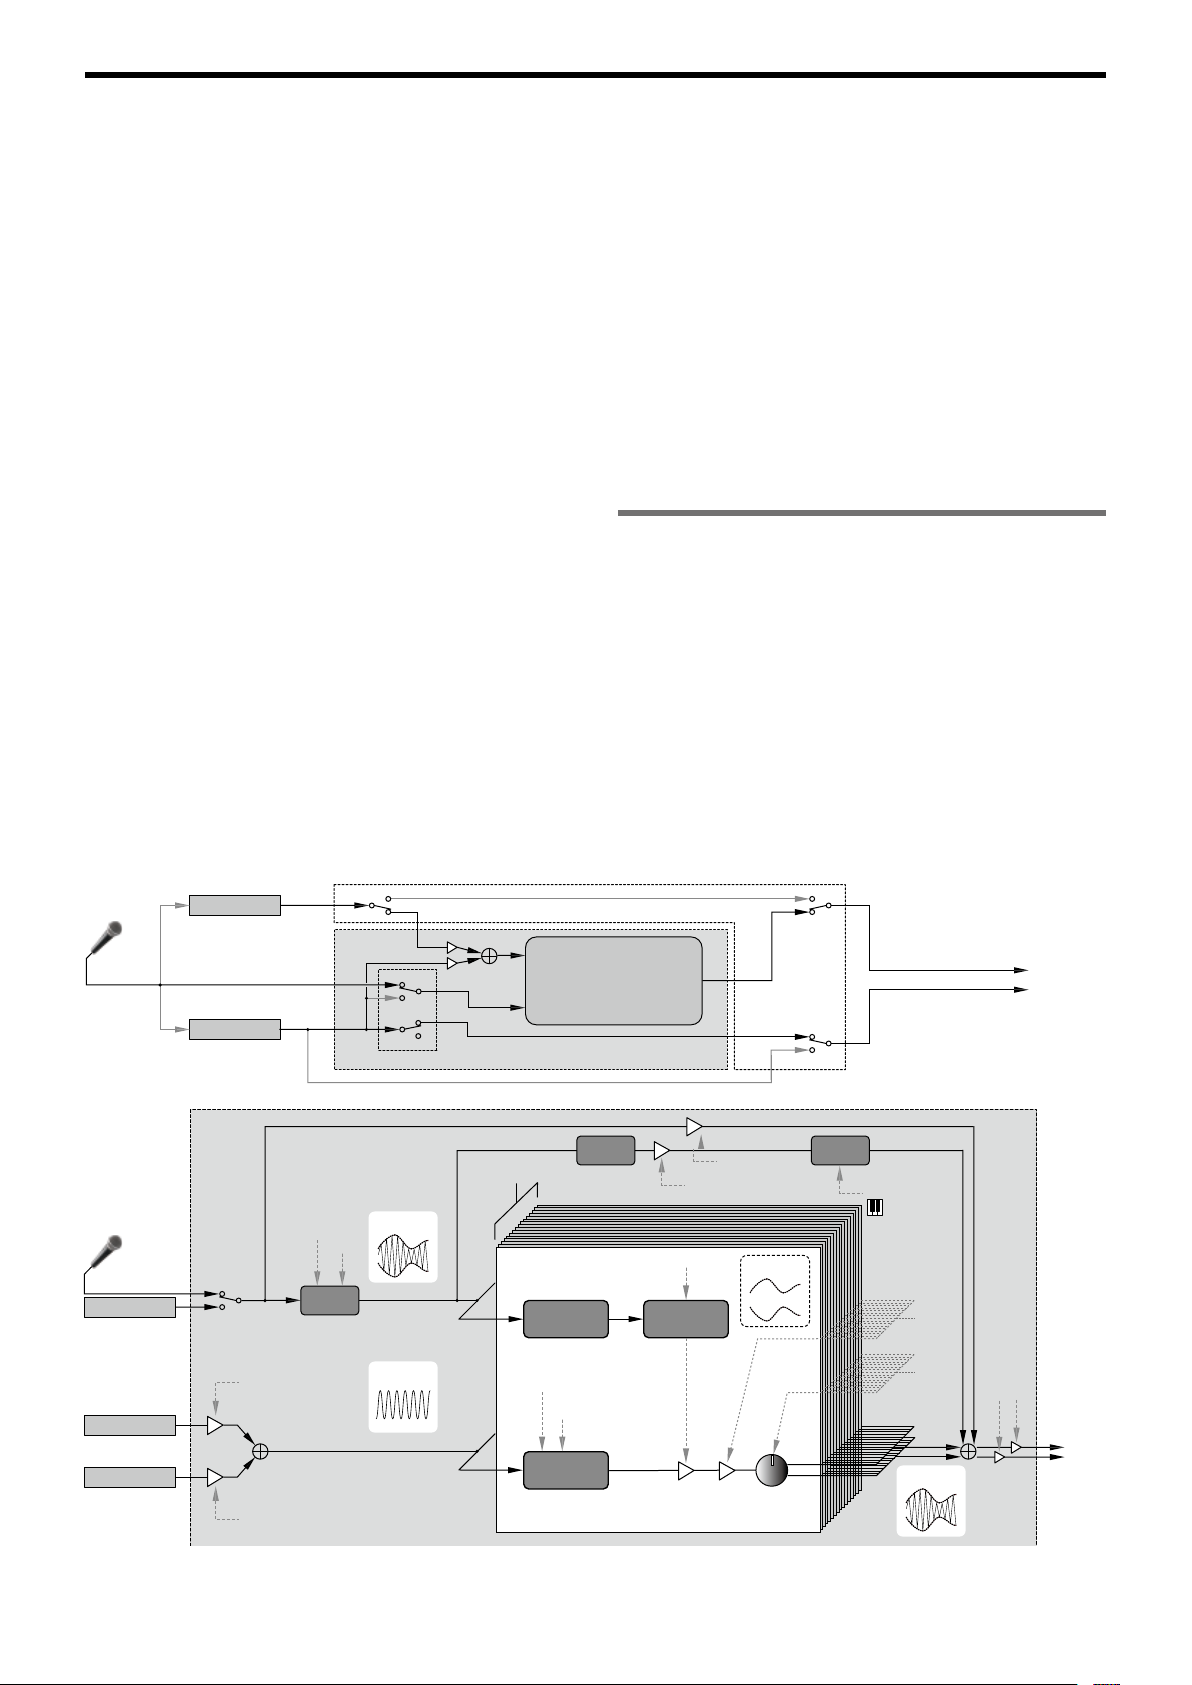
KingKORG Bedienungsanleitung
werden können. Laut Vorgabe dient Hüllkurve 1 (EG1) zum
Beeinflussen der Filterfrequenz und folglich zum Erzeugen von
zeitbedingten Klangfarbenänderungen.
Verstarker (AMP)
In dieser Sektion befinden sich der AMP- und PAN-Block. Mit dem
AMPBlock regeln Sie die Lautstärke und mit dem PAN-Block die
Stereoposition. Zeitbedingte Lautstärkeänderungen können mit
Hüllkurve 2 (EG2) programmiert werden.
Hullkurven (EG1, EG2)
Eine Hüllkurve erzeugt allmähliche Änderungen des beeinflussten
Aspekts und bestimmt also die „Form“ jenes Aspekts. Hierfür stehen
vier Parameter zur Verfügung: „Attack“, „Decay“, „Sustain“ und
„Release“. Hüllkurve 1(EG1) steuert die Cutoff-Frequenz des Filters,
Hüllkurve 2 (EG2) die Lautstärke des Verstärkers. Sie können zudem
einen Hüllkurvengenerator in Kombination mit einem virtuellen Patch
als Hüllkurvenquelle eines weiteren Parameters verwenden.
LFOs (LFO1, LFO2)
Ein LFO („Low Frequency Oscillator“) erzeugt periodische
Änderungen des beeinflussten Aspekts Pro Timbre stehen zwei
LFOs zur Verfügung, für die man eine von fünf Wellenformen
wählen kann. LFO2 dient als Quelle der über den Joystick
gesteuerten Tonhöhenmodulation. Sie können zudem einen LFO in
Kombination mit einem virtuellen Patch als Modulationsquelle eines
weiteren Parameters verwenden.
Virtuelle Patch-Verbindungen (VIRTUAL PATCH)
Die virtuellen Patch-Verbindungen erlauben nicht nur die
Verwendung der Hüllkurven und LFOs zum Modulieren der
gewünschten Klangparameter, sondern können auch die
Anschlagdynamik und Notenskalierung (d.h. die Tonhöhe der
gespielten Noten) als Quellen verwenden. Damit können die Sounds
expressiver gestaltet werden. Pro Timbre lassen sich sechs Parameter
über virtuelle Patch-Verbindungen beeinflussen. (PL: „1. TimbreParameter“)
Master-Effekte (MASTER FX)
Jedes Programm beinhaltet drei Arten von Master-Effekten. Indem
Sie jedes Timbre mit Effekten bearbeiten, verleihen Sie dem
Gesamtsound eines Programms den letzten Feinschliff.
Arpeggiator (ARPEGGIATOR)
Der Arpeggiator wandelt die von Ihnen gespielten Akkorde in
gebrochene Akkorde um. Bei Programs, die beide Timbres
ansprechen, können Sie bestimmen, ob der Arpeggiator nur ein
Timbre oder beide beeinflussen soll. Hierbei handelt es sich um
einen Step-Arpeggiator, der 6 Typen erzeugen kann.
2. Vocoder (VOCODER)
Ein Vocoder analysiert den Frequenzgang eines Signals (z.B. eine
mit einem Mikrofon abgegriffene menschliche Stimme) und
verwendet dieses Ergebnis zum Beeinflussen eines zweiten Signals
(z.B. einer Oszillatorwellenform). Das erste Signal nennt man
„Modulator“ und das zweite „Träger“. Das Ergebnis einer solchen
Bearbeitung erweckt den Eindruck, dass ein Synthesizer usw.
sprechen kann.
Der KingKORG bietet einen Vocoder mit 16 Frequenzbändern, der
so flexibel ist, dass er weit über die Möglichkeiten eines
„klassischen“ Vocoders hinausgeht. Die Abbildung unten
veranschaulicht, dass ein Vocoder (VOCODER) einen Träger (das
Signal, das moduliert wird) und einen Modulator (das Signal, dessen
Frequenzverhalten „transplantiert“ wird) voraussetzt.
MIC IN
VOCODER
MIC IN
TIMBRE B
TIMBRE A
TIMBRE B
TIMBRE A
TIMBRE B
MIC IN
TIMBRE B
TIMBRE A Level
TIMBRE B Level
Threshold
GATE
OFF
ON
MIC IN
TIMBRE B
Modulator Audio Src
Modulator
Sens
Carrier
MIC IN
TIMBRE B
TIMBRE A Level
TIMBRE B Level
Vocoder
Band 1–16
Resonance
Carrier
Vocoder
Modulator
Analysis
Filter
Cuto (Fc MOD)
Formant Shift
Synthesis
Filter
HPF
HPF Level
E.F.Sens
Envelope
Follower
Direct Level
Band
Level
Envelope
Band
PAN
OFF
ON
TIMBRE A / Vocoder
TIMBRE B
ON
OFF
to EFFECTs
HPF
HPF Gate &
Note On
Wet
Level
Wet
Spread
L
R
Output
Vocoder
Level
L
Vocoder
R
Output
60
Page 61

Editieren des Klangs
Träger (CARRIER)
Dies ist der Grundklang (Signal). Am besten als Träger geeignet sind
Wellenformen mit zahlreichen Obertönen, zum Beispiel Sägezahnoder Pulswellen mit fester Pulsbreite. Die Signale der beiden Quellen
Timbre A und Timbre B werden gemischt und dienen als Träger.
Modulator (MODULATOR)
Dies ist der Klang (Signal) dessen Eigenschaften auf den Träger
gelegt werden. Üblicherweise dient eine menschliche Stimme als
Modulator. An Ihrem KingKORG können Sie als Modulator
entweder den Mikrofoneingang (Input) oder Timbre B (Timbre B)
auswählen. Falls Sie Timbre B gewählt haben, wird der Ausgang von
Timbre B zum Eingang des Modulators des Vocoders geleitet.
Vocoder-Sektion (VOCODER)
Hier gibt es zwei Gruppen zu je 16 Bandpassfiltern („analysis filter“,
„synthesis filter“ und „envelope follower“) sowie eine
Hüllkurvenanalyse. Das eingehende Audiosignal wird von den 16
Analysefiltern „gemessen“. Gleichzeitig wird ermittelt, welche
Pegelentwicklung die einzelnen Frequenzbänder enthalten. Das
Audiosignal des Trägers wird mit Hilfe 16 weiterer Bandpassfilter (den
so genannten „Synthesefiltern“) bearbeitet, was im Grunde bedeutet,
dass 16 Frequenzbereiche den „Bewegungen“ des Modulatorsignals
entsprechend gefiltert werden. So entsteht z.B. der Eindruck, dass das
Trägersignal sprechen kann. Bei Bedarf können die Eckfrequenzen der
Synthesefilter (des Trägers) sogar versetzt werden. Das führt im
Extremfall zu einem „basslastigeren“ oder „helleren“ Sound,
2. Zwei Timbres editieren
In jedem Programm stehen Ihnen zwei Timbres zur Verfügung:
TIMBRE A und TIMBRE B.
Sie können TIMBRE B nit auswählen, falls in der PRO-
TIPP:
GRAM Seite „p03: common” als Voice Parameter „Single“
ausgewählt ist. Falls dort „Layer“ oder „Split“ ausgewählt
sind, zeigen die TIMBRE A/B-Wähltasten dur Aueuten
das Timbre an, das Sie gerade bearbeiten.
Der Voice Modus Parameter in der PROGRAM Seite „p03:
TIPP:
Common” gilt für das gesamte Programm.
Zwei Timbres (Layer) verwenden
Falls Sie mit zwei Timbres arbeiten möchten, können Sie unter zwei
unterschiedlichen Optionen auswählen. In diesem Beispiel setzen
wir in PROGRAM Seite „p03: Common“ den Voice Modus
Parameter auf „Layer“.
Unter dieser Einstellung sind beide Timbres gleichzeitig zu hören,
wenn Sie die Tastatur spielen.
1. Bewegen Sie sich mit den PAGE +/-Tasten zur PROGRAM
Seite „p03: Common“.
2. Wählen Sie mit dem Wählrad den Modus „Layer“.
TIMBRE A-Wahltaste und die Master-Effekt-Timbre-LEDs
leuchten auf.
Grundlegendes Editieren eines Programms
1. Klänge erzeugen
Mit dem KingKORG kann man auf zwei Arten Klänge erstellen.
₋ Wenn Sie schnell einen neuen Sound benötigen, wählen Sie am
besten ein Program, das dem gewünschten Sound schon in etwa
entspricht.
₋ Sie können aber auch alles selbst programmieren (d.h. ein
initialisiertes Programs als Ausgangspunkt nehmen).
Entscheiden Sie sich für einen dieser Ansätze und machen Sie sich
an die Arbeit!
Editieren eines abgespeicherten Programms
1. Wählen Sie das Program, das Sie editieren möchten. (BDA S.56
„Ein Programm auswählen“)
2. Bedienung über Regler und Wählräder der Oberseite.
Wägen Sie erst ab, wie sich der gewünschte Sound vom
Originalprogramm unterscheiden soll und wählen Sie
dementsprechend die zu editierenden Parameter.
Wenn Sie die Änderungen nicht speichern, gehen sie verloren,
sobald Sie einen anderen Speicher anwählen oder das
Instrument ausschalten. (BDA S.65 „2. Speichern der
Einstellungen“)
Wenn Sie ein völlig neues Program erstellen
möchten
Um alles selbst zu programmieren, müssen Sie das aktuell gewählte
Program zunächst initialisieren. (BDA S.63 „1. Initialisieren eines
Programs“)
So erhalten Sie einen Satz einfacher und leichtverständlicher
Einstellungen, dank denen Sie nachvollziehen können, wie jede
Sektion arbeitet; was gerade beim Erzeugen völlig neuer Sounds
eine große Hilfe ist.
Ein Timbre zum Editieren auswählen
Wenn Sie ein Programm editieren, das zwei Timbres verwendet,
müssen Sie die Timbres einzeln bearbeiten.
Mit den TIMBRE A/B-Wähltasten wählen Sie das Timbre zum
Bearbeiten aus. Wenn die entsprechende Timbre Wähltaste
aufleuchtet, können Sie das Timbre editieren.
Filter und Hüllkurven editieren
Mit den Reglern an der Oberseite des KingKORG können Sie Filter
und Hüllkurvengeneratoren in Echtzeit steuern.
Sie haben die Auswahl unter drei unterschiedlichen Funktionen der
Regler. (PL: „5. Global-Parameter “)
FILTER
Cutoff (CUTOFF)
Stellt die Cutoff-Frequenz des Filters ein und damit die Tonhöhe
des Klangs. Durch Drehen nach links wird der Klang dunkler,
durch Drehen nach rechts heller.
Resonanz (RESONANCE)
Zum Einstellen des Filterresonanzanteils. Resonanz verleiht dem
Klang einen spezifischen Charakter.
EG (Hüllkurvengenerator)
Attack (ATTACK1, ATTACK2)
Zum Einstellen der Attack-Zeiten von EG1 (Filterhüllkurve) und
EG2 (Verstärkerhüllkurve). Attack bestimmt die Zeit von
note-on (Augenblick, in dem die Taste gedrückt wird) bis zum
61
Page 62

KingKORG Bedienungsanleitung
EG2
Erreichen des Attack-Pegels und ändert die Art wie EG1 und
EG2 einsetzen. Durch Drehen nach links wird die Attack-Zeit
kürzer, durch Drehen nach rechts länger.
Decay (DECAY1, DECAY2)
Zum Einstellen der Decay-Zeiten von EG1 (Filterhüllkurve) und
EG2 (Verstärkerhüllkurve). Decay bestimmt den Zeitraum vom
Erreichen des Attack-Pegels bis zum Erreichen des SustainPegels. Durch Drehen nach links wird die Decay-Zeit kürzer,
durch Drehen nach rechts länger.
Sustain (SUSTAIN1, SUSTAIN2)
Zum Einstellen der Sustain-Zeiten von EG1 (Filterhüllkurve)
und EG2 (Verstärkerhüllkurve). Sustain bestimmt den Pegel, der
nach Ablauf der Decay-Zeit erreicht wird und ausklingt, solange
Sie die Taste gedrückt halten. Durch Drehen nach links wird der
Sustain-Pegel gesenkt, durch Drehen nach rechts erhöht.
Release (RELEASE1, RELEASE2)
Zum Einstellen der Release-Zeiten von EG1 (Filterhüllkurve)
und EG2 (Verstärkerhüllkurve). Release bestimmt den Zeitraum
von note-off (Augenblick, in dem Sie die Taste loslassen) bis
zum vollständigen Ausklingen des Tons. Durch Drehen nach
links wird die Release-Zeit kürzer, durch Drehen nach rechts
länger.
Pegel
Note off
3
Zeit
4
Attack-Pegel
0
Note on
1
2
2. Wählen Sie einen Effekt aus.
Die LED des gewählten Effekts leuchtet auf.
3. Mit den FX-Reglern können Sie die Parameterwerte einstellen.
3. Den Vocoder editieren
Den Vocoder zum Editieren auswählen
Beim Editieren des Vocoders gehen Sie im Prinzip genau so vor wie
beim Editieren eines Timbres, nur dass Sie zuvor den Vocoder
einschalten und als Ziel für die Editierung angeben müssen.
Die Seiten „02:Voc.Carrier–v18:Voc.Amp“ erscheinen erst
dann, wenn Sie mit der VOCODER-Taste den Vocoder
eingeschaltet haben.
Die Parameter des 16-Band-Pass-Filters (Analyse- und
Synthesefilter) und der Hüllkurvenfolger können in den PROGRAM
Seiten „v09:Voc.Filter–v18:Voc.Amp“ editiert werden.
1. Ein Synthie-Programm auswählen. (BDA S.56 „Ein Programm
auswählen“)
2. Drücken Sie die VOCODER-Taste, damit diese aufleuchtet.
Der Vocoder ist eingeschaltet und wird als Ziel für die
Editierung ausgewählt.
1: Attack-Zeit 3: Sustain-Pegel
2: Decay-Zeit 4: Release-Zeit
Effekteinstellungen vornehmen
Mit den Master-Effekten Ihres KingKORG können Sie ihren Sound
mit diversen Effekten wie Verzerrung, Modulation oder Hall
verfremden. Die Master-Effekte wirken auf den Gesamtsound der
beiden Timbres.
Die Master-Effekte sind in drei Sektionen unterteilt (PRE FX, MOD
FX, REV/ DELAY), wobei Sie für jede Sektion einen Effekttyp
auswählen können.
Für die PREF FX Sektion könnten sie zum Beispiel „EP.AMP“
wählen, für die MOD FX Sektion „TREMOLO“ und für die REV/
DELAY Sektion „HALL“.
Für jede Sektion können Sie zudem die Timbres wählen, die mit
dem entsprechenden Effekt bearbeitet werden sollen.
1. Durch Drücken eines FX Typ-Wählrades können Sie die
Timbres wählen, denen der Effekt zugewiesen wird.
Dabei leuchten die LEDs der ausgewählten Timbres. Leuchtet
keine der beiden Timbre-LEDs auf, wird der Effekt nicht
angewendet.
Falls der Voice Modus des Programms auf „Single“ steht,
leuchtet die Timbre LED B nicht auf.
3. Mit den PAGE +/-Tasten gelangen Sie zu den Editierseiten für
die Vocoderparameter.
Falls Sie in PROGRAM Seite „v15:Voc.Amp“ den direkten
TIPP:
Pegel erhöhen, wird der Audioeingang direkt ausgegeben.
Ändern Sie diesen Wert beim Überprüfen des Audioeingangs.
Falls Sie keinen Eekt feststellen können, drüen Sie die VO-
TIPP:
CODER-Taste, damit sie aueutet und ändern Sie den Pegel
von Timbre A in PROGRAM Seite „v02:Voc.Carrier“ oder den
Pegel des Vocoders in PROGRAM Seite „v18:Voc.Amp“.
Träger (CARRIER)
Am besten als Träger geeignet sind Wellenformen mit
zahlreichen Obertönen, zum Beispiel Sägezahn- oder Pulswellen
mit fester Pulsbreite. Sie können diese Parameter in den
PROGRAM Seiten „v02–v03:Voc.Carrier“ editieren.
Um eine Sägezahnwelle auf den Träger zu setzen, wählen
TIPP:
Sie für Timbre A auf der PROGRAM Seite „s13:OSC1“
die Einstellung „SAW“ und editieren Sie in den Vocoder
Einstellungen in PROGRAM Seite „v02:Voc.Carrier“ den
Eingangspegel von Timbre A.
62
Modulator (MODULATOR)
Üblicherweise dient eine menschliche Stimme als Modulator. An
Ihrem KingKORG können Sie als Modulator entweder den
Page 63

Mikrofoneingang (Input) oder Timbre B (Timbre B) auswählen.
Sie können die entsprechenden Parameter in PROGRAM Seite
„v04:Voc.Modultr“ editieren.
4. Editieren des Arpeggiators
Timbre-Zuordnung fur den Arpeggiator
Bei Programs, die zwei Timbres ansprechen, können Sie wählen, ob
nur ein Timbre oder beide vom Arpeggiator beeinflusst werden
sollen.
In PROGRAM Seite „a05:Arp” können Sie die Timbres bestimmen,
die mit dem Arpeggiator bearbeitet werden. Es können sowohl eins
als auch beide Timbres mit dem Arpeggiator bearbeitet werden.
Mit dem Arpeggio synchronisierte Klangeffekte
Die LFO-Frequenz oder Delay-Zeit mit dem Arpeggiatortempo
synchronisieren
Die LFO1- oder LFO2-Geschwindigkeit kann mit dem Arpeggiator
synchronisiert werden. Das hat den Vorteil, dass auch die
Modulationsbewegungen rhythmisch getimed sind. Selbst die
Delay-Verzögerungszeit lässt sich synchronisieren – und zwar als
Ein- oder Vielfaches des Arpeggiator-Tempos.
Außerdem kann der Arpeggiator des KingKORG zu einem externen
MIDI-Takt synchron laufen, was in der Folge bedeutet, dass auch
die Frequenz von LFO1/2 sowie die Delay-Verzögerungszeit zum
externen Sequenzer usw. synchron laufen.
Editieren des Klangs
6. Bestätigen Sie durch Drücken des Wählrades die ein/aus
Einstellungen der Arpeggioschritte.
Die Zahl der Arpeggiosrie kann in PROGRAM Seite
TIPP:
„a10:Arp“ festgelegt werden. (PL: „3. Arpeggioparameter“)
5. Wiederherstellen eines gespeicherten
Werts
Wenn Sie nach einer Änderung für den aktuellen Parameter wieder
den gespeicherten Wert wählen, leuchtet die ORIGINAL VALUEDiode.
Wenn Sie also beim Editieren nachprüfen möchten, welche Werte
die Parameter in der gespeicherten Version verwenden, müssen Sie
so lange an den Reglern drehen, bis die ORIGINAL VALUE-Diode
leuchtet.
Wenn Sie die geänderten Einstellungen nicht übernehmen wollen
und den ursprünglichen Inhalt des Speichers aufrufen wollen,
wählen Sie einfach ein anderes Programm aus, ohne die
Änderungen vorher zu speichern und kehren Sie anschließend ins
gewünschte Programm zurück.
Andern der Arpeggien
Arpeggien kann man abwandeln, indem man die benötigten
Arpeggio- Schritte aktiviert oder ausschaltet. Die Funktion, mit der
man das macht, nennt man den „Step-Arpeggiator“.
Vorbereiten eines Arpeggios mit dem StepArpeggiator
1. Drücken Sie die PROGRAM(GLOBAL)-Taste, damit diese
aufleuchtet.
2. Bewegen Sie sich mit den PAGE +/-Tasten zur PROGRAM
Seite „a12:Arp“.
3. Drücken Sie das Wählrad.
Im Hauptdisplay erscheint die Anzeige zur Schritteinstellung.
4. Mit den PAGE +/-Tasten bewegen Sie den „ “Cursor auf den
Schritt, den Sie editieren möchten.
5. Durch Drehen des Wählrads schalten Sie den Schritt ein oder
aus.
Im Hauptdisplay zeigt ein „O“ (on) die Schritte an, die gespielt
werden sollen. Mit einem „_” (off) markierte Schritte
bezeichnen Pausen.
Wiederholen Sie Schritt 4 und 5 für jeden einzelnen Schritt des
Arpeggiators.
Hinweise zu globalen Einstellungen
Im Global-Modus können Sie Einstellungen für das gesamte Gerät
ändern oder Einstellungen zu MIDI vornehmen.
Der Global-Modus beinhaltet diverse Einstellungen wie
Masterstimmung, Transponierung und globale MIDI-Kanäle.
(PL: „2. Global-Parameter“)
An diesen Einstellungen vorgenommene Änderungen gehen
verloren, wenn Sie das Gerät ausschalten, ohne diese vorher zu
speichern. Wenn Sie Ihre Einstellungen beibehalten möchten,
sollten Sie diese speichern. (BDA S.65 „1. Globale Einstellungen
speichern“)
Andere Funktionen
1. Initialisieren eines Programs
Mit folgendem Verfahren können die Einstellungen des aktuell
gewählten Programs initialisiert werden.
Dieser Vorgang initialisiert die Einstellungen des gerade
editierten Programms. Es ändert keine im internen Speicher
gespeicherten Inhalte.
Wenn Sie den initialisierten Status speichern möchten,
speichern Sie das Programm. (BDA S.65 „2. Speichern der
Einstellungen“)
1. Wählen Sie das Programm aus, das Sie initialisieren wollen.
(BDA S.56 „Ein Programm auswählen“)
2. Bewegen Sie sich mit den PAGE +/-Tasten zur PROGRAM
Seite „u01: Utility“ und drücken Sie das Wählrad.
Im Display erscheint eine Bestätigungsaufforderung zur
Initialisierung des Programms.
63
Page 64

KingKORG Bedienungsanleitung
Drüen Sie die SHIFT/EXIT-Taste, wenn Sie es si
TIPP:
anders überlegt haben.
3. Drücken Sie das Wählrad erneut.
Nach erfolgreicher Initialisierung erscheint im Display
„Complete!“ und Sie geraten automatisch zur übergeordneten
Anzeige zurück.
2. Ein Timbre kopieren
So können Sie Einstellungen des Timbres (A oder B) eines anderen
Programms dem Timbre des aktuell gewählten Programms zuweisen.
Dieser Vorgang überträgt Einstellungen auf ein Timbre des
Programms, das gerade editiert wird. Es ändert keine im
internen Speicher gespeicherten Inhalte.
Es kann jeweils nur ein Timbre kopiert werden.
1. Wählen Sie zuerst das Programm aus, welches das Zieltimbre
enthält. (BDA S.56 „Ein Programm auswählen“)
2. Bewegen Sie sich mit den PAGE +/-Tasten zur PROGRAM
Seite „u02: Utility“ und drücken Sie das VALUE-Wählrad.
3. Wählen Sie mit dem VALUE-Wählrad das Programm mit dem
Quelltimbre aus, das Sie kopieren möchten und bestätigen Sie
Ihre Auswahl durch Drücken des VALUE-Wählrad.
Bei der Programmauswahl leuchten die TIMBRE A oder
B-Wähltasten entsprechend dem vom Quellprogramm
verwendeten Timbre auf.
Die TIMBRE A oder B-Wähltasten reagieren in diesem Fall
nicht auf Druck.
4. Bestätigen Sie das Quelltimbre.
Falls das Quellprogramm zwei Timbres verwendet, blinkt die
Quelltimbre Taste. Wählen Sie falls nötig das gewünschte
Timbre aus und bestätigen Sie Ihre Auswahl durch Drücken des
VALUE-Wählrads.
Wenn die TIMBRE A oder B-Wähltasten blinkt, können
TIPP:
Sie au dur Drüen einer Taste Ihre Auswahl treen.
5. Bestätigen Sie das Zieltimbre.
Falls das Zielprogramm zwei Timbres verwendet, blinkt die
TIMBRE A oder B-Wähltasten. Wählen Sie falls nötig mit dem
VALUE-Wählrad das Zieltimbre aus und bestätigen Sie Ihre
Auswahl durch Drücken des VALUE-Wählrads.
6. Im Hauptdisplay erscheint eine Bestätigungsaufforderung.
Überprüfen Sie die Einstellungen und drücken Sie das
VALUE-Wahlrad .
Wenn der Kopiervorgang abgeschlossen ist, erscheint im
Display „Complete!“, und Sie gelangen zur übergeordneten
Anzeige der Seite „u02: Utility“.
Wenn Sie den kopierten Status speiern möten, speiern
TIPP:
Sie das Programm. (BDA S.65 „2. Speiern der Einstellungen“)
Dur Drüen der SHIFT/EXIT-Taste gelangen Sie zum
TIPP:
vorhergehenden Sri. Drüen Sie die SHIFT/EXIT-Taste,
wenn Sie das Timbre do nit speiern wollen.
3. Auf Werkseinstellungen zurücksetzen
Wenn Sie eine Weile mit dem KingKORG gearbeitet haben, möchten
Sie eventuell wieder die Werks-Programs und Global-Einstellungen
laden. Die Werkseinstellungen werden auch “Preload Data”
genannt. Um zu den Werkseinstellungen zurückzugelangen, müssen
Sie den Load Preload Befehl ausführen.
Beim Ausführen des Load Preload Befehls werden die von
Ihnen im internen Speicher gespeicherten Daten mit den
Werkseinstellungen überschrieben. Sie sollten sich also absolut
sicher sein, dass Sie Ihre Daten nicht mehr brauchen.
Solange der KingKORG Werksdaten lädt, dürfen Sie seine
Bedienelemente nicht berühren. Außerdem dürfen Sie ihn
während dieses Vorgangs niemals ausschalten.
Von den werksseitig eingestellten Programmen 1-300 werden
die Programme 201-300 (Programme ohne Preset-Daten) nicht
auf die Werkseinstellungen zurückgesetzt. Sollten Sie in diesen
Speicherplätzen Programme gespeichert haben, gehen diese
beim Zurücksetzen nicht verloren.
Bei aktivierter Memory Protect Funktion können Sie das Gerät
nicht auf die Werkseinstellungen zurücksetzen. Deaktivieren
Sie deshalb unbedingt die Memory Protect Funktion. (PL: „5.
Global-Parameter“)
1. Halten Sie die SHIFT/EXIT-Taste gedrückt und drücken Sie
die PROGRAM (GLOBAL)-Taste.
Sie gelangen in den Global-Modus, und die PROGRAM
(GLOBAL)-Taste blinkt.
2. Bewegen Sie sich mit den PAGE +/-Tasten zur GLOBAL Seite
„u01: Utility“ und drücken Sie das Wählrad.
3. Wählen Sie mit dem VALUE-Wählrad die Datentypen aus, die
Sie auf die Werkseinstellungen zurücksetzen möchten.
1Program: Daten des aktuellen Programms
ALL Program: Daten für die Programme 1–200
Global: Globale Daten
All Data: Programme –200 und globale Daten
64
Page 65

Speichern
4. Nachdem Sie VALUE-Wahlrad gedrückt haben, erscheint eine
Bestätigungsaufforderung.
Falls Sie die Daten nit laden wollen, drüen Sie die
TIPP:
SHIFT/EXIT-Taste oder die PROGRAM (GLOBAL)-Taste.
5. Drücken Sie das Wählrad erneut.
Wenn die gewählten Daten geladen sind, erscheint im Display
die Anzeige „Complete!”, und Sie gelangen automatisch zur
übergeordneten Anzeige zurück.
Speichern
Ihre Einstellungen speichern
Wenn Sie die von Ihnen editierten globalen Einstellungen oder
Programme auch weiterhin verwenden wollen, müssen Sie diese
speichern.
Falls Sie das Gerät ausschalten ohne zuvor zu speichern, gehen
die an den globalen Einstellungen vorgenommenen
Änderungen verloren. Speichern Sie deshalb Ihre editierten
Einstellungen, wenn Sie sie weiterhin verwenden wollen.
Wenn Sie ein Programm editiert haben ohne es zu speichern,
gehen die Änderungen bei der Wahl eines anderen Programms
oder beim Ausschalten verloren. Speichern Sie deshalb Ihre
editierten Einstellungen, wenn Sie sie weiterhin verwenden
wollen.
Bei aktivierter Memory Protect Funktion können Sie Ihre
Einstellungen nicht speichern. Deaktivieren Sie deshalb
unbedingt die Memory Protect Funktion. (PL: „5. GlobalParameter“)
1. Globale Einstellungen speichern
Welche Einstellungen werden gespeichert?
Beim Speichern globaler Daten werden folgende Einstellungen
gespeichert.
₋ Sämtliche Parameter in den GLOBAL Seiten „g01–g44“
Der Status der OCTAVE UP/DOWN-Tasten wird nicht
gespeichert. TUBE BOOST-Taste und TUBE ON-Taste
Einstellungen werden als globale Parameter gespeiert.
Das Speichern der globalen Einstellungen erfolgt im Global-Modus
wie folgt:
1. Halten Sie die SHIFT/EXIT-Taste gedrückt und drücken Sie
die PROGRAM (GLOBAL)-Taste, um in den Global-Modus zu
gelangen.
Im Hauptdisplay erscheint die Anzeige zur Editierung der
globalen Parameter und die PROGRAM (GLOBAL)-Taste blinkt.
2. Drücken Sie die WRITE-Taste.
Im Hauptdisplay erscheint eine Bestätigungsaufforderung und
die WRITE-Taste blinkt.
Drüen Sie die SHIFT/EXIT-Taste, wenn Sie es si
TIPP:
anders überlegt haben.
3. Drücken Sie die WRITE-Taste erneut.
Wenn die Daten gespeichert sind, erscheint im Display die
Anzeige „Complete!”, und Sie gelangen automatisch zur
übergeordneten Anzeige zurück.
Schalten Sie das Gerät niemals aus, solange noch Daten
gespeichert werden. Sonst droht Ihnen Datenverlust.
2. Speichern der Einstellungen
Welche Einstellungen werden gespeichert?
Beim Speichern eines Programms werden folgende Einstellungen
gespeichert.
₋ Sämtliche Parameter in PROGRAM „p01–06 (Program), s01–80
(Synth), v01–18 (Vocoder), a01–12 (Arp)”
₋ Master-Effekt-Einstellungen (PRE FX, MOD FX, REV/DELAY)
Der Status folgender Tasten auf der Oberseite wird nicht
gespeichert: TIMBRE A/B-Wähltasten , OSCILLATORWähltasten, LFO-Wähltaste.
Der Status der OCTAVE UP/DOWN-Tasten wird nicht
gespeichert.
Da TUBE und EQ globale Effekte sind, die auf sämtliche
Programme einwirken, werden ihre Einstellungen nicht für
jedes einzelne Programm gespeichert.
Das Speichern eines Programms erfolgt im Programm-Modus wie folgt.
1. Drücken Sie die WRITE Taste.
Im Hauptdisplay erscheint eine Anzeige zur Angabe des
Speicherorts und die WRITE-Taste blinkt.
2. Wählen Sie mit dem Wählrad den Speicherort aus
(Programmnummer).
Drüen Sie die SHIFT/EXIT-Taste, wenn Sie es si
TIPP:
anders überlegt haben.
3. Drücken Sie die WRITE-Taste erneut.
Wenn die Daten gespeichert sind, erscheint im Display die
Anzeige „Complete!”, und Sie gelangen automatisch zur
übergeordneten Anzeige zurück.
Schalten Sie das Gerät niemals aus, solange noch Daten
gespeichert werden. Sonst droht Ihnen Datenverlust.
3. Programme als Favoriten speichern
Der KingKORG bietet Ihnen die Möglichkeit, Ihre Programme als
Favoriten zu speichern, so dass sie mit einem einzigen Tastendruck
wieder aufgerufen werden können. Dies ist vor allem bei Auftritten sehr
hilfreich. Ihre Programme können Sie mithilfe der Kategorie/FavoritenTasten wie folgt als Favoriten speichern:
1. Wählen Sie das Programm aus, das Sie speichern wollen.
(BDA S.56 „Ein Programm auswählen“)
2. Halten Sie die WRITE-Taste gedrückt und drücken Sie die
FAVORITES-Taste.
Die FAVORITES-Taste und sämtliche Kategorie/FavoritenTasten blinken.
65
Page 66

KingKORG Bedienungsanleitung
3. Drücken Sie die FAVORITES-Taste, um die Bank (1–5)
auszuwählen, in der Sie das Programm speichern wollen.
Wenn die FAVORITES-Taste leuchtet, wählen Sie mit jedem
Druck auf die Taste die nächste Bank.
4. Drücken Sie die Kategorie/Favoriten-Taste, unter der Sie das
Programm speichern wollen.
Die gedrückte Taste blinkt während des Speicherns und leuchtet
permanent, wenn das Speichern abgeschlossen ist.
Schalten Sie das Gerät niemals aus, solange Sie speichern.
Sonst droht Ihnen Datenverlust.
Sie können ein unter Favoriten gespeiertes Programm
TIPP:
selbstverständli au ändern. Rufen Sie Favoriten auf,
wählen Sie dur Drehen des Wählrads das gewünste Programm und drüen Sie ansließend die WRITE-Taste.
Ich kann nichts editieren
Falls si dur Drehen eines Reglers kein Parameter ändert:
Womöglich wurde in der GLOBAL Seite
die Einstellung „Catch“ ausgewählt.
Falls die Position, auf die Sie den Regler gedreht haben, nit
mit dem im Display gezeigten Wert übereinstimmt:
Wenn in der GLOBAL Seite „g11: Common>Knob“ als
Einstellung „ValueScale“ gewählt wurde, kann sich der
eigentliche Parameterwert vom durch die Position des Reglers
angezeigten Wert unterscheiden.
Wenn si dur Drehen eines Reglers der Klang nit ändert:
Haben Sie mit den TIMBRE A/B-Wähltasten das korrekte
Timbre zum Bearbeiten ausgewählt?
Falls Sie kein Timbre B wählen können:
Womöglich ist in der PROGRAM Seite „p03: Common“ der
Voice Modus auf „Single“ gestellt.
Falls Sie im Editiermodus keine Vocoderparameter auswählen
können:
Leuchtet die VOCODER-Taste?
Wenn die Änderungen eines Programs oder der Global-
Einstellungen verswunden sind: Haben Sie sie gespeiert,
bevor Sie das Gerät ausgesaltet haben? Im Falle eines Programs werden die Änderungen außerdem gelöst, wenn Sie
ein anderes Program wählen. Speiern Sie die Änderungen,
bevor Sie ein anderes Program wählen oder das Instrument
aussalten.
„g11: Common>Knob“
Ich kann keine Programme Einstellungen speichern
Ist der GLOBAL Seite „g12: Common“ die Protect-Einstellung
auf „On” gesetzt?
Überprüfen Sie, ob Sie mit dem Wählrad einen korrekten
Speierort (Programmnummer) angegeben haben, falls das
von Ihnen editierte Programm nit gespeiert wird.
Fehlersuche
Falls Ihr KingKORG wider Erwarten nicht richtig funktioniert,
überprüfen Sie bitte folgendes:
Das Gerat kann nicht eingeschaltet werden
Haben Sie das AC-Netzteil an eine Stedose angeslossen?
(BDA S.54 „Anslusse“)
Halten Sie beim Einsalten den Netzsalter lange genug
gedrüt? (BDA S.55 „Ein-/Aussalten“)
Es ist nichts zu hören, wenn Sie auf der Tastatur spielen
Haben Sie die Aktivboxen/den Verstärker an die ritigen
Ausgänge angeslossen? (BDA S.54 „Anslusse“)
Ist der Verstärker/das Mispult eingesaltet und haben Sie
eine geeignete Lautstärke gewählt?
Bendet si der VOLUME-Regler eventuell auf dem Min-
destwert?
Ist in der GLOBAL Seite „g17: MIDI Basic” die „local control”
Einstellung auf „On” gesetzt?
Haben Sie eventuell einen lautstärkebezogenen Parameter auf
„0“ gestellt?
Ist in der PROGRAM Seite „s32: Filter“ der Cuto Wert auf
„0“ gesetzt?
Bei aktiviertem TUBE-Regler ist die Lautstärke zu gering
Eventuell ist die Vakuumröhre verslissen. Kontaktieren Sie
bie ein Korg Servicezentrum.
Der Arpeggiator startet nicht
Haben Sie den Arpeggiator aktiviert (leutet die ARP
(TEMPO)-Taste)?
Haben Sie den Arpeggiator einem Timbre zugeordnet?
Ist in der GLOBAL Seite „g19: MIDI Basic“ die Uhr ritig
eingestellt?
Die von einem externen Instrument gesendeten MIDIBefehle werden nicht ausgefuhrt.
Haben Sie das MIDI- oder USB-Kabel ordnungsgemäß ange-
slossen?
Verwendet der externe Sender die MIDI-Kanalnummer, die
Sie dem KingKORG zugeordnet haben?
Ist in der GLOBAL Seite „g23–g27: MIDI Filter“ die Einstellung
auf „Enable“ gesetzt?
Die Transposition, Anschlagkurve und/oder Arpeggiodaten
werden nicht ordnungsgemäß erkannt.
Ist in der GLOBAL Seite „g03: Common“ die korrekte Position
eingestellt?
Ich kann keine Timbres oder separaten MIDI-Kanäle steuern
Falls in der PROGRAM Seite „p03: Common“ der Voice Modus
auf „Single“ steht, empfängt der KingKORG nur einen MIDIKanal.
Wählen Sie die Einstellungen „Layer“ oder „Split“, um zwei
MIDI-Kanäle zur getrennten Steuerung der beiden Timbres
nutzen zu können.
Der Eingang scheint nicht zu funktionieren
Ist das Mikrofon ritig mit der Mikrofonbuse verbunden?
Ist der MIC LEVEL-Regler eventuell ganz na links gedreht?
Haben Sie im Vocoderprogramm „Input“ als Audioquelle des
Modulators angegeben?
66
Page 67

Technische Daten
Technische Daten
Klangerzeugung XMT (eXpanded Modeling Technology))
Programme
Anzahl der Programme 300 Programme (200 Presets / 100 Nutzer)
Anzahl der Kategorien 8 Kategorien
Timbres Max. 2 Timbres (Layer / Split)
Maximale Polyphonie Max. 24 Stimmen
Synthie
Oscillator
Aufbau 3 Oszillatoren (Auswahl unter analog, rauschen, DWGS. PCM und MIC IN)
Anzahl der Typen 127 Typen (32 analog und rauschen, 64 DWGS, 30 PCM, MIC IN)
Filter
Aufbau 1 Filter (Auswahl unter LPF, HPF, BPF)
Anzahl der Typen 18 Typen (7 LPF, 5 HPF, 6 BPF)
Modulation
Aufbau Hüllkurvengenerator: 2 Module, LFO: 2 Module
Routing Virtuelle Patches 6 Gruppen
Effekte
Sektionen Programmeffekte x 3 (PRE FX, MOD FX, REV/DELAY) + EQ (2Band) + TUBE (Stereo)
Typen PRE FX: 6 Typen (DISTORTION, DECIMATOR, RING MOD, GT.AMP, EP.AMP, TONE)
MOD FX: 6 Typen (FLANGER, CHORUS, U-VIBE, TREMOLO, PHASER, ROTARY) REV/
DELAY: 6 Typen (HALL, ROOM, PLATE, TAPE ECHO, MOD DELAY, BPM DELAY)
Vocoder 16-Band-Vocoder, Formant Shift und Formant Hold-Funktion
Arpeggiator Bis zu 8 Schritte (Anzahl der Schritte veränderbar), 6 Typen (UP/DOWN/ALT1/ALT2/
RANDOM/ TRIGGER)
Audio
Eingang
Mikrofonbuchse
Anschluss XLR-3-31 (symmetriert)
Eingangsimpedanz 6.8 kΩ
Maximalpegel -12 dBu
Ausgang
AUDIOAUSGANG(L/MONO,R)Buchsen
Anschlüsse 6,3 mm Klinkenbuchse (unsymmetriert) L/MONO, R
Verbraucherimpedanz 10 kΩ oder höher
Maximalpegel +8,2 dBu
Kopfhörerbuchse
Anschluss 3,5 mm Stereo-Miniklinkenbuchse
Maximalpegel 60 mW + 60 mW @ 33 Ω
Displays
Haupt 16 x 2 Zeichen OLED-Display
OSCILLATOR, FILTER 128 x 64 Pixel OLED-Display
Tastatur 61er-Leicht gewichtete Tastatur (anschlagdynamisch)
Spielhilfen
Intern Joystick, OCTAVE UP/DOWN-Tasten, Kategorie/Favoriten-Tasten
Eingänge DAMPER-Buchse (nicht Halbdämpferfähig), SWITCH/PEDAL-Buchse
Ausgang CV/GATE OUT-Buchse
Weitere Anschlüsse MIDI IN, OUT, USB B-Anschluss
Stromversorgung Anschluss fur das AC-Netzteil (DC 12V,
Leistungsaufnahme 10 W
Abmessungen (Breite x Tiefe x Höhe) 1.027 x 313 x 96 mm
Gewicht 7,0 kg
Betriebstemperatur 0 – +40 °C (ohne Kondensbildung)
Lieferumfang Bedienungsanleitung, AC-Netzteil, CV/GATE-Kabel
Sonderzubehor XVP-10: Schwell-/Volumenpedal, EXP-2: Schwellpedal, DS-1H: Dämpferpedal, PS-1, PS-3:
Fußtaster/Pedal
)
* Änderungen der technischen Daten und des Designs ohne vorherige Ankündigung vorbehalten.
67
Page 68

Manual de usuario
Españole
Índice
Caracteristicas generales . . . . . . . . . . . . . . . . . . . . . . . . . . . . . . . . . . . . . . . . . . . . . . . . . . . 70
Sonido sofisticado . . . . . . . . . . . . . . . . . . . . . . . . . . . . . . . . . . . . . . . . . . . . . . . . . . . . . . . . . . . . . . . . . . . . . . . . . . . . . . . . 70
Funcionamiento intuitivo . . . . . . . . . . . . . . . . . . . . . . . . . . . . . . . . . . . . . . . . . . . . . . . . . . . . . . . . . . . . . . . . . . . . . . . . . 70
Controladores y funciones que se pueden utilizar al tocar . . . . . . . . . . . . . . . . . . . . . . . . . . . . . . . . . . . . . . . . . . 70
Descripción y funciones de los paneles . . . . . . . . . . . . . . . . . . . . . . . . . . . . . . . . . . . . . . 71
Panel frontal (Joystick/Audio/Tube/FX) . . . . . . . . . . . . . . . . . . . . . . . . . . . . . . . . . . . . . . . . . . . . . . . . . . . . . . . . . . . 71
Panel frontal (control principal) . . . . . . . . . . . . . . . . . . . . . . . . . . . . . . . . . . . . . . . . . . . . . . . . . . . . . . . . . . . . . . . . . . . 72
Panel frontal (oscilador/filtro) . . . . . . . . . . . . . . . . . . . . . . . . . . . . . . . . . . . . . . . . . . . . . . . . . . . . . . . . . . . . . . . . . . . . . 73
Panel frontal (AMP/LFO/EG) . . . . . . . . . . . . . . . . . . . . . . . . . . . . . . . . . . . . . . . . . . . . . . . . . . . . . . . . . . . . . . . . . . . . . . . 74
Panel posterior . . . . . . . . . . . . . . . . . . . . . . . . . . . . . . . . . . . . . . . . . . . . . . . . . . . . . . . . . . . . . . . . . . . . . . . . . . . . . . . . . . . 75
Realizar conexiones y activar el equipo. . . . . . . . . . . . . . . . . . . . . . . . . . . . . . . . . . . . . . 76
Conexiones. . . . . . . . . . . . . . . . . . . . . . . . . . . . . . . . . . . . . . . . . . . . . . . . . . . . . . . . . . . . . . . . . . . . . . . . . . . . . . . . . . . . . . . 76
Activar/desactivar el equipo. . . . . . . . . . . . . . . . . . . . . . . . . . . . . . . . . . . . . . . . . . . . . . . . . . . . . . . . . . . . . . . . . . . . . . . 77
Desactivación automática. . . . . . . . . . . . . . . . . . . . . . . . . . . . . . . . . . . . . . . . . . . . . . . . . . . . . . . . . . . . . . . . . . . . . . . . . 77
Tocar el sintetizador KingKORG. . . . . . . . . . . . . . . . . . . . . . . . . . . . . . . . . . . . . . . . . . . . . 77
Escuchar las canciones de demostración. . . . . . . . . . . . . . . . . . . . . . . . . . . . . . . . . . . . . . . . . . . . . . . . . . . . . . . . . . . 77
Seleccionar y reproducir un programa. . . . . . . . . . . . . . . . . . . . . . . . . . . . . . . . . . . . . . . . . . . . . . . . . . . . . . . . . . . . . 78
Seleccionar un programa . . . . . . . . . . . . . . . . . . . . . . . . . . . . . . . . . . . . . . . . . . . . . . . . . . . . . . . . . . . . . . . . . . . . . . . . . 78
Añadir variedad al sonido . . . . . . . . . . . . . . . . . . . . . . . . . . . . . . . . . . . . . . . . . . . . . . . . . . . . . . . . . . . . . . . . . . . . . . . . . 79
Editar el sonido . . . . . . . . . . . . . . . . . . . . . . . . . . . . . . . . . . . . . . . . . . . . . . . . . . . . . . . . . . . . 80
Organización de un programa . . . . . . . . . . . . . . . . . . . . . . . . . . . . . . . . . . . . . . . . . . . . . . . . . . . . . . . . . . . . . . . . . . . . 80
Edición básica de programas. . . . . . . . . . . . . . . . . . . . . . . . . . . . . . . . . . . . . . . . . . . . . . . . . . . . . . . . . . . . . . . . . . . . . . 83
Acerca de los ajustes globales. . . . . . . . . . . . . . . . . . . . . . . . . . . . . . . . . . . . . . . . . . . . . . . . . . . . . . . . . . . . . . . . . . . . . 85
Otras funciones. . . . . . . . . . . . . . . . . . . . . . . . . . . . . . . . . . . . . . . . . . . . . . . . . . . . . . . . . . . . . . . . . . . . . . . . . . . . . . . . . . . 85
Guardar . . . . . . . . . . . . . . . . . . . . . . . . . . . . . . . . . . . . . . . . . . . . . . . . . . . . . . . . . . . . . . . . . . . 87
Guardar los ajustes . . . . . . . . . . . . . . . . . . . . . . . . . . . . . . . . . . . . . . . . . . . . . . . . . . . . . . . . . . . . . . . . . . . . . . . . . . . . . . . 87
Solución de problemas . . . . . . . . . . . . . . . . . . . . . . . . . . . . . . . . . . . . . . . . . . . . . . . . . . . . . 88
Especificaciones . . . . . . . . . . . . . . . . . . . . . . . . . . . . . . . . . . . . . . . . . . . . . . . . . . . . . . . . . . . 89
Page 69

Gracias por adquirir el sintetizador Korg KingKORG. Para ayudarle a sacar el máximo partido de su nuevo
instrumento, lea detenidamente este manual.
Precauciones
Ubicación
El uso de la unidad en las siguientes ubicaciones puede dar como
resultado un mal funcionamiento:
•Expuesto a la luz directa del sol
•Zonas de extremada temperatura o humedad
•Zonas con exceso de suciedad o polvo
•Zonas con excesiva vibración
•Cercano a campos magnéticos
Fuente de alimentación
Por favor, conecte el adaptador de corriente designado a una toma de
corriente con el voltaje adecuado. No lo conecte a una toma de corriente
con voltaje diferente al indicado.
Interferencias con otros aparatos
Las radios y televisores situados cerca pueden experimentar
interferencias en la recepción. Opere este dispositivo
a una distancia prudencial de radios y televisores.
Manejo
Para evitar una rotura, no aplique excesiva fuerza a los conmutadores o
controles.
Cuidado
Si exterior se ensucia, límpiese con un trapo seco. No use líquidos
limpiadores como disolvente, ni compuestos inflamables.
Guarde este manual
Después de leer este manual, guárdelo para futuras consultas.
Mantenga los elementos externos alejados del equipo
Nunca coloque ningún recipiente con líquido cerca de este equipo,
podría causar un cortocircuito, fuero o descarga eléctrica. Cuide de que
no caiga ningún objeto metálico dentro del equipo.
Nota respecto a residuos y deshechos (solo UE)
Cuando aparezca el símbolo del cubo de basura tachado sobre
un producto, su manual de usuario, la batería, o el embalaje
de cualquiera de éstos, significa que cuando quiere tire dichos
artículos a la basura, ha de hacerlo en acuerdo con la
normativa vigente de la Unión Europea. No debe verter
dichos artículos junto con la basura de casa. Verter este
producto de manera adecuada ayudará a evitar daños a su
salud pública y posibles daños al medioambiente. Cada país tiene
una normativa específica acerca de cómo verter productos
potencialmente tóxicos, por tanto le rogamos que se ponga en
contacto con su oficina o ministerio de medioambiente para más
detalles. Si la batería contiene metales pesados por encima del límite
permitido, habrá un símbolo de un material químico, debajo del
símbolo del cubo de basura tachado.
Gestion de datos
Un uso incorrecto o un funcionamiento anómalo pueden provocar una
pérdida del contenido de la memoria. Utilice el Editor incluido para
realizar copias de los datos importantes en el ordenador u otro soporte.
Tenga en cuenta que Korg no acepta ningún tipo de responsabilidad por
cualquier daño que pueda producirse por la pérdida de datos.
Acerca del tubo de vacío
La vida útil de un tubo de vacío no es uniforme. Si el tubo de vacío se
quema, póngase en contacto con un centro de atención al cliente de Korg.
Un profesional cualificado debe realizar todos los ajustes y tareas de
mantenimiento, incluida la sustitución del tubo de vacío.
Acerca del manual del usuario
La documentación de este producto incluye lo siguiente.
- Manual del usuario (el que está leyendo en este momento)
- Guía de parámetros (puede descargarla del sitio web de Korg)
http://www.korg.co.jp/English/Distributors/ or http://www.korg.com/
Manual del usuario
Proporciona explicaciones sencillas de las principales funciones de
KingKORG. Lea este documento en primer lugar.
Guía de parámetros
Proporciona información sobre todos los parámetros de KingKORG.
Lea esta guía si desea descubrir las funciones de parámetros específicos.
La guía de parámetros está estructurada del siguiente modo.
- Guía de parámetros
- Guía de efectos
- Guía de MIDI
Puede leer la guía de parámetros en pantalla.
Abreviaciones para los manuales
MU: Manual del usuario
GP: Guía de parámetros
Indicaciones en pantalla
Los valores de los diversos parámetros que se muestran en el manual son
solo ejemplos; es posible que no coincidan con lo que verá en la pantalla
de KingKORG.
Ejemplo de notación en la página de la pantalla principal
página GLOBAL “g15: Power Off”
En el modo Global, el nombre de la página se mostrará en la parte
superior de la pantalla principal.
* Todos los nombres de productos y compañías son marcas comerciales o
marcas registradas de sus respectivos propietarios.
69
Page 70

KingKORG Manual de usuario
Caracteristicas generales
Sonido sofisticado
1.Funciones del sintetizador con el motor de sonido
de modelado XMT de nueva creación
XMT (eXpanded Modeling Technology)) es una tecnología
patentada de Korg que permite crear una amplia gama de
variaciones sónicas mediante operaciones sencillas. El sistema
KingKORG proporciona una gama extremadamente diversa de
algoritmos de oscilador, como las ondas de diente de sierra o
cuadradas que se suelen encontrar en un sintetizador analógico,
pero también incluye ruido y PCM/DWGS.
2.Filtro con personalidad
El filtro es uno de los elementos más importantes que determina
el carácter de un sintetizador analógico. El sistema KingKORG
proporciona no solo un filtro digital de gran calidad, sino
también un modelado fidedigno de los filtros analógicos
encontrados en sintetizadores clásicos del pasado, lo que
permite el modelado agresivo del sonido.
3.Circuito activador del tubo de vacío analógico
completo
Como síntesis de los años de experiencia y conocimientos
técnicos de Korg en el diseño de circuitos analógicos, se
proporciona un controlador del tubo de vacío analógico
completo como efecto de masterización. No solo proporciona
calidez y volumen, sino también una potente sensación de
transmisión.
4.Vocoder
El sistema KingKORG presenta una función de vocoder que
puede utilizar su registro de voz a través de un micrófono para
modificar el sonido del oscilador, produciendo un efecto como si
el sintetizador estuviera hablando.
5.Patch virtual
Seis grupos de patch virtual permiten la conexión virtual de
señales de control como EG, LFO y funciones de joystick con
parámetros de sonido como intensidad o corte, lo que hace
posible modular los parámetros para lograr una flexibilidad de
creación de sonido aún mayor.
6.200 programas integrados
El sistema KingKORG contiene 200 programas organizados en
ocho categorías como sintetizador, distorsión y grave. Podrá
comenzar a reproducir inmediatamente una amplia gama de
sonidos. También existe un área de usuarios con 100 espacios
libres para que almacene sus propios sonidos originales.
Funcionamiento intuitivo
7. Panel frontal
Puede editar sonidos de manera intuitiva utilizando
directamente los mandos y botones que se organizan en
secciones en el panel.
La pantalla también proporciona páginas de edición que le
permiten editar todos los parámetros de KingKORG.
8.Favorites
Existe una función Favorites que le permite recuperar sus
programas favoritos con un solo toque. Puede registrar un total
de 40 programas en los ocho botones de categoría/favoritos y
recuperarlos al instante.
Controladores y funciones que se pueden utilizar al tocar
9.Arpegiador de pasos
El arpegiador de pasos genera automáticamente una frase
arpegiada (acorde “roto”) cuando mantiene pulsado un acorde
en el teclado. Puede elegir entre seis tipos de arpegios y
especificar la duración y el espaciado de las notas. También
puede activar/desactivar cada paso para disfrutar de una
variedad aún mayor.
10.Joystick
El sistema KingKORG proporciona el joystick, que es la
característica favorita de las estaciones de trabajo musicales de
Korg. Al desplazar el joystick hacia arriba/abajo/izquierda/
derecha puede controlar con libertad el pitch bend y los
parámetros de programas. También puede conectar un
conmutador de pedal y tocar manteniendo el efecto del joystick.
11.Software de biblioteca
Si conecta el sistema KingKORG a un ordenador mediante una
entrada USB, podrá utilizar el software de biblioteca para
gestionar los programas de KingKORG en su ordenador. El
software de biblioteca se puede descargar del sitio web de Korg
( http://www.korg.co.jp/English/Distributors/ or http://www.korg.com/ )
de forma gratuita.
70
Page 71

Descripción y funciones de los paneles
Panel frontal (Joystick/Audio/Tube/FX)
Mando VOLUME
Este mando ajusta el volumen de las salidas
AUDIO OUTPUT (L/MONO, R) así como el volumen
del jack para auriculares.
LED de MIC LEVEL PEAK
Este mando ajusta el nivel de entrada procedente
del jack para micrófono.
Mando MIC LEVEL
Este mando ajusta el nivel de entrada
procedente del jack para micrófono.
Botones OCTAVE UP/DOWN
Estos botones cambian la gama de
intensidades que se asigna al teclado en
pasos de una octava en una gama de +/-2
octavas. (MU: página 79, “Cambiar octavas”)
Efectos globales
(GLOBAL FX)
Descripción y funciones de los paneles
LED de timbre
El LED del timbre en el que está
aplicando un efecto se iluminará.
Efectos maestros
(MASTER FX)
Controles TUBE
Mando DRIVE
Ajusta la cantidad de transmisión del
circuito del tubo de vacío.
Botón BOOST
Este botón eleva la distorsión del tubo
de vacío.
Botón ON
Activa/desactiva el circuito del tubo
de vacío.
Jack para auriculares
Joystick (JS)
El joystick controla la intensidad y
la profundidad de la modulación
(expresión).
Al mover el joystick en dirección
izquierda/derecha controlará el
pitch bend, y al desplazarlo en
dirección arriba/abajo controlará la
modulación.
Puede asignar tipos independientes
de modulación a las direcciones
ascendente y descendente.
Conecte aquí los auriculares.
Este jack siempre emitirá la misma
señal que los jacks AUDIO OUTPUT
(L/MONO y R).
El volumen de los auriculares se
controla con el mando VOLUME.
TUBE (tubo de vacío)
El tubo de vacío se puede romper si sufre un golpe.
Si el tubo de vacío se rompe, asegúrese de sustituirlo.
Mandos de control FX
Estos mandos ajustan los parámetros
PRE FX, MOD FX y REV/DELAY.
Diales de selección de tipo FX
(con función de pulsación)
Estos diales permiten seleccionar los
tipos de efectos para PRE FX, MOD
FX y REV/DELAY.
Al pulsar un dial puede cambiar el
timbre en el que se aplicará el efecto.
Controles EQ
Estos controles permiten ajustar las
regiones de frecuencia alta y baja de
la salida de audio de KingKORG.
Mando HIGH
Este mando permite ajustar el tono
de la región de frecuencia alta.
Si utiliza este mando mientras
mantiene pulsado el botón
SHIFT/EXIT, puede ajustar la
frecuencia de corte HIGH.
Mando LOW
Este mando permite ajustar el tono
de la región de frecuencia baja.
Si utiliza este mando mientras
mantiene pulsado el botón
SHIFT/EXIT, puede ajustar la
frecuencia de corte LOW.
71
Page 72

KingKORG Manual de usuario
Panel frontal (control principal)
Botón PROGRAM (GLOBAL)
Este botón tiene dos funciones:
[PROGRAM]
Cuando desee reproducir programas,
pulse este botón para seleccionar el
modo Program. El botón se iluminará
y la pantalla de reproducción de
programas aparecerá en la
visualización principal.
[GLOBAL]
Cuando desee realizar ajustes
generales que se apliquen a todo el
sistema KingKORG, mantenga pulsado
el botón SHIFT/EXIT y pulse este botón
para seleccionar el modo Global.
El botón parpadeará y en la pantalla
principal aparecerá la pantalla de
ajustes globales.
Botones PAGE +/-
Utilice estos botones para acceder a la
página de edición deseada. Utilice los
botones +/- para desplazarse por las
páginas.
Pantalla principal
Muestra información variada como
datos
de programas y valores de
parámetros.
Dial de valores (con función de
pulsación)
Utilice este dial para editar valores de
parámetros o programas, o bien pulse
el dial para ejecutar ajustes. En las
páginas en las que esté disponible la
función de pulsación, aparecerá un
símbolo “ ” en la pantalla principal.
Botones de selección TIMBRE A/B
Estos botones permiten seleccionar el timbre
que se controlará mediante el panel frontal
(OSCILLATOR/FILTER, AMP/LFO/EG). Al
pulsar los botones A y B simultáneamente,
seleccionará ambos timbres.
LED ORIGINAL VALUE
Se iluminará cuando el valor que esté
editando con los mandos y botones del
panel frontal coincida con el valor
guardado internamente.
72
Botón SHIFT/EXIT
Utilice este botón para acceder a las
funciones ampliadas (SHIFT) de un
mando o botón, o bien para regresar a
la pantalla de selección de programas
(EXIT).
Botón WRITE
Utilice este botón para guardar un
programa o ajuste global que haya
editado, o bien para registrar un
programa deseado como un favorito.
(MU: pág.87 “Guardar”)
Botones de categoría/favoritos
Si el botón PROGRAM (GLOBAL) está
iluminado, al pulsar uno de estos botones
saltará al primer programa de la categoría
correspondiente. Si el botón FAVORITES
está iluminado, al pulsar uno de estos
botones recuperará directamente un
programa. Puede registrar sus programas
favoritos para poder recuperarlos con una
sola pulsación.
Botón FAVORITES
Utilice este botón para activar la función Favorites que facilita la
selección de un sonido, o bien para cambiar los grupos de favoritos.
Cada vez que pulse este botón, recorrerá A B C D E A….
Al pulsar este botón mientras mantiene pulsado el botón SHIFT/EXIT,
puede recorrer los bancos en el orden de E →D →C →B →A →E….
Para desactivar la función Favorites, pulse el botón PROGRAM (GLOBAL).
Botón ARP (TEMPO)
Utilice este botón para activar/
desactivar el arpegiador y para
establecer el tempo. También se
proporciona una función de
marcación del tempo.
(MU: pág.80 “3. Tocar arpegios”)
LED TEMPO
Parpadeará al ritmo del tempo.
Botón SPLIT (POSITION)
Utilice este botón para activar/desactivar
la función Split o para especificar la
posición de división.
La función Split se activará/desactivará
cada vez que pulse el botón. Este botón
también se utilizará para especificar la
posición de división. (GP: “1. Parámetros
de timbre”)
Page 73

Panel frontal (oscilador/filtro)
Botones de selección OSCILLATOR
Utilice este botón para seleccionar el número de
oscilador que desee controlar. El LED del oscilador
seleccionado actualmente se iluminará.
Descripción y funciones de los paneles
Pantalla secundaria OSCILLATOR
Muestra información sobre el oscilador
seleccionado actualmente.
Dial de selección OSCILLATOR
TYPE (con función de pulsación)
Permite seleccionar el tipo de oscilador.
Al pulsar el dial puede saltar al principio de las
categorías Off, ANALOG, DWGS, PCM o MIC IN.
Mando FILTER CUTOFF
Este mando permite ajustar la frecuencia
de corte del filtro.
Pantalla secundaria FILTER
Muestra información sobre el filtro
seleccionado actualmente
Controles OSCILLATOR
Estos mandos permiten editar los parámetros de cada
oscilador.
Mando TUNE (SEMI)
Permite ajustar la cantidad de desafinación en relación
con la intensidad básica. Si mantiene pulsado el botón
SHIFT/EXIT y gira este mando, puede realizar ajustes
en pasos de semitono.
Mando CONTROL
Permite ajustar el parámetro CONTROL 1 del oscilador.
El parámetro dependerá del tipo de oscilador seleccionado.
Si mantiene pulsado el botón SHIFT/EXIT y gira este mando,
puede ajustar el parámetro CONTROL 2.
(GP: “1. Parámetros de timbre”)
Mando PORTA. TIME
Especifica el tiempo de portamento.
Conmutador PORTAMENTO
Se trata de un botón de encendido/apagado para el efecto
de portamento, que crea una transición suave a una nota
de una intensidad distinta.
Controles FILTER
Estos mandos permiten editar los parámetros
de filtro.
Mando RESONANCE
Permite ajustar la cantidad de resonancia del
filtro.
Mando EG INT (KEY TRK)
Permite ajustar la profundidad a la que el EG
variará la frecuencia de corte durante un
periodo. Si mantiene pulsado el botón
SHIFT/EXIT y gira este mando, puede ajustar
la profundidad a la que la frecuencia de corte
se verá afectada por la posición al tocar el
teclado (es decir, notas altas a bajas).
Botón de selección FILTER TYPE (-)
Este botón le permite seleccionar el tipo de filtro.
Si mantiene pulsado el botón SHIFT/EXIT y pulsa
este botón, puede retroceder por las opciones
(05 04 03 02 01...).
73
Page 74

KingKORG Manual de usuario
Panel frontal (AMP/LFO/EG)
Mando AMP LEVEL
Permite ajustar el volumen del timbre.
Botón de selección LFO
Este botón permite seleccionar el LFO que se editará
mediante los controles de LFO. El LED del LFO
seleccionado actualmente se iluminará. El LED
parpadeará al ritmo de la frecuencia de LFO.
Controles LFO
Utilice estos controles para editar los parámetros de LFO.
Mando FREQ
Este mando permite ajustar la frecuencia del LFO.
Mando INTENSITY
Este mando permite ajustar la profundidad a la que el
LFO afectará al filtro o intensidad.
74
Botón VOCODER
Activa/desactiva el vocoder.
Activa/desactiva la función del
vocoder.
Al pulsar este botón mientras
mantiene pulsado el botón
SHIFT/EXIT, puede
activar/desactivar la función de
micrófono.
Botón UNISON
Activa/desactiva la función Voice
Unison del timbre.
Al pulsar este botón mientras
mantiene pulsado el botón
SHIFT/EXIT, puede saltar a la
pantalla de ajuste de voz de unísono.
Botón de selección EG
Este botón permite seleccionar el
EG que se editará mediante los
controles de EG. El LED del EG
seleccionado actualmente se
iluminará.
El LED parpadeará sincronizado
con el efecto del EG.
Botón VELOCITY
Este botón activa/desactiva la
sensibilidad de la velocidad para
el EG, lo que permite la variación
de los ajustes del EG en función de
la cantidad de fuerza que se utiliza
al tocar el teclado.
Controles EG
Permiten ajustar los parámetros de EG.
Mando ATTACK
Permite ajustar el tiempo desde el inicio de
la nota (el momento en el que toca una
tecla) hasta que se alcanza el nivel de
ataque (el valor máximo de la envolvente).
Mando DECAY
Permite ajustar el tiempo desde que se
alcanza el nivel de ataque hasta que se
alcanza el nivel sustain.
Mando SUSTAIN
Permite ajustar el nivel al que se mantendrá
el volumen una vez transcurrido el tiempo
de caída.
Mando RELEASE
Permite ajustar la cantidad de tiempo desde
el final de la nota (el momento en el que
suelta la tecla) hasta que el volumen se
silencia por completo.
Page 75

Panel posterior
Descripción y funciones de los paneles
Jack DAMPER
Aquí puede conectar un pedal damper.
Conectores MIDI IN/OUT
Estos conectores permiten al
sistema KingKORG intercambiar
mensajes MIDI con un dispositivo
MIDI externo.
Conector USB B
Este conector permite al sistema KingKORG
intercambiar mensajes MIDI con el ordenador.
Jack CV/GATE OUT
Permite emitir un voltaje de control y compuerta.
Al conectar este jack a un sintetizador analógico,
puede controlarlo de diversas formas.
Jacks AUDIO OUTPUT
Puede conectar monitores autoalimentados, un
amplificador estéreo, un mezclador o un grabador de
varias pistas a estos jacks. Si utiliza una conexión mono,
conecte el jack L/MONO.
Jack para micrófono
Aquí puede conectar un micrófono.
Los programas de tipo vocoder utilizan este
micrófono como el audio de modulación.
Conmutador de
alimentacion
Activa o desactiva el equipo.
Conector DC12V
Conecte el adaptador de CA incluido aquí.
Conecte el adaptador de CA al sistema
KingKORG antes de enchufarlo en una
toma de CA.
Jack SWITCH/PEDAL
Puede conectar una pedalera o un controlador de
pedal aquí.
Nota acerca de la alimentación
(función de desactivación automática)
Este instrumento está equipado con una función de
desactivación automática. La alimentación se desactivará
automáticamente si transcurre un determinado periodo
de tiempo sin que el usuario realice ninguna operación.
(Con los ajustes de fábrica, la alimentación se desactivará
una vez transcurridas cuatro horas sin que el usuario realice
ninguna operación.)
Para desactivar esta función, cambie los ajustes de la página
GLOBAL “g15: Power Off” .
Gancho para cable
Para evitar que el cable de alimentación se
desenchufe accidentalmente del Conector
DC12V, fije el cable en torno a este gancho.
75
Page 76
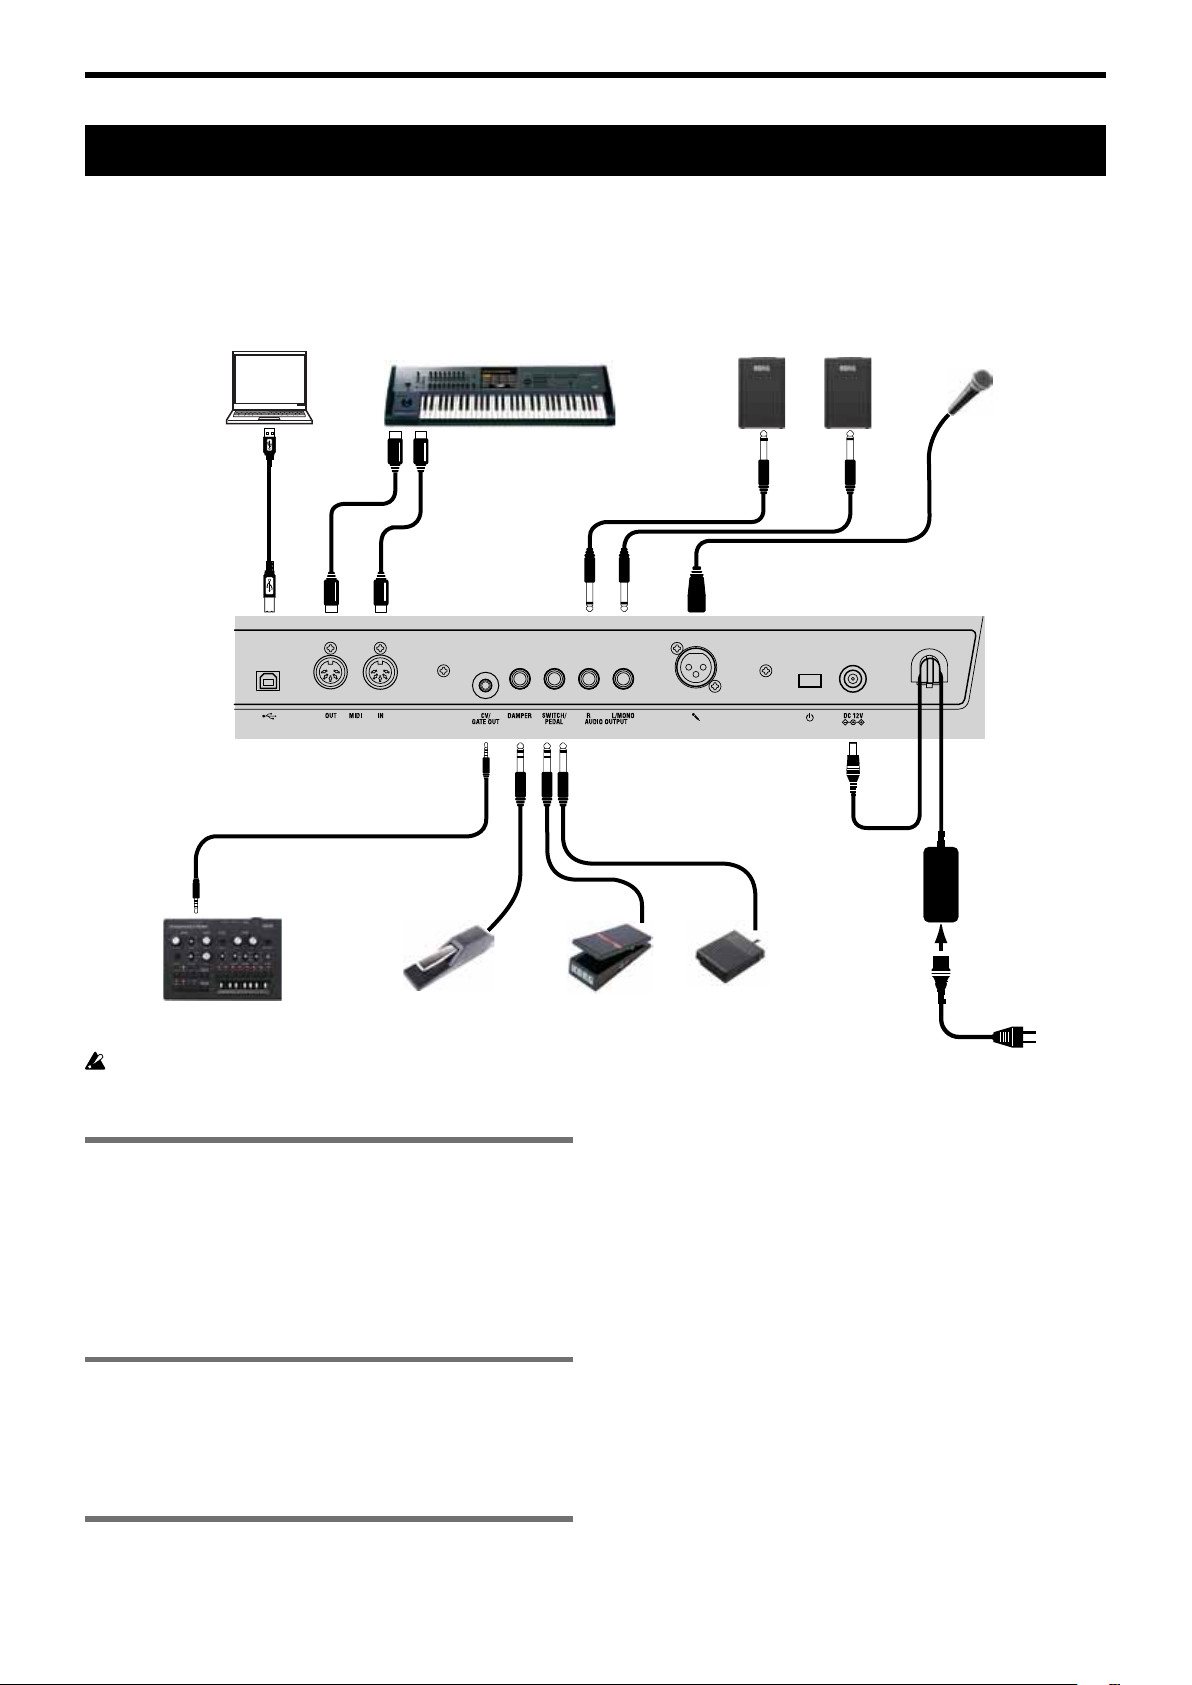
KingKORG Manual de usuario
Teclado MIDI, módulo de sonido,
Altavoces de monitor
Realizar conexiones y activar el equipo
Conexiones
En la ilustración siguiente se muestra un ejemplo típico de conexiones para el sistema KingKORG. Conecte el equipo en función de sus
necesidades específicas.
Ordenador
Cable USB
Cable CV/GATE (incluido)
caja de ritmos, etc.
MIDI OUTMIDI IN INPUT INPUT
Cable MIDI
(con amplificador interno)
DC12V
Micrófono
Adaptador
de CA
(incluido)
compatible con CV/GATE IN
Debe desactivar todos los equipos antes de realizar conexiones. Si realiza conexiones con la alimentación activada, podría dañar el sistema
de altavoces o bien provocar daños o un fallo de funcionamiento de los equipos.
Pedal damperSintetizador analógico
1. Conectar los altavoces o el
amplificador de monitor
Conecte los jacks AUDIO OUTPUT del sistema KingKORG a los
jacks de entrada del mezclador o de los altavoces de monitor
autoalimentado. Si realiza conexiones mono, utilice el jack L/MONO.
CONSEJO:
Le recomendamos que utilice las salidas estéreo para
aprovechar al máximo el sonido del sistema KingKORG.
2. Conectar el micrófono
Si tiene pensado utilizar el sistema KingKORG como un vocoder,
conecte el micrófono a la entrada de micrófono del panel posterior
de modo que el audio procedente de dicha entrada se pueda utilizar
como el modulador. (MU pág.80 “4. Reproducir sonidos del vocoder”)
Controlador
de pedal
Jack SWITCH/PEDAL
Aquí puede conectar una pedalera (PS-1/PS-3), un controlador de
pedal (EXP-2) o un pedal de expresión/volumen (XPV-10) opcional.
Antes de utilizarlos, debe ajustar la configuración en el modo Global
para especificar el tipo de dispositivo (conmutador o pedal) que ha
conectado. Con los ajustes de fábrica, este jack está configurado para
utilizar un dispositivo de tipo conmutador, y está asignado a la
función “program up” (Prog. Up).
Hay disponibles diversas funciones para los conmutadores y
pedales.
Si ha especificado un conmutador (Switch), podrá modificar
programas, cambiar la octava o activar/desactivar el portamento. Por
lo general, la función solo permanecerá activa mientras mantenga
pulsado el pedal, pero puede cambiar este ajuste en caso deseado
para que la función alterne entre encendido y apagado cada vez que
pulse el pedal. Si ha especificado un pedal (Pedal), podrá controlar
parámetros como el volumen, la expresión y la panoramización.
(GP: “8. Parámetros de utilidad globales”)
Conmutador
de pedal
a la toma
eléctrica
3. Conectar pedales y conmutadores
Conecte un controlador de pedal y un conmutador de pedal según
sus necesidades.
76
Page 77

Realizar conexiones y activar el equipo
Jack DAMPER
Aquí puede conectar un pedal damper DS-1H o una pedalera PS-1
opcional que le permitirá activar y desactivar el efecto damper.
4. Conectar un dispositivo MIDI o un
ordenador
Deberá realizar estas conexiones si desea utilizar el teclado o los
controladores del sistema KingKORG para controlar un módulo de
sonido MIDI externo o bien para utilizar un teclado MIDI distinto o
un secuenciador para controlar el generador de sonido del
KingKORG. (GP: “6. Parametros MIDI”)
5. Conectar el adaptador de CA
Debe utilizar el adaptador de CA incluido. El uso de un
adaptador de CA distinto puede provocar fallos de
funcionamiento.
Asegúrese de que la toma de CA proporciona el voltaje
correcto para su adaptador de CA.
1. Conecte el adaptador de CA incluido al jack DC12V ubicado
en el panel posterior.
2. Para evitar que el enchufe se desconecte accidentalmente,
enrolle el cable de alimentación en torno al gancho del panel
posterior. Asegúrese de no ejercer una fuerza excesiva sobre el
casquillo del enchufe de CC.
Conmutadorde
alimentación
Cuando fije el cable al
gancho para cable, evite
doblar esta área más de
lo necesario.
ConectorDC12V
Ganchopara
cable
Adaptadorde
CA(incluido)
Cablede
alimentaciónpara
adaptadordeCA
(incluido)
Conecte el enchufe
a una toma de CA.
2. Desactivar el equipo
Nunca desactive el equipo mientras se están guardando datos.
Si lo hace, podría dañar los datos del sistema KingKORG.
1. Baje el volumen de los altavoces de monitor o de cualquier
otro sistema de salida externa y desactive la alimentación del
sistema de salida.
2. Gire el mando VOLUME del sistema KingKORG al máximo
hacia la izquierda y mantenga pulsado el conmutador de
alimentación hasta que la pantalla principal se quede en
blanco.
Desactivación automática
El sistema KingKORG dispone de una función de desactivación
automática. Cuando haya transcurrido un determinado periodo de
tiempo sin que el usuario realice ninguna operación con los
conmutadores o mandos del panel frontal, o bien sin tocar el teclado, la
alimentación se desactivará automáticamente. Con los ajustes de fábrica,
este tiempo está configurado en cuatro horas.
Si lo desea, puede desactivar esta función de la siguiente forma.
1. Desactivar la función de desactivación
automática
1. Mantenga pulsado el botón SHIFT/EXIT y pulse el botón
PROGRAM (GLOBAL) para entrar en el modo Global.
2. Utilice los botones PAGE +/- para acceder a la página GLOBAL
“g15: Power Off”.
3. Gire el dial de valores para elegir “Disable”.
4. Para guardar el cambio realizado, pulse el botón WRITE para
guardar los ajustes globales. (MU pág.87 “1. Guardar ajustes
globales”)
Si desactiva la alimentación sin guardar, los cambios
realizados en los ajustes globales se descartarán. Si desea
utilizar los ajustes editados en el futuro, asegúrese de
guardarlos.
Activar/desactivar el equipo
1. Activar el equipo
Antes de activar el sistema KingKORG, debe desactivar los
dispositivos de salida externa, como los altavoces de monitor
autoalimentado.
1. Gire el mando VOLUME del sistema KingKORG
completamente hacia la izquierda para minimizar los
artefactos de audio no deseados durante el inicio.
2. Mantenga pulsado el conmutador de alimentación hasta que
aparezca la pantalla principal; a continuación, suelte el
conmutador.
Cuando el sistema KingKORG se inicie, en la pantalla principal
aparecerá información como el número y el nombre del
programa.
3. Con el volumen bajado en los altavoces de monitor o en
cualquier otro sistema de salida externa, active la alimentación
del sistema de salida.
4. Gire lentamente el mando VOLUME del sistema KingKORG
hacia la derecha para ajustar el volumen del sistema de salida.
Tocar el sintetizador
KingKORG
Escuchar las canciones de demostración
El sistema KingKORG contiene canciones de demostración
características de diversos estilos. Antes de comenzar a tocar,
dedique un momento a disfrutar de los Cuando el botón AVORITES
está iluminado Número de programa Nombre de programa sonidos
del sistema KingKORG. (MU pág.112 “Demo song list”)
1. Seleccionar y reproducir una canción
de demostración
Las canciones de demostración están asignadas a los botones de
categoría/favoritos.
1. Mantenga pulsado el botón SHIFT/EXIT y pulse un botón de
categoría/favoritos para seleccionar una canción de
demostración.
77
Page 78

KingKORG Manual de usuario
CuandoelbotónPROGRAM(GLOBAL)estáiluminado
CuandoelbotónFAVORITESestáiluminado
La demostración comenzará a reproducirse automáticamente y
continuará reproduciéndose consecutivamente hasta la última
canción. Cuando la última canción de demostración haya
terminado de reproducirse, la reproducción continuará desde la
primera canción de demostración. El botón correspondiente a la
canción de demostración que se está reproduciendo parpadeará.
Para seleccionar una canción de demostración distinta, pulse un
botón iluminado.
2. Durante la reproducción de la canción de demostración, pulse
el botón SHIFT/EXIT.
La reproducción de la canción de demostración se detendrá y
regresará al modo Program.
Seleccionar y reproducir un programa
Número de tipo de filtro
Nombre de tipo de filtro
Seleccionar un programa
El sistema KingKORG contiene 200 programas distintos que puede
comenzar a reproducir inmediatamente. Para poder seleccionarlos
de forma intuitiva, los programas se organizan por categorías de
sonido. Pruebe a seleccionar y reproducir diversos programas para
experimentar el sonido del sistema KingKORG.
1. Seleccionar programas por su número
1. Pulse el botón PROGRAM (GLOBAL) para que se ilumine.
En la pantalla principal se indicará el número y el nombre del
programa.
2. Gire el dial de valores para seleccionar el programa deseado.
CONSEJO:
Los programas en los que el botón SPLIT (POSITION) está iluminado tienen el modo de voz congurado como dividido. (GP: “1. Parámetros de timbre”)
1. Pantalla de visualización
Pantalla principal (al reproducir un programa)
Cuando el botón PROGRAM (GLOBAL) esté iluminado, en la
pantalla principal aparecerá el número de programa, el nombre de
programa.
Cuando el botón FAVORITES esté iluminado, en la pantalla aparecerá
el el banco, el número de programa, el nombre de programa.
Número
deprograma
Nombre
deprograma
Número
de programa
Pantalla principal (al editar un programa)
En la pantalla aparecerá el número de página, el nombre de página,
el nombre de parámetro y el valor. El mismo contenido también se
mostrará en la pantalla al editar ajustes globales (cuando el botón
PROGRAM (GLOBAL) esté parpadeando).
banco
Nombre
de programa
3. Toque el teclado para escuchar el sonido.
Puede utilizar los botones OCTAVE UP/DOWN para cambiar la
gama de intensidades que se pueden tocar con el teclado. (MU
pág.79 “Cambiar octavas”)
Seleccionar programas por categoría
1. Pulse el botón de categoría/favoritos que coincida mejor con el
programa (sonido) deseado.
Se seleccionará el primer programa en la categoría seleccionada
y dicho botón de categoría/favoritos se iluminará.
2. Gire el dial de valores para seleccionar el programa (sonido)
deseado.
3. Toque el teclado para escuchar el sonido.
Número
de página
Pantalla secundaria OSCILLATOR
En la pantalla aparecerá información sobre el oscilador seleccionado
actualmente.
Número de tipo de oscilador
Nombre de tipo de oscilador
Pantalla secundaria FILTER
En la pantalla aparecerá información sobre el filtro seleccionado
actualmente.
78
Nombre
de página
2. Seleccionar programas con el botón
FAVORITES
Valor de parámetroNombre de parámetro
Para seleccionar programas utilizando el botón FAVORITES,
primero debe haber almacenado sus programas favoritos en
los botones de categoría/favoritos. (MU pág.87 “3. Registrar
programas en los botones de categoría/favoritos”)
1. Pulse el botón FAVORITES para que se ilumine; a
continuación, seleccione un banco (A–E).
El banco cambiará cada vez que pulse el botón FAVORITES y en
la pantalla principal aparecerá el banco seleccionado.
Page 79

+Y
Variación de la profundidad del
CONSEJO:
Realizar conexiones y activar el equipo
joystick a un conmutador de pedal. (GP: “8. Parámetros de pedal”)
Puede utilizar el joystick como una fuente de patch
virtual. Esto le permite obtener efectos más complejos
y sonoros que los enumerados anteriormente. (GP:
“1. Parámetros de timbre”)
CONSEJO:
Si mantiene pulsado el botón SHIFT/EXIT y pulsa
el botón FAVORITES puede desplazarse en sentido
inverso por los bancos (E D C B A E...).
2. Pulse el botón de categoría/favoritos (1–8) en el que haya
almacenado el programa que desea seleccionar.
El programa se recuperará y la pantalla FAVORITES
seleccionada se iluminará.
3. Toque el teclado para escuchar el sonido.
Añadir variedad al sonido
Además de su teclado, el sistema KingKORG proporciona
numerosos controladores como el joystick, mandos y botones. Puede
variar el sonido utilizando estos controladores para controlar el
filtro, el LFO y el EG en tiempo real mientras toca.
1. Utilizar los controladores
Joystick (JS)
Puede controlar diversos parámetros y efectos moviendo el joystick
en cuatro direcciones (arriba/abajo/izquierda/derecha). El resultado
será diferente para cada programa; pruebe cada controlador para
oír lo que emite para el programa que ha seleccionado.
CONSEJO:
Reducción de la
intensidad, etc.
“Joystick” se abrevia como JS.
vibrato o la velocidad del
altavoz giratorio, etc.
-X +X
Incremento de la
intensidad, etc.
2. Tocar el teclado
El teclado del sistema KingKORG le permite controlar el sonido de
las siguientes formas.
Velocidad
Permite que la fuerza (velocidad) al tocar una tecla afecte al
sonido. Por lo general, la velocidad de las teclas se utiliza para
controlar el tono o el volumen.
El teclado del sistema KingKORG no admite el aftertouch.
Algunos sonidos producirán poca o ninguna variación
tonal en respuesta a la velocidad de las teclas, o bien se han
definido para no detectar velocidad.
Seguimiento del teclado
Permite que el sonido se vea afectado por la posición de la nota
en el teclado. Por lo general, el seguimiento del teclado se utiliza
para que el tono sea más claro cuando toque notas más agudas,
o bien para crear una diferencia de volumen entre las regiones
bajas y altas del teclado.
CONSEJO:
Cambiar octavas
Puede utilizar los botones OCTAVE UP/DOWN para cambiar la
región de intensidades asignadas al teclado en pasos de una
octava en una gama de +/-2 octavas.
La velocidad y el seguimiento del teclado se pueden
utilizar como una fuente de patch virtual. (GP: “1.
Parámetros de utilidad globales”)
Gama del teclado LED del botón
C4 – C9 Botón UP parpadeando
C3 – C8 Botón UP encendido
C2 – C7 Botones UP/DOWN apagados
C1 – C6 Botón DOWN encendido
C0 – C5 Botón DOWN parpadeando
CONSEJO:
-Y
Cuando suelte el joystick, regresará automáticamente
a la posición central. Sin embargo, si desea mantener
el efecto del joystick para que continúe después de
soltarlo, puede asignar la función de bloqueo del
Wah, intensidad del efecto, etc.
Octava ±0
Octava -1
Octava -2
Los números entre paréntesis ( ) corresponden a números de notas MIDI.
Octava +2
Octava +1
79
Page 80

KingKORG Manual de usuario
3. Tocar arpegios
El arpegiador es una función que reproduce automáticamente un
acorde “roto” (arpegio) cuando mantiene pulsado un acorde en el
teclado. El arpegiador del sistema KingKORG proporciona seis tipos
de arpegios y le permite cambiar diversos aspectos del arpegio,
como la duración (tiempo de compuerta) de las notas. También
proporciona un “arpegiador de pasos” que le permite especificar el
estado de activación/desactivación de hasta ocho pasos, lo que ofrece
una amplia gama de posibilidades de interpretación.
1. Seleccione un programa. (MU pág.78 “Seleccionar un
programa”)
Como ejemplo, vamos a seleccionar un sonido de piano para
probar esta función.
2. Pulse el botón ARP (TEMPO) para que se ilumine.
El arpegiador se activará.
3. Mantenga pulsado un acorde en el teclado; comenzará a
reproducirse un arpegio.
Si mantiene pulsado el acorde que se muestra en la ilustración
siguiente, las notas sonarán según lo representado en la notación
de la derecha. (Tipo de arpegio: UP)
3. Pulse el botón SE/VOC de categoría/favoritos para que se
ilumine y, a continuación, gire el dial de valores para
seleccionar un programa (sonido) para el que el botón
VOCODER está iluminado.
4. Gire el mando MIC LEVEL para ajustar el nivel de entrada del
micrófono.
CONSEJO:
Ajuste el nivel de modo que el LED MIC LEVEL
PEAK no se ilumine.
5. Toque el teclado mientras vocaliza a través del micrófono.
Pruebe a vocalizar distintas palabras y a mantener pulsadas
diferentes notas del teclado; observe el efecto que esta operación
tiene en el sonido del vocoder.
Editar el sonido
Organización de un programa
Para cambiar el tempo, mantenga pulsado el botón SHIFT/EXIT
y pulse el botón ARP (TEMPO) para acceder a la página
PROGRAM “a02: Arp”. Utilice el dial de valores para ajustar el
tempo.
CONSEJO:
El sistema KingKORG proporciona una función de
marcación del tempo. Mantenga pulsado el botón
SHIFT/EXIT y pulse varias veces el botón ARP (TEMPO) con el intervalo de tiempo deseado para denir
el tempo.
4. El arpegio dejará de sonar cuando deje de tocar las teclas.
CONSEJO:
En caso deseado, puede hacer que el arpegio continúe sonando incluso después de soltar las teclas. (GP:
“3. Parámetros de arpegio”)
4. Reproducir sonidos del vocoder
El vocoder es una función que le permite vocalizar a través de un
micrófono mientras mantiene pulsadas notas del teclado para crear
la impresión de que el sintetizador está hablando. Es una alternativa
al uso de una voz humana que le permite crear numerosos e
interesantes efectos introduciendo sonidos rítmicos y diversas
ondas.
Antes de comenzar la edición, debe comprender los aspectos básicos
de cómo se crean los sonidos. Una vez que comprenda cómo se
estructuran los sonidos del sistema KingKORG, podrá crear con
libertad los sonidos que desee.
1. Sintetizador
Tal como se muestra en la ilustración, un programa de sintetizador
está formado por A/B de timbres, arpegiador, sección del vocoder y
efectos maestro.
Conectar un micrófono y tocar el vocoder
1. Gire el mando MIC LEVEL del panel frontal completamente
hacia la izquierda. Conecte el micrófono al jack para
micrófono del panel posterior.
2. Pulse el botón PROGRAM (GLOBAL) para que se ilumine.
80
Page 81

PROGRAM
Editar el sonido
MIC IN
MIC IN
TIMBRE
Keyboard
JoyStick
MIDI IN
Pitch
TIMBRE A
Arpeggiator
TIMBRE B
ON
OFF
Keyboard Tracking
Keyboard Velocity
Pitch Bend (JS X)
Modulation (JS+Y/-Y)
MIDI 1〜3
OSC1
OSC2
OSC3
MASTER FX
Vocoder PRE FX MOD FX
Other Source
VIRTUAL PATCH
LFO1 LFO2 EG1 EG2
Cutoff Level PAN
MIXER FILTER AMP
REV/DELAY
Free Assign
Modulation to Synth
GLOBAL
TUBE EQ
OUTPUT
L/MONO, R
Modulation to Effect
L
Audio to Effect
R
Los tres elementos de sonido: intensidad, tono y
volumen
El sonido tiene tres elementos básicos: intensidad, tono y volumen.
Al igual que sucede con los sintetizadores analógicos antiguos, el
sintetizador de modelado analógico KingKORG proporciona
secciones de “oscilador”, “filtro” y “amplificador” que controlan
estos tres elementos. Edite los ajustes del oscilador para cambiar la
intensidad, los ajustes del filtro para cambiar el tono y los ajustes del
amplificador para cambiar el volumen.
Los osciladores, el filtro y el amplificador del
sistema KingKORG
En el sistema KingKORG, los ajustes del oscilador se encuentran en
las páginas PROGRAM “s05–s12: Pitch” y en las páginas
PROGRAM “s13:OSC1–s27: OSC3”. Utilice las páginas Pitch para
especificar la intensidad de la onda básica, y utilice las páginas
OSCILLATOR para seleccionar la onda. Las ondas generadas por
estos osciladores se mezclan en la página Mixer. Los ajustes del
filtro se encuentran en las páginas PROGRAM “s31–38: Filter”. En
estas páginas, puede modificar el carácter tonal aplicando un filtro
al sonido que generan los osciladores. Por último, los ajustes del
amplificador se encuentran en las páginas PROGRAM “s39–42:
Amp”, que le permiten ajustar el volumen. Mediante la edición de
estas páginas, creará el sonido básico del programa.
EG, LFO, seguimiento del teclado, patch virtual y
controladores
Además de los ajustes del oscilador, el filtro y el amplificador, el
sonido puede verse modificado por el cambio durante un periodo,
por su gama de intensidades o por las expresiones de interpretación.
Dichos cambios pueden controlarse mediante moduladores y
controladores como el EG (generador de envolventes), el LFO
(oscilador de baja frecuencia), el seguimiento del teclado, el patch
virtual y el joystick. Con estos moduladores y controladores puede
aplicar cambios complejos al sonido.
Eche un vistazo a la ilustración anterior. Observe el flujo de señales
desde OSC FILTER AMP y tenga en cuenta cómo los EG y los
LFO pueden afectar a cada sección.
Timbres (TIMBRE A/B)
Cada timbre está formado por una combinación de oscilador, filtro,
amplificador, EG, LFO, patch virtual y ecualizador. El sistema
KingKORG tiene dos timbres y puede combinarlos para crear un
programa con sonidos más complejos.
Oscilador (OSC1, OSC2, OSC3)
Los osciladores le proporcionan una gama de 127 tipos de algoritmos de
oscilador, incluidas las ondas de diente de sierra y cuadradas que se
suelen encontrar en un sintetizador analógico, así como ruido, PCM/
DWGS y la onda que se introduce desde el jack para micrófono. También
puede enriquecer y engrosar la onda aplicando el ajuste de unísono.
Mezclador (MIXER)
Esta sección permite ajustar los niveles de volumen del oscilador 1
(OSC1), oscilador 2 (OSC2) y oscilador 3 (OSC3), y emitir la señal
combinada al filtro (FILTER).
Filtro (FILTER)
El filtro permite variar la claridad del sonido eliminando o
aumentando determinadas partes del espectro de frecuencias del
sonido generado por el oscilador. Los ajustes del filtro afectarán en
gran medida al carácter del sonido. Además, puede utilizar el
generador de envolventes 1 (EG1) para variar la frecuencia de corte de
cada filtro durante un periodo.
81
Page 82

KingKORG Manual de usuario
Amp (AMP)
This section consists of the amp (AMP) and pan (PAN) settings. The
amp specifies the volume, and the pan specifies the stereo position
of the sound. You can also use envelope generator 2 (EG2) to vary
the volume over time.
Envelope generators (EG1, EG2)
An envelope generator applies time-variant change to parameters that
make up the sound. Each envelope generator defines the “shape” of
the time-variant change using four parameters: attack time, decay
time, sustain level, and release time. EG1 is assigned to control the
filter cutoff frequency, and EG2 is assigned to control the amp volume.
You are also free to use an envelope generator in conjunction with a
virtual patch as an envelope source for another parameter.
LFOs (LFO1, LFO2)
An LFO (Low Frequency Oscillator) applies cyclic change to
parameters that make up the sound. Each timbre has two LFOs, each
giving you a choice of five waveforms. LFO2 is assigned as the
source of the pitch modulation controlled by the joystick. You are
also free to use an LFO in conjunction with a virtual patch as a
modulation source for another parameter.
Patch virtual (VIRTUAL PATCH)
La funcionalidad de patch virtual le permite no solo utilizar el EG o
el LFO sino también fuentes como la velocidad (intensidad al tocar
el teclado) y el seguimiento del teclado (la región del teclado que
toca) como fuentes de modulación para controlar los parámetros que
conforman el sonido. Esto le proporciona una enorme libertad para
crear sonidos originales. Para cada timbre, puede crear ajustes de
patch virtual para seis parámetros. (GP: “1. Parámetros de timbre”)
Efectos maestro (MASTER FX)
Cada programa contiene tres tipos de efecto maestro. Al aplicar un
efecto a cada timbre, puede añadir toques de acabado al sonido
general del programa.
Arpegiador (ARPEGGIATOR)
El arpegiador genera automáticamente un arpegio (acorde “roto”)
cuando mantiene pulsado un acorde en el teclado. Para los
programas que utilizan dos timbres, puede aplicar el arpegiador a
uno de ellos o a ambos. Este es un arpegiador de pasos con seis tipos
de arpegios.
2. Vocoder (VOCODER)
Un vocoder analiza las características de frecuencia de una señal
denominada el “modulador”(como la entrada de una voz humana a
través de un micrófono) y aplica dichas características a un filtro que
procesa una señal distinta llamada el “portador” (como una onda de
oscilador), produciendo efectos distintivos, como por ejemplo un
instrumento que parece que está hablando. El sistema KingKORG
contiene un vocoder de dieciséis bandas que no solo simula los
sonidos clásicos de los vocoder antiguos sino que también permite
crear sonidos de vocoder originales en los que se puede controlar el
carácter tonal o el nivel de cada banda. Tal como se muestra en la
ilustración siguiente, el vocoder está formado por el portador (la
señal que se modifica), el modulador (la señal que controla la
modificación) y la propia sección del vocoder (VOCODER).
MIC IN
VOCODER
MIC IN
TIMBRE B
TIMBRE A
TIMBRE B
TIMBRE A
TIMBRE B
MIC IN
TIMBRE B
TIMBRE A Level
TIMBRE B Level
Threshold
GATE
OFF
ON
MIC IN
TIMBRE B
Modulator Audio Src
Modulator
Sens
Carrier
MIC IN
TIMBRE B
TIMBRE A Level
TIMBRE B Level
Vocoder
Band 1–16
Resonance
Carrier
Modulator
Analysis
Filter
Cuto (Fc MOD)
Formant Shift
Synthesis
Filter
Vocoder
HPF
HPF Level
E.F.Sens
Envelope
Follower
Direct Level
Band
Level
Envelope
Band
PAN
OFF
ON
TIMBRE A / Vocoder
TIMBRE B
ON
OFF
to EFFECTs
HPF
HPF Gate &
Note On
Wet
Level
Wet
Spread
L
R
Output
Vocoder
Level
L
Vocoder
R
Output
82
Page 83

Editar el sonido
Portador (CARRIER)
Se trata del sonido (señal) básico. La mejor opción para la onda del
portador es una onda que contenga numerosos armónicos
superiores, como una onda de diente de sierra o de impulso con una
magnitud del impulso fija. Las salidas de las dos fuentes (timbre A y
timbre B) se mezclan y se utilizan como el portador.
Modulador (MODULATOR)
Se trata del sonido (señal) cuyo carácter se impone en el portador.
Por lo general, como entrada del modulador se utiliza una voz
humana. En el sistema KingKORG, puede seleccionar la entrada de
micrófono (Input) o el timbre B (Timbre B) como el modulador. Si
selecciona el timbre B, la salida del timbre B se introducirá en el
modulador del vocoder.
Sección del vocoder (VOCODER)
Está formada por dos grupos de dieciséis filtros de paso de banda
(“analysis filter”, “synthesis filter” y “envelope follower”). La
entrada de la señal de audio al modulador se envía a los dieciséis
filtros (el filtro de análisis) y un seguidor de envolventes detectará la
envolvente del volumen (cambio de variación del tiempo) de cada
banda de frecuencia. La señal del portador se envía a un grupo
independiente de dieciséis filtros (el filtro de síntesis) y la envolvente
detectada por el filtro de análisis se utiliza para controlar el volumen
de cada banda en el filtro de síntesis, lo que varía el carácter tonal de
la señal del portador y produce la impresión de que la señal del
portador está hablando. También es posible cambiar las frecuencias
del filtro de paso de banda del portador. Esto le permite subir o bajar
la respuesta de frecuencia y conservar el carácter del modulador,
creando cambios drásticos en el sonido.
2. Editar dos timbres
En cada programa, puede utilizar dos timbres: TIMBRE A y TIMBRE B.
CONSEJO:
CONSEJO:
Utilizar dos timbres (Layer)
Cuando se utilizan dos timbres, puede elegir entre dos modos que
determinan cómo funcionarán los timbres. En este ejemplo,
definiremos el parámetro Voice Mode de la página PROGRAM “p03:
Common” como “Layer”.
Cuando se defina este parámetro como “Layer”, los dos timbres se
oirán simultáneamente al tocar el teclado.
1. Utilice los botones PAGE +/- para acceder a la página
2. Gire el dial de valores para definir el modo de voz como “Layer”.
No puede seleccionar TIMBRE B si el parámetro Voice
Mode de la página PROGRAM “p03: Common” se ha
denido como “Single”. Si se ha seleccionado “Layer” o
“Split”, los botones de selección TIMBRE A/B se iluminarán para indicar el timbre que está editando.
El parámetro de modo de voz en la página PROGRAM
“p03: Common” es común para todo el programa.
PROGRAM “p03 Common”.
Elbotones de selección TIMBRE A y los LED de timbre de efecto
maestro se iluminarán.
Edición básica de programas
1. Creación de sonidos
Existen dos formas de editar sonidos en el sistema KingKORG.
₋ Puede elegir un programa parecido al sonido que desea y crear el
programa deseado realizando los cambios necesarios.
₋ Puede comenzar a editar el programa desde cero (estado
inicializado).
¡Elija un método y comience a crear y tocar sus propios sonidos!
Editar desde un programa guardado
1. Seleccione el programa que desea editar. (MU pág.78
“Seleccionar un programa”)
2. Utilice los mandos y el dial del panel frontal.
Consider how the sound you’re imagining differs from the
original program, and select the parameter that you need to edit.
Plantéese en qué difiere el sonido que desea del programa
original y seleccione el parámetro que necesite editar. Si
selecciona otro programa o desactiva la alimentación antes de
haber escrito el programa editado, los cambios realizados se
perderán. (MU pág.87 “2. Guardar un programa”)
Editar desde cero
Si desea crear un programa desde cero, comience por inicializar para
acceder al programa. (MU pág.85 “1. Inicializar un programa”)
Esto genera un grupo de ajustes simples y de comprensión sencilla,
que le ayudarán a comprender cómo funciona cada sección, y que le
resultarán prácticos para crear un sonido desde cero.
Seleccionar un timbre para editar
Al editar un programa que utiliza dos timbres, deberá seleccionar el
timbre que va a editar.
Utilice los botones de selección TIMBRE A/B para seleccionar el
timbre que desea editar. El botón de selección de timbre
seleccionado se iluminará, lo que le permitirá editar ese timbre.
Editar el filtro y el EG
En el sistema KingKORG puede utilizar los mandos y botones del
panel frontal para controlar el filtro y el EG en tiempo real.
Puede elegir una de tres formas en que los mandos funcionarán
cuando los gire. (GP: “5. Parámetros globales”)
FILTER
Corte (CUTOFF)
Permite ajustar la frecuencia de corte del filtro. La claridad del
sonido cambiará. Si gira el mando hacia la izquierda el sonido se
oscurecerá; si lo gira hacia la derecha, el sonido se aclarará.
Resonancia (RESONANCE)
Permite ajustar la cantidad de resonancia del filtro. La
resonancia incorpora un carácter tonal distintivo.
EG (generador de envolventes)
Ataque (ATTACK1, ATTACK2)
Permite ajustar el tiempo de ataque de EG1 (EG del filtro) y EG2
(EG del amplificador). El ataque especifica el tiempo desde el
inicio de la nota (el momento en el que toca la tecla) hasta que se
alcanza el nivel de ataque. Cambia la forma en que se iniciarán
83
Page 84

KingKORG Manual de usuario
EG2
EG1 y EG2. Si gira el mando hacia la izquierda el tiempo de ataque
se reducirá; si lo gira hacia la derecha, el tiempo de ataque
aumentará.
Caída (DECAY1, DECAY2)
Permite ajustar el tiempo de caída de EG1 (EG del filtro) y EG2
(EG del amplificador). La caída especifica el tiempo desde que se
alcanza el nivel de ataque hasta que se alcanza el nivel sustain. Si
gira el mando hacia la izquierda el tiempo de caída se reducirá; si
lo gira hacia la derecha, el tiempo de caída aumentará.
Sustain (SUSTAIN1, SUSTAIN2)
Permite ajustar el nivel sustain de EG1 (EG del filtro) y EG2 (EG
del amplificador). El sustain especifica el nivel que se alcanza
una vez transcurrido el tiempo de caída y se mantiene mientras
mantenga pulsada la tecla. Si gira el mando hacia la izquierda el
nivel sustain se reducirá; si lo gira hacia la derecha, el nivel
sustain aumentará.
Liberación (RELEASE1, RELEASE2)
Permite ajustar el tiempo de liberación de EG1 (EG del filtro) y
EG2 (EG del amplificador). La liberación especifica el tiempo
desde el final de la nota (el momento en el que suelta la tecla)
hasta que el sonido se silencia por completo. Variará el tiempo
de liberación de EG1 y EG2. Si gira el mando hacia la izquierda
el tiempo de liberación se reducirá; si lo gira hacia la derecha, el
tiempo de liberación aumentará.
Nivel
Final de nota
3
Tiempo
4
Nivel
de ataque
Inicio de nota
0
2
1
2. Seleccione un efecto.
El LED del efecto seleccionado se iluminará.
3. Utilice los mandos de control FX para ajustar los valores de
parámetros.
3. Editar el vocoder
Seleccionar el vocoder para editar
El procedimiento para editar el vocoder es básicamente el mismo
que para editar un timbre, pero primero deberá activar el vocoder y
seleccionarlo como el destino de la edición.
Las páginas “v02:Voc.Carrier–v18:Voc.Amp” no aparecerán a
menos que haya pulsado el botón VOCODER para activar el
conmutador del vocoder.
Los parámetros de los 16 filtros de paso de banda (filtro de análisis y
filtro de síntesis) y el seguidor de envolventes se pueden editar en
las páginas PROGRAM “v09:Voc.Filter–v18:Voc.Amp”.
1. Seleccione un programa de sintetizador. (MU pág.78
“Seleccionar un programa”)
2. Pulse el botón VOCODER para que se ilumine.
El vocoder se activará y se seleccionará como el destino de la
edición.
1: Tiempo de ataque 3: Nivel sustain
2: Tiempo de caída 4: Tiempo de liberación
Configurar ajustes de efectos
El sistema KingKORG proporciona efectos maestros que le permiten
aplicar distintos efectos al sonido, como distorsión, modulación e
incorporación de reverberación. Los efectos maestros se aplican al
sonido general de los dos timbres.
Los efectos maestros están formados por tres secciones (PRE FX, MOD
FX, REV/ DELAY) y puede elegir un tipo de efecto para cada sección. Por
ejemplo, podría elegir “EP.AMP” para la sección PRE FX, “TREMOLO”
para la sección MOD FX y “HALL” para la sección REV/ DELAY.
Para cada sección, también puede especificar los timbres a los que se
aplicará ese efecto.
1. Pulse un dial de selección de tipo FX para seleccionar los
timbres a los que se aplicará ese efecto.
Los LED de los timbres seleccionados se iluminarán. Si los LED
A y B de los timbres están apagados, ese efecto no se aplicará.
El LED B del timbre no se iluminará si el modo de voz del
programa es “Single”.
3. Utilice los botones PAGE +/- para acceder a las páginas de
edición de parámetros del vocoder.
CONSEJO:
CONSEJO:
Si eleva el nivel directo en la página PROGRAM
“v15:Voc.Amp”, la entrada de audio se emitirá directamente. Ajuste este valor mientras comprueba la entrada
de audio.
Si no es capaz de detectar el efecto, pulse el botón VOCODER para que se ilumine y ajuste el nivel del timbre A
en la página PROGRAM “v02:Voc.Carrier” o el nivel del
vocoder en la página PROGRAM “v18:Voc.Amp”.
Portador (CARRIER)
La onda más adecuada para el portador es una onda que
contenga numerosos armónicos superiores, como una onda de
diente de sierra o de impulso con una magnitud del impulso fija.
Estos parámetros se pueden editar en las páginas PROGRAM
“v02 –v03:Voc.Carrier”.
CONSEJO:
Para introducir una onda de diente de sierra en el
portador, edite el timbre A para que su ajuste Type de
la página PROGRAM “s13:OSC1” sea “SAW”, y edite el
ajuste de vocoder en la página PROGRAM “v02:Voc.Carrier” para especicar el nivel de entrada A del timbre.
84
Page 85

Editar el sonido
Modulador (MODULATOR)
Una voz humana es la entrada habitual como el modulador. En
el sistema KingKORG, puede elegir la entrada de micrófono
(Input) o el timbre B (Timbre B) como el modulador. Puede
editar estos parámetros en la página PROGRAM “v04:Voc.
Modultr”.
4. Editar el arpegiador
Seleccionar los timbres para arpegiar
Para un programa que utiliza dos timbres, puede seleccionar los
timbres que interpretará el arpegiador.
En la página PROGRAM “a05:Arp” puede especificar los timbres
que emitirá el arpegiador. Puede arpegiar tanto el timbre A como el
B, o bien solo uno de ellos.
Efectos tonales sincronizados con el arpegio
Sincronizar la frecuencia de LFO o el tiempo de retardo con el
tempo del arpegiador
Puede sincronizar la frecuencia de LFO1 o LFO2 con el tempo del
arpegio. Esto le permite aplicar modulación que se sincroniza con el
tempo. También le permite especificar el tiempo de retardo de un
efecto como un múltiplo del tempo para que el tiempo de retardo
continúe aunque cambie el tempo del arpegio. Además, puede
sincronizar al arpegiador del sistema KingKORG con un
secuenciador MIDI externo, para que la frecuencia de LFO1/2 o el
tiempo de retardo se controlen desde el secuenciador externo.
Modificar el arpegio
Puede modificar el arpegio activando/desactivando cada paso de
arpegio. Esta función se denomina “arpegiador de pasos”.
Utilizar el arpegiador de pasos para modificar el
arpegio
1. Pulse el botón PROGRAM (GLOBAL) para que se ilumine.
2. Utilice los botones PAGE +/- para acceder a la página
PROGRAM “a12:Arp”.
3. Pulse el dial de valores.
Aparecerá la pantalla de ajuste de pasos.
4. Utilice los botones PAGE +/- para mover el cursor “ ” y
seleccionar el paso que desea editar.
6. Pulse el dial de valores para confirmar los ajustes de
activación/desactivación de los pasos.
CONSEJO:
El número de pasos disponibles se puede especicar en
la página PROGRAM “a10: Arp” (GP: “3. Parámetros de
arpegio”)
5. Restaurar un valor de programa
editado a su ajuste original
Cuando ajuste un valor al mismo valor almacenado en el programa
predefinido original o en un programa guardado, el LED
ORIGINAL VALUE se iluminará.
Tras editar un valor, puede restaurarlo a su ajuste original girando el
mando hasta el valor que hace que se ilumine el LED ORIGINAL
VALUE.
Si desea descartar todas las ediciones realizadas y recuperar el
contenido almacenado en la memoria interna, solo tiene que
seleccionar otro programa sin guardar las ediciones actuales y, a
continuación, volver a recuperar el programa deseado.
Acerca de los ajustes globales
Cambie al modo Global cuando desee modificar ajustes que se
apliquen al sistema KingKORG completo o cuando desee configurar
ajustes relacionados con MIDI.
El modo Global contiene diversos ajustes como la afinación maestra,
la transposición y el canal MIDI global. (GP: “5. Parámetros
globales”)
Los cambios que lleve a cabo en estos ajustes se perderán si
desactiva la alimentación sin guardar. Asegúrese de guardar
los ajustes si desea conservarlos. (MU pág.87 “1. Guardar ajustes
globales”)
Otras funciones
1. Inicializar un programa
A continuación se describe cómo inicializar los ajustes del programa
seleccionado.
Este procedimiento inicializará los ajustes del programa que se
está editando. No cambiará el contenido almacenado en la
memoria interna.
Si desea guardar el estado inicializado, guarde el programa.
(MU pág.87 “2. Guardar un programa”)
1. Seleccione el programa que desea inicializar. (MU pág.78
“Seleccionar un programa”)
2. Utilice los botones PAGE +/- para acceder a la página
PROGRAM “u01: Utility” y pulse el dial de valores.
Una pantalla le pedirá que confirme que desea inicializar el
programa.
5. Gire el dial de valores para activar/desactivar el paso.
En la pantalla principal, ajuste la indicación en “O” (activado)
para los pasos que desee activar. Si selecciona “_” (desactivado),
la nota de ese paso será un silencio.
Repita los pasos 4 y 5 para especificar otros pasos.
CONSEJO:
Si decide no inicializar, pulse el botón SHIFT/EXIT.
3. Pulse de nuevo el dial de valores.
Una vez finalizada la inicialización, en la pantalla aparecerá
“Complete!” y regresará automáticamente a la pantalla inicial.
2. Copiar un timbre
A continuación se describe cómo copiar los ajustes del timbre de
otro programa en un timbre (A o B) del programa seleccionado
actualmente.
85
Page 86

KingKORG Manual de usuario
Esta operación permite recuperar ajustes para un timbre del
programa que se está editando. No cambiará el contenido
almacenado en la memoria interna.
Los timbres solo se pueden copiar de uno en uno.
1. Seleccione primero el programa que incluye el timbre de
destino de copia. (MU pág.78 “Seleccionar un programa”)
2. Utilice los botones PAGE +/- para acceder a la página
PROGRAM “u02: Utility” y pulse el dial de valores.
3. Gire el dial de valores para seleccionar el programa que
contiene el timbre de origen de copia y pulse el dial para
confirmar la selección.
Al seleccionar un programa, el botones de selección TIMBRE A o
B se iluminará en función de los timbres utilizados por el
programa de origen de copia.
Los Botones de selección TIMBRE A o B no responderán si los
pulsa a la vez.
4. Confirme el timbre de origen de copia.
Si el programa de origen de copia utiliza dos timbres, el botones de
selección TIMBRE A o B de origen de copia parpadeará. Seleccione
el timbre deseado en caso necesario y pulse el dial de valores para
confirmar la selección.
3. Restaurar los ajustes de fábrica
A continuación se describe cómo restaurar los programas y los ajustes
de datos globales del sistema KingKORG a sus valores de fábrica. Los
ajustes de fábrica se denominan “datos precargados”. Para recuperar
los valores de fábrica, ejecute la operación Load Preload.
Al ejecutar Load Preload, los datos de ajustes de fábrica
sobrescribirán los datos que haya guardado en la memoria
interna. Asegúrese de que no le importa perder estos datos.
No toque los mandos ni el teclado del sistema KingKORG
mientras la operación Preload está en curso. Nunca desactive
la alimentación durante este proceso.
De los programas de valores de fábrica 1–300, los programas
201–300 (programas que no contienen datos predefinidos) no
recuperarán sus valores de fábrica. Si los programas se
guardan en estas ubicaciones, se conservarán sus valores.
No puede ejecutar la operación Load Preload si la protección
de memoria está activada. Desactive la protección de memoria
antes de continuar. (GP: “5. Parámetros globales”)
1. Mantenga pulsado el botón SHIFT/EXIT y pulse el botón
PROGRAM (GLOBAL).
Accederá al modo Global y el botón PROGRAM (GLOBAL)
parpadeará.
2. Utilice los botones PAGE +/- para seleccionar el elemento Load
Preload de la página GLOBAL “u01: Utility” y pulse el dial de valores.
3. Gire el dial de valores para seleccionar el tipo de datos que se
restaurarán a sus valores de fábrica.
1Program: Datos del programa seleccionado actualmente
ALL Program: Datos para los programas 1–200
Global: Datos globales
All Data: Programas 1–200 y datos globales
CONSEJO:
Cuando el botón TIMBRE A o B está parpadeando,
también puede realizar la selección pulsando un botón.
5. Confirme el timbre de destino de copia.
Si el programa de destino de copia utiliza dos timbres, el
de selección TIMBRE A o B
dial de valores para seleccionar el timbre de destino de copia y
pulse el dial de valores para confirmar la selección.
parpadeará. En caso necesario, gire el
botones
6. Aparecerá una pantalla de confirmación en la visualización
principal; verifique los ajustes y pulse el dial de valores.
Una vez finalizada la copia, en la pantalla aparecerá “Complete!”
y regresará a la pantalla inicial de la página “u02: Utility”.
CONSEJO:
CONSEJO:
Si desea guardar el estado copiado, guarde el programa.
(MU pág.87 “2. Guardar un programa”)
Puede pulsar el botón SHIFT/EXIT para regresar al paso
anterior. Si decide no copiar un timbre, pulse el botón
SHIFT/EXIT varias veces.
4. Pulse el dial de valores; aparecerá una pantalla de
confirmación.
CONSEJO:
Si decide no cargar los datos, pulse el botón SHIFT/
EXIT o el botón PROGRAM (GLOBAL).
5. Pulse de nuevo el dial de valores.
Una vez cargados los datos seleccionados, en la pantalla aparecerá
“Completed!” y regresará automáticamente a la pantalla inicial.
86
Page 87
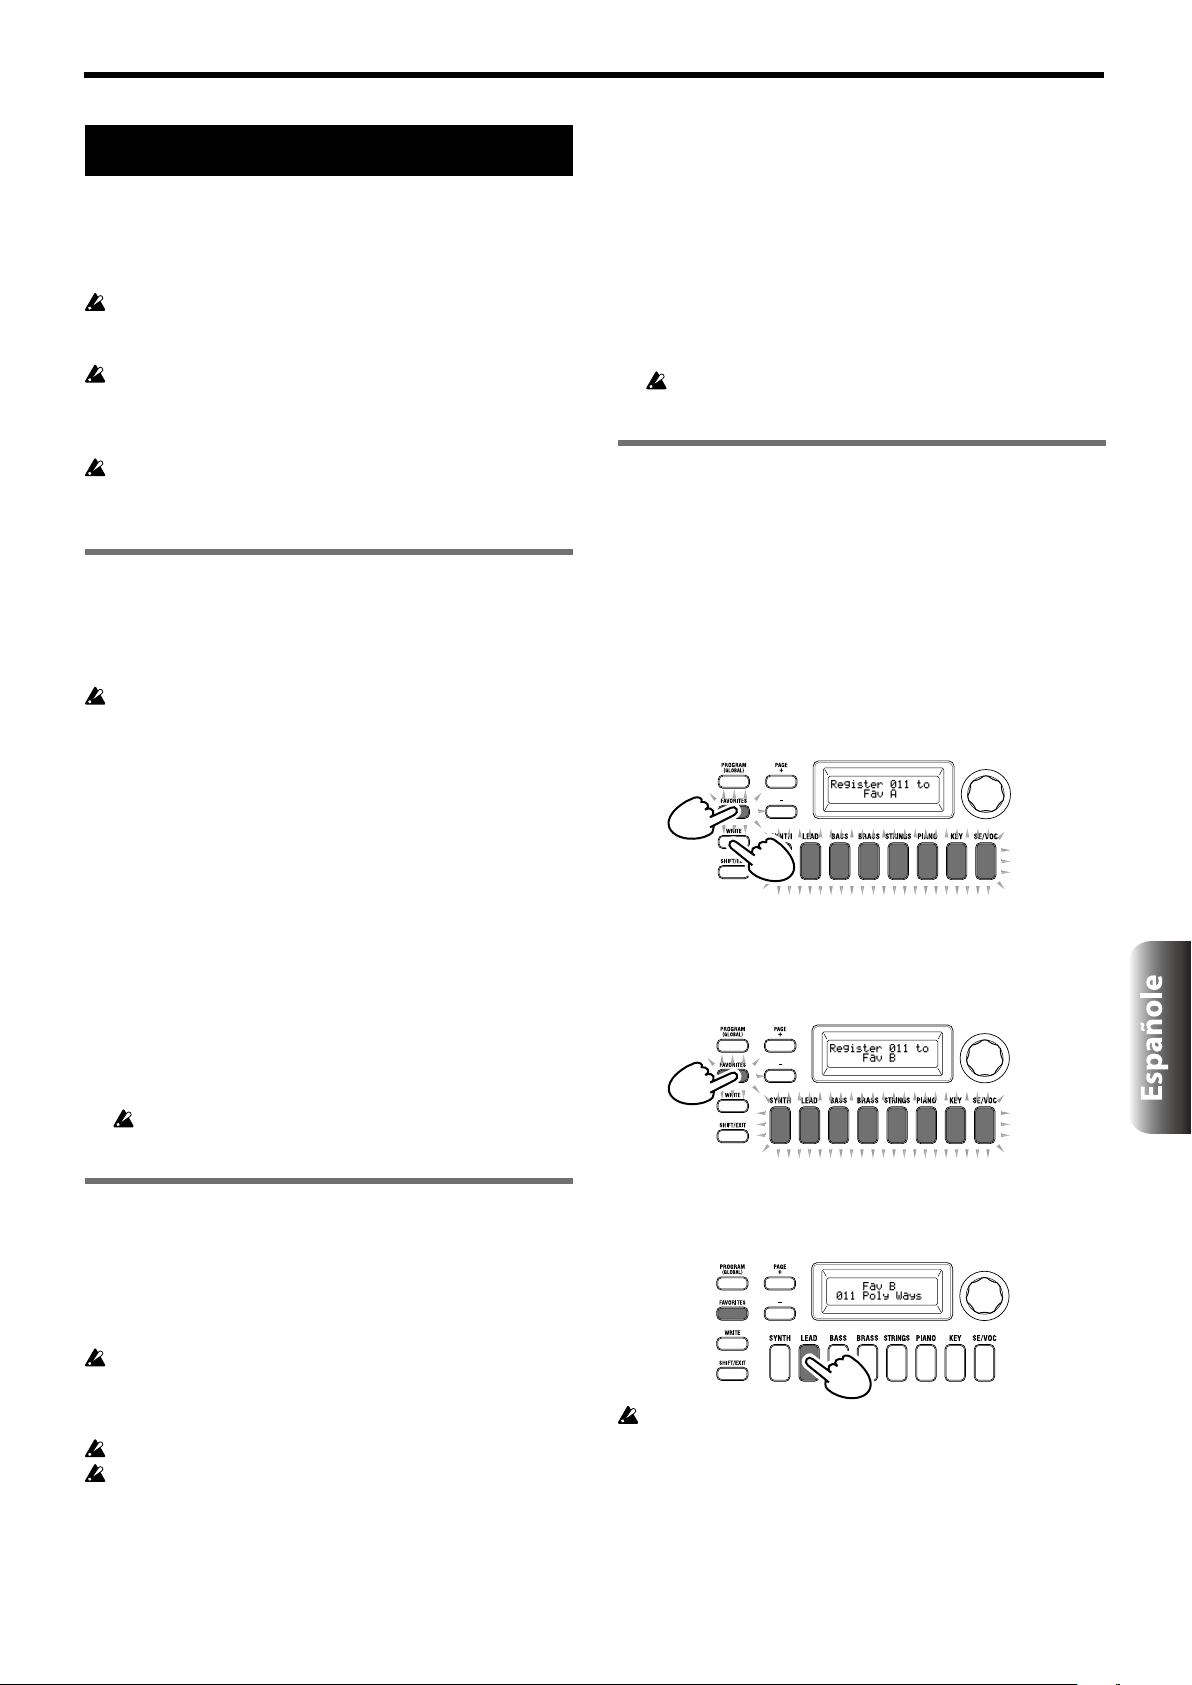
Guardar
Guardar los ajustes
Si desea conservar los programas o ajustes globales que ha editado,
debe guardarlos en la memoria interna.
Si desactiva la alimentación sin guardar, los cambios realizados
en los ajustes globales se perderán. Asegúrese de guardar los
ajustes editados si desea utilizarlos en el futuro.
Si ha editado un programa, los cambios realizados se perderán
si selecciona otro programa o desactiva la alimentación sin
guardar. Asegúrese de guardar los ajustes editados si desea
utilizarlos en el futuro.
No puede guardar los ajustes si la protección de memoria está
activada. Desactive la protección de memoria antes de
continuar. (GP: “5. Parámetros globales”)
1. Guardar ajustes globales
¿Qué ajustes se guardan?
Al guardar datos globales, se guardan los ajustes siguientes.
₋ Todos los parámetros de las páginas GLOBAL “g01–g44”
El estado de los botones OCTAVE UP/DOWN no se guarda.
Los ajustes botón TUBE BOOST y botón TUBE ON se guardan
como parámetros globales.
Para guardar los ajustes globales, realice las operaciones siguientes
en el modo Global.
1. Mantenga pulsado el botón SHIFT/EXIT y pulse el botón
PROGRAM (GLOBAL) para entrar en el modo Global.
En la visualización principal aparecerá la pantalla de edición de
parámetros globales y el botón PROGRAM (GLOBAL) parpadeará.
2. Pulse el botón WRITE.
En la visualización principal aparecerá una pantalla de
confirmación y el botón WRITE parpadeará.
CONSEJO:
3. Pulse de nuevo el botón WRITE.
Una vez guardados los datos, en la pantalla aparecerá
“Complete!” y regresará a la pantalla anterior.
Si decide no guardar, pulse el botón SHIFT/EXIT en
este punto.
Nunca desactive el equipo mientras se están guardando
datos. Si lo hace, los datos podrían destruirse.
Guardar
1. Pulse el botón WRITE.
En la visualización principal aparecerá una pantalla que le permitirá
especificar el destino de guardado, y el botón WRITE parpadeará.
2. Gire el dial de valores para seleccionar la ubicación de
almacenamiento (número de programa).
CONSEJO:
Si decide no guardar el programa, pulse el botón
SHIFT/EXIT en este punto.
3. Pulse de nuevo el botón WRITE.
Una vez guardados los datos, en la pantalla aparecerá
“Complete!” y regresará a la pantalla anterior.
Nunca desactive el equipo mientras se están guardando
datos. Si lo hace, los datos podrían destruirse.
3. Registrar programas en los botones de
categoría/favoritos
El sistema KingKORG proporciona una práctica función Favorites
que le permite recuperar un programa pulsando un solo botón. Esta
característica resulta muy práctica cuando toca en directo. Para
utilizar esta función, deberá registrar sus programas favoritos en los
botones de categoría/favoritos.
1. Seleccione un programa que desee registrar.
2. Mantenga pulsado el botón WRITE y pulse el botón
FAVORITES.
El botón FAVORITES y todos los botones de categoría/favoritos
parpadearán.
3. Pulse el botón FAVORITES para seleccionar el banco (1–5) en
el que desea registrar el programa.
El botón FAVORITES se iluminará y el banco cambiará cada vez
que pulse el botón.
2. Guardar un programa
¿Qué ajustes se guardan?
Al guardar un programa, se guardan los ajustes siguientes.
₋ Todos los parámetros en PROGRAM “p01–06 (Program), s01–80
₋ (Synth), v01–18 (Vocoder), a01–12 (Arp)”
₋ Ajustes de efectos maestros (PRE FX, MOD FX, REV/DELAY)
El estado de algunos de los ajustes del panel frontal no se
guardará (el estado seleccionado de los botones de selección
TIMBRE A/B, del botón de selección OSCILLATOR y del botón
de selección LFO)
El estado de los botones OCTAVE UP/DOWN no se guardará.
Debido a que TUBE y EQ son efectos globales que se aplican a
todos los programas de forma común, sus ajustes no se guardan
para cada programa.
Para guardar un programa, realice las operaciones siguientes en el
modo Program.
4. Pulse el botón de categoría/favoritos en el que desea registrar
el programa.
El botón de categoría/favoritos que haya pulsado parpadeará; cuando
el registro haya finalizado, el botón quedará iluminado de forma fija.
Nunca desactive el equipo mientras el registro está en curso. Si
lo hace, los datos podrían destruirse.
CONSEJO:
Puede cambiar cuando desee un programa que esté
registrado en Favorites. Seleccione Favorites, gire el dial
para seleccionar el programa deseado y pulse entonces el
botón WRITE.
87
Page 88

KingKORG Manual de usuario
Solución de problemas
Si el sistema KingKORG no funciona según lo esperado, compruebe
los puntos siguientes.
La alimentación no se enciende
¿Está el adaptador de CA conectado a una toma de CA? (MU
pág.76 “Conexiones”)
¿Está manteniendo pulsado el conmutador de alimentación
(pulsación larga) al activar la alimentación? (MU pág.77 “Activar/desactivar el equipo”)
Al tocar el teclado no se emite ningún sonido
¿Están el sistema de monitor autoalimentado o los auriculares
conectados a los jacks correctos? (MU pág.76 “Conexiones”)
¿Está el sistema de monitor conectado encendido? ¿Está subi-
do el volumen?
¿Está el mando VOLUME ajustado en una posición en la que se
emitirá sonido?
En la página GLOBAL “g17: MIDI Basic”, ¿está el ajuste de con-
trol local denido en “On”?
¿Se ha denido algún parámetro relacionado con el volumen
en un valor “0”?
En la página PROGRAM “s32: Filter”, ¿es posible que el valor
de corte sea “0”?
El volumen es demasiado suave cuando el control TUBE está
activado
Puede que el tubo de vacío esté gastado. Póngase en contacto
con un centro de atención al cliente de Korg.
No funciona la entrada de sonido
¿Está el micrófono conectado correctamente al jack para micrófono?
¿Es posible que el mando MIC LEVEL esté situado al máximo
hacia la izquierda?
En un programa de vocoder, ¿ha especicado “Input” para el
audio que utiliza como el modulador?
No se puede editar
Si al girar un mando no se cambia el parámetro:
En la página GLOBAL “g11: Common Knob”, ¿es posible que
el ajuste sea “Catch”?
Si al girar un mando, la posición indicada por este no coincide
con el valor que gura en la visualización:
Si el ajuste de la página GLOBAL “g11: Common Knob” se ha
definido como “ValueScale”, el valor del parámetro real
puede diferir de la posición indicada por el mando.
Si el sonido no cambia al utilizar un mando:
¿Ha utilizado los botones de selección TIMBRE A/B para
seleccionar correctamente el timbre que desea editar?
Si no puede seleccionar el timbre B:
En la página PROGRAM “p03: Common”, ¿es posible que el
modo de voz esté definido como “Single”?
Si no puede seleccionar los parámetros del vocoder en el
modo Edit:
¿Está el botón VOCODER activado (iluminado)?
Si los cambios que ha realizado en un programa o en los ajustes
globales no se recuerdan, ¿ha desactivado la alimentación antes
de ejecutar la operación Write? En el caso de un programa,
las ediciones también se perderán si selecciona un programa
distinto. Realice la operación Write para guardar las ediciones
antes de cambiar de programa o de desactivar la alimentación.
No se puede guardar el programa los ajustes
En la página GLOBAL “g12: Common”, ¿es posible que el ajuste
de protección esté denido como “On”?
Si el programa que ha editado no se guarda, ¿ha utilizado el
dial de valores para especicar correctamente el destino de
guardado (número de programa)?
El arpegiador no se inicia
¿Está el arpegiador del botón ARP (TEMPO) iluminado?
¿Se ha asignado el arpegiador a un timbre?
En la página GLOBAL “g19: MIDI Basic”, ¿es correcto el ajuste
del reloj?
Sin respuesta a los mensajes MIDI enviados desde un
dispositivo externo
¿Está el cable MIDI o el cable USB conectado correctamente?
¿Coincide el canal MIDI de los datos transmitidos desde el
dispositivo MIDI externo con el canal MIDI del sistema KingKORG?
En la página GLOBAL “g23–g27: MIDI Filter”, ¿está el ajuste
denido en “Enable”?
Los datos de transposición, curva de velocidad y arpegiador
no se reconocen correctamente
En la página GLOBAL “g03: Common”, ¿es el ajuste de posición
correcto?
No es posible controlar los timbres en canales MIDI
independientes
Si el modo de voz de la página PROGRAM “p03: Common” se
ha denido como “Single”, el sistema KingKORG solo recibirá
un canal MIDI.
Con los ajustes “Layer” o “Split”, podrá utilizar dos canales
MIDI para controlar los dos timbres por separado.
88
Page 89

Especificaciones
Especificaciones
Sistema de generación de sonido XMT (eXpanded Modeling Technology)
Programas
Número de programas 300 programas (200 predefinidos / 100 de usuario)
Número de categorías 8 categorías
Timbres Máx. 2 timbres (Layer / Split)
Polifonía máxima 24 voises max
Sintetizador
Oscilador
Estructura 3 osciladores (elección entre los tipos analógico, ruido, DWGS, PCM y MIC IN)
Número de tipos 127 tipos (32 analógicos y ruido, 64 DWGS, 30 PCM, MIC IN)
Filtro
Estructura 1 filtro (elección entre LPF, HPF, BPF)
Número de tipos 18 tipos (7 LPF, 5 HPF, 6 BPF)
Modulación
Estructura EG: 2 unidades, LFO: 2 unidades
Enrutamiento Patch virtual: 6 grupos
Efectos
Secciones Efectos de programa x 3 (PRE FX, MOD FX, REV/DELAY) + EQ (2Band) + TUBE (Stereo)
Tipos PRE FX: 6 tipos (DISTORTION, DECIMATOR, RING MOD, GT.AMP, EP.AMP, TONE)
MOD FX: 6 tipos (FLANGER, CHORUS, U-VIBE, TREMOLO, PHASER, ROTARY) REV/
DELAY: 6 tipos (HALL, ROOM, PLATE, TAPE ECHO, MOD DELAY, BPM DELAY)
Vocoder Vocoder de 16 bandas, función de cambio de formante, función de mantenimiento de
formante
Arpegiador Hasta 8 pasos (el número de pasos se puede cambiar), 6 tipos (UP/DOWN/ALT1/ALT2/
RANDOM/ TRIGGER)
Audio
Entrada
Jackparamicrófono
Conector Tipo XLR-3-31 (equilibrado)
Impedancia de entrada 6.8 kΩ
Nivel máximo -12 dBu
Salida
JacksAUDIOOUTPUT(L/MONO,R)
Conectores Jacks para teléfono TS de 6,3 mm (no equilibrados) L/MONO, R
Impedancia de carga 10 kΩ o superior
Nivel máximo +8,2 dBu
Jackparaauriculares
Conector Mini jack para teléfono estéreo de 3,5 mm
Nivel máximo 60 mW + 60 mW a 33 Ω
Pantallas
Principal Pantalla OLED de 16 x 2 caracteres
OSCILLATOR, FILTER Pantalla OLED de 128 x 64 píxeles
Teclado Teclado con semicontrapeso de 61 notas (sensible a la velocidad)
Controladores
Interno Joystick, botones OCTAVE UP/DOWN, botones de categoría/favoritos
Entradas Jack DAMPER (half-damper no admitido), jack SWITCH/PEDAL
Salida Jack CV/GATE OUT
Conexiones externas MIDI IN, OUT, conector USB B
Alimentación Jack de adaptador de CA (CC 12 V,
Consumo 10 W
Dimensiones (anchura x profundidad x altura) 1.027 x 313 x 96 mm
Peso 7,0 kg
Temperatura de funcionamiento 0 – +40 °C (sin condensación)
Elementos incluidos Manual de usuario, Adaptador de CA, CV/GATE cable
Opciones XVP-10: Pedal de expresión/volumen, EXP-2: Controlador de pedal, DS-1H: Pedal damper,
PS-1, PS-3: Pedalera
)
* Las especificaciones y el aspecto están sujetas a cambios sin previo aviso por mejora.
89
Page 90

Program list
No. Program Name Category
1 Stab King Synth Single — —
2 Synth 1984 Synth Single — —
3 Dance Stab Synth Single — —
4 French Toast Synth Single — —
5 Phase Synced Synth Single — —
6 FlangingSync Synth Single — —
7 VelDigiSynth Synth Single — —
8 CrowleySplit Synth Split — —
9 Synth Ranger Synth Single — —
10 Poly Synth Synth Single — —
11 Poly Ways Synth Single — —
12 Synth 1999 Synth Single — —
13 Oxyjarre Synth Single — —
14 Reso Comp Synth Single — —
15 Square Comp Synth Single — —
16 Touch BPF Synth Single — —
17 Anthem Stab Synth Single — —
18 Party Rock Synth Single — —
19 Big Saw Pad Synth Single — —
20 HitChart Hit Synth Single — —
21 OctUnisonPiz Synth Single — —
22 Slippy Pad Synth Layer — —
23 MoveMe Split Synth Split
24 Syn MuteGtr Synth Layer — —
25 Rej Pizz Synth Single
26 Velo Trance Synth Single — —
27 Plucked In Synth Single — —
28 Pulse BPF Synth Layer
29 Pumpin'Chord Synth Single
30 Space Pad Synth Single — —
31 Vel Repeater Synth Single — —
32 Vel Seq Synth Single
33 Twinkle Arp Synth Single
34 Hungry Arp Synth Single
35 Metalflex Synth Layer — —
36 Classic Lead Lead Single — —
37 Legend Lead Lead Single — —
38 BPF Pad&Lead Lead Split — —
39 Axel Lead Lead Single — —
40 Horizon Lead Lead Single — —
41 Fat Yeah! Lead Single — —
42 12 Saw Lead Lead Layer — —
43 5th Lead Lead Single — —
44 miniKORG700 Lead Single — —
45 Wired Lead Lead Single — —
46 VelGravy Arp Lead Single — —
47 Vibrato Lead Lead Single — —
48 AirHorn Lead Lead Single — —
49 Flutter Lead Lead Single — —
50 Scary Lead Lead Single — —
Voice
Mode
Arpeggio
Switch
Mic In
—
—
—
—
—
—
—
No. Program Name Category
51 Tropez Lead Lead Single — —
52 HitChartLead Lead Single — —
53 Uni Squ Lead Lead Single — —
54 Silk Lead Lead Single — —
55 Kalculator Lead Single — —
56 Square Lead Lead Single — —
57 Whistle Lead Single — —
58 Low Lead Lead Single — —
59 &U&I Lead Lead Single — —
60 3OSC mini Lead Single — —
61 Dirty Bit Lead Single — —
62 Floor Lead Lead Single — —
63 I'mJustASync Lead Single — —
64 Unison Sync Lead Single — —
65 Wedge Lead Lead Single — —
66 DistModLead Lead Layer — —
67 RockWahLead Lead Single — —
68 MG Bass Bass Single — —
69 Groove Bass Bass Single — —
70 SecretWeapon Bass Single — —
71 Bass & Lead Bass Layer — —
72 SEQ Bass Bass Single
73 Sawyer Bass Bass Single — —
74 Wire Bass Bass Single — —
75 Push Me Bass Bass Layer — —
76 BoostSawBass Bass Single — —
77 Sub Bass Bass Single — —
78 Square Bass Bass Single — —
79 35%PulseBass Bass Single — —
80 ChmeleonBass Bass Single — —
81 Summer Bass Bass Single
82 NeuroticBass Bass Single
83 Acid Bass Bass Single
84 AcidResoBass Bass Single — —
85 Smack Bass Bass Single — —
86 DistSqu Bass Bass Single — —
87 Hybrid Bass Bass Single — —
88 Pilot Bass Bass Single — —
89 Slap Bass Bass Single — —
90 Hoover Bass Bass Single — —
91 Pump Bass Bass Single — —
92 Wobbly Bass Bass Single — —
93 LFO Dub Bass Bass Single — —
94 Yahee LFO Bass Single — —
95 Talking Bass Bass Layer — —
96 Urban Brass Brass Single — —
97 Soft Brass Brass Single — —
98 Brass Pad Brass Single — —
99 Brass Comp Brass Single — —
100 Filter Brass Brass Single — —
Voice
Mode
Arpeggio
Switch
Mic In
—
—
—
—
110
Page 91

Program list
No. Program Name Category
101 Porta Brass Brass Single — —
102 Brass Stab Brass Single — —
103 Final Brass Brass Layer — —
104 Hybrid Brass Brass Single — —
105 Funk Brass Brass Single — —
106 Octave Brass Brass Single — —
107 HipHop Brass Brass Single — —
108 TRON Flute Brass Single — —
109 St.Strings Strings Layer — —
110 TRON Strings Strings Layer — —
111 Old Strings Strings Layer — —
112 PMW Strings Strings Single — —
113 NewWave Strg Strings Single — —
114 Strg Machine Strings Single — —
115 PhaseStrings Strings Single — —
116 Smooth Pad Strings Single — —
117 SoftAtk Pad Strings Single — —
118 Warm Pad Strings Single — —
119 Mighty Pad Strings Layer
120 TimeAfterPad Strings Layer — —
121 Dark Pad Strings Single — —
122 Sine Pad Strings Single — —
123 Big Blue Strings Single — —
124 Beach Pad Strings Layer
125 Gravy Pad Strings Single — —
126 ReverseSweep Strings Single — —
127 HPF SweepPad Strings Single — —
128 EvolutionPad Strings Single — —
129 Drum'n'Pad Strings Single — —
130 Str/Choir Strings Single — —
131 Church Choir Strings Single — —
132 Tronic Voice Strings Single — —
133 Shout Choir Strings Single — —
134 TranSweep Strings Layer — —
135 PadOfTheRing Strings Single — —
136 Fast S&H Pad Strings Layer — —
137 Acoust.Piano Piano Single — —
138 Bright Piano Piano Single — —
139 Live Piano Piano Single — —
140 Ballad Piano Piano Single — —
141 Ambi Pf&Pad Piano Layer — —
142 Piano Pad Piano Layer — —
143 Bass + Piano Piano Split — —
144 Elec Grand Piano Single — —
145 70's EP Piano Single — —
146 Suitcase EP Piano Single — —
147 Phaser EP Piano Single — —
148 Dyno EP Piano Single — —
149 Wurly EP Piano Single — —
150 VPM Piano Piano Single — —
151 DWGS Piano Piano Single — —
152 Clav 1 Key Single — —
153 Clav 2 Key Single — —
Voice
Mode
Arpeggio
Switch
Mic In
No. Program Name Category
154 Phaser Clav Key Single — —
155 Synth Clav Key Single — —
156 Backing Org Key Layer — —
157 888 Organ Key Single — —
158 2ndPercOrgan Key Layer — —
159 3rdPercOrgan Key Layer — —
160 DistPerc Org Key Layer — —
161 Dist Organ Key Single — —
162 Full Organ Key Single — —
163 Cat Organ Key Layer — —
164 M1 Organ Key Single — —
165 VOX Organ 1 Key Single — —
166 VOX Organ 2 Key Single — —
167 DarkSynth EP Key Single — —
168 Sequence me! Key Single — —
169 Miss you... Key Single — —
170 Pop Bell Key Single — —
171 Glassy Bell Key Layer — —
—
—
172 Vibraphone Key Single — —
173 Winter Bell Key Single — —
174 Snow Piano Key Single — —
175 Vulcan Bells Key Layer — —
176 Crystal Bell Key Layer — —
177 Flashverb SE/Voc Single
178 8bit Game SE/Voc Single
179 Hoover SE/Voc Single — —
180 Reverse Sync SE/Voc Layer — —
181 Pre Movie FX SE/Voc Single — —
182 Note Rez SE/Voc Single — —
183 Wind FX SE/Voc Single — —
184 Frankenstein SE/Voc Single — —
185 Bomb Fall SE/Voc Split — —
186 Magneto SE/Voc Single — —
187 Water Cave SE/Voc Single — —
188 Noise Bursts SE/Voc Single — —
189 Synth Drums SE/Voc Layer — —
190 Kick & Chord SE/Voc Layer
191 Modular Seq SE/Voc Layer
192 Electro Hit SE/Voc Layer
193 Dreamy Chord SE/Voc Single — —
194 Chill EP Hit SE/Voc Layer — —
195 Ring Percuss SE/Voc Single — —
196 Mr.Vocoder SE/Voc Single —
197 Let'sVocoder SE/Voc Layer —
198 RobotVocoder SE/Voc Single —
199 Talk Box SE/Voc Single —
200 Mic In SE/Voc Single —
Program 201–300 are Initialized Program.
All Programs were made by Dave Polich, Henning Verlage, Richard
Formidoni and KORG Inc.
For more information about “Dave Polich”, please visit.
http://www.davepolich.com/
For more information about “Henning Verlage”, please visit.
http://www.facebook.com/henningverlage
Voice
Mode
Arpeggio
Switch
Mic In
—
—
—
—
—
111
Page 92

Demo song list
No. Song name Author
1 Synth Riff KORG
2 Future Funk Akihiro Horikoshi
3 Epic Journey Henning Verlage
4 Mellowness Akihiro Horikoshi
5 Anthem King Henning Verlage
6 Keyboard Riff KORG
Demo Song. © 2013 KORG Inc. — All rights reserved.
Akihiro Horikoshi ( http://xsjazz.com/ or http://soundcloud.com/xsjazz/ )
Henning Verlage ( http://www.facebook.com/henningverlage )
112
Page 93

IMPORTANT NOTICE TO CONSUMERS
This product has been manufactured according to strict specifications and voltage requirements that are applicable in the country in which it is intended that
this product should be used. If you have purchased this product via the internet,
through mail order, and/or via a telephone sale, you must verify that this product
is intended to be used in the country in which you reside.
WARNING: Use of this product in any country other than that for which it is intended could be dangerous and could invalidate the anufacturer’s or distributor’s warranty. Please also retain your receipt as proof of purchase otherwise your
product may be disqualified from the anufacturer’s or distributor’s warranty.
REMARQUE IMPORTANTE POUR LES CLIENTS
Ce produit a été fabriqué suivant des spécifications sévères et des besoins en
tension applicables dans le pays où ce produit doit être utilisé. Si vous avez
acheté ce produit via l’internet, par vente par correspondance ou/et vente par
téléphone, vous devez vérifier que ce produit est bien utilisable dans le pays où
vous résidez.
ATTENTION: L’utilisation de ce produit dans un pays autre que celui pour lequel il
a été conçu peut être dangereuse et annulera la garantie du fabricant ou du distributeur. Conservez bien votre récépissé qui est la preuve de votre achat, faute
de quoi votre produit ne risque de ne plus être couvert par la garantie du fabricant ou du distributeur.
WICHTIGER HINWEIS FÜR KUNDEN
Dieses Produkt wurde unter strenger Beachtung von Spezifikationen und Spannungsanforderungen hergestellt, die im Bestimmungsland gelten. Wenn Sie
dieses Produkt über das Internet, per Postversand und/oder mit telefonischer
Bestellung gekauft haben, müssen Sie bestätigen, dass dieses Produkt für Ihr
Wohngebiet ausgelegt ist.
WARNUNG: Verwendung dieses Produkts in einem anderen Land als dem, für
das es bestimmt ist, verwendet wird, kann gefährlich sein und die Garantie des
Herstellers oder Importeurs hinfällig lassen werden. Bitte bewahren Sie diese
Quittung als Kaufbeleg auf, da andernfalls das Produkt von der Garantie des Herstellers oder Importeurs ausgeschlossen werden kann.
NOTA IMPORTANTE PARA EL CONSUMIDOR
Este producto ha sido fabricado de acuerdo a estrictas especificaciones y requerimientos de voltaje aplicables en el país para el cual está destinado. Si ha comprado este producto por internet, a través de correo, y/o venta telefónica, debe usted verificar que el uso de este producto está destinado al país en el cual reside.
AVISO: El uso de este producto en un país distinto al cual está destinado podría
resultar peligroso y podría invalidar la garantía del fabricante o distribuidor. Por
favor guarde su recibo como prueba de compra ya que de otro modo el producto puede verse privado de la garantía del fabricante o distribuidor.
4015-2 Yanokuchi, Inagi-city, Tokyo 206-0812 Japan
 Loading...