

Korg Havian 30 Owner's Manual

4E
HAVIAN 30 | User Manual
IMPORTANT NOTICE TO CONSUMERS
This product has been manufactured according to strict specifications and voltage requirements that are applicable in the country
in which it is intended that this product should
be used. If you have purchased this product
via the internet, through mail order, and/or
via a telephone sale, you must verify that this
product is intended to be used in the country
in which you reside.
WARNING: Use of this product in any country
other than that for which it is intended could
be dangerous and could invalidate the manufacturer’s or distributor’s warranty.
Please also retain your receipt as proof of
purchase otherwise your product may be disqualified from the manufacturer’s or distributor’s warranty.
NOTICE REGARDING DISPOSAL (EU ONLY)
If this symbol is shown on the product,
manual, battery, or package, you must
dispose of it in the correct manner to
avoid harm to human health or damage to the environment. Contact your
local administrative body for details
on the correct disposal method. If
the battery contains heavy metals in
excess of the regulated amount, a chemical
symbol is displayed below the symbol on the
battery or battery package.
THE FCC REGULATION WARNING (FOR USA)
This equipment has been tested and found
to comply with the limits for a Class B digital device, pursuant to Part 15 of the FCC
Rules. These limits are designed to provide
reasonable protection against harmful interference in a residential installation. This
equipment generates, uses, and can radiate
radio frequency energy and, if not installed
and used in accordance with the instructions,
may cause harmful interference to radio communications. However, there is no guarantee
that interference will not occur in a particular installation. If this equipment does cause
harmful interference to radio or television reception, which can be determined by turning
the equipment off and on, the user is encouraged to try to correct the interference by one
or more of the following measures:
• Reorient or relocate the receiving antenna.
• Increase the separation between the equipment and receiver.
• Connect the equipment into an outlet on
acircuit different from that to which the receiver is connected.
• Consult the dealer or an experienced radio/
TV technician for help.
If items such as cables are included with this
equipment, you must use those included
items.
Unauthorized changes or modification to this
system can void the user’s authority to operate this equipment.
DECLARATION OF CONFORMITY (FOR USA)
Responsible Party: KORG USA INC.
Address: 316 SOUTH SERVICE ROAD, MELVILLE
Telephone: 1-631-390-6500
Equipment Type: Digital Ensemble Piano
Model: HAVIAN 30
This device complies with Part 15 of FCC Rules.
Operation is subject to the following two conditions: (1) This device may not cause harmful
interference, and (2) this device must accept
any interference received, including interference that may cause undesired operation.
PERCHLORATE (CALIFORNIA, USA ONLY)
Perchlorate Material – special handling may
apply. See www.dtsc.ca.gov/hazardous-
waste/perchlorate.

Important safety
instructions
▪ Read these instructions.
▪ Keep these instructions.
▪ Heed all warnings.
▪ Do not use this apparatus near water.
▪ Clean only with dry cloth.
▪ Do not block any ventilation openings. Install
in accordance with the manufacturer’s instructions.
▪ Do not install near any heat sources such as
radiators, heat registers, stoves, or other apparatus (including amplifiers) that produce
heat.
▪ Do not defeat the safety purpose of the po-
larized or grounding-type plug. A polarized
plug has two blades with one wider than the
other. A grounding type plug has two blades
and a third grounding prong. The wide blade
or the third prong are provided for your safety. If the provided plug does not fit into your
outlet, consult an electrician for replacement
of the obsolete outlet.
▪ Protect the power cord from being walked on
or pinched particularly at plugs, convenience
receptacles, and the point where they exit
from the apparatus.
▪ Only use attachments/accessories specified
by the manufacturer.
▪ Use only with the cart, stand, tripod, bracket,
or table specified by the manufacturer, or
sold with the apparatus. When a cart is used,
use caution when moving the cart/apparatus
combination to avoid injury from tip-over.
▪ Unplug this apparatus during lightning
storms or when unused for long periods of
time.
▪ Refer all servicing to qualified service per-
sonnel. Servicing is required when the apparatus has been damaged in any way, such as
power-supply cord or plug is damaged, liquid
has been spilled or objects have fallen into
the apparatus, the apparatus has been exposed to rain or moisture, does not operate
normally, or has been dropped.
▪ WARNING – This apparatus shall be connect-
ed to a mains socket outlet with a protective
earthing connection.
▪ Turning off the standby switch does not com-
pletely isolate this product from the power
line, so remove the plug from the socket if
not using it for extended periods of time,
or before cleaning. Please ensure that the
mains plug or appliance couple remains
readily accessible.
▪ Mains powered apparatus shall not be ex-
posed to dripping or splashing and that no
objects filled with liquids, such as vases, shall
be placed on the apparatus.
▪ Install this product near the wall socket and
keep the power plug easily accessible.
▪ Do not install this equipment in a confined
space such as a box for the conveyance or
similar unit.
CAUTION – HAVIAN 30 is for use only with
the KORG ST-H30 -BK stand. Use with other
stands may result in loss of stability, and may
cause injury.
ATTENTION – HAVIAN 30 est conçu pour
être utilisé avec le support KORG ST-H30BK. L’utilisation avec d’autres supports peut
causer une déstabilisation et provoquer des
blessures.

Other notices
Automatic power-off
To avoid wasting power, HAVIAN 30 will by default automatically enter standby mode after
two hours of non-active use (playing, pressing
buttons or using the touch-screen). Please save
your data (Performances, Styles, Songs, and so
on) before taking a prolonged pause.
Data handling
Data in memory may sometimes be lost due to
incorrect user action. Be sure to save important
data to the internal memory or to an external
USB device. KORG will not be responsible for
damages caused by data loss.
Cleaning
If the exterior becomes dirty, wipe it with a
clean, dry cloth. Do not use liquid cleaners such
as benzene or thinner, or cleaning compounds
or flammable polishes.
Use a soft cotton cloth to clean the display.
Some materials, such as paper towels, could
cause scratches and damage it. Computer wipes
are also suggested, provided they are specifically designed for LCD screens.
Do not spray any liquid on the LCD screen directly. Always apply the solution to your cloth first,
then clean the screen.
Example screens
Some pages of the manuals show snapshots of
the screen along with an explanation of functions and operations. All sound, style, song or
parameter names, as well as shown values, are
merely examples and may not always match the
actual display you are working on.
Trademarks
Acrobat and PDF are registered trademarks
of Adobe Systems Incorporated. Mac is a registered trademark of Apple, Inc. MS-DOS and
Windows are registered trademarks of Microsoft
Corporation. All other trademarks or registered
trademarks are the property of their respective
holders.
Open source notice
Portions of this product’s software are copyright ©2007 “The FreeType Project” (www.
freetype.org). All rights reserved.
Disclaimer
The information contained in this manual have
been carefully revised and checked through.
Due to our constant efforts to improve our products, the specifications might differ to those
in the manual. KORG is not responsible for any
differences found between the specifications
and the contents of the instruction manual – all
specifications being subject to change without
prior notice.
Liability
KORG products are manufactured under strict
specifications and voltages required by each
country. These products are warranted by the
KORG distributor only in each country. Any
KORG product not sold with a warranty card or
carrying a serial number disqualifies the product sold from the manufacturer’s/distributor’s
warranty and liability. This requirement is for
your own protection and safety.
Service and user’s assistance
For service, please contact your nearest
Authorized KORG Service Center. For more information on KORG products, and to find software and accessories for your keyboard, please
contact your local Authorized KORG distributor.
For up-to-date information, please point your
web browser to our web site.
Keep your keyboard up-to-date
Your instrument can be constantly updated as
new versions of the operating system are released by KORG. You can download the operating system from our web site. Please, read the
instructions supplied with the operating system.
Copyright © 2016 KORG ITALY SpA

Contents
Part I 7 Let’s start!
9 Introduction
9 Welcome to HAVIAN 30!
12 Before starting to play…
14 Overview of the instrument
19 Setting up the accessories
19 Connecting the damper pedal
20 Connecting the audio outputs
22 Assembling the music stand
23 Powering
23 Turning the instrument on
24 Calibrating the touch screen
25 Listening to the Demo Songs
27 Interface basics
27 The main page
28 The user interface in detail
35 Navigating through the pages
38 Selecting the musical resources
|1
Part II 41 Playing and singing
43 The Easy Mode
43 Turning the Easy Mode on or off
44 The Easy Style Play page
46 The Easy Song Play page
48 Playing the Sounds
48 Playing Grand Piano
48 Choosing the Sounds
54 Tempo and Metronome
54 Tempo
57 Metronome
59 Playing the Styles
59 Choosing the Styles
64 Playing a Style
69 The Chord Sequencer
71 Playing the Songs
71 Choosing the Songs
76 Playing a Song
78 Playing along with the Song
79 Playing all the Songs in a folder
81 Playing a Jukebox list

2|
84 Lyrics, chords, score and markers
84 Reading lyrics and chords
89 Reading the music score
93 Moving through a Song with the markers
96 Searching for files and other items
96 Using the Search function
Part III 101 The SongBook
103 Using the SongBook
103 Choosing the SongBook Entries
112 Using the Custom Lists
113 Editing the SongBook
113 Creating and editing the SongBook Entries
122 Creating and editing the Custom Lists
126 Using the SongBook with a personal computer
Part IV 127 Customizing and editing the Sound sets
129 Customizing the Sound sets
129 Playing different Sounds with the left and right hand
133 Playing two or three Sounds at the same time
134 Choosing different Sounds
136 Mixing the Keyboard Sounds
138 Transposing the Sounds to a different octave
140 Using the Ensemble to add harmony
143 Advanced editing of the Sound sets
143 The editing procedure
145 Mixing the Sounds
147 Adding effects
153 Equalization
156 Octave and fine tuning
157 Sound routing, polyphony, key and velocity range
161 Easy editing of Drum Kits
164 Easy editing of Sounds
166 Writing the Sound sets
166 Writing a Performance
168 Writing an STS
172 Writing Style Settings, Song Settings and MIDI Song Sounds
Part V 173 Customizing, recording and editing the Styles
175 Customizing the Styles
175 Setting the Chord Recognition
178 Mixing the grouped Accompaniment Sounds
181 Editing the Style Settings
181 Mixing the individual Accompaniment Sounds

184 Changing the Sounds of the Accompaniment parts
187 Setting the Style controls
189 Writing the Style Settings
189 Writing the Style Settings
190 Recording the Styles
190 Overview on the Styles
194 Accessing the Style Record mode
196 Preparing to record
205 Recording a Style in Realtime Record
208 Recording a Style in Step Record
213 Recording a Guitar track
222 Editing the Styles
222 Editing the individual MIDI events
226 Editing the Style patterns
237 Editing the Sounds and controls
243 Editing the Chord Table
245 Editing the Style tracks
247 Importing and exporting the Styles
247 Importing from a Standard MIDI File
253 Export
255 Saving the new/edited Style
255 Saving the edited Style
257 Managing the Styles
257 The Favorite Styles
259 Copying the Styles
260 Writing over the Factory Styles (and STSs)
|3
Part VI 261 Customizing, recording and editing the Songs
263 Customizing the Songs
263 Customizing a Song
268 Writing the Song Play Settings
268 Writing the default Song Play Tracks and FX settings
269 Listening the MIDI Songs in Sequencer mode
269 Loading and listening a MIDI Song
272 Recording MIDI Songs
272 Multitrack Recording a Song
279 Step Recording a Song
284 Quick Recording a Backing Sequence Song
290 Step Recording a Backing Sequence Song
295 Editing the MIDI Songs
295 Editing the individual MIDI events
299 Editing the Song tracks

4|
309 Saving MIDI Songs
309 Saving the MIDI Song
311 Recording MP3 Songs
311 Recording and saving an MP3 Song
Part VII 315 Customizing and editing the Sounds
317 Listening and customizing the Sounds
317 Accessing the Sound Edit mode
319 Listening to individual Sounds
320 Customizing the Sound
323 Editing the Sounds
325 Setting the Sound’s basic parameters
330 Setting the oscillator’s basic parameters
336 Programming the Damper pedal
340 Equalizing the Sound
341 Setting the Drum Kit’s basic parameters
345 Equalizing the Drum Kit
347 Mixing and retriggering the drum samples
349 Modulating pitch
354 Programming the pitch envelope (Pitch EG)
358 Programming the filters
361 Modulating the filters
366 Programming the filter envelope (Filter EG)
370 Programming amplitude and pan
372 Modulating amplitude
375 Programming the amplitude envelope (Amp EG)
379 Programming the LFO
384 Adding effects to the Sound
385 Sound Edit utilities
387 AMS (Alternate Modulation Sources)
390 Writing the Sounds
390 Writing the edited Sound
392 Managing the User Samples
392 Getting information on the User Sample memory
393 Deleting the User Samples
Part VIII 397 The Effects
399 Effects for the MIDI Sounds
399 Adapting reverb to the room size
400 Effects list
402 DMS (Dynamic Modulation Sources)
404 Dynamics (Dynamic)
414 EQ and Filters (EQ/Filter)
439 Overdrive, Amp models, and Mic models (OD Amp Mic)

451 Chorus, Flanger, and Phaser (Cho/Fln Phaser)
472 Modulation and Pitch Shift (Mod./P.Shift)
507 Delay
536 Reverb and Early Reflections (Reverb ER)
541 Mono-Mono Serial (Mono-Mono)
585 Double Size
613 Limiter, Master EQ
613 Limiter
616 Master EQ
Part IX 619 Global settings, Preferences
621 Customizing the user interface
621 Colors and language
623 Program Change and activity indicators
625 Auto selection and locking
625 Automatically choosing Styles and Performances
627 Locking parameters to prevent changes
630 System preferences
630 Setting the date and time for file saving
631 Automatic power off
632 Mode preferences
632 Style Play preferences
634 Song Play and Sequencer preferences
636 Media and file preferences
638 Controllers
638 Programming the Joystick
640 Setting the velocity curve
641 Programming the Pedal/Footswitch
647 Master Transpose and Tuning
647 Master Tuning
648 Master Transpose
653 Scale
653 Main Scale
655 Sub-Scale
658 Quarter Tone Sub-Scale (SC Presets)
|5
Part X 663 MIDI Connections
665 MIDI
665 Introduction to MIDI
669 Quick settings using MIDI Presets
673 MIDI communication settings
678 Synchronizing Tempo with other instruments
680 Programming the MIDI channels

6|
683 Installing the KORG USB MIDI Driver
685 Connecting HAVIAN 30 to a personal computer or tablet
686 Control Change messages
689 Controlling the Styles and Player via MIDI
Part XI 691 File management
693 Managing files
693 Overview on file management
698 Loading musical resources and settings
703 Saving musical resources and settings
707 Copying files and folders
710 Deleting files and folders
711 Selecting more items at once
713 Formatting storage devices
715 Backing up and restoring musical resources
719 Connecting the internal drive to a personal computer
721 Storage device management
725 Exporting playlists
728 Care of storage devices
Part XII 729 Appendix
731 Musical Resources
732 Styles
737 Performances
740 Sounds and Drum Kits (Bank order)
758 Sounds (Program Change order)
774 Drum Kits
776 Multisamples
782 Drum Samples
797 Recognized chords
799 Shortcuts
802 Troubleshooting
804 Specs

PART I: LET’S
START!
|7

8| Introduction

Welcome to HAVIAN 30! |9
01 Introduction
Welcome to HAVIAN 30!
Many thanks, and congratulation on purchasing the KORG HAVIAN 30 Digital
Ensemble Piano. We’re sure it’ll give you countless hours of great piano and
band instrument tones that will feel as good as they sound!
The real piano experience
So much of the HAVIAN 30 digital ensemble piano has been designed to give
you a great piano experience. The high-quality, weighted piano-like keybed
gives you a completely authentic feel and touch. The grand piano, recorded
in multiple dynamic levels, sounds absolutely natural. You will feel you are
playing a real piano – no matter what your musical tastes are.
More than just grand piano
To broaden your choice of piano sounds beyond the meticulously crafted
grand piano, HAVIAN 30 features an intimate upright piano, an evocative
honky-tonk, and an extensive selection of electric pianos. A realistic harpsichord is also included, and can be tuned by choosing one of the carefully
crafted period tunings. From ragtime to R’n’B, from classic rock to modern
jazz, from early keyboard music to the latest piano hits, you’ll find what is
needed to play centuries of great music.
Listen the natural way
All HAVIAN 30 sounds go through studio-quality effect processors that further refine your sound before coming through high-quality stereo audio
outputs and integrated speakers for an amazing listening experience. The
sound is clear and detailed even at the lowest volume level, for the pleasure
of the late-night rehearsing musician.

10| Introduction
As good in tour or at home
HAVIAN 30 is a compact, lightweight digital piano that you can comfortably take with you on stage. But add the optional modern, stylish dedicated
stand, with support for the damper pedal (included) and a pair of (optional)
headphones, and you will be able to have it anywhere in your home – a stylish
piece of furniture.
Use it for rehearsing or practicing guided by the built in programmable metronome. Or let the included bank of dedicated Piano Styles play along with
you, to make a study session feel like an onstage experience.
Easy to use, like a real piano
Using your HAVIAN 30 is easy, thanks to the touch screen and the clean,
clearly laid-out user interface. This easy-to-use, handy technology, driving
every aspect of the instrument, will make advanced features seem as easy
as touching real objects in the real world.
If you are not comfortable with the touch display, then the innovative tactile
display navigation system will let anybody’s fingers, even if blind or visually
impaired, quickly find a reference to the display content.
A band always ready to play with you
Ultra-realistic sounds in the HAVIAN 30 are always ready to play along with
you, in the music style best fitting your music. The high number of included
Styles will satisfy any music genre, but can also be expanded by adding new
Styles. You may also create your Styles, or customize the existing ones.
There are eight Accompaniment parts which will follow your chords. You can
play in the simplest way or with the rich harmonization of a competent jazz
player. We have programmed them to sound natural, and give you the feeling
of a real band, ready to play with you at any time.
Play and write songs
Play Songs in MID and MP3 formats. With Songs, you can show lyrics for your
singer and chords for your fellow guitarist. Any MIDI Song track can be converted into a readable score. Markers allow for jumping back to a passage
you wish to repeat, for example in a piece you are studying or rehearsing.
You can record a MIDI Song using a full-featured Sequencer, or by using the
Styles to record your live performance. Even easier, just record what you
play as an MP3 file, and listen to it anywhere you like – even while driving to
a party with friends!

Welcome to HAVIAN 30! |11
Your music book
What is a huge collection of Styles and Songs, without an effective form of
organization? The HAVIAN 30 has the one most known to musicians: the
SongBook, a music database allowing for fast song retrieving based on
name, artist, genre or tempo. Styles and Songs are easily recalled by the
SongBook.
The SongBook can even be edited from a personal computer through our
free editor. It can also be synchronized with most modern tablets to become
your handy external digital music sheet reader (third-party software needed).
Open to the world, ready to the future
The USB ports allow for connecting the HAVIAN 30 to any external storage
device or personal computer, smartphone or tablet without the need for a
dedicated MIDI interface. The use of standard MID or MP3 file formats opens
a world of possibilities when exchanging files.
Enjoy your musical life with the new HAVIAN 30!

12| Introduction
Before starting to play…
What’s in the box
After you get your HAVIAN 30, please check that all the following items are
included in the package. If any of the following items is missing, please contact your KORG dealer immediately.
▪ HAVIAN 30
▪ Music stand
▪ DS2H damper pedal (with half-pedaling)
▪ DC power supply unit
▪ AC power cable
▪ Quick Guide
▪ Accessory Disc, containing the Video Manuals, the full User Manual, the
Piano Solo Collection (offering a selection of progressive piano studies) and
software utilities
What you can add
After having purchased HAVIAN 30, you might want to add these other fine
options:
▪ The elegant KORG piano stand, recommended for safety and comfort, per-
fectly matching your piano design. The stand will let you keep all your cables
in order, by hiding the power supply unit and adding a bar to keep the damper pedal firmly in place. It also supports your headphones when they are not
in use.
▪ One of the sturdy pedals and footswitches of the KORG catalogue.
Contacts
Your KORG dealers not only deliver this instrument, but also carry hardware
and software accessories, as well as useful information on how to use these
products. Ask them for any help you should eventually need.
Our international web site is www.korg.com. A list of all KORG Distributors
can be found in our dedicated web site (www.korg.com/us/corporate/dis-
tributors/).

Before starting to play… |13
Making a safety copy of your data
In case you like to customize your musical resources, we suggest you use the
Media > Utility > Full Resources Backup command to make frequent backup
copies into compact and easy-to-store archives.
Also, you can use the Media > Save All command to save individual files that
you can separately reload one by one.
Restoring a safety copy
To restore a backup, use the Media > Utility > Resources Restore command.
If you saved your data with the Media > Save All command, use the Media >
Load operations to reload them.
Restoring the original factory data
In case you want to restore the original factory data, use the Media > Utility
> Factory Restore command.
Warning: This operation will overwrite all the Factory, Local, Favorite and User data!
Loading the Operating System
Your HAVIAN 30 can be constantly updated as new versions of the operating
system are released by KORG. You can download the most up-to-date operating system from our web site. Please, read the instructions supplied with
the operating system on the site.
You can see which version of the operating systems is installed in your
HAVIAN 30 by going to the Media > Utility page.
Warning: Do not install an OS other than the official OS supplied by KORG for the
HAVIAN 30. Trying to install an OS created for different models or downloaded from
unofficial web sites may cause data loss and permanent damage to the instrument.
KORG is not responsible for any damage caused by improper installation of the OS.
14| Introduction
Overview of the instrument
The following pages show the functional areas of the front and real panels.
Front panel
The front panel is where you can find the instrument’s controls, the loudspeakers and the music stand.
Loudspeakers Loudspeakers
Loudspeakers
The output volume of the integrated loudspeakers can be controlled via the
VOLUME knob.
The speakers are automatically deactivated when connecting the headphones.
Keyboard
Use the keyboard to play notes and chords. Depending on the SPLIT indicator, the keyboard may be joint or split between different sounds.
Music stand holes
Keyboard
Music stand holes
A music stand comes standard with your HAVIAN 30. Use these holes to
insert the supplied music stand, as shown on page 13.
Overview of the instrument |15
Control panel
The control panel is the part of the front panel where you can find the instrument’s controls.
Display
Styles area Player area Sounds area
Navigation area
Display
Use this touchscreen display to interact with the instrument.
Metronome and
Tempo area
Display navigation aids for blinds and visually impaired
Marks on the border of the display will help you build a virtual grid of references, to quickly locate objects on the screen with your fingers. The (optional) support kit will make its use even more immediate. See Selecting the
musical resources on page 38.
16| Introduction
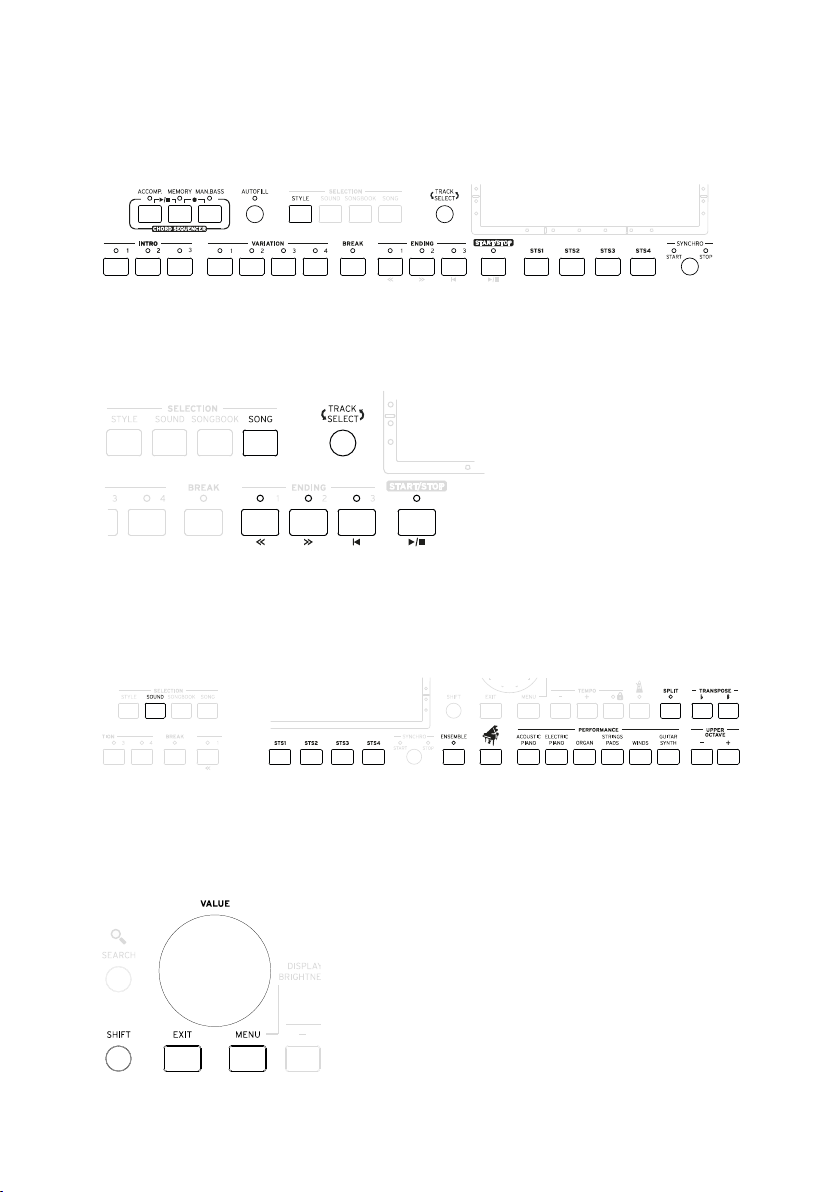
Styles area
Styles supply the automatic Accompaniment with a virtual band (see page
59).
Player area
Songs can be played and controlled by the Player (see page 71).
Sounds area
Sounds, organized in Performances and STSs, are what you can play on the
keyboard (see page 48).
Navigation area
Use these controls to go though the menus, pages and parameters, and
search for the various musical resources (see page 27).
Overview of the instrument |17
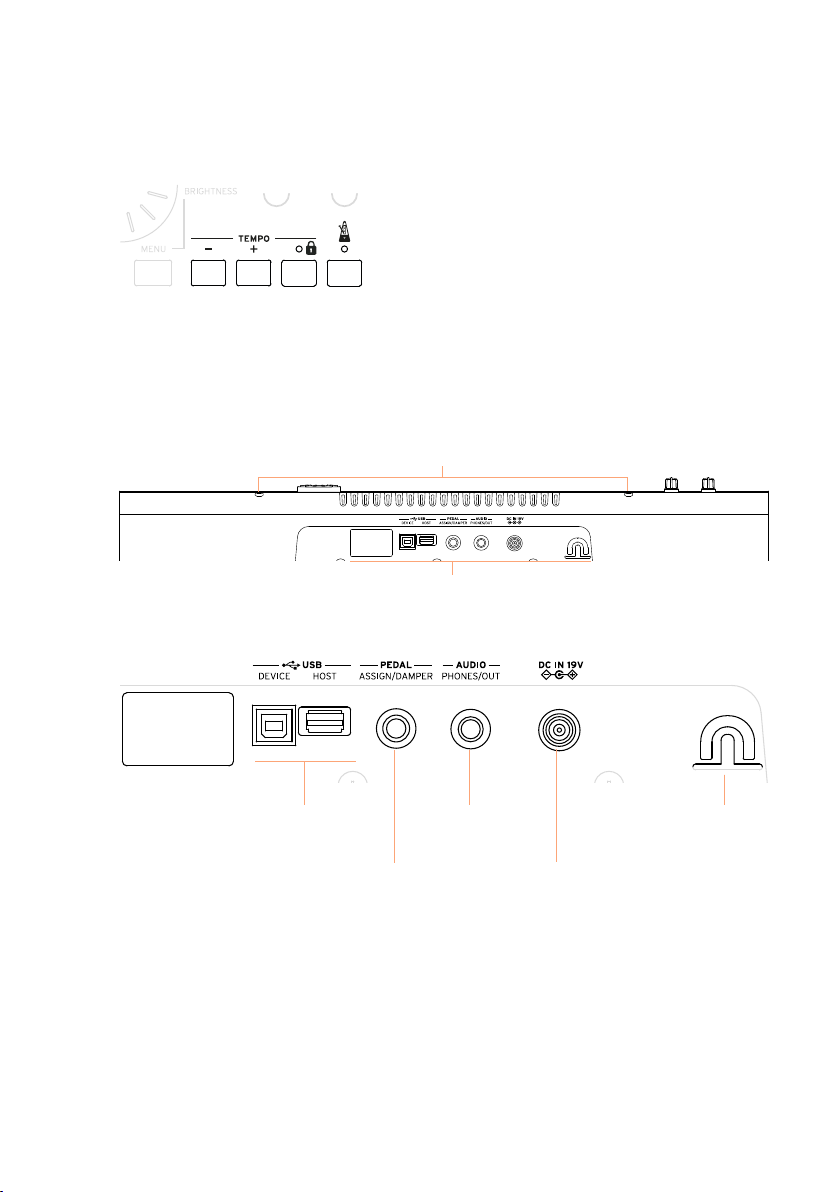
Connectors
Metronome and Tempo area
Use these controls to practice with the metronome and control the Tempo of
the metronome, the Styles and the Songs (see page 54).
Rear panel
The rear panel is where you can find the various connections (see page
19).
Music stand holes
USB connectors
Pedal connector
Phones/Line Out
connector
Power supply
Power cable
holder
connector
USB connectors
Use these connectors to connect your HAVIAN 30 to a personal computer
(DEVICE) or to connect an USB memory device, like an USB pendrive (HOST).

18| Introduction
Pedal connector
This is where you will connect the supplied DS2H damper pedal, or any other
pedal or footswitch.
Phones/Line Out connector
This connector will serve as an Headphone connector (default setting) or a
Line Out connector (see page 20).
Power supply connector and Power cable holder
Use this port to connect the power supply unit, and the cable holder to keep
the cable in order.

Connecting the damper pedal |19
02 Setting up the
accessories
Connecting the damper pedal
Connecting the DS2H damper pedal
Use the PEDAL connector to connect the supplied KORG DS2H damper pedal. This pedal supports all the nuances of half-pedaling on some Grand Piano
sounds. You can experiment how it works by gradually pressing it down, and
gradually releasing it, while playing one of the Grand Piano RX Sounds.
As an alternative, you can connect any other footswitch pedal like the (optional) KORG PS1, PS3 or DS1H, or a continuous pedal like the (optional)
KORG XVP-10 Volume pedal or EXP-2 Expression pedal.
By default, this connector will work as a Damper (Sustain) pedal. If you want
to change the assigned function, or you need to change the pedal’s polarity
and calibrate it, go to the Global > Controllers > Foot Controllers page.
What if the pedal does not behave correctly?
From time to time, you might want to recalibrate the pedal. See how to do in
Calibrating the pedal and setting its polarity on page 645.

20| Setting up the accessories
Connecting the audio outputs
Connecting the headphones
Connect a pair of headphones to the PHONES/AUDIO OUT connector. You
can use headphones with an impedance of 16-200 Ohms (50 Ohms suggested). When connecting the headphones, the speakers are automatically
deactivated.
Adjust the output level with the VOLUME knob.
In case the connector was set to work as a Line Out, you can choose the
Headphone option by using the Phones/Audio Out > Level parameter in the
Global > Audio & EQ > MP3/Speakers page (see below).
Connecting the audio outputs
Use the PHONES/AUDIO OUT connector to send the audio output to a mixer,
a set of powered monitors, or an audio amplification system. Use a stereo
jack to send the final stereo mix to an external device.
When using a home audio amplifier, connect the other end of the cable to the
CD, LINE IN or TAPE/AUX input of your audio system. Don’t use the PHONO
inputs of your audio system!
Adjust the output level with the VOLUME knob.
In case the connector is set to work as a Phone Out (it is by default), you
can choose the Line Out option by using the Level parameter in the Global >
Audio & EQ > MP3/Speakers page.
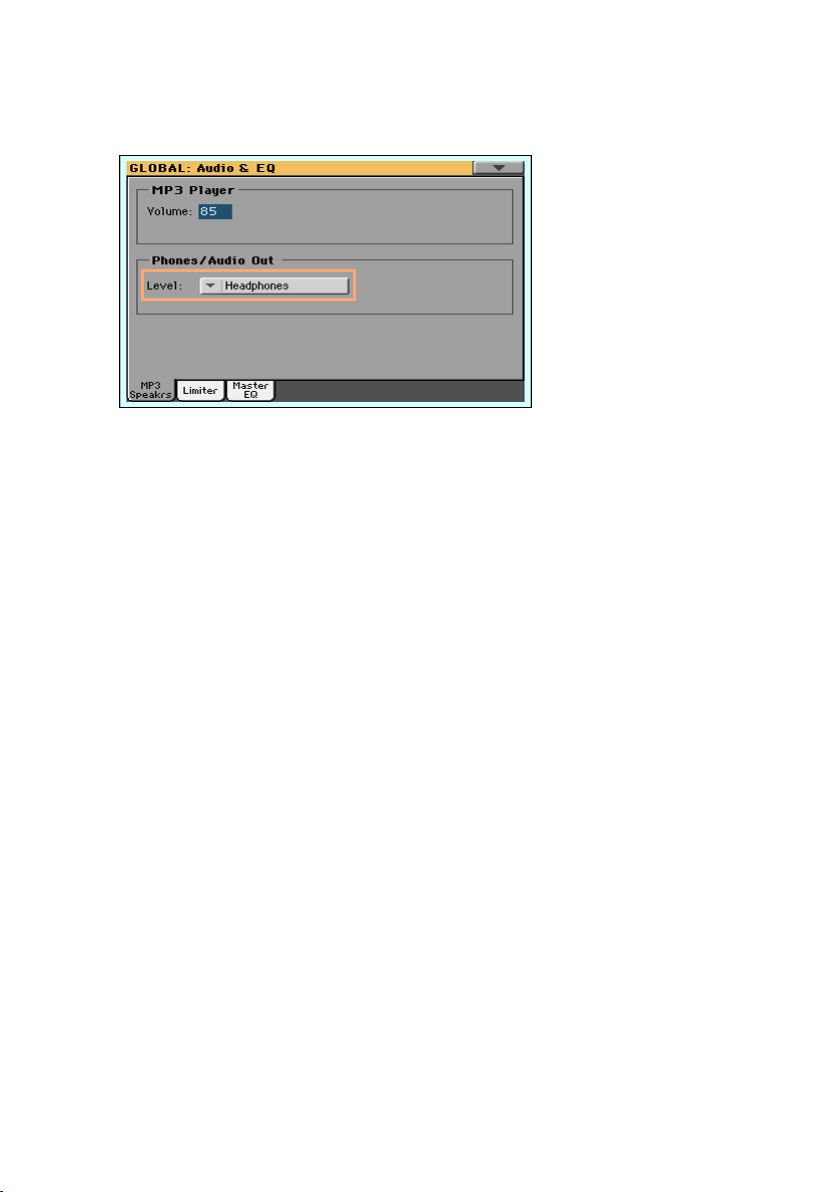
Connecting the audio outputs |21
Set the output level to Line Out (or back to Headphones)
1 Go to the Global > Audio & EQ > MP3/Speakers page.
2 Choose the output level by using the Phones/Audio Out > Level pop-up
menu.
3 Press the EXIT button to return to the previous page.
22| Setting up the accessories
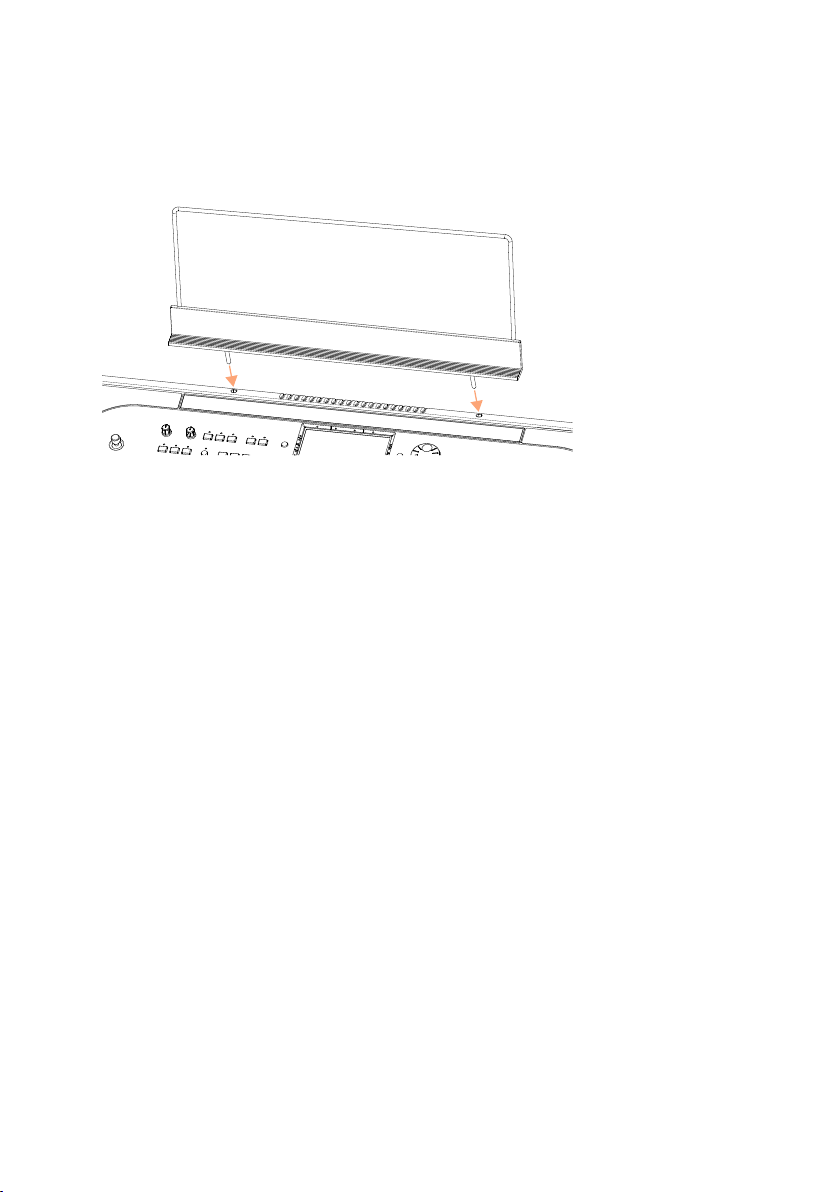
Assembling the music stand
To assemble the music stand, insert its legs into the dedicated holes on the
back of the instrument.

Turning the instrument on |23
03 Powering
Turning the instrument on
Connecting the power adapter
Plug the supplied power adapter AC cable into a wall power socket, and the
DC power adapter cable into the DC IN 15V connector on the back of the
instrument.
To avoid cable jamming, fix the power cable to the dedicated cable holder.
When the cable is connected, the instrument is in standby.
Warning: When the instrument is in standby, it is still connected to the power line.
Accessing the inside of the instrument can be dangerous. To completely disconnect
the instrument from the power, unplug the power plug from the power socket on the
wall.
Turning the power on or off
Turn the instrument on
▪ Press the POWER (
standby’). After you turn the instrument on, a welcome screen will be shown
for a few seconds, then the main page of the Style Play mode will appear.
Turn the instrument off (standby)
▪ Keep the POWER (
it when the screen appears dimmed. The shutdown procedure will begin and
last for a few seconds. Please do not disconnect the power cable during this
procedure.
) button to turn the instrument on (that is, ‘exit from
) button pressed for about one second, then release
24| Powering
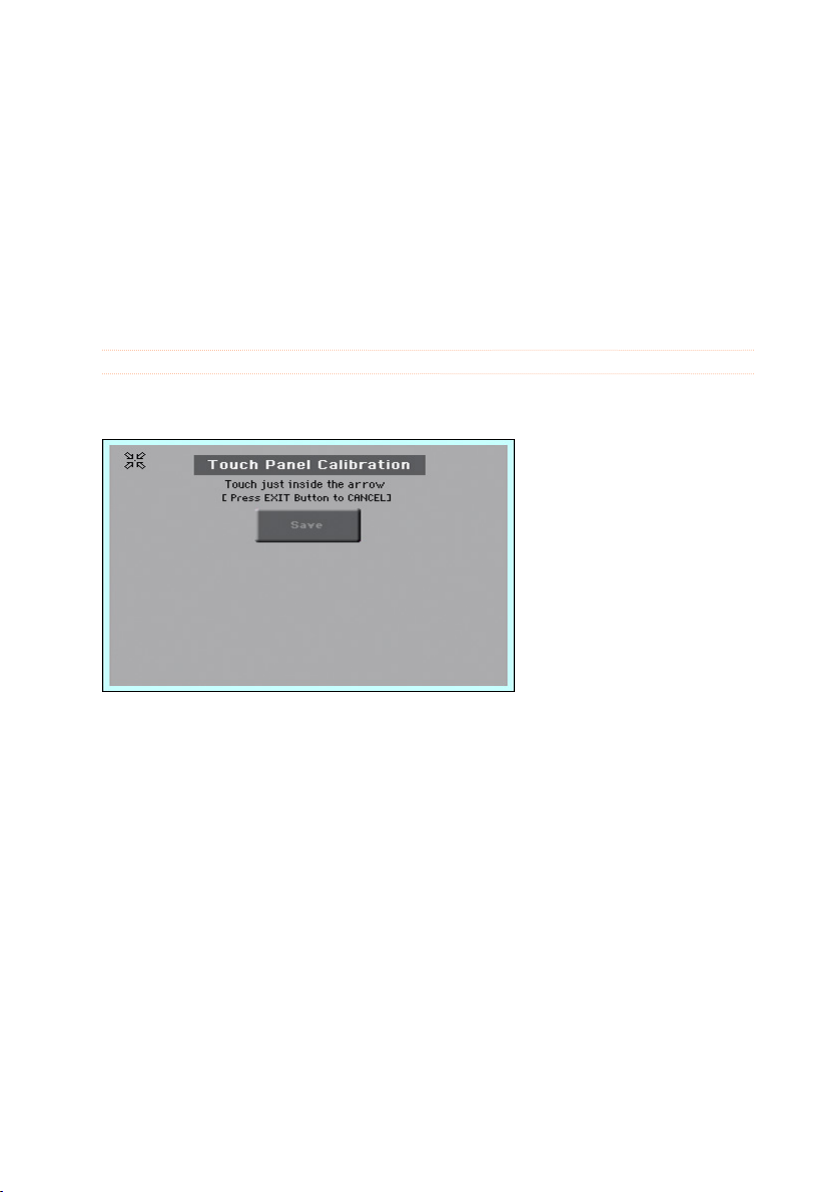
Calibrating the touch screen
Calibrating the screen
From time to time (for example, after loading a new operating system), calibrating your Color TouchView™ display may be necessary to make pointing
more precise.
To be more accurate, use a tablet stylus or the tip of a pen cap.
Warning: Do not use sharp objects, or you will damage your screen!
1 Keep the GLOBAL button pressed, until the Touch Panel Calibration page
appears.
2 First touch exactly inside the set of arrows in the upper left corner of the
display.
3 The arrows will subsequently move to the other corners of the display. Touch
exactly inside them.
4 Finally, touch Save to confirm the new calibration.
▪ In case you want to exit and cancel the calibration, press the EXIT button
before completing the procedure.

Listening to the Demo Songs |25
Listening to the Demo Songs
Playing the Demo Songs
Access the Demo mode
▪ Press the DEMO buttons together.
Listen to all the Demo Songs
▪ After accessing the Demo mode, do not press any button. All the Demo
Songs will be played back.
Choose a single Demo Song
▪ Touch one of the options on the display (Fu ll Song s , Solo Instruments,
Styles), then choose one of the Demo Songs.

26| Powering
Exit from the Demo mode
▪ Press any of the MODE buttons.
 Loading...