

Page 1

GEC3 User Manual
Page 2

Page 3

GEC3 User Manual
Page 4

clean, dry cloth. Do not use liquid cleaners such
To ensure long, trouble -free operation,
please read this manual carefully.
Precautions
Location
Using the unit in the following locations can
result in a malfunction in:
• Direct sunlight
• Locations of extreme temperature or humidity
• Excessively dusty or dirty locations
• Locations of excessive vibration
Power supply
Please connect the designated AC/AC power
sup-ply to an AC outlet of the correct voltage.
Do not connect it to an AC outlet of voltage
other than that for which your unit is intended.
Interference with other electrical devices
This product contains a microcomputer. Radios
and televisions placed nearby may experience
reception interference. Operate this unit at a
suitable distance from radios and televisions.
Handling
To avoid breakage, do not apply excessive
force to the switches or controls.
Care
If the exterior becomes dirty, wipe it with a
as benzene or thinner, or cleaning compounds
or flammable polishes.
Keep this manual
After reading this manual, please keep it for
later reference.
Keeping foreign matter out of your
equipment
• Never set any container with liquid in it near
this equipment. If liquid gets into the
equipment, it could cause a breakdown,
fire, or electrical shock.
• Be careful not to let metal objects get into the
equipment. If something does slip into the
equipment, unplug the AC/AC power supply
from the wall outlet. Then contact your
nearest Korg dealer or the store where the
equipment was purchased.
THE FCC REGULATION WARNING (for
U.S.A.)
This equipment has been tested and found to comply
with the limits for a Class B digital device, pursuant to
Part 15 of the FCC Rules. These limits are designed to
provide reasonable protection against harmful
interference in a residential installation. This equipment
generates, uses, and can radiate radio frequency energy
and, if not installed and used in accordance with the
instructions, may cause harmful interference to radio
communications. However, there is no guarantee that
interference will not occur in a particular installation. If
this equipment does cause harmful interference to radio
or television reception, which can be determined by
turning the equipment off and on, the user is encouraged
to try to correct the interference by one or more of the
following measures:
• Reorient or relocate the receiving antenna.
• Increase the separation between the equipment and
receiver.
• Connect the equipment into an outlet on a circuit
different from that to which the receiver is connected.
• Consult the dealer or an experienced radio/TV
technician for help.
• Unauthorized changes or modification to this system
can void the user’s authority to operate this equipment.
CE mark for European Harmonized
Standards
CE mark which is attached to our company’s products of
AC mains operated apparatus until December 31, 1996
means it conforms to EMC Directive (89/336/EEC) and
CE mark Directive (93/68/EEC). And, CE mark which is
attached after January 1, 1997 means it conforms to
EMC Directive (89/336/EEC), CE mark Directive
(93/68/EEC) and Low Voltage Directive (73/23/EEC).
Also, CE mark which is attached to our company’s
products of Battery operated apparatus means it
conforms to EMC Directive (89/336/EEC) and CE mark
Directive (93/68/EEC).
Data handling
Malfunctions due to incorrect operation may
cause the contents of memory to be lost, so we
recommend that you save important data.
Please be aware that Korg will accept no
responsibility for any damages that may result
from loss of data.
Company names, product names, and names of formats
etc.are the trademarks or registered trademarks of their
respective owners.
Page 5

Table of Contents
USING THIS MANUAL.............................................................................................9
MEET THE GEC3....................................................................................................11
OVERVIEW.........................................................................................................11
TEACHER (GEC3) UNIT..................................................................................13
Screen Display ...................................................................................................... 13
Power On.............................................................................................................. 14
Mode Buttons ........................................................................................................ 14
A, B and A+B Buttons ............................................................................................ 14
Back Panel ............................................................................................................ 15
STUDENT COMMUNICATIONS INTERFACE (SI) UN ITS ........................16
Front ..................................................................................................................... 17
Back..................................................................................................................... 18
QUICK START.........................................................................................................19
BASIC HOOK UP...............................................................................................19
Audio Cables for the GEC3 .................................................................................... 20
Audio Cables for the SI Boxes ................................................................................ 21
GEC Installation Hardware ..................................................................................... 22
Replacement Hardware .......................................................................................... 22
“OUT OF BOX” OPERATI ON.......................................................................... 22
TOP 10 HOW-TO’S...........................................................................................22
BASICS FOR USING THE GEC3.........................................................................27
QWERTY KEYPAD...........................................................................................27
SELECTION TYPES.........................................................................................29
CLASS & TEACHER PREFERENCES, CLASS SETUP.................................31
ADDING TEACHER NAMES...........................................................................31
ADDING CLASS NAMES.................................................................................33
ASSIGNING TEACHER PREFERENCES.....................................................35
ASSIGNING CLASS PREFERENCES...........................................................37
Page 6

SETTING UP STUDENT NAMES FOR A CLASS.......................................39
LECTURE MODE....................................................................................................41
PLAY TAB...........................................................................................................41
How to…............................................................................................................... 42
SETUP TAB ........................................................................................................ 44
How to…............................................................................................................... 45
Volume, Global & Disc Tabs ................................................................................... 46
PRACTICE MODE...................................................................................................47
PLAY TAB...........................................................................................................47
How to…............................................................................................................... 48
SETUP TAB ........................................................................................................ 50
How to…............................................................................................................... 51
Volume, Global & Disc Tabs ................................................................................... 52
GROUP MODE.........................................................................................................53
PLAY TAB...........................................................................................................54
How to…............................................................................................................... 55
Load Group Screen ................................................................................................ 56
Configuration Screen (Play tab) .............................................................................. 57
SETUP TAB ........................................................................................................ 59
Configuration Screen (Setup tab)............................................................................ 59
Group Setup Screen.............................................................................................. 60
Fields.................................................................................................................... 61
Group Setup Procedures (How to…)....................................................................... 61
SHARED TABS – VOLUME, GLOBAL & DISC................................................63
VOLUME TAB....................................................................................................63
Fields.................................................................................................................... 64
How to…............................................................................................................... 65
GLOBAL TAB.....................................................................................................67
Class/Teacher Setup – Teacher Mode .................................................................... 68
Fields.................................................................................................................... 68
How to…............................................................................................................... 70
Class/Teacher Setup – Class Mode........................................................................ 71
Fields.................................................................................................................... 72
How to…............................................................................................................... 74
Examples .............................................................................................................. 75
Teacher Selection and Edit Screen ......................................................................... 76
Class Selection and Edit Screen ............................................................................. 78
DISK TAB ............................................................................................................ 80
Fields.................................................................................................................... 81
Page 7

How To… .............................................................................................................. 81
INSTALLATION.......................................................................................................85
THE PLANNING STAGE..................................................................................85
Site Plan Checklist................................................................................................. 85
Cabling Estimates and Requirements...................................................................... 86
Sizing Cables ........................................................................................................ 87
THE INSTALLATION STAGE..........................................................................87
Positioning Equipment ...........................................................................................87
Mounting the SI’s................................................................................................... 88
Positioning the GEC3............................................................................................. 88
Connect Cabling .................................................................................................... 88
GEC3 Connections ................................................................................................ 88
More on the Communication Cables .......................................................................89
Crimping Your Own Cables .................................................................................... 90
Troubleshooting..................................................................................................... 90
INDEX ........................................................................................................................91
Page 8

Page 9

Using this Manual
This manual is set up for use as a step-by- step user guide and as a reference manual. The first
four chapters (including this one) allow you to get familiar with the unit, take you through the
basic steps for setting up the Group Education Controller 3 (GEC3) for use, and give a quick
review of use and answer frequently asked questions. The next five chapters describe how to
set up a class and teacher and describe each mode and the shared tabs. These chapters can be
read through (as a user guide) or used for reference purposes when you need to check what
the functionality is for a specific screen of field on a screen. The mode and tab descriptions
follow the actual setup of the modes and tabs on the GEC3, making it easy to find the section
you want. Each chapter is described below. The last chapter is an installation guide, to be used
by GEC3 Administrator, or the person in charge of installing the unit.
Meet the GEC3 – This chapter describes the hardware for the GEC3 and gives an overview of
the GEC3 (main teacher unit) and SI (Student units). It also gives a brief overview of the back
panel and describes some features and screens of the GEC3 that apply to multiple modes.
Quick Start (Class & Teacher Preferences, Class Setup) – This chapter gives a step-by-step
description for setting up class and teacher preferences and class setup. It gives you the basics
for setting up the GEC3. It is recommended that you set up preferences and classes before you
start using the GEC3 in a classroom setting; however, it is not required.
Using this Manual
Basics for Using the GEC3 - This chapter gives you information on the keypad (a frequently
used screen on the GEC3) and introduces the selection types that appear on the various
screens on the GEC3.
Class and Teacher Preferences, and Class Setup – This chapter describes how to individualize
the GEC3 for different teachers and set up class and student names.
Lecture Mode – This chapter describes Lecture mode and shows the all the screens (with the
exception of shared tab screens) you can access in Lecture mode. There is a table defining the
field and buttons for each screen and a How to section that gives step-by-step instructions for
performing tasks on that screen.
Practice Mode – This chapter describes Practice mode and shows the all the screens (with the
exception of shared tab screens) you can access in Practice mode. There is a table defining
the field and buttons for each screen and a How to section that gives step-by- step instructions
for performing tasks on that screen.
Group Mode – This chapter describes Group mode and shows the all the screens (with the
exception of shared tab screens) you can access in Group mode. There is a table defining the
field and buttons for each screen and a How to section that gives step-by-step instructions for
performing tasks on that screen.
9
Page 10

Using this Manual
Shared Tabs, Volume, Global and Disc – This chapter describes the Volume, Global and Disc
tabs, as these can be accessed and have the same functionality, regardless of what mode you
are in. There is an image of each tab, a table defining the field and buttons for each screen and
a “How to” section that gives step-by-step instructions for performing tasks on that screen.
The Global Tab section of this chapter also includes some examples, due to the complexity of
functions of the tab.
Installation – This chapter gives information and suggestions for planning, ordering
equipment, and installing your GEC3 system. Someone knowledgeable and skilled in
electronics and classroom setup should perform the setup pr ocedure. Setup should not be
attempted by a layperson.
10
Page 11

Meet the GEC3
This section gives an overview to the features and functions of the GEC3. In addition, it
introduces the GEC3 (main teacher unit) and back-panel and the SI (Student units).
The Basics section also describes some features and screens of the GEC3 that apply to
multiple modes and are referred to several times in the rest of this manual.
Overview
Congratulations on your purchase of the Korg Group Education Controller 3 (GEC3). The
GEC3 provides a fully digital, flexible and cost effective central routing system for your
school or studio’s music laboratory. Suitable for any teaching level, the GEC3 allows you (the
teacher) to interact with as many as 16 student stations and 32 different students, or, utilizing
the Expansion Unit and Split Function, up to 32 student stations, and 64 students. The GEC3
offers the following features:
• Fully digital design throughout, featuring digital transfer of audio from each student
station to the GEC3 unit, S/PDIF output for digital recording of any workstation in the
system, and conventional analog inputs and outputs.
• Large, intuitive touch-screen user interface featuring easy to use tabs and screens.
• Customizable teacher and class setups, including individual teacher preferences and class
set-ups displaying student names
• Split function that allows two students to independently work on the same MIDI
keyboard (with keyboards that can save custom panned splits) allowing you to more
effectively teach larger groups of students with fewer keyboards.
• MIDI that allows teacher remote control of student keyboards via conventional MIDI
cables.
• Smart media source that allows you to store or backup teacher and class information and
load MIDI settings for our most popular lab keyboards.
Meet the GEC3
The GEC3 system has two major components, the teacher, or GEC3 unit, and the Student
Interface (SI) units. The SI Units are each connected to audio source s like MIDI keyboards,
guitars, sound modules, and computer sound cards. The SI Units have jacks for two student
headsets (stereo headphones with microphones). All of these audio sources are combined in
the SI Unit, digitized and sent to the GEC3 Teacher U nit. These connections allow the
students to musically interact with one another and you, in virtually any combination of ways.
The GEC3 is a fully digital, microprocessor-based unit that performs all teacher functions and
interfaces with 16 student interface boxes. An Expansion Unit (GECEXP) is available to
provide support for up to 32 student interface connections, supporting (with Split Function) a
total of up to 64 students.
11
Page 12

Meet the GEC3
The GEC3 also comes equipped with Split-Function capability. One student unit is connected
to one keyboard, but if you activate the Split Function toggle, two students can share the use
of one keyboard. Combining this feature with the expansion units allows you to interface with
up to 64 students at one time.
Information for up to 16 teachers can be stored on the GEC3 and settings for up to eight
classes can be associated with each teacher. Settings can be stored to a Smart Media card or
backed up on your Windows based personal computer.
The display is a touch-screen enabled LCD, meaning that you tap the buttons on the display
screen to select options, menus and to set up and access class lists.
There are three main modes of GEC3 operation. Each of these can be selected from buttons to
the left of the touch-screen interface. They are:
• Lecture Mode: This mode is used if you want to present material in a lecture format. All
students hear your microphone and instrument as well as their own instruments. You
have the option of including any student or students (and their microphone and
instrument) in your lecture.
• Practice Mode: This mode is used if the students are working independently. Each
student hears only their own instrument. You have the option of “eavesdropping” on
students and you can initiate 2-way communication with the students.
• Group Mode: This mode is similar to Practice Mode but should be used if the students are
working together in groups (two or more student workstations in any conceivable order).
The students in a group hear their own instruments as well as the instruments of the other
members of their group. Students can also speak to each other if their microphones are
enabled. As in Practice Mode, you have the option of “eavesdropping” on the group and,
if you wish, initiating 2-way communication with the members of the group.
Five tabs appear on the touch- screen regardless of what mode you are in. Each tab allows you
to perform a variety of tasks. All of the tabs; Play, Setup, Volume, Global and Disk,
appear regardless of what mode you are in; however, the Play tab and the Setup tab
function differently in each mode. The remaining tabs; Volume, Global and Disk, function
the same way, regardless of the mode you are in.
12
In this manual, tabs that are the same in various modes are described only once, in the Shared
Tabs section of the manual. You are referred to the corresponding section in the Shared Tabs
chapter from various other sections in the manual.
The GEC3 is the name of the system as a whole, and it also refers to the teacher unit of the
entire GEC3 interface. The GEC3 is used to perform all the functions described in the
modules.
Page 13
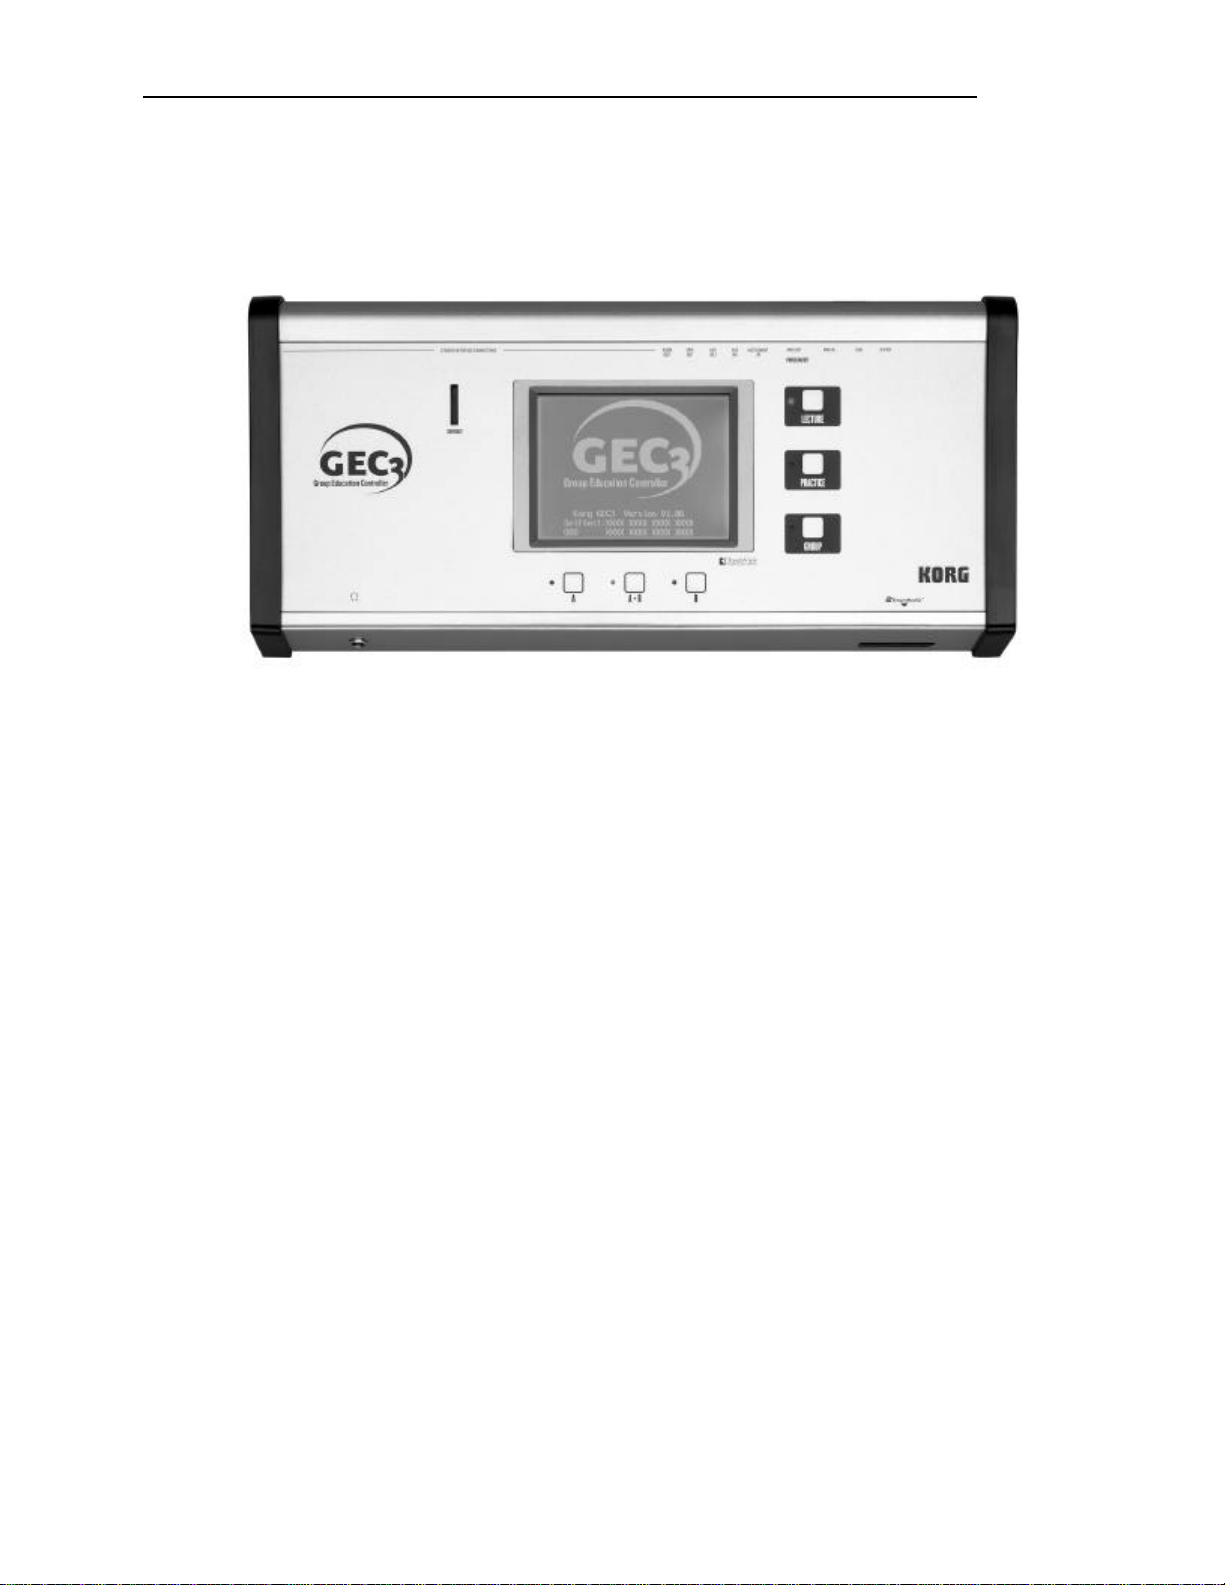
Teacher (GEC3) Unit
The Teacher or GEC3 unit looks like this:
Meet the GEC3
Screen Display
The screen display is a Touch View © touch screen, meaning, the screen is sensitive to the
touch and you tap the buttons on the display screen to select options, menus and to set up and
access class lists. All functions of the GEC3 (with the exception of powering on the unit and
selecting modes) are served from the screen.
On the first level of screens, the mode in use is displayed, followed by the name of the screen
you are on. When you are editing Class or Teacher Information, the name of the class or
teacher is displayed in place of the name of the screen. The tab you are on is also highlighted.
13
Page 14

Meet the GEC3
Power On
When you press the On button, the GEC3 logo appears while the unit performs self-test. It
looks like this:
All student units are tested and reported with on of the following symbols:
O – for “OK” if all SI units are connected.
X – for “Error” if not all SI units are connected.
If any of the units fail self test, the screen is visible until the teacher presses the screen. After
power on, the GEC3 automatically loads the first teacher and class setup.
If an expansion board is in use, it is automatically detected and all additional student boxes
are tested, or the "#17-32: not present" message appears.
If you experience problems during the Startup procedure, review the Installation process to
make sure you installed the system properly, or, contact your system administrator or Korg
representative.
Mode Buttons
The mode buttons are the three buttons to the right of the screen display. Press a mode button
to select the corresponding mode (Lecture, Practice and Group). The various modes are
described in the Overview section of this manual.
A, B and A+B Buttons
These are the three buttons below the screen display. They are used when you are using the
Split Feature and need to monitor a student. When you are using the Split Feature, press A or
B, then the keyboard group, to monitor the A or B student in that keyboard group.
14
Page 15
Meet the GEC3
If you are not using the Split Feature, A+B is active by default, and you do not have use for
these buttons.
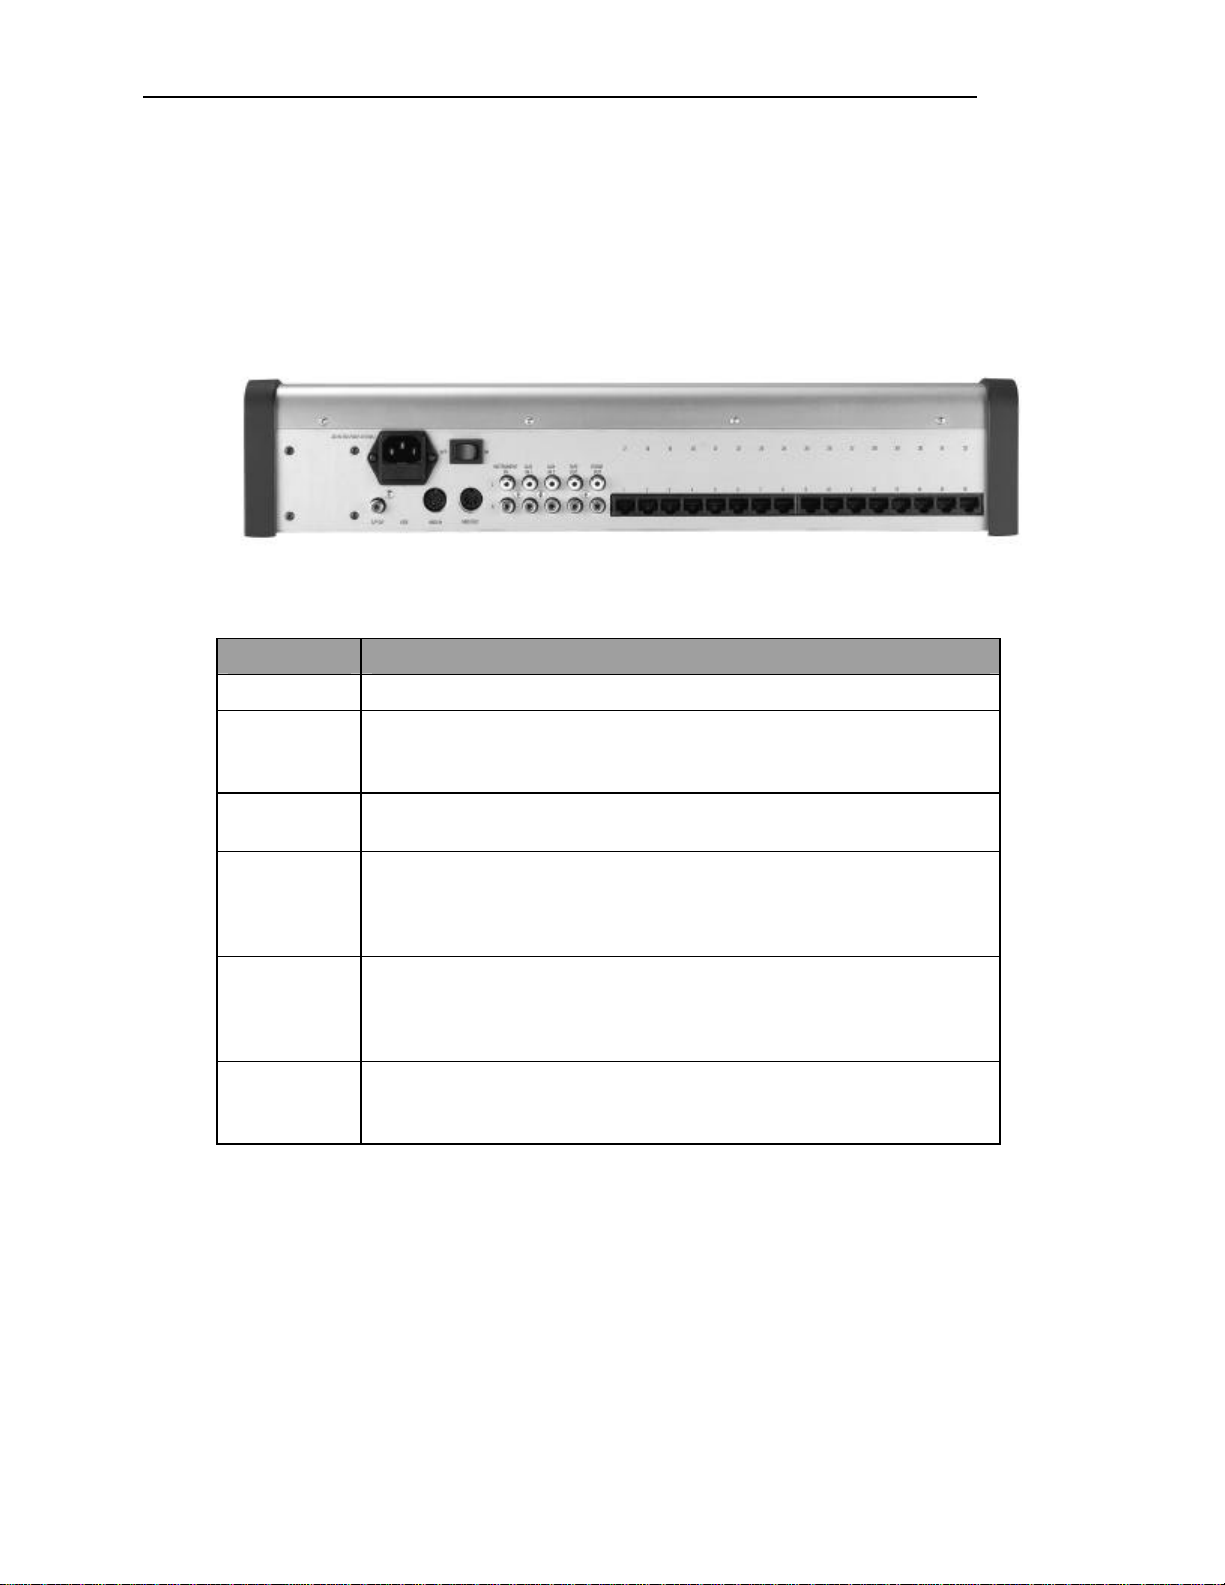
Back Panel
The Back Panel of the GEC3 is where all connections to Student Communication Interfaces,
keyboards and external devices are made. The back panel looks like this:
Fields
Switch/Socket Description
Power switch Toggle switch, powers unit on/off.
AC power
socket
INSTR. IN
L/R
AUX IN L/R Dual RCA stereo jacks for connecting cables to auxiliary input. Routes from
AUX IN 2 L/R Dual RCA stereo Jacks for connecting cables to tape deck or other auxiliary
TAPE OUT
L/R
15
Socket for connecting AC power cord to deliver power to GEC3 unit. Works
with standard AC 110 Watt, 60 Hertz plug.
Supports power supply ranging from 90 to 230Volts AC and 47 to 63 Hz.
Dual RCA stereo jacks for connecting cable to instrument providing input.
auxiliary source into GEC3. Store the name of this device in the Aux1
device field on Volume tab (see How to Setup an Auxiliary Source in the
Volume tab section of this manual).
unit. Routes from tape deck or other auxiliary source into GEC3. Store the
name of this device in the Aux 2 device field on Volume tab. (See How to
Setup an Auxiliary Source in the Volume tab section of this manual).
Dual RCA stereo Jacks for connecting cables to tape deck or other auxiliary
unit. Routes from GEC3 to tape deck or other auxiliary source. This enables
recording from GEC3 to the second auxiliary (Aux2) device.
Page 16
Meet the GEC3
Switch/Socket Description
ROOM OUT
L/R
MIDI IN (5 pin DIN)
MIDI OUT (5pin DIN)
S/P DIF Jack for connecting cable to digital output.
USB (b -type
connector)
SI connectors RJ45 connectors for connecting cables to SI units.
Dual RCA stereo Jacks for connecting cables to speaker throughout studio or
classroom, allowing output of GEC3 to be heard without use of headphones.
(See How to Route Signal in your Headset to Speakers in the Volume tab
section of this manual).
Used to connect the MIDI OUT of the teacher keyboard thereby allowing
“remote control” of student keyboards. When ALL CALL is enabled, the
teacher can send program and bank change information to student keyboards
that are connected to the MIDI OUT of the GEC3. By “daisy chaining”
student keyboards (MIDI OUT of GEC3 to MIDI IN of 1st student keyboard,
MIDI THRU of 1st student keyboard to MIDI IN of 2nd student keyboard,
etc.) When All Call is NOT enabled, the MIDI connection is broken between
teacher and student keyboards.
Sockets for connecting cables to MIDI device, allowing uploading of data to
Smart Media cards. (See the Disc tab section of this manual.) Types of data
include, but are not limited to: Configurations associated with classes and
teachers and MIDI settings. (See the Disc tab section of this manual for
details.)
Socket for connecting USB cable to PC.
Student Communications Interface (SI) Units
The Student Communications Interfaces (SI) units are the student units connected to the
GEC3. The SIs are not described in great detail, as their functionality is relatively simple.
They look like this:
16
Page 17
Meet the GEC3
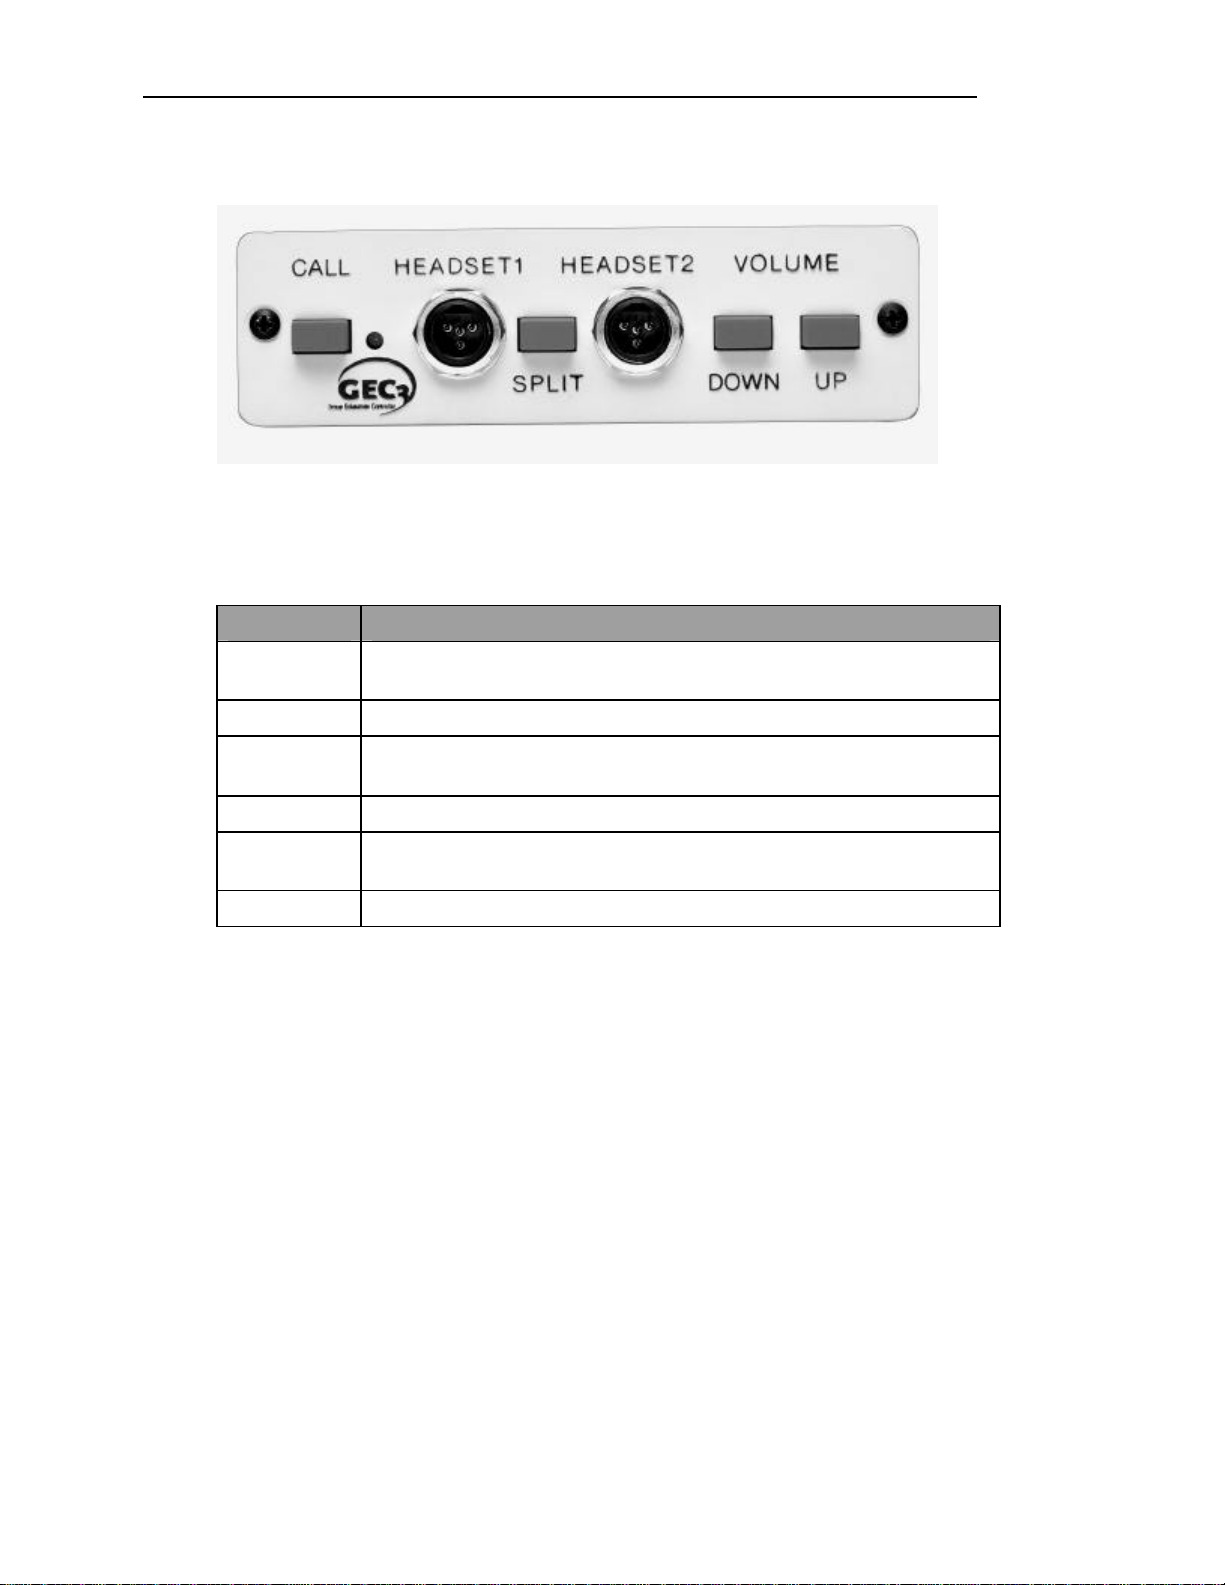
Front
Fields
The following is a list of buttons and jacks that can be accessed from the front of the SIs:
Switch/Socket Description
Call Student presses to send a Call to the teacher, indicating that they want to
communicate with the teacher.
HEADESET1 Socket for connecting the first headset.
SPLIT SPLIT. The student presses if they need to use the Split Feature (two
students using the same keyboard, in split function)
HEADSET2 Socket for connecting the second headset.
VOLUME
DOWN
VOLUME UP Student presses to increase volume in their headset.
17
Student presses to decrease volume in their headset.
Page 18
Meet the GEC3
Back
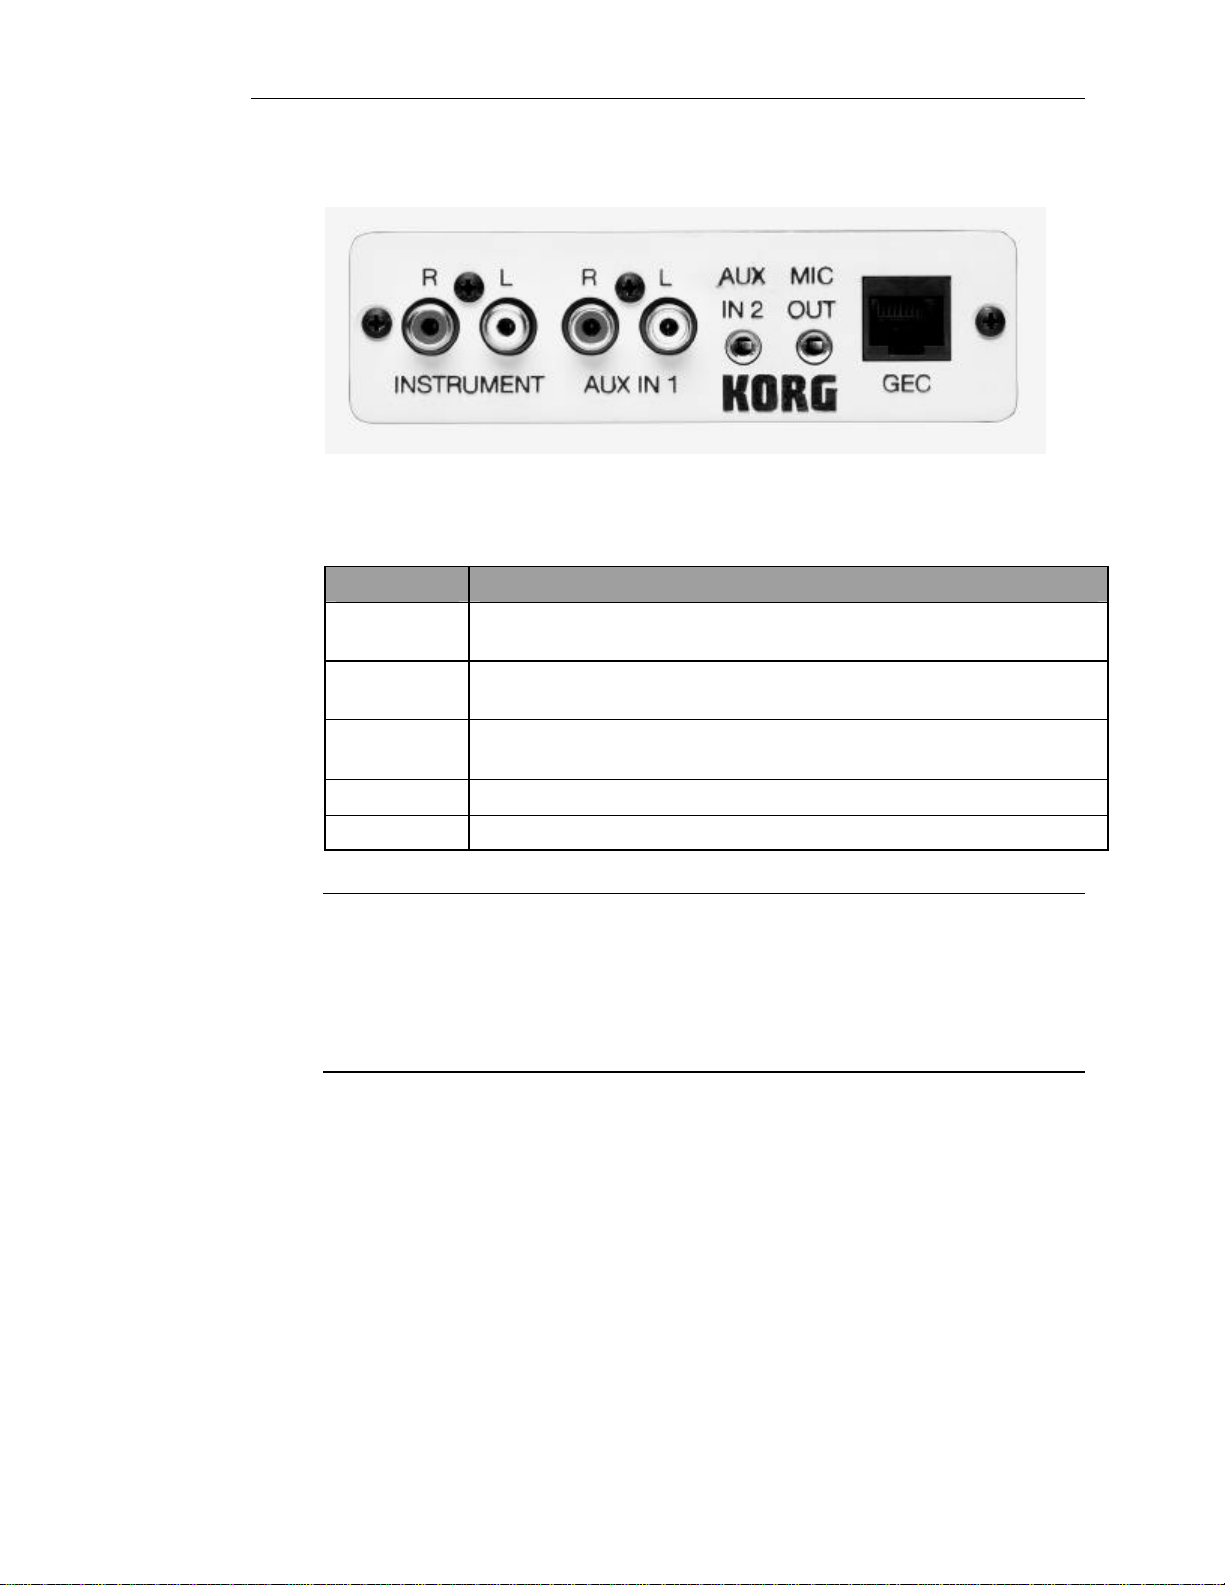
The following is a list of jacks that can be accessed from the back of the SIs:
Switch/Socket Description
INSTR. R / L Dual RCA stereo jacks for connecting cable to instr ument providing input,
right and left
18
AUX IN1 R/L Dual RCA stereo jacks for connecting cables to auxiliary input 1. Routes
from auxiliary source into SI.
AUX IN2 1/8” TRS stereo jack for connecting cables to auxiliary input 2. Routes from
auxiliary source into SI.
MIC OUT 1/8” mono jack for connecting cables to mic.
GEC Female RJ45 jack for connection to ethernet category 5 cable to GEC3 unit.
Note:
SI Boxes (student units) should only be connected or disconnected while the GEC3 teacher
unit is tur ned off. The GEC3 teacher unit establishes connection with the student units when
the GEC3 is powered on. DO NOT PLUG OR UNPLUG SI BOXES (STUDENT UNITS)
WHILE THE GEC3 IS TURNED ON. Permanent damage to the GEC3 and/or the SI boxes
may occur if student units are plugged or unplugged into the system when the GEC3 is turned
on.
Page 19
Quick Start
This section gives the user basic instructions for out-of-the-box use of the GEC3. It is
recommended that you review the “Meet the GEC3” chapter so you are familiar with the
device before starting operation.
Basic Hook Up
The GEC3 System consists of the GEC3 Teacher Unit and Student Interface Boxes (SI boxes)
for each workstation in your system. The base GEC3 system can accommodate up to 16 SI
boxes. By adding the optional GECEXP expansion card to the GEC3 Teacher unit, up to 32
SI boxes can be hooked up to the system.
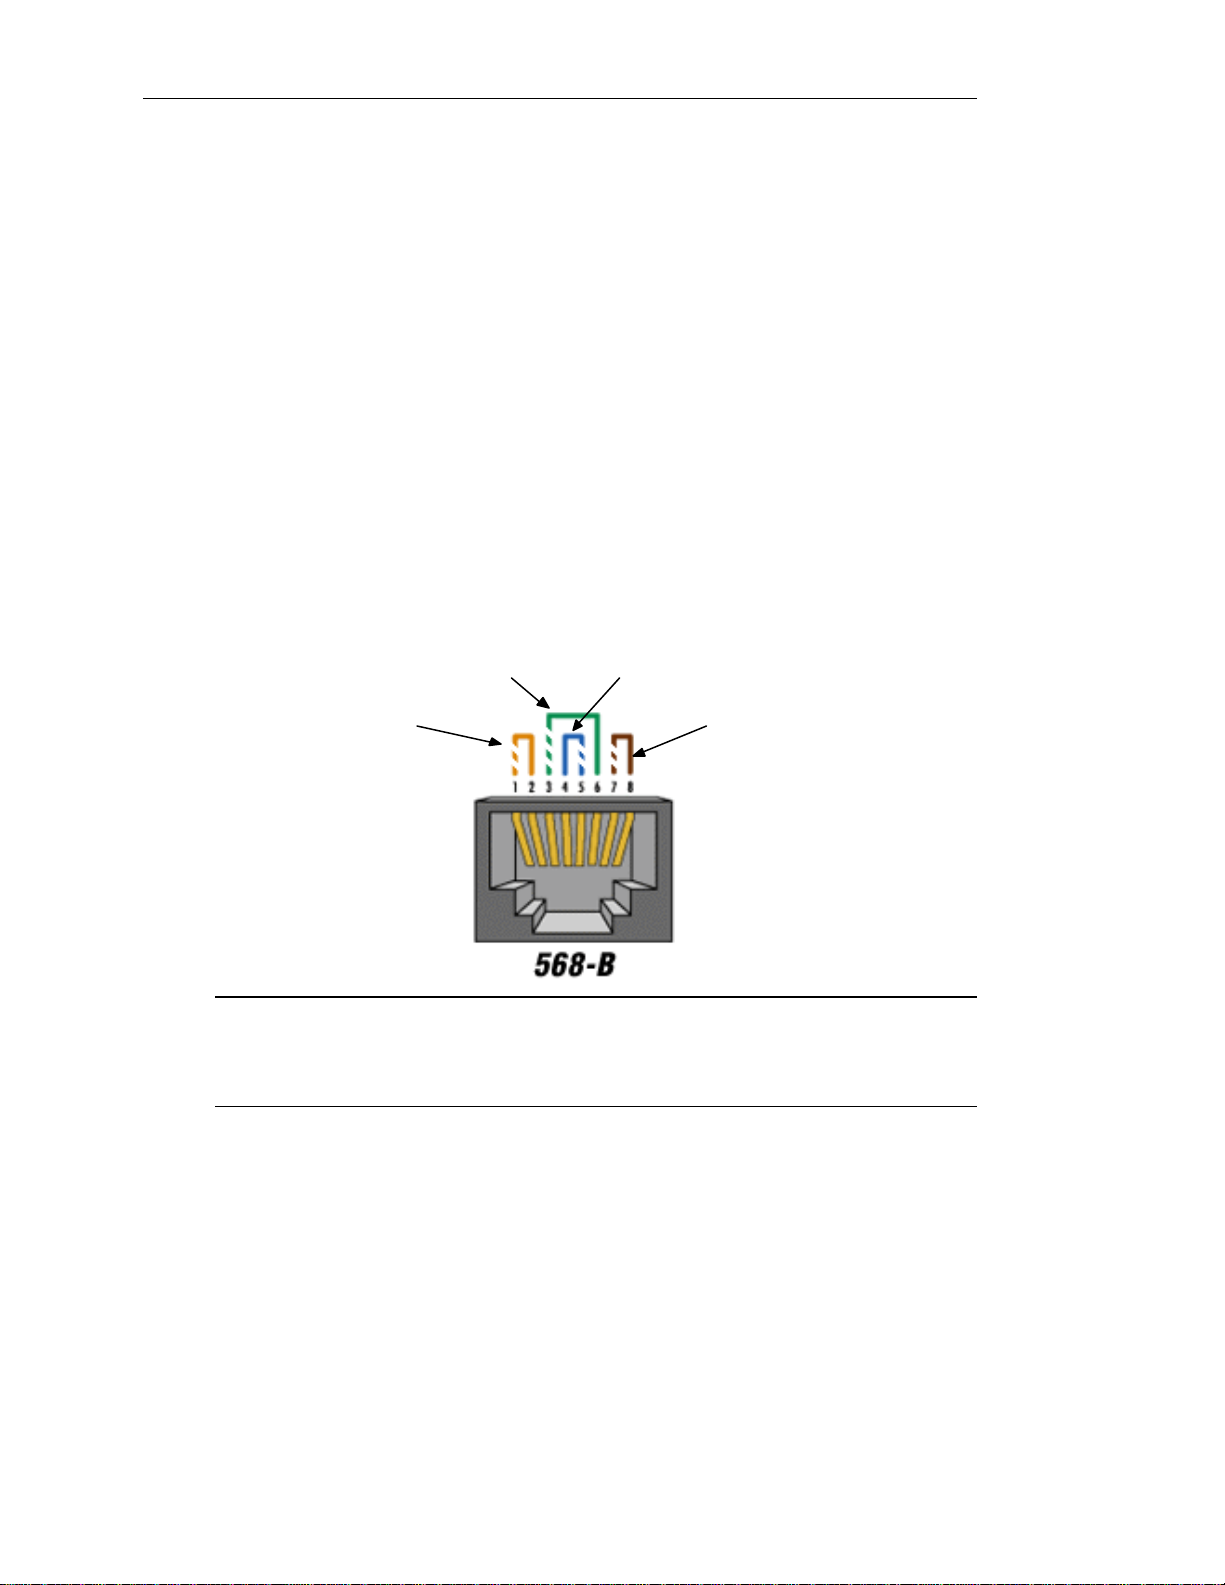
The cable used to connect SI boxes to the GEC3 Teacher uni t is conventional category 3 or
category 5 (recommended) Ethernet cable. Both ends of the cables terminate in standard
computer networking RJ45 connectors. Cable of this type can be purchased in fixed lengths,
or for custom installations, can be cut and “crimped” on site. The crimping scheme is the
standard “568B” specification shown below.
Quick Start
Green Blue
Yellow
Note:
If the cables are not crimped properly, permanent damage may be caused to the GEC and/or
the SIs. If you have questions regarding crimping procedures or you do not feel confident in
completing the cabling process, contact your dealer.
19
Brown
Page 20
Quick Start
Note:
SI Boxes (student units) should only be connected or disconnected while the GEC3 teacher
unit is turned off. The GEC3 teacher unit establishes connection with the student units when
the GEC3 is powered on. DO NOT PLUG OR UNPLUG SI BOXES (STUDENT UNITS)
WHILE THE GEC3 IS TURNED ON. Permanent damage to the GEC3 and/or the SI boxes
may occur if student units are plugged or unplugged into the system when the GEC3 is turned
on.
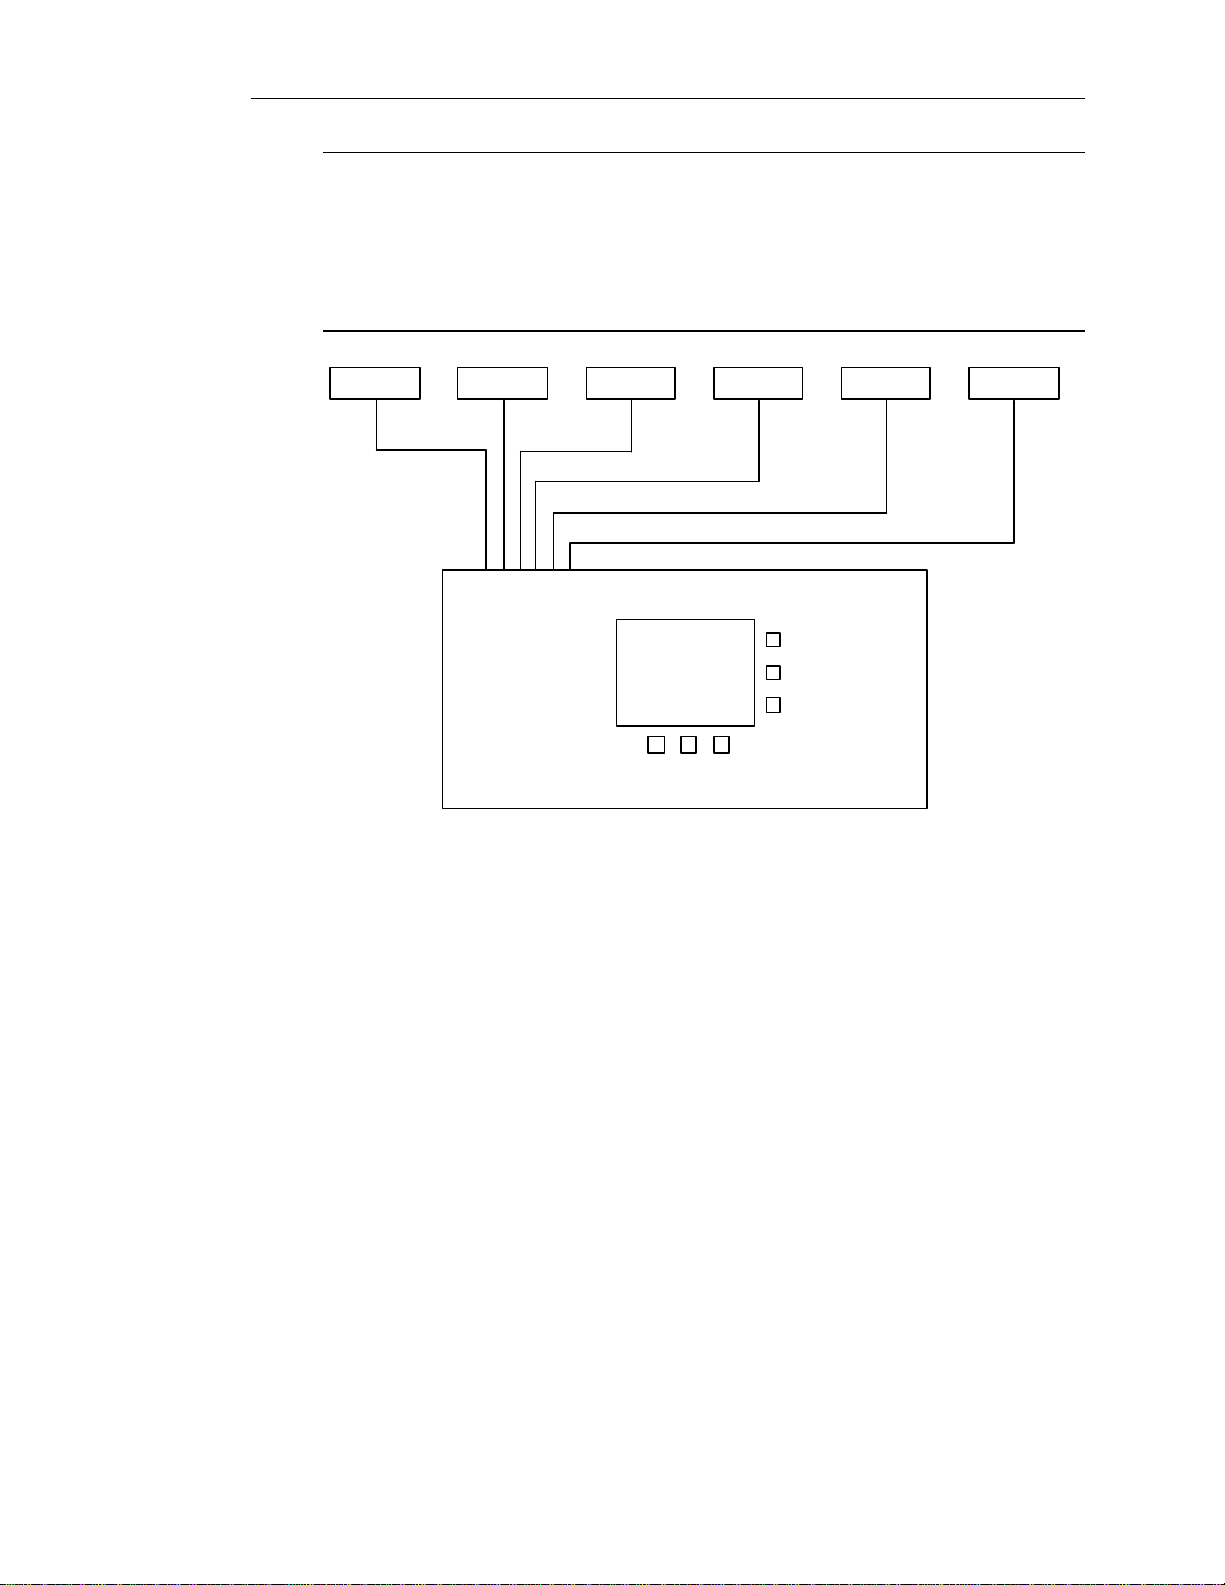
SI box #1 SI box #2 SI box #3 SI box #4 SI box #5 SI box #6
etc. . .
Audio Cables for the GEC3
All GEC3 audio connections (connections at the teacher controller) are configured as stereo
RCA inputs and outputs. The GEC3 Teacher unit accepts the following audio inputs:
• Teacher Instrument – audio from a MIDI keyboard, guitar (with preamp), sound module,
computer soundcard, or any stereo line level source. Since the GEC3 automatically
routes the Teacher Instrument to the student stations in many situations, it should
be the teacher’s primary instrument.
• Auxiliary Input 1 – audio from a CD player, tape player, computer soundcard, or any
stereo line level source.
20
GEC3
Page 21

Quick Start
• Auxiliary Input 2 – another place to connect audio from a CD player, tape player,
computer soundcard, or any stereo line level source.
The GEC3 Teacher unit has the following outputs:
• Tape Out – stereo line level output intended for recording whatever signal the teacher is
hearing in the teacher headset.
• Room Out - stereo line level output intended for sending whatever signal the teacher is
hearing in the teacher headset to a powered speaker system.
The GEC3 has a MIDI IN and a MIDI OUT port.
• MIDI IN – the MIDI OUT port of the Teacher Instrument can be connected to the GEC3
MIDI IN port via a conventional MIDI cable. When “ALL CALL” is enabled on the
GEC3 touchscreen, the teacher can control the sound of student keyboards with program
change messages
• MIDI OUT – the MIDI IN port of the first student keyboard can be connected to the
GEC3 MIDI OUT port to receive program change messages from the Teacher Instrument
connected to the MIDI IN port of the GEC3. Using the MIDI THRU port of the first
student keyboard, the second student keyboard can be included in the MIDI system as
well. This can be repeated to include all student keyboards in the lab. The MIDI OUT
port can also be used to deliver system exclusive “Keyboard S etups” to configure
popular keyboards to take advantage of the GEC3’s Split Function.
The GEC3 also has a USB port and a digital output (S/PDIF)
• USB – the USB port allows connection of the unit to a personal computer for back up of
GEC3 data as well as computer based control of the GEC3.
• S/PDIF OUT – outputs whatever signal that the teacher is hearing in the teacher
headset digitally (16 bit, 48 KHz) to a CD Recordable Drive or Audio Interface.
Audio Cables for the SI Boxes
SI (student interface) audio connections (connections at the student stations) are configured
as stereo RCA and 1/8” stereo inputs. The SI unit accepts the following stereo RCA audio
inputs:
• Student Instrument – audio from a MIDI keyboard, guitar (with preamp), sound module,
or any stereo line level source.
• Auxiliary Input 1 – another place to connect audio from a sound module, or any stereo
line level source.
The SI unit accepts the following stereo 1/8” stereo (TRS) input:
21
Page 22

Quick Start
• Auxiliary Input 2 – another place to connect audio from a CD player, tapeplayer,
computer soundcard, or any stereo line level source.
The SI unit has the following output (1/8” Mono):
• MIC OUT – allows connection of the student’s headset microphone to the AUDIO
INPUT of a computer soundcard, in order to allow digital recording of students voice or
interaction with software ear training programs.
GEC Installation Hardware
When installing your GEC3 Learning System, special care must be taken when permanently
attaching the SI’s to or near the student stations.
The SI’s are designed with two through-holes that will allow the student interfaces to be semipermanently attached to wooden desks/workstations.
Replacement Hardware
Over time, headsets, student interfaces (SI boxes) and cables may require replacement.
Contact your dealer for replacement information.
“Out of Box” Operation
The GEC3 allows many teachers to set their own preferences for how the GEC3 operates.
Teachers can also label their own classes and even input the names and locations of students
in each class so that students are always viewed by name. This is especially helpful when
multiple teachers are using the GEC3 for perhaps many different classes. See the Class &
Teacher Preferences, Class Setup section for information on how to do this.
If the situation is simple (for instance you are the only teacher using the GEC3 and you work
with a few small classes) you can bypass the class and teacher setup process and use the
GEC3 as is. If this is how you decide to use the GEC3, you will be using the default teacher
preferences and you will not have the capability to assign class preferences, setup classes with
class names and assigned student workstations. You will; however, have all the basic
functionality of the GEC3 available to you.
Top 10 How-To’s
For those who want to get up and running with the GEC3 right away, here are concise
instructions on how to perform the most common classroom tasks with your GEC3.
22
Page 23

Quick Start
These instructions do not show screens, define fields or explain the use of the Split Feature
and MIDI functions. For a more detailed look at each mode and tab, see the corresponding
Mode and Shared Tabs sections of this manual.
How to give a presentation “lecture” and play your teacher instrument
for the class
1. Press the Lecture mode button.
2. Press the Play tab from the row of tabs at the bottom of the screen.
3. To play your instrument to the class, make sure your instrument is plugged in to the
Instrument In connection in the back panel and play your instrument.
How to cue up and play musical examples from CD, tape, or any other
sound source to the class and add your own commentary
This example uses the Aux1 but the procedure is the same for devices plugged into Aux2.
1. Make sure the auxiliary source you want to use is connected to the back panel of your
GEC3. (AUX. IN for Aux 1 device and AUX IN 2 for Aux 2 device).
2. Press the Lecture mode button.
3. Press the Volume tab from the row of tabs at the bottom of the screen.
4. Determine the Auxiliary source (Aux 1 or Aux 2) you want to use.
5. Press (Aux 1) Enable to check it.
6. Press Aux 1 Cue. This will allow you to preview the track before broadcasting to the
class.
7. Cue up the auxiliary source to the desired selection of music.
8. To adjust the volume, use the volume controls corresponding with Aux 1.
9. When music is cued up, press Aux 1 to play the selection.
10. To interject commentary, press the Teacher ON checkbox at the top of the Volume
screen. Aux1/Aux2 volume is decreased by 12 dB (so the your voice can be heard over
the aux. source). Press Teacher ON a second time to uncheck it and resume the original
volume.
How to bring a student and their student instrument(s) into the lecture
so they can share their work and voice with the class
1. Press the Lecture mode button.
2. Press the Play tab from the row of tabs at the bottom of the screen.
23
Page 24

Quick Start
3. Press a student number, corresponding to where a student is sitting in the classroom, to
How to exclude students from a lecture so they can work independently
from the rest of the class
1. Press the Lecture mode button.
2. Press the Setup tab from the row of tabs at the bottom of the screen.
3. Press the number corresponding to where a student is sitting in the classroom, to bring up
4. Press Omit from Lecture to select it. If checked, the student will not be able to hear your
How to let students practice independently at their workstations while
you work independently at yours
bring students into the lecture.
When a student has been brought into the lectur e, their instruments and mic are enabled,
if student mics are enabled in class preferences (this is the default setting). You and the
class will be able to hear that student’s mic and instrument. A microphone appears next
to the student’s name to indicate that they have been brought into the lecture.
the QWERTY Keypad.
mic or instrument. This is ideal if one or multiple students are working outside of the rest
of the class. An X will appear on the Play and Setup tabs in the group box to indicate that
this student or group box is omitted from the lecture.
24
1. Press the Practice mode button.
2. Press the Play tab from the row of tabs at the bottom of the screen.
Students can work independently. You can also work independently.
How to “eavesdrop” on a student during practice
1. Press the Practice mode button.
2. Press the Play tab from the row of tabs at the bottom of the scr een.
3. Press the number corresponding to where a student is sitting in the classroom, to
eavesdrop on that student.
You will be able to hear that student’s mic and instrument, but they will not be able to
hear yours, and they will not be aware that you can hear their instrument or mic. The
student keyboard group will be highlighted on your GEC3 unit to indicate that you are
eavesdropping on that student.
4. To end eavesdropping, press the Practice Mode button, or select another student.
How to communicate with a student during practice
1. Press the Practice mode button.
Page 25

Quick Start
2. Press the Play tab from the row of tabs at the bottom of the screen.
3. Press the number corresponding to where a student is sitti ng in the classroom twice.
4. To end communication, press the Practice Mode button or select another student.
How to link student workstations into “Duets” and “Quartets” for peer
learning/collaboration
Setting duets automatically groups students in pairs according to student workstation number.
For example, students at workstation 1 and workstation 2 are grouped, students at workstation
3 and workstation 4 are grouped, etc. If the number of students is uneven, you can add the
unmatched student into any group you wish from the main group tab (see Group Screen in the
Group Mode chapter). Quartet Automatically groups students in fours according to
workstation number. For example, students at workstation 1, workstation 2, workstation 3 and
workstation 4 are grouped, students at workstation 5, workstation 6, workstation 7 and
workstation 8 are grouped, etc. If the number of students is not divisible by four, you can add
the unmatched students into groups from the main group tab (see Group Screen in the Group
Mode chapter).
1. Press the Group mode button.
2. Press the Play tab from the row of tabs at the bottom of the screen.
3. Press the dropdown arrow on the top right corner of the Play tab. The Load Group screen
displays, listing the default configurations and any custom configured groups (see the
Setup tab section in the Group Mode chapter for information on how to configure
permanent groups).
4. Select from duet or quartet (if you want to select custom groups, see the section Setup
Tab, in the Group Mode chapter). Once you have made your selection, press Back to
close the screen.
5. Press BACK to return to the Setup screen.
Students are now grouped into pairs or quartets.
How to make sure every student in the class is listening to you.
The All Call button appears at the bottom of the screen on every screen. Press it to route
signal from your mic to every headphone set connected in the studio or classroom. This is the
quickest way to establish communication with the students, and it is convenient when you are
in any mode other than Lecture mode.
By pressing the All Call button, you turn off all student instruments and student will hear you
(the teacher) and your instrument only. All other audio present in the system is disabled –
students can only hear you.
25
Page 26

Quick Start
How to broadcast anything in the teacher headset through the room
speaker system
1. From the Lecture, Practice, or Group mode button, Press the Volume tab from the row
2. Press the Room On button. It routes signal in teacher headset to external speakers set up
of tabs at the bottom of the screen.
in the classroom. This feature is useful if you want to have student’s remove headsets and
listen to a musical piece, or if you have a situation where there are some people present in
the room who are not on a GEC3 unit (for example: concert for parents).
26
Page 27
Basics for Using the GEC3
This section gives you information on the keypad (a frequently used screen on the GEC3) and
introduces the selection types that appear on the various screens on the GEC3.
The QWERTY Keypad, described below, is used whenever you want to enter data into the
GEC3 memory. This is essential when performing a number of tasks, including setting up
classes and assigning teacher preferences.
This section also gives an overview of the various types of selection buttons that appear in the
GEC3.
QWERTY Keypad
A number of the menus take you to the keypad – this is where you can “type in” information.
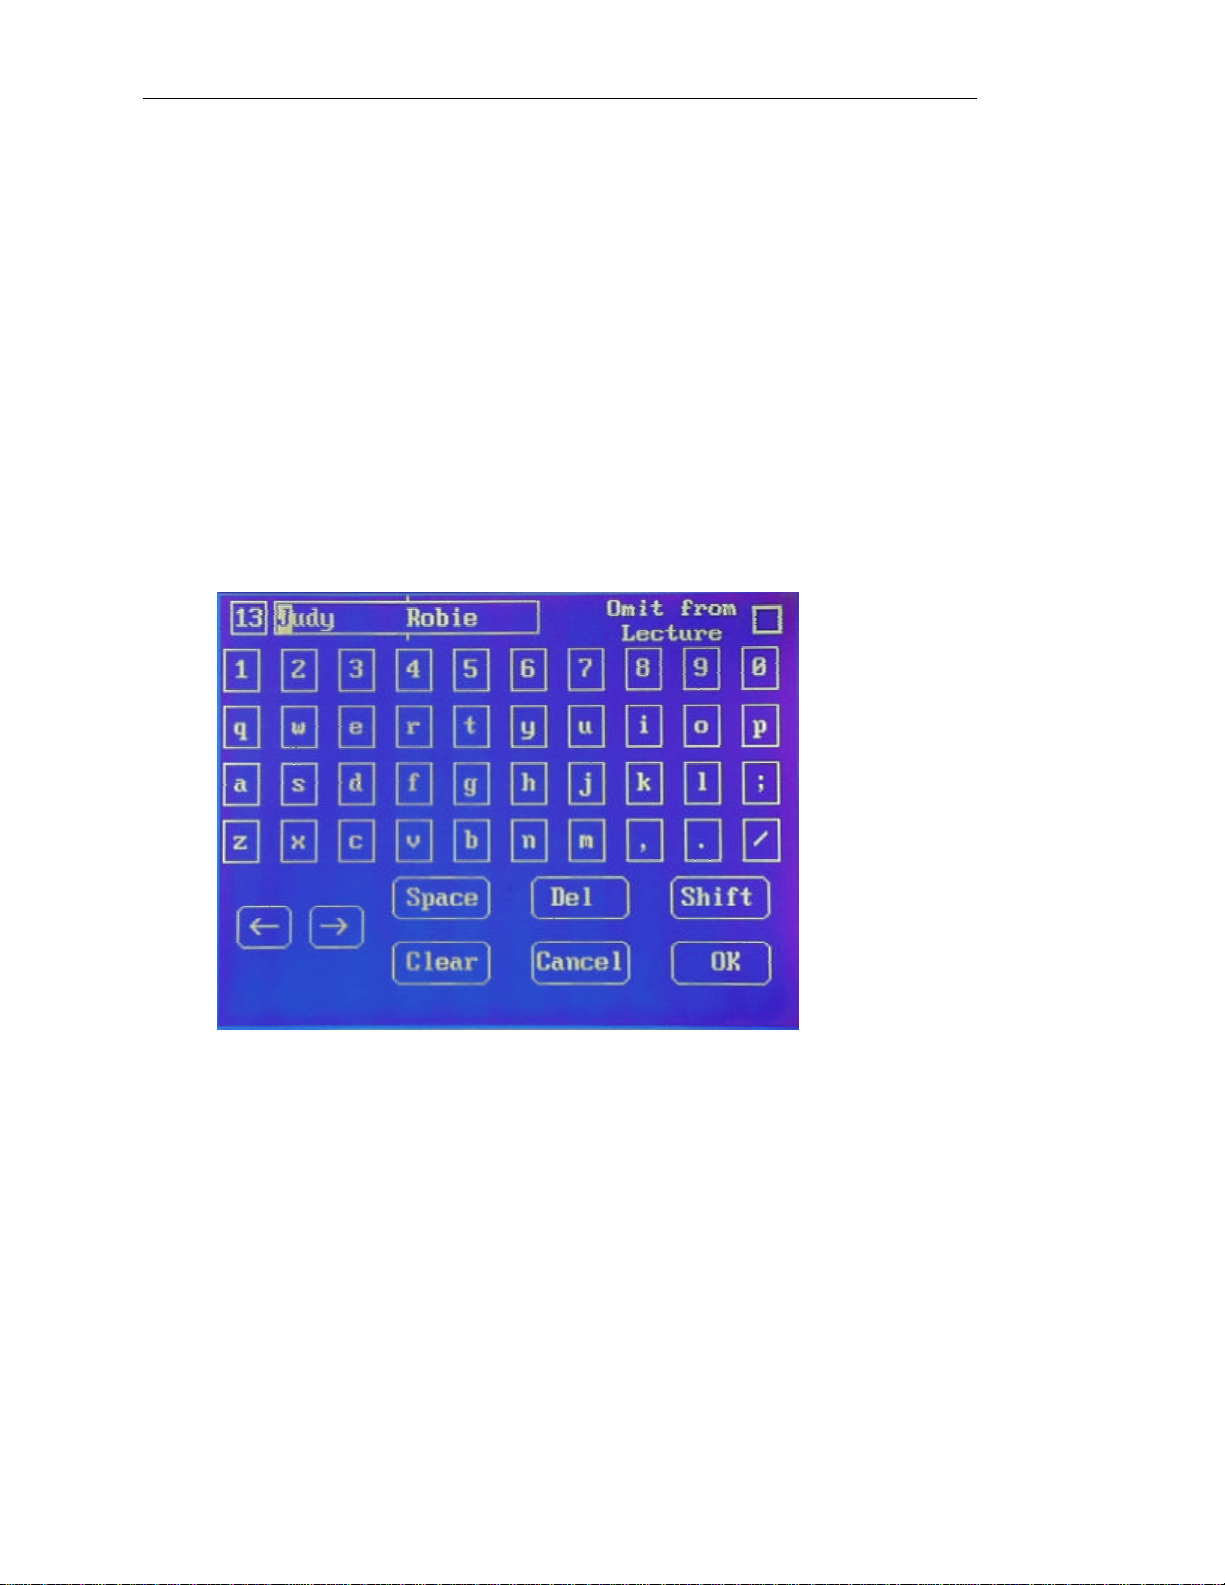
The following is an overview of the keypad screen, which looks like this:
Basics for Using the GEC3
Figure 1
The information shown in the top row varies depending on the screen you are on. Generally, it
displays the field into which you are entering information.
The keypad functions similarly to a computer keyboard. Press the screen to type in letters and
numbers. The following table provides a list of the fields on the QWERTY Keypad.
27
Page 28
Basics for Using the GEC3
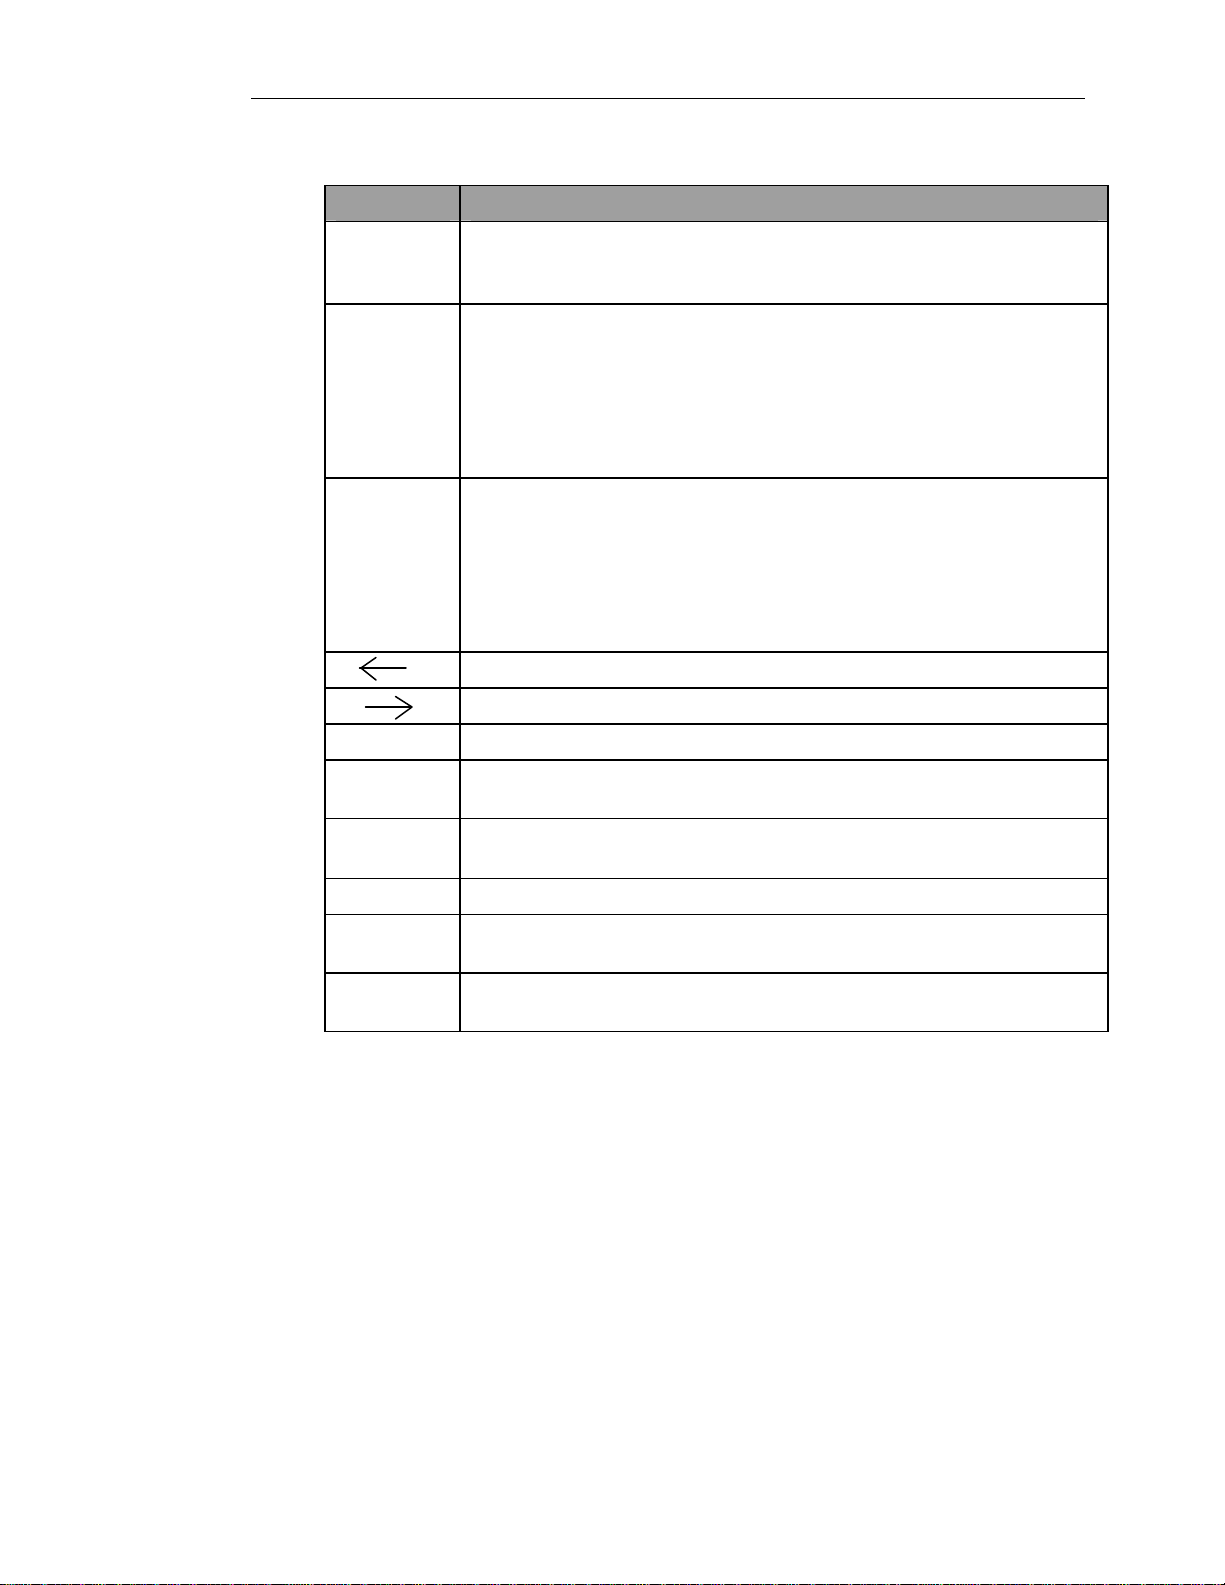
Fields
Button Description
Keyboard
Group
Number (13)
Field The field into which you are entering data, in this case, the name of the
Omit from
Lecture
Scroll to the right through existing text.
Scroll to the left through existing text
Space Add a space to text, or space over to another section of the field you are in.
Del Delete existing text. This removes the text positioned under the cursor or to
The keyboard group number of the selection you opened. If the GEC3 is in
split function, you can add or edit both students assigned to a keyboard group.
Student(s) in the keyboard group. The vertical line indicates where the top
line of the field ends and the bottom line of the field begins. If you utilize the
split function and are entering a student name, make sure to use only the
allotted space. If Student A’s name is shorter than the allotted space, use the
space bar to space over to Student B’s space. You can also use the line to
gauge where to place the first and last names of a student.
Check this if you want to omit the student from the lecture. If checked, the
student will not be able to hear your mic or instrument. This is ideal if one or
multiple students are working outside separate from the rest of the class. If
you are in split function and you select this checkbox, both students in the
keyboard group will be omitted from lecture. An X will appear on the Play
and Setup tabs in the group box to indicate that this student or group box is
omitted from the lecture.
the right of the cursor, as on a computer keyboard.
28
Shift Press Shift to change keypad screen to display capital letters. Press it a
second time to return the keypad screen to display lowercase letters.
Clear Clears all existing text. This removes all text in the field.
Cancel Cancel to cancel your entry. This closes the screen without saving changes
you typed in.
OK Press OK to save your entry. This closes the screen and saves changes you
typed in.
Page 29
Selection Types
UP
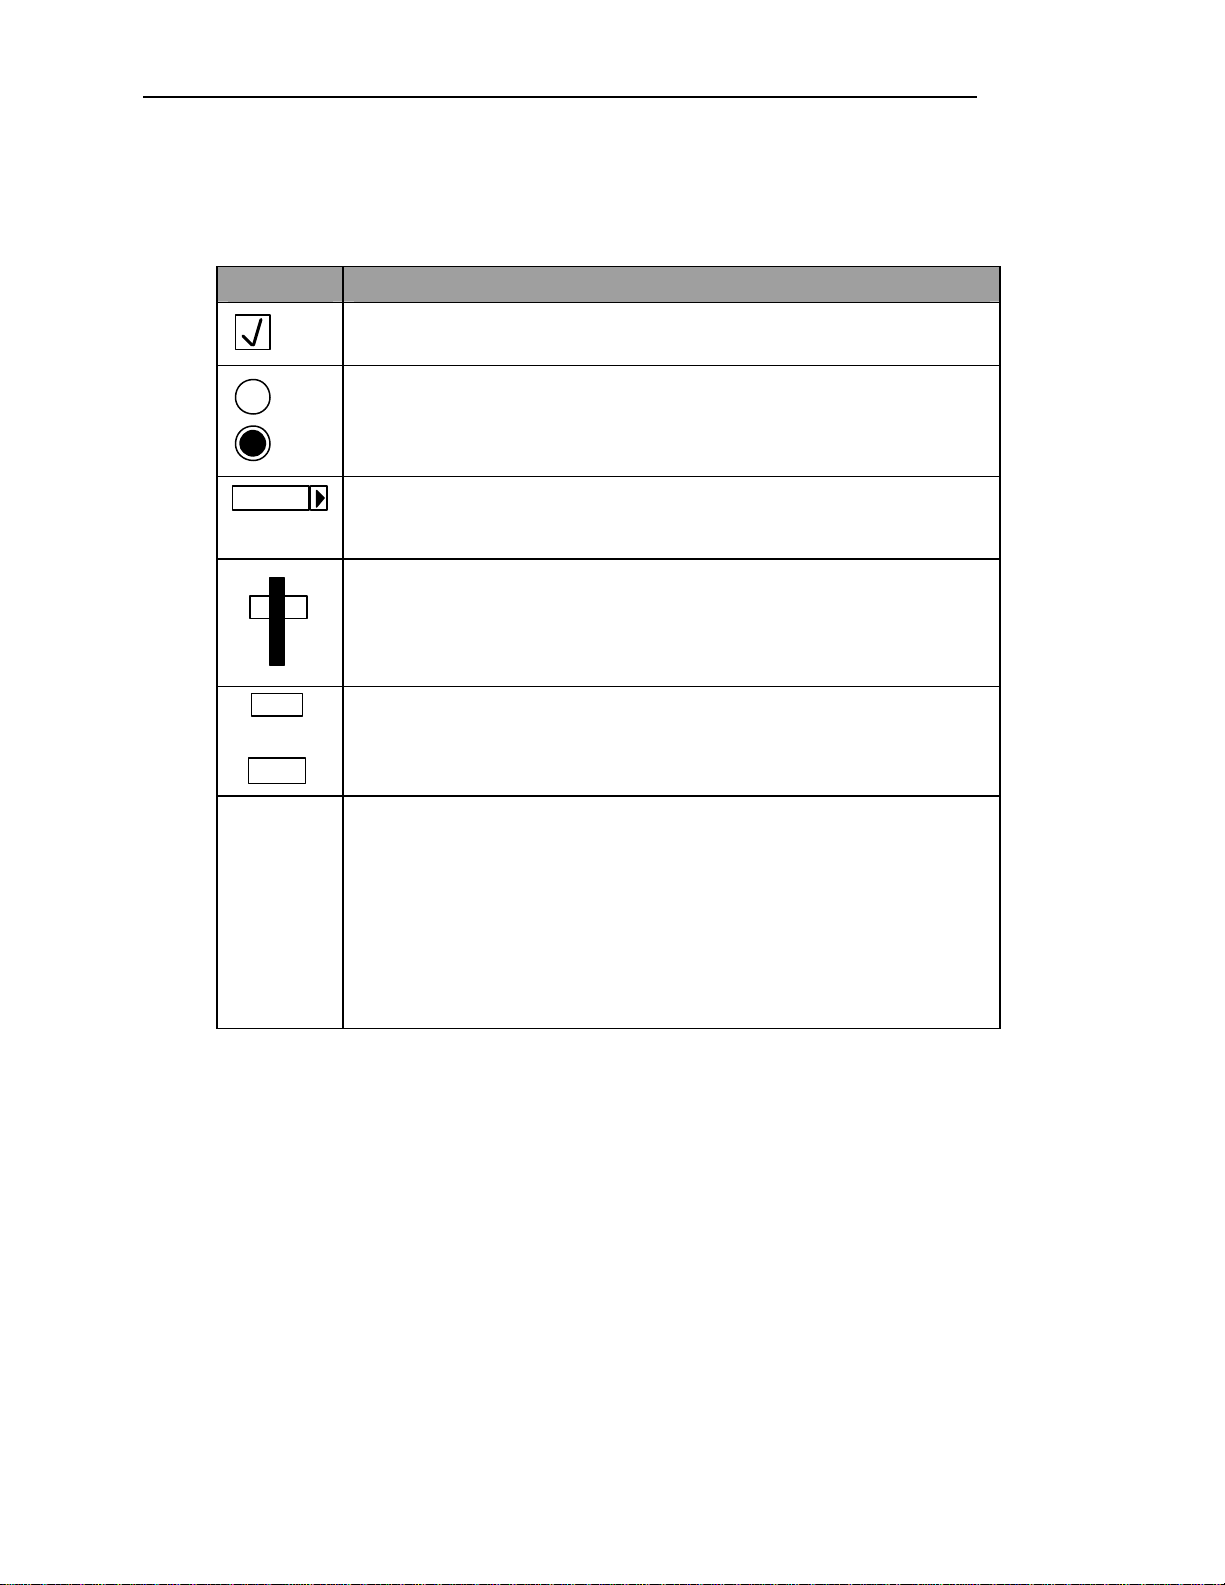
There are the different types of selection buttons used in the GEC3:
Button Description
Checkbox – Press to select, press again to unselect. This type of selection does
Select
not automatically turn off. Once selected, you must press it again to unselect it.
Radio Button – Press to select. Only one radio button in a group of radio
buttons can be selected at one time. If one is already selected and you press
another, the first one automatically un-selects. This type of selection is used in
cases when one of the settings is always selected – for example, On or Off.
Selection Box (with dropdown menu) – Press arrow to display options, press
option to select. This type of selection is used in cases when there are a number
of pre-set options to choose from.
Basics for Using the GEC3
Volume slide – For volume selection. Press on the intersection of the black and
white bars to grab the slide – slide up to raise volume and slide down to lower
it. You can also press anywhere on the black bar and the whi te bar will jump to
that point, raising or lowering the volume as selected. The actual volume
number displayed between the volume buttons (see below).
20
DOWN
Volume buttons – For volume selection. Press up to raise the volume; press
down to lower it. Pres s and hold down on either button to quickly scroll
through the volumes. The actual volume number displayed between the
volume buttons.
ALL CALL The All Call button appears at the bottom of the screen on every screen. Press
it to route signal from your mic to every headphone set connected in the studio
or classroom. This is the quickest way to establish communication with the
students, and it is convenient when you are in any mode other than Lecture
mode.
By pressing the All Call button, you turn off all student instruments and
student will hear you (the teacher) and your instrument only. All other
selections and button presses (like student box, two way communication, etc.)
are disabled.
The remainder of the manual takes you through the various modes and tabs on the GEC3.
29
Page 30

Page 31

Class & Teacher Preferences, Class Setup
Class & Teacher Preferences, Class Setup
This chapter gives an overview of how to set up the GEC3 if you are administering the system
or just setting up your own classes.
When you (the administrator or teacher responsible for administration) first get your GEC3
unit, you will want to add the names of the teacher s and classes that will be used, assign
teacher and class preferences to each of these and then setup classes that you will be teaching
(or are in charge of administering).
You must add the names of the teachers and classes in order to assign preferences for teachers
and classes and to setup classes.
Setting class and teacher preferences allows you to customize the GEC3 to suite your needs
depending on your needs as a teacher, or the needs of the specific class, if your needs vary
according to classes. In addition, it allows you to set teacher names and assign classes to each
teacher. You need to setup these features in order to set up classes. It is possible to use the
GEC3 and SI Units without first setting up teacher and class preferences; however, you will
then not be able to take full advantage of the GEC3’s functionality as all default settings will
be used and you will not be able to setup classes or make notations associated with classes or
students.
It is important to note that each student is associ ated with a class and each class is associated
with a teacher. It is easiest to perform administration from the bottom up, in the following
sequence:
1. Add the names of the teachers that will be using the GEC3.
2. Add classes to be associated with the set teachers.
3. Assign teacher preferences to each teacher.
4. Assign class preferences to each class (or select to apply teacher preferences).
5. Setup each class using the Setup tab.
Adding Teacher Names
Teacher information can be set up for up to 16 teachers on the GEC3. It does not matter which
mode you are in.
1. Open the Global tab by pressing Global from the row of tabs at the bottom of the screen.
The Global tab looks like this:
31
Page 32

Class & Teacher Preferences, Class Setup
Figure 2
2. Press on the arrow next to the Teacher field on the Global tab. The following screen
displays, listing all undefined teacher names.
Figure 3
3. Press the E next to an Undef. teacher field to add a new teacher. The Edit Teacher
Information screen displays. It looks like this:
32
Page 33

Class & Teacher Preferences, Class Setup
Figure 4
4. Press the T next to the Teacher field to access the QWERTY Keypad to enter a name in
this field. See the section QWERTY Keypad in Basics for instructions on how to use the
keypad.
5. Enter the desired name using the QWERTY Keypad.
6. Press Back to return to the Teacher Selection and Edit screen. Repeat steps 2 through 5
until you have added all the desired teachers.
7. Press Back twice to return to the main tab.
8. Press Disc to open the Disc tab.
9. Press Save Global Setup to save changes.
Adding Class Names
Class information can be set up for up to 128 classes on the GEC3. All the other class setup
and features for a class must be associated with this class name. It does not matter which
mode you are in.
1. Open the Global tab by pressing Global from the row of tabs at the bottom of the screen.
2. Press on the arrow next to the Teacher’s Name field to select the teacher who’s list of
classes you would like to create. (Classes are always assigned to a teacher.)
3. Press on the arrow next to the Class field. The following screen displays, listing all
classes and undefined classes associated with the selected teacher.
33
Page 34

Class & Teacher Preferences, Class Setup
Figure 5
4. Press the E next to an Undefined class field to add a new class. The Edit Class Info
window displays. It looks like this:
Figure 6
5. Press the T next to the Class field to access the QWERTY Keypad to enter a class name
in this field. See the section QWERTY Keypad in Basics for instructions on how to use
the keypad.
6. Enter the desired name using the QWERTY Keypad.
7. Press Back to return to the Class Selection and Edit screen. Repeat steps 2 through 5
until you have added all the desired classes to be associated with the teacher nam e.
34
8. Press Back twice to return to the main tab.
9. Press Disc to open the Disc tab.
Page 35

10. Press Save Global Setup to save changes.
Assigning Teacher Preferences
1. Open the Global tab by pressing Global from the row of tabs at the bottom of the screen.
2. Press on the arrow next to the Teacher’s Name field to select the teacher whose
preferences you would like to set.
3. Make the selections that you want to be associated with the teacher name in the Teacher
Preferences box (from the fields described below).
Field Description
Call enabled Select if you want to be notified when a student presses the Call button on
their SI units. If enabled, an audible beep is sent to your headset when a
student presses the Call button on their SI to signal that they want to
communicate with you. The name of the student flashes on the display. From
the Play screen, you can press on the student’s name to enable their mic.
Split display Split function allows two students to share one keyboar d. If student
keyboards are set up to accommodate split function, pressing this option to
check it enables students to set their SI to split function. (Note: This does not
set keyboards or student units to split function, it only enables the feature.)
Class & Teacher Preferences, Class Setup
Student Mics
en.
Student inst
en.
35
This field must be checked for SI Unit Mics to be functional. If Student Mics
Enabled field is not checked, there will be no communication through
mics between you and students. This option is convenient – uncheck for
practice-only classes where you do not want to communication through mics.
This field must be checked for the SI Units to be functional. If Student Inst
field is not checked, SI units will not function. This option is convenient uncheck for use in cases where a study hall or other not music-related class is
being taught in a lab equipped with GEC3 equipment, and you don’t want
students to play with equipment.
Page 36

Class & Teacher Preferences, Class Setup
Field Description
4 X 4 View View determines how the SI keyboard group units are numbered in all Play
and Setup screens. Select this field to number seats in a 4 by 4 pattern (or
horizontally) as shown:
13 14 15 16
9 10 11 12
5 6 7 8
1 2 3 4
If you are using the expansion unit and have a se cond set of seats, they are
numbered in the same pattern, numbers 17 thru 32.
2 X 8 View View determines how the SI keyboard group units are numbered in Play,
Setup and other screens. Select this field to number seats in a 2 by 8 pattern,
as shown:
7 8 15 16
5 6 13 14
3 4 11 12
36
1 2 9 10
If you are using the expansion unit and have a second set of seats, they are
numbered in the same pattern, numbers 17 thru 32.
Circular
View
Class Classes are linked to teachers – If you select a teacher name (see Teacher
4. Press Disk to open the Disk tab.
View determines how the SI keyboard group units are numbered in Play,
Setup an d other screens. Select this field to number seats in a circular pattern,
useful for workstations set up around the periphery of a room, as shown:
4 5 6 7
3 14 15 8
2 13 16 9
1 12 11 10
If you are using the expansion unit and have a second set of seats, they are
numbered in the same pattern, numbers 17 thru 32.
Name above) the classes corresponding to that teacher display. A total of 128
class periods can be stored in the GEC3 memory. Class names are added, and
names and preferences are edited using Edit Class Info, described below.
Select a class here (if listed) to edit associated preferences.
Page 37

5. Press Save Global Setup to save changes.
Assigning Class Preferences
1. Open the Global tab by pressing Global from the row of tabs at the bottom of the screen.
2. Press on the arrow next to the Teacher’s Name field to select the teacher whose class(es)
you would like to set preferences for. You will now be able to select from the classes
associated with the teacher in the Class field.
3. Press the arrow next to the Class field to select the class you would like to set preferences
for.
4. Make the selections that you want to be associated with the class name in the Class
Preferences box (from the fields described below).
OR
If you want to apply teacher preferences as they are set up in the Teacher Preferences
screen, select Use Teacher Preferences.
Field Description
4 X 4 View View determines how the SI keyboard group units are numbered in Play,
Setup and other screens. Select this field to number seats in a 4 by 4 pattern
(or horizontally) as shown:
Class & Teacher Preferences, Class Setup
13 14 15 16
9 10 11 12
5 6 7 8
1 2 3 4
If you are using the expansion unit and have a second set of seats, they are
numbered in the same pattern, numbers 17 thru 32.
37
Page 38

Class & Teacher Preferences, Class Setup
Field Description
2 X 8 View View determines how the SI keyboard group units are numbered in Play,
Setup and other screens. Select this field to number seats in a 2 by 8 pattern,
as shown:
7 8 15 16
5 6 13 14
3 4 11 12
1 2 9 10
If you are using the expansion unit and have a second set of seats, they are
numbered in the same pattern, numbers 17 thru 32.
Circular View View determines how the SI keyboard group units are numbered in Play,
Setup and other screens. Select this field to number seats in a circular
pattern, as shown:
4 5 6 7
3 14 15 8
2 13 16 9
38
1 12 11 10
If you are using the expansion unit and have a second set of seats, they are
numbered in the same pattern, numbers 17 thru 32.
Class Classes are linked to teachers – If you select a teacher name (see Teacher
Name above) the classes corresponding to that teacher display. A total of
128 class periods can be stored in the GEC3 memory. Class names are
added, and names and preferences are edited using Edit Class Info, described
below. Select a class here (if listed) to edit associated preferences.
Call enabled Select if you want to be notified when a student presses the Call button on
their SI units. If enabled, an audible beep is sent to your headset when a
student presses the Call button on their SI to signal that they want to
communicate with you. The name of the student flashes on the display.
From the Play screen, you can press on the student’s name to enable their
mic.
Split display
(function)
Split function allows two students to share one keyboard. If student
keyboards are set up to accommodate split function, pressing this option to
check it enables students to set their SI to split function. (Note: This does not
set keyboards or student units to split function, it only enables the feature.)
Page 39

Field Description
Class & Teacher Preferences, Class Setup
Student Mics
en.
Student inst
en.
5. Press Disk to open the Disk tab.
6. Press Save Global Setup to save changes.
This field must be checked for SI unit mics to be functional. If Student
Mics Enabled field is not checked, there will be no communication
through mics between you and students. This option is convenient –
uncheck for practice-only classes where you do not want to communication
through mics.
This field must be checked for the SI Units to be functional. If Student Inst
field is not checked, SI units will not function. This option is convenient uncheck for use in cases where a study hall or other not music-related class
is being taught in a lab equipped with GEC3 equipment, and you don’t want
students to play with equipment.
Setting Up Student Names for a Class
1. First, you must select the class you want to set up. Open the Global tab by pressing
Global from the row of tabs at the bottom of the screen.
2. From the Teacher field, select the teacher name that is associated with the class you want
to open. All the classes associated with the teacher will now be available from the Class
field.
3. Select the class name from the Class field.
4. The procedure for setting up a class is performed on the Setup tab. To open this screen,
press Setup from the row of tabs at the bottom of the screen. The Setup Screen looks like
39
Page 40

Class & Teacher Preferences, Class Setup
this:
5. Press a student's keyboard group in Setup mode to bring up the QWERTY Keypad.
6. Use the QWERTY keypad to enter in each student’s name into the Student Name field.
See the section QWERTY Keypad in Basics for instructions on how to use the keypad.
40
7. Close the QWERTY Keypad after you finish entering each student, and start the procedure
again for each student name you are entering.
Note:
When not using the Split Feature, you can use the whole Student Name field to enter the
student’s name. When you are using the Split Feature, the vertical line indicates where
Student A ends and Student B begins. Make sure to use on ly the allotted space for each
student. If student A’s name is shorter than the allotted space, use the space bar to space over
to Student B’s space
8. Press Disk to open the Disk tab.
9. Press Save Global Setup to save changes.
Repeat the procedure for each class you need to setup.
You are now ready to use the GEC3 for instruction in a class setting. Read through the
following chapters to understand the functionality and features available to you in each mode.
Page 41

Lecture Mode
Lecture Mode
Lecture mode is used when you (the teacher) want to present material in a lecture format. All
students hear your microphone and instrument as well as their own instruments. You can also
bring students into the lecture so they can be a part of the presentation. To access the Lecture
mode functions, you must use the tabs on the bottom of the screen to move around in the
various tabs. Below is a list of the tabs and the functions that can be performed from each tab.
• Play – The operational tab for Lecture mode. It is used to add students into the lecture.
• Setup – The Setup tab looks like Play tab. The Setup tab is used to assign and maintain
students in a class in the GEC3. You can edit a student’s name from the Setup tab,
regardless of what mode you are in.
• Volume - The Volume tab is used to set volume for the unit, auxiliary inputs and to route
sound to speakers. You can change volume using the Volume tab, regardless of what
mode you are in.
• Global - The Global/Class-Teacher Setup (Global) tab is used to set class and teacher
preferences, edit class and teacher information.
Disk - The Disk tab is used to backup information in the GEC3 and to initiate system
exclusive data transfers to co nfigure popular lab keyboards for use with the GEC3’s Split Feature.
Note:
Lecture Mode is the default system mode.
Teacher ON is automatically turned on in Lecture mode, so everybody (except students that
have Omit from Lecture selected) can hear the teacher's mic and instrument.
Play Tab
Note:
The Play tab is the default screen for Lecture mode; therefore, by default, the system starts up
on Play tab, in Lecture mode.
The Play tab is the main screen – it is used to bring students into the Lecture. When you enter
the Play tab, your mic and instrument are automatically broadcast to all students in the
lecture. You can bring students into the lecture (enabling their mics and instruments for the
class to hear) as needed.
If Call Enabled is selected in Class Preferences on the Global tab, a student can press the
Call button on their Student Interface (SI) to send an audible beep to your headset indicating
that the y want to communicate with you.
41
Page 42

Lecture Mode
To open the Play tab, press Play from the row of tabs at the bottom of the screen. In Lecture
mode, the Play tab looks like this:
Figure 7
Note:
When the GEC3 is using the Split Feature (as in the above figure) the top name in each
keyboard group is Student A and the second is Student B. For example, Ted is student 4A and
Vivi is student 4B.
How to…
Open a Class
All student names are associated with a class. Use the following procedure to open a class that
has already been set up on your GEC3:
1. Open the Global tab, by pressing Global from the row of tabs at the bottom of the screen.
2. From the Teacher field, select the teacher name that is associated with the class you want
to open. All the classes associated with the teacher will now be available from the Class
field.
OR
If desired teacher name is not listed, add the teacher name using the Edit Teacher
Information screen, described in the Global chapter.
42
Page 43

Lecture Mode
3. Select class name from Class field.
Bring a Student into the Lecture
1. Press a student’s name to bring that student into the lecture.
OR
Press the A or B button, then select the keyboard group you want to access. For example,
to select Ted, press A and then keyboard group 4. You can also select the Keyboard
group first, and then press A or B. If split function is not in use, A + B is activated, and
there is no need to make a selection using these buttons.
2. When a student has been brought into the lecture, their instruments and mic are enabled,
if student’s mics is enabled in class preferences. You and the class will be able to hear
that student’s mic and instrument. A microphone appears next to the student’s name to
indicate that they have been brought into the lecture. The microphone looks like this:
If the student’s mic is disabled in Class Preferences, and the teacher opens up
communication with a student, the mic icon has a greater than sign indicating that the
communication is one way only.
3. If you have an expanded GEC3, which can accommodate up to 32 workstations, students
from a different set of 16 (17 -32, 33-48), can be accessed by scrolling to that screen to
access the student’s name.
Bring a Student Who Called from their SI into the Lecture
1. If Call Enabled is selected in Class Preferences on the Global tab, a student can press
the Call button on their Student Interface (SI) to send an audible beep to your headset.
The word “CALL” appears next to the name of the student on the display, indicating that
the student would like to be brought into the lecture.
2. If a student calls from a different set of 16 (17-32, 33-48), the tab from that screen
flashes, signaling you to scroll to that screen to access the student’s name.
3. Press a student’s name to bring that student into the lecture.
OR
Press the A or B button, then select the keyboard group you want to access. For example,
to select Ted, press A and then keyboard group 4. You can also select the Keyboard
group first, and then press A or B. If split function is not in use, A + B is activated, and
there is no need to make a selection using these buttons.
4. When a student has been brought into the lecture, their instruments and mic are enabled,
regardless of whether the student mics are enabled in class preferences. You and the class
will be able to hear that student’s mic and instrument. A microphone appears next to the
43
Page 44

Lecture Mode
student’s name to indicate that they have been brought into the lecture. The microphone
looks like this:
Remove a Student from lecture
Press a student's name a second time to remove them from the lecture. They will continue to
hear your mic and instrument, but you and the rest of the class will no longer be able to hear
theirs.
Play Your Instrument to the Class
To play your instrument to the class, make sure your instrument is plugged in to the
INSTRUMENT IN connection on the back panel of the GEC3 and play your instrument.
Setup Tab
The Setup tab is used to assign and maintain students in a class in the GEC3. You can edit a
student’s name from the Setup tab, regardless of what mode you are in.
44
To open the Setup tab, press Setup from the row of tabs at the bottom of the screen. The Setup
tab looks like this:
Figure 8
Page 45

Lecture Mode
How to…
Open a Class (from which to view or edit student names)
All assigned student names are associated with a class. To bring up a class, you must first
assign that class a name using the Class Selection and Edit screen. Prior to viewing or editing
student names on this screen, open the class you wish to view or modify using the following
procedure. If you choose not to assign a class name, skip to the View or Edit a Student’s
Name procedure)
1. Open the Global tab, by pressing Global from the row of tabs at the bottom of the screen.
2. From the Teacher field, select the teacher name that is associated with the class you want
to open. All the classes associated with the teacher will now be available from the Class
field.
OR
If desired teacher name is not listed, add the teacher name using the Edit Teacher
Information screen, described in the Global chapter.
3. Select a class name from the Class field.
View or Edit a Student’s Name
1. Press a student's keyboard group in Setup tab to bring up the QWERTY Keypad.
2. Use the QWERTY keypad to enter each student’s name into the Student Name field.
3. Close the QWERTY Keypad after you finish entering each student, and start the procedure
again for each student name you are entering. See the section QWERTY Keypad in Basics
for instructions on how to use the keypad.
Note:
When not using the Split Feature, you can use the whole Student Name field to enter the
student’s name. When you are using the Split Feature, the vertical line indicates where
Student A ends and Student B begins. Make sure to use only the allotted space for each
student. If student A’s name is shorter than the allotted space, use the space bar or the scroll
arrow to space over to Student B’s space.
5. Press Disk to open the Disk tab.
6. Press Save Global Setup to save changes.
45
Page 46

Lecture Mode
Volume, Global & Disc Tabs
See the section Shared Tabs – Volume, Global & Disc for more information on any of these
tabs in Lecture mode.
46
Page 47

Practice Mode
Practice mode is used when the students are working independently. Each student hears only
their own instrument. You have the option of hearing the student, or hearing and speaking
with the student.
In Practice mode, the Setup, Volume, Global, and Disk tabs look and function exactly as in
Lecture mode. They appear in this module for continuity and so you can stay in Practice mode
while making changes to student names, volumes, preferences and files without disrupting the
student's practice.
To access the Practice Mode functions, you must use the tabs on the bottom of the screen to
move around in the various tabs. Below is a list of the tabs and the functions that can be
performed from each tab.
• Play – The operational tab for Practice mode. Although this tab looks the same as it does
in Lecture mode, it functions differently.
• Setup – The Setup tab looks like Play tab. It is used to assign and maintain students in a
class in the GEC3. You can edit a student’s name from the Setup tab, regardless of what
mode you are in. This tab functions the same way in this mode as it does in Lecture
mode. For a description of how the tab works, see the section Setup Tab in the Lecture
Mode chapter of this guide.
• Volume - The Volume tab is used to set volume for the unit, auxiliary inputs and to route
sound to speakers. You can change volume using the Volume tab, regardless of what
mode you are in. For a description of how the tab works, see the section Volume Tab in
the Lecture Mode chapter of this guide.
• Global - The Global/Class-Teacher Setup (Global) tab is used to set Class and Teacher
preferences, edit class and teacher information. For a descripti on of how the tab works,
see the section Global Tab in the Lecture Mode chapter of this guide.
• Disk - The Disk tab is used to backup information in the GEC3 and to initiate system
exclusive data transfers to configure popular lab keyboards for use with the GEC3’s Split
Feature. For a description of how the tab works, see the section Disk Tab in the Lecture
Mode chapter of this guide.
Practice Mode
Play Tab
Note:
The Play tab is the default screen for Practice mode.
47
Page 48

Practice Mode
The Play tab is the operational screen – you use it when you want to “eavesdrop” on students
or initiate 2 way communication with them. When you enter the Play tab, you cannot hear
students (except a beep if a student presses their Call button, see below) and they cannot hear
you- but everyone can hear themselves. This is ideal for individual practice.
If Call Enabled is selected in Class Preferences on the Global tab, a student can press the
Call button on their Student Interface (SI) to send an audible beep to your headset indicating
that they want to communicate with you.
To open the Play tab from Practice mode, select Play from the row of tabs at the bottom of
the screen. In Practice mode, the Play tab looks like this:
Figure 9
How to…
Open a Class
All student names are associated with a class. To bring up a class, use the following
procedure:
1. Open the Global tab, by pressing Global from the row of tabs at the bottom of the screen.
2. From the Teacher field, select the teacher name that is associated with the class you want
to open. All the classes associated with the teacher will now be available from the Class
field.
48
Page 49

Practice Mode
OR
If desired teacher name is not listed, add the teacher name using the Edit Teacher
Information screen, described in the Global chapter.
3. Select class name from Class field.
Eavesdrop on a student
1. Press a student’s name to eavesdrop on that student.
OR
If you are using the Split Feature, press the A or B button, then select the keyboard group
containing the student on which you want to eavesdrop. For example, to select Ted, press
B and then keyboard group 4. You can also select the Keyboard group first, and then
press A or B. If split function is not in use, A + B is selected, and there is no need to
make a selection using the se buttons.
You will be able to hear that student’s mic and instrument, but they will not be able to
hear yours, and they will not be aware that you can hear their instrument or mic. The
student keyboard group will be highlighted on your GEC3 unit to indicate that you are
eavesdropping on that student.
2. If you have an expanded GEC3, which can accommodate up to 32 workstations, students
from a different set of 16 (17 -32, 33-48), can be accessed by scrolling to that screen to
access the student’s name.
3. To end communication, press the Practice Mode button.
OR
to establish two-way communication, see the procedure Establish two-way
communication with a student, below.
Establish two-way communication with a student
1. Press on a student’s name twice to establish 2-way communication with the student. Not
only will you be able to hear the student, but they will also be able to hear you.
A small microphone displays next to the student with which you have 2-way
communication. It looks like this:
Note:
If you are using the Split Feature and you have established two-way communication with a
student, you can use the A and B buttons below the Touch Screen to toggle between listening
to student A and student B. Although the students will not be able to hear each other, they will
49
Page 50

Practice Mode
BOTH hear you regardless of which button is active. To end communication, press the
Practice Mode button or press the student’s name again.
Communicate with a student who called from their SI
1. If Call Enabled is selected in Class Preferences on the Global tab, a student can press
the Call button on their Student Interface (SI) to send an audible beep to your headset.
The word “CALL” appears next to the name of the student on the display, indicating that
the student would like to be brought into the lecture.
2. If a student calls from a different set of 16 (17 -32, 33-48), the tab from that screen
flashes, signaling you to scroll to that screen to access the student’s name.
3. See how to Establish two-way communication with a student, above, to communicate
with that student.
Note:
If you are eavesdropping or communicating with a student in one keyboard group and you
press on another student in another keyboard group, you will end your session with the first
student, as you cannot eavesdrop on or communicate with more than one student (or
keyboard group) at a time in Practice mode.
Setup Tab
50
The Setup tab is used to assign and maintain students in a class on the GEC3. You can edit a
student’s name from the Setup tab, regardless of what mode you are in.
To open the Setup tab, press Setup from the row of tabs at the bottom of the screen. The Setup
tab looks like this:
Page 51

Figure 10
How to…
Practice Mode
Open a Class (from which to view or edit Student Names)
All student names are associated with a class. To bring up a class, you must first assign that
class a name using the Class Selection and Edit screen. Prior to viewing or editing student
names on this screen, open the class you wish to view or modify using the following
procedure:
1. Open the Global tab, by pressing Global from the row of tabs at the bottom of the screen.
2. From the Teacher field, select the teacher name that is associated with the class you want
to open. All the classes associated with the teacher will now be available from the Class
field.
OR
If desired teacher name is not listed, add the teacher name using the Edit Teacher
Information screen, described in the Global chapter.
3. Select the class name from the Class field.
51
Page 52

Practice Mode
View or Edit a Student’s Name
1. Press a student's keyboard group in Setup mode to bring up the QWERTY Keypad.
2. Use the QWERTY Keypad to enter each student’s name into the Student Name field. See
the section QWERTY Keypad in Basics for instructions on how to use the keypad.
3. Close the QWERTY Keypad after you finish entering each student, and start the procedure
again for each student name you are entering.
Note:
When not in spit function, you can use the whole Student Name field to enter the student’s
name. When you are in split function, the vertical line indicates where Student A ends and
Student B begins. Make sure to use only the allotted space for each student. If student A’s
name is shorter than the allotted space, use the space bar or the scroll arrow to space over to
Student B’s space.
4. Press Disk to open the Disk tab.
5. Press Save Global Setup to save changes.
Volume, Global & Disc Tabs
See the section Shared Tabs – Volume, Global & Disc for more information on any of these
tabs in Practice mode.
52
Page 53

Group Mode
Group mode is used when you want to allow students at different workstations to work
together. Group mode allows you to define groups of two or more student workstationsso they
can collaborate on projects with complete audio capabilities. Each student hears their own
instrument and the mic(s) and instrument(s) of the other students working in their assigned
group (if mics and inst are enabled in teacher and class preferences). You have the option of
eavesdropping on the groups or having 2-way communication with them.
In Group mode, the Volume, Global, and Disk tabs look and function exactly as in Lecture
mode. They appear in this module for continuity and so you can stay in Group mode while
making changes to student names, volumes, preferences and files without disrupting student's
practice.
To access the Group mode functions, you must use the tabs on the bottom of the screen to
move around in the various tabs. Below is a list of the tabs and the functions that can be
performed from each tab.
• Play – The operational tab for Group mode. This tab looks very much like the Play tabs
in Lecture mode and Practice mode, but it functions differently. In Group mode the Play
tab is used to select groups on which to eavesdrop or with which to communicate, and to
temporarily assign students to groups.
• Setup – The Setup tab looks like Play tab. It is used to assign and maintain groups and
classes in the GEC3. In the Setup tab in Group mode, you can define student groups.
• Volume - The Volume tab is used to set volume for the unit, auxiliary inputs and to route
sound to speakers. You can change volume using the Volume tab, regardless of what
mode you are in. For a description of how the tab works, see the section Volume Tab in
the Shared tabs chapter of this guide.
• Global - The Global/Class-Teacher Setup (Global) tab is used to set Class and Teacher
preferences, edit class and teacher information. For a description of how the tab works,
see the section Global Tab in the Shared tabs chapter of this guide.
• Disk - The Disk tab is used to backup information in the GEC3 and to initiate system
exclusive data transfers to configure popular lab keyboards for use with the GEC3’s Split
Feature. For a description of how the tab works, see the section Disc Tab in the Shared
tabs chapter of this guide.
Group Mode
Note:
In Group mode, Teacher ON can be turned on manually, but any individual or grouped
student selection will automatically turn off Teacher ON . (If you want all students to hear
you, switch to Lecture mode.)
53
Page 54

Group Mode
Play Tab
Note:
The Play tab is the default screen for Group mode.
The Play tab is the operational screen – you use it when you want students to practice in
groups. You can use the Play tab to select groups on which to “eavesdrop” or to select groups
with which to communicate, and to setup short-term groups.
In Group mode, the Play tab looks like this:
54
Figure 11
If student’s names have not already been assigned to wor kstations in the setup modes, the
word “Student” followed by the student number appears twice in each student group box, as
in some instances in the illustration above. However, if student names have already been
assigned, the assigned name appears in each group box.
Page 55

How to…
Eavesdrop on a group
1. Press any student’s name (who is part of the group on which you want to eavesdrop).
You will be able to hear every student who is part of that group’s mics and instruments,
but they will not be able to hear you, and they will not be aware that you can hear their
instruments and mics.
2. To end eavesdropping, press the Group Mode button.
OR
To end eavesdropping on that group and begin eavesdropping on another group, simply
press a student belonging to that other group,
OR
to establish two-way communication, simply press a second time on a students name
belonging to the group you are eavesdropping on.
Establish two-way communication with a group
Group Mode
1. Press on a student’s name twice to establish 2-way communication with each member of
the group that student belongs to. Not only will you be able to hear the students, but they
will also be able to hear you.
A small microphone displays next to each student with which you have 2-way
communication (each member of the group). It looks like this:
2. To end communicati on, press the Group Mode button.
Communicate with a group (when a member called from their SI)
1. If Call Enabled is selected in Class Preferences on the Global tab, a student can press
the Call button on their Student Interface (SI) to send an audible beep to your headset.
The word “CALL” appears next to the name of the student on the display, indicating that
the student or group would like to communicate with you.
2. See how to Establish two-way communication with a group, above, to communicate with
that student.
55
Page 56

Group Mode
Note:
If you are eavesdropping on or communicating with a group and you press on a student in
another student group, you will end your session with the first group, as you cannot
eavesdrop on or communicate with more than one group at a time in Group mode.
Load Group Screen
The Load Group screen can be accessed from the Play tab in Group mode via the small
dropdown arrow in the top right corner of the screen. The name of the active configuration
appears next to the arrow (for example, Duet, Config 1 or the name of a custom configured
group).
How to load group info
1. Press the dropdown arrow on the top right corner of the Play tab. The following screen
displays, listing all the default configurations and any custom configured groups (up to 4
custom groups can be created for each class stored in the GEC3 - see the Setup tab
section in this chapter for information on how to configure custom, recallable groups).
The Load Group screen displays. It looks like this:
56
Figure 12
2. Select from the following fields:
Page 57

Group Mode
Field Description
Duet Automatically groups students in pairs according to SI number. For example,
students at SI 1 and SI 2 are grouped, students at SI 3 and SI 4 are grouped,
etc. If the number of students is uneven, you can add the unmatched student
into any group you wish from the main group tab (see Group Screen in this
chapter).
Quartet Automatically groups students in fours according to SI number. For example,
students at SI 1, SI 2, SI 3 and SI 4 are grouped, students at SI 5, SI 6, SI 7 and
SI 8 are grouped, etc.
Config 1
thru
Config 4
3. Once you have made your selection, press Back to close the screen.
Custom groups can be configured on the GEC3. See the section Setup Tab, in
this chapter, for more information on configuring custom groups. Select a
custom configuration here. (In setup, you can name custom configurations. If
names have been assigned, they will appear here instead of Config 1, Config 2,
etc....)
Configuration Screen (Play tab)
The Configuration screen can be accessed from the Play tab in Group mode via the text
(button) on the top right corner of each student group box. When no group is assigned, the
text reads OFF. If the student has been assigned to a group, the name of the active
configuration appears (for example, Duet, Config 1 or the name of a custom configured
group).
Use this screen to assign students to groups other than duet or quartet, or to make
modifications to existing default group settings. For exa mple, use this screen if you want
students #2, #5 and # 7 to be in a group, or if you used the Load Group screen to setup pre-
configured duets or quartets, and you want to add another student workstation to an existing
duet or quartet.
In the Play Tab, changes to group assignments via this screen are temporary- they will revert
back to their saved status when the class is changed. To configure permanent groups, see the
section Setup Tab in this chapter.
How to assign a group
1. Press the button on the top right corner of the student group box (by default reading
OFF) containing the name of the student you want to assign to a group. The
Configuration screen displays, listing all the possible groups to which you can assign the
student. It looks like this:
57
Page 58

Group Mode
2. Select the group you want the student to belong to.
Figure 13
OR
Select GR.OFF if you do not want the student assigned to a group. (You can use this
setting if it is not appropriate for that individual to be assigned to a group and you want
them to work independently.
3. Once you have made your selection, press BACK to close the screen.
The group you selected will appear on the top right corner of the student group box.
4. Repeat steps one thru three until you have assigned each student you wish to the group.
Note:
If you are using the Expansion Unit, each unit of 16 students works independently; you cannot
group students from one set of 16 with students from another set of 16. For example, you
cannot group a student in keyboard group 5 with a student from keyboard group 17.
5. When you are finished, begin assigning students to the next group.
6. Once you have assigned all students to groups as desired, press BACK to close the
screen.
The students are now ready to work in Group mode.
How to load and customize a (pre-set) group
1. Load a preset group (see the procedure How to load group info, in this chapter for
directions) Duet or Quartet.
2. Make any changes by adding students to the existing groups or by moving students from
one group to another (see the procedure How to assign a group, in this chapter for
directions).
58
Page 59

Setup Tab
The Setup tab looks like the Play tab. Re gardless of what mode you are in, you can use it to
assign student names to SI units in the GEC3. In Group mode, you can also use the Setup tab
to customize and save student groups for each class.
In Group mode, the Setup tab looks like this:
Group Mode
Figure 14
Procedures for group setup require you to use the Group Setup and Configuration screens,
both accessed from the Setup tab, and described below.
Configuration Screen (Setup tab)
The Configuration screen can be accessed from the Setup tab in Group mode via the text
(button) on the top right corner of each student group box. When no group is assigned, the
text reads OFF. If the student has been assigned to a group, the name of the active
configuration appears (for example, Duet, Config 1 or the name of a custom configured
group).
Use this screen, in conjunction with the Group Setup screen, to assign students to permanent
groups that you can later recall. You can assign groups other than duet or quartet, or make
modifications to existing default group settings. For example, use this screen if you want
59
Page 60

Group Mode
students #2, #5 and # 7 to be in a group that you can later recall. Groups that are assigned via
this screen are named (by default, Config 1, Config 2, etc. that can be changed to custom
names) and can be recalled for later use. To configure temporary groups that do not need to be
saved for later recall, see the section Play Tab in this chapter.
The Configuration screen looks like this:
Figure 15
Group Setup Screen
The Load Group screen can be accessed from the Setup tab in Group mode via the small
dropdown arrow in the top right corner of the screen. The name of the active configuration
appears next to the arrow (for example, Duet or Config 1).
Use this screen, in conjunction with the Configuration screen, to assign students to permanent
groups that you can later recall.
The Group Setup screen looks like this:
Figure 16
60
Page 61

Fields
Button/Field Description
Group Mode
Config 1
thru
Config 4
Load Config Use to upload a previously set group configuration. You might want to use
Save Config
As
Rename
Config T
Back Press to return to the Setup screen.
Select a group for which you want to perform any of the below listed
activities. For example, select Config 2 if you want to save the displayed
settings on Setup screen (Using Save Config As option, described below) as
Config 2. To save the system configuration, once you have assigned students
to groups using the Configuration screen. Stores a copy of all assigned groups
for later retrieval.
this option if you need to change previously assigned groups.
Use to save configuration currently set on Setup screen, to the selected
configuration option (Config 1 thru Config 4, described above).
Use to rename a configuration. This can be done at any time, before or after
saving a configuration. You might want to use this option if student groups
use assigned names (EG, colors, composers, instruments, etc…) for group
names, as opposed to group numbers.
Group Setup Procedures (How to…)
Save a group configuration
1. From the Setup screen, press the button on the top right corner of the first student you
want to assign to the group. The Configuration screen displays, listing all the possible
groups to which you can assign the student.
2. Select the group you want the student to belong to.
3. Once you have made your selection, press BACK to close the screen.
The group you selected will appear on the top right corner of the student group box.
4. Repeat steps one thru three until you have assigned each student you wish to the group.
5. When you are finished, begin assigning students to the next group.
6. When you have assigned all students to groups as desired, press the dropdown arrow in
the top right corner of the Setup tab to open the Group Setup screen
7. Select the desired configuration (EG: Config 1)
61
Page 62

Group Mode
8. Press SAVE CONFIG AS.
9. Press BACK to return to the Setup screen.
This configuration will now be available for future use.
Load a group configuration
Load configuration allows you to bring up previously saved configurations. You might use
this option if you need to edit a configuration setting.
1. From the Setup screen, press the small dropdown arrow in the top right corner of the
screen. The Group Setup screen displays.
2. Select the Configuration (EG: Config 1) you want to load.
3. Press the button LOAD CONFIG.
4. Press BACK to close the screen.
Rename a group configuration
1. From the Setup screen, press the small dropdown arrow in the top right corner of the
screen. The Group Setup screen displays.
2. Select the Configuration (EG: Config 1) for which you want to assign a different name.
62
3. Press the T button for RENAME CONFIG.
The QWERTY keypad displays. See the section QWERTY Keypad in Basics for
instructions on how to use the keypad.
4. The group will display with the new name. Press BACK to close the screen.
Page 63

Shared Tabs – Volume, Global & Disc
The Volume, Global and Disc tabs are shared tabs. Shared tabs can be accessed regardless of
what mode you are in. In addition, the features and functionality of the tabs is identical
regardless of what mode you ar e in – Lecture, Practice, or Group.
Volume Tab
The Volume tab is used to set volumes for auxiliary audio devices, teacher headphones and
room speakers. You can change these volume levels using the Volume tab, regardless of what
mode you are in.
To open the Volume tab, press Volume from the row of tabs at the bottom of the screen from
any of the three modes. The Volume tab looks like this:
Shared Tabs
Figure 17
63
Page 64

Shared Tab
Fields
Button Description
Teacher On Teacher On is on by default. When Aux1 or Aux2 is turned ON, Teacher ON
Aux1 device This feature allows you to keep track of what source coincides with what Aux
automatically turns off. When this is the case, select Teacher ON to address the
class. If Aux1 or Aux2 are on, the volume is dropped by 12 dB, so your voice
can be heard over the auxiliary source (for example when you are commenting
on a musical example being played for the class on a CD player). When
Teacher ON is turned off, the original volume of the Aux source resumes.
button. If you are changing the auxiliary device, press the T to bring up the
QWERTY Keypad to enter the source name. This may be a static setting
already set up on the GEC3, in which case, it is only an indictor of what
Auxiliary source coincides with Aux 1, and should not be changed.
(Aux 1)
Enable
Aux 1 Selecting routes output of Auxiliary 1 source to everyone who can hear your
Aux 1 Cue Routes output of Auxiliary source only to your headset. This is a convenient
Volume
controls
Room On Routes signal in teacher headset to external speakers set up in the classroom.
Volume
controls
Aux2 device This feature allows you to keep track of what source coincides with what Aux
If there is an Auxiliary source connected to the back panel, you can enable it
using thi s button. See the descriptions for Aux 1 and Aux 1 Cue to see output if
enabled.
headset. Source is enabled to play only if this button is selected and Aux 1
enable is checked.
feature if you want to cue-up music from a source such as a tape or CD player.
Source is enabled to cue only if this button is selected and Aux 1 enable is
checked.
Volume adjustment controls for Aux 1 device. For instructions on how to use
the volume controls, see the Volume Controls section in the Basics chapter of
this manual.
This feature is useful if you want to have student’s remove headsets and listen
to a musical piece, or if you have a situation where there are some people
present in the room who are not on a GEC3 unit (EG: concert for parents).
Volume adjustment controls for Room On. For instructions on how to use the
volume controls, see the Volume Controls section in the Basics chapter of this
manual.
button. If you are changing the auxiliary input, press the T to bring up the
QWERTY Keypad to enter the source name. This may be a static setting
already set up on the GEC3, in which case, it is only an indictor of what
Auxiliary source coincides with Aux 1, and should not be changed.
64
Page 65

Button Description
Shared Tabs
(Aux 2)
Enable
Aux 2 Selecting routes output of Auxiliary 2 source to everyone who can hear your
Aux 2 Cue Selecting routes output of Auxiliary 2 source only to your headset. This is a
Volume
controls
Headphone
Volume
controls
Up to two Auxiliary sources can be connected to the back panel of the GEC3.
If there are two Auxiliary sources connected to the back panel, you can enable
the second using this button. See the descriptions for Aux 2 and Aux 2 Cue to
see output if enabled.
headset. Source is enabled to play only if this button is selected and Aux 2
enable is checked.
convenient feature if you want to cue up music from a source such as a tape or
CD player. Source is enabled to cue only if this button is selected and Aux 2
enable is checked.
V olume adjustment controls for Aux 2 device. For instructions on how to use
the volume controls, see the Volume Controls section in the Basics chapter of
this manual.
Volume adjustment controls for your (teacher’s) headphone. For instructions
on how to use the volume controls, see the Volume Controls section in the
Basics chapter of this manual.
How to…
Setup an Auxiliary Source
Your system administr ator or installation professional should set up the auxiliary sources
when they are setting up the GEC3 for initial use. However, you might need to change the
auxiliary source if you are using an instrument, CD player, tape deck or other auxiliary source
that is not usually used in your classroom or studio.
1. Make sure the auxiliary source is connected to the back panel of your GEC3.
2. Press the T to access the QWERTY Keypad to enter a name in this field, or to edit an
existing entry (this is for convenience only). See the section QWERTY Keypad in Basics
for instructions on how to use the keypad.
Enable an Auxiliary Source (Aux 1) for Class Listening
This example uses Aux 1, but the procedure is the same for Aux 2 (using buttons
corresponding with Aux 2 functions).
1. Determine the Auxiliary source you want to use.
65
Page 66

Shared Tab
2. Press (Aux 1) Enable to check it.
3. Press Aux 1.
4. To adjust the volume, use the volume controls corresponding with Aux 1.
5. To interject commentary, press Teacher ON checkbox at the top of the Volume screen.
Aux1/Aux2 volume is decreased by 12 dB (so the teacher's voice can be heard over the
aux. source). Turn Teacher ON off to resume the original volume.
Cue Up a Static Auxiliary Source (Aux 1) then Enable it for Class
This example uses Aux 1, but the procedure is the same for Aux 2, using buttons
corresponding with Aux 2 functions.
1. Determine the Auxiliary source you want to use, but do not select it.
2. Press (Aux 1) Enable to check it.
3. Press Aux 1 Cue.
4. Cue up the auxiliary source to the desired se lection of music.
5. To adjust the volume, use the Volume Controls corresponding with Aux 1. See the
Volume Controls section in the Basics chapter of this manual for more information on the
volume controls.
6. When music is cued up, press Aux 1.
Route Signal in your Headset to Speakers
Press Room On to check the box.
Adjust Headphone Volume
Use the Volume Controls corresponding with headphone volume to adjust the volume in your
headset. See the Volume Controls section in the Basics chapter of this manual for more
information on the volume controls.
Record Out to Auxiliary Device
Audio signal present in the teacher headset of the GEC3 can be sent to an auxiliary recording
device that is connected to the GEC3’s Tape Out jack.
Set up your auxiliary system (for example, a tape player/recorder) to record – there is no need
to change any setting on your GEC3. If your auxiliary system is set up to record, it will record
the audio you are hearing in the teacher headset, regardless of what screen you are viewing or
mode you are in.
66
Page 67

Global Tab
The GEC3 has numerous settings – for example, Call enabled, which lets students notify you
if they wish to ask you a question, and Split display, which places an “A” or “B” in front of
student names as a convenience for using the Split Feature. Instead of having to make these
selections each time you start the GEC3, you can save settings using the Global tab. You can
store settings to be associated with your name or the class. This allows you to establish
settings that you use in most of your classes to your name, but if you have one class that
requires different settings, you can establish those accordingly. Because you associate settings
to classes, when you start the GEC3, you do not need to bring up the settings - the GEC3 does
it automatically.
To open the Global tab, press Global from the row of tabs at the bottom of the screen. The
Global tab looks like this:
Shared Tabs
Figure 18
Note:
The Global tab changes depending on whether or not you select the “Use Teacher
Preferences” option. Above, the default screen (with Use teacher Preferences selected) is
shown.
67
Page 68

Shared Tab
Class/Teacher Setup – Teacher Mode
The Global tab, when set for Teacher Setup (Use teacher preferences is selected) is used to set
Teacher preferences, edit teacher information, and more. The Global tab lets you to access
numerous additional tabs that allow you to set preferences and change settings that are
associated with the teacher.
To access the Global tab – Teacher Setup, select Global from the row of tabs at the bottom of
the screen. Press Use teacher preferences. The Global tab, when set for Teacher Setup (Use
teacher preferences is selected) looks like this:
Fields
68
Figure 19
Field Description
Teacher Sixteen teacher names can be stored in the GEC3. Teacher names are added,
and names and preferences are edited, using the Edit Teacher Info screen,
described in the Edit Teacher Info section of this guide. Selecting a teacher
here (if listed) brings up the associated settings. To change the settings
associated with a teacher, select that teacher’s name.
Use teacher
preferences
Teacher preferences are set using the Teacher Preferences group box, on this
screen. If this checkbox is selected, teacher preferences are applied to the
selected class, and the Teacher Preferences portion of the screen displays.
Page 69

Shared Tabs
Field Description
Teacher Preferences Group Box
Call enabled Select this field if you want to be notified when a student presses the Call
button on their SI units. If enabled, an audible beep is sent to your headset
when a student presses the Call button on their SI to signal that they want to
communicate with you. The name of the student flashes on the display. From
the Play screen, you can press on the student’s name to enable their mic.
Split display
(function)
Student Mics
en.
Student inst
en.
4 X 4 View View determines how the SI keyboard group units are numbered in Play,
Split function allows two students to share one keyboard. If student
keyboards are set up to accommodate split function, pressing this places an
“A” or “B” in front of student names as a convenience for using the Split
Feature.
This field must be checked for SI Unit Mics to be functional. If the Student
Mics Enabled field is not checked, there will be no communication
through mics between you and students. This option is convenient for use
in practice-only classes where you do not want to communication through
mics.
This field must be checked for the SI Units to be functional. If the Student
Inst field is not checked, SI units will not function. This option is
convenient for use in cases where a study hall or other not music-related class
is being taught in a lab equipped with GEC3 equipment, and you don’t want
students to play with equipment.
Setup an d other screens. Select this field to number seats in a 4 by 4 pattern
(or horizontally) as shown:
13 14 15 16
9 10 11 12
5 6 7 8
1 2 3 4
If you are using the expansion unit and have a second set of seats, they are
numbered in the same pattern, numbers 17 thru 32.
69
Page 70

Shared Tab
Field Description
2 X 8 View View determines how the SI keyboard group units are numbered in Play,
Setup and other screens. Select this field to number seats in a 2 by 8 pattern,
as shown:
7 8 15 16
5 6 13 14
3 4 11 12
1 2 9 10
If you are using the expansion unit and have a second set of seats, they are
numbered in the same pattern, numbers 17 thru 32.
Circular
View
Class Classes are linked to teachers – If you select a teacher name (see Teacher
View determines how the SI keyboard group units are numbered in Play,
Setup and other screens. Select this field to number seats in a circular pattern,
as shown:
4 5 6 7
3 14 15 8
2 13 16 9
1 12 11 10
If you are using the expansion unit and have a second set of seats, they are
numbered in the same pattern, numbers 17 thru 32.
Name above) the classes corresponding to that teacher display. A total of 128
class periods can be stored in the GEC3 memory. Class names are added, and
names and preferences are edited using Edit Class Info, described below.
Select a class here (if listed) to edit associated preferences.
How to…
Set Preferences for a Teacher
1. Select the teacher from Teacher Nam e field.
70
Note:
When a new teacher is selected, the teacher preferences (all settings on the Global and
Volume screens), first available class for that teacher, and first custom grouping for the class
(seen in Group mode) are automatically loaded. Other classes can be selected from the class
drop-down list.
Page 71

Shared Tabs
2. Make the selections that you want to be associated with the teacher name in the Teacher
Preferences group box.
3. You must assign a name to the teacher you are setting preferences for. If you have not yet
done this, see the Teacher Selection and Edit Screen section in this chapter of the manual
for instructions on how to associate these settings with a teacher name.
4. Press Disk to open the Disk tab.
5. Press Save Global Setup to save changes.
Apply Teacher Preferences to a Class
1. Select the class you want to apply preferences to using the Class dropdown menu.
OR
If desired class name is not in list, add the class using Edit Class Info screen described
below.
2. Once teacher settings have been defined (see Set Preferences for a Teacher, above) make
sure Use Teacher Preferences is checked.
Note:
Save any changes you have made by pressing Save Global Setup on the Disc tab.
Class/Teacher Setup – Class Mode
The Global tab, when set for Class Setup (Use teacher preferences is not selected) is used to
set Class preferences, in cases where you do not want to apply the settings associated with the
teacher. The Global tab, when set for Teacher Setup (Use teacher preferences is not selected)
looks like this:
71
Page 72

Shared Tab
Figure 20
Fields
Field Description
Teacher Sixteen teacher names can be stored in the GEC3. Teacher names are added,
and names and preferences are edited, using the Edit Teacher Info screen,
described in the Edit Teacher Info section of this guide. Selecting a teacher
here (if listed) brings up the associated settings, and in the Class field, lists
associated Classes. To change the settings associated with a teacher, select
that teacher’s name.
Use teacher
preferences
Class Preferences Group Box
Teacher preferences are set using the Teacher Preferences group box, on
this screen. If this checkbox is selected, teacher preferences are applied to
the selected class. Unselect this field to apply preferences other than teacher
preferences to a class, and enable the remainder of the fields shown on
Figure 18.
72
Page 73

Shared Tabs
Field Description
4 X 4 View View determines how the SI keyboard group units are numbered in Play,
Setup and other screens. Select this field to number seats in a 4 by 4 pattern
(or horizontally) as shown:
13 14 15 16
9 10 11 12
5 6 7 8
1 2 3 4
If you are using the expansion unit and have a second set of seats, they are
numbered in the same pattern, numbers 17 thru 32.
2 X 8 View View determines how the SI keyboard group units are numbered in Play,
Setup and other screens. Select this field to number seats in a 2 by 8 pattern,
as shown:
7 8 15 16
5 6 13 14
3 4 11 12
1 2 9 10
If you are using the expansion unit and have a second set of seats, they are
numbered in the same pattern, numbers 17 thru 32.
Circular View View determines how the SI keyboard group units are numbered in Play,
Setup and other screens. Select this field to number seats in a circular
pattern, as shown:
4 5 6 7
3 14 15 8
2 13 16 9
1 12 11 10
If you are using the expansion unit and have a second set of seats, they are
numbered in the same pattern, numbers 17 thru 32.
73
Page 74

Shared Tab
Field Description
Class Classes are linked to teachers – If you select a teacher name (see Teacher
Call enabled Select if you want to be notified when a student presses the Call button on
Name above) the classes corresponding to that teacher display. A total of 16
class periods can be stored in the GEC3 memory for each teacher. Class
names are added, and names and preferences are edited using Edit Class
Info, described below. Select a class here (if listed) to edit associated
preferences.
their SI units. If enabled, an audible beep is sent to your headset when a
student presses the Call button on their SI to signal that they want to
communicate with you. The name of the student flashes on the display.
From the Play screen, you can press on the student’s name to enable their
mic.
Split display
(Function)
Student Mics
en.
Student inst
en.
Split function allows two students to share one keyboard. If student
keyboards are set up to accommodate split function, pressing this places an
“A” or “B” in front of student names as a convenience for using the Split
Feature.
This field must be checked for SI Unit Mics to be functional. If Student
Mics Enabled field is not checked, there will be no communication
through mics between you and students. This option is convenient for use
in practice-only classes where you do not want to communication through
mics.
This field must be checked for the SI Units to be functional. If Student Inst
field is not checked, SI units will not function. This option is convenient
for use in cases where a study hall or other not music-related class is being
taught in a lab equipped with GEC3 equipment, and you don’t want students
to play with equipment.
How to…
Set Preferences for a Class
1. Select the teacher name from Teacher field. The classes associated with the teacher will
now appear in the Class field.
OR
If desired teacher name is not listed, add the teacher name using the Edit Teacher
Information screen, described in this chapter.
74
2. Select the cl ass name from Class field.
OR
Page 75

Shared Tabs
If desired class name is not listed, add the class using the Edit Class Information screen,
described in this chapter.
3. Make the selections that you want for the specific class in the Class Preferences group
box.
OR
If you want to apply teacher preferences as they are set up in the section Teacher
Preferences, select Use Teacher Preferences .
4. You must assign a name to the class you are setting preferences for. If you have not yet
done this, see the Class Selection and Edit Screen section in this chapter of the manual
for instructions on how to associate these settings with a class name.
5. Press Disk to open the Disk tab.
6. Press Save Global Setup to save changes.
Examples
Mr. Johnson is a music teacher who teaches two General Music classes (each of which have
24 students), one Advanced Piano class with six students and a Study Hall. Obviously, he has
different needs for the different classes. He might set his teacher preferences to accommodate
the type of class he teaches most often, in this case, a large General Music class.
Setting Teacher Preferences
To set Teacher Preferences, Mr. Johnson:
1. Selected his name from the Teacher field.
2. Decided to leave the fields at their default settings (shown in fig. 1.2), in which the
following are selected:
• Call enabled
• Split function enabled
• Student Mics. En.
• Student inst. En.
• 4X4 View
These settings work for Mr. Johnson because the y accommodate the classes he teaches
most frequently. The first four settings allow his students to use their instruments and
share keyboards (as there are more students in each class than there are keyboards). The
last two ensure that they are appropriately displayed on his GEC3.
75
Page 76

Shared Tab
Setting Class Preferences
For his two General Music classes, Mr. Johnson:
1. Selected his name from the Teacher field.
2. Selected Period 1 OR Period 2 General Music from the Class field.
3. Selected Use teacher preferences .
For his Advanced Piano class, Mr. Johnson:
1. Selected his name from the Teacher field.
2. Selected Period 6 General Music from the Class field.
3. In the Class Preferences group box, he un-selected Use teacher preferences , because he
wanted to change preferences for this class.
4. In the Class Preferences group box, he un-selected Split display, because there were only
six students, and each had their own keyboard.
5. In the Class Preferences group box, he selected 4X4 View, because although the
student’s seats were physically set up as in the other classes (four seats in each vertical
rows and four seats in each horizontal row) he wanted to number them left to right,
because there were so few student s.
For his study hall, Mr. Johnson:
1. Selected his name from the Teacher field.
2. Selected Period 9 Study Hall from the Class field
3. In the Class Preferences group box, he un-selected Use teacher preferences because he
wanted to change preferences for this class.
4. In the Class Preferences group box, he un-selected Student mics. En. because the class
would not be using the GEC3 and SI units.
5. In the Class Preferences group box, he un-selected Student inst. En. because the class
would not be using instruments.
Once he finished making changes to the Global tab, Mr. Johnson:
1. Pressed Disk to open the Disk tab.
2. Pressed Save Global Setup to save changes.
Teacher Selection and Edit Screen
The Teacher Selection and Edit screen can be accessed from the Global tab. Teacher
information can be set up for up to 16 teachers on the GEC3.
76
Page 77

How to Edit Teacher Information
1. Press on the arrow next to the Teacher field on the Global tab. The following screen
displays, listing all the teacher names already entered.
Shared Tabs
Figure 21
2. Press the E next to a teacher’s name to edit information for that teacher, or the E next to
an Undef. teacher field to add a new teacher. The Edit Teacher Information screen
displays. It looks like this:
Figure 22
77
Page 78

Shared Tab
2. Select from the following fields:
Field Description
Teacher The name of the teacher that is being edited. This field is blank if you are
adding a new teacher. Press the T to access the QWERTY Keypad to enter a
name in this field, or to edit an existing entry. See the section QWERTY
Keypad in Basics for instructions on how to use the keypad.
Teacher
Note 1 thru
Teacher
Note 6
Back Press to close the screen.
3. Press Disk to open the Disk tab.
4. Press Save Global Setup to save changes.
You can add notes on the Teacher Info screen. Press the T to access the
QWERTY Keypad to enter or edit a note this field. See the section QWERTY
Keypad in Basics for instructions on how to use the keypad.
Class Selection and Edit Screen
The Class Selection and Edit Screen can be accessed from the Global tab. Class information
can be set up for up to 128 classes on the GEC3. The class name is setup on this screen. All
the other class setup and features for a class must be associated with this class name;
therefore, you will always select the class you wish to edit or modify here, before setting other
options.
How to Edit Class Information
1. From the Global tab, press on the arrow next to the Teacher’s Name field and select the
teacher who’s list of classes you would like displayed.
2. Press on the arrow next to the Edit Class Info field. The following screen displays, listing
all the classes associated with the selected teacher.
78
Page 79

Shared Tabs
Figure 23
3. Press the E next to a class to edit info for that class, or the E next to an Undefined class
field to add a new class. The Edit Class Info window displays. It looks like this:
4. Select from the following fields:
Field Description
Class: The name of the class that is being edited. This field is blank if you are adding
a new class. Press the T to access the QWERTY Keypad to enter a class name,
or to edit an existing entry. See the section QWERTY Keypad in Basics for
instructions on how to use the keypad.
Teacher
Notes:
79
Teacher’s can add notes on the Class Info screen. Press the T to access the
QWERTY Keypad to enter or edit a note this field. See the section QWERTY
Keypad in Basics for instructions on how to use the keypad.
Page 80

Shared Tab
Field Description
Back Press to close the screen.
5. Press Disk to open the Disk tab.
6. Press Save Global Setup to save changes.
Disk Tab
The Disk tab is used to backup information in the GEC3, save settings, and initiate system
exclusive data transfers to configure popular lab keyboards for use with the GEC3’s Split
Feature. All the settings and information in the GEC3 can be stored in a Smart Media card.
The GEC3 contains several system exclusive “keyboard profiles” that configure popular lab
keyboards for use with the Split Feature. The Split Feature can only be used with keyboards
that have been configured with these system exclusive commands. These “keyboard profiles”
are delivered to the keyboards in your lab via MIDI, by attaching a MIDI cable to the MIDI
OUT port of the GEC3 and the MIDI IN port of one of the defined electronic keyboards. The
Disk tab looks like this:
80
Figure 24
Page 81

Shared Tabs
Fields
Button/Field Description
Smart Media Functions Group Box
Save Config Press to save the system configuration. Stores a copy of all settings (class,
teacher, etc.) and information (student names, class names, etc.) on the
inserted Smart Media card.
Load Config Press to upload the system configuration from the inserted Smart Media card.
Uploads all settings (class, teacher, etc.) and information (student names,
class names, etc.) from the inserted Smart Media card. Replaces all existing
information.
Load MIDI Press to upload MIDI information from a Smart Media card, if settings for
keyboards in use are not pre-programmed on GEC3. MIDI contents cannot be
loaded when All Call is active. Turn off All Call before loading!
MIDI Sys. Exclusive Commands Group Box
Default MIDI Selected keyboard makes and models are listed here. Press the appropriate
one to send the system exclusive command to the keyboard so the keyboard
can be used with the Split Feature.
Save Class and Global/Teacher Setup Group Box
Save Class
Setup
Save Global
Setup
Press to save the class setup, as configured on the Setup tab, for the classes
associated with your name.
Press to save the Global setup, as configured on the Global tab, for the
properties associated with the teacher.
How To…
Save System Configurations
1. Make sure the system is set as you would like it to be backed up.
2. Insert a Smartmedia card.
3. Press Save Config.
The Saving/Loading screen displays. It looks like this:
81
Page 82

Shared Tab
Wait until action is competed, then continue GEC3 use.
Save Class Setup
1. Make sure the system is set as you would like it to be backed up.
2. Press Save Class Setup .
The Saving/Loading screen displays. It looks like this:
Wait until action is competed, then continue GEC3 use.
Save Global Setup
1. Make sure the system is set as you would like it to be backed up.
2. Press Save Global Setup.
The Saving/Loading screen displays. It looks like this:
Wait until action is competed, then continue GEC3 use.
Load System Configuration
1. Insert the Smartmedia card on which system data is backed up.
2. Press the Load System Configuration button on the Disk tab.
The Saving/Loading screen displays. It looks like this:
82
Page 83

Wait until action is competed, then continue GEC3 use.
Load MIDI Settings
1. Press the button for the MIDI keyboard setting you would like to load
2.
The Saving/Loading screen displays. It looks like this:
Shared Tabs
Wait until action is competed.
The Split Feature allows 2 students to work independently at the same electronic keyboard
(they can’t hear each other). The feature works if custom splits have been defined on the
keyboard in which one side of the keyboard is “panned” all the way to the left side of the
stereo field and the other side of the keyboard is panned all the way to the right side of the
stereo field. These custom splits have already been defined for popular Korg keyboards and
can be delivered via MIDI system exclusive commands.
The Split Feature is initiated at the student workstations. The students select the split (done in
“Combination” mode on Korg Keyboards) and push the “Split” button on their workstation
Student Interface (SI) boxes.
The teacher can monitor the 2 students separately by pressing either the “A” or “B” buttons
under the Touch Screen display. Although the teacher can listen to the students separately, he
or she cannot speak to the students separately.
83
Page 84

Page 85

Installation
Note:
When installing your music laboratory, we strongly urge you to adhere to local building and
electrical codes. If you are not familiar with local building regulations for the installation of
electrical equipment in your school or studio, seek assistance from maintenance personnel,
electrical contractors, and/or local government (county or township) offices for information.
The Plannin g Stage
The more time and thought you give to planning your music laboratory, the fewer problems
you are likely to face when installing and using it in a teaching situation. The checklist below
will assist you in preliminary planning. We recommend that you use the checklist to design a
teaching environment that will meet your needs.
• Before you begin, consider the following:
• Allow for future expansion: if possible, leave sufficient room for additional equipment
and cabling.
• When planning teacher and student workstations, don’t forget that some instruments are
freestanding and others require stands, which add to their length, width, and/or depth.
• Take into account student sight lines; it will be important for students to see the teacher,
as well as blackboards and other teaching aids.
• If students are to work and perform in duets, quartets, or customized groups, place
student keyboard/workstations so that students within groups can easily establish eye
contact.
• Ensure that the teacher can easily access his or her instrument, as well as external audio
equipment (such as additional instruments, tape recorders, CD players/burners, etc.).
• Position the room monitors so that the teacher, as well as the students can hear them
clearly.
Installation
Site Plan Checklist
1. Diagram the dimensions of the physical site where the music laboratory will be located.
Make sure that the diagram is drawn to scale.
85
Page 86

Installation
2. Note on the diagram the pl acement of all doors, windows, and AC outlets.
3. List the equipment that will be used by the teacher, including the teacher’s keyboard,
Group Education Controller 3 , and any additional MIDI devices or MIDI instruments,
computer, audio accessories such as tape decks, CD players/burners, stereo
amplifier/receiver, self-powered monitors, and/or speakers.
4. How many student stations will the music laboratory contain?
5. List the equipment that will be used by each student.
6. What are the approximate dimensions of each student station? Include the student bench
or chair, allowing sufficient space between the instrument and bench for the student to be
seated comfortable and for the teacher and other students to walk between stations.
7. Draw to scale a diagram of teacher and student workstations, as well as all additional
audio and/or MIDI accessories.
8. Once the teacher station and student stations are positioned in the diagram, add AC and
Communication Cable (the cable that connects the Student Communications Interfaces,
or SI’s to the GEC3) routings. Finally, add the cable routings for the audio accessories
(such as tape decks, CD players/burners, stereo amplifiers, etc.).
Cabling Estimates and Requirements
86
Here are the different ki nds of cable that will be essential to the music laboratory installation:
1. AC Cable carrying electrical current to all devices. Be sure that there are enough
grounded AC outlets to accommodate the teacher and student stations.
2. Audio Cable carrying:
• Signals from the teacher’s instruments and external audio equipment to the GEC3.
• Signals from the GEC3 to an amplifier (or powered monitors), tape recorder, CD
player/burner.
• Signals from the student instruments and student computers to the SI’s.
All the audio inputs and outputs on the rear panel of the GEC3, as well as the SI’s student
instrument inputs, utilize standard phono jack connectors. See the “Position Your
Equipment” section below for suggestions on the placement of the GEC3 and SI’s.
1. Communications Cable carrying audio and communication signals between the GEC3
and the SI’s. This modular eight-conductor cabling is inexpensive and is available in
fourteen, twenty-five, and thirty-three foot lengths from your local authorized Korg
dealer.
2. MIDI Cables. MIDI IN – the MIDI OUT port of the Teacher Instrument can be
connected to the GEC3 MIDI IN port via a conventional MIDI cable. MIDI OUT – the
Page 87

Installation
MIDI IN port of the first student keyboard can be connected to the GEC3 MIDI OUT
port to receive program change m essages from the Teacher Instrument connected to the
MIDI IN port of the GEC3. Using the MIDI THRU port of the first student keyboard, the
second student keyboard can be included in the MIDI system as well. This can be
repeated to include all student keyboards in the lab. The MIDI OUT port can also be
used to deliver system exclusive “Keyboard Setups” to configure popular keyboards
to take advantage of the GEC3’s Split Function.
3. Speaker Cable. If your monitors are not self-powered, you will also require speaker wire
to carry audio signals from the room amplifier (which may be a standard stereo receiver)
to the room speakers. This wire should be of the heaviest gauge practical.
4. Computer Cable . If you are utilizing the GEC3 with a digital audio recording system, a
co-ax S/PDIF cable will be required. If you are utilizing the USB port of the GEC3, you
will need a USB accessory cable.
Sizing Cables
The placement of the equipment in your music laboratory will determine the lengths of
cabling required. In order to select the appropriate lengths of communications cable, measure
the distance from the GEC3 to the floor, floor distance from teacher station to student piano,
floor to SI, and include an additional twelve to twenty-four inches for movement and slack.
Korg offers communications cables in three sizes. The cables, CC-14, CC-25, and CC-33 are
available in fourteen, twenty-five, and thirty-three foot lengths respectively.
If your installation requires longer or shorter communications cables than those available
from Korg U.S.A., your authorized Korg Education Dealer will gladly assist in sourcing and
installing the cabling.
After all the equipment and cabling has arrived, it’s time for the actual installation.
The Installation Stage
Positioning Equipment
You should begin your installation by:
1. Positioning the teacher and st udent stations in accordance with your site plan;
2. Placing all audio accessories in their designated areas; and,
3. Positioning the GEC3 and each SI.
87
Page 88

Installation
Mounting the SI’s
Each Student Communications Interface should be mounted on or near the student
instruments, making it easier for students to access volume controls and call buttons. This
will also minimize the length of audio cables required between student instrument and SI.
Position SI’s so that student headset cables will not be in the way, inhibiting students’ natural
movement in playing. SI’s may be attached to desks or wooden tables using wood screws.
Positioning the GEC3
Similarly, the Group Education Controller should be placed on or near the teacher instrument
and close to external audio devices and the room amplifier, for ease of use.
Connect Cabling
Once all equipment is in place, you are ready to lay down the wiring that will connect all lab
equipment:
• Start with the AC cabling.
• Next, connect the fixed audio, modular, and speaker cabling (that is, cabling for devices,
such as the GEC3, SI’s, and teacher and student instruments that you don’t expect to
move).
• Finally, lay down cabling for any devices that you think may have to be moved from time
to time.
SI Connections
• Having permanently mounted the SI to or near the student instruments, connect all
student instrument outputs to the SI inputs.
• If the student workstations include a personal computer, connect the computer audio
signals to each SI’s auxiliary input. Consult the computer manufacturer regarding
procedures for disabling the computer’s internal speakers for connection to the SI’s.
GEC3 Connections
• Connect the teacher instrument’s auxiliary output(s) or headphone output to the GEC3’s
instrument inputs, left and right.
88
Page 89

Installation
• If the teacher workstation includes a stereo cassette recorder, auxiliary audio source (like
a CD player/burner), or additional MIDI sound sources, connect the equipment at this
time. Be sure to route all signals in stereo, or split the signal using an appropriate cable
or adapter.
• If the GEC3 is to be connected to an external amplification system, connect the Room
Outs to the amplifier, receiver, or powered monitors at this time.
Of particular concern are the AC, audio and communications (modular) cabling runs
themselves. In the interest of neatness and in order to avoid potential accidents, you should
use many cable ties. In order to minimize potential interference, always try to keep AC,
audio, and communications cables as far apart as possible, always attempting to avoid parallel
runs.
In addition, avoid exposed and/or loose cabling, avoiding cable runs across walkways and
aisles.
More on the Communication Cables
In configuring a GEC3 learning System, the only non-standard cables integral to installation
are the Communications Cables. These are Ethernet, eight conductor cables (category 3 or
5).
GEC3 Communication Cables can be purchased in two ways:
Korg supplies three lengths of Communications Cables, CC -14/25/33, in fourteen, twenty-
five, and thirty-three foot lengths.
When permanently installing a large GEC3 Learning System, the purchase of a spool of
category 3 or 5 cable, connectors, crimping tool, and cable tester may be preferable. Material
specifications are listed below and the cable, connectors, and crimper can be purchased from
any computer network or cable wholesaler:
1. Cable: eight-conductor category 3 or category 5
2. Connectors: RJ-45 type
3. Crimping: RJ-45 type
Note:
If you are not experienced in network installation, Korg U.S.A. recommends that you
purchase the Communications Cables noted above or that you contact a local professional
who has experience in network installation.
89
Page 90

Installation
Crimping Your Own Cables
When crimping your own cable for installation, the cable must not be pinned like a standard
telephone cable (pin 1 to pin 8). The cable must be crimped with pin 1 matching pin 1 at the
opposite end, pin 2 matching pin 2 at the opposite end, etc. in order for the GEC and SCI’s to
function properly.
Green Blue
Note:
If the cables are not crimped properly, permanent damage may be caused to the GEC3 and/or
the SI’s. If you have questions regarding crimping procedures or you do not feel confident in
completing the cabling process, contact your local Korg Educational Dealer or Korg U.S.A.
Technical Support.
Troubleshooting
If your GEC3 system does not work correctly, check instrument volume levels, the SI and
GEC3 volume levels, audio connections, and communications connections (crimping of RJ45
connectors). If problems cannot be resolved, contact your Korg-Authorized Educational
Dealer or Korg U.S.A. Technical Support at (516) 333 -USER.
Yellow
Brown
90
Page 91

Index
A, B and A+B buttons, 14
Adding class names, 33
Adding Teacher Names, 31
Adjusting headphone volume, 66
All Call, 29
Quick instructions, 25
Applying teacher preferences, 71
Assigning
Class preferences, 37
Teacher preferences, 35
Assigning a group, 57
Audio cables, 20
For SI boxes, 21
Auxiliary devices, 15, 64
Cables, 20
Volume, 41
Back Panel, 15
Backing up data, 80
Basic Hook Up, 19
Basics, 9, 11
Basics for using GEC3, 27
Bringing a student into lecture, 43
Bringing a student who called from their SI into
lecture, 43
Bringing students into lecture
Quick instructions, 23
Broadcasting to room speakers
Quick instructions, 26
Buttons
A, B and A+B, 14
All Call, 29
Mode, 14
Cables, 19
Crimping, 19
Cables for audio, 20
Cabling
Communication cables, 89
Connecting, 88
Estimates and requirements, 86
Sizing, 87
Call Enabled, 41
Call Enabled option, 35, 69
Checkbox
Installation
Definition, 29
Class preferences, 31
Assigning, 37
Class Selection and Edit screen
Global tab, 33, 78
Screen and fields, 78
Class setup, 71
Field descriptions, 37, 72
Communicating with a group, 55
Communicating with a student who called from
their SI
in practice mode, 50
Communicating with students during practice
Quick instructions, 24
Components
Defined.
Configuration screen, 57, 59
Connect cabling, 88
Connection cables, 19
Crimping cables, 19, 90
Cueing up an auxiliary device, 66
Definitions, 29
Disk tab, 80
Field descriptions, 81
Loading MIDI settings, 83
Loading system configuration, 82
Saving class setup, 82
Saving global setup, 82
Saving system configurations, 81
Screen and features, 80
Display
Touch screen, 12
Eavesdropping on a student, 49, 55
Quick instructions, 24
Edit class information screen
Field descriptions, 79
Edit teacher information screen
Field descriptions, 78
Editing a student's name, 45, 52
Editing class information, 78
Editing teacher information, 77
Enabling an auxiliary device, 65
91
Page 92

Index
Establishing two-way communication with a
student, 49, 55
Examples
setting class/ preferences, 76
setting teacher preferences, 75
Excluding students from lecture
Quick instructions, 24
Expansion units, 11
Features, 11
GEC3 Connections, 88
Global tab
Class Selection and Edit screen, 78
Class Selection and Edit Screen, 33
Class Selection and Edit Screen field
descriptions, 79
Teacher Selection and Edit Screen, 31, 76
Teacher Selection and Edit Screen field
descriptions, 78
Global tab, 67
Applying teacher preferences, 71
Call Enabled option, 35, 69
Class setup, 71
Editing class information, 78
Editing teacher information, 77
Examples, 75
Screen variations, 67
Setting class preferences, 74
Setting Preferences for a teacher, 70
Split display option, 35, 69
Teacher setup, 68
Global tab for class setup
Field descriptions, 37, 72
Global tab for teacher setup
Field descriptions, 35, 68
Group mode, 53
Configuration screen, 57, 59
Group setup screen, 60
Load group screen, 56
Play tab", 54
Setup tab, 59
Group setup screen, 60
Group Setup screen
Field descriptions, 61
Hardware
for installation, 22
for replacement, 22
Hook Up, 19
How to
Adjust headphone volume, 66
Apply teacher preferences, 71
Assign a group, 57
Bring a student into a lecture, 43
Bring a student who called from their SI into a
lecture, 43
Communicate with a group, 55
Communicate with a student who called from
their SI, 50
Cue up then enable an auxiliary device, 66
Eavesdrop on a student, 49, 55
Edit class information, 78
Edit teacher information, 77
Enable an auxiliary device, 65
Establish two-way communication with a
student, 49, 55
Load a group configuration, 62
Load group info, 56
Load MIDI Settings, 83
Load system configuration, 82
Open a class, 42, 45, 48, 51
Plan your Instrument to a class, 44
Record Out to auxiliary device, 66
Remove a student from lecture, 44
Rename a group configuration, 62
Route signal of auxiliary device to speakers, 66
Save a group configuration, 61
Save Class setup, 82
Save Global setup, 82
Save system configuration, 81
Set class preferences, 74
Set Preferences for a teacher, 70
Setup an auxiliary source, 65
View or edit a student's name, 45, 52
Installation, 85
Communication cables, 89
Connect cabling, 88
Crimping cables, 90
GEC3 Connections, 88
Mounting the SI’s, 88
Positioning equipment, 87
Positioning the GEC3, 88
SI Connections, 88
The Installation stage, 87
The planning stage, 85
Troubleshooting, 90
Installing the GEC3, 87
Introduction, 11
Keypad, 27
Field descriptions, 15, 18, 28
Uses, 27
LCD screen, 13
92
Page 93

Index
Lecture mode, 41
Default, 41
Definition, 12, 41
Disk tab, 80
Play tab, 41
Setup tab, 44, 50
Tabs, 41
Letting student practice indepedently
Quick instructions, 24
Linking students
Quick Instructions, 25
Load group, 56
Load Group
Field descriptions, 57
Loading
MIDI data, 80
MIDI settings, 83
System configuration, 82
Loading a group configuration, 62
Loading and customizing a pre-set group, 58
Loading group info, 56
MIDI
Ports, 21
Pre-programmed selections, 80
setting instrument selection, 80
MIDI IN / OUT, 16
Mode buttons, 14
Mounting the SI’s, 88
Numbering options
Class setup, 36, 37, 69, 73
Opening a class, 42, 45, 48, 51
Out of box operation, 22
Outputs, 21
Planning for installation, 85
Play tab, 41
Bringing a student into lecture, 43
Bringing a student who called from their SI into
lecture, 43
Editing a student's name, 45, 52
Group mode, 54
Practice mode, 47
Removing a student from lecture, 44
Screen and features, 42
Playing to the class, 44
Positioning equipment, 87
Positioning the GEC3, 88
Power on, 14
Practice mode, 47
Communicating with a student who called from
their SI, 50
Definition, 12
Eavesdropping on a student, 49
Establishing two-way communication with a
student, 49
Operational screen, 48
Play tab, 47
Split mode, 52
Tab descriptions, 47
Preferences
Class and teacher, 31
Presenting a Lecture
Quick Instructions, 23
Queueing up music
Quick Instructions, 23
Quick Start, 19
QWERTY Keypad, 27
Fields, 27
Uses, 27
Radio Button
Definition, 29
Recording out to auxiliary device, 66
Removing a student from lecture, 44
Renaming a group configuration, 62
Repeating buttons, 29
Routing signal of auxiliary device to speakers, 66
Saving a group configuration, 61
Saving class setup, 82
Saving global setup, 82
Saving settings
Global tab, 67
Saving system configurations, 81
Screen display, 13
Seat Numbering options
Class setup, 36, 37, 69, 73
Selection Box
Definition, 29
Selection types, 29
Setting class preferences, 74
Example, 76
Setting teacher preferences, 70
Example, 75
Setting up a class, 39
Setting up an auxiliary source, 65
Settings
Brought up automatically, 67
For GEC3, 67
93
Page 94

Index
Setup tab, 44, 50
Screen and features, 44, 50
Shared tabs, 63
Global tab, 67
Volume tab, 63
SI Connections, 88
SI Units
Definition, 16
Instructions for use, 18
Site planning checklist, 85
Sizing cabling, 87
Smartmedia card
Loading data onto, 81
Split display option, 35, 69
Split function
Definition, 12
Split mode
Limitations in practice mode, 50
Student Interface Units
Definition, 16
Field descriptions, 17
Students
Number supported, 11
Teacher preferences, 31
Assigning, 35
Teacher Selection and Edit Screen
Global tab, 31, 76
Screen and fields, 77
Teacher setup, 68
Field descriptions, 35, 68
Teacher Unit, 13
Top 10 how to's, 22
Touch screen, 12
Troubleshooting for installation, 90
Turning on, 14
UBS and digital output, 21
Viewing a student's name, 45, 52
Volume tab, 63
Adjusting headphone volume, 66
Cueing up an auxiliary device, 66
Enabling an auxiliary device, 65
Field descriptions, 64
Recording out to auxiliary device, 66
Routing signal of auxiliary device to speakers,
66
94
 Loading...