

Page 1
EasyStart
Main Features
• 4-track digital recorder featuring
two-track simultaneous recording,
with 8 virtual tracks per track for a
total of 32 tracks!
• Easy and intuitive knob-based user
interface allows instant access to
effects, rhythm patterns, virtual
tracks and digital editing with
dedicated knobs.
• High capacity Compact Flash™
data storage provides a stable and
quiet recording medium with
plenty of recording time! Compact
Flash cards of up to 2 GB can be
used!!
• Built in USB connectivity allows
you to easily-transfer data to your
computer for backup, playback and
editing.
• XLR and ¼ inch inputs
accommodate
keyboards, etc.
• Korg’s REMS modeling, technology
delivers 93 effect types that can
be used for guitar, insert, master
or final effect processing. 100
preset effect programs and 100
user programs.
• Effects include accurate amp,
cabinet and microphone modeling
simulations, as well as a large
variety of multi-effects including
reverb, delay, pitch-shift, chorus,
tremolo, flanger, phaser and more!
microphone, guitar,
• Favorite knob for instant recall of frequently used preset
and custom effects settings.
• A full suite of non-destructive editing tools including
copy/paste, punch in/out, as well as time
compression/expansion and more!
• 87 built-in rhythm/metronome patterns and chromatic
tuner are built-in.
• Full-range internal condenser microphone!
• Includes 64MB Compact Flash card and AC adaptor
EEaassyySSttaarrtt CCOONNTTEENNTTSS
Getting Started:
Installing the included Compact Flash™ card
Connections; Listening to the Demo Songs
The Mode Knob; Recording Basics
Using the Rhythm Patterns
Working with the Effects
Virtual Tracks; The Favorite Knob
Creating a two-track MP2 for playback on your computer
Backing up your songs to computer; More information on Compact Flash
2
2
3
3
4
5-6
6
7-8
Page 2

KORG D4 EasyStart
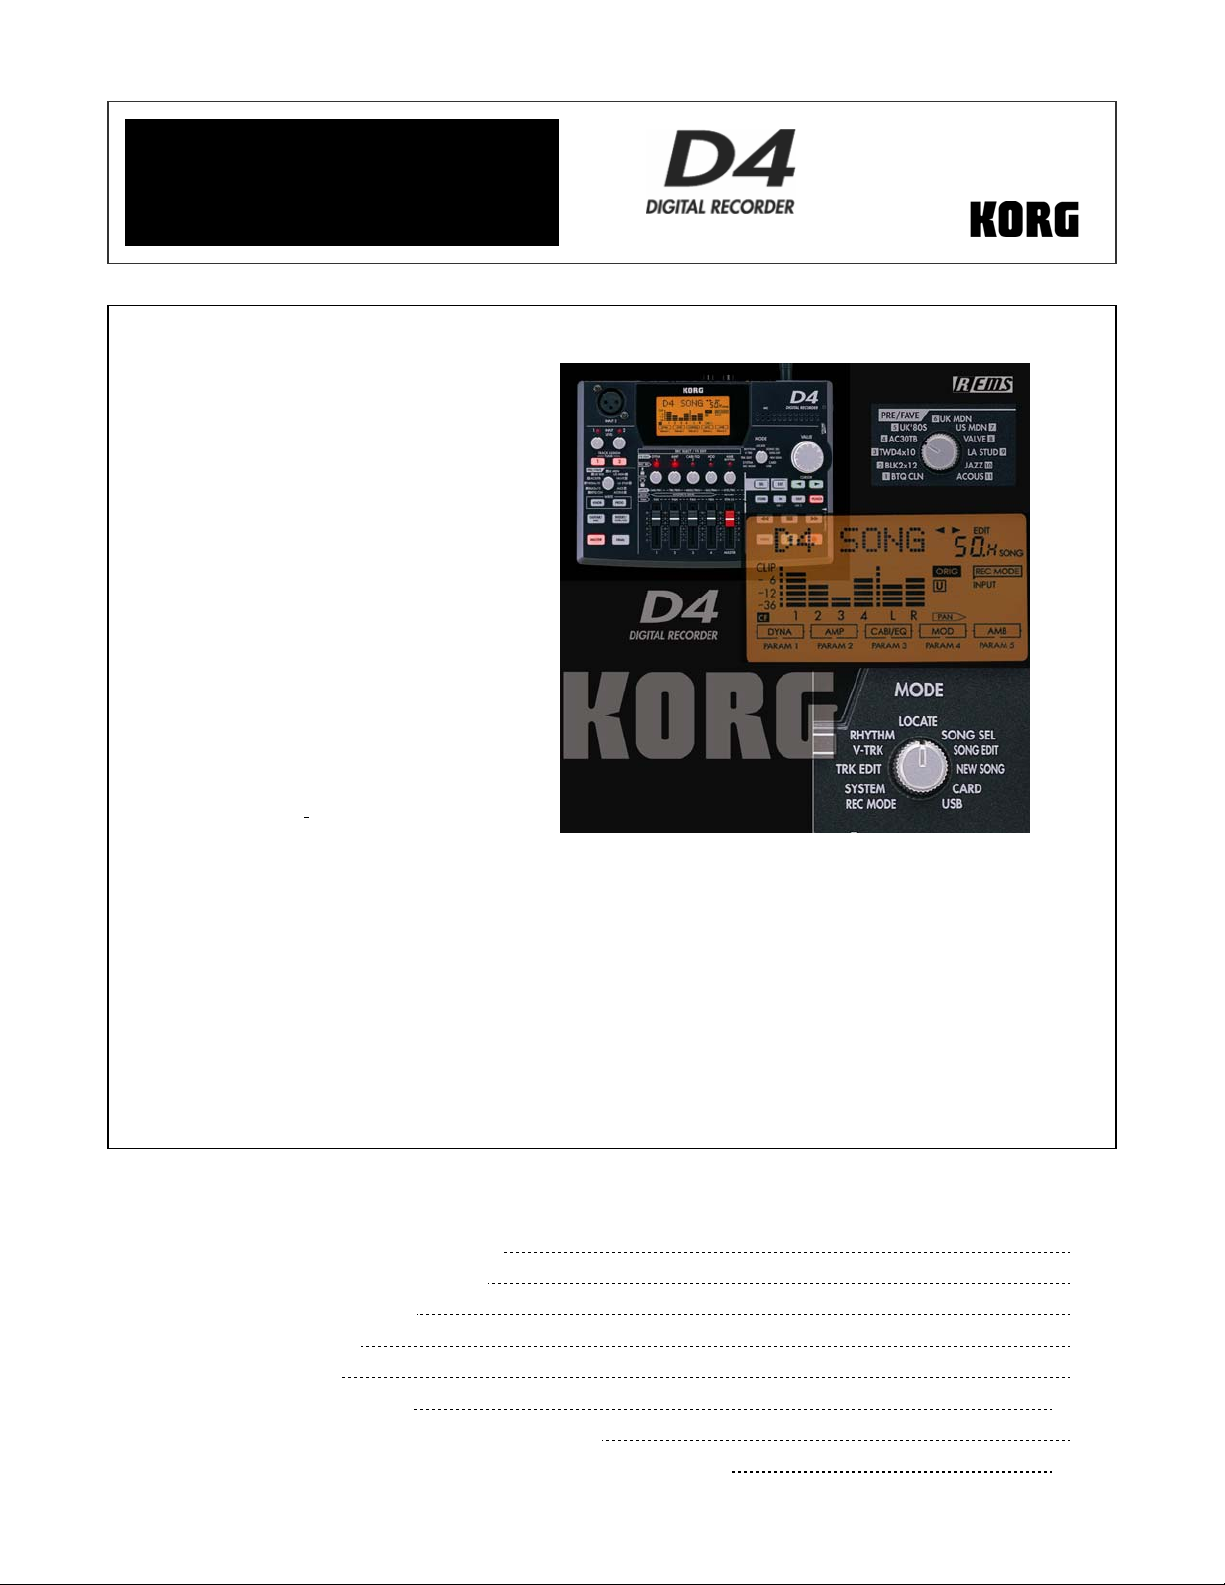
TThhee DD44 DDiiggiittaall RReeccoorrddeerr
The D4 is a digital multi-track recorder that uses Compact Flash as its recording and storage medium, and
provides high-quality audio using the MPEG1 Layer 2 recording format. A 2GB Compact Flash card provides
up to 70 hours of recording time (single track/economy mode)! You can record from any external sources
and you can also use the built-in condenser microphone to record acoustic instruments and vocals. The D4
provides two ¼ inch inputs and one XLR input, allowing you maximum flexibility to record up to two
different sources (like vocal and guitar, or the stereo outputs of a keyboard) simultaneously! Once you’ve
recorded your songs, you can transfer them to your computer (Mac or PC) for backup and conversion to
MP3 or .WAV formats, etc., using the built in USB connector. The included Compact Flash card contains one
demo song. You can use this song to jam along with, to learn the mixing, effects, and other functions in
the D4, and then if you like, erase the data on the card and use it for your own projects.
,
GGeettttiinngg SSttaarrtteedd
Install the included 64MB Compact Flash card:
! Make sure that the power is OFF before inserting or removing a Compact Flash card.
Inserting the card: Insert the card in the right panel Compact Flash slot, with the card label facing upward.
Removing the Card: Grasp the ridge located on the underside of the card and pull it out toward you.
Firmly push the card all the way into the card slot.
Get connected:
1. Connect the included AC adaptor to the rear panel DC 9V jack.
2. Make your external instrument connections as follows:
• To connect a guitar or bass: plug into the rear panel INPUT 1 jack, and set the INPUT 1 switch to
GTR.
• To connect a microphone with an XLR connection: Plug into the top panel INPUT 2 XLR
connector, and set the rear panel INPUT 2 switch to EXT.
• To connect a microphone using a ¼ inch connection: Plug into the rear panel INPUT 1 jack, and
set the INPUT 1 switch to MIC.
• To connect line level instruments such as a keyboard: For mono connection, use INPUT 1 and
set the INPUT 1 switch to LINE. For stereo connection, use both INPUT 1 and 2 and set both INPUT
1 and 2 switches to LINE.
• To use the built-in condenser MIC: On the rear panel, set INPUT 2 to INT.
! As with any microphone, remember to watch your monitor speaker and headphone levels when using a
microphone, as feedback can occur.
Power up, and listen to the demo song:
1. Connect the D4 to a powered stereo monitoring system, u sing the rear panel MASTER OUR L/R RCA
jacks. If using headphones, connect them to the right panel headphone jack.
2. To power-up, first lower the MASTER fader to 0, and set the rear panel POWER switch to ON.
3. Set the Track Faders 1-4 to “7”. (that’s right between 6 and 8
4. Press the ► play key to begin playback of the first demo song “BOA Blues”, and raise the MASTER Fader
to a comfortable listening level. If using headphones, set the volume control on the r ight side panel to a
desired level. When finished, press the
5. Try the transport controls before you go any further; you’ll notice that they work a lot like a portable CD
player, and should be easy and familiar to use.
■ stop key to stop playback.
☺ )
2
Page 3
KORG D4 EasyStart
Transport Control Tips:
• During playback, pressing the ◄◄ rewind key once resets the song back to the beg inning (will also
return song to the beginning when playback is stopped).
• Holding down ◄◄ “rewinds” the song and will playback in reverse at double speed.
• Holding down ►► “fast-forwards” or plays back the son g at double speed.
• During playback you can press and hold the ► play key to play back at half speed.
TThhee MMooddee KKnnoobb
The MODE Knob makes it easy to access the D4’s eleven different modes of operation, listed below:
LOCATE SONG SEL SONG EDIT
NEW SONG
REC MODE
V-TRK
CARD
SYSTEM
RHYTHM
USB
TRK EDIT
To select Modes, just rotate the MODE knob!
There are also four “sub modes”:
Effect
Effect Write
Tuner
Punch-Rec
After you’ve finished this guide, you can find more information on each MODE in the D4 owner’s manual,
beginning on page 24.
RReeccoorrddiinngg BBaassiiccss
Create a new song:
1. Set the MODE knob to “New Song”. The display will indicate the song grade (“SngGrade”) and “Std” will
be flashing
grade. (Song grade information is below)
2. After choosing the song grade, press the ► CURSOR key on the right (flashing). The display will briefly
indicate “WORKING”, and then “New Song”. That’s it - you’re almost ready to record!
! To rename songs, see page 29 of the owner’s manual, but for now, leave the song name set to “New Song”…
> Now use the VALUE dial to select the desired song grade. For this exercise, select “Std”
3
Page 4

KORG D4 EasyStart
Information on Song Grade selection
(based on the included 64MB card):
• Eco: Economy, extended-length recording (Max. time, 64MB, 1 Track: 132 minutes)
• STD: Standard, very high quality, normal use (Max. time, 64MB, 1 Track: 64 minutes)
• HiQ: High audio quality (Max. time, 64MB, 1 Track: 44 minutes)
Set up the Rhythm and Tempo for your new song:
1. Set the MODE knob to “RHYTHM”. The name of the currently selected rhythm pattern will be displayed.
2. Use the VALUE dial to select a pattern. Note: If the display indicates “off”, ro tate the VALUE DIAL to the
right, until you hear a drum pattern.
3. Press the ► CURSOR once, to display “Tempo”, and then use the VALUE dial to adjust the tempo. The
cursor will also take you to the beat (time signature) and “level” adjus tment if needed.
!
The drums NEED NOT be recorded to the tracks, but instead are always synchronized to the recorder and to
your recorded tracks! This means you can audition new rhythm patterns whenever you like!
4. Press the EXIT key twice – the rhythm playback will stop.
! For a list of rhythm patterns, available time signatures, and recording count-in options, please refer to page 91
in the D4 owner’s manual.
TThhee DD44 EEffffeeccttss
The D4 provides four types of professional effects:
• Guitar/Mic effects
• Insert/ Guitar+Vocal effects
• Master effects
• Final effects
The effect types available can be selected by pressing the keys just to the left of the Track Faders.
The D4 includes 93 effect algorithms (including Korg’s amazing REMS sound modeling effects), with 100 preset/100 user
effect programs. If you select the effect type GUITAR (for recording on input - mono/1 track only) or INSERT (for
stereo instrument recording - stereo in/out, stereo track bouncing, etc.), you can apply effects as you record.
If you select MASTER as the effect type, you can send the signal from any track to an effect for overall processing. If
you select FINAL as the effect type, you can apply an effect to the master L/R bus, and use th is effect as a mastering
processor for track bouncing and other track-related operations.
Using a Guitar to record…
Get ready to record:
1. Plug your guitar into INPUT 1 and set the INPUT 1 switch on the back panel to GUITAR.
4
Page 5

KORG D4 EasyStart
Tune up:
2. Press the TRACK ASSIGN 1 and 2 keys simultaneously to enter Tuner mode > When finished tuning, press
the EXIT key to exit Tuner mode.
! Entering Tuner mode bypasses the currently- assigned effect.
3. Press the TRACK ASSIGN 1 key- the key will light.
4. Track 1 is automatically selected as your recording destination. To arm a different track, press the PAN
knob above the desired track’s fader.
5. Press the GUITAR/MIC FX key (left of the faders) - the key will light.
6. Rotate the VALUE dial to select an effect program.
7. Press Exit to leave the effect sub-mode.
! When using the Guitar/Mic effects, you can only select one track for recording.
Record your first track…
Set your levels and then record:
1. While you play, adjust the INPUT LEVEL 1 knob above the TRACK ASSIGN keys. Set this knob so that you
achieve a fairly hot level without the INPUT 1 LED lighting.
2. Adjust the FADER for the previously selected destination TRACK to achieve a fairly hot level without reaching
the “CLIP” (distortion) level in the LCD display.
3. Press the
record-standby mode
4. Press the ► play key to record and press the
5. Press the PAN knob to disarm the record track, and then press the
Press the ► play key and listen to your results > Press the ■ key to stop playback.
6.
● record key - it will blink, and you’ll hear the previously selected rhythm pattern - you are now in
> Play your instrument to rehearse, and then…
■ key when you are finished recording.
<< key once, to go to the song beginning.
Recording a stereo source such as a keyboard:
1. Set the INPUT 1 and 2 switches both to LINE, and connect your keyboard to INPUT 1 and 2.
2. Press the TRACK ASSIGN 1 key; track 1 is automatically elected as your recording destination (if you wish to
record on track 3 and 4, press the PAN knob above the TRACK 3 fader).
3. Press the TRACK ASSIGN 2 key; track 2 is automatically selected as your recording destination (unless track 3
was selected in the previous step, then track 4 will automatically be armed).
4. Press the INSERT/GTR+VO key. The key will light
press Exit to leave the effect sub-mode.
5. While playing, adjust the INPUT LEVEL 1 knob above the TRACK ASSIGN keys. Set this knob so that you
achieve a fairly hot level without the INPUT 1 LED lighting. Repeat process for INPUT LEVEL 2.
6. Adjust the FADERS for the previously selected destination tracks (1 /2 or 3/4) to achieve a fairly hot level
without reaching the “CLIP” (distortion) level in the LCD display.
7. Follow steps 3-4 in the previous section to record and playback the song, disarming both tracks for playback by
pressing the respective PAN knobs.
VViirrttuuaall TTrraacckkss
There are 32 Virtual tracks available for recording on the D4. Each of the four tracks contains eight Virtual tracks,
allowing you to record multiple takes, and then choose your favorite take from the Virtual tracks. For more information
on how to use Virtual tracks, see the D4 owner’s manual, pages 30-31.
> Now use the VALUE dial to choose an effect program and
5
Page 6

KORG D4 EasyStart
A recap of basic recording:
1. Choose an input and plug in your instrument or microphone, or use the internal mic.
2. Choose the desired input type (GTR, MIC- EXT or INT or LINE).
3. Press the appropriate TRACK ASSIGN key (1 or 2).
4. Track 1 is automatically selected as your recording destination. To arm a different track, press the PAN knob
above the desired track’s fader.
5. Adjust trim level above track assign button, and then adjust fader level.
6. If you want to record with an effect, choose either GUITAR/MIC for mono or INSERT/GTR+VO for stereo.
7. Use the VALUE dial to choose an effect; then press Exit.
8. Make sure your Input and Fader levels aren’t clipping!!
9. Press the
● record key followed by the ► play key, and record!!
! For information on how to Mixdown your multitrack recordings to DAT, MD or other sources, see the D4 owner’s
manual, page 51,
Using the Favorite knob
The PRE/FAVE (Favorite) knob gives you instant access to effect programs at any time.
The D4 comes shipped from the factory with 11 effects prin ted o n the top panel and registered to the Favorite knob. You
can easily change this and store your own effects.
Registering effects to the Favorite knob:
1. Choose an effect program by pressing the appropriate FX key (i.e. GUITAR/MIC, INSERT/GTR+VO, MASTER,
FINAL); then scroll through the programs with the Value dial.
2. Press the WRITE - KNOB key (below the PRE/FAVE knob). The display will indicate “knobPosi.”
3. Use the VALUE dial to select the PRE/FAVE KNOB position where you want to register the effect (1-11), and
then press the CURSOR ► key. The display will then indicate “Write OK?”
4. Press the CURSOR ► key again, and the display will indicate “Finish!” The effect will now be registered to this
PRE/FAVE KNOB position for instant recall!
Selecting effects with the Favorite knob:
1. Rotate the PRE/FAVE knob to select the desired effect.
2. To bypass the currently selected effect program, press the illuminated FX key (GUITAR/MIC, INSERT, BTR+VO,
MASTER or FINAL).
3. To turn the effect off, press and hold the illuminated FX key.
Creating a 2-track (Stereo) MP2 conversion for transfer and playback on your
computer
You’ll need to have standard media software installed on your computer to go through the following section. If you do
not have the required software, you can download it from www.microsoft.co m (Windows Media Player) or
www.apple.com
(QuickTime Player). Playback of D4 transferred audio currently works with Windows ME 2000 or later, and Mac
OS 9.4 or later.
6
Page 7

KORG D4 EasyStart
In order for you to playback D4 songs on your computer, you’ll need to convert the D4 song data to a stereo MP2 format
file first:
1. Choose the song you wish to covert; select SONG SEL with the MODE knob, choose the song with the VALUE
dial and then press the CURSOR ► key (make sure the song is set to play from the song beginning).
2. Set the MODE knob to “REC MODE”.
3. Use the VALUE dial to select “ConvrtMP2”.
4. Press the EXIT key to return to play mode.
5. Press the TRACK 1 PAN knob; both track 1 and 2 record select LED’s will light.
6. Begin playback of the song and adjust the panning for each track as needed, as well as the TRACK and
MASTER faders. Make sure that the track and master (l eft and right) levels are not clipping.
7. Reset to the beginning of the song once y o u are satisfied with the playback levels.
! If the rhythm guide is on, the rhythm playback will also be recorded in the next step. If you don’t want the
rhythm to record, press the AMB/RHYTHM knob to turn the rhythm off.
8. Begin recording: Press the
key.
9. A new song (sharing the same title) will now be created in stereo MPEG audio layer 2 format.
Backing up your songs to a computer:
1. Connect a USB cable (not included) between the D4’s rear panel USB port and your computer’s USB port (PC
or Mac).
2. Use the MODE Knob to select USB.
3. When the display indicates “Ready?”, select “Yes” with the VALUE dial, and then press the CURSOR ► key
(the display will then read “CrdReady”).
On a Windows-based system: A drive named “Removable Disk” is added under ‘My Compu ter’.
On a Mac-based system: A drive named “Unnamed” is added to the desktop.
When you open the removable drive that was added to your computer, you will see th e contents of the card that is
inserted in the D4.
(Make sure to leave the song folders intact whenever you backup or restore data. Do n o t open the folders and try to
transfer files from within, as the entire folder
You can now copy the desired song/effect data to your computer. D4 song data from your computer c an also be written
to the card.
After copying, you can launch your media player software and playback your song, email it - even burn a CD from it!
To disconnect from your Windows PC: Select the card icon on the computer’s taskbar
safely remove the hardware/drive, you will be prompted: “It is safe to disconnect the USB mass storage device”
the D4’s CURSOR ► key
CURSOR ► key
> you can now unplug the USB cable.
For Macintosh computers: Drag the “Unnamed Drive” into the Trash, or select and highlight the drive on the desktop,
and then select “Eject” from the “Special” menu
and then press the D4’s CURSOR ► key
press the CURSOR ► key
> When the display indicates “Complete” select YES with the VALUE dial and then press the
> you can now unplug the USB cable
● key and the ► key, and when the song has finished playing back, press the ■
needs to be transferred.)
> Once you’ve selected to
> press
> Make sure the D4 display changes from “CardLock” to “CdNotRdy”,
> When the display indicates “Complete”, select “YES” with the VALUE dial and
7
Page 8

KORG D4 EasyStart
More information on using Compact Flash…
Deleting a song from the Compact Flash card:
1. Select SONG SEL with the MODE knob, choose the song with th e VALUE dial and then press the CURSOR ►
key.
2. Set the MODE knob to SONG EDIT.
3. Select the delete operation by rotating the VALUE dial to ”Delsong”, and then press the CURSOR ► key. The
display will now indicate “DestSong”.
4. Press the CURSOR ► key. The display will indicate “Del OK?” and “YES” will be flashing - if not, use the VALUE
dial to select “Yes”.
5. Press the CURSOR ► key. The display will indicate “Sure”?
press the CURSOR ► key. The song will now be deleted from the card.
> Use the VALUE dial to select “Yes”, and then
Formatting Compact Flash cards:
In order to use a Compact Flash card on the D4, it must be formatted on the D4 itself. Cards formatted on computer or
any device will not be recognized by the D4. See the D4 owner’s manual, page 55 for more information.
Be sure to read the D4 Owner’s Manual for more in-depth information, and
visit www.korg.com/D4
for new D4 support documents, tips and tricks!
8
 Loading...