

Page 1
PCI-760
User’s Guide (Version V1.10)
0-0096-4163
Page 2

This page is intentionally left blank.
Page 3

1. Table of Contents
1. Table of Contents
1. Table of Contents ..........................................................................................................................................................1
1.1. Table of Figures............................................................................................................................................................2
2. Introduction....................................................................................................................................................................3
2.1. Symbols used in this Manual........................................................................................................................................4
3. Safety Instructions ........................................................................................................................................................5
3.1. Safety Instructions for the Lithium Battery....................................................................................................................5
3.2. Basic Safety and EMC Compatibility ............................................................................................................................5
4. Important Instructions...................................................................................................................................................6
4.1. Electrostatic Discharge (ESD) ......................................................................................................................................6
4.2. Note on the Warranty....................................................................................................................................................6
4.3. Exclusion of Accident Liability Obligation......................................................................................................................6
4.4. Liability Limitation / Exemption from the Warranty Obligation....................................................................................... 6
4.5. General Instruction on Usage.......................................................................................................................................6
5. Scope of Delivery...........................................................................................................................................................7
5.1. Labeling Information.....................................................................................................................................................7
6. Features..........................................................................................................................................................................8
7. Functional Diagram.....................................................................................................................................................13
8. Memory Installation.....................................................................................................................................................14
9. Jumpers and Connectors Overview...........................................................................................................................15
9.1.1. Connectors located on Slot Bracket....................................................................................................................18
9.1.2. Jumpers on the PCI-760 .....................................................................................................................................20
9.1.3. Connectors On-Board .........................................................................................................................................22
9.1.4. PICMG 1.3 Connector (Edge Connector) PCI Express and PCI(-X) Interfaces ..................................................32
9.1.5. Lithium Battery....................................................................................................................................................36
10. AMI BIOS Configuration............................................................................................................................................37
10.1. BIOS Setup...............................................................................................................................................................37
10.1.1. Navigation.........................................................................................................................................................37
10.2. Main..........................................................................................................................................................................38
10.2.1. System Time / System Date..............................................................................................................................38
10.3. Advanced..................................................................................................................................................................40
10.3.1. CPU Configuration (Configure advanced CPU settings) ...................................................................................41
10.3.2. IDE Configuration..............................................................................................................................................42
10.3.3. AHCI Configuration (AHCI Settings)..................................................................................................................48
10.3.4. Super IO Configuration (Configure Win627 Super IO Chipset) .........................................................................49
10.3.5. USB Configuration.............................................................................................................................................51
10.3.6. Event Log Configuration (Event Logging details) ..............................................................................................53
10.3.7. Remote Access Configuration (Configure Remote Access type and parameters) ............................................54
10.3.8. ACPI Configuration............................................................................................................................................56
10.3.9. MPS Configuration............................................................................................................................................59
10.3.10. Trusted Computing..........................................................................................................................................59
10.3.11. ASF Configuration...........................................................................................................................................60
10.3.12. Intel AMT Configuration [Configure Intel AMT Parameters)............................................................................60
10.3.13. Intel TXT (LT) Configuration [Configure Intel TXT (LT) Parameters]...............................................................61
10.3.14. Intel VT-d Configuration ..................................................................................................................................61
10.3.15. Intel VA Configuration (Configure Intel VA Parameters)..................................................................................61
10.4. PCIPnP.....................................................................................................................................................................62
10.5. Boot..........................................................................................................................................................................65
10.6. Security.....................................................................................................................................................................69
PCI-760 – User’s Guide (V1.10) 1
Page 4

1. Table of Contents
10.6.1. Supervisor Password........................................................................................................................................69
10.6.2. User Password ................................................................................................................................................. 69
10.7. Chipset.....................................................................................................................................................................72
10.7.1. North Bridge Chipset Configuration .................................................................................................................. 72
10.7.2. South Bridge Chipset Configuration.................................................................................................................. 75
10.7.3. ME Subsystem Configuration ........................................................................................................................... 77
10.8. Exit........................................................................................................................................................................... 79
10.8.1. Save Changes and Exit .................................................................................................................................... 79
10.8.2. Discard Changes and Exit ................................................................................................................................ 79
10.8.3. Discard Changes ..............................................................................................................................................79
10.8.4. Load Optimal Defaults ......................................................................................................................................79
10.8.5. Load Failsafe Defaults...................................................................................................................................... 79
11. Technical Data...........................................................................................................................................................80
11.1. Electrical Specifications............................................................................................................................................ 81
11.2. Mechanical Specifications........................................................................................................................................ 81
11.3. Environmental Specifications ................................................................................................................................... 81
11.4. CE Directives ........................................................................................................................................................... 81
12. Technical Support..................................................................................................................................................... 82
12.1. Returning Defective Merchandise ............................................................................................................................ 82
1.1. Table of Figures
Fig. 1: PCI-760 board..........................................................................................................................................................7
Fig. 2: PCI-760 – Functional diagram................................................................................................................................13
Fig. 4: PCI-760 - Detail for jumpers and connectors located near the CMOS battery .......................................................17
Fig. 5: PCI-760 – Slot Interfaces.......................................................................................................................................18
Fig. 6: Placement of the battery ........................................................................................................................................36
2 PCI-760 – User’s Guide (V1.10)
Page 5

2. Introduction
2. Introduction
Kontron Embedded Computers would like to point out that the information contained in this manual may be subject to
technical changes, particularly as a result of continuous upgrades.
The attached documentation does not entail any guarantee on the part of Kontron Embedded Computers with respect to
technical processes described in the manual or any product characteristics set out in the manual. Kontron Embedded
Computers does not accept any liability for any printing errors or other inaccuracies in the manual unless it can be
proven that Kontron Embedded Computers is aware of such errors or inaccuracies or that Kontron Embedded
Computers is unaware of these as a result of gross negligence and Kontron Embedded Computers has failed to
eliminate these errors or inaccuracies for this reason.
Kontron Embedded Computers expressly informs the user that this manual only contains a general description of
technical processes and instructions which may not be applicable in every individual case. In cases of doubt, please
contact Kontron Embedded Computers.
This manual is protected by copyright. All rights are reserved by Kontron Embedded Computers. Copies of all or part of
this manual or translations into a different language may only be made with the prior written consent of Kontron
Embedded Computers. Kontron Embedded Computers points out that the information contained in this manual is
continuously being updated in line with the technical alterations and improvements made by Kontron Embedded
Computers to the products and thus this manual only reflects the technical status of the products at the time of printing.
Updated versions are available on the Kontron web page:
www.kontron.com.
© 2011 by Kontron Embedded Computers
Printing and duplication, even of sections, is only permissible with the express approval of
Kontron Embedded Computers GmbH
Oskar-von-Miller-Str. 1
85386 Eching
Germany
PCI-760 – User’s Guide (V1.10) 3
Page 6
2. Introduction
2.1. Symbols used in this Manual
Symbol Meaning
This symbol indicates the danger of injury to the user or the risk of damage to the product if the
corresponding warning notices are not observed.
This symbol indicates that the product or parts thereof may be damaged if the corresponding warning
notices are not observed.
This symbol refers to general information on the device and manual.
This symbol comes before useful information and tips for routine operation.
format a: Commands are printed in Courier.
® Microsoft, MS-DOS, Windows and Windows NT are registered trademarks of the Microsoft Corporation.
® IBM, PC-AT, OS/2 and PS/2 are registered trademarks of the International Business Machines Corporation.
® Intel and Pentium are registered trademarks of Intel Corporation.
® AMI is a registered trademark of American Megatrends, Inc.
Other product names cited in this manual may also be trademarks and are used here solely for identification purposes.
4 PCI-760 – User’s Guide (V1.10)
Page 7

3. Safety Instructions
3. Safety Instructions
3.1. Safety Instructions for the Lithium Battery
The PCI-760 board is equipped with a Lithium battery. For the replacing of this battery please observe the instructions
described in the chapter
Caution!
Danger of explosion when replaced with wrong type of battery. Replace the battery only with
UL recognized Lithium battery that has the same or equivalent type recommended by Kontron.
Do not dispose of lithium batteries in domestic waste. Dispose of the battery according to the local
regulations dealing with the disposal of these special materials (e.g. to the collecting points for the
disposal of batteries).
3.2. Basic Safety and EMC Compatibility
The PCI-760 board is a fixed component that shall be installed into a stationary system by applying good engineering
practices and respecting the information on the intended use of the components with a view to meeting the protection
requirements [refer to (a) and (b)].
9.1.5.1 ”Replacing the Lithium Battery”.
The PCI-760 board was designed and manufactured, having regard to the state of the art, as to ensure that:
(a) the electromagnetic disturbance generated does not exceed the level above which radio and telecommunications
equipment or other equipment cannot operate as intended;
(b) it has a level of immunity to the electromagnetic disturbance to be expected in its intended use which allows it to
operate without unacceptable degradation of its intended use.
The PCI-760 board was designed, manufactured and checked according to the basic safety requirements in the scope of
the low-voltage (LVD) directive.
PCI-760 – User’s Guide (V1.10) 5
Page 8

4. Important Instructions
4. Important Instructions
The manufacturer’s instructions provide useful information on your PCI-760 board.
4.1. Electrostatic Discharge (ESD)
The components on the board are sensitive to static electricity. Care must therefore be exercised at all times during
handling and inspection of the PCI-960 board, in order to ensure the product integrity.
❏ Do not handle this product while it is outside its protective enclosure, while it is not used for operational purposes,
unless it is otherwise anti-static protected.
❏ Unpack or install this product only at EOS/ESD safe workstations. When safe work station are not guaranteed, it is
important for the user to be electrically discharged before touching the PCI-960 board with his/her hands or tools.
This is most easily done by touching a metal part of your system housing.
❏ Only hold the assemblies at the edge.
❏ Do not touch any connection pins or conductors on the assembly.
4.2. Note on the Warranty
Due to their limited service life, parts which, by their nature, are especially subject to wear (wearing parts) are not
included in the guarantee beyond the legal stipulations. This applies to the batteries, for example.
4.3. Exclusion of Accident Liability Obligation
Kontron Embedded Computers shall be exempted from the statutory accident liability obligation if the user fails to
observe the safety instructions.
4.4. Liability Limitation / Exemption from the Warranty Obligation
In the event of damage to the device caused by failure to observe the hints in this manual and eventually on the device
(especially the safety instructions), Kontron Embedded Computers shall not be required to honor the warranty even
during the warranty period and shall be exempted from the statutory accident liability obligation.
4.5. General Instruction on Usage
In order to ensure safe operation, the user must observe the instructions and warnings contained in this manual.
Kontron Embedded Computers can only guarantee the safety, reliability and performance of the board if following
instructions are observed.
❏ The PCI-760 board must be used in accordance with the instructions for use.
❏ The PCI-760 board is designed to be built-in to a system, which fulfill all necessary technical and environmental
requirements.
❏ When installing the board into a system, ensure that the system is switched off and the systems power cord is
disconnected from the power source. Disconnect all cable connections of peripheral devices from the system.
❏ Ensure that the DC operating voltages adheres to the specification given in the “
❏ Only devices and components which fulfill the requirements of a SELV circuit (security extra low voltage) in
accordance with IEC / EN 60950-1 may be connected to the interfaces of the PCI-760 board.
❏ If extensions are made to the PCI-760 board, the legal stipulations and the board specifications must be observed.
6 PCI-760 – User’s Guide (V1.10)
Electrical Specifications”.
Page 9
5. Scope of Delivery
5. Scope of Delivery
Please check that your package is complete, and contains the items below (according to the ordered unit configuration).
If you discover damaged or missing items, please contact your dealer.
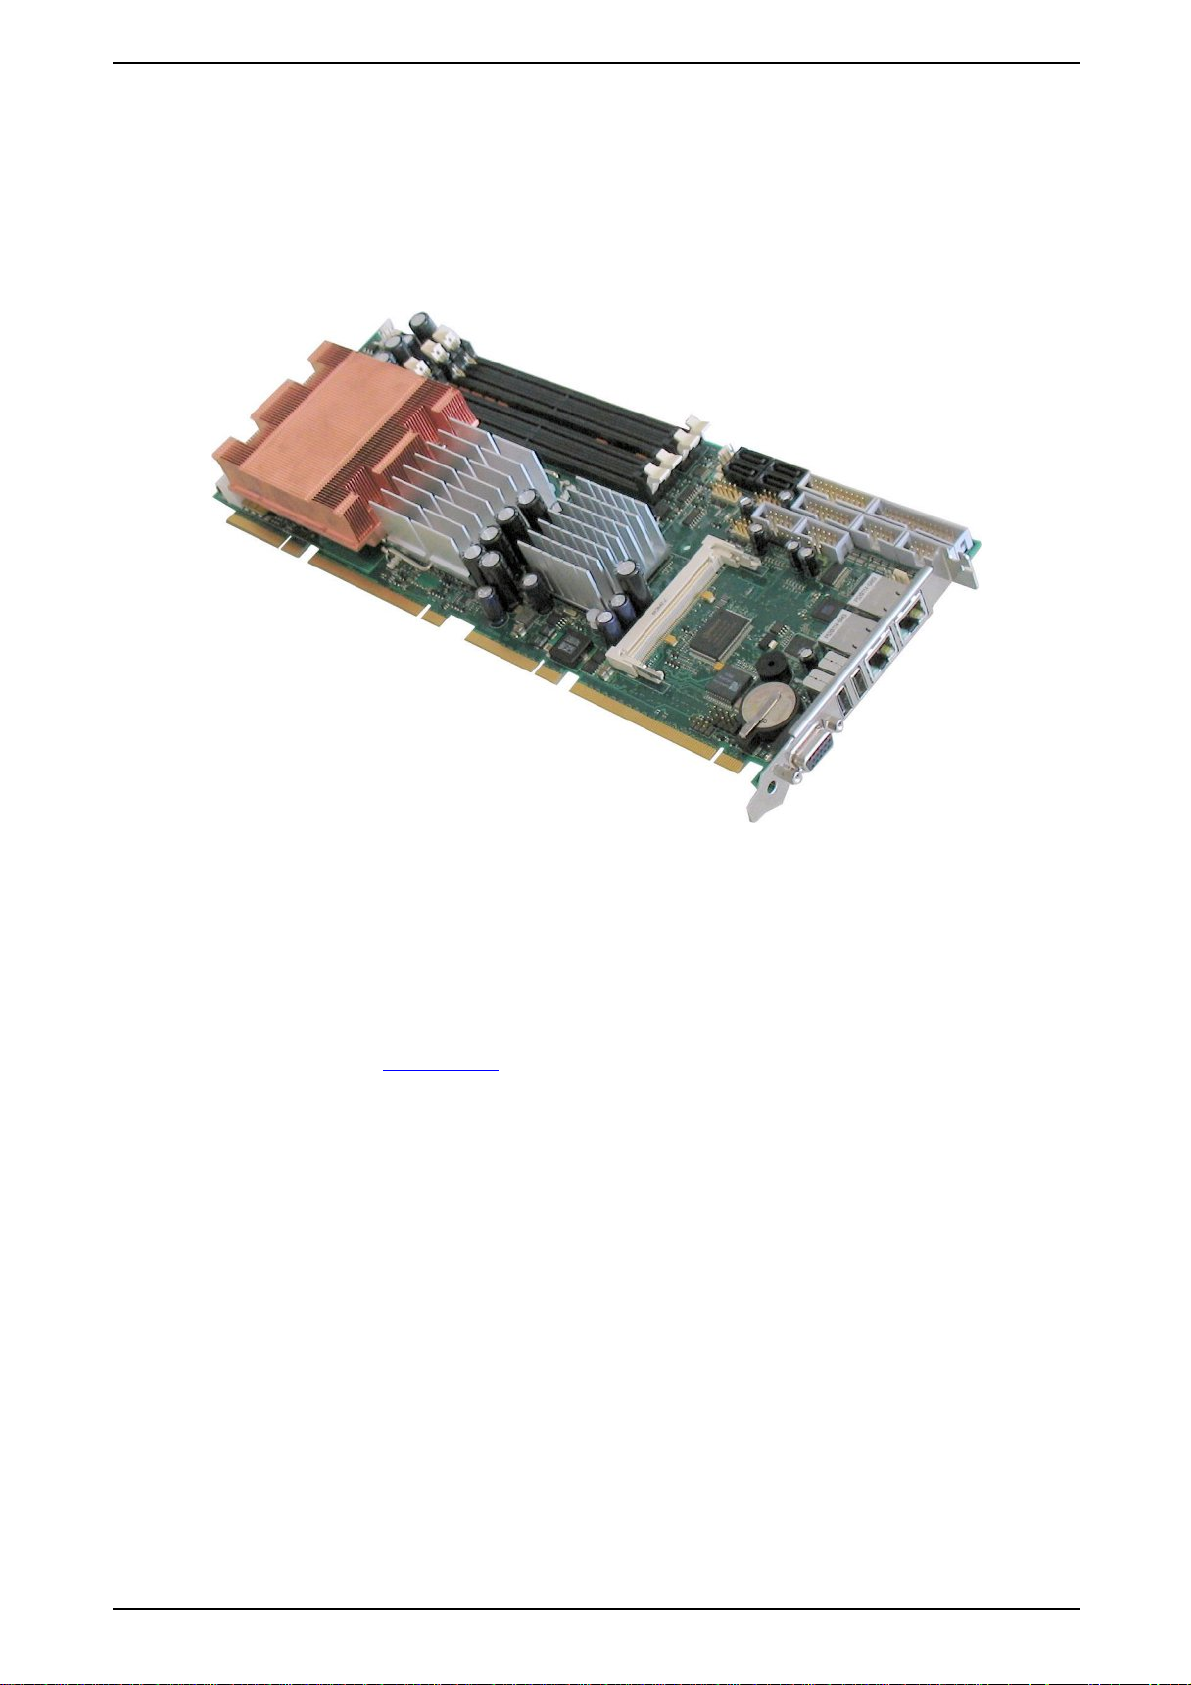
❏ 1x PCI-760 SBC (Single Board Computer) PICMG 1.3 (full-size)
❏ General Safety Instructions for Boards
Fig. 1: PCI-760 board
Optional
❏ 1x Cable Set (Accessories)
❏ Option: USB-Flash-Module-Intel® Z-U130
For more information refer to:
www.intel.com
5.1. Labeling Information
Two types of printed labels on the PCI-760 board must show the following information:
1. Board identification label that has implemented: Board Designation/Serial Number/Part Number/Product
Revision/QM-Field/Bar Code/Datamatrix Code
2. 4x MAC-Address Label
PCI-760 – User’s Guide (V1.10) 7
Page 10

6. Features
6. Features
Form Factor:
• Full size SHB PICMG 1.3 form factor (13.33 x 4.98 inch).
Processor (CPU):
Intel® Core™ 2 Duo/Quad, 65 nm (Desktop)
• 800/1066/1333 MHz FSB (Front Side BUS)
• LGA775
• 2MB/4MB/8MB, L2 Cache (depending on the installed CPU)
Processor Socket: LGA 775 (using LGA 771 heat sink)
Memory
• Dual-Channel DDR2 memory architecture, un-buffered, non-ECC
• 4x DDR2 DIMM 240-pin slots for up to 8GB 667/800 MHz DDR2 SDRAM
(use please: PC2-5300 and/or PC2-6400)
• Memory type: 512Mb, 1Gb DDR2 DRAM technologies
Chipset: Intel® ICH9DO + Q35 GMCH (Graphics Memory Controller Hub)
I/O Controller Hub: Intel® 82801IO [ICH9 Digital Office (ICH9DO)]
• PCI Express: 5 PCI Express (PCIe) root ports (PCI Express specification
Rev. 1.1)
• Integrated Serial ATA Host Controller: up to six SATA ports; Data transfer rates up to 3.0 Gb/s (300 MB/s)
• External SATA support including eSATA port multiplier
• Intel® Matrix Storage Technology
- Configures the SATA controller as a RAID controller (RAID 0/1/5/10)
• USB 2.0
- Six UHCI Host Controllers, supporting up to twelve external ports
- Two EHCI Host Controllers, supporting up to twelve external ports
- Two Configuration Options for EHCI Controllers 6+6 and 8+4
- Per-Port-Disable Capability
- Includes up to two USB 2.0 High-speed Debug Ports
- Supports wake-up from sleeping states S1–S5
- Supports legacy Keyboard/Mouse software
• Intel® Active Management Technology with System Defense
For Information refer to Intel® Active Management Technology.
❏ Features and Benefits Out-of-band system access
❏ Remote trouble-shooting and recovery
❏ Hardware-based agent presence checking
❏ Proactive alerting
❏ Remote hardware and software asset tracking
“Intel® Active Management Technology (Intel® AMT) requires the computer system to have an
Intel® AMT-enabled chipset, network hardware and software, as well as connection with a
power source and a corporate network connection. Setup requires configuration by the
purchaser and may require scripting with the management console or further integration into
existing security frameworks to enable certain functionality. It may also require modifications
of implementation of new business processes.”
8 PCI-760 – User’s Guide (V1.10)
Page 11

6. Features
• Intel® I/O Virtualization (VT-d) support
• Intel® Trusted Execution Technology support
• Power Management Logic
- Supports ACPI 3.0b
- ACPI-defined power states C1, C2, S1, S3–S5 for Desktop
• Enhanced DMA Controller
• SMBus
- Faster speed, up to 100 kbps
- Supports SMBus 2.0 Specification
• High Precision Event Timers
• Timers Based on 82C54
• Real-Time Clock
- 256-byte battery-backed CMOS RAM
• System TCO Reduction Circuits
Internal Graphics: Intel® GMA 3100 (Graphics Media Accelerator)
• Max memory allocation support based on total system memory
• 400-MHz integrated RAMDAC that can drive a standard progressive scan analog monitor with a resolution of up to
2048x1536 pixel (QXGA)
• Dedicated CRT interface with data-interface control: (15-pin D-SUB connector on I/O panel)
Integrated Audio:
• Integrated HDA (High Definition Audio) controller (ICH9DO) with ALC882
Codec
- Meets performance requirements for audio on PC2001 systems
- 10 DAC channels support 16/20/24-bit PCM format for 7.1 sound playback
- DACs (Digital-to-Analog Converter) support 44.1k/48k/96k/192kHz
- ADCs (Analog-to-Digital Converter) support 44.1k/48k/96kHz
- 16/20/24-bit S/PDIF-OUT supports 44.1k/48k/96k/192kHz sample rate
- 16/20/24-bit S/PDIF-IN supports 44.1k/48k/96k/192kHz sample rate
- Backward compatibility with AC'97
- Built-in headphone amplifiers
- Meets Microsoft WHQL/WLP 2.0 audio requirements
- EAX™ 1.0 & 2.0 compatible
- Direct Sound 3D™ compatible
- Microphone Acoustic Echo Cancellation (AEC),
- Noise Suppression (NS) technology for voice application
• On board audio ports:
- Line-In, Line-Out and Microphone-In available on boxed header on board
- Surround L/R, Side Surround L/R and Center/LFE available on boxed header on board
- SPDIF-In and SPDIF-Out header on board for coaxial and/or optical fiber connection via an adapter cable with
slot mounting bracket (not included)
PCI-760 – User’s Guide (V1.10) 9
Page 12

6. Features
Networking:
• Intel® 82566DM (ICH9DO) Ethernet controller that supports the LAN1
interface [RJ45 connector on I/O panel with integrated LEDs (LED with three signal outputs)]
- Compliant with IEEE 802.3ab
- LAN Connect Interface (LCI) and Gigabit LAN Connect Interface (GLCI)
- 10/100/1000 Mbps Ethernet Support
- Jumbo Frame Support
- Automatic MDI Crossover
- Wake-on-LAN
- supports Teaming
• Realtek RTL8111B PCI Express Controller (via internal PCIe x1 Link of ICH9DO) that supports the LAN2 (RJ45
connector on I/O panel with integrated LEDs)
- Compliant with IEEE 802.3u, IEEE 802.3ab
- 10/100/1000 Mbps Ethernet Support
- Crossover Detection & Auto-Correction
- Configurable 48 KB deep buffer
- Wake-on LAN (WOL)
• Realtek 8110SC Gigabit Ethernet Controller for PCI 32bit, 33MHz
- Compliant with IEEE 802.3u, IEEE 802.3ab
- Routed to the PICMG1.3 edge connector
- 10/100/1000 Mbps Ethernet Support
- Crossover Detection & Auto-Correction
- Wake-on-LAN (WOL)
Super-I/O
• Winbond W83627HF with integrated hardware monitor
- Compliant with Microsoft PC98/PC99 Hardware Design Guide
- LPC-based Super-I/O
- On board ports: 2x COM, 1x LPT, PS/2-Keyboard, PS/2 Keyb.-Lock and PS2-Mouse, Watchdog,
Hardware-Monitoring, Suspend-LED
Hardware Monitor, Temperature Monitor
• Chassis Intruder, via ICH9DO
• Monitoring of 3 fan tachometer outputs
• Fan control outputs, maximum current: 750mA each
• Monitoring of two board temperatures (core voltage regulator and DDR2-DIMM sockets)
• Remote diode temperature sense for the CPU temperature
• Voltage sense for +5V, +12V, +3.3V, +1.8 V, CPU coreA/B (1.05V), VBAT, +5VSB, +3.3VSB
Serial ATA (SATAII)
• Four 7-pin connectors (lockable connectors) on board and two interface connections routed to the PICMG1.3 edge
connector.
• Data transfer rate up to 300 Mbps on each port
• RAID 0/1/5/10 functionality with ICH9DO
10 PCI-760 – User’s Guide (V1.10)
Page 13

6. Features
USB Ports
Twelve USB 2.0 Port (USB0 – USB11):
• Two ports on the I/O slot bracket,
• Six ports on board
• Four USB signals routed to the PICMG1.3 edge connector
- Maximum continuous load current per port: 500mA
- Typical short-circuit current at 25°C: 900mA
- Overcurrent indicators
- Wake-up capability on the USB ports; The USB devices are supplied with standby power.
Serial Communication Ports
Two high-speed 16550 compatible UARTs with 16-byte send/receive FIFOs
• The serial ports support RS232 (COM1, COM2); COM2 is configurable RS422, RS485
• Fully programmable serial-interface characteristics
• Programmable baudrate up to 115kbit/s
• The pin 10 of the serial ports delivers 12V fused
• The serial ports have wake-up capability from any sleep state.
Parallel Port
One bi-directional LPT port, which is configurable for standard LPT
• Support Enhanced Parallel Port (EPP) - Compatible with IEEE 1284 specification
• Support Extended Capabilities Port (ECP) - Compatible with IEEE 1284 specification
Keyboard and Mouse
Interfaces (7-pin header on board) to standard AT keyboard and PS/2 mouse
• 8042 based with F/W from AMIKKEY
• Fast Gate A20 and Hardware Keyboard Reset
• Support port 92
• Keyboard Wake-up by programmable keys
• Mouse Wake-up by programmable buttons
PS/2 Keyboard Lock
2-pin row on board for PS/2 keyboard lock
Multifunction Connector
• One hard drive activity LED for all HDD devices
• Power LED
• PS/2 Keyboard & PS/2 Mouse
• Reset
Connector for Power Buttons
• 2-pin connector for additional power button
Power Button Control:
If an ATX power supply is used, the SBC can control it either through:
❏ the backplane via PICMG 1.3 edge connector or
❏ its additional power button connector (J34) or
❏ the hardware monitor connector (J7) power button (PWRBT#) input.
PCI-760 – User’s Guide (V1.10) 11
Page 14

6. Features
PCI -Support
• up to five PCI-Masters, 32-bit/33 MHz according to PCI Specification v2.3 for:
- one PCI-Master on board: optional single MiniPCI connector, type IIIA; signaling 3.3 V (installed Mini PCI card
must be 5 V tolerant)
Hint for the optional MiniPCI connector: the additional USB signals on reserved pins for e. g. bluetooth
are not supported.
- up to four PCI-Masters routed to the PICMG 1.3 edge connector
Supports 5V PCI backplanes
• PCI Express routed to the PICMG 1.3 edge connector
- 4x PCIe x1 or 1x PCIe x4
- 1x PCIe x16
Real Time Clock (RTC)
Motorola MC146818B-compatible RTC with 256 bytes of battery-backed RAM
• RTC supports a date alarm that allows for scheduling a wake-up event up to 30 days in advance
• A coin-cell battery (CR2032) powers the real-time clock and CMOS memory
• A battery socket eases replacing empty batteries
• Battery backup time > 5 years
• Accuracy better than 50ppm (max. deviation 4s/24 hours) within the whole temperature range
BIOS
The BIOS is based on the AMI BIOS Core Release 8.00.14.
• 4 MB (32MBit), Flash BIOS-ROM connected to the SPI-Bus
• Upgradeable via Flash updating tool
• PXE-Boot
• Legacy USB Support including USB 2.0
• Support of Serial Ports (RS232, serial console redirection); COM2 configurable as RS422 and RS485
• Support of VGA (CRT)
• ACPI Support
• Hardware Monitoring
Power and System Management
• BIOS-support for CPU-Internal temperature-sensor/s
• Power management according to ACPI 3.0
• Three Fan controls, additional four FAN-Tacho inputs available on Hardware Monitor Connector
• Supports Full-on (S0), Suspend (S1), Suspend-To-RAM (S3), Suspend-To-Disk (S4) and Soft-Off (S5).
• Wake-up events
• Optional customized logo in boot-screen feature
12 PCI-760 – User’s Guide (V1.10)
Page 15
7. Functional Diagram
7. Functional Diagram
P
I
C
M
G
1.3
E
D
G
E
C
O
N
N
E
C
T
O
R
LAN2
1Gbps
LAN
Controller
M
n
P
C
LAN
Controller
1x SATA
1x SATA
1x PCIe x16
LAN1
1Gbps
AMT LAN
Controller
1x PCIe x1
1x PCIe x1
1x PCIe x1
1x PCIe x1
4x USB
PCI 32 bit @ 33MHz
i
Battery
i
I
Surround
LFE,Cen
Sidesurr
Ext.
Battery
Line-In
Line-Out
Mic-In
Intel Core 2
Intel Core 2 Duo
FSB
800/1066/1333 MHz
Intel
Q35
PCIe x16
PCI Express 5
PCI Express 4
PCI Express 3
PCI Express 2
PCI Express 1
4x USB
Intel ICH9DO
CPU Fan
Fan1
Fan2
HD Audio
1x SPDIF-In
1x SPDIF-out
TPM
Memory
Controller
Graphics
Controller
2x USB
LPC
Super I/O
Multifunction
Connector
HW Monitor
1x intruder
DDR2 SDRAM DIMM
DDR2 SDRAM DIMM
DDR2 SDRAM DIMM
DDR2 SDRAM DIMM
1x VGA
SPI
BIOS Flash
0. SATA
1. SATA
2. SATA
3. SATA
4. SATA
5. SATA
1x Keyboard
and Mouse
1x Parallel
COM1 (RS232)
COM2
(RS232/422/485)
1x Suspend LED
2x USB
2x USB
2x USB
1x KBLock
Legend:
On board connectors
External interfaces
Option
Fig. 2: PCI-760 – Functional diagram
PCI-760 – User’s Guide (V1.10) 13
Page 16

8. Memory Installation
8. Memory Installation
The PCI-760 board supports four DDR2 DIMM sockets (240-pin) for up to a total memory of up to 8GB DDR2 SDRAM.
The single/double sided memory modules can be user-defined combined in sizes of 256MB, 512MB up to max. 2GB per
DDR2 DIMM-socket.
The majority of systems supporting dual-channel memory can be configured in either single-channel or
dual-channel memory mode.
The speed used in all channels is the speed of the slowest DIMM in the system.
Only around a memory of 3.5 GB is usable for most of 32 bit operating systems.
DIMM0 (nearest positioned to the CPU) must be fitted first for AMT and QST feature.
For the best dual-channel memory performance on boards with the Intel dual-channel DDR2 chipsets must be used
identically paired memory modules in channel A and B.
We recommend installing into the board DDR2 DIMM sockets a dual channel kit (identically manufacturer, capacity,
speed, number of chips and modules).
Prerequisites for dual-channel memory configuration:
1. Both modules are the same capacity (e.g. both are 256MB or 512MB)
2. Both modules are the same speed (e.g. both are PC2700 or PC3200)
3. Both have the same number of chips and module sides (e.g. both have the same number of chips on the module,
and both are either single-sided or double-sided).
If other memory configuration is used, the system will revert to the single-channel memory mode (lowerperforming mode).
The speed of the bus clock and the timing of the memory access for the whole main memory (RAM) are
given by the slowest DDR2 DIMM Module built-in the system.
14 PCI-760 – User’s Guide (V1.10)
Page 17

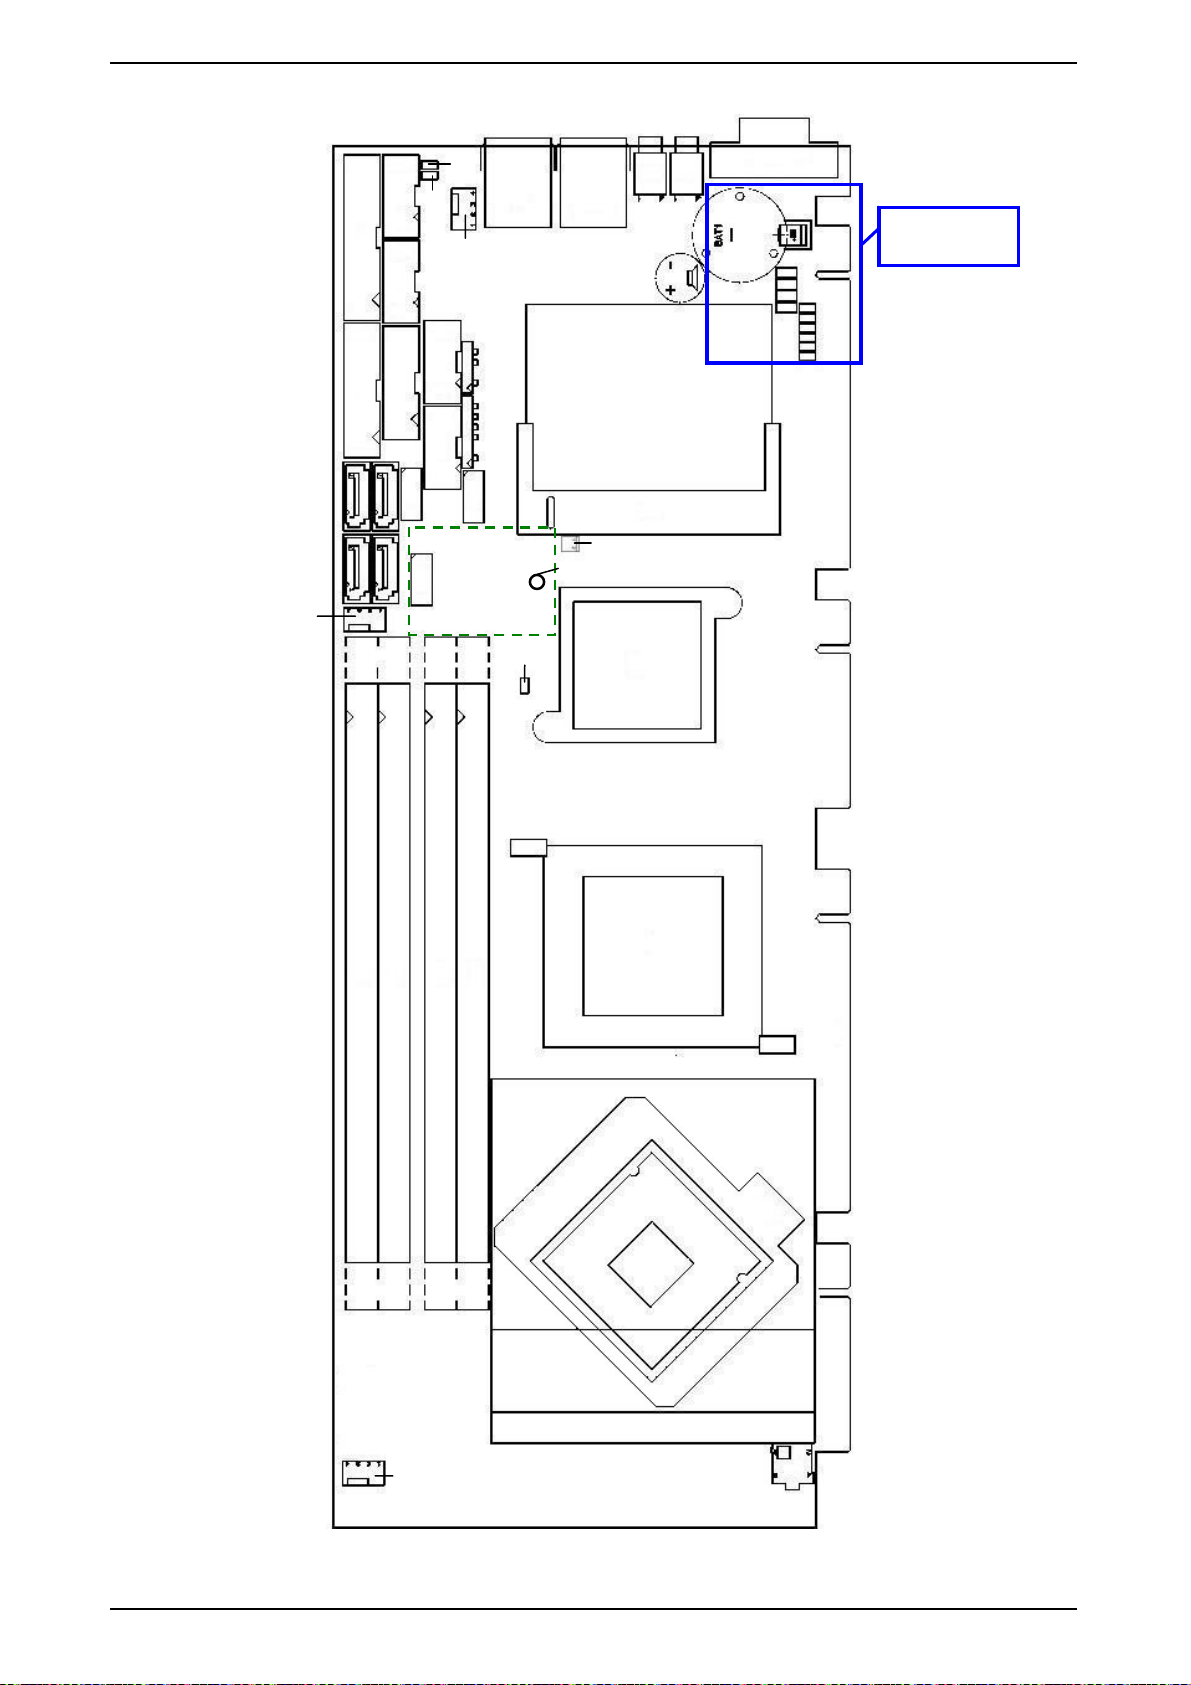
9. Jumpers and Connectors Overview
9. Jumpers and Connectors Overvie w
The jumpers and connectors of the PCI-760 board will be described in detail below.
Signals suffixed by a pound (#) are active-low.
All headers will have a pitch of 0.100" (2.54mm), otherwise noted different.
Connectors on the I/O Panel
J36 VGA Connector
J25 LAN1 Connector
J26 LAN2 Connector
J29 USB7 Connector
J30 USB6 Connector
On-Board Jumpers
JP1 COM2 (RS422) Enable Termination Resistors
JP2 COM2 (RS485/422) Enable Termination Resistors
JP3 Conn. for Ext. Temp. Sensor (not supported)
JP4
JP5 RTC Reset (Clear CMOS)
JP6 Disable Backup Restore Function
JP7 TPM Physical presence (reserved)
JP8 Image Flash; BIOS programming (before BIOS update contact our Technical Support Department)
JP9 Reset Management Engine (reserved)
JP10 Enable/Disable the HDACT LED of the USB Flash Module
On-Board Connectors
J1, J4, J24 12V Fan Connectors (3-pin)
J31 12V ATX Power Connector (4-pin)
J14 Multifunctional Connector (16-pin)
J15 Serial Connector COM1 (10-pin)
J16 Serial Connector COM2 (10-pin)
J8 Parallel Connector LPT (26-pin)
J22 SPDIF-IN&-Out Connector (5-pin)
J32 Keyboard Lock Connector (2-pin)
J33 Suspend-LED (2-pin)
J34 Additional Power Button Connector (2-pin)
J20 Audio Connector (10-pin) (Line-in, Line-out, Mic.)
J23 Audio Connector (10-pin) (Surround L/R, Side surround L/R, Center/LFE)
J13 USB header (USB4+USB5) (9-pin+key)
J19 USB header (USB8+USB9) (9-pin+key)
J10 USB header (USB10+USB11) (9-pin+key)
J5 SATA0 Connector
J11 SATA1 Connector
J6 SATA2 Connector
J12 SATA3 Connector
J28 MiniPCI Connector (124-pin)
J3 DDR2 DIMM Connector (240-pin) Channel B Bank 1
J9 DDR2 DIMM Connector (240-pin) Channel B Bank 0
J17 DDR2 DIMM Connector (240-pin) Channel A Bank 1
J18 DDR2 DIMM Connector (240-pin) Channel A Bank 0
BAT1 Lithium Battery Socket
J35 Ext Battery Connector (option)
J21 Keyboard&Mouse Connector
J7 Hardware Monitor Connector (20-pin)
J2 Extended Debug Port (XDP) Connector (reserved) [is located on the bottom side]
J27 CPU Socket
J41 Connector for Temp. Sensor (factory fitted with Temperature Sensor)
Always POWER ON (not supported)
PCI-760 – User’s Guide (V1.10) 15
Page 18
9. Jumpers and Connectors Overview
(Fig
VGA
(J36)
Refer to detail
JP1
JP2
(J25)
LAN1
(J26)
LAN2
USB6
(J30)
USB6
(J29)
. 4)
LPT (J8)
FAN3 (J24)
Audio (J23)
KB&M (J21) SPDIF (J22)
Audio (J20)
USB (J13)
Option
USB
USB (J10)
Flash Module
USB (J19)
(J40)
PICMG 1.3_A
Option: MiniPCI (J26)
Temp Sens. (J41)
Mounting hole for USB Flash Module
FAN2 (J4)
(J7)
Hardware Monitor
SATA2
SATA0
Multifunction
SATA3
SATA1
COM1 (J15) COM2 (J16)
(J14)
JP10
(J39)
PICMG 1.3_B
Fig. 3: PCI-760- Location of the jumpers and connectors
(J38)
DDR2-DIMM (J3) Channel B Bank 1
DDR2-DIMM (J9) Channel B Bank 0
DDR2-DIMM (J18) Channel A Bank 0
DDR2-DIMM (J17) Channel A Bank 1
PICMG 1.3_C
(J37)
PICMG 1.3_D
FAN1 (J1)
J31
Power
12V ATX
16 PCI-760 – User’s Guide (V1.10)
Page 19
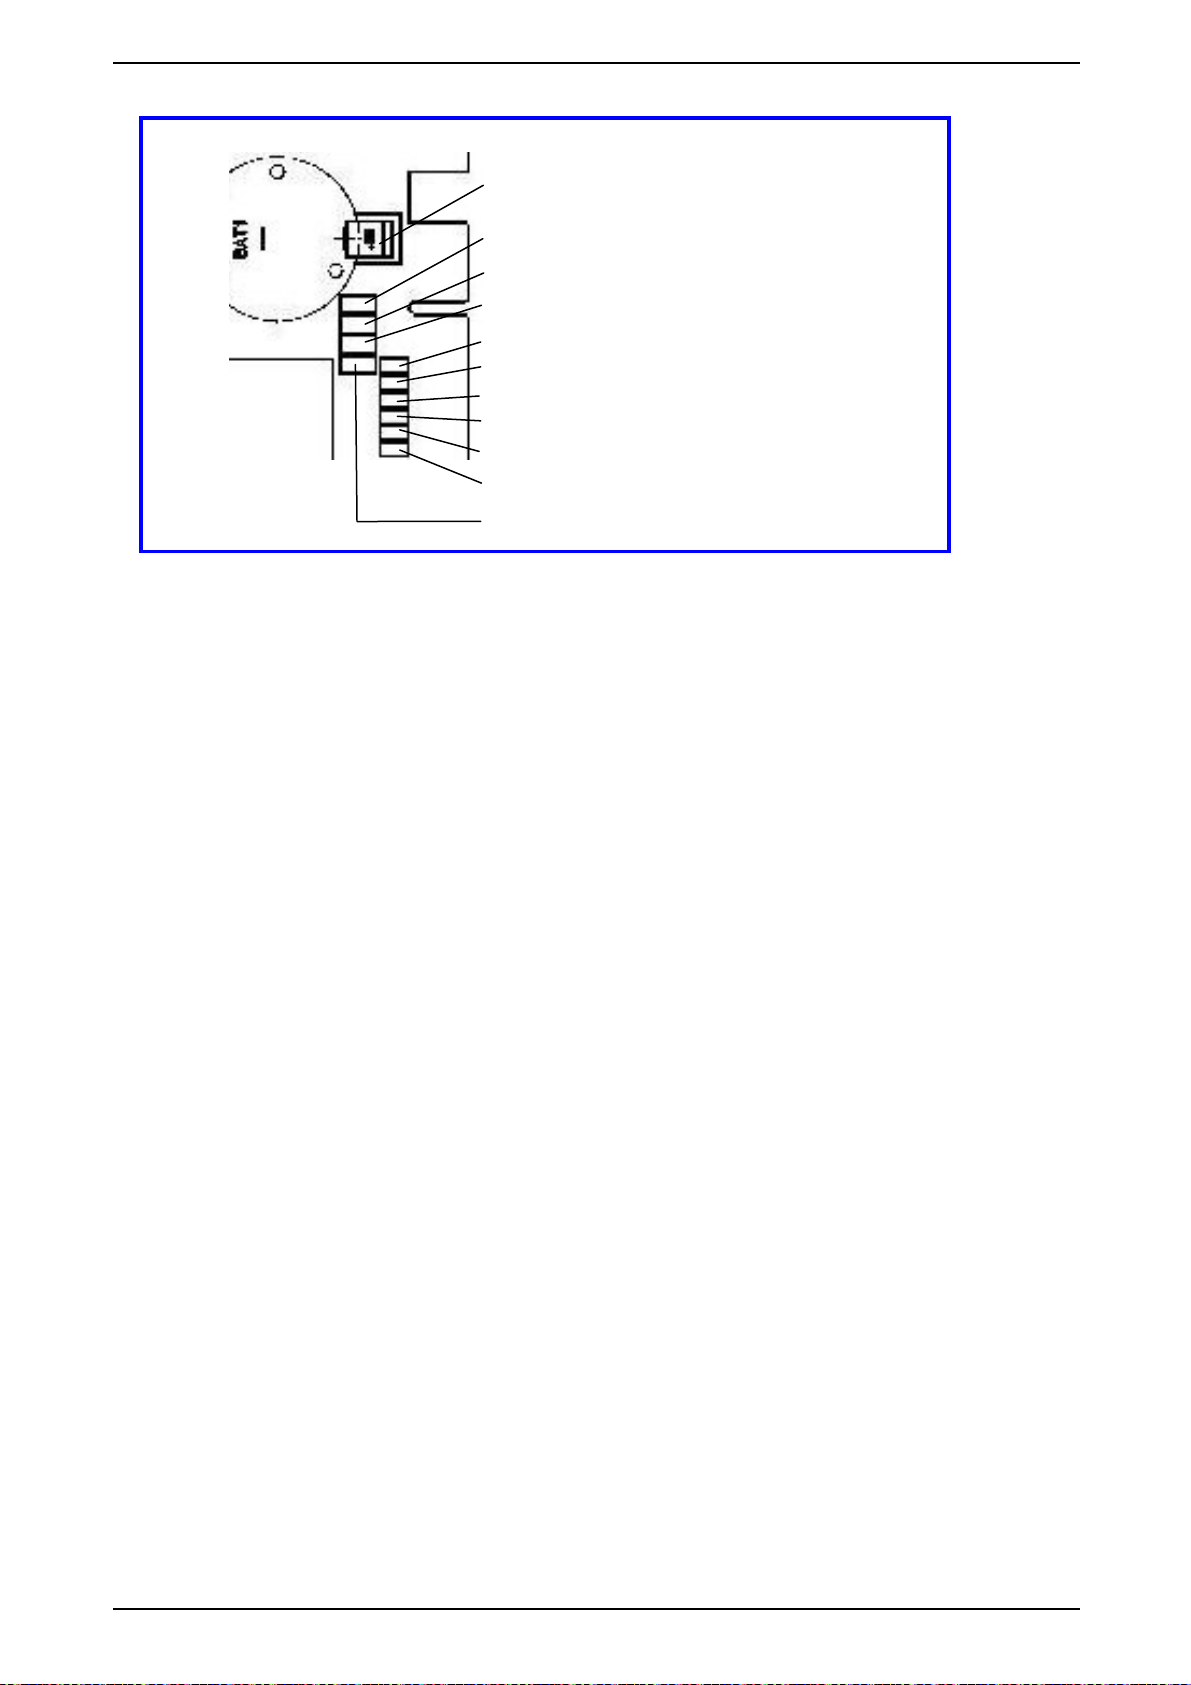
9. Jumpers and Connectors Overview
y
)
)
(
)
External battery connector (J35)
Additional power button (J34)
Suspend LED (J33
Ke
board Lock (J32
Reserved
Disable backup restore function (JP6)
Clear CMOS (JP5)
Always Power ON (JP4); (not
Image Flash; BIOS programming (JP8); (reserved for manufacturer)
Reset Management Engine (JP9)
Conn. for ext. temp. sensor (JP3); (not supported)
JP7
Fig. 4: PCI-760 - Detail for jumpers and connectors located near the CMOS battery
PCI-760 – User’s Guide (V1.10) 17
Page 20
9. Jumpers and Connectors Overview
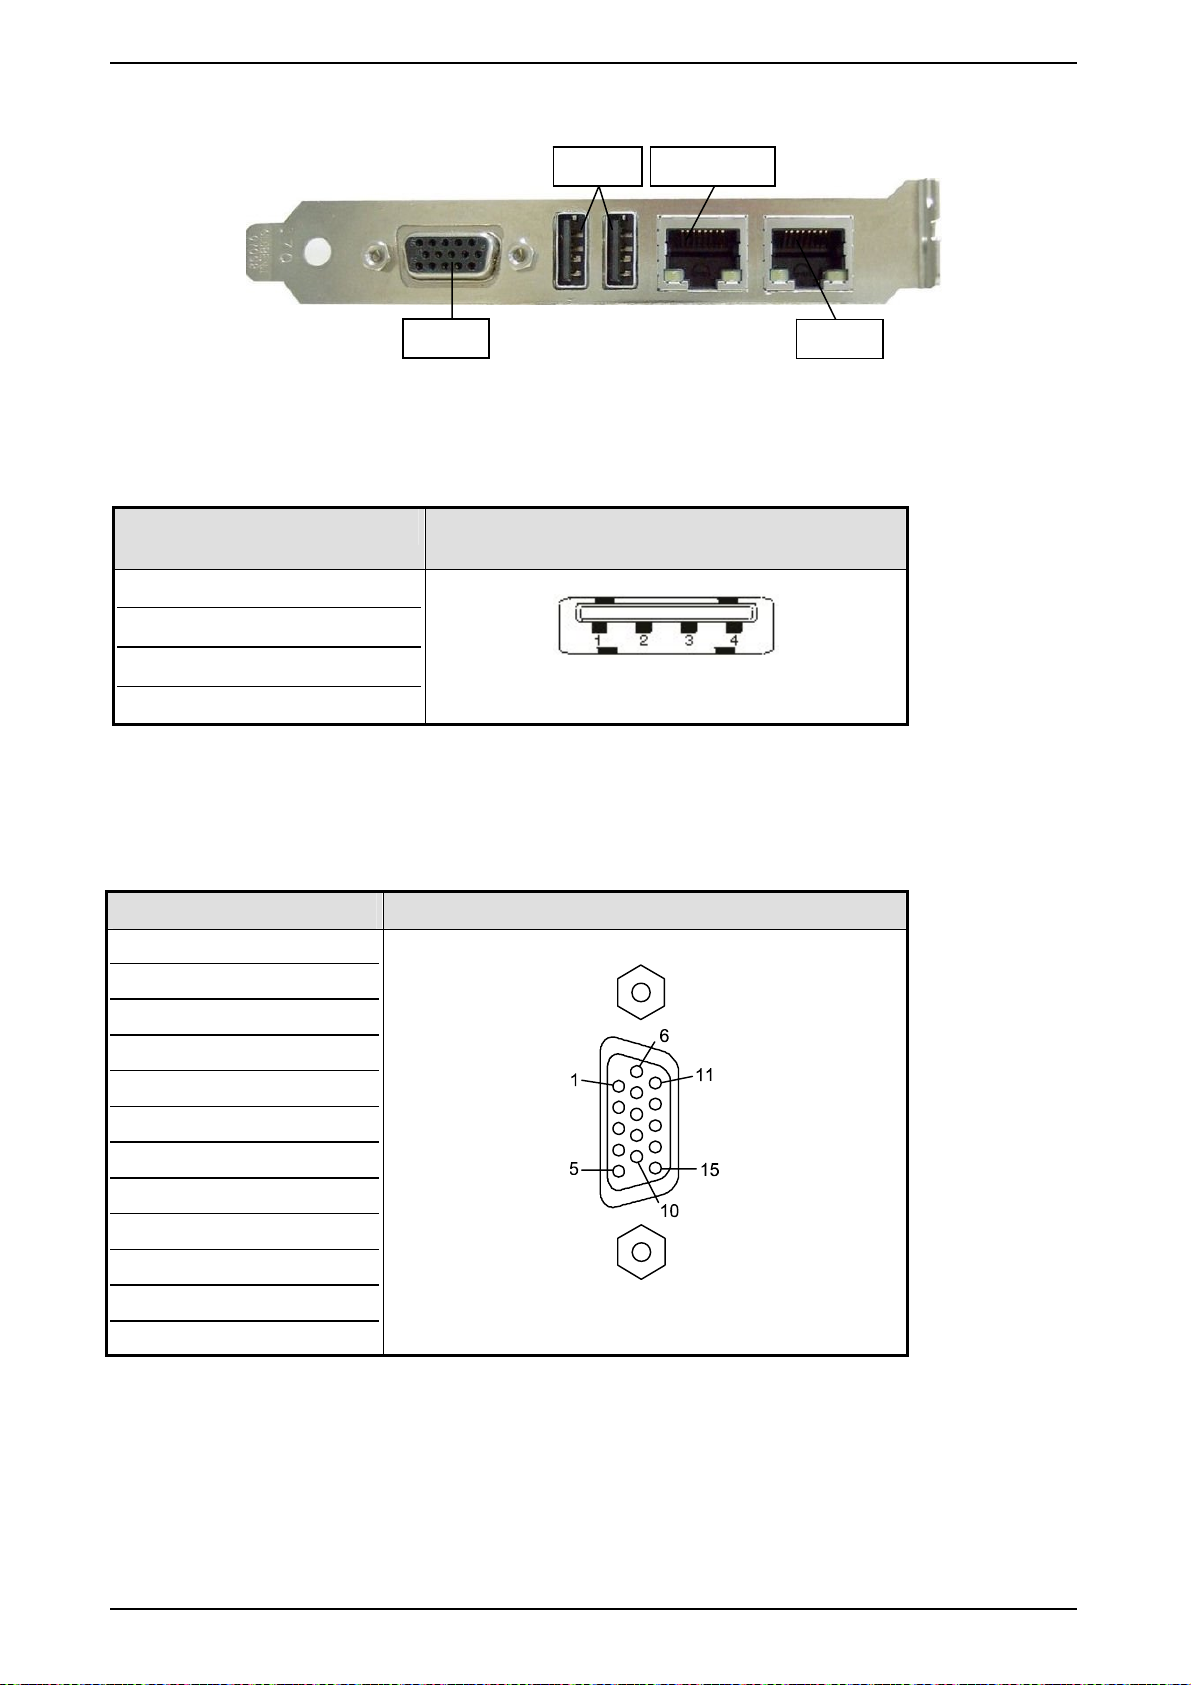
9.1.1. Connectors located on Slot Bracket
2x USB
LAN2
9.1.1.1. J29 and J30 USB Connectors
The slot bracket of the PCI-760 board provides two external USB 2.0/1.1 interfaces (USB6 and USB7). These
connectors allow connection of USB-compatible devices to the PCI-760 board (slot bracket).
Pin Signal Name 4-pin USB Socket
1 VCC, fused
2 Data3 Data+
4 GND
9.1.1.2. J36: VGA Connector
An external (analog) monitor can be plugged into this interface which is provided as a 15-pin D-SUB socket.
VGA
Fig. 5: PCI-760 – Slot Interfaces
Type A Version 2.0/1.1
LAN1
Pin Signal Name 15-pin D-SUB Socket (female)
1 Analog red output
2 Analog green output
3 Analog blue output
4 NC
5–8 GND
9 VCC, fused for DDC
10 GND
11 NC
12 SDA (DDC)
13 TTL HSync
14 TTL VSync
15 SCL (DDC)
J36
18 PCI-760 – User’s Guide (V1.10)
Page 21
9. Jumpers and Connectors Overview
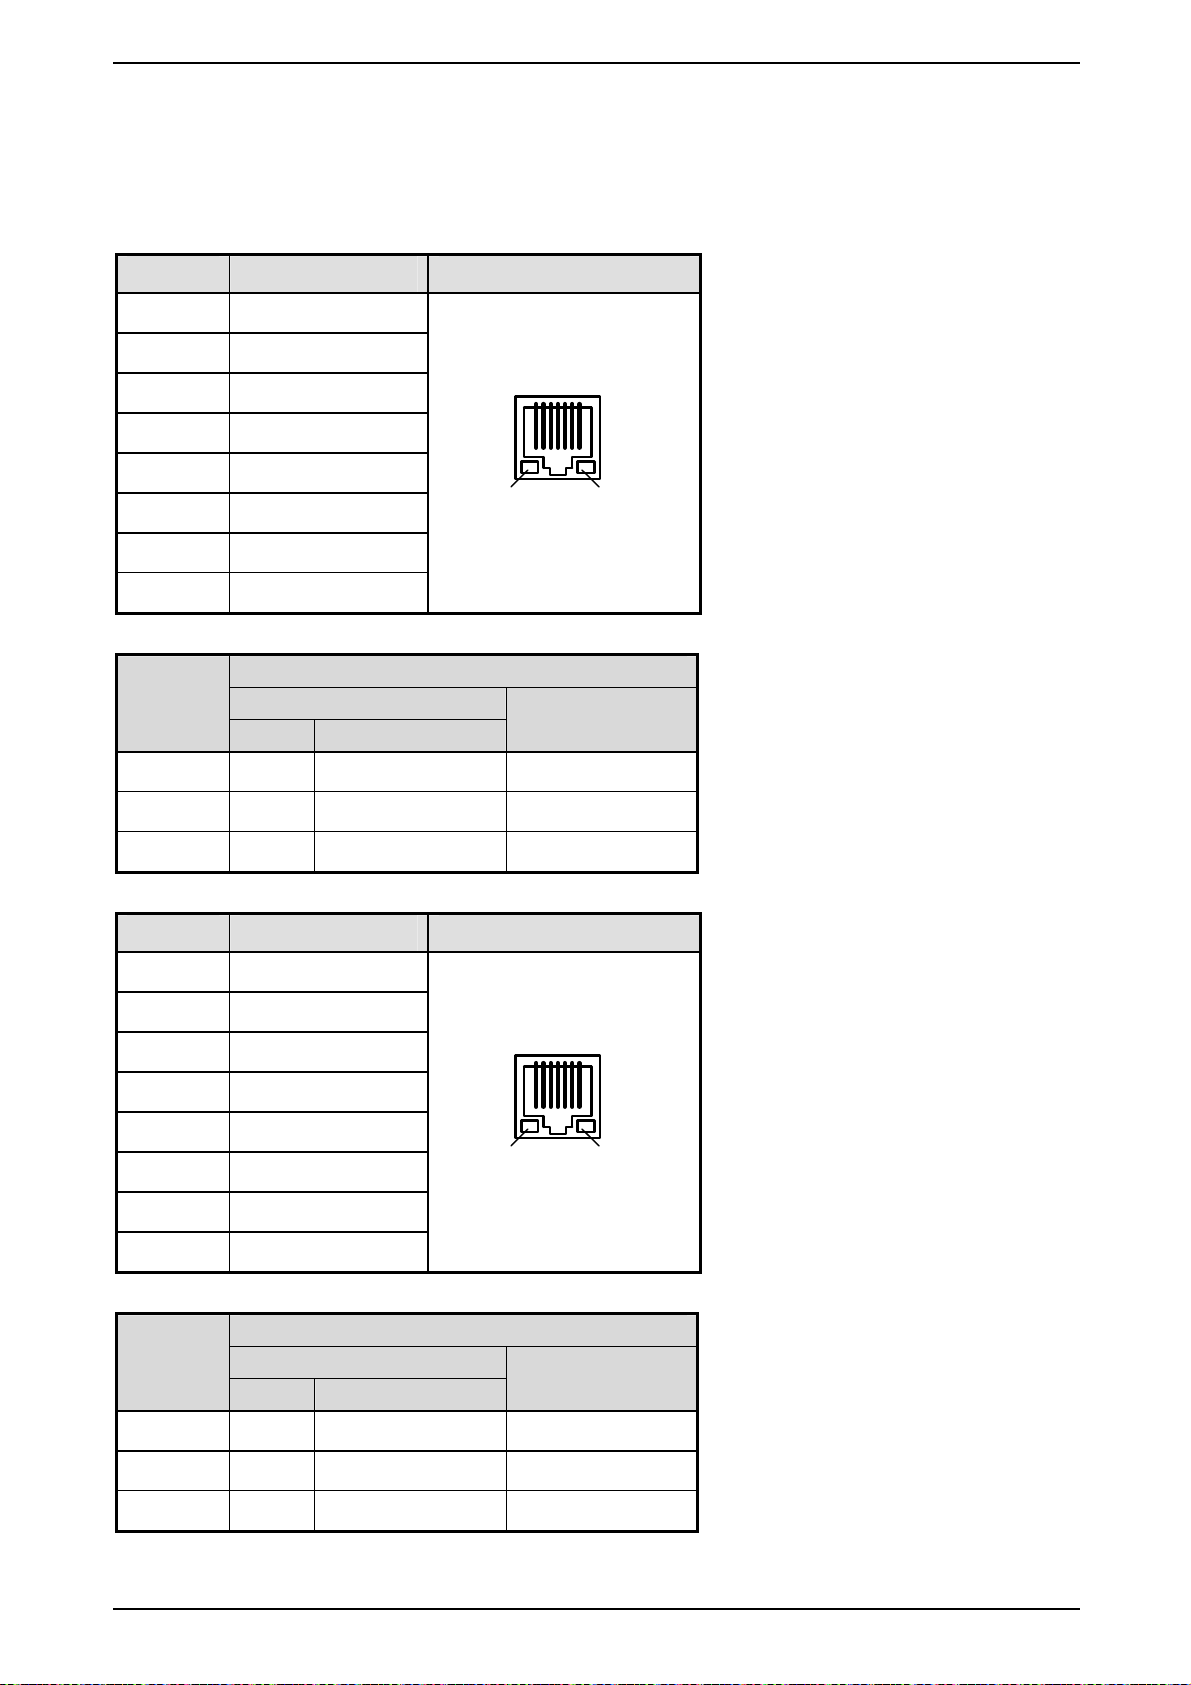
9.1.1.3. J25 and J26: Gigabit LAN Connectors
The slot bracket of the PCI-760 board is equipped with two LAN connectors. These interface connectors are provided as
RJ45-sockets with integrated LEDs. The data transfer rate for the LAN communication is up to 10/100/1000Mbps.
Only the LAN1 interface (via LAN controller Intel 82566DM) provides the Intel® AMT (Active Management Technology).
For more information about advanced features of AMT refer to “Intel® Active Management Technology”.
Pin# Signal Name J25: LAN1 [RJ45 (female)]
1 MDI0+
2 MDI03 MDI1+
4 MDI2+
18
5 MDI26 MDI1-
right LEDleft LED
7 MDI3+
8 MDI3-
LAN1: LED Indicators
Speed
(Mbps)
LED left
LED right
LINK ACTIVE
10 on orange on (blinking) off
100 on orange on (blinking) green
1000 on orange on (blinking) orange
Pin# Signal Name J26: LAN2 [RJ45 (female)]
1 MDI0+
2 MDI03 MDI1+
4 MDI2+
18
5 MDI26 MDI1-
right LEDleft LED
7 MDI3+
8 MDI3-
LAN2: LED Indicators
Speed
(Mbps)
LED left
LED right
LINK ACTIVE
10 off orange on (blinking) off
100 off orange on (blinking) green
1000 off orange on (blinking) orange
PCI-760 – User’s Guide (V1.10) 19
Page 22
9. Jumpers and Connectors Overview
9.1.2. Jumpers on the PCI-760
The jumpers on the PCI-760 allow you to configure your CPU card according to the needs of your applications.
The following examples show the conventions used in this section.
In order to change a jumper setting, turn off the computer using the ATX-power supply switch.
If your power supply has no On/Off switch, disconnect the main power source. The board otherwise
could be damaged.
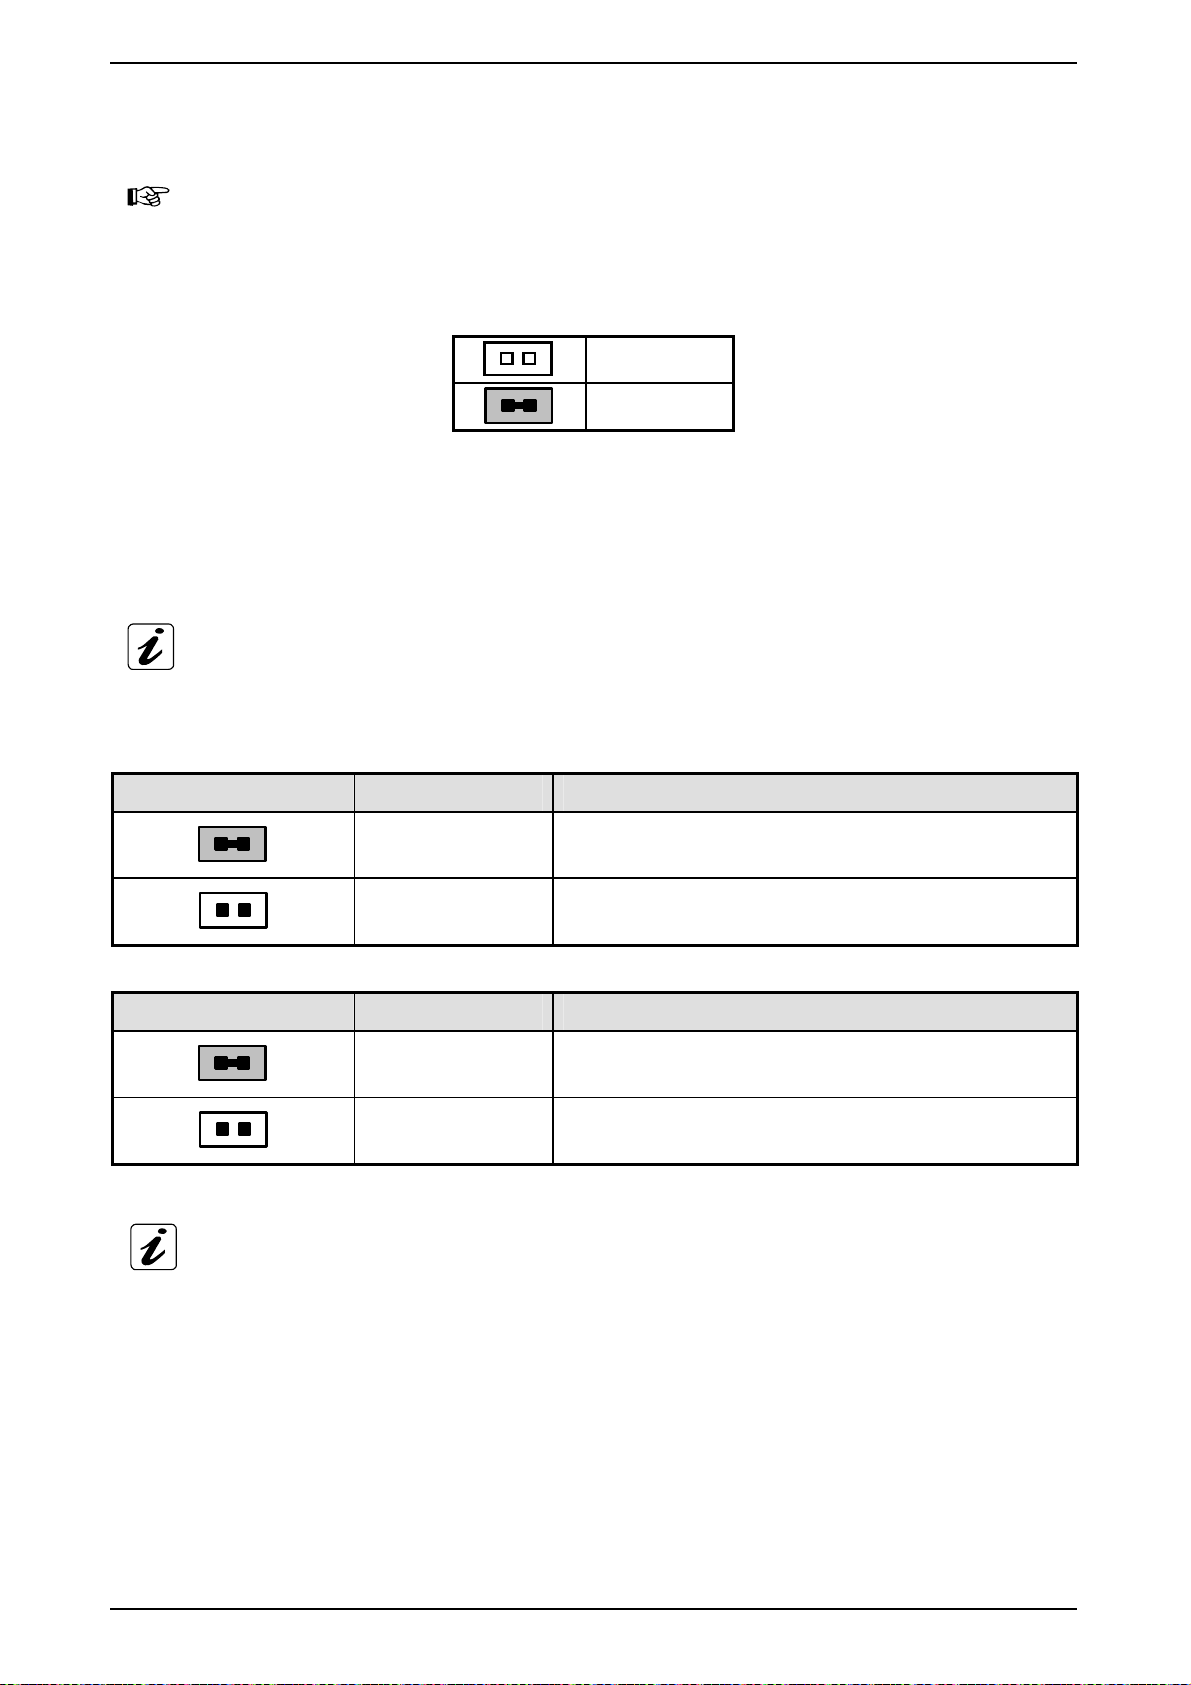
Jumper Open
21
Jumper Closed
21
9.1.2.1. JP1 and JP2: Jumpers for COM2 Configuration as RS422 or RS485
The serial port COM2 (RS232 default setting) can be configured in the BIOS setup RS422 or RS485.
The jumpers JP1 and JP2 allow you to connect or disconnect the termination resistors (120 ohm) on / from the serial port
COM2, when the operation mode in the BIOS is set to RS422 or RS485.
When installing the board at one end of the network, JP1 and JP2 jumper caps must be installed to
connect the 120 ohm termination resistors.
In RS422 mode, both jumper caps (JP1 and JP2) must be installed to connect the 120 ohm line
termination resistors.
JP1:-Pin Row, DIP 2-pin Setting Function COM2 (RS422)
21
21
Pin 1-2
Short/Closed
Pin 1-2
Open (Default)
RS422 with connected termination resistor
RS422 without connected termination resistor
JP2:-Pin Row, DIP 2-pin Setting Function COM2 (RS485 or RS422)
21
21
Pin 1-2
Short/Closed
Pin 1-2
Open (Default)
RS485 or RS422 with connected termination resistor
RS485 without connected termination resistor
The serial port COM2 (RS232 default setting) can be configured in the BIOS setup RS422 or RS485.
Refer to BIOS settings for COM2 configuration as RS422 and RS485.
20 PCI-760 – User’s Guide (V1.10)
Page 23
9. Jumpers and Connectors Overview
9.1.2.2. JP5: Jumper for RTC Reset (Clear CMOS Content)
This jumper allows you to clear the data (such as system password, date, time, and system setup parameters) in CMOS.
In order to change a jumper setting, please turn off the computer and unplug the power source to the
board. Otherwise, the board could be damaged.
The board might not start with this jumper in “closed” position.
JP5: Pin Row,
Setting Function
DIP 2-pin
Pin 1-2
21
21
Open (Default)
Pin 1-2
Short/Closed
Normal Operation
Clear CMOS
Content
For clearing of content, please wait 10 sec.
9.1.2.3. JP6: Disable CMOS Backup Restore Function
This jumper prevents the use of CMOS backup (in the case that the CMOS data are invalid). Set jumper (JP6) prevents,
that wrong settings of the backup are loading. The system boots using the “power on defaults” from onboard RAM.
In order to change a jumper setting, please turn off the computer and unplug the power source to the
board. Otherwise, the board could be damaged.
JP6: Pin Row,
Setting Function
DIP 2-pin
Pin 1-2
21
21
Open (Default)
Pin 1-2
Short/Closed
CMOS Backup-Function is enabled
CMOS Backup-Function is disabled
9.1.2.4. JP8: Image Flash; BIOS Programming
Before update the BIOS you have to contact our technical Support Department. Otherwise, the board
could be damaged.
9.1.2.5. JP10: Enable/Disable the HDACT# LED for the USB Flash Module
JP10:-Pin Row, DIP 2-pin Setting Function
Pin 1-2 (Default)
21
Short/Closed
On pin 10 of the J10 USB boxed header is available the HDACT#
LED signal of the USB Flash Module (refer to subsection
9.1.3.12)
Pin 1-2
21
Do not set this jumper, if you intend to connect to the J10 USB port another USB device than the USB
Flash Module.
Open
No signal on pin 10 of the J10 USB boxed header (refer to
subsection
9.1.3.12)
PCI-760 – User’s Guide (V1.10) 21
Page 24

9. Jumpers and Connectors Overview
9.1.3. Connectors On-Board
9.1.3.1. J31: +12V ATX Power Connector
The ATX connector is used to connect the +12V ATX power supply to the board in order to provide power to the CPU.
J31: 4-pin Connector Pin Signal Name
1 GND
2 GND
9.1.3.2. J14: Multifunctional Connector
A system chassis can be equipped with components, that provide acoustical or/and light indication of the computer
activities, and switches to change the computer status. J14 is a 16-pin box header that provides following connect i ons:
Signal Name Pin # J14: Boxed Header,
DIP 16-pin
KBCKL 1 2 GND
KBDATA 3 4 GND
VCC5V fused 5 6 PWRLED+
Speaker 7 8 VCC5V fused
MCKL 9 10 GND
MDATA 11 12 GND
PBRES# 13 14 GND
HDLED- 15
1
15
Multifunctional
3 +12V
4 +12V
Pin # Signal Name
2
16
16 HDLED+
The multifunctional connector (J5) provides an interface:
❏ for a PS/2 keyboard and a PS/2 mouse connector
❏ to a speaker for audio tone generation
❏ to connect the Power LED
❏ to connect the hard drive activity LED
❏ to connect the reset button
Power LED: pins 4 and 6
These-pins allow the connection of the power LED.
Reset Button: pins 13 and 14
To these pins can be connected a reset button. The reset button is used to restart the system without turning the main
power switch off and on again.
Depending on the software and operating system, some data may be lost if the reset button is activated.
22 PCI-760 – User’s Guide (V1.10)
Page 25
9. Jumpers and Connectors Overview
Hard Disk Drive LED: pins 15 and 16
To these pins can be connected a hard drive activity LED. This LED will flash when the HDD is being accessed.
Speaker: pins 7 and 8
These-pins provide an interface to connect a speaker for audio tone generation. An 8-ohm speaker is recommended.
Keyboard: pins 1, 2, 3, and 5
These-pins can be used to connect the cable connection for an external
PS/2 keyboard connector.
Mouse: pins 9, 10, 11, and 5
These-pins can be used to connect the cable connection for an external
PS/2 mouse connector.
9.1.3.3. J34: Additional Power Button Connector
This connection allows you to attach an external ATX power button.
J34: 2-pin Row Pin # Signal Name
1 2
9.1.3.4. J1: CPU Fan Power Connector
It is a 4-pin header that allows the connection of the CPU fan. The CPU fan must be a 12V fan (max. 750 mA).
J1: 4-pin Molex Connector (friction lock) Pin # Signal Name
14
9.1.3.5. J4: Chassis Fan1 Power Connector
It is a 4-pin header that allows the connection of a chassis fan. The chassis fan must be a 12V fan (max. 750 mA).
J4:- 4-pin Molex Connector (friction lock) Pin # Signal Name
14
1 GND
1 CTRL (PWM)
2 Rotation
3 +12V
4 GND
1 CTRL (PWM)
2 Rotation
3 +12V
4 GND
9.1.3.6. J24: Chassis Fan2 Power Connector
It is a 4-pin header that allows the connection of a chassis fan. The chassis fan must be a 12V fan (max. 750 mA).
J24: 4-pin Molex Connector (friction lock) Pin # Signal Name
1 CTRL (PWM)
2 Rotation
14
Also a 3-pin FAN connector cable can be can be connected to each of J1, J4 or J24.
PCI-760 – User’s Guide (V1.10) 23
3 +12V
4 GND
Page 26
9. Jumpers and Connectors Overview
9.1.3.7. J5, J6, J11, and J12: Serial ATA Connectors
These connectors allow you to connect Serial-ATA devices. (Each of the SATA interfaces supports one Serial-ATA
device).
The PCI-760 board supports up to six Serial ATA ports. Two of the SATA ports (SATA4 and SATA5)
are routed to the backplane via the PICMG 1.3 edge connector.
J5, J6, J11, and J12:Serial ATA: High Speed Headers
Molex 67800-8001, Locking Latch)
SATA
9.1.3.8. J8: Parallel Port Connector (LPT)
LPT is an IEEE1284 compatible interface and supports Normal/EPP/ECP mode.
This port is provided as a 26-pin boxed header.
Signal Name Pin # J8: Boxed Header,
DIP 26-pin
Strobe# 1 2 AutoFeed#
Pin # Signal Name
Pin # Signal Name
1 GND
2 TX+
3 TX4 GND
5 RX6 RX7 GND
PD0, Data 0 3 4 Error#
PD1, Data 1 5 6 Initialize#
PD2, Data 2 7 8 SLIN
PD3, Data 3 9 10 GND
PD4, Data 4 11 12 GND
PD5, Data 5 13 14 GND
PD6, Data 6 15 16 GND
PD7, Data 7 17 18 GND
Acknowledge# 19 20 GND
Busy 21 22 GND
Paper empty 23 24 GND
SLCT 25
25
1
2
26
LPT
26 NC
24 PCI-760 – User’s Guide (V1.10)
Page 27

9. Jumpers and Connectors Overview
9.1.3.9. J15: Serial Port Connector COM1
The 10-pin boxed header is to be used with the supplied serial cable.
COM1 pin assignment RS232:
J15: Boxed Header,
DIP 10-pin
1
9
COM1
2
10
RS232
(Pinning on the on-board header)
Pin # Signal Name
1 DCD, Data carrier detect
2 DSR, Data set ready
3 RxD, Receive data
4 RTS, Request to send
5 TxD, Transmit data
6 CTS, Clear to send
7 DTR, Data terminal ready
8 RI, Ring indicator
9 GND, ground
10 12 V, fused
D-SUB
Connector
Pining on the
supplied cable
connector:
PCI-760 – User’s Guide (V1.10) 25
Page 28

9. Jumpers and Connectors Overview
9.1.3.10. J16: Serial Port Connector COM2
The 10-pin box header is to be used with the supplied serial cable. This interface is RS232 (default) and can be
configured as RS422 or RS485 (BIOS Setup).
For RS422 and RS485 mode, please install the jumper caps (JP1 and JP2) to use the onboard
termination resistors (120ohm).
RS232 mode (default)
RS422 point-to-point mode:
The RX signal is always enabled via application software.
RS485 party line mode:
The RX signal is enabled when COM2 RTS is deasserted via application software.
The TX signal is enabled when COM2 RTS is asserted via application software.
COM2-pin assignment as RS232 (default):
J16: Boxed Header,
DIP 10-pin
(Pinning on the on-board header)
Pin # Signal Name
1 DCD, Data carrier detect
2 DSR, Data set ready
RS232
D-SUB
Connector
Pining on the
supplied cable
connector:
1
2
3 RxD, Receive data
4 RTS, Request to send
5 TxXD, Transmit data
9
COM2
10
6 CTS, Clear to send
7 DTR, Data terminal ready
8 RI, Ring indicator
9 GND, ground
10 12 V, fused
COM2 pin assignment as RS422:
J16: Boxed Header,
DIP 10-pin
1
9
2
10
COM2
(Pinning on the on-board header)
Pin # Signal Name
1 NC
2 NC
3 RxD–, Receive data
4 RxD+, Receive data
5 TxD–, Transmit data
6 TxD+, Transmit data
7 NC
RS422
D-SUB
Connector
Pining on the
supplied cable
connector:
RXD+
TXD+
RXD–
TXD–
8 NC
9 GND, ground
10 12 V fused
26 PCI-760 – User’s Guide (V1.10)
Page 29

9. Jumpers and Connectors Overview
–
T
COM2 pin assignment as RS485:
J16: Boxed Header,
DIP 10-pin
1
9
2
10
COM2
RS485
(Pinning on the on-board header)
Pin # Signal Name
1 NC
2 NC
TRxD–,
3
Transmit/Receive data
TRxD+,
4
Transmit/Receive data
5 12 V, fused
6 NC
7 NC
D-SUB
Connector
Pining on the
supplied cable
connector:
RxD+
TRxD
8 NC
9 GND, ground
10 12 V, fused
9.1.3.11. J7: Hardware Monitor & GPIO Connector
The hardware monitor & GPIO connector provides signals for hardware monitoring and allows you to monitor user
defined function GPIO[0-3].
Signal Name Pin# J7: Box Header,
Pin# Signal Name
DIP 20-pin
GND 1 2 PWRBTN#
SMBALERT# 3 4 GND
EXT_SMBDATA 5 6 EXT_SMBCLK
APFLT# (GPIO[0])
(not supported)
* EXFLT# (GPIO[2])
(not supported)
FANFLT# (GPIO[3])
(not supported)
7 8
9 10 GND
11 12 GND
CHASINT# 13 14 GND
FAN_TACH1X(J4)
(not supported)
FAN_TACH3X
(not supported)
SIO_TACH5
(not supported)
15 16
17 18
19
1
19
2
20
Hardware
Monitor & GPIO
CPUFLT# (GPIO[1])
(not supported)
FAN_TACH2X(J24)
(not supported)
SIO_TACH4
(not supported)
SIO_TACH6
20
(not supported)
* EXFLT# (GPIO[2])
Use this pin for alarm signal of a redundant PSU.
PCI-760 – User’s Guide (V1.10) 27
Page 30

9. Jumpers and Connectors Overview
9.1.3.12. J13, J19 and J10: USB Extension
Each of the onboard boxed 10-pin-header for USB extension (J13, J19 and J10) supports two USB ports (Port 4 and
Port 5 / Port 8 and Port 9 / Port 10 and Port 11). Pin 9 is removed for keying purposes. (A slot bracket with 2x USB type
A connectors can be ordered separately.)
The PCI-760 board supports twelve USB ports (USB0-USB11).
• J29 (USB7) and J30 (USB6) are available on the slot bracket.
• J13 (USB4 and USB5), J19 (USB8 and USB9) and
• J10 (USB10 and USB11) are on board
(J10 is used for the connection of the optional USB Flash Module; refer to the subsection 9.1.2.5
“JP10: Enable/Disable the HDACT# LED for the USB Flash Module")
• USB0, USB1, USB2and USB3 are routed to the backplane via the PICMG 1.3 edge connector.
USB Port 5 USB Port 4
Pin # Signal Name
1 VCC fused 2 VCC fused
3 D5- 4 D45 D5+ 6 D4+
7 GND 8 GND
9 Key
USB Port 9 USB Port 8
Pin # Signal Name
1 VCC fused 2 VCC fused
3 D9- 4 D85 D9+ 6 D8+
7 GND 8 GND
9 Key
J13: Boxed Header
DIP 10-pin
1
9
J19: Boxed Header
DIP 10-pin
1
9
2
10
2
10
Pin # Signal Name
10 NC
Pin # Signal Name
10 NC
USB Port 11 USB Port 10
Pin # Signal Name
1 VCC fused 2 VCC fused
3 D11- 4 D105 D11+ 6 D10+
7 GND 8 GND
9 Key
28 PCI-760 – User’s Guide (V1.10)
J10: Boxed Header
DIP 10-pin
1
9
2
10
Pin # Signal Name
10 Refer to the subsection
Enable/Disable the HDACT# LED for the USB Flash
Module“
9.1.2.5 „JP10:
Page 31

9. Jumpers and Connectors Overview
9.1.3.13. J21: Keyboard & Mouse for External Connector
This connector provides an interface for additional PS/2 keyboard and PS/2 mouse.
J21: Pin Row; DIP 7-pin Pin # Signal Name
1 KB DAT
2 Key
3 MS DAT
4 GND
KBMS
9.1.3.14. J32: PS/2 Keyboard-Lock Connector
The keyboard lock allows the user to lock the PS/2 keyboard (if the chassis is equipped with a keyboard lock), protecting
the system from unauthorized use.
J32:Pin-Row: 2-pin Pin # Signal Name
1 2
9.1.3.15. J22: SPDIF-In & -Out
The SPDIF connector (J21) allows digital audio input and output via an adapter cable with slot mounting bracket for
coaxial and/or optical fiber connection (not included).
J22: Pin-Row: 5-pin Pin # Signal Name
1
5 VCC fused
6 KB CLK
7 MS CLK
1 GND
2 KB Lock
1 +5V
2 Key
3 SPDIF-out
5
9.1.3.16. J35: External Battery Connector (option)
The PCI-760 is delivered with an on-board CMOS Lithium battery.
Depending on the configuration of your system, the CMOS Lithium battery can be connected to the J35 connector in
order to have external accessibility.
J35: 2-pin Molex 22-23-2021
(friction lock)
12
4 GND
5 SPDIF-in
Pin# Signal Name
1 V_BAT
2 GND
PCI-760 – User’s Guide (V1.10) 29
Page 32

9. Jumpers and Connectors Overview
9.1.3.17. J33: Suspend LED
J33 is available for connecting an LED, which indicates whether the system is in suspend mode or powered-up. The LED
will be on when the system is in the suspend mode. If the system is fully powered up the LED will be dark.
J33: Pin-Row: 2-pin Pin # Signal Name
1 2
9.1.3.18. J20 and J23: Audio Connectors
This is an interface for the I/O bracket audio cable that allows connection of audio devices (J20 for: Line-In, Line-Out,
Mic-In) and (J23 for: Surround).
Signal Name Pin # J20: 10-pin Header Pin # Signal Name
LINEOUT_R 1 2 LINEOUT_L
AUDIO_GND 3 4 AUDIO_GND
LINEIN_L 5 6 LINEIN_R
AUDIO_GND 7 8 AUDIO_GND
MIC_IN_R 9
Signal Name Pin # J23: 10-pin Header Pin # Signal Name
SURR_OUT_R 1 2 SURR_OUT_L
AUDIO_GND 3 4 AUDIO_GND
1 GND
2 SUSLED
1
9
1
2
10
2
10 MIC_IN_R
SIDESURR_L 5 6 SIDESURR_R
AUDIO_GND 7 8 AUDIO_GND
LFE_OUT 9
9.1.3.19. J41: Connector for Temperature Sensor
J41: Pin-Row: 2-pin Pin # Signal Name
The PCI-760 board comes factory-fitted with a temperature sensor [to the connector (J41)]. This
temperature sensor measures the inside ambient temperature of the computer.
9
1 THRM_D+
2 THRM_D-
10
10 CEN_OUT
30 PCI-760 – User’s Guide (V1.10)
Page 33

9. Jumpers and Connectors Overview
9.1.3.20. J28: MiniPCI Connector
MiniPCI Slot, 124-pin, Pin Assignments
Pin Signal Pin Signal Pin Signal
1 NC 51 AD21 101 GND
2 NC 52 AD22 102 GND
3 NC 53 AD19 103 AC97_SYNC
4 NC 54 AD20 104 GND (M66EN)
5 NC 55 GND 105 AC97_SDATAIN
6 NC 56 PAR 106 AC97_SDATAOUT
7 NC 57 AD17 107 AC97_BITCLK
8 NC 58 AD18 108 GND (ACCID0)
9 NC 59 -CEB2 109 PU (ACCID1)
10 NC 60 AD16 110 AC97_RESET
11 NC 61 -IRDY 111 MPCI_AUDMON
12 NC 62 GND 112 NC
13 NC 63 VCC3 113 GND
14 NC 64 -FRAME 114 GND
15 GND 65 -CLKRUN 115 MPCI_AUDOUT
16 NC 66 -TRDY 116 MPCI_AUDIN
17 -INTB 67 -SERR 117 GND
18 VCC 68 -STOP 118 GND
19 VCC3 69 GND 119 GND
20 -INTA 70 VCC3 120 GND
21 NC 71 -PERR 121 NC
22 NC 72 -DEVSEL 122 -MPCIACT
23 GND 73 -CBE1 123 VCC
24 V3.3Aux 74 GND 124 3.3VAUX
25 CLK 75 AD14
26 -RST 76 AD15
27 GND 77 GND
28 VCC3 78 AD13
29 -REQ 79 AD12
30 -GNT 80 AD11
31 VCC3 81 AD10
32 GND 82 GND
33 AD31 83 GND
34 -PME 84 AD9
35 AD29 85 AD8
36 NC 86 -CBE0
37 GND 87 AD7
38 AD30 88 VCC3
39 AD27 89 VCC3
40 VCC3 90 AD6
41 AD25 91 AD5
42 AD28 92 AD4
43 RESV 93 NC
44 AD26 94 AD2
45 -CBE3 95 AD3
46 AD24 96 AD0
47 AD23 97 VCC
48 IDSEL 98 NC
49 GND 99 AD1
50 GND 100 NC
PCI-760 – User’s Guide (V1.10) 31
Page 34

9. Jumpers and Connectors Overview
9.1.4. PICMG 1.3 Connector (Edge Connector) PCI Express and PCI(-X) Interfaces
The “Side A” pins are on component side, the “Side B” pins are on solder side.
9.1.4.1. SHB ExpressTM Connector Pinout
x16 PCIe Connector A x8 PCIe Connector B
Side B Side A Side B Side A
1 SMCLK SMDAT 1 +5Vaux +5Vaux
2 GND GND 2 GND RSVD NC*
3 TDI TCK 3 a_PETp8 GND
4 TDO TMS 4 a_PETn8 GND
5 TRST# WAKE# 5 GND a_PERp8
6 PWRBT# PME# 6 GND a_PERn8
7 PWRGD PSON# 7 a_PETp9 GND
8 SHB_RST# PERST# 8 a_PETn9 GND
9 CFG0 CFG1 9 GND a_PERp9
10 CFG2 CFG3 10 GND a_PERn9
11 RSVD NC* GND 11 RSVD NC* GND
Mechanical Key Mechanical Key
12 GND RSVD NC* 12 GND RSVD NC*
13 b_PETp0 GND 13 a_PETp10 GND
14 b_PETn0 GND 14 a_PETn10 GND
15 GND b_PERp0 15 GND b_PERp10
16 GND b_PERn0 16 GND b_PERn10
17 b_PETp1 GND 17 a_PETp11 GND
18 b_Petn1 GND 18 a_PETn11 GND
19 GND b_PERp1 19 GND b_PERp11
20 GND b_PERn1 20 GND b_PERn11
21 b_PETp2 GND 21 a_PETp12 GND
22 b_PETn2 GND 22 a_PETn12 GND
23 GND b_PERp2 23 GND b_PERp12
24 GND b_PERn2 24 GND b_PERn12
25 b_PETp3 GND 25 a_PETp13 GND
26 b_PETn3 GND 26 b_PETn13 GND
27 GND b_PERp3 27 GND b_PERp13
28 GND b_PERn3 28 GND b_PERn13
29 REFCLK0+ GND 29 b_PETp14 GND
30 REFCLK0- GND 30 b_PETn14 GND
31 GND REFCLK1+ 31 GND b_PERp14
32 RSVD_G NC* REFCLK1- 32 GND b_PERn14
33 REFCLK2+ GND 33 b_PETp15 GND
34 REFCLK2- GND 34 b_PETn15 GND
35 GND REFCLK3+ 35 GND a_PERp15
36 RSVD-G NC* REFCLK3- 36 GND a_PERn15
37 REFCLK4+ GND 37 RSVD NC* GND
38 REFCLK4- GND 38 RSVD NC* RSVD NC*
39 GND REFCLK5+ 39 GND GND
40 RSVD-G NC* REFCLK5- 40 GND GND
41 REFCLK6+ GND 41 GND GND
42 REFCLK6- GND 42 GND GND
43 GND REFCLK7+ 43 GND GND
44 GND PEFCLK7- 44 +12V +12V
45 a_PETp0 GND 45 +12V +12V
46 a_PETn0 GND 46 +12V +12V
47 GND a_PERp0 47 +12V +12V
48 GND a_PERn0 48 +12V +12V
49 a_PETp1 GND 49 +12V +12V
50 a_PETn1 GND
51 GND a_PERp1
52 GND a_PERn1
53 a_PETp2 GND
54 a_PETn2 GND
55 GND a_PERp2
56 GND a_PERn2
32 PCI-760 – User’s Guide (V1.10)
Page 35

9. Jumpers and Connectors Overview
57 a_PETp3 GND
58 a_PETn3 GND
59 GND a_PERp3
60 GND a_PERn3
61 a_PETp4 GND
62 a_PETn4 GND
63 GND a_PERp4
64 GND a_PERn4
65 a_PETp5 GND
66 a_PETn5 GND
67 GND a_PERp5
68 GND a_PERn5
69 a_PETp6 GND
70 a_PETn6 GND
71 GND a_PERp6
72 GND a_PERn6
73 a_PETp7 GND
74 a_PETn7 GND
75 GND a_PERp7
76 GND a_PERn7
77 RSVD NC* GND
78 +3.3V +3.3V
79 +3.3V +3.3V
80 +3.3V +3.3V
81 +3.3V +3.3V
82 +3.3Vaux NC* +3.3Vaux NC*
PCI-760 – User’s Guide (V1.10) 33
Page 36

9. Jumpers and Connectors Overview
x16 PCIe Connector C x8 PCIe Connector D
Side B Side A Side B Side A
1 USB0P GND 1 INTB# INTA#
2 USBON GND 2 INTD# INTC#
3 GND USB1P 3 GND VIO
4 GND USB1N 4 REQ3# GNT3#
5 USB2P GND 5 REQ2# GNT2#
6 USB2N GND 6 PCI_RST# GNT1#
7 GND USB3P 7 REQ1# GNT0#
8 GND USB3n 8 REQ0# SERR#
9 USBOC0# GND 9 SDONE NC* +3.3v
10 GND USBOC1# 10 GND CLKFI
11 USBOC2# GND 11 CLKFO GND
12 GND USBOC3# 12 CLKC CLKD
13 SATHAT0P GND 13 GND +3.3V
14 SATAH0N GND 14 CLKA CLKB
15 GND SATAHR0P 15 +3.3V GND
16 GND SATAHR0N 16 AD31 GND
17 SATAHT1P GND 17 AD29 +3.3V
18 SATAHT1N GND 18 M66EN AD30
19 GND SATAHR1P 19 AD27 AD28
20 GND SATAHR1N 20 AD25 GND
21 a_MDI0p GND 21 GND AD26
22 a_MDI0n GND 22 C/BE3# AD24
23 GND a_MDI1p 23 AD23 +3.3V
24 GND a_MDI1n 24 GND AD22
25 a_MDI2p GND 25 AD21 AD20
26 a_MDI2n GND 26 AD19 PCIXCAP
27 GND a_MDI3p 27 +5V AD18
28 GND a_MDI3n 28 AD17 AD16
29 IPMB_CL GND 29 C/BE2# GND
30 IPMB_DA GND 30 PCI_PRST# FRAME#
31 GA0 NC* GA1 NC* 31 IRDY# TRDY#
32 GA2 NC* GA4 NC* 32 DEVSEL# +5V
33 GA3 NC* GA5 NC* 33 LOCK# STOP#
34 b_MDI0p NC* GND 34 PERR# GND
35 b_MDI0n NC* GND 35 GND C/BE1#
36 GND b_MDI1p NC* 36 PAR AD14
37 GND b_MDI1n NC* 37 SB0# NC* GND
38 b_MDI2p NC* GND 38 GND AD12
39 b_MDI2n NC* GND 39 AD15 AD10
40 GND b_MDI3p NC* 40 AD13 GND
41 GND b_MDI3n NC* 41 GND AD09
42 +3.3V +3.3V 42 AD11 C/BE0#
43 +3.3V +3.3V 43 AD08 GND
44 +3.3V +3.3V 44 GND AD06
45 +3.3V +3.3V 45 AD07 AD05
46 +3.3V +3.3V 46 AD04 GND
47 +3.3V +3.3V 47 GND AD02
48 +3.3V +3.3V 48 AD03 AD01
49 +3.3V +3.3V 49 AD00 GND
50 +3.3V +3.3V
51 GND GND
52 GND GND
53 GND GND
54 GND GND
55 GND GND
56 GND GND
57 GND GND
58 GND GND
59 +5V +5V
60 +5V +5V
61 +5V +5V
62 +5V +5V
Mechanical Key
Mechanical Key
34 PCI-760 – User’s Guide (V1.10)
Page 37

9. Jumpers and Connectors Overview
63 GND GND
64 GND GND
65 GND GND
66 GND GND
67 GND GND
68 GND GND
69 GND GND
70 GND GND
71 GND GND
72 GND GND
73 +12V +12V
74 +12V +12V
75 +12V +12V
76 +12V +12V
77 +12V +12V
78 +12V +12V
79 +12V +12V
80 +12V +12V
81 +12V +12V
82 +12V +12V
NC*: Not connected
PCI-760 – User’s Guide (V1.10) 35
Page 38

9. Jumpers and Connectors Overview
9.1.5. Lithium Battery
PCI-760 is provided with a 3.0 V “coin cell” lithium battery for the RTC operation and CMOS Setup RAM. Please observe
the chapter
3.1 “Safety Instructions for the Lithium Battery”.
Battery socket
Lithium battery
Fig. 6: Placement of the battery
Spring
9.1.5.1. Replacing the Lithium Battery
To replace the battery please proceed as follows:
1. Turn the power off.
2. If your system is equipped with expansion cards, remove them first, if necessary.
3. Remove the battery by pressing outwards the ejector spring.
4. Insert the new battery into the socket.
5. Make sure that you insert the battery correctly. The minus pole must be as marked (with a white line on the battery)
in the
fig. 5!
The lithium battery must be replaced with an identical battery or a battery type recommended by Kontron Embedded
Computers (Lithium battery 3.0 V for RTC, type: CR2032).
Do not dispose of lithium batteries in domestic waste. Dispose of the battery according to the local
regulations dealing with the disposal of these special materials (e.g. to the collecting points for the
disposal of batteries).
36 PCI-760 – User’s Guide (V1.10)
Page 39

10. AMI BIOS Configuration
10. AMI BIOS Configuration
This chapter describes the settings available in the optional AMI BIOS for the
PCI-760 board. The AMI BIOS (Basic Input/Output System) pre- installed in your computer system’s ROM supports
Intel® Pentium® M processor in a standard IBM AT compatible I/O system.
10.1. BIOS Setup
The AMI BIOS provides a Setup utility program for specifying the system configurations and settings. The BIOS ROM of
the system stores the Setup utility. When you turn on the computer, the AMI BIOS is activated.
Pressing the <Del> key immediately allows you to enter the Setup utility. If you are a little bit late pressing the <Del> key,
POST (Power On Self Test) will continue with its test routines, thus preventing you from invoking the Setup. If you still
wish to enter Setup, restart the system by pressing the ”Reset” button or simultaneously pressing the <Ctrl>, <Alt> and
<Delete> keys. You can also restart by turning the system Off and back On again. The following message will appear on
the screen:
Press <DEL> to Enter Setup
In general, you press the arrow keys to highlight items, <Enter> to select, the <PgUp> and <PgDn> keys to change
entries, <F1> for help and <Esc> to quit.
When you enter the Setup utility, the Main Menu screen will appear on the screen. The Main Menu allows you to select
from various Setup functions and exit choices.
The BIOS Setup screen has two main frames. The left frame displays all the options that can be configured. “Grayedout” options cannot be configured. Blue options can be select and configured.
The right frame displays the key legend. Above the key legend is an area reserved for a text message. When an option
is selected in the left frame, it is highlighted in white. Often a text message will accompany it.
10.1.1. Navigation
Hot Key Description
→← Left/Right The Left and Right <Arrow> keys allow you to select a BIOS
Setup screen.
For example: Main screen, Advanced screen, Chipset
screen, and so on.
↑↓ Up/Down The Up and Down <Arrow> keys allow you to select a BIOS
Setup item or sub-screen.
+ / - Plus/Minus The Plus and Minus <Keys> keys allow you to change the field
value of a particular BIOS Setup item.
For example: Date and Time.
Tab The <Tab> key allows you to select BIOS Setup fields.
The <F8> key on your keyboard is the Fail-Safe key. It is not displayed on the key
legend by default. To set the Fail-Safe settings of the BIOS, press the < F8> key on your
keyboard. The Fail-Safe settings allow the motherboard to boot up with the least
amount of options enabled. This can lessen the probability of conflicting settings.
The <F9> key on your keyboard is the Optimal-Default key. To set the Optimal-Default
settings of the BIOS, press the <F9> key on your keyboard.
PCI-760 – User’s Guide (V1.10) 37
Page 40

10. AMI BIOS Configuration
10.2. Main
10.2.1. System Time / System Date
System Time This field indicates the time of the device. If you change the time setting, enter the time in
the format
HH=Hours
MM=Minutes
SS=Seconds
System Date This field indicates the date of the device. If you change the date setting, enter the date in
the format
MM=Month
DD=Day
YYYY=Year
The “System Date” format can be arbitrary configured.
HH:MM:SS
MM.DD.YYYY.
38 PCI-760 – User’s Guide (V1.10)
Page 41

10. AMI BIOS Configuration
¾ Board Information
¾ System Information
The system information is available only when a customized ordered tool is installed.
PCI-760 – User’s Guide (V1.10) 39
Page 42

10. AMI BIOS Configuration
10.3. Advanced
You can select the sub menus of the
• CPU Configuration
• IDE Configuration
• AHCI Configuration
• SuperIO Configuration
• USB Configuration
• Event Log Configuration
• Remote Access Configuration
• ACPI Configuration
Advanced BIOS Setup:
• MPS Configuration
• Trusted Computing
• ASF Configuration
• Intel AMT Configuration
• Intel TXT (LT) Configuration
• Intel VT-d Configuration
• Intel VA Configuration
40 PCI-760 – User’s Guide (V1.10)
Page 43

10. AMI BIOS Configuration
10.3.1. CPU Configuration (Configure advanced CPU settings)
10.3.1.1. Max CPUID Value Limit
Disabled for Windows XP
Available settings are:
10.3.1.2. Execute Disable Bit Capability
When “Disabled” is set, forces the Execute-Disable Bit Capability extended feature bit to always return 0.
Available settings are:
10.3.1.3. Core Multi-Processing
When “Disabled” is set, disables one execution core of each CPU die.
Available settings are:
10.3.1.4. PECI
When “Enabled” is set, enables the PECI interface.
Available settings are:
Disabled and Enabled.
Enabled and Disabled.
Enabled and Disabled.
Enabled and Disabled.
10.3.1.5. Intel ® SpeedStep ™ tech
If “Disabled” is set, disables GV3.
If “
Enabled” is set, enables GV3
Available settings are:
PCI-760 – User’s Guide (V1.10) 41
Enabled and Disabled.
Page 44

10. AMI BIOS Configuration
10.3.2. IDE Configuration
This field can be use to select options for the IDE Configuration settings.
10.3.2.1. SATA#1 Configuration (SATA#1 Controller)
Available settings are: Enhanced, Compatible and Disabled.
10.3.2.2. Configure SATA#1 as
Available settings are: IDE, RAID and AHCI.
10.3.2.3. SATA#2 Configuration (SATA#2 Controller)
Available settings are: Enhanced and Disabled.
10.3.2.4. Hard Disk Write Protect
This option allows you to enable or disable the device write protection. This will be effective only if the device is accessed
through BIOS.
Available settings:
Enabled and Disabled.
42 PCI-760 – User’s Guide (V1.10)
Page 45

10. AMI BIOS Configuration
10.3.2.5. IDE Detect Time Out (Sec)
Set this option to stop the AMI BIOS from searching for IDE devices within the specified number of seconds. Basically,
this allows you to fine-tune the settings to allow for faster boot times.
Low settings can cause unreliable detection!
Possible settings are:
0, 5, 10, 15, 20, 25, 30 and 35.
0 This is the optimal setting for systems whose onboard controllers point to a specific IDE device in the AMI
BIOS.
5 Set this option to stop the BIOS from searching the IDE Bus for IDE devices in five seconds.
10 Set this option to stop the BIOS from searching the IDE Bus for IDE devices in ten seconds.
15 Set this option to stop the BIOS from searching the IDE Bus for IDE devices in 15 seconds.
20 Set this option to stop the BIOS from searching the IDE Bus for IDE devices in 20 seconds.
25 Set this option to stop the BIOS from searching the IDE Bus for IDE devices in 25 seconds.
30 Set this option to stop the BIOS from searching the IDE Bus for IDE devices in 30 seconds.
35 This setting is recommended for all IDE devices that are set to AUTO in the BIOS setting (because a Master
waits 30 sec. max. for a slave device).
10.3.2.6. ATA(PI) 80Pin Cable Detection
Set this option to define the method used to detect an ATA (PI) 80-pin cable. Possible settings are: Host & Device, Host
and
Device.
Host & Device Set this value to use both the motherboard IDE controller and the IDE device to detect the type of
IDE cable present.
Host Set this value to use motherboard onboard IDE controller to detect the type of IDE cable present.
Device Set this value to use IDE disk drive to detect the type of IDE cable present.
PCI-760 – User’s Guide (V1.10) 43
Page 46

10. AMI BIOS Configuration
¾ Primary IDE Master / Primary IDE Slave
These fields call the submenu to make corresponding settings of the IDE devices.
You should change the default settings only if you are connecting an additional IDE drive (e.g. Hard disk
drive).
The description of the setting options for
The default settings strongly depend on the installed drive.
These entries are specific for each installed device as:
•
Primary IDE Master/Primary IDE Slave
• Secondary IDE Master/Secondary IDE Slave
• Third IDE Master/Third IDE Slave
• Fourth IDE Master/Fourth IDE Slave
The screens below are only an example for which entries could be available.
Primary IDE Master also applies to Primary IDE Slave
44 PCI-760 – User’s Guide (V1.10)
Page 47

10. AMI BIOS Configuration
PCI-760 – User’s Guide (V1.10) 45
Page 48

10. AMI BIOS Configuration
10.3.2.7. Type
Select the type of device connected to the system.
Not Installed, Auto, CD/DVD and ARMD (ATAPI Removable Media Device).
10.3.2.8. LBA/Large Mode
The LBA (Logical Block Addressing)/Large Mode option allows you to enable or disable support for IDE devices with
capacities greater than 528MB. The maximum drive capacity in the LBA mode is 137GB.
Auto This setting allows the BIOS to auto-detect LBA mode control on the specified channel (if the device
supports it and the device is not already formatted with LBA Mode disabled).
Disabled Disables the LBA Mode and prevent the BIOS from using LBA mode control on the specified channel.
10.3.2.9. Block (Multi-Sector Transfer)
If your hard disk supports the block mode, select Auto for the automatic determination of the number of the blocks per
request. Several sectors can be at the same time read/written. The data transfer rate will be increased.
Available settings are:
Auto The data transfer from and to the device occurs multiple sectors at a time if the device supports it. Block
Auto and Disabled.
mode allows transfers of up to 64Kb per interrupt.
Disabled The data transfer from and to the device occurs one sector at a time. Only 512 byte of data can be
transferred per interrupt if block mode is not used.
This setting should be used only if read and write failures occur with “Auto”.
10.3.2.10. PIO Mode
These fields allow your system IDE controller to work faster. Rather than have the BIOS issue a series of commands that
transfer to or from the IDE drive, PIO (Programmed Input/Output) allows the BIOS to communicate with the controller
and CPU directly.
The system supports five modes, numbered from 0 to 4, which primarily differ in timing. Available settings are:
and Auto. When Auto is selected, the BIOS will select the best available mode.
4
Available settings are:
Auto
This setting allows the BIOS to auto-detect the PIO mode. This setting is to be used if the IDE disk drive
cannot be determined.
0 This setting allows the BIOS to use the PIO mode 0. It has a data transfer rate of 3.3MBs.
1 This setting allows the BIOS to use the PIO mode 1. It has a data transfer rate of 5.2MBs.
2 This setting allows the BIOS to use the PIO mode 2. It has a data transfer rate of 8.3MBs.
3 This setting allows the BIOS to use the PIO mode 3. It has a data transfer rate of 11.1MBs.
Auto, 0, 1, 2, 3 and 4.
0, 1, 2, 3,
This setting allows the BIOS to use the PIO mode 4. It has a data transfer rat e of 16.6MBs. This setting
generally works with all hard disk drives manufactured after 1999. For other disk drive, such as IDE CD-
4
ROM drives, check the specifications of the drive.
Do not change the default setting “
If some read and write failures occur, check the length and quality of the integrated device cable first or
set this option to a setting with a lower data transfer rate as specified for your device.
Auto”.
46 PCI-760 – User’s Guide (V1.10)
Page 49

10. AMI BIOS Configuration
10.3.2.11. DMA Mode
This option allows you to select the DMA mode option (depending on the integrated device). Available sett i ngs are:
Auto, SWDMA0, SWDMA1, SWDMA2, MWDMA0, MWDMA1, MWDMA2, UDMA0, UDMA1, UDMA2, UDMA3, UDMA4,
UDMA5 and UDMA6.
Auto If “Auto” is set, the BIOS auto-detects the DMA mode. This is the default setting.
SWDMA0 If “SWDMA0” is set the BIOS uses the Single Word DMA mode 0. It has a data transfer rate of 2.1MBs.
SWDMA1 If “SWDMA1” is set the BIOS uses the Single Word DMA mode 1. It has a data transfer rate of 4.2MBs.
SWDMA2 If “SWDMA2” is set the BIOS uses the Single Word DMA mode 2. It has a data transfer rate of 8.3MBs.
MWDMA0 If “MWDMA0” is set the BIOS uses the Multi Word DMA mode 0. It has a data transfer rate of 4.2MBs.
MWDMA1 If “MWDMA1” is set the BIOS uses the Multi Word DMA mode 1. It has a data transfer rate of 13.3MBs.
MWDMA2 If “MWDMA2” is set the BIOS uses the Multi Word DMA mode 2. It has a data transfer rate of 16.6MBs.
UDMA0 If “UDMA0” is set the BIOS uses the Ultra DMA mode 0. It has a data transfer rate of 16.6MBs (the
same data transfer rate as PIO mode 4, and Multi Word DMA mode 2).
UDMA1 If “UDMA1” is set the BIOS uses the Ultra DMA mode 1. It has a data transfer rate of 25MBs.
UDMA2 If “UDMA2” is set the BIOS uses the Ultra DMA mode 2. It has a data transfer rate of 33.3MBs.
UDMA3 If “UDMA3” is set the BIOS uses the Ultra DMA mode 3. It has a data transfer rate of 44.4MBs. It is
required to be used the 80-conductor ATA cable for this data transfer rate.
UDMA4 If “UDMA4” is set the BIOS uses the Ultra DMA mode 4. It has a data transfer rate of 66.6MBs. It is
required to be used the 80-conductor ATA cable for this data transfer rate.
UDMA5 If “UDMA5” is set the BIOS uses the Ultra DMA mode 5. It has a data transfer rate of 99.9MBs. It is
required to be used the 80-conductor ATA cable for this data transfer rate.
UDMA6 If “UDMA6” is set the BIOS uses the Ultra DMA mode 6. It has a data transfer rate of 133.2MBs. It is
required to be used an 80-conductor ATA cable for this data transfer rate.
10.3.2.12. S.M.A.R.T.
S. M. A. R. T. (Self-Monitoring, Analysis and Reporting Technology) is used to predict drive failures. (The integrated
drive has to support this feature).
Available Settings are:
Auto, Disabled and Enabled.
10.3.2.13. 32Bit Data Transfer
This option allows you to enable or disable the 32bit data transfer rate for the IDE devices. If this option is “Enabled” the
date transfer is accelerated and the CPU (PCI Bus) is relieved.
Available settings are:
Enabled and Disabled.
PCI-760 – User’s Guide (V1.10) 47
Page 50

10. AMI BIOS Configuration
10.3.3. AHCI Configuration (AHCI Settings)
10.3.3.1. AHCI BIOS Support
In order to support the AHCI (Advanced Host Controller Interface) (referring to IDE Configuration/ Configure SATA#1
as/AHCI setting) this option must be set to
Available settings:
10.3.3.2. AHCI Port0/ /AHCI Port5
These options display the detected SATA devices (if configured in IDE Configuration/ Configure SATA#1 as to AHCI).
Each SATA detected device (AHCI configured) allows following:
SATA #(1/ /5) with available settings: Auto and Not Installed.
S.M.A.R.T.
Enabled and Disabled.
with available settings: Enabled and Disabled.
Enabled. For detailed information refer to “Serial ATA AHCI 1.2 Specification“.
48 PCI-760 – User’s Guide (V1.10)
Page 51

10. AMI BIOS Configuration
10.3.4. Super IO Configuration (Configure Win627 Super IO Chipset)
This field can be used to select the Super I/O settings.
10.3.4.1. Serial Port 1 & 2 Address
These fields allow you to select the onboard serial ports and their addresses.
Available settings are:
Serial Port 1 Address 3F8/IRQ4 3E8/IRQ4 / 2E8/IRQ3 / Disabled
Serial Port 2 Address 2F8/IRQ3 3E8/IRQ4 / 2E8/IRQ3 / Disabled
Default Available settings (without default setting)
PCI-760 – User’s Guide (V1.10) 49
Page 52

10. AMI BIOS Configuration
10.3.4.2. Serial Port2 Mode
This field allows you to select the line mode for serial communication.
Available settings are:
Normal (RS232), RS422 and RS485.
If the [Serial Port2 Mode] is set to
If Serial Port2 Mode is set to RS422 Available settings
RS422 is available a supplementary option: [Serial Port2 Transmitter].
Serial Port2 Transmitter Enabled and Disabled
10.3.4.3. Parallel Port Address
This field selects the I/O address used to access the parallel interface.
The possible values are:
The use of address space
eight consecutive addresses.
Disabled, 378, 278, 3BC.
3BC may be restricted for some modes because it doesn’t allow for
10.3.4.4. Parallel Port Mode
This field is used to specify whether the parallel port is to be used as a bi-directional input/output port or just as an output
port.
ECP and EPP transfer modes allow faster transfer rates of 2 and 2.4 Mbytes/s. These modes will only work with
peripheral devices which support them. In addition, the field
Parallel Port Address must be set to 378 or 278 when using
one of these two modes.
Normal The port functions as an output port only.
Bi-Directional Data can be transferred in both directions across the port.
EPP Fast transfer mode (up to 2 Mbytes/s), can output and receive data. The mode requires a peripheral
device which supports the EPP (Enhanced Parallel Port) transfer mode.
ECP Fast transfer mode (up to 2.4 Mbytes/s), can output and receive data. The mode requires a
peripheral device which supports the ECP (Enhanced Capability Port) transfer mode.
ECP & EPP Fast transfer mode (up to 2.4 Mbytes/s), can output and receive data. The mode requires a
peripheral device which supports both EPP (Enhanced Parallel Port) and ECP (Enhanced Capability
Port) transfer mode.
10.3.4.5. Parallel Port IRQ
This field selects the interrupt used for the parallel interface.
It is possible to choose between:
IRQ7 This setting allows the parallel port to use the interrupt IRQ7.
IRQ5 This setting allows the parallel port to use the interrupt IRQ5.
IRQ7 and IRQ5.
50 PCI-760 – User’s Guide (V1.10)
Page 53

10. AMI BIOS Configuration
10.3.5. USB Configuration
This field allows you to select options for USB configuration.
10.3.5.1. Legacy USB Support
This function enables or disables support for legacy USB. Enabling legacy USB support allows using USB devices under
DOS and other non-Plug & Play operating systems.
Possible settings are:
If “Auto” is set, the system searches for USB devices. Whether no device is detected, the BIOS disable this option in
background.
10.3.5.2. USB 2.0 Controller Mode
The [USB 2.0 Controller Mode] option is available only if the option [Legacy USB Support] is set to Enabled
or
Auto.
This option allows you to set the data signaling rate for the USB 2.0 controller.
Possible settings are:
HiSpeed
FullSpeed This setting allows data signaling rate of 12 Mbps.
10.3.5.3. BIOS EHCI Hand-Off
The [BIOS EHCI Hand-Off)] option is available only if the option [Legacy USB Support] is set to Enabled or
Auto.
Enabled, Disabled and Auto.
FullSpeed and HiSpeed.
This setting allows data signaling rate of 480 Mbps.
This option allows you to enable support for operating systems without “
Possible settings are:
10.3.5.4. USB Beep Message
This option allows you to enable or disable generating a beep during USB devices enumeration.
Possible settings are:
PCI-760 – User’s Guide (V1.10) 51
Enabled and Disabled.
Enabled and Disabled.
EHCI Hand-Off” features.
Page 54

10. AMI BIOS Configuration
¾ USB Mass Storage Device Configuration
This option is only available if USB storage devices are connected to the board.
10.3.5.5. USB Mass Storage Reset Delay
This option specifies amount of time the BIOS USB code should wait after issuing a reset to the USB mass storage
devices (only needed for slow starting devices).
It is possible to choose between:
10 Sec, 20 Sec, 30 Sec, and 40 Sec.
10.3.5.6. Emulation Type
This option specifies the type of emulation provided by the BIOS for the device.
It is possible to choose between:
Auto
When this option is selected the BIOS detects the current formatted media.
Auto, Hard Disk, CD-ROM, Floppy and Forced FDD.
Hard Disk This option allows the device to be emulated as hard disk.
CD-ROM This option allows the device to be emulated as a CD-ROM (if the block size of the media is greater
than 512 bytes).
Floppy This option allows the device to be emulated as floppy drive.
Forced FDD This opt ion allows a hard disk image to be connected as a floppy image.
52 PCI-760 – User’s Guide (V1.10)
Page 55

10. AMI BIOS Configuration
10.3.6. Event Log Configuration (Event Logging details)
AMI BIOS logs certain events to be event log, which can be configured using these options.
10.3.6.1. View Event Log
This selection allows you to view the event log.
10.3.6.2. Mark all events as read
This selection allows you to set the events as already read.
10.3.6.3. Clear Event Log
This selection allows you to clear all events in the event log.
PCI-760 – User’s Guide (V1.10) 53
Page 56

10. AMI BIOS Configuration
10.3.7. Remote Access Configuration (Configure Remote Access type and parameters)
10.3.7.1. Remote Access
This option allows you to enable or disable the console redirection features.
Available settings are:
If this option is set to “
Enabled and Disabled.
Enabled” are available following options:
54 PCI-760 – User’s Guide (V1.10)
Page 57

10. AMI BIOS Configuration
10.3.7.2. Serial port number
This option allows you to select the serial port for console redirection.
The available settings are:
COM1 COM2 and COM3.
The COM 3 interface is an internal virtual serial interface of the ICH9DO that allows remote access via
the LAN1 (AMT LAN Controller).
10.3.7.3. Serial Port Mode
This option allows you to select the serial port features (Speed, Data Bits, Parity, StopBits) for a proper data transfer with
the client system.
The available settings are:
10.3.7.4. Flow Control
115200 8,n,1 / 57600 8,n,1 / 38400 8,n,1 / 19200 8,n,1 / 09600 8, n,1.
Flow Control lets computers (host and client) tell each other when they can accept more data for transmission and when
to wait. This handshaking prevents data from being lost because one computer was busy.
The available settings are:
10.3.7.5. Redirection After BIOS POST
None, Hardware and Software.
This option allows you to select when the console redirection will be used.
Always Redirection is always act ive. (Some OSs may not work like expected if this setting is chosen.)
Boot Loader Redirection is active during POST and during Boot Loader.
Disabled Turns off the redirection after POST.
10.3.7.6. Terminal Type
This option allows you to select the target terminal type.
The available settings (industry standard terminal protocol) are:
10.3.7.7. VT-VTF8 Combo Key Support
ANSI, VT 100 and VT-UTF8.
This option allows you to enable or disable the VT-UTF8 Combo Key Support for ANSI/VT 100 terminals.
It is possible to choose between:
Client and target systems must have the same settings for a working communication.
Enabled and Disabled.
10.3.7.8. Sredir Memory Display Delay
This option allows you to pause the memory display during redirection for the set value.
Available settings are:
No Delay, Delay 1 Sec, Delay 2 Sec and Delay 4 Sec.
PCI-760 – User’s Guide (V1.10) 55
Page 58

10. AMI BIOS Configuration
10.3.8. ACPI Configuration
ACPI Configuration settings allow you to select the Advanced Power Management (APM) options.
¾ General ACPI Configuration
10.3.8.1. Suspend Mode
This option allows you to select the ACPI state used for System Suspend.
Available settings:
Auto, S1 (POS) and S3 (STR).
10.3.8.2. Repost Video on S3 Resume
The settings of this option allows or prevents the video BIOS to be initialized coming out of the S3 state.
Available settings:
10.3.8.3. PS/2 Keyboard PowerOn
This option allows you to wake up the system via PS/2 Keyboard.
Available settings:
10.3.8.4. PS/2 Mouse PowerOn
This option allows you to wake up the system via PS/2 Mouse.
Available settings:
56 PCI-760 – User’s Guide (V1.10)
Yes and No.
Specific Key, Any Key and Disabled.
Left Button, Right Button and Disabled.
Page 59

10. AMI BIOS Configuration
¾ Advanced ACPI Configuration
10.3.8.5. ACPI Versions Features
This option allows you to set the corresponding ACPI version.
It is possible to choose between:
ACPI v1.0, ACPI v2.0 and ACPI v3.0.
10.3.8.6. ACPI APIC support
This option determines whether or not to include the ACPI APIC table pointer to the RSDT pointer list.
It is possible to choose between:
Enabled This setting will initiate ACPI APIC support.
Disabled This setting disables ACPI APIC support.
Enabled and Disabled.
10.3.8.7. Headless mode
This option is used to update the ACPI FACP table to indicate headless operations.
It is possible to choose between:
Enabled This option enables updat ing the ACPI FACP table to indicate headless operation.
Disabled This option disables updating the ACPI FACP table to indicate headless operation.
Enabled and Disabled.
PCI-760 – User’s Guide (V1.10) 57
Page 60

10. AMI BIOS Configuration
¾ Chipset ACPI Configuration (South Bridge ACPI Configuration)
10.3.8.8. APIC ACPI SCI IRQ
This option allows you to enable or disable the APIC ACPI IRQ function.
Available settings:
10.3.8.9. USB Device Wakeup From S3/S4
Enabled and Disabled.
This option allows you to enable or disable the wakeup function from the S3/S4 state.
Available settings:
10.3.8.10. High Performance Event Timer
Enabled and Disabled.
This option allows you to enable or disable the HPET (High Performance Event Timer).
Available settings:
10.3.8.11. HPET Memory Address
Enabled and Disabled.
This option is available only if the [High Performance Event Timer] is set to “Enabled“.
Available settings:
FED00000h / FED01000h / FED02000h and FED03000h.
58 PCI-760 – User’s Guide (V1.10)
Page 61

10. AMI BIOS Configuration
10.3.9. MPS Configuration
This field allows you to select which MPS (Multi-Processor Specification) version is used. You have to select the MPS
version supported by your operating system.
Available settings are:
1.4 and 1.1.
10.3.10. Trusted Computing
10.3.10.1. TCG/TPM Support
This option allows you to enable or disable the TPM TCG (TPM 1.1/1.2) support in BIOS.
Available settings are:
10.3.10.2. Execute TPM Command
This option allows you to enable (activate), to disable (deactivate) the initialization of the TPM (Trusted Platform Module).
Available settings are:
If the option
PCI-760 – User’s Guide (V1.10) 59
[TCG/TPM Support] is set to “No” the option [Execute TPM Command] is not available.
Yes and No.
Don’t change, Disabled and Enabled.
Page 62

10. AMI BIOS Configuration
10.3.11. ASF Configuration
ASF Support with available settings: Enabled and Disabled.
Watchdog Timer with available settings: Enabled and Disabled.
For more information refer to the ASF (
and remote-control interfaces.
Alert Standard Format) 2.0 specification, which defines alerting
10.3.12. Intel AMT Configuration [Configure Intel AMT Parameters)
For Information refer to Intel® Active Management Technology.
10.3.12.1. Intel AMT Support
Available settings: Enabled and Disabled.
Force IDER: Available settings: IDER Pri. Master, IDER Pri Slave, IDER Sec. Master, IDER Sec. Slave and Disabled.
Force SOL: Available settings: Enabled and Disabled.
10.3.12.2. Unconfigure AMT/ME
Available settings: Enabled and Disabled.
60 PCI-760 – User’s Guide (V1.10)
Page 63

10. AMI BIOS Configuration
10.3.13. Intel TXT (LT) Configuration [Configure Intel TXT (LT) Parameters]
10.3.13.1. Intel TXT Initialization
This option allows you to configure Intel TXT Tech. Available settings: Enabled and Disabled.
10.3.14. Intel VT-d Configuration
This option allows you to configure Intel VT-d Tech. Available settings:
Enabled and Disabled.
10.3.15. Intel VA Configuration (Configure Intel VA Parameters)
PCI-760 – User’s Guide (V1.10) 61
Page 64

10. AMI BIOS Configuration
10.4. PCIPnP
The “PCI PnP Configuration” section of the BIOS controls the settings for the onboard PCI slots.
10.4.1.1. Clear NVRAM
This option allows you to clear the NVRAM during the system boot.
The available settings are:
10.4.1.2. Plug & Play O/S
This field determines the Plug&Play function. Plug&Play means that added components are automatically recognized
and installed if they support automatic recognition.
The available settings are:
No The system BIOS assumes the recognition of the components and assigns the resources (e.g. DOS,
WIN3.1).
Yes The operating system assumes part of the Plug&Play functions.
This setting should only be selected if the operating system supports Plug&Play (e. g. Windows 95 or
higher) (e.g. Windows 2000, XP, Modem, LINUX).
10.4.1.3. PCI Latency Timer
No and Yes.
No and Yes.
This choice specifies, how long (PCI clock) a PCI card can still use the PCI Bus as master, if another PCI card requests
the access to the PCI Bus.
The available settings are:
62 PCI-760 – User’s Guide (V1.10)
32, 64, 96, 128, 160, 192, 224 and 248.
Page 65

10. AMI BIOS Configuration
10.4.1.4. Allocate IRQ to PCI VGA
This option allows or restricts the system to allocate an IRQ to a VGA adapter card that uses the PCI Bus.
The available settings are:
Yes Assigns an IRQ to PCI VGA card if the card requests an IRQ.
No Does not assign an IRQ to a PCI VGA card even if the card requests an IRQ.
Yes and No.
10.4.1.5. Palette Snooping
This option allows the compliance of older higher resolution video cards to the VGA standard. As presently all video
boards are compliant to this standard, this option must stay
Disabled.
This default setting should not be changed unless the VGA card manufacturer requires Palette Snooping to be
“
Enabled”.
The available settings are:
10.4.1.6. PCI IDE BusMaster
Enabled and Disabled.
If this option is „Enabled“, the BIOS uses busmastering for reading/writing to IDE drives.
The available settings are:
10.4.1.7. OffBoard PCI/ISA IDE Card
Enabled and Disabled.
This option is to be used if an offboard PCI/ISA IDE controller adapter card is installed in the system.
The settings of this option allow you to specify the PCI expansion slot on the motherboard where the offboard PCI/ISA
controller is installed.
The available settings are:
10.4.1.8. IRQ3, IRQ4, IRQ5, IRQ7, IRQ9, IRQ10, IRQ11, IRQ14, IRQ15
PCI Slot1, PCI Slot2, PCI Slot3, PCI Slot4, PCI Slot5, PCI Slot6, and Auto.
These options allow you to configure the IRQ Resources.
Available settings are:
Available This setting allows the specified I RQ to be used by PCI/PnP device.
Reserved This setting allows the specified IRQ to be used by a legacy ISA device.
Available and Reserved.
10.4.1.9. DMA Channel 0, DMA Channel 1, DMA Channel 3, DMA Channel 5,
DMA Channel 6, DMA Channel 7
These options allow you to configure the DMA channels.
Available settings are:
Available This setting allows the specified DMA channel t o be used by PCI/PnP device.
Reserved This setting allows the specified DMA channel to be used by a legacy ISA device.
Available and Reserved.
PCI-760 – User’s Guide (V1.10) 63
Page 66

10. AMI BIOS Configuration
10.4.1.10. Reserved Memory Size
This option allows you to specify the memory size for the ISA extension cards (only to be used if the ISA-Bridge is
equipped on the backplane).
Available settings are:
16k, 32k, 64k and Disabled.
If this option is enabled to
16k, 32k or 64k a supplementary option is available: “Reserved Memory Address”.
10.4.1.11. Reserved Memory Address
This option allows you to specify the memory size for the ISA extension cards in the reserved memory address.
Available settings are: C0000, C4000,
For a proper ISA card installation, set the same values of the BIOS options “Reserved Memory Size”
and “Reserved Memory Address” like on the OS level and/or driver level (depending on the installed
C8000, CC000, D0000, D4000, D8000 and DC000.
ISA card).
64 PCI-760 – User’s Guide (V1.10)
Page 67

10. AMI BIOS Configuration
10.5. Boot
In the Boot menu you define the sequence in which the system BIOS searches the drives for system files to start the
operating system.
¾ Boot Settings Configuration
10.5.1.1. Quick Boot
This option allows or restricts the BIOS to perform all POST tests.
It is possible to choose between:
Enabled This setting allows the BIOS to skip certain POST tests to boot faster.
Disabled This setting allows the BIOS to perform all POST tests.
PCI-760 – User’s Guide (V1.10) 65
Enabled and Disabled.
Page 68

10. AMI BIOS Configuration
10.5.1.2. Quiet Boot
This option allows you to modify the boot up screen settings between POST messages or OEM logo.
It is possible to choose between:
Enabled This setting allows the computer system to display the OEM logo instead of POST messages.
Disabled This setting allows the computer system to display the POST messages.
Enabled and Disabled.
If this option is
Enabled the installed AMI-Logo (or a customized Company-Logo, if ordered) will be
displayed during POST.
10.5.1.3. AddOn ROM Display Mode
This option can be used to display add-on ROM (read-only memory) messages (e.g. the SCSI BIOS or VGA BIOS).
It is possible to choose between:
Keep Current A third party BIOS messages are not displayed during system boot.
Force BIOS This setting allows the computer system to force a third party BIOS to display its messages during
Force BIOS and Keep Current.
system boot.
10.5.1.4. Bootup Num-Lock
Set this value to allow the Number Lock setting to be modified during boot up.
It is possible to choose between:
On Set this value to allow the Number Lock on the keyboard to be enabled automatically when the
On and Off.
computer system is boot up. This allows the immediate use of 10-keys numeric keypad located on the
right side of the keyboard. To confirm this, the Number Lock LED light on the keyboard will be lit. This
is the default setting.
Off This option does not enable the keyboard Number Lock automatically. To use the 10-keys on the
keyboard, press the Number Lock key located on the upper left-hand corner of the 10-key pad. The
Number Lock LED on the keyboard will light up when the Number Lock is engaged.
10.5.1.5. PS/2 Mouse Support
This option allows you to activate or to restrict the PS/2 mouse support.
It is possible to choose between:
Enabled Set this value to force the system to reserve an IRQ for PS/2 devices.
Disabled This option will prevent the PS/2 mouse port from using system resources and will prevent the port
Auto, Enabled and Disabled.
from being active. Use this setting if you want to install an external serial mouse.
Auto Set this value to allow the BIOS to auto-detect a PS/2 mouse and to reserve the resources for it.
66 PCI-760 – User’s Guide (V1.10)
Page 69

10. AMI BIOS Configuration
10.5.1.6. Wait For ‘F1’ If Error
This option specifies if errors detected during the boot time, determine the interruption of the boot procedure.
It is possible to choose between:
Enabled The boot procedure is stopped, whenever the BIOS detect an error. The system waits for a user
Enabled and Disabled.
input.
Disabled The boot procedure will be not halted for any error that may be detected.
10.5.1.7. Hit ‘DEL’ Message Display
This option allows you to modify the setting for “Hit ‘DEL’ Message Display”.
It is possible to choose between:
Enabled This setting allows the system to display:
Hit Del to enter Setup
Enabled and Disabled.
during memory initialization.
If “Quiet Boot” option is enabled, the Hit ‘DEL’ message will not display.
Disabled This setting prevents the system to display:
Hit Del to enter Setup
during memory initialization.
If “Quiet Boot” option is enabled, the Hit ‘DEL’ message will not display.
10.5.1.8. Interrupt 19 Capture
Set this value to allow option ROMs such as network controllers to trap BIOS interrupt 19.
It is possible to choose between:
Enabled The BIOS allows option ROMs to trap interrupt 19.
Disabled The BIOS prevents option ROMs from trapping interrupt 19.
Enabled and Disabled.
10.5.1.9. Boot Delay Timeout
This option allows you to enable or to disable the “Boot Delay Time out”.
It is possible to choose between:
Enabled and Disabled.
PCI-760 – User’s Guide (V1.10) 67
Page 70

10. AMI BIOS Configuration
¾ Boot Device Priority
In the Boot Device Priority menu you define the sequence in which the system BIOS searches the drives for system files
to start the operating system.
List of devices available for use as boot devices: (
10.5.1.10. 1st / 2nd, / 3rd, .... / nth Boot Device
Available settings: [SATA: PS-WDC WD800AAJS-00PSA0]; [CD/DVD: PM-HL-DT-STDVD-ROM GDRH2];
[CD/DVD: PM-HL-DT-STDVD-ROM GDRH2]; [USB: Kingston DataTraveler]; [Network: B04 D00 Yukon PXE]; [Network:
B03 D00 Yukon PXE]
Boot Devices (examples) Description
1st Boot Device SATA: PM-Hitachi HDS721616PLA380 Primary Master (not included)
2nd Boot Device CD/DVD: SM-ASUS DVD-E818AT Secondary Master (not included)
3rd Boot Device USB: USB Flash Disk (not included)
In order to boot from LAN (network booting) you have to access the [
Configuration]
Set the Network device in
and Disabled.
and set “Enable” for the corresponding LAN Controller and the appropriate option [LAN Boot].
[BIOS Setup/Boot/Boot Device Priority] as [1st Boot Device].
Each of these changes will be adopted only, if “Save Changes and Exit” is selected after changing of the
default settings. Reboot your system. Refer to the chapter “
“
10.7.2.5 LAN Boot”
the possible selection is depending on the system configuration).
BIOS Setup/Chipset/South Bridge
10.7.2.41. / 2. / 3. Ethernet Controller” and
Boot Devices Priority (example for Network Device as 1st boot device) Description
1st Boot Device Network: IBA GE Slot 00C8 v 1270
2nd Boot Device CD/DVD: SM-ASUS DVD-E818AT Secondary Master (not included)
3rd Boot Device USB: USB Flash Disk (not included)
4th Boot Device SATA: PM-Hitachi HDS721616PLA380 Primary Master (not included)
68 PCI-760 – User’s Guide (V1.10)
Page 71

10. AMI BIOS Configuration
10.6. Security
PCI-760 supports Supervisor and User password.
Valid password (Supervisor and User) can be a 1 to 6 alphanumeric characters combination.
If you are using both passwords the Supervisor password must be set first.
Keep a record of the new password when the password is changed. If you forget the password, you
must erase the system configuration information in NVRAM.
The system can be configured so that all users must enter a password every time the system boots or when BIOS Setup
is executed, using either or either the Supervisor password or User password.
The Supervisor and User passwords activate two different levels of password security.
If you select password support, you are prompted for a one to six character password. Type the password on the
keyboard. The password does not appear on the screen when typed. Make sure you write it down. If you forget it, you
must drain NVRAM and reconfigure.
10.6.1. Supervisor Password
This field indicates whether a supervisor password has been set.
If the password has been installed,
Installed displays. If not, Not Installed displays.
10.6.2. User Password
This field indicates whether a user password has been set. If the password has been installed, Installed displays. If not,
Not Installed displays.
PCI-760 – User’s Guide (V1.10) 69
Page 72

10. AMI BIOS Configuration
10.6.2.1. Change Supervisor Password
Select this option and press <Enter> to access the sub menu.
You can use the sub menu to change the supervisor password. Select the “Change Supervisor Password” option from
the Security Setup menu and press <Enter>.
“Enter New Password:” input field appears. Valid password can be a 1 to 6 alphanumeric characters combination. Type
the password and press <Enter>. The screen does not display the characters entered. “Confirm New Password:” input
field appears. Retype the password as prompted and press <Enter>. If the password confirmation is incorrect, an error
message appears. The password is stored in NVRAM.
70 PCI-760 – User’s Guide (V1.10)
Page 73

10. AMI BIOS Configuration
If a Supervisor Password is installed two options are available:
“User Access Level” with following settings: Full Access, Limited, View Only, and No Access.
“Password Check” with following settings: Setup and Always.
10.6.2.2. Change User Password
Select this option and press <Enter> to access the sub menu.
You can use the sub menu to change the user password. Select Change User Password from the Security Setup menu
and press <Enter>.
“Enter New Password:” input field appears. Valid password can be a 1 to 6 alphanumeric characters combination. Type
the password and press <Enter>. The screen does not display the characters entered. “Confirm New Password:” input
field appears. Retype the password as prompted and press <Enter>. If the password confirmation is incorrect, an error
message appears. The password is stored in NVRAM.
If a User Password is installed are available the
“Clear User Password” option:
PCI-760 – User’s Guide (V1.10) 71
Page 74

10. AMI BIOS Configuration
10.7. Chipset
All “Chipset” BIOS Setup options are described in this section. The “Chipset” BIOS Setup screen is shown below.
10.7.1. North Bridge Chipset Configuration
You can use this field to select options for the NorthBridge chipset configuration.
10.7.1.1. Memory Remap Feature
This option allows you to enable or disable the remapping of the overlapped PCI memory above the physical memory.
The available settings are:
10.7.1.2. DRAM Frequency
The available settings are:
Auto, 533 MHz, 667 MHz, 800 MHz and 1067 MHz.
72 PCI-760 – User’s Guide (V1.10)
Enabled and Disabled.
Page 75

10. AMI BIOS Configuration
10.7.1.3. Configure DRAM Timing by SPD
The available settings are: Enabled and Disabled.
If the [
Configure DRAM Timing by SPD] option is set to “disabled” are available additional settings (refer to the
picture below).
10.7.1.4. DRAM CAS# Latency
Available settings: 3, 4, 5 and 6.
10.7.1.5. DRAM RAS# to CAS# Delay
Available settings: 3 DRAM Clocks, 4 DRAM Clocks, 5 DRAM Clocks and 6 DRAM Clocks.
10.7.1.6. DRAM RAS# Precharge
Available settings: 3 DRAM Clocks, 4 DRAM Clocks, 5 DRAM Clocks and 6 DRAM Clocks.
10.7.1.7. DRAM RAS# Activate to Precha
Available settings: 9 DRAM Clocks, 10 DRAM Clocks, 11 DRAM Clocks,
12 DRAM Clocks, 13 DRAM Clocks, 14 DRAM Clocks
10.7.1.8. Memory Hole
and 15 DRAM Clocks.
In order to improve performance, certain space in memory can be reserved for ISA cards. This memory must be mapped
into the memory space 15MB-16MB.
The available settings are:
10.7.1.9. Initiate Graphic Adapter
15MB-16MB and Disabled.
These settings allow you to select the graphics controller used as primary boot device.The available settings are: IGD,
PCI/IGD.
PEG: PCI Express Graphics
PCI: PCI Device
10.7.1.10. PEG Port Configuration
PEG Port: Available settings are: Disabled and Auto.
PCI-760 – User’s Guide (V1.10) 73
Page 76

10. AMI BIOS Configuration
¾ Video Function Configuration
10.7.1.11. DVMT Mode Select
This option allows you to select the DVMT operating mode.
Available settings are:
Fixed Mode and DVMT Mode.
10.7.1.12. DVMT/Fixed Memory
Available settings are: Maximum DVTM, 128MB and 256MB.
10.7.1.13. Spread Spectrum Clock
Available settings are: Enabled and Disabled.
74 PCI-760 – User’s Guide (V1.10)
Page 77

10. AMI BIOS Configuration
10.7.2. South Bridge Chipset Configuration
You can use this field to select options for the SouthBridge chipset configuration.
10.7.2.1. USB Function
This option allows you to enable or disable the host controllers.
Possible settings are:
10.7.2.2. USB Port Configure
Possible settings are: 6x6 USB Ports and 8x4 USB Ports.
10.7.2.3. USB 2.0 Controller
This option (EHCI USB controller function) is always enabled.
10.7.2.4. 1. / 2. / 3. Ethernet Controller
These options allow you to enable or to disable the corresponding Ethernet controller.
Possible settings are:
Disabled, 2 USB Ports, 4 USB Ports, 6 USB Ports, 8 USB Ports, 10 USB Ports and 12 USB Ports.
Enabled and Disabled.
1. Ethernet Controller is always
2. Ethernet Controller is set by default to Enabled.
3. Ethernet Controller is set by default to Disabled.
In order to use the LAN as boot device refer to the chapter 10.5.1.10 “1st / 2nd, / 3rd, .... / nth Boot Device”
Enabled.
PCI-760 – User’s Guide (V1.10) 75
Page 78

10. AMI BIOS Configuration
10.7.2.5. LAN Boot
Possible settings are: Enabled and Disabled.
In order to use the LAN as boot device refer to the chapter
10.7.2.6. Wake Up From S5
Possible settings are: Enabled and Disabled.
10.7.2.7. Wake Up From S5
Possible settings are: Enabled and Disabled.
10.7.2.8. HDA Controller
This option allows you to enable or disable the HAD audio controller.
Possible settings are:
10.7.2.9. SMBUS Controller
Enabled and Disabled.
This option allows you to enable or to disable the SMBUS controller.
Possible settings are:
10.7.2.10. SLP_S4# Min Assertion Width
Enabled and Disabled.
The available settings are: 1 to 2 seconds, 2 to 3 seconds,
3 to 4 seconds and 4 to 5 seconds.
10.5.1.10 “1st / 2nd, / 3rd, .... / nth Boot Device”
10.7.2.11. Restore on AC Power Loss
10.7.2.12.
This option allows you to specify the state the system should return to when power is restored after AC power
loss.
The available settings are:
10.7.2.13. PCIE Ports Configuration
10.7.2.14. PCIE Port 0 / PCIE Port 1 / PCIE Port 2 / PCIE Port 3
Power Off, Power On and Last State.
Possible settings are: Auto, Enabled and Disabled.
10.7.2.15. PCIE High Priority Port
Available settings are: Disabled, Port 0, Port 1, Port 2, Port 3, 2. Ethernet and 1. Ethernet.
10.7.2.16. PCIE Port 0 IOxAPIC Enable / PCIE Port 1 IOxAPIC Enable / PCIE Port 2 IOxAPIC Enable /
PCIE Port 3 IOxAPIC Enable
Available settings are: Disabled and Enabled.
76 PCI-760 – User’s Guide (V1.10)
Page 79

10. AMI BIOS Configuration
10.7.3. ME Subsystem Configuration
10.7.3.1. ME HECI Configuration
ME-HECI
This option is set by default to Enabled.
ME-IDER/ME-KT
Possible settings are: Enabled and Disabled.
10.7.3.2. ME QST Configuration
FAN Speed Monitor 1 / 2 / 3
Possible settings are: Enabled and Disabled.
QST Configuration
Possible settings are: Locked and Unlocked.
QST SST BUS
Possible settings are: Locked and Unlocked.
QST Sensor Thresholds
Possible settings are: Locked and Unlocked.
QST Manual Fan CTRL
Possible settings are: Locked and Unlocked.
QST Chipset
Possible settings are: Locked and Unlocked.
Thermal Sensor
Possible settings are: Hidden and Displayed.
PCI-760 – User’s Guide (V1.10) 77
Page 80

10. AMI BIOS Configuration
¾ ME QST Hardware Health Configuration
78 PCI-760 – User’s Guide (V1.10)
Page 81

10. AMI BIOS Configuration
10.8. Exit
10.8.1. Save Changes and Exit
This field saves the settings you have made and exits BIOS Setup.
10.8.2. Discard Changes and Exit
This field exits BIOS Setup without saving the new settings.
10.8.3. Discard Changes
This field resets all values to those that were active when the computer was turned on without exiting BI OS Setup.
10.8.4. Load Optimal Defaults
This option allows you to load the default values of your system configuration. These default settings (manufacturing
settings) are optimal and enable all high performance features.
10.8.5. Load Failsafe Defaults
By this option the system can reload all default settings, which are permanently stored in the BIOS-ROM.
These settings are not the optimized default settings (manufacturing defaults) for your system, but can be used, if after
changes, the system does not run reliably. The Fail-Safe settings are designed for maximum stability, but not maximum
performance.
PCI-760 – User’s Guide (V1.10) 79
Page 82

11. Technical Data
11. Technical Data
PCI-760 Board Main Specifications
Processor Intel® Core™ 2 Duo/Quad, (Desktop); Socket 775
For CPU frequency, please refer to the actually data sheet on the web page:
Board Type PICMG 1.3 standard, full size
Memory Socket 4x 240-pin DDR2 DIMMs
Memory Up to 8GB of 667/800 MHz DDR2 SDRAM (dual channel), unbuffered, non-ECC;
Memory Type: 256 Mb, 512Mb, 1Gb
Cache Up to4 MB Level 2 depending on the installed processor
Chipset Intel® 82Q35 GMCH with integrated Intel® GMA 3100 (Graphics Media Accelerator)
Intel® ICH9DO with Intel® Matrix Storage Technology for SATA RAID 0, 1, 5, 10 configuration
LPC Super I/O Winbond W83627HF
Gigabit Ethernet
Controllers
Audio Integrated HDA (High Definition Audio) controller (ICH9DO) with ALC882 Codec
BIOS AMI BIOS PnP; ACPI 3.0;
Watchdog Time-out occurs after 255 seconds/minutes
Operating Systems Information about the applicable operating systems refer to the web page: www.kontron.com
External Connectors
(on the slot bracket)
Onboard
Connectors
The table is continued on the next page.
80 PCI-760 – User’s Guide (V1.10)
1x Intel® 82566DM (ICH9DO) LAN-Controller
1x Realtek RTL8111B LAN Controller
1x Realtek 8110SC LAN Controller
4MB (32Mbits) Flash BIOS ROM
support@kontron.com
or:
1x Ethernet (LAN1) (10/100/1000 Mbps, [Intel® AMT (Active-Management-Technology)
1x Ethernet (LAN2) 10/100/1000 Mbps)
2x USB (2.0)
1x VGA
4x SATA II, 3Gbps
1x MiniPCI (Option)
2x Serial Port
1x COM1 (RS232)
1x COM2 (RS232) configurable RS422, RS485
1x Parallel Port
6x USB (2.0)
1x Audio (Line-In, Line-Out, Mic-In)
1x Audio (
1x SPDIF-In&-Out (supports coax. and optical fibre
via additional Multimedia Bracket)
1x Multifunctional Connector with support for:
1x PS/2 Keyboard
1x PS/2 Mouse
1x Power LED
1x Reset Button
1x Speaker
1x HDD LED
1x Hardware Monitor supports monitoring of:
4x Fan-Taacho
Power Button
Chassis Intruder
1x SMBus
4x user defined GPIO[0-3]
3x 12V Fan Power Connector (4-pin)
1x 12V ATX Power Connector
1x Additional Power Button Connecor
1x Suspend-LED
1x Keyboard&Mouse
1x Keyboard Lock
1x LPC-Bus (reserved)
1x Lithium Battery Socket
1x External Battery Connector
1x Connector for Temp. Sensor (factory-fitted with Temperature Sensor)
Surround L/R, Side surround L/R, Center/LFE),
www.kontron.com
Page 83

11. Technical Data
Onboard Jumpers
Power Supply Lithium battery 3.0 V for RTC, Type: CR2032
2x Configuration COM2 with Termination Resistors
1x Disable CMOS Backup Restore Function
1x RTC Reset (Clear CMOS)
External 12V ATX: [option: via on-board or backplane]
Power via backplane and PICMG 1.3 edge connector:
+3.3 VSB, +5.0 VSB, +12.0 V, +5.0 V, +3.3 V
11.1. Electrical Specifications
Board
Version
PCI-760 ATX PSU
Type of the external PSU Inputs via
Backplane and
PICMG 1.3 edge connector
On-board 12 V ATX power connector: J31 or
12V ATX power connector on the backplane
+3.3 VSB, +5 VSB,
+3.3 V, +5.0 V, +12.0 V
+12V
11.2. Mechanical Specifications
Dimensions 338.58 x 126.39 x 22.7 mm (13.33" x 4.98" x 0.89")
(height without CPU heatsink)
Weight 0.455 kg (1.003 lbs.) (without CPU fan)
11.3. Environmental Specifications
Operating Temperature 0 °C to 60 °C (32 °F to 140 °F )
Storage/Transport
Temperature
Relative Humidity 5 % to 95 % (non-condensing)
-40 °C to +70 °C (-40 °F to 158 °F)
11.4. CE Directives
CE Directives
Electrical Safety
ElectroMagnetic Compatibility
(EMC)
PCI-760 – User’s Guide (V1.10) 81
General Product Safety Directive (GPSD) 2001/95/EC
Low Voltage Directive (LVD) 2006/95/EC
EMC Directive 2004/108/EC
Page 84

12. Technical Support
12. Technical Support
For technical support, please contact our Technical Support department.
German headquarter Hotline:
TEL: (+49) 8165-77 112
FAX: (+49) 8165-77 110
E-mail:
Make sure you have the following on hand when you call:
Be ready to explain the nature of your problem to the service technician.
If you have any questions about Kontron Embedded Computers or our products and services, you may reach us at the
aforementioned numbers, or at:
Kontron Embedded Computers GmbH
Oskar von Miller-Str. 1
85386 Eching
Germany
support@kontron.com
• the unit part id number (P/No #),
• and the serial number (S/No #) of the unit (provide the serial
number found on the label, placed on the rear side of the board).
www.kontron.com or by writing to:
12.1. Returning Defective Merchandise
Before returning any merchandise please:
Download the form for returning a device with an RMA No. [RMA (
www.kontron.com / Support /RMA Information; contact our Customer Service department to obtain an RMA No.:
Fax: (+49) 8165-77 412
e-Mail: service@kontron.com
4. Ensure that you have received an RMA No. from Kontron Customer Services before returning any device. Write this
number clearly on the outside of the package that you are sending to us.
5. Describe the fault that has occurred.
6. Please provide the name and telephone number of a person we can contact t o obtain more information, where
necessary. Where possible, please enclose all the necessary customs documents and invoices.
7. When returning a device:
• Pack it securely in its original box.
• Enclose a copy of the RMA form with the consignment.
Corporate Offices
Return of Material Authorization)] from our website
Europe, Middle East & Africa
Oskar-von-Miller-Str. 1
85386 Eching/Munich
Germany
Tel.: +49 (0)8165/ 77 777
Fax: +49 (0)8165/ 77 219
info@kontron.com
82 PCI-760 – User’s Guide (V1.10)
North America
14118 Stowe Drive
Poway, CA 92064-7147
USA
Tel.: +1 888 294 4558
Fax: +1 858 677 0898
info@us.kontron.com
Asia Pacific
17 Building,Block #1,ABP.
188 Southern West 4th Ring
Beijing 100070, P.R.China
Tel.: + 86 10 63751188
Fax: + 86 10 83682438
info@kontron.cn
 Loading...