

Page 1

User Manual
SU2/3
www.minoltaeurope.com
The essentials of imaging
PageScope Light &
Scanner Mode
Page 2

Page 3

Contents
Contents
1 Before Making Connections and Specifying Settings
1.1 Welcome ........................................................................................1-1
1.2 Safety Precautions........................................................................1-2
General precautions...................................................................1-2
Trademark Acknowledgements ..................................................1-3
1.3 Use r In s tr u c tions ... .. ........ .. .. ........ .. ... ....... .. ... ....... .. ... ....... ... .. ....... ..1 -4
For the U.S.A. Users ..................................................................1-4
For Canada Users............. .........................................................1-4
For European Users................ ............................... .. .......... .. ......1-4
For Users of the Class B regulation’s countries..... .......... ..........1-5
For Users except the Class B regul ation’s countries...... .. ..........1-5
1.4 Enclosed Accessories............ .. .................. ........... .......... .......... ...1-6
1.5 Preparing the LAN Cable and IP Address............ .......... .............1-6
1.6 Acceptance of the End User License Agreement......................1-7
1.7 Com p a t ib le O p er a ti n g Sy st e m s.......... ........ .. ... ....... .. ... ....... .. ... .... 1 -7
1.8 Ope rating Env i ro n m e n t o f Utilities............... ... .. ....... ... .. ....... ... .. ..1-7
1.9 Specifying the IP Address............................................................1-8
2 Maki ng Connections
2.1 LAN C on ne c tion....................... ... .. ....... ... .. ........ .. .. ........ .. ... ....... .. ..2 -1
Connecting the LAN cable......... .. .................... .. .. .......... ............ .2-1
LED ind ic a to rs . ... .. ........ .. .. ........ .. ... ....... .. ... ....... .. ... ....... ... .. ....... ..2 -2
2.2 En v ir o n me n ts fo r T ra n s m it ti n g S c an D a ta ....... .. ... ....... ... ...........2-3
Required environment................................................................2-3
3 Network Settings
3.1 List of Network Settings ...............................................................3-1
3.2 Specifying Network Settings........................................................3-4
Displ ay i ng th e Netw o r k S e ttings scre e n......... ....... .. ............... .. ..3 -4
Printing the list of settings...........................................................3-6
4 Installing the Utilities
4.1 Ut il ities disk..................... .. .. ........ .. ... ....... .. ... ....... .. ... ....... ... ...........4-1
4.2 Installing IP Scanner (Windows Me, 98/95, XP,
Scanner Mode & Page Scope Light i
Page 4

2000 and NT4.0).... .. .......... .. .. .......... .. .......... .................... .. .. ..........4-1
4.3 Uninstalling IP Scanner ............................................................... 4-6
Uninstalli ng IP Scanner (Windows Me, 98/95 and NT4.0).........4-6
Uninstalli ng (Windows XP and 2000)........................ ............ .....4-7
5 Features of the Network Functions
5.1 Scan to E-mail............................................................................... 5-2
5.2 Scan to Server (FTP) .................................................................... 5-3
5.3 Scan to PC (FTP) .......................................................................... 5-5
5.4 Scan to HDD.................................................................................. 5-5
5.5 Internet Faxing.............................................................................. 5-6
5.6 IP Address FAX (LAN-FAX) ................ .. ....................... .. .. .. ..........5-7
5.7 Scan to PC (SMTP) ....................................................................... 5-8
5.8 IP Scanner..................................................................................... 5-9
5.9 Do c u me n t F o rw o r d in g /A r c hi v e Distribut io n.......... ....... .. ... ...... 5 -1 0
5.10 Network Fax Transmission........................................................ 5-11
6 Using PageScope Light
6.1 Sy s tem R e q u ir ements............ .. ....... ... .. ........ .. .. ........ .. ... ....... .. ... ... 6-1
Computer (Software).................................................................. 6-1
Network...................................................................................... 6-1
Di3510/Di3010/Di2510/Di2010/Di3510f/Di3010f/
Di2510f/Di2010f.........................................................................6-1
Network Interface Card .............................................................. 6-1
Any of the following options must be installed. .......................... 6-1
6.2 Accessing PageScope Light ................... .. .......... .. .................... ..6-3
6.3 Using Page S c o p e Ligh t .... .. ........ .. .. ........ .. ... ....... .. ... ....... .. ... ....... . 6 -4
6.4 Logging Into Administr ator Mode................................. ..............6-4
6.5 Selecting the Displ ay Language ......................... .. ............ ..........6-6
6.6 Structure of Pages........................................................................6-7
Contents
7 Performing a Scan to E-Mail Operation
7.1 Bas ic Tr a n s m is s io n... ... ............... .. .. ........ .. ............... .. ... ....... .. ... ... 7-1
If the tran sm ission cou ld n ot be com p le te d.. ............... .. .. ........ .. . 7-3
7.2 Selecting a Recipient From the List on the
One-Touch Screen........................................................................ 7-5
7.3 Selecting a Recipient by Searching for It by Name.............. .....7-6
ii Scanner Mode & Page Scope Light
Page 5

Contents
7.4 Typing In the Number of the One-Touch
Key for the Recipient ....................................................................7-8
7.5 Reg is tering a Re c ip ie n t ......... .. ... ....... .. ... ....... ... .. ....... ... .. ....... ... .. ..7-9
Registering indexes....................................................................7-9
Registering one-touch keys............ .. ................... .......... .......... .7-12
7.6 Changing/Deleting Recipients ...................................................7-15
7.7 Copying a One-Touch Key.........................................................7-16
7.8 Sp e c if yi n g the S ca n n in g Op tio n s................. ... .. ....... ... .. ....... ... ..7 -1 8
7.8.1 Qual ity & Re du c ti o n S c re e n ....... ... .. ....... ... .. ....... ... .. ........ .. .. .....7-18
Quality tab ................................................................................7-18
Contrast tab..............................................................................7-18
Reduction/Area tab........ .......... .. .. .......... .. .......... .. .......... ...........7-19
7.8.2 FAX Me n u Scr e e n .......... .. ... ....... ... .. ....... ... .. ....... ... .. ........ .. .. .....7-20
Network tab ..............................................................................7-20
7.9 Inserting Text Into a Transmission Document.........................7-22
8 Performing a Scan to PC (FTP) Operation
8.1 Bas ic Tr a n s m is s io n ... .............. ... .. ....... ... .. ........ .. .. ........ .. ... ....... .. ..8 -1
8.2 Reg is tering a Re c ip ie n t ................ ... .. ....... ... .. ....... ... .. ........ .. .. .......8-3
8.3 Changing/Deleting Recipients .....................................................8-6
8.4 Sp e c if yi n g the S ca n n in g Op tio n s........................ ... .. ........ .. .. .......8 -7
8.4.1 Quality/Reduction Screen............ .......... .....................................8-7
Quality tab ..................................................................................8-7
Contrast tab................................................................................8-7
Reduction/Area tab........ .......... .. .. .......... .. .......... .. .......... ............ .8-8
8.4.2 FAX Me n u Scr e e n .......... .. ... ....... ... .. ....... ... .. ....... ... .. ........ .. .. .......8 -9
9 Performing a Scan to Server (FTP) Operation
9.1 Bas ic Tr a n s m is s io n ... .............. ... .. ....... ... .. ........ .. .. ........ .. ... ....... .. ..9 -1
9.2 Reg is tering a Re c ip ie n t ................ ... .. ....... ... .. ....... ... .. ........ .. .. .......9-3
9.3 Changing/Deleting Recipients .....................................................9-7
9.4 Sp e c if yi n g the S ca n n in g Op tio n s........................ ... .. ........ .. .. .......9 -8
9.4.1 Qual ity & Re du c ti o n S c re e n ....... ... .. ....... ... .. ....... ... .. ........ .. .. .......9-8
Quality tab ..................................................................................9-8
Contrast tab................................................................................9-8
Reduction/Area tab........ .......... .. .. .......... .. .......... .. .......... ............ .9-9
9.4.2 FAX Me n u Scr e e n .......... .. ... ....... ... .. ....... ... .. ....... ... .. ........ .. .. .....9-10
Network tab ..............................................................................9-10
Scanner Mode & Page Scope Light iii
Page 6

9.5 URL R e po r t..... ........ .. .. ........ .. ... ....... .. ... ....... ... .. ....... ... .. ....... ... .. .... 9-11
10 Performing a Scan to HDD Operation
10.1 Basic Tr a n s m is s io n... ... ............... .. .. ........ .. ... ....... .. ... ....... .. ... ...... 1 0 -1
10.2 Registering a Rec ip ie n t................. .. ... ....... ... .. ....... ... .. ....... ... ...... 10 -2
Creating a mail box (PageScope Light)...................................10-2
10.3 Chang in g /D e l et in g R ec i pi e n ts.... .. ....... ... .. ....... ... .. ........ .. .. ........ . 1 0 -6
10.4 Specifying the S ca n n ing O p ti on s ....... ... .. ....... ... .. ........ .. .. ........ . 1 0 -7
10.4.1 [Quality &Reduction Screen]...................................... .......... .....10-7
Quality tab................................................................................10-7
Contrast tab ............................................................................. 10-7
Reduction/Area tab .................................................................. 10-8
10.4.2 FAX Menu Sc re e n... ... ............... .. .. ........ .. ... ....... .. ... ....... .. ... ...... 1 0 -9
Network tab.............................................................................. 10-9
10.4.3 Specifying th e Fil e S to r age Life ......... ... .. ....... ... .. ........ .. .. ....... 1 0 -1 0
10.5 Retri ev i n g S c an D a ta Us i ng Pa ge S c o p e Ligh t . ....... ... ........... 10-11
10.6 URL Re port........ .. ... ....... .. ... ....... ... .. ....... ... .. ....... ... .. ........ .. .. ....... 1 0 -1 3
Contents
iv Scanner Mode & Page Scope Light
Page 7

Before Making Connections and Specifying Settings
1 Before Making Connections and
Specifying Settings
1.1 Welcome
Congratulations on your selection of Min olta Pi3505e printer controller
and Network Interface Car d.
This User Manual explains the preparations to be made to use Scanner
Mode and gives a short outline over PageScope Light.
With the Scanner Mode paper documents can easily be converted to
electronic data and the scanned data can be sent through the network.
This equipment g ive s you enhan ced p ossibi lti es o f sendi ng an d recei ving
scanned data and inter net faxes.
The complete descri ption both of the Scanner Mode and PageScope Light
you ca n f ind on th e CD.
First read thi s manual ca refully and t horoughly; then, keep it close at hand
so you can refer to it whenever it becomes necessar y.
Some of the screens shown in this m anual may look different from what
you will view in actual applications.
1
Scanner Mode & Page Scope Light 1-1
Page 8

1
Before Making Connections and Specifying Settings
1.2 Safety Precautions
Before making connections and specifying settings, be sur e to read the
precautions described in “Precautions” of the Advanced Information
provided with copier .
General precautions
1. The reproducti on of the content of this manu al, either partiall y or in f ull,
is prohibited without prior permission.
2. The content of this manual i s subject to change without notice.
3. Unauthorized duplication or modification is strictly prohibited.
4. This manual was created with careful attenti on to conten t; however , if
inaccuracies, errors or omissions are noticed, please contact your
sales or service representative.
5. Some network appli cation funct ions may n ot be support ed, dependi ng
on the operating environment or other softwa re.
The actual perform ance of network applic ation functions is det ermined
by various factor s, such as the system conf iguration, customer data
and operator controls.
Since the operating envi ronment of network appli cation functions
differs depending on the customer, the confi guration of specif ic
products and the suitabi lity of the application software should be
determined speci fically for the customer.
6. We assume no responsibility for consequences arising from use,
regardless of items 4 and 5 mentioned above.
7. The software provided wit h the device, the softwa re i ncluded on the
CD-ROM and information su ch as the desi gn of and material s re lated
to this manual ar e t he sol e proper ty of NEC Corpor ation , NEC Access
Technica and their licensors.
NEC Corporation, NEC Access Techni ca and their licensor s own all
patents, copyrights and titles to this manual, from the design,
production and duplication to the use and marketing righ ts. However,
these limitations do not apply if written permission to transfer the
above-mentioned rights to another company is received.
1-2 Scanner Mode & Page Scope Light
Page 9

Before Making Connections and Specifying Settings
Trademark Acknowledgements
Windows®, Windows NT®, Microsoft® and its logo are registered
trademarks of Micr osoft Corporation in the Uni ted States and other
countries.
Ethernet is a registered trademark of Xerox Corporation.
Adobe® and Acrobat® are trademarks of Adobe Systems Incorporated.
Network FAX is a registered trad em ark of Comuse Co., Ltd.
Minolta, PageScope Light and DiALTA are registered trademarks of
Minolta Co., Ltd.
All other company names and product names mention ed in t his manual
are trademarks or registered trademarks of their respect ive companies.
This product uses the Soft ware Development Kit develo ped by Peerless
Systems Corporati on.
Copyright© 2001 Peerless Systems Corporation. All rights reserved.
This product uses the NEST Office SDK developed by Novell, Inc.
Copyright© 1999 Novell , Inc. NEST is a trademark of Novell, Inc . in the
United States and other countries.
1
Windows® XP is the abbreviat ion for the Microsoft® Windows® XP
operating system.
Windows® Me is the abbreviati on for the Microsoft® Windows®
Millennium Edition operating system.
Windows® 98 is the abbreviation for the Microsoft ® W indows® 98
operating system.
Windows® 95 is the abbreviation for the Microsoft ® W indows® 95
operating system.
Windows® 2000 is the abbreviation for the Microsoft® Windows® 2000
Professional operating system and the Microsoft® Windows® 2000
Server operating system.
Windows® NT 4.0 is the abbreviation for the Microsoft® Windows® NT
Workstation op erati ng syst em Vers ion 4. 0 and the Mic rosoft® W indows ®
NT Server network operating system Version 4.0.
Scanner Mode & Page Scope Light 1-3
Page 10
1
Before Making Connections and Specifying Settings
1.3 User Instructions
For the U.S.A. Users
FCC Part 15-Radio Frequency Devices
This device complies with Part 15 of the FCC Rules. Operation is subject to the following two
conditions: (1) This device may not cause harmful interference, and (2) this device must
accept any interference received, including interference that may cause undesired operation.
NOTE
This equipment has been tested and found to comply with the limits for a Class A digital
device, pursuant to Part 15 of the FCC Rules. These limits are designed to provide
reasonable protection against harmful interference when the equipment is operated in a
commercial environment. This equipment generates, uses, and radiate radio frequency
energy and if not installed and used in accordance with the instruction manual, may cause
harmful interference to radio communications.
Operation of this equipment in a residential area is likely to cause harmful interference in
which case the user will be required to correct the interference at his own expense.
WARNING
The design and production of this unit conform to FCC Regulations, and any changes or
modifications must be registered with the FCC and are subject to FCC control. Any changes
made by purchaser or user without first contacting the manufacturer will be subject to penalty
under FCC regulations.
FCC-F02
This device must be used with shielded interface cables. The use of non-shielded cables is
likely to result in interference with radio communications and is prohibited under FCC rules.
For Canada Users
Interference-Causing Equipment Standard (ICES-003 Issue 3)
This Class A digital apparatus complied with Canadian ICES-003
Cet appareil numérique de la classe A est conforme à la norme NMB-003 du Canada.
IC-F03
For European Users
CE Marking (Declarati on of Conf ormity)
This product complies with the following EU directives:
89/336/EEC, 73/23/EEC and 93/68/EEC directives.
This declaration is valid for the area of the European Union.
This device must be used with shielded interface cables. The use of non-shielded cables is
likely to result in interference with radio communications and is prohibited under EU
directives.
1-4 Scanner Mode & Page Scope Light
Page 11
Before Making Connections and Specifying Settings
For Users of the Class B regulation’s count ri es
This device must be used with shielded interface cables. The use of non-shielded cables is
likely to result in interference with radio communications and is prohibited under CISPR 22
rules and loca l rules.
For Users except the Class B regulation’s countries
WARNING
This is a Class A product. In a domestic environment this product may cause radio
interference in which case the user may be required to take adequate measures.
This device must be used with shielded interface cables. The use of non-shielded cables is
likely to result in interference with radio communications and is prohibited under CISPR 22
rules and loca l rules.
1
Scanner Mode & Page Scope Light 1-5
Page 12

1
Before Making Connections and Specifying Settings
1.4 Enclosed Accessories
Network Scan K it ( S U -2)
G CD-ROM containing electronic manuals
Internet Fax & Network Scan Kit (SU-3)
G CD-ROM containing electronic manuals
G Util ity Disk (CD-ROM)
Tip
In order to use the scanning operations, the Network Interface Card
(NC-4) and the Network Sc an Kit (SU-2) or the I nternet Fax & Network
Scan Kit (SU-3) must be install ed.
CAUTION
Only use the CD-ROM in a player that is CD-ROM-compatibl e.
§ If a player not compatible with the CD-RO M format is used, your ear s
or speakers may be damaged by t he loud noise produced.
1.5 Preparing the LAN Cable and IP Address
In order to use the network application functions, a LAN cable and a
registered IP address are required.
The LAN cable is not included; it mus t be pre pared by the user.
Note
The LAN cable should be a cable for Fast Ethernet 100BASE-TX
(Category 5).
1-6 Scanner Mode & Page Scope Light
Page 13
Before Making Connections and Specifying Settings
1.6 Acceptance of the End User License Agreement
In order to use the network functions, you must agree not t o m ake illegal
copies of or pass to unlicensed persons the software provided with the
device or the software i ncluded on the CD-ROM. Before using these
functions, you must read the enclos ed End User License Agreement and
agree to the terms of use for th e soft ware.
1.7 Compatible Operating Systems
Utility Operating System
IP Scanner Windows® Me/Windows® 98/Windows® 95/Windows® 2000/
Network FAX (EX Lite)
(Network FAX)
* Network FAX (EX Lite) is not supported by Windows® 95.
Windows® NT4.0
Windows® Me/Windows® 98/Windows® XP/Windows® 2000/
Windows® NT4.0
1.8 Operating Environment of Utilities
Network FAX application IP Scanner
Processor Pentium 133 MHz or higher
Memory 24 MB or more
(48 MB recommended)
Hard disk free space 50 MB or more
* 64 MB or more (128 MB recommended) for Windows® XP or Windows® 2000
32 MB or more
(64 MB recommended)*
1
Scanner Mode & Page Scope Light 1-7
Page 14
1
Before Making Connections and Specifying Settings
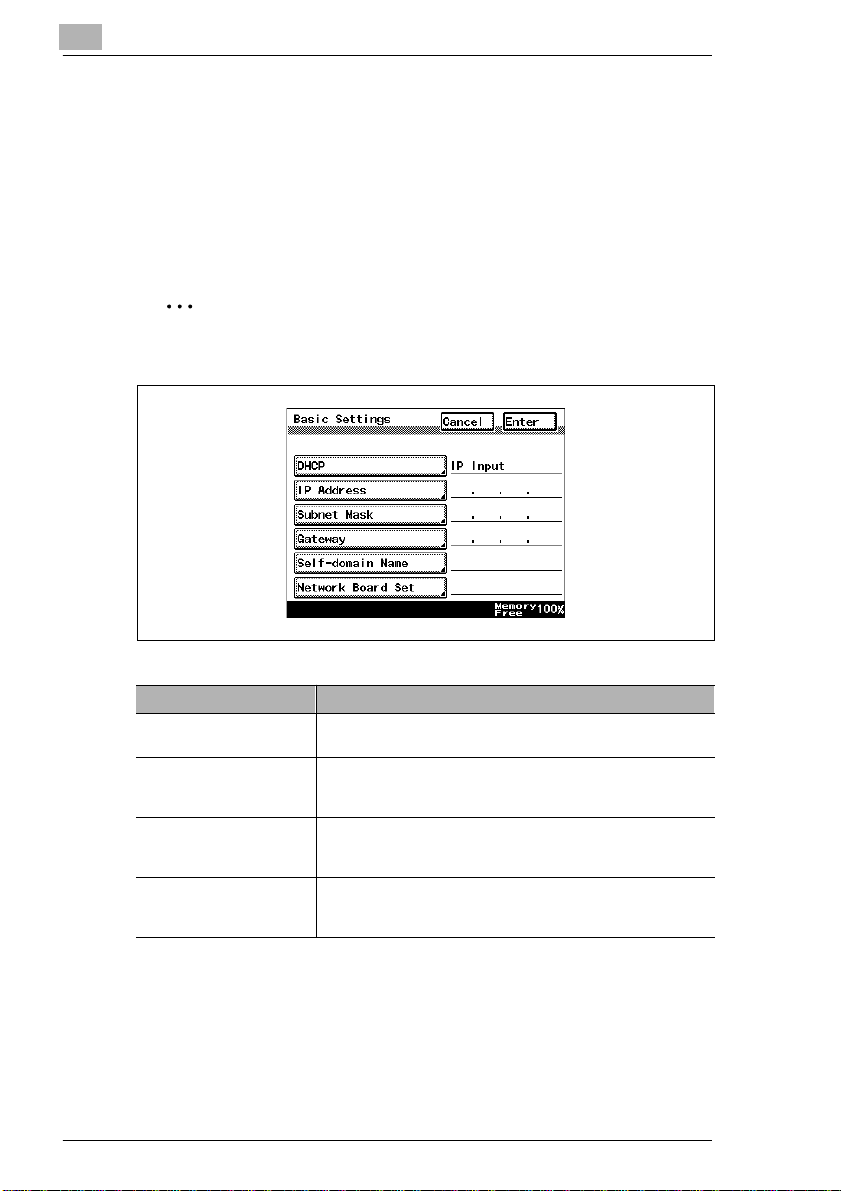
1.9 Specifying the IP Address
Be sure to specify the IP address of the copier befor e using the network
functions.
If network operati ons are performed before the IP address is specified,
malfunctions will occur.
Specify the IP addre ss fr om the Basic Settings screen.
Note
After changing the settings, turn the unit off, then on again.
Parameter Description
DHCP Specify whether to automatically retrieve the IP address from
IP Address Type in the IP address of this unit.
Subnet Mask Type in the subnet mask of the connected network.
Gateway Type in the default gateway address of the connected network.
the DHCP server or to specify a fixed IP address.
*Type in the IP address only if the “DHCP” parameter is set to
“IP Input”.
*Type in the subnet mask only if the “DHCP” parameter is set
to “IP Input”.
*Type in the default gateway address only if the “DHCP”
parameter is set to “IP Input”.
1-8 Scanner Mode & Page Scope Light
Page 15

Before Making Connections and Specifying Settings
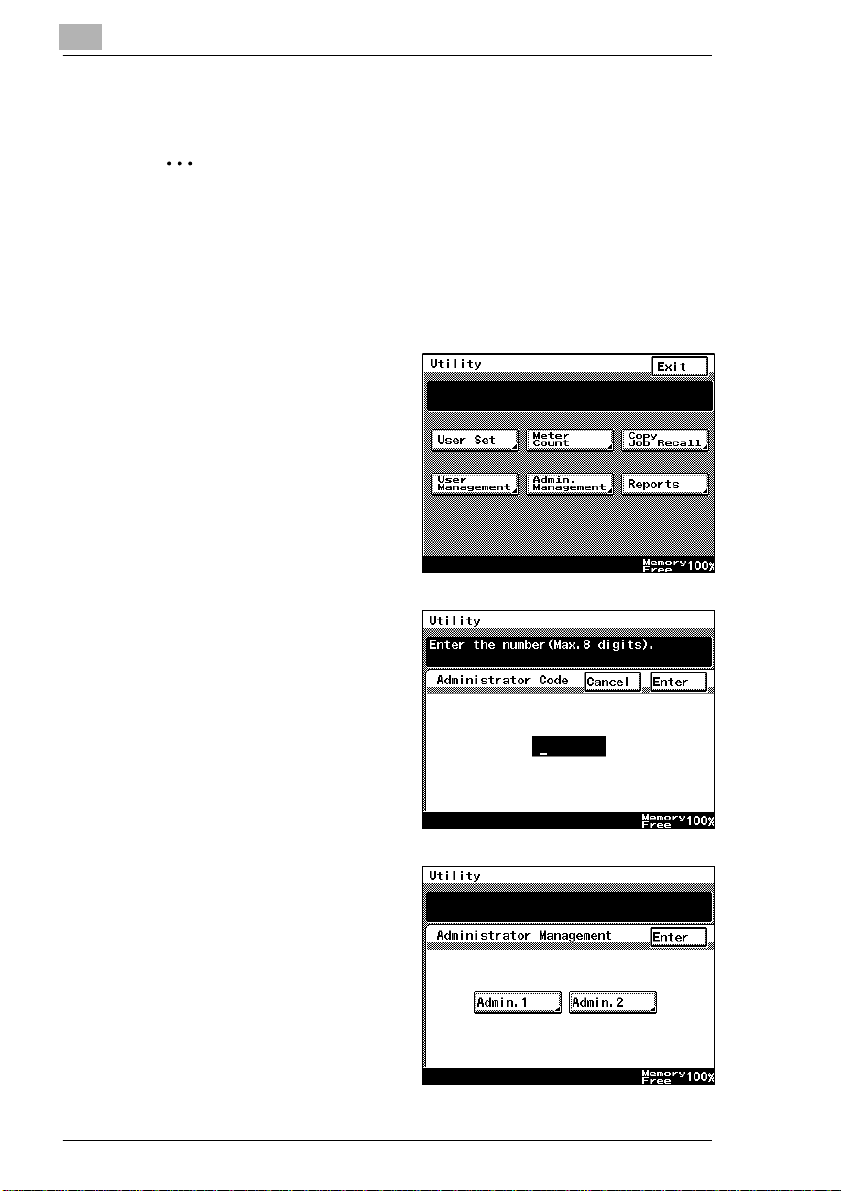
1 Press the [Utility] key on the copie r control panel.
2 Touch [Administrator Management].
3 Use the keypad to type in the administrator access code, and then
touch [Enter ].
4 Touch [Admin. 2].
5 Touch [Network Set].
6 Touch [Basic Setting].
7 Specify the settings described abov e.
8 Touch [Enter].
Note
In order to apply the ne w setti ngs, the unit must be turned of f, then on
again.
1
Scanner Mode & Page Scope Light 1-9
Page 16

1
Before Making Connections and Specifying Settings
1-10 Scanner Mode & Page Scope Light
Page 17
Making Connections
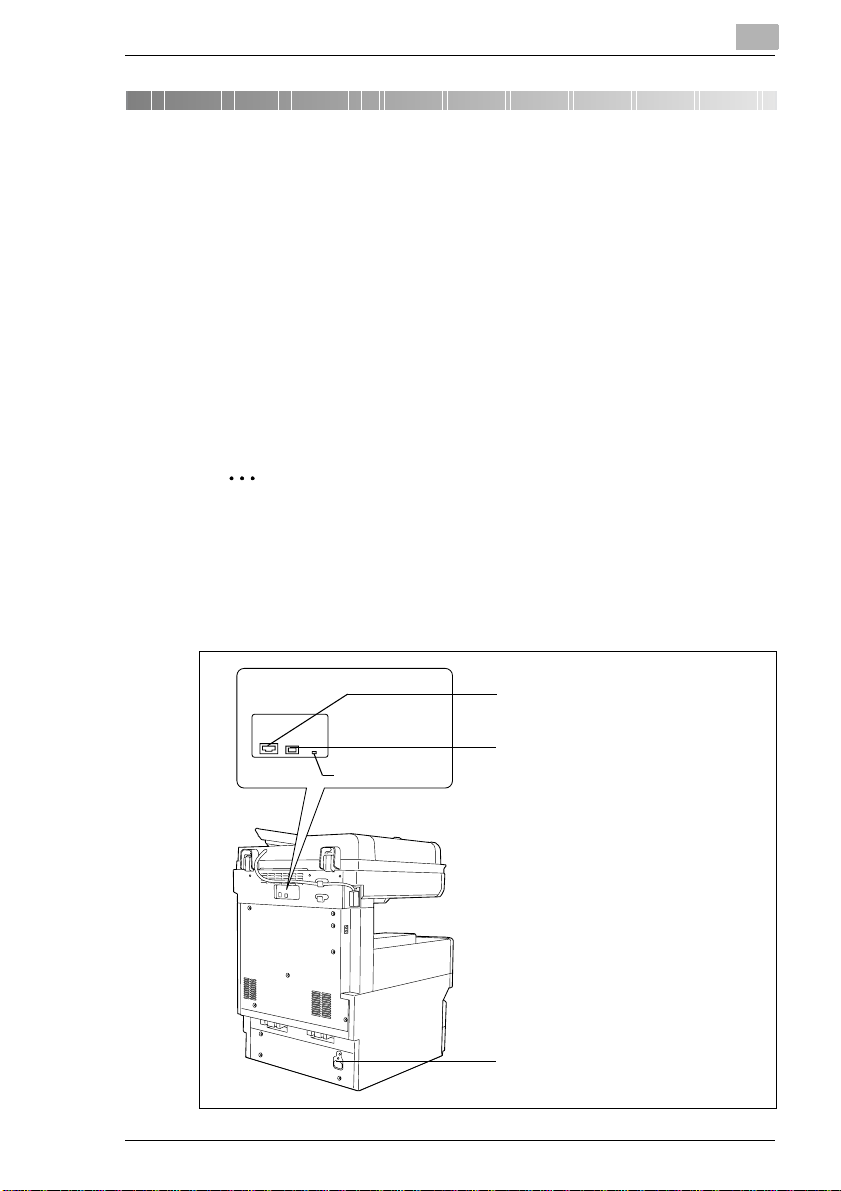
LAN
USB
2 Making Connections
2.1 LAN Connection
This copier can transmi t with the TCP/IP protocol on a LAN. Therefore, the
LAN cable must be connected.
Connect to the LAN by using a LAN cable (cable for Fast Ethernet
100BASE-TX).
Connecting the LAN cable
Insert one plug on the LAN cable i nto the connect or (marked LAN) at the
back of the machine, and then insert the other plug into the hub.
Tip
The connector is at the back of the machine.
The LAN cable should be a cable for Fast Ether net 100BASE-TX
(Category 5).
2
The LAN cable is not included as an accessory.
Connector for LAN cable
USB printer connector (optional)
LED indicator
Scanner Mode & Page Scope Light 2-1
For more details, refer to the manual
for the Pi3505e printer controller.
Power cord connector
Page 18

2
Making Connections
LED indicators
LED Color Condition Meaning
Green Lit The LAN is connected correctly.
Off The copier has not been turned on.
Flashing Data is being sent or received.
Red Lit Operating at 100 Mbps
Off Operating at 10 Mbps
The LAN is not connected correctly.
2-2 Scanner Mode & Page Scope Light
Page 19

Making Connections
2.2 Environments for Transm itti ng Sca n Data
The following types of environments are required in order to send scan data.
Tip
In order to use the scanning operations, the Network Interface Card
(NC-4) and the Network Sca n Kit (SU-2) or t he Internet Fax & Network
Scan Kit (SU-3) must be install ed.
All scanning operations can only be used in a TCP/IP network.
Required environment
Operations that can be p erformed if the Net work Scan Kit i s insta lled
2
Scan to
E-mail
Required options - - - Hard Disk Drive
Required
environment for
image data
transmission
Required
environment for
image data
importing
Mail ser v er FTP ser v er FTP clie nt
Mail client
computer
Scan to
Server(FTP)
FTP client
computer
Scan to
PC(FTP)
computer
(FTP server
application)
FTP client
computer
(FTP server
application)
Scan to
HDD
Kit
-
Web browser
Scanner Mode & Page Scope Light 2-3
Page 20

2
Making Connections
Operations that can be perfor med if the Internet Fax & Network Scan
Kit is installed
In addition to the operations that can be performed when the Network
Scan Kit is instal led (refer t o the above table) , the fol lowing operati ons are
available.
Scan to
PC
(SMTP)
Required
options
Required
environment for
image data
transmission
Required
environment for
image
data
importing
* 1: Di2010 and Di2010f are sold only in the U.S.A. and Canada.
----Only with
IP
Scanner
and Image
Receiver
utilities
IP
Scanner
and Image
Receiver
utilities
Internet
Faxing
Mail
server
Internet
fax
terminal
IP
Address
Faxing
The
recipient
must be
the same
type of unit
as the
copier.
The
recipient
must be
the same
type of unit
as the
copier.
IP
Scanner
IP
Scanner
and Image
Receiver
utilities
IP
Scanner
and Image
Receiver
utilities
Distribution of
Fax Documents
the
Di2010f*
Di2510f,
Di3010f or
Di3510f
Environme
nt required
for the
scan
function
selected
as the
distribution
method
1
,
Network
FAX
Only with
the
Di2010f*
Di2510f,
Di3010f or
Di3510f
Network
FAX
(EX Lite)
utility
-
1
,
2-4 Scanner Mode & Page Scope Light
Page 21

Network Settings
3Network Settings
The available network operations are limited according to the connected
LAN environment. Specify the network settings according to the
environment and functions to be used.
The network settings can be specified from the copier’s control panel or from
Administrator mode of PageScope Light. The procedure for specifying the
network settings from the copier’s control panel is described below.
For details on specif ying PageScope Light settings, refer to the
PageScope Light User Manual .
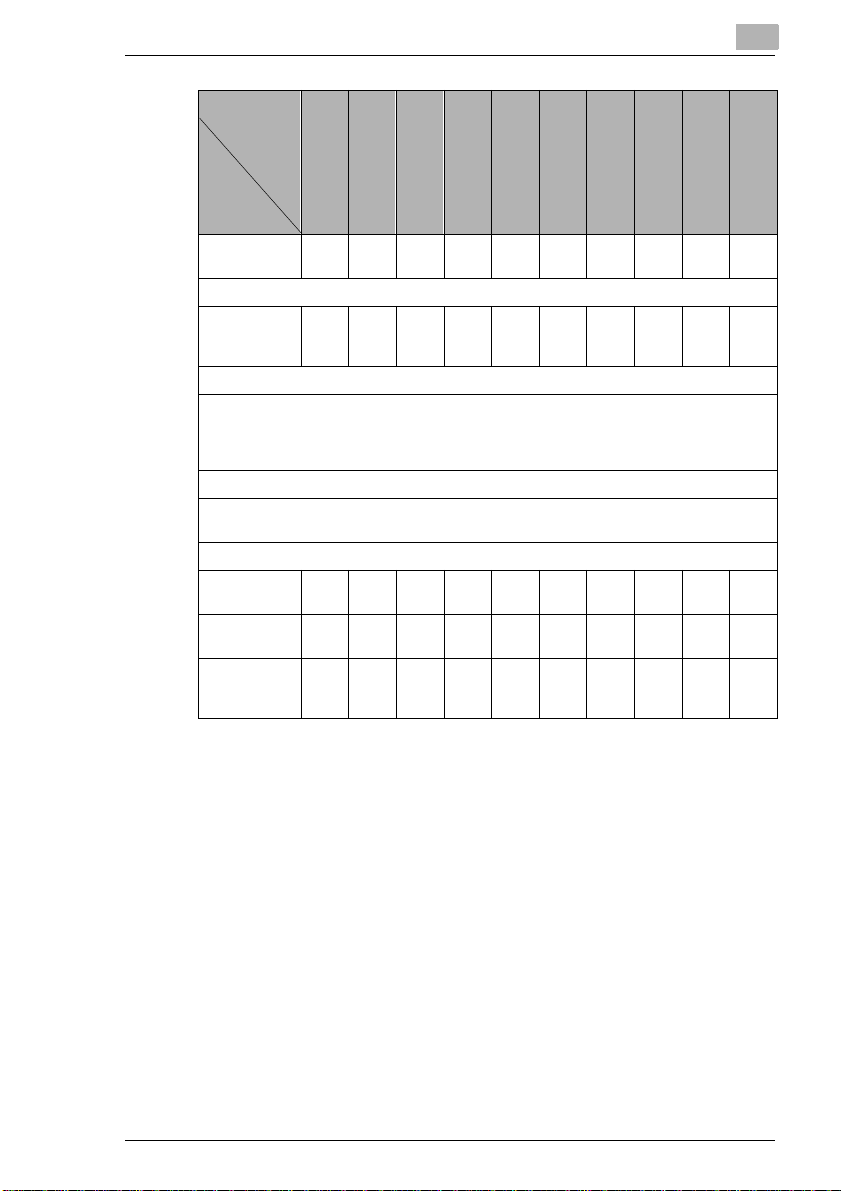
3.1 List of Network Settings
●: Required; 2: Available
▲: Necessary depending on envi ronment; -: Unnecessary
Operation
3
Parameter
Basic Settings screen
DHCP ▲▲▲▲▲▲ ▲▲▲▲
IP Address
Subnet Mask ● ●●●●●●●●●
Gateway ●●●●●● ●●●●
Self-domain
Name
Network
Board
Settings
DNS Settings screen
DNS Setting ▲▲▲▲▲ - ▲▲▲ -
Host Name ▲▲ ▲▲▲ - ▲▲▲ -
Domain
Name
DNS Server
Address
Scan to E-mail
Scan to
Server (FTP)
Scan to PC (FTP)
Scan to PC (SMTP)
Scan to HDD
IP Scanner
Internet Faxing
IP Address Faxing
Distribution of Fax
Documents
Network FAX
●●●●●●●●●●
-------2 - 2
▲▲▲▲▲▲▲▲▲▲
▲▲▲▲▲ - ▲▲▲ -
▲▲▲▲▲ - ▲▲▲ -
Scanner Mode & Page Scope Light 3-1
Page 22

3
Network Settings
Operation
Parameter
Equipment Name
Equipment
Name
SMTP Settings screen
SMTP Server
Address
Port Number
E-mail
Address
POP3 Settin gs scree n
POP3 Serve r
Address
Port Number-----POP3 User
Name
POP3
Password
Auto-RX
Check
Mail/Scan Settings screen
E-mail Mode------222 -
Scan Mode 22222 -----
Scanner Settings screen
Activity
Report
RX Doc.
Header Print
TX Doc. Text
Insert
Gateway
Send
Subject
Registration
Scan to E-mail
Scan to
Server (FTP)
Scan to PC (FTP )
Scan to PC (SMTP)
Scan to HDD
IP Scanner
Internet Faxing
IP Address Faxing
Distribution of Fax
Documents
Network FAX
222 - 2 - 2 - 2 -
● ▲*
● ▲*
● ▲*
1
--▲*1- ● - ● -
1
--▲*1- ● - ● -
1
--▲*1- ● - ● -
------
● ---
● ---
------
------
------
------2 ---
------2 ---
2 -----2 - 2 -
---------
2 -----2 ---
● ---
● ---
● ---
●
3-2 Scanner Mode & Page Scope Light
Page 23
Network Settings
Operation
3
Parameter
Devide
Setting
File Destination Memory Input
File
Destination
Memory Input
Ping
This function is used to check if the network connection (LAN connection) is correctly
connected.
*The ping can be sent with an SMTP server or POP3 server specified. In addition, a ping can
be sent with any IP address specified.
Frame Type Setting
When connecting to the NetWare server and using the PC print function, specify the frame
type.
Administrator mode in PageScope Light: [Network]>[FTP Server]>[FTP Configuration]
Proxy server
address
Proxy port
number
FTP
Connection
Timeout
* 1: If the “URL Notification” function is used, the e-mail transmission (SMTP) settings must
be specified. (Refer to the Scanner Mode User Manual.)
Scan to E-mail
Scan to
Server (FTP)
Scan to PC (FTP )
Scan to PC (SMTP)
Scan to HDD
IP Scanner
Internet Faxing
IP Address Faxing
Distribution of Fax
Documents
2 -----2 ---
● --------
-
- ▲ --------
- ▲ --------
- ▲ --------
Network FAX
Scanner Mode & Page Scope Light 3-3
Page 24
3
3.2 Specifying Network Settings
Note
Before specifying network settings , check with the network
administrator for the necessary inf ormation.
Displaying the Network Settings screen
1 Press the [Utility] key on the copie r control panel.
2 Touch [Admin. Management].
3 Use the keypad to type in the
administrator ac cess code, and
then touch [Enter].
Network Settings
4 Touch [Admin. 2].
3-4 Scanner Mode & Page Scope Light
Page 25
Network Settings
5 Touch [Network Set].
6 Specify the necessary settings
for the parameters in the
screen that appeare d.
Refer to “List of Networ k
Settings” on page 3-1.
7 Continue touching [Enter] to
return to the Uti lit y sc re e n, a nd
then touch [ Exit] to ret urn to t he
Basics screen.
3
Note
After changing the setting of a parameter marked wit h , the copier
must be turned off, then on agai n.
Tip
The list of the settings specified for each function can be printed.
Scanner Mode & Page Scope Light 3-5
Page 26

3
Network Settings
Printing the list of settings
1 Press the [Utility] key, and then touch [Administrator Management].
2 Type in the administrator access code, and then touch [Enter] .
3 Touch [Admin. 1], then [Rep. Print].
4 Touch [Setting List].
3-6 Scanner Mode & Page Scope Light
Page 27

Installing the Utilities
4
4 Installing the Utilities
This section describes how to install IP Scanner.
For details on in stalling t he Network FAX, refer to the Net work FAX User’s
Manual.
4.1 Utilities disk
The utilities disk contains the IP Scanner and Network FAX applicati ons.
In order to insta ll eac h ut ility, the amount of hard di sk space sh own bel ow
must be available.
G IP Scanner: About 5 MB
G Network FAX: About 22 MB
(Network FAX (EX Lite) is not supported by Windows 95.)
4.2 Installing IP Scanner (Windows Me, 98/9 5, XP, 2000 and NT4.0)
Note
Do not install IP Scanner onto computers used as mail servers or
computers where a mail ser ver is installed.
1 Start up Windows, and then i nsert t he utili ties di sk (CD-ROM) i nto the
CD-ROM drive.
The DiALTA Installer starts up, and the DiALTA Installer di alog box
appears.
Tip
If the installer does not start up automatically, double-click “My
Computer” on the desktop , and t hen double-click the icon for the
CD-ROM drive containing the CD-ROM. Double-click [setup.exe]
on the CD-ROM to start up the install er.
Scanner Mode & Page Scope Light 4-1
Page 28

4
Installing the Utilities
2 Click the [GO] button beside Instal l IP Sca n n e r
.
Note
The dialog boxes that appear may differ depending on the
operating system.
3 Check the contents of the dialog box, a nd then click the [Next] but ton.
4-2 Scanner Mode & Page Scope Light
Page 29
Installing the Utilities
4 Check the contents of the dialog box, and then cli ck the [Yes] button.
Note
If you do not agree with t he licen se agre ement, IP Sc anner ca nnot
be installed.
Check the provisions of the agreement, and then click the [Yes]
button.
5 Check which fol der I P Scanner will be insta lled into, and t hen cli ck th e
[Next] button.
4
H To change the folder where IP Scanner will be inst alled, click th e
[Browse...] button, and then select the desired folder.
H While specifying settings in the installe r di alog boxes, if you
choose the wrong setting or want to change a setting, click the
[Back] butt on to return to the previo us dialog box and specify the
settings as desired.
Scanner Mode & Page Scope Light 4-3
Page 30
4
Installing the Utilities
6 Select the folder where IP Scanner will be regi stered, and then clic k
the [Next] butto n .
The installation begins.
7 Click the [Finish] button.
A message may appear, informing you that the computer should be
restarted.
Restart the computer to complete the installation.
4-4 Scanner Mode & Page Scope Light
Page 31

Installing the Utilities
8 In the DiALTA Installer dialog box, click the [Close] button.
9 Restart the computer.
4
Click the [Yes] but ton to restart the computer.
Scanner Mode & Page Scope Light 4-5
Page 32

4
4.3 Uninstalling IP Scanner
Uninstalling IP Scanner (Windows M e, 98/ 95 and NT4.0)
Note
Quit Image Receiver before uninstalling IP Scanner.
1 In Windows, click the [Start] button, point to [Settings], and then click
[Control Panel] to displ ay the Control Panel window.
2 Double-click the [Add or Remove Programs] icon.
3 Select “IP Scanner”, and then click the [Add/Remove...] button.
Installing the Utilities
4 Click the [Yes] button.
5 Restart the computer.
4-6 Scanner Mode & Page Scope Light
Page 33

Installing the Utilities
Uninstalling (Windows XP and 2000)
Note
Quit Image Receiver before uninstalling IP Scanner.
1 In Windows, click the [Start] button, point to [Settings], and then click
[Control Panel] to di splay the Control Panel window.
2 Double-click the [Add/Remove Programs] icon (the [Add or Remove
Programs] icon in Windows XP).
3 Select “IP Scanner”, and then click the [Change/Remove] button.
4
4 Click the [Yes] but ton.
5 Restart the computer.
Scanner Mode & Page Scope Light 4-7
Page 34

4
Installing the Utilities
4-8 Scanner Mode & Page Scope Light
Page 35

Features of the Network Functions
5 Features of the Network Functions
Paper documents can eas ily be conver ted to ele ctronic da ta and used, fo r
example, with electr onic filing. Scan ned image data (scan data) can be
sent to other comput ers through a network as either a TIFF file or a PDF
file.
The scanned image can be sent using any of the following methods.
Choose the appropria te method according on the network environment
and purpose.
This chapter here just shall give you an outline of the differ ent methods. A
detailed descri ption how to perform th e scanning operation s, how to select
the recepient s and a d etailed description of the screens of the copier can
be found on the pdf-manual "Advanced Informati on Scanner Mode" on the
CD.
To perform one of the differ nt functions, pla ce the document(s) on the
glass and press the [Fax /Scan] key. Follow then the instructions or refer
to the pdf-manual.
5
Scanner Mode & Page Scope Light 5-1
Page 36

5
5.1 Scan to E-mail
G Scan data is at tached t o an e-mai l mess age as a TIFF or PDF file, then
sent to a computer through an intranet or the Internet.
G A network environment that includes a mail server is required.
Features of the Network Functions
Mail server
Client computer
Intranet
Internet
Mail server
Client computer
5-2 Scanner Mode & Page Scope Light
Page 37

Features of the Network Functions
5.2 Scan to Server (FTP)
G Scan data can be uploaded as TIFF or PDF files to a specified
directory on an FTP server.
G A network environm ent that includes an FTP serv er i s required.
G An FTP server on the Internet can be accessed through a proxy
server.
G A maximum of five FTP server can be registered, and a maximum of
five directori es can be set up on each FTP server.
5
FTP server
Intranet
Int ern et
FTP server
Scanner Mode & Page Scope Light 5-3
Page 38

5
Features of the Network Functions
G With the “URL Report” function, a notification of the URL where the
scan data is saved can be sent by e-mai l. (If th e “URL Report” func tion
is used, a mail server is required.)
FTP serv er
FTP server
Internet
Client computer
Intranet
Internet
Mail server
Client computer
5-4 Scanner Mode & Page Scope Light
Page 39

Features of the Network Functions
5.3 Scan to PC (FTP)
G Scan data can be sent as TI FF or PDF files to client computers using
FTP.
G The FTP server application must be running on the client computers .
G The forwarding destination on the client computer is the root folder
specified with the FTP server application. This setting cannot be
specified from the copi er’s cont rol panel or from PageScope Light.
5
FTP server
application
5.4 S can to HDD
G Scan data is saved on the copier’s hard disk as TIFF or PDF files.
The saved files can be retrieved with PageScope Light.
G With the “URL Report” function, a notification of the URL where the
scan data is saved can be sent by e-mail.
(If the “URL Report” function is used, a mail server is required.)
Scan
data
HDD
Intranet
Client computer
Client
comp uter
Intranet
Scanner Mode & Page Scope Light 5-5
Page 40

5
5.5 Internet Faxing
As opposed to a normal fax, which t ransmits through tel ephone lines,
Internet fax sends and receives fax images through t he Internet. Int ernet
fax uses the In ternet el ectronic ma il (e-mail ) setup to s end and recei ve fax
images. Image data scanned at an Internet fax terminal i s attached to an
e-mail message as a TIFF-F fil e, then sent to the recipient’s Internet fax
terminal. The fil e att a ched to the received e-mail message is printed by
the Internet fax ter m inal on the receiving en d.
In addition , since e-ma il is used, the fax can be sent to a n indivi dual e-mail
address, not just an Internet fax termi nal. In this case, the fax image
arrives at the receiving end as an attachment to an e-mail message
received with the usual mail client software.
Features of the Network Functions
Mail server
Mail server
Client computer
Intranet
Client comp uter
Internet fax
terminal
Internet
5-6 Scanner Mode & Page Scope Light
Page 41

Features of the Network Functions
5.6 IP Address FAX (LAN-FAX)
Scan data is sent to a copier of the same type (Internet fax) through the
Internet, without passing though a mail server.
Intranet
1 Program a one-touch key with the IP address or the host name of the
recipient.
2 Use the one-touch key to spe cify the recipient, and then specify the
settings for sending the data (IP address fa x transmission).
Internet fax termin al
(Same type of unit
as copier)
5
3 The recipient receives the fax image (IP addr ess fax reception).
Scanner Mode & Page Scope Light 5-7
Page 42

5
5.7 Scan to PC (SMTP)
G Scan data can be sent as TIFF or PDF fil es to client computers usi ng
SMTP.
G From the client computer, th e enclosed IP Scanner application must
be used to first specif y the folder where data is sav ed. In addi tion, the
IP Scanner appl icati on can b e set to sa ve t he data in a f older th at was
created using the name of the one- touch key.
G In order to receive the data at a client computer and save it as an
image file, the enclosed utilities IP Scanner and Image Receiver are
required.
G If there is a DHCP server on the network, this function may not operate
correctly since IP addresses are auto ma ti cally distri buted to each
computer. In t his case, speci fy a fixed IP a ddress for the com puter or
use IP Scanner.
Intranet
Features of the Network Functions
Client com p uter
1 Program a one-touch key with the IP address of the computer
receiving the data.
2 Using the same procedure for sending e-mail mes sages, specify that
the data is to be sent to a computer .
3 The sent scan data is received by the recipient computer.
4 The IP Scanner application converts the data to a TIFF or PDF file,
then saves the file in the specified folder.
5-8 Scanner Mode & Page Scope Light
Page 43

Features of the Network Functions
5.8 IP Scanner
G Scan data is sent to a client com puter, where it is saved in a folder that
is created using the name of the scanner button.
G After programming a b utton (Scan da ta desti nation and scan se tt ings)
from the clien t computer when scanning, a p aper documen t can easily
be saved as an electronic file with just the touch of a button in the
copier’s touch panel.
In order to receive the data at a client computer and save it as an
image file, the enclosed utilities IP Scanner and Image Receiver are
required.
G This function can be used in a network without a LAN if a crossover
cable is used to connect the copier to a client computer. (Network
settings are required.)
5
Client
computer
1 From the computer, prog ram a butt on (recipient of th e scan data).
2 Touch the programmed button to send the scan image.
3 The sent scan image is received by the recipient computer.
4 The IP Scanner application converts the data to a TIFF or PDF fil e,
then saves the file in the specified folder.
Scanner Mode & Page Scope Light 5-9
Page 44

5
Features of the Network Functions
5.9 Document Forword ing /Arch ive Distr ibu tio n
G Image data received from a fax m achine on a common telephone li ne
can be sent direct ly to a computer or attached to an e-mail message.
In order to transmi t the fax document by e- mail, a network envi ronment
that includes a mai l ser ver is required.
G The fax document can be be received at your own computer.
G Received fax documents can be classified as “F-Code”, “Port” or
“Public Document” , and the distribution destinations fo r each type of
document can be specifi ed.
Facsimile
terminal
Facsim ile
communication
Telephone
line
Client computer
Mail server
1 From the copier, select a Doc. Manage sett ing to classify the fax
image.
2 The fax image is sent to the computer specified as the recipient.
3 The fax image is received by the recipient computer as an image file.
5-10 Scanner Mode & Page Scope Light
Page 45

Features of the Network Functions
5.10 Network Fax Transmission
G To use Network Fax transmission, “Network FAX” is re quired, one of
the attache d util ities. Be sure t o conf irm the network environment , then
perform the network sett ing and the setup of Network FAX.
G A document created in an application, such as word-processing
software, ca n be faxed b y specify ing the t elephone ( fax) number of the
recipient, without first printing the document.
In addition, th e resul t of th e fax tr ans mission can be checked f rom t he
computer.
G An e-mail address or a telephone (fax) num ber can be specif ied for the
recipient.
G In order to perform direct faxing operations using a mail server, the
DNS settings must be specified.
Client comp uter
5
Mail server
Telepho n e
line
Facsim ile
comm un ication
Facsimile
ter mina l
1 Specify the fax number of the destination (sp ecify the recipien t af ter
specifying printing from the application).
2 The image data is transmi tt ed from the cl ient computer or mail ser ver.
3 The data recei ved by t he c omputer is se nt to t he s pecified f ax n umber.
Scanner Mode & Page Scope Light 5-11
Page 46

5
Features of the Network Functions
5-12 Scanner Mode & Page Scope Light
Page 47

Using PageScope Light
6 Using PageScope Light
PageScope Light i s a ut ili ty for m anagin g dev ices su pporte d by the HTTP
server integrat ed into the print er/scanner contr oller. Using a We b browser,
PageScope Light can remotely control the prin ter/scanner con trollers on
the network.
6.1 System Requirements
The following operating environment is required in order to use
PageScope Light.
Computer (Software)
Operating System Web Browser
Windows 95/98/Me/NT4.0 Internet Explorer 4 or later
Windows 2000 Internet Explorer 5 or later
Windows XP Internet Explorer 6 or later
MacOS 8.6 or 9.x Internet Explorer 4.5 or later
MacOS X Internet Explorer 5.1 or later
Netscape Communicator 4.7 or later
Netscape Navigator 7.0
Netscape Navigator 7.0
Netscape Navigator 6.1 or later
Netscape Navigator 6.1 or later
6
Network
G Ethernet
G TCP/IP protocol
Di3510/Di3010/Di2510/Di2010/Di3510f/Di3010f/Di2510f/Di2010f
Network Interface Car d
Any of the following options must be installed.
G Pi3505e Printer Controller
G Pi3505e/PS Printer Controller
G Network Scan Kit
G Internet Fax & Network Scan Kit
Scanner Mode & Page Scope Light 6-1
Page 48

6
Using PageScope Light
Note
The dialog boxes shown in this manual may differ fro m those that
appear on your computer. In addi tion, the specif ications and other
information concerning this product may change without noti ce.
6-2 Scanner Mode & Page Scope Light
Page 49

Using PageScope Light
6.2 Accessing PageScope Light
Note
In order to use PageScope Light, the IP address must be set i n
advance. (Refer to “Specifying the IP Address” on page 1-8.)
PageScope Light can be accessed through a Web browser.
1 Start up the Web browser.
2 In the Address bar, type t he IP address of the controller in the format
shown below, and then press the computer keyboard’s [Enter] key.
http://controller_IP_address/
(Example) If the con tr oller IP address is 192. 168.0.10:
http://192.168.0.10/
3 The initial page of PageSc ope Light appears.
Note
If your Web browser i s set to us e a proxy server, it may not be able to
access PageScope Light. In this case, specify the IP address of the
printer/scanner controller as an exception for access through the
proxy server.
6
(Example) With Internet Explorer 5
1 Click [Too ls ] in the me nu b ar , and th e n c lic k [I n te rn e t O p ti on s .. ..].
2 Click the [Connections] tab.
3 Click the [LAN Settings] button.
4 Click the [Advanced] button in the “Pro xy server” group box.
5 Type the IP address of the printer/scanner cont roller into the
“Exceptions” list box.
Scanner Mode & Page Scope Light 6-3
Page 50

6
6.3 Using PageScope Light
PageScope Light is used in the same way that Internet Web pages are
viewed. Click Web page links to display those pages, or click the [Back]
(or [Forward]) but ton to display the previous (or next) page.
6.4 Logging Into Adm inistrator M ode
By logging into PageScope Light in Administrator mode, printer/ scanner
controller system settings can be specified or checked.
1 In the Admin Password box in the u pper-l eft c orner o f the p age, ty pe
the administrator password.
2 Click the [Log-in] button to log into the Administrator mode.
Using PageScope Light
6-4 Scanner Mode & Page Scope Light
Page 51

Using PageScope Light
3 To lo g o ut, cli c k t h e [Log- o ut] button .
Note
For the administ rator passwor d, use the adm inistrat or access cod e for
the copier. For details, contact the administrator for your copier.
6
If no operation is performed for 10 minutes after logging into
PageScope Light in Administrator mode, the user is aut om atically
logged out.
While logged into PageScope Light in Administrator mode, not all
operations can be performed from the copier’s control panel.
Scanner Mode & Page Scope Light 6-5
Page 52

6
6.5 Selecting the Display Language
If necessary, the lang uage in which PageScope Light pages are displ ayed
can be changed. This setting only applies to PageScope Light pages.
1 Log into PageScope Light in Administrat or mode.
2 Click [Preference] in the menu on the [Syst em ] tab.
3 From the PageScope Light Language list, select the desired
language.
4 Click the [Apply] button.
Using PageScope Light
6-6 Scanner Mode & Page Scope Light
Page 53

Using PageScope Light
6.6 Structure of Pages
The following page (called the User mode page) can be viewed by
anyone. If t he admini strat or pass word is ty ped int o the Admi n Passwor d
box on the User mode page, the Administrator mode page can be
displayed.
The pages of PageScope Light are constructed as shown below.
6
1
3
5
1. Minolta PageScope Light logo
Click the Minolta logo to go to the fol lowing Web site.
www.minolta.com
Click the PageScope Light logo to di splay the versi on info rmatio n in a
separate window.
2
4
6
The version and copyright information for PageScope Light appear in
this window.
Click the Minolta logo to go to the Minolta Web site.
Click the PageScope Light logo to go to the PageScope Web site.
Scanner Mode & Page Scope Light 6-7
Page 54

6
Using PageScope Light
2. Status display
The statuses of the pr inter and scanne r are s hown wi th tex t and i cons.
In addition, the status warnings for the printer and scanner appear as
messages.
To view the most recent status message s, click t he [Refresh] button in
the Web browser.
3. Admin Password box
Use to log i n Administrator mode. (For details on the login procedure,
refer to “Logging i n Admini strat or mode” i n the PageScop e Light Us er
Manual.)
4. Tabs
The categories tha t can be controlled by PageScope Light are
displayed.
User mode
• System
• Job List
1
• File*
2
• Print*
• Scan*
3
Administrator mode
• System
4
• File*
2
• Print*
• Scan*
3
• Network
For details on each tab, refer to the “PageScope Light Users Manual”.
1
*
Available only if the network scan kit is installed
2
*
Available only if the printer control ler is installed
3
*
Available only with the Di3510f, Di3010f, Di251 0f or Di2010f, or if
the network scan kit or in ternet fax & network scan ki t is inst alled
4
*
Availabl e only if the hard disk dr ive kit and the network sc an kit are
installed
5. Menu
The information and sett ing items for the selec ted tab are listed.
For details on each menu, refer to the “PageScope Light Users
Manual”.
6. Information and settings
The details of the item selected from the menu are displayed.
6-8 Scanner Mode & Page Scope Light
Page 55

Performing a Scan to E-Mail Operation
7
7 Performing a Scan to E-Mail Operation
7.1 Basic Transmission
1 Position the documen t(s) to be scanned.
2 Press the [Fax/Scan] key.
H For a copier, press the [Scan] key.
3 Touch [10-Key Dialing].
Specify the recipient in any
of the following ways.
H For a copier, touch
[Addr. Inp u t].
H Select a recipient from
the list on the OneTou c h scre en . → Refer
to page 7-5.
H Select a recipient by
searching for it by name.
→ Refer to page7-6.
H Type in the number o f t he one-touch key for the desired rec ipient.
→ Refer to page7-8.
PageScope Light & Scanner Mode 7-1
Page 56

7
Performing a Scan to E-Mail Operation
4 Touch [Com. Mode].
5 To u c h [P C], then [E- m a il] ,
and then touch [Enter].
6 Type in the e-mail address
of the recipient.
7-2 PageScope Light & Scanner Mode
Page 57

Performing a Scan to E-Mail Operation
7 To change the file format or
coding method, touch [ Scan
Mode], and then specif y the
desired settings.
8 Specify the image quality,
density and zoom rati o
according to the docu me nt
to be scanned.
H Refer to “Specifying the
Scanning Options” on
page 7-18.
7
9 Press the [Start ] key.
The transmission be gins.
If the document is placed on t he original glass:
G When scanning multiple document pages, continue scanni ng by
placing each co nsecutive page on the or iginal glass, t hen pressin g the
[Start] ke y .
G After all pages of the document to be sent are scanned, touch [Scan
End], and then pre ss the [Start] key. The transmission begi ns.
If the transmission could not be completed
G The unit will automatically try agai n (auto redial) up to five more tim es
at one-minute intervals.
G The number of auto redials and the interval can be specified. For
details, refer to "Specifiying Tran smission Settings" in the Advanced
Information on the CD.
G If the transmission could not be completed after auto redialing, a
transmission report is outputted.
Part of the first page of sent docum ent is copied onto this repor t.
If it is not necessary to output the transmission report, change the
PageScope Light & Scanner Mode 7-3
Page 58

7
Performing a Scan to E-Mail Operation
settings.
For details, refe r to "Specifying Report Output Settins" in the
Advacned Information on the CD..
1 2
The Following document has not been transmitted. Try to retransmit.
ACCOUNT NAME :SALES
DESTINATION :NEW YORK
ADDRESS :123451234@xyz.com
F-CODE :
PAGES :0 sheets
RESULT :EA0006
2003 APR 23 (WED) 11:32
CHICAGO
DOCUMENT# :6514316-761
TIME STORED :APR 23 11:10
TIME SENT :APR 23 11:10
DURATION :2 min, 28 sec
MODE :E-mail
P.1
3
4
IMAGE
1 Report output date
2 Transmission source name
3 Details of transmission
4 Transmission results
• INTERR: The transmission was interrupted.
• F.MEM: T he m e m o ry is fu ll .
• NG: The trans mission failed.
• PT.DEL: Part of the transmission fai led.
• Error Code: Ref er to "Transmission Results Error Codes" in the
Advacned Information on the CD..
G You can try again to send documents that could not be transmitted.
(maximum of 20 documents)
To send documents again, t ouch [Job Li st], touch [Com .] , and then
search for documents that could not be sent.
If [Re-TX] or [Dest. chng] appears in the touch panel, the document
can be resent without having to be placed on the original glass.
Touch [Re-TX] to send the document to the same recipient.
Touch [Dest. chng] to change the recipient, then send the document.
7-4 PageScope Light & Scanner Mode
Page 59

Performing a Scan to E-Mail Operation
7.2 Selecting a Recipient From the List on the OneTouch Screen
Note
The recipient must have been registered as a one-touch key in
advance.
1 Position the documen t(s) to be scanned.
2 Press the [Fax/Scan] key.
H For a copier, press the [Scan] key.
3 Touch [One-Touch].
4 Select an index, and then
select a recipient from the
one-touch key lis t th at
appears.
Note
Touch an index tab or
touch [←], [→] or [Index
List], and then search for
the one-touch key of t he
desired recipient.
7
5 Press the [Start ] key.
PageScope Light & Scanner Mode 7-5
Page 60

7
Performing a Scan to E-Mail Operation
7.3 Selecting a Recipient by Searching for It by Name
Note
The recipient must ha ve been registered as a one-t ouch key in
advance.
1 Position the document(s) to be scanned.
2 Press the [Fax/Scan] key.
H For a copier, press the [Scan] key.
3 Touch [Search].
4 Touch [Search], type in the
search name for the
recipient, and then touch
[Enter].
Tip
A recipient can also be
selected by touchi ng its
one-touch key.
7-6 PageScope Light & Scanner Mode
Page 61

Performing a Scan to E-Mail Operation
5 Select the desired recipient,
and then press the
[Start] ke y .
7
PageScope Light & Scanner Mode 7-7
Page 62

7
Performing a Scan to E-Mail Operation
7.4 Typing In the Number of th e One-Touch Ke y for the Recipient
A number is specified fo r each one-touc h key, as shown below. Instead of
selecting a one-touch key, the number (between 000 an 539) of the onetouch key can be entered i n order to specify the recipient.
~
Index 1 Index 36
1 Position the document(s) to be scanned.
2 Press the [Fax/Scan] key.
H For a copier, press the [Scan] key.
3 Press the [#] key.
4 Type in the three-digit number of the one-touch key for the desi red
recipient.
The one-touch key of the entered number is highlig hted.
5 Press the [Start] key.
7-8 PageScope Light & Scanner Mode
Page 63

Performing a Scan to E-Mail Operation
7.5 Registering a Recipient
Registering a recipient in the copier in advance is useful for using a
scanning operation. Recipi ents can be registered from either the copier ’s
control panel or fro m PageSc ope Light.
In addition, regi stered one-touch keys can be searched through more
easily if t he in dexes ar e used t o classi fy t he one-tou ch k eys. T here are 36
indexes, and up to 15 one-touch keys can be registe red in each index.
The procedure for reg istering one-touc h keys from the copier’s control
panel is described below.
For details on r egi stering o ne- touch ke ys us ing PageSc ope L ight, refer to
the PageScope Light User Manual.
1
2
7
1 Index tab
2 One-touch key s registered in the sel ected index
Registering indexes
1 Press the [Utility] key.
2 Touch [User Set].
PageScope Light & Scanner Mode 7-9
Page 64

7
Performing a Scan to E-Mail Operation
3 Touch [Fax Input].
H For a copier, touch [E-
mail Input].
4 Touch [Index].
5 Touch a key where an index
has not yet been registered.
7-10 PageScope Light & Scanner Mode
Page 65

Performing a Scan to E-Mail Operation
6 Type in the name of the
index.
7 Touch [Enter].
7
PageScope Light & Scanner Mode 7-11
Page 66

7
Performing a Scan to E-Mail Operation
Registering one-touch keys
If a recipient is regi stered with a one- touch key, th e recipient’ s information
can be retrieved with just the to uch of a button in the copier’s touch panel .
Registering recipients where data is frequently sent is conveni ent since i t
no longer requi res the recipien t information to be entered each ti m e data
is sent.
Up to 540 one-touch keys can be registered. However, the total number
of one-touch keys and fax programs (maximum of 30) mu st not exceed
540.
1 Pr e ss th e [Utility] ke y .
2 Touch [User Set].
3 Touch [Fax Input].
H For a copier, touch [E-
mail Input].
7-12 PageScope Light & Scanner Mode
Page 67

Performing a Scan to E-Mail Operation
4 Touch [One-Touch].
5 Select an index, and then
touch a key where nothing
has been registered yet.
7
6 Type in the recipient name
that will appear on the onetouch key, and then touc h
[Next].
PageScope Light & Scanner Mode 7-13
Page 68

7
Performing a Scan to E-Mail Operation
7 To u c h [P C], then [E- m a il] ,
and then touch [Next].
8 Type in the e-mail address
of the recipient, and then
touch [Ne xt].
H To change the file format
or coding method, to uch
[Scan Mode], and then
specify the desi red
settings.
7-14 PageScope Light & Scanner Mode
Page 69

Performing a Scan to E-Mail Operation
9 Check the information to be
registered, and then touch
[Enter].
7.6 Changing/Deleting Recipients
1 Press the [Utility] key.
2 Touch [User Set].
3 Touch [Fax Input].
H For a copier, touch [E-mail Input].
4 Touch [One-Touch].
7
5 Select an index, and then touch the one-touch key that you wish to
delete or whose information you wish to change.
6 To change the one-touch key information, change the information as
desired, and then touch [Enter] .
H To delete the one-touch key, touch [Delete].
PageScope Light & Scanner Mode 7-15
Page 70

7
Performing a Scan to E-Mail Operation
7.7 Copying a One-Touch Key
1 Pr e ss th e [Utility] ke y .
2 Touch [User Set].
3 Touch [Fax Input].
H For a copier, touch [E-
mai Input].
4 Touch [One-Touch].
7-16 PageScope Light & Scanner Mode
Page 71

Performing a Scan to E-Mail Operation
5 Select an index, and then
touch a key where a
recipient has already been
registered.
6 Touch [One-Touch], and
then touch [One-Touch
Copy].
7
7 Touch the one-touch key
where nothing has been
registered yet and where
you wish to copy the
information to.
8 Check that the one-touch key is copied.
If so, touch [Enter].
9 Continue touching [Enter] to return to the Utility screen, and then touch
[Exit] to re tu r n to th e Basi c s sc r ee n .
PageScope Light & Scanner Mode 7-17
Page 72

7
Performing a Scan to E-Mail Operation
7.8 Specifying the Scanning Options
7.8.1 Quality & Reduction Screen
Quality tab
Select the scanni ng resolution.
“Standard” ( 200 × 100 dpi), “Fine” (200 × 200 dpi), “Super Fine” (400 × 400
dpi), “Text+Photo” (400 × 400 dpi), “GSR” (200 × 200 dpi), “Super GSR”
(400 × 400 dpi), “600dpi Text ” (600 × 600 dpi) , “600dpi Photo” ( 600 × 600
dpi), or “600dpi Photo +Text” (600 × 600 dpi)
Contrast tab
Touch [Lighter], [Normal] or [Darker] to select the desired scanning
contrast.
Note
If “600dpi Text” or “600dpi Photo+Text” was selected on the Quality
tab, the contrast can onl y be set to one of three level s: “ Lighter”,
“Normal” and “Darker”. (The two “Lighter ” settings and the two
“Darker” settings are each the same contr ast level.)
7-18 PageScope Light & Scanner Mode
Page 73

Performing a Scan to E-Mail Operation
Reduction/Area tab
Scan Area: Select the scanning size.
7
PageScope Light & Scanner Mode 7-19
Page 74

7
7.8.2 FAX Menu Sc r een
G With a copier, the settings are specified from the Menu screen.
Network ta b
Subject: <Subject text must have been registered in
Performing a Scan to E-Mail Operation
advance.> → Refer to "Scanner Settings Scr een"
in the Advanced Informati on on the CD.
Select the subject of t he e-mail message. If a
subject is not specif ied, the e-mail message is
sent with the default subject.
Default subject: [Image File] Onetouch_key_name, Device_name,
Automatic_numbering
Tip
Touch [Cancel] to cancel the setting.
7-20 PageScope Light & Scanner Mode
Page 75

Performing a Scan to E-Mail Operation
Reply: Specify the reply e-mail address. (Select from
the list of one-touch keys.) If a reply e-mail
address is not specified, the e-mail message is
sent with the e-mail addr ess of this unit.
For details on specifying the e-mail address of
this unit, refer to "SMTP Settings Screen" in the
Advanced Information on the CD..
Tip
Touch [Cancel] to cancel the setting.
7
File Name: Specify the name of the attached file. If a file
name is not specified, the default file name is
used.
Default file name: Device_name
Automatic_numbering_(date_and_time).Extensi
on
PageScope Light & Scanner Mode 7-21
Page 76

7
Performing a Scan to E-Mail Operation
Tip
Touch [Cancel] to cancel the setting.
An extension (.tif or .pdf) is automaticall y added to file name.
Settings for the “TSI”, “ TX Report”, “2in 1”, “2-Sided TX”, “Priority TX”,
“Timer Set”, and “TX Marker ” fun cti ons can also be specified. For
details, refer to "Fax Menu Screen" in the Advance d Information on the
CD..
7.9 Inserting Text Into a Transmission Document
By first setting thi s function, text (an y or a fixed string of characters) is
inserted in f ro nt of the i mage data f or t he Sc an to E-mail doc ument bef ore
the E-mail is s ent . For detail s on s pecif yi ng the s etti ngs, r efer to "Sc anner
Settings Screen" in the Advanced Information on t he CD.
FROM: NEWYORK
Image data has been attached to the e-mail.
7-22 PageScope Light & Scanner Mode
Page 77

Performing a Scan to PC (FTP) Opera tion
8 Performing a Scan to PC (FTP)
Operation
8.1 Basic Transmission
Note
The FTP server application must be running on the client computers.
With the Scan to PC ( FTP client) operation, the fo ll owing settings are
used and data is sent by FTP.
If necessary, spe cify the following sett ings from the FTP server
application on the computer at the receiving end.
Login: anonymous
Password: E-mail address of this machine
1 Position the documen t(s) to be scanned.
8
2 Press the [Fax/Scan] key.
H For a copier, press the [Scan] key.
3 Select an index, and then
select a recipient from the
list of one-touch keys.
Specify the recipient in any
of the following ways.
H Select a recipient by
searching for it by name.
H Type in the number of
the one-touch key for the
desired recipient.
PageScope Light & Scanner Mode 8-1
Page 78

8
Performing a Scan to PC (FTP) Operati on
4 Touch [Quality/Reduction],
and then adjust the image
quality, density and zoom
ratio according to t he
document to be scanned.
H Refer to “Specifying the
Scanning Options” on
page 8-7.
5 Press the [Start] key.
The transmission begins.
If the document is placed on t he original glass:
G When scanning multiple document pages, continue scanning by
placing each c onsecutive page on the or iginal glass, t hen pressin g the
[Start ] ke y .
G After all pages of the document to be sent are scanned, touch [Scan
End], and then press the [Start] key. The transmission begins.
8-2 PageScope Light & Scanner Mode
Page 79

Performing a Scan to PC (FTP) Opera tion
8.2 Registering a Recipient
1 Press the [Utility] key.
2 Touch [User Set].
3 Touch [FAX Input].
H For a copier, touch [E-
mail Input].
8
4 Touch [One-Touch].
PageScope Light & Scanner Mode 8-3
Page 80

8
Performing a Scan to PC (FTP) Operati on
5 Select an index, and then
touch a key where nothing
has been registered yet.
6 Type in the recipient name
that will appear on the onetouch key, and then touc h
[Next].
7 To u c h [P C ] , th en [F T P
Client], and then touch
[Next].
8-4 PageScope Light & Scanner Mode
Page 81

Performing a Scan to PC (FTP) Opera tion
8 Type in the IP address of the
computer that the data will
be sent to, and then touch
[Next].
H To change the port
number, touch [Port],
and then specify the
desired setting.
H To change the file format
or coding method, tou ch
[Scan Mode], and then
specify the desi red
settings.
8
9 Check the information to be
registered, and then touch
[Enter].
PageScope Light & Scanner Mode 8-5
Page 82

8
Performing a Scan to PC (FTP) Operati on
8.3 Changing/Deleting Recipients
1 Pr e ss th e [Utility] ke y .
2 Touch [User Set].
3 T o u ch [FA X I n pu t].
H For a copier, touch [E-mail Input].
4 Touch [One-Touch].
5 Select an index, and then touch the one-touch key that you wish to
delete or whose information you wish to change.
6 To change the one-touch key information, change the infor ma ti on as
desired, and then touch [Enter].
H To delete the one-touch key, touch [Del ete].
8-6 PageScope Light & Scanner Mode
Page 83

Performing a Scan to PC (FTP) Opera tion
8.4 Specifying the Scanning Options
8.4.1 Quality/Re d u cti o n Screen
Quality tab
Select the scanni ng resolution.
“Standard” ( 200 × 100 dpi), “Fine” (200 × 200 dpi), “Super Fine” (400 × 400
dpi), “Text+Photo” (400 × 400 dpi), “GSR” (200 × 200 dpi), “Super GSR”
(400 × 400 dpi), “600dpi T ext” (600 × 600 dpi) , “600dpi Photo” ( 600 × 600
dpi), or “600dpi Photo+Text” (600 × 600 dpi)
8
Contrast tab
Touch [Lighter], [Normal] or [Darker] to select the desired scanning
contrast.
Note
If “600dpi Text” or “600dpi Photo+Text” was selected on the Quality
tab, the contrast can onl y be set to one of three levels: “Lighter”,
“Normal” and “Darker”. (The two “Lighter ” settings and the two
“Darker” settings are each the same contr ast level.)
PageScope Light & Scanner Mode 8-7
Page 84

8
Performing a Scan to PC (FTP) Operati on
Reduction/Area tab
Scan Area: Select the scanning size.
Select “AutoDetect.” or specify a size.
8-8 PageScope Light & Scanner Mode
Page 85

Performing a Scan to PC (FTP) Opera tion
8.4.2 FAX Menu Sc r een
G With a copier, the settings are specified from the Menu screen.
File Name: Specify the name of the attached file. If a file
name is not specified, the default file name is
used.
Default file name: Device_name
Automatic_numbering_(date_and_time).Extensi
on
8
Tip
Touch [Cancel] to cancel the setting.
An extension (.tif or .pd f) is automatically added to file name.
Settings for the “TX Report” , “2in1”, “2-Side d TX”, “Priority TX”, “Timer
Set”, and “TX Marker” functions can also be specified. For details,
refer to "Fax Menu Screen " in the Advanced Information on the CD.
PageScope Light & Scanner Mode 8-9
Page 86

8
Performing a Scan to PC (FTP) Operati on
8-10 PageScope Light & Scanner Mode
Page 87

Performing a Scan to Server (FTP) Operation
9 Performing a Scan to Server (FTP)
Operation
9.1 Basic Transmission
1 Position the documen t(s) to be scanned.
2 Press the [Fax/Scan] key.
H For a copier, press the [Scan] key.
3 Select an index, and then
select a recipient from the
list of one-touch keys.
Specify the recipient in any
of the following ways.
H Select a recipient by
searching for it by name.
H Type in the number of
the one-touch key for the
desired recipient.
9
4 Touch [Quality&Reduction],
and then adjust the image
quality, density and zoom
ratio according to t he
document to be scanned.
H Refer to “Specifying the
Scanning Options” on
page 9-8.
5 Press the [Start ] key.
The transmission be gins.
PageScope Light & Scanner Mode 9-1
Page 88

9
Performing a Scan to Server (FTP) Operation
If the document is placed on t he original glass:
G When scanning multiple document pages, continue scanning by
placing each c onsecutive page on the or iginal glass, t hen pressin g the
[Start ] ke y .
G After all pages of the document to be sent are scanned, touch [Scan
End], and then press the [Start] key. The transmission begins.
Tip
If the “URL Report” paramet er was set to “ON”, a notification of the
URL where the image data is saved will be sent by e- m ail . Select the
setting for t he “URL Repor t ” paramet er when r egist ering the re cipie nt.
(Refer to page 9-3.)
9-2 PageScope Light & Scanner Mode
Page 89

Performing a Scan to Server (FTP) Operation
9.2 Registering a Recipient
Note
The FTP site must have been regi stered in advance. Refer to
"Registering an FTP site" in the Advanced Information on the CD.
1 Press the [Utility] key.
2 Touch [User Set].
3 Touch [FAX Input].
H For a copier, touch [E-
mail Input].
9
4 Touch [One-Touch].
PageScope Light & Scanner Mode 9-3
Page 90

9
Performing a Scan to Server (FTP) Operation
5 Select an index, and then
touch a key where nothing
has been registered yet.
6 Type in the recipient name
that will appear on the onetouch key, and then touc h
[Next].
7 To u c h [P C ] , th en [F T P
Server], and then touch
[Next].
9-4 PageScope Light & Scanner Mode
Page 91

Performing a Scan to Server (FTP) Operation
8 Touch the butt on for the FTP
site where you wish to send
the data, and then touch
[Next].
9 Touch the button for the
directory where you wish to
send the data, and then
touch [Next] .
9
10Check the informati on to be
registered.
PageScope Light & Scanner Mode 9-5
Page 92

9
Performing a Scan to Server (FTP) Operation
11Touch [Mode1], and then
specify the file f ormat and
coding method.
In addition, specify whether
a URL Report will be sen t. If
the “URL R eport ” para meter
was set to “ON”, type in the
e-mail address where the
notificatio n wil l be sent .
12Touch [Enter].
9-6 PageScope Light & Scanner Mode
Page 93

Performing a Scan to Server (FTP) Operation
9.3 Changing/Deleting Recipients
1 Press the [Utility] key.
2 Touch [User Set].
3 Touch [FAX Input].
H For a copier, touch [E-mail Input].
4 Touch [One-Touch].
5 Select an index, and then touch the one-touch key that you wish to
delete or whose information you wish to change.
6 To change the one-touch key information, change the information as
desired, and then touch [Enter] .
H To delete the one-touch key, touch [Delete].
9
PageScope Light & Scanner Mode 9-7
Page 94

9
Performing a Scan to Server (FTP) Operation
9.4 Specifying the Scanning Options
9.4.1 Quality & Reduction Screen
Quality tab
Select the scanni ng resolution.
“Standard” ( 200 × 100 dpi), “Fine” (200 × 200 dpi), “Super Fine” (400 × 400
dpi), “Text+Photo” (400 × 400 dpi), “GSR” (200 × 200 dpi), “Super GSR”
(400 × 400 dpi), “600dpi Text ” (600 × 600 dpi) , “600dpi Photo” ( 600 × 600
dpi), or “600dpi Photo +Text” (600 × 600 dpi)
Contrast tab
Touch [Lighter], [Normal] or [Darker] to select the desired scanning
contrast.
Note
If “600dpi Text” or “600dpi Photo+Text” was selected on the Quality
tab, the contrast can onl y be set to one of three level s: “ Lighter”,
“Normal” and “Darker”. (The two “Lighter ” settings and the two
“Darker” settings are each the same contr ast level.)
9-8 PageScope Light & Scanner Mode
Page 95

Performing a Scan to Server (FTP) Operation
Reduction/Area tab
Scan Area: Select the scanning size.
Select “AutoDetect.” or specify a size.
9
PageScope Light & Scanner Mode 9-9
Page 96

9
9.4.2 FAX Menu Sc r een
G With a copier, the settings are specified from the Menu screen.
Network ta b
File Name: Specify the name of the attached file. If a file
Performing a Scan to Server (FTP) Operation
name is not specified, t he default file name is
used. Default fil e name: Device_name
Automatic_numbering_(date_and_time).Extensi
on
Tip
Touch [Cancel] to cancel the setting.
An extension (.tif or .pdf) is automaticall y added to file name.
Settings for the “TX Report” , “2in1”, “2-S ided TX”, “Priorit y TX”, “Timer
Set”, and “TX Marker” functions can also be specified. For details,
refer to "FAX Menu Screen" in the Advan ced Information on the CD.
9-10 PageScope Light & Scanner Mode
Page 97

Performing a Scan to Server (FTP) Operation
9.5 URL Report
With this function, a notification of the URL where the scan data is saved
can be sent by e-mail. The file is not attached to the e-mail message.
However, the location where the scan data is saved can eas il y be
accessed when the r eceiver of t he URL Repo rt e- mail message cli cks the
URL in the text of the e-mail message.
Note
The URL Report e-mail message is sent according to the Scan to Email settings. I n order to use the “URL Report” function, setti ngs mus t
be specified for the par am eters on the SMTP Settings scre en.
<Notification information>
ftp://IP_address _of_FTP_server/Directory_name/File_name
Tip
In order to access the FTP server, the user name and password are
required.
The user name and password are not i ncluded in the notification email message.
9
PageScope Light & Scanner Mode 9-11
Page 98

9
Performing a Scan to Server (FTP) Operation
9-12 PageScope Light & Scanner Mode
Page 99

Performing a Scan to HDD Operation
10
10 Performing a Scan to HDD Operation
10.1 Basic Transmission
1 Position the documen t(s) to be scanned.
2 Press the [Fax/Scan] key.
H For a copier, press the [Scan] key.
3 Select an index, and then
select a recipient from the
list of one-touch keys.
Specify the recipient in any
of the following ways.
H Select a recipient by
searching for it by name.
H Type in the number of
the one-touch key for the
desired recipient.
4 Touch [Quality&Reduction],
and then adjust th e image quality, density and zoo m ratio accor ding to
the document to be scanned.
H Refer to “Specifying the Scanning Options” on page 10-7.
5 Press the [Start ] key.
The transmission be gins.
If the document is placed on t he original glass:
G When scanning multiple document pages, continue scanni ng by
placing each co nsecutive page on the or iginal glass, t hen pressin g the
[Start] ke y .
PageScope Light & Scanner Mode 10-1
Page 100

10
G After all pages of the document to be sent are scanned, touch [Scan
End], and then press the [Start] key. The transmission begins.
Tip
If the “URL Report” paramet er was set to “ON”, a notification of the
URL where the image data is saved will be sent by e- m ail . Select the
setting for t he “URL Repor t ” paramet er when r egist ering the re cipie nt.
(Refer to page 10-2.)
10.2 Registering a Recipient
Note
A mail box must have been created in advance using PageScope
Light.
A maximum of 115 mail boxes can be creat ed.
Creating a mail box (PageScope Light)
The following parameters can be set from the Create Mail Box page of
PageScope Light.
Performing a Scan to HDD Operation
Mail Box Name: Type in the name of the mail box.
(12 characters or less)
Password: Type in the password.
(64 characters or less)
Retype Password: Type in the password again.
10-2 PageScope Light & Scanner Mode
 Loading...