

Page 1

p
User Manual
Di152f/Di183f Scan Unit SU-1
www.minoltaeuro
e.com
The essentials of imaging
Page 2

Page 3

Forward
Foreword
If the Internet fax/network scanner is installed and a network is connected,
data scanned by the Di152
electronic mail (e-mail) and sent to a computer or Internet fax terminal
through an intranet or the Internet. In addition, scanned data can also be
uploaded to an FTP server.
*With the Di152/Di183, this is performed with the optional fax kit FX-1.
*
/Di183*/Di152f/Di183f can be attached to
Trademark Acknowledgements
Minolta is a registered trademark of MINOLTA CO., LTD.
PageScope is a trademark of MINOLTA CO., LTD.
Ethernet is a registered trademark of Xerox Corporation.
All other product names are trademarks or registered trademarks of their
respective holders.
Copyright 2002 MINOLTA CO., LTD.
Screen images shown in this manual may differ slightly from actual
ones. Specifi cations are subject to change wi thout prior notice.
i
Page 4

For the U.S.A. Users
FCC Part 15-Radio Frequency Devices
This device complies with Part 15 of the FCC Rules. Operation is subject to the
followingtwo conditions: (1) This device maynot cause har mful interface,and (2)
this device must accept any interface received, including interface that may
cause undesired operation.
NOTE:This equipment has been tested and found to comply with the limits for a
Class A digital device, pursuant to Part 15 of the FCC Rules. These limits are
designed to provide reasonable protectionagainst harmful interference when the
equipment is operated in a commercial environment. This equipment generates,
uses, and can radiate radio frequency energy and if not installed and used in
accordance with the instruction manual, may cause harmful interferenceto radio
communications.
Operation of this equipment in a residential area is likely to cause harmful interference in which case the user will be required to correct the interference at his
own expense.
WARNING: The design and production of this unit conform to FCC Regulations,
and any changes or modifications must be registered with the FCC and are subject to FCC control. Any changes made by purchaser or user without first contacting the manufacturer will be subject to penalty under FCC regulations.
This device must be used with shielded interface cables. The use of n onshielded cables is likely to result in interferencewith radio communications and is
prohibited under FCC rules.
For Canada Users
Interference-Causing Equipment Standard (ICES-003 Issue 3)
This Class A digital apparatus complies with Canadian ICES-003.
Cet appareil numerique de la classe A est conforme a la norme NMB-003 du
Canada.
ii
Page 5

For Europe
CE Marking (Declaration of Conformity)
This product complies with the following EU directives:
89/336/EEC, 73/23/EEC and 93/68/EEC directives.
This declaration is valid for the area of the European Union.
This device must be used with shielded interface cables. The use of n onshielded cables is likely to result in interferencewith radio communications and is
prohibited under EU directives.
For Users of the Class B regulation’s countries
This device must be used with shielded interface cables. The use of n onshielded cables is likely to result in interferencewith radio communications and is
prohibited under CISPR 22 rules and local rules.
For Users except the Class B regulation’s countries
WARNING
This is a Class A product. In a domestic environment this product may cause
radio interference in which case the user may be required to take adequate measures.
This device must be used with shielded interface cables. The use of n onshielded cables is likely to result in interferencewith radio communications and is
prohibited under CISPR 22 rules and local rules.
iii
Page 6

Contents
CONTENTS
1 Introduction ........................................................1
1.1 Available Features ...................................................1
1.2 Required Environment ............................................4
1.3 Connecting to a Network (LAN) ..............................4
1.3.1 Connecting the Ethernet Cable ........................... 5
1.4 Control Panel Parts and Their Functions .............. 6
1.4.1 Names of Control Panel Parts and Their
Functions ............................................................... 6
1.4.2 Display Indications ............................................... 8
1.5 Entering Text ............................................................9
1.5.1 Key operation: ....................................................... 9
1.5.2 Inputting Example ............................................... 10
1.6 Specifying Network Settings ................................12
1.6.1 Required Settings ............................................... 12
1.6.2 Specifying Network Settings
(“NETWORK(FAX/SCAN)” Menu) ....................... 14
1.6.3 Specifying E-mail Settings
(“E-MAIL SETTING 1” Menu) .............................. 17
1.6.4 Specifying E-mail Settings
(“E-MAIL SETTING 2” Menu) .............................. 21
iv
Page 7

Contents
2 Internet Faxing .................................................25
2.1 Basic Faxing ...........................................................25
2.1.1 Using the Automatic Document Feeder ............ 26
2.1.2 Positioning Documents on the Original
Glass .................................................................... 27
2.2 Transmission Settings ..........................................29
2.2.1 Adjusting the Fax Resolution ............................ 29
2.2.2 Specifying the Recipient .................................... 30
2.2.3 Broadcast Transmission .................................... 36
2.3 Timer Transmission ...............................................38
2.4 Cancelling (Deleting ) a Document Queued
for Transmission ....................................................39
2.5 Recei vi ng ................................................................ 41
2.5.1 E-Mail Formats That Can Be Received ............. 41
2.5.2 Automatic Reception .......................................... 41
2.5.3 Manual Reception ............................................... 42
3 Network Scanning ...........................................43
3.1 Sending by E-mail (Scan to E-mail) .....................43
3.1.1 Using the Automatic Document Feeder ............ 44
3.1.2 Positioning Documents on the Original
Glass .................................................................... 46
3.2 U ploading to an FTP Server (Scan to Server) ..... 50
3.2.1 Using the Automatic Document Feeder ............ 51
3.2.2 Positioning Documents on the Original
Glass .................................................................... 53
v
Page 8

Contents
4 Utility M ode Settings .......................................55
4.1 Programming Scan Settings
(“SCAN SETTING” Menu) ......................................55
4.1.1 Setting the “RESOLUTION” Function ............... 55
4.1.2 Setting the “IMAGE FORMAT” function ............ 55
4.1.3 Setting the Compression Encoding
Method (“CODING METHOD” Function) ........... 56
4.2 Programming E-mail Addresses ..........................57
4.2.1 Programming One-Touch Dial Keys .................. 57
4.2.2 Programming Speed Dial Numbers ................... 58
4.2.3 Programming Group Dialing .............................. 59
4.3 Specifying the “FORWARD” Function .................61
4.4 Specifying E-mail Settings (“E-MAIL SETTING 1”
and “E-MAIL SETTING 2” Menus) ........................62
4.5 Specifying Network Setting s
(“NETWORK (FAX/SCAN)” Menu) ........................62
5 Checking the Transmission/Reception
Result ...............................................................63
5.1 Checking the Transmission Result ......................63
6 Error Messag es ................................................ 64
6.1 Main Error Messages and Thei r Remedies . ........ 64
7 Appendix ..........................................................66
7.1 Specifications ........................................................66
vi
Page 9
1 Introduction
1 Introduction
1.1 Available Features
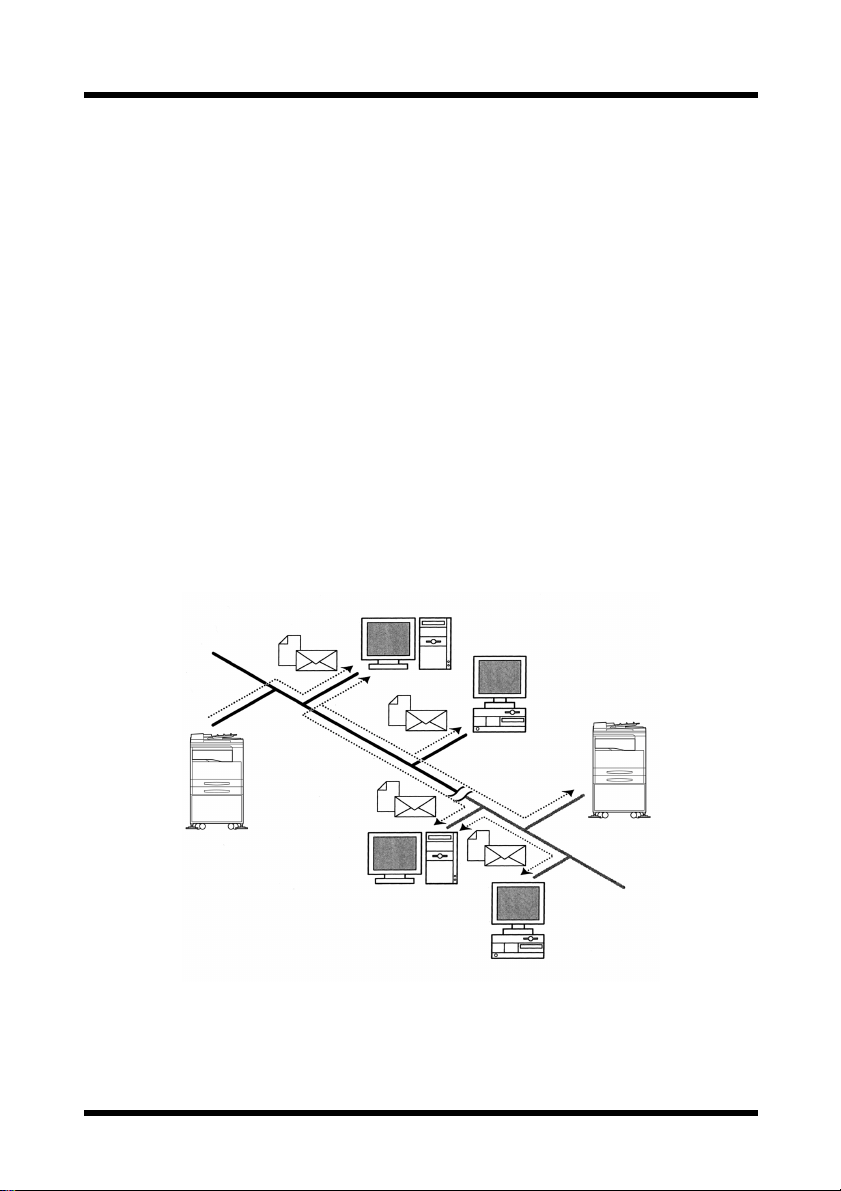
Internet faxing
• As opposed to a normal fax, which transmits through telephone lines,
Internet fax sends and receives fax images through the Internet. Internet fax uses the Internet electronic mail (e-mail) setup to send and
receive fax images. Image data scanned at an Internet fax terminal is
attached to an e-mail, then sent to the recipient’s Internet fax terminal.
The file attached to the received e-mail is printed by the Internet fax
terminal on the receiving end.
In addition, since e-mail is used, the fax can be sent to an individual email address, not just an Internet fax terminal. In this case, the fax
image arrives at the receiving end as an attachment to a mail received
with the usual mail client software.
Mail Ser ver
Client PC
Intranet
MailServer
Internet Fax
Terminal
Internet
Client PC
1
Page 10
1Introduction
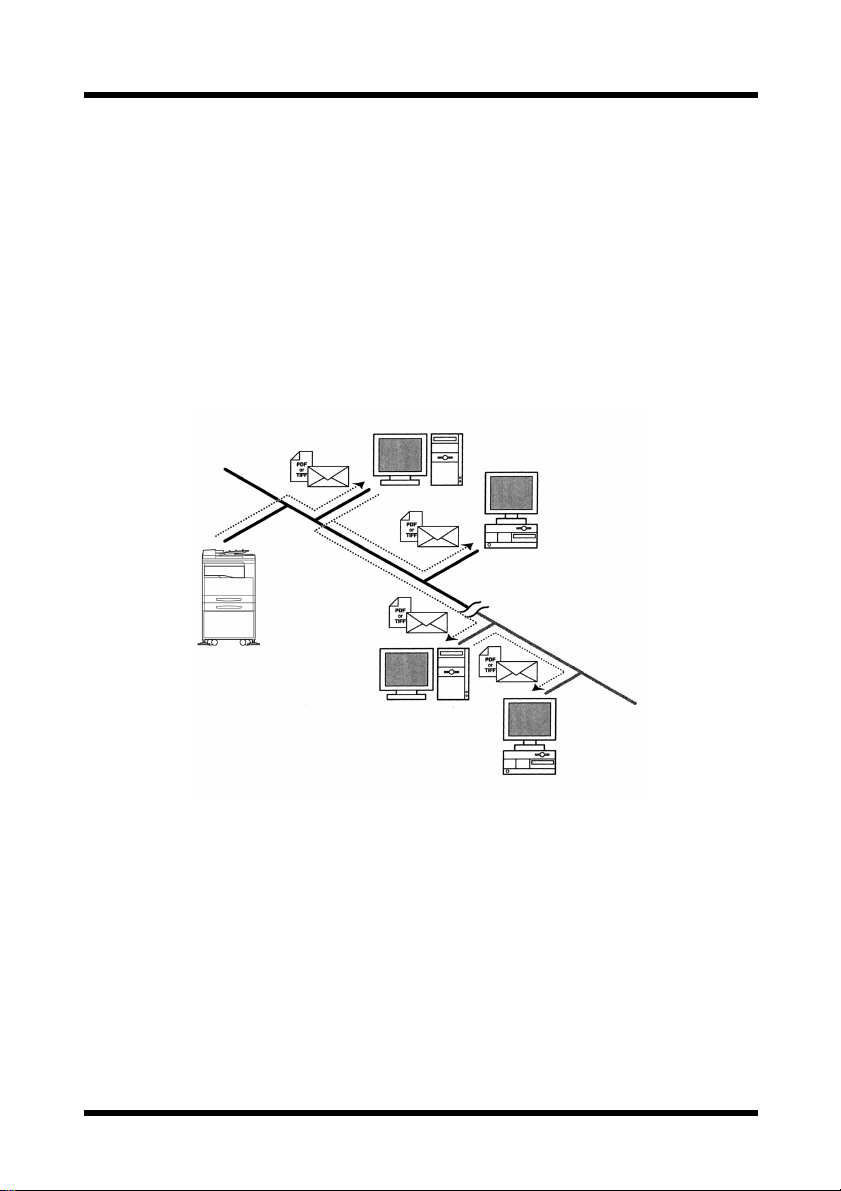
Network scanning
Paper documents can easily be converted to electronic data and used,
for example, with electronic filing.
Scanned image data (scan data) is sent to a computer through a network
as a TIFF-F or PDF file. The scanned image can be sent either as an email attachment or to an FTP server.
• Scan data is sent to a computer as a TIFF-F or PDF file attached to an
e-mail, then sent to a computer through an intranet or the Internet.
(Scan to E-mail)
Mail Ser ver
Client PC
Intranet
Internet
Mail Ser ver
Client PC
2
Page 11
1 Introduction
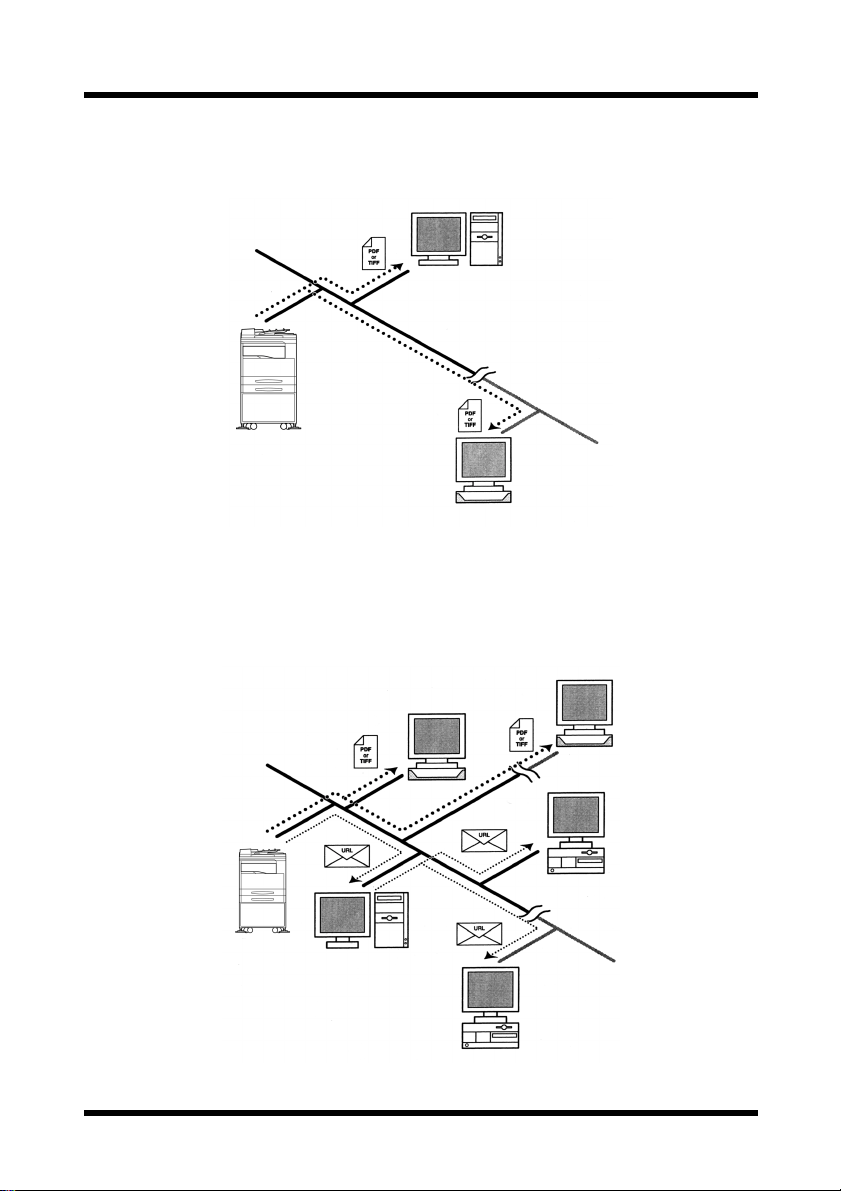
• Scan data is uploaded to an FTP server as a TIFF-F or PDF file.
(Scan to Server)
FTP Server
Intranet
Internet
FTP Server
In addition, the system can be set to send to a specified recipient (only
one) a notification of the FTP server address where the data was
uploaded.
Intranet
FTP Server
FTP Server
Internet
Client PC
Internet
MailServer
Client PC
3
Page 12

1Introduction
1.2 Required Environment
The following network environment is required in order to use the Internet
fax and network scanning features.
Internet faxing
• Mail server (POP3 server and SMTP server)
Network scanning (Scan to E-mail)
• Mail server (SMTP server)
Network scanning (Scan to Server)
• FTP server (The enclosed PageScope Cabinet can be used as a sim-
ple FTP server.)
• Mail server (SMTP server) in order to use mail notification
Common
• Ethernet 10/100Base-T
•TCP/IPprotocol
1.3 Connecting to a Network (LAN)
In order to use the Internet fax and network scanning features, this machine
must be connected to a LAN and be able to communicate using the TCP/IP
protocol.
Use an Ethernet cable (for 10/100Base-T Ethernet) to connect to the LAN.
(The Ethernet cable is not included with the Internet fax/network scanner.)
IMPORTANT
• Be sure to use a Category 5, shielded cable for the 10/100Base-T
connection, otherwise there may be electronic i nterference.
4
Page 13

1 Introduction
1.3.1 Connecting the Ethernet Cable
1. Make sure that the machine is turned off.
2. Insert one plug on the Ethernet cable into the connector (marked “NETWORK SCANNER”) on the left side of the machine, and then insert
the other plug into the hub.
5
Page 14
1Introduction
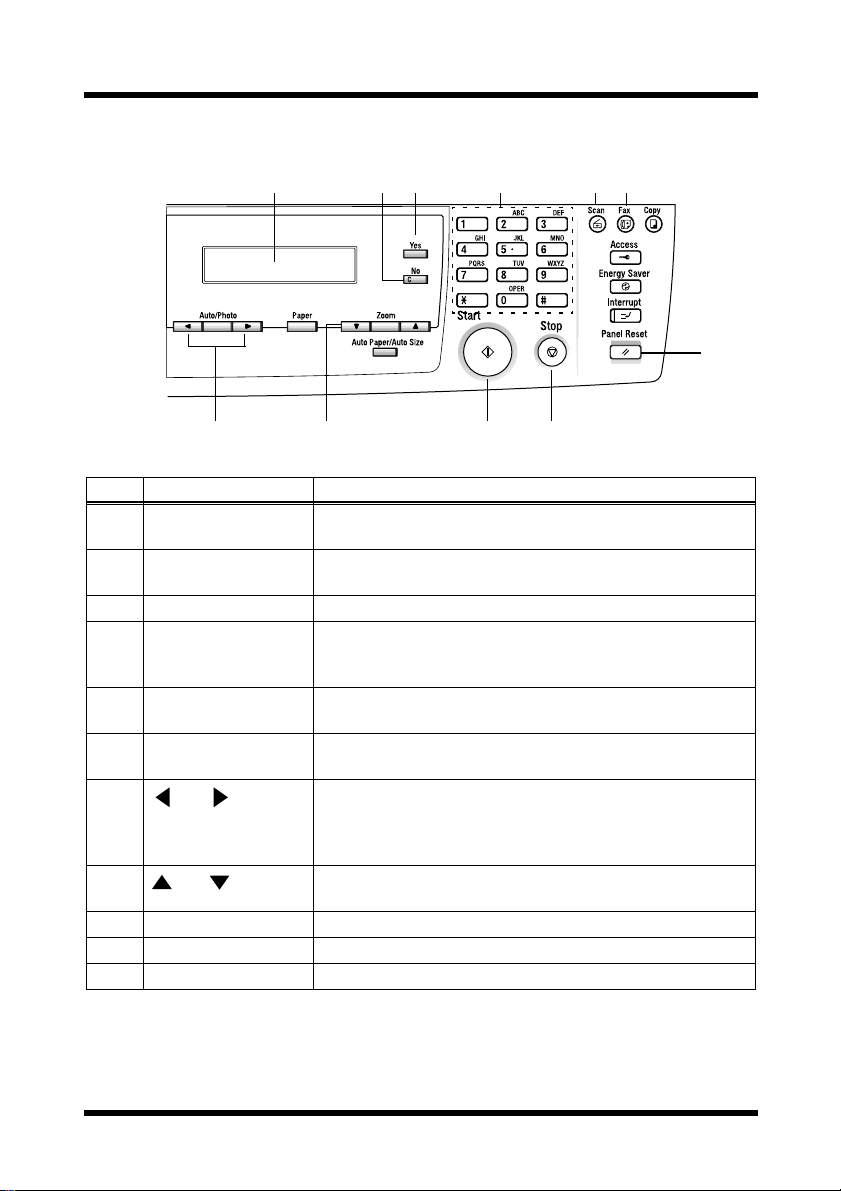
1.4 Control Panel Parts and Their Functions
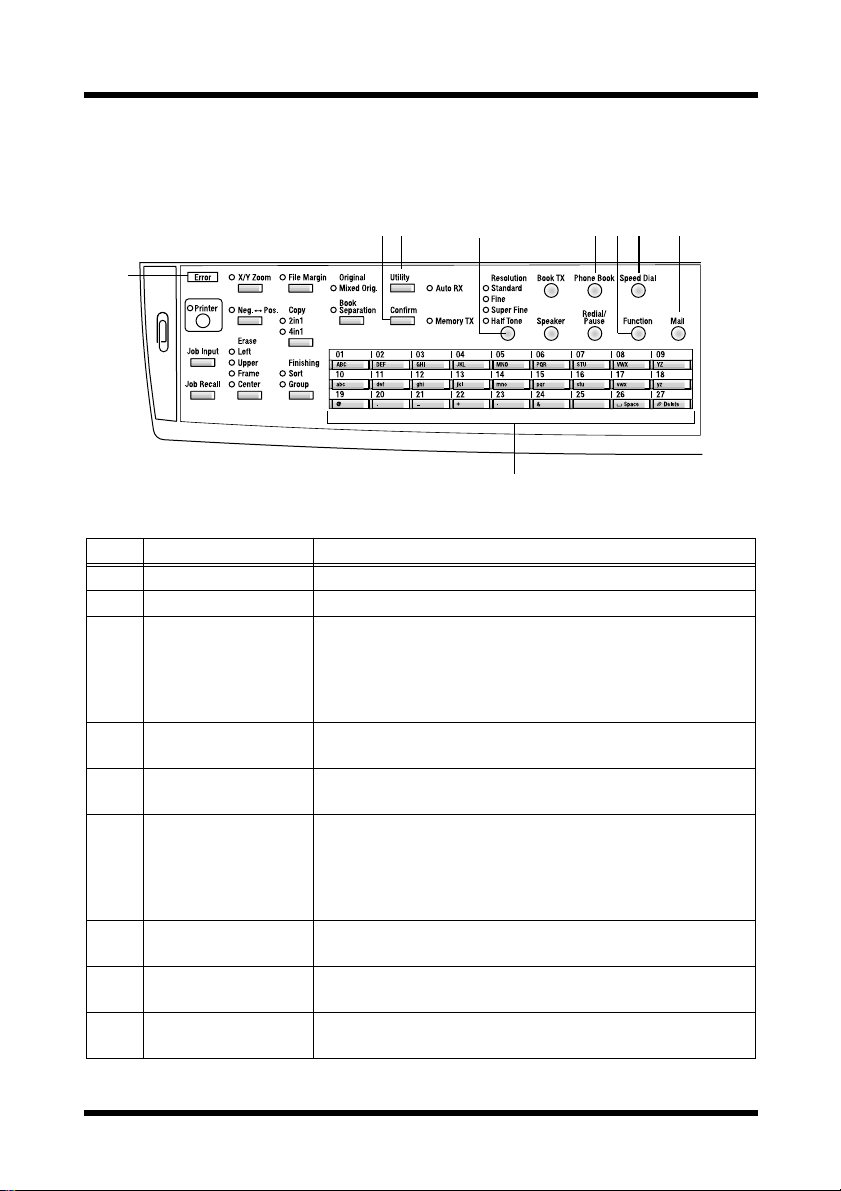
1.4.1 Names of Control Panel Parts and Their Functions
23 4 567 8
1
9
No. Part Name Function
1 [Error]indicator Lights up if an error has occurred.
2 [Confirm] key Used to view transmission results.
3 [Utility] key Used to display the first Utility mode screen.
4 [Resolution]key Used to select the image quality (transmission resolution)
5 [Phone Book] key Used to display the information programmed for one-touch
6 [Function]key Used to select a function.
7 [Speed Dial] key Used to specify previously programmed fax numbers
8 [Mail] key Press to enter an e-mail address. The key lights up in green
9 One-touch dial keys Used to select previously programmed fax numbers.
MACHINE SETTING, FAX REGISTRATION, E-MAIL
SETTING 1, E-MAIL SETTING 2, NETWORK(FAX/
SCAN)
Refer to “4 Utility Mode Settings” (p. 55).
with the Internet fax feature.
dialing, group dialing and speed dialing.
BROADCAST (broadcast transmission), TIMER TX
(timer transmission), CANCEL RESERV. (cancel queued
job) and INTERNET FAX RX (Internet fax reception) (p.
36, p. 38, p. 39 and p. 41)
represented by 3-digit numbers.
to indicate that an e-mail address can be entered.
Used to enter text such as e-mail addresses.
6
Page 15
1 Introduction
11 12 14 15
1310
20
181716
19
No. Part Name Function
10 Display Displays setting menus, error messages, and specified
settings such as e-mail addresses.
11 [No] key Erases the entered letters and numbers.
Returns to the previous screen.
12 [Yes] key Confirms the current setting.
13 10-key pad Used to enter setting values.
Used to enter numbers.
Used to enter speed dial numbers.
14 [Scan] key Press to enter Scan mode. The key lights up in green to
indicate that the machine is in Scan mode.
15 [Fax] key Used when sending scan data or receiving e-mail with the
Internet fax feature.
16
[Auto/Photo]key
and keys
Used to specify the scanning mode with the Network Scan
feature.
Used to specify the selection at the left or right in setting
screens.
17
and keys
Used to specify the selection above or below in setting
screens and menus.
18 [Start] key Starts scanning or starts sending the e-mail or file.
19 [Stop] key Stops scanning documents.
20 [Panel Reset] key Cancels all current operations.
7
Page 16
1Introduction
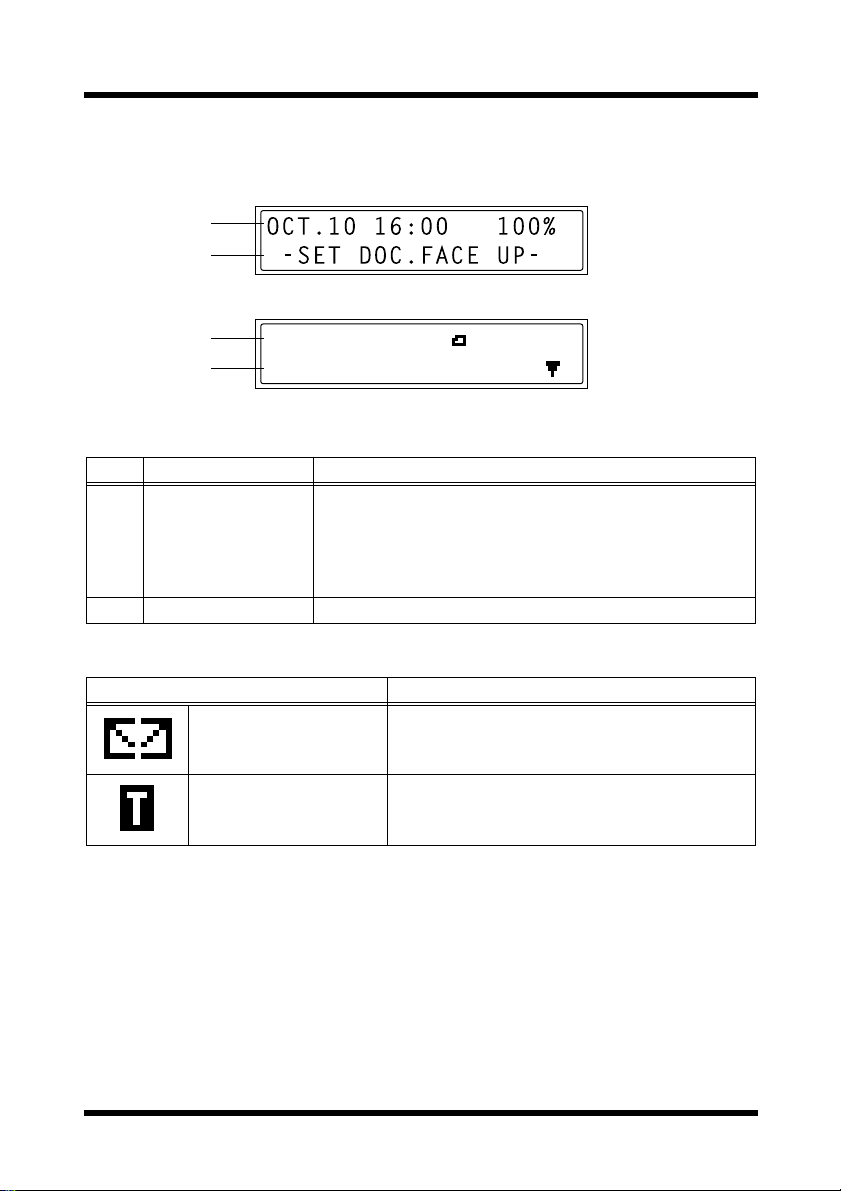
1.4.2 Display Indications
1
2
1
2
No. Display Indication Description
1 Mode or function
name
2 Message area Displays messages such as operating instructions.
SCAN BOOK(LT )
SCAN=YES (SIZE= )
• Displays the currently selected mode or function setting.
• Displays the current menu, function or setting.
• Error messages are displayed when errors occur.
• The current date and remaining amount of memory is
displayed during standby.
Symbol list:
Symbol Description
Sending/receiving mail E-mail is being sent or received.
In standby for timer
transmission
An e-mail is queued for timer transmission.
8
Page 17

1 Introduction
1.5 Entering Text
When specifying the user name or programming one-touch dial keys with
therecipient name, letters,accentedcharacters,numbers and symbols can be
entered.
1.5.1 Key operation:
• One-touch dial keys [01] through [27]: Used to enter letters and sym-
bols.
• 10-Key Pad: Used to enter numbers.
List of characters available with each one-touch dial key:
One-touchdial
key
01 ABC ABC 15 pqr pqr
02 DEF DEF 16 stu stu
03 GHI GHI 17 vwx vwx
04 JKL JKL 18 yz yz
05 MNO MNO 19 @ @
06 PQR PQR 20 . . (period)
07 STU STU 21 _ _ (underscore)
08 VWX VWX 22 + +
09 YZ YZ 23 - - (hyphen)
10 abc abc 24 & &#*/!=?$%[]’^`{}|˜()”
11 def def 25 ДдЦцЬьбЙйн”ъЕОазЖС¿
12 ghi ghi 26 (space)
13 jkl jkl 27 (deletes)
14 mno mno 28
Available characters*
One-touchdial
key
Available characters*
,:;<>
Øøß
* Repeatedly press the one-touch dial key to scroll through the corresponding char-
acters and symbols listed until the desired character appears in the display.
9
Page 18
1Introduction
1.5.2 Inputting E xample
To enter the name “NJ Office”
* The cursor (_) flashes alternately with the character at its current location.
NAME=_
Press the [MNO] key twice.
NAME=N
Press the [JKL] key once.
NAME=NJ
Press the [Space] key once.
NAME=NJ
Pressthe [MNO]key 3 times.
NAME=NJ O
Press the [def] key 3 times.
NAME=NJ Of
Press the key.
NAME=NJ Of_
10
Press the [def] key 3 times.
NAME=NJ Off
Press the [ghi] key 3 times.
NAME=NJ Offi
Press the [abc] key 3 times.
NAME=NJ Offic
Press the [def] key twice.
NAME=NJ Office
Page 19

1 Introduction
Correcting text and input precautions
• To erase all entered text, press the [No] key.
• To delete only part of the entered text, use the and keys to move
the cursor (_) to the character that you wish to delete, and then press
the
[Delete] key (one-touch dial key [27]).
• To change an entered character, use the and keys to move the
cursor (_) to the character that you wish to change, and then enter the
new character. (The character at the cursor’s position is replaced with
the new character.)
• If the same one-touch dial key is needed to enter two characters in a
row, press the key after selecting the first character. (Refer to the
above example.)
• To enter a space, press one-touch dial key
[26].
11
Page 20
1Introduction
1.6 Specifying Network Settings
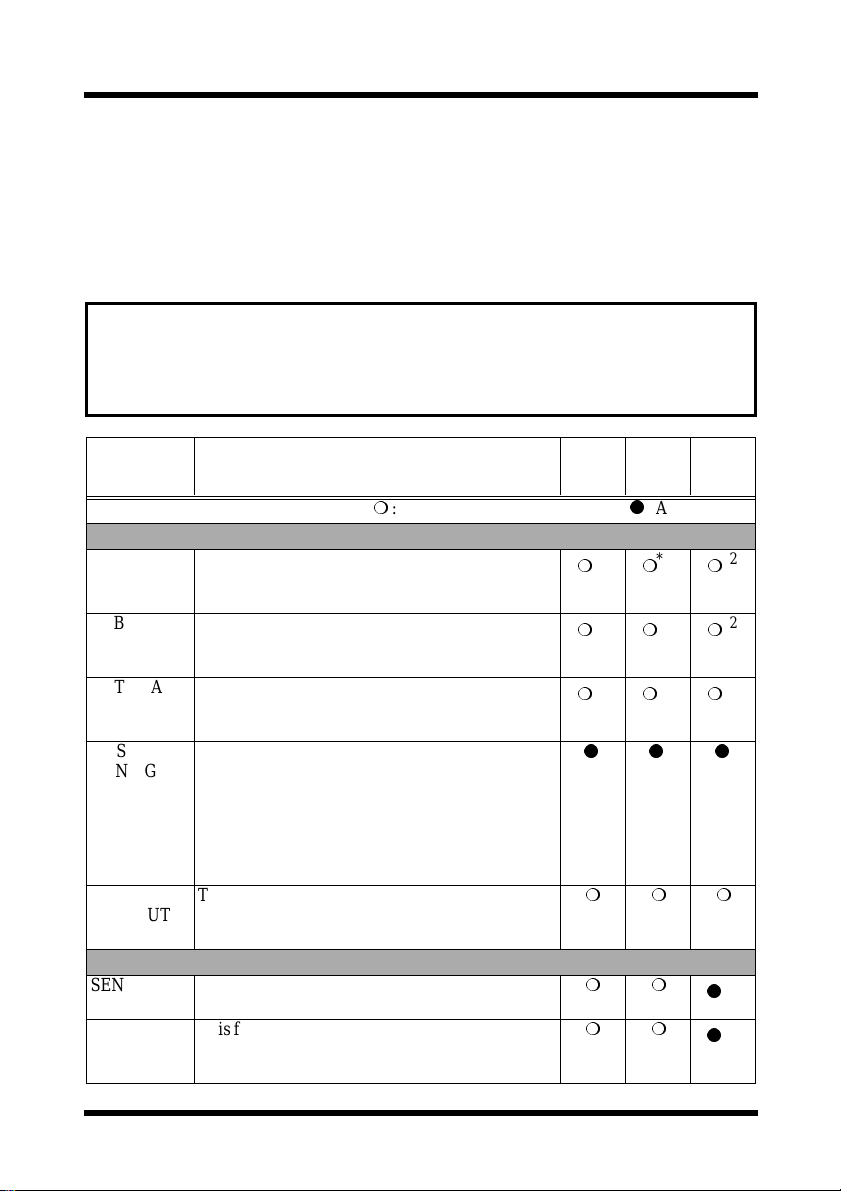
1.6.1 Required Setti ngs
In order to use the Internet fax and network scanning features, certain
settings must first be specified.
Note
• This machine must be set based on the network environment that it is
connected to. Therefore, before starting to s et this machine, be sure
to ask the network administratorfor the informationrequired to specify
the settings correctly.
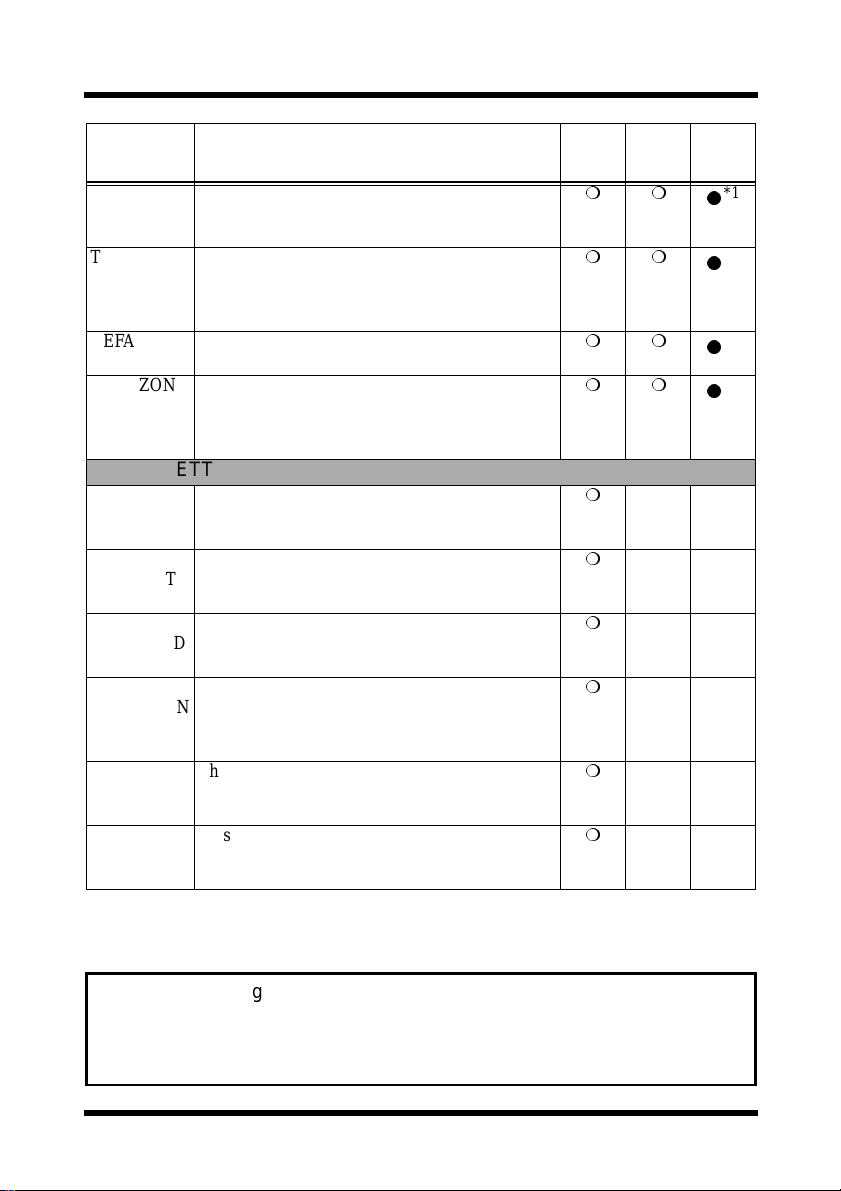
Settings Description
: Necessary – : Unnecessary:As necessary
NETWORK (FAX/SCAN)
IP
ADDRESS
SUBNET
MASK
GATEWAY This function is used to enter the IP address of the
DNS
CONFIG.
SERVER
TIMEOUT
This function is used to specify the IP address of
the Internet fax/network scanner.
*Obtain from the network administrator.
This function is used to set the subnet mask value
of the network.
*Consult with the network administrator.
router, if one is used on the network.
*Consult with the network administrator.
This function is used to enable or disable the
DNS (Domain Name System). If a DNS server is
used, specify its IP address.
*If a DNS server is used on the network, select
“ENABLE”. If an external server such as an
Internet provider is used, select “DISABLE”.
Consult with the network administrator.
This function is used to set the length of time
(between 5 and 20 seconds, in 1 second intervals)
until the connection with the server times out.
E-MAIL SETTING 1
SENDER
NAME
E-MAIL
ADDRESS
This function can be used to specify the sender’s
name.
This function is used to specify the e-mail address
of the sender.
*Obtain from the network administrator.
Internet
Faxing
*2
*2
*2
Network
Scanning
(Scan to
E-mail)
Network
Scanning
(Scan to
Server)
*2
*2
*2
*2
*2
*2
*1
*1
12
Page 21
1 Introduction
Network
Scanning
(Scan to
E-mail)
Settings Description
SMTP
SERVER
This function is used to enter the IP address or
host name for the SMTP server.
Internet
Faxing
*Consult with the network administrator.
TEXT
INSERT
This function is used to specify whether or not to
insert text explaining that an image data has been
attached when scan data attached to an e-mail is
being sent.
DEFAULT
SUBJECT
TIME ZONE This function is used to set the time zone
This function can be used to set the default subject
used when sending scan data attachedto an e-mail.
corresponding to the country where the machine
is being used. For the United States, the time will
appear as “GMT -05:00”.
E-MAIL SETTING 2
POP3
SERVER
POP3
ACCOUNT
POP3
PASSWORD
AUTO
RECEPTION
REPL Y
ADDRESS
HEADER
PRINT
*1: Necessary if notification of the URL is sent by e-mail.
*2: May also be assigned automatically by the DHCP server.
This function is used to enter the IP address or
host name for the POP3 server.
*Consult with the network administrator.
This function is used to specify the account name
used to log into the POP3 server.
*Consult with the network administrator.
This function is used to specify the password used
to log into the POP3 server.
*Consult with the network administrator.
This function is used to specify the time interval
(between 1 and 60 minutes, in 1 minute intervals)
for checking for new e-mail during automatic
reception.
This function is used to specify the recipient of
error notification e-mails if an error occurs while
receiving an Internet fax.
This function is used to specify whether or not to
print header information of “subject”, “from”,
and “cc” when printing e-mails.
––
––
––
––
––
––
Tip
• After specifying the IP address, subnet mask and gateway functions
on the “NETWORK(FAX/SCAN)” menu, other settings can be
specified using PageScope Light. For details, refer to the PageScope
Light for Di152f/Di183f Scanner User Manual.
Network
Scanning
(Scan to
Server)
*1
*1
*1
*1
13
Page 22
1Introduction
1.6.2 Specifying Network Settings (“NETWORK(FA X/ SCAN)” Menu)
From the “NETWORK(FAX/SCAN)” menu of the Utility mode, various
network settings can be specified.
Tip
• If, at any time, you wish to quit setting a “NETWORK(FAX/SCAN)”
function, press the [No] key. When the message “STOP SETTING?”
appears, press the [Yes] key to quit.
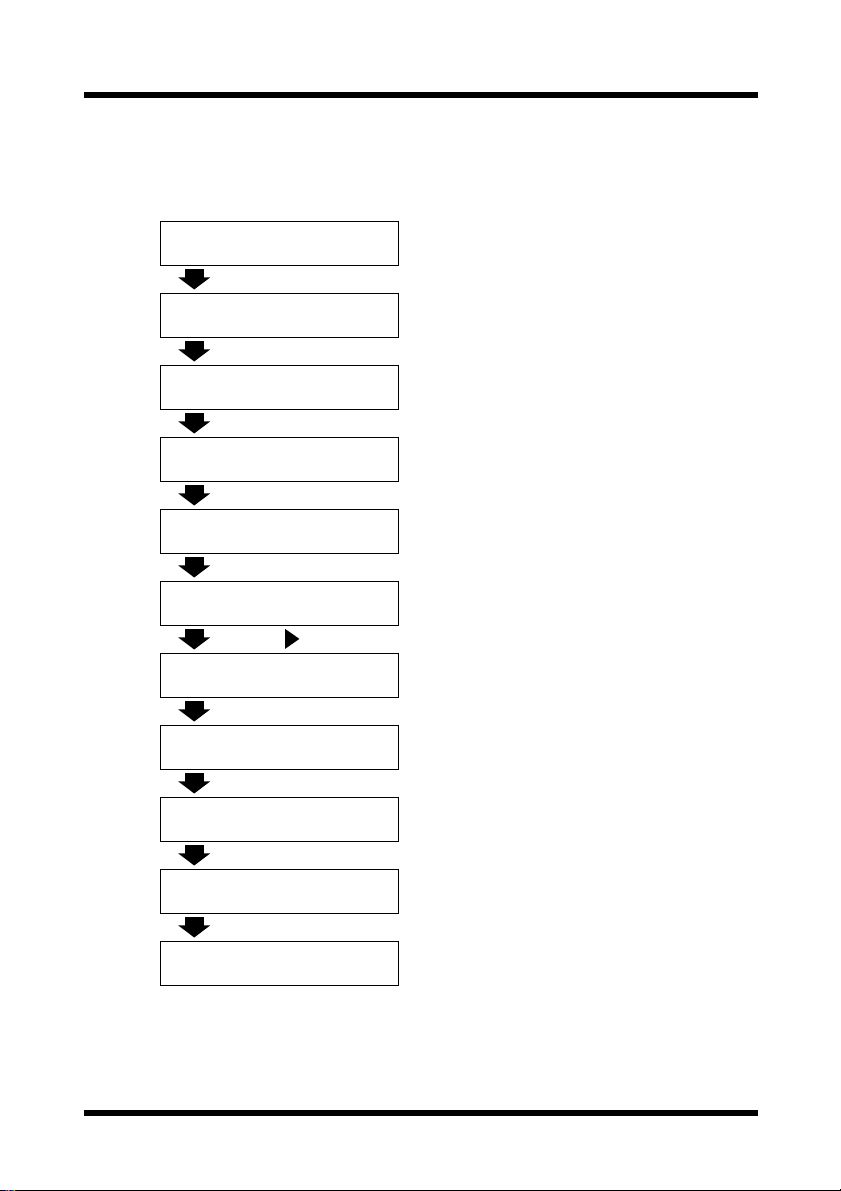
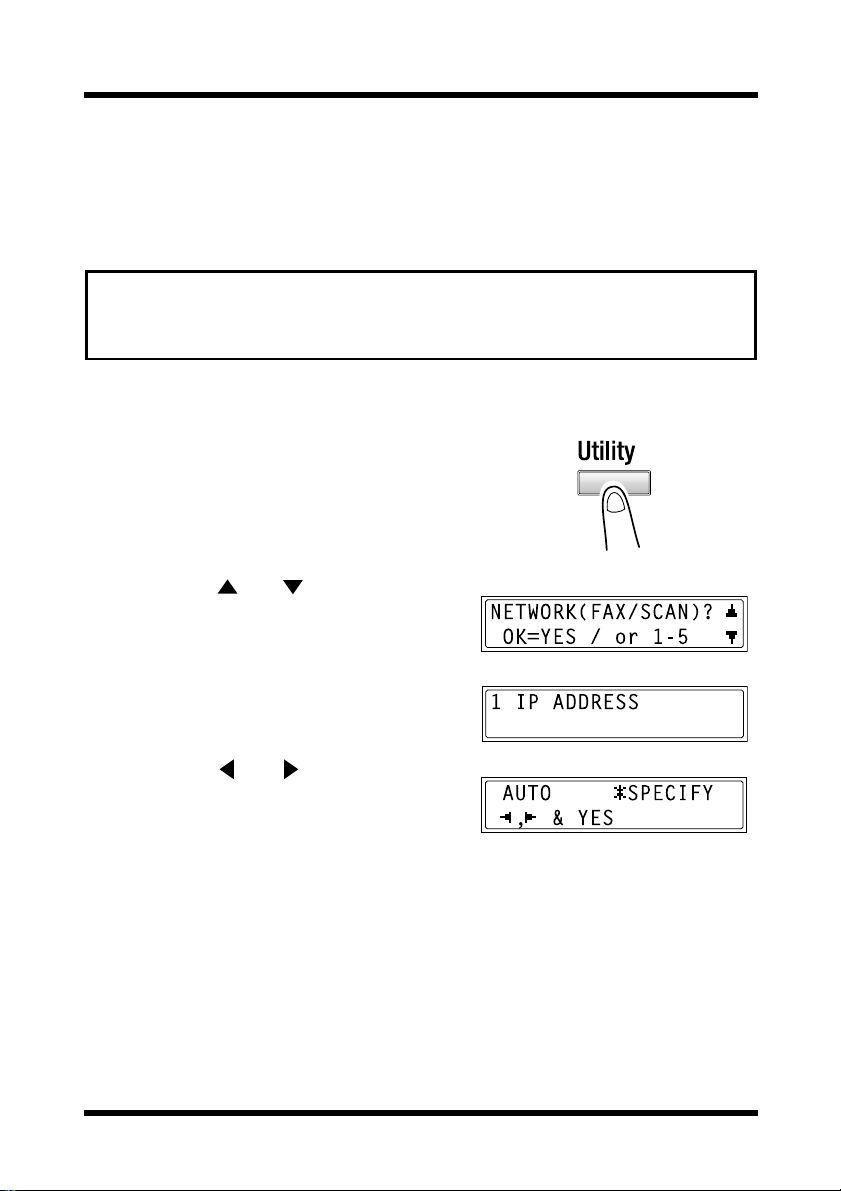
To set the “IP ADDRESS” function
1. Press the [Utility] key.
The first screen of the Utility mode
appears.
2. Using the and keys, select
“
NETWORK(FAX/SCAN)”.
3. Press the [1] key from the 10-key pad
to select “
IP ADDRESS”.
4. Using the and keys, select either
“
AUTO”or“SPECIFY”, and then
press the
•If“
[Yes] key.
AUTO” was selected so the IP
address will automatically be
assigned by the DHCP server, the
“
NETWORK(FAX/SCAN)”menu
appears again.
•If“
SPECIFY” was selected, a screen
appears, allowing you to specify the
IP address. (Continue with step 5.)
14
Page 23
1 Introduction
Note
• “AUTO” is available if a DHCP server is on the network. If “AUTO”
is selected, it will not be necessary to specify the subnet mask or
gateway settings.
• If a f ixed IP address has been set, you must select “IP Address in
NVRAM” i n the enclosed PageScope Light. Make this setting in
the “TCP/IP Configuration” menu on the “Network” tab. For more
details, refer to the PageScope Light for Di152f/Di183f Scanner
User Manual.
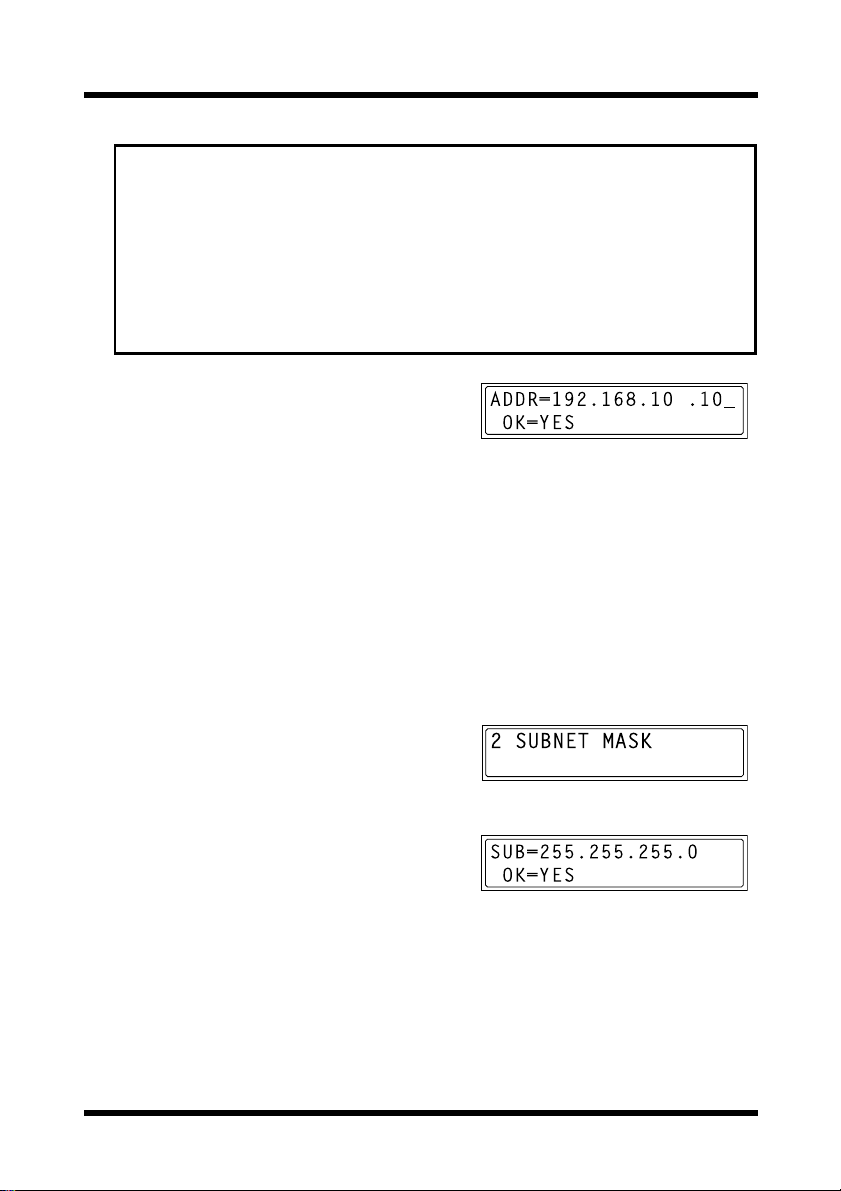
5. Using the 10-key pad, enter the IP
address of the Internet fax/network
scanner.
• The screen at the right shows an
example of an entered IP address.
For the appropriate setting, consult
the network administrator.
6. Press the
The “
[Yes] key.
NETWORK(FAX/SCAN)”
menu appears again.
To set the “SUBNET MASK” function
1. From the “NETWORK(FAX/SCAN) ”
menu of the Utility mode, press the
[2]
key from the 10-key pad to select
“
SUBNET MASK”.
2. Using the 10-key pad, enter the subnet
mask value.
• The screen at the right shows an
example of an entered subnet mask.
For the appropriate setting, consult
the network administrator.
3. Press the
The “
[Yes] key.
NETWORK(FAX/SCAN)”
menu appears again.
15
Page 24

1Introduction
To set the “GATEWAY” function
1. From the “NETWORK(FAX/SCAN) ”
menu of the Utility mode, press the
key from the 10-key pad to select
“
GATEWAY”.
2. Using the 10-key pad, enter the IP
address of the gateway.
• The screen at the right shows an
example of an entered IP address.
For the appropriate setting, consult
the network administrator.
[3]
3. Press the
The “
To set the “DNS CONFIG.” function
[Yes] key.
NETWORK(FAX/SCAN)” menu appears again.
1. From the “NETWORK(FAX/SCAN) ”
menu of the Utility mode, press the
[4]
key from the 10-key pad to select
“
DNS CONFIG.”.
2. Using the and keys, select either
“
DISABLE”or“ENABLE”, and then
press the
•If“
“
[Yes] key.
DISABLE” was selected, the
NETWORK(FAX/SCAN)”menu
appears again.
•If“
ENABLE” was selected, a screen
appears, allowing you to specify the
IP address of the DNS server. (Continue with step 3.)
3. Using the 10-key pad, enter the IP
address of the DNS server.
4. Press the
The “
[Yes] key.
NETWORK(FAX/SCAN)”
menu appears again.
16
Page 25

To set the “SERVER TIMEOUT” function
1. From the “NETWORK(FAX/SCAN) ”
menu of the Utility mode, press the
[5]
key from the 10-key pad to select
“
SERVER TIMEOUT”.
2. Using the 10-key pad, enter the timeout period (seconds).
• The timeout period can be set
between 5 and 120 seconds.
1 Introduction
3. Press the
The “
[Yes] key.
NETWORK(FAX/SCAN)”
menu appears again.
1.6.3 Specifying E -mail Settings (“E-M A IL SETTING 1”
Menu)
From the “E-MAIL SETTING 1”and“E-MAIL SETTING 2”menusofthe
Utility mode, various e-mail settings can be specified.
Tip
• If, at any time, you wish to quit setting an “E-MAIL SETTING 1” or “EMAIL SETTING 2” function, press the [No] key. When the message
“STOP SETTING?” appears, press the [Yes] key to quit.
To program the sender’s name
1. Press the [Utility] key.
The first screen of the Utility mode
appears.
2. Using the and keys, select “
MAIL SETTIN G 1
”.
E-
17
Page 26

1Introduction
3. Press the [1] key from the 10-key pad
to select “
4. Enter the sender’s name.
• For details on entering text, refer to
“1.5 Entering Text” (p. 9).
• The sender name can contain a max-
imum of 20 characters.
SENDER NAME”.
5. Press the
The “
To program the e-mail address of the sender
[Yes] key.
E-MAIL SETTING 1” menu appears again.
1. From the “E-MAIL SETTING 1”menu
of the Utility mode, press the
from the 10-key pad to select “
ADDRESS
”.
[2] key
E-MAIL
2. Enter the e-mail address of this
machine.
• For details on entering text, refer to
“1.5 Entering Text” (p. 9).
• The e-mail address can contain a
maximum of 64 characters.
• Be sure to first obtain the e-mail
address from the network administrator.
• If you do not receive e-mails on this
machine, enter the e-mail address of
the administrator.
3. Press the
The “
[Yes] key.
E-MAIL SETTING 1”menu
appears again.
18
Page 27

To set the SMTP server address
1. From the “E-MAIL SETTING 1”menu
of the Utility mode, press the
from the 10-key pad to select “
SERVER
”.
[3] key
SMTP
2. Enter the IP address or host name for
the SMTP server.
• For details on entering text, refer to
“1.5 Entering Text” (p. 9).
• The host name can contain a maximum of 64 characters.
• The upper-right screen shows an
example of an entered IP address.
For the appropriate setting, consult
the network administrator.
1 Introduction
3. Press the
The “
[Yes] key.
E-MAIL SETTING 1”menu
appears again.
To set the “TEXT INSERT” f unction
By first setting this function, text (fixed string of characters) is inserted in
front of the image data for the Internet fax document before the fax is sent.
Use this function for example when sending Internet faxes to computers.
1. From the “
of the Utility mode, press the
from the 10-key pad to select “
INSERT
E-MAIL SETTING 1”menu
[4] key
TEXT
”.
2. Using the and keys, select either
“
ON”or“OFF”, and then press the
[Yes] key.
The “
E-MAIL SETTING 1”menu
appears again.
19
Page 28

1Introduction
To set the “DEFAULT SUBJECT” function
1. From the “E-MAIL SETTING 1”menu
of the Utility mode, press the
from the 10-key pad to select
“
DEFAULT SUBJECT”.
2. Enter the default subject.
• For details on entering text, refer to
“1.5 Entering Text” (p. 9).
• The default subject can contain a
maximum of 20 characters.
[5] key
3. Press the
The “
[Yes] key.
E-MAIL SETTING 1”menu
appears again.
To set the “TIME ZONE” function
1. From the “E-MAIL SETTING 1”menu
of the Utility mode, press the
from the 10-key pad to select “T
ZONE
”.
[6] key
IME
2. Using the and keys, select the
time zone.
3. Press the
The “
[Yes] key.
E-MAIL SETTING 1”menu
appears again.
20
Page 29

1 Introduction
1.6.4 Specifying E-mail Settings (“E-MAIL SETTING 2” Menu)
To set the POP3 server address
1. Press the [Utility] key.
The first screen of the Utility mode
appears.
2. Using the and keys, select “
MAIL SETTIN G 2
3. Press the
to select “
[1] key from the 10-key pad
POP3 SERVER”.
”.
E-
4. Enter the IP address or host name for
the POP3 server.
• For details on entering text, refer to
“1.5 Entering Text” (p. 9).
• The host name can contain a maximum of 64 characters.
• The upper-right screen shows an
example of an entered IP address.
For the appropriate setting, consult
the network administrator.
5. Press the
The “
[Yes] key.
E-MAIL SETTING 2”menu
appears again.
21
Page 30

1Introduction
To set the “POP3 ACCOUNT” f unction
1. From the “E-MAIL SETTING 2”menu
of the Utility mode, press the
from the 10-key pad to select “
ACCOUNT
”.
2. Enter the account name.
• For details on entering text, refer to
“1.5 Entering Text” (p. 9).
• The account name can contain a
maximum of 64 characters.
[2] key
POP3
3. Press the
The “
[Yes] key.
E-MAIL SETTING 2”menu
appears again.
To set the “POP3 PASSWORD” function
1. From the “E-MAIL SETTING 2”menu
of the Utility mode, press the
from the 10-key pad to select “
PASSWORD
”.
[3] key
POP3
2. Enter the password.
• For details on entering text, refer to
“1.5 Entering Text” (p. 9).
• The password can contain a maximum of 32 characters.
• The upper-right screen shows an
example of an entered password. For
the appropriate setting, consult the
network administrator.
3. Press the
The “
[Yes] key.
E-MAIL SETTING 2” menu appears again.
22
Page 31

To set the “AUTO RECEPTION” function
1. From the “E-MAIL SETTING 2”menu
of the Utility mode, press the
from the 10-key pad to select “
RECEPTION
”.
[4] key
AUTO
2. Using the and keys, select either
“
ON”or“OFF”, and then press the
[Yes] key.
ON” was selected, a screen
•If“
appears, allowing you to specify the
time interval for checking for new email. (Continue with step 3.)
•If“OFF” was selected, the “E-MAIL
SETTING 2
” menu appears again.
3. Using the 10-key pad, enter the time
interval (minutes) for checking for
new e-mail.
• The time interval for automatically
checking for new e-mail can be set
between 1 and 60 seconds.
1 Introduction
4. Press the
The “
appears again.
[Yes] key.
E-MAIL SETTING 2”menu
23
Page 32

1Introduction
To set the address where results are sent
1. From the “E-MAIL SETTING 2”menu
of the Utility mode, press the
from the 10-key pad to select “
ADDRESS
”.
2. Enter the e-mail address for the recipient of error notifications.
• For details on entering text, refer to
“1.5 Entering Text” (p. 9).
• The e-mail address can contain a
maximum of 64 characters.
• Normally, enter the e-mail address
of the administrator.
[5] key
REPLY
3. Press the
The “
[Yes] key.
E-MAIL SETTING 2”menu
appears again.
To set the “HEADER PRINT” function
1. From the “E-MAIL SETTING 2”menu
of the Utility mode, press the
[6] key
from the 10-key pad to select
“
HEADER PRINT”.
2. Using the and keys, select either
“
ON”or“OFF”, and then press the
[Yes] key.
The “
E-MAIL SETTING 2”menu
appears again.
24
Page 33

2 Internet Faxing
2 Internet Faxing
The procedures for sending scan data and receiving e-mail are described
below.
Note
• For information on documents that can be used, the scanning area of
the image, the print area and paper types and sizes, refer to the User
Manuals for the Di152f/Di183f or the FX-1 Fax unit for the Di 152/
Di183.
• Internet faxing is not possible for approximatelyt hree minutes after
the machine is turned on.
2.1 Basic Faxing
Tip
• Internet faxes are sent and received with the help of a mail server;
they are not sent directly to the recipient or received directly from the
sender. In addition, as soon as transmissionwith the server is finished
correctly, the transmission is considered complete.
• The resolution and document size that can be used depends on the
performance of the Inter net fax f unction on the receiving end. Check
on the performance of the Internet fax function on t he receiving end
beforet ransmission. If the performance of the Internet fax function on
the receiving end is not known, send your Internet fax w ith a Letter or
A4 size and the “Standard” resolution setting.
• In order t o use Internet faxing, settings such as the IP address, SMTP
server address and e-mail address must be set in advance.
• With the “Standard” resolution setting, approximately 295 Letter or
A4-size document pages can be scanned at one time (approximately
720 pages if the optional “8 MB Memory for Fax” is installed).
• To stop scanning, press the [Stop] key.
• If the transmission could not be completed correctly, a transmission
result report is printed.
• To cancel the transmission of scan data that is queued, select
“CANCEL RESERV.” with the [Function] key. (p. 39)
25
Page 34

2 Internet Faxing
2.1.1 Using the Automatic Document Feeder
1. Press the [Fax] key.
The machine enters Fax mode, and
the fax screen appears.
2. Load the document to be sent into the
Automatic Document Feeder.
• Adjust the Document Guide Plates
to fit the size of the document.
• Load the document with the side to
be scanned facing up.
3. If necessary, change the “
Resolution”
setting (p. 29).
4. Press the
The
[Mail] key.
[Mail] key lights up, and an e-
mail address can be entered.
5. Enter the e-mail address of the recipient.
• For details on entering text, refer to
“1.5 Entering Text” (p. 9).
• The e-mail address of a previously programmed recipient can also be
specified. Refer to “2.2.2 Specifying the Recipient” (p. 30).
6. Press the
[Start] key to begin scanning and sending the fax.
• Once transmission is finished, a beep is sounded.
26
Page 35

2 Internet Faxing
2.1.2 Positioning Documents on the Original Glass
1. Press the [Fax] key.
The machine enters Fax mode, and
the fax screen appears.
2. Lift open the Original Cover, and then
position the document to be faxed on
the Original Glass.
• Position the document with the side
to be scanned facing down.
• Align the document on the scales
above and to the left of the Original
Glass.
• If the Automatic Document Feeder
is not installed, skip to step 4.
3. Press the
• Even when faxing sheet documents
positioned on the Original Glass, the
[Book TX] key should be pressed.
4. If necessary, change the “Resolution”
setting (p. 29).
[Book TX] key.
27
Page 36

2 Internet Faxing
5. Press the [Mail] key.
The
[Mail] key lights up, and an e-
mail address can be entered.
6. Enter the e-mail address of the recipient.
• For details on entering text, refer to
“1.5 Entering Text” (p. 9).
• The e-mail address of a previously programmed recipient can also be
specified. Refer to “2.2.2 Specifying the Recipient” (p. 30).
7. Check that the correct document size
appears in the screen.
SCAN BOOK(LT )
SCAN=YES (SIZE= )
• To change the document size, press
the key, and then use the and
keys to select the desired docu-
ment size in the screen that appears.
8. Press the
[Yes] key to scan the page.
9. If the document to be faxed contains
multiple pages, position the next page
of the document on the Original Glass
when the screen shown at the right
appears, and then press the
[Yes] key.
• Repeat step 9 until all pages of the document have been scanned.
10. Press the
[Start] key to begin scanning and sending the fax.
• Once transmission is finished, a beep is sounded.
If the memory becomes full while scanning documents
If the memory becomes full while a document is being scanned, the
transmission is cancelled.
28
Page 37

2 Internet Faxing
2.2 Transmission S ettings
2.2.1 Adjusting the Fax Resolution
Selecting one of the following resolutions to match the type of document to
be faxed will produce a sharper result.
Document Type Resolution Setting
Documents with normal print Standard
Documents containing small print, such as
newspapers
Documents containing detailed
illustrations
Documents containing text and objects
with varying shades, such as photos
Documents containing objects with
varying shades, such as photos
1. Position the document to be faxed.
Fine, Super Fine
Standard + Half Tone, Fine + Half Tone
Fine + Half Tone, Super Fine + Half Tone
2. Press the
[Resolution] key until the resolution that matches the docu-
ment is selected.
• Repeatedly pressing the
below.
[Resolution]key changes the setting as shown
29
Page 38

2 Internet Faxing
2.2.2 Specifying the Recipient
Specify the recipient using any of the different methods described below.
To directly enter the e-mail address
1. Press the [Mail] key.
The
[Mail] key lights up, and an e-
mail address can be entered.
2. Enter the e-mail address of the recipient.
• For details on entering text, refer to
“1.5 Entering Text” (p. 9).
• The e-mail address can contain a
maximum of 64 characters.
• If the e-mail address does not con-
tain “@”, the
[Start]key cannot be
pressed.
• If you wish to change the entered e-mail address, press the
and then enter the correct address.
30
[No] key ,
Page 39

2 Internet Faxing
To use one-touch dialing
Note
• For details on programming the one-touch dial keys, refer to “4.2.1
Programming One-Touch Dial Keys”(p. 57).
• If the recipient will be specified using a one-touch di al key, it is not
necessary to press the [Mail] key.
1. Press the one-touch dial key (
[01] through [27]) programmed with the e-
mail address of the desired recipient.
The machine automatically starts
scanning the document and sending
the fax.
Note
• If the specified one-touch dial key is programmed with a fax number,
transmission of the fax begins.
31
Page 40

2 Internet Faxing
To use speed dialing
Note
• For details on programming speed dial numbers, refer to “4.2.2
Programming Speed Dial Numbers” (p. 58).
• If the recipient will be specified using speed dialing, iti s not necessary
to press the [Mail] key.
1. Press the
[Speed Dial] key, and then
use the 10-key pad to enter the 3-digit
speed dial number (number programmed with the e-mail address).
• If you wish to change the entered
speed dial number, press the
[No]
key, and then enter the correct speed
dial number.
Note
• If the specified speed dial number is programmed with a fax number,
transmission of the fax begins.
32
Page 41

2 Internet Faxing
To use group dialing
Note
• For details on programming one-touch dial keys for group dialing,
refer to “4.2.3 Programming Group Dialing” (p. 59).
• If the recipient will be specified using group dialing, it is not necessary
to press the [Mail] key.
1. Press the one-touch dial key (
[01]
through [27]) programmed with th e
group of recipients that you wish to
send the fax to.
The machine automatically starts
scanning the document and sending
the fax.
To use program di aling
The only transmission functions where e-mail addresses can be specified are
broadcast transmission and timer transmission.
For setting procedures, refer to the User Manuals for the Di152f/Di183f or
the FX-1 Fax unit for the Di152/Di183.Enter the e-mail address when you
are asked to specify the recipient information.
33
Page 42

2 Internet Faxing
To use the phone book
The phone book contains all programmed one-touch dialing and speed
dialing numbers, allowing you to search for and select the recipient that you
wish to send the fax to.
1. Press the
[Phone Book] key.
2. Using the and keys, select either
“LIST”or“SEARCH”, and then press
the
[Yes] key.
LIST” was selected:
•If“
The list of programmed one-touch
dialingand speed dialingnumbers is
displayed. Usingthe and keys,
select the desired recipient.
•If“
SEARCH” was selected:
A screen appears, allowing you to
enter the text to be searched for.
Search for the desired recipient by
entering part (or all) of the name
programmed.For details on performing the search, refer to “ To search
the phone book” (p. 34).
To search the phone book
1. Press the [Phone Book] key.
2. Using the and keys, select
“
SEARCH”, and then press the [Yes]
key.
A screen appears, allowing you to
enter the text to be searched for.
34
Page 43

3. Enter the first few characters of the
name programmed for the desired
recipient.
• Enter the name programmed in the
one-touch dial key or the speed dial
number. (For details on entering
text, refer to “1.5 Entering Text” (p.
9).)
• A maximum of 10 numbers can be
entered.
2 Internet Faxing
4. Press the
[Yes] key.
• The number of names beginning
with the text entered in step 3 is displayed.
To select a recipient from the displayed search results, skip to step 7.
Tip
• If there are no one-touch dial keys or speed dialing numbers
beginning with the entered text, “(0)” is displayed, and then the
screen allowing you to enter the search text appears again.
5. To narrow down the search results
even further, press the
[Yes] key, and
then enter more search text.
6. Press the
[Yes] key.
7. Using the and keys, select the
desired recipient.
• If the desired recipient name does
not appear in the search results,
press the
[No] keytoreturntothe
screen allowing you to enter the
search text, and then try searching
for different text.
35
Page 44

2 Internet Faxing
2.2.3 Broadcast Transmission
The same scan data can be sent to multiple recipients at one time.
Tip
• Both e-mail addresses and fax numbers can be specified as
recipients.
• With the result report printed after the transmission is finished, you
can check whether the fax was sent to all recipients.
Note
• A maximum of 143 recipients can be specified for the same
transmission.
• A maximum of 16 recipients c an be specified by entering the
information directly.
To use broadcast transmission
1. Position the document to be faxed.
2. If necessary, change the “Resolution” setting (p. 29).
3. Press the
4. From the 10-key pad, press the
Otherwise, press the
once to select “
then press the
5. Specify the recipient, and then press the
[Function] key.
[1] key.
[Function] key
1 BROADCAST”, and
[Yes] key.
[Yes] key.
Repeat this step until all recipients have been specified.
• The recipient e-mail addresses can be specified by using the one-
touch dial keys, the speed dial numbers or group dialing, by selecting
from the phone book, or by entering the address directly.
36
Page 45

2 Internet Faxing
Tip
• If the e-mail address is entered directly, press the [Mail] key after
entering the address. (For details on entering text, refer to “1.5
Entering Text” (p. 9).)
• If the wrong recipient has been specified, press the [No] key to
delete the current selection. (This is valid only before the recipient
is set by pressing the [Yes] key.)
6. Press the
[Start] key.
A message appears, allowing you to select whether or not to check the
recipients.
7. Tocheck the recipients, press the
[Yes]
key.
• If you do not wish to check the
recipients, skip to step 9.
8. The recipients specified in step 5 are
displayed in the order that they were
selected.
Check the recipient, and then press the
[Yes] key.
• To delete the displayed recipient,
press the
[No] key.
• After all recipients have been
checked, “
Fin. =START”appearsin
the display.
9. Press the
[Start] key to begin scanning and sending the fax.
Note
• If both e-mail addresses and fax numbers are specified as
recipients for broadcast transmission, the faxing begins after the emails are sent.
37
Page 46

2 Internet Faxing
2.3 Timer Transmission
A document can be scanned and stored in the memory to be sent at a
specified time.
Note
• The time is set on a 24-hour system.
• If the machine is not programmed with the current time,the faxcannot
be sent at the specified time.
• Timer transmission can be combined with broadcast transmission.
To use timer transmission
1. Position the document to be faxed.
2. If necessary, change the “Resolution” setting (p. 29).
3. Press the
4. From the 10-key pad, press the
[Function] key.
[2] key.
Otherwise, press the [Function] key
twice to select “
then press the
2TIMERTX”, and
[Yes] key.
5. Using the 10-key pad, enter the
desired transmission time, and then
press the
[Yes] key.
• If you wish to change the time, press
the
[No] key, and then enter the cor-
rect time.
6. Specify the recipient.
• Refer to “2.2.2 Specifying the
Recipient” (p. 30).
7. Press the
[Start] key.
The machine scans the document, then enters transmission standby mode.
38
Page 47

2 Internet Faxing
2.4 Cancelling (Deleting) a Document Queued for
Transmissi on
Of the e-mails stored in the memory and queued to be sent by timer
transmission, a specific e-mail can be selected and deleted.
To cancel a queued document
1. Press the [Function] key.
2. From the 10-key pad, press the
Otherwise, press the
times to select “
RESERV.
key.
• The details (specified transmission
time/type of transmission) of the
jobs queued in the memory are displayed.
• If no jobs have been queued in the
memory, the message “
appears.
”,andthenpressthe[Yes]
[Function] key 8
8 CANCEL
*NONE*”
[8] key.
39
Page 48

2 Internet Faxing
3. Using the and keys, select the
job to be deleted.
• The following types of transmission
jobs are displayed. (Fax transmission jobs are also displayed.)
MEMORY: Memory transmission
B-CAST: Broadcast
transmission
TIMER: Timer Transmission
M.B. TX: Mailboxtransmission
POLL-TX: Polling transmission
POLL-RX: Polling reception
RELAY: Relay initiation
transmission or relay
broadcast
transmission
FORWARD: Fax forwarding
• To check the recipient of the cur-
rently displayed transmission job,
press the key. After checking,
press the
previous screen.
[Yes] key to return to the
4. Press the
[Yes] key to delete the dis-
played job.
“
CANCEL RESERV.” appears in the
display.
5. To delete another queued job, press either the
and then repeat steps 3 and 4.
• If you are finished deleting jobs, press the
main screen.
40
[Yes] key or the [8] key,
[No] keytoreturntothe
Page 49

2 Internet Faxing
2.5 Receiving
2.5.1 E-Mail Formats That Can B e Received
This machine can receive the following types of e-mail.
• Text (single byte character only)
• TIFF-F images
• Combination of text (single byte character only) and TIFF-F images
• Attached text file (single byte character only)
Note
• If the IP address and POP3 server address are not yet specified, email cannot be received. In addition, if the POP3 account and POP3
password are not correctly specified, a transmission error will occur.
Refer to “1.6.3 Specifying E-mail Settings (“E-MAIL SETTING 1”
Menu)” (p. 17).
• If a file with a format specific to a certain application is attached, the
e-mail cannot be received.
• If the received e-mail is in a format that cannot be received, a result
notification is forwarded to the administrator. Refer to “ To set the
address where results are sent” (p. 24).
2.5.2 Automatic Reception
If the machine is set to automatically check with the POP3 server for e-mails
received by Internet fax at a fixed interval, e-mails are automatically
received with any operations being performed. Refer to “ To set the “AUTO
RECEPTION” function” (p. 23).
If the machine is not set to automatically receive e-mails, the e-mail must be
received manually. Refer to “2.5.3 Manual Reception” (p. 42).
Screen during automatic reception
41
Page 50

2 Internet Faxing
2.5.3 Manual Reception
If the machine is not set to automatically receive e-mails or if you wish to
receive e-mails immediately, the e-mail must be received manually.
To receive e-mails manually
1. Press the [Fax] key.
The machine enters Fax mode, and
the fax screen appears.
2. Press the
[Function] key.
3. From the 10-key pad, press the
Otherwise, press the
times to select “
RX
”, and then press the [Yes] key.
4. Press the
[Yes] key.
[Function] key 10
0 INTERNET FAX
The machine checks for e-mails
received from the POP3 server, then
begins printing them if any are
received.
After checking for received e-mails
and printing them, the fax screen
appears again.
[0] key.
42
Page 51

3 Network Scanning
3 Network Scanning
The procedures for sending scan data in Scan mode and for uploading scan
data to an FTP server are described below.
Note
• For information on documents that can be used and the scanning
area of the image, refer t o the User Manuals for t he Di152f/Di183f or
the FX-1 Fax unit for the Di152/Di183.
• Network scanning is not possible for approximately three minutes
after the machine is turned on.
3.1 Sending by E-mail (Scan to E-mail)
Tip
• Network scanned e-mails are sent with the help of a mail server; they
are not sent directly to the recipient. In addition, as soon as
transmission with the server is finished correctly, the transmission is
considered complete.
• In order to use network scanning, settings such as the IP address,
SMTP server address and e-mail address must be set in advance.
• With the “200 × 200 dpi” resolution setting and “MH” compression
encoding method setting, approximately 100 Letter or A4-size
document pages can be scanned at one time (approximately 260
pages if the optional “8 MB Memory for Fax” is installed).
• To stop scanning, press the [Stop] key.
• If the transmission could not be completed correctly, a transmission
result report is printed.
• To cancel the transmission of scan data that is queued, select
“CANCEL RESERV.” with the [Function] key. (p. 39)
43
Page 52

3 Network Scanning
3.1.1 Using the Automatic Document Feeder
Note
• For details on entering text, such as the e-mail address and subject,
refer to “1.5 Entering Text” (p. 9).
1. Press the
[Scan] key.
The machine enters Scan mode, and
the scan screen appears.
2. Load the document to be scanned into
the Automatic Document Feeder.
• Adjust the Document Guide Plates
to fit the size of the document.
• Load the document with the side to
be scanned facing up.
3. Press the
The
[Mail] key.
[Mail] key lights up, and an e-
mail address can be entered.
4. Enter the e-mail address of the recipient, and then press the
[Yes] key.
• The e-mail address of a previously programmed recipient can also be
specified. Refer to “2.2.2 Specifying the Recipient” (p. 30).
• If settings such as the subject, cc recipient and resolution are not to be
specified, press the
[Start] key, instead of pressing the [Yes] key.
44
Page 53

5. Enter the subject (“SUBJ.”), and then
press the
[Yes] key.
6. Specify the e-mail address of the
recipient that you wish to send a copy
(cc) to, and then press the
[Yes] key.
• The e-mail address of a previously
programmed recipient can also be
specified. Refer to “2.2.2 Specifying
the Recipient” (p. 30).
7. If you wish to send a cc to multiple
recipients, press the
[Yes] key, and
then specify the other recipients.
Repeat steps 6 and 7 until all of the
recipients are specified.
When you are finished specifying the
cc recipients, press the
[No] key.
8. Using the and keys, select the
desiredresolution (200
× 300 dpi or 600 × 600 dpi), and then
press the
[Yes] key.
× 200 dpi, 300
3 Network Scanning
• To specify detailed Scan mode set-
tings, press the key.
For details on changing the settings,
refer to “ To change the Scan mode
settings” (p. 48).
9. Using the and keys, select
“
ADF”.
• To change the scanning size, press
the key.
For details on changing the setting,
refer to “ To change the scanning
size” (p. 49).
10. Press the
[Start] key to begin scanning and transmitting.
45
Page 54

3 Network Scanning
3.1.2 Positioning Documents on the Original Glass
1. Press the [Scan] key.
The machine enters Scan mode, and
the scan screen appears.
2. Lift open the Original Cover, and then
position the document to be scanned
on the Original Glass.
• Position the document with the side
to be scanned facing down.
• Align the document on the scales
above and to the left of the original
glass.
3. Press the
The
[Mail] key.
[Mail] key lights up, and an e-
mail address can be entered.
4. Enter the e-mail address of the recipient, and then press the
[Yes] key.
• The e-mail address of a previously
programmed recipient can also be
specified. Refer to “2.2.2 Specifying
the Recipient” (p. 30).
• If settings such as the subject, cc recipient and resolution are not to be
specified, press the
[Start]key, instead of pressing the [Yes] key.(Skip
to step 8.)
46
Page 55

5. Enter the subject (“SUBJ.”), and then
press the
[Yes] key.
6. Enter the e-mail address of the recipient that you wish to send a copy (cc)
to, and then press the
[Yes] key.
• The e-mail address of a previously
programmed recipient can also be
specified. Refer to “2.2.2 Specifying
the Recipient” (p. 30).
7. If you wish to send a cc to multiple
recipients, press the
[Yes] key, and
then specify the other recipients.
Repeat steps 6 and 7 until all of the
recipients are specified.
When you are finished specifying the
cc recipients, press the
[No] key.
8. Using the and keys, select the
desiredresolution (200
× 300 dpi or 600 × 600 dpi), and then
press the
[Yes] key.
× 200 dpi, 300
3 Network Scanning
• To specify detailed Scan mode set-
tings, press the key.
For details on changing the settings,
refer to “ To change the Scan mode
settings” (p. 48).
9. Using the and keys, select
“
BOOK”.
• To change the scanning size, press
the key.
For details on changing the setting,
refer to “ To change the scanning
size” (p. 49).
10. Press the
[Yes] key to scan the page.
47
Page 56

3 Network Scanning
11. If the document to be faxed contains
multiple pages, position the next page
of the document on the Original Glass
when the screen shown at the right
appears, and then press the
• Repeat step 11 until all pages of the document have been scanned.
[Yes] key.
12. Press the
To change the Scan mode settings
[Start] key to begin transmitting.
From the screen allowing you to select the resolution, you can change
various Scan mode settings. If you do not wish to change the settings,
documents will be transmitted from Scan mode with the manufacturer’s
default settings or with the settings specified using the Utility mode.
1. From the screen allowing you to select
a resolution, press the key.
A screen appears, allowing the
scanning resolution to be specified.
2. Press the
between the “
and “
[Auto/Photo] keytoselect
[A]”(AUTO),“PHOTO”
TEXT” settings.
• The current setting appears on the
left side of the screen.
3. If the “
PHOTO”or“TEXT” setting
was selected, use the and keys
to adjust the density level.
4. To specify another setting, press the
key. (Continue with step 5.)
To finish setting the Scan mode, press
the
[Start] key.
5. Using the and keys, select the
format (either “
TIFF”or“PDF”) for
the data that will be attached to e-mail.
48
Page 57

3 Network Scanning
6. To specify another setting, press the key. (Continue with step 7.)
To finish setting the Scan mode, press the
7. Using the and keys, select the
compression encoding method (“
“
MR”or“MMR”).
MH”,
[Start] key.
8. Press the
[Start] keytoreturntothescanscreen.
A screen appears, allowing you to select the document mode.
To change the scanning size
From the screen allowing you to select the document mode, you can change
the scanning size setting.
1. From the screen allowing you to select
the document mode (either “
“
BOOK”), press the key.
ADF” was selected, continue with step 2.
•If“
BOOK” was selected, skip to step 3.
•If“
ADF”or
2. Using the and keys, select
whether the document size is automatically detected (“
ning size is specified (“
and then press the
AUTO” was selected, a screen
•If“
AUTO”) or the scan-
MANUAL”),
[Yes] key.
appears, allowing you to select the
document mode.
•If“
MANUAL” was selected, skip to step 3.
3. Using the and keys, select the
scanning size, and then press the
[Yes]
key.
The screen allowing you to select
the document mode appears.
If the memory becomes full while scanning documents
If the memory becomes full while a document is being scanned, the
transmission is cancelled.
49
Page 58

3 Network Scanning
3.2 Uploading to an FTP Server (Scan to Server)
Tip
• In order to access an FTP server, certain settings such as the FTP
server address must be set in advance. These settings can be
specified using PageScopeLight. (For details, referto the PageScope
Light for Di152f/Di183f Scanner User Manual.)
• In addition, a specified recipient can be not ified by e-mail of the FTP
server address that t he data was uploaded to. This setting can be
specified using PageScopeLight. (For details, referto the PageScope
Light for Di152f/Di183f Scanner User Manual.)
• With the “200 × 200 dpi” resolution setting and “MH” compression
encoding method setting, approximately 100 Letter or A4-size
document pages can be scanned at one time (approximately 260
pages if the optional “8 MB Memory for Fax” is installed).
• To stop scanning, press the [Stop] key.
• If the transmission could not be completed correctly, a transmission
result report is printed.
• To cancel the transmission of scan data that is queued, select
“CANCEL RESERV.” with the [Function] key. (p. 39)
50
Page 59

3 Network Scanning
3.2.1 Using the Automatic Document Feeder
1. Press the [Scan] key.
The machine enters Scan mode, and
the scan screen appears.
2. Load the document to be scanned into
the Automatic Document Feeder.
• Adjust the Document Guide Plates
to fit the size of the document.
• Load the document with the side to
be scanned facing up.
3. Press the
use the 10-key pad to enter the 3-digit
speed dial number.
• Specify a speed dial number
between “101” and “110”.
• The FTP server can only be speci-
fied with a speed dial number.
In addition, the speed dial numbers
are programmed with the FTP server
addresses using PageScope Light.
For details, refer to the PageScope
Light for Di152f/Di183f Scanner
User Manual.
• If you wish to change the entered FTP server address, press the
key, and then enter the correct address.
• If nothing is programmed in the specified speed dial number, an error
message appears. Enter the correct speed dial number.
[Speed Dial] key, and then
[No]
51
Page 60

3 Network Scanning
4. Press the [Yes] key.
• If settings such as the resolution are
not to be specified, press the
key, instead of pressing the [Yes]
key.
5. Using the and keys, select the
desiredresolution (200
× 300 dpi or 600 × 600 dpi), and then
press the
[Yes] key.
× 200 dpi, 300
• To specify detailed Scan mode set-
tings, press the key.
For details on changing the settings, refer to “ To change the Scan
mode settings” (p. 48).
6. Using the and keys, select
“
ADF”, and then press the [Start] key.
• To change the scanning size, press
the key.
For details on changing the setting,
refer to “ To change the scanning
size” (p. 49).
[Start]
7. Press the
[Start]keytobeginscanning,
then connect to the FTP server and
upload the scan data.
Tip
• In order to send to a specified recipient (only one) a notification of the
FTP ser ver address where the data was uploaded, set “E-mail
Notification” when programming the speed dial number using
PageScopeLight. For details, refer to the PageScope Light for Di152f/
Di183f Scanner User Manual.
52
Page 61

3 Network Scanning
3.2.2 Positioning Documents on the Original Glass
1. Press the [Scan] key.
The machine enters Scan mode, and
the scan screen appears.
2. Lift open the Original Cover, and then
position the document to be scanned
on the Original Glass.
• Position the document with the side
to be scanned facing down.
• Align the document on the scales
above and to the left of the original
glass.
3. Press the
use the 10-key pad to enter the 3-digit
speed dial number.
• Specify a speed dial number
between “101” and “110”.
• The FTP server can only be speci-
fied with a speed dial number.
In addition, the speed dial numbers
are programmed with the FTP server
addresses using PageScope Light.
For details, refer to the PageScope
Light for Di152f/Di183fScanner User Manual.
• If you wish to change the entered FTP server address, press the
key, and then enter the correct address.
• If nothing is programmed in the specified speed dial number, an error
message appears. Enter the correct speed dial number.
[Speed Dial] key, and then
[No]
53
Page 62

3 Network Scanning
4. Press the [Yes] key.
• If settings such as the resolution are
not to be specified, press the
key, instead of pressing the [Yes]
key.
5. Using the and keys, select the
desiredresolution (200
× 300 dpi or 600 × 600 dpi), and then
press the
[Yes] key.
× 200 dpi, 300
• To specify detailed Scan mode set-
tings, press the key.
For details on changing the settings,
refer to “ To change the Scan mode settings” (p. 48).
6. Using the and keys, select
“
BOOK”.
• To change the scanning size, press
the key.
For details on changing the setting,
refer to “ To change the scanning
size” (p. 49).
[Start]
7. Press the
[Yes] key to scan the page.
8. If the document to be faxed contains
multiple pages, position the next page
of the document on the Original Glass
when the screen shown at the right
appears, and then press the
[Yes] key.
• Repeat step 8 until all pages of the document have been scanned.
9. Press the
[Start] key to connect to the FTP server and begin uploading.
Tip
• In order to send to a specified recipient (only one) a notification of the
FTP ser ver address where the data was uploaded, set “E-mail
Notification” when programming the speed dial number using
PageScopeLight. For details, refer to the PageScope Light for Di152f/
Di183f Scanner User Manual.
54
Page 63

4 Utility Mode Settings
4 Utility Mode Settings
4.1 Programming Scan Settings (“SCAN SETTING” Menu)
From the “SCAN SETTING” menu, the default settings for the resolution,
data format and compression encoding method during scanning and
transmission with network scanning can be changed.
4.1.1 Setting the “RESOLUTION” Function
1. Press the [Utility] key.
2. Using the and keys, select
“
SCAN SETTING”.
3. Press the [1] key from the 10-key pad
to select “
4. Using the and keys, select the
desiredresolution (200
× 300 dpi or 600 × 600 dpi), and then
press the
The “
appears again.
RESOLUTION”.
× 200 dpi, 300
[Yes] key.
SCAN SE TTING”menu
4.1.2 Setting the “I MAGE FORMAT” function
1. Press the [Utility] key.
2. Using the and keys, select
“
SCAN SETTING”.
3. Press the [2] key from the 10-key pad
to select “
IMAGE FORMAT”.
55
Page 64

4 Utility Mode Settings
4. Using the and keys, select the
data format (either “
and then press the
The “
SCAN SE TTING”menu
TIFF”or“PDF”),
[Yes] key.
appears again.
4.1.3 Setting the Compression E ncoding Method
(“CODING METHOD” Function)
1. Press the [Utility] key.
2. Using the and keys, select
“
SCAN SETTING”.
3. Press the
to select “
[5] key from the 10-key pad
CODING METHOD”.
4. Using the and keys, select the
compression encoding method
(“
MH”, “MR”or“MMR”), and then
press the
The “
[Yes] key.
SCAN SE TTING”menu
appears again.
56
Page 65

4 Utility Mode Settings
4.2 Programming E-mail Addresses
The procedures for programming one-touch dial keys and speed dial
numbers with e-mail addresses are described below.
Note
• For details on changing or deleting programmed e-mail addresses,
refer to the User Manuals for the Di152f/Di183f or the FX-1 Fax unit
for the Di152/Di183.
4.2.1 Programming One-Touch Dial Keys
1. Press the [Utility] key.
2. Press the key 6 times to select
“
FAX REGISTRATION”.
3. Press the
to select “
[1] key from the 10-key pad
ONE-TOUCH DIAL”.
4. Press the one-touch dial key that you
wish to program.
5. Enter the e-mail address of the recipient.
• For details on entering text, refer to
“1.5 Entering Text” (p. 9).
• The e-mail address can contain a
maximum of 64 characters.
• If only numbers are entered, it will
be regarded as a fax number.
6. Press the
[Yes] key.
• For details on entering text, refer to “1.5 Entering Text” (p. 9).
• If the e-mail address does not contain “@”, the
[Yes] key cannot be
pressed.
57
Page 66

4 Utility Mode Settings
7. Enter the name of the programmed email address.
• For details on entering text, refer to
“1.5 Entering Text” (p. 9).
• Text up to 20 characters long can be
entered for the name.
8. Press the
[Yes] key.
• The settings are registered. To program another one-touch dial key,
repeat steps 4 through 8.
9. Press the
[No] keytofinishprogram-
ming.
The “
FAX REG ISTRATION”menu
appears again.
4.2.2 Programming Speed Dial Numbers
1. Press the [Utility] key.
2. Press the key 6 times to select
“
FAX REGISTRATION”.
3. Press the [2] key from the 10-key pad
to select “
4. Using the 10-key pad, enter the 3digit speed dial number (ex. 011) that
youwishtoprogram.
5. Enter the e-mail address of the recipient.
SPEED DIAL”.
• For details on entering text, refer to
“1.5 Entering Text” (p. 9).
• The e-mail address can contain a
maximum of 64 characters.
• If only numbers are entered, it will be regardedas a fax number.
58
Page 67

6. Press the [Yes] key.
4 Utility Mode Settings
• If the e-mail address does not contain “@”, the
[Yes] key cannot be
pressed.
7. Enter the name of the programmed email address.
• For details on entering text, refer to
“1.5 Entering Text” (p. 9).
• Text up to 20 characters long can be
entered for the name.
8. Press the
[Yes] key.
• The settings are registered. To program another speed dial number,
repeat steps 4 through 8.
9. Press the
[No] keytofinishprogram-
ming.
The “
FAX REG ISTRATION”menu
appears again.
4.2.3 Programming Group D ialing
1. Press the [Utility] key.
2. Press the key 6 times to select
“
FAX REGISTRATION”.
3. Press the [3] key from the 10-key pad
to select “
GROUP DIAL”.
4. Press the one-touch dial key that you
wish to program.
59
Page 68

4 Utility Mode Settings
5. Enter the name of the group, and then
press the
• For details on entering text, refer to
“1.5 Entering Text” (p. 9).
• Text up to 20 characters long can be entered for the name of the
group.
6. By using the one-touch dial keys or
the speed dial numbers, or by entering
the dialing information directly, specify the recipients.
Tip
• To cancel the current selection, press the [No] key, and then
[Yes] key.
specify the correct recipient.
7. Press the
[Yes] key, and then specify
another recipient.
• Repeat steps 6 and 7 until all recipi-
ents have been specified.
• A maximum of 50 different recipients can be specified as one group.
• While specifying recipients using group dialing, a one-touch dial key
programmed with a group can be specified. In that case, the number
of recipients programmedin the specified one-touch dial key (group
dial key) is a dded.
8. When you are finished specifying
recipients, press the
[Start]key.
• The settings are registered. To pro-
gram another group, repeat steps 4
through 8.
9. Press the
[No] keytofinishprogram-
ming.
The “F
AX REG ISTRATION”menu
appears again.
60
Page 69

4 Utility Mode Settings
4.3 Specifying the “FORWARD” Function
You can set up the machine to forward any received faxes to other fax
machines and internet fax terminals (e-mails). You cannot forward any
received Internet faxes (e-mails).
To set the “FORWARD” function
1. Press the [Utility] key.
2. Press the key 8 times to select “
OPERATION
3. Press the
select “
”.
[6] key from the keypad to
FORWARD”.
RX
4. Using the and keys, select
“
ON”, “ON(PRINT)”or“OFF”, and
then press the
ON”or“O N(PRINT)”was
•If“
[Yes] key.
selected, a screen appears, allowing you to specify the forwarding
location. (Continue with step 5.)
•If“
OFF” was selected, the “RX OPERATION” menu appears again.
Tip
• If the “FORWARD” function is set to “ON(PRINT)”, this machine
prints the received document at the same time that it forwards it.
5. Enter the e-mail address or fax number of the recipient by using the
one-touch dial keys or the speed dial numbers or by entering it directly.
Tip
• If the e-mail address is entered directly, press the [Mail] key after
entering the address. For details on entering text, refer to “ 1.5
Entering Text” (p. 9).
6. Press the
The “
[Yes] key.
RX O PERATION” menu appears again.
61
Page 70

4 Utility Mode Settings
4.4 Specifying E-mail Settings (“E-MAIL SETTING
1” and “E-MAIL SETTING 2” Menus)
For details on specifying the functions available on the “E-MAIL SETTING
”and“E-MAIL SETTING 2” menus, refer to “1.6.3 Specifying E-mail
1
Settings (“E-MAIL SETTING 1” Menu)” (p. 17).
4.5 Specifying Network Settings (“NETWORK
(FAX/SCAN)” Menu)
For details on specifying the functions available on the “NETWORK(FAX/
SCAN)
(“NETWORK(FAX/SCAN)” Menu)” (p. 14).
” menu, refer to “1.6.2 Specifying Network Settings
62
Page 71

5 Checking the Transmission/Reception Result
5 Checking the Transmission/Reception
Result
The transmission result information for a maximum of 60 sent and received
e-mails, including sent and received faxes, is saved.
This machine is set to automatically print the report each time it reaches a
total of 60 transmissions.
In addition, the transmission report can be viewed or printed by pressing the
[Confirm] key .
5.1 Checking the Transmission Result
1. Press the [Confirm] key.
2. Press the
3. Using the and keys, display the
desired transmission results to check
them.
• In the transmission result screen,
“
faxes, and “
ones.
•Ifthe
while the transmission results are
displayed, the main screen appears.
•Ifthe
transmission result report is printed.
After the transmission result report
is printed, the main screen appears.
[Yes] key.
TX” indicates sent faxes/Internet
RX” indicates received
[No] key is pressed twice
[Start] key is pressed, the
63
Page 72

6 Error Messages
6 Error Messages
6.1 Main Error Messages and Their Remedies
Message Cause Remedy
*COMM.ERROR*
XXXX SERVER
*CANNOT CONNECT*
XXXX SERVER
*CANNOT GET IP*
XXXX SERVER
*DISCONNECT*
XXXX SERVER
*WRONG P ASSW ORD*
XXXX SERVER
*RECEIVE WRONG DATA* An e-mail that cannot be
*MEM.FULL/RX CANCEL* The memory has become
*SERVER MEMORY FULL*
SMTP SERVER
Communication is not
possible because of some
problem in the machine or
the condition of t he
network or server.
A connection to the server
cannot be established.
The IP address could not
be assigned by the DNS or
DHCP server.
The connection to the
server was cut.
The password is incorrect,
so the machine could not
log onto the server.
printed by this machine
was received. (For a file
attachment in a format
other than TIFF-F)
full while receiving email.
The memory of the SMTP
server has become full
while sending an e-mail.
Check the transmission
results.
Consult with the network
administrator.
Check that the Ethernet
cable is correctly connected.
(p. 4)
Check the “E-MAIL
SETTING1”, “E-MAIL
SETTING2”and
“NETWORK(FAX/
SCAN)”settings. (p. 12)
Consult with the network
administrator.
Consult with the network
administrator.
Consult with the network
administrator.
For a POP3 server, check
the “E-MAIL SETTING 2”
setting. (p. 22)
Consult with the network
administrator.
Ask the sender to send a
TIFF-F file or text in the
correct format.
Retrieve all received faxes
stored in the memory.
Consult with the network
administrator.
64
Page 73

Message Cause Remedy
MACHINE TROUBLE
(Flashing alternately)
(C####)
Some problem occurred in
the machine.
6 Error Messages
Turn the machine off, then
on again.
If the error is still displayed,
contact your service
representative.
65
Page 74

7 Appendix
7 Appendix
7.1 Specifications
Internet Faxing
Transmission protocol
Resolution Transmission: 203 × 98 dpi, 203 ×196 dpi, 408 ×392 dpi
Data format
Coding method
Network
Network Scanning
Transmission protocol
Resolution 200 × 200 dpi, 300 × 300 dpi, 600 × 600 dpi
Data format
Coding method
Network
E-mail transmission: SMTP,TCP/IP
E-mail reception: POP3, T CP/IP
Reception: 203 × 98 dpi, 203 × 196 dpi, 408 × 392 dpi,
200 × 100 dpi, 200 × 200 dpi
E-mail format: MIME
Attached file format: TIFF-F
Transmission: MH
Reception: MH, MR, MMR, JBIG
Ethernet LAN (10BASE-T, 100BASE-TX connections)
E-mail transmission: SMTP,TCP/IP
FTP transmission: FTP, TCP/IP
E-mail format: MIME
Attached file format: TIFF-F, PDF
MH, MR, MMR
Ethernet LAN (10BASE-T, 100BASE-TX connections)
66
 Loading...