

Page 1

Contents
1 Introduction
1.1 Points to note regarding this Quick Guide.................................1-1
1.2 Safe and reliable use of the system ............................................1-1
1.3 Displays in the Touch Screen......................................................1-2
The three Standard Displays...........................................................1-2
Important icons in the display..........................................................1-3
1.4 Filling the paper drawers..............................................................1-4
1. Filling the 1st paper drawer.........................................................1-5
Filling the 2nd paper drawer............................................................1-7
Placing paper in the single-document feed tray..............................1-8
1.5 Use the originals feed trays.........................................................1-9
Process originals with the automatic originals feed tray. ..............1-10
Process originals with the duplex-original feed tray......................1-11
1.6 Placing originals on the glass ...................................................1-12
2 Copying functions (selection)
2.1 Initial steps . . . ..............................................................................2-1
Making a copy - the step-by-step approach....................................2-1
Stop / delete copying process.........................................................2-3
2.2 Basic settings................................................................................2-4
Switch on automatic paper selection...............................................2-4
Select paper magazine manually....................................................2-5
Switch on automatic format selection..............................................2-6
Enter the repro factor manually.......................................................2-7
Sort / group copies..........................................................................2-8
Staple copies...................................................................................2-9
Punch copies.................................................................................2-12
2.3 Original>copy functions.............................................................2-14
Select copying mode.....................................................................2-14
2.4 Image density settings ...............................................................2-15
Enable or disable Auto Exposure..................................................2-15
Set manually to copy brighter / darker ..........................................2-15
Di251f/Di351f IVZ-1
Page 2

3 Fax functions (selection)
3.1 Initial steps . . ............................................................................... 3-1
Step-by-step instructions on sending a fax.....................................3-1
Delete fax process..........................................................................3-3
3.2 Send fax templates....................................................................... 3-4
Select recipient with p reselected number.......................................3-4
Select recipient with abbreviated number.......................................3-5
Dial the recipient using the number block.......................................3-6
3.3 Set quality and contrast...............................................................3-7
Set transmission quality (resolution)...............................................3-7
Set contrast ....................................................................................3-8
3.4 Set up / press document call-up .................................................3-9
Make document ready for free call-up............................................3-9
Call up document..........................................................................3-11
4 Specific system settings
4.1 Setup preselecteddialing,abbreviateddialing,and transmission
programs4-1
Setting up a one-touch destination.................................................4-1
Setting up an abbreviation dial number.........................................4-3
Set up group (transmission program).............................................4-5
Calling up Fax Input........................................................................4-7
4.2 Print lists and journals.................................................................4-8
5 Troubleshooting
5.1 If a paper jam is displayed . . . ....................................................5-1
Main Unit .......................................................................................5-2
Single Feed Tray ............................................................................5-6
Duplexing Document Feeder AFR-9 ..............................................5-8
Automatic Document Feeder AFR-7 ............................................5-10
5.2 If a malfunction code is displayed ........................................... 5-12
IVZ-2 Di251f/Di351f
Page 3
Introduction
1 Introduction
1.1 Points to note regarding this Q uick Guide
This Quick Guide is intended to give you the help you need at once when
working every day with your Multifunction System. The functions
describedhere represent a selectionof thesystem functions thatare used
most frequently. A comprehensive and fully detailed description of all the
functions in the system and the special accessories can be found in the
Operating Manual supplied with the machine.
This Quick Guide definitely does not replace the Operating Manual.
Please be sure to read the Operating M anual carefully before starting up
your system, and keep it handy at all times.
1.2 Safe and reliable use of the system
WARNING
The improper use of your system may result in health hazards, electrical
shock or even fires.
➜ Read the Operating Manual carefully before switching the system on.
➜ Always follow the instructions in the Operating Manual on using your
system safely.
1
Di251f/Di351f 1-1
Page 4
1
1.3 Displays in the Touch Screen
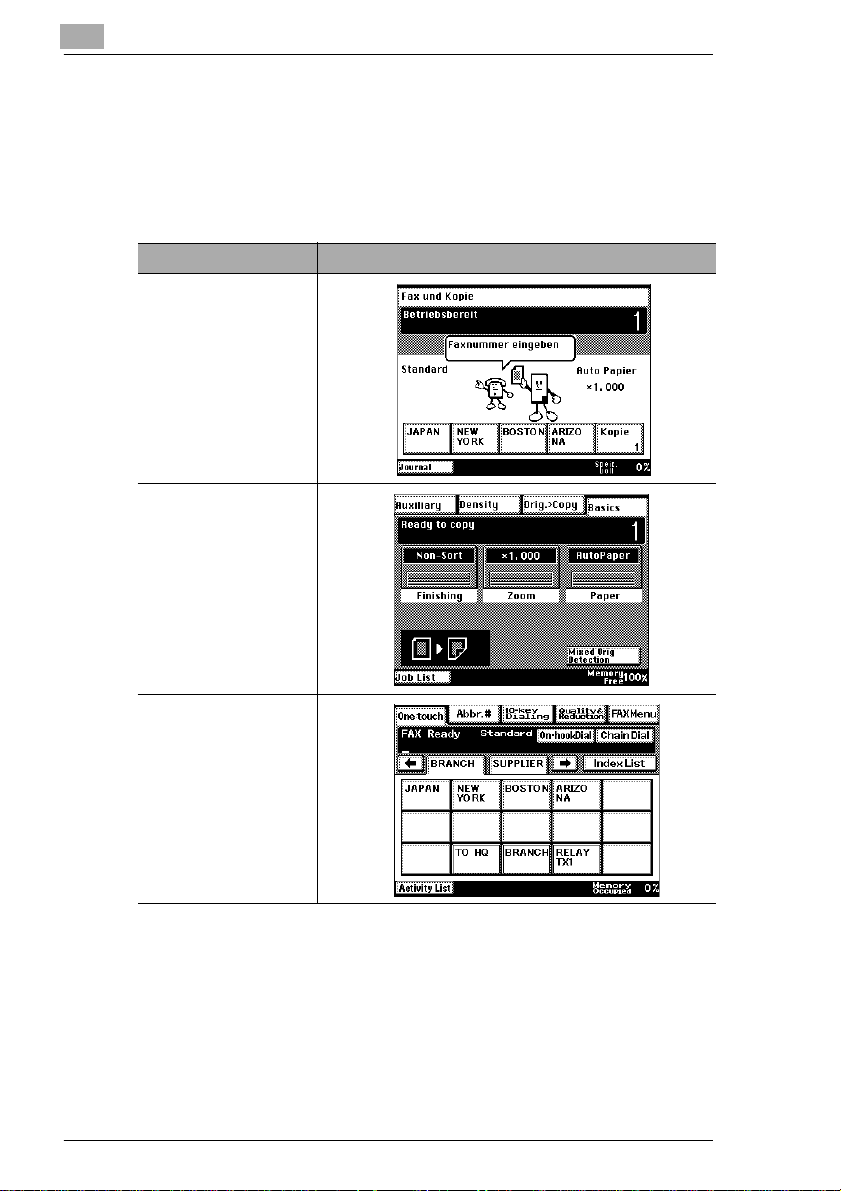
The three Standard Displays
When you switch the system on or reset the system, a default screen is
displayed. There are three default screens.
Default screen Indicator on the Touch Screen
Auto
Thesystem recognizes
from the entry on the
numerical keypad
whether you want to
copy or to fax.
Copier
Thesystemisincopy
mode. You can
execute the copying
functions.
Introduction
Fax
The system is in faxing
mode. You can
execute the copying
functions.
1-2 Di251f/Di351f
Page 5

Introduction
Important icons in the display
1
Display Panel Meaning
Scan The document is being read.
Waiting for redial The system is waiting for a redial.
Dialing The fax number is being dialed.
Receiving The system is receiving a fax.
Sending The system is sending a fax.
Copying Copies are being created.
Printing Printouts are being created.
Protected document A protected document is in the mailbox.
Waiting for call The system is waiting for a call.
Broadcast A document is saved as a broadcast
Receiving data from PC Data are being loaded into the system
Data not received PC print data stuck in memory.
Waiting for print job A document is being prepared for
Auto Receive OFF The system is set to manual receive.
No paper Load paper into the system.
No toner Replace the toner bottle.
Drum used up Replace the imaging unit.
Service Call customer service for regular
Access restriction The system is available only after
document.
from a PC.
printing.
servicing.
entering a valid access number.
Di251f/Di351f 1-3
Page 6
1
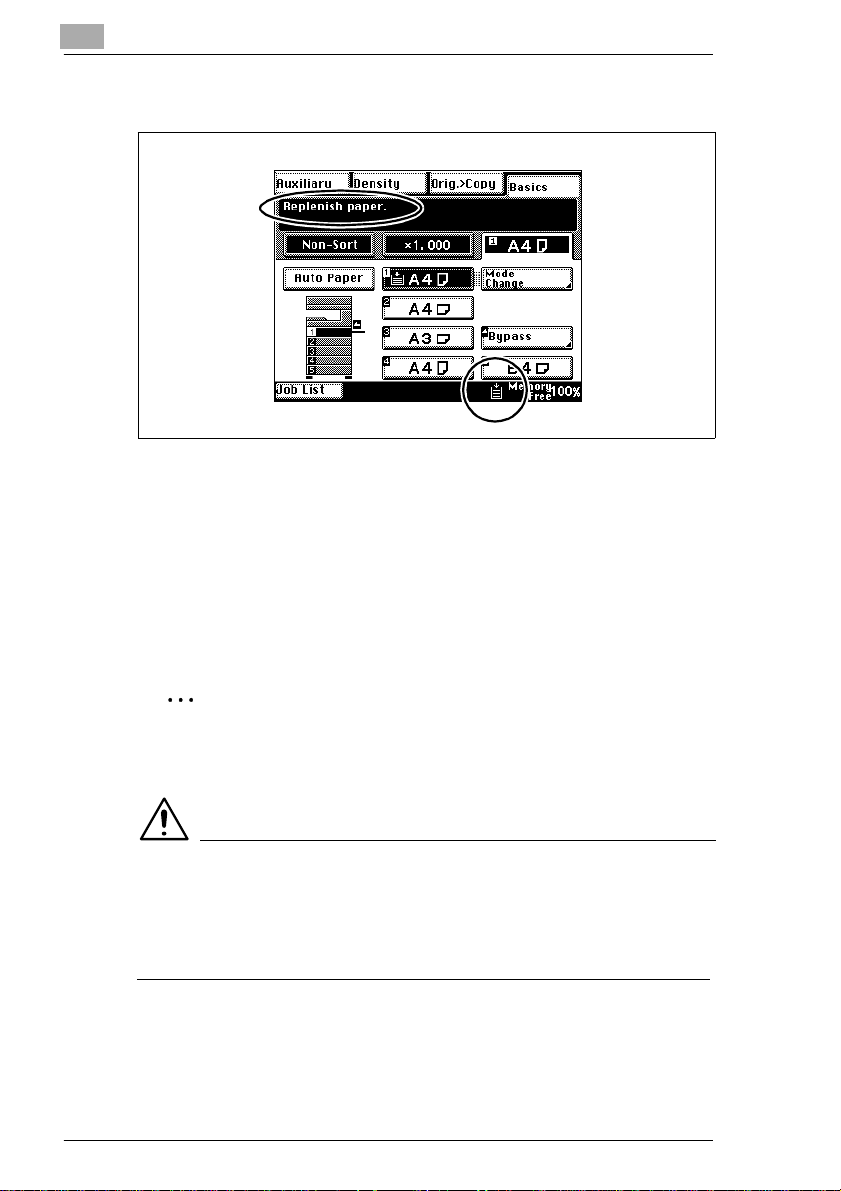
1.4 Filling the paper drawers
If the currently selected paper drawer is empty. . .
G A message is displayed on the touch screen.
G The current process is stopped.
G The empty drawer blinks.
➜ Addcopy paper to the empty paper tray. More information is provided
on the following pages.
Introduction
✎
Is there something you cannot find?
Further and more detailed descriptions can be found the in Operating
Manual supplied with the system.
CAUTION
Incorrect use can cause the system to malfunction!
Touchingthefeed rollersin the paper drawerscan soil theirsurfaces. This
can cause paper misfeeds.
➜ Never touch the feed roller.
1-4 Di251f/Di351f
Page 7
Introduction
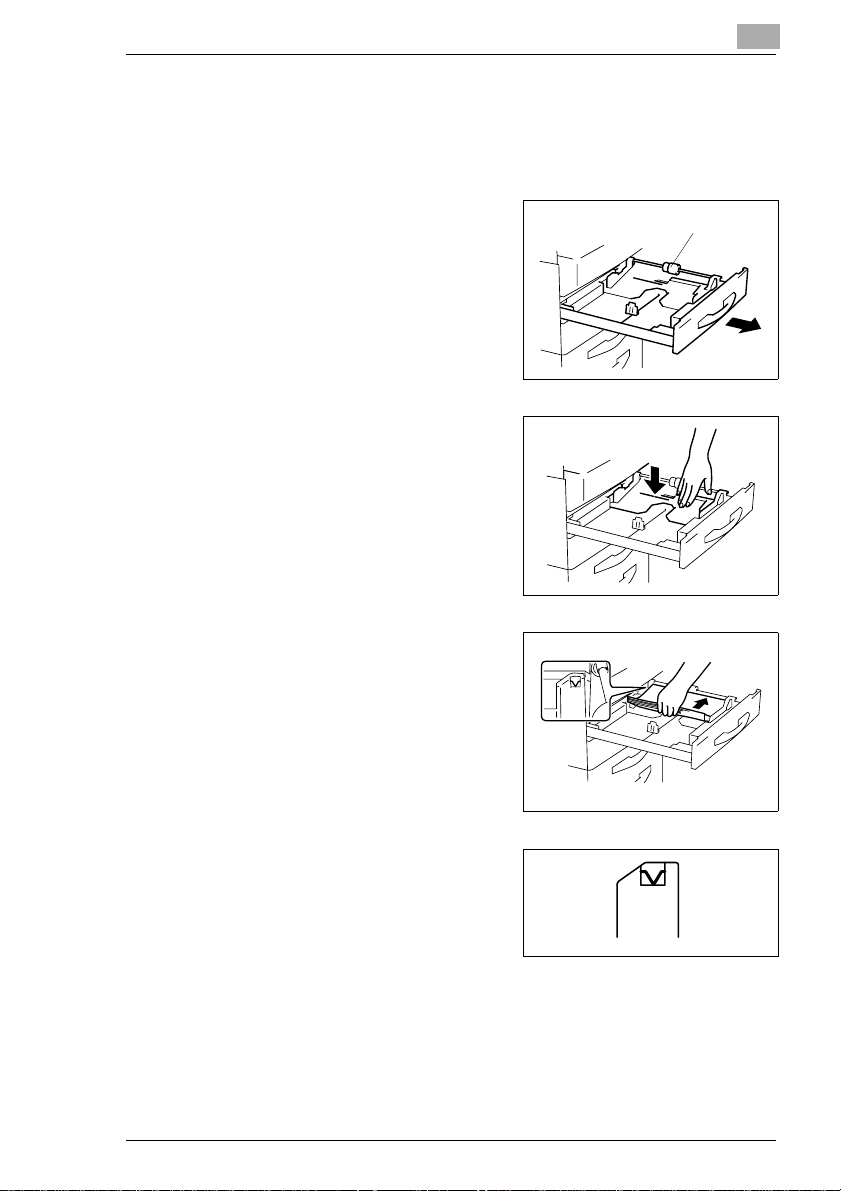
1. Filling the 1st paper drawer
The 1st drawer is a universal drawer.
The universal drawers can be set for different paper sizes.
1
2
Carefully pull the paper drawer out
as far as it will go.
Press the paper lifting plate down
until it locks.
1
Feed roller
Position the paper between the
3
paper size guides. The side that is
to be printed must be up.
Ensure that the maximum paper
4
filling height is not exceeded (see
markon insideof the paper drawer).
Di251f/Di351f 1-5
Page 8
1
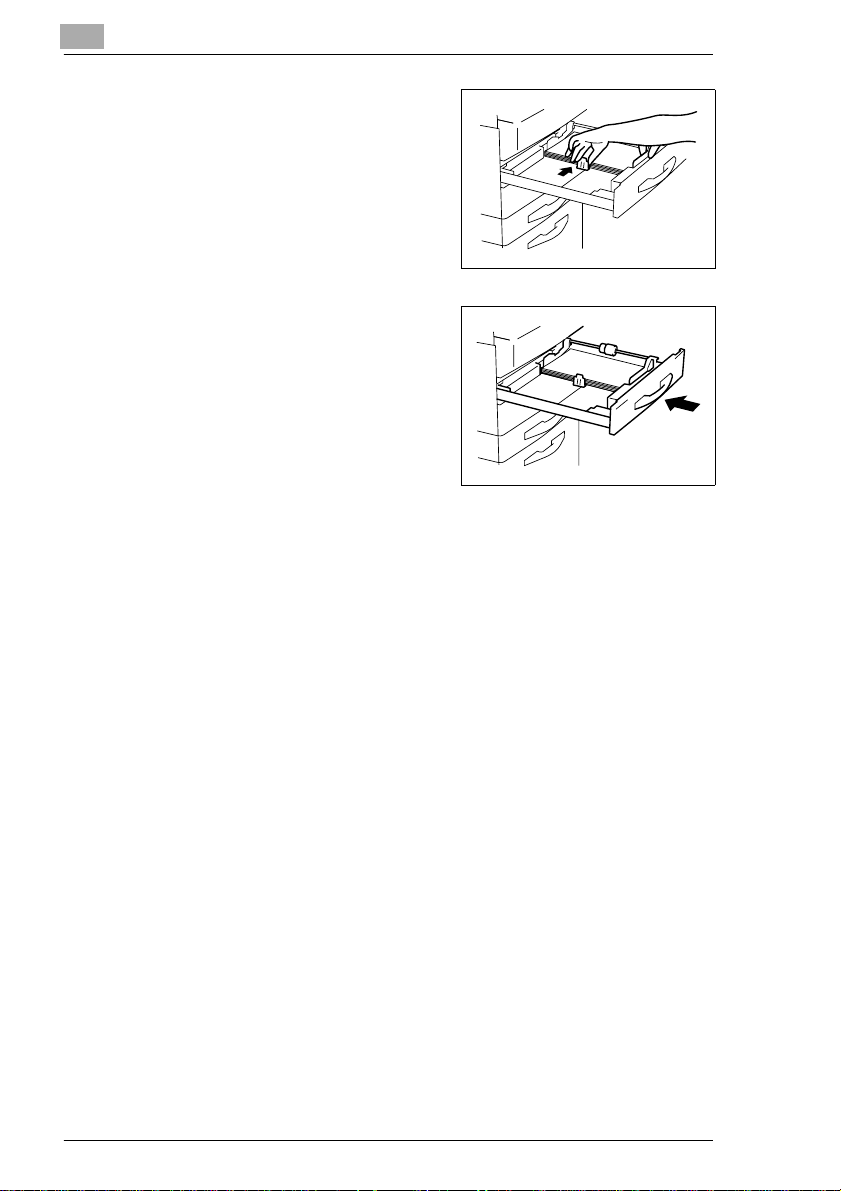
Adjust the paper guides to fit the
5
size of the loaded paper exactly.
Close the paper drawer carefully.
6
Introduction
1-6 Di251f/Di351f
Page 9
Introduction
Filling the 2nd paper drawer
This paper drawer is designed to hold one paper size.
This drawer can be modified by a technical representative to hold a
different paper size.
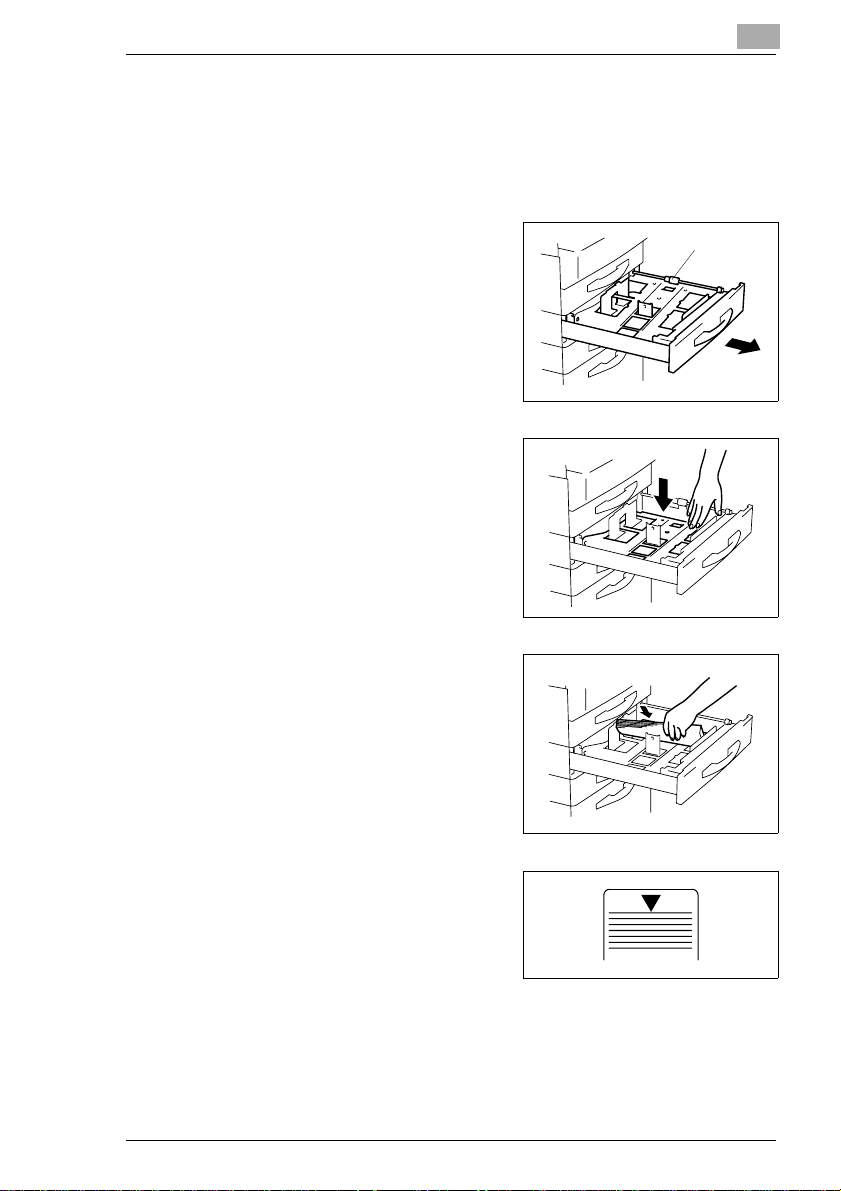
1
2
Carefully pull the paper drawer out
as far as it will go.
Press the paper lifting plate down
until it locks.
1
Feed roller
Position the paper between the
3
paper size guides. The side that is
to be printed must be up.
Ensure that the maximum paper
4
filling height is not exceeded (see
markon insideof the paper drawer).
Close the paper drawer carefully.
5
Di251f/Di351f 1-7
Page 10
1
Introduction
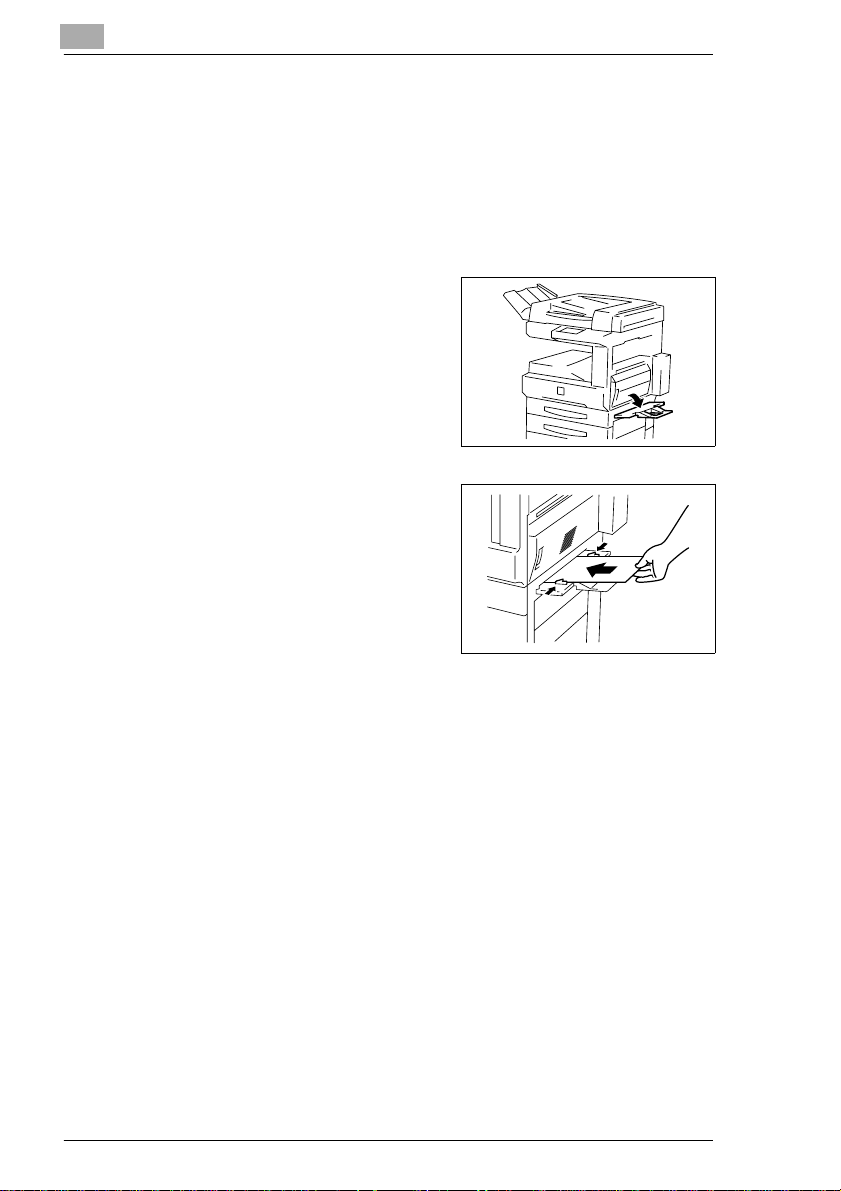
Placing paper in the single-document feed tray
Use the single document feed tray to feed individual sheets into the
system, such as special paper.
Load the original into the document feeder. If necessary, make
1
additional settings.
Lower the single feed tray.
2
Set the guide plates for the paper
3
width.
Lay the sheet of paper directly into
4
thefeedtray.Thesidethatistobe
printed must be down.
Specify the paper size and the
5
paper type.
Start a copy cycle by touching
6
[START]. A p rint or fax cycle will
start automatically.
1-8 Di251f/Di351f
Page 11

Introduction
1.5 Use th e originals feed trays
WARNING
Incorrect operation may damage document feeders!
Notall originalsare suitable foruse withdocument feeders. If you process
unsuitable originals using a document feeder, you may damage it.
➜ Use only suitable originals in document feeders.
The following types of originals are not suitable:
G Carbon paper, paraffin paper and thin paper of less than 50g/m
G Thick paper
G Originals larger than A3 L or smaller than A5
G Translucent paper, OHP transparencies (overhead projector films)
G Folded, curled originals
G Punched, stapled or clipped originals
G Wrinkled, damp, coarse or furled originals
G Carbon-backed originals.
1
2
.
✎
Is there anything you cannot find?
Furtherand more detailed descriptions can be found in the Operating
Manual supplied with the system.
Di251f/Di351f 1-9
Page 12
1
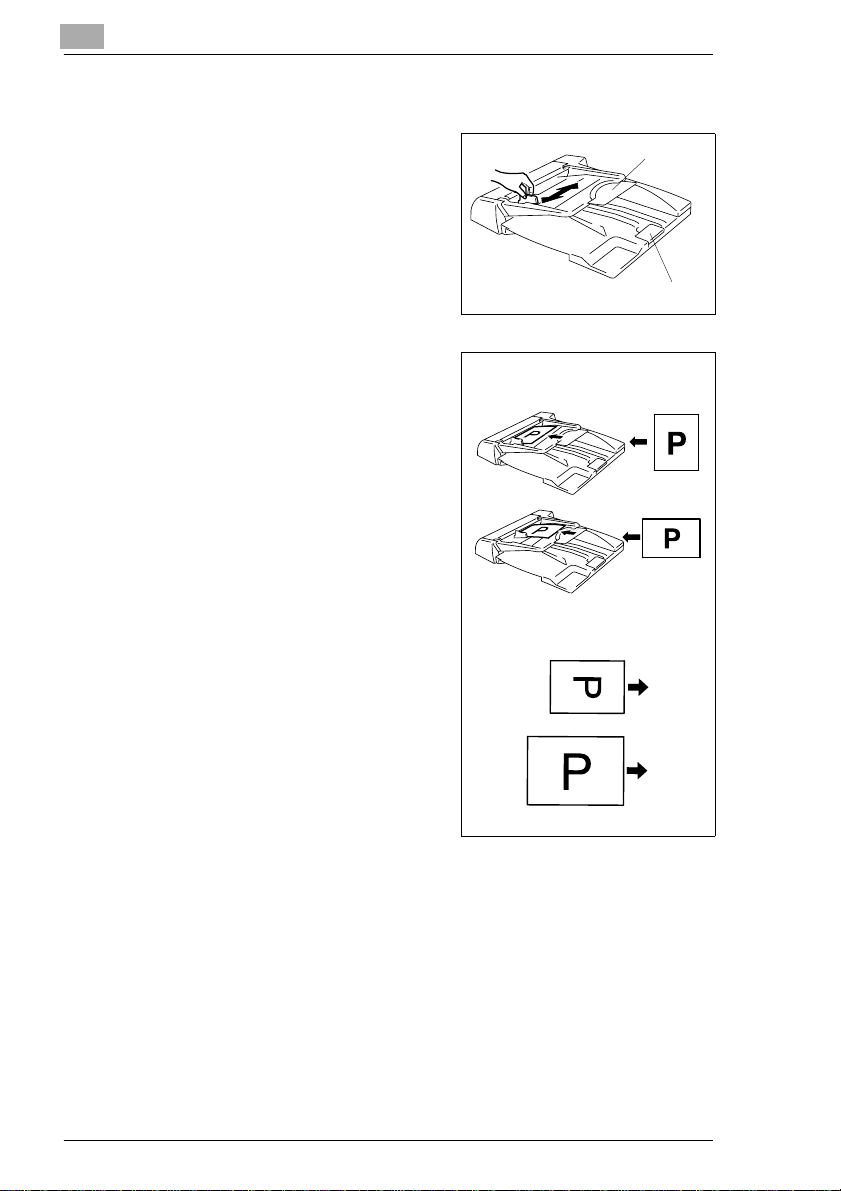
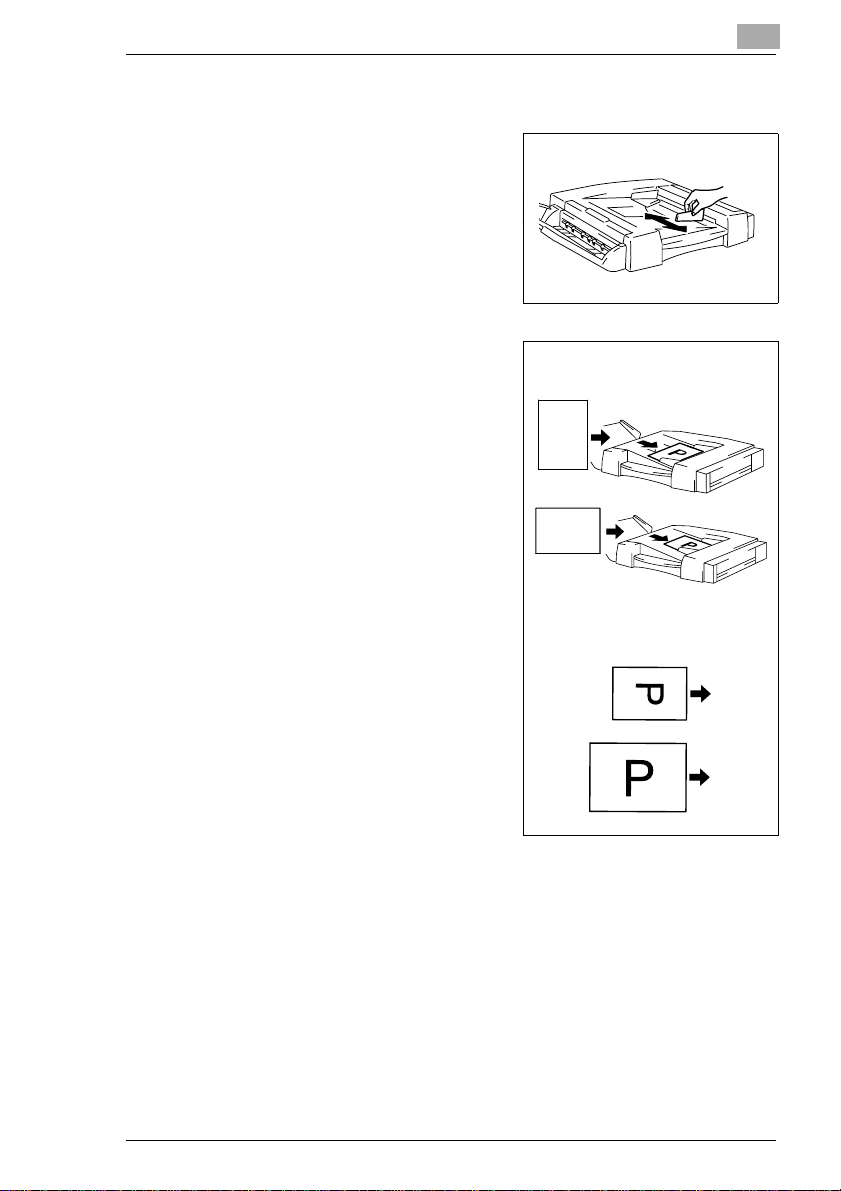
Process originals with the automatic originals feed tray.
Set the document guide to the size
1
of the original.
Are you copying originals that
?
are larger than A4?
➜ Pull out the document feed tray
extender and the original
stopper.
Place up to 70 originals (80g/m2)in
2
the automatic document feeder.
The side that is to be scanned must
be up.
Do you want to send a fax?
?
➜ Always feed the original short
end first into the document
feeder.
Ensure that the stack of originals
3
does not exceed the maximum fill
height (see Ä mark on the
document feeder).
Placing the Copy Original
Placing the Fax Original
Original Stopper
Introduction
Extender
Push the originals flush up against
4
thefeedchamber.
Press [START].
5
The originals are pulled in starting
with the top sheet.
1-10 Di251f/Di351f
Page 13
Introduction
Process originals with the duplex-original feed tray.
1
2
3
Set the document guide to the size
of the original.
Placeupto50originals(80g/m2)in
the automatic document feeder.
The side that is to be scannedmust
be up.
Do you want to send a fax?
?
➜ Always feed the original short
end first into the document
feeder.
Ensure that the stack of originals
does not exceed the maximum fill
height (see Ä mark on the
document feeder).
1
Placing the Copy Original
P
P
Placing the Fax Original
Push the originals flush up against
4
the feed chamber.
Start the cycle.
5
The originals are pulled in starting
with the top sheet.
Di251f/Di351f 1-11
Page 14
1
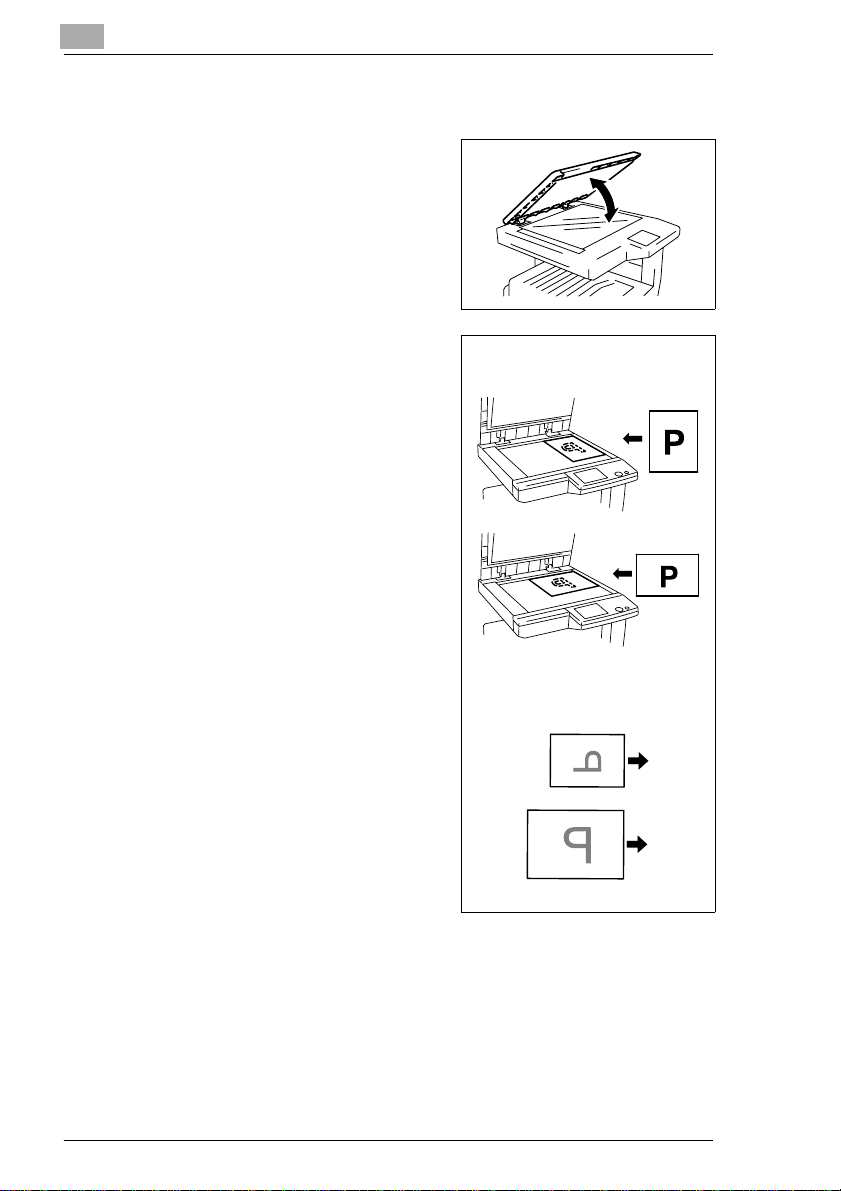
1.6 Placing originals on t he glass
Raise the original cover to at least
1
15°.
If the originalcover is not openwide
enough, the original size wi ll not be
detected automatically.
Place the original on the glass. The
2
side that is to be scanned must be
down.
Do you want to send a fax?
?
➜ Always place the short edge of
theoriginalagainsttherightside
of the original glass (width
scale).
Slide the original to the upper right
3
corner of the original glass.
Introduction
15°
Placing the Copy Original
Align the original with the Original
4
Scales.
Close the original cover.
5
1-12 Di251f/Di351f
Placing the Fax Original
Page 15
Copying functions (selection)
2 Copying functions (selection)
2.1 Initial step s . . .
Always maintain a specific sequence when selecting the modes. You can
then be certain that you have not forgotten anything.
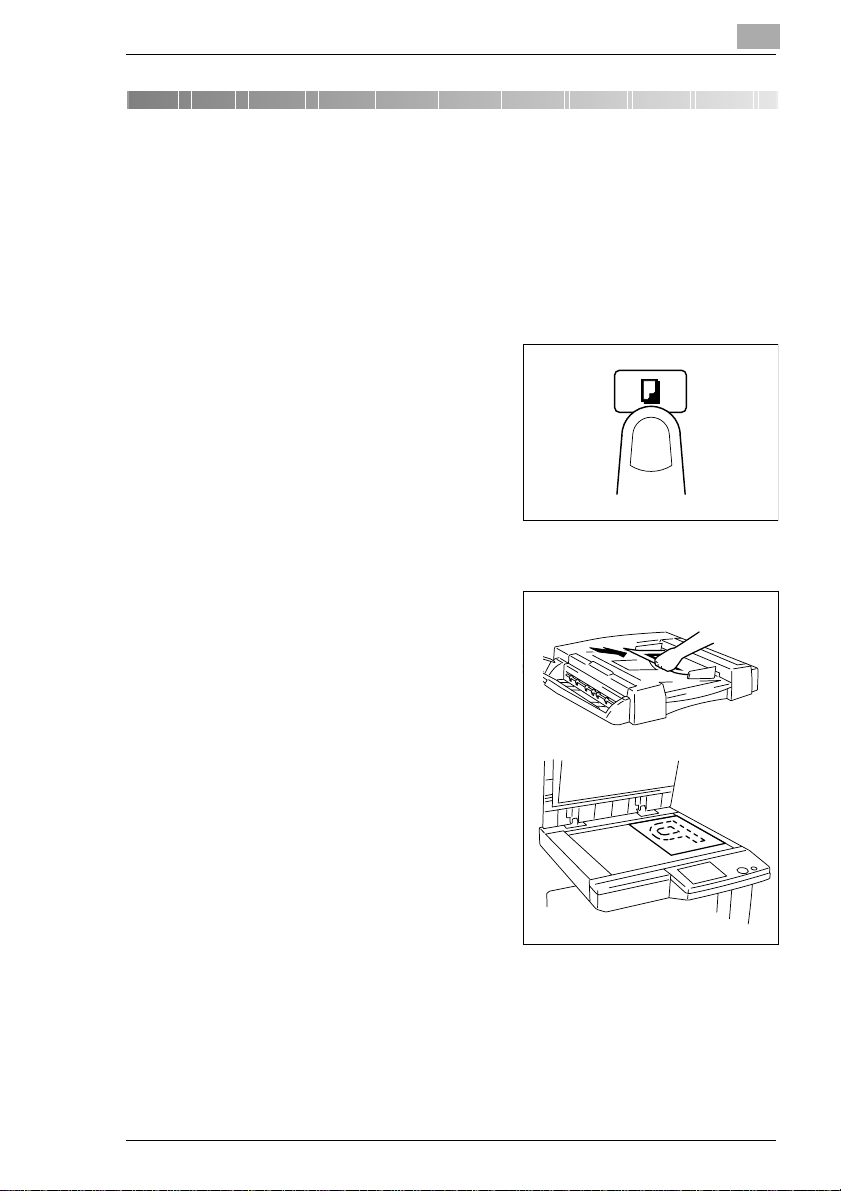
Making a copy - the step-by-step approach
Press [COPY MODE] on the control
1
panel to activate copy mode.
Load the originals:
2
❍ Load the originals face-up into
the automatic document feeder.
or
❍ Lift the original cover. Place the
original face down on the
original glass.
2
Pay attention to the following:
?
Not all documents can be
processed using the document
feed tray.
➜ Never load stapled or clipped
originalsinto the documentfeed
unit.
Di251f/Di351f 2-1
Page 16
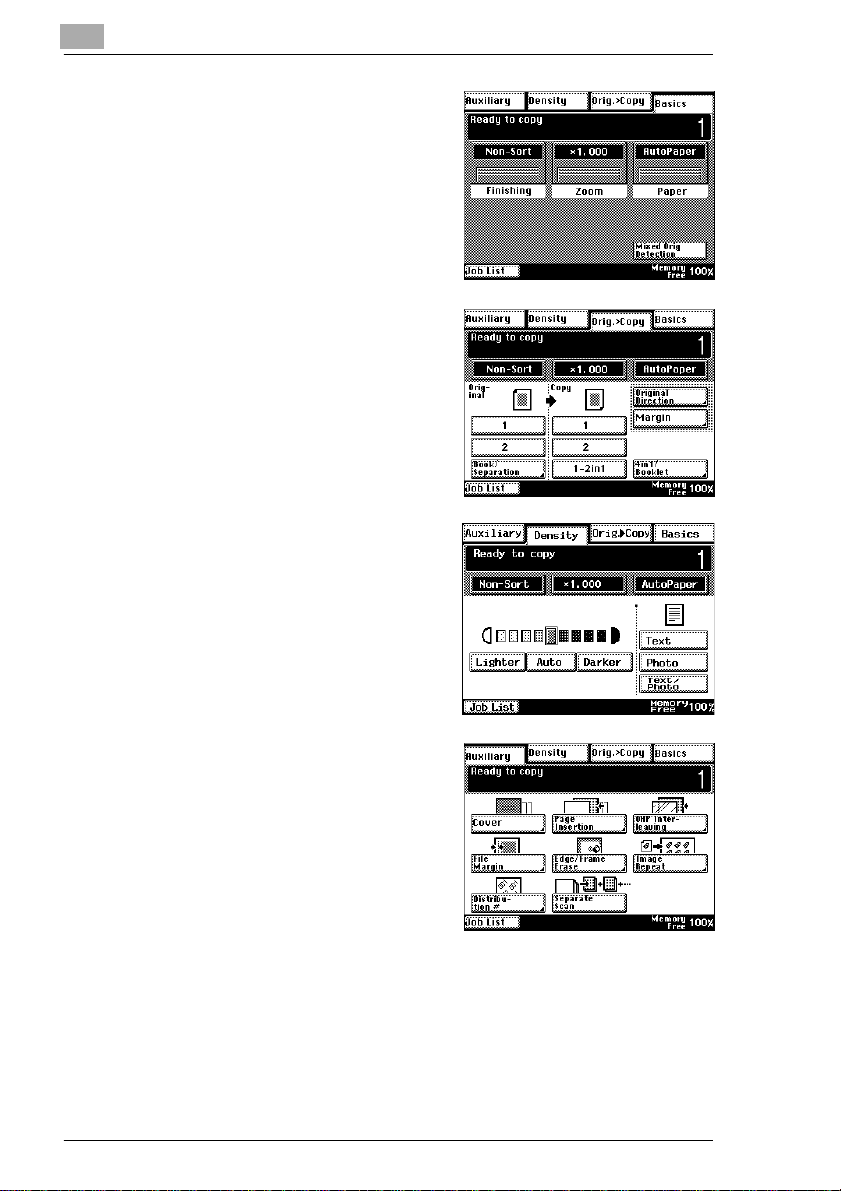
2
Change any one of the basic
3
settings, if necessary:
❍ Paper
❍ Zoom
❍ Finishing
If necessary, change the
4
Original>Copy settings, e.g.:
❍ 1>1
❍ 2>1
❍ Book > 2
If necessary, change the Density
5
settings, such as:
❍ Auto Exposure
❍ Manual Exposure
❍ Density Mode
Copying functions (selection)
If necessary, select an Auxiliary
6
function, such as:
❍ Cover
❍ File Margin
❍ Distribution #
2-2 Di251f/Di351f
Page 17
Copying functions (selection)
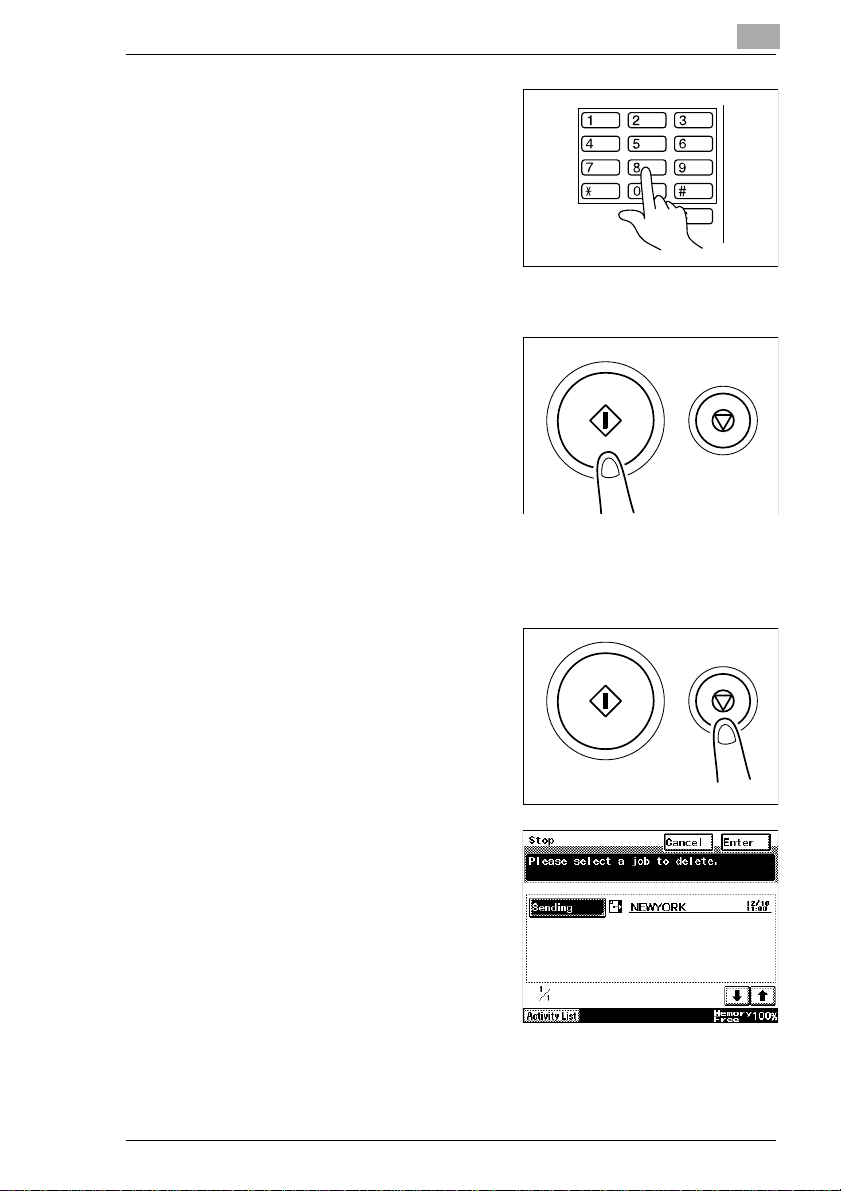
From the numeric keypad, set the
7
desired number of copies to be
made.
❍ Di251f: max.99 copies
❍ Di351f: max.999 copies
Did you enter an incorrect
?
number?
➜ Press [C] on the control panel. Enter the number of copies again.
Start the copy cycle by touching
8
[START].
Do you want to cancel the copy
?
cycle?
➜ Press [STOP] on the control
panel.
Stop / delete copying process
Stop a copy cycle to prevent further output of faulty copies.
2
Press [STOP].
1
Thecurrentprocessisstopped.The
display will change.
Follow the instructions provided on
2
the touch screen to delete the cycle
completely.
or
Press the [CANCEL] key to resume
the stopped job.
Di251f/Di351f 2-3
Page 18
2
2.2 Basic settin gs
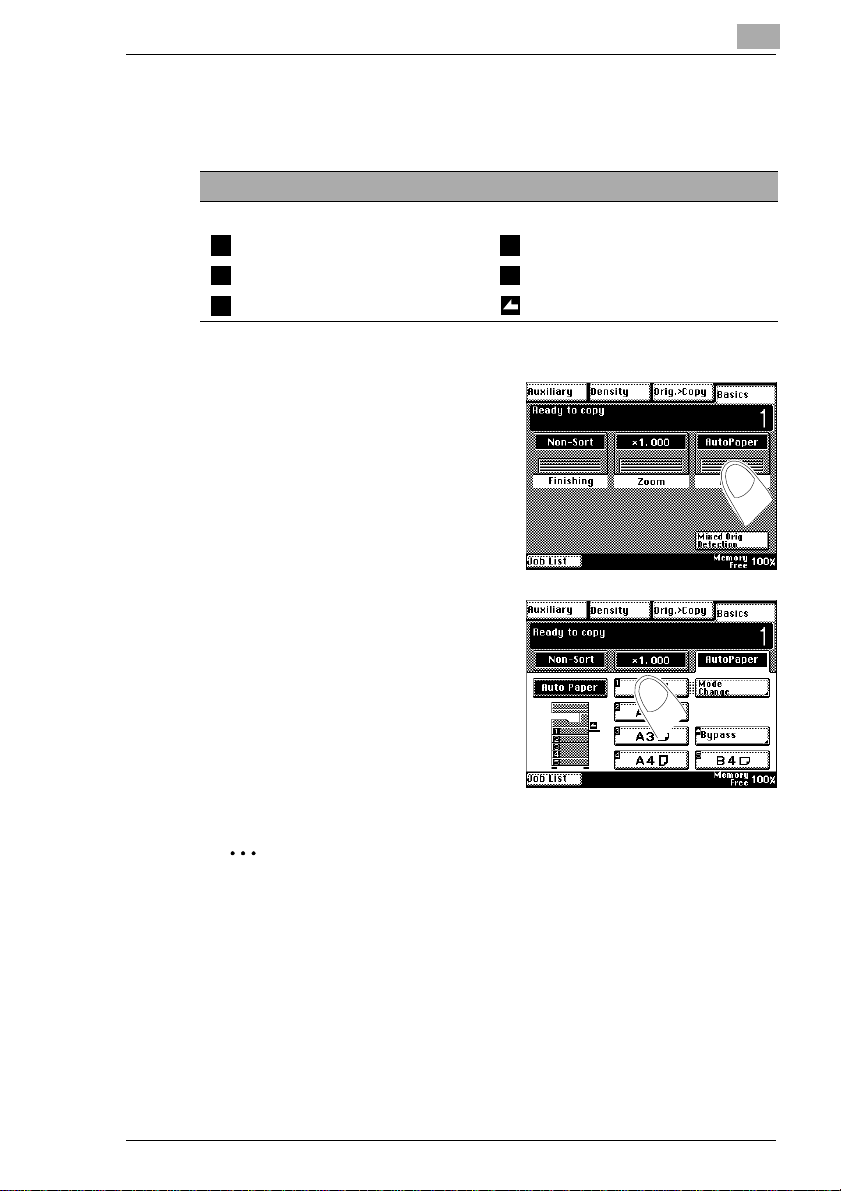
Switch on automatic paper selection
Allowthe system to select the appropriate paper size for your copies. The
system calculates the appropriate paper size according to the size of the
original and the zoom factor.
Touchthe Basicsmenu key [Paper].
1
The paper settings are shown.
Press the [AUTO PAPER] key.
2
The background of the key turns
black. "Auto Paper" mode is
enabled.
Touch the [BASICS] index key to
3
show the Basics menu keys again.
Copying functions (selection)
2-4 Di251f/Di351f
Page 19
Copying functions (selection)
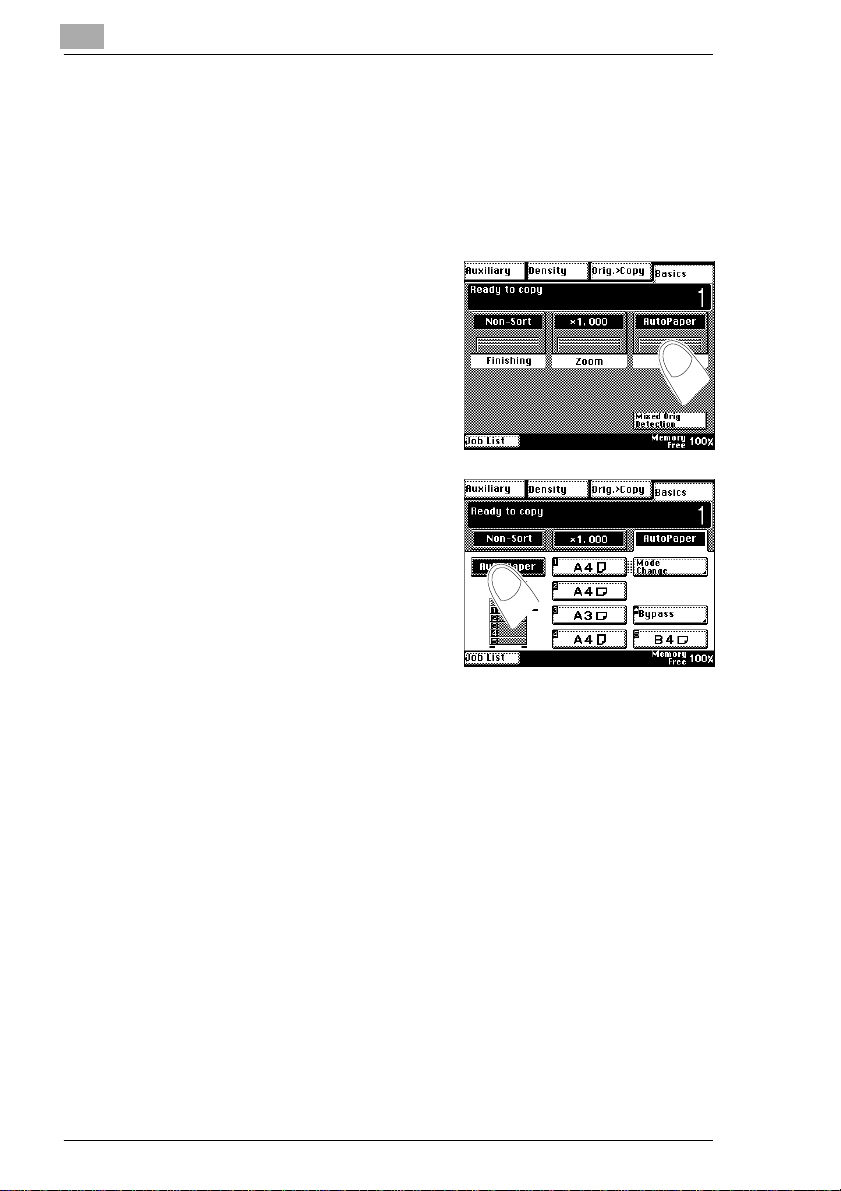
Select paper magazine manually
Specify the drawer from which the paper is to be fed.
Note the following important information!
The following symbols are used:
1st drawer 4th drawer
1 4
2nd drawer 5th drawer
2 5
3rddrawer Singlefeedtray
3
Touchthe Basics menu key [Paper].
1
The display will change.
Touch the desired paper drawer
2
key.
2
Touch[BASICS]to showthe Basics
3
menu keys again.
✎
Not all drawers are always available!
Whichpaper drawersare availabledepends on the equipment of your
system. The touch screen will only show the available drawers.
Di251f/Di351f 2-5
Page 20

2
Copying functions (selection)
Switch on automatic format selection
Allow the system to select the appropriate zoom factor for your copies.
The system calculates the appropriate zoom factor according to the size
of the original and the desired paper size.
Touch the Basics menu key [Zoom].
1
The zoom settings are shown.
Press the [AUTO SIZE] key.
2
The background of the key turns
black. "Auto Size" mode is enabled.
Call up the paper settings.
3
The paper settings are shown.
Select the paper drawer that
4
contains the paper.
2-6 Di251f/Di351f
Page 21

Copying functions (selection)
Enter the repro factor manually
Entera proportionalzoom factor usingthe numeric keypad. Aproportional
zoom factor ensures that the pages of the original are zoomed to equal
proportions.
Touchthe Basics menu key [Zoom].
1
The zoom settings are shown.
Press the [CUSTOM ZOOM] key.
2
The display will change.
2
Inputazoomfactorwiththenumeric
3
keypad.
Example:
Touch the numeric keypad keys 1,
3, 0, 0 in succession. The zoom factor is × 1,300.
Did you enter an incorrect
?
number?
➜ Press [C] and enter the
zoom factor again.
Confirm the zoom factor with
4
[ENTER].
Thezoom settings areshown again.
Di251f/Di351f 2-7
Page 22

2
Copying functions (selection)
Sort / group copies
The system is set to “Non-sort“ by default. Depending o n the number of
originalsloaded inthedocumentfeederand the desirednumberofcopies,
the system automatically switches between “Non-sort“ and “Sort“.
Press [FINISHING] in the Basics
1
menu.
The Finishing settings are shown.
Press the [SORTS]
2
or
Press the [GROUP] button.
The background of the key turns
black. The function is enabled.
2-8 Di251f/Di351f
Page 23

Copying functions (selection)
Staple copies
Feed out your copy sets stapled.
Corner Staple
(Only available if an FN-109, FN-110 or mailbin finisher is installed.)
Make sure not to exceed the
1
maximum staple capacity.
Make sure the originals are
2
loaded correctly.
Press [FINISHING] in the Basics
3
menu.
The Finishing settings are shown.
2
Press [CORNER STAPLE].
4
Corner staple
Di251f/Di351f 2-9
A
Page 24

2
Copying functions (selection)
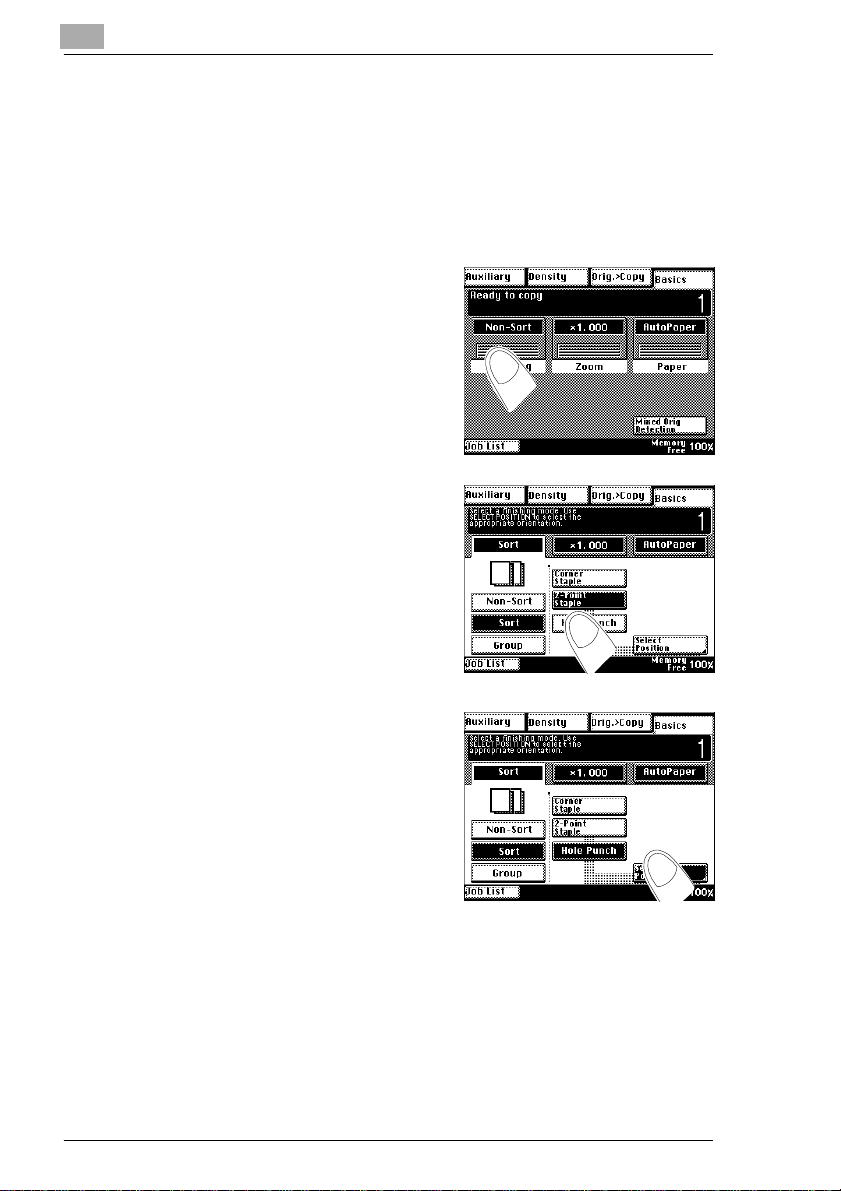
2-Point Staple
(Only available if the FN-109 finisher is installed.)
Make sure not to exceed the
1
maximum staple capacity.
Make sure the originals are
2
loaded correctly.
Press [FINISHING] in the Basics
3
menu.
The Finishing settings are shown.
Press [2-POINT STAPLE].
4
2-point staple
A
Press the [SELECT POSITION]
5
key.
The display will change.
2-10 Di251f/Di351f
Page 25

Copying functions (selection)
Select the staple position.
6
or
Press the [OFF] key. The system
then selects the stapling position
suitable for the alignment of the
originals.
Confirm your selection with
7
[ENTER].
2
Di251f/Di351f 2-11
Page 26
2
Copying functions (selection)
Punch copies
(Only available if an FN-109 or mailbin finisher is installed.)
Have holes punched in your copies.
Make sure the originals are
1
loaded correctly.
Press [FINISHING] in the Basics
2
menu.
The Finishing settings are shown.
Press [HOLE PUNCH].
3
Press the [SELECT POSITION]
4
key.
The display will change.
2-12 Di251f/Di351f
Page 27

Copying functions (selection)
Select the hole position.
5
or
Press the [OFF] key. The system
then selects the hole position suitable for the alignment of the originals.
Confirm your selection with
6
[ENTER].
2
Di251f/Di351f 2-13
Page 28

2
2.3 Original>copy functions
Select copying mode
Load the originals.
1
Touch the index key
2
[ORIG.>COPY].
The Original>Copy settings are
shown.
Select the type of original.
3
e.g. 1-sided original
Copying functions (selection)
Select the mode you wish to use for
4
your copies.
e.g. 2-sided copy
2-14 Di251f/Di351f
Page 29

Copying functions (selection)
2.4 Image density settings
Enable or disable Auto Exposure
Touch the index key [Density].
1
The Density settings are shown.
Press [AUTO].
2
The background of the key turns
black. “Auto Exposure“ mode is
enabled.
2
Set manually to copy brighter / darker
Touch the index key [DENSITY]
1
The display will change.
Press [LIGHTER] to make a lighter
2
copy.
or
Touch[DARKER]tomakeadarker
copy.
Di251f/Di351f 2-15
Page 30

2
Copying functions (selection)
2-16 Di251f/Di351f
Page 31

Fax functions (selection)
3 Fax functions (selection)
3.1 Initial step s . . .
Always maintain a specific sequence when selecting the modes. You can
then be certain that you have not forgotten anything.
Step-by-step instructions on sending a fax
Press [FAX/SCAN MODE] on the
1
control panel to activate fax mode.
Load the originals:
2
❍ Load the originals lengthwise
and face-up into the document
feeder.
or
❍ Lift the original cover. Place the
original lengthwise and facedown on the original glass.
3
Pay attention to the following:
Not all documents can be
processed using the document
feed tray.
➜ Never load stapled or clipped
originalsinto the documentfeed
unit.
Di251f/Di351f 3-1
Page 32

3
If necessary, change the fax
3
settings, e.g.:
❍ Quality
❍ Contrast
❍ Reduction/Area
Dial the fax number for the destination, for example:
4
❍ via 10-key Dialing
❍ via Abbreviated Dialing
❍ via One-Touch Dialing
Start sending the fax by pushing
5
[START].
The scanning cycle begins. A tone
ismade when the fax has been sent
successfully.Ifanerroroccurswhile
the fax is being sent, a transfer log
is printed.
Fax functions (selection)
Do you want to cancel the scan,
?
dial
or send process?
➜ Press the [ACTIVITY LIST] button
located in the lower left of the display.
Select the desired process.
Press the [DELETE] key.
3-2 Di251f/Di351f
Page 33

Fax functions (selection)
Delete fax process
Delete a fax job to prevent further transfers.
Press the [ACTIVITY LIST] button.
1
Up to four current transfer jobs are
displayed.
Press the Status button for a job.
2
Details about the selected job are
displayed.
Press [DELETE] to stop the proce-
3
dure.
3
Touch [EXIT] to close the view.
4
Di251f/Di351f 3-3
Page 34

3
3.2 Send fax templates
Select recipient with preselected number
In order to be able to use the following functions, preselected numbers or
agroup musthave alreadybeen set up. Formore information, seepage 1
and page 4-5.
Switch to fax mode.
1
Load the fax original.
Touch the [ONE-TOUCH] tab.
2
Touchthe one-touchdestination for
3
the recipient to which you want to
send the fax.
Fax functions (selection)
Press [START].
4
The fax original is scanned. The
transmission starts automatically
when all running processes finish.
3-4 Di251f/Di351f
Page 35

Fax functions (selection)
Select recipient with abbreviated number
In order to be able to use the following functions, abbreviated numbers
must have been already entered. For more information, see page 4-3.
Switch to fax mode.
1
Load the fax original.
Touch the [ABBR.#] tab.
2
Select the range of abbreviated
3
numbers such as [#000]. U se the
arrow keys to scroll through the list
until you see the desired abbreviation dial key. P ress the desired abbreviation dial key.
or
Press the [ABBR.#] button. Enter
the three-digit abbreviation dial
code using the numeric keypad.
3
Press [START].
4
The fax original is scanned. The
transmission starts automatically
when all running processes finish.
Di251f/Di351f 3-5
Page 36

3
Dial the recipient using the number block
Switch to fax mode.
1
Load the fax original.
Enter the call number using the
2
numeric keypad.
The display jumps automatically to
the “10-Key Dialing“ tab.
Did you enter an incorrect
?
number?
➜ Press [C] on the control panel.
Enter the number again.
Press [START].
3
The fax original is scanned. The
transmission starts automatically
when all running processes finish.
Fax functions (selection)
3-6 Di251f/Di351f
Page 37

Fax functions (selection)
3.3 Set quality and contrast
Set transmissionquality (resolution)
Switch to fax mode.
1
Load the fax original.
Touch the [QUALITY& REDUC-
2
TION].
The display will change.
Touch the [QUALITY] tab.
3
3
Select the desired resolution.
4
If necessary, make additional
5
settings.
Dial the fax number for the
6
destination, for example:
Press [START].
7
The fax original is scanned. The
transmission starts automatically when all running processes finish.
Di251f/Di351f 3-7
Page 38

3
Set contrast
Switch to fax mode.
1
Load the fax original.
Touch the [QUALITY& REDUC-
2
TION].
The display will change.
Touch the [CONTRAST] tab.
3
Fax functions (selection)
Press the [DARKER] button to in-
4
crease the contrast.
or
Press the [LIGHTER] button to decrease the contrast.
or
Press the [NORMAL] button to
keep the contrast.
If necessary, make additional
5
settings.
Dial the fax number for the destination.
6
Press [START].
7
The fax original is scanned. The transmission starts automatically
when all running processes finish.
3-8 Di251f/Di351f
Page 39

Fax functions (selection)
3.4 Set up / press document call-up
Make document ready for free call-up
Switch to fax mode.
1
Load the fax original.
Touch the [FAX MENU] tab.
2
Touch the [APPL.].
3
3
Press [POLLING TX].
4
Select the desired resolution.
5
Press [NEXT].
Di251f/Di351f 3-9
Page 40

3
Select the desired contrast. Press
6
[NEXT].
Press [START].
7
The document is scanned and
saved for request.
Fax functions (selection)
3-10 Di251f/Di351f
Page 41

Fax functions (selection)
Call up document
Switch to fax mode.
1
Touch the [FAX MENU] tab.
2
Touch the [APPL.] key.
3
3
Press [POLLING RX].
4
Select how you want to enter the
5
call number.
Dial the fax number for the
6
destination.
Press [START].
7
The document is being called up.
Di251f/Di351f 3-11
Page 42

3
Fax functions (selection)
3-12 Di251f/Di351f
Page 43

Specific system settings
4 Specific system settings
4.1 Set up preselected dialing, abbreviated di aling, and transmission pro grams
Setting u p a one-touch destination
Call up the “Fax Input“ screen.
1
For more information, see page 4-7.
Press the [ONE-TOUCH] button.
2
Press one of the available one-
3
touch keys.
4
Enter the name of the destination.
4
Press [NEXT].
Di251f/Di351f 4-1
Page 44

4
Use the keypad to enter an abbre-
5
viation dial number for the onetouch destination. Press[NEXT] to
confirm your input.
Use the numeric keypad to enter
6
the destination number.
Press [NEXT] when you are done
7
changing the settings.
Specific system settings
Check your settings. Press
8
[ENTER] if the settings are correct.
4-2 Di251f/Di351f
Page 45

Specific system settings
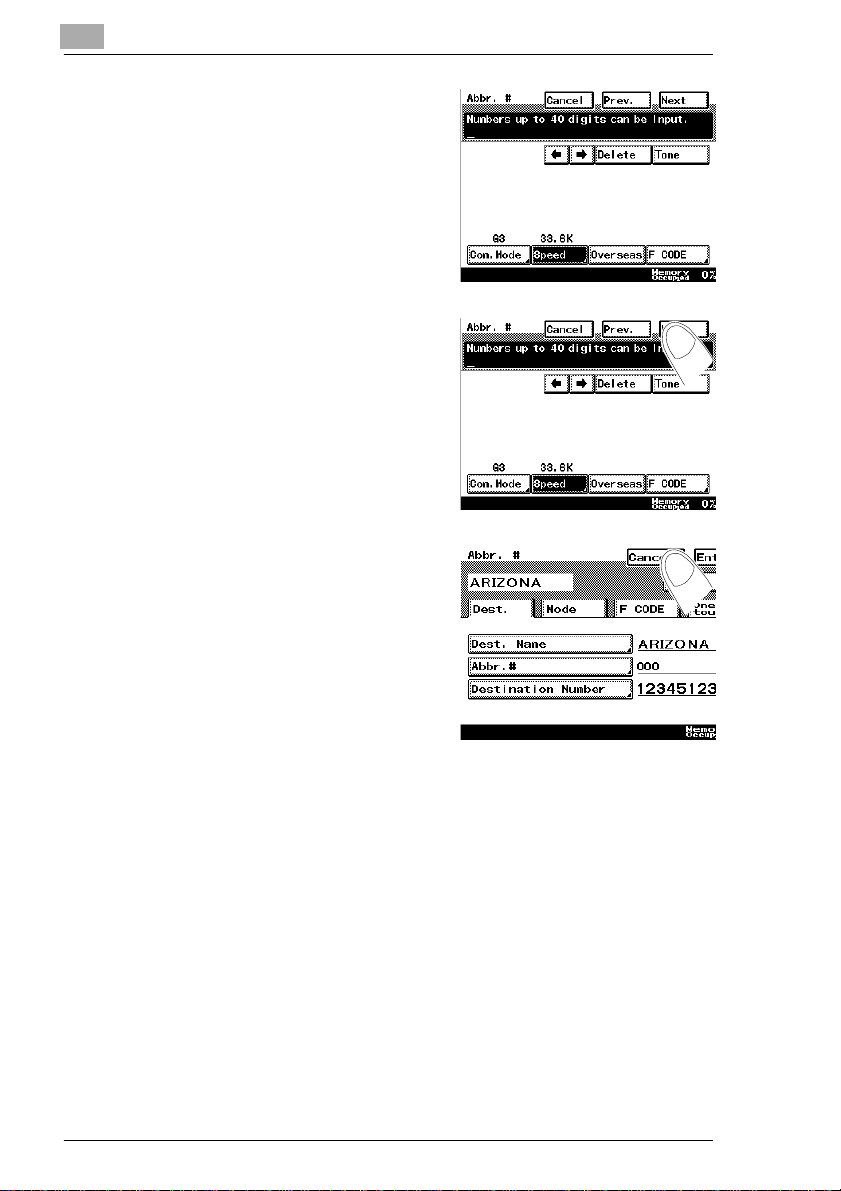
Settingupanabbreviationdialnumber
Call up the “Fax Input“ screen.
1
For more information, see page 4-7.
Press [ABBR.#].
2
Press one of the available abbrevi-
3
ation dial buttons.
4
Enter the name of the destination.
4
Press [NEXT].
Check the abbreviation dial num-
5
ber. Press [NEXT] if the abbreviation dial number is correct.
Di251f/Di351f 4-3
Page 46
4
Use the numeric keypad to enter
6
the destination number.
Press [NEXT] when you are done
7
changing the settings.
Press [ENTER] to confirm the set-
8
tings.
Specific system settings
4-4 Di251f/Di351f
Page 47

Specific system settings
Set up group (transmission program)
Set up a transmission program to send documents to one or more
destinations (groups) with the same settings.
Call up the “Fax Input“ screen.
1
For more information, see page 4-7.
Press [FAX PROGRAM].
2
Select an available one-touch key
3
for the fax program.
4
Specify a program name. Press
4
[NEXT] to confirm your input.
Di251f/Di351f 4-5
Page 48

4
Press the [SEND] button. Press
5
the [NEXT] button to confirm your
selection.
Enter the recipient's number.
6
or
Press [NO DEST.] if you do not
want to assign any call numbers to
the fax program.
Press [NEXT] to confirm your in-
7
put.
Specific system settings
Check the settings of the fax pro-
8
gram. Press [ENTER] to confirm
thesettings.Thefax programis set
up.
or
Press, for example, the [TRANSMISSION SETTING] button to
modify further transmission settings.
4-6 Di251f/Di351f
Page 49

Specific system settings
Calling up Fax Input
Press the [UTILITY] button on the
1
control panel.
Press the [INPUT] button.
2
Press the [FAX INPUT] button.
3
4
Select the desired area.
4
Di251f/Di351f 4-7
Page 50

4
4.2 Print lists and journals
Print the helpful lists and journals.
Press the [UTILITIES] button on the control panel.
1
Press the [REPORT] button.
2
Select the desired area.
3
Specific system settings
Overview – Report
Report 1 Report 2
TX Report One-touch Dial List
RX Report Abbr. # List
Confidential Polling List Fax Program List
Account List Relay Group List
4-8 Di251f/Di351f
Page 51

Troubleshooting
5 Troubleshooting
5.1 If a paper jam is displayed . . .
If a paper jam occurs, the following paper jam indicator is shown on the
touch screen:
5
The dots indicate the point at which the jam has occurred.
How to clear the paper misfeed:
G Main Unit see page 5-2.
G Single Feed Tray see page 5-6.
G Duplexing Document Feeder AF-17 see page 5-8.
G Automatic originals feed tray AF-9 see page 5-10.
✎
Is there anything you cannot find?
A further and more detailed description can be found in the Operating
Manual supplied with the system.
Di251f/Di351f 5-1
Page 52

5
Troubleshooting
Main Unit
CAUTION
Danger of burning from the heating unit!
The system heating unit may reach temperatures of up to 120°C.
➜ Do not touch the system's heating
unit.
WARNING
Incorrect handling can cause damage to the system!
When the right door (R1) is open, electrical contacts are within reach.
Touching the contacts can cause an electrostatic discharge, resulting in
damage to the unit.
➜ Do not touch the electrical contacts.
5-2 Di251f/Di351f
electrical contacts
Page 53

Troubleshooting
Open the right door (R1).
1
Pull the release lever and open the
2
upper-rightdoor.
Pull out the jammed paper found
3
there. Close the upper-right door.
5
Di251f/Di351f 5-3
Page 54

5
Remove any paper jammed in the
4
lower area of the upper-right door.
Close the right door (R1).
Open the lower-right door on the
5
right side of the unit.
Troubleshooting
Turn the green wheel to transport
6
jammed paper out.
5-4 Di251f/Di351f
Paper Feed Unit
Large Capacity Cassette
Page 55

Troubleshooting
Carefullypull out anypaperjammed
7
there to the front. Close the lowerright door.
Open the drawer from which the
8
paper was being fed. Remove the
paperandreload it.Close the paper
drawer.
5
Di251f/Di351f 5-5
Page 56

5
Troubleshooting
Single Feed Tray
CAUTION
Danger of burning from the heating unit!
The system heating unit may reach temperatures of up to 120°C.
➜ Do not touch the system's heating
unit.
WARNING
Incorrect handling can cause damage to the system!
When the right door (R1) is open, electrical contacts are within reach.
Touching the contacts can cause an electrostatic discharge, resulting in
damage to the unit.
➜ Do not touch the electrical contacts.
5-6 Di251f/Di351f
electrical contacts
Page 57

Troubleshooting
Open the right door (R1).
1
Carefullypull out anypaperjammed
2
there. Close the right door ( R1).
Load a new sheet of
3
paper onto the
single feed tray.
5
Di251f/Di351f 5-7
Page 58

5
Duplexing Document Feeder AFR-9
Open the originalmisfeed door(F1)
1
on the right side of the document
feeder.
Remove the stack of originals
2
fromthedocumentfeeder.Carefully
pull out any originals jammed there.
Troubleshooting
Opentheoriginalmisfeed door (F2).
3
Carefully pull out any originals
jammed there.
5-8 Di251f/Di351f
Page 59

Troubleshooting
Lift the duplexing document feeder.
4
Open the document guides.
Carefullypull out anypaperjammed
there.
Remove any originals left on the
5
original glass. Close the duplexing
document feeder again.
Close the original misfeed doors
6
(F1) and (F2).
Loadthe amountof originalsshown
7
on the touch screen back into the
document feeder.
5
Di251f/Di351f 5-9
Page 60

5
Automatic Document Feeder AFR-7
Open the original misfeed door on
1
theleft sideof the documentfeeder.
Remove the stack of originals
2
from the document feeder.
Troubleshooting
Open the document feeder. Pullout
3
the jammed originals.
5-10 Di251f/Di351f
Page 61

Troubleshooting
Lift the document feeder.
4
Pull out any originals jammed there.
5
Lower the document feeder tray
6
again. Close the original misfeed
door.
5
Loadthe amountof originalsshown
7
on the touch screen back into the
document feeder.
Di251f/Di351f 5-11
Page 62

5
5.2 If a malfunction code is displayed ...
If a malfunction code is displayed, proceed as follows.
Use the power switch to turn the system off and then on again.
1
The fault is checked again.
only if the error code continues to be displayed
2
Reportthe code shown on the display to your technicalrepresentative.
Troubleshooting
5-12 Di251f/Di351f
 Loading...