

Page 1
Film Scanner RX1 User Interface Manual
Ver2.1.0
First Edition
Konica Corporation
Page 2

KONICA FILM SCANNER RX-1
Film Scanner RX1 User Interface Manual
Introduction
This is a user interface program for Twain data sources which support Windows 95/98/NT4.0.
You can launch the program in the following two ways.
(1) Select the source data from the File/Acquire menu of an application supporting Twain,
such as Adobe Photoshop or PhotoDeluxe.
(2) Double-click the icon which activates a Twain data source as an independent
application.
1. Scan Setup tab
2
This tab appears first after starting the program.
The tab contains the conditions applicable to the particular image you are scanning.
RX1 User Interface - 2 -
Page 3

KONICA FILM SCANNER RX-1
Mode setting
Film type
The RX1 can acquire images from the following three types of film.
• Color negative film.
• Black-and-white negative film.
• Positive film.
Set this to fit the type of film you are scanning.
Focusing
You can focus the RX1 by the following three methods.
• Normal.
• Search.
• Lock.
Resolution
You have a choice of resolutions.
However, the choice differs according to the type of film.
Non-APS film:
• 512 x 768.
• 1024 x 1536.
• 2048 x 3072.
APS film:
• 512 x 912.
• 1024 x 1824.
3
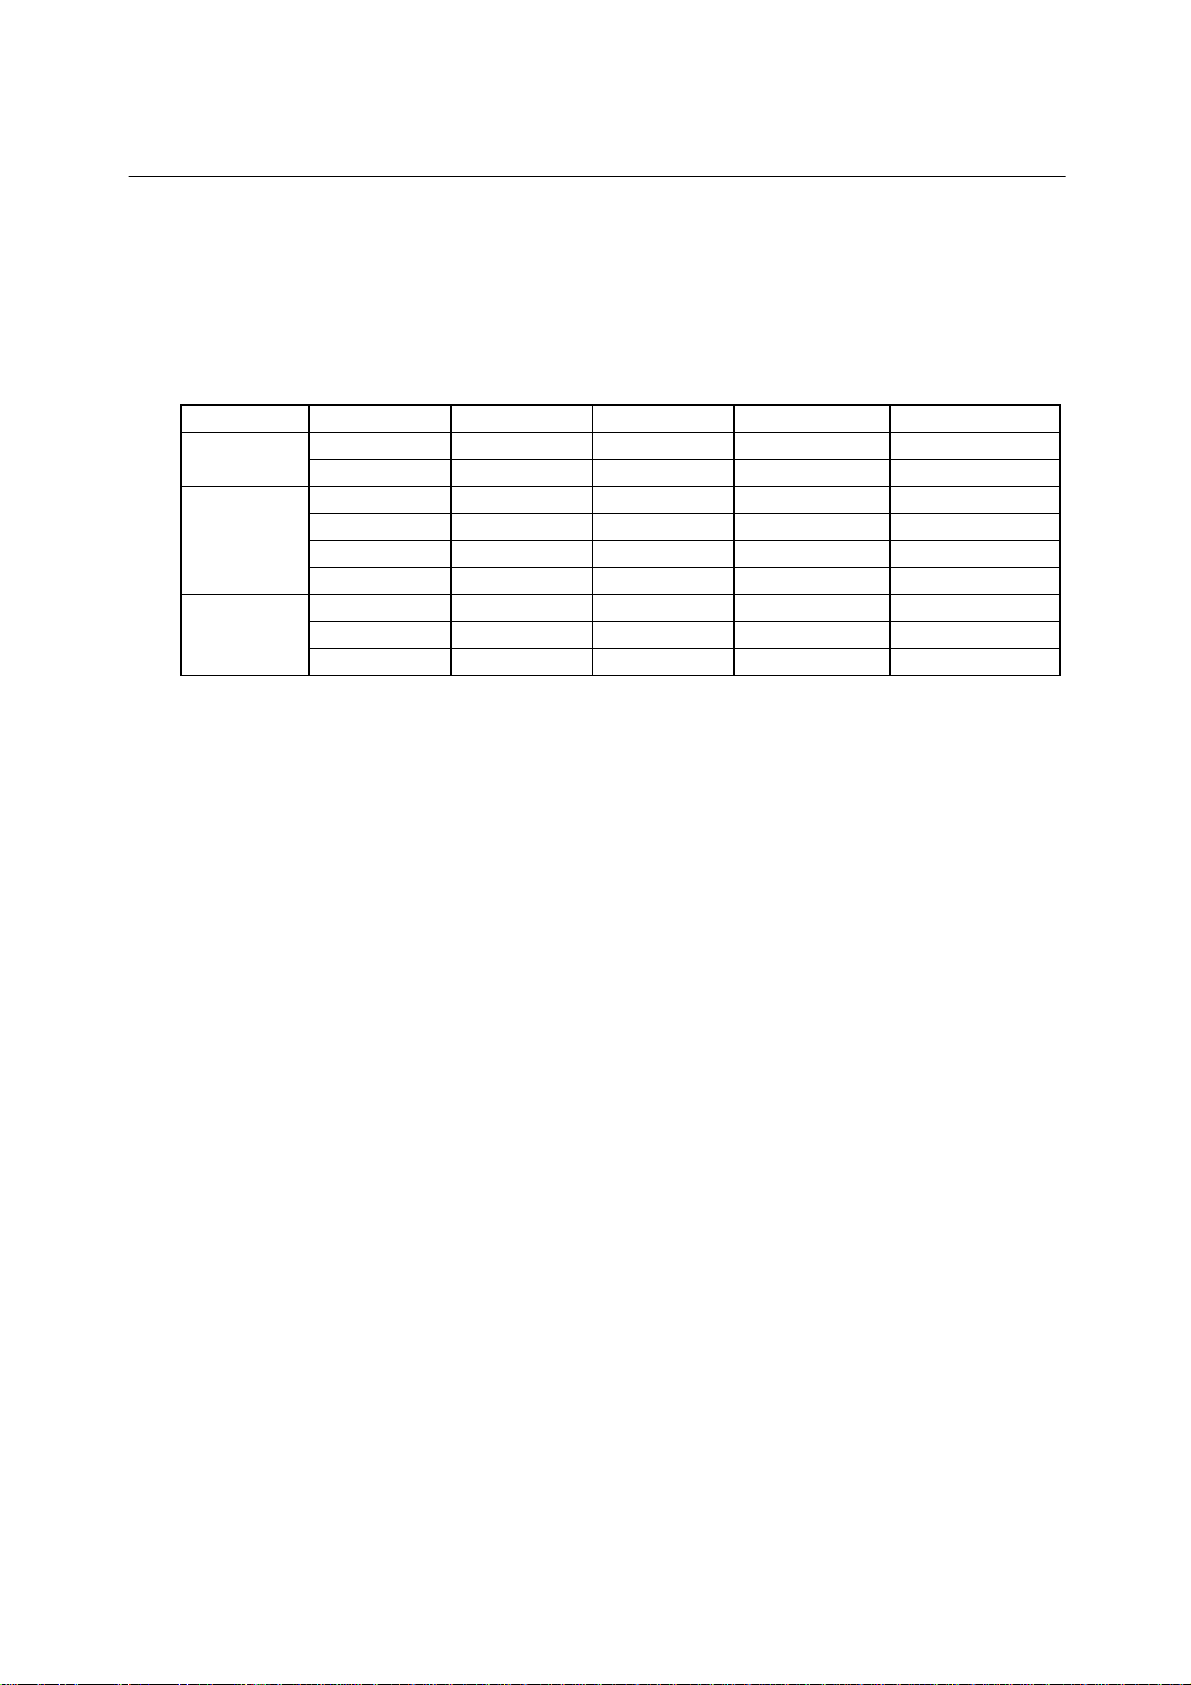
Carrier type
You can use the following three carriers.
• Sleeve carrier.
• APS carrier.
• Slide carrier.
When changing the carrier, close the Scan Setup tab or user interface first. The carrier
determines the film type and focusing you can use. The combinations are as follows.
Carrier Film Type Focusing
Color negative film NormalSleeve
Black-and-white negative film Normal
NormalPositive film
Lock
Slide Black-and-white negative film Normal
Positive film Normal
Search
Lock
Color negative film Normal
APS Black-and-white negative film Normal
Positive film Normal
Lock
RX1 User Interface - 3 -
Page 4
KONICA FILM SCANNER RX-1
Cropping
Cropping is changing the number of pixels the RX1 sends. The film type determines the
crop sizes you can set. The combinations are as follows
Film Type Cropping Prescan Standerd Fine Super Fine
Normal 128 x 192 512 x 768 1024 x 1536 2048 x 3072135
Panorama 128 x 192 272 x 768 544 x 1536 1088 x 3072
135 slide Normal 128 x 192 512 x 768 1024 x 1536 2048 x 3072
Panorama 68 x 176 272 x 704 544 x 1408 1088 x 2816
APS slide 80 x 144 320 x 576 640 x 1152 1280 x 2304
Slide 116 x 176 464 x 704 928 x 1408 1856 x 2816
APS Normal 108 x 192 512 x 912 1024 x 1824 ---------------
Panorama 68 x 192 320 x 912 640 x 1824 --------------C-size 108 x 144 512 x 688 1024 x 1376 ---------------
4
Frame edge detection
In automatic mode, the RX1 detects frames automatically. During a prescan of high
density positive film, however, a problem can occur in some cases with the RX1
detecting frames incorrectly and displaying a number of frames too few for those actually
in the film.
In fixed mode, the RX1 determines the beginning-of-frame position based on a fixed
value using the perforation width as a clue.
Sharpness
You can set this in five steps..
Buttons
Prescan button
Clicking this button starts a prescan.
Because the cursor rests on this button when you open the Setup tab, pressing the
Enter key starts a prescan, too.
After the end of the prescan, the cursor moves onto the Rotate/Mirror tab. The number of
pixels acquired during a prescan is as follows.
135 : 192 x 128 dots.
APS : 228 x 128 dots.
Cancel button
Clicking the Cancel button stops a prescan in progress.
Because the cursor moves onto this button after the start of a prescan, pressing the
Enter key stops the prescan, too.
(Once the film starts moving, the Cancel key is locked and the prescan continues to the
last frame; after the prescan, the cursor moves back on the Setup tab.)
Help button
RX1 User Interface - 4 -
Page 5

KONICA FILM SCANNER RX-1
Displays a description of how to use the buttons in the current screen.
Eject Film button
Clicking the button discharges the film.
Close button
Clicking the button quits the current program.
Status bar
Displays a description of the steps you need to perform next. During a prescan, a
progress bar appears, indicating the degree of progress.
5
RX1 User Interface - 5 -
Page 6
KONICA FILM SCANNER RX-1
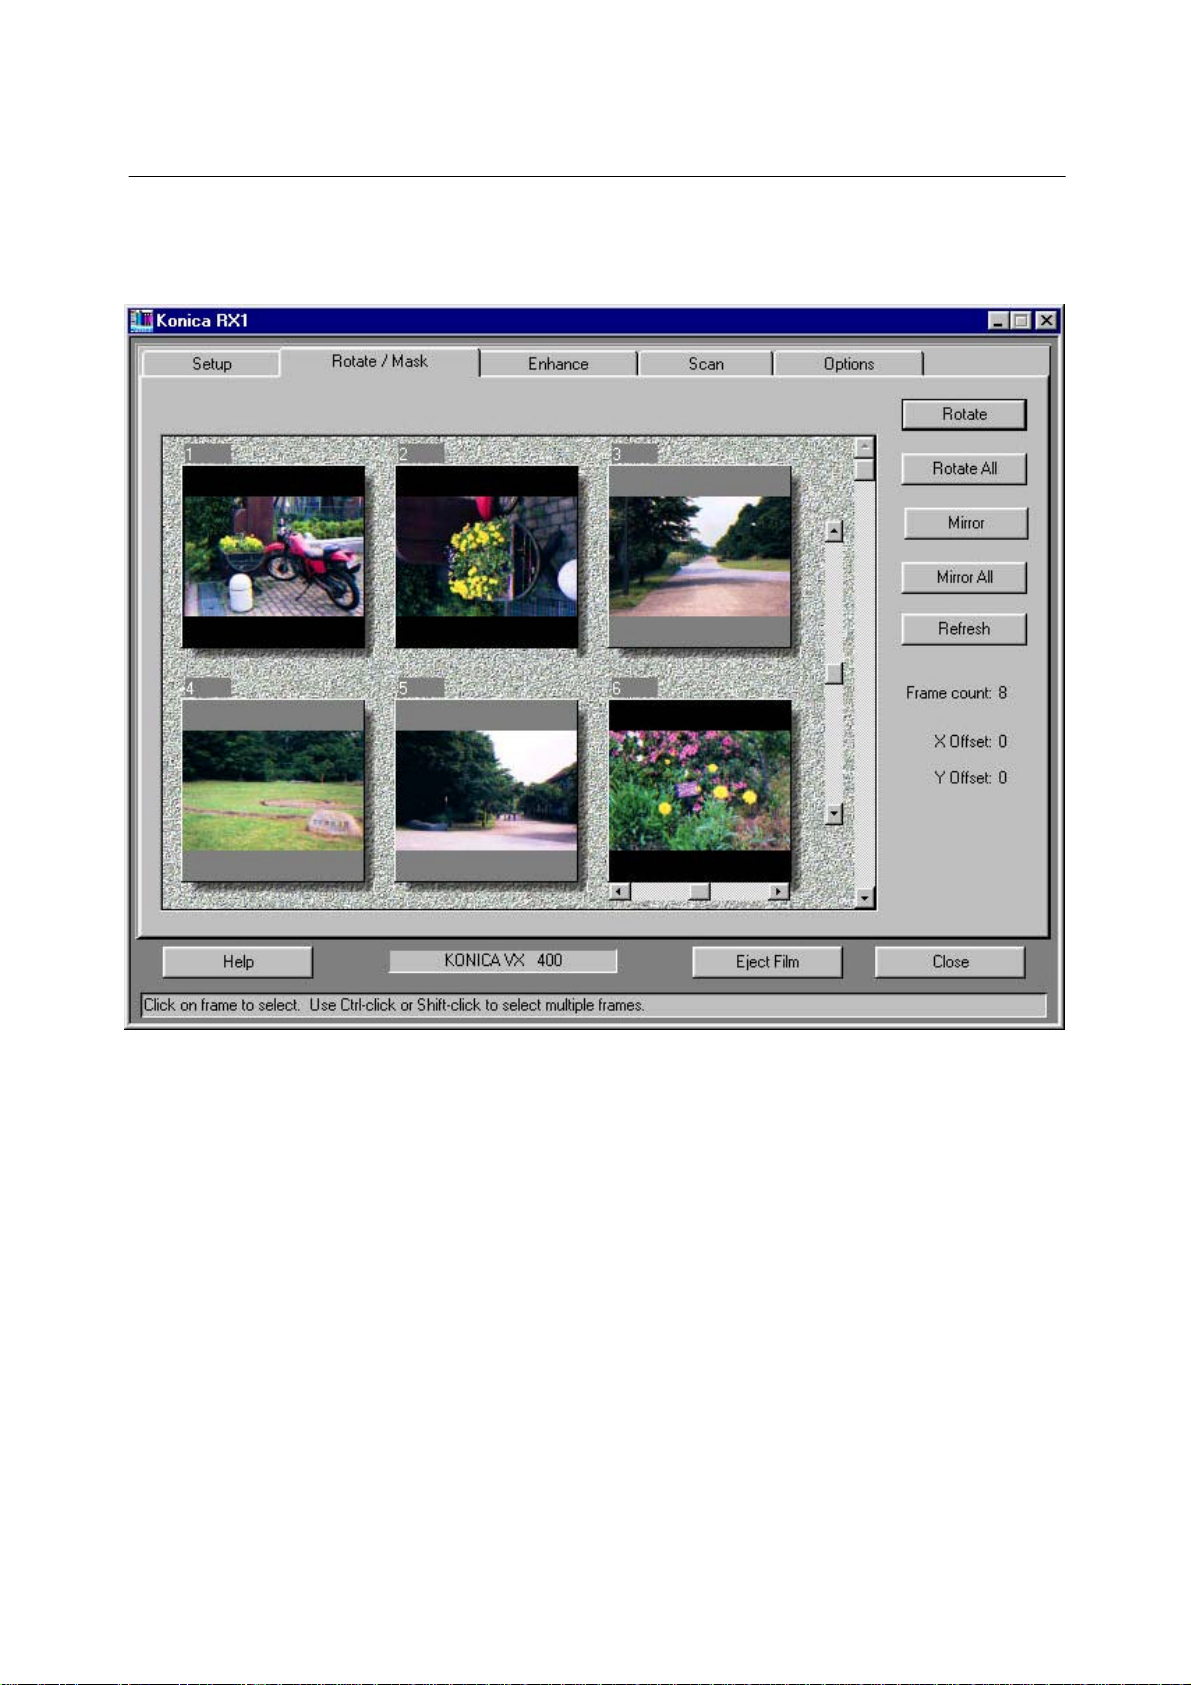
2.Rotate/Mirror tab
6
The cursor moves onto this tab after a prescan.
The acquired images appear.
When the Sleeve or APS carrier is used, one screen displays a maximum of six images...3
frames x 2 rows.
To display the sixth and subsequent frames, scroll the images using the scroll bar.
When the Slide carrier is used, one screen displays one frame.
This tab lets you rotate, mirror, and refresh images or manually adjust the beginning-offrame position.
Image selection
Before performing the operations mentioned above, select an image you wish to work on
by clicking it. You can select multiple frames simply by using this key in combination with
the Shift or CTRL key as you do in a Window.
RX1 User Interface - 6 -
Page 7

KONICA FILM SCANNER RX-1
Buttons
Rotate button
Clicking the Rotate button rotates the image in the selected frame through 90° clockwise.
Rotate All button
Clicking the Rotate All button rotates all images, selected or not, through 90° clockwise.
Mirror button
Clicking the Mirror button flips the image in the selected frame to give its mirror image.
Mirror All button
Clicking the Mirror All button flips all images, selected or not, to give their mirror
images.
However, because images are always flipped from their original positions, those already
flipped once are not flipped.
Refresh button
If the beginning-of-frame position is not accurate during a prescan, the image may have
unbalanced colors. Clicking the Refresh button after adjusting the position using the X/Y
offset recalculates the colors.
7
X/Y offset
This lets you manually adjust the beginning-of-frame position if inaccurate during a
prescan.
The X offset slide bar appears under the selected frame. Clicking an arrow or anywhere
between an arrow and the slider or dragging the slider shifts the frame position
Horizontally.
(Note that when you rotate an image, it is rotated from the X offset slide bar image posi-
tion.)
The Y offset slide bar appears to the left of the scroll bar.Operating the Y offset slide bar
shifts all the frame positions simultaneously. The offset value or how much
they were shifted appears at the right extremity of the screen.
Frame count
Displays the total number of frames acquired during a prescan.
Scroll bar
Because the screen displays a maximum of six frames, use the scroll bar to display the
remaining frames when the frame count is more than 7. Operate the scroll bar as you do in
a Window.
RX1 User Interface - 7 -
Page 8

KONICA FILM SCANNER RX-1
Right mouse button clicking
8
Selecting a frame and clicking the right mouse button on it display the dropdown menu
which offers the following functions.
• Rotate.
• Rotate All.
• Mirror.
• Mirror All.
• Refresh.
• Crop.
DX code
Displays decoded DX code information.
The information includes the film type and vendor name, but only the vendor name
appears in some cases, depending on film.
With film not yet registered, the DX code appears as coded numbers.
Caution: If the RX1 cannot recognize a DX code due to incorrectly loaded film, etc., a
RX1 User Interface - 8 -
Page 9

KONICA FILM SCANNER RX-1
dialog box appears, with the following three buttons inside.
Retry : The film needs to be reloaded and a second prescan to be executed.
Cancel : Cancels the prescan (same as a retry in effect).
Ignore : Ignores the DX code and switches to the Rotate/Mirror tab.
When you are done with the operations on the Rotate/Mirror tab, click the on-screen tab
to move to the next tab.
9
RX1 User Interface - 9 -
Page 10

KONICA FILM SCANNER RX-1
3. Enhance tab
10
This tab lets you adjust the colors of the image you are scanning.
Buttons
Color Adjustment button
Clicking the button displays the Color Adjustment dialog box.
When only one frame is selected, its exploded image appears in the dialog box.
The number of pixels displayed is as follows.
• When using the sleeve carrier : 384 x 256 (landscape)/256 x 384 (portrait).
• When using the slide carrier : 384 x 256 (landscape)/256 x 384 (portrait).
• When using the APS carrier : 384 x 216 (landscape)/216 x 384 (portrait).
When multiple frames are selected, no images appear in the dialog box.
Reset Selected button
Clicking the button undoes the adjustment applied immediately before in the Color
Adjustment dialog box.
When clicked, the displayed button name changes to Restore Selected.
RX1 User Interface - 10 -
Page 11

KONICA FILM SCANNER RX-1
Clicking the Restore Selected button restores the adjustment undone.
The button name toggles from one to the other and back.
Reset All button
Clicking the button undoes all the adjustments applied in the Color Adjustment dialog
box.
When clicked, the displayed button name changes to Restore All.
Clicking the Restore All button restores the adjustments undone.
The button name toggles from one to the other and back.
Right mouse button clicking
Selecting a frame and clicking the right mouse button on it displays a dropdown menu
which offers the following functions.
• Color Adjustment dialog box.
• Cropping.
Color Adjustment dialog box
11
This lets you use the color adjustment slide bars, buttons, etc.
Density adjustment
You can adjust density by operating the density slide bar.
With the default slider value in mid bar (0), the slider moves over the range of ±50.
The current slider value appears to the top right of the bar.
Use the slider as you do in a Window.
RX1 User Interface - 11 -
Page 12

KONICA FILM SCANNER RX-1
Clicking an arrow increases or reduces the value by 1 each time and clicking anywhere
between an arrow and the slider by 10 each time. You can drag the slider to a given
position, too.
Color adjustment
There are three slide bars: Y, M, and C. Operate them as you do the density slide bar.
Gray balance
Mark the check box and move the cursor onto the selected image. Clicking any point in
the image changes the color of the particular point into neutral gray and repaints the entire
image accordingly.
Clicking the check box again restores the original colors.
Use settings for all images
This applies the set gray balance to all the frames acquired during a prescan.
To other frames, however, the difference between gray and the color of the cursor
position used for the gray balance setting is added, so unless the color of the cursor
position is the same in every frame, these other frames will not have correct color
balance.
12
Correction
Automatically compensates for the differences between images due to the place or light-
ing used for picture-taking.
F_correction:
Automatically corrects negatives showing lack of overall color balance, such as over-
and under-exposed negatives or scenes taken under tungsten, fluorescent or other
artificial lighting.
L_correction:
Automatically corrects negatives showing predominance of certain colors.
Clicking the L1 and L2 radio buttons gives you progressively heavier corrections in the
order mentioned.
Clicking the None radio button undoes all the corrections.
OK button
Clicking this button closes the Color Adjustment dialog box and applies the adjustment
to the selected image. The adjustment applies to the subsequent scans, too.
Cancel button
Clicking the button closes the Color Adjustment dialog box and undoes the adjustment.
Reset button
Clicking the button undoes all the adjustments applied in the current Color Adjustment
dialog box.
RX1 User Interface - 12 -
Page 13

KONICA FILM SCANNER RX-1
13
RX1 User Interface - 13 -
Page 14

KONICA FILM SCANNER RX-1
4. Scan tab
14
This lets you manually select the frames you wish to scan.
Scan check box
There is a check box to the top right of each displayed frame.
When a check box is marked, the frame with that box is acquired during a scan.
To mark a check box, click the frame or check box.
On entering the Scan tab, you will find that the frames adjusted on the Rotate/Mirror tab
or in the Color Adjustment box are marked.
Buttons
Transfer button
Clicking the button scans the marked frames and displays them as undefined images in
the host application.
RX1 User Interface - 14 -
Page 15

KONICA FILM SCANNER RX-1
When the plug-in is driving the RX1, it lets you use these images. But, the scan utilities
gray them out.
Save button
Places the images in the Save dialog box.
Select All button
Marks all frames.
Deselect All button
Removes the marks from all frames.
15
RX1 User Interface - 15 -
Page 16

KONICA FILM SCANNER RX-1
Save dialog box
16
Displays only the marked frames. Because the dialog box displays only a maximum of
three frames, use the scroll bar at the right extremity of the displayed frames to see if
there are more.
The dialog box lets you save acquired images under suitable file names to a suitable
folder.
RX1 User Interface - 16 -
Page 17

KONICA FILM SCANNER RX-1
Buttons:
Save button
Clicking the button scans the images and saves them as the set file types under the
set file names to the set folder one by one.
Cancel button
Clicking the button returns to the Save tab without scanning the images.
Frame Names box
Displays images with their frame names below.
The frame names appear in order of age as Image 0001, Image 0002, and Image 0003.
If the folder contains a previously saved Image 0001, the frame names move up to
Image 0002, Image 0003, and Image 0004.
If you save a frame, the frame name becomes the file name as it is.
To change a file name, move the cursor into the Frame Names box and rewrite it. When
you do this, all the subsequent frame names change as rewritten except for the accompanying numbers which move up by 1.
To cite an instance, if you have four frames named Image 0001, Image 0002, Image
0003, Image 0004, and rewrite Image 0002 as Data 0001, the subsequent frame names
are automatically rewritten as Image 0001, Data 0001, Data 0002, and Data 0003.
If the folder accidentally contains the file name rewritten in the Frame Names box, the
RX1 prompts “This file already exists; overwrite it?” immediately before saving the file.
In this respect, you may operate the box as you do a Window.
17
RX1 User Interface - 17 -
Page 18

KONICA FILM SCANNER RX-1
Save In box
18
Operate this box as you do a Window.
File Names box
This box continuously displays the contents of the frame names box. Moving the cursor
scrolls the contents.
RX1 User Interface - 18 -
Page 19

KONICA FILM SCANNER RX-1
Save as Type box
19
The RX1 lets you save files as the following types.
• JPEG.
• BMP.
• TIFF.
RX1 User Interface - 19 -
Page 20

KONICA FILM SCANNER RX-1
• FlashPix.
• PICT.
Clicking the arrow at the right extremity of the box displays the file types in a dropdown
menu. Select the type you wish to use.
20
RX1 User Interface - 20 -
Page 21

KONICA FILM SCANNER RX-1
5. Options tab
21
This tab displays the version No. of the RX1 to the top left in the screen.
It displays the address of the Log file, too.
It lets you download the LUT.
Log file
This file is saved to the hard disk and contains a carrier-by-carrier breakdown of frames
acquired during prescans and scans.
LUT download
Once downloaded, the particular LUT is subsequently used.
To return to the original LUT, click the arrow to the right side of the box, select the default
LUT, and click the Download Now button again or restart the user interface.
RX1 User Interface - 21 -
 Loading...