

Page 1
Software Instruction Manual
Page 2

Thank you for purchasing the Minolta Dimâge Scan Multi.The Dimâge Scan Multi is a multiple format film scanner
capable of scanning medium-format, 35mm, 16mm, and sleeved APS film.With the optional APS adapter,
Advanced Photo System film in the cassette can also be scanned.
This manual has been designed to help you understand the operation of your scanner.To realize all the benefits of
your scanner, please read this manual and the accompanying hardware manual thoroughly.
The instructions in this manual assume you have a working knowledge of the operating system for your computer
(Mac OS, Windows 95, or Windows NT) and its conventions. Familiarity with the mouse and standard operating
system menus and commands is necessary before operating the Dimâge Scan Multi software.
This manual does not instruct in the:
• basic use of personal computers.
• use of Window 95, Windows NT, or Mac OS.
• use of Adobe Photoshop, Paint Shop Pro, or Corel Draw.
The examples in this manual use Windows 95.The appearance of some screens may differ from the examples
when using Windows NT or the Macintosh operating system.
Microsoft, Windows®, Windows 95®, and Windows NT® are registered trademarks of the Microsoft Corporation.
Macintosh™, Apple®, and Power Macintosh® are registered trademarks of Apple Computer, Inc.
Adobe® and Photoshop™ are registered trademarks of Adobe Systems Incor porated.
Corel Draw™ is the trademark of Corel Cor poration.
Paint Shop Pro is the copyright of Met’s Corporation.
Other corporate and product names are the trademarks and registered trademarks of their respective companies.
Page 3

1
TABLE OF CONTENTS
Before Y ou Begin
Package Contents . . . . . . . . . . . . . . . . ...2
Software Registration . . . . . . . . . . . . . ...2
System Requirements . . . . . . . . . . . . . ...3
Installing the Software
Windows 95/Windows NT . . . . . . . . . . ...4
Macintosh . . . . . . . . . . . . . . . . . . . . . . ...7
Macintosh – Plug-In . . . . . . . . . . . . . . ...8
Macintosh – ColorSync . . . . . . . . . . . . ...9
Launching the Software – Windows
Launching the TWAIN Driver . . . . . . . . .10
Launching the Utility Software . . . . . . . .10
Launching the Software – Macintosh
Launching the Plug-In . . . . . . . . . . . . . .11
Launching the Utility Software . . . . . . . .11
Quick Guide to Basic Operation . . . . . .12
BEGIN SCANNING
Command Window
Command Window – Names of Par ts . . . .15
Film Format . . . . . . . . . . . . . . . . . . . . .16
Selecting Film Type . . . . . . . . . . . . . . . .16
Index Scan
Making an Index Scan . . . . . . . . . . . . . .17
Changing the Window Size . . . . . . . . . .18
Selecting Frames . . . . . . . . . . . . . . . . .18
Reversing the Frame Order . . . . . . . . . .19
Rotating the Index Frames . . . . . . . . . .19
Saving the Index Scan Image . . . . . . . .20
Prescan
Prescan Window . . . . . . . . . . . . . . . . . .21
Making a Prescan
35mm film/APS cassette . . . . . . . . . . .22
Medium Format, TEM, 16mm . . . . . . .23
Rotate . . . . . . . . . . . . . . . . . . . . . . . . . .23
Crop . . . . . . . . . . . . . . . . . . . . . . . . . . .24
Flip . . . . . . . . . . . . . . . . . . . . . . . . . . . .25
Full-Screen View . . . . . . . . . . . . . . . . . .25
Magnifying or Reducing the View . . . . . .26
Scroll . . . . . . . . . . . . . . . . . . . . . . . . . .26
RGB/CMY Info . . . . . . . . . . . . . . . . . . .27
APS Formats; C, H, and P . . . . . . . . . . .27
Focus . . . . . . . . . . . . . . . . . . . . . . . . . .28
Point AF . . . . . . . . . . . . . . . . . . . . . . .28
Manual Focus . . . . . . . . . . . . . . . . . . .29
MAKING IMAGE CORRECTIONS
Variations
Opening the Variations Dialog Box . . . . .31
Brightness and Contrast Changes . . . . .32
Adjusting the Colour Balance . . . . . . . .33
Full-Screen View Button . . . . . . . . . . . .33
Cancelling or Applying the Changes . . .33
Histogram
Opening the Histogram Dialog Box . . . .34
Setting the White, Black, and
Gray Points . . . . . . . . . . . . . . . . . . . . . .35
Brightness and Contrast Changes . . . . .36
Colour Balance Adjustment . . . . . . . . . .37
Applying or Cancelling Corrections . . . .37
Saving and Loading Histogram Settings 38
Tone Curves
Opening the Tone Curves Dialog Box . .39
Setting the White and Black Points . . . .40
Changing the Tone Curves . . . . . . . . . .41
Applying or Cancelling Corrections . . . .41
Saving and Loading Tone Curve Settings42
MAKING THE FINAL SCAN
Jobs
Loading a Job . . . . . . . . . . . . . . . . . . . .44
Creating a Job . . . . . . . . . . . . . . . . . . .45
Final Scan
TWAIN Driver/Plug-In Software . . . . . . .46
Utility Software . . . . . . . . . . . . . . . . . . .47
Utility Software File Formats . . . . . . . . .47
ADDITIONAL FEATURES
Scan Settings
Opening the Scan Settings Dialog Box .49
Quick Guide to Scan Settings . . . . . . . .50
Scan Setting Options . . . . . . . . . . . . . .51
Preferences
Setting the Preferences . . . . . . . . . . . . .53
Preferences Options . . . . . . . . . . . . . . .54
APPENDIX
Accessory Information . . . . . . . . . . . . . .57
Troubleshooting . . . . . . . . . . . . . . . . . . .58
Resolution Information . . . . . . . . . . . . .59
Glossary . . . . . . . . . . . . . . . . . . . . . . . .60
User Technical Support . . . . . . . . . . . . .61
MINOLTA . . . . . . . . . . . . . . . . . . . . . . . .62
Page 4

2
BEFORE Y OU BEGIN
PACKAGE CONTENTS
SOFTWARE REGISTRATION
Please register this software before using it.
You will receive technical support, as well as software upgrade and product information once this software is
registered. Complete and return the enclosed Product & Software Registration form after detaching it from the
Warranty. No postage is necessary.
• The information provided in the questionnaire will only be used for Minolta customer service and product
research & development.The information you provide will be kept private and confidential.
Check this packing list before you begin. If some parts are missing, contact your dealer or a Minolta Ser vice
Facility.
• Minolta Dimâg e Scan Multi scanner
• 35mm Film Holder FH-M1
• 35mm Slide Mount Holder SH-M1
• Medium Format Film Holder MH-M1
• Film Masks:
6 x 4.5 Medium Format Film Mask
6 x 6 Medium Format Film Mask
6 x 7 Medium Format Film Mask
6 x 8 Medium Format Film Mask
6 x 9 Medium Format Film Mask
APS Sleeve Film Mask
16mm Film Mask
• Power Cord PW-M2
• SCSI Cable SC-11
• Dimâg e Scan Multi CD-ROM v1.0
• Instruction Manuals (1 software, 1 hardware)
• Warranty and Software Registration card.
Page 5

3
SYSTEM REQUIREMENTS
MACINTOSH
CPU: Power PC
OPERATING SYSTEM: System 7.5 to Mac OS 8.5.1
MEMORY: A minimum of 8MB (megabytes) free memory.
HARD DISK SPACE: 90 MB or more of available hard disk space.
When 16bit or 16bit linear is selected from the Color Depth list box in the
Preferences dialog box, 200MB or more of available hard disk space.
MONITOR: Minimum 13 inch monitor capable of displaying at least 32,000 colors. 16
inch
(832 x 642) or larger is recommended.
OTHER: Adobe PhotoShop 3.0.5 or Adobe PhotoShop 4.0.1 and 5.02 have been fully
tested for use with the plug-in software.
PC/AT
CPU: i486DX2 66MHz or above (Windows98/NT: Intel Pentium or later).
OPERATING SYSTEM: Windows NT 4.0, Windows 98 or Windows 95 (incl.OSR2).
MEMORY: A minimum of 32MB (megabytes) of RAM.
HARD DISK SPACE: 90 MB or more of available hard disk space.
When 16bit or 16bit linear is selected from the Color Depth list box in the
Preferences dialog box, 200MB or more of available hard disk space.
MONITOR: Minimum VGA monitor capable of displaying High Color (16 bit) is required.
SVGA (800 x 600) or larger is recommended.
SCSI BOARD: Adaptec AVA-1505*, AVA-1505AE*, AHA-1520B, AHA-1540CP,
AHA-2910B, AHA-2910C, AHA-2940, or AHA-2940U/AU/UW/W.
OTHER: PhotoShop 3.0.5, PhotoShop 4.0.1, 5.0.2, Paint Shop Pro 4.1E, 5.0.1E,
Corel Draw 7, and Corel Draw 8 have been have been fully tested for use
with the TWAIN driver software.
*Adaptec AVA-1505, AVA-1505AE are only recommended for Windows 95.
Page 6
4
INST ALLING THE SOFTW ARE
1.Turn on the Dimâge Scan Multi, then turn on your PC.
2.Start Windows 95 or Windows NT.
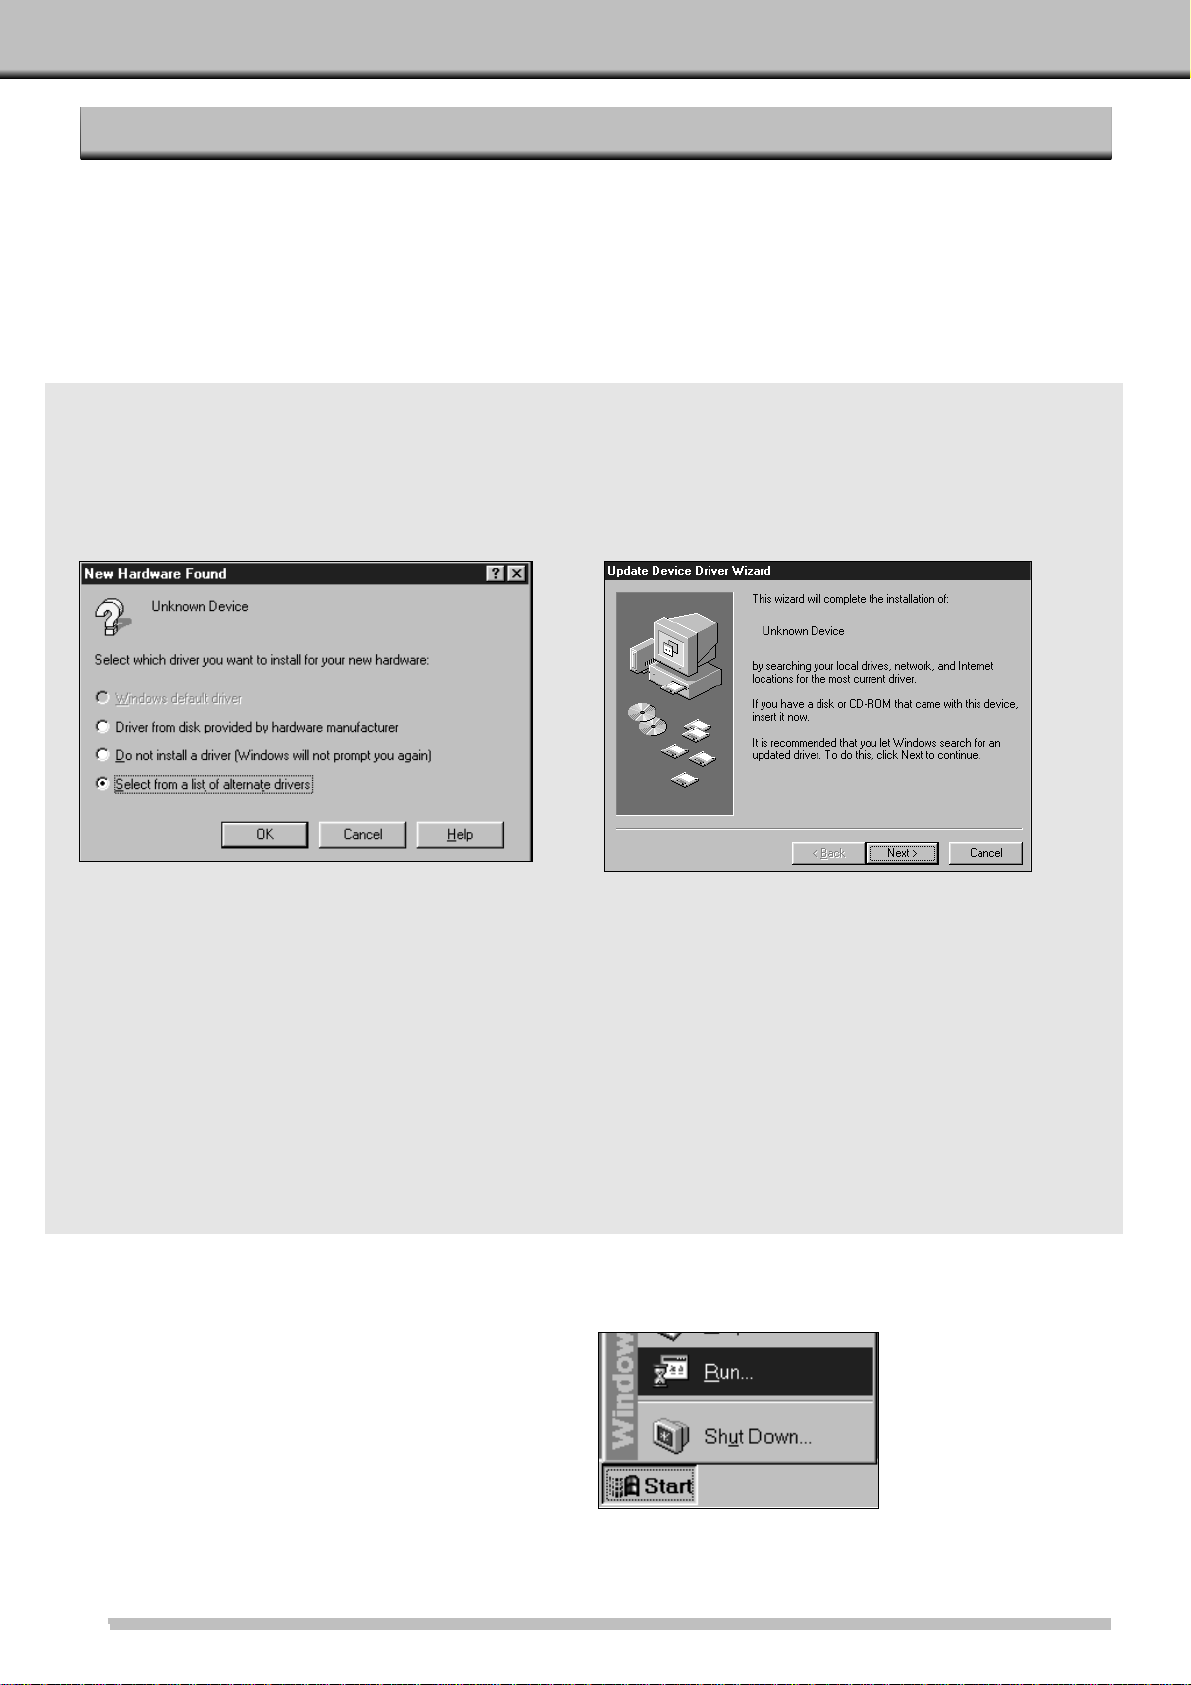
WINDOWS 95/WINDOWS NT
Windows 95
• The New Hardware Found dialog box will appear.
Windows 95 Release 2 (OSR2)
• The appearance and/or wording of some dialog
boxes may vary.
• The following dialog box will appear.
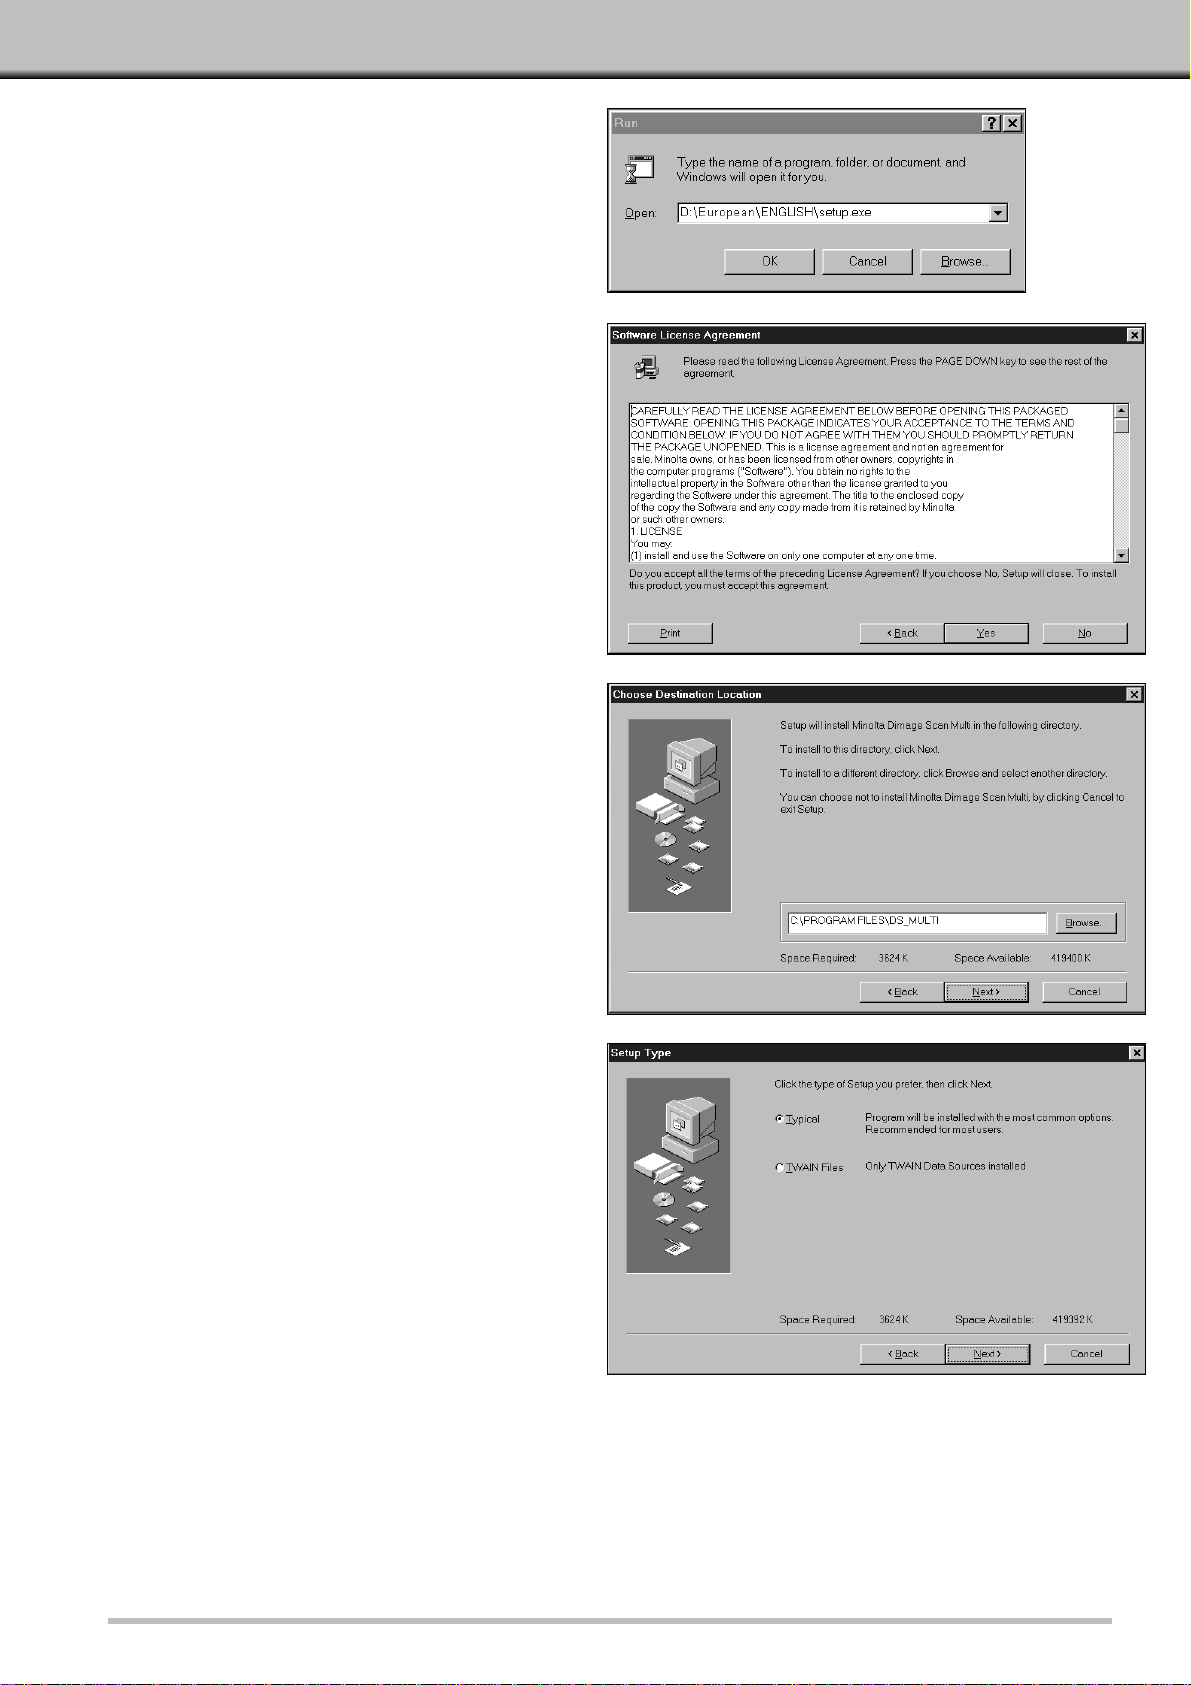
5 From the START button, select Run…
• The Run dialog box will appear.
3.Click on Cancel.
• This dialog box may appear several times.
Repeat step 3 until the dialog box no longer
appears.
3a. Click on Next.
• A similar dialog box will appear.
3b. Click on Finish.
• This dialog box may appear several times. Repeat
step 3 until the dialog box no longer appears.
4.Insert the Dimâge Scan Multi CD-ROM into the CD-ROM drive.
• These installation instruction assume drive D is the CD-ROM drive.
Windows NT
3.Select Start ‘ Settings ‘ Control Panel, then double-click on the SCSI Adapters icon.
Confirm that Minolta #2883 appears as a connected device for your SCSI board.
• If Minolta #2883 does not appear, turn the system off and check all the connections.Repeat the procedure.
3.This step varies with your specific operating software…
Page 7
5
7.After reading the agreement, click on Yes.
• The Choose Destination Location dialog box will
appear.
8.To select another destination directory,
click on Browse… and select the
directory. Click on Next.
• The Setup Type dialog box will appear.
9.Choose either Typical or TWAIN Files
Only install, then click on Next.
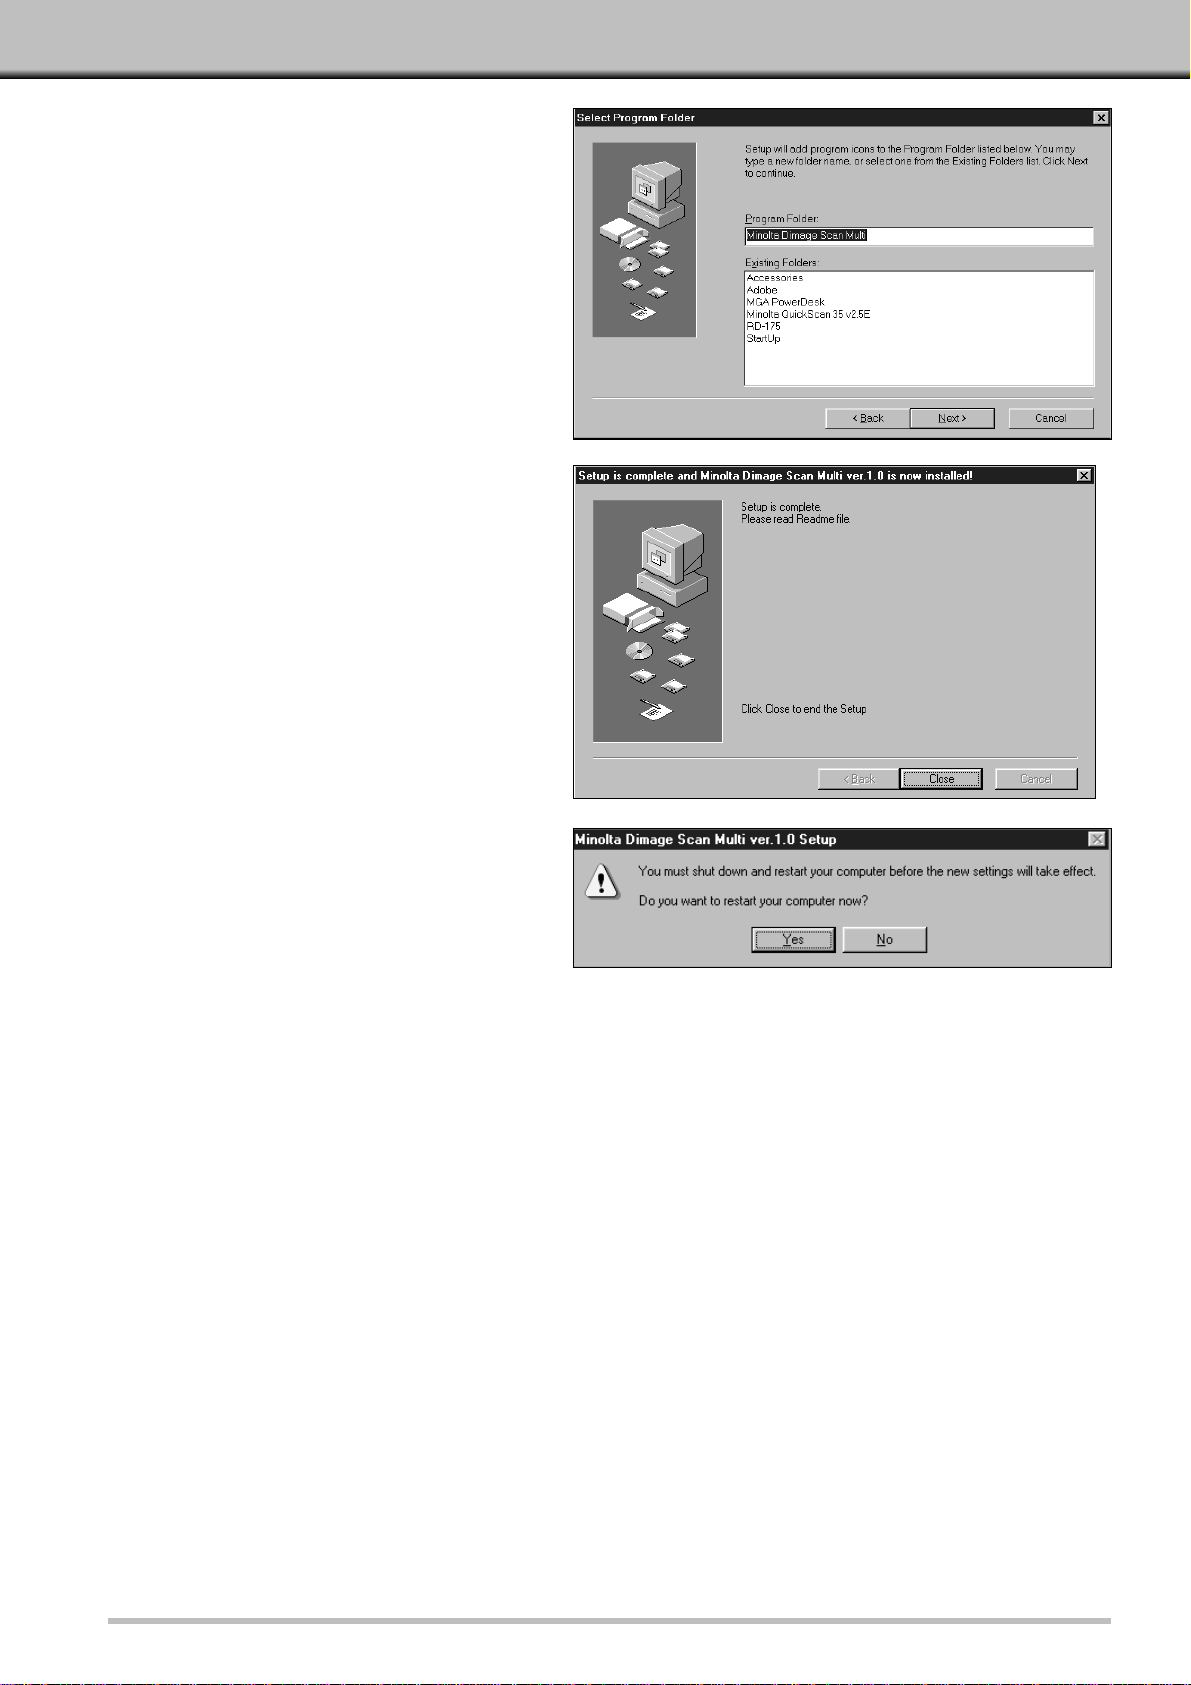
• The Select Program Folder dialog box will appear.
6.Select D:\ENGLISH\Setup.exe from the
Open drop-down list, then click on OK.
• If your CD-ROM drive is not the D drive, replace the
D with the appropriate letter for your CD-ROM drive.
• The Software License Agreement will appear.
Continued on next page.
Page 8
6
10. Click on Next.
• Setup will begin.
• When setup is complete a message will appear
informing you installation was successful.
11. Click on Close.
• A message will appear asking if you want to
restart the computer.
12. Click on Yes.
The Dimâge Scan Multi setup will have placed the following files on your computer.
ds_multi.exe
Readme.txt
Job
twain.dll
twain32.dll
twunk_16.exe
twunk_32.exe
dsm_tw.ini
Dsmulti.hlp
Dsmultij.hlp
ds_multi.dll
dsm_resj.dll
DS_multi.ds
Page 9
7
INST ALLING THE SOFTW ARE
MACINTOSH
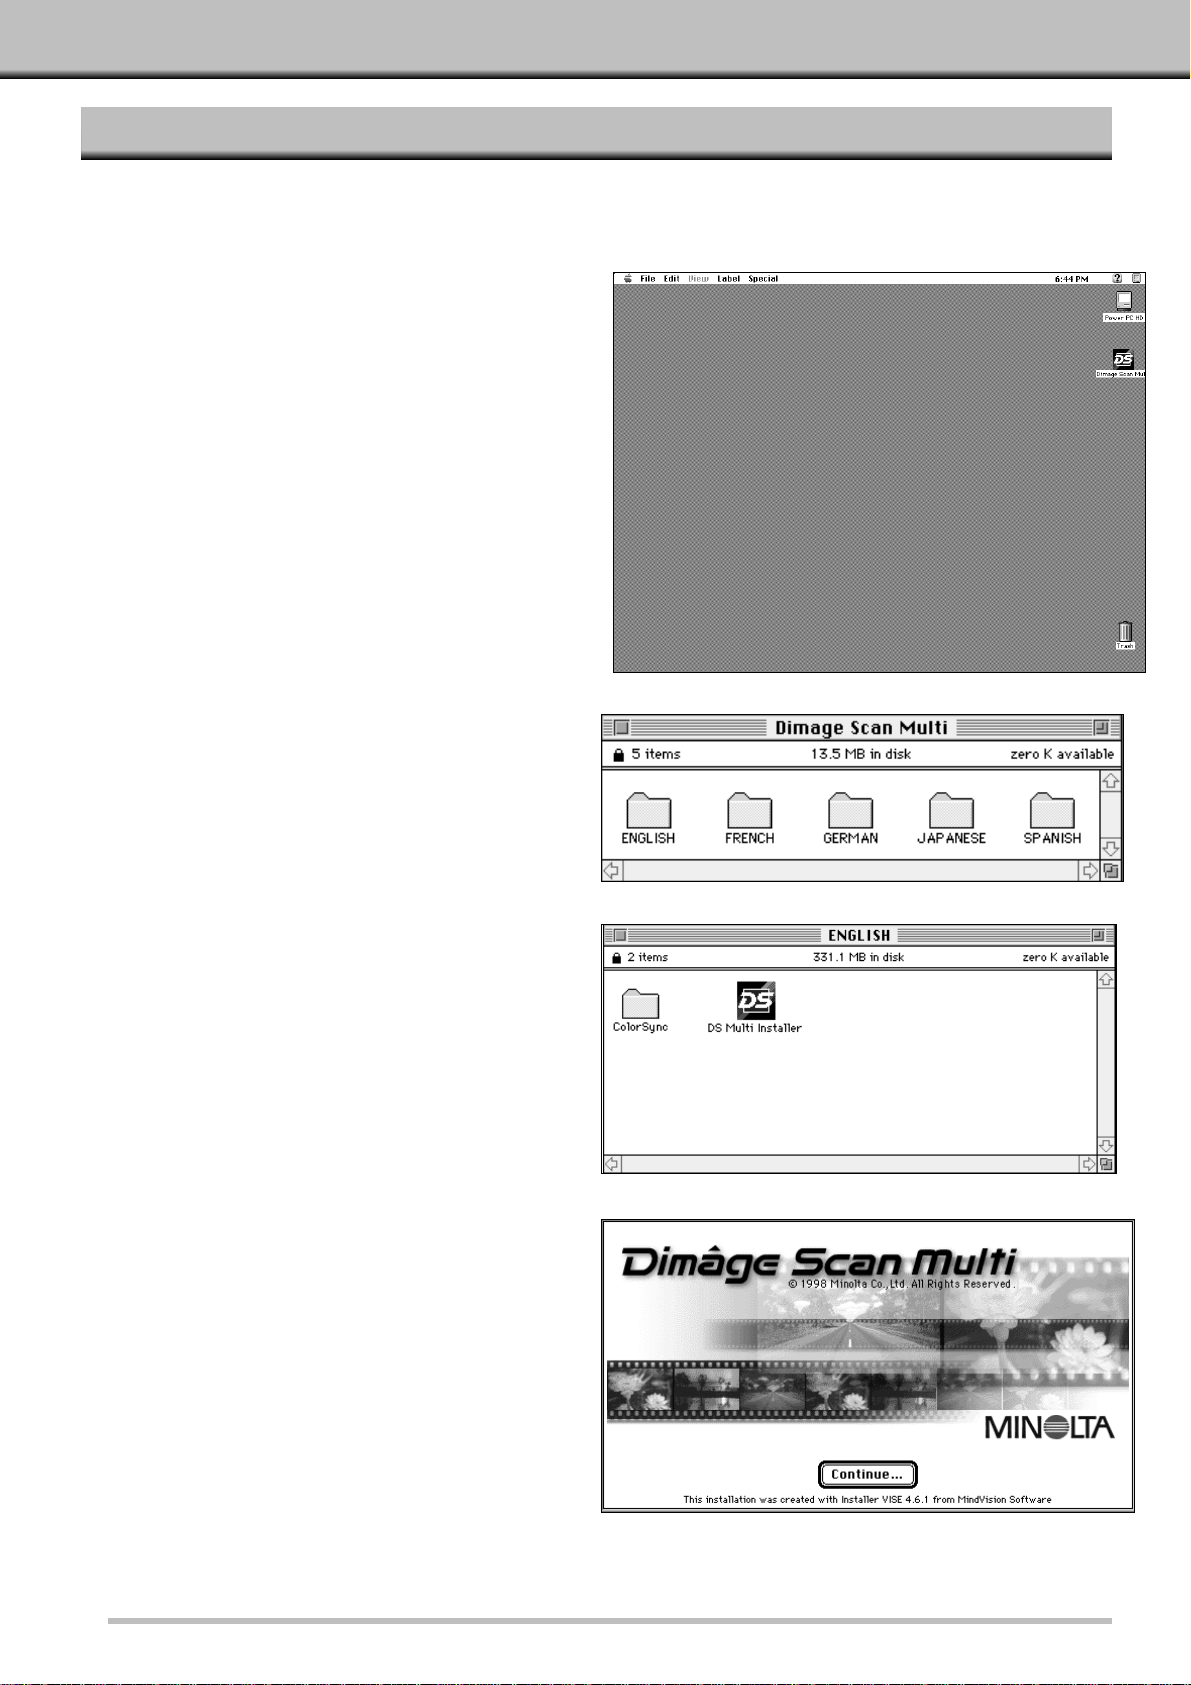
1.Insert the Dimage Scan Multi CD-ROM into the CD-ROM drive.
• The Dimage Scan Multi CD-ROM icon will appear on the desktop.
2.Double-click on the Dimage Scan Multi
CD-ROM icon.
• The language folders will appear.
3.Double-click on the English language
folder.
• The Dimage Scan Multi Installer icon will appear.
4.Double-click on the Dimage Scan Multi
Installer icon.
• The installer screen will appear.
5.Click on Continue… .
• The User License Agreement will appear.
Continued on next page.
Page 10
8
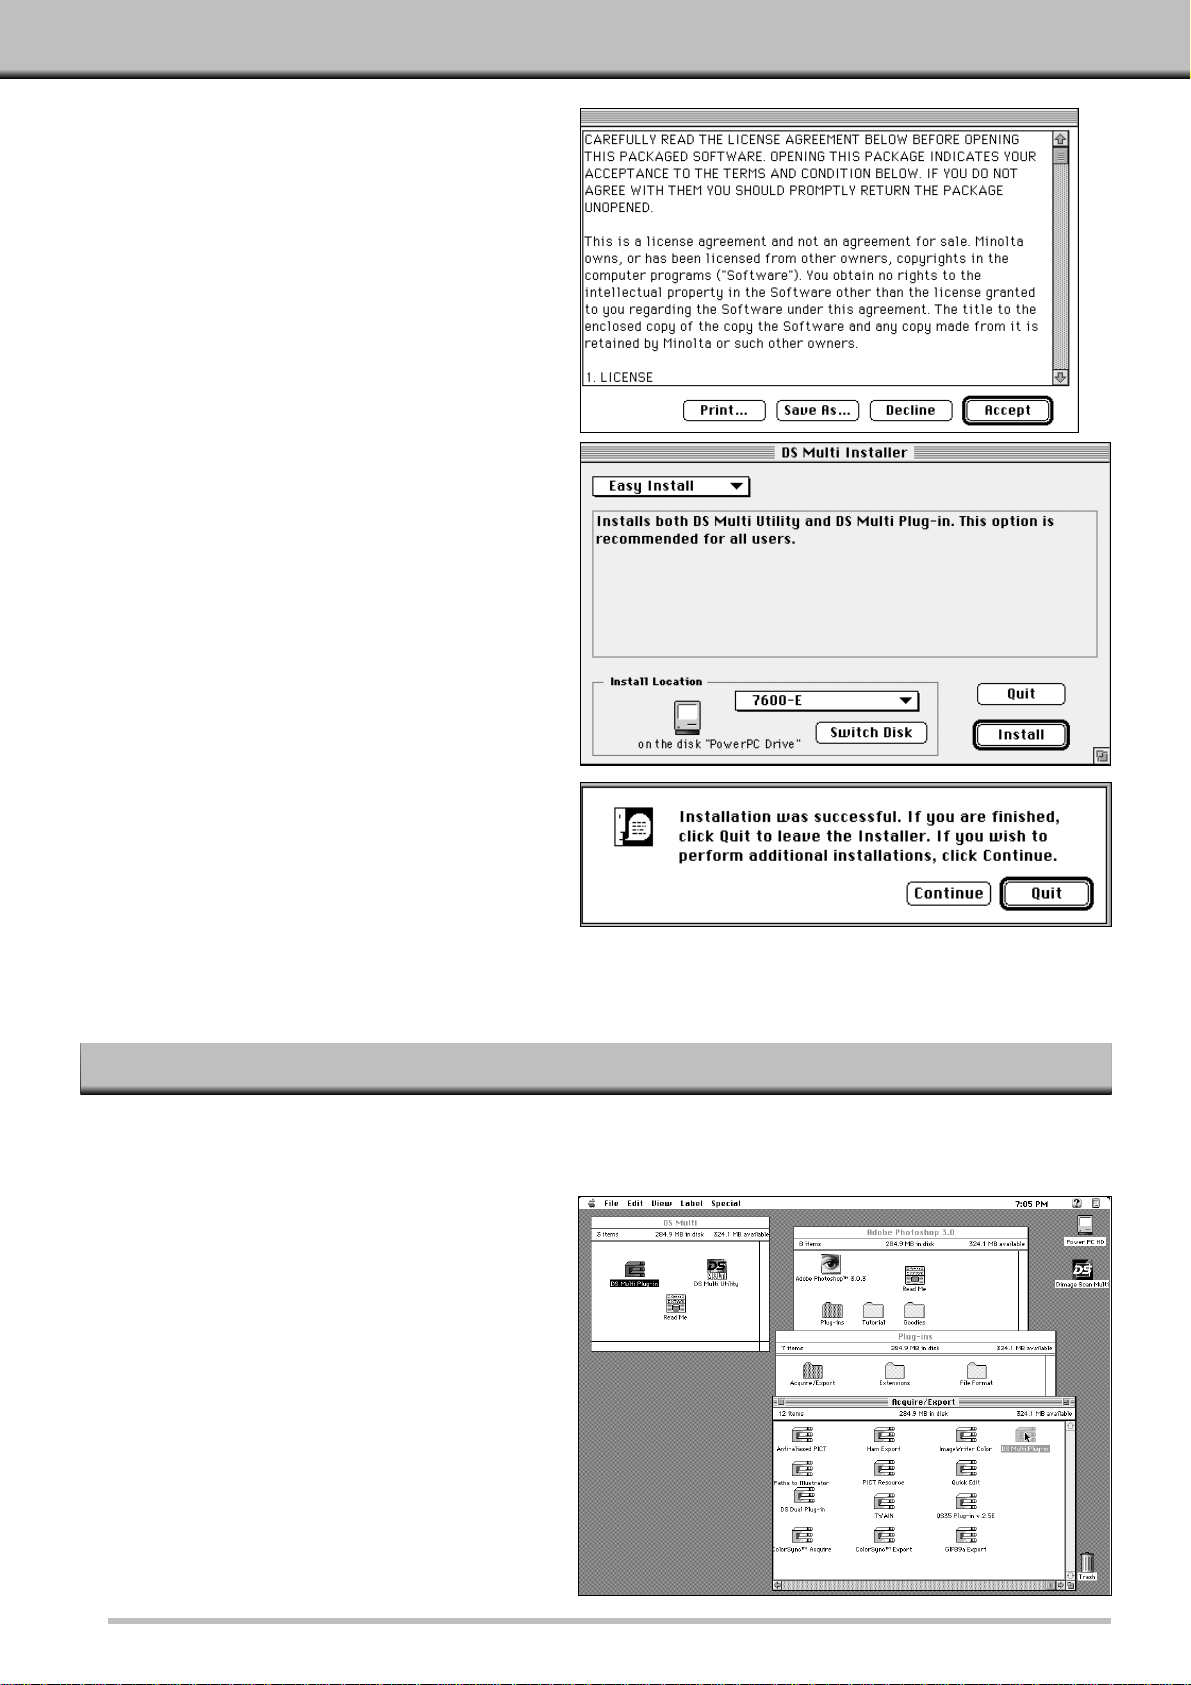
6.Click on Accept.
• The Dimage Scan Multi Installer will appear.
7.Choose the Install Type and confirm
the Install Location of the software,
then click on Install.
• Installation will begin.When installation is
complete, a message will appear informing you
installation was successful.
8.Click on Quit.
• The software will be installed in a new folder
titled Dimage Scan Multi.
• If Easy Install was chosen, the Dimage Scan
Multi folder will contain the following items: the
DS Multi Utility, DS Multi Plug-in, and Read Me
file.
Adobe Photoshop 3.0.5
• Open Photoshop’s Plug-ins folder then drag and
drop the DS Multi Plug-in into the Plug-ins’
Acquire/Export folder.
Adobe Photoshop 4.0.1
• Open Photoshop’s Plug-ins folder then drag and
drop the DS Multi Plug-in into the Plug-ins’
Import/Expor t folder.
MACINTOSH – PLUG-IN
Once the installation procedure is complete, move the DS Multi Plug-in from the Dimage Scan Multi folder to the
appropriate folder for the host application.
Page 11
9
MACINTOSH – COLORSYNC™2.0
ColorSync helps your color devices (monitor, scanner, printer etc.) match their colors.This makes it faster and
easier to obtain the correct colors in the final image.
The Dimâge Scan Multi driver software is compatible with ColorSync 2.0, which is included with the software. If
ColorSync 1.0 is already installed on your computer, please remove it before installing ColorSync 2.0.
Removing ColorSync 1.0:
To remove ColorSync 1.0 from your system, drag the following items into the trash:
ColorSync™ system extension from the Extensions folder.
ColorSync™ System Profile control panel from the Control Panels folder.
ColorSync™ Profiles folder from the Preferences folder.
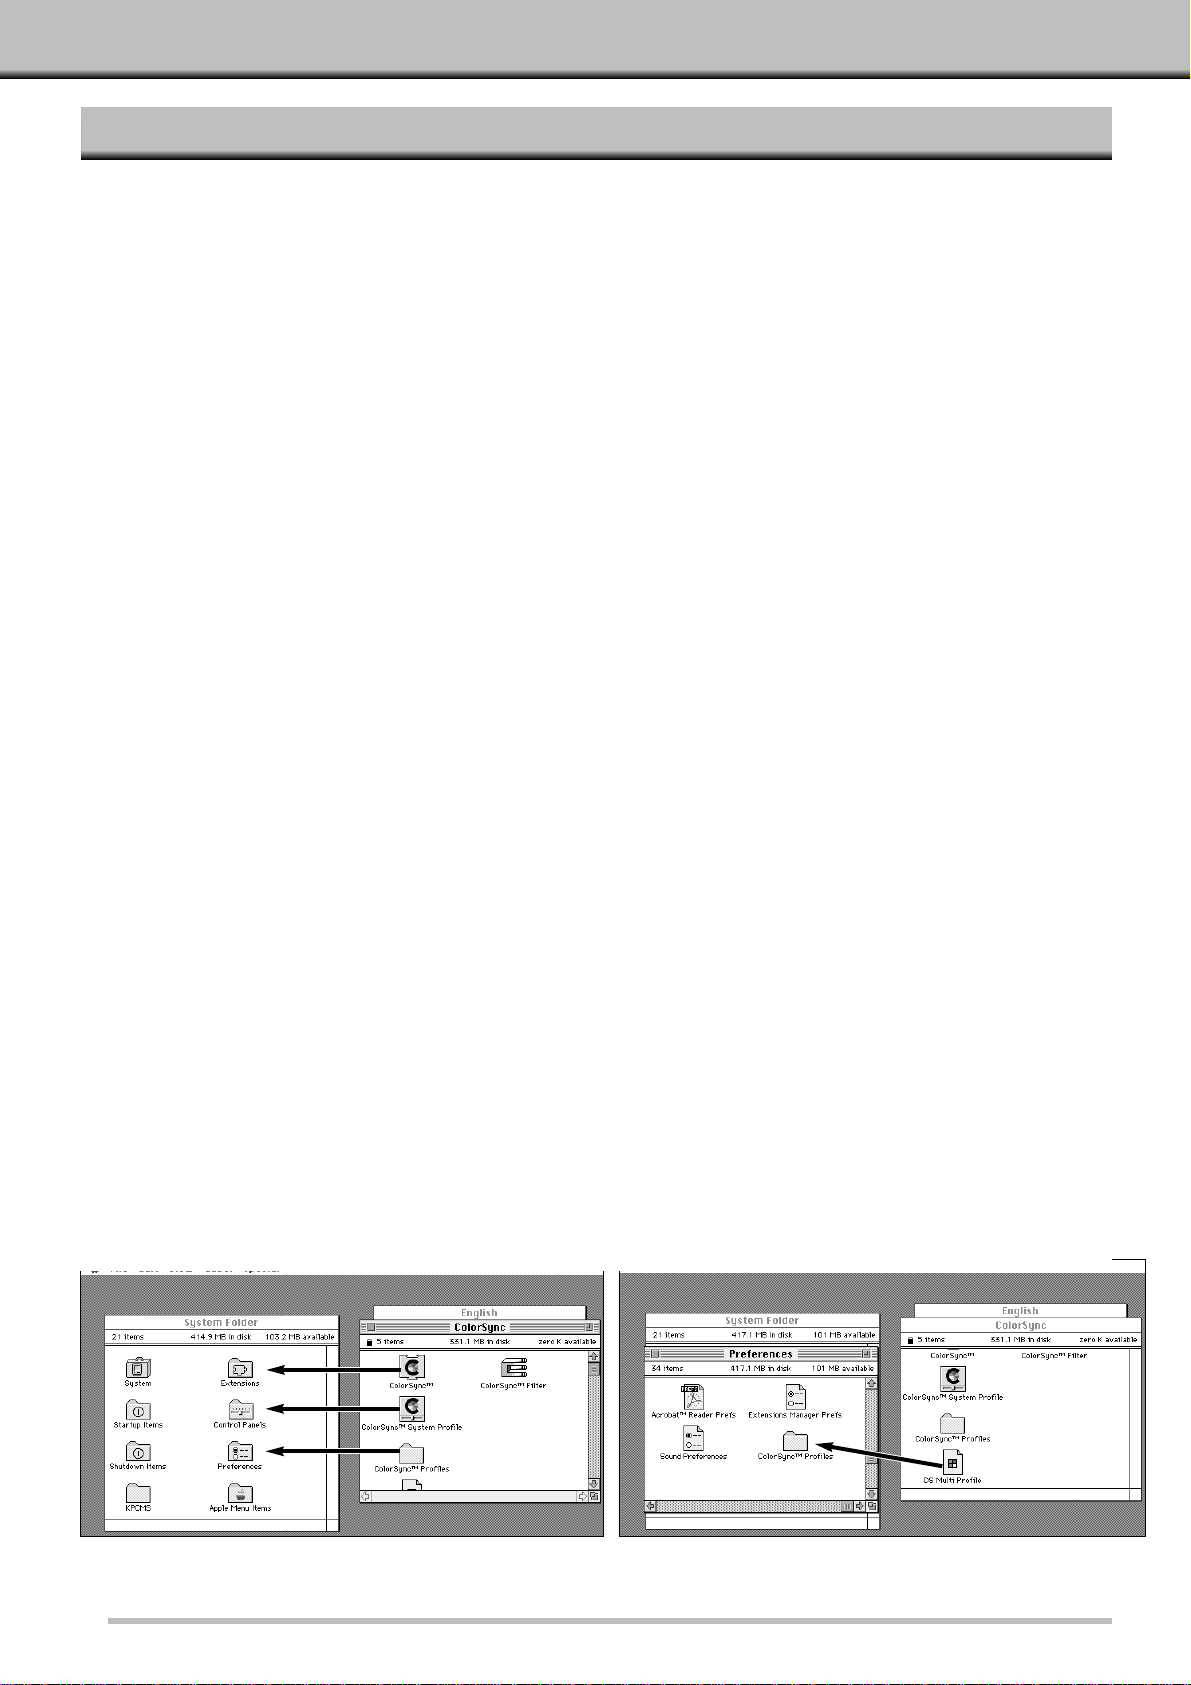
Installing ColorSync 2.0
The included ColorSync software can be installed directly from the Dimâge Scan Multi CD-ROM
• For Mac OS 7.5 and 7.5.2 or later, follow steps 1, 2, 6, and 7 only.
1.Insert the Dimâge Scan Multi CD-ROM into the CD-ROM drive, then double click on the
Dimâge Scan Multi icon.
• The language folders will appear.
2.Double-click on the English folder to open it, then double click on the ColorSync folder.
3.Drag the ColorSync™ system extension to the Extensions folder.
4.Drag the ColorSync™ System Profile to the Control Panels folder.
5.Drag the ColorSync™ System Profiles folder to the Preferences folder.
6.Drag the DS Multi Profiles into the ColorSync™ System Profile folder now in the
Preferences folder.
7.Drag the ColorSync filter to Adobe Photoshop’s Filters folder located inside the Plugins folder.
Page 12
10
LAUNCHING THE SOFTWARE – WINDOWS
LA UNCHING THE TWAIN DRIVER
LAUNCHING THE UTILITY SOFTWARE
• The start-up screen will briefly appear.
The software is ready for use when the
Command window appears.(p 15)
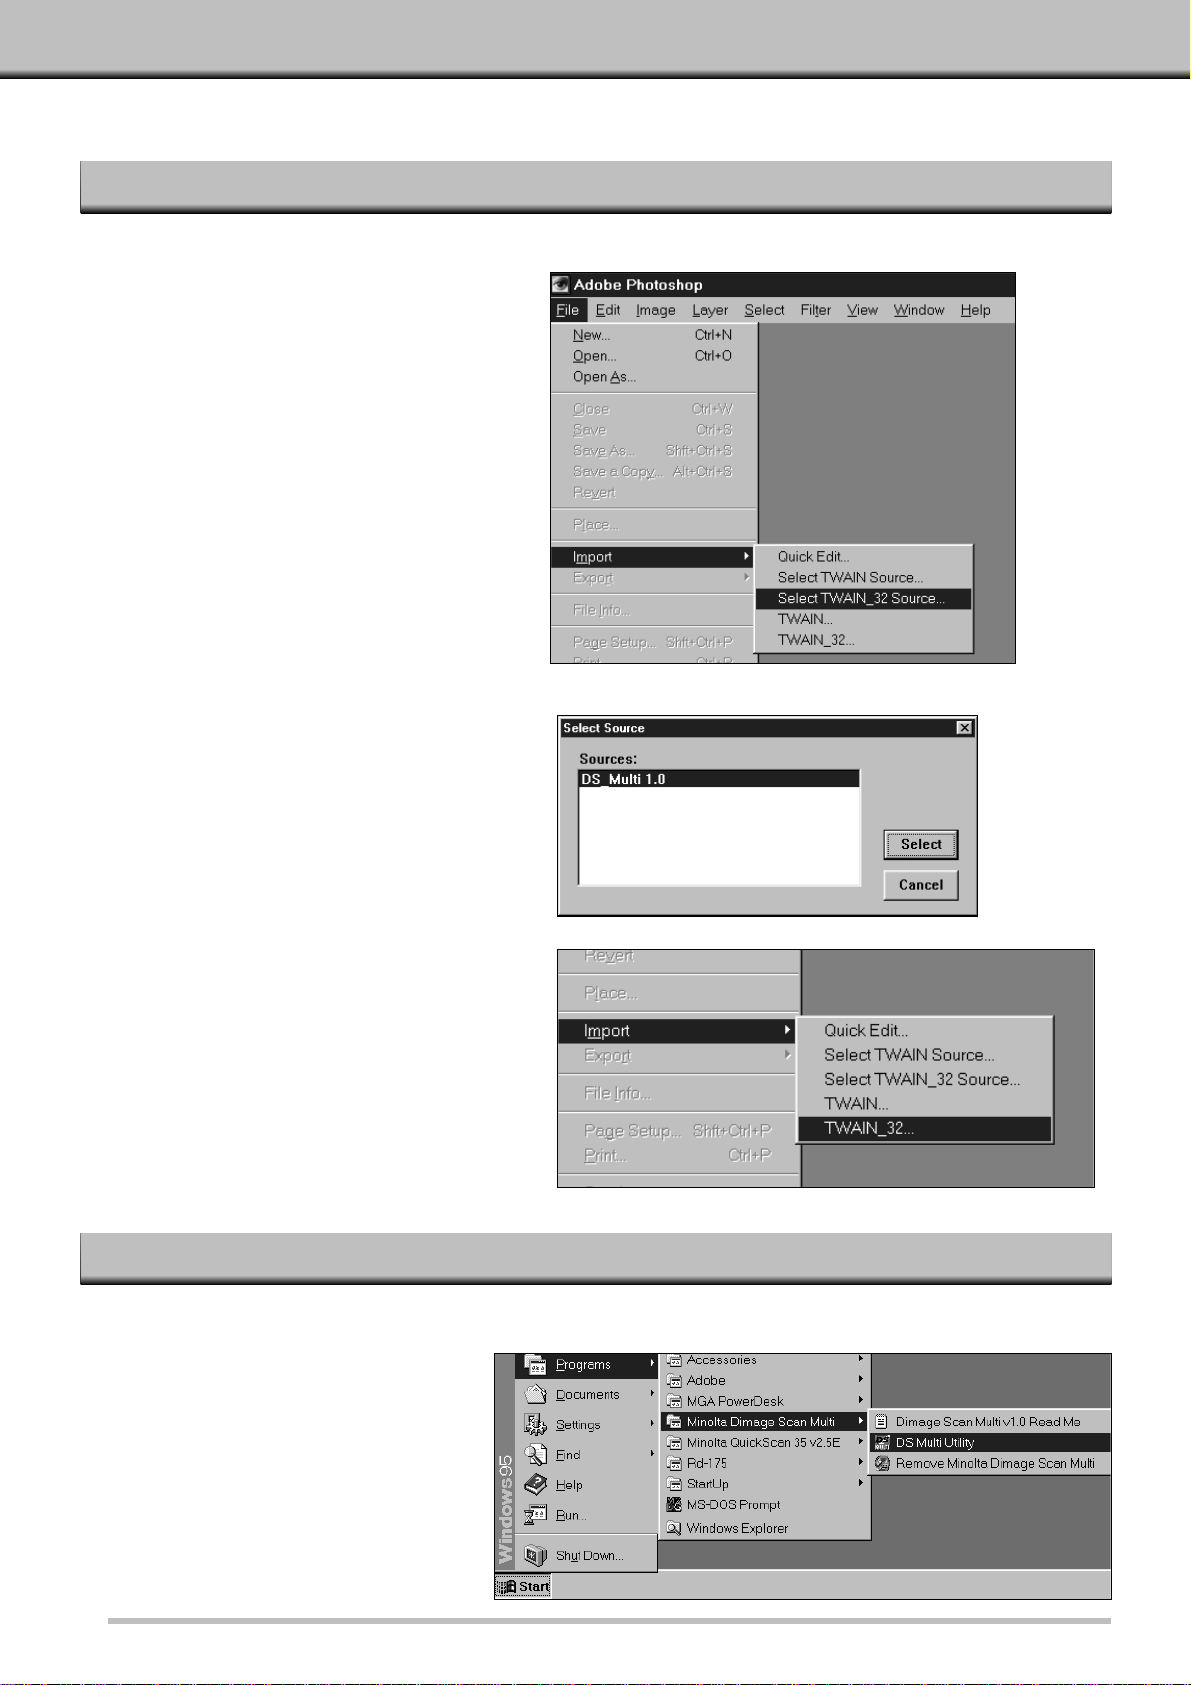
This uses Adobe Photoshop 4.0.1 as the example.Commands may vary among applications.
The utility software is a stand alone application used to control the scanner.The TWAIN driver lets you control the
software through another application, such as your image editing software.
1.Open the host application.
2.Select File – Import – Select
TWAIN_32 Source…
• The Select Source dialog box appears.
3.Select DS_Multi 1.0, then click on
Select.
4.Select File – Import – TWAIN_32.
• The start-up screen will briefly appear.The
software is ready for use when the
Command window appears.
Select Start – Programs – Minolta Dimage Scan Multi ‘ DS Multi Utility.
Page 13
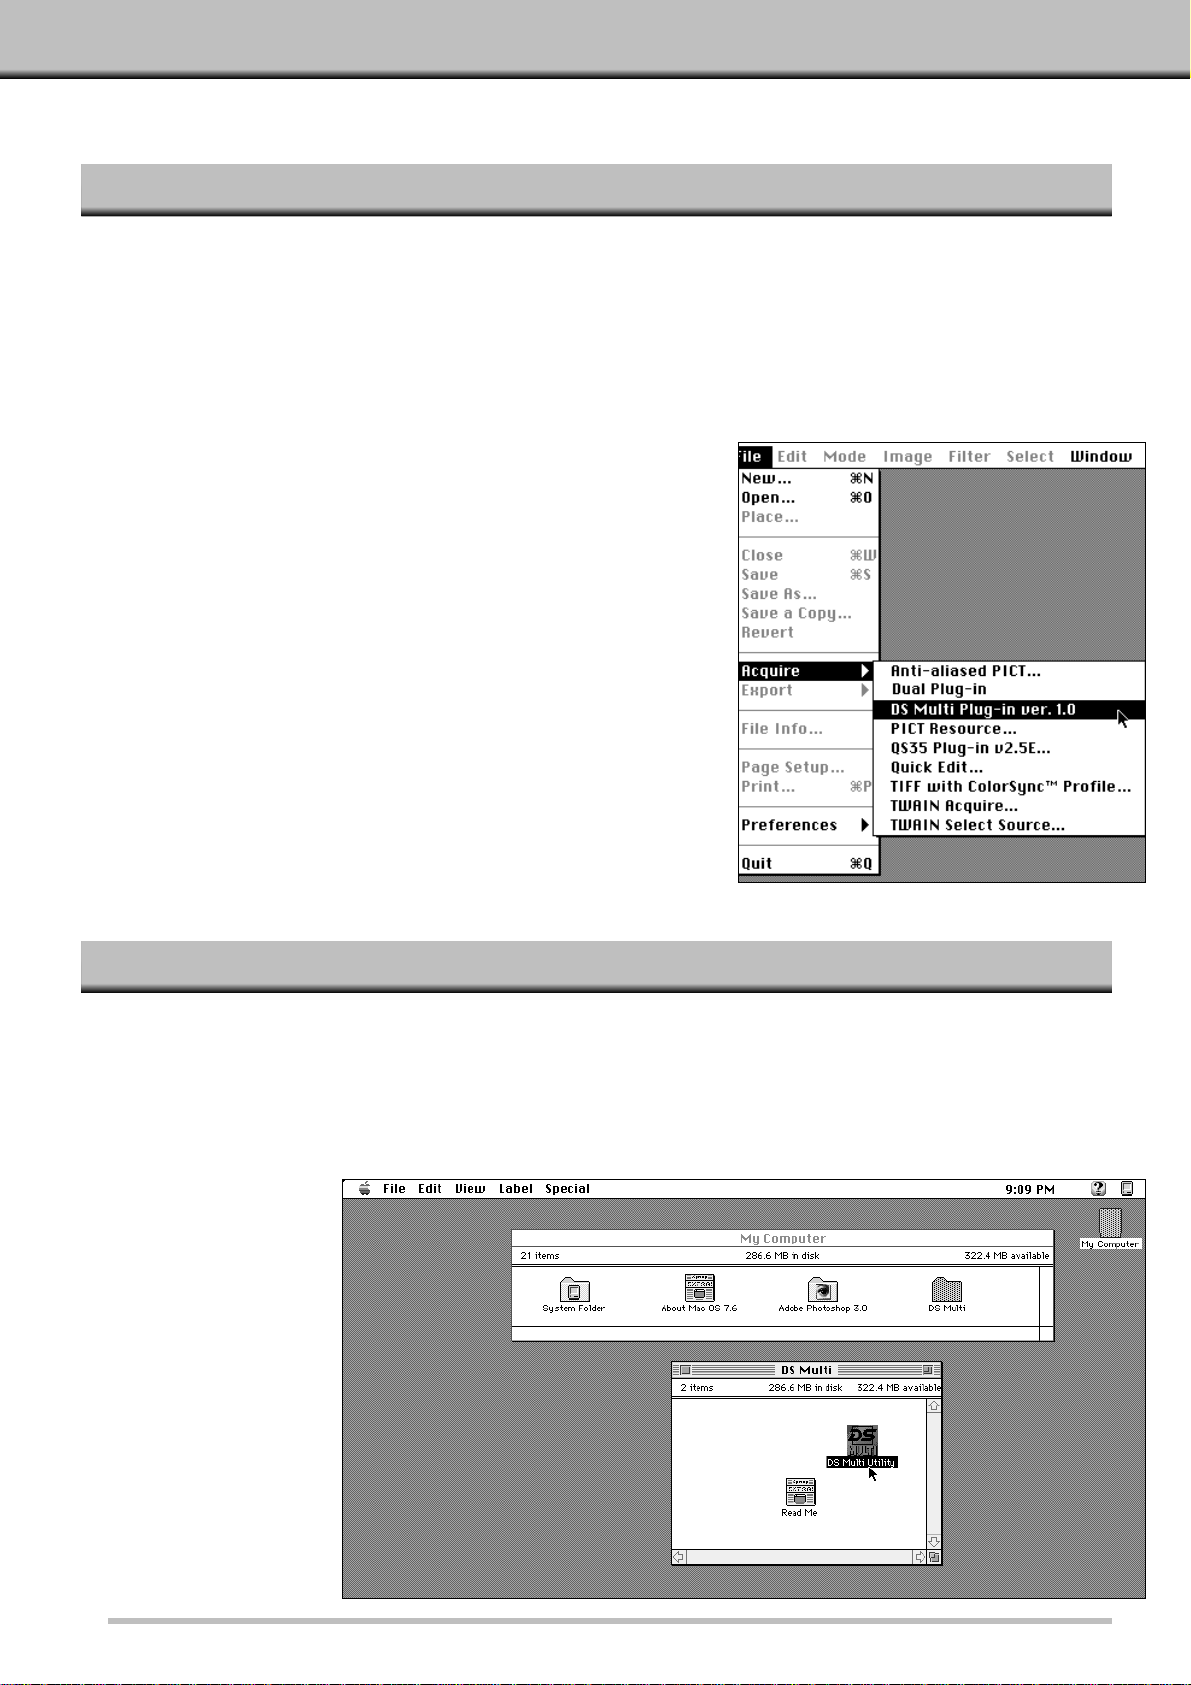
1.Launch Adobe Photoshop.
2.Photoshop 3.0.5:
• Select File – Acquire – DS Multi plug-in ver. 1.0.
Photoshop 4.0.1:
• Select File – Import – DS Multi plug-in ver. 1.0.
3.The start-up screen will briefly appear.The software is
ready for use when the Command window appears.
11
LAUNCHING THE SOFTWARE – MACINTOSH
LA UNCHING THE PLUG-IN
LAUNCHING THE UTILITY SOFTWARE
The utility software is a stand alone application used to control the scanner.The plug in lets you control the software
through Adobe Photoshop.
1.Open the DS Multi folder.
• This folder will be in the location selected during installation.
2.Double click on the DS Multi Utility icon.
• The start-up screen will briefly appear.The software is ready for use when the Command window appears.
Page 14
12
QUICK GUIDE TO BASIC OPERATION
This quick guide will help you get started right away with your new scanner.Refer to the page number in
parenthesis for additional information.
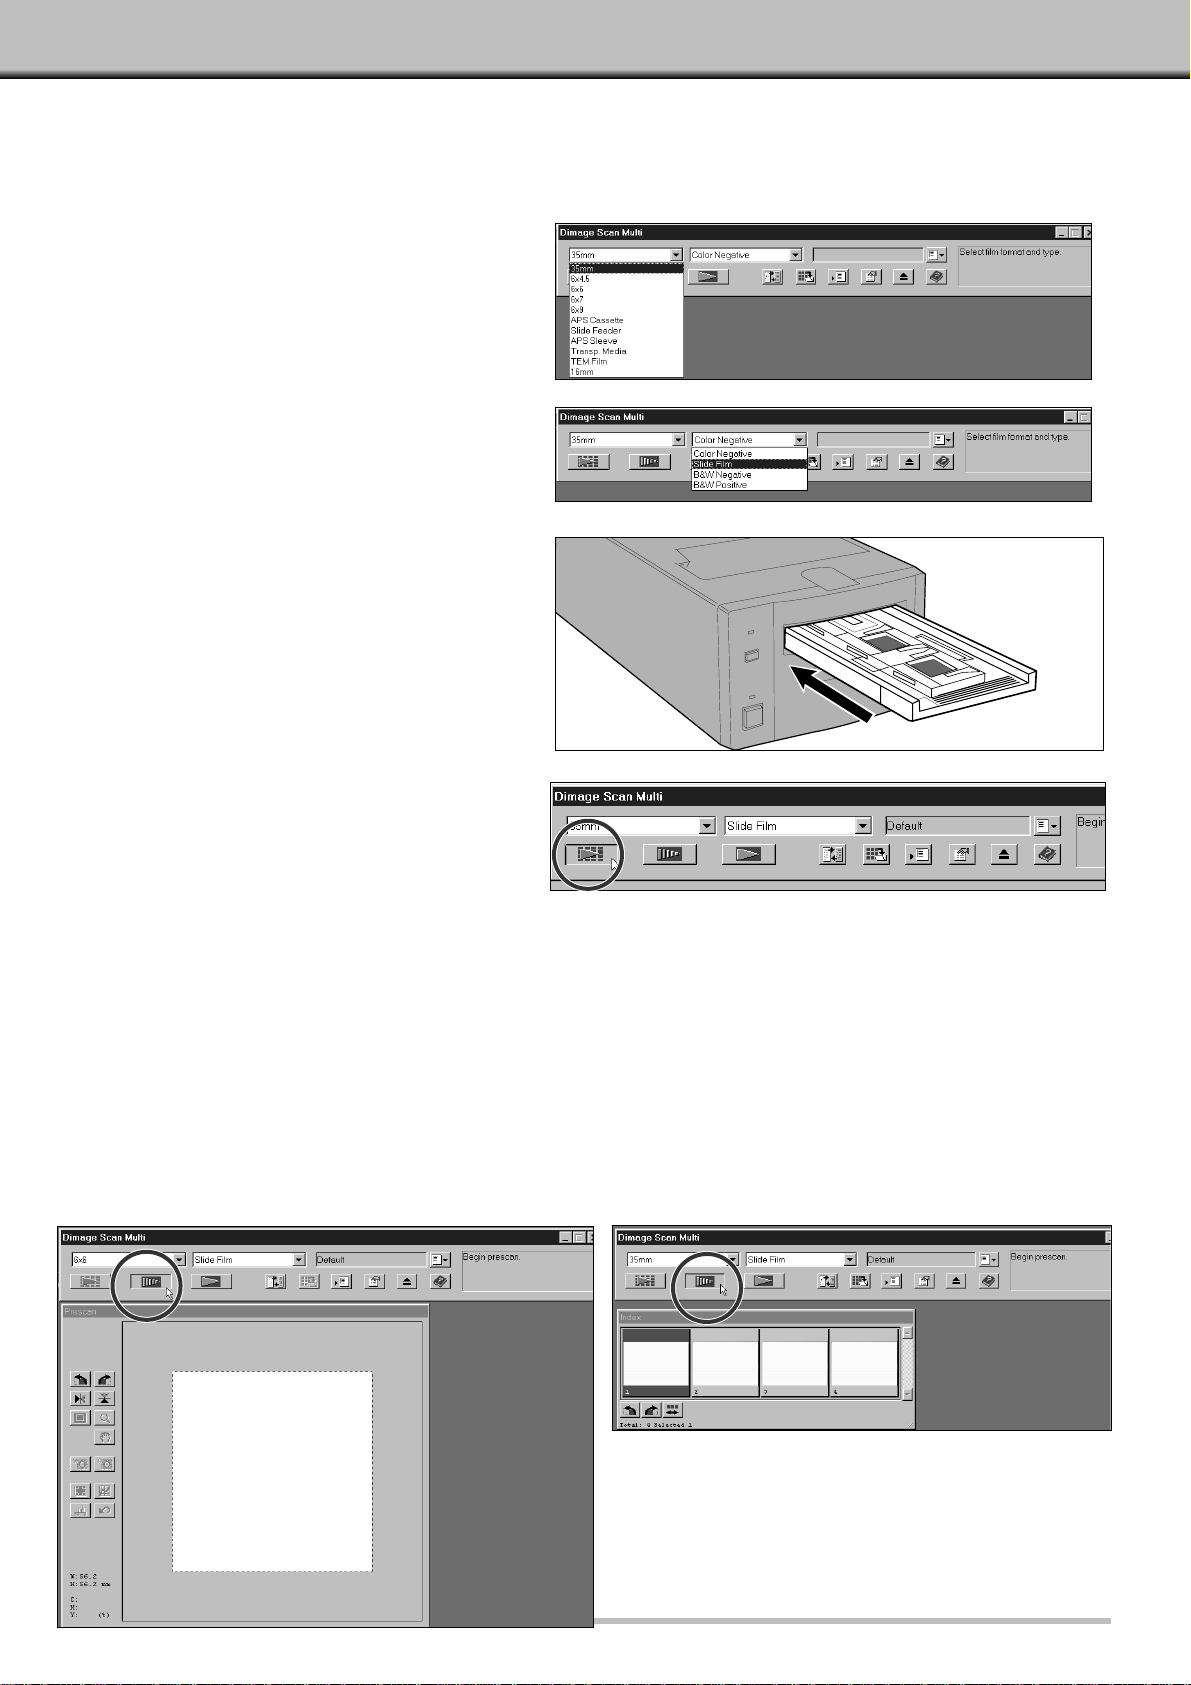
1.Select the film format (p. 16).
2.Select the film type (p. 16).
3.Insert the film into the film holder,
then insert the holder into the
scanner as instructed in the
hardware manual.
4.For 35mm film and APS cassette,
click on the Index Scan button
(p. 17).
Medium format films, 16mm, and TEM:
5.Click on the Prescan button (p. 23).
35mm film and APS Cassette:
5.Click on a frame to select it, then click
on the Prescan button (p. 22).
• The prescanned image will appear in the Prescan
window (p.21).
• The prescanned image will appear in the Prescan
window (p.21).
Page 15
13
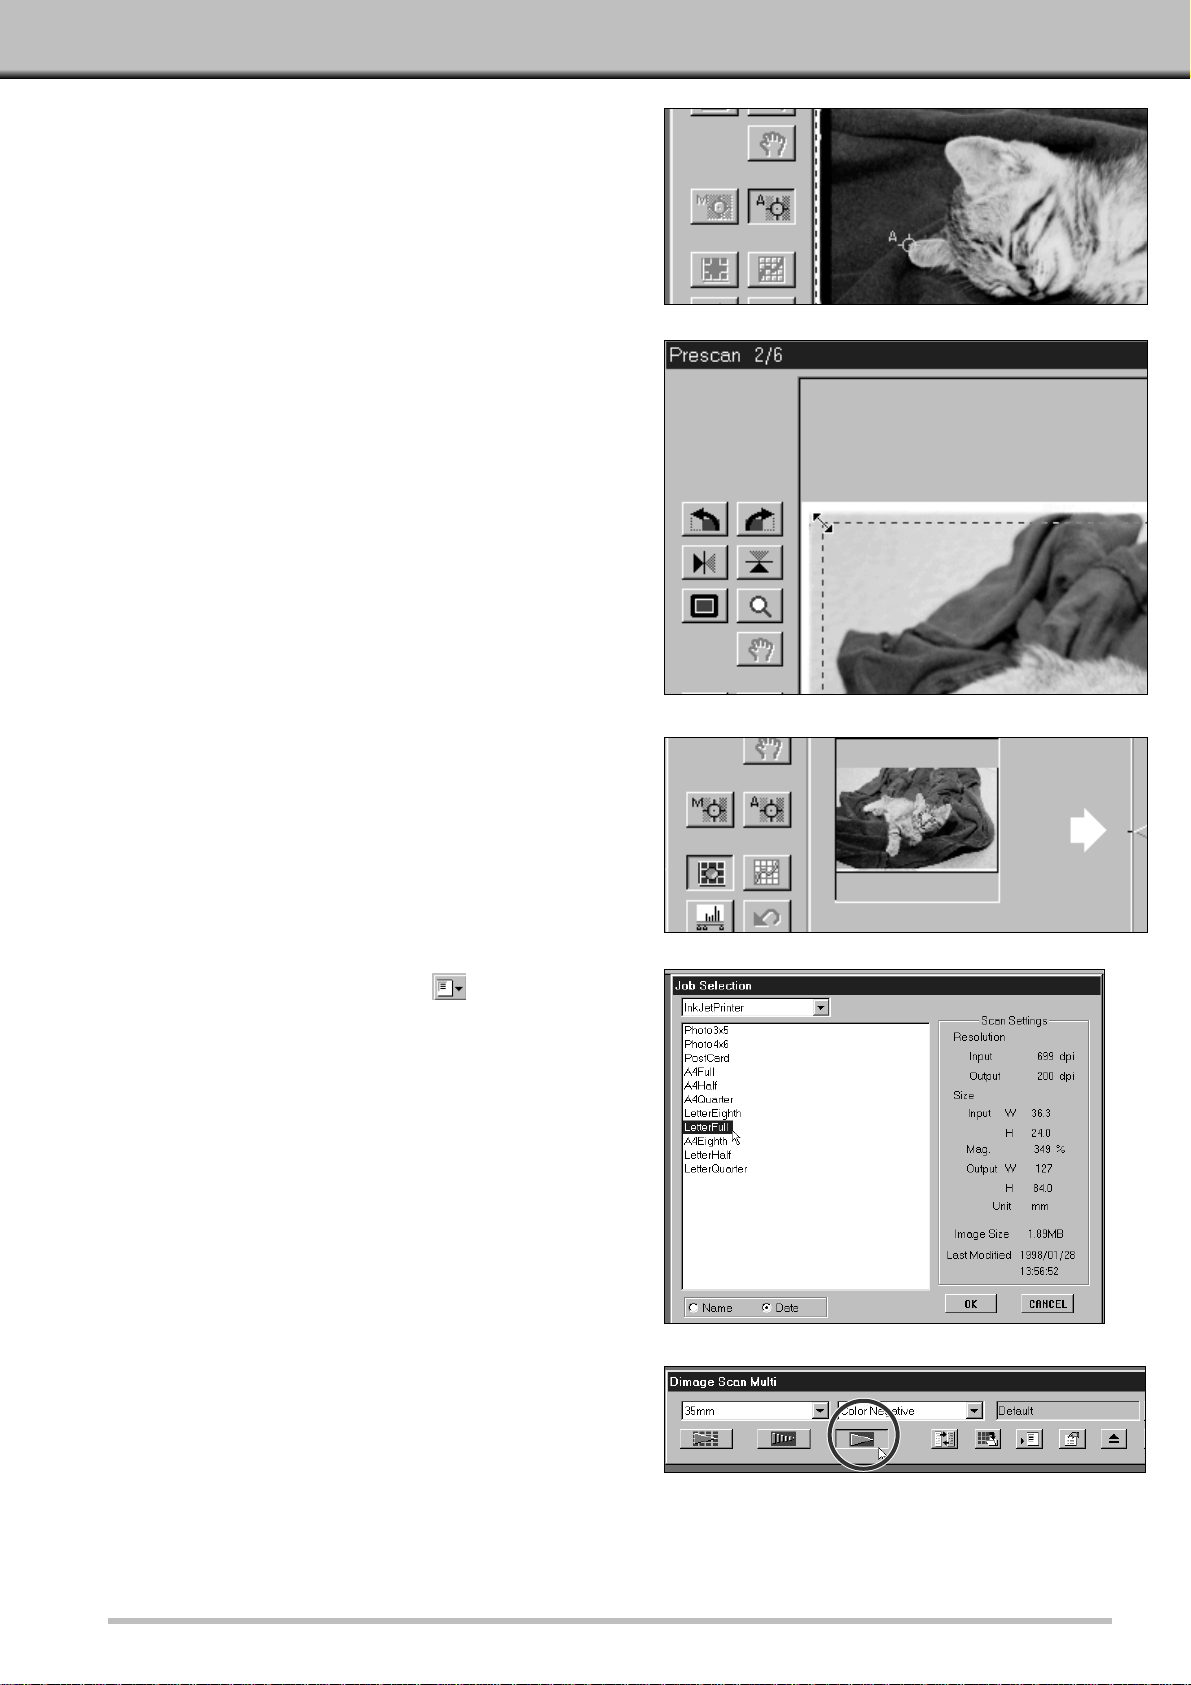
6.If required, use Manual Focus or Point AF
(p. 28 – 29).
• A new prescan will begin.
7.Crop, rotate, and flip the image as desired
(p. 23 – 25).
8.Make brightness, color, and contrast
corrections as needed.
• There are three options for making these corrections:
Variations (p. 31)
Histogram (p.34)
Tone Curve (p. 39)
• The Variations window is recommended for beginners.
9.Click on the load job button , then
select the Job category and job file name
(p. 44).
10. Click on the Scan button.
• TWAIN/Plug-in:Scanning will begin. The scanned
image will appear in the host application’s window
(p.46).
• Utility:You will be asked to name the file, choose a file
format, and select the destination. Scanning will begin.
When scanning is complete, the computer will return
to the utility software and image will be in the selected
destination (p.47).
Page 16

14
BEGIN SCANNING
Page 17

15
The command window appears when you launch the software.This is the main window for the Dimâge Scan Multi
software.
COMMAND WINDOW – NAMES OF PARTS
Index Scan button
Prescan button
Scan button
Scan Settings button
Save Index Scan button
Save Job button
Preferences button
Eject film button
Help button (Macintosh Help button: )
Status bar
Load Job button
Displays current Job selection
Film Type drop-down list
Film Format drop-down list
Page 18
16
35mm
HOLDERFILM FORMAT
5mm Film Holder FH-M1(sleeved film)/Slide Mount Holder SH-M1(mounted slides)
6x6
Medium Format Film Holder MH-M1 – 6x4.5 mask6x4.5
Medium Format Film Holder MH-M1 – 6x6 mask
6x8
Medium Format Film Holder MH-M1 – 6x7 mask6x7
Medium Format Film Holder MH-M1 – 6x8 mask
APS Cassette
Medium Format Film Holder MH-M1 – 6x9 mask6x9
APS Adapter AD-100*
APS Sleeve
Slide Feeder SC-100*Slide Feeder
Medium Format Film Holder MH-M1 – APS mask
TEM Film
Slide Mount Holder SH-M1Transparent Media
Medium Format Film Holder MH-M1
16mm Medium Format Film Holder MH-M1 – 16mm mask
COMMAND WINDO W
SELECTING THE FILM TYPE
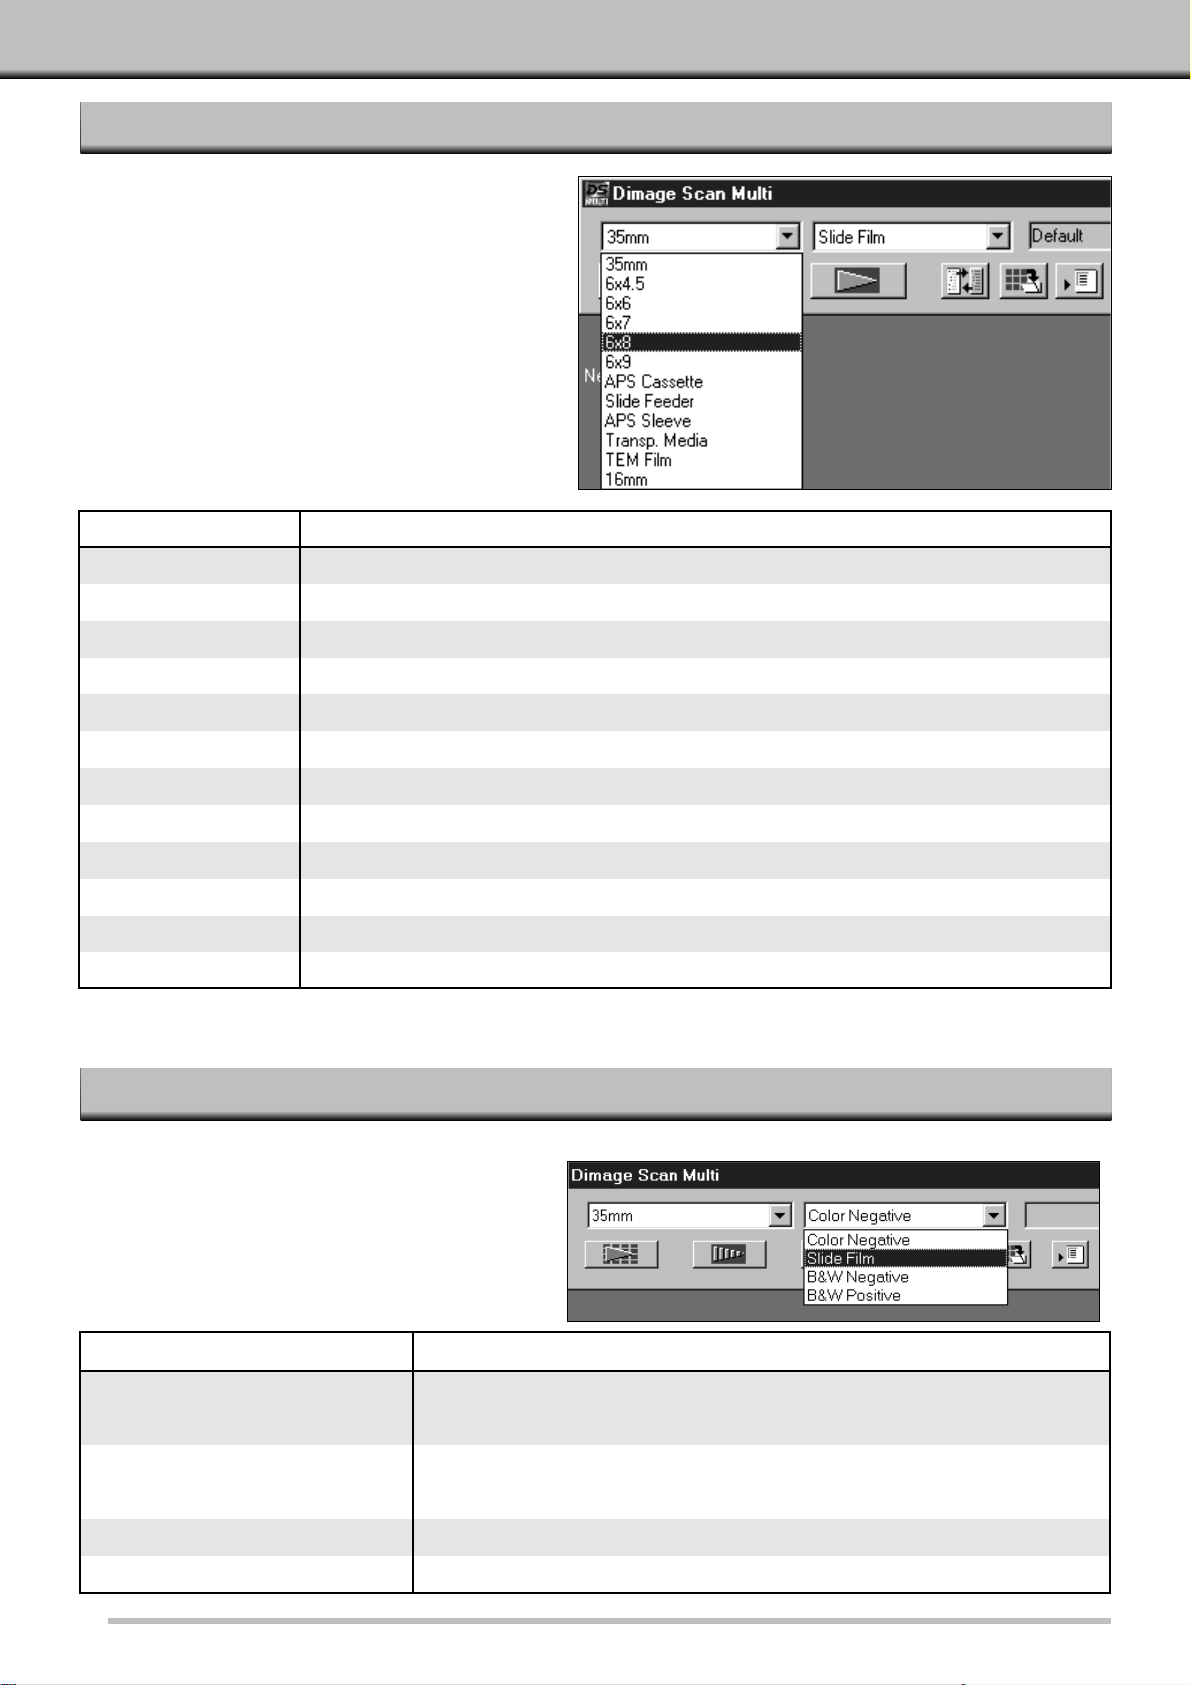
SELECT THE FILM FORMAT
1.In the Command window, select the
film size from the drop-down list.
• The Prescan window will appear if a medium-
format film size (6x4.5, 6x6, 6x7, 6x8, 6x9), TEM,
or 16mm was selected. See Prescan Window (p.
21).
• The Index window will appear if 35mm or APS
Cassette is selected (p 17).
1.In the Command window, select the
type of film from the drop-down list.
• The film type options differ according the the film
format currently selected.
*The APS Adapter AD-100 and the Slide Feeder SC-100 are optional accessories (p. 57).
35mm, APS Sleeve, Mediumformat films, Slide Feeder, 16mm
FILM TYPESFILM FORMATS
Color Negative, Slide Film, B&W Negative, B&W Positive
Transparent Media
Auto Detect (color), Color Negative, Slide Film, B&W Negative, B&W PositiveAPS Cassette
Special (color), Color Negative, Slide Film, B&W Negative, B&W Positive
Special (B&W), Color Negative, Slide Film, B&W Negative, B&W PositiveTEM film
Page 19
17
INDEX SCAN
• The frame number that appears in the Index window corresponds to the film holder; it is not related to the
frame number that appears on the film.
• The following Index Scan options can be set in Preferences (p.53).
- Index Scan Priority; Speed or Quality.
- Index window scroll direction:Hor izontal or Vertical.
• To cancel the index scan:
Windows: Press the ESC key.
Macintosh: Press Command and the period key.
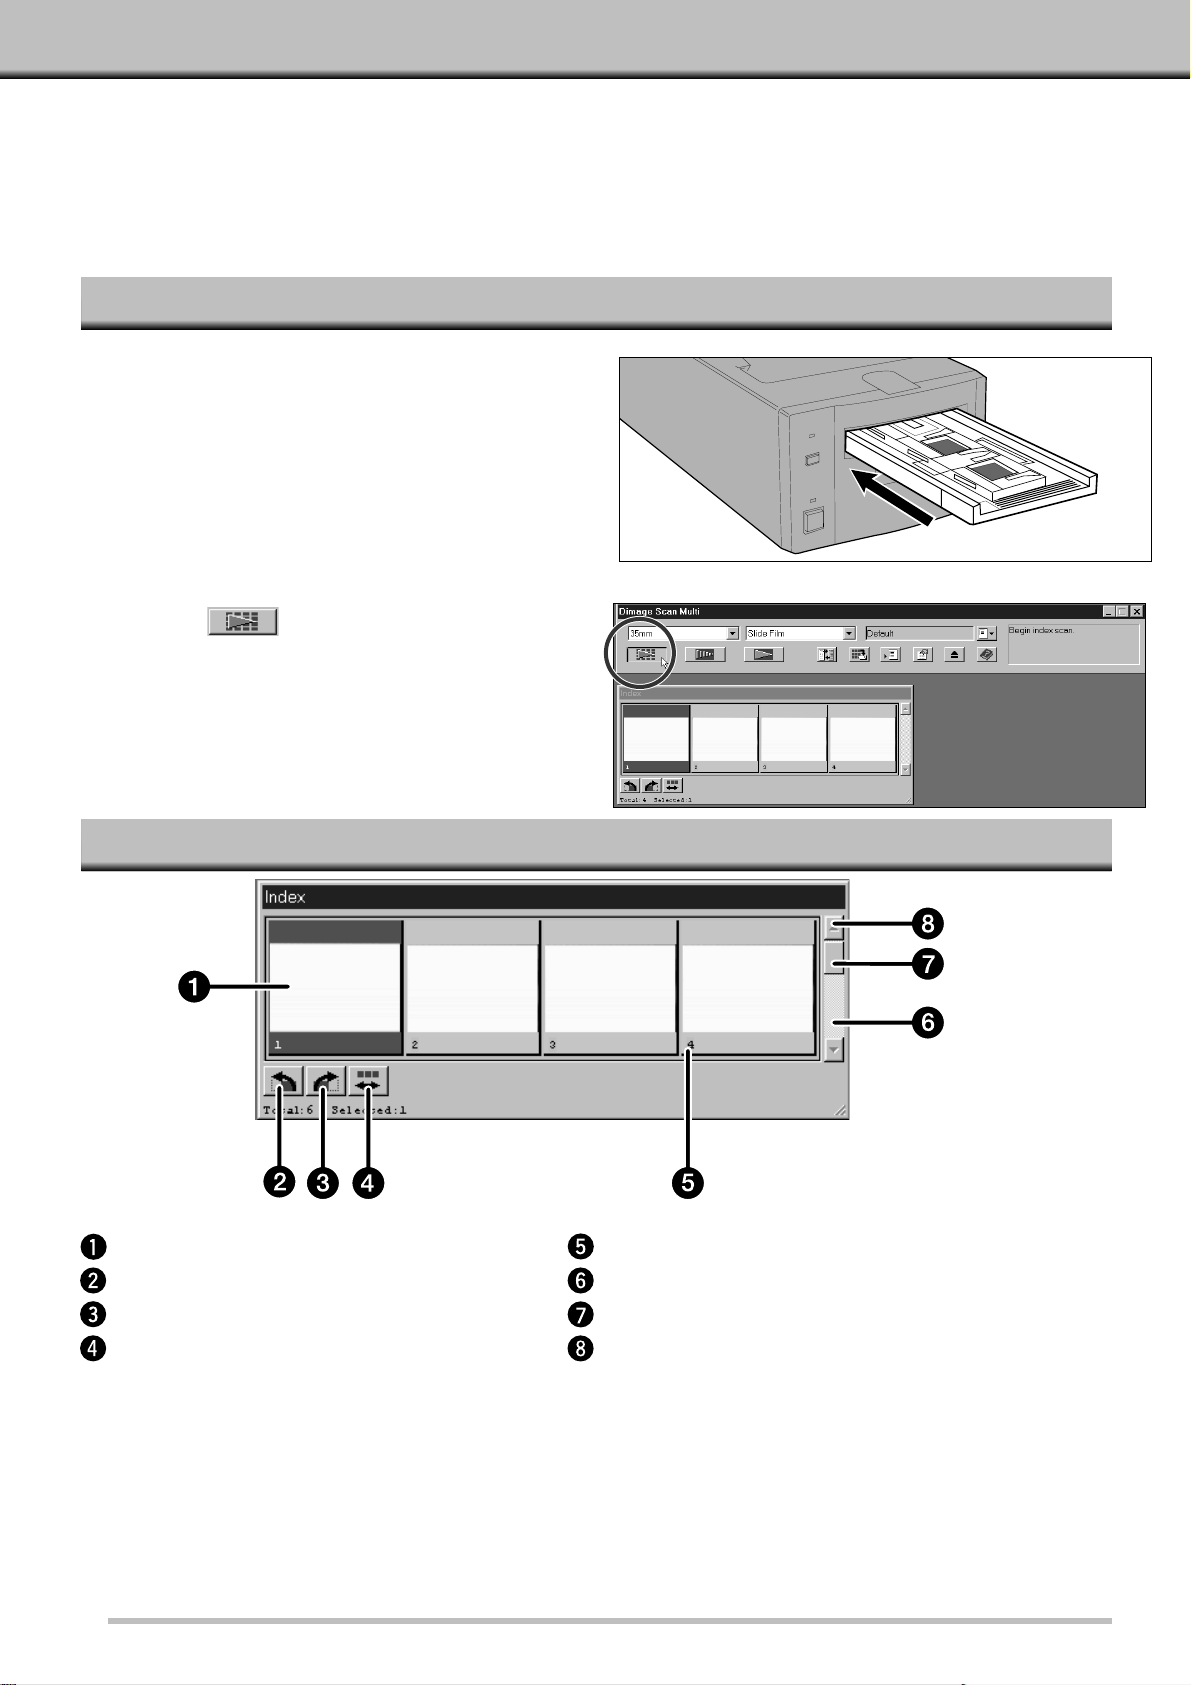
MAKING AN INDEX SCAN
INDEX WINDOW – NAMES OF PARTS
The index scan function can be used with 35mm film (in the 35mm Film Holder FH-M1 or Slide Mount Holder SHM1) and APS film in the cassette (using the optional APS Adapter AD-100). Index Scan performs a low resolution
scan of each image and displays them in the Index Window.
It is not necessary to create an index scan before prescanning and scanning.
1.Inser t the film holder into the scanner as
instructed by the hardware manual.
• Index scans can only be performed when using the
35mm film holder, slide mount holder, or optional
APS adapter.
2.Click on in the Command window.
• All frames will be scanned and appear in the Index
window.
• When using the 35mm film holder, the frames are
scanned in the following order: 1, 2, 4, 3, 5, 6.
Frame area
Rotate left button
Rotate right button
Reverse frame order button
Frame number
Scroll bar
Scroll box
Scroll arrow
Page 20
18
INDEX SCAN
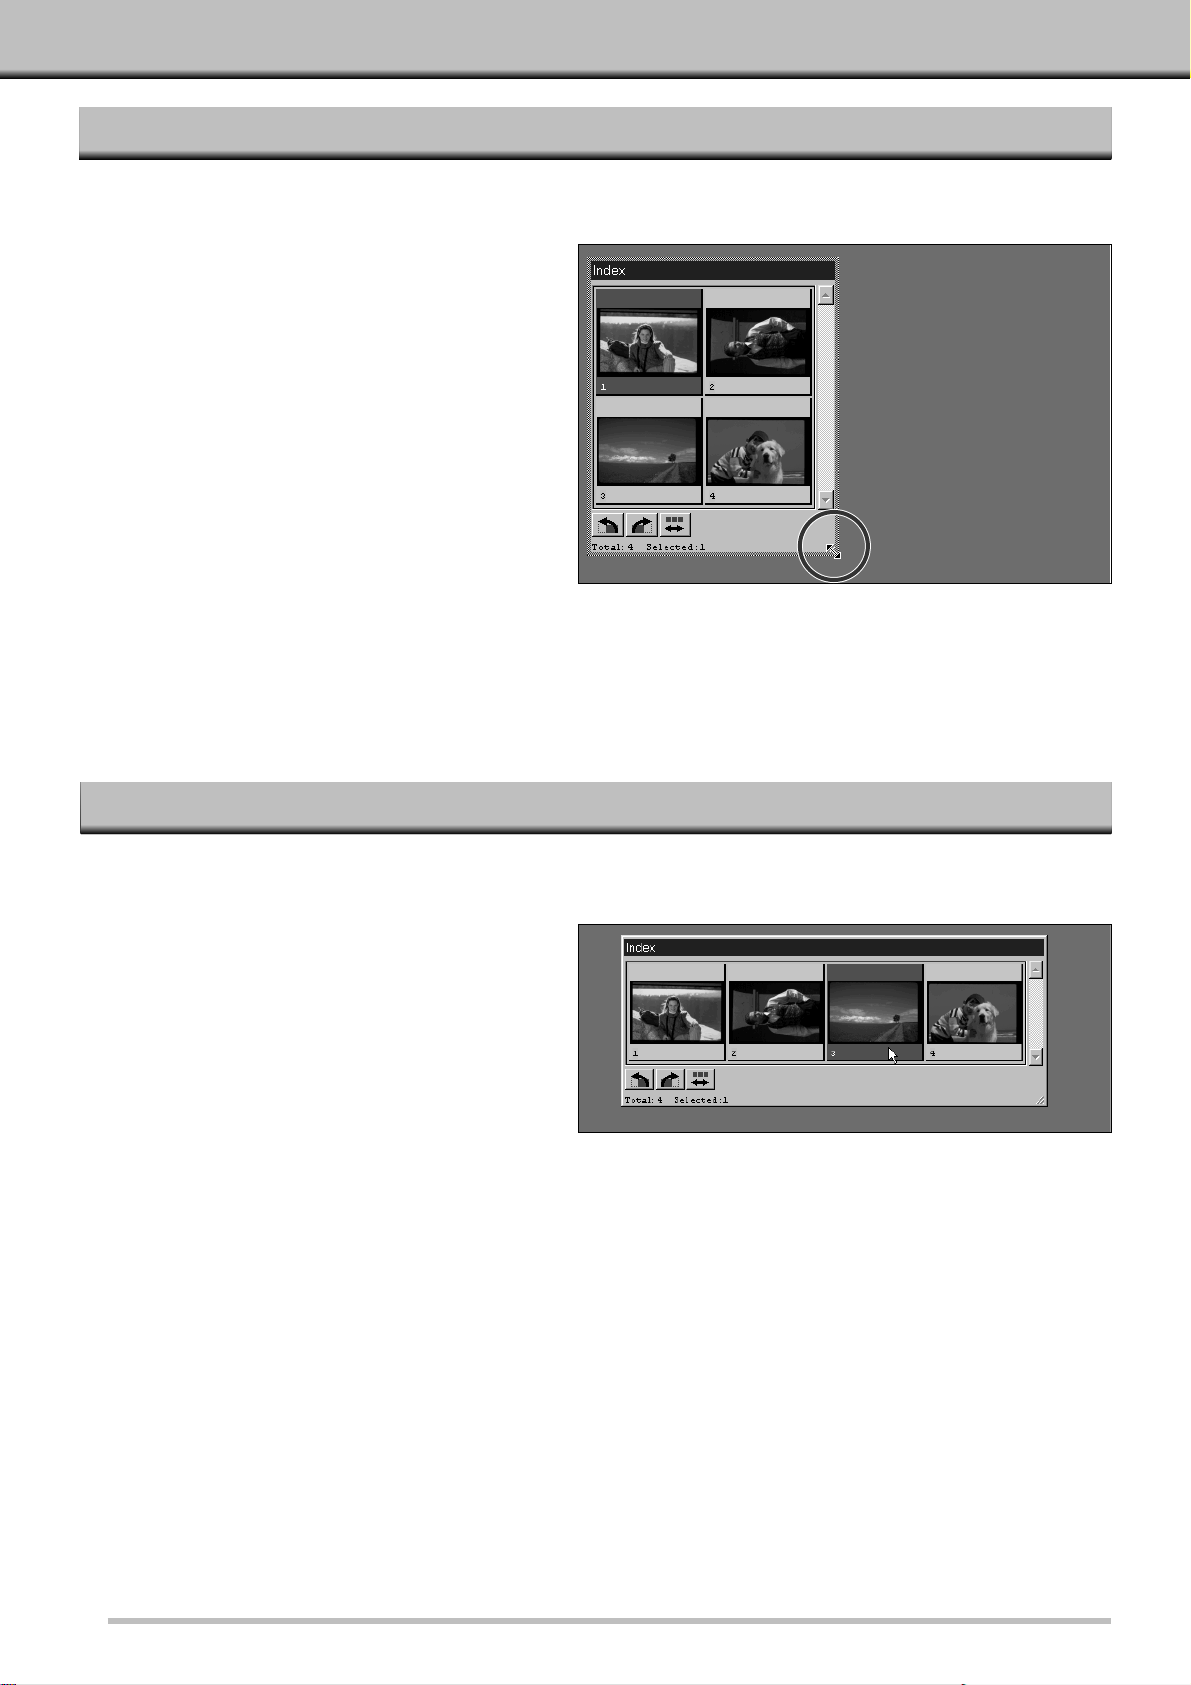
Change the size of the Index window as desired.The position of the frames will change accordingly.
CHANGING THE WINDOW SIZE
SELECTING FRAMES
Click on a frame to select it.
• A border will appear around the image.
Click on the corner tab and drag to
reach the desired size.
• The size and shape of the index frames do not
change.
Selected frames can be rotated or prescanned. A border appears around selected images.
Windows
• Select multiple frames by holding the Ctrl key
while clicking on frames.
• Select a group of frames by holding the Shift key
while clicking on the first and last frame in the
group.
• Select all the frames by pressing Ctrl and A.
• Delete all the frames by pressing Ctrl, Shift,
and R.
Macintosh
• Select multiple frames by holding the Command key
while clicking on frames.
• Select a group of frames by holding the Shift key
while clicking on the first and last frame in the group.
• Select all the frames by pressing Command and A.
• Delete all the frames by pressing Command, Shift,
and R.
Page 21

19
Rotate index frames so they appear in the index window with the proper orientation.
REVERSING THE FRAME ORDER
ROTATING THE INDEX FRAMES
Some cameras are reverse-winding, so the last frame appears at the beginning of the roll of film.The order of the
index display can be reversed to correct the chronology.
Click on in the Index window.
Select the desired frames, then click on
or .
• The selected frames will rotate in 90° increments
either clockwise or counter-clockwise.
• Rotating the index frame will not affect the
Prescan or Scan.
Page 22

20
It is possible to save the index scan as an image file that can be opened and edited in other applications.
SAVING THE INDEX SCAN IMAGE
1.Click on .
• The standard save dialog box for your operating
system will appear.
2.Enter the desired file name , choose the
file destination, then click on OK.
• Windows:The displayed index scan will be saved
in JPEG (.jpg) or in the BMP file format.
Macintosh:The displayed index scan will be saved
in JPEG or in the PICT file format.
If a frame area in the Index window is empty because
the index scan was cancelled partway through the
process or the film holder has changed, an index scan
of the empty frames will begin.
Page 23

21
PRESCAN
PRESCAN WINDOW
It is necessary to create a prescan of your image before making the final scan. Use the prescan to make focus,
brightness, color, contrast, and cropping changes to your final scan.
Zoom button
Flip V ertical button
Rotate Right button
Rotate Left button
Flip Horizontal button
Full-Screen View button
Scroll button
Point AF button
Manual Focus button
Variations button
Histogram button
Reset All button
Frame Area display (width and height)
RGB/CMY display
Tone Curves button
Image area
AE-Lock (AEL) Button
Page 24

22
PRESCAN
Prescanning creates a scan of the image that you can apply and view color, contrast, focus, orientation, and
brightness corrections before clicking on the Scan button.This will ensure the final scan will be the best it can be.
MAKING A PRESCAN 35MM FILM (APS CASSETTE)
1.Select the film type and format, then
insert the film holder.
• The Index window will appear.
Optional – To create an index scan:
2.Click on the index scan button .
• The index scans will appear in the Index window.
3.Click on the image area of the desired
frame number in the Index window to
select it.
• A border will appear around selected images
• Multiple images can be selected (p.18).
4.Click on in the Command
window.
• When the prescan is complete, the prescanned
image will appear in the Prescan window.
If multiple images are prescanned: Only one prescan can appear in the Prescan window at a time. Click on the
desired index frame to display the image in the prescan window.Adjustments made to the prescan are not lost
when displaying or scanning another prescan .
There are two options for making index scan, Speed or Quality. Select the desired option in the Preference window
(p.53).
Page 25

23
MAKING A PRESCAN MEDIUM FORMAT, TEM, 16MM
Prescanning creates a scan of the image that you can apply and view color, contrast, focus, orientation, and brightness
corrections before clicking on the Scan button.This will ensure the final scan will be the best it can be.
1.Select the film type and format, then
insert the film holder.
• The Prescan window will appear.
2.Click on the Prescan button in the
Command window.
• When the prescan is complete, the prescanned
image will appear in the Prescan window.
ROTATE
Use the rotate left and rotate right buttons to correct the orientation of your image before scanning.
Click on to rotate the image 90° clockwise.
Click on to rotate the image 90° counter-clockwise.
• Changes will be reflected in the Prescan image.
Page 26

24
CROP
The cropping area defined on the prescan by the cropping frame determines the area of the final scan.The
cropping frame dimensions are displayed in the Prescan window.
Resize the cropping frame by clicking
on the frame, then dragging the
pointer in or out.
Move the cropping frame without
changing its size by placing the
pointer inside the frame, then click
and drag it to its new location.
Define a new cropping frame by
clicking and dragging outside the
current frame.
Page 27

25
The Flip Vertical and Flip Hor izontal buttons let you flip the image from top to bottom or left to right before
scanning.
FLIP
Click on to flip the image from top to bottom.
Click on to flip the image from left to right.
• Changes will be reflected in the Prescan image.
The Full-Screen View button enlarges the area inside the cropping frame so it fills the screen. This allows you
to see close details and view the final composition.
• Full-screen view is only for viewing in the Prescan window.It does not affect the final scan.
FULL-SCREEN VIEW
1.Click on in the Prescan window.
• The cropping frame area will fill the screen.
Page 28

26
PRESCAN
The scroll button can only be selected when the view of the Prescan image has been magnified by the Zoom
button.This function allows you to view other parts of the image when it is too big to fit in the window.
MAGNIFYING OR REDUCING THE VIEW
SCROLL
Use the Zoom button to magnify or reduce the view of the image. This allows you to see close details of
specific areas.
1.Click on in the Prescan window.
• The pointer will change to a magnifying glass
with a + inside.
2.Click anywhere on the image to zoom
in.
• The clicked position will be the center of the
magnified view in the Prescan window.
• When the maximum magnification is reached,
the + will disappear.
3.Windows: Press and hold the Ctrl key.
Macintosh: Press and hold the Option
key.
• The pointer will change to a magnifying glass
with a – inside.
4.Click anywhere on the image to zoom
out.
• When the minimum magnification is reached,
the – will disappear.
1.Click on .
• The pointer will change to a hand icon.
2.Click on and drag the image to move
the image around in real time.
Page 29

27
RGB/CMY INFO
The RGB (red, green, and blue channel) information from the pointer position is always displayed in the Prescan
window.The information is descr ibed in brightness levels from 0 to 255.The display can be changed to show CMY
(cyan, magenta, and yellow) percentages.
To change the display to show CMY
information:
Windows: Press and hold the Ctrl key while the
Prescan window is active.
Macintosh: Press and hold the Option key while the
Prescan window is active.
• The RGB information will change to CMY.
When APS Cassette or APS Sleeve is the selected film for mat, the CHP button allows you to quickly and easily
define the cropping frame by the standard APS formats; C, H, and P.
APS FORMATS; C, H, AND P
Click on the CHP button to display the
APS cropping frames.
• The cropping frames are displayed in sequence
with each click of the CHP button.
Page 30

28
This allows you to use autofocus on a specific area of the image.
POINT AF
The Dimâge Scan Multi uses the CCD sensor for autofocus.
Autofocus uses the center of the image to determine focus. Normally, this results in an excellent scan because the
film plane is flat. However, if the film is warped or cur led, or if Autofocus is turned off in the preferences, focus may
not be accurate and Point AF or Manual Focus should be used.
• Automatic autofocus can be turned on and off in the Preferences (p. 53).
1.Click on in the Prescan window.
• The pointer will change to the Point AF icon.
• Click on the Point AF button again to escape the
function.
2.Click on the area of the image to be in
sharp focus.
• Autofocus will begin, then a new prescan will
start.
• The prescanned image will appear in the
Prescan window when complete.
For best results when using
Point-AF and Manual Focus,
click on an area with contrast
or detail. Manual Focus and
Point-AF will not be able to
focus on an area with flat color
(such as a a gray sky or solid
black subject).
FOCUS
Page 31

29
MANUAL FOCUS
Use manual focus to focus on a specific area of the image or to reduce the appearance of grain in grainy film (such as
high-speed or pushed film) by slightly defocusing it.
1.Press the Manual Focus button in the
Prescan window.
• The pointer will change to the Manual Focus icon.
• Click on the Manual Focus button again to escape
the function.
2.Click on the area of the image to be in
sharp focus.
• The Focus Control dialog box will appear.
4.Click on OK.
• A new prescan will begin.
• The prescanned image will appear in the Prescan
window when complete.
3.Adjust the slider until the black and gray
lines are at their longest for maximum
focus.
• Click and drag the slider to the left and right. Click
on the slider arrow to make a small change.Click
on the slider bar to make a larger change.
• To slightly defocus, adjust the sliders until the black
bar is a little shorter than the gray bar.
Page 32

30
Variations
• This is the easiest way to make corrections and is recommended for beginning
users. It uses a visual display of contrast and brightness differences and you
choose the one that looks best. Color corrections are made by clicking on slider
bars.
• An unchanged version of the prescan (control image) and a preview of the changed
image (preview image) appear in the Variations dialog box for comparison.
Reset All – Prescan Window
• The Reset All button, located in the Prescan window, will reset all the br ightness,
contrast, and color balance changes made in all three of these modes.
Tone Curves
• The Tone Curves dialog box displays correction curves for the red, green, and blue
channels of the prescanned image. By adjusting these curves, the brightness,
contrast, gamma, and color of the output image can be changed.
• Making brightness changes first may eliminate the need for color corrections.
Histogram
•The Histogram dialog box gives a graphical representation of the 256
brightness levels in the image for each of the red, green, and blue channels.
Using slider bars, the input and output levels can be adjusted to make changes
in the brightness, overall contrast, gamma (midtone contrast), and color of the
image. A control and preview image appear in the Histogram dialog box for
comparison.
You can change the brightness, contrast, and color balance of the prescan and the resulting final scan.
The Dimâge Scan Multi software gives you three options for making such corrections:
MAKING IMAGECORRECTIONS
Especially useful when scanning bracketed exposures, AE Lock lets you scan multiple images with the same initial
exposure settings.AE Lock saves the automatic exposure settings determined when an image is prescanned.
Subsequent images are prescanned using the ‘locked’ exposure settings.
• AE-Lock does not save exposure corrections made in the Variations, Histogram, or Tone Curves dialog boxes.
SETTING AE-LOCK
After prescanning the image…
1.Click on the AE-Lock button .
• AE-Lock button can not be selected until an image has been prescanned.
2.Select another image , then click on the prescan button .
• The scanner skips the setting exposure step in the prescan sequence.
• Images will be scanned using the AE-Lock settings until AE-Lock is cancelled or the scanner is reinitialized.
CANCELLING AE-LOCK
1.Click on the AE-Lock button .
2.Click on the prescan button to prescan the image again.
AUTO-EXPOSURE LOCK (AE-LOCK)
Page 33

31
VARIATIONS
OPENING THE VARIATIONS DIALOG BO X
VARIATIONS DIALOG BOX – NAMES OF PARTS
Open the Variations dialog box by clicking
on in the Prescan window.
• The Variations dialog box will appear.
• Only the area inside the cropping frame appears in the variations dialog box.
Grayscale
Represents changes in brightness, contrast,
and color.
R, G, and B sliders
Use to make color changes.
Control image
Shows the unchanged prescan.
Full Screen Display button
Displays the Control and Preview images so
they fill the monitor screen.The Control will be
at the top or the left, while the Preview will be
at the bottom or right.
Help button
Click on the help button to launch the help file.
Contrast slider
Brightness slider
Preview image
Shows the prescan with the changes.
Reset button
Cancels the changes without closing the Variations
dialog box.
Cancel button
Closes the Variations dialog box without making
changes.
OK button
Applies the changes and closes the Variations dialog
box.
Page 34

32
VARIATIONS
BRIGHTNESS AND CONTRAST CHANGES
Brightness changes are represented horizontally; by the bar at the bottom and the thumbnails in a row (from left to
right). Contrast changes are represented vertically; by the bar on the side and the thumbnails in a column (from top
to bottom).
Click on a thumbnail that represents a
correction.
The preview image will receive the
change and the brightness/contrast
on the grid will shift accordingly.
• Example:The thumbnail in the first column/first
row represents a decrease in brightness and an
increase in contrast.
You can also use the arrows on the
slider bars to make corrections.
• If the upper or lower limits of brightness or
contrast are reached, the preview image will not
be in the center.
Page 35

33
ADJUSTING THE COLOR BALANCE
Adjust the color balance as necessary
by clicking on the R, G, and B sliders.
• R can subtract red (left arrow) or subtract cyan
(right arrow).
• G can subtract green (left arrow) or subtract
magenta (right arrow).
• B can subtract blue (left arrow) or subtract yellow
(right arrow).
CANCELLING OR APPLYING THE CHANGES
Click on in the Variations dialog box to apply the changes and close the dialog box.
Click on to close the Variations dialog box without making any changes.
Click on to cancel the changes without closing the dialog box.
FULL-SCREEN VIEW BUTT ON
Click on to view the control and preview images full screen.
• The control image will be to the left or on top.
• Click the mouse anywhere on the screen to return the the normal Variations dialog box.
Page 36

34
HISTOGRAM
The Histogram dialog box displays the frequency of occurrence of the 256 levels of brightness (0 – 255) for each of
the color channels that make up the image area inside the cropping frame.Level 0 is the minimum brightness
(black).Level 255 is the maximum brightness (white).The midtone values fall in between.
Click on in the Prescan window to
display the Histogram dialog box.
OPENING THE HISTOGRAM DIALOG BOX
HISTOGRAM DIALOG BOX – NAMES OF PARTS
• The level from the location of the pointer on the histogram is displayed to the left of each histogram.
• Changes made to the image in the Histogram dialog box will be displayed in the Preview image.
Control image
White point button
Black point button
Gray point button
View Output Histogram button
RGB Synchro button
Load Histogram button
Full Screen Display button
Help button
Save Histogram button
Shadow slider
Midtone slider
Highlight slider
Output level sliders
Input level sliders
Preview image
Page 37

35
6.Click on the tone in either the Control or Prescan image that should be scanned as a
neutral tone.
• The tone of the clicked area will become neutral and the color balance of the image will shift accordingly.The
adjustment will be reflected in the Preview image.
SETTING THE WHITE, BLACK, AND GRAY POINTS
Properly setting an image’s white and black points will usually correct the color cast and midtone distribution.
Properly setting the gray point will correct the color balance.
1.Click on .
• The cursor will change to the white eye-dropper.
2.Click on the tone in either the Control or
Prescan image that should be scanned
as the brightest neutral white in your
image.
• The RGB brightness value of the selected tone will
be changed to 255.The change will be reflected in
the Preview image.
3.Click on .
• The cursor will change to the black eye-dropper.
4.Click on the tone in either the Control or
Prescan image that should be scanned
as the darkest neutral black in your
image.
• The RGB brightness value of the selected tone will
be changed to 0.The change will be reflected in
the Preview image.
5.Click on .
• The cursor will change to the gray eye-dropper.
Page 38

36
HISTOGRAM
BRIGHTNESS AND CONTRAST CHANGES – RGB SYNCHRO
Under each histogram are two slider bars.The upper bar has three sliders that allow you to change the input
values for the highlights, shadows, and midtones; the lower bar has two sliders that allow you to change the output
values for the highlights and shadows.
By using RGB Synchro, the sliders for the highlights, midtones, or shadows for each of the channels move in
unison.This means you can make overall brightness and contrast changes without changing the color.
1.Click on the RGB Synchro button .
2.Click on and move the input level highlight
and shadow sliders to the edges of the flat
line area.
• Changes are automatically applied to the Preview
image.
• Values to the right of the highlight slider will be scanned
as pure white (level 255).Values to the left of the
shadow slider will be scanned as pure black (level 0).
• Click on to view the control and preview images full
screen.The control image will be to the left or on top.
Then, click anywhere on the screen to return to the
normal Histogram dialog box.
3.Adjust the midtone contrast by moving the
midtone slider. Contrast can be decreased
by using the output level sliders.
If the histogram contains large flat line areas…
4.Click on and hold to view the output
level histograms.
INPUT SLIDERS
OUTPUT HISTOGRAM
Page 39

37
COLOR BALANCE ADJUSTMENT – INDIVIDUAL CHANNELS
Changing the slider positions for individual channels affects the color balance of the image.
3.Click on and hold to view the output
level histograms.
APPLYING OR CANCELLING CORRECTIONS
Click on to apply the changes.
Click on to close the dialog box without making changes.
Click on to cancel the changes without closing the dialog box.
1.Make sure RGB Synchro is off.
2.Click on and move the R, G, and B
sliders to the desired locations.
• Changes are automatically applied to the Preview
image.
• Click on to view a full-screen display of the
Control and Preview images.
Page 40

38
The Dimâge Scan Dual software lets you save the histogram settings as a file that can be loaded and applied to
other images.This is convenient when you will be scanning more images that require the same corrections.
SAVING AND LOADING HISTOGRAM SETTINGS
1.Click on .
• The standard save dialog box for your operating system will appear.
2.Select the destination and name the file .
• The file will be saved as a data (.dat) file.
3.Click on Save.
SAVE HISTOGRAM
1. Click on .
• The standard open dialog box for your operating system will appear.
2. Select the desired histogram file.
• The settings in the selected file are applied to the current image.
3. Click on Open.
LOAD HISTOGRAM
• Histogram settings for color and B&W films are not interchangeable.
Page 41

39
TONE CURVES
The Tone Curves dialog box displays curves for the prescanned image inside the cropping frame.The curve
represents the input brightness values (x-axis) in relation to the output values (y-axis).This dialog box allows you to
make changes to the tone curves. It is possible to make changes to the individual curves for each channel;red (R),
green (G), and blue (B), or to make changes to the overall cur ve (RGB curve).
Click on in the Prescan window to
open the Tone Curves dialog box.
OPENING THE TONE CURVES DIALOG BOX
TONE CURVES DIALOG BOX – NAMES OF PARTS
• The right side of the curve affects highlights, the left side of the curve affects shadows, and the midtones fall in
between. Brightness values are 0 (black) at the bottom of the grid, 255 (white) at the top of the grid, and the
middle values fall in between.
Control image
Color channel drop-down list (R, G, B, RGB)
White point button
Black point button
Freehand curve button
Smooth curve button
Load Tone Cur ve button
Save Tone Curve button
Full Screen Display button
Help button
Output brightness value
Input brightness value
Reset button
Cancel button
OK button
Preview image
Page 42

40
TONE CURVES
SETTING THE WHITE AND BLACK POINTS
Properly setting an image’s white and black points will usually correct the color cast and midtone distribution.
1.Click on .
• The cursor will change to the white eye-
dropper.
2.Click on the tone in the control image
that should be scanned as the
brightest neutral white in your image.
• The RGB brightness value of the selected tone
will be changed to 255.The change will be
reflected in the Preview image.
3.Click on .
• The cursor will change to the black eye-
dropper.
4.Click on the tone in the control image
that should be scanned as the
darkest neutral black in your image.
• The RGB brightness value of the selected tone
will be changed to 0.The change will be
reflected in the Preview image.
Page 43

41
CHANGING THE TONE CURVES – CONTRAST,
BRIGHTNESS, AND COLOR BALANCE
Changing the shape of a curve changes the output brightness level for each corresponding brightness level. Changing
the shape of the individual R (red), G (green), and B (blue) curves affects the color balance of the image. Changes to
the RGB (overall) curve affect the image contrast and brightness.
2.Click on and drag the portion of the
curve you want to change.
• Changes are automatically applied to the preview
image.
• Click on to view the control and preview images
full screen.The Control image will be to the left or
on top.
APPLYING OR CANCELLING CORRECTIONS
Click on to apply the changes.
Click on to close the dialog box without making changes.
Click on to cancel the changes only to the currently selected channel with out
closing the Tone Cur ves dialog box.
1.Select the color channel you want to
adjust from the channel drop-down list.
• RGB will change brightness and contrast with little
change to color balance.
R will affect red and cyan.
G will affect green and magenta.
B will affect blue and yellow.
• Click on to draw a curve with the mouse.
• Click on to smooth out the final curve.
• This function draws a smooth curve based on the
intersection of the corrected curve through seven input
brightness values; 31, 63, 95, 127, 159, 191, 223, and
255.
Click on the curve to fix an
anchor point. Anchor points
let you modify part of the
curve with little or no effect to
the remaining values.
Page 44

42
TONE CURVES
The Dimâge Scan Multi software lets you save the tone curve settings as a file that can be loaded and applied to
other images.This is convenient when you will be scanning more images that require the same corrections.
SAVING AND LOADING TONE CURVE SETTINGS
1.Click on in the Tone Cur ve dialog box.
• The standard save dialog box for your operating system will appear.
2.Select the destination and name the file .
• The file will be saved as a data (.dat) file.
3.Click on Save.
SAVE TONE CURVE
1.Click on in the Tone Cur ve dialog box.
• The standard open dialog box for your operating system will appear.
2.Select the desired tone cur ve file.
• The settings in the selected file are applied to the current image.
3.Click on Open.
LOAD T ONE CURVE
Page 45

43
MAKING THE FINAL SCAN
Page 46

44
JOBS
1.Click on the Load Job button in the
Command window.
• The Job Selection dialog box will appear.
LOADING A JOB
Before making the final scan, the scanner needs to know how big the final image will be and the quality of output
that will be used (printer, monitor, etc.) so it knows what resolution to scan the film. Using the Load Job function is
a quick and easy way to enter the scan settings.
Load an existing job and apply it to the current Prescan image.
2.Select the appropriate category from
the drop-down list.
3.Click on the job name to select it,
then click on OK.
• The settings are applied to the active Prescan
window.
• The job names can be listed chronologically or
alphabetically. Select the format by clicking on
the Name or Date option button.
• The cropping frame will change accordingly,
but can be proportionally resized.
Custom
• This category allows the user to create customized
settings using the Scan Settings dialog box.
Color Laser Printer
• (Digital color copiers and color laser printers) Uses
output resolution of 400dpi or 600dpi.There are two
paper-size options; letter and A4.
Photosensitive
• (Printers that use photosensitive/photographic
material) Can use output resolutions of 400 dpi, 360
dpi, 267 dpi, and 180 dpi.There are ten paper size
options.
Dye-Sub Printer
• (Dye-sublimation printers) Uses an output resolution
of 300dpi.There are 4 available paper sizes.
Ink Jet Printer
• Uses an output resolution of 200 dpi.There are 4
available paper sizes.
Web Page
• (For use on home pages) Image size is listed in
pixels and will vary. There are also standard
PhotoCD sizes available.
Screen
• (For display on monitors) Image size is listed in
pixels and will be the VGA standard of 640 x 480
pixels or larger.
Document
• (For insertion into documents) Uses an output
resolution of 72 dpi. Image size can be determined
based on two paper sizes.
Film Recorder
• For high input resolution images that will be output
to a film recorder.
Default
• This category uses the default settings for each film
format.The scan settings appear in the Job
Selection window.
There are nine Job Categories available for various film formats.
Page 47

45
In addition to the Job settings included with the software, it is possible to create and save your own Job settings.
CREATING A JOB
DELETING A JOB
1.Set the desired settings in the Scan
Settings dialog box (p. 49).
2.Click on the Save Job button in the
command window.
• The Save Job dialog box will appear.
3.Name the job by entering a title and
select the desired category, then click on
OK.
It is possible to delete the Job you
created when it is no longer needed.
Click on the name of the job in the Job
Selection window, then press the delete
key on your keyboard.
Page 48

46
FINAL SCAN
Once all the desired adjustments are made to the Prescan and the Scan Settings have been entered, you are
ready to make the final scan of the displayed Prescan image.
With the Prescan image displayed in
the Prescan window…
1.Click on the Scan button in the
Command window.
• The final scan will begin.
• When scanning is complete, the final scan will
appear in the host application’s window.
TWAIN DRIVER/PLUG-IN SOFTWARE
2.Save the image using the instructions for
your host application.
Page 49

47
UTILITY SOFTWARE – FILE FORMATS
With the Dimâge Scan Multi utility software, you can save the final scan in one of the following file for mats.
JPEG
• The JPEG (Joint Photographic Experts Group) compression standard is capable of producing a high
compression ratio while maintaining image quality. JPEG is a widely supported image file format.
TIFF
• Tagged Image File Format (TIFF) files contain bit-mapped data. In addition to being a widely suppor ted format,
TIFF is able to handle the color palette needed for professional-quality images and graphics.
WINDOWS® BMP (Windows only)
• The BMP graphic file format is for bit-mapped images. BMP images are suppor ted by the Paint accessory and
can easily be opened on most PCs running Windows.
PICT (Macintosh operating system only)
• The PICT graphic file format uses a lossless compression scheme and is compatible with many Macintosh
applications.
With the Prescan image displayed in the
Prescan window…
1.Click on the Scan button in the
Command window.
• The standard save dialog box for your operating
system will appear.
UTILITY SOFTWARE
2.Enter the desired file name and
select the file destination.
3.Select the file type from the dropdown list.
4.Click on Save.
• The final scan will begin.
• When scanning is complete, the scan will be
saved in the selected location.The software
will return to the Prescan window.
Multiple scans will be saved
using the selected file name and
numbered chronologically.
Example: File_Name01,
File_Name02, File_Name03…
Page 50

48
ADDITIONAL FEATURES
Page 51

49
SCAN SETTINGS
The scan settings determine your final image’s resolution, dimensions, and file size, as well as helping determine the
image quality.You can select a Job (p.44) to have the scan settings selected for you or you can directly enter them into
the Scan Settings dialog box.
Click on in the command window to
display the Scan Settings dialog box.
• Use the same button to hide the Scan Settings
dialog box to optimize window space.
OPENING THE SCAN SETTINGS DIALOG BOX
SCAN SETTINGS DIALOG BOX – NAMES OF PARTS
Input Resolution list box
Output Resolution list box
Input Size text boxes
Input Size lock
Magnification text box
Output Size text boxes
Output Size lock
Units list box
Image size display
Reset button
Page 52

50
This Quick Guide only describes one method of determining the settings. Please read the entire Scan Settings
section in the manual for details.
QUICK GUIDE TO SCAN SETTINGS
1.Select Default as the Job categor y
(p. 44).
2.Enter the desired OUTPUT RESOLUTION.
• Example:You want to print the image at 300dpi on
your printer.
• When the selected unit is pixels (from the Unit drop-
down list) the output resolution cannot be selected.
3.Select the UNIT of measurement.
• Example:You want the size to be listed in inches..
4.Enter the desired OUTPUT SIZE.
• Example:You want the image to be printed as 4.5
x 3 inches (width x height).
• The cropping frame on the prescan will change to
meet this ratio.
5.Lock the OUTPUT SIZE by clicking on
the lock button next to it.
6.Adjust the cropping frame if needed.
The INPUT SIZE will automatically
change.
• With the Output size locked, the frame ratio will
not change, but the size can change.
• If you do not like the ratio and the output size
doesn’t have to be exact – unlock the output size,
then make minor adjustments to the cropping
frame.
7.The Scan Settings are ready for you to
do the final scan of the image.
• Using this Quick Guide, the INPUT RESOLUTION
is determined by the other settings.
Page 53

51
SCAN SETTINGS
INPUT RESOLUTION
Input resolution is the number of pixels per inch (ppi or dpi) on the film that will be scanned.
Select a value from the Input Resolution drop-down list or input the desired value
directly.
• The available resolution values are dependent on the Film Format selected.
SCAN SETTING OPTIONS
Film Formats Resolution Options (dpi)
35mm, APS Cassette, APS Sleeve,
Transparent Media, 16mm
2820, 1410, 940, 705, 470, 352, 282*
1128, 564, 376, 282, 188, 141, 112** 1128, 564, 376, 282, 188, 141, 112**
OUTPUT RESOLUTIOM
The output resolution is the number of pixels per inch (ppi or dpi) that for final image will be printed or displayed.
Select a value from the Output resolution drop-down list or input the desired value
directly.
• A variety of output resolution options are listed. However, whole numbers can be typed in directly.
• When the selected unit is pixels (from the Unit drop-down list), the output resolution cannot be selected.
UNITS
The Unit drop-down list displays the unit options for the input and output sizes.
Select the desired unit of measurement from the Unit drop-down list.
• The available units are pixel, mm, cm, inch, pica, and point.
INPUT SIZE
The Input Size boxes list the dimensions of the part of the film you will be scanning. These values are the width (W)
and height (H) of the cropping frame and are always displayed in the lower-left corner of the Prescan window.
Usually the input size is automatically determined by the chosen cropping frame.However, if you need a specific
dimension:
1.Select the unit, then input the width and height directly into the list box.
2.Click on the lock button to lock the input size.
• The cropping frame will change accordingly.
• When the selected unit is pixels (from the Unit drop-down list), the input size cannot be selected.
* Any whole number between 176 and 2820 can be input directly.
** Any whole number between 70 and 1128 can be input directly.
Continued on next page.
Page 54

52
OUTPUT SIZE
The Output Size boxes list the dimensions of the final scan (the size your image will be if printed at 100%). Usually,
the output size is set by default according to the input resolution, output resolution, and cropping frame area.To
specify an output size:
1.Select the unit and the output resolution.
• The output resolution cannot be selected when pixel is the selected unit.
2.Enter the width and height directly into the list box.
3.Lock the output size by clicking on the lock button.
• The input size and resolution will change accordingly.
• The cropping frame can be proportionally resized.
MAGNIFICATION
Magnification is equal to the input resolution divided by the output resolution (or the output size divided by the input
size).
Magnification is determined by the input and output settings.
The magnification can be set directly, the input and output values will change accordingly.
• When the selected unit is pixels (Unit drop-down list), the magnification cannot be selected.
• If the input size and output size are not locked, the output size and input resolution will change according to the
set magnification.
• If the output size is locked, the input size and input resolution will change according to the set magnification.
• If the input size is locked, output size and input resolution will change according to the set magnification.
IMAGE SIZE
The image size is listed in megabytes (MB), kilobytes (KB) or bytes (B). Actual file size may differ among file types.
RESET BUTTON
Cancels the changes made to the scan settings of the selected Job.
Page 55

53
PREFERENCES
The Preferences dialog box gives options for customizing the software to your needs.
1.Click on the Preferences button in
the Command window to open the
Preferences dialog box.
2.Select the desired Preference Options.
SETTING THE PREFERENCES
3.Click on to set the Preferences.
Continued on next page.
Page 56

54
INDEX SCROLL DIRECTION
When there are more frames in the index window than can be displayed at once, the scroll bar will appear. Choose
either a vertical or horizontal scroll direction for the Index window.
INDEX SCAN PRIORITY
Choose either a fast index scan or a quality index scan.
The purpose of the fast index scan (Speed) is to give a quick thumbnail representation of each frame. Autofocus is
not utilized.
The quality index scan (Quality) uses autofocus and autoexposure (unless they are turned off in the Preferences),
creating both a Prescan image and a thumbnail. So when you double-click on the index image, the ready-made
prescan pops-up.
AUTOFOCUS OPTIONS
For each prescan, the CCD makes three passes;one for autofocus, one for exposure adjustment, and one for the
prescan. It is possible to have the scanner skip the autofocus step during the prescan.
You can turn AF off for the Slide Feeder and/or all other film formats.
AUTOEXPOSURE FOR SLIDES
It is possible to have the scanner skip the autoexposure step dur ing the prescan when using color slides. Most slide
users prefer to fine tune all the image details on the slides themselves so they turn AE off. However, the AE is
convenient when scanning improperly exposed slides.
CLOSE DRIVER AFTER SCANNING
The driver software can be automatically closed after making a scan.This is convenient when you prefer to retouch
each image in an image application program after scanning.
• Do not select this option when scanning multiple images at once.
• Some applications are not able to make multiple scans regardless if this option is not selected.
PRESCAN SIZE OPTIONS
There are three options for setting the prescan size:Small, Large, and Auto.
The automatic setting determines the appropriate prescan size based on monitor size and film format.
PREFERENCE OPTIONS
Prescan Size in PixelsFilm Formats
6x4.5
448 x 672 (L) 336 x 504 16mm, 35mm, Transparent Media
416 x 310 (L) 312 x 232
6x7
APS Cassette, APS Sleeve
416 x 416 (L) 312 x 312
416 x 619 (L) 312 x 464
6x6
6x9, TEM Film
416 x 480 (L) 312 x 360 (S)
320 x 555 (L) 240 x 416 (S)
Page 57

55
MAXIMUM NUMBER OF FRAMES
This function is designed for use with the Slide Feeder or the APS adapter.
It enables you to limit the number of continuous scans in a row.The range is from 1 to 100.
Type the desired number into the text box or use the arrows to scroll through the values.
COLOR DEPTH LIST BOX
Version 1.1 allows you to select the pixel depth of each color channel used to scan your image (RGB or CMY).
Three options are available.The default setting is 8bit.
• 8bit: over 16.7 million colors
• 6bit: over 2.8 billion colors
• 16bit linear: same as 16bit, but image correction is not applied when the image is scanned.
* If you are using the Dimâge Scan Multi utility software, 16bit and/or 16bit linear color depth are valid only when
the TIFF format is chosen as a file format after final scanning.
* Some image-process applications do not support 16bit images.
APS SETTINGS – REWIND FILM AT EJECT
This option is for use with APS Cassettes.Select this if you would like the film to be automatically rewound into the
cassette before the film is ejected after the eject button in the Command window is pressed.
The film will always rewind into the cassette if the Eject button on the front of the scanner is used.
APS SETTINGS – ROTATE ALL INDEX FRAMES 180 DEGREES
When this option is selected, all the frames in the index window will automatically appear rotated by 180 degrees.
HELP BUTTON
Click on the help button to launch the help file.
CANCEL BUTTON
Closes the Preferences dialog box without making the changes.
Page 58

56
APPENDIX
Page 59

57
ACCESSORY INFORMATION
The Slide Feeder holds up to 50 mounted slides and is compatible with the Utility Software and the TWAIN
driver/Plug-in software.Please follow the instructions in the Slide Feeder manual for loading the slides and
attaching the Slide Feeder to the Dimâge Scan Multi.
1.Load the slides and attach the Slide
Feeder to the Dimâge Scan Multi as
instructed in the Slide Feeder manual.
2.Launch the software, select “Slide Feeder”
from the Film Formart drop-down list, then
select the type of film from the Film Type
drop-dpwn list.
3.Click on the prescan button in the
Command window.
• A slide at the bottom of the “IN”column is carried
into the scanner and is prescanned.When the
prescan is complete, the prescanned image will
appear in the Prescan window.
• You can change or adjust the brightness, contrast,
color balance, focus, orientation, etc.against a
prescanned image (Software Instruction Manual
pages 21 - 42).
Windows TWAIN Driver:
The available file type for use with
the slide feeder is BMP.
Macintosh Plug-in:
The available file type for use with
the slide feeder is PICT.
Utility Software:
All normal file formats can be
selected.
SLIDE FEEDER SC-100
4.After the desired adjustments are made to a
prescanned image, click on the Scan
button in the Command window.
• The standard save dialog box for your operating system will
appear.
5.Select the destination and file type, enter a
file name, then click on Save.
• Scanning will begin.
• Same adjustments that you have done to a prescanned
image will be applied to the all remaining slides in the “IN”
column of Slide Feeder.
• The scans will be saved using the selected file name and
numbered chronologically. Exsample: File_Name01,
File_Name02, File_Name03,…
Page 60

58
TROUBLESHOOTING
Symptom Cause/Action
The scanned image colour is strange. Check that there is no dust on the film or film
holder.
Check that the colour palette (START –
SETTINGS – CONTROL PANEL – DISPLAY
– SETTINGS) is on High Colour (16 bit) or
higher.Different or additional steps may be
necessary depending on your graphics board.
Refer to your graphics board‘s documentation.
If using the Medium-format holder, be sure to
use the proper fitting mask. If the holder is
dirty, clean it as directed.
Reinitialisise the scanner.
Windows: press the Ctrl, Shift, and i keys
simultaneously.
Macintosh: press the Command, Shift, and
i keys simultaneously.
Reinitializing while using the APS adapter:
1. Press the initialisation key combination.
2. The adapter will eject automatically.
3. Initialisation (set-up) will stop.
4. Remove the adapter.
5. Close the accessory panel.
• Initialisation (set-up) will resume.
Page 61

59
RESOLUTION INFORMATION
Image size (width x height) and resolution determine file size.The greater the dpi and
image size, the larger the file size will be.
As all the image adjustments are made before scanning and the Dimâge Scan Multi
will not allow you to enter an Input resolution lower than the relative output resolution,
there is no need for users of the Utility software to be concerned about resampling up
or interpolation (two computer functions that can result in loss of image quality) when
scanning.
Users of image editing software (such as Adobe Photoshop) however, can adjust
image size and resolution in the application after scanning. If done incorrectly, resizing
can result in loss of image quality. Please refer to your image editing software user’s
guide for additional information regarding resolution, file size, and resizing.
RESOLUTION, RESIZING, AND RESAMPLING
Page 62

60
GLOSSARY
BRIGHTNESS:
The lightness or darkness of the image.
CHANNEL
The component of an image.Your scanned image has three channels; red, green, and blue (RGB).
CONTRAST
The gradation of shades in an image.A high contrast image has very dar k areas and bright areas without many
middle shades. A low contrast image has many tones that are close to the same brightness. Low contrast images
are often described as looking ‘flat’.
CROP
To trim and delete the unwanted edges of the image.
DPI
Dots (pixels) per inch.
EMULSION SIDE
The side of the film coated with the photographic material.
GAMMA
The contrast of only the middle tones.
HIGHLIGHTS
The lighter areas of the image.
HISTOGRAM
A graph showing the amount of each level of the 256 br ightness levels.
INTERPOLATION
A form of adding new pixels in an image when resampling up.
MIDTONE
The middle shades of an image, in between light and dark.
NEUTRAL
Having no colour cast, such as black, white, or gray.
PIXEL
Abbreviation for picture element.The dots that make up an electronic image.
RESAMPLE
To change the number of pixels in the image. If pixels are discarded when shrinking an image, it is called
resampling down. If new pixels are created in an image, it is called resampling up (p. 59).
RESOLUTION
The number of pixels in a given area of the image;such as pixels per inch or pixels per centimeter.High resolution
is the term for an image with a lot of pixels in a given area.Low resolution means there are not many pixels in a
given area.
RGB
Red, Green, and Blue.These are the colours of the three channels that make up the scanned image. Monitors use
red, green, and blue phosphors to create the image you see on the screen.
SHADOWS
The dark areas of an image.
Page 63

USER TECHNICAL SUPPORT
Please contact your dealer regarding installation, SCSI interface recommendations, or application compatibility.If
your dealer is unable to help you, contact us toll free.
Technical Support
Minolta (UK) LTD.Photographic Division
Precedent Drive,
Rooksley, Milton Keynes, MK13 8HF, England
Tel:01 908 208 349 Fax:01 908 208 334
http://www.minoltaeurope.com
Please have the following information ready when calling Minolta Technical Support:
Make and model of your computer:
Available application RAM:
Operating system and version:
Other connected SCSI devices and their SCSI IDnumbers:
DS Multi software version number:
Symptoms:
Messages that appear on the screen when the problem occurs:
Frequency of occurrence:
To determine the version number of your driver software:
Place the pointer over the Status Bar in the Command window.The version number will be displayed in the status
window.
61
Page 64

A Minolta Austria Ges.m.b.H
Amalienstr.59-61,A-1131 Wien,Österreich
Tel:01 87868 176 Fax:01 87868 153 http://www.minoltaeurope.com
B Minolta Belgium Branch
Kontichsesteenweg 38,B-2630 Aartselaar,Belgique
Tel:03 877 04 30 Fax:03 877 00 49 http://www.minolta.be
CAN Minolta Canada Inc.,Head office
369 Britannia Road East,
Missussauga,Ontario L4Z 2H5,Canada
Tel.0905 890 66 00 Fax:0905 890 71 99 http://www.minolta.com
CH Minolta (Schweiz) AG
Riedstr.6,CH-8953 Dietikon,Schweiz
Tel:157 57 11 (sFr 2.15/min) Fax:01 741 33 12 http://www.minolta.ch
D Minolta GmbH
Kurt-Fischer-Str.50,D-22923 Ahrensburg,Deutschland
Tel:0221 93 76 71 50 Fax:0221 93 76 71 77 http://www.minolta.de
Mo – Fr,10.00 – 19.00
DK Paul Westheimer A/S
Erhvervsvej 30,DK-2610 Rødovre,Danmark
Tel:44 85 34 00 Fax:44 85 34 01 http://www.minoltaeurope.com
E Videosonic S.A.
c/ Valportillo II,8,Pol.Ind.de Alcobendas,
E-28108 Alcobendas/Madrid,Spain
Tel:91 4840077 Fax:91 4840079 http://www.minoltaeurope.com
F Minolta France S.A.
365,Route de Saint-Germain,
F-78420 Carrières-Sur-Seine,France
Tel:0130 86 62 02 Fax:0130 86 62 82 http://www.minolta.fr
FIN Minolta Finland Branch
Niittykatu 6,PL 37 SF-02201 Espoo,Finland
Tel:09 423 499 Fax:09 423 116 http://www.minolta.fi
GB Minolta (UK) LTD.Photographic Division
Precedent Drive,
Rooksley,Milton Keynes,MK13 8HF,England
Tel:01 908 208 349 Fax:01 908 208 334 http://www.minoltaeurope.com
IRL Photopak Sales
241 Western Industrial Estate,Naas Road,Dublin 12,Ireland
Tel:01 45 66 400 Fax:01 45 00 452 http://www.minoltaeurope.com
I Rossi & C.S.p.A.
Via Ticino,40 ,I-50019 Osmannoro Sesto Fiorentino (Fi),Italy
Tel:055 323141 Fax:055 32314252 http://www.minoltafoto.it
N Scandiafilm AS
Enebakkveien 304,N-1188 Oslo 11,Norge
Tel:022 28 00 00 Fax:022 28 17 42 http://www.minoltaeurope.com
NL Minolta Camera Benelux B.V.
Zonnebaan 39,P.O.Box 6000,
NL-3600 HA,Maarssen,Nederland
Tel:030 241 14 11 Fax:030 241 41 65 http://www.minolta.nl
P Minolta Portugal Lda
Av.do Brasil 33-a,P-1700 Lisboa,Portugal
Tel:01 793 00 16 Fax:01 793 10 64 http://www.minoltaeurope.com
S Minolta Svenska AB
P.O.Box 9058,Albygatan 114,S-17109 Solna,Sverige
Tel:08 627 76 50 Fax:08 627 76 21 http://www.minoltaeurope.com
Sin Minolta Singapore (Pte) Limited
10 Teban Gardens Crescent,Singapore 2260
Tel:56 35 533 Fax:56 10 217 http://www.minolta.com
 Loading...