

Page 1
No. 26-2, Nishishinjuku 1-chome, Shinjuku-ku, Tokyo 163-0512, Japan
Page 2

Table of Contents
Foreword ...............................................................1
About this Manual.................................................3
Ch.1 Safety Precautions & Warnings ................7
Ch.2 Operation ..................................................19
Screen Flowchart ........................................................................20
Start up........................................................................................23
Shut-Down (Power OFF).............................................................24
Using the Input Panel..................................................................25
Ch.3 Sequence of Examination........................27
Before Examination.....................................................................28
Selection of Operator ..................................................................31
Patient Data Input (Input from CS-3)...........................................31
Patient Data Input (Search from Data Base)...............................32
Checking Patient Data ................................................................33
Initialization of Examination.........................................................33
Examination Body Part/Parameter Selection..............................34
Reserving Patient Data ...............................................................36
Exposure
[Single-Image Format] Upright Position Reader.........................36
Exposure
[Single-Image Format] Cassette Reader, Bar Code Registration.......38
Exposure
[Single-Image Format] Cassette Reader, Screen Menu Selection .....39
Exposure
[Multiple-Image Format] Upright Position Reader.......................41
Exposure
[Multiple-Image Format] Cassette Reader, Bar Code Registration ......42
Exposure
[Multiple-Image Format] Cassette Reader, Screen Menu Selection .....44
Image Output
[Single-Image Format] Output per Order..........................45
Image Output
[Single-Image Format] Batch Mode Output of all Orders ......46
Image Output
[Multiple-Image Format] Output per Order........................47
Image Output
[Multiple-Image Format] Batch Mode Output of all Orders .....48
Image Erasing.............................................................................49
Image Substitution ......................................................................51
Print Format ................................................................................52
Examination Suspension.............................................................58
Examination Termination ............................................................60
Image Reference after Examination (Output Again) ...................61
Image Sharing.............................................................................62
Overlay .......................................................................................64
Allocating Maker, Stamp or Grid/Scale.....................................64
Allocating the Annotations........................................................66
Ch.4 Description of Screens ............................77
Examination Search Screen........................................................78
(When the examination search screen has been set as the initial screen)
Examination List Screen .............................................................79
(When the examination search screen has been set as the initial screen)
Examination Check Screen [Single-Image Screen] ....................81
Examination Check Screen [Multiple-Image Screen]..................85
Examination List Screen .............................................................90
(When the examination list screen has been set as the initial screen)
Patient Data Input/Search Screen...............................................92
(When the examination list screen has been set as the initial screen)
Search Result Screen .................................................................94
Patient Data Amendment Screen................................................95
Extraction Parameter Screen......................................................96
Body Part/Parameter Selection Screen ......................................98
Detailed Data Setting Screen (Acquisition)...............................101
Detailed Data Setting Screen (Image Processing)....................103
Processing Menu Selection Screen ..........................................105
ROI Adjustment Screen ............................................................106
Rotation/Flipping Selection Screen...........................................107
Parameter Adjustment Screen..................................................108
Enhancement Type (E-processing) Selection Screen ..............110
Enhancement Type (F-processing) Selection Screen...............110
Detailed Data Setting Screen (Print Format).............................111
Film Size Selection Screen .......................................................115
Masking Size Adjustment Screen .............................................116
Detailed Data Setting Screen (Overlay)....................................118
Marker 1 Selection Screen........................................................120
Marker 2 Selection Screen........................................................120
Stamp Selection Screen............................................................121
Scale/Grid Selection Screen .....................................................122
Annotation Setup Screen ..........................................................123
Additional Information Screen...................................................126
System Menu Screen................................................................128
Device Status Screen................................................................129
Reader Status Check Screen....................................................131
JM Status Check Screen...........................................................132
Host Status Check Screen........................................................134
Printer Status Check Screen.....................................................135
RIS Status Check Screen .........................................................136
Operator Selection Screen........................................................138
Examination History Screen......................................................139
Console Select Screen..............................................................141
Image Reference Screen ..........................................................142
Output Setting Screen...............................................................144
Reject Reasons Screen ............................................................145
Ch.5 Operator Security Mode.........................147
User Name & Access Right.......................................................148
Log In ........................................................................................149
Log Off ......................................................................................149
Ch.6 Troubleshooting .....................................151
Trouble of JM ............................................................................152
Error List....................................................................................154
Ch.7 Optional Functions.................................171
Overview of the Optional Functions ..........................................172
Image Stitching Process ...........................................................173
Ch.8 Operating the Optional Equipments.....183
Single Bar code Reader............................................................184
Multiple Bar code Reader..........................................................187
Ch.9 Care & Maintenance ...............................189
Care & Maintenance .................................................................190
Care & Maintenance Schedule .................................................191
Specifications ...................................................193
Index .................................................................197
Mammo Use is not approved in the United States of America.
Page 3

REGIUS Console CS-3 OPERATION MANUAL Ver. 1.10 2005.2
< 1 >
Thank you for purchasing "Regius Console CS-3"(hereinforth referred to as CS-3).
The CS-3 is a console (controller) that can be commonly shared and utilized by REGIUS
Product Series. With the CS-3, it becomes possible to integrally control the examination
flow including the registration of patient information / examination information as well as
the overall verification of the final radiographic image, and thus a comfortable environment
with an efficient work flow can be secured.
In this manual, safety precautions and operational procedures are described to allow the
users of the CS-3 to be fully familiarized with the potential of the CS-3. The manual should
be at all times be kept in a readily accessible place for easy reference. Should you loose
this manual, please contact your Service Representative for the new one.
Foreword
Page 4

Foreword
< 2 >
REGIUS Console CS-3 OPERATION MANUAL Ver. 1.10 2005.2
Features
1. Two types of cassette registration method are available.
Depending on the operational environment or device layout, you can select from 2 types of
cassette registration method, i.e. "Registration with a bar code reader (at the time of exposure)" and "Manual registration using a screen menu (at the time of cassette reading)".
2. Capable of controlling multiple readers.
Various reader devices for upright studies and cassette reading can be simultaneously controlled by a single CS-3. This enables efficient flow of image verification from either reader
device without disturbing the exposure workflow.
3. Multiple Reader Input
Even with multiple cassette readers (REGIUS MODEL 170/190), the image read by any reader
in the system will be displayed on the CS-3 by which the objective cassette was registered.
This feature realizes highly reliable image identification as well as efficient use of readers.
4. Real Time Display
The image read by each reader will be displayed in real time in synchronization with the
reader operation. Therefore image verification is instantaneous.
5. ID Registration
In the case that patient registration is made at each X-ray room, the operator can search the
patient information or examination information via "Examination Search Screen". On the other hand, when the facility has a separate reception, the operator can display and browse the
registered Examination Information and Patient Information using "Examination List" screen.
In this case, use of an ID Registration System will be necessary.
< Cautions >
(1) Unauthorized reproduction of this manual in whole or in part is prohibited.
(2) The content of this manual is subject to change without prior notice.
(3) Should any discrepancies, errors or omissions be discovered, KONICA MINOLTA should be con-
tacted.
(4) Notwithstanding Item (3) above, KONICA MINOLTA shall accept no responsibility for any claims
made against loss or loss of profits arising from use of the product.
Trademarks
- "Microsoft" and "Windows" are trademarks or registered trademarks of Microsoft Corporation
(America) valid in America and other countries.
- "Windows 2000" is the abbreviation of "Microsoft / Windows 2000 Professional Operating System.
- Other company or product names used in this manual are trademarks or registered trademarks.
The indications ””, ”” and ”TM” shall be omitted henceforth.
Page 5

REGIUS Console CS-3 OPERATION MANUAL Ver. 1.10 2005.2
< 3 >
About this Manual
Be sure to read this chapter before using this
manual.
Page 6

About this Manual
< 4 >
REGIUS Console CS-3 OPERATION MANUAL Ver. 1.10 2005.2
Chapter1 Safety Precautions & Warnings
When using the REGIUS Console CS-3, the cautions detailed in
this chapter must be strictly followed in order to correctly use the
device.
Chapter2 Operation
The operation of CS-3 is described in this chapter.
Chapter3 Sequence of Examination
This chapter describes the sequence of examination using CS-3.
Chapter4 Description of Screens
This chapter describes each of the CS-3 screens.
Chapter5 Troubleshooting
This chapter describes typical methods of trouble shooting and
the error message list displayed on CS-3.
Chapter6 Optional Functions
The operation of optional functions available for CS-3 is described
in this chapter.
Chapter7 Operation of Optional Equipment
This chapter describes how to operate the optional equipments
for the CS-3.
Chapter8 Care & Maintenance
This chapter details the procedure for care and maintenance of
the CS-3.
Specification This chapter details the specification of the CS-3.
Index The index describes special terminology used in the CS-3 User's
Manual.
Structure of this manual
This manual consists of the chapters listed below.
How to use this manual
Notes on Device Identification
Upright/Cassette in this manual denote Upright Reader (REGIUS 350/370) and Cassette
Reader (REGIUS 190/170) respectively.
CS-3 Control Unit and CS-3 Operation Unit denote the following devices.
CS-3 Control Unit
Implements control of the reader devices, image data processing and output of image
data. CS-3 Control Unit can be interfaced to reader devices in the configuration where
maximum one Upright Reader (REGIUS MODEL 350/370) and 16 REGIUS Cassette
Readers (REGIUS MODEL 170/190) at a time.
CS-3 Operation Unit
Comprised of LCD for display and touch panel that is incorporated in the LCD surface,
allowing inputs of various data and checks on the image data. A desk-stand is provided
as an accessory.
Page 7
About this Manual
< 5 >
REGIUS Console CS-3 OPERATION MANUAL Ver. 1.10 2005.2
Hint
Points to be noted.
Technical Term
Technical terms are
explained.
Reference
Shows reference
pages or sections.
See the page for
more details.
Title
This title stands for the
general meanings for
the descriptions.
Display
Display with the operational procedure is
shown.
Operation Procedure
Operation procedure is
explained in order.
Caution
Cautions for operating the machine.
Details should be
carefully noted.
User Tool
Settings or other
things to be made
through the User
Tool.
Contact your system administrator to
change the settings
using the user tool.
Display in this manual
In this manual, the unnecessary area of the display may be trimmed away.
Parenthesis in a sentence.
The word in this mark shows that it is displayed in the touch panel of the CS-3
operation unit.
The word in this mark shows that it is the
name of the button to be pushed or
touched.
Ex. "Ready"
Ex. [Complete] Button
Page Layout
Page 8

About this Manual
< 6 >
REGIUS Console CS-3 OPERATION MANUAL Ver. 1.10 2005.2
Page 9

REGIUS Console CS-3 OPERATION MANUAL Ver. 1.10 2005.2
< 7 >
Safety
Precautions &
Warnings
1
When using the REGIUS Console CS-3, the cautions detailed in this chapter must be strictly followed in order to correctly use the device.
Page 10
Ch.1 Safety Precautions & Warnings
< 8 >
REGIUS Console CS-3 OPERATION MANUAL Ver. 1.10 2005.2
This is the safety alert symbol and is intended to draw the attention of the user to potential dangers to the user
him/herself or to others that may arise during the use or operation of this system.
These messages must be read thoroughly and strictly observed.
All safety related precautions should be carefully read and fully understood before proceeding with assembly or
usage of this system.
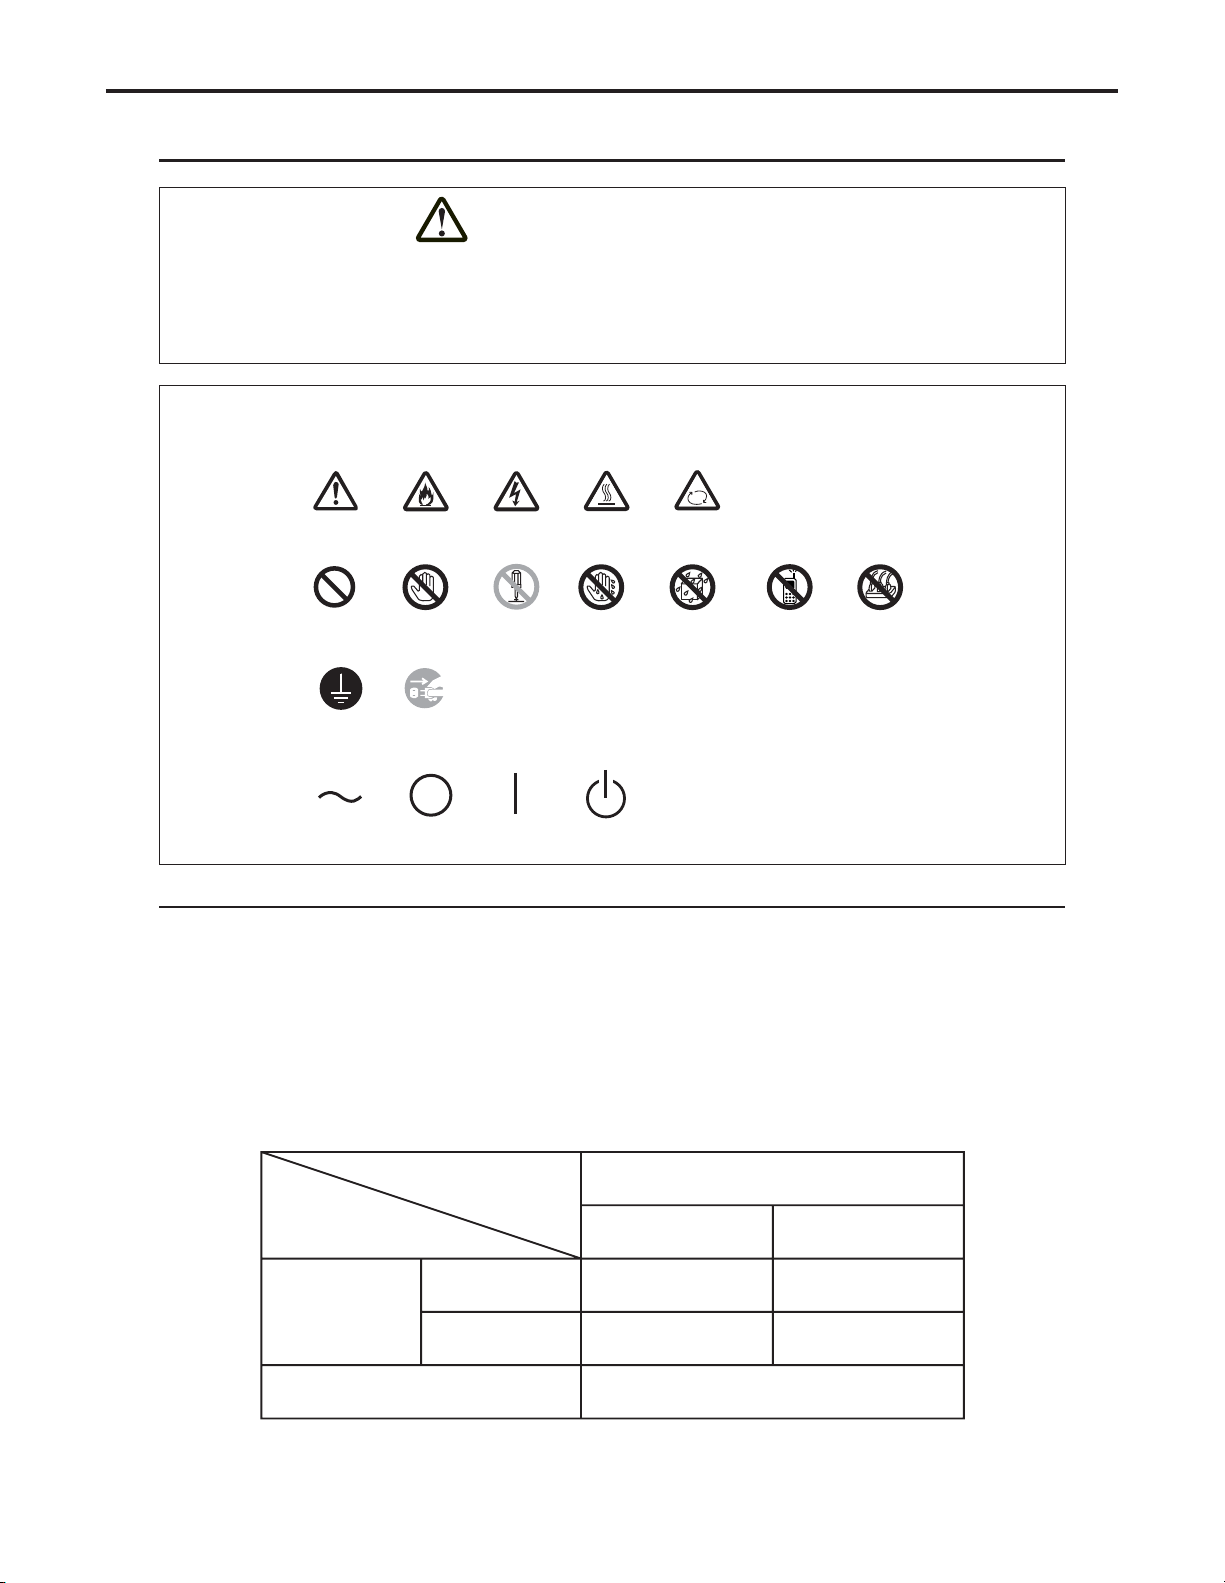
Safety Alert Symbol
Symbols indicating the need for caution (including danger and warnings)
Symbols indicating prohibited acts
Symbols indicating essential acts (compulsory or indicated acts)
Other Symbols
Description of Graphic Symbols
Normal Caution
Danger of Fire
Prohibited
AC Voltage
(Power Supply)
Ground
Danger of
High
Temperature
Danger of
Rotation
Main Power
Supply OFF
Main Power
Supply ON
Power Supply
Standby
Remove the plug
from the power
outlet
Do not touch
Do not disassemble
Do not touch
with wet hand
Mobile
Prohibited
Multi-Leads
Prohibited
Do not expose
to moisture
Danger of
Electrocution
Alert and Symbol Marks
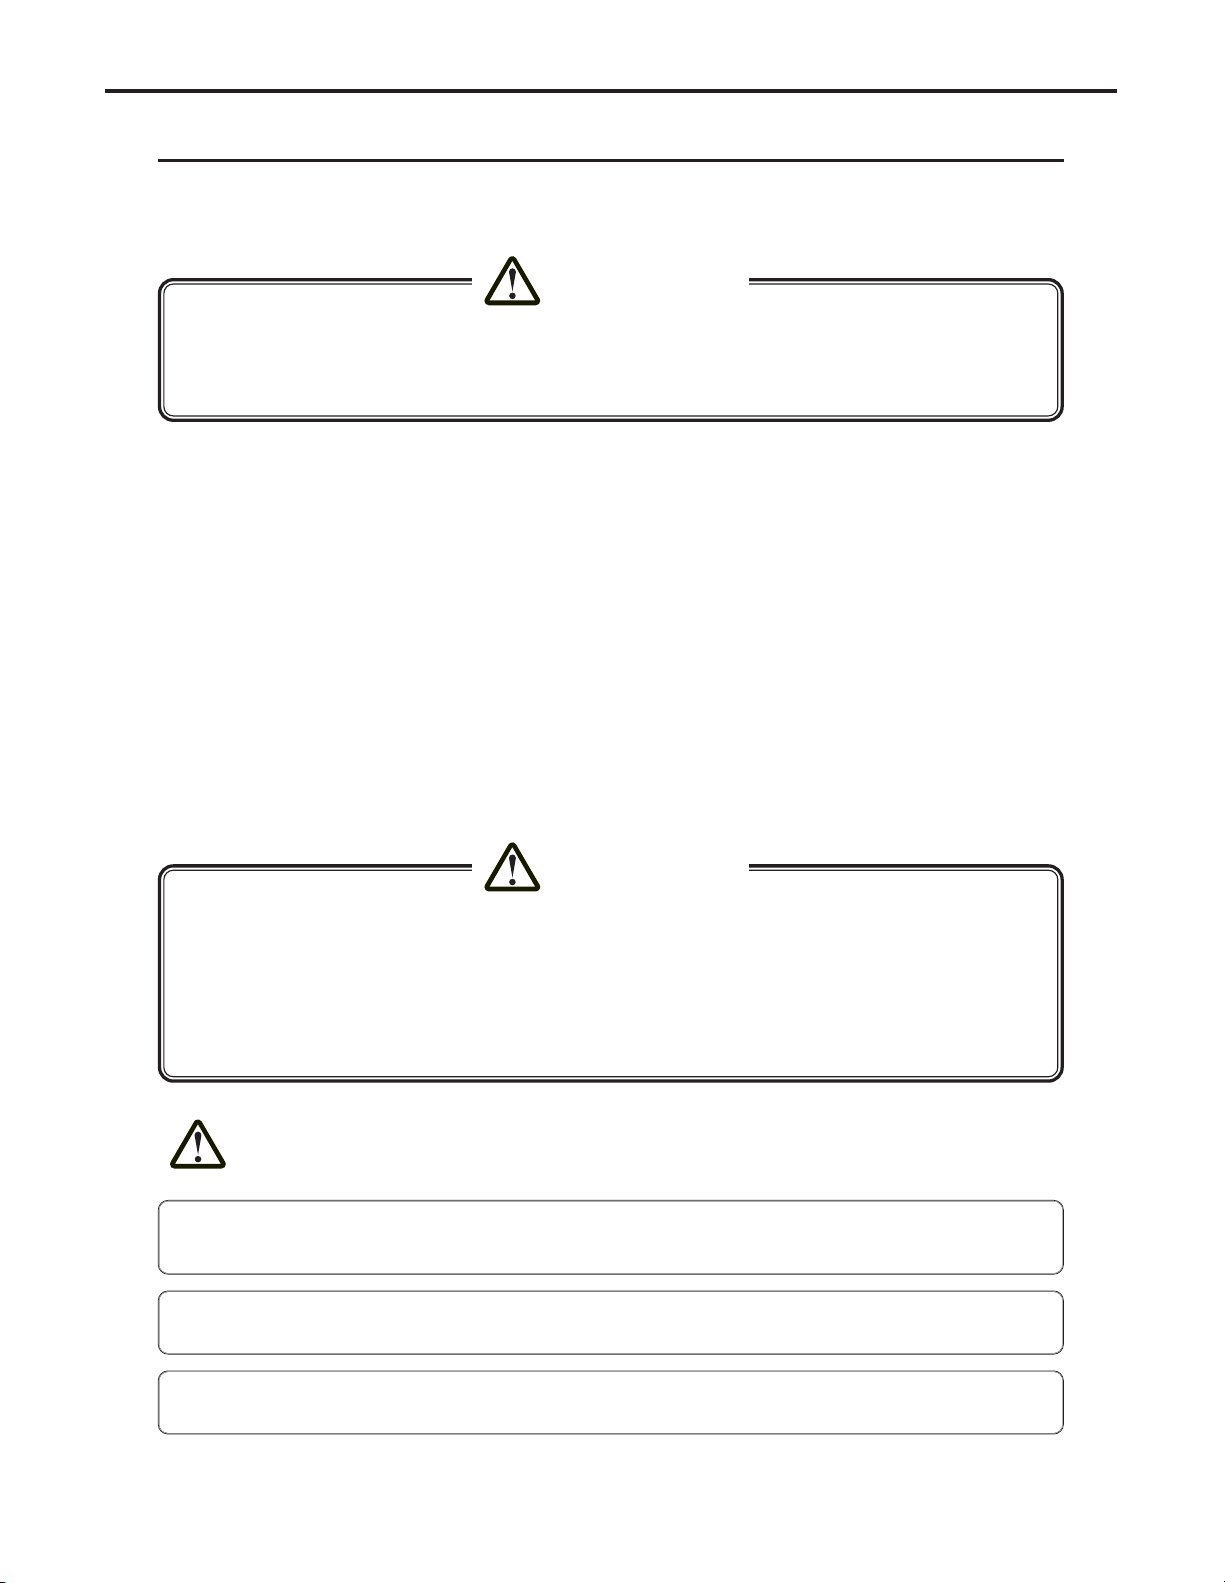
Warning Text (Signal Word)
Signal words indicate the degree of potential hazards in the product.
There are 3 degrees of caution labels, and each is used depending on the level of risk and damage caused by
incorrect use and mishandling.
DANGER
: Failure to observe the caution will produce high risk of serious or fatal injury.
WARNING
: Failure to observe the caution will produce moderate risk of serious or fatal injury.
CAUTION
: Failure to observe the caution will produce moderate risk of serious or fatal injury or dam-
age to property.
NOTE : If the contents of this page are not legible, order a new manual.
Risk of the damage
Bodily injury
(and damage to property)
Damage to property only
Loss of life or serious injury
(Damage is serious)
High Low
DANGER WARNING
WARNING
CAUTION
CAUTION
CAUTION
Moderate damage or light injury
(Damage is light)
or
Page 11
Ch.1 Safety Precautions & Warnings
< 9 >
REGIUS Console CS-3 OPERATION MANUAL Ver. 1.10 2005.2
Cautions for Handling the CS-3
Following cautions must be observed when handling the CS-3 and followed in order to handle the CS-3 in a correct
manner. Before using the CS-3, thoroughly read this operation manual, and become fully familiar with the operation of
the CS-3.
CS-3 is classified as Class B Information Technologies Equipment based on the standard prescribed by VCCI
(Voluntary Control Council of Interference by Information Technology Equipment).
Use of this product may cause electromagnetic disturbance. In such cases, the user may be requested to take
necessary actions to remedy the problem.
Data Handling
The manufacturer of CS-3 cannot be held liable for the loss of important data such as patient's data as a result of
installing the CS-3 at the facility.
Disposal
Disposal of the CS-3 must be carried out following the cautions listed below. Especially, the lead battery incorporated in the main unit as an emergency power source is defined as industrial waste, and requires a special care
for disposal.
High-Frequency Compliance Product
CS-3 complies with the guideline prescribed by the Ministry of International Trade and Industry for prevention of
electromagnetic disturbance caused by home and general electric appliances.
CAUTION
Cautions when disposing of the product
When disposing of the following used parts, accept the regulations of each local government.
1)The CS-3 (Operation Unit and Control Unit).
2)The packaging materials for the CS-3 (Operation Unit and Control Unit).
3)The lead and lithium batteries inside the CS-3 Control Unit, which can be hazardous and must be
disposed of properly.
4)The optional bar code reader.
Be certain to comply with any and all laws and government regulations including electric codes
and utility regulations, regarding the installation and operation of this equipment.
CAUTION
NOTE : If the contents of this page are not legible, order a new manual.
Cautions for Computer Virus
Be careful not to introduce computer virus to the CS-3 whether it is used as stand alone or in connection to the
network.
CD-RW drive is exclusively for the service engineer's use to carry out the maintenance service.
Users are requested not to use this drive for any purpose.
Devices that the user purchased from the supply source other than Konica Minolta cannot be connected
to the CS-3.
Software that the user purchased from the supply source other than Konica Minolta cannot be installed on
the CS-3.
Page 12
Ch.1 Safety Precautions & Warnings
< 10 >
REGIUS Console CS-3 OPERATION MANUAL Ver. 1.10 2005.2
●
The unit must not be used if smoke, unusual odors or sounds are detected.
In the event of detection of smoke, unusual odors or sounds, the power should be switched off immediately
and the power plug disconnected from the power outlet. Then contact your Service Representative.
Continued use under such circumstances could result in fire.
● Do not insert wire or metal blades.
Do not insert wire, metal blades or other foreign objects into the floppy disk slot; there is a danger of electrocution.
● Be certain to comply with any and all laws and government regulations including electric codes and
utility regulations, regarding the installation and operation of this equipment.
● Do not introduce water or other foreign objects into the CS-3.
Do not introduce foreign objects such as water or other liquids, pins or clips into the CS-3: fire, electrocution
or damage may result. In the event of accidental introduction of such foreign objects or substances into the
unit, the power should be switched off immediately and the power plug disconnected from the power outlet.
No attempts should be made to disassemble the unit. Then contact your Service Representative.
Overall Cautions
WARNING
CAUTION
● Shutdown or removal of the disk from the CS-3 should be implemented only after confirming that the
access lamp of the CS-3's hard disk is extinguished.
● When recycling the power of the CS-3, leave it for minimum 10 seconds after power OFF, and then
turn the power ON.
●When relocating the CS-3, which may cause vibration to the device, wait for 30 seconds or more after
the shutdown to start moving the device.
● Regularly clean the CS-3.
Regular cleaning helps to avoid various malfunctions in advance.
CAUTION
NOTE : If the contents of this page are not legible, order a new manual.
Page 13
Ch.1 Safety Precautions & Warnings
< 11 >
REGIUS Console CS-3 OPERATION MANUAL Ver. 1.10 2005.2
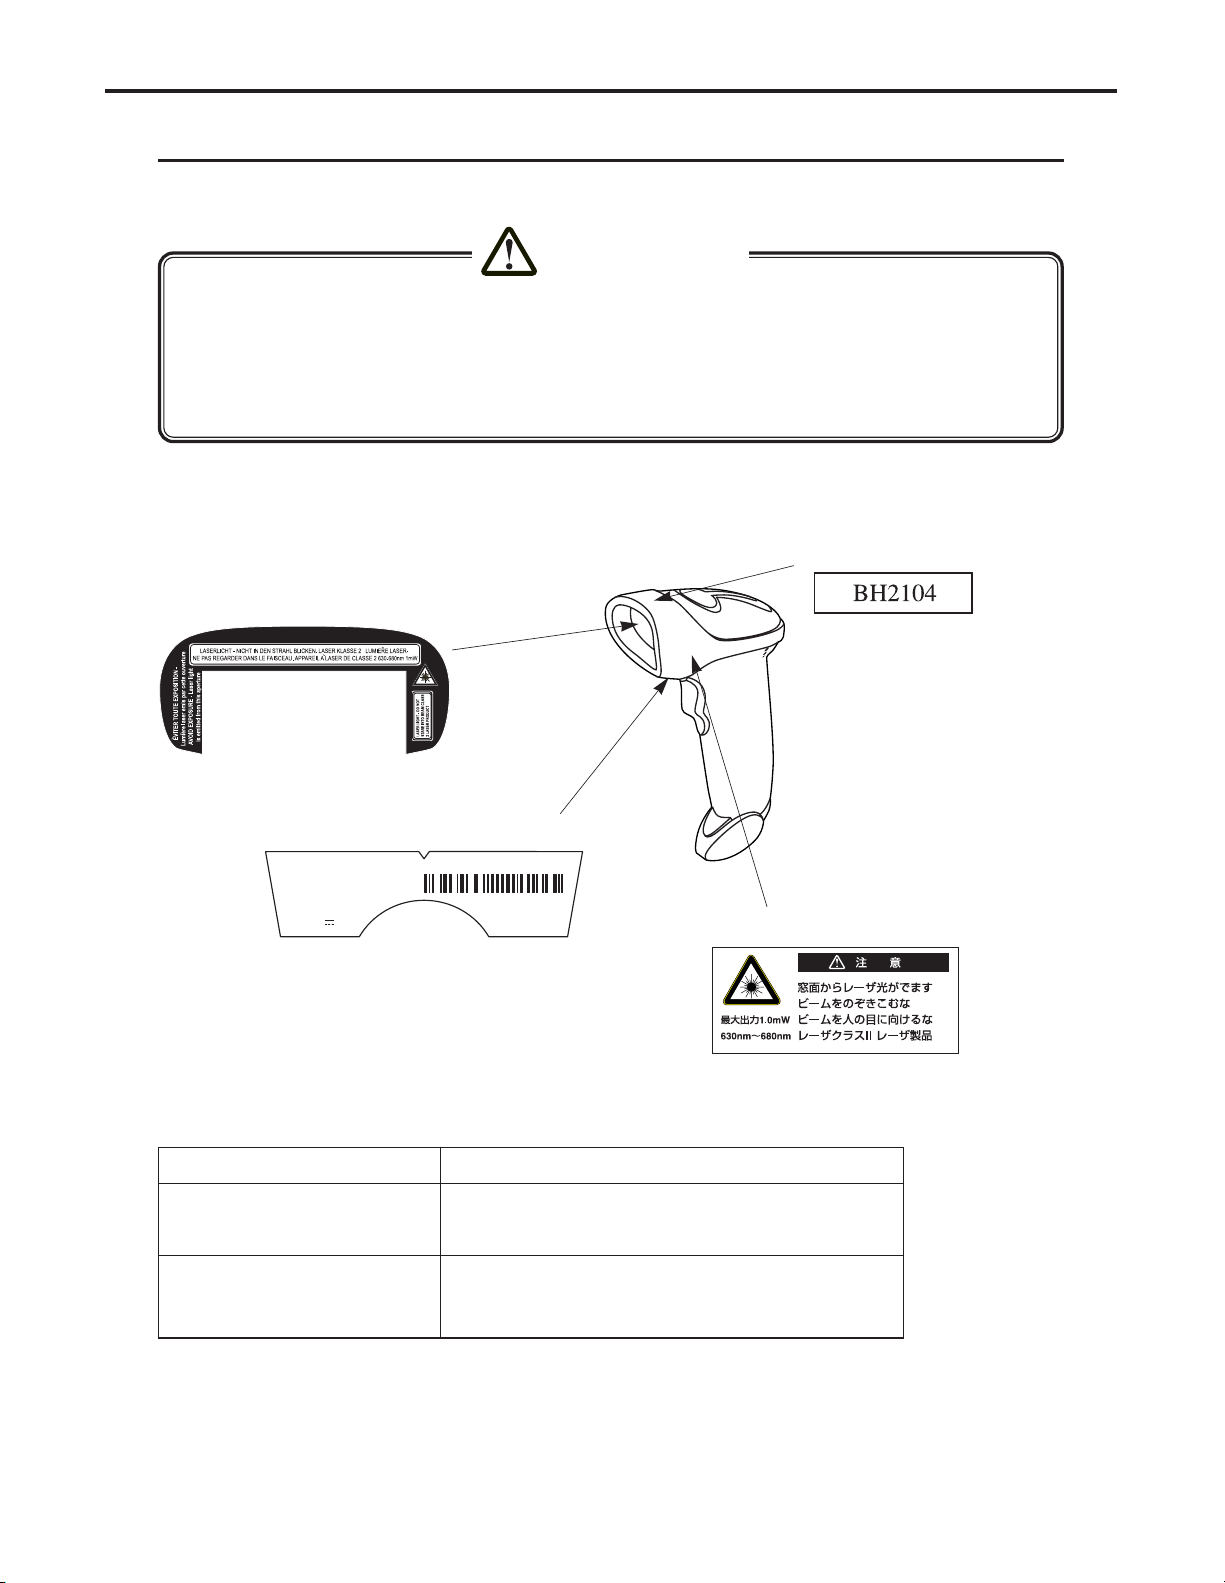
Cautions Relating to Handling Single Bar Code Reader
The single bar code reader (option) conforms to the CDRH Class II Laser Products. Be sure to follow the description
below when handling the bar code reader.
The caution label illustrated below is stuck on the bar code reader.
● The laser beams will be radiated from the window on the front of the reader. Never look at the laser
beam directly; this may cause serious damage to the eyes.
● Do not direct the laser beam to the eyes; this may cause serious damage to the eyes.
● The laser beams may be radiated while disassembling. Do not disassemble the bar code reader.
● Be careful to ensure that the reading window does not become cracked or scratched. Any cracks or
scratches may result in lowered levels of performance or malfunction.
CAUTION
NOTE : If the contents of this page are not legible, order a new manual.
Safety Acquisition Standard
MFD: September,2004
SYMBOL TECHNOLOGIES INC.,
5V 0.2A
SBRE
S/N: XXXXXX
HOLTSBILLE, N.Y. 11742
MADE IN MEXICO
P/N: LS2208-SR20111
Back Side
Left Side
Item Specification
Laser Safety Standard Conforms to CDRH Class 2
Conforms to IEC Class 2
Electricity Safety Regulations Conforms to UL, CSA, CE (EMC), CTICK, GS
Conforms to VCCI Class B
Conforms to FCC Part15 Class B
Scan Window
Upper Side
Page 14

Ch.1 Safety Precautions & Warnings
< 12 >
REGIUS Console CS-3 OPERATION MANUAL Ver. 1.10 2005.2
Ergonomic Recommendations
Caution: In order to avoid or minimize the potential risk of ergonomic injury follow the rec-
ommendations below. Consult with your local Health & Safety Manager to ensure that you
are adhering to your company’s safety programs to prevent employee injury.
• Reduce or eliminate repetitive motion
• Maintain a natural position
• Reduce or eliminate excessive force
• Keep objects that are used frequently within easy reach
• Perform tasks at correct heights
• Reduce or eliminate vibration
• Reduce or eliminate direct pressure
• Provide adjustable workstations
• Provide adequate clearance
• Provide a suitable working environment
• Improve work procedures.
Regulatory Information
Radio Frequency Interference Requirements
This device has been tested and found to comply with the limits for a Class B digital
device pursuant to Part 15 of the Federal Communications Commissions Rules and
Regulation. These limits are designed to provide reasonable protection against harmful
interference when the equipment is operated in a commercial environment.
This equipment generates, uses, and can radiate radio frequency energy and, if not
installed and used in accordance with the instruction manual, may cause harmful interference to radio communications. Operation of this equipment in a residential area is likely to
cause harmful interference in which case the user will be required to correct the interference at his own expense.
However, there is no guarantee that interference will not occur in a particular installation. If
the equipment does cause harmful interference to radio or television reception, which can
be determined by turning the equipment off and on, the user is encouraged to try to correct the interference by one or more of the following measures:
•Re-orient or relocate the receiving antenna.
• Increase the separation between the equipment and receiver.
• Connect the equipment into an outlet on a circuit different from that which the receiver
is connected.
• Consult the dealer or an experienced radio/TV technician for help.
This device complies with FCC Part 15. Operation is subject to the following two conditions: (1) this device may not cause harmful interference and (2) this device must accept
any interference received, including interference that may cause undesired operation.
Radio Frequency Interference
Requirements - Canada
This Class B digital apparatus complies with Canadian ICES-003.
NOTE : If the contents of this page are not legible, order a new manual.
Page 15

Ch.1 Safety Precautions & Warnings
< 13 >
REGIUS Console CS-3 OPERATION MANUAL Ver. 1.10 2005.2
CE Marking and European Union Compliance
Products intended for sale within the European Union are marked with the CE
Mark which indicates compliance to applicable Directives and European Norms
(EN), as follows.
Amendments to these Directives or ENs are included:
Applicable Directives
• Electromagnetic Compatibility Directive 89/336/EEC
• Low Voltage Directive 73/23/EEC
Applicable Standards
• EN 55022:1998, Limits and Methods of Measurement of Radio Disturbance
Characteristics of Information Technology Equipment
• EN 55024:1998; Information Technology equipment -Immunity characteristics - Limits
and methods of measurement
• IEC 1000-4-2:1995; Electromagnetic compatibility(EMC); Part 4:Testing and measurement techniques;Section 4.2:Electrostatic discharge immunity test
• IEC 1000-4-3:1997; Electromagnetic Compatibility(EMC); Part 4:Testing and measurement techniques;Section 3. Radiated, radio frequency, electromagnetic field
immunity test.
• IEC 1000-4-4:1995; Electromagnetic compatibility(EMC); Part 4: Testing and measurement techniques;Section 4:Testing electrical fast transient,/Burst immunity.
• IEC1000-4-5:1995; Electromagnetic compatibility(EMC), Part 4: Testing and measurement techniques;Section 5: Surge Immunity
• IEC 1000-4-6:1996; Electromagnetic compatibility(EMC), Part 4:Testing and measurement techniques;Section 6: Immunity to conducted disturbances, induced by radio frequency fields.
• IEC 1000-4-11:1994; Electromagnetic compatibility(EMC), Part 4: Testing and measurement techniques;Section 11: Voltage Dips, Short Interruptions, and Voltage
Variations.
• EN 60 950 + A1+A2+A3+A4+A11 - Safety of Information Technology Equipment
Including Electrical Business Equipment
• EN 60 825-1 (EN 60 825) - Safety of Devices Containing Lasers
Laser Devices
Symbol products using lasers comply with US 21CFR1040.10, and IEC825-1:1993,
EN60825-1:1994+A11:1996. The laser classification is marked on one of the labels on the
product.
Caution: Use of controls, adjustments or performance of procedures other than those
specified herein may result in hazardous laser light exposure.
Class 2 laser scanners use a low power, visible light diode. As with any very bright light
source, such as the sun, the user should avoid staring directly into the light beam.
Momentary exposure to a Class 2 laser is not known to be harmful.
NOTE : If the contents of this page are not legible, order a new manual.
Page 16

Ch.1 Safety Precautions & Warnings
< 14 >
REGIUS Console CS-3 OPERATION MANUAL Ver. 1.10 2005.2
In accordance with Clause 5, IEC 0825 and EN60825,
the following information is provided to the user:
ENGLISH
CLASS 2 LASER LIGHT
DO NOT STARE INTO BEAM
CLASS 2 LASER PRODUCT
DANISH / DANSK
KLASSE 2 LASERLYF
SE IKKE IND I STRÅEN
KLASSE 2 LASERPRODUKT
DUTCH / NEDERLANDS
KLASSE 2 LASERLICHT
NIET IN STRAAL STAREN
KLASSE-2 LASERPRODUKT
FINNISH / SUOMI
LUOKKA 2 LASERVALO
ÄLÄ TUIJOTA SÄDETTÄ
LUOKKA 2 LASERTUOTE
SPANISH / ESPANOL
CLASE 2 LUZ LASER
NO MIRE FIJAMENTE EL HAZ
PRODUCTO LASER DE LA CLASE 2
GERMAN / DEUTCH
KLASSE 2 LASERSTRAHLEN
NICHT DIREKT IN DEN LASERSTRAHL SCHAUEN
LASERPRODUKT DER KLASSE 2
SWEDISH / SVENSKA
KLASS 2 LASERLJUS STIRRA INTE MOT STRÅEN
LASERPRODUKT KLASS 2
HEBREW
ITALIAN / ITALIANO
CLASSE 2 LUCE LASER
NON FISSARE IL RAGGIOPRODOTTO
AL LASER DI CLASSE 2
NORWEGIAN / NORSK
KLASSE 2 LASERLYS IKKE STIRR INN I LYSSTRÅLEN
LASERPRODUKT, KLASSE 2
PORTUGUESE / PORTUGUÊS
CLASSE 2 LUZ DE LASER NÃO FIXAR O RAIO LUMINOSO
PRODUTO LASER DA CLASSE 2
FRENCH / FRANÇAIS
CLASSE 2 LUMIERE LASER
NE PAS REGARDER LE RAYON FIXEMENT
PRODUIT LASER DE CLASSE 2
NOTE : If the contents of this page are not legible, order a new manual.
Page 17
Ch.1 Safety Precautions & Warnings
< 15 >
REGIUS Console CS-3 OPERATION MANUAL Ver. 1.10 2005.2
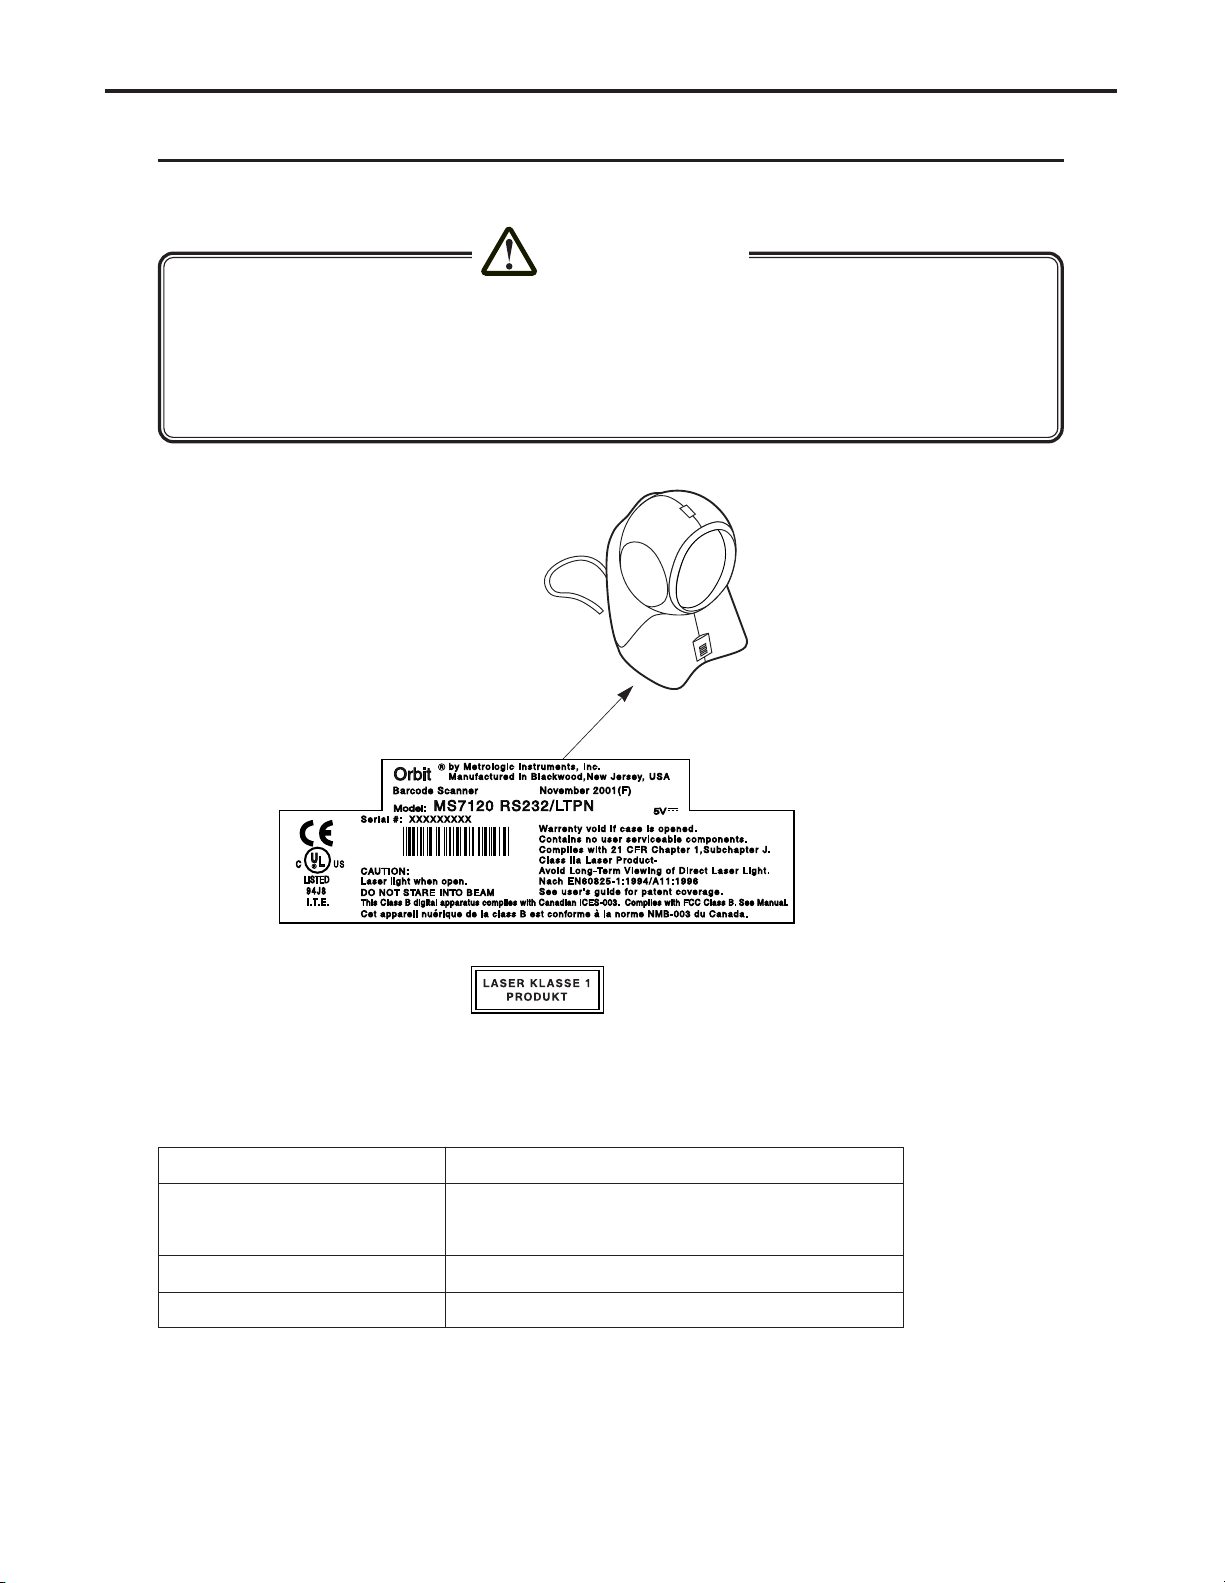
Cautions Relating to Handling Multi Bar Code Reader
The Multi bar code reader (option) conforms to the CDRH Class II a Laser Products. Be sure to follow the description below
when handling the bar code reader.
● The laser beams will be radiated from the window on the front of the reader. Never look at the laser
beam directly; this may cause serious damage to the eyes.
● Do not direct the laser beam to the eyes; this may cause serious damage to the eyes.
● The laser beams may be radiated while disassembling. Do not disassemble the bar code reader.
● Be careful to ensure that the reading window does not become cracked or scratched. Any cracks or
scratches may result in lowered levels of performance or malfunction.
Located on the underside
CAUTION
NOTE : If the contents of this page are not legible, order a new manual.
Safety Acquisition Standard
Item Specification
Laser Safety Standard Conforms to CDRH Class 2a
Conforms to IEC Class 1
Electricity Safety Regulations Conforms to UL, CSA, VDE, EC
EMC Safety Regulations Conforms to FCC Class A, CISPR Class B, EC
Page 18

Ch.1 Safety Precautions & Warnings
< 16 >
REGIUS Console CS-3 OPERATION MANUAL Ver. 1.10 2005.2
Notices
This equipment has been tested and found to comply with the limits for a Class
B digital device, pursuant to part 15 of the FCC rules. These limits are designed
to provide reasonable protection against harmful interference in a residential
installation. This equipment generates, uses and can radiate radio frequency
energy and, if not installed and used in accordance with the instructions, may
cause harmful interference to radio communications. However, there is no guarantee that interference will not occur in a particular installation. If this equipment
does cause harmful interference to radio or television reception, which can be
determined by turning the equipment off and on, the user is encouraged to try to
correct the interference by one or more of the following measures:
• Reorient or relocate the receiving antenna.
• Increase the separation between the equipment and receiver.
• Connect the equipment into an outlet on a circuit different from that to which
the receiver is connected.
• Consult the dealer or an experienced radio/TV technician for help.
Changes or modifications not expressly approved by the party responsible for
compliance could void the user's authority to operate the equipment.
This device complies with part 15 of the FCC Rules. Operation is subject to the
following two conditions: (1) This device may not cause harmful interference,
and (2) this device must accept any interference received, including interference
that may cause undesired operation.
Notice
This Class B digital apparatus complies with Canadian ICES-003.
Remarque
Cet appareil numérique de la classe B est conforme à la norme NMB-003 du
Canada.
Caution
Use of controls or adjustments or performance of procedures other than
those specified herein may result in hazardous laser light exposure. Under no
circumstances should the customer attempt to service the laser scanner. Never
attempt to look at the laser beam, even if the scanner appears to be nonfunctional. Never open the scanner in an attempt to look into the device. Doing so
could result in hazardous laser light exposure. The use of optical
instruments with the laser equipment will increase eye hazard.
Atención
La modificación de los procedimientos, o la utilización de controles o ajustes
distintos de los especificados aquí, pueden provocar una luz de láser peligrosa.
Bajo ninguna circunstancia el usuario deberá realizar el mantenimiento del láser
del escáner. Ni intentar mirar al haz del láser incluso cuando este no esté operativo. Tampoco deberá abrir el escáner para examinar el aparato. El hacerlo
puede conllevar una exposición peligrosa a la luz de láser.
El uso de instrumentos ópticos con el equipo láser puede incrementar el riesgo
para la vista.
NOTE : If the contents of this page are not legible, order a new manual.
Page 19

Ch.1 Safety Precautions & Warnings
< 17 >
REGIUS Console CS-3 OPERATION MANUAL Ver. 1.10 2005.2
Attention
L'emploi de commandes, réglages ou procédés autres que ceux décrits ici peut
entraîner de graves irradiations. Le client ne doit en aucun cas essayer d'entretenir lui-même le scanner ou le laser. Ne regardez jamais directement le
rayon laser, même si vous croyez que le scanner est inactif. N'ouvrez jamais le
scanner pour regarder dans l'appareil. Ce faisant, vous vous exposez à une
rayonnement laser qú êst hazardous. L'emploi d'appareils optiques avec cet
équipement laser augmente le risque d'endommagement de la vision.
Achtung
Die Verwendung anderer als der hier beschriebenen Steuerungen,
Einstellungen oder Verfahren kann eine gefährliche Laserstrahlung hervorrufen.
Der Kunde sollte unter keinen Umständen versuchen, den Laser-Scanner selbst
zu warten. Sehen Sie niemals in den Laserstrahl, selbst wenn Sie glauben, daß
der Scanner nicht aktiv ist. Öffnen Sie niemals den Scanner, um in das Gerät
hineinzusehen. Wenn Sie dies tun, können Sie sich einer gefährlichen
Laserstrahlung aussetzen. Der Einsatz optischer Geräte mit dieser
Laserausrüstung erhöht das Risiko einer Sehschädigung.
Attenzione
L'utilizzo di sistemi di controllo, di regolazioni o di procedimenti diversi da quelli
descritti nel presente Manuale può provocare delle esposizioni a raggi laser rischiose. Il cliente non deve assolutamente tentare di riparare egli stesso lo scanner laser. Non guardate mai il raggio laser, anche se credete che lo
scanner non sia attivo. Non aprite mai lo scanner per guardare dentro
l'apparecchio. Facendolo potete esporVi ad una esposizione laser rischiosa.
L'uso di apparecchi ottici, equipaggiati con raggi laser, aumenta il rischio di
danni alla vista.
NOTE : If the contents of this page are not legible, order a new manual.
Page 20

Ch.1 Safety Precautions & Warnings
< 18 >
REGIUS Console CS-3 OPERATION MANUAL Ver. 1.10 2005.2
Page 21

REGIUS Console CS-3 OPERATION MANUAL Ver. 1.10 2005.2
< 19 >
Operation
2
The operation of CS-3 is described in this chapter.
Page 22
Ch.2 Operation
< 20 >
REGIUS Console CS-3 OPERATION MANUAL Ver. 1.10 2005.2
Screens available with an option
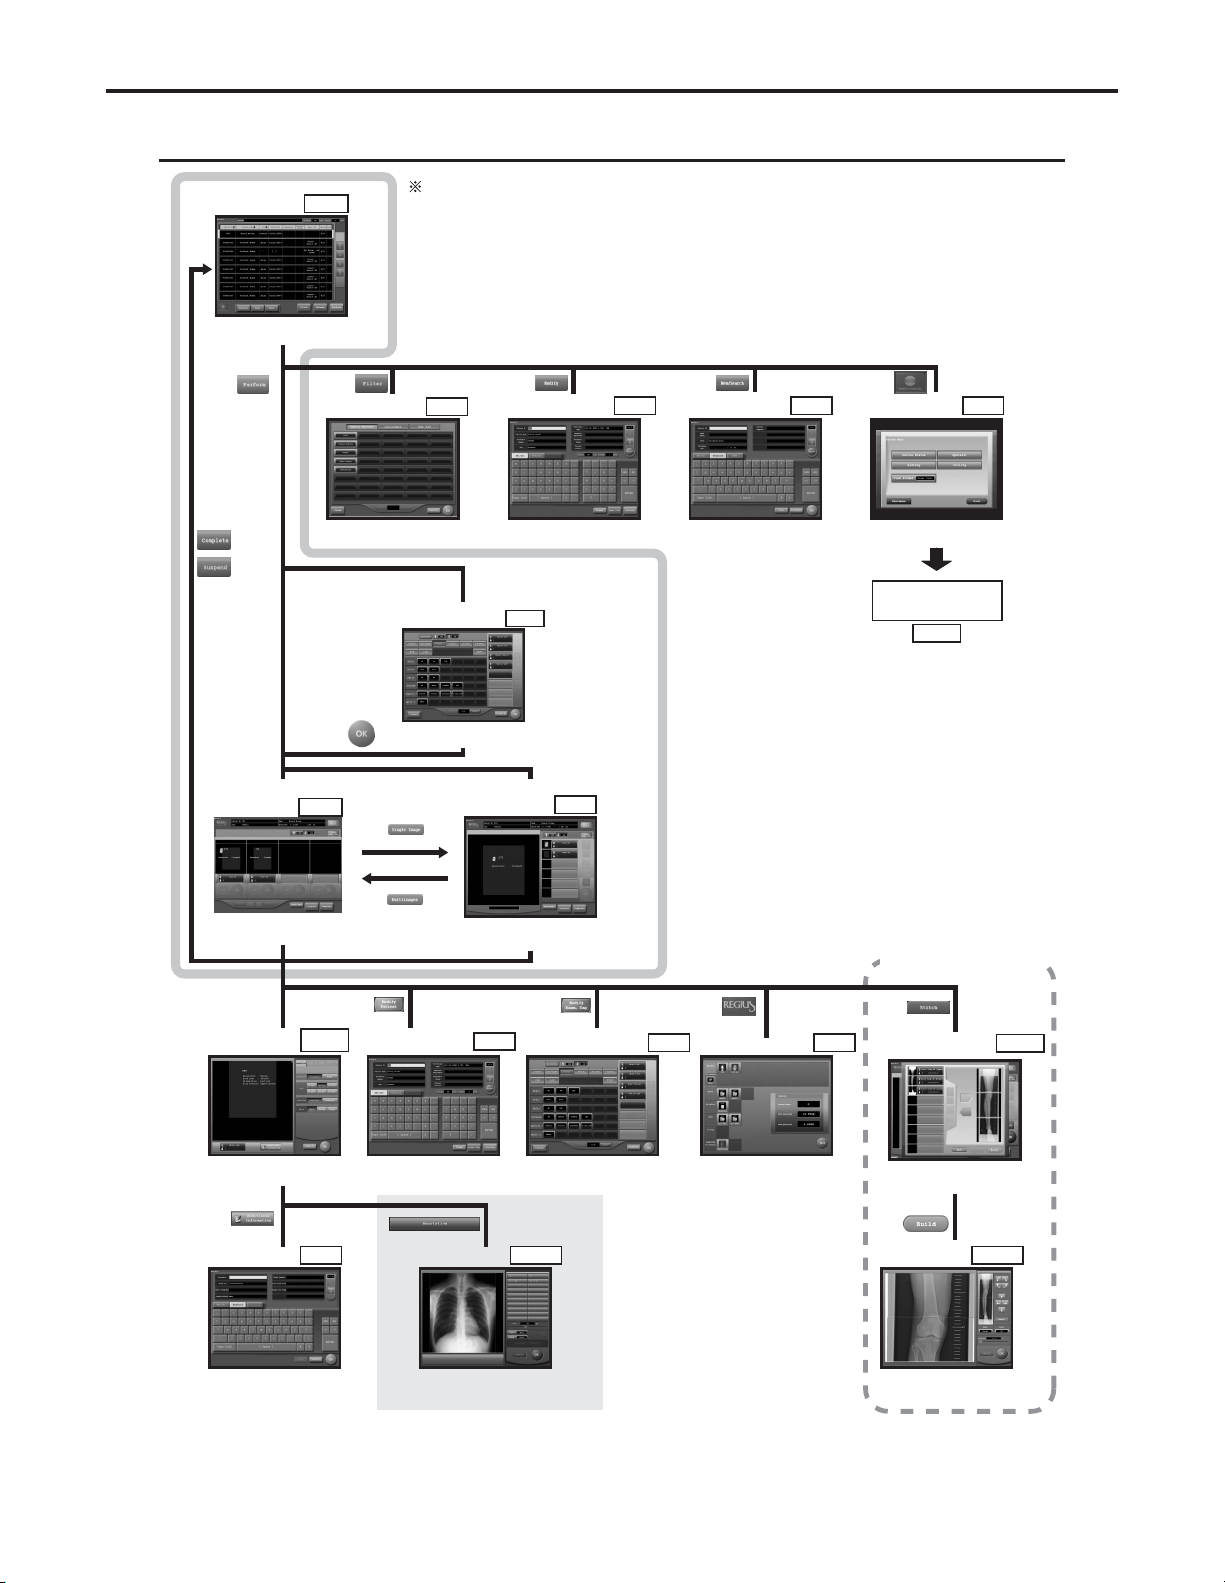
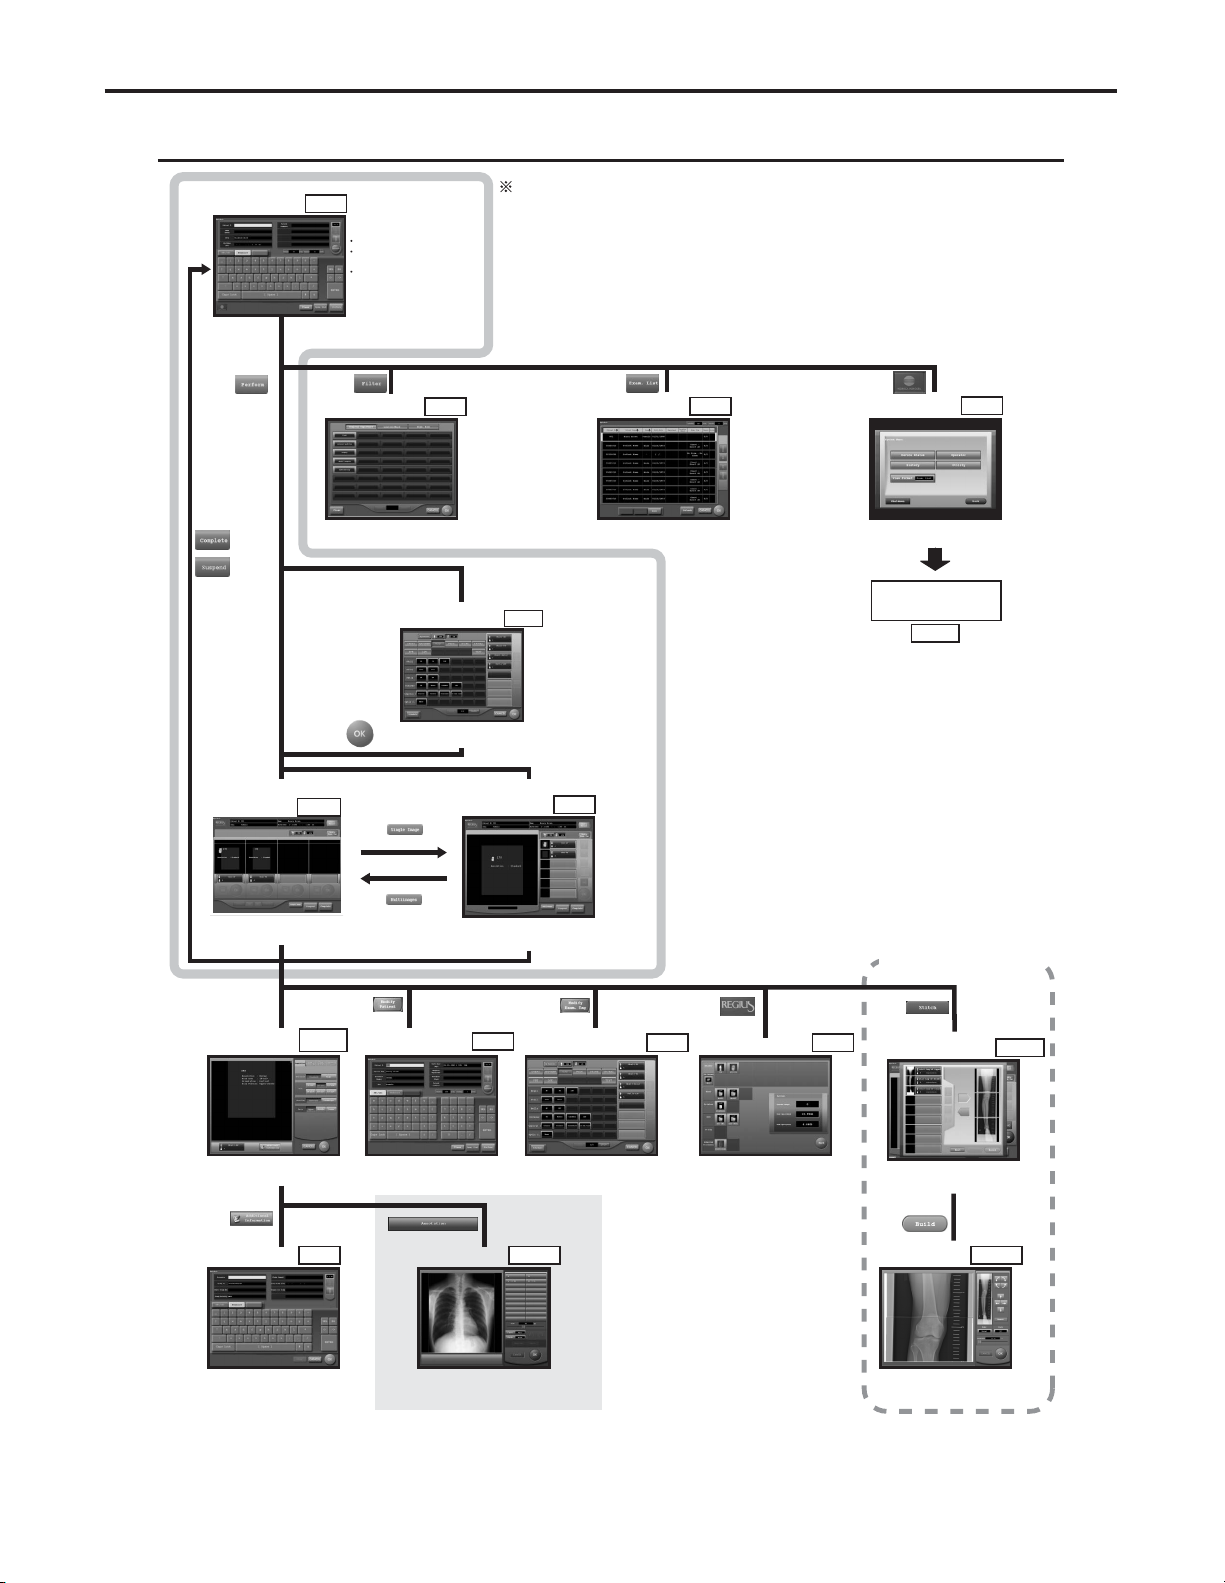
Screen Flowchart C
(System Menu)
Page.
22
The shaded area shows that
they (Procedure1 to 3) are
frequently used.
Examination
List Screen
Page.90
A list of patient data reserved for
examination is displayed.
Procedure 1
Extraction
Parameter Screen
Page.96
"Department", "Patient Location",
"Exam. Room" can be selected.
Patient Data
Amendment Screen
Page.95
The patient data in the list can be
amended.
Patient Data Input/
Search Screen
Page.92
New patient data may be input.
Alternatively, patient data
registered in the data base may
be searched for input.
System Menu
Screen
Page.128
Controls all the devices connected
to CS-3.
The exposure parameter
has been selected already
or set as default.
The exposure parameter
has not been selected.
Page.98
Body Part/Parameter
Selection Screen
The exposure body part and
parameter can be selected.
Procedure 2
Procedure 3
Page.85
Examination Check
Screen
[Multiple-Image Screen]
A list of orders and images are
displayed to be judged for their
quality
Page.81
Examination Check
Screen
[Single-Image Screen]
Select the order from the list to display its image in
large and single mode in the display field so that the
image can be judged for its quality.
Touch the
"Image Display
Field".
Detailed Data
Setting Screen
Page.101,103,
111,118
"Acquisition", "Image Processing",
"Print Format" and "Overlay" can
be set.
Additional
Information
Screen
Page.126
"Accession Number", "Requesting
Doctor", "Requesting
Department", "Operator" can be
input or amended.
Patient Data
Amendment Screen
Page.95
The patient data currently being
examined on the examination
check screen can be modified.
Body Part/Parameter
Selection Screen
Page.98
The exposed body part and
parameter can be selected.
The status of all devices
connected to CS-3 are displayed.
Device Status Screen
Page.129
Position where annotation should
be attached can be selected.
Anotation Screen
Page.123
Images to be stitched to make a
composite image for a long body part
can be selected.
Composite Image
Select Screen
Page.174
The boarder of stitched images
selected in "Composite Image Select"
screen can be adjusted.
Composite Image
Adjust Screen
Page.176
Screen Flowchart A (When the examination list screen has been set as the initial screen)
Page 23
Ch.2 Operation
< 21 >
REGIUS Console CS-3 OPERATION MANUAL Ver. 1.10 2005.2
Screens available with an option
Screen Flowchart C
(System Menu)
Page.
22
The shaded area shows that
they (Procedure1 to 3) are
frequently used.
Procedure 1
Extraction
Parameter Screen
Page.96
"Department", "Patient Location",
"Exam. Room" can be selected.
System Menu
Screen
Page.128
Controls all the devices connected
to CS-3.
The exposure parameter
has been selected already
or set as default.
The exposure parameter
has not been selected.
Page.98
Body Part/Parameter
Selection Screen
The exposure body part and
parameter can be selected.
Procedure 2
Procedure 3
Page.85
Examination Check
Screen
[Multiple-Image Screen]
A list of orders and images are
displayed to be judged for their
quality
Page.81
Examination Check
Screen
[Single-Image Screen]
Select the order from the list to display its image in
large and single mode in the display field so that the
image can be judged for its quality.
Touch the
"Image Display
Field".
Detailed Data
Setting Screen
Page.101,103,
111,118
"Acquisition", "Image Processing",
"Print Format" and "Overlay" can
be set.
Additional
Information
Screen
Page.126
"Accession Number", "Requesting
Doctor", "Requesting
Department", "Operator" can be
input or amended.
Examination
Search Screen
Page.78
Following things can be carried
out on this screen.
Addition of the new examination.
Modification of the examination
already input.
Search of the patient data from
the data base.
Examination List
Screen
Page.90
A list of patient data reserved for
examination is displayed.
Patient Data
Amendment Screen
Page.95
The patient data currently being
examined on the examination
check screen can be modified.
Body Part/Parameter
Selection Screen
Page.98
The exposed body part and
parameter can be selected.
The status of all devices
connected to CS-3 are displayed.
Device Status Screen
Page.129
Position where annotation should
be attached can be selected.
Anotation Screen
Page.
123
Images to be stitched to make a
composite image for a long body part
can be selected.
Composite Image
Select Screen
Page.
174
The boarder of stitched images
selected in "Composite Image Select"
screen can be adjusted.
Composite Image
Adjust Screen
Page.
176
Screen Flowchart B (When the examination search screen has been set as the initial screen)
Page 24
Ch.2 Operation
< 22 >
REGIUS Console CS-3 OPERATION MANUAL Ver. 1.10 2005.2
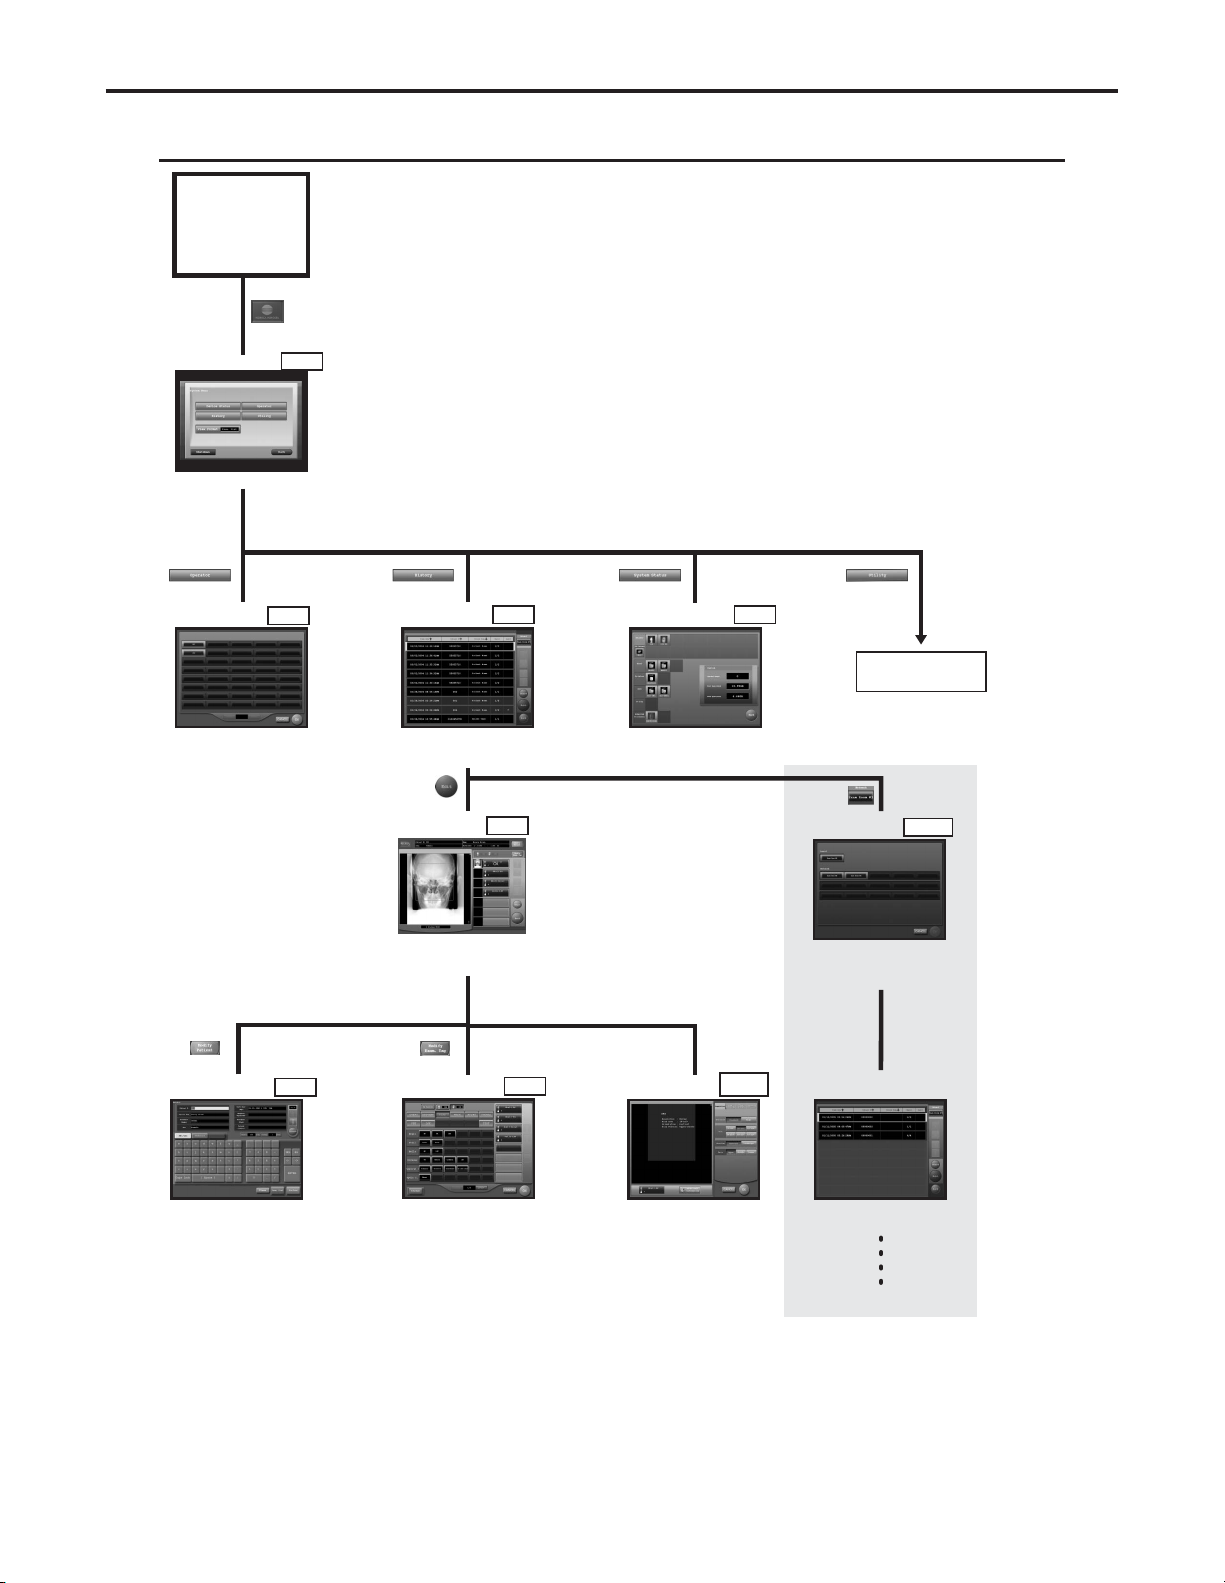
UserTool
Initial Screen
Examination List Screen
or
Examination Search Screen
System Menu Screen
Controls all the devices connected
to CS-3.
Page.128
Operator
Selection Screen
Page.138
Enables selection of the name of
the operator carrying out the
examination.
Examination
History Screen
The patient data for which
examination has already been
completed or suspended are
listed in this screen.
Page.139
Device Status Screen
Page.129
The status of all devices
connected to CS-3 are displayed.
Image Reference
Screen
Enables referencing or outputting
the patient data for which
examination has already been
completed or suspended.
Page.142
Patient Data
Amendment Screen
Page.95
The patient data currently being
examined on the examination
check screen cab be modified.
Body Part/Parameter
Selection Screen
Page.98
The body part and parameter can
be selected.
Detailed Data
Setting Screen
Page.101,103,
111,118
"Acquisition", "Image Processing",
"Print Format" and "Overlay" can
be set.
Touch the
"Image Display".
Examination History screen of the
browse target console. Starting from
this screen, browse or reprint can be
implemented.
Examination History Screen
of the browse target
Console Select
Screen
Browse of images processed on
other consoles is enabled using
the image sharing function. Select
the target console to be browed in
this screen.
Page.
141
Screen Flowchart C (System Menu)
Page 25
Ch.2 Operation
< 23 >
REGIUS Console CS-3 OPERATION MANUAL Ver. 1.10 2005.2
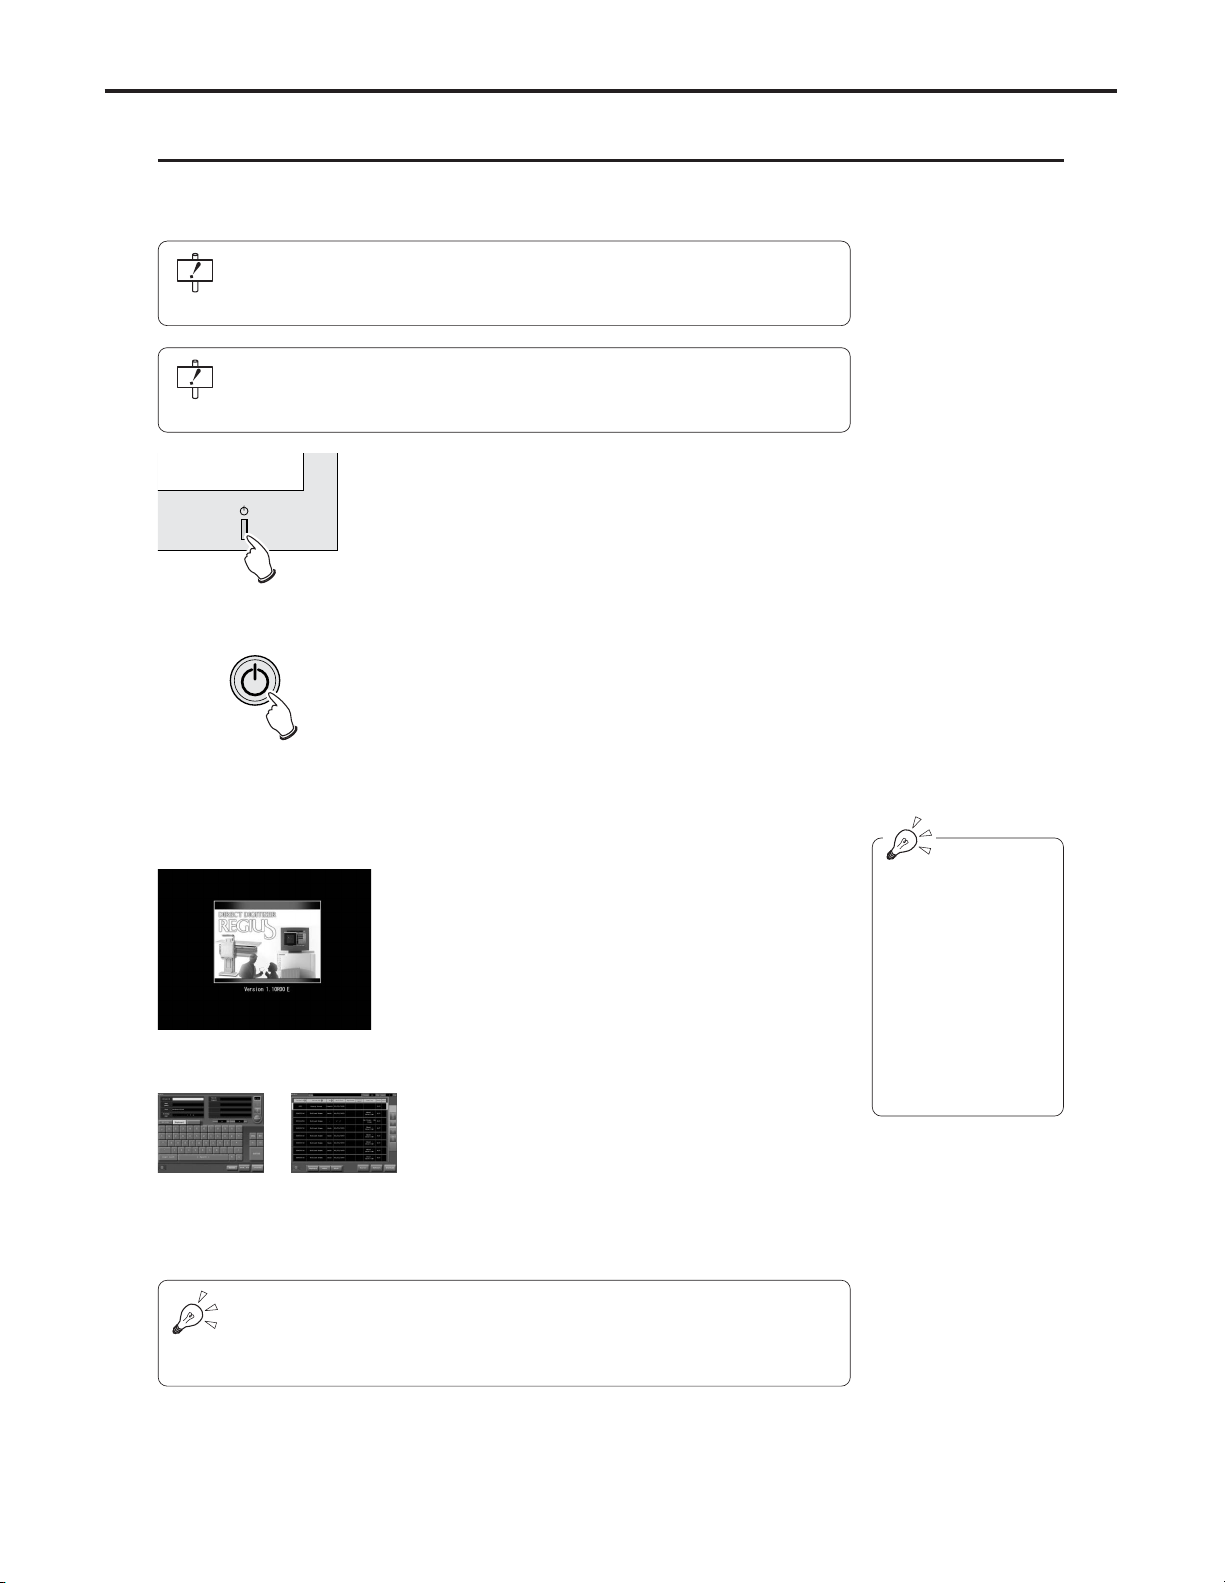
Start Up
The procedure for start up of CS-3 is described below.
Exam Search Screen Exam List Screen
System Start Up Screen
The CS-3 software version will be displayed
under the heading
"Version" during display
of the system start up
screen.
Initialization will be
completed approximately three minutes
after switching on
power.
1 Switch on the CS-3 Operation Unit stand-by but-
ton.
2 Press the Power button located on the front of
the CS-3 Control Unit.
•A CS-3 start up message and an OS (Operating
System) start up message will be displayed in
order on the CS-3 Operation Unit.
• After a short time, the CS-3 system start up screen
will be displayed. During display of this screen,
internal system initialization will be executed.
• After completion of initialization, the CS-3 initial
screen (examination search screen or examination
list screen) will be displayed; this indicates that
the CS-3 can be operated.
Before turning on the CS-3, check that all devices (Cassette Readers, Upright
Readers, Printers, Viewers, Servers, etc.) are properly connected to the CS-3 and
switched on.
Check that a floppy disk is not inserted in slot of the CS-3 Control Unit. If it is inserted, push the eject button to remove it. CS-3 will not start up with the floppy disk
inserted.
There are two types of display shown on the CS-3 initial screen; these are the
examination search screen and the examination list screen. Which of the two will be
displayed should be selected through the system menu depending on factors such
as the system configuration of the CS-3.
Page 26
Ch.2 Operation
< 24 >
REGIUS Console CS-3 OPERATION MANUAL Ver. 1.10 2005.2
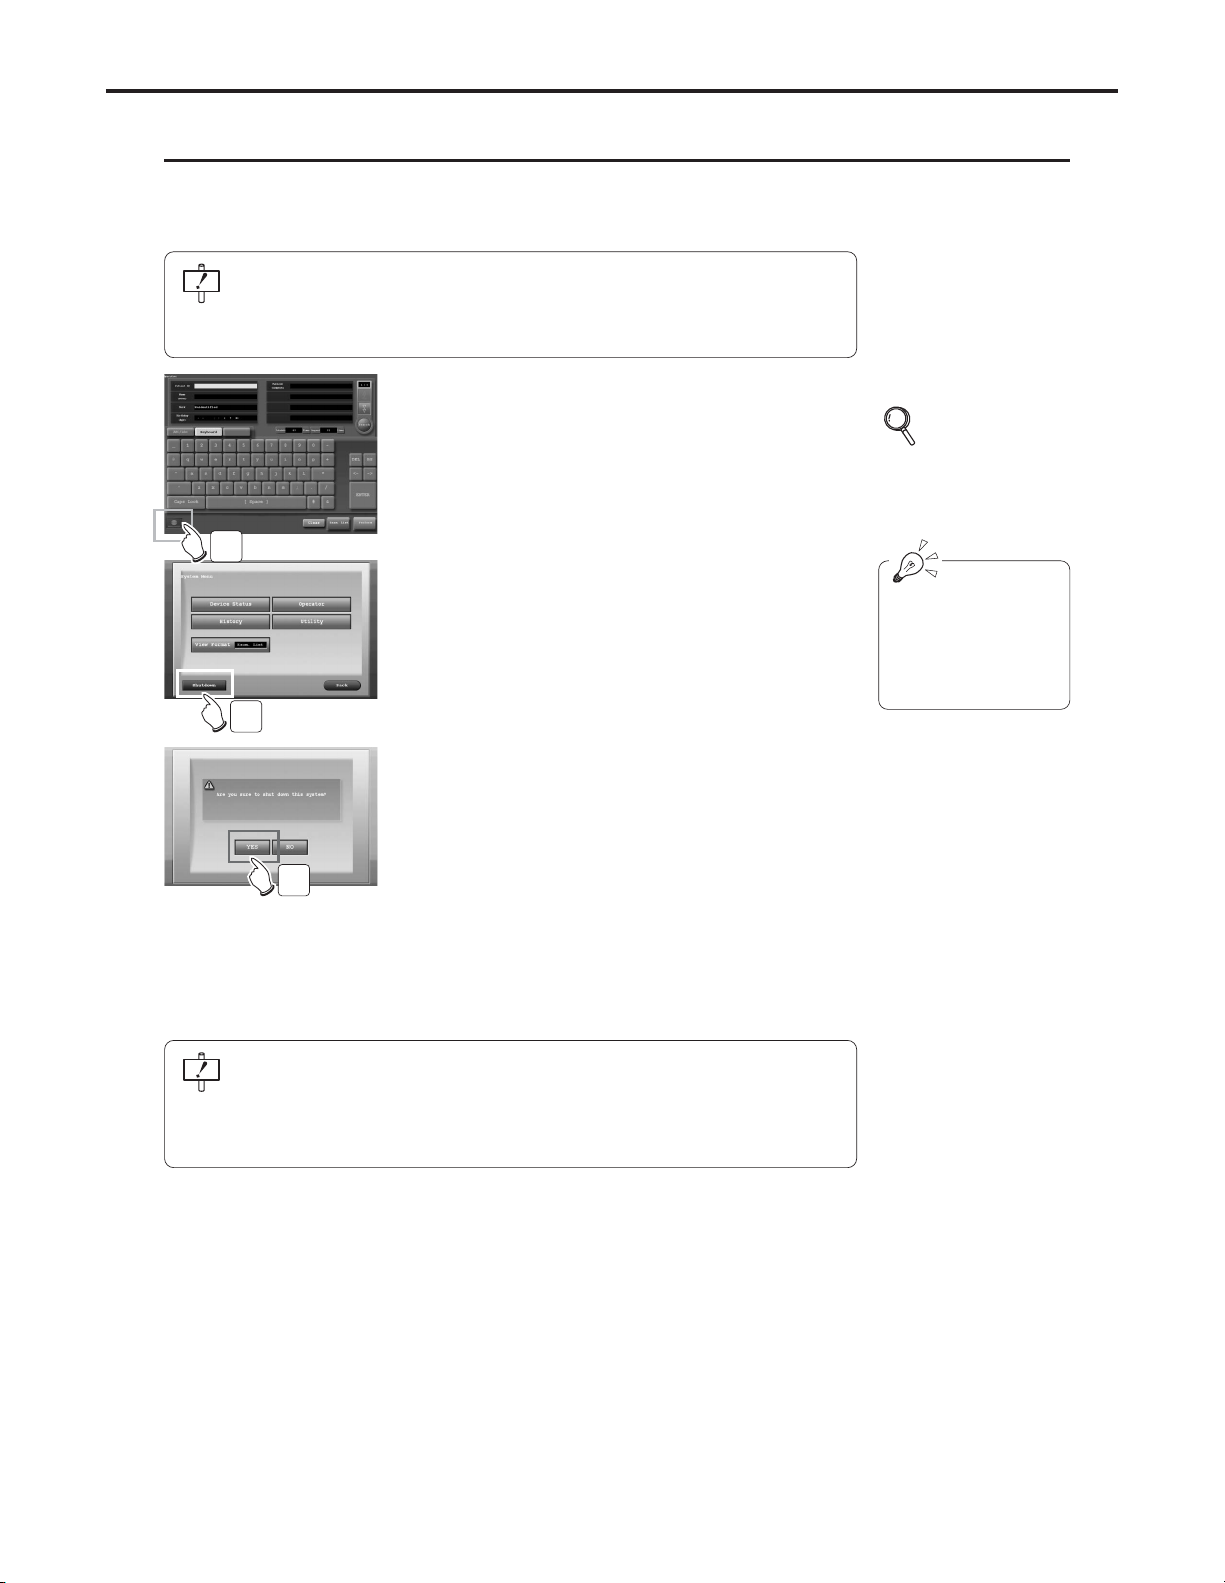
Shut-Down (Power OFF)
The procedure for switching off the CS-3 power supply is described below.
Switching off the CS-3 power supply may be done from the examination search screen or the examination list screen
on the CS-3 Operation Unit (monitor).
The procedure detailed below must be followed when switching off the CS-3 power
supply.
Do not switch off power from the control unit power switch: doing so may result in
loss of data or damage to the system software.
1 Touch the [KONICAMINOLTA] button at the bot-
tom left of the initial screen (examination search
screen or examination list screen).
• The system menu will be displayed.
2 Touch the [Shutdown] button on the system
menu.
•A confirmation request will be displayed.
3 Touch the [YES] button.
• CS-3 termination processing will be carried out
and, after a short time,
power will be automatically switched off.
• To discontinue system termination, touch the [NO]
button and then the [Back] button on the system
menu. Termination will be aborted and the initial
screen (examination search screen or examination
list screen) displayed.
• Upon termination of CS-3, the reader unit will auto-
matically be put into power-save (sleep) mode.
If image data is still being transmitted to external devices such as the printer, a message will be displayed. System shut-down will be executed upon completion of
image transmission.
Any images not output upon completion of system shut-down will be transmitted the
next time CS-3 is activated.
p.28 Before
Examination
The figure at left shows
display when the examination search screen
has been set as the initial screen.
1
2
3
Page 27
Ch.2 Operation
< 25 >
REGIUS Console CS-3 OPERATION MANUAL Ver. 1.10 2005.2
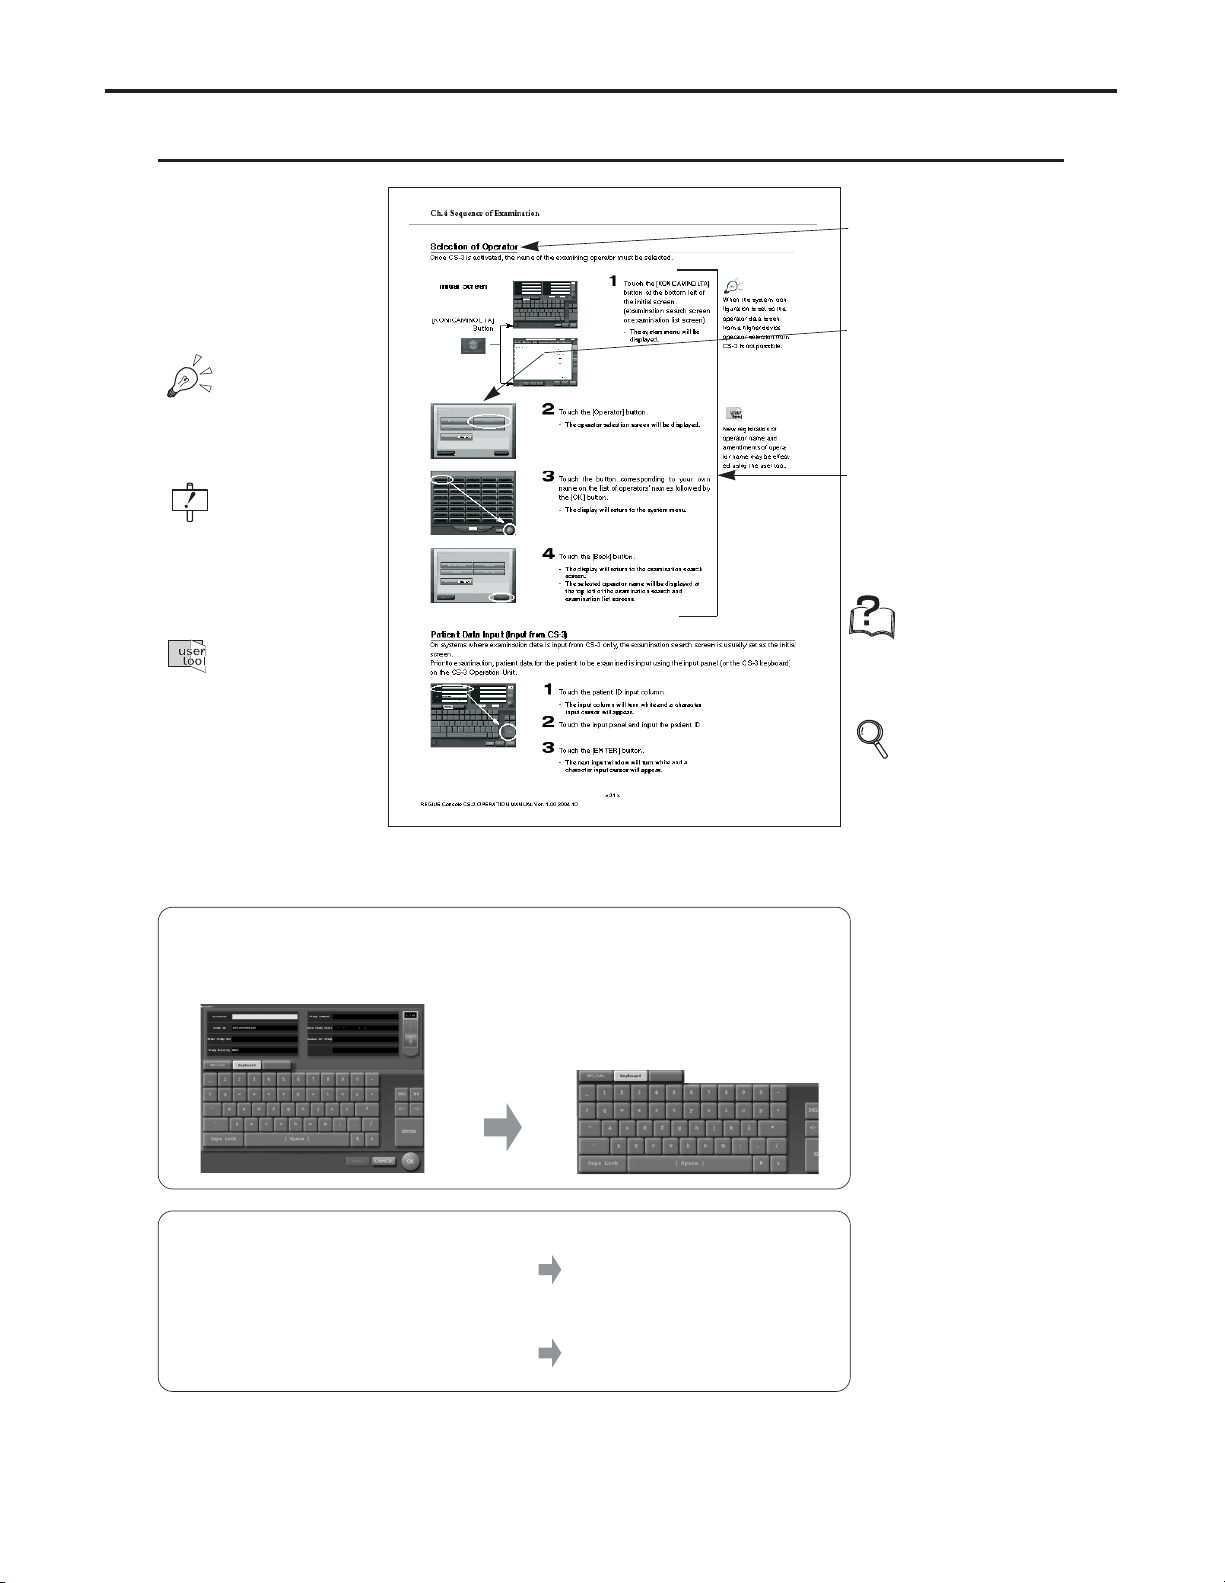
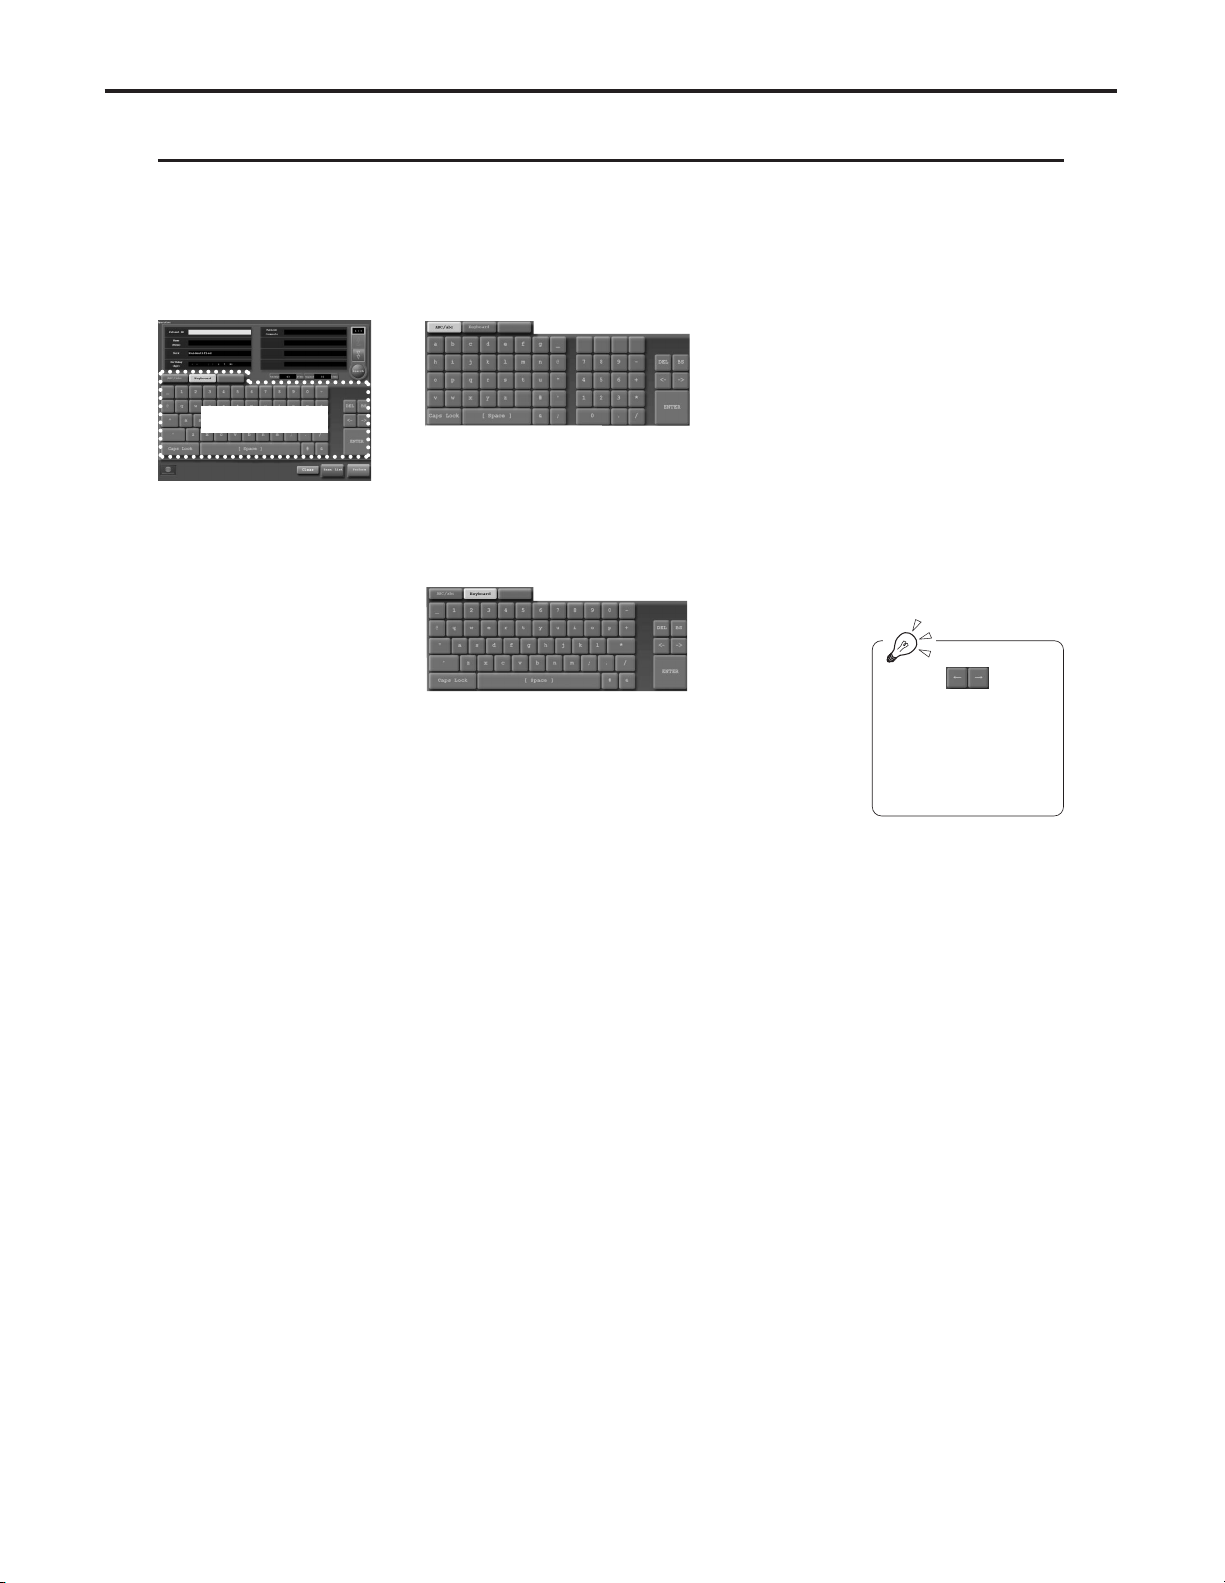
Using the Input Panel
An input panel from which character data may be input is displayed on the examination search screen and the additional information screen (screens requiring data input).
The following two types of input panel are available.
• Display changes automatically according to the input column currently selected on screen.
• Changes may be effected by touching the "ABC/abc" and "Keyboard" buttons at the top of the keyboard.
Input Panel
[ABC/abc]
Displayed when an input column requiring input of
alphabetical or numerical characters is selected.
Touching the "Caps Lock" key will switch between
upper and lower case characters.
[Keyboard]
Displayed when an input column requiring input of
alphabetical or numerical characters is selected.
Touching the "Caps Lock" key will switch between
upper and lower case characters.
The arrow marks above
the "ENTER" key are
used to move the cursor position in the
time/date input column.
Page 28

Ch.2 Operation
< 26 >
REGIUS Console CS-3 OPERATION MANUAL Ver. 1.10 2005.2
Page 29

REGIUS Console CS-3 OPERATION MANUAL Ver. 1.10 2005.2
< 27 >
Sequence
of Examination
3
This chapter describes the sequence of examination using CS-3.
Page 30
Ch.3 Sequence of Examination
< 28 >
REGIUS Console CS-3 OPERATION MANUAL Ver. 1.10 2005.2
Before Examination
CS-3 is furnished with two initial screens displayed after system initialization;
the "Examination Search Screen" and the "Examination List Screen".
The examination list screen displays data for
patients scheduled for examination and facilitates
selection of data for patients examined.
This display makes for ease of checking examination data transmitted at once from ID-680 Series or
Radiology Information System from the list.
The examination search screen allows direct input
of patient data and search of patient data from the
data base for input.
The unit features ease of input and confirmation of
patient data to be examined.
Examination Search
screen
Examination List screen
Two Initial Screens
From the examination search screen, you can display the examination list screen
and check the scheduled examination. From the examination list screen, you can
display the examination search screen and input the patient data. Note, however,
that initialization of examination using CS-3 is possible from only one initial screen.
The [KONICAMINOLTA] button is displayed at the bottom left of the initial screen
(examination search screen or examination list screen).
• Touching the [KONICAMINOLTA] button displays the system menu.
• The initial screen may be changed using the [View Format] button in the
system menu.
p.78
Examination
Search Screen
(When the examination
search screen has been
set as the initial screen)
The "search" button is
displayed in the following cases:
In systems where
patient information is
retrieved from the
device in upper stream.
When using the CS-3
patient data base.
When using the CS-3
patient data base,
backup should be carried out regularly using
the User Tool.
p.79
Examination List
Screen
(When the examination
search screen has been
set as the initial screen)
p.128
System Menu
Screen
Page 31

Ch.3 Sequence of Examination
< 29 >
REGIUS Console CS-3 OPERATION MANUAL Ver. 1.10 2005.2
Examination Starts Examination Starts
[OK]
Button
[OK]
Button
[Perform]
Button
[Perform]
Button
[Exam. List]
Button
[New/Search]
Button
Selection of patient
data already registered on the list
Search or input of
new patient data.
Starting from
the Examination Search Screen
Starting from
the Examination List Screen
Page 32

Ch.3 Sequence of Examination
< 30 >
REGIUS Console CS-3 OPERATION MANUAL Ver. 1.10 2005.2
There are two screen formats for reading and checking of X-RAY images: the singleimage format which allows display of only one image and the multiple-image format which
allows display of multiple screens in alignment.
Two Examination Check Screens
Single-Image Format Multiple-Image Format
The single-image format
Display of only one screen
selected from the exposure
orders.
This format provides large
display of the image and is
therefore most suitable for
examination of images of
wide range, such as the thorax.
The multiple-image format
Display of four ordered
images in alignment.
This format provides ease of
comparison of multiple
images of the same patient
exposed from differing
angles.
Touching the [Multi images] or [Single Image] button enables change of format as
required.
Thus, comparison of images may be carried out using the multiple-image format and
detailed examination of images carried out using the single-image format.
Page 33

Ch.3 Sequence of Examination
< 31 >
REGIUS Console CS-3 OPERATION MANUAL Ver. 1.10 2005.2
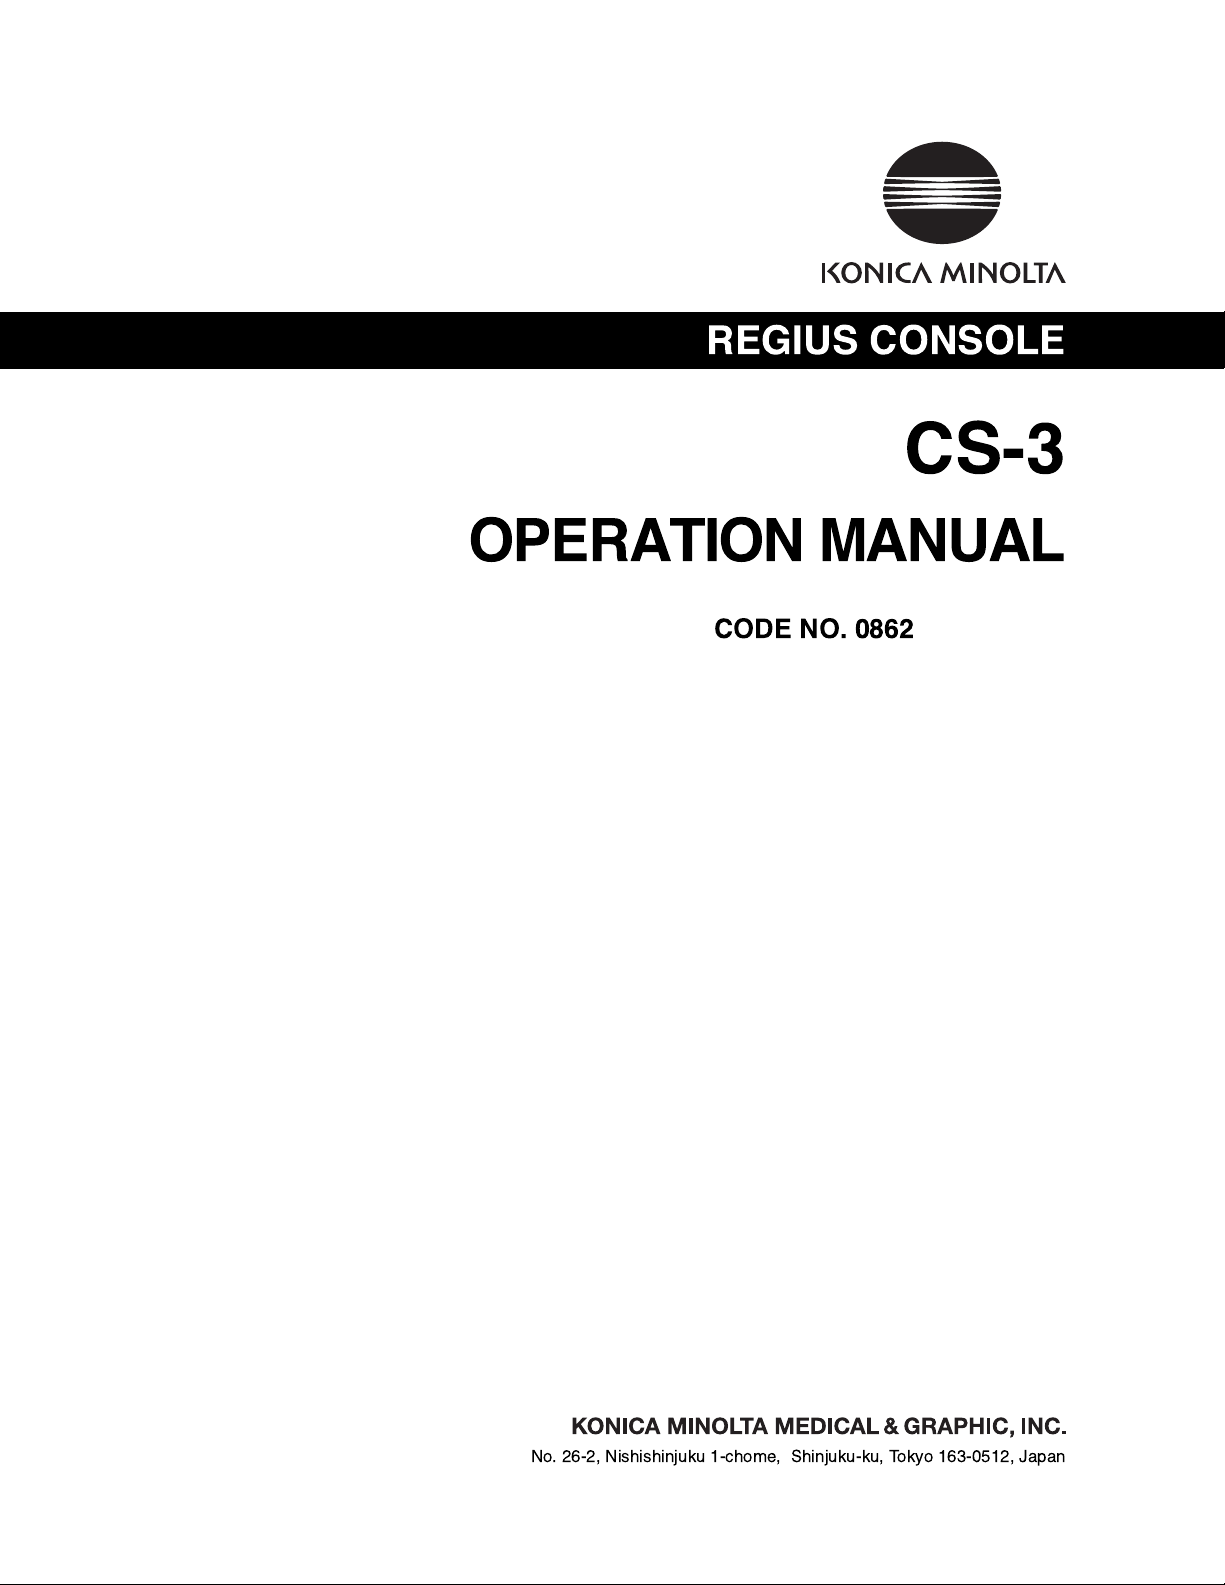
Once CS-3 is activated, the name of the examining operator must be selected.
Selection of Operator
1 Touch the
[KONICAMINOLTA]
button at the bottom left of
the initial screen.
(examination search screen
or examination list screen)
• The system menu will be
displayed.
2 Touch the [Operator] button.
• The operator selection screen will be displayed.
[KONICAMINOLTA]
Button
Initial Screen
3 Touch the button corresponding to your own
name on the list of operators' names followed by
the [OK] button.
• The display will return to the system menu.
4 Touch the [Back] button.
• The display will return to the examination search
screen.
• The selected operator name will be displayed at
the top left of the examination search and examination list screens.
When the system configuration is set so that
operator data is sent
from a higher device,
operator selection from
CS-3 is not possible.
New registration of
operator name and
amendments of operator name may be effected using the user tool.
On systems where examination data is input from CS-3 only, the examination search screen is usually set as the initial
screen.
Prior to examination, patient data for the patient to be examined is input using the input panel (or the CS-3 keyboard)
on the CS-3 Operation Unit.
Patient Data Input (Input from CS-3)
1 Touch the patient ID input column.
• The input column will turn white and a character
input cursor will appear.
2 Touch the input panel and input the patient ID.
3 Touch the [ENTER] button.
• The next input window will turn white and a character input cursor will appear.
2
3
3
4
1
3
2
Page 34

Ch.3 Sequence of Examination
< 32 >
REGIUS Console CS-3 OPERATION MANUAL Ver. 1.10 2005.2
After input of one item and execution of the [ENTER] button, the cursor will automatically move to the next column.
Where input is unnecessary, touch the [ENTER] button or the column to be input
directly.
For input of "sex", "pregnancy" and "ward", input
buttons are displayed instead of the input window.
Touch these buttons to select each item. If input of
"ward" is not required, touch the empty window.
Ex. : Screen for selection of sex
Following this screen:
• Initializing examination
• Display of list of input patient data
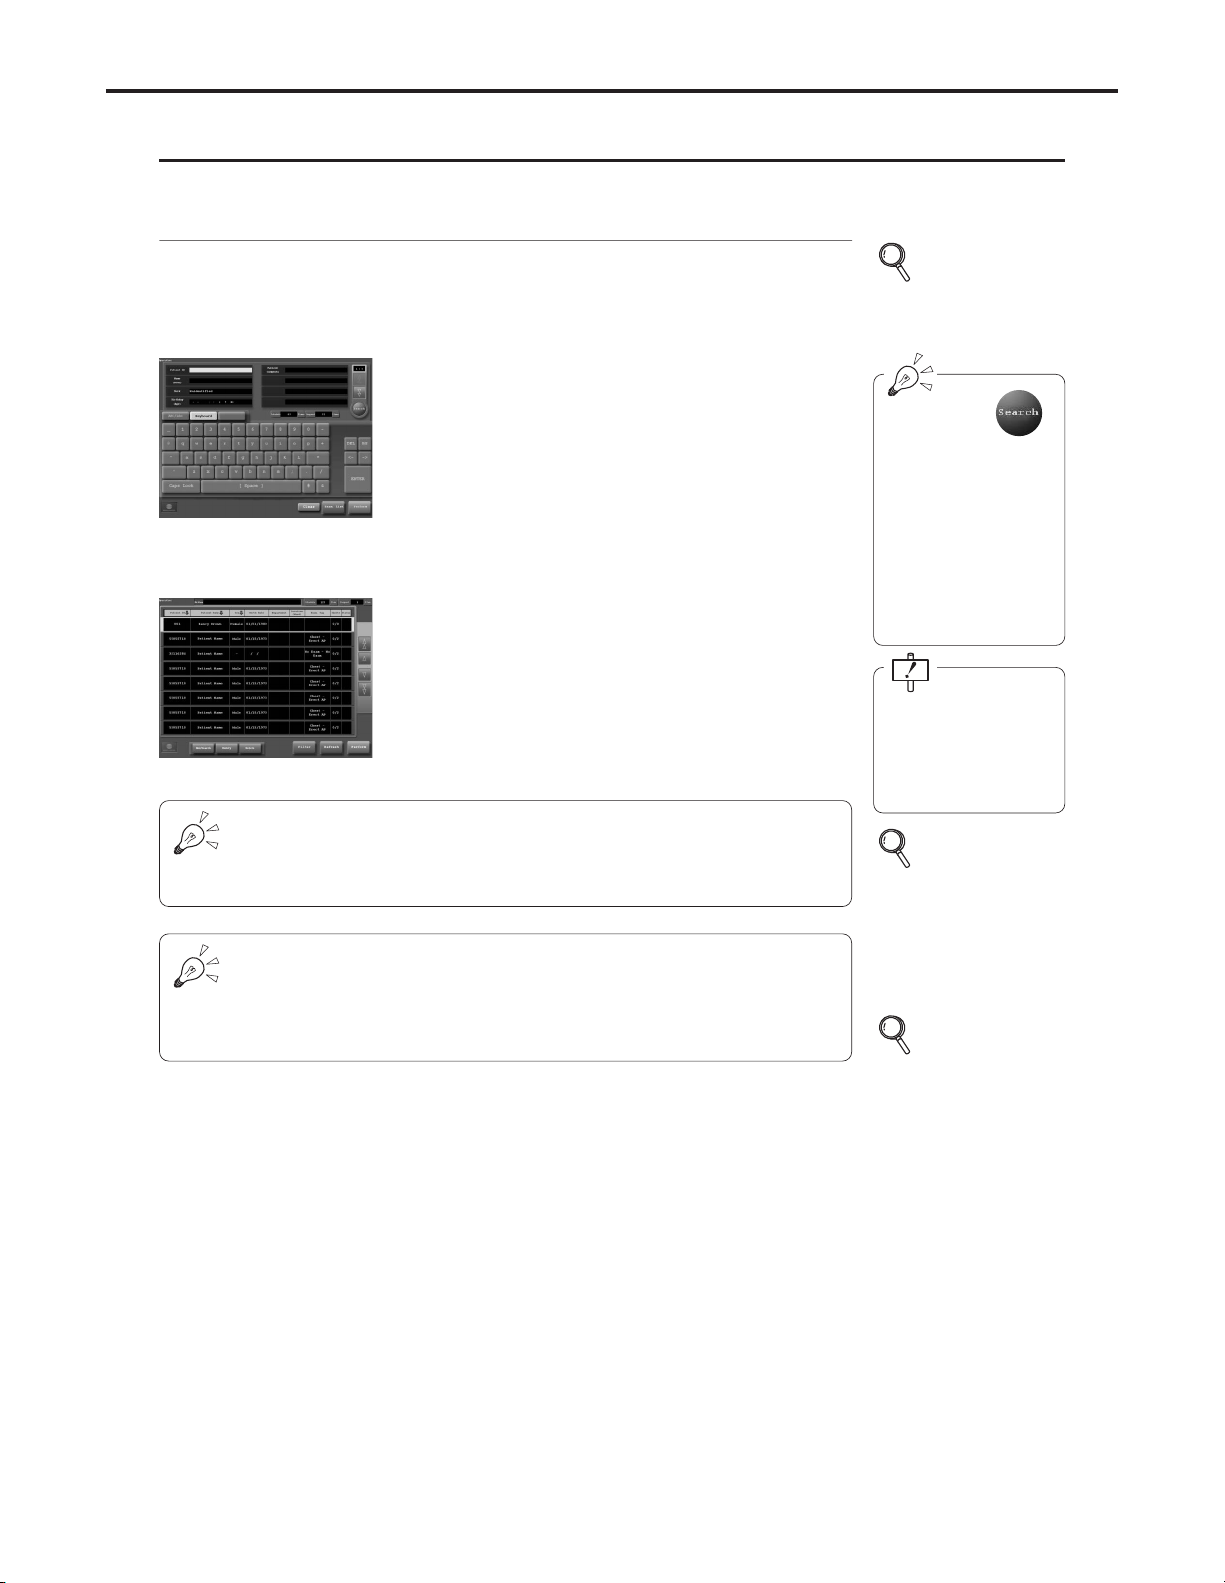
With basic system or the search-type system, it is possible to search patient data from the examination search screen
using the patient ID, etc., as a key and to input this data into the examination search screen.
Patient Data Input (Search from Data Base)
p.33 Initialization
of
Examination
p.36 Reserving
Patient Data
1 Touch the input window for input of patient ID,
name (English) and input the characters to be
searched from the input panel (or CS-3 keyboard).
2 Touch the [Search] button.
• Patient data including the input characters will be
searched and the result screen (patient ID, name,
sex, age) displayed.
Items of patient data that can be retrieved: patient ID, name.
Search by Patient ID
: Searches only those Patient IDs that perfectly match the ID.
Search by Patient Name
: Searches all patient names that partially match the con-
dition.
3 Make selection by touching the patient data to
be input and touch the [OK] button.
• The selected patient data will be input into the
examination search screen.
Following this screen:
• Initializing examination
• Display of list of input patient data
p.33 Initialization
of
Examination
p.36 Reserving
Patient Data
Input of patient data on
the examination search
screen will be registered in the data base
upon initialization of
examination.
In systems where
patient information is
retrieved from higher
devices or where the
patient data base is in
CS-3, the search is
automatically executed
when the cursor moves
to the next search item
after input of the previous item.
The [Search] button is displayed only when the system configuration is set so that
the patient data is searched from the data base in the higher device or CS-3.
Where only one lot of
patient data is
searched, the list
reflecting the result of
search will not be displayed. Data will be
directly input into the
examination search
screen.
1
2
3
Page 35

Examination Body
Part/Parameter
Selection Screen
Examination
List
Screen
Examination
Search
Screen
or
Ch.3 Sequence of Examination
< 33 >
REGIUS Console CS-3 OPERATION MANUAL Ver. 1.10 2005.2
In systems where examination data is sent from ID-680 Series or Radiology Information System (RIS), the examination list screen is usually set as the initial screen.
Patient data sent from ID-680 Series or Radiology Information System (RIS) is displayed on the examination list
screen in the order in which it is registered.
Checking Patient Data
1 Make selection by touching the patient data to
be examined.
• The selected data will be displayed in blue characters in a green frame.
Following this screen:
• Initialization of Examination
• Deletion of patient data
➔Select the patient data to be deleted
from the list and touch the [Delete] button.
• Modification of patient data
➔Select the patient data to be modified
from the list and touch the [Modify] button.
• Input of new patient data
➔Touch the [New/Search] button
• Search and input of patient data
➔Touch the [New/Search] button
p.33 Initialization
of
Examination
p.95 Patient Data
Amendment
Screen
p.92 Patient Data
Input/Search
Screen
(When the
examination
list screen
has been set
as the initial
screen)
In systems where
patient information is
retrieved from higher
devices, touch the "list
update" button to
update the list if the
patient information to
be retrieved is not displayed.
Touch the [Perform] button on the examination search or examination list screen.
Initialization of Examination
When patient data is input using the examination search screen or when examination data
sent from ID-680 Series or Radiology Information System (RIS) does not include order,
the examination body part/parameter selection screen is displayed.
Following this screen:
• Examination Body Part/ Parameter Selection
p.34 Examination
Body Part/
Parameter
Selection
When order is not registered
1
Page 36

Examination
Check
Screen
Examination
List
Screen
Examination
Search
Screen
or
Ch.3 Sequence of Examination
< 34 >
REGIUS Console CS-3 OPERATION MANUAL Ver. 1.10 2005.2
When order is registered
When the examination order is already registered or the order is contained in the examination information sent from ID-680 Series or Radiology Information System (RIS),
the examination check screen is displayed.
Following this screen:
• Exposure
p.36-44 Exposure
The [Perform] button
appears on the initial
screen (examination
search or examination
list screen).
The body part to be examined is selected using the list of buttons displayed and the order is registered.
Up to 32 examination orders may be registered for one patient data.
Examination Body Part/ Parameter Selection
1 Touch the reader classification button to select
the reader.
• The display of buttons will automatically change
according to the reader selection.
2 Touch and select the body part from the general
classification buttons.
3 Touch the parameter button and select
detailed parameters.
• Selection using the parameter button is registered
as an order and displayed on the list.
•A parameter button with a yellow line indicates a
button where multiple parameters are set.
Touching such buttons will result in simultaneous
registration of all orders.
• The cursor in the order column (green frame)
moves to the next order.
4 To register multiple parameters in orders, touch the
following parameter buttons.
• To delete parameters mistakenly registered, move
the cursor to the relevant order by touching that
order before the "delete" button.
• After display of the exposure parameter selection
screen, parameters registered in orders by set
parameters are sorted in the sequence in which
they are registered.
[My Favorite] Button
p.98
Body
Part/Parameter
Selection
Screen
[My Favorite] Button
In [My Favorite] Button,
register the "parameter
key" and "set key" that
are frequently used.
Several parameter keys
of different readers can
be registered as a
favorite "set key".
Set Key
Several exposure parameters are registered in
the set keys.
The parameter that is
used frequently can be
registered.
A yellow under line is displayed at the bottom of
the parameter button.
Yellow
1
2
3
Page 37

Ch.3 Sequence of Examination
< 35 >
REGIUS Console CS-3 OPERATION MANUAL Ver. 1.10 2005.2
5 After the order registration is completed;
s Touch the [OK] button to start the examination.
• The examination check screen will be displayed.
s Touch the [Schedule] button to register another
examination.
• The screen will return to the initial screen.
[OK] Button
Following this screen:
• Start examination
• Register another examination
[Schedule]
Button
p.31, 32
Patient Data
Input
p.36-44 Exposure
When the reader device is a cassette reader, and the
registration method is "Bar Code Registration",
the cassette bar code may be read into the order registered on the examination check screen (see right).
Select the order in which the bar code should be registered to read the cassette bar code.
Touch the [OK] button to validate the registration of the
bar code. Insertion of the cassette without touching the
[OK] button will result in error ("REGISTRATION
ERROR - PRESS EJECT").
If this message is displayed, push the eject button on
the cassette reader to remove the cassette. Then, register the bar code again and touch the [OK] button to
move to the examination check screen. When the examination check screen is displayed, insert the cassette
again.
XXXXXXXXXXXxxxxx
Page 38

Ch.3 Sequence of Examination
< 36 >
REGIUS Console CS-3 OPERATION MANUAL Ver. 1.10 2005.2
Once orders have been registered using the examination body part/parameter selection screen, examination may be
initiated immediately; after registration of the examination body part/parameters additional patient data may be input or
searched using CS-3, it is also possible to simply make a reservation on the examination list.
Reserving Patient Data
1 Input patient data on the examination search
screen.
2 Touch the [Perform] button.
• The examination body part/parameter selection
screen will be displayed.
3 Select exposure parameters and register the
order.
4 Touch the [Schedule] button.
• The exposure parameters will be registered in
patient data input in step 1 and the display
returned to the initial screen.
• The number displayed in the [items] column will be
increment by “1” each time a reservation is added.
p.31, 32
Patient Data Input
(Input from CS-3)
(Search from Data
Base)
p.34 Examination
Body Part/
Parameter
Selection
After reserving patient
data on the examination list and returning to
the examination search
screen,
the next patient data
may be input. To check
patient data reserved
on the examination list,
touch the [Exam. List]
button on the examination search screen.
The procedure for doing exam using an upright position reader with the examination search screen in Single-Image
format is described below.
Exposure [Single-Image Format/Upright Position Reader]
1 Touch the order to be read on the examination
check screen.
• The selected order will be shown in a green frame.
• Parameters corresponding to exposure parameters
and reader status will be displayed in the image
display field.
2 Ensure that "Ready" is displayed in the reader
status window.
• If "Erasing" is displayed, wait until erasure has
been completed and the display changes to
"Ready".
Reader Status
Exposure Parameter
p.81 Examination
Check
Screen
[Single-Image
Screen]
If the reader device is
upright position reader,
the patient name and
patient ID will be displayed in the reader
display panel.
Check with the patient
to ensure that the correct name is displayed.
2
4
Page 39

Ch.3 Sequence of Examination
< 37 >
REGIUS Console CS-3 OPERATION MANUAL Ver. 1.10 2005.2
3 Position the reader device to match the patient.
• If it is necessary to alter size, angle or position,
use the panel switches on the reader device or
touch the image display field on the CS-3
Operation Unit to select them on the detailed data
selection screen.
• For details of operation of the reader device, refer
to the reader device operation manual.
4 Depress the exposure button on the X-ray gener-
ator.
• The image read by the reader will be displayed in
the image display field.
• The S-value of the image read will be displayed
below the image display field.
• The green frame will move to the next order on the
order list.
5 Repeat steps 1~4 to execute exposure for
each of the orders on the order list.
Whenever the examination is started and the
device is switched to
another device, an erasure will be carried out.
In order to carry out the
examination smoothly,
it is recommended that
order selection be
made prior to positioning the patient for exposure when using the
upright position reader.
Automatic Confirmation Function
In cases where there is an automatic confirmation function, after a certain time has elapsed from reading the image with a green frame
around the order, the confirmation process will be judged to be completed and the image will be output.
This function is not available in the examination check screen (multipleimage format).
• The [OK] button displays time remaining (secs.) until the order
is confirmed automatically.
p.45, 46
Image Output
[Single-Image Format]
p.95
Patient Data
Amendment Screen
p.98
Body Part/ Parameter
Selection Screen
p.103
Detailed Data
Setting Screen
(Image Processing)
p.111
Detailed Data
Setting Screen
(Print Format)
p.118
Detailed Data
Setting Screen
(Overlay)
Following this screen:
Select the target
order from the
order list.
Amending patient data
Amending exposure parameters/
Adding or deleting the order
Amending image processing
Select the target
order from the
order list.
Select the target
order from the
order list.
Amending print format
Amending overlay
Image
Display
Field
Image
Processing
Print
Format
Overlay
Touch
Select the target
order from the order
list.
Outputting the image
Touch
Touch
Touch
Image
Display
Field
Touch
Image
Display
Field
Touch
Touch
Touch
Touch
Page 40

Ch.3 Sequence of Examination
< 38 >
REGIUS Console CS-3 OPERATION MANUAL Ver. 1.10 2005.2
The procedure for doing an examination using a cassette reader with the examination check screen in single-image
format using a bar code reader is described below.
Exposure [Single-Image Format/Cassette Reader + Bar Code Registration]
1 Touch the order to be read on the order list.
• The selected order will be displayed in a green
frame.
2 Read the bar code on the cassette using the bar
code reader.
• Successful reading of the bar code will be indicated by a short tone (beep) and illumination (green)
of the LED indicator.
• The cassette bar code will be displayed in the
selected order.
3 Repeat steps 1 and 2 to read the bar code for
each order.
4 Insert the cassettes which have completed the
exposure process into the insertion slot of the
cassette reader.
•Cassettes may be inserted in any order.
• The image read will be displayed at the left of the
order.
XXXXXXX
XXXXxxxxx
5 To check images read, touch the order corre-
sponding to the image to be checked.
• The image of the selected order will be displayed
in the image display field.
• The S-value of the image read will be displayed
below the image display field.
Automatic Confirmation Function
In cases where there is an automatic confirmation function, after a certain time has elapsed from reading the image with a green frame
around the order, the confirmation process will be judged to be completed and the image will be output.
This function is not available in the examination check screen (multipleimage format).
• The [OK] button displays time remaining (secs.) until the order
is confirmed automatically.
p.81
Examination Check
Screen
[Single-Image Screen]
Bar code reading
/
exposure /cassette
reading may be carried
out individually for each
order.
The description for the
use of bar code reader
in the left is an example
for a single bar code
reader. However, it can
be also applied to a
multi-bar code reader.
1
Page 41

Ch.3 Sequence of Examination
< 39 >
REGIUS Console CS-3 OPERATION MANUAL Ver. 1.10 2005.2
The procedure for carrying out an examination using a cassette reader without a bar code reader with the examination
check screen in single-image format is described below.
Exposure [Single-Image Format/Cassette Reader + Screen Menu Selection]
1 Touch the order to be read on the order list.
• The reading sequence will be displayed according
to the touch sequence.
• Touching again an order displayed in the
reading sequence will result in cancellation of
reading of that order and deletion from the reading
sequence.
2 After exposure, insert the cassette into the cassette
insertion slot in the sequence set in step
1.
• The image read from the cassette will be displayed
in the image display field corresponding to the
order "#1".
• Each time the reading is completed, the reading
order of each order will be descended.
p.81 Examination
Check
Screen
[Single-Image
Screen]
p.45, 46
Image Output
(Single-Image Format)
p.95
Patient Data
Amendment Screen
p.98
Body Part/ Parameter
Selection Screen
p.103
Detailed Data
Setting Screen
(Image Processing)
p.111
Detailed Data
Setting Screen
(Print Format)
p.118
Detailed Data
Setting Screen
(Overlay)
Following this screen:
Select the target
order from the
order list.
Amending patient data
Amending exposure parameters/
Adding or deleting the order
Amending image processing
Select the target
order from the
order list.
Select the target
order from the
order list.
Amending print format
Amending overlay
Image
Display
Field
Image
Processing
Print
Format
Overlay
Touch
Select the target
order from the order
list.
Outputting the image
Touch
Touch
Touch
Image
Display
Field
Touch
Image
Display
Field
Touch
Touch
Touch Touch
1
Page 42

Ch.3 Sequence of Examination
< 40 >
REGIUS Console CS-3 OPERATION MANUAL Ver. 1.10 2005.2
3 To check images read, touch the order corre-
sponding to the image to be checked.
• The image of the selected order will be displayed
in the image display field.
• The S-value of the image read will be displayed
below the image display field.
Automatic Confirmation Function
In cases where there is an automatic confirmation function, after a certain time has elapsed from reading the image with a green frame
around the order, the confirmation process will be judged to be completed and the image will be output.
This function is not available in the examination check screen (multipleimage format).
• The [OK] button displays time remaining (secs.) until the order
is confirmed automatically.
The detailed data settings ("Image Processing",
"Print Format" and "Overlay") cannot be modified
once the order is reserved in the step
1.
Touch the image display field to change it after the
reading is completed or the reading reservation is
canceled.
p.45, 46
Image Output
(Single-Image Format)
p.95
Patient Data
Amendment Screen
p.98
Body Part/ Parameter
Selection Screen
p.103
Detailed Data
Setting Screen
(Image Processing)
p.111
Detailed Data
Setting Screen
(Print Format)
p.118
Detailed Data
Setting Screen
(Overlay)
Following this screen:
Select the target
order from the
order list.
Amending patient data
Amending exposure parameters/
Adding or deleting the order
Amending image processing
Select the target
order from the
order list.
Select the target
order from the
order list.
Amending print format
Amending overlay
Image
Display
Field
Image
Processing
Print
Format
Overlay
Touch
Select the target
order from the order
list.
Outputting the image
Touch
Touch
Touch
Image
Display
Field
Touch
Image
Display
Field
Touch
Touch
Touch Touch
Page 43

Ch.3 Sequence of Examination
< 41 >
REGIUS Console CS-3 OPERATION MANUAL Ver. 1.10 2005.2
The procedure for carrying out an examination using an upright position reader with the examination check screen in
multiple-image format is described below.
Exposure [Multiple-Image Format/Upright Position Reader]
1 Touch the order to be read on the order list.
• The selected order will be shown in a green frame.
• Parameters corresponding to exposure parameters
and reader status will be displayed in the image
display field.
2 Ensure that "Ready" is displayed in the reader
status window.
• If "Erasing" is displayed, wait until erasure has
been completed and the display changes to
"Ready".
p.85 Examination
Check
Screen
[Multiple Image
Screen]
If the reader device is
REGIUS 350, the
patient name and
patient ID will be displayed in the reader
display panel.
Check with the patient
to ensure that the correct name is displayed.
3 Position the reader device to match the patient.
• If it is necessary to alter size, angle or position,
use the panel switches on the reader device or
touch the image display field on the CS-3
Operation Unit, select them on the detailed data
selection screen.
• For details of operation of the reader device, refer
to "Upright Reader Operation Manual".
4 Depress the exposure button on the X-ray gener-
ator.
• The image read by the reader will be displayed in
the image display field.
• The S-value of the image read will be displayed
below the image display field.
• The green frame will move to the next order on the
order list.
5 Repeat steps 1~4 to execute exposure for
each of the orders on the order list.
Whenever the examination is started and the
device is switched to
another device, an erasure is carried out.
In order to expose
smoothly, it is recommended that order
selection be made prior
to positioning the
patient for exposure.
The automatic confirmation function cannot be used in the multiple-image format.
1
Page 44

Ch.3 Sequence of Examination
< 42 >
REGIUS Console CS-3 OPERATION MANUAL Ver. 1.10 2005.2
The procedure for carrying out an examination using a cassette reader with the examination check screen in multipleimage format using a bar code reader is described below.
Exposure [Multiple-Image Format/Cassette Reader + Bar Code Registration
1 Touch the order to be read on the order list.
• The selected order will be displayed in a green
frame.
2 Read the bar code on the cassette using the bar
code reader.
• Successful reading of the bar code will be indicated by a short tone (beep) and illumination (green)
of the LED indicator.
• The cassette bar code will be displayed in the
selected order.
XXXXX
XXXXXXxxxxx
3 Repeat steps 1, 2 to read the bar code for
each order.
p.45, 46
Image Output
(Single-Image Format)
p.95
Patient Data
Amendment Screen
p.98
Body Part/ Parameter
Selection Screen
p.103
Detailed Data
Setting Screen
(Image Processing)
p.111
Detailed Data
Setting Screen
(Print Format)
p.118
Detailed Data
Setting Screen
(Overlay)
Following this screen:
Select the target
order from the
order list.
Amending patient data
Amending exposure parameters/
Adding or deleting the order
Amending image processing
Select the target
order from the
order list.
Select the target
order from the
order list.
Amending print format
Amending overlay
Image
Display
Field
Image
Processing
Print
Format
Overlay
Touch
Select the target
order from the order
list.
Outputting the image
Touch
Touch
Touch
Image
Display
Field
Touch
Image
Display
Field
Touch
Touch
Touch Touch
p.85
Examination Check
Screen
[Multiple Image Screen]
Bar code reading
/
exposure /cassette
reading may be carried
out individually for each
order.
1
Page 45

Ch.3 Sequence of Examination
< 43 >
REGIUS Console CS-3 OPERATION MANUAL Ver. 1.10 2005.2
4 Insert the cassettes which have completed the
exposure process into the insertion slot of the
cassette reader.
• Cassettes may be inserted in any order.
• The image read will be displayed above the order
with bar code registration.
• The S-value of the image read will be displayed
above the image display field.
The description for the
use of bar code reader
in the left is an example
for a single bar code
reader. However, it can
be also applied to a
multi-bar code reader.
The automatic confirmation function cannot be used in the multiple-image format.
Once the cassette is inserted into the reader, no
operation may be carried out for the image.
When the message shown right is displayed, touch
[YES] to close the message.
p.45, 46
Image Output
(Single-Image Format)
p.95
Patient Data
Amendment Screen
p.98
Body Part/ Parameter
Selection Screen
p.103
Detailed Data
Setting Screen
(Image Processing)
p.111
Detailed Data
Setting Screen
(Print Format)
p.118
Detailed Data
Setting Screen
(Overlay)
Following this screen:
Select the target
order from the
order list.
Amending patient data
Amending exposure parameters/
Adding or deleting the order
Amending image processing
Select the target
order from the
order list.
Select the target
order from the
order list.
Amending print format
Amending overlay
Image
Display
Field
Image
Processing
Print
Format
Overlay
Touch
Select the target
order from the order
list.
Outputting the image
Touch
Touch
Touch
Image
Display
Field
Touch
Image
Display
Field
Touch
Touch
Touch Touch
Page 46

Ch.3 Sequence of Examination
< 44 >
REGIUS Console CS-3 OPERATION MANUAL Ver. 1.10 2005.2
The procedure for carrying out an examination using a cassette reader without a bar code reader with the examination
check screen in multiple-image format is described below.
Exposure [Multiple-Image Format/Cassette Reader + Screen Menu Selection]
1 Touch the order to be read on the order list.
• The reading sequence will be displayed according
to the touch sequence.
• Touching again an order displayed in the reading
sequence will result in cancellation of reading of
that order and deletion from the reading sequence.
2 After exposure, insert the cassette into the cas-
sette reader insertion slot in the sequence set in
step
1.
• The image read from the cassette will be displayed
in the image display field corresponding to the
order "#1".
• The S-value of the image read will be displayed
below the image display field.
• Each time the reading is completed, the reading
sequence of each order will be descended.
The automatic confirmation function cannot
be used in the multipleimage format.
p.45, 46
Image Output
(Single-Image Format)
p.95
Patient Data
Amendment Screen
p.98
Body Part/ Parameter
Selection Screen
p.103
Detailed Data
Setting Screen
(Image Processing)
p.111
Detailed Data
Setting Screen
(Print Format)
p.118
Detailed Data
Setting Screen
(Overlay)
Following this screen:
Select the target
order from the
order list.
Amending patient data
Amending exposure parameters/
Adding or deleting the order
Amending image processing
Select the target
order from the
order list.
Select the target
order from the
order list.
Amending print format
Amending overlay
Image
Display
Field
Image
Processing
Print
Format
Overlay
Touch
Select the target
order from the order
list.
Outputting the image
Touch
Touch
Touch
Image
Display
Field
Touch
Image
Display
Field
Touch
Touch
Touch Touch
p.85
Examination Check
Screen
[Multiple Image Screen]
1
Page 47

Ch.3 Sequence of Examination
< 45 >
REGIUS Console CS-3 OPERATION MANUAL Ver. 1.10 2005.2
The detailed data settings ("Image Processing",
"Print Format" and "Overlay") cannot be modified
once the order is reserved in the step
1.
Touch the image display field to change it after the
reading is completed or the reading reservation is
canceled.
The procedure for image output per order with the examination check screen in single-image format is
described below.
Image Output [Single-Image Format/Output per Order]
In cases where there is an automatic confirmation function, after a certain time has elapsed from reading the
image, the confirmation process will be judged to be completed and the image will be output.
1 Touch the order to be output on the order list.
• The selected order will be displayed in a green
frame.
2 Touch the [OK] button.
• Image output will be initiated and small printer and
host icons will be displayed at the top left of the
image display field.
• Upon initialization of image output, the icons will
change from white to green.
• After completion of output to each device, the
icons will disappear.
3 Repeat steps 1 and 2 to output all the images.
4 Touch the [Complete] button.
• The display changes to the examination search
screen or examination list screen.
When outputting the image again even after the examination is completed, or outputting the image more than once, the second or later image will be output through
the "Image Reference Screen".
p.81 Examination
Check
Screen
[Single-Image
Screen]
Images may be output
one at a time upon
completion of each
image reading operation, or in batch mode
upon completion of the
reading operation for all
orders.
p.46
Image Output
[Single-Image
Format/Batch Mode
Output of all Orders]
: Printer Output
Queue
: Host Output
Queue
Green: Outputting
White: Awaiting output
p.61
Image Reference
after Examination
(Output Again)
Depending on the set up at the time of installation,
either of the icons shown in the right may be printed on
the edge of output film(image data when output to the
Host), indicating the image is mirrored or not.
: not mirrored
: mirrored
2
Page 48

Ch.3 Sequence of Examination
< 46 >
REGIUS Console CS-3 OPERATION MANUAL Ver. 1.10 2005.2
The procedure for batch mode image output with the examination check screen in single-image format is
described below.
Image Output [Single-Image Format/Batch Mode Output of all Orders]
In cases where the automatic confirmation function is activated, after a specific time has elapsed from reading the
image, the confirmation process will be judged to be completed and the image will be output.
1 Check the image processing and overlay for all the
images exposed.
2 Touch the [Complete] button.
•A message will be displayed indicating that there
are images that are not specified to OK or NG.
3 Touch the [YES] button.
• All images will be output and examination terminated.
• Display will return to either the examination search
or examination list screen.
• Touching the [NO] button will result to the examination check screen.
When outputting the image again even after the examination is completed, or outputting the image more than once, the second or later image will be output through
the "Image Reference Screen".
After batch mode output of all orders, examination will be terminated and display will
return to the initial
screen (examination
search or examination
list screen).
p.81 Examination
Check
Screen
[Single-Image
Screen]
p.61
Image Reference
after Examination
(Output Again)
Depending on the set up at the time of installation,
either of the icons shown in the right may be printed on the
edge of output film(image data when output to the Host),
indicating the image is mirrored or not.
: not mirrored
: mirrored
2
3
Page 49

Ch.3 Sequence of Examination
< 47 >
REGIUS Console CS-3 OPERATION MANUAL Ver. 1.10 2005.2
The procedure for image output per order with the examination check screen in multiple-image format is
described below.
Image Output [Multiple-Image Format/Output per Order]
2 Touch the [OK] button.
• Image output will be initiated and small printer and
host icons will be displayed at the top left of the
image display field.
• Upon initialization of image output, the icons will
change from white to green.
• After completion of output to each device, the
icons will disappear.
1 Check the image processing and overlay for the
order to be output.
3 Repeat steps 1 and 2 to output all the images.
4 Touch the [Complete] button.
• The display changes to the examination search
screen or examination list screen.
Images may be output
one at a time upon
completion of each
image reading operation, or in batch mode
upon completion of the
reading operation for all
orders.
p.48
Image Output
[Multiple-Image
Format/Batch Mode
Output of all Orders]
When outputting the image again even after the examination is completed, or outputting the image more than once, the second or later image will be output through
the "Image Reference Screen".
: Printer Output
Queue
: Host Output
Queue
Green: Outputting
White: Awaiting output
p.61
Image Reference
after Examination
(Output Again)
Depending on the set up at the time of installation,
either of the icons shown in the right may be printed on
the edge of output film(image data when output to the
Host), indicating the image is mirrored or not.
: not mirrored
: mirrored
2
Page 50

Ch.3 Sequence of Examination
< 48 >
REGIUS Console CS-3 OPERATION MANUAL Ver. 1.10 2005.2
The procedure for batch mode image output with the examination check screen in multiple-image format is
described below.
Image Output [Multiple-Image Format/Batch Mode Output of all Orders]
2 Touch the [Complete] button.
•A message will be displayed indicating that there
are images that are not specified to OK or NG.
3 Touch the [YES] button.
• All images will be output and examination terminated.
• Display will return to the initial screen (examination search or examination list screen).
• Touching the [NO] button will result to the examination check screen.
1 Check the image processing and overlay for all the
images exposed.
When outputting the image again even after the examination is completed, or outputting the image more than once, the second or later image will be output through
the "Image Reference Screen".
p.85 Examination
Check
Screen
[Multiple-Image
Screen]
p.60 Examination
Termination
After batch mode output of all orders, examination will be terminated and display will
return to the initial
screen (examination
search or examination
list screen).
p.61
Image Reference
after Examination
(Output Again)
Depending on the set up at the time of installation,
either of the icons shown in the right may be printed on
the edge of output film(image data when output to the
Host), indicating the image is mirrored or not.
: not mirrored
: mirrored
2
3
Page 51

Ch.3 Sequence of Examination
< 49 >
REGIUS Console CS-3 OPERATION MANUAL Ver. 1.10 2005.2
The procedure for erasing images in cases where a problem exists with the image read that requires re-execution of exposure is described below.
Image Erasing
In cases where an erroneous cassette has been read onto a selected order from the screen menu, the substitution
function may be used to substitute the correct image for the wrong image.
Single-Image Screen
1 Touch the order for which the image is to be
erased.
2 Touch the [NG] button.
•A confirmation request will be displayed.
3 Touch the [YES] button.
• The image for the selected order will be erased.
• To abort erasure, touch the [NO] button.
• If the erroneous cassette is read for the selected
order from the screen menu, a [substitute] button
will appear on the screen show at left.
p.51 Image
Substitution
When the automatic confirmation function is activated, touch the [NG] button before
the time remaining displayed by the [OK] button decrements to [0].
Change the screen to another one such as a "Multiple-Image Screen" in order to
return the counter to the initial value.
2
3
4 Select the reason for image rejection from the
displayed list (buttons).
• Selecting the reason for image rejection will abort
the image, and displays a message confirming
whether or not to make reexamination.
• Touching the [CANCEL] button will switch to the
“Exam Check” screen without image abortion.
4
5 Touch the [YES] button to implement a reexami-
nation.
• Unprocessed order that is identical to the one
whose image has been aborted will be added.
The order whose image has been aborted will be
displayed with “NG” on the order button.
• Touching the [NO] button will not add an
unprocessed order, while the order whose image
has been aborted will be displayed with “NG” on
the order button.
Text strings displayed on the buttons can be edited using the User Tool.
Changes on “Rejected Reason” and whether or not reexamination was done can be
implemented on the “Image Reference” screen even after completing the examination.
Selected “Rejected Reason” will be controlled by the CS-3 administrator of each
institute.
Page 52

Ch.3 Sequence of Examination
< 50 >
REGIUS Console CS-3 OPERATION MANUAL Ver. 1.10 2005.2
Multiple-Image Screen
1 Touch the order for which the image is to be
erased.
2 Touch the [NG] button under the order whose
image to be erased.
•A confirmation request will be displayed.
3 Touch the [YES] button
• “Reject Reason” screen will be displayed.
When Auto-Confirm is enabled, touch the [NG] button before the remaining time displayed on the [OK] button reaches “0”.
Switching to other screen such as “Multi-Image” screen will reset the count of the
Auto-Confirm.
p.36-44 Exposure
2
3
4 Select the reason for image rejection from the
displayed list (buttons).
• Selecting the reason for image rejection will abort
the image, and displays a message confirming
whether or not to make reexamination.
• Touching the [CANCEL] button will switch to the
“Exam Check” screen without image abortion.
4
5 Touch the [YES] button to implement a reexami-
nation.
• Unprocessed order that is identical to the one
whose image has been aborted will be added.
The order whose image has been aborted will be
displayed with “NG” on the order button.
• Touching the [NO] button will not add an
unprocessed order, while the order whose image
has been aborted will be displayed with “NG” on
the order button.
Text strings displayed on the buttons can be edited using the User Tool.
Changes on “Rejected Reason” and whether or not reexamination was done can be
implemented on the “Image Reference” screen even after completing the examination.
Selected “Rejected Reason” will be controlled by the CS-3 administrator of each
institute.
Page 53

Ch.3 Sequence of Examination
< 51 >
REGIUS Console CS-3 OPERATION MANUAL Ver. 1.10 2005.2
When a post registered cassette is being used and an image is read from a cassette differing from that in the order,
the following procedure may be followed to substitute the image into the correct order.
Image Substitution
1 Following the image erasing procedure, select
the order mistakenly read and touch the [NG]
button.
•A message requesting confirmation of erasure of
data read will be displayed.
2 Touch the [Recovery] button.
• Orders for which the read process has not been
executed will be displayed on an order selection
list.
Example
The image read into the "skull A>P" order has been mistakenly read
into the "skull R->L" order.
The image substitution
can be carried out only
when the image is read
by the cassette reader
with a screen menu
selection method.
p.49 Image
Erasing
3 Select the correct order for the image read.
• The selected order will be displayed in a green
frame.
4 Touch the [OK] button.
• Display will return to the examination search
screen.
• The image of the order selected in step
1 will be
displayed in the image display field of the order
selected in step
3.
Selection of the "skull A->P" order.
Only cassette reader
orders images of which
have not been read are
displayed as orders
available for substitution on the order selection screen.
Transfer of the image to the "skull
A->P" order.
1
2
3
4
Page 54

Ch.3 Sequence of Examination
< 52 >
REGIUS Console CS-3 OPERATION MANUAL Ver. 1.10 2005.2
Use of print formats allows aligned output on one film either of two versions of the same image each
processed differently or of two different images.
Print Format
Two Images Aligned Horizontally Two Images Aligned Vertically
Primary image Secondary image
Primary image
Secondary image
[1 on 1 Output] (From 1 Image to 2 Frames on 1 Film)
Two versions of the same exposed image may be output on one film.
[2 on 1 Output] (From 2 Images to 2 Frames on 1 Film)
Two different exposed images may be output on one film.
Two Images Aligned Horizontally Two Images Aligned Vertically
First Image Second Image
First Image
Second Image
If this print format is frequently used, register
the settings in advance
in parameter keys on
the user tool so that
you can skip the setting
procedure that has to
be carried out each
time the image is read.
Primary/Secondary
Image
When the image is output by "1 on 1 Output",
the image on the left or
at the top is referred to
as the "Primary Image";
while the one at the
right or the bottom is
referred to as the
"Secondary Image."
(AA)
( )
A
A
(AB)
( )
A
B
Primary
Primary
Secondary
Secondary
For one image to two frames, a stamp will be positioned at one location. For two
images to two frames, a stamp will be positioned for each frame.
Refer to the page for “Detailed Setup” screen (Overlay).
[2 on 1 Output] (Mammography)
Two different exposed images may be output on one film.
Two Images Aligned Horizontally (AB)
First Image Second Image
Mammo Use is not approved in the United States of America.
Page 55

Ch.3 Sequence of Examination
< 53 >
REGIUS Console CS-3 OPERATION MANUAL Ver. 1.10 2005.2
1 on 1 Output Procedure
1 Expose following the normal procedure.
2 Touch the image display area for which "1 on 1
output" is to be carried out.
•A detailed data setting screen (image processing)
will be displayed.
3 Touch the "Print Format" tab.
•A detailed data setting screen (print format) will be
displayed.
4 Touch the "1 on 1" button in the "Print Format" col-
umn and select the direction in which the two
images are to be aligned.
• The white "A" character represents the printed
position of the Primary image, the gray "A" character that of the Secondary image.
5 Set "Film Size", "Orientation" and "Mag. Method"
under the "Trimming" item.
6 Touch the "Image Processing" tab.
•A detailed data setting screen (image processing)
will be displayed.
(When "AA" is selected)
p.36-44 Exposure
If there are images for
which examination has
been completed, the 1
on 1 output can be carried out through the
examination history
screen.
7 Touch the [Secondary] button.
• Check the image to be output as a secondary
image.
• Image processing or ROI may be changed.
"2 on 1 Output" is possible only when the following conditions are satisfied:
• Images must belong to the same examination order.
• The setting "film size" under the print format tab must be identical.
• The setting "direction" under the print format tab must be identical.
• The setting "print format" under the print format tab must be identical.
When "equal-size output" has been selected as the method of image output and the
size of the image read exceeds the output field, the image is trimmed.
Trimming is carried out using the centre of the image read as base.
User tools may be utilized to change the trimming position.
When "full-size output"
has been selected as
the method of image
output and the size of
the image read
exceeds the output
field, the image size is
reduced.
2
3
4
5
6
7
Page 56

Ch.3 Sequence of Examination
< 54 >
REGIUS Console CS-3 OPERATION MANUAL Ver. 1.10 2005.2
9 Touch the [OK] button to output the Image.
The image read is output in 2 frames on 1 film in accordance with set parameters.
Image processing of Primary and Secondary images is carried out according to
image processing conditions registered in parameter keys selected prior to exposure.
When trimming is carried out with "equal-size output" selected as the method of output, the image read is output after trimming using the image centre as base.
2 on 1 Output Procedure
1 Expose following the normal procedure.
2 Touch the image display field where "2 on 1 out-
put" is to be carried out as a first image.
•A detailed data setting screen (image processing)
will be displayed.
3 Touch the "Print Format" tab.
•A detailed data setting screen (print format) will be
displayed.
4 Touch the "2 on 1" button in the "Print Format" col-
umn and select the direction in which the two
images are to be aligned.
• The character "A" represents the printed position
of the first image, the character "B" that of the second image.
• The relative positions of the two images are determined by the order in which they are output (by
touching the "OK" button). However, these positions may be switched when the second image is
output.
p.36-44 Exposure
If there are images for
which examination has
been completed, the 2
on 1 output can be carried out through the
examination history
screen.
p.103
Detailed Data
Setting Screen
(Image Processing)
p.111
Detailed Data
Setting Screen
(Print Format)
The secondary image will be
displayed.
8 Touch the [OK] button.
• Display will return to the examination check
screen.
8
9
2
3
4
Page 57

Ch.3 Sequence of Examination
< 55 >
REGIUS Console CS-3 OPERATION MANUAL Ver. 1.10 2005.2
5 Set "Film Size", "Orientation" and "Mag. Method"
under the "Trimming" item.
6 Touch the [OK] button.
• Display will return to the examination check
screen.
7 Repeat steps 2~6 to make "Print Format" and
"Trimming" settings for the second image.
• Settings made must be identical to those for the
first image. If settings differ, the second image will
be identified as the first image of a different "2 on 1
output".
8 Touch the [OK] button for the first image (image
"A") to be output.
• At this point, the image output is just set in the
printer queue, not actually output to the printer.
• The printer icon will remain displayed in the top
left corner of the image display field.
"AB" will be displayed.
The display of
the print format switches
from "A" to
"AB".
10 Touch the [OK] button.
• Images are output in the 2 on 1 format.
AB is selected.
9 Touch the [OK] button for the second image
(image "B") to be output.
•A message requesting confirmation of "2 on 1 output" will be displayed.
• Touching the [Right/Left Field Switch] button here
will enable switching of the relative positions of
images "A" and "B."
Image A
Image B
If an error has been made in the "2-on-1 output" combination, touch the "CANCEL"
button. This will return the second image to its status prior to touching the "OK button.
Return the print format of the order mistakenly set to "2-on-1 output" to single-image
format and set the print format of the correct second order to the "2-image" status.
If the examination is completed with only one image confirmed ([OK]), only the confirmed image is output on one side of the film.
If the confirming message is not displayed,
either the "Print Format"
or "Trimming" settings
for the second image
may differ to those for
the first image.
Check "Print Format"
and "Trimming" settings
and correct them so
that they are same as
those for the first
image.
p.111
Detailed Data
Setting Screen
(Print Format)
is selected.
A
B
@@@@@@@@e?
@@@@@@@@e?
@@h?
@@h?
@@h?
@@h?
@@h?
@@h?
@@@@@@@@e?@@@@@@@@?e
@@@@@@@@e?@@@@@@@@?e
@@@@@@@@
@@@@@@@@
@@
@@
@@
@@
@@
@@
@@
@@
@@
@@
@@
@@
@@
@@
?@@
?@@
?@@
?@@
?@@
?@@
?@@@@@@@@
?@@@@@@@@
?@@@@@@@@?e@@@@@@@@
?@@@@@@@@?e@@@@@@@@
@@g
@@g
@@g
@@g
@@g
@@g
@@@@@@@@
@@@@@@@@
@@
@@
@@
@@
@@
@@
@@
@@
@@@@@@@@e?
@@@@@@@@e?
@@h?
@@h?
@@h?
@@h?
@@h?
@@h?
@@@@@@@@e?@@@@@@@@?e
@@@@@@@@e?@@@@@@@@?e
@@@@@@@@
@@@@@@@@
@@
@@
@@
@@
@@
@@
@@
@@
@@
@@
@@
@@
@@
@@
?@@
?@@
?@@
?@@
?@@
?@@
?@@@@@@@@
?@@@@@@@@
?@@@@@@@@?e@@@@@@@@
?@@@@@@@@?e@@@@@@@@
@@g
@@g
@@g
@@g
@@g
@@g
@@@@@@@@
@@@@@@@@
@@
@@
@@
@@
@@
@@
@@
@@
[Exchange Left and Right] button
[Exchange Upper and Bottom] button
6
8
9
10
10
Page 58

Ch.3 Sequence of Examination
< 56 >
REGIUS Console CS-3 OPERATION MANUAL Ver. 1.10 2005.2
2 on 1 Output Procedure (Mammography)
1 Expose mammography images following the
normal procedure.
2 Touch the image display field where "2 on 1 out-
put" is to be carried out as a first image.
•A detailed data setting screen (image processing)
will be displayed.
3 Touch the "Print Format" tab.
•A detailed data setting screen (print format) will be
displayed.
4 Touch the "2 on 1" button in the "Print Format" col-
umn and select the direction in which the two
images are to be aligned.
• The character "A" represents the printed position
of the first image, the character "B" that of the second image.
• The relative positions of the two images are determined by the order in which they are output (by
touching the "OK" button). However, these positions may be switched when the second image is
output.
p.36-44 Exposure
If there are images for
which examination has
been completed, the 2
on 1 output can be carried out through the
examination history
screen.
p.103
Detailed Data
Setting Screen
(Image Processing)
p.111
Detailed Data
Setting Screen
(Print Format)
5 Set "Film Size", "Orientation" and "Mag. Method"
under the "Trimming" item.
6 Touch the [OK] button.
• Display will return to the examination check
screen.
7 Repeat steps 2~6 to make "Print Format" and
"Trimming" settings for the second image.
• Settings made must be identical to those for the
first image. If settings differ, the second image will
be identified as the first image of a different "2 on 1
output".
The display of
the print format switches
from "A" to
"AB".
@@@@@@@@e?
@@@@@@@@e?
@@h?
@@h?
@@h?
@@h?
@@h?
@@h?
@@@@@@@@e?@@@@@@@@?e
@@@@@@@@e?@@@@@@@@?e
@@@@@@@@
@@@@@@@@
@@
@@
@@
@@
@@
@@
@@
@@
@@
@@
@@
@@
@@
@@
?@@
?@@
?@@
?@@
?@@
?@@
?@@@@@@@@
?@@@@@@@@
?@@@@@@@@?e@@@@@@@@
?@@@@@@@@?e@@@@@@@@
@@g
@@g
@@g
@@g
@@g
@@g
@@@@@@@@
@@@@@@@@
@@
@@
@@
@@
@@
@@
@@
@@
@@@@@@@@e?
@@@@@@@@e?
@@h?
@@h?
@@h?
@@h?
@@h?
@@h?
@@@@@@@@e?@@@@@@@@?e
@@@@@@@@e?@@@@@@@@?e
@@@@@@@@
@@@@@@@@
@@
@@
@@
@@
@@
@@
@@
@@
@@
@@
@@
@@
@@
@@
?@@
?@@
?@@
?@@
?@@
?@@
?@@@@@@@@
?@@@@@@@@
?@@@@@@@@?e@@@@@@@@
?@@@@@@@@?e@@@@@@@@
@@g
@@g
@@g
@@g
@@g
@@g
@@@@@@@@
@@@@@@@@
@@
@@
@@
@@
@@
@@
@@
@@
8 Touch the [OK] button for the first image (image
"A") to be output.
• At this point, the image output is just set in the
printer queue, not actually output to the printer.
• The printer icon will remain displayed in the top
left corner of the image display field.
"AB" will be displayed.
2
3
4
6
6
Mammo Use is not approved in the United States of America.
Page 59

Ch.3 Sequence of Examination
< 57 >
REGIUS Console CS-3 OPERATION MANUAL Ver. 1.10 2005.2
11Touch the [OK] button.
• Mammograpic Images are output in the 2 on 1 format.
AB is selected.
9 Touch the [OK] button for the second image
(image "B") to be output.
•A message requesting confirmation of "2 on 1 output" will be displayed.
• Touching the [Right/Left Field Switch] button here
will enable switching of the relative positions of
images "A" and "B."
If an error has been made in the "2-on-1 output" combination, touch the "CANCEL"
button. This will return the second image to its status prior to touching the "OK button.
Return the print format of the order mistakenly set to "2-on-1 output" to single-image
format and set the print format of the correct second order to the "2-image" status.
If the examination is completed with only one image confirmed ([OK]), only the confirmed image is output on one side of the film.
If the confirming message is not displayed,
either the "Print Format"
or "Trimming" settings for
the second image may
differ to those for the first
image.
Check "Print Format"
and "Trimming" settings
and correct them so that
they are same as those
for the first image.
p.111
Detailed Data
Setting Screen
(Print Format)
Image A
Image B
10Touch the [Up/Down] arrow buttons to adjust the
image position in vertical level.
9
10
10
11
Mammo Use is not approved in the United States of America.
Page 60

Ch.3 Sequence of Examination
< 58 >
REGIUS Console CS-3 OPERATION MANUAL Ver. 1.10 2005.2
One of two examination suspension screens may be displayed depending on the type of system.
- Systems where photography for all examinations is carried out at one location.
- Systems where a suspended examination is continued at a different location.
Examination Suspension
Systems where photography for all examinations is carried out at one location.
1 Touch the [Suspend] button on the examination
check screen.
•A message requesting confirmation of suspension
will be displayed.
2 Touch the [YES] button.
• The examination check screen will be closed and
the display returned to the examination list screen.
" *" is displayed.
Systems where a suspended examination is continued at a different location.
In systems where the same examination list is displayed on multiple CS-3 units and
examinations for which all photography has not been completed and may be carried
out in another photography room, the following procedure should be followed to
suspend examinations.
1 Touch the [Suspend] button on the examination
check screen.
•A message requesting confirmation of suspension
will be displayed.
1
2
1
Page 61

Ch.3 Sequence of Examination
< 59 >
REGIUS Console CS-3 OPERATION MANUAL Ver. 1.10 2005.2
2Select the button corresponding to the examina-
tion room where photography is to be continued.
[Suspend]
Select when the examination is to be continued
using the same CS-3.
• The examination check screen is terminated and the
examination list displayed.
[Change CS-3]
The examination is displayed as suspended on a different
CS-3 to the one on which the examination was suspended.
The list is no longer displayed on the CS-3 on which examination was suspended.
• The examination check screen is terminated and the
examination list displayed.
[Cancel]
"Examination suspension" is discontinued and the examination check screen displayed.
For the examination
that is in exposure
process with other
CS-3
,
"Start" will be displayed
on the line of "Suspend"
item.
When the [Change CS3] button is touched
and examination continued in another room
(on another CS-3),
orders for which photography has been
completed in the previous room will also be
displayed as incomplete. Necessary photography only should be
carried out and examination terminated.
When an examination
has been continued on
another CS-3, the
examination will be
shown as [suspended]
for a certain length of
time on the examination
list even after completion.
To restart an examination in suspended status:
•When the initial screen is the examination search screen
After suspension of the examination and return to the examination search
screen, the next patient data may be input. Touch the [List] button on the
examination search screen to display the examination list and select patient
data for the suspended examination.
•When the initial screen is the examination list screen
Select the examination displayed as " *" and touch the [Perform] button.
To delete a suspended examination:
In order to prevent operational error of suspended examination data, deletion
from the examination list screen is not possible.
To delete a suspended examination that is not required, restart the examination, transfer it to the examination check screen and touch the [Complete] button.
Page 62

Ch.3 Sequence of Examination
< 60 >
REGIUS Console CS-3 OPERATION MANUAL Ver. 1.10 2005.2
To terminate examination after images for all orders have been read, touch the [Complete] button.
Examination Termination
Single-Image Screen Multiple-Image Screen
When Some Images have not been Confirmed
The following message is displayed.
[YES] Touching the [YES] button will make
all images "OK" and terminate examination.
[NO] Touching the [NO] button will effect
return to the examination check
screen.
[YES] Touching the [YES] button will result
in deletion of orders for which
images have not been read and terminate examination.
[NO] Touching the [NO] button will effect
return to the examination check
screen.
When Some Images have not been Read
The following message is displayed.
[YES] Touching the [YES] button will termi-
nate the examination itself.
[NO] Touching the [NO] button will effect
return to the examination check
screen.
When no Image has been Read
The following message is displayed.
Page 63

Ch.3 Sequence of Examination
< 61 >
REGIUS Console CS-3 OPERATION MANUAL Ver. 1.10 2005.2
The procedures to reference and output the image after finishing examination are described below.
Image Reference after Examination (Output Again)
1 Touch the [KONICAMINOLTA] button on the initial
screen.
• The system menu is displayed.
3 Touch the patient data in which the image to be
referenced or output again is contained.
• The patient data in suspend status is displayed in
purple color.
• The frame color around the patient data that is
selected will turn to green.
2 Click the [History] button.
• The examination history screen is displayed.
4 Touch the [Edit] button.
• The image reference screen is displayed.
5 Touch the order to be referenced.
• The image corresponding to the selected order is
displayed in the image display field.
6 Touch the [Output] button to output the image.
• The output setting screen is displayed.
Only suspended examination information for
which image output has
been completed may
be re-output.
Data for which exposure has been completed but for which image
output has not will be
displayed, but may not
be re-output.
Because the image
has not been verified
as OK, the [Output]
button is not active.
7 Click the [Output Destination] button to select
the output device.
8 Touch the [OK] button.
• The image data is output to the selected output
device.
• The output setting screen is closed.
Follow the steps below to cancel the queue that has not been output.
1. Ensure that there is
the queue that has
not been output in
the printer status
check screen or host
status check screen.
2. Invoke the output setting screen.
• Ensure that the [Output
Destination] button for
the queue that has not
been output is kept
selected.
3. Touch the selected
[Output Destination]
button to cancel the
queue.
p.134 Host Status
Check
Screen
p.135 Printer
Status
Check
Screen
Multiple devices can be
selected at a time as
the output device.
2
4
3
6
7
8
1
2
3
Page 64

Ch.3 Sequence of Examination
< 62 >
REGIUS Console CS-3 OPERATION MANUAL Ver. 1.10 2005.2
Using this function, images processed on the other console can be browsed from your console and can be reprinted.
Procedures to browse the images processed on the other console and to reprint these images are described below.
Image Sharing
1 Touch the [KONICAMINOLTA] button on the initial
screen.
• The system menu is displayed.
3 Touch the [Network] Button at the upper right of
the examination history screen.
• ”Console Select” screen will be displayed.
• Name of your CS-3 will be displayed on the
[Network] button.
2 Touch the [History] Button.
• The examination history screen is displayed.
4 In the network field, touch the button for the
Console on which the desired image resides.
• Frame of the touched button changes to green.
• Name of CS-3s whose images can be browsed are
shown on each button.
5 Touch the [OK] Button.
• “Exam History” screen of the selected Console will
be displayed. The name of CS-3 that is currently
referred will be displayed at the upper right of the
“Exam History” screen.
• Touching the button in the local column where the
name of your CS-3 is shown will display the “Exam
History” screen of your own CS-3.
• Touch the [CANCEL] button to return to the “Exam
History” screen of your own CS-3.
Browsing is made possible only when the setting is made so by the
service engineer.
5
4
3
2
It may take a little longer before the ”Exam History” screen of the target Console
appears depending on the data size of the image stored in the target Console.
The images that can be browsed using the “Image Sharing” function are only those
available at the time when the connection to the target Console is made. (step 5)
Changes brought during browsing will not be updated. To update the browsing
images, close the browsing screen first, then make a connection again to the target
console. A message “Importing exam data. Please wait ....” will be displayed during
update process.
Page 65

Ch.3 Sequence of Examination
< 63 >
REGIUS Console CS-3 OPERATION MANUAL Ver. 1.10 2005.2
8 Touch the order whose image shall be referred.
• Image of the selected order will be displayed in the
image display field.
• Image processing or overlay setting as practiced
in “Exam Check” screen can be possible on this
screen as well.
9 Touch the [Output] to make a reprint.
• “Output Setup” screen will be displayed.
10
Select the [Device Select] button of the output
device (output devices set to your own Console)
from which the image shall be output.
11Touch the [OK] Button.
• Output of the image will be made to the selected
output device.
• Return to the “Image Reference” screen after closing the “Output Setup” screen.
Output devices set on
the “Output Setup”
screen are those set on
your own Console.
Actual output is also
performed from your
own Console.
Exiting the Image Reference/Reprint
Procedures to exit the image reference/reprint and to return to the “Exam History” screen
of your own Console is described below.
1 Touch the [Back] Button at the bottom right of
the examination history screen.
• “Console Select” screen will be displayed.
• Name of the target CS-3 that is under reference will
be shown on the [Network] button.
2 Touch the button in the local column (name of
your own CS-3 is displayed).
• Frame of the touched button changes to green.
3 Touch the [OK] Button.
• Returns to the “Exam History” screen of your own
CS-3.
• Touching the [CANCEL] button will switch to the
target CS-3 that has been referred to.
3
2
1
11
10
9
8
6 Touch the Patient Info that contains the images to
be browsed or reprinted.
• Suspended Patient Info is displayed in purple.
• The frame of the selected Patient Info changes to
green.
7 Touch the [Edit] Button.
• “Image Reference” screen will be displayed.
7
6
Changes on Exam
Condition, Image
Processing and Overlay
will be made using the
settings of your own
console.
Multiple output devices
can be selected at a
time.
Page 66

Ch.3 Sequence of Examination
< 64 >
REGIUS Console CS-3 OPERATION MANUAL Ver. 1.10 2005.2
CS-3 allows texts to be printed as an overlay on the printed film.
Overlay function includes “Marker” or “Stamp” that allows prescribed text strings to be printed at the specified position,
“Grid/Scale” that allows the grid or scale layer to be layed over the image and “Annotation” that allows text strings to
be allocated at any position.
These functions can be used in combination or alone by itself.
Overlay
“Marker”, “Stamp” and “Grid/Scale” can be predefined in the Exam Condition using
the User Tool. This is therefore useful to predefine and register “Marker”, “Stamp” or
“Grid/Scale” using the User Tool especially when any of these is required to be
overlaid for every output.
Allocating Marker, Stamp or Grid/Scale
Procedures to allocate Marker, Stamp or Grid/Scale is described below.
1 Expose following the normal procedure.
2 Touch the image area of the order on which an
overlay should be allocated.
• “Detailed Data Setting” screen (Image Processing)
will be displayed.
3 Touch the [Overlay] tab.
• “Detailed Data Setting” screen (Overlay) will be displayed.
4 Touch the [Marker1], [Marker2], [Stamp], or
[Scale/Grid] button.
• Touching [Marker1] button will display “Marker1
Select” screen.
• Touching [Marker2] button will display “Marker2
Select” screen.
• Touching [Stamp] button will display “Stamp
Select” screen.
• Touching [Grid/Scale] button will display
“Grid/Scale Select” screen.
It is not possible to allocate two or more same overlays. For example, it is not possible to select Grid and Scale at the same time from “Grid/Scale”. However, it is possible to select one each from Marker1 and Marker2.
2
3
4
Page 67

Ch.3 Sequence of Examination
< 65 >
REGIUS Console CS-3 OPERATION MANUAL Ver. 1.10 2005.2
6 When the “Marker” or “Stamp” is selected, touch the
position where the Marker or Stamp should be allocated.
• Marker or Stamp will move to the selected position.
8 Touch the [OK] button of the order in which the
[Marker], [Stamp] or [Grid/Scale] has been allocated.
• Output of the image starts, and small icons indicating the printer and host will be displayed at the
upper left of the image display field.
• Upon completion of output to each device, the
icons will disappear.
• Selected “Marker”, “Stamp” or “Grid/Scale” will be
allocated and film will be printed.
7 Touch the [OK] Button.
• Returns to the “Exam Check” screen.
5 Touch the [Marker], [Stamp] or [Grid/Scale] that
should be allocated on the film.
• Selected “Marker”, “Stamp” or “Grid/Scale” will be
registered, and returns to the “Detailed Data
Setting” (Overlay) screen.
• Selected “Marker”, “Stamp” or “Grid/Scale” will be
displayed in the image display field.
Destination printer
name will be displayed
at the upper left of
“Marker1 Select”,
“Marker2 Select”,
“Stamp Select” and
“Grid/Scale Select”
screen.
Overlay allocation described in the above can also be applied to the scanned
images in the “Exam History” screen.
However, when there are multiple printers are connected t to the CS-3, print out of
the order selecting the overlay position is only capable from one printer. The name
of the printer from which the order can be printed with the overlay position selected
will be displayed at the upper left of each screen, that is “Marker1 Select”, “Marker2
Select”, “Stamp Select” and “Grid/Scale Select” screen. When a reprint is required,
always select the printer selected here.
5
6
6
6
6
7
8
Page 68

Ch.3 Sequence of Examination
< 66 >
REGIUS Console CS-3 OPERATION MANUAL Ver. 1.10 2005.2
Allocating the Annotations
Procedures to allocate the annotations are described below.
Mouse and keyboard may be necessary to operate some of annotation functions.
Maximum 10 annotations can be allocated.
Maximum number of characters that can be used for annotation is 128 (full size) or
256 (half size) characters.
Relation between Annotation and Rotation/Flip
How it is look like when the image is rotated or flipped after the annotation has been
allocated. The upper left corner of text box for the annotation is interlocked with the
image, but the text itself will not rotate or flip.
• Rotation
• Flip
90º Rotate
Flip
Annotation font size and output method (1 to 1/ whole image output)
When the whole image is output after allocating the annotation, the annotation fonts
are reduced in proportion to the image so that the whole image fits to the output
size. This results in output of annotation font size not identical to the “Font Size” set
in the “Annotation” screen.
When a large image, especially a long body part is output to a smaller film by setting
to “Whole Image” output, it may be necessary to set the annotation with a little larger
font. Also to be noted is that even the output is made under the same font size and
output method, output font size may be slightly different depending on the resolution (Normal/High Res).
Page 69

Ch.3 Sequence of Examination
< 67 >
REGIUS Console CS-3 OPERATION MANUAL Ver. 1.10 2005.2
4 Touch the [Annotation] button.
• “Annotation Setup” screen will be displayed.
4
1 Expose following the normal procedure.
2 Touch the image area of the order on which an
overlay should be allocated.
• “Detailed Data Setting” screen (Image Processing)
will be displayed.
3 Touch the [Overlay] tab.
• Detailed Data Setting Screen (Overlay) will be displayed.
2
3
Page 70

Ch.3 Sequence of Examination
< 68 >
REGIUS Console CS-3 OPERATION MANUAL Ver. 1.10 2005.2
2 Input the text strings using the keyboard.
3 Press the [Enter] key of the keyboard.
• Text string will be registered on the preset button.
Deleting the text string from the preset button.
Right-click the mouse over the preset button from which the text string should be
deleted to display the cursor, and delete the text string by pressing the [Delete] or
[Back Space] key on the keyboard.
Once the text string is registered on the preset button, it will be retained even after
turning the power OFF.
2
3
1) Registering the text string on the preset buttons
Annotations can be preset on the [Annotation] buttons using
the “Annotation Setup” screen.
1 Place the mouse button over the preset button
and right-click the mouse.
• Cursor blinks over the selected preset button.
1
Maximum count of
characters for preset
button is 7 (full size) or
14(half size) characters.
Page 71

Ch.3 Sequence of Examination
< 69 >
REGIUS Console CS-3 OPERATION MANUAL Ver. 1.10 2005.2
3) Directly allocating any text strings
Procedures to allocate in the image display field the text
strings not registered on the preset button is described below.
1 Left-click the mouse over the position where an
annotation should be allocated.
• Cursor blinks over the selected position in the
image display field.
2 Input the text strings using the keyboard.
• Pressing the [Enter] on the keyboard allow a line
break, and annotation of several lines can be input.
Left-clicking the mouse
over the annotation
already present switches the mode to the one
where the current annotation can be edited.
1
2) Allocating the annotation assigned to the preset
buttons
Procedures to allocate the annotation that has been assigned
to the preset button is described below.
1 Touch the preset button that should be allocated and
on which the text string has been registered.
• Selected text string for the preset button will be
allocated at the upper left of the image display
field.
2 Click the [OK] button or left-click the mouse in the
area other than annotation.
• When the [OK] button is clicked, returns to the
“Detailed Data Setting” (Overlay) screen after allocating the annotation.
• When the area other than annotation is clicked,
switches the status to the one where the next
annotation can be allocated after the first annotation is allocated.
1
2
Page 72

Ch.3 Sequence of Examination
< 70 >
REGIUS Console CS-3 OPERATION MANUAL Ver. 1.10 2005.2
1 Move the cursor over the allocated annotation.
• The cursor changes from the arrow to the cross.
2 Hold and drag the annotation to the desired position.
• The annotation moves to the point to which it is
dragged.
4) Displacing the allocated annotation
Procedures to displace the allocated annotation are described below.
3 Click the [OK] button or left-click the mouse in the
area other than annotation.
• When the [OK] button is clicked, returns to the
“Detailed Data Setting” (Overlay) screen after allocating the annotation.
• When the area other than annotation is clicked,
switches the status to the one where the next
annotation can be allocated after the first annotation is displaced.
3
3 Click the [OK] button or left-click the mouse in the
area other than annotation.
• When the [OK] button is clicked, returns to the
“Detailed Data Setting” (Overlay) screen after allocating the annotation.
• When the area other than annotation is clicked,
switches the status to the one where the next
annotation can be allocated after the first annotation is allocated.
3
Page 73

Ch.3 Sequence of Examination
< 71 >
REGIUS Console CS-3 OPERATION MANUAL Ver. 1.10 2005.2
5) Changing the text string of the annotation
Procedures to change the text strings of the annotation are
described below.
1 Move the cursor over the allocated annotation.
• The cursor changes from the arrow to the cross.
2 Left-click the mouse.
• Cursor blinks over the selected annotation.
Changes cannot be made on the rotated annotation. First, restore the original status
that is not rotated, then change the text strings.
3 Change the text strings using the keyboard.
• Pressing the [Enter] on the keyboard allow a line
break, and annotation of several lines can be input.
4 Click the [OK] button or left-click the mouse in the
area other than annotation.
• When the [OK] button is clicked, returns to the
“Detailed Data Setting” (Overlay) screen after
changing the annotation.
• When the area other than annotation is clicked,
switches the status to the one where the next
annotation can be allocated after the change is
effected.
When the text strings are selected, they change the color to “Black” when the background is
black, to “White” when the background is white, to “Blue” when the background is transparent.
4
2
p.72 Rotating the
allocated
annotation
Page 74

Ch.3 Sequence of Examination
< 72 >
REGIUS Console CS-3 OPERATION MANUAL Ver. 1.10 2005.2
6) Rotating the allocated annotation
Procedures to rotate the allocated annotation are described
below.
1 Move the cursor over the allocated annotation.
• The cursor changes from the arrow to the cross.
2 Left-click the mouse.
• Cursor blinks over the selected annotation.
3 Click the [Rotate] button.
• Text string rotate by 15º every time the button is
clicked.
• Click the clockwise arrow to rotate the text string
clockwise.
• Click the counterclockwise arrow to rotate the text
string counterclockwise.
4 Click the [OK] button or left-click the mouse in the
area other than annotation.
• When the [OK] button is clicked, returns to the
“Detailed Data Setting” (Overlay) screen after
rotating the annotation.
• When the area other than annotation is clicked,
switches the status to the one where the next
annotation can be allocated after the rotation is
effected.
The text strings of the rotated annotation cannot be changed. Text can be changed
only after restoring the original status where the annotation is not rotated. Font size,
font color and background color can be changed even in the rotated status.
4
2
3
Ex) 15º rotation counterclockwise
Page 75

Ch.3 Sequence of Examination
< 73 >
REGIUS Console CS-3 OPERATION MANUAL Ver. 1.10 2005.2
3 Hold down the left mouse button and drag the font
size slider.
• Dragging the slider increases or decreases the font
size.
• Drag to the left to decrease the font size.
• Drag to the right to increase the font size.
4 Click the [OK] button or left-click the mouse in the
area other than annotation.
• When the [OK] button is clicked, returns to the
“Detailed Data Setting” (Overlay) screen after
rotating the annotation.
• When the area other than annotation is clicked,
switches the status to the one where the next
annotation can be allocated after the font size is
changed.
7) Changing the font size of allocated annotation
Procedures to change the font size of the allocated annotation
are described below. Font size can be changed within the
scope of 10mm ~ 100mm (0.4in ~ 4.0in).
1 Move the cursor over the allocated annotation.
• The cursor changes from the arrow to the cross.
2 Left-click the mouse.
• Cursor blinks over the selected annotation.
Unit of the font size
(mm or inch) shall be
set up by the service
engineer at the time of
installation.
Ex) Changing the size from 20mm to
30mm
3
4
2
Page 76

Ch.3 Sequence of Examination
< 74 >
REGIUS Console CS-3 OPERATION MANUAL Ver. 1.10 2005.2
1 Move the cursor over the allocated annotation.
• The cursor changes from the arrow to the cross.
2 Left-click the mouse.
• Cursor blinks over the selected annotation.
3 Click the [Fore] or [Back] button, and select the
color for text (fore) or background (Back).
• Display changes as it is clicked.
4 Click the [OK] button or left-click the mouse in the
area other than annotation.
• Text color and background color of the annotation
will be effected.
• Next annotation is ready to be allocated.
Text color and background color are interlinked.
Selecting “White” for text allows only “Black” or “Transparent” to be selected for the background.
Selecting “Black” for text allows only “White” or “Transparent” to be selected for the background.
When the text strings are selected, they change the color to “Black” when the background is
black, to “White” when the background is white, to “Blue” when the background is transparent.
3
4
2
8) Changing the color or background color of allocated
annotation
Procedures to change the text color or background color of the
allocated annotation are described below. Select the text color
from “White” and “Black”, while the background from “White”,
“Black” and “Transparent”.
Page 77

Ch.3 Sequence of Examination
< 75 >
REGIUS Console CS-3 OPERATION MANUAL Ver. 1.10 2005.2
10) Deleting all allocated annotations.
Procedures to delete all annotations that have been allocated
are described below.
1 Click the [Delete All] button.
• A message confirming deletion of all annotations
will be displayed.
2 Click the [YES] button.
• All annotations will be deleted.
• Clicking the [NO] button returns to the “Annotation
Setup” screen without deleting the annotation.
9) Deleting one of allocated annotations.
Procedures to delete one of annotations that have been allocated.
1 Move the cursor over the allocated annotation.
• The cursor changes from the arrow to the cross.
2 Left-click the mouse.
• Cursor blinks over the selected annotation.
• [Delete] button becomes active. (Button color
changes from gray to yellow)
3 Click the [Delete] button.
• A message confirming deletion of the annotation
will be displayed.
4 Click the [YES] button.
• Selected annotation will be deleted.
• Clicking the [NO] button returns to the “Annotation
Setup” screen without deleting the annotation.
3
4
1
2
2
Page 78

Ch.3 Sequence of Examination
< 76 >
REGIUS Console CS-3 OPERATION MANUAL Ver. 1.10 2005.2
Page 79

REGIUS Console CS-3 OPERATION MANUAL Ver. 1.10 2005.2
< 77 >
Description
of Screens
4
This chapter describes each of the CS-3 screens.
Page 80

Ch.4 Description of Screens
< 78 >
REGIUS Console CS-3 OPERATION MANUAL Ver. 1.10 2005.2
This is the initial screen displayed when CS-3 is activated.
• Patient data may be input and registered on the reservation list.
• Patient data already on the reservation list may be modified.
• Examination is initiated using patient data displayed in the patient data display window.
Examination Search Screen
(When the examination search screen has been set as the initial screen)
Patient Data Display
Items of patient data are displayed.
To input data into an item, touch the input window at
the right of that item.
Patient data is displayed over multiple screen pages.
Display of Order/Pending
The number of patient data already reserved and of
examinations in suspended status are displayed.
p.28
Before Examination
p.31
Patient Data Input
(Input from CS-3)
p.32
Patient Data Input
(Search from Data Base)
In cases of patients for
whom there is input in
patient data items displayed in yellow (selection of data "Possibility"
or "Pregnancy" under
"pregnancy"),
an exclamation mark (!)
is displayed in the left
corner of the patient data
list and on the patient
data amendment screen.
Depending on the setting, there may be
cases where a new
patient ID is automatically created when the
screen is displayed.
The determination of
which patient data is to
be used should be
made depending on the
facility when the system
is installed.
Input Panel (Touch panel)
This panel is for input of patient data.
Display changes depending on which item is selected
from the patient data display.
• For items requiring character or numerical input, data will
be displayed in a format matching the item
(alphabetical/numerical characters).
• For items where the selected branch is set, a branch
selection button is displayed.
p.25 Using the
Input Panel
[KONICAMINOLTA] Button
Used to display the system menu screen.
If an error occurs on the CS-3 or any other device connected to the CS-3 such as a input/output device, the
[REGIUS] button is displayed in red color.
p.128 System
Menu
Screen
Color of the
[KONICA MINOLTA]
button.
Black : Normal
Red : Error occurred
or
Page 81

Ch.4 Description of Screens
< 79 >
REGIUS Console CS-3 OPERATION MANUAL Ver. 1.10 2005.2
Scroll Button [ ]
Used to scroll patient data display pages.
The current page is shown on the button.
[Search] Button
Used to search patient data.
This button is displayed only with basic system or the
search-type system.
• The search result screen is displayed.
[Perform] Button
Used to initiate exposure and reading using patient
data displayed in the list display of patient data.
• The examination check screen is displayed if exposure
parameters are already set.
•If exposure parameters are not yet set, the exposure parameter selection screen is displayed.
[Exam. List] button
Used to check patient data already reserved.
• The examination list screen that shows a patient data list
is displayed.
[Clear] Button
Used to delete all items of patient data currently displayed.
p.94 Search
Result
Screen
p.79
Examination List
Screen
(When the examination search screen
has been set as the
initial screen)
p.81, 85
Examination Check
Screen
[Single-Image
Screen]
[Multiple-Image
Screen]
p.98
Body Part/
Parameter
Selection Screen
This screen is used to give a list display of patient data input on the examination list screen.
• Patient data to be used for examination may be selected from reserved patient data.
• Patient data already reserved may be deleted.
Examination List Screen
(When the examination search screen has been set as the initial screen)
Patient data items displayed will differ
depending upon settings.
Schedule/Pending
The number of patient data already reserved and of
examinations in suspended status are displayed.
Examination
Search
Screen
Examination
List
Screen
Page 82

Scroll Button [ ]
Scrolls the list one patient data at a time.
Scroll Button [ ]
Scrolls the list 8 patient data at a time.
Ch.4 Description of Screens
< 80 >
REGIUS Console CS-3 OPERATION MANUAL Ver. 1.10 2005.2
List Display of Patient Data
Reserved patient data, exposure parameters, and
exposure counts are displayed.
Touching any line of patient data will result in selection
of that data and display of the data in a green frame in
green and blue characters.
An asterisk " *" is displayed in the "suspend" column
against patient data for which examination has been
restarted and suspended on the examination check
screen.
•8 reserved patient data are displayed on one screen.
Where there are more than 9 reserved data, the scroll button may be used to scroll down the list.
• Touching the title of an item of patient data allows that
item name to be used as a key for patient data sorting.
One touch results in display in ascending order, one more
touch in descending order.
• The suspended patient data is displayed in a purple color.
[Refresh] Button
Updates the patient data list from the data base.
[CANCEL] Button
Returns to the examination search screen.
• When examination data being edited on the examination
search screen has been saved, that patient data will be
displayed and can be edited continuously.
• When examination data being edited on the examination
search screen has not been saved, input of new patient
data is allowed.
[OK] Button
Returns to the examination search screen.
• Patient data selected from the examination list screen is
displayed on the examination search screen.
[Delete] Button
Deletes the current selected patient data from the
reservation list.
p.78 Examination
Search
Screen
(When the
examination
search
screen has
been set as
the initial
screen)
In cases of patients for
whom there is input in
patient data items displayed in yellow (selection of data "Possibility"
or "Pregnancy" under
"pregnancy"),
an exclamation mark (!)
is displayed in the left
corner of the patient data
list and on the patient
data amendment screen.
or
Page 83

Ch.4 Description of Screens
< 81 >
REGIUS Console CS-3 OPERATION MANUAL Ver. 1.10 2005.2
This screen is used for checking examination data, reading cassette images and execution of exposure in
upright position reader. One large screen is displayed. The image read after completion of exposure is displayed.
Examination Check Screen [Single-Image Screen]
Patient Data Display
Patient data to be used for exposure is displayed.
• In cases where the patient data is insufficient or wrong,
touch the [Modify Patient] button to modify the patient
data.
[Modify Patient] Button
Used to modify the patient data.
Order List Display
A list of orders set in patient data is displayed in button
format.
Orders to be used for examination and reading may be
selected prior to exposure.
<When Using REGIUS 170/190>
Select an order and register a corresponding
cassette using a bar code reader.
After exposure, depending on the image quality, the
image is either output (print or save) [OK] or erased
[NG]. Touching an order will result in selection of that
order and display of the order in a green frame.
An asterisk " *" is displayed in the "suspend" column
against patient data for which examination has been
restarted and suspended on the examination check
screen.
• Data for up to 6 set orders are displayed on one screen.
Where there are more than 7 orders set, the scroll button
may be touched to scroll down the list.
•A reduced image is displayed to the left of the button for
orders for which exposure has been completed.
• [OK] is displayed for orders for which exposure has been
completed and that have been output.
XXXXXXXXXXXxxxxx
Examination
Search
Screen
Examination
Check
Screen
Page 84

Ch.4 Description of Screens
< 82 >
REGIUS Console CS-3 OPERATION MANUAL Ver. 1.10 2005.2
Image Display Field
<Prior to exposure>
The exposure parameters and reader
status are displayed.
• To make detailed data settings relating to
exposure and output, touch the screen
within the frame.
Notch mark
The rotation/inversion
status of the image
read is displayed directly.
Display of the ( )
mark at the top right of
the screen indicates noinversion/no-rotation
status.
Display/none-display of
the notch mark and Xray unit depends upon
settings
Order Display
[Reader Device]
The reader device used
for exposure is displayed as an icon.
350
170
[Image Direction]
Displays the image direction, "Front/Reversal"
or "Rotated".
[Image Format]
Displays the print format of the image.
Single display of the image printed as it is.
Two displays of the same image printed aligned left and right.
Two displays of the same image printed aligned vertically.
Two images printed aligned left and right.
Two images printed aligned vertically.
Exposure Parameters
Image Direction
Print Format
Reader
Device
Bar Code Registration : Bar code value is displayed.
Screen Menu Selection: Reading sequence is dis-
played.
0° / Front 90° / Front 180° / Front 270° / Front
0° / Reversal 90° / Reversal 180° / Reversal 270° / Reversal
Image Direction
The direction set in the
exposure parameters is
displayed. When
changes in settings are
made to the
"Rotation/Flipping"
parameters on the
Detailed Data Setting
Screen (Image
Processing),
the display is amended
according to those
changes.
Notch Mark
Reader Status
Exposure Parameters
Page 85

Ch.4 Description of Screens
< 83 >
REGIUS Console CS-3 OPERATION MANUAL Ver. 1.10 2005.2
Image Display Field
<After exposure>
The exposed image and its S-value are
displayed.
The trimming frame set on the detailed
data setting screen (print format) is
shown as a blue frame.
The X-ray irradiated area is shown in a
yellow frame. (Displayed only on images
exposed with the masking irradiation field
"ON.")
• To make detailed data settings relating to
exposure and output, touch the screen
within the frame.
Reader Status
The reader status and exposure parameters for the selected order are displayed.
• Ready
The reader status for the selected order is ready to expose.
• Erasing
The reader status for the selected order is now erasing. When the erasure is completed, the display changes to "Ready".
• Initializing
The reader status for the selected order is now initializing. When the initializing is
completed, the display changes to "Ready".
Change Reader Button
Used to change the reader device used in the
order selected from the order list display.
The reader type of the current order
(upright<350>/cassette<170>)
is displayed.
p.101, 103, 111, 118
Detailed Data
Setting Screen
(Acquisition)
(Image Processing)
(Print Format)
(Overlay)
S-Value Display
Masking frame
(Irradiation field)
(Yellow)
Trimming frame
(Blue)
[Modify Exam. Tag] Button
Enables changes to the parameters (reader, parameter
keys) of the order selected from the list.
• New orders may be added.
[Upright] Button
Selects the upright reader.
[C-Reader] Button
Selects the cassette
reader.
Page 86

Ch.4 Description of Screens
< 84 >
REGIUS Console CS-3 OPERATION MANUAL Ver. 1.10 2005.2
[REGIUS] Button
Used to check the status of input/output devices connected to CS-3 (reader device, host, printer, RIS) as
well as the capacity used and remaining in the CS-3
hard disk.
If an error occurs on the CS-3 or any other device connected to the CS-3 such as a input/output device, the
[REGIUS] button is displayed in red color.
• The Device Status Screen is displayed.
p.49 Image
Erasing
p.51 Image
Substitution
Following things can be
set through the user
tool.
• Whether the automatic
confirmation function
is valid or not.
• Time remaining until
confirmation.
p.45
Image Output
[Single-Image Format
Output per Order]
p.85
Examination Check
Screen
[Multiple-Image Screen]
p.58 Examination
Suspension
p.78
Examination
Search Screen
(When the examination search screen
has been set as the
initial screen)
p.60 Examination
Termination
p.129
Device Status Screen
Scroll Button [ ]
Scrolls the order list one order at a time.
Scroll Button [ ]
Scrolls the order list 6 orders at a time.
[NG] Button
Erases the image of the selected order after exposure.
• An order for which OK has been selected cannot be
erased.
[OK] Button
Outputs the image for the selected order after exposure.
Where the automatic confirmation function is valid, the
time remaining until confirmation is automatically displayed below the button.
[Multi images] Button
Used to switch to the multiple-image.
[Suspend] Button
Holds the examination currently being executed and
returns to the initial screen (examination search screen
or examination list screen).
• The examination put in hold status remains on the examination list.
[Complete] Button
Terminates examination and returns to the initial screen
(examination search screen or examination list screen).
• In cases where exposure is not completed or when an
order not yet confirmed (not OK) remains, an operation
confirmation screen is displayed.
Color of the [REGIUS]
button.
Black : Normal
Red : Error occurred
[Stitch] Button
Displays the “Composite Image Select” screen.
Selection is enabled when there is an order for long
body parts and the exposure is actually completed.
p.173 Image
Stitching
Process
“Stitch” function is an option. On the CS-3 that has not incorporated this option,
“Composite Image Select” screen or “Composite Image Adjustment” screen will not
be displayed.
Page 87

Ch.4 Description of Screens
< 85 >
REGIUS Console CS-3 OPERATION MANUAL Ver. 1.10 2005.2
Examination data checks and execution of exposure/read operation may be executed from this screen.
Four images are displayed in alignment. Images read after execution of exposure are displayed.
Examination Check Screen [Multiple-Image Screen]
Patient Data Display
A part of the patient data to be used for exposure is
displayed.
• In cases where patient data is insufficient or wrong, touch
the [Modify Patient] button to modify the patient data.
[Modify Patient] Button
Used to modify the patient data.
Image Display Field <Prior to exposure>
The exposure parameters and reader status are displayed.
Examination
Search
Screen
Examination
Check
Screen
Reader Status
Notch Mark
Exposure Parameters
Notch mark
The rotation/inversion
status of the image
read is displayed directly.
Display of the ( )
mark at the top right of
the screen indicates noinversion/no-rotation
status.
Page 88

Ch.4 Description of Screens
< 86 >
REGIUS Console CS-3 OPERATION MANUAL Ver. 1.10 2005.2
Image Display Field <After exposure>
The exposed image and its S-value are displayed.
The trimming frame set on the detailed data setting
screen (print format) is shown as a blue frame.
The X-ray irradiated area is shown in a yellow frame.
(Displayed only on images exposed with the masking
irradiation field "ON.")
• To make detailed data settings relating to exposure and
output, touch the screen within the frame.
Display/none-display of
the notch mark and Xray unit depends upon
settings
p.101, 103, 111, 118
Detailed Data
Setting Screen
(Acquisition)
(Image Processing)
(Print Format)
(Overlay)
S-Value Display
Trimming frame (Blue)
Masking frame (Irradiation field) (Yellow)
Change Reader Button
Used to change the reader device used in the order
selected from the order list display.
The reader type of the current order (upright<350>/cassette<170>)
is displayed.
[Upright] Button
Selects the upright reader.
[C-Reader] Button
Selects the cassette
reader.
[Modify Exam. Tag] Button
Enables changes to the parameters (reader, parameter
keys) of the order selected from the list.
• New orders may be added.
[NG] Button
Erases the image of the selected order after exposure.
• An order for which OK has been selected cannot be
erased.
p.49 Image
Erasing
p.51 Image
Substitution
Order List Display
A list of orders set in patient data is displayed in button
format. Orders to be used for examination and reading
may be selected prior to exposure. After exposure,
depending on the image quality, the image is either
output (print or save) [OK] or erased [NG]. Touching an
order will result in selection of that order and display of
the order in a green frame.
• [OK] is displayed for orders for which exposure has been
completed and that have been output.
Page 89

Ch.4 Description of Screens
< 87 >
REGIUS Console CS-3 OPERATION MANUAL Ver. 1.10 2005.2
[REGIUS] Button
Used to check the status of input/output devices connected to CS-3 (reader device, host, printer, RIS) as
well as the capacity used and remaining in the CS-3
hard disk.
If an error occurs on the CS-3 or any other device connected to the CS-3 such as a input/output device, the
[REGIUS] button is displayed in red color.
• The Device Status Screen is displayed.
Following things can be
set through the user
tool.
• Whether the automatic
confirmation function
is valid or not.
• Time remaining until
confirmation.
p.45
Image Output
[Single-Image Format
Output per Order]
p.85
Examination Check
Screen
[Multiple-Image Screen]
p.58 Examination
Suspension
p.78
Examination
Search Screen
(When the examination search screen
has been set as the
initial screen)
p.60 Examination
Termination
p.129
Device Status Screen
[OK] Button
Outputs the image for the selected order after exposure.
Where the automatic confirmation function is valid, the
time remaining until confirmation is automatically displayed below the button.
[Multi images] Button
Used to switch to the multiple-image.
[Suspend] Button
Holds the examination currently being executed and
returns to the initial screen (examination search screen
or examination list screen).
• The examination put in hold status remains on the examination list.
[Complete] Button
Terminates examination and returns to the initial screen
(examination search screen or examination list screen).
• In cases where exposure is not completed or when an
order not yet confirmed (not OK) remains, an operation
confirmation screen is displayed.
Color of the [REGIUS]
button.
Black : Normal
Red : Error occurred
[Stitch] Button
Displays the “Composite Image Select” screen.
Selection is enabled when there is an order for long
body parts and the exposure is actually completed.
p.173 Image
Stitching
Process
“Stitch” function is an option. On the CS-3 that has not incorporated this option,
“Composite Image Select” screen or “Composite Image Adjustment” screen will not
be displayed.
Page 90

Ch.4 Description of Screens
< 88 >
REGIUS Console CS-3 OPERATION MANUAL Ver. 1.10 2005.2
On this screen, image layout for “2 on 1output” can be checked and modified.
Selection can be made from horizontal and vertical alignments.
2 on 1 Image Confirm Screen (except mammo images)
Examination
Check
Screen
2 on 1 Image
Confirm Screen
Press the [OK] button after the first
image is OK for “2 on 1 Output”.
Image Position Check Field
Displays the layout of each image in 2 on 1 output.
[Exchange left and right (upper and bottom] Button
Switch the positions of the image between the two.
Right and left (upper and lower) images switch their
positions every time the button is pressed.
[CANCEL] Button
Cancels the 2 on 1 output.
• Returns to “Exam Check” screen.
Horizontally aligned (AB)
Vertically aligned (
A
B
)
[OK] Button
Execute the “1 on 2 Output” using the layout displayed
in the “Image Position Check Field”.
• Returns to “Exam Check” screen.
Page 91

Ch.4 Description of Screens
< 89 >
REGIUS Console CS-3 OPERATION MANUAL Ver. 1.10 2005.2
On this screen, image layout for “2 on 1output” can be checked and modified.
Vertical position of the mammo images can be adjusted in this screen.
2 on 1 Image Confirm Screen (for mammo images)
Examination
Check
Screen
2 on 1 Image
Confirm Screen
Press the [OK] button after the first
image is OK for “2 on 1 Output”.
Image Position Check Field
Displays the layout of each image in 2 on 1 output.
[Exchange upper and bottom] Button
Switch the positions of the image between the two.
Upper and bottom images switch their positions every
time the button is pressed.
[CANCEL] Button
Cancels the 2 on 1 output.
• Returns to “Exam Check” screen.
[OK] Button
Execute the “1 on 2 Output” using the layout displayed
in the “Image Position Check Field”.
• Returns to “Exam Check” screen.
Up/Down Arrow Buttons
Adjusts the vertical position of the image.
Pressing these buttons on the right will adjust the position of right image while those on the left will adjust the
left image.
Mammo Use is not approved in the United States of America.
Page 92

Ch.4 Description of Screens
< 90 >
REGIUS Console CS-3 OPERATION MANUAL Ver. 1.10 2005.2
The screen displays a list of patient data reserved for examination by CS-3 or ID-680 Series or Radiology
Information System (RIS).
The patient data required for examination may be selected from the patient data list.
• New patient data reserved.
• Patient data already reserved may be modified or deleted.
• Based on parameters (Hospital department, Location(Ward), Exam. Room) input into patient data, specific patient
data can be extracted and list displayed.
Examination List Screen
(When the examination list screen has been set as the initial screen)
List Display of Patient Data
Reserved patient data and exposure parameters and
count added to patient data are displayed.
Patient data used for examination may be selected
here.
Touching any line of patient data will result in selection
of that data and display of the data in a green frame in
blue characters.
Patient data for which examination has been restarted
and suspended on the examination check screen is
displayed as " *"
•8 reserved patient data are displayed on one screen.
Where there are more than 9 reserved data, the scroll button may be used to scroll down the list.
• Touching the title of an item of patient data allows that
item name to be used as a key for patient data sorting.
One touch results in display in ascending order, one more
touch in descending order.
• The suspended patient data is displayed in a purple color.
Filter, Schedule, Pending Display
Display of parameters extracted from the patient data
list, reservation count and count of examinations in
hold status.
p.28 Before
Examination
In cases of patients for
whom there is input in
patient data items displayed in yellow (selection of data "Possibility"
or "Pregnancy" under
"pregnancy"),
an exclamation mark (!)
is displayed in the left
corner of the patient data
list and on the patient
data amendment screen.
or
Page 93

Ch.4 Description of Screens
< 91 >
REGIUS Console CS-3 OPERATION MANUAL Ver. 1.10 2005.2
[Modify] Button
Enables modification to the current selected patient
data.
• The examination search screen is displayed.
[New/Search] Button
Used to input new patient data which is then added to
the reservation list
• The patient data input search screen is displayed.
[Filter] Button
Used to set parameters for extraction of data from the
reservation list.
• The extraction parameter screen is displayed.
[Delete] Button
Deletes the current selected patient data from the
reservation list.
[KONICAMINOLTA] Button
Used to display the system menu screen.
If an error occurs on the CS-3 or any other devices
connected to the CS-3 such as input/output devices,
the [REGIUS] button is displayed in red color.
[Refresh] Button
Updates the patient data list based on receipt of the latest data input from ID-680 Series or Radiology
Information System (RIS).
[Perform] Button
Exposure/reading is initiated using patient data selected from the reservation list.
• When exposure parameters have already been set, the
examination check screen is displayed.
• When exposure parameters have not yet been set, the
exposure parameter selection screen is displayed.
It is not possible to start the same examination on several CS-3s at the same time.
• On the system where the same examination list is displayed on several CS-3s interfaced to the network, attempting to start
study of an order that has been already in
process on the other CS-3 will cause a
message "This order is being examined in
other CS-3. Please suspend the study".
When such message is displayed, suspend
the study for a while, and restart the study
after suspending the study being implemented on the other CS-3.
p.128 System
Menu
Screen
p.92 Patient Data
Input/Search
Screen
(When the
examination
list screen
has been set
as the initial
screen)
p.96 Extraction
Parameter
Screen
p.81,85
Examination
Check
Screen
[Single-Image
Screen]
[MultipleImage
Screen]
p.98 Body Part/
Parameter
Selection
Screen
Scroll Button [ ]
Scrolls the list one patient data at a time.
Scroll Button [ ]
Scrolls the list 8 patient data at a time.
Color of the
[KONICA MINOLTA]
button.
Black : Normal
Red : Error occurred
Page 94

Ch.4 Description of Screens
< 92 >
REGIUS Console CS-3 OPERATION MANUAL Ver. 1.10 2005.2
New patient data may be input. Alternatively, patient data registered in the data base may be searched for input.
Patient Data Input/Search Screen
(When the examination list screen has been set as the initial screen)
Patient Data Input
For new registration, fill in each column.
To input data into an item, touch the column to the right
of the desired item.
For search, input some of the characters of the data to
be searched.
For search purposes, only patient ID and name in
English may be input (2 items).
The examination is initiated when the [Search] button is
touched or when the cursor is moved to another item.
Scroll Button [ ]
Used to scroll the patient data page.
The current page number is shown on the button.
[Search] Button
Used to search patient data.
This button is displayed only with basic system or the
search-type system.
• The search result screen is displayed.
p.28 Before
Examination
p.31
Patient Data Input
(Input from CS-3)
p.32
Patient Data Input
(Search from Data
Base)
When input is made in
several items, search is
made so that the result
contains all inputs.
Setting can be made so
that a new patient ID is
automatically assigned
when a new screen is
opened for input.
p.32
Patient Data Input
(Search from Data
Base)
p.94
Search Result
Screen
In cases of patients for
whom there is input in
patient data items displayed in yellow (selection of data "Possibility"
or "Pregnancy" under
"pregnancy"),
an exclamation mark (!)
is displayed in the left
corner of the patient data
list and on the patient
data amendment screen.
or
Examination
List
Screen
Patient Data
Input/Search
Screen
Page 95

Ch.4 Description of Screens
< 93 >
REGIUS Console CS-3 OPERATION MANUAL Ver. 1.10 2005.2
In systems where data is retrieved from a higher device, the [search] button
display changes from "search" to "cancel" during retrieval of patient data from
the higher device.
Touching the [cancel] button will terminate the search for patient data in the
higher device.
[Clear] Button
All items of the patient data displayed are deleted.
Input Panel (Touch panel)
This panel is for input of patient data.
Display changes depending on which item is selected
from the patient data display.
• For items requiring character or numerical input, data will
be displayed in a format matching the item
(alphabetical/numerical).
• For items where the selected branch is set, a branch
selection button is displayed.
[CANCEL] Button
Cancels the patient data input mode.
• Display returns to the examination list screen.
[OK] Button
The input patient data is added to the reservation list.
• Display returns to the examination list screen.
• The input patient data is added to the examination list.
p.25 Using the
Input Panel
Page 96

Ch.4 Description of Screens
< 94 >
REGIUS Console CS-3 OPERATION MANUAL Ver. 1.10 2005.2
A list of patient data searched is displayed.
Patient data selected on this screen can be input into the patient data input/search screen.
Search Result Screen
Search Result List Display
The patient ID, name, sex and age from the patient
data searched are displayed.
The patient data touched will be displayed in blue.
[CANCEL] Button
Cancels the patient data selected and closes the
search result screen.
[OK] Button
The selected patient data is input into the patient data
input/search screen and the search result screen closed.
• The selected patient data is displayed in the patient data
input/search screen.
p.32 Patient Data
Input
(Search from
Data Base)
Patient Data
Input/Search
Screen
Search
Result Screen
Scroll Button [ ]
Scrolls the patient data display page.
Page 97

Ch.4 Description of Screens
< 95 >
REGIUS Console CS-3 OPERATION MANUAL Ver. 1.10 2005.2
This screen allows amendment to patient data selected from the examination list screen.
• Patient data selected from the examination list screen is displayed in the patient data input window.
Alternatively, allows modification to patient data currently being examined on the examination check screen.
• The patient data currently being examined on the examination check screen is displayed.
Patient Data Amendment Screen
Patient Data Display
All items of the patient data either selected from the
examination list screen or from the patient data shown
to be currently under examination on the examination
check screen are displayed.
To modify the patient data, touch the input window to
the right of the desired item.
Input Panel (Touch panel)
This panel is for modification of patient data.
Display changes depending on which item is
selected from the patient data display.
• For items requiring character or numerical
input, the keyboard will be displayed. (alphabetical/numerical).
• For items where the selected branch is set, a
branch selection button is displayed.
p.25 Using the
Input Panel
Examination
List
Screen
Patient Data
Amendment
Screen
Examination
Check
Screen
Patient Data
Amendment
Screen
Scroll Button [ ]
Used to scroll the patient data page.
The current page number is shown on the button.
In cases of patients for
whom there is input in
patient data items displayed in yellow (selection of data "Possibility"
or "Pregnancy" under
"pregnancy"),
an exclamation mark (!)
is displayed in the left
corner of the patient data
list and on the patient
data amendment screen.
or
p.28 Before
Examination
p.31
Patient Data Input
(Input from CS-3)
p.32
Patient Data Input
(Search from Data
Base)
Page 98

Ch.4 Description of Screens
< 96 >
REGIUS Console CS-3 OPERATION MANUAL Ver. 1.10 2005.2
[CANCEL] Button
Cancels the patient data adjustment mode.
• Display returns to the examination list screen.
[OK] Button
Patient data is modified.
• Display returns to the examination list screen.
Parameters may be selected for extraction of patient data from the examination list screen."Hospital
Department", "Location(Ward)" or "Exam. Room" may be used as parameters for extraction.
• If more than one of the parameters for extraction "Hospital Department" "Location(Ward)" or "Exam. Room" are
set, patient data matching all the set parameters will be extracted.
Extraction Parameter Screen
[Hospital Department] Button
Used to select "hospital department" parameters.
[Location(Ward)] Button
Used to select "location(ward)" parameters.
[Exam. Room] Button
Used to select "exam. room" parameters.
Allows input of new
extraction parameters
using CS-3.
Examination
List
Screen
Extraction
Parameter
Screen
Page 99

Ch.4 Description of Screens
< 97 >
REGIUS Console CS-3 OPERATION MANUAL Ver. 1.10 2005.2
Parameter Selection Button Display
The button format shows the extraction parameters.
Touch the extraction category button required
("Hospital department", "Location(Ward)" or "Exam.
Room") and effect selection by touching the parameter
selection button displayed on screen.
• Multiple parameters may be selected for each of the categories
([Hospital department], [Location(Ward)] or [Exam. Room])
• The selected button will be displayed in a dark colour.
[Clear] Button
Extraction parameters are cleared.
• All categories ( [Hospital department], [Location(Ward)] or
[Exam. Room] ) are cleared.
[CANCEL] Button
Extraction parameter settings/changes are cancelled.
• Display returns to the examination list screen.
[OK] Button
Sets extraction parameters.
• Display returns to the examination list screen.
• The examination list screen is modified to match the set
extraction parameters.
To return to the list prior to extraction:
Touch the [Filter] button again to display the extraction parameter screen and touch
the [Clear] and [OK] buttons in sequence.
Scroll Button [ ]
Where there are 40 or more parameter selection buttons, the scroll
button may be used.
List Screen
Extraction Parameter Screen
Page 100

Ch.4 Description of Screens
< 98 >
REGIUS Console CS-3 OPERATION MANUAL Ver. 1.10 2005.2
To initialize examination when the body part/parameters are not set, reader type and body part should be
selected and parameters registered in the order.
• When body part/parameters are selected, it is possible to move from this screen to the examination check screen.
• Patient data may be set in the order and added to the reservation list.
• Body part/parameters for the patient shown as currently under examination on the examination check screen may
be added or amended.
Body Part/Parameter Selection Screen
Reader Selection Display
Displayed when multiple readers are connected.
The exposure parameter buttons displayed will differ
depending on the reader selected here.
General Category Button
The body part for examination may be selected using
the buttons displayed.
Body part/parameter buttons will differ depending on
the body part selected here.
Sort, addition, edit and
deletion of the body
part/parameter may be
carried out with the
user tool.
Initial Screen
Body Part/
Parameter
Selection Screen
Body Part/
Parameter
Selection Screen
Examination
Check
Screen
When exposure
parameters are
not set on the initial screen.
[My Favorite] Button
Displays body parts,
body part sets set by
the user in advance.
[Upright] Button
Selected when the
upright reader is to be
used.
[C-Reader] Button
Selected when the
cassette reader is to
be used.
 Loading...