

Page 1

1
This mark on your camera certifies that this camera meets the
requirements of the EU (European Union) concerning interference causing equipment regulations. CE stands for Conformité
Européenne (European Conformity).
This device complies with Part 15 of the FCC Rules.Operation
is subject to the following two conditions:(1) This device may not
cause harmful interference, and (2) this device must accept any
interference received, including interference that may cause
undesired operation.
Tested by the Minolta Corporation
101 Williams Drive, Ramsey, New Jersey 07446, U.S.A.
This Class B digital apparatus complies with Canadian ICES-003.
Cet appareil numérique de la classe B est conforme à la norme NMB-003 du Canada.
Do not remove the ferrite cores from the cables.
• Digita™ and the Digita™ logo are licensed trademarks or registered trademarks of FlashPoint Technology
Inc. in the U.S.and other countries.
• Other company names and product names are the trademarks and registered trademarks of their respective
companies.
Thank you for purchasing the Minolta Dimâge RD 3000.Your new megapixel camera
is a compact and lightweight, interchangeable lens SLR type digital still camera.
Using revolutionary technology, your camera produces high-quality, high-resolution
images quickly and easily.New and extraordinary features expand your imagecapturing horizons.
• 2.7 million pixel dual CCD image sensor.
• Interchangeable lenses – cover focal lengths from 25 to 360 mm (35mm format equivalent).
• CompactFlash™ card removable media storage – so there is no limit on how many shots you can take.
• 2-inch colour LCD monitor – review images instantly.
• Real-time OS and multi-tasking speeds up image processing time.
• Prism-based infrared filtering – does not reduce the CCD’s visible light sensitivity.
• Video-output – view camera images on the television.
• Sturdy, compact, lightweight body.
• Continuous drive mode – capture up to 5 frames at 1.5 frames per second with one press of the shutterrelease button.
• PC terminal for sync-cord flash units.
• SCSI connector – a fast and convenient way to hook up directly to the computer.
• Uses AA-size NiMH batteries.
Please take the time to read through this instruction manual so you can enjoy all of its
features.
For information on installing and operating the included software, please read the
accompanying software instruction manual.
This manual contains information regarding products introduced before Jul., 1999.To
obtain compatibility information for products released after this date, contact a Minolta
Service Facility listed on the back cover of this manual.
Digital Camera:
FOR HOME OR OFFICE USE
Dimâge RD3000
Tested To Comply
With FCC Standards
Page 2
2
FOR PROPER AND SAFE USE
Use caution, accidents may occur when using this product near young children.
Keep batteries or things that could be swallowed away from young children.
Contact a doctor immediately if an object is swallowed.
Immediately remove the batteries and discontinue use if…
• the camera is dropped or subjected to an impact in which the interior is
exposed.
• the product emits a strange smell, heat, or smoke.
Do not disassemble.Electric shock may occur if a high voltage circuit inside the
camera is touched.Take your camera to a Minolta Service Facility when repairs
are required.
Do not look directly at the sun through the viewfinder.
The heat of the camera rises with extended periods of use. Use caution when
handling the camera.
WARNING
CAUTION
CUTIONS FOR SAFE USE OF DIGITAL CAMERA RD3000.
Page 3
1
This mark on your camera certifies that this camera meets the
requirements of the EU (European Union) concerning interference causing equipment regulations. CE stands for Conformité
Européenne (European Conformity).
This device complies with Part 15 of the FCC Rules.Operation
is subject to the following two conditions:(1) This device may not
cause harmful interference, and (2) this device must accept any
interference received, including interference that may cause
undesired operation.
Tested by the Minolta Corporation
101 Williams Drive, Ramsey, New Jersey 07446, U.S.A.
This Class B digital apparatus complies with Canadian ICES-003.
Cet appareil numérique de la classe B est conforme à la norme NMB-003 du Canada.
Do not remove the ferrite cores from the cables.
• Digita™ and the Digita™ logo are licensed trademarks or registered trademarks of FlashPoint Technology
Inc. in the U.S.and other countries.
• Other company names and product names are the trademarks and registered trademarks of their respective
companies.
Thank you for purchasing the Minolta Dimâge RD 3000.Your new megapixel camera
is a compact and lightweight, interchangeable lens SLR type digital still camera.
Using revolutionary technology, your camera produces high-quality, high-resolution
images quickly and easily.New and extraordinary features expand your imagecapturing horizons.
• 2.7 million pixel dual CCD image sensor.
• Interchangeable lenses – cover focal lengths from 25 to 360 mm (35mm format equivalent).
• CompactFlash™ card removable media storage – so there is no limit on how many shots you can take.
• 2-inch colour LCD monitor – review images instantly.
• Real-time OS and multi-tasking speeds up image processing time.
• Prism-based infrared filtering – does not reduce the CCD’s visible light sensitivity.
• Video-output – view camera images on the television.
• Sturdy, compact, lightweight body.
• Continuous drive mode – capture up to 5 frames at 1.5 frames per second with one press of the shutterrelease button.
• PC terminal for sync-cord flash units.
• SCSI connector – a fast and convenient way to hook up directly to the computer.
• Uses AA-size NiMH batteries.
Please take the time to read through this instruction manual so you can enjoy all of its
features.
For information on installing and operating the included software, please read the
accompanying software instruction manual.
This manual contains information regarding products introduced before Jul., 1999.To
obtain compatibility information for products released after this date, contact a Minolta
Service Facility listed on the back cover of this manual.
Digital Camera:
FOR HOME OR OFFICE USE
Dimâge RD3000
Tested To Comply
With FCC Standards
Page 4

4
TABLE OF CONTENTS
FOR PROPER AND SAFE USE . . . . . . . . . . . . . . . . . . . . . . . . . . . . . . . . 2
BEFORE YOU BEGIN . . . . . . . . . . . . . . . . . . . . . . . . . . . . . . . . . . . . . . . . 3
TABLE OF CONTENTS . . . . . . . . . . . . . . . . . . . . . . . . . . . . . . . . . . . . . . 4
INTRODUCTION
NAMES OF PARTS . . . . . . . . . . . . . . . . . . . . . . . . . . . . . . . . . . . . . . . . . . 10
Camera Body . . . . . . . . . . . . . . . . . . . . . . . . . . . . . . . . . . . . . . . . . . . . 10
Left side of Body . . . . . . . . . . . . . . . . . . . . . . . . . . . . . . . . . . . . . . . . . 12
Bottom of Body . . . . . . . . . . . . . . . . . . . . . . . . . . . . . . . . . . . . . . . . . . 12
Data Panel . . . . . . . . . . . . . . . . . . . . . . . . . . . . . . . . . . . . . . . . . . . . . . . 13
Viewfinder . . . . . . . . . . . . . . . . . . . . . . . . . . . . . . . . . . . . . . . . . . . . . . . 14
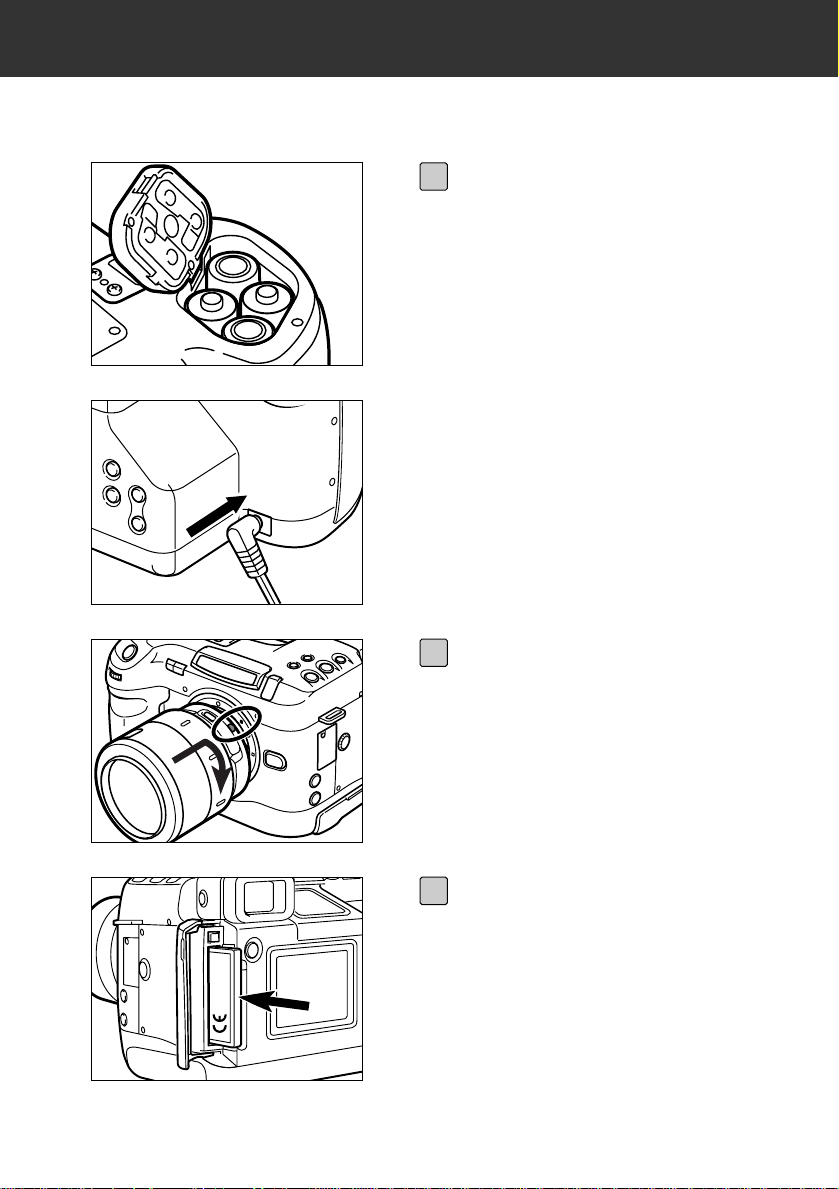
GETTING STARTED RIGHT AWAY . . . . . . . . . . . . . . . . . . . . . . . . . . . . . . 16
Preparation . . . . . . . . . . . . . . . . . . . . . . . . . . . . . . . . . . . . . . . . . . . . . . 16
Recording . . . . . . . . . . . . . . . . . . . . . . . . . . . . . . . . . . . . . . . . . . . . . . . 17
Play . . . . . . . . . . . . . . . . . . . . . . . . . . . . . . . . . . . . . . . . . . . . . . . . . . . . 18
Deleting Images . . . . . . . . . . . . . . . . . . . . . . . . . . . . . . . . . . . . . . . . . . 18
PREPARATION . . . . . . . . . . . . . . . . . . . . . . . . . . . . . . . . . . . . . . . . . . . . . 20
Holding Strap . . . . . . . . . . . . . . . . . . . . . . . . . . . . . . . . . . . . . . . . . . . . 20
Attaching The Holding Strap . . . . . . . . . . . . . . . . . . . . . . . . . . . . . . . . . 20
Inserting Batteries . . . . . . . . . . . . . . . . . . . . . . . . . . . . . . . . . . . . . . . . 22
Low Battery Warning . . . . . . . . . . . . . . . . . . . . . . . . . . . . . . . . . . . . . . 23
Auto Power Off . . . . . . . . . . . . . . . . . . . . . . . . . . . . . . . . . . . . . . . . . . 24
Using the AC Adapter(AC-2) . . . . . . . . . . . . . . . . . . . . . . . . . . . . . . . . . 25
Attaching and Removing the Lens . . . . . . . . . . . . . . . . . . . . . . . . . . . . 26
Attaching the Lens . . . . . . . . . . . . . . . . . . . . . . . . . . . . . . . . . . . . . . . . 26
Removing the Lens . . . . . . . . . . . . . . . . . . . . . . . . . . . . . . . . . . . . . . . . 27
Setting the Date/Time . . . . . . . . . . . . . . . . . . . . . . . . . . . . . . . . . . . . . . 28
Diopter Adjustment . . . . . . . . . . . . . . . . . . . . . . . . . . . . . . . . . . . . . . . 31
Compact Flash Card . . . . . . . . . . . . . . . . . . . . . . . . . . . . . . . . . . . . . . . 32
Inserting the Compact Flash Card . . . . . . . . . . . . . . . . . . . . . . . . . . . . . 32
Removing the Compact Flash Card . . . . . . . . . . . . . . . . . . . . . . . . . . . 33
Page 5

5
TABLE OF CONTENTS
RECORDING
BASIC OPERATION . . . . . . . . . . . . . . . . . . . . . . . . . . . . . . . . . . . . . . . . . 36
Taking Pictures in Automatic Mode . . . . . . . . . . . . . . . . . . . . . . . . . . . . 36
Selecting the Record Setting . . . . . . . . . . . . . . . . . . . . . . . . . . . . . . . . . 38
Quick View . . . . . . . . . . . . . . . . . . . . . . . . . . . . . . . . . . . . . . . . . . . . . . 39
Image Quality Selection . . . . . . . . . . . . . . . . . . . . . . . . . . . . . . . . . . . . 40
FOCUS DETAILS . . . . . . . . . . . . . . . . . . . . . . . . . . . . . . . . . . . . . . . . . . . 42
Focus Signals . . . . . . . . . . . . . . . . . . . . . . . . . . . . . . . . . . . . . . . . . . . . 42
Special Focusing Situations . . . . . . . . . . . . . . . . . . . . . . . . . . . . . . . . 43
Focus Hold . . . . . . . . . . . . . . . . . . . . . . . . . . . . . . . . . . . . . . . . . . . . . . 44
Direct Manual Focus (DMF) . . . . . . . . . . . . . . . . . . . . . . . . . . . . . . . . . 45
Manual Focus . . . . . . . . . . . . . . . . . . . . . . . . . . . . . . . . . . . . . . . . . . . . 46
EXPOSURE . . . . . . . . . . . . . . . . . . . . . . . . . . . . . . . . . . . . . . . . . . . . . . . 47
Exposure Compensation . . . . . . . . . . . . . . . . . . . . . . . . . . . . . . . . . . . 47
Spot Metering . . . . . . . . . . . . . . . . . . . . . . . . . . . . . . . . . . . . . . . . . . . . 49
Exposure Modes . . . . . . . . . . . . . . . . . . . . . . . . . . . . . . . . . . . . . . . . . . 51
P Mode – Programmed Exposure . . . . . . . . . . . . . . . . . . . . . . . . . . . . . 51
A Mode – Aperture Prior ity . . . . . . . . . . . . . . . . . . . . . . . . . . . . . . . . . . 52
S Mode – Shutter Priority . . . . . . . . . . . . . . . . . . . . . . . . . . . . . . . . . . . 54
M Mode – Manual Operation . . . . . . . . . . . . . . . . . . . . . . . . . . . . . . . . . 56
Page 6

6
TABLE OF CONTENTS
ADDITIONAL FEATURES . . . . . . . . . . . . . . . . . . . . . . . . . . . . . . . . . . . . . 58
White Balance . . . . . . . . . . . . . . . . . . . . . . . . . . . . . . . . . . . . . . . . . . . . 58
Custom White Balance – Creating a Setting . . . . . . . . . . . . . . . . . . . . . 60
Continuous Drive Mode . . . . . . . . . . . . . . . . . . . . . . . . . . . . . . . . . . . . 62
Self-timer . . . . . . . . . . . . . . . . . . . . . . . . . . . . . . . . . . . . . . . . . . . . . . . 66
Remote Control (Sold Separately) . . . . . . . . . . . . . . . . . . . . . . . . . . . . 68
Remote Control Mode . . . . . . . . . . . . . . . . . . . . . . . . . . . . . . . . . . . . . . 68
Focus Hold in Remote Control Mode . . . . . . . . . . . . . . . . . . . . . . . . . . . 70
Changing the Remote Control Battery . . . . . . . . . . . . . . . . . . . . . . . . . . 71
Program-reset button . . . . . . . . . . . . . . . . . . . . . . . . . . . . . . . . . . . . . . 72
Counter button . . . . . . . . . . . . . . . . . . . . . . . . . . . . . . . . . . . . . . . . . . . 73
Changing ISO Sensitivity . . . . . . . . . . . . . . . . . . . . . . . . . . . . . . . . . . . 74
Formatting a Compact Flash Card . . . . . . . . . . . . . . . . . . . . . . . . . . . . 76
FLASH . . . . . . . . . . . . . . . . . . . . . . . . . . . . . . . . . . . . . . . . . . . . . . . . . . . 78
Using Flash . . . . . . . . . . . . . . . . . . . . . . . . . . . . . . . . . . . . . . . . . . . . . . 78
Attaching an Accessory Flash . . . . . . . . . . . . . . . . . . . . . . . . . . . . . . . . 78
Flash Signals . . . . . . . . . . . . . . . . . . . . . . . . . . . . . . . . . . . . . . . . . . . . 79
PC Terminal . . . . . . . . . . . . . . . . . . . . . . . . . . . . . . . . . . . . . . . . . . . . . . 80
Using Flash in P, A, S, and M Modes . . . . . . . . . . . . . . . . . . . . . . . . . . 81
Slow Shutter Sync . . . . . . . . . . . . . . . . . . . . . . . . . . . . . . . . . . . . . . . . 82
Flash Compensation . . . . . . . . . . . . . . . . . . . . . . . . . . . . . . . . . . . . . . 84
Wireless/Remote Off-camera Flash . . . . . . . . . . . . . . . . . . . . . . . . . . . 85
Page 7

7
TABLE OF CONTENTS
PLAY
VIEWING IMAGES . . . . . . . . . . . . . . . . . . . . . . . . . . . . . . . . . . . . . . . . . . 88
Viewing Full Screen . . . . . . . . . . . . . . . . . . . . . . . . . . . . . . . . . . . . . . . 88
Viewing AN IMAGE Index . . . . . . . . . . . . . . . . . . . . . . . . . . . . . . . . . . . 89
CHANGING THE INDEX DISPLAY . . . . . . . . . . . . . . . . . . . . . . . . . . . . . . 93
DELETING A SINGLE IMAGE . . . . . . . . . . . . . . . . . . . . . . . . . . . . . . . . . 94
CLEARING UNPROTECTED IMAGES . . . . . . . . . . . . . . . . . . . . . . . . . . . 96
PROTECTING IMAGES . . . . . . . . . . . . . . . . . . . . . . . . . . . . . . . . . . . . . . 98
UNPROTECTING IMAGES . . . . . . . . . . . . . . . . . . . . . . . . . . . . . . . . . . . . 100
ADJUSTING THE LCD MONITOR BRIGHTNESS/CONTRAST . . . . . . . . . 102
CHECKING FLASH CARD STATUS . . . . . . . . . . . . . . . . . . . . . . . . . . . . . 105
VIDEO OUT . . . . . . . . . . . . . . . . . . . . . . . . . . . . . . . . . . . . . . . . . . . . . . . 107
REPLACING THE CLOCK BACKUP BATTERY . . . . . . . . . . . . . . . . . . . . 108
CLEANING THE LENS IN THE RELAY OPTICAL SYSTEM . . . . . . . . . . . 110
APPENDIX
ACCESSORY INFORMATION . . . . . . . . . . . . . . . . . . . . . . . . . . . . . . . . . . 114
Lenses . . . . . . . . . . . . . . . . . . . . . . . . . . . . . . . . . . . . . . . . . . . . . . . . . 114
Flashes . . . . . . . . . . . . . . . . . . . . . . . . . . . . . . . . . . . . . . . . . . . . . . . . 114
Other . . . . . . . . . . . . . . . . . . . . . . . . . . . . . . . . . . . . . . . . . . . . . . . . . . 114
File Size/Card Capacity . . . . . . . . . . . . . . . . . . . . . . . . . . . . . . . . . . . . 116
Camera Warnings . . . . . . . . . . . . . . . . . . . . . . . . . . . . . . . . . . . . . . . . . 117
Troubleshooting . . . . . . . . . . . . . . . . . . . . . . . . . . . . . . . . . . . . . . . . . . 120
Care and Storage . . . . . . . . . . . . . . . . . . . . . . . . . . . . . . . . . . . . . . . . . 122
Technical Details . . . . . . . . . . . . . . . . . . . . . . . . . . . . . . . . . . . . . . . . . 124
Page 8

8
Page 9

9
INTRODUCTION
Page 10
10
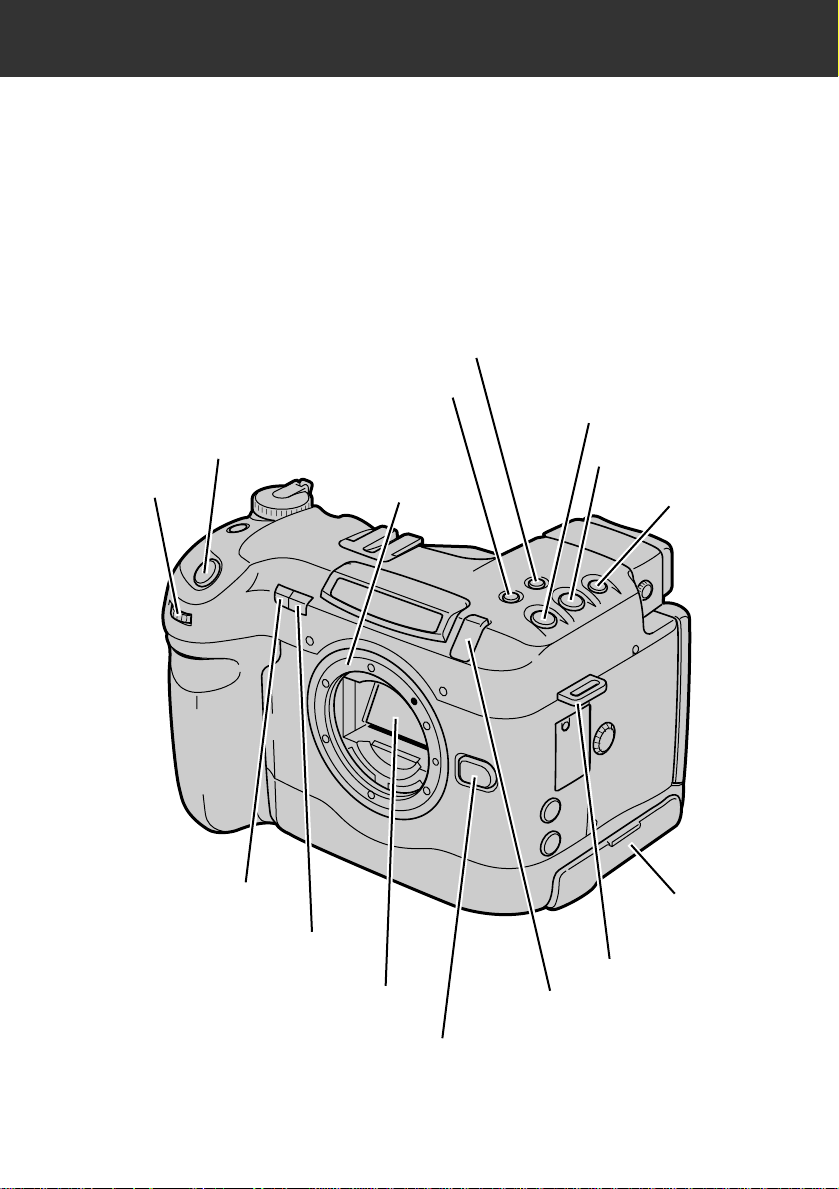
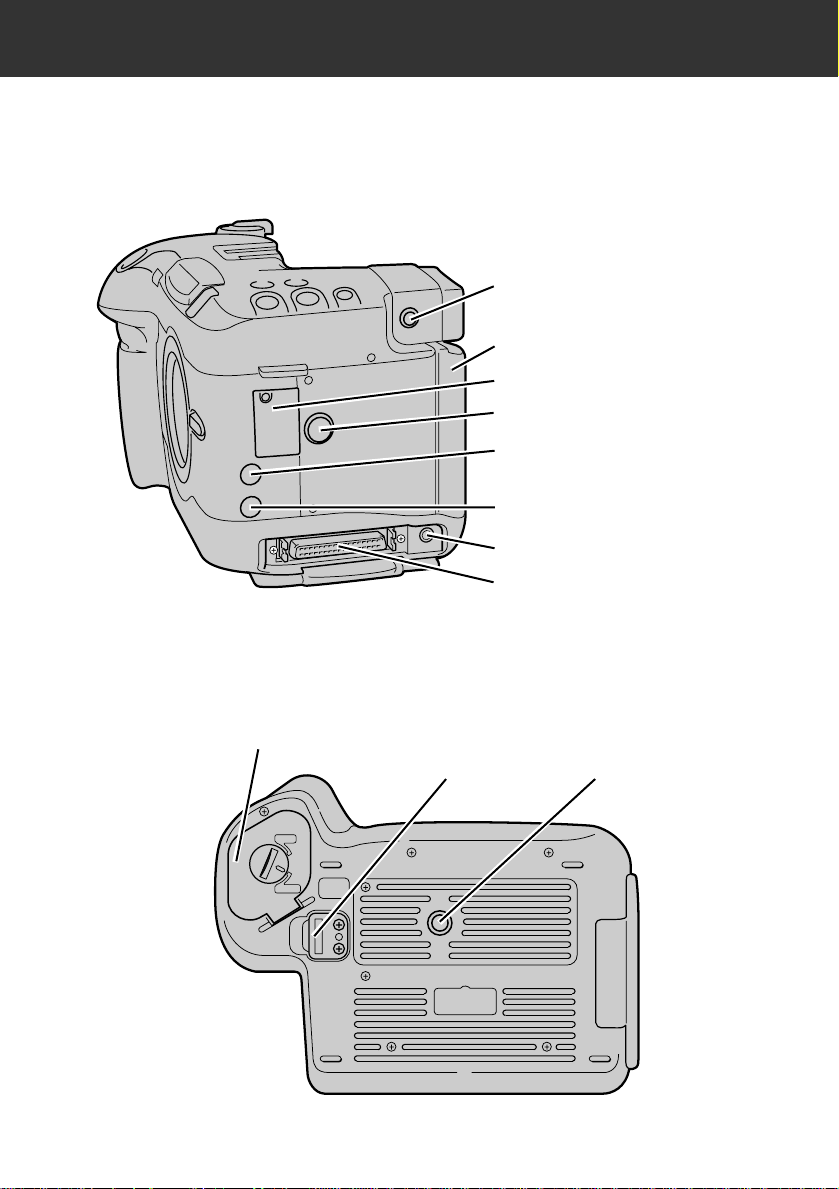
NAMES OF PARTS
CAMERA BODY
Connector cover
White balance sensor*
Self-timer lamp
Remote-control receiver
Shutter-release button
Dial
Exposure-mode button
White-balance button
Quality-select button
Drive-mode button
Counter button
Lens release
Lens mount*
Mirror*
Strap eyelet
*Do not touch.
Page 11
11
NAMES OF PARTS
Accessory shoe
Viewfinder*
BUSY lamp
Quick View button
LCD Monitor*
Data panel*
MENU button
SET button
button
button
SPOT button
Control dial
Control dial lock
Program-reset button
DC terminal*
Strap eyelet
Page 12
12
NAMES OF PARTS
LEFT SIDE OF BODY
BOTTOM OF BODY
SCSI connector
Video-out terminal
Diopter-adjustment dial
Card-chamber door
Exposure-compensation button
Manual fill-flash button
PC terminal
Clock battery cover
Strap eyelet
Battery-chamber cover
Tripod socket
With connector cover open
Page 13
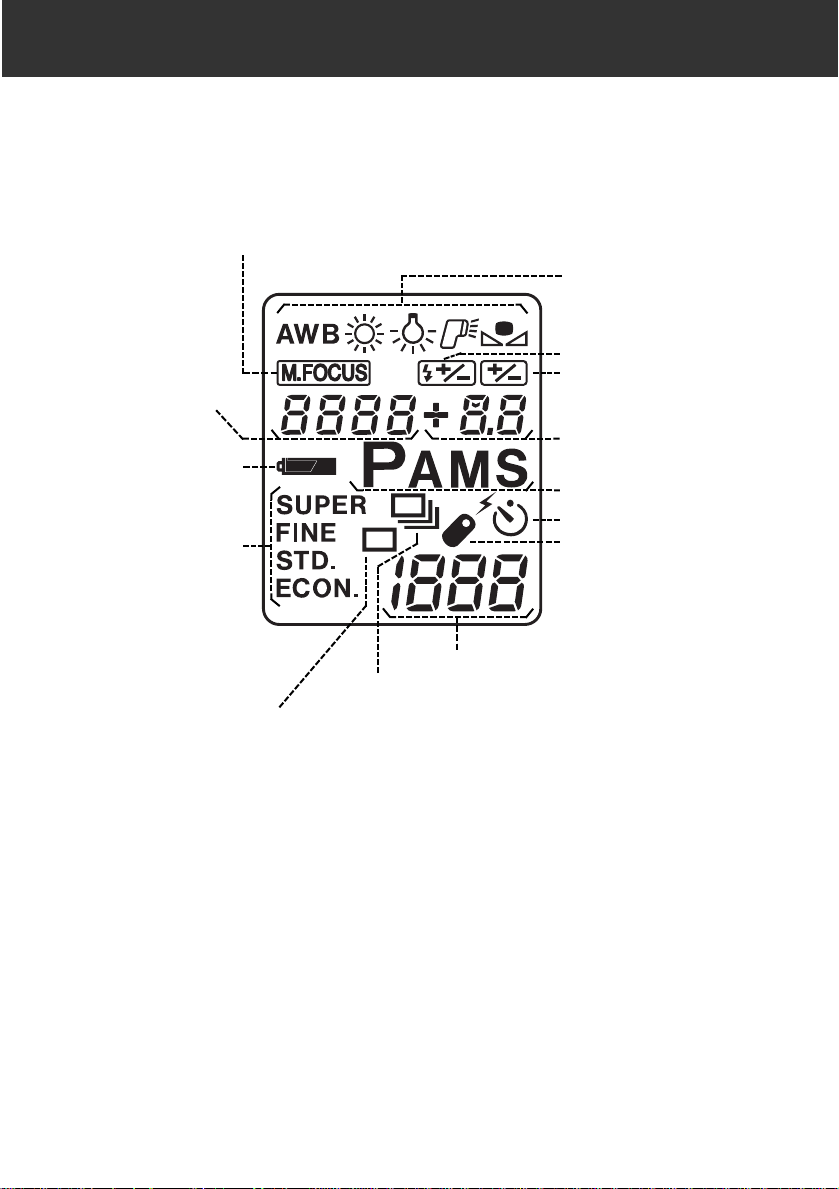
13
NAMES OF PARTS
DATA PANEL
White balance indicators
Flash-compensation
indicator
Exposure-compensation
indicator
Exposure mode indicators
Aperture/Exposurecompensation display
Self-timer indicator
Continuous-drive indicator
Single-frame advance indicator
Remote-control indicator
Image quality
indicators
Shutter-speed/
Message display
Battery-condition
indicator
Manual-focus indicator
The following diagram shows all items displayed to aid the explanation.
Frame counter
Page 14
14
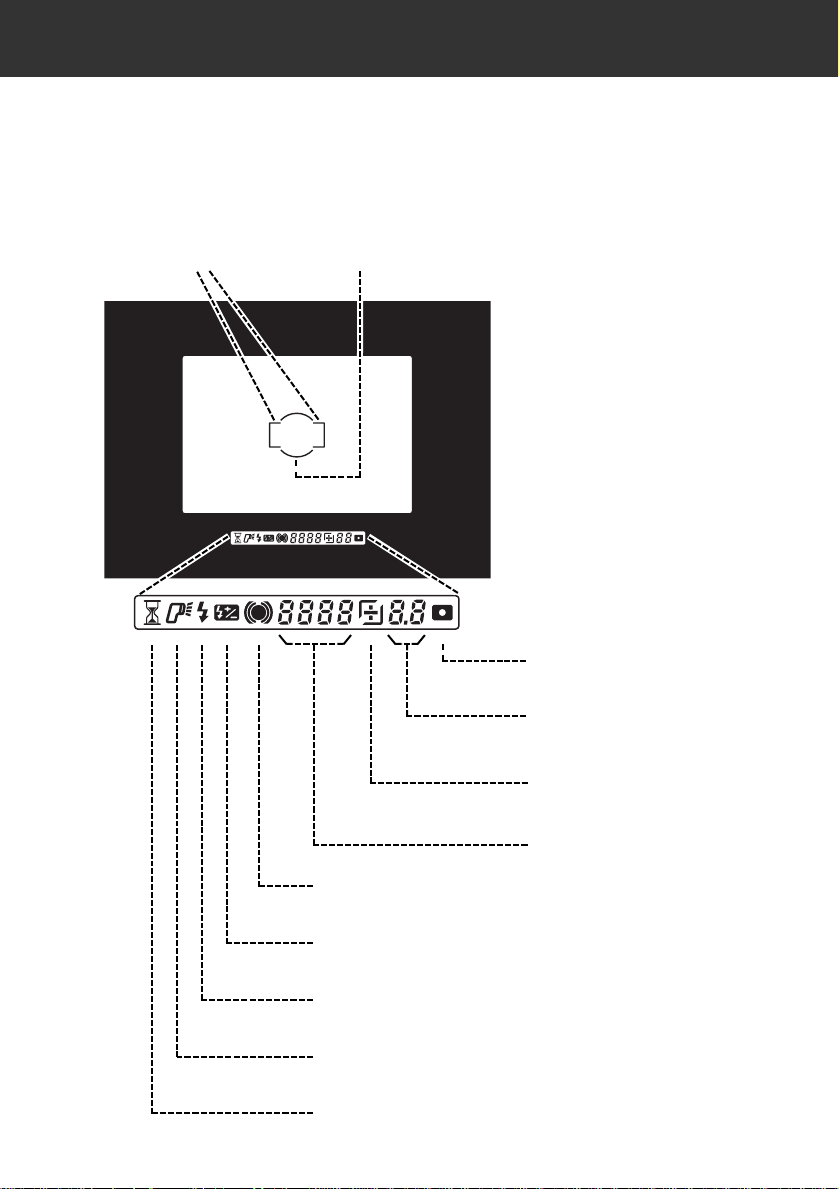
NAMES OF PARTS
VIEWFINDER
The following diagram shows all items displayed to aid the explanation.
“Please wait” mar k
Flash-on indicator
Focus signals
Flash-compensation indicator
Flash signals
Shutter-speed display
Exposure-compensation
indicator
Aperture/Exposurecompensation display
Spot metering indicator
Focus frame Spot metering frame
Page 15
15
NAMES OF PARTS
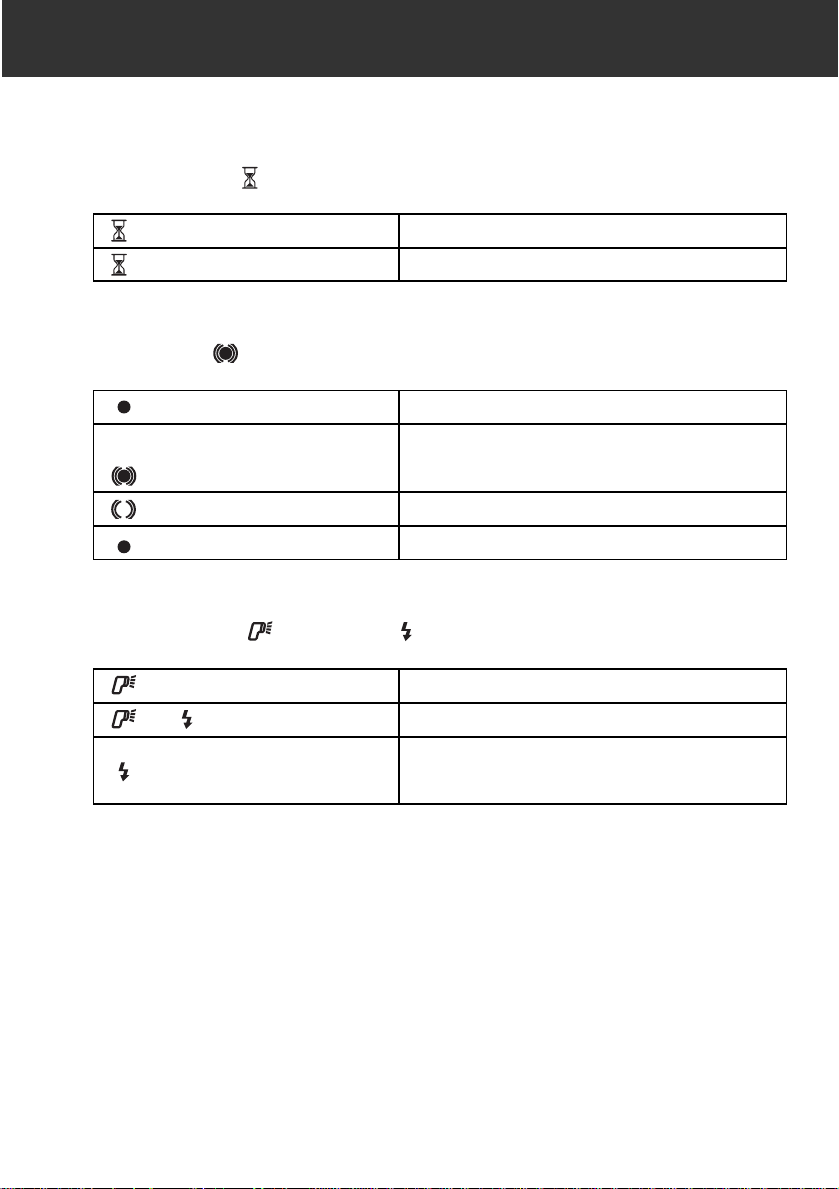
Please wait mark
LIT
EXTINGUISHED
WAIT. SHUTTER LOCKED.
READY T O SHOOT.
Focus signals
LIT
LIT
IN FOCUS.
IN FOCUS. FOCUS CHANGES WITH MOVEMENT OF
SUBJECT.
LIT
BLINKING
FOCUSING. SHUTTER LOCKED.
NOT FOCUSED.SHUTTER LOCKED.
Flash-on indicator , Flash signals
LIT
BLINKING
(AFTER TAKING PHOTO)
READY FOR FLASH PHOTOGRAPHY.
FLASH OUTPUT WAS SUFFICIENT TO PROVIDE
CORRECT EXPOSURE.
AND LIT
FLASH CHARGED.
Page 16
16
GETTING STARTED RIGHT AWAY
PREPARATION
Insert the batteries or connect
the AC adapter
(see pages 22, 25).
1
Attach the lens (see page 26).
2
Insert the compact flash card
(see page 32).
3
Page 17
17
GETTING STARTED RIGHT AWAY
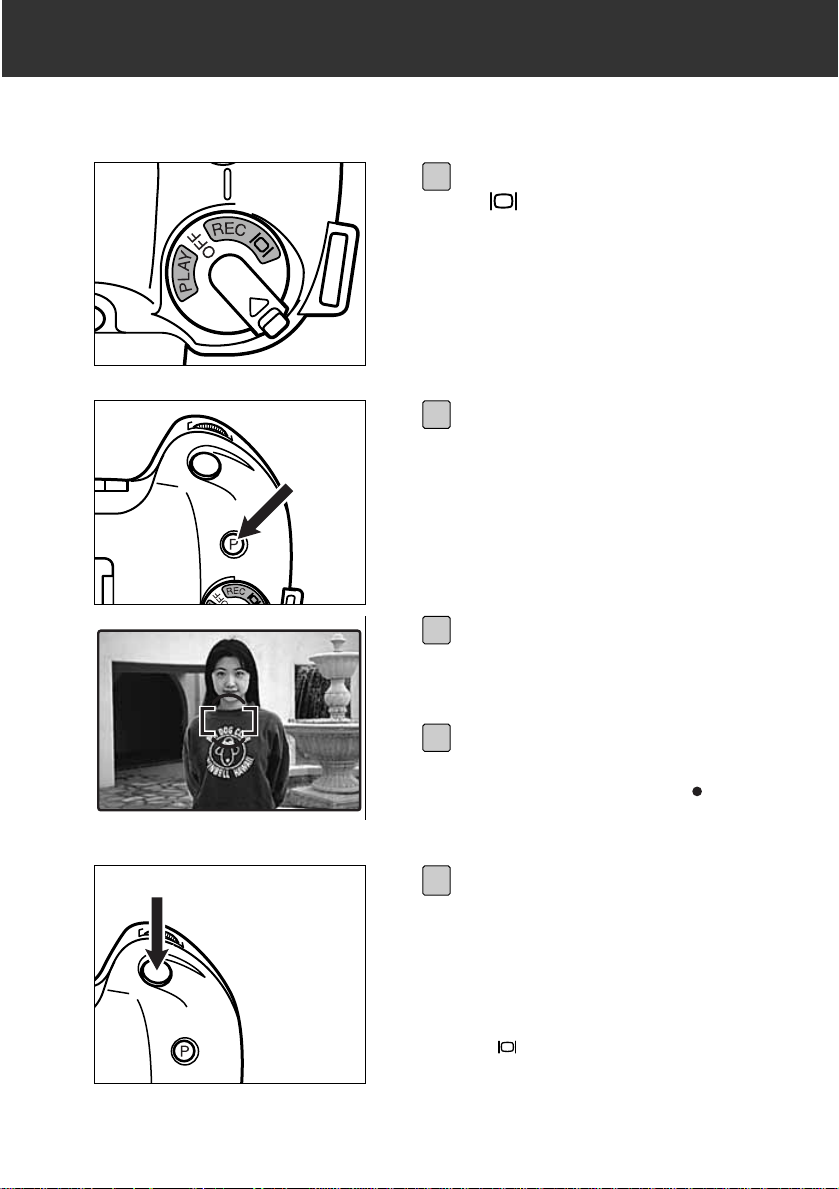
RECORDING
Turn the Control dial to REC
or .
1
Press the Program-reset button.
• This puts the camera in full-auto
mode.
2
Frame the image in the
viewfinder.
• Place the focus frame on your subject.
3
Press the shutter-release button
partway down.
• Autofocus will activate and will glow
in the viewfinder if focus is confirmed
and locked.
4
Press the shutter release button
all-the-way down to take the picture.
• The busy lamp and the frame counter
in the data panel will blink while the
recorded image is being written to
memory.
• In , the camera will display the
image in the LCD monitor.In REC,
press the Quick View button to see a
brief display of the image.
5
Page 18

18
GETTING STARTED RIGHT AWAY
PLAY
DELETING IMAGES
Turn the Control dial to PLAY.
1
Press the or button to
scroll through the images.
3
Turn the Control dial to PLAY.
1
Select the desired image.
• Press the or button until the image
appears in the LCD monitor.
2
Press the MENU button.
3
Page 19

19
GETTING STARTED RIGHT AWAY
Press the button until
DELETE is highlighted.
4
Press the SET button.
5
Press the button until
DELETE is highlighted.
6
Press the SET button.
• A confirmation screen will appear.
7
Press the button until YES is
highlighted.
8
Press the SET button.
• The LCD monitor will return to the
PLAY screen after the image is
deleted.
9
Page 20
20
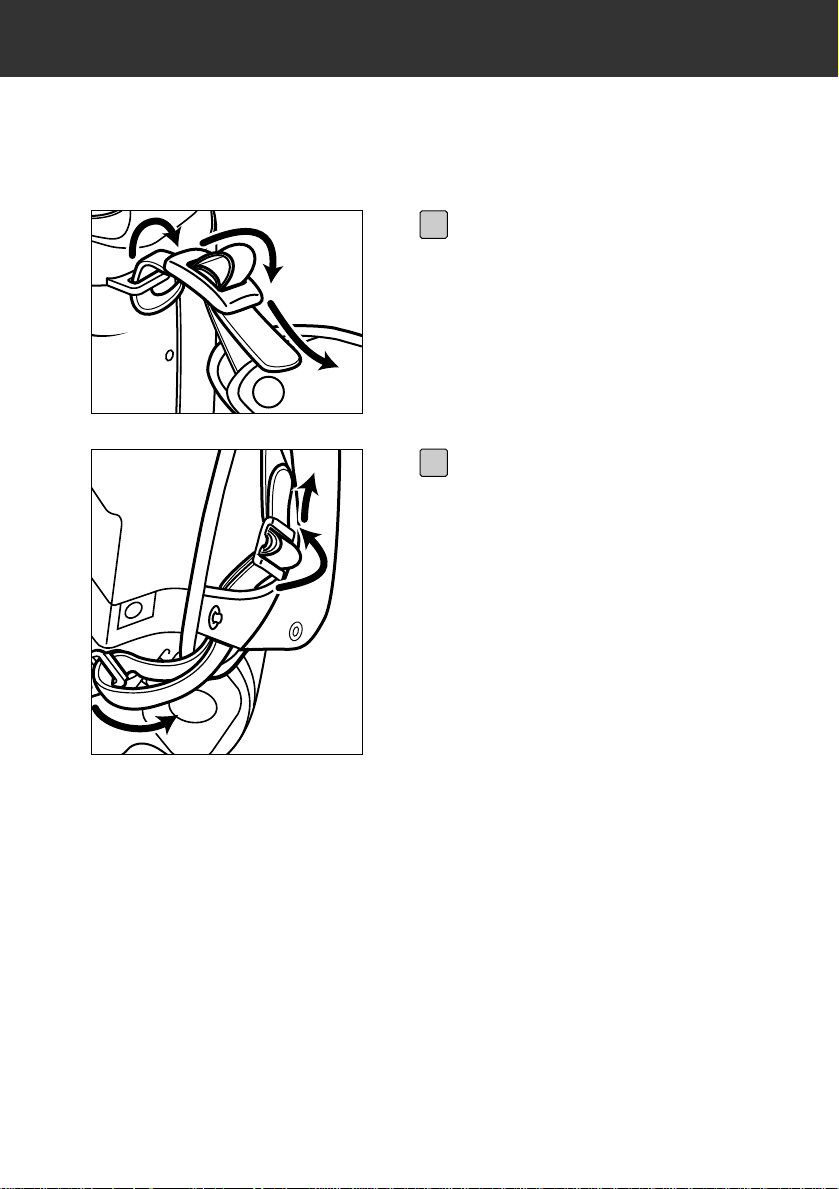
PREPARATION
HOLDING STRAP
Use the Holding Strap HC-RD1 for a more secure grip on the camera.
ATTACHING THE HOLDING STRAP
Pass the short tip of the holding
strap through the camera’s upper
strap eyelet, then through the
strap eyelet on the holding strap.
1
Pass the long tip of the holding
strap through the camera’s bottom eyelet, then through the
buckle on the holding strap.
2
Page 21

21
PREPARATION
• The holding strap may be fitted to three locations on this camera.Use the strap
eyelet at the left side of the back of the camera when attaching the camera neck
strap or wide strap (available separately) designed for Minolta single-lens reflex
(SLR) cameras.
Page 22
22
PREPARATION
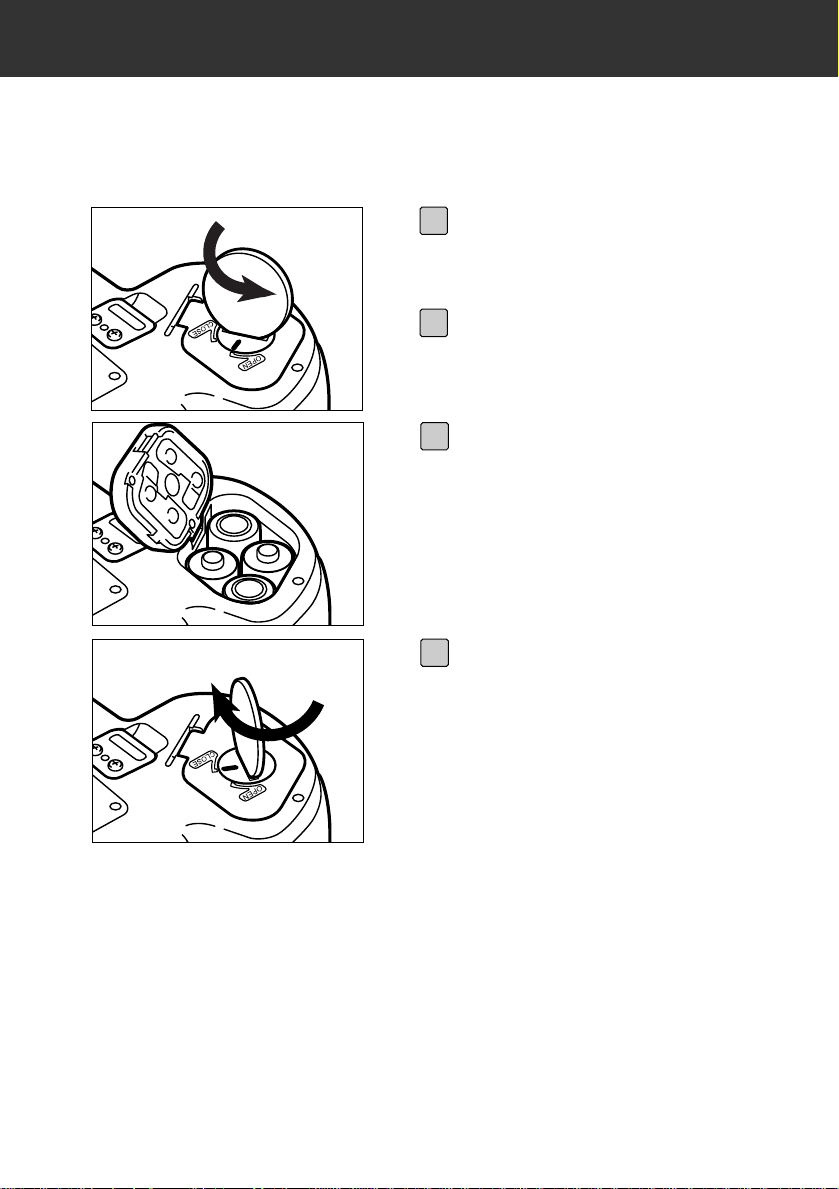
INSERTING BATTERIES
Fully charge all four of the supplied NiMH batteries before use.
• To prevent damage to the cover, do not set the camera down on a surface with the
cover open.
Using a coin or similar object,
turn the battery-chamber lock
counter-clockwise.
1
Open the battery chamber.
2
Insert the batteries as indicated
by the + and – marks.
3
Close the cover, then turn the
battery-chamber cover to CLOSE
to lock it.
4
Page 23

23
PREPARATION
LOW BATTERY WARNING
Your camera is equipped with an automatic batter y-condition indicator.
• If no display appears, replace the batteries or check that they are inserted
correctly.
Full-Battery symbol – Each time the camera is
turned on, the battery-condition indicator will briefly
appear in the data panel. indicates the battery
power is full.
Blinking low battery – Power is low, but all functions are operational.The battery will have to be
replaced very soon.
Blinking low-battery alone and shutter locks – Power
is insufficient for camera operation.
Page 24

24
PREPARATION
Control Dial set to PLAY
To save power, the LCD monitor will shut down after approximately 10 minutes if the
camera is not used (unless the camera is connected to the PC). Press the Quick View
button to switch on the monitor again.
Control Dial set to REC or
The Auto Power Off function does not work with this setting. If the camera is left
unused for more than 8 minutes with a compact flash card warning (Card Full, Card
Error, Non-compatible Card) on the data panel, the panel is shut down. Retur n the
Control Dial to the OFF position, and then turn it to REC or .
AUTO POWER OFF
Page 25
25
PREPARATION
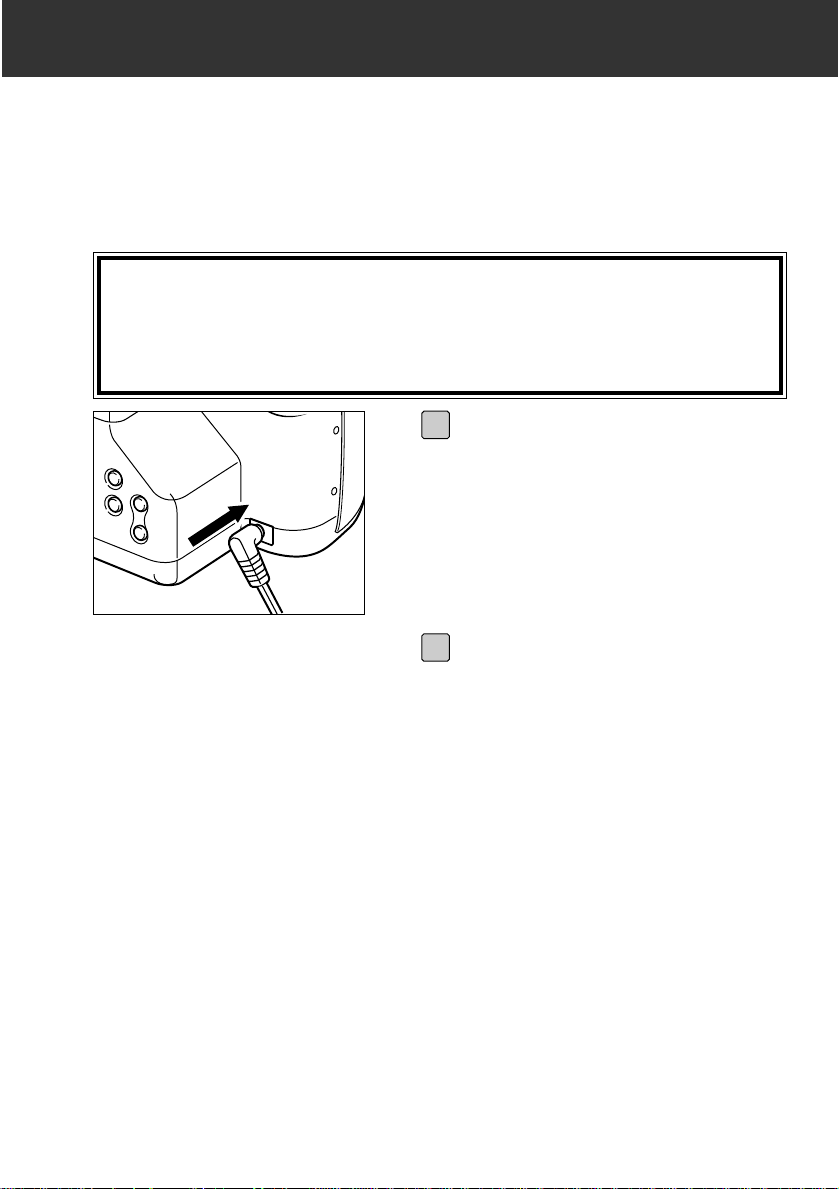
USING THE AC ADAPTER (AC-2)
Use the AC Adapter AC-2 allows the camera to receive power from an electrical outlet. Use of the AC adapter is recommended to conserve batteries during per iods of
heavy use.It is also recommended when interfacing the camera with the computer.
Always turn the Control Dial to OFF, and switch the digital camera
power supply off, before changing from batteries to AC adapter or
vice versa. Do not change the power supply while the camera is ON.
Insert the mini plug into the camera’s AC terminal.
1
Insert the AC plug into an electrical outlet.
2
Page 26
26
PREPARATION
ATTACHING AND REMOVING THE LENS
A TT A CHING THE LENS
• Do not insert the lens at an angle.
• Do not press the lens release when attaching the lens.
A
F
/
M
8
0
5
6
Remove the camera body cap
and rear lens cap as shown.
1
Align the red mounting dot on
the lens with the red dot on the
mount.
2
Turn the lens clokwise until it
clicks.
3
Page 27
27
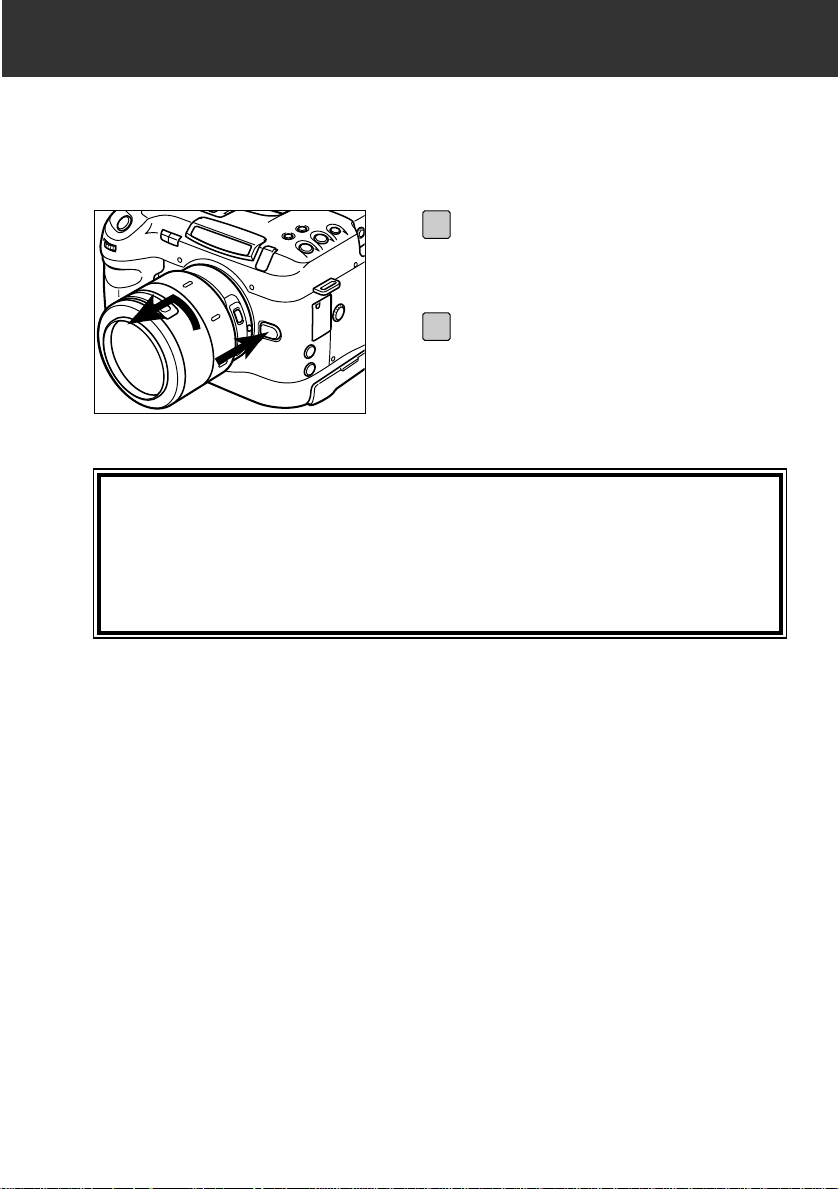
PREPARATION
REMOVING THE LENS
Press the lens release and turn
the lens counter-clockwise until it
stops.
1
Gently remove the lens from the
mount and replace the caps.
2
• Do not force the lens if it does not turn smoothly.
• Do not touch the inside of the camera, especially the lens contact and mirror.
• Remove dust, dirt, and moisture from the lens mount area before attaching or
removing a lens.
Page 28
28
PREPARATION
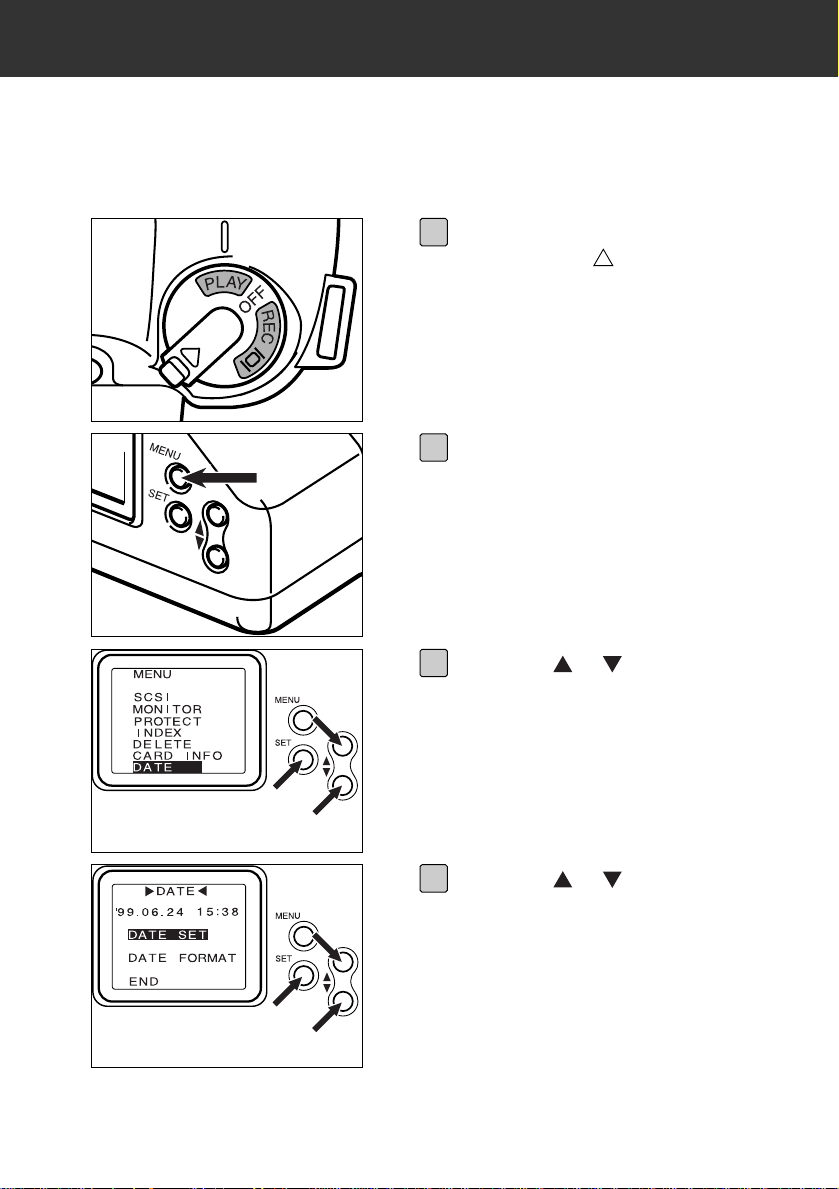
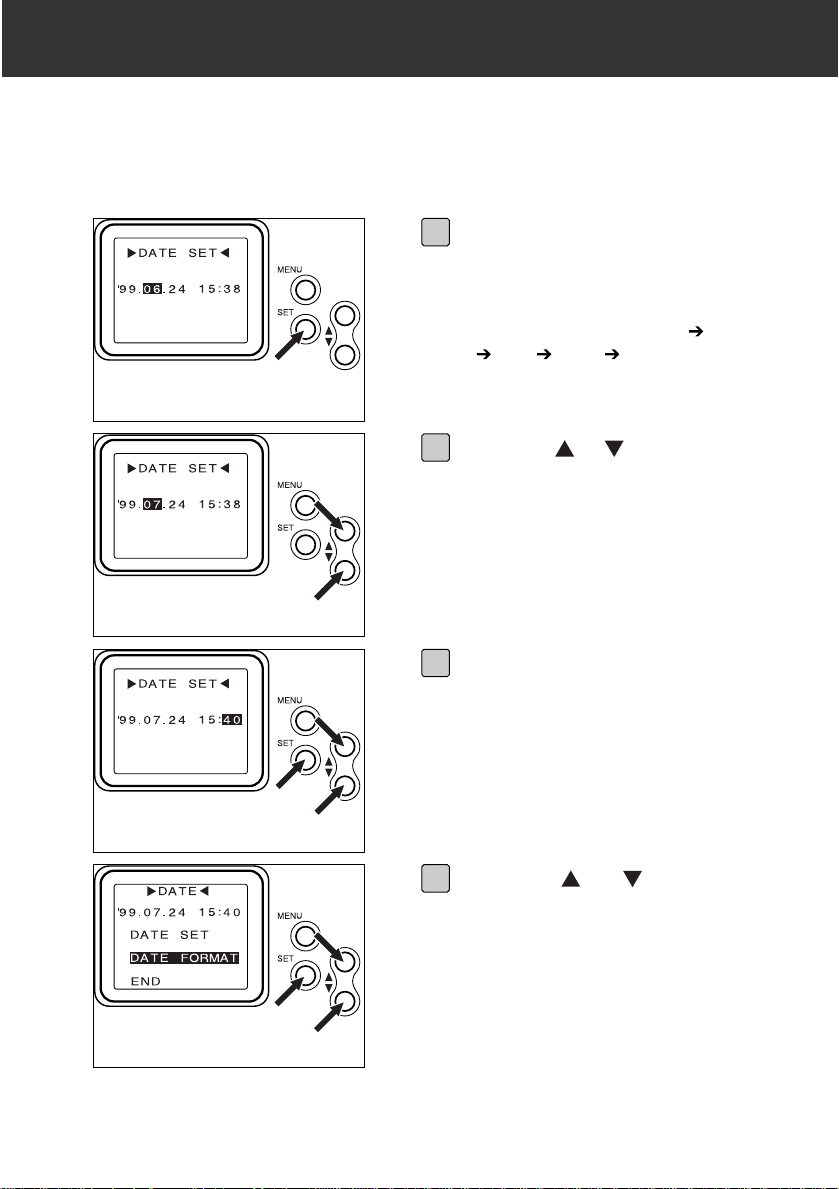
SETTING THE D A TE/TIME
This camera records the date and time an image was captured. For your reference,
set the date and time for accuracy.
With the Control dial lock button
pushed in the direction, turn
the Control dial to the right to the
PLAY position.
1
Press the MENU button on the
back of the camera.
• The top menu will appear.
2
Press the or button a number of times to highlight DATE,
and press the SET button.
• The DATE menu will appear.
3
Press the or button to highlight DATE SET on the DATE
menu, and press the SET button.
• The DATE SET menu will appear.
• Skip this adjustment if the date and
time are correct, and go directly to [8].
4
Page 29
29
PREPARATION
Press the SET button as many
times as required to highlight the
value to be changed.
• Press the SET button repeatedly to
move the highlight to year month
day hour minute.
5
Press the or button to adjust
the setting.
6
Once the Minute value has been
changed, press the SET button.
• The internal clock begins operation,
and the system returns to the DATE
menu.
7
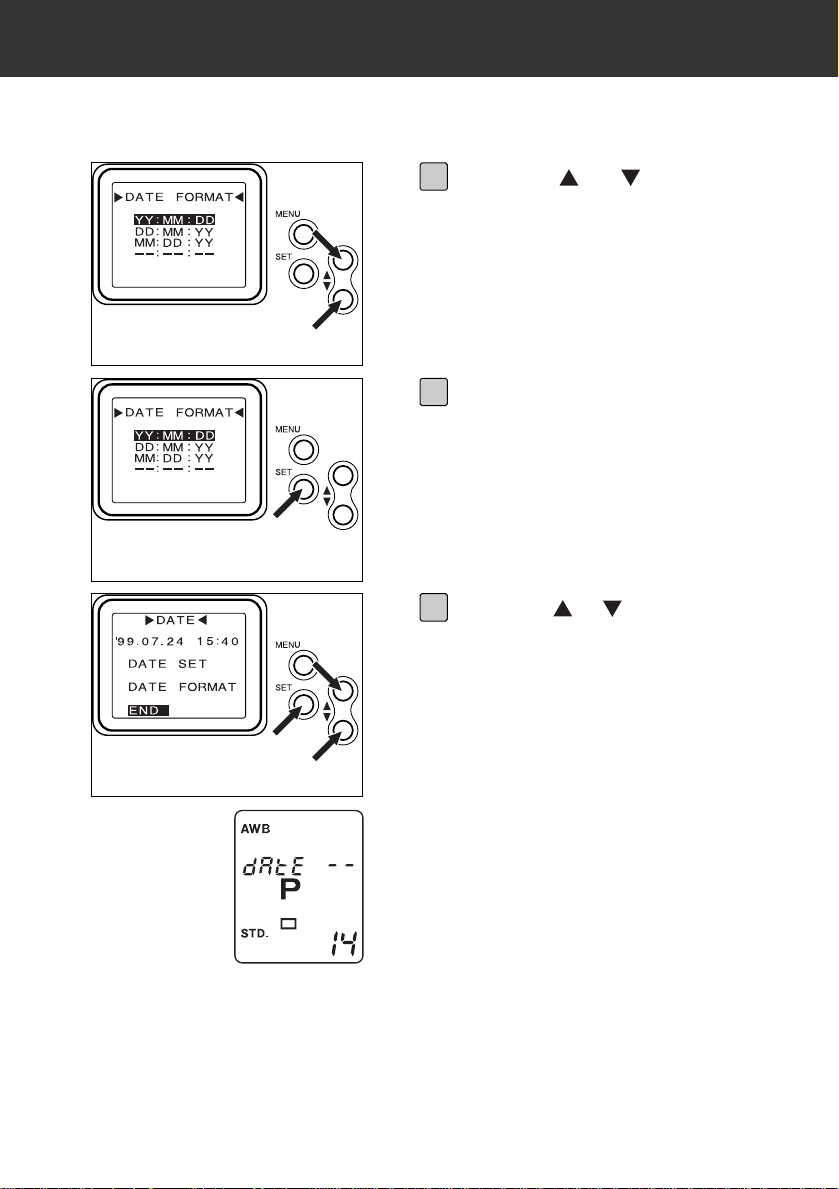
Press the or button to
highlight DATE FORMAT on the
DATE menu, and press the SET
button.
• The DATE FORMAT menu will appear.
• Skip this adjustment if the date format
is correct, and go directly to [11].
8
Page 30
30
PREPARATION
Press the or button to
highlight the desired date format.
9
Press the SET button.
• The LCD monitor returns to [1].
10
Press the or button to highlight END on the DATE menu, and
press the SET button.
• The LCD monitor returns to [1].
11
The clock backup battery is low if the item
at left appears on the data panel. Read the
section on page 108, and then replace the
battery.
Page 31

31
PREPARATION
DIOPTER ADJUSTMENT
If you are near or far sighted, you can use this control to adjust the eyepiece for your
eyesight.The diopter adjustment range is from -4 to +2 dioptres.
ADJUSTING THE DIOPTER
Remove the lens (see page 27),
and direct the camera body
towards the light.
1
Look through the viewfinder and
turn the viewfinder dial until the
focus frame is clearly visible.
2
Page 32

32
PREPARATION
COMPACT FLASH CARD
INSERTING THE COMPACT FLASH CARD
Your camera requires a compact flash card to be inserted before capturing images.
• Always ensure that the BUSY lamp is extinguished or not blinking before inserting
or removing the compact flash card from the camera.
• The data in the card will be lost, or the card itself may be damaged, if the
compact flash card is removed while the BUSY lamp is lit.
Open the card-chamber door.
1
Insert the compact flash card into
the card slot, pushing it in until
the card-release lever pops out.
• Insert the card so the back label faces
away from the camera.
• Push the card in straight, not at an
angle.
• Wrong direction: If the card stops midway, confir m the direction of the card.
Do not force the card.
2
Close the card-chamber door.
3
Page 33

33
PREPARATION
REMOVING THE COMPACT FLASH CARD
Open the card-chamber door.
1
Press the card-release button to
eject the card.
2
Pull the memory card straight
out.
3
Close the card-chamber door
after removing the card.
4
Page 34

34
Page 35

35
RECORDING
Page 36

36
BASIC OPERATION
TAKING PICTURES IN AUTOMATIC MODE
Full Auto mode is the camera’s standard operating mode and is suited for use in
almost any situation.When the Program-reset button is pressed, the camera is
returned to fully-automatic operation. See page 72.
With the Control dial lock button
pushed in the direction, turn
the Control dial to REC or .
1
Press the Program-reset button
to set the camera to Full Auto
mode.
2
Turn the zoom ring on the lens
until the subject is the desired
size in the viewfinder (this
applies only to the zoom lens).
3
Center your subject in the focus
frame [ ] and press the shutterrelease button partway down to
activate autofocus. or will
glow when the subject is in
focus.
4
Page 37

37
BASIC OPERATION
SAVING IMAGES IMAGES SAVED
BUSY LAMP
DATA PANEL
Press the shutter-release button
all-the-way down to take the picture.
• The images taken are saved to the
compact flash card when photography
is complete.While the images are
being saved to the compact flash card
the BUSY lamp is lit, and the frame
counter on the data panel blinks.To
prevent loss of image data, do not
remove the AC adapter plug from the
socket, or remove the compact flash
card from the camera, until all the
images have been saved.
• When all the images have been saved
to the compact flash card the BUSY
lamp is extinguished, and the frame
counter on the data panel stops
blinking.
5
Page 38

38
BASIC OPERATION
This camera has two settings for recording.
SELECTING THE RECORD SETTING
Images are saved in the compact flash card
as they are taken, without being displayed
on the LCD monitor.
Use this mode to take large numbers of
images when the light source and the photography conditions are relatively stable.
Press the QUICK VIEW button to display the
previous picture taken on the LCD monitor
for approximately 8 seconds.
REC
Each image is in saved in the compact flash
card as it is taken, and then displayed automatically on the LCD monitor for approximately 8 seconds.
Use this mode to check each image as it is
taken.
Page 39

39
BASIC OPERATION
The quick view button allows you see a preview of the captured image after it has
been recorded.
QUICK VIEW
In REC, take the picture.
1
Wait until the image has been
written to the compact flash card.
• The busy lamp and the counter
display in the data panel will stop
blinking.
2
Press the QUICK VIEW button.
• The recorded image will appear in the
LCD monitor for approximately 8
seconds.
3
Page 40

40
BASIC OPERATION
IMAGE QUALITY SELECTION
This digital camera supports four image quality modes – super-fine (SUPER FINE),
fine (FINE), standard (STD.), and economy (ECON.).
Image quality is related to the rate of compression of the image.The rate of compression increases, and image quality decreases, in the order super-fine fine standard economy.
The lower the rate of compression of the image, the higher its quality. If image quality
is important, use the super-fine or fine mode. Note, however, that as the rate of image
compression is low (no compression in the super-fine mode), the number of images
able to be saved in the compact flash card will be less than in the economy or standard modes.
If economic use of the compact flash card is important (the need to save as many
images as possible in it), use the economy or standard modes.Note, however, that as
the rate of image compression is high, the quality of the images will be lower than in
the super-fine or fine modes.
The rate of compression, the image recording format, and the number of images
which may be saved in a 30MB compact flash card is shown below for the four image
quality modes.
• The number of images for every image quality are approximate values only.The
actual numbers will vary with the scenes photographed.
RATE OF
COMPRESSION
Uncompressed Approx.1/5 Approx.1/10 Approx.1/15
IMAGE
RECORDING
FORMAT
Exif2-TIFF Exif2-JPEG
NUMBER OF
IMAGES WHICH
MAY BE SAVED IN
A 30MB COMPACT
FLASH CARD
Approx. 3pics Approx. 17pics Approx. 33pics Approx. 52pics
SUPER-FINE
(SUPER FINE)
FINE
(FINE)
STANDARD
(STD.)
ECONOMY
(ECON.)
Page 41

41
BASIC OPERATION
In REC or , press and hold
the QUALITY button.
• The image quality options will appear
in the data panel.
1
Turn the front dial until the
desired quality setting blinks.
• Both SUPER and FINE blink when the
super-fine mode is selected.
2
Release the QUALITY button to
set the change.
3
• Image quality may be changed while the capacity of CF card remains.One compact
flash card may contain images of various image qualities.
• The image quality cannot be changed while the images are being saved to the
compact flash card.
• The image quality setting is maintained when power is switched off (Control dial set
to OFF).
• Changing the image quality will affect the remaining number of images which may
be stored in the card. Selecting the super-fine or fine modes, in par ticular, will
dramatically reduce this number.Press the COUNTER button to check the
remaining number of images which may be stored in the card (see page 73).
Page 42

42
FOCUS DETAILS
FOCUS SIGNALS
When the camera is set to autofocus (AF) mode, pressing the shutter-release button
partway down will activate the autofocus system and one of the signals below will
appear at the base of the viewfinder.In autofocus mode, the shutter will not release
until the focus is confirmed.
Focus signals
Focus signals
LIT
BLINKING
In focus.
Not focused. Shutter locked.
Focus is not possible (shutter locked). Your subject is too close or
is one of the special focusing situations described on the next page.
LIT
LIT
In focus. Focus changes with movement of subject.
Focusing. Shutter locked.
Page 43

43
FOCUS DETAILS
SPECIAL FOCUSING SITUATIONS
In situations like those described below it may be difficult or impossible for the
camera to focus accurately;you may need to use focus hold, direct-manual focus,
or manual focus.
If two subjects at different distances overlap in the focus
frame [ ].
If a subject composed of alternating light and dark lines completely fills the focus frame [ ].
If the subject within the focus
frame [ ] is ver y bright, or low in
contrast.
Page 44

44
FOCUS DETAILS
FOCUS HOLD
Focus hold should be used when you want to take a picture with your subject outside
the focus frame [ ] or when autofocus is difficult to confirm.
• Focus hold can only be used when appears in the viewfinder.
Center your subject in the focus
frame [ ] and press the shutterrelease button partway down.
1
Continue to hold the shutterrelease button partway down
while you recompose your picture.
2
Press the shutter-release button
all-the-way down to take the picture.
3
Page 45

45
FOCUS DETAILS
• This function cannot be used on lenses without a focusing ring.
• Turning the focus ring will not change the focus unless the shutter button is pressed
lightly at the same time.
• The focus icon is lit when the subject is in focus in the frame [ ].
• This function cannot be used if or are lit (i.e. when the subject it moving).
DIRECT MANUAL FOCUS (DMF)
DMF lets you adjust the focus manually without taking the camera out of autofocus
mode.
With the camera in the autofocus
mode, press the shutter-release
button partway down to activate
autofocus.
1
Without releasing the shutterrelease button adjust the focus
manually using the focusing ring
on the lens.
2
Press the shutter-release button
all-the-way down to take the picture.
• will appear in the viewfinder to
indicate when the subject in the focus
frame is in focus.
3
Page 46

46
FOCUS DETAILS
MANUAL FOCUS
When autofocus is not suitable and focus hold is not possible, focus the lens manually.The autofocus system will monitor focus and indicate when a subject in the focus
frame [ ] is in focus.
• will appear in the viewfinder to indicate when the subject in the focus frame is in
focus.
• The Minolta V lenses 28-56 mm f/4-5.6 2X zoom lens and the 25-150 mm f/4.5-6.3
4X zoom lens are autofocus only, manual focus is not possible.
Press the focus-mode button,
will appear in the data
panel.
1
Turn the lens focusing ring until
your subject appears sharp and
focused.
2
Page 47

47
EXPOSURE
EXPOSURE COMPENSATION
This function lets you compensate exposure up to +/- 3 EV in 1/2 EV increments in
situations where the camera’s metering system may not be able to accurately determine exposure.More exposure is recommended for very bright scenes, such as snow
or beach scenes. Less exposure is recommended when the scene is composed of
mostly darker tones.
Over Exposure
Metered Exposure
Under Exposure
Page 48

48
EXPOSURE
Press and hold the exposurecompensation button, then turn
the front dial until the compensation value you want appears in
the data panel.
1
Release the exposure-compensation button to enter the setting.
• will remain in the data panel and
viewfinder as a reminder that
exposure compensation is set.
• To cancel exposure compensation,
perform the above procedure and
select 0.0, or press the program-reset
button.
2
Page 49

49
EXPOSURE
SPOT METERING
The standard metering mode for this camera uses a fourteen segment honeycomb
pattern metering system to determine the correct exposure.
When the exposure needs to be set according to a very small part of the scene, spot
metering lets you use a single metering segment to determine correct exposure.
When selected, only the center segment of the honeycomb pattern is used to read
the brightness of the subject in the spot circle in the center of the viewfinder.
Move the area of the subject to
be exposed into the spot metering frame.
1
Press and hold the SPOT button.
will appear in the viewfinder.
• Exposure will be locked until the spot
button is released.
2
Recompose the picture, then
press the shutter-release button
all-the-way down to take the picture.
3
Page 50

50
EXPOSURE
• Press and hold the SPOT button to take pictures continuously with the same
exposure.
• When the flash is used ( lit in the viewfinder), pressing and holding the SPOT
button will result in the slow-shutter sync facility being set (see page 82).
• When the icon blinks the subject is either too bright or too dark for the metering
range, and the correct exposure will not be possible.
Page 51

51
EXPOSURE
P mode is ideal when you want to give your full attention to the subject and give the
camera control over exposure. For additional information on P mode, refer to Taking
Pictures in Full Auto Mode.
P MODE – PROGRAMMED EXPOSURE
EXPOSURE MODES
This camera has four different exposure modes: Aper ture-pr ior ity, Shutter-priority,
Manual, and Program.The exposure modes allow you to tailor the degree of camera
control needed to capture the desired image.
MODE EXPLANATION
P
Program Exposure Mode Camera selects aperture and shutter
speed
A
Aperture Priority Mode Manually select aperture
S
Shutter Priority Mode Manually select shutter speed
M
Manual Exposure Manually select aperture and shutter
speed
In REC or , press and hold
the MODE (exposure-mode) button.
• PAMS will appear in the data panel.
1
Turn the front dial until P blinks
in the data panel, then remove
your finger from the MODE button.
• The camera is also returned to P
mode when the Program-reset button
is pressed.
2
Page 52

52
EXPOSURE
In A mode, you select the aperture and the camera automatically sets the shutter
speed required for proper exposure. A mode should be used when you want to control
the range of sharpness (depth-of-field) in an image.
A MODE – APERTURE PRIORITY
In REC or , press and hold
the MODE button.
• PAMS will appear in the data panel.
• The currently set exposure mode
blinks on the data panel.
1
Turn the front dial until A blinks
in the data panel, then remove
your finger from the MODE button.
2
Page 53

53
EXPOSURE
• With photography in the A mode, image quality may be degraded at shutter speeds
slower than 1/2 second.
• To end photography in the A mode, repeat the operation described on the previous
page to display P on the data panel, or press the Program-reset button.
• Changing the aperture value does not change the value in the viewfinder, however
the effects of the change are reflected on the CCD and in the saved images.
• See page 81 for use of the flash in the A mode.
Turn the front dial to select the
aperture.
• In the viewfinder, only the plane on
which the camera is focused will
appear sharp.The photographed
image will have a depth-of-field
corresponding to the aperture used.
• While the aperture range differs with
the lens selected, the maximum
aperture is F6.7, and the minimum
aperture is F22.
3
• If 2000 or 2˝ (2 seconds) blinks, the
required setting is beyond the
camera’s shutter speed range, and
the image will be either under or overexposed. Change the aper ture value
until the blinking stops.
Page 54

54
EXPOSURE
In S mode, you select the shutter speed and the camera automatically sets the aperture required for proper exposure.This mode is useful when you want to control subject blur.
S MODE – SHUTTER PRIORITY
In REC or , press and hold
the MODE button.
• PAMS will appear in the data panel.
• The currently set exposure mode
blinks on the data panel.
1
Turn the front dial until S blinks
in the data panel, then remove
your finger from the MODE button.
2
Page 55

55
EXPOSURE
• With photography in the S mode, image quality may be degraded at shutter speeds
slower than 1/2 second.
• To end photography in the S mode, repeat the operation described on the previous
page to display P on the data panel, or press the Program-reset button.
• See page 81 for use of the flash in the S mode.
Turn the front dial to select the
shutter speed.
• The shutter speed range is 1/2000~2
seconds.
• If the aperture display in the data
panel blinks, the required setting is
outside the aperture range of the lens.
Turn the control dial until the blinking
stops.
3
• If the aperture value blinks the
required setting is beyond the
camera’s shutter speed range, and
the image will be either under or overexposed. Change the shutter speed
until the aperture value stops blinking.
• Numbers such as 90 and 500 on the
data panel indicate shutter speeds of
1/90th of a second, or 1/500th of a
second respectively.Numbers such as
or indicate 0.7 seconds and
2 seconds respectively.
Page 56

56
EXPOSURE
In M mode, you have full control of the exposure.You select both the shutter speed
and the aperture. The viewfinder data panel will tell you if the exposure you have
selected is over, under, or the same as the metered exposure.
M MODE – MANUAL OPERATION
In REC or , press and hold
the MODE button.
• PAMS will appear in the data panel.
• The currently set exposure mode
blinks on the data panel.
1
Turn the front dial until M blinks
in the data panel, then remove
your finger from the MODE button.
2
Turn the front dial to select the
shutter speed.
• The shutter speed range is 1/2000~30
seconds.
3
Page 57

57
EXPOSURE
While pressing the manual fillflash button, turn the front dial to
select the aperture.
• While the aperture range differs with
the lens selected, the maximum
aperture is F6.7, and minimum
aperture is F22.
4
Metering in Manual Mode
In the manual mode, the meter index will show you how the exposure you have set
compares with the camera’s meter reading.The + indicator tells you when your exposure is over, the – indicator tells you when your exposure is under.If neither indicator
appears, the camera’s meter reading agrees with the exposure you have set.
Press the shutter-release button partway down to activate the meter.
Optimum exposure
The image will be over-exposed
The image will be under-exposed
• With photography in the M mode, image quality may be degraded at shutter speeds
slower than 2 seconds.
• To end photography in the M mode, repeat the operation described on the previous
page to display P on the data panel, or press the Program-reset button.
• See page 81 for use of the flash in the M mode.
Page 58

58
ADDITIONAL FEATURES
WHITE BALANCE
However, manual white balance is necessary when the light source illuminating the
white balance sensor is different than the light source illuminating the subject.
• For example, if the camera is in a room lit by a household lamp and the subject is
outside lit by direct sunlight, then manually set the white balance to daylight mode.
• Auto White Balance may not work properly when the sensor is lit by morning or
evening sunlight.Manually set the white balance to daylight mode.
This camera has five white balance modes:
White Balance sensor
White Balance is the camera’s ability to
make different types of lighting appear neutral.The camera’s Auto White Balance setting is appropriate for most situations.
ICON MODE EXPLANATION
Auto White Balance The Auto setting will detect the type of light and adjust
the white balance accordingly.
Daylight For outdoor/sunlight illuminated subjects.
Tungsten For incandescent lighting, such as the filament light
bulbs in household lamps.
Flash
Custom
Select this setting when using a non-dedicated
attached accessory flash or PC mounted flash. Auto
White Balance should be used for dedicated flash
units.
Create a white balance setting for a special lighting
situation.
Page 59

59
ADDITIONAL FEATURES
• The white-balance selection remains until another white-balance mode is selected or
the program button is pressed.Turning the camera off does not reset the white
balance selection.
In REC or mode, press and
hold the WB (White-Balance) button.
1
Turn the front dial until the icon
for desired setting blinks, then
remove your finger from the
WB button.
• The white-balance mode icon will
appear in the data panel.
2
Page 60

60
ADDITIONAL FEATURES
Create a custom white balance setting that can be selected again and again or
changed at any time.
CUSTOM WHITE BALANCE – CREATING A SETTING
In REC or mode, press and
hold the WB button.
1
Turn the front dial until and
blink in the data
panel, then remove your finger
from the WB button.
2
Focus on a white piece of paper
large enough to fill the viewfinder
frame.
3
Page 61

61
ADDITIONAL FEATURES
Reset to a new custom setting, or exit white balance setup by turning the dial while
pressing the WB button.
• The display will change from to or within 2 or 3
seconds. Do not make any other selections during this time.
• Custom setting is also possible for flash lighting.
• The correct white balance may not be obtainable with custom settings for subjects
under bright florescent lighting.
Press the shutter-release button
all-the-way down.
• The shutter will release, but the
camera does not record an image.
will appear briefly in the
data panel and viewfinder.
will appear on the data
panel, and in the viewfinder, if the white
balance custom setting is satisfactory,
and then return to the normal photography display.
When the white balance cannot be set
correctly, for example when the selected
setting is outside the custom setting
range for the camera, will
appear on the data panel, and in the
viewfinder, and the system will then
return to the condition prior to [4].
4
Page 62

62
ADDITIONAL FEATURES
CONTINUOUS DRIVE MODE
In this mode, the camera continuously takes pictures as fast as 1.5 frames per second. Up to five frames can be captured with one press of the shutter-release button.
Press and hold the DRIVE
(drive-mode) button.
• The drive-mode icons will appear in
the data panel.
1
Turn the front dial until
blinks.
2
Release the DRIVE button.
3
Press and hold the shutterrelease button.
• Up to five pictures may be taken while
holding down the shutter-release
button.
4
Page 63

63
ADDITIONAL FEATURES
The camera has a 5-frame internal image memory in which images are temporarily
saved until being transferred to the compact flash card in the order in which they were
taken.
The icon is lit in the viewfinder when this image memory is full to indicate that no
more pictures may be taken.When images in the image memor y are transferred to
the compact flash card and space becomes available, the icon is extinguished and
more pictures may then be taken.
Note that since the icon is extinguished when enough space becomes available for
one frame in the image memory, even though the icon is extinguished, it may not be
possible to take five pictures in quick succession.
During continuous photography the speed at which images are saved from the image
memory to the compact flash card may result in a delay between shutter operation
and recording of the image taken.
Note that the number blinking in the frame counter is the number of the frame currently being saved to the compact flash card, not the number of the frame currently being
taken.
When the COUNTER button is pressed while images are being saved to the compact
flash card, the number of images remaining in the image memory is shown in the
shutter speed section of the data panel.
More pictures may be taken when
the icon is extinguished.
Page 64

64
ADDITIONAL FEATURES
For example, if four successive frames are taken beginning from the
status shown at left, the display will change as shown below.
The 21st frame
is being saved…
The 24th frame
is saved.
The 22nd frame
is being saved…
The 23rd frame
is being saved…
The 24th frame
is being saved…
When the COUNTER button is pressed
the number of frames yet to be saved to
the compact flash card from the image
memory is shown in the shutter speed
section of the data panel.
Page 65

65
ADDITIONAL FEATURES
• Pictures cannot be taken continuously while appears on the data panel.
• Either select the frame photography icon with [1] to [3] on page 66, or press the
Program-reset button, to clear continuous photography.
• When using the flash, pictures may be taken without waiting for the flash to finish
charging.
• The focus is automatically adjusted (however the shutter is not released until the
focus has been adjusted) if the distance to the subject changes while holding down
the shutter button.
Page 66

66
ADDITIONAL FEATURES
SELF-TIMER
The self-timer will delay the release of the shutter for approximately 10 seconds after
you press the shutter-release button.
Place the camera on a tripod,
then press and hold the DRIVE
(drive-mode) button.
• The drive-mode icons will appear in
the data panel.
1
Turn the front dial until
blinks.
2
Release the DRIVE button.
3
Arrange the camera and subject
positions, and compose your picture.
4
Page 67

67
ADDITIONAL FEATURES
ATTACHING THE EYEPIECE CAP
Attach the eyepiece cap if there is a bright light source behind the camera.The eyepiece cap prevents exposure problems caused by stray light from entering the eyepiece.
• The self-timer mode will automatically cancel after the exposure is made.
• Do not press the shutter-release button while standing in front of the camera.
• If you want to take a picture with your subject outside of the focus frame, use focus
hold. See page 44.
• To stop the countdown, press the DRIVE button while turning the Front dial once.To
cancel the self-timer before the shutter releases, turn the main switch to switch the
camera off or press the program-reset button.
Press the shutter-release button
all-the-way down to start the
timer.The self-timer lamp on the
front of the camera will blink,
then glow just before the shutter
releases.
5
Remove the eyepiece cup.
1
Slide the eyepiece cap on.
2
Page 68

68
ADDITIONAL FEATURES
REMOTE CONTROL (SOLD SEPARATELY)
The IR Remote Control RC-3 allows remote camera operation up to 5m away.
• The remote control may not operate with backlit subjects or under fluorescent light.
• Remote control is not cleared after a photograph is taken, and photography can
therefore be continued.
• To save power, remote-control mode is canceled if the remote control is not
operated for more than 8 minutes.
REMOTE CONTROL MODE
Place the camera on a tripod,
then press and hold the DRIVE
(drive-mode) button.
• The drive-mode icons will appear in
the data panel.
1
Turn the front dial until
blinks.
2
Release the DRIVE button.
3
Page 69

69
ADDITIONAL FEATURES
• If the • button is pressed, the lamp on the front of the camera will blink once and
take the picture.
• If the 2s button is pressed, the lamp on the front of the camera will blink for two
seconds before the picture is taken.
• To cancel, reset the drive-mode, press the program-reset button, or turn the camera
off.
Remote emitter
2s Button
Button
Arrange the camera and subject
positions, and compose your picture.
4
Point the remote emitter toward
the front of the camera and press
the • or 2s button.
5
Page 70

70
ADDITIONAL FEATURES
When your subject is not centered in the focus frame, use manual focus or focus hold.
FOCUS HOLD IN REMOTE CONTROL MODE
• The focus remains set after photography is complete. It is cleared by any operation
of the camera (eg pressing a button).
• Photography is also possible using manual focusing.
Center your subject in the focus
frame, then press the shutter-release
button partway down.
2
Release the shutter button when
the focus signal in the
viewfinder is lit (i.e. focus has
been adjusted).
• The focus icon is extinguished when
the shutter button is released,
however the focus remains set.
3
Set the camera to the remotecontrol mode.
1
Recompose the picture.
4
Point the remote toward the front
of the camera and press the • or
2s button.
5
Page 71

71
ADDITIONAL FEATURES
The remote control uses a 3V lithium battery (CR2032). When pressing the remotecontrol buttons does not release the shutter, the battery must be replaced.A new battery should be sufficient for around ten years of operation.
CHANGING THE REMOTE CONTROL BATTERY
Pull out the battery chamber and
remove the old battery.
1
Insert a new battery into the battery chamber with its plus side
up.
2
Slide the battery chamber back
into the remote control.
3
KEEP BATTERIES THAT COULD BE SWALLOWED AWAY FROM
YOUNG CHILDREN. CONTACT A DOCTOR IMMEDIATELY IF A
BATTERY IS SWALLOWED.
WARNING
Page 72

72
ADDITIONAL FEATURES
PROGRAM-RESET BUTTON
The following settings are unaffected by pressing the Program-reset button.
• Image quality
• ISO sensitivity
Pressing the Program-reset button is a
quick way to return the camera to fully automatic operation.
PAGEFUNCTION P MODE SETTING
51
Exposure Mode P (Programmed Autoexposure)
42
Focus Mode Auto Focus Mode
58
White Balance AWB (Auto White Balance)
–Drive-mode Single-frame Advance
66
Self-timer Cleared (both before and during)
47
Exposure Compensation 0.0
84
Flash Compensation 0.0
Page 73

73
ADDITIONAL FEATURES
COUNTER BUTTON
This display allows the user to determine the space remaining in the compact flash
card as a guide to the number of frames which may be saved.
• The displayed value for the remaining number of frames which may be saved is only
a guide.The actual number will depend on the scenes photographed.
• The remaining number of frames which may be saved changes with image quality.
This number may change dramatically when the super-fine or fine mode is selected.
Before using the camera, press the COUNTER button to check the remaining
number of frames which may be saved.
When not saving to
the compact flash
card.
When saving to the
compact flash card.
Space remaining in the compact
flash card (approximately 7MB
in the example at left).
Number of frames in the image
memory yet to be saved to the
compact flash card (three
frames in the example at right).
Approximate number of remaining frames which may be
taken in the currently selected mode (standard mode in
the example at left).
Currently selected image quality mode
(the standard mode in the example above).
Press and hold the COUNTER
button.
• The following is displayed on the data
panel.
• Release the COUNTER button to
return to normal display.
1
Page 74

74
ADDITIONAL FEATURES
CHANGING ISO SENSITIVITY
The CCD used in this camera has a sensitivity of ISO200 when shipped from the factory.It may be set to ISO800 if required.
This will improve camera performance by letting you use it in dark, indoor locations
with high shutter speeds, thus eliminating camera shake, and in the A mode (aperture
priority) with smaller apertures, thus ensuring a wider depth of field.
Press and hold the exposure
compensation button, then press
the SPOT button.
• The current ISO sensitivity will appear
on the data panel.
• Continue pressing both the exposure
compensation and SPOT buttons until
setting is complete.
1
With both buttons held down,
turn the dial to display ‘800’ in
the frame counter.
• The value in the frame counter
alternates between 200 and 800 with
each click of the dial.
2
Page 75

75
ADDITIONAL FEATURES
Release both the exposure compensation and SPOT buttons.
• The ISO sensitivity selected in [2] is
now set.
• To return to the ISO200 value, display
200 in the frame counter in [2] and
release both buttons.
3
• Changing to ISO800 sensitivity does not change the CCD, but rather amplifies the
video signal electronically. As is the case with a gain up in a video camera, the
noise component of the signal is also amplified.The image therefore assumes a
speckled appearance, and image quality is degraded in comparison to that when
ISO200 is selected.
Page 76

76
ADDITIONAL FEATURES
FORMATTING A COMPACT FLASH CARD
Formatting a Compact Flash card removes all protected and unprotected images from
the card.
The standard accessory cards are pre-formatted. Compact Flash cards purchased
separately may need formatting.
This deletes all write-protected images.Take extreme care when formatting.
Turn the Control dial to PLAY.
1
Press the MENU button.
2
Press the button until DELETE
is highlighted, then press the
SET button.
3
Page 77

77
ADDITIONAL FEATURES
Press the button until FORMAT
is highlighted, then press the
SET button.
• A confirmation screen will appear.
4
Press the button until YES is
highlighted, then press the SET
button.
• The LCD monitor will return to the
PLAY screen after the card is
formatted.
5
Page 78

78
FLASH
USING FLASH
Your camera has a Minolta standard accessor y shoe for attaching dedicated flash
units (Accessory Information p.114).
Flash units can also be attached to the camera using a sync cord via the PC terminal.
The accessory flash’s AF illuminator will be activated when necessary.
Accessory Flash Notes
• To use a 1000 series AF flash unit, the Flash Shoe Adapter FS-1100 must be
attached to the camera.When the flash is on, the flash will fire each time the shutter
is released. At no time will the flash’s AF illuminator activate.
• The 5400HS, 5400xi, 3500xi, 3200i, and 5200i flashes zoom according to the focal
length of the lens.
• For the 5400HS, 5400xi, and 5200i flashes, the flash range and coverage angle
displays on the flash may not display focal lengths accurately.
• The flash range diagrams in the 3500xi and 3200i flash units are applicable for focal
lengths with this camera.
This camera has a Minolta standard accessory shoe.
ATTACHING AN ACCESSORY FLASH
Remove the cap from the
accessory shoe.
1
Align the flash’s mounting shoe
with the camera’s accessory
shoe, then slide the flash forward
until it locks firmly in place.
2
Page 79

79
FLASH
BLINKING
(AFTER TAKING
PHOTO)
FLASH OUTPUT WAS SUFFICIENT TO PROVIDE CORRECT
EXPOSURE.
LIT
AND LIT
FLASH CHARGING.
FLASH CHARGED.
When the shutter-release button is pressed partway down, the necessary flash
signals will appear.
FLASH SIGNALS
Flash-on indicator , Flash signals
Page 80

80
FLASH
PC TERMINAL
This camera is equipped with a PC connector which enables you to connect PC-capable flash units with a flash sync cord.
• Your camera’s PC terminal is compatible with both center-positive and centernegative flash units.
• Flash units with an extremely low trigger voltage may not work with the camera. If
your flash has a low trigger voltage, contact a Minolta Service Facility.
Set the exposure mode to M, then
set the shutter to 1/125 or slower.
Manually set white balance to the
flash mode (see page 58).
• Turn the flash unit off before
connecting the sync cord to the PC
terminal or the flash unit may fire
unexpectedly while connecting.
Page 81

81
FLASH
P Mode Flash
When a programmable flash is attached and power is ON it will fire automatically
when flash becomes necessary.Shutter speed and aperture value are determined
automatically
The Flash-on indicator is lit in the viewfinder when the flash is fired. The flash will
not fire when the Flash-on indicator is extinguished, or when the flash power supply is OFF.
A Mode Flash
When an attached accessory flash is on, it will fire each time a picture is taken.The
attached accessory flash will not fire when OFF.The camera will automatically set the
shutter to 1/125 (the flash sync speed). Refer to the accessory flash manual to determine the aperture and the flash range. While the aper ture range differs with the lens
selected, the maximum aperture is F6.7, and minimum aperture is F22.
S Mode Flash
When an attached accessory flash is ON, it will fire each time you take a picture.The
attached accessory flash will not fire when OFF.
• Flash operation in the S mode is the same as P mode.The camera automatically
sets the aperture and the shutter speed.
M Mode Flash
When an attached accessory flash is on, it will fire each time you take a picture.The
attached accessory flash will not fire when OFF.
• Refer to the accessory flash manual to determine the aperture setting and the flash
range.
• In manual mode, you select both the aperture and the shutter speed for each
exposure.While the aper ture range differs with the lens selected, the maximum
aperture is F6.7, and minimum aperture is F22.
• The shutter speed can not be set faster than 1/125th of a second when using flash.
USING FLASH IN P, A, S, AND M MODES
If the flash is to be used with each picture,
press the shutter button while holding down
the manual fill-flash button.
Page 82

82
FLASH
SLOW-SHUTTER SYNC
In P and A modes, slow-shutter sync sets a slower shutter speed to increase the
background or ambient lighting exposure in a flash picture. Flash output will automatically be decreased to maintain a correct exposure of your subject.
With Slow-Shutter Sync Without Slow-Shutter Sync
While pressing the SPOT button,
press the shutter-release button
all-the-way down to take the picture.
2
Frame your subject.
1
Page 83

83
FLASH
• If the background is bright or a small aperture is a set (in A mode), the shutter
speed may not be reduced.
• Use a tripod if the shutter speed becomes too slow to allow sharp, hand-held
pictures after you press the SPOT button.
Page 84

84
FLASH
FLASH COMPENSATION
This function enables you to bias the output of an accessory flash as much as + or –
3 EVs in 0.5 EV increments.
• Check the compensation amount by pressing the flash-compensation and exposurecompensation buttons.
• Cancel flash compensation by resetting it to 0.0 or pressing the Program-reset
button.
• Use exposure compensation when the exposure level for the overall image is to be
compensated for both flash and normal illumination (see page 47). If flash
compensation is also set in this case the light from the flash will be subject to dual
compensation.The desired result will not be obtained if the sum of the exposure
compensation and flash compensation values is less than -3.0 or greater than +3.0.
Press and hold the Exposurecompensation button and the
manual fill-flash button.
1
Turn the Front dial until the
desired compensation factor
appears in the data panel and
viewfinder, then release the buttons.
2
• will remain in the data panel.
• will remain in the viewfinder.
• Flash compensation does not operate
with flash units connected to the PC
terminal.
3
Page 85

85
FLASH
WIRELESS/REMOTE OFF-CAMERA FRASH
A flat, lifeless photograph may result when
the flash is attached to the camera. In such
cases, remove the flash from the camera
and reposition it to provide shadows to provide a three-dimensional feel to the photograph (see Photo 2).
Photo 3 was taken using two programm flash
units distant from the camera and providing
flash illumination in a ratio of 2:1.This has
resulted in gentle transitions from light to
dark, with natural shadows.
The camera and flash must normally be connected by cable in such cases.This camera
permits transmission of signals to flash units
using light from the flash rather than cables.
The camera automatically determines the
optimum exposure.
The separately available 5400HS or 5400xi programm flash units are necessary for
Wireless/Remote off-camera flash photography.
Photo 1
Normal Flash
Photo 2
Wireless/Remote Flash
Photo 3
Wireless/Remote Ratio Flash
Page 86

86
FLASH
This illustration shows a singlelens reflex camera.The digital
camera is used in exactly the
same way.
Wireless/Remote off-camera flash is used as follows:
Wireless/Remote off-camera flash photography with a program
flash unit attached to the camera, and the camera supplying the
flash signal.
The 5400HS or 5400xi programm flash units
must be attached to the camera for
Wireless/Remote off-camera flash photography
(ie two program flash units are required).
See the 5400HS or 5400xi manual for details.
• The 5400xi manual shows the Dynax 9xi
body, however it may also be used with this
camera.The AE-lock button is used for test
illumination with the Dynax 9xi, however the
SPOT button is used for this purpose with
this camera.
1
This illustration shows a singlelens reflex camera.The digital
camera is used in exactly the
same way.
Wireless/Remote off-camera flash photography with the Wireless
Remote Flash Controller (separately available) supplying the flash
signal.
The Wireless Remote Flash Controller may be
attached to the camera in place of the built-in
flash for Wireless/Remote off-camera flash
photography. Using the Wireless Remote Flash
Controller allows illumination with two or more
distant programm flash units, and proportional
illumination control of each.
See the Wireless Remote Flash Controller
manual for details.
• The Wireless Remote Flash Controller is sold
as a Dynax 9xi accessory, however it may
also be attached to this camera.The AE-lock
button is used for test illumination with the
Dynax 9xi, however the SPOT button is used
for this purpose with this camera.
2
Page 87

87
PLAY
Page 88

88
VIEWING IMAGES
The captured images are displayed in the LCD monitor in Play mode. It is possible to
view the images full-screen or view them in index form.
VIEWING FULL SCREEN
View one full-frame image at a time.
Image frame No. Image record date
With the Control dial lock button
pushed in the direction, turn
the Control dial to the right to the
PLAY position.
• After a short wait the last image
recorded is displayed on the LCD
monitor.
1
Press the and buttons to
scroll through the images.
• The button scrolls forward, the
button scrolls backward.
• The image appears on the LCD
monitor, it will be rough while the
camera is reading from memory, then
a clear image will appear.
2
Page 89

89
VIEWING IMAGES
VIEWING AN IMAGE INDEX
This function displays four or nine frames on the LCD monitor simultaneously, and is
therefore a convenient way to find the desired image.
With the Control dial lock button
pushed in the direction, turn
the Control dial to the right to the
PLAY position.
• After a short wait the last image
recorded is displayed on the LCD
monitor.
1
Press the SET button on the back
of the camera.
• The LCD monitor changes from
single-frame play to index play.The
monitor is divided into a four or nineimage index depending upon which
was selected during previous index
play.
• The red border appears around the
image displayed before the SET
button was pressed.
• When changing from single-frame
play to index play, in addition to the
image displayed before the SET
button was pressed, three or eight
images are transferred to the image
memory one-by-one. A shor t wait is
required before they are displayed.
Once the images are in the image
memory they may be selected
immediately.
2
Page 90

90
VIEWING IMAGES
Use the or button on the
back of the camera to move the
border to the image to be viewed.
• Pressing the button moves the
border to the previous image.
Pressing the button moves the
border to the next image.
• The image will appear coarse
immediately after it is selected,
however it will gradually become clear
as it is read from the memory.
3
• When the border is on the image at bottom-right, pressing the button displays the
next four or nine frames.
• When the border is on the image at top-left, pressing the button displays the
previous four or nine frames.
• When the next or previous four or nine frames are not already in the image memory
they are read into it one-by-one.A short wait is required before they are displayed.
• The diagram below includes frame numbers for the purposes of clarity in explaining
the changes on the LCD monitor.These numbers do not appear during index play.
910 131514
16
1211
12
34
56
78
button
button
Page 91

91
VIEWING IMAGES
1211
109
Press the SET button on the back
of the camera.
• The LCD monitor changes from index
play to single-frame play.
• The image enclosed in the red border
appears on the LCD monitor.
• The diagrams below, and on the next
page, include frame numbers for the
purposes of clarity in explaining index
play.These numbers do not appear
during index play.
4
Page 92

92
VIEWING IMAGES
Index play displays pages of four or nine frames.
If, as shown in the example below, the nine-frame index play is selected when the
seventh frame is displayed, the nine-frame page containing the seventh frame is
displayed.
123
456
789
The LCD monitor is blank if there is no image data.
If, for example, only 25 frames have been saved in the compact flash card, the
26th and later frames will be displayed as black on the LCD monitor.
19 20 21
22 23 24
25
Page 93

93
CHANGING THE INDEX DISPLAY
Press the MENU button on the
back of the camera.
• The top menu will appear.
1
Press the or button as
required to move the highlight to
INDEX, and then press the SET
button.
• The INDEX menu will appear.
2
Press the or button as
required to move the highlight to
INDEX 4 (four-image index) or
INDEX 9 (nine-image index), and
then press the SET button.
• Index play uses the selected setting.
Press the SET button again to select
single-frame play.
3
Set the index display to a 4-image index or 9-image index.
Page 94

94
DELETING A SINGLE IMAGE
Delete a single, unprotected image from the compact flash card in the camera.
As a deleted image cannot be recovered, care is required when deleting
images. Impor tant images can be wr ite-protected to prevent accidental deletion
(see page 98).
Turn the Control dial to PLAY.
1
Select the desired image.
• Press the or button until the image
appears in the LCD monitor.In Index
display, press the or button until a
border appears around the desired
image.
2
Press the MENU button.
3
Page 95

95
DELETING A SINGLE IMAGE
Press the button until DELETE
is highlighted, then press the
SET button.
4
Press the button until DELETE
is highlighted, then press the
SET button.
• A confirmation screen will appear.
5
Press the button until YES is
highlighted, then press the SET
button.
• The LCD monitor will return to the
PLAY screen after the image is
deleted.
6
Repeat [2] to [6] if you have other
images to be deleted.
7
Page 96

96
CLEARING UNPROTECTED IMAGES
Turn the Control dial to PLAY.
1
Press the MENU button.
2
Press the button until DELETE
is highlighted, then press the
SET button.
3
Clearing removes all unprotected images from the compact flash card in the camera.
AS A DELETED IMAGE CANNOT BE RECOVERED, CARE IS
REQUIRED WHEN DELETING IMAGES.
Page 97

97
CLEARING UNPROTECTED IMAGES
Press the button until ALL
CLEAR is highlighted, then press
the SET button.
• A confirmation screen will appear.
4
Press the button until YES is
highlighted, then press the SET
button.
• The LCD monitor will return to the
PLAY screen after the image is
deleted.
5
• Protected images will remain on the compact flash card after clearing.
Page 98

98
PROTECTING IMAGES
Important images can be write-protected to guard them from accidental deletion.
Protected images cannot be removed from the CF card in the camera by Using the
Delete or Clear All functions.
PROTECTING IMAGES
PROTECTED IMAGES WILL BE REMOVED WHEN THE FORMAT
FUNCTION IS USED.
Turn the Control dial to PLAY.
1
Select the desired image.
• Press the or button until the image
appears in the LCD monitor.In Index
display, press the and buttons until
a border appears around the desired
image.
2
Press the MENU button.
3
Page 99

99
PROTECTING IMAGES
Protect icon
Press the button until PROTECT is highlighted, then press
the SET button.
• The PROTECT menu will appear.
4
Press the button until ON is
highlighted, then press the SET
button.
• The camera will return to the Play
screen and will appear in the
information bar when the image is
selected.
5
Repeat steps [2] to [5] for any
other images to be write-protected.
6
Page 100

100
PROTECTING IMAGES
UNPROTECTING IMAGES
Display the images for which
write-protect is to be cleared with
steps [1] to [2] on page 98.
1
Select the Protect menu with
steps [3] to [4] (see pages 98, 99),
highlight OFF with step [5] , and
press the SET button.
• This clears write-protect for the
displayed image.
• The write-protect icon at the bottom
left of the LCD monitor disappears.
2
Repeat [1] to [2] for any other
images for which write-protect is
to be cleared.
3
 Loading...