

Konica Minolta QMS 2060 WX User manual
QMS® 2060 WX Print
System
User's Guide
1800457-001

Trademarks
The following are trademarks or registered trademarks of their respective owners. Other
product names mentioned in this manual may also be trademarks or registered
trademarks of their respective owners. Registered trademarks are registered in the
United States Patent and Trademark Office; some trademarks may also be registered in
other countries. QMS and the QMS logo are registered trademarks of QMS, Inc.
TrueType/Apple Computer, Inc. Windows/Microsoft Corporation. Xerox/Xerox
Corporation. Hammermill/Hammermill. Avery/Avery.
Proprietary Statement
The digitally encoded software included with your QMS 2060 WX Print System is
Copyrighted © 1997 by QMS, Inc. All Rights Reserved. This software may not be
reproduced, modified, displayed, transferred, or copied in any form or in any manner or
on any media, in whole or in part, without the express written permission of QMS, Inc.
Copyright Notice
This manual is Copyrighted © 1997 by QMS, Inc., One Magnum Pass, Mobile, AL
36618. All Rights Reserved. This manual may not be copied in whole or in part, nor
transferred to any other media or language, without the express written permission of
QMS, Inc.
Manual Notice
QMS, Inc. reserves the right to make changes to this manual and to the equipment
described herein without notice. Considerable effort has been made to ensure that this
manual is free of inaccuracies and omissions. However, QMS, Inc. makes no warranty
of any kind including, but not limited to, any implied warranties of merchantability
and fitness for a particular purpose with regard to this manual. QMS, Inc. assumes
no responsibility for, or liability for, errors contained in this manual or for incidental,
special, or consequential damages arising out of the furnishing of this manual, or the
use of this manual in operating the equipment, or in connection with the performance of
the equipment when so operated.
.

Contents
1 Introduction
About the Documentation .................................................1-2
About This Manual .............................................................1-2
Typographic Conventions 1-4
2 Printing
Introduction ........................................................................2-2
Configuring the Windows 95 Printer Driver ....................2-2
Setting the Printer Driver Defaults 2-2
Configuring the Printer Driver for the Current
Print Job 2-3
Configuring Paper Options 2-4

Configuring More Paper Options 2-8
Configuring Graphics Options 2-10
Configuring the Windows NT 4.0 Printer Driver ............2-12
Methods of Configuration 2-13
Configuring Device Settings 2-15
Configuring Page Setup Options 2-22
Configuring Advanced Options 2-26
Configuring Halftone Adjustments 2-32
Printer Sharing .................................................................2-36
Windows 95 2-36
Windows NT 4.0 2-38
Sharing Someone Else's Printer 2-40
Using a Network Print Monitor 2-40
About the QMS Network Print Monitor ..........................2-40
Components 2-41
Using the Network Print Monitor 2-42
Refilling the Media Cassette ...........................................2-45
Preparing the Paper 2-46
Loading the Paper 2-47
Printing on Different Types of Media .............................2-57
Transparencies 2-57
Labels 2-58
Letterhead and Other Preprinted Media 2-59
Envelopes 2-60
Postcards and Thick Stock 2-62
Odd-size Paper 2-63
More About Print Media ...................................................2-64
Print Media Sizes and Imageable Areas 2-64
Print Media Types, Weights, and Recommended
Brands 2-66
Print Media Storage 2-66
QMS 2060 WX Print System User’s Guideiv

Preventing Media Jams ...................................................2-67
Cancelling a Print Job .....................................................2-68
3 Control Panel
Introduction ........................................................................3-2
About the Control Panel ....................................................3-3
The Message Window 3-3
The Control Panel Indicators 3-4
The Function Keys 3-5
Printer Configuration .........................................................3-6
The Configuration Menu 3-7
Accessing the Configuration Menu 3-8
Selecting Configuration Menu Options 3-8
Setting the Message Window Language 3-9
Setting Energy Conservation 3-10
Setting the Internet Address 3-10
Setting the Subnet Mask 3-11
Setting the Router Address 3-12
Setting the Communications Port 3-13
Setting the Ethernet Hardware Address 3-13
Using the Service Menu 3-13
Using the Board Test Menu 3-14
4 Printer Options
Introduction ........................................................................4-2
Duplexer ..............................................................................4-3
Memory Requirements 4-3
Installing the Duplexer 4-4
Removing the Duplexer 4-7
vQMS 2060 WX Print System User’s Guide

Additional Media Cassettes ..............................................4-8
Optional Feeder ..................................................................4-9
Unpacking the Optional Feeder 4-9
Installing the Optional Feeder 4-10
Single In-Line Memory Modules (SIMMs) ......................4-12
Installing a SIMM 4-12
Updating System Software .............................................4-19
Updating the Printer Drivers ...........................................4-20
Windows 95 Printer Driver 4-20
Windows NT Printer Driver 4-21
5 Maintenance
Introduction ........................................................................5-2
Handling the Printer ...........................................................5-2
About Toner Cartridges .....................................................5-4
Toner Cartridge Life 5-4
Ordering Toner Cartridges 5-4
Handling Toner Cartridges 5-5
Storing Toner Cartridges 5-5
Replacing a Toner Cartridge 5-6
Cleaning the Printer .........................................................5-10
Cleaning Guidelines 5-10
Cleaning the Outside of the Printer 5-10
Cleaning the Inside of the Printer 5-12
Using the Maintenance Kit ..............................................5-14
6 Repacking the Printer
Introduction ........................................................................6-2
QMS 2060 WX Print System User’s Guidevi

Remove Cables and Cassette(s) ......................................6-2
Remove the Toner Cartridge .............................................6-3
Repack the Printer .............................................................6-4
7 Troubleshooting
Introduction ........................................................................7-2
Printer Status Messages ...................................................7-2
Print Monitor Status Messages ........................................7-8
Spooler Status Information 7-8
Monitor Status Information 7-10
Printer Status Information 7-11
Troubleshooting Quick Check ........................................7-11
Performing a Board Test .................................................7-13
Accessing Page Count ....................................................7-14
Media Jams .......................................................................7-15
Locating Print Media Jams 7-15
Clearing a Media Jam Inside the Printer 7-16
Clearing Cassette Area Jams 7-18
Clearing Multipurpose Tray Area Jams 7-20
Clearing a Duplexer Media Jam 7-23
Control Panel Problems ..................................................7-24
Data Indicator Stays Lit 7-24
Jam Message Stays On 7-24
Output Problems ..............................................................7-24
Only Partial Pages Print 7-24
Blank Pages 7-25
Not All Pages Print 7-25
Fonts Don't Print Correctly 7-25
Frequent Media Jams 7-26
viiQMS 2060 WX Print System User’s Guide

Printer Will Not Duplex 7-26
Print Quality Problems ....................................................7-26
General 7-27
Specific 7-27
Installing the Printer Driver Manually ............................7-32
Windows 95 7-32
Windows NT 4.0 7-33
Uninstalling the QMS Network Print Monitor for Windows
95 ................................................................................. 7-34
Placing a Service Call ......................................................7-35
A QMS Customer Support
Sources of Support ........................................................... A-2
Your QMS Vendor A-2
Your Application Vendor A-2
Q-FAX A-2
The QMS Corporate Bulletin Board System A-3
CompuServe A-3
Internet A-3
QMS Customer Response Center (CRC) A-4
QMS World-wide Offices .................................................. A-5
B Technical Specifications
Print Engine Specifications ............................................. B-2
Controller Specifications ................................................. B-3
Environmental Requirements .......................................... B-3
Print Media ......................................................................... B-4
Print Media Selection B-5
QMS 2060 WX Print System User’s Guideviii

Print Media Sizes B-5
Cable Pinouts .................................................................... B-6
Centronics/IEEE 1284 Parallel B-6
Ethernet B-8
Printer Options .................................................................. B-8
Consumables .................................................................... B-9
Regulatory ....................................................................... B-10
FCC Compliance Statement B-10
Canadian Users Notice B-11
Laser Safety B-12
Power Cord B-12
Warranty Considerations ............................................... B-12
Consumables and Your Warranty B-12
Electrostatic Discharge and Your Warranty B-13
C TCP/IP Concepts
Introduction ....................................................................... C-2
Terminology ...................................................................... C-2
Subnetting ......................................................................... C-4
Internet Routing ................................................................ C-5
Index
v
Subnet Masks C-4
Class A, B, and C Internet Addresses C-5
ixQMS 2060 WX Print System User’s Guide


1
Introduction
In This Chapter . . .
n “About the Documentation” on page 1-2
n “About This Manual” on page 1-2
n “Typographic Conventions” on page 1-4

About the
&
Documentation
About the Documentation
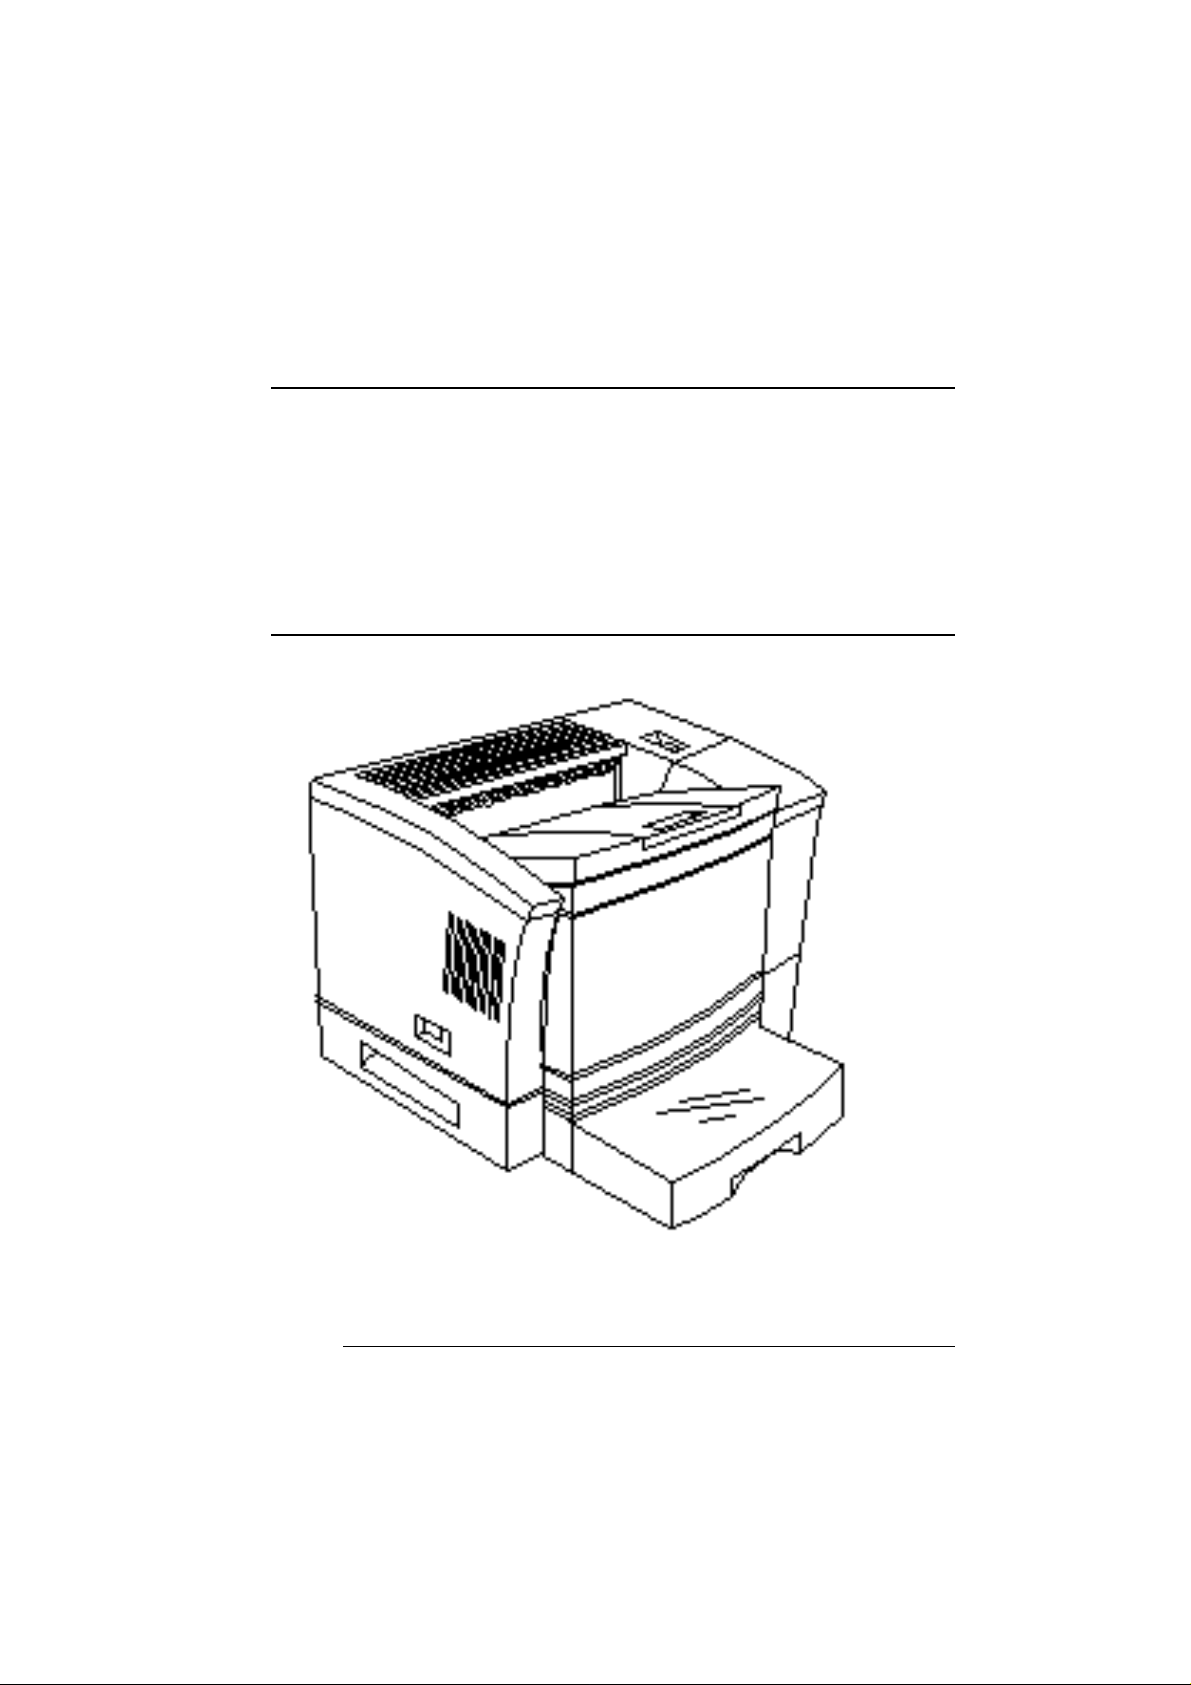
You received the following documentation with your QMS 2060 WX
Print System:
QMS 2060 WX
Print System
Getting Started
QMS 2060 WX
Print System
User’s Guide
About This Manual
This manual guides you through the day-to-day operation of your
printer and provides troubleshooting information. It is organized as
follows:
Introduction
1
Printing
2
This manual contains detailed,
illustrated instructions to guide you as
you unpack and set up your printer,
connect it to a PC via the parallel or
Ethernet interface, and install the
Windows 95 or Windows NT printer
drivers.
You’re looking at this document right
now. The following section, “About this
Manual,” later in this chapter, tells you
what’s included in this manual.
Presents an overview of this
manual.
Explains how to configure the
printer drivers, share the printer,
use the QMS Network Print Monitor,
refill the media cassette, print on
different types of media, prevent
media jams, and cancel a print job.
Control Panel
3
Introduces the parts of the control
panel and discusses how to use the
keys and the configuration menu.
QMS 2060 WX Print System User
’s Guide1-2

About This Manual
Printer Options
4
Maintenance
5
Repacking the
6
Printer
Troubleshooting
7
QMS Customer
A
Support
Explains how to remove and
replace the printer controller board,
how to install available options, and
how to update system software and
printer drivers.
Describes how to handle and clean
your printer as well as how to
replace a toner cartridge.
Provides printer repacking
instructions.
Interprets printer and QMS Network
Print Monitor status messages,
explains how to remove a media
jam, discusses various output
problems, and describes how to
install the printer driver manually.
Provides product sales and support
telephone numbers and describes
how to communicate with QMS
through the QMS Bulletin Board,
CompuServe, Internet
.
Technical
B
Specifications
TCPIP Concepts
C
Index
Introduction
Provides print engine, controller,
environmental, print media,
consumable, and cabling
specifications.
Defines TCP/IP terminology and
then discusses subnetting and
Internet routing.
1-3

About This Manual
Typographic Conventions
The following typographic conventions are used in this manual:
Mixed-Case
Courier
Mixed-Case
Italic
Courier
UPPERCASE
COURIER
lowercase bold PostScript operators and DOS commands
lowercase italic Variable information in text
UPPERCASE File and utility names
↵ Press the Enter key (PC) or Return key
^ Press and hold down the Ctrl key (PC)
» Note: Notes contain tips, extra information, or important information
that deserves emphasis or reiteration.
s Caution: Cautions present information that you need to know to avoid
equipment damage, process failure, or extreme annoyance.
M WARNING! Warnings indicate the possibility of personal injury if a
specific procedure is not performed exactly as described in the
manual.
Text you type, and messages and information
displayed on the screen
Variable text you type; replace the italicized
word(s) with information specific to your printer
or computer
Information displayed in the printer message
window
(Macintosh)
ACHTUNG! Bitte halten Sie sich exakt an die im Handbuch
beschriebene Vorgehensweise, da sonst Verletzungsgefahr
bestehen könnte.
v
QMS 2060 WX Print System User
’s Guide1-4

2
Printing
In This Chapter . . .
n Configuring the Windows 95 printer driver on page 2-2
n Configuring the Windows NT 4.0 printer driver on page 2-12
n Sharing a printer on page 2-36
n Using the QMS Network Print Monitor on page 2-40
n Refilling the media cassette on page 2-45
n Printing on different types of media page 2-57
n Imageable area, page margin, and print media specifications on
page 2-64
n Preventing media jams on page 2-67
n Cancelling print jobs page 2-68

Introduction
Introduction
This chapter provides all of the information you need to print documents on your QMS 2060 WX Print System.
Configuring the Windows 95 Printer Driver
This section explains how to configure the QMS 2060 WX Print System
Windows 95 printer driver. Windows on-line help is also available while
you’re configuring the printer driver. Just choose any Help button.
» Note: If you’re using Windows NT, refer to “Configuring the Windows
NT 4.0 Printer Driver” on page 2-12 for complete information.
Setting the Printer Driver Defaults
» Note: Changes you make here apply to all documents. However, any
changes you make through your application override these settings.
1 Open the printer driver.
a From the Windows 95 Start menu choose Settings.
b Choose Printers.
2 In the Printers window, select the QMS 2060 WX printer
driver.
3 From the File menu choose Properties.
The following tabs appear:
n General—Allows you to name the printer, use a separator
page, and print a test page. See your Windows documentation.
n Details—Allows you to set interface connection details. See
your Windows documentation.
n Sharing (optional)—Allows you to set up the printer so others
on the network can use it. See your Windows documentation.
QMS 2060 WX Print System User’’'s Guide2-2

Configuring the
Windows 95
Printer Driver
n Paper—Allows you to provide information about the type and
location of the media you want to print on. See “Configuring
Paper Options” on page 2-4.
n Graphics—Allows you to provide information how the text
and images in your job will be printed. See “Configuring
Graphics Options” on page 2-10.
4 Make your selections, and then choose OK to save your
changes and return to the Printers window.
5 Close the Printers window.
Configuring the Printer Driver for the Current Print Job
» Note: Any changes you make here apply only to the current
document. These changes override any default settings you made
through the Printers window.
1 From the application’s File menu choose Print (or, in some
cases, Print Setup or Page Setup).
2 In the Print, Print Setup, or Page Setup dialog box, select the
QMS 2060 WX printer driver.
3 Choose the Properties button.
Two tabs appear:
n Paper—Allows you to provide information about the type and
location of the media you want to print on. See “Configuring
Paper Options” on page 2-4.
n Graphics—Allows you to provide information on how the text
and images in your job will be printed. See “Configuring
Graphics Options” on page 2-10.
» Note: General, Details, and Sharing tabs are not available. See
“Setting the Printer Driver Defaults” on page 2-2 for information.
4 Make your selections, and then choose the OK button to
return to the Print, Print Setup, or Page Setup dialog box.
5 Either print the file or close the dialog box.
Printing
2-3
Configuring the
Windows 95
Printer Driver
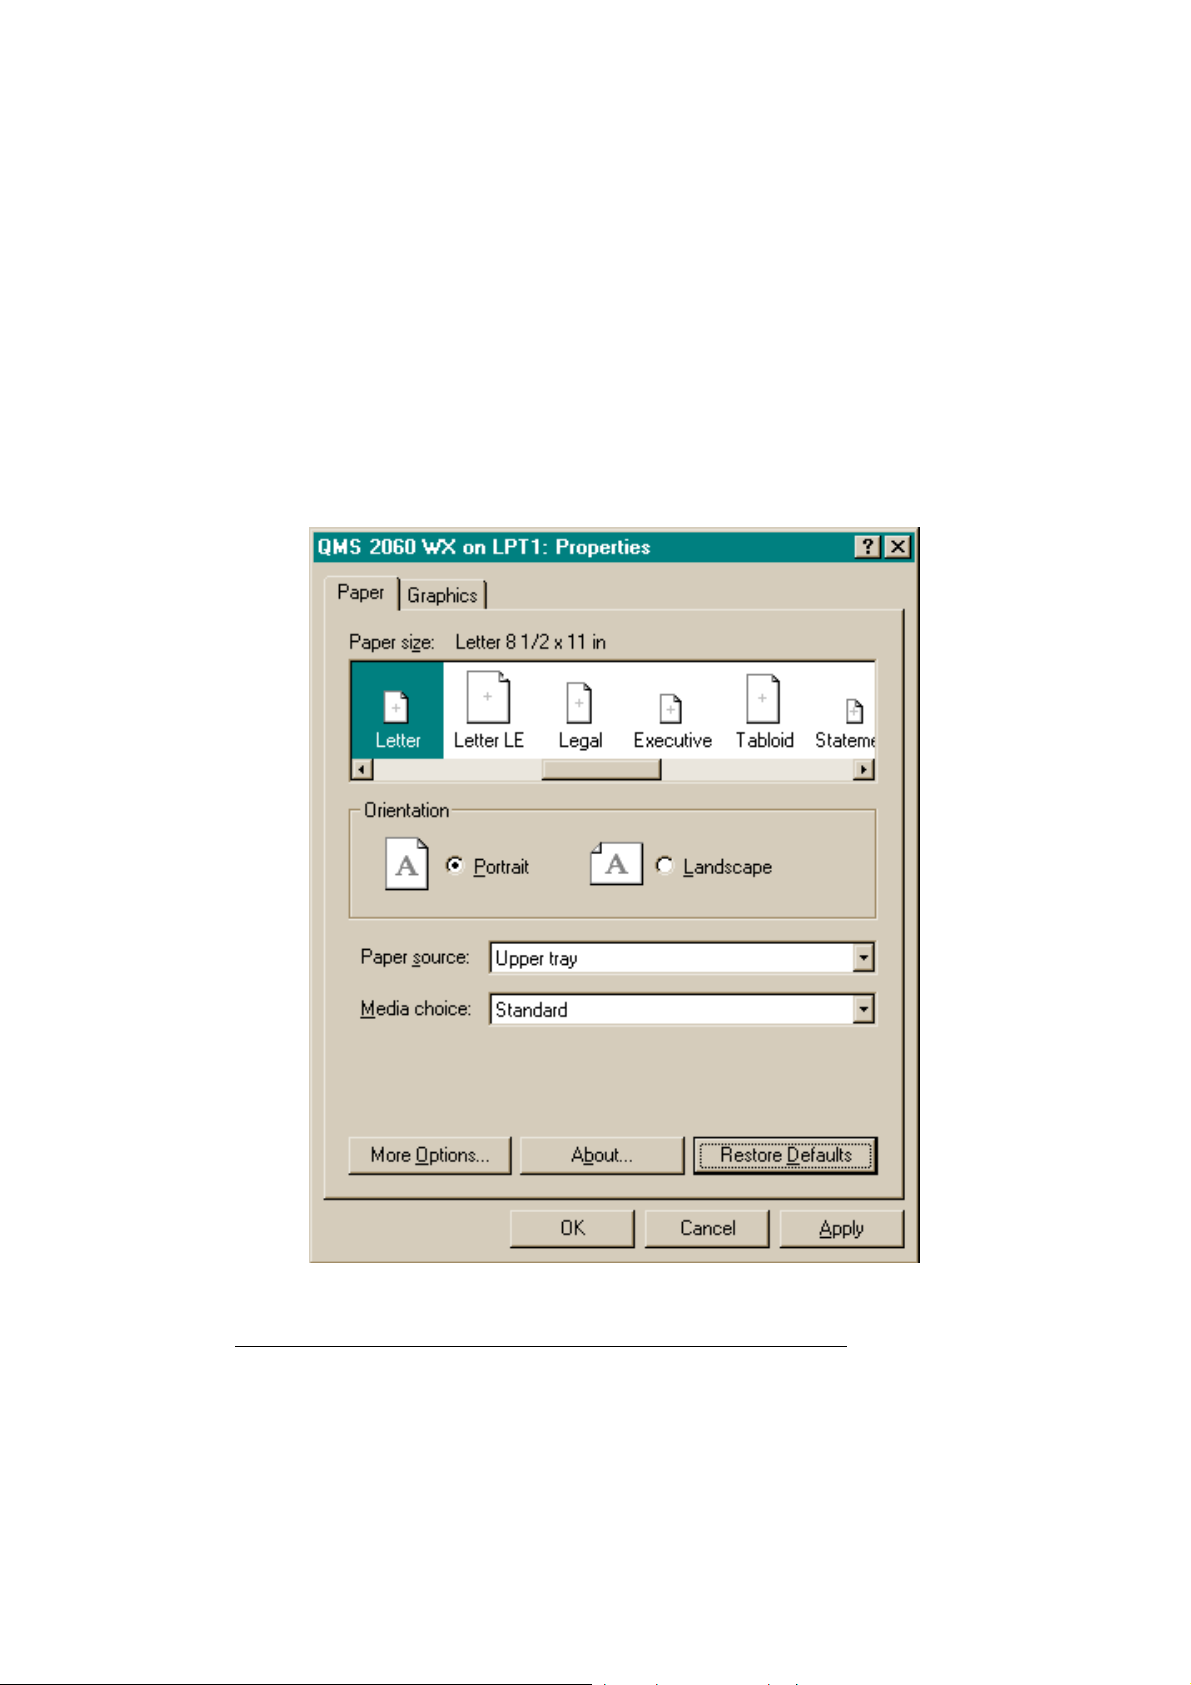
Configuring Paper Options
The Paper tab allows you to provide information about the type and
location of the media you want to print on. Each option and button is
explained in detail in this section.
Paper Size
QMS 2060 WX Print System User’’'s Guide2-4

Configuring the
Windows 95
Printer Driver
s Caution: LEF refers to “long-edge feed.” All other page sizes are fed
into the printer short-edge first. If you’re using LEF media, choose the
page orientation in your application before you choose the media
size. This ensures proper printed output (and the proper icon in
applications such as Microsoft Word that display media icons in the
Page Setup dialog box). Choosing the page size first will yield
unexpected results.
Purpose Sets the media size.
Choices Size Inches Millimeters
12x19 12.00 x 19.50 304.8 x 495.3
A3 11.69 x 16.53 297.0 x 420.0
A4 8.27 x 11.69 210.0 x 297.0
A4 LEF 11.69 x 8.27 297.0 x 210.0
A5 5.85 x 8.27 148.5 x 210.0
B4 (JIS) 10.12 x 14.33 257.0 x 364.0
B5 (JIS) 7.17 x 10.12 182.0 x 257.0
C5 6.38 x 9.02 162.0 x 229.0
Envelope 6.93 x 9.76 176.0 x 248.0
Envelope #10 4.125 x 9.50 104.8 x 241.3
Envelope C5 6.38 x 9.02 162.0 x 229.0
Envelope DL 4.33 x 8.66 110.0 x 220.0
Executive 7.25 x 10.50 185.0 x 267.0
Legal 8.50 x 14.00 215.9 x 355.6
Letter 8.50 x 11.00 215.9 x 279.4
Letter LEF 11.0 x 8.50 279.4 x 215.9
Monarch 3.875 x 7.50 98.4 x 190.5
Postcard 3.94 x 5.83 100.0 x 148.0
Statement 5.50 x 8.50 139.7 x 215.9
Tabloid 11.00 x 17.00 279.4 x 431.8
Universal 13.00 x 19.00 330.2 x 482.6
Default Letter
Notes If a media size other than that chosen in the driver is installed
in the cassette, an error message displays, but the job still
prints on the currently installed media size.
Printing
2-5
Configuring the
—The tray or
cassette chosen through the
Windows 95
Printer Driver
Orientation
s Caution: If you’re using LEF media (see “Paper Size” on page 2-4),
choose the page orientation in your application before you choose
the media size. This ensures proper printed output (and the proper
icon in applications such as Microsoft Word that display media icons
in the Page Setup dialog box). Choosing the page size first will yield
unexpected results.
Purpose Sets the orientation (printing direction) of the print media.
Choices Portrait—Printing along the short edge of the page
Landscape—Printing along the long edge of the page
Default Portrait
Notes Portrait Letter/A4 LEF is the same as landscape Letter/A4, and
Landscape Letter/A4 LEF is the same as portrait Letter/A4.
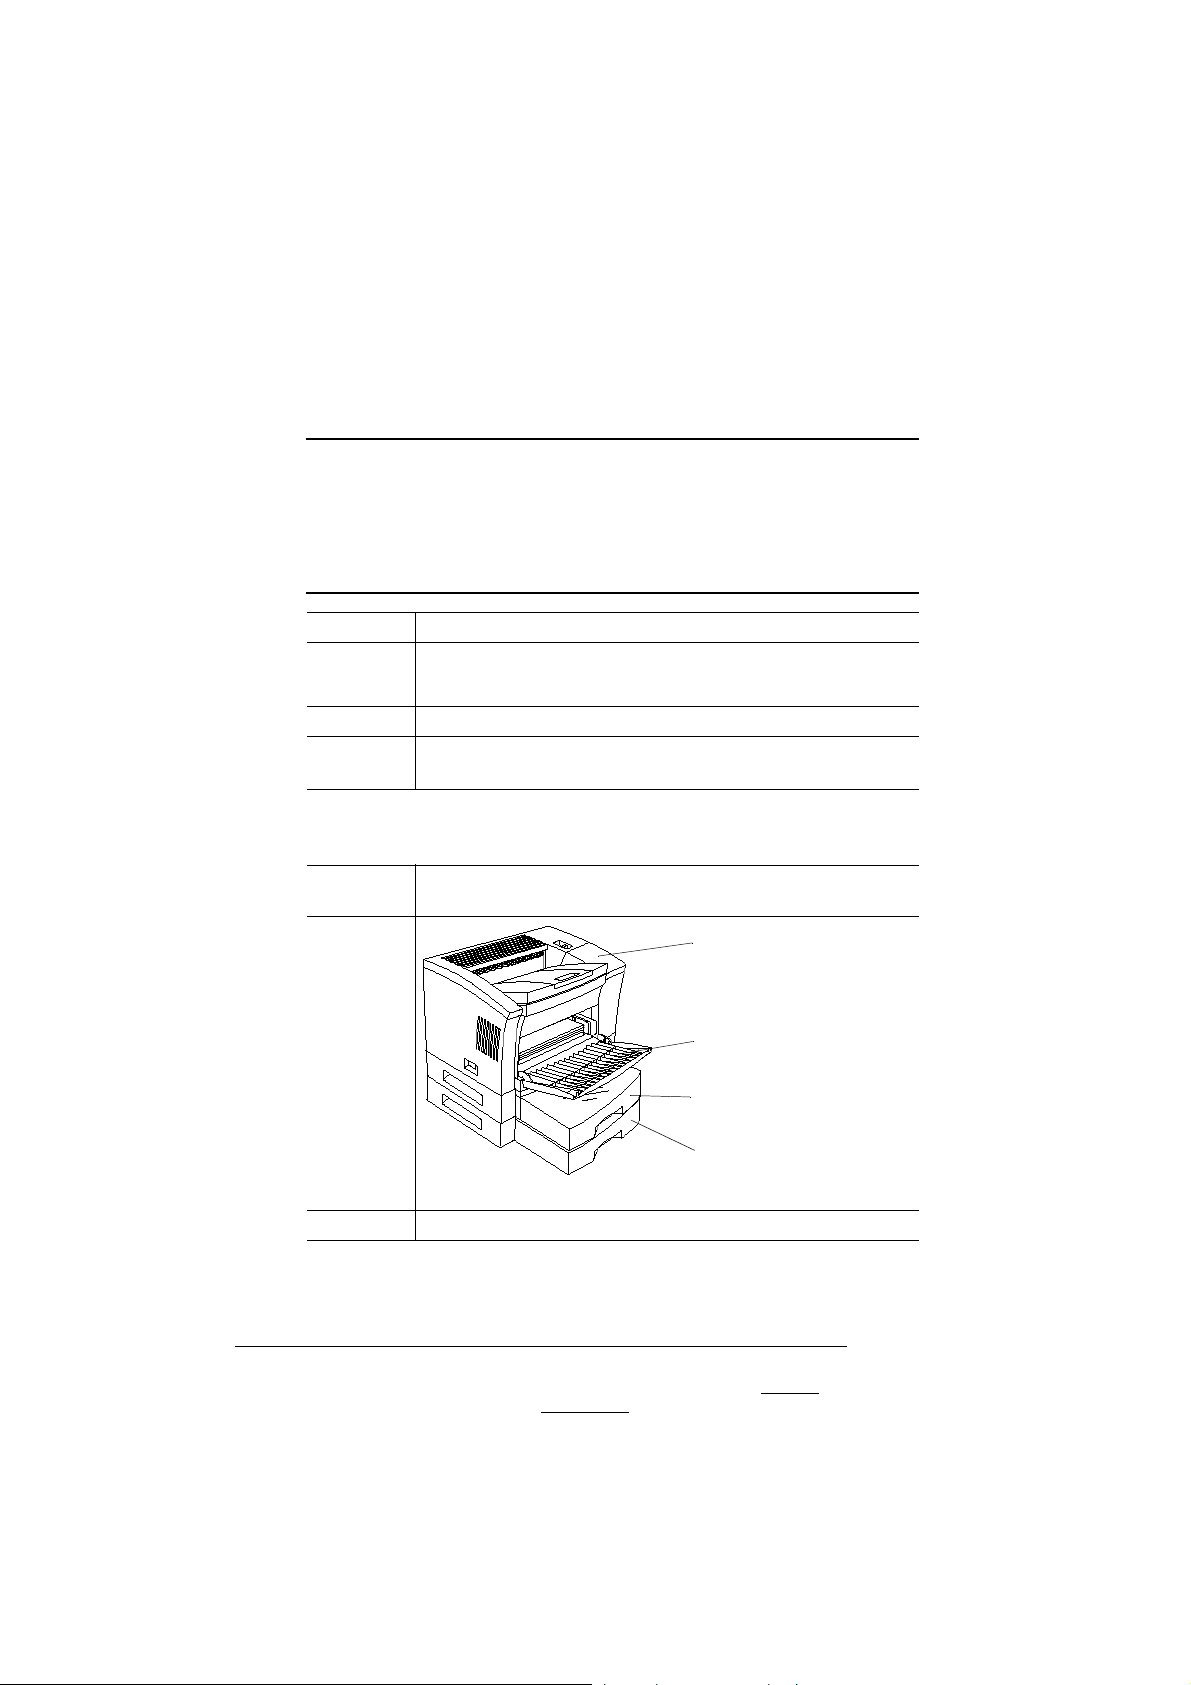
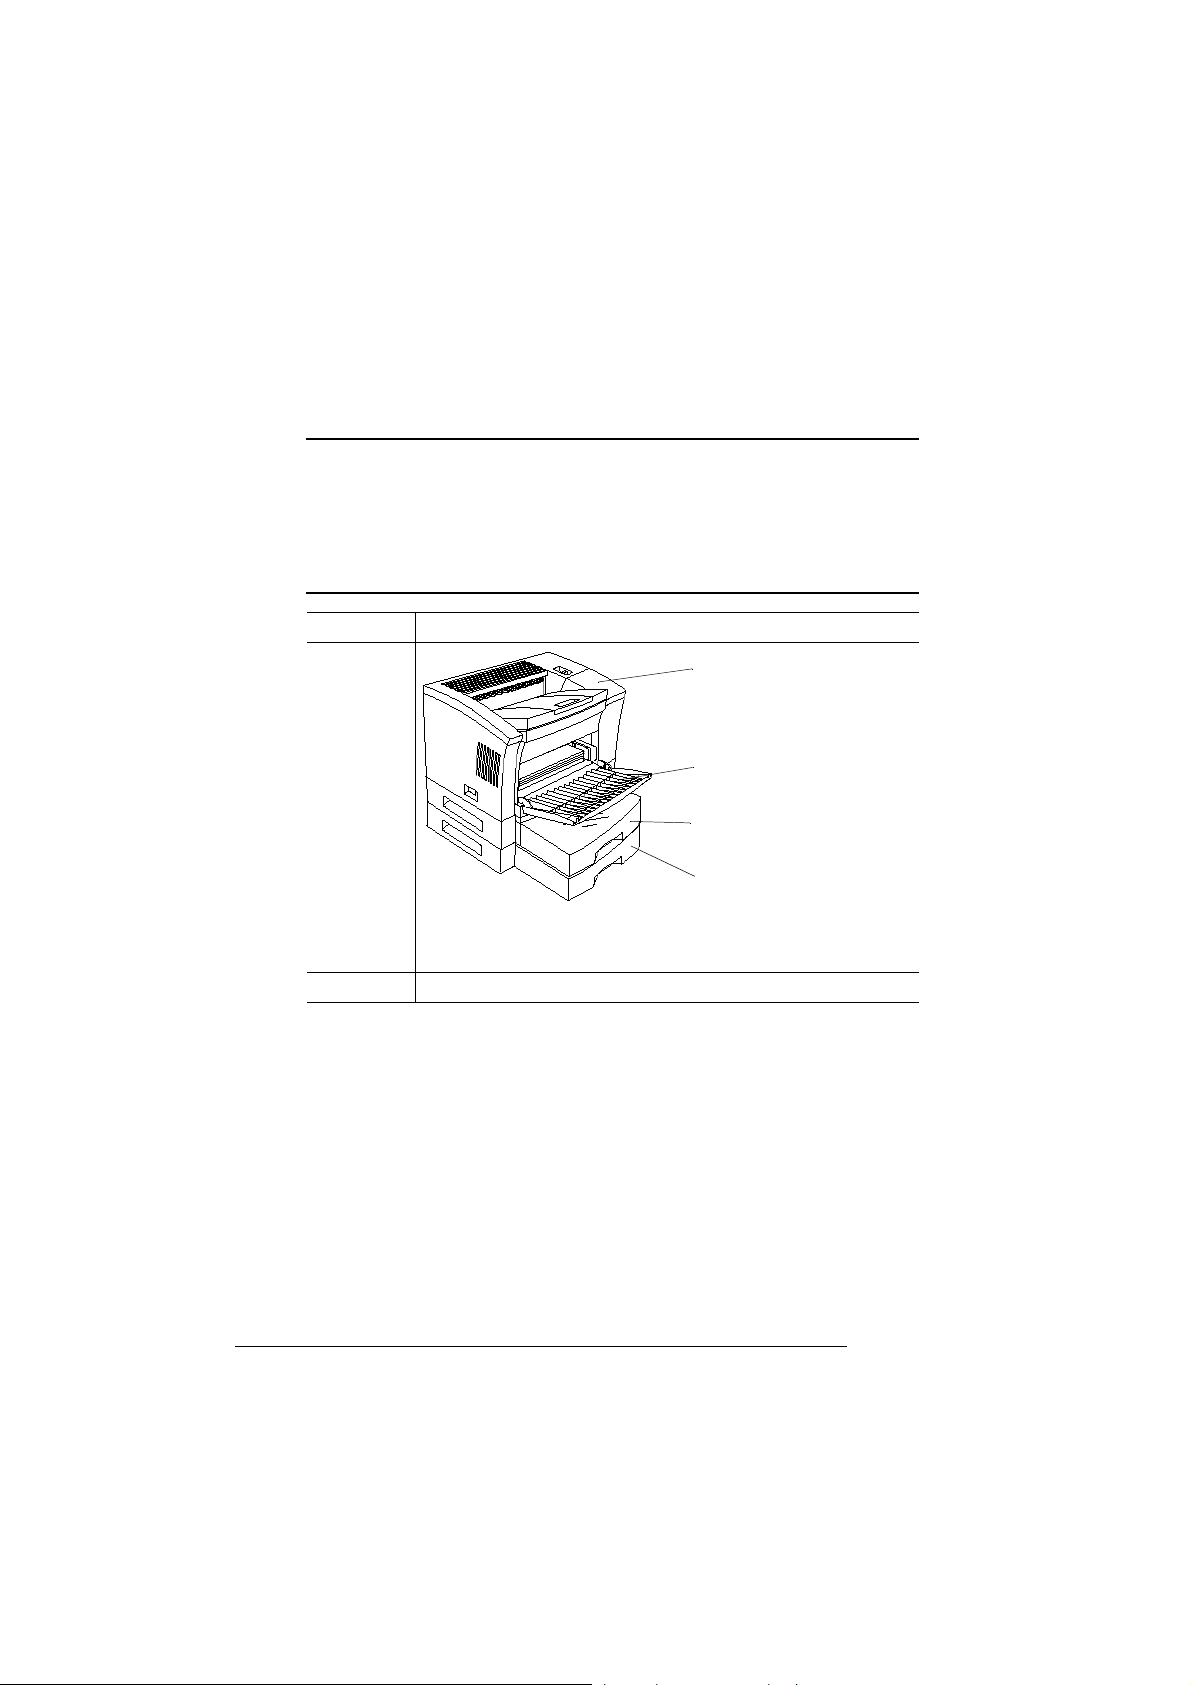
Paper Source
Purpose Sets the input source (cassette/tray) from which print media is
pulled into the printer
Choices
Default Upper Tray
QMS 2060 WX Print System User’’'s Guide2-6
Printer Default
Tray Select Key on the
printer control panel
Manual Feed—The multipurpose tray
Upper Tray—The standard
media cassette
Lower Tray—The optional
lower media cassette
Multipurpose tray
Universal cassette in
the “upper tray”
position

Configuring the
Windows 95
Printer Driver
Media Choice
Purpose Sets the type of media to be printed
Choices Standard—Normal weight paper, envelopes, and labels
Thick Stock—24–43 lb (90–163 g/m
Transparency—Overhead transparency film
Default Standard
2
) stock
Copies
Purpose Sets the number of copies to be printed.
Choices 1-999
Default 1
Notes This scroll box is available only when you’re setting the printer
driver defaults. If you’re configuring the printer for the current
print job, set the number of copies in the Print dialog box.
About... Button
The About... button displays the version number of the printer driver.
Restore Defaults Button
The Restore Defaults button allows you to reset all of the selections
on the Paper tab to their default settings.
Apply and OK Buttons
The Apply button allows you to save your changes and continue working in the Properties window, while the OK button allows you to save
your changes and exit from the Properties window.
Cancel Button
The Cancel button allows you to cancel your changes and exit from
the Properties window.
Printing
2-7

Configuring the
Windows 95
Printer Driver
Configuring More Paper Options
Use the More Options... button on the Paper tab to display the
Paper—More Options window.
Printing on Both Sides (Duplex Printing)
Purpose Select between simplex (single-sided) and duplex (double-
sided) printing.
Choices None—Simplex printing
Flip on Long Edge—Duplex printing with the pages flipped
along the long edge
Flip on Short Edge—Duplex printing with the pages flipped
along the short edge
Default None
Notes Because the printer normally expects short-edge-feed media,
these options are reversed for long-edge-feed (LEF) media. In
other words, choose Flip on Long Edge if you want to duplex
and flip the pages on the short edge, or choose Flip on Short
Edge if you want to duplex and flip the pages on the long edge.
QMS 2060 WX Print System User’’'s Guide2-8

Configuring the
Windows 95
Printer Driver
Restore Defaults Button
The Restore Defaults button allows you to reset all of the selections
on the Paper tab to their default settings.
OK Button
The OK button allows you to save your changes and exit from the
Paper—More Options window.
Cancel Button
The Cancel button allows you to cancel your changes and exit from
the Properties window.
Printing
2-9
Configuring the
Windows 95
Printer Driver
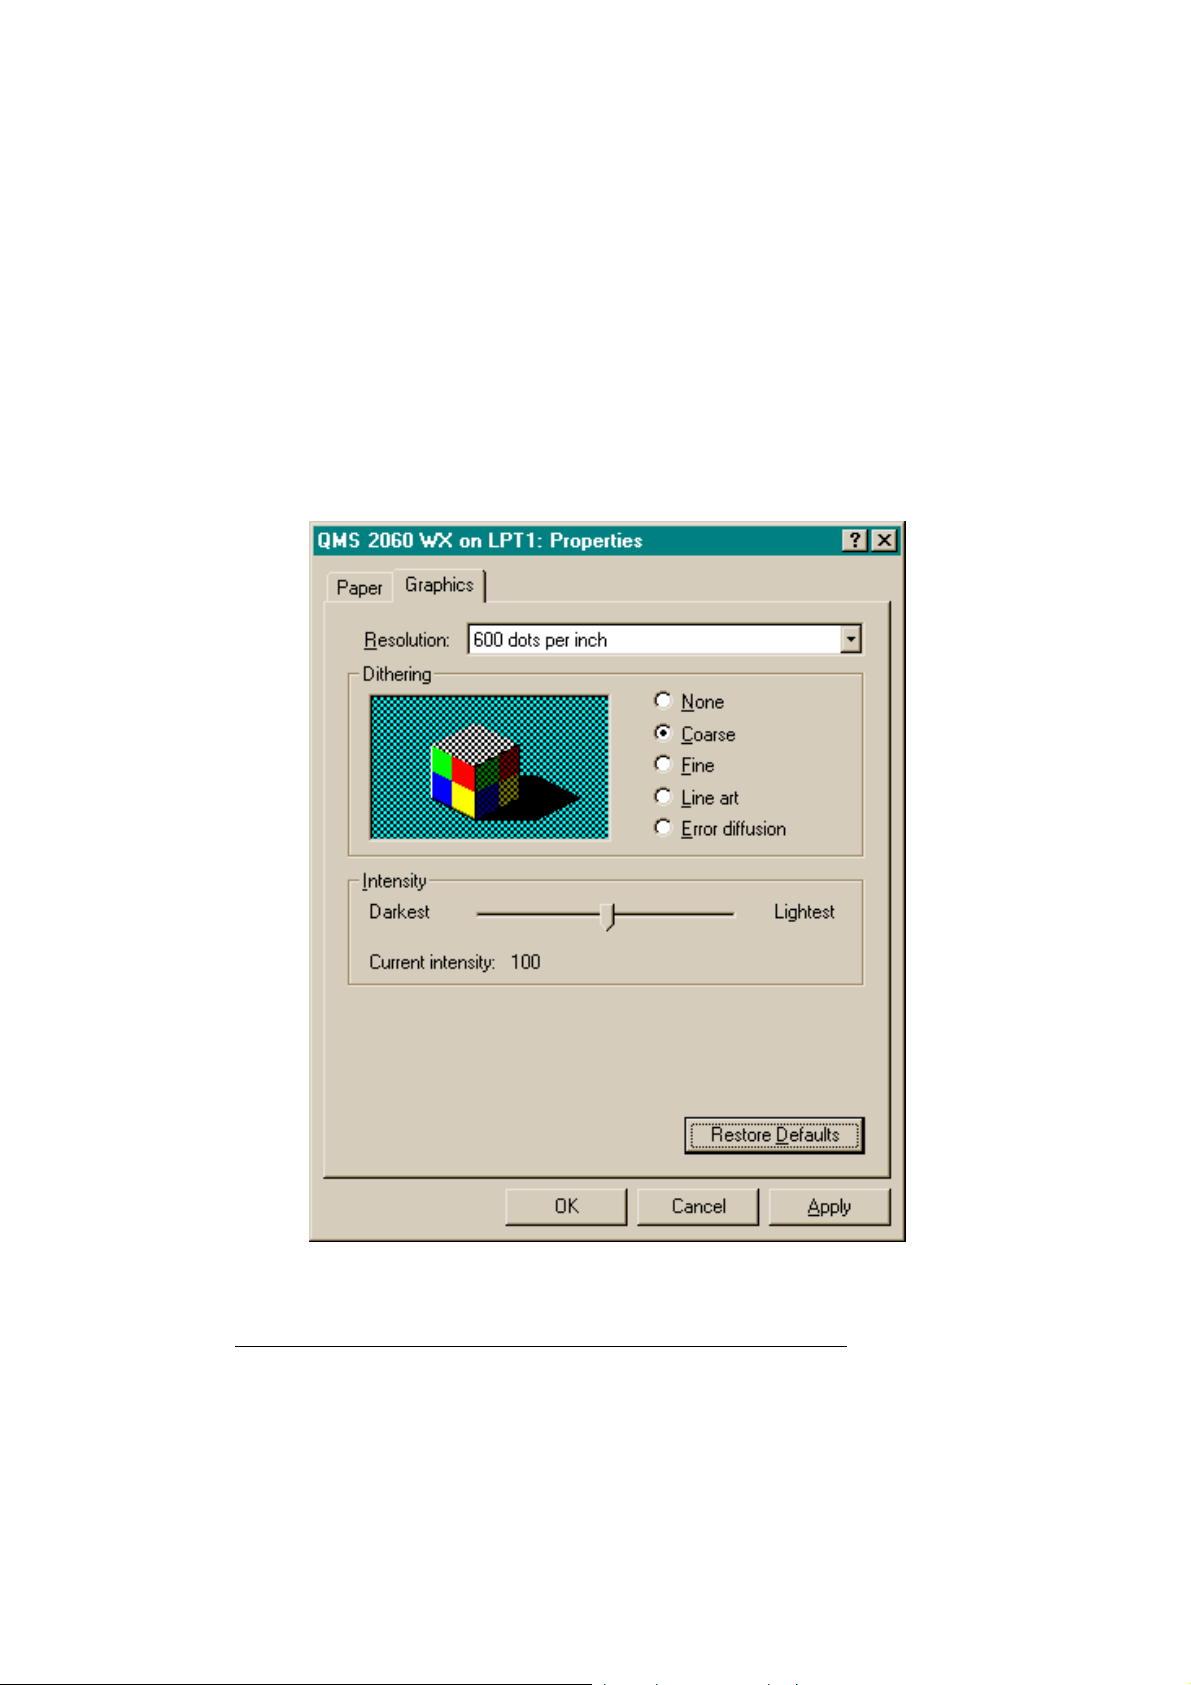
Configuring Graphics Options
The Graphics tab allows you to provide information on how the text
and images in your job will be printed. Each option and button is
explained in detail in this section.
QMS 2060 WX Print System User’’'s Guide2-10

Configuring the
Windows 95
Printer Driver
Resolution
Resolution is the measurement of the dots per inch (dpi) at which
your documents are printed. Your printer is capable of printing at 300
and 600 dpi.
For print jobs in which print speed is more important than print quality,
you might want to select 300 dpi. But for print jobs requiring the best
quality your printer can provide, set the printer resolution to 600 dpi.
Printing at 600 dpi is a good choice for documents with photographs
or other images that contain great detail, such as graphics with multiple levels of shading, or for documents requiring the sharpest possible text and line art.
Purpose Sets the printing resolution.
Choices 300 dots per inch—For printing documents at 300x300 dpi
600 dots per inch—For printing documents at 600x600 dpi
Default 600 dots per inch
Dithering
Dithering, a technique for placing dots, allows the printer to create
halftones, in which areas of print appear to contain many different values and densities and thus simulate a full range of grays.
Purpose Sets the dither pattern.
Choices None—No dithering
Fine—For printing at resolutions less than 300 dpi (not
recommended for this printer)
Coarse—For printing text and most graphics at 300 or 600 dpi
Error Diffusion—For printing photographs or pictures that
don’t have sharp, well-defined edges at 300 or 600 dpi
Line Art—For printing monochrome graphics with clearly
defined lines
Default Coarse
Printing
2-11

Configuring the Windows NT 4.0 Printer Driver
Intensity
Intensity specifies how light or dark to print the graphics in your document.
Purpose Sets the degree of lightness/darkness at which graphics are
Range
Default 100
Restore Defaults Button
The Restore Defaults button allows you to reset all of the selections
on the Paper tab to their default settings.
Apply and OK Buttons
The Apply button allows you to save your changes and continue working in the Properties window, while the OK button allows you to save
your changes and exit from the Properties window.
printed.
0 (darkest)–200 (lightest)
Cancel Button
The Cancel button allows you to cancel your changes and exit from
the Properties window.
Configuring the Windows NT 4.0
Printer Driver
This section explains how to configure the QMS 2060 WX Print
System Windows NT 4.0 printer driver, and it describes all of the
available options. Context-sensitive Windows on-line help is also
available while you’re configuring the printer driver. Just choose the ?
button in the driver dialog box, and then select any driver option for
more information.
» Note: If you’re using Windows 95, refer to “Configuring the Windows
95 Printer Driver” on page 2-2 for complete information.
QMS 2060 WX Print System User’’'s Guide2-12

Configuring the
Windows NT 4.0
Printer Driver
Methods of Configuration
There are three methods you can use to configure the printer driver.
However, these three methods don’t all have the same options.
This section explains how to use these three methods. The following
sections explain the options available through each configuration
method.
Setting Printer Properties
1 From the Windows NT Start menu choose Settings.
2 From the Settings menu choose Printers.
3 In the Printers window, select the QMS 2060 WX printer icon.
4 From the File menu choose Properties.
Six tabs appear in the QMS 2060 WX Properties window:
General, Ports, Scheduling, Sharing, Security, and Device
Settings.
For information on all the tabs except Device Settings, refer to your
Windows NT 4.0 documentation. For information on the Device
Settings tab, see “Configuring Device Settings” on page 2-15.
5 Make your option selections, and then choose OK.
Your changes are saved and you are returned to the Printers
window.
Setting Default Document Properties
» Note: Changes you make here apply to all documents. However, any
changes you make through the Document Properties window or
through your application override these settings.
1 Open the printer driver.
a From the Windows NT Start menu choose Settings.
b From the Settings menu choose Printers.
2 In the Printers window, select the QMS 2060 WX printer icon.
Printing
2-13

Configuring the
Windows NT 4.0
Printer Driver
3 From the File menu choose Properties.
Two tabs appear in the QMS 2060 WX Default Document
Properties window:
n Page Setup—Allows you to provide information about paper
size, paper source, copy count, and orientation. See “Configuring Page Setup Options” on page 2-22.
n Advanced—Allows you to provide information about the
page setup options as well as about resolution, media, and
metafile spooling. See “Configuring Advanced Options” on
page 2-26.
4 Make your selections, and then choose OK to save your
changes and return to the Printers window.
Setting Document Properties
» Note: Any changes you make here apply only to the current
document. These changes override any settings you made through
the Default Document Properties window.
1 From the application’s File menu choose Print (or, in some
cases, Print Setup).
2 In the Print or Print Setup dialog box, select the QMS 2060
WX.
3 Choose the Properties button.
Two tabs appear in the QMS 2060 WX Document Properties
window:
n Page Setup—Allows you to provide information about paper
size, paper source, copy count, and orientation. See “Configuring Page Setup Options” on page 2-22.
n Advanced—Allows you to provide information about the
page setup options as well as about resolution, halftone color
adjustment, media, and metafile spooling. See “Configuring
Advanced Options” on page 2-26.
4 Make your selections, and then choose the OK button to
return to the Print or Print Setup dialog box.
QMS 2060 WX Print System User’’'s Guide2-14
Configuring the
Windows NT 4.0
Printer Driver
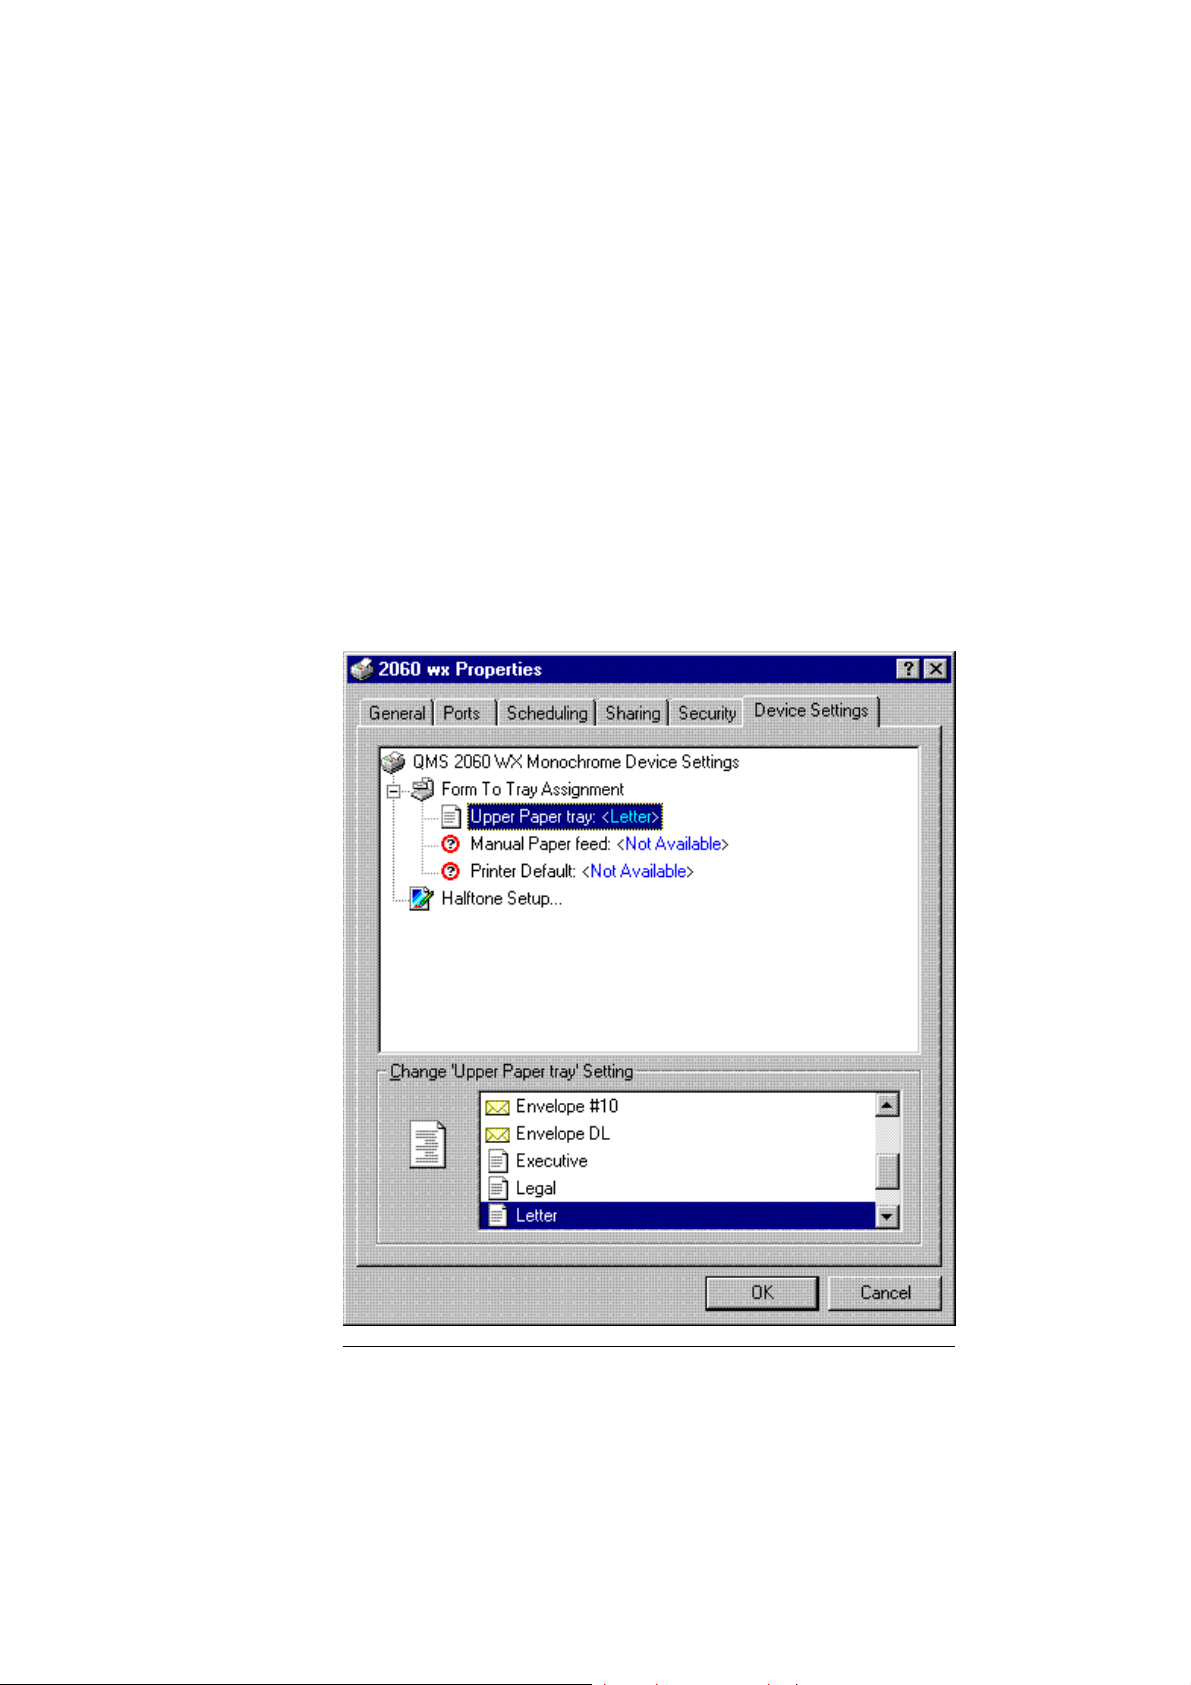
Configuring Device Settings
Device Settings is the sixth tab in the QMS 2060 WX Properties dialog box. The QMS 2060 WX Device Settings tree has two branches:
n Form To Tray Assignment—Upper Paper tray, Manual Paper
feed, Lower Paper tray, and Printer Default.
n Halftone Setup—No subbranches. Selecting Halftone Setup...
displays a button that in turn displays the Device Color / Halftone
Properties dialog box.
Printing
2-15
Configuring the
—The tray or
cassette chosen through the
Windows NT 4.0
Printer Driver
Form To Tray Assignment
s Caution: If you’re using LEF media (see “Paper Size” on page 2-4),
choose the page orientation in your application before you choose
the media size. This ensures proper printed output (and the proper
icon in applications such as Microsoft Word that display media icons
in the Page Setup dialog box). Choosing the page size first will yield
unexpected results.
Purpose Assigns a specific form (media size) to a tray.
Choices
Printer Default
Tray Select Key on the
printer control panel
Manual Feed—The multipurpose tray
Upper Tray—The standard
media cassette
See the “Notes” section at the bottom of this table for a list of
the choices for each of these trays.
Default No defaults
Lower Tray—The optional
lower media cassette
QMS 2060 WX Print System User’’'s Guide2-16
 Loading...