

KONICA MINOLTA QMS 2060WX User Guide

QMS® 2060 WX
Print System
User's Guide
1800457-001A
Trademarks
The following are trademarks or registered trademarks of their respective owners. Other
product names mentio ned in this manua l may also be trademar ks or register ed
trademarks of their resp ective owners. Regis tered trademark s are regis tered in the
United States Patent and Trademark Office; s ome tradem ar ks may also be regis tere d in
other countries. QMS and the QMS logo are r egistered trademar ks of QMS, Inc.
TrueType/Apple Computer, Inc. Windows/Mic rosoft Cor poration. Xerox/Xerox
Corporation. Hamme rm ill/Hammerm ill. Avery/Avery.
Proprietary Statement
The digitally encoded software included with your Q MS 2060 WX Print System is
Copyrighted © 1997 by QMS, Inc. All Rights Reserved. This software may not be
reproduced, modified , displayed, transferred, or copied in any form or i n any manner o r
on any media, in whole or in par t, without the express written per miss ion of QMS, Inc.
Copyright Notice
This manual is Copyrighte d © 1997 by QMS, Inc., One Magnum Pass, Mobile, AL
36618. All Rights Reser ved. This manual m ay not be copied in whole or in par t, nor
transferred to any other media or language, without the expr ess written permiss ion of
QMS, Inc.
Manual Notice
QMS, Inc. reserves the right to m ake changes to this manual and to the eq uipment
described herein w ithout notice. Considerable effor t has been mad e to ensure tha t this
manual is free of inaccuracies and omissions. However, QMS, Inc. makes no warranty
of any kind including, but not limited to, any implied warranties of merchantability
and fitness for a particular pur pose w ith regard to t his ma nual. QMS, Inc. assumes
no responsibility for, or liability for, errors contained in this manual or for incidental,
special, or conseque ntial damages ar ising out of the fur nishing of this manual, or the
use of this manual in operating the equipm ent, or in con nection with the performanc e of
the equipment when so ope rated.
.

Contents
1 Introduction
About the Documentation .................................................1-2
About This Manual .............................................................1-2
Typographic Conventions 1-4
2 Working with the Printer
Drivers
Introduction ........................................................................ 2-2
Configuring the Windows 95 Prin ter Driver ....................2-2
Setting the Printer Driver Defaults 2-2
Configuring the Printer Driver for the Current
Print Job 2-3

Configuring Paper Options 2-4
Configuring More Paper Options 2-8
Configuring Graphics Options 2- 10
Configuring the Windows NT 3.51 Printer Driver ..........2-12
Setting Printe r Properties 2-12
Setting Printe r Setup Options 2-14
Setting Job Defaults (Document Properties) 2-22
Setting Job Defaults (Advanced Document
Properties) 2-25
Setting Job Defaults (Halftone Color Adjustment
Properties) 2-28
Configuring the Windows NT 4.0 Printer Driver ............2-34
Methods of Configuration 2-34
Configuring Device Settings 2-36
Configuring Page Setup Options 2-44
Configuring Advanced Options 2-48
Configuring Halftone Adjustments 2-54
Printer Sharing .................................................................2-58
Windows 95 2-58
Windows NT 3.51 2-60
Windows NT 4.0 2-61
Sharing Someone Else's Printer 2-63
Using a Network Print Monitor 2-64
About the QMS Network Print Monitor ..........................2-64
Components 2-65
Using the Network Print Monitor 2-66
3 Printing
Introduction ........................................................................ 3-2
Refilling the Media Cassette .............................................3-2
Preparing the Paper 3-2
QMS 2060 WX Pr int System User’s Guideiv

Loading the Paper 3-3
Printing on Different Types of Media .............................3-12
Transparen cies 3-12
Labels 3-13
Letterhead and Other Preprinted Media 3-14
Envelope s 3 -15
Postcards and Thick Stock 3-17
Odd-size Pa per 3-18
More About Print Media ...................................................3 -19
Print Media Sizes and Imageable Areas 3-20
Print Media Types, Weights, and Recommended
Bran ds 3- 21
Print Media Storage 3-21
Optimizing Printing ..........................................................3-22
Short-edg e and Long-edge F eed 3-22
Special Notes on Orientation .......................................... 3 -23
Portrait-Oriented and Landscape-Oriented
Printer Output 3-23
Using Applications with a Rotate Page Feature
3-24
Printing PowerPoint 7.0 Files in Windows NT 4.0
3-24
Printing Word 7.0 Files in Windows NT 4.0 3-26
Special Notes on Duplexing ............................................3-29
Short-Edg e and Long-Edge F lipping 3-29
Printing Multiple, Duplexed, Collated Copies
(Wind ow s 95 ) 3-3 0
Preventing Media Jams ...................................................3-31
Cancelling a Print Job .....................................................3-32
vQMS 20 6 0 WX Print System U s e r’s Guide
4 Control Panel
Introduction ........................................................................ 4-2
About the Control Panel ....................................................4-3
The Message Window 4-3
The Control Panel Indicators 4-4
The Function Keys 4-5
Printer Configuration .........................................................4-6
The Configuration Menu 4-7
Accessing the Configuration Menu 4-8
Selecting Configuration Menu Options 4-8
Setting the Message Window Language 4-9
Setting Energy Conservation 4-10
Setting the Internet Address 4-10
Setting the Subnet Mask 4-11
Setting the Router Address 4-12
Setting the Ethernet Hardware Address 4-13
Using the Service Menu 4-13
Using the Board Test Menu 4-13
5 Printer Options
Introduction ........................................................................ 5-2
Duplexer ..............................................................................5-3
Memory Requirements 5-3
Installing the Duplexer 5-3
Removing the Duplexe r 5-7
Additional Media Cassettes ........................ ......................5-8
Optional Feeder ..................................................................5-9
Unpacking the Optional Feeder 5- 9
Installing the Optional Feeder 5-10
QMS 20 6 0 WX Print System User’s Guidevi

Single In-Line Memory Modules (SIMMs) ......................5-12
How the PC and Printer Use Memory 5-12
Installing a SIMM 5-13
Updating System So ftware .............................................5 -19
Updating the Printer Drivers ...........................................5-20
Windows 95 Pr inter Driver 5-20
Windows NT 3.51 Printer Driver 5-22
Windows NT 4.0 Printer Driver 5-24
6 Maintenance
Introduction ........................................................................ 6-2
Handling the Printer ...........................................................6-2
About Toner Cartridges .....................................................6-4
Toner Cartridge Life 6-4
Ordering Toner Cartridges 6-4
Handling Toner Cartridges 6-5
Storing Toner Cartridges 6-5
Replacing a Toner C artridge 6-6
Cleaning the Printer .........................................................6-10
Cleaning Guidelines 6-10
Cleaning the Outside of the Printer 6-10
Cleaning the Inside of the Printer 6-12
Using the Maintenance Kit ..............................................6-14
7 Repacking the Printer
Introduction ........................................................................ 7-2
Remove Cables and Cassette(s) .......... ............................7-2
Remove the Toner Cartridge .............................................7-3
viiQMS 20 6 0 WX Print System U s e r’s Guide
Repack the Printer .............................................................7-4
8 Troubleshooting
Introduction ........................................................................ 8-2
Printer Status Messa ges ...................................................8-2
Print Monitor Status Messages ........................................8-8
Spooler Status Information 8-8
Monitor Status Information 8-10
Printer Status Information 8-11
Troubleshooting Quick Check ........................................8-12
Performin g a Board Test .................................................8-13
Accessing Page Count ................................ ....................8-14
Media Jams .......................................................................8-15
Locating Print Media Jams 8-15
Clearing a Media Jam Inside the Printer 8-16
Clearing Cassette Area Jams 8-18
Clearing Multipurpose Tray Area Jams 8-20
Clearing a Duplexer Media Jam 8-23
Control Panel Problems ..................................................8-24
Data Indicator Continues to Blink 8-24
Jam Message Stays On 8-24
Printing Message Stays On 8-25
Paper Mismatch Message Stays On 8-25
Output Probl ems ......... .....................................................8-25
Only Partial Pages Print 8-26
Blank Pages 8-26
Not All Pages Print 8-27
Files Fail to Print 8-27
Fonts Don't Print C orrectly 8-29
QMS 20 6 0 WX Print System User’s Guideviii
Frequent Media Jams 8-30
Duplexing Problems 8-30
Print Quality Problems ....................................................8-32
General 8-32
Specific 8-33
Uninstalling the QMS Network Print Monitor for
Windows 95 .............................................. ..................8-40
Placing a Service Call ......................................................8-41
A QMS Customer Support
Sources of Support ........................................................... A-2
Your QMS Vendor A-2
Your Application Vendor A-2
Q-FAX A-2
The QMS Corporate Bulletin Board System A-3
CompuServe A-3
Internet A-3
QMS Customer Resp onse Center (CRC) A-4
QMS World-wide Offices .................................................. A-5
B Technical Specifications
Print Engine Specifications ............................................. B-2
Controller Specif ic ations ................................................. B-3
Environmental Requireme nts .... ........... .......................... .B-3
Print Media .........................................................................B-4
Print Media Selection B-5
Print Media Sizes B-5
ixQMS 206 0 WX Print System User’s Guide
Cable Pinouts .................................................................... B-6
Centronics/IEEE 1284 Parallel B-6
Ethernet B-8
Printer Optio ns .................................................................. B-8
Consumables .................................................................... B-9
Regulatory ....................................................................... B-10
FCC Compliance Statement B-10
Canadian Users Notice B-11
Laser Safety B-12
Power Cord B-12
Warranty Considerations ...............................................B-12
Consumables and Your Warranty B-12
Electrostatic Discharge and Your Warranty B-13
C TCP/IP Concepts
Introduction ....................................................................... C-2
Terminology ...................................................................... C-2
Subnetting ......................................................................... C-4
Internet Routi ng ........................................... ..................... C-5
Index
v
Subnet Masks C-4
Class A, B, and C Internet Addresses C-5
QMS 20 6 0 WX Print System User’s Guidex

1
Introduction
In This Chapter . . .
n
“About the Documentat ion ” on page 1-2
n
“About This Manual” on page 1-2
n
“Typographic Conventions” on page 1-4
About the
Documentation
About the Documentation
You received the following document atio n with your QMS 2060 WX
Print System:
&
&
QMS 2060 WX
Print System
Getting Started
QMS 2060 WX
Print System
User’s Guide
This manual contains d etai led,
illustrated instr u ction s to guide you as
you unpack and set up your printer,
connect it to a PC via the parallel or
Etherne t interface, and install th e
Windows 95 or Windows NT printer
drivers.
You’re looking at this document right
now. The following section, “About this
Manual,” later in this chapt er, tells you
what’s included in this manual.
About This Manual
This manual guides you through the day-to-day operation of your
printer and provides troubleshooting informat ion . It is organized as
follows:
Introduction
1
Working with the
2
Printer Drivers
Presents an overview of this
manual.
Explains how to configure the
printer drivers, share the printer,
and use the QMS Network Prin t
Monitor.
3
Printing
QMS 20 6 0 WX Print System User’s Guide1-2
Describes how to refill the media
cassette, print on different types of
media, prevent media jams, and
cancel a print job.
About This
Manual
Control Panel
4
Printer Options
5
Maintenance
6
Repacking the
7
Printer
Troubleshooting
8
QMS Customer
A
Support
Introduces the parts of the control
panel and discusses how to use the
keys and the configuration menu.
Explains how to remove and
replace the printer controller board,
how to install available options, and
how to update system software and
printer drivers.
Describes how to handle and clean
your printer as well as how to
replace a toner cartridge.
Provides printer repacking
instructions.
Interprets printer and QMS Network
Print Monitor status me ssage s,
explains how to remove a media
jam, discusses various output
problems, and describes how to
install the printer driver manually.
Provides product sales and support
telephone numbers and describes
how to communicate with QMS
through the QMS Bul let in Bo ard,
CompuSer ve, Internet, and Q-FAX
.
Technical
B
Specifications
TCPIP Concepts
C
Index
Introduction
Provides print engine, controller,
environmental, print media,
consumable, and cabling
specifications.
Defines TCP/IP ter minolo gy and
then discusses subnetting and
Internet ro uting.
1-3
About This
Manual
Typographic Conventions
The following typographic conventions are used in this manual:
Mixed-Case
Courier
Mixed-Case
Italic
Courier
UPPERCASE
COURIER
lowercase bold PostScript operators and DOS commands
lowercase italic
UPPERCASE File and utility na mes
↵ Press the Ent er key (PC) or Retur n key
^ Press and hold down the Ctrl key (PC)
» Note:
▲ Caution:
M
Notes contain tip s, extra information, or impo rtant infor m ati on
that deserves emphasis or reiteration.
Cautions present information that you need to know to a void
equipment damage, process failure, or extreme annoyance.
WARNING!
specific procedure is not performed exactly as des cribed in the
manual.
Warnings indicate the possibility of personal injury if a
Text you type, and messages and information
displayed on the screen
Variable text you type; replace the italicized
word(s) with information specific to your printer
or computer
Information displayed in the printer message
window
Variable information in text
(Macintosh)
ACHTUNG!
beschriebene Vorgehensweise, da sonst Verletzungsgefahr
bestehen könnte.
Bitte halten Sie sich exakt an die im Handbuch
v
QMS 20 6 0 WX Print System User’s Guide1-4

2
Working with the Printer Drivers
In This Chapter . . .
n
Configuring the Windows 95 printer dri ver on page 2-2
n
Configuring the Windows NT 3.51 print er driver on page 2-12
n
Configuring the Windows NT 4.0 printe r drivers on page 2-34
n
Sharing a printer on page 2-58
n
Using the QMS Network Print Monitor on page 2-64
Introduction
Introduction
This chapter explains how to configure the QMS 2060 WX printer
drivers, share the printer, and use the QMS Network Prin t Monit or.
Configuring the Windows 95 Printer Driver
This section e xpla ins ho w to c onfigu re the QMS 2060 WX Print System
Windows 95 printer driver. Windows on-line help is also available while
you’re configuring the printer driver. Just choose any Help button.
» Note:
If you’re using Windows NT, refer to either “Configu ring the
Windows NT 3.51 Printer Driver” on page 2-12 or “Configuring the
Windows NT 4.0 Printer Driver” on page 2-34.
Setting the Printer Driver Defaults
» Note:
Changes you make here apply to all documents. However,
most changes you make through your application override these
settings (see “Special Notes on Or ient ation” in chapter 3, “Printi ng”).
1 Open the printer driver.
a From the Windows 95 Start menu choose Settings.
b Choose Printers.
2 In the Printers window, select the QMS 2060
3 From the File m enu choose Properti es.
The following tabs appear :
n
General—Allows you to name the printer, use a separator
page, and print a tes t p age. See y our Win dows documentatio n.
n
Details—Allows you to set interface connection details. See
your Windows documentation.
WX printer driver .
QMS 20 6 0 WX Print System U ser's Guide2-2
Configuring the
Windows 95
Printer Driver
n
Sharing (optional)—Allows you to set up the printer so others
on the network can use it. See your Windows documentation.
n
Paper—Allows you to provide information about the type and
location of the media you want to print on. See “Configuring
Paper Options” on page 2-4.
n
Graphics—A llows you to provide information how the text
and images in your job will be printed . See “Co nfi guri ng
Graphics Options” on page 2-10.
4 Make your selections, and then choose OK to save your
changes and return to the Printers window.
5 Close the Printe rs window.
Configuring the Printer Driver for the Current Print Job
» Note:
» Note:
Any changes you make here apply only to the current
document. These changes override most default settings you made
through the Printers window (see “Special Not es on Orie ntat ion ” in
chapter 3, “Printing”).
1 From the applicati on’s File menu choo se Prin t (or, in some
cases, Print Setup or Page Setup).
2 In the Print, Print Setup, or Page Setup dialog box, select the
QMS 2060 WX printer driver.
3 Choose the Properti es but ton.
Two tabs appear:
n
Paper—Allows you to provide information about the type and
location of the media you want to print on. See “Configuring
Paper Options” on page 2-4.
n
Graphics—Allows you to provide information on how the text
and images in your job will be printed . See “Co nfi guri ng
Graphics Options” on page 2-10.
General, Details, and Sharing tabs are not available. See
“Setting the P rinter Driver Defaults” on page 2-2 for information.
Working with the Printer Driver s
2-3

Configuring the
Windows 95
Printer Driver
4 Make your selections, and then choose the OK button to
return to the Print, Print Setup, or Page Setup dialog box.
5 Either print the fil e or close the dial og box.
Configuring Paper Options
The Paper tab allows you to provide information about the type and
location of the media you want to print on.
QMS 20 6 0 WX Print System U ser's Guide2-4
Configuring the
Windows 95
Printer Driver
Paper Size
s
Caution
into the printer short-edge first. If you’re using LEF media, choose the
page orientati on in your application (in th e Page Setup or similar
dialog box) before you choose the media size. This ensures proper
printed output (and the proper icon in appl icati ons such as Microsoft
Word that display media icons in the Page Setup dialog box).
Choosing the page size first will yield unexpected results.
Purpose Sets the media size.
Choices Size Inches Millimeters
Default Letter
Notes More media sizes may be listed in the Microsoft printer driver
: LEF refers to “long-edge feed.” All other page sizes are fed
A3 11.69 x 16.53 297.0 x 420.0
A4 8.27 x 11.69 210.0 x 297.0
A4 LEF 11.69 x 8.27 297.0 x 210.0
A5 5.85 x 8.27 148.5 x 210.0
B4 (JIS) 10.12 x 14.33 257.0 x 364.0
B5 (JIS) 7.17 x 10.12 182.0 x 257.0
Envelope #10 4.125 x 9.50 104.8 x 241.3
Envelope C5 6.38 x 9.02 162.0 x 229.0
Envelope DL 4.33 x 8.66 110.0 x 220.0
Executive 7.25 x 10.50 185.0 x 267.0
Legal 8.50 x 14.00 215.9 x 355.6
Letter 8.50 x 11.00 215.9 x 279.4
Letter LEF 11.0 x 8.50 279.4 x 215.9
Monarch 3.875 x 7.50 98.4 x 190.5
Postcard 3.94 x 5.83 100.0 x 148.0
Statement 5.50 x 8.50 139.7 x 215.9
Tabloid (11x17) 11.00 x 17.00 279.4 x 431.8
Universal 13.00 x 19.00 330.2 x 482.6
than are actually supported by the printer. Refer to the table
above to ensure that you chose a printer-supported media size.
If a media size other than that chosen in the driver is installed
in the cassette, an error message displays, but the job still
prints on the currently installed media size.
Working with the Printer Driver s
2-5
Configuring the
Windows 95
Printer Driver
Orientation
s
Caution:
choose the page orientat ion in your application (in the Page Setup or
similar dialog box) before you choose the media si ze. This ensures
proper printed output (and the proper icon in applications such as
Microsoft Word that display media icons in the Page Setup dialog
box). Choosing the page size first will yield unexpected results.
Purpose Sets the orientation (printing direction) of the print media.
Choices Portrait—Printing along the short edge of the page
Default Portrait
Notes Portrait Letter/A4 LEF is the same as landscape Letter/A4, and
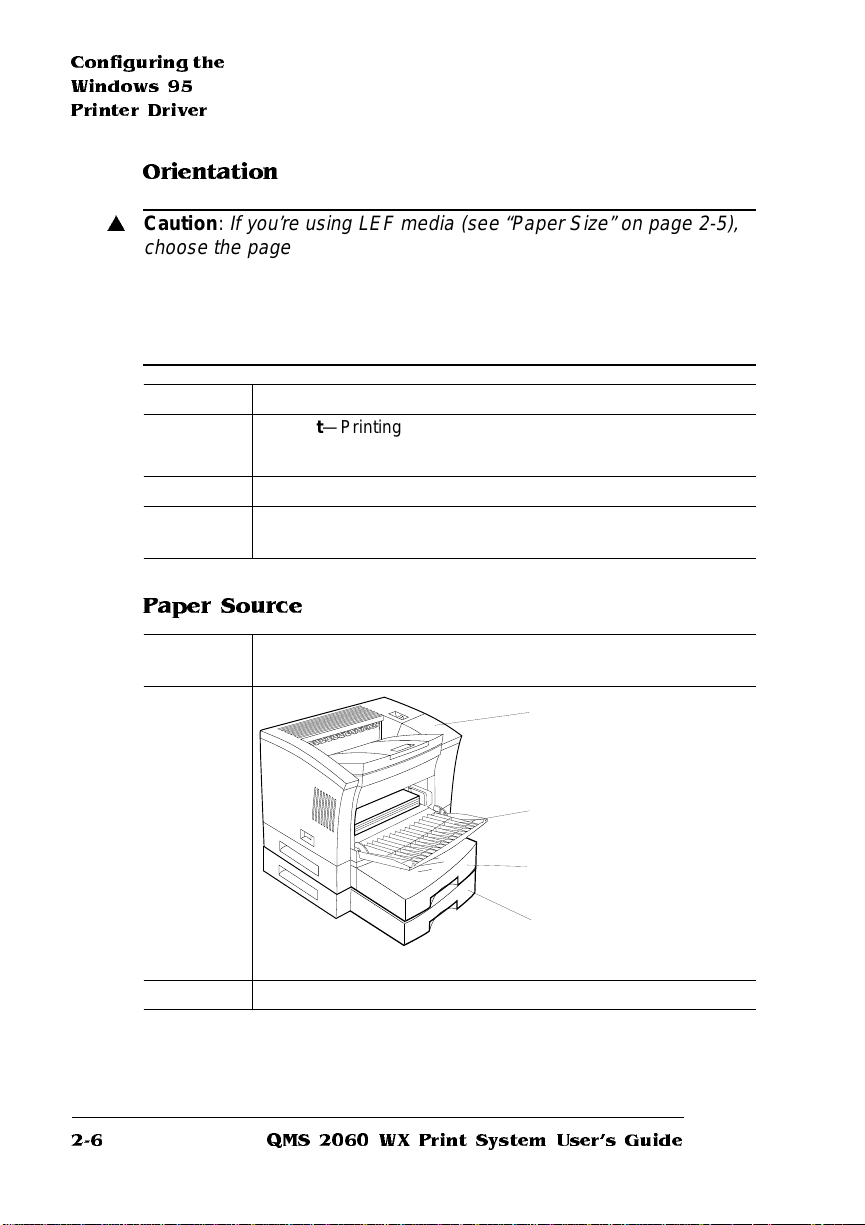
Paper Source
If you’re using LEF media (see “Paper Size” on page 2-5),
Landscape—Printing along the long edge of the page
Landsc ape Letter/A4 LEF is the same as portrait Letter/ A4.
Purpose Sets the input source (cassette/tray) from which print media is
pulled into the printer
Choices
Default Upper Tray
Printer Default—The tray
or casse tte chosen through
the Tray Select Key on the
printer control panel
Manual Feed—The multipurpose tray
Upper T ray—The standard
media cassette
Lower Tray—The optional
lower media cassette
QMS 20 6 0 WX Print System U ser's Guide2-6
Configuring the
Windows 95
Printer Driver
Media
Purpose Sets the type of media to be printed
Choices Standard—Nor mal weight paper, envelopes, and labels
Default Standard
Choice
Copies
Purpose Sets the number of copies to be printed.
Choices 1-999
Default 1
only
Notes This scroll box is available
driver defaults. If you’re configuring the printer for the current
print job, set the number of copies in the Print dialog box.
when you’re setting the printer
About... Button
The About... button displays the version number of the printe r dri ver.
Restore D efaults Button
The Restore Defaults button allows you to reset all of the selections
on the Paper tab to their default settings.
Apply and OK Buttons
The Apply button allows you to save your changes and continue working in the Properties window, while the OK button allows you to save
your changes and exit from the Properties window.
Cancel Button
The Cancel button allows you to cancel your changes and exit from
the Properties window.
Working with the Printer Driver s
2-7
Configuring the
Windows 95
Printer Driver
Configuring More Paper Options
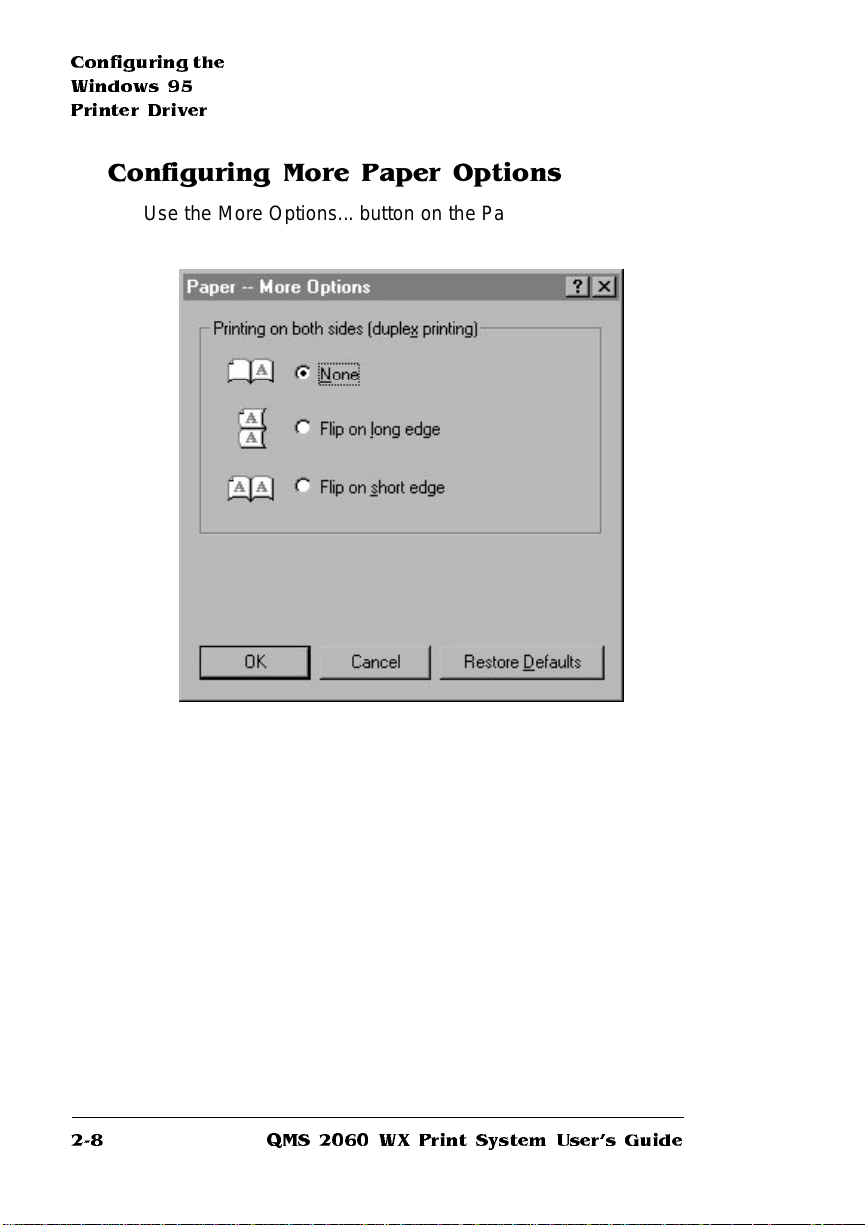
Use the More Option s... button on th e Paper tab to display the
Paper—More Options window.
QMS 20 6 0 WX Print System U ser's Guide2-8

Configuring the
Windows 95
Printer Driver
Printing on Both Sides
» Note:
You must have an optional duplexer installed to print duplex.
Purpose Select between simplex (single-sided) and duplex (double-
sided) printing.
Choices None—Simplex printing
Flip on Long Edge—Duple x printing; choose this option when
you’re feeding media by the long edge
Flip on Short Edge—Duplex printing; choose th is option when
you’r e fe ed ing media by t he short e dge
Default None
Notes See “Special Notes on Duplexing” in chapter 3, “Printing.”
(Duplex Printing)
Restore D efaults Button
The Restore Defaults button allows you to reset all of the selections
on the Paper tab to their default settings.
OK Button
The OK button allows you to save your changes and exit from the
Paper—More Options window.
Cancel Button
The Cancel button allows you to cancel your changes and exit from
the Properties window.
Working with the Printer Driver s
2-9
Configuring the
Windows 95
Printer Driver
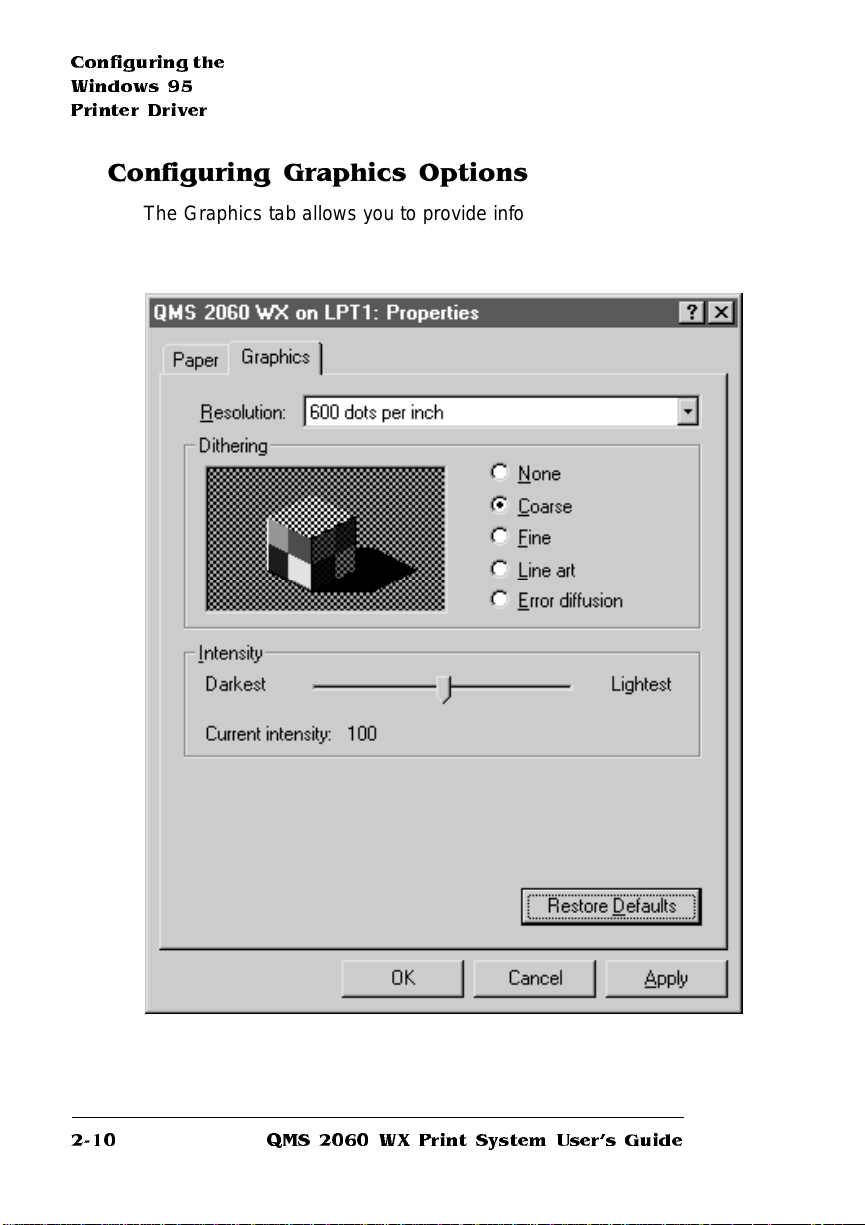
Configuring Graphics Options
The Graphics tab allows you to provide information on how the text
and images in your job will be printed. Each option and button is
explained in detail in this section.
QMS 20 6 0 WX Print System U ser's Guide2-10
Configuring the
Windows 95
Printer Driver
Resolution
Resolution is the measurement of the dots per inch (dpi) at which
your documents are printed. Your printer is capable of printing at 600
dpi.
Purpose Sets the printing resolution.
Choices 6 00 dots per inch—For printing documents at 600x 600 dpi
Default 600 dots per inch
Dithering
Dithering, a technique for placing dots, allows the printe r to create
halftones, in which areas of print
appear
ues and densities and thus simulate a full range of grays.
Purpose Sets the dither pattern.
Choices None—No dithering
Fine—For printing at resolutions less than 200 dpi (not
recommended for this printer)
Coarse—For printing text and most graphics at 600 dpi
Error Diffusion—For printing photographs or pictures that
don’t have sharp, well-defined edges at 600 dpi
Line Art—For printing monochrome graphics with clearly
defined lines
Default Coarse
to contain many dif ferent val-
Intensity
Intensity speci fies how light or dar k to p rint the g raphics in your document.
Purpose Sets the degree of lightness/darkness at which graphics are
printed.
Range
Default 100
Working with the Printer Driver s
0 (darkest)–200 (lightest)
2-11
Configuring the
Windows NT
3.51 Printe r
Driver
Restore Defaults Button
The Restore Defaults button allows you to reset all of the selections
on the Paper tab to their default settings.
Apply and OK Buttons
The Apply button allows you to save your changes and continue working in the Properties window, while the OK button allows you to save
your changes and exit from the Properties window.
Cancel Button
The Cancel button allows you to cancel your changes and exit from
the Properties window.
Configuring the Windows NT
3.51 Printer Driver
This section explains how to configure the QMS 2060 WX Print
System Windows NT 3.51 printer driver, and it describes all of the
available options. Windows on-line help is also available while you’re
configuring the print er driver. Just choose the Help button in the
appropriate dialog box.
» Note:
If you’re using Windows 95, refer to “Configuring the Windows
95 Printer Driver” on page 2-2 for complete configuration information.
If you’ re using Windows NT 4.0, refer to “Configuring the Windows NT
4.0 Printer Dr iver” on page 2-34 for complete confi guration
informat ion.
Setting Printer Properties
Usually, you set printer properties when you create the printer (see
QMS 2060 WX Setup Gui de
the
change them later by using the following instructions:
1 Open Print Manag er.
QMS 20 6 0 WX Print System U ser's Guide2-12
for informat ion). However, you can
2 Select the printer’s icon or window.
3 From the Printer menu choose Prop er ties .
A Printer Proper ties window displays.
Configuring the
Windows NT
3.51 Printe r
Driver
4 Make your changes.
Printer proper ties include the following:
n
Identifying inform atio n— Print er Name, Driver, Description,
and Print to (port)
See your Windows NT documentation for more information.
n
Sharing informati on —S hare th is printer on the net wo rk,
Share Name, and Location
See “Windows NT 3.51” on page 2-60 for more information.
n
Printer setup options—Forms and Half ton e
Choose the Setup... button to access these options. See
“Setting Printer Se tup Op tio ns ” on page 2-14 for more information.
Working with the Printer Driver s
2-13
Configuring the
Windows NT
3.51 Printe r
Driver
n
n
Printer details—Availability From/To, Separator File, Pr int to
Additional Ports, Delete Port, Priority, Print Processor, Default
Datatype, Prin t Directly to Ports, Hold Misma tched Jobs,
Delete Jobs After P rint ing , Job Print s Wh ile S poolin g, Prin t
Spooled Jobs First, and Job Defaults
Choose the Details... button to access t hese options. See
your Windows NT documentation for more information on all
of these except Job Defaults. For more information on Job
Defaults see “Setting Job Defaults (Document Properties)” on
page 2-22, “Setting Job Defaults (Advanced Document Properties)” on page 2-25, and “Setting Job Defaults (Halftone
Color Adjustment Proper t ies)” on page 2-28.
QMS port configuration—Timer s, Events to Log, and
Au di ble Ale rt
Choose the Settings... button to access these options for the
QMS Network Print Monitor. See the on-line help (choose the
Help button in the Configure QMS Port dialog box) or the
QMS Network Print Mon itor for Windows NT Administrat or’s
for more information.
Guide
5 Make your changes.
6 Choose OK.
Setting Printer Setup Options
» Note:
Changes you make here apply to all documents. However,
most changes you make through your application override these
settings (see “Special Notes on Orient ati on” in chapter 3, “Printing”).
Use the following procedure to access these options:
1 Open Print Manag er.
2 Select the printer’s icon or window.
3 From the Printer menu choose Prop er ties .
QMS 20 6 0 WX Print System U ser's Guide2-14
Configuring the
Windows NT
3.51 Printe r
Driver
4 In the Printer Properties di alo g box choose the Setup. ..
button.
Working with the Printer Driver s
2-15
Configuring the
Windows NT
3.51 Printe r
Driver
Forms
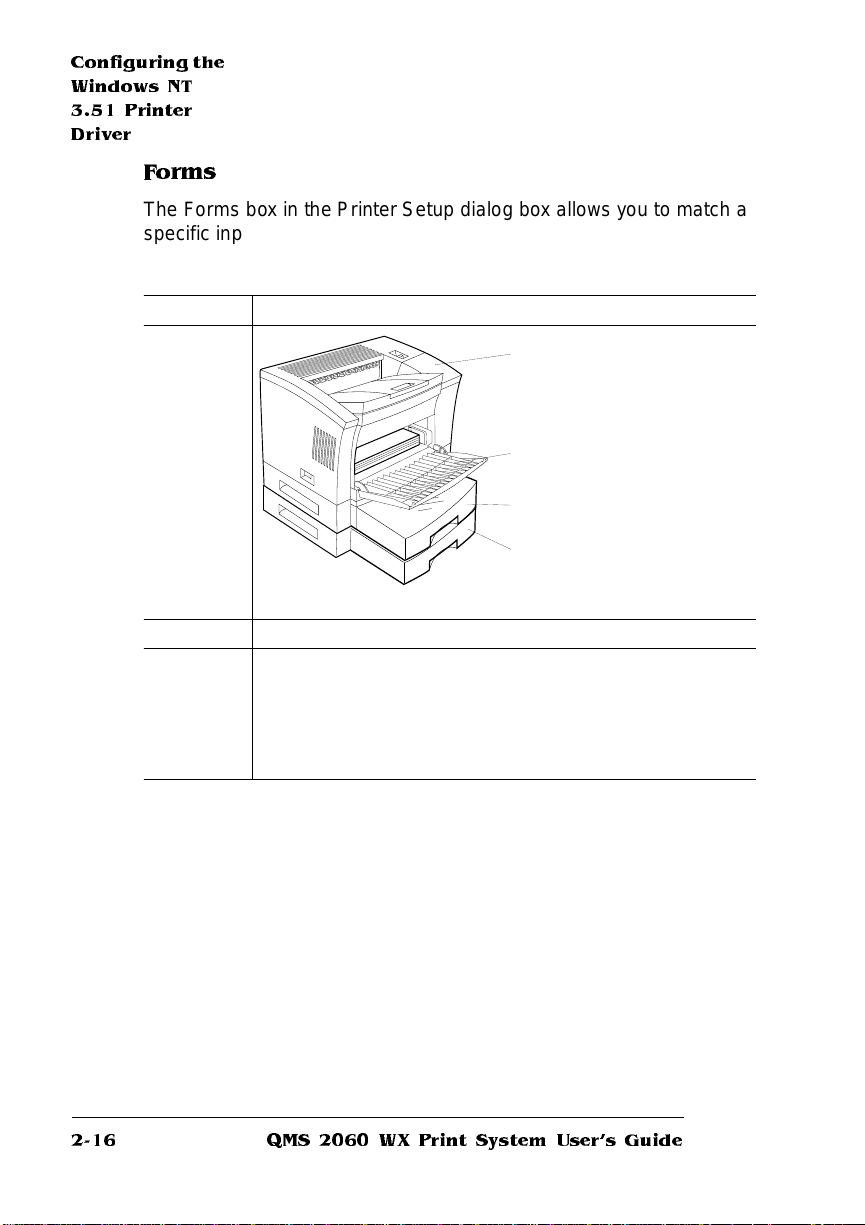
The Forms box in the Printer Setup dialog box allows you to match a
specific input source to a specific media size.
Source
Purpose Allows you to select a specific input source.
Choices
Default No default
Notes Select an input source from the drop-down list box, and then
Printer Default—The tray or
cassette chosen through the
T ra y Select Key on the printer
control panel
Manual Paper Feed—The
multipurpose tray
Upper Paper Tray—The
standard media cassette
Lower Paper T ray—Th e
optional lower media cassette
select a media name (size) in the Name drop-down list box.
Not all media sizes are supported by all input sources. See
“More About Print Media” in chapter 3, “Printing,” for more
information.
QMS 20 6 0 WX Print System U ser's Guide2-16
 Loading...