

Page 1
Page 2
Names of main parts/Camera body
①
②
③
④
⑤
⑥
⑦
⑧
① Flash mode switch
⑨
② Self-timer/Close-up mode switch
⑩
③ Image quality mode switch
④ Data display panel (LCD)
⑤ Shutter release button
⑥ Viewfinder
⑪
⑦ Grip rubber
⑧ Objective lens/Lens barrier*
⑨ Self-timer indicator
⑩ Flash adjustment sensor
⑪ Flash tube
⑫
⑫ Video port cover/Video port (inside cover)
⑬ Power input terminal
⑬
⑭ Serial port
⑮ I/O terminal cover
⑭
⑯ Lens barrier switch
⑮
⑯
Page 3
⑰
⑱
⑲
⑳
控
攻
⑰ Viewfinder
昂
⑱ MENU button
晃
⑲ SET button
⑳ SELECT buttons
更
控 LCD monitor
攻 Battery cover
昂 Green lamp
杭
晃 Monitor power switch
更 Card access warning lamp
校
杭 Red lamp
校 CF card cover/CF card ejector button (inside cover)
梗 Card cover release button
梗
構 Strap eyelet
江 Tripod socket hole
構
* The lens barrier that shuts and opens by operation of the lens
barrier switch protects the objective lens.
江
Don't directly touch both the lens barrier and objective lens.
Page 4
① ② ④ ⑤ ③
⑨
⑧
⑦
* In the following picture, all indicators of the data display panel
are on for explanation.
① Battery's remaining energy indicator
Remaining energy of the battery is indicated in three steps of
[
] (full), [ ] (half) and [ ] (depleted).
⑥
② Card NG indicator
This indicator goes on when the inserted CF card is unusable.
For example, when a CF card which is unformatted, unconformable to this camera, has broken data and so on is inserted,
this indicator goes on.
③ Close-up indicator
When you want to photograph close to an object (at a distance
of 0.2 to 0.8 m to an object), press the self-timer/close-up
switch to turn this indicator on.
In this mode, the shutter is actuated a little later than the normal photography.
④ Self-timer indicator
For self-timer photography, press the self-timer/close-up switch
to turn this indicator on.
Page 5

⑤ Flash mode indicator
Each time the flash mode switch is pressed, indication of this
indicator circularly changes from 1) automatic flash (AUTO), to
2) automatic flash with red-eye reduction, to 3) forced flash
(ON), to 4) forced flash with red-eye reduction, to 5) non-flash
(OFF), and to 1) again for selection of a desired f lash mode.
⑥ Image quality (resolution) mode indicator
Each time the picture quality mode switch is pressed, indication
of this indicator circularly changes from “FINE” to “SUPER
FINE” to “ECONOMY” and to “FINE” again. Each indication
expresses the pi cture quality at the sele cted mode. Number of
pixels to be used to record a picture is 1152 (horizontal) X 872
(vertical) in the FINE and SUPER FINE modes, or 576 (horizontal) X 436 (vertical) in the ECONOMY mode.
⑦ Remaining exposure counter
This counter does not show number of exposed frames but
shows number of remaining frames. When the camera is connected with a personal computer, “PC” appears in this indicator.
⑧ Sandglass mark
This sandglass mark blinks in a camera operation that it takes
a considerably long time to finish, for example, picture data
writing on a CF card or picture data transfer to a personal computer, etc.
While this sandglass mark is blinking, the camera cannot
otherwise be operated.
⑨ Card status indicator
This indicator is on when the CF card cover is closed with a
proper CF card set inside. This indicator goes out when the CF
card cover is opened or a CF card is removed from the camera.
※ When the remaining exposure counter shows “Err” and all
other indicators appearing on the indicator panel are blinking,
there is an error in camera control. On such an occasion, refer
to “Error message”.
Page 6
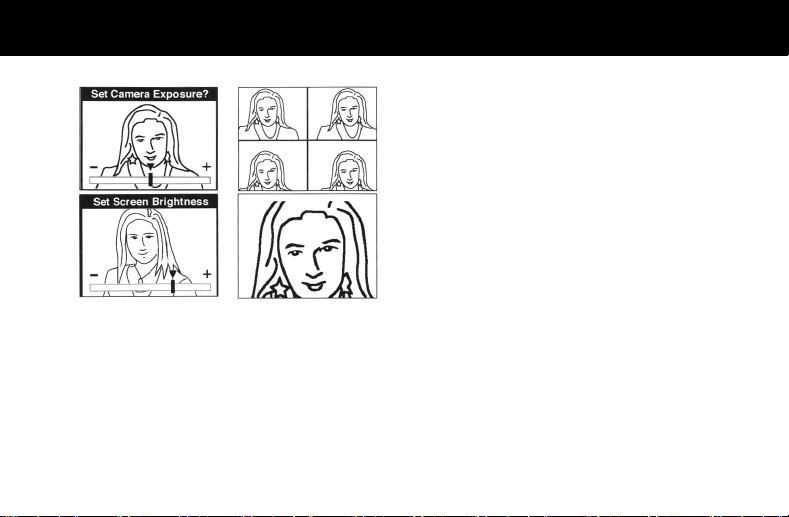
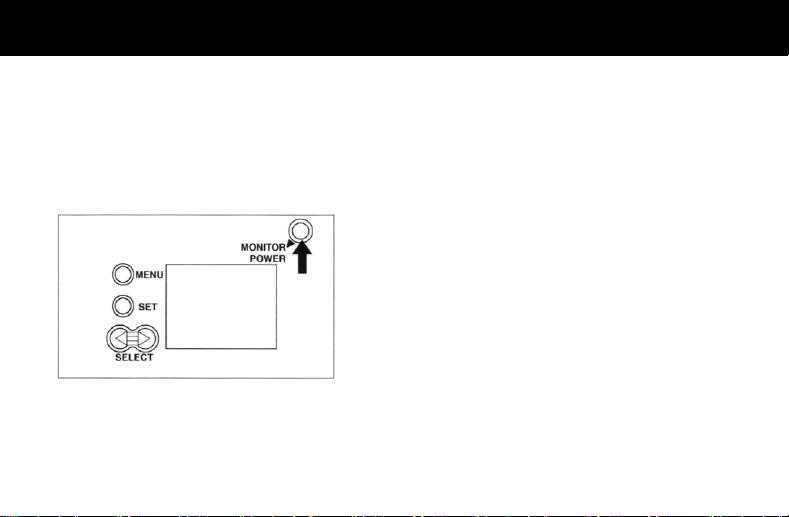
Name of main parts/LCD monitor
1.Ⓐ
Ⓒ
Ⓑ
Ⓓ
● The LCD monitor is used for many purposes such as to show
playback pictures, to preview pictures and to show menus for
selecting various functions.
For details of each function or operation, read explanations on
and after the next page.
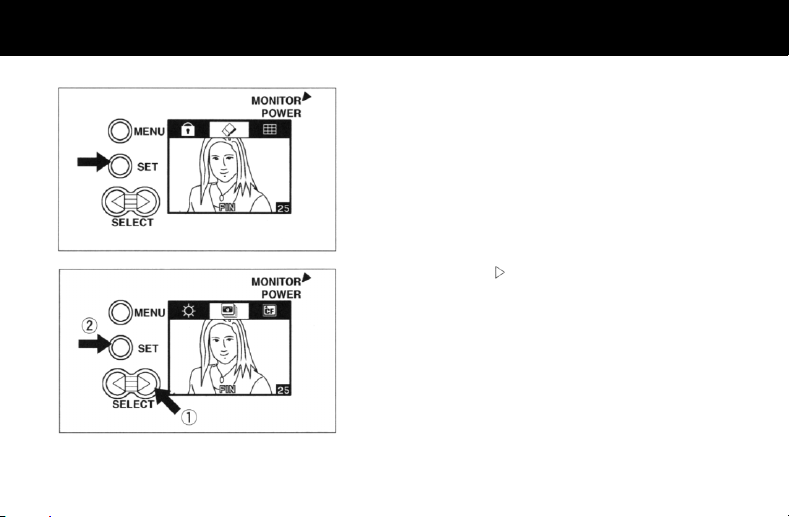
1. Functions that can be selected by pressing the MENU
button in the preview mode are shown below.
Ⓐ Exposure compensation
Ⓑ LCD monitor's brightness adjustment
Ⓒ 4-frame continuous shooting.
Ⓓ Digital 2x zoom
Page 7
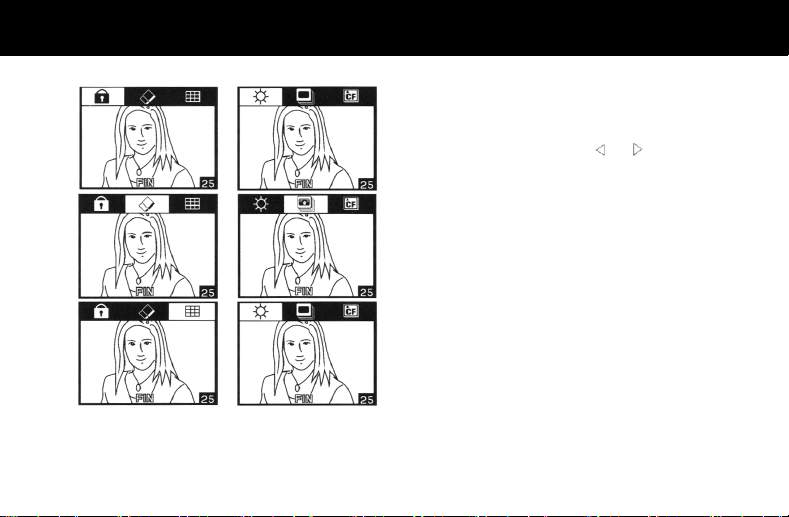
2.ⓐ
ⓓ
ⓑ
ⓒ
ⓔ
ⓕ
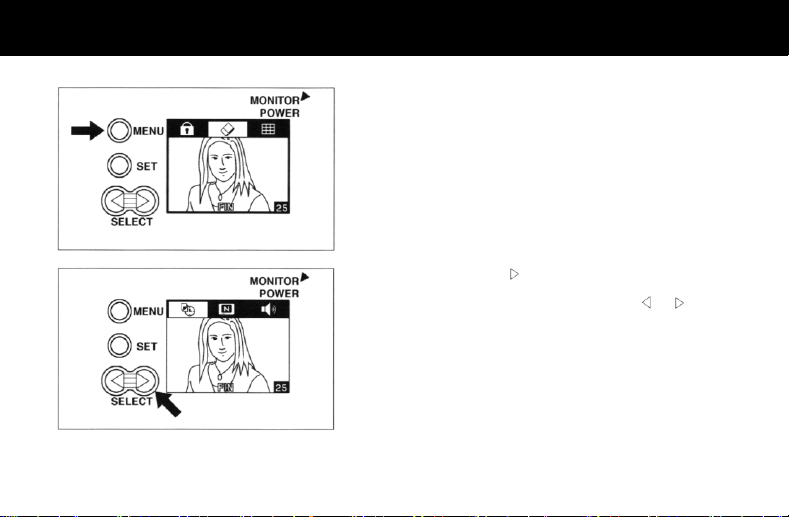
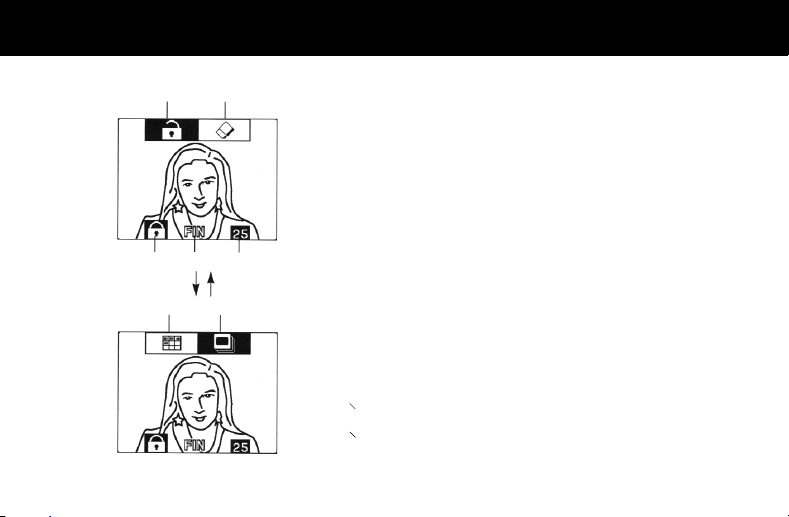
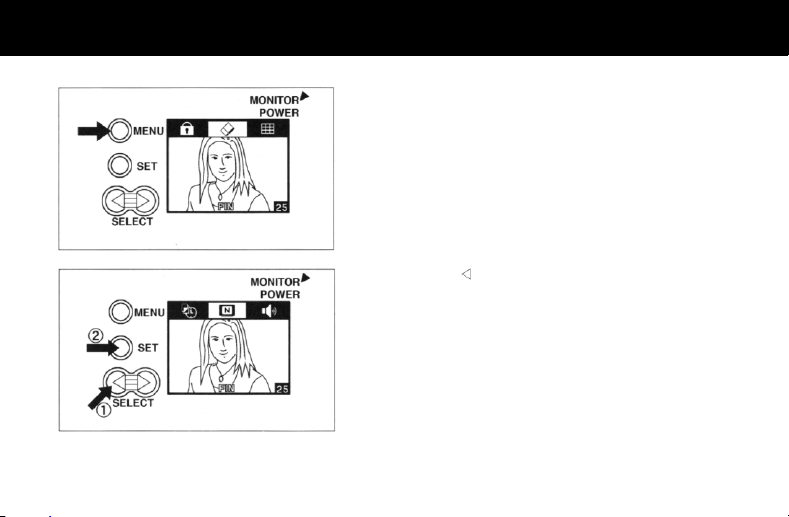
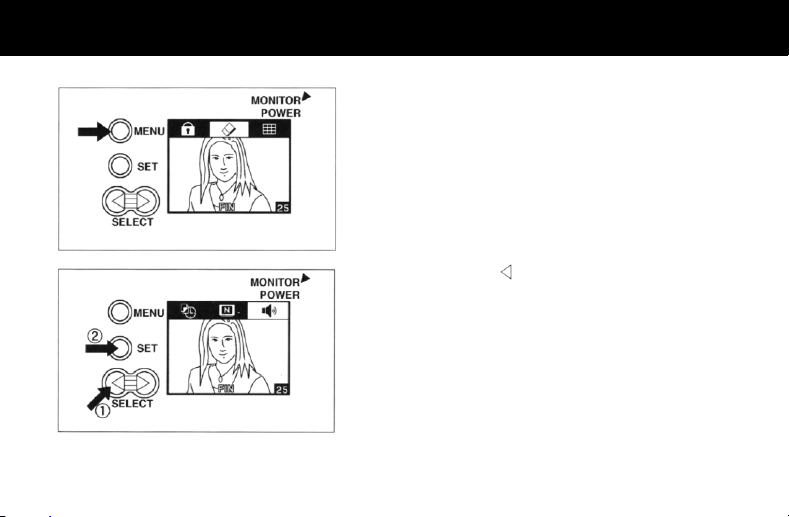
2. Functions that can be selected by pressing the MENU
button in the playback mode are shown below. (Number
appearing in the lower right part of each menu shows the
menu number.)
(Each time the SELECT button (“
following menus are circularly shown by turn.)
ⓐ Setting of frame protection
ⓑ Erase
ⓒ Index playback
ⓓ Adjustment of LCD monitor's brightness
ⓔ Slide show playback
ⓕ Formatting of CF card
ⓖ Setting of calendar and clock
ⓗ Switching between NTSC and PAL
ⓘ Setting of buzzer
” or “ ”) is pressed, the
Page 8
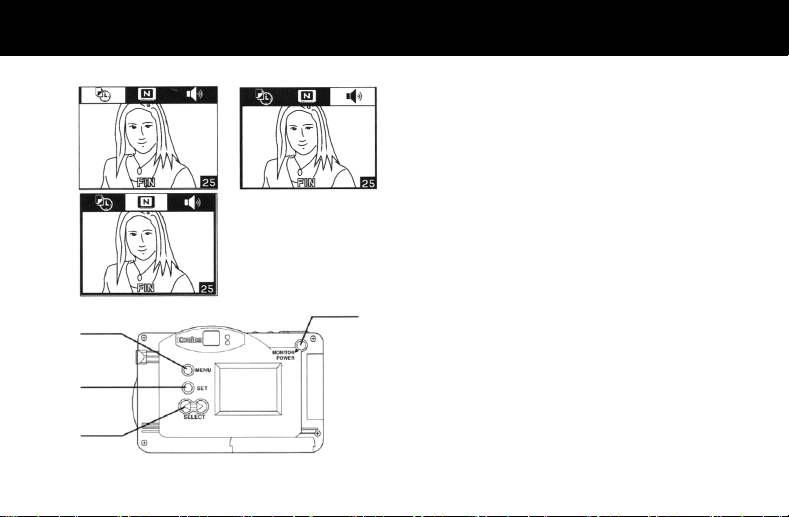
ⓖ
ⓗ
(1)
(2)
(3)
ⓘ
(4)
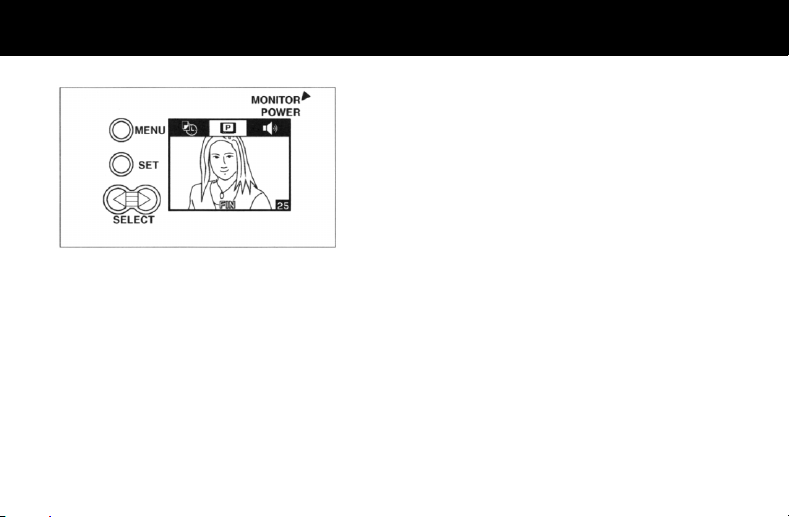
(1) MENU button
To access menus on the LCD monitor.
(2) SET button
To execute a selected function.
(3) SELECT buttons
To select a function from a menu.
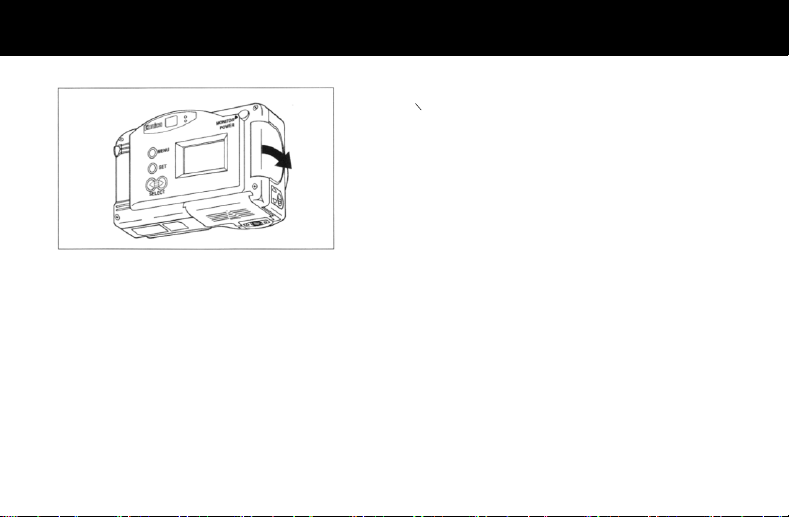
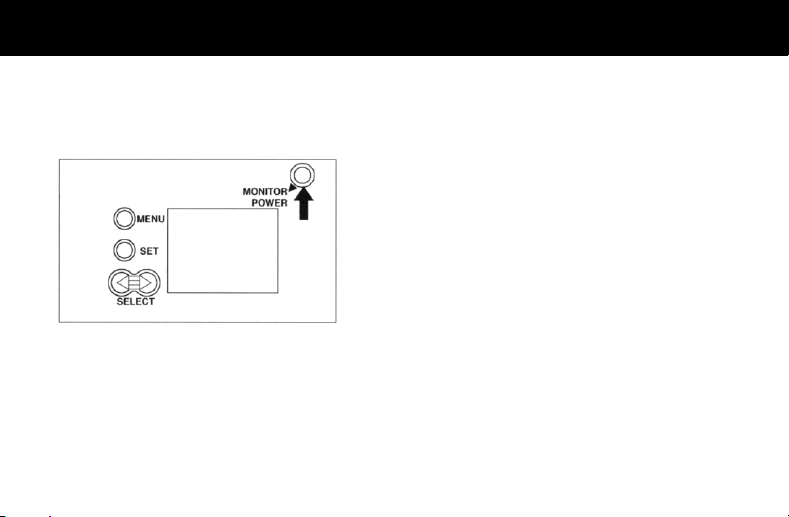
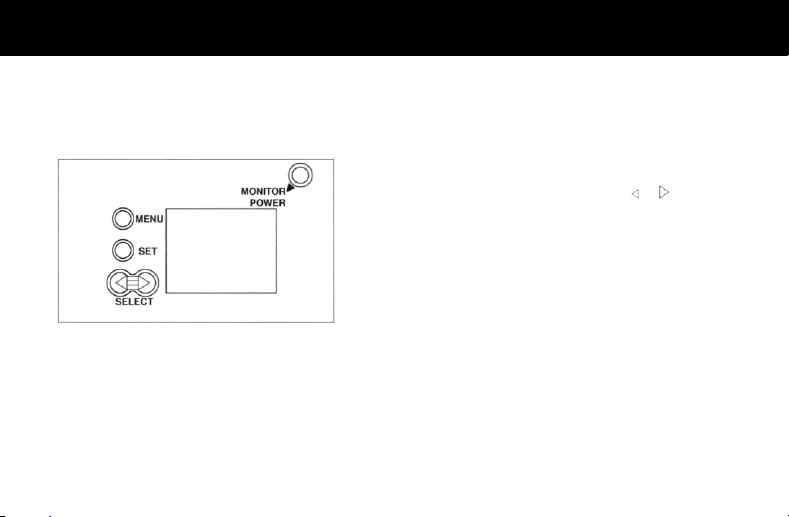
(4) Monitor power switch
To turn on/off the LCD monitor.
Page 9
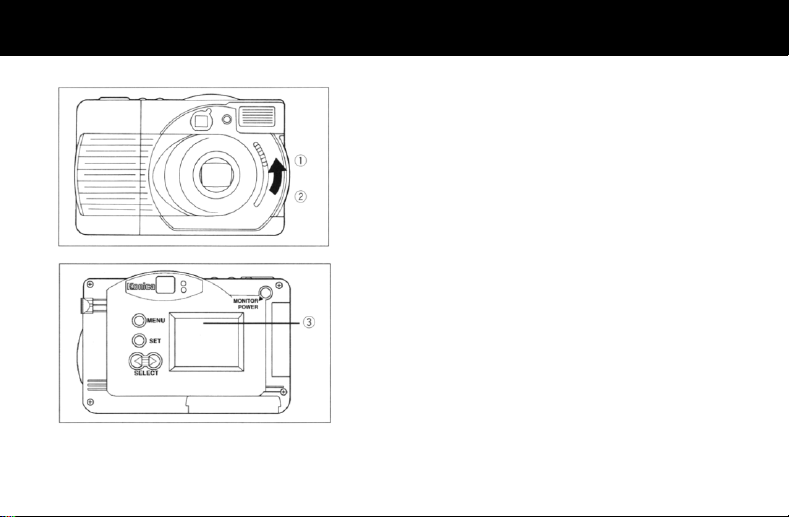
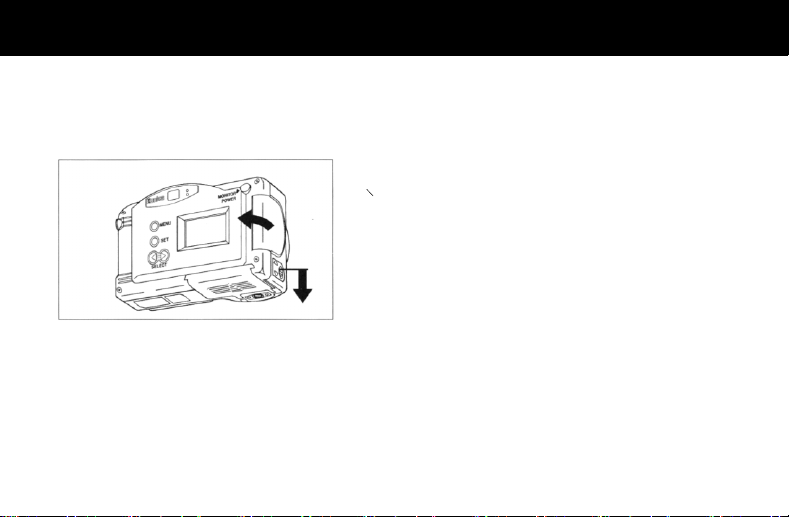
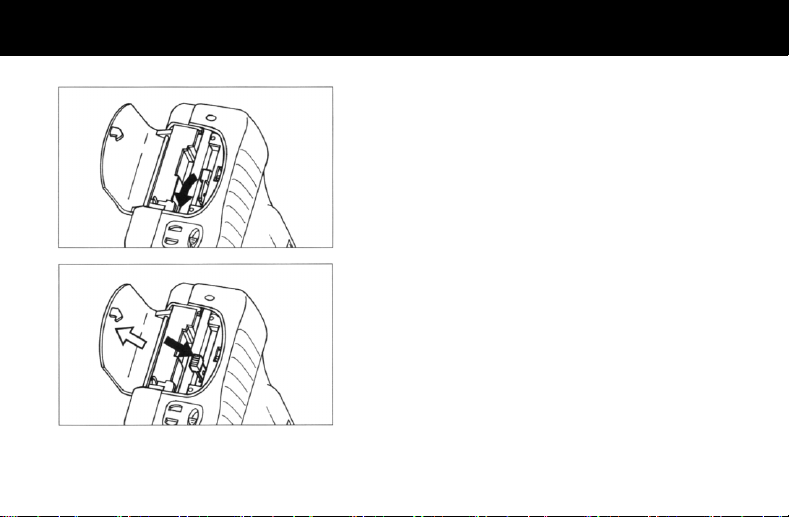
Setting batteries in camera
1. First of all, close the lens barrier without fail.
(Slide the lens barrier switch upwards.)
2. Make sure that the LCD monitor on the back of the camera is off .
Page 10

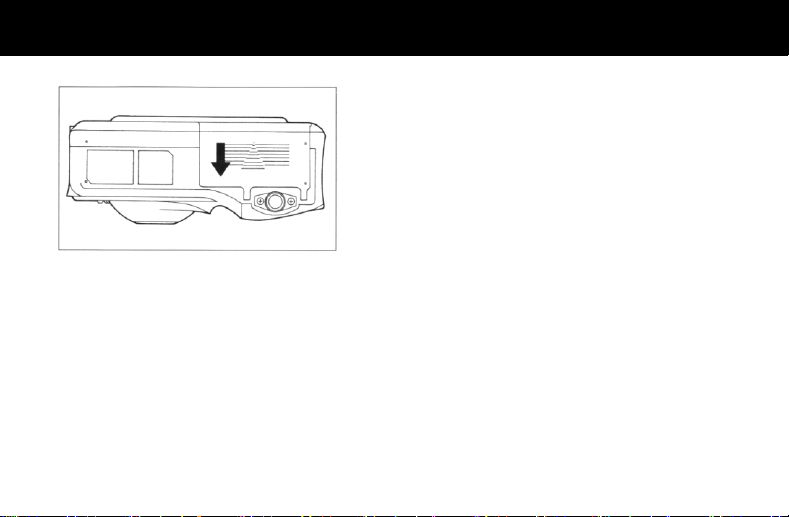
3. Slide the battery cover on the bottom of the camera in the direction of the
arrow to open it.
Warning: Don’t touch the battery cover with wet hand, otherwise you may
get an electric shock.
4. Set AA-size batteries (four) in the battery chamber paying careful attention
to their respective orientations referring to + and - indications inside the
battery chamber.
Caution: If some battery is set in wrong orientation, it may cause not only
damage to or soil of the camera but also injury on you, because
a wrong set battery generates heat or leaks electrolyte.
<figure>
① CLOSE
② OPEN
③ LCD monitor
Page 11
5. After confirming that all batteries are set right, firmly close the battery
cover by sliding it in the direction of the arrow until it clicks.
* When the battery's remaining energy indicator indicates the half level,
the batteries need replacement. When replacing the battery, prepare
four new batteries of the same type to replace all at the same time.
When going out with the camera, it is recommended to have four new
batteries always ready.
Page 12
Use of AC adaptor (optional accessory) for Q-M100
* If you use an optional AC adaptor for Q-M100 to supply power to the
camera, you can transfer picture data to a personal computer without worry
about remaining energy of batteries.
● Correctly connect an AC adaptor (optional) for Q-M100 to the camera
and a mains AC outlet referring to “Safety precautions” of this book and
the precautions of the AC adaptor.
● Be sure to use an optional specified AC adaptor, because use of another
AC adaptor may cause camera failure, fire or electric shock.
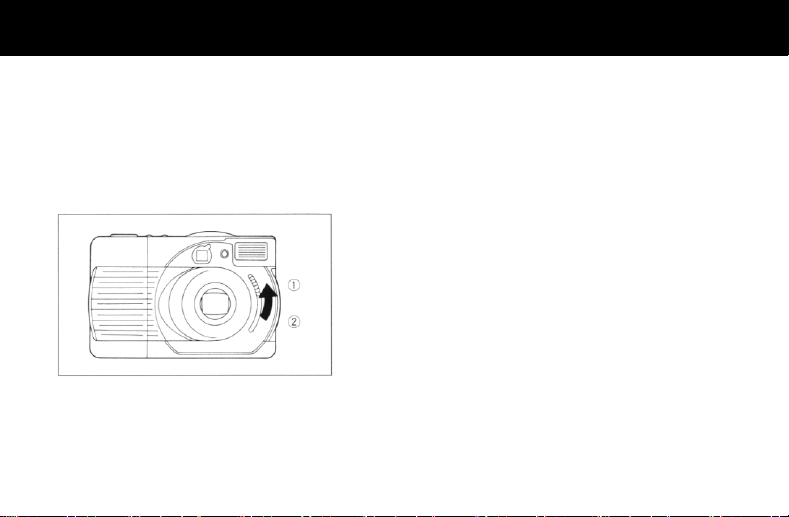
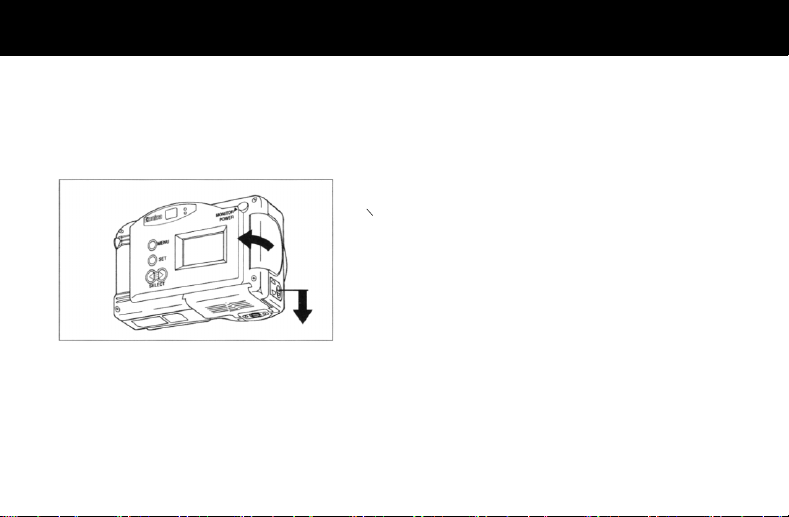
1. First of all, close the lens barrier without fail.
(Slide the lens barrier switch upwards.)
Page 13
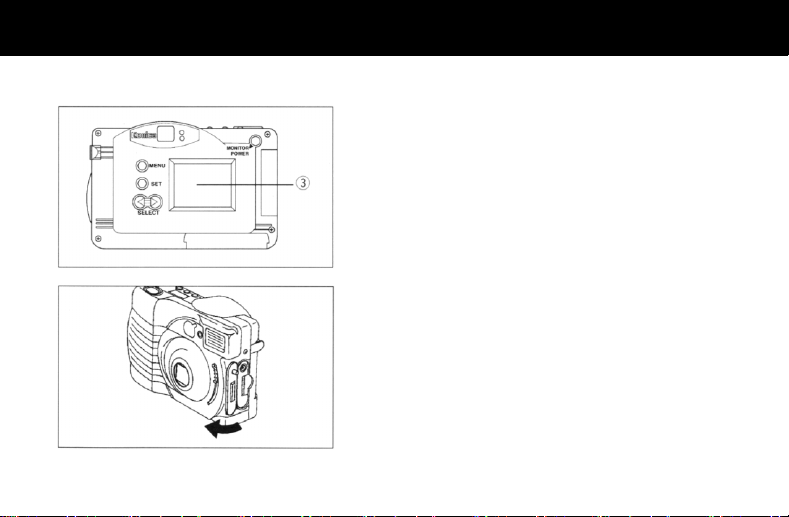
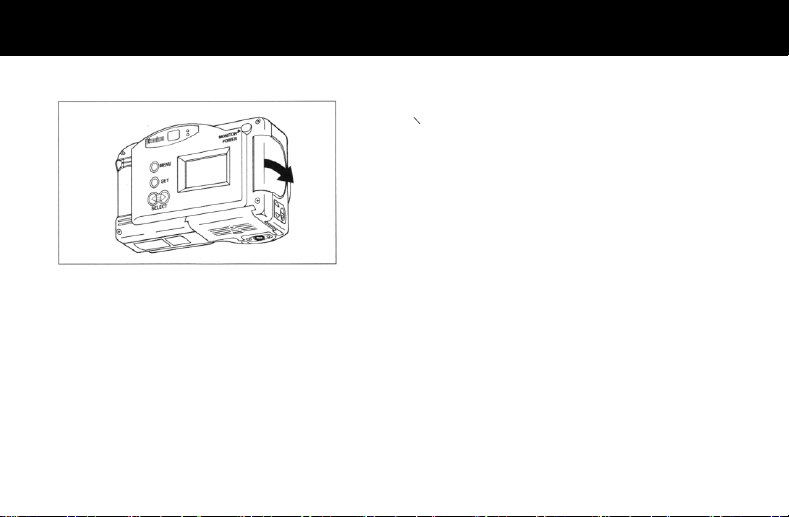
2. Make sure that the LCD monitor on the back of the camera is off .
3. Open the I/O cover.
Page 14
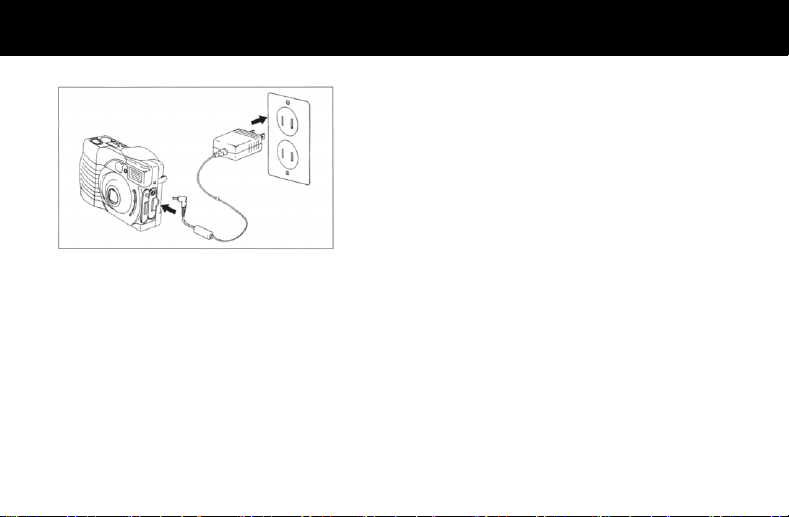
4. Plug the cord connector of the AC adaptor into the power input terminal
of the camera.
Next, plug the AC adaptor in to a mains outlet (Input 100V ∼ 240V,
50/60Hz AC).
<figure>
① CLOSE
② OPEN
③ LCD monitor
Page 15
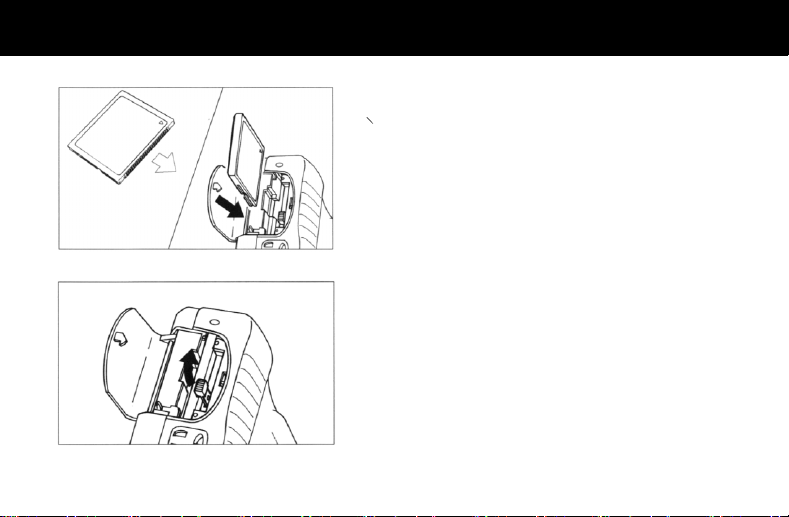
Setting CF card in camera
● First of all, make sure that the lens barrier is closed, the LCD monitor is off
and all the power switches are off. If the camera is turned on in whole or in
part, it may cause damage to the camera and a CF card set in the camera.
1. Press down the CF card cover release button to unlock the CF card cover,
and then open the CF card cover.
○ Don't open the CF card cover by force, otherwise the pivot of the cover
may be damaged.
Page 16
(2A)
(2B)
2. Paying heed to the orientation of a CF card, insert it straight into the
deepest end. (2B)
○ Be sure to insert a CF card correctly referring to the figure 2A for
orientation of the CF card. If a CF card is inserted in wrong orientation,
the connector may be damaged.
3. Bend the card ejector button so that it will be covered by the CF card cover.
* If the card ejector button is not bent, the CF card cover cannot be closed.
Page 17
f
4. Close the CF card cover.
Caution:
If the CF card cover is opened during playback of picture, the
○
camera is compulsorily turned off. Before inserting or setting a
CF card, be sure to turn off the camera.
Don’t open the CF card cover while the card access warning
lamp is on in the shooting mode, otherwise operation o
picture data writing on a CF card is interrupted.
Page 18
Removing CF card from camera
● First of all, make sure that the lens barrier is closed, the LCD monitor is
off and all the power switches are off. If the camera is turned on in whole
or in part, it may cause damage to the camera and a CF card set in the
camera.
1. Press down the CF card cover release button to unlock the CF card
cover, and then open the CF card cover.
○ Don’t open the CF card cover by force, otherwise the pivot of the
cover may be damaged.
Page 19
2. Raise the CF card ejector button.
3. Press the CF card ejector button to stick out the CF card, then pick it out
of the camera.
* If the CF card cannot be stuck out by pressing the CF card ejector
button, again push the CF card into the deepest end and press the CF
card ejector button strongly once more.
* If the CF card ejector button is pressed with the card slot down, the CF
card may fall down. Avoid pressing the CF card ejector button with the
card slot down.
Page 20
4. Shut the CF card cover.
Caution: ○ If the CF card cover is opened during playback of picture, the
camera is compulsorily turned off. Before inserting or setting a
CF card, be sure to turn off the camera. Don’t open the CF
card cover while the card access warning lamp is on in the
shooting mode, otherwise operation of picture data writing on
a CF card is interrupted.
Page 21
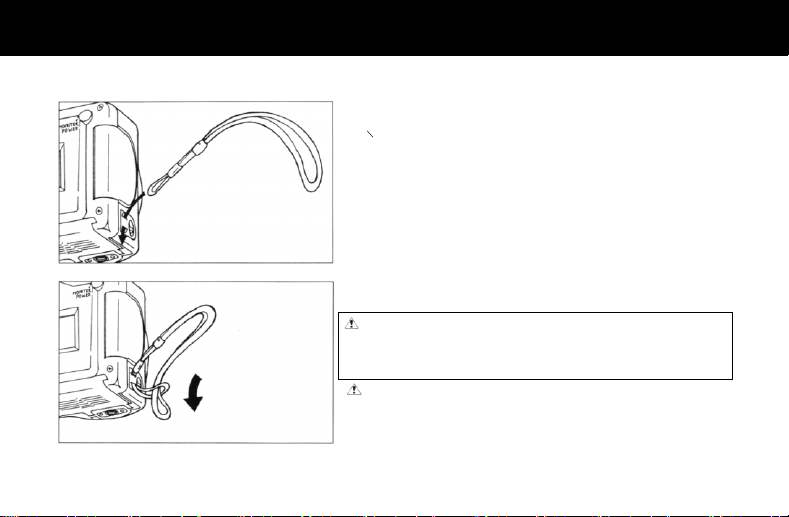
Use of strap (attachment) and soft case (attachment)
<Fitting strap to camera>
1. Pass the shorter and thinner end of the strap (supplied with the camera)
through the strap eyelet of the camera.
○ Since it is considerably hard to pass the strap end through the strap
eyelet, use a toothpick or the like to do it.
2. Pass the other end of the strap through th e ring of the strap end pass ed
first, and pull the secondly passed end to tighten the strap.
Warning: W hen carrying the camera by the strap, don't wear it around the
neck, particularly around the neck of an infant or child.
If the strap tightens itself around the neck, it may cause
suffocation.
When carrying the camera by the strap, be careful not to knock the
camera against something other.
Page 22

<Putting camera into soft case>
1. When putting the camera into the soft case (supplied with the camera),
insert the flashlight side first as shown in the figure on the lef t.
2. After putting the camera in the soft case, lid the soft case.
Page 23
Setting calendar and clock
● Before starting calendar setting, make sure that batteries are properly set
in the camera or a specified AC adaptor is connected to supply power to
the camera and the lens barrier is closed (the lens barrier switch is set at
“CLOSE”).
● W hen you press the MONITOR POWER switch for the first time since
you got the camera, you have access to the scene of the following step 4
for setting the calendar and clock. On such the occasion, be sure to set
the calendar and clock correctly first of all.
1. Press the monitor power switch to turn on the LCD monitor.
* When no CF card is set in the camera or no picture is recorded on the
inserted CF card, a message “No pictures in camera” appears on the
LCD monitor.
Page 24
2. Press the MENU button once. The “Erase” icon reversely appears on the
screen.
* When no CF card is set in the camera or no picture is recorded on the
inserted CF card, a message “No pictures in camera” appears on the
LCD monitor. If the MENU button is pressed in this status, the previous
operation is canceled and the camera (screen) status returns to the step
1.
3. Press the SELECT button (“ ”) five times.The “Calendar setting” icon
reversely appears on the screen.
* If you fail in repeatedly pressing the SELECT button (“
fully continue pressing the button until the “Calendar setting” icon again
appears on the screen.
* If the MENU button is pressed in this status, the previous operation is
canceled and the camera (screen) status returns to the step 1.
” or “ ”), care-
Page 25
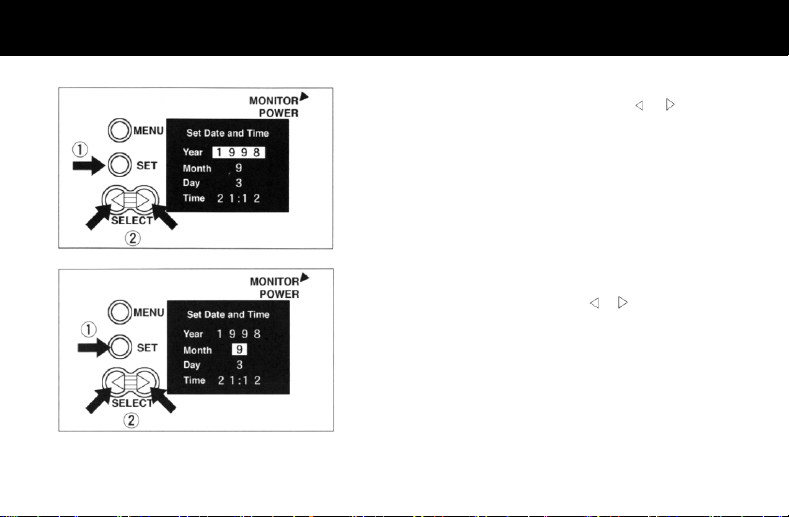
4. Press the SET button. The camera enters into a calendar setting mode
for “Year”. Set “Year” by pressing the SELECT button (“
* If the MENU button is pressed in this status, the previous setting is
canceled and the camera (screen) status returns to the step 3.
” or “ ”).
5. Press the SET button. The camera enters into a calendar setting mode
for “Month”.
Set “Month” by pressing the SELECT button (“
* If the MENU button is pressed in this status, the previous setting is can-
celed and the camera (screen) status returns to the step 3.
”or “ ”).
Page 26
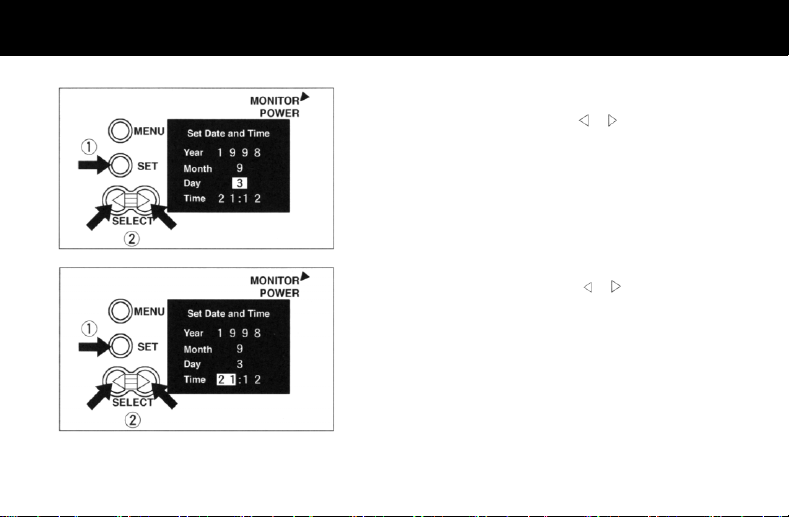
6. Press the SET button. The camera enters into a calendar setting mode
for “Day”.
Set “Day” by pressing the SELECT button (“
* If the MENU button is pressed in this status, the previous setting is
canceled and the camera (screen) status returns to the step 3.
”or “ ”).
7. Press the SET button. The camera enters into the clock setting mode.
Set “Hour” by pressing the SELECT button (“
* If the MENU button is pressed in this status, the previous setting is can-
celed and the camera (screen) status returns to the step 3.
”or “ ”).
Page 27
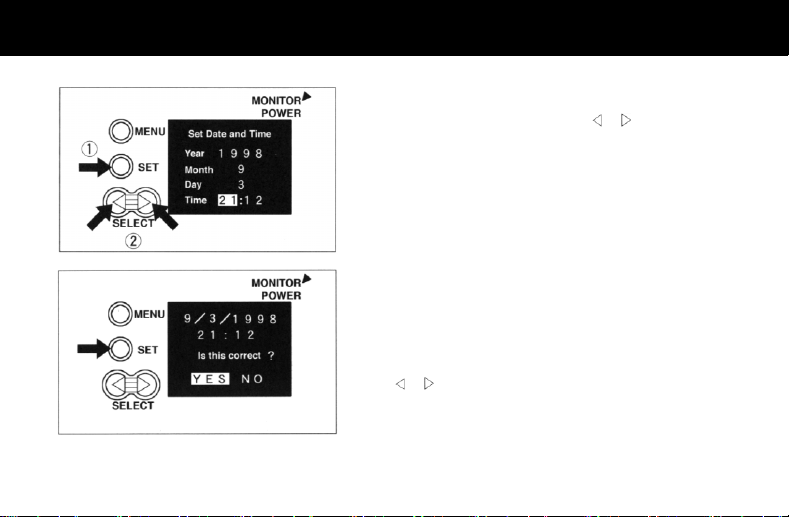
8. Press the SET button. The camera enters into a clock setting mode for
“Minute”.
Set “Minute” by pressing the SELECT button (“
* If the MENU button is pressed in this status, the previous setting is can-
celed and the camera (screen) status returns to the step 3.
”or “ ”).
9. Press the SET button. The camera enters into the mode to fix or cancel
the input data on calendar and clock (year, month, day, hour and minute).
If the SET button is pressed with “YES” appearing on the screen, the input of calendar and clock is fixed and the camera (screen) status returns
to the step 1.
* If the MENU button is pressed in this status, the previous setting is can-
celed and the camera (screen) status returns to the step 3.
To cancel the input data on calendar and clock, press the SELECT but-
”or “ ”) to let “No” appear on the screen and then press the SET
ton (“
button, or press the MENU button.
* When the batterie s are replaced, make s ure of the setting of the ca len-
dar and clock.
The calendar and clock that can be set effectively are for the period from
0:00 hour of January 1, 1970 to midnight of December 31, 2037.
Page 28

Taking pictures
● Firmly hold the camera by both hands and slightly compress your sides
by elbows to stabilize the camera.
● For flash photography in vertical camera position, hold the camera with
the flashlight up.
○ Carefully hold the camera not to cover the flashlight and lens with the
strap or fingers.
Page 29
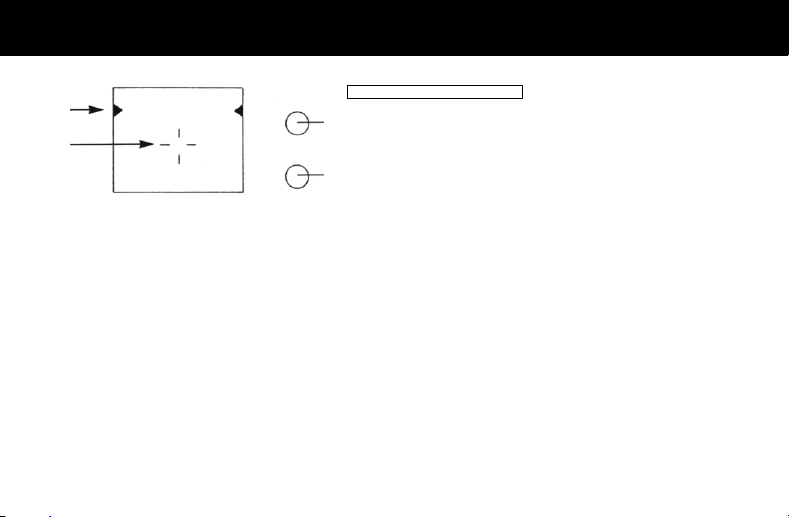
Viewfinder and indicator lamps
①
②
* If both the green and red lamps ar e blinking, it is impossible to take pictures.
In this case, the following causes are thinkable.
1) T he CF card has no room for writing data in the selected data compression mode.
2) T here is no CF card set in the camera.
3) T he CF card set in the camera is differently formatted.
4) T he CF card cover is open.
5) T he batteries are dead or depleted.
6) T here occurs an error in camera operation.
Refer to “Error message”.
①Parallax correction marks
③
The area below these marks is the effective picture range in the close-up
mode (0.2 m to 0.8 m to object).
For composing (framing) the picture more precisely, use the preview
function.
④
②Target/Auto-focus frame
③Green lamp
ON: Indicates that camera is ready for shooting.
Blinking: Indicates that camera fails in automatic focusing.
④Red lamp
ON: Indicates that flashlight is being charged.
Blinking: ● Low illumination warning (blinks 4 times/second).
→Use the flashlight.
● Camera shake warning (blinks twice/second).
→Use a tripod.
Page 30

1. Slide the lens barrier switch downwards to set it at the “OPEN” position.
The lens barrier is opened and the camera is turned on.
* Open/close the lens barrier by operating the lens barrier switch only.
2. Compose a picture looking through the viewfinder, and lightly press the
shutter release button.
The green lamp goes on to indicate that exposure and focus controls are
locked.
Page 31

3. Moreover press the shutter release button to actuate the shutter.
With beep sound, the shooting is complete. After that, the camera starts
writing picture data on the CF card.
4. The sandglass mark appears on the indicator panel, and the sand part of
the sandglass starts blinking while the card access warning lamp goes
on.
While the card access warning lamp is on, the camera does not accept
any operation because data writing is performed in this period.
○ Don't remove the CF card until the sandglass mark stops blinking.
Usual object distance: 0.8 m to ∞
* For shooting an object at a close distance of 0.2 m to 0.8 m from the
camera, refer to “Close up photography”.
Page 32

● Automatic power-off operation
If the camera is left without operation for more 5 minutes as it
is turned on, the automatic power-off function is activated to
turn off the data display panel and LCD monitor, therefore,
the batteries are prevented from getting consumed.
To cancel the automatic power-off mode after it is activated,
slide the lens barrier switch upwards to set it at the “CLOSE”
position once and again slide it downwards to set it at the
“OPEN” position to turn on both the indicator panel and LCD
monitor.
At that time, reset the shooting mode depending on the situation because it was canceled with activation of the automatic
power-off function.
Automatic power-off function is also activated when the AC
adaptor is used.
※ Af ter shooting is complete, close the lens barrier without fail
to protect the lens.
※ If the camera is turned off as the lens barrier is open, set the
lens barrier switch at the “CLOSE” position once and then
slide it to the “OPEN” position again to turn on the camera for
shooting.
Page 33

Switching image quality (resolution) mode
● Each time the image quality mode switch is pressed, the “
on the data display panel to indicate an image quality mode one after another repeatedly.
* An image quality mode set once is fixed for continuous shooting, but it is
reset to the “FINE” mode when the lens barrier is opened again after it
was closed once.
1. When the lens barrier is opened with a CF card set in the camera, the
image quality mode is reset to the “FINE” mode (normal mode) .
” mark moves
Page 34
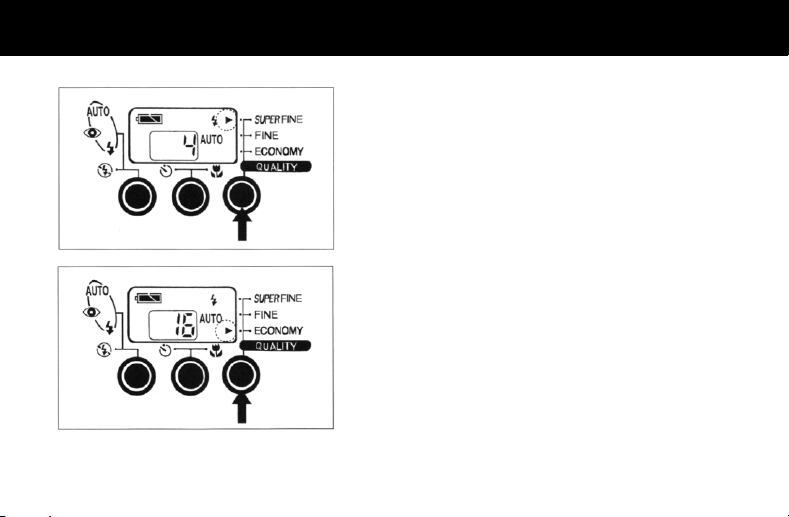
2. When the image quality mode switch is pressed once, the image quality
mode is switched to the “SUPER FINE”.
* With switching of the image quality mode, number of frames available
for future shooting changes.
3. W hen the image quality mode switch is pressed once more, the image
quality mode is switched to the “ECONOMY”.
* With switching of the image quality mode, number of frames available
for future shooting changes.
<figure> ① Image quality mode switch
Page 35

t
Use of each image quality mode
1) “SUPER FINE” mode: 1152 (horizontal) × 872 (vertical)
pixels.
Use this mode that records picture in the highest image quality
(finest resolution) to shoot important objects worthy to
preserve or to edit pictures on a personal computer, etc.
2) “FINE” mode: 1152 (horizontal ) × 872 (vertical) pixels.
Usually take pictures in this mode.
3) “ECONOMY” mode: 576 (horizont al) × 436 (vertical) pixels.
Use this mode for recording pictures temporarily, for taking
pictures that are worthless to preserve or to be played back by
a TV set, or for taking pictures as many as possible.
Number of pictures (frames) that can be taken in respective image quality modes.
* Each number of pictures shown in the following table is just for
reference, because each number decreases if there is data or file
other than that of picture recorded on the CF card.
※ When files (pictures) of a CF card are recorded in differen
image quality (resolution) modes or/and shooting modes,
number of files (pictures) that can be recorded on a CF card
differs from the above-mentioned standard.
Page 36

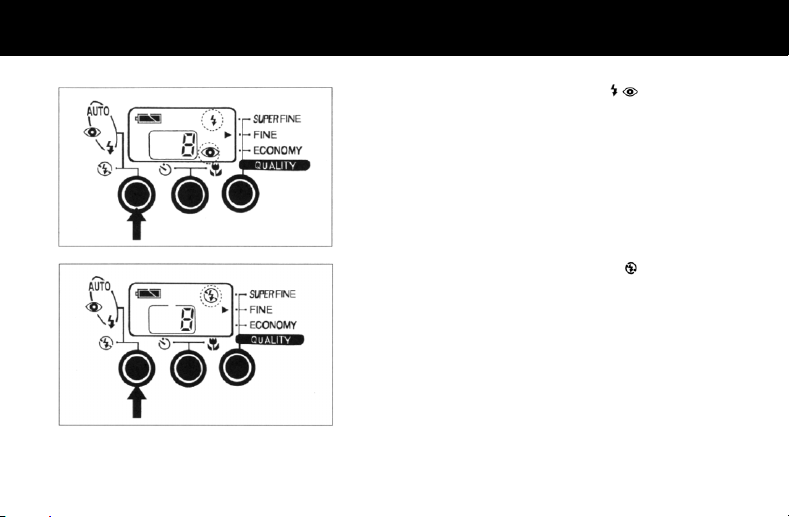
Switching flash mode
● Each time the flash mode switch is pressed, one of five flash modes
1. When the lens barrier is opened with a CF card set in camera, the flash
appears in turn on the data display panel.
* The flash mode set once is fixed for continuous shooting, but it is reset
to the “AUTO” (automatic flash) mode when the lens barrier is opened
again after it was once closed.
* While the red lamp is on after flash photography, the shutter release
button is locked because the flashlight is being charged.
mode is set to the “AUTO” (automatic flash) mode (preset normal mode).
In this mode, the flashlight is automatically actuated for dar k objects.
Page 37

2. If the flash mode switch is pressed once in the “AUTO” mode, the
“
” mark is selected and the flash mode is changed to the “red-eye reduction automatic flash mode”.
In this mode, the fiashlight emits light twice for a shot, namely preliminary
emission and actual emission, to control red-eye phenomenon.
* Since it takes about 0.8 second from preliminary emission to actual
emission of th e flashlight, be carefu l not to shake the camera a nd to prevent the object from moving during this period.
3. If the flash mode switch is pressed once in the “red-eye reducing automatic flash mode”, the “
changed to the “forced flash mode”. In this mode, the flashlight is actuated at every shooting regardless of darkness or brightness of obj ect.
* Use this forced flash mode to soften a contrast between light and shade
in the picture, for example a contrast between light and shaded parts in
a face when you take a portrait in the sunny outdoors, or when you take
a picture against the light or in artificial light such as a fluorescent lamp,
etc.
* In case of low illuminance, the shutter speed is automatically set at a
low speed and the flashlight is synchronized with it, therefore, it is advised to use a tripod for camera shake prevention.
<figure> ① Flash mode switch
” mark is selected and the flash mode is
Page 38
4. If the flash mode switch is moreover pressed, the , mark is selected
and the flash mode is changed to the “red-eye reduction forced flash
mode”. In this mode, the flashlight emits light twice for a shot, namely
preliminary emission and actual emission, to control red-eye phenomenon.
5. If the flash mode switch is furthermore pressed, the
and the flash mode is changed to the “non-flash mode”. In this mode the
flashlight never works even in a dark place.
Therefore, select this mode for taking pictures in such a place as use of
flashlight is forbidden (art museum, etc.) and for taking pictures of
nightscape.
* W hen taking pictures without flash in a dark place or at night, it is ad-
vised to use a tripod to avoid camera shake because the shutter speed
is automatically set considerably slow in such a situation.
* If a moving object is shot, the picture comes out badly as the object
blurs.
mark is selected
Page 39

Recommended object distance for flash photography:
0.5 m to 3.0 m approx.
※ If object distance is shorter than 0.5 m, the picture (camera
subject) comes out too brightly.
※ If object distance is longer than 3.0 m, the picture (camera
subject) comes out darkly because the flash has no effect
on the distant object.
Page 40

Self-timer photography/Close-up
● Each time the self-timer switch is pressed, one of three modes is selected
one after another as indicated on the data display panel.
1. When the self-timer switch is pressed once, the close-up mode is selected with an indication on the data display panel. Use the close-up
mode for shooting an object at a short distance of 0.2 m t o 0.8 m.
* The camera generally focalizes on an object at a distance of 0.8 m to
the infinity (∞) out of the close-up mode.
Page 41

2. When the self-timer switch is pressed twice, the camera enters th e
self-timer mode with an indication on the data display panel.
In the self-timer photography mode, the shutter opens about 10 seconds
after the shutter release button is pressed. Through the period from
pressing the shutter release button and practical operation of the shutter,
the self-timer lamp blinks.
* If you want to cancel self-timer operation halfway, press the self-timer
switch once again.
3. When the self-timer switch is pressed three times, the camera is ready for
close-up with self-timer. If the shutter release button is pressed in this
mode, the shutter opens 10 seconds or more later for precise focusing on
the object in the close-up range.
* To cancel self-timer operation halfway, press the self-timer switch once
again.
<figure> ① Self-timer switch
Page 42

Regarding self-timer photography
● On taking pictures with self-timer, carefully set up the camera
on a tripod or a horizontal stable plane.
● The self-timer mode is canceled each time self-timer photog-
raphy is complete. If you want to continue to take pictures with
self-timer, set the self-timer switch for each photography.
Regarding close-up
● In t he close-up mode, it takes a slightly long time compared
with the normal photography to actuate the shutter after the
shutter release button is pressed, because the lens is comparatively slowly operated for precise focalization.
● In the close-up mode, the actual photographing field is limited
to the range below the parallax correction marks (side marks)
appearing in the viewfinder. In the close-up mode carefully
determine composition of the picture before pressing the shutter release button.
● In a close-up in a dark place where the camera activates the
automatic flash function, the object may be illuminated too
brightly by the flashlight. In such a case, take a picture at a
distant of 0.5 m or more from the object.
● When a close-up subject is extremely dark, the camera
occasionally falls into difficulty in focusing. In such a case,
temporarily light up the subject with a light bulb or the like to
make the camera easily come into focus. In the close-up mode,
the camera has difficulty in focusing on such objects as mentioned below.
● Flat objects unclear between light and shade (sky, white
wall, bonnet of a car, etc.),
● Objects plane in surface such as a plane with horizontal
lines,
● Fast moving objects,
● Dark objects and places (low luminance/illuminance),
● Objects in backlight or strongly reflective objects,
● Flickering objects such as fluorescent lamp, etc.
On photographing such an object, be sure to lock the focus
(focus lock function) before pressing the shutter .
Page 43

Photographing with focus lock
※ Make sure that the
1. Aim at the camera subject with the auto-focus frame and then lightly
press the shutter release button. The green lamp goes on to indicate that
the focus is locked at the aimed point.
* If the shutt er release butto n is released from pressure of fing er, fo-
cus-lock is canceled and the camera is ready for next focus lock operation.
2. While pressing the shutter release button lightly, confirm the composition
of picture first and then gently press the shutter release button furthermore to actuate the shutter.
<figure> ① Auto-focus frame
mark is bright.
Page 44

Normal playback/Double magnified playback
● Close the lens barrier and confirm that a CF card which picture data is
recorded on is set in the camera and the camera is turned on with power
of batteries or an AC adaptor.
1. Press the monitor power switch and the LCD monitor will be turned on.
Page 45
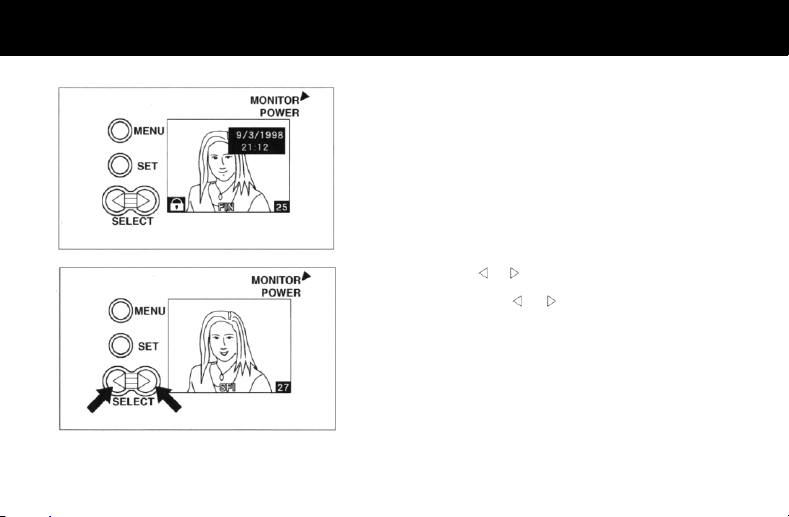
2. The picture taken last with the CF card appears on the LCD monitor
screen. Data on the picture such as the date* when the picture was
taken, frame protection information (key mark), image quality mode and
frame number of the picture are shown on the screen together with the
picture.
Symbols of image quality modes are as follows.
・SFI = SUPER FINE
・FIN = FINE
・ECM = ECONOMY
* The date is shown for 1 second only.
3. If the SELECT button (“ ” or “ ”) is pressed, the picture appearing on the
screen is changed for the next or preceding one.
* W hen the SELECT button (“
pears following the last picture or the last picture appears ahead of the
first picture.
* To turn off the LCD monitor , press the monitor power switch once again.
” or “ ”) is pressed, the first picture ap-
Page 46

W hen no CF card is set in the camera or a CF card on which no picture
data is recorded is set in the camera, a message “No pictures in camera”
appears on the monitor screen. In this case, no picture is shown on the
screen.
Page 47

Double magnified playback
When the SET button is pressed in the condition that a picture is being
played back on the LCD monitor, the picture is magnified double in its center
part.
If the SET button is pressed again, the magnified playback is canceled and
the picture is played back normally.
* Pictures taken in the ECONOMY image quality mode or in the 4-frame
continuous shooting mode cannot be magnified.
○ Be careful not to touch the shutter release button or not to open the lens
barrier during playback, because it may cause malfunction of the camera.
Page 48

Adjusting brightness of LCD monitor
● Before adjustment of brightness of LCD monitor, close the lens barrier
and confirm that a CF card which picture data is recorded on is set in the
camera and the camera is turned on with power supplied from batteries
or an AC adaptor.
1. Press the monitor power switch to turn on the LCD monitor.
* When no CF card is set in the camera or a CF card on which no picture
data is recorded is set in the camera, a message “No pictures in camera” appears on the monitor screen.
Page 49

2. Press the MENU button once. The “Erase” icon is reversely shown on the
screen.
* If the MENU button is pressed again in this status, the last operation is
canceled and the display of the previous step 1 appears again.
3. Press the SELECT button ( ) twice.
The “Brightness adjustment” icon reversely appears on the screen
(“Brightness adjustment” menu).
* When the SELECT button (
appears on the screen. If you fail in accessing the “Brightness adjustment” menu, press the SELECT button (
access the menu.
* If the MENU button is pressed in this status, the previous operation is
canceled and the display on the LCD monitor is changed for that of the
previous step 1.
) is pressed seven times, the same display
or ) repeatedly until you
Page 50

4. Press the SET button. The camera enters the LCD monitor brightness
adjustment mode.
The cursor in the center indicates the standard level.
5. If the SELECT button is pressed, the cursor moves rightwards (to “+”
side) and the screen becomes brighter.
If the SELECT button
side) and the screen becomes darker.
● Press the SELECT button (
monitor as desired.
* If the MENU button is pressed in this stage, the previous adjustment is
canceled and the brightness is reset to the level saved last. At the same
time, the display is changed for that of the previous step 3.
is pressed, the cursor moves leftwards (to “-”
or ) to adjust the brightness of the LCD
Page 51

6. If the SET button is pressed after brightness adjustment, the last setting
of the brightness is saved and the display is changed for that of the previous step 1.
* The saved data on brightness adjustment will be maintained regardless
of operation of the lens barrier and monitor power switch unless it is replaced with new data.
※ Brightness of the LCD monitor can be adjusted in the preview mode, too.
If it is desired, select the “Brightness adjustment” icon referring to page
80.
Page 52

Playback with TV set
● You can look at pictures on a TV screen. However, pictures that can be
seen with a TV set are limited to playback pictures only and preview pictures cannot be seen on a TV screen.
● Close the lens barrier first and confirm that a CF card on which picture
data is recorded and the camera is turned on with power supplied from
batteries or an AC adaptor.
● When a TV set is used to play back pictures, the LCD monitor cannot be
used to play back pictures at the same time.
1. Open the video port cover.
Page 53

2. Connect the video output cord (supplied with the camera) to the camera's
video port and the video input terminal of a TV set.
After connection between the camera and a TV set is complete, turn on
the TV set and set the input source selector of the TV set to “VIDEO” .
3. Press the monitor power switch, and the last frame recorded on the CF
card is played back on the TV screen.
* When no CF card is set in the camera or a CF card on which no picture
data is recorded is set in the camera, a message “No pictures in camera” appears on the monitor screen.
When a valid CF card is set in the camera, use the SELECT button to
select desired frames.
Page 54

4. To discontinue playback with a TV set, disconnect the video output cord
from the video port of the camera.
The picture will appear on the LCD monitor.
After disconnecting the video output cord, be sure to close the video port
cover and turn off the TV set.
* Read the instructions of the apparatus to be connected with this camera
together.
* When the Q-M100 is connected with a video apparatus by the
through-connection video input terminal, make sure that nothing is connected to the same video input terminal except the Q-M100.
Page 55
①
③
⑥
④
②
⑤
⑦
Getting icons to appear on TV screen
① Setting of frame protection
② Erase
③ Information on Frame protection
④ Image quality mode
⑤ Frame number
⑥ Index playback
⑦ Slide show
※Select a desired icon with the SELECT button.
● In the condition that a TV set is used to play back pictures, available
functions are limited to those mentioned below.
When a picture is played back with a TV set, data and time when the picture was taken don’t appear on the screen.
Only four icons that respectively represent “Setting of frame protection”,
“Erase”, “Index playback” and “Slide show” functions can be shown on a
TV screen, and two of them can be shown on the screen at a time.
For selecting other functions, disconnect the TV set and select a desired
function with the picture appearing on the LCD monitor.
For details of respective functions, refer to explanation of “Applied operation”.
○ Don’t connect/disconnect video output cord to/from the video port during
setting operation, otherwise previous setting is canceled.
○ Don’t connect/disconnect the video output cord while the card access
warning lamp is on, otherwise the CF card or stored data may be damaged.
Page 56

● Picture can be double zoomed-in on a TV screen.
● If the video output cord is connected/disconnected to/from the video port
during index playback, the picture that is selected at that time appears
without the frame number on the display (LCD monitor or TV set)
switched on by connection/disconnection of the video output cord, and
the index playback is automatically canceled at the same time.
● When the video output cord is connected/disconnected to/from the video
port during index playback, it takes a considerably long time to switch the
display to show the picture.
● If the video output cord is connected/disconnected to/from the video port
during slide show operation, the picture that is selected at that time appears without the frame number on the display (LCD monitor or TV set)
switched on by connection/disconnection of the video output cord, and
the slide show is automatically canceled at the same time.
● Some TV sets show playback picture in a frame.
Page 57

Applied operation/Use of preview function
● The preview function helps you to take well-composed pictures.
● Open the lens barrier and confirm that the camera is turned on with
power supplied from batteries or an AC adaptor.
1. Press the monitor power switch to turn on the LCD monitor.
The LCD monitor serves as a viewfinder and you can see the same image as the lens catches.
This operation is called “through image display”.
Page 58

2. Press the shutter release button halfway, and the focus and exposure are
locked.
Press the shutter release button furthermore, and the shutter is opened to
record the same image as shown on the LCD monitor.
* The image to be recorded is shown through recording. With completion
of recording, the monitor returns to the “thr ough image display” status.
3. If the monitor power switch is pressed again, the LCD monitor is turned
off and the camera status is restored to the normal shooting mode.
* Since use of the LCD monitor considerably consumes the battery power,
be careful to turn on/off the LCD monitor frequently or to use an AC
adaptor. Therefore, it is recommended to use an AC adaptor for operating the LCD monitor.
Page 59
Compensation of exposure
● Open the lens barrier and confirm that the camera is turned on with
power supplied from batteries or an AC adaptor.
● Exposure can manually be compensated in the range of ±2 in EV (Expo-
sure Value).
1. Press the monitor power switch to turn on the LCD monitor. A “through
image” appears on the LCD monitor.
* When no CF card is set in the camera, “through image” appears on the
LCD monitor.
Page 60

2. Press the MENU button once. The “Exposure” icon reversely appears on
the screen and the “through image” appearing on the screen becomes a
still picture.
* If the MENU button is pressed in this status, previous setting is canceled
and the display of the LCD monitor returns to the status of the step 1.
3. Press the SET button. The exposure compensation menu bar appears in
the lower part of the screen.
* If the MENU button is pressed in this status, previous setting is canceled
and the display of the LCD monitor returns to the status of the step 1.
* If you want to adjust the brightness of the LCD monitor, select the
“Brightness adjustment” icon appearing.
Page 61

4. Each time the SELECT button ( or ) is pressed, the indicator bar
moves step by step.
When the SELECT bu tton
moves leftwards to decrease exposure time (under-exposure). When the
SET button is pressed in this status, the “through image” is dar kened.
When the SELECT button
moves rightwards to increase exposure time (over-exposure). When the
SET button is pressed in this status, the “through image” is br ightened.
* If the MENU button is pressed in this status, previous setting is canceled
and the display of the LCD monitor returns to the status of the step 2.
is continuously pressed, the indicator bar
is continuously pressed, the indicator bar
5. If the exposure is not compensated as desired when the display is
restored to the “through image” status, again press the MENU button and
then press the SET button. The display returns to the status of the step 4,
and you can try to compensate exposure once more.
* When aiming at an object in a dark place, it is hard to recognize the ef-
fect of exposure compensation. In such a case, it is recommended to
take pictures of the same object repeatedly with different exposure
compensation, and play them back on a TV screen or a personal computer display to choose a favorite one.
Page 62

● Setting of exposure compensation is maintained until the lens barrier is
closed.
When the lens barrier is opened again after it was once closed, the exposure is set at the initial status (indicator bar in the center position).
● In flash photography, it is difficult to compensate exposure as desired.
● W hen exposure is compensated for under-exposure, taken pictures are
played back comparatively dark. Therefore, proper under-exposure
compensation is useful to take pictures that emphasize the atmosphere
of evening scenes.
● When exposure is compensated for over-exposure, taken pictures are
played back comparatively brightly. Therefore, proper over-exposure
compensation brings good results in taking pictures against t he light.
Page 63

4-frame continuous shooting function/Digital 2x Zoom
● The continuous shooting function snaps four consecutive scenes at a
time and records them together in a frame. A frame of four pictures is
composed of 576×436 pixels, and each of four pictures is composed of
288×218 pixels, namely a quarter of the frame. In the continuous shooting mode, the flashlight cannot be used.
● The digital 2x zoom function magnifies the center part of a frame and
records it as a picture. In other words, the center part composed of 576×
436 pixels of a frame composed of 1152×872 pixels is magnified to a
full-size picture. When the digital 2x zoom-in function is activated in the
ECONOMY image quality mode, the picture is roughly played back because the resolution of the original full-size picture is 576×436 pixels.
● Conf irm that the lens barrier is open and the camera is turned on with
power supplied from batteries or an AC adaptor.
1. Press the monitor power switch to turn on the LCD monitor. A “through
image” appears on the LCD monitor.
* When no CF card is set in the camera, “through image” appears on the
LCD monitor.
Page 64

2. Press the MENU button once. The “Exposure” icon reversely appears on
the screen.
* If the MENU button is pressed in this status, previous setting is canceled
and the display of the LCD monitor returns to the status of the step 1.
* Select the “Brightness adjustment” icon to adjust the brightness of the
LCD monitor.
3. Press the SELECT button twice to select the “PHOTO MODE” icon.
* Or, press the SELECT button
Next, press the SET button.
once for the same result.
Page 65

4. The “Normal shooting” icon is generally selected at this stage and the
camera is accordingly set in the normal shooting mode.
* If the MENU button is pressed, previous setting is canceled and the dis-
play of the LCD monitor returns to the status of the step 1.
* If the camera has been set in the “Continuous shooting” or “Zoom-in”
mode, the icon of the selected mode appears on the screen.
5. For selecting “4-frame continuous shooting” mode
To select the “4-frame continuous shooting” mode, select the “4-frame
continuous shooting” icon with the SELECT button (“
press the SET button.
* If the MENU button is pressed for the SET button by mistake, previous
setting is canceled and the display returns to the status of the step 1.
* If you want to select the digital 2x zoom-in mode at this stage, proceed
to the step 9.
” or “ ” ) and then
Page 66

6. A blue frame ⓐ appears on the screen and a “through image” appears
in the frame.
Since the blue frame represents the continuous shooting mode, you can
take continuous snapshot of four scenes each in this condition.
* In the continuous shooting mode, the flashlight is inactivated. For
shooting a dark object, it is recommended to use a tripod or lighting apparatus.
7. If you start shooting in the continuous shooting mode, a shot is shown on
the screen each time it is taken. When the fourth shot is taken, a series of
the four shots are recorded on a CF card.
* Pictures taken in the continuous shooting mode cannot be magnified in
playback.
Page 67

8. When recording of a series of four shots is complete, a “through image” in
a blue frame appears on the screen.
* In this status, the camera is still set in the continuous snapshot mode. If
you want to discontinue the continuous snapshot mode and to take a
picture in the normal shooting or zoom-in mode, repeat the
above-mentioned steps 2 and 3 to select the “Normal shooting” or
“Zoom-in” icon. After selection of a desired mode, press the SET button.
9. For selecting “Digital 2x zoom” mode
For selecting the digital 2x zoom mode, repeat the steps 2 and 3 and select the “Zoom-in” icon with the SELECT button (“
tion, be sure to press the SET button.
* If the MENU button is pressed for the SET button by mistake, previous
setting is canceled and the display returns to the status of the step 1.
” or “ ”).After selec-
Page 68

10. A red fr ame ⓑ appears on the screen and the double magnified center
part of a “through image” is shown in the frame. This red frame represents the digital 2x zoom-in mode.
If a picture is taken in this mode, the magnified center part is recorded on
a CF card by a resolution of 1152×872 pixels.
* In the ECONOMY image quality mode, the magnified center part is re-
corded by a resolution of 576×436 pixels.
When recording is complete, the LCD monitor again shows a “through
image” in the red frame.
* In this status, the camera is still set in the digital 2x zoom mode. If you
want to discontinue the digital 2x zoom mode and to take a picture in the
normal shooting or continuous shooting mode, repeat the
above-mentioned steps 2 and 3 to select the “Normal shooting” or “Continuous shooting” icon. After selection of a desired mode, press the SET
button.
Page 69

● To return to the normal shooting mode
To reset the camera to the normal shooting mode, carry out one of the
following means.
1) Repeat the above-mentioned steps 2 and 3 to select the “Normal
shooting” icon. After selecting it, press the SET button. (See the figure
on the left.)
2) Press the monitor power switch to turn off the “through image” (to turn
off the LCD monitor). Accordingly, the “continuous shooting” mode or
“digital 2x zoom” mode is canceled. When the monitor power switch is
pressed again, the camera is reset to the “normal shooting” mode.
3) Set the lens barrier switch to the “CLOSE” position, and the “continu-
ous shooting” or “digital 2x zoom” mode is accordingly canceled.
When the lens barrier switch is set at “OPEN” position, the camera is
reset to the “nomal shooting” mode. However, if the shooting mode is
reset in this way, all settings of exposure compensation, flash mode
and image quality mode are canceled at the same time and they are
reset to their respective initial settings. When the automatic power off
function is activated, the camera mode is reset to the initial status.
When resetting the shooting mode, pay heed to this point .
Page 70

Erasing recorded pictures in part or in whole
● First of all, confirm that the lens barrier is closed and the camera is turned
on with power supplied from batteries or an AC adaptor.
1. Press the monitor power switch to turn on the LCD monitor.
* When no CF card is set in the camera or a CF card on which no picture
is recorded is set in the camera, a message “No pictures in camera”
appears on the screen.
Page 71

2. To erase recorded pictures one by one, select a desired picture with the
SELECT button (
(To erase pictures recorded on the CF card in whole, proceed to the step
3.)
or ).
3. Press the MENU button once. The “Erase” icon reversely appears on the
screen.
* When no CF card is set in the camera or a CF card on which no picture
is recorded is set in the camera, a message “No pictures in camera”
appears on the screen.
* If the MENU button is pressed at this stage, previous setting is canceled
and the display returns to the status of the step 1.
Page 72
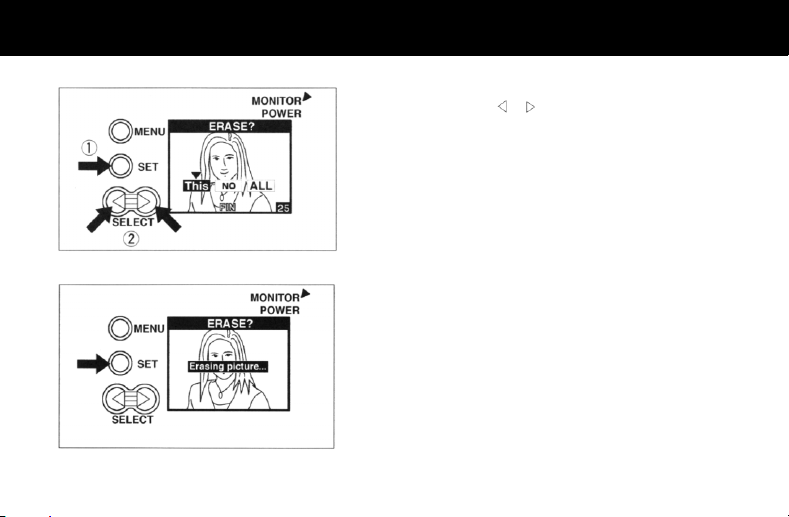
4. Press the SET button. Three erasing modes are shown on the screen.
Press the SELECT button (
* If the MENU button is pressed at this stage, the display returns to the
status of the step 3.
* If the selected frame is protected against erasing, “This” cannot be se-
lected but “NO” or “ALL” can be selected.
To erase a protected frame, cancel the setting of f rame protection.
If the SET button is pressed with selection of “NO”, the display returns to
the status of the step 1.
5. If the SET button i s pressed with select ion of “This”, the fram e selected in
the step 2 is erased.
When erasure of the selected frame is complete, the display returns to
the status of the step 1.
* If the MENU button is pressed for the SET button at this stage, the dis-
play returns to the status of the step 3.
or ) to select “This”, “NO” or “ALL”.
Page 73

6. If the SET button or the MENU button is pressed with selection of “NO”,
the display returns to the status of the step 3.
7. To erase all pictures recorded on the CF card set in the camera, select
“ALL” and press the SET button. The display changes as shown on the
left.
* If the MENU button is pressed for the SET button at this stage, the dis-
play returns to the status of the step 3. Frames that are protected
against erasing cannot be erased.
Page 74

8. In case of the status shown by the left figure, “NO” is selected.
Select “YES” and press the SET button to erase all the frames, or press
the SET button as “NO” is selected if you don't want to erase all the
frames.
* If the MENU button is pressed, previous setting is canceled and the dis-
play returns to the status of the step 3.
Page 75

9. If there is a protec ted frame on the CF card, a m essage “No pictures i n
camera” appears on the screen after the erasing operation is complete.
At that time, a frame that was taken last among protected frames is
shown on the screen. After a protected frame is shown on the screen, the
display returns to the status of the step 1.
* To erase a protected frame, cancel the set ting of frame protection.
* If all frames recorded on a CF card is protected against erasing, a mes-
sage “All pictures protected” appears on the screen. In such the case,
erasing operation results in failure and the display returns to the status
of the step 1. To erase protected frames, cancel the setting of frame
protection.
Page 76
To protect important pictures against erasing (Setting of frame protection)
● Important pictures can be protected from careless erasure by setting of
the frame protection.
● Before starting setting, confirm that the lens barrier is closed and the
camera is turned on with power supplied from batteries or an AC adaptor.
1. Press the monitor power switch to turn on the LCD monitor.
Select a picture desired to protect against careless erasure or to cancel
its erasure protection by pressing the SELECT button (
* When no CF card is set in the camera or a CF card on which no picture
is recorded is set in the camera, a message “No pictures in camera”
appears on the screen.
or ).
Page 77

2. Press the MENU button once, and the “Erase” icon reversely appears on
the screen.
* When no CF card is set in the camera or a CF card on which no picture
is recorded is set in the camera, a message “No pictures in camera”
appears on the screen.
* If the MENU button is pressed at this stage, previous setting is canceled
and the display returns to the status of the step 1.
3. Press the SELECT butt on once to select the “Setting of frame protection” icon, and then press the SET button.
When the selected frame (picture) is not protected,
versely. (3A)
is shown re-
(3A)
Page 78

When the select ed frame has been protected, is shown reversely.
(3B)
(3B)
4. To protect a selected frame:
With the display of the figure 3A, press t he SET button.
The selected frame is protected against erasing and the display returns to
the status of the step 1.
If the MENU button is pressed for the SET button, the display returns to
the status of the step 1 without setting of erasure protection for the selected frame.
(4A)
Page 79

To cancel erasure protection of a selected frame:
With the display of the figure 3B, press t he SET button.
The selected picture is released from erasure protection and the display
returns to the status of the step 1.
If the MENU button is pressed for the SET button, the display returns to
the status of the step 1 without canceling the erasure protection of the
frame.
● Be careful not to change any attribute of a picture file that has been
protected against erasure with a personal computer, because the camera
may fail in reading a file if its attribute is changed with a personal computer.
(4B)
Page 80

Looking at multiple pictures at a time (index playback)
● Before starting setting, confirm that the lens barrier is closed and the
camera is turned on with power supplied from batteries or an AC adaptor.
1. Press the monitor power switch to turn on the LCD monitor.
* When no CF card is set in the camera or a CF card on which no picture
is recorded is set in the camera, a message “No pictures in camera”
appears on the screen.
Page 81

2. Press the MENU button once, and the “Erase” icon reversely appears on
the screen.
* When no CF card is set in the camera or a CF card on which no picture
is recorded is set in the camera, a message “No pictures in camera”
appears on the screen.
* If the MENU button is pressed at this stage, previous setting is canceled
and the display returns to the status of the step 1.
3. Press the SELECT button once. After confirming that the “Index
playback” icon reversely appears on the screen press the SET button.
* If you fail in selecting the “Index playback” icon, continue to press the
SELECT button
screen.
until the “Index playback” icon appears on the
Page 82

4. The display turns into the index playback menu.
If the SELECT button (
cation box) move s on frames one after anot her. When the cursor pass es
the last frame, the nine frames appearing on the screen are replaced by
the next nine frames, if there are.
* If t he SET button is pressed in this condition, only a selected frame is
shown on the screen (display status of the step 1.).
* If the MENU button is pressed for the SET button, the display returns to
the status of the step 3.
※ If a picture is recorded in the SUPER FINE image quality mode, it takes a
considerably long time to show the picture on the screen in the index
playback mode.
or ) is continuously pressed, the cursor (indi-
Page 83

Slide show playback
● In the slide show playback mode, recorded pictures can be seen one by
one from the first frame.
● Before starting operation of the slide show playback, confirm that the lens
barrier is closed and the camera is turned on with power supplied from
batteries or an AC adaptor.
1. Press the monitor power switch to turn on the LCD monitor.
* When no CF card is set in the camera or a CF card on which no picture
is recorded is set in the camera, a message "No pictures in camera"
appears on the screen.
Page 84
2. Press the MENU button once, and the "Erase" icon reversely appears on
the screen.
* When no CF card is set in the camera or a CF card on which no picture
is recorded is set in the camera, a message "No pictures in camera"
appears on the screen.
* If the MENU button is pressed at this stage, previous setting is canceled
and the display returns to the status of the step 1.
3. Pr ess the SELECT button three times. The "Slide show playback" icon
reversely appears on the screen.
Press the SET button to start slide show playback. Recorded pictures are
played back one by one for 3 seconds each.
* If the MENU button is pressed at this stage, the display returns to the
status of the step 1.
* If a picture is recorded in the SUPER FINE image quality mode, it takes
a considerably long time to get the picture appearing on the screen as
compared with other image quality mode.
Page 85

4. After the last picture is shown on the screen, the display returns to the
status of the step 3.
* If the SET button is pressed at this stage, slide show playback starts
again with the CF card set in the camera.
* When pictures are shown on the camera's LCD monitor screen in the
slide show playback mode, respective frame numbers of the pictures are
also shown on the screen. However, when a TV set is used to play back
pictures in the slide show playback mode, pictures are shown without
frame numbers.
※ To quit the slide show playback mode
Press the MENU button in the slide show playback mode. The slide show
playback mode is canceled and the camera mode is reset to the status of
the step 1.
Page 86

Formatting (initializing) CF card
● First of all, confirm that the lens barrier is closed and the camera is turned
on with power supplied from batteries or an AC adaptor.
● When formatting (initializing) a used CF card, mind that all recorded
pictures are erased by formatting if pictures are protected f rom erasing.
1. Press the monitor power switch to turn on the LCD monitor.
* When no CF card is set in the camera or a CF card on which no picture
is recorded is set in the camera, a message “No pictures in camera”
appears on the screen.
Page 87

2. Press the MENU button once and the “Erase” icon reversely appears on
the screen.
* When no CF card is set in the camera or a CF card on which no picture
is recorded is set in the camera, a message “No pictures in camera”
appears on the screen.
* If the MENU button is pressed at this stage, previous setting is canceled
and the display returns to the status of the step 1.
3. Press the SELECT button f our times. While confirming that the “Format” icon reversely appears on the screen, press the SET button.
Page 88

4. To execute formatting of the CF card, select “YES” by pressing the SELECT button (
CF card.
* If the SET button is pressed with selection of “NO”, formatting mode is
canceled and the display returns to the status of the step 1.
* When f ormatting is complet e, a message “No pictur es in camera” ap-
pears on the screen.
or ).Then, press the SET button to start formatting the
Page 89

Switching from NTSC TV system to PAL TV system
● For playback with a TV set, this camera is initially set for the NTSC TV
system on shipment. For playing back pictures with a TV set in the area
of the PAL TV system, the camera needs to switch the initial setting for
the NTSC TV system to the PAL TV system.
● Make sure that effective power is supplied to the camera from the batteries or an AC adapter and the lens barrier is closed.
1. Press the MONITOR POWER switch to turn on the LCD monit or.
* When no CF card is set in the camera or nothing is recorded on a CF
card set in the camera, a message “No pictures in camera” appears on
the display.
Page 90
2. Press the MENU button once.
A scene which shows the “Erase” icon reversely appears on the screen.
* When no CF card is set in the camera or nothing is recorded on a CF
card set in the camera, a message “No pictures in camera” appears on
the display.
* If the MENU button is pressed in this stage, previous setting is canceled
and the scene is shifted to that of the step 1.
3. Press the SELECT button three times.
The “N” icon reversely appears on the screen since the camera is set for
the NTSC TV system. Press the SET button once and the “N” icon
changes to the “P” icon, which indicates that the camera is set for the
PAL TV system.
If the MENU button is pressed in this stage, the scene is shifted to that of
the step 1.
Page 91
※ For switching the setting from the NTSC TV system to the PAL TV
system, perform the same operation as the steps from 1 through 3. In this
case, the “P” icon appearing in the step 3 is reversely shown because the
camera is set for the PAL TV system.
Page 92

TV systems in main countries
・ A TV set or video monitor having a video input connector of
either NTSC or PAL TV system can be used for playing
back pictures taken by the camera.
・ For connecting the camera with such a TV set or video
monitor, a VIDEO OUTPUT cord supplied with the camera
is necessary.
・ On shipment, this camera is set for the NTSC TV system for
playback of pictures with a TV set of the PAL TV system (in
the PAL TV area), switch the setting of the video output of
the camera to the PAL TV system.
・ Pictures cannot be played back with a TV set of the SECAM
TV system (in the SECAM TV area).
[For reference]
■ For playback in the area of PAL TV system
Change the camera's playback output setting for a TV set referring to the instructions of the camera.
・ West European countries
except France
・ China
・ Australia
■ For playback in the area of NTSC TV system
The camera need not change the setting for playing back pictures
with a TV set.
・ U.S.A.
・ Korea
・ Canada
・ Taiwan
・ Cuba
■ In the area of SECAM TV system
In the area of SECAM TV system (France, Russia, etc.), pictures
taken by the camera cannot be played back with a TV set.
* Even in the SECAM TV system area, pictures can be played
back on a TV screen if a TV set that is compatible with the PAL
TV system is available. On such an occasion, set the camera's
playback output for the PAL TV system.
NOTE: For the TV broadcasting system of the area, inquire at an
electric appliance store.
・ New Zealand
・ Singapore
・ Brazil
・ Malaysia, etc.
・ Chile
・ Guam
・ Mexico
・ Japan, etc.
Page 93

Setting buzzer inactive
● Confirm that the lens barrier is closed and the camera is turned on with
power supplied from batteries or an AC adaptor.
1. Press the monitor power switch to turn on the LCD monitor.
* When no CF card is set in the camera or a CF card on which no picture
is recorded is set in the camera, a message “No pictures in camera”
appears on the screen.
Page 94
2. Press the MENU button once, and the “Erase” icon reversely appears on
the screen.
* When no CF card is set in the camera or a CF card on which no picture
is recorded is set in the camera, a message “No pictures in camera”
appears on the screen.
* If the MENU button is pressed at this stage, previous setting is canceled
and the display returns to the status of the step 1.
3. Press the SELECT button twice. The “Buzzer ON” icon appears on
the screen.
Press the SET button to set the buzzer inactive (the “Buzzer OFF” icon
replaces the “Buzzer ON” icon). At the same time, the display returns to
the status of the step 1.
If the MENU button is pressed at this stage, the display returns to the
status of the step 1 without change of the buzzer setting.
Page 95

※ W hen the buzzer icon appears as
buzzer has already been set inactive (OFF). In such the case, press the
SET button to set the buzzer active (the “Buzzer ON” icon replaces the
“Buzzer OFF” icon).
If the MENU button is pressed at this stage, the display returns to the
status of the step 1 without change of the buzzer setting.
in the figure of the step 3, the
Page 96

Explanation of “Auto white balance”
What is white balance?
Human eyes have such an adaptability as they recognize the color
of a white object as white even when the color of lighting changes.
This digital still camera senses color temperature of the light
source and adjust the white balance according to the sort of the
light source so that a white object can be reproduced as white as
possible. However, the camera frequently fails in sensing the color
temperature when the scene is colored almost in monotone.
Cases difficult to adjust white balance:
・ Close-up photography of monotone flower,
・ Object thoroughly lighted up by color lighting such as the
evening sun, stage lights, etc.
In such a case, take pictures and make sure of recording results
with the preview function while checking the composition and
coloring.
White balance of a picture can be checked on the LCD monitor
screen, therefore, compose a picture so that it has a variety of
colors and you obtain a satisfactory result in white balance of the
picture.
※ Im age seen on the LCD monitor screen in the preview mode
cannot be transferred as video output to a personal computer to
see it on its display.
※ Since the battery power is considerably consumed in the
preview mode, it is recommended to use an AC adaptor to see
image in the preview mode.
It is also recommended to set the flash to the forced f lash mode,
because white balance is automatically adjusted in accordance
with the characteristic of the flashlight.
Page 97

Others/Connecting camera with personal computer
● For the working environment of a personal computer, refer to the installation manual.
● Install the required software in your personal computer. Before starting
operation with the installed software, be sure to read the instructions
“Readme” supplied with the software.
● Confirm that the lens barrier is closed, a recorded CF card is set in the
camera and the camera is turned on with power supplied from batteries
or an AC adaptor.
● To save the battery power, it is recommended to use an optional AC
adaptor as a power source for the camera.
● Turn off the personal computer without fail.
1. Open the camera's I/O terminal cover and connect the camera and a
personal computer with each other by means of the connecting cord.
* Plug the 8-pin connector of the connecting cord into the camera's serial
port jack. To disconnect the connecting cord from the camera’s serial
port, refer to the instruction manual for Q- M100.
ⓐ To serial port of personal computer.
ⓑ Since the type of personal computer’s connector differs from personal
computer to personal computer, carefully read the installation manual and
use a proper connector or adaptor for connecting the cord.
ⓒ Personal computer (optional)
Page 98

2. Open the camera's lens barrier and turn on the personal computer.
When the lens bar rier is opened, “PC” appears on the camera's data display panel.
3. W hen batteries are used as the power source, the battery mark continues
blinking while the camera is being on.
* It is recommended to use an AC adaptor to supply power to the camera
because battery power is considerably consumed when the camera is
connected with a personal computer.
Page 99

Directly reading/writing data saved on CF card with
personal computer
● If a CF card adaptor (available on the market) is used, data saved on a
CF card can directly be read or rewritten with a personal computer, because a CF card adaptor deals with a CF card as an ATA card conforming to the PCMCIA TYPEⅡ standard.
1. Set a CF card taken out of the camera into a CF card adaptor.
Page 100

2. Set a CF card adaptor in the slot of a personal computer which is capable
of reading ATA card and has a slot designed to accept an ATA card conforming to the PCMCIA TYPEⅡ standard.
* For details of the setting, refer to the instructions of the personal com-
puter to be used.
* There is a case that a personal computer requires to install an exclusive
software, to register the software, to reset the personal computer itself,
and so on depending on the operating environment.
Therefore, it is advised to read the instructions of the personal computer
and the operating system carefully.
3. Open the picture file by the application software supporting the Exif
(JPEG).
In the directory whose name is led by IM, there are picture files named:
DSC00001.JPG,
DSC00002.JPG,
DSC00003.JPG,
and so on.
※ File names that the camera can deal with are from DSC00001.JPG to
DSC32767.JPG. On the other hand, file names such as DSC32768.JPG
to DSC99999.JPG, and DSC00000.JPG cannot be dealt with by the
camera.
 Loading...