

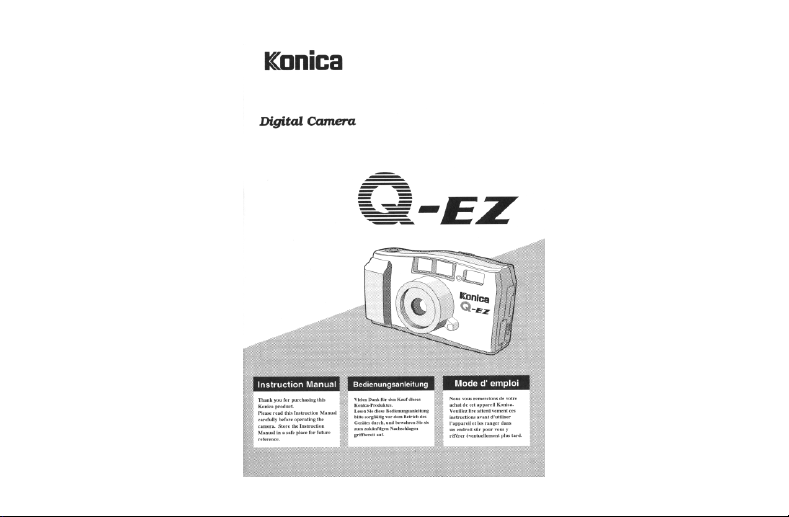
Page 1
Page 2
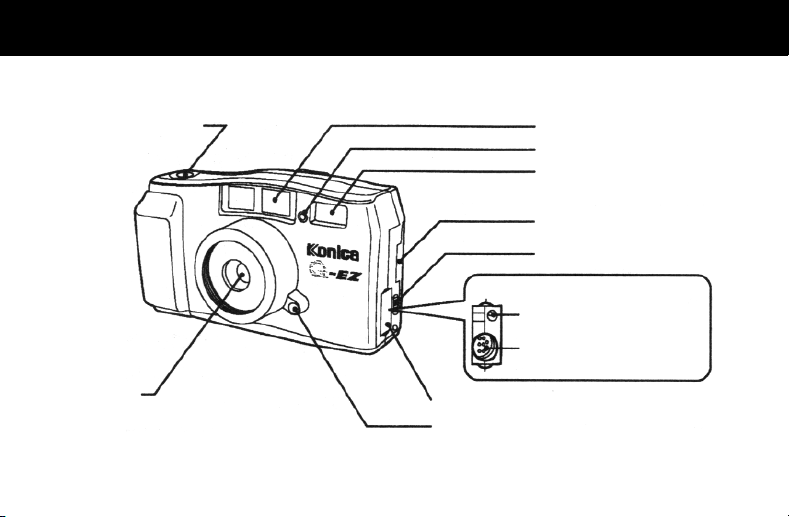
Names and functions of individual sections
Main Unit
Shutter release button
Viewfinder
Flash sensor
Flash
Miniature card cover
Miniature card cover open/close knob
(Inside connector cover)
Connector for DC power
source input
Digital signal connector
Lens
Connector cover
Self-timer lamp
Page 3
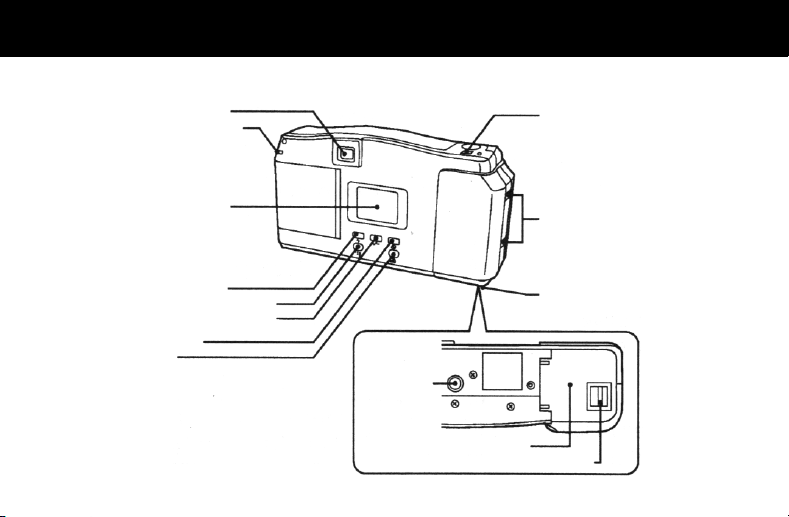
Viewfinder window
Miniature card
operation lamp
Photography
display panel
Flash setting button
Compression setting button
Exposure correction button
Self-timer button
Erase button
Power button
Strap attachment hole
Battery case cover
Tripod hole
Battery case cover
Battery case cover open/close knob
Page 4

Photography Display Panel
Displays the various setting states.
Press the setting buttons to change
settings according to the photography purpose.
● The picture shows all LCDs in lit state.
Page 5
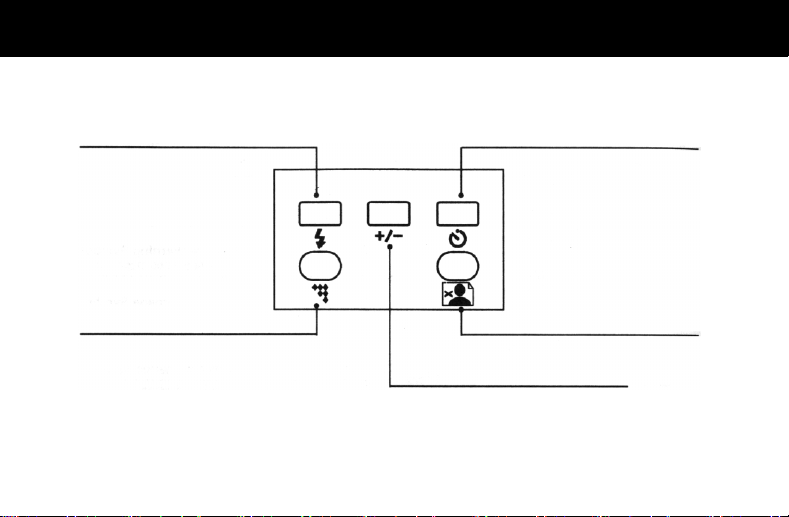
Setting Buttons
Flash setting button
Automatic flash (AUTO)
Forced flash (ON)
Flash inhibit (OFF)
Compression setting button
Selection of picture quality.
● For various settings
Self-timer button
Erase button
Erases the last frame.
Exposure correction button
Adjusts the brightness for picture-taking.
Page 6

Viewfinder Displays
● For checking the operational state of the camera.
Green lamp,
Red lamp
Simultaneous blinking:
Warning that
photography is not possible.
(Check the miniature card and batteries.)
Closeup viewfinder frame
Viewfinder frame
Red lamp
Continuous light: Flash is charging.
Blinking light: Low brightness warning
Continuous light: Photography preparations complete.
Blinking light: Warning that AF is not possible.
Green lamp
Page 7

r
Buzzer Sound
• A buzzer sounds when the shutter is pressed and photography is complete.
• The buzzer sounds when photography is not possible.
• If photography is not possible when the powe
is ON or when replacing the miniature card, the
buzzer sounds 5 times.
If the release button is pressed there is a
repeated buzzer sound while the button is held
down. Check the miniature card and batteries.
Probable causes are listed to the right.
• There is no reserve space on the miniature
card in the selected compression mode.
• The miniature card has not been inserted.
• The format of the miniature card is different.
• The miniature card is write-protected.
• There is no reserve power in the batteries.
Page 8
Getting ready to take pictures
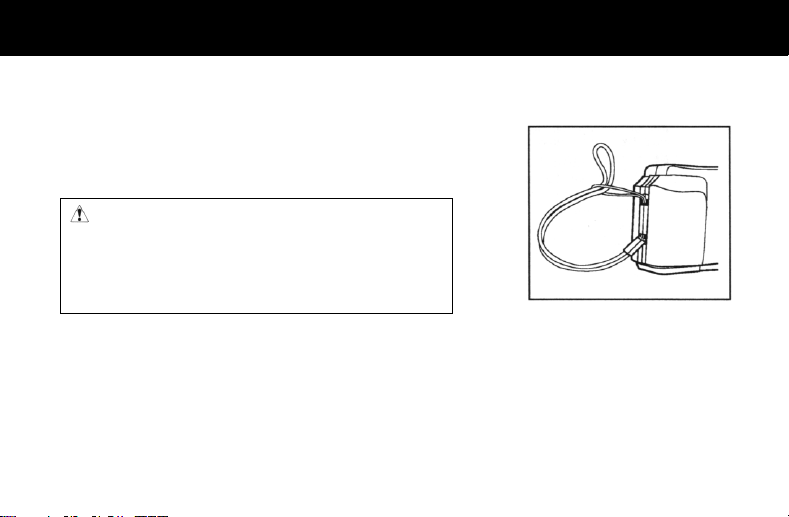
1. Attach the strap
察 Attach the strap.
Pass the narrow end of the strap through the strap
attachment hole and then pass the broad end of the strap
through the ring.
Warning
When using the strap, be careful that it does not wind
around your neck. Never hang the strap around the
necks of infants or children as this could cause
suffocation.
Page 9
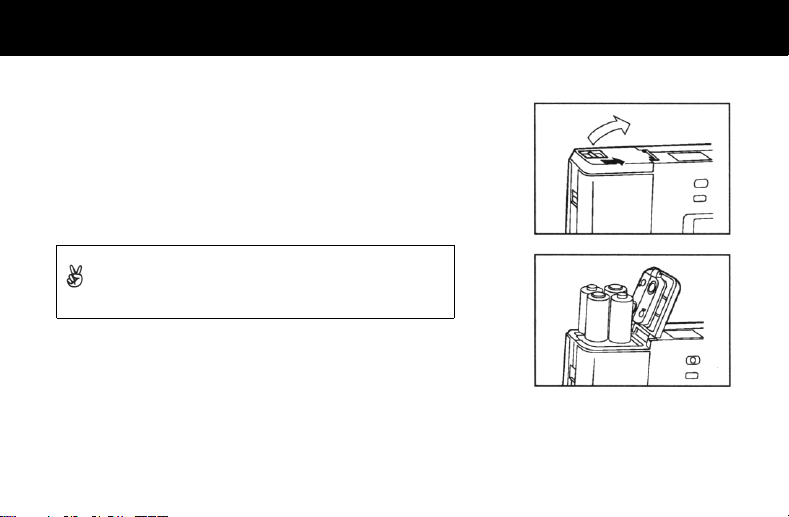
2. Insert the batteries
察 Pull the battery case cover open/close knob in the
direction shown by the arrow to open the battery case
cover.
拶 Insert new batteries with the plus and minus poles
facing in the right direction shown on the case.
撮 Press the battery case cover to securely close the case.
When replacing the batteries, be sure to use four new
batteries. Carry along a spare set of batteries when away
from home.
Page 10
Warning
Never handle the batteries with wet hands.
Danger of electrical shock.
Caution
• Mistaken use of the batteries could cause equipment
damage or fire. Leaking batteries can corrode the
equipment and soil hands and clothing.
• Be sure the plus and minus poles of the batteries are
facing in the right directions.
• Never leave worn out batteries in the camera.
Page 11

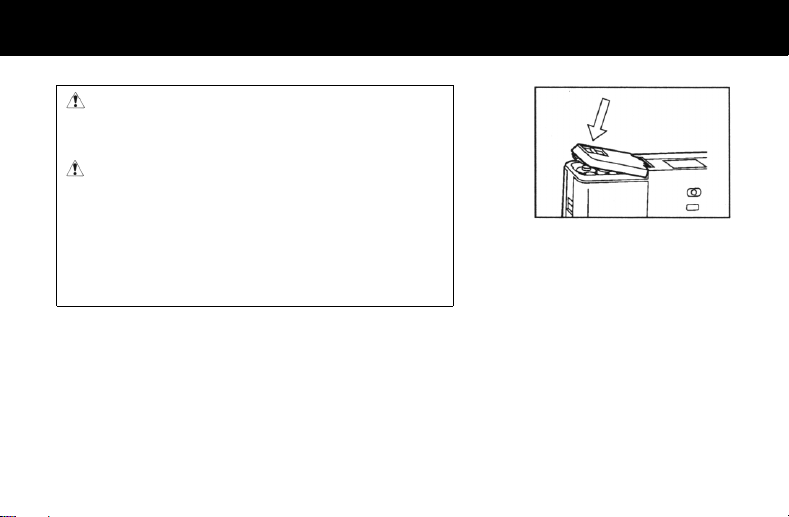
3. Insert or replace the miniature card
Always confirm that the power is OFF before inserting or
replacing the miniature card. Be sure to insert or replace the
miniature card during the power OFF.
察 Pull the miniature card cover open/close knob toward
the bottom side of the camera to open the miniature
card cover.
Applying excessive force when opening the miniature card
cover might cause it to come loose from the camera. The
cover is not broken and can be reattached to the camera.
拶 When replacing the miniature card
Press the miniature card lock hook. The holder is released
and the miniature card can be pulled up and removed.
Miniature card lock
hook
Miniature card
Page 12

撮 When inserting the miniature card
Make sure the outside of the miniature card is facing upward.
The angles of the card in relation to the camera should be at
least 14 degrees and up to 35 degrees when inserting the
miniature card. Make sure that the miniature card comes in
contact with the back and listen for the clicking sound to
confirm that the card is properly inserted.
Cautions concerning insertion angle and direction
Angle and distance where insertion is possible
Outer
surface
Contact point
Page 13

Caution
Never apply excessive force to the miniature card cover when it is open. The miniature card cover
has been created so that it can be removed without applying excessive force to the camera. In such
a case, return the cover immediately to its original position.
擦 Close the miniature card cover
Push the miniature card cover to close it securely.
When the miniature card is not inserted or when it cannot be used or when the
write protect is ON, the display shown in the figure blinks in the photography
display panel.
Page 14

Caution
Do not remove the miniature card during operation.
• Never remove the miniature card when the miniature card operation lamp is lit or when the
clock symbol on the photography display panel is displayed.
Removing the miniature card at this time could cause damage to the card or cause the
recorded image to be erased.
Other Cautions
• If the miniature card is not inserted in the camera, do not touch the miniature card contact
point on the camera main unit or insert pointed objects at this could cause damage to the
equipment.
• Never apply excessive force to the miniature card as this could damage the card.
• Do not touch or cause soiling of the miniature card contact point as this could cause damage
to the card.
• When transporting the miniature card be sure to insert it in the accessory case.
• The miniature card has a product life. After the product life is reached it will no longer be
possible to record on the card. Please replace with a new card at this time.
• It the write-protect switch is set to Write Inhibit, it is not possible to write to the card. When
taking pictures, set the write-protect switch to the Write Possible side.
Page 15

• There are some types of miniature cards that cannot be used with the camera. When using
miniature cards from other makers, be sure to confirm with the maker that use is possible with
the camera.
• If the contents of the miniature card have been altered with the personal computer such as
changing the file names on the miniature card inserted in the PC card slot or copying files from
the PC to the miniature card, there are cases where the card cannot be handled with the
camera. However, even in cases where the card cannot be used with the camera, there is no
hindrance whatsoever to use with the personal computer. If the contents of the card have been
altered with the computer, we suggest copying the data in the camera to another media such as
a hard disk. If a miniature card can no longer be handled, carry out formatting in order to reuse
it with the camera.
Terminal section
Write-protect switch
Write-protect
side
Page 16

Ready to take pictures!
1. Turn the power ON
察 Press the power button.
The power goes on and the photography display panel appears.
Check the batteries and the number of pictures that can be taken.
When turning the power ON after
replacing the miniature card, the
miniature card operation lamp
may remain lit for several seconds.
This is for arranging stored data
and does not indicate a problem.
Never remove the miniature card
while the lamp is lit.
Automatic flash mode
Photography image display example
There is sufficient battery power.
Fine mode
There are 16 pictures
remaining to be taken.
No power left in the batteri es. (Not possible
to take pictures. Replace t he batteries).
The batteries are at about hal f capacity.
(Possible to take pict ures but replace the
batteries as soon as possibl e).
Sufficient batter y capacity.
(Possible to take pict ures).
Page 17

Battery Symbol
This symbol lights for 60 seconds after turning the power ON and then goes out.
There is a 60-second display even when the remaining battery capacity has changed.
Power Save
To prevent battery wear, the power is turned OFF automatically if about five minutes elapse without
taking pictures.
When taking pictures again, press the power button to turn the power ON again.
Page 18

2. Take the picture
察 Look through the viewfinder and make the subject you
want to photograph come into the frame.
拶 Press the shutter down halfway.
The camera automatically carries out a check of exposure,
white balance and focus. When preparations are complete,
green lamp lights. (Viewfinder displays.)
Page 19

撮 Slowly depress the shutter to trip the shutter.
A high-pitched buzzer sounds to indicate that the photograph
has been taken.
Caution
For subjects to which automatic focus is difficult to be applied.
In the following cases, the green lamp may not light.
Photography is also possible in these cases, although the focus range is between 90 cm and
infinity.
• Subjects that are shining or reflecting strong light.
• White walls and similar objects with no contrast.
• Striped objects.
• Subjects where distant and near objects are mixed together.
Page 20

3. Photography is finished
察 Start recording on the miniature card.
The miniature card operation lamp lights and the
action bar is displayed in the photography display panel.
拶 Recording is finished when the miniature
card operation lamp and action bar go out.
The following photographic preparations are possible.
If the number of photographs that can be taken is
0, replace the miniature card. If there are 0
frames available, the buzzer sounds five times.
4. Turn the power OFF
察 Press the power button.
The power goes off and the photography display
panel display disappears.
When a total of 16
photographs can be taken.
When only one photograph
can be taken.
Page 21

Becoming skilled
Erasing unwanted pictures
It is only possible to erase the last photograph taken.
However, if the same operation is repeated it is possible to
erase the tenth photograph followed by the ninth photograph,
etc. in that order.
察 Press the erase button.
• The erasure warning symbol is displayed as a blinking image
for five seconds in the photography display panel.
• To stop erasure, press one of the buttons other than the
erase button.
• If five seconds pass without pressing the button, the erasure
warning symbol disappears and the erasure mode is
canceled.
Page 22

拶 If the erase button is pressed the second time while the
erase warning symbol is displayed, the final frame is
erased.
The number of pictures that can be photographed increases
by one in the photography display panel and the number of
photographs that are completed is decreased by one.
Page 23

Exposure Correction
察 Each time the exposure button is pressed,
the ▼ mark moves in order, allowing you to
adjust to the desired correction.
If the power is ON, the exposure correction
symbol is not displayed. It is displayed if the
exposure correction button is pressed.
If the ▼ mark is in the center position, the
display disappears after it is displayed for 2-3
seconds. Exposure correction is released with
power OFF.
Each time the exposure button is pressed,
the ▼ mark moves to the right in half
calibrations.
Page 24

Closeup Photography
It is possible to photograph as close as 3.5 cm.
The camera contains an automatic focus function, thus eliminating the need for focus adjustment. If there is
insufficient light we suggest use of an auxiliary light source.
If a flash is required, it is possible to cause the flash to
operate in the forced flash mode. However, there will not
be sufficient light on the subject. Use a handkerchief or
white paper to disperse the light of the strobe. Be
careful not to block the flash sensor to the side of the
strobe.
If you come too close to the subject there will be a
discrepancy between the range of the subject seen in
the viewfinder and the photographic range.
Photographic Range
Page 25

Taking pictures in the forced flash mode
At times such as when the subject is in back light there may be
cases where the light amount on the subject is insufficient even
though the overall light is sufficient. By switching to the forced
flash mode in such cases it is possible to correct the difference
between the subject and the surrounding light amount.
察 Press the flash setting button to go to the forced flash
mode.
The forced flash mode is released when the power is turned
OFF. If the power is ON, it is set to the automatic flash mode.
The setting changes in
order each time the
flash setting button is
pressed.
Page 26

Taking pictures in the flash inhibit mode
In cases where flash photography is prohibited, such as in theaters, use this mode to prevent the flash from
functioning.
察 Press the flash setting button to go to the flash inhibit
mode.
The flash inhibit mode is released when the power is turned
OFF.
If the power is ON, it is set to the automatic flash mode.
Page 27

Changing the picture quality mode
It is possible to choose among three varieties: superfine, fine and normal.
Select the mode according to your purpose. The superfine mode will provide extremely fine recording.
Although the normal mode does not allow the same level of quality as in the fine mode, it provides the largest
number of photographs. For standard use we suggest photographing subjects in the fine mode.
The compression mode returns to the fine mode when
the power is turned OFF.
If the power is ON, it is set to the fine mode.
Compression mode
Fine
Superfine
Normal
The setting changes in
order each time the flash
setting button is pressed.
Page 28

Taking pictures with the self-timer
It is possible to take pictures with the self-timer.
Press the self-timer button down and the shutter will be tripped automatically after about 10 seconds.
察 Press the self-timer button.
The self-timer symbol is displayed in the photography display
panel.
To release the self-timer press the self-timer button once
again.
拶 Press the shutter.
The self-timer lamp on the front of the camera blinks.
After blinking for 10 seconds the shutter is tripped.
The self-timer is also released and the self-timer symbol
disappears.
Page 29

Initializing the miniature card
When recording on a new card, be sure to first initialize the card.
* The Konica Miniature Card (Model number: MC-2M) has been initialized at time of shipment from the
factory for use with the Q-EZ camera. You can use the card without initializing it.
Caution
• If you initialize a miniature card that has already been used for photography, all the images
recorded on the card will be erased.
Be careful not to erase important images.
• It is only possible to initialize a card that is not write-protected.
Page 30

察 Insert the miniature card.
拶 Depress the erase button for at least 3 seconds.
• The card symbol, image symbol and action bar blink in
the photography display panel.
• If the erase button is released during blinking, the initialize
mode is canceled.
撮 While depressing the erase button during blinking of the
display, press the compression setting button for at
least 1 second.
• Initializing takes some time.
• When initializing is finished, the number of completed
photographs is displayed as 0.
The number of possible photographs is displayed
according to the compression mode.
Page 31

Looking at your pictures with the personal computer
Transfer the images you have taken to the PC for display.
You can use the accessory application software to enjoy correcting your images. Before transferring
and displaying images, follow the installation instructions to install the application software such as
PhotoDeluxe which has been produced for the accessory CD-ROM. Once the software has been
installed it is not necessary to install it again. The template for PhotoDeluxe has been inserted in the
CD-ROM. When using the software, be sure to first insert the CD-ROM.
1. Connect to the personal computer
察 Before connecting.
Turn the power OFF on the personal
computer and camera.
Page 32

拶 Connect the connecting cable.
PC Side
In case of DOS/V
In case of Macintosh
Connect the PC-IF cable (VCB-1) to the serial port
(usually indicated as COM1, COM2 or RSA232).
Connect the round connector on the Macintosh PC-IF
cable (ACB-1) to the Macintosh. Connect the larger
connector and the connecting cable.
Page 33

Camera Side
Open
connector cover and connect while aligning the notches.
the
撮 When connection is finished.
Turn the power ON on the camera and PC.
If the camera and PC are properly connected, the computer
symbol appears in the photography display panel.
Page 34

Preparations are completed for transferring the images to the computer.
When using the Q-EZ for a long time with the PC, etc., we suggest use of an AC adapter.
Be sure to use a special Q-EZ AC adapter (Model number: EZ-AD2).
Be sure the camera power is OFF when connecting the AC adapter.
Page 35

2. Start up the application software
The following functions are carried out on the PC side.
Read the README file in the application software or consult Help regarding the operational method.
When the digital camera (Q-EZ) is connected to the personal computer, depending on the application
software it is possible now to control transfer, display, correction and storage of images as well as
camera functions on the personal computer side.
Software Included in the CD-ROM
Page 36

In case of possible breakdowns
If you suspect that something is wrong with
the equipment, check the following points.
Please read this Instruction Manual again to
check whether you have made any mistakes in
operations. If the problem persists, discontinue
use of the equipment and contact your dealer.
Power does not go ON.
• Press the power button to turn the power ON
again.
• Check whether the batteries are properly
inserted.
• If the batteries are low, replace them with
new ones.
Not possible to take pictures.
• Check the number of remaining pictures, if
the number is 0, either erase pictures that
have already been taken or replace the
miniature card.
• Check whether the miniature card is properly
inserted and reinsert when necessary.
• Check whether the write-protect switch on
the miniature card is in the position to allow
writing.
Not possible to transfer images.
• Check whether the cable is properly
connected.
• Check the battery level.
• Recheck the PC settings and connection.
• Restart the PC software and PC.
The images fail to appear with the proper
brightness.
• Use the flash to take the picture again.
• Make adjustments with the exposure
correction button.
Page 37

The image color is poor.
• Check the color adjustment of the PC
monitor.
• If pictures are taken with indoor light, such
as fluorescent lamps, the color may be
slightly altered. Use the PC software to
adjust the color.
The date and time is not correct.
• Set with the PC. If the batteries are low, the
clock is reset in about 20 minutes.
☆ Not set when shipped from the factory.
An E is included with the number of possible
photographs displayed in the photography
display panel (E1, E2, E5, etc.).
• Turn the power OFF and ON again and
check.
If the E is still displayed, this indicates a
breakdown. Contact your dealer.
Page 38

Main Specifications
Page 39

The CE Marking is a Directive Conformity mark of the European Community
(EC).
* These specifications are subject to change without prior notice.
 Loading...