

Page 1

PageScope
Workware Ver. 1.1
User’s Guide
Workware
Page 2

Page 3

Contents
Contents
1 Introduction
1.1 Welcome ........................................................................................ 1-1
1.2 Structure of This User’s Guide ....................................................1-2
Content of Each Chapter............................................................1-2
Explanation of Guide Conventions .............................................1-3
2 Features of PageScope Workware
2.1 Software Capabilities.................................................................... 2-1
3 Installation
3.1 System Requirements ..................................................................3-1
3.2 Installing the Software.................................................................. 3-3
3.3 Uninstalling the Software.............................................................3-5
For Windows XP:........................................................................3-5
For Windows 2000:.....................................................................3-5
4 Basic Operation and Setup
4.1 Starting Up and Quitting PageScope Workware ........................4-1
To start up PageScope Workware..............................................4-1
To quit PageScope Workware....................................................4-2
4.2 Main Window .................................................................................4-3
Main window toolbars.................................................................4-4
4.3 Setting the User Environment...................................................... 4-6
To display the “Setup” dialog box ...............................................4-6
“General” Tab .............................................................................4-8
“FTP” Tab .................................................................................4-10
“Launcher” Tab.........................................................................4-12
To register an application .........................................................4-13
To register e-mail message settings.........................................4-14
To register folder settings .........................................................4-16
To register FTP client settings..................................................4-18
To register SharePoint Portal Server settings ..........................4-20
To register printer settings........................................................4-22
To change the icon...................................................................4-23
To change settings registered in the launcher..........................4-24
To unregister settings in the launcher ......................................4-24
PageScope Workware i
Page 4

Contents
“OCR” Tab ............................................................................... 4-25
“Watch folder” Tab ................................................................... 4-26
To change the monitored folder settings.................................. 4-30
To cancel the monitored folder settings ................................... 4-30
“E-mail” Tab ............................................................................. 4-31
4.4 Displaying the IP Address ......................................................... 4-33
4.5 Displaying the Version Information .......................................... 4-33
4.6 Importing Document Files ......................................................... 4-34
Importing a File ........................................................................ 4-34
Importing a Folder.................................................................... 4-36
4.7 Shared Folders ........................................................................... 4-37
Registering Shared Folders ..................................................... 4-37
Cancelling Shared Folders....................................................... 4-38
Registering Existing Shared Folders........................................ 4-39
Cancelling Existing Shared Folders ......................................... 4-40
4.8 Opening Folders......................................................................... 4-41
Displaying as Thumbnails ........................................................ 4-41
Displaying as Card................................................................... 4-43
Displaying as Icons.................................................................. 4-45
Displaying as a List.................................................................. 4-46
Displaying Details .................................................................... 4-47
Changing the Displayed Columns............................................ 4-49
Creating a File List................................................................... 4-50
Sorting Document Files............................................................ 4-51
Lining Up Document Files ........................................................ 4-51
4.9 Thumbnails ................................................................................. 4-52
Creating Thumbnails................................................................ 4-52
Updating Thumbnails............................................................... 4-52
Changing the Display Size of Thumbnails ............................... 4-53
Rotating Thumbnails................................................................ 4-53
To rotate all pages ................................................................... 4-53
To rotate the displayed page ................................................... 4-53
4.10 Moving Data Folders .................................................................. 4-54
5 Managing Document Files
5.1 Editing Document Files................................................................ 5-1
Adding New Folders With PageScope Workware...................... 5-1
Selecting Document Files .......................................................... 5-1
Changing the Name of a File or Folder ...................................... 5-2
Copying Folders or Document Files........................................... 5-2
Moving Folders or Document Files ............................................ 5-3
Deleting Folders or Document Files........................................... 5-3
ii PageScope Workware
Page 5

Contents
5.2 Displaying the Property Dialog Box for Folders and
Document Files .............................................................................5-4
To display the “Folder Properties” dialog box of a folder............5-4
To display the “File Properties” dialog box of a document file....5-5
To display the “BinderProperty” dialog box of a binder ..............5-9
5.3 Page-Editing Functions ..............................................................5-11
Opening a Document File.........................................................5-11
Opening an Original File...........................................................5-11
Scanning Through the Pages of Document Files.....................5-12
Grouping Document Files.........................................................5-12
Grouping Files Using Menu Commands...................................5-12
Grouping Files Using a Drag-and-Drop Operation ...................5-13
Separating Document Files......................................................5-14
Separating All Pages................................................................5-14
Separating the Specified Page.................................................5-15
Binder .......................................................................................5-16
Creating Binder.........................................................................5-16
Removing a File From the Binder.............................................5-18
Rearranging the Document Files Within a Binder ....................5-19
Changing the Order of Pages ...................................................5-20
Automatically Inserting a Blank Page .......................................5-21
Specifying Headers/Footers .....................................................5-22
5.4 Changing the Link.......................................................................5-24
When there is one original file: .................................................5-24
When there are multiple original files: ......................................5-24
5.5 Updating the Document File ......................................................5-25
5.6 Creating a New Original File ......................................................5-26
5.7 Converting Files..........................................................................5-26
5.8 Managing File Versions ..............................................................5-28
5.9 Specifying Search Information ..................................................5-30
Specifying File Properties.........................................................5-30
Specifying Additional Information .............................................5-31
5.10 Exporting Data From a Document File......................................5-32
Exporting a Text File.................................................................5-32
Exporting an Image File............................................................5-34
Extracting Text for a File Content Search.................................5-35
Editing Text for a File Content Search......................................5-36
5.11 Editing and Enhancing Image Files...........................................5-37
Image Editor window ................................................................5-38
Toolbars of the Image Editor window .......................................5-40
Image Editing Operations.........................................................5-42
Updating the Image File ...........................................................5-42
PageScope Workware iii
Page 6

Contents
Saving an Image File With a Different Name ........................... 5-42
Converting to the Compact PDF Format.................................. 5-43
Copying an Image File............................................................. 5-44
Cutting Out Part of the Image .................................................. 5-44
Changing the Page Order in the Image File ............................ 5-44
Displaying Pages of the Image File ......................................... 5-45
Image Enhancement Operations ............................................. 5-45
To specify despeckling............................................................. 5-45
To specify background removal ............................................... 5-45
To specify halftone removal ..................................................... 5-46
To specify bleed-through enhancement................................... 5-46
To specify automatic document enhancement ........................ 5-47
To specify automatic photo image enhancement .................... 5-47
To specify a defined photo image enhancement ..................... 5-48
To specify image enhancement ............................................... 5-50
To adjust the sharpness........................................................... 5-52
To change the number of colors .............................................. 5-53
To specify negative/positive inverting ...................................... 5-53
To specify mirror imaging (left/right flipping) ............................ 5-53
To specify embossing .............................................................. 5-53
Changing the Resolution and Image Size................................ 5-54
To specify trimming.................................................................. 5-55
Erasing an Image (Selecting an Area) ..................................... 5-56
Erasing an Image (Selecting a Section)................................... 5-57
To rotate the image.................................................................. 5-58
To specify skew adjustment ..................................................... 5-58
6 Searching for Document Files
6.1 Searching for Files ....................................................................... 6-1
6.2 Specifying the Search Conditions .............................................. 6-4
Searching Properties Information .............................................. 6-4
Searching for Text...................................................................... 6-8
6.3 Performing a Refined Search .................................................... 6-10
6.4 Displaying Search Results ........................................................ 6-11
7Printing
7.1 Printing a File List ........................................................................ 7-1
7.2 Printing Document Files .............................................................. 7-2
7.3 Printing Image Files ..................................................................... 7-3
iv PageScope Workware
Page 7

Contents
8 Importing
8.1 Importing an Image From a TWAIN Device.................................8-1
Specifying the TWAIN Device ....................................................8-1
Importing an Image From a TWAIN Device................................8-2
8.2 FTP Server Function.....................................................................8-5
8.3 Importing From a Mail Server ......................................................8-5
8.4 Importing From a Monitored Folder ............................................8-5
9 Distributing Document Files
9.1 Attaching Document Files to E-Mail Messages..........................9-1
9.2 Sending Files With Launcher Folder Settings............................9-1
9.3 Sending Document Files to an FTP Server................................. 9-2
9.4 Sending Document Files to a SharePoint Portal Server ...........9-3
10 Appendix
10.1 Glossary.......................................................................................10-1
10.2 Index.............................................................................................10-3
PageScope Workware v
Page 8

Contents
vi PageScope Workware
Page 9

Introduction
1 Introduction
1.1 Welcome
Thank you for purchasing the PageScope Workware software.
Before using this software for the first time, be sure to read this User’s
Guide carefully.
Unauthorized reproduction, translation or duplication of this document,
whether in its entirety or in part, is strictly prohibited.
The content of this document is subject to change without notice.
Copyright © 2005 KONICA MINOLTA BUSINESS TECHNOLOGIES,
INC. All rights reserved.
Trademark Acknowledgements
KONICA MINOLTA, KONICA MINOLTA Logo are registered trademarks
or trademarks of KONICA MINOLTA HOLDINGS, INC.
PageScope is registered trademark or trademark of KONICA MINOLTA
BUSINESS TECHNOLOGIES, INC.
Microsoft®, SharePointTM, Windows® and Windows NT® are either
registered trademarks or trademarks of Microsoft Corporation in the
United States and/or other countries.
Adobe®, the Adobe logo and Acrobat® are either registered trademarks
or trademarks of Adobe Systems Incorporated in the United States and/or
other countries.
ABBYY FineReader, ABBYY, and FINEREADER are trademarks of
ABBYY Software Ltd.
All other product names are trademarks or registered trademarks of their
respective companies.
© Copyright 1998-2003 SUMITOMO ELECTRIC FIELD SYSTEMS
CO.,LTD.
TM
ABBYY
ABBYY FineReader - the keenest eye in OCR
This software is based in part on the work of the Independent JPEG
Group.
FineReaderTM 6.0 Engine © ABBYY Software Ltd. 2002.
1
PageScope Workware 1-1
Page 10
1
1.2 Structure of This User’s Guide
Content of Each Chapter
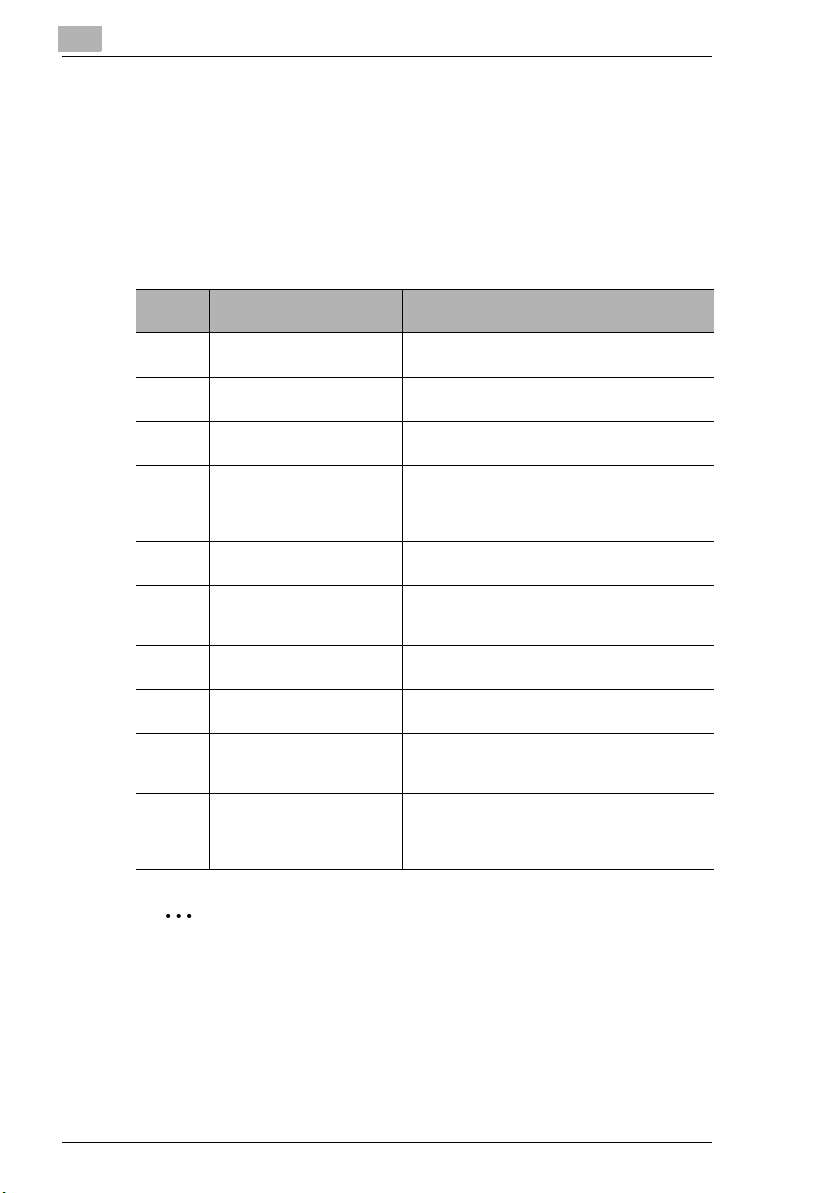
This User’s Guide has the following structure and contains the information
listed below. Refer to this table to retrieve information from this guide.
In addition, when searching for specific information or the answer to
certain questions, use the index at the back of this User’s Guide.
Introduction
Chapter
No.
1 Introduction This chapter provides information on how to use
2 Features of PageScope
3 Installation This chapter describes the installation and
4 Basic Operation and Setup This chapter provides explanations on how to
5 Managing Document Files This chapter provides descriptions of the various
6 Searching for Document
7 Printing This chapter provides descriptions on printing
8 Importing This chapter provides explanations on importing
9 Distributing Document Files This chapter contains descriptions on specifying
10 Appendix This chapter contains the following additional
Chapter Title Chapter Content
this User’s Guide.
Workware
Files
This chapter contains general information on the
software functions.
uninstallation of the software.
begin using the softwa re, on the various areas of
the main window, and on how to specify basic
program settings.
functions for efficiently managing documents.
This chapter provides information on how to
search for files by file name, modification date,
properties information, text, etc.
document files and file lists.
document files into PageScope Workware.
settings in order to send document files by e-mail
or transfer them to an FTP server.
information.
• Glossary
• Index
Note
For the most up-to-date information on the software, refer to the
Readme file.
1-2 PageScope Workware
Page 11

Introduction
Explanation of Guide Conventions
The various marks and text formats used in this User’s Guide to indicate
various circumstances are explained below.
1
[Menu] The name of a key on the computer keyboard, a button in a
§
software dialog box, an icon or a menu is written as shown.
Text formatted as shown here indicates a single action that is
to be performed. (It is not followed by additional steps.)
1 Text formatted as shown here
indicates the first step of a
sequence of actions.
2 Text formatted as shown here
indicates the second step of the
sequence of actions. (Subsequent
steps are also formatted as shown
here.)
Text formatted in this style provides additional assistance for the
?
step.
§ Text formatted in this style describes the action that will ensure the
desired results are achieved.
Here you can see a
corresponding
screenshot.
This is a helpful tip.
Text highlighted in this manner contains useful information and handy
tips for easy operation of the software.
PageScope Workware 1-3
Page 12

1
Introduction
1-4 PageScope Workware
Page 13

Features of PageScope Workware
2 Features of PageScope Workware
This chapter provides information on the various features of PageScope
Workware.
2.1 Software Capabilities
PageScope Workware allows you to do the following:
G Convert files of various formats to PDF files so that they can be
efficiently used.
G Create thumbnails of each document file in order to facilitate
identifying them.
G Easily search document files by their contents and additional specified
information.
G Combine multiple document files for filing and enable them to be used
as a binder.
G Group multiple files to create a single document file.
G Apply headers and footers to document files.
G Link the original file to the document file and manage it, and update the
document file from the original file.
G Create TIFF files from PDF files that are not linked to an original file to
make original files.
G Output text and image files from document files.
G If the linked original file is an image file, that image file can be opened
in Image Editor, where various image enhancements or image
processing operations can be performed.
G Convert image files to the compact PDF file format, which has a
smaller file size.
G Import images from TWAIN devices, and then manage the files.
G Automatically import files registered in a specific Windows folder as
well as specify that certain processes (such as image enhancement)
be performed when the file is imported.
G Periodically check for incoming e-mail messages and import text from
the e-mail message and attached document.
G Specify a folder as shared.
G Obtain FTP server functionality.
(The FTP server function of PageScope Workware only allows files to
be received from KONICA MINOLTA multifunctional products using
limited FTP commands.)
2
PageScope Workware 2-1
Page 14

2
Features of PageScope Workware
G Create e-mail messages with document files attached.
G Send document files to an FTP server or SharePoint Portal Server
2001.
G Distribute document files and thumbnail images to the specified folder.
2-2 PageScope Workware
Page 15
Installation
3 Installation
This chapter provides procedures on the installation and uninstallation of
the software.
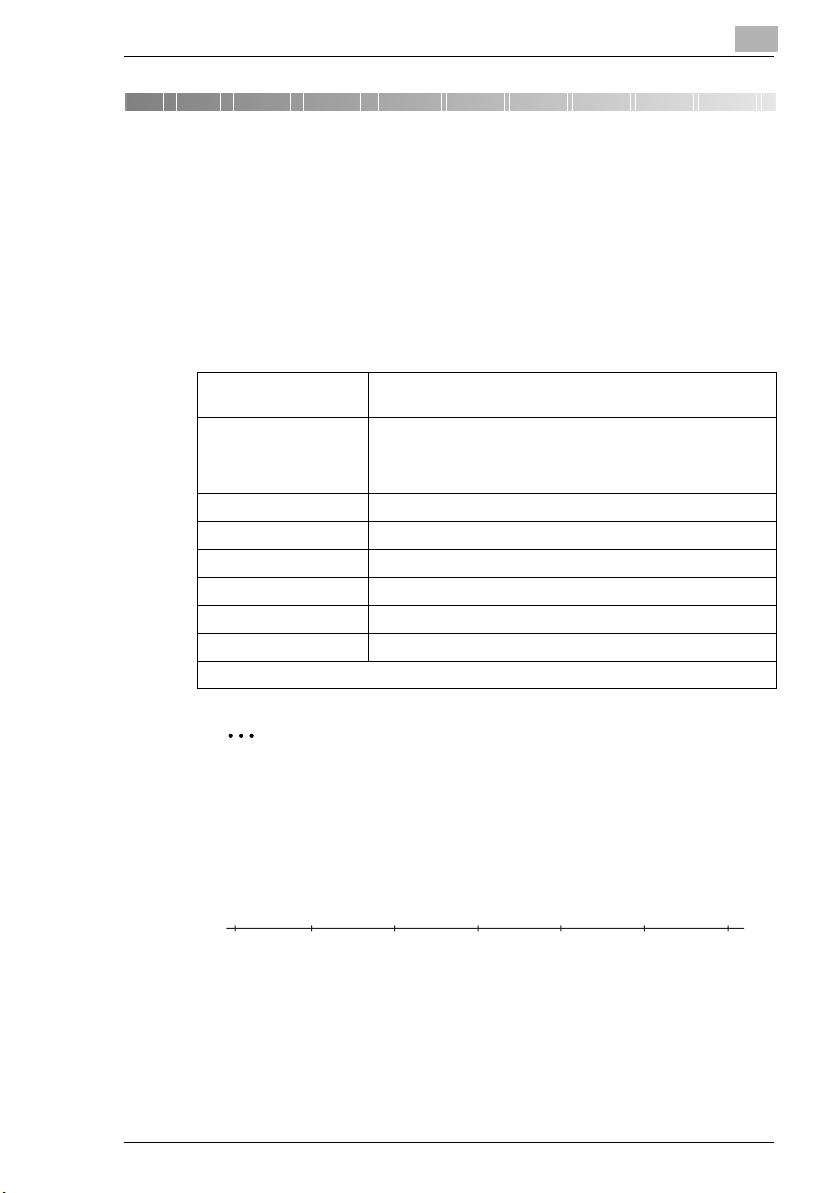
3.1 System Requirements
The following operating environment is required in order to use
PageScope Workware.
3
Operating System Windows 2000 Professional (SP2), Windows XP Home Edition,
Memory Windows 2000 Professional: 128MB (192MB or higher is
CPU Pentium®III 1GHz or higher is recomended
Web Browser Internet Explorer 5.5 or later
Hard Disk Free Space 800 MB
Monitor Resolution 1024
Network TCP/IP protocol
Reguired Applications Adobe® Acrobat® 7.0
• Acrobat 7.0 must be installed on the computer.
and Windows XP Professional
recomended)
Windows XP Home Edition/Windows XP Professional: 192MB
(256MB or higher is recomended)
× 768 pixels or higher, High Color (16 bit)
Note
If the operating system and network settings are not completely
specified, PageScope Workware cannot be installed or it will not work
correctly.
The full length of the path name for document files must not exceed
200 characters.
Example:
C:\Program Files\KONICA MINOLTA\PageScope Workware\abcde.bmp
1
= 60 letters
10
20
30
40 50 60
PageScope Workware 3-1
Page 16

3
Installation
Note
PageScope Workware creates a driver called “PageScope Workware”
in the Printers folder. This driver is required in order for PageScope
Workware to operate. Do not delete this driver.
If Acrobat 7.0 is installed, check that the Adobe PDF driver was
created in the Printers folder. If it was not created, an error will occur
when applications are registered.
3-2 PageScope Workware
Page 17

Installation
3.2 Installing the Software
Note
Unexpected data loss can be prevented. Before running the
PageScope Workware installer, close all open files and exit all
applications.
If Windows 2000 or XP is being used, log on as a user with
Administrator privileges before installing the software.
1 Insert the CD-ROM into the CD-ROM drive.
The installer starts up automatically.
Note
If Acrobat 7.0 is not installed, click [Acrobat 7.0 Standard]. Follow
the instructions that appear to install Acrobat. The serial code can
be found attached to the back of the CD-ROM case.
2 Click [PageScope Workware Ver.1.1] in the installer dialog box to
install PageScope Workware.
3
3 Follow the instructions in the dialog box to continue the installation.
4 When the License Agreement appears, read it carefully.
H Click the [Yes] button to accept the terms and conditions of the
license agreement.
5 When the dialog box for entering the user information appears, type
the necessary information into the User Name, Company Name and
Serial Number boxes.
H The serial number can be found on a label affixed to the back of
the CD case.
6 Follow the instructions in the dialog box to continue the installation.
H To change the Drive or folder where the software is to be installed,
click the [Browse] button in the “Choose Destination Location”
dialog box, and then select the destination folder.
H To change the Programs folder where the program icon will be
added, type in or select the name of the folder in the “Select
Programs Folder” dialog box.
PageScope Workware 3-3
Page 18

3
Installation
7 Follow the instructions in the dialog box to complete the installation.
This completes the installation of PageScope Workware.
3-4 PageScope Workware
Page 19

Installation
3.3 Uninstalling the Software
For Windows XP:
1 Click the [start] button in the taskbar, and then click [Control Panel].
2 In the Control Panel window, double-click the [Add or Remove
Programs] icon.
3 Select “PageScope Workware 1.1” from the list.
4 Click the [Change/Remove] button.
5 Follow the instructions in the dialog box to complete the uninstallation.
For Windows 2000:
1 Click the [Start] button in the taskbar, point to [Settings], and then click
[Control Panel].
2 In the Control Panel window, double-click the [Add/Remove
Programs] icon.
3 Select “PageScope Workware 1.1” from the list.
3
4 Click the [Change/Remove] button.
5 When the message appears, requesting confirmation for deleting the
file, click the [OK] button.
6 Follow the instructions in the dialog box to complete the uninstallation.
Note
During uninstallation, folders that contain edited files and folders
created after the installation of PageScope Workware are not deleted.
Delete these folders manually if necessary.
PageScope Workware 3-5
Page 20

3
Installation
3-6 PageScope Workware
Page 21
Basic Operation and Setup
4 Basic Operation and Setup
This chapter provides explanations on the various areas of the main
window and on how to specify basic program settings.
4.1 Starting Up and Quitting PageScope Workware
To start up PageScope Workware
Double-click the [PageScope Workware 1.1] icon on the desktop.
or
1 Click the [Start] button, and then point to [All Programs].
H On Windows 2000: Click the [Start] button, point to [Programs].
2 Point to [KONICA MINOLTA], then [PageScope Workware 1.1], and
then click [PageScope Workware].
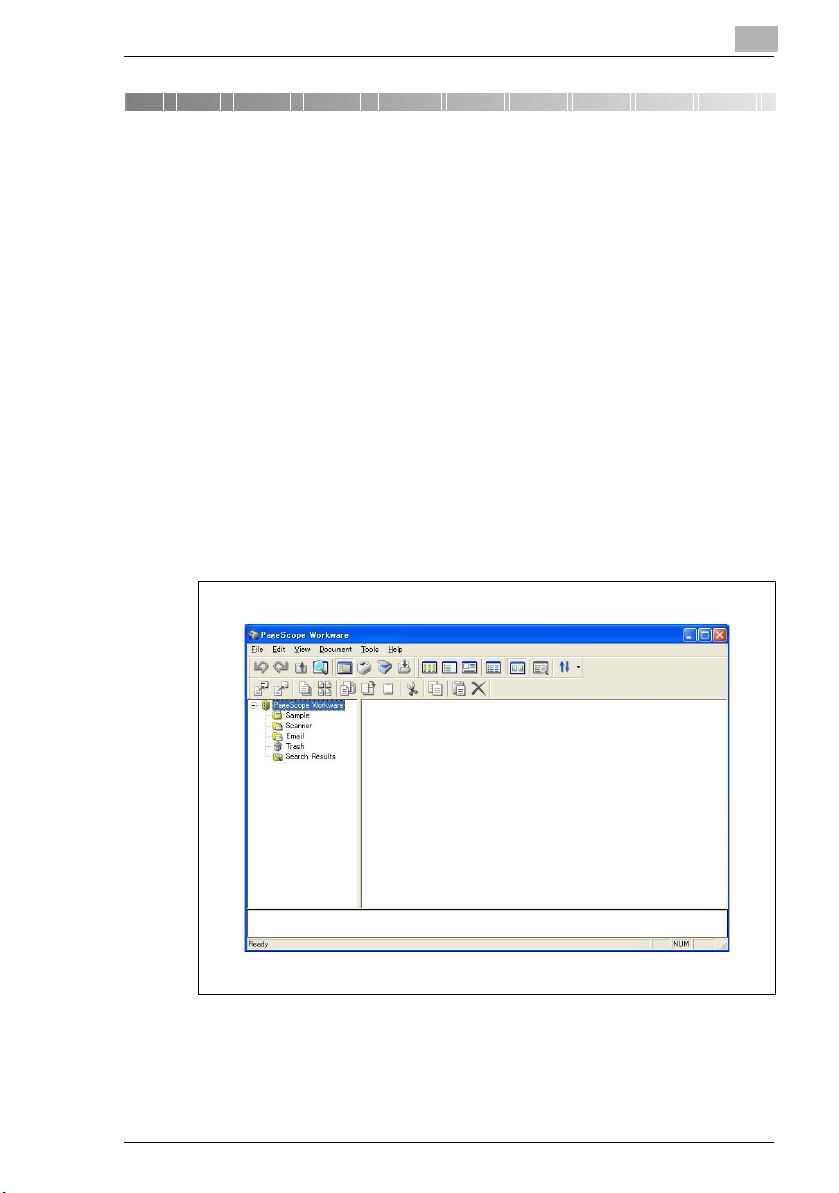
The main window of PageScope Workware appears.
4
PageScope Workware 4-1
Page 22
4
Basic Operation and Setup
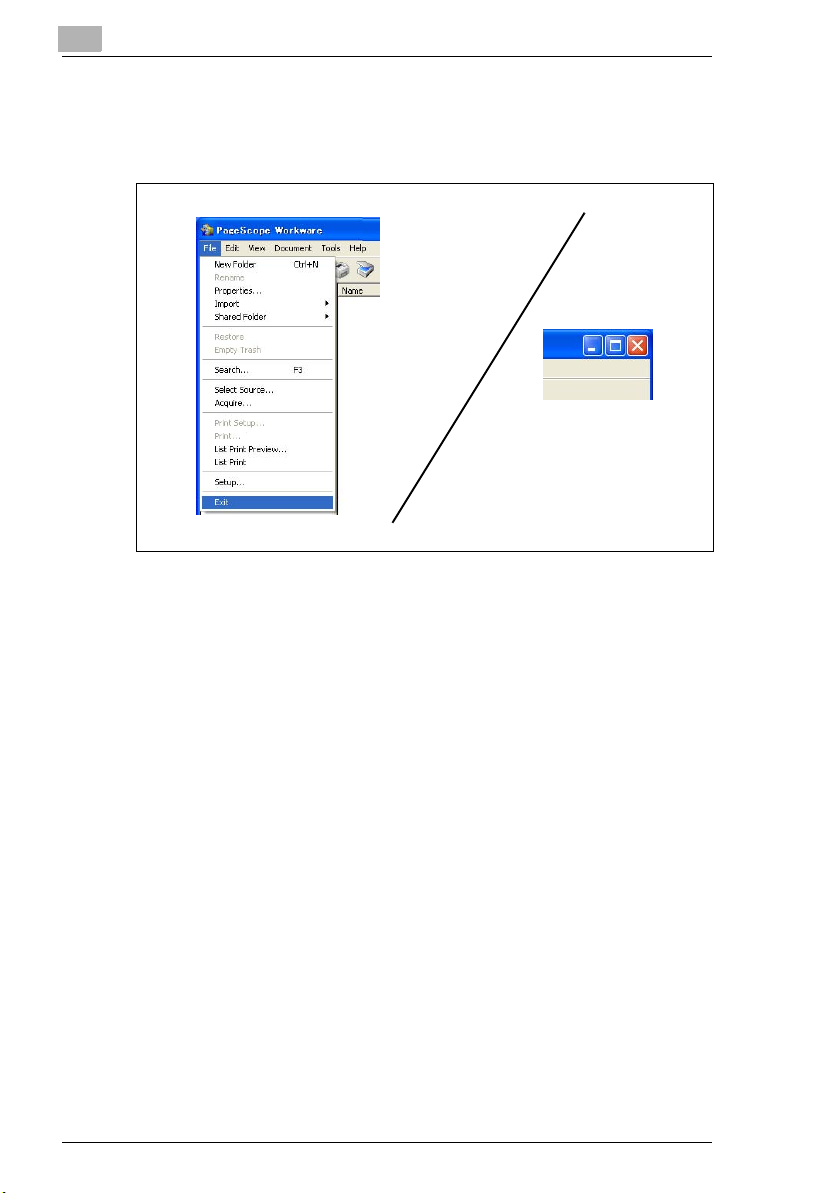
To quit PageScope Workware
§ Either click [Exit] on the [File] menu or click [x] in the title bar of the
main window.
4-2 PageScope Workware
Page 23
Basic Operation and Setup
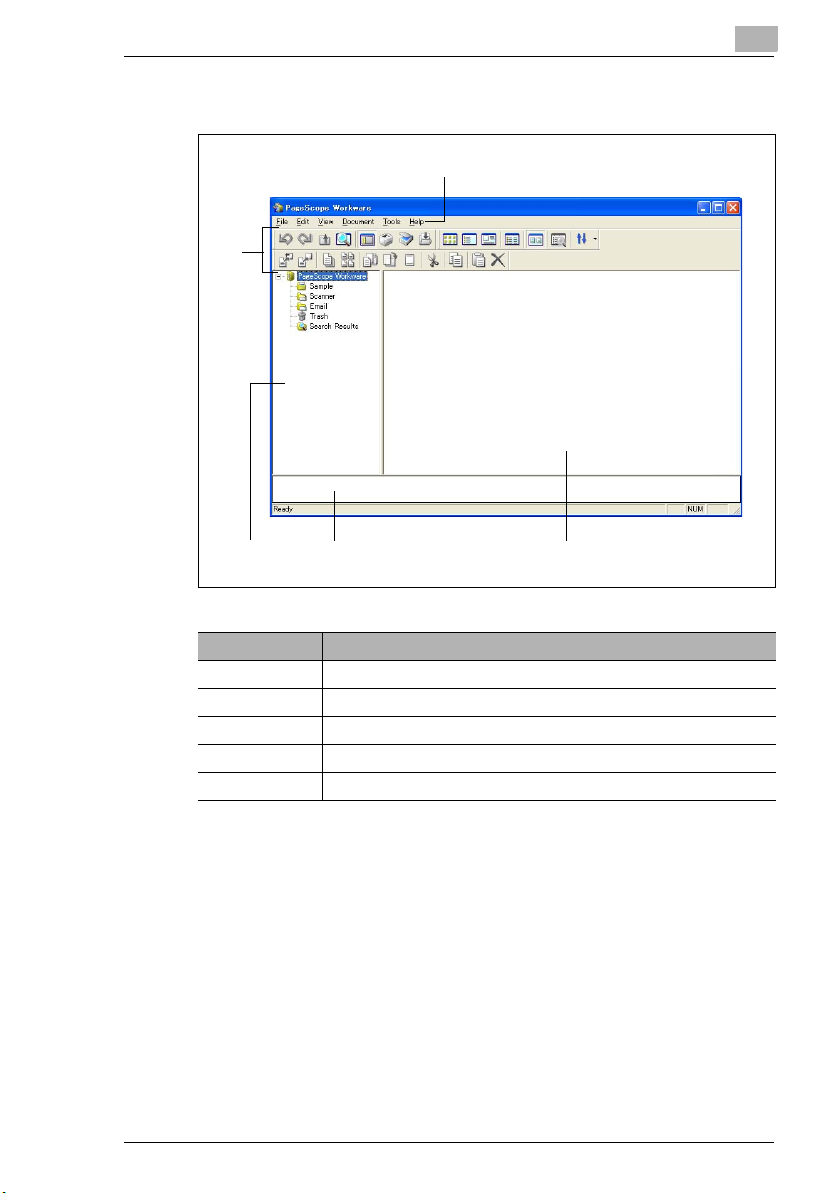
4.2 Main Window
2
3 5 4
4
1
No. Element Name
1 menu bar
2 toolbar
3 Folder area
4 File area
5 launcher
PageScope Workware 4-3
Page 24
4
Basic Operation and Setup
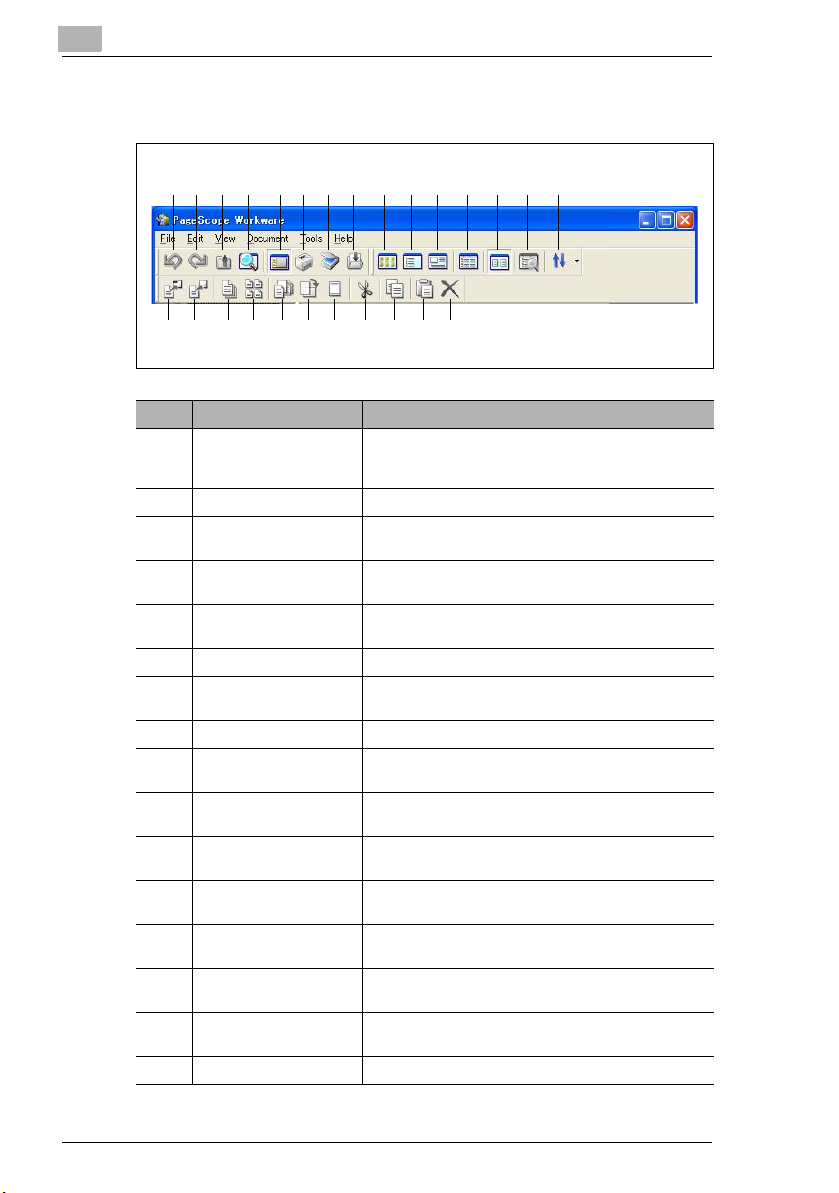
Main window toolbars
1 2 3 4 5 6 7 8 9 10 11 12 13 14 15
16 17 18 19 20 21 22 23 24 25 26
No. Element Name Description
1 Undo Click this button to undo the last operation that was
2 Redo Click this button to redo the operation that was undone.
3 Up to folder Click this button to display the folder that contains the
4 Search Click this button to search for a document file based on
5 Folder Tree Click this button to display Folder area in the main
6 Print Click this button to print the document file.
7 Acquire Click this button to scan an image with a TWAIN
8 Import file Click this button to import a file.
9 Icon Click this button to display the contents of File area as
10 List Click this button to display the contents of File area as
11 Card Click this button to display the contents of File area as
12 Details Click this button to display the details of the contents of
13 Thumbnails Click this button to display the contents of File area as
14 Text Search Results Click this button to display the search results from the
15 Sort in File area Click this button to specify the sort order and sort the
16 Open PDF Click this button to open the document file.
performed. Depending on the operation being
performed, it may not be possible to undo it.
one currently displayed.
the search criteria.
window.
device.
icons.
a list.
cards.
File area.
thumbnails.
file content search.
document files in page B.
4-4 PageScope Workware
Page 25

Basic Operation and Setup
No. Element Name Description
17 Open Original Click this button to open the original file for the
18 Bind Click this button to combine multiple document files into
19 Unbind all pages Click this button to separate the multi-page document
20 Insert blank page Click this button to insert a blank page into the
21 90 (Right) Click this button to rotate the thumbnail of the
22 Add Page number/
Header/Footer
23 Cut Click this button to cut folders and document files.
24 Copy Click this button to copy folders and document files.
25 Paste Click this button to paste folders and document files.
26 Delete Click this button to delete folders and document files.
4
document file.
a single document file.
file into its individual pages.
document file.
document file 90 degrees clockwise.
Click this button to apply headers and footers to
document files.
PageScope Workware 4-5
Page 26
4
4.3 Setting the User Environment
Various user settings for PageScope Workware can be specified from the
“Setup” dialog box.
To display the “Setup” dialog box
§ On the [File] menu, click [Setup].
The “Setup” dialog box appears.
Basic Operation and Setup
The “Setup” dialog box contains the following tabs.
G “General” tab:
Contains settings for importing files and specifying the colors of the
main window.
G “FTP” tab:
Contains FTP server settings.
G “Launcher” tab:
Allows applications, printers, etc. to be registered for automatic
startup.
G “OCR” tab:
Contains settings for specifying the character recognition language
4-6 PageScope Workware
Page 27

Basic Operation and Setup
G “Watch folder” tab:
Contains settings for automatically transferring files from a specific
folder to a different folder.
G “E-mail” tab:
Contains settings for the e-mail address that is periodically checked
for incoming messages.
When any setting is changed, the [Apply] button becomes available.
Clicking the [Apply] button saves the changes made to the settings.
Clicking the [OK] button saves the changes made to the settings and
closes the “Setup” dialog box. Clicking the [Cancel] button cancels the
changes made to the settings and closes the “Setup” dialog box.
4
PageScope Workware 4-7
Page 28
4
Basic Operation and Setup
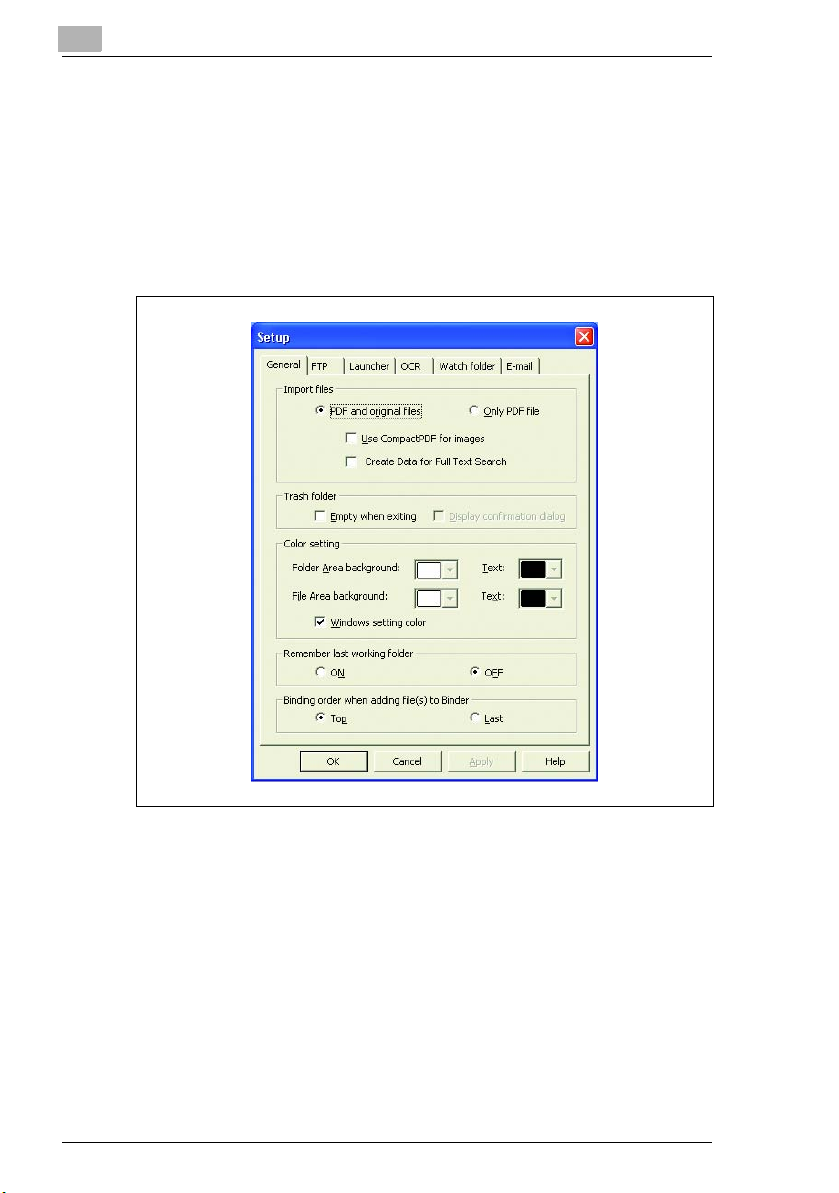
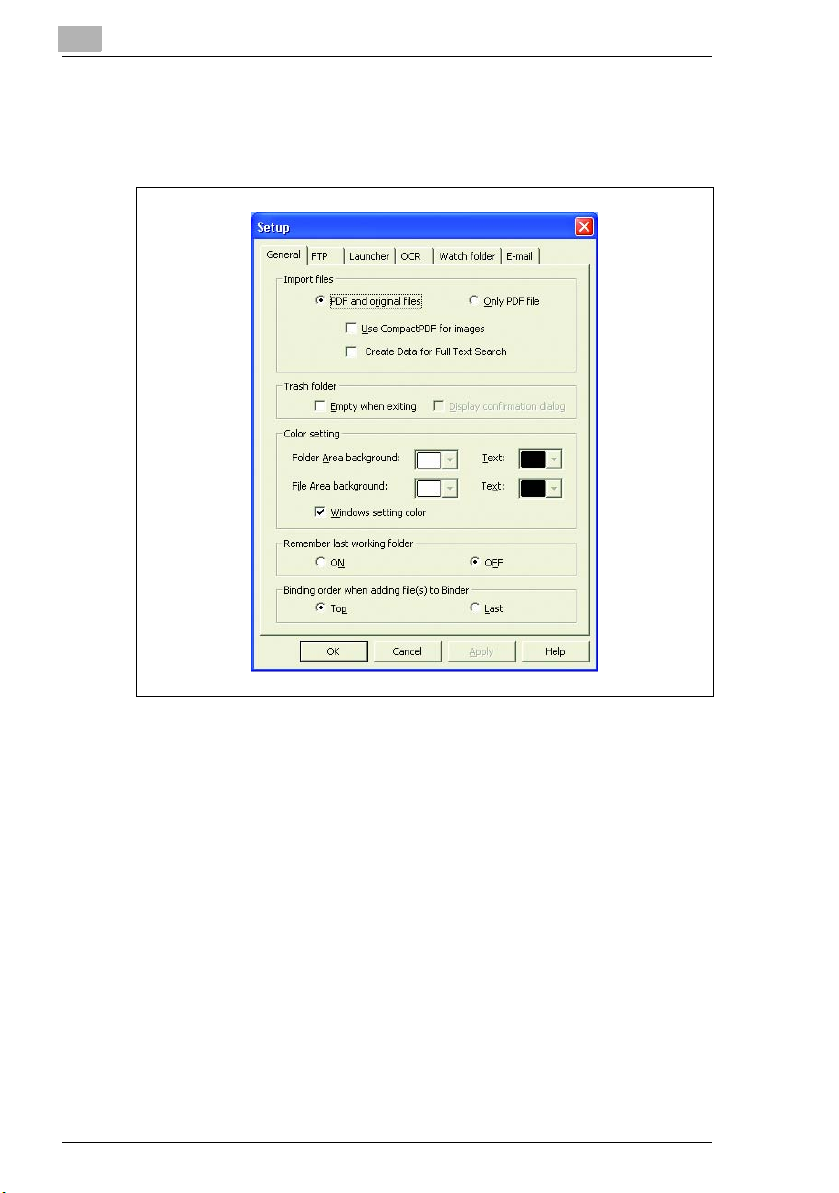
“General” Tab
Contains settings for importing files and specifying the colors of the main
window.
1 Specify the settings for importing files. In the Import files group box,
select either the PDF and original files or Only PDF file check box.
H To link the original file to the PDF file imported into PageScope
Workware, select the PDF and original files check box.
H To import only PDF files into PageScope Workware, select the
Only PDF file check box.
H To convert image files to the compact PDF format before importing
them into PageScope Workware, select the Use CompactPDF for
Images check box.
H To extract the text for a file content search at the same time that a
file is registered, select the Create Data for full text search check
box.
4-8 PageScope Workware
Page 29

Basic Operation and Setup
2 Specify the appropriate settings for the Trash folder.
H To automatically delete document files from the Trash folder when
PageScope Workware is closed, select the Empty when exiting
check box.
H To display a message confirming that document files be deleted
from the Trash folder when PageScope Workware is closed, select
the Display confirmation dialog check box.
3 Specify the colors of the main window. In the Color setting group box,
select the color of Folder area from the Folder area background box,
and select the color of File area from the File area background box.
H Click the Folder area background or File area background box
to display the “Color” dialog box, and then specify the desired
color. In addition, the text color can be set for each area.
H To set the Folder area and File area to the Windows color, select
the Windows setting color check box.
4 Specify the folder that appears first when the program is started up. To
display the folder used in the previous session the next time that
PageScope Workware is started up, select ON in the Remember last
working folder group box. To display the PageScope Workware
folder tree selected the next time that PageScope Workware is started
up, select OFF in the Remember last working folder group box.
4
5 Specify the position where files are added to binder. To add files at the
beginning of binder, select the Top check box in the Binding order
when adding file(s) to Binder group box. To add files at the end of
binder, select the Last check box.
6 Click the [OK] button.
The settings are applied.
PageScope Workware 4-9
Page 30
4
Basic Operation and Setup
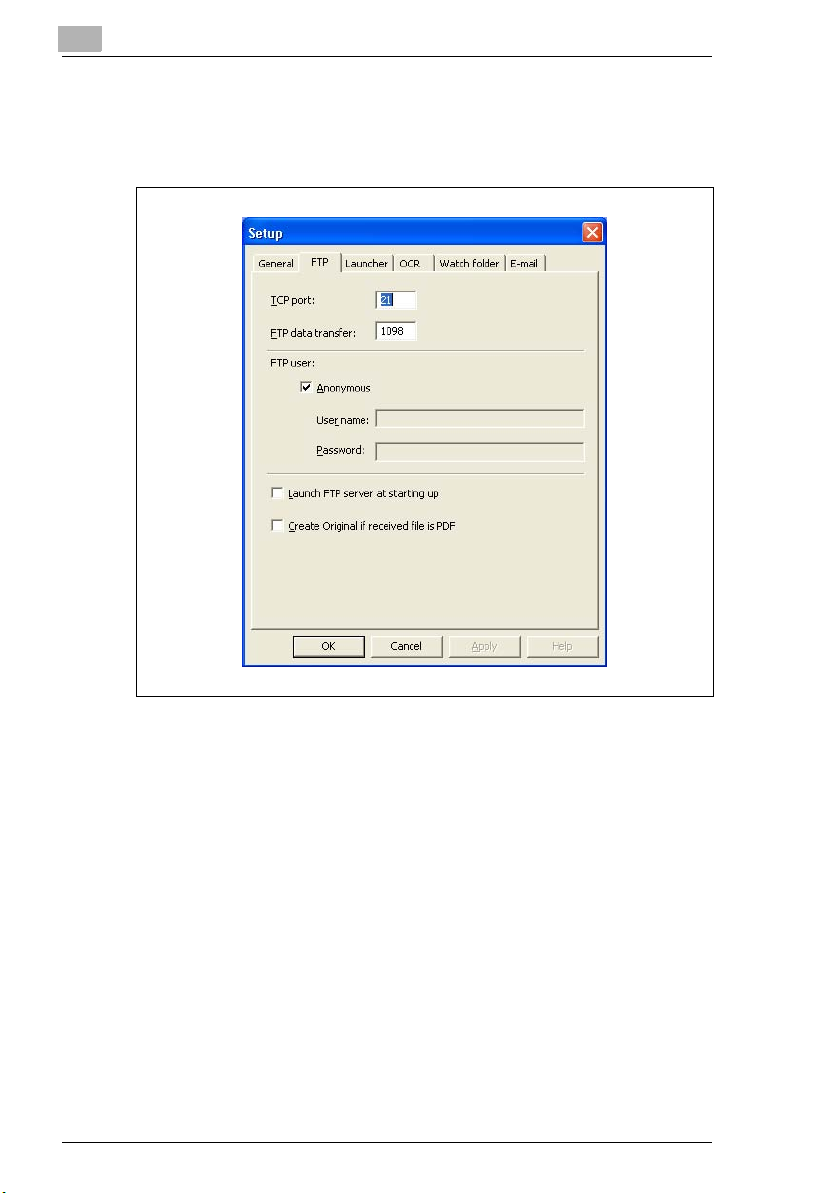
“FTP” Tab
PageScope Workware can function as an FTP server. Therefore, it can
import data from KONICA MINOLTA multifunctional products.
The settings in the TCP port and FTP data transfer boxes can be
changed only from the device. The default TCP port setting is “21”, and
the default FTP data transfer port setting is “1098”.
1 In the FTP User group box, specify the settings for the user permitted
to log on. Only the user specified here will be permitted to log on.
H To log on as Anonymous, select the Anonymous check box.
H To specify a user, type the user login name in the User name box,
and then type the user login password in the Password box.
4-10 PageScope Workware
Page 31

Basic Operation and Setup
2 Specify the appropriate settings for the FTP server function.
H To enable the FTP server when PageScope Workware is started
up, select the Launch FTP server at starting up check box.
After selecting the check box, PageScope Workware must be
restarted in order for the FTP server to be started.
H To create an image (TIFF file) as an original file when a PDF file is
received with the FTP server function, select the Create Original
if received file is PDF check box.
3 Click the [OK] button.
The settings are registered.
4
PageScope Workware 4-11
Page 32

4
Basic Operation and Setup
“Launcher” Tab
With PageScope Workware, various applications, e-mail transmission
settings, folder settings, FTP client settings, SharePoint Portal Server
settings, and printer settings can registered in the launcher. Registered
settings appear in the launcher as icons.
Tip
This tab can also be displayed by right-clicking in the launcher of the
main window, then clicking [Launcher Setup].
4-12 PageScope Workware
Page 33

Basic Operation and Setup
To register an application
1 Select “Application” from the list box at the left, and then click the [Add]
button.
The “Open” dialog box appears.
4
2 Select the application to be registered, and then click the [Open]
button.
The selected application appears in the list box at the right.
3 Click the [OK] button.
The icon of the registered application appears in the launcher.
PageScope Workware 4-13
Page 34

4
Basic Operation and Setup
To register e-mail message settings
1 Select “Email” from the list box at the left, and then click the [Add]
button.
The “E-mail Setting” dialog box appears.
2 In the Setting names box, specify a name.
3 Specify the e-mail message settings that you wish to register.
H Type in the desired recipient (To:), carbon copy recipient (Cc:),
blind carbon copy recipient (Bcc:) and text (no more than 500
characters) of the e-mail message.
4 Click the [OK] button.
The name of the recipient for the specified e-mail message
transmission settings appears in the list box at the right.
5 Click the [OK] button.
An icon for the registered e-mail message transmission settings
appears in the launcher.
4-14 PageScope Workware
Page 35

Basic Operation and Setup
Tip
The name specified in the Setting names box appears as the ToolTip
for the launcher icon.
If a file is dragged and dropped onto the icon for the e-mail message
settings in the main window, the application set as the computer's
default e-mail application starts up. In addition, if the specified e-mail
application is MAPI-compatible, a new e-mail message is created
using the information (recipient, text, etc.) specified in the e-mail
message settings and with the dropped file as an attachment.
4
PageScope Workware 4-15
Page 36

4
Basic Operation and Setup
To register folder settings
1 Select “Folder” from the list box at the left, and then click the [Add]
button.
The “Folder Settings” dialog box appears.
2 In the Setting Name box, specify a name.
3 In the Destination folders group box, select the check box for the
type of file to be sent, and then specify the destination for the file.
H To copy the document file selected from File area into the specified
folder, select the PDF File check box. To specify the folder, click
the [Browse] button, and then select the folder.
H To extract text from the document file selected in File area and
save it to the specified folder, select the Text file check box. To
specify the folder, click the [Browse] button, and then select the
folder.
H To save the thumbnail image of the document file selected from
File area into the specified folder, select the Thumbnail Image of
PDF check box. In the Width and Height boxes, specify the size
of the thumbnail image. To specify the folder, click the [Browse]
button, and then select the folder.
4-16 PageScope Workware
Page 37

Basic Operation and Setup
H To create a TIFF file of the document file selected from File area
and save it in the specified folder, select the TIFF Image of PDF
check box. To specify the folder, click the [Browse] button, and
then select the folder.
Tip
A maximum of 240 can be specified in the Width and Height
boxes. In addition, the image is saved as a JPEG file.
4 Click the [OK] button.
The name of the specified folder settings appears in the list box at the
right.
5 Click the [OK] button.
An icon for the registered folder settings appears in the launcher.
Tip
The name specified in the Setting Name box appears as the ToolTip
for the launcher icon.
4
PageScope Workware 4-17
Page 38

4
Basic Operation and Setup
To register FTP client settings
1 Select “FTP” from the list box at the left, and then click the [Add]
button.
The “FTP Setting” dialog box appears.
2 In the Setting Name box, specify a name.
3 Specify the FTP client settings that you wish to register.
H In the FTP Server Name box, type the IP address of the FTP
server.
H In the Directory box, type the name of the folder where the
document file will be saved.
H In the FTP User group box, specify the settings for the user
permitted to log on. To log on as Anonymous, select the
Anonymous check box. To specify a user, type the user name in
the User Name box, and then type the user password in the
Password box.
4 Click the [OK] button.
The name of the specified FTP client settings appears in the list box at
the right.
5 Click the [OK] button.
An icon for the registered FTP client settings appears in the launcher.
4-18 PageScope Workware
Page 39

Basic Operation and Setup
Tip
The name specified in the Setting Name box appears as the ToolTip
for the launcher icon.
4
PageScope Workware 4-19
Page 40

4
Basic Operation and Setup
To register SharePoint Portal Server settings
1 Select “SharePoint Portal Server” from the list box at the left, and then
click the [Add] button.
The “SharePoint Portal Server Settings” dialog box appears.
2 In the Setting Name box, specify a name.
3 Specify the SharePoint Portal Server settings that you wish to register.
H In the Server Address box, type the URL of the SharePoint Portal
Server.
H In the Username box, type the name of the user permitted to log
on. In the Password box, type the password for the user.
H To specify the profile for the document file selected in the File area
and dragged to the SharePoint Portal Server icon, select the Edit
document profile when registering check box.
Note
In the Server Address box, specify the following:
Example: http://<server_name>/<workspace_name>/Document/
Test
4-20 PageScope Workware
Page 41

Basic Operation and Setup
4 In the Status group box, specify the attributes for the document file.
H Select either Check Out or Check In. If Check In was selected,
select the Published after checking in check box, if desired.
H In the Comment box, specify a comment.
5 Click the [OK] button.
The name of the specified SharePoint Portal Server settings appears
in the list box at the right.
6 Click the [OK] button.
An icon for the registered SharePoint Portal Server settings appears
in the launcher.
Tip
The name specified in the Setting Name box appears as the ToolTip
for the launcher icon.
Note
In order to send a file to a SharePoint Portal Server, the SharePoint
Portal Server client component must be installed. Only a SharePoint
Portal Server 2001 is compatible. Files cannot be sent to a SharePoint
Portal Server 2003. Contact the server administrator for the server
address and user information.
4
PageScope Workware 4-21
Page 42

4
Basic Operation and Setup
To register printer settings
1 Select “Printer” from the list box at the left, and then click the [Add]
button.
The “Print Setup” dialog box appears.
2 Select a printer, and then specify the necessary settings.
3 Click the [OK] button to close the “Print Setup” dialog box.
The name of the specified printer settings appears in the list box at the
right.
4 Click the [OK] button.
The icon of the registered printer settings appears in the launcher.
4-22 PageScope Workware
Page 43

Basic Operation and Setup
To change the icon
The printer icon displayed in the launcher can be changed.
1 In the list box at the right, select the item whose icon is to be changed,
and then click the [Change Icon] button.
The “Change Icon” dialog box appears.
2 Select the desired icon.
H To add a new icon, click the [Add] button, and then add the new
icon from the “Open” dialog box that appeared.
H To delete a printer icon, select the printer icon, and then click the
[Delete] button.
4
3 Click the [OK] button.
PageScope Workware 4-23
Page 44

4
Basic Operation and Setup
To change settings registered in the launcher
Follow the procedure described below to change any settings for an
application, e-mail message, folder, FTP client, SharePoint Portal Server,
or printer currently registered in the launcher.
1 In the list box at the right, select the item whose settings are to be
changed, and then click the [Edit] button.
2 Change the settings as necessary. For details on changing the
settings, refer to the procedure describing the registration of that
particular item.
H To register an application
H To register e-mail message settings
H To register folder settings
H To register FTP client settings
H To register SharePoint Portal Server settings
H To register printer settings
To unregister settings in the launcher
Follow the procedure described below to unregister the settings for an
application, e-mail message, folder, FTP client, SharePoint Portal Server,
or printer currently registered in the launcher.
1 In the list box at the right, select the item whose settings are to be
unregistered, and then click the [Delete] button.
2 Click the [OK] button.
4-24 PageScope Workware
Page 45

Basic Operation and Setup
“OCR” Tab
With PageScope Workware, text can be extracted from image files using
the OCR conversion function.
4
1 Select either Standard OCR engine or External OCR engine
(WinReader Pro).
H If Standard OCR engine was selected, select Japanese,
English, or OS Language as the recognition language.
2 Click the [OK] button.
Note
External OCR engine (WinReader Pro) can be selected only if
WinReader Pro is installed on the computer. Only WinReader Pro ver.
9 is compatible.
PageScope Workware 4-25
Page 46

4
Basic Operation and Setup
“Watch folder” Tab
With PageScope Workware, automatically import files registered in a
specific Windows folder as well as specify that certain processes (such as
image enhancement) be performed when the file is imported.
4-26 PageScope Workware
Page 47

Basic Operation and Setup
1 Click the [Add] button.
The “Watch folder” dialog box appears.
4
2 Click the [Browse] button beside the Target folder box, and then
specify the folder to be monitored.
H If PageScope ScanDirect is installed on the computer, the
[ScanDirect] button appears. Click the [ScanDirect] button to
display a list of folders set as destination folders for PageScope
ScanDirect.
Tip
By selecting one of the set folders, scan files from
KONICA MINOLTA multifunctional products and imported with
PageScope ScanDirect can easily be registered in PageScope
Workware.
PageScope Workware 4-27
Page 48

4
Basic Operation and Setup
3 Click the [Browse] button beside the Destination folder box, and then
specify the folder where the files will be transferred.
Note
Only folders in Folder area can be specified as a destination folder.
A folder specified as a folder to be monitored cannot be specified
as a folder where files are transferred to.
4 In the Check Interval box, specify the interval (in seconds) that the
folder is checked.
5 A process can be specified to be automatically performed before the
file is transferred. In the Processing group box, select the process
that should be performed.
H Select the Auto deskew check box to automatically adjust the
skewing of image files.
H Select the Auto orientation check box to automatically orient the
image files.
H Select the Auto Enhancement of Document Image check box to
automatically enhance image files.
H Select the Extract text for full text search check box to extract
the text for a file content search.
H Select the Trimming check box to trim the files as specified. Click
the [Properties] button to display a dialog box that allows you to
specify the trimming size. Specify the desired settings in the Paper
Size boxes, and then click the [OK] button.
H Select the Print check box to print the file after it is transferred.
Click the [Properties] button to display a dialog box that allows you
to specify the print settings. Specify the desired settings, and then
click the [OK] button.
H To separate a multi-page file into its individual pages and import it,
select the Save as single page TIFF if the file is multipage TIFF
check box.
6 Click the [OK] button.
The settings are registered, and the folder appears in the list of
monitored folders.
7 Click the [OK] button.
4-28 PageScope Workware
Page 49

Basic Operation and Setup
Note
If the Trimming check box is selected, trimming cannot be performed
if the resolution of the image file cannot be obtained.
If a file with the same name already exists in the destination folder
when a file is transferred to it from the monitored folder, the new file is
saved with a different name so that the old file is not overwritten. For
example, if a file titled “MyPic” already exists in the destination folder
when a new file titled “MyPic” is transferred to it, the new file is saved
as “MyPic(2)”.
If multiple processes are to be performed, they are performed in the
order that they appear in the list.
With the Auto Deskew, Auto orientation, Auto Enhancement of
Document Image, and Trimming processes, the image after
processing replaces the original image and the file is moved to the
destination folder.
If the Save as single page TIFF if the file is multipage TIFF check
box is selected, each file is titled “file_name_x” (where “x” is the page
number).
4
PageScope Workware 4-29
Page 50

4
Basic Operation and Setup
To change the monitored folder settings
Follow the procedure described below to change the monitored folder
settings that are currently registered.
1 From the list of monitored folders, select the folder whose settings are
to be changed, and then click the [Edit] button.
2 Change the settings as desired.
3 Click the [OK] button.
The settings are changed, and the folder appears in the list of
monitored folders.
4 Click the [OK] button.
To cancel the monitored folder settings
Follow the procedure described below to cancel the monitored folder
settings that are currently registered.
1 From the list of monitored folders, select the folder whose settings are
to be cancelled, and then click the [Delete] button.
2 Click the [Yes] button.
The settings are registered, and the folder is removed from the list of
monitored folders.
3 Click the [OK] button.
4-30 PageScope Workware
Page 51

Basic Operation and Setup
“E-mail” Tab
PageScope Workware can periodically check for incoming e-mail
messages and import the e-mail message text or the attached file. The email message text and the attached file are each converted to PDF files,
the two are combined to create a binder file with the date of the e-mail
message as the file name, and then the file is imported into the Email
folder. With this tab, various settings, such as those for the e-mail account,
can be specified.
4
1 In the POP Server Address box, type the IP address of the POP
server.
2 In the Account Name box, type the account name for the POP server.
3 In the Password box, type the password for logging into the POP
server.
4 In the Interval box, type the interval (in minutes) that the e-mail
account is checked for incoming messages.
PageScope Workware 4-31
Page 52

4
Basic Operation and Setup
5 Specify the appropriate settings for e-mail.
H To leave a copy of received e-mail messages on the mail server,
select the Leave a copy of mail on Server check box.
H To specify the time period (in days) that received e-mail messages
are left on the mail server, select the Delete from Server after x
Days check box. Type in the number of days to specify the time
period.
6 Click the [OK] button.
Note
With e-mail sent in the HTML format, the text is blank.
4-32 PageScope Workware
Page 53

Basic Operation and Setup
4.4 Displaying the IP Address
Follow the procedure described below to view the IP address of your
computer.
1 On the [Tools] menu, click [Display IP Address].
The “IP Address” dialog box appears.
2 Click the [OK] button.
Note
When scanning a file and sending it from a KONICA MINOLTA
multifunctional product to the FTP server for PageScope Workware,
specify this address as the recipient’s IP address.
4
4.5 Displaying the Version Information
Follow the procedure described below to view the version information and
serial number used during the installation of PageScope Workware.
1 On the [Help] menu, click [About PageScope Workware].
The “About PageScope Workware” dialog box appears.
2 Click the [OK] button.
PageScope Workware 4-33
Page 54

4
4.6 Importing Document Files
Files saved on the computer can be imported into PageScope Workware
as document files.
Importing a File
Follow the procedure described below to import a single file into
PageScope Workware.
1 In Folder area, select the folder that contains the document file to be
imported.
2 On the [File] menu, point to [Import], and then click [Files]. Otherwise,
click [Import Files] on the menu that appears after right-clicking the
selected folder.
The “Open” dialog box appears.
Basic Operation and Setup
3 Select the file to be imported.
4 Click the [Open] button.
The selected file is converted to a PDF file, then imported into Folder
area.
4-34 PageScope Workware
Page 55

Basic Operation and Setup
Note
Multiple files can be specified and imported at the same time. To
specify multiple files, hold down the [Ctrl] key while clicking each file.
Files with the following extensions can be registered in PageScope
Workware.
DOC (Word), RTF (Word), XLS (Excel), PPT (PowerPoint), JTD
(Ichitaro), PDF, TXT, JPG, J2K, BMP, EPS, PSD, PIC, TIF, HTM, PNG
4
PageScope Workware 4-35
Page 56

4
Basic Operation and Setup
Importing a Folder
Follow the procedure described below to import multiple files from a folder
into PageScope Workware.
1 In Folder area, select the folder that contains the folder to be imported.
2 On the [File] menu, point to [Import], and then click [Folders].
The “Browse for Folder” dialog box appears.
3 Select the folder to be imported.
4 Click the [OK] button.
The selected folder is imported into PageScope Workware with the
same name and displayed in Folder area. In addition, the files within
the folder are converted to PDF files and imported.
Note
If the folder to be imported contains subfolders, the files in the
subfolders that can be imported into PageScope Workware are also
imported.
4-36 PageScope Workware
Page 57

Basic Operation and Setup
4.7 Shared Folders
With PageScope Workware, shared folders can be registered in Folder
area.
Registering Shared Folders
Follow the procedure described below to register a shared folder in Folder
area.
1 On the [File] menu, point to [Shared Folder], and then click [Create
Shared Folder].
The “Create Shared Folder” dialog box appears.
4
2 In the Share Name, Machine, and Path boxes, specify the
appropriate settings.
H If the [...] button beside the Machine box is clicked, the “Browse for
Shared Folder” dialog box appears, allowing a machine to be
selected.
H If the [...] button beside the Path box is clicked, the “Browse for
Folder” dialog box appears, allowing a path to be selected.
H If the [Permissions] button is clicked, a dialog for specifying access
permissions appears. Specify the access permissions for users to
be sharing this folder.
3 Click the [OK] button.
The selected shared folder is registered in Folder area.
PageScope Workware 4-37
Page 58

4
Basic Operation and Setup
Cancelling Shared Folders
Follow the procedure described below to cancel the registration of a
shared folder registered in Folder area by clicking [Create Shared Folder].
1 In Folder area, select the shared folder.
2 On the [File] menu, point to [Shared Folder], and then click [Remove
Sharing].
The selected shared folder is cancelled from Folder area.
4-38 PageScope Workware
Page 59

Basic Operation and Setup
Registering Existing Shared Folders
Follow the procedure described below to register an existing shared folder
in Folder area.
1 On the [File] menu, point to [Shared Folder], and then click [Add
Shared Folder].
The “Browse for Shared Folder” dialog box appears.
4
2 Select the folder to be added.
Note
The permissions for the folder to be added must have been set to
allow access by the user logged onto the computer using their
corresponding password.
3 Click the [OK] button.
The selected shared folder is registered to Folder area.
PageScope Workware 4-39
Page 60

4
Basic Operation and Setup
Cancelling Existing Shared Folders
Follow the procedure described below to cancel the registration of a
shared folder registered in Folder area by clicking [Add Shared Folder].
1 In Folder area, select the shared folder.
2 On the [File] menu, point to [Shared Folder], and then click [Remove
Shared Folder].
The selected shared folder is cancelled from Folder area.
4-40 PageScope Workware
Page 61

Basic Operation and Setup
4.8 Opening Folders
Click a folder in Folder area to display in File area all document files
contained within the folder. In addition, the way that File area is displayed
can be changed depending on the desired use.
Note
Subfolders do not appear in File area.
Displaying as Thumbnails
With the thumbnail view, the contents of the document files in the folders
are displayed as small images. The thumbnails can be arranged in any
orientation.
1 In Folder area, select a folder.
2 On the [View] menu or on the menu that appears after right-clicking in
File area, click [Thumbnails].
Thumbnails of all document files in the selected folder are displayed in
File area.
4
1 25
43
PageScope Workware 4-41
Page 62

4
Basic Operation and Setup
No. Element Name Description
1 previous page arrow Click this arrow to display the page before the currently
2 next page arrow Click this arrow to display the page after the currently
3 file name The name of the file is indicated. (For a binder, the
4 number of page The following is displayed: (the number of the currently
5 icon If the file is linked to the original file, the icon for the
displayed page. If the first page is displayed, this arrow
does not appear.
displayed page. If the last page is displayed, this arrow
does not appear.
name of the binder is indicated.)
displayed page)/(the total number of pages).
application that created the original file is displayed.
4-42 PageScope Workware
Page 63

Basic Operation and Setup
Displaying as Card
With the card view, the thumbnail and properties information for the
document files within the folder are displayed.
1 In Folder area, select a folder.
2 On the [View] menu or on the menu that appears after right-clicking in
File area, click [Card].
The thumbnail and properties information for the document files within
the selected folder are displayed.
4
12 53 4 6
7
No. Element Name Description
1 thumbnail Double-click the thumbnail to open the PDF file.
2 previous page/file arrow Click this arrow to display the page/file before the
currently displayed page/file. The page/file display is
changed with the Page/File display selector.
PageScope Workware 4-43
Page 64

4
Basic Operation and Setup
No. Element Name Description
3 number of page/file The following is displayed: (the number of the currently
4 next page/file arrow Click this arrow to display the page/file after the
5 Page/File display
selector
6 properties information The properties information is displayed.
7 properties information Properties information is displayed. This information
displayed page)/(the total number of pages) or (the
position of the currently displayed file)/(the total
number of files). The page/file display is changed with
the Page/File display selector.
currently displayed page/file. The page/file display is
changed with the Page/File display selector.
Select “Pages” or “Files” to display by pages or files.
Switches between displaying the number of pages in
the displayed file or the position of the currently
displayed file.
can be edited.
4-44 PageScope Workware
Page 65

Basic Operation and Setup
Displaying as Icons
With the icon view, the document files in the folder are displayed as icons.
The icon for the application that created the original file is displayed.
1 In Folder area, select a folder.
2 On the [View] menu or on the menu that appears after right-clicking in
File area, click [Icons].
The document files in the folder are displayed as icons.
4
PageScope Workware 4-45
Page 66

4
Basic Operation and Setup
Displaying as a List
With the list view, the document files in the folder are displayed as a list.
1 In Folder area, select a folder.
2 On the [View] menu or on the menu that appears after right-clicking in
File area, click [List].
The document files in the folder are displayed as a list.
4-46 PageScope Workware
Page 67

Basic Operation and Setup
Displaying Details
With the details view, the list of document files in the folder are displayed
with their detailed information.
1 In Folder area, select a folder.
2 On the [View] menu or on the menu that appears after right-clicking in
File area, click [Details].
The list of document files in the folder are displayed with their detailed
information.
4
With the details view, the following information is displayed for the
document files.
Item Description
Name The name of the document file and icon are indicated.
Modified Date and Time The date when the file was last modified is indicated.
Size The data size (KB) of the file is indicated.
Total Page Number The number of pages in the file is indicated.
Title The title specified for the file is indicated.
Author The author of the file is indicated.
Keyword The keyword specified for the file is indicated.
Creator The application of the file is indicated.
Subject The subject specified for the file is indicated.
PageScope Workware 4-47
Page 68

4
Basic Operation and Setup
Item Description
Created Date and Time The creation date and time for the file are indicated.
Accessed Date and Time The access date and time for the file are indicated.
Original modified date and
time
Comment The comment specified for the file is indicated.
Importance The priority specified for the file is indicated.
Modification Progress The modification progress specified for the file is indicated.
Deadline The deadline specified for the file is indicated.
Path The directory containing the file is indicated.
Text Whether or not text has been extracted for a file content search
The modification date and time for the original file are indicated.
is indicated.
4-48 PageScope Workware
Page 69

Basic Operation and Setup
Changing the Displayed Columns
If File area is displayed in the details view, the document file information
that is displayed can be changed.
§ On the [View] menu, click [Choose Details].
The “Choose Columns” dialog box appears.
4
1
2
3
No. Item Description
1 list of column items The column items that can be displayed in the details
2 [Upper] button Click this button to move the selected item up one
3 [Lower] button Click this button to move the selected item down one
view are listed. Select the check box of the items to
be displayed in the details view.
position in the list. After the [OK] button is clicked, the
corresponding column is moved one position to the
left in the details view.
position in the list. After the [OK] button is clicked, the
corresponding column is moved one position to the
right in the details view.
PageScope Workware 4-49
Page 70

4
Basic Operation and Setup
Creating a File List
With PageScope Workware, the information displayed in the details view
can be saved as a file in the CSV format.
1 On the [Tools] menu, click [Create File List].
The “Choose Columns” dialog box appears.
2 Select the check boxes for the items to be included.
3 Click the [Upper] and [Lower] buttons to adjust the order that the
columns are displayed in.
4 Click the [OK] button.
The “Save As” dialog box appears.
5 Specify the location where the file is saved and the file name that the
file is saved as, and then click the [Save] button.
The file list is saved in the CSV file format.
Note
The path to the applicable folder is automatically added as the last line
of the saved file.
4-50 PageScope Workware
Page 71

Basic Operation and Setup
Sorting Document Files
The files and binders displayed in the File area can be sorted. The files
and binders can be sorted by name, date or size in ascending or
descending order.
Perform the operation described below to sort the files and binders in the
desired order.
§ Click [Sort] on the [View] menu or on the menu that appears after right-
clicking in File area, and then select how the files and binders are to
be sorted.
The files and binders are sorted in the specified order.
Lining Up Document Files
When thumbnails are displayed in File area, the document files, which
may be arranged in any orientation, can easily be lined up.
Perform the operation described below to line up the document files and
subfolders.
§ On the [View] menu, click [Auto Line Up].
The document files and subfolders are lined up.
Note
When [Auto Line Up] is clicked, a check mark appears beside it. [Auto
Line Up] is applied until it is clicked again and the check mark
disappears. While there is a check mark beside [Auto Line Up], the
thumbnails cannot be arranged as desired.
4
PageScope Workware 4-51
Page 72

4
4.9 Thumbnails
The contents of all document files in the folder selected in Folder area can
be displayed as small images in PageScope Workware. (For more details,
refer to
Creating Thumbnails
Thumbnails are automatically created when the contents of a folder
selected in Folder area are displayed in File area.
Files with the following extensions can be registered in PageScope
Workware.
DOC (Word), RTF (Word), XLS (Excel), PPT (PowerPoint), JTD (Ichitaro),
PDF, TXT, JPG, J2K, BMP, EPS, PSD, PIC, TIF, HTM, PNG
“Displaying as Thumbnails” on page 4-41
Note
Depending on the contents of the file, some thumbnails may not be
displayed correctly. The thumbnail of a PDF file with security settings
specified, such as password protection, appear as shown below.
Basic Operation and Setup
.)
Updating Thumbnails
PageScope Workware automatically updates the thumbnail when it
detects that the file has been changed. However, depending on the order
in which thumbnails are created, it may take some time until the thumbnail
of the desired file is updated.
Follow the procedure described below to update a thumbnail.
1 Select the thumbnail that you wish to update.
2 On the [Document] menu, click [Create Thumbnail].
The thumbnail is updated.
4-52 PageScope Workware
Page 73

Basic Operation and Setup
Changing the Display Size of Thumbnails
The thumbnails can be displayed in one of three sizes.
Follow the procedure described below to change the display size of the
thumbnail.
1 Select File area, where the thumbnails whose size you wish change
are displayed.
2 On the [View] menu or on the menu that appears after right-clicking the
File area, point to [Thumbnail Size], and then click the desired
thumbnail size ([Large], [Normal] or [Small]).
Rotating Thumbnails
Thumbnails displayed in File area can be rotated.
Note
The original file linked to the document file is not rotated.
To rotate all pages
1 Select the thumbnail(s) of the file(s) that you wish to rotate.
H When rotating a document file in a binder, display the document
file that you wish to rotate. For details, refer to
page 5-16
4
“Binder” on
.
2 On the [Document] menu or on the menu that appears after right-
clicking the selected thumbnail, point to [Rotate All Page], and then
click the command for the desired rotation angle.
The thumbnails are rotated.
To rotate the displayed page
1 Select a file, and then display the page to be rotated.
2 On the [Document] menu or on the menu that appears after right-
clicking the selected thumbnail, point to [Rotate Current Page], and
then click the command for the desired rotation angle.
The thumbnail for the displayed page is rotated.
PageScope Workware 4-53
Page 74

4
4.10 Moving Data Folders
By using PageScope Workware, the data folder to be used can be moved
to the specified drive or folder.
1 On the [Tools] menu, click [Move Repository].
The “Move Repository” dialog box appears.
2 Select the folder to be moved, and then click the [OK] button.
The data folder is moved.
Basic Operation and Setup
Note
Depending on the size of the data, it may take some time to move the
data.
Be sure to select a local disk or a folder on a local disk as the
destination to where the data is to be moved.
If a shared folder on the network or a drive mapped for the shared
folder on the network is selected, PageScope Workware will not
operate correctly.
4-54 PageScope Workware
Page 75

Managing Document Files
5 Managing Document Files
This chapter provides descriptions of the various software functions
available for efficiently managing documents and descriptions on the file
formats that can be managed by PageScope Workware.
5.1 Editing Document Files
PageScope Workware can be used to change file names and copy, move
or delete files in the same way as Windows Explorer. In addition, as with
Windows Explorer, PageScope Workware can be used to create new
folders, change folder names, and copy, move or delete folders.
Adding New Folders With PageScope Workware
1 In Folder area, select the folder that you wish to add a new folder to.
2 On the [File] menu or on the menu that appears after right-clicking in
the File area, click [New Folder].
A new folder with the name “New Folder” is added to the selected
folder. For details on changing the folder name, refer to
Name of a File or Folder” on page 5-2
.
5
“Changing the
Selecting Document Files
Document files can be selected in the same way as in Windows Explorer.
G In File area, click the document file that you wish to select.
G To select all document files in File area, click [Select All] on the [Edit]
menu.
G To select multiple document files, hold down the [Shift] or [Ctrl] key
while clicking each document file, or drag the pointer in File area to
select the desired document files.
PageScope Workware 5-1
Page 76

5
Managing Document Files
Changing the Name of a File or Folder
Note
The name of a folder containing a file that is open cannot be changed.
1 Select the folder or document file whose name you wish to change.
2 On the [File] menu or on the menu that appears after right-clicking the
selected file or folder, click [Rename].
The name of the folder or document file can now be changed.
3 Type in the new name for the folder or document file.
4 Press the [Enter] key.
Note
To cancel the renaming of the folder or document file before the [Enter]
key is pressed, press the [Esc] key.
It is not possible to change the name of a file to the name of a
document file already in the folder.
Copying Folders or Document Files
1 In Folder area or File area, select the folder or document file that you
wish to copy.
2 On the [Edit] menu or on the menu that appears after right-clicking the
selected folder or file, click [Copy].
3 Open the folder where you wish to copy the file or folder to.
4 On the [Edit] menu or on the menu that appears after right-clicking the
selected folder or file, click [Paste].
The selected folder or document file is copied.
5-2 PageScope Workware
Page 77

Managing Document Files
Moving Folders or Document Files
1 In Folder area or File area, select the folder or document file that you
wish to move.
2 On the [Edit] menu or on the menu that appears after right-clicking the
selected folder or file, click [Cut].
3 Select the folder where the folder or file is to be moved.
4 On the [Edit] menu or on the menu that appears after right-clicking the
selected folder, click [Paste].
The selected folder or document file is moved.
Deleting Folders or Document Files
Note
A folder containing a file that is open cannot be deleted. Close the file,
and then perform the operation again.
1 Select the file or folder that you wish to delete.
5
2 On the [Edit] menu or on the menu that appears after right-clicking the
selected file or folder, click [Delete].
A message appears, requesting confirmation to delete the file or
folder.
3 Click the [Yes] button.
The selected folder or document file is moved to the Trash folder.
Note
To return a document file or folder moved to the Trash folder back to
its original location, select the document file or folder, and then click
[Restore] on the [File] menu.
PageScope Workware 5-3
Page 78

5
Managing Document Files
5.2 Displaying the Property Dialog Box for Folders and Document Files
To display the “Folder Properties” dialog box of a folder
Follow the procedure described below to display the “Foler Properties”
dialog box of a folder.
1 In Folder area, select the folder for the “Foler Properties” dialog box
that you wish to display.
2 On the [File] menu or on the menu that appears after right-clicking the
selected folder, click [Properties].
The “Folder Properties” dialog box for the folder appears.
1
3
4
5
6
No. Item Description
1 icon The folder icon is displayed.
2 folder name The name of the folder is indicated. The folder name
3 Location The location of only shared folders is indicated.
4 Created The date and time when the folder was created are
5 Contains The number of files, the number of folders and the
6 Color The color of the folder can be changed here. Click the
can be changed here.
indicated.
number of binders that the folder contains are
indicated.
box to display a color list.
The default color setting is yellow.
2
5-4 PageScope Workware
Page 79

Managing Document Files
To display the “File Properties” dialog box of a document file
Follow the procedure described below to display the “Files Properties”
dialog box of a document file.
1 In File area, select the document file for the “Files Properties” dialog
box that you wish to display.
2 On the [File] menu or on the menu that appears after right-clicking the
selected file, click [Properties].
The “File Properties” dialog box for the document file appears.
Information about the selected document file is displayed in this dialog
box.
5
PageScope Workware 5-5
Page 80

5
Managing Document Files
“General” tab
1
2
3
4
5
6
7
8
No. Item Description
1 File Name The name of the file is indicated. The file name can be
2 Created The date when the file was created is indicated.
3 Modified The date when the file was updated is indicated.
4 Accessed The date when the file was last accessed is indicated.
5 Size The data size (KB) of the file is indicated.
6 Total No Of Pages The number of pages in the file is indicated.
7 Versions The version number is indicated if versions of the file
8 Original File List The extension and modification date of all original files
changed here.
are being managed.
linked to the file are listed.
5-6 PageScope Workware
Page 81

Managing Document Files
“PDF Properties” tab
1
2
3
4
5
6
5
No. Item Description
1 Title The title of the file can be specified.
2 Subject The subject for the file can be specified.
3 Author The author of the file can be specified.
4 Keywords The keywords for the file can be specified.
5 Creator The application of the file can be indicated.
6 properties information Various settings for the file are indicated.
Note
The information in the Title, Subject, Author, Keywords, and
Creator boxes can be changed.
PageScope Workware 5-7
Page 82

5
Managing Document Files
“Additional Properties” tab
1
2
3
4
No. Item Description
1 Comment Comments for the file can be typed in.
2 Importance The priority of the file (“High”, “Normal”, “Low” or “N/A”)
3 Modification Progress The amount of the file that is completed (“0%”, “10%”,
4 Deadline Select the check box in order to specify a submission
can be specified.
The default priority setting is “N/A”.
“20%”, “30%”, “40%”, “50%”, “60%”,“70%”, “80%”,
“90%” or “100%”) can be specified.
The default setting is “0%”.
date. As a default, a submission date cannot be
specified.
If the check box is selected, a date can be specified.
Click the box to display a calendar.
The default date setting is the date currently set on the
operating system.
5-8 PageScope Workware
Page 83

Managing Document Files
To display the “BinderProperty” dialog box of a binder
Follow the procedure described below to display the “BinderProperty”
dialog box of a binder.
1 In File area, select the binder for the “BinderProperty” dialog box that
you wish to display.
2 On the [File] menu or on the menu that appears after right-clicking the
selected file, click [Properties].
The “BinderProperty” dialog box for the binder appears.
1
2
3
5
4
No. Item Description
1 Name The name of the binder is indicated. The name of the
2 Color The color of the folder can be changed here. Click the
3 File List The files included in the binder are listed.
4 [Up] button Click this button to move the selected file up one
binder can be changed here.
box to display a color list.
The default color setting is yellow.
• Name: The name of the file is displayed.
• Page: The number of pages in the file is indicated.
position in the list. The document file moves one
position forward within the binder.
5
PageScope Workware 5-9
Page 84

5
Managing Document Files
No. Item Description
5 [Down] button Click this button to move the selected file down one
position in the list. The document file moves one
position backward within the binder.
5-10 PageScope Workware
Page 85

Managing Document Files
5.3 Page-Editing Functions
With PageScope Workware, various page-editing operations can be
performed, such as grouping multiple document files, changing the page
order, and inserting blank pages.
Opening a Document File
Follow the procedure described below to open an document file.
1 In File area, select a document file.
2 On the [Document] menu or on the menu that appears after right-
clicking the selected file, click [Open PDF], or double-click the selected
document file.
H If a card is displayed, double-click the thumbnail.
H When opening a PDF file with security settings specified, a dialog
box appears, allowing the security settings to be cancelled.
Opening an Original File
If the document file is linked to an original file, the original file can be
opened from PageScope Workware.
1 In File area, select a document file.
5
2 On the [Document] menu or on the menu that appears after right-
clicking the selected file, click [Open Original].
H If thumbnails are displayed, the original file can also be opened by
double-clicking the application icon for the original file in the lowerright corner of the document file.
Note
If the document file is not linked to its original file, the PDF icon
appears in the lower-right corner of the thumbnail, and the original file
cannot be opened.
If the original file is an image file, the original file is opened in Image
Editor.
If the document file has multiple original files, the list of original files
appears. From the list, select a file, and then click the [OK] button to
open the file. Multiple original files can be selected.
PageScope Workware 5-11
Page 86

5
Managing Document Files
Scanning Through the Pages of Document Files
When thumbnails are displayed in File area, follow the procedure
described below to scan through the pages of a multi-page document file
and display the desired page.
1 Display thumbnails in File area, and then select a document file.
2 On the [Document] menu, point to [Go To], and then click the
command for the desired page.
Tip
The pages can also be scanned through by using the page arrows in
the upper-left corner of the thumbnail.
Grouping Document Files
Multiple document files can be grouped into a single file. The name of the
grouped document file becomes the name of the file for the first page after
the files are grouped.
Note
Document files can be grouped with all view formats except when
displayed as cards.
Grouping Files Using Menu Commands
1 In the File area, hold down the [Ctrl] key and select the files that you
wish to merge.
Note
The files are merged in the order that they are selected with the
first file selected at the front.
2 On the [Document] menu or on the menu that appears after right-
clicking the selected files, click [Bind].
5-12 PageScope Workware
Page 87

Managing Document Files
Grouping Files Using a Drag-and-Drop Operation
§ Drag the document file that you wish to merge and drop it onto the
other document file that you wish to merge.
When document files are grouped by dragging and dropping their
thumbnails, the files are grouped differently depending on the displayed
page of the document file that the other file was dropped on. The
displayed page of the dragged and dropped file does not affect how the
files are grouped.
If file A is dropped on file B:
5
Displayed page of file B Grouping result
First page All pages of file A + All pages of file B
Second page First page of file B + All pages of file A + Remaining pages of
file B starting with the second page
If file A and file B is dropped on file C:
Displayed page of file C Grouping result*
First page All pages of file A + All pages of file B + All pages of file C
Second page First page of file C + All pages of file A + All pages of file B +
* If file A was selected first
Remaining pages of file C starting with the second page
PageScope Workware 5-13
Page 88

5
Managing Document Files
Separating Document Files
A multi-page document file can be separated into individual files
containing a single page or containing only the specified page.
Note
When document files linked to original files are separated, the link to
the original file changes. For details, refer to “Changing the Link” on
page 5-24.
Separating All Pages
1 In File area, select a document file.
2 On the [Document] menu or on the menu that appears after right-
clicking the selected file, point to [Unbind], and then click [All Pages/
Files].
The document file is separated into individual files containing a single
page.
Note
All pages of a document file can be separated into individual files with
all view formats except when displayed as cards.
Each document file is titled “file_name_x” (where “x” is the page
number). The name of the file containing the first page does not
change.
5-14 PageScope Workware
Page 89

Managing Document Files
Separating the Specified Page
1 Display thumbnails in File area, and then select a document file.
2 Display the page to be separated from the file.
3 On the [Document] menu or on the menu that appears after right-
clicking the selected file, point to [Unbind], and then click [Current
Page/File].
The selected page is separated into a different document file.
Note
The specified page of a document file can be separated into an
individual file only when the files are displayed as thumbnails.
The file containing the specified page is titled “file_name_1”. If a page
has already been separated from the document file, the file containing
the specified page is titled “file_name_2”.
5
PageScope Workware 5-15
Page 90

5
Managing Document Files
Binder
With PageScope Workware, binder can be created to allow multiple
document files to be managed together, such as with filing, without
grouping them.
Creating Binder
Follow the procedure described below to create a binder.
1 On the [Document] menu, point to [Binder], and then click [Create].
The “New Binder” dialog box appears.
2 In the Name and Color boxes, specify the appropriate settings. Click
the Color box to display a color list, and then select the color.
3 Click the [OK] button.
The binder appears in File area.
4 Select a document file and binder, point to [Binder] on the [Document]
menu, and then click [Add Files], or drag the file and drop it on the
binder.
The selected document file is combined with the binder.
5-16 PageScope Workware
Page 91

Managing Document Files
Note
A document file dropped on a binder is added to the binder at the
location specified with the user environment settings.
5
PageScope Workware 5-17
Page 92

5
Managing Document Files
Removing a File From the Binder
Follow the procedure described below to remove a document file from the
binder.
1 In File area, select the binder.
H To remove a specified document file, display the thumbnail of the
file to be removed.
2 On the [Document] menu, point to [Binder], and then click [Remove
Current File] or [Remove All Files].
H To remove the specified file displayed a thumbnail, click [Remove
Current File].
H To remove all document files, click [Remove All Files].
The document file is removed from the binder file.
5-18 PageScope Workware
Page 93

Managing Document Files
Rearranging the Document Files Within a Binder
Follow the procedure described below to change the order of the
document files within the binder.
1 In File area, select the binder.
2 On the [File] menu or on the menu that appears after right-clicking the
selected file, click [Properties].
The “BinderProperty” dialog box appears.
5
3 From the File List box, select a document file, and then click the [Up]
or [Down] button to change the order of the selected document file.
4 Click the [OK] button.
PageScope Workware 5-19
Page 94

5
Managing Document Files
Changing the Order of Pages
Follow the procedure described below to change the order of the pages
within a multi-page document file.
1 In File area, select a document file.
2 On the [Document] menu or on the menu that appears after right-
clicking the selected file, click [Change Page Order].
The “Change Page Order” dialog box appears. All pages are displayed
as thumbnails on the left side of the dialog box, and a large thumbnail
of the selected page is displayed on the right side of the dialog box.
3 From the left side of the dialog box, select the page to be moved, and
then drag it to the desired location, or click the [Previous] or [Next]
button.
H To move the selected page forward, click the [Previous] button.
H To move the selected page backward, click the [Next] button.
4 Click the [OK] button.
The page order is rearranged.
5-20 PageScope Workware
Page 95

Managing Document Files
Automatically Inserting a Blank Page
A blank page of the same size will be inserted in front of the selected
document page currently displayed as a thumbnail. If the second page of
a two-page file is displayed when a blank page is inserted, the second
page becomes the blank page and the third page becomes the original
second page.
1 Display thumbnails in File area, and then select a document file.
2 Display the page after the location where you wish to insert the blank
page.
3 On the [Document] menu or on the menu that appears after right-
clicking the selected page, click [Insert Blank Page].
A blank page of the same size as the currently displayed page is
inserted in front of the displayed page.
Tip
If the pages in front of and after the location where the blank page is
inserted have different sizes, the blank page will be inserted with the
same size as the page after it.
5
PageScope Workware 5-21
Page 96

5
Managing Document Files
Specifying Headers/Footers
Follow the procedure described below to add headers or footers to the
document file.
Note
If Acrobat 5.0.5 is installed on your computer, the headers and footers
cannot be used.
Headers/footers can be specified with all view formats except when
displayed as cards.
1 In File area, select a document file.
2 On the [Document] menu or on the menu that appears after right-
clicking the selected file, click [Add Page Number/Header/Footer].
The “Add Headers & Footers” dialog box appears.
3 Click the “Header” tab, and then specify the desired settings for the
header. Text is added to the header at the position determined by the
position of the box (at the left, center or right).
H From the Font drop-down list, select the font for the header text.
Any font installed on the computer can be selected.
5-22 PageScope Workware
Page 97

Managing Document Files
H From the Font Size drop-down list, select the font size for the
header text.
H Select the date format from the Style drop-down list in the Insert
Date group box, select the insertion position from the Align
buttons, and then click the [Insert] button. The date appears at the
specified position in the selected format.
H Select the page number format from the Style drop-down list in the
Insert Page Number group box, select the insertion position from
the Align buttons, and then click the [Insert] button. The page
number appears at the specified position in the selected format.
H Specify the text in the Text box of the Insert Custom Text group
box, select the insertion position from the Align buttons, and then
click the [Insert] button. The specified text appears at the specified
position.
H In the Page Range box of the Page Options group box, specify
the pages where the header is added. If “Apply to Page Range” is
selected, the page range can be specified in the From and To
boxes.
H In the Alternation box of the Page Options group box, specify the
pages where the header is added.
H In the Margin box of the Page Options group box, specify the
width of the margin (in inches).
H To change the position of a header, select the header, and then
select the insertion position from the Align buttons.
H To delete a header, select the header, and then click the [Remove]
button.
H If the [Help] button is clicked, the “Adobe Acrobat Help” dialog box
appears.
5
4 Click the “Footer” tab, and then specify the desired settings for the
footer. Since the settings are specified in the same way as on the
“Header” tab, specify the settings as described in step 3. Text is added
to the header at the position determined by the position of the box (at
the left, center or right).
5 Click the [OK] button.
The header and footer is added as specified.
Tip
Click the [Preview] button to display previews of the headers and
footers.
PageScope Workware 5-23
Page 98

5
5.4 Changing the Link
When a document file linked to its original file is separated, the link
changes as described below.
When there is one original file:
Editing operation Link status
Separating all pages The first page of the document file is linked to the original file.
Separating the specified
page
When there are multiple original files:
Editing operation Link status
Separating all pages The document file for the first page of each original file is linked
Separating the specified
page
The link for the remaining pages is cut, and the files are only
PDF files.
The original document file is linked to the original file. The link
for the separated page is cut, and the files are only PDF files.
to its original file. The link for the remaining pages is cut, and
the files are only PDF files.
The original document file is linked to the original file. The link
for the separated page is cut, and the files are only PDF files.
However, if the separated page is a single page linked to the
original file, the link is not changed.
Managing Document Files
Note
If the original file is a TIFF file, the link is not changed if the document
file is separated.
5-24 PageScope Workware
Page 99

Managing Document Files
5.5 Updating the Document File
With PageScope Workware, the document file can be updated with the
original file. When the document file is updated, the document file and the
original file are overwritten.
Follow the procedure described below to update a document file.
Note
The document file can be updated if it is linked to an original file.
1 In File area, select a document file.
2 On the [Document] menu, click [Update PDF].
The “Confirmation” dialog box appears.
5
3 If desired, select the check box.
H To leave a copy of the original PDF file and original file, select the
Save current PDF and original as other file name check box,
and then specify a file name in the File Name box.
The document file is updated.
4 Click the [OK] button.
PageScope Workware 5-25
Page 100

5
5.6 Creating a New Original File
A TIFF file can be created from a PDF file and saved as an original file. If
the document file contains multiple pages, a multi-page TIFF file is
created. Follow the procedure described below to create a TIFF file.
1 In File area, select a document file.
2 On the [Document] menu, click [Create Original as Image File].
A TIFF file is created with the same file name and linked to the original
file.
5.7 Converting Files
PageScope Workware can be used to convert image files to compact PDF
files.
1 In the File area, select an image file as the original file.
2 On the [Document] menu, click [Save Original As Compact PDF].
A screen appears, allowing you to specify the folder where the file is
to be saved.
Managing Document Files
3 Specify the object name, and then click the [Save] button.
The selected file is converted to a compact PDF file.
5-26 PageScope Workware
 Loading...